

Page 1

KM240 series KM260 series
KM280 series
instructions
Page 2

English 3 - 11
´¸∂w
21 - 91
Page 3

AT282 AT283
Page 4
T282
A
AT283
&
AT284
Page 5

efore using your Kenwood
b
appliance/attachments
●
Read these instructions carefully and retain for future
eference.
r
●
Remove all packaging and any labels.
●
Wash the parts: see ‘care and cleaning’.
●
ush excess cord in the cord storage compartment
P
in the back of the appliance.
safety
●
Switch off and unplug before fitting or removing tools
and attachments, after use and before cleaning.
●
Never let the cord hang down where a child could
grab it.
●
Keep your fingers away from moving parts and fitted
tools/attachments. Never put your fingers etc in the
hinge mechanism.
●
Never leave the appliance unattended when it is
operating.
●
Never use a damaged appliance or attachment. Get it
checked or repaired: see ‘service and customer care’.
●
Never let the power unit, cord or plug get wet.
●
Never use an unauthorised attachment or more than
one attachment at a time.
●
When using an attachment also read the safety
information included in this manual relating to that
particular product.
●
Never exceed the maximum capacities.
●
Take care when lifting this appliance. Ensure the head
is locked and that the bowl, tools, and cord are
secure before lifting.
●
This appliance is not intended for use by persons
(including children) with reduced physical, sensory or
mental capabilities, or lack of experience and
knowledge, unless they have been given supervision
or instruction concerning use of the appliance by a
person responsible for their safety.
●
Children should be supervised to ensure that they do
not play with the appliance.
●
Only use the appliance for its intended domestic use.
Kenwood will not accept any liability if the appliance
is subject to improper use, or failure to comply with
these instructions.
before plugging in
●
Make sure your electricity supply is the same as the
one shown on the underside of your appliance.
mportant - UK only
i
●
The wires in the cord are coloured as follows:
Blue = Neutral,
rown = Live.
B
●
The appliance must be protected by a 13A approved
(BS1362) fuse.
Note:
●
or non-rewireable plugs the fuse cover MUST be
F
refitted when replacing the fuse. If the fuse cover is
lost then the plug must not be used until a
replacement can be obtained. The correct fuse cover
is identified by colour and a replacement may be
obtained from your Kenwood Authorised Repairer
(see Service).
●
If a non-rewireable plug is cut off it must be
DESTROYED IMMEDIATELY. An electric shock hazard
may arise if an unwanted non-rewireable plug is
inadvertently inserted into a 13A socket outlet.
●
This appliance conforms to EC directive 2004/108/EC
on Electromagnetic Compatibility and EC regulation
no. 1935/2004 of 27/10/2004 on materials intended
for contact with food.
key
kitchen machine
medium speed outlet
high speed outlet
tool socket
head release lever
mixer head
bowl
on/off and speed switch
power unit
cord storage compartment
beater
dough hook with removable guard
whisk
splashguard
attachments
Not all of the attachments listed will
necessarily be included with your kitchen
machine. Attachments are dependent
upon the model variant.
blender
citrus press
food processor
(AT282 and AT283)
(AT284)
3
Page 6

the mixing tools and some of their
P
uses
beater
●
or making cakes, biscuits, pastry, icing, fillings,
F
clairs and mashed potato.
é
hisk
w
●
For eggs, cream, batters, fatless sponges, meringues,
cheesecakes, mousses, soufflés. Don’t use the whisk
for heavy mixtures (eg creaming fat and sugar) - you
could damage it.
dough hook
●
For yeast mixtures.
to use your mixer
1 Press down on the head release lever and raise
the mixer head until it locks into position.
2 Select a tool and push into the tool socket .
●
Always ensure the guard is fitted onto the shaft of the
dough hook before inserting into the outlet. Once
inserted fit the guard to the mixer outlet to prevent
food ingress.
3 Fit the bowl into the base and turn clockwise to lock
into position .
4 Press down on the head release lever and lower the
mixer head until it locks into position.
5 Plug into the power supply then switch on and turn
the speed switch to the desired setting. To switch off
turn to ‘0’.
●
Switch to pulse for short bursts
6 Unplug from the power supply.
7 Raise the mixer head and whilst holding it steady, pull
the tool from the outlet.
important
●
Some movement of the mixer head is
normal when mixing heavy loads such as
bread dough.
●
If the mixer head is raised during operation, the
machine will stop working straight away. To re-start
the mixer, lower the mixer head, turn the speed
switch to the off position, wait a few seconds and
then re-select the speed. The mixer should resume
operating straight away.
●
If for any reason power to the mixer is interrupted and
the machine stops working, turn the speed switch to
the off position, wait a few seconds and then re-select
the speed. The mixer should resume operating
straight away.
●
The mixer will not operate unless all the
outlet covers are correctly fitted to the
machine.
●
f you hear the machine labouring either switch off and
I
remove some of the mixture or increase the speed.
●
lways remove attachments fitted to the medium and
A
igh speed outlets before raising the mixer head.
h
hints
●
Switch off and scrape the bowl with a spatula when
ecessary.
n
●
Eggs at room temperature are best for whisking.
●
Before whisking egg whites, make sure there’s no
grease or egg yolk on the whisk or bowl.
●
Use cold ingredients for pastry unless your recipe
states otherwise.
●
When creaming fat and sugar for cake mixes, always
use the fat at room temperature or soften it first.
●
Your mixer has been fitted with a ‘soft start’ feature to
minimise spillage. However if the machine is switched
on with a heavy mixture in the bowl such as bread
dough, you may notice that the mixer takes a few
seconds to reach the selected speed.
points for bread making
important
●
Never exceed the maximum capacities stated - you
will overload the machine.
●
Some movement of the mixer head is normal when
mixing heavy loads such as bread dough.
●
The ingredients mix best if you put the liquid in first.
●
At intervals stop the machine and scrape the mixture
off the dough hook.
●
Different batches of flour vary considerably in the
quantities of liquid required and the stickiness of the
dough can have a marked effect on the load imposed
on the machine. You are advised to keep the machine
under observation whilst the dough is being mixed;
the operation should take no longer than 6-8 minutes.
4
Page 7

speed switch
These are a guide only and will vary depending upon
the quantity of mix in the bowl and the ingredients
eing mixed.
b
beater
●
creaming fat and sugar start on min gradually
ncreasing to a higher speed
i
●
beating eggs into creamed mixtures use a
medium to high speed
●
folding in flour, fruit etc use a low to medium
speed
●
all in one cakes start on a low speed gradually
increasing
to a higher speed
●
rubbing fat into flour use a low to medium speed
whisk
●
Gradually increase to maximum
dough hook
●
Use a low to medium speed
maximum capacities
shortcrust pastry 450g flour weight
sponge cake (one stage mix) 1.6 Kg total mix
fruit cake mix 1.8 Kg total mix
bread dough 500g flour weight
egg whites 8
electronic speed sensor control
Your mixer is fitted with an electronic speed sensor
control that is designed to maintain the speed under
different load conditions, such as when kneading
bread dough or when eggs are added to a cake mix.
You may therefore hear some variation in speed
during the operation as the mixer adjusts to the load
and speed selected - this is normal.
care and cleaning
●
Always switch off and unplug before cleaning.
power unit
●
Wipe with a damp cloth, then dry.
●
ever use abrasives or immerse in water.
N
bowl, tools, splashguard, removable guard
on dough hook
●
Wash by hand, then dry thoroughly or wash in the
dishwasher.
●
Never use a wire brush, steel wool or bleach to clean
your stainless steel bowl. Use vinegar to remove
limescale.
●
Keep away from heat (cooker tops, ovens,
microwaves).
to fit and use the splashguard
1 Fit the bowl into the base and add the ingredients.
2 Fit the tool then lower the mixer head
3 Fit the splashguard onto the bowl by sliding the cut
away section around the mixer head .
4 To remove the splashguard reverse the above
procedure.
●
During mixing, ingredients can be added directly to
the bowl via the chute.
5
Page 8

Blenders AT282 and AT283
(if supplied)
Use the blender for soups, drinks, pâtés, mayonnaise,
readcrumbs, biscuit crumbs, chopping nuts and
b
crushing ice.
safety
●
SCALD RISK: Hot ingredients should be allowed to
cool to room temperature before blending.
●
Don’t touch the sharp blades. Keep the blade unit
away from children.
●
Only use the goblet with the blade unit supplied.
●
Never attempt to fit the blade unit to the machine
without the goblet fitted.
●
Always unplug the machine before putting your hands
or utensils in the goblet.
●
Never run the blender empty.
●
Only operate the blender with the lid in place.
●
Never fit the blade unit to the power unit
without the blender goblet fitted.
●
Always take care when handling the blade assembly
and avoid touching the cutting edge of the blades
when cleaning.
●
When removing the blender from the power unit:
●●
switch off;
●●
wait until the blades have completely stopped;
●●
model AT283 care should be taken not to
unscrew the goblet from the base assembly
●
Misuse of your blender can result in injury.
important
The skirt on the bottom of the AT282 acrylic
goblet is fitted during manufacture and no
attempt should be made to remove it.
●
The attachment will not operate if it is
incorrectly assembled or incorrectly fitted
to the kitchen machine or if the medium
speed outlet cover is not fitted.
●
Never run the blender for longer than one minute - it
will overheat. Switch off as soon as you have the right
consistency.
●
Don’t put dry ingredients into the blender before
switching on. Cut them into cubes, then remove the
filler cap and drop the cubes through the hole in the
lid whilst the machine is running.
●
model AT282 don’t process spices such as cloves,
dill and cumin seeds - they damage the acrylic.
●
Don’t use the blender as a storage container. Keep it
empty before and after use.
●
Never crush ice on its own, always add a little water.
●
model AT282 never blend more than 1.5 litres (2
pints 12fl oz) - less for frothy liquids like milk shakes.
●
odel AT283 never blend more than 1.2 litres (2
m
pints 2fl oz) - less for frothy liquids like milk shakes.
●
moothie recipes - never blend frozen ingredients that
S
ave formed a solid mass during freezing, break it up
h
before adding to the blender.
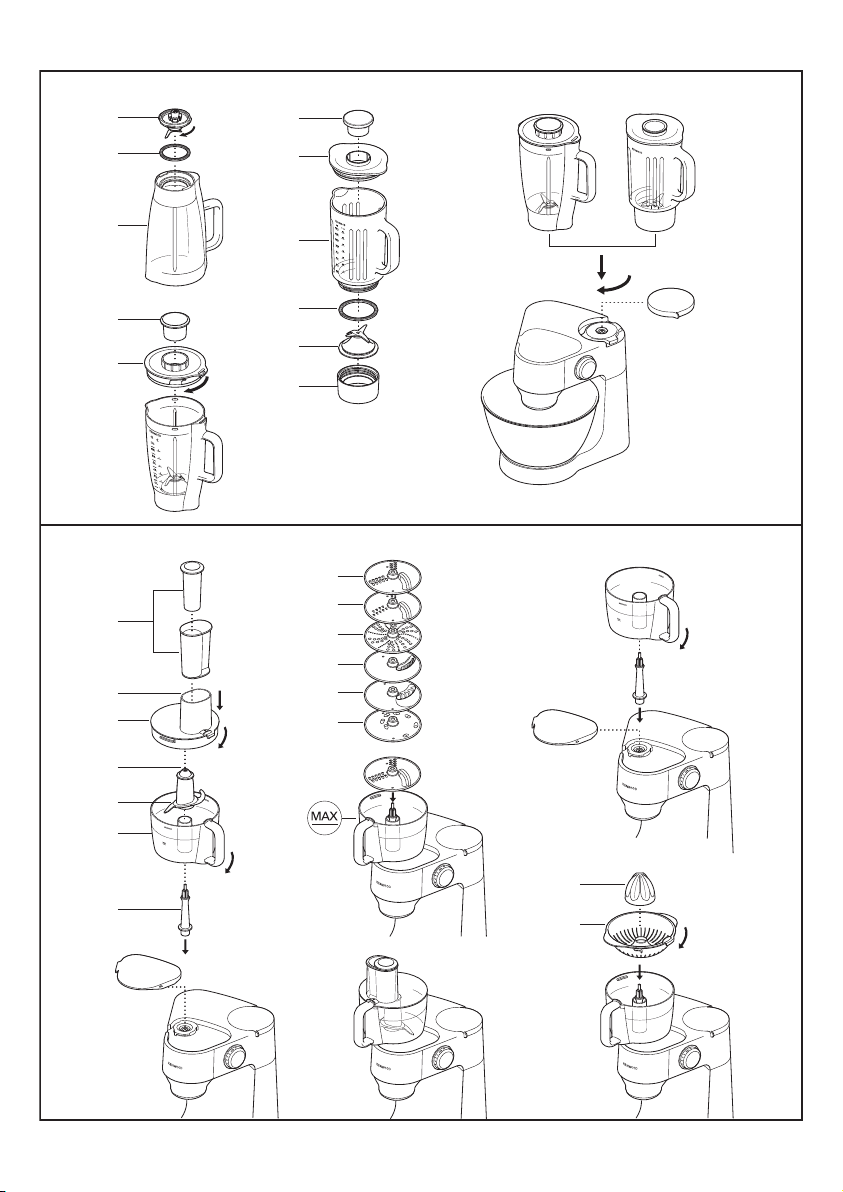
key
acrylic blender AT282
lid
filler cap
goblet
sealing ring
blade unit
glass blender AT283
filler cap
lid
goblet
sealing ring
blade unit
base
to use your acrylic blender AT282
1 Ensure the sealing ring is correctly fitted on the blade
unit.
2 Hold the underside of the blade unit and insert the
blades into the base of the blender. Twist to lock the
assembly firmly in place.
3 Put your ingredients into the goblet.
4 Fit the lid to the goblet and twist clockwise into place,
making sure that the tab on the lid slots into the
groove in the handle. When correctly fitted the
markings should align .
5 Place the filler cap into the lid.
6 Remove the high speed outlet cover by turning anti
clockwise and lifting off
.
7 Place the blender over the outlet, handle towards the
back and turn clockwise to lock firmly into place.
8 Switch to maximum speed.
9 Once the desired consistency has been achieved,
switch off and unplug.
10 Remove the blender.
11 Refit the high speed outlet cover after use.
to use your glass blender AT283
1 Ensure the sealing ring is correctly fitted on the blade
unit.
2 Fit the blade unit inside the base.
3 Screw the glass goblet onto the base.
4 Put your ingredients into the goblet.
5 Fit the lid and push down to secure.
6
Page 9

Place the filler cap into the lid and push down to
6
secure.
Remove the high speed outlet cover by turning anti
7
lockwise and lifting off
c
8 Place the blender onto the outlet, handle towards the
ack. Turn the blender clockwise to lock firmly into
b
lace until the two arrows align .
p
9 Switch to maximum speed.
10 Once the desired consistency has been achieved,
switch off and unplug.
11 Remove the blender.
12 Refit the high speed outlet cover after use.
hints
●
To prevent leaks make sure the base is locked firmly
into the goblet.
●
When making mayonnaise, put all the ingredients,
except the oil, into the blender. Then, with the
machine running, remove the filler cap and add the oil
slowly and evenly.
●
Thick mixtures, eg pâté, dips: use low to medium
speed, scraping down when necessary. If it’s difficult
to process, add more liquid. Alternatively use the
pulse setting to get the ingredients moving over the
blades.
.
care and cleaning
●
Always switch off and unplug before removing the
attachment from the kitchen machine.
●
Dismantle the attachment fully before cleaning.
●
Empty the goblet before unlocking the base.
blade unit
1 Remove and wash the sealing ring.
2 Brush the blades clean under the tap. Keep the
underneath of the unit dry.
3 Leave to dry.
other parts
Wash by hand in hot, soapy water.
Alternatively the filler cap, lid, base and glass blender
can be washed in your dishwasher.
carrot and coriander soup
ingredients
25g butter
onion chopped
1
1 clove garlic crushed
750g carrot cut into 1.5 cm cubes
alternatively for a lighter soup use 600g carrot cut
(
into 1.5 cm cubes)
cold chicken stock
10-15ml ground coriander
salt and pepper
method
1 Melt the butter in a pan, add the onion and garlic and
fry until soft.
2 Place the carrot into the blender, add the onion and
garlic. Add sufficient stock to reach the 1.5 level
marked on the goblet. Fit the lid and filler cap.
3 Blend on the pulse setting for 5 seconds for a coarse
soup or longer for a finer result.
4 Transfer the mixture to a saucepan, add the coriander
and seasoning and simmer the soup for 30 to 35
minutes or until cooked.
5 Adjust the seasoning as necessary and add extra
liquid if required.
Additional recipes can be found on the Kenwood
website:
www.kenwoodworld.com
7
Page 10

Food Processor AT284
(if supplied)
Use the food processing attachment to chop, slice,
hred and rasp. The citrus juicer attachment (if supplied)
s
an be used to juice citrus fruit and can only be used
c
ith the AT284 food processor.
w
important
When removing the packaging, ensure the plastic
blade cover is removed from the knife blade. Take
care the blades are very sharp. The cover
should be discarded as it is to protect the blade
during manufacture and transit only.
safety
●
The blades and discs are very sharp, handle with
care. Always hold the knife blade by the
finger grip at the top, away from the cutting
edge, both when handling and cleaning.
●
Always remove the knife blade before pouring
contents from the bowl.
●
Keep hands and utensils out of the processor bowl
whilst connected to the power supply.
●
Never use your fingers to push food down the feed
tube. Always use the pusher/s supplied.
●
Before removing the lid from the bowl or the
attachment from the power unit:-
●●
switch off;
●●
wait until the blades/discs have completely
stopped;
●
When slicing/shredding or rasping don’t let
the bowl fill up as far as the cutting disc:
empty it regularly.
●
Do not exceed the ‘MAX’ capacity level on
the bowl.
●
Should excessive vibration occur when using this
attachment, either reduce the speed or stop the
machine and remove some of the contents.
●
This machine will be damaged and may
cause injury if the interlock mechanism is
subjected to excessive force.
key &
ood processor
f
pushers: large and small
feed tube
food processor lid
finger grip
knife blade
food processor bowl
drive shaft
thick slicer/shredder disc
thin slicer/shredder disc
rasping disc
discs (if supplied)
thin (julienne style) chipper disc
standard chipper disc
extra coarse shredding disc
citrus juicer (if supplied)
cone
sieve
Not all of the above parts will necessarily be
included in pack. Contents are dependent
upon model variant.
knife blade
Use the knife blade to chop raw and cooked meat,
cooked eggs, vegetables, nuts, pâtés and dips and to
also make crumbs from bread and biscuits.
to use the knife blade
1 Remove the medium speed outlet cover by lifting off
.
2
Place the drive shaft onto the outlet .
3 Fit the bowl over the drive shaft with the handle above
the on/off and speed switch and turn clockwise until it
locks into position .
4 Fit the knife blade over the drive shaft and turn until it
drops all the way down. The knife blade is very
sharp always handle with care.
5 Cut the food up and place into the bowl ensuring that
it is evenly distributed.
6 Fit the lid, feed tube above the speed switch and turn
clockwise ensuring that the tab on the lid slots into
the groove in the bowl handle. When correctly fitted
the markings should align .
●
The attachment will not operate if it is
incorrectly assembled or incorrectly fitted
to the kitchen machine or if the high speed
outlet cover is not fitted.
7 Fit the pushers.
8 Switch on and process until the desired consistency
is achieved. We recommend a high speed for most
chopping functions.
8
Page 11

●
P
Use the pulse for short burst of power. The pulse
ill operate for as long as the switch is held in
w
osition.
p
9 Switch off and unplug.
0 Remove the attachment.
1
1 Refit the medium speed outlet cover after use.
1
hints
●
Cut food up before placing into the bowl. Meat,
bread, vegetables and other foods of a similar texture
should be cut into cubes approximately 2cm/3⁄4 in.
Biscuits should be broken into pieces and added
down the feed tube whilst the machine is operating.
●
Herbs are best chopped when clean and dry.
●
Don’t blend liquid ingredients as they may leak from
around the lid. A blender is available for this purpose.
However, when puréeing soups etc., drain solids,
blend and then return to the liquid.
●
Take care not to over process when using the knife
blade.
●
Don’t use the knife blade to mix heavy loads such as
bread dough otherwise you may damage the mixer.
Use the dough hook in the mixing bowl to make
bread and the beater in the bowl to make cakes and
pastry.
●
Don’t use the knife blade to chop ice cubes or other
hard foods, such as spices, they may damage the
attachment.
●
If adding almond essence or flavouring to mixtures
avoid contact with the plastic as this may result in
permanent marking.
maximum capacity
●
meat 400g (14oz)
Make ‘mince’ by trimming raw meat of any excess fat
and cutting into 2 cm/
3
⁄4 in cubes, place into the
processor bowl and operate for approximately 20
seconds or until the desired texture is achieved. The
longer you run the machine the smoother the texture
will be.
slicer/shredder and rasping disc
Use the slicer/shredder to slice or shred fruit,
vegetables and cheese and the rasping disc for
grating Parmesan cheese and potato for German
potato dumplings.
to use the slicer/shredder/rasper
what the cutting discs do
slicer/shredders
Discs and are reversible: one side slices, the
ther side shreds. You can slice cheese, carrot,
o
potato, cabbage, cucumber, courgette, beetroot,
onion. You can shred cheese, carrot, potato and
foods of a similar texture. Your chosen cutting
side must be uppermost.
rasping disc grates parmesan cheese and
potato for German potato dumplings.
thin (julienne style) chipper
This disc cuts potatoes for Julienne style French fries
and firm ingredients for salads, garnishes, casseroles
and stir fries (eg carrot, swede, courgette and
cucumber).
standard chipper cuts potatoes for thin French
fries and firm ingredients for salads and dips (eg
swede, cucumber).
extra coarse shredder coarsely shreds cheese
and carrot.
using the cutting discs
1 Remove the medium speed outlet cover by lifting off.
2 Place the drive shaft onto the outlet.
3 Fit the bowl over the drive shaft with the handle above
the on/off and speed switch and turn clockwise until it
locks into position.
4 Place the cutting disc onto the drive shaft. Your
chosen cutting side must be uppermost. Handle
the cutting discs with care - they are
extremely sharp. Hold the discs by the
centre grip.
5 Fit the lid, feed tube above the speed switch and turn
clockwise ensuring that the tab on the lid slots into
the groove in the bowl handle. When correctly fitted
the markings should align .
●
The attachment will not operate if it is
incorrectly assembled or incorrectly fitted
to the kitchen machine or if the high speed
outlet cover is not fitted.
6 Choose which feed tube you want to use. The pusher
contains a smaller feed tube for processing individual
items or thin ingredients.
to use the small feed tube
●
First put the large pusher inside the feed tube.
to use the large feed tube
●
Use both pushers together.
7 Put the food into the feed tube.
9
Page 12

Switch on and push down evenly with the pusher -
8
never put your fingers in the feed tube. We
ecommend a medium speed for processing soft
r
oods such as cucumber and a medium/high speed
f
for processing firmer foods such as carrots and hard
heese.
c
●
hen slicing/shredding or rasping don’t let
W
the bowl fill up as far as the cutting disc:
empty it regularly.
●
Do not exceed the ‘MAX’ capacity level on
the bowl.
9 Switch off and unplug.
10 Remove the attachment.
11 Refit the medium speed outlet cover after use.
hints
●
Use fresh ingredients.
●
Don’t cut food up too small. Fill the width of the large
feed tube fairly full. This prevents the food from
slipping sideways during processing. Alternatively, use
the small feed tube.
●
When slicing or shredding: food placed upright comes
out shorter than food placed horizontally.
●
After using a cutting disc there will always be a small
amount of waste on the disc or in the food.
care and cleaning
●
Always switch off and unplug before removing the
attachment from the kitchen machine.
●
Dismantle the attachment fully before cleaning.
bowl, lid and attachments
●
Wash by hand then dry. Take care as the blades and
cutting discs are sharp.
●
Alternatively they can be washed on the top rack of
your dishwasher. A short low temperature programme
is recommended.
After use store the knife blade in the processor bowl.
key
cone
sieve
to use your citrus juicer
Remove the medium speed outlet cover by lifting off
1
.
2 Place the drive shaft onto the outlet.
3 Fit the bowl over the drive shaft with the handle above
the on/off and speed switch and turn clockwise until it
locks into position.
4 Fit the sieve into the bowl ensuring that the lug on the
rim locks into the corresponding slot in the bowl
handle .
●
The attachment will not operate if it is
incorrectly assembled or incorrectly fitted
to the kitchen machine or if the high speed
outlet cover is not fitted.
5 Place the cone over the drive shaft turning until it drops
all the way down.
6 Cut the fruit in half. Switch to speed 3 and press the
fruit onto the cone.
Note
Empty the bowl regularly and never let the juice reach
the underside of the sieve.
7 Switch off and unplug.
8 Lift off the cone. Unlock and remove the sieve.
9 Unlock the bowl and pour off the juice.
care and cleaning
●
Always switch off and unplug before removing the
attachment from the kitchen machine.
●
Wash the cone, sieve and bowl by hand, then dry
thoroughly. Alternatively wash in the dishwasher (top
rack only).
citrus juicer
Note:
This attachment can only be used in conjunction with
the food processor AT284.
Use the citrus juicer to squeeze the juice from citrus
fruits, eg oranges, lemons, limes, grapefruits.
10
Page 13

service and customer care
●
If the cord is damaged it must, for safety reasons, be
replaced by KENWOOD or an authorised KENWOOD
epairer.
r
K
U
If you need help with:
●
using your appliance
●
servicing or repairs
call Kenwood Customer Care on 023 9239 2333.
Have your model number ready - it is located
on the underside of your appliance.
●
spares and attachments
call 0844 557 3653.
other countries
●
Contact the shop where you bought your appliance.
●
Designed and engineered by Kenwood in the UK.
●
Made in China.
IMPORTANT INFORMATION FOR CORRECT
DISPOSAL OF THE PRODUCT IN ACCORDANCE
WITH EC DIRECTIVE 2002/96/EC.
At the end of its working life, the product must not be
disposed of as urban waste.
It must be taken to a special local authority differentiated
waste collection centre or to a dealer providing this service.
Disposing of a household appliance separately avoids
possible negative consequences for the environment
and health deriving from inappropriate disposal and
enables the constituent materials to be recovered to
obtain significant savings in energy and resources. As a
reminder of the need to dispose of household
appliances separately, the product is marked with a
crossed-out wheeled dustbin.
uarantee UK only
g
●
f your machine goes wrong within one year from the
I
ate you bought it, we will repair or replace it free of
d
harge provided:
c
●
you have not misused, neglected or damaged it;
●
it has not been modified;
●
it is not second-hand;
●
it has not been used commercially;
●
you have not fitted a plug incorrectly; and
●
you supply your receipt to show when you
bought it.
This guarantee does not affect your statutory rights.
11
Page 14

«∞ªb±W ˸´U¥W «∞FLö¡
●
≠w •U∞W ¢Kn «∞ºKp «∞JNd°w, ¥πV «ß∑∂b«∞t _ß∂U» ±∑FKIW
OOWNEK
√Ë ±dØe ÅOU≤W ±F∑Lb ±s Æ∂q
D
°U∞ºö±W ±s Æ∂q
DOOWNEK.
«∞b∞Oq
±ªdË◊ «∞FBd
«∞LBHU…
«ß∑ªb«Â ´BU¸… «∞Lu«∞`
●
≈–« √¸œ‹ «∞∫Bu‰ ´Kv ±ºU´b… °AQÊ:
●
«ß∑ªb«Â «∞πNU“ ´LKOU‹ ÅOU≤W Ë≈Åö•U‹
●
«¢BKw °U∞L∑πd «∞cÍ «®∑d¥∑w ±Mt «∞πNU“.
● ¢BLOr Ë¢Du¥d doowneK ≠w «∞LLKJW «∞L∑∫b….
● ÅMl ≠w «∞BOs.
ffo/no) Ë«∞ºd´W Ë∞HONU ≠w «¢πUÁ
±FKu±U‹ ≥U±W •u‰ ØOHOW «∞∑ªKh «∞B∫O∫W ±s «∞LM∑Z
CE/69/2002.
Ë≠IU ∞∑u§Ot «ô¢∫Uœ «_˸˰w
≠w ≤NU¥W «∞FLd «∞∑AGOKw ∞KπNU“, ¥πV ´b «∞∑ªKh ±s «∞πNU“ ≠w
≤HU¥U‹ «∞LMU©o «∞∫Cd¥W.
°q ¥πV √îcÁ ≈∞v ±dØe ¢πLOl îU’ °πNW ±∫KOW ±∑ªBBW ≠w
«∞∑ªKh ±s ≥cÁ «∞MHU¥U‹ √Ë ≈∞v ¢U§d ¥Ib ≥cÁ «∞ªb±W.
«∞∑ªKh ±s «_§Ne… «∞LMe∞OW ´Kv ≤∫u ±MHBq, ¥πMV «ü£U¸
«∞ºK∂OW «∞L∫∑LKW ´Kv «∞∂OµW Ë«∞B∫W Ë«∞∑w ¢M∑Z ´s «∞∑ªKh ±s
≥cÁ «∞MHU¥U‹ °Dd¥IW ¨Od ±MUß∂W, ØLU √Ê ≥cÁ «∞FLKOW ¢ºL`
°Uß∑dœ«œ «∞Lu«œ «∞LJu≤W «_±d «∞cÍ ¥∑O` «∞∫Bu‰ ´Kv Ë≠u¸«‹
Ø∂Od… ≠w ±πU‰ «∞DUÆW Ë«∞Lu«¸œ. ∞K∑cØOd °Cd˸… «∞∑ªKh ±s
«_§Ne… «∞LMe∞OW ´Kv ≤∫u ±MHBq, ¥u§b ´Kv «∞πNU“ Åu¸…
±ADu°W ∞ºKW ÆLU±W –«‹ ´πö‹.
1 √“¥Kw ¨DU¡ ±MHc «ùîd«Ã ´Kv «∞ºd´W «∞L∑ußDW ´s ©d¥o ¸≠Ft
_´Kv .
2 ¸Ø∂w ±∫u¸ «∞b˸«Ê ´Kv «∞LMHc.
3 ¸Ø∂w «∞ºKDU≤OW ´Kv ±∫u¸ «∞b˸«Ê °∫OY ¥JuÊ «∞LI∂i ≠u‚
±H∑UÕ «∞∑AGOq/«ù¥IU· (
´IU¸» «∞ºU´W •∑v ¢º∑Id ≠w ±u{l «∞∑FAOo.
4 ¸Ø∂w «∞LBHU… ≠w «∞ºKDU≤OW ±l «∞∑QØb ±s «ß∑Id«¸ «∞πe¡
«∞Lº∫u» ±s «∞∫U≠W ≠w «∞∑πu¥n «∞LIU°q «∞Lu§uœ ≠w ±I∂i
«∞ºKDU≤OW .
●●
∞s ¥FLq «∞L∫Ko ≠w •U∞W ¢πLOFt √Ë ¢dØO∂t °AJq ¨Od
Å∫O` ≠w §NU“ ¢∫COd «∞DFU √Ë ≠w •U∞W ´b ¢dØOV
¨DU¡ ±ªdà «∞ºd´W «∞FU∞OW.
5 ¸Ø∂w ±ªdË◊ «∞FBd ´Kv ±∫u¸ «∞b˸«Ê Ë√œ¥d¥t •∑v ¥º∑Id
¢LU±UÎ ≠w «∞IUŸ.
6 ÆDFw £LU¸ «∞Hu«Øt ≈∞v ≤BHOs. £r ®GKw «∞πNU“ ´Kv «∞ºd´W 3
Ë«{GDw «∞HUØNW ´Kv ±ªdË◊ «∞FBd.
±ö•EW
√≠d¨w «∞ºKDU≤OW °U≤∑EU ˫•c¸Í ËÅu‰ «∞FBOd ≈∞v √ßHq
«∞LBHU….
7 √ËÆHw ¢AGOq «∞πNU“ Ë«≠BKOt ´s ±Bb¸ «∞∑OU¸ «∞JNd°w.
8 «¸≠Fw ±ªdË◊ «∞FBd _´Kv. ≠Jw ¢FAOo «∞LBHU… Ë√“¥KONU.
9 ≠Jw ¢FAOo «∞ºKDU≤OW ËÅ∂w «∞FBOd.
«∞FMU¥W Ë«∞∑MEOn
●
«≠BKw «∞πNU“ œ«zLUÎ ´s ±Bb¸ «∞∑OU¸ «∞JNd°w Æ∂q ≈“«∞W
«∞LK∫o ´s §NU“ ¢∫COd «∞DFUÂ.
●
«¨ºKNU °U∞Ob £r §HHNU. ¥πV ¢uîw «∞∫c¸ _Ê «∞AHd«‹
Ë√Æd«’ «∞∑IDOl •Uœ….
°Fb «ôß∑ªb«Â Ær °∑ªe¥s ®Hd… «∞ºJOs ≠w «∞u´U¡.
91
Page 15

ôß∑ªb«Â ≠∑∫W ≈œîU‰ «∞DFU «∞BGOd…
●●
{Fw ´BU œ≠l «∞DFU «∞J∂Od… œ«îq ≠∑∫W ≈œîU‰ «∞DFU √ËôÎ.
ôß∑ªb«Â ≠∑∫W ≈œîU‰ «∞DFU «∞J∂Od…
●●
«ß∑ªb±w Øq ±s ´BU œ≠l «∞DFU «∞BGOd Ë«∞J∂Od… ±FUÎ.
7 {Fw «∞DFU ±s îö‰ ≠∑∫W ≈œîU‰ «∞LJu≤U‹.
8 ®GKw «∞πNU“ ±l œ≠l «∞DFU °U∞∑ºUËÍ °u«ßDW ´BU œ≠l
«∞LJu≤U‹ - «•c¸Í Ë{l √ÅU°Fp œ«îq ≠∑∫W ≈œîU‰
«∞LJu≤U‹. ≤uÅw °Uß∑ªb«Â «∞ºd´W «∞L∑ußDW ∞∑πNOe
«_©FLW «∞KOMW ±∏q «∞ªOU¸ Ë«ß∑ªb«Â «∞ºd´W «∞L∑ußDW/«∞FU∞OW
∞∑πNOe «_©FLW «_Ø∏d Åö°W ±∏q «∞πe¸ Ë«∞π∂s «∞BKV.
●
´Mb ¢IDOl «∞Ad«z` / «∞Hd √Ë «∞∂Ad; ô ¢πFq «∞u´U¡
¥L∑KT °Fb ∞u•W «∞IDl: √≠d⁄ °U≤∑EUÂ.
●●
ô ¢∑πUË“Í ±º∑uÈ «∞ºFW «∞IBuÈ «∞Lu{` ´Kv
XAM".
«∞ºKDU≤OW °U∞JKLW «ù≤πKOe¥W "
9 √ËÆHw ¢AGOq «∞πNU“ Ë«≠BKOt ´s ±Bb¸ «∞∑OU¸ «∞JNd°w.
ôß∑ªb«Â √œ«… «∞∑IDOl ≈∞v ®d«z`/ÆDl
ÅGOd…/√œ«… «∞∂Ad
±U «∞cÍ ¢Iu °t √Æd«’ «∞∑IDOl √œË«‹ «∞∑IDOl ≈∞v
®d«z` / ÆDl ÅGOd…
«∞IdÅOs Ë ÆU°KOs ∞KFJf: ¥º∑ªb √•b «∞πU≤∂Os
∞K∑IDOl ≈∞v ®d«z`, Ë¥º∑ªb «üîd ∞K∑IDOl ≈∞v ÆDl ÅGOd….
¥LJMp ¢IDOl «∞π∂s Ë«∞πe¸ Ë«∞∂DU©f Ë«∞Jd≤V Ë«∞ªOU¸ Ë«∞IdŸ
«∞BOHw Ë«∞Hπq Ë«∞∂Bq ≈∞v ®d«z`. Ë¥LJMp ¢IDOl «∞π∂s
Ë«∞πe¸ Ë«∞∂DU©f Ë«_©FLW –«‹ «∞MºOZ «∞LLU£q ≈∞v ÆDl
ÅGOd…. ¥πV √Ê ¥JuÊ «∞πU≤V «∞cÍ ¢ª∑U¸Á ∞K∑IDOl ≥u
«_´Kv.
¥Iu Æd’ «∞∑IDOl °∂Ad «∞π∂s «∞πU· Ë«∞∂DU©f ∞FLq
“ô°OW «∞∂DU©f «_∞LU≤OW.
01√“¥Kw «∞LK∫o.
11√´ObÍ ¢dØOV ¨DU¡ ±MHc «∞ºd´W «∞L∑ußDW °Fb «ôß∑ªb«Â.
¢KLO∫U‹
●●
«ß∑ªb±w ±Ju≤U‹ ©U“§W.
●●
ô ¢IDFw «∞DFU ≈∞v ÆDl ÅGOd… §b«Î. «§FKw ´d÷ (±IDl)
√≤∂u» ≈œîU‰ «∞LJu≤U‹ «∞J∂Od ±L∑KT °AJq ±∑ºUË. ¥∫u‰ –∞p
œËÊ «≤eô‚ «∞DFU ´Kv «∞πu«≤V √£MU¡ ¢∫COd «∞DFUÂ. √Ë °Dd¥IW
√îdÍ, ¥LJMp «ß∑ªb«Â √≤∂u» «∞∑Gc¥W «∞BGOd.
●●
´Mb «∞∑IDOl √Ë «∞HdÂ: «∞DFU «∞Lu{uŸ °AJq ¸√ßw ¥ªdÃ
ÆBOd«Î ´s «∞DFU «∞Lu{uŸ °AJq √≠Iw.
●●
°Fb «ß∑ªb«Â ßD` ¢IDOl, ≥MU„ œ«zLU ØLOW ÅGOd… ±s «∞MHU¥W
´Kv «∞ºD` √Ë ≠w «∞Gc«¡.
ßD` «∞Ad«z` «∞d≠OFW
¥IDl ≥c« «∞ºD` «∞∂DU©f °Dd¥IW ¸≠OFW ˱Ju≤U‹ «∞ºKDU‹,
«∞e¥MW Ë«∞ªCU¸ «∞ºu¢Ot (±∏q «∞πe¸, «∞KHX, «∞JußW Ë«∞ªOU¸).
ßD` ¢IDOl «∞Ad«z` «∞FUœ¥W ¥IDl «∞∂DU©f °Dd¥IW
«∞∂DU©f «∞LIKOW «∞FUœ¥W ˱Ju≤U‹ «∞ºKDU‹ Ë«∞LGLußU‹ (±∏q
«∞KHX, «∞ªOU¸).
ßD` ¢IDOl √Ø∏d îAu≤W ¥IDl «∞π∂s Ë«∞πe¸ °AJq
îAs.
«ß∑ªb«Â √ßD` «∞∑IDOl
1 √“¥Kw ¨DU¡ ±MHc «ùîd«Ã ´Kv «∞ºd´W «∞L∑ußDW ´s ©d¥o ¸≠Ft
«∞FMU¥W Ë«∞∑MEOn
●●
«≠BKw «∞πNU“ œ«zLUÎ ´s ±Bb¸ «∞∑OU¸ «∞JNd°w Æ∂q ≈“«∞W
«∞LK∫o ´s §NU“ ¢∫COd «∞DFUÂ.
●●
≠Jw «∞LK∫o ¢LU±UÎ Æ∂q «∞∑MEOn.
«∞ºKDU≤OW Ë«∞GDU¡ «∞FKuÍ Ë«∞LK∫IU‹
●●
¨ºOq ¥bËÍ £r «∞∑πHOn. ¢uîw «∞∫c¸ •OY √Ê ≤Bq «∞ºJOs
Ë√ßD` «∞∑IDOl •Uœ… §b«Î.
●●
√Ë °Dd¥IW √îdÈ, ¥LJMp ¨ºq ≥cÁ «∞LJu≤U‹ ´Kv «∞d· «∞FKuÍ
∞GºU∞W «_©∂U‚. ¥uÅv °Uß∑ªb«Â °d≤U±Z ÆBOd ±l œ¸§W
•d«¸… ±MªHCW.
°Fb «ôß∑ªb«Â, îe≤w ≤Bq «∞ºJOs ≠w ßKDU≤OW §NU“ ¢∫COd
«∞DFUÂ.
´BU¸… ±u«∞`
±ö•EW:
¥LJs «ß∑ªb«Â ≥c« «∞LK∫o ≠Ij ±l §NU“ ¢∫COd «∞DFUÂ
482TA.
ǰLuϴq
ffo/no) Ë«∞ºd´W Ë∞HONU ≠w «¢πUÁ
_´Kv.
2 ¸Ø∂w ±∫u¸ «∞b˸«Ê ´Kv «∞LMHc.
3 ¸Ø∂w «∞ºKDU≤OW ´Kv ±∫u¸ «∞b˸«Ê °∫OY ¥JuÊ «∞LI∂i ≠u‚
±H∑UÕ «∞∑AGOq/«ù¥IU· (
´IU¸» «∞ºU´W •∑v ¢º∑Id ≠w ±u{l «∞∑FAOo.
4 {Fw ßD` «∞∑IDOl ´Kv ±∫u¸ «∞b˸«Ê. ¥πV √Ê ¥JuÊ ßD`
«∞∑IDOl ±∑πNUÎ _´Kv. ¢uîw «∞∫c¸ √£MU¡ «∞∑FU±q ±l
√ßD` «∞∑IDOl - √ßD` «∞∑IDOl •Uœ… §b«Î. «±ºJw
√ßD` «∞∑IDOl ±s «∞LUßJW «∞LdØe¥W.
5 ¸Ø∂w «∞GDU¡ «∞FKuÍ Ë≠∑∫W ≈œîU‰ «∞LJu≤U‹ ≠u‚ ±H∑UÕ «∞ºd´W
Ë∞Hw ≠w «¢πUÁ ´IU¸» «∞ºU´W ±l «∞∑QØb ±s «ß∑Id«¸ «∞KºUÊ
«∞Lu§uœ ≠w «∞GDU¡ «∞FKuÍ œ«îq «∞∑πu¥n «∞Lu§uœ ≠w ±I∂i
«∞ºKDU≤OW. ≠w •U∞W «∞∑dØOV «∞B∫O`, ¢∑∫U–È «∞Fö±U‹ .
●●
∞s ¥FLq «∞L∫Ko ≠w •U∞W ¢πLOFt √Ë ¢dØO∂t °AJq ¨Od
Å∫O` ≠w §NU“ ¢∫COd «∞DFU √Ë ≠w •U∞W ´b ¢dØOV
¨DU¡ ±ªdà «∞ºd´W «∞FU∞OW.
6 «î∑U¸Í √≤∂u» ≈œîU‰ «∞LJu≤U‹ «∞LDKu». ¢∑CLs ±πLu´W ´BU
œ≠l «∞LJu≤U‹ √≤∂u» ¢Gc¥W ÅGOd ùœîU‰ «∞LJu≤U‹ «∞d≠OFW √Ë
«∞LJu≤U‹ ≠w Åu¸… ≠dœ¥W ´Kv •b….
«ß∑ªb±w ´BU¸… «∞Lu«∞` ∞∑∫COd «∞FBOd ±s «∞Lu«∞` (±∏q
«∞∂d¢IU‰ Ë«∞KOLuÊ Ë«∞KOLuÊ «∞∫LCw Ë«∞πd¥V ≠dË‹).
81
Page 16

7 £∂ÒX «∞Cu«¨j.
PP
8 Ær °U∞∑AGOq Ë°b¡ «∞FLq •∑v ¢∫Bq ´Kv «∞M∑OπW «∞LDKu°W.
+
≤MB` °Uß∑ªb«Â ßd´W ±d¢HFW ∞LFEr Ë™Uzn «∞∑IDOl.
●
«ß∑ªb «∞CGj ∞K∫Bu‰ ´Kv «≤b≠UŸ ∞H∑d… ÆBOd… ±s
«∞DUÆW. ßOFLq «∞CGj ©U∞LU ¥∑r «ô•∑HUÿ
°U∞LH∑UÕ ≠w ±u{l «∞∑AGOq.
9 √ËÆn ´Lq «∞πNU“ Ë«≠BKt ´s «∞JNd°U¡.
01≠p «∞Ld≠o.
11√´b ¢∏∂OX ¨DU¡ ≠∑∫W «∞ºd´W «∞L∑ußDW °Fb «ôß∑ªb«Â.
¢KLO∫U‹
●
ÆDÒl «∞DFU Æ∂q Ë{Ft ≠w «∞u´U¡. ¥πV ¢IDOl «∞K∫u ˫∞ª∂e
Ë«∞ªCd«Ë«‹ Ë«_©FLW «_îdÈ –«‹ «∞MºOZ «∞LLU£q ≈∞v
±JF∂U‹ °∫πr 2 ßr / 3/4 °uÅW. ¥πV ¢JºOd «∞∂ºJu¥X ≈∞v
ÆDl Ë≈{U≠∑t ´s ©d¥o √≤∂u» «∞∑KIOr √£MU¡ ´Lq «∞πNU“.
●
√≠Cq ËÆX ∞∑IDOl «_´AU» ≥u ´Mb±U ¢JuÊ ≤EOHW ˧U≠W.
●●
ô ¢ªKDw ±Ju≤U‹ ßUzKW ≠Ib ¢∑ºd» ±s •u‰ «∞GDU¡ «∞FKuÍ.
«ß∑ªb±w «∞LºOq ∞KIOU °c∞p. ≠w •U∞W «∞∫ºU¡ «∞LdØe, ÅHw
«∞Lu«œ «∞BK∂W, £r «îKDONU ≠w «∞ªö◊ £r √´Ob¥NU ≈∞v «∞ºUzq
±d… √îdÈ.
●
¥πV ¢uîw «∞∫c¸ Ë´b «ù≠d«◊ ≠w «∞LFU∞πW ´Mb «ß∑ªb«Â
®Hd… «∞ºJOs.
●●
ô ¢º∑ªb±w ≤Bq «∞ºJOs ∞ªKj «_•LU‰ «∞∏IOKW ±∏q ´πOs
«∞ª∂e •OY Æb ¥∑º∂V –∞p ≠w ¢Kn «∞ªö◊. «ß∑ªb±w îDU·
«∞FπOs ≠w Ë´U¡ «∞ªKj ∞∑∫COd «∞ª∂e Ë«ß∑ªb±w «∞LCd» ≠w
«∞ºKDU≤OW ∞∑∫COd «∞JOp Ë«∞LFπMU‹.
●
ô ¢º∑ªb ®Hd… «∞ºJOs ∞∑IDOl ±JF∂U‹ «∞∏KZ √Ë «_©FLW
«∞BK∂W «_îdÈ, ±∏q «∞∑u«°q, •OY Æb ¢∑Kn «∞Ld≠o.
●
≈–« ¢r ≈{U≠W “¥X «∞Ku“ √Ë √Í ±u«œ ±MJNW ≈∞v «∞ªKOj ≠∑πMV
«∞b∞Oq
§NU“ ¢∫COd «∞DFUÂ
{u«¨j: Ø∂Od… ËÅGOd…
√≤∂u» «∞∑KIOr
¨DU¡ ±BMl «∞DFUÂ
±I∂i «_ÅU°l
®Hd… «∞ºJOs
Ë´U¡ ±BMl «∞DFUÂ
´Luœ ¢AGOq
∞u•W «∞Ad«z` «∞ºLOJW / «∞HdÂ
∞u•W «∞Ad«z` «∞M∫OHW / «∞HdÂ
∞u•W «∞∂Ad
«î∑OU¸¥W (≠w •U∞W «∞∑eË¥b œ«îq ÅMbË‚ «∞∂Ol)
ßD` «∞Ad«z` «∞d≠OFW
ßD` ¢IDOl «∞Ad«z` «∞FUœ¥W
ßD` ¢IDOl √Ø∏d îAu≤W
´BU¸… ±u«∞` (≠w •U∞W «∞∑eË¥b œ«îq ÅMbË‚ «∞∂Ol)
±ªdË◊ «∞FBd
«∞LBHU…
∞Of °U∞Cd˸… ¢eË¥b Øq «_§e«¡ «∞Lu{∫W √´öÁ œ«îq
ÅMbË‚ «∞∂Ol. ¢ª∑Kn «∞LJu≤U‹ ¢∂FUÎ ôî∑ö· ±uœ¥ö‹
«∞πNU“.
®Hd… «∞ºJOs
«ß∑ªb ®Hd… «∞ºJOs ∞∑IDOl «∞K∫r «∞MOT Ë«∞LMCZ Ë«∞∂Oi
«∞LMCZ Ë«∞ªCd«Ë«‹ Ë«∞∫∂u» Ë«∞∂U¢Ot Ëßu«zq «∞GLf ËØc∞p
∞FLq غd «∞ª∂eË«∞∂ºJu¥X.
«¢BU∞NU °U∞IDl «∞∂öß∑OJOW •OY Æb ¥M∑Z ´s –∞p ˧uœ ´ö±W
œ«zLW.
«∞ºFW «∞IBuÈ
●
«∞K∫r 004 §d«Â
Æd’ «∞∑IDOl ≈∞v ®d«z` / ÆDl ÅGOd…
«ß∑ªb ¬∞W «∞∑IDOl ≈∞v ®d«z` / ÆDl ÅGOd… ∞∑IDOl «∞HUØNW
Ë«∞ªCd«Ë«‹ Ë«∞πOs ≈∞v ®d«z` √Ë ÆDl ÅGOd… ËÆd’
«∞∑IDOl ∞∂Ad «∞π∂s «∞πU· Ë«∞∂DU©f ∞K∫Bu‰ ´Kv “ô°OW
«∞∂DU©f «_∞LU≤OW.
ôß∑ªb«Â ®Hd… «∞ºJOs
1 ≠p ¨DU¡ ≠∑∫W «∞ºd´W «∞L∑ußDW °d≠FNU
.
2 {l ´Luœ «∞L∫d„ ≠w «∞H∑∫W .
3 £∂ÒX «∞u´U¡ ≠u‚ ´Luœ «∞L∫d„ °Uß∑ªb«Â «∞LI∂i ≠u‚ ±H∑UÕ
«∞∑AGOq/«ù≤NU¡ ˱H∑UÕ «∞ºd´W ËÆr °Sœ«¸¢t ≠w «¢πUÁ ´IU¸»
«∞ºU´W •∑v ¥∑r ÆHKt ≠w «∞Lu{l .
4 £∂ÒX ®Hd… «∞ºJOs ≠u‚ ´Luœ «∞L∫d„ Ë√œ¸≥U •∑v ¢ºIj ≈∞v
«_ßHq. ®Hd… «∞ºJOs •Uœ… §bΫ ∞c∞p ¥πV «∞∑FU±q ±FNU
°∫d’.
5 ÆDÒl «∞DFUÂ Ë{Ft ≠w «∞u´U¡ ±l «∞∑QØb ±s ¢u“¥Ft °AJq
±∑ºUË.
6 £∂ÒX «∞GDU¡, √≤∂u» «∞∑KIOr ≠u‚ ±H∑UÕ «∞ºd´W Ë√œ¸Á ≠w «¢πUÁ
´IU¸» «∞ºU´W Ë«∞∑QØb ±s œîu‰ «∞KºUÊ «∞Lu§uœ ≠w «∞GDU¡ ≠w
¢πu¥n ±I∂i «∞u´U¡ . ´Mb ¢∏∂O∑t °AJq §Ob ≠OπV √Ê ¢∑r
¢BDn «∞Fö±U‹ ≈∞v §U≤V °FCNU .
●●
∞s ¥FLq «∞L∫Ko ≠w •U∞W
¢πLOFt √Ë ¢dØO∂t °AJq ¨Od Å∫O` ≠w §NU“ ¢∫COd
«∞DFU √Ë ≠w •U∞W ´b ¢dØOV ¨DU¡ ±ªdà «∞ºd´W
«∞FU∞OW.
71
Page 17

±FU∞Z «∞DFU «∞Luœ¥q 482TA (≠w •U∞W
«∞∑eË¥b œ«îq ÅMbË‚ «∞∂Ol)
¥LJMp «ß∑ªb«Â ±K∫o ±FU∞Z «∞DFU ≠w ´LKOU‹ «∞Hd ˫∞∑IDOl ≈∞v
®d«z` Ë«∞∑IDOl «∞Du∞w Ë«∞∂Ad. ¥LJs «ß∑ªb«Â ´BU¸… «∞Lu«∞`
(≠w •U∞W «∞∑eË¥b œ«îq ÅMbË‚ «∞∂Ol) ∞∑∫COd «∞FBOd ±s
82TA
4
.
«∞Lu«∞` Ë¥LJs «ß∑ªb«±NU ≠Ij ±l ±FU∞Z «∞DFU «∞Luœ¥q
≥UÂ
´Mb ≈“«∞W ±Ju≤U‹ «∞∑GKOn, ¢QØbÍ ±s ≈“«∞W «∞GDU¡ «∞∂öß∑OJw
«∞LGKn ∞MBq ßJOs «∞∑IDOl. ¢uîw «∞∫c¸ ≠ºJOs «∞∑IDOl
•Uœ §b«Î. ¥πV «∞∑ªKh ±s «∞GDU¡ •OY √≤t ±eËœ ∞∫LU¥W
ßJOs «∞∑IDOl √£MU¡ «∞∑BMOl Ë«∞MIq ≠Ij.
«ß∑ªb ±K∫o ¢BMOl «∞DFU ∞KHd ˫∞Ad«z` Ë«∞∂Ad.
•ºU¡ «∞πe¸ Ë«∞Je°d…
«∞LJu≤U‹
52 Ã “°b
°BKW ±Hd˱W
≠h £u ±º∫u‚
057 Ã §e¸ ±IDl ±JF∂U‹ 5\1 ßr
(√Ë ±l «∞∫ºU¡ «∞ªHOn, «ß∑ªb 006 §d«Â §e¸ ±IDFW
±JF∂U‹ 5.1 ßr)
±d‚ œ§Uà °U¸œ
51-01 ±q Øe°d… ±D∫u≤W
±K` Ë≠KHq
«∞Dd¥IW:
1 ¥c«» «∞e°b ≠w «∞u´U¡ Ë¥CU· «∞∂Bq Ë«∞∏u £r ¥∫Ld ≈∞v √Ê
¥KOs.
«∞ºö±W
●
«∞AHd«‹ Ë«∞Ku•U‹ •Uœ… §bΫ, ¥πV «∞∑FU±q ±FNU °∫c¸. √±ºp
®Hd… «∞ºJOs œ«zLÎU ±s ±ºJW «ùÅ∂l ≠w «_´Kv, °FObΫ
´s «∞∫U≠W «∞IU©FW ßu«¡ ´Mb «∞∑FU±q √Ë «∞∑MEOn.
●
œ«zLÎU ≠p ®Hd… «∞ºJOs Æ∂q ßJV «∞L∫∑u¥U‹ ±s «∞u´U¡.
●
√°Fb «_¥bÍ Ë√œË«‹ «∞LD∂a ´s Ë´U¡ «∞LFU∞Z «∞L∑Bq °LBb¸
«∞∑OU¸.
●
ô ¢º∑ªb «_ÅU°l √°bΫ ∞b≠l «∞DFU œ«îq √≤∂u» «∞∑Gc¥W.
2 ¥u{l «∞πe¸ ≠w «∞LºOq Ë¥CU· «∞∂Bq Ë«∞∏uÂ. ¢CU· ØLOW
ØU≠OW ±s «∞Ld‚ ∞KuÅu‰ ≈∞v ±º∑uÈ 5\1 ≠w «∞IbÕ. £∂X «∞GDU¡
˨DU¡ «∞∑F∂µW.
3 ¢ªHo ≠w Ë{l «∞M∂i ∞Lb… 5 £u«Ê ∞K∫ºU¡ «∞ªAs √Ë √Ø∏d
∞K∫ºU¡ «∞MU´r.
4 ¥MIq «∞Le¥Z ≈∞v Æb¸, £r ¢CU· «∞Je°d… Ë«∞∑u«°q Ë¥DNv «∞∫ºU¡
°∂j¡ ∞Lb… 03 ≈∞v 53 œÆOIW √Ë ≈∞v √Ê ¢MCZ.
5 ¢C∂j «∞∑u«°q •ºV «∞∫U§W Ë¥CU· «∞Le¥b ±s «∞ºUzq ≈–« ∞eÂ
«_±d.
Ë«ß∑ªb «∞CU¨j «∞Ld≠o œ«zLÎU.
●
Æ∂q ≠p «∞GDU¡ ±s «∞u´U¡ √Ë «∞LK∫o ±s Ë•b… «∞∑OU¸:
●●
√ËÆn «∞∑AGOq
●●
«≤∑Ed ≈∞v √Ê ¢∑uÆn «∞AHd«‹ / «∞Ku•U‹ ¢LU±ÎU.
●
´Mb ¢IDOl «∞Ad«z` / «∞Hd √Ë «∞∂Ad; ô ¢πFq «∞u´U¡
¥LJMp «∞∫Bu‰ ´Kv ±e¥b ±s ËÅHU‹ «∞DNw ±s îö‰ ±uÆl
doowneK ´Kv «ù≤∑d≤X:
moc.dlrowdoownek.www
¥L∑KT °Fb ∞u•W «∞IDl: √≠d⁄ °U≤∑EUÂ.
●●
ô ¢∑πUË“Í ±º∑uÈ «∞ºFW «∞IBuÈ «∞Lu{` ´Kv
XAM".
«∞ºKDU≤OW °U∞JKLW «ù≤πKOe¥W "
●
≈–« •bÀ «≥∑e«“ “«zb ´Mb «ß∑ªb«Â «∞LK∫o; ÆKq «∞ºd´W √Ë
√ËÆn «∞πNU“ Ë√îdà °Fi «∞L∫∑u¥U‹.
●
ßO∑Kn ≥c« «∞πNU“ ËÆb ¥º∂V «ùÅU°W ≈∞v ¢Fd{X
¬∞OW «∞IHq ∞Iu… “«zb….
61
Page 18

´Jf ´IU¸» «∞ºU´W ˸≠Ft _´Kv .
7 √“¥Kw ¨DU¡ «ùîd«Ã ´Kv «∞ºd´W «∞FU∞OW ´s ©d¥o ∞Ht ≠w «¢πUÁ
●
«∞uÅHU‹ «∞KOMW - ô ¢ªKj «∞LJu≤U‹ «∞LπLb… «∞∑w ®JKX §ºLÎU
ÅK∂ÎU √£MU¡ «∞∑πLb; «Øºd≥U Æ∂q ≈{U≠∑NU ≈∞v «∞LºOq.
8 {Fw «∞ªö◊ ´Kv «∞LªdÃ, °∫OY ¥JuÊ «∞LI∂i ±∑πNUÎ ≈∞v
«∞ªKn. ∞Hw «∞ªö◊ ≠w «¢πUÁ ´IU¸» «∞ºU´W °∫OY ¥º∑Id ¢LU±UÎ
≠w ±u{l «∞∑FAOo •OY ¢∑r ±∫U–«… «∞ºNLOs .
9 ®GKw «∞πNU“ ´Kv «∞ºd´W «∞IBuÈ.
01°Lπdœ «∞uÅu‰ ≈∞v «∞Iu«Â «∞LDKu», √ËÆHw ¢AGOq «∞πNU“
Ë«≠BKOt ´s ±Bb¸ «∞∑OU¸ «∞JNd°w.
11√“¥Kw «∞ªö◊.
21√´ObÍ ¢dØOV ¨DU¡ ±ªdà «∞ºd´W «∞FU∞OW °Fb «ôß∑ªb«Â.
≤BUz`
●
∞LMl «∞∑ºd» °Kq •KIW «∞ºb Æ∂q ¢dØO∂NU ËØc∞p ¢QØb √Ê «∞IU´b…
±∏∂∑W ≠w «ù°d¥o.
●
´Mb ´Lq «∞LU¥u≤Oe; {l ØU≠W «∞LJu≤U‹ ≠w «∞LºOq °Uß∑∏MU¡
382TA
«∞e¥X. £r «ßJV «∞e¥X √£MU¡ ´Lq «∞πNU“ °∂j¡ Ë°U∞∑ºUËÍ °Fb
≠p ¨DU¡ «∞∑F∂µW.
●
«∞Le¥Z «∞ºLOp, ±∏q «∞∂U¢Ot, «∞LFπMU‹: «ß∑ªb «∞ºd´W
«∞L∑ußDW, ±l «∞∑IAOd ´Mb «∞∫U§W. ≈–« ØUÊ ±s «∞BFV
±FU∞π∑t; √{n ±e¥bΫ ±s «∞ºUzq. √Ë «ß∑ªb «∞M∂i ∞∑∫d¥p
«∞LJu≤U‹ ´∂d «∞AHd«‹.
«∞b∞Oq
«∞ªö◊ «_Ød¥KOp 282TA
¨DU¡
¨DU¡ ≠∑∫W «∞∑F∂µW
«∞b˸‚
©u‚ «ù•JUÂ
Ë•b… «∞AHd«‹
«∞ªö◊ «∞e§U§w
¨DU¡ ≠∑∫W «∞∑F∂µW
¨DU¡
«∞b˸‚
©u‚ «ù•JUÂ
Ë•b… «∞AHd«‹
«∞IU´b…
«ß∑ªb«Â «∞ªö◊ «_Ød¥KOp 282TA
1 ¢QØb ±s Å∫W ¢∏∂OX •KIW «∞ºb ≠w Ë•b… «∞AHd….
«∞FMU¥W Ë«∞∑MEOn
●●
«≠BKw «∞πNU“ œ«zLUÎ ´s ±Bb¸ «∞∑OU¸ «∞JNd°w Æ∂q ≈“«∞W
«∞LK∫o ´s §NU“ ¢∫COd «∞DFUÂ.
●●
≠Jw «∞LK∫o ¢LU±UÎ Æ∂q «∞∑MEOn.
●
√≠d⁄ «ù°d¥o Æ∂q «∞HBq ±s «∞IU´b….
Ë•b… «∞AHd…
1 ≠p •KIW «∞ºb Ë«¨ºKNU.
2 ≤En «∞AHd«‹ ¢∫X «∞BM∂u¸ °U∞Hd®U…. «•d’ ´Kv √ô ¥∂∑q
«∞πe¡ «∞ºHKw ±s «∞u•b….
3 «¢dØNU ¥πn.
«∞IDl «_îdÈ
¨ºOq ¥bËÍ ≠w ±∫Ku‰ ±U¡ ËÅU°uÊ ßUîs. √Ë °Dd¥IW √îdÈ,
¥LJMp ¨ºq ≠∑∫W «∞∑F∂µW Ë«∞GDU¡ «∞FKuÍ Ë«∞IU´b… Ë«∞ªö◊
«∞e§U§w ≠w ¨ºU∞W «_©∂U‚.
2 √±ºp «∞πU≤V «∞ºHKw ±s Ë•b… «∞AHd… Ë√œîq «∞AHd«‹ ≠w
ÆU´b… «∞LºOq. ∞n ∞∑∏∂OX «∞LπLu´W ≠w ±JU≤NU.
3 {l «∞LJu≤U‹ ≠w «ù°d¥o.
4 ¸ØV «∞GDU¡ ≠w «ù°d¥o, £r ∞Ht ≠w «¢πUÁ ´IU¸» «∞ºU´W, ±l
«∞∑QØb √Ê «∞KºUÊ ≠w ≠∑∫U‹ «∞GDU¡ ±u§uœ ≠w «∞AIu‚ ≠w
«∞LI∂i. ¥b‰ «∞∑dØOV ´Kv «∞B∫O` ±∫U–«… «∞Fö±U‹ .
5 {l ¨DU¡ «∞∑F∂µW ≠w «∞H∑∫W.
6 ≠p ¨DU¡ ±MHc «∞ºd´W «∞FU∞OW °U∞∑bË¥d ´Jf «¢πUÁ ´IU¸»
«∞ºU´W Ë«∞d≠l _´Kv .
7 {l «∞LºOq ´Kv «∞LMHc Ë«∞LI∂f ¢πUÁ «∞LRîd… £r ∞Ht ≠w «¢πUÁ
´IU¸» «∞ºU´W ≈∞v √Ê ¥∏∂X ≠w ±JU≤t.
8 ®Gq «∞ºd´W «∞IBuÈ.
9 °Fb «∞uÅu‰ ≈∞v «∞Iu«Â «∞LDKu»; √ËÆn «∞πNU“ Ë«≠BKt ±s
«∞JNd°U¡.
01≠p «∞LºOq.
11√´ObÍ ¢dØOV ¨DU¡ ±ªdà «∞ºd´W «∞FU∞OW °Fb «ôß∑ªb«Â.
«ß∑ªb«Â «∞ªö◊ «∞e§U§w 382TA
1 ¢QØbÍ ±s ¢dØOV •KIW «ù•JU °AJq Å∫O` ´Kv Ë•b…
«∞AHd«‹.
2 ¸Ø∂w Ë•b… «∞AHd«‹ œ«îq «∞IU´b….
3 ∞Hw «∞b˸‚ «∞e§U§w ≠w «∞IU´b… ∞∑dØO∂t ≠ONU.
4 {Fw «∞LJu≤U‹ œ«îq «∞b˸‚.
5 ¸Ø∂w «∞GDU¡ «∞FKuÍ Ë«{GDw ´KOt _ßHq •∑v ¥º∑Id ≠w
±u{Ft.
6 {Fw ≠∑∫W «∞∑F∂µW ´Kv «∞GDU¡ «∞FKuÍ Ë«{GDw ´KONU _ßHq
∞∑º∑Id ≠w ±u{FNU.
51
Page 19

«∞ªö◊ «∞Luœ¥KOs 282TA Ë382TA (≠w
•U∞W «∞∑eË¥b œ«îq ÅMbË‚ «∞∂Ol)
4 «´Jf ´LKOW «∞∑dØOV √´öÁ ∞Hp «∞u«Æw.
●
√£MU¡ «∞ªKj; ¥LJs ≈{U≠W «∞LJu≤U‹ ±∂U®d… ≈∞v «∞u´U¡ ´∂d
«_≤∂u».
«ß∑ªb±w «∞ªö◊ ∞∑∫COd «∞∫ºU¡, «∞LAdË°U‹, «∞LFπMU‹,
«∞LU¥u≤Oe, غd«‹ «∞ª∂e, غd«‹ «∞∂ºJu¥X, ¢∫COd «∞LJºd«‹
«∞FMU¥W Ë«∞∑MEOn
˧d‘ «∞∏KZ.
●
œ«zLÎU √ËÆn «∞∑AGOq Ë«≠Bq «∞πNU“ ±s «∞JNd°U¡ Æ∂q «∞∑MEOn.
«∞ºö±W
●●
±ªU©d «∞∑Fd÷ ∞∫dË‚: °πV «∞ºLUÕ °∑∂d¥b «∞LJu≤U‹
«∞ºUîMW ≈∞v œ¸§W •d«¸… «∞Gd≠W Æ∂q ´LKOW «∞ªKj.
●
ô ¢KLf «∞AHd«‹ «∞∫Uœ…. √°Fb Ë•b… «∞AHd… ´s «_©HU‰.
●
«ß∑ªb±w «∞b˸‚ ≠Ij ±l Ë•b… «∞AHd«‹ «∞LeËœ….
●
¥∫c¸ ±∫UË∞W ¢dØOV Ë•b… «∞AHd«‹ ≠w «∞πNU“ °bËÊ ¢dØOV
«∞b˸‚.
●
«≠BKw «∞πNU“ ´s ±Bb¸ «∞∑OU¸ «∞JNd°w œ«zLUÎ Æ∂q Ë{l ¥b¥p
√Ë √œË«‹ «∞LUzb… ≠w «∞b˸‚.
●
¥∫c¸ ¢AGOq «∞ªö◊ ≠U¸¨UÎ.
●
¥πV ¢AGOq «∞ªö◊ ≠Ij ±l ¢dØOV «∞GDU¡ «∞FKuÍ ≠w ±u{Ft.
●
¥∫c¸ ¢dØOV Ë•b… «∞AHd«‹ ´Kv Ë•b… «∞DUÆW («∞Lu¢u¸)
Ë•b… «∞DUÆW
●
«±º` °IDFW ÆLU‘ ¸©∂W £r §HHNU.
●
ô ¢º∑ªb ±u«œ √ØU∞W Ëô ¢GLdÁ ≠w «∞LU¡.
«∞u´U¡, «_œË«‹, Ë«Æw «∞d–«–, «∞u«Æw «∞IU°q ∞KHp,
îDU· «∞FπOs
●
¢Gºq °U∞Ob £r ¥πHn ¢LU±ÎU √Ë ¢Gºq ≠w ¨ºU∞W «∞B∫uÊ.
●
ô ¢º∑ªb ≠d®U… ßKJOW, Ëô Åu≠ÎU ±Fb≤OÎU Ëô ±∂OCÎU ∞∑MEOn
Ë´U¡ «∞º∑U≤Kf ß∑Oq. «ß∑ªb «∞ªq ù“«∞W «∞πOd.
●
√°Fb «∞πNU“ ´s «∞∫d«¸… (√´Kv «∞LuÆb, «∞HdÊ, «∞LOJdËË¥n).
°bËÊ ¢dØOV œË¸‚ «∞ªö◊.
●
¢uîw «∞∫c¸ œ«zLUÎ ´Mb «∞∑FU±q ±l Ë•b… «∞AHd«‹ Ë¢πM∂w ∞Lf
•U≠W «∞IDl «∞ªUÅW °U∞AHd«‹ √£MU¡ «∞∑MEOn.
●
´Mb ≈“«∞W «∞ªö◊ ±s Ë•b… «∞DUÆW:
●●
√ËÆHw ¢AGOq «∞πNU“;
●●
«≤∑EdÍ •∑v ¢uÆn «∞AHd«‹ ¢LU±UÎ;
●●
«∞Luœ¥q 382TA ¥πV ¢uîw «∞∫c¸ •∑v ô ¥∑r ≠p «∞b˸‚
´s ±πLu´W «∞IU´b…
●
Æb ¥RœÍ ßu¡ «ß∑ªb«Â «∞ªö◊ ≈∞v •bËÀ ≈ÅU°U‹.
≥UÂ
282TA √£MU¡
¢r ¢dØOV §u«≤V ÆU´b… «∞b˸‚ «_Ød¥KOp
«∞∑BMOl Ëô ¥πV ±∫UË∞W ≈“«∞∑NU.
●●
∞s ¥FLq «∞L∫Ko ≠w •U∞W ¢πLOFt √Ë ¢dØO∂t °AJq ¨Od
Å∫O` ≠w §NU“ ¢∫COd «∞DFU √Ë ≠w •U∞W ´b ¢dØOV
¨DU¡ ±ªdà «∞ºd´W «∞L∑ußDW.
●
ô ¢AGq «∞LºOq _Ø∏d ±s œÆOIW - _Ê •d«¸¢t ß∑d¢Hl §bΫ.
√ËÆn «∞∑AGOq ≠u¸ «∞uÅu‰ ≈∞v «∞Iu«Â «∞LDKu».
●
ô ¢Cl ±Ju≤U‹ §U≠W ≠w «∞LºOq Æ∂q ¢AGOKt. °q ¢IDl ≈∞v
±JF∂U‹, £r ¥Hp «∞GDU¡ Ë¢ºIj «∞LJF∂U‹ ´∂d «∞H∑∫W ≠w «∞GDU¡
√£MU¡ ´Lq «∞πNU“.
●
«∞Luœ¥q 282TA ô ¥º∑FLq ±l «∞∂NU¸«‹ ±∏q «∞∏uÂ, «∞A∂X,
Ë°c˸ «∞JLuÊ - _≤NU ¢∑Kn «_Ød¥KOp.
●
ô ¢º∑ªb «∞LºOq Ø∫UË¥W ¢ªe¥s. «•∑Hk °t îU∞OÎU Æ∂q
«ôß∑ªb«Â Ë°FbÁ.
●
ô ¢º∫o «∞∏KZ °MHºt, °q √{n ÆKOöÎ ±s «∞LU¡.
●
«∞Luœ¥q 282TA ô ¢ªKj √Ø∏d ±s ∞∑d Ë≤Bn 1,5 ∞∑d - Ë√Æq
±s –∞p ±l «∞ºu«zq «∞Ld¨OW ±∏q ±ªHu‚ «∞∫KOV (±OKp ®Op).
●
«∞Luœ¥q 382TA ô ¢ªKj √Ø∏d ±s ∞∑d Ë≤Bn 1,3 ∞∑d - Ë√Æq
±s –∞p ±l «∞ºu«zq «∞Ld¨OW ±∏q ±ªHu‚ «∞∫KOV (±OKp ®Op).
41
Page 20

●
PP
¢∑MuŸ «∞FπMU‹ «∞Lª∑KHW ±s «∞bÆOo °AJq Ë«{` ≠w ØLOU‹
«∞ºUzq «∞LDKu°W, ËÆb ¥JuÊ ô∞∑BU‚ «∞FπOs √£d ±K∫uÿ ´Kv
«∞∫Lq «∞u«Æl ´Kv «∞πNU“. ¥MB` °Ld«Æ∂W «∞πNU“ √£MU¡ ±eÃ
«∞FπOs, ∞s ¢º∑Gd‚ «∞FLKOW √Ø∏d ±s
0.
6 - 8 ϮUzo.
4 «{Gj –¸«Ÿ ¢∫d¥d «∞d√” _ßHq Ë«îHi ¸√” «∞ªö◊ ≈∞v √Ê
¢∏∂X ≠w ±JU≤NU.
5 Åq «∞JNd°U¡ £r ®Gq «∞πNU“ £r •u‰ ±H∑UÕ «∞ºd´W ≈∞v «∞u{l
«∞Ld¨u». ∞û≤NU¡ «≤∑Iq ≈∞v
●
«≤∑Iq ≈∞v «∞M∂i ∞Kb˸«‹ «∞IBOd….
6 «≠Bq «∞πNU“ ±s «∞JNd°U¡.
±H∑UÕ «∞ºd´W
7 «¸≠l ¸√” «∞ªö◊, Ë√£MU¡ «ù±ºU„ °NU §ObΫ «ß∫V «_œ«… ±s
«∞LI∂f.
≥cÁ ±πdœ ≈¸®Uœ«‹ Ë¢∑MuŸ ¢∂FÎU ∞LIb«¸ «∞Le¥Z ≠w «∞u´U¡
Ë«∞LJu≤U‹ «∞πU¸Í ±e§NU.
«∞ªHU‚
●
îHo «∞b≥s Ë«∞ºJd: «°b√ ¢b¸¥πOÎU £r «≤∑Iq ≈∞v ßd´W √´Kv
●
îHo «∞∂Oi ≠w ±e¥Z «∞Jd¥LW: «ß∑ªb «∞ºd´W «∞L∑ußDW
Ë«∞FKOU
●
{r «∞D∫Os Ë«∞HUØNW: «ß∑ªb «∞ºd´W «∞LMªHCW
Ë«∞L∑ußDW
●
«∞JOp «∞AU±q: «°b√ ´Kv ßd´W ±MªHCW ¢b¸¥πOÎU £r «≤∑Iq ≈∞v
ßd´W √´Kv
●
≠d„ «∞b≥s ≠w «∞HUØNW: «ß∑ªb «∞ºd´W «∞LMªHCW
Ë«∞L∑ußDW
«∞LCd»
●
“œ «∞ºd´W ¢b¸¥πOÎU ≈∞v «∞∫b «_ÆBv
îDU· «∞FπOs
●
«ß∑ªb «∞ºd´W «∞LMªHCW Ë«∞L∑ußDW
≥UÂ
●
±s «∞FUœÍ ¢∫d„ ¸√” «∞ªKj ´Mb îKj √©FLW £IKOW ±∏q
´πOs «∞ª∂e.
●
≈–« ∞r ¢d¢Hl ¸√” «∞ªö◊ √£MU¡ «∞FLq; ≠ºO∑uÆn «∞πNU“ ´s
«∞FLq ±∂U®d…. Ëù´Uœ… ¢AGOKt; «îHi ¸√” «∞ªö◊, £r •u‰
±H∑UÕ «∞ºd´W ≈∞v Ë{l «ù≤NU¡, Ë«≤∑Ed °Cl £u«Ê £r √´b
«î∑OU¸ «∞ºd´W. ¥πV √Ê ¥º∑Q≤n «∞ªö◊ «∞FLq ±∂U®d….
●
Ë≈–« «≤IDFX «∞JNd°U¡ ´s «∞πNU“ _Í ß∂V ±LU √œÈ ≈∞v ¢uÆHt
´s «∞FLq; •u‰ ±H∑UÕ «∞ºd´W ≈∞v Ë{l «ù≤NU¡, Ë«≤∑Ed °Cl
£u«Ê £r √´b «î∑OU¸ «∞ºd´W. ¥πV √Ê ¥º∑Q≤n «∞ªö◊ «∞FLq
±∂U®d….
●
∞s ¥FLq «∞ªö◊ ≈ô ≈–« ØU≤X §LOl √¨DOW «∞LMU≠c
Å∫O∫W «∞∑∏∂OX ≠w «∞πNU“.
●
≈–« ØUÊ Åu‹ «∞πNU“ ±e´πÎU; ≠QËÆn ¢AGOKt Ë√îdà °Fi
«∞Le¥Z √Ë “œ «∞ºd´W.
●
√“¥Kw œ«zLUÎ «∞LK∫o «∞LdØV ´Kv ±ªd§w «∞ºd´∑Os «∞L∑ußDW
Ë«∞FU∞OW Æ∂q ¸≠l ¸√” «∞ªö◊.
«∞ºFU‹ «∞IBuÈ
±FπMU‹ ÆBOd… «∞IAd… 054 Ã ©∫Os
ØOJW «ßHMπOW (±eà °Ld•KW
Ë«•b…) 6\1 Øπr ≈§LU∞w «∞Le¥Z
±e¥Z ØOJW «∞HUØNW 8\1 Øπr ≈§LU∞w «∞Le¥Z
´πOMW «∞ª∂e 005 à ©∫Os
°OU÷ «∞∂Oi 8
{U°j ±º∑AFd «∞ºd´W «ù∞J∑dË≤w
¥∫∑uÍ «∞ªö◊ ´Kv {U°j ±º∑AFd ßd´W ≈∞J∑dË≤w ±BLr
≤BUz`
●
√ËÆn «∞πNU“ Ë≤En «∞u´U¡ °LKFIW ´Mb «∞∫U§W.
●
√≠Cq ®w¡ ∞K∂Oi ´Mb «∞ªHo √Ê ¥JuÊ ´Kv œ¸§W •d«¸…
«∞Gd≠W.
●
Æ∂q îHo «∞∂Oi; ¢QØb √≤t ô ¥u§b ®∫r √Ë ÅHU¸ «∞∂Oi ´Kv
«∞LCd» √Ë «∞u´U¡.
●
«ß∑ªb ±Ju≤U‹ °U¸œ… ∞KLFπMU‹ ±U ∞r ¢∑DKV «∞uÅHW ¨Od –∞p.
●
´Mb îHo «∞b≥s Ë«∞ºJd ù´b«œ «∞JOp; «ß∑ªb «∞b≥s («∞ºLs)
´Mb œ¸§W •d«¸… «∞Gd≠W √Ë •u∞t ≈∞v «∞∫U∞W «∞ºUzKW √ËôÎ.
●
¥∫∑uÍ «∞ªö◊ ´Kv Ë™OHW "«∞∂b«¥W «∞ªHOHW" ∞∑IKOq «ô≤ºJU».
Ë∞Js; ´Mb ¢AGOq «∞πNU“ ±l ˧uœ ±e¥Z ßLOp ≠w «∞u´U¡ ±∏q
´πOMW «∞ª∂e; ≠Ib ¢K∫k √Ê «∞ªö◊ ¥º∑Gd‚ °Cl £u«Ê ∞∂Ku⁄
«∞ºd´W «∞L∫bœ….
∞KL∫U≠EW ´Kv «∞ºd´W ≠w ØU≠W «_•LU‰, ±∏q «∞Fπs √Ë ´Mb
≈{U≠W «∞∂Oi ≈∞v ±e¥Z «∞JOJW. Ë∞c« Æb ¢ºLl °Fi «∞∑GOd ≠w
«∞ºd´W √£MU¡ «ôß∑ªb«Â _Ê «∞ªö◊ ¥C∂j ≤Hºt ±l «∞∫Lq
Ë«∞ºd´W «∞L∫bœ…, Ë–∞p √±d ´UœÍ.
¢dØOV «∞u«Æw Ë«ß∑ªb«±t
1 ¸ØV «∞u´U¡ ≠w «∞IU´b… Ë√{n «∞LJu≤U‹.
2 ¸ØV «_œ«… £r «îHi ¸√” «∞ªö◊.
3 ¸ØV «∞u«Æw ≠w «∞u´U¡ °∑∫d¥p «∞IU©l ÆKOöÎ •u‰ ¸√” «∞ªö◊
.
≤IU◊ ´Mb ≈´b«œ «∞ª∂e
≥UÂ
●
ô ¢∑πUË“ «∞ºFU‹ «∞IBuÈ «∞L∫bœ… - ≠c∞p ¥e¥b «∞∫Lq ´Kv
«∞πNU“.
●
±s «∞FUœÍ ¢∫d„ ¸√” «∞ªKj ´Mb îKj √©FLW £IKOW ±∏q ´πOs
«∞ª∂e.
●
¢ª∑Kj «∞LJu≤U‹ °AJq √≠Cq ´Mb Ë{l «∞ºu«zq √ËôÎ.
●
√ËÆn «∞πNU“ ´Kv ≠∑d«‹ Ë«ØAj «∞Le¥Z ´s îDU· «∞FπOs.
31
Page 21

´d°w
Æ∂q Æd«¡… «∞∑FKOLU‹ «∞d§U¡ ≠∑` «∞BH∫W «ô±U±OW «∞∑w ¢∫∑uÍ ´Kv «∞dßu±U‹ «∞∑u{O∫OW
«∞b∞Oq
oowneK
§NU“ ¢∫COd «∞DFUÂ
±MHc «∞ºd´W «∞L∑ußDW
±MHc «∞ºd´W «∞FU∞OW
±I∂f «_œË«‹
–¸«Ÿ ¢∫d¥d «∞d√”
¸√” «∞ªö◊
Ë´U¡
±H∑UÕ «∞∑AGOq Ë«∞ºd´W
Ë•b… «∞DUÆW
•πd… ¢ªe¥s «∞ºKp
«∞ªHU‚
îDU· «∞FπOs ±l Ë«‚ ÆU°q ∞KHp
«∞LCd»
±U≤l ¸–«–
Æ∂q «ß∑ªb«Â §NU“/±K∫IU‹ d
●
«Ædzw «∞∑FKOLU‹ «∞∑U∞OW Ë«•∑HEw °NU ≠w «∞L∑MUˉ ∞öß∑ªb«±U‹
«∞Lº∑I∂KOW «∞Ld§FOW.
●
√“¥Kw ±Ju≤U‹ «∞∑GKOn Ë√¥W ±KBIU‹.
●
«¨ºKw «_§e«¡ «∞LºLuÕ °GºKNU: ¸«§Fw ƺr "«∞FMU¥W
Ë«∞∑MEOn".
●●
√œîKw ±U ¥e¥b ´s •U§∑p ±s «∞ºKp «∞JNd°w ≠w •Oe «∞∑ªe¥s
«∞Lu§uœ ≠w «∞πU≤V «∞ªKHw ∞KπNU“.
«∞ºö±W
●●
√ËÆHw ¢AGOq «∞πNU“ Ë«≠BKOt ´s ±Bb¸ «∞∑OU¸ «∞JNd°w Æ∂q
¢dØOV √Ë ≈“«∞W «∞LK∫IU‹ Ë°Fb «ôß∑ªb«Â ËÆ∂q «∞∑MEOn.
●●
ô ¢∑d„ «∞ºKp ¥∑b∞v °∫OY ¥LJs ∞ú©HU‰ «ù±ºU„ °t.
●
●
√°FbÍ √ÅU°Fp ´s «_§e«¡ «∞L∑∫dØW Ë«_œË«‹/«∞LK∫IU‹ «∞∑w
¢r ¢dØO∂NU. ¥∫c¸ ≈œîU‰ «_ÅU°l ˨Od≥U ±s «_§ºU œ«îq
«ü∞OW «∞LHBKOW.
«∞LK∫IU‹
∞Of °U∞Cd˸… ¢eË¥b Øq «∞LK∫IU‹ «∞Lb¸§W œ«îq
ÅMbË‚ °Ol §NU“ ¢∫COd «∞DFU ∞b¥p. ¢ª∑Kn
«∞LK∫IU‹ ¢∂FUÎ ôî∑ö· ±uœ¥ö‹ «∞πNU“.
282TA Ë382TA)
482TA)
«∞ªö◊ («∞Luœ¥öÊ
´BU¸… «∞Lu«∞`
±FU∞Z «∞DFU («∞Luœ¥q
●●
¥∫c¸ ¢d„ «∞πNU“ œËÊ ±ö•EW √£MU¡ ¢AGOKt.
●●
¥∫c¸ «ß∑ªb«Â §NU“ √Ë ±K∫o ¢U∞n. ≠w ±∏q ≥cÁ «∞∫U∞W ¥πV
≠∫h «∞πNU“ √Ë ≈Åö•t: ¸«§Fw ƺr "«∞BOU≤W ˸´U¥W
«∞FLö¡".
●●
ô ¢ºL` °U°∑ö‰ Ë•b… «∞DUÆW √Ë «∞ºKp √Ë «∞IU°f.
●●
ô ¢º∑ªb ±K∫IU‹ ¨Od ±F∑Lb… Ëô √Ø∏d ±s ±K∫o ≠w ≤Hf
«∞uÆX.
●●
´Mb «ß∑ªb«Â ±K∫o, «Ædzw √¥CUÎ ±FKu±U‹ «∞ºö±W «∞LeËœ… ≠w
≥c« «∞b∞Oq Ë«∞L∑FKIW °Nc« «∞LM∑Z «∞LFOs.
√œË«‹ «∞ªKj Ë°Fi «ß∑ªb«±U¢NU
«∞ªHU‚
●
∞FLq «∞JOp Ë«∞∂ºJu¥X Ë«∞LFπMU‹ Ë«∞L∏KπU‹ Ë«∞∫Au«‹
Ë«∞∫Ku¥U‹ Ë«∞∂DU©f «∞LNdËßW.
«∞LCd»
●
∞K∂Oi Ë«∞Jd¥LW Ë«∞e°b Ë«∞FπOMW «ôßHMπOW «∞ªU∞OW ±s «∞b≥s,
Ë«∞Ld≤m, ËØOp «∞π∂s, Ë«∞ºu≠KOW ô ¢º∑ªb «∞LCd» ±l «∞Le¥Z
«∞ºLOp (تHo «∞b≥s Ë«∞ºJd ±∏öÔ) - ≠Ib ¥∑Kn.
îDU· «∞FπOs
●
∞Leà «∞ªLOd….
doowneK √¥W ±ºµu∞OW ≠w •U∞W «ß∑ªb«Â
ôß∑ªb«Â «∞ªö◊
1 «{Gj –¸«Ÿ ¢∫d¥d «∞d√” _ßHq Ë«¸≠l ¸√” «∞ªö◊ ≈∞v √Ê
¢∏∂X ≠w ±JU≤NU.
2 «î∑d «_œ«… Ë«{GDNU ≠w ±I∂f «_œË«‹ .
●
¢QØb √Ê «∞u«Æw ±∏∂X ≠w ´Luœ îDU·
«∞FπOs Æ∂q «ùœîU‰ ≠w «∞LMHc. °Fb «ùœîU‰; ¸ØV «∞u«Æw ≠w
±MHc «∞ªö◊ ∞LMl œîu‰ «∞DFUÂ.
4002/5391 «∞BUœ¸… °∑U¸¥a
3 ¸ØV «∞u´U¡ ≠w «∞IU´b… £r ∞Ht ≠w «¢πUÁ ´IU¸» «∞ºU´W ∞∑∏∂O∑t
.
●●
ô ¢∑πUË“ «∞ºFU‹ «∞IBuÈ ≠w.
●●
¢uŒ «∞∫c¸ ´Mb ¸≠l ≥c« «∞πNU“. ¢QØb √Ê «∞d√” ±IHKW Ë√Ê
«∞u´U¡ Ë«_œË«‹ Ë«_ßö„ ±∏∂∑W Æ∂q «∞d≠l.
●
≥c« «∞πNU“ ¨Od ±ªBh ∞öß∑ªb«Â ±s Æ∂q √®ªU’ (°Ls
≠ONr «_©HU‰) –ËÍ «≤ªHU÷ ≠w «∞Ib¸«‹ «∞πºb¥W √Ë «∞∫ºOW √Ë
«∞FIKOW √Ë ∞Ls œËÊ î∂d… √Ë ±Fd≠W °U∞πNU“, ±U ∞r ¥∑r «ù®d«·
´KONr √Ë ≈´DUzNr ¢FKOLU‹ °AQÊ «ß∑ªb«Â «∞πNU“ ±s Æ∂q
«∞Aªh «∞Lºµu‰ ´s ßö±∑Nr.
●
¥πV «ù®d«· ´Kv «_©HU‰ ∞K∑QØb ±s ´b ´∂∏Nr °U∞πNU“.
●
«ß∑ªb±w «∞πNU“ ≠Ij ≠w «ôß∑ªb«±U‹ «∞LMe∞OW «∞LªBh
∞NU. ∞s ¢∑∫Lq ®dØW
«∞πNU“ °Dd¥IW ¨Od Å∫O∫W √Ë ´b «ô±∑∏U‰ ∞K∑FKOLU‹
«∞LcØu¸….
Æ∂q ¢uÅOq «∞πNU“ °LBb¸ «∞∑OU¸ «∞JNd°w
●
¥πV «∞∑QØb ±s ¢LU£q ±u«ÅHU‹ «∞LBb¸ «∞JNd°w ±l
«∞Lu«ÅHU‹ «∞Lu{∫W ´Kv «∞πU≤V «∞ºHKw ∞KπNU“.
●
¥∑u«≠o ≥c« «∞πNU“ ±l ¢u§ONU‹ «ô¢∫Uœ «_˸˰w
CE/801/4002 °AQÊ «∞∑u«≠o «∞JNd˱GMU©Oºw Ë¢MEOLU‹
«ô¢∫Uœ «_˸˰w ¸Ær
72/01/4002 Ë«∞L∑FKIW °U∞Lu«œ «∞L∑ö±ºW ±l «_©FLW.
21
Page 22

Page 23

HEAD OFFICE: Kenwood Limited, 1-3 Kenwood Business Park, New Lane, Havant, Hampshire PO9 2NH
41142/5
 Loading...