

Page 1

KDC-BT752HD
KDC-X796
CD-RECEIVER
INSTRUCTION MANUAL
AMPLI-TUNER LECTEUR DE CD
MODE D’EMPLOI
REPRODUCTOR DE DISCOS COMPACTOS RECEPTOR DE FM/AM
MANUAL DE INSTRUCCIONES
Take the time to read through this instruction manual.
Familiarity with installation and operation procedures will help you obtain the best performance from
your new CD-receiver.
For your records
Record the serial number, found on the back of the unit, in the spaces designated on the warranty card, and in the
space provided below. Refer to the model and serial numbers whenever you call upon your Kenwood dealer for
information or service on the product.
Model KDC-BT752HD/ KDC-X796 Serial number
US Residents Only
Register Online
Register your Kenwood product at www.Kenwoodusa.com
B64-4935-00/01 (KW)© 2011 JVC KENWOOD Corporation
Page 2

CONTENTS
Safety 3
Maintenance
Preparation 4
How to attach/detach the faceplate
How to reset your unit
How to prepare the remote controller
(RC- 40 5)
Getting Started 5
Canceling the display demonstration
Setting the demonstration mode
Adjusting the clock
Initial settings before operations
Basic Operations 6
Listening to HD Radio™ Broadcasts 8
Direct Access Tuning using the remote
controller (RC-405)
Using the remote controller (RC-405)
iTunes Tagging
Adjust [SETTINGS] mode settings
Listening to the other external
components 9
Listening to a Disc/ USB device/ iPod
Start playing a disc
Start playing a USB device or iPod
Removing the USB device or iPod
Selecting Repeat Play
Selecting Random Play
All Random Play
Selecting a folder/track/file
Alphabet Search for iPod
Direct Music Search using the remote
controller (RC-405)
Using the remote controller (RC-405)
Selecting App & iPod Control Mode
Adjust [SETTINGS] mode settings
Listening to Pandora® internet radio
Removing the iPhone
Station Search mode
Using the remote controller (RC-405)
10
14
Getting Started of Bluetooth 16
Easy Pairing function
Registering from Bluetooth devices (Pairing)
Operation of Hands-Free Phoning 18
Making a Call
Make a Voice Dialing Call
Receiving a Call
During a Call
Call Waiting
Clearing the disconnection message
Downloading the Phone Book
Using the remote controller (RC-405)
Listening to a Bluetooth Audio 21
Selecting Repeat Play
Selecting Random Play
Switching between Bluetooth devices
Bluetooth Setup 22
Registering a Bluetooth Device (Pairing)
Selecting the Bluetooth Device
Bluetooth Device Registration Test
Bluetooth Setup
SMS (Short Message Service) 24
Downloading the SMS
Display the SMS
Return message setting
Creating an original message
SMS Setup
Function settings 26
Installation/connection 28
Troubleshooting 32
Specifications 35
2 English
Page 3
Safety
¤WARNING
Stop the car before operating the unit.
Important to know...
To prevent a short circuit, never put or leave
any metallic objects (such as coins or metal
tools) inside the unit.
Caution: Adjust the volume so that you can
hear the sound outside the car. Driving with
the volume adjusted to a too high level may
cause an accident.
Condensation: When the car is airconditioned, moisture may collect on the
laser lens. This may cause disc read errors. In
this case, remove the disc and wait for the
moisture to evaporate.
The illustrations in this manual are examples
used to explain more clearly how the
controls are used. Therefore, what appears
on the illustrations may differ from what
appears on the actual equipment.
If you experience problems during
installation, consult your Kenwood dealer.
When you purchase external components,
check with your Kenwood dealer to make
sure that they work with your model and in
your area.
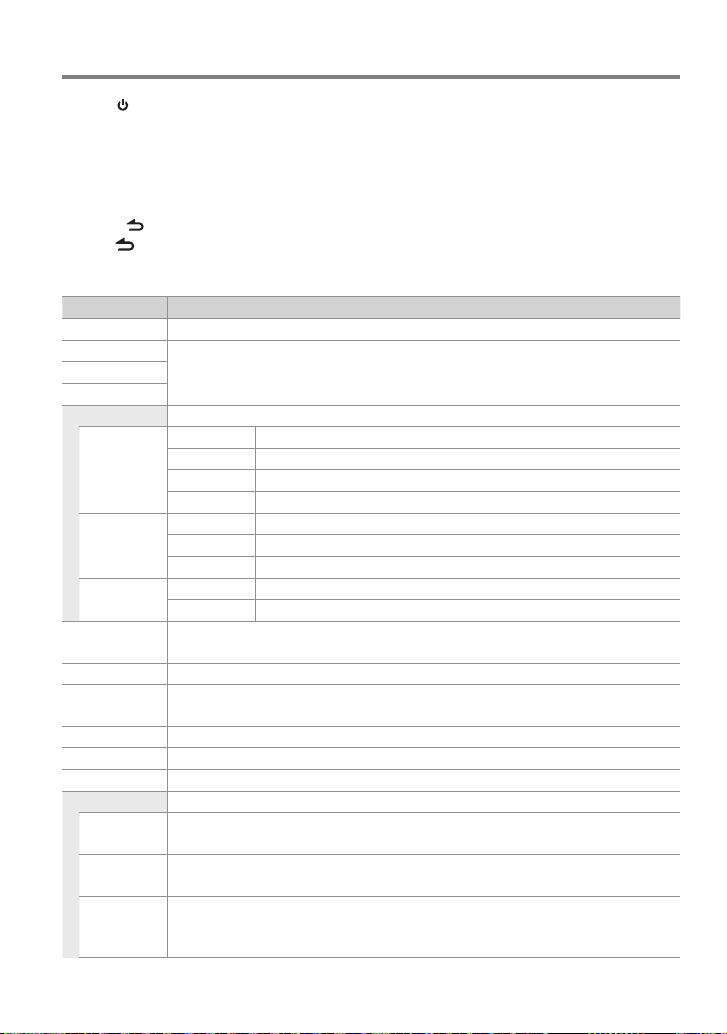
Maintenance
Cleaning the unit: Wipe off the dirt on the
panel with a dry silicon or soft cloth. Failure
to observe this precaution may result in
damage to the monitor or unit.
Cleaning the connector: The unit may not
function properly if the connector between
the unit and faceplate are dirty. Detach the
faceplate and clean the connector with a
cotton swab gently, being careful not to
damage the connector.
Connector (on the reverse
side of the faceplate)
HD Radio Technology
manufactured under license from
iBiquity Digital Corporation. U.S. and
Foreign Patents. HD Radio™ and the HD,
HD Radio, and “Arc” logos are proprietary
trademarks of iBiquity Digital Corp.
The “AAC” logo is a trademark of Dolby
Laboratories.
The Bluetooth word mark and logos are
owned by the Bluetooth SIG, Inc. and
any use of such marks by JVC KENWOOD
Corporation is under license. Other
trademarks and trade names are those of
their respective owners.
“Made for iPod” and “Made for iPhone”
mean that an electronic accessory has
been designed to connect specifically
to iPod or iPhone, respectively, and has
been certified by the developer to meet
Apple performance standards. Apple is
not responsible for the operation of this
device or its compliance with safety and
regulatory standards. Please note that the
use of this accessory with iPod or iPhone
may affect wireless performance.
iPhone, iPod, iPod classic, iPod nano, and
iPod touch are trademarks of Apple Inc.,
registered in the U.S. and other countries.
iTunes is a trademark of Apple Inc.
PANDORA, the PANDORA logo, and the
Pandora trade dress are trademarks or
registered trademarks of Pandora Media,
Inc., used with permission.
Android is a trademark of Google Inc.
BlackBerry®, RIM®, Research In Motion®
and related trademarks, names and logos
are the property of Research In Motion
Limited and are registered and/or used in
the U.S. and countries around the world.
Used under license from Research In
Motion Limited.
English 3
Page 4
Preparation
How to attach/detach the faceplate
1
2
Do not expose the faceplate to direct
2
sunlight, excessive heat, or humidity. Also
avoid places with too much dust or the
possibility of water splashing.
Keep the faceplate in its casing while
detached.
The faceplate is a precision component of
the unit and can be damaged by shocks or
jolts.
To prevent deterioration, do not touch the
terminals of the unit and faceplate with your
fingers.
1
How to reset your unit
If this unit fails to operate
properly, press the reset
1
button.
The unit returns to the
2
factory settings when the
reset button is pressed.
3
Reset button
How to prepare the remote controller (RC-405)
When you use the remote controller for the
first time, pull out the insulation sheet.
Insulation sheet
If the effectiveness of the remote
controller decreases, replace the battery.
2
1
¤
Caution:
Do not set the remote control in hot places
such as on the dashboard.
Lithium batter y.
Danger of explosion if the battery is
incorrectly replaced. Replace only with the
same or equivalent type.
The battery pack or batteries shall not be
exposed to excessive heat such sunshine,
fire or the like.
Keep battery out of reach of children and in
original package until ready to use. Dispose
of used batteries promptly. If swallowed,
contact a physician immediately.
4
3
4 English
CALIFORNIA, USA ONLY
This product contains a CR Coin Cell Lithium
Battery which contains Perchlorate Material –
special handling may apply.
See www.dtsc.ca.gov/hazardouswaste/
perchlorate
Page 5
Getting Started
Canceling the display demonstration
The display demonstration is always turned
on unless you cancel it.
When you turn on the power (or after you
reset the unit), the display shows:
[CANCEL DEMO] \ [PRESS] \ [VOLUME
KNOB]
1 Press the volume knob.
[YES] is selected as the initial setup.
2 Press the volume knob again to confirm.
[DEMO OFF] appears.
If no operation is done for about 15 seconds
or if you turn the volume knob to select
[NO] in step 2, [DEMO MODE] appears and
the display demonstration starts.
Setting the demonstration mode
1 Press the volume knob to enter
[FUNCTION].
2 Turn the volume knob to select [DEMO
MODE], then press to enter.
3 Turn the volume knob to select [ON] or
[OFF].
If [ON] is selected, display demonstration
starts if no operation is done for about 20
seconds.
4 Hold to finish the procedure.
Item Selectable setting (Preset:*)
PRESET TYPE NORMAL *: Memorizes one s tation for each pre set button in eac h band (FM1/ FM2/ FM3/ AM). ;
MIX: Memorize s one station for eac h preset butto n regardless of the sel ected band (FM1/ FM2/ FM3/ AM).
KEY BEEP ON */ OFF: Activates/deactivates the keypress tone.
PAND ORA
SRC
BUILT-IN AUX ON *: Enables “AUX” in source se lection. Sound o f the connected e xternal componen t is produced through t he car
CD READ 1 *: Automatic ally distinguishe s between audio f ile disc and music CD. ; 2: Forces to p lay as a music CD. No sound can
SP SELECT OFF */ 5/4/ 6 × 9/6/ OEM: Selects t he speaker size for optim um performance.
F/W UP xx. xx YES: Sta rts upgrading t he firmware. ; NO *: Cancels (upgrading is not activated).
ON *: Allows you t o select “PANDORA” sourc e by connecting an iPho ne, iPod touch, Android or B lackBerry (wit h the
Pandora® inter net radio applicati on). ; OFF: Disables “PANDORA” in source selection.
speakers. ; O FF: Disables “AUX” in source selection.
be heard if an aud io file disc is played.
For detail s on how to update the fir mware, see: www.kenwoo d.com/cs/ce/
Adjusting the clock
1 Press the volume knob to enter
[FUNCTION] mode.
2 Turn the volume knob to select
[SETTINGS], then press to enter.
3 Turn the volume knob to select [CLOCK],
then press to enter.
4 Turn the volume knob to select [CLOCK
ADJUST], then press to enter.
Clock hour flashes on the display.
5 Turn the volume knob to adjust the hour,
then press to enter minute adjustment.
Clock minutes flashes on the display.
6 Turn the volume knob to adjust the
minute, then press to confirm.
Press 4 / ¢ to move between the
hour and minute adjustment.
7 Hold to finish the procedure.
Initial settings before operations
1 Press SRC to enter [STANDBY] mode.
2 Press the volume knob to enter
[FUNCTION] mode.
3 Turn the volume knob to select [INITIAL
SET], then press to enter.
4 Turn the volume knob to make a
selection, then press to confirm.
See table below for selection.
5 Hold to finish the procedure.
English 5
Page 6
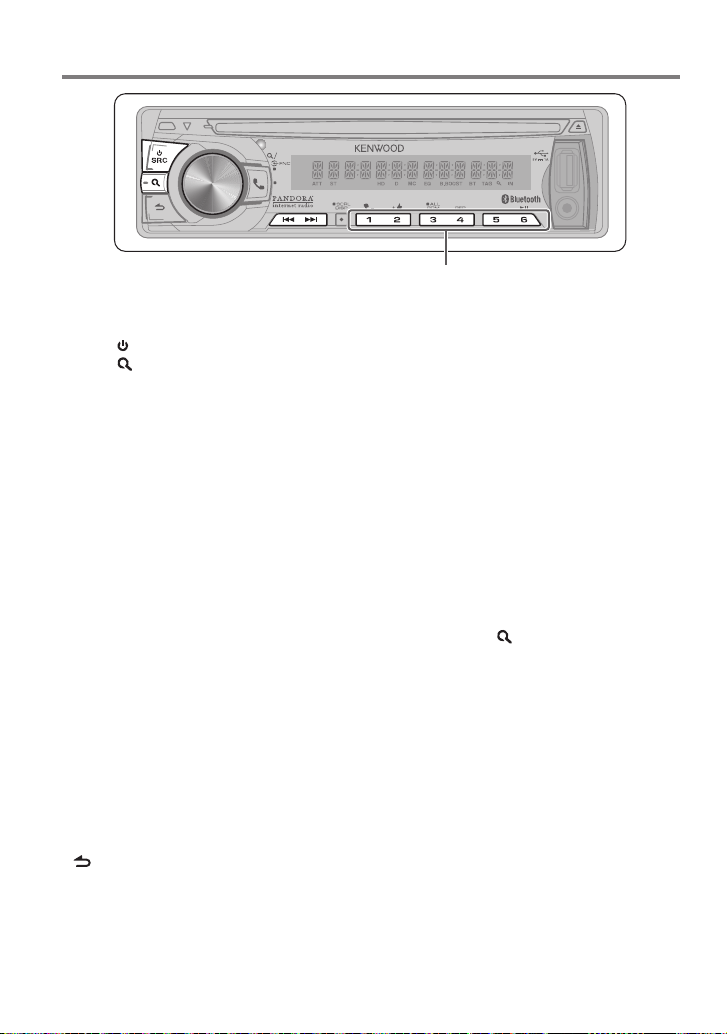
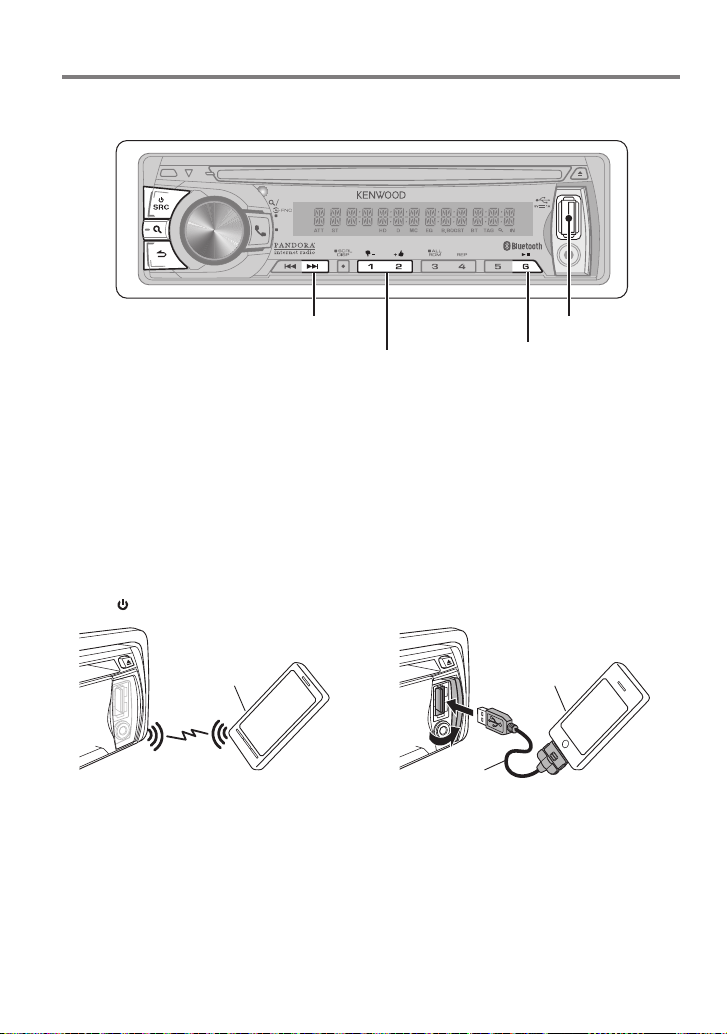
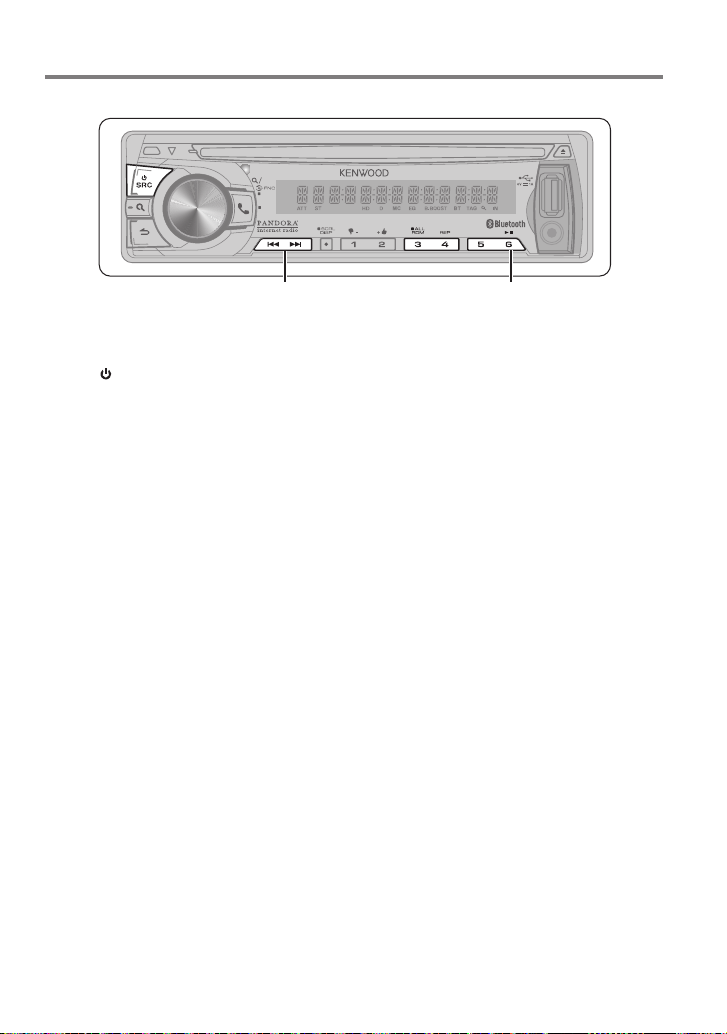
Basic Operations
Remote sensor
Do not expose to bright sunlight.
TAG
VOICE
PAR
Loading slot
Ejects the disc
iPod
Volume knob
Detaches the faceplate
The following indicator lights up when...
ST: A stereo broadcast is received.
HD: HD Radio™ broadcast is tuned in.
D: HD Radio digital broadcast is tuned in.
MC: HD Radio multicast broadcast is tuned in.
TAG: The song information can be registered.
IN: A disc is in the unit.
ATT: The sound attenuates.
EQ: [PRESET EQ] is set to an EQ mode other
than [NATURAL]. (page 26)
B.BOOST: [BASS BOOST] is set to [LV1],
[LV2] or [ LV3]. (page 26)
: Indicates that the Music Search mode is
selected now.
BT: Bluetooth cell-phone connection status.
Display window
USB terminal
Auxiliary input jack
Slide open the cover
6 English
Page 7
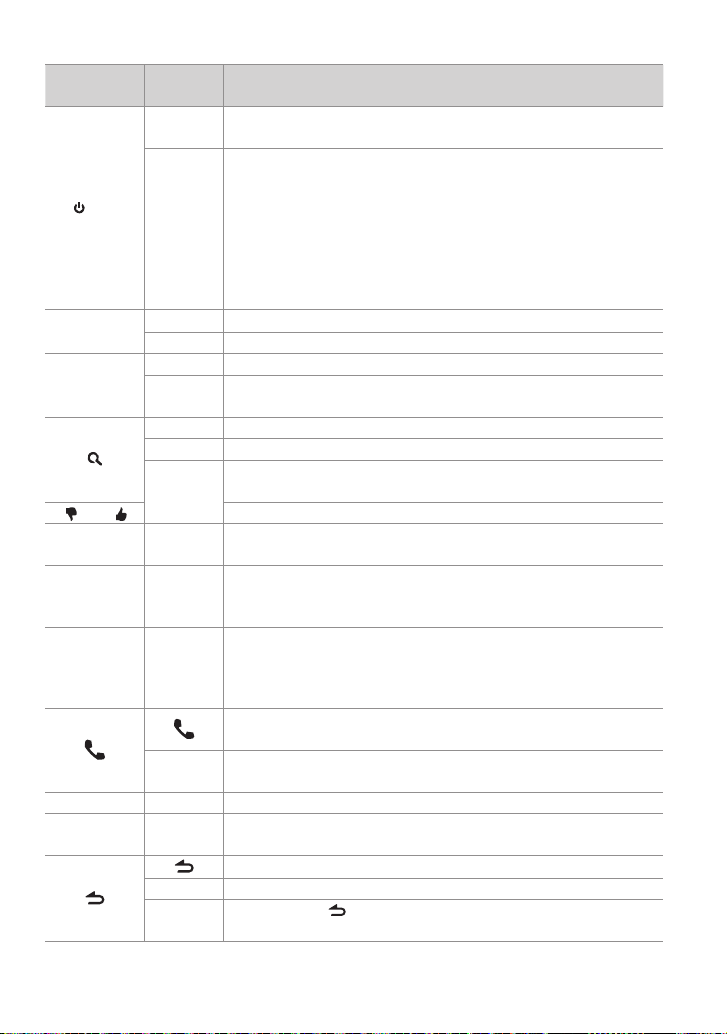
When you press or hold the following button(s)...
Main unit
Remote
controller
—
Tur ns on.
Turns off if pressed and held.
Selects the available sources (HD Radio, BT AUDIO, USB or iPod,
PANDORA, CD, AUX, STANDBY), if the power is turned on.
SRC
• Ifthesourceisready,playbackalsostarts.
• “PANDORA”isselectableonlywhenaniPhone,iPodtouch,Androidor
SRC
BlackBerry(withthePandora®internetradioapplication)isconnected
and[ON]isselectedfor[PANDORA SRC].(page5)
• “iPod”or“CD”isselectableonlywhenaniPodisconnectedoradisc
isloaded.
Volume knob
VOLud
(turn)
Volume knob
ENT 38 Confirms selection.
(press)
–)/ 2 ( +)
1 (
6 (38) ENT 38
4 / ¢
SCRL DISP —
5 / ∞ Selects items.
5 / ∞
*AM– /
#FM+
+¢
Adjusts the volume level.
—
Enters [FUNCTION] settings.
Start voice recognize of cell-phone if pressed and held.
Enters Music Search mode.
Enters HD Radio tagging mode if pressed and held. (page 8)
—
Selects the FM bands (FM1/ FM2/ FM3) or AM when “HD RADIO” is
selected as the source.
Selects the previous/ next folder.
Pauses/resumes playback of a disc/ USB device/ iPod/ Pandora/
Bluetooth Audio.
4/
Searches for radio station.
Selects track/file.
Fast-forwards/reverses tracks/files if pressed and held.
Changes the display information.
Scrolls the display information if pressed and held.
Enters clock adjustment mode directly if pressed and held while
in clock display screen. (page 5)
Enters Bluetooth mode. (page 18)
Press to answer an incoming call.
—
— AUD
— ATT
Enters Bluetooth easy pairing mode if pressed and held. (page
16)
Enters [AUDIO CONTROL] settings directly.
Attenuates the sound.
• Toreturntothepreviouslevel,pressthebuttonagain.
Returns to the previous item.
Exit from setting mode.
EXIT
• Pressandhold
—
mode.
General operation
onthemainunitwillalsoexitfromthesetting
English 7
Page 8
Listening to HD Radio™ Broadcasts
TAG
VOICE
PAR
iPod
Press and hold to memorize the current station or channel.
Press briefly to recall memorized station or channel.
1 Press SRC to select “HD Radio”.
2 Press repeatedly to select a band (FM1/
FM2/ FM3/ AM).
3 Press 4 / ¢ to search for a station or
channel.
“LINKING” appears while linking to a
multicast channel.
The tuning mode can be changed. Refer to
<SEEK MODE> (page 9).
Direct Access Tuning using the remote controller (RC-405)
1 Press FM+ / AM– to select a band.
2 Press DIRECT repeatedly to select the
tuning item.
“– – – –” appears.
3 Press DIRECT to enter Direct Access
Tuning mode.
Tuning item: Frequency “– – – –”,
Channel “HD –”, or Cancelling Direct Access
Tuning
4 Press the number buttons to enter the
frequency or channel.
5 Press 4 / +¢ to tune in to the
entered frequency or channel.
To cancel Direct Access Tuning mode, press
or EXIT.
If no operations is done for 10 seconds after
step 3, Direct Access Tuning is automatically
canceled.
Using the remote controller (RC-
405)
#FM+ / *AM– : Selects band.
4 / +¢ : Selects station.
1 – 6 : Selects preset station.
iTunes Tagging
When you hear a song you enjoy on your
local HD Radio station, you can tag the song
and save the song’s information on this unit.
Up to 50 TAGs (song’s information) can be
registered in this unit.
By using this tagging function, you can easily
purchase the songs from Apple iTunes Store.
Press and hold
tagging mode and tag the song.
“TAG” will be indicated on the display when
the song information can be registered.
To transfer the tagged songs to your iPod
and purchase the songs from iTunesStore
1 Connect an iPod to this unit. (page 10)
The tagged information registered to this
unit is automatically transferred to the
connected iPod.
2 Connect the iPod to your computer.
3 Synchronize the iPod to the iTunes.
The saved songs will be shown in a playlist
called “Tagged.” You can now purchase
and download the songs easily from the
iTunes Store.
to enter HD Radio
8 English
Page 9
Adjust [SETTINGS] mode settings
While listening to the radio...
1 Press the volume knob to enter [FUNCTION] mode.
2 Turn the volume knob to select [SETTINGS], then press to enter.
3 Turn the volume knob to make a selection, then press to confirm.
See table below for selection.
4 Hold to finish the procedure.
Item Selectable setting (Preset:*)
SEEK MODE AUTO1 *: Autom atically search for a s tation or channel. ; AUT O2: Search in the order o f the stations in the p reset
memory. ; MANUAL: Manually search for a st ation.
AUTO MEMORY YES: Automat ically starts m emorizing 6 stat ions with good rece ption. ; NO *: Cancels (autom atic memorizing is
not activated). (Selectable only if [NORMAL] is selec ted for [PRESET TYPE].) (pa ge 5)
RECEIVEMODE Se ts the receive mod e of the HD Radio receiver.
AUTO *: Automatica lly tunes to analog broa dcast when there is no d igital broadcas t. ; DIGITAL: Tunes in to digit al
broadcas t only. ; ANALOG: Tunes in to an alog broadcast onl y.
TAGMEMORY Displays th e tag memory usag e of the HD Radio receiver.
00—50(Pres et:00): Up to 50 tags can be re gistered to this unit .
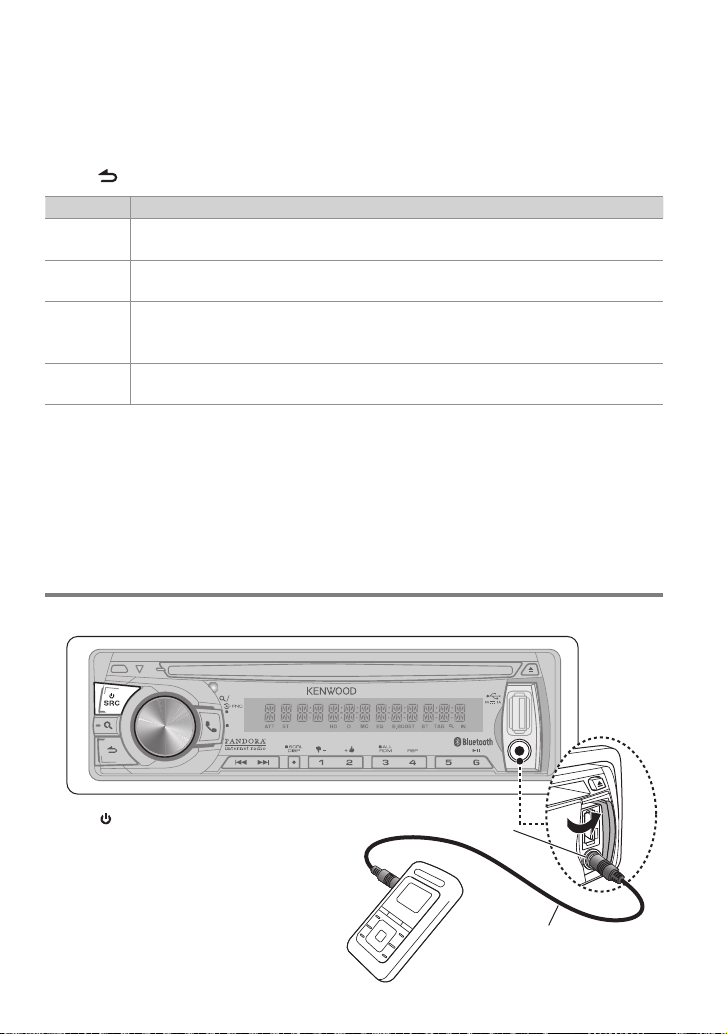
Listening to the other external components
Preparation : Make sure [ON] is selected for [BUILT-IN AUX]. (page 5)
TAG
VOICE
PAR
1 Press SRC to select “AUX”.
2 Turn on the external component and
start playing.
3 Turn the volume knob to adjust the
volume.
Portable audio device
(commercially available)
iPod
Auxiliary input jack
3.5 mm (1/8”) stereo mini plug
(commercially available)
English 9
Page 10
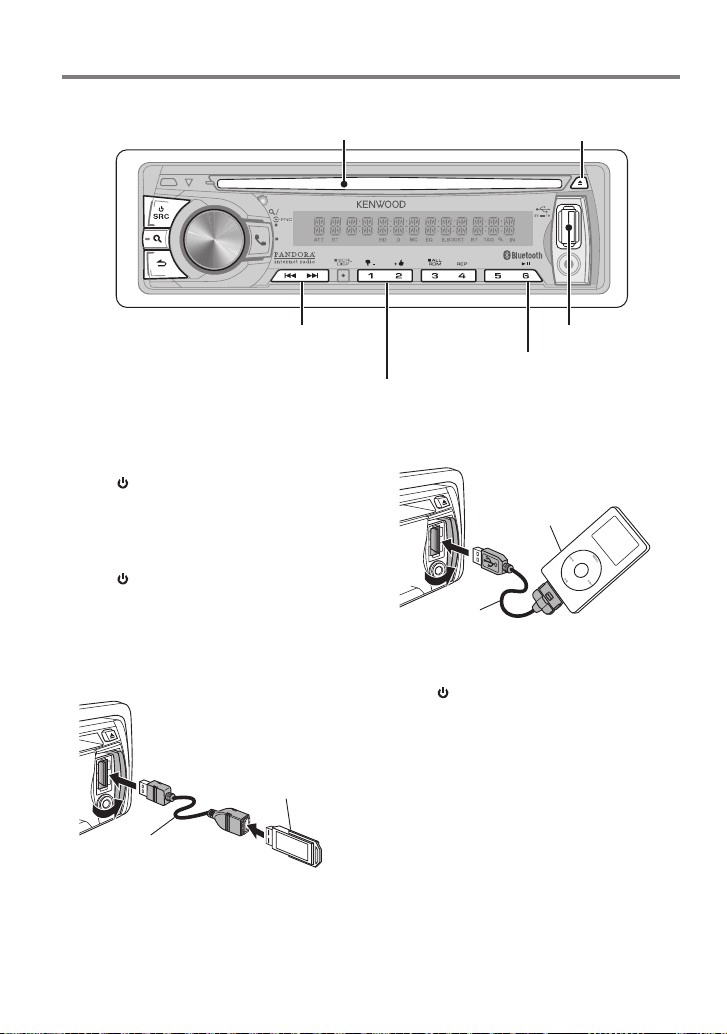
Listening to a Disc/ USB device/ iPod
Ejects the disc. (“NO DISC” appears and “IN”
Loading slot
TAG
VOICE
PAR
Press to select track/file.
Hold to fast-forwards/reverses.
Press to select folder of Audio File/iPod.
Start playing a disc
1 Press SRC to turn on the power.
2 Insert a disc into the loading slot.
Playback starts automatically.
Start playing a USB device or iPod
1 Press SRC to turn on the power.
2 Slide open the cover.
3 Connect a USB device or iPod to the USB
terminal.
The source automatically switches, and
playback starts.
indicator goes off.)
iPod
USB terminal
Press to pause. Press again
to resume playback.
Apple iPod
(commercially available)
KCA-i P102
(optional accessory)
Removing the USB device or iPod
1 Press SRC to select a source other than
“USB”, “iPod” or “PANDORA”.
2 Remove the USB device or iPod.
CA-U1EX (Max.: 5 00 mA)
(optional accessory)
10 English
USB device
(commercially available)
Selecting Repeat Play
Press number button 4 (REP) repeatedly
to make a selection.
Audio CD : TRACK REPEAT, REPEAT OFF
Audio File :
FILE REPEAT, FOLDER REPEAT, REPEAT OFF
iPod :
FILE REPEAT, REPEAT OFF
Page 11

Selecting Random Play
Press number button 3 (ALL RDM)
repeatedly to make a selection.
Audio CD : DISC RANDOM, RANDOM OFF
Audio File/ iPod :
FOLDER RANDOM, RANDOM OFF
All Random Play
Press and hold number button
3 (ALL RDM).
Pressing this button again plays songs in
the normal mode starting.
Audio File/ iPod :
ALL RANDOM, RANDOM OFF
Changes the iPod browsing item to “songs”.
Selecting a folder/track/file
1 Press to enter Music Search mode.
“SEARCH” appears, then the current file
name appears on the display.
2 Turn the volume knob to select a folder/
track/ file, then press to confirm.
To skips songs, press 4/ ¢. Holding
4/ ¢ skips songs at 10% regardless of
the setting made. (page 12)
This operation is effective only for the iPod
or Kenwood Music Editor media.
To return to the root folder (audio file), top
menu (iPod) or first track (audio CD), press 5.
To return to the previous folder, press .
To cancel the Music Search mode, press and
hold .
< or > on the display indicates that
preceded/next item is available.
Alphabet Search for iPod
1 Press to enter Music Search mode.
“SEARCH” appears.
2 Turn the volume knob to select a
category, then press to confirm.
3 Press again to enter alphabet search
mode.
“SEARCH <– – –>” appears.
4 Turn the volume knob to select the
character to be searched for.
5 Press 4 / ¢ to move to the entry
position.
You can enter up to three characters.
6 Press the volume knob to start searching.
After this step, see step 2 of <Selecting a
folder/track/file> (page 11) to select a
song.
To return to the Music Search mode, press
.
To cancel the Music Search mode, press and
hold .
A longer searching time is required if there
are many songs or playlists in the iPod.
To search for a character other than A to Z
and 0 to 9, enter only “ * ”.
The article (a, an, the) of songs name will be
skipped during search.
Direct Music Search using the remote controller (RC-405)
• NotavailableifRandomPlay,KENWOOD
MusicEditormedia,iPodplaybackisselected.
1 Press DIRECT to enter Direct Music
Search mode.
“– – –” appears.
2 Press the number buttons to enter the
track number.
3 Press 4 / +¢ to search for the music.
To cancel the Direct Music Search mode,
press or EXIT.
Using the remote controller (RC-
405)
In playback mode:
#FM+ / *AM– : Selects folder.
4 / +¢ : Selects track/file.
ENT 38 : Pauses/resumes playback.
5 / ∞ : Enter Music Search mode.
In Music Search mode:
ENT 38 : Confirms selection.
5 / ∞ : Selects folder/file/track.
: Returns to the previous folder.
Continued to next page
English 11
Page 12
Selecting App & iPod Control Mode
Press number button 5 (iPod) repeatedly
to make a selection.
MODE ON :
Control iPod from the iPod *. “APP&iPod
MODE” appears on the display.
MODE OFF: Control iPod from the unit.
* Youcanstillcontrolplay/pause,selectfiles,fast-
forward/reversefilesfromtheunit.
Adjust [SETTINGS] mode settings
While listening to an iPod or KENWOOD Music
Editor media ...
1 Press the volume knob to enter
[FUNCTION] mode.
Handling discs
Do not touch the recording surface of the
disc.
Do not stick tape etc. on the disc, or use a
disc with tape stuck on it.
Do not use any accessories for the disc.
Clean the disk by moving the cloth
outward from the center of the disc.
Discs that cannot be used
This unit can only play the CDs with:
A disc that is not round.
A disc with coloring on the recording
surface or a disc that is dirty.
About the Audio file
Playable Audio files:
MP3 (.mp3), WMA (.wma), AAC-LC (.m4a)
Playable disc media: CD-R/RW/ROM
Playable disc file formats: ISO 9660 Level
1/2, Joliet, Romeo, Long file name.
Playable USB device file systems:
FAT16, FAT 32
2 Turn the volume knob to select
[SETTINGS], then press to enter.
3 Turn the volume knob to select [SKIP
SEARCH], then press to enter.
4 Turn the volume knob to make a
selection, then press to confirm.
0.5% (initial)/ 1%/ 5%/ 10% : Sets the ratio
of skip when searching for a song in Music
Search mode.
(Holding 4 / ¢ skips songs at 10%
regardless of the setting made.)
5 Hold to finish the procedure.
Clean the disc with a dry silicon or soft
cloth. Do not use any solvents.
When removing a disc from this unit, pull it
out horizontally.
If the center hole or outside rim of a disc
has burrs, remove them before inserting
a disc.
You cannot play a Recordable/ReWritable
disc that has not been finalized. (For the
finalization process, refer to the instruction
manual that came with your disc writing
software or your disc recorder.)
3-inch CD cannot be used. An attempt
to insert using an adapter can cause
malfunction.
Although the audio files are complied with
the standards listed above, the play maybe
impossible depending on the types or
conditions of media or device.
Detailed information and notes about the
playable audio files are stated in an online
manual on the following site:
www.kenwood.com/cs/ce/audiofile/
12 English
Page 13

About the USB device
This unit can play audio files stored on a
USB mass storage class device.
Install the USB device in the place where
it will not prevent you from driving your
vehicle properly.
You cannot connect a USB device via a USB
hub or multi card reader.
Make sure all important data has been
backed up to avoid losing the data.
About compatible iPod/iPhone
Made for
– iPod touch (4th generation)
– iPod touch (3rd generation)
– iPod touch (2nd generation)
– iPod touch (1st generation)
– iPod classic
– iPod with video
– iPod nano (6th generation)
– iPod nano (5th generation)
– iPod nano (4th generation)
– iPod nano (3rd generation)
– iPod nano (2nd generation)
– iPod nano (1st generation)
– iPhone 4S
– iPhone 4
– iPhone 3GS
– iPhone 3G
– iPhone
(AsofJanuary2012)
About “KENWOOD Music Editor”
This unit supports the PC application
“KENWOOD Music Editor Light ver1.1” or
later.
When you use the audio file with database
information added by the “KENWOOD
Music Editor Light ver1.1”, you can search
for a file by title, album or artist name using
the function mentioned in Music Search
(page 11).
In the Instruction manual, the term “Music
Editor media” is used to mean the device
Connecting a cable whose total length
is longer than 5 m can result in abnormal
playback.
This unit cannot recognize a USB device
whose rating is other than 5 V and exceeds
500 mA.
When connecting the USB device, use of
the CA-U1EX (option) is recommended.
The maximum current consumption of the
CA-U1EX is 500 mA.
Latest compatible list of iPod/iPhone.
For details, see:
www.kenwood.com/cs/ce/ipod
Types of available control vary depending
on the type of connected iPod. For details,
see above URL.
The word “iPod” appearing in this manual
indicates the iPod or iPhone connected to
this unit with a connection cable, KCAiP102 (optional accessory).
If you start playback after connecting the
iPod, the music that has been played by
the iPod is played first.
In this case, “RESUMING” is displayed
without displaying a folder name, etc.
Changing the browse item will display a
correct title, etc.
You cannot operate the iPod if “KENWOOD”
or “” displayed on the iPod.
that contains audio files with database
information added with KENWOOD Music
Editor.
“KENWOOD Music Editor Light ver1.1” is
available from the following web site:
www.kenwood.com/cs/ce/
For further information on “KENWOOD
Music Editor Light ver1.1”, refer to the site
above or the application help.
English 13
Page 14
Listening to Pandora® internet radio
TAG
VOICE
PAR
iPod
Press to skip a song.
Press to select thumbs down/up.
Android or BlackBerry
Preparation :
You need to register your cell-phone before
using it with this unit. (page 16)
Disconnect the iPhone or iPod touch.
Make sure [ON] is selected for [PA NDORA
SRC]. (page 5)
1 Open the Pandora® application on your
device.
2 Press SRC to select “PANDORA”.
Android or BlackBerry
(commercially available)
Connection through
Bluetooth
Speakers from which audio is output
change depending on the Bluetooth setting
“BT HF/AUDIO”. The default is Front. (page
24)
USB terminal
Press to pause. Press again
to resume playback.
iPhone or iPod touch
Preparation : Make sure [ON] is selected for
[PANDO RA SRC]. (page 5)
1 Open the Pandora® application on your
device.
2 Slide open the cover.
3 Connect an iPhone to the USB terminal.
The source switches, and broadcasting
starts automatically from your current
station.
iPhone or iPod t ouch
(commercially available)
KCA-i P102
(optional accessory)
14 English
Page 15

To select thumbs down/up, press number
button 1 ( – )/ 2 ( + ).
To skip a song, press ¢.
To pause or resume playback, press number
button 6 (38).
Removing the iPhone
1 Press SRC to select a source other than
“PANDORA” or “iPod”.
2 Remove the iPhone.
Station Search mode
While listening to “PANDORA” source...
1 Press to enter Station Search mode.
2 Turn the volume knob to select [A–Z]
(stations are displayed in alphabetical
order) or [BY DATE] (stations are
displayed in date order), then press to
enter.
3 Turn the volume knob to select a desired
station, then press to confirm.
Using the remote controller (RC-
405)
In playback mode:
+¢ : Skips a song.
ENT 38 : Pauses/resumes playback.
5 / ∞ : Enter Station Search mode.
In Station Search Mode:
5 / ∞ : • Selects [A–Z] or [BY DATE].
• Selects item.
ENT 38 : Confirms selection.
EXIT : Cancels Station Search mode.
About Pandora® internet radio
Requirements for listening to the PANDORA®
internet radio are as follows:
iPhone or iPod touch
– Use an Apple iPhone or iPod touch
running under iOS3 or later.
– Search for “Pandora” in the Apple
iTunes App Store to find and install the
most current version of the Pandora®
application on your device.
– iPhone/ iPod touch connected to this
unit with a KCA-iP102.
Android™ or BlackBerry®
– Download the Pandora application to
your smartphone from Pandora site using
it’s standard browser.
– Bluetooth must be built in and the
following profiles must be supported.
SPP (Serial Port Profile)
A2DP (Advanced Audio Distribution
Profile)
In the application on your device, log in
and create an account with Pandora.
(If you are not already a registered user,
an account can also be created at www.
pandora.com.)
Internet connection by 3G, EDGE, or WiFi.
Pandora® is available only in the U.S.
Because Pandora® is a third-party service,
the specifications are subject to change
without prior notice. Accordingly,
compatibility may be impaired or some or
all of the services may become unavailable.
Some functions of Pandora® cannot be
operated from this unit.
For issues using the application, please
contact Pandora® at pandora-support@
pandora.com
English 15
Page 16
Getting Started of Bluetooth
TAG
VOICE
PAR
iPod
Press and hold to easy pairing mode.
Easy Pairing function
1 Press and hold to enter easy pairing
mode
“PAIRING” is displayed.
Any of the following is displayed
depending on Bluetooth device
registration condition:
– “SEARCHING”: When registering a
Bluetooth device for the first time.
– “(device name)”: When a Bluetooth
device has already been registered.
– “DEVICE FULL”: When a maximum of five
Bluetooth devices have already been
registered.
To cancel the easy pairing mode, press .
When registering a Bluetooth device for the
first time (Registering a Bluetooth device)
2 “SEARCHING” is displayed.
Search for the Bluetooth device.
When search is completed, “FINISHED” is
displayed.
3 Turn the volume knob to select a
Bluetooth device name, press to confirm.
4 “CONFIRM DVC” is displayed.
If “PAIRING OK” is displayed, proceed to
ste p 7.
If “PIN CODE” is displayed, proceed to steps
5.
If “*** NG” is displayed, press the volume
knob. Proceed to steps 4.
16 English
5 Input the PIN code
To select the number, turn the volume
knob.
To move to the next digit, press ¢.
To delete the last digit, press 4.
6 Press the volume knob to transmit the
PIN code.
If “PAIRING OK” is displayed, registration is
completed.
When “CONFIRM DVC” is displayed, confirm
connection with a Bluetooth device
operation.
7 The receiver is connected to a Bluetooth
device, with “HF CONNECT” or “AUD
CONNECT” displayed, and exits the easy
pairing mode.
If an error code is displayed during paring,
see <Troubleshooting> (page 32).
If the error message appears even though
the PIN code is correct, try the procedure
mentioned in <Registering a Special
Bluetooth device> (page 22).
When a Bluetooth device has already been
registered, or maximum of five Bluetooth
devices have already been registered
(Selecting a Bluetooth device)
2 “(device name)” or “DEVICE FULL” is
displayed.
3 Turn the volume knob to select a
Bluetooth device name.
Page 17

To register a new Bluetooth device,
select “[NEW DEVICE]”, then go to “When
registering a Bluetooth device for the first
time.”
4 Press the volume knob.
5 Turn the volume knob to select the
profile for the device to connect.
“HANDSFREE”/ ”AUDIO”: The device can
be connected using either a hands-free
or audio profile.
“HF/AUD”: The device is can be connected
using both hands-free and audio profiles.
6 Press the volume knob to set up the
Bluetooth device.
“HA (device name)”: The selected
Bluetooth device is busy.
“-H-A (device name)”: The selected
Bluetooth device is on standby.
“ H A (device name)”: The Bluetooth
device is deselected.
• “H”(HFP)or“A”(A2DP)indicatesthe
correspondingprofile.
7 Press to exit easy pairing mode.
Deleting the registered Bluetooth device
2 “(device name)” or “DEVICE FULL” is
displayed.
3 Turn the volume knob to select a
Bluetooth device name.
4 Press and hold the volume knob to delete
the selected Bluetooth device.
“DELETE” is displayed.
5 Turn the volume knob to select “YES”,
then press to confirm.
“COMPLETED” is displayed.
6 Press to exit easy pairing mode.
Registering from Bluetooth devices (Pairing)
1 Press SRC to turn on the power.
2 Start registering this unit by operating
the Bluetooth device.
By operating the Bluetooth device, register
the hands-free unit or audio unit (pairing).
Select “KENWOOD BT CD/R-6P1” from the
list of found units.
3 Input the PIN code (“0000”) in the
Bluetooth device.
Check that registration is complete on
the Bluetooth device. PIN code is set to
“0000” as the default. You can change this
code. Refer to [PIN CODE EDIT] under
<Bluetooth Setup> (page 23).
4 By operating the Bluetooth device, start
hands-free connection.
If there are 5 or more Bluetooth devices
registered, you cannot register a new
Bluetooth device.
About the Cell-Phone
Version: Bluetooth Standard Ver. 3.0
Certified
Profile:
HFP (Hands Free Profile)
HSP (Headset Profile)
SPP (Serial Port Profile)
OPP (Object Push Profile)
PBAP (Phone book Access Profile)
A2DP (Advanced Audio Distribution Profile)
AVRCP (Audio/Video Remote Control
Profile)
For the cell-phones verified for compatibility,
access the following URL:
www.kenwood.com/cs/ce/bt/
The units supporting the Bluetooth
function have been certified for conformity
with the Bluetooth Standard following the
procedure prescribed by Bluetooth SIG.
However, it may be impossible for such
units to communicate with your cellphone depending on its type.
English 17
Page 18
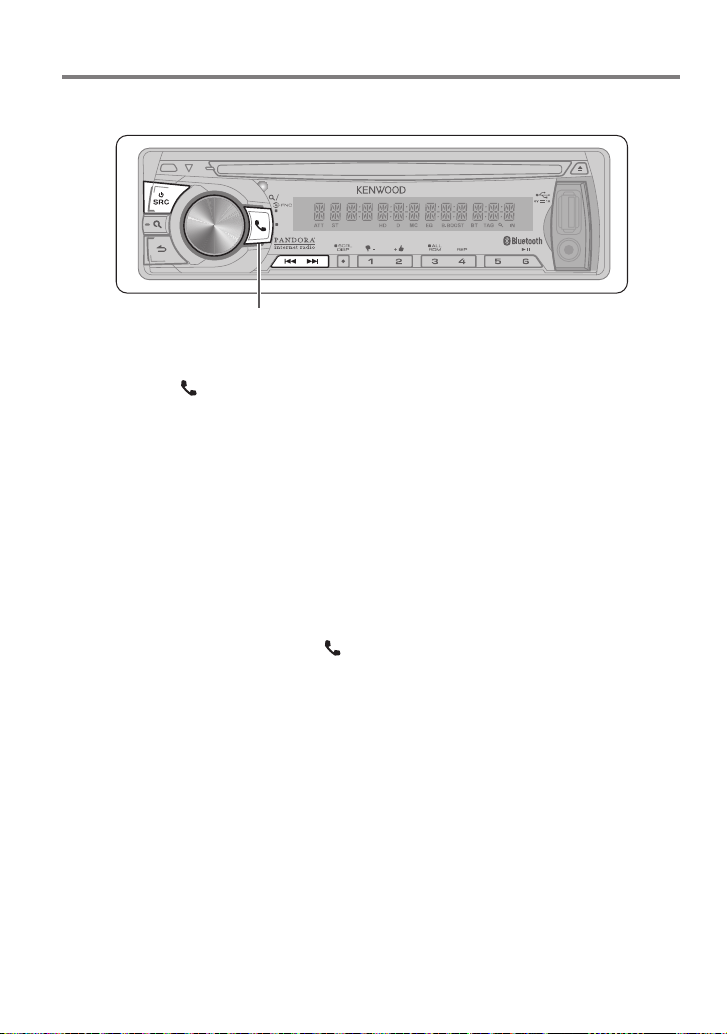
Operation of Hands-Free Phoning
Preparation : You need to register your cell-phone before using it with this unit. (page 16)
Built-in microphone (KDC-BT752HD only)
TAG
VOICE
PAR
iPod
Press to enter Bluetooth mode.
Press to answer an incoming
call.
Making a Call
1 Press to enter Bluetooth mode.
2 Turn the volume knob to select a dialing
method, then press to enter.
Operation method of each mode is
described below.
– “PHONE BOOK”: Calling a Number in the
Phone Book
– “OUTGOING”/ “INCOMING”/ “MISSED
CALLS”: Calling a Number in the Call
Log
– “NUMBER DIAL”: Dialing a Number
– Speed Dialing (Preset Dial)
Switches between name and phone
number, press DISP.
To return to the Bluetooth mode, press and
hold .
To cancel the Bluetooth mode, press .
Calling a Number in the Phone Book
2 Turn the volume knob to select “PHONE
BOOK”, then press to enter.
3 Press to enter alphabet search mode.
4 Turn the volume knob to select the
character to be searched for.
To move to the next row, press 4 /
¢.
18 English
Press and hold to memorize the current phone
number.
Press briefly to recall memorized phone
number.
To return to the Phone Book mode, press
.
5 Press the volume knob to start searching.
6 Turn the volume knob to select a name
and category.
To move to the next character, press 4
/ ¢.
7 Press the volume knob to make a call.
To use the Phone Book, it must be
downloaded to this unit in advance. Refer
to <Downloading the Phone Book> (page
20).
During search, a non-accent character such
as “u” is searched for instead of an accent
character such as “ü”.
The category items in the Phone Book are
displayed as follows.
GE: General ; HM: Home ; OF: Office ;
MO: Mobile ; OT: Other
Calling a Number in the Call Log
2 Turn the volume knob to select the
“OUTGOING” (outgoing call), “INCOMING”
(incoming call), or “MISSED CALLS”
(missed call), then press to enter.
3 Turn the volume knob to select a name or
phone number.
4 Press the volume knob to make a call.
Page 19

The outgoing call list and incoming call
list, and missed call list, are the lists of calls
originated from and received by this unit.
They are not the ones stored in the cellphone memory.
Dialing a Number
2 Turn the volume knob to select “NUMBER
DIAL”, then press to enter.
3 Turn the volume knob to select the
phone number
To move to the next digit, press ¢.
To delete the last digit, press 4.
Press number button (1 – 0), #(FM+),
*(AM–), or +(¢) on the remote
controller.
4 Press the volume knob to make a call.
Press OK on the remote controller.
You can input max 32 digits.
Speed Dialing (Preset Dial)
2 Press number button (1 – 6).
3 Press the volume knob to make a call.
Registering in the preset dial number list
2 Enter the phone number with reference
to the following:
Dialing a Number/ Calling a number in the
call log/ Calling a number in the Phone
Book
3 Press and hold number button (1 – 6).
Make a Voice Dialing Call
You can make a voice call using the voice
recognition function of your cell-phone.
1 Press and hold the volume knob to start
voice recognize.
2 Pronounce the name registered in the
cell-phone.
Make a call.
To cancel the voice recognize, press and
hold the volume knob.
If “NO SUPPORT” is displayed, your
cell-phone does not support the voice
recognition function.
If “N/A VOICE TAG” is displayed, your cellphone cannot start voice recognition.
If your voice cannot be recognized, a
message is displayed. Pressing the Volume
knob allows you to retry voice input.
Audio sound is not output during voice
recognition.
Receiving a Call
Answering a Phone Call
Press or the volume knob.
The following operations disconnect the
line:
– Insert a CD.
– Connect a USB device.
The name of the calling party is displayed
if it has already been registered in the
Phone Book.
Rejecting an Incoming Call
Press SRC.
During a Call
Disconnecting a Call
Press or SRC.
Switching to the Private Mode
Press number button 6 to switches
between Private talk (“PRIVATE TALK”)
and Hands-free talk (“HANDS FREE”).
Adjusting the Voice Volume during a Call
Turn the volume knob.
Call Waiting
Answering Another Incoming Call with the
Current Call Suspended
1 Press the volume knob.
2 Turn the volume knob to select
[ANSWER], then press to enter.
Continuing the Current Call
1 Press the volume knob.
2 Turn the volume knob to select [REJECT],
then press to enter.
Switching between the Curre nt Call and
Waiting Call
Press the volume knob to switches the
calling party.
Continued to next page
English 19
Page 20

Clearing the disconnection message
Press to “HF DISCONCT” disappears.
Downloading the Phone Book
To download automatically
If the cell-phone supports a phone book
synchronization function, the phone
book is downloaded automatically after
Bluetooth connection.
Setting on the cell-phone may be required.
If no phone book data is found in the unit
even after the compete display, your cellphone may not support a phone book data
automatic downloading function. In this
case, try downloading manually.
To download from the cell-phone manually
1 By operating the cell-phone, end the
hands-free connection.
2 By operating the cell-phone, send the
phone book data to this unit
By operating the cell-phone, download the
phone book data to this unit.
During downloading: “DOWNLOADING”
is displayed.
After completion of downloading:
“COMPLETE” is displayed.
3 By operating the cell-phone, start the
hands-free connection.
To clear the downloading completion
message, press any button.
Up to 600 phone numbers can be registered
for each registered cell-phone.
Up to 32 digits can be registered for each
phone number along with up to 50*
characters representing a name.
(* 50: Number of alphabetical characters.
Fewer characters can be input depending
on the type of characters.)
To cancel downloading of the phone book
data, operate the cell-phone.
Using the remote controller (RC-
405)
Making a call:
: Enter Bluetooth mode.
5 / ∞ : Selects a dialing method.
ENT 38 : Enter dialing mode
DIRECT : Make a call
1 — 6 : Selects preset dial.
0 — 9 : Input a digit in number dial mode.
#FM+ : Input “#” in number dial mode.
*AM– : Input “*” in number dial mode.
+¢ : Input “+” in number dial mode.
4 : Clear the entered phone number.
Receiving a call:
: Answer the call.
Call waiting:
: Answer Another Incoming Call
with the Current Call Suspended.
SRC : Answer another Incoming Call after
Terminating the Current Call.
1 : Continue the Current Call.
During a call:
SRC : End the call.
ENT 38 : Switch between the private talk
mode and the hands-free talk
mode.
20 English
Page 21
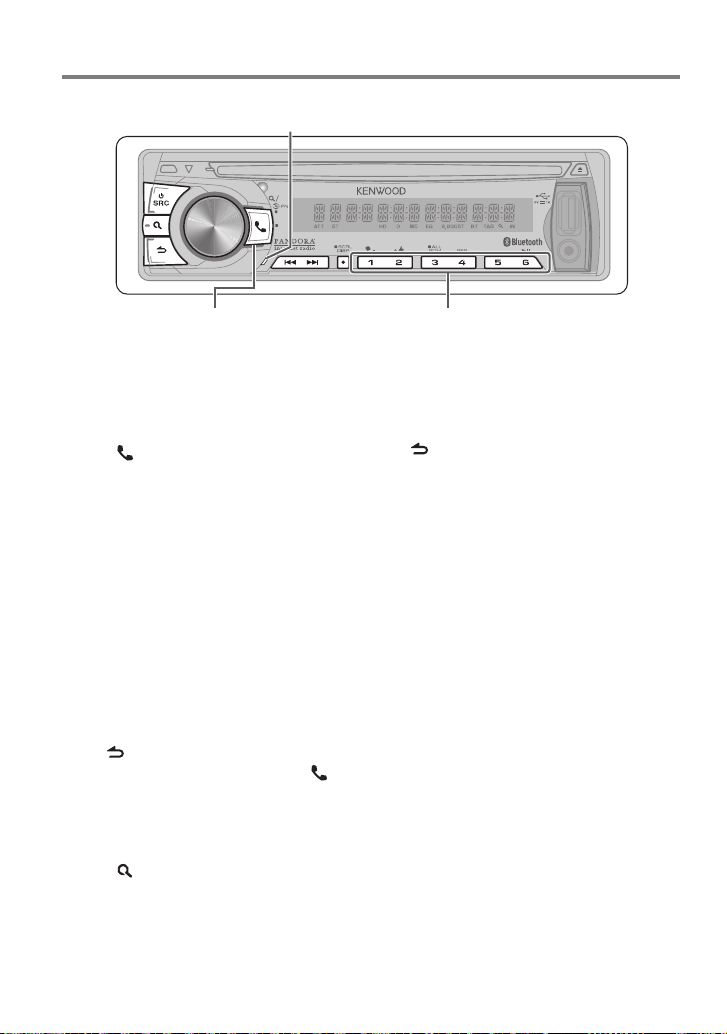
Listening to a Bluetooth Audio
Preparation : You need to register your audio player before using it with this unit. (page 16)
TAG
VOICE
PAR
iPod
Press to select file.
Press and hold to fastforwards/fast-backwards.
Press to pause. Press again to resume playback.
1 Press SRC to select “BT AUDIO”.
2 Press 4 / ¢ to selects a file.
Bluetooth audio players that do not support
AVRCP (Audio/Video Remote Control Profile)
cannot be used with this unit. Operate from
the audio player.
Some functions cannot be operated from
the Bluetooth audio player.
Speakers from which audio is output
change depending on the Bluetooth setting
“BT HF/AUDIO”. The default is Front. (page
24)
Selecting Repeat Play
Press number button 4 (REP) repeatedly
to make a selection.
FILE REPEAT, REPEAT OFF
Selecting Random Play
Press number button 3 (ALL RDM)
repeatedly to make a selection.
RANDOM ON, RANDOM OFF
Switching between Bluetooth devices
Press number button 5.
The currently selected device name is
displayed.
English 21
Page 22

Bluetooth Setup
Registering a Bluetooth Device (Pairing)
Registering from this unit
1 Press to enter Bluetooth mode.
2 Turn the volume knob to select
[SETTINGS], then press to enter.
3 Turn the volume knob to select
[PAIRING], then press to enter.
4 Turn the volume knob to select [DEVICE
SEARCH], then press to enter.
Search for the Bluetooth device.
When search is completed, “FINISHED” is
displayed.
5 Turn the volume knob to select a
Bluetooth device name, press to confirm.
6 “CONFIRM DVC” is displayed
If “PAIRING OK” is displayed, proceed to
step 9.
If “PIN CODE” is displayed, proceed to steps
7.
If “*** NG” is displayed, press the volume
knob. Proceed to steps 6.
7 Input the PIN code
To select the number, turn the volume
knob.
To move to the next digit, press ¢.
To delete the last digit, press 4.
8 Press the volume knob to transmit the
PIN code.
If “PAIRING OK” is displayed, registration is
completed. If the error message appears
even though the PIN code is correct, try
the procedure mentioned in <Registering a
Special Bluetooth device>.
9 Hold to finish the procedure.
To cancel the Bluetooth mode, press .
If there are 5 or more Bluetooth devices
registered, you cannot register a new
Bluetooth device.
Registering a Special Bluetooth device
1 Press to enter Bluetooth mode.
2 Turn the volume knob to select
[SETTINGS], then press to enter.
22 English
3 Turn the volume knob to select
[PAIRING], then press to enter.
4 Turn the volume knob to select [S-DVC
SELECT], then press to enter.
5 Turn the volume knob to select a device
name, press to confirm.
6 Go through the procedure step 4
of <Registering from this unit> and
complete the registration (pairing).
If the device name is not in the list, select
“OTHER PHONE”.
Selecting the Bluetooth Device
1 Press to enter Bluetooth mode.
2 Turn the volume knob to select
[SETTINGS], then press to enter.
3 Turn the volume knob to select
[PAIRING], then press to enter.
4 Turn the volume knob to select [PHONE
SELECT] or [AUDIO SELECT], then press
to enter.
5 Turn the volume knob to select a
Bluetooth device name.
6 Press the volume knob to set up the
Bluetooth device.
“ (device name)”: The selected
Bluetooth device is busy.
“- (device name)”: The selected Bluetooth
device is on standby.
“(blank) (device name)“: The Bluetooth
device is deselected.
If a cell-phone is already selected,
deselect it, and then select a different
one.
7 Hold to finish the procedure.
To cancel the Bluetooth mode, press .
Bluetooth Device Registration Test
You can check whether your Bluetooth device
can be registered using this unit.
1 Press and hold to enter easy pairing
mode
“PAIRING” is displayed.
Search for the Bluetooth device.
When search is completed, “FINISHED” is
Page 23
displayed.
When “(device name)” is displayed, select
"[NEW DEVICE]" and press the control
knob.
When “DEVICE FULL” is displayed, delete a
Bluetooth device and retry.
1. Turn the volume knob to select the
Bluetooth device, then press and hold
to confirm.
2. Turn the volume knob to select “YES”,
then press to confirm.
2 Turn the volume knob to select a
Bluetooth device name, press and hold
to confirm.
“BT TEST MODE” is displayed.
3 “CONFIRM DVC” is displayed.
If “PAIRING OK” is displayed, proceed to
step 6.
If “PIN CODE” is displayed, proceed to steps
4.
If “*** NG” is displayed, press the volume
knob. Proceed to steps 3.
4 Input the PIN code
Turn the volume knob to select the
number.
To move to the next digit, press ¢.
To delete the last digit, press 4.
5 Press the volume knob to transmit the
PIN code.
6 The connection result, “OK” or “NG”, is
displayed.
“PAIRING”: Registration to this unit
“HF CONNECT”: Hands-free phoning
“AUD CNT”: Audio playback
“PB DL”: Phone Book downloading
7 Press to exit pairing mode.
Data (Phone Book, etc.) of the cell-phone
checked for connection does not remain in
this unit.
Bluetooth Setup
1 Press to enter Bluetooth mode.
2 Turn the volume knob to select
[SETTINGS], then press to enter.
3 Turn the volume knob to make a
selection, then press to confirm.
See table below for selection.
Repeat step 3 until the desired item is
selected/activated.
Press to return to the previous item.
4 Hold to finish the procedure.
To cancel the Bluetooth mode, press .
Item Selectable setting (Preset:*)
PAIRING
DEVICE SEARCH Register s a Bluetooth device ( pairing). (For details, se e page 22.)
PHONE SELECT Sele cts a cell-phone co nnection. (For de tails, see page 22.)
AUDIO SE LECT Selec ts a Bluetooth aud io player connectio n. (For details, see p age 22.)
S-DVC SELEC T (For details, see page 22.)
DEVICE DELETE Cancel re gistration of th e Bluetooth device.
1. Turn th e volume knob to selec t the Bluetooth dev ice, then press to confi rm.
2. Turn the volum e knob to select “Y ES”, then press t o confirm.
DETAILED SET
PIN CODE EDIT Specif y the PIN code requi red when register ing this unit using the Blu etooth device. By de fault, “0000 ” is
specified.
1. Turn th e volume knob to selec t the number.
To move to the nex t digit, press ¢.
To delete the last d igit, press 4.
2. Press t he volume knob to regis ter a PIN code
AUTO ANSWER OFF: Does n ot answer the phone ca ll automatically. ; 0: Automatic ally answers the pho ne call at once. ;
1 – 8 * –99: Automat ically answers the p hone call after lap se of 1 – 99 seconds.
Continued to next page
English 23
Page 24
Item Selectable setting (Preset:*)
RECONNECT ON *: Au tomatically reconne cts the selec ted Bluetooth d evice when radio wave be comes strong enou gh,
even aft er it is disconnect ed. ; OFF: Cancels.
When this f unction is turne d ON, the Bluetooth de vice is reconnect ed if it has been disco nnected by
selecting [PHONE SELECT]/ [AU DIO SEL ECT] .
BT H F/AUDI O FRONT *: Outpu ts audio from the f ront speakers. ; ALL: Ou tputs audio fro m the all speakers.
CALL BEEP ON *: Sets wh ether to output a be ep from the speaker wh en a call comes in. ; OFF: Cancels.
BT F/W UPDATE Display the f irmware version and up date the firmware.
MIC GAIN 1 — 20 * — 30: Adjust th e sensitivity o f the microphone for te lephone call or adjus ts the voice of the caller.
NR LEVEL –1 — 0 * — +1: Reduce the noise gener ated by the surround ing environment witho ut changing the
built-in micro phone volume or adjus ts the voice of the caller w hen it is not clear. Sett ing to “+” increases the
noise reduction.
EC LEVEL –1 — 0 * — +1: Adjust the level of echo c ancellation. Sett ing to “+” increases the e cho cancel reduct ion.
SMS (Short Message Service)
Downloading the SMS
1 Press to enter Bluetooth mode.
2 Turn the volume knob to select
[SETTINGS], then press to enter.
3 Turn the volume knob to select [SMS],
then press to enter.
4 Turn the volume knob to select [SMS
DOWNLOAD], then press to enter.
5 Start downloading
During downloading: “DOWNLOADING”
is displayed.
After completion of downloading:
“COMPLETE” is displayed.
6 Hold to finish the procedure.
To cancel the Bluetooth mode, press .
The cell-phone must be able to transmit the
SMS using Bluetooth. Setting on the cellphone may be required. If the cell-phone
does not support an SMS function, the
SMS download item is not displayed in the
Settings mode.
When the SMS is downloaded from the
cell-phone, the unopened messages in the
cell-phone are opened.
Up to 149 already read and unread short
messages can be downloaded.
24 English
Display the SMS
¤
To prevent car accidents, the driver should
not read the SMS while driving.
When a new message arrives
“SMS RECEIVED” is displayed.
Displaying the SMS
1 Press to enter Bluetooth mode.
2 Turn the volume knob to select [SMS
INBOX], then press to enter.
3 Turn the volume knob to select a
message.
Switches between name, phone number
and message reception date, press DISP.
4 Press the volume knob to display the
text.
To scrolls the message, turn the volume
knob.
To return to the message list, press the
volume knob.
5 Hold to finish the procedure.
To cancel the Bluetooth mode, press .
The unopened message is displayed at the
beginning of the list. Other messages are
displayed in the order of reception.
Page 25
The SMS that has arrived when the cellphone is not linked with Bluetooth cannot
be displayed. You need to download it.
The short message cannot be displayed
during downloading.
Unread messages are prefixed with an
asterisk (*).
Return message setting
1 Press to enter Bluetooth mode.
2 Turn the volume knob to select
[SETTINGS], then press to enter.
3 Turn the volume knob to select [SMS],
then press to enter.
4 Turn the volume knob to select [SMS
MESSAGE], then press to enter.
5 Turn the volume knob to select a
message, then press to confirm.
When the [USER] is selected, a message
is displayed. Press the volume knob again.
6 Hold to finish the procedure.
Creating an original message
1 Press to enter Bluetooth mode.
2 Turn the volume knob to select
[SETTINGS], then press to enter.
3 Turn the volume knob to select [SMS],
then press to enter.
4 Turn the volume knob to select [SMS
MESSAGE], then press to enter.
5 Turn the volume knob to select [USER],
then press and hold to enter.
6 Turn the volume knob to select the
character.
To move to the column, press 4 / ¢.
To select the character type, press DISP.
To delete the character, press .
To delete the all characters, press and
hold .
You can enter alphanumeric characters
using the ten keys on the remote
controller.
7 Press the volume knob to confirm.
8 Hold to finish the procedure.
SMS Setup
1 Press to enter Bluetooth mode.
2 Turn the volume knob to select
[SETTINGS], then press to enter.
3 Turn the volume knob to select [SMS],
then press to enter.
4 Turn the volume knob to make a
selection, then press to confirm.
See table below for selection.
5 Hold to finish the procedure.
To cancel the Bluetooth mode, press .
Item Selectable setting (Preset:*)
SMS
SMS
Download a sh ort message. (F or details, see page 24.)
DOWNLOAD
SM S REP LY AUTO * : Replies to th e received SMS automat ically. ; MANUAL : Sets whether to r eply to the received SMS. ;
OFF : Does not r eply to the received SMS .
SMS MESSAGE You can selec t a return messa ge.
[SM S RE PLY]:
– When “AUTO” is select ed, a reply is made only to the S MS from the phone wh ose phone number has be en registered in th e
Phone Boo k. If an SMS is received f rom the phone whose p hone number has not be en registered in the P hone Book, you can re ply
to it in the sam e manner as you selec ted “MANUAL”.
– When an SMS is recei ved with “MANUAL” selecte d, “REPLY Y/ N” is displayed . Selecting “Y” s ends the reply. Selec ting “N” cancels
the reply. Sele cting “Y” allows yo u to select a mess age.
– If sending of a rep ly message fails, “SE ND ERROR” is displaye d. While “RESEND Y/ N” is still dis played on the display, selec ting “Y”
resends t he reply. Selecting “N ” cancels the reply.
English 25
Page 26
Function settings
1 Press SRC to select a source other than “STANDBY”.
2 Press the volume knob to enter [FUNCTION] mode.
3 Turn the volume knob to select [AUDIO CONTROL] or [SETTINGS], then press to enter.
4 Turn the volume knob to make a selection, then press to confirm.
See table below for selection.
Repeat step 4 until the desired item is selected/activated.
Press to return to the previous item.
5 Hold to finish the procedure.
[AUDIO CONTROL] : While listening to any source except in STANDBY state or Bluetooth mode.
Item Selectable setting (Preset:*)
SUB-W LEVEL –15 — 0 * — +15: Adjusts the subwoofer output level.
BASS LEVEL –8 — 0 * — +8: Source ton e memory: Adjust s the level to memori ze in each source. (Befor e making an
MID LEVEL
TRE LEVEL
EQ PRO KDC-X796 only
BASS ADJUST BASS CTR FRQ 6 0/ 80/ 100 */ 200: Sele cts the center f requency.
MID ADJUST MID CTR FRQ 0.5K/ 1.0K */ 1.5K/ 2.5K: Sele cts the center f requency.
TRE ADJUST TRE CTR FRQ 10.0K/ 12.5K */ 15.0K/ 17.5K: Select s the center frequen cy.
PRESET EQ NATURAL */ USER/ ROCK / POPS/ EASY/ TOP40/ JAZZ / POWERFUL: Select s a preset sound mo de suitable
BASS BOOST B.BOOST LV1/ B.BOOST LV2/ B. BOOST LV3: Selects you r preferred bass b oost level. ; OFF *: Cancels.
LOUDNESS LOUDNESS LV1 */ LOUDNESS LV2: Selec ts your preferr ed low and high freque ncies boost to pro duce a well-
BALANCE L15 — 0 * — R15: Adjusts th e left and right sp eaker output balance.
FADER R15 — 0 * — F15: Adjusts the rear and f ront speaker output b alance.
SUBWOOFER SET ON *: Turns on the subwoofer o utput. ; OFF: Cancels.
DETAILED SET
HPF THROUGH *: All signa ls are sent to the front sp eaker. ;
LPF
SUBWOOFER
SUB-W PHASE RE VERSE (180°)/ NORMAL (0°) *: Selects the ph ase angle of the subwoof er output to be in line wi th the
adjustm ent, select the s ource you want to adjust.)
BASS LEVEL –8 — 0 * — +8: Adjusts th e level.
BASS Q FACTOR 1.00 */ 1.25/ 1.50/ 2.00: Ad justs the qualit y factor.
BASS EX TEND ON: Turns on the e xtended bass . ; OFF *: Cancels.
MID LEVEL –8 — 0 * — +8: Adjusts the le vel.
MID Q FACTOR 0.75/ 1.00 */ 1.25: Adjust s the quality fac tor.
TRE LEVEL –8 — 0 * — +8: Adjus ts the level.
to the music gen re. (Selects [USER] to use t he customized bas s, middle, and treble se ttings.)
balanced so und at a low volume level. ; OFF: Cancels.
100/ 120/ 150 (HZ): Frequencie s lower than the speci fied value are cut of f.
THROUGH *: All signals are sent to t he subwoofer. ;
85/ 120/ 160 (HZ): Frequenci es higher than the spe cified value are cu t off.
speaker out put for optimum per formance. (Selec table only if a set ting other than [THROUGH] is sel ected for
[LPF SUBWOOFER].)
26 English
Page 27

Item Selectable setting (Preset:*)
SUPREME SET O N *: Creates realistic s ound by interpolatin g the high-freque ncy components t hat are lost in AAC/ MP3/
WMA audio compr ession. ; OFF: Cancels. (Sel ectable only whe n playback an AAC/ MP3/ WMA dis c or a USB
device, excep t iPod.) (Selectable on ly if “CD”/ “USB” is se lected as the sou rce.)
VOLUME OFFSET –8 — 0 * — +8 (f or AUX) ; –8 — 0 * (for othe r sources): Presets th e volume adjustment le vel of each
source. The vo lume level will automatic ally increase or decr ease when you change th e source. (Before mak ing
an adjustm ent, select the s ource you want to adjust.)
Selec t a source before makin g a source tone memory a djustment, [EQ PRO].
[SUB-W LEVEL / LPF SUBWOOFER/ SUB-W PHA SE] is selectable only if [SUBWOOFER SET ] is set to [ON].
[SETTINGS]
Item Selectable setting (Preset:*)
AUX NAME SET AUX */ DVD/ PORTABLE/ G AME/ VIDEO/ TV: Selec ts the desired n ame for the connec ted component.
(Select able only if “AUX” is selecte d as the source.)
CLOCK
CLOCK ADJUST (For details, see page 5.)
TIME SYNC ON: Synchronizes the Radi o Data System statio n time data and the unit ’s clock. ; OFF *: Cancels.
DISP&KEY
COLOR SELECT VARIABLE SC AN * / COLOR 01 — 24/ USER: Selects your preferred key illumination color.
Adjusti ng the RGB values
You can create your ow n “USER” color (when [COLOR 01] — [COLOR 24] is selected).
1. Pre ss and hold the volume k nob to enter the detail col or adjustment mode.
2. Press
4
/ ¢ to selec t the color (R/ G/ B) to adjus t. Turn the vo lume knob to adjust the l evel (0 — 9).
3. Press t he volume knob to confi rm and exit.
DISP DIMMER O N: Dims the display illuminat ion. ; OFF *: Cancels.
TEXT SCROLL AUTO */ ONCE: Selec ts to scroll the display i nformation automa tically, or scroll only once. ; O FF: Cancels.
BT DVC STATUS You can display the conne ction statu s, signal strength, an d battery level of B luetooth device.
HF-CON : Connection st atus for cell-phone. ; A D-CON: Connec tion status fo r BT Audio. ;
BAT T: Bat tery level of cell-pho ne. ; SIGNAL: Signal strength of cell-phone.
KEY DIMMER LV 1: Dims the key illumination. ; LV2: D ims the key illumination dar ker than LV1. ; OFF *: Cancels.
English 27
Page 28

Installation/connection
Part list:
A Faceplate ................................................................... (×1)
B Escutcheon ..............................................................(×1)
C Mounting sleeve ...................................................( ×1)
D Wiring harness .......................................................(×1)
E Removal tool .......................................................... (×2)
F Flat head screw (for Nissan cars).................(×4)
G Round head screw (for Toyota cars) .........(×4)
H Microphone (3 m) (KDC-X796 only) ..........(×1)
Basic procedure
1 Remove the key from the ignition switch,
then disconnect the · terminal of the
car battery.
2 Make proper input and output wire
connections.
\ <Wiring connection> (page 30)
3 Install the unit to your car.
\ <Installing the unit> (page 31)
4 Reconnect the · terminal of the car
bat tery.
5 Reset the unit. (page 4)
¤Warning
The unit can only be installed in a car with a
12 V DC power supply, negative ground.
If you connect the ignition wire (red) and
the battery wire (yellow) to the car chassis
(ground), you may cause a short circuit,
that in turn may start a fire. Always connect
those wires to the power source running
through the fuse box.
Disconnect the battery’s negative terminal
and make all electrical connections before
installing the unit.
Insulate unconnected wires with vinyl tape
or other similar material. To prevent a short
circuit, do not remove the caps on the ends
of the unconnected wires or the terminals.
Be sure to ground this unit to the car’s
chassis again after mounting.
If the power is not turned ON (“PROTECT”
is displayed), the speaker wire may have a
short-circuit or touched the chassis of the
vehicle and the protection function may
have been activated. Therefore, the speaker
wire should be checked.
¤Caution
If your car’s ignition key switch does not
have an ACC position, connect the ignition
wires to a power source that can be turned
on and off with the ignition key. If you
connect the ignition wires to a constantvoltage power source, as with battery wires,
the battery may die.
Do not use your own screws. Use only the
screws provided.
Install this unit in the console of your
vehicle. Make sure the faceplate will not hit
the lid of the console (if any) when closing
and opening.
After the installing the unit, check whether
the brake lamps, blinkers, wipers, etc. on the
car are working properly.
Mount the unit so that the mounting angle
is 30° or less.
If the fuse blows, first make sure the wires
are not touching other parts to cause a
short circuit, and then replace the old fuse
with one with a new the same rating.
Connect the speaker wires correctly to the
corresponding terminals. The unit may be
damaged or fail to work if you share the ·
wires or ground them to any metal part in
the car.
When only two speakers are being
connected to the system, connect the
connectors either to both the front output
terminals or to both the rear output
terminals (do not mix front and rear).
28 English
Page 29

Mounting and wiring this product requires
skills and experience. For safety’s sake, leave
this work to professionals.
If you experience problems during
installation, consult your Kenwood dealer.
Reception may become poor if there are
metal objects near the Bluetooth antenna.
iPod
Bluetooth antenna unit
For Good Reception
To assure good reception, note the following:
Communicate with the cell-phone within
the line-of-sight distance of 10 m (30
ft). The communication range becomes
shorter depending on the surrounding
environment. The communication
range also becomes shorter when there
is an obstacle between this unit and
the cell-phone. The above maximum
communication range (10 m) is not always
assured.
A broadcast station or walkie-talkie located
nearby can interfere with communication
due to a too strong signal.
¤ CAUTION
Install this unit in the console of your
vehicle.
Do not touch the metal part of this unit
during and shortly after the use of the
unit. Metal part such as the heat sink and
enclosure become hot.
English 29
Page 30
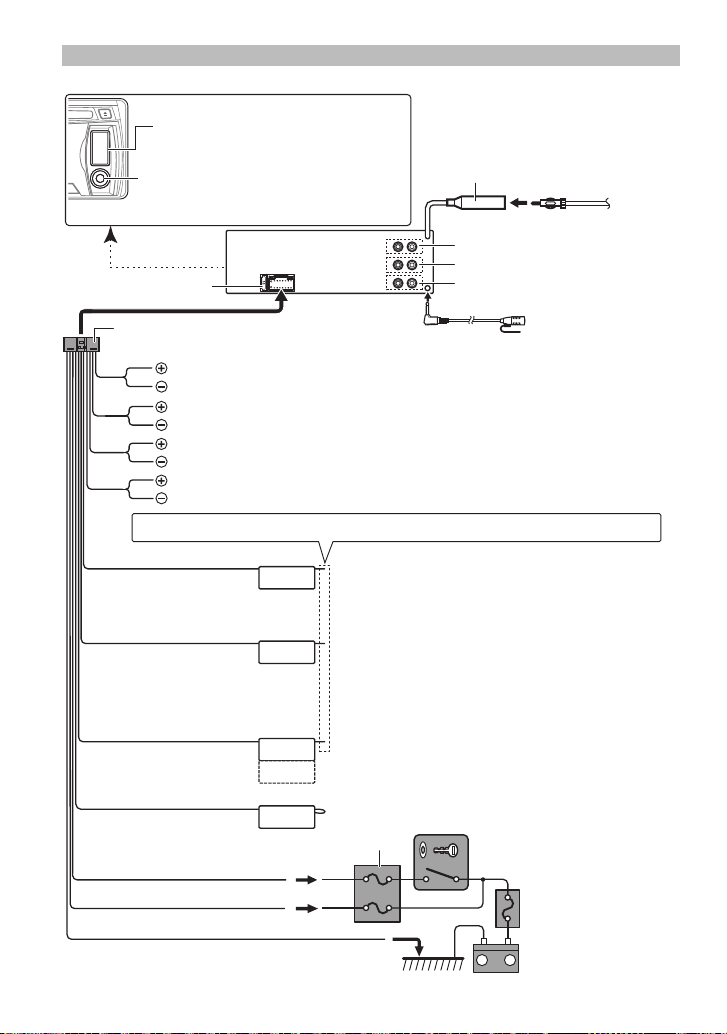
Wiring connection
USB connector
AUX input (Stereo)
Use the mini-plug (3.5 mm; 1/8”) cable
which is stereo type and does not have
any resistance.
Fuse (10A)
Wiring harness D
FM/AM antenna
input (JASO)
Antenna Cord
R
Front output
Rear output
L
Sub Woofer output
Microphone H
(KDC-X796 only)
White
White/Black
Gray
Gray/Black
Green
Green/Black
Purple
Purple/Black
To front left speaker
To front right speaker
To rear left speaker
To rear right speaker
If no connections are made, do not let the wire come out from the tab.
Blue/White
(Power control/ Antenna
P.CONT
control wire)
Brown
(Mute control wire)
MUTE
Light Blue/Yellow
(Steering remote control
wire)
Blue
REMOTE CONT
STEERING WHEEL
REMOTE INPUT
ANT. CONT
Red (Ignition wire)
Yellow (Battery wire)
Black (Ground wire)
To the metallic body or chassis of the car
30 English
Connect either to the power control terminal when
using the optional power amplifier, or to the antenna
control terminal in the vehicle. (Max. 300mA, 12V)
To connect the Kenwood navigation system, consult
your navigation manual.
To use the steering wheel remote control feature, you
need to an exclusive remote adapter (not supplied)
matches your car is required.
(Not used)
Car fuse box
Ignition key switch
ACC
Car fuse box
(Main fuse)
+
–
Battery
Page 31

Installing the unit
1
3
2
1
B
A
Before attaching, make
2
sure the direction of the
escutcheon is correct.
(Wider hooks on the
bottom side.)
4
5
B
A
Installing without using the mounting sleeve (Japanese car)
1 Remove the mounting sleeve and
escutcheon B from the unit.
2 Align the holes in the unit (on both sides)
with the vehicle mounting bracket and
secure the unit with the supplied screws.
Connect the wiring harness to the
unit. Other wiring connection has
C
been completed earlier. (page 30)
1
3
C
Bend the appropriate tabs
to hold the mounting sleeve
firmly in place.
N
T
N
T
B
8 mm
MAX.
ø5mm
F
ø5mm
G
D
2
Dashboard of
your car
T/N
T: Toyota cars
8mm
N: Nissan cars
MAX.
Removing the unit
1 Detach the faceplate A.
2 Engage the catch pin on the removal
tools E into the holes on both sides of
the escutcheon B, then pull it out.
3 Insert the removal tools E deeply into
the slots on each side, then follow the
arrows instructions as shown on the
right.
E
B
C
3
1
2
A
E
English 31
Page 32

Installing the Microphone Unit (KDC-X796 only)
1 Check the installation position of the
microphone H.
2 Remove oil and other dirt from the
installation surface.
3 Install the microphone.
4 Wire the microphone cable up to the
hands-free box with it secured at several
positions using tape or the like.
Install the microphone as far away as
possible from the cell-phone.
Peel off the release
coated paper of
double-face adhesive
tape to secure the
microphone on the
place shown above.
Fix a cable with a commercial
item of tape.
H
Turn the microphone
toward the driver.
Troubleshooting
Symptom Remedy/Cause
Sound cann ot be heard. Adjust the vo lume to the optimum level. / C heck the cords and conn ections.
“PROTECT” a ppears and no operat ions can
be done.
The unit doe s not work at all. Reset the unit.
Radio recep tion is poor. / Static nois e while
listening to t he radio.
“MEMORY FULL” appears. The tag memo ry of HD Radio receiv er is full.
“NO TAG FNC” appears . The connec ted iPod does not sup port iTunes tagging f unction.
“TAG ERROR” appears. The unit is una ble to complete trans ferring the tagg ed information to th e iPod.
“IN” flashes. The CD player is no t operating proper ly. Reinsert the disc p roperly. If the conditi on did
CD-R/CD -RW cannot be played b ack and
track s cannot be skipped.
Disc sound i s sometimes inter rupted. Stop playback while d riving on rough road s. / Change the disc. / Ch eck the cords and
“NA FILE” appe ars. The unit is playing an unsu pported audio f ile.
“NO DISC” appe ars. Insert a playable disc into the loading slot.
Check to be s ure the terminals of the sp eaker leads are covered wit h insulating tape
properly, the n reset the unit. If “P ROTECT” does not dis appear, consult your neares t
service center.
Connect t he antenna firmly. / Pull the an tenna out all the way.
not improve, tu rn off the unit and co nsult your nearest se rvice center.
Insert a f inalized CD-R/C D-RW (finalize with t he component which you u sed for
recording).
connections.
32 English
Page 33

Symptom Remedy/Cause
“TOC ERROR” appears. The CD is quite dirt y. / The CD is upside-do wn. / The CD is scratche d a lot. Try another
disc instead.
“ERROR 99” appears. The unit is mal functioning f or some reason. Pres s the reset butto n on the unit. If the
“ERROR 99 ” code does not disap pear, consult your nearest s ervice center.
“COPY PRO” appears. A copy-protected file is playe d.
“READ ERROR” appears. Copy the files and fo lders for the USB device a gain. If the error mes sage is still
displayed, ini tialize the USB device or us e other USB devices.
“NO DEVIC E” appears. No USB device is connect ed. Connect a USB devi ce, and change the source to USB
again.
“NO MUSIC” appea rs. The co nnected USB device c ontains no playable audio f ile.
“NA DEVICE” a ppears. Connect a suppor ted USB device, and che ck the connectio ns.
“iPod ERROR” appears. Reconnec t the iPod. / Confir m that the soft ware for the iPod is the late st version. /
Reset the iPod.
“iPod FULL” appears. The iPod memo ry is full.
Noise is generated. Skip to anothe r track or change the di sc.
Tracks canno t play back as you have intende d
them to play.
“READING” keeps flashing. Longer reado ut time is required. D o not use too many hierarch ies and folders.
Elapsed pla ying time is not correc t. This is c aused by how the trac ks are recorded.
The number of s ongs contained in “SO NGS”
categor y of this unit is dif ferent from that
contained in “SONGS” category of iPod.
Correc t characters are n ot displayed (e.g.
album name).
Playback ord er is determined whe n files are recorded .
Podcast f iles are not counted in t his unit as this unit doe s not support the p layback of
podcast files.
This unit ca n only display letter s (upper ca se), numbers, and a limited num ber of
symbols.
Pandora
Symptom Remedy/Cause
“PANDORA ERR 5” ap pears. Thumb up/down ope ration has failed.
“NO SKIPS” appe ars. The sk ip count limit has been ex ceeded.
“CHECK DEVI CE” appears. Check the Pa ndora® application on t he iPhone/iPod touc h.
Bluetooth
Symptom Remedy/Cause
The hands-f ree talk volume is low. The hand s-free talk volume ca n be adjusted indepe ndently. Adjust it durin g hands-
free talk . [MIC GAIN], [NR LEV EL] and [EC LE VEL] of <Blueto oth Setup> (page
23).
No beep is hea rd at reception of an incomin g
call.
No beep is hea rd depending on the t ype of your cell-phone. T he [CALL BEEP] of
<Bluetooth S etup> (page 23) is set ON.
Continued to next page
English 33
Page 34

Symptom Remedy/Cause
Voice is not recogn ized.
The vehicle wi ndow is open. If the sur rounding noise is large, vo ice cannot be
recognize d properly. Close the veh icle windows to reduce n oise.
Small voice. If voice i s too small, it cannot be reco gnized properly. Speak i nto the
microphone a little more loudly and naturally.
The pers on uttering the voi ce tag is not the one who reg istered the it. Onl y the
voice of the per son who register ed the voice tag can be re cognized.
“NO NUMBER ” appears. The c alling party doe s not notify a calle r ID. / There is no phone number da ta.
“NO DATA” appears. There is no ou tgoing call list. / Ther e is no incoming call list. / T here is no missed call
list. / Ther e is no phone book list . / Data is not contained in t he phone book.
“NO ENTRY” appears. The cell- phone has not been reg istered (pairing).
“HF DISCONC T” appears. The unit can not communicate with th e cell-phone.
“AUD DISCON CT” appear s. The unit cannot co mmunicate with the aud io player.
“HF ERROR 07” appears. The memo ry cannot be access ed. Turn off the power an d on again. If this mess age still
appears, pr ess the reset but ton on the control uni t.
“HF ERROR 68” appears. The unit c annot communicate wit h the cell-phone. Turn of f the power and on again. If
this mess age still appears, p ress the reset but ton on the control un it.
“HF ERROR 89” appears. Update of t he Bluetooth firmw are has failed. Retr y it.
“UNKNOWN” ap pears. The Bluetooth d evice cannot be dete cted.
“DEVICE FU LL” appears. 5 Bluetoot h device have already been r egistered. No more B luetooth device can not
be registered.
“PIN CODE NG” appear s. T he PIN code is wrong.
“CONNECT NG” appears. The unit cannot be conne cted to the device .
“PAIRING NG” appears. Pairing error.
“NO MESSAGE” app ears. No short mes sage in In Box.
“NO ACTIVE DVC” ap pears. No cell-phone i s connected. Conne ct your cell-phone b efore start ing voice
recognition.
The sound f rom the Bluetooth au dio player is
discontinuous.
Another Bluetooth device is affe cting the Bluetooth communication. Turn off
another Blue tooth device. Move anot her Bluetooth dev ice away from this unit.
Another Bluetooth device or profile is used for communicat ion. The downloading of
the Phone bo ok or the SMS disconne cts the sound.
34 English
Page 35

Specifications
FM tuner section
Frequenc y range (200kHz spac e):
87.9 MHz — 107.9 MHz
Usable se nsitivity (S/N = 26dB):
9.3 dBf (0.8 μV/75 Ω)
Quietin g sensitivity (D IN S/N = 46dB):
15.2 dBf (1.6 μV/75 Ω)
Frequenc y response (±3dB): 30 Hz — 15 kHz
Signal-to-Noise ratio (MONO): 70 dB
Stereo sep aration (1kHz): 40 dB
Digital FM tuner section
Frequenc y range (200kHz spac e):
87.9 MHz — 107.9 MHz
Frequenc y response (±3dB): 20 Hz — 20 kHz
Signal-to-Noise ratio (STEREO): 70 dB
AM tuner section
Frequenc y range (10kHz space):
530 kHz — 1,700 kHz
Usable se nsitivity (S/N= 2 0dB): 28 dBμ (25 μV)
Digital AM tuner section
Frequenc y range (10kHz space):
530 kHz — 1,700 kHz
Frequenc y response (±3dB): 40 Hz — 15 kHz
Signal-to-Noise ratio (STEREO): 70 dB
CD player section
Laser diode: GaAIAs
Digital filter (D/A): 8 Times Over Sampling
D/A converter: 24 Bit
Spindle speed: 500 rpm — 200 rpm (CLV)
Wow & Flutter: Below Measurable Limit
Frequency response (±1 dB): 10 Hz — 20 kHz
Total harmoni c distortion (1 kHz):
K DC-X 79 6: 0.008 %
K DC- BT 75 2HD : 0.01 %
Signal-to-Noise ratio (1 kHz):
K DC-X 79 6: 110 dB
K DC- BT 75 2HD : 105 dB
Dynamic range: 93 dB
AAC decode: AAC-LC “.m4a” files
MP3 decode:
WMA decode:
USB interface
USB standard: USB1.1/ 2.0 (Full speed)
Maximum supply current: DC 5 V
File system: FAT16/ 32
Compliant with MPEG-1/2 Audio Layer-3
Compliant with Windows Media Audio
1 A
AAC decode: AAC-LC “.m4a” files
MP3 decode:
WMA decode:
Bluetooth section
Technology: Bluetooth Ver. 3.0 Certified
Frequency: 2.402 – 2.480 GHz
Output Pow er: +4 dBm (MAX), 0 dBm (AVE)
Maximum Communication range:
Profile:
Audio section
Maximum output power: 50 W × 4
Full bandw idth power (at less than 1 % TH D):
Speaker impedance: 4 Ω — 8 Ω
Tone action:
Preout level / load (CD):
Preout impedance: ≤ 600 Ω
Auxiliary input section
Frequency response (±3 dB): 20 Hz — 20 kHz
Input maximum voltage: 1,200 mV
Input impedance: 10 k Ω
General
Operating voltage:
Maximum current consumption: 10 A
Installa tion size (W × H × D):
Weight : 2.9 lbs (1.3 kg)
Subject to change without notice.
Compliant with MPEG-1/2 Audio Layer-3
Compliant with Windows Media Audio
Power Class 2
Line of sight approx. 10m (32.8 ft)
HFP (Hands Free Profile),
HSP (Headset Profile),
SPP (Serial Port Profile),
OPP (Object Push Profile),
PBAP (Phonebook Access Profile),
A2DP (Advanced Audio Distribution Profile),
AVRCP (Audio/Video Remote Control Profile)
22 W × 4
Bass: 100 Hz ±8 dB
Middle: 1 kHz ±8 dB
Treb le: 12.5 kHz ±8 dB
K DC-X 79 6: 4,000 mV/ 10 kΩ
K DC- BT 75 2HD : 2,500 mV/ 10 kΩ
14.4 V (10.5 V — 16 V allowable)
182 mm × 53 mm × 160 mm
(7-3/16” × 2-1/16” × 6-5/16”)
English 35
Page 36

TABLE DES MATIERES
Sécurité 37
Entretien
Préparation 38
Comment attacher/détacher la façade
Comment réinitialiser votre appareil
Comment préparer la télécommande (RC-
405)
Pour commencer 39
Annulation des démonstrations des
affichages
Réglage du mode de démonstration
Réglage de l’horloge
Réglages initiaux avant d’utiliser l’appareil
Fonctionnement basique 40
Écoute de diffusions HD Radio™ 42
Syntonisation à accès direct en utilisant la
télécommande (RC-405)
Utilisation de la télécommande (RC-405)
Balisage iTunes
Réglages du mode [SETTINGS]
Écoute d’un autre appareil extérieur
43
Écoute d’un disque/ périphérique
USB/ iPod 44
Démarrage de la lecture d’un disque
Démarrage de la lecture d’un périphérique
USB ou d'un iPod
Retrait du périphérique USB ou de l'iPod
Sélection de la lecture répétée
Sélection de la lecture aléatoire
Lecture aléatoire globale
Sélection d’un dossier/plage/fichier
Recherche alphabétique pour iPod
Recherche directe d’un morceau en utilisant
la télécommande (RC-405)
Utilisation de la télécommande (RC-405)
Sélectionner le mode commande App &
iPod
Réglages du mode [SETTINGS]
Écoute de la radio Internet PANDORA®
Retirez l'iPhone
Mode"Recherche de station"
Utilisation de la télécommande (RC-405)
48
36 Français
Pour bien démarrer avec Bluetooth
Fonction de pairage simplifié
Enregistrement à partir des appareils
Bluetooth (pairage)
50
Fonctionnement de la téléphonie
mains libres 52
Effectuer un appel
Effectuer un appel par numérotation vocale
Recevoir un appel
Pendant un appel
Appel en attente
Effacement du message de déconnexion
Téléchargement du répertoire téléphonique
Utilisation de la télécommande (RC-405)
Ecoute d'un Bluetooth audio 55
Sélection de la lecture répétée
Sélection de la lecture aléatoire
Alterner entre les appareils Bluetooth
Configuration Bluetooth 56
Enregistrement d'un appareil Bluetooth
(pairage)
Sélection de l'appareil Bluetooth
Bluetooth Device Registration Test (test
d'enregistrement de périphérique
Bluetooth)
Configuration Bluetooth
SMS (Service de messagerie - Short
Message Service) 58
Téléchargement de SMS
Afficher les SMS
Réglage d'un message de réponse
Création d'un message d'origine
Configuration SMS
Réglages des fonctions 60
Installation/raccordement 62
Guide de dépannage 66
Caractéristiques techniques 69
Page 37

Sécurité
¤AVERTISSEMENT
Arrêtez la voiture avant de manipuler l’appareil.
Important...
Pour éviter les courts-circuits, ne jamais mettre
ou laisser d’objets métalliques (comme une
pièce de monnaie ou un outil en métal) à
l’intérieur de l’appareil.
Attention: Ajustez le volume de façon à
pouvoir entendre les sons extérieurs à la
voiture. Conduire avec le volume trop fort peut
être la cause d’un accident.
Condensation: Quand une voiture est
climatisée, de la condensation peut se produire
sur la lentille du laser. Cela peut être la cause
d’une erreur de lecture du disque. Dans ce cas,
retirez le disque et attendez que l’humidité
s’évapore.
Les illustrations dans ce manuel sont des
exemples utilisés pour expliquer plus
clairement comment les commandes sont
utilisées. Par conséquent, ce qui apparaît sur
les illustrations peut différer de ce qui apparaît
réellement sur l’appareil.
Si vous rencontrez des problèmes pendant
l’installation, consultez votre revendeur
Kenwood.
Lorsque vous achetez des appareils extérieurs,
vérifiez auprès de votre revendeur Kenwood
que ces accessoires fonctionnent avec votre
modèle dans votre région.
Entretien
Nettoyage de l’appareil: Essuyez la saleté
sur le panneau avec un chiffon sec au silicone
ou un chiffon doux. Ne pas respecter ces
précautions peut entraîner des dommages au
moniteur ou à l’appareil.
Nettoyage du connecteur: L'appareil
ne fonctionnera pas correctement si
le connecteur entre lui et la façade est
crasseux. Détachez la façade et nettoyez
précautionneusement le connecteur avec un
coton-tige, afin de ne pas le détériorer.
Connecteur (face arrière de la façade)
HD Radio Technology manufactured under
license from iBiquity Digital Corporation. U.S.
and Foreign Patents. HD Radio™ and the HD,
HD Radio, and “Arc” logos are proprietary
trademarks of iBiquity Digital Corp.
The “AAC” logo is a trademark of Dolby
Laboratories.
La marque et les logos Bluetooth
appartiennent à Bluetooth SIG, Inc. et toute
utilisation de ces marques par JVC Kenwood
Corporation est sous licence. Les autres
marques et appellations commerciales
appartiennent à leurs propriétaires
respectifs.
“Made for iPod” and “Made for iPhone”
mean that an electronic accessory has
been designed to connect specifically
to iPod or iPhone, respectively, and has
been certified by the developer to meet
Apple performance standards. Apple is not
responsible for the operation of this device
or its compliance with safety and regulatory
standards. Please note that the use of this
accessory with iPod or iPhone may affect
wireless performance.
iPhone, iPod, iPod classic, iPod nano, and
iPod touch are trademarks of Apple Inc.,
registered in the U.S. and other countries.
iTunes is a trademark of Apple Inc.
PANDORA, the PANDORA logo, and the
Pandora trade dress are trademarks or
registered trademarks of Pandora Media, Inc.,
used with permission.
Android is a trademark of Google Inc.
BlackBerry®, RIM®, Research In Motion® and
related trademarks, names and logos are the
property of Research In Motion Limited and
are registered and/or used in the U.S. and
countries around the world. Used under
license from Research In Motion Limited.
Français 37
Page 38

Préparation
Comment attacher/détacher la façade
1
2
N’exposez pas la façade à la lumière directe du
2
soleil, à trop de chaleur ou d’humidité. Évitez
également les endroits trop poussiéreux ou
exposés aux éclaboussures.
Conserver la façade dans son étui lorsqu’elle
est détachée.
La façade est une pièce de précision de
l’équipement et elle peut être endommagée
en cas de chocs ou de secousses.
Afin d’éviter d’endommager les contacts de
l’appareil et de la façade, ne les touchez pas
avec les doigts.
Comment réinitialiser votre appareil
Si l’appareil ne fonctionne pas
correctement, appuyez sur la
1
touche de réinitialisation.
L’appareil retourne aux
2
réglages d’usine une fois la
touche de réinitialisation
enfoncée.
3
Bouton de réinitialisation
1
Comment préparer la télécommande (RC-405)
Lorsque vous utilisez la télécommande pour la
première fois, tirez sur la feuille isolante pour la
retirer.
Feuille isolante
Si la télécommande perd de son efficacité,
remplacez la pile.
2
1
¤
Attention:
Ne pas placer la télécommande dans des
endroits exposés à la chaleur, comme sur le
tableau de bord par exemple.
Pile au lithium.
Danger d’explosion en cas de remplacement
incorrect de la pile. Ne remplacer uniquement
qu’avec le même type de pile ou son
équivalent.
Le boîtier de la pile ou les piles ne doivent pas
être exposés à des chaleurs excessives telles
que les rayons du soleil, du feu, etc.
Conservez les piles hors de portée des enfants
dans leur conditionnement original jusqu’à leur
utilisation. Débarrassez-vous des piles usagées
rapidement. En cas d'ingestion, contactez un
médecin immédiatement.
4
3
38 Français
Page 39

Pour commencer
Annulation des démonstrations des affichages
La démonstration des affichages reste toujours
en service tant que vous ne l’annulez pas.
Quand vous mettez l’appareil sous tension (ou
après une réinitialisation de l’appareil), l’affichage
apparaît.
[CANCELDEMO] \ [PRESS] \ [VOLUMEKNOB]
1 Appuyez sur le bouton de volume.
[YES] est choisi comme réglage initial.
2 Appuyez de nouveau sur le bouton de
volume pour valider.
[DEMOOFF] apparaît.
Si aucune opération n’est effectuée pendant
environ 15 secondes, ou si vous tournez le
bouton de volume pour choisir [NO] à l’étape
2, [DEMOMODE] apparaît et la démonstration
des affichages démarre.
Réglage du mode de démonstration
1 Appuyez sur le bouton de volume pour
entrer [FUNCTION].
2 Tournez le bouton de volume pour choisir
[DEMOMODE], puis appuyez sur le bouton
pour valider.
3 Tournez le bouton de volume pour choisir
[ON] ou [OFF].
Si [ON] est choisi, la démonstration des
affichages démarre si aucune opération n’est
faite pendant environ 20 secondes.
4 Maintenez
procédure.
enfoncé pour terminer la
Réglage de l’horloge
1 Appuyez sur le bouton de volume pour
entrer dans le mode [FUNCTION].
Élément Réglage sélectionnable (Préréglage: *)
PRESET TYPE NORMAL *: Mémo rise une statio n pour chaque touc he de préréglage dans c haque bande (FM1/ FM2/ FM3/ AM). ;
KEY BEEP ON */ OFF: Met en/ho rs service la ton alité des touches .
PANDORA SRC ON *: Vous permet d e sélectionne r la source “PANDORA” en conne ctant un iPhone, i Pod touch, Android ou B lackBerry
BUILT-IN AUX ON *: Met en ser vice “AUX” en sélection d e la source. Le son de l’appar eil extérieur co nnecté pass e par les enceintes de la
CD READ 1 *: Dist ingue automatiqu ement les disque s de fichiers audi o et les CD de musique. ; 2: Re produit de force le di sque
SP SELECT OFF */ 5/4/ 6×9/6/ OEM: Choisit la taille d’enceinte permettant d’obtenir les perfor mances optimales.
F/W UP xx. xx YES: Démarre r la mise à niveau du microl ogiciel. ; NO *: Annulat ion (la mise à niveau n’est pa s activée).
MIX: Mémoris e une station pou r chaque touche de pr éréglage quelle que s oit la bande choisi e (FM1/ FM2/ FM3/ AM).
(avec l'applicat ion de radio Intern et Pandora®). ; OFF: Met hor s service “PANDOR A” dans la sél ection de la sou rce.
voiture. ; O FF: Met hors ser vice “AUX” dans la sélectio n de la source.
comme un CD de mu sique. Aucun son n’est en tendu si un disque de f ichiers audio es t reproduit.
Pour en savoi r plus sur la mise à niveau du mi crologiciel, réf érez-vous à: ww w.kenwood.com/cs/ce/
2 Tournez le bouton de volume pour choisir
[SETTINGS], puis appuyez sur le bouton
pour valider.
3 Tournez le bouton de volume pour choisir
[CLOCK], puis appuyez sur le bouton pour
valider.
4 Tournez le bouton de volume pour choisir
[CLOCK ADJUST], puis appuyez sur le
bouton pour valider.
Le chiffre des heures de l’horloge clignote sur
l’affichage.
5 Tournez le bouton de volume pour régler les
heures, puis appuyez dessus pour passer au
réglage des minutes.
Le chiffre des minutes de l’horloge clignote
sur l’affichage.
6 Tournez le bouton de volume pour régler les
minutes, puis appuyez dessus pour valider.
Appuyez sur 4 / ¢ pour passer entre le
réglage des heures et des minutes.
7 Maintenez pressée
procédure.
pour terminer la
Réglages initiaux avant d’utiliser l’appareil
1 Appuyez sur SRC pour entrer dans le
mode [STANDBY].
2 Appuyez sur le bouton de volume pour
entrer dans le mode [FUNCTION].
3 Tournez le bouton de volume pour choisir
[INITIALSET], puis appuyez sur le bouton
pour valider.
4 Tournez le bouton de volume pour faire
votre choix, puis appuyez dessus pour
valider.
Voir le tableau pour la sélection.
5 Maintenez pressée
procédure.
pour terminer la
Français 39
Page 40

Fonctionnement basique
Capteur de télécommande
NE l’exposez PAS à la lumière directe
du soleil.
TAG
VOICE
PAR
Bouton de volume
Détacher la façade
L’indicateur suivant s’allume quand...
ST: Une émission stéréo est reçue.
HD: La diffusion HD Radio™ est syntonisée.
D: La diffusion numérique HD Radio est
syntonisée.
MC: La multidiffusion HD Radio est syntonisée.
TAG: Les informations de la chanson peuvent
être enregistrées.
IN: Un disque se trouve dans l’appareil.
ATT: Le son est atténué.
EQ: [PRESET EQ] est réglé sur un autre mode EQ
que [NATURAL]. (page 60)
B. BOOST: [BASS BOOST] est réglé sur [LV 1],
[LV2] ou [ LV3]. (page 60)
: Indique que le mode Recherche de morceau
est à présent sélectionné.
BT: État de connexion du téléphone portable
Bluetooth.
Fente d’insertion
Éjection d’un disque
iPod
Fenêtre d’affichage
Prise USB
Prise d’entrée auxiliaire
Faites glisser le couvercle pour l’ouvrir
40 Français
Page 41

Quand vous appuyez ou maintenez pressées les touches suivantes...
Appareil
principal
Télécommande Opérations générales
Met l’appareil sous tension.
—
Maintenez cette touche pressée pour mettre l’appareil hors
tension.
Choisit les sources disponibles (HD Radio, BT AUDIO, USB ou iPod,
PANDORA, CD, AUX, STANDBY) si l’appareil est sous tension.
SRC
SRC
• Silasourceestprête,lalecturedémarreaussi.
• “PANDORA”peutêtresélectionnéuniquementquanduniPhone,iPod
touch,AndroidouBlackBerry(avecl'applicationderadioInternet
Pandora®)estconnectéet[ON]sélectionnépour[PANDORA SR C].
(page39)
• “iPod”ou“CD”peuventêtrechoisisuniquementquanduniPodest
connectéouqu’undisqueestenplace.
Bouton de
VOLud
volume
(tournez)
Bouton de
volume
(appuyez)
1 (
–)/ 2 ( +)
6 (38) ENT 38
4 / ¢
5 / ∞
ENT 38 Valide la sélection.
—
5 / ∞
—
*AM– /
#FM+
4/
+¢
Ajuste le niveau de volume.
Choisit les éléments.
Permet d’accéder aux réglages [FUNCTION].
Entame la reconnaissance de voix du portable si elle est appuyée
et maintenue.
Entre le mode "Recherche de morceau".
Permet d'accéder au mode de balisage HD Radio si appuyée et
maintenue. (page 42)
Sélectionne les bandes FM (FM1/ FM2/ FM3) ou AM quand “HD
RADIO” est sélectionné comme source.
Choisit le dossier précédant/suivant.
Met en pause/reprend la lecture d’un disque/périphérique USB/
iPod/Pandora/Bluetooth Audio.
Recherche une station radio.
Choisit une plage ou un fichier.
Avance/retour rapide dans la plage ou le fichier si maintenue
pressée.
Change l’information sur l’affichage.
Fait défiler les informations affichées si maintenue pressée.
SCRL DISP —
Permet d’accéder directement au mode de réglage de l’horloge
si la touche est maintenue pressée pendant que l’horloge est
affichée. (page 39)
Permet d'accéder au mode Bluetooth. (page 52)
Appuyez pour répondre à un appel entrant.
—
— AUD
Permet d'accéder au mode de pairage Bluetooth simplifié si
maintenue pressée. (page 50)
Permet d’accéder directement aux réglages [AUDIO CONTROL].
Atténue le son.
— ATT
• Pourretournerauniveauprécédent,appuyezdenouveausurla
touche.
Retourne à l’élément précédent.
EXIT
—
Quitte le mode de réglage.
• Maintenirpressée
surl’appareilpermetaussidequitterlemode
deréglage.
Français 41
Page 42

Écoute de diffusions HD Radio™
TAG
VOICE
PAR
iPod
Appuyez et maintenez pour mémoriser la station ou le canal actuel.
Appuyez brièvement pour rappeler la station ou le canal mémorisé.
1 Appuyez sur SRC pour choisir “HD Radio”.
2 Appuyez de manière répétée pour
sélectionner une bande pour choisir une
bande (FM1/ FM2/ FM3/ AM).
3 Appuyez sur 4 / ¢ pour rechercher une
station ou un canal.
“LINKING” apparaît lors de la liaison avec un
canal de multidiffusion.
Le mode de syntonisation peut être changé.
Voir <SEEK MODE> (page 43).
Syntonisation à accès direct en utilisant la télécommande (RC-405)
1 Appuyez sur FM+ / AM– pour sélectionner
une bande.
2 Appuyez sur DIRECT de manière
répétée pour sélectionner l'élément de
syntonisation.
“– – – –” apparaît.
3 Appuyez sur DIRECT pour entrer dans le
mode Syntonisation à accès direct.
Élément de syntonisation : Fréquence “–
– – –”, Canal “HD –” ou Annulation de la
syntonisation à accès direct
4 Entrez la fréquence ou le canal en appuyant
sur les touches numériques.
5 Appuyez sur 4 / +¢ pour syntoniser sur
la fréquence ou le canal entré.
Pour annuler le mode "Syntonisation à accès
direct", appuyez sur
Si rien n'est entrepris dans les 10 secondes
ou EXIT.
suivant l'étape 3, "Syntonisation à accès direct"
est automatiquement annulé.
42 Français
Utilisation de la télécommande (RC-
405)
#FM+ / *AM– : Choisit la bande.
4 / +¢ : Choisit la station.
1 – 6 : Choisit une station préréglée.
Balisage iTunes
Lorsque vous entendez une chanson qui vous
plaît sur votre station HD Radio locale, vous
pouvez la baliser et enregistrer ses informations
sur cet appareil. Vous pouvez enregistrer jusqu'à
50 balises (données relatives aux chansons) dans
cet appareil.
Grâce à cette fonction de balisage, vous pouvez
acheter facilement les chansons sur l'iTunes Store
d'Apple.
Appuyez sur
maintenez-le enfoncé pour
accéder au mode de balisage HD Radio et
baliser la chanson.
“TAG” s'affiche à l'écran lorsque les
informations de la chanson peuvent être
enregistrées.
Pour transférer les chansons balisées
vers votre iPod et les acheter auprès de
l'iTunesStore :
1 Reliez un iPod à cet appareil. (page 44)
Les informations balisées enregistrées sur cet
appareil sont automatiquement transférées
vers l'iPod connecté.
2 Connectez l'iPod à votre ordinateur.
3 Synchronisez l'iPod avec iTunes.
Les chansons enregistrées s'affichent dans
Page 43

une liste de lecture intitulée “Tagged”. Vous pouvez maintenant acheter et télécharger facilement
des chansons auprès de l'iTunes Store.
Réglages du mode [SETTINGS]
Lors de l’écoute de la radio...
1 Appuyez sur le bouton de volume pour entrer dans le mode [FUNCTION].
2 Tournez le bouton de volume pour choisir [SETTINGS], puis appuyez sur le bouton pour
valider.
3 Tournez le bouton de volume pour faire votre choix, puis appuyez dessus pour valider.
Voir le tableau pour la sélection.
4 Maintenez pressée pour terminer la procédure.
Élément Réglage sélectionnable (Préréglage: *)
SEEK MODE AUTO1 *: Re cherche automat ique d'une station o u d'un canal. ; AUTO2: Re cherche dans l’ordre de s stations pré sentes
dans la mémoi re de pré-réglag e. ; MANUAL: Recherche manuellement une station.
AUTO MEM ORY YE S: Mémorise autom atiquement 6 stat ions dont la récept ion est bonne. ; NO *: Annulation (la mémorisation
automati quement n’est pas en ser vice). (Peut être séle ctionné uniqu ement si [NORMAL] est sélect ionné pour [PRESET
TYPE].) (p age 39)
RECEIVEMODE Pe rmet de définir l e mode de réception d u récepteur HD Radio .
AUTO *: Sélec tionne automati quement la diff usion analogiqu e lorsqu'il n'y a pas de dif fusion numé rique. ; DIGITAL:
Syntonise u niquement sur la dif fusion numér ique. ; ANALOG: Syntonise uniquement sur la diffusio n analogique.
TAGMEMORY Af fiche l'utilisa tion de la mémoire de s balises pour le ré cepteur HD Radio.
00—50(prér églage :00): Il est p ossible d'enregis trer un maximum de 50 b alises sur cet app areil.
Écoute d’un autre appareil extérieur
Préparation : Assurez-vous que [ON] est sélectionné pour [BUILT-IN AUX]. (page 39)
TAG
VOICE
PAR
1 Appuyez sur SRC pour choisir “AUX”.
2 Mettez l’appareil extérieur sous tension et
démarrez la lecture.
3 Tournez le bouton de volume pour régler
le volume.
Appareil audio portable
(disponible dans le
commerce)
iPod
Prise d’entrée auxiliaire
Minijack stéréo 3,5 mm (1/8”)
(disponible dans le commerce)
Français 43
Page 44

Écoute d’un disque/ périphérique USB/ iPod
Éjection d’un disque. (“NO DISC” apparaît et
Fente d’insertion
TAG
VOICE
PAR
Appuyez sur cette touche pour choisir
une plage ou un fichier.
Maintenez pressée cette touche pour
faire une avance/retour rapide.
Appuyez pour passer au dossier suivant du
fichier Audio/iPod.
Démarrage de la lecture d’un disque
1 Appuyez sur SRC pour mettre l’appareil
sous tension.
2 Insérez un disque dans la fente d’insertion.
La lecture démarre automatiquement.
Démarrage de la lecture d’un périphérique USB ou d'un iPod
1 Appuyez sur SRC pour mettre l’appareil
sous tension.
2 Faites glisser le couvercle pour l’ouvrir.
3 Connectez un périphérique USB ou un iPod
à la borne USB.
La source est sélectionnée automatiquement
et le lecture démarre.
Périphér ique USB
(disponible dans le
commerce)
CA-U1EX (Max .: 500 mA)
(accessoire en option)
44 Français
l’indicateur “IN” s’éteint.)
iPod
Prise USB
Appuyez pour mettre en
pause. Appuyez de nouveau
pour reprendre la lecture.
iPod Apple
(disponible dans le
commerce)
KCA-i P102
(accessoire en option)
Retrait du périphérique USB ou de l'iPod
1 Appuyez sur SRC pour choisir une autre
source que “USB”, “iPod” ou “PANDORA”.
2 Retirez le périphérique USB ou l'iPod.
Sélection de la lecture répétée
Appuyez de manière répétée sur la touche
numérique 4(REP) pour faire un choix.
CD audio : TRACK REPEAT, REPEAT OFF
Fichier audio :
FILE REPEAT, FOLDER REPEAT, REPEAT OFF
iPod : FILE REPEAT, REPEAT OFF
Sélection de la lecture aléatoire
Appuyez de manière répétée sur la touche
numérique 3 (ALL RDM) pour faire un choix.
CD audio : DISC RANDOM, RANDOM OFF
Fichier audio/ iPod :
FOLDER RANDOM, RANDOM OFF
Page 45

Lecture aléatoire globale
Maintenez pressée la touche 3 (ALL RDM).
Une nouvelle pression sur la touche permet
de lire les morceaux de musique dans le mode
normal.
Fichier audio/ iPod :
ALL RANDOM, RANDOM OFF
Change l’élément parcouru du iPod sur “songs”
(chansons).
Sélection d’un dossier/plage/fichier
1 Appuyez sur pour entrer dans le mode de
recherche de morceau.
“SEARCH” apparaît, puis le nom du fichier
actuel apparaît sur l’affichage.
2 Tournez le bouton de volume pour choisir
un dossier/plage/fichier, puis appuyez
dessus pour valider.
Pour sauter des morceaux, appuyez sur 4/
¢. Le maintien de 4 / ¢ permet de
sauter les morceaux à 10% quel que soit le
réglage effectué. (page 46)
Ce fonctionnement est effectif uniquement
pour l'iPod ou le support Kenwood Music
Editor.
Pour revenir au dossier racine (fichier audio), au
menu supérieur (iPod) ou à la première plage
(CD audio), appuyez sur 5.
Pour revenir au dossier précédent, appuyez
.
sur
Pour annuler le mode de recherche de
morceau, maintenez pressée
< ou > indique sur l’affichage que l’élément
.
précédent/suivant est disponible.
Recherche alphabétique pour iPod
1 Appuyez sur pour entrer dans le mode de
recherche de morceau.
“SEARCH” apparaît.
2 Tournez le bouton de volume pour choisir
une catégorie, puis appuyez dessus pour
valider.
3 Appuyez sur pour entrer dans le mode de
recherche de morceau.
“SEARCH <– – –>” apparaît.
4 Tournez le bouton du volume pour choisir
le caractère à rechercher.
5 Appuyez sur 4 / ¢ pour déplacer la
position d’entrée.
Vous pouvez entrer un maximum de trois
caractères.
6 Appuyez sur le bouton de volume pour
démarrer la recherche.
Après cette étape, référez-vous à l'étape 2
de <Sélection d’un dossier/plage/fichier>
(page 45) pour sélectionner un morceau
de musique.
Pour revenir au mode de recherche de
morceau, appuyez sur
Pour annuler le mode de recherche de
morceau, maintenez pressée
Un temps de recherche plus long est
.
.
nécessaire s’il y a beaucoup de chansons ou de
listes de lecture dans l’iPod.
Pour rechercher un autre caractère qu’une
lettre de A à Z et un chiffre de 0 à 9, entrez
seulement “ * ”.
L’article (un, une, des, le, la les) apparaissant
au début du nom d’une chanson sera ignoré
pendant la recherche.
Recherche directe d’un morceau en utilisant la télécommande (RC-405)
• N’estpasdisponiblesilalecturealéatoire,la
lecturedusupportKENWOODMusicEditor,la
lectured’iPodestchoisie.
1 Appuyez sur DIRECT pour entrer dans le
mode de recherche directe de morceau.
“– – –” apparaît.
2 A l’aide des touches numériques, entrez le
numéro de plage.
3 Appuyez sur 4 / +¢ pour rechercher
un morceau.
Pour annuler le mode "Recherche directe de
morceau", appuyez sur
ou EXIT.
Utilisation de la télécommande (RC-
405)
Dans le mode de lecture:
#FM+ / *AM– : Choisit un dossier.
4 / +¢ : Choisit une plage ou un fichier.
ENT 38 : Arrête provisoirement (pause)
ou reprend la lecture.
5 / ∞ : Entrer en mode Recherche de
morceau.
Dans le mode de recherche de morceau:
ENT 38 : Valide la sélection.
5 / ∞ : Choisit un dossier/fichier/plage.
: Retour au dossier précédent.
Continue à la page suivante
Français 45
Page 46

Sélectionner le mode commande App & iPod
Appuyez de manière répétée sur la touche
numérique 5(iPod) pour faire un choix.
MODE ON :
Commandez l’iPod à partir de l’iPod.
“APP&iPod MODE” s'affiche.
MODE OFF: Commandez l’iPod à partir de
l’appareil.
* Vouspouveztoujourscommanderlecture/pause,
sélectiondefichiers,fichiersavance/retourrapide
àpartirdel'appareil.
Réglages du mode [SETTINGS]
Lors de l'écoute d'un iPod ou du support
KENWOOD Music Editor ...
1 Appuyez sur le bouton de volume pour
entrer dans le mode [FUNCTION].
Manipulation des disques
Ne pas toucher la surface d’enregistrement
du disque.
Ne pas coller de ruban adhésif, etc. sur les
disques et ne pas utiliser de disque avec du
ruban adhésif collé dessus.
N’utilisez aucun accessoire pour le disque.
Pour nettoyer le disque avec le chiffon, partir
du centre du disque vers la périphérie.
Disques qui ne peuvent pas être utilisés
Cet appareil ne peut lire que les CD
comportant:
Un disque qui n'est pas rond.
Un disque avec des colorations sur la surface
d’enregistrement ou un disque sale.
Vous ne pouvez pas reproduire un disque
À propos de fichier audio
Fichiers audio compatibles :
MP3 (.mp3), WMA (.wma), AAC-LC (.m4a)
Supports de disque compatibles: CD-R/RW/
ROM
Formats de fichiers de disques compatibles :
ISO 9660 Niveau 1/2, Joliet, Romeo, Nom de
fichier étendu.
Systèmes de fichiers de dispositif USB
compatibles : FAT16, FAT32
46 Français
2 Tournez le bouton de volume pour choisir
[SETTINGS], puis appuyez sur le bouton
pour valider.
3 Tournez le bouton de volume pour choisir
[SKIP SEARCH], puis appuyez sur le bouton
pour valider.
4 Tournez le bouton de volume pour faire
votre choix, puis appuyez dessus pour
valider.
0.5% (initial)/ 1%/ 5%/ 10% : règle la
proportion de saut dans une recherche de
chanson en mode "Recherche de morceau".
(Conserve 4 / ¢ à 10% la proportion de
saut de chansons quelle que soit la méthode
employée.)
5 Maintenez pressée pour terminer la
procédure.
Nettoyez le disque avec un chiffon sec au
silicone ou un chiffon doux. N’utilisez aucun
solvant.
Pour retirer les disques de cet appareil, les tirer
horizontalement.
Si le trou central ou la bordure externe d'un
disque révèle des ébarbures, les retirer avant
d'insérer un disque.
enregistrable/réinscriptible qui n’a pas été
finalisé. (Pour le processus de finalisation,
reportez-vous au Mode d'emploi fourni avec
le logiciel utilisé pour graver les disques ou
votre graveur de disque.)
Les CD de 3 pouces ne sont pas
supportés. Essayer d’insérer un disque à
l’aide d’un adaptateur peut entraîner un
dysfonctionnement de l’appareil.
Bien que les fichiers audio soient conformes
aux normes établies ci-dessus, il est possible
que la reproduction ne soit pas possible
suivant le type ou les conditions du support ou
périphérique.
Des informations détaillées et des remarques
à propos des fichiers audio pouvant être
lus se trouvent dans le manuel en ligne
disponible sur le site suivant:
www.kenwood.com/cs/ce/audiofile/
Page 47

À propos du périphérique USB
Cet appareil peut reproduire les fichiers
audio mémorisés sur un périphérique USB à
mémoire de grande capacité.
Placer le périphérique USB de façon à ce qu’il
ne gêne pas la conduite du véhicule.
Vous ne pouvez pas connecter un
périphérique USB via une plate-forme USB ou
un lecteur multicartes.
Assurez-vous que toutes les données
importantes ont été sauvegardées pour éviter
toute perte de données.
À propos des iPod/iPhone compatibles
Made for
– iPod touch (4th generation)
– iPod touch (3rd generation)
– iPod touch (2nd generation)
– iPod touch (1st generation)
– iPod classic
– iPod with video
– iPod nano (6th generation)
– iPod nano (5th generation)
– iPod nano (4th generation)
– iPod nano (3rd generation)
– iPod nano (2nd generation)
– iPod nano (1st generation)
– iPhone 4S
– iPhone 4
– iPhone 3GS
– iPhone 3G
– iPhone
(Apartirdejanvier2012)
Liste la plus récente des iPod/iPhone
À propos de “KENWOOD Music Editor”
Cet appareil prend en charge le programme
“KENWOOD Music Editor Light ver1.1” ou
supérieure
Lorsque vous utilisez des fichiers audio
possédant des informations de base de
données ajoutées par le programme
“KENWOOD Music Editor Light ver1.1”, vous
pouvez chercher un fichier par titre, par
album ou par nom d’artiste à l’aide de la
"Recherche de morceau" (page 45).
Dans ce manuel, l'expression “support Music
Editor” désigne un dispositif qui contient des
La connexion d’un câble dont la longueur
totale dépasse 5 m peut avoir pour
conséquence un fonctionnement anormal de
la lecture.
Cette unité ne peut pas reconnaître un
périphérique USB dont la tension nominale
est différente de 5 V et l'intensité nominale
dépasse 500 mA.
Pour la connexion du périphérique USB,
l'utilisation du CA-U1EX (option) est
recommandée. La consommation maximale
de courant du CA-U1EX est de 500 mA.
compatibles.
Pour en savoir plus, consultez le site
www.kenwood.com/cs/ce/ipod
Le type de commande disponible varie en
fonction du type d’iPod connecté. Pour les
détails, voir l'URL ci-dessus.
Tout au long de ce mode d’emploi, le mot
“iPod” désigne un iPod ou iPhone raccordé à
cet appareil avec un câble de connexion KCAiP102 (accessoire en option).
Si vous démarrez la lecture après avoir
connecté l’iPod, le morceau qui a été
reproduit par l’iPod est lu en premier.
Dans ce cas, “RESUMING” apparaît sans
afficher de nom de dossier, etc. Le
changement de l'élément de recherche
permettra d'afficher un titre correct, etc.
Il n’est pas possible d’utiliser votre iPod
lorsque “KENWOOD” ou “” est affiché sur
l’iPod.
fichiers audio associés aux informations de la
base de données ajoutées par le programme
Music Editor de KENWOOD.
“KENWOOD Music Editor Light ver1.1” est
disponible sur le site Web suivant:
www.kenwood.com/cs/ce/
Pour en savoir plus sur le programme
“KENWOOD Music Editor Light ver1.1”, veuillez
consulter le site Web ci-dessus ou bien l’aide
du programme.
Français 47
Page 48

Écoute de la radio Internet PANDORA®
TAG
VOICE
PAR
iPod
Appuyez pour sauter une chanson.
Appuyez pour sélectionner vers le haut/bas.
Android ou BlackBerry
Préparation :
Vous devez enregistrer votre téléphone
portable avant de l'utiliser avec cet appareil.
(page 50)
Déconnectez l'iPhone ou l'iPod touch.
Assurez-vous que [ON] est sélectionné pour
[PAN DORA SR C]. (page 39)
1 Activez l'application PANDORA® sur votre
appareil.
2 Appuyez sur SRC pour choisir
“PA NDO RA”.
Android ou BlackBerry
(disponible dans le
commerce)
Connexion via Bluetooth
Les haut-parleurs dont l'audio provient
changent d'après le réglage Bluetooth “BT HF/
AUDIO”. Le défaut est Front. (page 58)
Prise USB
Appuyez pour mettre en pause.
Appuyez de nouveau pour reprendre
la lecture.
iPhone ou iPod touch
Préparation : Assurez-vous que [ON] est
sélectionné pour [PAN DORA SRC]. (page 39)
1 Activez l'application PANDORA® sur votre
appareil.
2 Faites glisser le couvercle pour l’ouvrir.
3 Connectez un iPhone à la prise USB.
La source est commutée, et la diffusion radio
commence automatiquement à partir de
votre station actuelle.
iPhone ou iPod touch
(disponible dans le
commerce)
KCA-i P102
(accessoire en option)
48 Français
Page 49

Pour sélectionner les onglets de haut/en bas,
appuyez sur la touche numérique 1 (
+ ).
2 (
Pour sauter une chanson, appuyez sur ¢.
Pour mettre en pause/reprendre la lecture,
– )/
appuyez sur la touche numérique 6 (38).
Retirez l'iPhone
1 Appuyez sur SRC pour choisir une autre
source que “PANDORA” ou “iPod”.
2 Retirez l'iPhone.
Mode"Recherche de station"
A l'écoute d'une source “PANDORA”...
1 Appuyez sur pour basculer en mode de
"recherche de station".
2 Tournez le bouton de volume pour
sélectionner [A–Z] (les stations sont
affichées par ordre alphabétique) ou
[BY DATE] (stations affichées par ordre
chronologique de dates), puis appuyez pour
valider.
3 Tournez le bouton de volume pour choisir
une station, puis appuyez pour valider.
Utilisation de la télécommande (RC-
405)
Dans le mode de lecture:
+¢ : Saute une chanson.
ENT 38 : Arrête provisoirement (pause) ou
reprend la lecture.
5 / ∞ : Entre le mode "Recherche de
station".
Dans mode " Recherche de station" :
5 / ∞ : • Sélec tionne [A–Z] ou [BY DAT E].
• Sélectionne des éléments .
ENT 38 : Valide la sélection.
EXIT : Annule le mode "Recherche de
station".
À propos de la radio en ligne PANDORA®
Les conditions requises pour pouvoir écouter la
radio internet PANDORA® sont les suivantes :
iPhone ou iPod touch
– Utilisez un iPhone ou un iPod touch
d'Apple fonctionnant sous iOS3 ou une
version ultérieure.
– Recherchez « PANDORA » dans "Apple
iTunes App Store" pour trouver et installer
la version la plus à jour de l'application
Pandora® sur votre appareil).
– iPhone/ iPod touch connecté à cet
appareil avec un accessoire KCA-iP102.
Android™ ou BlackBerry®
– Téléchargez l'application Pandora sur
votre smartphone à partir du site Pandora
via son navigateur standard.
– Le Bluetooth doit être intégré et les
profils suivants doivent être pris en
charge.
SPP (profil port série)
A2DP (Profil de distribution audio
avancée)
Dans l'application sur votre appareil, ouvrez et
créez un compte Pandora.
(si vous n'êtes pas déjà un utilisateur
enregistré, vous pouvez créer un compte sur
www.pandora.com).
Connexion Internet à la norme 3G, EDGE ou
WiFi.
Pandora® est disponible aux États-Unis
uniquement.
La radio PANDORA® est un service tiers,
ses spécifications peuvent faire l'objet
de changements sans avis préalable. En
conséquence, la compatibilité peut s'en
trouver dégradée ou tout ou partie des
services peuvent devenir indisponibles.
Certaines fonctionnalités de PANDORA® ne
sont pas utilisables à partir de cet appareil.
En cas de problème lors de l'utilisation de
l'application PANDORA®, veuillez contacter
Pandora à l'adresse pandora-support@
pandora.com
Français 49
Page 50

Pour bien démarrer avec Bluetooth
TAG
VOICE
PAR
iPod
Maintenez pressée pour accéder au mode de pairage simplifié.
Fonction de pairage simplifié
1 Maintenez pressée pour entrer dans le
mode de pairage simplifié
L'indication “PAIRING” s'affiche.
L'une des options suivantes sera affichée,
selon l'état d'enregistrement du dispositif
Bluetooth :
– “SEARCHING”: Lors de l'enregistrement
pour la première fois d'un dispositif
Bluetooth.
– “(nom d'appareil)”: Quand un dispositif
Bluetooth a déjà été enregistré.
– “DEVICE FULL” : Quand le maximum de
5 périphériques Bluetooth a déjà été
enregistré.
Pour annuler le mode pairage aisé, appuyez
.
sur
Lors de l'enregistrement pour la première
fois d'un périphérique Bluetooth
(Enregistrement d'un dispositif Bluetooth).
2 L'indication “SEARCHING” s'affiche.
Recherche de l'appareil Bluetooth.
Lorsque la recherche est terminée, “FINISHED”
s'affiche.
3 Tournez le bouton de volume pour choisir
un nom d'appareil Bluetooth, puis appuyez
dessus pour valider.
4 “CONFIRM DVC” s'affiche.
Si “PAIRING OK” s'affiche, passez à l'étape 7.
Si “PIN CODE” s'affiche, passez à l'étape 5.
Si “*** NG” s'affiche, appuyez sur le bouton de
volume. Passez à l'étape 4.
5 Saisir le code PIN
Pour sélectionner le numéro, tournez le
50 Français
bouton de volume.
Pour passer au chiffre suivant, appuyez sur
¢.
Pour effacer le dernier chiffre, appuyez sur
4.
6 Appuyez sur le bouton de volume pour
transférer le code PIN.
Si “PAIRING OK” s'affiche, l'enregistrement est
terminé.
Lorsque “CONFIRM DVC” s'affiche, confirmez
la connexion avec une utilisation de l'appareil
Bluetooth.
7 Le récepteur est connecté au périphérique
Bluetooth, avec l'affichage “HF CONNECT”
ou “AUD CONNECT” et quit te le mode
pairage aisé.
Si un code d'erreur s'affiche pendant le pairage,
référez-vous à <Guide de dépannage> (page
66).
Si un message d'erreur apparaît après la saisie
correcte du code PIN, suivez les consignes
de la section <Enregistrement d’un dispositif
Bluetooth spécial> (page 56).
Quand un périphérique Bluetooth est
déjà enregistré, ou que le maximum de
cinq périphériques Bluetooths est déjà
enregistré (sélection d'un périphérique
bluetooth)
2 “(nom d'appareil)” ou “DEVICE FULL”
s'aff iche.
3 Tournez le bouton de volume pour
sélectionner un nom d'appareil Bluetooth.
Pour enregistrer un nouveau périphérique
Bluetooth, sélectionnez “[NEW DEVICE]”,
Page 51

puis allez à “Lors de l'enregistrement pour la
première fois d'un périphérique Bluetooth”.
4 Appuyez sur le bouton de volume.
5 Tournez le bouton du volume pour
sélectionner le profil du périphérique à
connec ter.
“HANDSFREE”/ ”AUDIO”: Le périphérique
peut être connecté en utilisant soit le kit
mains-libres soit le profil audio.
“HF/AUD”: Le périphérique peut être
connecté en utilisant à la fois le kit mainslibres et le profil audio.
6 Appuyez sur le bouton de volume pour
configurer l'appareil Bluetooth.
“HA (nom d'appareil)”: L'appareil
Bluetooth sélectionné est occupé.
“-H-A (nom d'appareil)”: L'appareil Bluetooth
sélectionné est en veille.
“ H A (nom d'appareil)”: L'appareil Bluetooth
est désélectionné.
• “H”(HFP)ou“A”(A2DP)indiqueleprofil
correspondant.
7 Appuyez sur pour quitter le mode de
pairage simplifié.
Effacez le périphérique Bluetooth enregistré
2 “(nom d'appareil)” ou “DEVICE FULL”
s'aff iche.
3 Tournez le bouton de volume pour
sélectionner un nom d'appareil Bluetooth.
4 Maintenez pressé le bouton de volume pour
supprimer l'appareil Bluetooth sélectionné.
L'indication “DELETE” s'affiche.
5 Tournez le bouton de volume pour choisir
“YES”, puis appuyez sur le bouton pour
valider.
L'indication “COMPLETED” s'affiche.
6 Appuyez sur pour quitter le mode de
pairage simplifié.
Enregistrement à partir des appareils Bluetooth (pairage)
1 Appuyez sur SRC pour mettre l’appareil
sous tension.
2 Lancez l'enregistrement de cet appareil en
utilisant l'appareil Bluetooth.
En utilisant le dispositif Bluetooth, enregistrez
l'appareil mains libres ou l'appareil audio
(pairage). Sélectionnez “KENWOOD BT CD/R6P1” dans la liste des appareils connectés.
3 Saisissez le code PIN (“0000”) dans l'appareil
Bluetooth.
Vérifiez que l'enregistrement est terminé
sur l'appareil Bluetooth. Le code PIN par
défaut est “0000”. Vous pouvez changer ce
code. Référez-vous à [PIN CODE EDIT] sous
<Configuration Bluetooth> (page 57).
4 En utilisant l'appareil Bluetooth, lancez les
connexions mains libres.
S'il y a 5 appareils Bluetooth ou plus
enregistrés, vous ne pouvez pas enregistrer
d'autre appareil Bluetooth.
À propos du téléphone portable
Version: Certification norme Bluetooth ver. 3.0
Profil:
HFP (profil mains libres)
HSP (profil casque)
SPP (profil port série)
OPP (profil d'envoi de fichiers)
PBAP (profil d'accès au répertoire
téléphonique)
A2DP (Profil de distribution audio avancée)
AVRCP (Profil de télécommande audio/vidéo)
Pour les téléphones portables dont la
compatibilité est vérifiée, accédez à l'URL
suivante :
www.kenwood.com/cs/ce/bt/
Les unités supportant la fonction Bluetooth
ont été certifiées conformes à la norme
Bluetooth selon la procédure prescrite par
Bluetooth SIG. Cependant, il est possible que
ces appareils ne puissent pas communiquer
avec certains types de téléphones portables.
Français 51
Page 52

Fonctionnement de la téléphonie mains libres
Préparation : Vous devez enregistrer votre téléphone portable avant de l'utiliser avec cet appareil.
(page 50)
Microphone intégré (KDC-BT752HD uniquement)
TAG
VOICE
PAR
iPod
Appuyez sur pour basculer en
mode Bluetooth.
Appuyez pour répondre à un
appel entrant.
Effectuer un appel
1 Appuyez sur pour basculer en mode
Bluetooth.
2 Tournez le bouton de volume pour choisir
une méthode de numérotation, puis
appuyez dessus pour valider.
Chacune de ces méthodes de numérotation
est décrite ci-dessous.
– “PHONE BOOK”: Appeler un numéro du
répertoire téléphonique
– “OUTGOING”/ “INCOMING”/ “MISSED
CALLS”: Appeler un numéro présent dans
le journal des appels
– “NUMBER DIAL”: Composer un numéro
– Numérotation rapide (Numérotation
préréglée)
Pour commuter entre le nom et le numéro de
téléphone, appuyez sur DISP.
Pour revenir au mode Bluetooth, maintenez
pressée
Pour annuler le mode Bluetooth, appuyez sur
.
.
Appeler un numéro du répertoire
téléphonique
2 Tournez le bouton de volume pour choisir
“PHONE BOOK”, puis appuyez sur le bouton
pour valider.
3 Appuyez sur pour entrer dans le mode de
recherche alphabétique.
52 Français
Appuyez et maintenez pour mémoriser le numéro
de téléphone actuel.
Appuyez brièvement pour rappeler le numéro de
téléphone.
4 Tournez le bouton du volume pour choisir
le caractère à rechercher.
Pour passer au caractère suivant, appuyez
sur 4 / ¢.
Pour revenir au mode Répertoire
téléphonique, appuyez sur
.
5 Appuyez sur le bouton de volume pour
démarrer la recherche.
6 Tournez le bouton de volume pour
sélectionner un nom et une catégorie.
Pour passer au caractère suivant, appuyez
sur 4 / ¢.
7 Appuyez sur le bouton de volume pour
effectuer un appel.
Pour utiliser le répertoire téléphonique, il est
nécessaire de l'avoir téléchargé auparavant
sur cet appareil. Veuillez consulter la section
<Téléchargement du répertoire téléphonique>
(page 54).
Pendant la recherche, une lettre sans accent
comme “u” sera recherchée à la place d'une
lettre accentuée, par exemple “ü”.
Les différentes catégories du répertoire
téléphonique sont affichées comme suit.
GE: Généralités ; HM: Domicile ; OF: Bureau ;
MO: Portable ; O T: Autre
Appeler un numéro présent dans le journal
des appels
2 Tournez le bouton de volume pour
sélectionner “OUTGOING” (appel sortant),
Page 53

“INCOMING” (appel entrant) ou “MISSED
CALLS” (appel manqué), puis appuyez sur le
bouton pour valider.
3 Tournez le bouton de volume pour
sélectionner un nom et un numéro de
téléphone.
4 Appuyez sur le bouton de volume pour
effectuer un appel.
La liste des appels sortants, la liste des appels
entrants et la liste des appels manqués sont
des listes d'appels effectués depuis et reçus par
cet appareil. Ce ne sont pas les appels stockés
dans la mémoire du téléphone portable.
Composer un numéro
2 Tournez le bouton de volume pour choisir
“NUMBER DIAL”, puis appuyez sur le bouton
pour valider.
3 Tournez le bouton de volume pour
sélectionner le numéro de téléphone.
Pour passer au chiffre suivant, appuyez sur
¢.
Pour effacer le dernier chiffre, appuyez sur
4.
Appuyez sur la touche (1 – 0), #(FM+),
*(AM–), ou +(¢) de la télécommande.
4 Appuyez sur le bouton de volume pour
effectuer un appel.
Appuyez sur la touche OK de la
télécommande.
Vous pouvez entrer 32 chiffres au maximum.
Numérotation rapide (Numérotation
préréglée)
2 Appuyez sur la touche numérique (1 – 6).
3 Appuyez sur le bouton de volume pour
effectuer un appel.
Enregistrement sur la liste préréglée des
numéros composés
2 Entrez le numéro de téléphone en référence
à ce qui suit :
Composer un numéro / Appeler un numéro
présent dans le journal des appels / Appeler
un numéro du répertoire téléphonique
3 Appuyez la touche numérique (1 – 6) et
maintenez-la enfoncée.
Effectuer un appel par numérotation vocale
Vous pouvez effectuer un appel vocal en
utilisant la fonction de reconnaissance de voix de
votre portable.
1 Appuyez sur le bouton de volume pour
démarrer la reconnaissance vocale.
2 Prononcez le nom the enregistré dans le
portable.
Effectuer un appel.
Appuyez sur le bouton de volume et
maintenez-le enfoncé pour annuler la
reconnaissance vocale.
Si “NO SUPPORT” s'affiche, votre portable ne
dispose pas de la fonction reconnaissance
vocale.
Si “N/A VOICE TAG” s'affiche, votre portable ne
peut pas entamer la reconnaissance vocale.
Si l'appareil ne parvient pas à reconnaître votre
voix, un message est affiché. Vous pouvez
refaire un essai d'entrée vocale en appuyant
sur le bouton de volume.
Le son audio n'est pas émis pendant la
reconnaissance vocale.
Recevoir un appel
Répondre à un appel téléphonique
Appuyez sur ou sur le bouton de volume.
Les opérations suivantes entraînent la
déconnexion de la ligne :
– Insérez un CD.
– Connecter un périphérique USB.
Le nom de l'appelant apparaît s'il a déjà été
enregistré dans l'annuaire téléphonique.
Rejeter un appel entrant
Appuyez sur SRC.
Pendant un appel
Mettre fin à un appel
Appuyez sur ou sur SRC.
Passer dans le mode privé
Appuyez sur la touche numérique 6 pour
commuter entre le mode de conversation
privé (“PRIVATE TALK”) et le mode de
conversation mains libres (“HANDS FREE”).
Ajustez le volume sonore pendant un appel
Tournez le bouton de volume.
Continue à la page suivante
Français 53
Page 54

Appel en attente
Répondre à un appel entrant en mettant en
attente l'appel en cours
1 Appuyez sur le bouton de volume.
2 Tournez le bouton de volume pour choisir
[ANSWER] , puis appuyez sur le bouton pour
valider.
Poursuivre l'appel en cours
1 Appuyez sur le bouton de volume.
2 Tournez le bouton de volume pour choisir
[REJECT], puis appuyez sur le bouton pour
valider.
Basculer entre l'appel en cours et l'appel en
attente
Appuyez sur le bouton de volume pour
commuter entre les appelants.
Effacement du message de déconnexion
Appuyez sur pour que “HF DISCONCT”
disparaisse.
Téléchargement du répertoire téléphonique
Pour réaliser un téléchargement automatique
Si le téléphone portable comprend une
fonction de synchronisation du répertoire
téléphonique, le répertoire téléphonique
est téléchargé automatiquement après la
connexion Bluetooth.
Il peut être nécessaire d'allumer le téléphone
portable.
Si vous ne trouvez aucune donnée de répertoire
téléphonique même après l'affichage complet,
il se peut que votre téléphone portable ne
prenne pas en charge le téléchargement
automatique des données de répertoire
téléphonique. Dans ce cas, essayez de réaliser
un téléchargement manuel.
Pour réaliser un téléchargement manuel à
partir du téléphone portable
1 En faisant fonctionner le téléphone portable,
terminez la connexion mains libres.
2 En faisant fonctionner le téléphone
portable, envoyez les données du répertoire
téléphonique vers cet appareil
En faisant fonctionner le téléphone portable,
téléchargez les données du répertoire
téléphonique vers cet appareil.
Pendant le téléchargement : L'indication
54 Français
“DOWNLOADING” s'affiche.
Une fois le téléchargement terminé :
L'indication “COMPLETE” s'affiche.
3 En faisant fonctionner le téléphone portable,
démarrez la connexion mains libres.
Pour effacer le message de fin de
téléchargement, appuyez sur n'importe quel
bouton.
Chaque téléphone portable enregistré peut
mettre en mémoire jusqu'à 600 numéros de
téléphone.
Pour chaque numéro de téléphone il est
possible d'enregistrer jusqu'à 32 chiffres et
jusqu'à 50* caractères pour un nom.
(* 50: Nombre de caractères alphabétiques. En
fonction du type de caractères, il peut ne pas
être possible de saisir autant de caractères.)
Pour annuler le téléchargement des données
du répertoire téléphonique, faites fonctionner
le téléphone portable.
Utilisation de la télécommande (RC-405)
Effectuer un appel:
: Entrer dans le mode Bluetooth.
5 / ∞ : Sélectionner une méthode de
numérotation.
ENT 38 : Entrer dans le mode de numérotation
DIRECT : Effectuer un appel
1 — 6 : Sélectionne un numéro composé
préréglé.
0 — 9 : Entrer un chiffre dans le mode
numérotation.
#FM+ : Entrer “#” dans le mode numérotation.
*AM– : Entrer “*” dans le mode numérotation.
+¢ : Entrer “+” dans le mode numérotation.
4 : Effacer le numéro de téléphone
composé.
Recevoir un appel:
: Répondre à l'appel.
Appel en attente:
: Répondre à un appel entrant en
mettant en attente l'appel en cours.
SRC : Répondre à un appel entrant après
avoir terminé l'appel en cours.
1 : Continuer l'appel en cours.
Pendant un appel:
SRC : Terminer l'appel.
ENT 38 : Alterne entre le mode de conversation
privé et le mode de conversation
mains libres.
Page 55

Ecoute d'un Bluetooth audio
Préparation : Vous devez enregistrer votre lecteur audio avant de l'utiliser avec cet appareil. (page
50)
TAG
VOICE
PAR
iPod
Appuyez pour sélectionner
un fichier.
Appuyez et maintenez pour
avance/retour rapide.
1 Appuyez sur SRC pour choisir “BT AUDIO”.
2 Appuyez 4 / ¢ pour choisir un fichier.
Les lecteurs audio Bluetooth qui ne prennent
pas en charge la télécommande AVRCP (Profil
Télécommande Audio/Video) ne peuvent
s'utiliser avec cet appareil. Opérer à partir du
lecteur audio.
Certaines fonctions ne peuvent être utilisées à
partir d'un lecteur audio Bluetooth.
Les haut-parleurs dont l'audio provient
changent d'après le réglage Bluetooth “BT HF/
AUDIO”. Le défaut est Front. (page 58)
Appuyez pour mettre en pause. Appuyez de
nouveau pour reprendre la lecture.
Sélection de la lecture répétée
Appuyez de manière répétée sur la touche
numérique 4(REP) pour faire un choix.
FILE REPEAT, REPEAT OFF
Sélection de la lecture aléatoire
Appuyez de manière répétée sur la touche
numérique 3 (ALL RDM) pour faire un
choix.
RANDOM ON, RANDOM OFF
Alterner entre les appareils Bluetooth
Appuyez sur la touche numérique 5.
Le nom d'appareil actuellement sélectionné
s'affiche.
Français 55
Page 56

Configuration Bluetooth
Enregistrement d'un appareil Bluetooth (pairage)
Enregistrement à partir de cet appareil
1 Appuyez sur pour basculer en mode
Bluetooth.
2 Tournez le bouton de volume pour choisir
[SETTINGS], puis appuyez sur le bouton
pour valider.
3 Tournez le bouton de volume pour choisir
[PAIRING], puis appuyez sur le bouton pour
valider.
4 Tournez le bouton de volume pour choisir
[DEVICE SEARCH], puis appuyez sur le
bouton pour valider.
Recherche de l'appareil Bluetooth.
Lorsque la recherche est terminée, “FINISHED”
s'affiche.
5 Tournez le bouton de volume pour choisir
un nom d'appareil Bluetooth, puis appuyez
dessus pour valider.
6 “CONFIRM DVC” s'affiche
Si “PAIRING OK” s'affiche, passez à l'étape 9.
Si “PIN CODE” s'affiche, passez à l'étape 7.
Si “*** NG” s'affiche, appuyez sur le bouton de
volume. Passez à l'étape 6.
7 Saisir le code PIN
Pour sélectionner le numéro, tournez le
bouton de volume.
Pour passer au chiffre suivant, appuyez sur
¢.
Pour effacer le dernier chiffre, appuyez sur
4.
8 Appuyez sur le bouton de volume pour
transférer le code PIN.
Si “PAIRING OK” s'affiche, l'enregistrement
est terminé. Si un message d'erreur apparaît
après la saisie correcte du code PIN, suivez les
consignes de la section <Enregistrement d'un
dispositif Bluetooth spécial>.
9 Maintenez pressée pour terminer la
procédure.
Pour annuler le mode Bluetooth, appuyez sur
.
S'il y a 5 appareils Bluetooth ou plus
enregistrés, vous ne pouvez pas enregistrer
d'autre appareil Bluetooth.
Enregistrement d'un dispositif Bluetooth
spécial
1 Appuyez sur pour basculer en mode
Bluetooth.
2 Tournez le bouton de volume pour choisir
56 Français
[SETTINGS], puis appuyez sur le bouton
pour valider.
3 Tournez le bouton de volume pour choisir
[PAIRING], puis appuyez sur le bouton pour
valider.
4 Tournez le bouton de volume pour choisir
[S-DVC SELECT], puis appuyez sur le bouton
pour valider.
5 Tournez le bouton de volume pour choisir
un nom d'appareil, puis appuyez dessus
pour valider.
6 Appliquez la procédure de l'étape 4 dans
la section <Enregistrement à partir de cet
appareil> et terminez l'enregistrement
(association).
Si le nom de l'appareil ne figure pas dans la
liste, sélectionnez “OTHER PHONE”.
Sélection de l'appareil Bluetooth
1 Appuyez sur pour basculer en mode
Bluetooth.
2 Tournez le bouton de volume pour choisir
[SETTINGS], puis appuyez sur le bouton
pour valider.
3 Tournez le bouton de volume pour choisir
[PAIRING], puis appuyez sur le bouton pour
valider.
4 Tournez le bouton de volume pour choisir
[PHONE SELECT] ou [AUDIO SELECT], puis
appuyez sur le bouton pour valider.
5 Tournez le bouton de volume pour
sélectionner un nom d'appareil Bluetooth.
6 Appuyez sur le bouton de volume pour
configurer l'appareil Bluetooth.
“ (nom d'appareil)”: L'appareil Bluetooth
sélectionné est occupé.
“- (nom d'appareil)”: L'appareil Bluetooth
sélectionné est en veille.
“(blank) (nom d'appareil)“: L'appareil
Bluetooth est désélectionné.
Si un téléphone portable est déjà
sélectionné, désélectionnez-le puis
sélectionnez-en un autre.
7 Maintenez pressée pour terminer la
procédure.
Pour annuler le mode Bluetooth, appuyez sur
.
Bluetooth Device Registration Test (test d'enregistrement de périphérique Bluetooth)
Vous pouvez vérifier si votre périphérique
Page 57

Bluetooth peut être enregistré en utilisant cet
appareil.
1 Maintenez pressée pour entrer dans le
mode de pairage simplifié
L'indication “PAIRING” s'affiche.
Recherche de l'appareil Bluetooth.
Lorsque la recherche est terminée, “FINISHED”
s'affiche.
Quand “(nom d'appareil)” s'affiche,
sélectionnez "[NEW DEVICE]" et appuyez sur
le bouton de commande.
Quand “DEVICE FULL” s'affiche, ef facez le
périphérique Bluetooth et recommencez.
1. Tournez le bouton de volume pour
choisir l'appareil Bluetooth, puis
appuyez dessus et maintenez-le
enfoncé pour valider.
2. Tournez le bouton de volume pour
choisir “YES”, puis appuyez sur le
bouton pour valider.
2 Tournez le bouton de volume pour choisir
un nom d'appareil Bluetooth, puis appuyez
dessus et maintenez-le enfoncé pour
valider.
“BT TEST MODE” s'affiche.
3 “CONFIRM DVC” s'affiche.
Si “PAIRING OK” s'affiche, passez à l'étape 6.
Si “PIN CODE” s'affiche, passez à l'étape 4.
Si “*** NG” s'affiche, appuyez sur le bouton de
volume. Passez à l'étape 3.
4 Saisir le code PIN
Tournez le bouton de volume pour
sélectionner le numéro.
Pour passer au chiffre suivant, appuyez sur
¢.
Pour effacer le dernier chiffre, appuyez sur
4.
5 Appuyez sur le bouton de volume pour
transférer le code PIN.
6 Le résultat de la connexion, “OK” ou “NG”,
s'aff iche.
“PAIRING”: Enregistrement pour cet appareil
“HF CONNECT”: Téléphonie mains libres
“AUD CNT”: Lecture audio
“PB DL”: Téléchargement Répertoire
téléphonique
7 Appuyez sur pour quitter le mode de
pairage.
Les données (Répertoire, etc.) du portable
contrôlées pour la connexion ne seront pas
retenues dans cet appareil.
Configuration Bluetooth
1 Appuyez sur pour basculer en mode
Bluetooth.
2 Tournez le bouton de volume pour choisir
[SETTINGS], puis appuyez sur le bouton
pour valider.
3 Tournez le bouton de volume pour faire
votre choix, puis appuyez dessus pour
valider.
Voir le tableau pour la sélection.
Répétez l’étape 3 jusqu’à ce que l’élément
souhaité soit sélectionné/activé.
Appuyez sur pour retourner à l’élément
précédent.
4 Maintenez pressée pour terminer la
procédure.
Pour annuler le mode Bluetooth, appuyez sur
.
Élément Réglage sélectionnable (Préréglage: *)
PAIRING
DEVICE SEARCH Enregi stre un appareil B luetooth (associ ation). (Pour les détails , référez-vous à la p age 56.)
PHONE SELECT Sélec tionne la connex ion à un téléphone p ortable. (Pour le s détails, référ ez-vous à la page 56.)
AUDIO SE LECT Ch oisit la connexio n à un lecteur audio B luetooth. (Pour le s détails, référ ez-vous à la page 56.)
S-DVC SELEC T (Pour les détails, réf érez-vous à la page 5 6.)
DEVICE DELETE Annuler l'enregistrement de l'appareil Bluetooth.
1. Tournez le bouton d e volume pour chois ir l'appareil Bluetoo th, puis appuyez de ssus pour valider.
2. Tour nez le bouton de volu me pour choisir “Y ES”, puis app uyez sur le bouton p our valider.
DETAILED SET
PIN CODE EDIT S pécifier le cod e PIN nécessaire l ors de l'enregistr ement de cet apparei l à l'aide de l'appareil Blueto oth. Par défaut,
"0000" est spécifié.
1. Tournez le bouton d e volume pour séle ctionner le numé ro.
Pour pass er au chiffre s uivant, appuyez s ur ¢.
Pour ef facer le dernier ch iffre, appu yez sur 4.
2. Ap puyez sur le bouto n de volume pour enre gistrer le code PIN .
Continue à la page suivante
Français 57
Page 58

Élément Réglage sélectionnable (Préréglage: *)
AUTO ANSW ER OFF: Ne ré pond pas aux appel s téléphoniques au tomatiquement . ; 0: Répond aux appels té léphoniques
automatiquement immédiatement. ; 1 – 8 * –99: Répo nd automatiquem ent aux appels téléph oniques dans un
délai de 1 à 99 s econdes.
RECONNECT ON *: Re connecte automatiquement l'appareil Bluetooth sélectionné lorsque le signal radio devient suf fisamment
puissant , même après qu'il a été dé connecté. ; OFF: Annulatio n.
Lorsque c ette fonct ion est sur ON (act ivée), l'appareil Bluetoot h est reconnec té s'il a été déconne cté en
sélectionnant [PHONE SELECT]/ [AU DIO SEL ECT].
BT H F/AUDIO FR ONT *: Le son est repro duit par les haut-p arleurs avant. ; AL L: Le son est émis par l'en semble des enceint es.
CALL BEEP ON *: Vous pouvez fai re émettre un bip à p artir du haut-p arleur lorsqu'un app el survient. ; O FF: Annulation.
BT F/W UPDATE Aff icher la version du micrologiciel et mettre à jour le micrologiciel.
MIC GAIN 1 — 2 0 * — 30: Ajustez la sensi bilité du micropho ne pour l'appel téléph onique ou réglez la vo ix de l'appelant.
NR LEVEL –1 — 0 * — +1: Permet de limite r l'effet des bru its d'ambiance sans c hanger le volume du mic rophone intégré o u
de régler le v olume de la voix de l'appelan t si elle n'est pas claire. Un ré glage sur “+” augmente l a réduction du br uit.
EC LEVEL –1 — 0 * — +1: Règle le niveau d'atté nuation de l'écho. Un rég lage sur “+” augmente l'at ténuation de l'écho.
SMS (Service de messagerie - Short Message Service)
Téléchargement de SMS
1 Appuyez sur pour basculer en mode
Bluetooth.
2 Tournez le bouton de volume pour choisir
[SETTINGS], puis appuyez sur le bouton
pour valider.
3 Tournez le bouton de volume pour choisir
[SMS], puis appuyez sur le bouton pour
valider.
4 Tournez le bouton de volume pour choisir
[SMS DOWNLOAD], puis appuyez sur le
bouton pour valider.
5 Commencer le téléchargement
Pendant le téléchargement : L'indication
“DOWNLOADING” s'affiche.
Une fois le téléchargement terminé :
L'indication “COMPLETE” s'affiche.
6 Maintenez pressée pour terminer la
procédure.
Pour annuler le mode Bluetooth, appuyez sur
.
Le téléphone portable doit être capable de
transmettre les SMS en utilisant le Bluetooth.
Il peut être nécessaire d'allumer le téléphone
portable. Si le téléphone mobile ne prend
pas en charge la fonction SMS, l'élément
téléchargement de SMS n'apparaît pas dans le
mode Settings.
Lorsque le SMS est téléchargé depuis le
téléphone portable, les messages non ouverts
dans le téléphone portable sont ouverts.
Les 149 derniers SMS lus et non lus peuvent
être téléchargés.
58 Français
Afficher les SMS
¤
Pour éviter les accidents de voiture, le
conducteur ne doit pas lire les SMS pendant
qu'il conduit.
Lorsqu'un nouveau message arrive
“SMS RECEIVED” s'affiche.
Afficher le SMS
1 Appuyez sur pour basculer en mode
Bluetooth.
2 Tournez le bouton de volume pour choisir
[SMS INBOX], puis appuyez sur le bouton
pour valider.
3 Tournez le bouton de volume pour
sélectionner un message.
Pour commuter entre le nom, le numéro
de téléphone et la date de réception du
message, appuyez sur DISP.
4 Appuyez sur le bouton de volume pour
afficher le texte.
Pour faire défiler le message, tournez le
bouton de volume.
Pour revenir à la liste des messages, appuyez
sur le bouton de volume.
5 Maintenez pressée pour terminer la
procédure.
Pour annuler le mode Bluetooth, appuyez sur
.
Le message non ouvert est affiché au début de
la liste. Les autres messages sont affichés dans
l'ordre de réception.
Un SMS qui est arrivé alors que le téléphone
Page 59

portable n'était pas connecté en Bluetooth ne
peut pas être affiché. Pour l'afficher, vous devez
le télécharger.
Le message ne peut pas être affiché pendant
le téléchargement.
Les messages non lus sont précédés d'un (*).
Réglage d'un message de réponse
1 Appuyez sur pour basculer en mode
Bluetooth.
2 Tournez le bouton de volume pour choisir
[SETTINGS], puis appuyez sur le bouton
pour valider.
3 Tournez le bouton de volume pour choisir
[SMS], puis appuyez sur le bouton pour
valider.
4 Tournez le bouton de volume pour choisir
[SMS MESSAGE], puis appuyez sur le
bouton pour valider.
5 Tournez le bouton de volume pour choisir
un message, puis appuyez dessus pour
valider.
Lorsque [USER] est sélectionné, un
message s'affiche. Appuyez de nouveau sur
le bouton de volume.
6 Maintenez pressée pour terminer la
procédure.
Création d'un message d'origine
1 Appuyez sur pour basculer en mode
Bluetooth.
2 Tournez le bouton de volume pour choisir
[SETTINGS], puis appuyez sur le bouton
pour valider.
3 Tournez le bouton de volume pour choisir
[SMS], puis appuyez sur le bouton pour
valider.
4 Tournez le bouton de volume pour choisir
[SMS MESSAGE], puis appuyez sur le
bouton pour valider.
5 Tournez le bouton de volume pour choisir
[USER], puis appuyez dessus et maintenezle enfoncé pour valider.
6 Tournez le bouton de volume pour
sélectionner le caractère.
Pour accéder à la colonne, appuyez sur 4
/ ¢.
Pour sélectionner le type de caractère,
appuyez sur DISP.
Pour supprimer le caractère, appuyez sur .
Pour supprimer tous les caractères, appuyez
sur le bouton
Vous pouvez entrer des caractères
et maintenez-le enfoncé.
alphanumériques à l'aide des dix touches de
la télécommande.
7 Appuyez sur le bouton de volume pour
confirmer.
8 Maintenez pressée pour terminer la
procédure.
Configuration SMS
1 Appuyez sur pour basculer en mode
Bluetooth.
2 Tournez le bouton de volume pour choisir
[SETTINGS], puis appuyez sur le bouton
pour valider.
3 Tournez le bouton de volume pour choisir
[SMS], puis appuyez sur le bouton pour
valider.
4 Tournez le bouton de volume pour faire
votre choix, puis appuyez dessus pour
valider.
Voir le tableau pour la sélection.
5 Maintenez pressée pour terminer la
procédure.
Pour annuler le mode Bluetooth, appuyez sur
.
Élément Réglage sélectionnable (Préréglage: *)
SMS
SMS DOWNLOAD Télé charger un messa ge court. (Pour le s détails, référ ez-vous à la page 58.)
SM S REP LY AUTO * : Permet d e répondre automat iquement au SMS reç u. ; MANUAL: Détermine si vou s souhaitez répo ndre au
SMS reçu. ; O FF : Aucune réponse n'es t envoyée au SMS reçu.
SMS MESSAGE Vous pouvez sélectionner un message de réponse.
[SM S RE PLY]:
– Lo rsque cette f onction est r églée sur “AUTO”, une réponse es t envoyée uniquement a u SMS provenant du télép hone dont le numéro
a été enregi stré dans le réper toire téléphon ique. Si le SMS reçu pro vient d'un téléphone do nt le numéro n'a pas été enre gistré dans le
répert oire, vous pouvez y r épondre de la même f açon que si vous aviez s électionné “M ANUAL”.
– Si u n SMS est reçu lor sque la foncti on est réglée sur “ MANUAL”, l a mention “REPLY Y/ N” s'affich e à l'écran. Sélect ionnez “Y” pou r
répondre . Sélectionn ez “N” pour annuler la r éponse. Lorsqu e vous sélect ionnez “Y”, vous pouvez c hoisir un messa ge.
– Si l'envo i d'un message de rép onse échoue, la men tion “SEND ERROR ” s'affiche à l'écra n. Si vous sélect ionnez “Y” lor sque la mention
“RESEND Y/ N” es t encore affic hée à l'écran, la répon se est renvoyée. S électionne z “N” pour annuler la rép onse.
Français 59
Page 60

Réglages des fonctions
1 Appuyez sur SRC pour choisir une autre source que “STANDBY”.
2 Appuyez sur le bouton de volume pour entrer dans le mode [FUNCTION].
3 Tournez le bouton de volume pour choisir [AUDIO CONTROL] ou [SETTINGS], puis appuyez sur
le bouton pour valider.
4 Tournez le bouton de volume pour faire votre choix, puis appuyez dessus pour valider.
Voir le tableau pour la sélection.
Répétez l’étape 4 jusqu’à ce que l’élément souhaité soit sélectionné/activé.
Appuyez sur pour retourner à l’élément précédent.
5 Maintenez pressée pour terminer la procédure.
[AUDIO CONTROL] : Pendant l’écoute de n’importe quelle source, sauf dans le mode STANDBY ou
dans le mode Bluetooth.
Élément Réglage sélectionnable (Préréglage: *)
SUB-WLEVE L –15 — 0 * — +15: Ajuste le nive au de sortie du ca isson de grave.
BASSLEVE L – 8 — 0 * — +8: Mémoire de tonali té de source: Régle z le niveau à mémorise r pour chaque sourc e. (Avant de
MIDLEVEL
TRELEVEL
EQ PRO KDC-X796 uniquement
BASS ADJU ST BASS CTR FR Q 60/ 80/ 10 0 */ 200: Choisit la fré quence centrale.
MID ADJUST MID C TR FRQ 0.5K/ 1.0K */ 1.5K/ 2.5K: Choisit la fréquence centrale.
TRE ADJUST TRE C TR FRQ 10.0 K/ 12.5K */ 15.0K/ 17.5K: Choisit la fréquence centrale.
PRESET EQ NATUR AL */ USER/ RO CK/ POPS/ EAS Y/ TOP40/ JAZ Z/ POWERFUL: Cho isit un mode sonor e préréglé adapté à
BASSBOOS T B.BO OST LV1/ B.BOOST LV2/ B.BOOST LV3: Choi sit votre niveau préf éré d’accentuation d es graves. ;
LOUDNESS LOUDNESS LV1 */ LOUDNESS LV2: Sélecti onnez vos basse s et hautes fréq uences boosté es pour produir e un son
BALANCE L15 — 0 * — R15: Règle la balance de s ortie gauche -droite des ence intes.
FADER R15 — 0 * — F15: Règle la balance de sor tie des enceinte s arrière et avant .
SUBWOOFER SET ON *: Met en service la s ortie du caiss on de grave. ; OFF: Annulation.
DETAILED SET
HPF THROUGH *: Tous le s signaux sont envoyé s aux haut-parleur s avant. ;
LPF SUBWOOFER THROUG H *: Tous les signaux sont env oyés au caisson de g rave. ;
réaliser un aj ustement, choi sissez la source qu e vous souhaitez aju ster.)
BASSLEVE L –8 — 0 * — +8: Règle le niveau.
BASS Q FACTOR 1.00 */ 1.25/ 1.50/ 2.00: R égle le facteu r de qualité.
BASS EX TEND ON: Met en ser vice les graves é tendus. ; OFF *: Annulation.
MIDLEVEL –8 — 0 * — +8: Règle le niveau.
MID Q FACTOR 0.75/ 1.00 */ 1.25: Régle le f acteur de qualit é.
TRELEVEL –8 — 0 * — +8: Règle le niveau.
votre genre d e musique. (Choisit [USER] po ur utiliser les ré glages person nalisés des grave s, médiums et aigus .)
OFF *: Annulation.
bien équili bré à volume bas. ; OFF: Annulatio n.
100/ 120/ 150 (HZ) : Les fré quences inférie ures à la valeur spéc ifiée sont cou pées.
85/ 120/ 160 (HZ) : Les fré quences supér ieures à la valeur spé cifiée sont co upées.
60 Français
Page 61

Élément Réglage sélectionnable (Préréglage: *)
SUB-W PHASE REVERSE (18 0°)/ NORMAL (0°) *: Cho isit l’angle de phase de la s ortie du caiss on de grave à synchr oniser avec la
sorti e des enceintes af in d’obtenir des per formances opti males. (Peut être u niquement sélec tionné si un régl age
autre que [ THROUGH] est choisi pour [LPFSUBWOOFER].)
SUPREME SET ON *: Crée u n son réaliste par int erpolation des c omposantes hau te fréquence qui s ont perdues lors d e la
compress ion AAC/ MP3/ WMA. ; OFF: Annulation. (Sélec tionnable uniquement lors de la lecture d’un disque AAC/
MP3/ WMA ou d’un pér iphérique USB, sau f iPod.) (Peut être séle ctionné uniqu ement si “CD"/ "USB" est choisi
comme source.)
VOLUME OFFSET –8 — 0 * — + 8 (pour AUX) ; –8 — 0 * (pour les autre s sources): Prérègle le n iveau de réglage du volu me pour
chaque so urce. Le niveau de volume au gmente ou diminue auto matiquement quan d vous changez la sou rce. (Avant
de réaliser u n ajustement, cho isissez la source q ue vous souhaitez a juster.)
Choisiss ez une source avant d e réaliser le réglage d e la mémoire de tonalité d e source, [EQ PRO] .
[SUB-W LEVE L/ LPF SUBWOOFER/ SUB -W PHASE] peut êt re choisi uniqueme nt si [SUBWOOFER SET] est rég lé sur [ON].
[SETTINGS]
Élément Réglage sélectionnable (Préréglage: *)
AUX NAME SET AUX */ DVD/ PORTABLE/ G AME/ VIDEO/ TV: Cho isit le nom souhait é pour l’appareil conne cté. (Peut être c hoisi
uniquemen t si “AUX” est c hoisi comme source.)
CLOCK
CLOCK ADJUST (Pour le s détails, référ ez-vous à la page 39.)
TIME SYNC ON: Synchronis e les données d’h orloge de la stat ion Radio Data Sys tem avec l’horlog e de cet appareil. ;
OFF *: Annulation.
DISP&KEY
COLOR SELEC T VARIABLE SCAN */ COLOR 01 — 24/ USER: Sélec tionne votre couleur d'éclairage des touches préférée.
Réglage d es valeurs RVB
Vous pouvez c réer votre propr e couleur “USER” (lor sque [COLOR 01] — [COLOR 24] est sélectionné).
1. Appuyez sur le bo uton de volume et main tenez-le enfoncé p our accéder au mode d e réglage fin des co uleurs.
4
2. Ap puyez sur
/ ¢ pour séle ctionner la comp osante (R/ G/ B) à ajus ter. Tournez le bouton de v olume pour
régler le ni veau (0 — 9).
3. Ap puyez sur le bouto n de volume pour conf irmer et quit ter.
DISP DIMMER ON: Ass ombrit l’éclairag e de l’affichage . ; OFF *: Annulation.
TEXT SCROLL AUTO */ ONCE: C hoisit de faire dé filer automatiq uement l’inform ation sur l’affi chage, de la faire déf iler une seule foi s.
; OFF: Annulation.
BT DVC STATUS Vous pouve z afficher l'ét at de connexion, la f orce du signal et le niveau d e la batterie du pé riphérique Blue tooth.
HF-CON : Éta t de connexion du tél éphone porta ble. ; AD-CON: État de connexi on pour audio Bluet ooth. ;
BAT T: Niveau de b atterie du télép hone portabl e. ; SIGNAL: Force du signal du téléphone portab le.
KEY DIMME R LV 1: Atténue l'éclai rage des touche s. ; LV2: At ténue l'éclairage de s touches de façon p lus poussée que LV1. ;
OFF *: Annulation.
Français 61
Page 62

Installation/raccordement
Liste de pièces:
A Façade................................................................................(×1)
B Écusson ............................................................................. (×1)
C Manchon de montage ............................................(×1)
D Câblage électrique ....................................................(×1)
E Outil de démontage ................................................ (×2)
F Vis à tête fraisée (pour voitures Nissan) .......(×4)
G Vis à tête bombée (pour voitures Toyota) ..(×4)
H Microphone (3 m)
(KDC-X796 uniquement) ........................................ (×1)
Procédure de base
1 Retirez la clé de contact, puis déconnectez
la borne · de la batterie de la voiture.
2 Réalisez une connexion correcte des fils
d’entrée et sor tie.
\ <Connexions> (page 64)
3 Installez l’appareil dans votre voiture.
\ <Installation de l’appareil> (page 65)
4 Reconnec tez la borne · de la batterie de
la voiture.
5 Réinitialisez l’appareil. (page 38)
¤Avertissement
L’appareil peut uniquement être installé dans
une voiture avec une alimentation de 12 V CC,
à masse négative.
Si vous connectez le câble d’allumage (rouge)
et le câble de batterie (jaune) au châssis de
la voiture (masse), vous risquez de causer un
court-circuit qui peut provoquer un incendie.
Connectez toujours ces câbles à la source
d’alimentation passant par le boîtier de
fusibles.
Déconnectez la borne négative de la batterie
et réaliser toutes les connexions avant
d’installer l’appareil.
Isolez les câbles non-connectés avec un ruban
de vinyle ou d’un autre matériel similaire.
Pour éviter les courts-circuits, ne retirez pas
les capuchons à l’extrémité des câbles nonconnectés et des prises.
Assurez-vous de raccorder de nouveau la mise
à la masse de cet appareil au châssis de la
voiture après l’installation.
Si l’appareil ne parvient pas à se mettre sous
tension (le message “PROTECT” s’affiche), cela
est peut être dû à un court-circuit au niveau
du cordon d’enceinte ou à un contact entre ce
dernier et le châssis du véhicule, ce qui a pu
activer la fonction de protection. Le câble des
enceintes doit donc être vérifié.
¤Attention
Si l’allumage de votre voiture n’a pas de
position ACC, connectez le câble d’allumage à
une source d’alimentation qui peut être mise
sous et hors tension avec la clef de contact.
Si vous connectez le câble d’allumage à une
source d’alimentation constante, comme
un câble de batterie, la batterie risque de se
décharger.
N’utilisez pas vos propres vis. N’utilisez que les
vis fournies.
Installez cet appareil dans la console de votre
véhicule. Assurez-vous que la façade ne
heurtera pas le couvercle de la console (s’il y en
a) lors de sa fermeture ou de son ouverture.
Après avoir installé l'appareil, vérifiez si les feux
de frein, les clignotants, les essuie-glaces etc.,
de la voiture fonctionnent correctement.
Monter l’unité de façon à ce que l’angle de
montage soit de 30˚ ou moins.
Si un fusible saute, assurez-vous d’abord que
les câbles n’ont pas causé de court-circuit
puis remplacez le fusible grillé par un neuf de
même valeur.
Connectez correctement chaque câble
d’enceinte aux bornes correspondantes.
L’appareil peut être endommagé si le câble
négatif · pour une des enceintes ou le câble
de masse entre en contact avec une partie
métallique du véhicule.
Quand deux haut-parleurs seulement sont
connectés au système, connectez les câbles
soit aux prises de sortie avant, soit aux prises
de sortie arrière (c.a.d. ne mélangez pas l’avant
et l’arrière).
62 Français
Page 63

Le montage et le câblage de ce produit
nécessitent des compétences et de
l’expérience. Pour des raison de sécurité, laissez
ce travail à des professionnels.
Si vous rencontrez des problèmes pendant
l’installation, consultez votre revendeur
Kenwood.
La qualité de réception peut chuter si des
objets métalliques se trouvent près de
l'antenne Bluetooth.
iPod
Antenne Bluetooth
Pour obtenir une bonne réception
Pour assurer une bonne réception, veuillez tenir
compte des indications suivantes :
Communiquez avec le téléphone portable
à une distance en visibilité directe de
10 m maximum (30 pieds). La portée
de communication diminue selon
l'environnement. La portée de communication
diminue également lorsqu'un obstacle se
trouve entre cet appareil et le téléphone
portable. La portée de communication
maximale (10 m) indiquée ci-dessus n'est pas
toujours garantie.
La présence d'une station d'émission ou d'un
émetteur-récepteur portatif à proximité peut
entraîner des interférences de communication
à cause d'un signal trop fort.
¤ ATTENTION
Installez cet appareil dans la console de votre
véhicule.
Ne touchez pas la partie métallique de cet
appareil pendant ou juste après son utilisation.
Les parties métalliques, comme le dissipateur
de chaleur et le boîtier, deviennent chaudes.
Français 63
Page 64

Connexions
Connecteur USB
Entrée AUX (Stéréo)
Utilisez un câble avec minijack (3,5
mm; 1/8”) de type stéréo et qui ne
comporte pas de résistance.
Fusible (10A)
Câblage électrique
D
Blanc
Blanc/Noir
Gris
Gris/Noir
Vert
Vert /Noir
Violet
Violet/Noir
Si aucune connexion n'est faite, ne laissez pas le câble sortir de la languette.
Bleu/Blanc
(Commande
d’alimentation/ Fil de
commande d’antenne )
Marron
(Câble de contrôle de la
sourdine)
Entrée d'antenne
FM/AM (JASO)
R
Sortie avant
Sortie arrière
L
Sortie subwoofer
Microphone H
(KDC-X796 uniquement)
Vers l'enceinte avant gauche
Vers l'enceinte avant droite
Vers l'enceinte arrière gauche
Vers l'enceinte arrière droite
Connectez soit à la borne de commande d'alimentation
lorsque vous utilisez l'amplificateur de puissance en
P.CONT
option, soit à la borne de commande d'antenne du
véhicule. (Max. 300mA, 12V)
Pour connecter au système de navigation Kenwood,
MUTE
consultez votre manuel de navigation.
Cordon
antenne
Bleu clair/Jaune
(Fil de télécommande de
volant)
Bleu
REMOTE CONT
STEERING WHEEL
REMOTE INPUT
ANT. CONT
Boîte de fusible de la voiture
Rouge (Câble d’allumage)
Jaune (Câble de batterie)
Noir (Fil de terre)
Vers corps métallique ou châssis de la voiture
64 Français
Pour utiliser la fonction de télécommande au volant,
vous devez vous procurer un adaptateur à distance
exclusif (non fourni) correspondant à votre type de
véhicule.
(Non utilisé)
Commutateur de clé de
ACC
contact
Boîte de fusible de
la voiture (Fusible
principal)
+
–
Batterie
Page 65

Installation de l’appareil
1
3
2
1
B
A
Avant la fixation, assurez-vous
2
que la direction de l’écusson est
correcte.
(Crochets plus larges sur
le côté inférieur.)
4
5
B
A
Installation sans utiliser le manchon de montage (voitures pour le Japon)
1 Retirer le manchon de montage et l’écusson
B de l'appareil.
2 Aligner les trous de l'appareil (des deux
côtés) avec le suppor t de montage dans
le véhicule et f ixer l'appareil avec les vis
fournies.
Connectez le faisceau de câbles à
l’appareil. Les autres connexions ont
C
déjà été réalisées précédemment.
(page 64)
1
3
C
Tordez les languettes
appropriées pour maintenir
le manchon de montage en
place.
N
T
N
T
B
ø5mm
8 mm
MAX.
F
ø5mm
8mm
MAX.
G
D
2
Tableau de bord
de votre voiture
T/N
T : Voitures Toyota
N : Voitures Nissan
Retrait de l’appareil
1 Retirez la façade A.
2 Engagez les ergots des outils de retrait E
dans les trous de chaque côté de l’écusson
B, puis tirez vers l’extérieur.
3 Introduisez les outils de retrait E
profondément dans les fentes de chaque
côté, puis suivez les flèches du schéma qui
se trouve à droite.
E
B
C
3
1
2
A
E
Français 65
Page 66

Installation du microphone (KDC-X796 uniquement)
1 Vérifiez la position d'installation du
microphone H.
2 Retirez toute huile et autres impuretés à la
surface de l'installation.
3 Installez le microphone.
4 Connectez le câble de microphone au
boîtier mains libres en le sécurisant en
plusieurs endroits, à l'aide d'une bande ou
similaire.
Montez le micro aussi loin que possible du
téléphone portable.
Détachez la protection
du ruban adhésif
double-face et pliez-le
pour fixer durablement
le microphone en place
comme illustré ci-dessus.
Fixez le câble avec une bande
adhésive commerciale.
H
Tournez le microphone
vers le conducteur.
Guide de dépannage
Symptôme Remède/Cause
Le son ne peu t pas être entendu. Ajuste z le volume sur le niveau opt imum. / Vérifiez le s cordons et les conn exions.
“PROTEC T” apparaît et auc une opération ne
peut être réalisée.
Cet autora dio ne fonctio nne pas du tout. Réinitialisez l’appareil.
La récept ion radio est mauv aise. / Bruit st atique
pendant l’éco ute de la radio.
“MEMORY FULL” apparaît. La mémoire pou r les balises du réce pteur HD Radio est p leine.
“NO TAG FNC” appara ît. L'iPod connecté n e prend pas en charge la f onction de bali sage iTunes.
“TAG ERROR” apparaît. L'appareil ne p eut pas procéder a u transfert d es informatio ns balisées ver s l'iPod.
“IN” clignote. Le lecte ur CD ne fonctio nne pas correc tement. Réinsére z le disque corre ctement. La
Un CD-R /CD-RW ne peut pa s être reproduit e t
les plage s ne peuvent pas êtr e sautées.
Le son du disq ue est parfo is interrompu. Ar rêtez la lectu re lorsque vous con duisez sur une rou te accidentée. / Chan gez le disque. /
“NA FILE” apparaît. L’appareil es t en train de reprodu ire un fichier audi o non pris en charge.
“NO DISC” apparaît. Insé rez un disque repr oductible dan s la fente d’inser tion.
“TOC ERROR” apparaît. Le CD est très sa le. / Le CD est à l’envers. / Le C D est très rayé. E ssayez un autre di sque.
66 Français
Assure z-vous que les pris es des fils d’enceinte s sont recouver tes correc tement de ruban
isolant, p uis réinitialise z l’appareil. Si “PROTEC T” ne disparaît p as, consultez le cent re de
servi ce après-vente le plus p roche.
Connectez l’antenne solidement. / Sor tez l’antenne complètement.
conditio n n’est pas améliorée, m ettez l’apparei l hors tension et con sultez votre centr e de
servi ce le plus proche.
Insérez u n CD-R/CD RW fina lisé (finalisez- le avec l’appareil que vou s avez utilisé pou r
l’enregistrement).
Vérifie z les cordons et les co nnexions.
Page 67

Symptôme Remède/Cause
“ERROR 9 9” apparaît. L’appareil fonctionne mal pour certaines raisons. Appu yez sur la touche de réinitialisation
“COPY PRO” apparaît. Un f ichier interdit d e copie a été lu.
“READ ERROR” apparaît. Copier les f ichiers et les do ssiers pour le pér iphérique USB de no uveau. Si le messag e
“NO DEVICE” apparaît. Auc un périphériqu e USB n’est connecté. Co nnectez un pé riphérique USB, pui s repassez à
“NO MUSIC” apparaît. Le pér iphérique USB conne cté ne contient au cun fichier audio r eproductib le.
“NA DEVICE” apparaît. Co nnectez un pér iphérique compa tible et vérifi ez les connexio ns.
“iPod ERROR” apparaît. Reconnec tez l’iPod. / Vérif iez que le logiciel d e l’iPod soit de la ver sion la plus récente. /
“iPod FULL” apparaît. La mémoire de l'iPod es t pleine.
Du bruit e st produit. Saut ez à une autre plage ou c hangez le disque.
Les plages n e sont pas reprodu ites comme vous
le souhaitiez.
“READING” continue de clignoter. Le tem ps d’initialisa tion est plus long . N’utilisez pas tr op de hiérarchies e t de dossiers.
La durée de l ecture écoul ée n’est pas correc te. Cela es t dû à la façon dont les pla ges ont été enregi strées sur le dis que.
Le nombre de mo rceaux contenus dans la
catégor ie “SONGS” de cet app areil diffè re du
nombre de morceaux contenus dans la catégorie
“SONGS” de l’ iPod.
Les carac tères correc ts ne sont pas af fichés (ex. :
nom de l’album).
sur l’appareil. S i le message “ERR OR 99” ne dispara ît pas, veuillez con sulter votre centre d e
servi ce après-vente le plus p roche.
d’erreur es t toujours af fiché, initialis er le dispositif U SB ou utiliser un aut re dispositif USB.
la source USB.
Réinitialisez l'iPod.
L’ordre de lecture e st déterminé qua nd les fichiers s ont enregistr és.
Les fichi ers podcast s ne comptent pas dan s cet appareil étant d onné que leur lec ture n’est
pas pris e en charge.
Cet apparei l peut uniquement a fficher les l ettres (majusc ules), les chiff res et un nombre
limité de sy mboles.
Pandora
Symptôme Remède/Cause
“PANDORA ER R 5” apparaît. L'indexation en pouce levé/pouce baissé n'a pas abouti.
“NO SKIPS” apparaît. Le nombre limite d e sauts de chanso ns a été dépassé.
“CHECK DEVICE” apparaît. Contrôlez l'application Pandora® sur l'iPhone/iPod touch.
Bluetooth
Symptôme Remède/Cause
Le volume de la con versation es t bas. Le vo lume de la conversat ion mains libres peu t être ajusté indé pendamment. Ajus tez-
On n'entend aucun b ip à l'arrivée d'un appel
entrant.
le pendant la co nversation main s libres. [MIC GAIN], [NR LE VEL] et [E C LEVEL] d ans
<Configuration Bluetooth> (page 57).
On entend le bi p selon le type de v otre téléphone po rtable. Le menu [CALL BEEP] de la
sect ion <Configurati on Bluetooth> (pag e 57) est réglé sur a ctivé (ON).
Continue à la page suivante
Français 67
Page 68

Symptôme Remède/Cause
La voix n'est pa s reconnue.
La vitre d u véhicule est ouve rte. Si le bruit env ironnant est for t, la voix ne peut p as être
reconnue co rrectement . Fermez les vit res du véhicule.
Voix faible. S i la voix est trop fa ible, elle ne peut pas ê tre reconnue cor rectement. Pa rlez
dans le micro u n peu plus fort et n aturellement.
La pers onne qui prononce la ba lise vocale n'est pas ce lle qui l'a enregistré e. Seule la voix
de la perso nne qui a enregist ré la balise vocale p eut être reconnu e.
“NO NUMBER” apparaît. L'appelant ne pré cise pas d'identi fication. / Il n'y a pas d e données de numér os de
téléphone.
“NO DATA” apparaît. I l n'y a pas de liste des app els sortant s. / Il n'y a pas de liste des ap pels entrants . / Il n'y a
pas de list e des appels manqué s. / Il n'y a pas de liste dans l'annu aire. / Les données n e sont
pas prés entes dans le réper toire téléphoniq ue.
“NO ENTRY” apparaît. Le tél éphone port able n'a pas été enregis tré (pairage).
“HF DISCONCT” apparaît. L'appareil ne peut p as communiquer ave c le téléphone por table.
“AUD DISCONCT” apparaît. L'appareil ne peut pa s communiquer avec le le cteur audio.
“HF ERROR 07 ” apparaît. Impos sible d'accéder à la mémoir e. Éteignez puis rall umez. Si ce messa ge continue
d'apparaître, appuyez sur la touche de réinitialisation de l'appareil de commande.
“HF ERROR 6 8” apparaît. L'appareil ne peut p as communiquer avec l e téléphone por table. Éteignez p uis rallumez.
Si ce message continue d'apparaître, appuyez sur la touche de réinitialis ation de l'appareil
de commande.
“HF ERROR 8 9” apparaît. La mise à j our du Bluetooth a é choué. Recommen cez.
“UNKNOWN” apparaît. L'appareil Blue tooth ne peut pas ê tre détecté.
“DEVICE FULL” apparaît. 5 appareils B luetooth ont déjà é té enregistré s. Vous ne pouvez pas en registrer d'aut re
appareil Bluetooth.
“PIN CODE NG” apparaît. Le code PIN es t erroné.
“CONNECT NG” apparaît. L'unité ne peut pas êtr e connectée à l'app areil.
“PAIRING NG” apparaît. Erreur d'association.
“NO MESSAGE” apparaît. Il n'y a pas de mes sage dans la boît e de réception.
“NO ACTIV E DVC” apparaît. Aucun po rtable n'est conne cté. Connec tez votre port able avant de commenc er la
reconnais sance de voix.
Le son évant d e commeencermis p ar le lecteur
audio Blue tooth n'est pas réguli er.
Un autre appareil Bluetooth nuit à la communication Bluetoot h. Éteignez l'autre appareil
Bluetooth. Éloignez l'autre appareil Bluetooth de cet appareil.
Un autre app areil ou profil Blu etooth est uti lisé pour la communic ation. Le
téléchar gement du réper toire téléphoniqu e ou des SMS déconne cte le son.
68 Français
Page 69

Caractéristiques techniques
Section tuner FM
Bandes d e fréquences (espa cement de 200kHz):
87,9 MHz — 107,9 MHz
Sensibilité utilisable (S/B = 26dB):
9,3 dBf (0,8 μV/75 Ω)
Seuil de se nsibilité (DIN S/N = 4 6dB):
15,2 dBf (1,6 μV/75 Ω)
Réponse e n fréquence (±3dB): 30 Hz — 15 kHz
Taux de Signal/Bruit (MONO): 70 dB
Séparat ion stéréo (1kHz): 40 dB
Section tuner FM numérique
Bandes d e fréquences (espa cement de 200kHz):
87,9 MHz — 107,9 MHz
Réponse e n fréquence (±3dB): 20 Hz — 20 kHz
Taux de Signal/B ruit (STEREO): 70 dB
Section tuner AM
Bandes d e fréquences (espa cement de 10kHz):
530 kHz – 1 700 kHz
Sensibilité utilisable (S/B = 20dB): 28 dBμ (25 μV)
Section tuner AM numérique
Bandes d e fréquences (espa cement de 10kHz):
530 kHz – 1 700 kHz
Réponse e n fréquence (±3dB): 40 Hz — 15 kHz
Taux de Signal/B ruit (STEREO): 70 dB
Section Disque Compact
Diode laser: GaAIAs
Filtre numérique (D/A): 8 fois suréchantillonnage
Convertisse ur D/A: 24 Bit
Vitesse d e rotation:
500 t/min. — 200 t/min. (CLV)
Pleurage et scintillement: Non mesurables
Réponse e n fréquence (±1dB): 10 Hz — 20 kHz
Distorsion harmonique totale (1kHz):
KDC-X796: 0,008 %
KDC-BT752HD: 0,01 %
Taux de Signal/B ruit (1kHz):
KDC-X796: 110 dB
KDC-BT752HD: 105 dB
Gamme dynamique: 93 dB
Décod e AAC: Fichiers AAC-LC “.m4a”
Décodag e MP3:
Décodeur WMA:
Interface USB
Standard USB: USB1.1/ 2.0 (Full speed)
Courant d’alimentation maximum: DC 5 V
Système de fichiers: FAT16/ 32
Compatible avec le format MPEG-1/2
Audio Layer-3
Compatible Windows Media Audio
1 A
Décod e AAC: Fichiers AAC-LC “.m4a”
Décodag e MP3:
Décodeur WMA:
Section Bluetooth
Technologie: Bluetooth Ver. 3.0 Certified
Fréquence : 2,402 – 2,480 GHz
Puissan ce de sortie: +4 dBm (MAX), 0 dBm (AVE)
Portée de communication maximale:
Profil:
Section audio
Puissan ce de sortie max imum: 50 W × 4
Pleine Pui ssance de Largeu r de Bande (avec une DHT
Impédance d’enceinte: 4 Ω — 8 Ω
Action e n tonalité:
Niveau de préamplification/charge (CD):
Impédance du préamplificateur: ≤ 600 Ω
Section d’entrée auxiliaire
Réponse e n fréquence (±3dB): 20 Hz — 20 kHz
Tension maximum d’entrée: 1 200 mV
Impédance d’entrée: 10 kΩ
Généralités
Tension de fonctionnement :
Consommation de courant maximale: 10 A
Dimensio ns d’installat ion (L x H x P):
Poids: 2,9 livres (1,3 kg)
Sujet à changement sans notification.
Compatible avec le format MPEG-1/2
Audio Layer-3
Compatible Windows Media Audio
Classe d'énergie 2
Ligne de vue environ 10 m (32,8 pieds)
HFP (profil mains libres),
HSP (profil casque),
SPP (profil port série),
OPP (profil d'envoi de fichiers),
PBAP (profil d'accès au répertoire
téléphonique),
A2DP (profil de distribution audio avancée),
AVRCP (Profil de télécommande audio/vidéo)
inférieure à 1 %): 22 W × 4
Graves : 100 Hz ±8 dB
Fréquences moyennes : 1 kHz ±8 dB
Aiguës : 12,5 kHz ±8 dB
KDC-X796: 4 000 mV/ 10 kΩ
KDC-BT752HD: 2 500 mV/ 10 kΩ
14,4 V (entre 10,5 V — 16 V admissible)
182 mm × 53 mm × 160 mm
(7-3/16” × 2-1/16” × 6-5/16”)
Français 69
Page 70

CONTENIDO
Seguridad 71
Mantenimiento
Preparativos 72
Cómo instalar/desmontar la placa frontal
Cómo reposicionar su unidad
Cómo preparar el mando a distancia (RC-
405)
Procedimientos iniciales 73
Cancelación de las demostraciones en
pantalla
Ajuste del modo de demostración
Ajuste del reloj
Ajustes iniciales previos a las operaciones
Funciones básicas 74
Se sintoniza la difusión de HD Radio™
Sintonizador de acceso directo mediante el
mando a distancia (RC-405)
Empleo del mando a distancia (RC-405)
iTunes Tagging
Ajuste de la configuración del modo
[SETTINGS]
Escuchando otros componentes
externos 77
Escucha de un disco/ dispositivo USB/
iPod 78
Comience a reproducir un disco
Inicio de la reproducción de un dispositivo
USB o iPod
Extracción del dispositivo USB o iPod
Cómo seleccionar Repetir reproducción
Cómo seleccionar Reproducción aleatoria
Reproducción aleatoria de todas las
canciones
Cómo seleccionar una carpeta, pista o
archivo
Búsqueda alfabética para iPod
Búsqueda directa de música mediante el
mando a distancia (RC-405)
Empleo del mando a distancia (RC-405)
Selección del modo de control de App &
iPod
Ajuste de la configuración del modo
[SETTINGS]
76
Escuchar la radio por Internet
Pandora® 82
Retirada del iPhone
Modo de búsqueda de emisoras
Empleo del mando a distancia (RC-405)
Procedimientos iniciales de Bluetooth
Función de emparejamiento fácil
Registro desde dispositivos Bluetooth
(emparejamiento)
84
Funcionamiento para llamar por
teléfono con manos libres 86
Realizar una llamada
Realización de una llamada con marcación
por voz
Recepción de una llamada
Durante una llamada
Llamada en espera
Borrado del mensaje de desconexión
Descarga de la agenda
Empleo del mando a distancia (RC-405)
Escuchar el audio del Bluetooth 89
Cómo seleccionar Repetir reproducción
Cómo seleccionar Reproducción aleatoria
Cambio entre dispositivos Bluetooth
Configuración de Bluetooth 90
Registro de un dispositivo Bluetooth
(emparejamiento)
Selección del dispositivo Bluetooth
Prueba de registro del dispositivo Bluetooth
Configuración de Bluetooth
SMS (Servicio de mensajes cortos) 92
Descarga de SMS
Visualizar el SMS
Ajuste del mensaje de respuesta
Crear un mensaje original
Configuración de SMS
Configuraciones de las funciones 94
Instalación/conexión 96
Localización de averías 100
Especificaciones 103
70 Español
Page 71

Seguridad
¤ADVERTENCIA
Detenga el automóvil antes de operar la unidad.
Información importante…
Para evitar cortocircuitos, nunca coloque ni
deje objetos metálicos (por ejemplo, monedas
o herramientas metálicas) dentro de la unidad.
Precaución: Ajuste el volumen de forma tal
que pueda escuchar los sonidos exteriores. Si
conduce con el volumen ajustado demasiado
alto podría provocar un accidente.
Condensación: Cuando funciona el
acondicionador de aire del automóvil puede
acumularse humedad en la lente del láser.
Esto puede provocar errores en la lectura de
los discos. En tal caso, retire el disco y espere
hasta que se evapore la humedad.
Las ilustraciones del presente manual
son ejemplos utilizados para explicar más
claramente cómo se utilizan los controles.
Por lo tanto, las imágenes de las ilustraciones
pueden diferir de las que aparecen en el
equipo real.
Si tiene problemas durante la instalación,
consulte con su distribuidor Kenwood.
Cuando compre componentes externos,
verifique antes con su distribuidor Kenwood
que dichos accesorios funcionen con su
modelo y en su área.
Mantenimiento
Limpieza de la unidad: Limpie la suciedad
del panel con un paño seco o de silicona. Si
no observa esta precaución podría dañar el
monitor o la unidad.
Limpieza del conector: La unidad puede
no funcionar adecuadamente si el conector
entre la unidad y la placa frontal. Retire la
placa frontal y limpie el conector utilizando un
hisopo de algodón, teniendo cuidado de no
dañar el conector.
Conector (en el lado posterior
de la placa frontal)
HD Radio Technology manufactured under
license from iBiquity Digital Corporation. U.S.
and Foreign Patents. HD Radio™ and the HD,
HD Radio, and “Arc” logos are proprietary
trademarks of iBiquity Digital Corp.
The “AAC” logo is a trademark of Dolby
Laboratories.
La marca denominativa y los logos de
Bluetooth son propiedad de Bluetooth SIG,
Inc. y cualquier uso de dichas marcas por
JVC KENWOOD Corporation está sujeto
a los términos de licencia. El resto de
marcas comerciales y nombres comerciales
corresponden a sus respectivos propietarios.
“Made for iPod” and “Made for iPhone”
mean that an electronic accessory has
been designed to connect specifically
to iPod or iPhone, respectively, and has
been certified by the developer to meet
Apple performance standards. Apple is not
responsible for the operation of this device
or its compliance with safety and regulatory
standards. Please note that the use of this
accessory with iPod or iPhone may affect
wireless performance.
iPhone, iPod, iPod classic, iPod nano, and
iPod touch are trademarks of Apple Inc.,
registered in the U.S. and other countries.
iTunes is a trademark of Apple Inc.
PANDORA, the PANDORA logo, and the
Pandora trade dress are trademarks or
registered trademarks of Pandora Media,
Inc., used with permission.
Android is a trademark of Google Inc.
BlackBerry®, RIM®, Research In Motion® and
related trademarks, names and logos are the
property of Research In Motion Limited and
are registered and/or used in the U.S. and
countries around the world. Used under
license from Research In Motion Limited.
Español 71
Page 72

Preparativos
Cómo instalar/desmontar la placa frontal
1
2
No exponga la placa frontal a la luz directa
2
del sol, calor excesivo ni humedad. Además
deberá evitar sitios con mucho polvo o la
posibilidad de que se derrame agua sobre ella.
Guarde la placa frontal en su estuche cuando
se encuentre desmontada.
La placa frontal es un componente de
precisión de la unidad y puede resultar
dañada por golpes o sacudidas.
Para evitar el deterioro, no toque los
terminales de la unidad y la placa frontal con
los dedos.
1
Cómo reposicionar su unidad
Si la unidad no funciona
correctamente, pulse el
1
botón de reposición.
Cuando se pulsa el botón de
2
Reinicio la unidad vuelve a
ajustarse a la configuración
de fábrica.
3
Botón de reposición
Cómo preparar el mando a distancia (RC-405)
Cuando utilice el mando a distancia por primera
vez, quite la lamina aislante.
Lámina aislante
Si la efectividad del mando a distancia
disminuye, cambie la batería.
2
1
¤
Precaución:
No deje el mando a distancia en superficies
calientes como el salpicadero.
Batería de litio.
Existe peligro de explosión si la batería no se
sustituye correctamente. Sustituya la batería
únicamente con el mismo tipo o un tipo
equivalente.
El bloque de baterías no debe exponerse a
una fuente de calor excesiva, como luz solar,
fuego o similar.
Mantenga la batería fuera del alcance de los
niños y en su embalaje original hasta que
esté listo para su uso. Deseche las baterías
utilizadas de forma rápida. Si se produce una
ingestión de las mismas, póngase en contacto
de inmediato con un médico.
4
3
72 Español
Page 73

Procedimientos iniciales
Cancelación de las demostraciones en pantalla
La demostración en pantalla está siempre
activada a menos que la cancele.
Cuando enciende la unidad (o después de
reposicionarla) la pantalla muestra:
[CANCELDEMO] \ [PRESS] \ [VOLUMEKNOB]
1 Pulse la rueda de volumen.
Se selecciona [YES] como configuración
inicial.
2 Pulse nuevamente la rueda de volumen
para confirmar.
Aparece [DEMOOFF].
Si no realiza ninguna operación durante
aproximadamente 15 segundos o gira la
rueda de volumen para seleccionar [NO] en el
paso 2, aparece el mensaje [DEMOMODE] y
comienza la demostración en pantalla.
Ajuste del modo de demostración
1 Pulse la rueda de volumen para entrar en
[FUNCTION].
2 Gire la rueda de volumen para seleccionar
[DEMOMODE] y, después, púlsela para
entrar.
3 Gire la rueda de volumen para seleccionar
[ON] u [OFF].
Si selecciona [ON], comienza la demostración
en pantalla si no realiza ninguna operación
durante aproximadamente 20 segundos.
4 Mantenga pulsado
procedimiento.
para finalizar el
Ajuste del reloj
1 Pulse la rueda de volumen para entrar en el
Opción Ajuste seleccionable (Predefinido: *)
PRESET TYPE NORMAL *: Memo riza una emisora p ara cada botón pre definido de cad a banda (FM1/FM2/FM3/AM). ; MIX: Memoriza
KEY BEEP ON */ OFF: Activ a/desactiva el to no de teclas.
PANDORA SRC ON *: Le permite s eleccionar la fuen te “PANDORA” mediante la con exión de un dispos itivo iPhone, iPod to uch, Android o
BUILT-IN AUX O N *: Activa “AUX” en la selecci ón de fuente. El soni do del componente e xterno conec tado se produce a t ravés de los
CD READ 1 *: Dist ingue automátic amente entre disco de a rchivos de audio y CD de mú sica. ; 2: Fuerza la re producción como CD d e
SP SELECT OFF */ 5/4/ 6×9/6/ OEM: Selecci ona el tamaño de altavo z para una reproducc ión óptima.
F/W UP xx. xx Y ES: Se empieza a ac tualizar el fir mware. ; NO *: Se cancela (la a ctualizació n no se activa).
una emisor a para cada botón pr edefinido ind ependientemente d e la banda seleccion ada (FM1/ FM2/ FM3/ AM).
BlackBe rry (con la aplicació n de radio por Inter net Pandora®). ; OFF: Se des activa “PANDOR A” en la sele cción de fuente.
altavoce s del vehículo. ; OFF: Se de sactiva “AUX” en la sele cción de fuente.
música. No s e puede escuch ar el sonido si se repr oduce un disco de archi vo de audio.
Para obtener información sobre cómo actualizar el firmware, consulte: ww w.kenwood.com/cs/ce/
modo [FUNCTION].
2 Gire la rueda de volumen para seleccionar
[SETTINGS] y, después, púlsela para entrar.
3 Gire la rueda de volumen para seleccionar
[CLOCK] y, después, púlsela para entrar.
4 Gire la rueda de volumen para seleccionar
[CLOCK ADJUST] y, después, púlsela para
entrar.
La hora del reloj destella en la pantalla.
5 Gire la rueda de volumen para ajustar la
hora y, después, púlsela para pasar al ajuste
de los minutos.
Los minutos del reloj destellan en la pantalla.
6 Gire la rueda de volumen para ajustar los
minutos y, después, púlsela para confirmar.
Pulse 4 / ¢ para alternar entre los
ajustes de horas y minutos.
7 Mantenga pulsado
procedimiento.
para finalizar el
Ajustes iniciales previos a las operaciones
1 Pulse SRC para entrar en el modo
[STANDBY].
2 Pulse la rueda de volumen para entrar en el
modo [FUNCTION].
3 Gire la rueda de volumen para seleccionar
[INITIALSET] y, después, púlsela para
entrar.
4 Gire la rueda de volumen para seleccionar
y, después, púlsela para confirmar.
Consulte la siguiente tabla para realizar la
selección.
5 Mantenga pulsado
procedimiento.
para finalizar el
Español 73
Page 74

Funciones básicas
Sensor remoto
No lo exponga a la luz solar brillante.
TAG
VOICE
PAR
Ranura de carga
Expulsa el disco
iPod
Rueda de volumen
Desmonte la placa frontal
El siguiente indicador se enciende cuando…
ST: se recibe una difusión en estéreo.
HD: Se sintoniza la difusión de HD Radio™.
D: Se sintoniza la difusión de HD Radio digital.
MC: Se sintoniza la difusión de HD Radio de
multidifusión.
TAG: Puede registrarse la información de la
canción.
IN: existe un disco en la unidad.
ATT: El sonido se atenúa.
EQ: [PRESET EQ] está ajustado a un modo EQ
que no sea [NATURAL]. (página 94)
B.BOOST: [BASS BOOST] está ajustado a [LV1] ,
[LV2] o [LV3] . (página 94)
: Indica que el modo de búsqueda de música
está seleccionado en este momento.
BT: Estado de conexión del teléfono móvil
Bluetooth.
Ventanilla de
visualización
Terminal USB
Toma de entrada auxiliar
Abra la tapa deslizándola
74 Español
Page 75

Si pulsa o mantiene pulsado(s) el(los) siguiente(s) botón(es)...
Unidad
principal
Mando a
distancia
—
Operaciones generales
Se enciende.
Se apaga si lo pulsa y mantiene pulsado.
Selecciona las fuentes disponibles (HD Radio, BT AUDIO, USB o iPod,
PANDORA, CD, AUX, STANDBY), si la alimentación está encendida.
• Silafuenteestápreparada,tambiénseiniciarálareproducción.
SRC
• Lepermiteseleccionarlafuente“PANDORA”cuandoseconecteun
SRC
dispositivoiPhone,iPodtouch,AndroidoBlackBerr y(conlaaplicación
deradioporInternetPandora®)yseseleccione[ON]para[PANDORA
SRC].(página73)
• “iPod”o“CD”sólopuedeseleccionarsecuandosehaconectadouniPodo
sisehacargadoundisco.
Rueda de
VOLud
volumen
(girar)
Rueda de
ENT 38 Confirma la selección.
volumen
(pulse)
1 (
–)/ 2 ( +)
6 (38) ENT 38
4 / ¢
SCRL DISP —
5 / ∞
5 / ∞
*AM– /
#FM+
Ajusta el nivel de volumen.
Selecciona las opciones.
Entrar en la configuración [FUNCTION].
—
Inicie el reconocimiento de voz del teléfono móvil manteniendo
pulsado el botón.
Entra en el modo de búsqueda de música.
Si lo mantiene pulsado, entra en el modo de etiquetado de HD Radio.
—
(página 76)
Selecciona las bandas de FM (FM1/ FM2/ FM3) o AM cuando se
selecciona “HD RADIO” como la fuente.
Selecciona la carpeta anterior/siguiente.
Pausa/reanuda la reproducción de un disco/ dispositivo USB/ iPod/
Pandora/ audio de Bluetooth.
4/
+¢
Busca una emisora de radio.
Selecciona una pista/archivo.
Si lo mantiene pulsado, adelanta/retrocede pistas/archivos.
Cambia la información en pantalla.
Si lo pulsa y mantiene pulsado desplaza la información en pantalla.
Entra en el modo de ajuste de hora directamente si se mantienen
pulsado mientras se visualiza la pantalla de ajuste de la hora. (página
73)
Entra en el modo Bluetooth. (página 86)
Pulse para contestar una llamada entrante.
—
— AUD
— AT T
Si lo mantiene pulsado, entra en el modo de emparejamiento fácil
de Bluetooth. (página 84)
Entra directamente en la configuración [AUDIO CONTROL].
Atenúa el sonido.
• Paravolveralnivelanteriorpulsenuevamenteelbotón.
Volver al elemento anterior.
Sale del modo de configuración.
EXIT
• Sipulsaymantienepulsado
—
mododeconfiguración.
enlaunidadprincipaltambiénsaldrádel
Español 75
Page 76

Se sintoniza la difusión de HD Radio™
TAG
VOICE
PAR
iPod
Mantenga pulsado para memorizar la emisora o canal actual.
Pulse brevemente para recuperar la emisora o canal memorizado.
1 Pulse SRC para seleccionar “HD Radio”.
2 Pulse repetidamente
para seleccionar
una banda (FM1/ FM2/ FM3/ AM).
3 Pulse 4 / ¢ para buscar una emisora
o canal.
Aparece “LINKING” mientas se enlaza con un
canal de multidifusión.
Puede cambiar el modo de sintonización.
Consulte <SEEK MODE> (página 77).
Sintonizador de acceso directo mediante el mando a distancia (RC-405)
1 Pulse FM+ / AM– para seleccionar una
banda.
2 Pulse DIRECT repetidamente para
seleccionar el elemento de sintonización.
Aparece “– – – –”.
3 Pulse DIRECT para entrar en el modo de
sintonización de acceso directo.
Elemento de sintonización: Frecuencia “– – –
–”, Canal “HD –”, o Cancelar sintonización de
acceso directo
4 Pulse los botones numéricos para
introducir la frecuencia o canal.
5 Pulse 4 / +¢ para sintonizar a la
frecuencia o canal introducido.
Para cancelar el modo de sintonización del
acceso directo, pulse
Si no se realiza ninguna operación durante
o EXIT.
10 segundos después del paso 3, la
sintonización del acceso directo se cancela
automáticamente.
76 Español
Empleo del mando a distancia (RC-405)
#FM+ / *AM– : Selecciona una banda.
4 / +¢ : Selecciona una emisora.
1 – 6 : Selecciona una emisora
predefinida.
iTunes Tagging
Cuando escuche una canción en su emisora
de HD Radio local, puede etiquetar la canción
y guardar la información de la canción en esta
unidad. En esta unidad pueden registrarse hasta
50 etiquetas (información de la canción).
Al utilizar esta función de etiquetado,
puede adquirir fácilmente las canciones de
Apple iTunes Store.
Mantenga pulsado
de etiquetado de HD Radio y etiquetar la
canción.
Cuando sea posible registrar la información
de la canción se indicará "TAG" en la pantalla.
Para transferir las canciones etiquetadas
a su iPod y comprar las canciones desde
iTunesStore
1 Conectar un iPod en esta unidad. (página
78)
La información de etiquetas guardada en la
unidad se transfiere automáticamente al iPod
conectado.
2 Vuelva a conectar el iPod a su ordenador.
3 Sincronice el iPod a iTunes.
Las canciones guardadas se mostrarán en
una lista de reproducción denominada
“Tagged.” Ahora puede comprar y descargar
las canciones de forma sencilla desde
iTu nes Store.
para entrar en el modo
Page 77

Ajuste de la configuración del modo [SETTINGS]
Cuando escucha la radio…
1 Pulse la rueda de volumen para entrar en el modo [FUNCTION].
2 Gire la rueda de volumen para seleccionar [SETTINGS] y, después, púlsela para entrar.
3 Gire la rueda de volumen para seleccionar y, después, púlsela para confirmar.
Consulte la siguiente tabla para realizar la selección.
4 Mantenga pulsado
para finalizar el procedimiento.
Opción Ajuste seleccionable (Predefinido: *)
SEEK MODE AUTO1 *: Buscar automáticamente una emisora o canal. ; AUTO2 : Búsqueda de emisoras por orden en la memoria de
presintonización. ; MANUAL: Buscar manualmente una emisora.
AUTO MEM ORY YES: Memorización automática de 6 emisoras con buena señal de recepción. ; NO *: Se cancela (la mem orización
automátic a no se activa). (Solo pu ede seleccionar se si seleccion a previamente [N ORMAL] en [PRE SET TYPE].) (página
73)
RECEIVEMODE Est ablece el modo de rec epción del recepto r de HD Radio.
AUTO *: Sintoniz a automáticamente l a difusión analóg ica cuando no se disp one de retransmi sión digital. ;
DIGITAL: Solo sintoniza la di fusión digital . ; ANALOG: Solo sintoniza la difusión analógica.
TAGMEMORY Muest ra el uso de la memoria d e etiquetas del r eceptor de HD Radio.
00—50(Pred efinido:00): En e sta unidad pued en registrar se hasta 50 etiqu etas.
Escuchando otros componentes externos
Preparativos : Asegúrese de que ha seleccionado [ON] para [BUILT-IN AUX]. (página 73)
TAG
VOICE
PAR
1 Pulse
SRC para seleccionar “AUX”.
2 Encienda el componente externo y
comience la reproducción.
3 Gire la rueda de volumen para ajustar el
volumen.
Dispositivo de audio portátil
(disponible en el mercado)
iPod
Toma de entrada auxiliar
Clavija mini estéreo de 3,5 mm
(1/8”) (disponible en el mercado)
Español 77
Page 78

Escucha de un disco/ dispositivo USB/ iPod
Expulsa el disco. (Aparece el mensaje “NO
Ranura de carga
TAG
VOICE
PAR
Pulse para seleccionar una pista o archivo.
Mantenga pulsado para adelantar o
retroceder rápidamente.
Pulse para seleccionar la carpeta de
archivo de audio/iPod.
Comience a reproducir un disco
1 Pulse SRC para encender la unidad.
2 Inserte un disco en la ranura de carga.
La reproducción se inicia automáticamente.
Inicio de la reproducción de un dispositivo USB o iPod
1 Pulse SRC para encender la unidad.
2 Abra la tapa deslizándola.
3 Conecte un dispositivo USB o iPod al
terminal USB.
La fuente cambia automáticamente y se inicia
la reproducción.
Disposi tivo USB
(disponible e n el comercio)
CA-U1EX (máx.: 5 00 mA)
(accesorio opcional)
78 Español
DISC” (sin disco) y el indicador “IN” se apaga.)
iPod
Terminal USB
Pulse para detener la reproducción
(pausa). Pulse de nuevo para
reanudar la reproducción.
Apple iPod
(disponible e n el comercio)
KCA-i P102
(accesorio opcional)
Extracción del dispositivo USB o iPod
1 Pulse SRC para seleccionar una fuente
que no sea “USB”, “iPod” o “PANDORA”.
2 Extraiga el dispositivo USB o iPod.
Cómo seleccionar Repetir reproducción
Pulse repetidamente el botón numérico
4(REP) para realizar la selección.
CD de audio : TRACK REPEAT, REPEAT OFF
Archivo de audio :
FILE REPEAT, FOLDER REPEAT, REPEAT OFF
iPod : FILE REPEAT, REPEAT OFF
Cómo seleccionar Reproducción aleatoria
Pulse repetidamente el botón de número
3 (ALL RDM) para realizar la selección.
CD de audio : DISC RANDOM, RANDOM OFF
Archivo de audio/iPod :
FOLDER RANDOM, RANDOM OFF
Page 79

Reproducción aleatoria de todas las canciones
Mantenga pulsado el botón numérico
3 (ALL RDM).
Al pulsar de nuevo este botón, se reproducen
las canciones nuevamente en el modo
normal.
Archivo de audio/iPod :
ALL RANDOM, RANDOM OFF
El elemento de búsqueda de iPod cambia a
“songs” (canciones).
Cómo seleccionar una carpeta, pista o archivo
1 Pulse para entrar en el modo de
búsqueda de música.
Aparece “SEARCH” y, a continuación, aparece
en la pantalla el nombre del archivo actual.
2 Gire la rueda de volumen para seleccionar
una carpeta, pista o archivo y, después,
púlsela para confirmar.
Para saltar canciones, pulse 4/ ¢. Si
mantiene pulsado 4/ ¢, las canciones
saltarán al 10% sea cual sea el ajuste realizado.
(página 80)
Esta operación sólo funciona en el soporte del
editor de música de iPod o Kenwood.
Para volver a la carpeta raíz (archivo de audio),
a la parte superior del menú (iPod) o a la
primera pista (CD de audio), pulse 5.
Para volver a la carpeta anterior, pulse .
Para cancelar el modo de búsqueda de
música, pulse y mantenga pulsado
El mensaje < o > en la pantalla indica que el
.
elemento anterior o siguiente se encuentra
disponible.
Búsqueda alfabética para iPod
1 Pulse para entrar en el modo de
búsqueda de música.
Aparece “SEARCH”.
2 Gire la rueda de volumen para seleccionar
una categoría, luego púlsela para
confirmar.
3 Pulse de nuevo
búsqueda por alfabeto.
Aparece “SEARCH <– – –>”.
4 Gire la rueda de volumen para seleccionar
el carácter que desea buscar.
5 Pulse 4 / ¢ para desplazarse a la
posición de introducción.
para entrar al modo de
Podrá introducir hasta tres caracteres.
6 Pulse la rueda de volumen para iniciar la
búsqueda.
Después de este paso, consulte el paso 2
de <Cómo seleccionar una carpeta, pista o
archivo> (página 79) para seleccionar una
canción.
Para volver al modo de búsqueda de música,
.
pulse
Para cancelar el modo de búsqueda de
música, pulse y mantenga pulsado
Se requiere un tiempo de búsqueda más
.
prolongado si hay numerosas canciones o
listas de reproducción en el iPod.
Para realizar la búsqueda de un carácter
distinto de A a Z y 0 a 9, introduzca solamente
“ * ”.
El artículo (“a”, “an”, “the”) de los nombres
de las canciones será omitido durante la
búsqueda.
Búsqueda directa de música mediante el mando a distancia (RC-405)
• Noestádisponiblesisehaseleccionadola
reproducciónaleatoria,elsoportedeleditorde
músicadeKENWOODolareproduccióndeliPod.
1 Pulse DIRECT para entrar en el modo de
búsqueda directa de música.
Aparece “– – –”.
2 Pulse los botones de número para entrar el
número de pista.
3 Pulse 4 / +¢ para buscar la música.
Para cancelar el modo de búsqueda directa de
música, pulse
o EXIT.
Empleo del mando a distancia (RC-
405)
En el modo de reproducción:
#FM+ / *AM– : Selecciona la carpeta.
4 / +¢ : Selecciona una pista/archivo.
ENT 38 : Pausa/reanuda la
5 / ∞ : Entra en el modo de búsqueda
En el modo de búsqueda de música:
ENT 38 : Confirma la selección.
5 / ∞ : Selecciona una pista/carpeta/
: Volver a la carpeta anterior.
reproducción.
de música.
archivo.
Sigue en la página siguiente
Español 79
Page 80

Selección del modo de control de App & iPod
Pulse repetidamente el botón de número
5 (iPod) para realizar la selección.
MODE ON :
Controlar el iPod desde el iPod *. En la
pantalla aparece “APP&iPod MODE”.
MODE OFF: Controlar el iPod desde la unidad.
* Puedeseguirreproduciendo/deteniendo
lareproducción,asícomoseleccionando
archivosyavanzandoyretrocediendoarchivos
rápidamentedesdelaunidad.
Ajuste de la configuración del modo [SETTINGS]
Al escuchar un iPod o un soporte del editor de
música de KENWOOD...
Cómo manipular los discos
No toque la superficie de grabación del
disco.
No pegue cinta etc. sobre el disco ni utilice
un CD con cinta pegada sobre él.
No utilice accesorios para el disco.
Limpie el disco moviendo paño desde el
centro de éste hacia el exterior.
Discos que no se pueden utilizar
Esta unidad sólo puede reproducir los CD
con:
Un disco que no es redondo.
Un disco con la superficie de grabación
pintada o discos sucios.
Acerca del archivo de audio
Archivos de audio reproducibles:
MP3 (.mp3), WMA (.wma), AAC-LC (.m4a)
Medio de disco reproducible: CD-R/RW/ROM
Formatos de archivo de disco reproducibles:
ISO 9660 Nivel 1/2, Joliet, Romeo, nombre de
archivo largo.
Sistemas de archivos del dispositivo USB
reproducibles:
FAT16, FAT 32
1 Pulse la rueda de volumen para entrar en el
modo [FUNCTION].
2 Gire la rueda de volumen para seleccionar
[SETTINGS] y, después, púlsela para entrar.
3 Gire la rueda de volumen para seleccionar
[SKIP SEARCH] y, después, púlsela para
entrar.
4 Gire la rueda de volumen para seleccionar
y, después, púlsela para confirmar.
0.5% (initial)/ 1%/ 5%/ 10% : Ajusta el
porcentaje de omisiones al buscar una
canción en el modo de búsqueda de música.
(Si mantiene pulsado 4 / ¢ se omite el
10% de las canciones, independientemente
del modo de ajuste.)
5 Mantenga pulsado
para finalizar el
procedimiento.
Limpie el disco con un paño seco o de
silicona. No utilice disolventes.
Cuando extraiga un disco de esta unidad, tire
de éste en sentido horizontal.
Si el orificio central o el borde de un disco
tienen rebaba, retírela antes de insertar un
disco.
No se puede reproducir un disco grabable/
regrabable que no esté finalizado. (Si
necesita información acerca del proceso
de finalización, consulte el manual de
instrucciones incluido con el software de
grabación de discos o con la grabadora.)
No pueden utilizarse CDs de 3 pulgadas.
Intentar insertar uno con un adaptador
puede resultar en una avería.
Aunque los archivos de audio cumplen los
estándares anteriores, puede que no sea
posible la reproducción según los tipos o
condiciones del medio o dispositivo.
En un manual en línea en el siguiente sitio,
encontrará información detallada y notas
acerca de los archivos de audio que pueden
reproducirse:
www.kenwood.com/cs/ce/audiofile/
80 Español
Page 81

Acerca del dispositivo USB
Esta unidad puede reproducir archivos de
audio guardados en un tipo de dispositivo de
almacenamiento masivo USB.
Instale el dispositivo USB en un lugar
que no le impida conducir su vehículo
correctamente.
No puede conectar un dispositivo USB a
través de un concentrador USB ni de un
lector multitarjeta.
Realice la copias de respaldo de todos los
datos importantes para evitar la pérdida de
los datos.
Acerca del iPod/iPhone compatible
Made for
– iPod touch (4th generation)
– iPod touch (3rd generation)
– iPod touch (2nd generation)
– iPod touch (1st generation)
– iPod classic
– iPod with video
– iPod nano (6th generation)
– iPod nano (5th generation)
– iPod nano (4th generation)
– iPod nano (3rd generation)
– iPod nano (2nd generation)
– iPod nano (1st generation)
– iPhone 4S
– iPhone 4
– iPhone 3GS
– iPhone 3G
– iPhone
(Confechadeenerode2012)
Acerca del “Editor de música KENWOOD”
Esta unidad es compatible con la aplicación
informática “KENWOOD Music Editor Light
ver1.1” o superior.
Cuando se utiliza el archivo de audio con
información de la base de datos agregada
mediante “KENWOOD Music Editor Light
ver1.1,” puede buscar un archivo por título,
álbum o nombre del artista utilizando la
búsqueda de música mencionada (página
79).
En el Manual de instrucciones, el término
“soporte del editor de música” hace
Conectar un cable cuya longitud total
sea superior a 5 m puede provocar una
reproducción anormal.
Esta unidad no puede reconocer un
dispositivo USB que no sea de 5 V y supere
500 mA.
Al conectar el dispositivo USB, se recomienda
el uso de CA-U1EX (opción). El consumo de
corriente máximo del CA-U1EX es de 500 mA.
Última lista compatible de iPod/iPhone.
Para obtener más información, consulte:
www.kenwood.com/cs/ce/ipod
Los tipos de control disponibles varían
según el tipo de iPod conectado. Para más
información, consulte la URL de más arriba.
La palabra “iPod” que se utiliza en este
manual hace referencia a un iPod o iPhone
conectado a esta unidad mediante el cable
de conexión KCA-iP102 (accesorio opcional).
Si inicia la reproducción después de conectar
el iPod, se reproduce primero la música que
se ha reproducido en el iPod.
En este caso, se mostrará “RESUMING” sin
mostrar ningún nombre de carpeta, etc. Si
se cambia el elemento de exploración se
visualizará un título correcto, etc.
No es posible utilizar el iPod si en éste
aparece “KENWOOD” o “”.
referencia a que el dispositivo contiene
archivos de audio con información de la base
de datos añadida con el editor de música
KENWOOD.
“KENWOOD Music Editor Light ver1.1” está
disponible desde el siguiente sitio web:
ww w.kenwood.com/cs/ce/
Para obtener más información acerca del
programa “KENWOOD Music Editor Light
ver1.1”, consulte la página web anterior o la
sección de ayuda de la aplicación.
Español 81
Page 82

Escuchar la radio por Internet Pandora®
TAG
VOICE
PAR
iPod
Pulse para omitir una canción.
Pulse para seleccionar la aprobación/
Android o BlackBerry
Preparativos :
Tiene que registrar su teléfono móvil antes de
utilizarlo con esta unidad. (página 84)
Desconecte el iPhone o iPod touch.
Asegúrese de que ha seleccionado [ON] para
[PANDORA SRC]. (página 73)
1 Abra la aplicación Pandora® en su
dispositivo.
2 Pulse
SRC para seleccionar “PANDORA”.
Android o Bla ckBerry
(disponible e n el comercio)
Conexió n a través de
Bluetooth
Los altavoces desde los que se reproduce
el audio cambian dependiendo del ajuste
de Bluetooth “BT HF/AUDIO”. La opción
predeterminada es la delantera. (página 92)
Pulse para detener la reproducción
desaprobación.
(pausa). Pulse de nuevo para
reanudar la reproducción.
iPhone o iPod touch
Preparativos : Asegúrese de que ha
seleccionado [ON] para [PANDORA SRC].
(página 73)
1 Abra la aplicación Pandora® en su
dispositivo.
2 Abra la tapa deslizándola.
3 Conecte un iPhone al terminal USB.
La fuente cambia y la reproducción se inicia
automáticamente desde la estación actual.
iPhone o iPod t ouch
(disponible e n el comercio)
KCA-i P102
(accesorio opcional)
Terminal USB
82 Español
Page 83

Para seleccionar la aprobación/desaprobación,
pulse el botón numérico 1 (
Para omitir una canción, pulse ¢.
Para detener o reanudar la reproducción, pulse
– )/ 2 ( + ).
el botón numérico 6 ( 38).
Retirada del iPhone
1 Pulse SRC para seleccionar una fuente
distinta de “PANDORA” o “iPod”.
2 Retire el iPhone.
Modo de búsqueda de emisoras
Mientras escucha la fuente “PANDORA” ...
1 Pulse
2 Gire la rueda de volumen para seleccionar
3 Gire la rueda de volumen para seleccionar
para entrar en el modo de
búsqueda de emisoras.
[A–Z] (las emisoras se muestran en orden
alfabético) o [BY DATE ] (las emisoras se
muestran por orden de fecha) y, después,
pulse para entrar.
la emisora deseada y, después, púlsela para
confirmar.
Empleo del mando a distancia (RC-
405)
En el modo de reproducción:
+¢ : Omite una canción.
ENT 38 : Pausa/reanuda la reproducción.
5 / ∞ : Entre en el modo de búsqueda de
emisoras.
En el modo de búsqueda de emisoras:
5 / ∞ : • Selecciona [A–Z] o [ BY DATE].
• Selecciona el elemento.
ENT 38 : Confirma la selección.
EXIT : Cancela el modo de búsqueda de
emisoras.
Información sobre el servicio de radio por Internet PANDORA®
Los requisitos para escuchar la radio por
Internet PANDORA® son los siguientes:
iPhone o iPod touch
– Utilice un iPhone o iPod touch de Apple
que funcione con el sistema iOS 3 o
versiones posteriores.
– Busque “Pandora” en la tienda iTunes
Store de Apple para obtener e instalar la
última versión de la aplicación Pandora®
en su dispositivo.
– iPhone/iPod conectado a esta unidad
mediante un KCA-iP102.
Android™ o BlackBerry®
– Descargue la aplicación Pandora a su
smartphone desde el sitio de Pandora
utilizando su navegador estándar.
– Bluetooth debe estar integrado y deben
admitirse los perfiles.
SPP (Perfil de puerto serial)
En la aplicación de su dispositivo, inicie la
sesión y cree una cuenta con Pandora.
(Si todavía no se ha registrado como usuario,
puede crear su cuenta en www.pandora.
com).
Conexión a Internet mediante 3G, EDGE, o
Wi-Fi.
Pandora® sólo está disponible en los EE. UU.
Debido a que Pandora® es el servicio de un
tercero, las especificaciones podrían cambiar
sin previo aviso. Por consiguiente, pueden
aparecer problemas de compatibilidad o
algunos o todos los servicios pueden dejar
de estar disponibles.
Algunas funciones de PANDORA® no están
disponibles desde esta unidad.
Si tiene cualquier problema para utilizar
la aplicación, póngase en contacto con
Pandora® en la dirección: pandora-support@
pandora.com.
A2DP (Perfil de Distribución de Audio
Avanzado)
Español 83
Page 84

Procedimientos iniciales de Bluetooth
TAG
VOICE
PAR
iPod
Mantenga pulsado para entrar en el modo de emparejamiento
fácil
Función de emparejamiento fácil
1 Mantenga pulsado para entrar en el
modo de emparejamiento fácil
Aparece “PAIRING”.
Aparece una de las siguientes opciones
dependiendo del estado del registro del
dispositivo Bluetooth:
– “SEARCHING”: Cuando se registra un
dispositivo Bluetooth por primera vez.
– “(nombre del dispositivo)”: Cuando ya se
ha registrado un dispositivo Bluetooth.
– “DEVICE FULL”: Cuando ya se ha registrado
el máximo de cinco dispositivos
Bluetooth.
Para cancelar un modo de emparejamiento
fácil, pulse
Cuando se registra un dispositivo Bluetooth
por primera vez (Registro de un dispositivo
Bluetooth)
2 Aparece “SEARCHING”.
Busque el dispositivo Bluetooth.
Cuando se haya completado la búsqueda,
aparecerá “FINISHED”.
3 Gire la rueda de volumen para seleccionar
un nombre de dispositivo Bluetooth y, a
continuación, púlsela para confirmar.
4 Aparece “CONFIRM DVC”.
Si aparece “PAIRING OK”, proceda al paso 7.
Si aparece “PIN CODE” proceda al paso 5.
Si aparece “*** NG” , pulse la rueda de
volumen. Proceda al paso 4.
5 Introduzca el código PIN
.
Para seleccionar el número, gire la rueda de
volumen.
Para desplazarse al siguiente dígito, pulse
¢.
Para eliminar el último dígito, pulse 4.
6 Pulse la rueda de volumen para transmitir
el código PIN.
Si aparece “PAIRING OK”, el registro ha
finalizado.
Si aparece “CONFIRM DVC”, confirme
la conexión a través de un dispositivo
Bluetooth.
7 El receptor está conectado a un dispositivo
Bluetooth, en el que se muestra “HF
CONNECT” o “AUD CONNECT”, y sale del
modo de emparejamiento fácil.
Si aparece un código de error durante
el proceso de emparejamiento, consulte
<Localización de averías> (página 100).
Si el mensaje de error aparece incluso
cuando el código PIN es correcto, intente el
procedimiento que se menciona en <Registro
de un dispositivo Bluetooth especial> (página
90).
Cuando ya se ha registrado un disp ositivo
Bluetooth, o cuando ya se ha registrado el
máximo de cinco dispositivos Bluetooth
(Selección de un dispositivo Bluetooth)
2 Aparece “(nombre del dispositivo)” o
“DEV IC E F ULL”.
3 Gire la rueda de volumen para seleccionar
un nombre de dispositivo Bluetooth.
84 Español
Page 85

Para registrar un nuevo dispositivo
Bluetooth, seleccione “[NEW DEVICE]” y,
después, vaya a “Cuando se registra un
dispositivo Bluetooth por primera vez.”
4 Pulse la rueda de volumen.
5 Gire la rueda de volumen para seleccionar
el perf il del dispositivo que se va a
conectar.
“HANDSFREE”/ ”AUDIO”: El dispositivo puede
conectarse utilizando un manos libres o un
perfil de audio.
“HF/AUD”: El dispositivo puede conectarse
utilizando los dos manos libres y los perfiles
de audio.
6 Pulse la rueda de volumen para conf igurar
el dispositivo Bluetooth.
“HA (nombre del dispositivo)”: El
dispositivo Bluetooth seleccionado está
ocupado.
“-H-A (nombre del dispositivo)”: El
dispositivo Bluetooth seleccionado se
encuentra en modo de espera.
“ H A (nombre de dispositivo)”: El dispositivo
Bluetooth no está seleccionado.
• “H”(HFP)or“A”(A2DP)indicaelperfil
correspondiente.
7 Pulse
para salir del modo de
emparejamiento fácil.
Borrar el dispositivo Bluetooth registrado
2 Aparece “(nombre del dispositivo)” o
“DEV IC E F ULL”.
3 Gire la rueda de volumen para seleccionar
un nombre de dispositivo Bluetooth.
4 Pulse y mantenga pulsada la rueda de
volumen para eliminar el dispositivo
Bluetooth seleccionado.
Aparece “DELETE”.
5 Gire la rueda de volumen para seleccionar
“YES” y, después, púlsela para confirmar.
Aparece “COMPLETED”.
6 Pulse
para salir del modo de
emparejamiento fácil.
Registro desde dispositivos Bluetooth (emparejamiento)
1 Pulse SRC para encender la unidad.
2 Empiece a registrar esta unidad activando
el dispositivo Bluetooth.
Al utilizar el dispositivo Bluetooth, registre la
unidad de manos libres o la unidad de audio
(emparejamiento). Seleccione “KENWOOD BT
CD/R-6P1” en la lista de unidades conectadas.
3 Escriba el código PIN (“0000”) en el
dispositivo Bluetooth.
Verifique que haya finalizado el registro
en el dispositivo Bluetooth. El código PIN
está configurado como “0000” de manera
predeterminada. Puede cambiar este
código. Consulte [PIN CODE EDIT] en
<Configuración de Bluetooth> (página 91).
4 Utilizando el dispositivo Bluetooth, inicie la
conexión de manos libres.
Si existen 5 o más dispositivos Bluetooth
registrados, no puede registrar un nuevo
dispositivo Bluetooth.
Acerca del teléfono móvil
Versión: Estándar Bluetooth Ver. 3.0
certificado
Perfil:
HFP (Perfil de manos libres)
HSP (Perfil Auriculares)
SPP (Perfil de puerto serial)
OPP (Perfil de introducción de objetos)
PBAP (Perfil de acceso a la agenda telefónica)
A2DP (Perfil de Distribución de Audio
Avanzado)
AVRCP (Perfil de Audio/ Vídeo por Control
Remoto)
Para verificar la compatibilidad de los teléfonos
móviles, acceda a la siguiente URL:
www.kenwood.com/cs/ce/bt/
Las unidades que admiten la función
Bluetooth han certificado su conformidad
con el estándar Bluetooth siguiendo el
procedimiento descrito por Bluetooth SIG.
Sin embargo, puede que resulte imposible
que dichas unidades se comuniquen con el
teléfono móvil en función del tipo.
Español 85
Page 86

Funcionamiento para llamar por teléfono con manos libres
Preparativos : Tiene que registrar su teléfono móvil antes de utilizarlo con esta unidad. (página 84)
Micrófono incorporado (sólo KDC-BT752HD)
TAG
VOICE
PAR
iPod
Pulse para entrar en el modo
Bluetooth.
Pulse para contestar una llamada
entrante.
Realizar una llamada
1 Pulse para entrar en el modo Bluetooth.
2 Gire la rueda de volumen para seleccionar
un método de marcación y, a continuación,
púlsela para entrar.
A continuación se describe el método de
funcionamiento de cada modo.
– “PHONE BOOK”: Llamar a un número en la
agenda telefónica
– “OUTGOING”/ “INCOMING”/ “MISSED
CALLS”: Llamar a un número en el registro
de llamadas
– “NUMBER DIAL”: Marcación de un número
– Marcación rápida (Marcación
preestablecida)
Alterna entre el nombre y el número de
teléfono, pulse DISP.
Para volver al modo Bluetooth, mantenga
pulsado
Para cancelar el modo Bluetooth, pulse .
.
Llamar a un número en la agenda
telefónica
2 Gire la rueda de volumen para seleccionar
“PHONE BOOK” y, después, púlsela para
entrar.
3 Pulse
para entrar en el modo de
búsqueda alfabética.
4 Gire la rueda de volumen para seleccionar
el carácter que desea buscar.
86 Español
Mantenga pulsado para memorizar el número de
teléfono actual.
Pulse brevemente para recuperar el número de
teléfono memorizado.
Para moverse a la siguiente fila, pulse 4
/ ¢.
Para volver al modo de agenda telefónica,
.
pulse
5 Pulse la rueda de volumen para iniciar la
búsqueda.
6 Gire la rueda de volumen para seleccionar
un nombre y categoría.
Para desplazarse al siguiente carácter, pulse
4 / ¢.
7 Pulse la rueda de volumen para realizar una
llamada.
Para utilizar la agenda, debe descargarse
con antelación en esta unidad. Consulte
<Descarga de la agenda> (página 88).
Durante la búsqueda, se buscará un carácter
sin acento, como “u”, en lugar de un carácter
con acento, como “ü”.
Los elementos de categoría en la Agenda
Telefónica se muestran del siguiente modo:
GE: General ; HM: Casa ; OF: Oficina ;
MO: Móvil ; OT: Otro
Llamar a un número en el registro de
llamadas
2 Gire la rueda de volumen para seleccionar
“OUTGOING” (llamada saliente),
“INCOMING” (llamada entrante), o “MISSED
CALLS” (llamada perdida) y, a continuación,
púlsela para entrar.
Page 87

3 Gire la rueda de volumen para seleccionar
un nombre o un número de teléfono.
4 Pulse la rueda de volumen para realizar una
llamada.
La lista de llamadas realizadas, la lista de
llamadas recibidas y la lista de llamadas
perdidas son listas de llamadas que se
originaron desde y se recibieron en esta
unidad. No son los guardados en la memoria
del teléfono móvil.
Marcación de un número
2 Gire la rueda de volumen para seleccionar
“NUMBER DIAL” y, después, púlsela para
entrar.
3 Gire la rueda de volumen para seleccionar
el número de teléfono
Para desplazarse al siguiente dígito, pulse
¢.
Para eliminar el último dígito, pulse 4.
Pulse el botón numérico (1 – 0), #(FM+),
*(AM–), o +(¢) en el mando a distancia.
4 Pulse la rueda de volumen para realizar una
llamada.
Pulse OK en el mando a distancia.
Puede introducir un máximo de 32 dígitos.
Marcación rápida (Marcación
preestablecida)
2 Pulse el botón numérico (1 – 6).
3 Pulse la rueda de volumen para realizar una
llamada.
Registro en la lista de números de
marcación preajustada
2 Introduzca el número de teléfono en
relación con lo siguiente:
Marcación de un número/ Llamar a un
número en el registro de llamadas/ Llamar a
un número en la agenda telefónica
3 Mantenga pulsado el botón numérico
(1 – 6).
Realización de una llamada con marcación por voz
Puede realizar una llamada de voz usando
la función de reconocimiento de voz de su
teléfono móvil.
1 Mantenga pulsada la rueda de volumen
para iniciar el reconocimiento de voz.
2 Pronuncie el nombre registrado en el
teléfono móvil.
Realice una llamada.
Para cancelar el reconocimiento de voz,
mantenga pulsada la rueda de volumen.
Si aparece “NO SUPPORT”, significa que su
teléfono móvil no es compatible con la
función de reconocimiento de voz.
Si aparece “N/A VOICE TAG”, significa
que el teléfono móvil no puede iniciar el
reconocimiento de voz.
Si no se puede reconocer su voz, se muestra
un mensaje. Si pulsa la rueda de volumen,
podrá volver a intentar la entrada de voz.
El sonido de audio no se emite durante el
reconocimiento de voz.
Recepción de una llamada
Respuesta a una llamada
Pulse o la rueda de volumen.
Las siguientes operaciones desconectan
la línea:
– Inserte a CD.
– Conecte un dispositivo USB.
El nombre de la persona que llama se
mostrará si ya se ha registrado en la agenda
telefónica.
Rechazo de una llamada entrante
Pulse SRC.
Durante una llamada
Desconexión de una llamada
Pulse o SRC.
Cambio al modo privado
Pulse el botón numérico 6 para alternar
entre conversación privada (“PRIVATE
TALK”) y conversación manos libres
(“HANDS FREE”).
Ajuste del volumen de voz durante una
llamada
Gire la rueda de volumen.
Sigue en la página siguiente
Español 87
Page 88

Llamada en espera
Contestar otra llamada entrante
suspendiendo la llamada actual
1 Pulse la rueda de volumen.
2 Gire la rueda de volumen para seleccionar
[ANSWER], después púlsela para ingresar.
Continuación de la llamada actual
1 Pulse la rueda de volumen.
2 Gire la rueda de volumen para seleccionar
[REJECT], después púlsela para ingresar.
Alternar entre la llamada actual y la
llamada en espera
Pulse la rueda de volumen para alternar las
llamadas entrantes.
Borrado del mensaje de desconexión
Pulse para que “HF DISCONCT”
desaparezca.
Descarga de la agenda
Para descargas automáticas
Si el teléfono móvil es compatible
con la función de sincronización de la
agenda telefónica, la agenda se descarga
automáticamente después de la conexión
Bluetooth.
Pueden requerirse ajustes en el teléfono móvil.
Si no se encuentran datos de la agenda
telefónica en la unidad incluso después de
completar la visualización, su teléfono móvil
podría no ser compatible con la función de
descarga automática de datos de la agenda
telefónica. En este caso, intente descargar los
datos manualmente.
Para descargar manualmente desde el
teléfono móvil
1 Utilizando el teléfono móvil, finalice la
conexión manos libres.
2 Utilizando el teléfono móvil, envíe los datos
de la agenda a esta unidad
Utilizando el teléfono móvil, descargue los
datos de la agenda en esta unidad.
Durante la descarga: Aparece
“D OWNLOAD ING”.
Después finalizar la descarga: Aparece
“CO MPLE TE”.
3 Utilizando el teléfono móvil, inicie la
conexión manos libres.
Para borrar el mensaje de finalización de
descarga, pulse cualquier botón.
Se puede registrar un máximo de 600
números de teléfono para cada teléfono móvil
registrado.
Se puede registrar un máximo de 32 dígitos
para cada número de teléfono junto con un
máximo de 50* caracteres para indicar un
nombre.
(* 50: Número de caracteres alfabéticos.
Se pueden introducir menos caracteres
dependiendo del tipo de caracteres).
Para cancelar la descarga de los datos de la
agenda telefónica, utilice el teléfono móvil.
Empleo del mando a distancia (RC-
405)
Realizar una llamada:
: Entre en el modo Bluetooth.
5 / ∞ : Selecciona un método de marcación.
ENT 38 : Entrar en el modo de marcación
DIRECT : Realice una llamada
1 — 6 : Selecciona la marcación predefinida.
0 — 9 : Introducir un dígito en el modo de
#FM+ : Introducir “#” en el modo de
*AM– : Introducir “*” en el modo de
+¢ : Introducir “+” en el modo de
4 : Borra el número de teléfono
Recepción de una llamada:
Llamada en espera:
SRC : Contestar otra llamada entrante
1 : Continuar con la llamada actual.
Durante una llamada:
SRC : Finalizar la llamada.
ENT 38 : Cambiar entre el modo de
marcación numérica.
marcación numérica.
marcación numérica.
marcación numérica.
introducido.
: Responda la llamada.
: Contestar otra llamada entrante con
la llamada actual suspendida.
después de finalizar la llamada
actual.
conversación privada y el modo de
conversación manos libres.
88 Español
Page 89

Escuchar el audio del Bluetooth
Preparativos : Tiene que registrar su reproductor de audio antes de utilizarlo con esta unidad.
(página 84)
TAG
VOICE
PAR
iPod
Pulse para seleccionar el archivo.
Mantenga pulsado para adelantar
o retroceder rápidamente.
Pulse para detener la reproducción (pausa).
Pulse de nuevo para reanudar la reproducción.
1 Pulse
SRC para seleccionar “BT AUDIO”.
2 Pulse 4 / ¢ para seleccionar un
archivo.
Los reproductores de audio de Bluetooth
que no son compatibles con AVRCP (Perfil de
Audio/Vídeo por Control Remoto) no pueden
utilizarse con esta unidad. Utilizar desde el
reproductor de audio.
Algunas funciones no pueden utilizarse desde
el reproductor de audio Bluetooth.
Los altavoces desde los que se reproduce
el audio cambian dependiendo del ajuste
de Bluetooth “BT HF/AUDIO”. La opción
predeterminada es la delantera. (página 92)
Cómo seleccionar Repetir reproducción
Pulse repetidamente el botón numérico
4(REP) para realizar la selección.
FILE REPEAT, REPEAT OFF
Cómo seleccionar Reproducción aleatoria
Pulse repetidamente el botón de número
3 (ALL RDM) para realizar la selección.
RANDOM ON, RANDOM OFF
Cambio entre dispositivos Bluetooth
Pulse el botón numérico 5.
Aparece el nombre del dispositivo
seleccionado actualmente.
Español 89
Page 90

Configuración de Bluetooth
Registro de un dispositivo Bluetooth (emparejamiento)
Registro desde esta unidad
1 Pulse para entrar en el modo Bluetooth.
2 Gire la rueda de volumen para seleccionar
[SETTINGS] y, después, púlsela para entrar.
3 Gire la rueda de volumen para seleccionar
[PAIRING] y, después, púlsela para entrar.
4 Gire la rueda de volumen para seleccionar
[DEVICE SEARCH] y, después, púlsela para
entrar.
Busque el dispositivo Bluetooth.
Cuando se haya completado la búsqueda,
aparecerá “FINISHED”.
5 Gire la rueda de volumen para seleccionar
un nombre de dispositivo Bluetooth y, a
continuación, púlsela para confirmar.
6 Aparece “CONFIRM DVC”
Si aparece “PAIRING OK”, proceda al paso 9.
Si aparece “PIN CODE” proceda al paso 7.
Si aparece “*** NG” , pulse la rueda de
volumen. Proceda al paso 6.
7 Introduzca el código PIN
Para seleccionar el número, gire la rueda de
volumen.
Para desplazarse al siguiente dígito, pulse
¢.
Para eliminar el último dígito, pulse 4.
8 Pulse la rueda de volumen para transmitir
el código PIN.
Si aparece “PAIRING OK”, el registro ha
finalizado. Si el mensaje de error aparece
incluso cuando el código PIN es correcto,
intente el procedimiento que se menciona
en <Registro de un dispositivo Bluetooth
especial>.
9 Mantenga pulsado
procedimiento.
Para cancelar el modo Bluetooth, pulse .
Si existen 5 o más dispositivos Bluetooth
para finalizar el
registrados, no puede registrar un nuevo
dispositivo Bluetooth.
Registro de un dispositivo Bluetooth
especial
1 Pulse para entrar en el modo Bluetooth.
2 Gire la rueda de volumen para seleccionar
[SETTINGS] y, después, púlsela para entrar.
90 Español
3 Gire la rueda de volumen para seleccionar
[PAIRING] y, después, púlsela para entrar.
4 Gire la rueda de volumen para seleccionar
[S-DVC SELECT] y, después, púlsela para
entrar.
5 Gire la rueda de volumen para seleccionar
un nombre de dispositivo y, a continuación,
púlsela para confirmar.
6 Realice el paso 4 del procedimiento
<Registro desde esta unidad> y finalice el
registro (emparejamiento).
Si el nombre del dispositivo no aparece en la
lista, seleccione “OTHER PHONE”.
Selección del dispositivo Bluetooth
1 Pulse para entrar en el modo Bluetooth.
2 Gire la rueda de volumen para seleccionar
[SETTINGS] y, después, púlsela para entrar.
3 Gire la rueda de volumen para seleccionar
[PAIRING] y, después, púlsela para entrar.
4 Gire la rueda de volumen para seleccionar
[PHONE SELECT] o [AUDIO SELECT],
después púlsela para entrar.
5 Gire la rueda de volumen para seleccionar
un nombre de dispositivo Bluetooth.
6 Pulse la rueda de volumen para conf igurar
el dispositivo Bluetooth.
“ (nombre del dispositivo)”: El dispositivo
Bluetooth seleccionado está ocupado.
“- (nombre del dispositivo)”: El dispositivo
Bluetooth seleccionado se encuentra en
modo de espera.
“(vacío) (nombre del dispositivo)“: El
dispositivo Bluetooth no está seleccionado.
Si ya se ha seleccionado un teléfono móvil,
quite la selección y después seleccione uno
diferente.
7 Mantenga pulsado
procedimiento.
Para cancelar el modo Bluetooth, pulse .
Prueba de registro del dispositivo Bluetooth
Puede comprobar si el dispositivo Bluetooth
puede registrarse usando esta unidad.
1 Mantenga pulsado
modo de emparejamiento fácil
Aparece “PAIRING”.
Busque el dispositivo Bluetooth.
para finalizar el
para entrar en el
Page 91

Cuando se haya completado la búsqueda,
aparecerá “FINISHED”.
Si aparece “(nombre del dispositivo)”,
seleccione "[NEW DEVICE]" y pulse la rueda
de control.
Si aparece “DEVICE FULL”, borre un
dispositivo Bluetooth e inténtelo de nuevo.
1. Gire la rueda de volumen para
seleccionar el dispositivo Bluetooth y, a
continuación, manténgala pulsada para
confirmar.
2. Gire la rueda de volumen para
seleccionar “YES” y, después, púlsela
para confirmar.
2 Gire la rueda de volumen para seleccionar
un nombre de dispositivo Bluetooth y
manténgala pulsada para confirmar.
Aparece “BT TEST MODE”.
3 Aparece “CONFIRM DVC”.
Si aparece “PAIRING OK”, proceda al paso 6.
Si aparece “PIN CODE” proceda al paso 4.
Si aparece “*** NG” , pulse la rueda de
volumen. Proceda al paso 3.
4 Introduzca el código PIN
Gire la rueda de volumen para seleccionar
el número.
Para desplazarse al siguiente dígito, pulse
¢.
Para eliminar el último dígito, pulse 4.
5 Pulse la rueda de volumen para transmitir
el código PIN.
6 Se realiza la conexión y aparece “OK” o
“N G”.
“PAIRING”: Registro en esta unidad
“HF CONNECT”: Dispositivo manos libres
“AUD CNT”: Reproducción de audio
“PB DL”: Descarga de la agenda telefónica
7 Pulse
para salir del modo de
emparejamiento.
Los datos (agenda telefónica, etc.) del
teléfono móvil en el que se ha comprobado la
conexión no permanecen en esta unidad.
Configuración de Bluetooth
1 Pulse para entrar en el modo Bluetooth.
2 Gire la rueda de volumen para seleccionar
[SETTINGS] y, después, púlsela para entrar.
3 Gire la rueda de volumen para seleccionar
y, después, púlsela para confirmar.
Consulte la siguiente tabla para realizar la
selección.
Repita el paso 3 hasta que el elemento
deseado se seleccione/active.
Pulse para volver a la opción anterior.
4 Mantenga pulsado
procedimiento.
Para cancelar el modo Bluetooth, pulse .
para finalizar el
Opción Ajuste seleccionable (Predefinido: *)
PAIRING
DEVICE SEARCH R egistra un disp ositivo Blueto oth (emparejamiento). (Para los d etalles, consult e la página 90.)
PHONE SELECT Sel ecciona una conex ión al teléfono móv il. (Para los detalle s, consulte la página 9 0.)
AUDIO SE LECT Selecci ona una conexión a u n reproductor de a udio Bluetooth. (Pa ra los detalles, co nsulte la página 90.)
S-DVC SELE CT (Par a los detalles, con sulte la página 90.)
DEVICE DELETE Cancelación del registro del dispositivo Bluetooth.
1. Gire la rueda de volum en para seleccio nar el dispositiv o Bluetooth y, a continuac ión, púlsela para co nfirmar.
2. Gir e la rueda de volumen p ara seleccionar “ YES” y, después, púls ela para confirma r.
DETAILED SET
PIN CODE EDIT Espe cifica el códi go PIN que se requiere a l registrar es ta unidad utiliz ando el dispositi vo Bluetooth. De f orma
predeterminada, se encuentra especi ficado “0000”.
1. Gire la rueda de volum en para seleccio nar el número.
Para despl azarse al siguie nte dígito, pulse ¢.
Para eliminar e l último dígito, puls e 4.
2. Puls e la rueda de volumen p ara registra r un código PIN
AUTO ANSW ER O FF: No responde la llamada telefónica automáticamente. ; 0: Responde la llamada telefónica automáticamente de
inmediato. ; 1 – 8 * –99: Conte sta automática mente el teléfono mó vil después de un lap so de 1 – 99 segundo s.
Sigue en la página siguiente
Español 91
Page 92

Opción Ajuste seleccionable (Predefinido: *)
RECONNECT ON *: Vuelve a con ectar automát icamente el dispos itivo Bluetoot h seleccionado cu ando la onda de radio es
suficientemente intensa, incluso después de que se haya desconec tado. ; OFF: Se cancela.
Cuando se ac tiva esta fu nción, el disposi tivo Bluetooth se v uelve a conect ar si se ha desconec tado seleccio nando
[PHONE SELECT]/ [AUDI O SELEC T].
BT HF/AUDIO FRONT *: Emite audio des de los altavoces d elanteros. ; ALL: Prop orciona salida de a udio desde todos l os altavoces.
CALL BEEP ON *: Defin e si debe emitirs e un sonido del altavoz c uando se produce un a llamada entrante. ; OFF: S e cancela.
BT F/W UPDATE Muestra la v ersión de firmw are y actualiza el f irmware.
MIC GAIN 1 — 20 * — 30: Ajus ta la sensibilidad d el micrófono par a una llamada telefóni ca o ajusta la voz de la per sona
que llama.
NR LEVEL –1 — 0 * — +1: Reduce el ruido gener ado por el entorno s in cambiar el volumen d el micrófono integ rado o
ajusta la voz d el interlocutor c uando no se escuc ha con claridad. Si se aj usta en “+” aumenta la re ducción del ruido .
EC LEVEL –1 — 0 * — +1: Ajuste el nivel de un a cancelación de eco. S i se ajusta en “+” aumenta la reducción d e la
cancelaci ón de eco.
SMS (Servicio de mensajes cortos)
Descarga de SMS
1 Pulse para entrar en el modo Bluetooth.
2 Gire la rueda de volumen para seleccionar
[SETTINGS] y, después, púlsela para entrar.
3 Gire la rueda de volumen para seleccionar
[SMS] y, después, púlsela para entrar.
4 Gire la rueda de volumen para seleccionar
[SMS DOWNLOAD] y, después, púlsela para
entrar.
5 Comience la descarga
Durante la descarga: Aparece
“D OWNLOAD ING”.
Después finalizar la descarga: Aparece
“CO MPLE TE”.
6 Mantenga pulsado
procedimiento.
Para cancelar el modo Bluetooth, pulse .
El teléfono móvil debe ser compatible con
para finalizar el
la transmisión de SMS utilizando Bluetooth.
Pueden requerirse ajustes en el teléfono móvil.
Si el teléfono móvil no admite una función
SMS, no se muestra el elemento de descarga
SMS en el modo de configuración.
Al descargar SMS del teléfono móvil, se abrirán
los mensajes del teléfono móvil que no han
sido abiertos.
Pueden descargarse hasta 149 mensajes
cortos leídos y no leídos.
92 Español
Visualizar el SMS
¤
Para prevenir accidentes automovilísticos, el
conductor no debe leer el SMS mientras se
encuentre conduciendo.
Al recibir un nuevo mensaje
Aparece “SMS RECEIVED”.
Visualización del SMS
1 Pulse para entrar en el modo Bluetooth.
2 Gire la rueda de volumen para seleccionar
[SMS INBOX], después púlsela para
ingresar.
3 Gire la rueda de volumen para seleccionar
un mensaje.
Alterna entre el nombre, el número de
teléfono y la fecha de recepción del
mensaje, pulse DISP.
4 Pulse la rueda de volumen para que
aparezca el texto.
Para desplazarse a través del mensaje, pulse
la rueda de volumen.
Para volver a la lista de mensajes, pulse la
rueda de volumen.
5 Mantenga pulsado
procedimiento.
Para cancelar el modo Bluetooth, pulse .
para finalizar el
Page 93

El mensaje que no ha sido abierto se visualiza
al inicio de la lista. Se visualizan otros mensajes
en el orden en que se han recibido.
No se puede visualizar el SMS que se ha
recibido cuando el teléfono móvil no estaba
ligado con Bluetooth. Tiene que descargarlo.
No se puede mostrar el mensaje corto durante
la descarga.
Los mensajes no leídos van precedidos por un
asterisco (*).
Ajuste del mensaje de respuesta
1 Pulse para entrar en el modo Bluetooth.
2 Gire la rueda de volumen para seleccionar
[SETTINGS] y, después, púlsela para entrar.
3 Gire la rueda de volumen para seleccionar
[SMS] y, después, púlsela para entrar.
4 Gire la rueda de volumen para seleccionar
[SMS MESSAGE] y, después, púlsela para
entrar.
5 Gire la rueda de volumen para seleccionar
un mensaje, luego púlsela para confirmar.
Cuando se selecciona el [USER], se muestra
un mensaje. Pulse la rueda de volumen de
nuevo.
6 Mantenga pulsado
para finalizar el
procedimiento.
Crear un mensaje original
1 Pulse para entrar en el modo Bluetooth.
2 Gire la rueda de volumen para seleccionar
[SETTINGS] y, después, púlsela para entrar.
3 Gire la rueda de volumen para seleccionar
[SMS] y, después, púlsela para entrar.
4 Gire la rueda de volumen para seleccionar
[SMS MESSAGE] y, después, púlsela para
entrar.
5 Gire la rueda de volumen para seleccionar
[USER], y, a continuación, manténgala
pulsada para confirmar.
6 Gire la rueda de volumen para seleccionar
el carácter.
Para moverse a la siguiente columna, pulse
4 / ¢.
Para seleccionar el tipo de carácter, pulse
DISP.
Para eliminar este carácter, pulse .
Para eliminar todos los caracteres,
mantenga pulsado
Puede introducir caracteres alfanuméricos
.
con las diez teclas del mando a distancia.
7 Pulse la rueda de volumen para conf irmar.
8 Mantenga pulsado
para finalizar el
procedimiento.
Configuración de SMS
1 Pulse para entrar en el modo Bluetooth.
2 Gire la rueda de volumen para seleccionar
[SETTINGS] y, después, púlsela para entrar.
3 Gire la rueda de volumen para seleccionar
[SMS] y, después, púlsela para entrar.
4 Gire la rueda de volumen para seleccionar
y, después, púlsela para confirmar.
Consulte la siguiente tabla para realizar la
selección.
5 Mantenga pulsado
procedimiento.
Para cancelar el modo Bluetooth, pulse .
para finalizar el
Opción Ajuste seleccionable (Predefinido: *)
SMS
SMS DOWNLOAD Desca rga un mensaje cor to. (Para los detalle s, consulte la página 92.)
SM S REP LY AUTO * : Responde automáticamente al SMS recibido. ; MANUAL: Establ ece si se responde a l SMS recibido. ;
OFF : No resp onde al SMS recibid o.
SMS MESSAGE Puede seleccionar un mensaje de respuesta.
[SM S RE PLY]:
– Cuand o se selecciona “AUTO”, solo se res ponde al SMS si se rec ibe desde un númer o de teléfono regis trado en la agenda te lefónica. Si se
recibe un S MS desde un teléfo no no registrad o en la agenda telefón ica, puede respo nder al mismo como si s eleccionara “MANUAL”.
– Cuand o se recibe un SMS con “ MANUAL” selecc ionado, aparece “RE PLY Y/ N”. Si se selecciona “ Y” se envía la respue sta. Si se selecc iona
“N” se cance la la respuesta. S i se selecciona “Y ” se puede selecc ionar un mensaje.
– Si fa lla el envío de un mensaj e de respuesta, ap arece “SEND ERROR ”. Mientra s se visualiza “RE SEND Y/ N” en la pantalla, si se sele cciona
“Y” se re envía la respuest a. Si se selecciona “ N” se cancela la respu esta.
Español 93
Page 94

Configuraciones de las funciones
1 Pulse SRC para seleccionar una fuente distinta de “STANDBY”.
2 Pulse la rueda de volumen para entrar en el modo [FUNCTION].
3 Gire la rueda de volumen para seleccionar [AUDIO CONTROL] o [SETTINGS] y, después,
púlsela para entrar.
4 Gire la rueda de volumen para seleccionar y, después, púlsela para confirmar.
Consulte la siguiente tabla para realizar la selección.
Repita el paso 4 hasta que el elemento deseado se seleccione/active.
Pulse para volver a la opción anterior.
5 Mantenga pulsado
[AUDIO CONTROL] : Cuando se escuche cualquier fuente, excepto en el estado STANDBY o el modo
Bluetooth.
Opción Ajuste seleccionable (Predefinido: *)
SUB-WLEVE L –15 — 0 * — +15: Ajust a el nivel de salida del su bwoofer.
BASSLEVEL –8 — 0 * — +8: Memori a del tono de fuente: Aj usta el nivel a memo rizar para cada f uente. (Antes de reali zar un
MIDLEVEL
TRELEVEL
EQ PRO KDC-X796únicamente
BASS ADJU ST BASS C TR FRQ 60/ 80/ 100 */ 200: S elecciona la frecuencia central.
MID ADJUS T M ID CTR FRQ 0.5K/ 1.0K */ 1.5K/ 2.5K: Selecciona la frecuencia central.
TRE ADJUST T RE CTR FRQ 10.0K / 12.5K */ 15.0K/ 17.5K: Selecciona la frecuencia central.
PRESET EQ NATURAL */ USER/ RO CK/ POPS/ EAS Y/ TOP40/ JAZ Z/ POWERFUL: Selecciona un modo de sonido predefinido
BASSBOOS T B.BOOST LV1/ B.BOOS T LV2/ B.B OOST LV3: Selecciona su nive l de refuerzo de g raves preferid o. ;
LOUDNESS LOUDNESS LV1 */ LOUDNESS LV2: Sel ecciona el refue rzo de las frecu encias altas y bajas p referidas par a producir
BALANCE L15 — 0 * — R15: Ajusta el balance de sa lida de los altavoces i zquierdo y derech o.
FADER R15 — 0 * — F15: Ajust a el balance de salida de lo s altavoces tras ero y delantero.
SUBWOOFER SET ON *: Ac tiva la salida del subw oofer. ; OFF: Se cancela.
DETAILED SET
HPF THROUGH *: Todas las s eñales se envían al alt avoz delantero. ;
LPF SUBWOOFER THROUGH *: Todas las señ ales se envían al subwo ofer. ;
para finalizar el procedimiento.
ajuste, se leccione la fuente q ue desea ajusta r.)
BASSLEVEL –8 — 0 * — +8: Ajus ta el nivel.
BASS Q FACTOR 1.00 */ 1.25/ 1.50/ 2.00: Ajust a el factor de cali dad.
BASS EXTEND ON: Acti va la ampliación de grave s. ; OFF *: Se cancela.
MIDLEVEL –8 — 0 * — +8: Ajus ta el nivel.
MID Q FACTOR 0.75/ 1.00 */ 1.25: Ajusta el fac tor de calidad.
TRELEVEL –8 — 0 * — + 8: Ajusta el nivel.
adecuad o para el género de mús ica. (Selecciona [USER] par a utilizar los ajus tes de graves, med ios y agudos
personalizados.)
OFF *: Se cancela.
un sonido bi en equilibrado a un ni vel de volumen bajo. ; OFF: S e cancela.
100/ 120/ 150 (HZ): Se cort an las frecuenc ias inferiores al v alor especif icado.
85/ 120/ 160 (HZ): Se cor tan las frecuenc ias superiores a l valor especif icado.
94 Español
Page 95

Opción Ajuste seleccionable (Predefinido: *)
SUB-W PHASE REVER SE (180°)/ NORMAL (0°) *: Selecciona e l ángulo de fase de la s alida del subwoofer e n línea con la salida de
los altavo ces, para lograr un d esempeño óptim o. (Sólo puede selec cionarse si se ha se leccionado un ajus te distinto
de [THROUGH] para [LPFSUBWOOFER].)
SUPREME SET ON *: C rea sonido realist a al interpolar los co mponentes de alta f recuencia que s e pierden en la compre sión de
audio AAC/ M P3/ WMA. ; OFF: Se cancela. (Só lo puede selecci onarse durante la re producción de un dis co AAC/
MP3/ WMA o de un dispo sitivo USB, excepto i Pod.) (Sólo puede sele ccionarse si se ha aj ustado “CD”/ “USB” como
la fuente.)
VOLUME OFFSET –8 — 0 * — +8 (para AUX) ; –8 — 0 * (para otras fu entes): Prede fine el nivel de ajus te de volumen para ca da
fuente. El n ivel de volumen aument a o disminuye automát icamente al cambia r la fuente. (Antes de rea lizar un
ajuste, se leccione la fuente q ue desea ajusta r.)
Seleccio ne una fuente antes d e realizar un ajuste e n la memoria de tono de la f uente, [EQ PRO].
[SUB-W LEVEL / LPF SUBWOOFER/ SUB -W PHASE] solo pue de seleccionars e si [SUBWOOFER SET] está aju stado en [ON].
[SETTINGS]
Opción Ajuste seleccionable (Predefinido: *)
AUX NAME SET AUX */ DVD/ PORTABLE/ GAME / VIDEO/ TV: Seleccio na el nombre desead o para el componente c onectado. (Sol o
puede se leccionarse si s e selecciona “AUX” como fu ente.)
CLOCK
CLOCK ADJUST (Para los det alles, consulte la pág ina 73.)
TIME SYNC ON: Sinc roniza los datos ho rarios de la emisor a Radio Data System y e l reloj de esta unida d. ; OFF *: Se cancela.
DISP&KEY
COLOR SELEC T VARIABLE SC AN */ COLOR 01 — 24/ USER: Selecciona su color de iluminación de teclas preferido.
Ajuste de lo s valores RGB
Puede cre ar su propio color de “USE R” (cuando se selecc iona [COLOR 01] — [COLOR 24]).
1. Mantenga pulsada la r ueda de volumen par a entrar en el modo de a juste de color de det alle.
4
/ ¢ ara selecc ionar el color (R/ G/ B) a aju star. Gire la rueda de vo lumen para ajust ar el nivel (0 —
2. Puls e
9).
3. Pul se la rueda de volumen p ara confirmar y s alir.
DISP DIMMER ON: La iluminaci ón de la pantalla se osc urece. ; OFF *: Se cancela.
TEXT SCROLL AUTO */ ONCE: Selecciona entre el desplazamiento automático de la información en pantalla o un único
desplazamiento. ; OFF: Se cancela.
BT DVC STATUS P uede visualizar el e stado de conex ión, la intensidad de la s eñal y el nivel de la bater ía del dispositiv o Bluetooth.
HF-CON: E stado de la cone xión del teléfon o móvil. ; AD-CON: E stado de la conex ión para audio BT. ;
BAT T: Nivel de la b atería del teléfon o móvil. ; SIGNAL: Fuerza de la s eñal del teléfono m óvil.
KEY DIMMER LV1: Atenú a la iluminación de las te clas. ; LV2: Atenúa la iluminación de la s teclas más oscuro q ue LV1. ;
OFF *: Se cancela.
Español 95
Page 96

Instalación/conexión
Lista de componentes:
A Placa frontal ..................................................................(×1)
B Escudete ......................................................................... (×1)
C Manguito de montaje............................................(×1)
D Mazo de conductores ............................................ ( ×1)
E Herramienta de extracción ................................(×2)
F Tornillo de cabeza plana
(para coches Nissan) ...............................................(×4)
G Tornillo de cabeza redonda
(para coches Toyota) .............................................. (×4)
H Micrófono (3 m) (Sólo KDC-X796) ................... (×1)
Procedimiento básico
1 Quite la llave del interruptor de encendido;
después, desconecte el terminal · de la
batería del automóvil.
2 Realice las conexiones de los cables de
entrada y salida correspondientes.
\ <Conexión del cableado> (página 98)
3 Instale la unidad en su automóvil.
\ <Instalación de la unidad> (página
99)
4 Vuelva a conectar el terminal · de la
batería del automóvil.
5 Reinicialice la unidad. (página 72)
¤Advertencia
La unidad solo puede instalarse en un
automóvil con fuente de alimentación de 12 V
CC con masa negativa.
Si conecta el cable de encendido (rojo) y
el cable de la batería (amarillo) al chasis
del automóvil (tierra), podría producir un
cortocircuito y esto a su vez, un incendio.
Conecte siempre esos cables a la fuente de
alimentación que pasa por la caja de fusibles.
Desconecte el terminal negativo de la batería
y realice todas las conexiones eléctricas antes
de instalar la unidad.
Enrolle los cables no conectados con una
cinta de vinilo u otro material similar para que
queden aislados. Para evitar cortocircuitos, no
retire las tapas de los extremos de los cables o
terminales no conectados.
Asegúrese de volver a conectar a masa esta
unidad al chasis del automóvil después de la
instalación.
96 Español
¤Precaución
Si no se enciende la alimentación (se muestra
“PROTECT”), el cable de altavoz puede que
haya sufrido un cortocircuito o que haya
tocado el chasis del vehículo y se haya
activado la función de protección. Por lo tanto,
el cable del altavoz debe ser revisado.
Si el encendido de su automóvil no está
provisto de la posición ACC, conecte los cables
de encendido a una fuente de alimentación
que pueda conectarse y desconectarse con
la llave de encendido. Si conecta el cable
de encendido a una fuente de alimentación
que recibe un suministro constante de
alimentación tales como los cables de la
batería, la batería podría descargarse.
No utilice sus propios tornillos. Utilice sólo los
tornillos suministrados.
Instale esta unidad en la consola de su
vehículo. Asegúrese de que la placa frontal
no golpee la tapa de la consola (si la hubiera)
cuando la abre y la cierra.
Después de instalar la unidad, compruebe que
las lámparas de freno, las luces intermitentes,
el limpiaparabrisas, etc. funcionen
satisfactoriamente.
Instale la unidad en un ángulo de 30˚ o
menos.
Si se funde el fusible, en primer lugar
asegúrese de que los cables no hayan tocado
otras partes y causado un cortocircuito, y
luego reemplace el fusible usado por otro del
mismo régimen.
Conecte los cables de los altavoces a cada
uno de los terminales correspondientes. La
conexión compartida de los cables · o la
conexión a tierra de los mismos a cualquier
parte metálica del automóvil podrá dañar la
unidad o impedir su correcto funcionamiento.
Cuando se han conectado solamente dos
altavoces al sistema, conecte los conectores ya
sea a ambos terminales de salida delanteros,
o a ambos terminales de salida traseros (o sea,
no mezcle terminales delanteros y traseros).
Page 97

La instalación y cableado de este producto
requiere de habilidad y experiencia. Por
seguridad, deje que un profesional realice este
trabajo.
Si tiene problemas durante la instalación,
consulte con su distribuidor Kenwood.
La recepción podría reducirse si existen
objetos metálicos cerca de la antena
Bluetooth.
iPod
Unidad de antena Bluetooth
Para una buena recepción
Para garantizar una buena recepción, tenga en
cuenta lo siguiente:
Comuníquese con el teléfono móvil dentro de
la distancia de línea de visión de 10 m (30 pies).
El intervalo de comunicación puede acortarse
en función del entorno de la zona. El intervalo
de comunicación también puede acortarse
cuando hay un obstáculo entre esta unidad y
el teléfono móvil. El intervalo de comunicación
máximo mencionado anteriormente (10 m) no
siempre está garantizado.
Una estación emisora o un radio portátil
ubicado en los alrededores puede interferir
con la comunicación debido a una señal
demasiado fuerte.
¤ PRECAUCIÓN
Instale esta unidad en la consola de su
vehículo.
No toque las partes metálicas de la unidad
durante o justo después de utilizar la unidad.
Las partes metálicas, tales como el radiador o
la carcasa, pueden estar muy calientes.
Español 97
Page 98

Conexión del cableado
Conector USB
Entrada AUX (estéreo)
Utilice el cable para clavija mini (3,5
mm; 1/8”) de tipo estéreo y sin resistencia.
Fusible (10 A)
Mazo de
conductores D
Blanco
Blanco/Negro
Gris
Gris/negro
Verde
Verde/negro
Púrpura
Púrpura/negro
Si no se ha realizado ninguna conexión, no deje que el cable sobresalga de la lengüeta.
Azul/blanco
(Cable de control de
alimentación/control de la
antena)
Marrón
(Silenciar cable del control)
Entrada de antena
FM/AM (JASO)
R
Salida delantera
Salida trasera
L
Salida del Sub Woofer
Hacia el altavoz delantero izquierdo
Hacia el altavoz delantero derecho
Hacia el altavoz trasero izquierdo
Hacia el altavoz trasero derecho
Conecte ya sea el terminal de control de potencia,
P.CONT
al utilizar el amplificador de potencia opcional, o el
terminal de control de la antena en el vehículo. (máx.
300 mA, 12 V)
Para conectar el sistema de navegación Kenwood,
MUTE
consulte el manual del sistema de navegación.
Cable de
antena
Micrófono H
(Sólo KDC-X796)
Luz azul/amarilla
(Cable del mando a
distancia para la dirección)
Azul
REMOTE CONT
STEERING WHEEL
REMOTE INPUT
ANT. CONT
Caja de fusibles del vehículo
Rojo (Cable de encendido)
Amarillo (Cable de la batería)
Negro (Cable a tierra)
A un cuerpo metálico o chasis del automóvil
98 Español
Para utilizar la función de mando a distancia en el
volante, es necesario un adaptador remoto exclusivo (no
suministrado) para su vehículo.
(Sin utilizar)
Interruptor de la llave de
ACC
encendido
Caja de fusibles
del vehículo
(fusible principal)
+
–
Batería
Page 99

Instalación de la unidad
1
3
2
1
B
A
Antes de fijarlo, compruebe
2
si la dirección del escudete es
correcta.
(Ganchos más anchos en
el lado inferior.)
4
5
B
A
Instalación sin usar el manguito de montaje (coche japonés)
1 Extraiga el manguito de montaje y el
escudete B de la unidad.
2 Alinee los orificios de la unidad (en
ambos lados) con el soporte de montaje
del vehículo y asegure la unidad con los
tornillos suministrados.
Conecte el mazo de conductores
a la unidad. El resto de la conexión
C
de conductores fue finalizada
anteriormente. (página 98)
1
3
C
Doble las pestañas
correspondientes para
sostener el manguito de
montaje firmemente en
posición.
N
T
N
T
B
8 mm
MAX.
ø5mm
F
ø5mm
G
D
2
Salpicadero del
automóvil.
T/N
T: Automóviles
Toyota
8mm
MAX.
N: Automóviles
Nissan
Desmontaje de la unidad
1 Retire la placa frontal A.
2 Enganche las clavijas de las herramientas
de extracción E en los orificios de ambos
lados del escudete B y, a continuación,
extráigalo.
3 Introduzca profundamente las
herramientas de extracción E en las
ranuras de cada lado y, a continuación, siga
la dirección de las flechas tal y como se
muestra a la derecha.
E
B
C
3
1
2
A
E
Español 99
Page 100

Instalación de la unidad del micrófono (sólo KDC-X796)
1 Compruebe la posición de instalación del
micrófono H.
2 Elimine la grasa y la suciedad de la
superficie de instalación.
3 Instale el micrófono.
4 Conecte el cable del micrófono a la caja del
manos libres y fíjelo en varias posiciones
utilizando cinta, etc.
Instale el micrófono lo más lejos posible del
teléfono móvil.
Fije un cable con cinta adhesiva.
H
Retire el papel de cinta
adhesiva de doble
cara para fijarlo en el
micrófono o en el lugar
indicado anteriormente.
Gire el micrófono hacia
el conductor.
Localización de averías
Síntoma Soluciones/Causas
El sonido n o se escucha. Aju ste el volumen al nivel ó ptimo. / Inspecci one los cables y las con exiones.
Aparece “PR OTECT” y no se pued e realizar
ninguna operación.
El recepto r no funciona en abs oluto. Reinicialice la unidad.
Recepci ón de radio defic iente. / Ruidos
estáticos mientras se escucha la radio.
Aparece “MEMORY FULL”. L a memoria de etiqu etas del receptor d e HD Radio está llen a.
Aparece “N O TAG FNC”. E l iPod conectad o no admite la funció n de etiquetado d e iTunes.
Aparece “ TAG ERROR ” La unidad no pu ede finalizar la t ransferencia d e información et iquetada al iPod.
“IN” parpadea. El reprodu ctor de CD no est á funcionando ap ropiadamente. Vuelv a a colocar el disco
El CD-R /CD-RW no puede re producirse ni s e
pueden omitir pistas.
Algunas vece s el sonido del disc o se
interrumpe.
Aparece “N A FILE”. La unidad re produce un archivo de a udio no compatible .
Aparece “N O DISC”. Insert e un disco reproduci ble en la ranura de carg a.
Aparece “ TOC ERROR”. El C D está muy sucio. / El C D está boca aba jo. / El CD está muy ray ado. Pruebe otro di sco.
100 Español
Asegúr ese de que los termi nales de los conduc tores de altavoz es tén correct amente
cubier tos con cinta aislante y l uego reposicio ne la unidad. Si el mensaj e “PROTECT” no
desapa rece, póngase en cont acto con su centro d e servicio más ce rcano.
Conecte firmemente la antena. / Extr aiga completamente la antena.
correc tamente. Si el probl ema no mejora, apagu e la unidad y consulte al cent ro de servicio
más cercano.
Inser te un CD-R/CD-R W finalizado (fin alícelo con el componen te que utilizó para
grabarlo).
Detenga la re producción mient ras conduce por ca minos accidentad os. / Expulsa el di sco. /
Inspecci one los cables y las co nexiones.
 Loading...