

Page 1

DRV-830
GPS Integrated Dashboard Camera
INSTRUCTION MANUAL
B5A-2175-11 (E)© 2018 JVC KENWOOD Corporation
Page 2

ContentsContents
Drive Recorder Function Guide ..........................4
About the setup function ......................................4
About the recording functions ...........................4
Setting the microphone sound during
recording ..........................................................................6
Accessories ................................................................7
Precautions for Use .................................................8
Precautions and notices ..........................................8
Caring for your device ..............................................8
Precautions for installation .................................10
Precautions for use ..................................................11
Cleaning the device ................................................11
If you notice a problem with the device ...11
How to Install ......................................................... 12
Installation Procedure ............................................12
How to Wire ............................................................ 14
Part Names and Functions ................................ 15
Before Using the Driving Support
Functions ................................................................. 17
Adjust according to the vehicle ......................17
Before Using ........................................................... 19
Inserting and ejecting SD cards ...................... 19
Turning the power on and off ..........................19
Turning the power on and off manually....19
Formatting SD cards ...............................................19
Recording when the power is on ...................21
Parked recording when the power is off ...23
Recording ................................................................ 24
Recording manually (manual recording) ...24
Returning to normal recording .......................24
Taking photos (still image recording) ..........24
Taking photos automatically .............................24
Indicators on the recording screen ...............25
Shortcut menu ...........................................................25
Playback ................................................................... 26
Playing files ...................................................................26
Indicators on the playback screen .................27
Protecting Files ......................................................28
Protecting Files...........................................................28
Canceling file protection .....................................28
Deleting Files ......................................................... 29
Deleting Files ...............................................................29
Configuring the Settings ................................... 31
Operating using the menu ................................31
Setting the date and time ...................................36
Using the Viewer Software ................................ 37
Installing the software ...........................................37
Playing files ...................................................................37
Outputting still pictures from the
images .............................................................................40
Outputting travel information..........................40
Backing up files ..........................................................40
Troubleshooting ................................................... 41
Appendix ................................................................. 44
Folder/file structure ................................................45
KENWOOD DRIVE REVIEWER operating
environment ................................................................45
Recording time ..........................................................46
Number of recordable files ................................46
Main Specifications .............................................. 47
Important Notice Concerning the
Software ................................................................... 48
z
The screen images and operation
examples in this document were created
for explaining the operating procedures.
There may be screen images that dier
from the actual screens or examples of
operations not actually performed.
z
The latest instruction manual, rmware
update information, etc., are available at
the JVC KENWOOD website. Please visit
the following website.
http://www.kenwood.com/cs/ce/
Disclaimer
z
Please note that JVC KENWOOD shall not
be responsible for any damages suffered by
the customer or a third party as a result of
incorrectly using this product, a failure during
use of this product, or other trouble, or due to
the use of this product, unless such liability is
acknowledged by law.
Copyrights
z
Recorded video, image, and audio content
cannot be used for other than personal
enjoyment without the consent of the
copyright holder as specified in the
Copyright Act.
z
Please note that the recording of an event
such as a show, performance, or exhibition
may be restricted even when doing so for
personal enjoyment.
2 3
Page 3
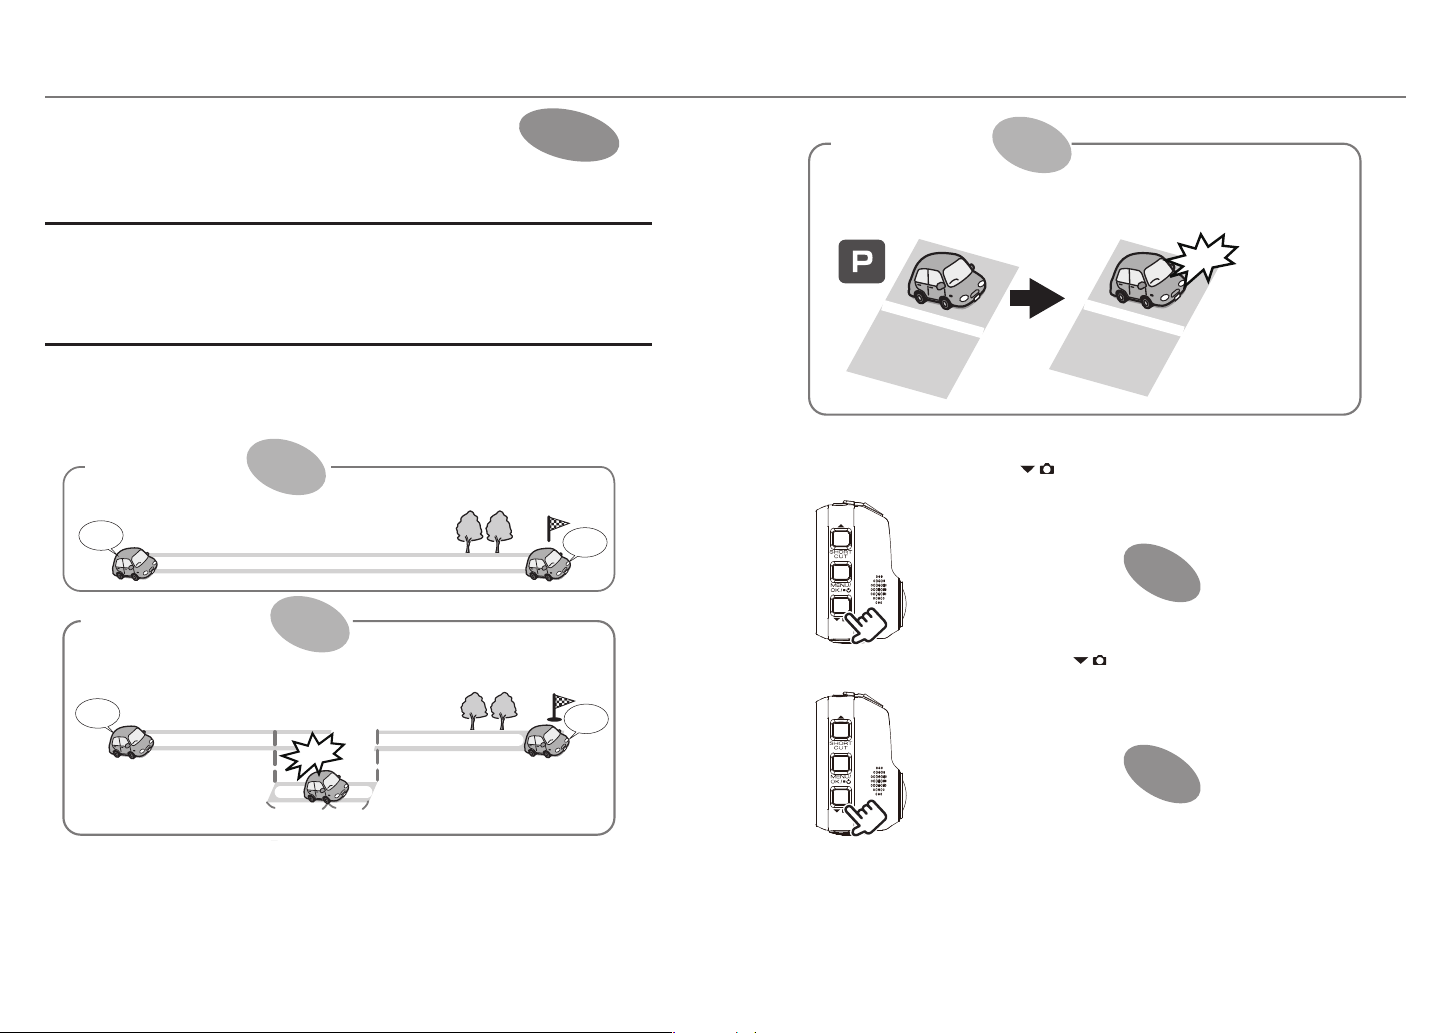
Dashboard camera Function Guide
Continuous recording
Approximately 10 seconds before impact
Arrival
Arrival
Recording is performed all the time, from when the power is turned on until it is turned o.
When the camera detects an impact, the mode switches from
continuous recording to event recording,
and the video le of the time before and after the impact was detected is saved.
Go
Go
Continuous recording
Event recording
Event recording (for approximately 25 seconds)
Continuous recording Continuous recording
Approximately 15 seconds after impact
The time for recording after the
impact is detected can be changed.
Impact
This dashboard camera records videos and still pictures and stores them
on the microSD card (hereafter referred to as “SD card”).
Be sure to insert the SD card into SD card slot 1 before using the camera.
SD card slot 2 is extend storage capacity for normal recording data.
About the setup function
The setup menu is displayed the first time the camera's power is turned on.
Follow the instructions on the menu screen to configure the settings and complete the basic
setup related to installation. The settings can also be configured in the same way using the
setup function from the MENU settings. (➜ P. 31)
About the recording functions
The camera can record images while you are driving (when the camera's power is on) (normal
recording).
Furthermore, the camera can record images before and after major impacts to the vehicle or
directly after impacts while the vehicle is running or parked (event recording/parked recording).
Continuous recording
Recording is performed all the time, from when the power is turned on until it is turned o.
Go
Event recording
When the camera detects an impact, the mode switches from
and the video le of the time before and after the impact was detected is saved.
Go
Continuous recording Continuous recording
Approximately 10 seconds before impact
P. 21
Continuous recording
P. 21
Event recording (for approximately 25 seconds)
Impact
Approximately 15 seconds after impact
continuous recording to event recording,
The time for recording after the
impact is detected can be changed.
P. 19
Arrival
Arrival
Parked recording
When the vehicle is parked, in a parking lot or elsewhere, and the engine key is turned o, the parked
recording function is set to standby, and recording starts if an impact to the vehicle is detected.
Parked recording function Standby Parked recording starts
P. 23
Impact
The CA-DR100 power cable for Dashcam (optional
accessory) is required to enable the parked recording function.
* When there was an impact between the start time (when you left the vehicle) and the stop
time (when you got into the vehicle), recording is not possible.
Other recording functions
Still image recording: When the [ ] button is pressed during recording, the image being
recorded is stored as a still image.
P. 22
Automatic still image capture: When the [ ] button is pressed and held for over 1 second
during recording, the set number of still images is captured automatically at a specific interval.
P. 22
(over 1 second)
54
Page 4
Dashboard camera Function Guide
Manual recording: Images can be stored in a manual recording folder separate from the normal
recording folder by pressing the [REC] button during continuous recording.
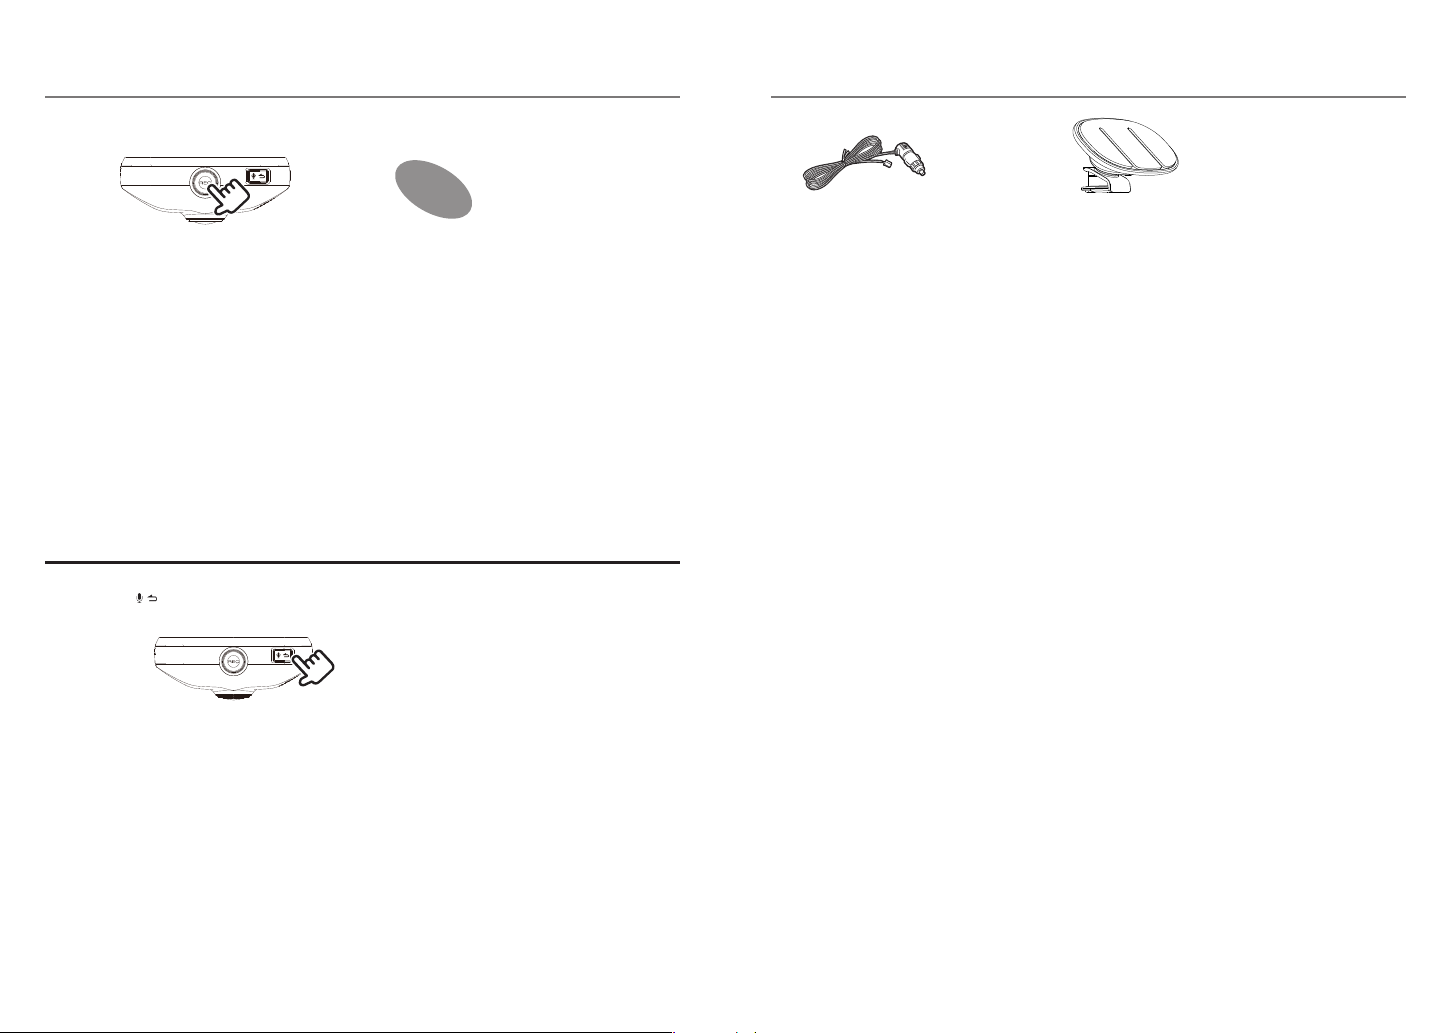
Accessories
P. 22
Changing the resolution (recording quality)
The resolution (recording quality) can be selected from among the following: “1280×720 (HDR)”,
“1920×1080 (HDR) (setting upon purchase)”, “2304×1296 (HDR)” and “2560×1440 (HDR)”. (➜ P. 33)
For a rough estimate of the recording time and number of recordable files, see Page 46 .
Overwriting recorded files
z
When “Overwrite” is set to “ON”, the old files are overwritten in the event recording, manual recording and parked recording modes. (➜ P. 32) Back up (copy) any necessary files on a computer, etc.
When set to “OFF”, recording is no longer possible once the maximum number of recorded files
for that size of SD card is reached. (➜ P. 46) You are notified of this by a warning sound, a warning
message and an indicator. Upon purchase, overwriting is set to “OFF” for event recording and
manual recording, “ON” for parked recording.
z
Overwriting cannot be switched on and off for continuous recording or still image recording. When
there is no more recordable space, old files are overwritten.
Setting the microphone sound during recording
It is possible to set whether or not to record the sound of the microphone during recording by
pressing the [ ] button. Upon purchase, this is set to “ON”. The setting switches between “ON” and
“OFF” each time the button is pressed. When set to “ON”, the MIC indicator lights green.
Cigarette lighter plug cord (4 m) × 1 Mount bracket × 1
6 7
Page 5

Precautions for Use
Precautions and notices
Warning! Do not operate the device while driving. Using this product does not change the
requirement for a driver to take full responsibility for his or her behavior. This responsibility includes
observing all traffic rules and regulations in order to avoid accidents, personal injury or property
damage.
z
For your own safety, do not operate the controls of the product while driving.
z
A window mount is needed when using the recorder in a car. Make sure that you place the
recorder in an appropriate place, so as not to obstruct the driver's view or deployment of airbags.
z
Make sure that no object is blocking the camera lens and no reflective material is placed near the
lens. Please keep the lens clean.
z
If the car's windscreen is tinted with a coating, this may impact the recording quality.
z
Connect the charger to a proper power source. The voltage requirements are found on the
product case and/or packaging.
Do not use the charger if the cord becomes damaged.
•
Do not attempt to service the unit. There are no serviceable parts inside. Replace the unit if it is
•
damaged or exposed to excess moisture.
Caring for your device
Taking good care of your device will ensure trouble-free operation and reduce the risk of damage.
z
Keep your device away from excessive moisture and extreme temperatures.
z
Avoid exposing your device to direct sunlight or strong ultraviolet light for extended periods of
time.
z
Do not place anything on top of your device or drop objects on your device.
z
Do not drop your device or subject it to severe shock.
z
Do not subject your device to sudden and severe temperature changes. This could cause
moisture condensation inside the unit, which could damage your device. In the event of moisture
condensation, allow the device to dry out completely before use.
z
The screen surface can easily be scratched. Avoid touching it with sharp objects. Nonadhesive
generic screen protectors designed specifically for use on portable devices with LCD panels may
be used to help protect the screen from minor scratches.
z
Never clean your device with the power on. Use a soft, lint-free cloth to wipe the screen and the
exterior of your device.
z
Do not use paper towels to clean the screen.
z
Never attempt to disassemble, repair or make any modifications to your device.
Disassembly, modification or any attempt at repair could cause damage to your device and even
bodily injury or property damage and will void any warranty.
z
Do not store or carry flammable liquids, gases or explosive materials in the same compartment as
your device, its parts or accessories.
z
To discourage theft, do not leave the device and accessories in plain view in an unattended
vehicle.
z
Overheating may damage the device.
Information on Disposal of Old Electrical and Electronic Equipment and Batteries
(applicable for countries that have adopted separate waste collection systems)
Products and batteries with the symbol (crossed-out wheeled bin) cannot be disposed of as
household waste.
Old electrical and electronic equipment and batteries should be recycled at a facility capable of
handling these items and their waste by products.
Contact your local authority for details in locating a recycle facility nearest to you.
Proper recycling and waste disposal will help conserve resources while preventing detrimental
effects on our health and the environment.
Notice: The sign “Pb” below the symbol for batteries indicates that this battery contains lead.
98
Page 6

Precautions for Use
Precautions for installation
z
Install the device in a position where it will not block the front view of the driver (position where
hidden by the rear-view mirror).
z
Install the device so that it is within the wiping range of the wiper.
z
Install the device in a position where it will not interfere with the movement of the rear-view
mirror.
z
Take care not to install the device over the vehicle inspection sticker or other sticker.
z
Take care not to install the device where it will interfere with driving or airbag operation.
z
When installing the device in a vehicle equipped with a driving support system, check the
instruction manual of the vehicle and then select an installation location that will not interfere
with the driving support system.
z
If the device is installed incorrectly, event recording or parked recording may not work correctly.
Refer to “How to Install” for the loosening of fixing knob, installation orientation, installation angle,
and other information and then install the device correctly.
z
Do not install the device near a digital terrestrial television antenna or an electrical component.
Doing so may reduce television receiver sensitivity or cause flickering and noise.
z
Use a commercially available cleaning cloth or the like to wipe off all dirt and grease on the
mounting surface and then fix the mount base in place. If the device is re-affixed or mounted
using, for example, general-purpose double-sided tape, the adhesion strength may weaken and
cause the device to fall.
z
After mounting the device, leave it for 24 hours before use to enable the mounting strength of
the mount bracket to improve. Failing to do so may result in the adhesion of the mount bracket
becoming weak and the device falling.
z
Fix the cord in place with tape or the like so that it does not interfere with driving.
(➜ P. 12)
Precautions for use
z
Do not block the camera lens, get dirt on it, or place a reflective object near it.
z
When LED traffic lights are recorded, video in which they appear to be flickering or flashing
may be recorded. JVC KENWOOD assumes no responsibility with regard to the distinguishing
or recording of traffic lights.
z
If coating is used on the windshield of the vehicle, recording quality may be affected.
z
There is no guarantee that the device can record video in all conditions.
Cleaning the device
z
When the device is dirty, wipe it with a dry silicone cloth or other soft cloth. If the device is very
dirty, remove the dirt with a cloth with neutral cleaner on it then wipe off the cleaner. Wiping
the device with a hard cloth or using a volatile substance such as thinner or alcohol may cause
scratches, deformation, deterioration or other damage.
z
When the lens is dirty, gently wipe it with a soft cloth dampened with water. Rubbing the lens
strongly with a dry cloth may cause scratches.
If you notice a problem with the device
If you notice a problem with the device, first refer to “Troubleshooting” ➜ P. 41and check whether
there is a way to resolve the problem.
If the device does not return to normal, turn off the power of the device and then contact your
dealer or nearest JVC KENWOOD service center.
1110
Page 7

How to Install
How to Install
Installation Procedure
Check that the vehicle is parked on a level
surface.
1. Attach the device to the mount
bracket. (accessory)
Insert the mount bracket into the bracket attachment part of the device and attach it to the device.
Mount bracket
Camera
lens side
2. Determine where to mount the device.
Determine the mounting position in reference
to “Recommended installation position”.
3. Clean the mounting surface and then
ax the device to the windshield.
Use a commercially available cleaning cloth or
the like to wipe off all dirt and grease on the
mounting surface. Peel off the release paper of
the double-sided tape on the mount bracket
and push the bracket against the windscreen
to affix it in place. Leave the device for 24 hours
before using it to enable the mounting
strength of the mount bracket to improve.
Adjust the device's mount angle, then
5.
fasten it.
When adjusting the mount angle, check that the
camera's field of vision is parallel to a flat ground
surface and that the sky to ground ratio is equal.
There is a spirit level at [MENU] – [System
settings] – [Mouting support tools] – [Level].
(➜ P. 34)
Use it to help adjustment of the mount angle.
Adjust the angle so that the moving circle
is as close as possible to the center of the
screen.
Windshield
Rear-view mirror
The “Adjust according to the vehicle”
•
adjustments must be made in order to use
the driving support functions. (➜ P. 17)
Do this in a flat place with a line-of-sight
distance of approximately 200 meters.
Recommended installation position
z
Install the device in a position where it will not block the front view of the driver (position where hidden
by the rear-view mirror).
z
Install the device so that it is within the wiping range of the wiper.
z
Mounting the device to the center of the windshield behind the rear-view mirror will facilitate optimal
video recording.
Outside
vehicle
Doublesided
tape
Inside
vehicle
* Fix the power cord in place with commercially available soft
tape or the like.
Windshield
Rearview
mirror
Recommended installation position
Ceramic
part
Clip
Power cord
Front pillar cover
Soft tape*
Power cord
Power cord
Front pillar
CAUTION
When passing the power cord through the front pillar or another part, observe the points below when
performing the wiring work.
z
Wire the power cord farther forward or farther rearward than the airbag so that it does not interfere with
Release paper
4. Perform the cord wiring work.
Refer to “How to Wire” and perform the wiring
work.(➜ P. 14)
12 13
the airbag.
z
In the case of a vehicle in which the front pillar cover is fixed in place with special clips or the like, the
clips may need to be replaced after you remove the front pillar cover. For how to remove the front pillar
cover, the availability of replacement parts and other information, contact the vehicle dealer.
z
Fix the power cord in place with commercially available soft tape or the like so that it does not interfere
with driving.
Page 8
How to Wire
CAUTION
Part Names and Functions
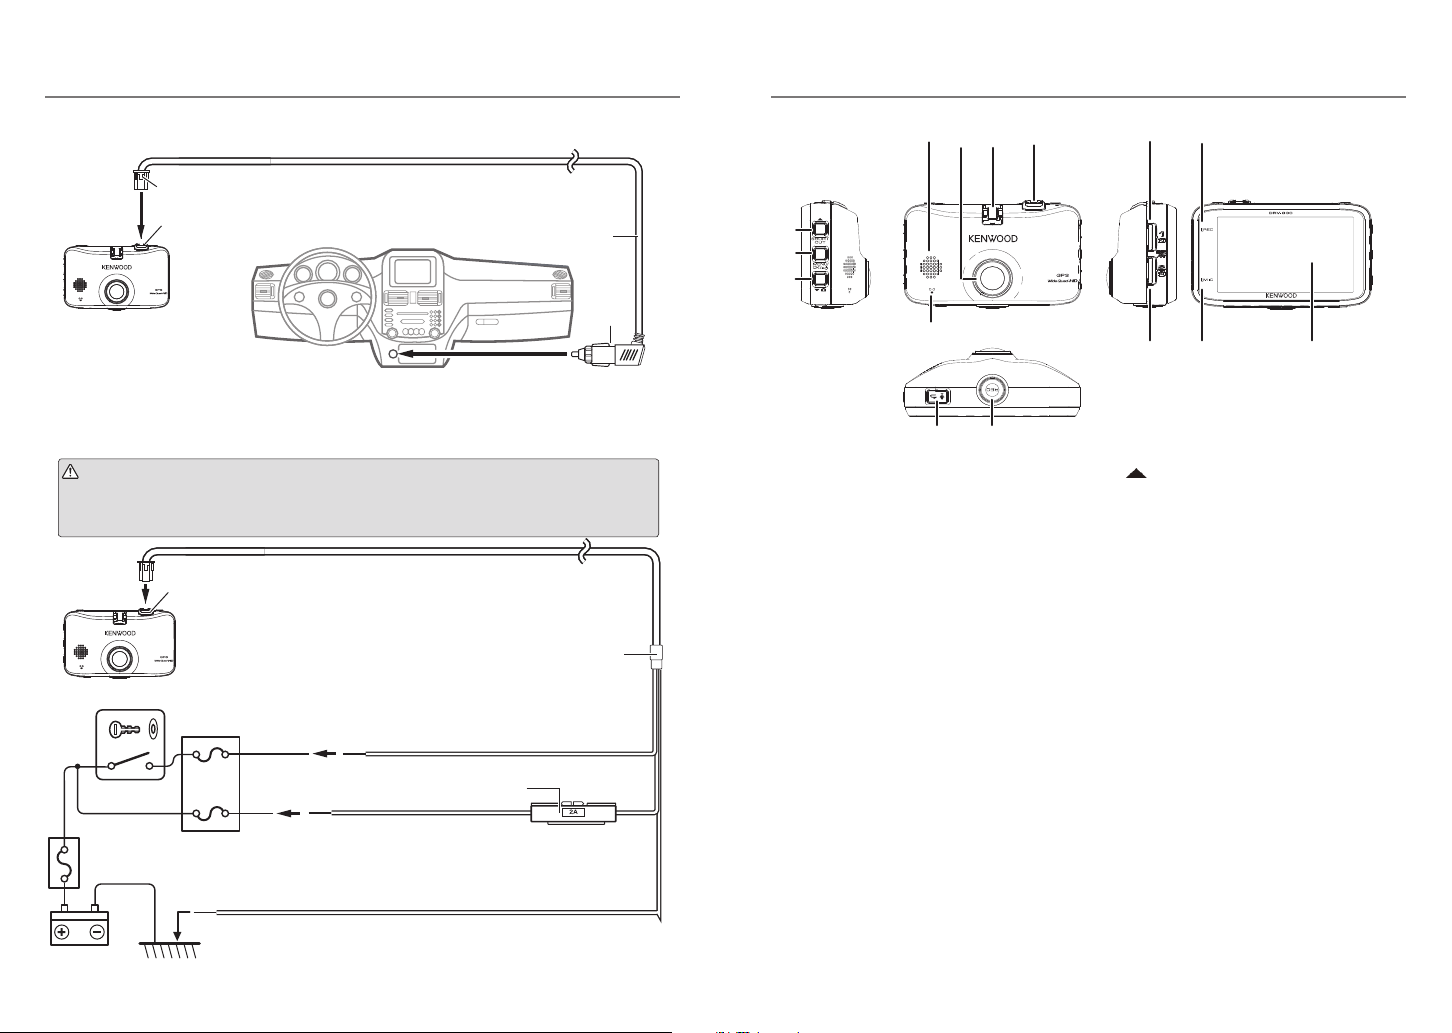
Connecting the cigarette lighter plug cord (accessory)
Connect the dashboard camera and power cord of the cigarette lighter plug cord.
When disconnecting the power cord, disconnect it while pressing the hook of the connector.
Open the power cord connector terminal’s cover and connect the power cord.
After connecting the power cord, close the cover.
Cord length
(4 m)
Dashboard Camera
Connect the cigarette lighter plug to the cigarette lighter socket.
Use the Power Cable for Dashcam; CA-DR100 (optional accessory)
Before performing the connection work, first check that the engine key is removed
and then be sure to disconnect the negative terminal of the battery to prevent a
short-circuit accident.
Connect the Dashboard Camera and power cord.
Open the power cord connector terminal’s cover and connect the power cord.
After connecting the power cord, close the cover.
Cord length (3.5 m)
Engine key switch
Dashboard Camera
Accessory power supply
Fuse
ACC
Accessory cord (Red)
Connect to a power supply that can be turned
on and off with the switch.
Fuse
(2 A)
34
5
6
7
8
9
0
1
Power cord connector terminal
Connect the included cigarette lighter plug
cord or the CA-DR100 power cable for Dashcam
(optional accessory).
2
Bracket attachment part
Mount the included mount bracket.
3
Camera lens
4
Speaker
Outputs audio guidance, warning sounds and
the audio when files are played.
12
%
$
@
!
5
/SHORTCUT button
z
When pressed while the menu is displayed,
#
moves to the previous item.
z
When pressed while recording, displays the
shortcut menu.
z
When pressed and held while recording,
switches the recording mode (normal/low
frame rate). ➜ P. 33)
z
When pressed during playback, plays the
previous file.
z
Fast-reverses when pressed and held during
playback, slow-reverses when pressed and held
while paused. Switches to playback when the
button is released while fast-reversing, to pause
when released during slow-reverse playback.
BAT T
Fuse (2 A)
Battery cord (Yellow)
Main fuse
Connect to a power supply with a voltage that is always applied regardless
of whether or not the engine key is on or off at a point after the power has
passed through the main fuse.
Ground cord (Black)
Battery
Connect to a metal part of the vehicle (part of the chassis with an electrical
connection to the negative side of the power supply).
GND
14 15
Page 9

How to Wire
continued
Before Using the Driving Support Functions
6
MENU/OK button
z
Turns the camera's power on and off when
pressed and held.
z
Displays the MENU screen.
z
Functions as the enter button when the menu
is displayed.
z
During playback, the mode switches between
pause and playback each time the button is
pressed.
z
When pressed and held while pausing, protects
the file. (Files created with continuous recording
cannot be protected.)
z
When pressed and held while playing, changes
the volume.
z
When pressed while the monitor screen
power-saving function is activated, cancels
the power-saving function. (➜ P. 34)
7
8
9
button
z
When pressed while the menu is displayed,
moves to the next item.
z
When pressed and held recording, takes a
photo. (It is not possible to take photos during
parked recording.)
z
When pressed during recording, turns automatic
still image capture on and off. (This cannot be
set during parked recording.)
z
When pressed during playback, plays the next file.
z
Fast-forwards when pressed and held during
playback, slow-forwards when pressed and held
while paused. Switches to playback when the
button is released while fast-forwarding, to pause
when released during slow-forward playback.
Microphone
Records audio.
button
z
When the menu is displayed, functions as the
cancel, return or stop button.
z
When pressed during recording, turns the
audio recording setting on and off.
z
When pressed and held while pausing, deletes
the file. (➜ P. 29)
0
REC button
z
When pressed during continuous recording,
starts manual recording.
z
When pressed during playback, zooms playback.
z
When pressed and held during playback, returns
to continuous recording.
!
SD card slot 2
z
Insert an SD card for recording here.
(➜ P. 19)
z
SD card slot 2 is extend storage capacity for
continuous recording data.
@
MIC indicator
z
Lights (green) when the audio recording setting
is on while in the recording mode.
#
Monitor screen
$
REC indicator
z
Lights (blue) during recording.
%
SD card slot 1
z
Insert an SD card for recording here.
(➜ P. 19)
z
Be sure to insert the SD card into SD card
slot 1 before using the camera.
Adjust according to the vehicle
Before using the driving support functions, adjust
the mounting height from the road surface to the
camera, the horizon, the position of the tip of the
engine hood according to the vehicle body, etc.
1. Press the [MENU/OK] button.
The menu is displayed.
2. Operate the [ ] and [ ] buttons
to select <Driving support settings>,
then press the [MENU/OK].
1
2
1
3. Operate the [ ] and [ ] buttons to
select <Mounting height>, then press
the [MENU/OK] button.
1
2
1
4. Operate the [ ] and [ ] buttons to
select the mounting height from the
road surface to the camera, then press
the [MENU/OK] button.
Set the mounting height to about 1.2 m for a
passenger car or compact SUV, about 1.35 m for
a large SUV or minivan, about 2 m for a large truck.
1
2
1
5. Operate the [ ] and [ ] buttons to
select <Detection range>, then press
the [MENU/OK] button.
1
2
1
6. Operate the [ ] and [ ] buttons to
ne-adjust the guide line (the white line)
so that it is lined up with the horizon, then
press the [MENU/OK] button.
Line up the red line in the center of the picture
with the center of the driving lane .
The explanations on the screen turn off when a
button is operated.
Adjust as shown on the diagram.
1
2
1
16 17
Page 10

Before Using the Driving Support Functions
continued
7.
Operate the [ ] and [ ] buttons to
adjust the guide line (the white line)
so that it is lined up with the tip of the
engine hood.
The explanations on the screen turn off when a
button is operated.
Adjust as shown on the diagram.
1
Before Using
Inserting and ejecting SD cards
Turn the camera's power off, then insert the SD card
into SD card slot 1, pressing in until a click is heard.
Be sure to insert the card in the proper direction.
When inserting an SD card in SD card slot 2, do
so in the same way.
Formatting SD cards
To use an SD card, first format it on the camera.
1. Insert the SD card into SD card slot 1
or SD card slot 2.
2. Press the [MENU/OK] button.
The menu is displayed.
2
1
8.
Press the [MENU/OK] button to complete
the adjustment.
z
If the engine hood does not appear on the
screen, adjust so that the guide line (the
white line) is lined up with the road surface
at a point about 3 meters forward when the
vehicle is stopped.
z
The driving support function is set to “OFF”
upon purchase. (➜ P. 34)
To eject the card, first turn the camera's power
off, press the SD card in so that it pops out some,
then pull it out.
z
Be sure to format the SD card on this unit.
z
When an SD card is formatted, all the files
on it, including protected files, are deleted.
z
The camera will not work properly unless an
SD card is inserted in SD card slot 1.
z
If you remove an SD card without turning
the camera's power off, the files recorded on
the card could be damaged or lost.
Turning the power on and off
When the vehicle's engine key is turned to “ACC” or
“ON”, the camera's power turns on and
recording starts. When the engine key is set to
“OFF”, the camera's power turns off.
continuous
Turning the power on and off manually
• When the [MENU/OK] button is pressed and held
for at least 3 seconds while the camera's power is
on, the power turns off.
• When the [MENU/OK] button is pressed and held
for over 1 second while the camera's power is off,
the power turns on.
z
The power cannot be turned on manually
when the engine key is set to “OFF”.
3. Operate the [ ] and [ ] buttons to
select <SD card menu>, then press the
[MENU/OK] button.
1
2
1
4. Operate the [ ] and [ ] buttons
to select <Format SD card (Slot1)> or
<Format SD card (Slot2)>, then press
the [MENU/OK] button.
1
2
1
18 19
Page 11

Before Using
Approx. 3 minutesApprox. 3 minutesApprox. 3 minutes
・・・・・
Operate the [ ] and [ ] buttons to
5.
select <OK>, then press the [MENU/
OK] button.
The SD card is formatted.
1
2
1
6.
Press the [MENU/OK] button to complete
the adjustment.
Recording when the power is on
continuous recording
When the camera's power turns on, continuous recording starts.
z
The maximum recording time for continuous recording depends on the resolution setting. The resolution
is set to “1920×1080 (HDR)” upon purchase. (➜ P. 46)
z
During continuous recording, the video is split and stored in files of a set time. The recording time per file
can be selected from among 1 minute (the setting upon purchase), 3 minutes and 5 minutes. (➜ P. 33)
z
During continuous recording, when there is no more recordable space on the SD card, the files are
overwritten, starting from the oldest files.
z
If an SD card is inserted in SD card slot 2, when there is no more recordable space on the SD card in SD
card slot 1, continuous recording switches to SD card slot 2 and recording continues.
z
When there is no more recordable space on the SD card in SD card slot 2, continuous recording switches to
SD card slot 1 and recording continues. The recorded files on the SD card in SD card slot 1 are overwritten,
starting from the oldest files, and continuous recording continues.
Recorded le storage location
z
Recorded files are stored in the “NORMAL” folder on the SD card. (➜ P. 45)
Event recording
When a sudden impact, etc., is detected during
and event recording starts. When event recording ends, continuous recording resumes.
z
The recording time for event recording is the 10 seconds before the impact was detected and a set time
after the impact was detected, selectable among 15 seconds (the setting upon purchase), 30 seconds
and 1 minute. (➜ P. 33)
z
If another impact is detected before event recording ends, event recording is extended from there for the
set amount of time. The maximum recording time per file is 1 minute. When the recording time reaches
1 minute, the file is split and recording starts on a new file.
z
The sensitivity for detecting impacts can be set. (➜ P. 33)
Impact detection
Continuous recording
continuous
Continuous recording
recording,
continuous
recording is interrupted
Event recording
10 seconds before impact recorded
Upon purchase, overwriting is set to “OFF”. When the upper limit of the recordable number of
z
files is reached, event recording is no longer possible.
15 seconds after impact recorded
Recorded le storage location
z
The files are stored in the “EVENT” folder on the SD card. (➜ P. 45)
2120
Page 12

Before Using
Approx. 3 minutesApprox. 3 minutesApprox. 3 minutes
・・・・・
Approx. 3 minutesApprox. 3 minutesApprox. 3 minutes
・・・・・
Approx. 3 minutes
・・・・・
Approx. 3 minutesApprox. 3 minutes
Overwrite Overwrite
Continuous recording
Continuous recording
Manual recording
When the camera's [REC] button is pressed during
continuous
recording,
continuous
recording is
Automatically captured still image le storage location
z
The still image files are stored in the “PICTURE” folder on the SD card. (➜ P. 45)
interrupted and manual recording starts. When manual recording ends, continuous recording resumes.
z
The recording time for manual recording is the 10 seconds before the [REC] button was pressed and a set
time after the button was pressed, selectable among 15 seconds (the setting upon purchase), 30 seconds
and 1 minute. (➜ P. 33)
z
If the [REC] button is pressed again before manual recording ends, manual recording is extended from
there for the set amount of time. The maximum recording time per file is 1 minute. When the recording
time reaches 1 minute, the file is split and recording starts on a new file.
Press the [REC] button.
Continuous recording
Continuous recording
Parked recording when the power is off
To enable the parked recording function, the power must be connected with the CA-DR100
•
power cable for Dashcam (optional accessory).
z
Parked recording does not work if the power is turned off with the camera's power button
before turning the vehicle's engine key off.
z
Parked recording may not work if the power supply voltage is low due to deterioration of the
vehicle's battery, etc.
Parked recording
Manual recording
10 seconds before button
pressed recorded
z
Upon purchase, overwriting is set to “OFF”. When the upper limit of the number of recordable
files is reached, manual recording is no longer possible.
15 seconds after button
pressed recorded
Recorded le storage location
z
The files are stored in the “MANUAL” folder on the SD card. (➜ P. 45)
Still image recording
When the camera's [ ] button is pressed during continuous recording, a still image is recorded.
z
The resolution of the still images is the same resolution as set at “Resolution”. (➜ P. 33)
Recording is not interrupted when still images are recorded during recording.
z
Still image le storage location
z
The still image files are stored in the “PICTURE” folder on the SD card. (➜ P. 45)
Automatic still image capture
This function automatically captures a set number of still images at fixed intervals.
When the
function turns on.
z
z
z
22 23
[ ]
button is pressed and held for over 1 second, the automatic still image capture
When the [ ] button is pressed and held for over 1 second or the set number of images are captured,
the automatic still image capture function turns off.
The number of images can be selected from among 10, 30 (the setting upon purchase) and 50. The capture interval
can be selected from among 1 minute, 5 minutes (the setting upon purchase), 15 minutes and 30 minutes. (➜ P. 33)
The resolution of the automatically captured still images is the same resolution as set at “Resolution”. (➜ P. 33)
z
If the camera's power is turned off while the automatic still image capture function is on, the automatic still
image capture function turns off. Capturing does not resume even if the camera's power is turned back on.
z
The capture function also turns off if the menu or shortcut menu screen is displayed or if the recording
mode is changed during recording.
When the vehicle's engine key is turned off, the parked recording function is set to standby and the
camera monitors the vehicle for impacts. When an impact to the vehicle is detected, the power turns
on and parked recording starts. When parked recording ends, the power turns off and the function
is set back to standby.
z
The recording time for parked recording can be selected among OFF (parked recording not performed),
10 seconds (the setting upon purchase), 20 seconds and 30 seconds. When OFF (parked recording not
performed) is set, the parked recording function is turned off. (➜ P. 32)
z
With parked recording, recording starts several seconds after the impact is detected.
z
The sensitivity for detecting impacts can be set. (➜ P. 32)
Impact detection
Standby
Parked recording for 10 seconds
z
No picture is displayed on the monitor screen during parked recording.
z
If parked recording has been performed, the user is notified when the power is turned on by
audio guidance and a monitor display.
z
The overwrite setting is set to “ON” upon purchase. When the upper limit of the number of
recordable files is reached, recording continues, overwriting the oldest files.
Disabling parked recording when getting in and out of the vehicle
Parked recording may be activated when the vibrations from the door closing are detected when
getting in and out of the vehicle. Parked recording can be disabled temporarily so that it is not performed when the vibrations from the door closing are detected when getting in and out of the vehicle.
z
The start time (when getting out) and stop time (when getting in) can be selected among OFF (the setting
upon purchase), 30 seconds, 1 minute and 3 minutes. (➜ P. 32)
Parked recording le storage location
z
The parked recording files are stored in the “PARKING” folder on the SD card. (➜ P. 45)
Page 13

Recording
$
%
^
&
*
Recording manually (manual recording)
Videos can be recorded whenever desired
and stored in the manual recording folder by
pressing the [REC] button during continuous
recording.
1. Press the [REC] button.
Manual recording starts, and once the time
set at “Manual recording time” has passed, the
mode returns to
z
z
z
continuous recording.
If you wish to extend the recording time,
press the [REC] button again.
The recording time for manual recording is
the 10 seconds before the [REC] button was
pressed and the time set at “Manual recording
time”. (➜ P. 33)
Manual recording is not possible while
folders or files are being selected or during
the playback, deleting, setting or event
recording operations.
Returning to continuous
recording
Continuous recording can be started forcibly even
while files are playing or a menu is displayed.
1. Press and hold the [REC] button.
File playback or menu display is canceled and
the mode returns to
24 25
continuous recording.
Taking photos (still image recording)
Photos (still images) can be taken at any time by
pressing the [ ] button during recording.
1. Press the [ ] button.
The camera icon appears in the upper left of the
display, the shutter sounds and the photo is taken.
z
If you wish to take multiple photos, press
the [ ] button again.
z
It is not possible to take photos when not
recording, such as while files are playing,
menu settings are being made, etc.
Taking photos automatically
When the [ ] button is pressed and held for
over 1 second during recording,
capture icon appears in the upper left of the display
and photos (still images) are captured automatically
at fixed intervals.
the continuous
1. Press and hold the [ ] button.
(over 1 second)
z
The number of photos taken and the
interval can be set at “Automatic still image
capture”. (➜ P. 33)
z
Automatic still image capture turns off when
the [ ] button is pressed and held for
over 1 second or once the set number of
still images has been captured.
z
Automatic still image capture also turns off
when the menu is displayed or when the
power is turned off.
Indicators on the recording screen
1 4 5
3
2
8
Recording mode
1
Remaining recording time (remaining time
2
for manual or event recording)
Still image recording mode (taking photos/
3
taking photos continuously)
This is only displayed during still image capture
and continuous capture.
HDR recording mode
4
Resolution (2560×1440, 2304×1296,
5
1920×1080, 1280×720)
The underlined number is displayed.
Low frame rate display (9 fps, 3 fps)
6
Current time
7
8 Position captured by positioning satellite
This is displayed when the current position has
been established by positioning satellite.
Button guide (manual recording)
9
Button guide (audio recording switching)
0
! File limit reached (manual recording)
This is displayed when the limit to the number of
files that can be recorded with manual recording
has been reached.
@ File limit reached (event recording)
This is displayed when the limit to the number of
files that can be recorded with event recording
has been reached.
# File limit reached (parked recording)
This is displayed when the limit to the number of
files that can be recorded with parked recording
has been reached.
SD card slot 1 status
$
SD card detected
Currently recording on SD card
Recording on SD card not possible
67 9 0!
@ #
% SD card slot 2 status
SD card detected
Currently recording on SD card
Recording on SD card not possible
Button guide (shortcut menu/recording
^
mode switching)
Button guide (MENU)
&
Button guide (still image capture)
*
Shortcut menu
This displays setting items related to recording
and frequently used setting items.
1. Press the [J] button during recording.
The shortcut menu appears.
Resolution
Recording mode
Low frame rate
Detecting sensitivity
(event)
Notification
volume
SD card
information
z
The settings are the same as the setting
items with the same names on the menu.
z
The shortcut menu items cannot be edited.
Sets the resolution for recording.
(➜ P. 33)
Sets the recording mode.
(➜ P. 33)
Sets the image update rate for
low frame rate recording.
(➜ P. 33)
Sets the impact detection sensi
tivity for event recording.
(➜ P. 33)
Sets the volume of the notifica
tion sound.
(➜ P. 34)
Use this to check the SD card information.
(➜ P. 35)
-
-
Page 14

Playback
Playing files
Use the procedure below to select and play
recorded files, photos (still images), etc.
1. Press the [MENU/OK] button.
The menu is displayed.
2. Operate the [ ] and [ ] buttons
to select <Playback>, then press the
[MENU/OK] button.
1
2
1
3. Operate the [ ] and [ ] buttons
to select the folder you want to play,
then press the [MENU/OK] button.
A list of the most recent files or groups in
the selected folder is displayed.
1
2
1
z
For the continuous recording folder, the files
are displayed as a list of groups of 10 files
recorded on the same date.
Continuous REC
(Slot 1)
Continuous REC
(Slot 2)
Manual REC
Event REC
Parking REC
Still images
This contains the continuous
recording files (SD card slot 1).
This contains the normal recording
files (SD card slot 2).
This contains the manual
recording files.
This contains the event
recording files.
This contains the parking
recording files.
This contains the files of the
photos that were taken.
4. Operate the [ ] and [ ] buttons to
select the le or group to be played,
then press the [MENU/OK] button.
Playback of the selected file or group starts.
1
2
1
If the [ ] or [ ] button is pressed during
recording, the previous or next file is played.
To return to continuous recording
Press and hold the [REC] button.
z
The files are sorted in the order in which they
were recorded.
z
Files organized in groups are indicated by a
folder mark in front of the file date.
z
Recording stops while folders or files are
being selected or played. Manual recording
by pressing the [REC] button is also not
possible at this time.
Indicators on the playback screen
2
1
8
9
0
!
4
1
Playback status
2
Time counter/playback progress bar
3
Playback volume icon
4
Date
5
Button guide (zoom playback)
This doubles the playback screen. The displayed
position can be changed by pressing the button
repeatedly.
6
Recording mode status (9 fps, 3 fps)
This is only displayed when playing files recorded
with a low frame rate.
7
Button guide (return/delete le)
8
Playback zoom icon
This is only displayed when playback is zoomed.
9
Number of playing le/total number of les
0
File protected icon
This is only displayed when playing files that are
protected.
!
Folder type
@
Button guide
z
Fast-forwards/reverses when pressed and held
during playback, slow-forwards/reverses when
pressed and held while paused.
#
Button guide
During playback (pause/playback volume switching)
z
When pressed and held, the playback volume
changes by 1 step.
When pausing (playback/file protection)
5
3
6 7
@
#
@
26 27
Page 15

Protecting Files
continued
Deleting Files
Recorded video and still image files can be
protected and their protection can be canceled.
Protecting Files
1. Play the le you want to protect.
If you have played the still image file that you
want to protect, skip to step 3.
2. Press the [MENU/OK] button to pause.
3. Press and hold the [MENU/OK] button.
4. Operate the [ ] and [ ] buttons to
select <OK>, then press the [MENU/
OK] button.
1
2
1
5.
Press the [MENU/OK] button to complete
the adjustment.
The “ ” mark is displayed on the file playback screen.
z
Continuous recording files cannot be protected.
Canceling file protection
1. Play the protected le.
If you have played a still image file, skip to step 3.
2. Press the [MENU/OK] button to pause.
3. Press and hold the [MENU/OK] button.
4. Operate the [ ] and [ ] buttons to
select <OK>, then press the [MENU/
OK] button.
1
2
1
5.
Press the [MENU/OK] button to complete
the adjustment.
The “ ” mark disappears from the file playback screen.
z
To delete protected files, first cancel their
protection, then delete them.
z
When an SD card is formatted, all the files
on it, including protected files, are deleted.
Deleting Files
Recorded video files and still image files can
be deleted.
Deleting files
1. Play the le you want to delete.
If you have played a still image file, skip to step 3.
2. Press the [MENU/OK] button to pause.
3. Press and hold the [ ] button.
(over 1 second)
4. Operate the [ ] and [ ] buttons to
select <OK>, then press the [MENU/
OK] button.
1
2
1
The currently playing file is deleted.
5.
Press the [MENU/OK] button to complete
the adjustment.
Deleting files in a group
Recorded video files in groups of continuous
recordings can be deleted.
1. Press the [MENU/OK] button.
The menu is displayed.
2.
Operate the [ ] and [ ] buttons
to select <Playback>, then press the
[MENU/OK] button.
1
2
1
3. Operate the [ ] and [ ] buttons to
select the slot in which the continuous
recording group you want to delete
is located (slot 1 or 2), then press the
[MENU/OK] button.
1
2
1
4. Operate the [ ] and [ ] buttons to
select the group you want to delete,
then press and hold the [
button.
1
1
]
(over 1 second)
2
28 29
Page 16

Deleting Files
Configuring the Settings
5.
Operate the [ ] and [ ] buttons to
select <OK>, then press the [MENU/
OK] button.
1
2
1
The files in the selected group are deleted.
6.
Press the [MENU/OK] button to complete
the adjustment.
Deleting entire folders
1. Press the [MENU/OK] button.
The menu is displayed.
2. Operate the [ ] and [ ] buttons to
select <Playback>, then press the [MENU/
OK] button.
1
2
1
3. Operate the [ ] and [ ] buttons to
select the folder you want to delete,
then press and hold the [
button.
1
1
2
(over 1 second)
]
4. Operate the [ ] and [ ] buttons to
select <OK>, then press the [MENU/
OK] button.
1
2
1
All the files in the selected folder are deleted.
5.
Press the [MENU/OK] button to complete
the adjustment.
z
To delete protected files, first cancel the file
protection.
Operating using the menu
Operations for playing files, configuring video
recording settings, etc., can be performed from
the menu screen.
1. Press the [MENU/OK] button.
The menu is displayed.
2. Operate the [ ] and [ ] buttons to
select the item, then press the [MENU/
OK] button.
1
2
1
Repeat this procedure as necessary, depending
on the selected item.
3. Press and hold the [REC] button to
end.
The menu turns off and continuous recording
begins.
z
There is also a shortcut menu on which you
can find setting items related to recording
and frequently used setting items. (➜ P. 25)
z
You can also turn off the menu screen and
return to continuous recording by pressing
] button.
the [
The menu screen in step 2 switches in the order
shown below.
Playback
Parking
recording
settings
Recording
settings
Driving
support
settings
System
settings
SD card
menu
30 31
Page 17

Configuring the Settings
MENU
Playback
Continuous REC (Slot 1) Select the folder and play the desired file. (➜ P. 26)
It is also possible to protect or delete the file during file playback. (➜ P. 28)
Continuous REC (Slot 2)
Manual REC
Event REC
Parking REC
Still images
Parking recording settings
To use the parking recording function, the power must be connected with the CA-DR100 (optional
accessory). (➜ P. 14)
Recording time OFF (parking recording not performed)/10 sec*/20 sec /30 sec
Set the time for recording after an impact is detected.
Overwrite ON*/OFF
Set whether or not to overwrite old files after the maximum number of recording
files has been reached.
Detecting sensitivity 1 (Low Sensitivity)/2/3*/4/5 (High Sensitivity)
Set the sensitivity for detection of impacts to the parked vehicle.
Exit time after ACC OFF OFF*/30 sec/1 min/3 min
Set the time for which parking recording will be disabled after the engine key
is turned off.
Entry time before ACC ON OFF*/30 sec/1 min/3 min
Set the time for which parking recording will be disabled before the engine key
is turned on.
* Factory default settings
Recording settings
Audio recording ON*/OFF
Continuous recording file
length
Manual recording time 15 sec*/30 sec/1 min
Event recording time 15 sec.*/30 sec./1 min.
Overwrite (manual) ON/OFF*
Overwrite (event) ON/OFF*
Resolution 2560×1440 (HDR)/2304×1296 (HDR)
Recording mode Normal*/Low frame rate
Low frame rate 9 fps*/3 fps
Detecting sensitivity (event) 1 (Low Sensitivity) /2/3*/4/5 (High Sensitivity)
Automatic still image capture Capture interval
Information stamps ON*/OFF
Set whether or not to record the sound from the microphone when recording.
1 min*/3 min/5 min
Set the recording time for continuous recording. The recordings are split according
to the recording time set here.
For low frame rate recordings, the file length is 10 minutes, regardless of the
value set here.
Set the time for recording after manual recording is started. The recording time
before the [REC] button is set is fixed to 10 seconds.
Set the time for recording after an impact is detected. The recording time before
an impact to the vehicle is detected is fixed to 10 seconds.
Set whether or not to overwrite old files after the maximum number of recording
files has been reached.
Set whether or not to overwrite old files after the maximum number of recording
files has been reached.
/1920×1080 (HDR)*/1280×720 (HDR)
Sets the resolution for recording.
Select a recording mode. Selecting low frame rate recording increases the recording
time to more than usual.
Set the image update frequency during low frame rate recording. The smaller the
value, the longer the recording time.
Set the sensitivity for detecting impacts to the vehicle.
1 min./5 min.*/15 min./30 min.
Set the interval for capturing images with the automatic still image capture function.
Number of captured images
10/30*/50
Set the number of images to be captured with the automatic still image capture
function.
Set whether or not to record subtitles (date and time, position information, etc.).
* Factory default settings
3332
Page 18

Configuring the Settings
* Factory default settings
Driving support settings
Forward collision warning ON/OFF*
Lane departure warning ON/OFF*
Departure delay warning ON/OFF*
Detection range Adjust the horizon, position of the front tip of the engine hood, etc., before using
Mounting height 1.2 m*/1.35 m/2 m
This function detects the distance between you and the vehicle in front, and
sounds a warning if the distance is not safe in order to prevent a collision with
the vehicle in front. This functions at speeds of approximately 30 km/h and higher.
This function detects the lane in which you are driving and sounds a warning if you
veer out of that lane. This functions at speeds of approximately 60 km/h and higher.
This function sounds a warning if, while you are stopped, the vehicle in front of
you has taken off and your departure is too slow. With this function, a warning is
also sounded if you are backing up.
the driving support functions. (➜ P. 17)
Set the height from the road surface to the position at which the camera is
mounted. (➜ P. 17)
System settings
Date/time Automatic*/Manual
Daylight saving time OFF*/+1 hr./+30 min Set daylight saving time.
Notification volume The volume of the notification sound can be set in 6 steps (mute to maximum).
Playback volume
Monitor Time settings 10 sec.*/1 min./3 min.
Mounting support tool Level
Select units km/h/mph*
Factory reset Restores the settings to the values set upon purchase.
Setup Configure the settings related to installation of the camera in a specific order.
Update system Update the camera's firmware.
System version Display the camera's firmware version.
Set whether to record the date and time automatically or manually. (➜ P. 36)
You must set the “Time Zone”
The notification sound is the sound issued as guidance during event recording,
when operating buttons, etc.
Set the volume of the sound when playing recorded files in 6 steps (mute to
maximum).
Set the time after which the monitor screen switches to the power-saving mode
during recording.
Operation settings
Always on*/OFF/Dim
Set the monitor screen's power-saving operation during recording. When the
MENU/OK button is pressed, the power-saving operation is temporarily canceled.
Use this to check whether the camera is level.
Satellite reception level
This displays the positioning satellite reception strength screen.
Switch to kilometer or mile display.
When executed, the power turns off then back on and the setup screen appears.
Follow the instructions on the screen to configure the settings.
About updating the system
This function updates the camera's system firmware. For information and instructions on
updating, see the Kenwood website. http://www.kenwood.com/cs/ce/
SD card menu
SD card information (Slot 1) Display the information screen for the SD card in slot 1.
SD card information (Slot 2) Display the information screen for the SD card in slot 2.
Format SD card (Slot 1) Formats the SD card in slot 1, deleting all the files on the card.
Format SD card (Slot 2) Formats the SD card in slot 2, deleting all the files on the card.
3534
Page 19

Configuring the Settings
Using the Viewer Software
Setting the date and time
Set the date and time.
1. Press the [MENU/OK] button.
The menu is displayed.
2. Operate the [ ] and [ ] buttons to
select <System settings>, then press
the [MENU/OK] button.
1
2
1
3. Operate the [ ] and [ ] button
to select <Date/time>, then press the
[MENU/OK] button.
1
2
1
4. Operate the [ ] and [ ] buttons to
select the item, then press the [MENU/
OK] button.
1
2
1
Set the time zone.
Automatic
Manual
The date and time are set
automatically according to the
date and time received from the
positioning satellite.
After setting the time zone, set the
date and time manually..
z
If “Automatic” was selected, the is
completed.
5. Operate the [ ] and [ ] buttons
to input the date and time, then press
the [MENU/OK] button.
To return to the previous step, press the [ ]
button.
1
2
1
6. Press the [MENU/OK] button while the
cursor is set to the seconds' position to
nish the procedure.
z
If “Automatic” was selected, the correct date and
time will not be set until the signal from the
positioning satellite can be properly received.
KENWOOD DRIVE REVIEWER is viewer software
for computers, allowing images recorded on the
camera to be displayed.
The application can be downloaded from the
Kenwood website.
Please visit http://www.kenwood.com/cs/ce/.
For the operating environment, please see Page 45.
Installing the software
1.
After downloading the application onto
the computer, double-click the installer,
then follow the instructions on the screen
to install KENWOOD DRIVE REVIEWER.
Playing files
1.
Eject the SD card from the camera, insert
it into the included SD card converter/
adapter, then connect it to the computer
using a card reader (commercially available).
2. Launch KENWOOD DRIVE REVIEWER.
KENWOOD DRIVE REVIEWER screen
2
3
1
6
7
8
9
0
**********************************
3.
Select the SD card drive from the list
of drives.
To play a file stored on the computer, select the
folder in which the file is stored using the <SELECT
FOLDER (S)> command in the FILE (F) menu.
4.
Select the le you want to play from
the [FILE], [EVENT] or [PHOTO] tab and
play the le.
FILE Displays all the files.
EVENT
PHOTO
5.
To quit, either press the [x] button or
select <EXIT (X)> from the FILE (F) menu.
4
!
Displays the event recording, manual
recording and parked recording files.
Displays the photos (still images)
taken with the camera.
5
@
36 37
Page 20

Using the Viewer Software
1
File operations
Perform the file operations, such as file selection,
backing up files from the SD card to the computer,
and so on.
SELECT
FOLDER (S)
EXPORT
kmz/kml (E)
BACKUP
(B)
EXIT (X) Closes the computer application.
Select the SD card drive or the folder
that was backed up on the computer.
Outputs a travel information file
(kml/kmz) usable with the Google
Earth map service.
Backs up the files on the SD card
onto the computer's hard disk, etc.,
as necessary.
(list of drives)
Use this to play files stored on the SD card.
2
DISPLAY
LANGUAGE (L) Select the language.
SELECT UNITS
(S)
DISPLAY
DRIVINGWARNING (D)
3
HELP
Switch to kilometer or mile display.
Turns the drive warning indicators
on and off.When turned on, the
icon is displayed in the playback bar.
Displays the viewer's software version.
4
Selection of the image playback screen
Enlarges the image being played.
When pressed while the image is
enlarged, sets the screen back to
the normal screen.
These enlarge the center, upper
left, upper right, lower left or lower
right of the screen.
The frame displayed can be moved
and any position can be enlarged to
a maximum of 5 times the original
size. When [RESET] is pressed, the
image returns to original size (1×).
5
File list
A list of the files and thumbnails selected with
the selection tab is displayed here.
6
Image screen
The image of the selected file is displayed here.
The playback bar can be operated to move to the
desired position. Also, the image can be displayed
in full screen by double-clicking the image screen
during playback. When the image is displayed in
full screen, click it to return to the normal screen.
7
Playback bar/playing time/total playing
time/drive warning indicators
Frontal collision warning icon
Lane departure warning icon
Departure delay warning icon
8
Operation buttons
These are buttons for performing such operations
as playing images, stopping, etc.
Displays the previous or next frame.
Returns to the beginning of the
currently playing file. Plays the next file.
Stops playback.
When pressed during playback, sets
the pause mode. When pressed while
paused, resumes playback.
Captures the image at the point where
the button is pressed.
Displays operations (play status, etc.).
Changes the playing speed.
Adjusts the volume.
9
G sensor chart
Displays the acceleration of the movement of
the vehicle in the front/back (GX), left/right (GY)
and upward/downward (GZ) directions and the
vehicle speed in waveforms.
0
Path of currently playing le
!
Speedometer
Displays the vehicle's speed.
z
The vehicle's speed displayed here differs from
the actual speed. It is only an approximation.
@ Map display button
When the file list is clicked, the position information of the selected video file is displayed on the map.
If no map is displayed, click
1 2
x.xxxxx
xxxxxx
.
xx.xxxxx
5
4
3
6
xxxx
xxxxxxxx
xxxx
7
xxxxxxxxxxxxxxxxxxxxx
9
8
1 Enlarges/reduces the map.
2 Displays the latitude and longitude.
3 Reloads the map.
4 Opens the map in a separate window.
5 Turns the map display off. When
is clicked, the map is displayed.
6 Used to turn the display of routes and icons on the map on and off.
7 Displays a wide area map.
8 Route
When 2 or more days of routes are displayed, different days are displayed in different colors.
1st day 2nd day 3rd day 4th day 5th day 6th day 7th day
Blue Red Green White Pink Light blue Yellow
9 Displays your position on the currently selected file.
Beginning of each file
When the cursor is placed at the icon, an image of the beginning position of the file is displayed. When
clicked, that file is played.
z
Files are deleted depending on the capacity of the SD card (normal recording) or the “Overwr ite” setting
(manual recording, event recording and parked recording). Erased sections are not displayed on the map.
z
The built-in positioning satellite antenna is used to determine your current position on the map. If you
are located in a place where the positioning satellite signal reception conditions are poor, such as amid
tall buildings, in tunnels, under bridges, etc., your current position may not be displayed properly and
the displayed trajectory may differ from the actual trajectory.
3938
Page 21

Using the Viewer Software
Troubleshooting
Outputting still pictures from the images
Any point in the currently playing video can be
captured and output as a still image.
1. Select the le whose image you want
to capture and play it.
2. Press the [ ] button at the point
you want to capture.
3. Select the folder in which you want to
store the le and give the le a name.
4. Press the [SAVE] button.
Outputting travel information
Outputs a travel information file (kml/kmz)
usable with the Google Earth map service.
1. Select <EXPORT TO kmz/kml (E)> from
the FILE (F) menu.
2. Select the folder in which you want to
back up the information, then select
“KML/KMZ” as the le type and give
the le a name.
3. Press the [SAVE] button.
z
For usage instructions, see the Google
Earth map service's help.
Backing up files
Back up the files on SD cards onto a computer's
hard disk, etc., as necessary.
1. Select <BACKUP (B)> from the FILE (F)
menu.
2. Select the folder in which the les are to
be backed up.
3. Check the les you want to save and
select the les to be stored.
4. Press the [EXECUTE] button.
Find the corresponding symptom on the table below and take the appropriate measures. If you
cannot find a solution, contact your store of purchase or a Kenwood service center.
Common
Symptom Cause/Countermeasures
The power does not turn on.
z
Recording is not possible.
z
the screen.
The monitor screen turns off after
a while.
The camera's power does not turn off
even when the engine is turned off.
The power cover has come off.
is displayed on
z
The power to the vehicle's cigarette lighter socket is not turned on.
å
Turn on the vehicle's accessory (ACC) power switch or start the engine.
å Check that the cigarette lighter plug is properly connected.
z
The fuse is blown.
å
After checking that no cords are short-circuited, replace with a fuse
of the same capacity. Contact your store of purchase.
z
The power cord is improperly connected.
å Have the connection checked at your store of purchase.
z
No SD card is inserted.
z
An SD card other than one of size 8 to 128 GB is inserted.
z
An SD card not conforming to SDHC or SDXC standards is inserted.
z
The SD card has not been formatted.
å Insert an SD card usable on this camera into the SD card slot.
å If necessary, format the SD card on the camera. (➜ P. 19)
z
The temperature inside the camera is too high.
å
Lower the temperature in the vehicle. This will deactivate the
protection circuit, and recording will then be possible.
z
The monitor screen power-saving setting is set to off. (➜ P. 34)
å Change the setting.
z
The temperature inside the camera is too high.
å Lower the temperature in the vehicle. The protection circuit will
be deactivated and forced turn-off of the monitor screen will be
canceled.
z
For some vehicles, etc., power to the cigarette lighter socket is
supplied even when the power is turned off.
å
Disconnect the cigarette lighter plug cord when leaving the vehicle.
z
The cover has been pulled up strongly.
å Insert the cover back into the original holes, then continue using
the camera as such.
40 41
Page 22

Troubleshooting
Display messages and audio guidance
If any of the messages below should be displayed, take the countermeasures indicated on the table.
For messages marked , audio guidance is also provided.
Message Cause/Countermeasures
No SD card inserted
Please insert SD card
SD card error
SD card error
SD card requires formatting
This SD card needs formatting
Uncompatible SD card
This SD card is not compatible
Recording has stopped
Recording has stopped
No space on the SD card
Event recording failed
(file limit exceeded)
Manual recording failed
(file limit exceeded)
z
The power was turned on with no SD card in SD card slot 1.
å Refer to “Main specifications” (➜ P. 47)and insert an SD card that
is usable on this camera into SD card slot 1. This camera will not
be functional without the SD card inserted in the SD card slot 1
z
An SD card that cannot be identified is inserted.
å Refer to “Main specifications” (➜ P. 47) and insert an SD card that
is usable on this camera into the SD card slot.
z
The SD card has not been formatted in a format that the camera
can identify.
å Refer to “Formatting SD cards” and format the SD card on the
camera. (➜ P. 19)
z
An SD card with a capacity of less than 8 GB or more than 128 GB
is inserted.
å Refer to “Main specifications” (➜ P. 47) and insert an SD card that
is usable on this camera into the SD card slot.
z
Recording is no longer possible due to a faulty SD card.
z
Some sort of problem has occurred and recording has been interrupted.
z
Recording may be interrupted if an SD card with an incompatible
speed class is used.
å Eject then reinsert the SD card.
å Replace the SD card with a new one.
å Replace the SD card with a compatible one. (➜ P. 47)
z
There is not enough space on the SD card to start normal recording.
z
There is not enough space to record the maximum number of
manual or event recording files.
å Refer to “Deleting files” and delete unnecessary files. (➜ P. 29)
å
Back up the necessary files on a computer, etc., then refer to
“Formatting SD cards” and format the SD card on the camera. (➜ P. 19)
z
The maximum number of recordable files for event recording has
been reached with “Overwrite (event)” set to “OFF”.
å When “Overwrite (event)” is set to “ON”, old files are overwritten
when recording new files. (➜ P. 33)
å Refer to “Deleting Files” and delete unnecessary files. (➜ P. 29)
z
The maximum number of recordable files for manual recording has
been reached, with “Overwrite (manual” set to “OFF”.
z
When “Overwrite (manual)” is set to “ON”, old files are overwritten
when recording new files. (➜ P. 33)
å Refer to “Deleting Files” and delete unnecessary files. (➜ P. 29)
Message Cause/Countermeasures
Playback has stopped
Recording stopped due to high
temperature
System will turn off due to high
temperature
No update file available
System update failed
z
For some reason a file that cannot be played was recorded.
z
The file can no longer be read due to a faulty SD card.
å
Back up the necessary files on a computer, etc., then refer to
“Formatting SD cards” and format the SD card on the camera. (➜ P. 19)
z
Recording was not possible because the camera's temperature is
too high.
å
Lower the temperature in the vehicle. This will deactivate the
protection circuit, and recording will then be possible.
z
The power has been turned off for safety because the camera's
temperature is too high.
å
Lower the temperature in the vehicle. This will deactivate the
protection circuit, and it will then be possible to turn the power on.
z
There is no update file on the SD card.
å Place the file for updating the camera on the SD card.
z
The update file on the SD card is for the same or an older version
than the current firmware version.
å Place the latest update file on the SD card.
å If the latest update file is on the SD card, the camera's firmware is
already the most recent version and there is no need to update it.
z
The update file could not be properly read from the SD card.
z
The update file is corrupt.
å
After formatting the SD card on the camera, copy the update file onto
the SD card again and perform the update procedure once more.
42 43
Page 23

Appendix
Root folder (JVCKENWOOD)
YYMMDDhhmmss.MOV
YYMMDDhhmmss.MOV
Folder File
NORMAL
(continuous recording)
EVENT
(event recording)
MANUAL
(manual recording)
PARKING
(parked recording)
SYSTEM
(position information)
YYMMDDhhmmss.MOV
YYMMDDhhmmss.MOV
YYMMDDhhmmss.MOV
YYMMDDhhmmss.MOV
YYMMDDhhmmss.MOV
YYMMDDhhmmss.MOV
PICTURE
(still image recording)
YYMMDDhhmmss.JPG
YYMMDDhhmmss.JPG
About the driving support functions
z
The driving support functions are intended
to support the driver's driving, not to prevent
accidents. In addition, the system does not warn
against all dangers.
z
When driving, respect traffic rules, pay attention to
the distance between yourself and the vehicle in
front, the surroundings and the driving environment,
brake as necessary, and in general make an effort
to drive safely. Furthermore, we do not guarantee
perfect operation, even when the camera is used
properly as described in this manual. Please note
that Kenwood will accept no responsibility for any
damages incurred thereby.
z
The lane departure warning is not linked to the turn
signals, so because of the camera's specifications,
the warning will be sounded when changing
lanes as well.
z
The driving support functions may not work properly
in the cases below.
-
In places where the positioning satellite
signals cannot be received properly, such as
in tunnels, amid tall buildings, etc.
-
When the lane lines cannot be identied
properly due to poor pavement conditions,
reections due to rainwater, etc.
-
When the vehicle in front cannot be identied
as a vehicle due to its shape, color, the light
conditions, etc.
-
Changes due to climatic conditions (rain, snow,
thick fog, etc.), time period (morning, evening,
night, etc.), backlighting, trac conditions
(trac jams, pedestrians), etc.
z
If objects are placed on the dashboard, they may
reflect in the windshield and cause the camera
to not operate properly. Do not place objects on
the dashboard.
About the monitor screen
z
Do not subject the screen section to strong shocks.
Doing so could damage it.
z
Do not let direct sunlight shine on the screen. Leaving
the screen with direct sunlight shining on it for long
periods of time will increase the temperature and
could damage the screen.
z
Extremely high or low temperatures could cause
the display to operate slowly or darken, or result
in residual images. This is due to the properties
of liquid crystal displays and is not a malfunction.
Normal operation will return once the temperature
in the car returns to normal.
z
There may be small dots on the screen. This is a
phenomenon typical of liquid crystal displays and
is not a malfunction.
z
Due to the properties of liquid crystal displays, the
display may be hard to see depending on the angle
at which it is viewed, but this is not a malfunction.
About positioning satellite (GPS)
reception
z
When the camera's power is turned on, satellite
positioning starts. Depending on the satellite
positioning conditions, it could take about 5 minutes
for positioning to be completed.
z
Satellite signals cannot pass through solid objects
(other than glass). Positioning is not possible in
tunnels or between buildings. Signal reception may
be influenced by such conditions as poor weather
or a concentration of obstacles overhead (for
example trees, tunnels, bridges, high-rise buildings,
etc.). The speed, position information, etc., will not
be displayed properly if satellite signals cannot be
properly received.
z
The positioning data is for reference purposes only.
Important Notices
RegardingTrademarks and Software
Microsoft, and Windows are registered trademark
•
or trademark of Microsoft Corporation in the
US and other countries.
Macintosh, Mac are trademarks of Apple Inc.,
•
registered in the U.S. and other countries.
Intel and Intel Core are trademarks of Intel
•
Corporation or its subsidiaries in the U.S. and/or
other countries.
microSDXC logo is a trademark of SD-3C LLC.
•
©2017 Google LLC All rights reserved. Google
•
Maps™ and Google Earth™ are
registered trademarks of Google LLC.
This product is licensed only for the following
•
applications based on the AVC Patent
Portfolio License.
1) Consumers recording video (hereinafter
referred to as AVC Video) compliant with
the MPEG-4 AVC standard for personal use
and non-profit purposes.
2) Playing AVC Video (video consumers
recorded for personal use and non-profit
purposes or video recorded by a provider
that has obtained a license from MPEG LA)
For details, refer to the MPEG LA, LLC website.
http://www.mpegla.com/.
Folder/file structure
Files recorded on the SD card are saved in
separate folders for the different items. The files
are automatically given names corresponding to
the date and time at which they were recorded.
Do not change or delete files on the SD card
using a computer, etc. Doing so may make it
impossible to properly play the files on the
camera or using computer applications.
SD card recorded in slot 1
SD card recorded in slot 2
(Extend storage capacity for normal recording data. )
Root folder (JVCKENWOOD)
Folder File
NORMAL
(normal recording)
SYSTEM
(position information)
YYMMDDhhmmss.MOV
YYMMDDhhmmss.MOV
About file name
YYMMDDhhmmss.MOV or .JPG
Year Day Hours Min. Sec.Month
KENWOOD DRIVE REVIEWER operating environment
Windows version
Windows 7 Service Pack 1
(32-bit/64-bit)
Supported
OSs
CPU Intel Core i3 2 GHz or greater
Memory
Display
Sound
Others
Mac OS X version
Supported
OSs
Windows 8.1/8.1Pro
(32-bit/64-bit)
Windows 10
(32-bit/64-bit)
Not included Windows 10
mobile
2 GB or greater
1280×800 or greater
PCM sound playback function usable on Windows
An internet connection environment is required.
Apple Mac OS X 10.11
(El Capitan) or greater
4544
Page 24

Appendix
Main Specifications
Recording times
Resolution
(recording quality)
(frame rate)
8 GB 16 GB 32 GB 64 GB 128 GB
2560×1440
27 fps
9 fps
3 fps
40 minutes
130 minutes
350 minutes
80 minutes
260 minutes
700 minutes
2304×1296
27 fps
9 fps
3 fps
50 minutes
160 minutes
390 minutes
100 minutes
320 minutes
780 minutes
1920×1080
27 fps
9 fps
3 fps
70 minutes
200 minutes
440 minutes
140 minutes
400 minutes
880 minutes
1280×720
27 fps
9 fps
3 fps
z
The above recording times are the total (maximum) for continuous recording, manual recording, event
recording and parked recording.
z
The recording times are approximate. The recording times may be shorter, depending on the scenes that
are recorded.
z
The recording times with low frame rates (9 or 3 fps) can fluctuation greatly, depending on the scenes
that are recorded.
100 minutes
270 minutes
580 minutes
200 minutes
540 minutes
1160 minutes
SD card capacity
160 minutes
520 minutes
1400 minutes
200 minutes
640 minutes
1560 minutes
280 minutes
800 minutes
1760 minutes
400 minutes
1080 minutes
2320 minutes
320 minutes
1040 minutes
2800 minutes
400 minutes
1280 minutes
3120 minutes
560 minutes
1600 minutes
3520 minutes
800 minutes
2160 minutes
4640 minutes
640 minutes
2080 minutes
5600 minutes
800 minutes
2560 minutes
6240 minutes
1120 minutes
3200 minutes
7040 minutes
1600 minutes
4320 minutes
9280 minutes
Screen size
3.0inches full color TFT
Operating voltage
DC 12V
Current Consumption
210mA (Max.450mA)
GPS Receiver
Built-in
G-sensore
Built-in
Collision sensitivity
-4.0G to +4.0G (0.1G Step)
Image sensor
1/3 Color CMOS sensor
Number of Pixel
3.7M Pixels(2560 x 1440)
Angles of view
Horizontal : 132°
Vertical : 70°
Diagonal :144°
Lens
F2.0
Recording Mode
1 / 3 / 5 min.
Video format
H.264 / MPEG-4 AVC
Audio format
Linear PCM
Picture format
JPEG (Max.1920 x 1080)
Recording media
microSDXC/SDHC card 8GB to 128GB
Class10
Dimensions WxHxD (Main unit)
87mm x 55mm x 35mm
Weight Main unit
110g
Accessories
Car charger cord (3.5 m) x 1
Mounting bracket (double-sided tape) x 1
•
The specifications and design are subject to change
due to technological developments.
• The microSDXC logo is a trademark of SD-3C LLC.
Operating temperature
Number of recordable files
Recording function
8 GB 16 GB 32 GB 64 GB 128 GB
Event recording 5 10 20 40 80
Manual recording 10 20 40 80 160
Parked recording 20 40 80 160 320
Still image recording 100 200 400 800 1600
z
The number of normal recording files will differ according to the number of recorded event recordings,
manual recordings and parked recordings.
z
For event recording, manual recording and parked recording, old files are overwritten if “Overwrite” is set
to “ON”. (➜ P. 32) Back up any necessary files on a computer, etc. (➜ P. 40)
SD card capacity
–10 °C to +60 °C
Recording resolution
2560 x 1440 Full HD (Max.3.7M)
Frame rate
27fps / 9fps / 3fps
Recording preservation timing
Full Time / Event / Manual / Parking*
*:need optional cable
Recording time for collision detection
maximum 70sec
Before
previous 10sec
After
46 47
after 15/30/60sec
Page 25

Important Notice Concerning the Software
Important Notice Concerning the Software
MD5 utility
/* crypto/md5/md5.h */
Copyright (C) 1995-1998 Eric Young
(eay@cryptsoft.com) All rights reserved.
This package is an SSL implementation written
by Eric Young (eay@cryptsoft.com).
The implementation was written so as to conform
with Netscape's SSL.
This library is free for commercial and non-commercial use as long as the following conditions are
adhered to. The following conditions apply to all
code found in this distribution, be it the RC4, RSA,
lhash, DES, etc., code; not just the SSL code. The SSL
documentation included with this distribution is
covered by the same copyright terms except that
the holder is Tim Hudson (tjh@cryptsoft.com).
Copyright remains Eric Young's, and as such
any Copyright notices in the code are not to be
removed.
If this package is used in a product, Eric Young
should be given attribution as the author of the
parts of the library used.
This can be in the form of a textual message at
program startup or in documentation (online or
textual) provided with the package.
Redistribution and use in source and binary forms,
with or without modification, are permitted provided that the following conditions are met:
1. Redistributions of source code must retain the
copyright notice, this list of conditions and the
following disclaimer.
2. Redistributions in binary form must reproduce
the above copyright notice, this list of conditions
and the following disclaimer in the documentation and/or other materials provided with the
distribution.
3. All advertising materials mentioning features or
use of this software must display the following
acknowledgement:
“This product includes cryptographic software
written by Eric Young (eay@cryptsoft.com)”
The word ‘cryptographic’ can be left out if the
routines from the library being used are not
cryptographic related :-).
4. If you include any Windows specific code (or
a derivative thereof) from the apps directory (application code) you must include an
acknowledgement:
“This product includes software written by Tim
Hudson (tjh@cryptsoft.com)”
THIS SOFTWARE IS PROVIDED BY ERIC YOUNG “AS
IS” AND ANY EXPRESS OR IMPLIED WARRANTIES,
INCLUDING, BUT NOT LIMITED TO, THE IMPLIED WAR
RANTIES OF MERCHANTABILITY AND FITNESS FOR
A PARTICULAR PURPOSE ARE DISCLAIMED. IN NO
EVENT SHALL THE AUTHOR OR CONTRIBUTORS BE
LIABLE FOR ANY DIRECT, INDIRECT, INCIDENTAL, SPE
CIAL, EXEMPLARY, OR CONSEQUENTIAL DAMAGES
(INCLUDING, BUT NOT LIMITED TO, PROCUREMENT
OF SUBSTITUTE GOODS OR SERVICES; LOSS OF USE,
DATA, OR PROFITS; OR BUSINESS INTERRUPTION)
HOWEVER CAUSED AND ON ANY THEORY OF LIABILITY, WHETHER IN CONTRACT, STRICT LIABILITY,
OR TORT (INCLUDING NEGLIGENCE OR OTHERWISE)
ARISING IN ANY WAY OUT OF THE USE OF THIS
SOFTWARE, EVEN IF ADVISED OF THE POSSIBILITY
OF SUCH DAMAGE.
The license and distribution terms for any publicly
available version or derivative of this code cannot
be changed. i.e. this code cannot simply be copied
and put under another distribution license [including the GNU Public License].
---------------------------------------------------------------------
CRC utility
COPYRIGHT (C) 1986 Gary S. Brown. You may use
this program, or code or tables extracted from it, as
desired without restriction.
First, the polynomial itself and its table of feedback
terms. The polynomial is X^32+X^26+X^23+
X^22+X^16+X^12+X^11+X^10+X^8+X^7+
X^5+X^4+X^2+X^1+X^0
Note that we take it “backwards” and put the
highest-order term in the lowest-order bit. The
X^32 term is “implied”; the LSB is the X^31 term,
etc. The X^0 term (usually shown as “+1”) results in
the MSB being 1.
Note that the usual hardware shift register implementation, which is what we're using (we're merely
optimizing it by doing eight-bit chunks at a time)
shifts bits into the lowest-order term. In our imple
mentation, that means shifting towards the right.
Why do we do it this way? Because the calculated
CRC must be transmitted in order from highest-order
term to lowest-order term. UARTs transmit characters
in order from LSB to MSB. By storing the CRC this way
we hand it to the UART in the order low-byte to highbyte; the UART sends each low-bit to high-bit; and
the result is transmission bit by bit from highest- to
-
-
-
lowest-order term without requiring any bit shuffling
on our part. Reception works similarly.
The feedback terms table consists of 256, 32-bit
entries. Notes
The table can be generated at runtime if desired;
code to do so is shown later. It might not be obvious, but the feedback terms simply represent the
results of eight shift/xor operations for all combinations of data and CRC register values.
The values must be right-shifted by eight bits by
the “updcrc logic”; the shift must be unsigned
(bring in zeroes). On some hardware you could
probably optimize the shift in assembler by using
byte-swap instructions polynomial $edb88320
CRC32 code derived from work by Gary S. Brown.
------------------------------------------------------------------
About Open Source Software included in
the viewer software
This viewer software includes certain open
source or other software originating from third
parties that is subject to the GNU General Public
License version 3 (GPLv3) and different copyright
licensees, disclaimers and notices. The source
code of software licensed under GPLv3 and
different copyright licenses, disclaimers and
notices are distributed at the website below,
http://www.kenwood.com/gpl.
Important notices regarding software
This product uses software components (licensed
software) in accordance with the software license
agreements granted by third parties. For details,
see the support information for this product at
http://www.kenwood.com/cs/ce/.
48 49
 Loading...