


ECFM 17, 20
Instructions For Use
Instrucciones para el uso
Guides d’utilisation
Euroclean Models: |
01470A (17); 01480A (20) |
EN English (2 - 6)
ES Español (8 - 12)
FR Français (14 - 18)
6/05 Form Number 71041A

ENGLISH EN
IMPORTANT SAFETY INSTRUCTIONS
This machine is only suitable for commercial use, for example in hotels, schools, hospitals, factories, shops and offices other than normal residential housekeeping purposes.
When using an electrical appliance, basic precautions should always be followed, including the following: Read all instructions before using.
WARNING!
To reduce risk of fire, electric shock, or injury:
*Do not leave the appliance when it is plugged in. Unplug the unit from the outlet when not in use and before servicing.
*To avoid electric shock, do not expose to rain. Store indoors.
*Do not allow to be used as a toy. Close attention is necessary when used by or near children.
*Use only as described in this manual. Use only manufacturer’s recommended attachments.
*Do not use with damaged cord or plug. If appliance is not working as it should, has been dropped, damaged, left outdoors, or dropped into water, return it to a service center.
*Do not pull or carry by cord, use cord as a handle, close a door on a cord, or pull cord around sharp edges or corners. Do not run appliance over cord. Keep cord away from heated surfaces.
*Do not unplug by pulling on cord. To unplug, grasp the plug, not the cord.
*Do not handle plug or appliance with wet hands.
*Do not put any object into openings. Do not use with any opening blocked; keep free of dust, lint, hair, and anything that may reduce air flow.
*Keep hair, loose clothing, fingers, and all parts of body away from openings and moving parts.
*Turn off all controls before unplugging.
*Use extra care when cleaning on stairs.
*Do not use with flammable or combustible liquids such as gasoline or use in areas where they may be present.
*Connect to a properly grounded outlet only. See Grounding Instructions.
SAVE THESE INSTRUCTIONS
2 - FORM NO. 71041A - ECFM 17, 20
ENGLISH EN
GROUNDING INSTRUCTIONS
This appliance must be grounded. If it should electrically malfunction, grounding provides a path of least resistance for electric current to reduce the risk of electric shock. This appliance is equipped with a cord having an equipment-grounding conductor and grounding plug. The plug must be plugged into an appropriate outlet that is properly installed and grounded in accordance with all local codes and ordinances.
DANGER!
Improper connection of the equipment-grounding conductor can result in a risk of electric shock. Check with a qualified electrician or service person if you are in doubt as to whether the outlet is properly grounded. Do not modify the plug provided with the appliance. If it will not fit the outlet, have a proper outlet installed by a qualified electrician.
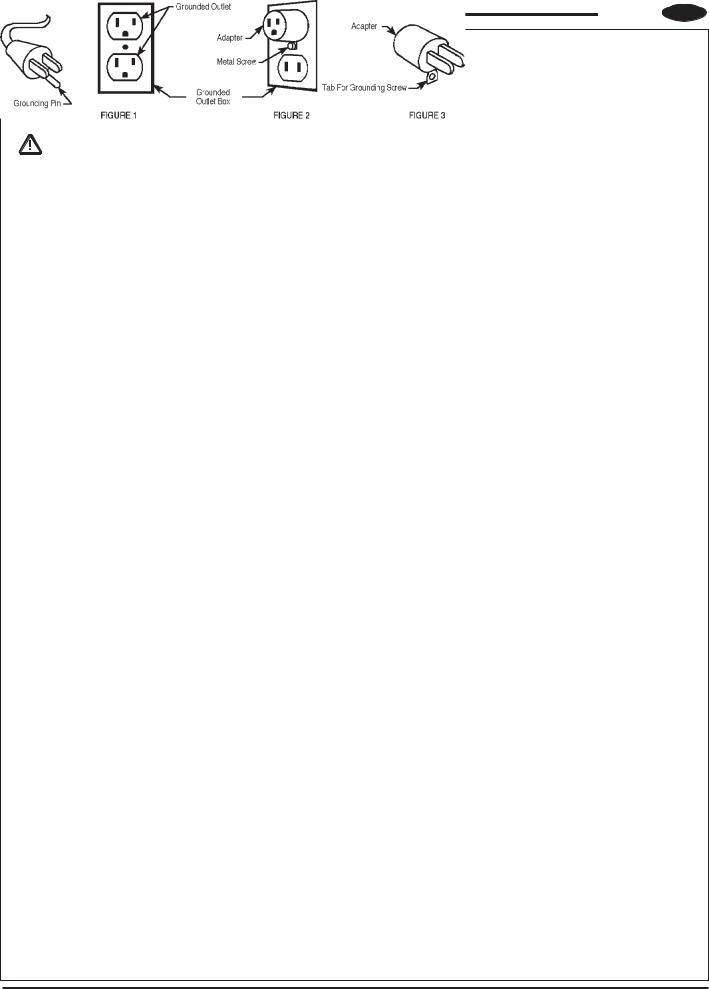
This appliance is for use on a nominal 120-volt circuit, and has a grounding plug that looks like the plug illustrated in Figure 1 below. A temporary adapter illustrated in Figures 2 and 3 may be used to connect this plug to a 2-pole receptacle as shown in Figure 2 if a properly grounded outlet is not available. The temporary adapter should be used only until a properly grounded outlet (Figure 1) can be installed by a qualified electrician. The green-colored rigid ear, tab, or the like extending from the adapter must be connected to a permanent ground such as a properly grounded outlet box cover. Whenever the adapter is used, it must be held in place by a metal screw. Grounding adapters are not approved for use in Canada.
Replace the plug if the grounding pin is damaged or broken.
The Green (or Green/Yellow) wire in the cord is the grounding wire. When replacing a plug, this wire must be attached to the grounding pin only.
Extension cords connected to this machine should be 12 gauge, three-wire cords with three-prong plugs and outlets. DO NOT use extension cords more than 50 feet (15 m) long.
PLEASE NOTE: FOR NORTH AMERICA ONLY
FORM NO. 71041A - ECFM 17, 20 - 3

ENGLISH EN
A
2
3
6
7
5
4
ECFM 17, 20
B
Lugs
Slots
4 - FORM NO. 71041A - ECFM 17, 20

ENGLISH EN
INTRODUCTION
This manual will help you get the most from your Euroclean floor machine. Read it thoroughly before operating the machine.
This product is intended for commercial use; polishing, spray buffing, scrubbing, stripping and rotary carpet shampooing.
PARTS AND SERVICE
Repairs, when required, should be performed by your Authorized Euroclean Service Center, who employs factory trained service personnel, and maintains an inventory of Euroclean original replacement parts and accessories.
Call the Euroclean dealer named below for repair parts or service. Please specify the Model and Serial Number when discussing your machine.
(Dealer, affix service sticker here.)
NAME PLATE
The Model Number and Serial Number of your machine are shown on the Nameplate on the bottom of the machine. This information is needed when ordering repair parts for the machine. Use the space below to note the Model Number and Serial Number of your machine for future reference.
MODEL NUMBER
SERIAL NUMBER
UNCRATE THE MACHINE
When the machine is delivered, carefully inspect the shipping carton and the machine for damage. If damage is evident, save the shipping carton so that it can be inspected. Contact the Euroclean Customer Service Department immediately to file a freight damage claim (phone number is provided on the back cover of this manual).
(A)-KNOW YOUR MACHINE
1Operator Handle Grips
2Switch Lever Safety Lock Button
3Switch Levers - Squeeze - ON / Release - OFF
4Handle Release Compression Lever
5Power Cord
6Operator Handle
7Cord Hook
WARNING!
This machine contains moving parts. To reduce the risk of injury, always unplug the power cord before servicing.
(B)-INSTALLING THE BRUSH OR PAD HOLDER
Align the lugs with the corresponding slots in the brush or pad holder and turn the brush or pad holder counterclockwise to lock it in place. To remove brush/
pad holder, give it a quick, hard turn clockwise.
CAUTION!
Using the wrong brush or pad on this machine can damage the floor or overload the motor.
OPERATION
1Unwrap the Power Cord (5) and plug it into a properly grounded outlet.
2Pull up on the Handle Release Compression Lever (4). Move the Operator Handle (6) downward until your arms are almost straight. Push down on the Handle Release Compression Lever (4) to lock it in place.
3Lift up on the Operator Handle (6) until the brush (or pad) is flat against the floor.
WARNING!
Be prepared to control the machine as soon as the motor starts. Just a slight up or down movement of the Handle will make the machine move from side to side. Raise the Handle to go right. Lower the Handle to go left.
CAUTION!
Immediately start moving the machine back and forth. Keep the machine moving while the motor is running to avoid damage to the floor or carpet.
4Hold one of the Operator Hand Grips (1) firmly, push the Safety Lock Button (2) and then compress the Switch Levers (3) to start the motor. NOTE: When the Switch Levers (3) are released, the machine shuts off immediately.
NOTE: When spray buffing, check the pad every 15 minutes for dirt and wax build-up. If the pad is dirty, turn it over to expose the clean side or install a clean pad.
AFTER USE
1Place the Operator Handle (6) in the upright position and unplug the Power Cord (5). Wrap the Power Cord (5) around the Operator Handle Grips (1) and the Cord Hook (7).
2Remove the pad holder or brush from the machine. Clean the pad or brush and hang it up to dry. Allow buffing pads to dry completely before using again.
Store brushes and pad holders separate from the machine. Never store the machine with the pad holder or brush on the machine.
3Wipe the entire machine with a clean, damp cloth. Wipe the underside of the brush housing after wet use.
4Inspect the entire machine and all accessories for damage. Perform any required maintenance or repairs before storage.
5Store the machine in a clean, dry place with the Operator Handle (6) locked in the upright position.
FORM NO. 71041A - ECFM 17, 20 - 5

ENGLISH EN
TROUBLESHOOTING
SWIRLS ON THE FLOOR AFTER SCRUBBING
•Floor not clean.
•Incorrect solution.
•Area not properly swept - debris in pad or brush.
•Improper pad or brush for the job.
•Moving the machine too fast.
SWIRLS ON THE FLOOR AFTER DRY BUFFING
•Moving the machine too fast.
•Floor finish too soft.
•Area not properly swept - debris in pad or brush.
•Improper pad or brush for the job.
CIRCLES ON THE FLOOR
•Machine standing still while the brush or pad is running.
FLOOR FINISH REMOVED
•Improper pad... too aggressive.
•Solution too strong.
MACHINE WOBBLES DURING OPERATION
•Defective pad... one side is more dense than the other.
•Machine left sitting on brush or pad for extended period of time causing bristles or pad to “take a set”.
•Pad not “seated” properly into pad holder bristles.
•Warped block on brush or padholder - replace.
MACHINE DOES NOT RUN
•Check plug for proper connection - on machine and at wall outlet.
•Check building circuit breaker.
•Call for service.
TECHNICAL SPECIFICATIONS (as installed and tested on the unit)
Model |
ECFM 17 |
ECFM 20 |
Model Number |
01470A |
01480A |
Motor |
1 hp |
1 hp |
Transmission |
Two-Planetary |
Two-Planetary |
Clutch Plate |
NP-92 |
NP-92 |
Pad/Brush Speed |
175 rpm |
175 rpm |
Pad/Brush Size |
17” (43 cm) |
20” (51 cm) |
Wheels |
5” (13 cm) |
5” (13 cm) |
Cord Length |
50’ (15 m) |
50’ (15 m) |
Height w/Handle |
46” (117 cm) |
46” (117 cm) |
Weight (w/cord) |
83 lbs (37.7 kg) |
87 lbs (39.5 kg) |
Construction: |
|
|
Handle Tube |
Tubular Steel |
Tubular Steel |
Base |
Die-Cast Aluminum |
Die-Cast Aluminum |
6 - FORM NO. 71041A - ECFM 17, 20
 Loading...