


66595189300
Kenmore 66595189300, 66595184300, 66595183300, 66595182300, 66595179301 Owner’s Manual
...
®
Electric Range
_!,,,,J_!:::'ili:,:,_!!!!ii_¸,,ii!_!iii_iC_i!i::!!!'_iiiii_i_"_'_,_!_!!_(iii_iiiii_biiiiiii,,,_i:i_::_,i!_!ii!i_
Estufa el ctrica
Models/Modelos 665.9514_, 9214_, 9515_, 9215_, 951 6_, 9216_, 9517_,
9217_, 9518_
_= color number, nQmero de color
iiiii
iiiii_iil_i/iii
To the installer: Please leave this instruction book with the unit.
To the consumer: Please read and keep this book for future reference.
Para el instatador: favor de dejar este manual de instrucciones con Ia unidad.
Para el consumidor: favor de leer y guardar este manual para futuras referencias.
Super Capacity with ULTRABAKE TM System
Capacidad extra con el Sistema ULTRABAKE TM
9756926B Sears Roebuck and Co., Hoffman Estates, IL 60179 U.S.A.
www.sears.com

TABLEOF CONTENTS
iNDICE
PROTECTION AGREEMENTS ....................................................... 3
WARRANTY ..................................................................................... 3
RANGE SAFETY .............................................................................. 4
The Anti-Tip Bracket ..................................................................... 4
PARTS AND FEATURES ................................................................ 6
COOKTOP USE ............................................................................... 7
Control Knobs .............................................................................. 7
Cooktop Lockout .......................................................................... 7
Radiant Glass ............................................................................... 8
Dual Cooking Zone ....................................................................... 8
SURESIMMEF M.......................................................................... 8
STEADYTEMP TM Warming Zone ................................................. 9
Home Canning .............................................................................. 9
Cookware ..................................................................................... 9
ELECTRONIC OVEN CONTROL ................................................ 10
Display ....................................................................................... 10
Start ........................................................................................... 10
Stop/Clear .................................................................................. 10
Add 1 Minute ............................................................................. 10
Clock .......................................................................................... 10
Tones ......................................................................................... 10
Fahrenheit and Celsius .............................................................. 11
Timer .......................................................................................... 11
Oven Temperature Control ........................................................ 11
Oven Lockout ............................................................................ 11
OVEN USE .................................................................................... 12
Aluminum Foil ............................................................................ 12
Positioning Racks and Bakeware ............................................. 12
STURDIGLIDF MOven Racks ................................................... 12
Bakeware ................................................................................... 13
Oven Vent .................................................................................. 13
Bake ........................................................................................... 13
Broil ............................................................................................ 14
RECIPE RECALLTM with Slow Cooker Function ....................... 15
Sabbath Mode ........................................................................... 15
Serve Warm ............................................................................... 16
Timed Oven Control .................................................................. 17
Using Triple Task Oven Drawer ................................................. 18
Using Warm & Ready Drawer ................................................... 18
12-Hour Shut-Off ....................................................................... 19
RANGE CARE .............................................................................. 20
Self-Cleaning Cycle ................................................................... 20
General Cleaning ....................................................................... 22
Oven Light ................................................................................. 24
Console Night Light ................................................................... 24
Oven Door ................................................................................. 25
Storage Drawer .......................................................................... 25
Warming Drawer ........................................................................ 25
Triple Task Oven Drawer ........................................................... 26
TROUBLESHOOTING .................................................................. 26
SERVICE NUMBERS ............................................... BACK COVER
CONTRATOS DE PROTECCION ................................................ 28
GARANTIA .................................................................................... 28
SEGURIDAD DE LA ESTUFA ...................................................... 29
El soporte antivuelco ................................................................. 29
PARTES Y CARACTERiSTICAS ................................................. 32
USO DE LA SUPERFICIE DE COCCION ................................... 33
Perillas de control ...................................................................... 33
Bloqueo de la superficie de cocci6n ......................................... 33
Vidrio radiante ............................................................................ 34
Zona de cocciGn dual ................................................................ 34
SURESIMMER TM ....................................................................... 34
La zona de calentamiento STEADYTEMP TM ............................. 35
Enlatado casero ......................................................................... 35
Utensilios de cocina .................................................................. 35
CONTROL ELECTRONICO DEL HORNO .................................. 36
Pantalla ...................................................................................... 36
Inicio........................................................................................... 36
Detener/Despejar ....................................................................... 36
C6mo agregar minutos .............................................................. 36
Reloj ........................................................................................... 36
Set,ales audibles ........................................................................ 36
Fahrenheit y centfgrados ........................................................... 37
Temporizador ............................................................................. 37
Control de temperatura del homo ............................................. 37
Bloqueo del homo ..................................................................... 37
USO DEL HORNO ........................................................................ 38
Papel de aluminio ...................................................................... 38
PosiciGn de las parrillas y los utensilios para hornear .............. 38
Parrillas del horno STURDIGLIDE TM .......................................... 38
Utensilios para hornear .............................................................. 39
Ducto de escape del homo ....................................................... 40
CGmo hornear ............................................................................ 40
CGmo asar ................................................................................. 40
RECIPE RECALLTM Con funciGn de cocimiento lento .............. 41
Modo de descanso .................................................................... 42
Servir caliente ............................................................................ 43
Control temporizado del homo ................................................. 44
CGmo usar el cajGn de homo de triple funciGn ......................... 45
CGmo usar el cajGn de Caliente y Listo .................................... 45
Apagado despues de 12 horas ................................................. 46
CUIDADO DE LA ESTUFA .......................................................... 47
Ciclo de autolimpieza ................................................................ 47
Limpieza general ........................................................................ 49
Luz del homo ............................................................................. 51
La luz nocturna de la consola .................................................... 51
Puerta del homo ........................................................................ 52
CajGn de almacenamiento ......................................................... 53
CajGn de calentamiento ............................................................. 53
Caj6n de homo de triple funciGn ............................................... 54
SOLUCION DE PROBLEMAS ..................................................... 54
NOMEROS DE SERVICIO .............................. CONTRAPORTADA

PROTECTION AGREEMENTS
Master Protection Agreements
Congratulations on making a smart purchase. Your new
Kenmore _product is designed and manufactured for years of
dependable operation. But like all products, it may require
preventive maintenance or repair from time to time. That's when
having a Master Protection Agreement can save you money and
aggravation.
Purchase a Master Protection Agreement now and protect
yourself from unexpected hassle and expense.
The Master Protection Agreement also helps extend the life of
your new product. Here's what's included in the Agreement:
v' Expert service by our 12,000 professional repair specialists
v' Unlimited service and no charge for parts and labor on all
covered repairs
v' "No-lemon" guarantee - replacement of your covered
product if four or more product failures occur within twelve
months
v' Product replacement if your covered product can't be fixed
v' Annual Preventive Maintenance Check at your request - no U.S.A. call 1-800-4-MY-HOME ®.
extra charge
v' Fast help by phone - phone support from a Sears technician
on products requiring in-home repair, plus convenient repair
scheduling
v' Power surge protection against electrical damage due to
power fluctuations
v' Rental reimbursement if repair of your covered product takes
longer than promised
Once you purchase the Agreement, a simple phone call is all that
it takes for you to schedule service. You can call anytime day or
night, or schedule a service appointment online.
Sears has over 12,000 professional repair specialists, who have
access to over 4.5 million quality parts and accessories. That's
the kind of professionalism you can count on to help prolong the
life of your new purchase for years to come. Purchase your
Master Protection Agreement today!
Some limitations and exclusions apply. For prices and
additional information, call 1-800-827-6655.
Sears Installation Service
For Sears professional installation of home appliances, garage
door openers, water heaters, and other major home items, in the
WARRANTY
ONE-YEAR FULL WARRANTY ON RANGE PARTS
For one year from the date of purchase, when installed and
operated according to the Installation Instructions and Use &
Care Guide, if any part of this range fails due to a defect in
material or workmanship, Sears will repair or replace it, at our
option, free of charge.
ADDITIONAL FOUR-YEAR LIMITED WARRANTY ON
RANGE PARTS
For the second through the fifth year from the date of purchase,
when installed and operated according to the Installation
Instructions and Use & Care Guide, Sears will supply the
following range parts free of charge if they fail for the reasons
listed below. Customer must pay labor cost of installation.
• Cooktop glass if it fails due to thermal shock
• Cooking elements if they are defective
• Rubber seal if it cracks between the cooktop glass and the
porcelain edge.
What Sears will not cover:
• Failure of the product if it is abused, misused, or used for
other than the intended purpose.
• Damage to the cooktop glass caused by the use of cleaners
or utensils other than the recommended cleaning cream and
tools.
Damage to the cooktop glass caused by hardened spills of
sugary materials (including starches from vegetables or
pastas) or melted plastic that are not cleaned according to
the directions in the Use & Care Guide. - Repairs to parts or
systems resulting from unauthorized modifications made to
the appliance.
WARRANTY RESTRICTION
If the product is subjected to other than private residential use, all
warranty coverage is effective for only 90 days
WARRANTY SERVICE
WARRANTY SERVICE IS AVAILABLE BY CONTACTING THE
NEAREST SEARS SERVICE CENTER IN THE UNITED STATES.
WARRANTY SERVICE IS AVAILABLE BY CONTACTING SEARS
AT 1-800-4-MY-HOME ®.
This warranty gives you specific legal rights and you may also
have other rights which vary from state to state.
Sears, Roebuck and Co.
D/817WA, Heffman Estates, IL 60179
PRODUCT RECORD
In the space below, record your complete model number, serial
number, and purchase date. You can find this information on the
model and serial number label, located as shown in the Parts and
Features section of this book. Have this information available to
help you quickly obtain assistance or service when you contact
Sears concerning your appliance.
Model number 665.
Serial number
Purchase date
Save these instructions and your sales receipt for future
reference.
!!!!!!!!!!!!!!!!!!!!!!!!!
RANGE SAFETY
Your safety and the safety of others are very important.
We have provided many important safety messages in this manual and on your appliance. Always read and obey all safety
messages.
This is the safety alert symbol.
This symbol alerts you to potential hazards that can kill or hurt you and others.
All safety messages will follow the safety alert symbol and either the word "DANGER" or "WARNING."
These words mean:
You can be killed or seriously injured if you don't immediately
follow instructions.
You can be killed or seriously injured if you don't follow
instructions.
All safety messages will tell you what the potential hazard is, tell you how to reduce the chance of injury, and tell you what can
happen if the instructions are not followed.
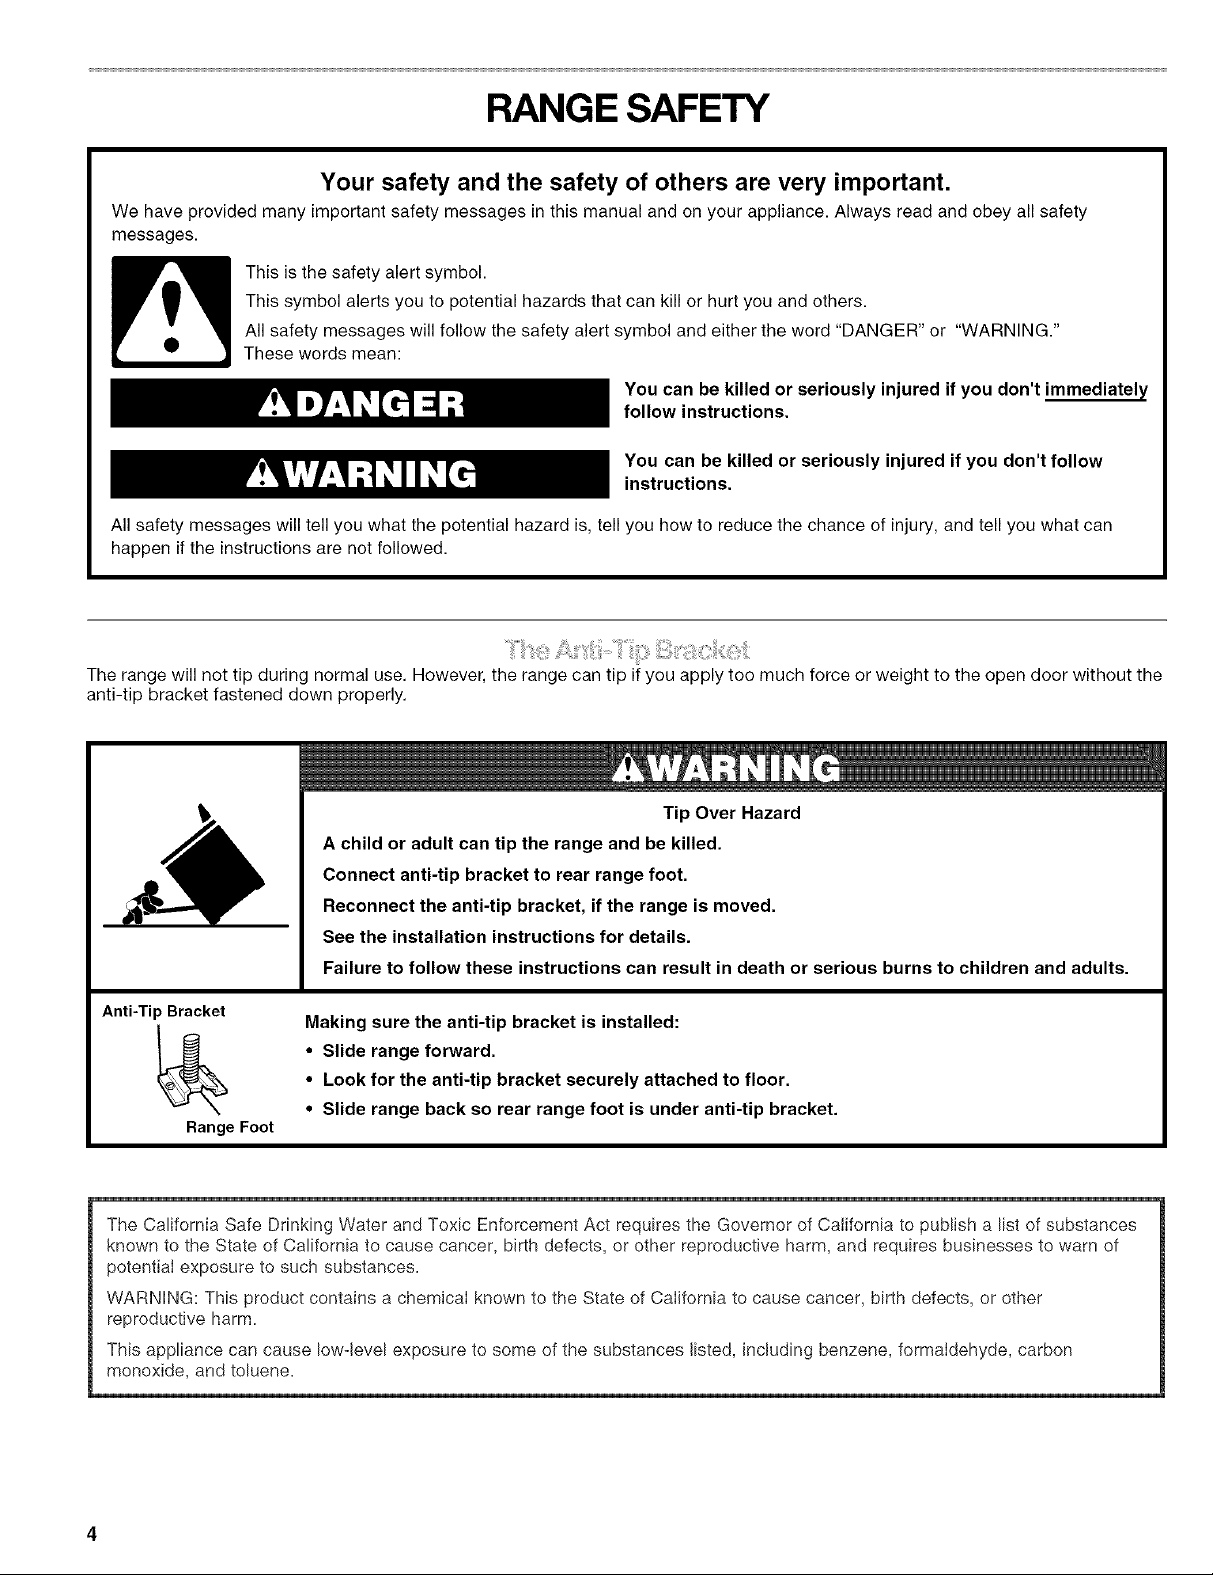
The range will not tip during normal use. However, the range can tip if you apply too much force or weight to the open door without the
anti-tip bracket fastened down properly.
Tip Over Hazard
A child or adult can tip the range and be killed.
Connect anti-tip bracket to rear range foot.
Reconnect the anti-tip bracket, if the range is moved.
See the installation instructions for details.
Failure to follow these instructions can result in death or serious burns to children and adults.
Anti-Tip Bracket
Range Foot
The California Safe Drinking Water and Toxic Enforcement Act requires the Governor of California to publish a list of substances
known to the State of California to cause cancer, birth defects, or other reproductive harm, and requires businesses to warn of
potential exposure to such substances+
WARNHNG: This product contains a chemical known to the State of California to cause cancer, birth defects, or other
reproductive harm+
This appliance can cause low-level exposure to some of the substances listed, including benzene, formaldehyde, carbon
monoxide, and toluene+
Making sure the anti-tip bracket is installed:
• Slide range forward.
• Look for the anti-tip bracket securely attached to floor.
• Slide range back so rear range foot is under anti-tip bracket.
iMPORTANT SAFETY mNSTRUCTmONS
WARNING: To reduce the risk of fire, electrical shock,
inNry to persons, or damage when using the range, follow
basic precautions, including the following:
,, WARNING: TO REDUCE THE RISK OF TIPPING OF
THE RANGE, THE RANGE MUST BE SECURED BY
PROPERLY INSTALLED ANTI-TIP DEVICES. TO CHECK
IF THE DEVICES ARE INSTALLED PROPERLY, SMDE
RANGE FORWARD, LOOK FOR ANTI-TIP BRACKET
SECURELY ATTACHED TO FLOOR, AND SMDE RANGE
BACK SO REAR RANGE FOOT IS UNDER ANTI-TIP
BRACKET.
,, CAUTION: Do not store items of interest to children in
cabinets above a range or on the backguard of a range -
children climbing on the range to reach items could be
seriously injured.
_, Proper Instatlation - Be sure the range is properly installed
and grounded by a qualified technician.
_, Never Use the Range for Warming or Heating the Room.
_, Do Not Leave Children Alone - Children should not be Ieft
alone or unattended in area where the range is in use.
They should never be allowed to sit or stand on any part of
the range.
_, Wear Proper Apparel - Loose-fitting or hanging garments
should never be worn while using the range.
_, User Servicing - Do not repair or replace any part of the
range unless specifically recommended in the manual. All
other servicing should be referred to a qualified technician.
_, Storage in or on the Range - Flammable materials should
not be stored in an oven or near surface units.
_, Do Not Use Water on Grease Fires - Smother fire or flame
or use dry chemical or foam-type extinguisher.
_, Use Only Dry Potholders - Moist or damp potholders on
hot surfaces may result in burns from steam. Do not let
potholder touch hot heating elements. Do not use a towel
or other bulky cloth.
_, DO NOT TOUCH SURFACE UNITS OR AREAS NEAR
UNITS - Surface units may be hot even though they are
dark in color. Areas near surface units may become hot
enough to cause burns. During and after use, do not touch,
or let clothing or other flammable materials contact surface
units or areas near units until they have had sufficient time
to cool. Among those areas are the cooktop and surfaces
facing the cooktop.
_, Use Proper Pan Size - The range is equipped with one or
more surface units of different size. Select utensils having
flat bottoms large enough to cover the surface unit heating
element. The use of undersized utensils wilI expose a
portion of the heating element to direct contact and may
result in ignition of clothing. Proper relationship of utensil to
burner will also improve efficiency.
_, Never Leave Surface Units Unattended at High Heat
Settings - Boilover causes smoking and greasy spillovers
that may ignite.
_, Make Sure Reflector Pans or Drip Bowls Are in Place -
Absence of these pans or bowls during cooking may
subiect wiring or components underneath to damage.
,,, Protective Liners - Do not use aluminum foil to line surface
unit drip bowls or oven bottoms, except as suggested in
the manual. Improper installation of these liners may result
in a risk of electric shock, or fire.
_, Glazed Cooking Utensils - Only certain types of glass,
glass/ceramic, ceramic, earthenware, or other glazed
utensils are suitable for range-top service without breaking
due to the sudden change in temperature.
_, Utensil Handles Should Be Turned Inward and Not Extend
Over Adiacent Surface Units - To reduce the risk of burns,
ignition of flammable materials, and spillage due to
unintentional contact with the utensil, the handle of a
utensil should be positioned so that it is turned inward, and
does not extend over adiacent surface units.
_, Do Not Soak Removable Heating Elements - Heating
elements should never be immersed in water.
,,, Do Not Cook on Broken Cooktop - If cooktop should
break, cleaning solutions and spilIovers may penetrate the
broken cooktop and create a risk of electric shock. Contact
a qualified technician immediately.
_, Clean Cooktop With Caution - If a wet sponge or cloth is
used to wipe spills on a hot cooking area, be careful to
avoid steam burn. Some cleaners can produce noxious
fumes if applied to a hot surface.
_, Use Care When Opening Door - Let hot air or steam
escape before removing or replacing food.
_, Do Not Heat Unopened Food Containers - Build-up of
pressure may cause container to burst and result in injury.
_, Keep Oven Vent Ducts Unobstructed.
_, Placement of Oven Racks - Always place oven racks in
desired location while oven is cool. If rack must be moved
while oven is hot, do not let potholder contact hot heating
element in oven.
,,, DO NOT TOUCH HEATING ELEMENTS OR INTERIOR
SURFACES OF OVEN - Heating elements may be hot even
though they are dark in color. Interior surfaces of an oven
become hot enough to cause burns. During and after use,
do not touch, or let clothing or other flammable materials
contact heating elements or interior surfaces of oven until
they have had sufficient time to cool. Other surfaces of the
appliance may become hot enough to cause burns - among
these surfaces are oven vent openings and surfaces near
these openings, oven doors, and windows of oven doors.
For self-cleaning ranges -
_, Do Not Clean Door Gasket - The door gasket is essential
for a good seal. Care should be taken not to rub, damage,
or move the gasket.
_, Do Not Use Oven Cleaners - No commercial oven cleaner
or oven liner protective coating of any kind should be used
in or around any part of the oven.
_, Clean Only Parts Listed in Manual.
_, Before Self-Cleaning the Oven - Remove broiler pan and
other utensils.
For units with ventilating hood -
_, Clean Ventilating Hoods Frequently - Grease should not
be allowed to accumulate on hood or filter.
When flaming foods under the hood, turn the fan on.
SAVE THESE iNSTRUCTiONS

PARTSAND FEATURES
This manual covers several different models. The range you have purchased may have some or all of the items listed. The locations and
appearances of the features shown here may not match your model.
Control Panel
A B C
[
J K
A. EASYGLANCE TM Hot Surface
Indicator Light
B. Left Rear Cooking Zone
Control (SURESlMMER TM on
some models)
C. Left Front Cooking Zone
Control (Dual Cooking zone on
some models)
Range
D. Warm & Ready Warming
Drawer Selector Switch (on
some models), or Triple Task
Oven Drawer (on some models)
E. Slow Cooker function
(on some models)
E Electronic Oven Control
G. STEADYTEMP TM Warming
Zone Control (on some models)
H. Right Front Cooking Zone
Control (Dual Cooking Zone on
some models)
L Right Rear Cooking Zone
Control
G
H /
J. SURESIMMER TM Indicator
Light (on some models)
K. SURESlMMER TM Button (on
some models)
L. Cooktop On Indicator Light
A. Oven Vent
B. Cooking Zone (SURESlMMER TM
on some models)
C. Radiant Glass Cooktop
D. SURESlMMER TM Cooking Zone
(on some models) or Dual Cooking
Zone (on some models)
E. STURDIGLIDE TM Half-Rack
(with removable insert -- on some
models)
E STURDIGLIDE TM Oven Rack
(with integrated handle -- on
some models)
G. Anti-Tip Bracket
H. Door Stop Clip
L Model and Serial Number Plate
(behind left side of storage
drawer)
III II
I!
J. Warm & Ready Warming
Drawer (on some models);
Storage Drawer (on some
models)
K. Console Night Light (on
some models)
L. Control Panel
M. STEADYTEMP TM Warming
Zone (on some models)
M
N
0
P
0
R
N. Dual Cooking Zone (on some
models)
O.Automatic Oven Light Switch
,9 Self-Clean Latch
Q. Broil Element (not shown)
R. Gasket
S. Bake Element
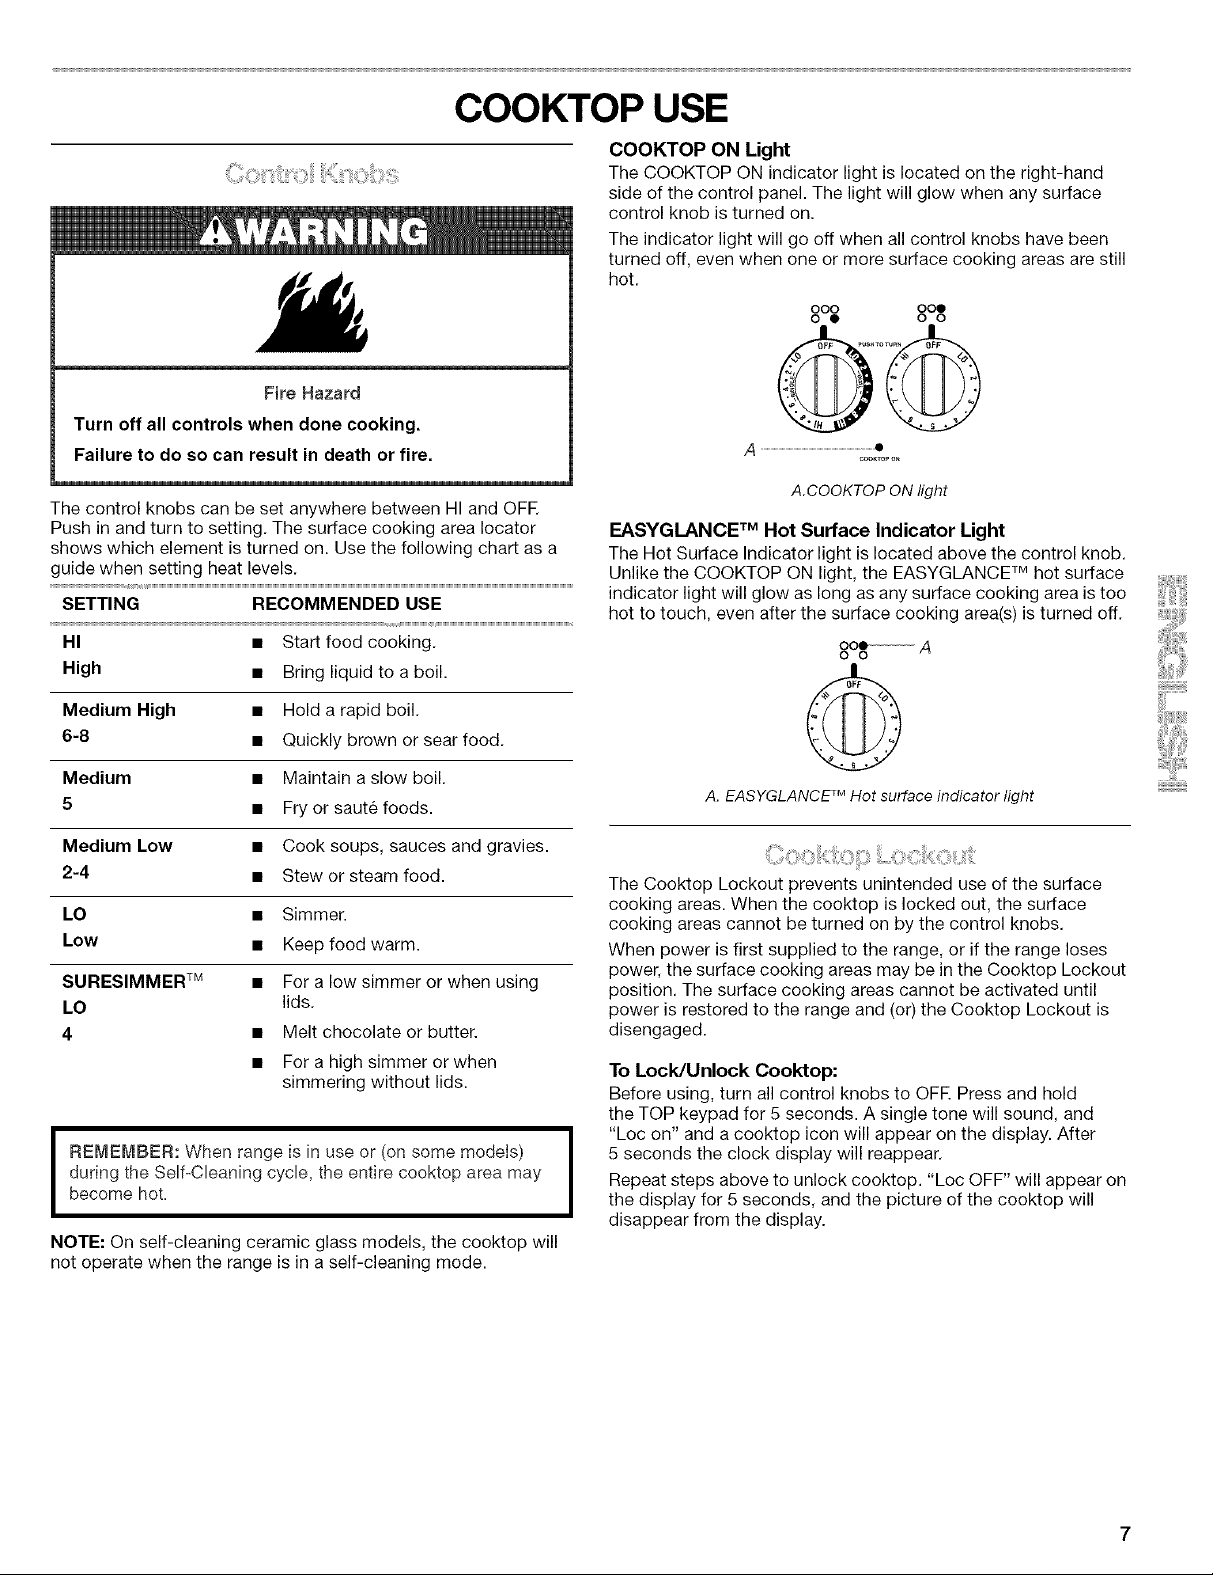
COOKTOP USE
Fire Hazard
Turn off all controls when done cooking.
Failure to do so can result in death or fire.
The control knobs can be set anywhere between HI and OFR
Push in and turn to setting. The surface cooking area Iocator
shows which element is turned on. Use the following chart as a
guide when setting heat levels.
SETTING RECOMMENDED USE
HI • Start food cooking.
High • Bring liquid to a boil.
COOKTOP ON Light
The COOKTOP ON indicator light is located on the right-hand
side of the control panel. The light will glow when any surface
control knob is turned on.
The indicator light will go off when all control knobs have been
turned off, even when one or more surface cooking areas are still
hot.
000 00@
0 @ 0 0
A.COOKTOP ON light
EASYGLANCE TM Hot Surface Indicator Light
The Hot Surface Indicator light is located above the control knob.
Unlike the COOKTOP ON light, the EASYGLANCE TMhot surface
indicator light will glow as long as any surface cooking area is too
hot to touch, even after the surface cooking area(s) is turned off.
Medium High • Hold a rapid boil.
6-8 • Quickly brown or sear food.
Medium • Maintain a slow boil.
5 • Fry or saute foods.
Medium Low • Cook soups, sauces and gravies.
2-4 • Stew or steam food.
LO • Simmer.
Low • Keep food warm.
SURESlMMER TM • For a low simmer or when using
LO lids.
4 • Melt chocolate or butter.
• For a high simmer or when
simmering without lids.
REMEMBER: When range is in use or (on some models)
during the Self-Cleaning cycle, the entire cooktop area may
become hot.
NOTE: On self-cleaning ceramic glass models, the cooktop will
not operate when the range is in a self-cleaning mode.
A. EASYGLANCE TMHot surface indicator light
The Cooktop Lockout prevents unintended use of the surface
cooking areas. When the cooktop is locked out, the surface
cooking areas cannot be turned on by the control knobs.
When power is first supplied to the range, or if the range loses
power, the surface cooking areas may be in the Cooktop Lockout
position. The surface cooking areas cannot be activated until
power is restored to the range and (or) the Cooktop Lockout is
disengaged.
To Lock/Unlock Cooktop:
Before using, turn all control knobs to OFF. Press and hold
the TOP keypad for 5 seconds. A single tone will sound, and
5 seconds the clock display will reappear.
Repeat steps above to unlock cooktop. "Loc OFF" will appear on
i "Loc on" and a cooktop icon will appear on the display. After
the display for 5 seconds, and the picture of the cooktop will
disappear from the display.
Thesurfacecookingareawillglowredwhenanelementison.It
willcycleonandoff,atallsettings,tomaintaintheselectedheat
level.
Wipingoffthecooktopbeforeandaftereachusewillhelpkeepit
freefromstainsandprovidethemostevenheating.Formore
information,see"GeneralCleaning"section.
• Donotstorejarsorcansabovethecooktop.Droppinga
heavyorhardobjectonthecooktopcouldcrackthe
cooktop.
• Donotleaveahotlidonthecooktop.Asthecooktopcools,
aircanbecometrappedbetweenthelidandthecooktop,
andtheceramicglasscouldbreakwhenthelidisremoved.
Cleanupsugaryspillsandsoilsassoonashotsurface
indicatorlightgoesoff.Ifspillsareallowedtocooldownon
thesurfacetheycanadheretothecooktopandcausepitting
andpermanentmarks.
• Liftpotsandpansonandoffthecooktop.Slidingpots,pans
andskilletsthathavealuminumorcopperbasescouldleave
permanentscratchesandmarksonthecooktop.
• Donotcookpopcorninprepackagedaluminumcontainers
onthecooktop.Itcouldleavealuminummarksthatcannot
beremovedcompletely.
• Donotallowobjectsthatcouldmelt,likeplasticoraluminum
foil,totouchanypartoftheentirecooktop.
• Donotusethecooktopasacuttingboard.
• Usecookwareaboutthesamesizeasthesurfacecooking
area.Cookwareshouldnotextendmorethan1"(2.5cm)
outsidethearea.
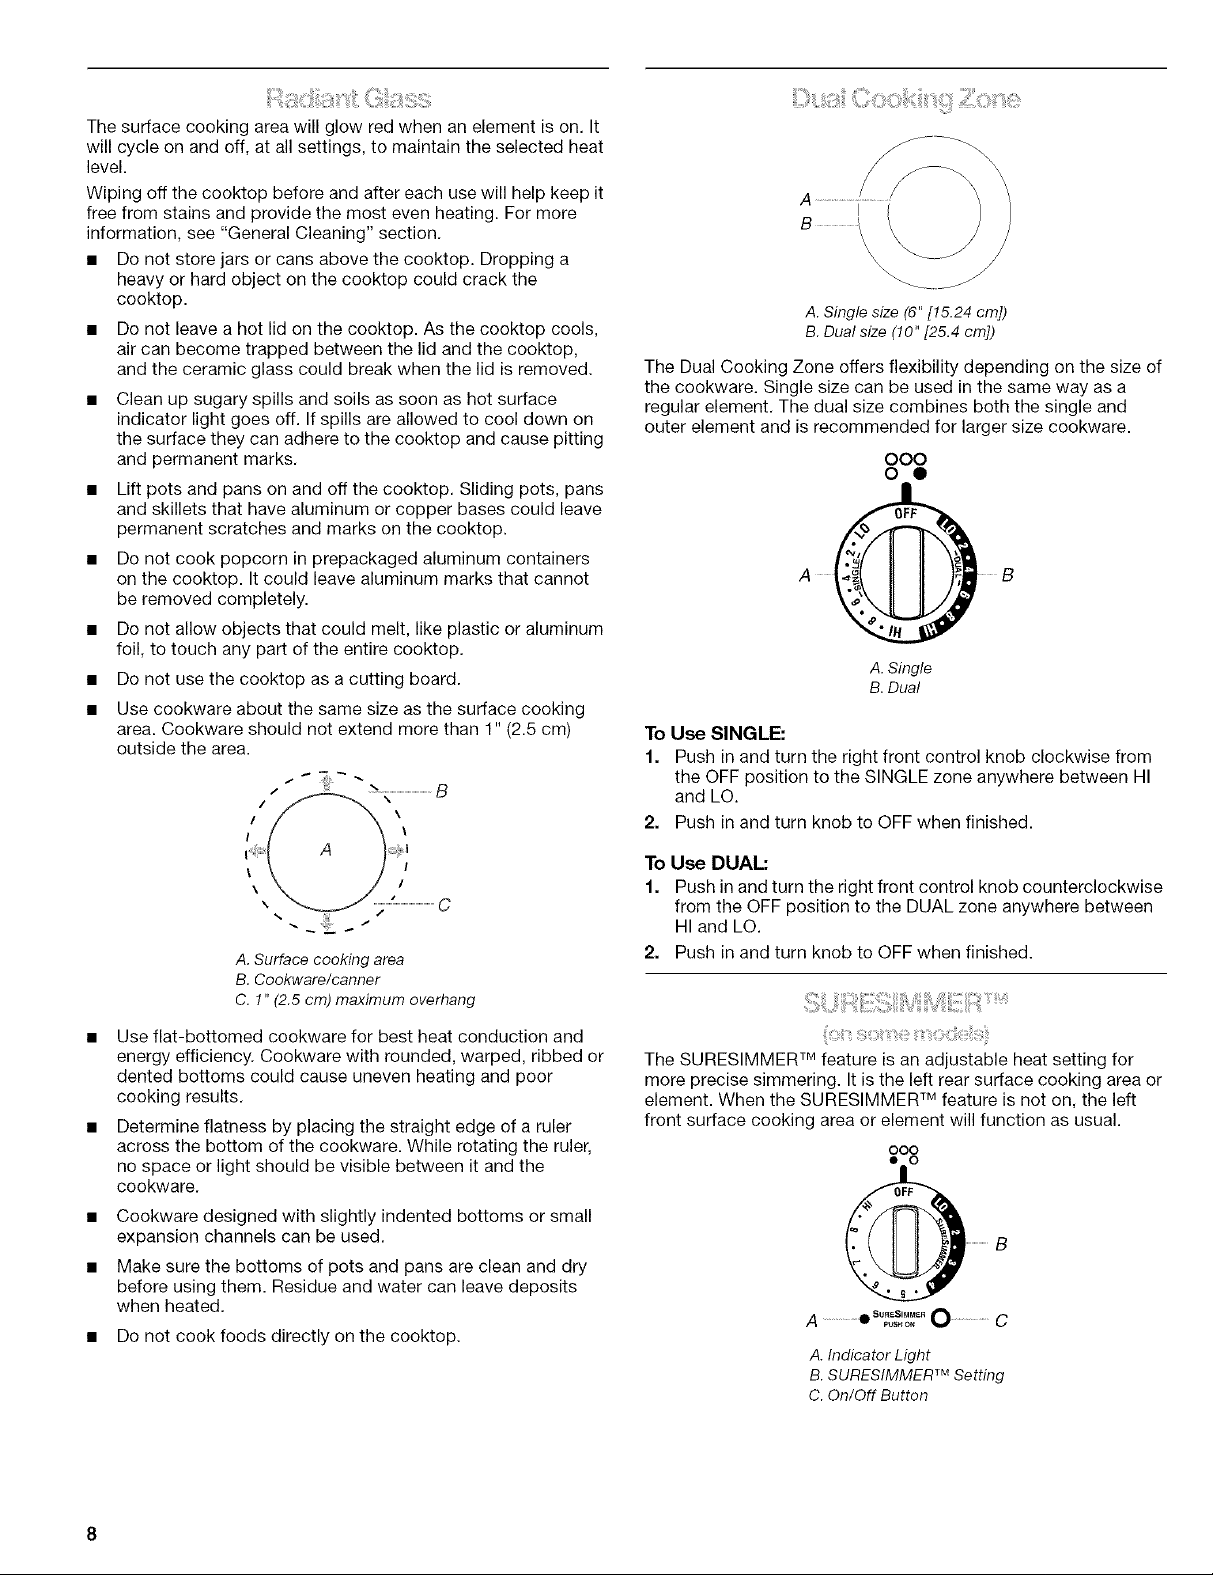
A. Single size (6" [15.24 cm])
B. Dual size (!0" [25.4 cm])
The Dual Cooking Zone offers flexibility depending on the size of
the cookware. Single size can be used in the same way as a
regular element. The dual size combines both the single and
outer element and is recommended for larger size cookware.
000
o •
A I1_ II I B
A. Single
B. Dual
To Use SINGLE:
1. Push in and turn the right front control knob clockwise from
the OFF position to the SINGLE zone anywhere between HI
and LO.
2. Push in and turn knob to OFF when finished.
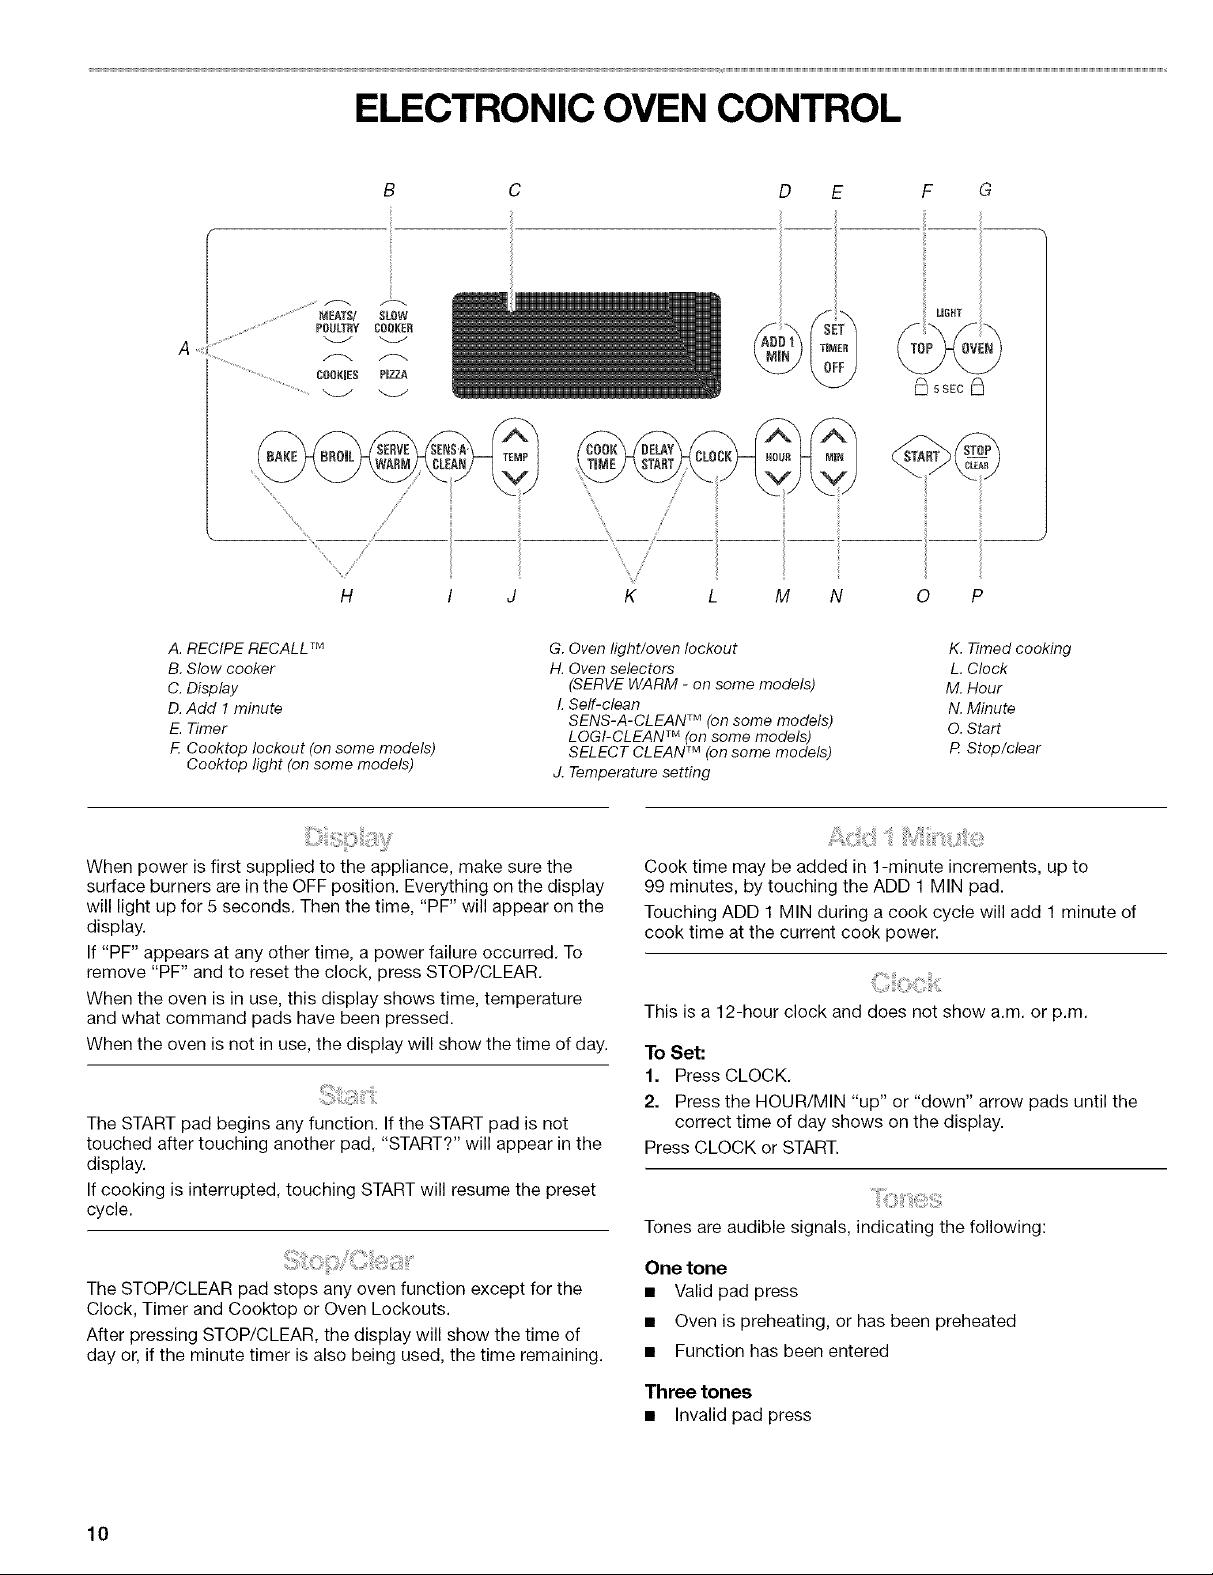
A. Surface cooking area
B. Cookware/canner
C. !" (2.5 cm) maximum overhang
Use flat-bottomed cookware for best heat conduction and
energy efficiency. Cookware with rounded, warped, ribbed or
dented bottoms could cause uneven heating and poor
cooking results.
Determine flatness by placing the straight edge of a ruler
across the bottom of the cookware. While rotating the ruler,
no space or light should be visible between it and the
cookware.
Cookware designed with slightly indented bottoms or small
expansion channels can be used.
Make sure the bottoms of pots and pans are clean and dry
before using them. Residue and water can leave deposits
when heated.
• Do not cook foods directly on the cooktop.
To Use DUAL:
1. Push inand turn the right front control knob counterclockwise
from the OFF position to the DUAL zone anywhere between
HI and LO.
2. Push in and turn knob to OFF when finished.
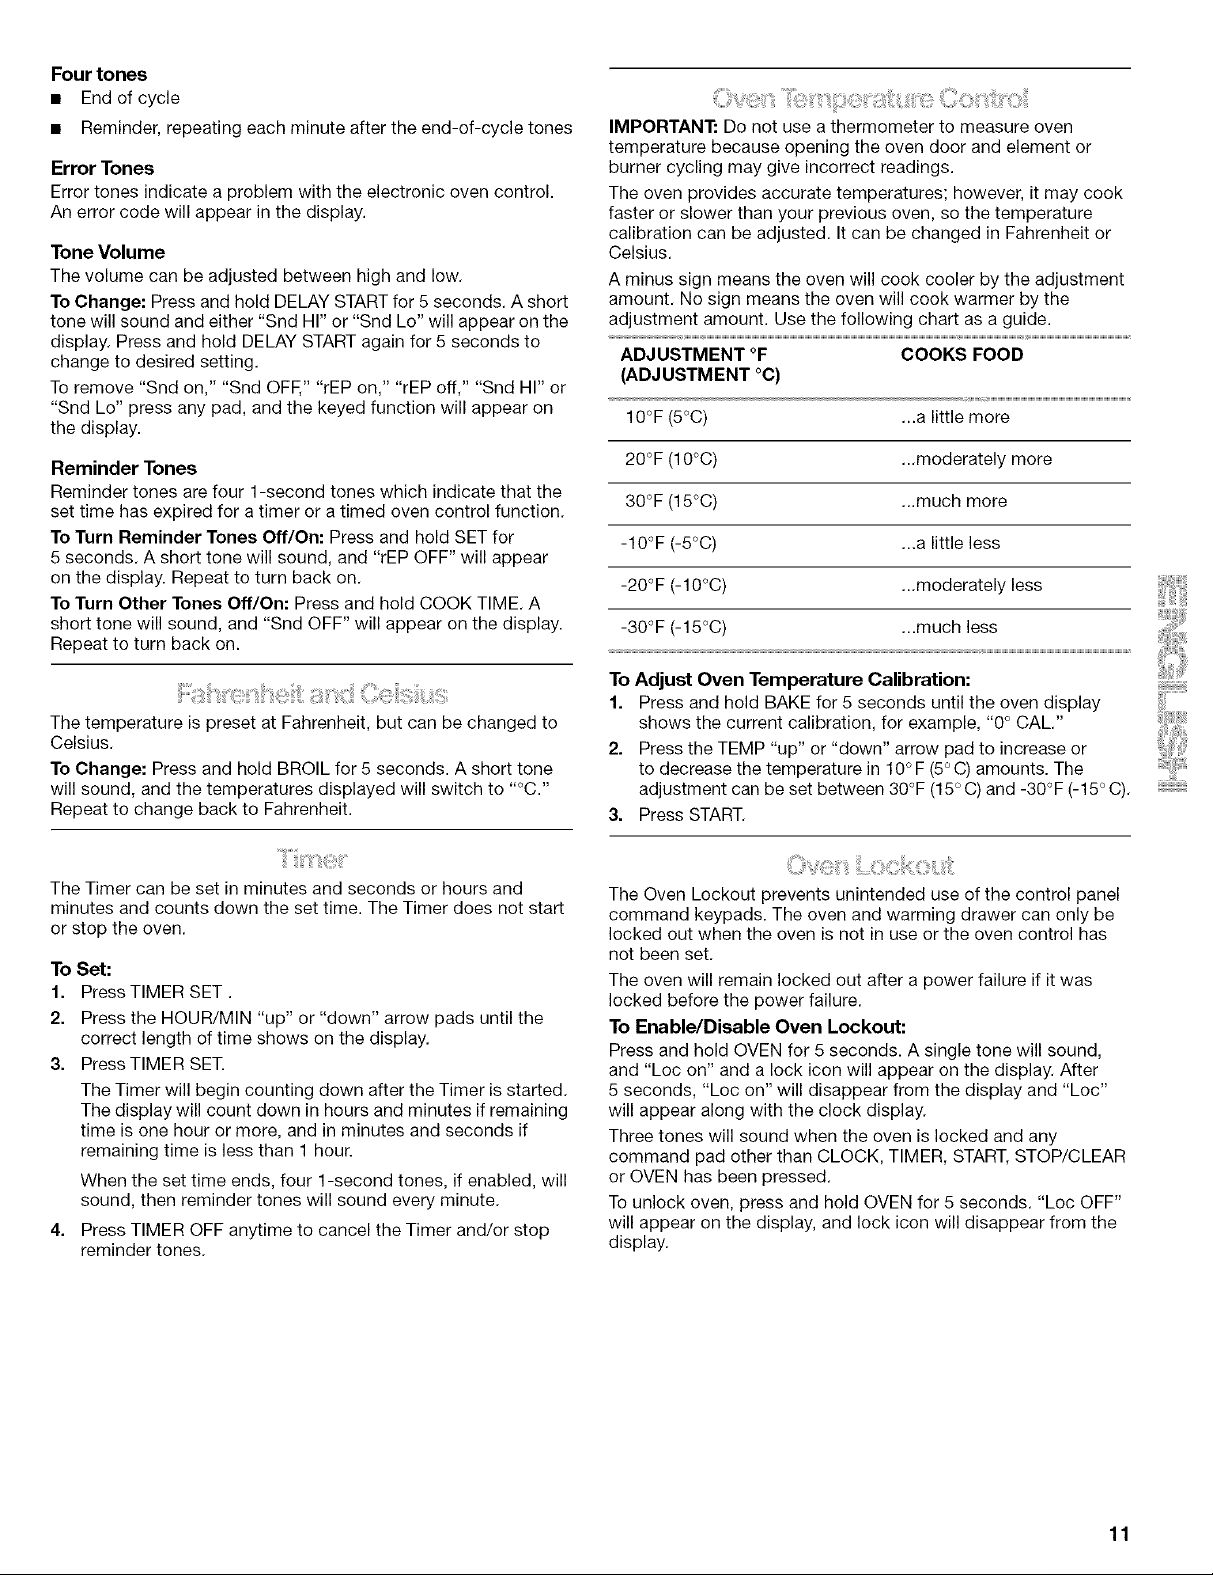
The SURESlMMER TM feature is an adjustable heat setting for
more precise simmering. It is the left rear surface cooking area or
element. When the SURESIMMEF Mfeature is not on, the left
front surface cooking area or element will function as usual.
ooo
• o
A ...............• ..,.o. 0 ...............C
A. Indicator Light
B. SURESIMMER TM Setting
C. On/Off Button
SuR_SNMM_R

To Use:
1. Push the SURESIMMER TMbutton to ON.
The light will glow when SURESIMMER TMis on.
2. Turn and set the left front knob to the SURESIMMER TM
setting between LO and 4.
Food Poisoning Hazard
Do not let food sit for more than one hour before or
after cooking.
Doing so can result in food poisoning or sickness.
The STEADYTEMP TMwarming zone is used to keep cooked
foods warm, and may be used whether the other surface cooking
zones are in use or not. It is not recommended for heating cold
foods. The warming zone will not glow red like the cooking
zones, but the indicator light will glow on the control panel.
Use only cookware and dishes recommended for oven and
cooktop use, and that have flat bottoms to make direct contact
with the cooktop surface. Use pot holders or oven mitts to
remove cookware.
Cover all foods with a lid or aluminum foil. Do not use plastic
wrap to cover food, as it may melt onto the cooktop surface.
When warming baked goods, allow a small opening in the cover
for moisture to escape.
Food quality may deteriorate if it is kept on the STEADYTEMP TM
warming zone for an extended period of time. For best results,
hold food no longer than 30 to 45 minutes. Choose the MIN
setting for heat-sensitive and smaller quantities of foods. Choose
the MAX setting for liquids and larger quantities of foods. Adjust
as needed.
To Use:
1. Push in and turn the control knob to the desired setting from
MIN to MAX for different levels of heating.
2. Turn to OFF when finished. The warming zone will remain
warm until the hot surface indicator light on the control panel
goes off.
ii__!l¸o _ __i!!!_O _!!i!i__ih_l¸_iii_ii'_i!ii:iii_iIi
When canning for long periods, alternate the use of surface
cooking areas, elements or surface burners between batches.
This allows time for the most recently used areas to cool.
• Center the canner on the grate or largest surface cooking
area or element. Canners should not extend more than
1" (2.5 cm) outside the cooking area.
• Do not place canner on two surface cooking areas, elements
or surface burners at the same time.
• On ceramic glass models, only use flat-bottomed canners.
• On coil element models, the installation of a Canning Unit Kit
is recommended. If not installed, the life of the coil element
will be shortened. See back cover for ordering instructions.
For more information, contact your local U.S. Government
Agricultural Department Extension Office. Companies who
manufacture home canning products can also offer
assistance.
IMPORTANT: Do not leave empty cookware on a hot surface
cooking area, element or surface burner.
Ideal cookware should have a flat bottom, straight sides, a well-
fitting lid and the material should be of medium-to-heavy
thickness.
Rough finishes may scratch the cooktop. Aluminum and copper
may be used as a core or base in cookware. However, when used
as a base they can leave permanent marks on the cooktop or
grates.
Cookware material is a factor in how quickly and evenly heat is
transferred, which affects cooking results. A nonstick finish has
the same characteristics as its base material. For example,
aluminum cookware with a nonstick finish will take on the
properties of aluminum.
On some models, griddles with nonstick surfaces should not be
used in the broiler.
Use the following chart as a guide for cookware material
characteristics.
COOKWARE CHARACTERISTICS
Aluminum • Heats quickly and evenly.
• Suitable for all types of cooking.
• Medium or heavy thickness is best for
most cooking tasks.
Cast iron
Ceramic or
Ceramic glass
Copper • Heats very quickly and evenly.
Earthenware • Follow manufacturer's instructions.
Porcelain • See stainless steel or cast iron.
enamel-on-
steel or cast
iron
Stainless steel • Heats quickly, but unevenly.
• Heats slowly and evenly.
• Good for browning and frying.
• Maintains heat for slow cooking.
• Follow manufacturer's instructions.
• Heats slowly, but unevenly.
• Ideal results on low to medium heat
settings.
• Use on low heat settings.
• A core or base of aluminum or copper
on stainless steel provides even
heating.
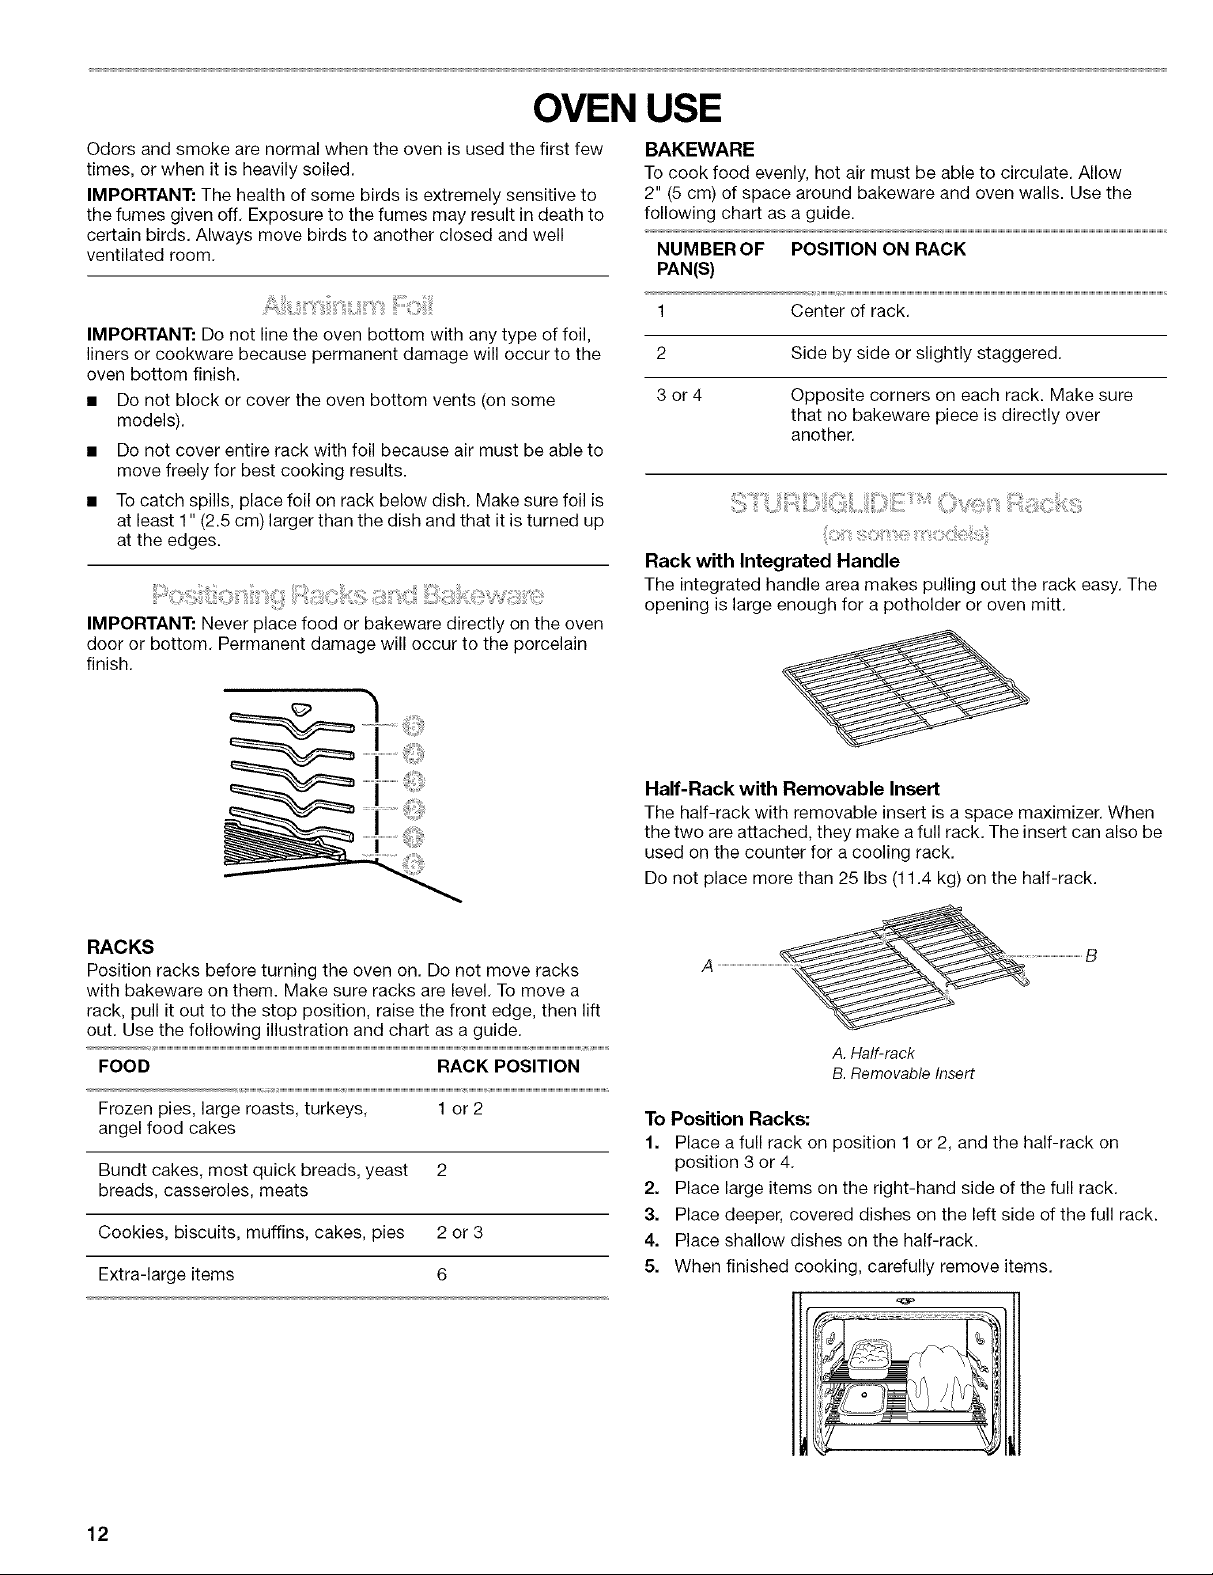
ELECTRONIC OVEN CONTROL
B C D E F G
........MEAT';/ SLOW
.................................POULTRy COOKER
COGKmES PIZZA
H K
A. RECIPE RECALL TM
B. Slow cooker
C. Display
D.Add 1minute
E. Timer
E Coektop lockout (on some models)
Cooktop light (on some models)
When power is first supplied to the appliance, make sure the
surface burners are in the OFF position. Everything on the display
will light up for 5 seconds. Then the time, "PF" will appear on the
display.
If "PF" appears at any other time, a power failure occurred. To
remove "PF" and to reset the clock, press STOP/CLEAR.
When the oven is in use, this display shows time, temperature
and what command pads have been pressed.
When the oven is not in use, the display will show the time of day.
The START pad begins any function. If the START pad is not
touched after touching another pad, "START?" will appear in the
display.
If cooking is interrupted, touching START will resume the preset
cycle.
G. Oven light/oven lockout
H. Oven selectors
(SERVE WARM - on some models)
L Self-clean
SENS-A-CLEAN TM (on some models)
LOGI-CLEAN TM (on some models)
SELECT CLEAN TM (on some models)
J. Temperature setting
SET
r_
[] 5 SEC [_
M N O P
K. Timed cooking
L. Clock
M. Hour
N. Minute
O. Start
P Stop/clear
Cook time may be added in 1-minute increments, up to
99 minutes, by touching the ADD 1 MIN pad.
Touching ADD 1 MIN during a cook cycle will add 1 minute of
cook time at the current cook power.
This is a 12-hour clock and does not show a.m. or p.m.
To Set:
1. Press CLOCK.
2. Press the HOUR/MIN "up" or "down" arrow pads until the
correct time of day shows on the display.
Press CLOCK or START.
Tones are audible signals, indicating the following:
The STOP/CLEAR pad stops any oven function except for the
Clock, Timer and Cooktop or Oven Lockouts.
After pressing STOP/CLEAR, the display will show the time of
day or, if the minute timer is also being used, the time remaining.
10
One tone
• Valid pad press
• Oven is preheating, or has been preheated
• Function has been entered
Three tones
• Invalid pad press
Four tones
• End of cycle
• Reminder, repeating each minute after the end-of-cycle tones
Error Tones
Error tones indicate a problem with the electronic oven control.
An error code will appear in the display.
Tone Volume
The volume can be adjusted between high and low.
To Change: Press and hold DELAY START for 5 seconds. A short
tone will sound and either "Snd HI" or "Snd Lo" will appear on the
display. Press and hold DELAY START again for 5 seconds to
change to desired setting.
To remove "Snd on," "Snd OFF," "rEP on," "rEP off," "Snd HI" or
"Snd Lo" press any pad, and the keyed function will appear on
the display.
Reminder Tones
Reminder tones are four 1-second tones which indicate that the
set time has expired for a timer or atimed oven control function.
To Turn Reminder Tones Off/On: Press and hold SET for
5 seconds. A short tone will sound, and "rEP OFF" will appear
on the display. Repeat to turn back on.
To Turn Other Tones Off/On: Press and hold COOK TIME. A
short tone will sound, and "Snd OFF" will appear on the display.
Repeat to turn back on.
IMPORTANT: Do not use a thermometer to measure oven
temperature because opening the oven door and element or
burner cycling may give incorrect readings.
The oven provides accurate temperatures; however, it may cook
faster or slower than your previous oven, so the temperature
calibration can be adjusted. It can be changed in Fahrenheit or
Celsius.
A minus sign means the oven will cook cooler by the adjustment
amount. No sign means the oven will cook warmer by the
adjustment amount. Use the following chart as a guide.
ADJUSTMENT °F COOKS FOOD
(ADJUSTMENT °C)
10°F (5°0) ...a little more
20°F (10°C) ...moderately more
30°F (15°C) ...much more
-10°F (-5°C) ...a little less
-20°F (-10°C) ...moderately less
-30°F (-15°C) ...much less
The temperature is preset at Fahrenheit, but can be changed to
Celsius.
To Change: Press and hold BROIL for 5 seconds. A short tone
will sound, and the temperatures displayed will switch to "°C."
Repeat to change back to Fahrenheit.
The Timer can be set in minutes and seconds or hours and
minutes and counts down the set time. The Timer does not start
or stop the oven.
To Set:
1. Press TIMER SET.
2. Press the HOUR/MIN "up" or "down" arrow pads until the
correct length of time shows on the display.
3. PressTIMER SET.
The Timer will begin counting down after the Timer is started.
The display will count down in hours and minutes if remaining
time is one hour or more, and in minutes and seconds if
remaining time is less than 1 hour.
When the set time ends, four 1-second tones, if enabled, will
sound, then reminder tones will sound every minute.
4. Press TIMER OFF anytime to cancel the Timer and/or stop
reminder tones.
To Adjust Oven Temperature Calibration:
1. Press and hold BAKE for 5 seconds until the oven display
shows the current calibration, for example, "0° CAL."
2. Press the TEMP "up" or "down" arrow pad to increase or
to decrease the temperature in 10° F (5°C) amounts. The
adjustment can be set between 30°F (15° C) and -30°F (-15 °C).
3. Press START.
©
The Oven Lockout prevents unintended use of the control panel
command keypads. The oven and warming drawer can only be
locked out when the oven is not in use or the oven control has
not been set.
The oven will remain locked out after a power failure if it was
locked before the power failure.
To Enable/Disable Oven Lockout:
Press and hold OVEN for 5 seconds. A single tone will sound,
and "Loc on" and a lock icon will appear on the display. After
5 seconds, "Loc on" will disappear from the display and "Loc"
will appear along with the clock display.
Three tones will sound when the oven is locked and any
command pad other than CLOCK, TIMER, START, STOP/CLEAR
or OVEN has been pressed.
To unlock oven, press and hold OVEN for 5 seconds. "Loc OFF"
will appear on the display, and lock icon will disappear from the
display.
11
OVEN USE
Odors and smoke are normal when the oven is used the first few
times, or when it is heavily soiled.
IMPORTANT: The health of some birds is extremely sensitive to
the fumes given off. Exposure to the fumes may result in death to
certain birds. Always move birds to another closed and well
ventilated room.
IMPORTANT: Do not line the oven bottom with any type of foil,
liners or cookware because permanent damage will occur to the
oven bottom finish.
• Do not block or cover the oven bottom vents (on some
models).
• Do not cover entire rack with foil because air must be able to
move freely for best cooking results.
• Tocatch spills, place foil on rack below dish. Make sure foil is
at least 1" (2.5 cm) larger than the dish and that it is turned up
at the edges.
IMPORTANT: Never place food or bakeware directly on the oven
door or bottom. Permanent damage will occur to the porcelain
finish.
BAKEWARE
To cook food evenly, hot air must be able to circulate. Allow
2" (5 cm) of space around bakeware and oven walls. Use the
following chart as a guide.
NUMBEROF POSITION ON RACK
PAN(S)
1 Center of rack.
2 Side by side or slightly staggered.
3 or 4 Opposite corners on each rack. Make sure
that no bakeware piece is directly over
another.
Rack with Integrated Handle
The integrated handle area makes pulling out the rack easy. The
opening is large enough for a potholder or oven mitt.
RACKS
Position racks before turning the oven on. Do not move racks
with bakeware on them. Make sure racks are level. To move a
rack, pull it out to the stop position, raise the front edge, then lift
out. Use the following illustration and chart as a guide.
FOOD RACK POSITION
Frozen pies, large roasts, turkeys, 1 or 2
angel food cakes
Bundt cakes, most quick breads, yeast 2
breads, casseroles, meats
Cookies, biscuits, muffins, cakes, pies 2 or 3
Extra-large items 6
Half-Rack with Removable Insert
The half-rack with removable insert is a space maximizer. When
the two are attached, they make a full rack. The insert can also be
used on the counter for a cooling rack.
Do not place more than 25 Ibs (11.4 kg) on the half-rack.
A ....................................................._ ..........................................B
A. Half-rack
B. Removable Insert
To Position Racks:
1. Place a full rack on position 1 or 2, and the half-rack on
position 3 or 4.
2. Place large items on the right-hand side of the full rack.
3. Place deeper, covered dishes on the left side of the full rack.
4. Place shallow dishes on the half-rack.
5. When finished cooking, carefully remove items.
12

STURDIGLIDE TM Mate Rack
The STURDIGLIDE TM Mate Rack is designed especially for your
broiler or roasting pan. This rack is elevated on each side, and
has a unique shallow basin-shaped depression in the center,
allowing for easier removal of your broil or roasting pan from the
oven,
BAKEWARE/RESULTS RECOMMENDATIONS
Insulated cookie • Place in the bottom third of
sheets or baking pans oven.
• Little or no bottom • May need to increase baking
browning time.
Stainless steel • May need to increase baking
• Light, golden crusts time.
• Uneven browning
Stoneware • Follow manufacturer's
• Crisp crusts instructions.
The broiler pan can be placed on the STURDIGLIDF MMate Rack
and placed below food that may spill over during cooking.
To Use:
1. When using the broiler pan, remove broiling rack.
2. Place broiler pan directly on the STURDIGLIDE TM Mate Rack.
3. Preheat the oven with broiler pan in place.
Food can be placed on a rack above the pan, or directly on the
pan during cooking. Use the following chart as a guide when
cooking foods using the STURDIGLIDE TM Mate Rack.
FOOD RACK RACK POSITION
POSITION WITH BROIL PAN
OF FOOD
Pie 2 2
Casserole/ 3 2
Frozen lasagna*
Pizza
Thin 2 or 3 1
Thick 2 1
* Lasagna cook time may be longer than manufacturer's
recommendation.
The bakeware material affects cooking results. Follow
manufacturer's recommendations and use the bakeware size
recommended in the recipe. Use the following chart as a guide.
BAKEWARE/RESULTS RECOMMENDATIONS
Light colored • Use temperature and time
aluminum recommended in recipe.
• Light golden crusts
• Even browning
Dark aluminum and •
other bakeware with
dark, dull and/or
nonstick finish •
• Brown, crisp crusts •
May need to reduce baking
temperatures 25°F (15°C).
Use suggested baking time.
For pies, breads and
casseroles, use temperature
recommended in recipe.
• Place rack in center of oven.
Ovenproof glassware,
ceramic glass or
ceramic
• Brown, crisp crusts
The oven vent releases hot air and moisture from the oven, and
should not be blocked or covered. Doing so will cause poor air
circulation, affecting cooking and cleaning results. Never set
plastics, paper or other items that could melt or burn near the
oven vent.
ULTRABAKE TM Temperature Management System
The ULTRABAKE TM system electronically regulates the oven heat
levels during preheat and bake to maintain a precise temperature
range for optimal cooking results. The bake and broil burners
cycle on and off in intervals. This feature is automatically
activated when the oven is in use.
To Bake or Roast:
Before baking and roasting, position the racks according to the
"Positioning Racks and Bakeware" section. When roasting, it is
not necessary to wait for the oven to preheat before putting food
in, unless recommended in the recipe.
1. Press BAKE.
Press the TEMP "up" or "down" arrow pad to enter a
temperature other than 350°F (177°C). The bake range can be
set between 170°F and 500°F (77°C and 260°C).
• May need to reduce baking
temperatures 25°F (15°C).
A. Oven Vent
13

2. Press START.
A preheat time will count down and "PrE HEAt" will appear on
the oven display if the actual oven temperature is under
170°F (77°0).
When the actual oven temperature reaches 170°F (77°C), the
timer will continue counting down. The temperature setting
can be changed any time after pressing START.
While the oven is in the preheat mode, the set temperature
can be seen for 5 seconds by pressing BAKE.
When the set temperature is reached, if tones are enabled,
one tone will sound.
3. Press STOP/CLEAR when finished cooking.
• Use only the broiler pan and grid provided with the range. It is
designed to drain juices and help prevent spatter and smoke.
• For proper draining, do not cover the grid with foil. The
bottom of the pan may be lined with aluminum foil for easier
cleaning.
• Trim excess fat to reduce spattering. Slit the remaining fat on
the edges to prevent curling.
• Pull out oven rack to stop position before turning or removing
food. Use tongs to turn food to avoid the loss of juices. Very
thin cuts of fish, poultry or meat may not need to be turned.
• After broiling, remove the pan from the oven when removing
the food. Drippings will bake on the pan if left inthe heated
oven, making cleaning more difficult.
Broiling uses direct radiant heat to cook food. Before broiling,
position rack according to Broiling Chart. It is not necessary to
preheat the oven before putting food in unless recommended in
the recipe. Position food on grid inthe broiler pan, then place it in
the center of the oven rack. Open oven door to the broil stop
position to ensure proper broiling temperature.
BROILING CHART
For best results, place food 3" (7 cm) or more from the broil
element. Times are guidelines only and may need to be adjusted
for individual tastes. Recommended rack positions are numbered
from the bottom (1) to the top (5). For diagram, see the
"Positioning Racks and Bakeware" section.
TOTAL
RACK MINUTES
FOOD POSITION TEMP
Steak
1" (2.5 cm)
thick
medium rare 4 HI 14-15 7-8
medium 4 HI 15-16 8-9
well done 4 HI 18-19 9-10
Ground meat
patties*
3/4"(2 cm) thick 4 HI 13-14 6-7
well done
Pork chops
1" (2.5 cm) 4 HI 18-21 8-10
thick
Ham slice
[precooked] 4 HI 8-10 4-5
1/2"(1.25 cm)
thick
Bacon 4 500°F 8-9 1-2
(260°C)
Frankfurters 4 HI 6-7 3-4
Lamb chops
1" (2.5 cm) 4 HI 15-17 8-9
thick
Side 1 Side2
To Broil:
1. Press BROIL.
2. Press START.
The temperature setting can be changed any time before or
after pressing START.
3. Press STOP/CLEAR when finished.
Precision Broiling
Precision Broiling allows more precise temperature control while
cooking. The lower the temperature, the slower the cooking.
Thicker cuts and unevenly shaped pieces of meat, fish and
poultry may cook better at lower broiling temperatures.
To Precision Broil:
1. Press BROIL.
2. Press the TEMP "down" arrow pad to lower the temperature
in 5°F amounts. The broil range is 300°F to 500°F (145°C to
260°C).
3. Press START.
4. Press STOP/CLEAR when finished.
Chicken
bone-in pieces 3 HI 20-24 15-18
boneless 4 HI 12-16 11-16
Fish
1/2"(1.25 cm) 4 HI 8-10 4-5
thick
1" (2.5 cm) 4 500°F 13-15 10-13
thick (260°C)
*Place up to 9 patties, equally spaced, on broiler pan grid.
14

wiii_:iiiSiliOw _iiiiiiii',',_i:_i_i::iii_i',i,_;:_!!!_i¸¸¸¸iii!::::_,ii:liii%;_i:iii,O__
RECIPE RECALL TM with Slow Cooker function makes cooking
favorite foods faster and easier. The temperatures and times have
been chosen to cover a variety of choices in each food category.
Cooking times and temperatures are adjustable for individual
recipes and can be saved. When changed, the display will not
show "PrEHEAt" while the oven is preheating.
If recipe recommends no preheat is needed, put food in oven.
Use the following chart as a guide when using RECIPE RECALLTM:
KEYPAD SET TEMP PRESET TIME
MEATS/POULTRY* 325°F (163°C) 1 hour
3 Ibs (1.4 kg)
SLOW COOKER HI (high) Timer counts
LO (low) up in hours
and minutes,
COOKIES 375°F (191 °C) 10 minutes
PIZZA 400°F (204°C) 20 minutes
*The MEATS/POULTRY functions do not have a programmed
preheat. If your recipe suggests you preheat before cooking
meats, poultry or casseroles, preheat using the BAKE function.
Once the preheat temperature has been reached, cancel BAKE
and select MEATS/POULTRY function.
To Use RECIPE RECALL:
1. Press one of the three keypads MEATS POULTRY, COOKIES
or PIZZA.
2. Press START.
The cook time can be changed after pressing START, by
pressing the HOUR/MIN pads. The oven will finish cooking
with the new time.
When cook time ends, the oven will automatically shut off.
"End" and COOK TIME will appear on the display. Four tones
will sound, then four 1-second reminder tones will sound
every minute after.
COOKIES and PIZZA keypads include a preheat. When the
preheat ends, a single tone will sound and the cooking time
will appear counting down on the display.
3. Press STOP/CLEAR or open the oven door to stop reminder
tones and remove "End" from display. The time of day will
appear on the display.
To Change Preset Cook Time and Temperature:
The temperature and length of cooking time for each of the
3 keypads can be changed, and the range will store the new
information for the next use.
1. Press one of the 3 keypads MEATS POULTRY, COOKIES or
PIZZA.
2. Press the HOUR/MIN "up" or "down" arrow pads until the
length of cooking time shows on the display.
3. Press the TEMP "up" or "down" arrow pad until desired
temperature is shown in the display.
4. Press same pad selected in step 1 to save the change for the
next use. A single tone will sound.
5. Press STOP/CLEAR if only changing the stored preset cook
time and preset temperature. Press START if proceeding to
cook with new set cook time and temperature.
Slow Cooker Function
The SLOW COOKER function cooks food slowly at a low
temperature, similar to a countertop slow cooker. Recommended
cook times are 4 to 5 hours for the HI (high) setting and 8 to
9 hours for LO (low), (small quantities my require less time). The
maximum time the SLOW COOKER function will operate is
12 hours unless the 12-hour override has been activated. The
time counts up when the function starts.
The SLOW COOKER is ideal for roasting beef, pork and poultry.
The exterior of beef and pork will become very dark, but not
burnt. This is normal. The interior will remain juicy and tender.
Poultry will also darken, especially in areas not covered with skin,
and it will become crispier than if roasted conventionally.
• Thaw all frozen foods before cooking using the SLOW
COOKER function.
• Preheating the oven is not necessary.
• Cook on a single rack, using rack positions 2 or 3. See
"Positioning Racks and "Bakeware" section.
• Do not open the oven door often, or leave the door open
when checking foods. If heat loss occurs, cooking time may
need to be extended.
• Cover foods to keep them moist, or use a loose or vented
cover to allow foods to brown and crisp.
• Roasts can be left uncovered so browning can occur. Cook
time will vary, however, depending on the weight, amount of
fat and bone and the shape of the roast.
• Use a food thermometer and refer to a current food
temperature chart to determine when food is done.
• Stirring, turning or rearranging the food is not necessary.
To Use:
1. Press SLOW COOKER.
2. Set to HI or LO by pressing the TEMP "up" and "down" arrow
pad.
3. Press START. Timer will begin to count up the time.
4. Press STOP/CLEAR when finished.
The Sabbath Mode sets the oven to remain on in a bake setting
until turned off. A timed Sabbath Mode can also be set to keep
the oven on for only part of the Sabbath.
When the Sabbath Mode is set, the start pads and BAKE, BROIL,
CLEAN, COOK TIME, DELAY START, CLOCK HOUR UP MINUTE
UP,TIMER SET will be used for adjusting the oven temperatures.
No tones will sound, and the displays will not show messages or
temperature changes. The heat icons will appear lit on the oven
display throughout the Sabbath Mode.
When the oven door is opened or closed, the oven light will not
turn on or off. The heating elements will not turn on or off
immediately after the temperature has been changed.
If a power failure occurs when the Sabbath Mode is set, the oven
will return to the OFF mode and will turn off the power to the
oven. The oven will stay in the Sabbath Mode until exited.
To Enable the Sabbath Mode (one time only):
Before the Sabbath Mode can be regularly set, the oven must
first be enabled with a one time only set up.
1. Open the oven door.
2. Press STOP/CLEAR.
15

3. Press both the HOUR "up" and "down" arrow pad at the
same time and hold for 5 seconds. "SAb On" will appear on
the display.
4. Press START to accept the change. "SAb On" will disappear
from the display.
5. Close the oven door.
To Disable the Sabbath Mode:
The oven can be disabled of the ability to set the Sabbath Mode
by repeating the steps above. "SAb OFF" will appear on the
display. When disabled the Sabbath Mode cannot be regularly
set until re-enabled.
To Set the Sabbath Mode for use during the Sabbath/
Holidays:
1. Press BAKE.
2. Press the TEMP "up" and "down" arrow pad to enter a
temperature other than 350°F (177°C). The bake range can be
set between 170°F and 500°F (77°C and 260°C).
3. Press COOK TIME. Press the HOUR/MIN "up" or "down"
arrow pads to set cooktime.
4. Press DELAY START to set a delayed bake start time
(optional).
5. Press and hold TIMER OFF for 5 seconds. "SAb" will appear
on the display indicating the Sabbath Mode is ready.
6. Press START.
7. To stop cooking, press STOP/CLEAR. To exit the Sabbath
Mode and return to normal oven operation, press and hold
TIMER OFF for 5 seconds.
Temperature Change
The oven temperature can be changed when the oven is in the
Sabbath Mode. No tones will sound, and the display will not
change. The heating elements will not turn on or off for a random
time, anywhere from 16 to 30 seconds. It may take up to one-half
hour for the oven to change temperature.
The following keypads represent temperatures. Use the following
chart as a guide.
KEY PAD OVEN TEMPERATURE
BAKE 170°F (77°C)
BROIL 200°F (93°C)
CLEAN 250°F (121 °C)
COOK TIME 275°F (135°C)
DELAY START 300°F (149°C)
CLOCK 325°F (163°C)
HOUR "up" 350°F (177°C)
MIN (minute) "up" 375°F (191°C)
TIMER SET 400°F (204°C)
Food Poisoning Hazard
Do not let food sit in oven more than one hour before
or after cooking.
Doing so can result in food poisoning or sickness.
IMPORTANT: Food must be at serving temperature before
placing it in the warmed oven. Food may be held up to one hour.
Serve Warm allows hot cooked foods to stay warm before
serving. It can also be used at the end of a timed cook.
To Use:
f. Press SERVE WARM.
2. Set the temperature (optional).
Press the TEMP "up" or "down" arrow pad to raise or lower
the temperature in 5°F (5°C) amounts to set a temperature
other than 150°F (65°C). The warm range is 100°F-200°F
(38°C-93°C).
3. Press START.
4. Press STOP/CLEAR when finished.
To Add to the End of a Set Cook Time:
1. Press BAKE.
2. Set the temperature (optional).
Press the TEMP "up" or "down" arrow pad to set a
temperature other than 350°F (177°C).
3. Press COOK TIME.
4. Press the HOUR/MIN "up" or "down" arrow pads to set cook
time.
5. Press SERVE WARM.
A one hour warm time will automatically be set.
6=
Set the warm temperature (optional).
Press the TEMP "up" or "down" arrow pad to raise or lower
the temperature in 5°F (5°C) amounts to set a temperature
other than 150°F (65°C). The warm range is 100°F-200°F
(38°C-93°C).
7. Press START.
The display will show the cook time counting down. When
cook time ends, the display will show a warming time,
When warming time ends, the oven will automatically shut off
and "End" and COOK TIME will show on the display. Four
tones will sound and then four 1-second reminder tones will
sound every minute thereafter.
8. Press STOP/CLEAR or open the oven door to stop reminder
tones and remove "End" from display. The time of day will
return to the display.
OVEN 450°F (232°C)
To Change Temperature:
1. Press the key pad from the chart for 1 second.
2. Press START.
16

To Add to the End of a Delay Start/Set Cook Time:
1. Press BAKE,
2. Set the temperature (optional),
Press the TEMP "up" or "down" arrow pad to set a
temperature other than 350°F (177°C).
3. Press COOK TIME.
Press the HOUR/MIN "up" or "down" arrow pads to set cook
time,
4. Press DELAY START.
Press the HOUR/MIN "up" or "down" arrow pads to set the
time of day to start cooking.
5. Press SERVE WARM.
A one hour warm time will automatically be set.
Set the warm temperature (optional).
Press the TEMP "up" or "down" arrow pad to raise or lower
the temperature in 5°F (5°C) amounts to set a temperature
other than 150°F (65°C). The warm range is 100°F-200°F
(38°C-93°C).
Press START.
When the start time is reached, the display will show the cook
time counting down. When cook time ends, the display will
show a warming time.
When warming time ends, the oven will automatically shut off
and "End" and COOK TIME will show on the display. Four
tones will sound and then four 1-second reminder tones will
sound every minute thereafter.
8. Press STOP/CLEAR or open the oven door to stop reminder
tones and remove "End" from display. The time of day will
return to the display.
The time settings can be changed any time after pressing
START by repeating step 3.
When the countdown is complete, the oven will shut off
automatically and "End" and COOK TIME will appear on the
oven display. Four tones will sound, then four 1-second
reminder tones will sound every minute thereafter.
Press STOP/CLEAR or open the oven door to remove "End"
from display. The time of day will appear on the display.
To Set a Cook Time and Stop Time [Delay Start]:
1. Press BAKE.
Press the TEMP "up" or "down" arrow pad to set a
temperature other than 350°F (177°C),
2. Press COOK TIME,
3. Press the HOUR/MIN "up" or "down" arrow pads to enter the
length of time to cook.
4. Press DELAY START.
5. Press the HOUR/MIN "up" or "down" arrow pads to enter the
time of day to start.
6. Press START.
"DELAY" and the time of day will appear on the oven display.
When the start time is reached, the oven will automatically
turn on, display the cook time, and immediately start
counting down.
When cook time ends, four tones will sound, then four
1-second reminder tones will sound every minute.
7. Press STOP/CLEAR or open the oven door to remove "End"
from display. The time of day will appear on the display.
To Recall Programmed Timed Settings
(displayed for 5 seconds):
To Recall Set Press
Food Poisoning Hazard
Do not let food sit in oven more than one hour before
or after cooking.
Doing so can result in food poisoning or sickness.
The Timed Oven Control allows the oven to be set to turn on at a
certain time of day, cook for a set length of time, and/or shut off
automatically. Delay start should not be used for foods such as
breads and cakes because they may not bake properly.
To Set a Cook Time:
Before setting, make sure the clock is set to the correct time of
day. See "Clock" section.
1. Press BAKE.
Press the TEMP "up" or "down" arrow pad to set a
temperature other than 350°F (177°C),
2. Press COOK TIME,
3. Press the HOUR/MIN "up" or "down" arrow pads to enter the
length of time to cook.
4. Press START.
The cook time will appear on the oven display. The display
will count down the baking/roasting time in hours and
minutes (if cook time is more than 1 hour), or in minutes and
seconds (if cook time is less than 1 hour).
Cook Time COOK TIME*
Delay Start DELAY START
Temperature BAKE
* If cook time has begun, when DELAY START is pressed, the
display will show the time it started. When COOK TIME is
pressed, the display will remove the seconds from the remaining
countdown time.
To Change Programmed Timed Settings:
To Change Set Press Setting Displayed
Cook Time COOK TIME Press HOUR/MIN
"up/down" arrow
Press START
Delay Start* DELAY START
Temperature BAKE Press TEMP "up/
*Cannot change the set delay start time once it has been
reached.
Press HOUR/MIN
"up/down" arrow
Press START
down" arrow
Press START
17
 Loading...