


66568682991
Kenmore 66568682991, 66568682891, 66568682890, 66568681991, 66568681891 Owner’s Manual
...
Owner's Guide
Guia del usuario
I I I IJ I IllI
\
Microwave Hood Combination
Combinaci6n Microondas Campana
Warranty .......................................... 2
Sears Service .................................. 2
Microwave Oven Safety ............... 3-5
Installation Instructions ................. 6
Getting to Know Your
Microwave Oven .............................. 9
Using Your Microwave Oven ......... 22
8169427 s_or.r_.ck._ co .o.m.,,E.t_ ,L_0_79U_A MODEL/MODELO 68880/1/2
Caring for Your Microwave Oven ..... 35
Cooking Gu)de .................................. 38
Questions _and Answers .................... 40
Troubleshooting ................................ 41
Index ................................................. 43
Seccibn _n Espar3ol .......................... 44
Sears Toll-Free Numbers .................. 92

Microwave Oven Warranty
FULL ONE-YEAR WARRANTY ON MICROWAVE OVEN
For one year from the date of purchase, if this Kenmore Microwave Oven fails due to a defect in material or
workmanship, Sears will repair it free of charge.
FULL FIVE-YEAR WARRANTY ON THE MAGNETRON
For five years from the date of purchase, if the magnetron in this Kenmore Microwave Oven fails due to a
defect in material or workmanship, Sears will repair it free of charge.
The above warranty coverage applies only to Microwave Ovens which are used for private household purposes.
WARRANTY SERVICE IS AVAILABLE BY SIMPLY CONTACTING THE NEAREST SEARS STORE OR
SERVICE CENTER IN THE UNITED STATES.
This warranty applies only while this product is in use in the United States.
This warranty gives you specific legal rights, and you may also have other rights which vary from state to state.
Sears, Roebuck and Co., For service call:
Dept. 817WA, 1-800-4-REPAIR
Hoffman Estates, IL 60179 1-800-473-7247
Sears Service
"We service what we sell"
"We service what we sell" is our assurance to you that you can depend on Sears for service because Sears
Service is nationwide.
Your Sears Kenmore Microwave Oven has added value when you consider that Sears has a service unit near
you, staffed by Sears Trained Technicians - professional technicians specifically trained on Sears Kenmore
Microwave Ovens, having the pads, tools, and equipment to insure that we meet our pledge to you -
"We service what we selfi"
To further add to the value of your microwave oven,
buy a Sears Maintenance Agreement.
Sears Kenmore Microwave Ovens are designed, manufactured, and tested for years of dependable operation.
Yet, any modem appliance may require service from time to time. A Sears Maintenance Agreement is more
than an extension of the Warranty. It provides complete protection from unexpected repair bills and undue
inconvenience. It assures you of maximum efficiency from your Microwave Oven.
Here's a comparative Warranty and Maintenance Agreement chart showing you the benefits of a Sears
Microwave Oven Maintenance Agreement.
YEARS OF OWNERSHIP COVERAGE 1ST YR. 2ND YR. THRU 5TH YR.
Replacement of defective parts other than magnetron W MA
Replacement of magnetron W W
Annual preventative maintenance check at your request MA MA
W - WARRANTY
MA - MAINTENANCE AGREEMENT
Contact your Sears salesperson or local Sears Service Center today and purchase-a Sears Maintenance
Agreement.
Keep this book and the sales slip together in a safe place for future reference.
2
Microwave Oven Safety
Your safety and the safety of others is very important.
We have providedmany importantsafety messages in this manual and onyour appliance. Always read and
obey all safety messages.
This is the-safety alert symbol.
This symbol alerts you tohazards that can kill or hurt you and others.
All safety messages will be preceded by the safety alert symbol and the word "DANGER" or
"WARNING." These words mean:
You will be killed or seriously injured if you don't
follow instructions.
You can be killed or seriously injured if you don't
follow instructions.
All safety messages will identify the hazard, tell you how to reduce the chance of injury, and tell you what can
happen if the instructions are not followed.
IMPORTANT SAFETY INSTRUCTIONS
When using electrical appliances basic safety precautions should be followed, including the following:
WARNING -To reduce the riskof burns,
electricshock, fire, injuryto persons or exposure
to excessivemicrowave energy:
• Read all instructions before using the
microwave oven.
• Read and follow the specific "PRECAUTIONS TO
AVOID POSSIBLE EXPOSURE TO EXCESSIVE
MICROWAVE ENERGY" found in this section.
• The microwave oven must be grounded. Connect
onlyto properly grounded outlet. See "GROUND-
ING INSTRUCTIONS" found at the end of this
section.
• Install or locate the microwave oven only in
accordance with the provided installation
instructions.
• Some products such aswhole eggs and sealed
containers- for example, closedglassjars -
may explode and shouldnot be heated in the
microwaveoven.
• Use the microwave oven only for its intended use
as described in this manual. Do not use corrosive
chemicals or vapors in the microwave oven. This
type of oven is specifically designed to heat,
cook, or dry food. It is not designed for industrial
or laboratory use.
• As with any appliance, close supervision is
necessary when used by children.
• Do not operatethe microwave oven if it has a
damaged cord or plug, ifit isnot working properly,
or if it has been damaged or dropped.
• The microwave oven should be serviced only by
qualified service personnel. Call an authorized
service company for examination, repair or
adjustment.
• Do not cover or block any openings on the
microwave oven.
• Do notstorethe microwave oven outdoors.Do not
use the microwave oven near water- for example,
neara kitchen sink, in awet basement, or near a
swimmingpool,and the like.
• Do not immersecord or plug inwater.
• Keep cordaway from heated surfaces.
• DOnot let cord hang over edge of table or
counter.
• Sea door surface cleaning instructions in the
"Caring for Your Microwave Oven" section.
• DO not mount over a sink.
• Do not store anythingdirectly on top of the
microwaveovenwhen the microwave oven is
in operation.
- SAVE THESE INSTRUCTIONS -
continued on next page
3
IMPORTANT SAFETY INSTRUCTIONS
• To reduce the risk of fire in the oven cavity:
- Do not overceok food. Carefully attend the
microwave oven if paper, plastic, or other
combustible materials are placed inside the
oven to facilitate cooking.
- Remove wire twist-ties from paper or plastic
bags before placing bag in oven.
- If materials inside the oven should ignite, keep
oven door closed, turn oven off, and disconnect
the power cord, or shut off power at the fuse
or circuit breaker panel.
- Do not use the cavity for storage purposes. Do
not leave paper products, cooking utensils, or
food in the cavity when not in use.
• Suitable for use above both gas and electric
cooking equipment.
• Intended to be used above ranges with maximum
width of 36 inches.
• Clean Ventilating Hoods Frequently - Grease
should not be allowed to accumulate on hood
or filter.
When flaming foods under the hood, turn the fan
on
Use care when cleaning the vent-hood filter.
Corrosive cleaning agents, such as lye-based
oven cleaners, may damage the filter.
- SAVE THESE INSTRUCTIONS -
PRECAUTIONS TO AVOID POSSIBLE EXPOSURE TO
EXCESSIVE MICROWAVE ENERGY
(a) Do not attempt to operate this oven with the door
open since open-door operation can result in
harmful exposure to microwave energy. It is
important not to defeat or tamper with the safety
interlocks.
(b) Do not place any object between the oven front
face and the door or allow soil or cleaner residue
to accumulate on sealing surfaces.
(c) Do not operate the oven if it is damaged. It is
particularly important that the oven door close
properly and that there is no damage to the:
(1) door (bent),
(2) hinges and latches (broken or loosened),
(3) door seals and sealing surfaces.
(d) The oven should not be adjusted or repaired by
anyone except propedy qualified service personnel.
4
Electrical requirements
Observe all governing codes and ordinances.
A 120 Volt, 60 Hz, AC only, 15 or20 amp fused
electrical supply is required. (A time-delay fuse is
recommended.) It is recommended that a separate
circuit serving only this appliance be provided.
GROUNDING INSTRUCTIONS
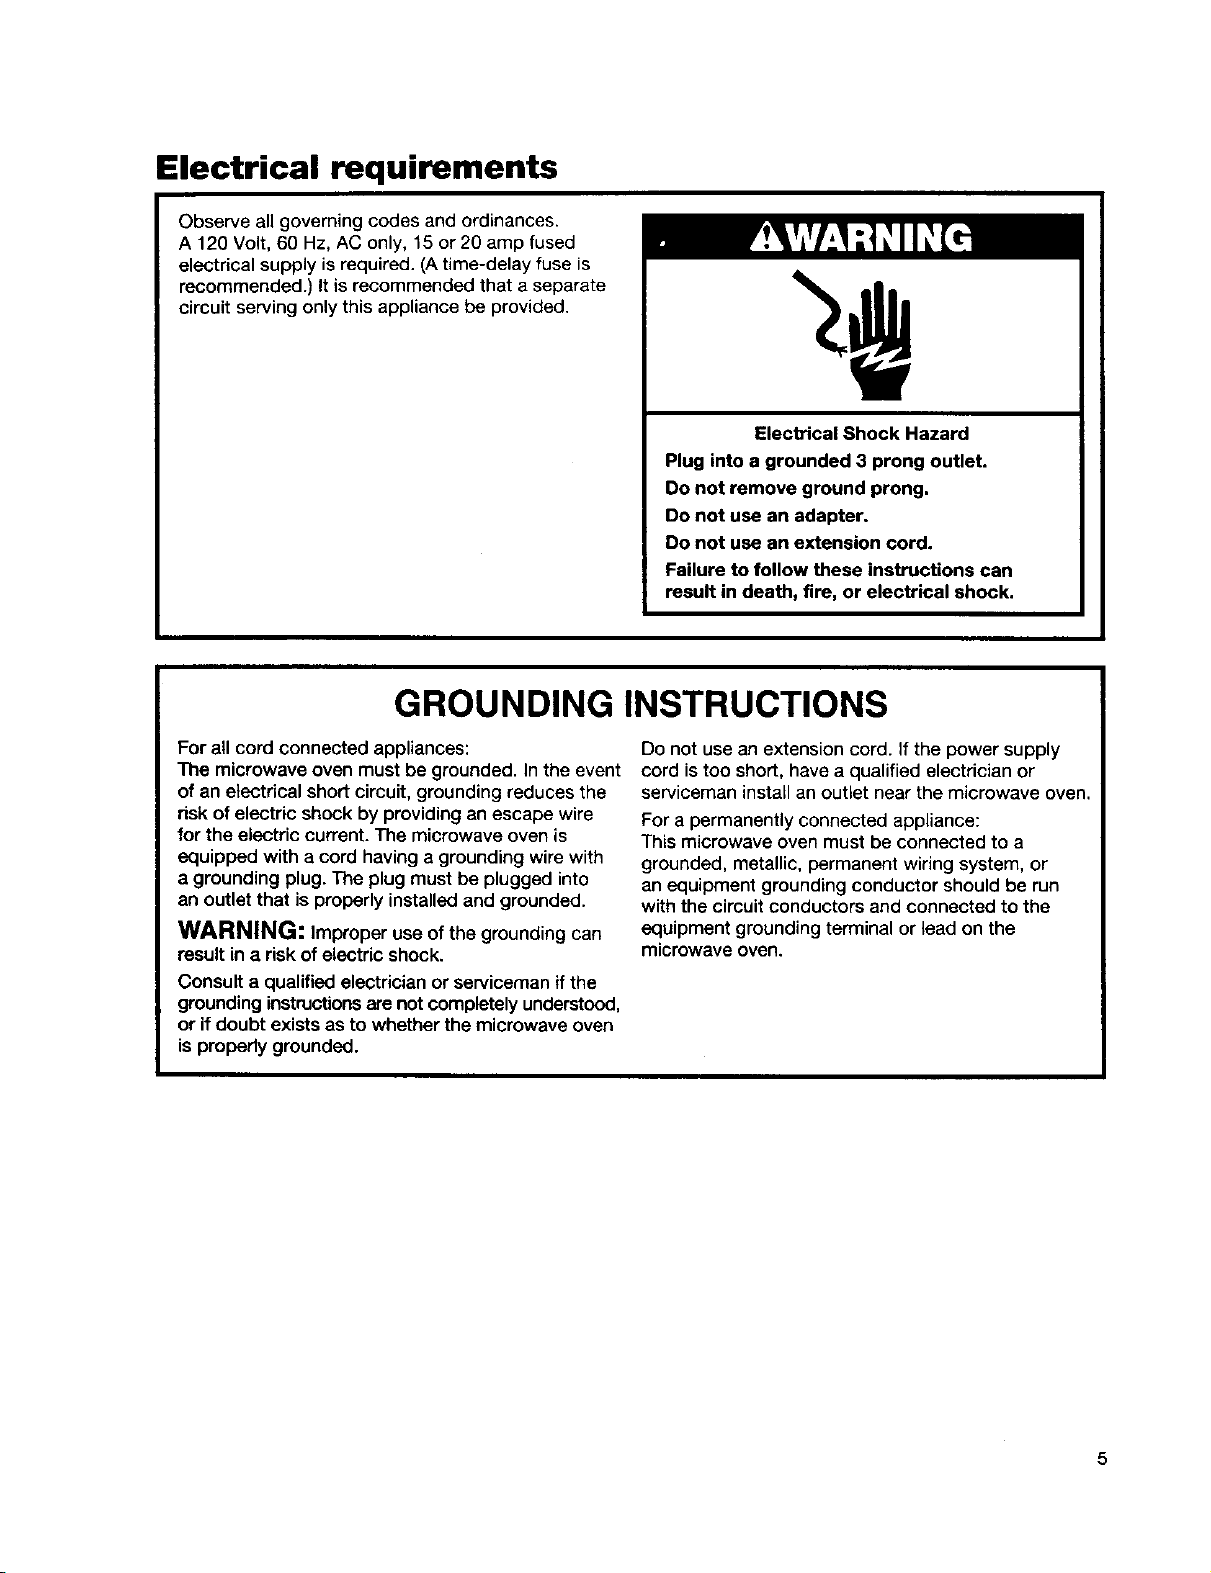
Electrical Shock Hazard
Plug into a grounded 3 prong outlet.
Do not remove ground prong.
Do not use an adapter.
Do not use an extension cord.
Failure to follow these instructions can
result in death, fire, or electrical shock.
For allcord connected appliances:
The microwave oven must be grounded. In the event
of an electrical short circuit, grounding reduces the
risk of electric shock by providing an escape wire
for the electric current. The microwave oven is
equipped with a cord having a grounding wire with
a grounding plug. The plug must be plugged into
an outlet that is properly installed and grounded.
WARNING: Improper use of the grounding can
result in a risk of electric shock.
Consult a qualified electrician or serviceman if the
grounding instructions are not completely understood,
or if doubt exists as to whether the microwave oven
is properly grounded.
Do not use an extension cord. Ifthe power supply
cord is too short, have a qualified electrician or
serviceman install an outlet nearthe microwave oven.
For a permanently connected appliance:
Thismicrowave oven must be connected to a
grounded, metallic, permanent wiring system, or
an equipment grounding conductor should be run
with the circuit conductors and connected to the
equipment grounding terminal or lead on the
microwave oven.
Installation Instructions
Space requirements
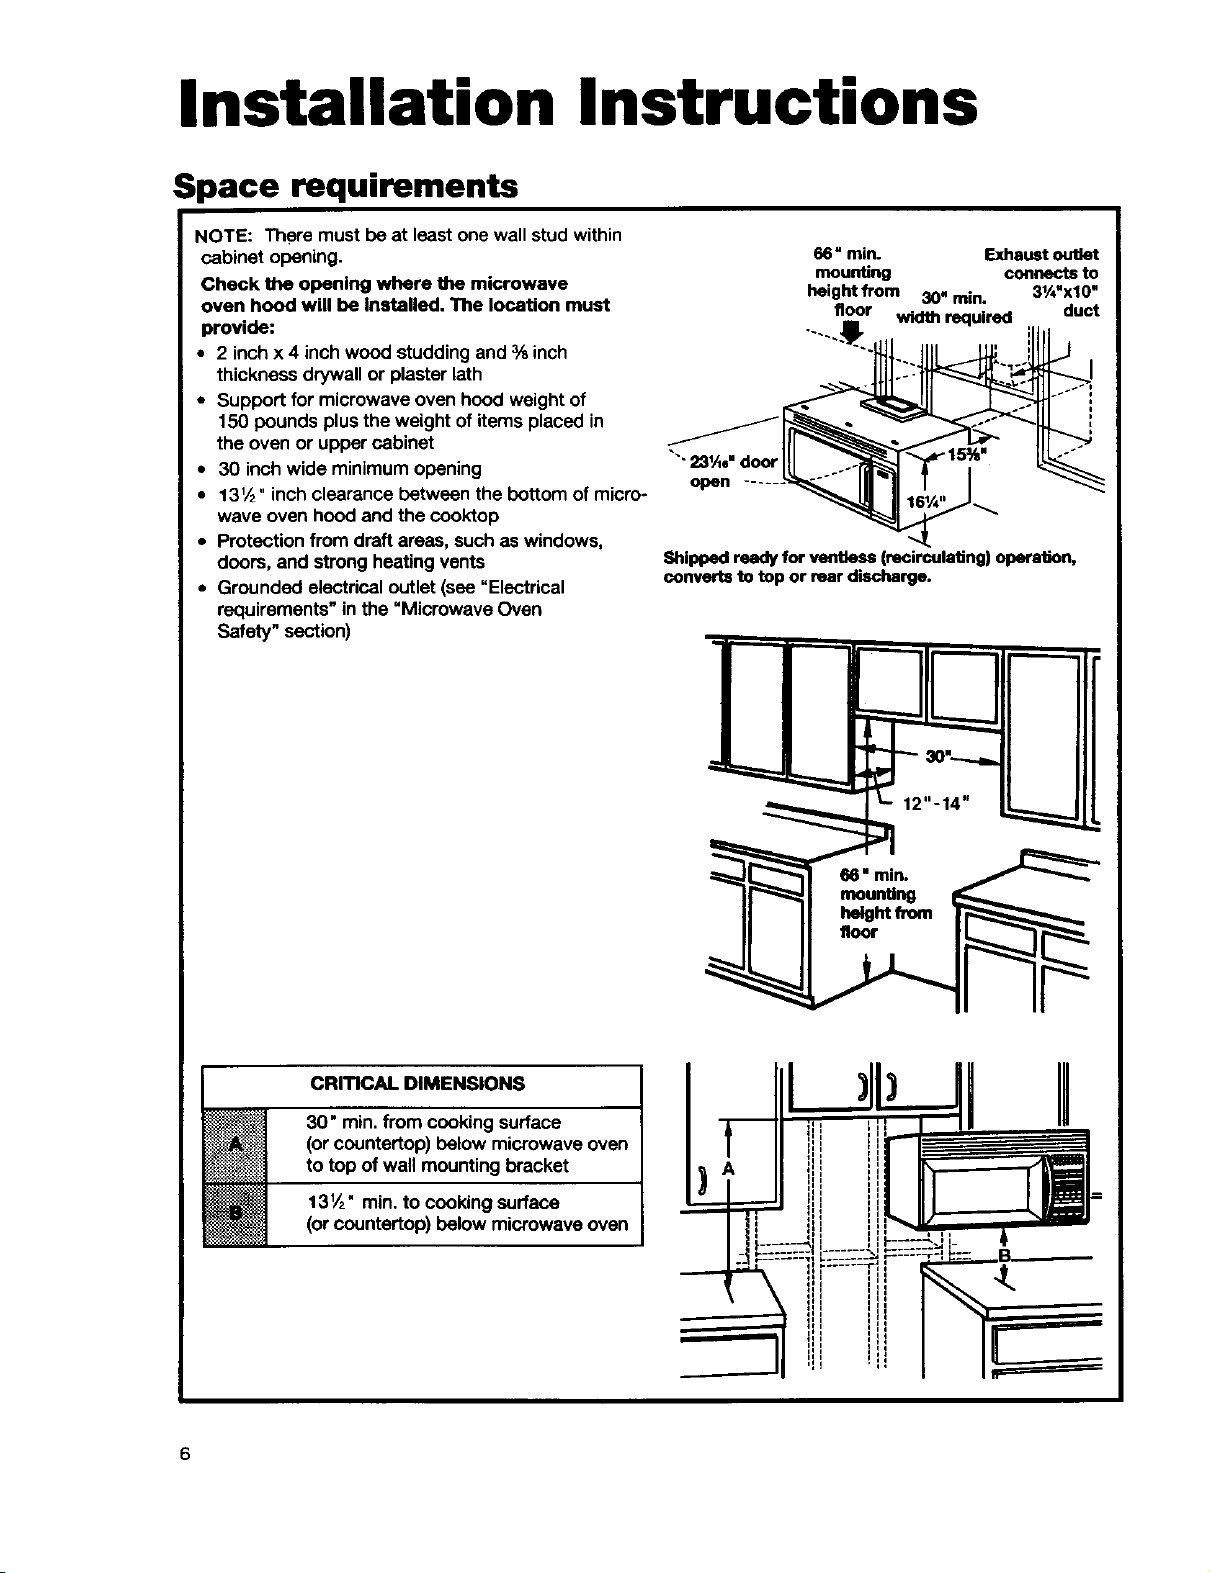
NOTE: There must be at least one wall stud within
cabinet opening.
Check the opening where the microwave
oven hood will be installed. The location must
provide:
• 2 inch x 4 inchwood studdingand % inch
thickness drywall or plaster lath
• Support for microwave oven hood weight of
150 pounds plus the weight of items placed in
the oven or upper cabinet
• 30 inch wide minimum opening
• 13V2"inch clearance betwean the bottom of micro-
wave oven hood and the cooktop
• Protection from draft areas, such as windows,
doors, and strong heating vents
• Grounded electrical outlet (see "Electrical
requirements" inthe =Microwave Oven
Safety" section)
66" rain. Exhaust outlet
mounting connectsto
heightfrom 30=rain, 31/4"x10"
floor width required duct
J
""23_.,%"door
open
Shipped ready for ventless (recirculating) opera_n,
converts to top or rear discharge.
CRITICAL DIMENSIONS
30" rain. from cooking surface
(orcountertop) below microwave oven
to top of wall mountingbracket
13V2"min.to cookingsurface
(orcountertop) below microwave oven
I
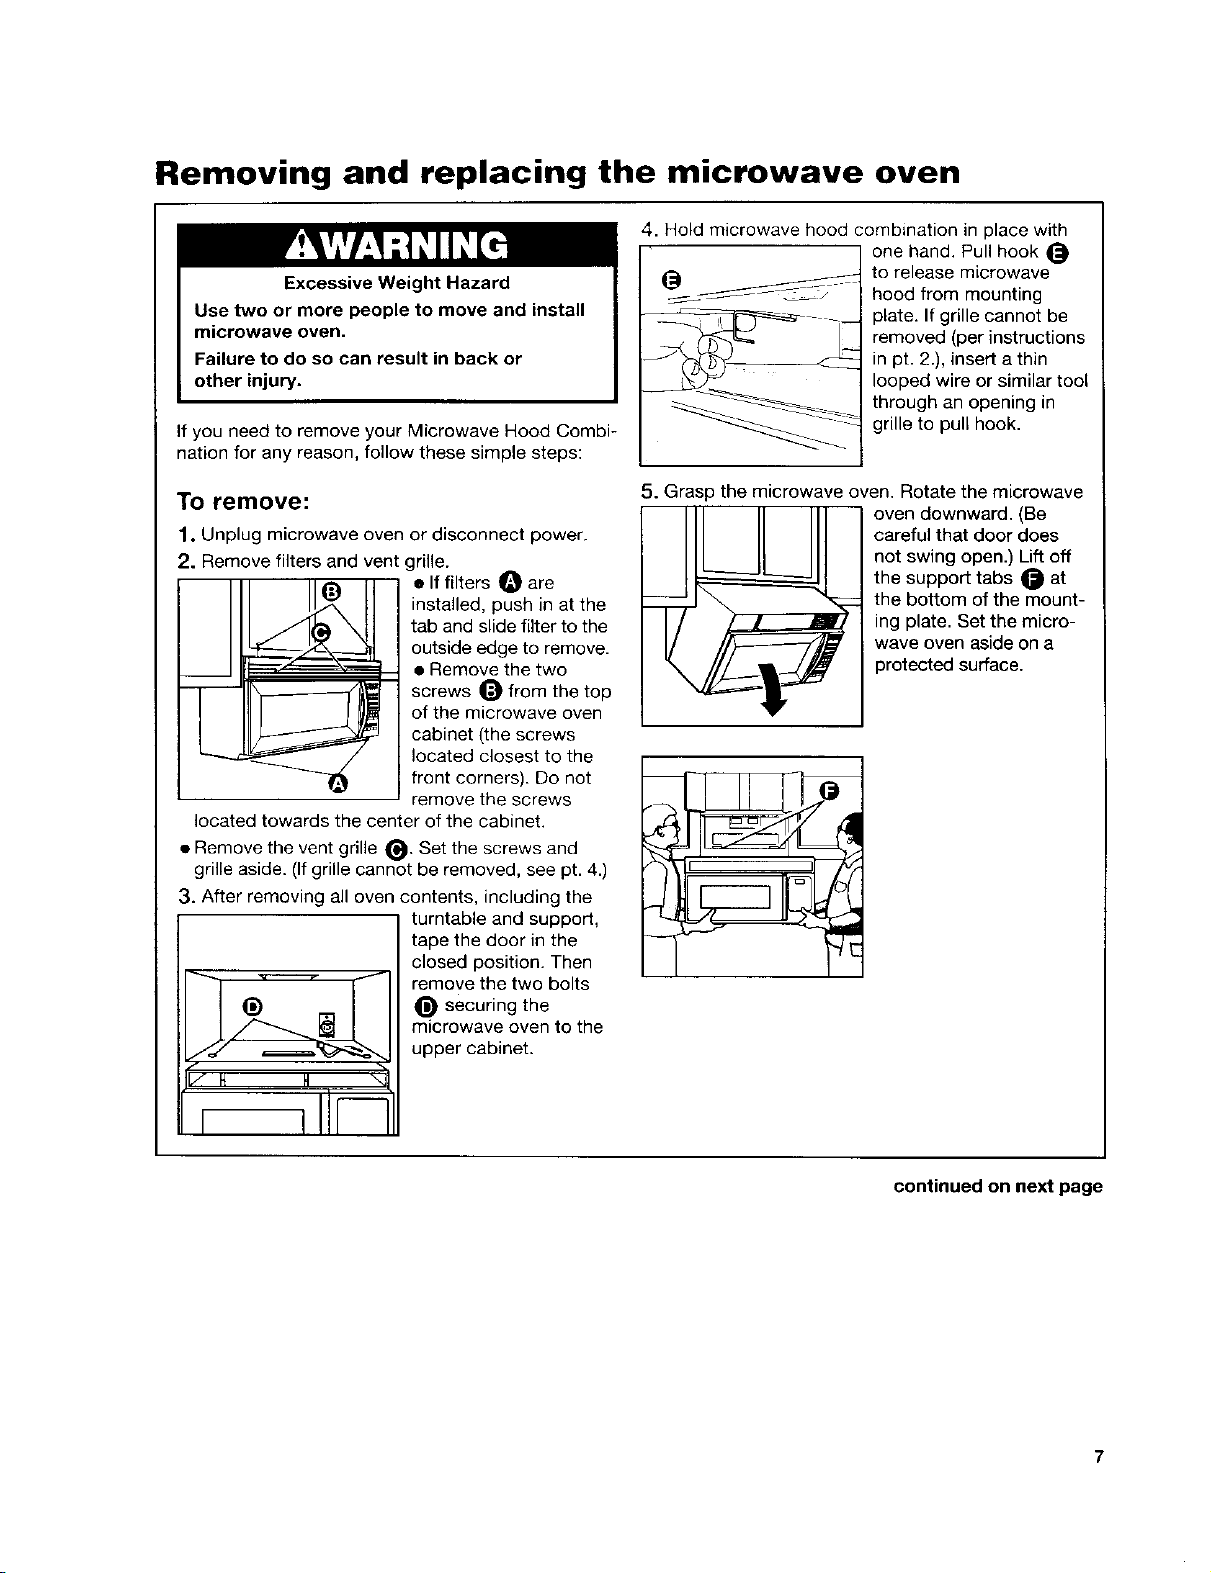
Removing and replacing the microwave oven
4. Hold microwave hood combination in place with
one hand. Pull hook
Excessive Weight Hazard
Use two or more people to move and install
microwave oven.
Failure to do so can result in back or
other injury.
If you need to remove your Microwave Hood Combi-
nation for any reason, follow these simple steps:
__ hood from mounting
to release microwave
plate. If grille cannot be
removed (per instructions
in pt. 2.), insert a thin
looped wire or similar tool
through an opening in
grille to pull hook.
To remove:
1. Unplug microwave oven or disconnect power.
2. Remove filters and vent grille.
installed, push in at the
tab and slide filter to the
• If filters O are
outside edge to remove.
• Remove the two
screws _t from the top
of the microwave oven
cabinet (the screws
located closest to the
front corners). Do not
remove the screws
located towards the center of the cabinet.
• Remove the vent grille _. Set the screws and
grille aside. (Ifgrille cannot be removed, see pt. 4.)
3. After removing all oven contents, including the
turntable and support,
tape the door in the
closed position. Then
remove the two bolts
(_ securing the
microwave oven to the
upper cabinet.
5. Grasp the microwave oven. Rotate the microwave
careful that door does
not swing open.) Lift off
the support tabs _) at
the bottom of the mount-
ing plate. Set the micro-
wave oven aside on a
oven downward. (Be
protected surface.
continued on next page
7
Removing and replacing the microwave oven (cont.)
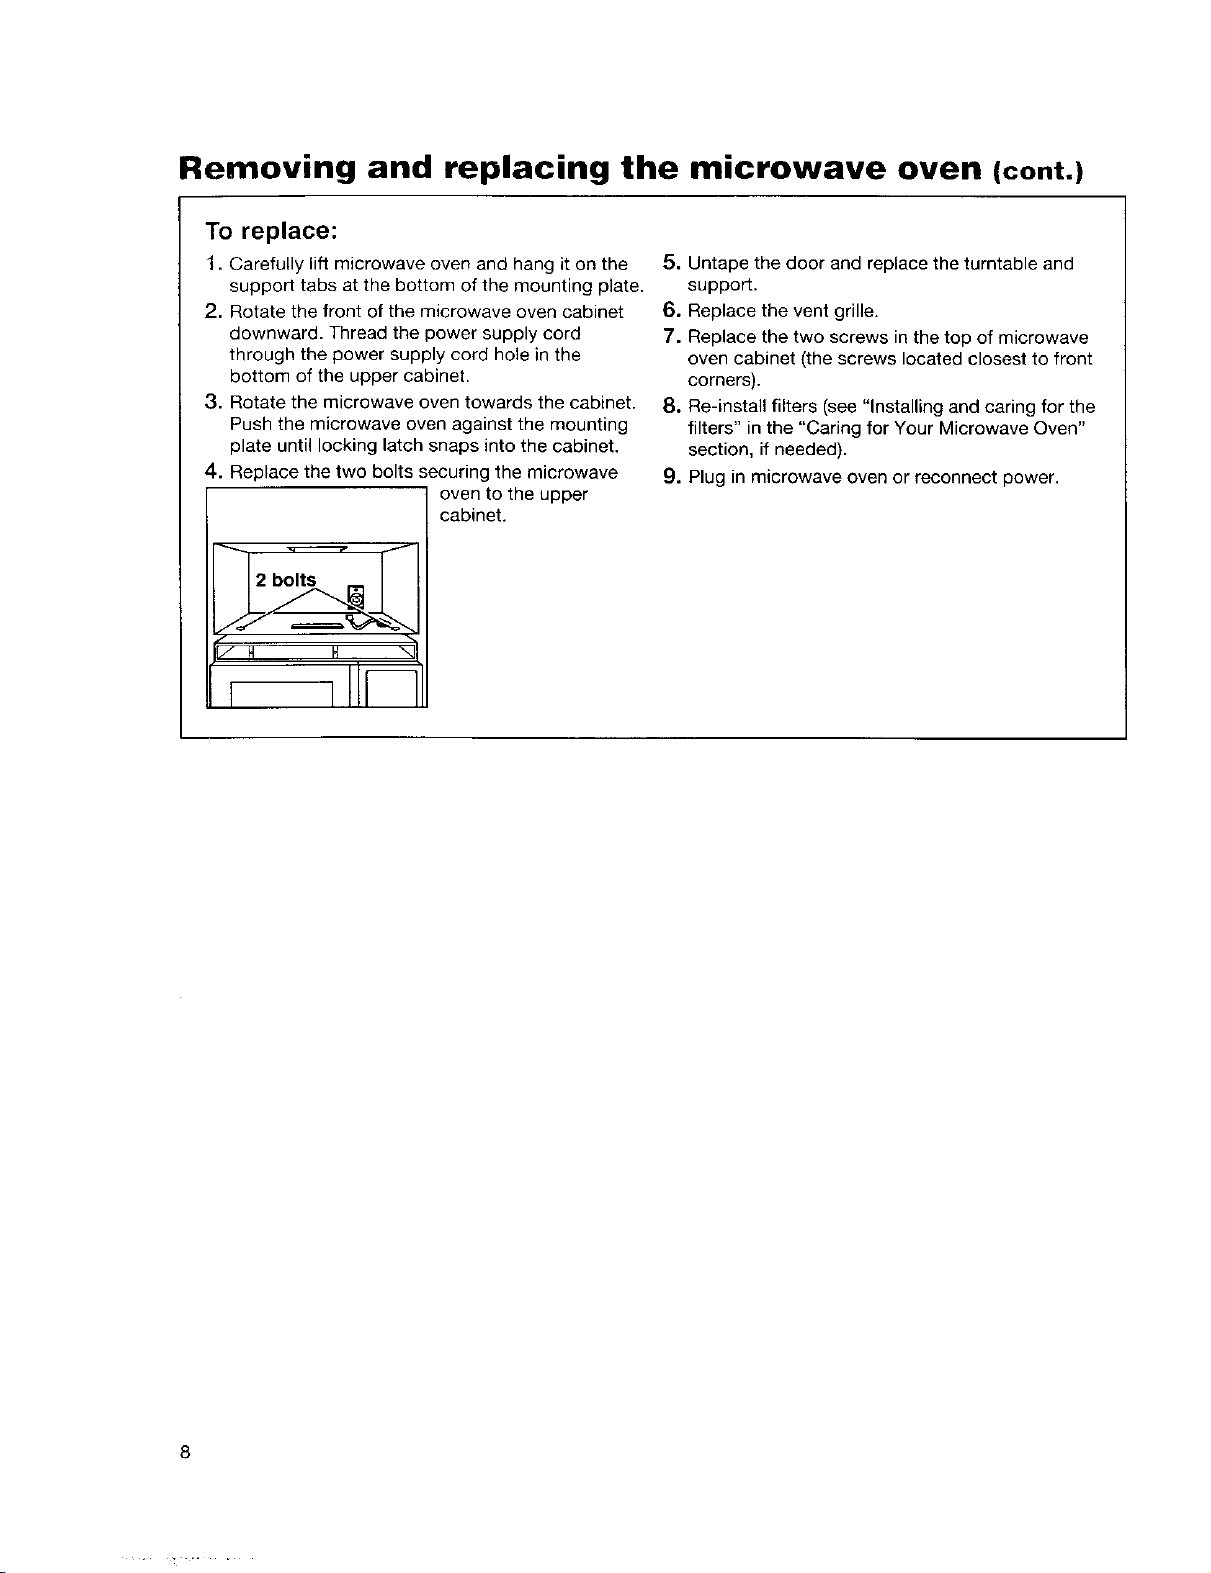
To replace:
1. Carefully lift microwave oven and hang it on the
support tabs at the bottom of the mounting plate.
2. Rotate the front of the microwave oven cabinet
downward. Thread the power supply cord
through the power supply cord hole in the
bottom of the upper cabinet.
3. Rotate the microwave oven towards the cabinet.
Push the microwave oven against the mounting
plate until locking latch snaps into the cabinet.
4. Replace the two bolts securing the microwave
oven to the upper
cabinet.
/ H H "4
5. Untape the door and replace the turntable and
support.
6o Replace the vent grille.
7. Replace the two screws in the top of microwave
oven cabinet (the screws located closest to front
corners).
8. Re-install filters (see "Installing and caring for the
filters" in the "Caring for Your Microwave Oven"
section, if needed).
9. Plug in microwave oven or reconnect power.
Getting to Know Your
Microwave Oven
This section discusses the concepts behind microwave cooking, tt also shows you the basics you need to
know to operate your microwave oven. Please read this information before you use your microwave oven.
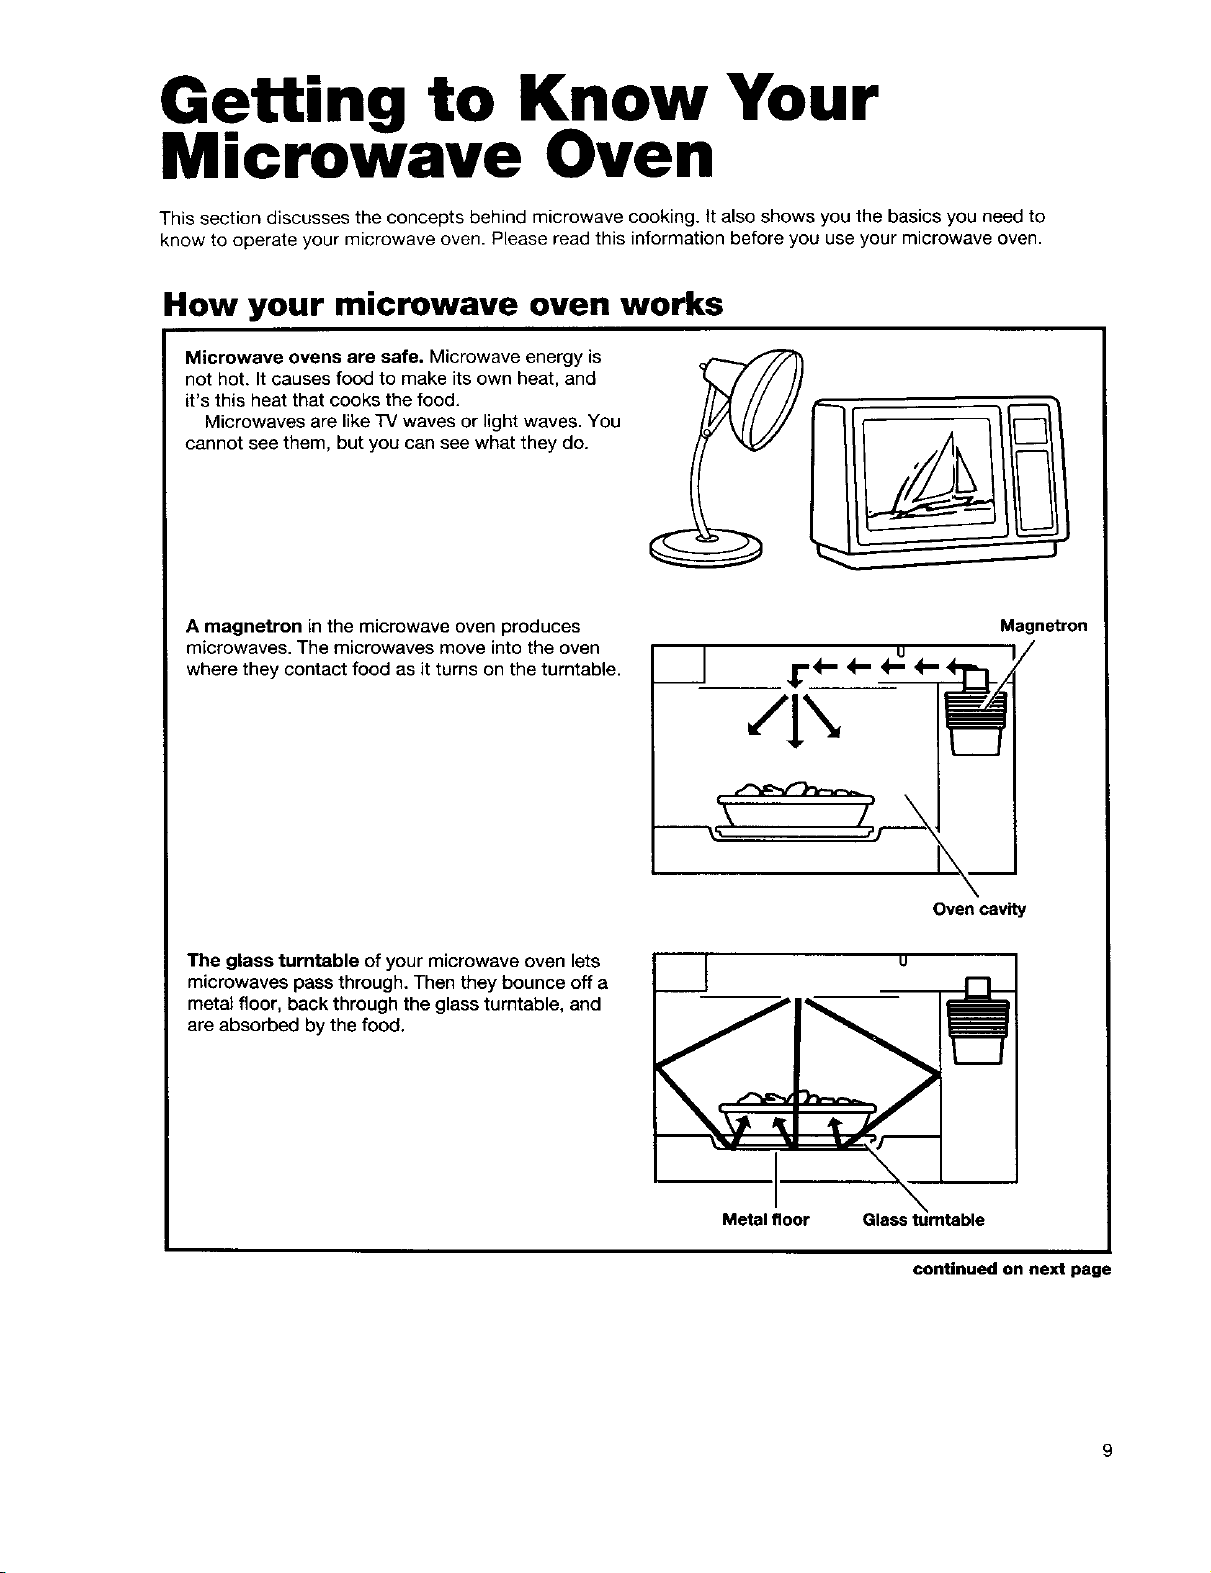
How your microwave oven works
Microwave ovens are safe. Microwave energy is
not hot. It causes food to make its own heat, and
it's this heat that cooks the food.
Microwaves are like TV waves or light waves. You
cannot see them, but you can see what they do.
A magnetron in the microwave oven produces
microwaves. The microwaves move into the oven
where they contact food as it turns on the turntable.
The glass turntable of your microwave oven lets
microwaves pass through. Then they bounce off a
metal floor, back through the glass turntable, and
are absorbed by the food.
Magnetron
/I\
Oven cavity
Metal floor Glass turntable
continued on next page
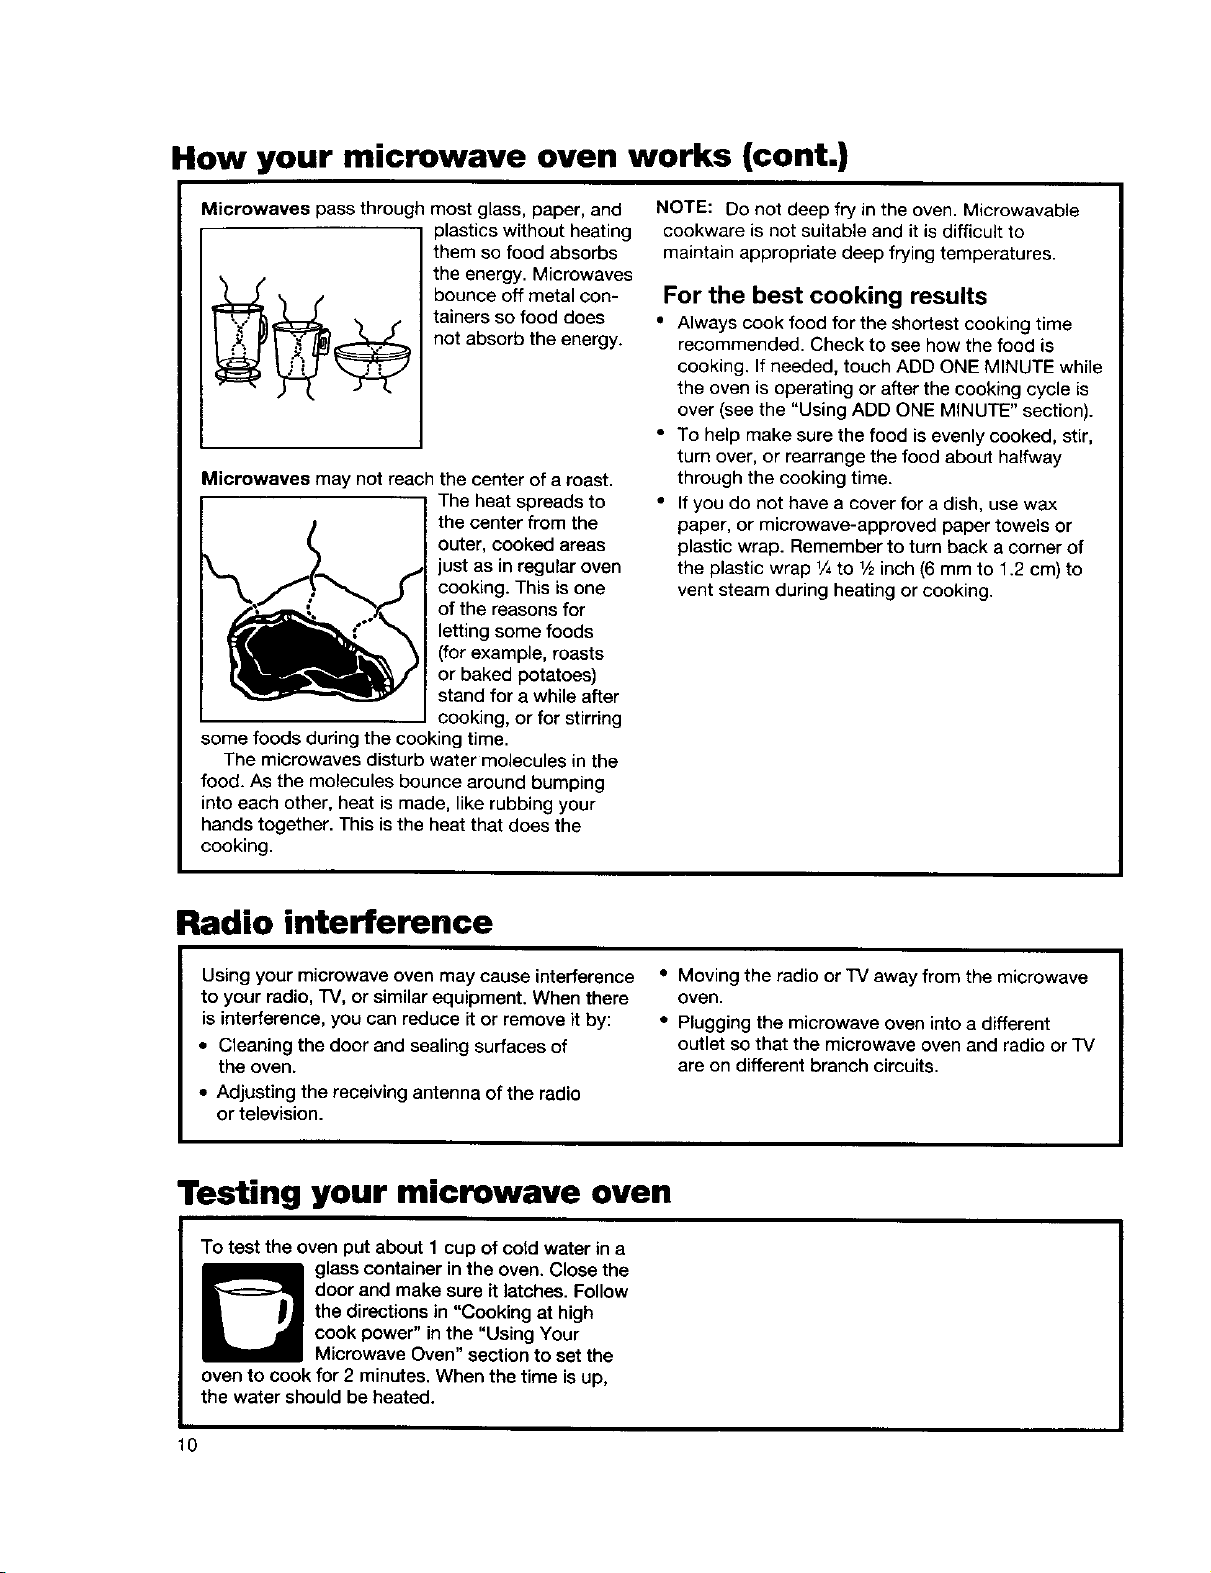
How your microwave oven works (cont.)
Microwaves pass through most glass, paper, and
plastics without heating
them so food absorbs
the energy. Microwaves
bounce off metal con-
tainers so food does
not absorb the energy.
Microwaves may not reach the center of a roast.
The heat spreads to
the center from the
outer, cooked areas
just as in regular oven
cooking. This is one
of the reasons for
letting some foods
(for example, roasts
or baked potatoes)
stand for a while after
cooking, or for stirring
some foods during the cooking time.
The microwaves disturb water molecules in the
food. As the molecules bounce around bumping
into each other, heat is made, like rubbing your
hands together. This is the heat that does the
cooking.
NOTE: Do not deep fry in the oven. Microwavable
cookware is not suitable and it is difficult to
maintain appropriate deep frying temperatures.
For the best cooking results
• Always cook food for the shortest cooking time
recommended. Check to see how the food is
cooking. If needed, touch ADD ONE MINUTE while
the oven is operating or after the cooking cycle is
over (see the "Using ADD ONE MINUTE" section).
• To help make sure the food is evenly cooked, stir,
turn over, or rearrange the food about halfway
through the cooking time.
• If you do not have a cover for a dish, use wax
paper, or microwave-approved paper towels or
plastic wrap. Remember to turn back a corner of
the plastic wrap _,4to 1/2inch (6 mm to 1.2 cm) to
vent steam during heating or cooking.
Radio interference
Using your microwave oven may cause interference
to your radio, TV, or similar equipment. When there
is interference, you can reduce it or remove it by:
• Cleaning the door and sealing surfaces of
the oven.
• Adjusting the receiving antenna of the radio
or television.
Testing your microwave oven
To test the oven put about I cup of cold water in a
glass container in the oven. Close the
door and make sure it latches. Follow
the directions in "Cooking at high
cook power" in the "Using Your
Microwave Oven" section to set the
oven to cook for 2 minutes. When the time is up,
the water should be heated.
10
• Moving the radio or "IV away from the microwave
oven.
• Plugging the microwave oven into a different
outlet so that the microwave oven and radio or TV
are on different branch circuits.
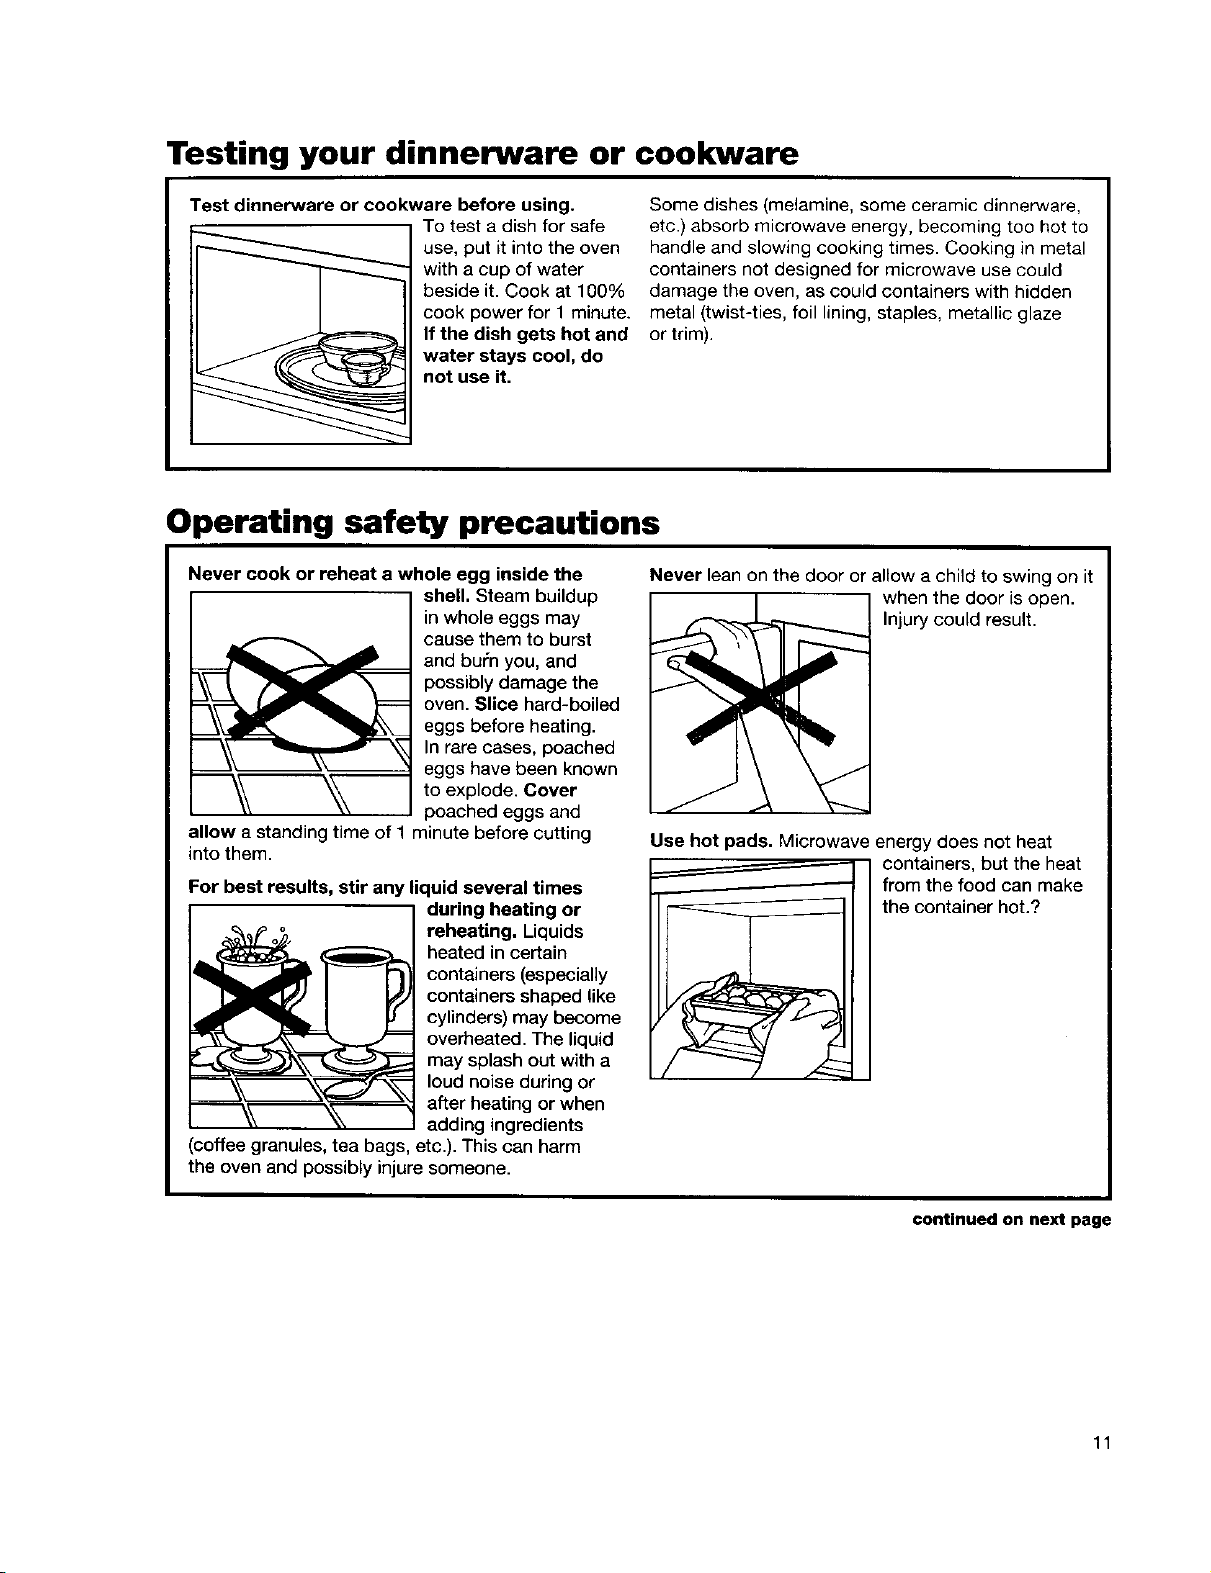
Testing your dinnerware or cookware
Test dinnerware or cookware before using. Some dishes (melamine, some ceramic dinnerware,
To test a dish for safe etc.) absorb microwave energy, becoming too hot to
use, put it into the oven handle and slowing cooking times. Cooking in metal
with a cup of water containers not designed for microwave use could
beside it. Cook at 100% damage the oven, as could containers with hidden
cook power for 1 minute, metal (twist-ties, foil lining, staples, metallic glaze
If the dish gets hot and or trim).
water stays cool, do
not use it.
Operating safety precautions
Never cook or reheat a whole egg inside the
shell. Steam buildup
inwhole eggs may
cause them to burst
and burn you,and
possiblydamage the
oven.Slice hard-boiled
eggs before heating.
In rare cases, poached
eggs have been known
to explode. Cover
poached eggs and
allow a standingtime of 1 minute before cutting
into them.
For best results, stir any liquid several times
during heating or
reheating. Liquids
heated incertain
containers (especially
containers shaped like
cylinders) may become
overheated. The liquid
may splash out with a
loud noise during or
after heating or when
adding ingredients
(coffee granules, tea bags, etc.). This can harm
the oven and possibly injure someone.
Never lean on the door or allow a child to swing on it
when the door is open.
Injury could result.
Use hot pads. Microwave energy does not heat
from the food can make
the container hot.?
containers, but the heat
continued on next page
11
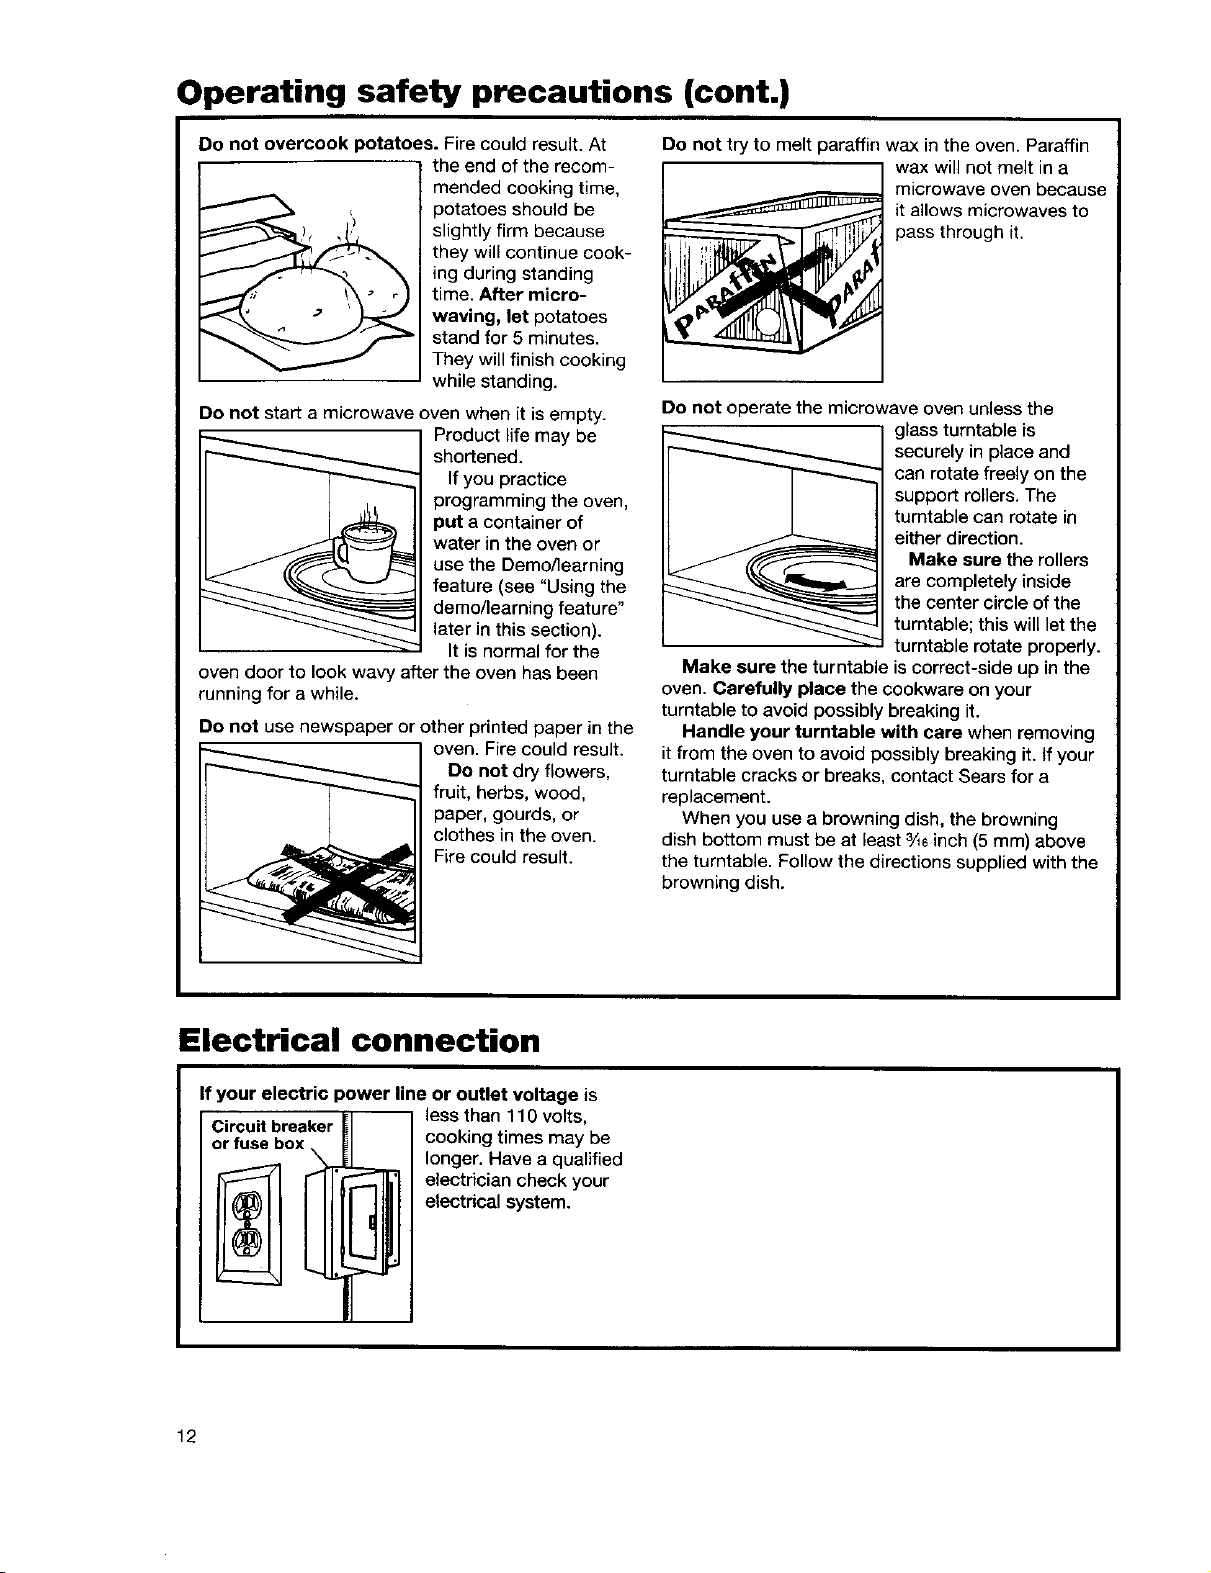
Operating safety precautions (cont.)
Do not overcook potatoes. Fire could result. At
the end of the recom-
mended cooking time,
potatoes should be
slightly firm because
they will continue cook-
ing during standing
time. After micro-
waving, let potatoes
stand for 5 minutes.
They will finish cooking
while standing.
Do not start a microwave oven when it is empty.
Product life may be
shortened.
If you practice
programming the oven,
put a container of
water in the oven or
use the Demo/learning
feature (see "Using the
demo/learning feature"
later in this section).
It is normal for the
oven door to look wavy after the oven has been
running for a while.
Do not use newspaper or other printed paper in the
Do not dry flowers,
fruit, herbs, wood,
paper, gourds, or
clothes in the oven.
Fire could result.
_ oven. Fire could result.
Do not try to melt paraffin wax in the oven. Paraffin
wax will not melt in a
microwave oven because
it allows microwaves to
pass through it.
Do not operate the microwave oven unless the
glass turntable is
securely in place and
can rotate freely on the
support rollers. The
turntable can rotate in
either direction.
Make sure the rollers
are completely inside
the center circle of the
turntable; this will let the
turntable rotate properly.
Make sure the turntable is correct-side up in the
oven. Carefully place the cookware on your
turntable to avoid possibly breaking it.
Handle your turntable with care when removing
it from the oven to avoid possibly breaking it. if your
turntable cracks or breaks, contact Sears for a
replacement.
When you use a browning dish, the browning
dish bottom must be at least 3,46inch (5 ram) above
the turntable. Follow the directions supplied with the
browning dish.
Electrical connection
If your electric power line or outlet voltage is
Circuit breaker
or fuse box
I@11
12
less than 110 volts,
cooking times may be
longer. Have a qualified
electrician check your
electrical system.
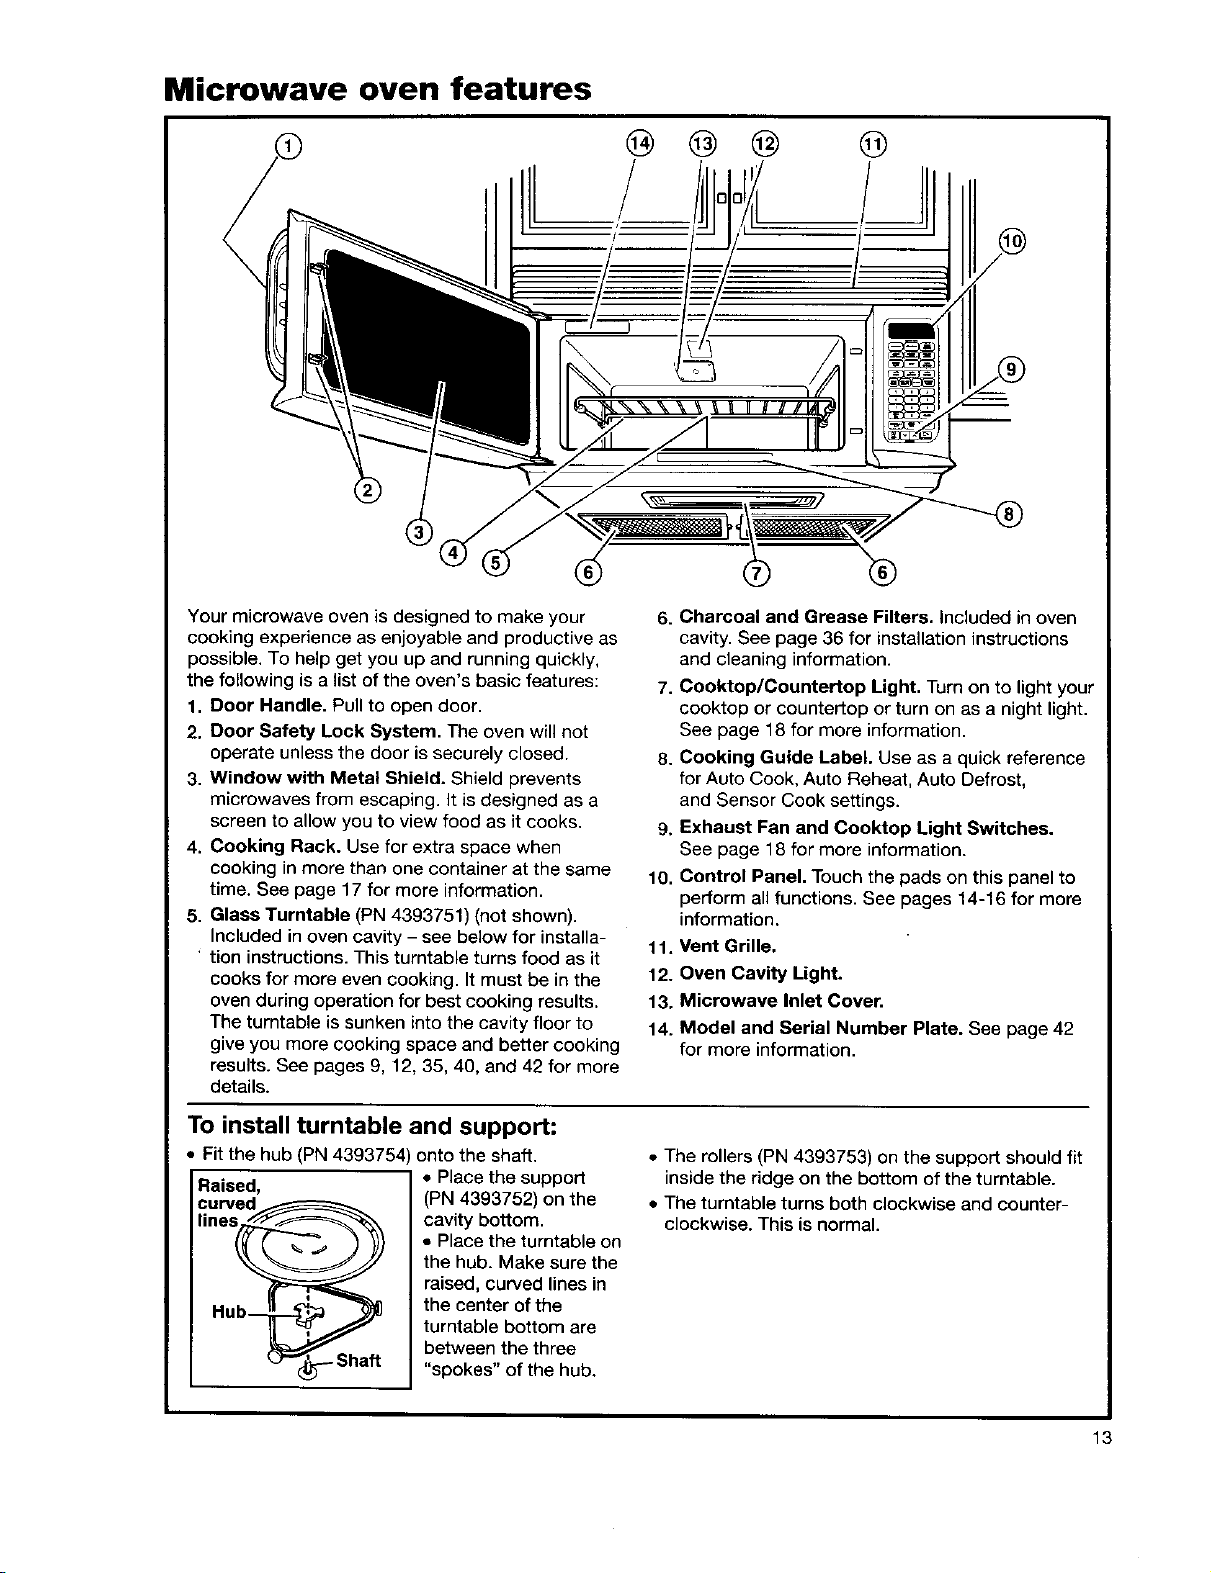
Microwave oven features
@ @ @ @
Your microwave oven is designed to make your
cooking experience as enjoyable and productive as
possible. To help get you up and running quickly,
the following is a list of the oven's basic features:
1. Door Handle. Pull to open door.
2. Door Safety Lock System. The oven will not
operate unless the door is securely closed.
3. Window with Metal Shield. Shield prevents
microwaves from escaping. It is designed as a
screen to allow you to view food as it cooks.
4. Cooking Rack. Use for extra space when
cooking in more than one container at the same
time. See page 17 for more information.
5. Glass Turntable (PN 4393751) (not shown).
Included in oven cavity - see below for installa-
tion instructions. This turntable turns food as it
cooks for more even cooking. It must be in the
oven during operation for best cooking results.
The turntable is sunken into the cavity floor to
give you more cooking space and better cooking
results. See pages 9, 12, 35, 40, and 42 for more
details.
To install turntable and support:
Fit the hub (PN 4393754
Raised,
curved_
lines__
Hu__
"-J'_-.-- Shaft
, onto the shaft.
• Place the support
(PN 4393752) on the
cavity bottom.
• Place the turntable on
the hub. Make sure the
raised, curved lines in
the center of the
turntable bottom are
between the three
"spokes" of the hub.
6. Charcoal and Grease Filters. Included in oven
cavity. See page 36 for installation instructions
and cleaning information.
7. Cooktop/Countertop Light. Turn on to light your
eooktop or countertop or turn on as a night light.
See page f 8 for more information.
8. Cooking Guide Label. Use as a quick reference
for Auto Cook, Auto Reheat, Auto Defrost,
and Sensor Cook settings.
9. Exhaust Fan and Cooktop Light Switches.
See page 18 for more information.
10. Control Panel. Touch the pads on this panel to
perform all functions. See pages 14-16 for more
information.
11. Vent Grille.
12. Oven Cavity Light.
13. Microwave Inlet Cover.
14. Model and Serial Number Plate. See page 42
for more information.
• The rollers (PN 4393753) on the support should fit
inside the ridge on the bottom of the turntable.
• The turntable turns both clockwise and counter-
clockwise. This is normal.
13
Control panel features
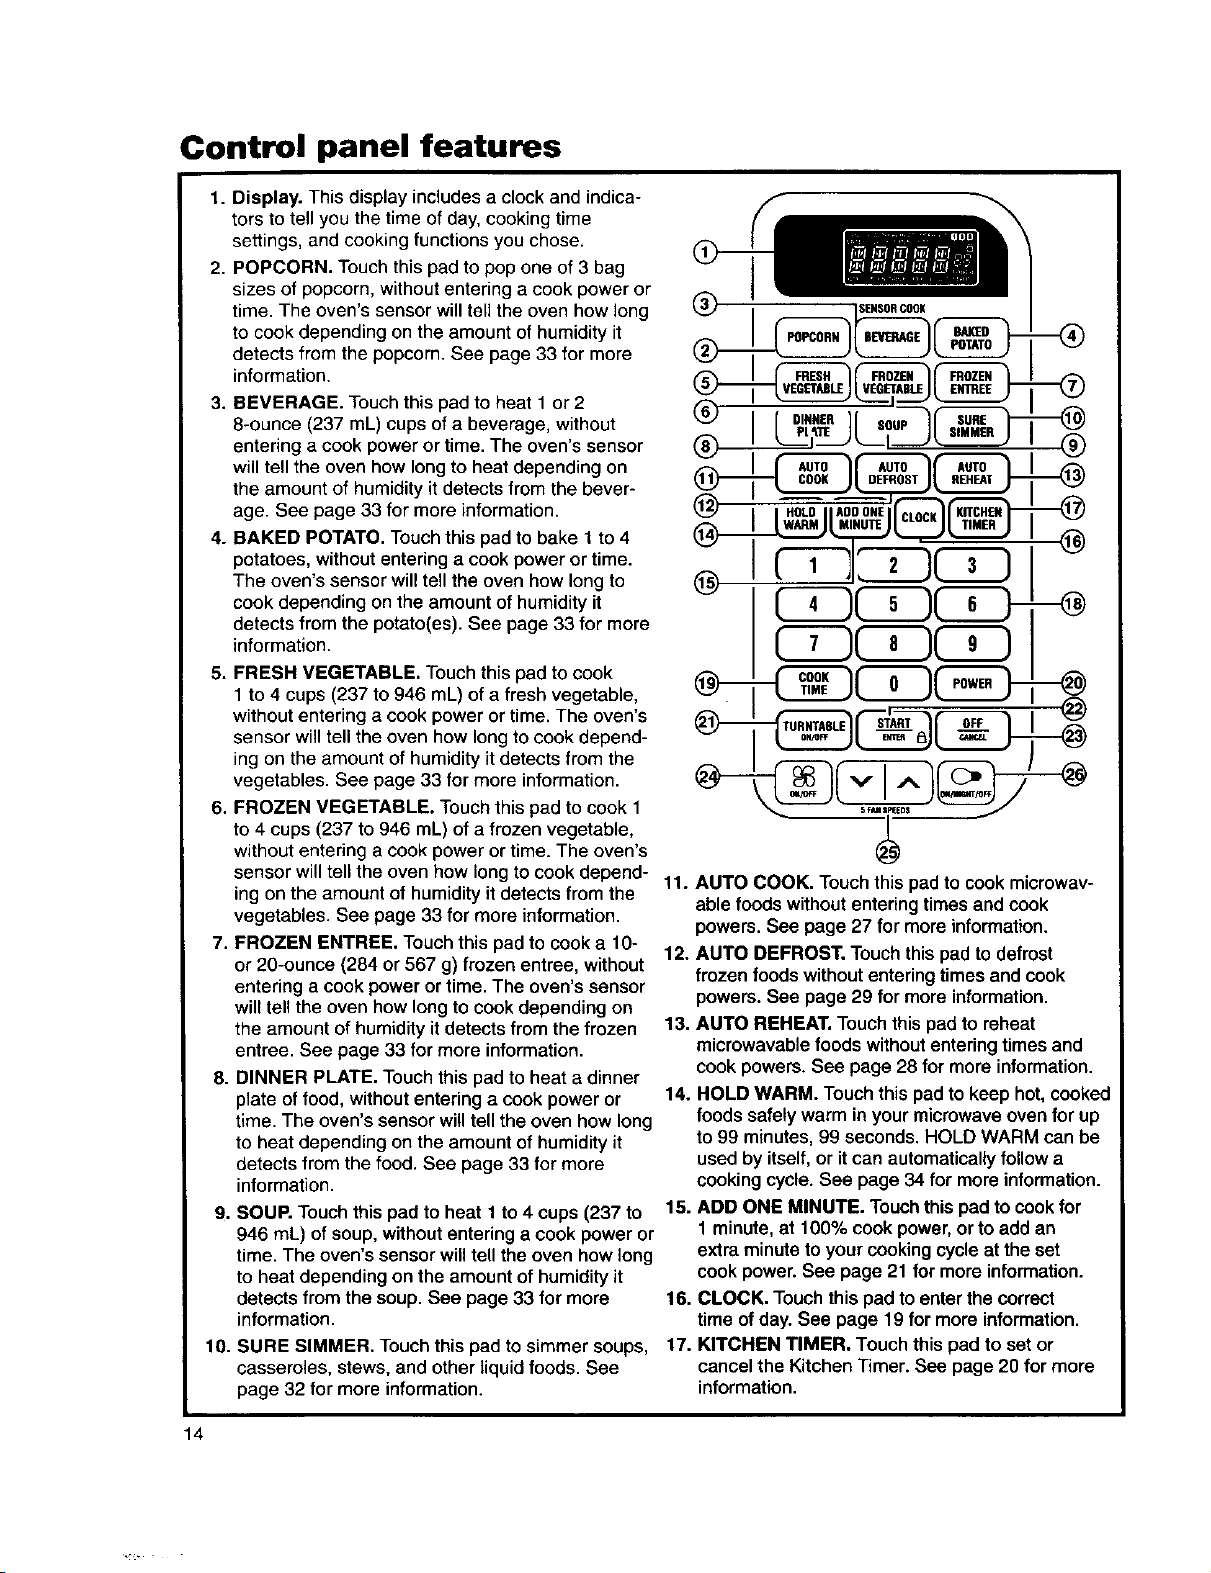
1.
Display. This display includes a clock and indica-
tors to tell you the time of day, cooking time
settings, and cooking functions you chose.
2.
POPCORN. Touch this pad to pop one of 3 bag
sizes of popcorn, without entering a cook power or
time. The oven's sensor will tell the oven how long
to cook depending on the amount of humidity it
detects from the popcorn. See page 33 for more
information.
3. BEVERAGE. Touch this pad to heat 1 or 2
8-ounce (237 mL) cups of a beverage, without
entering a cook power or time. The oven's sensor
will tell the oven how long to heat depending on
the amount of humidity it detects from the bever-
age. See page 33 for more information.
4. BAKED POTATO. Touch this pad to bake 1 to 4
potatoes, without entering a cook power or time.
The oven's sensor will tell the oven how long to
cook depending on the amount of humidity it
detects from the potato(es). See page 33 for more
information.
5. FRESH VEGETABLE. Touch this pad to cook
1 to 4 cups (237 to 946 mL) of a fresh vegetable,
without entering a cook power or time. The oven's
sensor will tell the oven how long to cook depend-
ing on the amount of humidity it detects from the
vegetables. See page 33 for more information.
6. FROZEN VEGETABLE. Touch this pad to cook 1
to 4 cups (237 to 946 mL) of a frozen vegetable,
without entering a cook power or time. The oven's
sensor will tell the oven how long to cook depend- 11. AUTO COOK. Touch this pad to cook microwav-
ing on the amount of humidity it detects from the able foods without entering times and cook
vegetables. See page 33 for more information.
7. FROZEN ENTREE. Touchthis pad to cook a 10-
or 20-ounce (284 or 567 g) frozen entree, without
12. AUTO DEFROST. Touchthis pad to defrost
entering a cook power ortime. The oven's sensor
will tell the oven how long to cook depending on
the amount of humidity it detects from the frozen
13. AUTO REHEAT. Touchthispad to reheat
entree. See page 33 for more information.
8. DINNER PLATE. Touch this pad to heat a dinner
plate of food, without entering a cook power or
14. HOLD WARM. Touchthis padto keep hot,cooked
time. The oven's sensor will tell the oven how long
to heat depending on the amount of humidity it
detects from the food. See page 33for more
information.
. SOUP. Touch this pad to heat 1 to 4 cups (237 to
946 mL) of soup, without entering a cook power or
time. The oven's sensor will tell the oven how long
to heat depending on the amount of humidity it
detects from the soup. See page 33 for more
information.
10. SURE SIMMER. Touch this pad to simmer soups, 17.
casseroles, stews, and other liquid foods. See
page 32 for more information.
15. ADD ONE MINUTE. Touchthis padto cookfor
16. CLOCK. Touchthispad to enter thecorrect
I ISENSORCOOK
powers. See page 27 for moreinformation.
frozen foodswithoutenteringtimes and cook
powers.See page 29 for moreinformation.
microwavablefoods withoutenteringtimes and
cookpowers.See page 28 for more information.
foods safelywarm inyourmicrowaveovenfor up
to99 minutes,99 seconds.HOLD WARM can be
used by itself,or itcan automaticallyfollow a
cookingcycle.See page 34 for moreinformation.
1 minute,at 100% cookpower,orto add an
extraminute to your cookingcycleat the set
cook power.See page 21 for moreinformation.
time ofday.See page 19 for more information.
KITCHEN TIMER. Touch thispad toset or
cancel the KitchenTimer. Seepage 20 for more
information.
14

Control panel features (cont.)
18. Number pads. Touch Number pads to enter
cooking times, cook powers, quantities,
weights, or food categories.
19. COOK TIME. Touch this pad followed by
Number pads to set a cooking time. See
pages 22, 23, and 25 for more information.
20. POWER. Touch this pad after the cooking time
has been set, followed by a Number pad to set
the amount of microwave energy released to
cook the food. Also touch this pad to lengthen
or shorten a preset cooking time. See pages 21
and 23 for more information.
21. TURNTABLE ON/OFF. Touch this pad to turn
your turntable on and off. See page 16 for more
information.
22. START/ENTER. Touch this pad to start a
function. See page 16 for more information.
23. OFF/CANCEL Touch this pad to erase an
incorrect command, cancel a program during
cooking, or to clear the display. See page 16
for more information.
24. VENT FAN ON/OFF. Touch this pad to turn the
fan on or off. See page 18 for more information.
25. 5 SPEED FAN. Touch the "up" pad to increase
fan speed and the "down" pad to decrease fan
speed. See page 18 for more information.
26. LIGHT ON/NIGHT/OFF. Touch this pad to turn
the light or night light on or off. See page 18 for
more information.
NOTES:
• If you have entered all settings for a function but
do not touch START/ENTER in 5 seconds, the
START? indicator light will show.
= For nonsensor functions, if you open the door
while the oven is on and then shut the door within
15 minutes, the START? indicator light will show.
Touch START/ENTER to continue. If you open the
door when sensor cooking, cooking is cancelled
and you have to start over.
* If you choose a function but do not press another
Command pad within 1 minute, the display retums
to the time of day and you have to start over.
Audible signals
Your microwave oven comes with audible signals
that can guide you when setting and using
your oven:
• [_ A programming tone will sound each time
you touch a pad.
• [_ One long tone signals the end of a Kitchen
Timer countdown.
"F_[_[_]_ Four tones signal the end of a
cooking cycle.
" [_[_ Two quick, short tones sound once
every minute for the first 15 minutes after an end-
of-cooking signal as a reminder if the food has
not been removed from the oven.
• I_11_ Two quick, short tones will sound while
entering and exiting from a hidden feature (for
example, Child Lock) or time of day.
• [_[_-lr_ Three tones sound if you have
made an incorrect entry.
To disable the programming tone;
TOUCH
and hold for 5 seconds
To turn the programming tone back on:
TOUCH
and hold for 5 seconds
To disable all audible signals except the
end-of-timer and hidden feature signals:
TOUCH
CSD
and hold for 5 seconds
To turn signals back on:
TOUCH
CSD
and hold for 5 seconds
NOTE: Two tones will sound when audible signals
are turned on or off.
continued on next page t 5

Control panel features (cont.)
Interrupting cooking
You can stop the oven during a cycle by opening
the door. The oven stops heating and the fan
stops, but the light stays on. To restart cooking,
close the door and
TOUCH
Heating more than one plate of food
When heating plates of food with a cook time that
you set, you can heat
two 101/4-inch (26 cm)
plates side by side or
one dish larger than the
turntable. You can heat
2 more plates on the
Cooking Rack for a
possible total of 4 plates.
For best results, halfway
through cooking turn the
plates halfway around
until the food in the front is in the back. Do the same
when heating a larger (9- to 13-inch [23 to 33 cm])
casserole. When heating 4 dinner plates turn as
described above and switch the top plates with the
bottom plates.
If you do not want to continue cooking:
• Close the door and the light goes off.
OR
• TOUCH
NOTE: Before setting a function, touch OFF/CAN-
CEL to make sure no other function is on.
To heat 2 bottom plates together or one larger
turning. You can shut the turntable
dish, the turntable should not be
off by touching TURNTABLE ON/OFF.
"TURN TABLE OFF" appears on the
display. If you touch TURNTABLE ON/OFF before
starting to set the cooking function, your oven will
prompt you to enter a cooking time without you
needing to touch COOK TIME. Your turntable will be
turned back on when cooking is over or when you
touch OFF/CANCEL.
NOTE: You cannot turn off the turntablewhen using
an "auto" function.
Using the child lock
The Child Lock locks the control panel so chil-
dren cannot use the microwave oven when you
do not want them to.
To lock the control panel:
TOUCH
and hold for 5 seconds
Two tones will sound and IQI will appear on the
display. When the control panel is locked, 3 tones
will sound and LOCK will appear when you touch
any pad except for EXHAUST FAN and LIGHT.
To unlock the control panel:
TOUCH
and hold for 5 seconds
Two tones will sound and PI will be cleared from
the display.
Using the demo/learning feature
You can set your microwave oven to display your
commands as you enter them without turning the
magnetron on. This feature helps you learn to use
your oven without actually cooking food.
To set the demo/leaming feature:
TOUCH
and hold for 5 seconds
Two tones will sound and a small "d" will appear
on the display.
To cancel the demo/leaming feature:
TOUCH
and hold for 5 seconds
Two tones will sound and the small "d" will
disappear from the display.
16
Using the cooking rack
The Cooking Rack gives you extra space when
cooking in more than one container at the same
time.
If you need a replacement rack, you can order
one from your Sears Service Center, or by calling
1-800-366-7278. Make sure to have your model
number when ordering.
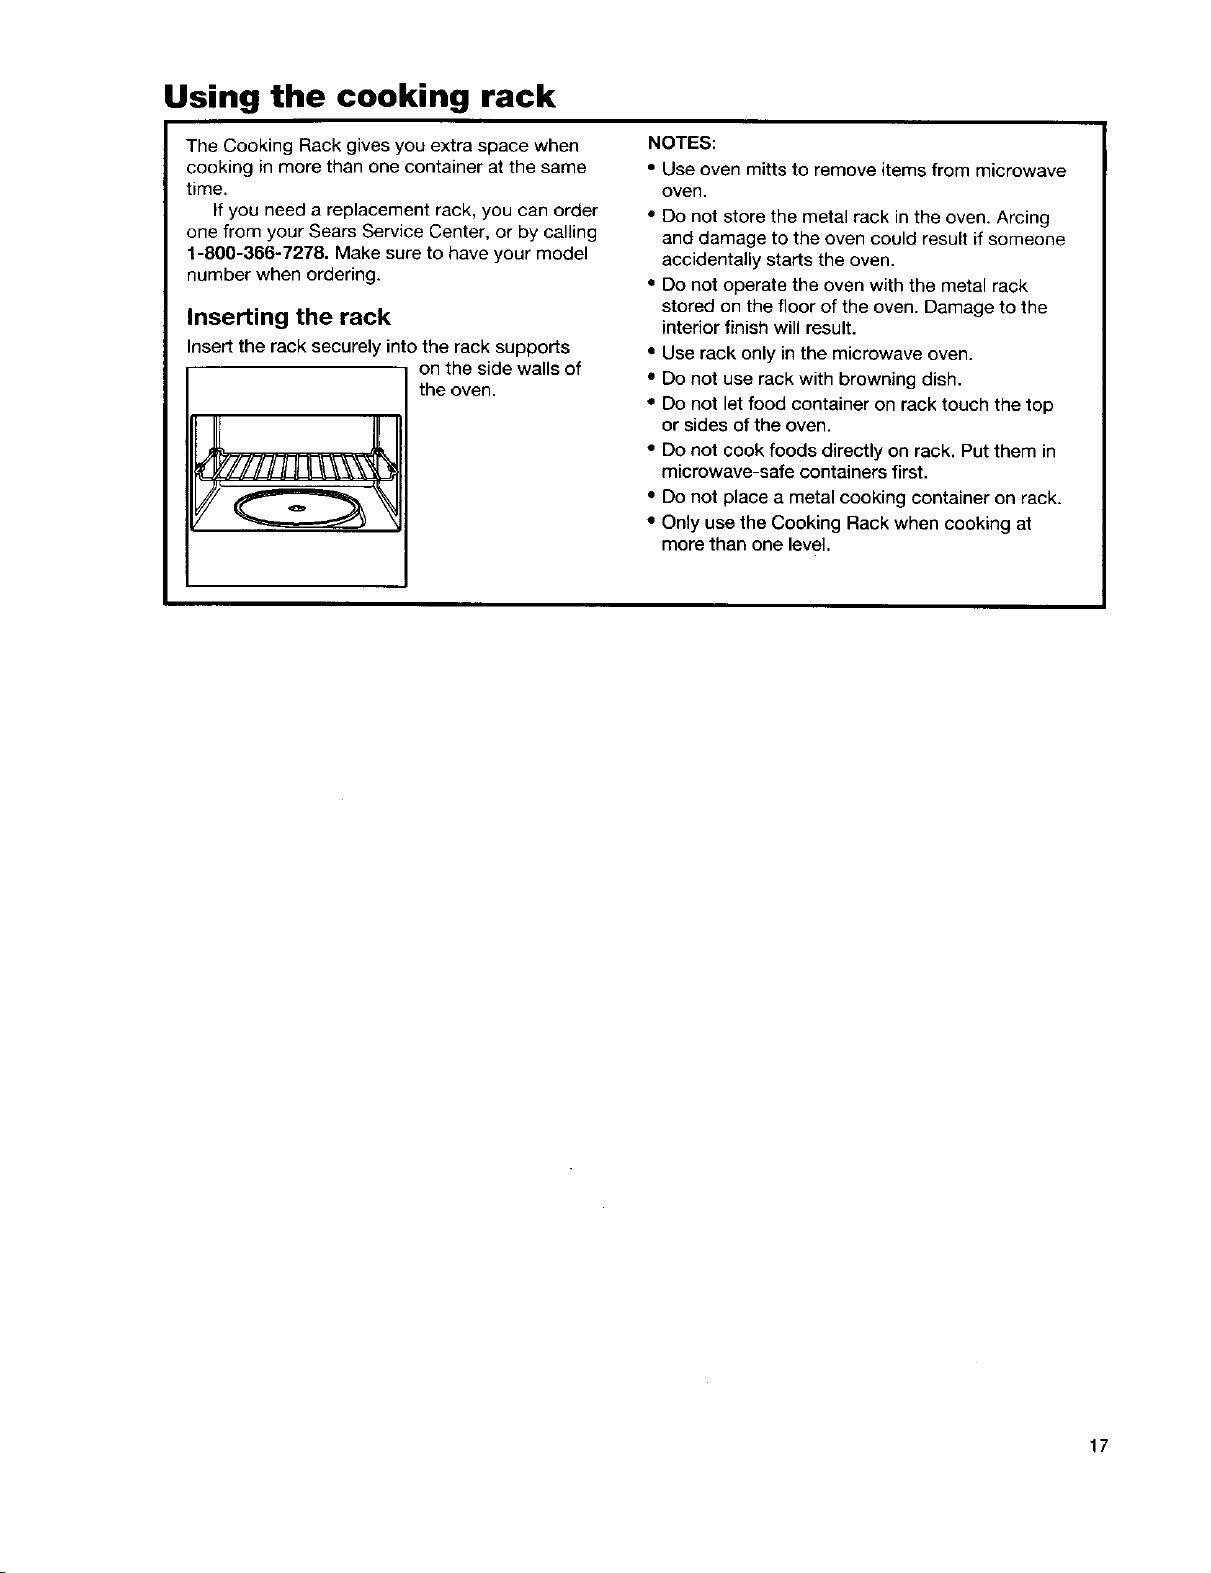
Inserting the rack
Insert the rack securely into the rack supports
I 1 on the side walls of
the oven.
NOTES:
• Use oven mitts to remove items from microwave
oven.
• DO not store the metal rack in the oven. Arcing
and damage to the oven could result if someone
accidentally starts the oven.
• Do not operate the oven with the metal rack
stored on the floor of the oven. Damage to the
interior finish will result.
• Use rack only in the microwave oven.
• Do not use rack with browning dish.
• Do not let food container on rack touch the top
or sides of the oven.
• Do not cook foods directly on rack. Put them in
microwave-safe containers first.
• Do not place a metal cooking container on rack.
• Only use the Cooking Rack when cooking at
more than one level.
17
Using the exhaust fan
The pads on the bottom right of the control panel
control the 5-speed exhaust fan.
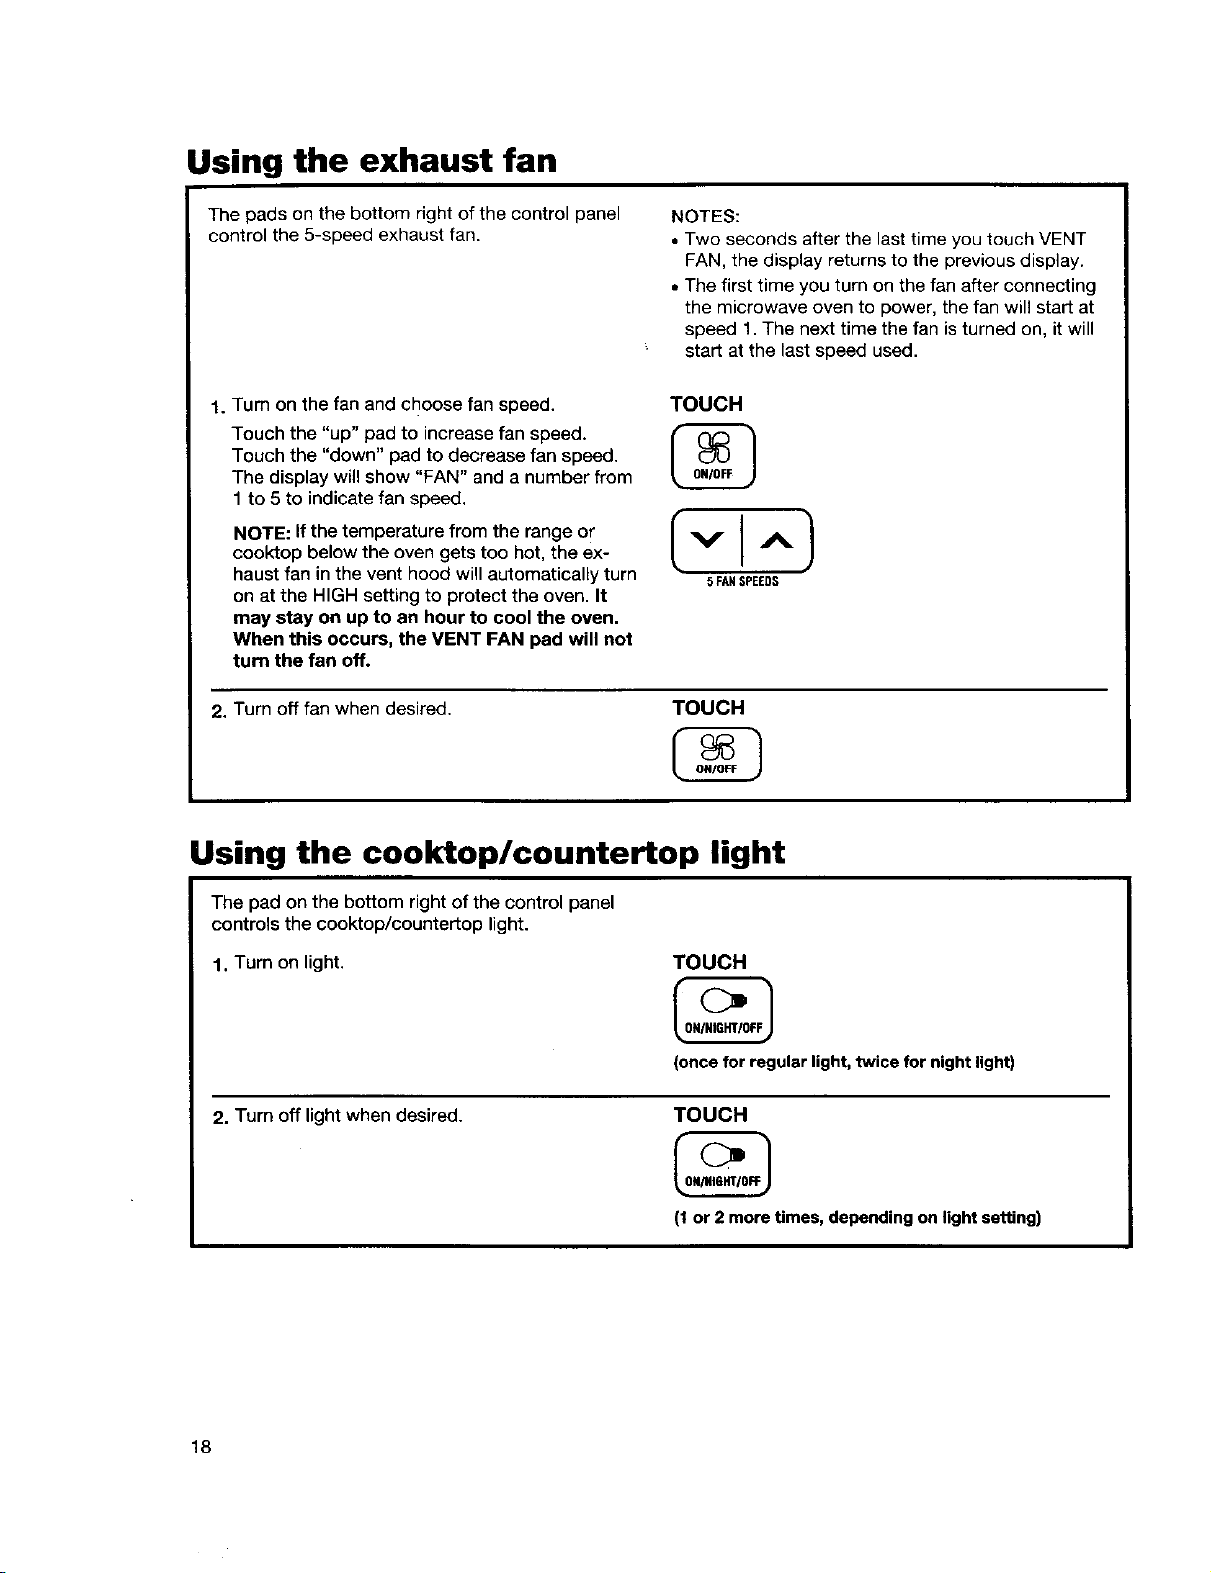
1. Turn on the fan and choose fan speed.
Touch the "up" pad to increase fan speed.
Touch the "down" pad to decrease fan speed.
The display will show "FAN" and a number from
1 to 5 to indicate fan speed.
NOTE: If the temperature from the range o r
cooktop below the oven gets too hot, the ex-
haust fan in the vent hood will automatically turn
on at the HIGH setting to protect the oven. It
may stay on up to an hour to cool the oven.
When this occurs, the VENT FAN pad will not
turn the fan off.
2. Turn off fan when desired,
NOTES:
• Two seconds after the last time you touch VENT
FAN, the display returns to the previous display.
• The first time you turn on the fan after connecting
the microwave oven to power, the fan will start at
speed 1. The next time the fan is turned on, it will
start at the last speed used.
TOUCH
5 FAN SPEEDS
TOUCH
Using the cooktop/countertop light
The pad on the bottom right of the control panel
controls the cooktop/countertop light.
1. Turn on light.
2. Turn off light when desired.
TOUCH
(once for regular light, twice for night light)
TOUCH
(1 or 2 more times, depending on light setting)
18
Setting the clock
When your microwave oven is first plugged in, or
after a power failure, the display will flash ":'. If a
time of day is not set, ":" will flash until you touch
any pad.
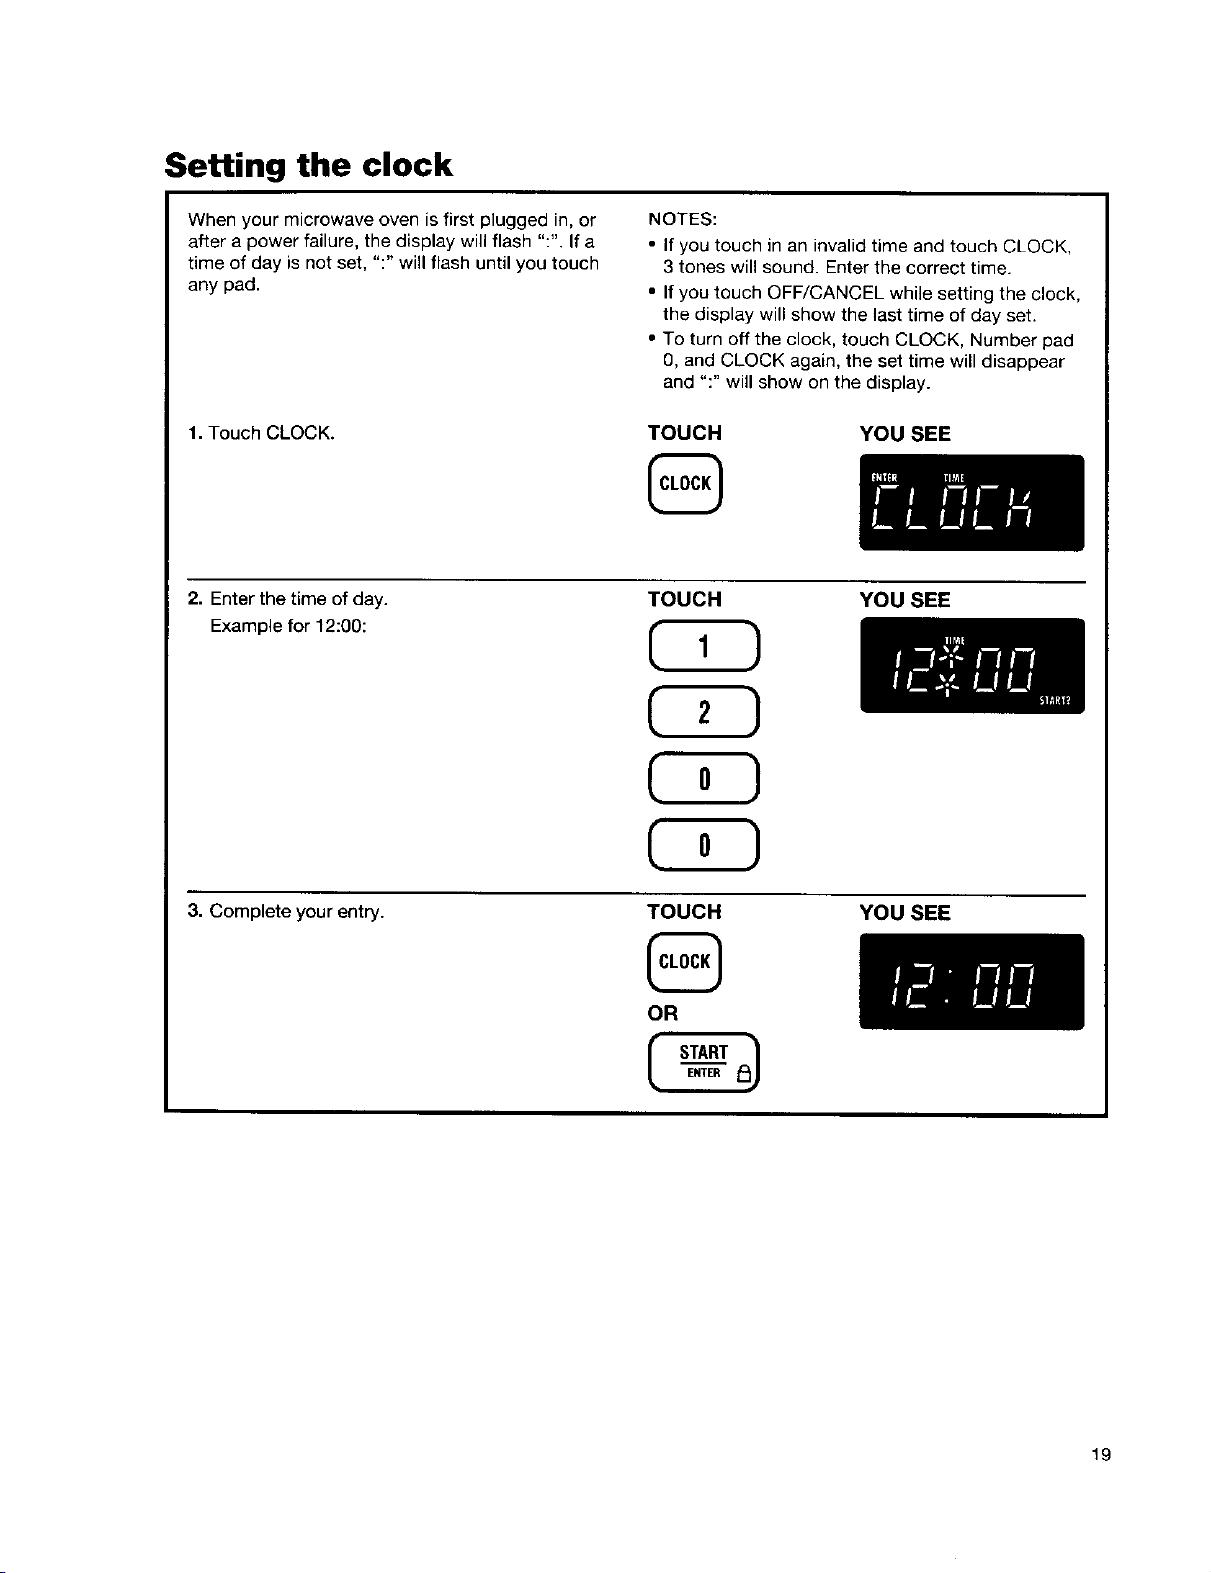
1. Touch CLOCK.
2. Enter the time of day.
Example for 12:00:
NOTES:
• If you touch in an invalid time and touch CLOCK,
3 tones will sound. Enter the correct time.
• If you touch OFF/CANCEL while setting the clock,
the display will show the last time of day set.
• To turn off the clock, touch CLOCK, Number pad
0, and CLOCK again, the set time will disappear
and ":" will show on the display.
YOU SEE
TOUCH YOU SEE
3. Complete your entry.
TOUCH
Q
OR
YOU SEE
19
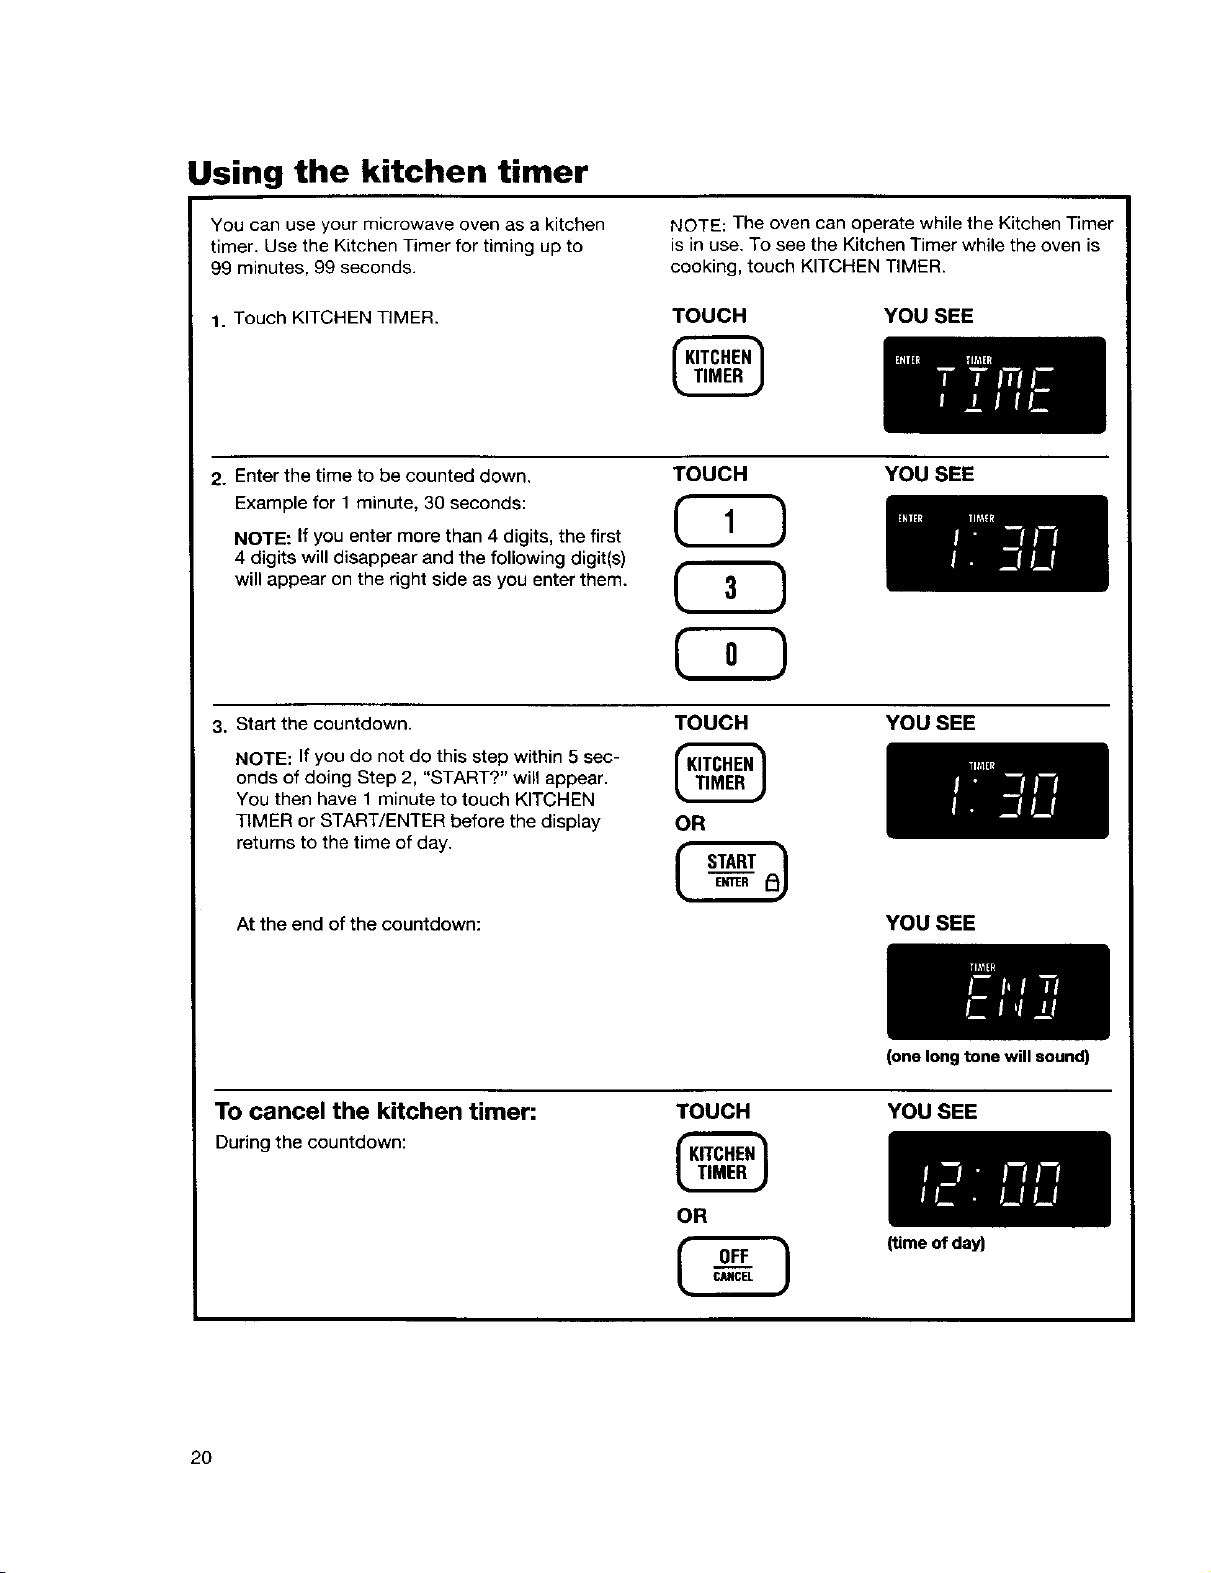
Using the kitchen timer
You can use your microwave oven as a kitchen
timer. Use the Kitchen Timer for timing up to
99 minutes, 99 seconds.
1. Touch KITCHEN TIMER.
2. Enter the time to be counted down,
Example for 1 minute, 30 seconds:
NOTE: If you enter more than 4 digits, the first
4 digits will disappear and the following digit(s)
will appear on the right side as you enter them.
3. Start the countdown.
NOTE: If you do not do this step within 5 sec-
onds of doing Step 2, "START?" will appear.
You then have 1 minute to touch KITCHEN
TIMER or START/ENTER before the display
returns to the time of day.
NOTE: The oven can operate while the Kitchen Timer
is in use. To see the Kitchen Timer while the oven is
cooking, touch KITCHEN TIMER.
TOUCH
TOUCH YOU SEE
TOUCH
YOU SEE
YOU SEE
OR
At the end of the countdown:
To cancel the kitchen timer:
During the countdown:
20
TOUCH
OR
YOU SEE
(one long tone will sound)
YOU SEE
(time of day)
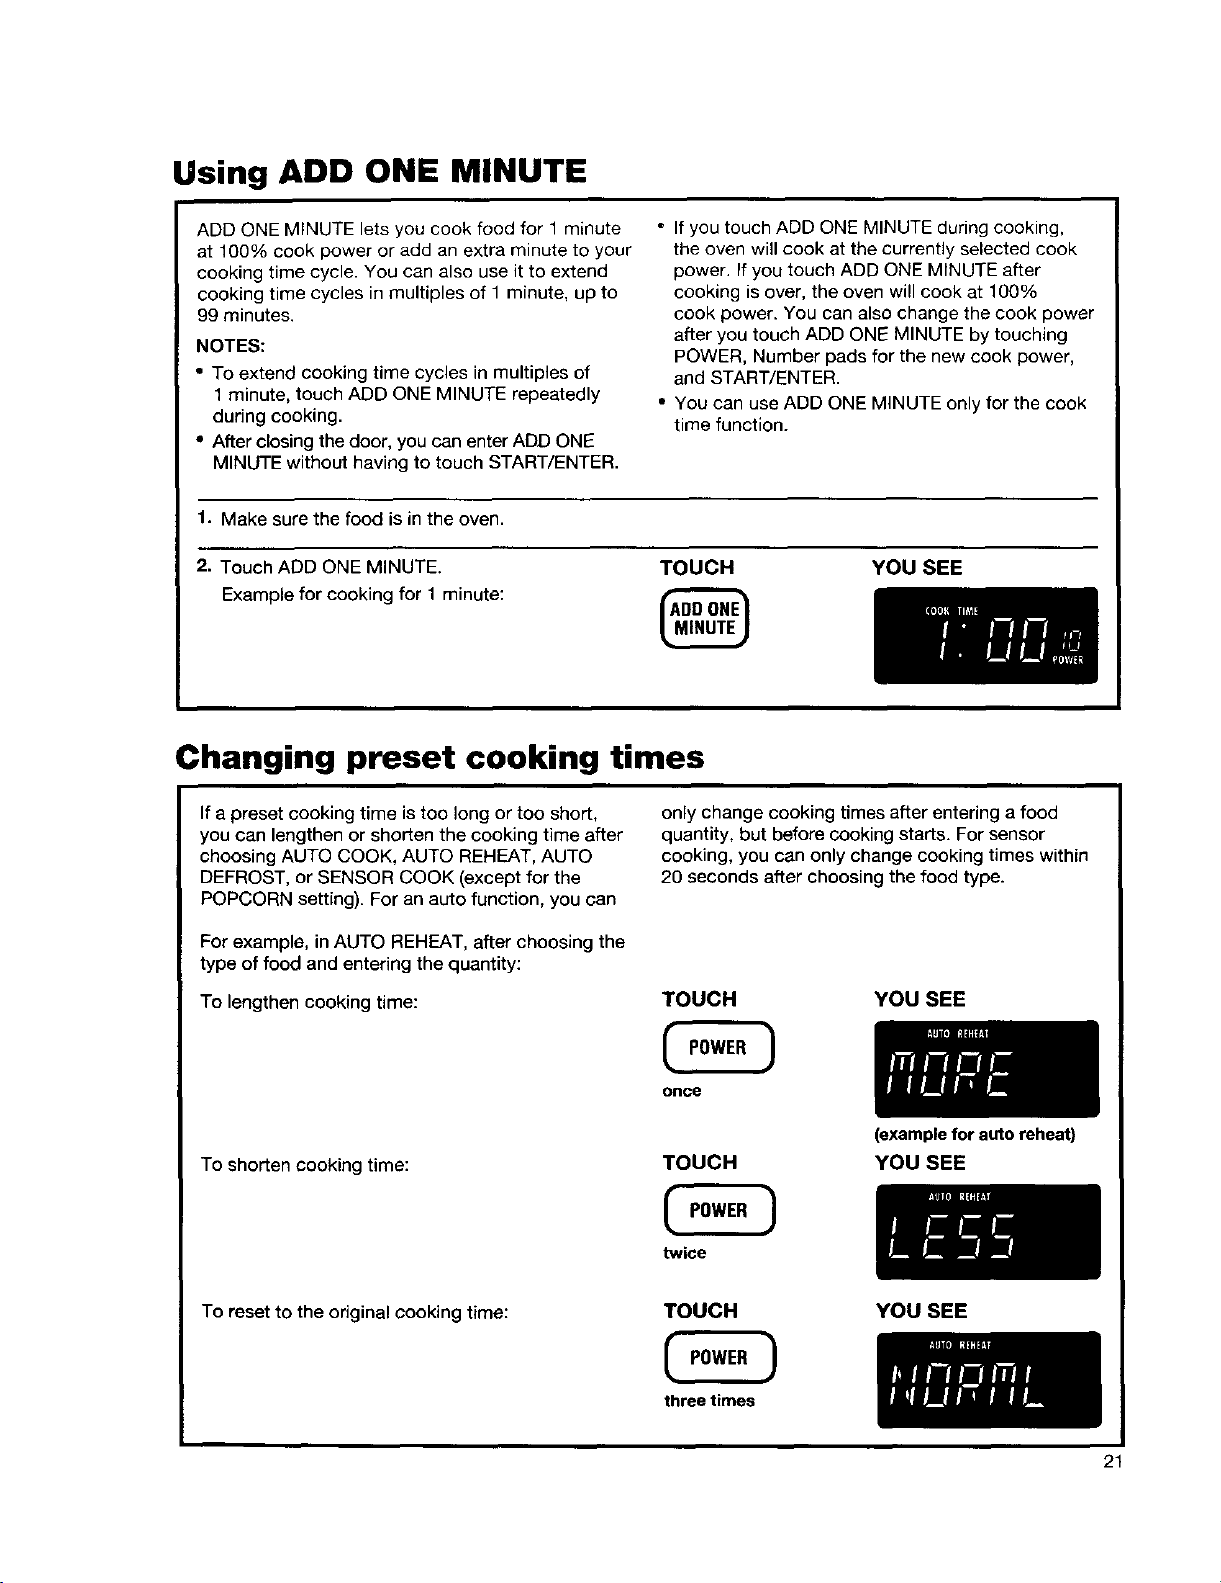
Using ADD ONE MINUTE
ADD ONE MINUTE lets you cook food for 1 minute
at 100% cook power or add an extra minute to your
cooking time cycle. You can also use it to extend
cooking time cycles in multiples of 1 minute, up to
99 minutes.
NOTES:
• To extend cooking time cycles in multiples of
1 minute, touch ADD ONE MINUTE repeatedly
during cooking.
• After closing the door, you can enter ADD ONE
MINUTE without having to touch START/ENTER.
1. Make sure the food is in the oven.
2. Touch ADD ONE MINUTE.
Example for cooking for 1 minute:
• If you touch ADD ONE MINUTE during cooking,
• You can use ADD ONE MINUTE only for the cook
TOUCH YOU SEE
Changing preset cooking times
the oven will cook at the currently selected cook
power. If you touch ADD ONE MINUTE after
cooking is over, the oven will cook at 100%
cook power. You can also change the cook power
after you touch ADD ONE MINUTE by touching
POWER, Number pads for the new cook power,
and START/ENTER.
time function.
If a preset cooking time is too long or too short,
you can lengthen or shorten the cooking time after
choosing AUTO COOK, AUTO REHEAT, AUTO
DEFROST, or SENSOR COOK (except for the
POPCORN setting). For an auto function, you can
For example, in AUTO REHEAT, after choosing the
type of food and entering the quantity:
To lengthen cooking time:
To shorten cooking time:
To reset to the original cooking time:
only change cooking times after entering a food
quantity, but before cooking starts. For sensor
cooking, you can only change cooking times within
20 seconds after choosing the food type.
TOUCH
once
TOUCH
twice
TOUCH
YOU SEE
(example for auto reheat)
YOU SEE
YOU SEE
three times
21

Using Your Microwave Oven
This section gives you instructions for operating each function. Please read these instructions carefully.
Cooking at high cook power
t. Put your food in the oven and close the door.
2. Touch COOK TIME.
3, Enterthe cooking time.
Examplefor 1 minute, 30 seconds:
4. Start the oven.
At the end of the cooking time:
TOUCH
TOUCH
TOUCH
YOU SEE
YOU SEE
YOU SEE
YOU SEE
Changing instructions
You can change the cooking time any time
during cooking by repeating Steps 2, 3, and 4.
22
(four tones will sound)

Cooking at different cook powers
For best results, some recipes call for different cook
powers. The lower the cook power, the slower the
cooking. Each Number pad also stands for a
different percentage of cook power. Many micro-
wave cookbook recipes tell you by number,
percent, or name which cook power to use.
COOK POWER NAME WHEN TO USE IT
10=100% of full power High • Quick heating many convenience foods and
(automatic) foods with high water content, such as soups
9=90% of full power • Heating cream soups
8=80% of full power • Heating rice, pasta, or stirrable casseroles
7=70% of full power Medium-High • Cooking and heating foods that need a cook
6=60% of full power • Cooking sensitive foods, such as cheese and egg
5=50% of full power Medium • Cooking ham, whole poultry, and pot roasts
4=40% of full power • Simmering stews
3=30% of full power Medium-Low, • Defrosting foods, such as bread, fish, meats,
Defrost poultry, and precooked foods
2=20% of full power • Softening butter, cheese, and ice cream
1=10% of full power Low • Keeping food warm
The following chart gives the percentage of cook
power each Number pad stands for, and the cook
power name usually used. It also tells you when to
use each cook power. Follow recipe or food package
instructions if available.
NOTE: Refer to a reliable cookbook for cooking times.
and beverages
• Cooking small tender pieces of meat, ground
meat, poultry pieces, fish fillets, and most
vegetables
power lower than high (for example, whole fish
and meat loaf) or when food is cooking too fast
• Reheating a single serving of food
dishes, pudding, and custards
• Cooking nonstirrable casseroles, such as lasagna
• Melting chocolate
• Heating pastries
• Taking chill out of fruit
NOTE: Once cook time has been entered you can also use the POWER pad as a second Kitchen Timer
by entering "0" for the cook power. The oven wilt count down the cooking time you set without cooking.
1. Put your food in the oven and close the door.
2. Touch COOK TIME. TOUCH YOU SEE
continued on next page
23
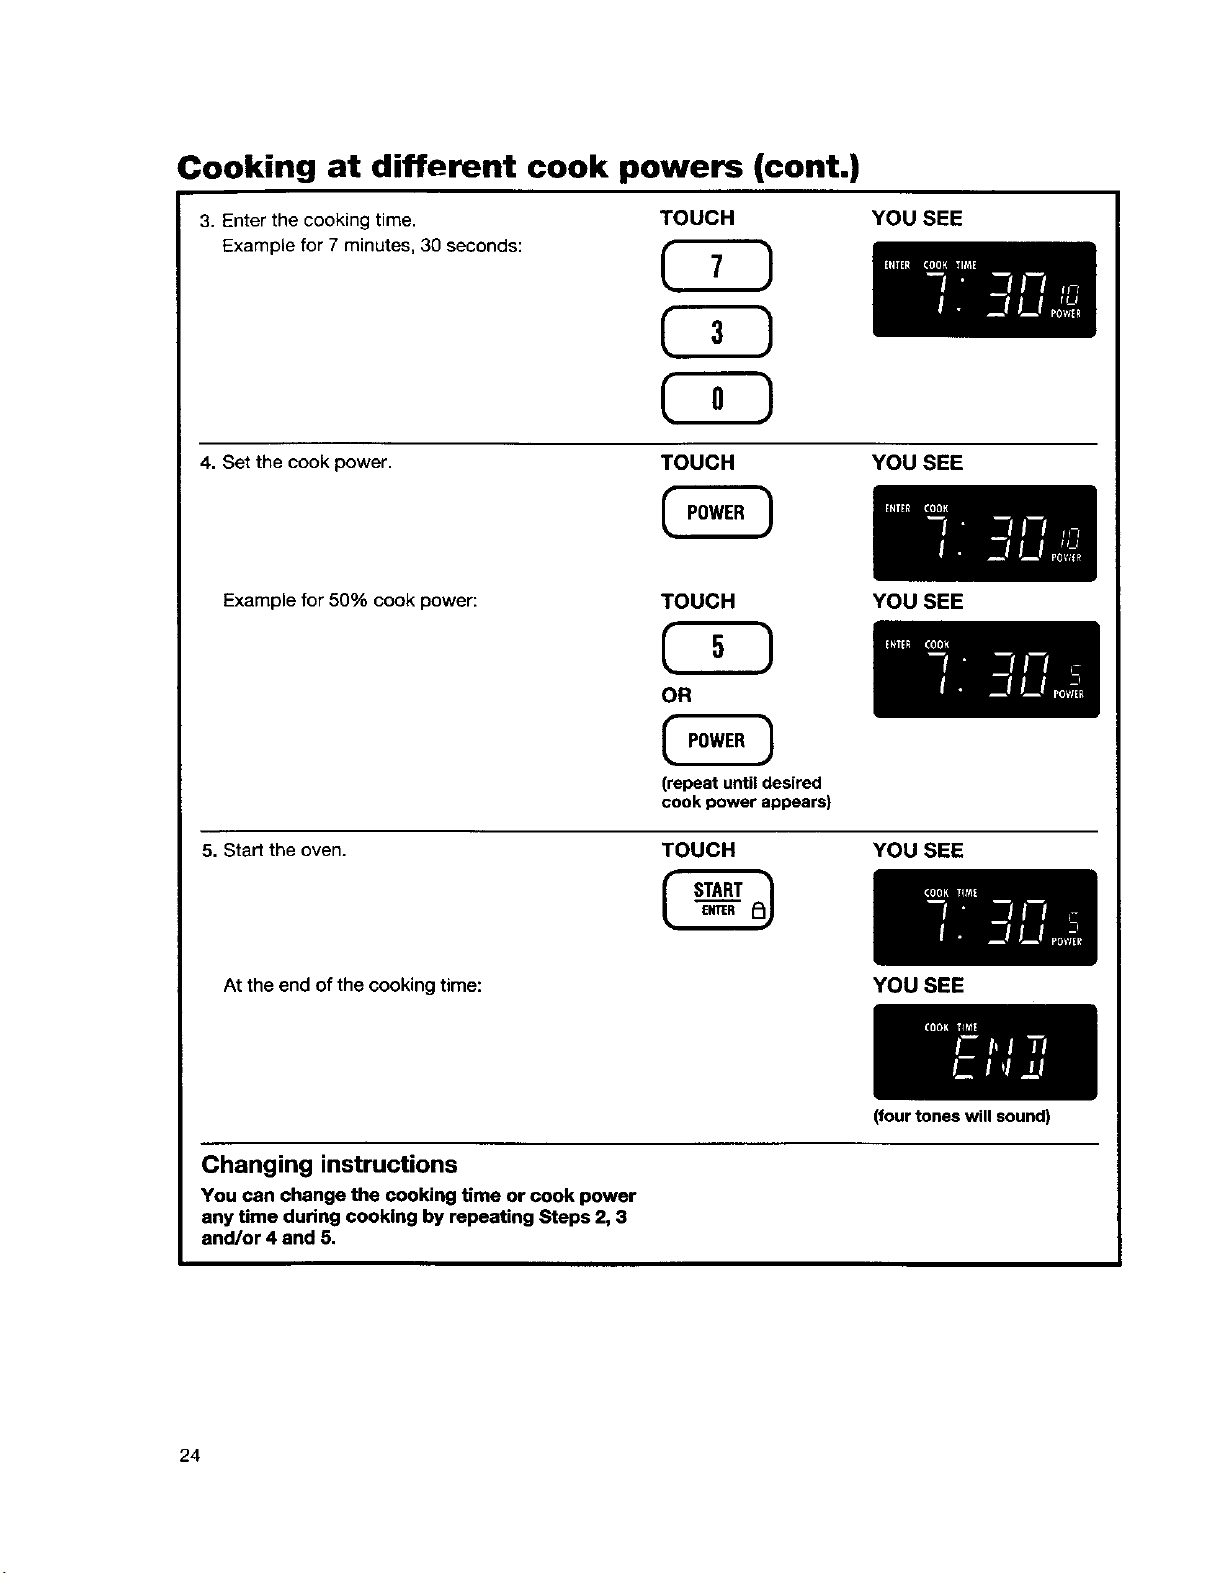
Cooking at different cook powers (cont.)
3. Enter the cooking time.
Example for 7 minutes, 30 seconds:
4. Set the cook power.
Example for 50% cook power:
TOUCH YOU SEE
TOUCH YOU SEE
TOUCH
YOU SEE
K!D
OR
(repeat until desir_l
cook power appears)
5. Start the oven.
At the end of the cooking time:
Changing instructions
You can change the cooking time or cook power
any time during cooking by repeating Steps 2, 3
and/or 4 and 5.
TOUCH
YOU SEE
YOU SEE
ffourtones willsoun_
24
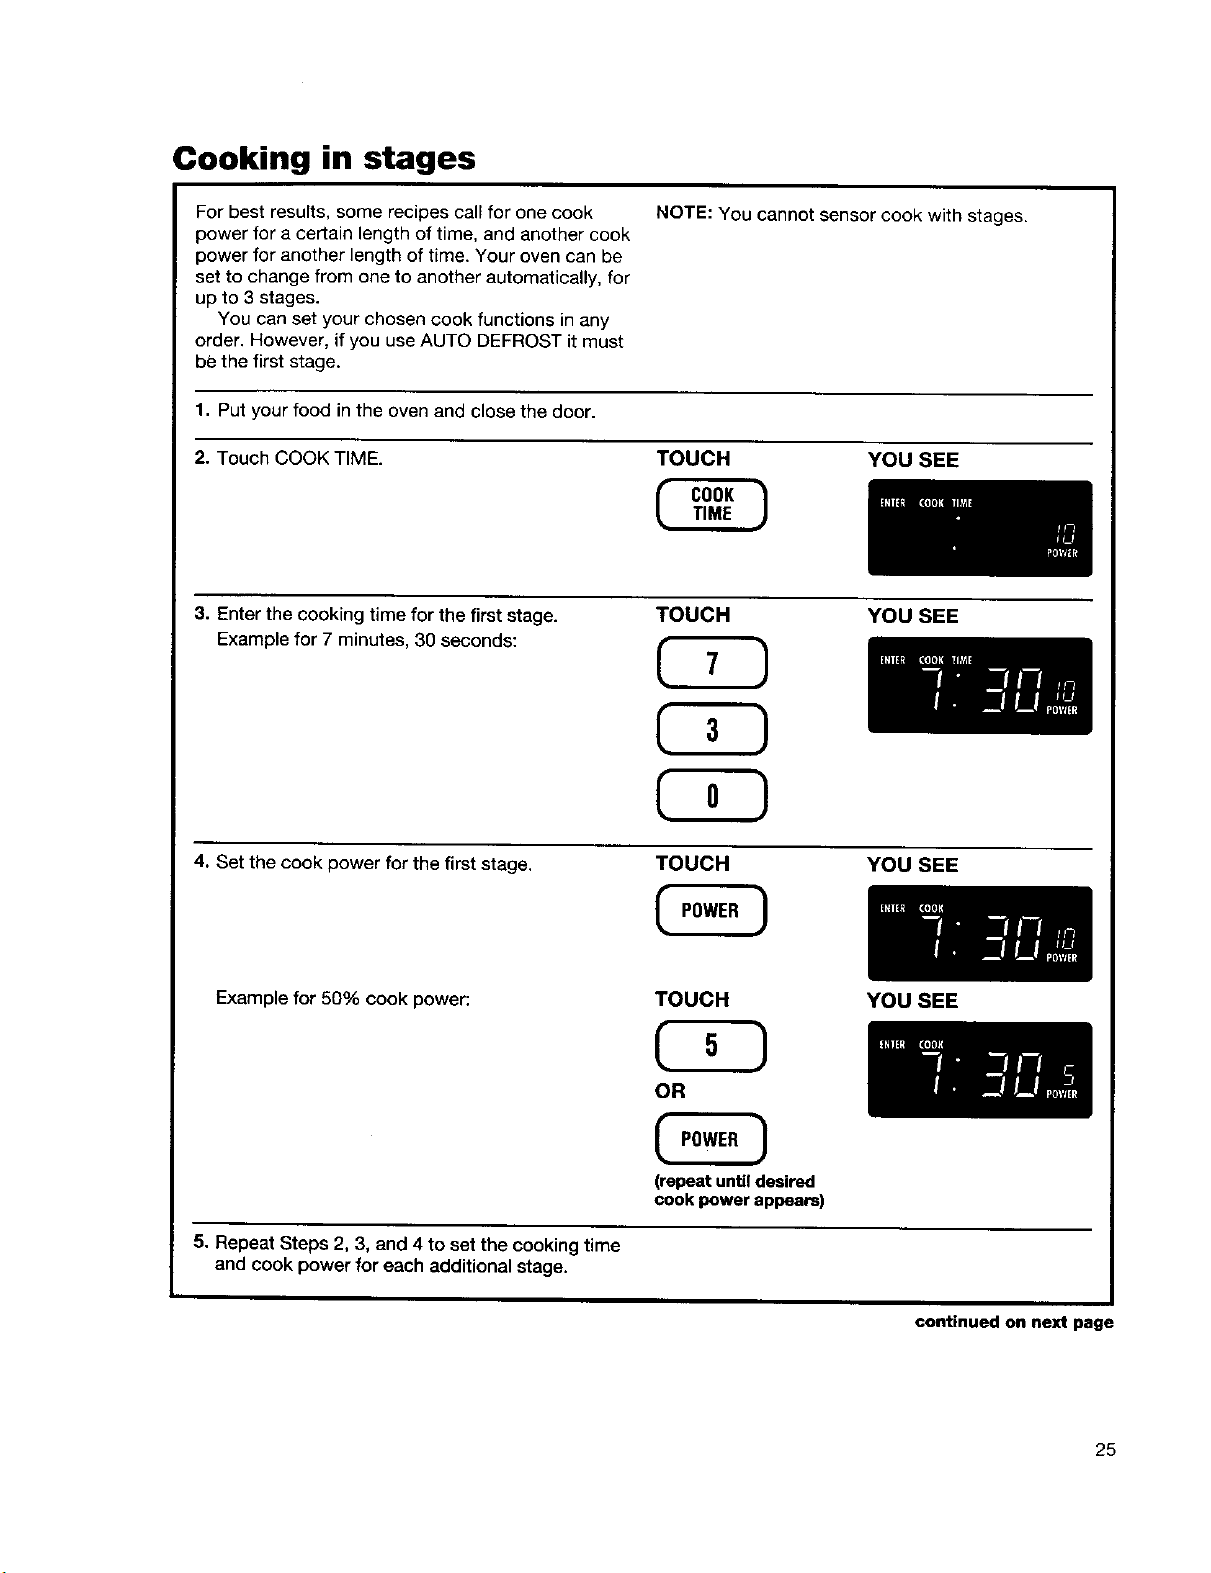
Cooking in stages
For best results, some recipes call for one cook
power for a certain length of time, and another cook
power for another length of time. Your oven can be
set to change from one to another automatically, for
up to 3 stages.
You can set your chosen cook functions in any
order. However, if you use AUTO DEFROST it must
be the first stage.
1. Put your food in the oven and close the door.
2. Touch COOK TIME. TOUCH YOU SEE
3. Enter the cooking time for the first stage. YOU SEE
Example for 7 minutes, 30 seconds:
NOTE: You cannot sensor cook with stages.
TOUCH
4. Set the cook power for the first stage.
Example for 50% cook power:
5. Repeat Steps 2, 3, and 4 to set the cooking time
and cook power for each additional stage.
TOUCH
TOUCH
OR
(repeat until desired
cook power appears)
YOU SEE
YOU SEE
continued on next page
25
Cooking in stages (cont.)
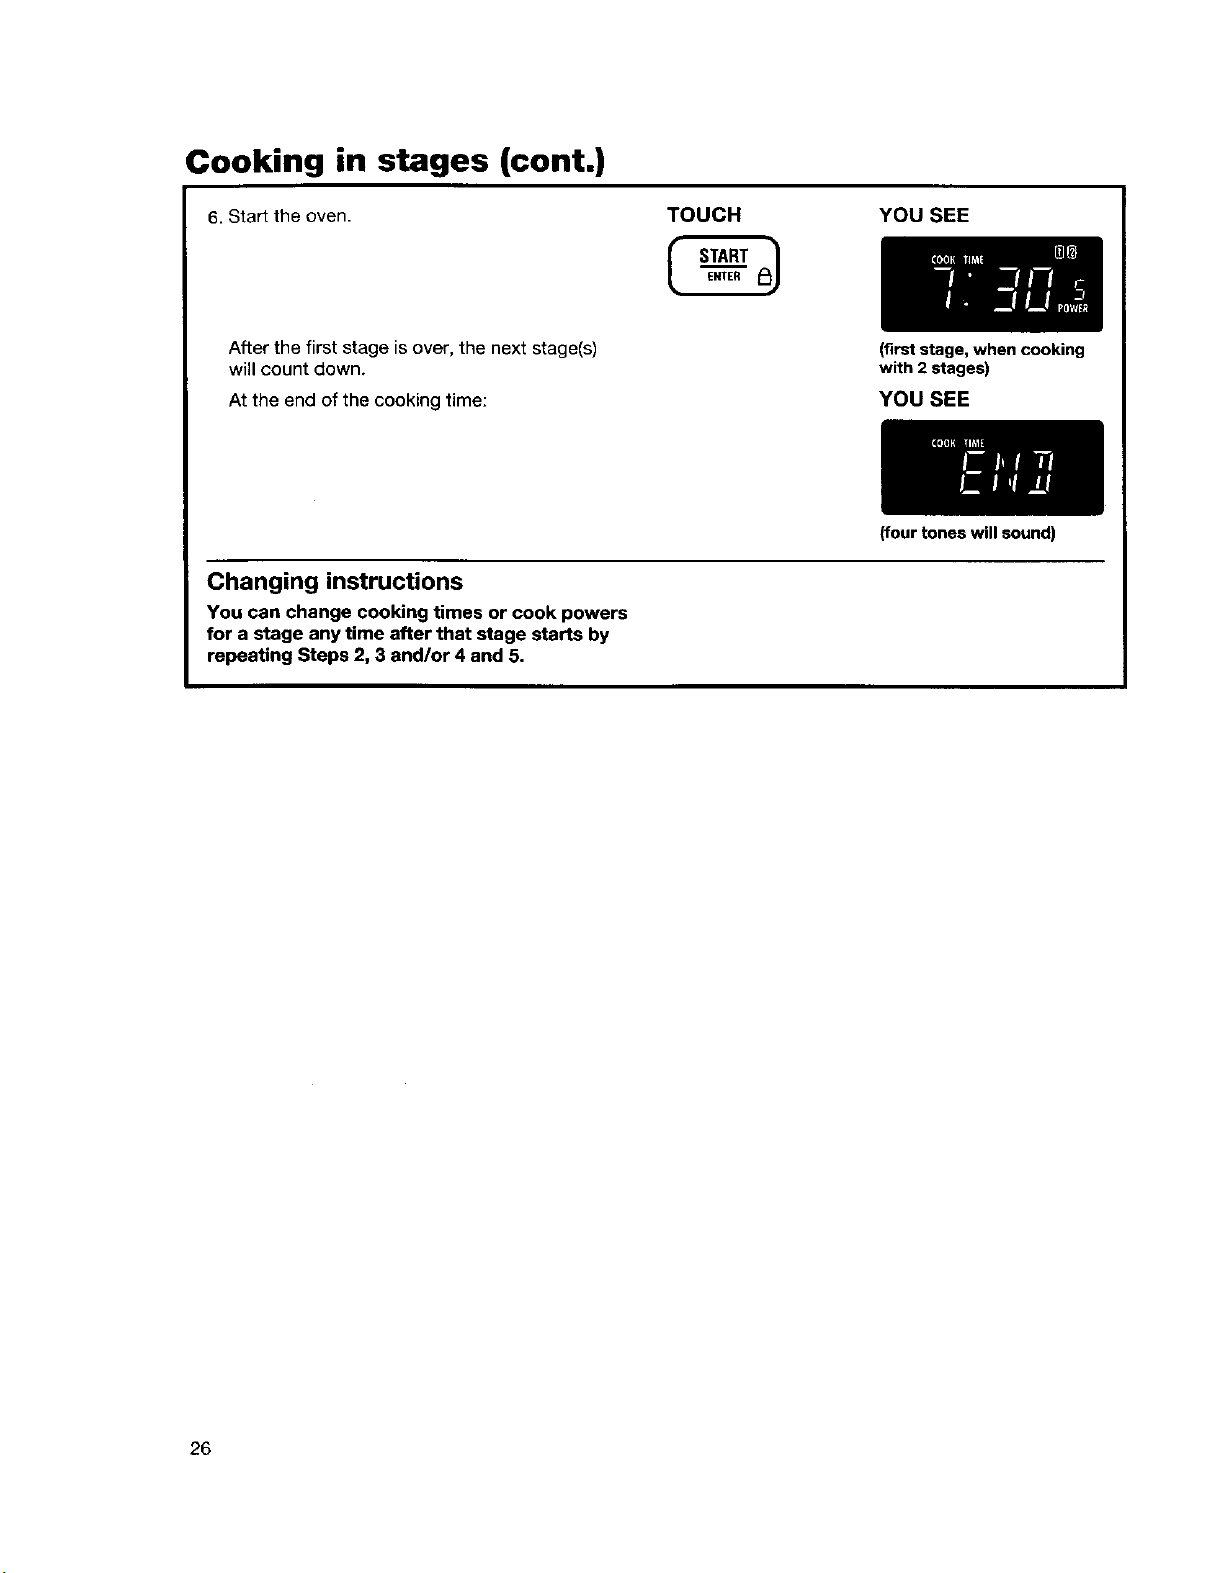
6. Start the oven.
After the first stage is over, the next stage(s)
will count down.
At the end of the cooking time:
Changing instructions
You can change cooking times or cook powers
for a stage any time after that stage starts by
repeating Steps 2, 3 and/or 4 and 5.
TOUCH YOU SEE
(first stage, when cooking
with 2 stages)
YOU SEE
Uourtones willsound)
26
Using AUTO COOK
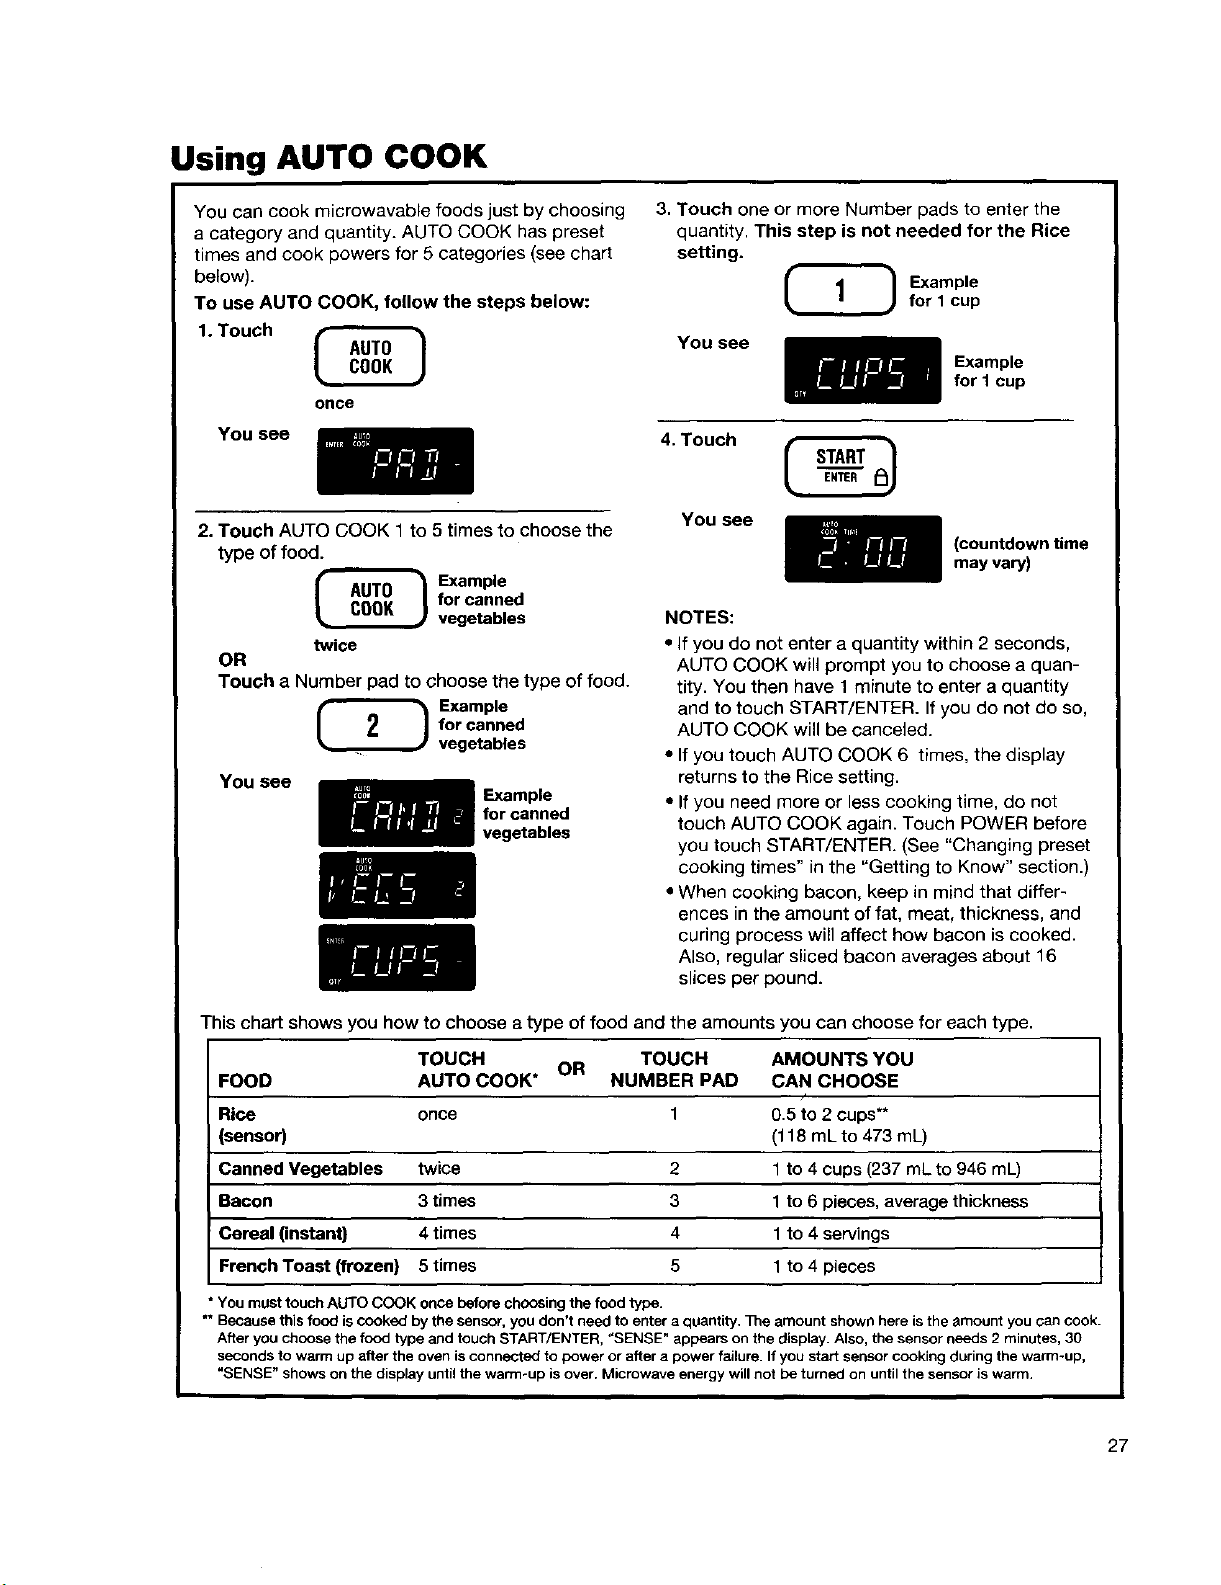
You can cook microwavable foods just by choosing
a category and quantity. AUTO COOK has preset
times and cook powers for 5 categories (see chart
below).
To use AUTO COOK, follow the steps below:
1.Touch
once
You see
2. Touch AUTO COOK 1to 5 times to choose the
type of food.
_ xample
for canned
vegetables
twice
OR
Touch a Number pad to choose the type of food.
for canned
Example
for canned
vegetables
You see
_ _xample
- vegetables
3. Touch one or more Number pads to enter the
quantity. This step is not needed for the Rice
setting.
Example
for 1 cup
You see
Example
for I cup
4. Touch
You see
(countdown time
may vary)
NOTES:
• If you do not enter a quantity within 2 seconds,
AUTO COOK will prompt you to choose a quan-
tity. You then have 1 minute to enter a quantity
and to touch START/ENTER. If you do not do so,
AUTO COOK will be canceled.
• If you touch AUTO COOK 6 times, the display
returns to the Rice setting.
• If you need more or less cooking time, do not
touch AUTO COOK again. Touch POWER before
you touch START/ENTER. (See "Changing preset
cooking times" in the "Getting to Know" section.)
• When cooking bacon, keep in mind that differ-
ences in the amount of fat, meat, thickness, and
curing process will affect how bacon is cooked.
Also, regular sliced bacon averages about 16
slices per pound.
This chart shows you how to choose a type of food and the amounts you can choose for each type.
FOOD AUTO COOK* NUMBER PAD CAN CHOOSE
TOUCH OR TOUCH AMOUNTS YOU
Rice once 1 0,5 to 2 cups**
(sensor) (118 mL to 473 mL)
Canned Vegetables twice 2 1 to 4 cups (237 mL to 946 mL)
Bacon 3 times 3 1 to 6 pieces, average thickness
Cereal (instant} 4 times 4 1 to 4 servings
French Toast (frozen) 5 times 5 1to 4 pieces
* You must touch AUTO COOK once before choosing the food type.
** Because this food is cooked by the sensor, you don't need to enter a quantity. 33_e amount shown here is the amount you can cook.
After you choose the food type and touch START/ENTER, "SENSE" appears on the display. Also, the sensor needs 2 minutes, 30
seconds to warm up after the oven is connected to power or after a power failure. If you start sensor cooking during the warm-up,
"SENSE" shows on the display until the warm-up is over. Microwave energy will not be turned on until the sensor is warm.
27

Using AUTO REHEAT
You can reheat microwavable foods just by choos-
ing a category and quantity. AUTO REHEAT has
preset times and cook powers for 4 categories (see
chart below).
To use AUTO REHEAT, follow the steps below:
1, Touch
once
You see
2. Touch AUTO REHEAT 1 to 4 times to choose
the type of food.
_ xample for
casserole
OR 3 times
Touch a Number pad to choose the type
of food.
Example for
casserole
You see
Example for
casserole
3. Touch a Number pad to enter the quantity.
Example for
1 cup
You see
Example for
1 cup
4. Touch
You see
(countdown
time may
vary)
NOTES:
• If you do not enter a quantity within 2 seconds,
AUTO REHEAT will prompt you to choose a
quantity. You then have 1 minute to enter a quantity
and to touch START/ENTER. If you do not do so,
AUTO REHEAT will be canceled.
• If you touch AUTO REHEAT 5 times, the display
returns to the Pizza Slice setting.
• If you need more or less cooking time, do not touch
AUTO REHEAT again. Touch POWER before you
touch START/ENTER. (See "Changing preset
cooking times" in the "Getting to Know" section.)
• When reheating a large (4 oz [113 g]) muffin or
bagel use the 2-piece setting. The 1-piece setting
warms 1 regular-size muffin or bagel, or 2 small
dinner rolls.
This chart shows you how to choose a type of food and the amounts you can choose for each type.
FOOD AUTO REHEAT* NUMBER PAD CAN CHOOSE
TOUCH OR TOUCH AMOUNTS YOU
Pizza Slice** once 1 1 to 3 slices, 5 oz (142 g) each
(sensor)
Sauce** twice 2 1 to 4 cups (237 mL to 946 mL)
(sensor)
Casserole 3 times 3 1 to 4 cups (237 mL to 946 mL)
Baked Goods 4 times 4 1 to 6 pieces, 2 oz (57 g) each
You must touch AUTO REHEAT once before choosing the food type.
** After you choose the food type and quantity and touch START/ENTER, "SENSE" appears on the display. Also, the sensor needs
2 minutes, 30 seconds to warm up after the oven is connected to power or after a power failure. If you start sensor cooking
during the warm-up, "SENSE" shows on the display until the warm-up is over. Microwave energy will not be turned on until the
sensor is warm.
28
 Loading...