

Page 1
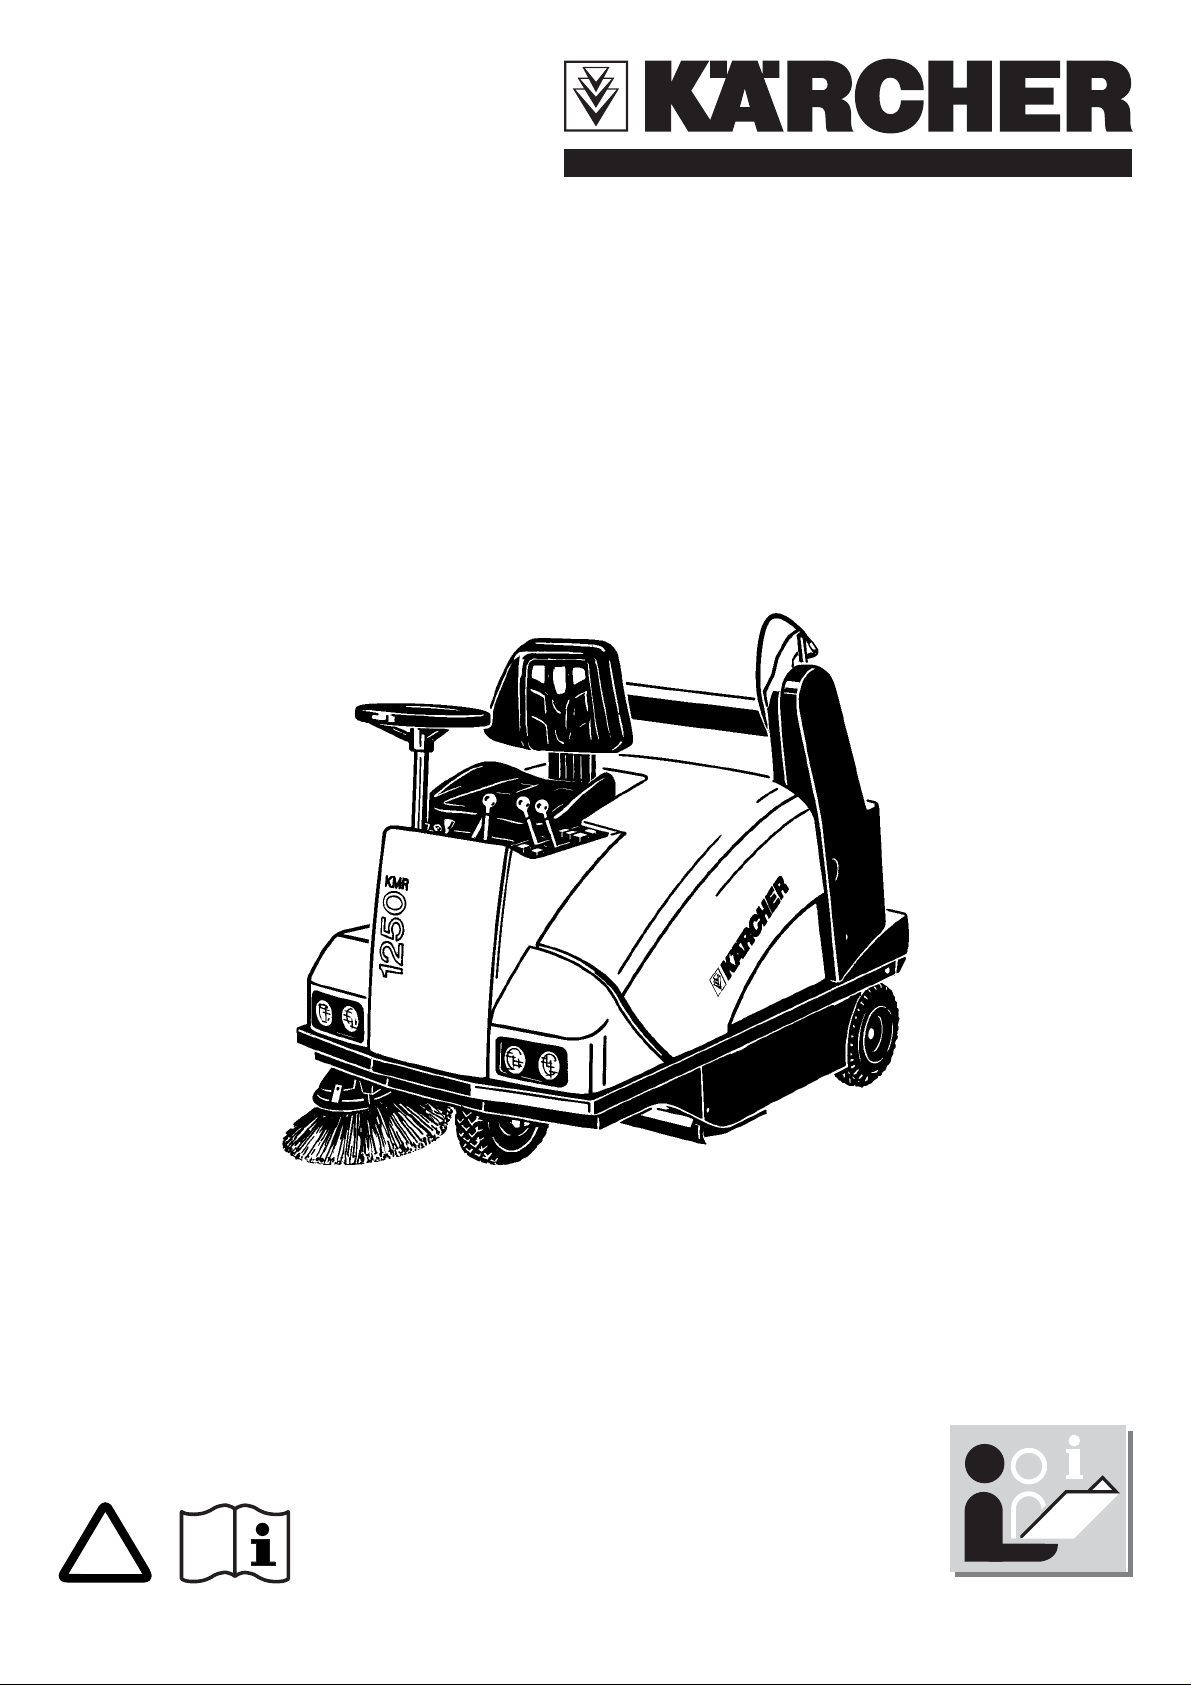
KMR 1250 BAT
!
1.091-101
1.091-111
www.kaercher.com
5.956-832 A2008274 (04/04)
Page 2

Deutsch
Lesen Sie vor der Inbetriebnahme diese Betriebsanleitung und beachten
Sie besonders die “Sicherheitshinweise”.
1–12
English
13–24
Français
25–36
Italiano
37–48
Nederlands
49–60
Español
61–72
Português
73–84
ЕллзнйкЬ
85–96
Please read these operating instructions before starting and strictly
observe the "Safety Instructions".
Veuillez lire attentivement la présente notice d´instructions avant la mise en
service et respecter en particulier les "Consignes de sécurité".
Leggere queste istruzioni per l´uso prima della messa in esercio facendo
particolarmente "Istruzioni per la sicurezza".
Lees voor de ingebruikneming deze gebruikshandleiding en neem in het
bijzonder de "Veiligheidsvoorschriften" in acht.
Antes de poner en marcha el aparato deberá estudiar atentamente las
"Advertencias y observaciones relativas a la seguridad".
Antes da primeira utilização do aparelho leia este manual de utilização e
tenha em especial atenção a brochura anexa «Conselhos de
segurança».
Рсйн иЭуефе фз ухукехЮ гйб рсюфз цпсЬ уе лейфпхсгЯб,
дйбвЬуфе фйт рбспэует пдзгЯет чейсйумпэ кбй фзсеЯфе
йдйбЯфесб фйт "ХрпдеЯоейт буцблеЯбт".
Dansk
97–108
Norsk
109–120
Svenska
121–132
Suomi
133–144
Polski
145–156
De bedes læse denne driftsvejledning igennem før idrifttagningen i denne
forbindelse skal især "Sikkerhedsforskrifter" overholdes.
Før ibruktaking må bruksanvisningen leses nøye og det må taes hensyn til
"Sikkerhetsregler".
Läs igenom bruksanvisningen före driftstart och uppmärksamma
"Säkerhetsanvisningar" extra noga.
Lue ennen käyttöönottoa tämä käyttöohje huolellisesti läpi ja kiinnitä
erikoista huomiota "Turvallisuusohjeitiin".
Jeszcze przed pierwszym u¿yciem urz¹dzenia przeczytaæ tê Instrukcjê
obs³ugi i Wskazówki bezpieczeñstwa i przestrzegaæ podanych w nich
warunków!
Page 3
English
!
Contents
IMPORTANT INFORMATION ............................... 13
For your safety ........................................................... 13
Risk of explosion when charging the battery ................ 13
Take care when handling the battery! .......................... 13
The sweeper can topple over when travelling or turning
on steep slopes. ......................................................... 13
Risk of sweeper toppling over when negotiating turns
quickly! ...................................................................... 13
Precautions to take when doing repair and
maintenance .............................................................. 13
On behalf of the environment ..................................... 13
General data .............................................................. 14
Precautions to take when transporting the sweeper .... 14
Intended usage .......................................................... 14
Function of the main components ............................... 14
OPERATING CONTROLS .................................... 15
PRIOR TO INITIAL START-UP ............................. 16
Directions for unloading .............................................. 16
Pushing the sweeper by hand .................................... 16
After sweeper has been moved by hand: .................... 16
PRIOR TO EVERY START-UP.............................. 16
STARTING THE SWEEPER ................................. 16
Adjusting the driver’s seat ........................................... 16
Initial driving trials ....................................................... 16
Working with the sweeper .......................................... 17
Braking ...................................................................... 17
Going up slopes ......................................................... 17
Stopping the sweeper and switching off ...................... 17
Cleaning the filter ....................................................... 17
Emptying the waste hopper ........................................ 17
TYPICAL APPLICATIONS .................................... 18
Picking up larger items (sticks, tins, etc.) ..................... 18
Overcoming obstacles ................................................ 18
BATTERY ............................................................. 19
Checking the level of electrolyte in the battery ............. 19
Charging the battery ................................................... 19
MAINTENANCE ................................................... 20
Initial inspection after 8 operating hours ...................... 20
Daily maintenance ...................................................... 20
Maintenance intervals ................................................ 20
Maintenance tasks ..................................................... 20
Checking the hydraulic system ................................... 20
Replacing the sealing skirts ........................................ 20
Replacing the side brush ............................................ 20
Adjusting the sweeping pattern ................................... 21
Replacing the main brush roller .................................. 21
Replacing fuses .......................................................... 22
Replacing the dust filters ............................................ 22
TECHNICAL DATA ............................................... 23
TROUBLESHOOTING.......................................... 24
IMPORTANT INFORMATION
For your safety
Before using the machine for the first time, read these user
instructions and the appended booklet Safety Informa-
tion 5.956-250.
Please note carefully all the information contained in them.
Risk of explosion when charging the battery
When low-maintenance batteries are being charged, explosive gases are given off. Each time the battery is charged
open the cover of the sweeper and make sure there is
sufficient ventilation. Do not smoke and make sure there is
no naked flame. For further information, see chapter
Battery.
Take care when handling the battery!
Observe the information on safety provided by the battery
manufacturer. The right to claim under the warranty exists
only if you are using Kärcher recommended batteries and
battery chargers.
Risk of sweeper toppling over when slope
too great!
The sweeper can topple over when travelling or turning on
steep slopes.
If you are working in the direction of motion, only attempt
slopes of up to 18 % gradient
If you are working across the direction of motion, only
attempt slopes of up to 10 % gradient
Risk of sweeper toppling over when
negotiating turns quickly!
The sweeper can topple over if turns are negotiated quickly.
Make slow turns.
Precautions to take when doing repair and
maintenance
To avoid the sweeper being started unintentionally, proceed
as follows after switching the sweeper off:
Remove starting key
Pull out battery plug connection
On behalf of the environment
Caution! Used batteries are a danger to the environment!
Used batteries do not belong in the household rubbish. See
that they are disposed of in a way that will cause no harm
to the environment.
Caution! Hydraulic fluid is a danger to the environment!
When you change the oil, hand in the used oil at a usedoil collection point or to a disposal firm.
13
Page 4
English
General data
The sweeper is designed for 24 V direct current. It has been
provided with a 24 V trough battery (supplied with the 1.091-
111). In the case of other machines, the battery and its
appropriate charger must be obtained separately.
Your Kärcher dealer will be pleased to advise you.
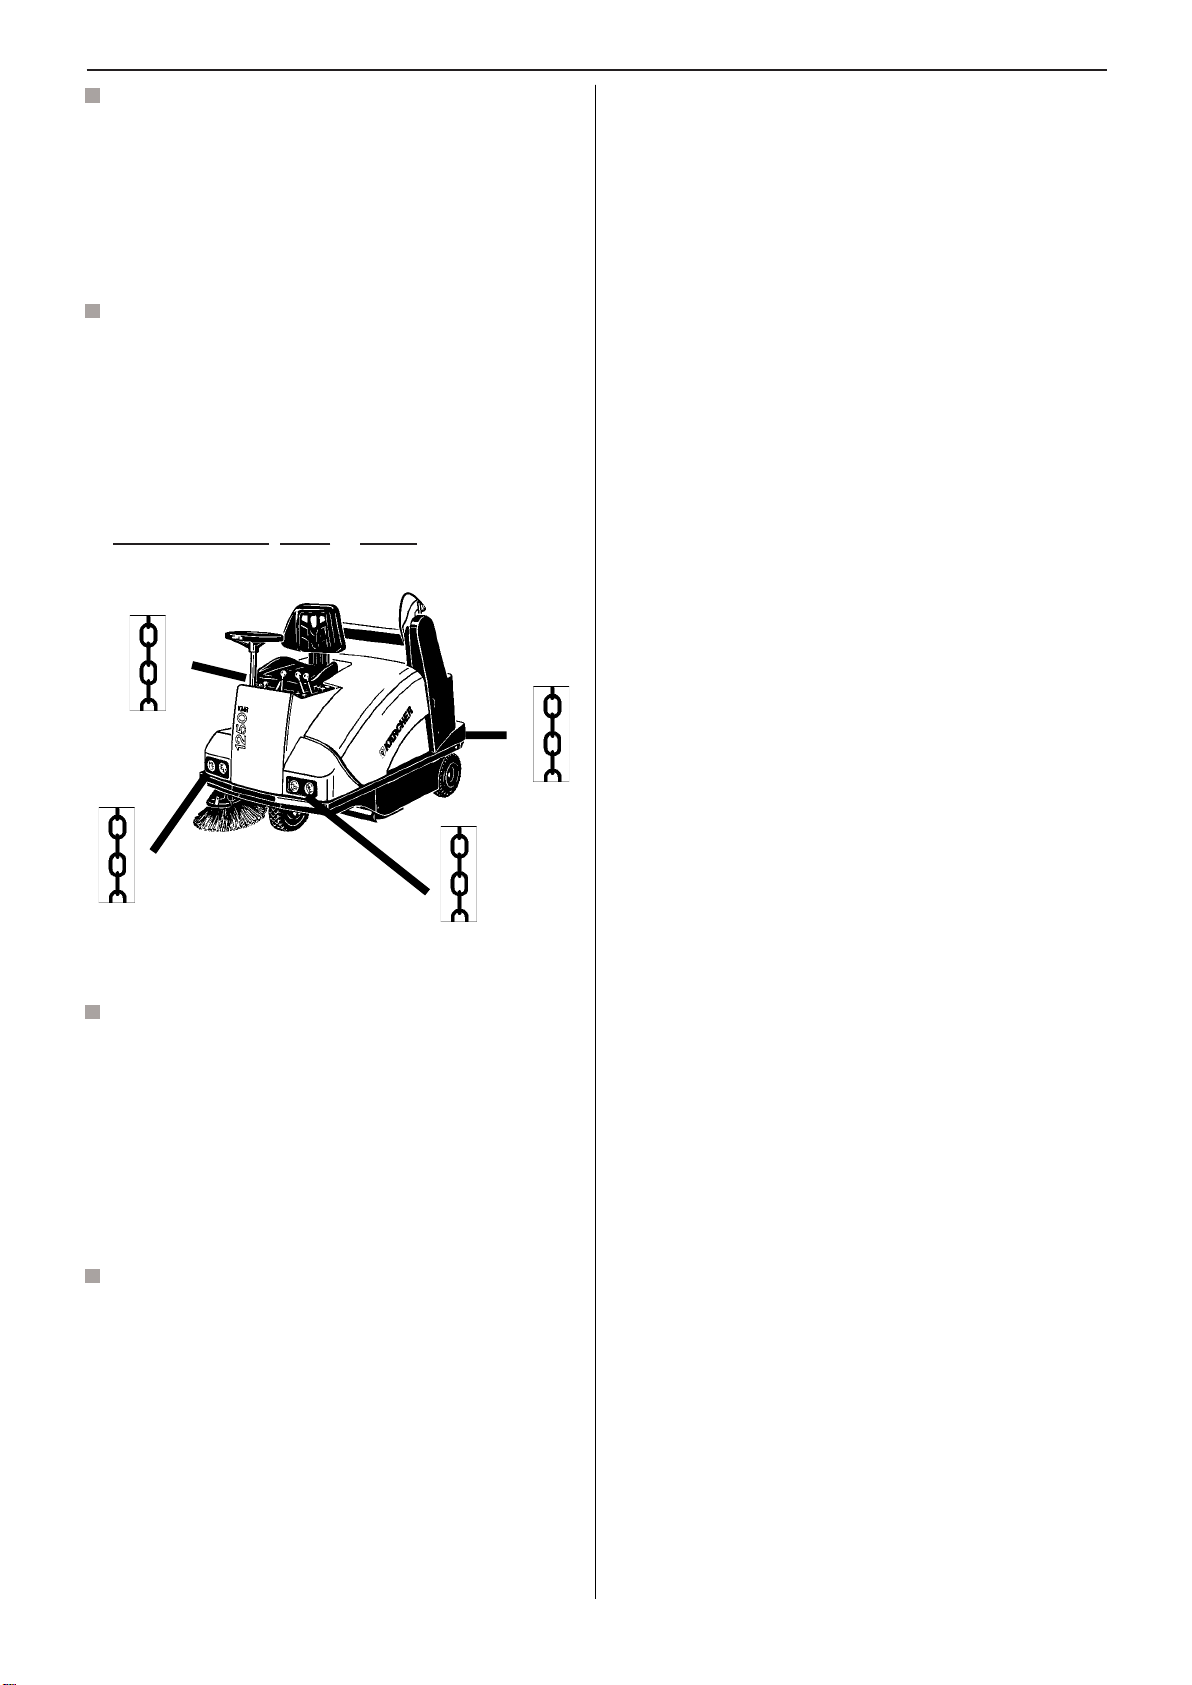
Precautions to take when transporting the
sweeper
If you have to transport the sweeper to another location
see that it is firmly attached. Do not use a fork-lift truck to
load or unload it as the sweeper could sustain damage in
this way.
Lock parking brake
Attach sweeper only in the manner illustrated, using
elasticated straps, ropes or chains
Sweeping mechanism
main brush employing throw-over principle for particu-
larly effective filling of waste hopper
floating main brush roller with adjustable height above
ground
quick-change mechanism for main brush
side brush can be raised and swivels automatically
bulk waste flap for picking up larger items (e.g.
cigarette packs or drink cans)
Filter system
integrated dust extraction on the main roller by means
of radial turbine
2 circular filters with 2 x 3 m2 effective surface area
electric filter cleaner with automatic shaking mecha-
nism
Intended usage
This sweeper
is intended to be used for sweeping outdoor and indoor
surfaces,
corresponds to Usage Category U for dust that is not
injurious to health,
can only be used on public paths and highways if it has
been fitted with the StVZO Accessory Kit.
Function of the main components
Drive unit
driven by an electric motor
continuously-adjustable hydraulic drive to rear wheels
main brush and side brush driven by means of electric
motor
hydraulically controlled emptying of waste hopper
14
Page 5
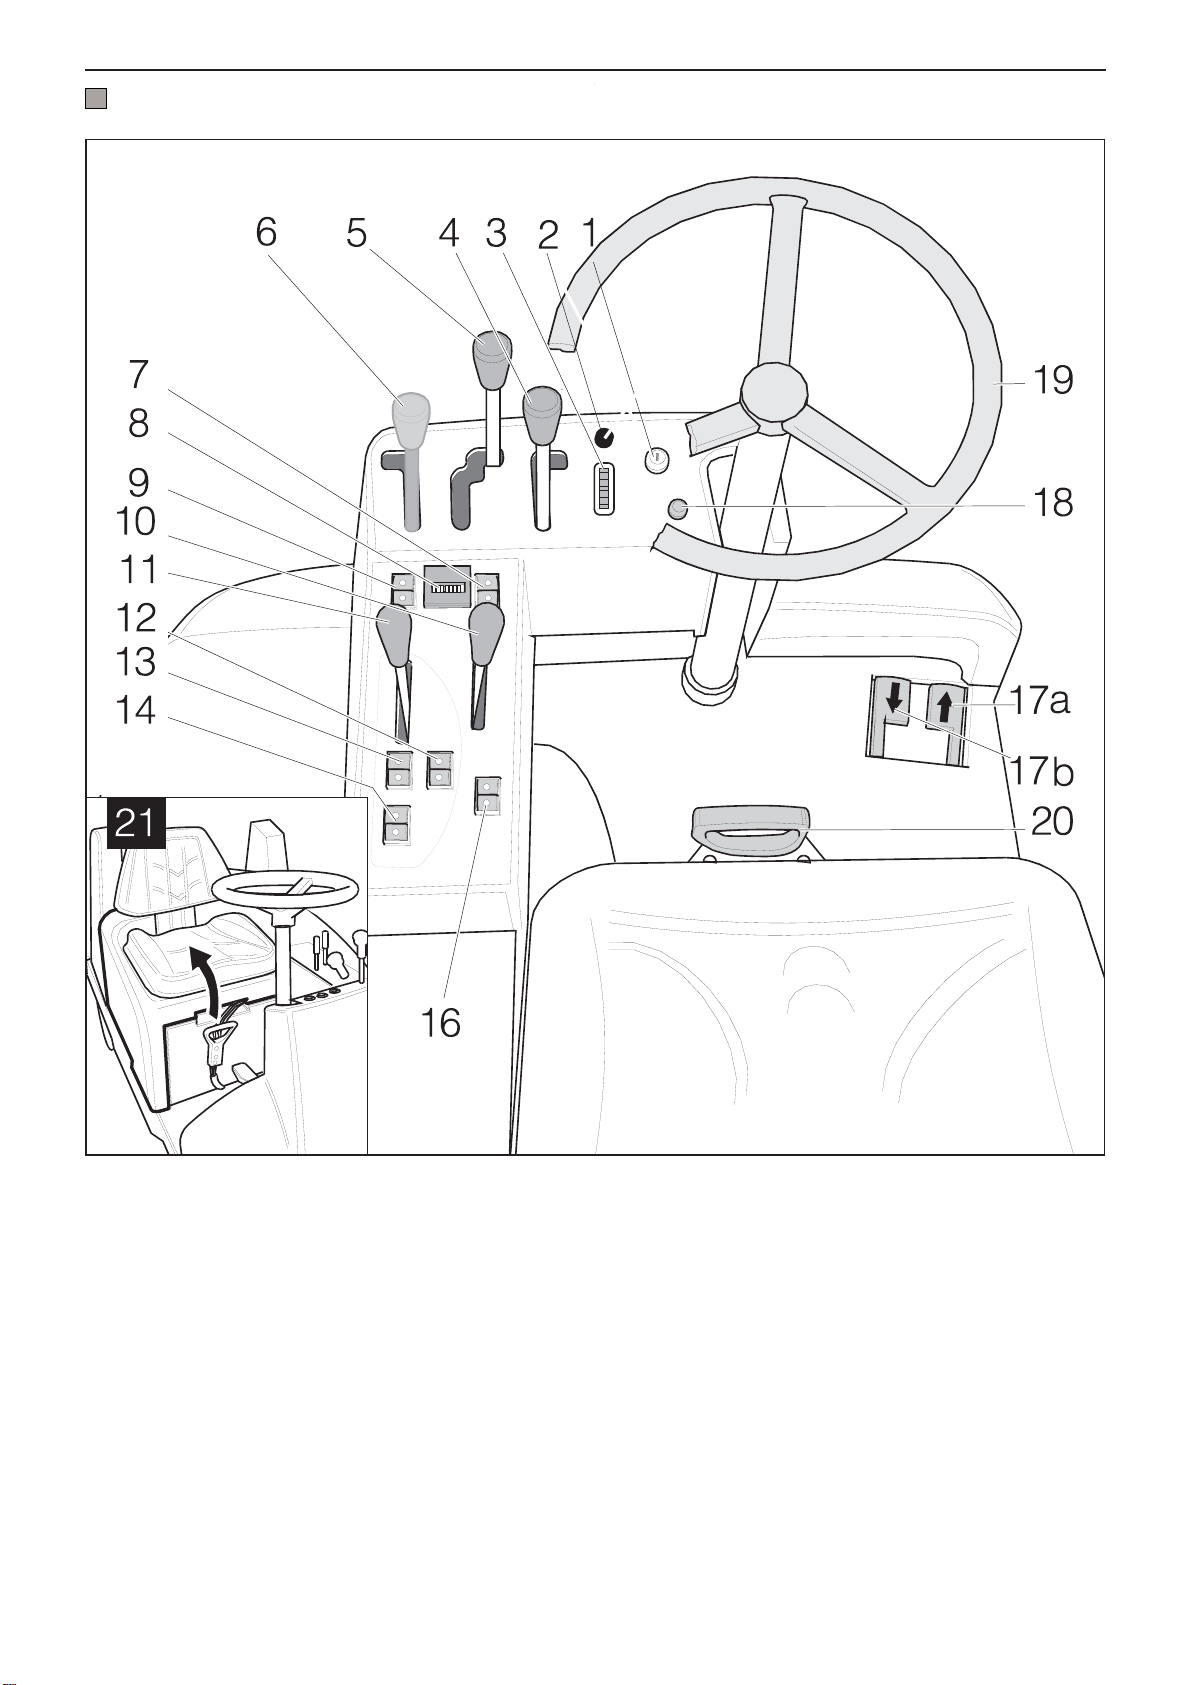
OPERATING CONTROLS
English
1. Ignition lock
2 . Pilot lamp - drive malfunction
3. Battery charge monitoring indicator
4. Raise/lower RH side brush
5. Raise/lower main brush
6. Raise/lower LH side brush (optional)
7. Two-handed operation hydraulics
8. Operating hours counter
9. Lights
10. Bulk waste flap
Function only operative in conjunction with 7 (two-handed operation).
*
11. Parking brake/Driving brake
12. Tip waste hopper *
13. Raise waste hopper *
14. Lower waste hopper *
16. Blower ON/OFF
17a. Drive pedal forwards
17b. Drive pedal backwards
18. Horn
19. Steering wheel
20. Battery plug connection
21. Cover open/close
15
Page 6
English
!
PRIOR TO INITIAL START-UP
Directions for unloading
Do not use a fork-lift truck for unloading the
sweeper as the sweeper can sustain damage
in this way.
The sweeper has been fastened to a pallet for safe transport.
Proceed as follows for unpacking it:
1. Remove wooden boards from the pallet and nail them to
the abutments of the pallet (front end of the sweeper)
2. Remove strap attachments at the abutment points
3. Knock away the wooden blocks for locking the wheels
and use them for supporting the wooden boards on right
and left
4. Push the sweeper off the pallet over the ramp that has
been created
In sweepers with installed battery (1.091-111) it is
possible to drive down the ramp. To do this, open motor
cover and fold it back. Put gear lever into position
(slow), and close the cover again. Insert battery plug
connection (at drivers seat). Key switch to Position 1
and drive down carefully - see in addition chapter Driving
trials and Stopping the sweeper and switching off.
5. The side brush is tied to the frame for transportation
purposes. Undo the string.
Release the handbrake.
Push the sweeper to the required destination.
After sweeper has been moved by hand:
Apply the handbrake.
Put gear lever into position (fast) or slow, as
otherwise the sweeper cannot be driven.
PRIOR TO EVERY START-UP
Check the hydraulic-fluid level, fill up if necessary (see
chapter Maintenance)
Check main brush roller for strapping or cord that may
have wrapped round it. If so, remove it.
Examine the dust filters, if there is heavy dust accumu-
lation shake them out
Empty waste hopper.
STARTING THE SWEEPER
Adjusting the drivers seat
The drivers seat can be adjusted to suit persons of various
heights by changing the seat position.
Pushing the sweeper by hand
If you wish to move the sweeper without using its own drive:
Open the engine cover.
Fold the cover towards the rear; it will be held in place by
the gas-filled spring.
Put gear lever in direction of motion on to the
symbol N
Unhook the rods for the seat tilting device.
Undo the 4 attachment screws
Move the seat to the desired position.
Tighten the screws and hook the rods back into the tilting
device.
Initial driving trials
Carry out initial driving trials in an area where there is plenty
of free space until you are familiar with the individual
operating controls and their functions.
All indications of direction (right/left, front/rear) are given in
relation to the direction of travel as seen from the drivers
seat.
Sit on the drivers seat.
The sweeper cannot be started until the driver has sat
down (seat contact switch). As soon as driver gets up
from the seat, the safety shut-down comes into force and
the drive control, blower fan and main brush roller drive
are disconnected.
16
Page 7

English
!
!
Make sure that
the LH side brush (if fitted) is still in the raised position,
the RH side brush is still in the raised position,
the main brush is still in the raised position.
Put the starting key into Position 1. The sweeper is
ready to operate.
Important information
The drive mechanism is equipped with an electronic
overload fuse. Overload is indicated by a pilot lamp. In
the event engage the parking brake and release the drive
pedals(approx. 10 min.) until the drive components have
cooled down.
For safety reasons the drive mechanism remains inac-
tive if a drive pedal is engaged before the keyswitch is
turned on.
Working with the sweeper
Lower the main brush and, if required, the side
brush as well .
Main brush roller and side brush switch themselves on
automatically.
Switch the blower fan on in order to sweep without clouds
of dust forming.
Release the parking brake by moving the lever
forwards
Slowly depress the drive pedal, the speed can be
selected smoothly according to the setting.
Depress left pedal, machine moves backwards.
Depress right pedal, machine moves forwards.
Braking
Release the drive pedal and the sweeper will brake
automatically.
Note: The braking effect can be increased by careful
operation of the drive pedal for the opposite direction
and/or by using the parking brake.
Going up slopes
The sweeper can be driven in the fast gear (position )
Recommendation: Clean interior with compressed air.
Wipe over the exterior with a damp cloth but do not use
an aggressive cleaning agent.
Park sweeper in a protected place and stop it from rolling
away.
Pull out battery plug connection.
If the sweeper is shut down for a relatively long period,
charge the battery at approx. two-monthly intervals, see
in addition chapter Maintenance.
Cleaning the filter
Manual cleaning
While the sweeper is operating, the filter should be cleaned
approx. every 1530 minutes (depending on amount of
dust).
Switch off the blower fan. The electric filter cleaner is
operated automatically for approx. 10 seconds.
Switch on the blower fan again.
Emptying the waste hopper
Important information
Injury hazard!
No person or animal should be allowed to remain in the area
traversed by the hopper while it is being emptied.
Danger of being crushed!
Do not reach into the shafts and linkage of the emptying
mechanism.
Do not stand under the raised hopper.
Risk of sweeper toppling over!
If the sweeper is standing on a slope with a gradient of more
than 5 %, it could topple over while the hopper is being
emptied. The hopper should therefore only be emptied when
the gradient at the location where the sweeper is standing
is less than 5 % for the direction in which it is facing.
Stop the sweeper.
Raise the main brush .
Note: Following steps can only be performed with the
sweeper set to two-handed operation.
for slopes up to a gradient of 15 %.
For slopes of gradients between 15 % and 18 %, the
sweeper must be operated in low gear (position ).
Stopping the sweeper and switching off
Release the drive pedal. The sweeper brakes automati-
cally and comes to a halt.
Apply the parking brake .
Make sure the main roller and side brush are raised so
that the bristles are not damaged. (Main brush roller,
side brush and blower fan switch off automatically).
Turn the ignition key to Position 0 and then remove it.
Clean the sweeper inside and outside as required.
Raise the waste hopper, 1 + 2. +
When the hopper has reached the required height drive
backwards towards the discharge container.
17
Page 8

English
!
!
Note: The hopper can only be emptied when the supporting
arms have reached a horizontal position. To avoid the dust
billowing up when the hopper is emptied, the waste hopper
should be lowered as far as possible into the discharge
container.
Tip the waste hopper
1 + 3 +
When you release the button for tipping the waste
hopper, the waste hopper returns to its home position
automatically.
Raise the waste hopper, drive away from the discharge
container and retract the waste hopper.
1 + 4 +
Typical applications
Caution while sweeping!
Do not sweep up packing bands, wires or similar items,
otherwise the sweeping mechanism will be damaged.
Do not sweep any burning/glowing objects.
For cleaning even surfaces
set the lever for the main brush roller to the middle
position (minimum brush wear).
For cleaning uneven surfaces
set the lever for the main brush roller to the lower
position (increased brush wear).
switch on blower fan for dust extraction
for cleaning right up to the edges lower the side brush
.
If you are sweeping up fine dust, use the side brush as
little as possible as it will increase the amount of dust
stirred up by the sweeper.
If the side brush encounters an obstacle, it automatically swivels back inside the outer contours of the
sweeper. Avoid collisions!
To protect the filter from getting damp when sweeping
wet surfaces, switch off the dust extraction
Picking up larger items (sticks, tins, etc.)
Caution!
When the bulk waste flap is open, stones or grit could be
thrown forwards by the main brush. Make sure therefore
that when you open the flap no persons, animals or
property are endangered.
Open the bulk waste flap by hand.
Drive over the items to be picked up, at low speed and
with the bulk waste flap open.
Note: In order to avoid stirring up dust unnecessarily, the
bulk waste flap should be open for short periods only.
Overcoming obstacles
Obstacles up to 2 cm in height can be driven over without
any problems. Before you do so, open the bulk waste flap
and raise the main brush.
Obstacles more than 2 cm in height can be only be driven
over with the aid of a suitable ramp.
18
Page 9

English
Battery
Safety instructions to be noted when handling
batteries are:
Note instructions for use and display
them where they can be easily seen at
the place where the battery is charged.
Work with batteries only after having
had instruction from skilled personnel.
Wear protective glasses and protective
clothing when working with batteries.
Note the accident-prevention
regulations as well as DIN VDE 0510,
VDE 0105 T.1.
No Smoking !
No naked flames, glowing embers or
sparks in the vicinity of the battery as
there is a risk of explosion and fire.
Splashes of acid in the eyes or on the
skin should be rinsed out or washed
away with copious amounts of clean
water, thereafter consult a doctor
without delay. Wash clothes
contaminated with acid in water.
Checking the level of electrolyte in the
battery
Note: Applies only to batteries that are not maintenancefree.
Check regularly the level of electrolyte in batteries filled
with acid. Make sure the battery is fully charged before you
carry out the check.
If required top up each cell with distilled water up to the
mark or until the lead plates are covered by approx.
1 cm of liquid.
Charging the battery
Note: Use only the Kärcher recommended battery charger
6.654-107 for the battery 6.654-112 which is installed.
Bring the sweeper to a halt, remove the starting key
Pull out battery plug connection
Tip seat forwards and open cover
Connect battery cable to the charger
Connect charger to the mains power supply and switch
it on. For the period for charging see the information
supplied by the manufacturer of the battery charger.
It is essential to observe the instructions provided
by the manufacturer of the battery charger!
Risk of explosion and fire! Avoid shortcircuits. Caution! Metal parts of the
battery cells are always live so do not
put any foreign object or tool down on
the battery.
Electrolyte is highly corrosive. Under
normal operating conditions there is
absolutely no contact with the
electrolyte. If the housing is destroyed
the bound electrolyte released is
equally as corrosive as the liquid form.
Return to manufacturer!
Used batteries bearing this symbol are
reusable articles and must be fed back
into the recycling process. Used
batteries which are not fed back into the
recycling process are to be disposed of
as special rubbish in compliance with
the regulations.
19
Page 10

English
!
!
MAINTENANCE
Initial inspection after 8 operating hours
Caution!
For the safe functioning of your sweeper, an initial inspection
must be carried out after 8 hours of operation. You should
have the inspection done by your Kärcher Customer Service.
inspect all bowden cables and adjust where necessary
check that all hydraulic parts are leakproof and function
correctly
check that the handbrake functions
Daily maintenance
Inspect main brush roller for strapping and/or cord, etc.,
which may have wrapped round it. If so remove them.
Check dust filters. If they are heavily contaminated with
dust, shake them out.
Empty waste hopper.
Checking the hydraulic system
Carry out a visual inspection. If there is any loss of fluid
from the hydraulic unit, cylinder or hoses, call Kärcher
Customer Service.
Replacing the sealing skirts
The sealing skirts fulfil an important function. They retain the
partial vacuum in the area round the main brush roller which
is essential so that the sweeper can function properly. They
ensure that sweeping can take place without clouds of dust
being raised.
If the sealing skirts are damaged or worn out, they must be
replaced immediately.
Park the sweeper and switch off the engine.
Remove the retaining screws and detach the sealing
skirts.
Fit new skirts, and align them as follows:
The side skirts should be adjusted so that they clear the
ground by 13 mm. Adjust the rear skirt so that it clears
the ground by 1-5 mm.
Maintenance intervals
Keep to the maintenance schedule given in the Maintenance
booklet (5.950-535) in order to ensure that the sweeper
functions reliably and to maintain your rights under the
guarantee.
The maintenance work required must be carried out by an
authorised specialist workshop.
Maintenance tasks
Risk of injury
Before you work under the waste hopper in its swung-up
position, you must first secure the hopper against dropping
unintentionally by using the swing-out safety bar.
The front skirt cannot be adjusted. Replace the skirt as
soon as you see signs of excessive wear.
Tighten the retaining screws.
Replacing the side brush
Park the sweeper, switch it off and make it secure.
Raise the side brush.
Remove the three hex-socket bolts (SW 5).
Remove ignition key
Pull out battery plug connection
Open cover
Tip seat forwards. Pull cover up by the handle grip
designed for the purpose.
Detach the side brush.
Push the new side brush onto the drive pin.
Tighten the bolts again.
20
Page 11

English
Adjusting the sweeping pattern
Open the unit cover and secure it in place.
–
The sweeping pattern can be altered by turning the
–
central adjusting knob:
To increase size of sweeping pattern: turn adjusting
knob counter-clockwise (towards +).
To reduce size of sweeping pattern: turn adjusting
knob clockwise (towards ).
After any adjustments have been made, check the
–
sweeping pattern.
Drive the sweeper onto a dusty surface and apply the
parking brake.
Lower the main brush (lever set to middle position) and
allow it to brush the floor for several seconds.
Raise the main brush and drive backwards a short
distance with the bulk waste flap open (first release the
parking brake).
The width of the sweeping pattern should be
3050 mm.
Replacing the main brush roller
Park the sweeper and switch off the engine.
–
Lower the brush roller.
–
Open the RH side flap 1 (seen in direction of travel).
–
Undo the retaining bolt on the lower forked head 2 and
–
swivel the push rod towards the rear.
Unscrew the knurled knob 3.
–
Remove the oscillating linkage 4.
–
Open the flap over the end of the brush roller 5 (turn-lock
–
fastener).
Pull out the brush roller 6.
–
Note: The shape of the sweeping pattern should not be
trapezoidal. If it is, call Kärcher Customer Service.
Screw in the knob for adjusting the sweeping pattern as
–
far as it will go (clockwise, towards ).
Fit the new brush roller in reverse order to the removal
–
procedure.
Note: Make sure the bristles point in the right direction see
illustration.
Brush roller seen from above
Direction of travel
Set up the sweeping pattern by turning the adjusting
–
knob see Adjusting the sweeping pattern.
21
Page 12

English
Replacing fuses
Park the sweeper, switch it off and make it secure.
–
Pull out battery plug connection and open the unit
–
cover.
Replace blown fuses with ones with the same rating.
–
Note: If a fuse blows repeatedly, this indicates a fault
somewhere in the electrical system. Please call Kärcher
Customer Service.
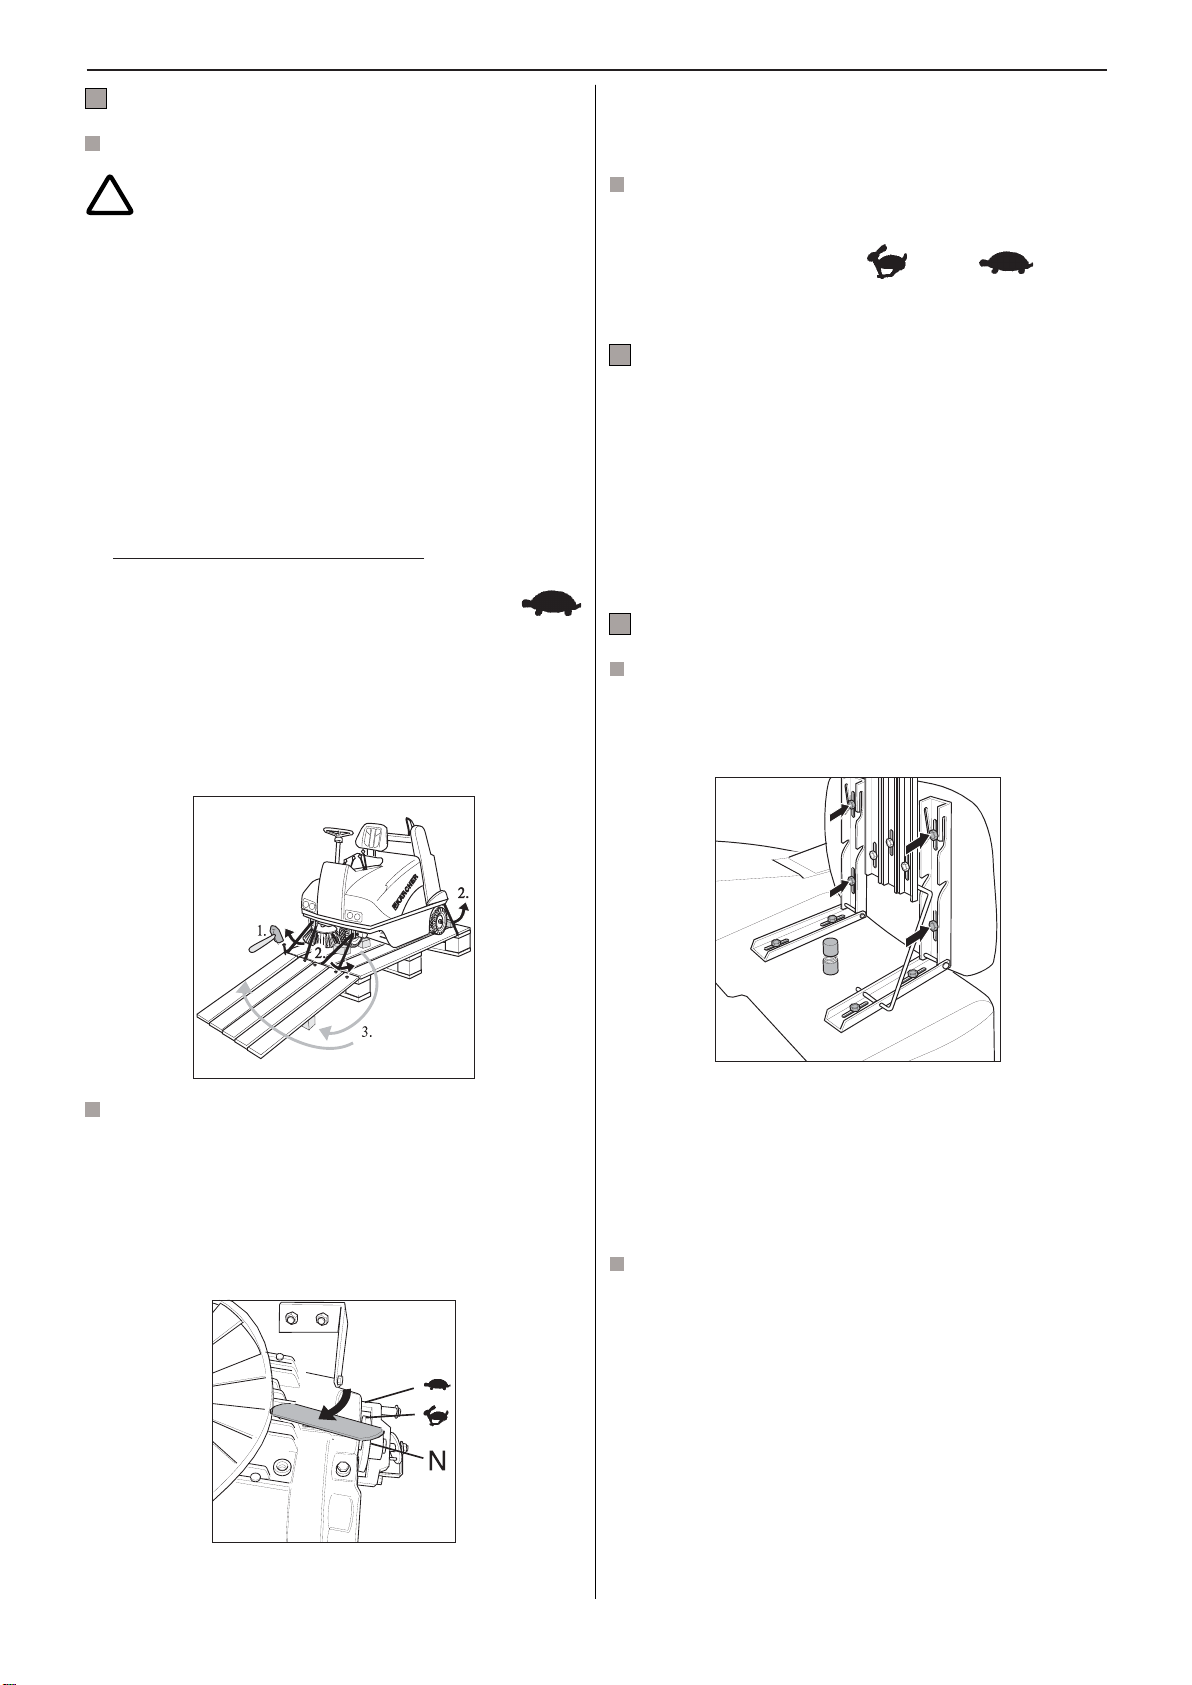
Replacing the dust filters
The dust filters should be inspected for damage every 50
operating hours.
A significant build-up of dust at the air outlet from the fan
is a sign of a filter that is not fitted properly or is defective.
Raise the hopper half way 1.
–
Release the catches on the filter box 2.
–
Swivel the filter box forwards and lift it off 3.
–
Replace light unit
Stop the machine and turn it off
Take out the ignition key
Undo 6 screws S on the panel
Remove the panel 1
Unscrew the Phillips screw between the supports of the
lamp holder on the defective headlight
Turn the lens of the defective headlight anti-clockwise
about 1/4 of a turn 2 and take out reflector housing 3
Replace light unit
Insert reflector housing with new light unit in panel again
from below and secure with about 1/4 of a turn clockwise. Make certain it engages properly, the label
HALOGEN on the headlight glass must be able to be
read horizontally 4
Screw in again the screw between the supports, then
secure the panel with the 6 screws.
Open out the handle, pull it outwards and turn it through
–
90º (make sure it engages) 4.
Remove the filter cartridge 5.
–
Insert a new filter cartridge (pins should fit into the
–
holes) 6.
Turn the handle back to its original position and make
–
sure it locks in place.
Mount the filter box and engage the catches.
–
22
Page 13

English
Technical Data
Dimensions and weights:
Length 1.650 mm
Width 1.000 mm
Height 1.270 mm
Weight unladen (ready to operate) 580 kg
Total permissible weight 730 kg
Driving and sweeping performance:
Sweeping path width without side brush 750 mm
Sweeping path width with 1 side brush 1.000 mm
Sweeping path width with 2 side brushes 1.300 mm
Fast gear (Position )
Max. speed 6 km/h
Max. gradient of climb 15 %
Low gear (Position )
Max. speed 4 km/h
Max. gradient of climb 18 %
Surface area performance (theoretical):
Without side brush 4.500 m
With 1 side brush 6.000 m
With 2 side brushes 7.800 m
Waste hopper:
Theoretical volume 100 l
Max. usable volume 80 l
Lift of stroke 1.430 mm
Filter surface area 6 m
Sweeping mechanism:
Main brush roller with rows of bristle in V-formation
Diameter of main brush roller 285 mm
Diameter of side brush 450 mm
2
/h
2
/h
2
/h
2
Drive system:
Mechanical gear drive with differential, operating on the
rear wheels.
Hydraulic fluid:
Class DIN HVLP 51 524/2
46 c St /40 °C
Capacity * 1.5 l
* We recommend BP BARTRAN Hydraulic Fluid.
Protection type: dripping-water protection IPX3
Ambient conditions:
– temperature –5 to +40 °C
– air humidity, not wet with dew 0–90 %
Operating period:
With one battery charging and under favourable
conditions the operating period is 3 hours. It is
dependent on several factors:
– nature of the ground and evenness of the terrain
– maintenance of the unit
– type and wear of the brush roller.
Noise emission
Sound level (EN 60704-1) 74 dB(A)
Guaranteed noise level
(2000/14/EC) 94 dB(A)
Machine vibration
Rated vibration value (ISO 5349)
Upper limb
measurements < 2,5 m/s²
Feet/seating area < 0,5 m/s²
Tyres
Diameter 300 mm
Designation 4.00-4
Lighting
Light unit DIN 49 848
HS3 6 V/2,4 W
Battery:
e.g. HAGEN Favorit 24 V/240 Ah
Your Kärcher Customer Service will be pleased to advise
you about the existing supply.
Motor data:
Drive control motor, AMER MP80 M 24 V/1100 W
Main brush motor, AMER MP80/2 24 V/600 W
Blower motor, AMER MP80/2 24 V/600 W
23
Page 14

English
Troubleshooting
Problem Possible cause Remedy
Sweeper does not move Battery is flat Recharge or replace battery
Warning light flashes Follow the startup sequence
Call Customer Service
Fuse has blown Replace fuse
Free-wheeling mechanism
switched on
The safety cutout triggered Reset the safety cutout
Brushes do not rotate V-belt has snapped Call Customer Service
V-belt too loose Check belt tension and adjust
Main brush or side b rush has been
jammed by packing bands or
similar item
Fuse has blown Replace fuse
Blower fan does not rotate Fan li mit switch is not being
operated
Fuse has blown Replace fuse
See “Pushing the sweeper by
hand”
as required
Remove blockage
Lower waste hopper completely
so that limit switch is operated
Poor sweeping results Brushes are worn down Replace brushes
Waste hopper is full Empty waste hopper
Incorrect sweeping pattern Adjust sweeping pattern
Filter is blocked Clean or replace filter
Dust is stirred up during
sweeping
Lifting mechanism for
emptying hopper does not
work
Worn out seals on sweeper, filter
not fitted properly or defective
Fuse has blown Replace fuse or inform
Defective switch Inform Customer Service
Defective hydraulic unit Inform Customer Service
Replace defective seals; fit filter
correctly or replace it
Customer Service if fuse blows
repeatedly
24
Page 15

KMR 1250 BAT
1.091-101.0
KMR 1250 BAT Package
1.091-111.0
KMR
0
6.414-532.0
6.348-306.0
6.905-986.0
7.312-260.0
7.313-003.0
5
2
1
6.435-319.0
6.435-318.0
KARCHER
6.644-299.0
6.644-246.0
6.644-272.0
6.644-246.0
7.644-013.0
6.682-429.0
5.031-452.0
7.644-017.0
7.644-017.0
7.651-002.0
6.651-382.0
6.654-112.0
6.277-428.0
7.306-500.0
6.654-107.0
6.277-427.0
6.277-435.0
5.190-084.0
5.031-378.0
K
I
N
H
C
E
T
E
D
A
L
<
<
P
M
O
R
C
I
M
>
>
Wa
A
0
3
V
4
2
6.905-982.0
4.038-524.0
5.190-084.0
6.277-427.0
20.03.2000
Page 16

EG-Konformitätserklärung
Hiermit erklären wir, daß die nachfolgend bezeichnete Maschine
aufgrund ihrer Konzipierung und Bauart sowie in der von uns in
Verkehr gebrachten Ausführung den einschlägigen grundlegenden
Sicherheits- und Gesundheitsanforderungen der EG-Richtlinien
entspricht.
Bei einer nicht mit uns abgestimmten Änderung der Maschine verliert
diese Erklärung ihre Gültigkeit.
Produkt: Kehrsaugmaschine Aufsitzgerät
Typ: 1.091-xxx
Einschlägige EG-Richtlinien:
EG-Maschinenrichtlinie (98/37/EG)
EG-Richtlinie Elektromagnetische Verträglichkeit (89/336/EWG),
geändert durch 91/263/EWG, 92/31/EWG, 93/68/EWG
EG-Richtlinie über Geräuschemissionen (2000/14/EU)
Angewandte harmonisierte Normen:
DIN EN 60 335 - 1
DIN EN 60 335 - 2 - 72
DIN EN 55 014 - 1 : 2000 + A1: 2001
DIN EN 55 014 - 2 : 1997
Angewandte nationale Normen: –
Angewandtes Konformitätsbewertungsverfahren: Anhang V
Gemessener Schallleistungspegel: 92 dB(A)
Garantierter Schallleistungspegel: 94 dB(A)
Es ist durch interne Maßnahmen sichergestellt, daß die Seriengeräte
immer den Anforderungen der aktuellen EG-Richtlinien und den
angewandten Normen entsprechen.
Die Unterzeichnenden handeln im Auftrag und mit Vollmacht der
Geschäftsführung.
EU Declaration of Conformity
We hereby declare that the equipment described below conforms to
the relevant fundamental safety and health requirements of the
appropriate EU Directives, both in its basic design and construction as
well as in the version marketed by us.
This declaration will cease to be valid if any modifications are made to
the machine without our express approval.
Product: Sweeping suction machine
Model: 1.091-xxx
Relevant EU Directives:
EU Machinery Directive (98/37/EEC)
EU Directive on Electromagnetic Compatibility (89/336/EEC), amended
by 91/263/EEC, 92/31/EEC, 93/68/EEC
EC directive on noise emissions (2000/14/EU)
Harmonised standards applied:
DIN EN 60 335 - 1
DIN EN 60 335 - 2 - 72
DIN EN 55 014 - 1 : 2000 + A1: 2001
DIN EN 55 014 - 2 : 1997
National standards applied: –
Applied conformity evaluation procedure: Appendix V
Measured sound power level: 92 dB(A)
Guaranteed sound power level: 94 dB(A)
Appropriate internal measures have been taken to ensure that seriesproduction units conform at all times to the requirements of current EU
Directives and relevant standards.
The signatories are empowered to represent and act on behalf of the
company management.
EU-conformiteitsverklaring
Hiermee verklaren wij dat de hierna vermelde machine op grond van
haar concipiëring en constructie en in de door ons in omloop
gebrachte uitvoering beantwoordt aan de desbetreffende veiligheidsen gezondheidsvoorschriften van de EG-richtlijnen.
Na een wijziging aan de machine die niet in overleg met ons wordt
uitgevoerd, verliest deze verklaring haar geldigheid.
Produkt: Veegzuigmachine
Type: 1.091-xxx
Desbetreffende EG-richtlijn:
EG-machinerichtlijn (98/37/EEG)
EG-richtlijn elektromagnetische verenigbaarheid (89/336/EEG),
gewijzigd door 91/263/EEG, 92/31/EEG en 93/68/EEG
EG-richtlijn geluidsemissies (2000/14/EU)
Toegepaste geharmoniseerde normen:
DIN EN 60 335 - 1
DIN EN 60 335 - 2 - 72
DIN EN 55 014 - 1 : 2000 + A1: 2001
DIN EN 55 014 - 2 : 1997
Toegepaste nationale normen: –
Toegepaste conformiteitswaarderingsmethode: aanhangsel V
Gemeten geluidsvermogenniveau: 92 dB(A)
Gegarandeerd geluidsvermogenniveau: 94 dB(A)
Door interne maatregelen is er voor gezorgd dat de standaard-apparaten
altijd beantwoorden aan de eisen van de actuele richtlijnen en de
toegepaste normen.
De ondergetekenden handelen in opdracht en op volmacht van de
bedrijfsleiding.
Declaración de conformidad de la Unión Europea
Por la presente declaramos los abajo firmantes que la máquina
designada a continuación cumple, tanto por su concepción y clase de
construcción como por la ejecución que hemos puesto en circulación,
las normas fundamentales de seguridad y protección de la salud
formuladas en las directivas comunitarias correspondientes.
La presente declaración pierde su validez en caso de alteraciones en
la máquina efectuadas sin nuestro consentimiento explícito.
Producto: Barredora-aspiradora
Modelo: 1.091-xxx
Directivas comunitarias aplicables:
Directiva comunitaria sobre máquinas (CEE 98/37)
Directiva sobre compatibilidad electromagnética (CEE 89/336),
modificada mediante CEE 91/263, CEE 92/31 y CEE 93/68
Directiva comunitaria sobre emisiones sonoras (UE 2000/14)
Normas armonizadas aplicadas:
DIN EN 60 335 - 1
DIN EN 60 335 - 2 - 72
DIN EN 55 014 - 1 : 2000 + A1: 2001
DIN EN 55 014 - 2 : 1997
Normas nacionales aplicadas: –
Procedimiento de evaluación de la conformidad aplicado: Anexo V
Nivel de potencia acústica medido: 92 dB(A)
Nivel de potencia acústica garantizado: 94 dB(A)
Mediante una serie de medidas internas, queda asegurado que los
aparatos y equipos de serie cumplan siempre las exigencias
formuladas en las directivas comunitarias actuales y en las normas
correspondientes a aplicar.
Los firmantes actúan autorizados y con poder otorgado por la dirección
de la empresa.
Déclaration de conformité européenne
Par la présente, nous déclarons que la machine ci-après répond, de
par sa conception et sa construction ainsi que de par le modèle que
nous avons mis sur le marché, aux exigences de sécurité et d’hygiène
en vigueur de la directive européenne.
En cas de modification de la machine effectuée sans notre accord,
cette déclaration sera caduque.
Produit: Machine de balayage-aspiration
Type: 1.091-xxx
Directives européennes en vigueur:
Directive européenne sur les machines (98/37/CE)
Directive européenne sur la compatibilité électromagnétique (89/336/
CE), modifiée par 91/263/CE, 92/31/CE, 93/68/CE
Directive européenne sur les émissions sonores (2000/14/CE)
Normes harmonisées appliquées:
DIN EN 60 335 - 1
DIN EN 60 335 - 2 - 72
DIN EN 55 014 - 1 : 2000 + A1: 2001
DIN EN 55 014 - 2 : 1997
Normes nationales appliquées: –
Procédure appliquée d’évaluation de la conformité: annexe V
Niveau de puissance sonore mesuré: 92 dB(A)
Niveau de puissance sonore garanti: 94 dB(A)
La conformité permanente des appareils de série avec les exigences
consignées dans les directives actuelles de la CE et avec les normes
appliquées est garantie par des mesures internes.
Les soussignés agissent par ordre et avec les pleins pouvoirs de la
Direction commerciale.
Dichiarazione di conformità CE
Dichiariamo con la presente, che la macchina qui di seguito indicata,
in base alla sua concezione e al tipo di costruzione, e nella versione
da noi introdotta sul mercato, è conforme ai relativi requisiti
fondamentali di sicurezza e di sanità delle direttive della CE.
In caso di modifica apportate alla macchina senza il nostro accordo,
questa dichiarazione perde la sua validità.
Prodotto: Spazzatrice aspiratrice
Tipo: 1.091-xxx
Direttive CE pertinenti:
Direttiva macchine CE (98/37/CEE)
Direttiva compatibilità elettromagnetica CE (89/336/CEE), modificata
dalle 91/263/CEE, 92/31/CEE, 93/68/CEE
Direttiva CEE sulle emissioni acustiche (2000/14/UE)
Norme armonizzate applicate:
DIN EN 60 335 - 1
DIN EN 60 335 - 2 - 72
DIN EN 55 014 - 1 : 2000 + A1: 2001
DIN EN 55 014 - 2 : 1997
Norme nazionali applicate: –
Procedura di valutazione di conformità applicata: Allegato V
Livello di potenza sonora misurato: 92 dB(A)
Livello di potenza sonora garantito: 94 dB(A)
Mediante accorgimenti interni, è stato assicurato che gli apparecchi di
serie siano sempre conformi ai requisiti delle attuali direttive CE e alle
norme applicate.
I firmatari agiscono su incarico e con i poteri dell’Amministrazione.
CE - Declaração de conformidade
Nós declaramos pelo presente instrumento que a máquina abaixo
indicada corresponde, na sua concepção, fabricação bem como no
tipo por nós comercializado, às exigências básicas de segurança e de
saúde da directiva da CE.
Se houver uma modificação na máquina sem o nosso consentimento
prévio, a presente declaração perderá a sua validade.
Produto: Vassoura mecânica
Tipo: 1.091-xxx
Directivas aplicáveis da CE:
Directiva de máquinas CE (98/37/CEE)
Directiva de compatibilidade electromagnética CE (89/336/CEE),
modificada 91/263/CEE, 92/31/CEE, 93/68/CEE
Directiva CE sobre emissões de ruído (2000/14/EU)
Normas harmonizadas aplicadas:
DIN EN 60 335 - 1
DIN EN 60 335 - 2 - 72
DIN EN 55 014 - 1 : 2000 + A1: 2001
DIN EN 55 014 - 2 : 1997
Normas nacionais aplicadas: –
Processo de avaliação de conformidade aplicado: Suplemento V
Nível de potência acústica medido: 92 dB(A)
Nível de potência acústica garantido: 94 dB(A)
Assegura-se, através de medidas internas da empresa, que os
aparelhos de série correspondem sempre às exigências das directivas
actualizadas da CE e às normas aplicadas.
Os abaixo assinados, actuam e representam através de procuração a
gerência.
ДЮлщуз Рйуфьфзфбт ЕК
ЕмеЯт, дзлюнпхме ме фзн рбспэуб, ьфй фп мзчЬнзмб рпх
чбсбкфзсЯжефбй рбсбкЬфщ, льгщ фпх учедйбумпэ кбй фпх фсьрпх
кбфбукехЮт, ьрщт кбй льгщ фзт рбсбллбгЮт рпх дйбфЯиефбй брь мбт
уфзн бгпсЬ, бнфбрпксЯнефбй уфйт учефйкЭт вбуйкЭт брбйфЮуейт
буцблеЯбт кбй хгеЯбт фщн Пдзгйюн ЕК.
Уе ресЯрфщуз бллбгюн уфп мзчЬнзмб чщсЯт рспзгпэменз
ухнненьзуз мбжЯ мбт, рбэей нб йучэей з рбспэуб дЮлщуз.
Рспъьн: Mзчбнйкь уЬсщисп ме бнбссьцзуз
Фэрпт: 1.091-xxx
УчефйкЭт ПдзгЯет ЕК:
ПдзгЯб ЕК учефйкЬ ме фйт мзчбнЭт (98/37/ЕПК)
ПдзгЯб ЕК ресЯ злекфспмбгнзфйкЮт ухмвбфьфзфпт (89/336/ЕПК),
рпх фспрпрпйЮизке ме фзн ПдзгЯб 91/263/ЕПК, 92/31/ЕПК, 93/68/
ЕПК
ПдзгЯб ЕК ресЯ екрпмрюн ипсэвщн (2000/14/EE)
ЕнбсмпнйумЭнб рсьфхрб рпх Эчпхн ецбсмпуиеЯ:
DIN EN 60 335 - 1
DIN EN 60 335 - 2 - 72
DIN EN 55 014 - 1 : 2000 + A1: 2001
DIN EN 55 014 - 2 : 1997
ЕинйкЬ рсьфхрб рпх Эчпхн ецбсмпуиеЯ:
ЕцбсмпумЭнз дйбдйкбуЯб бойпльгзузт рйуфьфзфбт: РбсЬсфзмб V
МефсзмЭнз уфЬимз бкпхуфйкЮт йучэпт: 92 dB(A)
ЕггхзмЭнз уфЬимз бкпхуфйкЮт йучэпт: 94 dB(A)
Ме лзциЭнфб еущфесйкЬ мЭфсб Эчей еобуцблйуиеЯ, ьфй пй ухукехЭт
уейсЬт кбфбукехЮт бнфбрпксЯнпнфбй рЬнфб уфйт брбйфЮуейт фщн
ерйкбЯсщн пдзгйюн ЕК кбй уфб ецбсмпуиЭнфб рсьфхрб.
Пй хрпгсЬцпнфет енесгпэн ме енфплЮ кбй кбфьрйн еопхуйпдьфзузт
фзт ГенйкЮт Дйеэихнузт.
Page 17

EU-overensstemmelseserklæring
Hermed erklærer vi at nedenstående maskine på grund af sin
udformning og konstruktion i den udførelse, i hvilken den sælges af
os, overholder EU-direktivernes relevante, grundlæggende
sikkerheds- og sundhedsmæssige krav.
Hvis maskinen ændres uden aftale med os, mister denne attest sin
gyldighed.
Produkt: Fejesugemaskine
Type: 1.091-xxx
Relevante EU-direktiver:
EU-maskindirektiv (98/37/EØF)
EU-direktiv om elektromagnetisk kompatibilitet (EMC)(89/336/EØF)
som ændret ved 91/263/EØF, 92/31/EØF og 93/68/EØF
EF-direktiv for støjemissioner (2000/14/EU)
Harmoniserede standarder, der blev anvendt:
DIN EN 60 335 - 1
DIN EN 60 335 - 2 - 72
DIN EN 55 014 - 1 : 2000 + A1: 2001
DIN EN 55 014 - 2 : 1997
Nationale standarder, der blev anvendt: –
Anvendte procedurer for overensstemmelsesvurdering: Bilag V
Målt lydeffektniveau: 92 dB(A)
Garanteret lydeffektniveau: 94 dB(A)
Interne forholdsregler sikrer, at serieapparaterne altid opfylder kravene
fra de aktuelle EU-direktiver og de standarder, der blev anvendt.
Underskriverne handler på forretningsledelsens vegne og med dennes
fuldmagt.
EU-KONFORMITETSERKLÆRING
Vi erklærer herved at maskinen som er beskrevet nedenfor, i
konstruksjon og utførelse tilsvarer markedsførte modell og er i
overensstemmelse med de gjeldende og grunnleggende sikkerhetsog helsekrav i EU-direktivet.
Denne erklæring mister sin gyldighet dersom maskinen endres uten
etter avtale med oss.
Produkt: Selvopptagende feiemaskin
Type: 1.091-xxx
Gjeldende EU-direktiv:
EU-direktiv for maskiner (98/37/EØF)
EU-direktiv for elektromagnetisk toleranse (89/336/EØF), endret ved
91/263/EØF, 92/31/EØF og 93/68/EØF
EU-direktiv vedr. støyutslipp (2000/14/EU)
Anvendte overensstemmende normer:
DIN EN 60 335 - 1
DIN EN 60 335 - 2 - 72
DIN EN 55 014 - 1 : 2000 + A1: 2001
DIN EN 55 014 - 2 : 1997
Anvendte nasjonale normer: –
Anvendte samsvarsvurderinger: Vedlegg V
Målt støynivå: 92 dB(A)
Garantert støynivå: 94 dB(A)
Gjennom interne tiltak er det sikret at serieproduserte maskiner alltid er i
overensstemmelse med kravene i de aktuelle EU-direktiver og anvendte
normer.
Undertegnede handler etter oppdrag og med fullmakt fra ledelsen.
Deklaracja zgodnoci z normami Wspólnoty Europejskiej Niniejszym owiadczamy,
¿e poni¿ej wymieniona maszyna ze wzglêdu na jej koncepcjê i budowê, jak i
wprowadzone przez nas w obieg wykonanie, odpowiada odnonym i
podstawowym wymogom bezpieczeñstwa i zdrowia i poni¿ej wymienionym
wytycznym Wspólnoty Europejskiej.
JeWeli przeprowadzone w maszynie zmiany nie zostan¹ z nami uzgodnione,
owiadczenie to traci na wa¿noci.
Wyrób: zamiatarka mechaniczna / maszyna z siedzeniem
Typ: 1.091-xxx
Odnone wytyczne Wspólnoty Europejskiej
Wytyczna Wspólnoty Europejskiej dotycz¹ca maszyn (98/37/EG)
Wytyczna Wspólnoty Europejskiej dotycz¹ca zgodnoci elektromagnetycz-
nej (89/336/EWG) zmieniona przez 91/263/EWG, 92/31/EWG, 93/68/EWG
Wytyczna Wspólnoty Europejskiej e misja ha³asu (2000/14/EU)
Zastosowane tzw. normy zharmonizowane, tzn. dostosowane do norm
Wspólnoty Europejskiej
DIN EN 60335-1
DIN EN 60335-2-79
DIN EN 55014-2:1997
Zastosowane normy krajowe:
Zastosowana metoda oceny zgodnoci: Za³¹cznik V
Mierzony poziom mocy akustycznej: 92 dB(A)
Gwarantowany poziom mocy akustycznej: 94 dB (A)
Wewnêtrzne zarz¹dzenia w przedsiêbiorstwie gwarantuj¹ dostosowanie
urz¹dzeñn seryjnych do aktualnych wytycznych Wspólnoty Gospodarczej i
stosowanych norm. Sygnatariusze dzia³aj¹ w imieniu i z pe³nomocnictwa dyrekcji
przedêbiorstwa.
Försäkran om överensstämmelse
Härmed försäkrar vi att den enligt nedan angivna maskinen till
konstruktion, byggnadssätt och i av oss levererat utförande motsvarar
tillämpliga baskrav beträffande säkerhet och hälsa enligt EUdirektiven.
Vid ändringar på maskinen som icke avtalats med oss upphör denna
försäkran att gälla.
Produkt: Sopmaskin
Typ: 1.091-xxx
Tillämpliga EU-direktiv:
EG maskindirektiv (98/37/EEG)
EG direktiv för elöverkänslighet (89/336/EEG), ändrat genom 91/263/
EEG, 92/31/EEG, 93/68/EEG
EG-direktiv för buller (2000/14/EU)
Tillämpade harmoniserade normer:
DIN EN 60 335 - 1
DIN EN 60 335 - 2 - 72
DIN EN 55 014 - 1 : 2000 + A1: 2001
DIN EN 55 014 - 2 : 1997
Tillämpade nationella normer: –
Tillämpat värderingsförfarande för överensstämmelse: Bilaga V
Uppmätt ljudeffektnivå: 92 dB(A)
Garanterad ljudeffektnivå: 94 dB(A)
Vi har genom interna åtgärder säkerställt, att serietillverkade maskiner
alltid motsvarar aktuella EU-direktiv och tillämpade normer.
De undertecknade agerar på uppdrag av och med fullmakt av
företagsledningen.
Alfred Kärcher Kommanditgesellschaft. Sitz
Winnenden.
Registergericht: Waiblingen, HRA 169.
Persönlich haftende Gesellschafterin: Kärcher
Reinigungstechnik GmbH.
Sitz Winnenden, 2404 Registergericht Waiblingen, HRB
S. Reiser H. Jenner
Geschäftsführer: Dr. Bernhard Graf, Hartmut Jenner,
Georg Metz
EU-vaatimustenmukaisuusvakuutus
Me vakuutamme, että alla mainittu tuote vastaa suunnittelultaan ja
rakenteeltaan sekä valmistustavaltaan EU-direktiivien asianomaisia
turvallisuus- ja terveysvaatimuksia.
Jos koneeseen tehdään muutoksia, joista ei ole sovittu kanssamme,
tämä vakuutus ei ole enää voimassa.
Tuote: Lakaisuimuri
Tyyppi: 1.091-xxx
Asianomaiset EU-direktiivit:
EU-konedirektiivi (98/37/ETY)
EU-direktiivi sähkömagneettinen yhteensopivuus (89/336/ETY)
muutettu 91/263/ETY, 92/31/ETY, 93/68/ETY
EY-direktiivi melupäästöistä (2000/14/EU)
Sovelletut harmonisoidut normit:
DIN EN 60 335 - 1
DIN EN 60 335 - 2 - 72
DIN EN 55 014 - 1 : 2000 + A1: 2001
DIN EN 55 014 - 2 : 1997
Sovelletut kansalliset normit: –
Sovellettu vaatimustenmukaisuusmenettely: liite V
Mitattu äänitehotaso: 92 dB(A)
Taattu äänitehotaso: 94 dB(A)
Sisäisin toimenpitein varmistetaan, että sarjatuotantolaitteet vastaavat
aina voimassaolevien EU-direktiivien vaatimuksia ja sovellettuja
normeja.
Allekirjoittaneet toimivat yrityksen johdon toimeksiannosta ja
valtuuttamina.
Alfred Kärcher GmbH & Co. KG
Cleaning Systems
Alfred-Kärcher-Str. 28–40
P.O. Box 160
D-71349 Winnenden
Tel.: ++ 49 71 95 14-0
Fax: ++ 49 71 95 22 12
5.957-544
(04/03)
 Loading...