

Page 1

UX-T200R E MICRO COMPONENT SYSTEM
MICRO COMPONENT SYSTEM
SISTEMAS DE MICROCOMPONENTES
SISTEMA A MICROCOMPONENTI
UX-T77R
INSTRUCTIONS
INSTRUCCIONES
MANUALE DI ISTRUZIONI
For Customer Use:
Enter below the Model No. and Serial No.
which are located either on the rear, bottom or side of the cabinet. Retain this
information for future reference.
Model No.
Serial No.
LVT0280-002A
[E]
Page 2

ENGLISH ESPAÑOL ITALIANO
Thank you for purchasing this JVC product.
Please read these instructions carefully before
starting operation to be sure to obtain optimum
performance and a longer service life from the
unit.
Le agradecemos la adquisición de este producto
de JVC. Por favor lea detenidamente las
instrucciones antes de comenzar la operación
para obtener de esta unidad un rendimiento
óptimo y una vida de servicio más larga.
Grazie per avere acquistato questo prodotto
JVC. Si prega di leggere queste istruzioni con
attenzione prima dell’uso per essere certi di
ottenere prestazioni ottimali ed una lunga durata
dell’unità.
CONTENTS INDICE INDICE
Features ......................................... 3
Safety precautions.......................... 3
Handling precautions...................... 5
Connections ................................... 6
Power supply.................................. 9
Names of parts and their
functions....................................... 10
Remote control unit ...................... 12
Switching the power on/off ........... 14
Volume, tone and other controls... 15
Handling CDs. .............................. 16
Playing CDs.................................. 17
Handling cassette tapes. .............. 21
Cassette playback ........................ 22
Radio reception ............................ 23
Recording..................................... 29
Clock adjustment.......................... 32
Timer operations .......................... 33
Maintenance................................. 38
Troubleshooting............................ 39
Specifications ............................... 39
Características ............................... 3
Precauciones de seguridad........... 3
Precauciones de manipulación...... 5
Conexiones .................................... 6
Alimentación................................... 9
Nombres de las partes y sus
funciones...................................... 10
Unidad de control remoto ............ 12
Conexión/desconexión de la
alimentación................................. 14
Volumen, tono y otros controles ... 15
Manipulación de CD .................... 16
Reproducción de CD ................... 17
Manipulación de cassettes de
cinta ............................................. 21
Reproducción de cassettes ......... 22
Radiorrecepción........................... 23
Grabación .................................... 29
Ajuste del reloj.............................. 32
Operaciones por temporizador .... 33
Mantenimiento.............................. 38
Caratteristiche ................................ 3
Precauzioni per la sicurezza........... 3
Precauzioni per l'uso ...................... 5
Collegamenti .................................. 6
Alimentazione................................. 9
Nomi e funzioni delle parti ............ 10
Unità di telecomando.................... 12
Accensione e spegnimento .......... 14
Volume, toni ed altri comandi ....... 15
Maneggio dei CD.......................... 16
Riproduzione di CD ...................... 17
Maneggio dei nastri a cassetta..... 21
Riproduzione di cassette .............. 22
Ricezione con la radio .................. 23
Registrazione ............................... 29
Regolazione orologio.................... 32
Funzionamento col timer .............. 33
Manutenzione............................... 38
Diagnostica .................................. 39
Dati tecnici.................................... 39
Detección de problemas.............. 39
Especificaciones .......................... 39
WARNING:
TO REDUCE THE RISK OF FIRE OR
ELECTRIC SHOCK, DO NOT EXPOSE
THIS APPLIANCE TO RAIN OR
MOISTURE.
CAUTION
RISK OF ELECTRIC SHOCK
DO NOT OPEN
CAUTION: TO REDUCE THE RISK OF ELECTRIC SHOCK.
DO NOT REMOVE COVER (OR BACK).
NO USER-SERVICEABLE PARTS INSIDE.
REFER SERVICING TO QUALIFIED SERVICE PERSONNEL.
IMPORTANT FOR LASER
PRODUCTS
PRECAUTIONS
1.CLASS 1 LASER PRODUCT
2.DANGER: Invisible laser radiation when open
and interlock failed or defeated. Avoid direct
exposure to beam.
3.CAUTION: Do not open the rear cover. There
are no user serviceable parts inside the unit;
leave all servicing to qualified service
personnel.
4.CAUTION: The CD player uses invisible laser
radiation and is equipped with safety switches
which prevent the emission of radiation when
the CD holder or CD tray is open. It is
dangerous to defeat the safety switches.
5.CAUTION: Use of controls for adjustments
and the performance of procedures other than
those specified herein may result in exposure
to hazardous radiation.
2
ADVERTENCIA:
PARA REDUCIR EL RIESGO DE
INCENDIO O DE CHOQUES ELECTRICOS,
NO EXPONGA ESTE APARATO A LA
LLUVIA O A LA HUMEDAD.
The lightning flash with arrowhead symbol, within an
equilateral triangle, is intended to alert the user to the
presence of uninsulated "dangerous voltage" within the
product's enclosure that may be of sufficient magnitude
to constitute a risk of electric shock to persons.
The exclamation point within an equilateral triangle is
intended to alert the user to the presence of important
operating and maintenance (servicing) instructions in
the literature accompanying the appliance.
IMPORTANTE PARA PRODUCTOS
LASER
PRECAUCIONES
1.PRODUCTO LASER CLASE 1
2.PELIGRO: Radiación láser invisible cuando
se abre, falla o se desactiva el enclavamiento.
Evite la exposición directa al rayo.
3.PRECAUCION: No abra la cubierta trasera.
Dentro de la unidad no hay componentes que
el usuario pueda reparar; deje toda
reparación al personal de servicio cualificado.
4.PRECAUCION: El reproductor de CD utiliza
radiación láser invisible y está equipado con
interruptores de seguridad que evitar la
emisión de radiación cuando se abre el
portadisco de CD o compartimiento del CD.
Es peligroso desactivar los interruptores de
seguridad.
5.PRECAUCION: La utilización de los contr oles
de ajuste y de procedimientos que no estén
especificados aquí, puede resultar en
exposición a radiación peligrosa.
AVVERTENZA:
NON ESPORRE L’APPARECCHIO A
PIOGGIA O UMIDITA’ ONDE RIDURRE I
RISCHI DI FIAMME O SCOSSE
ELETTRICHE.
Per l’Italia:
“Si dichiara che il questo prodotto di marca
JVC è conforme alle prescrizioni del Decreto
Ministeriale n.548 del 28/08/95 pubblicato
sulla Gazzetta Ufficiale della Repubblica
Italiana n.301 del 28/12/95.”
IMPORTANTI PRECAUZIONI PER
PRODOTTI LASER
PRECAUZIONI
1.
PRODOTTO LASER DI CLASSE 1
2.PERICOLO:
ed i dispositivi di sicurezza non funzionano o
sono stati disattivati, vengono prodotte invisibili
radiazioni laser. Evitare l’esposizione diretta
al raggio.
3.ATTENZIONE:
posteriore. All’interno dell’unità non vi sono
parti che possono interessare l’utente; fare
eseguire qualsiasi intervento a personale di
assistenza qualificato.
4.ATTENZIONE:
laser invisibili ed è fornito di interruttori di
sicurezza per evitare l’emissione di tali
radiazioni quando il piatto del CD è aperto.
Non escludere tali interruttori di sicurezza in
quanto ciò è pericoloso.
5.ATTENZIONE:
diversi da quanto specificato possono risultare
nell’esposizione a radiazioni pericolose.
Quando l’apparecchio è aperto
Non aprire la copertura
Il lettore CD utilizza radiazioni
L’uso di comandi e procedure
Page 3

REPRODUCTION OF LABELS
AND THEIR LOCA TION
REPRODUCCION DE ETIQUET AS
Y SU UBICACION
Name/Rating plate
Placa de nombre/especificaciones
Piastrina nome/caratteristiche
ETICHETTE E LORO POSIZIONE
CLASS 1
LASER PRODUCT
Caution:
DANGER: Invisible laser
radiation when op en and
interlock failed or defeated.
AVOID DIRECT EXPOSURE
TO BEAM. (e)
ADVARSEL: Usynlig laserstråling ved åbning, når
sikkerh edsafbryd ere e r u de
af funktion. Undgåudsættelse for stråling. (d)
VARNING: Osynlig laser-
strålning när denna del
är öppnad och spärren
urkopplad. Betrakta
strålen. (s)
VARO: Avattaessa ja suojalukitus ohitettaessa olet
är
alttiina näkymättömälle
ej
lasersäteilylle. Älä katso
säteeseen. (f)
This production contains a laser component of higher
laser class than Class 1.
Attenzione:
Questo prodotto contiene un laser di classe
susperiore alla 1.
Precaución:
Este producto contiene un componente láster de
clase superior a la Clase 1.
FEATURES CARACTERISTICAS CARATTERISTICHE
● CD-size micro component system consisting
of 3 units
● Radio data system (RDS)
● Active Hyper-Bass PRO circuit for low-
frequency sound reproduction
● One-touch operation (COMPU PLAY)
● 35-key remote control unit operates all CD,
cassette deck and tuner functions
● Multi-function CD player
● Programmed play of up to 20 tracks
● Repeat Play
● Random Play
● U-Turn auto-reverse full-logic mechanism
● Auto tape select mechanism
● Metal (type IV) and CrO2 (type II) tape can be
played back for superior tone quality
● CrO2 (type II) tape recording capability
● 2-band digital synthesizer tuner with 45-station
(30 FM and 15 AM (MW/L W)) preset capability
● Seek/manual tuning
● Auto preset tuning
● Timer/Clock function
● Timer on/off with preset volume function
● Sleep timer can be set for up to 120 minutes
● Sistema de microcomponentes del tamaño
de un CD, consistente de 3 unidades
● Sistema de datos por radio (RDS)
● Circuito Active Hyper-Bass PRO para
reproducción sonidos de baja frecuencia
● Operación de un solo toque (COMPU PLAY)
● Unidad de control remoto con 35 teclas para
operación del CD, platina de cassette y
funciones del sintonizador
● Reproductor de CD con funciones múltiples
● Reproducción programada hasta 20 pistas
● Repetición de reproducción
● Reproducción aleatoria
● Mecanismo de lógica completa inversión
automática en U
● Mecanismo de selección automática de cinta
● Para obtener una calidad de tono superior
es posible utilizar cintas de metal (tipo IV) y
de CrO2 (tipo II)
● Capacidad para grabación de cintas de CrO2
(tipo II)
● Sintonizador sintetizador digital de 2 bandas
con capacidad para presintonización de 45
estaciones (30 de FM y 15 de AM (OM/OL))
● Sintonización búsqueda/manual
● Sintonización programada automática
● Función de temporizador/reloj
● Activación/desactivación del temporizador
con función de volumen preajustado
● El temporizador despertador puede ser
programado hasta un máximo de 120 minutos
●
Sistema a microcomponenti formato CD
composto da 3 unità
●
Sistema dati radio (RDS)
●
Circuito Active Hyper-Bass PRO di nuova
concezione per la riproduzione delle basse
frequenze
●
Funzionamento ad un tocco (COMPU PLAY)
●
L’unità di telecomando da 35 tasti controlla
tutte le funzioni del lettore CD, del registratore
a cassette e del sintonizzatore
●
Lettore CD multifunzione
●
Riproduzione programmata di fino a 20 brani
●
Riproduzione ripetuta
●
Riproduzione casuale
●
Meccanismo U-Turn di inversione automatica
completamente logico
●
Meccanismo per la selezione automatica del
tipo di nastro
●
Possono essere riprodotti nastri Metal (tipo
IV) e CrO2 (tipo II) che forniscono una migliore
qualità musicale
●
Capacità di registrazione su nastri CrO2 (tipo II)
●
Sintonizzatore a sintetizzazione digitale a 2
bande con capacità di preselezione di fino a
45 stazioni (30 FM e 15 AM (MW/LW))
●
Sintonizzazione con ricerca/manuale
●
Sintonizzazione con preselezione automatica
●
Funzione timer/orologio
●
Funzione di attivazione e disattivazione via
timer con preimpostazione del volume
●
Il timer per lo spegnimento automatico può
essere impostato per fino a 120 minuti
SAFETY PRECAUTIONS PRECAUCIONES DE SEGURIDAD PRECAUZIONI PER LA SICUREZZA
Prevention of Electric Shocks, Fire Hazards
and Damage
1. Even when the button is set to
STANDBY, a very small current will flow. To
save power and for safety when not using
the unit for an extended period of time,
disconnect the power cord from the
household AC outlet.
2. Do not handle the power cord with wet hands.
Prevención de choques eléctricos, peligro
de incendio y daños
1. Aunque el botón de alimentación , esté
colocado en espera STANDBY, fluye una
pequeñísima corriente eléctrica. Para
ahorrar energía y por seguridad cuando no
utiliza esta unidad durante un largo período,
desconecte el cordón eléctrico del
tomacorriente de CA.
2. No manipule el cordón eléctrico con las
manos mojadas.
Prevenzione di scosse elettriche, fiamme e
danni
1. Anche quando l’interruttore si trova sulla
posizione STANDBY, una piccola quantità di
corrente continua a fluire. Per risparmiare
energia e per ragioni di sicurezza, scollegare il
cavo dell’alimentazione dalla presa di corrente
CA quando si prevede di non utilizzare l’unità
per un periodo prolungato.
2. Non maneggiare il cavo di alimentazione con
le mani bagnate.
3
Page 4

3. When unplugging from the wall outlet, always
grasp and pull the plug, not the power cord.
4. Consult your nearest dealer when damage,
disconnection, or contact failure affects the
cord.
5. Do not bend the cord severely , or pull or twist
it.
6. Do not modify the power cord in any manner .
7. To avoid accidents, do not remove screws
to disassemble the unit and do not touch
anything inside the unit.
8. Do not insert any metallic objects into the
unit.
9. Unplug the power cord when there is a
possibility of lightning.
10.If water gets inside the unit, unplug the power
cord from the outlet and consult your dealer.
11.Do not block the unit’s ventilation holes that
allow heat to escape.
Do not install the unit in a badly ventilated
place.
3. Cuando lo desenchufa del tomacorriente de
la pared, sujételo siempre por el enchufe,
nunca por el cordón.
4. En caso de que el cordón sea afectado por
daños, desconexión, o falso contacto,
consulte a su agente más cercano.
5. No doble en ángulo agudo el cordón, no jale
del mismo ni lo retuerza.
6. No modifique el cordón eléctrico de ninguna
manera.
7. Para evitar accidentes, no extraiga los
tornillos para desarmar la unidad y no toque
nada dentro de la misma.
8. No inserte ningún objeto metálico dentro de
la unidad.
9. Desenchufe el cordón eléctrico cuando
haya posibilidad de caída de rayos.
10.Si se introduce agua dentro de la unidad,
desenchufe el cordón eléctrico del
tomacorriente y consulte a su agente.
11.No bloquee los orificios de ventilación de la
unidad que permiten el escape de calor.
No instale la unidad en un lugar mal
ventilado.
3. Per scollegarsi dalla presa di rete, afferrare
sempre la spina e non il cavo
dell’alimentazione.
4. Consultare il rivenditore più vicino quando il
cavo è danneggiato, scollegato o con contatti
scadenti.
5. Non piegare eccessivamente il cavo, non
tirarlo e non torcerlo.
6. Non modificare il cavo di alimentazione in
alcun modo.
7. Per evitare incidenti, non rimuovere viti per
smontare l’unità e non toccare alcun
componente interno.
8. Non inserire alcun oggetto metallico nell’unità.
9. Scollegare il cavo di alimentazione durante
temporali con fulmini.
10.Se dell’acqua dovesse penetrare all’interno
dell’unità, scollegare il cavo dell’alimentazione
dalla presa di rete e consultare il proprio
rivenditore.
11.Non bloccare i fori per la ventilazione dell’unità
che permettono la dissipazione del calore.
Non installare l’unità in un luogo con
ventilazione scadente.
button
When the power cord is connected to a
household AC outlet, the power indicator
lights in red indicating the STANDBY mode.
When the button is pressed, the power
indicator goes out and the display window
lights.
When this unit is plugged into an AC outlet,
it consumes a small current to operate the
remote control and timer, or to back up the
memory of the microprocessor, even when
the button is set to STANDBY.
Caution:
Proper Ventilation
To avoid risk of electric shock and fire, and to
prevent damage, locate the apparatus as
follows:
1. Front:
No obstructions and open spacing.
2. Sides/Top/Back:
No obstructions should be placed in the
areas shown by the dimensions below.
3. Bottom:
Place on a level surface. Maintain an
adequate air path for ventilation by placing
on a table with a height of 10 cm or more.
Front view
Vista frontal
Visione anteriore
Botón
Cuando se conecta el cordón eléctrico al
tomacorriente de CA, el indicador de
alimentación se enciende en rojo
indicando el modo STANDBY. Cuando
presiona el botón , el indicador de
alimentación se apaga y se enciende la
ventanilla de indicación.
Esta unidad consume una pequeña
corriente cuando se la conecta a un
tomacorriente de CA, para hacer funcionar
el controlador remoto y el temporizador, o
para apoyo de la memoria del
microprocesador, aún cuando se haya
colocado el botón en STANDBY.
Precaución:
Ventilación correcta
Para evitar el riesgo de descargas eléctricas e
incendio y prevenir posibles daños, instale el
equipo en un lugar que cumpla los siguientes
requisitos:
1. Parte frontal:
Sin obstrucciones, espacio abierto.
2. Lados/Parte superior/Parte posterior:
No debe haver ninguna obstrucción en las
áreas mostradas por las dimensiones de la
siguiente figura.
3. Parte inferior:
Sitúe el equipo sobre una superficie
nivelada. Mantenga un espacio adecuado
para permitir el paso del aire y una correcta
ventilación, situando el equipo sobre una
mesa de 10 o más cm de altura.
15 cm
Interruttore di accensione ( )
Quando il cavo di alimentazione è collegato
con una presa di rete CA, l’indicatore
dell’alimentazione si illumina in rosso per
indicare il modo STANDBY. Quando il tasto
viene premuto, l’indicatore
dell’alimentazione si spegne ed il display
si illumina.
Quando questa unità è collegata ad una
presa di corrente CA, essa consuma una
piccola quantità di corrente per il
funzionamento del telecomando e del timer
o per il mantenimento della memoria del
microprocessore anche quando il tasto
è impostato su STANDBY.
Attenzione:
Ventilazione corretta
Per evitare rischi di scosse elettriche e fiamme,
installare l’apparecchio come indicato di seguito:
1. Lato anteriore:
Nessun ostacolo e spazio aperto.
2. Lati sinistro e destro/superiore/posteriore:
Nessun ostacolo deve essere posto nell’area
indicata dalle dimensioni riportate in basso.
3. Fondo:
Posizionare su di una superficie a livello.
Mantenere un percorso adeguato per la
ventilazione utilizzando una tavola con
un’altezza di 10 cm o più.
Side view
Vista lateral
Visione laterale
15 cm
15 cm
1cm
AUX
UX-T77R
4
1cm
15 cm
10 cm
15 cm
UX-T77R
Page 5

HANDLING PRECAUTIONS
PRECAUCIONES DE
MANIPULACION
PRECAUZIONI PER L’USO
Do not use this unit in direct sunlight where
it would be exposed to high temperatures
above 40°C (104°F).
1. Avoid installing in the following places
● Where it could be subject to vibrations.
● Where it is excessively humid, such as in
a bathroom.
● Where it could be magnetized by a magnet
or speaker.
2. Pay attention to dust
Be sure to close the CD holder or CD tray so
that dust does not collect on the lens.
3. Condensation
In the following cases, condensation may
occur in the unit, in which case the unit may
not operate correctly.
● In a room where a heater has just been
switched on.
● In a place where there is smoke or high
humidity.
● When the unit is moved directly from a cold
to a warm room.
In these cases, set the button to
STANDBY and wait 1 or 2 hours before use.
4. Volume setting
CDs produce very little noise compared with
analog sources. If the volume level is
adjusted for these sources, the speakers
may be damaged by the sudden increase of
output level. Therefore, lower the volume
before operation and adjust it as required
during play.
5. Safety mechanism
This unit incorporates a safety interlock
mechanism which switches the laser beam
on and off, so that when the CD holder or
CD tray is open, the laser beam stops
automatically.
6. Do not place cassette tapes, etc. near the
speakers
Since there are magnets in the speakers, do
not place tapes or magnetic cards on them
as recorded data could be erased.
7. Keep this unit away from your TV
When this unit is used near a TV, the TV
picture could be distorted. If this happens,
move this unit away from the TV . If this does
not correct the situation, avoid using this unit
when the TV is turned on.
8. Cleaning the cabinet
If the cabinet gets dirty, wipe it with a soft,
dry cloth. Never use benzine or thinner as
these could damage the surface finish.
9. When listening with headphones
● Do not listen at high volumes as this could
damage your hearing.
● For safety, do not drive while listening to
this unit.
No utilice esta unidad bajo la luz directa
del sol donde podría quedar expuesta a
temperaturas superiores a 40°C.
1. Evite instalarla en los siguientes lugares
● Donde pueda ser sujeta a vibraciones.
● Donde haya humedad excesiva, tal como
en un cuarto de baño.
● Donde pueda ser magnetizada por un
imán o altavoz.
2. Preste atención al polvo
Asegúrese de cerrar el portadisco o
compartimiento de CD para que el polvo no
se deposite sobre la lente. No toque la lente.
3. Condensación
En los siguientes casos, puede producirse
condensación dentro de la unidad y en
consecuencia la unidad no funcionará
correctamente.
● En una sala donde haya un calentador
encendido.
● En un lugar donde haya humo o gran
humedad.
● Cuando se traslada rápidamente la
unidad de una sala fría a una templada.
En estos casos, coloque el botón en
STANDBY (conectado) y esper e 1 o 2 horas
antes de utilizarla.
4. Ajuste del volumen
Los productos de CD producen muy poco
ruido comparados con las fuentes
analógicas. Si ajusta el nivel de volumen
para estas fuentes, es posible que los
altavoces sean dañados por el incremento
brusco del nivel de salida. Por ello, reduzca
el volumen antes de la operación y ajústelo
como desee durante la reproducción.
5. Mecanismo de seguridad
Esta unidad posee un mecanismo de
enclavamiento de seguridad que apaga y
enciende el rayo láser de tal manera que
cuando se abre el portadisco o
compartimiento de CD, el rayo láser se
apaga automáticamente.
6. No coloque cassettes de cinta, etc.,
próximos a los altavoces
Como hay imanes en los altavoces, no
coloque cintas o tarjetas magnéticas sobre
los mismos, ya que los datos grabados
pueden ser borrados.
7. Mantenga esta unidad lejos de su TV
Cuando se usa esta unidad próxima a un
TV, la imagen de éste puede ser
distorsionada. Si ello ocurre, mueva esta
unidad lejos del TV. Si esto no corrige el
problema, evite usar esta unidad cuando el
TV está encendido.
8. Limpieza del gabinete
Si el gabinete se ensucia límpielo con un
paño suave y seco. Nunca utilice bencina o
solventes ya que estos pueden dañar la
terminación de la superficie.
9. Cuando escuche con auriculares
● No escuche con el volumen muy alto
porque podrían dañarse sus oídos.
● Por seguridad, no conduzca cuando esté
escuchando esta unidad.
Non utilizzare questa unità in luoghi esposti
alla luce solare diretta dove la temperatura
può superare i 40°C.
1. Evitare l’installazione nei luoghi seguenti
●
In luoghi dove l’unità può essere soggetta
a vibrazioni.
●
In luoghi eccessivamente umidi come una
stanza da bagno.
●
In luoghi dove l’unità può essere
magnetizzata da un magnete o da un
diffusore.
2. Fare attenzione alla polvere
Accertarsi di chiudere il piatto o caricatore di
CD in modo che la polvere non si raccolga
sulla lente del pickup. Non toccare la lente
del pickup
3. Condensa
Nei casi seguenti della condensa si potrebbe
formare nell’unità impedendo il
funzionamento corretto dell’unità stessa.
●
In una stanza in cui il riscaldamento è
appena stato acceso.
●
In un luogo fumoso o con elevata umidità.
●
Quando l’unità viene spostata direttamente
da una stanza fredda ad una calda.
In questi casi, portare il tasto su STANDBY
ed attendere 1 o 2 ore prima di utilizzare l’unità.
4. Impostazione del volume
I CD producono un rumore estremamente
basso se confrontati con fonti analogiche. Se
il livello del volume fosse impostato per tali
fonti, i diffusori potrebbero venire danneggiati
dall’improvviso aumento del livello in uscita.
Abbassare perciò il volume prima dell’uso e
regolarlo quindi durante la riproduzione.
5. Meccanismo di sicurezza
Questa unitá incorpora un meccanismo di
sicurezza che attiva e disattiva il raggio laser
in modo che quando il piatto del CD é aperto
il raggio laser viene disattivato
automaticamente.
6. Non posare nastri a cassetta, ecc., in
prossimità dei diffusori
Dato che i diffusori incorporano dei magneti,
non posare nastri registrati o schede
magnetiche su di essi in quanto i materiali
registrati potrebbero venire cancellati.
7. Tenere l’unità lontana dal televisore
Quando questa unità viene utilizzata in
prossimità di un televisore, l’immagine TV
potrebbe venire distorta. Se ciò dovesse
accadere, allontanare l’unità dal televisore. Se
ciò non fosse sufficiente ad eliminare le
interferenze, evitare di utilizzare questa unità
quando il televisore è acceso.
8. Pulizia dell’esterno dell’unità
Se l’esterno dell’unità fosse sporco, strofinare
con un panno morbido ed asciutto.
Non usare mai benzina o diluente in quanto
essi possono danneggiare la finitura delle
superfici.
9. Ascolto con le cuffie
●
Non ascoltare ad alto il volume in modo
da danneggiare le orecchie.
● Per motivi di sicurezza, non guidare mentre
si ascolta questa unitê.
5
Page 6

CONNECTIONS CONEXIONES COLLEGAMENTI
● Do not switch the power on until all connections
are completed.
Antenna connection and adjustment
● AM (MW/LW) loop antenna adjustment
● No conecte la alimentación hasta haber
completado todas las conexiones.
Conexión y ajuste de la antena
● Ajuste de la antena de cuadro para AM (OM/
●
Non attivare l’alimentazione prima del
completamento dei collegamenti.
Collegamento e regolazione antenna
●
Regolazione antenna AM ad anello (MW/LW)
OL)
AM (MW/LW) loop antenna (provided)
Antena de cuadro de AM (OM/OL) (suministrada)
Antenna AM (MW/LW) ad anello (in dotazione)
AM LOOP
Insert in the direction of the arrow.
Inserte en la dirección de la flecha.
Inserire nella direzione della freccia.
AM EXT
FM
COAXIAL
75Ω
` AC IN
—
DC IN
R
L
RIGHT
LEFT
12V
● Keep the loop antenna away from the unit and install it so that the best reception is obtained. (Do not leave the antenna wire in a bundle.)
● Conserve la antena de cuadro separada de la unidad e instálela de tal manera que se obtenga la mejor recepción. (No deje arrollado el cable
de la antena.)
●
Tenere l’antenna ad anello lontana dall’unità ed installarla in modo da ottenere la migliore ricezione possibile. (Non lasciare avvolto il filo
dell’antenna).
● FM antenna connections and adjustments ● Conexiones y ajuste de la antena de FM ●
R
L
RIGHT
LEFT
` AC IN
—
12V
DC IN
● Use an outdoor antenna when stable reception cannot be obtained with the provided antenna.
● Cuando no sea posible obtener una recepción estable con la antena suministrada, utilice una antena exterior.
●
Utilizzare un’antenna esterna quando non è possibile ottenere una ricezione stabile per mezzo dell’antenna in dotazione.
Notes:
● Do not place the loop antenna on a metal desk
or near a TV or personal computer.
● Installing an outdoor antenna requires
expertise; we recommend that you consult an
audio dealer.
● Install the antenna cord away from the power
and speaker cords as these could generate
noise. Do not install the loop antenna so that
it touches the rear of the unit.
6
FM wire antenna (provided)
Antena de cable FM (suministrada)
Antenna FM a filo (in dotazione)
FM outdoor antenna (option)
Antena exterior de FM (opcional)
Antenna FM esterna (opzionale)
Coaxial cable
Cable coaxil
Cavo coassiale
Notas:
● No coloque la antena de cuadro sobre un
escritorio de metal o cerca de un TV o
computador personal.
● La instalación de una antena externa requiere
conocimientos; nosotros le recomendamos
que consulte con su agente de audio.
● Coloque el cable de la antena lejos de los
cordones de alimentación y de los altavoces
ya que estos pueden generar interferencia.
Cuando instale la antena de cuadro no
permita que entre en contacto con la parte
trasera de la unidad.
Raccordements et réglages de l’antenne FM
Note:
●
Non installare l’antenna ad anello su di un
tavolo metallico oppure nelle vicinanze di un
televisore o di un personal computer.
●
L’installazione di un’antenna esterna richiede
esperienza; si raccomanda di consultare un
rivenditore di apparecchiature audio.
●
Installare il cavo dell’antenna lontano dal cavo
di alimentazione e dai cavi dei diffusori in
quanto questi potrebbero generare disturbi.
Installare l’antenna ad anello in modo che non
tocchi il retro dell’unità.
Page 7

Speaker cord connection Conexión de los cordones de los
altavoces
Collegamento cavi diffusori
` AC IN
—
DC IN
1
R
L
RIGHT
LEFT
Connect the Black cord to the
Conecte el cordón negro al terminal
Collegare il cavo nero al terminale œ.
Right speaker (rear side)
Altavoz derecho (lado posterior)
Diffusore destro (lato posteriore)
12V
23
œ
terminal.
œ.
Left speaker (rear side)
Altavoz izquierdo (lado posterior)
Diffusore sinistro (lato posteriore)
Speaker cord
Cable de altavoz
Cavo diffusorie
LEFT
RIGHT
Black
Negro
Nero
● Connect the cord from the speaker on the left to the (LEFT) terminals and the
cord from the speaker on the right to the (RIGHT) terminals.
● Conecte el cabel del altavoz de la izquierda a los terminales (LEFT) y el
cabel del altavos de la derecha a ;os terminales (RIGHT).
●
Collegare il cavo del difuscore a sinista con i terminali (LEFT) ed il cavo del
difusore a destra con i terminali (RIGHT).
● The speaker grilles can be removed.
● When removing.
1.Insert your fingers at the top and pull towards you.
2.Also pull the bottom towards you.
Notes:
● The polarity of the two connected speakers will
be the same if the black speaker cords are
connected to the œ terminals. If the speakers
are connected with polarities reversed, stereo
effect and tone will be degraded.
● The speakers of this unit are not magnetically
shielded. When they are placed directly on or
adjacent to a TV, the TV’s picture could be
distorted. Install the speakers more than 20
cm away from your TV.
● Las rejillas de los altavoces pueden ser
extraídas.
● Cuando extrae.
1.Inserte los dedos en la parte superior y tire hacia
usted.
2.También tire el fondo hacia usted
●
Colocación de la rejilla del altavoz● Attaching the speaker grille
Speaker grille
Rejilla del altavoz
Pannello anteriore diffusore
Match the fittings when attaching the grille.
Haga coincidir los encajes cuando coloque la rejilla.
Nell'applicare i pannelli anteriori, badare a che le sporgenze
coincidano con i fori.
Notas:
● La polaridad de los dos altavoces conectados
es la misma si los cables negros son
conectados a los terminales œ. Si se conectan
los altavoces con las polaridades invertidas,
se degradará el efecto estereofónico y el tono.
● Los altavoces de esta unidad no están
blindados magnéticamente. Cuando se los
coloca directamente o adyacentes a un TV,
la imagen de éste puede ser distorsionada.
Instale los altavoces a más de 20 cm. de
distancia de su TV.
●
Il pannello anteriore dei diffusori può venire
tolto.
●
Per toglierlo:
1.Inserire le dita in alto e tirare verso di sé.
2.Tirare anche il fondo verso di sé.
●
Applicazione del pannello anteriore al diffusore
Note:
●
La polarità dei diffusori collegati è la stessa
se i loro cavi neri vengono collegati ai terminali
œ
. Se i diffusori vengono collegati con le
polarità invertite, l’effetto stereofonico ed i toni
possono degradarsi.
●
I diffusori di quest’unità non sono
magneticamente schermati. Se vengono
installati vicino o sopra un televisore, l’immagine
di q uest’ultimo può subire distorsioni. Installarli
ad almeno 20 cm di distanza da televisori.
7
Page 8
● When connecting the speaker cord make sure
that the wire core, not the insulating cover, is
connected to the speaker terminal. Otherwise,
sound cannot be heard.
● Cuando conecta el cordón del altavoz,
asegúrese de que el núcleo del cable, y no
la cubierta aislante, quede conectado al
terminal del altavoz, de lo contrario no se
escuchará sonido.
●
Nel collegare i cavi audio, controllare che il
conduttore in rame, e non il suo isolante, faccia
contatto direttamente con i termi nali. La
riproduzione non può altrimenti avere luogo.
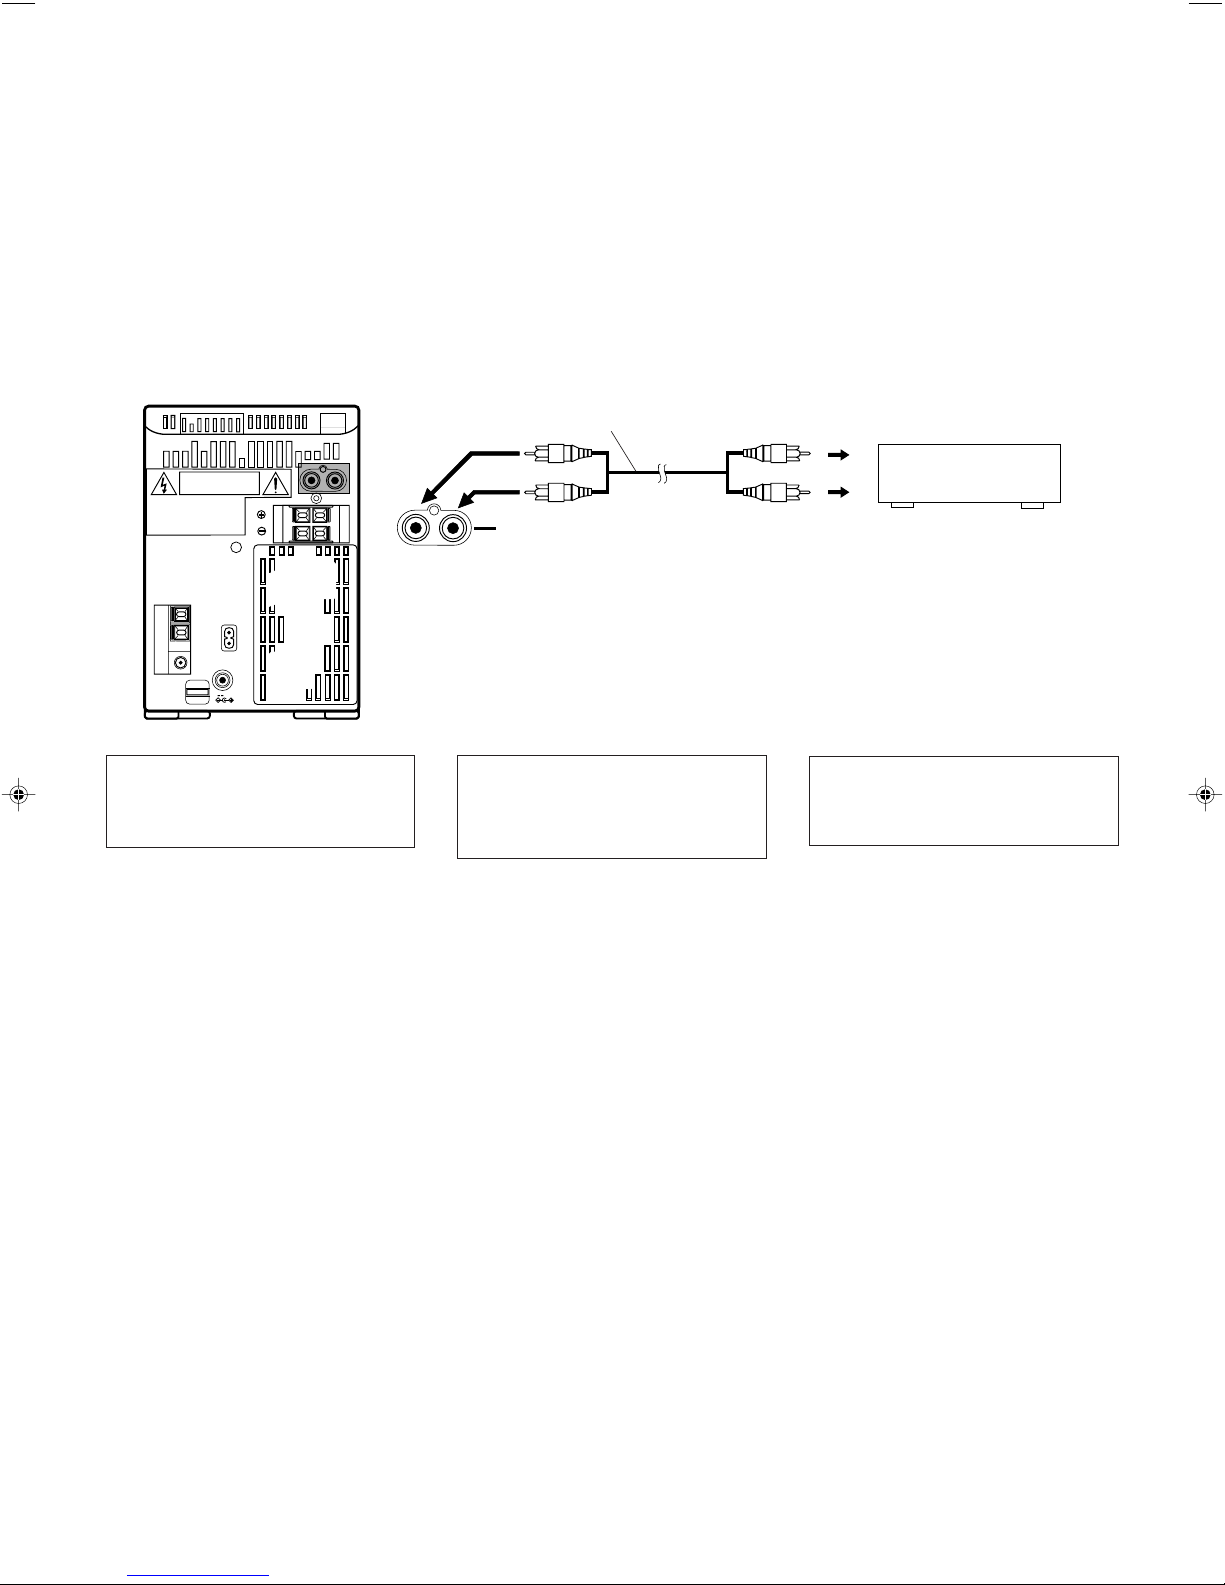
Connection of external audio units
● Connection with a turntable (or MD player)
R
L
RIGHT
LEFT
` AC IN
—
12V
DC IN
Note:
Regarding the connection with external
units and their operations, refer to the
instructions provided with those units.
Conexión de unidades externas de
audio
● Conexión con un tocadiscos
(o reproductor de MD)
Signal cord (optional)
Cordón de señal (opcional)
Cavo collegamento (opzionale)
R
L
Nota:
En relación a la conexión de unidades
externas y sus operaciones, refiérase a las
instrucciones suministradas con esas
unidades.
Pin-plug x 2
AUX
2 clavijas
Spinotto a spillo x 2
Collegamento di componenti esterni
● Collegamento con un giradischi (o lettore
MD)
Pin-plug x 2
2 clavijas
Spinotto a spillo x 2
Nota:
Per il collegamento con unità esterne ed il
loro funzionamento, vedere le istruzioni
fornite in dotazione a tali unità.
Turntable (with built-in equalizer) or MD player
(optional)
Reproductor de discos (con ecualizador
incorporado) o reproductor MD (opcional)
Giradischi (con equalizzatore incorporato)
o lettore MD (opzionale)
8
Page 9

POWER SUPPLY ALIMENTACION ALIMENTAZIONE
A. Connection of AC power cord
● Connect the AC power cord after all other
connections have been made.
R
L
RIGHT
LEFT
` AC IN
—
12V
DC IN
CAUTIONS:
1. ONLY USE THE JVC POWER CORD
PROVIDED WITH THIS UNIT TO AVOID
MALFUNCTION OR DAMAGE TO THE
UNIT.
2. BE SURE TO UNPLUG THE POWER CORD
FROM THE OUTLET WHEN GOING OUT
OR WHEN THE UNIT IS NOT IN USE FOR
AN EXTENDED PERIOD OF TIME.
A. Conexión del cordón de CA
● Conecte el cordón de CA después de haber
terminado todas las conexiones.
`
AC IN
PRECAUCIONES:
1. PARA EVITAR FALLAS O DAÑOS EN LA
UNIDAD UTILICE EL CORDON DE
ALIMENTACION DE JVC SUMINISTRADO
CON ESTA UNIDAD.
2. ASEGURESE DE DESENCHUFAR EL
CORDON DE ALIMENTACION DEL
TOMACORRIENTES CUANDO SALGA O
CUANDO NO VAYA A UTILIZAR LA
UNIDAD POR UN LARGO PERIODO.
Power cord
Cordón de alimentación
Cavo alimentazione
A. Collegamento del cavo di alimentazione
CA
●
Collegare il cavo di alimentazione CA dopo
aver eseguito tutti gli altri collegamenti.
PRECAUZIONI:
1. UTILIZZARE SOLO IL CAVO DI
ALIMENTAZIONE JVC IN DOTAZIONE A
QUESTA UNITA’ PER EVITARE
DISFUNZIONI O DANNI ALL’UNITA’
STESSA.
2. ACCERTARSI DI SCOLLEGARE IL CAVO
DI ALIMENTAZIONE DALLA PRESA DI
RETE QUANDO SI ESCE O QUANDO SI
PREVEDE DI NON UTILIZZARE L’UNITA’
PER UN PERIODO PROLUNGAT O.
B. Operation on car battery (DC 12 V)
R
L
RIGHT
LEFT
` AC IN
—
12V
DC IN
● First connect the car adapter to the DC IN 12
V jack, not the cigarette lighter socket,
because shorting of a plug on the car may
cause the fuse to blow out. In addition, be
careful not to make a short-circuit between
the plugs.
● When using a car battery, be sure to use
the specified car adapter (JVC model CAR120E) to prevent mishaps or damage
resulting from different polarity design.
DC IN
B. Funcionamiento con batería de
automóvil (12 V de CC)
1
12V
● Primero conecte el adaptador al jack DC IN
12V, no al enchufe del encendedor de
cigarrillos, porque si pone en cortocircuito
una clavija del automóvil, puede quemarse
un fusible. Además, tenga cuidado de no
producir un cortocircuito entre las clavijas.
● Cuando utilice una batería de automóvil,
emplee el adaptador especificado (JVC
modelo CA-R120E) para evitar fallas o
daños por diferentes tipos de polaridad.
Optional exclusive car adapter (JVC model CA-R120E)
Adaptador exclusivo para automóvil opcional (JVC modelo CA-R120E)
Adattatore esclusivo per automobile opzionale (modello JVC CA-R120E)
B. Funzionamento con la batteria di una
vettura (CC 12 V)
2
To car’s cigarette lighter socket (12 V)
Al enchufe del encendedor de cigarrillos del
automóvil (12 V)
Alla presa dell’accendisigari della vettura (12 V)
●
Collegare prima l’alimentatore alla presa DC
IN 12V e non alla presa dell’accendisigari in
quanto un cortocircuito nella vettura potrebbe
far saltare il fusibile. Inoltre, fare attenzione a
non mettere in cortocircuito le prese.
● Quando si utilizza la batteria di una vettura
per l’alimentazione, accertarsi di utilizzare
l’alimentatore specificato (modello JVC
CA-R120E) onde evitare danni derivanti da
polarità differenti.
Note:
● When there is a power failure or the AC
power cord is disconnected, the timer/clock
setting is erased from memory. Reset the
clock when the power supply is restored.
Nota:
● Cuando hay un corte de energía eléctrica o
cuando se desconecta el cordón de
alimentación CA, el ajuste del temporizador/
reloj se borra de la memoria. Reposicione el
reloj cuando se restaure el suministro eléctrico.
Nota:
●
Quando si verifica un’interruzione di corrente
oppure quando il cavo di alimentazione CA
viene scollegato, l’impostazione del timer/
orologio viene cancellata dalla memoria.
Reimpostare l’orologio quando
l’alimentazione viene riattivata.
9
Page 10
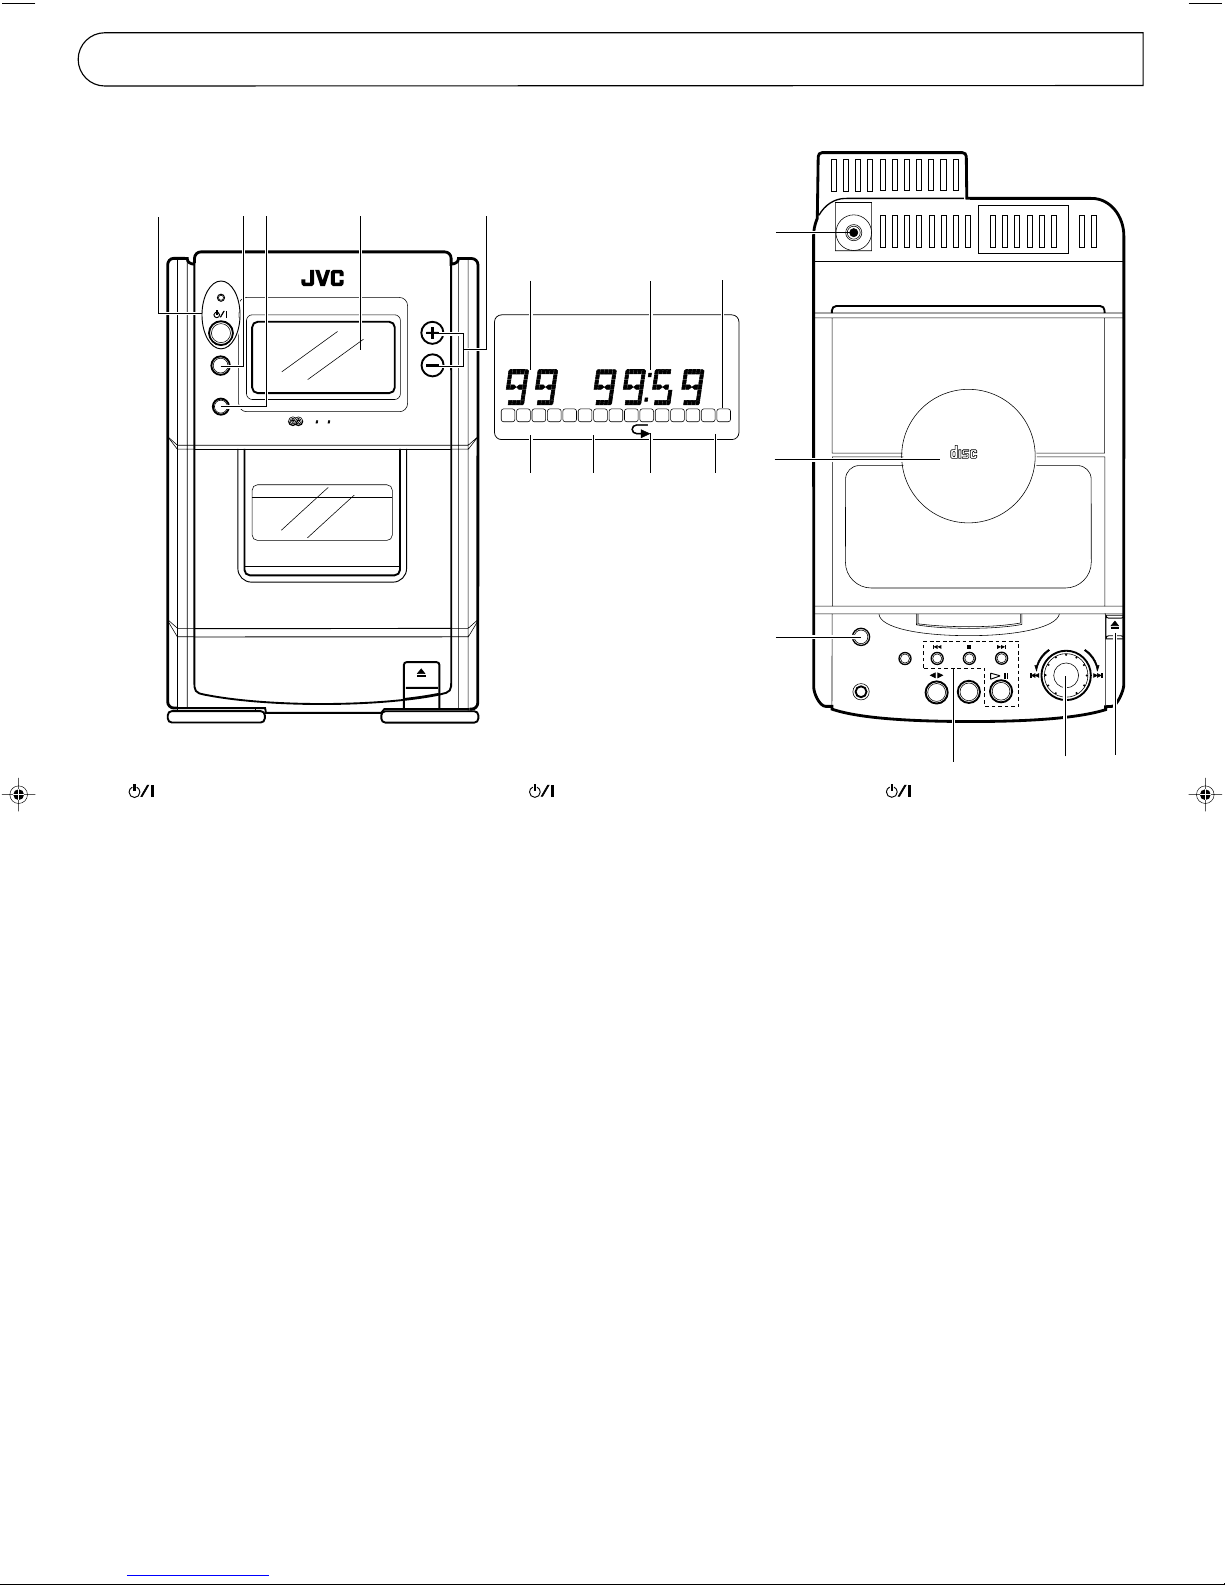
NAMES OF PARTS AND THEIR
FUNCTIONS
NOMBRES DE LAS PARTES Y
SUS FUNCIONES
NOMI E FUNZIONI DELLE PARTI
CD player /General section Reproductor de CD/sección general Sezione lettore CD/generale
Front
Parta
Lato
1
3
24 5
4
STANDBY
VOLUME
AUX
1
2
Top
Frontal
Anteriove
PHONES
6
3
EON
R D S
MICRO COMPONENT SYSTEM UX-T77R
AUTO TAPE SELECTOR
AUTO REVERSE
button and power STANDBY indicator
1
2 AUX button
3 Remote sensor section
4 Display window
1 Function/Track number display
2 Play time display
3 Music calendar display
4 Program mode indicator (PROGRAM)
5 RANDOM play indicator
6 Repeat play indicator (∂ALL)
7 OVER indicator
5 VOLUME buttons
+: Use to increase the volume.
- : Use to decrease the volume.
(Control range from 0 to 50.)
6 Headphones jack (PHONES) (3.5 mm dia.
stereo mini)
Connect headphones (impedance 16Ω to
1kΩ) to this jack. Speaker sound is
automatically switched off when the
headphones are connected.
7 CD holder
8 ACTIVE HYPER BASS PRO button
9 CD operations buttons
CD search buttons (™, £):
Press to locate the beginning of a track and
to start forward/reverse search operations.
Stop button (5):
Press to stop playing a CD.
CD play/pause button ($6):
Press to play a CD or to stop temporarily.
0 MULTI JOG dial
When the function is CD and the dial is
turned, the beginning of a track can be
searched. (1 track is selected by 2 clicks.)
! CD holder OPEN (8) button
234
1
PROGRAM RANDOM
5
4
9
12 131415
10 11
8
6
7
ALL
OVER
56 7
1 Botón e indicador de alimentación
STANDBY
2 Botón AUX
3 Sección del sensor remoto
4 Ventanilla de indicación
1 Indicación de función/número de pista
2 Indicación de tiempo de reproducción
3 Indicación de calendario musical
4 Indicador de modo de programa
(PROGRAM)
5 Indicador de reproducción RANDOM
6 Indicador de reproducción repetida
(∂ALL)
7 Indicador OVER
5 Botones VOLUME
+: Sirve para aumentar el volumen.
-: Sirve para reducir el volumen.
(Los límites de control van de 0 a 50).
6 Jack de auriculares (PHONES) (mini jack
estereofónico de 3,5 mm de diám.)
Conecte los auriculares (impedancia de 16Ω
a 1kΩ), a este jack. El sonido de los
altavoces se desconecta automáticamente
cuando se conectan los auriculares.
7 Portadisco de CD
8 Botón ACTIVE HYPER BASS PRO
9 Botones de operación de CD
Botones (™, £) de búsqueda de CD
Presiónelos para ubicar el principio de una
pista e iniciar las operaciones de búsqueda
hacia adelante/hacia atrás.
Botón de parada (5):
Presiónelo para parar la reproducción de
un CD.
Botón ($6) de reproducción de CD/pausa
Presiónelo para reproducir un CD o para
parar temporariamente.
0 Disco MULTI JOG
Cuando la función está en CD, gire el disco
para iniciar la búsqueda del principio de una
pista. (1 pista es seleccionada con 2
presiones).
! Botón (8 ) de abertura (OPEN) del
portadisco de CD
7
8
COMPACT
DIGITAL AUDIO
ACTIVE HYPER
BASS PRO
ONE TOUCH
REC
1
Tasto ed indicatore STANDBY
CLOCK
TIMER/SNOOZE
BAND
TUNER
TAPE
9
I
T
L
U
M
CD
0
alimentazione
2
Tasto AUX
3
Sezione sensore telecomando
4
Finestrella display
1
Visualizzazione funzione/numero brano
2
Visualizzazione tempo di riproduzione
3
Visualizzazione tavola musicale
4
Indicatore modo programmazione
(PROGRAM)
5
Indicatore riproduzione casuale
RANDOM
6
Indicatore riproduzione ripetuta (∂ALL)
7
Indicatore OVER
5
Tasti VOLUME
+: Utilizzato per aumentare il volume.
-: Utilizzato per diminuire il volume.
(Gamma di controllo da 0 a 50).
6
Presa cuffie (PHONES) (stereo mini da 3,5
mm di diametro)
Collegare le cuffie (impedenza da 16Ω a
1kΩ) a questa presa. Il suono dei diffusori
viene disattivato automaticamente quando
si collegano le cuffie.
7
Piatto CD
8
Tasto ACTIVE HYPER BASS PRO
9
Tasti operazioni lettore CD
Tasti di ricerca CD ™, £):
Premerli per trovare l'inizio di un brano e per
attivare le operazioni di ricerca in avanti ed
all'indietro.
Tasto di arresto (5):
Premerlo per interrompere la riproduzione
del CD.
Tasto riproduzione CD/pausa ($6):
Premere questo tasto per riprodurre un CD
oppure per interrompere temporaneamente
la riproduzione.
0
Manopola MULTI JOG
Ruotando la manopola quando la funzione
selezionata CD, possibile ricercare l'inizio di
un brano. (1 brano viene selezionato con 2
scatti).
!
Tasto aperturas (OPEN) piatto CD (8)
OPEN
J
O
G
!
10
Page 11

Tuner/Deck section Sección del sintonizador/platina Sezione sintonizzatore/registratore
PHONES
1
STANDBY
AUX
MICRO COMPONENT SYSTEM UX-T77R
AUTO TAPE SELECTOR
R D S
EON
VOLUME
7
8
1
9
4
25
3
EON
6
MONO STEREO
TA NEWS
0
INFO
COMPACT
DIGITAL AUDIO
AUTO REVERSE
1
1
Display window
23
1 Band indicator
2 Radio frequency display
3 EON indicator
4 Programme type (TA/NEWS/INFO)
indicators
5 MONO indicator
6 STEREO indicator
7 Recording indicator (REC)
8 Tape direction indicator (1, 4)
9 Reverse mode indicator ( / / )
0 Tape (TAPE) mode display
2 Cassette holder
3 Cassette holder eject (8) button
4 ONE TOUCH REC button
5 TUNER/BAND button
Press to select tuner mode.
Press to select the band.
Tuning buttons (™/£)
6 Cassette operation buttons
™: Press to rewind the tape.
5: Press to stop the tape.
£: Press to fast wind the tape.
TAPE (14): Press to select the T APE mode.
: Press to play back the tape in the
forward direction.
The 4 indicator lights in the display
window.
: Press to play back the tape in the
reverse direction.
The 1 indicator lights in the display
window.
7 MULTI JOG Dial
The preset station can be selected. (1 station
is selected by 2 clicks.)
REC
1 Ventanilla de indicación
1 Indicador de banda
2
Indicación de frecuencia de radio
3 Indicador de EON
4 Indicador del tipo de programa (TA/
NEWS/INFO)
5
Indicador MONO
6
Indicador STEREO
7
I
ndicador (REC) de grabación
8
Indicador (1 , 4) del sentido de la cinta
9
Indicador ( / / ) del modo de
inversión
0
Indicación (TAPE) del modo de cinta
2 Portacassette
3 Botón (8) de eyección del portacassette
4 Botón ONE TOUCH REC
5 Botón TUNER/BAND
Presiónelo para activar el modo de
sintonizador
Presiónelo para seleccionar la banda.
Botones (™/£) de sintonización
6 Botones de operación del cassette
™: Presiónelo para rebobinar la cinta.
5
:
Presiónelo para parar la cinta.
£: Presiónelo para avanzar rápidamente
la cinta.
TAPE (14): Presiónelo para activar el
modo T APE.
: Presiónelo para reproducir la cinta
hacia adelante.
El indicador
4 s
e enciende en la
ventanilla de indicación.
: Presiónelo para reproducir la cinta
hacia atrás.
El indicador 1
se enciende en la
ventanilla de indicación.
7 Disco MULTI JOG
Para seleccionar la emisora presintonizada.
(1 estación es seleccionada con 2 presiones)
ACTIVE HYPER
BASS PRO
ONE TOUCH
REC
4
1
Finestrella display
1
Indicatore di banda
2
Visualizzazione frequenza radio
3
Indicarore EON
4
Indicatore del tipo di programma (TA/
CLOCK
TIMER/SNOOZE
BAND
TUNER
TAPE
5
M
CD
67
I
J
T
O
L
G
U
NEWS/INFO)
5
Indicatore MONO
6
Indicatore STEREO
7
Indicatore di registrazione (REC)
8
Indicatore direzione nastro (1, 4)
9
Indicatore modo reverse ( / / )
0
Visualizzazione modo registratore (T APE)
2
Vano portacassetta
3
Tasto espulsione vano portacassetta (8)
4
Tasto ONE TOUCH REC
5
Tasto TUNER/BAND
Premerlo per selezionare il modo del
sintonizzatore.
Premerlo per selezionare la banda.
Tasti di sintonizzazione (™/£)
6
Tasti operazioni registratore a cassette
™
: Premere questo tasto per riavvolgere
il nastro.
5
: Premere questo tasto per fermare il
nastro.
£
: Premere questo tasto per avvolgere il
nastro.
TAPE (14): Premere per selezionare il
modo TAPE.
: Premere per riprodurre il nastro nella
direzione in avanti.
L'indicatore 4 si illumina sul display.
: Premere per riprodurre il nastro nella
direzione all'indietro.
L'indicatore 1 si illumina sul display.
7
Manopola MULTI JOG
E' possibile selezionare una stazione
preselezionata. (1 stazione viene selezionata
con 2 scatti).
OPEN
11
Page 12

REMOTE CONTROL UNIT UNIDAD DE CONTROL REMOTO UNIT A ’ DI TELECOMANDO
Preparation before use
● Installing batteries in the remote control
unit
1. Remove the battery cover from the back of
the remote control unit.
2. Insert two “R6/AA (15F)” size batteries.
● Insert the batteries with the Œ and œ
terminals matching the indication inside
the battery compartment.
3. Replace the cover.
● Battery replacement
When the remote control operation becomes
unstable or the distance from which remote
control is possible decreases, replace the
batteries.
Preparativos antes usarla
● Instalación de las pilas en la unidad de
control remoto
1. Extraiga la tapa de las pilas de la parte
trasera de la unidad de control remoto.
2. Inserte dos pilas de tamaño “R6/AA (15F)”.
● Inserte las pilas con los terminales Œ y œ
de acuerdo a la indicación en el interior
del compartimiento de las pilas.
3. Recoloque la tapa.
Insert the œ ends first.
Primero inserte el terminal
Inserire il lato œ per primo.
● Reemplazo de las pilas
Cuando el funcionamiento del controlador
remoto se vuelve inestable o la distancia
dentro de la cual actúa se reduce, reemplace
las pilas.
œ.
Preparativi prima dell’uso
● Installazione delle batterie nel
telecomando
1. Rimuovere il coperchio del vano batterie dal
retro del telecomando.
2. Inserire due batterie di formato “R6/AA
(15F)”.
●
Inserire le batterie con i terminali Πe
orientati come indicato all’interno del vano
stesso.
3. Reinstallare il coperchio.
● Sostituzione batterie
Quando il funzionamento dell’unità di
telecomando è intermittente oppure quando
la distanza utile diminuisce, sostituire le
batterie.
œ
Using the remote control unit
● Point at the remote sensor and operate within
about 7 m (approx. 23 ft).
● The remote control range is less when the unit
is used at an angle.
● Do not expose the remote sensor to strong
direct sunlight or artificial lighting.
● Make sure that there are no obstacles
between the remote sensor and the unit.
Utilización de la unidad de control
remoto
● Apúntela hacia el sensor remoto y hágala
funcionar dentro de un radio de 7 m. aprox.
● El radio de acción del controlador remoto es
menor cuando se lo apunta en ángulo.
● No exponga el sensor remoto a la luz directa
del sol o a fuerte iluminación artificial.
● Asegúrese de que no hayan obstáculos entre
el sensor remoto y el controlador remoto.
Uso dell’unità di telecomando
●
Utilizzare l’unità di telecomando entro una
distanza di circa 7 metri puntandola verso la
sezione sensor telecomando.
●
Il campo di funzionamento dell’unità di
telecomando è inferiore se essa viene
utilizzata da una posizione angolare.
●
Non esporre la sezione sensor telecomando
a luce naturale o artificiale intensa.
●
Accertarsi che non vi siano ostacoli tra la
sezione sensor telecomando e l’unità di
telecomando.
12
Page 13
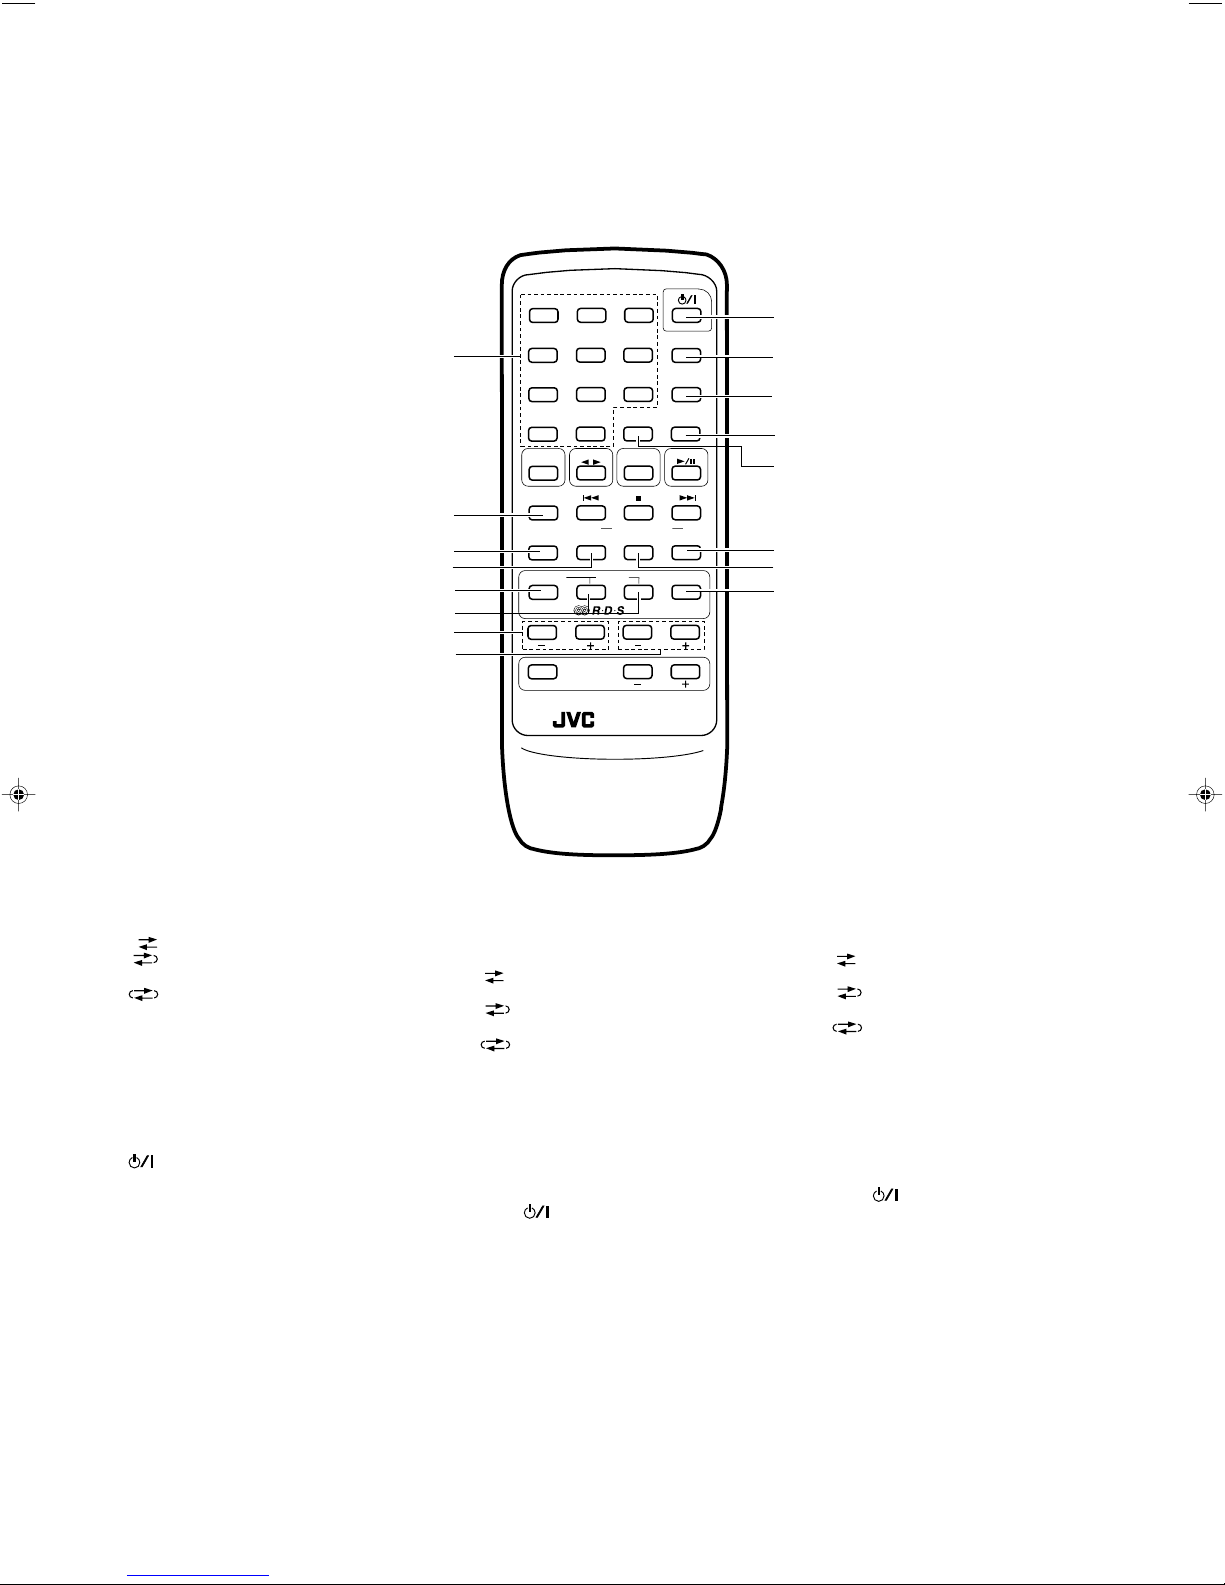
The following operations can be performed
1
2
3
4
5
6
^
7
8
9
0
!
@
#
$
%
using the remote control unit.
● Check the operation button functions
carefully and operate them correctly.
Las siguientes operaciones deben ser
ejecutadas utilizando la unidad de control
remoto.
● Compruebe detalladamente el
funcionamiento de los botones de
operación y opérelos correctamente.
Le operazioni seguenti possono essere
eseguite utilizzando l’unità di telecomando.
● Controllare con attenzione le funzioni dei
tasti ed utilizzare quest’ultimi in modo
corretto.
12
4
5
8
7
10
+10
TAPE TUNER
AUX
REVERSE
MODE
REW
PROGRAM RANDOM
PTY/EON SELECT
BASS
AHB.PRO
3
SLEEP
6
DISPLAY
9
AUTO
STEREO
PRESET
AUTO/MONO
BAND
MULTI CONTROL
REPEATBEAT CUT
DISPLAY MODE
EON
TREBLE
VOLUME
REMOTE CONTROL
RM-RXUT200R
C D
FF
1 Track number buttons (No. 1 to No. 10. +10)
Press station buttons (No. 1 to No. 10. +10)
2 REVERSE MODE button
: For single-side recording or playback.
: For recording or playback on both
sides.
: For continuous play.
3 BEAT CUT button
4 PROGRAM button
5 PTY (Programme Type)/EON (Enhanced
Other Networks) button
6 PTY/EON SELECT buttons
7 BASS buttons (+, -)
(Control range from -6 to 6.)
8 TREBLE buttons (+. -)
(Control range from -6 to 6.)
9 button
0 SLEEP button
! DISPLAY button
Use to display the current time.
@ STEREO AUTO/MONO button
# AUTO PRESET botton
$ REPEAT button
% RANDOM button
^ DISPLAY MODE button
● Buttons not mentioned here have the same
functions as those on the main unit.
1 Botones (No. 1 a No. 10, +10) de número
de pista
Presione los botones de radioemisora (No.
1 a No. 10, +10)
2 Botón REVERSE MODE
: Para grabación del solo lado o
reproducción.
: Para grabar o reproducir ambos
lados.
: Para reproducción continuada.
3 Botón BEAT CUT
4 Botón PROGRAM
5 Botón PTY (tipo de programa)/EON
(realzado de otra redes)
6 Botón SELECT PTY/EON
7 Botones BASS (+, -)
(Límites de control de -6 a 6.)
8 Botones TREBLE (+, -)
(Límites de control de -6 a 6.)
9 Botón
0 Botón SLEEP
! Botón DISPLAY
Emplee para llamar la indicación de la hora.
@ Botón STEREO AUTO/MONO
# Botón de presiontonización automática
(AUTO PRESET)
$ Botón REPEAT
% Botón RANDOM
^ Botón DISPLAY MODE
● Los botones que no están aquí
mencionados tienen las mismas funciones
que los de la unidad principal.
1
Tasti numeri brano (No. 1 - No. 10. +10)
Tasti stazioni preselezionate (No. 1 - No. 10.
+10)
2
Tasto REVERSE MODE
: Per la registrazione o riproduzione del
solo lato.
: Per la registrazione o riproduzione su
entrambi i lati.
: Per la riproduzione continuata.
3
Tasto BEAT CUT
4
Tasto PROGRAM
5
Tasto PTY (Tipo Programma)/EON
(Potenziamento Altra Rete)
6
Tasto PTY/EON SELECT
7
Tasti BASS (+, -)
(Gamma di controllo da -6 a 6.)
8
Tasti TREBLE (+, -)
(Gamma di controllo da -6 a 6.)
9
Tasto
0
Tasto SLEEP
!
Tasto DISPLAY
Utilizzato per visualizzare l'orario attuale.
@
Tasto STEREO AUTO/MONO
#
Tasto preselezione automatica (AUTO
PRESET)
$
Tasto REPEAT
%
Tasto RANDOM
^
Tasto DISPLAY MODE
● I tasti non menzionati possiedono le stesse
funzioni di quelli dell'unitê principale.
13
Page 14

SWITCHING THE POWER ON/OFF
STANDBY
button
Botón
Tasto
AUX button
Botón AUX
Tasto AUX
AUX
MICRO COMPONENT SYSTEM UX-T77R
AUTO TAPE SELECTOR
AUTO REVERSE
R D S
CONEXION/DESCONEXION DE LA
ALIMENTACION
PHONES
VOLUME
EON
ACCENSIONE E SPEGNIMENTO
COMPACT
DIGITAL AUDIO
Switching the power on/off
● Switching on:
STANDBY
STANDBY
TAPE play (1, 4) buttons
Botones de reproducción TAPE (1, 4)
Tasti di riproduzione TAPE (1, 4)
Conexión/desconexión de la alimentación
● Conexión:
The STANDBY indicator goes out.
El indicador STANDBY se apaga.
L’indicatore ST ANDBY si spegne.
● Desconexión:● Switching off:
The STANDBY indicator lights.
El indicador STANDBY se enciende.
L’indicatore ST ANDBY si illumina.
ACTIVE HYPER
BASS PRO
ONE TOUCH
REC
CLOCK
TIMER/SNOOZE
BAND
TUNER
TAPE
OPEN
I
J
T
O
L
G
U
M
CD
CD play/pause ($6) button
Botón de reproducción/pausa de CD
($6)
Tasto riproduzione/pausa CD ($6)
TUNER/BAND button
Botón TUNER/BAND
Tasto TUNER/BAND
Accensione e spegnimento dell’unità
●
Accensione:
● The indicator in the display window lights.
● Se apaga el indicador en la ventanilla, se enciende.
● L’indicatore nel display
● The indicator in the display window goes out and only the clock is indicated.
● Se apaga el indicador en la ventanilla de indicación y solo permanece la indicación del reloj.
L’indicatore nel display si spegne e rimane indicato solo l’orario.
●
si illumina.
●
Spegnimento:
14
Page 15

One touch operation (COMPU PLAY)
Even when the power is set to STANDBY,
pressing the button shown below switches on
the power and selects the source.
Operación de un solo toque (COMPU
PLAY)
Cuando la alimentación está colocada en
ST ANDBY , el presionar el botón mostrado abajo
conecta la alimentación y selecciona la fuente.
Funzionamento ad un solo tocco
(COMPU PLAY)
Anche se l’unità si trova nel modo STANDBY,
premendo uno dei tasti indicati di seguito essa si
accende e una sorgente di segnale viene attivata.
Function mode
Modo de función
Modo di funzionamento
CD
TAPE
BAND
TUNER
AUX
CD
TAPE
TUNER
AUX
Notes:
● When switching off the power, be sure to press
the button.
● The COMPU PLAY function on the remote
control has the same function as that on the
main unit.
VOLUME, TONE AND OTHER
CONTROLS
Operations
Operaciones
Operazioni
When this button is pressed with a CD loaded, CD playback begins.
Cuando se presiona este botón habiendo un CD colocado, comienza la reproducción del mismo.
Se questo tasto viene premuto a lettore CD carico, la riproduzione del CD ha immediatamente inizio.
When this button is pressed with a tape loaded, tape playback begins.
Cuando se presiona este botón habiendo una cinta colocada, comienza la reproducción de la misma.
Se questo tasto viene premuto a registratore a cassette carico, la riproduzione della cassetta ha
immediatamente inizio.
When this button is pressed, the tuner is engaged.
Cuando se presiona este botón, se activa el sintonizador.
Se questo tasto viene premuto, il sintonizzatore si accende.
A sound source connected to the AUX terminal can be engaged.
Es posible activar una fuente de sonido que esté conectada al terminal AUX.
Può attivare una sorgente di segnale collegata al terminale AUX .
Notas:
● Para desconectar la alimentación asegúrese
de presionar el botón .
● La función COMPU PLAY del controlador
remoto tiene la misma función que el de la
Note:
●
Spegnere l’unità solo premendo il tasto .
●
Il funzione COMPU PLAY del telecomando
possiede le stesse funzioni di quello omonimo
dell’unità principale.
unidad principal.
VOLUMEN, TONO Y OTROS
CONTROLES
VOLUME, TONI ED ALTRI
COMANDI
VOLUME buttons
+ : Use to increase the volume.
– : Use to decrease the volume.
(Control range from 0 to 50.)
BASS/TREBLE buttons (using the remote
control unit)
To set the bass or treble level, press the
corresponding button. The level setting ranges
from –6 to 6.
BASS TREBLE
ACTIVE HYPER-BASS PRO button
ON: The BASS indicator lights up. Set to this
position to activate ACTIVE HYPERBASS PRO sound.
OFF: The BASS indicator goes out. Set to this
position when ACTIVE HYPER-BASS
PRO sound is not required.
Botones VOLUME
+: Uselo para aumentar el volumen.
– : Uselo para reducir el volumen.
(Los límites de control van de 0 a 50.)
VOLUME
Botones BASS/TREBLE (usando el mando
a distancia)
Para ajustar el nivel de grave o agudo, presione
el botón correspondiente. El ajuste de nivel va
de –6 a 6.
Botón de hiper graves activos profesionales
(ACTIVE HYPER-BASS PRO)
ON: Se enciende el indicador BASS.
Colóquelo en esta posición para activar
el sonido hiper grave activo profesional.
OFF: Se apaga el indicador BASS. Colóquelo
en esta posición cuando no desee
escuchar el sonido de hiper grave activo
profesional.
Tasti VOLUME
+ : Per aumentare il volume.
– : Per diminuire il volume.
(Gamma controllo volume da 0 a 50.)
Tasti BASS/TREBLE (con l’unità di
telecomando)
Per impostare il livello dei bassi o degli acuti,
premere il tasto corrispondente. L’impostazione
del livello spazia da –6 a 6.
Tasto ACTIVE HYPER-BASS PRO
ON : L’indicatore
BASS
si illumina. Selezionare
questa impostazione per attivare la
funzione Active Hyper Bass Pro.
OFF: L’indicatore BASS si spegne. Selezionare
questa impostazione per disattivare la
funzione Active Hyper Bass Pro.
15
Page 16

HANDLING CDs MANIPULACION DE CD MANEGGIO DEI CD
Since dirty, damaged and warped CDs may
damage the unit, take care regarding the
following:
1. Usable CDs
Use CDs with the mark shown.
2. Notes on handling CDs
● Do not touch the reflective recorded
surface.
● Do not stick or write anything on the label
side.
● Do not bend CDs.
3. Storage
● After removing a CD from the unit, be sure
to put it back in its case.
● Do not expose CDs to direct sunlight, high
temperatures from a heater, etc., high
humidity, or dust.
4. Cleaning CDs
● Before loading a CD, wipe off any dust,
dirt or fingerprints with a soft cloth. CDs
should be cleaned by wiping radially from
the center to the edge.
● Never use thinner, benzine, record cleaner
or antistatic spray.
● Removing the CD from its storage case and loading it.
● Extracción del CD de su caja y colocación del mismo.
Rimozione del CD dalla sua custodia e suo caricamento nel lettore.
●
Como los CD sucios, dañados o alabeados
pueden dañar la unidad, tome precauciones
en relación a lo siguiente:
1. CD utilizables
Utilice CD con la marca indicada.
2. Notas sobre manipulación de CD
● No toque la superficie grabada reflejante.
● No adhiera ni escriba nada sobre el lado
de la etiqueta.
● No doble los CD.
3. Almacenamiento
● Después de extraer un CD de la unidad,
asegúrese de colocarlo otra vez en su caja.
● No exponga los CD a la luz directa del
sol, altas temperaturas provenientes de un
calentador, etc., alta humedad, o polvo.
4. Limpieza de CD
● Antes de colocar un CD, limpie el polvo,
suciedad o huellas digitales, con un paño
suave. Los CD deben ser limpiados
radialmente desde el centro hacia el borde.
● Nunca utilice solvente, bencina, limpiador
de discos o aerosol antiestático.
Dato che CD sporchi, danneggiati o deformati
possono danneggiare l’unità, fare attenzione a
quanto segue:
1. CD utilizzabili
Utilizzare solo CD recanti il marchio indicato.
2. Note sul maneggio dei CD
●
Non toccare la superficie registrata
iridescente.
●
Non incollare o scrivere alcunchè sul lato
etichettato.
●
Non piegare i CD.
3. Conservazione
●
Dopo aver rimosso un CD dall’unità,
accertarsi di riporlo nella sua custodia.
●
Non esporre i CD alla luce solare diretta, a
temperature elevate, ad umidità elevate o a
polvere.
4. Pulizia CD
●
Prima di inserire un CD, pulire polvere,
sporco o impronte digitali con un panno
morbido. I CD devono essere puliti
strofinando radialmente, dal centro verso
il bordo.
● Non utilizzare mai diluente, benzina, liquido
pulente per dischi o spray antistatici.
● Press the center and lift out.
● Presione el centro y levántelo.
●
Premere il centro e sollevare.
● Handling
● Manipulación
Maneggio
●
Note:
CDs shaped like a heart, flower, etc. (speciallyshaped CDs) cannot be used with this unit. If
this type of CD is loaded, it will cause a trouble.
● Cleaning
Incorrect
Incorrecto
Scorretto
● Limpieza
Pulizia
●
Nota:
Los CD con forma de corazón, flor, etc. (CD
con forma especial), no pueden ser uasados
con esta unidad. Si coloca estos tipos de CD,
se producirá una falla.
● Press to secure the CD.
● Presiónelo para sujetar el CD.
Premere per fissare il CD.
●
Correct
Correcto
Corretto
Incorrect
Incorrecto
Scorretto
Nota:
I compact disc a forma di cuore, fiori o altro
(cioè compact disc di forme diverse dal
normale) non possono essere utilizzati in
questo apparecchiro. Il loro eventuale uso può
causare disfunzioni.
16
Page 17

PLAYING CDs REPRODUCCION DE CD
RIPRODUZIONE DI CD
Playing an entire CD
The following example of playing an entire CD
assumes a CD with 12 tracks and a total playing
time of 48 minutes 57 seconds.
Operate in the order shown
COMPACT
DIGITAL AUDIO
ACTIVE HYPER
BASS PRO
ONE TOUCH
REC
CLOCK
TIMER/SNOOZE
BAND
TUNER
TAPE
I
J
T
O
L
G
U
M
CD
3
1 Press to open the CD holder.
2 Load a CD with the label side facing up and
close the CD holder.
3 Press to start play. (The power is switched
on.)
4 Adjust.
● As tracks are played, their track numbers go
out one by one.
Reproducción de un CD completo
El siguiente ejemplo de reproducción de un CD
completo supone que se ha colocado un CD
con 12 pistas y un tiempo total de reproducción
de 48 minutos y 57 segundos.
Opere en el orden mostrado
2
OPEN
1
1 Presione para abrir el compartimiento del
CD.
2 Coloque un CD con la etiqueta apuntando
hacia arriba y cierre el compartimiento del
CD.
3 Presione para iniciar la reproducción.
(La alimentación está conectada.)
4 Ajuste.
● A medida que las pistas son reproducidas,
el número de pista desaparecerá uno por
uno.
Riproduzione di un intero CD
L'esempio seguente per la riproduzione di un
intero CD considera un CD con 12 brani ed un
tempo di riproduzione totale di 48 minuti e 57
secondi.
Eseguire le operazioni nell'ordine indicato
STANDBY
VOLUME
AUX
EON
R D S
MICRO COMPONENT SYSTEM UX-T77R
AUTO TAPE SELECTOR
AUTO REVERSE
1
Premere il tasto per aprire il piatto del CD.
2
Inserire un CD col lato etichettato in alto e
quindi chiudere il piatto del CD.
3
Premere il tasto per l'avvio della riproduzione.
(L'alimentazione viene attivata.)
4
Regolare.
●
Quando i brani vengono riprodotti, i loro
numeri di brano si spengono uno alla volta.
4
● 8-cm (3") CDs can be used in this unit
without an adapter.
● To stop in the middle of a CD
During play, press the stop/clear (5) button
to stop play.
234
1
● To stop a CD temporarily
Press the $6 button to stop play temporarily.
The playing time display blinks.
When pressed again, play resumes from the
point where it was paused.
Caution:
● To change CDs, press the stop/clear (5)
button; check that the CD has stopped rotating
completely before unloading it.
Notes:
● When no CD is loaded, “NO DISC” is indicated
in the display window. This indication may also
appear when a CD is loaded upside down.
● The following indication may appear when a
CD is dirty or scratched, or when the CD is
loaded upside down.
In such a case, check the CD and insert again
after cleaning the CD or turning it over.
● Los CD de 8-cm. pueden ser usados con
esta unidad sin necesidad de adaptador .
● Para detener la reproducción de un CD en
la mitad de la misma
Presione el botón (5) de parada/borrado para
detener la reproducción.
● The total number of tracks and total playback time are displayed.
● La unidad indica el número total de pistas y el tiempo total de reproducción.
●
9
5
6
7
12
10 11
8
Viene visualizzato il numero totale di brani ed il tempo totale di riproduzione.
● Para parar un CD temporariamente
Presione el botón $6 para parar la
reproducción temporariamente, en este
momento la indicación de tiempo de
reproducción parpadea.
Si lo presiona otra vez, la reproducción
continúa desde el punto dónde se efectuó la
pausa.
Precaución:
● Para cambiar CD, presione el botón (5) de
parada/ borrado; compruebe que el CD haya
parado de girar antes de extraerlo.
Notas:
● Cuando no hay ningún CD colocado, se
visualiza el mensaje “NO DISC” en el visor
de indicación. Esta indicación también puede
ser visualizada cuando se coloca un CD
invertido.
● La siguiente indicación puede aparecer
cuando el CD está sucio o rayado, o cuando
se lo ha colocado al revés.
En tal caso, inspeccione el CD y colóquelo
otra vez después de limpiarlo o de girarlo.
●
La riproduzione di CD da 8 cm non
richiede l'uso di alcun adattatore.
● Per l'interruzione nel mezzo di un CD
Premere il tasto arresto/cancellazione (5) per
interrompere la riproduzione.
● Per interrompere temporaneamente la
riproduzione del CD
Premere il tasto $6 per interrompere
temporaneamente la riproduzione e far
lampeggiare la visualizzazione del tempo.
Quando il tasto viene premuto nuovamente,
la riproduzione riprende dalla posizione dove
era stata interrotta.
Attenzione:
●
Per cambiare i CD, premere il tasto arresto/
cancellazione (5); controllare che il CD abbia
smesso completamente di girare prima di
estrarlo.
Note:
●
Quando non è stato inserito alcun CD,
l’indicazione “NO DISC” viene visualizzata
nel display. Questa indicazione può apparire
anche quando un CD viene inserito
capovolto.
●
L'indicazione seguente potrebbe apparire
quando un CD è sporco o graffiato oppure
quando il CD viene inserito rovescio.
In tali casi, controllare il CD e quindi
reinserirlo dopo averlo pulito o voltato.
17
Page 18

● Do not use the unit at excessively high or
2
1
low temperatures. The recommended
temperature range is from 5°C (41°F) to
35°C (95°F).
● After play, unload the CD.
● If mistracking occurs during play, lower the
volume.
● No utilice la unidad en temperaturas
excesivamente altas o bajas. Los límites
de temperatura recomendados son de 5°C
a 35°C.
● Después de la reproducción extraiga el CD.
● Si ocurre un error de seguimiento durante la
reproducción, baje el volumen.
● Non utilizzare l’unità con temperature
eccessivamente elevate o basse. La
gamma raccomandata va dai 5°C ai 35°C.
●
Dopo la riproduzione, togliere il CD.
●
Se la lettura del CD fosse scorretta durante
la riproduzione, abbassare il volume.
Skip play
● During play, it is possible to skip forward to
the beginning of the next track or back to the
beginning of the track being played or the
previous track; when the beginning of the
required track has been located, play starts
automatically.
To listen to the next track...
Press the £ button once to skip to the
beginning of the next track.
To listen to the previous track...
Press the ™ button to skip to the beginning
of the track being played. Press twice quickly to
skip to the beginning of the previous track.
● By using the MULTI JOG dial, the beginning
of tracks can be searched and played.
T
L
U
or
o
o
M
Search play (to locate the required
position on the CD)
● The required position can be located using
fast-forward or reverse search while playing
a CD.
Keep pressing for fast-reverse search.
Mantenga presionado para la búsqueda regresiva rápida.
Tenere premuto per la ricerca rapida all'indietro.
● Hold down the button; search play starts
slowly and then gradually increases in speed.
● Since low-volume sound (at about one quarter
of the normal level) can be heard in the search
mode, monitor the sound and release the
button when the required position is located.
Direct access play (using the remote
control unit)
● Pressing any of the track number buttons will
start play from the beginning of the designated
track. (This function cannot be used during
programmed play.)
12
3
Reproducción con salto
● Durante la reproducción es posible saltar
hacia adelante hasta el principio de la
próxima pista o hacia atrás hasta el principio
de la pista que está siendo reproducida o de
la pista anterior; cuando haya localizado el
principio de la pista deseada, la reproducción
se inicia automáticamente.
Para escuchar la próxima pista...
Presione una vez el botón £ para saltar al
principio de la próxima pista.
Para escuchar la pista anterior...
Presione el botón ™ para saltar al principio
de la pista que está siendo reproducida.
Presiónelo dos veces rápidamente para saltar
al principio de la pista anterior.
● Para buscar el principio de una pista y
I
J
O
reproducirla emplee el disco MULTI JOG.
G
Reproducción con búsqueda (para
localizar la posición deseada en el CD)
● La posición deseada puede ser ubicada
utilizando la búsqueda de avance rápido o
invertida mientras reproduce un CD.
● Mantenga presionado el botón; la búsqueda
con reproducción se inicia lentamente y luego
aumenta gradualmente la velocidad.
● Como en el modo de búsqueda es posible
escuchar el sonido a bajo volumen
(aproximadamente a un cuarto del nivel
normal), monitoree el sonido y suelte el botón
cuando haya localizado la posición deseada.
Reproducción por acceso directo
(utilizando la unidad de control remoto)
● Si presiona cualquiera de los botones de
número de pista la reproducción se iniciará
desde el principio de la pista escogida. (Esta
función no puede ser usada durante la
reproducción programada.)
Riproduzione con salto
●
Durante la riproduzione è possibile saltare
all’inizio del brano successivo oppure all’inizio
del brano in corso di riproduzione o di un brano
precedente; la riproduzione inizia
automaticamente quando l’inizio del brano
desiderato viene raggiunto.
Per ascoltare il brano successivo...
Premere una volta il tasto £ per saltare
all’inizio del brano successivo.
Per ascoltare il brano precedente...
Premere il tasto ™ per saltare all’inizio del
brano in corso di riproduzione. Premerlo due
volte in rapida successione per saltare all’inizio
del brano precedente.
●
Utilizzando la manopola MULTI JOG e
possibile ricercare all'inizio dei vari brani per
poi riprodurli.
Riproduzione con ricerca (per localizzare
una determinata posizione sul CD)
●
La posizione desiderata può essere
localizzata utilizzando la ricerca rapida in
avanti o all’indietro durante la riproduzione di
un CD.
Keep pressing for fast-forward search.
Mantenga presionado para la búsqueda progresiva rápida.
Tenere premuto per la ricerca rapida in avanti.
●
Tenere premuto il tasto; la riproduzione con
ricerca inizia lentamente e quindi aumenta
gradualmente di velocità.
●
Dato che il suono può essere udito a basso
volume (circa un quarto del livello normale)
nel modo di ricerca, ascoltare e rilasciare il
tasto quando la posizione desiderata viene
raggiunta.
Riproduzione ad accesso diretto
(utilizzando l’unità di telecomando)
●
La pressione di uno qualsiasi dei tasti del
numero del brano avvia la riproduzione
dall’inizio del brano designato. (Questa
funzione non può essere utilizzata durante la
riproduzione programmata.)
6
9
AUTO
PRESET
BAND
SLEEP
DISPLAY
STEREO
AUTO/MONO
C D
1 Press the CD 4
5
4
8
7
10
+10
TAPE TUNER
AUX
/
6 button to set to the CD
mode.
2 Designate the required track using the track
number buttons.
● To designate track numbers 1 to 10, press
the track number button corresponding to
the track number.
18
1 Presione el botón CD 4/6 para activar el
modo de CD
2 Seleccione la pista deseada usando los
botones de número de pista.
● Para designar las pistas del número 1 al
10, presione el botón de número de pista
correspondiente a la misma.
1
Premere il tasto CD 4/6 per impostare il
modo del lettore CD.
2
Designare il brano desiderato utilizzando i
tasti dei numeri di brano.
●
Per designare i numeri di brano da 1 a 10,
premere il tasto numerico corrispondente
al numero del brano.
Page 19

1
5
● To designate track number 11 or higher,
press the +10 button the required number
of times, then a track number button.
(Example: To designate the 20th track,
press the +10 button once, then press track
number button 10.)
* +10 button:
Each time this button is pressed, the
number increases by 10. First press this
button to set the 10's digit, then press the
track number button to set the 1's digit.
● Para designar el número de pista 11 o
superior , presione el botón +10 el número
necesario de veces, y luego un botón de
número de pista. (Ejemplo: Para designar
la pista 20, presione el botón +10 una vez,
y luego presione el botón 10 de número
de pista.)
* Botón +10:
Cada vez que presiona este botón el
número se incrementa en 10. Primero
presione este botón para ingresar las
decenas, luego presione el botón de
número de pista para ingresar las
unidades.
●
Per designare il numero 11 o un numero
maggiore, premere il tasto +10 per il
numero di volte necessario e quindi un
tasto numerico. (Esempio: Per indicare il
20° brano, premere una volta il tasto +10
e quindi il tasto di numero di brano 10.)
* Tasto +10:
Ogni volta che questo tasto viene premuto,
il numero aumenta di 10. Premere questo
tasto per impostare le decine e quindi
premere un tasto numerico per impostare
le unità.
● To skip to another track during play
When the required track number button is
pressed, the display shows the designated
track number and play starts from the
beginning of the designated track.
Programmed play (using the remote
control unit)
● Up to 20 tracks can be programmed to be
played in any required order.
The total playing time of programmed tracks
is displayed (up to 99 minutes, 59 seconds).
(Example: When programming the 2nd track
to be played first, and the 6th track next, then
the 12th track, etc.)
23 4
C D
PROGRAM
● Para saltar a otra pista durante la
reproducción
Cuando presiona el número de pista
deseada, la indicación muestra el número de
la pista y se inicia la reproducción desde el
principio de la pista designada.
Reproducción programada (utilizando
la unidad de control remoto)
● Es posible programar un máximo de 20 pistas
para reproducción en el orden deseado.
La unidad indicará el tiempo total de
reproducción de las pistas programadas
(máximo de 99 minutos, 59 segundos).
(Ejemplo: Cuando programa la 2ª pista para
que sea reproducida primero y la 6ª para ser
reproducida a continuación, y luego la pista
12ª, etc.)
● Per saltare ad un altro brano durante la
riproduzione
Quando il tasto del numero di brano
desiderato viene premuto, il display indica il
numero di brano designato e la riproduzione
inizia da tale brano.
Riproduzione programmata (utilizzando
l'unità di telecomando)
●
Fino a 20 brani possono essere programmati
per essere riprodotti in qualsiasi ordine
desiderato.
Il tempo totale di riproduzione dei brani
programmati viene visualizzato (fino a 99
minuti e 59 secondi).
(Esempio: Quando si programma per
riprodurre per primo il brano numero 2, per
secondo il brano numero 6, per terzo il brano
numero 12, ecc.)
To designate the 2nd track.
Para seleccionar la 2ª pista.
Per designare il brano numero 2.
2
PROGRAM PROGRAM
2
6
2
PROGRAM
6
1 Press the CD 4/6 button to set to the CD
mode.
2 Press the 5 button.
3 Press the PROGRAM button to set to the
programming mode.
4 Press to designate the required track
number.
5 Designate the remaining tracks by pressing
the track number buttons.
6 Press the 4/6 button when programming
is completed. Programmed play starts.
To designate the 12th track.
Para seleccionar la 12ª pista.
Per designare il brano numero 12.
+10
2
PROGRAM
The total playback time of programmed tracks is displayed.
Se visualiza el tiempo de reproducción total de las pistas programadas.
Il tempo di riproduzione totale dei brani programmati viene visualizzato.
1 Para activar el mode CD, presione el botón
CD 4/6.
2 Presione el botón 5.
3 Para activar el modo de programación,
presione el botón PROGRAM.
4 Presione para seleccionar el número
deseado de pista.
5 Designe las pistas restantes presionando los
botones de número de pista.
6 Cuando termine la programación presione
el botón 4/6. Se inicia la reproducción
programada.
2
The 12th track
La 12ª pista
Il brano numero 12
6
1
Premiere il tasto CD 4/6 del timer per
12
6
C D
impostare il modo del lettore CD.
2
Premere il tasto 5.
3
Premere il tasto PROGRAM del timer per
impostare il modo di programmazione.
4
Designare il numero di brano desiderato con
i tasti numerici.
5
Designare gli altri brani con i tasti numerici.
6
Premere il tasto 4/6 quando la
programmazione è terminata. La
riproduzione programmata si avvia.
19
Page 20

To confirm the details of a program...
Press the PROGRAM button; the tracks making
up the program will be displayed in programmed
order.
Para confirmar los detalles de un programa...
Presione el botón PROGRAM; las pistas que
componen el programa serán indicadas en el
orden programado.
PROGRAM
2
PROGRAM
Track number
Número de pista
Numero di brano
Per controllare i dettagli di un programma...
Premere il tasto PROGRAM; i brani
programmati vengono visualizzati nell’ordine
programmato.
Program order number
Número de orden de programa
Numero ordine programma
To clear the programmed tracks...
Press the 5 button before playing a CD. During
programmed play, press this button twice. When
the CD holder is opened, programmed tracks
are cleared automatically.
Notes:
● If the total playing time of the programmed
tracks exceeds 99 minutes 59 seconds, the
total playing time indication will go out.
● When programming a track number higher
than 21 on a disc containing more than 21
tracks, the total playback time of all the
programmed tracks will not be displayed.
● When a disc with 16 or more tracks is loaded,
the “OVER” indicator will appear.
Repeat play (using the remote control
unit)
Press the REPEAT button before or during play .
A single track or all the tracks can be repeated.
Whether a single track or all tracks are to be
repeated can be specified. Each time the
REPEAT button is pressed, the mode will
change from a single track (∂), to all the tracks
(∂ ALL), to the clear mode, in this order.
∂
REPEAT
Single track
Una sola pista
Brano singolo
Para borrar las pistas programadas...
Presione el botón 5 antes de reproducir el CD.
Durante la reproducción programada presione
este botón dos veces. Cuando se abre el
compartimiento del CD, las pistas programadas
se borran automáticamente.
Notas:
● Si el tiempo total de reproducción de las
pistas programadas excede los 99 minutos
y 59 segundos, se apagará la indicación de
tiempo total de reproducción.
● Cuando se programa un número de pista
mayor que 21 en un disco que contiene más
de 21 pista, el tiempo de reproducción total
de todas las pistas programadas, no es
indicado.
● Cuando coloca un disco con 16 pistas o más
aparecerá la indicación “OVER”.
Repetición de reproducción (utilizando
la unidad de control remoto)
Presione el botón REPEAT antes o durante la
reproducción. Es posible repetir una sola o
todas las pistas.
Es posible especificar la reproducción de una
sola o de todas las pistas. Cada vez que
presiona el botón REPEAT, el modo cambiará
de la siguiente manera: una sola pista (∂), a
todas las pistas (∂ ALL), al modo de borrado,
en este orden.
Goes off.
ALL
∂
All tracks
Todas las pistas
Tutti i brani
Se apaga.
Si spegne.
Repeat playback is released.
Desactivación de la repetición de reproducción.
La riproduzione ripetuta viene cancellata.
Per cancellare i brani programmati...
Premere il tasto 5 prima di riprodurre un CD.
Durante la riproduzione programmata, premere
questo tasto due volte. Quando il piatto del CD
viene aperto, i brani programmati vengono
cancellati automaticamente.
Notas:
●
Se la durata dei brani programmati per la
riproduzione supera i 99 minuti e 59 secondi,
l’indicazione della durata della riproduzione
scompare dal display.
●
Se si programma un numero di brano
superiore al 21 su di un disco che contiene
oltre 21 brani, la durata totale di tutti i brani
non viene visualizzata.
●
Quando viene inserito un CD con 16 brani o
più, l’indicatore “OVER” appare.
Riproduzione ripetuta (utilizzando
l’unità di telecomando)
Premere il tasto REPEAT prima o durante
l’esecuzione. La riproduzione ripetuta può
essere eseguita per un brano singolo oppure
per tutti i brani.
E’ possibile specificare se si desidera la
riproduzione ripetuta di un singolo brano oppure
di tutti i brani. Ogni volta che il tasto REPEAT
viene premuto, il modo cambia dal modo di
ripetizione di un brano (∂), al modo di
ripetizione di tutti i brani (∂ ALL) al modo di
cancellazione della riproduzione ripetuta,
nell’ordine.
● Single track repeat (∂)
The current or specified track will be played
repeatedly.
● All tracks of one CD repeat (∂ ALL)
All tracks on the current or specified CD will
be played repeatedly.
Random play (using the remote control
unit)
Press the RANDOM button, and all tracks on a
CD play once in random order.
20
● Repetición de una sola pista (∂)
La pista actual o la especificada será
reproducida repetidamente.
● Repetición de todas las pista de un CD (∂
ALL)
Todas las pistas del CD actual o del
especificado serán reproducidas
repetidamente.
Reproducción aleatoria (utilizando la
unidad de control remoto)
Para reproducir una vez todas las pistas de un
CD aleatoriamente, presione el botón RANDOM.
RANDOM
● Ripetizione di un singolo brano (∂)
Il brano attuale o da voi indicato viene
riprodotto più volte.
● Ripetizione di un intero CD (∂ ALL)
Tutti i brani del CD attuale o programmato
vengono riprodotti ripetutamente.
Riproduzione casuale (utilizzando
l’unità di telecomando)
Premere il tasto RANDOM per riprodurre tutti i
brani di un CD per una volta in un ordine
casuale.
Page 21

HANDLING CASSETTE TAPES
MANIPULACION DE CASSETTES
DE CINT A
MANEGGIO DEI NASTRI A
CASSETTA
Cassette tapes
1. Loose tape may cause trouble. Using a pencil
or like object, gently tighten the tape as
shown.
2. To prevent recordings from being erased
accidentally, remove the tab(s) with a
screwdriver, etc. Reseal the slots with
adhesive tape to erase and re-record after
the tabs have been removed.
3. C-120 cassettes are not recommended
because they are prone to malfunction.
Cassette loading
1. Press the eject (8) button to open the
cassette holder.
2. Load a cassette as shown.
3. Close the cassette holder by pressing it
gently. Listen for the click indicating that the
holder is securely shut.
Turn the pencil to tighten the tape.
Gire el lápiz para ajustar la cinta.
Ruotare la matita per stringere il nastro.
Tab “B”
Lengüeta “B”
Linguetta "B"
Cassettes de cinta
1. La cinta floja puede causar problemas.
Utilice un lápiz o un objeto similar y tensione
gentilmente la cinta tal como se muestra.
2. Para evitar borrar grabaciones
accidentalmente, extraiga la/s lengüeta/s
con un destornillador, etc. Para borrar la
cinta después de haber extraído las
lengüetas, selle las ranuras con cinta
adhesiva.
3. No se recomienda el uso de cassettes C120 porque tienen tendencia a fallar.
Colocación de cassettes
1. Presione el botón eject (8) para abrir el
portacassette.
2. Extraiga el cassette como se muestra.
3. Cierre el portacassette presionándolo
suavemente. Cuando oiga un “clic” ello
indica que el portacassette está
correctamente cerrado.
Side “A”
Lado “A”
Lato "A"
Side “B”
Lado “B”
Lato "B"
Tab “A”
Lengüeta “A”
Linguetta "A"
Adhesive tape
Cinta adhesiva
Nastro adesivo
Nastri a cassetta
1. Nastri allentati possono causare problemi.
Eliminare l’allentamento del nastro come
illustrato per mezzo di una matita o di un
oggetto simile.
2. Per evitare la cancellazione accidentale di
registrazioni, rimuovere le linguette con un
cacciavite o un oggetto simile. Per cancellare
o registrare nuovamente il nastro, coprire i
fori con nastro adesivo.
3. Si raccomanda di non utilizzare cassette C120 in quanto queste possono causare
problemi.
Inserimento cassette
1. Premere il tasto eject (8) per aprire il vano
portacassetta.
2. Inserire una cassetta come indicato.
3. Chiudere il vano portacassetta premendo
gentilmente su di esso. Accertarsi di udire lo
scatto che indica la sua chiusura.
Note:
If the power is switched off while a tape is
running, it may be impossible to remove the
cassette. If this happens, switch the power on
again before attempting to remove the cassette.
Auto tape select mechanism
This unit has an Auto Tape Select mechanism
which distinguishes between different types of
tape using detection holes in the cassette. After
the type of tape has been detected, bias and
equalization suitable for the tape are set.
● Cassettes with detection holes:
Metal tape (EQ: 70 µs) .................... Type IV
CrO2 (chrome) tape (EQ: 70 µs) ..... Type II
● Cassettes without detection holes:
Normal tape (EQ: 120 µs) ............... Type I
Nota:
Si se desconecta la alimentación durante el
transporte de cinta, puede que sea imposible
extraer el cassette. Si ello ocurre, conecte la
alimentación otra vez antes de intentar extraer
el cassette.
Mecanismo de selección automática de la
cinta
Esta unidad posee un mecanismo de selección
automática de la cinta que distingue los diferentes
tipos de cinta por medio de orificios de detección
en el cassette. Después de haber detectado el
tipo de cinta, la unidad establece la polarización
y ecualización adecuadas para la cinta.
● Cassettes con orificios de detección:
Cinta de metal (EQ: 70 µs)................Tipo IV
Cinta de CrO2 (cromo) (EQ: 70 µs)... Tipo II
● Cassettes sin orificios de detección:
Cinta normal (EQ: 120 µs).................Tipo I
Metal/CrO2 tape detection holes
Orificios de detección de cintas de metal/cromo
Fori identificazione nastro Metal/CrO
Nota:
Se l’alimentazione viene disattivata durante lo
scorrimento del nastro, potrebbe essere
impossibile rimuovere la cassetta. Se ciò
dovesse accadere, riattivare l’alimentazione
prima di riprovare a rimuovere la cassetta.
Meccanismo per la selezione automatica del
tipo di nastro
Questa unità possiede un meccanismo per la
selezione automatica del tipo di nastro che è in
grado di rilevare automaticamente il tipo di nastro
utilizzato per mezzo dei fori appositi sulla cassetta.
Una volta rilevato il tipo di nastro, la polarizzazione
e l’equalizzazione adatte a tale tipo di nastro
vengono impostate automaticamente.
●
Cassette con fori di identificazione:
Nastro Metal (EQ: 70 µs) ....Tipo IV
Nastro CrO2 (al cromo) (EQ: 70 µs) ....Tipo II
●
Cassette senza fori di identificazione:
Nastro normale (EQ: 120 µs) ....Tipo I
2
21
Page 22
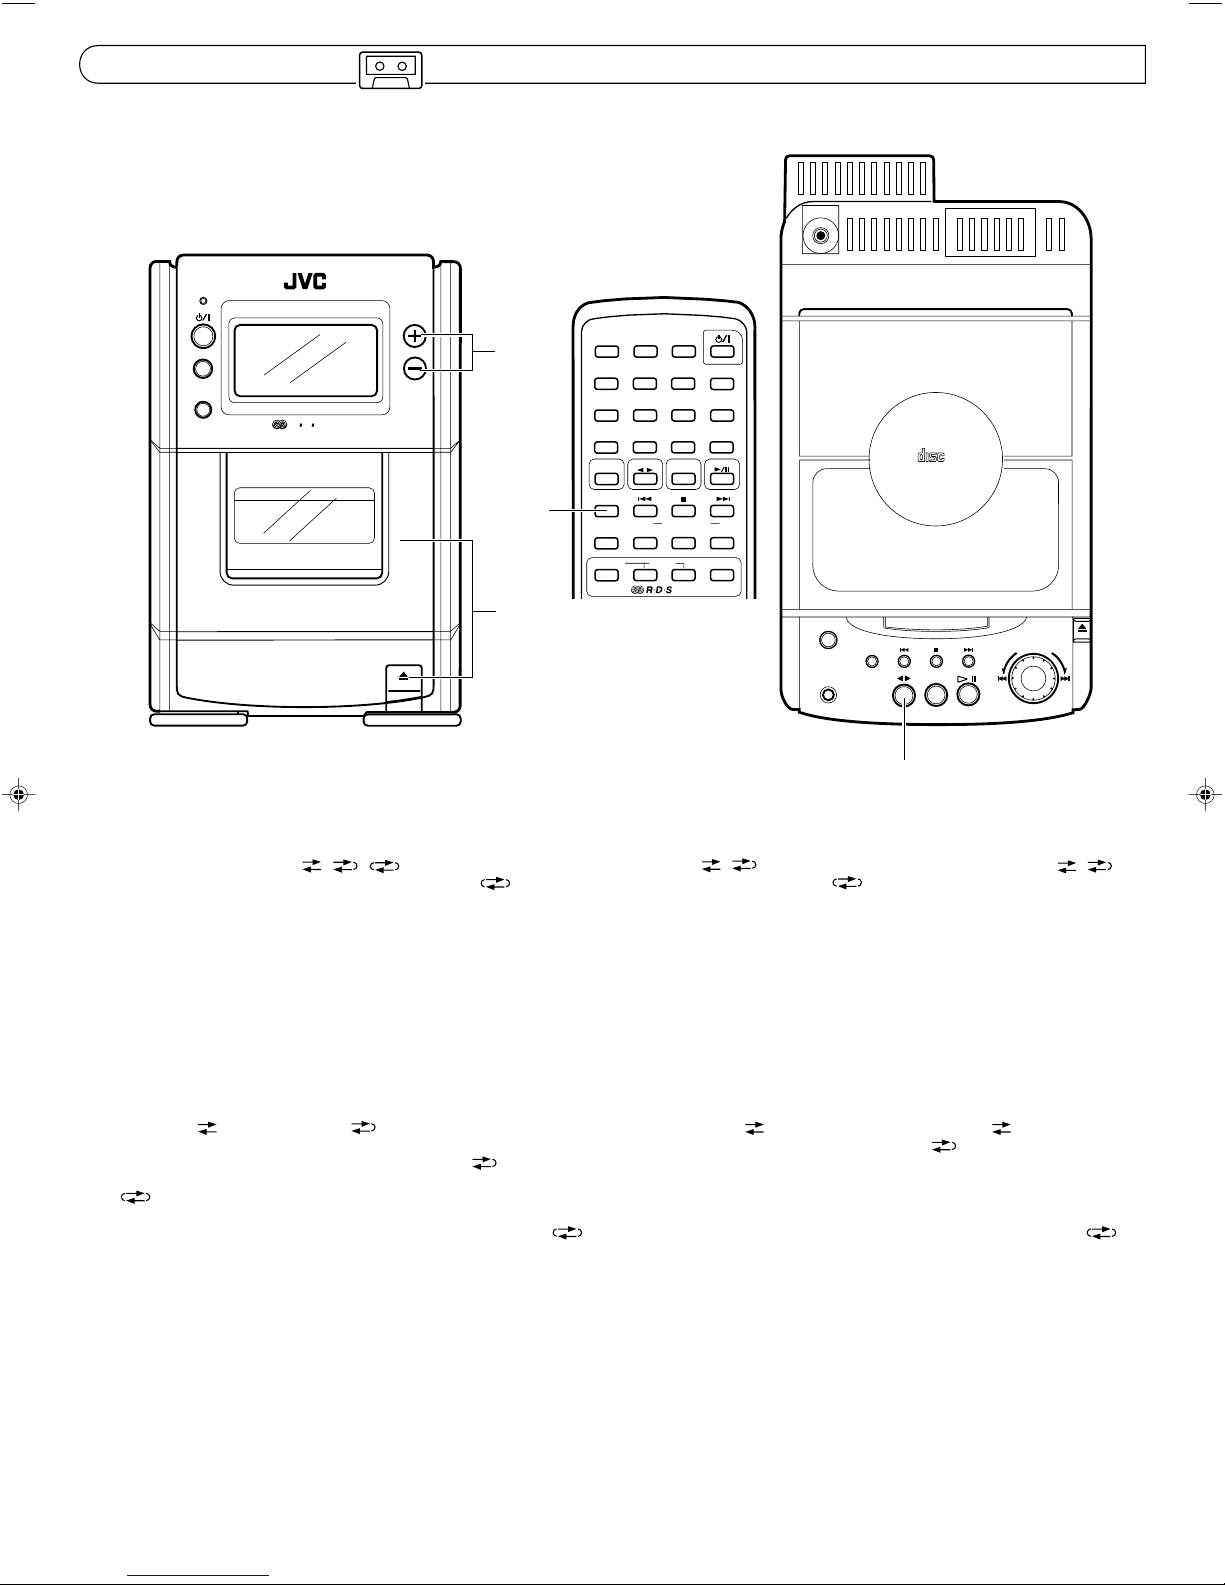
CASSETTE PLAYBACK REPRODUCCION DE CASSETTES RIPRODUZIONE DI CASSETTE
Operate in the order shown Opere en el orden mostrado Eseguire le operazioni nell’ordine indicato
PHONES
STANDBY
VOLUME
AUX
MICRO COMPONENT SYSTEM UX-T77R
AUTO TAPE SELECTOR
AUTO REVERSE
R D S
EON
4
1
3
12
4
7
10
AUX
REVERSE
MODE
PTY/EON SELECT
3
5
6
8
AUTO
PRESET
+10
TAPE TUNER
BAND
MULTI CONTROL
REW
PROGRAM RANDOM
EON
9
SLEEP
DISPLAY
STEREO
AUTO/MONO
C D
FF
REPEATBEAT CUT
DISPLAY MODE
ACTIVE HYPER
BASS PRO
ONE TOUCH
REC
CLOCK
COMPACT
DIGITAL AUDIO
TIMER/SNOOZE
BAND
TUNER
TAPE
OPEN
I
J
T
O
L
G
U
M
CD
1 Load a cassette tape.
2 Press to start playback. (The power is
switched on and the TAPE mode is engaged
to start tape playback.)
3 Select the reverse mode ( / / ).
4 Adjust.
● After loading a cassette tape, simply press the
TAPE 14 button. The power is switched on
and the tape starts playback. (To select the
playback direction, press the TAPE 14
button. The change in direction can be
checked in the tape direction indicator (1 or
4).)
● When the tape plays back with the reverse
mode set to (single side play) or (both
side play) mode, the tape stops automatically
at the end of tape after playing one or both
sides. When the reverse mode is set to the
(continuous play) mode, the tape
continuously plays one side after the other
until you stop operation.
How to fast-wind tapes
1. Press the TAPE (;') button (to set TAPE
mode).
2. Press the ™ or £ button.
● A tape can be fast-wound in either tape
playback direction, and when it reaches the
end of a side, it stops automatically.
1 Coloque un cassette de cinta.
2 Presiónelo para iniciar la reproducción. (Se
conecta la alimentación y se activa el modo
TAPE para iniciar la r eproducción de la cinta.)
3 Seleccione el modo de inversión ( / /
).
4 Ajuste.
● Después de colocar un cassette de cinta,
simplemente presione el botón TAPE 14.
Se conecta la alimentación y la cinta
comienza a ser reproducida. (Para
seleccionar el sentido de reproducción,
presione el botón TAPE 14. El cambio de
dirección puede ser verificado en el indicador
(1 o 4) de la dirección de la cinta.)
● La cinta está siendo reproducida en el modo
de inversión colocado en el modo
(reproducción de un solo lado) o en el modo
(reproducción de ambos lados), la cinta
se detiene automáticamente al fin de la misma
después de la reproducción de uno o ambos
lados. Cuando se activa el modo de inversión
en el modo (reproducción continuada),
la cinta es reproducida continuadamente de
ambos lados hasta que usted pare la
operación.
Método para avanzar/rebobinar rápido
la cinta
1. Presione el botón TAPE (;'), para activar
el modo TAPE.
2. Presione el botón ™ o £.
● La cinta puede ser bobinada o rebobinada
rápidamente en ambos sentidos de
reproducción y cuando llega al fin de un
lado, para automáticamente.
2
1
Inserire una cassetta.
2
Premere il tasto di riproduzione. (L’unità si
accende e il modo TAPE viene impostato,
attivando il registratore a cassette.)
3
Selezionare il modo auto reverse ( / /
).
4
Regolare.
●
Caricato un nastro, premere il tasto TAPE
14
. L'unità si accende e il nastro viene
riprodotto. (Per scegliere una direzione di
riproduzione, premere il tasto TAPE 14. Il
cambio di direzione può essere controllato con
l'indicatore della direzione del nastro (1 o
4
).)
●
Quando il nastro viene riprodotto col modo di
autoreverse impostato su (riproduzione di
un solo lato) o su (riproduzione di entrambi
i lati), la riproduzione del nastro si interrompe
automaticamente alla fine del nastro dopo aver
riprodotto un lato oppure entrambi i lati
rispettivamente. Se viene scelto il modo di
scorrimento in direzione inversa
(riproduzione continua), la riproduzione dei due
lati della cassetta continua senza fine sino a che
non viene interrotta dall'utente.
Come avvolgere rapidamente i nastri
1. Premere il nastro TAPE (14) (per
impostare il modo TAPE).
2. Premere il tasto ™ o £.
●
Un nastro può essere avvolto rapidamente
in entrambe le direzioni e quindi, alla fine
di un lato, esso si ferma automaticamente.
22
Page 23

RADIO RECEPTION RADIORRECEPCION RICEZIONE CON LA RADIO
Operate in the order shown Opere en el orden mostrado Eseguire le operazioni nell’ordine indicato
COMPACT
DIGITAL AUDIO
ACTIVE HYPER
BASS PRO
ONE TOUCH
REC
CLOCK
TIMER/SNOOZE
BAND
TUNER
TAPE
CD
12
1 Press the TUNER/BAND button.
● The power is switched on and the band
and radio frequency will be shown in the
display.
2 Select the band.
3 Tune to the required station.
4 Adjust.
STANDBY
VOLUME
3
OPEN
I
J
T
O
L
G
U
M
1 Presione el botón TUNER/BAND.
● Se conecta la alimentación y aparece en el
visor una banda y una frecuencia de radio.
2 Seleccione la banda.
3 Sintonice la estación deseada.
4 Ajuste.
AUX
R D S
MICRO COMPONENT SYSTEM UX-T77R
AUTO TAPE SELECTOR
EON
1
Premere il tasto TUNER/BAND.
●
Il sistema si accende e sul display viene
visualizzata la banda e la frequenza.
2
Selezionare la banda.
3
Sintonizzare la stazione desiderata.
4
Regolare.
STEREO AUTO/MONO button
Botón STEREO AUTO/MONO
Tasto STEREO AUTO/MONO
12
4
4
7
10
AUX
REVERSE
MODE
3
5
6
8
9
AUTO
PRESET
+10
TAPE TUNER
BAND
MULTI CONTROL
REW
PROGRAM RANDOM
SLEEP
DISPLAY
STEREO
AUTO/MONO
C D
FF
REPEATBEAT CUT
STEREO AUTO/MONO button (using the
remote control unit)
Auto mode:
Set to this position when listening to or recording
an FM stereo broadcast. The STEREO indicator
lights when the FM stereo broadcast is received.
MONO:
Set to this position when FM stereo reception is
noisy.
When another station is tuned to in the MONO
mode, the unit automatically enters Auto mode.
Seek tuning
Press the ™ or £ button for one second
or more. The unit enters the seek tuning mode
to tune in the nearest station automatically, so
the broadcast can be heard. In AM operation,
the frequency moves continuously from the MW
to the LW band and vice versa.
Manual tuning
Each time the ™ or £ button is pressed,
the unit steps through the current frequency
band. Tuning is done in steps of 50 kHz for FM
and 9 kHz for AM (MW/LW).
In AM operation, the tuned frequency moves
continuously from the MW (522-1,629 kHz) to
the LW (144-288 kHz) band and vice versa.
Press to move to lower frequencies.
Presione para disminuir la frecuencia.
Presser pour diminuer la frequence.
Notes:
● When seek tuning to the required station is
not possible because the broadcast signal is
too weak, press the ™ or £ button
momentarily to perform manual tuning.
● When the power is set to STANDBY, or
another mode (TAPE, CD or AUX) is selected,
the last tuned frequency is stored in memory.
When the power is switched on again and
TUNER/BAND button is pressed, the same
station will be tuned to.
Botón STEREO AUT O/MONO (utilizando
la unidad de control remoto)
Modo automático:
Colóquelo en esta posición cuando escucha o
graba una radiodifusión estereofónica de FM.
El indicador STEREO se enciende cuando se
recibe una radiodifusión estereofónica de FM.
MONO:
Colóquelo en esta posición cuando la
recepción estereofónica de FM tenga ruido.
Si se sintoniza otra estación en el modo MONO,
la unidad ingresa automáticamente en el modo
automático.
Búsqueda de sintonía
Presione el botón ™ o £ durante un
segundo o más. La unidad ingresa en el modo
de búsqueda de sintonía sintonizando
automáticamente la estación más próxima y por
eso se escucha la radiodifusión. En la operación
de AM la frecuencia se mueve continuamente
desde la banda de OM a la de OL y viceversa.
Sintonización manual
Cada vez que se presiona el botón ™ o £,
la unidad pasa a través de la banda de
frecuencia actual. La sintonización es
efectuada en pasos de 50 kHz para FM y de 9
kHz para AM (OM/OL).
En AM, la frecuencia sintonizada se mueve
continuamente de la banda de OM (522-1.629
kHz) a la de OL (144-288 kHz) y viceversa.
Press to move to higher frequencies.
Presione para aumentar la frecuencia.
Presser pour augmenter la frequence.
Notas:
● Cuando la búsqueda de sintonía de la estación
deseada no es posible porque la señal de
radiodifusión es demasiado débil, presione el
botón ™ o £ por un momento para
efectuar la sintonización manual.
● Cuando se coloca la alimentación en
STANDBY, u otro modo (TAPE, CD o AUX), la
última frecuencia sintonizada queda
almacenada en memoria. Cuando conecta la
alimentación otra vez y presiona el botón
TUNER/BAND, la unidad sintoniza la misma
estación.
T asto STEREO AUTO/MONO (utilizzando
l'unità di telecomando)
Modo auto:
Impostare questa posizione quando si ascolta
o si registra una trasmissione FM stereo.
L’indicatore del modo STEREO si accende
quando la trasmissione ricevuta è in stereo.
MONO:
Impostare questa posizione quando la ricezione
FM è disturbata.
Quando un’altra stazione viene sintonizzata nel
modo MONO, l’unità entra automaticamente nel
modo automatico.
Sintonizzazione con ricerca
Premere il tasto ™ o £ per un secondo o
più. L’unità entra nel modo di sintonizzazione
con ricerca per sintonizzarsi automaticamente
sulla stazione più vicina in modo da poter udire
la trasmissione. Durante il funzionamento in AM,
la frequenza passa continuamente dalla banda
MW a quella LW e viceversa.
Sintonizzazione manuale
Ogni volta che il tasto ™ o £ viene
premuto, la frequenza cambia all’interno della
banda corrente. La sintonizzazione viene
eseguita in passi da 50 kHz in FM e 9 kHz in
AM (MW/LW).
Durante il funzionamento in AM, la frequenza
sintonizzata passa continuamente dalla banda
MW (522-1.629 kHz) alla banda LW (144-288
kHz) e viceversa.
Note:
●
Quando la sintonizzazione con ricerca della
stazione desiderata non è possibile in quanto
il segnale trasmesso è troppo debole, premere
leggermente il tasto ™ o £ per eseguire
la sintonizzazione manuale.
●
Quando l’alimentazione si trova nel modo
STANDBY, oppure quando viene selezionato
un altro modo (TAPE, CD o AUX), l’ultima
frequenza sintonizzata viene memorizzata.
Quando l’alimentazione viene riattivata e si
preme il tasto TUNER/BAND, l’unità si
sintonizza su quella stessa frequenza.
23
Page 24

Auto preset tuning (using the remote
3
4
control unit)
This function scans the current band, detecting
frequencies used to broadcast signals, and
stores the first 30 FM frequencies and 15 AM
(MW/LW) frequencies in memory automatically .
● Press the AUTO PRESET button for more
than 2 seconds. The frequencies of stations
broadcasting signals can be stored in memory
automatically in the order of increasing
frequency. (30 stations in FM band and 15
stations in AM (MW/LW) band).
Presintonización automática (utilizando
la unidad de control remoto)
Esta función busca la banda actual, detectando
frecuencias usadas para señales de
radiodifusión y almacena las primeras 30
frecuencias de FM y 15 frecuencias de AM (OM/
OL) en memoria automáticamente.
● Presione el botón AUTO PRESET durante más
de 2 segundos. Las frecuencias de las
emisoras emitiendo señales de radiodifusión
pueden ser almacenadas en memoria
automáticamente en orden de frecuencia
creciente. (30 estaciones en la banda de FM
y 15 estaciones en la banda de AM (OM/OL)).
AUTO
PRESET
Press for more than 2 seconds.
Presione durante más de 2 segundos.
Premere per almeno 2 secondi.
Sintonizzazione con preselezione
automatica (utilizzando l’unità di
telecomando)
Questa funzione esegue la scansione della
banda attuale, rilevando così le frequenze
utilizzate per la trasmissione dei segnali, e
memorizza automaticamente le prime 30
frequenze FM e le prime 15 frequenze AM (MW/
LW).
●
Premere il tasto AUTO PRESET per almeno 2
secondi. Le frequenze delle stazioni che
trasmettono dei segnali possono essere
memorizzate automaticamente in ordine
crescente. (30 stazioni per la banda FM e 15
stazioni per la banda AM (MW/LW)).
Presetting stations (using the remote
control unit)
30 stations in the FM band and 15 stations in
the AM (MW/L W) band can be preset as follows:
● Example: (Presetting an FM station
broadcasting at 103.5 MHz to preset button
“15”)
12
4
7
10
AUX
REVERSE
MODE
PROGRAM RANDOM
3
5
6
8
9
AUTO
PRESET
+10
TAPE TUNER
BAND
MULTI CONTROL
REW
SLEEP
DISPLAY
STEREO
AUTO/MONO
C D
REPEATBEAT CUT
1 Press the TUNER/BAND button.
2 Select the FM band using the TUNER/BAND
button.
3 Tune to the required station.
4 Press preset button “+10”, then “5” for more
than 2 sec.
(When “15” blinks in the preset station
display, the station has been stored.)
● Repeat the above procedure for each of the
other stations, using a different preset button
each time.
● Repeat the above procedure for the other
band.
● To change preset stations
Perform step 4 above after tuning to the
required station.
Notes:
● The previously stored station is erased when
a new station is stored, because the new
station’s frequency replaces the previous
frequency in memory.
● When listening to an AM (MW/LW) broadcast,
noise may be heard if the remote control unit
is used.
Presintonización de estaciones
(utilizando la unidad de control remoto)
Es posible presintonizar 30 estaciones en la
banda de FM y 15 estaciones en la banda de
AM (OM/OL) de la siguiente forma:
● Ejemplo: (Presintonización de la radioemisión
de una estación de FM en 103,5 MHz en el
botón “15” de presintonización)
1
2
FF
1 Presione el botón TUNER/BAND.
2 Seleccione la banda de FM utilizando el
botón TUNER/BAND.
3 Sintonice la estación deseada.
4 Presione el botón “+10” de presintonización
y luego el “5” durante más de 2 segundos.
(Cuando el “15” parpadea en la indicación
de estación presintonizada, ésta ha sido
registrada.)
● Repita el procedimiento de arriba para cada
una de las otras estaciones, utilizando un
botón de presintonización diferente para
cada estación.
● Repita el procedimiento de arriba para la otra
banda.
● Cambio de estaciones presintonizadas
Ejecute el paso 4 de arriba después de
sintonizar la estación deseada.
Notas:
● La estación previamente almacenada se
borra cuando se almacena otra estación, ya
que la frecuencia de la nueva estación
reemplaza la frecuencia anterior en memoria.
● Cuando escucha una radiodifusión de AM
(OM/OL), es posible que se escuche ruido si
se utiliza la unidad de control remoto.
Preselezione delle stazioni (utilizzando
l’unità di telecomando)
30 stazioni per la banda FM e 15 stazioni per la
banda AM (MW/LW) possono essere
preselezionate nel modo seguente:
●
Esempio: (per preselezionare una stazione
FM che trasmette sui 103,5 MHz nel tasto di
preselezione numero “15”).
1
Premere il tasto TUNER/BAND.
2
Selezionare la banda FM utilizzando il tasto
TUNER/BAND.
3
Sintonizzare la stazione desiderata.
4
Premere il tasto di preselezione “+10” e
quindi quello “5” per oltre 2 secondi.
(Quando la cifra “15” lampeggia sul display di
preselezione, la stazione è preselezionata.)
●
Ripetere la procedura sopraindicata per
ciascuna stazione desiderata utilizzando ogni
volta un tasto di preselezione diverso.
●
Ripetere la procedura sopradescritta per l’altra
banda.
● Per cambiare le stazioni preselezionate
Eseguire la fase 4 dopo aver sintonizzato la
nuova stazione desiderata.
Note:
●
Quando si memorizza una nuova stazione, la
stazione memorizzata in precedenza viene
cancellata in quanto la frequenza della nuova
stazione sostituisce quella memorizzata in
precedenza.
●
Quando si ascolta una trasmissione AM (MW/
LW) si possono udire dei disturbi se viene
utilizzato il telecomando.
24
Page 25
● All preset stations will be erased when the
power cord is disconnected or a power
failure occurs for more than 24 hours. In
such cases, store the stations again.
● Todas las estaciones presintonizadas se
borran cuando se desconecta el cordón
de alimentación u ocurre un corte de
energía de más de 24 horas. En tales
casos almacene las estaciones otra vez.
●
Tutte le stazioni preselezionate vengono
cancellate se il cavo di alimentazione
viene cancellato oppure se si verifica
un’interruzione di corrente per più di 24
ore. In tali casi eseguire nuovamente la
memorizzazione delle stazioni.
Preset tuning
● The stations must be preset before this
operation can be performed.
Using the main unit
1 Press the TUNER/BAND button.
2 Select the band using the TUNER/BAND
button.
3 T o select the requied preset station, turn the
MULTI JOG dial.
Using the remote control unit
1 Press the TUNER/BAND button.
2 Select the band using the TUNER/BAND
button.
3 Press the required preset station buttons (No.
1 – No. 10 and +10).
● The preset station number and frequency
corresponding to the button pressed are
shown.
Using the antennas (see page 6)
FM: Connect the provided FM wire
antenna.
AM (MW/LW): Adjust the position of AM (MW/
LW) loop antenna.
Presintonización
● Las estaciones deben ser presintonizadas
antes de que se pueda ejecutar esta
operación.
Utilizando la unidad principal
1 Presione el botón TUNER/BAND.
2 Seleccione la banda utilizando el botón
TUNER/BAND.
3 Para seleccionar la estación presintonizada
deseada, gire el disco MULTI JOG.
Down
Abajo
Giù
U
M
Up
Arriba
Su
I
J
T
O
L
G
Utilizando la unidad de control remoto
1 Presione el botón TUNER/BAND.
2 Seleccione la banda utilizando el botón
TUNER/BAND.
3 Presione los botones (No. 1 - No. 10 y +10)
de la estación presintonizada deseada.
● En el visor aparecen el número de estación
presintonizada y la frecuencia correspondiente al botón presionado.
Utilización de antenas (ver página 6)
FM: Conecte la bajada de antena
AM (OM/OL): Ajuste la posición de la antena
FM cable.
de cuadro de AM (OM/OL).
Sintonizzazione stazioni preselezionate
●
Le stazioni devono essere preselezionate
prima di poter eseguire questa operazione.
Uso dell’unità principale
1
Premere il tasto TUNER/BAND.
2
Scegliere la banda di frequenza col tasto
TUNER/BAND.
3
Ruotare la manopola MULTI JOG per
selezionare la stazione preselezionata
desiderata.
Utilizzando l’unità di telecomando
1
Premere il tasto TUNER/BAND.
2
Selezionare la banda utilizzando il tasto
TUNER/BAND.
3
Premere il tasto della stazione
preselezionata desiderata (No. 1 – No. 10,
+10).
●
Il numero della stazione preselezionata e la
frequenza corrispondenti al tasto premuto
vengono visualizzati.
Uso delle antenne (vedi pag. 6)
FM:
AM (MW/LW):
Collegare l’antenna FM a filo in
dotazione .
Regolare la posizione
dell’antenna AM (MW/LW) ad
anello.
RDS (Radio Data System)
(Using the remote control unit)
Using the RDS (Radio Data System) to
Receive FM Stations
RDS allows FM stations to send additional
signals with their regular programme signals. For
example, the stations send their station names,
and information about what type of programmes
they broadcast, such as sports or music, etc.
This unit can receive the following types of RDS
signals:
PS (Programme Service):
shows commonly known station names.
PTY (Programme Type):
shows types of broadcast programmes.
RT (Radio Text):
shows text messages the station sends.
TA (Traffic Announcement):
shows traffic announcements being broadcast.
RDS (Sistema de datos por radio)
(Utilizando la unidad de control remoto)
Uso de RDS (Sistema de Datos por Radio)
para recibir estaciones de FM
El RDS permite que las estaciones de FM
envíen señales adicionales con las señales de
los programas normales. Por ejemplo, las
estaciones envían sus nombres, e información
acerca del tipo de programas que difunden
tales como deportes o música, etc.
Esta unidad puede recibir los siguientes tipos
de señales RDS:
PS (Servicio de programación):
muestra nombres de radiodifusoras conocidas.
PTY (Tipo de programa):
muestra los tipos de programas emitidos.
RT (Texto por radio):
muestra mensajes textuales que la estación
emite.
TA (Anuncio de tráfico):
muestra anuncios de tráfico que están siendo
emitidos.
Sistema dati radio (RDS)
(Utilizzando l’unità di telecomando)
Uso del sistema RDS (sistema dati radio) per
ricevere stazioni FM
Il sistema RDS permette alle stazioni FM di
trasmettere segnali addizionali oltre ai normali
segnali dei programmi regolari. Per esempio, le
stazioni possono trasmettere il nome della
stazione ed informazioni riguardanti il tipo di
programma, come sport, musica, ecc.
L'unità è in grado di ricevere i seguenti tipi di
segnale RDS:
PS (Servizio Programma):
per i nomi di stazioni comunemente noti.
PTY (Tipo Programma):
per il tipo di programma.
RT (Testo Radio):
per messaggi trasmessi dalla stazione.
TA (Annuncio Traffico):
per annunci sul traffico.
25
Page 26
What information can RDS signals provide?
The display shows RDS signal information that
the station sends.
To show the RDS signals on the display:
Press the DISPLAY MODE button while listening
to an FM station.
Each time you press the button, the display
changes to show information in the following
order:
DISPLAY MODE
¿Qué información puede suministrar la señal
RDS?
El visor muestra la información de señales RDS
que la estación envía.
Para visualizar señales RDS en el visor:
Presione el botón DISPLAY MODE mientras
escucha una estación de FM.
Cada vez que presione el botón, la indicación
cambia mostrando información en el siguiente
orden:
PS PTY
RT
Frequency
Frequencia
Frequenza
Quali informazioni vengono fornite dal
sistema RDS?
Il display visualizza le informazioni RDS
trasmesse dalla stazione.
Per visualizzare i segnali RDS sul display:
Premere il tasto DISPLAY MODE mentre si
ascolta una stazione FM.
Ogni volta che il tasto viene premuto, il display
cambia la visualizzazione nell'ordine seguente:
PS (Programme Service):
While searching, “PS” appears, then station
name is displayed. “NO PS” appears if no signal
is sent.
PTY (Programme Type):
While searching, “PTY” appears, then broadcast
programme type is displayed. “NO PTY”
appears if no signal is sent.
RT (Radio T ext):
While searching, “RT” appears, then a text
message sent by the station is displayed. “NO
RT” appears if no signal is sent.
Station Frequency:
Station frequency (non-RDS service)
Notes:
● If searching finishes at once, “PS”, “PTY” and
"RT" will not appear on the display.
● If you press the DISPLAY MODE button while
listening to an AM (MW/LW) station, the
display only shows station frequency.
● RDS is not available for AM (MW/LW)
broadcasts.
On characters displayed
When the display shows PS, PTY or RT signals:
● The display shows upper case letters only.
● The display cannot show accented letters; For
example, “A” may represent accented “A’ s” like
“Á, Â, Ã, À, Ä and Å”.
PS (Servicio de programación):
Mientras busca, “PS” aparece, luego el nombre
de la estación es indicado. “NO PS” aparece si
no se radiodifunden señales.
PTY (Tipo de programa):
Mientras busca. “PTY” aparece, luego se
visualiza el tipo de programa radiodifundido.
“NO PTY” aparece si no se radiodifunden
señales.
RT (Texto por radio):
Mientras busca, “RT” aparece, luego el mensaje
de texto enviado por la estación es visualizado.
“NO RT” aparece si no se radiodifunde señal.
Frecuencia de estación:
Frecuencia de estación (servicio no RDS)
Notas:
● Si la búsqueda termina súbitamente, “PS”,
“PTY” y "RT" no aparecerán en el visor.
● Si usted presiona el botón DISPLAY MODE
mientras escucha una estación de AM (OM/
OL), la indicación solo muestra la frecuencia
de la estación.
● RDS no está disponible para radiodifusiones
de AM (OM/OL).
Sobre los caracteres indicados
Cuando el visor muestra señales PS, PTY o RT:
● El visor muestra letras en mayúscula
solamente.
● El visor no puede mostrar letras acentuadas:
Por ejemplo, “A” acentuada puede aparecer
como “Á, Â, Ã, À, Ä, y Å”.
PS (Servizio Programma):
Durante la ricerca appare l’indicazione “PS” e
quindi viene visualizzato il nome della stazione.
Se il segnale non viene trasmesso, viene
visualizzata l’indicazione “NO PS”.
PTY (Tipo Programma):
Durante la ricerca appare l’indicazione “PTY” e
quindi viene visualizzato il tipo di programma
trasmesso. Se il segnale non viene trasmesso,
viene visualizzata l’indicazione “NO PTY”.
RT (Testo Radio):
Durante la ricerca appare l’indicazione “RT” e
quindi viene visualizzato il messaggio trasmesso
dalla stazione. Se il segnale non viene
trasmesso, viene visualizzata l’indicazione “NO
RT”.
Frequenza stazione:
Frequenza della stazione (servizio non RDS)
Note:
●
Se la ricerca finisce immediatamente, le
indicazioni “PS”, “PTY” e "RT" non appaiono
sul display.
●
Se si preme il tasto DISPLAY MODE mentre
si ascolta una stazione AM (MW/LW), il display
visualizza solo la frequenza della stazione.
●
Il sistema RDS non è disponibile per le
trasmissioni AM (MW/LW).
Caratteri visualizzati
Quando il display visualizza segnali PS, PTY o
RT:
●
Il display visualizza solo lettere maiuscole.
●
Il display non è in grado di visualizzare lettere
accentate; Per esempio, la lettera “A” può
rappresentare una qualsiasi delle “A”
accentate come “Á, Â, Ã, À, Ä e Å”.
A, Á, Â, Ã,
À, Ä, Å
B
C,C,C
D, D
E, É, Ê,
È, Ë
F
G
H
I, Í, Î,
Ì, Ï
J
26
K
L
M
N, Ñ
O, Ó, Ô, Õ,
Ò, Ö, Ø
P
Q
R, R, R
S, S, S
T
U, Ú, Û,
Ù, Ü
V
W
X
Y
Z, Z, Z
0
1
2
3
4
5
6
7
8
9
*
+
–
,
.
/
<
>
=
'
Page 27

1
To search for a programme by PTY codes
One of the advantages of the RDS service is
that you can locate a particular kind of
programme by specifying the PTY codes.
Para buscar un programa por códigos PTY
Una de las ventajas del servicio RDS es que
usted puede ubicar un tipo particular de
programa especificando los códigos PTY.
Per ricercare un programma per mezzo dei
codici PTY
Uno dei vantaggi del sistema RDS è che esso
permette di localizzare programmi di un tipo
particolare specificando il codice PTY.
To search for a programme using PTY or TA
codes:
PTY/EON SELECT
1 Press the PTY button once while listening
to an FM station.
The display alternates between "PTY" and
"SELECT".
2 Select the PTY code using the SELECT
buttons within 10 seconds.
Each time you press the button, the display
shows a category in the following order:
NEWS ↔ AFFAIRS ↔ INFO ↔ SPORT ↔
EDUCATE ↔ DRAMA ↔ CULTURE ↔
SCIENCE ↔ VARIED ↔ POP M ↔ ROCK
M ↔ M.O.R.M ↔ LIGHT M ↔ CLASSICS
↔ OTHER M ↔ TRAFFIC ↔ NEWS
3 Press the PTY button within 10 seconds
again.
While searching, the display alternates
between "SEARCH" and the selected PTY
code.
The unit searches 30 preset stations and
stops when it finds a station of the category
you have selected, then tunes into that
station.
To continue searching after the first stop,
press the PTY button again while the display
indications blink.
If no programme is found, "NOT FOUND"
appears on the display.
To stop searching at any time during the
process
Using any tuner operating buttons and controls
stops search operation.
Descriptions of the PTY Codes
NEWS: News
AFFAIRS: Topical programme expanding on
the current news or affairs
INFO: Programmes on medical service,
weather forecasts, etc.
SPORT: Sports events
EDUCATE: Educational programmes
DRAMA: Radio plays
CULTURE: Programmes on national or
regional culture
SCIENCE: Programmes on natural sciences
and technology
VARIED: Other programmes like comedies
or ceremonies
POP M: Pop music
ROCK M: Rock music
M.O.R.M: Middle-of-the-road music (usually
called "easy listening")
LIGHT M: Light music
CLASSICS: Classical music
OTHER M: Other music
ALARM: Emergency broadcasts
TRAFFIC: Broadcasts which carry traffic
announcements
NONE: Undefined (this cannot be
searched.)
Para buscar un programa utilizando códigos
PTY o TA:
2
1 Presione una vez el botón PTY mientras
escucha una estación de FM.
La indicación conmuta entre "PTY" y
"SELECT".
2 Seleccione el código PTY usando los
botones SELECT dentro de 10 segundos.
Cada vez que usted presiona el botón, la
indicación muestra una categoría en el
orden siguiente:
NEWS ↔ AFFAIRS ↔ INFO ↔ SPORT ↔
EDUCATE ↔ DRAMA ↔ CULTURE ↔
SCIENCE ↔ V ARIED ↔ POP M ↔ ROCK M
↔ M.O.R.M ↔ LIGHT M ↔ CLASSICS ↔
OTHER M ↔ TRAFFIC ↔ NEWS
3 Presione otra vez el botón PTY dentro de
10 segundos.
Mientras busca, la indicación conmuta entre
"SEARCH" y el código PTY seleccionado.
La unidad busca entre las 30 estaciones
presintonizadas y para cuando encuentra
una estación de la categoría que usted ha
seleccionado, luego sintoniza esa estación.
Para continuar la búsqueda después de la
primera parada, presione otra vez el botón PTY
mientras parpadean las indicaciones del visor .
Si no se encuentra ningún programa en el visor
aparece "NOT FOUND".
Para detener la búsqueda en cualquier
momento durante el proceso
El utilizar cualquiera de los botones de
operación del sintonizador y los controles
detiene la operación de búsqueda.
Descripción de los códigos PTY
NEWS: Noticias
AFFAIRS: Programación de temas que
abarcan las noticias o asuntos
actuales
INFO: P rogramas sobre servicios
médicos, pronóstico del tiempo,
etc.
SPORT: Eventos deportivos
EDUCATE: Programas educativos
DRAMA: Teatro por radio
CUL TURE: Programas sobre cultura nacional
o regional
SCIENCE: Programas sobre ciencias
naturales y tecnología
VARIED: Otros programas como comedias
o ceremonias
POP M: Música Pop
ROCK M: Música Rock
M.O.R.M: Música en mitad de la carretera
(usualmente llamada "escucha
fácil")
LIGHT M: Música leve
CLASSICS: Música clásica
OTHER M: Otras músicas
ALARM: Radiodifusiones de emergencia
TRAFFIC: Radiodifusiones sobre anuncios
de tráfico
NONE: Indefinido (esta no puede ser
buscada.)
Per ricercare un programma utilizzando i
codici PTY o TA:
3
PTY/EON
1 Premere una volta il tasto PTY mentre si
ascolta una stazione FM.
La visualizzazione sul display si alterna tra
"PTY" e "SELECT".
2 Selezionare il codice PTY utilizzando i
tasti SELECT entro 10 secondi.
Ogni volta che un tasto viene premuto, il
display visualizza una categoria nell'ordine
seguente:
NEWS ↔ AFFAIRS ↔ INFO ↔ SPORT
EDUCATE ↔ DRAMA ↔ CULTURE
SCIENCE ↔ VARIED ↔ POP M ↔ ROCK
M ↔ M.O.R.M ↔ LIGHT M ↔ CLASSICS
↔
OTHER M ↔ TRAFFIC ↔ NEWS
3 Premere nuovamente il tasto PTY entro
10 secondi.
Durante la ricerca, la visualizzazione sul
display si alterna tra "SEARCH" ed il codice
PTY selezionato.
L'unità ricerca 30 stazioni preselezionate, si
ferma quando trova una stazione della
categoria selezionata e quindi si sintonizza
stabilmente su tale stazione.
Per continuare la ricerca dopo la prima
stazione,
mentre le indicazioni sul display lampeggiano.
Se non viene trovato alcun programma,
l'indicazione "NOT FOUND" appare sul display.
Per interrompere la ricerca in qualsiasi
momento
Utilizzare un qualsiasi tasto o comando del
sintonizzatore per interrompere la ricerca.
Descrizione dei codici PTY
NEWS: Notizie
AFF AIRS: Programma di attualità con notizie
INFO: Programmi riguardanti servizi
SPORT: Avvenimenti sportivi
EDUCATE: Programmi educativi
DRAMA: Sceneggiati radiofonici
CULTURE: Programmi di cultura regionale o
SCIENCE: Programmi di scienze naturali e
VARIED: Altri programmi come commedie e
POP M: Musica pop
ROCK M: Musica rock
M.O.R.M: Musica "Middle of the road" (detta
LIGHT M: Musica leggera
CLASSICS: Musica classica
OTHER M: Altra musica
ALARM: Trasmissioni di emergenza
TRAFFIC: Trasmissioni di annunci sul traffico
NONE: Non definita (non ricercabile)
premere nuovamente il tasto PTY
ed affari
medici, previsioni del tempo, ecc.
nazionale
tecnologia
cerimonie
anche "easy listening")
↔
↔
27
Page 28

1
To temporarily switch to a broadcast
programme of your choice
EON (Enhanced Other Networks) is another
convenient RDS service that allows this unit to
switch temporarily to a broadcast programme
of your choice (NEWS, TA or INFO) from the
currently selected station, except if you are
listening to a non-RDS station (all AM (MW/L W)
stations or some FM stations).
● If an FM station does not broadcast EON
information, EON cannot be activated.
Para conmutar temporariamente a una
radiodifusión de su selección
EON (Realzado de Otra Redes) es otro
conveniente servicio de RDS que permite a esta
unidad conmutar temporariamente a un
programa de radio de su selección (NEWS, T A
o INFO), desde la estación actualmente
seleccionada, excepto si usted está
escuchando una estación sin RDS (todas las
estaciones de AM (OM/OL) o algunas
estaciones de FM).
● Si una radioemisora de FM no emite
información EON, EON no podrá ser
activada.
Per ricevere temporaneamente un
programma diverso
Il sistema EON (Potenziamento Altra Rete) è
un altro comodo servizio RDS che permette la
commutazione temporanea dell'unità su una
trasmissione desiderata (NEWS, TA o INFO)
dalla stazione correntemente selezionata a
meno che non si stia ascoltando una stazione
non RDS (tutte le stazioni AM (MW/LW) ed
alcune stazioni FM).
●
Se una stazione FM non trasmette
informazioni EON, la funzione EON non può
essere attivata.
To select a programme type
PTY/EON SELECT
1 Press the EON button twice while listening
to an FM station.
The display alternates between "EON" and
"SELECT".
2 Select the programme type with the SELECT
buttons within 10 seconds.
The display shows a programme type in the
following order:
TA : Traffic Announcement
NEWS : News
INFO : Programmes on medical service,
weather forecast, etc.
OFF: EON off
3 Press the EON button within 10 seconds
again to set the selected programme type.
The selected programme type indicator lights
up on the display, and the unit enters EON
standby mode.
● The EON indicator lights up when tuned to a
station which provides EON information.
Case 1: If there is no station broadcasting
the type of programme you have selected
The broadcast station being currently heard will
continue to be heard.
=
When a station starts broadcasting the
programme you have selected, this unit
automatically switches to the station. The
programme type (TA, NEWS or INFO) indicator
starts blinking.
=
When the programme is over, this unit goes back
to the currently selected station, but still remains
in EON standby mode.
Case 2: If there is a station broadcasting the
type of programme you have selected
This unit tunes to the station broadcasting the
programme. The programme type (TA, NEWS
or INFO) indicator starts blinking.
=
When the programme is over, this unit goes back
to the currently selected station, but remains in
EON standby mode.
Para seleccionar el tipo de programa
2
1 Presione dos veces el botón EON mientras
escucha una emisora de FM.
La indicación alterna entre "EON" y
"SELECT".
2 Seleccione el tipo de programa con los
botones SELECT dentro de los 10 segundos.
La indicación muestra el tipo de programa
en el siguiente orden:
TA NEWS INFO
OFF
TA: Anuncio de tráfico
NEWS: Noticias
INFO: Programas de consejos médicos,
pronóstico del tiempo, etc.
OFF: EON desconectado
3 Presione otra vez el botón EON dentro de
los 10 segundos para sintonizar el tipo de
programa seleccionado. Se encenderá la
indicación del tipo de programa
seleccionado y la unidad ingresa en el modo
de espera EON.
● La luz indicadora EON se enciende cuando
se sintoniza una estación que suministra
información EON.
Caso 1: Si no hay un estación emitiendo el
tipo de programa que usted ha seleccionado
La estación emisora que está siendo
escuchada continuará siendo escuchada.
=
Cuando una estación comienza la emisión de
un programa que usted ha seleccionado, esta
unidad conmuta automáticamente a la estación.
El indicator del tipo de programa ( T A, NEWS o
INFO) comienza a parpadear.
=
Cuando el programa termina, esta unidad
regresa a la estación actualmente
seleccionada, pero permanece en el modo de
espera EON.
Caso 2: Si hay una estación que está
emitiendo el tipo de programa que usted ha
seleccionado
Esta unidad sintoniza la estación que emite el
programa.
El indicator del tipo de programa ( T A, NEWS o
INFO) comienza a parpadear.
=
Cuando el programa termina, esta unidad
regresa a la estación actualmente
seleccionada, pero permanece en el modo de
espera EON.
Per selezionare un tipo di programma
3
PTY/EON
1
Premere due volte il tasto EON mentre si
ascolta una stazione FM.
Il display alterna tra “EON” e “SELECT”.
2
Selezionare il tipo di programma entro 10
secondi con i tast SELECT.
Il display visualizza i tipi di programma
nell’ordine seguente:
TA: Annunci sul traffico
NEWS: Notizie
INFO: Programmi su servizi sanitari,
previsioni del tempo, ecc.
OFF: Funzione EON disattivata
3
Premere nuovamente il tasto EON entro 10
secondi per impostare il tipo di programma
selezionato. L’indicatore del tipo di
programma selezionato si illumina e l’unità
entra nel modo standby della funzione EON.
●
L’indicatore EON si illumina quando ci si
sintonizza su una stazione che fornisce
informazioni EON.
Caso 1: Se non vi è alcuna stazione che
trasmette il tipo di programma selezionato
Si continuerà ad udire la stazione correntemente
ricevuta.
Quando una stazione inizia la trasmissione del
=
programma selezionato, l’unità viene
commutata automaticamente su tale stazione.
L’indicatore del tipo di programma (TA, NEWS
o INFO) inizia a lampeggiare.
=
Quando il programma termina, l’unità ritorna alla
stazione correntemente selezionata ma rimane
nel modo di attesa EON.
Caso 2: Se vi è una stazione che trasmette il
tipo di programma selezionato
L’unità si sintonizza sulla stazione che trasmette
tale programma.
L’indicatore del tipo di programma (TA, NEWS
o INFO) inizia a lampeggiare.
=
Quando il programma termina, l’unità ritorna alla
stazione correntemente selezionata ma rimane
nel modo di attesa EON.
28
Page 29

Notes:
● If the EON is in standby mode and the function
(CD, TAPE, AUX) switch is changed or the
power is switched off, then the EON mode will
be released. When the band is set to AM (MW/
LW), the EON is not activated. When the band
is set to FM again, the EON will be set to
standby mode.
● When the EON is being operated (i. e. the
selected programme type is being received
from the broadcast station) and if the DISPLAY
MODE, ™, £ button or MULTI JOG dial
is operated, the station will not switch back to
the current selected station even after the
programme ends. The programme type
indicator remains in the display, indicating that
the EON is in standby mode.
● When the EON is in standby mode and a radio
broadcast is being recorded, be careful
because the EON may be activated and a
different programme than the intended one
may be recorded. When the EON mode is not
required, release the EON mode.
● When the alarm signal is detected by EON,
the station broadcasting the alarm is received
with priority. "ALARM" is not displayed.
Caution:
When the sound alternates intermittently
between the station tuned in by the EON function
and the current selected station, cancel the EON
mode. This does not constitute malfunction of
the unit.
Notas:
● Si EON está en el modo de espera y el
conmutador de función (CD, TAPE, AUX) es
cambiado o se desconecta la alimentación,
el modo EON es desactivado. Cuando la
banda es sintonizada en AM (OM/OL), EON
no se activa. Cuando la banda es sintonizada
en FM otra vez, EON se activa en el modo de
espera.
● Cuando EON está en operación (ej.: el tipo
de programa seleccionado está siendo
recibido desde una estación radioemisora),
y si se presiona DISPLA Y MODE, botón ™,
£ o disco MULTI JOG, la estación no
regresará a la estación seleccionada
actualmente aún cuando el programa
termine. El indicador de tipo de programa
permanece en el visor, indicando que EON
está en el modo de espera.
● Cuando EON está en el modo de espera y
se está grabando una emisión de radio, tome
precauciones porque EON puede ser
activado y puede grabar un programa
diferente que el que se planea grabar.
Cuando no es necesario usar el modo EON,
desactive el modo EON.
● Cuando la señal de alarma es detectada por
EON, la estación emitiendo la alarma es
recibida con prioridad. "ALARM" no es
indicada.
Precaución:
Cuando el sonido alterna intermitentemente
entre la estación sintonizada por medio de la
función EON y la estación actualmente
seleccionada, desactive el modo EON. Esto no
es una falla de la unidad.
Note:
●
Se il sistema EON si trova nel modo di attesa
ed il modo (CD, TAPE, AUX) viene cambiato,
oppure se l'alimentazione viene disattivata, il
modo EON viene cancellato. Quando la banda
è impostata su AM (MW/LW) il sistema EON
non viene attivato. Quando la banda viene
reimpostata su FM, il sistema EON viene
impostato nel modo di attesa.
●
Quando il sistema EON viene utilizzato (cioè
quando il tipo di programma selezionato viene
ricevuto), se i tasti DISPLAY MODE, tasto
™, £
o monopola MULTI JOG vengono
utilizzato, l'unità non ritorna alla stazione
correntemente selezionata anche se il
programma termina. L'indicatore del tipo di
programma rimane visualizzata per indicare
che il sistema EON si trova nel modo di attesa.
●
Quando il sistema EON si trova nel modo di
attesa e si sta registrando una stazione radio,
fare attenzione poichè la funzione EON
potrebbe essere attivata e potrebbe venire
registrato un programma diverso desiderato.
Cancellare il modo EON quando esso non è
necessario.
●
Quando un segnale di emergenza viene
rilevato dal sistema EON, la trasmissione di
emergenza viene ricevuta con priorità.
l'indicazione "ALARM" non viene visualizzata.
Attenzione:
Quando l'audio si alterna tra la stazione
sintonizzata dalla funzione EON e la stazione
correntemente sintonizzata, cancellare il modo
EON. Ciò non rappresenta una disfunzione
dell'unità.
RECORDING GRABACION REGISTRAZIONE
● During recording, the ALC (Automatic Level
Control) circuit automatically optimizes the
recording level, so manual recording level
adjustment is unnecessary.
● Check that the safety tab on the cassette tape
is not broken off.
Note:
This unit has recording characteristics
suitable for normal and CrO2 tapes. Normal
and CrO2 tapes have different
characteristics from metal tapes.
Synchronized recording with the CD
player
● In this system, the CD player starts play when
the cassette deck enters the recording mode.
● Durante la grabación, el circuito ALC (control
automático de nivel), optimiza automáticamente
el nivel de grabación, haciendo innecesario el
ajuste manual del nivel de grabación.
● Verifique que la lengüeta de seguridad del
cassette de cinta no esté rota.
Nota:
Esta unidad posee características de
grabación adecuadas para cintas
normales y de CrO2. Las cintas normales
y de CrO2 tienen características diferentes
que las cintas de metal.
Grabación sincronizada con el
reproductor de CD
● En este sistema el reproductor de CD inicia
la reproducción cuando la platina de cassette
ingresa en el modo de grabación.
●
Durante la registrazione, il circuito ALC
(controllo automatico del livello) ottimizza
automaticamente il livello di registrazione
rendendo così superflua la regolazione
manuale del livello di registrazione stesso.
●
Controllare che la linguetta di protezione della
registrazione della cassetta non sia stata
rimossa.
Nota:
Questa unità possiede caratteristiche di
registrazione adatte per nastri normali e
CrO2. I nastri normali e CrO2 possiedono
caratteristiche diverse da quelle dei nastri
Metal.
Registrazione sincronizzata col lettore
CD
●
In questo modo di funzionamento, il lettore CD
inizia a riprodurre quando il registratore entra
nel modo di registrazione.
29
Page 30
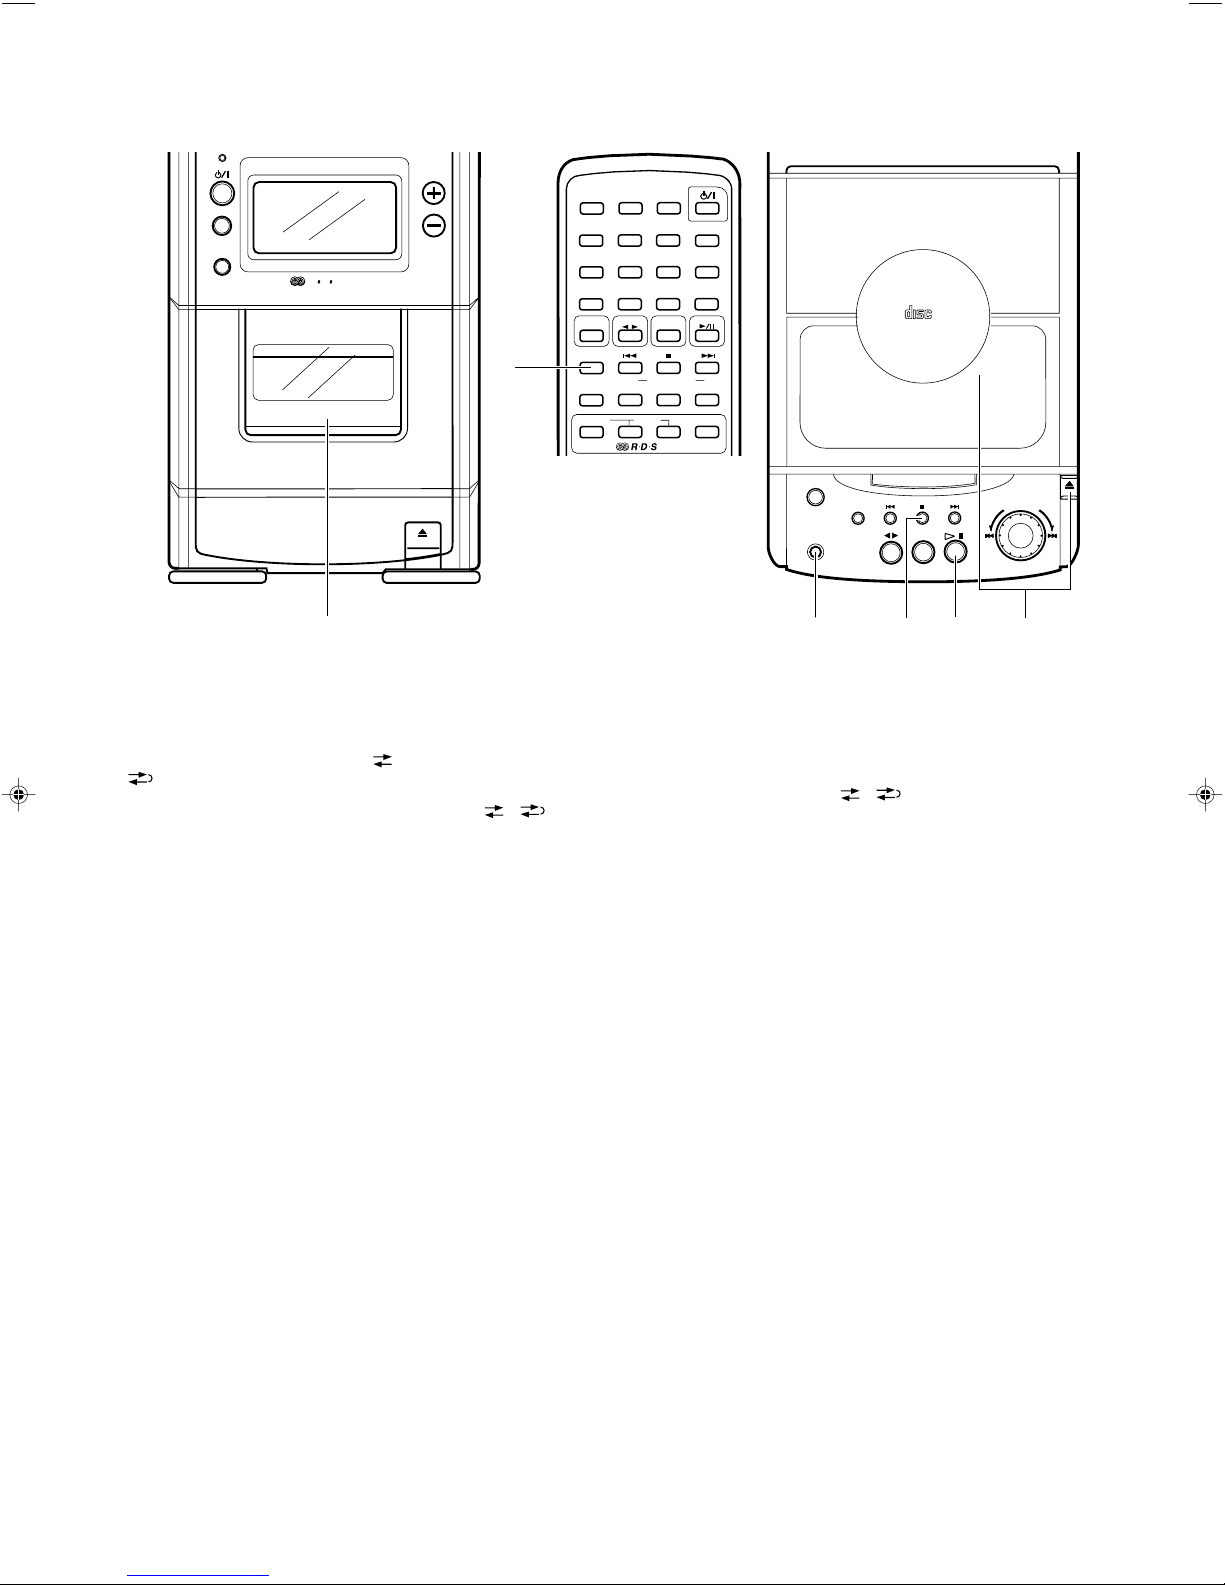
Operate in the order shown Eseguire le operazioni nell’ordine indicatoOpere en el orden mostrado
VOLUME
AUX
MICRO COMPONENT SYSTEM UX-T77R
AUTO TAPE SELECTOR
AUTO REVERSE
R D S
EON
5
12
4
5
8
7
10
+10
TAPE TUNER
AUX
REVERSE
MODE
REW
PROGRAM RANDOM
PTY/EON SELECT
3
6
9
AUTO
STEREO
PRESET
AUTO/MONO
BAND
MULTI CONTROL
DISPLAY MODE
EON
SLEEP
DISPLAY
C D
FF
REPEATBEAT CUT
ACTIVE HYPER
BASS PRO
ONE TOUCH
REC
CLOCK
COMPACT
DIGITAL AUDIO
TIMER/SNOOZE
BAND
TUNER
TAPE
OPEN
I
J
T
O
L
G
U
M
CD
1
1 Load a cassette with side A facing out. (Wind
past the tape leader before starting
recording.)
2 Load a CD and close the CD holder.
3 Set to the CD mode.
4 Press the 5 button to set stop mode.
5 Select the required reverse mode ( or
).
● When programmed play is required,
program the required tracks using the
remote control. (See page 19.)
● Select tracks with a total playing time which
does not exceed the tape length.
6 Press the ONE TOUCH REC button;
synchronized recording will start.
(The recording indicator lights up.)
● Recording starts in the forward direction and
CD play starts automatically.
● After the CD player has played the entire CD
or programmed tracks, the deck stops
automatically
● Non-recorded sections of approx. 4 seconds
are automatically left between tunes
● To stop recording in the middle, press the 5
button. The cassette deck also stops after 4
seconds.
Note:
● During CD synchro recording, the $6,
SEARCH (™, £) buttons and MULTI
JOG dial do not function.
1 Coloque un cassette con el lado A
apuntando hacia afuera. (Bobine hasta
pasar extremo no grabable de la cinta antes
de iniciar la grabación.)
2 Coloque un CD y cierre el portadisco.
3 Active el modo de CD.
4 Presione el botón 5 para activar el modo
de parada.
5 Seleccione el modo de inversión deseado
( o ).
● Cuando desea la reproducción
programada, programe las pistas
deseadas utilizando el controlador remoto.
(Ver página 19).
● Seleccione las pistas con un tiempo total
de reproducción que no exceda la
longitud de la cinta.
6 Presione el botón ONE TOUCH REC; se
inicia la grabación sincronizada.
(Se enciende la luz indicadora de grabación.)
● La grabación se inicia hacia adelante y se
inicia automáticamente la reproducción del
CD.
● Después de que el reproductor de CD
termina de reproducir todo el CD o las pistas
programadas, la platina se detiene
automáticamente.
● En la cinta quedan automáticamente sin
grabar secciones de 4 segundos aprox..
● Para parar la grabación en la mitad, presione
el botón (5) . La platina de cassette también
para después de transcurridos 4 segundos.
Nota:
● Durante la grabación sincronizada de CD, los
botones $6, SEARCH (™, £) y disco
MULTI JOG no funcionan.
6
1
Inserire una cassetta col lato A rivolto
4 3 2
all’esterno. (Superarne la sezione guida del
nastro prima di avviare la registrazione.)
2
Inserire un CD e chiudere il piatto del CD.
3
Impostare il modo del CD.
4
Premere il tasto 5 per impostare il modo di
arresto.
5
Selezionare il modo autoreverse desiderato
( o ).
●
Per la riproduzione programmata,
programmare i brani richiesti col
telecomando. (Consultare a proposito pag.
19.)
●
cegliere i brani con un tempo di riproduzione
totale che non superi la lunghezza del
nastro.
6
Premere il tasto ONE TOUCH REC; la
registrazione sincronizzata inizia.
(L’indicazione di registrazione si illumina.)
●
La registrazione inizia nella direzione in avanti
e la riproduzione del CD inizia automaticamente.
●
Dopo che il lettore CD ha riprodotto l'intero CD
o i brani programmati, il registratore si ferma
automaticamente.
●
Degli spazi non registrati da circa 4 secondi
vengono creati automaticamente tra i brani.
●
Per interrompere la registrazione, premere il
tasto arresto/cancellazione (5). Il registratore
a cassette si ferma a sua volta dopo 4 secondi.
Note:
●
Durante la registrazione sincronizzata, i tasti
$6
, SEARCH (™, £) e manopola
MULTI JOG non funzionano.
When non-recorded section between tunes
is not required ...
1 Press the $6 button twice.
The CD player enters the pause mode.
2 Press the ONE TOUCH REC button to start
recording.
Note:
● Depending on the CD used, non-recorded
sections of different lengths may be left
between tunes.
30
Cuando no es necesario dejar espacios sin
grabar entre músicas...
1 Presione dos veces el botón $6.
El reproductor ingresa en el modo de pausa.
2 Para iniciar la grabación presione el botón
ONE TOUCH REC.
Nota:
● Dependiendo del CD utilizado es posible
dejar entre músicas secciones sin grabar de
diferentes longitudes.
Quando sezioni non registrate tra i brani non
sono necessarie ...
1
Premere due volte il tasto $6.
Il lettore CD entra nel modo di pausa.
2
Premere il tasto ONE TOUCH REC per
avviare la registrazione.
Nota:
●
A seconda del CD utilizzato, degli spazi non
registrati di lunghezza diversa possono essere
lasciati tra i brani.
Page 31
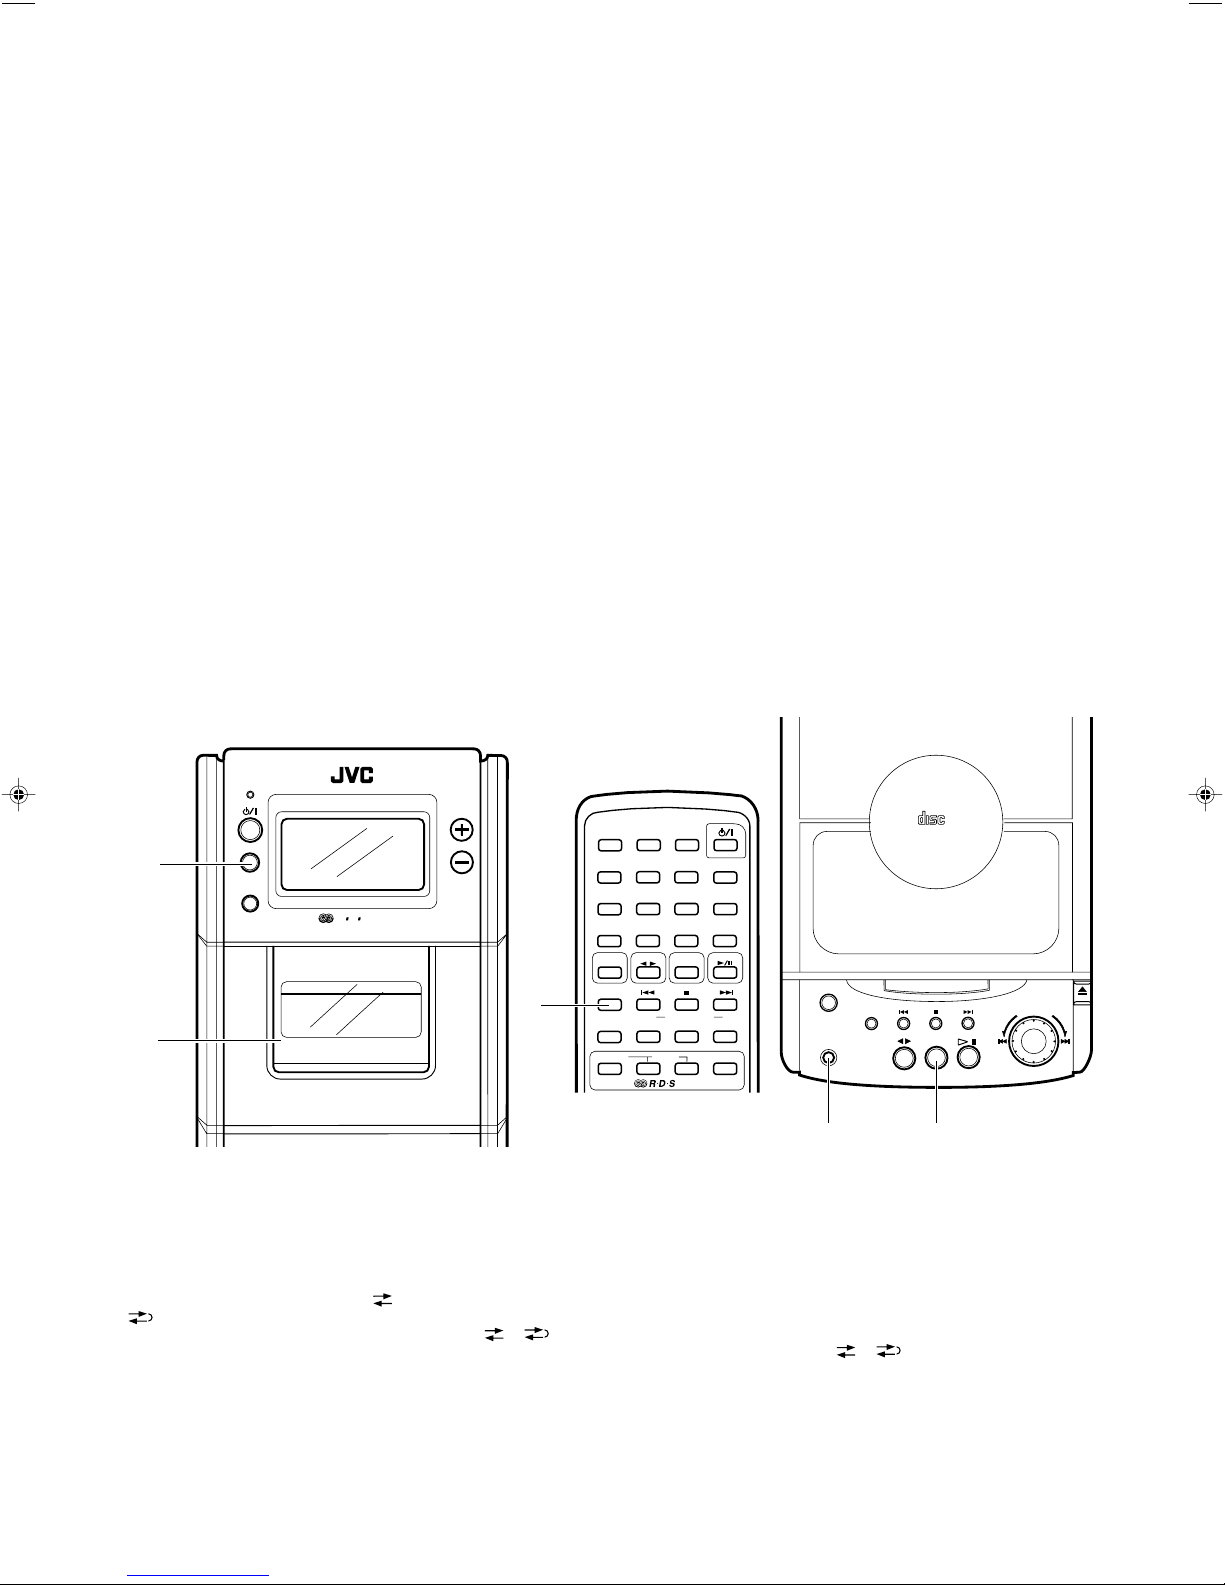
● CD complete recording function (Synchro
recording mode only)
If the tape is reversed while a CD is being
played, recording will be done on the reverse
side of the tape as follows:
* When less than 12 seconds of the last tune
on the forward side of the tape have been
recorded, recording on the other side of the
tape will start from the beginning of the
previous track.
* When more than 12 seconds of the last tune
on the forward side of the tape have been
recorded, recording on the other side of the
tape will start from the beginning of the
current track.
● Función de grabación del CD completo
(modo de grabación sincronizada
exclusivamente)
Si la cinta es invertida mientras el CD está
siendo reproducido, la grabación se
efectuará en el lado opuesto de la cinta, de
la siguiente manera:
* Cuando se hayan grabado menos de 12
segundos de la última música en el lado
frontal de la cinta, la grabación del otro lado
se iniciará desde el principio de la pista
anterior.
* Cuando se hayan grabado más de 12
segundos de la última pista en el lado frontal
de la cinta, la grabación del otro lado se
iniciará desde el principio de la pista actual.
● Funzione di registrazione completa del CD
(solo nel modo di registrazione
sincronizzata)
Se la direzione del nastro viene invertita
durante la riproduzione del CD, la registrazione
viene eseguita sul lato opposto nel modo
seguente:
* Se sono stati registrati meno di 12 secondi
dell’ultimo brano sul lato anteriore del brano,
la registrazione sul lato opposto del nastro
inizierà dall’inizio del brano precedente.
* Se sono stati registrati più di 12 secondi
dell’ultimo brano sul lato anteriore del brano,
la registrazione sul lato opposto del nastro
inizierà dall’inizio del brano in corso di
riproduzione.
● To record one track
Play the track to be recorded. Then pressing
the ONE TOUCH REC button locates the
beginning of the track and enter the one track
recording mode. After the recording is finished,
the CD player and cassette deck both stop.
Recording from the radio or an external
source connected to the AUX terminals
Operate in the order shown
STANDBY
AUX
2
EON
R D S
MICRO COMPONENT SYSTEM UX-T77R
AUTO TAPE SELECTOR
1
AUTO REVERSE
● Grabación de una sólo pista
Reproduzca la pista a ser grabada. Luego
presionando el botón ONE TOUCH REC
ubique el principio de la pista y active el modo
de grabación de una sólo pista.
Después de terminar la grabación, el
reproductor de CD y la platina de cassette
paran.
Grabación desde la radio o desde una
ente externa conectada a los terminales
AUX
Opere en el orden mostrado
VOLUME
3
12
4
7
10
AUX
REVERSE
MODE
PTY/EON SELECT
3
5
6
8
9
AUTO
PRESET
+10
TAPE TUNER
BAND
MULTI CONTROL
REW
PROGRAM RANDOM
EON
SLEEP
DISPLAY
STEREO
AUTO/MONO
C D
REPEATBEAT CUT
DISPLAY MODE
●
Registrazione di un brano
Riprodurre il brano da registrare, quindi
premere il tasto ONE TOUCH REC per trovare
l’inzio del brano e impostare il modo di
registrazione di un brano.
Terminata la registrazione, il lettore CD ed il
registratore a cassette si fermano.
Registrazione della radio o del
componente collegato ai terminali AUX
Eseguire le operazioni nell’ordine indicato
COMPACT
DIGITAL AUDIO
ACTIVE HYPER
BASS PRO
FF
ONE TOUCH
REC
CLOCK
TIMER/SNOOZE
BAND
TUNER
TAPE
OPEN
I
J
T
O
L
G
U
M
CD
1 Load a cassette with side A facing out.
(Wind past the tape leader before starting
recording.)
2 Select the source to be recorded.
TUNER: Press the TUNER/BAND button.
Tune to the required station.
AUX: Press the AUX button.
3 Select the required reverse mode ( or
).
4 Press the ONE TOUCH REC button.
1 Coloque un cassette con el lado A apuntado
hacia afuera.
(Bobine hasta pasar extremo no grabable
de la cinta antes de iniciar la grabación).
2 Seleccione la fuente a ser grabada.
TUNER: Presione el botón TUNER/BAND.
Sintonice la estación deseada.
AUX: Presione el botón AUX.
3 Seleccione el modo de inversión deseado
( o ).
4 Presione el botón ONE TOUCH REC.
4
1
Inserire una cassetta col lato A rivolto
2
all’esterno.
(Prima di avviare la registrazione, superare
la sezione guida del nastro).
2
Selezionare la fonte da registrare.
TUNER: Premere il tasto TUNER/BAND.
Sintonizzare la stazione
desiderata.
AUX : Premere il tasto AUX.
3
Selezionare il modo autoreverse desiderato
( o ).
4
Premere il tasto ONE TOUCH REC.
31
Page 32

BEAT CUT button (using the remote
control unit)
When recording an AM broadcast, beats may
be produced which are not heard when listening
to the broadcast. In such case, set this button
after setting the deck to the record mode so that
the beats are eliminated. Normally set this button
to “CUT-1”.
BEAT CUT
Botón BEAT CUT (utilizando la unidad
de control remoto)
Cuando graba una radiodifusión de AM, es
posible que se escuchen compases inaudibles
cuando escucha la radiodifusión. En tal caso,
ajuste este botón después de activar el modo
de grabación de la platina, para eliminar los
compases. Normalmente, ajuste este botón en
“CUT -1”.
Tasto BEAT CUT (utilizzando l’unità di
telecomando)
Durante la registrazione di una trasmissione AM,
si possono verificare dei battimenti che non si
sentono mentre si ascolta la trasmissione stessa.
In tali casi, impostare questo tasto dopo aver
portato il registratore nel modo di registrazione
in modo da eliminare i battimenti. Impostare
normalmente questo tasto su “CUT-1”.
Erasing
A recorded tape can be erased by recording new
material over the previous material.
To erase a tape without making a new
recording...
1. Press the TAPE (;') button to set to the
TAPE mode.
2. Press the 5 button.
3. Insert the cassette with the side to be erased
facing out.
4. Press the ONE TOUCH REC button.
It may be unlawful to record or playback
copyrighted material without the consent
of the copyright owner.
Borrado
La cinta grabada puede ser borrada grabando
otro material sobre el material anterior.
Para borrar una cinta sin efectuar una
nueva grabación...
1. Presione el botón TAPE (;') para activar
el modo TAPE.
2. Presione el botón 5.
3. Coloque un cassette con el lado a ser
borrado apuntando hacia afuera.
4. Presione el botón ONE TOUCH REC.
Puede ser ilegal el grabar o reproducir
material con derechos de autor sin el
consentimiento del dueño de los mismos.
CLOCK ADJUSTMENT AJUSTE DEL RELOJ
Names of parts in the clock/timer section,
and their functions:
Nombre de las parte de la sección del reloj/
temporizador y sus funciones:
Cancellazione
Un nastro registrato può essere cancellando
eseguendo una nuova registrazione sopra a
quella precedente.
Per cancellare un nastro senza eseguire una
nuova registrazione...
1. Premere il tasto TAPE (;') per impostare
il modo TAPE.
2. Premere il tasto 5.
3. Inserire la cassetta col lato da cancellare
rivolto all'esterno.
4. Premere tasto ONE TOUCH REC.
Notare che la registrazione o la riproduzione
di materiali protetti da diritti d’autore senza
il permesso del proprietario di tali diritti
potrebbe essere contro la legge.
REGOLAZIONE OROLOGIO
Nome e funzioni delle varie parti dell’orologio
e del timer:
COMPACT
DIGITAL AUDIO
REC
ON
OFF
CLOCK
1 Timer mode indicator
2 Timer indicator (ON/OFF)
3 CLOCK indicator
4 SLEEP indicator
5 Time display
6 CLOCK button
7 TIMER/SNOOZE button
8 MULTI JOG dial
It is used to set the current time and perform
timer setting.
32
5
4213
SLEEP
ACTIVE HYPER
BASS PRO
ONE TOUCH
REC
1 Indicador del modo de temporizador
2 Indicador de temporizador (ON/OFF)
3 Indicador CLOCK
4 Indicador SLEEP
5 Indicación de la hora
6 Botón CLOCK
7 Botón TIMER/SNOOZE
8 Disco MULTI JOG
Es empleado para ajustar la hora y efectuar
el ajuste del temporizador.
CLOCK
6
TIMER/SNOOZE
BAND
TUNER
TAPE
OPEN
I
J
T
O
L
G
U
M
CD
87
1
Indicatore modo timer
2
Indicatore timer (ON/OFF)
3
Indicatore CLOCK
4
Indicatore SLEEP
5
Visualizzazione tempo
6
Tasto CLOCK
7
Tasto TIMER/SNOOZE
8
Manopola MULTI JOG
Viene utilizzata per impostare l'orario ed il
timer.
Page 33
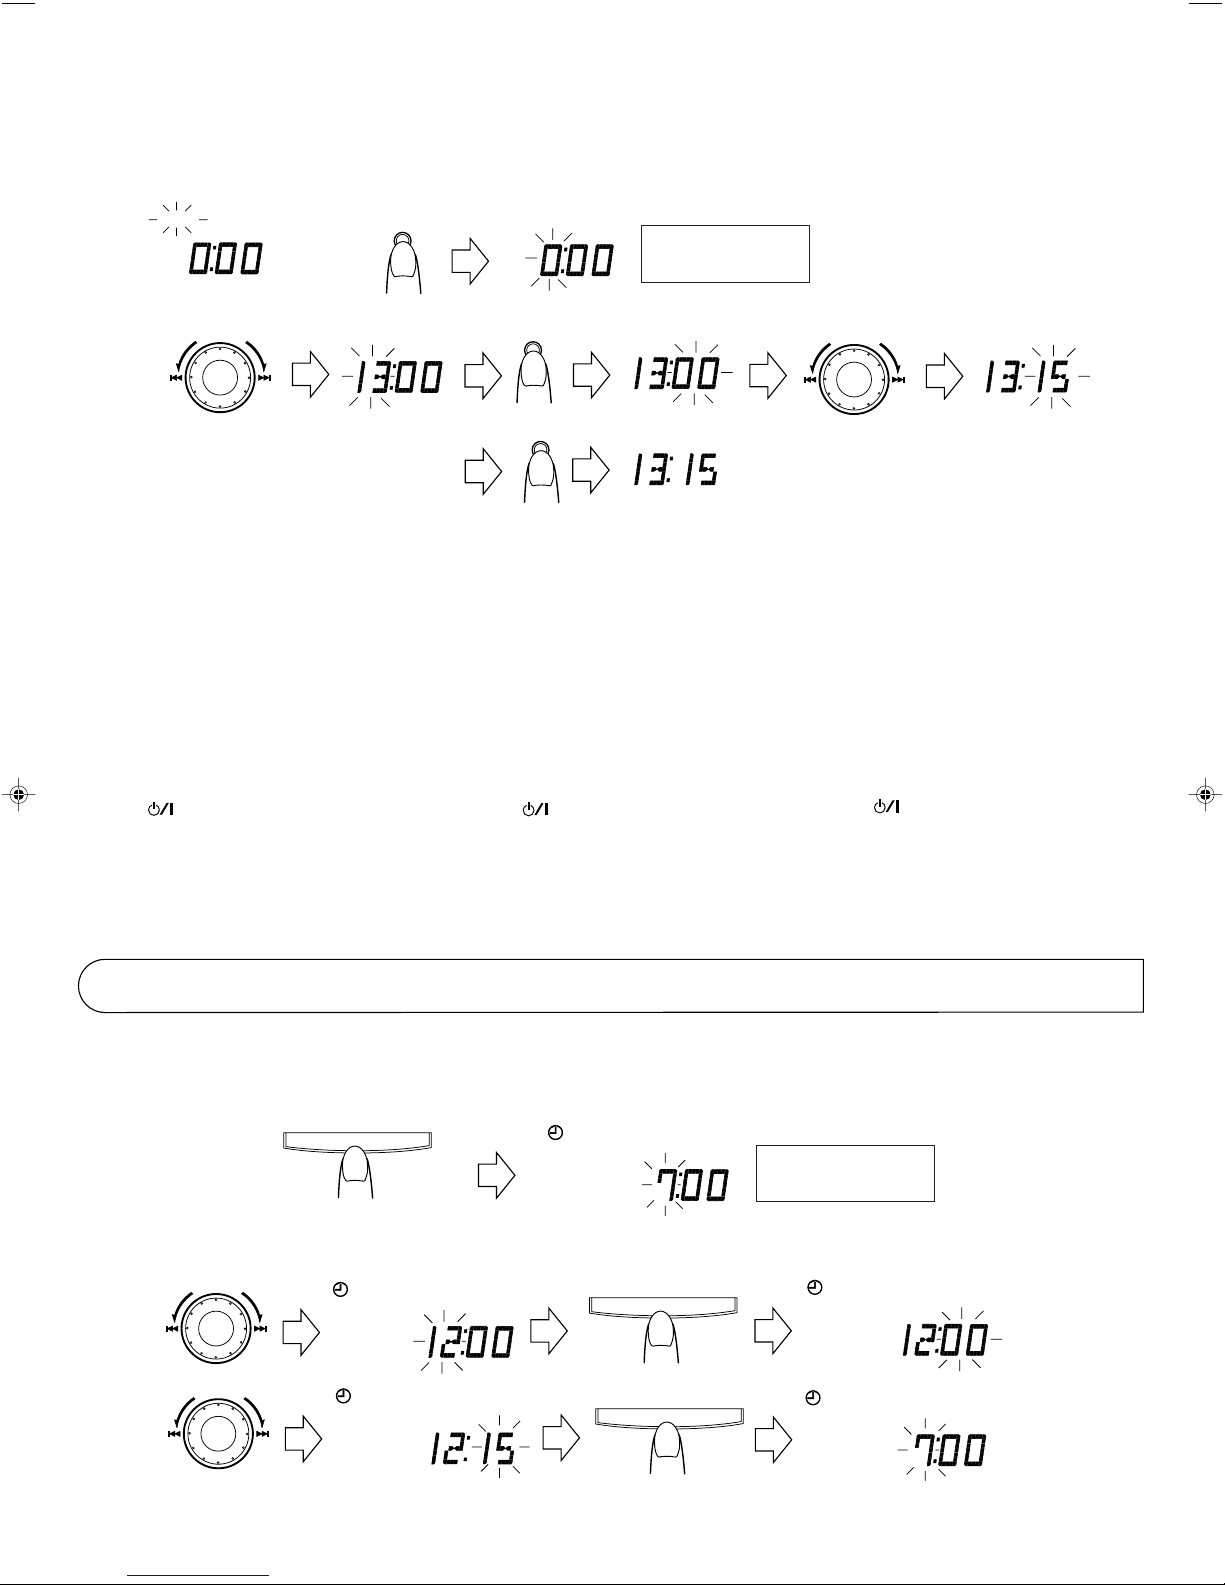
1
3
Setting the current time (when this unit
is used for the first time)
(Example: To set the clock to 13:15.)
2
CLOCK
Back
Atrás
Indietro
Advance
Adelantar
Avanzare
I
J
T
O
L
G
U
M
CLOCK
CLOCK
Ajuste de la hora actual (Cuando se usa
la unidad por primera vez)
(Ejemplo: Para ajustar el reloj a las 13:15.)
CLOCK
CLOCK
Within 2 minutes.
Dentro de los 2 minutos.
Entro 2 minuti.
CLOCK
Impostazione orario(Quando l'unità
viene utilizzata per la prima volta)
(Esempio: Per impostare l'orologio sulle 13:15.)
I
J
T
O
L
G
U
M
CLOCK
One hour is advanced/moved back every 2 clicks.
Cada 2 “clic” adelanta/atrasa una hora.
Si avanza/indietreggia di 1 ora ogni 2 scatti.
1 Connect the AC power cord; “CLOCK” will
blink in the display.
2 Press the CLOCK button for 2 seconds or
more.
3 Set to 13: 15 using the MULTI JOG Dial and
CLOCK button.
● Setting the current time.
Use the time signal of television and radio
broadcasts.
When adjusting the clock, follow steps 2 -
3.
Notes:
● Before performing timer recording or playback,
it is necessary to set the current time.
● It is recommended to set the current time with
the button set to STANDBY so that the
current display mode is maintained.
● When the power cord is plugged in again after
being disconnected or power is restored after
a power failure, “CLOCK” will blink in the
display. Set the current time again.
TIMER OPERATIONS
CLOCK
CLOCK
1 Conecte el cordón de alimentación de CA;
“CLOCK” parpadeará en la indicación.
2 Presione durante 2 o más segundos el botón
CLOCK.
3 Ajuste a las 13:15 empleando el disco MULTI
JOG y el botón CLOCK.
● Ajuste de la hora
Emplee la señal de hora de televisión o de
radiodifusión.
Para ajustar el reloj siga los pasos 2 y 3.
Notas:
● Antes de efectuar la grabación o
reproducción por temporizador , es necesario
ajustar la hora actual.
● Se recomienda ajustar la hora actual con el
botón colocado en STANDBY para
conservar el modo de indicación actual.
● Cuando se conecta el cordón de alimentación
después de haberlo desconectado o cuando
vuelve la energía después de un corte de la
misma, “CLOCK” parpadeará en el visor.
Ajuste otra vez la hora actual.
OPERACIONES POR
TEMPORIZADOR
One minute is advanced/moved back every 2 clicks.
Cada 2 “clic” adelanta/atrasa un minuto.
Si avanza/indietreggia di 1 minuto ogni 2 scatti.
1
Collegare il cavo di alimentazione CA;
l'indicazione "CLOCK" lampeggia sul display.
2
Premere il tasto CLOCK per 2 secondi o più.
3
Impostare 13:15 utilizzando la manopola
MULTI JOG ed il tasto CLOCK
●
Impostazione ora esatta.
Utilizzare il segnale orario della televisione o
di una trasmissione radio.
Seguire le fasi 2-3 per eseguire la
regolazione dell'orario.
Note:
●
Prima di eseguire la registrazione o la
riproduzione col timer è necessario impostare
l’ora esatta.
●
Si raccomanda di impostare l’ora esatta col
tasto su STANDBY in modo da
mantenere il modo di visualizzazione corrente.
●
Quando il cavo di alimentazione viene
ricollegato dopo essere stato scollegato
oppure quando l’alimentazione viene riattivata
dopo un’interruzione di corrente, l’indicazione
“CLOCK” lampeggia sul display. Impostare
nuovamente l’ora esatta.
OPERAZIONI COL TIMER
Setting the timer
● The current time must be set before the timer
can be used.
1 Press the TIMER/SNOOZE button for 2
seconds or more.
TIMER/SNOOZE
2 Set the start time.
(Example: To set the timer to 12: 15.)
I
J
T
O
L
G
U
M
I
J
T
O
L
G
U
M
ON
ON
Ajuste del temporizador
● Es necesario ajustar la hora actual antes de
emplear el temporizador.
1 Presione el botón TIMER/SNOOZE durante
2 segundos o más.
ON
2 Ajuste la hora de activación.
(Ejemplo: Para ajustar el temporizador a las
12:15.)
TIMER/SNOOZE
TIMER/SNOOZE
● Press to set the start time.
● Presione para fijar la hora de comienzo.
Premerlo per impostare l'ora di inizio.
●
Impostazione del timer
●
Prima di poter utilizzare il timer Å necessario
impostare l'ora esatta.
1
Premere il tasto TIMER/SNOOZE per 2
secondi o più.
Within 30 sec.
Dentro de los 30 seconda.
Entro 30 segunda.
2
Impostare l'orario di avvio.
(Esempio: Per impostare il timer su 12:15.)
ON
OFF
33
Page 34

3 Set the stop time.
(Example: To set the timer stop timer to 13:
15.)
I
J
T
O
L
G
U
M
I
J
T
O
L
G
U
M
OFF
OFF
3 Ajuste la hora de desactivación.
(Ejemplo: Para ajustar el temporizador a las
13:15.)
TIMER/SNOOZE
TIMER/SNOOZE
● Press to set the timer off time.
● Presione para fijar la hora de desconexión del temporizador
Premerlo per impostare l'ora di fine.
●
3
Impostare l'orario di fine.
(Esempio: Per impostare il timer su 13:15.)
OFF
4 Select the TIMER mode
● The selected TIMER mode is shown in the
display.
I
J
T
O
L
G
U
M
TUNER
When the MULTI JOG dial is turned to select the timer
mode, the mode changes from TUNER (timer reception
of a broadcast), to TUNER/REC (timer recording of a
broadcast), to CD (timer play of a CD), to TAPE (timer
playback of a tape) in forward or reverse order.
TUNER REC
4 Seleccione el modo TIMER.
● El modo TIMER seleccionado aparecerá
en la indicación.
CD
Al girar el disco MUL TI JOG para seleccionar el modo
de temporizador, el modo cambia en el siguiente
orden: TUNER (recepción de radiodifusión por
temporizador), TUNER/REC (grabación de
radiodifusión por temporizador), CD (reproducción de
un CD por temporizador), y TAPE (reproducción de
cinta por temporizador) hacia adelante o hacia atrás.
TAPE
TIMER/SNOOZE
5 Set the volume. 5 Ajuste el volumen. 5
I
J
T
O
L
G
U
M
This shows when volume level 1 is selected.
Esto se visualizará cuando se seleccione el nivel de volumen 1.
Indica se il livello di volume 1 è stato scelto.
TIMER/SNOOZE
● The selected volume is set.
● Se fija el volumen desseado.
Viene scelto il livello di volume.
●
● When the volume setting is set to “VOLUME - “
(volume level is not specified), the timer
playback volume is at the level used before
setting the timer.
● To confirm the timer setting
1. When (‰) is displayed...
Press the TIMER/SNOOZE button for more
than 2 seconds. (‰) disappears.
2. Press the TIMER/SNOOZE button for more
than 2 seconds once again.
Then each time the TIMER/SNOOZE button
is pressed the timer setting can be confirmed.
When the previous function mode is restored,
showing that the timer setting has been
completed.
Note:
● When the timer is set incorrectly or the correct
mode is not selected, perform "Setting the
timer" from the beginning.
● The unit enters the previously engaged mode and timer setting has been completed.
● La unidad ingresa en el modo previamente activado y el ajuste del temporizador queda completado.
●
L’unità entra nel modo precedentemente attivato e l’impostazione del timer è così terminata.
● Al colocar el ajuste de volumen en “VOLUME-“
(el nivel de volumen no está especificado),
el volumen de reproducción por temporizador
está al nivel usado antes del ajuste del
temporizador.
● Confirmación del ajuste del temporizador
1. Cuando aparece indicado ‰...
Presione el botón TIMER/SNOOZE durante
2 segundos o más. Desaparece ‰.
2. Presione otra vez el botón TIMER/SNOOZE
durante 2 segundos o más.
Luego, para confirmar el ajuste del
temporizador presione el botón TIMER/
SNOOZE. Cuando se reactiva el modo de
función anterior, el ajuste del temporizador
ha sido completado.
Nota:
● Cuando se ajusta el temporizador
incorrectamente o no se selecciona el modo
correcto, ejecute el “Ajuste del temporizador”,
desde el principio.
4
Selezionare il modo TIMER.
●
Il modo TIMER selezionato viene
visualizzato sul display.
Quando la manopola MULTI JOG viene ruotata per
selezionare il modo del timer, il modo di funzionamento
cambia da TUNER (ricezione a timer di una
trasmissione) a CD (riproduzione a timer di un CD) a
TAPE (riproduzione a timer di un nastro) in ordine
normale o inverso.
Impostare il volume.
●
Quando l'impostazione del volume si trova su
“VOLUME -“ (il livello del volume non Å
specificato), il volume della riproduzione col
timer si trova al livello di prima
dell'impostazione del timer.
● Per controllare l'impostazione del timer
1. Quando viene visualizzata l'indicazione (‰)...
Premere il tasto TIMER/SNOOZE per più di
2 secondi.
L'indicazione (‰) scompare.
2.Premere nuovamente il tasto TIMER/
SNOOZE per più di 2 secondi.
Ogni volta che il tasto TIMER/SNOOZE viene
premuto Å possibile controllare l'impostazione
del timer. Quando viene ripristinato il modo
di funzione precedente, ciÿ indica che
l'impostazione del timer Å stata completata.
Note:
●
Quando il timer viene impostato in modo
scorretto oppure quando il modo corretto non
viene selezionato, eseguire quanto descritto
nella sezione "Impostazione del timer"
dall'inizio.
34
Page 35

Timer recording of broadcast
● The current time must be set before the timer
can be used.
● Make sure that the safety tabs of the cassette
have not been broken off.
Grabación por temporizador de una
radiodifusión
● Antes de utilizar el temporizador es necesario
ajustar la hora actual.
● Asegúrese de que las lengüetas de
seguridad del cassette no estén rotas.
Registrazione di trasmissioni col timer
●
Prima di poter utilizzare il timer deve essere
impostata l’ora esatta.
●
Accertarsi che le linguette di protezione della
registrazione della cassetta non siano state
rimosse.
Operations
STANDBY
1
5
2
1 Set the button to ON.
2 Load a cassette.
● Insert the cassette with the side to be
recorded facing out.
● Select the required reverse mode. ( or
)
3 Set the timer. (Refer to “Setting the timer” on
page 33.)
● Set the timer about a minute before the
broadcast to be recorded is scheduled to
start.
4 Tune to the station to be recorded. (Refer to
page 23.)
5 Set the button to STANDBY.
● Timer recording will start at timer start time
and the power will be switched off at timer
stop time. (The timer mode is then released.)
● To cancel timer operation
Press the TIMER/SNOOZE button for more
than 2 seconds so that the timer mode
indicator (‰) goes out.
If you do this, timer recording will not start at the
timer start time.
Notes:
Once the timer has been set, the start and stop
times, etc., are stored in memory. When timer
recording or playback is required at different
times, the timer must be set again.
● After setting the timer start and stop times,
check that the tuner is tuned to the required
frequency.
● When the power cord is disconnected or there
is a power failure, timer settings will be erased
from memory. If this happens, set the current
time and perform the timer setting again.
AUX
MICRO COMPONENT SYSTEM UX-T77R
AUTO TAPE SELECTOR
AUTO REVERSE
Operaciones
VOLUME
EON
R D S
1 Coloque el botón en ON.
2 Coloque un cassette.
● Inserte el cassette con el lado a ser
grabado apuntando hacia afuera.
● Seleccione el modo de inversión deseado.
( o )
3Ajuste el temporizador. (Refiérase a “Ajuste
del temporizador” en la página 33.)
● Ajuste el temporizador a un minuto
aproximadamente antes del comienzo
programado de la radiodifusión a ser
grabada.
4 Sintonice la estación a ser grabada.
(Refiérase a la página 23.)
5 Coloque el botón en STANDBY.
● La grabación por temporizador se iniciará
en a la hora de activación del temporizador
y la unidad desconecta la alimentación a
la hora de parada del temporizador. (Luego
se desactiva el modo de temporizador.)
● Cancelación de la operación por
temporizador
Presione el botón TIMER/SNOOZE durante
más de 2 sequndos para borrar el o indicador
de modo de temporizador (‰).
Si usted hace esto, la grabación por
temporizador no se iniciará a la hora de
activación del temporizador.
Notas:
Una vez ajustado el temporizador, la hora de
activación y desactivación, etc., son registradas
en memoria. Cuando se desea efectuar una
grabación o reproducción por temporizador a
horas diferentes, es necesario ajustar otra vez
el temporizador.
● Después de ajustar la hora de activación y
desactivación, etc. del temporizador,
verifique que el sintonizador esté sintonizado
en la frecuencia deseada.
● Si se desconecta el cordón de alimentación
o si hay un corte de energía, los ajustes del
temporizador se borran de la memoria. Si
ocurre esto, ajuste la hora actual y ajuste el
temporizador otra vez.
ACTIVE HYPER
BASS PRO
ONE TOUCH
REC
CLOCK
Operazioni
COMPACT
DIGITAL AUDIO
TIMER/SNOOZE
BAND
TUNER
TAPE
CD
OPEN
I
J
T
O
L
G
U
M
3
4
1
Portare l’interruttore su ON.
2
Inserire una cassetta.
●
Inserire la cassetta col lato da registr are
rivolto all’esterno.
●
Selezionare il modo reverse desiderato.
( o )
3
Impostare il timer. (Vedi “Impostazione del
timer” a pag. 33.)
●
Impostare il timer su circa un minuto prima
dell’inizio della trasmissione che si desidera
registrare.
4
Sintonizzare la stazione che si desidera
registrare. (Vedi in proposito pag. 23.)
5
Portare l’interruttore su STANDBY.
● La registrazione col timer inizia all’orario
di avvio e l’alimentazione viene disattivata
all’orario di arresto.
quindi abbandonato).
● Per cancellare il funzionamento col timer
Premere il tasto TIMER/SNOOZE per piùdi
2 secondi in modo da far spegnere l’indicatore
del modo del timer (‰).
Se questa operazione viene eseguita, la
registrazione col timer non si avvierà all’orario
di avvio del timer.
Note:
Una volta che il timer è stato impostato, gli orari
di avvio e di arresto, ecc., vengono memorizzati.
Quando si desidera eseguire la registrazione o
la riproduzione ad un orario diverso, il timer deve
essere reimpostato.
●
Dopo aver impostato gli orari di avvio e di
arresto del timer, controllare che il
sintonizzatore sia sintonizzato sulla frequenza
desiderata.
●
Quando il cavo di alimentazione viene
scollegato o si verifica un’interruzione di
corrente, le impostazioni del timer vengono
cancellate dalla memoria. Se ciò dovesse
accadere, impostare l’orario corrente e
reimpostare il timer.
(Il modo del timer viene
35
Page 36

Timer playback
● Timer playback of tapes, broadcasts and CDs
is possible.
Operations
STANDBY
1
3
AUX
MICRO COMPONENT SYSTEM UX-T77R
AUTO TAPE SELECTOR
Reproducción por temporizador
● La reproducción por temporizador de cintas,
radiodifusiones, y CD es posible.
Operaciones
VOLUME
EON
R D S
Riproduzione col timer
●
E’ possibile eseguire la riproduzione col timer
di nastri, trasmissioni e CD.
Operazioni
COMPACT
DIGITAL AUDIO
AUTO REVERSE
1 Set the button to ON.
2 Set the timer. (Refer to “Setting the timer” on
page 33.)
Source sound
Fuente de sonido
Fonte
CD play
Reproducción de CD
Riproduzione CD
Tape playback
Reproducción de una cinta
Riproduzione nastri
Broadcast
Radioemisión
Programma radio
3 Set the button to STANDBY.
● Timer playback will start at the timer start time
and the power will be switched off at the timer
stop time.
The unit remains in the same timer mode even
after the power is switched off. The same timer
function will repeat at the same time on the
following day.
● When the power is switched on, it is possible
to fade in the sound from volume level 0 (zero)
to the preset volume.
ACTIVE HYPER
BASS PRO
CLOCK
ONE TOUCH
REC
1 Coloque el botón en ON.
2 Ajuste el temporizador. (Refiérase a “Ajuste
del temporizador” en la página 33)
Timer mode
Modo de temporizador
Modo di funzionamento
CD
CD
CD
TAPE
TAPE
TAPE
TUNER
TUNER
TUNER
Operations
Operaciones
Operazioni
Load a disc.
Coloque un disco.
Inserire un CD.
Load a cassette tape.
Coloque una cinta de cassette.
Caricare una cassetta.
Tune to the required station.
Sintonice la estación deseada.
Mettere in sintonia la stazione desiderata.
3 Coloque el botón en STANDBY.
● La reproducción por temporizador se iniciará
a la hora de activación del temporizador y la
alimentación se desconecta a la hora de
desactivación del temporizador.
La unidad permanece en el mismo modo de
temporizador aun después de desconectar
la alimentación. La misma función de
temporización se repetirá a la misma hora el
día siguiente.
● Cuando se conecta la alimentación es posible
hacer que el sonido aumente gradualmente
desde el volumen 0 (cero) al volumen actual.
TIMER/SNOOZE
BAND
TUNER
TAPE
OPEN
I
J
T
O
L
G
U
M
CD
1
Impostare il tasto su ON.
2
Impostare il timer. (Vedi “Impostazione del
2
timer” a pag. 33.)
3
Portare l’interruttore su STANDBY.
●
La riproduzione col timer inizia all’orario di
avvio del timer mentre l’alimentazione viene
disattivata all’orario di arresto.
L’unità rimane nello stesso modo del timer
anche dopo che l’alimentazione viene
disattivata. La stessa funzione del timer viene
ripetuta alla stessa ora il giorno seguente.
●
Quando l’alimentazione viene iniziata, è
possibile eseguire un’apertura in dissolvenza
dal livello di volume 0 (zero) al livello
impostato.
● To cancel timer operation
Press the TIMER/SNOOZE button for more
than 2 seconds button so that the timer mode
indicator (‰) goes out.
Notes:
● When the volume setting is set to “VOLUME -”
(volume level is not specified), the timer playback
volume is set to the level used before setting
the timer.
● To stop during timer playback, press the
button to switch the unit off.
36
● Cancelación de la operación por
temporizador
Presione el botón TIMER/SNOOZE durante
más de 2 sequndos para borrar el indicador
de modo de temporizador (‰).
Notas:
● Cuando se ajusta el volumen en “VOLUME -”
(el nivel de volumen no está especificado), el
volumen de reproducción por temporizador
permanece en el nivel usado antes del ajuste
del temporizador.
● Para parar durante la reproducción por
temporizador, presione el botón para
desconectar la unidad.
● Per cancellare il funzionamento col timer
Premere il tasto TIMER/SNOOZE per piùdi 2
secondi in modo da far spegnere l’indicatore
del modo del timer (‰).
Note:
●
Quando l’impostazione del volume è
“VOLUME -” (il livello del volume non è stato
specificato), il volume della riproduzione col
timer viene impostato come prima
dell’impostazione del timer.
●
Per interrompere il funzionamento durante la
riproduzione col timer, premere l’interruttore
per interrompere l’alimentazione.
Page 37
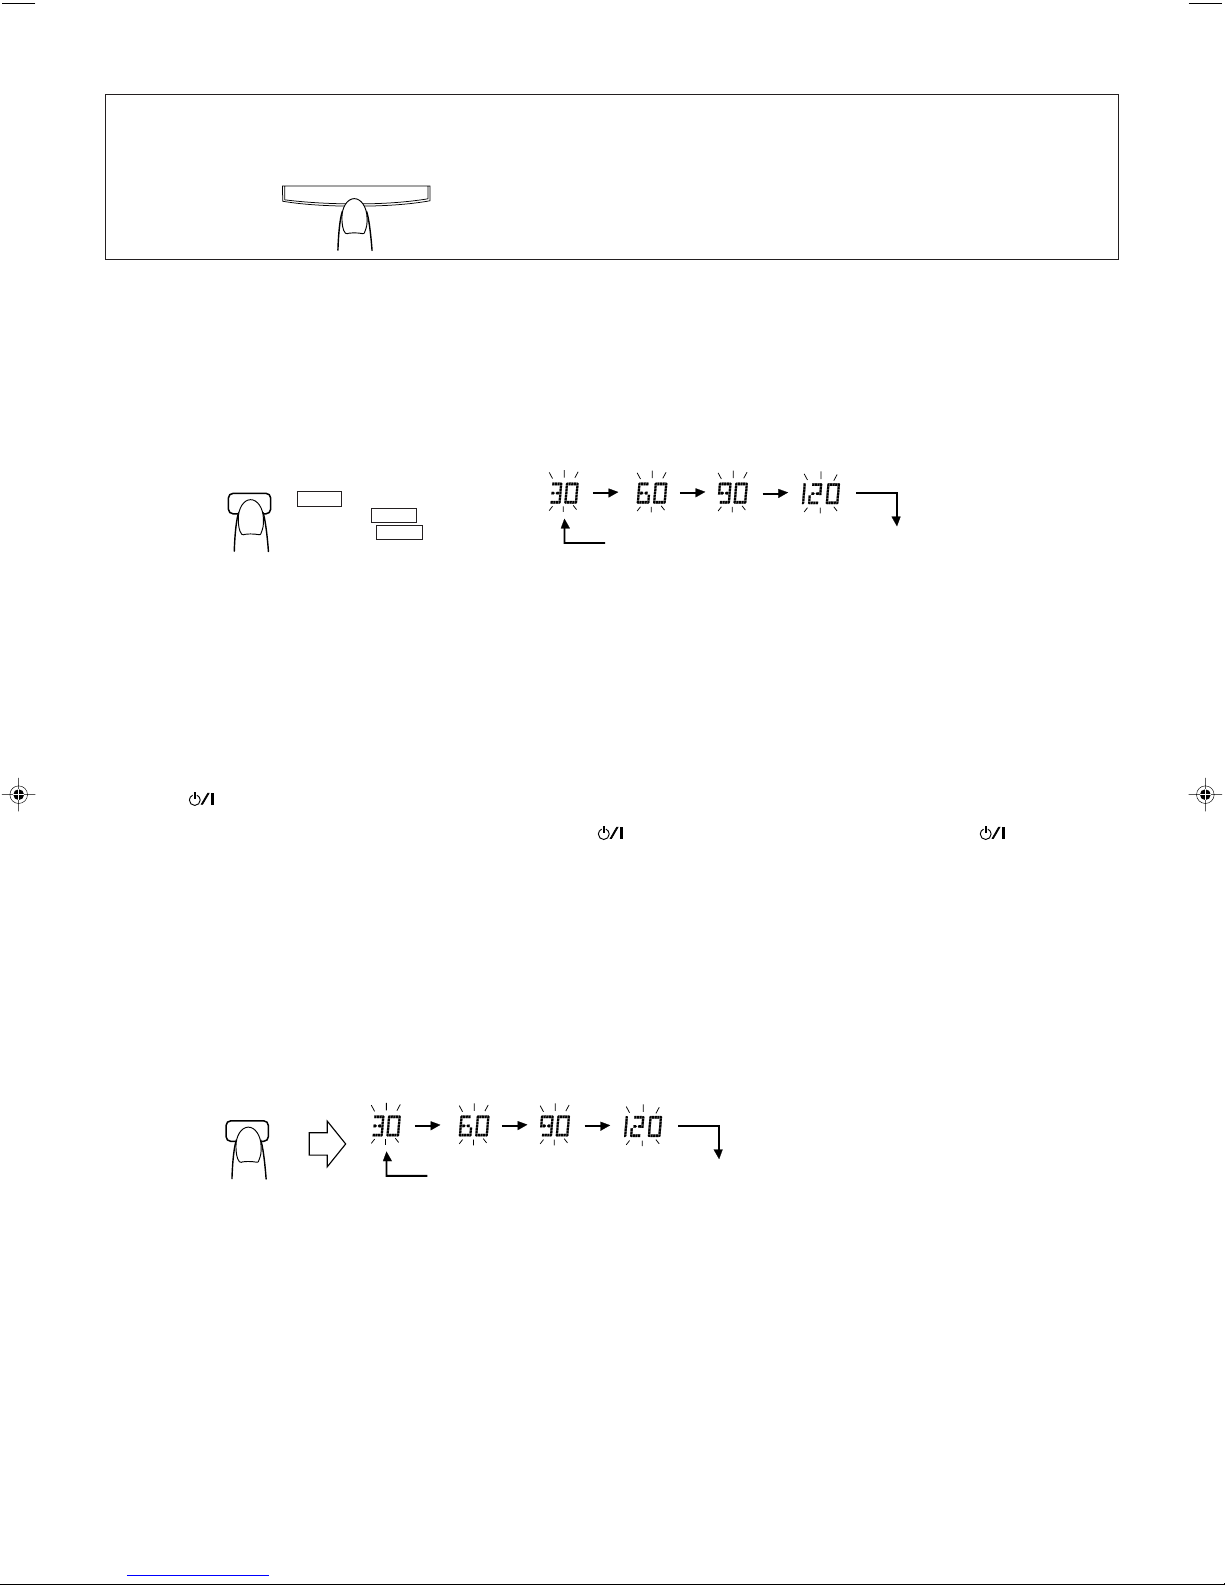
● To get an extra 5 minutes of sleep....
When timer playback starts, press the TIMER/
SNOOZE button. The power is switched off
and timer playback restarts after 5 minutes
(snooze function).
TIMER/SNOOZE
● Para dormir 5 minutos más....
Cuando se activa la reproducción por
temporizador, presione el botón TIMER/
SNOOZE. Se desconecta la alimentación y la
reproducción por temporizador se reinicia 5
minutos después (función de siesta).
● Per avere 5 minuti di sonno in più....
Quando la riproduzione col timer inizia,
premere il tasto TIMER/SNOOZE.
L’alimentazione viene disattivata e la
riproduzione riprende dopo 5 minuti (funzione
Sleep timer operations (using the
remote control unit)
A. Use this when you want to fall asleep
while listening to a tape, broadcast
or CD.
Set to the required source and tune
1
(broadcast) or play back (CD or tape).
2 Press the SLEEP button to set the sleep time.
SLEEP
● Sleep time settings of 30, 60, 90 or 120
minutes can be set. When you release the
SLEEP button, the source is displayed after
5 sec.
● The sleep timer operation will start and the
power will be switched off after the specified
time.
● Checking the sleep time
When the SLEEP button is pressed, the
remaining sleep time is displayed. If it is
pressed again, a new sleep time can be set.
● To cancel the sleep timer operation
Press the button to switch the power off
or press the SLEEP button until the sleep time
indicator disappears.
SLEEP is shown in the display.
Se visualiza SLEEP en el display.
L'indicazione SLEEP viene
visualizzata sul display.
Operación del temporizador de
desconexión (utilizando la unidad de
control remoto)
A.Utilícelo cuando desee dormir
mientras escucha una cinta,
radiodifusión o CD.
Ajuste la fuente deseada y sintonice
1
(radiodifusión) o reproduzca (CD o cinta).
2 Presione el botón SLEEP para ajustar el
tiempo que va a dormir.
Source mode display (Releasing the sleep mode)
Visualización del modo de fuente (Cancelación del modo de desconexión)
Visualizzazione fonte (Abbandono del modo di spegnimento a tempo)
● Los ajustes el tiempo para dormir pueden ser
30, 60, 90 o 120 minutos. Cuando usted suelta
el botón SLEEP , la fuente es indicada después
de que hayan transcurrido 5 segundos.
● Después de transcurrido el tiempo
especificado se activa el temporizador de
desconexión y la alimentación es desconectada.
● Verificación del tiempo para dormir
Cuando presiona el botón SLEEP , apar ece la
indicación del tiempo restante. Si lo presiona
otra vez, es posible establecer un nuevo
período para dormir.
● Cancelación del temporizador de
desconexión
Presione el botón para desconectar la
alimentación o presione el botón SLEEP hasta
que el indicador del tiempo para dormir
desaparezca.
Operazioni per lo spegnimento
automatico via timer (utilizzando l’unità
di telecomando)
A.Utilizzare questa funzione per
addormentarsi ascoltando un nastro,
una trasmissione o un CD.
Impostare la fonte desiderata e sintonizzarsi
1
(trasmissioni) o riprodurre (CD o nastro).
2
Premere il tasto SLEEP per impostare l’orario
di spegnimento.
●
Lo spegnimento automatico può essere
impostato su 30, 60, 90 o 120 minuti. Quando
si rilascia il tasto SLEEP, la fonte viene
visualizzata 5 secondi dopo.
●
Lo spegnimento automatico via timer viene
eseguito dopo che il tempo impostato è
trascorso.
● Controllo del tempo specificato
Quando il tasto SLEEP viene premuto, il tempo
rimanente fino allo spegnimento viene
visualizzato. Se il tasto viene premuto
nuovamente è possibile impostare un nuovo
tempo per lo spegnimento automatico via timer.
● Per cancellare lo spegnimento automatico
Premere l’interruttore per spegnere il
sistema o premere il tasto SLEEP sino a che
l’indicatore dell’ora di spegnimento automatico
via timer scompare.
B. To fall asleep while listening to a
tape, broadcast or CD and to perform
timer playback the following morning
1 Set the timer. (Refer to “Setting the timer” on
page 33.)
2 Set to the required source (broadcast, tape
or CD).
3 Press the SLEEP button to set the sleep time.
SLEEP
● Any source can be selected for sleep timer
operation and timer playback. For example;
• CD play for sleep timer operation and
broadcast reception for timer playback.
• T ape playback for sleep timer operation and
CD play for timer playback.
However, when broadcast reception is selected
for both sleep timer operation and timer
playback, the station you heard at night will be
tuned to the following morning.
B. Para dormir mientras escucha una
cinta, radiodifusión, o CD y para
efectuar la reproducción por
temporizador la mañana siguiente
Ajuste el temporizador . (Refiérase a “Ajuste
1
del temporizador” en la página 33.)
2 Ajuste la fuente deseada (radiodifusión,
cinta o CD).
3 Presione el botón SLEEP para ajustar la hora
de desconexión del temporizador.
B. Per addormentarsi ascoltando una
trasmissione, un nastro o un CD ed
eseguire quindi la riproduzione col
timer la mattina successiva
Impostare il timer. (Vedi “Impostazione del
1
timer” a pag. 33.)
2
Impostare la fonte desiderata (trasmissione
radio, nastri o CD).
3
Premere il tasto SLEEP per impostare il
tempo per lo spegnimento automatico via
timer.
Source mode display (Releasing the sleep mode)
Visualización del modo de fuente (Cancelación del modo de desconexión)
Visualizzazione fonte (Abbandono del modo di spegnimento a tempo)
● Para las operaciones del temporizador de
desconexión y para reproducción por
temporizador es posible seleccionar
cualquier fuente. Por ejemplo:
• Reproducción de CD para la operación por
temporizador de desconexión y recepción
de radiodifusión para la reproducción por
temporizador.
• Reproducción de cinta para la operación
del temporizador de desconexión y
reproducción de CD para la reproducción
por temporizador.
Sin embargo, cuando se selecciona la
recepción de radiodifusión tanto para el
temporizador de desconexión como para la
reproducción por temporizador , la estación que
usted escucha durante la noche será
sintonizada a la mañana siguiente.
●
Per lo spegnimento automatico e per la
riproduzione col timer è possibile selezionare
qualsiasi fonte. Per esempio:
• Riproduzione di un CD per lo spegnimento
automatico e ricezione di una trasmissione
per la riproduzione col timer.
• Riproduzione di un nastro per lo
spegnimento automatico e riproduzione di
un CD per la riproduzione col timer.
Quando si seleziona la ricezione di trasmissioni
sia per lo spegnimento automatico che per la
riproduzione col timer, comunque, la stazione
sintonizzata per lo spegnimento automatico viene
sintonizzata anche per la riproduzione col timer.
37
Page 38
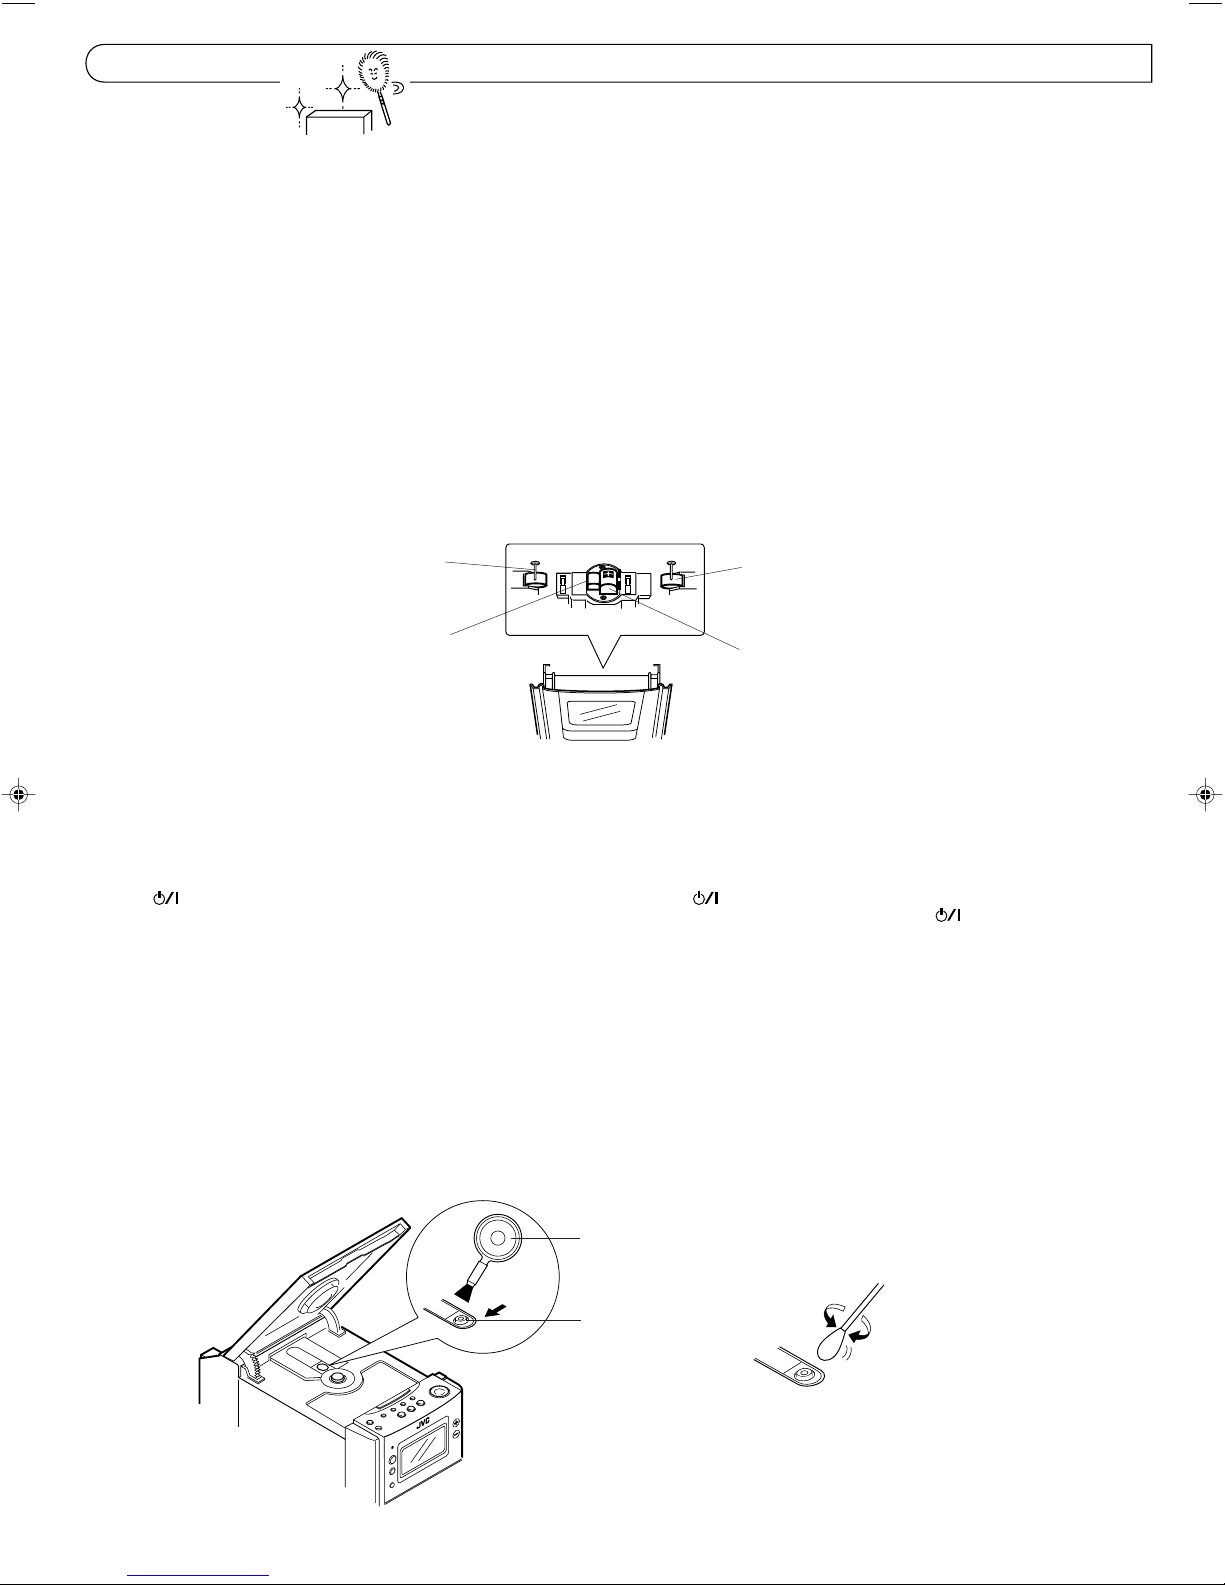
MAINTENANCE MANTENIMIENTO MANUTENZIONE
Cleaning is important!
When the tape is running, magnetic powder and
dust naturally accumulate on the heads,
capstan and pinch roller. When they become
too dirty...
● Sound quality deteriorates.
● The output sound level drops.
● Previously recorded tape is not completely
erased.
● Recording is not performed satisfactorily.
Therefore, you should clean the heads, etc. after
every 10 hours of use for optimal recording
conditions.
Cleaning the heads, capstan and pinch roller
Open the cassette holder.
Clean the heads, pinch roller and capstan.
For effective cleaning, use a cleaning kit
available from an audio store.
After cleaning, be sure that the cleaning fluid
has dried completely before loading a cassette.
Capstan shaft(s)
Eje(s) de cabrestante
Albero(i) capstan
Erase head
Cabeza de borrado
Testina cancellazione
¡La limpieza es importante!
Cuando la cinta está girando, el polvo
magnético y el polvo se acumulan naturalmente
en las cabezas, cabrestante y rodillo de
presión. Cuando estén muy sucios...
● La calidad de sonido se deteriora.
● El nivel de salida de sonido se reduce.
● Las cintas grabadas no se borran
completamente.
● La grabación no se realiza satisfactoriamente.
Por lo tanto, usted debe limpiar las cabezas,
etc. después de cada 10 horas de uso para
obtener condiciones de grabación óptimas.
Limpieza de las cabezas, cabrestante y
rodillo de presión
Abra el portacassette.
Limpie las cabezas, rodillo de presión y
cabrestante.
Para una limpieza efectiva, utilice un conjunto
de limpieza disponible en cualquier tienda de
audio.
Después de la limpieza, asegúrese de que el
líquido para la misma se haya secado
completamente antes de colocar un cassette.
Pinch roller(s)
Rodillo(s) de presión
Rullino(i) pressore
Combination record/play head
Cabeza combinada de grabación/reproducción
Testina registrazione/riproduzione combinata
La pulizia è estremamente importante!
Quando il nastro scorre, polvere magnetica e
sporco si accumulano sulle testine, sui capstan
e sui rullini. Quando essi sono troppo sporchi...
●
La qualità del suono si deteriora.
●
Il livello in uscita cala.
●
Registrazioni precedenti non vengono
cancellate completamente.
●
La registrazione non viene eseguita in modo
insoddisfacente.
Le testine, ecc., devono perciò essere pulite ogni
10 ore di uso per mantenere condizioni di
funzionamento ottimali.
Pulizia di testine, capstan e rullini pressori
Aprire il vano della cassetta.
Pulire testine, rullini pressori e capstan.
Per pulire in modo efficace, utilizzare un corredo
di pulizia disponibile presso i negozi
specializzati.
Dopo la pulizia accertarsi che il liquido pulente
si sia asciugato completamente prima di inserire
una cassetta.
Cautions:
1. Keep magnets and metallic objects away
from the head.
If the head becomes magnetized, noise will
increase and the sound will deteriorate.
Demagnetize the head every 20-30 hours of
use with a head eraser (available from an
audio store). (When demagnetizing the head,
the button should be set to STANDBY.)
2. Do not use anything other than alcohol for
cleaning.
Thinner and benzine will damage the rubber
pinch roller.
Cleaning the lens
If the lens in the CD pickup is dirty, dropout, etc.,
could degrade sound.
Open the CD holder and clean the lens as
shown.
● Use a blower (available from a camera store)
to blow dust off the lens.
● If there are fingerprints, etc. on the lens, gently
wipe clean with a cotton swab.
Precauciones:
1. Mantenga los imanes y los objetos metálicos
lejos de la cabeza.
Si la cabeza se magnetiza, el ruido aumentará
y el sonido se deteriorará. Desmagnetice la
cabeza cada 20-30 horas de uso con un
desmagnetizador de cabezas (disponible en
cualquier tienda de audio). (Cuando
desmagnetiza la cabeza, el botón deberá
estar colocado en ST ANDBY.)
2. Para limpieza no utilice ningún otro producto
que no sea alcohol.
El diluyente y la bencina dañarán el rodillo
de presión de goma.
Limpieza de la lente
Si la lente del lector de CD está sucia o
manchada, etc., puede degradar el sonido.
Abra el compartimiento del CD y limpie la lente
como se muestra.
● Utilice un soplador (disponible en una tienda
de cámaras), para quitar el polvo de la lente.
● Si hay huellas digitales, etc. en la lente, limpie
suavemente con un isopo de algodón.
Blower
Soplador
Soffietto
Lens
Lente
Lente
Precauzioni:
1. Non avvicinare magneti o oggetti metallici
alla testina.
Se la testina si dovesse magnetizzare, i
disturbi aumentano ed il suono si deteriora.
Smagnetizzare la testina ogni 20-30 ore di
utilizzo con un dispositvo apposito
(disponibile presso un negozio
specializzato). (Quando si smagnetizza la
testina, il tasto deve essere impostato
su STANDBY.)
2. Utilizzare solo alcool per la pulizia.
Diluente o benzina danneggiano la gomma
del rullini pressori.
Pulizia della lente
Se la lente del pickup del lettore CD è sporca,
ecc., la qualità del suono potrebbe degradare.
Aprire il vano del CD e pulire la lente come
indicato.
●
Utilizzare un soffietto (reperibile in un negozio
di materiale fotografico) per soffiare via la
polvere dalla lente.
●
Se sulla lente vi sono impronte digitali, ecc.,
pulire con gentilezza utilizzando in bastoncino
ovattato.
38
Page 39

TROUBLESHOOTING DETECCION DE PROBLEMAS DIAGNOSTICA
What appears to be trouble is not always
serious. First make sure....
● Power cannot be turned on.
* Is the power cord unplugged?
● No sound from the speakers.
* Are headphones connected?
CD Player Section
● The CD player does not play.
* Is the CD upside down?
* Is the CD dirty?
● A certain portion of the CD does not play
correctly.
* Is the CD scratched?
Cassette Deck Section
● Playback sound is at a very low level.
* Is the head dirty?
● The ONE TOUCH REC button does not
function.
* Have the safety tabs of the cassette been
broken off?
Tuner Section
● Reception is noisy.
* Try adjusting the antenna.
Timer Section
● Timer operation does not start.
* Is the current time set correctly?
* Is the timer mode (‰) displayed?
Remote Control
● Remote control is impossible.
* Are the batteries in the remote control
exhausted?
* Is the remote sensor section exposed to bright
light (direct sunlight, etc.)?
Note:
Before making an important recording, be sure
to make a test recording first to check that the
deck, etc. is working correctly.
Lo que parece ser un problema no siempre
es grave. Primero asegúrese.....
● No es posible conectar la alimentación.
* ¿Está el cordón de alimentación
desenchufado?
● No sale sonido de los altavoces.
* ¿Están los audífonos conectados?
Sección del reproductor de CD
● El reproductor de CD no funciona.
* ¿Está el CD invertido?
* ¿Está el CD sucio?
● Cierta porción de un CD no es
correctamente reproducida.
* ¿Está el CD rayado?
Sección la platina de cassette
● El sonido de reproducción tiene un nivel
muy bajo.
* ¿Está la cabeza sucia?
● No funciona el botón ONE TOUCH REC.
* ¿Se han extraido las lengüetas de seguridad
del cassette?
Sección del sintonizador
● La recepción es ruidosa.
* Intente ajustar la antena.
Sección del temporizador
● La operación por temporizador no se
activa.
* ¿Está la hora actual correctamente ajustada?
* ¿Está el modo de temporizador (‰) indicado?
Controlador remoto
● El controlador remoto no funciona.
* ¿Están las pilas del controlador remoto
agotadas?
* ¿Está la sección sensor remoto expuesta a
una luz brillante (luz solar directa, etc.)?
Nota:
Antes de efectuar una grabación importante,
asegúrese de hacer una grabación de prueba
para verificar que la platina, etc. esté
funcionando correctamente.
Quanto sembra essere un problema spesso
non è nulla di serio. Accertasi prma di tutto...
● L'alimentazione non può essere attivata.
* Il cavo di alimentazione è scollegato?
● I diffusori non producono alcun suono.
* Le cuffie sono collegate?
Sezione lettore CD
● Il lettore CD non riproduce.
* Il CD è rovescio?
* Il CD è sporco?
● Una parte del CD non viene riprodotta
correttamente.
* Il CD è graffiato?
Sezione registratore a cassette
● Il livello del suono riprodotto è molto
basso.
* La testina è sporca?
● Il tasto ONE TOUCH REC non funziona.
* Le linguette di protezione della registrazione
della cassetta sono state rimosse?
Sezione sintonizzatore
● La ricezione è disturbata.
* Provare ad orientare l'antenna.
Sezione timer
● Il funzionamento col timer non si avvia.
* L'orario corrente è impostato in modo
corretto?
* Il modo del timer (‰) viene visualizzato?
Telecomando
● Il funzionamento col telecomando è
impossibile.
* Le batterie del telecomando sono scariche?
* Il sensore di telecomando è colpito da luce
(solare o artificiale) intensa?
Nota:
Prima di eseguire registrazioni importanti,
accertarsi di eseguire una registrazione di prova
per essere certi che il funzionamento del
registratore, ecc., sia corretto.
● When the above remedies do not help
Many operations of this unit are performed
by the control of a microprocessor. If none of
the buttons function, unplug the power cord,
wait for a while, the plug it back in. Reset the
correct values for the clock and timer.
SPECIFICATIONS ESPECIFICACIONES DATI TECNICI
CD player section
Type : Compact disc player
Signal detection
system : Non-contact optical pickup
Number of channels : 2 channels
Frequency response : 20 Hz - 20,000 Hz
Signal-to-noise ratio : 90 dB
Wow & flutter : Less than measurable limit
Radio section
Frequency range : FM 87.5-108 MHz
Antennas : Loop antenna for AM (MW/
AM (MW) 522-1,629 kHz
AM (LW) 144-288 kHz
LW)
External antenna terminal
for FM (75 Ω)
● Cuando los remedios de arriba no ayudan
Muchas de las operaciones de esta unidad
son efectuandas por medio de un
microprocesador de control. Si no funciona
ninguno de los botones, desenchufe el
cordón de alimentación, espere un momento
y enchúfelo otra vez. Reposicione los valores
correctos del reloj y del temporizador.
Sección del reproductor de CD
Tipo : Reproductor de discos
Sistema de detección
de señal : lector óptico sin contacto
Número de canales : 2 canales
Respuesta de
frecuencia : 20 Hz - 20.000 Hz
Relación señal-ruido : 90 dB
Fluctuación y
tremolación : Menor que el límite medible
Sección de la radio
Sección de la radio
Límites de frecuencia: FM 87,5-108 MHz
Antena : Antena de cuadro para AM
compactos
AM (OM) 522-1.629 kHz
AM (OL) 144-288 kHz
(OM/OL)
Terminal de antena exterior
para FM (75 Ω)
● Quando i rimedi sopraindicati non
funzionano
Molte delle operazioni di questa unità
vengono eseguite sotto il controllo di un
microprocessore. Se nessuno dei pulsanti
funziona, scollegare il cavo di
alimentazione, attendere un momento e
quindai ricollegarlo. Reimpostare i valori
corretti per l’orologio ed il timer.
Sezione lettore CD
Tipo : Lettore di CD
Sistema rilevamento
segnale : Pickup ottico senza contatto
Numero canali : 2 canali
Risposta frequenza : 20 Hz - 20.000 Hz
Rapporto
segnale/rumore : 90 dB
Wow e flutter : Meno del limite misurabile
Sezione radio
Gamma frequenza : FM 87,5-108 MHz
Antenna : Antenna ad anello per AM
AM(MW) 522-1.629 kHz
(LW) 144-288 kHz
(MW/LW)
Terminale per antenna FM
esterna (75
Ω
)
39
Page 40

Tape deck section
Track system : 4-track 2-channel stereo
Motor : Electronic governor DC
Heads : Hard permalloy head for
Frequency response : 60-15,000 Hz (with CrO
Wow & flutter : 0.15% (WRMS)
Fast wind time : Approx. 130 sec (C-60
Speaker Section (each unit)
Speakers
(Impedance) : 8 cm (4 Ω),
Dimensions : 131 (W) x 203 (H) x 194 (D)
Weight : Approx. 1.6 kg
General
Power output : 28 W (14 W + 14W) at 4 Ω
Input terminals : AUX IN (300 mV/47 kΩ)
Output terminals : PHONES (Output level: 0-15
Power requirements : AC 230 V, 50 Hz
Power consumption : 35 W (with
Dimensions : 404 (W) x 209 (H) x 270 (D)
Weight : Approx. 6.5 kg
Accessories provided : Power cord x 1
Design and specifications are subject to change without
notice.
motor for capstan
recording/playback, 2 gap
ferrite head for erasure
(Combination head)
tape)
cassette)
mm
(Max.)
20 W (10 W + 10 W) at 4 Ω
(10% THD)
mW/ch, 32 Ω, Matching
impedance: 16 Ω - 1 kΩ)
SPEAKER (Matching
impedance 4 Ω - 16 Ω)
Ext. DC 12V (car battery via
optional CA - R120E car
adapter)
2.8 W (with
STANDBY)
mm, including knobs
Remote control unit (RMRXUT200R) x 1
"R6/AA (15F)" batteries x 2
(for the remote control)
FM wire antenna x 1
Loop antenna stand x 1
2
button ON)
button
Sección de la platina de cinta
Sistema de pistas : 4 pistas 2 canales
Motor : Motor de CC con mandos
Cabezas : Cabeza de aleación dura
Respuesta de
frecuencia : 60-15.000 Hz (con cinta de
Fluctuación y
tremolación : 0,15% (WRMS)
Tiempo de bobinado
rápido : 130 seg. aprox. (cassette C-
Sección de altavoces (cada unidad)
Altavoces
(impedancia) : 8 cm (4 Ω)
Dimensiones : 131 (A) x 203 (Alt.) x 194 (P)
Peso : 1,6 kg. aprox.
Generalidades
Salida de potencia : 28 W (14 W + 14 W) a 4 Ω
Terminales de
entrada : AUX IN (300 mV/47 kΩ)
Terminales de
salida : Auriculares (PHONES)
Requisitos de
alimentación : 230 V CA, 50 Hz
Consumo de energía : 35 W (con
Dimensiones : 404 (A) x 209 (Alt.) x 270
perillas
Peso : 6,5 kg. aprox.
Accesorios
suministrados : Cable de corriente alterna x1
Diseño y especificaciones sujetos a cambio sin aviso.
estereofónicos
electrónicos para
cabrestante
"permalloy" para grabación/
reproducción, cabeza de
ferrita de doble entrehierro
para borrado (Cabeza
combinada)
2)
CrO
60)
mm.
(máx.)
20 W (10 W + 10 W) a 4 Ω
(10% THD)
(Nivel de salida: 0-15 mW/
Ω,
canal, 32
adaptación: 16
Altavoz (SPEAKER)
(impedancia de a
daptación 4
CC 12V ext. (batería del
automóvil vía adaptador
opcional CA-R120E para
automóvil)
ON)
2,8 W (con
STANDBY)
(P) mm., incluyendo las
Unidad de control remoto
(RM-RXUT200R) x 1
Pilas "R6/AA (15F)" x 2 (para
el controlador remoto)
Antena de cable FM x 1
Soporte para la antena de
cuadro x 1
impedancia de
Ω -
1 kΩ)
Ω - 16
Ω)
botón en
botón en
Sezione registratore
Sistema registrazione: 4 piste, 2 canali stereo
Motore : Motorino CC controllato
Testine : Testina in permalloy duro
Risposta in frequenza: 60-15.000 Hz (con nastro
Wow e flutter : 0,15% (WRMS)
Tempo avvolgimento
rapido : Circa 130 secondi
Sezione diffusori (per ciascun diffusore)
Diffusori (impedenza) : 8 cm (4Ω)
Dimensioni : 131 (L) x 203 (A) x 194
Peso : Circa 1,6 k
Generali
Potenza in uscita : 28 W (14 W + 14 W ) a 4
Terminali di ingresso : AUX IN (300 mV/47 k
Terminali uscita : Cuffie (PHONES) (Livello
Alimentazione : 230 V CA, 50 Hz
Consumo : 35 W (con
Dimensioni : 404 (L) x 209 (A) x 270
Peso : Circa 6,5 k
Accessori in
dotazione : Cavo alimentazione x 1
Disegno e dati tecnici soggetti a cambiamenti senza
preavviso.
elettronicamente per il
capstan
per registrazione/
riproduzione, testina in
ferrite a doppio traferro
per cancellazione
(Testina combinata)
2
)
CrO
(cassetta C-60)
(P) mm
Ω
20 W (10 W + 10 W) a 4
(10% THD)
in uscita: 0-15 mW/can.,
32
corrispondente: 16
Diffusori (SPEAKER)
(Impedenza
corrispondente: 4
DC 12V esterna (batteria
della vettura con
alimentatore per vettura
opzionale CA-R120E)
ON),
2,8 W (con tasto
STANDBY)
(P) mm, comandi inclusi
Unità telecomando (RMRXUT200R) x 1
Batterie "R6/AA (15F)" x
2 (per unità di
telecomando)
Antenna FM a filo x 1
Base antenna ad anello x 1
(Mass.)
Ω
, impedenza
g
Ω
Ω
- 1 kΩ)
Ω
- 16 Ω)
tasto
g
Ω
)
UX-T200R E MICRO COMPONENT SYSTEM
MICR
SISTEM
SISTEM
SISTEMA DE MICROCOMPONENTES
SISTEMA A MICROCOMPONENTI
UX
EN,SP,IT
VICTOR COMPANY OF JAPAN, LIMITED
Printed in China
0199MNMOZKJSC
 Loading...