

Page 1

Instruction Manual
32” HD-Ready LED TV with DVD
LT-32C345 / LT-32C346
GB
LT-32C345/46_IB.indd 1 10/07/2014 12:27
Page 2

Contents
1 Safety Warnings ...........................................................................................................................................................................5
2 Preparation ...................................................................................................................................................................................7
Unpacking the TV ...............................................................................................................................................................................................................7
Installing / Removing the Base Stand .........................................................................................................................................................................8
Mounting the TV to a Wall ...............................................................................................................................................................................................8
Front / Right Side View and Controls ...........................................................................................................................................................................9
Rear View and Sockets ....................................................................................................................................................................................................10
Installing Batteries in the Remote Control ..............................................................................................................................................................11
Remote Control Operation Range ..............................................................................................................................................................................11
Remote Control .................................................................................................................................................................................................................12
3 Initial Setup ................................................................................................................................................................................14
Turning the TV On for the First Time .........................................................................................................................................................................14
− Choose Region.......................................................................................................................................................................................................15
− Connecting an Analogue Device ....................................................................................................................................................................16
− Channel Selection ...............................................................................................................................................................................................16
− Display Channel Information ...........................................................................................................................................................................16
− Volume Adjustment .............................................................................................................................................................................................16
4 Customising TV Settings ...........................................................................................................................................................17
Adjusting the Picture Settings .....................................................................................................................................................................................17
− Aspect Ratio ............................................................................................................................................................................................................18
Adjusting the Sound Settings ......................................................................................................................................................................................18
Editing the Channel List .................................................................................................................................................................................................19
Creating a Favourite Channel List ...............................................................................................................................................................................19
− Activate your favourite channel list ............................................................................................................................................................... 19
Saving a Channel/Source to the My Buttons (
/ ) ......................................................................................................................... 20
5 Using the Features .....................................................................................................................................................................21
Programme Guide ............................................................................................................................................................................................................21
− Switch On / O Programme Guide ................................................................................................................................................................21
− Select a Programme ............................................................................................................................................................................................21
Time Shift Recording onto a USB Storage Device ............................................................................................................................................... 23
Recording DTV Programmes onto a USB Storage Device ................................................................................................................................ 24
Timer Programming ....................................................................................................................................................................................................... 25
Recording Conguration .............................................................................................................................................................................................. 26
Playing Recorded Programmes .................................................................................................................................................................................. 27
Digital Teletext (DTV Mode) ......................................................................................................................................................................................... 28
− Teletext within Digital Service ........................................................................................................................................................................ 28
Listening to the Radio .................................................................................................................................................................................................... 28
6 Using the DVD Features ............................................................................................................................................................29
Using the Built-in DVD Player ...................................................................................................................................................................................... 29
Compatible Disc Types .................................................................................................................................................................................................. 29
− Supported Formats ............................................................................................................................................................................................. 29
− Region Code .......................................................................................................................................................................................................... 29
Basic DVD Playback Functions .................................................................................................................................................................................... 30
7 Other Information ......................................................................................................................................................................33
CI (Common Interface) (DTV Mode) .......................................................................................................................................................................... 33
Time Settings..................................................................................................................................................................................................................... 34
Other Settings ................................................................................................................................................................................................................... 35
Language Settings .......................................................................................................................................................................................................... 36
Sources................................................................................................................................................................................................................................. 36
Resetting your TV ............................................................................................................................................................................................................ 37
Parental Settings .............................................................................................................................................................................................................. 38
LT-32C345/46_IB.indd 2 10/07/2014 12:27
Page 3

8 Entertainment ............................................................................................................................................................................39
Connecting a USB Storage Device ............................................................................................................................................................................. 39
Viewing Videos ................................................................................................................................................................................................................. 40
Viewing Photos ..................................................................................................................................................................................................................41
Listening to Music ............................................................................................................................................................................................................ 42
9 Technical Information and Help ...............................................................................................................................................43
Maintenance ...................................................................................................................................................................................................................... 43
Hints and Tips .................................................................................................................................................................................................................... 44
Specications .................................................................................................................................................................................................................. 46
License Information used with JVC Televisions .................................................................................................................................................... 47
LT-32C345/46_IB.indd 3 10/07/2014 12:27
Page 4

WE KNOWHOW
TO HELP YOU
WITH YOUR TV
We want you to be able to enjoy your new TV for many years. From getting it home and setting it up, to
helping you get the most out of your new purchase. And in the unlikely event your TV lets you down, we
can get it working again in no time.
Here are some of our TV services but if you want to know more look us up at www.knowhow.com or call
us on: 0344 561 1234
TV SET UP & DEMO
We’ll assemble the stand and connect your new TV to the existing equipment. We’ll tune your TV so it’s
ready to watch. We'll also give you a demonstration of your new TV's functions.
TV WALLMOUNT & DEMO
We’ll fi x your TV to a suitable position on the wall and connect your existing equipment, so it’s all ready
to go. We’ll use neat wire management so you don't have to look at any untidy cabling and to complete
your fuss-free installation, we'll test and demonstrate your TV's functions.
FREESAT INSTALLATION
We’ll set up the Freesat receiver and connect it to your existing dish, TV and cabling. We'll then tune in
all available channels.
AERIAL INSTALLATION
We'll supply, install and align a new, high quality aerial and connect it to your Freeview receiver and TV.
Then we'll scan and tune in all available digital channels.
HOME CINEMA OR SOUNDBAR INSTALLATION
We’ll un-box, connect and set up your new and existing equipment. We’ll then confi gure, calibrate and
optimise the equipment. To avoid ugly trailing cables, we’ll clip them to your skirting board, if you’d like
us to. Then we’ll give you a demonstration.
FAULT & FIX SERVICES
With our Fault & Fix services we can repair a wide range of products at our new state-of-the-art repair
lab. This service is available for:
• Computer desktops • Laptops
• Netbooks • TVs
LT-32C345/46_IB.indd 4 10/07/2014 12:27
Page 5

Chapter
1 Safety Warnings
1
• Read all the instructions carefully before using the unit
and keep them for future reference.
• Retain the manual. If you pass the unit onto a third
party make sure to include this manual.
• Check that the voltage marked on the rating label
matches your mains voltage.
Damage
• Please inspect the unit for damage after unpacking.
• Do not continue to operate the unit if you are in any
doubt about it working normally, or if it is damaged
in any way - switch off, withdraw the mains plug and
consult your dealer.
Location of Unit
• The unit must be placed on a flat stable surface and
should not be subjected to vibrations.
• Do not place the unit on sloped or unstable surfaces as
the unit may fall off or tip over.
• The mains socket must be located near the unit and
should be easily accessible.
• This unit is designed for indoor, domestic use only.
Temperature
• Avoid extreme degrees of temperature, either hot or
cold. Place the unit well away from heat sources such
as radiators or gas / electric fires.
• Avoid exposure to direct sunlight and other sources of
heat.
Naked Flames
• Never place any type of candle or naked flame on the
top of or near the unit.
Moisture
• To reduce the risk of fire, electric shock or product
damage, do not expose this unit to rain, moisture,
dripping or splashing. No objects filled with liquids,
such as vases, should be placed on the unit.
• If you spill any liquid into the unit, it can cause serious
damage. Switch it off at the mains immediately.
Withdraw the mains plug and consult your dealer.
Ventilation
• To prevent the risk of electric shock or fire hazard
due to overheating, ensure that curtains and other
materials do not obstruct the ventilation vents.
• Do not install or place this unit in a bookcase, built-in
cabinet or in another confined space. Ensure the unit is
well ventilated.
• Make sure that there is a gap of at least 10 cm on both
sides and a gap of 20 cm at the top.
20 cm
10 cm 10 cm
Safety
• Always disconnect the unit from the mains supply
before connecting / disconnecting other devices or
moving the unit.
10 cm
• Unplug the unit from the mains socket during a
lightning storm.
Mains Cable
• Make sure the unit or unit stand is not resting on top of
the mains cable, as the weight of the unit may damage
the mains cable and create a safety hazard.
• If the mains cable is damaged it must be replaced
by the manufacturer, its service agent, or similarly
qualified persons in order to avoid a hazard.
Interference
• Do not place the unit on or near appliances which may
cause electromagnetic interference. If you do, it may
adversely affect the operating performance of the unit,
and cause a distorted picture or sound.
Optimum viewing
• View the unit in moderate light to prevent eye strain. It
is recommended to watch the unit from a distance
3-7 times that of the screen height.
LCD screen
• The LCD screen is manufactured using high-precision
technology. However, some tiny black points and /
or bright points (red, blue or green in colour) may
constantly appear on the LCD screen. These points
are generated in the manufacturing process and are
normal.
Screen Burn
• A characteristic of Plasma and TV Panels is that
displaying the same image for a long time may cause
a permanent after-image to remain on the screen. This
is called screen burn. Most pictures shown on the unit
will be constantly moving and fill the screen.
• Examples of images that you need to watch out for are
as follows (this is not an all-inclusive list):
1. Black Bars: If black bars appear at the left / right or
top / bottom of the screen, it is recommended to
change the format so that the picture fills the entire
screen.
2. TV Channel Logos: e.g. Shopping channel logos
and pricing displays - especially if they are bright
and stationary. Moving or low-contrast graphics are
less likely to cause ageing of the screen.
3. Time Displays
4. Teletext: Do not view a stationary page for long
periods of time.
5. TV Menus
6. Pause Mode: Do not leave the screen in pause
mode for long periods of time, e.g. when watching
videos.
• To prevent screen burn if viewing any of the above for
long periods of time, reduce contrast and brightness
when viewing. Once burn-in occurs it will never
disappear completely.
Earphones
• Listening to loud sounds for prolonged periods of time
may permanently damage your hearing.
• Before putting on earphones, turn the volume down
then put the earphones on and slowly increase the
volume until you reach a comfortable listening level.
5
LT-32C345/46_IB.indd 5 10/07/2014 12:27
Page 6
1
Safety Warnings
Standby
• The
Batteries
• Batteries used in the remote control for this unit
• Keep loose batteries away from young children and
• Please dispose of batteries correctly by following the
• The batteries shall not be exposed to excessive heat
Supervision
• Children should be supervised to ensure that they do
• Never let anyone especially children push anything
DVD
• Class 1 Laser Product
• Before moving the unit, ensure the disc tray is empty.
• Always remove the disc when the unit is not in use.
• Failure to do so will risk severely damaging the disc
• Do not stack devices, heat from other devices may
button on the remote control does not switch
off the unit completely. The unit will continue to draw
electricity from the mains supply while in standby. In
the interests of safety and to avoid unnecessary energy
consumption, never leave the unit in standby while
unattended for long periods of time, e.g. overnight,
while on holiday or while out of the house. Disconnect
the mains plug from the mains socket.
are easily swallowed by young children and this is
dangerous.
make sure that the battery holder tray is secure in the
remote control. Seek medical advice if you believe a
cell has been swallowed.
guidance in this manual.
such as sunshine, fire or the like.
not play with the unit and the remote control.
into the holes, slots or any other openings in the case this could result in a fatal electric shock.
This unit utilises a laser. Use
of controls, adjustments or
performance of procedures other
than those specified herein may
result in hazardous radiation
exposure.
and the unit.
aect the performance of the unit.
CLASS 1
LASER PRODUCT
CAUTION
RISK OF ELECTRIC SHOCK
The lightning flash with arrowhead symbol,
within an equilateral triangle, is intended to
alert the user to the presence of uninsulated
“dangerous voltage” within the unit’s
enclosure that may be of sufficient
magnitude to constitute a risk of electric
shock.
The exclamation point within an equilateral
triangle is intended to alert the user to the
presence of important operating and
maintenance (servicing) instructions in the
manual accompanying the unit.
Service
• To reduce the risk of electric shock, do not remove
screws. The unit does not contain any user-serviceable
parts. Please leave all maintenance work to qualified
personnel.
• Do not open any fixed covers as this may expose
dangerous voltages.
Maintenance
• Ensure to unplug the unit from the mains socket before
cleaning.
• Do not use any type of abrasive pad or abrasive
cleaning solutions as these may damage the unit’s
surface.
• Do not use liquids to clean the unit.
• The wall socket plug is used as a disconnect device, the
disconnect device should be readily accessible.
•
This equipment is a Class II or double insulated
electrical appliance. It has been designed in such
a way that it does not require a safety connection
to electrical earth.
DO NOT OPEN
To prevent the spread of
fire, keep candles or other
open flames away from this
product at all times.
6
LT-32C345/46_IB.indd 6 10/07/2014 12:27
Page 7
Chapter
4
Slide under
the lip
2 Preparation
2
Thank you for purchasing your new JVC TV.
Your new TV has many features and incorporates the latest technology to enhance your viewing
experience. We recommend that you spend some time reading this instruction manual so that you fully
understand these features. You will also find some hints and tips to help you resolve any issues.
Read all the safety instructions carefully before use and keep this instruction manual for future reference.
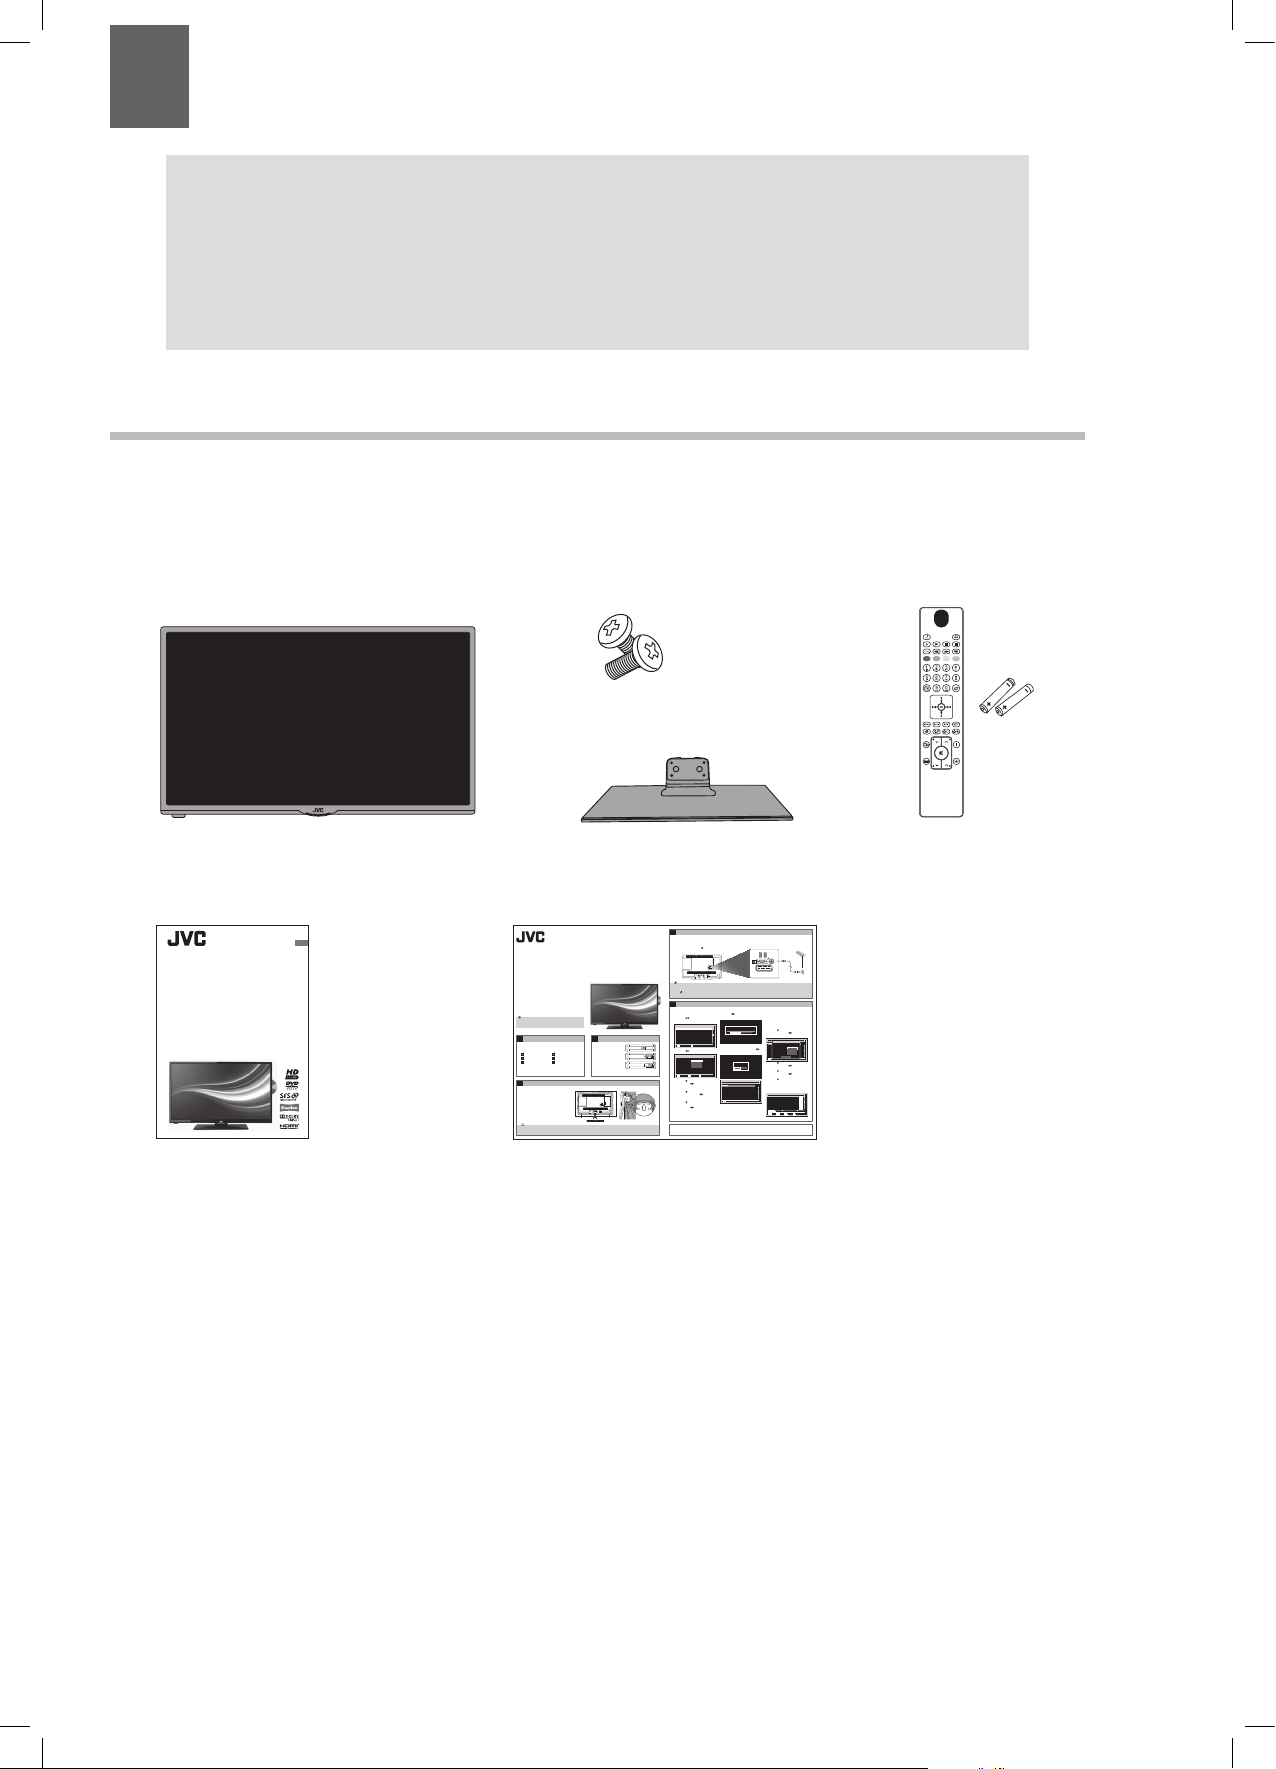
Unpacking the TV
Remove all packaging from the TV. Retain the packaging. If you dispose of it please do so according to local regulations.
The following items are included:
SOURCE
Stand screws x4
TV TV Stand
Instruction Manual
32” HD-Ready LED TV with DVD
LT-32C345 / LT-32C346
GB
Quick Start Guide
32" HD-Ready LED TV
with DVD
LT-32C345 / LT-32C346
Thank you for purchasing your new JVC TV.
Your new TV incorporates the latest technology to enhance your viewing
experience. We would suggest that you allow about 20 mins for initial setup.
Please follow this guide for a successful rst time installation.
The latest eco-friendly power-saving technology will switch o the TV if
device is left on and idle for 4 hours. Please refer to “Auto Standby” under
the “Time Settings” section of the instruction manual for more detail.
Unpacking
1
Remove all packaging from the unit. Retain the packaging.
If you dispose of it please do so according to any local regulations.
TV
TV Stand
Remote Control/
AAA Batteries x2
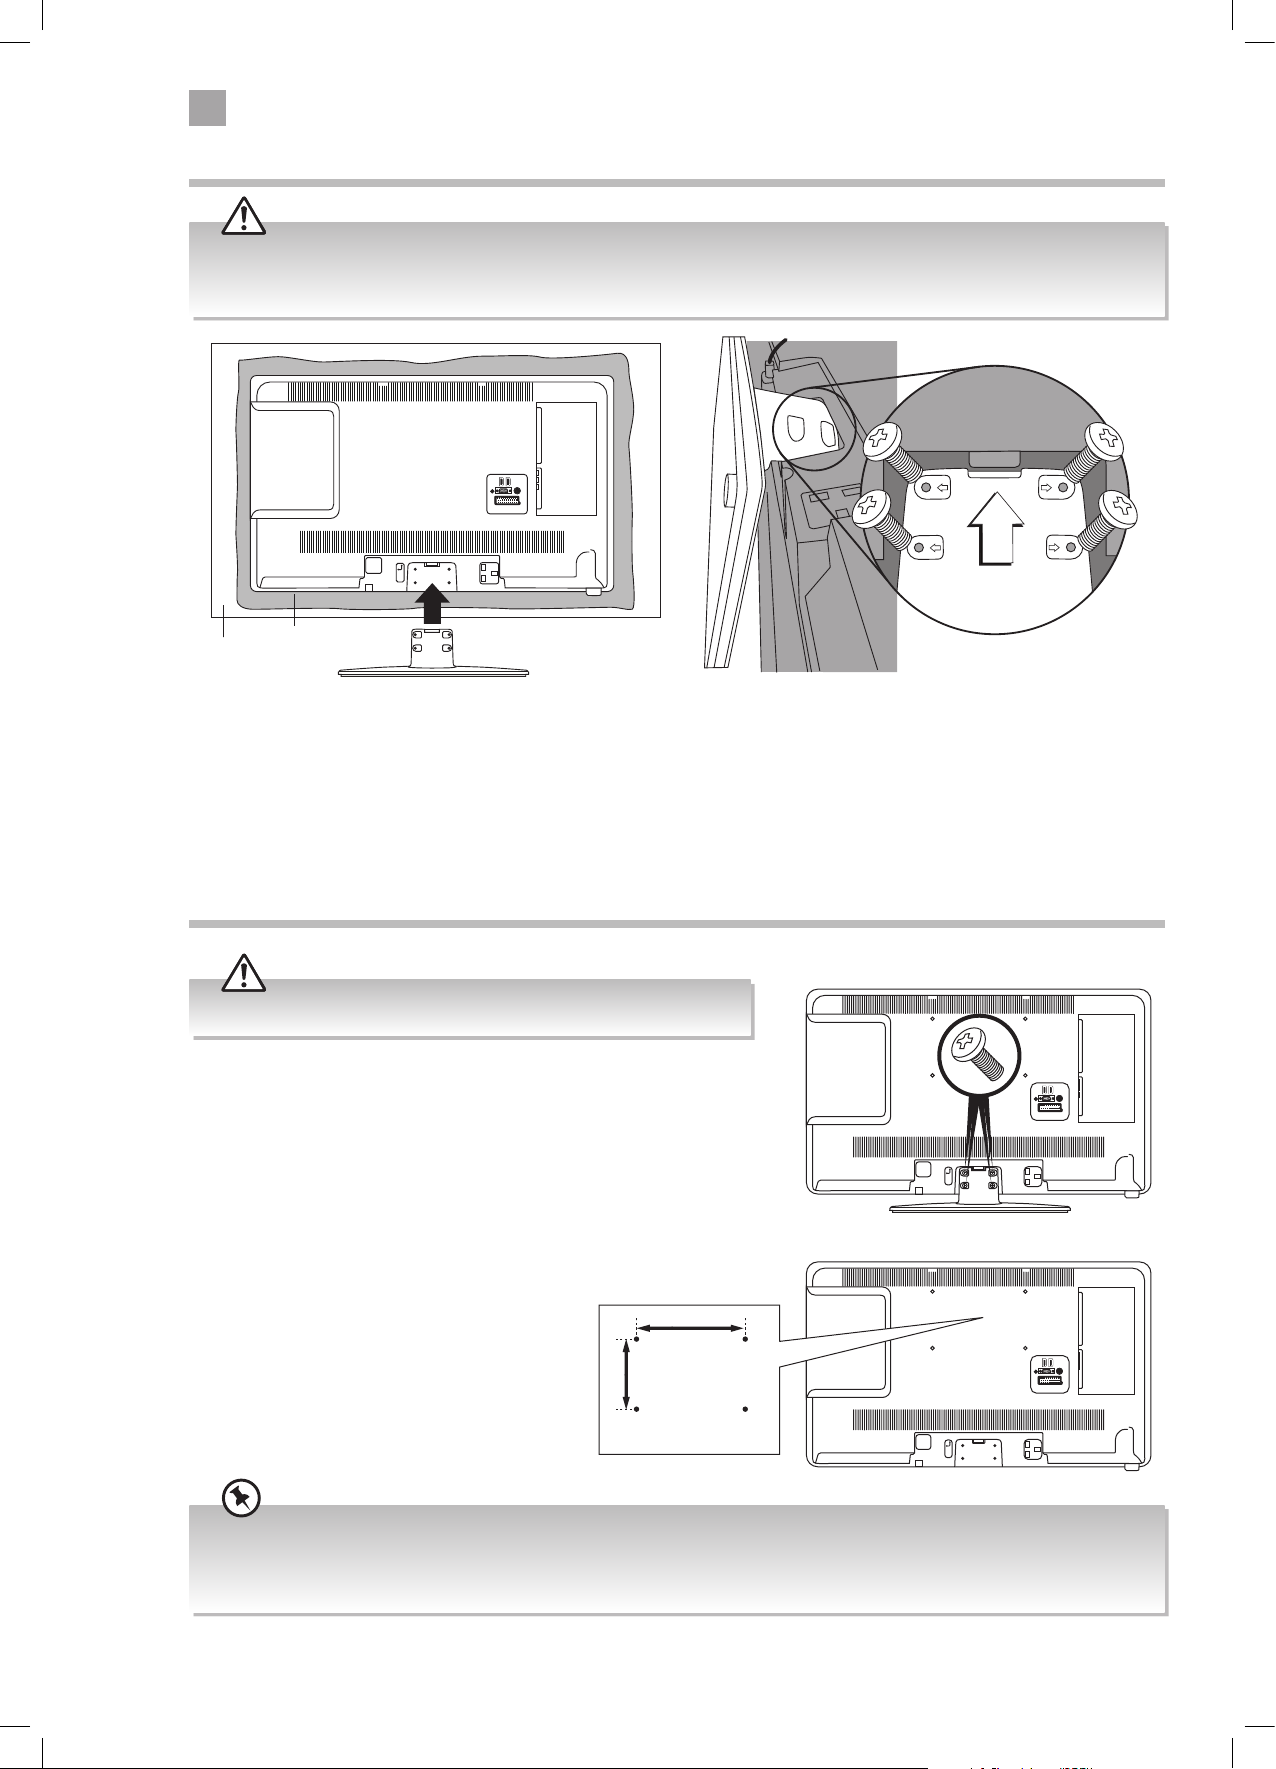
Installing the Base Stand
3
1. Ensure the TV is switched o and not connected to
the mains power supply.
2. Lay the TV down on a at surface ideally on the edge
of a table so the base of the TV slightly overhangs
the edge of the table, with the back side facing up.
Please make sure a soft cushioned material (such as
a dry bath towel or thick piece of foam) is placed
beneath the screen.
3. Slide the stand under the lip, the neck will t snuggly
over the screw holes. Then screw the stand to the TV
using the 4 screws supplied.
The LCD display is very fragile, and must be protected at all times when installing and removing the base stand. Be sure that no hard or sharp object,
or anything that could scratch or damage the LCD display, comes into contact with it. DO NOT exert pressure on the front of the TV at any time because
the screen could crack.
Screws x 4
Instruction Manual
Quick Start Guide
Cushioned
material
Operating Your Remote Control
2
1. Open the battery
compartment on the back
of the remote control.
2. Insert two AAA size
batteries. Make sure to
match the (+) and ( - ) ends
of the batteries with the
(+) and ( - ) ends indicated
in the battery compartment.
3. Replace the battery
compartment cover. Make sure it clicks into place.
Table
Instruction Manual Quick Start Guide
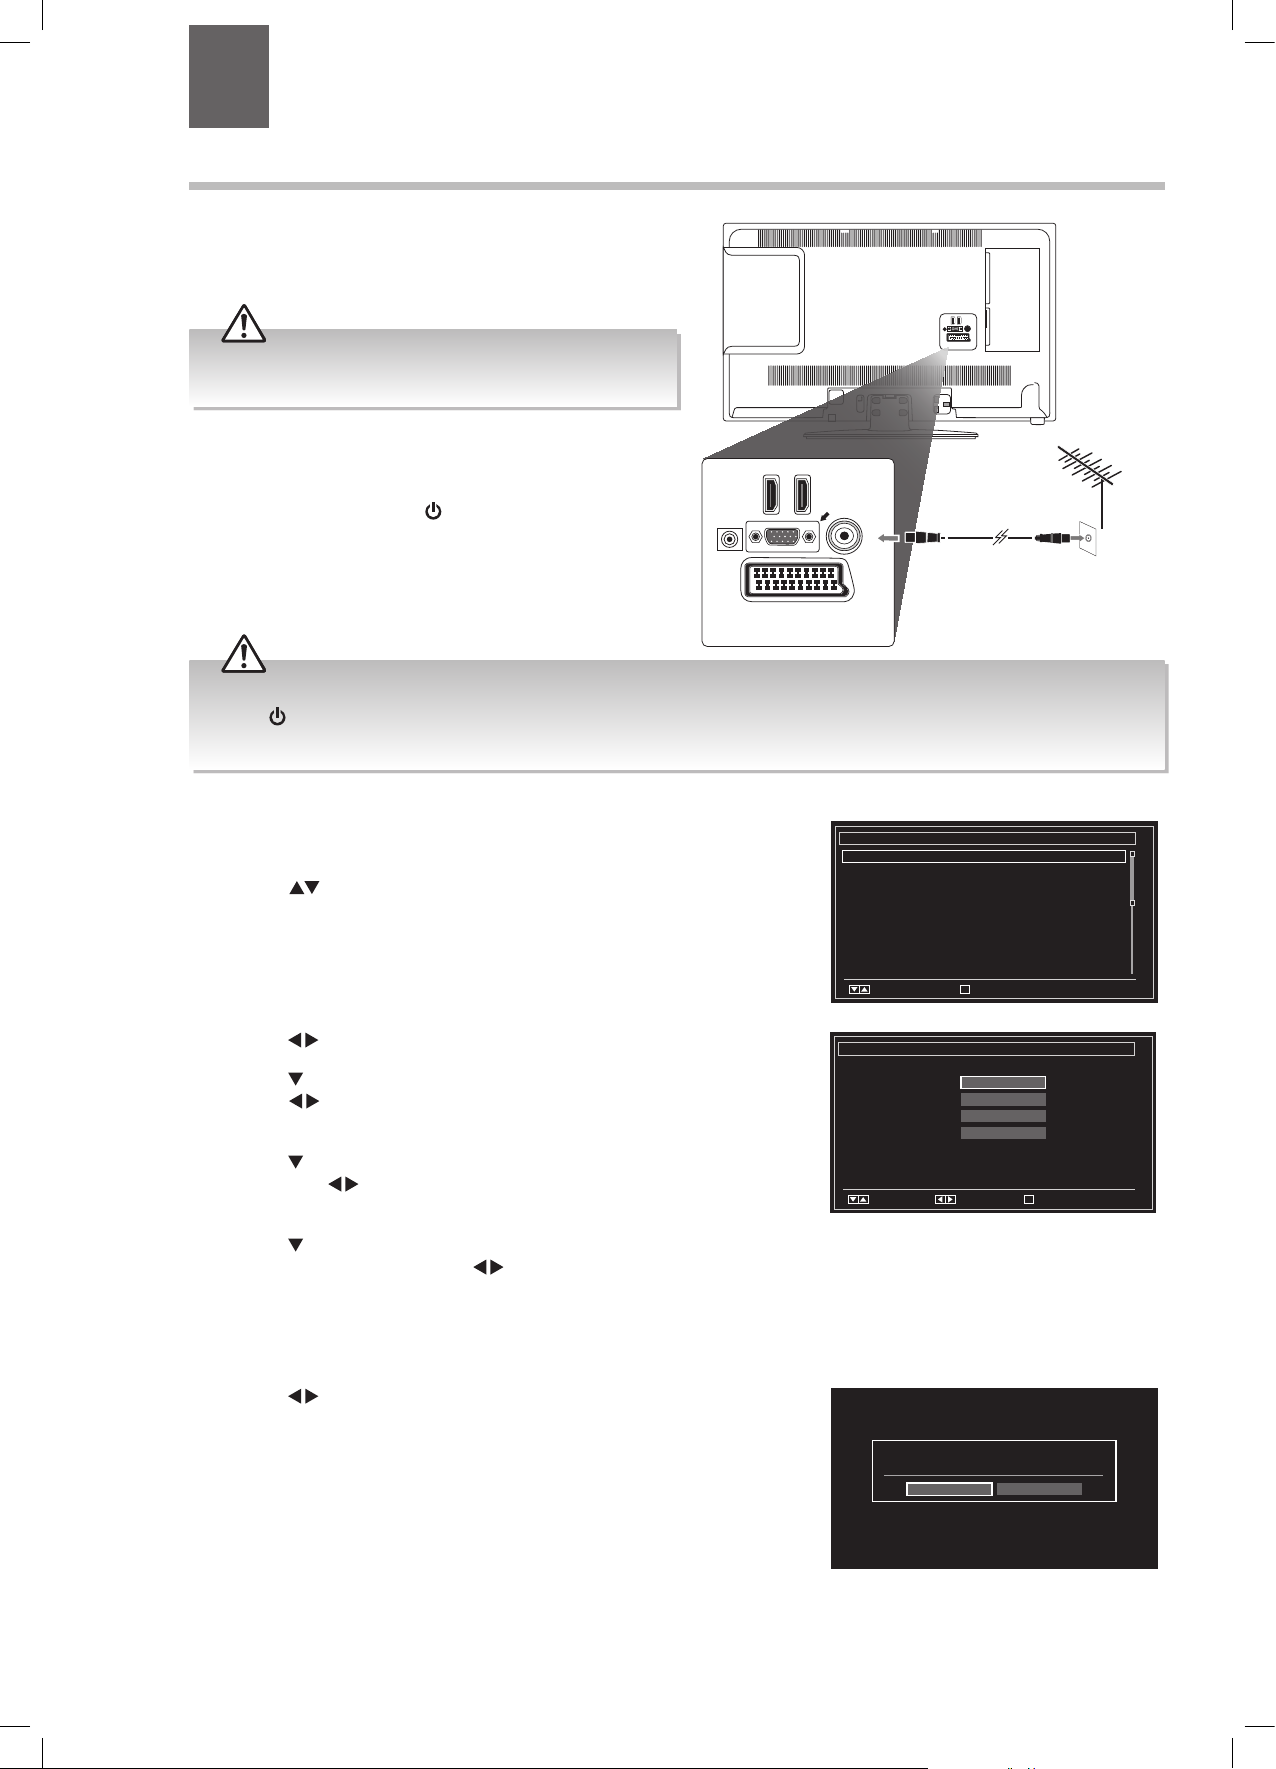
Connecting the Aerial and Turning on the TV
1. Connect one end of the RF coaxial cable to the aerial socket on the wall and the
other end of the cable to the ANT socket on the back of your TV.
2. Plug the TV into a mains socket and switch on at the mains.
3. In standby mode, press the
button on the remote control to turn the TV on.
The red LED indicator will ash for a few seconds then the TV will switch on.
• Do not connect the TV to the mains supply until you have completed all the connections.
• Always disconnect the TV from the mains socket when not in use for a long period of time.
button on the remote control is only used for switching the TV into standby, it does not disconnect the TV from the mains power.
• The
To completely disconnect the mains power, please remove the mains plug from the mains socket.
Tuning in the TV
5
6. Con rm these settings by pressing OK.
1. The rst time you turn the TV on, it will go
straight into the First Time Installation
7. Press the
menu. Please ensure the aerial is plugged in.
buttons to highlight your
Press the
language then press OK.
First time installation
Welcome please select your language! English
Bienvenue ! Veuillez choisir une langue. Francais
Willkommen, Wahlen Sie bitte lhre Sprache aus! Deutsch
Benvenuti, Selezionate la vostra lingua! Italiano
Bienvenido, seleccione un idioma Espanol
Hos geldiniz, lutfen dil secimini yapiniz! Turkce
Dobrodosli, izberite vas jezik! Slovenski
Valkommen, valj ditt sprak! Svenska
Udvozoljuk, kerjuk valassza ki a nyelvet! Magyar
Bem-vendo, favor selectionar seu idioma Portugues
Tervetuloa, valitse kielesi! Suomi
OK
Select Language Set Language
8. You will now be asked if you want to start
buttons to select your country.
2. Press the
First time installation
Welcome!
< >
Country
UK
Search Type
Digital only
Teletext Language
West
Scan Encrypted Channels
Yes
Please ensure your aerial is plugged in before tuning in your TV
OK
Select Language Start searchOKChoose your country
button to highlight Search Type,
3. Press the
buttons to select Digital
then press the
Only. This will only search for the digital
channels.
button to highlight Teletext
4. Press the
buttons to
Language, then press the
select your language. The majority of people
will want this set to West.
button to highlight Scan
5. Press the
Encrypted Channel (pay-per-view channels),
buttons to select Yes
then press the
or No.
Slide under
the lip
Well done, your new TV is now ready to use. You will nd that there are many exciting features available. To get to know all these features, please take
some time to read the instruction manual provided with your TV.
buttons to highlight Home
Mode then press OK.
If the TV is to be used in a store, please select the Store Mode. For domestic use,
Home Mode is recommended.
the automatic channel scan. Press the
buttons to highlight Yes and press OK.
Do you want to start an automatic
channel
Automatic channel scan (Retune)
Please wait. This will take a few minutes. Scanning digital channels: UHF 22
Cambs & Beds: BBC TWO HD
Cambs & Beds: Channel 4 HD
Cambs & Beds: BBC ONE HD
Cambs & Beds: ITV HD
Cambs & Beds: BBC THREE HD
Cambs & Beds: CBBC HD
Channels Found : 6
MENU
Cancel scan
Store ModeHome Mode
NoYes
HDMI 2
SPDIF
SCART
HDMI 1
VGA
ANT.
RF coaxial cable
(not included)
Choose Region
During tuning, your TV may have received
signals from more than one transmitter. If this
has occurred the Choose Region screen will be
displayed. This will enable you to select the
correct regional transmission for the local news
service that you require.
button to highlight Primary
1. Press the
buttons to select
region, then press the
your Primary Region e.g. England.
Automatic channel scan (Retune)
Choose region
Please wait. This will take a few minutes. Scanning digital channels: UHF 22
Multiple regional variants have been detected.
Please choose your preferred region.
Cambs & Beds: BBC TWO HD
Cambs & Beds: Channel 4 HD
Country
Cambs & Beds: BBC ONE HD
Primary region
Any
Cambs & Beds: ITV HD
Cambs & Beds: BBC THREE HD
Secondary region
Any
Cambs & Beds: CBBC HD
Tertiary region
Any
Channels Found : 6
OK
MENU
Cancel scan
button to highlight Secondary
2. Press the
buttons to select
region, then press the
your Secondary Region e.g. London.
button to highlight Tertiary
3. Press the
buttons to select
region, then press the
your Tertiary Region e.g. Greater London.
button to highlight OK then
4. Press the
press OK. Your TV is now fully tuned in.
5. The Edit Channel list will appear, press the
EXIT button to remove this. Your TV is now
fully tuned in and ready to use.
Edit Channel List
1. BBC ONE Lon
2. BBC TWO
3. ITV
4. Channel 4
5. Channel 5
6. ITV2
7. BBC THREE
9. BBC FOUR
10. ITV3
OK Move Delete Edit name Lock
Function
Navigate
Filter
MENU
RET.BACK
0....9 P+OKP-
Cancel scan
Back
Jump
(QSG-LT-32C345/46-140408V1)
Remote Control /
AAA Batteries x 2
UK
DTVTV
DTVTV
DTVTV
DTVTV
DTVTV
DTVTV
DTVTV
DTVTV
DTVTV
Watch
Page UP/DOWN
7
LT-32C345/46_IB.indd 7 10/07/2014 12:27
Page 8
2
Preparation
Installing / Removing the Base Stand
The LCD display is very fragile, and must be protected at all times when installing and removing the base stand. Be sure that
no hard or sharp object, or anything that could scratch or damage the LCD display, comes into contact with it. DO NOT exert
pressure on the front of the TV at any time because the screen could crack.
Slide under
the lip
Cushioned
Table
1. Ensure the TV is switched off and not connected to the mains power supply.
material
2. Lay the TV down on a flat surface ideally on the edge of a table so the base of the TV slightly overhangs the edge of the table,
with the back side facing up. Please make sure a soft cushioned material (such as a dry bath towel or thick piece of foam) is
placed beneath the screen.
3. Slide the stand under the lip, the neck will fit snugly over the screw holes. Then screw the stand to the TV using the 4 screws
supplied.
Mounting the TV to a Wall
Remove the stand assembly before mounting the TV onto the wall.
x4
1. Press the button in the middle of the stand neck and gently pull
the stand away from the TV.
2. This TV is designed to be wall-mounted with
a standard 200 mm x 100 mm mounting kit
(sold separately) designed for flat-panel TVs.
Mount this TV according to the instructions
included in the mounting kit. Due to space
restrictions, we recommend that you make all
connections before mounting on to
the wall.
200mm
100mm
Four mounting holes
(size M4 screw)
• Please read this instruction manual carefully while setting up your TV.
• If you require additional assistance please call our UK Call Centre on 0344 561 1234. Our UK Customer Contact Centre is
open Monday-Saturday 8am-8pm or Sunday 8am-6pm.
8
LT-32C345/46_IB.indd 8 10/07/2014 12:27
Page 9
2
Preparation
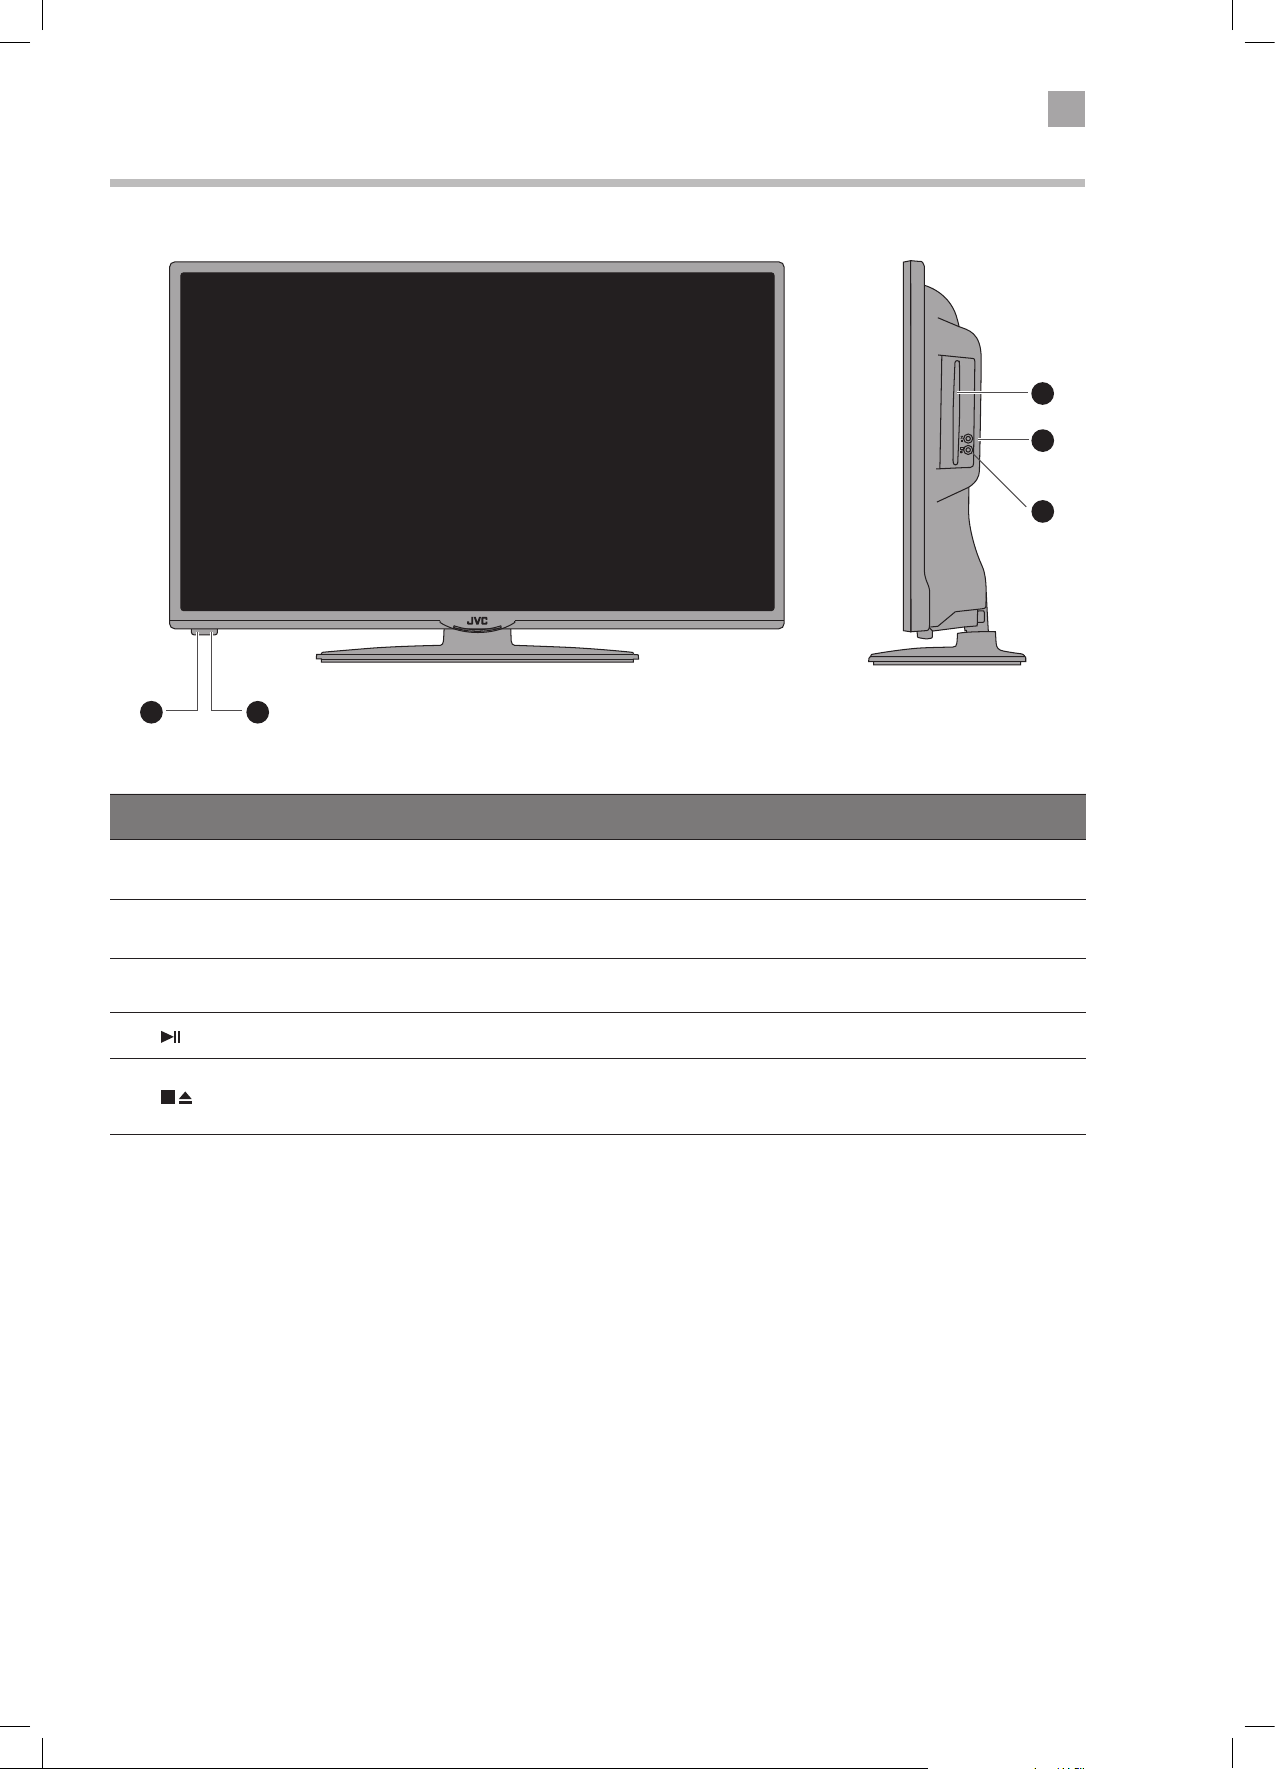
Front / Right Side View and Controls
1 2
3
4
5
Item Description
1 POWER LED
2 IR (Infrared Receiver)
3 Disc Slot
4
5
Illuminates when the TV is in standby mode. The LED will blink confirming that a timer
recording programme has started in the standby mode.
Receives IR signals from the remote control.
Do not put anything near the sensor, as its function may be affected.
Insert the disc with the label side facing the rear of the TV. (12 cm discs only. Don't
insert 8 cm discs.)
Press to start playback or pause. (DVD mode)
Press once to stop playback and leave in resume state. (DVD mode)
Press twice to stop playback completely. (DVD mode)
Press to eject disc. (DVD mode)
9
LT-32C345/46_IB.indd 9 10/07/2014 12:27
Page 10
2
Preparation
COMMON INTERFACE
USB
5Vdc
Max. 500mA
LR
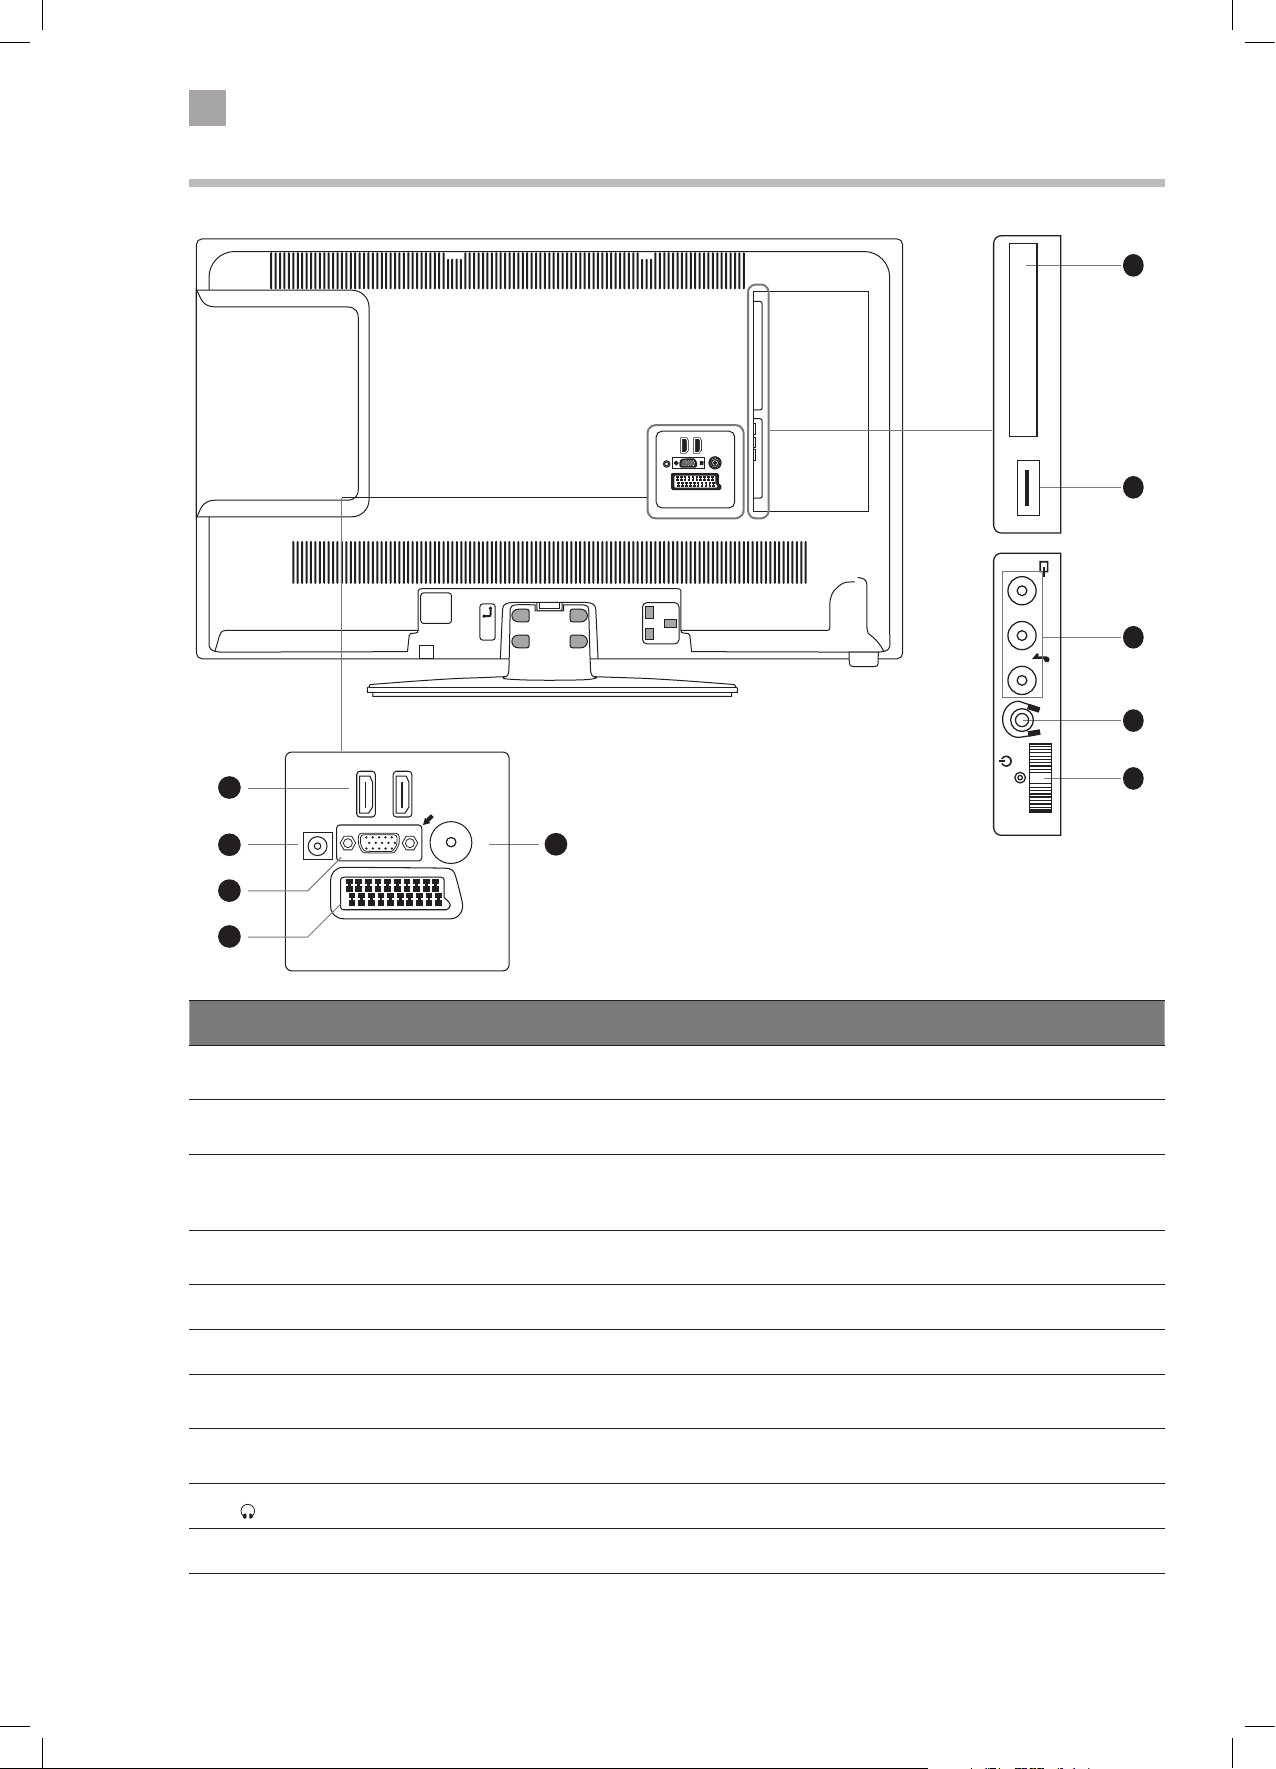
Rear View and Sockets
USB
5Vdc
Max. 500mA
6
COMMON INTERFACE
7
LR
8
1
HDMI 1
HDMI 2
SPDIF
2
VGA
ANT.
5
3
4
Item Description
1 HDMI 1 & 2
2 SPDIF COAX audio out (Digital) - Connects to an audio device via a coax cable.
3 VGA/YPbPr
4 SCART (S-Video)
SCART
Connects to a High-Definition (HD) signal output device, such as a set-top box, blu-ray
disc player or AV receiver.
Connects to a computer or other devices with a VGA interface.
The VGA input is also used for component input via a VGA to component cable (not
supplied).
Connects to a VCR, DVD Player, or other AV device with a SCART output socket.
Select SCART 1 (S-VIDEO) when connecting to a device using S-VIDEO.
- +
MODE - / I
9
10
5 ANT Connects to the aerial socket on the wall with the RF coaxial cable.
6 COMMON INTERFACE Allows the insertion of a Common Access Module.
7 USB
8 CVBS/AUDIO IN (L/R)
(audio L/R also used for YPbPr and VGA)
9
10 MULTI FUNCTION SWITCH Switches the TV into standby and on. Selects modes (channel,volume, and source).
Allows the insertion of a USB storage device to play video, audio, photo and text files
(USB mode) and record DTV programmes on to a USB storage device.
Connects to the Composite VIDEO and AUDIO (L/R) output sockets on external video
devices.
Connects to the headphones.
10
LT-32C345/46_IB.indd 10 10/07/2014 12:27
Page 11
2
Preparation
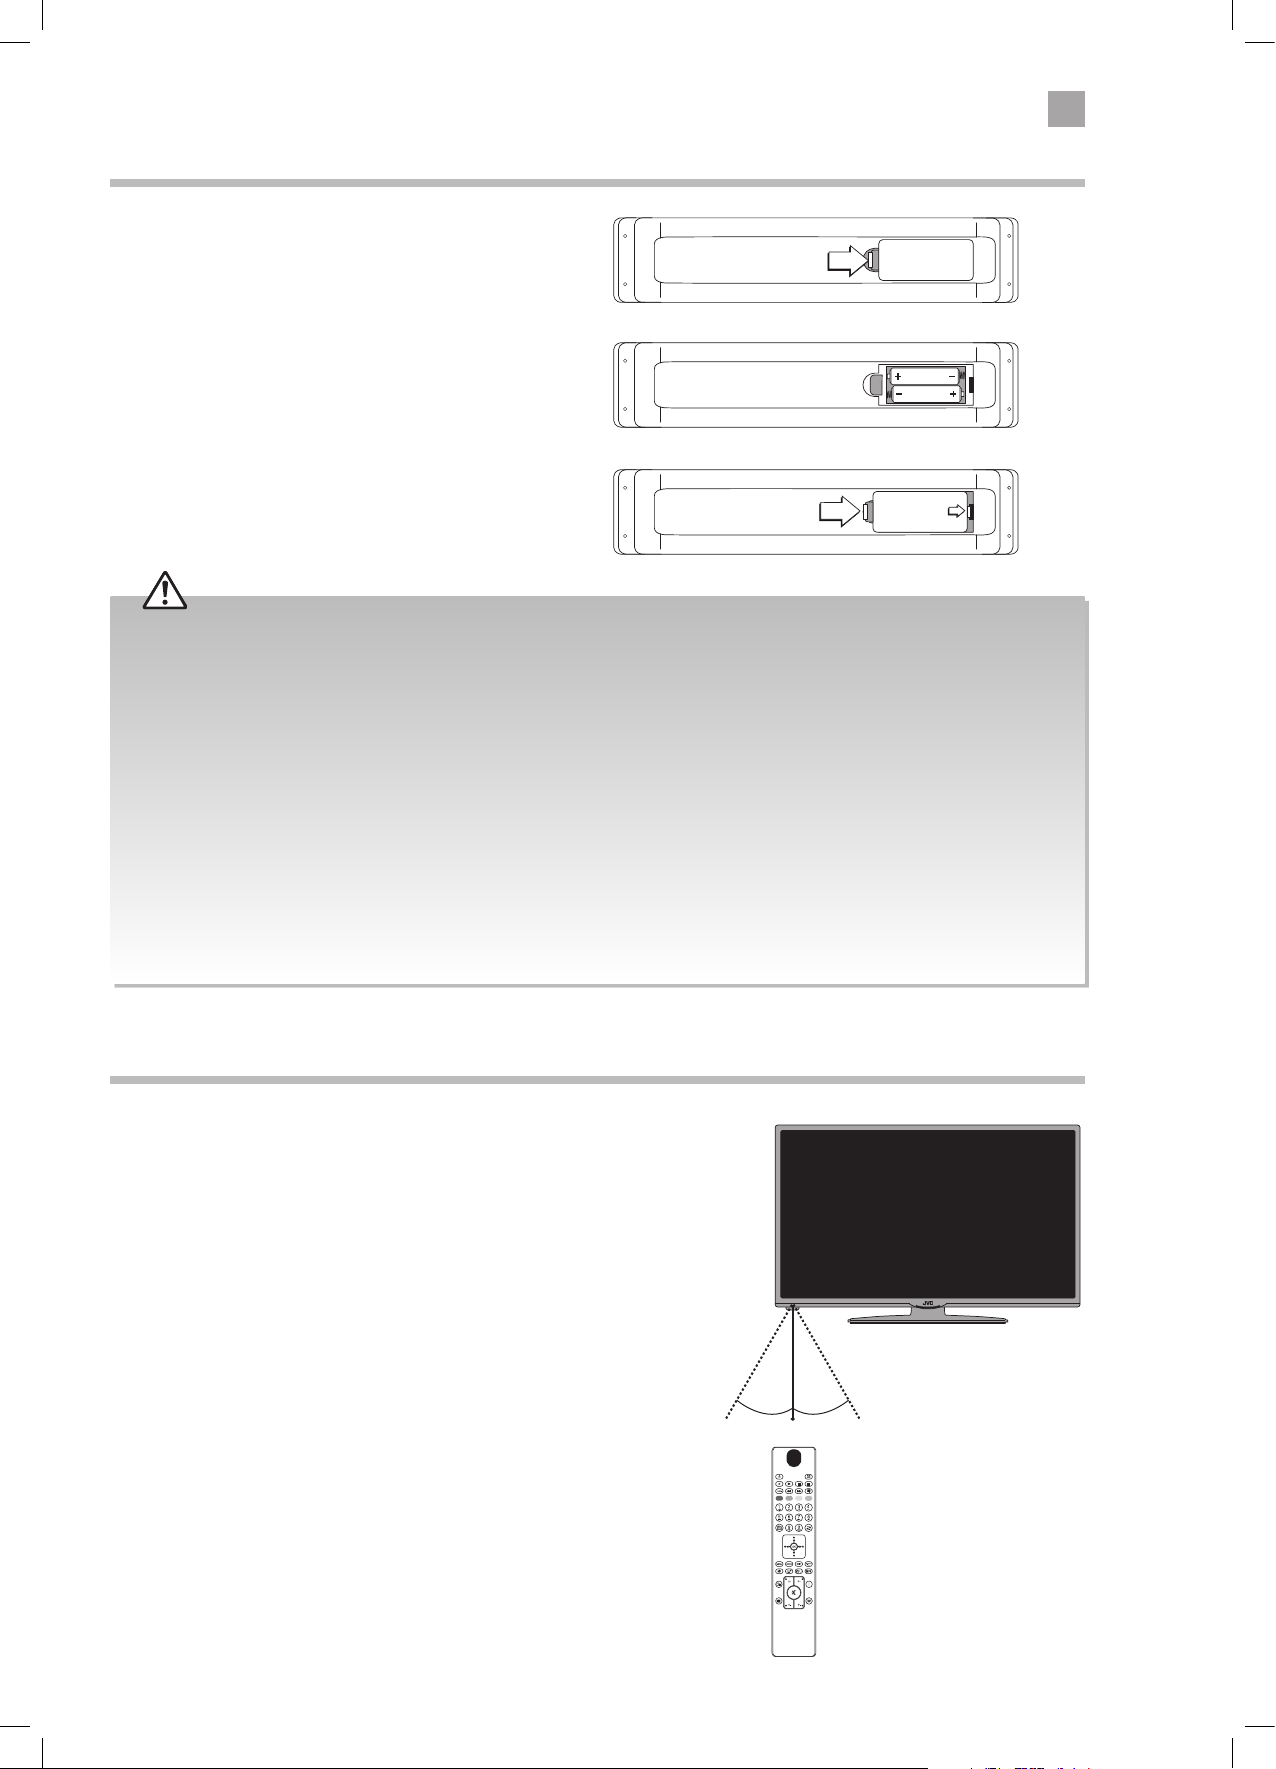
Installing Batteries in the Remote Control
1. Open the battery compartment on the back of the
remote control.
2. Insert two AAA size batteries. Make sure to match the (+)
and ( - ) ends of the batteries with the (+) and ( - ) ends
indicated in the battery compartment.
3. Replace the battery compartment cover. Make sure it
clicks into place.
Handling the Batteries
• Improper or incorrect use of batteries may cause
corrosion or battery leakage, which could cause
fire, personal injury or damage to property.
• Only use the battery type indicated in this manual.
• When the batteries are exhausted, the remote will
not function. Replace both batteries at the same
time with new ones.
• Do not install new batteries with used ones and do
not mix different types of batteries.
• Do not dispose of used batteries as domestic
waste. Dispose of them in accordance with local
regulations.
Remote Control Operation Range
Point the remote control at the TV no more than 5 metres from the
remote control sensor on the TV and within 60° in front of the TV.
The operating distance may vary depending on the brightness of
the room.
Handling the Remote Control
• Take care of your fingernails when you press and
hold the battery release tab.
• Do not drop or cause impact to the remote control.
• Do not spill water or any liquid on the remote
control.
• Do not place the remote control on a wet object.
• Do not place the remote control under direct
sunlight or near sources of excessive heat.
• Remove the battery from the remote control
when not in use for a long period of time, as it
could cause corrosion or battery leakage and may
result in physical injury and/or property damage
including fire.
30° 30°
5M
SOURCE
11
LT-32C345/46_IB.indd 11 10/07/2014 12:27
Page 12
2
Preparation
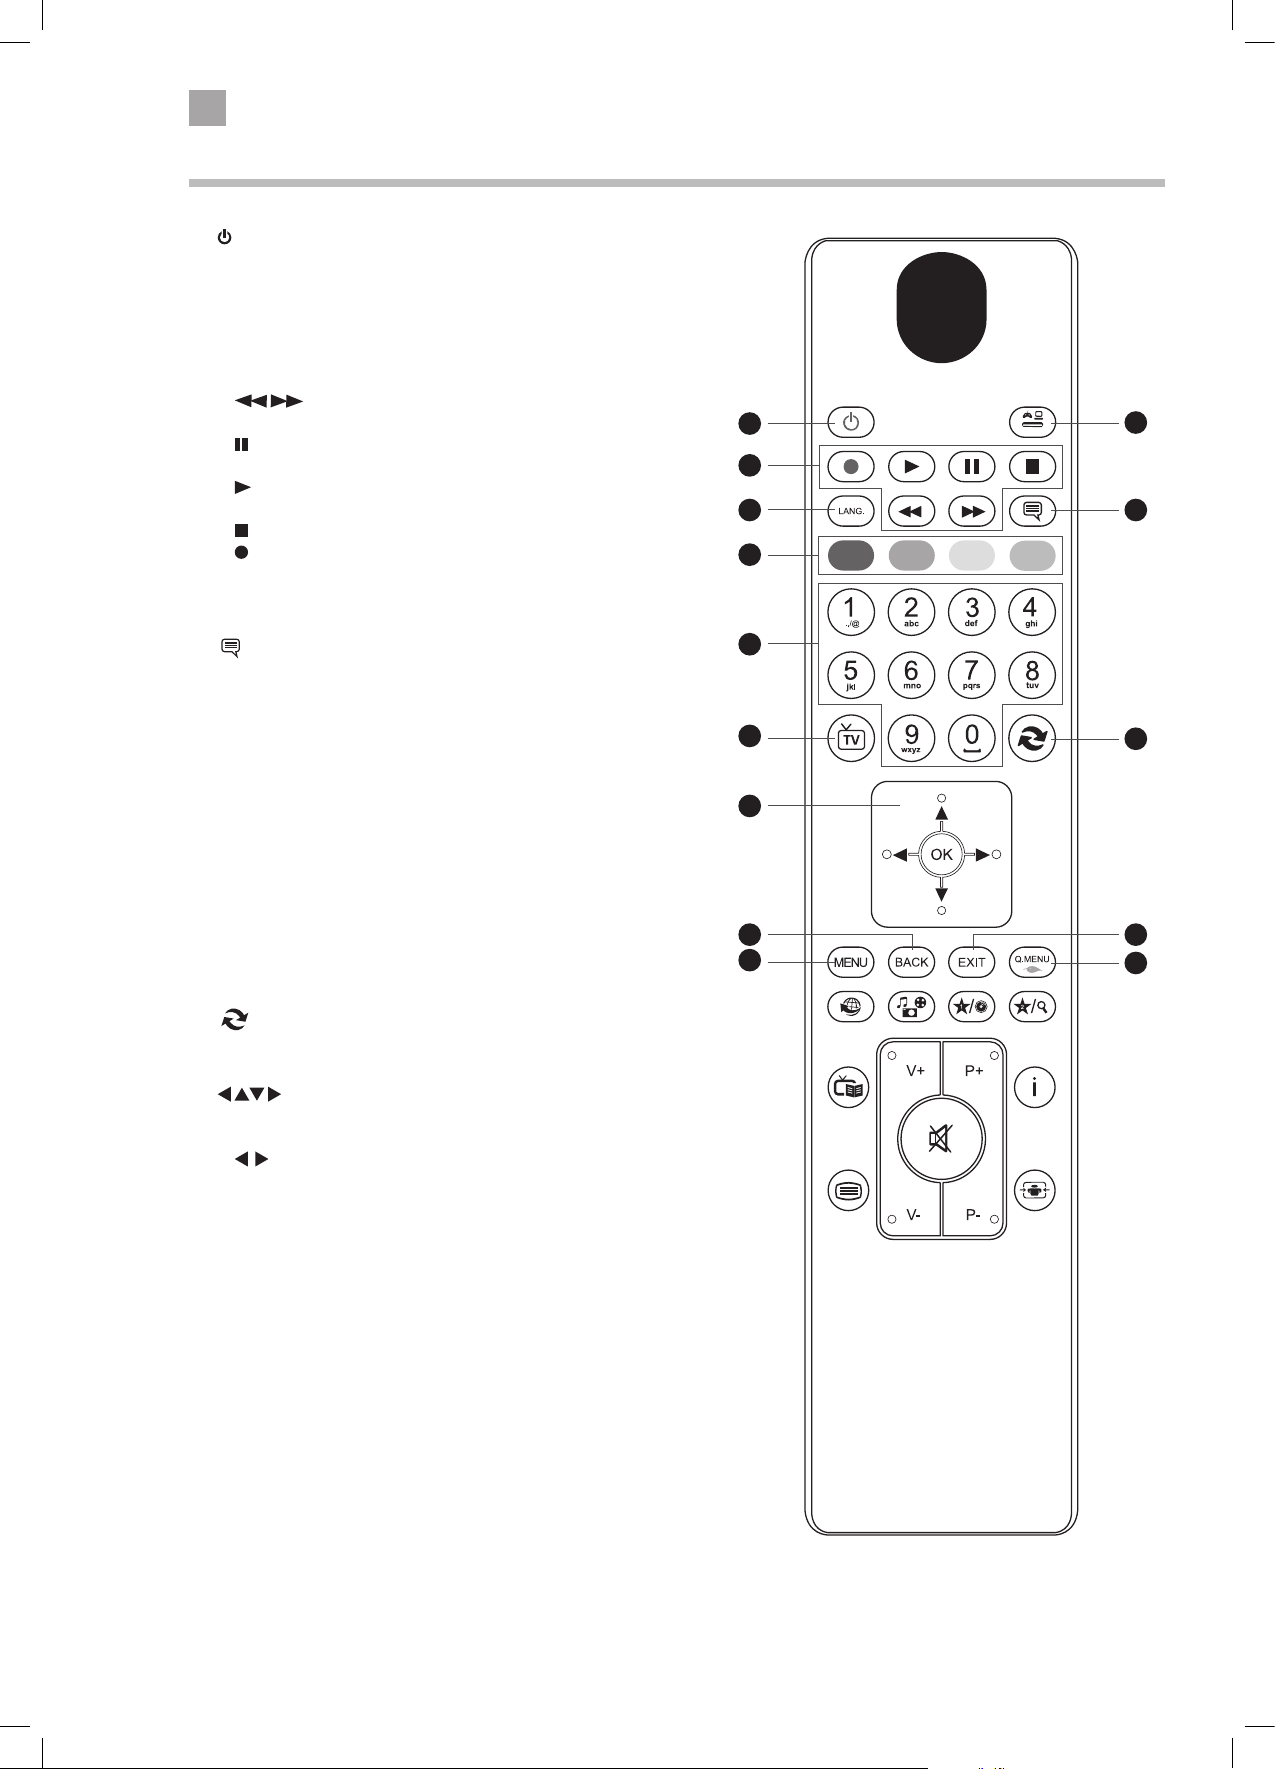
Remote Control
1.
Switch the TV between on and standby mode.
2. SOURCE
Press to change the source you are viewing.
TV - SCART 1 - SCART 1 (S-VIDEO) - SIDE AV - HDMI 1 -
HDMI 2 - YPbPr - VGA/PC - DVD.
3. PLAYBACK and RECORD buttons
searches forwards and backwards when viewing a
•
DVD or recording.
•
pauses a DVD or recording and starts timeshifting in TV
mode if you have a hard drive attached to the USB port.
• plays a DVD or recording.
Selects DVD mode when in any other source.
• stops a DVD or recording.
• starts a recording, continue to press will add more
recordings.
4. LANG.
Selects the Current Language menu.
(Subtitles)
5.
Press to switch subtitles on and o.
6. COLOURED BUTTONS
Access the TELETEXT items ( TV mode) or menu options.
ZOOM (RED)
To zoom in and out of the picture in DVD mode.
REPEAT (GREEN)
Repeat Chapter, Title or All in DVD mode.
DVD FILM MENU (YELLOW)
Select the Root menu of the DVD playing (DVD mode).
7. 0-9 Number Button
• Press to select a programme. (TV / RADIO mode)
• Select numbered items in a menu. (DVD mode)
8. TV
• Press to enter TV mode when viewing other sources.
• Press to view the channel list when in TV mode.
9.
(Previous programme/source)
• Press to switch between the previous programme or source
that was selected.
/ OK
10.
• Allow you to navigate the OSD menus and adjust the system
settings to your preference.
skip chapters in DVD mode.
•
• Press OK to select or save a setting.
11. BACK
Press to move backwards through menus.
12. EXIT
Press to exit a menu.
13. MENU
Display the main menu.
14. Q. MENU
Press the select the Settings menu.
1
SOURCE
3
4
6
7
8
10
11 12
13
14
2
5
9
12
LT-32C345/46_IB.indd 12 10/07/2014 12:27
Page 13
2
Preparation
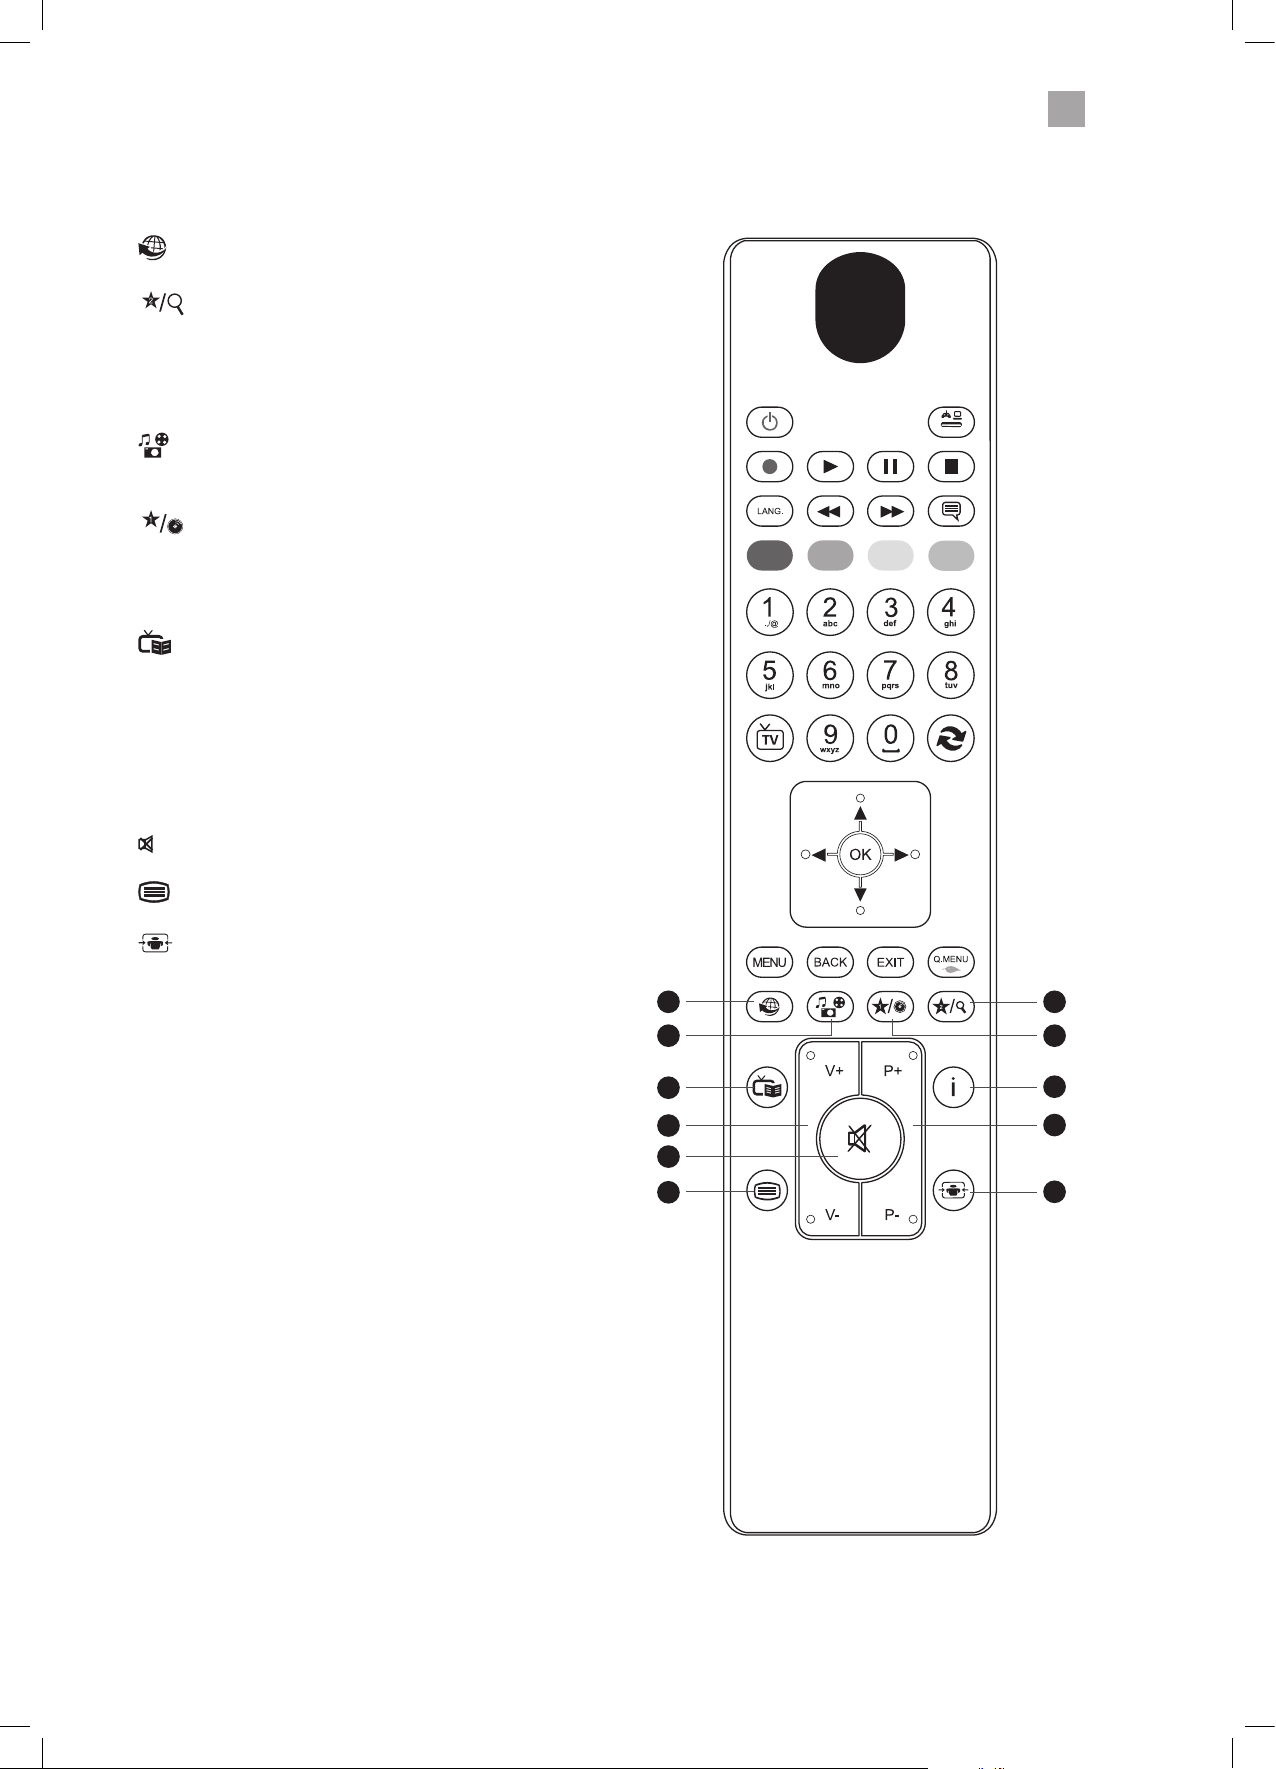
15.
No function.
16.
17.
18.
(My Button 2)
• Selects the Channel Network Type menu in TV mode.
• Press and hold for 5 seconds to set a favourite channel/
source, this will then remove the Channel Network Type
menu.
• Selects the Title and Chapter menus in DVD mode.
(Media Browser)
Press to enter the media browser menu, a hard drive will
need to be attached to the USB port.
(My Button 1)
• Press and hold for 5 seconds to set a favourite channel/
source.
• Selects the Title Elapsed menu in DVD mode.
• Selects the DVD setup menus in DVD mode.
SOURCE
19.
20. i (info)
21. VOL + / –
22. P+ / P-
23.
24.
25.
(Programme Guide)
Press to view the Programme Guide.
Press to see programme information in TV mode.
Adjust the volume.
Press to select the next channel up or down the channel list.
(Mute)
Mute and restore the sound.
Press to enter teletext if available.
(Aspect ratio)
Press to adjust the aspect ratio of the picture.
AUTO - 16:9 - Subtitle - 14:9 - 14:9 Zoom - 4:3 - Cinema.
15
17
19
21
23
24
16
18
20
22
25
13
LT-32C345/46_IB.indd 13 10/07/2014 12:27
Page 14
Chapter
3 Initial Setup
3
Turning the TV On for the First Time
1. Connect one end of the RF coaxial cable to the aerial
socket on the wall and the other end of the cable to
the ANT socket on the back of your TV.
Do not connect the TV to the mains supply until you have
completed all the connections.
2. Plug the TV into a mains socket and switch on at the
mains.
3. In standby mode, press the
control to turn the TV on. The LED indicator will flash
for a few seconds then the TV will switch on.
button on the remote
SPDIF
HDMI 2
SCART
HDMI 1
VGA
ANT.
RF coaxial cable
(not included)
• Always disconnect the TV from the mains socket when not in use for a long period of time.
• The
button on the remote control is only used for switching the TV into standby, it does not disconnect the TV from the
mains power. To completely disconnect the mains power, please remove the mains plug from the mains socket.
4. The first time you turn the TV on, it will go straight
into the First Time Installation menu. Please ensure
the aerial is plugged in.
Press the
buttons to highlight your language
then press OK.
5. Press the buttons to select your country.
6. Press the
press the
button to highlight Search Type, then
buttons to select Digital Only. This will
only search for the digital channels.
7. Press the
then press the
button to highlight Teletext Language,
buttons to select your language.
The majority of people will want this set to West.
8. Press the
per-view) Channel, then press the
button to highlight Scan Encrypted (pay-
buttons to
First time installation
Welcome please select your language! English
Bienvenue ! Veuillez choisir une langue. Francais
Willkommen, Wahlen Sie bitte lhre Sprache aus! Deutsch
Benvenuti, Selezionate la vostra lingua! Italiano
Bienvenido, seleccione un idioma Espanol
Hos geldiniz, lutfen dil secimini yapiniz! Turkce
Dobrodosli, izberite vas jezik! Slovenski
Valkommen, valj ditt sprak! Svenska
Udvozoljuk, kerjuk valassza ki a nyelvet! Magyar
Bem-vendo, favor selectionar seu idioma Portugues
Tervetuloa, valitse kielesi! Suomi
Select Language Set Language
First time installation
Welcome!
Country
Search Type
Teletext Language
Scan Encrypted Channels
Please ensure your aerial is plugged in before tuning in your TV
Select Language Start search
Choose your country
select Yes or No.
OK
< >
UK
Digital only
West
Yes
OK
OK
9. Confirm these settings by pressing OK.
10. Press the
buttons to highlight Home Mode then
press OK.
If the TV is to be used in a store, please select the Store Mode. For domestic use,
Home Mode is recommended.
Store ModeHome Mode
14
LT-32C345/46_IB.indd 14 10/07/2014 12:27
Page 15
3
Initial Setup
11. You will now be asked if you want to start the
automatic channel scan. Press the
buttons to
highlight Yes and press OK.
Do you want to start an automatic
channel
NoYes
Automatic channel scan (Retune)
Please wait. This will take a few minutes. Scanning digital channels: UHF 22
Cambs & Beds: BBC TWO HD
Cambs & Beds: Channel 4 HD
Cambs & Beds: BBC ONE HD
Cambs & Beds: ITV HD
Cambs & Beds: BBC THREE HD
Cambs & Beds: CBBC HD
Channels Found : 6
MENU
Cancel scan
Choose Region
During tuning, your TV may have received signals from more than one
transmitter. If this has occurred the Choose Region screen will be displayed.
This will enable you to select the correct regional transmission for the local
news service that you require.
• Press the
buttons to select your Primary Region e.g. England.
• Press the
buttons to select your Secondary Region e.g. London.
• Press the
buttons to select your Tertiary Region e.g. Greater London.
• Press the
Your TV is now fully tuned in.
Country Code This will be shown as UK.
Primary Region
Secondary Region
Tertiary Region
button to highlight Primary region, then press the
button to highlight Secondary region, then press the
button to highlight Tertiary region, then press the
button to highlight OK then press OK.
This will show the regional country (England, Wales,
Scotland, NI).
This will allow you to set the region for your local
news service on BBC and ITV (London, Beds and
Cambs etc).
You may receive signals from more than one
transmitter within the Secondary Region, (e.g Beds
and Cambs may have Luton or Sandy Heath).
Automatic channel scan (Retune)
Choose region
Please wait. This will take a few minutes. Scanning digital channels: UHF 22
Cambs & Beds: BBC TWO HD
Cambs & Beds: Channel 4 HD
Cambs & Beds: BBC ONE HD
Cambs & Beds: ITV HD
Cambs & Beds: BBC THREE HD
Cambs & Beds: CBBC HD
Channels Found : 6
MENU
Country
Primary region
Secondary region
Tertiary region
Cancel scan
Multiple regional variants have been detected.
Please choose your preferred region.
UK
Any
Any
Any
OK
The Edit Channel list will appear, press the EXIT button to remove this. Your
TV is now fully tuned in and ready to use.
Edit Channel List
1. BBC ONE Lon
2. BBC TWO
3. ITV
4. Channel 4
5. Channel 5
6. ITV2
7. BBC THREE
9. BBC FOUR
10. ITV3
OK Move Delete Edit name Lock
Function
MENU
Cancel scan
Navigate
Back
Filter
0....9 P+OKP-
Jump
RET.BACK
Watch
Page UP/DOWN
DTV TV
DTV TV
DTV TV
DTV TV
DTV TV
DTV TV
DTV TV
DTV TV
DTV TV
15
LT-32C345/46_IB.indd 15 10/07/2014 12:27
Page 16

3
Initial Setup
Connecting an Analogue Device
If you have connected an analogue device such as a video recorder via the
aerial socket on your TV you will have to tune it in using Analogue mode. Ensure
Install and Retune
Autoimatic channel scan (Retune)
Manual channel scan
Analogue ne tune
First time installation
the device is switched on before you start the tuning process.
1. Press the MENU button, press the
buttons to select INSTALL AND
RETUNE and press OK.
2. Select AUTOMATIC CHANNEL SCAN (RETUNE) and press OK.
3. Press the
4. Press the
automatically start, this will not delete your Digital channels, so don't worry!
buttons to select ANALOGUE and press OK.
buttons to select YES then press OK. The search will
Auto channel scan (Retune)
Digital
Analogue
Full
5. When the search has finished the EDIT CHANNEL LIST will appear. Your
analogue channel will be at the end of the channel list.
Channel Selection
• Press the P + / – buttons on the remote control repeatedly or the 0-9 buttons to select the channel.
Alternative
Press the OK button to enter the Channel List. Then use the buttons to highlight and select the channel.
Press the OK button to view the selected channel.
OR
Press the i (info) button then the
buttons to search for a channel you wish to watch then press OK.
• If a locked channel is selected, the password screen will be displayed. Press the 0-9 buttons to enter the password, the
channel will then be unlocked (refer to Locking Channel for details).
• Press the
button to return to the previously viewed channel.
Display Channel Information
• Press the INFO button to view the current information.
Volume Adjustment
• Press the V + or – button on the remote control or rotate the multi-function
switch up or down on the back of the TV.
• If you wish to switch the sound off, press the
button again or the VOL + or – button to resume listening.
button. Press the
16
LT-32C345/46_IB.indd 16 10/07/2014 12:27
Page 17

4
Customising TV Settings
Chapter
4 Customising TV Settings
4
Adjusting the Picture Settings
Allows you to set your preferred picture mode.
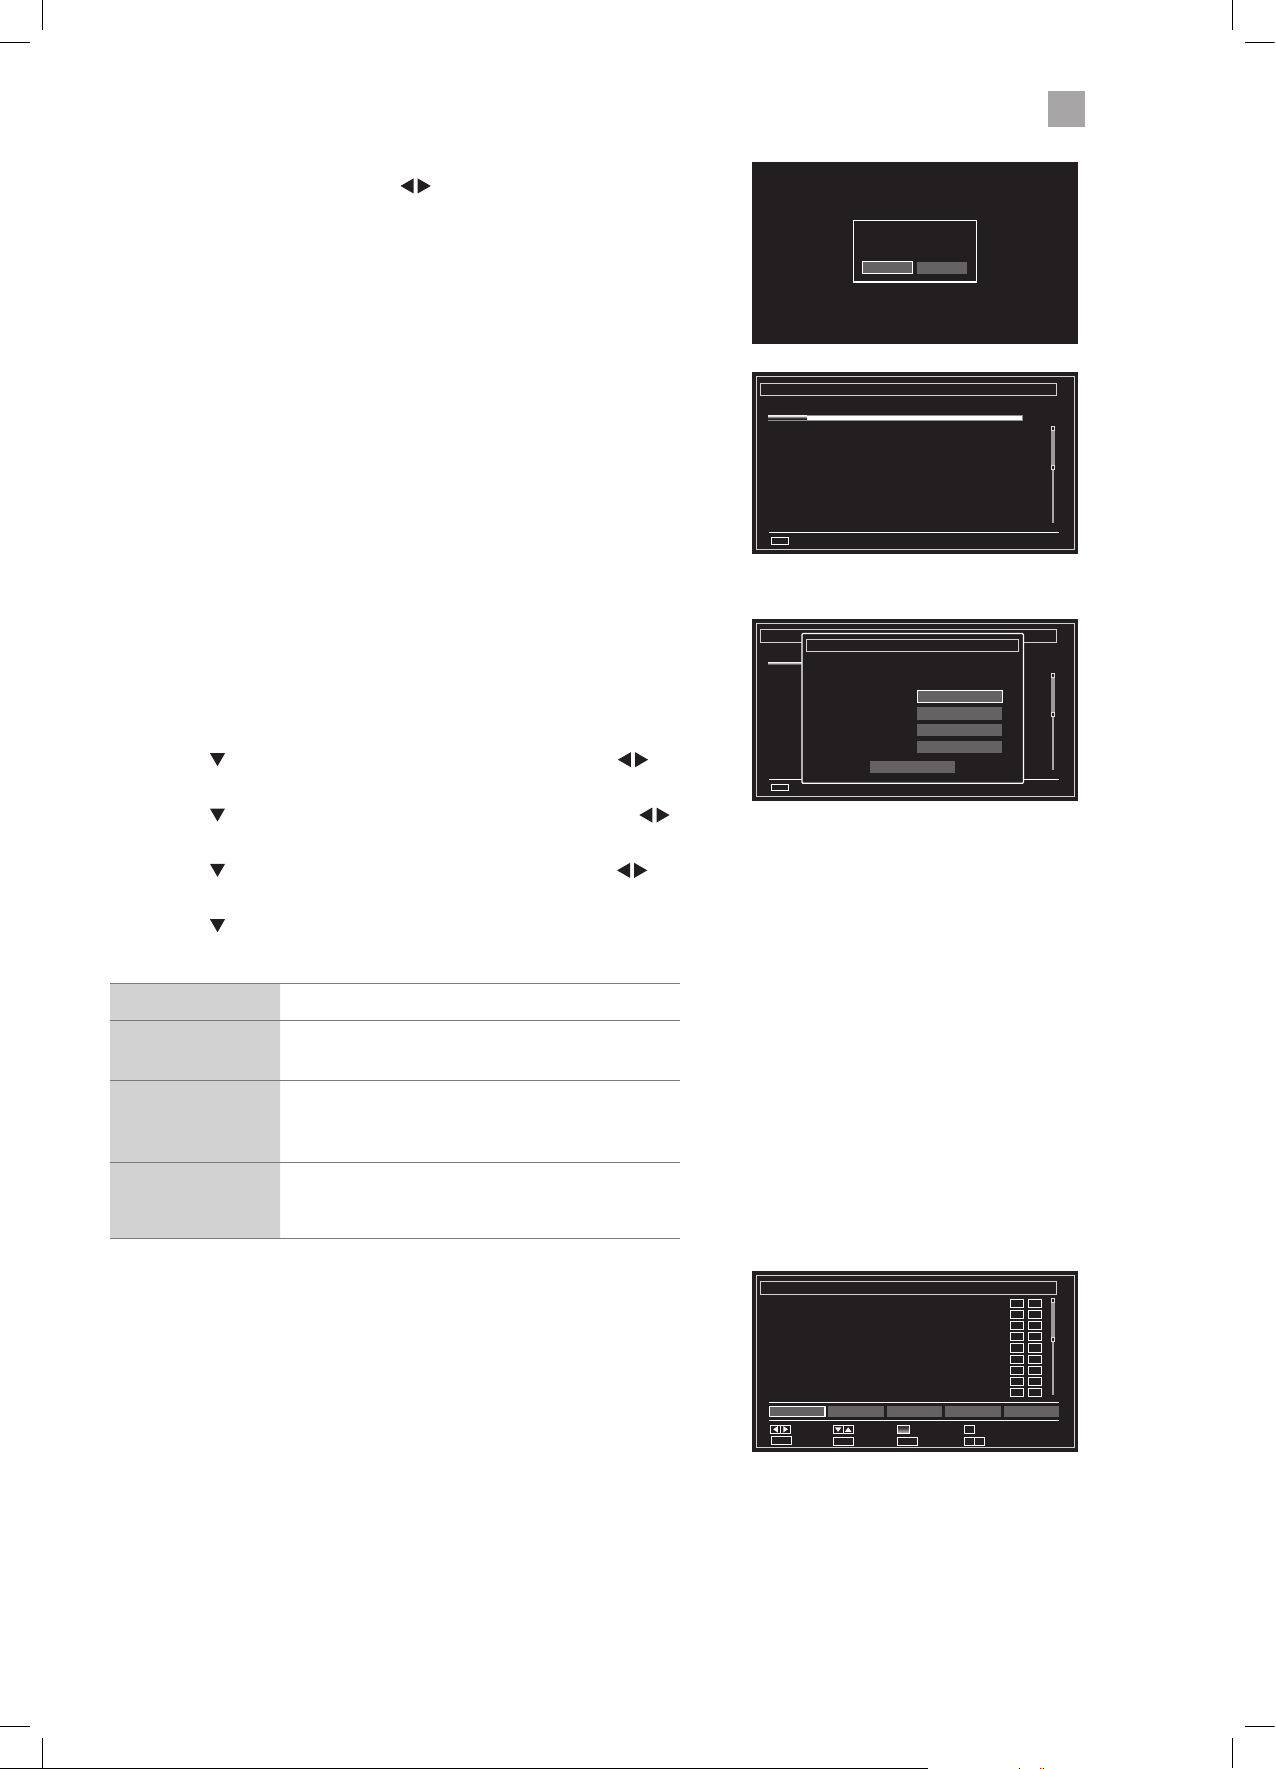
1. Press the MENU button and then press the
buttons to select the
PICTURE and then press the OK button.
Picture
2. Press the buttons to select the following picture options and then
press the OK button.
• Press the
buttons to adjust the levels in the menus.
Picture Settings
Mode
- Contrast
- Brightness
- Sharpness
- Colour
Power Save Mode
Backlight
Noise Reduction
Advanced Settings
Reset
Navigate Change value Back
MENU
Exit
UK
< >
Eco
High
Low
OK
OK
RET/BACK
Picture Mode Your TV has some pre-set picture modes: Dynamic - Natural - Cinema - Game. The default setting
is Standard. You can also manually adjust each mode.
Contrast Adjusts the difference between light and dark levels in the picture.
Brightness Increases or decreases the picture brightness.
Sharpness Adjusts the level of crispness in the edges between light and dark areas of the picture.
Colour Controls the colour intensity.
Power Save
Mode
The power save mode can be switched off (Disabled), to Eco or to screen off. Adjusting this
setting will reduce the power consumption of your TV.
Backlight Adjusts the backlight setting. Low - Medium - High - Auto.
Noise Reduction Reduces the noise level of the connected device: Off / Low / Middle / High.
60
32
12
38
Advanced
Select to have more advanced adjustments to your TVs picture.
Picture Settings
Dynamic
Contrast
Colour
Temp
Picture
Zoom
Adjusts the contrast to pre-set levels.
OFF - LOW - MEDIUM -HIGH
Adjusts the colour temperature.
NORMAL - WARM - COOL
Adjusts the aspect ration of the
picture. AUTO - 16:9 - SUBTITLE - 14:9
- 14:9 Zoom - 4:3 - CINEMA.
Film Mode Film mode can be switched to AUTO
or OFF. Auto mode will adjust the
frame rate to produce the clearest
motion.
Skin Tone Adjusts the skin tone from -5 to 5.
Colour
Shift
Adjusts the colour tint from red to
green.
RGB Gain Press to adjust the Red, Green and
Blue colour in the picture.
3. Press the BACK button to return to the previous menu.
4. Press the EXIT button to exit the menu.
Advanced Picture Settings
Dynamic Contrast
Colour Temp
Picture Zoom
Film Mode
Skin Tone
Colour Shift
RGB Gain
Navigate Change value Back
MENU
Exit
O
< >
Normal
Auto
Auto
OK
RET/BACK
5-5
GR
17
LT-32C345/46_IB.indd 17 10/07/2014 12:27
Page 18

4
Customising TV Settings
SOURCE
Aspect Ratio
Allows you to watch the screen in various picture formats: Auto / 16:9 / Subtitle / 14:9 / 14:9 Zoom / 4:3 / Cinema.
The default setting is AUTO.
1. Press the
button to scroll through the aspect rations.
The aspect Ratio can also be adjusted in the PICTURE ZOOM section of
the Advanced Picture settings menu.
Simply adjust the aspect ratio until you see a picture format you are happy
with. This may need to be adjusted when viewing a 4:3 transmission, if you
want to fill the screen.
Adjusting the Sound Settings
Allows you to adjust the sound settings on your TV.
1. Press the MENU button and then press the
SOUND and then press the OK button.
buttons to select
Sound
2. Press the buttons to select the following sound options and then
press the OK button to select or press the
option’s setting.
buttons to adjust each
Sound Settings
Volume
Equalizer
Balance
Headphone
Sound Mode
AVL
SRS TruSurround HD
Digital Out
Navigate Change value
RET/BACK
Back
15
User
0
20
Stereo
O
On
PCM
MENU
Exit
Volume Adjusts the volume level.
Equalizer Selects pre-set equalizer modes. Highlight the equalizer mode then press OK to enter the EQUALIZER
SETTINGS menu. The equalizer modes are: MOVIE - SPEECH - FLAT - CLASSIC - USER - MUSIC.
Balance Adjusts the sound level from the left and right speakers.
Headphone Adjusts the volume level when listening to the TV with headphones. To prevent damaging your hearing
set the volume level low and gradually increase the level until you're happy.
Sound Mode Selects the sound modes. STEREO - DUAL I - DUAL II.
AVL (Automatic
volume limiting)
AVL will set the sound level so that its the same across all programmes. So when you change channels
the sound level won't change. Set AVL to ON or OFF.
SRS TruSurround HDSurround Sound can be switched ON or OFF. When switched on you will hear a more spacious sound, to
make you feel more immersed in the action on your TV.
Digital Out Sets the digital audio out type to PCM or COMPRESSED.
3. Press the BACK button to return to the previous menu.
4. Press the EXIT button to exit the menu.
18
LT-32C345/46_IB.indd 18 10/07/2014 12:27
Page 19

4
Customising TV Settings
Editing the Channel List
You can move, delete, edit the name of or lock channels in the EDIT CHANNEL LIST menu.
1. Press the MENU button and then press the
buttons to select
Channel List and then press the OK button.
2. Press the
buttons to select EDIT CHANNEL LIST then press the OK
button.
Move 1. Press the buttons to select the channel that you wish to move.
2. Press the
buttons to select MOVE then press OK.
3. Press the NUMBER buttons to enter the channel number that you want to move the channel to,
then press OK.
4. Select YES and press OK. The channel will now have moved positions in the channel list.
Delete 1. Press the
2. Press the
buttons to select the channel that you wish to delete.
buttons to select DELETE then press OK.
3. Select YES and press OK. The channel will be deleted. To get the channel back you will need to tune
your TV in again.
Edit name 1. Press the
2. Press the
3. Press the NUMBER buttons and
buttons to select the channel that you wish to change the name of.
buttons to select EDIT NAME then press OK.
buttons to enter the new name of the channel, then press OK.
Edit Channel List
1. BBC ONE Lon
2. BBC TWO
3. ITV
4. Channel 4
5. Channel 5
6. ITV2
7. BBC THREE
9. BBC FOUR
10. ITV3
OK Move Delete Edit name Lock
Function
MENU
Cancel scan
Navigate
Back
Filter
0....9 P+OKP-
Jump
RET.BACK
Watch
Page UP/DOWN
DTV TV
DTV TV
DTV TV
DTV TV
DTV TV
DTV TV
DTV TV
DTV TV
DTV TV
Lock 1. Press the
2. Press the
buttons to select the channel that you wish to lock.
buttons to select LOCK then press OK.
3. Press the NUMBER buttons to enter your PIN number. The lock symbol will appear next to the
channel. To view the locked channel you will now have to enter your PIN number.
Creating a Favourite Channel List
You can select your favourite channel that you watch the most and create a channel list of just your favourites.
1. Press the MENU button and then press the
2. Press the
3. Press the
buttons to select FAVOURITES then press the OK button.
buttons to select a channel you wish to add to the list then press the OK button. A pink star will appear next to
the channel. Select as many channels as you like.
Activate your favourite channel list
1. Press the MENU button and then press the buttons to select Channel List and then press the OK button.
2. Press the
buttons to select ACTIVE CHANNEL LIST then press the OK button.
buttons to select Channel List and then press the OK button.
3. Press the
buttons to select FAVOURITES then press the OK button. A tick will appear next to favourites.
4. Exit the menu and press the OK button. You will now see your Favourite channel list.
5. If you want to go back to the full list of channels go back into the ACTIVE CHANNEL LIST and select SHOW ALL.
19
LT-32C345/46_IB.indd 19 10/07/2014 12:27
Page 20

4
Customising TV Settings
Saving a Channel/Source to the My Buttons ( / )
You can save your favourite TV channel or source to both of the My Buttons.
1. Select the channel or source that you want to save to the My Button.
2. Press are hold
appear on the screen when the channel/ source is stored.
• When you set the button the Channel Network Type menu will
disappear. These settings can still be found in the channel list.
• If you perform a first time installation at any time the My Buttons
will be reset to youtube for button 1 and Channel Network type for
button 2.
or for 5 seconds. The message 'My Button Set' will
My Button is set
20
LT-32C345/46_IB.indd 20 10/07/2014 12:27
Page 21

Chapter
5 Using the Features
5
Programme Guide
This system has a Programme Guide to help you navigate through all the possible viewing options.
The Programme Guide supplies information such as programme listings, start and end times for all available services. In addition,
detailed information about the programme is often available in the Programme Guide (the availability and amount of programme
information will vary, depending on the particular broadcaster).
This function can be used only when the Programme Guide information is broadcast by broadcasting companies.
The Programme Guide displays the programme details for the next 7 days.
Switch On / Off Programme Guide
1. Press the button to view the Programme Guide.
2. Press the
button or the EXIT button again to switch off Programme Guide and return to normal TV viewing.
current programme title
current date and time
channel no. and
channel name
Programme Guide
Fri 07/03 19:00
Fri 07/03 18:00 19:00 20:00
1. BBC ONE Lon
2. BBC TWO
3. ITV
4. Channel 4
5. Channel 5
6. ITV2
7. BBC THREE
8. London Live
9. BBC FOUR
10. ITV3
11.Pick
0.....9
Jump
BBC News at Six BBC London News The One Show
Revenge of the Eggh Sport R elief’s Top D Athletics: World Indoor Championships
ITV News London ITV News & Weather
Paralympics Winter Hollyoaks
Home and Away NewsTalk Live
Dinner Date
This is BBC Three
London Live - Coming Soon
This is BBC Four
Heartbeat
Animal Emergency Animal Emergency
OK
Options Search
Emmerdale Coronation Street
Channel 4 News Crufts 2014
New: The Gadget Show 5 New
You’ve Been Framed You’ve Been Framed
Great Movie Mistake Doctor Who
World News Today
Murder She Wrote
Futurama Futurama
Filter Select G enre Event DetailsPrev day Next day Zoom
Now Rec./Stop
A Question of Sport
i
Select a Programme
Press the buttons to select the desired channel and then press the buttons to select the desired programme. Press the
OK button to confirm.
Button Functions in a 7-Days Guide
Remote Control Button Function
RED (Previous Day) Press the RED button to view the previous days programmes.
GREEN (Next Day)
YELLOW (Zoom)
BLUE (Filter)
Press the GREEN button to view the next days programmes. Up to 7 days.
Press the YELLOW button to condense the programme information so you can see more
programmes for your selected day.
Press the BLUE button to select the CHANNEL LIST FILTER.
Here you can filter the Programme Guide to make it easier
to find your programmes.
• TV/Radio - Filter ALL - TV ONLY - RADIO ONLY - TEXT ONLY.
• Free/CAS - Filter ALL - FREE - ENCRYPTED
• A-Z - Filter using the first letter of the programme A - B - C...
Channel list lter
TV/Radio
Free/CAS
A-Z
Sort
HD/SD
< >
• Sort - Filter NUMERIC or ALPHABETIC
• HD/SD - Filter for High Definition or Standard Definition.
All
All
All
Numeric
All
(Select Genre)
• Press the
is selected the programmes in that Genre will be
highlighted in grey. Press the
highlighted programmes.
Example of
Drama selected.
button to select a Genre. Once a Genre
until you see the
Programme Guide Fri 07/03 19:00
Fri 07/03 18:00 19:00 20:00
1. BBC ONE Lon
2. BBC TWO
3. ITV
4. Channel 4
5. Channel 5
6. ITV2
7. BBC THREE
8. London Live
9. BBC FOUR
10. ITV3
11.Pick
BBC News at Six BBC London News The One Show
Revenge of the Eggh Sport Relief’s Top D Athletics: World Indoor Championships
ITV News London ITV News & Weather
Paralympics Winter Hollyoaks
Home and Away NewsTalk Live
Dinner Date
This is BBC Three
London Live - Coming Soon
This is BBC Four
Heartbeat
Animal Emergency Animal Emergency
0.....9
Jump
Options SearchOKNow Rec./Stop
Emmerdale Coronation Street
Channel 4 News Crufts 2014
New: The Gadget Show 5 New
You’ve Been Framed You’ve Been Framed
Great Movie Mistake
World News Today
Murder She Wrote
Futurama Futurama
Filter Select Genre Event DetailsPrev day Next day Zoom
A Question of Sport
Doctor Who
i
Select Genre
No Genre
Culture
Children’s
Drama
Education
Edu./Sci./Fac.
Entertainment
21
LT-32C345/46_IB.indd 21 10/07/2014 12:27
Page 22

5
Using the Features
i (information) Press i to see a brief description of the selected programme.
0....9 (Jump)
Press the number buttons to jump to that channel number or the nearest number in the list.
When a programme is highlighted press the OK button to
see the EVENT OPTIONS menu.
• Select Channel - Select this option to view the selected
programme.
• Record - Select this option to set the selected programme
to automatically record. The programme will be
highlighted in red to show a recording is set.
OK (Options)
• Set Timer on Event - Select this option to set the
selected programme to switch on when the programme
starts. The programme will be highlighted in yellow to
show a 'timer on event' is set.
Not all of the event options may be available, it depends if a programme has started
and it a USB storage device is connected.
Programme Guide
BBC News at Six 18:00 - 18:30
(News and Factual) The latest national and international news stories from the BBC News team, followed by the weather.
Also in HD.
[S]
Fri 07/03 18:00 19:00 20:00
1. BBC ONE Lon
2. BBC TWO
3. ITV
4. Channel 4
5. Channel 5
6. ITV2
BBC News at Six
Revenge of the Eggh Sport Relief’s Top D Athletics: World Indoor Championships
ITV News London ITV News & Weather
Paralympics Winter Hollyoaks
Home and Away NewsTalk Live
Dinner Date
Prev day Next day Zoom
0.....9
Jump
Options SearchOKNow Rec./Stop
BBC London News The One Show
Filter Select Genre Close Event Details
Fri 07/03 19:00
A Question of Sport
Emmerdale Coronation Street
Channel 4 News Crufts 2014
New: The Gadget Show 5 New
You’ve Been Framed You’ve Been Framed
i
PR+ P R-
More Event Info
Event Options
Select Channel
Record
Set Timer on Event
Press the
button to enter the GUIDE SEARCH menu. Use this menu to search the Programme
Guide for a specific programme or type of programme on a particular day.
• Search - This is the field that you wish to search though.
Select ALL CHANNELS - ALL TV CHANNELS - ALL RADIO
CHANNELS - CURRENT CHANNEL LIST - SINGLE CHANNEL.
• Channel - If you have selected SINGLE CHANNEL you can
now select the channel you wish to search.
Guide search
Search
Channel
From
Until
Search By
Match on
< >
• From - Select the day you want to search from. To select
Navigate Change value
RET/BACK
Back
Search Results
Guide search
Search:
All channels, Today -> Thursday, Contains “TOP GEAR”
Top Gear Today 14:00 - 15:00 Dave
Top Gear Today 18:00 - 19:00 Dave
Top Gear Thu 09:00 - 10:00 Dave
Top Gear Thu 10:00 - 11:00 Dave
Top Gear Thu 13:00 - 14:00 Dave
Top Gear Thu 14:00 - 15:00 Dave
Top Gear Thu 17:00 - 18:00 Dave
Top Gear Thu 18:00 - 19:00 Dave
Total 8 Matches
RET/BACK
OK
Options
MENU
Back
Exit
(Search)
from your current day select TODAY.
• Until - Select the day you want to search until. Make sure
this day is after the 'FROM' day.
• Search By - Select GENRE to search by genre or select
NAME MATCH to manually type in the name of the
programme you are searching for.
• Match on - If you selected GENRE above, press OK to
open the SELECT GENRE menu. If you selected NAME
MATCH above then press the NUMBER buttons to enter
the name of the programme you are searching for.
• Start search - Select START SEARCH and then press OK
to start searching. A list of search results will appear on
screen, this may take a few seconds to generate.
(Now) Press the button to automatically go back to the programme that is on now.
Start search...
Current channel list
Today
Today
Genre
Undened
Wed 12/03 12:06
i
Event DetailsPrev day
(Record/Stop)
Press the
highlighted red. To remove the record function, highlight the programme then press
button to record the selected programme, to show a recording is set it will be
.
22
LT-32C345/46_IB.indd 22 10/07/2014 12:27
Page 23

5
Using the Features
Time Shift Recording onto a USB Storage Device
This function allows you to pause live TV. The picture will pause and the programme will begin recording so you don't miss any of
the programme. You will have to have a USB storage device attached to the USB socket for Time Shift Recording to work.
• Time Shift Mode and Recording functions may
not work if the signal strength is weak.
• Stop the time shift function before switching to
another input source.
If the transfer rate of the USB storage device is too slow for
recording or time shift function, a warning statement will be
shown on the screen. If this happens, please upgrade your USB
storage device. The minimum transfer speed is 5MB/s.
While watching your TV, you may press the button to pause the live programme if you want to go out for a while (e.g. going to
the bathroom / kitchen). "
When you have returned, press the
" will show on the screen.
(PLAY) button to play the missed broadcast programme. " " will briefly show on the
screen.
The video and sound may have a little bit of delay or be out-of-sync for a few seconds when the unit starts to playback the missed
programme. It will soon turn to normal.
1
The ‘PVR Time Shift Progress Bar’
1 Indicates the status of the currently
displayed video (
/ / / )
2 Channel name being recorded.
Timeshifting...
2
BBC One Lon
Place in the Sun
Timeshift
00m01s
12:56
3 Programme name being recorded.
4 Indicates the amount of time
recorded.
3 4
Using the Remote Control
You can shift playback to any point of the virtually recorded programme.
or When playing,
• Press the
• During fast forward press the
When paused
• Press the
• During playback, press the button to display a still screen and then press the button again or
the
OK When timeshifting press the OK button to play or pause the recording.
If you want to exit timeshifting, press the button.
button repeatedly to speed up - x 2 / x 4 / x 8 / x 16 / x 32.
(PLAY) button to return to normal playback.
button repeatedly to view in slow motion - x / / x / / x 1 (normal playback).
(PLAY) button to resume playback.
23
LT-32C345/46_IB.indd 23 10/07/2014 12:27
Page 24

5
Using the Features
Recording DTV Programmes onto a USB Storage Device
Use this function to record the DTV programme you are watching on the main screen and save it for future viewing.
The recording from timer programme or direct recording may have a little bit of delay when it starts to record the broadcast
programme.
Please make sure the USB device is inserted. If not, a warning message will pop up. You can only record the programme that you
are currently watching.
1. Press the
button to record the programme that you are currently
watching.
Recording BBC One Lon
The recording screen will briefly appear. It will display the channel and
programme name and the minutes of that programme left.
Place in the Sun
Press record to add more events.
2. If you want to record the next programme on the selected channel press
the
button again and the next programme will be added. This will
only work while the recording screen is still on the screen.
3. To stop a recording press the
button, then select YES and press OK.
Recording will stop automatically when the disk is full.
You can turn off the TV while recording. Press the button. The standby indicator light will flash to show the TV is still
recording.
12:56
20mins
24
LT-32C345/46_IB.indd 24 10/07/2014 12:27
Page 25

5
Using the Features
Timer Programming
This function is used to perform scheduled recordings or timers (will switch the programme on when it starts).
The recording from timers or direct recording may have a little bit of delay when it starts to record the broadcast programme.
Please make sure the USB device is inserted. If not, a warning message will pop up.
1. Press the MENU button then press the
buttons to select SETTINGS and
press OK.
2. Press the
to highlight TIMERS then press OK.
3. Press the YELLOW button to add a timer. The ADD TIMER menu will be
displayed.
4. Adding the timer
Press the
to select each setting below.
Timer Type Press the buttons to select RECORD or TIMER.
RECORD - Will record a programme
TIMER - Will automatically switch to the selected
programme when it starts.
Channel Press the
buttons to select the channel.
Record Type Not adjustable.
Date Press the
buttons and the NUMBER buttons to
set the date.
Start Press the
buttons and the NUMBER buttons to
set the start time.
End Press the
buttons and the NUMBER buttons to
set the end time.
Duration Set automatically.
Repeat Press the buttons to set the recording to record
ONCE - DAILY - WEEKLY or just WEEKDAYS.
Change/Delete Press the
buttons to select ALLOWED or
DISALLOWED
ALLOWED - You allow anyone to change or delete the
recording.
DISALLOWED - You will have to enter the PIN code to
change or delete the recording.
Playback Press the
buttons to select USE PARENTAL
SETTINGS, DISALLOWED or ALLOWED. You will
need to enter the PIN number if you want to play a
recording when you select 'use parental settings and
disallowed'.
Settings
Settings
Conditional Access
Language
Parental
Timers
Recording Confuguration
Date/Time
Sources
Other Settings
Timers Thu 13/03 15:24
Sleep Timer
Name
Used: 9929 MB Reserved:1440 MB Free space: 942032 MB
Change value
RET/BACK
Back
Add timer Thu 13/03 15:24
Timer More 4
Timer Type
Channel
Record Type
Date
Start
End
Duration
Repeat
Change/Delete
Playback
RET/BACK
OK
Discard
Save
>
<
O
Start Length Repeat
MENU
< >
Add Timer
Exit
Use parental settings
Record
14 - More 4
Time
13/03/2014
15:21
16:21
60 min
Once
Allowed
• When the preset time is reached, the
TV will start recording automatically.
• If a programme recording starts
when the TV is in standby mode, the
LED indicator will flash.
25
LT-32C345/46_IB.indd 25 10/07/2014 12:27
Page 26

5
Using the Features
Recording Configuration
The recording configuration menu allows you to adjust the recording setting. You can add time to the start and end of each
recording and set and maximum recording time for timeshifting.
You can also select how you want your TV to automatically delete your recordings so you won't run out of space on your USB
storage device.
1. Press the MENU button then press the
buttons to select SETTINGS and
press OK.
2. Press the
to highlight RECORDING CONFIGURATION then press OK. The
Recording configuration menu will be displayed.
3. Press the
to select each setting below.
Start early Press the buttons to select an amount of time
you would like the recording to start before the
programme starts (max 10 mins).
End late Press the
buttons to select an amount of
time you would like the recording to end after the
programme finishes (max 10 mins).
Max Timeshift Press the
buttons to select a maximum amount
of time you would like the timeshift recording to
record (from 10 mins to 2 hours).
Auto discard
- Discard
Press the
buttons to select the recording that
you want to automatically delete when the USB
storage device is full.
NONE - OLDEST - LONGEST - SHORTEST
Auto discard
- Unplayed
Hard disk
Press the
buttons to select to delete the played
or unplayed recordings.
Select to see the Hard disk information.
information
Format Disk Select to format the USB storage device, you will
need to enter your PIN number. Any previous
recordings will be deleted.
Settings
Conditional Access
Language
Parental
Timers
Recording Confuguration
Date/Time
Sources
Other Settings
Recording Conguration
Start early
End late
Max Timeshift
Auto discard
- Discard
- Unplayed
Hard disk information
Format Disk
Select Setting
RET/BACK
Back
Settings
MENU
0 min
0 min
30 min
Oldest
Excluded
Select
Select
Select Start Early Option
Exit
< >
26
LT-32C345/46_IB.indd 26 10/07/2014 12:27
Page 27

5
Using the Features
Playing Recorded Programmes
All of your recording are stored in the Media Browser, in the
1. Press the MENU button, then press the
buttons to select MEDIA
BROWSER then press OK.
2. Press the buttons to select RECORDINGS LIBRARY then press OK.
3. The RECORDING LIBRARY menu will be displayed. Press the
to select the recording that the want to watch then press
buttons
(PLAY).
Media Browser
Media Browser
Recordings Library
Navigate Exit
Recordings Library Fri 14/03 14:31
Name Start Length
TopGear
Doctor Who
Eastenders
Who do you think you are
OK
Select
13/03/14 13:00
13/03/14 18:00
14/03/14 16:00
14/03/14 22:00
MENU
60m 03s
60m 04s
30m 05s
45m 03s
TV
TV
TV
TV
Recordings Library Controls
RED button
(Delete)
GREEN button
(Edit)
BLUE button
(Sort)
OK
(Play Options)
(Play) Press the (play) button to play the recording.
i Press the i button to see information about the recorded programme.
• Press the
buttons to select the recording that you wish to delete then press the RED button.
You will be asked if you want to delete the recording, select YES then press OK.
• To edit the recording permissions press the GREEN button. You can allow or disallow the
recording to be deleted or played back.
• Press the BLUE button to see the SORT BY menu. Press the
option then press OK.
NAME - NAME, REVERSED - START, OLDEST FIRST - START, NEWEST FIRST - LENGTH, SHORTEST FIRST LENGTH, LONGEST FIRST - UNVIEWED FIRST - VIEWED FIRST.
• Press the
buttons to select the recording that you wish to play then press OK. The PLAY
OPTIONS menu will be displayed.
PLAY FROM START - This option will play the recording from the start.
RESUME - This option with play the recording from the point you last watched the recording.
PLAY FROM OFFSET - This option allows you to select a start point into the recording.
Used: 9929 MB
Reserved:1440 MB Free space: 942032 MB
Edit Sort Resume Details
OK
Play OptionsDelete
buttons to select your sorting
i
27
LT-32C345/46_IB.indd 27 10/07/2014 12:27
Page 28

5
Using the Features
Digital Teletext (DTV Mode)
Digital teletext can access special digital teletext services and specific services which broadcast digital teletext. You will need to
turn off Subtitle Function before using teletext (refer to page 35 for details).
Teletext within Digital Service
1. In DTV mode press the button to display teletext page.
2. Follow the instructions on digital teletext page and move around the page
by pressing
To change digital teletext services, you will need to exit the current text service
and change channels. Then enter the text service on the newly selected channel.
Alternative
You may press the RED button to display the teletext information when you see a red "press " logo in the top right corner
of the screen (e.g. BBC services). This will now display the teletext menu and available information categories.
To access the pages, use navigation buttons to highlight item required and press the OK button to select.
Follow on screen prompts for other functions.
, OK, RED, GREEN, YELLOW, BLUE or 0-9 buttons etc.
3. Press the
button to exit.
Listening to the Radio
You can listen to radio stations through your TV.
1. Press the
2. Press the BLUE button to select the filter.
3. Press the
4. Press the
listen to it.
5. The radio stations are from channel position 700, you can also select them
using the P+/P- buttons or the NUMBER buttons.
button to select the PROGRAMME GUIDE.
buttons to select RADIO ONLY then press OK.
buttons to select your desired radio station then press OK to
Programme Guide Fri 14/03 19:00
Fri 07/03 17:00 18:00 19:00
700. BBC Radio 1
701. BBC R1X
702. BBC Radio 2
703. BBC Radio 3
704. BBC Radio 4
705. BBC R5L
706. BBC R5SX
707. BBC 6 Music
708. BBC Radio 4 Ex
709. BBC Asian Net.
710. BBC World Sv.
0.....9
Greg James Newsbeat
Charlie Sloth Newsbeat Charlie Sloth
Simon Mayo
In Tune
PM
Drive
Horse Racing
Steve Lamacq
Smelling of Roses
Asian Network Report
The Newsroom World business rep
Jump
Options SearchOKNow Rec./Stop
B B C
RADIO
Now Playing: 22 by Taylor
Swift
Dance Anthems with Greg James
Composer of the week
Six O’Clock News The News Quiz
Coming up on 5 Live sports extra
A call from the dead
Bobby Friction
World have your say
Filter Select Genre Event DetailsPrev day Next day Zoom
Scott Mills
13.00 - 16.00
For programme info,
events & news, press RED
i
28
LT-32C345/46_IB.indd 28 10/07/2014 12:27
Page 29

DVD+ReWritable
DVD+R
Chapter
6 Using the DVD Features
6
Using the Built-in DVD Player
1. Insert a disc with the label side facing towards the front of the TV. (CD-
R, CD-RW, DVD-R, DVD-RW, CD, DVD+R, or DVD+RW) Allow 10 seconds
for the player to load the disc. If you insert the disc incorrectly, an error
message will be displayed.
2. After the disc is inserted, the TV will change the input source to DVD
automatically.
Label side at
the front
3. If the DVD player does not automatically play the disc, press the
on the remote control to start playing.
4. Press the
• Only insert 12cm discs. Do not insert or play 8cm discs; they will get stuck.
• Ensure the disc is fully ejected before removing it, or else you risk damaging the DVD player.
• If you eject a DVD and want to play it again, fully remove the disc then replace it. Do NOT push it straight back in, it may
damage the DVD mechanism.
button 3 times on the TV if you want to remove the disc.
button
Incorrect Disc
Check the disc was the correct way around.
Check the disc is not dirty or damaged.
Check the disc is compatible.
Compatible Disc Types
Disc Types Disc Logo Recorded Content
DVD-VIDEO (Digital Versatile Disc)
DVD±RW (Audio/Video format or JPEG files)
DVD±R (DVD Recordable - Audio/Video format or JPEG files)
AUDIO + VIDEO
AUDIO + VIDEO + JPEG
AUDIO + VIDEO + JPEG
CD-R (CD Recordable - Audio/Video format or JPEG files)
CD-RW (CD-Rewritable - Audio/Video format or JPEG files)
AUDIO-CD (Compact Disc Digital Audio)
AUDIO + VIDEO + JPEG
AUDIO + VIDEO + JPEG
AUDIO
Supported Formats
JPEG
• Pictures encoding must comply with JPEG/ISO format.
Some recorded files may not be played due to the type and format of the disc or condition of the recording.
Region Code
Both the DVD player and the discs are coded by region. These regional codes must match in order to play the disc. If the codes do
not match, the disc will not play.
The Region Number for this DVD player is described on the rear panel of the TV.
Disc Type DVD-VIDEO
Region code
29
LT-32C345/46_IB.indd 29 10/07/2014 12:27
Page 30

6
Using the DVD Features
Basic DVD Playback Functions
Playing the DVD
Depending on the disc, a menu may appear on the TV screen once the disc has loaded. Press the (Play) button to play a DVD.
Press the
Menu Playback (for DVD)
For DVD discs, the screen will display the DVD Disc Menu (Root Menu).
Press the
Press the BACK button to return to the Root Menu when playing the disc.
Stopping Playback
Press the button once to stop. Press the (PLAY) button to resume from where you stopped. Pressing the button twice to
stop will remove the resume feature. The next time you play the DVD it will start from the beginning of the disc.
In order to protect the disc, press the
hold the disc edge and remove it from the disc slot.
When not using the DVD function, please take out the disc to protect the DVD loader and the disc.
Previous / Next (for DVD / CD / Multimedia discs)
Press the button to play the last Title / Chapter / Track / Folder.
Press the
to pause playback.
(PLAY) button or the OK button to start from the highlighted content.
button and then press the button on the TV to eject the disc. When the disc is ejected,
button to play the next Title / Chapter / Track / Folder.
If the current track is the first one, pressing the button will restart the disc from the beginning.
If the current track is the last one, pressing the
For DVD discs, the above functions may vary due to different DVD disc’s structure.
button will stop the playback.
Forward / Backward (for DVD / CD / Multimedia discs)
There are 5 forwards and backwards speeds. Press the or button to toggle between the dierent speed options in
sequence. (x 2 / x 4 / x 8 / x 16 / x 32).
Press the
For DVD discs, when selecting backward to first title / chapter, the disc will start from the beginning.
(PLAY) button to return to normal speed playback.
The sound is muted during these actions.
Pause (for DVD / CD / Multimedia discs)
• Press the button to pause; press the button again to resume playback.
Repeat (for DVD / CD / Multimedia discs)
Press the GREEN button to select repeat modes.
• For CD discs, while playing in sequence, you may use the repeat playback. Repeatedly press the GREEN button to toggle
between the different repeat functions (SHUFFLE / RANDOM / SINGLE / REPEAT ONE / REPEAT FOLDER / REPEAT OFF).
• For DVD discs, you may setup the repeat playback mode. There are 3 repeat modes, press the GREEN button to toggle
between the different repeat functions (REPEAT CHAPTER / REPEAT TITLE / REPEAT ALL/ REPEAT OFF).
For example.
REPEAT CHAPTER: will repeat the current selected chapter of the film
REPEAT TITLE: will repeat the current title playing
REPEAT ALL: will repeat the film when it finishes
• For MP3 / JPEG discs, while playing the disc, you may use the repeat playback. Repeatedly press the GREEN button to toggle
between the different repeat functions (SHUFFLE / RANDOM / SINGLE / REPEAT ONE / REPEAT FOLDER / REPEAT OFF).
30
LT-32C345/46_IB.indd 30 10/07/2014 12:27
Page 31

6
Using the DVD Features
Info (for DVD / CD)
Press the
button to activate the on screen roll-down menu for the current Title, Chapter, Time and other information.
For DVD discs, press the
Title Elapsed
Tt 02/11 CH 05/10
Audio 1/1:Dolby Digital 5.1ch English
Subtitle Off
button. For CD discs, press the
02:34 Single Elapsed
0:02:59
001/021
button.
Goto (for DVD / CD)
This function allows you to play your favourite Title / Chapter / Time. Press the button. Enter your Title / Chapter / Time by
pressing the 0-9 buttons or enter the playback time. Press the OK button to start. If the enter an invalid Title / Chapter or Time, it
will not function.
button.
Title 01/05 Chapter /30
Title 01/05 Time
Chapter 04/30 Time
: :
: :
For CD discs, press the
02:34 Single Elapsed
- - - /021
- - : - - Single Elapsed
001/021
button.For DVD discs, press the
For some discs, only Time can be selected in the
function.
Zoom (for DVD)
Allows you to zoom into the picture, 2x, 3x or 4x. Then if you keep pressing the RED button the picture size will reduce 1/2, 1/3
then 1/4.
Press the RED button to select the size you want.
31
LT-32C345/46_IB.indd 31 10/07/2014 12:27
Page 32

6
Using the DVD Features
Video
Language
Set Tv Standard
Preference
– – Video Setup Page – –
Tv Type Pal Tv
Video
Language
Set Osd Language
Preference
– – Language Setup Page – –
Osd Lang
Audio
Disc Menu
Subtitle
English
Français
Deutsch
Nederlands
Español
Italiano
Svenska
Português
Video
Language
Set Tv Standard
Preference
– – Video Setup Page – –
Tv Type Pal Tv
Using the DVD General Setup Menus
In the DVD mode, press the
button on the remote control the DVD setup menu will appear. Press the
the VIDEO - LANGUAGE - PREFERENCE menu, and then press the
button to exit the menu.
In Setup mode, the disc playback function will not be available.
Video Menu
TV Type
Press the
buttons to select PAL TV.
Language Menu
buttons to select
buttons to select the menu options. Press the
Video
– – Video Setup Page – –
Tv Type Pal Tv
Set Tv Standard
Language
Preference
OSD Lang Select the OSD language for the DVD menus.
Video
– – Language Setup Page – –
Osd Lang
Audio
Disc Menu
Subtitle
Set Osd Language
Audio Select the Audio language for the DVD if the feature is available on the disc.
Disc Menu Select the Disc Menu language for the DVD if the feature is available on the disc.
Subtitle Select the Subtitle language for the DVD if the feature is available on the disc.
Preference Menu
Default To reset all of your DVD settings select RESET.
Downmix Select SURROUND or STEREO.
Parental Set a parental guide from 1 to 8. This feature may not be available on all DVD discs.
Password Select password to change the DVD password. The default password is '0000'.
Video
– – Preference – –
Default
Downmix
Parental
Password
SPDIF OUTPUT
Language
Language
English
Français
Deutsch
Nederlands
Español
Italiano
Svenska
Português
Reset
Preference
Preference
SPDIF OUTPUT Select the SPDIF Output to RAW or PCM.
32
LT-32C345/46_IB.indd 32 10/07/2014 12:27
Page 33

CI CARD IN
SCART
SPDIF
VGA
ANT.
HDMI 1
HDMI 2
Chapter
7 Other Information
7
CI (Common Interface) (DTV Mode)
The common interface allows the use of a Common Access Module to enable you to view scrambled (pay-per-view) services.
These services are provided by TopUp TV (UK only) and others. The Common Access Module and viewing card can be obtained
from the service provider.
Rear Left Side View of TV
Do not repeatedly insert or remove the
Common Access Module as this may damage
the interface and cause a malfunction.
MODE - / I
- +
LR
Max. 500mA
5Vdc
USB
COMMON INTERFACE
This feature is not available in all countries.
To insert the Common Access Module
1. Before you insert the Common Access Module, ensure that the TV is
switched off and the viewing card is inserted in accordance with the
Service Provider’s instructions.
2. Insert the Common Access Module into the slot. Flip it to the other side
and try again if you feel resistance.
3. Switch the TV on.
To remove the Common Access Module
1. Before you remove the Common Access Module, ensure that the TV is
switched off at the mains.
2. Pull the Common Access Module from the slot.
3. Switch the TV on.
To view the module information
1. Press the MENU button and then press the buttons to select the
SETTINGS and then press the OK button.
CI (Common Interface)
Allows the Common Access Module to be
inserted and access the content that has
been encrypted.
Common Access
Module
2. Press the
buttons to select CONDITIONAL ACCESS and then press
the OK button.
3. The CONDITIONAL ACCESS menu will pop up.
4. Press the OK to view the MAIN MENU of the common interface card,
menu items my differ depending on the type of card.
5. Press the BACK button to exit the menu.
This screen is for illustration only.
Settings
Conditional Access
Language
Parental
Timers
Recording Confuguration
Date/Time
Sources
Other Settings
Conditional Assess
Top Up TV
Main menu
Module information
Smart card information
Language
Software Download
Press OK to select, or Exit to quit
Settings
CancelOK
33
LT-32C345/46_IB.indd 33 10/07/2014 12:27
Page 34

7
Other Information
Time Settings
The time and date are set automatically. You can manually change the time zone if required.
1. Press the MENU button and then press the
buttons to select the
SETTINGS and then press the OK button. The SETTINGS menu will be
displayed.
2. Press the
buttons to select DATE/TIME and then press the OK
button.
3. Press the
buttons to select TIME SETTING MODE and then press the
buttons to select MANUAL.
4. Press the
buttons to select TIME ZONE then press the buttons to
select your desired time zone.
5. Press the MENU button to exit the menu.
Settings
Conditional Access
Language
Parental
Timers
Recording Confuguration
Date/Time
Sources
Other Settings
Date/Time Setting
Date
Time
Time Setting Mode
Time Zone
Change value
RET/BACK
Back
MENU
Exit
17/03/2014
10:02
< >
Auto
GMT + 00:00
34
LT-32C345/46_IB.indd 34 10/07/2014 12:27
Page 35

7
Other Information
Other Settings
The Other Settings menu has more advanced setting that you can adjust, these are not everyday setting.
1. Press the MENU button and then press the
buttons to select the
SETTINGS and then press the OK button. The SETTINGS menu will be
displayed.
2. Press the
buttons to select OTHER SETTINGS and then press the OK
button.
Other Settings
Menu Timeout
Scan Encypted Channels
Blue Background
Software upgrade
Application Version
Hard of Hearing
Audio Description
Auto TV OFF
Store Mode
Power Up Mode
MENU
Back
< >
Change value
O
Yes
O
V.0.7.7d
V.0.1.2
O
O
4 Hours
Disabled
Standby
Navigate
Menu Timeout You can select a time that your TV menus will be displayed. If you select OFF the menu will
remain on the screen until you press a button to remove it.
OFF - 15 Sec - 30 Sec - 60 Sec.
Scan Encrypted Channels To can select your TV to scan encrypted channels or not. Select YES or NO.
Blue Background You can set your TV to show a blue screen is not signal is detected. Select ON or OFF.
Software upgrade Select SOFTWARE UPGRADE then press OK. The Upgrade Options menu will appear. Select OK
then press OK to start searching for new software. This may take a while.
If you want to cancel the search press BACK then select YES and press OK.
Application Version No function, this shows the latest application version code.
Hard of Hearing Hard of Hearing will enhance the dialogue to make it easier to hear. Select ON or OFF.
Audio Description Audio description describes the action when
people aren't speaking.
• Select AUDIO DESCRIPTION then press the
OK button.
• If any available languages are available
then press the
to select your desired
Audio Description
Audio Description
Available Languages
Preered Language
Relative Volume
O
< >
English
English
language.
• Press the to select your preferred
language.
• Press the to set your desired volume of
the audio description.
0
Auto TV OFF Select a time that you would like your TV to switch off if no buttons are pressed for a certain
amount of time.
OFF - 1 HOUR - 2 HOURS - 3 HOURS - 4 HOURS - 5 HOURS - 6 HOURS
Store Mode
Power Up Mode
Press the
Press the
to enable or disable store mode. Store mode will brighten the display.
to select STANDBY or LAST STATE. If you choose LAST STATE, and switch your
TV off and back on again at the mains it will switch on at its last state. Its best to leave it as
STANDBY, otherwise your TV may switch on after a power cut.
35
LT-32C345/46_IB.indd 35 10/07/2014 12:27
Page 36

7
Other Information
Language Settings
Allows you to select your desired language settings for your TV.
1. Press the MENU button and then press the
SETTINGS and then press the OK button. The SETTINGS menu will be
displayed.
2. Press the
buttons to select LANGUAGE and then press the OK
button.
buttons to select the
Language Setting
Menu
Preferred
Audio
Subtitles
Teletext
Guide
Current
Audio
Subtitle
Navigate
MENU
Exit
Menu Press the buttons to select your desired menu language.
Preferred
Audio Press the
Subtitle Press the
Teletext Press the
Guide Press the
buttons to select your preferred audio language.
buttons to select your preferred subtitle language.
buttons to select your preferred teletext language.
buttons to select your preferred guide language.
Current
Audio Shows the current audio language, this may not be able to be changed.
Subtitle Shows the current subtitle language. Press the
buttons to select a different subtitle
language.
English
< >
English
English
West
England
English
None
Set the language used in menus
Sources
In the SOURCE SETTING menu you can decide to switch each input source on or off, by selecting ENABLED or DISABLED.
1. Press the MENU button and then press the
SETTINGS and then press the OK button. The SETTINGS menu will be
displayed.
2. Press the
3. Press the
buttons to select SOURCES and then press the OK button.
buttons to select a source then press the buttons to
select ENABLED or DISABLED.
buttons to select the
Source Settings
TV
SCART 1
SCART (S-VIDEO)
SIDE AV
HDMI1
HDMI2
YPbPr
VGA/PC
DVD
Navigate
MENU
Back
< >
Change value
Edit name
Enabled
Enabled
Enabled
Enabled
Enabled
Enabled
Enabled
Enabled
Enabled
RET/BACK
Back
36
LT-32C345/46_IB.indd 36 10/07/2014 12:27
Page 37

7
Other Information
Resetting your TV
Restores all settings to the factory defaults and will delete all channels you currently have stored.
1. Press the MENU button and then press the
buttons to select the
INSTALL AND RETUNE and then press the OK button. The INSTALL AND
RETUNE menu will be displayed.
2. Press the buttons to select FIRST TIME INSTALLATION and then press
the OK button.
3. Press the
buttons to select YES the press OK. The screen will
turn black and then in a few seconds you will see the FIRST TIME
INSTALLATION MENU.
Install and Retune
Install and Retune
Autoimatic channel scan (Retune)
Manual channel scan
Analogue ne tune
First time installation
Do you want to delete all channels and
settings for rst time installation?
Your recordings will be preserved.
All channel and user settings will be lost and the TV will revert to
"First Time Installation".
NoYes
37
LT-32C345/46_IB.indd 37 10/07/2014 12:27
Page 38

7
Other Information
Parental Settings
To access the PARENTAL SETTINGS menu options, you must enter the password. Enter the default password “0000” for first time
use. To change the password, select SET PIN.
1. Press the MENU button and then press the
buttons to select the
SETTINGS and then press the OK button. The SETTINGS menu will be
displayed.
2. Press the buttons to select PARENTAL and then press the OK button.
3. Press the NUMBER buttons to enter your PIN number. The PARENTAL
SETTINGS menu will appear on screen.
Settings
Conditional Access
Language
Parental
Timers
Recording Confuguration
Date/Time
Sources
Other Settings
Enter PIN
Settings
Menu Lock You can lock all of the menus or just the installation menus.
Press the
buttons to select ALL MENUS - INSTALLATION MENUS - OFF.
If you choose to lock the menus you will have to enter your PIN number to enter the selected
menu.
Child Lock The child lock will prevent the buttons working on your TV, to stop children from accidentally
changing any of the settings.
Press the
Set PIN • Press the
buttons to set the child lock to ON or OFF.
buttons to select SET PIN.
• Press OK.
• Press the NUMBER buttons to enter and NEW PIN
• Press the NUMBER buttons to CONFIRM the new pin. The words 'PIN CHANGED' will briefly
appear on the screen.
Don't forget to make a note of your new PIN number.
The default password is “0000”.
If you change the password, be sure to remember the new password!
38
LT-32C345/46_IB.indd 38 10/07/2014 12:27
Page 39

SCART
SPDIF
VGA
ANT.
HDMI 1
HDMI 2
Chapter
8 Entertainment
8
Connecting a USB Storage Device
You must use a USB storage device with a minimum of 2GB of storage space.
1. Switch off the TV before connecting any USB
storage device.
2. Connect your USB storage device to the USB port
MODE - / I
- +
Rear Left Side View of TV
Max. 500mA
5Vdc
LR
USB
COMMON INTERFACE
of your TV. If your USB device is powered by the
main, plug the connected devices into the mains
socket and switch on.
3. Press the
button on the remote control to turn
on your TV.
4. Press the
button on the remote control to
USB
USB Cable
(not included)
USB Hub
Portable
hard Disk
enter MEDIA BROWSER mode.
• Some versions of portable hard disk may require more power than the TV USB socket can provide. To ensure correct
operation please use the power adapter for that device.
• If a USB hub is used, make sure its mains adapter is connected to the mains supply as the total current consumption may
exceed 500mA.
• The file system only supports FAT32 format.
• If you want to store the video streaming of a DTV programme, the transfer rate of the USB storage device must not be less
than 5MB/s, otherwise the picture and sound of the programme will be affected and a warning statement will be shown
on the screen. If this happens, please upgrade your USB storage device.
• The TV screen will be blank temporarily as it will take time to start up and stabilise the connected hard disk. This is normal
and the starting time may vary depending on the brand and the memory size of the connected hard disk.
• Disconnect the USB storage device if it is not in use.
Adapter
39
LT-32C345/46_IB.indd 39 10/07/2014 12:27
Page 40

8
Entertainment
Viewing Videos
1. Press the button on the remote control. The MEDIA BROWSER will be
displayed.
Media Browser
Videos
LANG
MENU
Shark Tale.avi
Play Preview
Q.MENU
Q.Menu
Navigate
2. Press the buttons to select VIDEOS and then press the OK button.
• NUMBER Buttons - Jump to a video in the list.
• OK Button - Plays the selected video.
• PLAY button - Plays the selected video.
• GREEN button - Repeats or shuffles your videos.
• YELLOW button - Changes the menu style.
Navigate Exit
Videos
No File Name
0001. Shark Tale.avi
0002. Star Wars.mkv
0003. Matrix Reloaded.vob
OK
0....9
Jump
Play
OK
Select
Sort by Name
Play This
Loop/Shue Toggle View Style Change Media
• LANG button - Plays a preview of the selected video.
• BLUE button - Changes to another media.
3. Press the buttons to select the video you wish to play, then press
the OK button. The video will start to play.
•
buttons - Plays the next or previous video
•
button - Stops the video.
• LANG button - Shows the Subtitle/Audio menu
•
button - Pauses the video, press again to resume playback.
Finding Nemo.vob
x1 00:00:02 00:16:56
Play
Stop
LANG
Select
Subtitle/Audio
RET/BACK
Pause
Rewind
Forward
Jump
Back
Subtitle Time Correction
• BACK button - Returns back to the video menu.
•
buttons - Rewind and fast forward the video 2x - 4x - 8x.
• GREEN button - Press to jump to a selected time in your video.
• YELLOW button - Press to see the SUBTITLE TIME CORRECTION menu, where you can adjust the time delay of the subtitles to
match the action in the video.
40
• Supported file formats: MPEG1 & 2, VOB, and MKV.
LT-32C345/46_IB.indd 40 10/07/2014 12:27
Page 41

8
Entertainment
Viewing Photos
1. Press the button on the remote control. The MEDIA BROWSER will be
displayed.
2. Press the
buttons to select PHOTOS and then press the OK button.
• NUMBER Buttons - Jump to a photo in the list.
• OK Button - Press to view the selected photo on the full screen.
• PLAY button - Plays a slide show of all the photos in the list.
• GREEN button - Shows thumbnail images of the photos in the list.
• RED button - Sorts the photos by date.
• YELLOW button - Changes the menu style.
• BLUE button - Changes to another media.
3. Press the buttons to select the photo you wish to view, then press
the OK button. The photo will now be displayed on the full screen.
Media Browser
Photos
0....9
Jump
Sort by Date
OK
Select
OK
View in full screen
Toggle View Style
Navigate Exit
Photos
No File Name Date
0001 Holiday 1 09/03/14
0002 Holiday 2 09/03/14
0003 Holiday 3 09/03/14
0004 Holiday 4 09/03/14
0005 Holiday 5 09/03/14
0006 Holiday 6 09/03/14
0007 Holiday 7 09/03/14
0008 Holiday 8 09/03/14
Navigate
Thumbnails
Holiday 1
155x948
1/300
MENU
Q.MENU
Q.Menu
Change Media
27KB
Slideshow
• PLAY button - Plays a slide show of all the photos in the list.
•
button - Pauses the slide show.
• BACK button - Returns back to the photo menu.
• RED button - Zooms into the photo 150% - 200% - 300% - 400% - 50%.
When zoomed in press the
•
button - Press to rotate the photo.
•
button - Press to see the next or previous photo in the list.
buttons to move around the photo.
• i button - Press to see the information bar.
• Supported file formats: JPEG and BMP.
Holiday1.jpg
Start Slideshow
Helpi
RET/BACK
Back to le list
1/4
Jump
Rotate Previous/Next
41
LT-32C345/46_IB.indd 41 10/07/2014 12:27
Page 42

8
Entertainment
Listening to Music
1. Press the button on the remote control. The MEDIA BROWSER will be
displayed.
2. Press the
buttons to select Music and then press the OK button.
• NUMBER Buttons - Jump to a track in the list.
• OK Button - Press to play the selected track.
• PLAY button - Press to play the selected track.
• GREEN button - Press to repeat or shuffle the tracks.
• RED button - Sorts the tracks by Title - Artist - Album.
• YELLOW button - Changes the menu style.
• BLUE button - Changes to another media.
•
button - Pauses the track, press again to resume playback.
•
button - Stops the track.
Media Browser
Navigate Exit
Music
usb1
0001. Mumford and Sons – Little Lion Man.mp3
0002. Stereophonics – Dakota.mp3
0003. Achilles Heel – Toploader.mp3
0004. Good Girl Down – Morcheeba.mp3
005. Stanley Road – Paul Weller.mp3
006. Little by Little – Groove Armada.mp3
Navigate
Loop/Shue
OK
Select
Q.MENU
Play
Q.Menu
0....9
OK
Play This
Jump
Music
MENU
Mumford and Sons – Little Lion Man.mp3
04.18
Stop
Pause
Toggle View Style
Sort
Previous/Next
Change Media
• Supported file formats: MP3 and WMA /ASF.
Media Browser Settings
1. Press the button on the remote control. The MEDIA BROWSER will be
displayed.
2. Press the
In the SETTINGS menu you can adjust the settings for your slideshows and
subtile settings for when you are watching a video.
buttons to select Settings and then press the OK button.
Media Browser
Navigate Exit
Settings
View Style
Slideshow Interval
Show Subtitle
Subtitle Language
Subtitle Position
Subtitle Font Size
OK
Select
MENU
Folder
< >
5 sec.
On
English
Down
44 pt.
Settings
Flat view style displays all les in removable device. Folder view style displays les in selected folder.
Select
Navigate
RET/BACK
Back
MENU
Exit
42
LT-32C345/46_IB.indd 42 10/07/2014 12:27
Page 43

Chapter
9 Technical Information and Help
9
Maintenance
Careful and regular cleaning can prolong the life of your TV.
Be sure to press the button on the remote control and disconnect the
mains cable from the mains socket before any cleaning.
1. Use a soft dry cloth to wipe away the dust from the screen and surfaces.
2. If the surfaces are extremely dirty, clean the TV with a damp cloth.
3. Ensure there is no excess water on the screen. Allow any water or dampness to
evaporate before switching the TV on.
Never use alcohol, benzine, paint-thinner, cleaning fluid or other chemicals.
Do not use compressed air to remove dust.
Handling Discs
• Do not touch the playback side of the disc.
• Do not attach paper or tape to the disc.
Playback side
Cleaning Discs
• Fingerprints and dust on the disc cause picture and sound deterioration. Wipe the disc from the centre outwards with a soft
cloth. Always keep the disc clean.
• If you cannot wipe off the dust with a soft cloth, wipe the disc lightly with a slightly moistened soft cloth and finish with a dry
cloth.
• Do not use any type of solvent such as thinner, benzine, commercially available cleaners or antistatic spray. They may damage
the disc.
Storing Discs
• Do not store discs in places subjected to direct sunlight or near heat sources.
• Do not store discs in places subjected to moisture and dust such as a bathroom or near a humidifier.
• Storing discs vertically in a case, stacking discs or placing objects on discs outside of their cases may cause warping.
43
LT-32C345/46_IB.indd 43 10/07/2014 12:27
Page 44

9
Technical Information and Help
Hints and Tips
The following table contains various hints and tips to get the best performance from your TV. If you require additional assistance
please call our UK Call Centre on 0344 561 1234. Our UK Customer Contact Centre is open Monday-Saturday 8am-8pm or Sunday
8am-6pm.
The TV does not operate properly.
The TV does not respond when
pressing any buttons
TV cannot be switched on
The remote control does not work
Power is suddenly turned off
The video function does not work.
No Picture & No Sound
Picture appears slowly after
switching on
No or poor colour or poor picture
Horizontal / Vertical bar or picture
shaking
Poor reception on some channels
Lines or streaks in pictures • Check aerial (Change the position of the aerial.)
No pictures when connecting HDMI • Check if the input source is HDMI.
• The TV may freeze up during use. Switch the TV off at the mains for a few minutes.
Switch on again and try to operate it again as usual.
• Check that the TV is connected to the mains supply and switched on.
• Make sure all connected AV devices are switched off before switching on your TV.
• Check to see if there are any objects between the TV and the remote control
causing an obstruction. Ensure that you are pointing the remote control directly at
the TV.
• Ensure that the batteries are installed with the correct polarity (+ to +, - to -).
• Install new batteries.
• Check the TV has power to it. The mains supply maybe interrupted.
• Check if the sleep timer is set.
• Check whether the Auto Standby is activated.
• Check whether the TV is switched on.
• Try another channel. The problem may be caused by the broadcaster.
• This is normal, the image is muted during the TV startup process. Please contact
your service centre, if the picture has not appeared after five minutes.
• Adjust the settings in the PICTURE menu.
• Try another channel. The problem may be caused by the broadcaster.
• Check if the video cables are connected properly.
• Check for local interference such as an electrical appliance or power tool.
• Station or cable channel may be experiencing problems, tune to another station.
• Station signal is weak, reposition the aerial for better reception.
• Check for sources of possible interference.
44
Picture appears in wrong ratio
The audio function does not work.
Picture OK but no sound
No output from one of the speakers • Adjust the Balance settings in the SOUND menu.
Unusual sound from inside the TV
No sound when connecting HDMI • Check if the input source is HDMI1 or HDMI2.
Audio noise • Keep the RF coaxial cable away from other connected cables.
Password
Lost password
• Adjust the Aspect Ratio. Press the
• Press the VOL + / – buttons.
• Sound muted? Press the
• Try another channel. The problem may be caused by the broadcaster.
• A change in ambient humidity or temperature may result in an unusual noise when
the TV is switched on or off and does not indicate a fault with the TV.
• Select the Set Password setting in the LOCK menu, then enter the following master
password “4725”. The master password clears your previous password and allows
you to enter a new password.
button.
(ASPECT) button on the remote control.
LT-32C345/46_IB.indd 44 10/07/2014 12:27
Page 45

9
Technical Information and Help
There is a problem in PC mode.
The signal is out of range (Invalid
format)
Vertical bar or stripe on background
& horizontal noise & incorrect
position
Screen colour is unstable or shows a
single colour
The DVD function does not work.
DVD will not read the disc
DVD does not have the signal • Check if the TV is in DVD mode.
FAQs (Frequently Asked Questions)
Why have I lost some / all of my
channels?
Why do I get ‘blocking’ on my digital
picture?
Can I watch Freeview using a
portable set-top aerial?
What type of aerial do I need?
• Adjust the resolution, horizontal frequency, or vertical frequency.
• Use Auto configure or adjust clock, phase, or H/V position.
• Check the signal cable.
• Reinstall the PC video card.
• Check if the disc is correctly inserted.
• Check that the disc is clean.
• Check if there is any obvious damage to the disc.
• Try to play the disc on another DVD player to check whether it has content.
• It happens sometimes if you have a weak signal. Usually it just means you’ll need to
re-tune your TV. Don’t worry, it is easy to do. And once you’ve done it, you should
get all the Freeview channels available to you. If problems persist you may need to
get your aerial checked. Talk to your retailer or contact your local aerial installer.
• In most cases, blocking is caused by a reception problem – either the signal is too
weak or there is some kind of interference. Talk to your retailer or contact your local
aerial installer.
• Blocking can also be caused by a digital signal that is too strong. If you are still
experiencing blocking and the signal is strong, consult your local aerial installer
for advice.
• Some, but only a few, homes may be able to use a set top aerial. However, for a
much better reception, we strongly recommend that you use a rooftop aerial.
• If you do not have access to a rooftop aerial – for example, if you rent a flat and
the aerial is the responsibility of your landlord, or if you’re using a second TV in
the bedroom and don’t want the hassle and expense of using extension cables,
a set top aerial may be your only option.
• If you are installing a new aerial, we recommend a wideband rooftop aerial rather
than a loft aerial. Loft aerials generally receive a weaker digital signal and are more
likely to get interference from other electrical devices at home. We suggest you
have an aerial survey done before getting an aerial upgrade.
• Talk to your retailer or contact your local aerial installer.
45
LT-32C345/46_IB.indd 45 10/07/2014 12:27
Page 46

9
Technical Information and Help
Specifications
Model LT-32C345 (Black) / LT-32C346 (White)
Panel System 32 inch LED Panel
Display Resolution 1366 pixels (horizontal) x 768 pixels (vertical)
PAL I / BG / DK SECAM I / BG / DK
Television System
Brightness 300 cd/m
Contrast Ratio 1200 : 1
Power Source 220-240V ~50Hz
Energy Efficiency Class A
Screen Size (measured diagonally) 32" - 81cm
Power Consumption (In HOME mode) 41W
Average Annual Energy Consumption** 59 kWh / annum
Standby Power Consumption 0.5W
DVBT (VIDEO: MPEG-2 MP@ML,
SOUND: MPEG-1 LAYER 1/2, MPEG-2 LAYER 2)
2
Operating Temperature 0°C – 40°C
Operating Humidity 80% (max)
Mercury Content (mg) X
Presence of Lead √*
Reference Period 2010/1062 - 2014
Speaker Power 2 x 6W
Dimension( W x D x H) with base 735(W) x 478(H) x 185(D)
Weight (Net) 6.5kg
Inputs / Output
SCART (S-VIDEO) 1
HDMI 2
PC-RGB (VGA) 1
PC AUDIO (L & R) 1
YPbPr in via VGA 1
Common Interface 1
USB 1
RF 1
SPDIF (Coaxial) 1
Headphone 1
Features and specifications are subject to change without prior notice.
*This television contains lead in certain parts or components where no technology alternatives exist in accordance with existing
exemption clauses under the RoHS Directive.
**Energy consumption 59 kWh per year, based on the power consumption of the television operating 4 hours per day for 365
days. The actual energy consumption will depend on how the television is used.
46
LT-32C345/46_IB.indd 46 10/07/2014 12:27
Page 47

9
Technical Information and Help
License Information used with JVC Televisions
The software pre-installed in the JVC Digital Televisions consists of multiple, independent software components. Each software
component is copyrighted by JVC or a third party. The JVC Digital Televisions uses software components that are distributed as
freeware under a third-party end-user license agreement or copyright notice (hereinafter referred to as a "EULA"). Some EULAs
require that the source code of the applicable component be disclosed as the condition for distributing the software component
in executable format. The JVC warranty provided in respect of the Digital TV is the only warranty provided and no additional
warranties are provided in respect of the software components subject to EULAs. Some of the software components distributed
under EULAs are made available for use by the user on the premise that they are not copyrighted or warranted by JVC or any
third party. These software components are licensed to the user free of charge and therefore not covered by any warranty within
the scope of the applicable laws. These software components are provided in "as is" condition without any warranty, whether
express or implied. "Warranty" here includes, but not limited to, an implied warranty for marketability or fitness for specific uses.
All risks associated with the quality or performance of these software components are assumed by the user. JVC shall not be
liable whatsoever for any cost of repair or correction or other incidental expense incurred in connection with a defect found in
any of these software components. Unless specified under the applicable laws or in a written agreement, a party who changes
or redistributes the software with consent from the copyright holders or based on the aforementioned licenses shall not be held
liable whatsoever for any loss arising from the use of or inability to use such software components. The same applies even when
the copyright holders or relevant third parties have been informed of the possibility of such loss. "Loss" here includes normal,
special, incidental and indirect loss (including, but not limited to, the loss of data or its accurary; loss incurred by the user or any
third party; and interface incompability with other software).
Please read each EULA for details on the use conditions and items that must be observed regarding these software components.
For details of software components covered by "GPL", please visit the following website:
http://www.currys.co.uk/compliance
47
LT-32C345/46_IB.indd 47 10/07/2014 12:27
Page 48

9
Technical Information and Help
Dear Customer,
This apparatus is in conformance with the valid European directives compatibility and electrical safety.
European representative of the manufacturer is:
DSG Retail Ltd. (co. no. 504877), Maylands Avenue, Hemel Hempstead, Herts., HP2 7TG, UK
For general information about this appliance and handy hints and tips,
please visit www.knowhow.com/knowledgebank or call 0344 5611234.
Visit Partmaster.co.uk today for the easiest way to buy electrical spares and accessories. With over
1 million spares and accessories available we can deliver direct to your door the very next day. Visit
www.partmaster.co.uk or call 0344 800 3456 (UK customers only). Calls charged at National Rate.
The symbol on the product or its packaging indicates that this product must not be disposed of with your other
household waste. Instead, it is your responsibility to dispose of your waste equipment by handing it over to a
designated collection point for the recycling of waste electrical and electronic equipment. The separate collection
and recycling of your waste equipment at the time of disposal will help conserve natural resources and ensure
that it is recycled in a manner that protects human health and the environment.
For more information about where you can drop off your waste for recycling, please contact your local authority,
or where you purchased your product.
MPEG-2 NOTICE
Any use of this product in any matter other than personal
use that complies with the MPEG-2 standard for encoding
video information for packaged media is expressly prohibited
without a license under applicable patents in the MPEG-2
Patent Portfolio, which license is available from MPEG LA, LLC,
6312 S. Fiddlers Green Circle, Suite 400E, Greenwood Village,
Colorado, 80111 U.S.A.
Rovi Proprietary Rights
This item incorporates copy protection technology that is
protected by U.S. patents and other intellectual property rights
of Rovi Corporation. Reverse engineering and disassembly are
prohibited.
Restriction on Use & Rovi Trade Mark Rights
Use of the copyright protection technology contained in
this product must be authorised by Rovi Corporation and is
intended for home and other limited viewing uses only unless
otherwise authorised by Rovi Corporation. The names “Rovi
Corporation” and “Macrovision” are protected by trademarks.
Dolby Digital
Manufactured under license from Dolby Laboratories.
Dolby and the double-D symbol are trademarks of Dolby
Laboratories. Confidential unpublished works. ©1992-1997
Dolby Laboratories, Inc. all rights reserved.
Notes for battery disposal
The batteries used with this product contain chemicals that
are harmful to the environment. To preserve our environment,
dispose of used batteries according to your local laws
or regulations. Do not dispose of batteries with normal
household waste.
For more information, please contact the local authority or
your retailer where you purchased the product.
HDMI, the HDMI logo and High-Definition Multimedia
Interface are trademarks or registered trademarks of HDMI
Licensing LLC.
The FREEVIEW word and logo are trademarks of DTV services
Ltd and are used under licence. ©DTV Services Ltd 2002
The “HD Ready” logo is a trademark of DIGITALEUROPE.
SRS TruSurround HD™ creates an immersive, feature-rich
surround sound experience from two speakers, complete with
rich bass, high frequency detail and clear dialogue.
TruSurround HD, SRS and the
SRS Labs, Inc.
All trademarks are the property of their respective owners and
all rights are acknowledged.
symbol are trademarks of
The product is distributed and warranted exclusive by DSG Retail Ltd.
“JVC” is the trademark of JVC KENWOOD Corporation, used by DSG Retail Ltd. under license.
DSG Retail Limited (Registered in England No. 504877)
Maylands Avenue, Hemel Hempstead, Hertfordshire HP2 7TG. UK
48
LT-32C345/46_IB.indd 48 10/07/2014 12:27
(IB-LT-32C345/LT-32C346-140710V2)
 Loading...