

Page 1

GPS NAVIGATION SYSTEM
SISTEMA DE NAVEGACIÓN GPS
SYSTÈME DE NAVIGATION GPS
ENGLISHESPAÑOL
KW-NT3HDT / KW-NT3HD
Only for KW-NT3HDT
Sólo para KW-NT3HDT
Uniquement pour le
HD Radio Traffic is available only for KW-NT3HDT.
HD Radio Traffic se encuentra disponible sólo con el
KW-NT3HDT.
HD Radio Traffic est disponible uniquement pour
le KW-NT3HDT.
For installation and connections, refer to the separate manual.
Para la instalación y las conexiones, refiérase al manual separado.
Pour l’installation et les raccordements, se référer au manuel séparé.
INSTRUCTIONS
MANUAL DE INSTRUCCIONES
MANUEL D’INSTRUCTIONS
For customer Use:
Enter below the Model No.
and Serial No. which are
located on the top or bottom
of the cabinet. Retain this
information for future
reference.
Model No.
Serial No.
KW-NT3HDT
ESPAÑOL
FRANÇAIS
LVT2141-001B
[J/C]
Page 2

Thank you for purchasing a JVC product.
Please read all instructions carefully before operation, to ensure your complete understanding and to obtain the best
possible performance from the unit.
IMPORTANT FOR LASER PRODUCTS
1. CLASS 1 LASER PRODUCT
ENGLISH
2. CAUTION: Do not open the top cover. There are no user serviceable parts inside the unit; leave all servicing to
qualified service personnel.
3. CAUTION: (For U.S.A.) Visible and/or invisible class II laser radiation when open. Do not stare into beam.
(For Canada) Visible and/or invisible class 1M laser radiation when open. Do not view directly with
optical instruments.
4. REPRODUCTION OF LABEL: CAUTION LABEL, PLACED OUTSIDE THE UNIT.
INFORMATION (For U.S.A.)
This equipment has been tested and found to
comply with the limits for a Class B digital device,
pursuant to Part 15 of the FCC Rules. These limits
are designed to provide reasonable protection
against harmful interference in a residential
installation. This equipment generates, uses,
and can radiate radio frequency energy and, if
not installed and used in accordance with the
instructions, may cause harmful interference
to radio communications. However, there is no
guarantee that interference will not occur in a
particular installation. If this equipment does
cause harmful interference to radio or television
reception, which can be determined by turning the
equipment off and on, the user is encouraged to
try to correct the interference by one or more of the
following measures:
– Reorient or relocate the receiving antenna.
– Increase the separation between the equipment
and receiver.
– Connect the equipment into an outlet on a circuit
different from that to which the receiver is
connected.
– Consult the dealer or an experienced radio/TV
technician for help.
Caution
Changes or modifications not approved by JVC could
void the user’s authority to operate the equipment.
(For USA)
CAUTION: This device and its antenna(s) must not be
co-located or operating in conjunction with any other
antenna or transmitter. End user cannot modify this
transmitter device. Any unauthorized modification
made on the device could avoid the user’s authority to
operate this device.
(For Canada) “The installer of this radio equipment
must ensure that the antenna is located or pointed such
that it does not emit RF field in excess of Health Canada
limits for the general population, consult Safety Code
6, obtainable from Health Canada’s website www.
hc-sc.gc.ca/rpb”
The term “IC:” before the radio certification number
only signifies that Industry Canada technical
specifications were met.
This device complies with RSS 210 of Industry Canada “IC”.
“Operation is subject to the following two conditions:
(1) this device may not cause interference, and
(2) this device must accept any interference, including
interference that may cause undesired operation of
the device.”
L’ utilisation de ce dispositif est autorisée seulement
aux conditions suivantes: (1) il ne doit pas produire de
brouillage et (2) l’ utilisateur du dispositif doit étre prêt
à accepter tout brouillage radioélectrique reçu, même
si ce brouillage est susceptible de compromettre le
fonctionnement du dispositif.
2
Page 3

Cautions on the monitor:
WARNINGS:
• The monitor built in this unit has been produced
with high precision, but it may have some
ineffective dots. This is inevitable and is not
malfunction.
• Do not expose the monitor to direct sunlight.
• Do not operate the touch panel using a ball-point
pen or similar tool with the sharp tip.
Touch the buttons on the touch panel with your
finger directly (if you are wearing a glove, take it
off).
• When the temperature is very cold or very hot...
– Chemical changes occur inside, causing
malfunction.
– Pictures may not appear clearly or may move
slowly. Pictures may not be synchronized
with the sound or picture quality may
decline in such environments.
To prevent accidents and damage
• DO NOT install any unit or wire any cable in a
location where;
– it may obstruct the steering wheel and
gearshift lever operations.
– it may obstruct the operation of safety
devices such as air bags.
– it may obstruct visibility.
• DO NOT operate the unit while driving.
If you need to operate the unit while driving, be
sure to look around carefully.
• The driver must not watch the monitor while
driving.
[European Union only]
ENGLISH
• Manufactured under license from Dolby Laboratories.
Dolby and the double-D symbol are trademarks of Dolby
Laboratories.
• “DVD Logo” is a trademark of DVD Format/Logo Licensing
Corporation registered in the US, Japan and other
countries.
• HD Radio™ Technology Manufactured Under License
From iBiquity Digital Corp. U.S. and Foreign Patents.HD
Radio™ and the HD and the HD Radio and Arc logos are
proprietary trademarks of iBiquity Digital Corp.
• “SIRIUS” and the SIRIUS dog logo are registered
trademarks of SIRIUS Satellite Radio Inc.
• XM and its corresponding logos are registered trademarks
of XM Satellite Radio Inc.
• “SAT Radio,” the SAT Radio logo and all related marks are
trademarks of SIRIUS Satellite Radio Inc., and XM Satellite
Radio, Inc.
• Microsoft and Windows Media are either registered
trademarks or trademarks of Microsoft Corporation in the
United States and/or other countries.
• The Bluetooth word mark and logos are owned by the
Bluetooth SIG, Inc. and any use of such marks by Victor
Company of Japan, Limited (JVC) is under license. Other
trademarks and trade names are those of their respective
owners.
• “Made for iPod”, and “Made for iPhone” mean that
an electronic accessory has been designed to connect
specifically to iPod, or iPhone, respectively, and has been
certified by the developer to meet Apple performance
standards. Apple is not responsible for the operation of
this device or its compliance with safety and regulatory
standards. iPhone, iPod, iPod classic, iPod nano, and iPod
touch are trademarks of Apple Inc., registered in the U.S.
and other countries.
• This product incorporates copyright protection technology
that is protected by U.S. patents and other intellectual
property rights. Use of this copyright protection
technology must be authorized by Rovi Corporation, and
is intended for home and other limited viewing uses only
unless otherwise authorized by Rovi Corporation. Reverse
engineering or disassembly is prohibited.
• Google Maps™ is a trademark of Google Inc.
• SD Logo is a trademark.
Only for KW-NT3HDT:
• HD Total Traffic Network® + is a registered mark
of Clear Channel in the United States and other
countries and hereby used under license.
• Journaline® technology licensed by Fraunhofer IIS.
http://www.journaline.info
3
Page 4

For safety...
• Do not raise the volume level too much, as this will
block outside sounds, making driving dangerous.
• Stop the car before performing any complicated
operations.
ENGLISH
Temperature inside the car...
If you have parked the car for a long time in hot or cold
weather, wait until the temperature in the car becomes
normal before operating the unit.
When replacing/rotating the tires:
It is required to clear all the accumulated calibration
data which is important for accurate navigation. To
clear the data, perform <Reset Calibration Data>.
(☞ page 39)
Detaching/attaching the monitor
panel
Detaching
1
2
How to forcibly eject a disc
[Hold]
• Be careful not to drop the disc when it ejects.
• If this does not work, detach the monitor panel then
attach it (☞ right).
3
Soft case (supplied)
Attaching
Caution:
• Hold the monitor panel securely so as not to drop
it accidentally.
• Fit the monitor panel onto the attaching plate
until it is firmly locked.
How to read this manual:
• Illustrations of KW-NT3HDT are mainly used for explanation.
• < > indicates the variable screens/menus/operations/settings that appear on the touch panel.
• [ ] indicates the buttons on the touch panel.
4
Page 5

Contents
How to forcibly eject a disc ....................................................... 4
Detaching/attaching the monitor panel .................................... 4
Introduction .......................................... 8
Parts identification ..................................................................8
Installation settings ................................................................ 9
Basic operations .................................................................... 10
• Turning on the power ..................................................................... 10
• Messages about the status of GPS signal reception ......................... 10
• Turning off/on the screen ............................................................... 10
• Operations on the touch panel ........................................................ 11
Switching screens .................................................................. 12
Navigation System ............................. 14
Safety instructions/information for the Navigation System ...... 14
• Information/icons on the map ........................................................ 14
Basic operations .................................................................... 15
• About the current position screen ................................................... 15
• To change the map scale ................................................................. 15
• To scroll the map ............................................................................. 16
• To display your current position ...................................................... 16
• To change the map view ................................................................. 16
ENGLISH
Registering your home/favorite points ................................... 17
Searching for a place .............................................................. 18
• Setting a destination by scrolling the map ...................................... 18
• About the search result screen ........................................................ 18
• Setting a destination using the <Destination Menu> .................... 19
• About search screens and input screens .......................................... 20
• By address <Address> ................................................................... 21
• By telephone number <Phone> .................................................... 22
• From the list of POI <POI Name> ................................................... 23
• POI near a place/route <Vicinity> .................................................. 24
• By coordinates <Coordinates> ....................................................... 25
• From the list of POIs imported by yourself <Assistant POIs> .......... 25
• Quick Search ................................................................................... 26
How you are guided ............................................................... 28
• Starting guidance to the destination or via point ............................ 28
• Changing route options .................................................................. 29
• Canceling guidance ......................................................................... 29
• Adjusting the volume of the voice guidance ................................... 29
• About route guidance screen .......................................................... 30
• Getting information on your route and places ................................ 31
5
Page 6

Contents
ENGLISH
Arranging your route ............................................................. 32
• Changing the sequence of the destination/via points ..................... 32
• Avoiding a congestion ahead .......................................................... 33
• Adjusting the vehicle position ......................................................... 33
Editing registration of home/favorite points ........................... 34
Only for KW-NT3HDT
Using information service ...................................................... 35
• Using the traffic information service ............................................... 35
• Using the area information service
(Total Traffic HD NET WORK Service) ............................................... 37
Checking the information of the navigation system ................. 38
Initializing memories/navigation settings .............................. 39
Navigation menu items .......................................................... 40
Additional information .......................................................... 42
AV Operations ..................................... 44
Common operations on AV screens .......................................... 44
• Selecting the playback source ......................................................... 44
• Turning off the AV source ................................................................ 44
Listening to the HD Radio™ broadcast ..................................... 45
• Changing HD Radio reception mode ............................................... 46
• Storing stations in memory ............................................................. 46
• Selecting a preset station ................................................................ 47
• Reducing the interference ............................................................... 47
• Tagging/purchasing your favorite songs from iTunes Store ............ 48
Disc operations ...................................................................... 50
• Playable disc types .......................................................................... 51
• Selecting playback modes ............................................................... 55
• Settings for the disc playback .......................................................... 56
SD/USB operations ................................................................. 57
Listening to the iPod/iPhone device ........................................ 59
• Selecting a track/video from menu on the iPod/iPhone .................. 61
Listening to the satellite radio ............................................... 62
• Storing channels in memory ........................................................... 64
• Selecting preset channels ............................................................... 64
• Selecting a channel quickly ............................................................. 64
Using other external components ........................................... 65
• Front AUX ........................................................................................ 65
• AV-IN .............................................................................................. 65
6
Page 7

Sound equalization ................................................................ 66
Changing illumination color ................................................... 67
Settings for video playback .................................................... 68
• Picture adjustment ......................................................................... 68
• Changing the aspect ratio ............................................................... 68
AV menu items ...................................................................... 68
Additional information .......................................................... 72
Bluetooth Operations ........................ 74
Information for using Bluetooth® device ................................. 74
Using Bluetooth device .......................................................... 75
• Registering a Bluetooth device ....................................................... 75
• Connecting/disconnecting a registered Bluetooth device ............... 76
• Deleting a registered Bluetooth device ........................................... 76
Using Bluetooth mobile phone ............................................... 77
• Receiving a call ............................................................................... 77
• Adjusting the volume of calls/earpiece ........................................... 77
• Switching between handsfree mode and phone mode ................... 78
• Making a call ................................................................................... 78
• Copying the phone book ................................................................. 79
• Searching for a phone number from phone book ............................ 79
• Deleting the phone number memory in the unit ............................ 80
• About mobile phone compatible with Phone Book Access Profile
(PBAP) ............................................................................................ 80
ENGLISH
Using Bluetooth audio player ................................................. 81
Bluetooth device settings ...................................................... 82
Rear View Camera Operations ........... 83
Using a rear view camera ....................................................... 83
• Activating the rear view camera ..................................................... 83
• Displaying the picture from the rear view camera ........................... 83
References ........................................... 84
Maintenance ......................................................................... 84
Troubleshooting/error messages ............................................ 85
Specifications ........................................................................ 91
7
Page 8

Introduction
Parts identification
ENGLISH
Screen (touch panel) Monitor panel
1 Loading slot
2 0 (Eject) button
Ejects the disc.
3 AV MAP/DISP OFF button
• Switches the screen between the map screen
and AV screen. (☞ page 12)
• Turns off/on the screen. [Hold] (☞ page 10)
4 SRC /
• Selects the source. (☞ page 44)
• Turns off/on the AV function. [Hold]
button
(☞ page 44)
5 Volume adjustment knob
Adjusts the audio volume.
• About the adjustable volume range, ☞ page 69
(<Amplifier Gain>).
• To adjust the guidance volume, ☞ page 29.
IncreaseDecrease
6 AUX input terminal
7 USB
8
Detaches the monitor panel. (☞ page 4)
input terminal
(Detach) button
You can change the color of the buttons on the
monitor panel. (☞ page 67)
8
Page 9
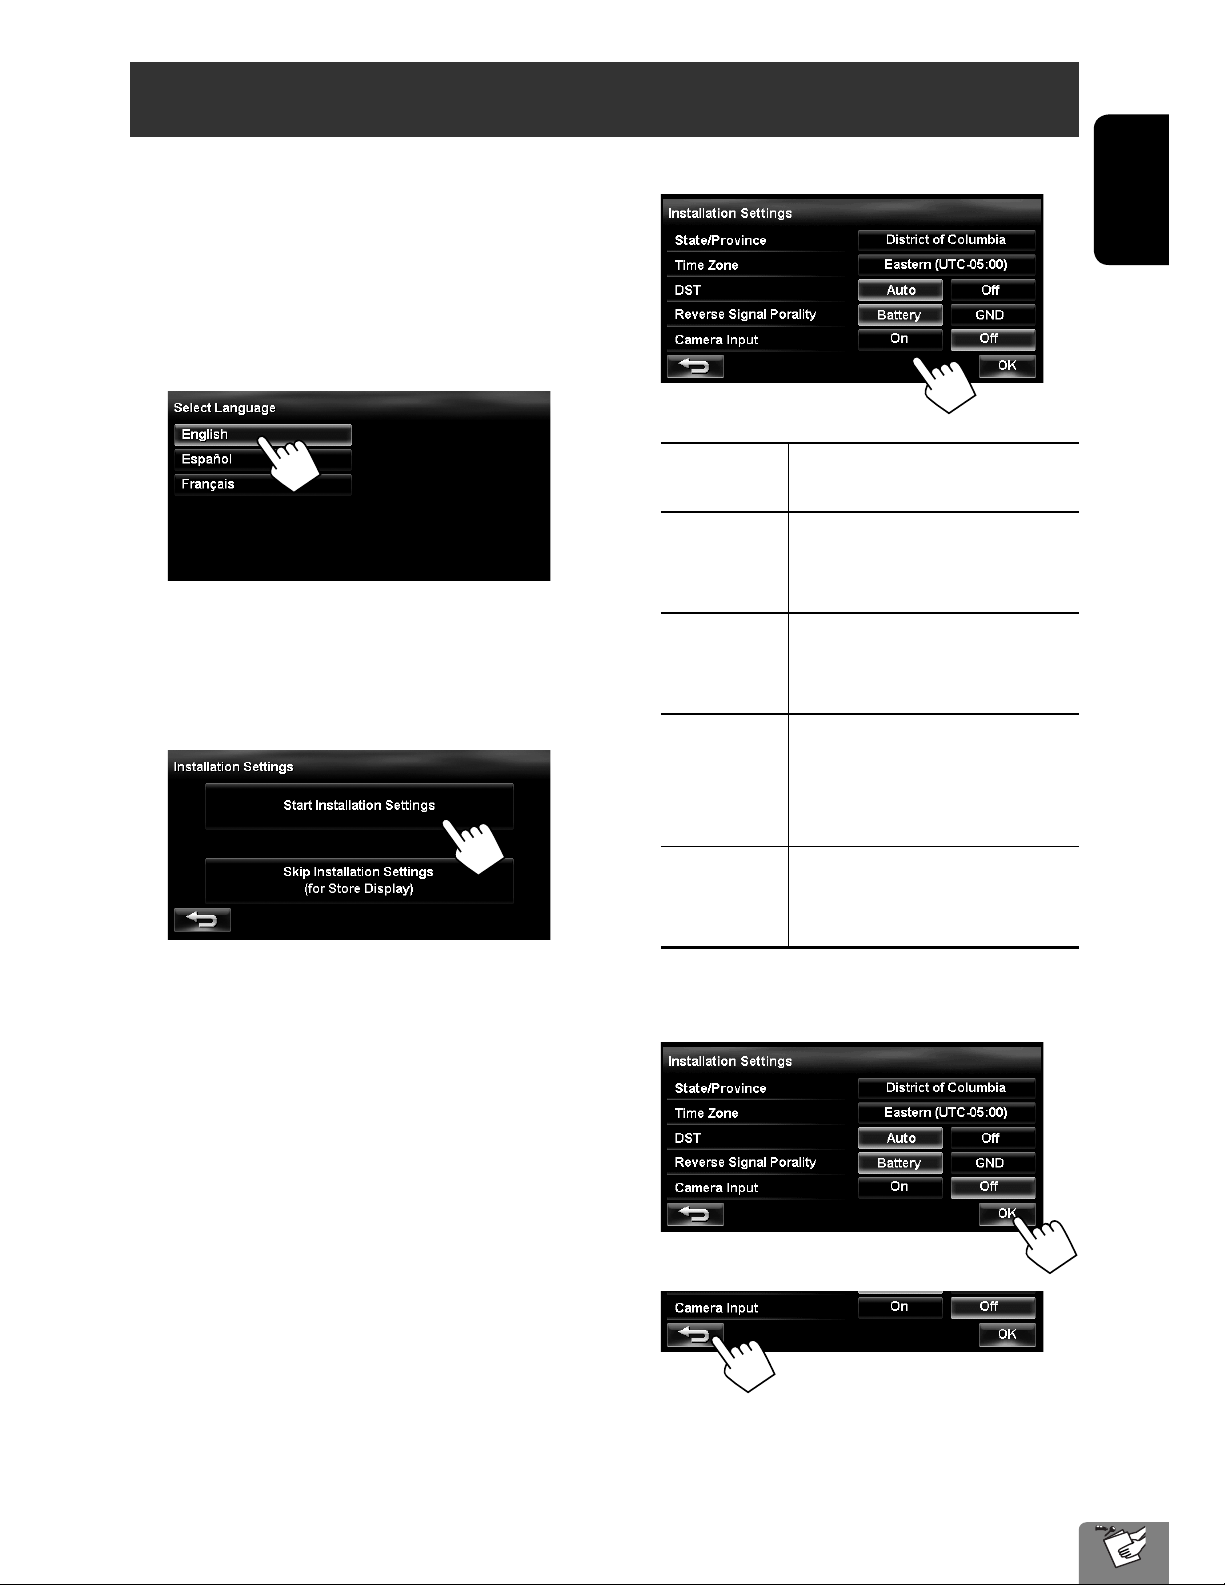
Installation settings
When you turn on the unit for the first time, the initial
setup screen appears.
1 Turn on the ignition switch.
The power is turned on, and the startup screen is
displayed for about 5 seconds.
2 Select the language you want for the display
and the voice guidance.
• You can also select the system language through
the AV menu (<Settings> - <System> <Language>, ☞ page 71)
3 Display installation settings screen.
4 Adjust the settings.
State/
Province
Time Zone * Select your residential area for
DST * Select <Auto> if your residential
Reverse
Signal
Polarity *
Select the State or Province where
you are now.
automatic clock adjustment by
GPS signal.
area is subject to Daylight Saving
Time.
Select the reverse signal polarity
(<Battery> or <GND>)
according to the connection of
your car.
ENGLISH
• If you select [Skip Installation Settings (for
Store Display)], the System starts in the store
display mode.
You need to make the installation settings next
time you turn on the power.
– When you turn on the power, <Select
Language> appears. After selecting
the language, the confirmation message
appears. Press [Yes] so that the System starts
initialization. When initialization is complete,
<Select Language> (☞ Step 2 above) is
displayed.
Camera
Input *
* You can also change these settings through the AV
menu (<Settings>, ☞ page 71).
Select <On> when connecting
the rear view camera to the
CAMERA IN jack.
5
6
9
Page 10

Basic operations
Turning on the power
Turn on the ignition switch.
ENGLISH
Startup screen appears for about 5 seconds.
• You can change the startup screen. (☞ page 71)
• When displaying the map screen for the first time
after turning on the power, the screen below
appears. Press [OK] to use the map screen.
• The power is turned off when the ignition switch is
turned off.
Turning off/on the screen
[Hold]
Messages about the status of
GPS signal reception
Current status of the GPS signal reception
“Check GPS
Antenna”
“Acquiring
GPS Signal”
Check the connection of the GPS
antenna.
• Acquiring GPS signals. Wait until
signal reception is completed.
• GPS signals cannot be received. Move
to the place where the System receives
the GPS signals.
The screen is turned on.
• You can erase the clock display while the screen is
turned off. (<Clock on Video/Screen-Off>, ☞
page 70)
10
Page 11
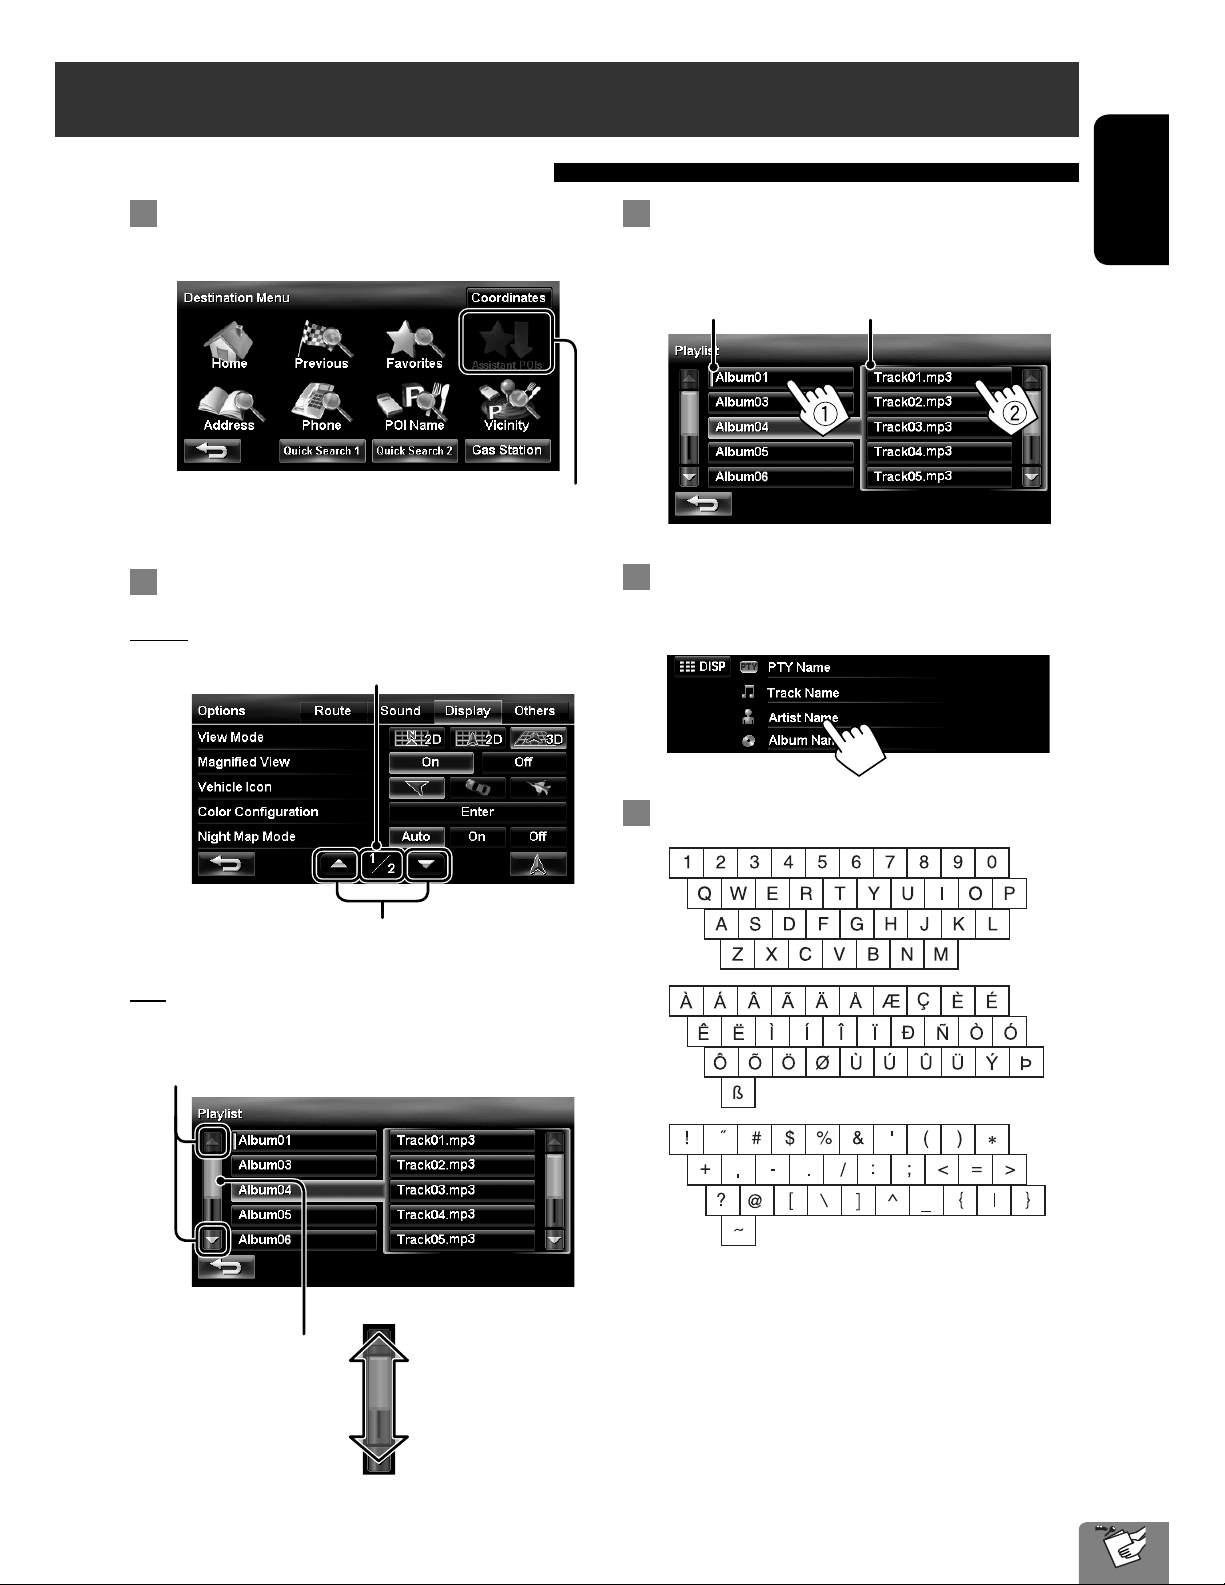
Operations on the touch panel
Basic operations
When items on the menu are not
available
Non-available items will be shaded
To change the page of menu/list
Menu
Current page/total menu pages
To select folder/track on the list
ENGLISH
Select a folder (1), then a track (2).
Current folder Current track
Scrolling the track/song information
When all the text is not shown at once...
List
Ex.: Folder/track list
Changes the page
Skips the list up or down
Characters you can use
Changes the page
11
Page 12

Switching screens
ENGLISH
Map screen
The AV control bar is displayed on the map
screen. You can perform AV source operations
using the AV control bar.
• Pressing
bar. In this case, the AV control bar
disappears automatically after 5 seconds.
also displays the AV control
Erases the AV control bar
• You can change the source by pressing
while the AV control bar is displayed.
While driving at a speed greater than 6 mi (10 km/h), some screens on the navigation menus are not available.
• Press [ ] to return to the previous screen.
• On navigation screens only: press [
• On <Settings> on <AV Menu> only: press [
] to display the current position on the map.
] to display the current source screen.
12
Page 13

AV screen
Switching screens
ENGLISH
Navi Menu
Shows the destination menu and information
about the navigation system.
Only for KW-NT3HDT
Options
Changes the navigation settings. (☞ page 40)
AV Menu
Changes or turns off the AV source.
Settings
Changes the detailed settings. (☞ page 68)
Only for KW-NT3HDT
13
Page 14

Navigation System
Safety instructions/information for the Navigation System
ENGLISH
SAFETY INSTRUCTIONS
Terms of licence
Use of the Navigation System is only permitted if the
traffic conditions are suitable and you are absolutely
sure that no risk, obstruction or inconvenience will be
incurred to you, your passengers or other road users.
The requirements of the Road Traffic Regulations must
always be followed. The destination must not be
entered while driving the car.
The Navigation System serves solely as an aid to
navigation. It never releases the drivers from their
duties to drive carefully and to make own judgement
in road traffic. Inaccurate or incorrect instructions
may happen to be given due to changing traffic
conditions. The actual road signs and traffic regulations
must therefore always be observed. In particular,
the Navigation System cannot be used as an aid to
orientation when visibility is poor.
This Navigation System must only be used for its
intended purpose. The volume of the car radio/
Navigation System must be adjusted so that external
noise is still audible.
Navigation guidance is performed, based on the
database, therefore, it may not be applicable to
the current situation because of changes in traffic
conditions (e.g. changes in tollroads, principal roads,
one-way traffic, or other traffic regulations). In this
case, observe the current traffic signs or regulations.
• Traffic signs should be observed carefully while
driving using the Navigation System. Navigation
System is only an aid. Driver must always decide
whether or not to heed the information provided.
JVC does not accept liability for erroneous data
provided by the Navigation System.
• Traffic guidance is restricted to passenger vehicles
only. Special driving recommendations and
regulations for other vehicles (e.g. commercial
vehicles) are not included.
• Do not operate the unit while driving.
You are granted a non-exclusive licence to use the
database for your personal purposes. The present
licence does not authorise the granting of sublicenses.
Use of the data is only permitted in this specific JVC
system. It is forbidden to extract or make further use
of significant parts of the database content, or to
duplicate, modify, adapt, translate, analyse, decompile
or reverse-engineer any part thereof.
WARNING:
Road traffic regulations always take priority when a
vehicle is being driven in traffic. Navigation System is
only an aid. Errors may occur in individual data items/
entries. At all times, the driver must decide whether or
not to heed the information provided.
JVC does not accept liability for erroneous data provided
by the Navigation System.
© 2009 NAVTEQ All rights reserved.
Information/icons on the map
• The information on the map (such as street name, the
POI information, and speed limit) may not be always
displayed (for example, if the System does not have
the information of the position).
• Home (
displayed after home/favorite points are registered.
• POI icons are displayed on the map depending on the
<POI Icon> setting (☞ page 15) and the map scale
is between 80 ft (25 m) and 800 ft (250 m).
– The following icons are displayed when the map
scale is between 80 ft (25 m) and 0.6 mi (1 km):
– Airport icon in the travel category
– Golf course icon in the leisure category
– Gas station icons
• POI icons may not be displayed correctly when the
System displays the wide area of map. In this case,
zoom in the map to display the detailed map.
) and favorite point ( ) icons are
14
Page 15

Basic operations
About the current position screen
Favorite points (☞ pages 17 and 34)
POI (Point Of Interest)
(☞ “List of POI icons”,
page 43)
Home (☞ pages 17
and 34)
Traffic information
(only for KW-NT3HDT)
(☞ page 35)
Shows <Navi Menu> (☞ page 13)
To display/hide POI icons on the map
On <Navi Menu>:
1
Your position
Current street
Speed limit on the current street
Current time
Direction
Scale
Zoom buttons
(☞ below)
Shows the AV control
bar (☞ page 12)
To change the map scale
1 Display the zoom buttons and scale buttons.
ENGLISH
2 Select categories (1) and sub-categories
(2) of POI which you want to be displayed on
the map.
[Select All]: Selects all sub-categories
[Deselect All]: Deselects all sub-categories.
• The selected items are marked with “✔.”
3 Activate or deactivate the POI icons of the
selected categories.
Displays the selected POI icons Deactivates
• When the AV control bar is displayed, the zoom
buttons are not shown. Erase the AV control
bar by pressing the source icon on the bar.
(☞ page 12)
2
You can also select a scale directly by pressing
one of the scale buttons.
Zoom in
Zoom out
15
Page 16
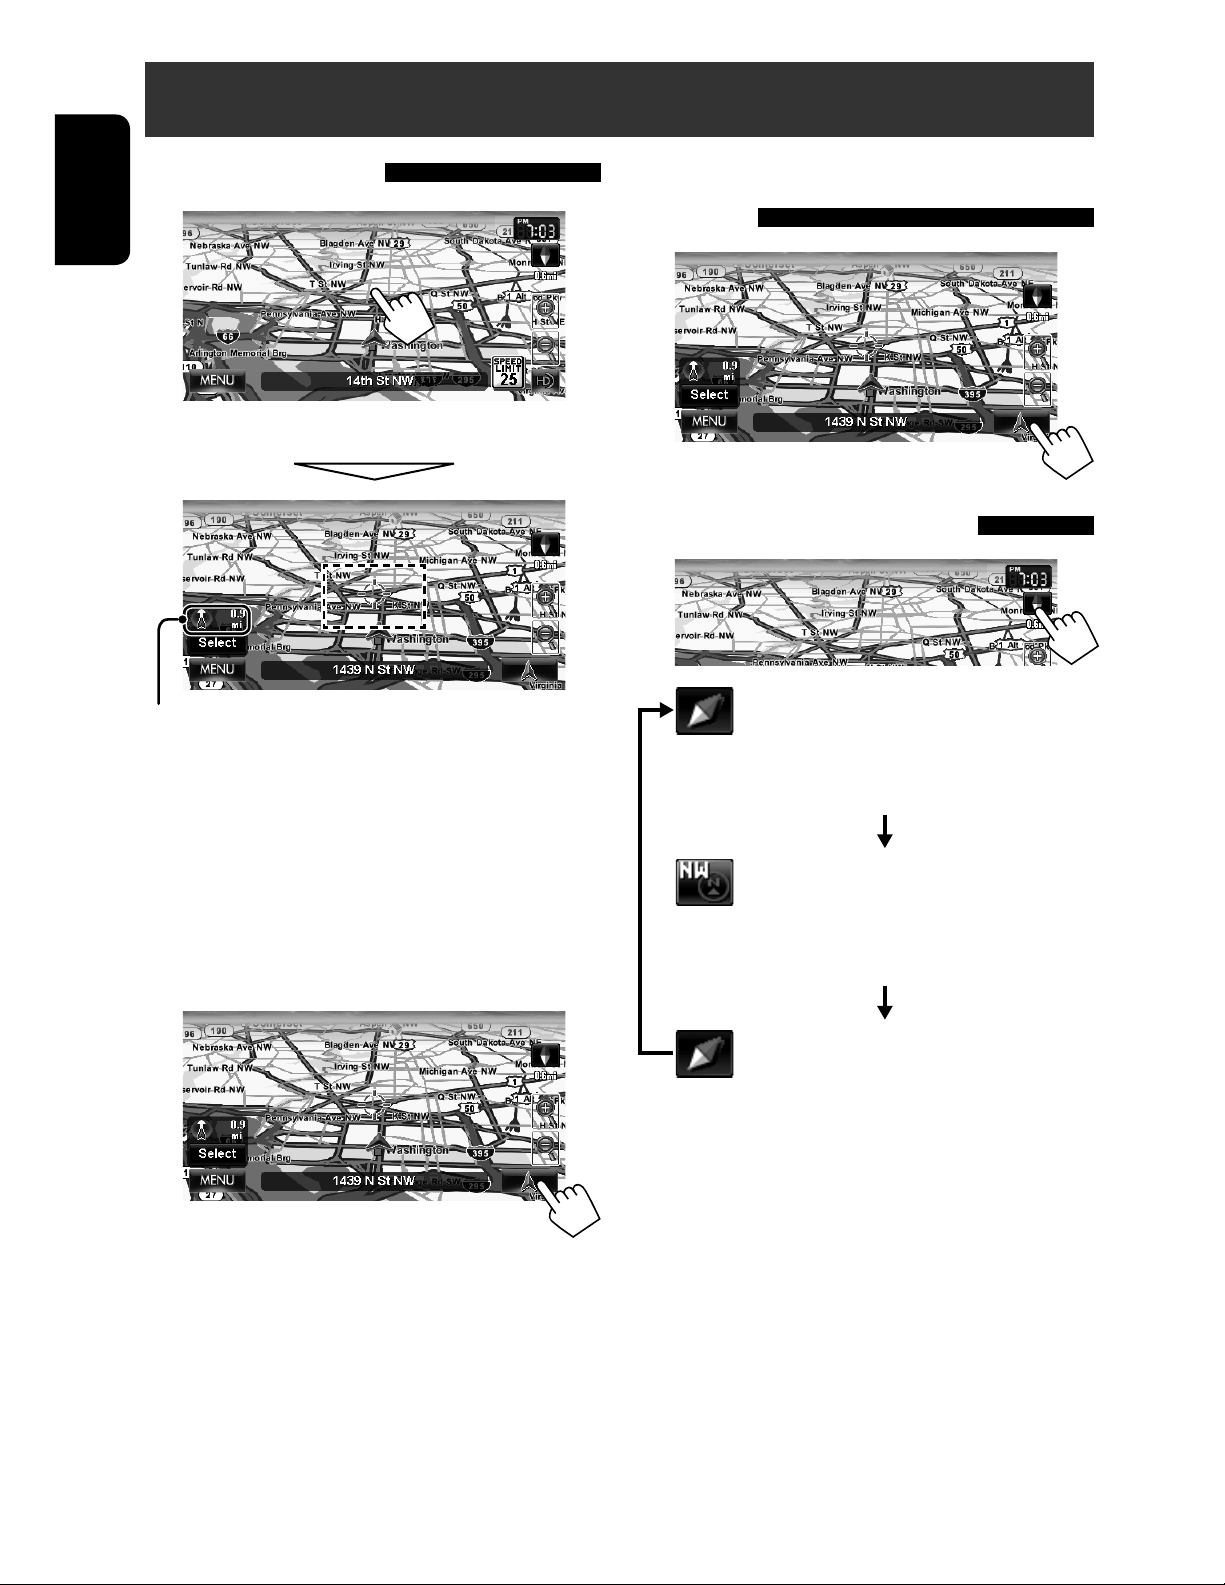
Basic operations
To scroll the map
ENGLISH
The position you touched is centered on the map.
Direction and distance from your current position
• Touch and hold the map to keep scrolling the map.
• The scrolling speed varies depending on the position
you are touching and holding:
– Inner area: slow
– Outer area: fast
To display the current position
To display your current
position
To change the map view
3D Map
The three dimensional map is displayed in
“heading up.”
• The icon shows the direction of north.
2D North Up
The map view is oriented with north
“upwards,” as in usual paper maps.
• The icon shows the direction of the car.
2D Heading Up
The map rotates so that you are always
displayed heading “upwards.”
• The icon shows the direction of north.
• You can also change the map view through the
navigation menu (<Options> - <Display> <View Mode>, ☞ page 41).
16
Page 17
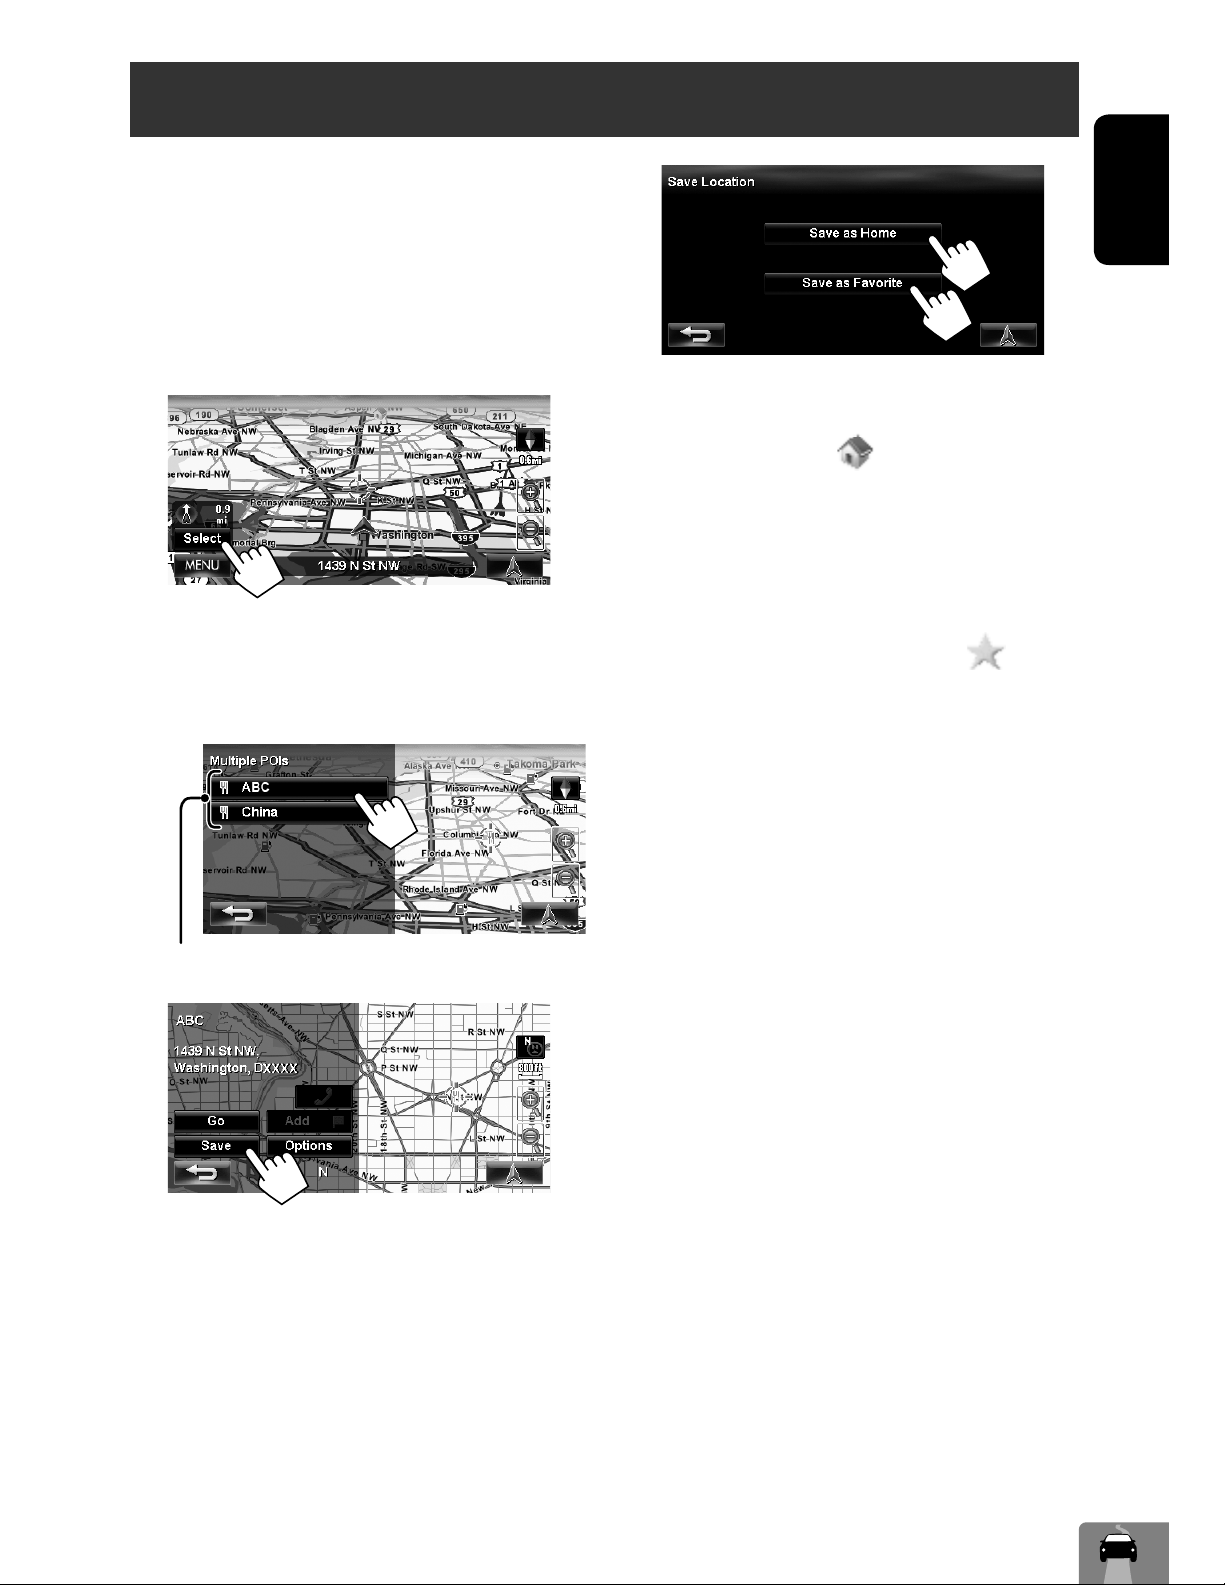
Registering your home/favorite points
You can register one point as your home or 100 favorite
points.
1 Scroll the map to select the position you
want to select as a destination.
• To search the destination using <Destination
Menu>, ☞ pages 19 to 27.
2
• If there are several POIs on the selected position,
select one from the list.
– The list appears only when <POI Icon> is set
to <On>. (☞ page 15)
4
[Save as Home]:
The selected position is saved as home and the
home is marked with
• When the home is already registered, you
are asked if you want to replace the old home.
Press [Yes] to replace, or press [No] to cancel.
[Save as Favorite]:
The selected position is saved as a favorite point
and the favorite point is marked with
the map.
• To edit the registration, ☞ page 34.
icon on the map.
ENGLISH
icon on
3
POIs
17
Page 18

Searching for a place
Setting a destination by scrolling
the map
ENGLISH
1 Scroll the map to select the position you
want to select as a destination. (☞ page 16)
2
• If there are several POIs on the selected position,
select one from the list.
– The list appears only when <POI Icon> is set
to <On>. (☞ page 15)
The search result is displayed.
About the search result screen
Zoom buttons
• You can change the map scale by pressing the zoom
buttons.
• You can display the map of selected area on whole
screen by touching the map part once. (If you press
more than once, the map scrolls.) To display the
information screen again, press [Select].
• The information screen is always displayed with the
2D North Up map view regardless of the current map
view setting. (☞ page 16)
Guidance starts.
• To cancel guidance, ☞ page 29.
• To set the selected position as via point, ☞ page 28.
• To change route options, ☞ page 29.
• For details about the search result screen, ☞ right.
18
Page 19

Setting a destination using the <Destination Menu>
Searching for a place
1
2
3 Select a method to search for a destination.
Home * Goes to your home.
• To register your home, ☞ page 17.
Previous * Searches from the history of previous
destinations and via points.
• You can select a place from the last
50 destinations and via points.
• To delete the history, ☞ page 39.
Favorites * Searches from your favorite points.
• To register your favorite points,
☞ page 17.
• To edit the information about the
favorite points, ☞ page 34.
Assistant
POIs
Address
Phone Searches by a telephone number.
Searches from the list of POIs (Point Of
Interest) saved on the SD card using
Street Director Assistant. (☞ page 25)
Searches by an address. (☞ page 21)
(☞ page 22)
ENGLISH
POI Name Searches from the database of POI.
(☞ page 23)
Vicinity Searches for POIs (Point Of Interest)
around your current position, the
position selected on the map, the
destination, or the route you are taking.
(☞ page 24)
Coordinates Searches by coordinates of the
destination. (☞ page 25)
Quick
Search
* Selectable only when at least one place is registered.
Searches for POIs of a registered
category — [Quick Search 1]/[Quick
Search 2]/[Gas Station] (Initial). (☞
page 26)
19
Page 20

Searching for a place
About search screens and input screens
Read through the following instructions for using search screens and input screens before using <Destination
ENGLISH
Menu>.
To enter names, addresses, or numbers
Number of matches
• When there are more than 100 matches, “100+” is
displayed and only first 100 matches are displayed.
Hold: Adds “+”
Selects 1st candidate
Displays the list of matches
(☞ “List of matches” on
State/Province selecting screen
You can change the State/Province if the selecting
button appears on the screen.
the right)
Enters a space
Press: Deletes last character
Hold: Deletes all characters
Displays other keyboards
• For available characters, ☞ page 11.
• Buttons vary depending on the input item.
• Non-available items will be shaded on the menu
screen.
• For some input screens, available characters are
automatically narrowed down as the System
searches its database for matches.
• Lower cases are not available.
List of matches
When you press [List] on the input screen, the list of
matches appears. Select desired item from the list.
• When the number of matches is 5 or less, the list of
matches automatically appears.
20
Page 21
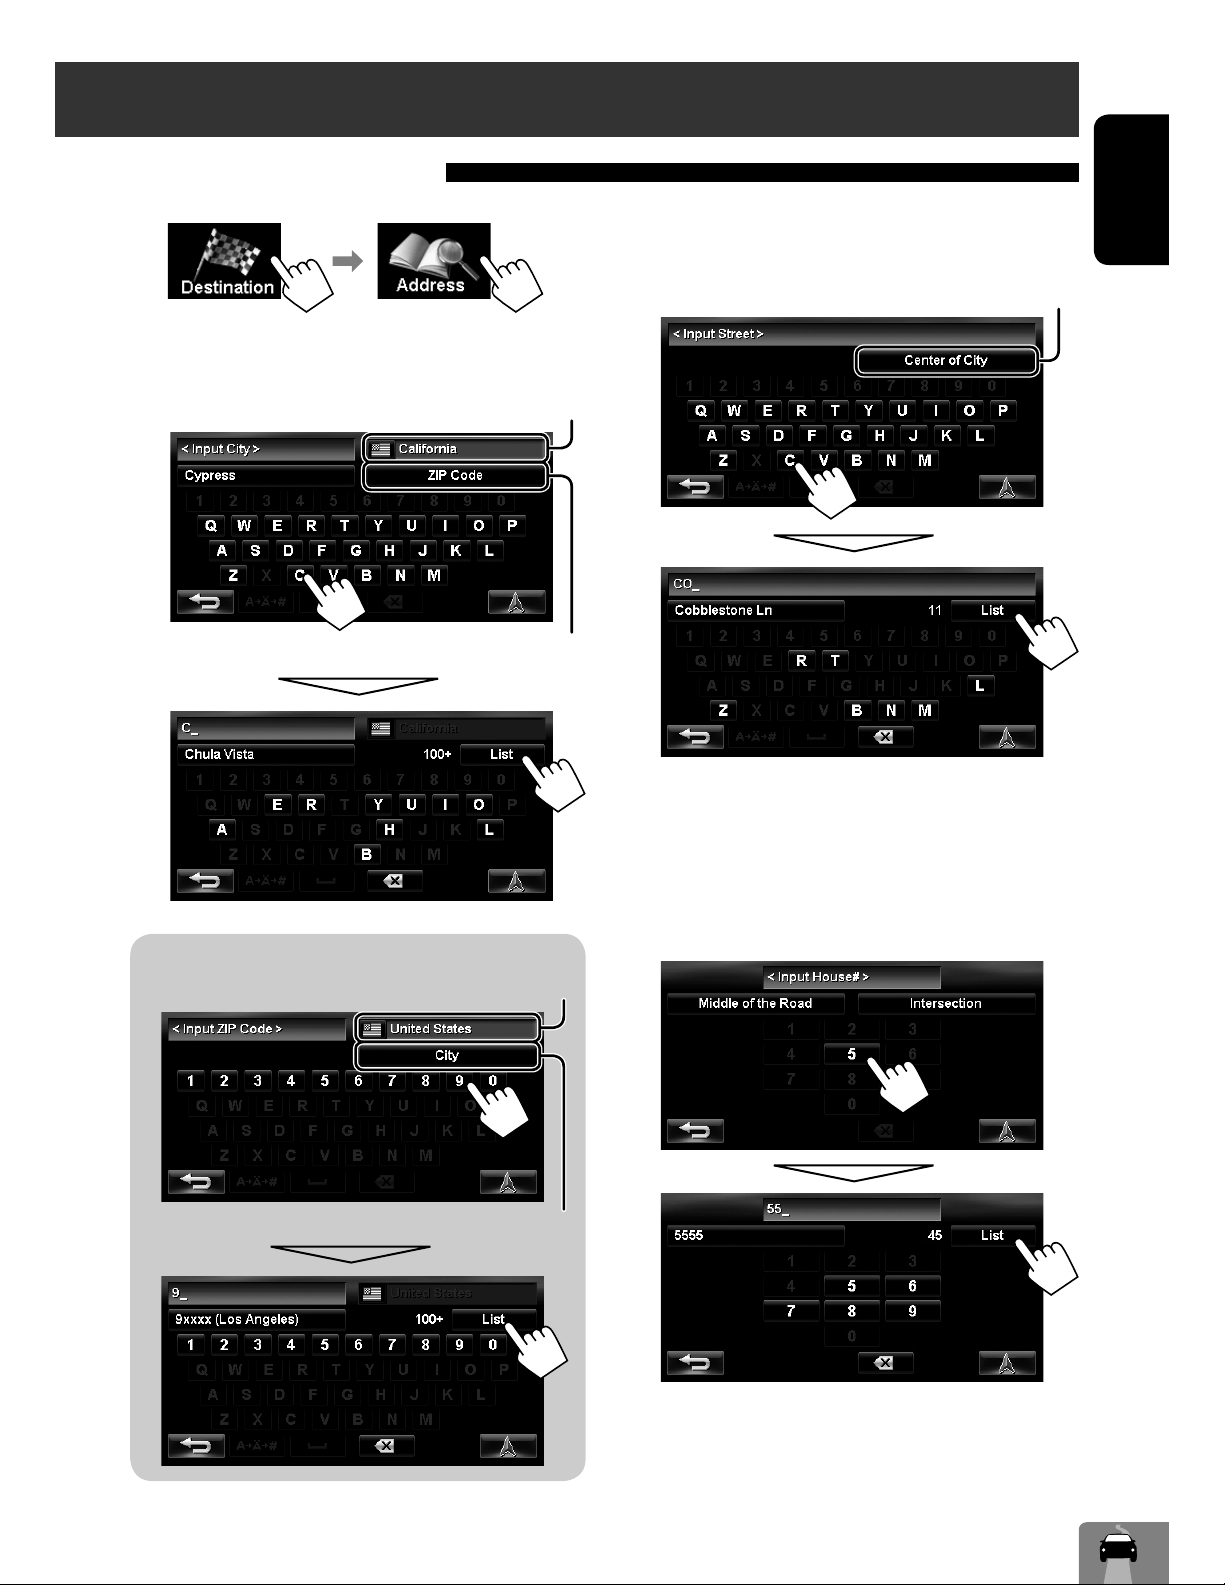
By address <Address>
Searching for a place
1
2 Enter the city name, then select from the list
(☞ page 20).
Changes State or Province
Specifies the zip code (☞ “To specify the zip code” below)
To specify the zip code
Changes country
3 Enter the street name, then select from the
list (☞ page 20).
Selects the center of the city (Then, go to step 5.)
4 Enter the house number, then select from
the list (☞ page 20).
• If no data of house number for the selected
street is available in the database, select
[Middle of the Road] or [Intersection].
ENGLISH
Returns to the city input screen
Continued on the next page
21
Page 22

Searching for a place
To select the center of the street or intersection
on the street
ENGLISH
Selects the center of the street
Specifies the crossing street to
select intersection on the street
5
By telephone number
<Phone>
1
2 Enter the telephone number, then select
from the list (☞ page 20).
Changes country
Guidance starts.
• To cancel guidance, ☞ page 29.
• To set the selected position as via point, ☞ page 28.
• To change route options, ☞ page 29.
• For details about the search result screen,
☞ page 18.
The search result is displayed.
Guidance starts.
• To cancel guidance, ☞ page 29.
• To set the selected position as via point, ☞ page 28.
• To change route options, ☞ page 29.
• For details about the search result screen,
☞ page 18.
22
Page 23
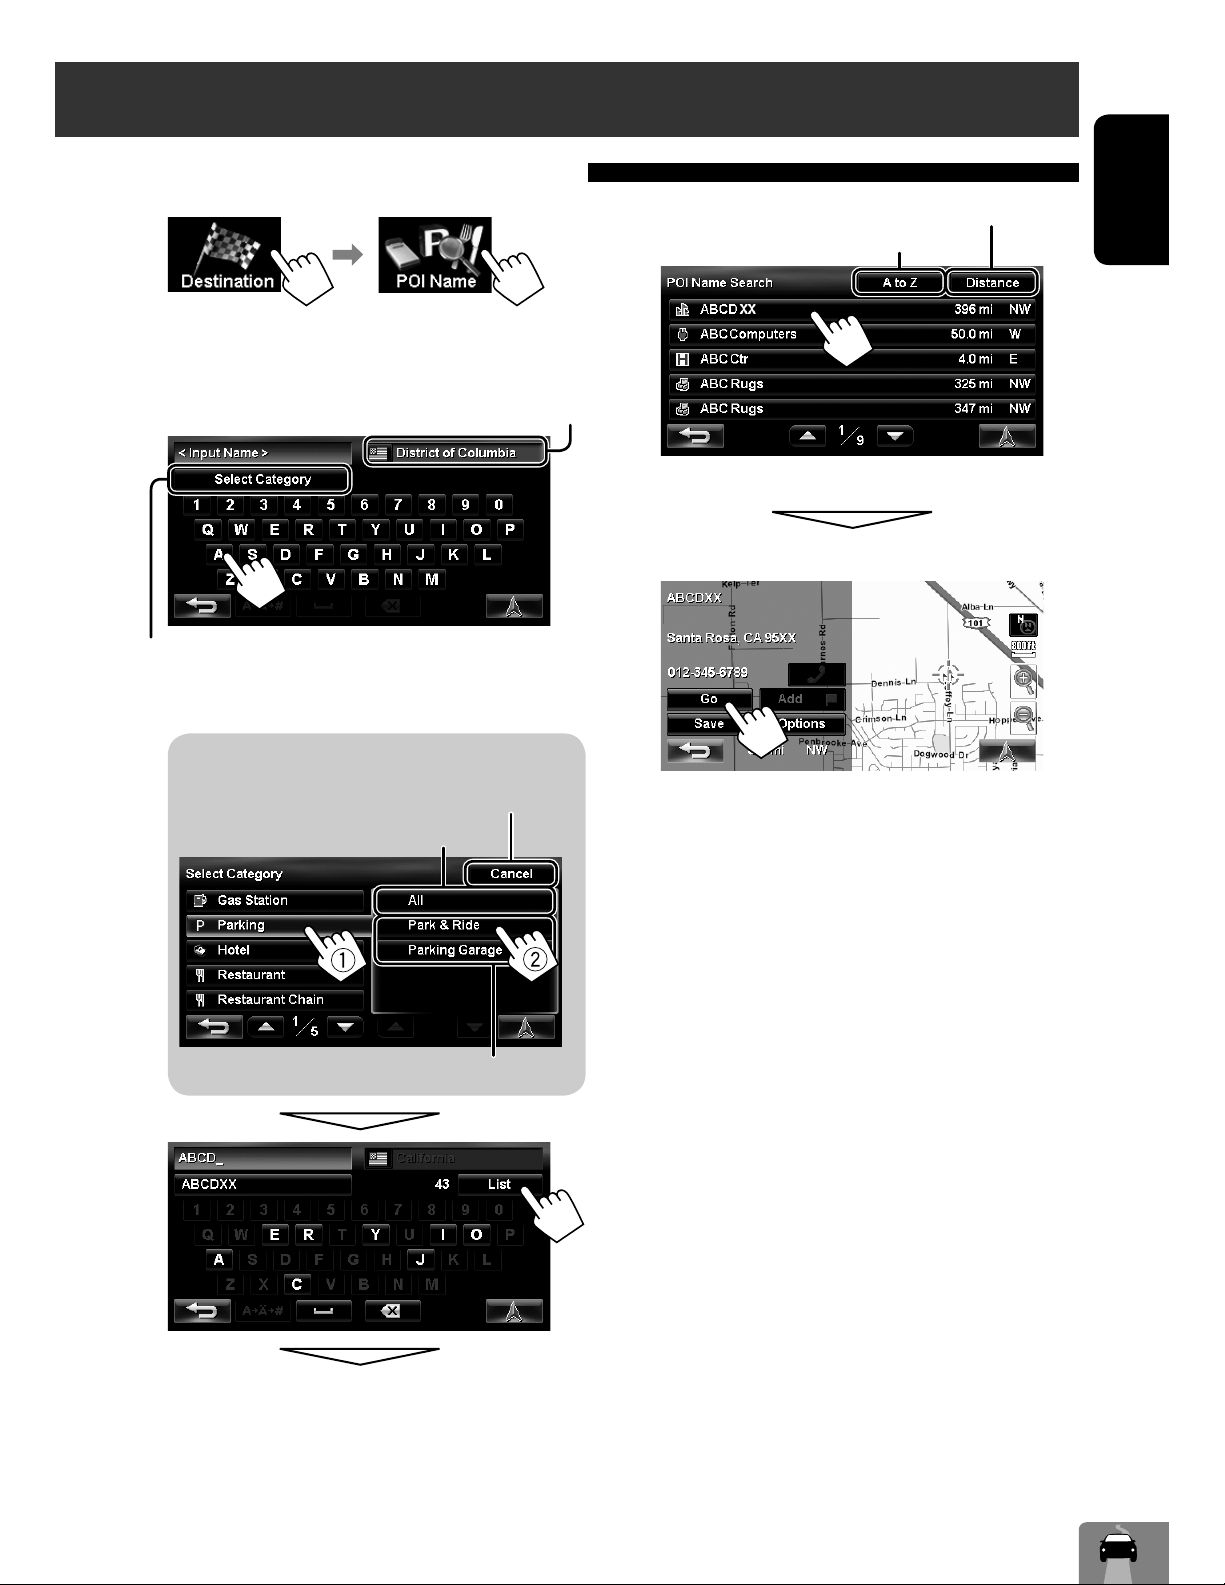
From the list of POI <POI Name>
Searching for a place
1
2 Enter the POI name, then select from the list
(☞ page 20).
Changes State or Province
Specifies the category and sub-category (☞ “To specify the
category and sub-category” below)
To specify the category and sub-category
Lists in alphabetical order
The System displays up to 100 POIs.
The search result is displayed.
Lists from the nearest
ENGLISH
Cancels the selected category
Selects all sub-categories
Sub-categories
Guidance starts.
• To cancel guidance, ☞ page 29.
• To set the selected position as via point, ☞ page 28.
• To change route options, ☞ page 29.
• For details about the search result screen,
☞ page 18.
23
Page 24

Searching for a place
POI near a place/route <Vicinity>
The System has a huge database of POIs (Point Of
ENGLISH
Interest), such as restaurants, gas stations, hospitals,
etc.
You can search for a POI around the place where you are
now. While guided, you can also search for a POI near
the destination or along the route.
1
2 Select the area to search.
3 Select a category (1), then a sub-category
(2) for the POI.
Selects all sub-categories
Sub-categories
“Searching...”
4 Select a POI from the list.
Local Within 12.5 mi (20 km) of your
current position or the position
selected on the map. If no POI
is found in this area, the System
expands the area to search.
Dest. Within 12.5 mi (20 km) of the
destination. If no POI is found in
this area, the System expands the
area to search.
On Route • On freeway: 180 mi (300 km)
along the route you are taking.
• Others: 15 mi (25 km) along the
route you are taking.
• The System displays up to 50 POIs.
The search result is displayed.
Guidance starts.
• To cancel guidance, ☞ page 29.
• To set the selected position as via point, ☞ page 28.
• To change route options, ☞ page 29.
• For details about the search result screen,
☞ page 18.
24
Page 25

Searching for a place
By coordinates
<Coordinates>
1
2 Enter the latitude and the longitude.
From the list of POIs imported by
yourself <Assistant POIs>
ENGLISH
Importing POI information on Google Maps
You can import POI information on Google Maps
through an SD card.
For details about Street Director Assistant, visit <http://
www.jvc.co.jp/english/car/> (English website only).
• When the SD card is ejected, the imported POI cannot
be used.
1
The search result is displayed.
Guidance starts.
• To cancel guidance, ☞ page 29.
• To set the selected position as via point, ☞ page 28.
• To change route options, ☞ page 29.
• For details about the search result screen,
☞ page 18.
2
Lists in alphabetical order
The search result is displayed.
Guidance starts.
• To cancel guidance, ☞ page 29.
• To set the selected position as via point, ☞ page 28.
• To change route options, ☞ page 29.
• For details about the search result screen,
☞ page 18.
Lists from the nearest
25
Page 26

Searching for a place
Quick Search
You have three [Quick Search] buttons in
ENGLISH
<Destination Menu>. You can assign a POI category
to each button. When you press one of the buttons, the
System searches for a POI of the registered category.
• [Gas Station] is registered to one of the three
buttons when shipped from the factory. You can also
change the registered category of this button.
To register a category to the buttons
Select one of the [Quick Search] buttons to
1
register the category.
3
Registered category
2 Select a category (1), then a sub-category
(2) of the POI.
Selects all sub-categories
Sub-categories
The search for the selected category starts to
register it to the [Quick Search] button.
4 Repeat steps 1 to 3 until three categories are
registered.
The selected category (or sub-category) name is
assigned to the button.
• The selected category is registered to the [Quick
Search] button even if you cancel the searching
before the search is completed.
26
Page 27

Searching for a place
To change a category assigned to the
[Quick Search] button
Select one of the [Quick Search] buttons
1
whose category you want to change.
To use Quick Search
1
“Searching...”
2 Select a POI from the list.
ENGLISH
or
2 Perform steps 2 and 3 of “To register a
category to the buttons” (☞ page 26).
• The System displays up to 50 search results.
The search result is displayed.
Guidance starts.
• To cancel guidance, ☞ page 29.
• To set the selected position as via point, ☞ page 28.
• To change route options, ☞ page 29.
• For details about the search result screen,
☞ page 18.
27
Page 28

How you are guided
Starting guidance to the destination or via point
1 Select a destination or via point. (☞ pages 18
ENGLISH
to 27)
2 To set as destination
The System starts calculating the route to the selected
destination, and guidance starts.
To change the destination
To set as via point
You can add the via points only after selecting your
destination.
Cancels the calculation
To cancel guidance, ☞ page 29.
Destination
Via point
• You can select up to four via points.
• For editing your route, ☞ page 32.
28
Page 29

How you are guided
Changing route options
1 On the search result screen:
2 Set options.
Canceling guidance
1
ENGLISH
2
A confirmation message appears.
Priority Select the priority for route
calculation ([Fastest]: fastest
route/[Shortest]: shortest
route).
Freeway
Toll Road
Ferry
Bypass Traffic
(Only for KWNT3HDT)
• You can also change these settings through the
navigation menu (<Options> - <Route>,
☞ page 40).
• The settings are effective next time the System
calculates a route.
Select whether to use ([Use]) or
avoid ([Avoid]) these types of
options to go to the destination.
Select the route calculation
method with traffic information.
(☞ page 35)
3
Adjusting the volume of the
voice guidance
• About the adjustable volume range, ☞ page 69
(<Amplifier Gain>).
• You can also adjust the volume through the
navigation menu (<Guidance Volume>,
☞ page 40).
29
Page 30

How you are guided
About route guidance screen
Distance to the next turn
ENGLISH
• Press to listen to the last voice guidance again.
Next turn to make
The second turn to make
(if any)
Direction and distance to the destination
(
) or a via point ( )
• Press to switch the information
between the final destination and the
nearest via point.
Guidance at turns
Lanes to take
Next street
Current street
: Estimated time of arrival (ETA)
: Remaining time to the selected destination or a via point
• Press to switch the information between estimated time of arrival (ETA)
and remaining time.
(Appears when coming within 3 mi (5 km) of it.)
Route to take
Shows AV control
bar
Speed limit on the current street
When you approach a turn, the System guides you with voice guidance and indications on the screen.
• Guidance voice comes out only through the front speakers (and the F OUT jacks on the rear).
To remove the magnified map, touch the map part
on the right side of the screen.
What if I miss a turn?
Don’t worry. The System calculates a new route
Magnified map
• You can select whether or not to display the magnified
map through the navigation menu (<Options> <Display> - <Magnified View>, ☞ page 41).
quickly.
• When you reach the area approximately within 120 ft (40 m) around the destination/via point, the Navigation
System considers you to have reached your destination/via point.
30
Page 31

Getting information on your route and places
How you are guided
To check the entire route
Returns to previous screen
To check the information on the
destination and via points
1
To confirm how your trip will go
ENGLISH
Drive simulation starts.
Shows the simulation just before the next turn
Changes the speed of the drive simulation
(normal/faster)
2 Select a desired point to check its detailed
information.
To cancel the simulation and resume guidance
A confirmation message appears.
31
Page 32

Arranging your route
Changing the sequence of the destination/via points
• Highways are always used to calculate the route if distance to a destination exceeds a certain distance.
ENGLISH
• If the destination cannot be reached without using highways, ferries, or toll roads, they are used to calculate
the route without respect to the <Route> settings. (☞ page 40)
1
2
3 Change the sequence of the destination/via
points.
To optimize the sequence
To rearrange the sequence manually
]: Moves up the order of selected point.
[
]: Moves down the order of selected point.
[
• Repeat 1 and 2 to move other via points
before pressing [Recalculate].
The System starts calculating the new route, and
guidance starts.
To delete a via point
Press [Delete] after selecting the item you want
to delete, then press [Recalculate].
32
Page 33

Arranging your route
Avoiding a congestion
ahead
If you realize a congestion exists ahead...
1
2 Select the distance to avoid.
Adjusting the vehicle
position
ENGLISH
If you find your current position is displayed on a wrong
place on the map, use this setting to correct your
position.
1
2
3
A detour is calculated, and guidance starts.
• A detour may not be calculated depending on the
route.
4 Move the cursor to the position where you
want to set as current position.
5 Adjust the direction.
33
Page 34

Editing registration of home/favorite points
1
ENGLISH
2 Select a registered point you want to edit.
Selects your home
Displays the favorite point list and select one to
edit on the list.
A To edit the name
• You can use up to 30 characters.
Enters a space
Displays other keyboards
• For available characters, ☞ page 11.
B To edit the phone number
3
4 Edit the information.
A Displays the name editing screen
B Displays the phone number editing screen
C Deletes the registration
Press: Deletes last character
Hold: Deletes all characters
C To delete the registration
A confirmation message appears.
To delete all registered items, ☞ page 39.
34
Page 35

Using information service (Only for KW-NT3HDT)
This function is available on KW-NT3HDT only, not equipped with on KW-NT3HD.
Using the traffic information service
As the traffic information is transmitted by radio
stations, JVC cannot assume responsibility for the
completeness or accuracy of the information.
Traffic information on the map
Traffic icon (☞ page 36)
Congestion
• Traffic icons are displayed on the map when its scale
is between 80 ft (25 m) and 1.5 mi (2.5 km) with
<Traffic Icon> setting activated (☞ page 41).
How traffic information is reflected in
navigation
ENGLISH
2
Auto The System automatically calculates
a new route when you approach a
traffic event.
Manual Operating buttons appear on
the screen when you approach a
traffic event. Recalculate the route
manually. (☞ below)
Off The System does not take traffic
information into account.
• It may not avoid a congestion even if <Auto> is
selected.
When <Manual> is selected...
The traffic information is reflected in navigation
differently according to <Bypass Traffic> setting.
1
Recalculates the route Ignores the traffic alert
Shows the detail of the alert
Appears when you approach a traffic
event on your route
• The traffic alert indication disappears while you are
checking due to a change of traffic conditions. The
traffic alert indication also disappears if you do not
confirm the rerouting in one minute.
35
Page 36

Using information service (Only for KW-NT3HDT)
This function is available on KW-NT3HDT only, not equipped with on KW-NT3HD.
ENGLISH
Checking the traffic information
From <Traffic List>
1
2 Select a list (1), then a traffic alert (2).
The icons of traffic alert which are not on your route are
shown in gray when all the information is displayed.
[All]: Lists all the information.
[On Route]: Lists the information on your route.
On the map
1 Touch the traffic icon.
2
• If there are several POIs on the selected position,
select one from the list.
– The list appears only when <POI Icon> is set
to <On>. (☞ page 15)
Details of the selected alert are displayed.
List of traffic icons
Traffic jam Narrow lanes Other caution event
Roadworks Accident
Road is blocked or closed Condition
36
Information
Page 37

Using information service (Only for KW-NT3HDT)
This function is available on KW-NT3HDT only, not equipped with on KW-NT3HD.
Using the area information service (Total Traffic HD NET WORK Service)
You can use the information service provided by HD Radio broadcasts.
• The contents of the information service depends on the HD Radio station.
To display the information screen
The information screen appears.
• The contents of the screen depend on the
broadcast.
To bookmark favorite items
You can store favorite items on the bookmark list.
[
[
To delete the item from the bookmark list
]: Displays the bookmark list.
]: Adds the selected item to the bookmark list.
1
2 Select items to delete (1), then delete them
(2).
The selected items are marked with "✔."
Selects/deselects all items
ENGLISH
37
Page 38

Checking the information of the navigation system
ENGLISH
GPS
8 Version of the map database
1
2
3
4
5
Satellites
(Green): Receiving the GPS signals and used for the
positioning.
(Yellow): Receiving the GPS signals.
(Gray): Not receiving the GPS signals.
1 Current speed *
2 Direction of the car *
3 Latitude and longitude of your current position *
4 Altitude of your current position *
1
1
1
1
5 Date/Local time
• When the System cannot receive the GPS signals, the
value of each item above are shown as “- -.”
System
9 Serial number
p Connection status of the illumination control lead
<On>: The illumination signal is detected.
q Connection status of the parking brake lead
<On>: The parking brake is engaged.
w Connection status of the reverse gear signal lead
<On>: Reverse gear signal is detected.
• If the rear view screen is displayed when shifting
the gear to the reverse (R) position, the reverse
gear signal is detected (<On>).
e Status of the gyroscope
r Speed pulse rate
t Status of calibration *
2 *3
<Processing>: The current position cannot be
determined without data from GPS satellites.
<Learning>: The current position can be
determined even when the System cannot receive
data from GPS satellites.
<Learned>: The current position can be
determined accurately even when the System
cannot receive data from GPS satellites.
6
7
8
9
t
6 Name of the unit
7 Version of the software
p
q
w
e
r
1
These information may not be shown correctly when
*
the reception of GPS signals is poor.
2
The calibration does not function without the
*
connection of GPS antenna and the speed signal
lead. For the connection, ☞ Installation/Connection
Manual (separate volume).
3
Driving under various conditions completes the
*
calibration faster. If <Processing> remains on the
screen for long period, check the connection of the
GPS antenna and the speed signal lead.
38
Page 39

Initializing memories/navigation settings
1 2
ENGLISH
Memories of home, favorite points or
previous destination/via points
Deletes your home.
Deletes all favorite points.
Deletes all the places in the list of previous
destinations/via points.
Navigation settings
Calibration Data
The Navigation System is gradually optimized by
automatic calibration.
Reset the calibration data in the following cases:
• When you reinstall the unit in another car.
• When you replace or rotate the tires.
The initial settings of the navigation menu are restored.
A confirmation message appears.
39
Page 40

Navigation menu items
Navi Menu —Options
ENGLISH
Menu items Selectable settings Initial: Underlined
Priority
Freeway/ Toll Road/ Ferry
Route
Bypass Traffic
(Only for KW-NT3HDT)
Attention tone* Select the type of attention tone, coming out before the voice guidance by
Guidance Volume* Adjust the volume of the voice guidance. (The adjustment does not affect
Switches the category by pressing the corresponding tab
Fastest, Shortest (☞ page 29)
Use, Avoid (☞ page 29)
Auto, Manual, Off (☞ page 35)
pressing [2] or [3].
Off, Normal, Prompt, A.I.
the audio volume.)
0 to 20; Initial 10
Output* Select the guidance output channel (for front channel only). (This setting
does not affect the output balance (Fader setting) of AV source.)
L ch., L+R ch., R ch.
Music Mix You can turn down the volume of the AV source while voice guidance is
produced.
Muting: The AV source sound does not come out.
Sound
Speed Alert The System sounds an alarm when you surpass the speed limit of the
POI Alert Alert sounds when you approach within 0.2 mi (300 m) of a POI of the
Att.: The AV source sound is lowered.
Normal: The AV source sound is not affected.
current road by the set value. Press [+] or [−] to select the value. The unit
(“km/h” or “mph”) follows the <Scale unit> setting. (☞ page 41)
Off, 3mph (5km/h), 6mph (10km/h), 10mph (15 km/h),
15mph (25km/h), 20mph (35km/h)
selected category. (You can select any categories from the following; Gas
Station, Parking, Car Rental and Car Dealer & Service.)
• To select categories for POI alert, press [Edit], then select categories and
sub-categories (the selected items are marked with “✔”). To activate
POI alert for selected categories, press [On]. To deactivate it, press [Off].
* When adjusting these items, test tone is produced.
40
Page 41

Navigation menu items
Menu items Selectable settings Initial: Underlined
View Mode
Magnified View
(☞ page 30)
Vehicle Icon
Color Configuration Change the color of the map and the route you take for day time and night
Night Map Mode Auto: Switches to the night screen when you turn on the headlights.
Display
Current Street Name Select whether to show or hide the current street name on the map.
On: A magnified map is displayed when approaching the next turn.
Off: No magnified map is displayed.
time. Press [Enter] to display the adjustment screen, then change the
following settings:
• Day Map Color/Night Map Color: Normal, Soft, Vivid
• Day Route Color/Night Route Color: Select from 3 colors.
To switch between the day color setting and night color setting, press [ ].
On: Activates night screen.
Off: Deactivates night screen.
Show, Hide (☞ page 15)
, , (☞ page 16)
, ,
• The illumination control lead connection needs to be completed. (☞
Installation/Connection Manual)
ENGLISH
Speed Limit Sign Select whether to show or hide the speed limit icon on the map.
Show, Hide (☞ page 15)
One Way Select whether to show or hide the information of one way road on the map.
Show, Hide
Traffic Icon
(Only for KW-NT3HDT)
Scale unit Select the measuring units for distance.
WAAS /EGNOS Select whether to use WAAS and EGNOS to increase the accuracy of
Others
Vehicle Position
Clear User Memory
Select whether to show or hide the traffic icon on the map.
Show, Hide (☞ page 36)
• The unit setting you find at your first access to the menu varies depending
on your State/Province selection in the initial settings (☞ page 9).
km, mile
positioning.
• For some areas or conditions, the position accuracy may not be improved
even if <On> is selected. In this case, select <Off>.
On, Off
☞ page 33
☞ page 39
Restore Navi Settings
Reset Calibration Data
☞ page 39
☞ page 39
41
Page 42

Additional information
How you are guided
• If GPS signal reception is poor, navigation guidance
ENGLISH
may not be correct.
• The System may not receive GPS signals in the
following places...
– in a tunnel or parking lot in a building
– under an overhead road
– in a place surrounded by high buildings or by
closely standing trees
• Make sure to connect reverse signal lead
(☞ Installation/Connection Manual); otherwise, your
current position may not be displayed correctly.
• The position of your car may not be detected correctly
in the following cases...
– when driving on a road close to the other one
(e.g. a highway and ordinary road running in
parallel)
– when turning at an almost straight fork in the
road
– when driving on a gridiron road
– after taking a ferry, etc.
– when driving on a steep mountain road
– when driving on a spiral road
– when turning left or right after running on a long
straight road
– when driving in a zigzag line on a broad road
– when starting your car shortly after starting the
engine
– when driving for the first time after installing the
unit
– when changing tires or attaching chains on the
tires
– when tire slip occurs continuously and frequently
– after driving on areas other than a road (e.g.
private lands or parking lots)
– after driving in underground or tower type
parking lots
– after rotating your car on a turntable
– after frequent stops and starts in a congestion
– when the accuracy of GPS is deteriorated
intentionally
– when driving on a road constructed recently
• The route calculated by the System is one of the
possible routes to your destination. The route is not
always the most appropriate one.
• If no-exit roads (only entering the rotary from the
roads is allowed) exist on the rotary, the no-exit
roads can neither be shown in the route guidance on
the display nor counted in the route guidance voice
message.
• The following phenomena may occur even if the
System is working correctly...
– It may guide to a closed road or to a route
requiring U-turn.
– It may not guide to your destination if there
is only a narrow road or no road to your
destination.
– It may show a different road name.
– It may not ask you to turn at a junction even if
you need to.
– It may give guidance different from the actual
road conditions.
– It may give incorrect distance information.
42
Page 43

List of POI icons
Additional information
Gas Station
Parking
Park & Ride
Parking Garage
Hotel
Restaurant
Restaurant Chain
Desserts & Cafe
Shopping
Book Store
Convenience store
Fashion
Flower & Jewelry
Furniture
Hair & Beauty
Home Improvement
Music & Video
Office Supply
Shopping Mall
Sporting Goods
Supermarket
Toys
Department & Grocers
Special store
Barnes & Noble Booksellers
Bed Bath & Beyond
Big5
Blockbuster Video
Borders
Crate & Barrel
Hollywood Video
Home Depot
IKEA
Lowe’s
Movie Gallery
Office Depot
Office Max
Sports Authority
Staples
Toys“r”us
Electronics
Wireless Carrier
Leisure
Amusement Park
Bowling Center
Camping Ground
Golf Course
Recreation Facility
Ski Resort
Tourist Attraction
Travel Agency
Zoo
Travel
Airport
Rest Area
Car Rental
Car Dealer & Service
Motorcycle Dealer
Used Car Dealer
Auto Service shop
Bank
Pharmacy
Medical
Dentist
Emergency
Hospital/Polyclinic
Medical Service
Community
City Hall
Community Center
Court House
Exhibition Center
Government Office
Library
Place of Worship
Police & Fire
Post Office
School
Service
University & College
ENGLISH
Entertainment
Art Galleries
Casino
Museum
Night Life
Theater
43
Page 44

AV Operations
Common operations on AV screens
ENGLISH
<AV Menu> screen
Selects the source (☞ below)
Turns off the AV source (☞ below)
Selecting the playback source
HD
Radio
DISC
SD
USB *
iPod *
BT
Audio
Switches to the radio broadcast. (☞ pages 45
to 49)
Plays a disc. (☞ pages 50 to 56)
Plays files on an SD card. (☞ pages 57 and 58)
Plays files on a USB device. (☞ pages 57 and
58)
Plays an iPod/iPhone. (☞ pages 59 to 61)
Plays a Bluetooth audio player. (☞ page 81)
Displays <Settings> (☞ pages
68 to 71)
• Available sources depend on the external
components you have connected, media you have
attached and the <Front Aux Input>, <AV
Input> or <Bluetooth Audio> settings you have
made (☞ pages 70 and 71).
• You can erase the clock display while a video source
is played back (such as DVD, video from an external
component, or iPod video). (<Clock on Video/
Screen-Off>, ☞ page 70)
You can also change the source by pressing
repeatedly.
Turning off the AV source
Front
AUX
AV-IN Switches to an external component connected
SAT Switches to the satellite radio broadcast.
* “iPod” is shown as the source instead of “USB” when an
Switches to an external component connected
to the AUX input terminal on the monitor
panel. (☞ page 65)
to VIDEO IN/LINE IN jacks on the rear panel.
(☞ page 65)
(☞ pages 62 to 64)
iPod/iPhone is connected.
AV source is turned off.
• To activate the AV function, press
44
or
[Hold]
.
Page 45

Listening to the HD Radio™ broadcast
What is HD Radio™ broadcasting?
HD Radio stations can deliver high-quality digital sound—AM digital will have FM-like sound quality (in stereo)
and FM digital will have CD-like sound quality—with static-free and clear reception. Furthermore, stations can
offer text and data, such as artist names, song titles, and Program Service Data (PSD).
• HD Radio tuners can also tune in to conventional analog broadcasts.
• Many HD Radio stations offer more than one channel of programming. This service is called multicasting.
• By using PSD, you can easily purchase the songs at iTunes Store.
• To find HD Radio stations in your area, visit <http://www.hdradio.com/>.
Reception indicators
• HD: Lights when receiving an HD Radio broadcast
• ST: Lights when receiving an FM stereo broadcast
Station frequency currently tuned in
Preset no.
Band
TAG indicator
(☞ page 48)
Sound mode (☞ page 66)
HOLD indicator
(☞ page 46)
Station Call Sign and channel
number for the HD Radio broadcast
PTY code for the HD Radio
broadcast
Only when receiving HD Radio
station: the song information
currently received
ENGLISH
• When tuning into an HD Radio Multicast sub-channel directly (such as from the preset list), “Linking...”
appears for a while.
[Band] Selects the band.
[
Searches for HD Radio stations only.
]
[4] [¢] • Searches for a station.
Press: Auto search
Hold: Manual search
• Selects a sub-channel when
receiving HD Radio Multicast
channels.
Switches between the preset list
[5] [∞] Selects a preset station.
☞ page 48
[
]
[
[Mode]
]
screen and tuner source screen.
☞ pages 46 to 48
45
Page 46

Listening to the HD Radio™ broadcast
Changing HD Radio reception
mode
ENGLISH
While receiving an HD Radio broadcast, you can change
the reception mode — digital or analog.
• This setting cannot take effect for the conventional
FM/AM stations.
1
2
Storing stations in memory
You can preset six channels for each band.
Automatic presetting — SSM (Strong-station
Sequential Memory)
1
2
Auto Switch between digital and analog
audio automatically.
• In the case when the radio station
forces the reception mode to digital,
the HOLD indicator flashes.
Digital Tuning to digital audio or analog audio
Analog
• The setting automatically returns to <Auto> in the
following cases:
– When you tune in to another broadcast.
– When you change to another source.
– When you turn off the power.
only.
• HOLD indicator lights.
A confirmation message appears.
Local stations with the strongest signals are
searched and stored automatically.
To stop searching, press [4] or [¢].
• During SSM search, all stations including
conventional stations are searched and stored for the
selected band.
46
Page 47

Listening to the HD Radio™ broadcast
Manual presetting
1 Tune in to a station or channel you want to
preset. (☞ page 45)
Band The station frequency you want to preset
2 Display the preset list.
Selecting a preset station
1 Display the preset list.
ENGLISH
2
Also changes preset stations
3 Select a preset number.
[Hold]
Reducing the interference
1
2
Auto Increases the tuner selectivity to
reduce interference noises between
adjacent stations. (Stereo effect may
be lost.)
Wide Subject to the interference from
adjacent stations, but sound quality
will not be degraded and the stereo
effect will remain.
47
Page 48

Listening to the HD Radio™ broadcast
Tagging/purchasing your favorite songs from iTunes Store
Some HD Radio broadcasts provide PSD (Program
ENGLISH
Service Data) for a song. You can tag the song and store
its PSD while listening the song.
By using the tagging function, you can easily purchase
the songs from iTunes Store.
Notes on storing tagged PSDs
• When pressing [Tag] within 10 seconds before
or after the PSD changes (while the TAG indicator
flashes), the tags for two songs are stored.
• You cannot tag a song in the following cases:
– When the broadcast currently received does not
support the iTunes Tagging or does not support
PSD.
– When stored PSDs on the unit exceeds 100.
– When the song is already tagged.
– While transferring the tagged PSDs to your iPod/
iPhone is in progress.
Step 1: Tagging the song
While receiving a song with PSD...
Lights up while receiving a song with PSD
The tagged PSD is stored on the unit.
• You can enjoy iTunes Tagging with the following
types of iPod/iPhone models:
– iPod classic, software version 1.0 or later
– iPod nano (3rd Generation), software version 1.0
or later
– iPod nano (4th Generation), software version 1.0
or later
– iPod nano (5th Generation), software version 1.0
or later
– iPod touch (1st Generation), software version 2.1
or later
– iPod touch (2nd Generation), software version
2.1 or later
– iPhone/iPhone 3G, software version 2.1 or later
– iPhone 3GS, software version 3.0 or later
• When iPod/iPhone is connected, the tagged PSD
is automatically transferred to the iPod/iPhone. Go
to “Step 3: Purchasing songs from iTunes Store
(☞ page 49)” to purchase the song.
To check/delete the PSDs stored on the unit
1
2
The number of stored PSDs/max storage
48
Deletes all PSDs from the unit
Page 49

Listening to the HD Radio™ broadcast
Step 2: Transferring the tagged PSD to
your iPod/iPhone
Connect the iPod/iPhone to the unit (☞ page 59).
The source is changed to “iPod,” and the tagged PSDs
are transferred automatically to your iPod/iPhone.
Appears during
transferring the PSDs
Transferring
progress
Step 3: Purchasing songs from iTunes
Store
ENGLISH
• iTunes 7.4 or later version is required to purchase the
tagged songs.
• For details about iPod/iPhone and iTunes, refer also
to the instructions supplied with the iPod/iPhone or
visit <http://www.apple.com/>.
1 Connect the iPod/iPhone to the PC.
2 Synchronize the iPod/iPhone to the iTunes.
The tagged PSDs are transferred to PC, and iTunes
displays the list of the tagged songs.
• After the data transfer is completed, the stored
PSDs are automatically deleted from the iPod/
iPhone.
• After the data transfer is completed, the tagged PSDs
are automatically deleted from the unit.
• Your iPod/iPhone must have 64 KB free space, which
is required for transferring a tagged PSD.
49
Page 50

Disc operations
~ Insert a disc.
The source changes to “DISC” and playback starts.
ENGLISH
Label side
If “ ” appears on the screen, the unit cannot accept the operation you have tried to do.
• In some cases, without showing “
When playing back a multi-channel encoded disc, the multi-channel signals are downmixed.
,” operations will not be accepted.
Caution on volume setting:
Discs produce very little noise compared with other
sources. Lower the volume before playing a disc
to avoid damaging the speakers by the sudden
increase of the output level.
• If a disc does not have any disc menu, all tracks on it
will be played repeatedly until you change the source
or eject the disc.
To eject a disc
• You can eject a disc when playing another AV source.
• If the ejected disc is not removed within 15 seconds,
the disc is automatically inserted again into the
loading slot to protect it from dust.
• If the disc cannot be ejected, ☞ page 4.
To prohibit disc ejection
+
[Hold]
A confirmation message appears.
To cancel the prohibition, repeat the same
procedure.
50
Page 51

Playable disc types
Disc operations
Disc type Recording format, file type, etc. Playable
DVD
DVD Video (Region Code: 1) *
1
• DTS sound cannot be reproduced
or output from this unit.
DVD Audio
DVD-ROM
DVD Recordable/Rewritable
2
(DVD-R/-RW *
, +R/+RW *3)
• DVD Video: UDF bridge
• DVD-VR
DVD Video
DVD-VR *
MP3/WAV
JPEG
4
• MP3/WAV: ISO 9660 level 1,
level 2, Romeo, Joliet
WMA/AAC
DivX/MPEG1/MPEG2/MPEG4
DVD+VR
DVD-RAM
Dual Disc DVD side
Non-DVD side
CD/VCD Audio CD/CD Text (CD-DA)
ENGLISH
VCD (Video CD)
DTS-CD
SVCD (Super Video CD)
CD-ROM
CD-I (CD-I Ready)
CD Recordable/Rewritable
(CD-R/-RW)
• ISO 9660 level 1, level 2, Romeo,
Joliet
CD-DA
MP3/WAV
WMA/AAC
JPEG
DivX/MPEG1/MPEG2
MPEG4
1
If you insert a DVD Video disc of an incorrect Region Code, “Region code error” appears on the screen.
*
2
DVD-R recorded in multi-border format is also playable (except for dual layer discs).
*
DVD-RW dual layer discs are not playable.
3
It is possible to play back finalized +R/+RW (Video format only) discs. “DVD” is selected as its disc type when a
*
+R/+RW disc is loaded. +RW double layer discs are not playable.
4
This unit cannot play back contents protected with CPRM (Content Protection for Recordable Media).
*
51
Page 52

Disc operations
Only for DVD Video/DVD-VR:
Pressing DISP or touching the screen shows the operating buttons and playback information on the screen. The
ENGLISH
operating buttons and playback information disappear by pressing DISP or when no operation is done for about
5 seconds.
Disc type
Title no./Chapter no./
Playing time
[3 / 8] Starts playback/pauses.
[7] Stops playback.
[4] [¢] Press: Selects chapter.
Hold: Reverse/forward search .
(Search speed: x2 ] x10)
[Aspect]
Selects aspect ratio. (☞ page 68)
[Angle] Selects view angle.
[Audio] Selects audio language.
[Subtitle] Selects subtitle language.
[Menu] [Top M] Displays the disc menu.
Playback mode
Audio format
Playback status
(8: pause/7: stop)
[
]
Hides/displays the operating
buttons on the screen.
[
[
]
]
Adjusts the picture. (☞ page 68)
Displays the menu selecting
screen. (☞ below)
[Mode] • Selects repeat playback mode.
(☞ page 55)
• Changes the settings for disc
playback. (☞ page 56)
Using the menu selecting screen
[5] [∞] [2] [3] Selects the menu items.
[Enter] Confirms the selection.
[Return] Returns to the previous menu.
Caution for DualDisc playback
The Non-DVD side of a “DualDisc” does not comply with the “Compact Disc Digital Audio” standard. Therefore,
the use of Non-DVD side of a DualDisc on this product may not be recommended.
52
Page 53

VR playback mode—VR-PRG
(program) or VR-PLAY (playlist)
Disc type
Program no. (or Playlist
no.)/Chapter no. (or file
no.)/Playing time
Playback mode
Disc operations
Audio format
ENGLISH
Playback status
(8: pause/7: stop)
[3 / 8] Starts playback/pauses.
[7] Stops playback.
[4] [¢] Press: Selects chapter.
Hold: Reverse/forward search .
(Search speed: x2 ] x10)
[Aspect]
Selects aspect ratio. (☞ page 68)
[Audio] Selects audio channel (ST: stereo,
L: left, R: right).
[Subtitle] Shows (ON)/hides (OFF) the subtitle.
[Play L] Displays the Playlist.
• For details about DVD-VR
format and Playlist, refer to the
instructions supplied with the
recording equipment.
[
Hides/displays the operating buttons
]
on the screen.
[
Adjusts the picture. (☞ page 68)
]
[Mode] • Selects repeat playback mode.
(☞ page 55)
• Changes the settings for disc
playback. (☞ page 56)
[Prog.L] Displays the Original Program.
53
Page 54

Disc operations
Playback mode Sound mode (☞ page 66)
ENGLISH
Track no./Playing time
Disc type
[3 / 8] Starts playback/pauses.
[4] [¢] Press: Selects track.
Hold: Reverse/forward search.
(Search speed: x2 ] x10)
Audio format (MP3/WAV)
Disc type
Folder no./Track no./
Playing time
While playing, “Jacket
picture” is shown if the file
has the tag data including
“Jacket picture.”
Playback status (8: pause)
The track information
appears when it is recorded.
[ ] [ ]
Selects playback modes.
(☞ page 55)
[Mode] Changes the settings for disc
playback. (☞ page 56)
Playback mode Sound mode (☞ page 66)
Playback status
(8: pause)
Tag data appears only
when it is recorded. *
(Current folder name and
file name appear if not
recorded.)
[3 / 8] Starts playback/pauses.
[4] [¢] Press: Selects track.
Hold: Reverse/forward search .
(Search speed: x2 ] x10)
[5] [∞] Selects folder.
[ ] [ ]
[Mode] Changes the settings for disc
[List] Displays Folder/Track Lists.
Selects playback modes.
(☞ page 55)
playback. (☞ page 56)
(☞ page 11)
* When switching the folder, the folder name and file name appear for about 5 seconds even if tag data is recorded.
Playing Recordable/Rewritable discs
• This unit can recognize a total of 5 000 files and 250 folders (a maximum of 999 files per folder).
• Use only “finalized” discs.
• This unit can play back multi-session discs; however, unclosed sessions will be skipped while playing.
• Some discs or files may not be played back due to their characteristics or recording conditions.
54
Page 55

Selecting playback modes
Disc operations
For DVD/DVD-VR
1
Playback mode
2 Select Repeat mode.
• For DVD:
For CD/MP3/WAV
Playback mode
Selects Random
playback mode
• You cannot activate the repeat mode and the random
mode at the same time.
• For CD:
TRACK
DISC Randomly plays all tracks.
Repeats current track.
Selects Repeat
playback mode
ENGLISH
Chapter Repeats current chapter.
Title Repeats current title.
• For DVD-VR
Chapter Repeats current chapter.
Program Repeats current program (not
available for Playlist playback).
To cancel, select <Off>.
• For MP3/WAV:
TRACK
FOLDER
FOLDER Randomly plays all tracks of current
DISC Randomly plays all tracks.
• Press the button repeatedly until the desired
playback mode is selected.
To cancel, press the button repeatedly until the
indicator disappears.
Repeats current track.
Repeats all tracks of the current
folder.
folder, then tracks of next folders.
55
Page 56

Disc operations
Settings for the disc playback
ENGLISH
Disc Setup items Selectable settings Initial: Underlined
Menu Language
Audio Language
Subtitle Language Select the initial subtitle language or erase the subtitle (Off); Initial Off
Video Output Format Select the color system of the external monitor.
Monitor Type
16:9 4:3LB
4:3PS
D. Range Compres. You can enjoy a powerful sound at a low volume level while playing Dolby
Select the initial disc menu language; Initial English (☞ also page 73).
Select the initial audio language; Initial English (☞ also page 73).
(☞ also page 73).
NTSC, PAL
• This setting is valid only to the external monitor connected.
Select the monitor type to watch a wide screen picture on the external monitor.
16:9 : Select when the aspect ratio of the external monitor is 16:9.
4:3LB (Letterbox)/4:3PS (Pan Scan): Select when the aspect ratio of the
external monitor is 4:3.
• When you select <16:9> for a picture whose aspect ratio is 4:3, the picture
slightly changes due to the process for converting the picture width.
• Even if <4:3PS> is selected, the screen size may become <4:3LB> for some
discs.
Digital software.
Auto : Select to apply the effect to multi-channel encoded software.
On : Select to always use this function.
56
Page 57

SD/USB operations
This unit can play the MP3/WMA files stored in SD card/USB mass storage class device.
• All tracks in the SD card/USB device will be played repeatedly until you change the source.
• Make sure all important data has been backed up.
ENGLISH
Inserting SD card
Detach the monitor panel.
1
2 Insert an SD card.
Monitor panel
Push in the SD card until you hear a clicking sound.
Connecting USB device
You can connect a USB mass storage class device such as
a USB memory, Digital Audio Player, etc. to the unit.
• You cannot connect a computer or portable HDD to
the USB (
• When connecting a USB device, refer also to its
instructions.
The source changes to “USB” and playback starts.
) terminal of the unit.
USB cable (not supplied)
3 Attach the monitor panel.
The source changes to “SD” and playback starts.
To eject the SD card
Detach the monitor panel, then push in the SD card
lightly.
Caution:
• Avoid using the USB device if it might hinder your
safety driving.
• Do not start the car engine if a USB device is
connected.
• Do not pull out and attach the USB device
repeatedly while “File Check” is shown on the
screen.
• Disconnect a USB device while playback is paused
or another source is selected.
• Electrostatic shock at connecting a USB device
may cause abnormal playback of the device. In
this case, disconnect the USB device then reset it
and detach the monitor panel (then attach it).
• Do not leave a USB device in the car, expose to
direct sunlight, or high temperature to avoid
deformation or cause damages to the device.
• For more details about USB operations,
☞ page 72.
57
Page 58

SD/USB operations
ENGLISH
Source type (“SD” or “USB”)
Folder no./Track no./
Playing time
While playing, “Jacket
picture” is shown if the file
has the tag data including
“Jacket picture.”
[3 / 8] Starts playback/pauses.
[4] [¢] Press: Selects track.
Hold: Reverse/forward search.
(Search speed: x10)
[5] [∞] Selects folder.
[
] Selects Random playback mode. *2 *
• FOLDER: Randomly plays all
tracks of the folder.
SD/ USB: Randomly plays
•
all tracks.
Audio format
(MP3/WMA)
Playback mode Sound mode (☞ page 66)
Playback status
(8: pause)
Tag data appears only
when it is recorded. *
(Current folder name
and file name appear if
not recorded.)
[ ]
Selects Repeat playback mode. *
• TRACK: Repeats current
track.
FOLDER: Repeats all tracks of
•
the current folder.
3
[List] Displays Folder/Track Lists.
(☞ page 11)
1
2
3
*
*1 When switching the folder, the folder name and file name appear for about 5 seconds even if tag data is recorded.
2
To cancel random or repeat mode, press the button repeatedly until the indicator disappears.
*
3
*
You cannot activate the repeat mode and the random mode at the same time.
• While playing from a USB device, the playback order may differ from other players.
• This unit may be unable to play back some USB devices or some files due to their characteristics or recording
conditions.
• This unit may not play back files in a USB device properly when using a USB extension cord.
• This unit cannot assure proper functions or supply power to all types of the devices.
• This unit can recognize a total of 5 000 files and 999 folders (a maximum of 999 files per folder).
58
Page 59

Listening to the iPod/iPhone device
Connecting iPod/iPhone
• Use the following cables:
– To listen to the music: USB 2.0 cable (accessory
of the iPod/iPhone)
– To watch the video: USB Audio and Video cable
for iPod/iPhone—KS-U29 (not supplied)
KS-U29 (not supplied)
or
USB 2.0 cable (accessory of
the iPod/iPhone)
• When you turn on this unit, the iPod/iPhone is
charged through the unit.
• You can control the following iPod/iPhone models:
– iPod with video (5th Generation) *
– iPod classic *
– iPod nano (1st Generation)
– iPod nano (2nd Generation)
– iPod nano (3rd Generation) *
– iPod nano (4th Generation) *
– iPod nano (5th Generation) *
– iPod touch (1st Generation) *
– iPod touch (2nd Generation) *
– iPhone*
– iPhone 3G *
– iPhone 3GS *
* To watch the video with its audio, connect the iPod/
iPhone using USB Audio and Video cable (KS-U29, not
supplied).
Setting the iPod control mode and the speed
of the audio books
Audiobooks
Select the speed of audio books.
iPod Control Mode
• When using iPod nano (1st Generation) or iPod
with video (5th Generation), only <Head> mode is
selectable.
Head
iPod
Ext
Controls playback from this unit.
Controls audio/video playback from the
iPod/iPhone.
• Playback information is shown.
Allows any audio/video signals from
iPod/iPhone.
• No information is shown.
ENGLISH
For some iPod/iPhone models, the performance may be abnormal or unstable during operation. In this case,
disconnect the iPod/iPhone device, then check its condition.
If the performance is not improved or slow, reset your iPod/iPhone.
59
Page 60

Listening to the iPod/iPhone device
• The operations explained in this manual are under <Head> mode (☞ page 59).
• When <iPod> or <Ext> mode is selected, only [Mode] is displayed.
ENGLISH
Track no./Total track number/Playing time
Playback mode
Sound mode (☞ page 66)
iPod control mode (☞ page 59)
, *
While playing, Artwork (the
picture displayed on the screen
of iPod/iPhone) is shown if the
song contains the Artwork.
1
1
*
• You cannot resume playback for video sources under some conditions.
[3 / 8] Starts playback/pauses.
]
[
[4] [¢] Press: Selects track/video.
Hold: Reverse/forward search.
[List] Displays the Music/Video menu on
the iPod/iPhone. (☞ page 61)
[Aspect] *
[
1
Selects aspect ratio. (☞ page 68)
] Selects Random playback mode. *
• SONGS: Functions the same as
“Shuffle Songs.”
ALBUMS: Functions the same
•
[
2
[
]*
]*
[Mode] Changes the iPod control mode or
as “Shuffle Albums.”
Playback status
(8: pause/7: stop)
Song/video
information
Selects Repeat playback mode. *
• ONE: Functions the same as
“Repeat One.”
ALL: Functions the same as
•
“Repeat All.”
1
Hides/displays the operating buttons
on the screen.
1
Adjusts the picture. (☞ page 68)
speed of audio books. (☞ page 59)
2
*1 Appears only when video is played back.
2
To cancel random or repeat mode, press the button repeatedly until the indicator disappears.
*
• When playing back a track containing Artwork ,
operating buttons temporarily disappear while
loading its Artwork.
Notice:
When operating an iPod/iPhone, some operations
may not be performed correctly or as intended. In
this case, visit the following JVC web site: <http://
www.jvc.co.jp/english/car/> (English website only)
If the iPod/iPhone does not play correctly, update your iPod/iPhone software to the latest version. For details
about updating your iPod/iPhone, visit <http://www.apple.com/>.
60
Page 61

Listening to the iPod/iPhone device
Selecting a track/video from menu on the iPod/iPhone
1
2 Select the menu (Music or Video) (1), a
category (2), then a desired item (3).
Music menu:
Select the item in the selected layer until a desired
track starts playing.
Corresponding icon lights in orange. ( : Music / : Video)
• Available categories depend on the type of your iPod/
iPhone.
1
You can also select the category by pressing the
*
corresponding tab.
2
These categories are shown in the language selected
*
on your iPod/iPhone.
Searching items in the selected category by
alphabet and number
1
1
*
Display the first character of the title of the
2
item you want to search for (1), then search
for an item (2).
ENGLISH
Returns to the previous layer
Video menu:
2
*
Erases the search operation buttons
Press the character button repeatedly until the
desired item is displayed.
• Only available characters are selectable.
• When selecting other character than the
alphabet, press [#].
3 Select the desired item from the list.
61
Page 62

Listening to the satellite radio
Before operating, connect either one of the following (separately purchased) to the satellite unit connector on the
rear of this unit.
To listen to the SIRIUS Satellite radio SC-C1 and KS-SRA100
ENGLISH
PnP, SC-VDOC1 and KS-SRA100
To listen to the XM Satellite radio JVC Smart Digital Adapter–XMDJVC100
CNP2000UC and CNPJVC1
For SIRIUS Radio
Activate your subscription after connection:
1 Select “SAT” as the source. (☞ page 44)
The SIRIUS Satellite radio starts updating all the
SIRIUS channels. (☞ “GCI update” below.)
• Once completed, SIRIUS Satellite radio tunes in
to the preset channel, CH184.
2 Check your SIRIUS ID.
Press [Mode] to show SIRIUS ID. (☞ page 63)
3 Contact SIRIUS on the internet at
<http://activate.siriusradio.com/> to
activate your subscription, or you can
call SIRIUS toll-free at 1-888-539-SIRIUS
(7474).
“Subscription Updated. Press Any Key to Continue.”
appears on the screen once subscription has been
completed.
For XM Radio
Activate your subscription after connection:
• Only Channel 0, 1, and 247 are available before
activation.
1 Select “SAT” as the source. (☞ page 44)
XM Tuner * starts updating all the XM channels.
“Channel 1” is tuned in automatically. (☞ “GCI
update” below.)
* XM Tuner: XMDirect ™ Tuner Box or XMDirect2
Tuner System
2 Check your XM Satellite Radio ID labelled
on the casing of the XM Tuner, or tune in
to “Channel 0”
(☞ page 63).
3 Contact XM Satellite radio on
the internet at <http://xmradio.
com/activation/> to activate your
subscription, or you can call 1-800-XMRADIO (1-800-967-2346).
Once completed, the unit tunes in to one of the
available channels (Channel 4 or higher).
GCI (Global Control Information) update:
• If channels are updated after subscription, updating starts automatically, and no sound can be heard.
For SIRIUS : “Updating” appears.
For XM : “Channel Not Authrized” appears.
• Updating takes a few minutes to complete.
62
Page 63

Band
Only for SIRIUS
Signal Reception
indicator
Listening to the satellite radio
Sound mode (☞ page 66)Preset no.
ENGLISH
Channel no./Channel name
Category name
The song information currently
received
[Band] Selects the band.
For SIRIUS:
[5] [∞] Selects a preset channel.
[2 CAT]
Selects a category.*
[CAT 3]
For XM:
[4] [¢] Press: Selects a channel.
Hold: Changes the channel rapidly.
– While searching, invalid and
unsubscribed channels are
skipped.
[List] Displays the Category/Channel List.
[
[
Selects a channel directly.
]
Switches between preset list screen
]
and tuner source screen.
[Mode] Only for SIRIUS: Shows the SIRIUS ID.
* For SIRIUS Radio:
– To select a channel from all categories, select <ALL>.
For XM Radio:
– To select a channel from all categories (including non-categorized channels), press [5] or [∞].
– If you do not select a channel within 15 seconds, the category selected is canceled. You can select a channel from all
categories now.
• To know more about SIRIUS Satellite radio or to sign up, visit <http://www.sirius.com>.
• For the latest channel listings and programming information, or to sign up for XM Satellite radio, visit <http://
www.xmradio.com>.
63
Page 64

Listening to the satellite radio
Storing channels in memory
You can preset six channels for each band.
ENGLISH
1 Tune in to a station you want to preset.
(☞ page 63)
2 Display the preset list.(☞ page 63)
Selecting preset channels
Also changes preset channels
Selecting a channel quickly
Select a channel from the
Category/Channel List
Select a channel directly by
entering channel number
3 Select a preset number.
[Hold]
Selecting on the list
Select a category (1), then a channel (2) from
the selected category.
Current category Current channel
Selecting a channel directly
Enter the channel number (1), then
confirm (2).
64
Page 65

Using other external components
Sound mode (☞ page 66)
Source type
(“Front AUX” or
“AV-IN”)
The following buttons appear while playing video with “AV-IN” selected as the source.
[Aspect]
[
[
• Select an appropriate setting on <Front Aux Input> or <AV Input>. (☞ pages 70 and 71)
]
]
Front AUX
1 Connect an external component.
Selects aspect ratio. (☞ page 68)
Hides/displays the operating buttons on the screen.
Adjusts the picture. (☞ page 68)
AV-IN
You can connect an external component to the LINE
IN/VIDEO IN jacks. (☞ Installation/Connection Manual)
ENGLISH
AV mini cord (not supplied)
2 Select “Front AUX” as the source.
(☞ page 44)
3 Turn on the connected component and
start playing the source.
1 Select “AV-IN” as the source. (☞ page 44)
2 Turn on the connected component and
start playing the source.
65
Page 66

Sound equalization
You can select a preset sound mode suitable to the music genre.
You can also customize the sound mode.
ENGLISH
1
2
Storing your own adjustments
You can store your adjustments into <User1>,
<User2>, and <User3>.
1 Repeat steps 1 and 2, then in step 3 on the
left...
2 Select the frequency (1), then adjust the
frequency level (2).
3 Select a sound mode.
Also adjusts the frequency level
3 Store the adjustment.
66
Page 67

Changing illumination color
You can change the illumination color of the buttons on the monitor panel.
1
2
3
Storing your own adjustments
• When variable color illumination is selected, you
cannot adjust the color.
1 After selecting a color in step 4 on the left...
2 Adjust the color.
ENGLISH
4 Select a color.
Your own color stored (☞ right)
Variable color illumination
• Illumination color changes gradually.
3 Store the adjustment into <User1> or
<User2>.
67
Page 68

Settings for video playback
Picture adjustment
You can adjust the picture quality for video playback
ENGLISH
such as DVD, iPod video, video from an external
component or camera.
1 Display the adjustment menu.
2 Adjust the picture (−5 to +5).
Adjusts the brightness
Adjusts the contrast
Adjusts the tint
Adjusts the color
Changing the aspect ratio
You can change the aspect ratio for video playback.
4:3 signal 16:9 signal
Full:
For 16:9 original
pictures
Zoom:
For 4:3LB
original pictures
Regular:
For 4:3 original
pictures
Auto: • For “DISC” only: Aspect ratio
is automatically selected to
match to the incoming signals.
AV menu items
Switches the category by pressing the corresponding tab
Menu items Selectable settings Initial: Underlined
Fader/Balance Fader: Adjust the front and rear speaker output balance.
• F6 to R6; Initial 0
– When using a two-speaker system, set the fader to the center (0).
Audio
Cursor
Balance: Adjust the left and right speaker output balance.
• L6 to R6; Initial 0
Press [5/∞/2/3] or drag the cursor to adjust.
• To set the fader and balance to the center (0), press [Center].
68
Page 69

AV menu items
Menu items Selectable settings Initial: Underlined
Equalizer Flat/Natural/Dynamic/Vocal Boost/Bass Boost/Super Bass/
Rhythm/Acoustic/Relax/User1/User2/User3 (☞ page 66)
Subwoofer/HPF Adjust the subwoofer output level, Low Pass Filter, and High Pass Filter.
Press [Enter] to adjust each setting.
• Subwoofer Level: Adjust the subwoofer output level.
Off, –24dB to +20dB; Initial 0dB
• LPF Frequency: Adjust the cut-off frequency of low pass filter. *
50Hz to 150Hz (in 10 Hz intervals); Initial 100Hz
• LPF Slope: Adjust the Q-slope for the low pass filter. *
–24dB, –18dB, –12dB, –6dB
• HPF Frequency: Adjust the cut-off frequency of high pass filter.
Off, 50Hz to 150Hz (in 10 Hz intervals)
• HPF Slope: Adjust the Q-slope for the high pass filter.
– Not selectable when <HPF Frequency> is <Off>.
–24dB, –18dB, –12dB, –6dB
ENGLISH
Volume Adjust Adjust and store the auto-adjustment volume level for each source,
Audio
Adaptive Volume When this function is activated, the System automatically increases the
Amplifier Gain You can change the maximum volume level of this unit.
comparing to the FM volume level. The volume level will automatically
increase or decrease when you change the source.
• <Fix> appears if an FM broadcast is selected as the source.
–12 to +12; Initial 0
volume level (both for guidance and for audio) as the car speeds up.
Off, Min, Mid, Max
High: VOL 0 to 20 (for guidance)/VOL 00 to 50 (for audio)
Low: VOL 0 to 15 (for guidance)/VOL 00 to 30 (for audio)
(Select this if the peak power of the speakers is less than 50 W.)
Off: Deactivates the built-in amplifier (VOL 0 to 20 for guidance/VOL 00
to 50 for audio.)
• If you change this setting from <High>/<Off> to <Low
the volume level is set higher than the maximum level of <Low>,
the unit automatically lowers the volume level (guidance: VOL 15/
audio: VOL 30).
> while
Not selectable when the <Subwoofer Level> is <Off>.
*
Continued on the next page
69
Page 70

AV menu items
ENGLISH
Menu items Selectable settings Initial: Underlined
Dimmer Off: Cancels.
Switches the category by pressing the corresponding tab
On: Activates dimmer.
Auto: Dims the screen and the button illumination when you turn on
the headlights.
• The illumination control lead connection is required. (☞
Installation/Connection Manual)
Time: Activates the Dimmer Time setting below.
Dimmer Time Sets the Dimmer On/Off times.
Brightness Adjust the display brightness.
–5 to +5; Initial +5
Illumination Color
Display
Display Color Select the color of the bars and buttons on the touch panel.
Clock on Video/Screen-Off On: The clock time is displayed while video source is played back or the
Off-axis Viewing Select <On> if the screen is hard to see due to the installation angle or
Demonstration This setting will be deactivated and disappear from the menu when the
Front Aux Input On: Select when connecting an audio component to the AUX input
Input
☞ page 67
screen is turned off.
Off: Cancels.
position.
On, Off
System detects the first car movement.
On, Off
terminal on the monitor panel.
Off *: Select when no audio component is connected (“Front AUX” is not
selectable).
* Not selectable when the input is selected as the source.
70
Page 71

AV menu items
Menu items Selectable settings Initial: Underlined
AV Input You can determine the use of the LINE IN and VIDEO IN jacks.
(☞ page 65)
AV: Select when connecting an AV component such as a camcorder.
Audio: Select when connecting an audio component such as a portable
audio player.
1
Off *
: Select when no component is connected (“AV-IN” is not
Input
Bluetooth Audio On: Activates “BT Audio” for source selection.
Camera Input *
Reverse Signal Polarity *
2
2
Language Select the language used for on-screen information and voice guidance.
Time Format 12 Hours, 24 Hours
Time Zone *
DST (Daylight Saving Time) *
System
Beep Adjust the volume of the key-touch tone.
2
2
selectable).
1
: Deactivates “BT Audio” for source selection (“BT Audio” is not
Off *
selectable).
On, Off (☞ page 83)
Battery, GND (☞ page 9)
English, Español, Français
Select your residential area from one of the following time zones for
clock adjustment.
Hawaii (UTC–10:00), Alaska (UTC–09:00), Pacific (UTC–08:00),
Mountain (UTC–07:00), Central (UTC–06:00),
Eastern (UTC–05:00), Atlantic (UTC–04:00),
Newfoundland (UTC–03:30)
Activate this if your residential area is subject to DST.
Auto : Activates daylight saving time.
Off : Cancels.
Off, 1 to 10; Initial 5
ENGLISH
Startup Message Edit the voice message at startup/shutdown of the unit.
Shutdown Message
• To edit the message, press [Edit], enter the message, then press [OK].
You can listen to the edited message by pressing [Test].
– For entering the characters, ☞ page 11.
Startup Screen Select the startup screen when the power is turned on.
Restore Factory Default Initialize all settings you have made. Press [Restore] to initialize the
settings.
• When restoring the settings, adjust the settings on installation setting
screen (☞ page 9).
1
Not selectable when the input is selected as the source.
*
2
*
The setting varies depending on the installation settings (☞ page 9).
71
Page 72

Additional information
File playback
Playing MP3/WMA*1/WAV *2 files
ENGLISH
• This unit can play back files with the extension code
<.mp3>, <.wma>, or <.wav> (regardless of the
letter case—upper/lower).
• This unit can play back the files meeting the
conditions below:
– Bit rate:
MP3/WMA: 32 kbps — 320 kbps
– Sampling frequency:
MP3: 48 kHz, 44.1 kHz, 32 kHz
24 kHz, 22.05 kHz, 16 kHz
WMA: 48 kHz, 44.1 kHz, 32 kHz, 22.05 kHz
WAV: 44.1 kHz
• This unit can show ID3 Tag Version
1.0/1.1/2.2/2.3/2.4 (for MP3).
– ID3 Tag Version 2.4 is not available for SD/USB
playback.
• This unit can also show WAV/WMA Tag.
• This unit can play back files recorded in VBR (variable
bit rate).
• Files recorded in VBR have a discrepancy in elapsed
time indication.
• This unit cannot play back the following files:
– MP3 files encoded with MP3i and MP3 PRO
format.
– MP3 files encoded with Layer 1/2.
– WMA files encoded with lossless, professional,
and voice format.
– WMA files which are not based upon Windows
Media® Audio.
– WMA files copy-protected with DRM.
1
*
WMA files are played only when recorded on a USB
device or SD card.
2
WAV files are played only when recorded on a disc.
*
USB
• This unit cannot recognize a USB device whose rating
is other than 5 V and exceeds 500 mA.
• USB devices equipped with special functions such as
data security functions cannot be used with the unit.
• Do not use a USB device with 2 or more partitions.
• Depending on the shape of the USB devices and
connection ports, some USB devices may not be
attached properly or the connection might be loose.
• This unit may not recognize a memory card inserted
into the USB card reader.
• Connect only one USB device to the unit at a time. Do
not use a USB hub.
• When connecting with a USB cable, use the USB 2.0
cable.
Disc information shown on the
external monitor
The following screens appear only on the external
monitor.
1
*
1 Current folder (highlighted) *
2 Current folder number/total folder number *
3 Folder list *
2
4 Selected playback mode
5 Elapsed playing time of the current track
6 Operation status
7 CD: Current track number/total number of
tracks on the disc
MP3/WAV: Current track number/total
number of tracks in the current folder
8 Track information
9 Track list
p Current track (highlighted)
1
If tag data includes “Jacket Picture” (baseline JPEG), it
*
will be displayed.
2
Only for MP3/WAV
*
2
2
72
Page 73

Additional information
Sound signals emitted through the rear terminals
Through the analog terminals (Speaker out/F OUT/R OUT)
2-channel signal is emitted. When playing multi-channel encoded disc, multi-channel signals are downmixed.
• DTS sound cannot be reproduced.
Language codes (for DVD language selection)
Code Language Code Language Code Language Code Language Code Language
AA Afar FA Persian KK Kazakh NO Norwegian ST Sesotho
AB Abkhazian FI Finnish KL Greenlandic OC Occitan SU Sundanese
AF Afrikaans FJ Fiji KM Cambodian OM (Afan) Oromo SW Swahili
AM Ameharic FO Faroese KN Kannada OR Oriya TA Tamil
AR Arabic FY Frisian KO Korean (KOR) PA Panjabi TE Telugu
AS Assamese GA Irish KS Kashmiri PL Polish TG Tajik
AY Aymara GD Scots Gaelic KU Kurdish PS Pashto, Pushto TH Thai
AZ Azerbaijani GL Galician KY Kirghiz QU Quechua TI Tigrinya
BA Bashkir GN Guarani LA Latin RM
BE Byelorussian GU Gujarati LN Lingala RN Kirundi TL Tagalog
BG Bulgarian HA Hausa LO Laothian RO Rumanian TN Setswana
BH Bihari HI Hindi LT Lithuanian RW Kinyarwanda TO Tonga
BI Bislama HR Croatian LV Latvian, Lettish SA Sanskrit TR Turkish
BN Bengali, Bangla HU Hungarian MG Malagasy SD Sindhi TS Tsonga
BO Tibetan HY Armenian MI Maori SG Sangho TT Tatar
BR Breton IA Interlingua MK Macedonian SH Serbo-Croatian TW Twi
CA Catalan IE Interlingue ML Malayalam SI Singhalese UK Ukrainian
CO Corsican IK Inupiak MN Mongolian SK Slovak UR Urdu
CS Czech IN Indonesian MO Moldavian SL Slovenian UZ Uzbek
CY Welsh IS Icelandic MR Marathi SM Samoan VI Vietnamese
DZ Bhutani IW Hebrew MS Malay (MAY) SN Shona VO Volapuk
EL Greek JA Japanese MT Maltese SO Somali WO Wolof
EO Esperanto JI Yiddish MY Burmese SQ Albanian XH Xhosa
ET Estonian JW Javanese NA Nauru SR Serbian YO Yoruba
EU Basque KA Georgian NE Nepali SS Siswati ZU Zulu
Rhaeto-Romance
TK Turkmen
ENGLISH
73
Page 74

Bluetooth Operations
Information for using Bluetooth® devices
ENGLISH
Bluetooth is a short-range wireless radio
communication technology for the mobile device such
as mobile phones, portable PCs, and other devices. The
Bluetooth devices can be connected without cables and
communicate with each other.
The countries where you may use the
Bluetooth® function
• United States of America
• Canada
Bluetooth profile
This unit supports the following Bluetooth profiles;
• HFP (Hands-Free Profile) 1.5
• OPP (Object Push Profile) 1.1
• PBAP (Phonebook Access Profile) 1.0
• A2DP (Advanced Audio Distribution Profile) 1.2
• AVRCP (Audio/Video Remote Control Profile) 1.3
• Some operations are not available while driving.
When you perform operations, stop your car in a
safe place.
• Some Bluetooth devices may not be connected to
this unit depending on the Bluetooth version of
the device.
• This unit may not work for some Bluetooth
devices.
• Connecting condition may vary depending on
circumstances around you.
• When the unit is turned off, the device is
disconnected.
Warning messages for Bluetooth operations
“Cannot connect. Please
connect from your
device.”
“System can not connect
with this device. Please
disconnect current
device, then connect
from this device.”
“System can not connect
with this device. Please
connect from the
device.”
“Pairing Error.” The operation you have tried
“Connect error.”
“Disconnect error.”
“Delete error.“
“Memory full.” You have tried to copy a
The device is registered but
the connection has failed.
Connect from your phone, or
use <Connect> to connect
the device again (☞ page
76).
Disconnect the current
device, then operate another
device to connect.
Operate the device to
connect.
cannot be completed. Try
the operation again.
501st phone book entry.
Delete unwanted names
before copying.
Bluetooth Information:
If you wish to receive more information about
Bluetooth, visit the following JVC web site:
<http://www.jvc.co.jp/english/car/> (English
website only)
To check the connection status of a
Bluetooth device
74
indicator appears when a Bluetooth device is connected
Page 75

Using Bluetooth device
Registering a Bluetooth device
To connect a Bluetooth device for the
first time
When you connect a Bluetooth device to the unit
for the first time, make pairing between the unit
and the device. Pairing allows Bluetooth devices to
communicate each other.
• Once you register a Bluetooth device, the device
remains registered until the registration is deleted.
(☞ page 76)
• Up to 5 devices can be registered in total.
• Only one device for Bluetooth phone and one for
Bluetooth audio can be connected at a time.
• To use the Bluetooth function, you need to turn on
Bluetooth function of the device.
1 Operate the Bluetooth device to turn on its
Bluetooth function.
2 Display the Bluetooth setting screen.
For connecting a Bluetooth audio player
ENGLISH
• To activate “BT Audio” for source selection, ☞
page 71 (<Bluetooth Audio>).
<Mode> is displayed.
3 Change the PIN code.
• If you skip changing PIN code, go to step 4.
For connecting a Bluetooth mobile phone
<Phone Settings> is displayed.
PIN code (initial: 0000)
Press: Deletes last character
Hold: Deletes all characters
4
75
Continued on the next page
Page 76

Using Bluetooth device
5
ENGLISH
6 Operate the Bluetooth device to connect.
Cancel PIN code (initial: 0000)
“Connected” appears. Press [OK] to confirm the
operation.
Now connection is established and you can use the
Bluetooth device through the unit.
2 To connect
Select the device you want to connect.
: mobile phone / : audio player / : both mobile phone
and audio player
• All registered devices (mobile phone and audio
player) are listed on <Connect Device>.
– Selectable items depend on the device you are
operating.
Connecting/disconnecting a
registered Bluetooth device
1 Display the Bluetooth setting screen. (☞
page 82)
• For Bluetooth mobile phone: <Phone
Settings>
• For Bluetooth audio player: <Mode>
To disconnect
A confirmation message appears.
Deleting a registered Bluetooth
device
Select a device whose registration you want to
delete on <Connect Device> (☞ step 2 above).
A confirmation message appears.
76
Page 77

Using Bluetooth mobile phone
Receiving a call
When a call comes in/making a call...
On map screen:
The mobile phone control bars appear.
Status of the device /Battery reminder (only when the
information comes from the device)
Ends/rejects the call
On AV screen:
Call information (if acquired)
Adjusting the volume of calls/
earpiece
ENGLISH
IncreaseDecrease
• This adjustment does not affect the volume level of
the other sources.
• About the adjustable volume range, ☞ page 69
(<Amplifier Gain>).
This adjustment does not affect the microphone
volume. It is adjusted automatically.
Ends/rejects the call
• Phone operation is not available while the picture
from the rear view camera is displayed (☞ page 83).
When <Auto Answer> is set to <On>
The unit answers the incoming call automatically.
(☞ page 82)
About icons for category of the phone number
Icons which indicate the category of the phone
number appear when the phone number is shown.
The category icons shown may differ depending on
the connected mobile phone.
Category icon
77
Page 78

Using Bluetooth mobile phone
Switching between handsfree
mode and phone mode
ENGLISH
While talking...
Each time you press the button, the talking method is
switched. The corresponding indicator lights in orange
(
: handsfree mode / : phone mode).
• The call may end automatically when switching to
the phone mode, depending on the type of mobile
phone.
Using the phone book/call lists
[ ]
[
[
[
From dialed call list.
From received call list.
]
From missed call list.
]
From phone book.
]
• For copying the phone book, ☞ page 79.
• For searching for a number, ☞ page 79.
Making a call
1
2
Hold: Adds “+”
• You can enter up to 30 numbers.
• If your mobile phone is compatible with Phone Book
Access Profile (PBAP), ☞ page 80.
Making a call while operating on the
navigation system
or
Press: Deletes last character
Hold: Deletes all characters
78
Page 79

Using Bluetooth mobile phone
Copying the phone book
You can copy the phone book memory of a mobile
phone into the unit (up to 500 memories).
1 Display <Phone Book>.
2
Searching for a phone number
from phone book
ENGLISH
1
2 Display the first character of the name you
want to search for (1), then search for a
name (2).
Erases the search operation buttons
PIN code (initial: 0000)
Numbers of the phone book memories copied
3 Operate the target mobile phone.
• Refer to the instruction manual supplied with
your mobile phone.
• To cancel the transfer, press [Finish].
4 Finish the procedure.
The phone book memory is copied from the mobile
phone.
Press the character button repeatedly until the
desired item is displayed.
• Only available characters are selectable.
• When selecting other character than the
alphabet, press [#].
3 Select the phone number to call from the list.
79
Page 80

Using Bluetooth mobile phone
Deleting the phone number
memory in the unit
ENGLISH
1 Display the phone book/call list you want to
delete. (☞ page 78)
2
3 Select the items to delete (1), then delete
them (2).
• The selected items are marked with “✔.”
Selects/deselects all items
About mobile phone compatible
with Phone Book Access Profile
(PBAP)
When your mobile phone supports PBAP, phone book
and call lists are automatically copied to the unit.
• Phone book: up to 5 000 entries
• Dialed calls, received calls, and missed calls: up to 50
entries each
To display the phonebook/call lists of the
mobile phone or the unit
Connected mobile phone Unit
A confirmation message appears.
80
Page 81

Using Bluetooth audio player
• To activate “BT Audio” for source selection, ☞ page 71 (<Bluetooth Audio>).
• To register a new device, ☞ page 75.
• To connect/disconnect a device, ☞ page 76.
Battery reminder (only when the information
comes from the device)
Track no./Playing time
• The operating buttons, indicators and information displayed on the screen differ depending on the connected
device.
Playback mode Sound mode (☞ page 66)
Playback status
(3: play/8: pause)
Tag data (current track
title/artist name/album
title)
ENGLISH
[3] Starts playback.
[8] Pauses.
[4] [¢] Selects track.
[5] [∞] Selects the group. (Works only when
the device supports the function.)
* To cancel random or repeat mode, press the button repeatedly until the indicator disappears.
[ ] Selects Random playback mode. *
]
[
[Mode] Displays the Bluetooth setting
Selects Repeat playback mode. *
screen. (☞ page 82)
81
Page 82

Bluetooth device settings
For Bluetooth mobile phone
1
ENGLISH
2
For Bluetooth audio player
1
2
Menu items Selectable settings Initial: Underlined
Connection
PIN Code Displays the PIN code of the unit.
Device Name Shows the device name to be shown on the Bluetooth device — “KW-NT3HDT” or
Device Address Shows the MAC address of the unit.
Auto Connect On: The connection is automatically established with the last connected Bluetooth
Auto Answer* On: The unit answers the incoming calls automatically.
* Appears only for <Phone Settings>.
Connect: ☞ page 76
Disconnect: ☞ page 76
• To change the PIN code, press [Change], enter a new PIN code, then press [OK].
“KW-NT3HD.”
device when the unit is turned on.
Off: Cancels.
Off: The unit does not answer the calls automatically. Answer the calls manually.
82
Page 83

Rear View Camera Operations
Using a rear view camera
• To use a rear view camera, the reverse gear signal lead connection is required. For connecting a rear view camera,
☞ Installation/Connection Manual.
Activating the rear view
camera
1
Displaying the picture from the
rear view camera
The rear view screen is displayed when you shift the
gear to the reverse (R) position.
2
To display the operating buttons, touch the screen.
Caution message
ENGLISH
3
To deactivate the rear view camera, select <Off>
for <Camera Input>.
[
[
[Bottom][Top] Adjusts the position of the caution
• While picture from the rear view camera is displayed,
only volume adjustment and disc ejection are
available.
• If the picture from the rear view camera is displayed
even though the gear lever is in a position other than
reverse (R), press and hold
picture from the rear view camera, then try one of the
following:
– Perform steps 1 and 2 in “Activating the
– Check the connection of the reverse gear signal
]
]
rear view camera” (☞ left), then change the
<Reverse Signal Polarity> setting in step 3.
lead.
Hides/displays the operating buttons
on the screen.
Adjusts the picture. (☞ page 68)
message.
or to erase the
83
Page 84

References
Maintenance
Caution on cleaning the unit
ENGLISH
Do not use any
solvent (for
example, thinner,
benzine, etc.),
detergent, or
insecticide. This may damage the monitor or the unit.
Recommended cleaning method:
Gently wipe the panel with a soft, dry cloth.
How to clean the connector
Frequent detachment will deteriorate the connectors.
To minimize this possibility, periodically wipe the
connectors with a cotton swab or cloth moistened with
alcohol, being careful not to damage the connectors.
Connectors
How to handle discs
When removing a disc from its case, press down the
centre holder of the case and lift the
disc out, holding it by the edges.
• Always hold the disc by the edges.
Do not touch its recording surface.
When storing a disc into its case,
gently insert the disc around the centre holder (with the
printed surface facing up).
• Make sure to store discs into the cases after use.
Centre holder
To keep discs clean
A dirty disc may not play correctly.
If a disc does become dirty, wipe it with
a soft cloth in a straight line from centre
to edge.
• Do not use any solvent (for example, conventional
record cleaner, spray, thinner, benzine, etc.) to clean
discs.
Moisture condensation
Moisture may condense on the lens inside the unit in
the following cases:
• After starting the heater in the car.
• If it becomes very humid inside the car.
Should this occur, the unit may malfunction. In this
case, eject the disc and leave the unit turned on for a
few hours until the moisture evaporates.
Do not use the following discs:
Warped discSingle CD—8 cm (3-3/16”) disc
Unusual shape
C-thru Disc (semi-transparent disc) Transparent or semi-transparent on its recording area
To play new discs
New discs may have some rough spots
around the inner and outer edges. If
such a disc is used, this unit may reject
the disc.
To remove these rough spots, rub the edges with a
pencil or ball-point pen, etc.
Stick-on labelSticker and sticker residue
84
Page 85

Troubleshooting/error messages
What appears to be trouble is not always serious. Check the following points before calling a service center.
• For operations with the external components, refer also to the instructions supplied with the adapters used for the
connections (as well as the instructions supplied with the external components).
Symptoms Remedies/Causes
No sound comes out of the speakers. • Adjust the volume to the optimum level.
• Check the cords and connections.
The screen is not clear and legible. Sunshine from the windshield may cause this symptom.
Adjust the picture. (☞ page 68)
ENGLISH
The unit does not work at all.
The touch panel does not respond properly. • Keep your hands and the touch panel clean and dry.
General
Navigation guidance or AV source is hard to
listen to.
<Adaptive Volume> setting has no effect
even though it is activated.
CD Text or Tag information of track or song,
etc. is not displayed correctly.
“System start up failed.” The System cannot start up. Detach the monitor panel,
Detach the monitor panel, then attach it. (☞ page 4)
• Eliminate static electricity and do not place magnetic
items near the unit.
• Leave the unit until the temperature becomes stable in
the car.
• A rubber mat on the floor may cause this symptom. In
this case, do not use the rubber mat.
Surround noise interferes. Increase the <Adaptive
Volume> level. (☞ page 69)
Reset the calibration data by selecting <Reset
Calibration Data>. (☞ page 39)
The text may not be displayed correctly depending on the
condition of recording or the type of the character, etc.
though 2-byte and 1-byte characters can be displayed on
the unit.
then attach it. (☞ page 4)
Guidance does not start. The System proceeds calibration. Wait until calibration is
completed. When calibration is completed, the guidance
starts.
You cannot operate some functions of an AV
source on the map screen.
Navigation
Route calculation seems to have stopped. Route calculation may take long depending on the route.
On the map screen, you can operate some limited
functions of the current source only. Press AV MAP and
operate the source on the AV screen.
Wait for a while.
Continued on the next page
85
Page 86

Troubleshooting/error messages
Symptoms Remedies/Causes
Navigation voice cannot be heard from the
ENGLISH
speakers.
The voice guidance does not come out from the
speaker on the driver’s side.
Navigation guidance is sometimes incorrect. Reversing signal/speed signal leads are not connected.
A POI found using <POI Name> in the
<Destination Menu> is not within the
selected city.
The current position displayed on the map
remains wrong for more than 30 minutes.
Guidance volume level is set to the minimum level. Adjust
it to the optimum level. (☞ page 40)
Change the <Output> setting. (☞ page 40)
Connect them correctly (☞Installation/Connection
Manual).
This is not a malfunction. The System may also search
areas around the selected city/state.
Check the connection of the following leads.
– GPS antenna
– Speed signal lead
If any disconnection is found, connect the lead again.
• If no problems are found with connections, reset the
calibration data by selecting <Reset Calibration
Data>. (☞ page 39)
The distance and estimated time in the
guidance are inaccurate after replacing/
Navigation
rotating the tires.
“Check GPS Antenna” Check the connection of the GPS antenna.
“Acquiring GPS Signal” • Acquiring GPS signals. Wait until signal reception is
“Route calculation failed.” Failed to calculate the route. The destination/via point is
“Route calculation is aborted because
destination is too far.”
“Specified destination is not found.” Valid information is not found in the database. Search
“Speed pulse not detected. System works as
GPS only mode until speed pulse is detected.”
Perform <Reset Calibration Data> to clear the
accumulated calibration data. (☞ page 39)
completed.
• GPS signals cannot be received. Move to the place where
the System receives the GPS signals.
too far from any road. Select another destination/via point
where is close to a road.
The destination/via point is too far from the current
position. Select another destination/via point where is
nearer to the current position.
for another place. Press [
different conditions (such as different category or place).
Check the connection of the speed signal lead.
] and search again with
86
Page 87

Troubleshooting/error messages
Symptoms Remedies/Causes
“There is no available traffic information now.” No valid traffic information is available now. Try one of the
followings:
• Move to the place where you can receive traffic service.
• No traffic information on your route. Display the list of all
Navigation
“Selected coordinates are out of map area.
Please input again.”
traffic information. (☞ page 36)
The coordinates you have entered are not available. Press
[OK] and input the coordinates again.
ENGLISH
SSM automatic presetting does not work.
Static noise while listening to the radio. Connect the antenna firmly.
Sound quality changes when receiving HD
Radio stations.
No sound can be heard. • <Analog> is selected when receiving all digital
HD Radio reception
The song cannot be tagged. The HD Radio broadcast does not support iTunes Tagging
“Memory Full. Connect iPod.” You are trying to store the 101st PSD in the unit. Transfer
Store stations manually. (☞ page 47)
Fix the reception mode either to <Digital> or
<Analog>. (☞ page 46)
broadcast of HD Radio station. Select <Digital> or
<Auto>. (☞ page 46)
• <Digital> is selected when receiving weak digital
signals or receiving conventional radio broadcast. Select
<Analog> or <Auto>. (☞ page 46)
function or the broadcast does not contain PSD. You can
tag the PSD only when the TAG indicator lights up on the
screen.
the tagged PSDs to iPod/iPhone or delete all tagged PSDs
from the unit.
“iPod not support tagging.” The connected iPod/iPhone is not compatible with iTunes
Tagging. (☞ page 48)
iTunes Tagging
“Tags transfer failed.” The iPod/iPhone is disconnected during data transfer.
“iPod full. Tags can not be stored.” The memory of the iPod/iPhone is full.
Disc can be neither recognized nor played back.
Disc cannot be ejected.
• Recordable/Rewritable discs cannot be
played back.
Disc in general
• Tracks on the Recordable/Rewritable discs
cannot be skipped.
Eject the disc forcibly. (☞ page 4)
Unlock the disc. (☞ page 50)
• Insert a finalized disc.
• Finalize the discs with the component which you used
for recording.
Continued on the next page
87
Page 88

Troubleshooting/error messages
Symptoms Remedies/Causes
Playback does not start. • Insert the disc correctly again.
ENGLISH
• The format of files is not supported by the unit.
Sound and pictures are sometimes interrupted
or distorted.
No playback picture is shown and caution
message about parking brake appears on
the screen, even when the parking brake is
engaged.
No picture appears on the external monitor. • Connect the video cord correctly.
Disc in general
“Read error” • A disc is inserted upside down. Replace the disc.
“No Disc“ Disc is not inserted. Insert a disc or select another playback
• “Eject Error”
• “Loading Error”
“Region code error”
Disc cannot be played back. • Change the disc.
• Stop playback while driving on rough roads.
• Change the disc.
Parking brake lead is not connected properly.
(☞ Installation/Connection Manual)
• Select the correct input on the external monitor.
• A disc has no playable files.
source.
• Eject the disc forcibly. (☞ page 4)
• Check the disc.
Region code is not correct. (☞ page 51)
• Record the tracks using a compliant application on the
appropriate discs. (☞ page 51)
• Add appropriate extension codes to the file names.
Noise is generated. The track played back is not a playable file format. Skip to
another file.
Tracks are not played back as you have
MP3/WMA/WAV
intended them to play.
Elapsed playing time is not correct. This sometimes occurs during playback. This is caused by
“Error” The track is unplayable.
Noise is generated. The track played back is not a playable file format. Skip to
Tracks cannot play back as you have intended
SD/USB
them to play.
Playback order may differ from the one played back using
other players.
how the tracks are recorded.
another file.
Playback order may differ from the one played back using
other players.
88
Page 89

Troubleshooting/error messages
Symptoms Remedies/Causes
While playing a track, sound is sometimes
interrupted.
“No Files” The SD card/USB device has no playable files. Change the
“No SD Card” No SD card is inserted. Insert an SD card or select another
SD/USB
“No USB Device” No USB device is connected. Connect a device or select
“Read error” The file has not been formatted correctly.
“Error” The track is unplayable.
The iPod/iPhone does not turn on or does not
work.
Sound is distorted. Deactivate the equalizer either on this unit or the
The tracks are not properly copied into the SD card/USB
device. Copy tracks again, and try again.
SD card/USB device.
playback source.
another playback source.
• Check the connection.
• Charge the battery.
• Check whether <Head>, <iPod> or <Ext> is
correctly selected for <iPod Control Mode>. (☞
page 59)
• Reset the iPod/iPhone.
iPod/iPhone.
ENGLISH
Playback pauses. The headphones are disconnected during playback with
iPod/iPhone
No operations are available when playing back
a track containing artwork.
Video is not played back. Check the connection of USB Audio and Video cable (KS-
“Disconnected” Check the connection.
Satellite radio does not work at all. Reconnect the Satellite radio after a few seconds.
“CALL 1-888-539-SIRIUS TO SUBSCRIBE”
“Channel Not Authorized” (XM) Selected channel is unauthorized. Select another channel
Satellite radio
• ”Invalid Channel” (SIRIUS)
• ”Channel Not Available” (XM)
<iPod Control Mode> set to <iPod> or <Ext> (☞
page 59). Restart playback.
It takes a long time to loading an artwork. Operate the
unit after the artwork is loaded. (☞ page 60)
U29, not supplied).
Start subscribing to SIRIUS Satellite radio. (☞ page 62)
or continue listening to the previous channel.
No broadcast on the selected channel. Select another
channel or continue listening to the previous channel.
89
Continued on the next page
Page 90

Troubleshooting/error messages
Symptoms Remedies/Causes
“Channel Off Air” (XM) Selected channel is not broadcasting at this time.
ENGLISH
“Loading” (XM) The unit is loading the channel information and audio.
Text information are temporarily unavailable.
• “Acquiring Signal” (SIRIUS)
• “No Signal” (XM)
“Check XM Tuner” (XM) The XM Mini tuner is not connected. Connect the tuner.
Satellite radio
• “No Antenna” (SIRIUS)
• “Check Antenna” (XM)
“Reset 08” Reconnect this unit and the Satellite radio correctly, and
“No Signal” • Turn on the external component if it is not on.
AV-IN/Front Aux
Bluetooth device does not detect the unit. This unit can be connected with one Bluetooth device at
Signals cannot be received. Move to the place where the
System receives the satellite radio signals.
Connect the antenna firmly.
detach the monitor panel then attach it.
• Connect the external component correctly.
• Check whether <AV Input> setting is correct for “AV-
IN”. (☞ page 71)
a time.
While connected to a device, this unit cannot be detected
from another device. Disconnect currently connected
device and search again.
The unit does not detect the Bluetooth device. Check the Bluetooth setting of the device.
Echo or noise occurs. Adjust the microphone unit position.
Phone sound quality is poor. • Reduce the distance between the unit and the
Bluetooth mobile phone.
• Move the car to place where you can get a better signal
reception.
Bluetooth
The sound is interrupted or skipped while using
a Bluetooth audio player.
The connected audio player cannot be
controlled.
The unit does not response when you tried to
copy the phone book to the unit.
• Reduce the distance between the unit and the
Bluetooth audio player.
• Disconnect the device connected for Bluetooth phone.
• Turn off, then turn on the unit.
• (When the sound is not yet restored) connect the player
again.
Check whether the connected audio player supports
AVRCP (Audio Video Remote Control Profile).
You may have tried to copy the same entries (as stored)
to the unit.
90
Page 91

Troubleshooting/error messages
Symptoms Remedies/Causes
The rear view screen is not displayed when the
gear is shifted to the reverse (R) position.
“No Signal” Check the connection.
Rear view camera
• Check <Camera Input> setting. (☞ page 83)
• Check the connection.
Specifications
Design and specifications are subject to change without notice.
If a kit is necessary for your car, consult your telephone directory for the nearest car audio speciality shop.
System & Service L1, C/A code
Global Positioning System
Standard Positioning Service
ENGLISH
Reception System 12-channel multi-channel reception system
Reception Frequency 1 575.42 MHz
Sensitivity –130 dBm
Update Rate 1/second, continuous
GPS Antenna Polarization Right Handed Circular Polarization
NAVIGATION SYSTEM
Dimensions (approx.) (W × H × D) 30.4 mm × 11.7 mm × 35.5 mm
(1-1/4 inches × 1/2 inch × 17/16 inches)
Cable (approx.) 5.0 m (16.4 feet)
91
Page 92

Specifications
Power Output 20 W RMS × 4 Channels at 4 Ω and
≤ 1% THD+N
ENGLISH
Signal-to-Noise Ratio 80 dBA (reference: 1 W into 4 Ω)
Load Impedance 4 (4 to 8 allowance)
Equalizer Control
Range
Audio Output Level
LINE OUT (F OUT/R
AMPLIFIER
OUT), SUBWOOFER
Video Output
(composite)
VIDEO OUT
Other Terminals Input USB (
Frequency Range FM 87.5 MHz to 107.9 MHz
FM Tuner Usable Sensitivity: 8.3 dBf (0.7 μV/75 Ω)
Frequencies 45 Hz, 120 Hz, 315 Hz, 800 Hz, 2.4 kHz,
6.3 kHz, 15 kHz
Level ±10 dB
Line-Out Level/Impedance 2.5 V/20 kΩ load (full scale)
Output Impedance 1 kΩ
Color System NTSC/PAL
Video-Out Level/Impedance 1 Vp-p/75 Ω
), Front AUX, LINE IN, VIDEO IN,
CAMERA IN, Antenna input, MIC IN
Others OE REMOTE, Satellite unit connector
AM 530 kHz to 1 710 kHz
50 dB Quieting Sensitivity: 14.3 dBf (1.4 μV/75 Ω)
Alternate Channel Selectivity (400 kHz): 65 dB
Frequency Response: 20 Hz to 20 000 Hz (HD Radio broadcast)
Stereo Separation: 70 dB (HD Radio broadcast)
Capture Ratio 3.5 dB
AM Tuner Sensitivity: 13 μV
FM/AM TUNER (HD Radio System Compatible)
Selectivity: 80 dB
Frequency Response: 40 Hz to 15 000 Hz (HD Radio broadcast)
Stereo Separation: 70 dB (HD Radio broadcast)
40 Hz to 15 000 Hz (Conventional
broadcast)
50 dB (Conventional broadcast)
92
Page 93

Signal Detection System Non-contact optical pickup (semiconductor laser)
Specifications
Frequency Response DVD, fs=48 kHz/96 kHz
CD
Dynamic Range 93 dB
DVD/CD
Signal-to-Noise Ratio 95 dB
Wow and Flutter Less than measurable limit
Compatible File System FAT 32/16/12
Capacity 8 Mbytes to 2 Gbytes
SD
Data Transfer Rate Maximum 10 Mbps
USB Standards USB 2.0 High Speed
Data Transfer Rate High Speed: Maximum 480 Mbps
Full Speed: Maximum 12 Mbps
USB
Compatible Device Mass storage class
Compatible File System FAT 32/16/12
Max. Current DC 5 V
Version Bluetooth 1.2 certified
Output Power +4 dBm Max. (Power class 2)
Low Speed: Maximum 1.5 Mbps
500 mA
16 Hz to 20 000 Hz
ENGLISH
Service Area Within 10 m (10.9 yd)
Profile HFP (Hands-Free Profile) 1.5
OPP (Object Push Profile) 1.1
BLUETOOTH
Screen Size 6.1 inch wide liquid crystal display
Number of Pixel 336 960 pixels: 480 × 3 (horizontal) × 234 (vertical)
Drive Method TFT (Thin Film Transistor) active matrix format
MONITOR
Color System NTSC/PAL
Aspect Ratio 16:9 (wide)
Power Requirement Operating Voltage DC 14.4 V (11 V to 16 V allowance)
Grounding System Negative ground
Allowable Storage Temperature –10°C to +60°C (14°F to 140°F)
Allowable Operating Temperature 0°C to +40°C (32°F to 104°F)
Dimensions (W × H × D)
• With trim plate and
GENERAL
sleeve attached
PBAP (Phonebook Access Profile) 1.0
A2DP (Advanced Audio Distribution Profile) 1.2
AVRCP (Audio/Video Remote Control Profile) 1.3
Installation Size (approx.) 182 mm × 111 mm × 161 mm
(7-3/16” × 4-3/8” × 6-3/8”)
Panel Size (approx.) 188 mm × 117 mm × 10 mm
(7-7/16” × 4-5/8” × 7/16”)
Mass (approx.) 2.9 kg (6.4 lbs) (including trims/sleeve/
brackets)
93
Page 94

END-USER LICENSE AGREEMENT
END-USER TERMS
The Map Data Disc (“Data”) is provided for your personal, internal use only and not for
resale. It is protected by copyright, and is subject to the following terms (this “End-User
License Agreement”) and conditions which are agreed to by you, on the one hand,
and NAVTEQ North America, LLC (“NT”) and its licensors (including their licensors and
ENGLISH
suppliers) on the other hand.
The Data for areas of Canada includes information taken with permission from Canadian
authorities, including: © Her Majesty the Queen in Right of Canada, © Queen’s Printer
for Ontario, © Canada Post Corporation, GeoBase ®.
NT holds a non-exclusive license from the United States Postal Service ® to publish and
sell ZIP+4 ® information.
© United States Postal Service ® 2010. Prices are not established, controlled or
approved by the United States Postal Service ®. The following trademarks and
registrations are owned by the USPS: United States Postal Service, USPS, and ZIP+4.
TERMS AND CONDITIONS
Personal Use Only. You agree to use this Data for the solely personal, non-commercial
purposes for which you were licensed, and not for service bureau, time-sharing or
other similar purposes. Accordingly, but subject to the restrictions set forth in the
following paragraphs of this End-User License Agreement, you may copy this Data
only as necessary for your personal use to (i) view it, and (ii) save it, provided that you
do not remove any copyright notices that appear and do not modify the Data in any
way. Except as otherwise set forth herein, you agree not to otherwise reproduce, copy,
modify, decompile, disassemble or reverse engineer any portion of this Data, and may
not transfer or distribute it in any form, for any purpose, except to the extent permitted
by mandatory laws. You may transfer the Data and all accompanying materials on a
permanent basis if you retain no copies and the recipient agrees to the terms of this EndUser License Agreement. Multi-disc sets may only be transferred or sold as a complete
set as provided to you and not as a subset thereof.
Restrictions. Except where you have been specifically licensed to do so by NT
and without limiting the preceding paragraph, you may not (a) use this Data with
any products, systems, or applications installed or otherwise connected to or in
communication with vehicles capable of vehicle navigation, positioning, dispatch,
real time route guidance, fleet management or similar applications; or (b) with or in
communication with, including without limitation, cellular phones, palmtop and handheld
computers, pagers, and personal digital-assistants or PDAs.
Warning. This Data may contain inaccurate or incomplete information due to the
passage of time, changing circumstances, sources used and the nature of collecting
comprehensive geographic data, any of which may lead to incorrect results.
No Warranty. This Data is provided to you “as is,” and you agree to use it at your own
risk. NT and its licensors (and their licensors and suppliers) make no guarantees,
representations or warranties of any kind, express or implied, arising by law or otherwise,
including but not limited to, content, quality, accuracy, completeness, effectiveness,
reliability, fitness for a particular purpose, usefulness, use or results to be obtained from
this Data, or that the Data or server will be uninterrupted or error-free.
Disclaimer of Warranty: NT AND ITS LICENSORS (INCLUDING THEIR LICENSORS
AND SUPPLIERS) DISCLAIM ANY WARRANTIES, EXPRESS OR IMPLIED, OF QUALITY,
PERFORMANCE, MERCHANTABILITY, FITNESS FOR A PARTICULAR PURPOSE OR
NON-INFRINGEMENT. Some States, Territories and Countries do not allow certain
warranty exclusions, so to that extent the above exclusion may not apply to you.
94
Page 95

Disclaimer of Liability: NT AND ITS LICENSORS (INCLUDING THEIR LICENSORS AND
SUPPLIERS) SHALL NOT BE LIABLE TO YOU IN RESPECT OF ANY CLAIM, DEMAND
OR ACTION, IRRESPECTIVE OF THE NATURE OF THE CAUSE OF THE CLAIM,
DEMAND OR ACTION ALLEGING ANY LOSS, INJURY OR DAMAGES, DIRECT OR
INDIRECT, WHICH MAY RESULT FROM THE USE OR POSSESSION OF THIS DATA; OR
FOR ANY LOSS OF PROFIT, REVENUE, CONTRACTS OR SAVINGS, OR ANY OTHER
DIRECT, INDIRECT, INCIDENTAL, SPECIAL OR CONSEQUENTIAL DAMAGES ARISING
OUT OF YOUR USE OF OR INABILITY TO USE THIS DATA, ANY DEFECT IN THIS DATA,
OR THE BREACH OF THESE TERMS OR CONDITIONS, WHETHER IN AN ACTION IN
CONTRACT OR TORT OR BASED ON A WARRANTY, EVEN IF NT OR ITS LICENSORS
HAVE BEEN ADVISED OF THE POSSIBILITY OF SUCH DAMAGES. Some States,
Territories and Countries do not allow certain liability exclusions or damages limitations,
so to that extent the above may not apply to you.
Export Control. You agree not to export from anywhere any part of the Data provided
to you or any direct product thereof except in compliance with, and with all licenses and
approvals required under, applicable export laws, rules and regulations.
Entire Agreement. These terms and conditions constitute the entire agreement between
NT (and its licensors, including their licensors and suppliers) and you pertaining to
the subject matter hereof, and supersedes in their entirety any and all written or oral
agreements previously existing between us with respect to such subject matter.
Governing Law. The above terms and conditions shall be governed by the laws of the
State of Illinois, without giving effect to (i) its conflict of laws provisions, or (ii) the United
Nations Convention for Contracts for the International Sale of Goods, which is explicitly
excluded. You agree to submit to the jurisdiction of the State of Illinois for any and all
disputes, claims and actions arising from or in connection with the Data provided to you
hereunder.
ENGLISH
Government End Users. If the Data is being acquired by or on behalf of the United
States government or any other entity seeking or applying rights similar to those
customarily claimed by the United States government, this Data is a “commercial item”
as that term is defined at 48 C.F.R. (“FAR”) 2.101, is licensed in accordance with this
End-User License Agreement, and each copy of Data delivered or otherwise furnished
shall be marked and embedded as appropriate with the following “Notice of Use,” and
be treated in accordance with such Notice:
NOTICE OF USE
CONTRACTOR (MANUFACTURER/ SUPPLIER) NAME: NAVTEQ
CONTRACTOR (MANUFACTURER/SUPPLIER) ADDRESS:
425 West Randolph Street, Chicago, IL 60606.
This Data is a commercial item as defined in FAR 2.101 and is subject to the End-User
License Agreement under which this Data was provided.
© 2010 NAVTEQ. All rights reserved.
If the Contracting Officer, federal government agency, or any federal official refuses to
use the legend provided herein, the Contracting Officer, federal government agency, or
any federal official must notify NAVTEQ prior to seeking additional or alternative rights in
the Data.
© 2010 NAVTEQ. All Rights Reserved.
95
Page 96

Having TROUBLE with operation?
Please detach the monitor panel,
then attach it
Still having trouble??
USA ONLY
Call 1-800-252-5722
http://www.jvc.com
We can help you!
EN, SP, FR
© 2010 Victor Company of Japan, Limited
0410NSMMDWJEIN
Page 97

KW-NT3HDT/KW-NT3HD
JVC
LVT2141-002A
This
electrical
voltage inverter
dealers.
[JIG]
ENGLISH
unitisdesigned to operate on12V DC, NEGATIVE
systems.
is
required, which can be purchased at
Installation/Connection
Manual
Manuel
rfyouf
vehicle does not have this system, a
Manual
de
instalacion/conexion
d'installation/raccordement
ESPANOL
Jve
ground
car
Esta
unidad esta disenada para funcionar can12V
sistemas
audio
este sistema,
adquiridoenlos concesionariosdeJVCdeequiposdeaudio
autom6viles
electricosdemasa
sera
necesario un inversordetension, que puede
NEGATIVA.Sisu
de
ee,
con
vehiculonoposee
para
ser
© 2010 Victor Company of Japan, Limited
FRAN<;:AIS
Cet appareil est
continude12
type d'alime'ltation, il vous
pouvez
con~u
pour
V a
masse
ache/a
chezunrevendeur d'autoradios
0410NSMMDWJEIN
EN,SP,FR
Jonctionner sur des sources de
NEGATIVE. Si votre vJhicule n'offre pas
Jaut
un convertisseur de tension, que
courant
jVc.
VallS
ce
WARNINGS
• DO
NOT
install
any
unitorwife
any
- it may obstruct
as this
- it may obstruct
this
- it may obstruct visibility.
• DO
NOT
this may result in a traffic accident.
•
The
driver must not watch the
carelessness
• If you need to operate the unit while driving, be sure to look
carefullyoryou may be involved in a traffic accident.
• If the parking brake
brake appears on the screen, and no playback picture
- This warning appears only when the parking brake lead
connected to the parking brake system built in the car.
Notesonelectrical
• Replace
frequently, consult your JVC
• It
is
recommendedtoconnect
of
more than 50 W (both at the rear
impedance
If
the
setting to prevent the speakers from being damaged (see page 69
the
INSTRUCTIONS),
•Toprevent short circuits, cover the terminalsofthe UNUSED leads
with insulating tape.
• The heat sink becomes very hot after use.
when removing this unit.
At
the timeofinstallation, be
•
this unit
into contact with the heat sink on the rearofthe unit.
Dissipateur de chaleur
the
may
may
steering wheel
result in a traffic accident.
the
operationofsafely devices such as air bags, as
result in a fatal accident.
operate any unit while manipulating the steering wheel, as
and
cause an accident.
is
not engaged, caution message about parking
connections:
the
fuse with
oneofthe specified rating. If
of40to
8
maximum
and
Sumidero rermico~..
0).
powerisless
from the car itself) in a way thatnowires can
Heat sink
cable in a location where;
and
gearshift lever operations,
monitor
while driving.Itmay lead to
wl1l
car
audio dealer.
speakers with a
and
than
50 W, change <Amplifier Gain>
suretofix
the
maximum
at the front, with
Be
careful not to touch it
all
wires (wires both from
around
be shown.
is
fuse blows
power
an
come
ADVERTENCIAS
NO
instale ningun receptor 0 tienda ningun cable en una ubicaci6n
donde;
- Oonde pueda obstruirlamaniobra del volante de direccion y del
cambia
de
engranajes, canelconsiguiente riesgo de accidentes
de
trafico.
- Oonde pueda obstruir
seguridad tales
accldente fatal.
- Oonde pueda obstruir
NO
OPERElaunidad mientras
direccion, pues podrfa producirse un accidentedetratko
·EIconductornodebe mirarelmonitor
producirse un descuido, y causar un accidente
•
Si
necesita operarlaunidad mientras conduce, asegurese de mirar
atentamente a
un accidente de trMico.
Sielfreno de estacionamiento no esta aplicado, aparece un mensaje
de precauci6n acerca del
no
se
visualizaralaimagen reproducida.
Esta
advertencia aparece unlcamente cuandoelcable del
-
estacionamientoseencuentra conectadoalsistema del freno de
estacionamfento incorporado
Notas
sobre
of
• Reemplaceelfusible par
se
equiposdeaudiO
Se
mas
40a80)
Silapotencia maximaesde
Amplific.> para evitardanos en
de
Para
UTILlZAOOS
La
denoquemarsealefectuarsudesmontaje.
AI
los que proceden de
manera tal que
de
las
funde frecuentemente, consulte cansuconcesionanodeJVC
recomfenda conectar
de 50 W (tanto atras
MANUALDEINSTRUCCIONfS)
evitar cortocircuitos. (ubra los terminalesdelos cables
unidad estara muy caliente despues del
realizarlainstalaci6n, aseguresedefijar todos los cables (tanto
las
partes traseras delaunidad
el
funcionamiento de dispositivos de
como
bolsasdeaire.
la
su
alrededor pues de10contrario,sepodria producir
Freno
conexi
ones
otro
para
autom6viles
los
como
con cinta aislante
esta
unidad
ninguno
quedeencontaeto coneldisipador termico
pues podrfa resultarenun
visibilidad.
esta
maniobrandoelvolante
mientras conduce. Podrfa
de estacionamiento enlapantalla, y
al
autom6vll
electricas:
del regimen especificado.Siel
altavoces can una porencia maxima
adelante. can una impedancia
menos
de50W,
los
cambie <Gncia
altavoces (consultelapagina 69
uso.
Tengalaprecauci6n
como
los del vehiculo en
AVERTISSEMENTS
•
N'INSTALLEZ
- au iI peut gener raccesauvolant au au levier de vitesse car
peut entrailler un accident delacirculation.
- ou il peut gener
les
- ou
•
NE
car cela peut entrainer un accident de
I.e
corulucleur ne doit pas regarder le
•
de
Freno
fusible
NO
SI)
peut lui Jaire perdre
• Si vous souhaitez operer l'appareil per/dant
assurez-vous de bien regarder
accident delacirculation.
• Si le Jrejn
propos duJrein a
lecture n'apparait.
- Cet avertissement apparait
stationnement est connecte au systeme deJrein de
integni
de
Remarques
• Rernplacer lefusible parW/deLavaLeur precisee. Siiefusible saule
souvent, consulter votre revendeur d'autoradios
• If est recommarutc de connecler des enceil/les avec ur/e puissance de
plus de 50
de
impedance comprise entre 4 0
Silapllissance
de
A mplific. > pour cviter d'elldommllger
de
MANUEL
• Pour eviter
PAS UTILISES avec de
Le
dissipateur de chaleur devient tres chaud apres usage. Faire
•
attention de ne pas
• Au
de cet apparei{ et al/ssi de
filne
I'arriere de I'appareil.
de
au(Un
appareilni
aUClln
la
airbags car
il
peut
COMMANDEZ
moment
pllisse entrer ell contact avec le dissipateur de chaleur situes a
manipulation de dispositifs de securite tels
cela
peul entrainer un acciderlt Jatal.
generlavisibifite.
pas l'appareillors delamanipulation du volant
sa
concentratioll et
amairl n'est pas
main
apparait sur l'ecran et
ala
voiture.
sur
les
connexions
W (les enceintes arriere et
maximum
V'INSTRUCTlONS),
les
cOtlrt-circuits, couvrir
la
bande isolante.
Ie
toucher en
de /'ir/staUation, assurez-vous de
la
la
moniteur
autour
de vous afill de ne pas causer
er/gage,
un message d'avertissemeflt
uniquement
electriques:
les
et
8
0).
est inferieure a 50W,changez <Gain
vos
les
retinmt
voiture eUe-meme) de
ciible dansWIendroit
circulation.
lorsqu'i! conduit. Cela
muser
un accident.
que
vous conduisez,
aunale
image de
quandlefil duJreill de
stationnement
jVc.
enceintes avant, avec
enceintes (voir page69du
barnes des fils
eel
appareil.
fixer
tous
fil(OIl
qui
lie
les
fils
qu'aucun
ala
sont
au:
que
a-
1I11e
(les
WI
fils
Parts
list for
The
Ifanything
Main unitlSleeve/Brackets/Trim plate
Unidad principal/Cubierta/Mensulas/Placa de guarnicion
Appordl
Crimp
Conectordeengarce
Raccord asertir
Use these screws when installing the unit without the supplied sleeve
brackets, (See page 2,)
Utilice estos tornillos cuando instalelaunidad
suministrados. (Consulte
Utilisez (es vis lars de l'installatioll de l'appareil sansIemarlchonJourni et
supports. (Voir page 2.)
installation
following parts are prOVided for this unit.
is
missing, contact your dealer immediately.
principallManchonlSupporlslPlaque d'assel1lblage
connectors
and
connection
antenna(5m/16.4 feet)/Attachment mat
CPS
Antena
GPS
(5
m/16.4
Anterme CPS (5ml16.4pleds)IFeuifle de fixation (Ruban adhesif double-faceY1
la
pagina
2.)
ples)/Estera de fijaci6n (Cinta adhesivadedoble
*1
For installing inside the car
*1
Para
*1 Installation al'interieure de
sinlacubierta y
las
mensulas
Listadepiezas
Con esta unidadsesuministran
SI
hay algun elemento faltante, p6ngase inmedlatamente en contaeto
su
con
Soft case
Estuche blando
ftui
souple
(Double
instalar
and
les
conceslonano
face tape)'"l
dentro
del autom6vil
para
instalacion
la
voiture
Flat head screws
(MS x 8
Tornillosdecabeza plana
(MS
x 8
Vis
arete plate
8
(MS x
las
siguientes piezas
Power
Cord6n de alimentaci6n
Cordon d'alimenlation
cara)*l
mmlMS
x 318")
mm/MS
x
318
I11mlMS
x
318
y conexi
cord
pulgada)
pouces)
on
Microphone
Micr6fono
Micropho/1e
Liste
des
pieces
Les
pieces suivanles
Si quelque chose
immediatement.
AV
1/0
cord
Cordon
AVIIO
Cordon A V EIS
Microphone
Presilla
para
Attache de microphone
pour
I'installationetraccordement
SOnl
fournies avec
manquait,
contactez votre revendeur
clip
micr6fono
Round
head screws
(MS x 8
mmlMS
8
mmlMS
x 318")
318
x
318
pulgada)
pouces)
Tornfllosdecabeza esferica
(MS
x 8 mm/MS x
Vis alete ronde
(MS x
cel
appareil.
Extension lead
Cable prolongador
Cordoll rIlllonge
Microphone
Sa
Support de microphone
holder
porte del micr6fono
Page 98

INSTALLATION
The
following illustration
should
make
any
questionsorrequire
have
consult
your
•
If
you arc
by
a qualified technician.
Before installing
•
When
mounting
instructed.Ifother
damaged.
• When tightening screwsorbolts,becareful not to
connection
• Make sure not to block the fanonthe rear to maintain
ventilation
When installing
brackets
• Use flat head screwsorround
installation location.
unit, use
below). vVhen you use screws
(3/8")-long screws. If
unit.
Tighten
•
Remove
• Keep the
necessary.
Extraiga las placas
· Guarde los tornillosdecabeza esferica
futuro
Retirez les
• Conservez
utiliser si necessaire pour une installation.
(IN-DASH
adjustments
JVC
car
audio
not
sure how to install this unit correctly, have it installed
the
the
unit,besuretouse
screws
cord.
when
installing the unit.
the
When
the
screws
removed
longer
the screws firmlytoprevent the unit from falling off.
the
metal
protection
round
head screws (MS x 8
durantelainstalaci6n,sifuera necesario.
plaques
les
vis
atete ronde (M5 x 8
MOUNTING)
shows
a typical installation. However, you
correspondingtoyour
information
dealerora
unit
arc
used.
unit
without
head screws,
you use
from
other
screws
metalicas
metalliquesdeprotection
regarding
company
the
screws
parts
could
using
dependingonthe
round
head
the
metal
protection
than
those
are
used, they
plates
before
rnm/MS
protectoras
(MS
x B mm/MS x
mmlMSx318
specific car. If you
supplying
become
pinch
the
sleeve
screws to install
supplied, use 8 mill
could
x 318") for installation use
antesdela instalaci6n.
installation kits,
kits.
provided,
as
loose
or
any
proper
and
the
plates (see
damage
the
installation.
318
pulgada) para usa
avant
I'installation.
pouces) afin de pouvoir
INSTALACION
(MONTAJEENEL
TABLERO
DE
INSTRUMENTOS)
La
siguiente ilustraci6n muestra una instalaci6n trpica.
usted debera efectuar los ajustes correspondientes asuautomovil.
Si
tiene alguna pregunta 0 necesita informacion ace
herramientas para instalacion, consuite consuconcesionario
JVCdeequiposdeaudio para autom6viles 0 a una compania
suministra tales herramientas.
·
Sinoesta seguradepoder instalarlaunidad correctarnente, dejela
en manos
de
Antesdeinstalarlaunidad
•AIinstalarlaunidad, aseguresedeusar los tornillos suministrados,
de
corre
·
AI
de
•
AI
panel trasero a fin
Instalaci6ndela
mensulas
· Utilice tornillosdecabeza plana 0 esferica,
de
instalar
protectoras (vease debajo).
los suministrados, escoja tornillos
lOrnillas mas largos producir danos alaunidad.
Apriete los tornillos
un tecnico cualiflcado.
acuerdo
con
las
el
apretar los tornillos 0 los pernos, aseguresedeque
eonexi6n
efectuarlainstalaci6n, aseguresedeno
instalaci6n.Sidecide utilizar lOrnillosdecabeza esferica para
if
les
instruccianes.Siemplea otras tipos de tornillos,
riesgodeque
la
unidad, utilice los extraidosdelas
quede
las
piezasseaflojen 0sedanen.
pillado
de
mantener
unidad
una ventilaci6n correcta
sin utilizar la
Si
decide utilizar tornillos distintos
deBmm
firmemente
para evitar
(MS
(MS
Tornillos
x 8 mm/MS x
Sin
embargo
rcadelas
de
que
ningun
bloquear el ventilador del
cubierta
y las
dependiendo
placasdemetalieas
(3IB
quelaunidadsecaiga.
(M5
x 8
mmlMSx318
dellugar
U
)
de
largo.EIuso
Round
head
x 8
screws
mm/M5
x 318")
de
cabeza esferica I
318
pulgadal - ,
Vis atete ronde _
pouces)
cable
de
INSTALLATION
DE
BORD)
L'illustration suivante est
Cependant, vous devezfaire
voiture.
Si
kits d'installation, consulter votre revel1deur d'autoradios
compagnie d'approvisio11nement.
• Si vous n'etes pas sur de pouvoir installer l'appareil correctement,
faite-Ie installer par un technicien qualifie.
Avant
d'installer
•
Lors
du montage de l'appareil, assurez-vous d'uti/iser
de
la
fafon
peuvent etre perdues ou endommagees.
• Lorsque vous serrez
pillcer un cordon de connexion.
• Assurez-vous de ne pas bloquer
lors de !'installation afin de permettre une ventilation correcte.
LorsdeI'installationdeI'appareil
manchonetles
• Uti/isez des
l'emplacemerlt de l'installation. Quand vous utilisez
pour installer l'apparei/, uti/isez
de protection (voir ci-dessous). Quand vous utilisez d'autres vis que
de
les
vis
fournies, lllilisez
risquez d'endommager l'appareil
• Serrez
les
Metal
protection
Placas
metalicas protectoras
Plaques metalliques de protection
<_I'
=~~;;:;;JJIP
vous avez
(MONTAGE
urI
des
questions ou avez besoin d'information surdes
DANSLETABLEAU
exemple d'installation typique.
les
ajustements correspondant avotre
I'appareil
indiquee. Si vous utilisez d'autres vis, certaines pieces
des
visoudes
boulons,faites attention de ne pas
Ie
ventilateur surIepanneau arriere
sans
supports
vis
atete plate ou des
vis
solidement pour eviter que l'appareil tombe.
plates
des
vis
vis
les
vis retirees
d'une longueur
si
)
utiliser
atete ronde,
vous llti/isez
Tornillosdecabeza esferica
des
de8mm
des
Round
head
(M5
x 8
mm/M5
x 8 mm/MS x
IMS
Vis atete ronde
(M5
x 8
mmlMSx318
erl
IVC
ou une
les
visfotlrtlies,
de
fonction de
des
vis
atete ronde
plaques metalliques
(318").
Vous
vis
plus longues.
screws
x 318")
318
pulgada)
pouces)
Remove
the
audio
with its
Be
•
for
2 Detach
J Detach
sure to keep all
future
system originally installed in the car,
mounting
brackets.
use.
the
monitor
the
trim
plate.
4 Detach the sleeve from
5 Install
the
sleeve in the
6
Do
the
required
• See pages 4-6.
7 Install
• Make
118")
they
S Attach
9 Attach the
electrical
the
main unit in the sleeve.
suretouse the
originally
attachedtothe
could
damage
the
trim
plate.
monitor
the
screws
and
panel.
the
unit.
dashboardofthe car.
connections.
round
head
unit.
the unit.
panel.
parts
removed
screws (M2.6 x 3
Iflonger
screws
from
mm/M2.6
are
together
your
used,
2
Desmonteelsistemadeaudio
junto
can
cache,
• Asegurese
car
vehfculo para poderios usar enelfuturo.
2 Desenganche
J Desenganche
4 Separe
5 Instale
6 Realice todas
. Consulte
7
(oloquelaunidad principal enlacubierta
Asegurese de utilizar los tornillos
x
mm/M2.6
3
usodetornillos mas largos producir danos
8 Fije
la
9 Fije
el
los
de
guardar lOdos los lOrnillos y piezas quitadosdesu
el
panel del monitor.
la
placa de guarnici6n.
la
cubiertadela
la
cublerta enelcubretablero del aulOm6vii.
las
canexiones electrieas necesarias.
las
paginas 4-6.
x
118
placadeguarnici6n
panel del
monitor.
instalado
mensulas de montaje.
unidad.
pulgadal Djados
de
origlnalmente
originalmente
cabeza esferica (M2.6 x
en el
ala
unidad.
ala
unidad
RetirezIesystbne
temps que
les
• Assurez-vous de conserver toutes
votre voiture pour wle utilisation dans
Z Derachez
J Detachez
4 Detachez
5 lnstallez
6 Realisez
7 Installez l'appareil principal
EI
8 Fixez
9 Attachez
Ie
Ia
Ie
Ie
les
• Referez-vous
• Assurez-vous d'utiliser
1/8 pouces) originellement attaches
d'endommager l'appareil
fa
plaque d'assemblage.
Ie
3
audio d'origine instaUe danslavoiture en
supports de wOlltage.
panneau du mOlliteur.
plaque de gamiture.
manchon de l'appareil.
mallchon dallsIetableau de bord delavoiture.
conncxiollS eJectriques requises.
aux
pages 4-6.
panllcau dll moniteur.
les
vis et pieces defachees de
Ie
future.
damIemanchon.
les
vis atete ronde (M2.6 x 3 mm1M2.6 x
al'apparei/.
si vaus utilisez des vis plus longues.
VOriS
meme
risquez
98
Monitor
panel
Panel del
monitor
Panneau du nlOniteur
2
Page 99

Install the unit at an angle of less than 30· vertically and ofless than 5· horizontally.
Instalelaunidad a un
lnstallez l'appareit avec un aflgle vertical de moirls de
angulo
de menos de
30°
en sentido vertical, ydemenosde5°
30·
et un angle horizolltal de moillS de
en sentido horizontal.
5·
S'
Installing
• People who
the magnetic antenna and should not handle
causes malfunctions
• Keep the magnetic antenna away from the storage media such
disks, credit cards; otherwise, their data willbecollapsed.
• The antenna should
in the event
Inside
Beneath a non-metallised*2 window,
dashboard.
• Make sure that the antenna
parts
Outside
Fix the antenna to a pre-washed, flat, metallic surface.
• Wire the antenna cord so
• The antenna magnetically attached
180
secured for higher speeds.
• Detach the antenna before you wash the car with the car-wash
facilities.
the
GPS
antenna
use
pacemakers should avoid a physical contact with
of
the pacemakers.
be
attached so firmly thatitcannotbedetached
of
a collisionorsudden braking.
the
car
The windows with screen antenna, windshield heating or
thermally insulated screens
will
degrade the reliabilityofthe Navigation System.
of
the car anditcan receive the signals from
will
is
not covered by any components and
fix
the antenna on the
interfere with
it
themselves. This
GPS
reception, and
all
directions.
':;;:::~~,:
Attachment mat (Double face
Esrera
de fijaci6n (Cinta adhesiva de
Feuille de
fixation
(Ruban adhesifdouble-face)
the
car
as
not to allow the rain to leak in.
km/h (110 mi/h) (maximum). The antenna must be specially
will be used even at a speed
GPS
Instalaci6ndela
•
Las
personas portadorasdemarcapasos
Fisico
conlaantena magnetica, y deben abstenersedeintentar
su
as
antenna.
manejo. Esto puede producir un fallodefuncionamientoenel
marcapasos
la
Mantenga
como
por
ejemplo
dana
ran
los datos
la
antena firmemente, para evitar
Sujete
de
eventual
Dentro del autom6vil
Debajodeuna ventananometalizada*2, fijelaantena sobreeltablero
de instrumentos.
*2
Las
ventanillas
en el cristal del parabnsas
interfieren con
sistema de navegaci6n
denotaparlaantena con
Asegurese
del autom6vil, y
las
direcciones.
todas
~
......•.
~.-
tape)~·
doble
cara)-"":;::':
Fuera del autom6vil
Fijelaantena sobre una superficie metalica plana, previamenre lavada
tenderelcable de antena paranopermitirlaentrada de
Procure
of
lIuvia
La
antena fijada magneticamente
velocidades del orden
velocidades superiores,laantena debera estar especial mente
asegurada.
la
Desmonte
automatico
GPSantenna
Antena
GPS
Antenne
CPS
antena
GPS
deben
evitarelcontacto
antena magnetica alejada de los mediosdealmacenaje
disquetes, tarjetasdecredito, y otros, pues
un choque 0 de un frenado brusco.
que
cuentan con antenas con panralla, calefacci6n
0 pantallas
la
recepci6n
de
quelarecepci6ndela
.~J
..
~
...
-.~.
.
quesesalga enelcaso
termicamente
GPS,
y disminuiranlaconfiabilidad del
ningun
componente
senalesposible desde
~
puede
km/h
......-
utilizarse incluso a
(110
mi/hl
~r>
(maximo).
de
180
antena antesdelavarelautom6vil
~
se
aisladas
ni pieza
Para
en un lavacoches
InstallationdeI'antenne
• Les personnes utilisant un stimulateur cardiaque doivent eviter tout
contact physique avec I'mllenne magnetique
manipuler elles-meme. Cela pourrait efltrainer un dysfonctionnement
du
stimulateur
• Tenez l'arltenne magnCtique
que
corrompues.
• L'antenne doit etre fixee suffisamment sofidement pour qu'elle ne
puisse pas
AI'interieurdela
Derriere
bard.
*2 Les vitres avec
ou
CPS et reduisent
• Assurez-vous
ou aucune partie de
les
cardiaque.
les
disques,
les
cartes de credit; sinon,
se
detacher en
unefenetre
les
ecrans d'isoLation thermique in/erferent aveclareceptiOfI
directions.
voiture
non metallisee*2,jixez l'antenne surIetableau de
une
antenne
la
fiabilite du systeme de navigation.
que
l'antenneII'est
La
voiture et peut reccvoir
GPS
et
ne doivent pas
adistallce des supports de
cas
de choc ou de coup defrein brutal.
incrustee,
les
donnees pourraient
Ies
chauffagesdepare-brise
recotlverte par aucun composalll
ies
signaux de toutes
la
mbnoire
I"
AI'exterieur
Fixez l'antenne sur une surface metalliquc plate preaiablement
nettoyee.
• Cablez
al'interieur.
• Une fois fixee, l'antenne magnCtique ne
une
fixee specialement pour
• Detachez !'antcune avant de faver votre voiture dans un poste de
lavage.
delavoiture
Ie
cordon
vitesse de 180
d'antemu
km/h(J/0
de fa(on aempecher
milh)
(maximum).
ies
vitesses plus
se
dtitachera pas
eIew!es.
fa
pluie de penetrer
meme
L'antenne doit i:tre
a
tels
are
TROUBLESHOOTING
•
The
fuse
blows.
~
Are the red and black leads connected correctly?
•
Power
cannotbeturned
~
Is
the yellow lead connected?
•Nosound
"+-
•
,.
,.
• Noise
,.Isthe rear ground terminal connectedtothe car's chassis using
• This
"+-
"+-
• This
....
from
Is
the speaker output lead short-circuited?
Soundisdistorted.
Is the speaker output lead grounded?
Are the
"-"
terminalsofLand
interfere
shorter and thicker cords?
unit
becomes
Is
the speaker output lead grounded?
Are the
"-"
terminalsofLand
unit
does
Detach the monitor panel, then attach it.
the
with
hot.
not
workatall.
on.
speakers.
Rspeakers grounded in common?
sounds.
Rspeakers grounded in common?
~
,I.>
~
~!f!};i
"'"
LOCALIZACIONDEAVERIAS
•EIfusiblesequema.
* tEstan los conductores rojo y negro correctamente conectados?
•Noes
posible
* tEsta el cable amarillo coneetado?
•Nosale
* tEsta el cable
•EIsonido
* tEsta
* tEstan los terminales
masa comun?
•
Perturbacion
* tEl terminal
utilizando los cordones mas corto y mas grueso?
•Launidadsecalienta.
* tEsta
* tEstan
conectados a una masa comun?
• Esta
* Oesenganche el panel del monitor, a continuaci6n, enganchelo.
conectarlaalimentaciim.
sonidodelos
presenta
el
cabledesalida del altavoz conectado amasa?
el
cabledesalida del altavoz conectado a masa
los
terminales N-"de
unidadnofuncionaenabsoluto.
altavoces.
de
salida del altavoz cortocircuitado?
distorsion.
"-"delos
altavoces L y Rconectadosa una
de
ruido~
de
tierra trasero esta conectadoalchasis del autom6vil
los altavoces izquierdo y derecho
7
EN
CASDEDIFFICUL
•Lefusible
~
• L'appareilnepeut
~
•
"+-
•Leson
,.
,.
•
"+-
• L'appareil
".
~
•
"+-
saute.
Les
fils rouge et noir sont-ils racordes correctement?
Le
fil
jaune
est-elle raccordee?
Pasdeson
alamasse?
Interference
Le fil de sortie d'enceitlte est-if alamasse?
a
eet
Detacheziepanneaudumoniteur, puis reattachez·le.
des
Le
fil de sortie d'enceinte est-it court-circuitC?
est
deforme.
Le
fil de sortie d'enceinte est-it a
Les
bomes
"-"
des eflceintes gauche et droit sorJf-elies mises ensemble
La
voiture avec un cordon court et epais?
Les
la
avec
prise
arrif?re
devient
bornes
"-"
des enceintesgauche et droit sont-elles mises
masse?
appareilnefonctionne
TES
pas
etre
mise
enceintes.
la
masse?
les
sons.
de mise a
la
terre est-eUe coYmecteeauchassis de
chaud.
pasdutout.
sous
tension.
la
oisemble
Page 100

ENGLISH
ESPAI'JOL
FRAN<;:AIS
ELEaRICAL
To
prevent
battery's negative terminal and make
installing
• Be
suretoground
installation
•Besure any cableisnot caughtonthe car's chassisorunder
PRECAUTIONSonpower supply and speaker connections:
- DO NOT
car
_ BEFORE connecting the speaker leadsofthe power cord to the
speakers, check the speaker wiring in your car.
Before
Incorrect connection may cause serious damage to this unit.
The leads
body may be different
Connect the colored leads
specified
CONNECTIONS
short
circuits, we
the
unit.
.
connect
battery;
otherwise,
connecting:
of
the power cord and thoseofthe connector
in
the illustration below.
recommend
all
this
unittothe
the
speaker
Check the wiring in the vehicle carefully.
in
color.
car's
leadsofthe
the
unit
willbeseriously
of
the power cord in the order
that you disconnect the
electrical connections before
chassis
again
power
cordtothe
damaged.
frol11
2 Connect the antenna cord and the GPS antenna.
3 Finally connect the wiring harness to the unit.
Rear ground terminal
Terminaldetierra posterior
Bome
arriere de masse
B~m
o
©CJ
.,,;oN..",
I I
6
CONEXIONES
Para
evitar cortocircuitos, recomendamos Que desconecte el terminal
negativo
de
antes
after
•
AseguresedevolveT a
del
scals.
the car
automovil
• Asegurese
autom6vil0debajodelos asientos.
PRECAUCIONES
de
los altavoces:
-NOeonecte
alimentacion
producirse
ANTESdeconectar a los altavaces los
cabledealimentaci6n. verifique el
autom6vil.
Antes
delaconexion:
vehiculo. Una conexi6n incorrecta
la
unidad. Los cordones del cable de alimentaci6n y los del conector
procedentes
en color.
Coneete los conductoresdecolor del cabledealimentaci6n en
orden especificado enlailustraci6ndeabajo.
2 Conecte el cable
3
Por
T
OO~
[J]
~o
~
~Fusiblede
ELEaRICAS
delabateria y
instalarlaunidad.
ultimo.
I
Venlilador
que
efeetue todas
conectar
despues
de
que
ningun
sabre
las
los
eonductoresdealtavoz
a la
bate
graves
danosenlas
Verifique
delacarroceria del aUlOm6vii podrian
de
antena ylaantena
conecte el cabledealimentaci6n alaunidad.
Fan
Velllilale",
IDA
fuse
PrlSlble
lOA
amasa
delainstalaci6n.
cable quede atrapadoenel chasis del
conexionesdela
riadeautomovil,
unidades.
conduct
canexionadodealtavozdesu
atentamenteelconexionado
pod
ria
producir
See each diagramonpages 5-6.
Vea
cada
Rejerez-volls a
lOA
las
conexiones electricas
esta
unidadalchasis
fuemedealimemaci6n
del
cable
de
pues
podrian
oresdealtavoz
dallaS graves
serdediferentes
GPS
unodelos diagramas en
dwque
diagrammedes pages 5-6.
RACCORDEMENTS
Pour eviler
tout
fa
bome
fII}gativedela
avant
electriques
-
Assurez-vousderaccorderdenouveaulamise
eet
appareilauchassisdela
•
ASSllreZ-VOlls
sous
fes
sieges.
y
PRECAUTIONS
•NECONNECTEZ
d'alimentation
serieusement
_ A
del
del
en
VANTdeCOfl1Iecter
tWX
enceilltes, verifiezIecabfage des enceintes de votre voilure.
A
van!decommetlcer
cabfagcdulIehicufe. Vile connexion incorrecte peut
serieusement rappareil.Lefilducordon d'afimel'ltatiollelceux des
coli/we/curs
el
Z Connectez
du
Conneclez
les
specifie sur I'illustra/ion ci-nessous.
Ie
3 Finaleme1lt, COllllectez
las
paginas 5-6.
ELECTRIQUES
court-circuit,
d'installer l'appareil.
qu'allwtl
sur
ch(jssis delavoilure peuvenl eire differents
fils coloresducordo11
cordon d'anfenlle el!'anfell11e CPS.
"ous
vous recol1lmandons de debrancher
batterie et d'effectller
voiture
cable n'cst coince sur du;ssis delaI'oiture
ralimentatiolletfa
PAS
les
it la
batterie;
endommage.
les
fifs d'enceintesducordon d'alimelltation
112
(onnexion:
Ie
*\
.\
(onnexion
fils
d'enceintesducordon
sinon,
\!erifiez attelllivement
d'alime1lfalion
faisceau de fils ti !'appareil.
ot included for this unit
No
suministrado
Non
foumi
tOilS
les
raCi'ordemenls
ala
apres
I'installation.
des ellceitltes:
I'appareil
sera
endommager
dOllS
con
esta
avec cet appareil
masse
it
Ie
ell
I'ordre
unidad
de
Oll
cOLl/eur.
~
~W~R
u
l---f--'1f--Lf-----,
t
n
2
GPS antenna
(see
page
3)
Antena
GPS
(consultelapagina
Antenne
CPS Radio
(lloir page 3) Antena
....
__
._
..
_._--_._.
__
-1
Before checking the operationofthis unit prior to
installation, this lead must be connected, otherwise
power cannot be turned on.
-2
Antesdecomprobarelfuncionamientodeesta
unidad previa a
conectar este cable.
coneetar
*2
Pour verifierIefmlctiomlement de eet appareit
avant
l'appareil ne pellt pas
delainstalaci6n,esnecesario
la
alimentaci6n.
installation,
t
3)
2~
Anlemle
._._.
__
.
__
._
...._....._....
de10contrarionose
cepl
doit etre raccorde, si,,01l
are
mis sous tension.
antel1n~
a
_-__-_-_-._..
~.
[]
....._.....
t
;------------------------------------------------------------------------------------;
: :
_..: :
~BI:a;C.rrko
3 tGND) 1
Yellow
*2
2
Amarillo·
Jaune
*2
(g)
Red
Rojo
de
radio
1
podra
radiO
"':
_.
Rouge
Blue
Azul
Bleu
(POWER
Blue with white stripe
Azul
con
rayas
can
rayas blancas
(ILLUMINATION
blancas
(REMOTE
(PARKING
Bleu avec halide blanche
Orange with white stripe
Naranja
Orange avec bande blanche
Light green
Verde claro r
Vertc/air
!===============r
To
metallic bodyorchassisofthe car
Auncuerpo
CD
Ven
Toalive
terminal in the fuse block connecting to the car battery
(bypassing the ignition switch) (constant
Aunterminal ac.tivo del
autom6vil
A
wle
/Jome
lIoiture (ell derivant l'inlerruptellr d'alhll/wge)
ANTENNA)
OUT)
CONTROL)
BRAKE)
metalico 0 chasis del
corp' mCtalliqlle au chtissi, delavaillire
(desvlandoelmterruptordeencendido) (12 V constantes)
bloquedefusibles
SOtH
ICflsiOl/duporle-fusible cOllllectee
To
an accessory terminalinthe fuse block
A un terminal accesorio del
®
Vers borne accessoire du porle-fusible
'1'0
automatic antennaifany (250 mA max.)
®
~
la
antena automatica.sihubiere
A rantet/He
To
the remote leadofother
AI
conductor
®
Au
fil de teleeomf11ll1ule d'ull autre appareil (200mAmax.)
To
car light control switch
Al
interruptordecontroldelas
®
A I'interrupteur d'eclairage de
:;
(])
~
12 V)
automalique
remota
~
~
Crimp
Conectordeengarce
Raccord asertir
autom6vil
,------------,
Ignition switch
Interrupterdeencendido
}
...
~ii'
".,
j JlJterrupteur d'allumage
L-
conectado
ala
bateria del
ri:
fa
ballerie de
la
(/2
V constmlt)
bloquedefusibles
(250mAmax.)
s'it y ell a
une
equipment (200mAmax.)
del
otra
equipo
luces del
la
I'Oitllre
To
parking brake (see diagram~on
AI
renodeestacionamiento (veaseeldiagrama ~delapagina
(,
did
Au;rei/l
estatio1lttement(voir e
connector
}"+a'---O-+------
~Fuse
}
Bloquedefuslbles
Porte-fusible
(250
mA
max.)
(200mAmax.)
automovil
page 5.)
.iagramtlle.~
block
-d
,
elapage5.)
I
~
~
5).
White with black stripe
Blanco
con
rayas
Blanc avec bande /loire
negras
White Gray with black stripe
Blanco Gris con rayas negras
(-)
(+)
Blanc Cris avec bande noire
Left speaker
;am;
Altavoz Izquierdo (frontal)
~
Erlceillte gauche (avIHIt)
~
(front)
®
Gray Green with black stripe
Gris Verde
(-)
(+) Cris
Right speaker (front)
;am;
Altavoz derecho (frontal)
~
Enceinle droit (avant)
con
VerI
avec bande noire
4
rayas
negras
Green Purple with black stripe Purple
Verde Purpura
(-)
(+) Vert Violet avec ballde noire
~
~
Left speaker (rear)
Altavoz izquierdo (trasero)
Enceinte gauche (arriere) Enceinle droit (arriere)
can
rayas negras Purpura
(-)
~
~
(+)
Violet
Right speaker (rear)
Altavoz derecho (trasero)
 Loading...