

Page 1

KD-R492M / KD-R491M
CD RECEIVER
INSTRUCTION MANUAL
CD-PECИBEP
ИHCTPУKЦИЯ ПO ЭKCПЛУATAЦИИ
CD RECEİVER
KULLANIM KILAVUZU
ENGLISH
РУCCKИЙ
TÜRKÇE
B5A-2124-00 [M2]
Page 2
Information on Disposal of Old Electrical and Electronic Equipment and Batteries (applicable
for countries that have adopted separate waste collection systems)
Products and batteries with the symbol (crossed-out wheeled bin) cannot be disposed as household waste.
Old electrical and electronic equipment and batteries should be recycled at a facility capable of handling
these items and their waste byproducts.
Contact your local authority for details in locating a recycle facility nearest to you. Proper recycling and
waste disposal will help conserve resources whilst preventing detrimental effects on our health and the
environment.
Notice: The sign “Pb” below the symbol for batteries indicates that this battery contains lead.
For Turkey
Bu ürün 28300 sayılı Resmi Gazete’de yayımlanan Atik Elektrikli ve Elektronik Eşyalarin Kontrolü
Yönetmeliğe uygun olarak üretilmiştir.
Eski Elektrik ve Elektronik Ekipmanların İmha Edilmesi Hakkında Bilgi (atık yan ürün toplama
sistemlerini kullanan ülkeleri için uygulanabilir)
Sembollü (üzerinde çarpı işareti olan çöp kutusu) ürünler ev atıkları olarak atılamaz.
Eski elektrik ve elektronik ekipmanlar, bu ürünleri ve ürün atıklarını geri
dönüştürebilecek bir tesiste değerlendirilmelidir. Yaşadığınız bölgeye en yakın geri
dönüşüm tesisinin yerini öğrenmek için yerel makamlara müracaat edin. Uygun geri
dönüşüm ve atık imha yöntemi sağlığımız ve çevremiz üzerindeki zararlı etkileri
önlerken kaynakların korunmasına da yardımcı olacaktır.
For Israel
The marking of products using lasers
The label is attached to the chassis/case and says that the component uses laser beams that have been
classified as Class 1. It means that the unit is utilizing laser beams that are of a weaker class. There is no
danger of hazardous radiation outside the unit.
Маркировка изделий, использующих лазеры
К корпусу устройства прикреплена табличка, указывающая, что устройство использует лазерные
лучи класса 1. Это означает, что в устройстве используются лазерные лучи слабой интенсивности.
Они не представляют опасности и не распространяют опасную радиацию вне устройства.
Lazer kullanan ürünlerdeki işaretler
Şasi/Kasa üzerinde bulunan ve bileşenin Class 1 (Sınıf 1) olarak sınıflandırılan lazer ışını kullandığını
belirten bir etiket bulunur. Bu etiket, ünitenin düşük sınıf lazer ışınları kullandığı anlamına gelir. Ünite
dışında zararlı radyasyon tehlikesi yoktur.
i
Page 3

Declaration of Conformity with regard to the RE Directive 2014/53/EU
Declaration of Conformity with regard to the RoHS Directive 2011/65/EU
Manufacturer:
JVC KENWOOD Corporation
3-12, Moriya-cho, Kanagawa-ku, Yokohama-shi, Kanagawa, 221-0022, JAPAN
EU Representative:
JVCKENWOOD Deutschland GmbH
Konrad-Adenauer-Allee 1-11, 61118 Bad Vilbel, GERMANY
English
Hereby, JVCKENWOOD declares that the radio equipment “KD-R492M/KD-R491M” is in compliance with
Directive 2014/53/EU.
The full text of the EU declaration of conformity is available at the following internet address:
http://www.jvc.net/cs/car/eudoc/
Декларация соответствия относительно Директивы RE 2014/53/EU
Декларация соответствия относительно Директивы RoHS 2011/65/EU
Производитель:
JVC KENWOOD Corporation
3-12, Moriya-cho, Kanagawa-ku, Yokohama-shi, Kanagawa, 221-0022, JAPAN
Представительство в ЕС:
JVCKENWOOD Deutschland GmbH
Konrad-Adenauer-Allee 1-11, 61118 Bad Vilbel, GERMANY
Русский
JVCKENWOOD настоящим заявляет, что радиооборудование «KD-R492M/KD-R491M» соответствует
Директиве 2014/53/EU.
Полный текст декларации соответствия ЕС доступен по следующему адресу в сети Интернет:
http://www.jvc.net/cs/car/eudoc/
RE Direktifi 2014/53/EU uyarınca Uygunluk Beyanı
RoHS Yönergesi 2011/65/EU'ya göre Uygunluk Bildirimi
Üretici:
JVC KENWOOD Corporation
3-12, Moriya-cho, Kanagawa-ku, Yokohama-shi, Kanagawa, 221-0022, JAPAN
AB Temsilcisi:
JVCKENWOOD Deutschland GmbH
Konrad-Adenauer-Allee 1-11, 61118 Bad Vilbel, GERMANY
Turkish
Burada, JVCKENWOOD “KD-R492M/KD-R491M” radyo ekipmanının 2014/53/AB Direktifine uygun
olduğunu bildirir.
AB uyumluluk deklarasyonunun tam metni aşağıdaki internet adresinde mevcuttur.
http://www.jvc.net/cs/car/eudoc/
ii
Page 4
CONTENTS BEFORE USE
BEFORE USE 2
BASICS 3
GETTING STARTED 5
1 Cancel the demonstration
2 Set the clock and date
3 Set the basic settings
RADIO 7
CD/USB/ANDROID 8
AUX 10
AUDIO SETTINGS 11
DISPLAY SETTINGS 14
REFERENCES 15
Maintenance
More information
TROUBLESHOOTING 17
INSTALLATION/
CONNECTION 18
SPECIFICATIONS 21
IMPORTANT
•
To ensure proper use, please read through this manual before using this product. It is especially important that you read and observe
Warning and Caution in this manual.
•
Please keep the manual in a safe and accessible place for future reference.
WARNING
•
Do not operate any function that takes your attention away from safe driving.
•
Do not ingest the battery, Chemical Burn Hazard
The remote control supplied with this product contains a coin/button cell battery.
If the coin/button cell battery is swallowed, it can cause severe internal burns in just 2 hours and can lead to death.
Keep new and used batteries away from children.
If the battery compartment does not close securely, stop using the product and keep it away from children.
If you think batteries might have been swallowed or placed inside any part of the body, seek immediate medical attention.
Caution
Volume setting:
•
Adjust the volume so that you can hear sounds outside the car to prevent accidents.
•
Lower the volume before playing digital sources to avoid damaging the speakers by the sudden increase of the output level.
General:
•
Avoid using the external device if it might hinder safe driving.
•
Make sure all important data has been backed up. We shall bear no responsibility for any loss of recorded data.
•
Never put or leave any metallic objects (such as coins or metal tools) inside the unit to prevent a short circuit.
•
If a disc error occurs due to condensation on the laser lens, eject the disc and wait for the moisture to evaporate.
•
Depending on the types of cars, the antenna will automatically extend when you turn on the unit with the antenna control wire connected
( 20)
. Turn off the unit when parking at a low ceiling area.
Remote control (RM-RK52):
•
Do not leave the remote control in hot places such as on the dashboard.
•
The Lithium battery is in danger of explosion if replaced incorrectly. Replace it only with the same or equivalent type.
•
The battery pack or batteries shall not be exposed to excessive heat such as sunshine, fire or the like.
How to read this manual
• Operations are explained mainly using buttons on the faceplate of
• English indications are used for the purpose of explanation. You can select the display language from the
menu.
( 6)
•
•
[XX]
( XX)
indicates the selected items.
indicates references are available on the stated page.
KD-R492M
and
KD-R491M
.
2
ENGLISH
Page 5
BASICS
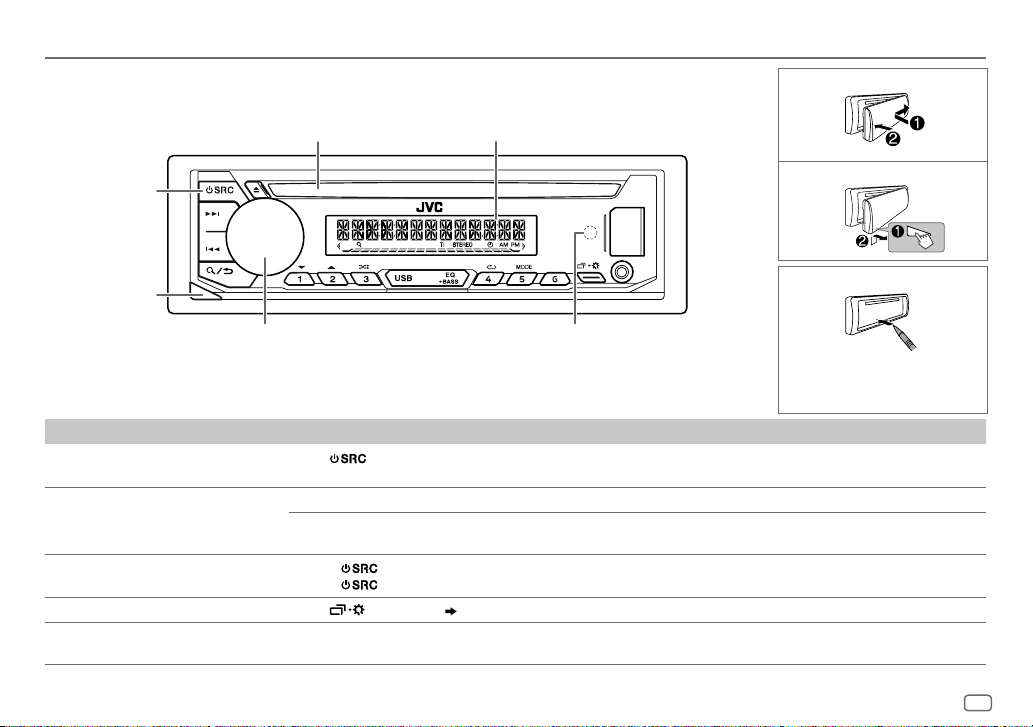
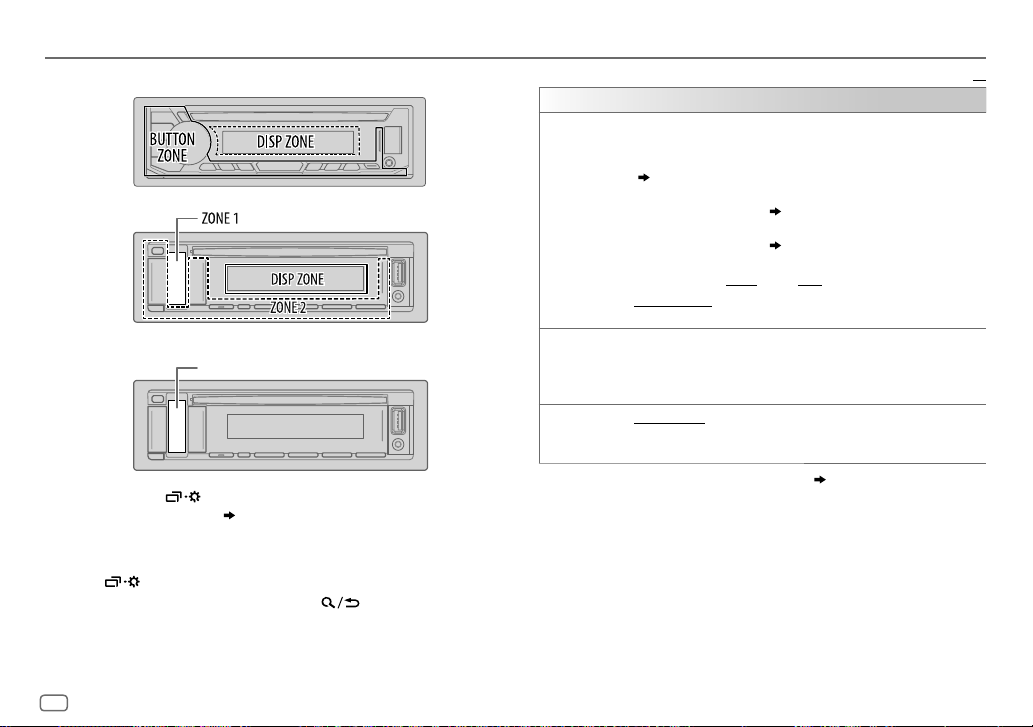
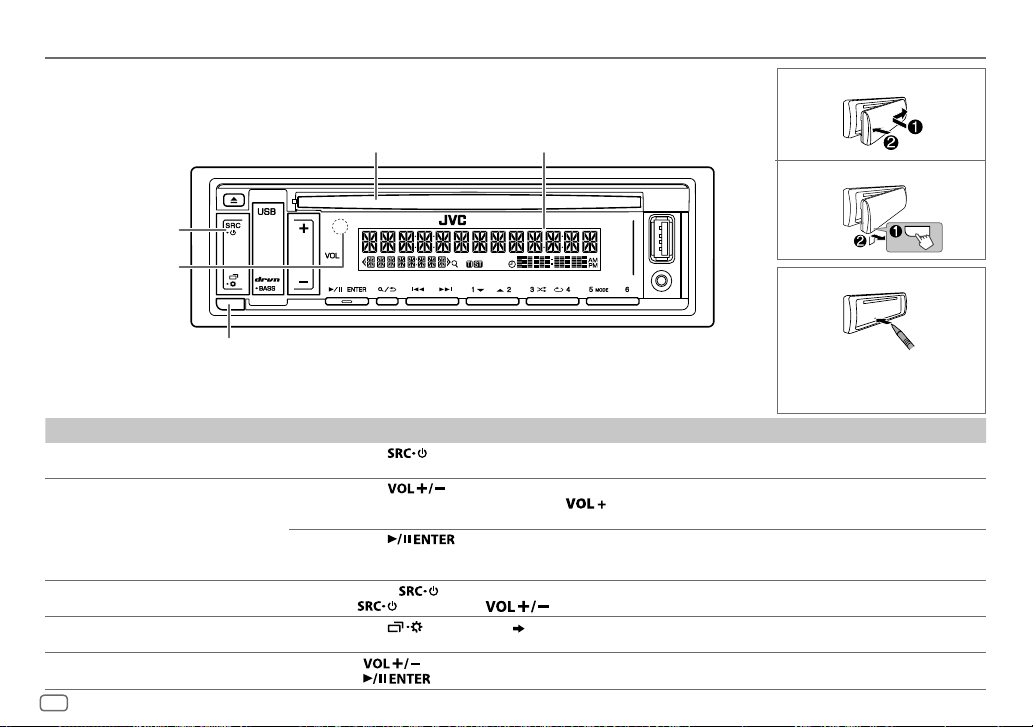
Faceplate for KD-R492M
Attach
Loading slot
Source button
Detach button
Volume knob
To On the faceplate
Turn on the power
Adjust the volume Turn the volume knob.
Select a source
Change the display information
Select an item
Press
• Press and hold to turn off the power.
Press the volume knob to mute the sound or pause playback.
• Press again to cancel. The volume level returns to the previous level before muting or pause.
• Press
• Press
Press
1 Turn the volume knob to select an item.
.
repeatedly.
, then turn the volume knob within 2seconds.
repeatedly.
2 Press the knob to confirm.
Display window
Remote sensor
(Do not expose to bright sunlight.)
( 16)
Detach
How to reset
Your preset adjustments will
be erased except stored radio
stations.
ENGLISH
3
Page 6
BASICS
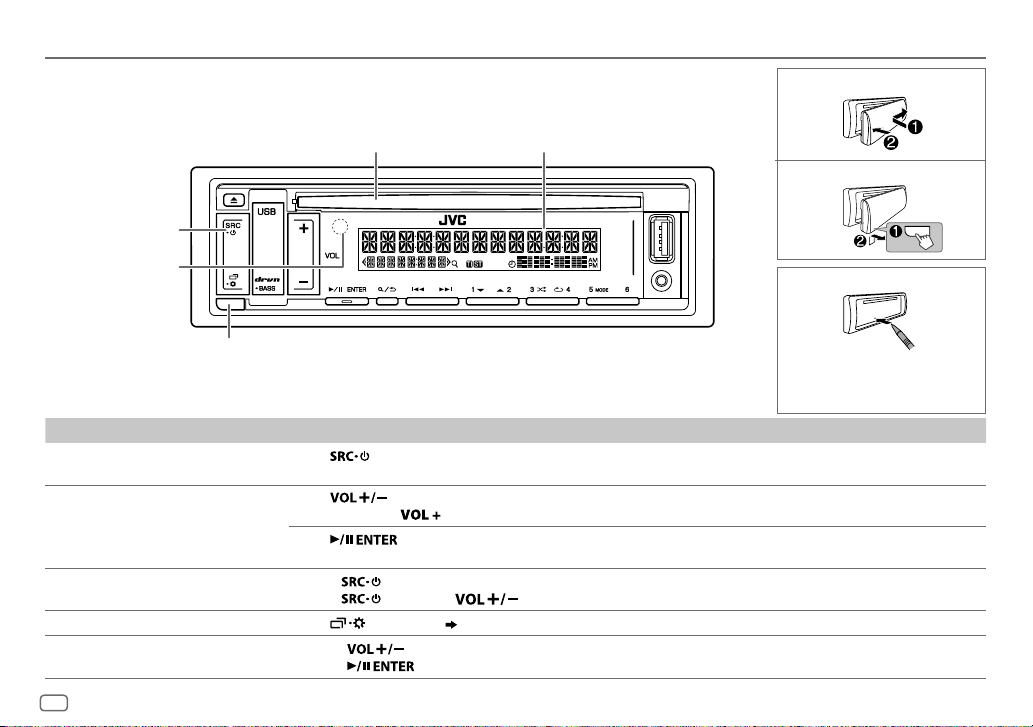
Faceplate for KD-R491M
Source button
Attach
Loading slot Display window
Detach
Remote sensor
(Do not expose to
bright sunlight.)
Detach button
To On the faceplate
Turn on the power Press .
Adjust the volume Press
Select a source • Press
Change the display information
Select an item
• Press and hold to turn off the power.
• Press and hold
Press
• Press again to cancel. The volume level returns to the previous level before muting or pause.
• Press
Press
1 Press to select an item.
2 Press to confirm.
4
ENGLISH
.
to continuously increase the volume to 15.
to mute the sound or pause playback.
repeatedly.
, then press within 2 seconds.
repeatedly.
( 17)
How to reset
Your preset adjustments will
be erased except stored radio
stations.
Page 7
BASICS
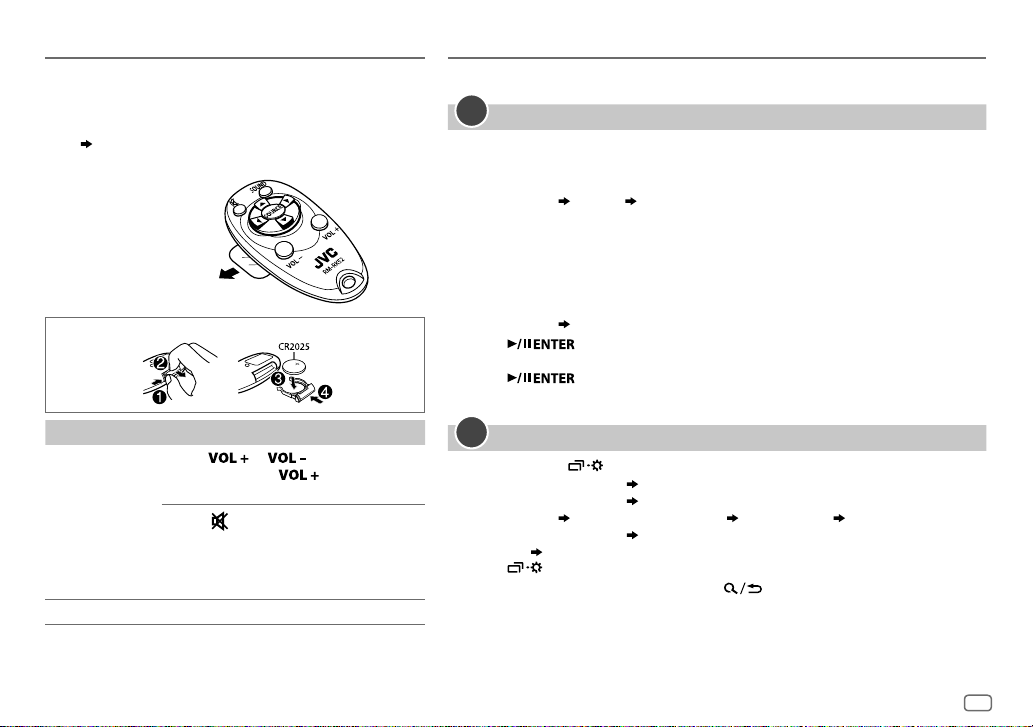
Remote control (RM-RK52)
This unit can be remotely controlled with an optionally
purchased remote control.
Aim the remote control directly to the remote sensor on the
unit.
( 3 or 4)
Pull out the insulation
sheet when using for
the first time.
How to replace the battery
GETTING STARTED
For key layout on the faceplate, see page3 or page4.
1
Cancel the demonstration
When you turn on the power for the first time (or after you reset the unit), the display
shows:
KD-R492M
:
“CANCEL DEMO”
1 Press the volume knob.
[YES]
is selected for the initial setup.
2 Press the volume knob again.
“DEMO OFF” appears.
KD-R491M
:
“CANCEL DEMO”
1 Press .
[YES]
is selected for the initial setup.
2 Press again.
“DEMO OFF” appears.
“PRESS” “VOLUME KNOB”
“PRESS ENTER”
To On the remote control
Adjust the
volume
Select a source Press SOURCE repeatedly.
Press or .
• Press and hold
increase the volume to 15.
Press
to mute the sound or pause
playback.
• Press again to cancel. The volume
level returns to the previous level
before muting or pause.
to continuously
2
Set the clock and date
1
Press and hold .
2 Perform ‘select an item
3 Perform ‘select an item
[CLOCK ADJUST]
set the hour and minute
4 Perform ‘select an item
[DATE SET]
set the day, month and year
( 3 or 4)’
operation to select
( 3 or 4)’
operation to adjust the clock.
( 3 or 4)’
operation to set the date.
[CLOCK FORMAT] [12H]
5 Press to exit.
To return to the previous setting item, press .
[CLOCK]
.
or
[24H]
ENGLISH
5
Page 8
GETTING STARTED
3
Set the basic settings
1
Press and hold .
2 Perform 'select an item
(see the following table).
( 3 or 4)’
operation to select an item
3 Repeat step 2 until the desired item is selected or activated.
4 Press to exit.
To return to the previous setting item, press .
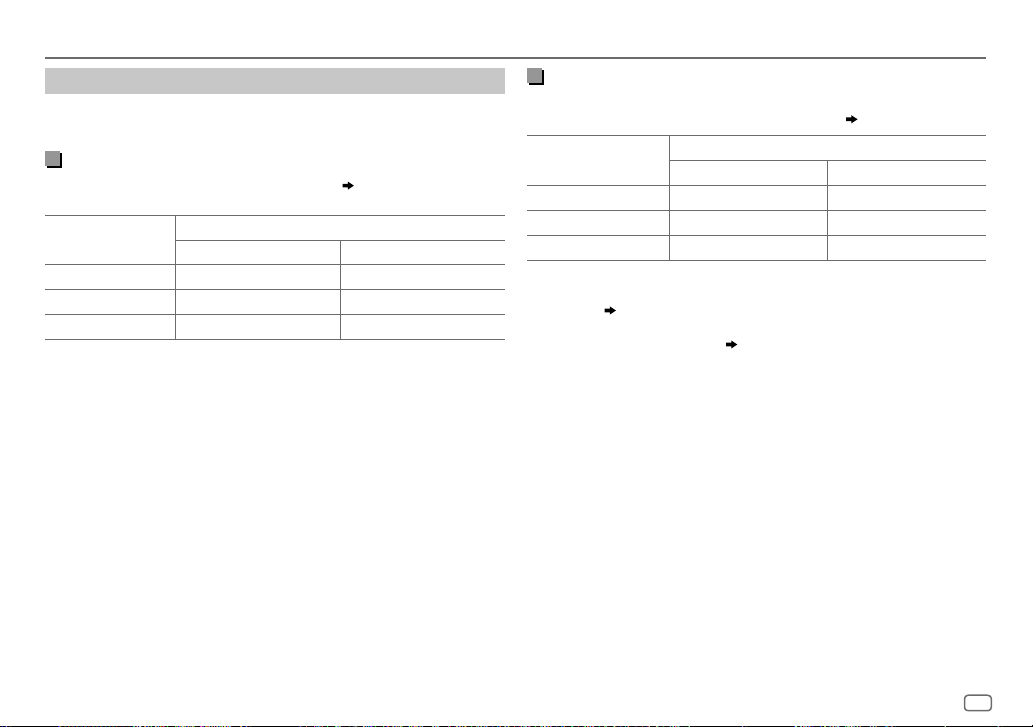
SYSTEM
KEY BEEP
SOURCE SELECT
*
AM SRC
BUILT-IN AUX
F/W UPDATE
UPDATE SYSTEM
F/W UP xxxx
*
Not displayed when the corresponding source is selected.
ON
:Activates the keypress tone.;
ON
:Enables AM in source selection.;
*
ON
:Enables AUX in source selection.;
YES
:Starts upgrading the firmware.; NO:Cancels (upgrading is not
activated).
For details on how to update the firmware, see:
<http://www.jvc.net/cs/car/>.
OFF
:Deactivates.
OFF
OFF
:Disables.
:Disables.
( 7)
( 10)
Default:
CLOCK
TIME SYNC
CLOCK DISPLAY ON
ENGLISH
РУССКИЙ
XX
ESPANOL
ON
:The clock time is automatically set using the Clock Time (CT) data in
FM Radio Data System signal.;
:The clock time is shown on the display even when the unit is turned
off.;
OFF
:Cancels.
Select the display language for menu and music information if
applicable.
By default,
ENGLISH
is selected.
OFF
:Cancels.
6
ENGLISH
Page 9
RADIO
For key layout on the faceplate, see page3 or page4.
Search for a station
1
Press source button repeatedly to select FM or AM.
2 Press (or press on the remote control) to search for a
station automatically.
(or)
Press and hold (or press and hold on the remote
control) until “M” flashes, then press repeatedly to search for a
station manually.
• “ST” or “STEREO” lights up when receiving an FM stereo broadcast with
sufficient signal strength.
Settings in memory
You can store up to 18 stations for FM and 6 stations for AM.
Store a station
While listening to a station....
Press and hold one of the number buttons (1 to 6).
(or)
1 Press and hold the following button until “PRESETMODE” flashes.
KD-R492M
KD-R491M
2 Perform ‘select an item
The preset number flashes and “MEMORY” appears.
Select a stored station
Press one of the number buttons (1to6).
(or)
1 Press .
2 Perform ‘select an item
number.
number.
: Volume knob
:
( 3 or 4)
’ operation to select a preset
( 3 or 4)
’ operation to select a preset
Other settings
1
Press and hold .
2 Perform 'select an item
(
see the following table).
( 3 or 4)
' operation to select an item
3 Repeat step 2 until the desired item is selected/activated or follow
the instructions stated on the selected item.
4 Press to exit.
To return to the previous setting item, press .
Default:
TUNER SETTING
RADIO TIMER
SSM
LOCAL SEEK ON
1
*
Selectable only when
Turns on the radio at a specific time regardless of the current source.
1 ONCE/DAILY/WEEKLY/OFF
on.
2 FM/AM
:Select the band.
3 01
to 18 (for FM)/01 to 06 (for AM):Select the preset station.
4
Set the activation day
“
M
” lights up when complete.
Radio Timer will not activate for the following cases.
•
The unit is turned off.
•
[OFF]
is selected for
AM is selected.
SSM 01–06/SSM 07–12/SSM 13–18
stations for FM. “SSM” stops flashing when the first 6 stations are stored.
Select
:Searches only FM stations with good reception.;
•
Settings made are applicable only to the selected source/station. Once you
change the source/station, you need to make the settings again.
( 6)
SSM 07–12/SSM 13–18
[ONCE]
or
[WEEKLY]
:Select how often the timer will be turned
1
*
and time.
[AM SRC]
in
[SOURCE SELECT]
: Automatically presets up to 18
to store the following 12 stations.
is selected in step 1.
after Radio Timer for
OFF
:Cancels.
ENGLISH
XX
7
Page 10
RADIO
CD/USB/ANDROID
IF BAND AUTO
:Increases the tuner selectivity to reduce interference noises from
adjacent FM stations. (Stereo effect may be lost.);
WIDE
:Subjects to
interference noises from adjacent FM stations, but sound quality will not
be degraded and the stereo effect will remain.
MONO SET ON
NEWS SET
REGIONAL
*
AF SET
:Improves the FM reception, but the stereo effect will be lost.;
OFF
:Cancels.
2
*
ON
:The unit will temporarily switch to News Programme if available.;
OFF
:Cancels.
2
*
ON
: Switches to another station only in the specific region using the “AF”
control.;
OFF
:Cancels.
2
ON
: Automatically searches for another station broadcasting the same
program in the same Radio Data System network with better reception
TI ON
when the current reception is poor.;
: Allows the unit to temporarily switch to Traffic Information if
OFF
: Cancels.
available (“TI” lights up) while listening to all sources except in AM. ;
OFF
:Cancels.
2
PTY SEARCH
*
Select a PTY code (see below).
If there is a station broadcasting a program of the same PTY code as you
have selected, that station is tuned in.
2
*
Only for FM source.
PTY code
NEWS, AFFAIRS, INFO, SPORT, EDUCATE, DRAMA, CULTURE, SCIENCE, VARIED
POP M
(music),
ROCK M
(music),
EASY M
(music),
LIGHT M
OTHER M
(music),
WEATHER, FINANCE, CHILDREN, SOCIAL, RELIGION, PHONE IN
TRAVEL, LEISURE, JAZZ, COUNTRY, NATION M
(music),
(music),
OLDIES, FOLK M
DOCUMENT
,
CLASSICS
(music),
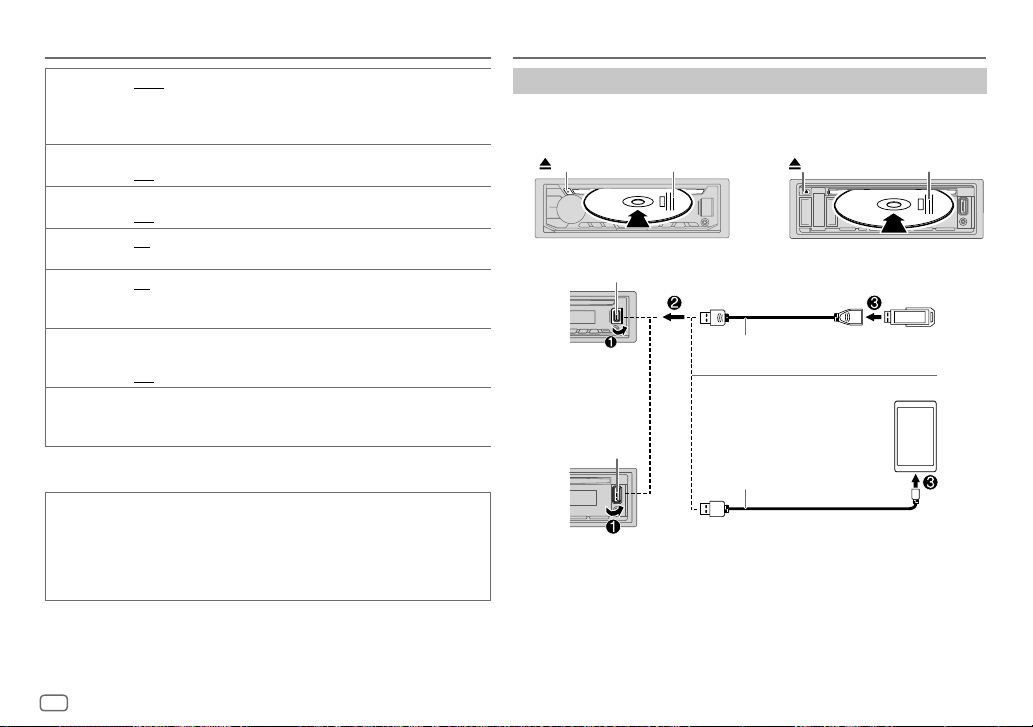
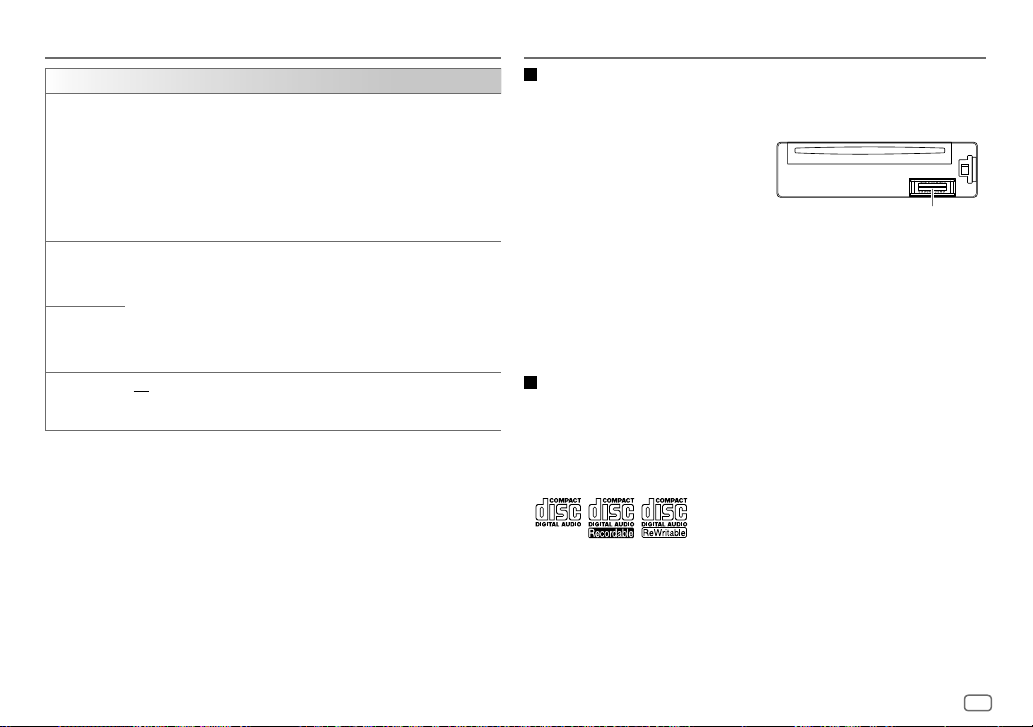
Start playback
The source changes automatically and playback starts.
CD
KD-R491M:KD-R492M:
Eject disc
Label side
Eject disc
USB input terminal
KD-R492M
USB
USB 2.0 cable
ANDROID
1
*
(commercially available)
2
*
USB input terminal
KD-R491M
USB cable
1
*
(commercially available)
,
,
1
*
Do not leave the cable inside the car when not using.
2
*
When connecting an Android device, “Press [VIEW] to install JVC MUSIC PLAY APP” is shown.
Follow the instructions to install the application. You can also install the latest version of JVC
MUSIC PLAY application on your Android device before connecting. For more information, visit
<http://www.jvc.net/cs/car/>.
Label side
8
ENGLISH
Page 11
CD/USB/ANDROID
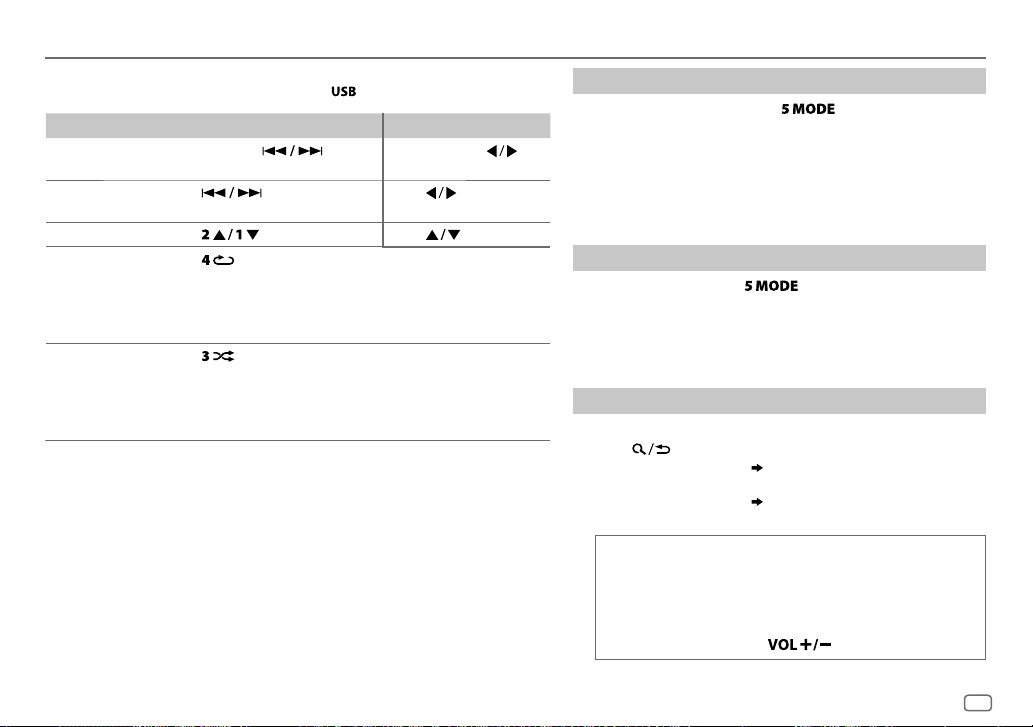
For key layout on the faceplate, see page3 or page4.
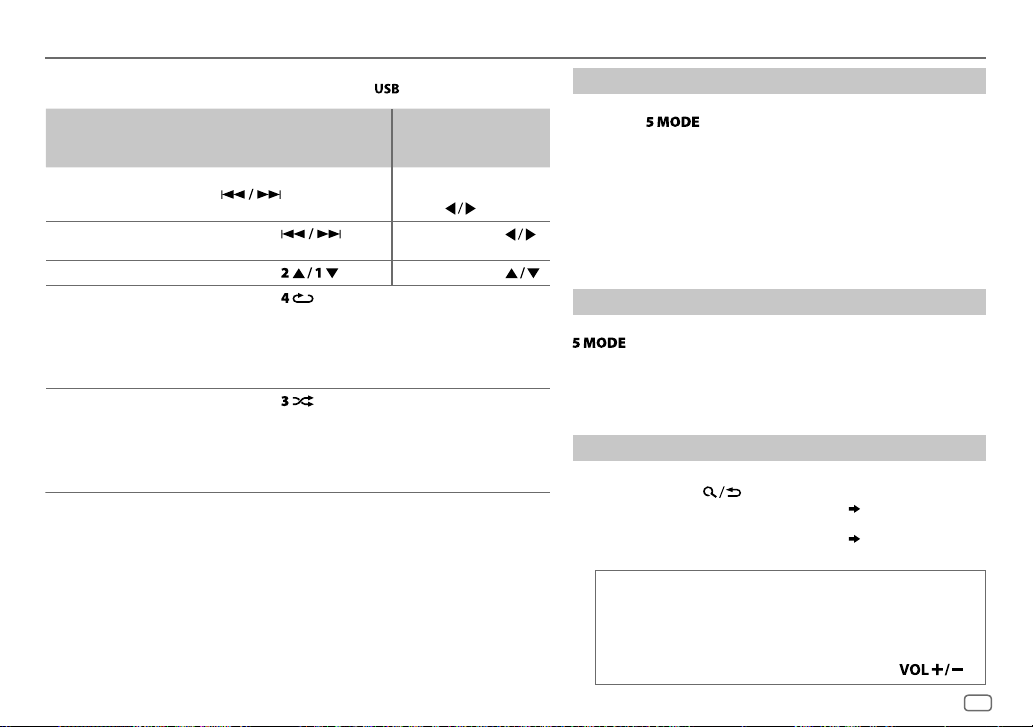
To directly select USB/ANDROID source, press
To On the faceplate On the remote control
Reverse/
Fast-forward
Select a track/
Press and hold .
3
*
Press
.
file
4
*
Select a folder
Repeat play
Press . Press .
3
*
Press repeatedly.
TRACK REPEAT/ALL REPEAT
TRACK REPEAT/FOLDER REPEAT/ALL REPEAT
ONE REPEAT/ALL REPEAT/REPEAT OFF
3
Random play
*
Press repeatedly.
ALL RANDOM/RANDOM OFF
FOLDER RANDOM/ALL RANDOM/RANDOM OFF
SONG RANDOM/ALL RANDOM/RANDOM OFF
3
*
For ANDROID: Applicable only when
4
*
For CD: Only for MP3/WMA files. This does not work for ANDROID.
[AUTO MODE]
.
Press and hold
Press
.
: Audio CD
: MP3/WMA/WAV/
FLAC file
: ANDROID
: Audio CD
: MP3/WMA/WAV/
FLAC file
: ANDROID
is selected.
Select control mode
While in ANDROID source, press repeatedly.
AUTO MODE
.
AUDIO MODE
: Control Android device from this unit via JVC MUSIC
PLAY application installed in the Android device.
: Control Android device using the Android device
itself via other media player applications installed
in the Android device. However, you can still play/
pause or file skip from this unit.
Select music drive
While in USB source, press repeatedly.
Stored songs in the following drive will be played back.
• Selected internal or external memory of a smartphone (Mass
Storage Class).
• Selected drive of a multiple drives device.
Select a file from a folder/list
For ANDROID, applicable only when
[AUTO MODE]
1 Press .
2 Perform ‘select an item
( 3 or 4)
’ operation to select a
folder/list.
3 Perform ‘select an item
( 3 or 4)
’ operation to select a
file.
Quick search
If you have many files, you can search through them quickly.
Perform the following operation to browse through the list
quickly.
KD-R492M
: Turn the volume knob quickly
KD-R491M
: Press and hold
is selected.
ENGLISH
9
Page 12
CD/USB/ANDROID
AUX
Alphabet search
You can search for a file according to the first character.
(applicable only for ANDROID source)
1 Press to enter character search.
2 Perform the following operation to select the desired
character.
KD-R492M
^A^ : Upper case (A to Z)
_A_ : Lower case (a to z)
-0- : Numbers (0 to 9)
-OTHERS- : Character other than A to Z, 0 to 9
: Turn the volume knob
KD-R491M
: Press
3 Press the following to start searching.
KD-R492M
KD-R491M
: Volume knob
:
.
• To return to the previous setting item, press .
• To cancel, press and hold
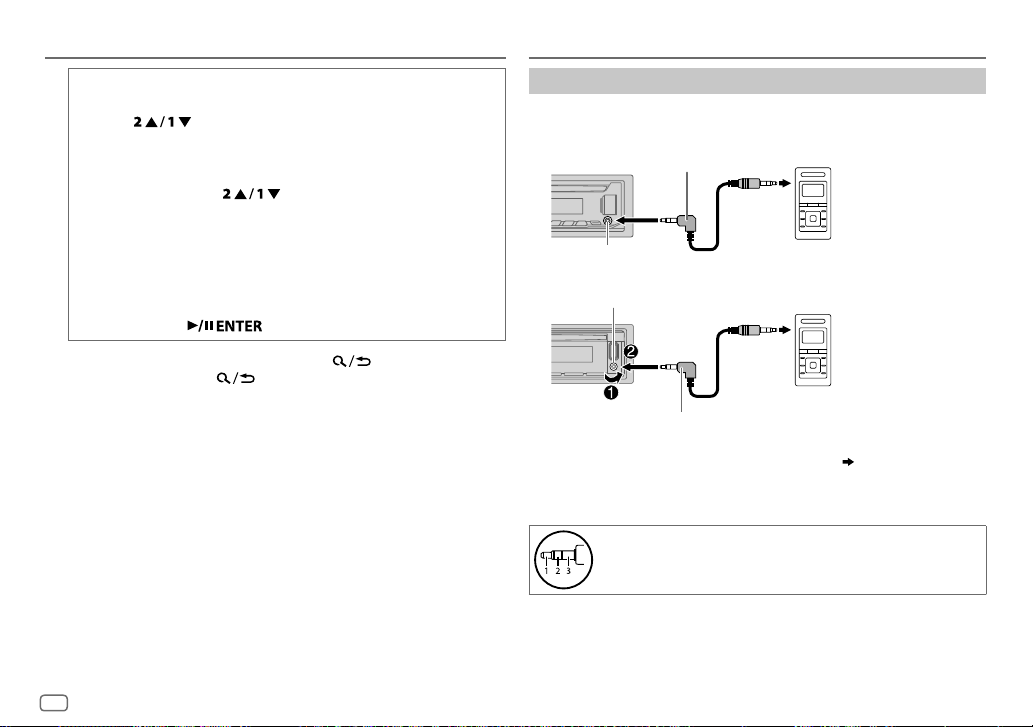
Use a portable audio player
1
Connect a portable audio player (commercially available).
KD-R492M
:
3.5mm stereo mini plug with “L” shaped connector
(commercially available)
Portable audio player
Auxiliary input jack
KD-R491M
:
Auxiliary input jack
Portable audio player
3.5mm stereo mini plug with “L” shaped connector
(commercially available)
2 Select
[ON]
for
[BUILT-IN AUX]
in
[SOURCE SELECT]. ( 6)
3 Press source button repeatedly to select AUX.
4 Turn on the portable audio player and start playback.
Use a 3-core plug head stereo mini plug for optimum audio
output.
10
ENGLISH
Page 13
AUDIO SETTINGS
For key layout on the faceplate, see page3 or page4.
Select a preset equalizer directly
Press repeatedly.
(or)
Press
Preset equalizer:
FLAT
(default),
TALK, USER, VOCAL BOOST, BASS BOOST, CLASSICAL, DANCE
, then turn the volume knob within 5seconds.
DRVN 3, DRVN 2, DRVN 1, HARD ROCK, HIP HOP, JAZZ, POP, R&B
Select a drive equalizer directly
Drive equalizer boosts specific frequencies in the audio signal to reduce
the noise heard from outside the car or running noise of the tyres.
Press
Drive equalizer:
repeatedly.
DRVN 3
(default),
Store your own sound settings
1
Press and hold the following button to enter EASY EQ setting.
KD-R492M
KD-R491M
2 Perform 'select an item
Refer to
• To return to the previous setting item, press
• Press the following button to exit.
KD-R492M
KD-R491M
setting.
:
:
( 3 or 4)
[EASY EQ]
for setting and the result is stored to
:
:
(for KD-R492M)
(for KD-R491M)
DRVN 2, DRVN 1
' operation to make the
,
[USER]
.
.
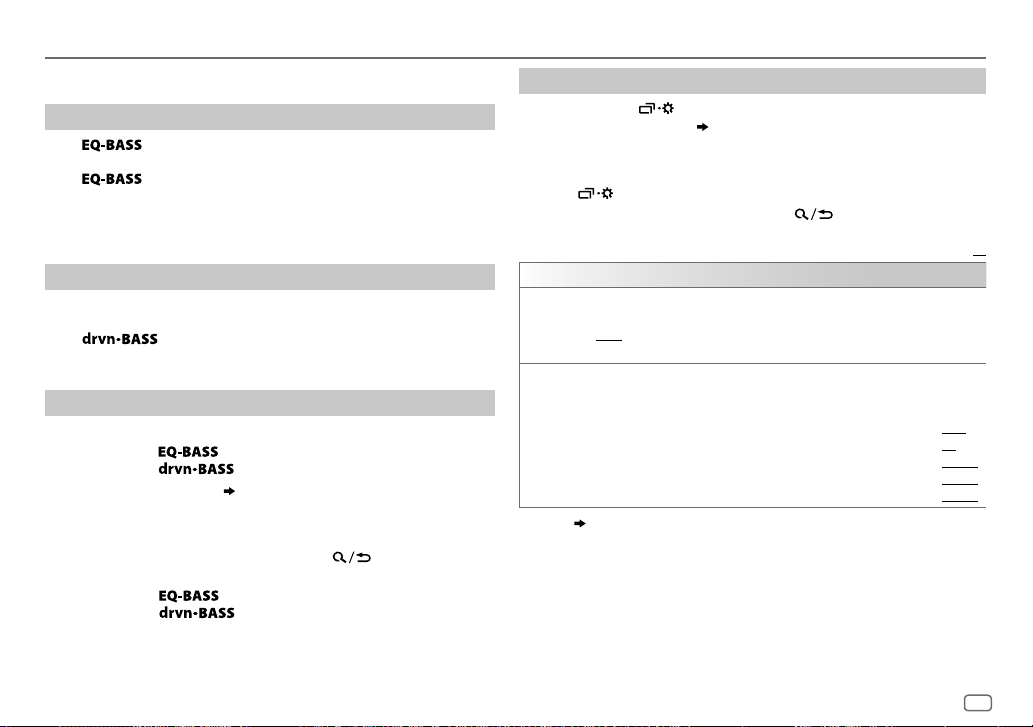
Other settings
1
Press and hold .
2 Perform 'select an item
(
see the following table).
( 3 or 4)
' operation to select an item
3 Repeat step 2 until the desired item is selected/activated or follow
the instructions stated on the selected item.
4 Press to exit.
To return to the previous setting item, press .
Default:
EQ SETTING
PRESET EQ
EASY EQ
1
*
*
,
Select a preset equalizer suitable to the music genre.
•
Select
[USER]
2
*1*
3
*1*
:
:
:
:
to use the settings made in
[USER]
: 00to
+06
(Default:
–08
to
+08
LVL–06
to
LVL+06
LVL–06
to
LVL+06
LVL–06
to
LVL+06
FLAT/DRVN 3/DRVN 2/DRVN 1/HARD ROCK/HIP HOP/JAZZ/POP/R&B
TALK/USER/VOCAL BOOST/BASS BOOST/CLASSICAL/DANCE
Adjust your own sound settings.
•
The settings are stored to
•
The settings made may affect the current settings of
SUB.W SP
SUB.W
BASS
MID
TRE
2
3
*
,
:
( 12)
[EASY EQ]
.
or
[PRO EQ]
[PRO EQ]
.
/
.
+03
00
LVL 00
LVL 00
LVL 00
XX
)
ENGLISH
11
Page 14
AUDIO SETTINGS
PRO EQ
1 BASS/MIDDLE/TREBLE
2
Adjust the sound elements of the selected sound tone.
•
The settings are stored to
•
The settings made may affect the current settings of
BASS Frequency:
Level:
Q:
MIDDLE Frequency:
Level:
Q:
TREBLE Frequency:
Level:
Q:
AUDIO CONTROL
BASS BOOST
LEVEL +01
OFF
:Cancels.
to
LEVEL +05(LEVEL +01
LOUDNESS LEVEL 01/LEVEL 02
at low volume.;
2
SUB.W
1
*
LEVEL
SUBWOOFER
3
*
SET
SUBWOOFER
1
*
LPF
*
SPK-OUT
3
*
PRE-OUT
ON
: Turns on the subwoofer output.;
FRQ THROUGH
:All signals are sent to the subwoofer;
FRQ 55HZ/FRQ 85HZ/FRQ 120HZ
55Hz/85Hz/120Hz are sent to the subwoofer.
SUB.W
PHASE
REVERSE
*1*
4
(180°)/
with the speaker output for optimum performance.
:Select a sound tone.
[USER]
.
60HZ/80HZ/100HZ/200HZ
LVL–06
to
LVL+06
Q1.0/Q1.25/Q1.5/Q2.0
0.5KHZ/1.0KHZ/1.5KHZ/2.5KHZ
LVL–06
to
LVL+06
Q0.75/Q1.0/Q1.25
10.0KHZ/12.5KHZ/15.0KHZ/17.5KHZ
LVL–06
to
LVL+06
Q FIX
[EASY EQ]
.
(Default:
(Default:
(Default:
): Selects your preferred bass boost level.;
:Boosts low or high frequencies to produce a well-balanced sound
OFF
:Cancels.
SUB.W 00
to
level of the subwoofer connected via speaker lead.
SUB.W +06(SUB.W +03
SUB.W –08
to
SUB.W +08(SUB.W 00
):Adjusts the output
( 20)
):Adjusts the output level
of the subwoofer connected to the lineout terminals (REAR/SW)
through an external amplifier.
OFF
( 20)
: Cancels.
:Audio signals with frequencies lower than
NORMAL
(0°):Selects the phase of the subwoofer output to be in line
80HZ
LVL 00
Q1.0
)
1.0KHZ
LVL 00
Q1.25
10.0KHZ
LVL 00
Q FIX
FADER POSITION R06
the front and rear speaker output balance.
5
*
BALANCE
POSITION L06
the left and right speaker output balance.
VOLUMEADJUST LEVEL –15
volume level of each source (compared to the FM volume
level). Before adjustment, select the source you want to
adjust. (“VOLADJFIX” appears if FM is selected.)
)
AMPGAIN LOW POWER
25. (Select if the maximum power of each speaker is
)
D.T.EXPANDER
(Digital Track
Expander)
less than 50W to prevent damaging the speakers.);
HIGH POWER
ON
:Creates realistic sound by compensating the highfrequency components and restoring the rise-time of
the waveform that are lost in audio data compression.;
OFF
SPK/PRE OUT
Depending on the speaker connection method, select the
appropriate setting to get the desired output. (
Speaker output settings
1
*
Displayed only when
2
*
Displayed only when
3
*
Displayed only when
[SUB.W/SUB.W]. ( 13)
4
*
Selectable only if a setting other than
[SUBWOOFER LPF]
5
*
This adjustment will not affect the subwoofer output.
[SUBWOOFER SET]
[SPK/PREOUT]
[SPK/PRE OUT]
.
to
POSITION F06(POSITION 00
to
POSITION R06(POSITION 00
to
LEVEL +06(LEVEL 00
:Limits the maximum volume level to
:The maximum volume level is 35.
:Cancels.
)
is set to
is set to
[SUB.W/SUB.W]. ( 13)
is set to
[REAR/SUB.W]
[FRQ THROUGH]
[ON]
.
is selected for
):Adjusts
):Adjusts
):Preset the initial
13,
or
12
ENGLISH
Page 15
AUDIO SETTINGS
Speaker output settings
Select the output setting for the speakers
speaker connection method.
[SPK/PRE OUT]
Connection via lineout terminals
For connections through an external amplifier.
Setting on
[SPK/PRE OUT]
REAR/REAR
REAR/SUB.W
SUB.W/SUB.W
Front speakers output Rear speakers output
(default) Front speakers output Subwoofer output
Front speakers output Subwoofer output
Audio signal through lineout terminal
FRONT REAR/SW
( 20)
, based on the
Connection via speaker leads
For connections without using an external amplifier. However, with this
settings you can also enjoy the subwoofer output.
Setting on
[SPK/PRE OUT]
REAR/REAR
REAR/SUB.W
SUB.W/SUB.W
If
[SUB.W/SUB.W]
–
[FRQ 120HZ]
available.
–
[POSITION R01]
[POSITION R06]
is selected:
is selected in
( 12)
is selected in
to
[POSITION 00]. ( 12)
Rear speakers output Rear speakers output
Rear speakers output Rear speakers output
Subwoofer output (Mute)
Audio signal through rear speaker lead
L (left) R (right)
[SUBWOOFER LPF]
[FADER]
and selectable range is
and
( 20)
[FRQ THROUGH]
is not
ENGLISH
13
Page 16
DISPLAY SETTINGS
Zone identification for brightness setting
KD-R492M
(Symbolic button)
KD-R491M
Zone identification for color setting
KD-R491M
1 Press and hold .
2 Perform 'select an item
(see the following table).
3 Repeat step 2 until the desired item is selected/activated or follow
the instructions stated on the selected item.
4 Press to exit.
To return to the previous setting item, press .
Symbolic button
( 3 or 4)
' operation to select an item
DISPLAY
DIMMER
BRIGHTNESS
TEXT SCROLL
1
*
The illumination control wire connection is required.
2
*
Some characters or symbols will not be shown correctly (or will be blanked).
Dim the illumination.
OFF
:Dimmer is turned off. Brightness changes to
ON
:Dimmer is turned on. Brightness changes to
(
[BRIGHTNESS]
DIMMER TIME
1
Perform ‘select an item
[ON]
2
Perform ‘select an item
[OFF]
(Default:
DIMMER AUTO
off or on the car headlights.
Set the brightness for day and night separately.
1 DAY/NIGHT
2
Select a zone. (See the illustration.)
3 LEVEL 00
2
*
SCROLL ONCE
SCROLL AUTO
SCROLL OFF
)
:Set the dimmer on and off time.
time.
time.
[ON]: 18:00
to
:Scrolls the display information once.;
:Repeats scrolling at 5-second intervals.;
:Cancels.
( 3 or 4)
( 3 or 4)
;
[OFF]: 6:00
:Dimmer turns on and off automatically when you turn
:Select day or night.
LEVEL 31
: Set the brightness level.
1
*
’ operation to adjust the
’ operation to adjust the
)
( 20)
[DAY]
[NIGHT]
Default:
setting.
setting.
XX
14
ENGLISH
Page 17
DISPLAY SETTINGS
COLOR
(for
KD-R491M:
PRESET
DAY COLOR
NIGHT COLOR
MENU COLOR
Symbolic button only)
Select an illumination color for the symbolic button. (See the illustration on
page14.)
•
COLOR 01
•
USER
: The color you have created for
shown.
•
COLOR FLOW01
•
Preset color:
SUNSET, RELAX
Store your own day and night illumination colors for the symbolic button.
1 RED/GREEN/BLUE
2 00
to 31:Select the level.
Repeat steps
•
Your setting is stored to
•
[NIGHT COLOR]
car’s headlight.
ON
: The illumination color of symbolic button changes to white color
when in menu mode or when selecting a music file from a folder/list.;
OFF
:Cancels.
to
COLOR 49
to
COLOR FLOW03
CRYSTAL, FLOWER, FOREST, GRADATION, OCEAN
:Select a primary color.
1
and 2 for all primary colors.
[USER]
or
[DAY COLOR]
[DAY COLOR]
: Color changes at different speeds.
in
[PRESET]
is changed by turning on or off your
.
or
[NIGHT COLOR]
REFERENCES
Maintenance
Cleaning the unit
Wipe off dirt on the faceplate with a dry silicone or soft cloth.
Cleaning the connector
Detach the faceplate and clean the connector
is
gently with a cotton swab, being careful not to
,
damage the connector.
Handling discs:
•
Do not touch the recording surface of the disc.
•
Do not stick tape etc. on the disc, or use a disc with tape stuck on it.
•
Do not use any accessories for the disc.
•
Clean from the center of the disc and move outward.
•
Clean the disc with a dry silicone or soft cloth. Do not use any solvents.
•
When removing discs from this unit, pull them out horizontally.
•
Remove burrs from the center hole and disc edge before inserting a disc.
Connector (on the reverse
side of the faceplate)
More information
For: – Latest firmware updates and latest compatible item list
– Any other latest information
Visit <http://www.jvc.net/cs/car/>.
General
•
This unit can only play the following CDs:
•
This unit can play back multi-session discs; however, unclosed sessions will be skipped during
playback.
•
DualDisc playback:
Disc Digital Audio” standard. Therefore, the use of Non-DVD side of a DualDisc on this product
cannot be recommended.
•
For detailed information and notes about the playable audio files, visit
<http://www.jvc.net/cs/car/>.
The Non-DVD side of a “DualDisc” does not comply with the “Compact
ENGLISH
15
Page 18
REFERENCES
Playable files
•
Playable audio file:
For disc: MP3 (.mp3), WMA (.wma)
For USB mass storage class device: MP3 (.mp3), WMA (.wma), WAV (.wav), FLAC (.flac)
•
Playable disc media: CD-R/CD-RW/CD-ROM
•
Playable disc file format: ISO 9660 Level 1/2, Joliet, Long file name
•
Playable USB device file system: FAT12, FAT16, FAT32
Even when audio files comply with the standards listed above, playback may be impossible
depending on the types or conditions of media or device.
Unplayable discs
•
Discs that are not round.
•
Discs with coloring on the recording surface or discs that are dirty.
•
Recordable/ReWritable discs that have not been finalized.
•
8 cm CD. Attempting to insert using an adapter may cause malfunction.
About USB devices
•
You cannot connect a USB device via a USB hub.
•
Connecting a cable whose total length is longer than 5m may result in abnormal playback.
•
This unit cannot recognize a USB device whose rating is other than 5V and exceeds 1A.
About Android device
•
This unit supports Android OS 4.1 and above.
•
Some Android devices (with OS4.1 and above) may not fully support Android Open Accessory
(AOA)2.0.
•
If the Android device supports both mass storage class device and AOA2.0, this unit always
playback via AOA2.0 as priority.
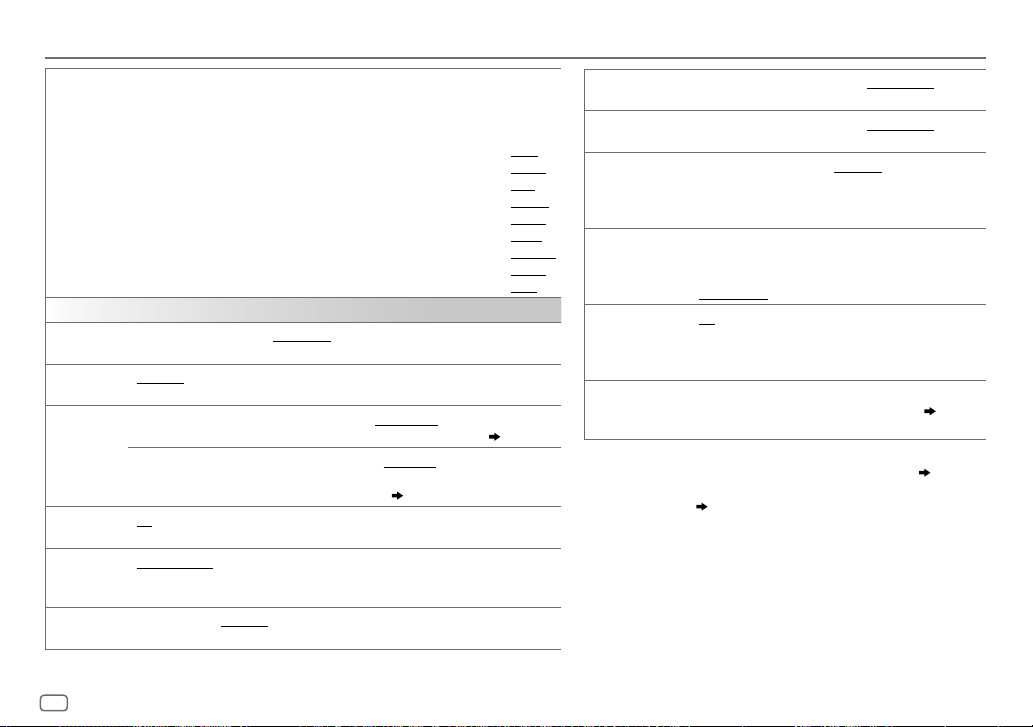
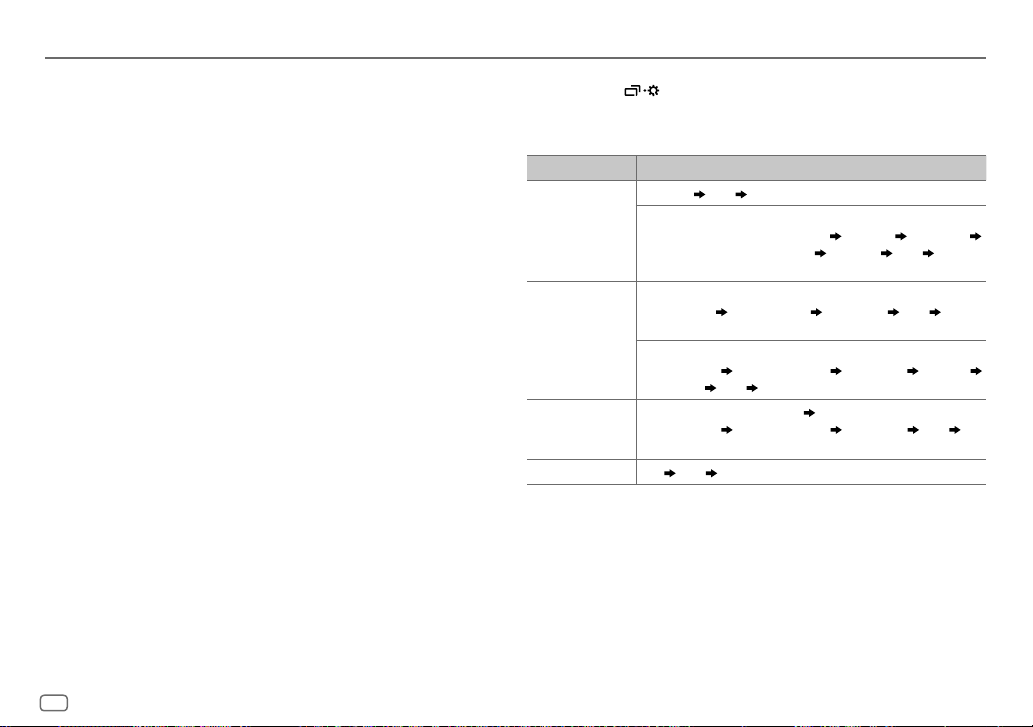
Change the display information
Each time you press , the display information changes.
•
If the information is unavailable or not recorded, “NO TEXT”, “NO NAME”, or other
information (eg. station name) appears or display will be blank.
Source name Display information (for KD-R492M)
FM
or
AM
CD
or
USB (For CD-DA)
ANDROID
AUX
Frequency Clock (back to the beginning)
(For FM Radio Data System stations only)
Station name (PS)/Program type (PTY) Radiotext Radiotext+
Radiotext+ title/Radio text+ artist
the beginning)
Disc title/Artist Track title/Artist Playing time Clock (back to
the beginning)
(For MP3/WMA/WAV/FLAC files)
Song title/Artist Album name/Artist Folder name File name
Playing time
When
Song title/Artist
(back to the beginning)
AUX Clock (back to the beginning)
Clock (backtothebeginning)
[AUTO MODE]
is selected
Album name/Artist Playing time Clock
Frequency Clock (back to
( 9)
:
16
ENGLISH
Page 19
REFERENCES TROUBLESHOOTING
Source name Display information (for KD-R491M)
FM
or
AM
CD
or
USB (For CD-DA)
ANDROID
AUX
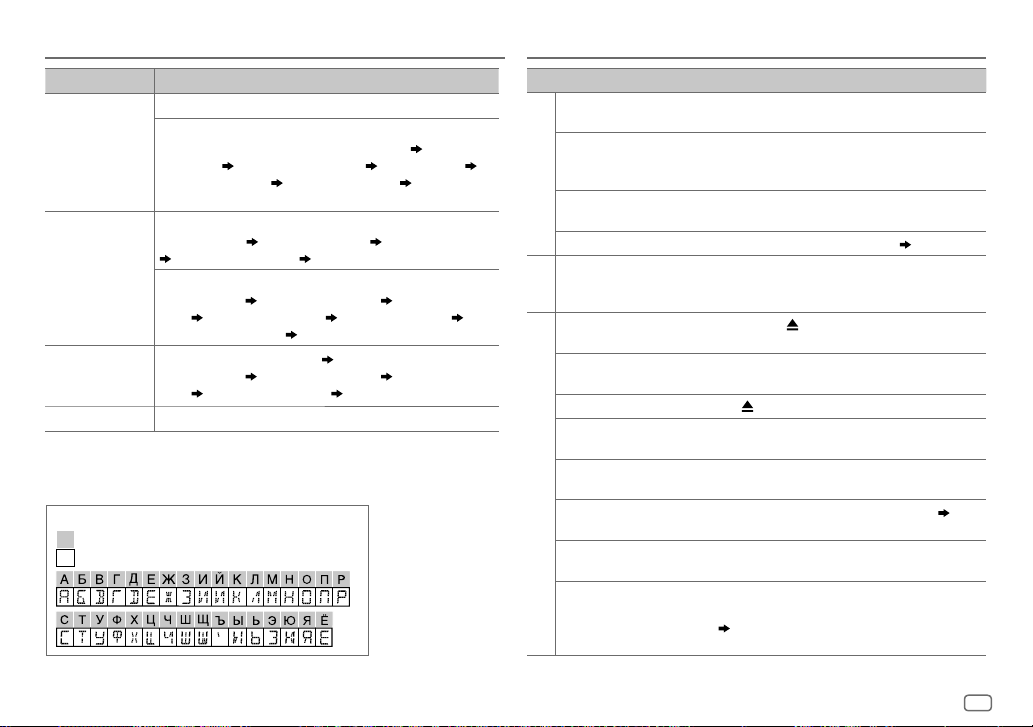
Available Cyrillic letters
Available characters
Display indications
Frequency (Date/Clock)
(For FM Radio Data System stations only)
Station name (PS)/Program type (PTY) (Date/Clock) Radiotext
(Date/Clock)
Song title (Date/Clock)
beginning)
Track title (Artist) Track title (Disc name) Track title (Date/Clock)
Playing time (Date/Clock) (backtothebeginning)
(For MP3/WMA/WAV/FLAC files)
Song title (Artist) Song title (Album name) Song title (Date/
Clock)
Playing time (Date/Clock)
When
Song title (Artist)
Clock)
AUX (Date/Clock)
Radiotext+ (Radiotext+) Song title (Artist)
Frequency (Date/Clock) (back to the
File name (Folder name) File name (Date/Clock)
[AUTO MODE]
Playing time (Date/Clock) (backtothebeginning)
(backtothebeginning)
is selected
( 9)
Song title (Album name) Song title (Date/
:
Symptom Remedy
Sound cannot be heard.
“MISWIRING CHECK
WIRING THEN PWR ON”
appears.
General
“PROTECTING SEND
SERVICE” appears.
Source cannot be selected.
•
Radio reception is poor.
•
Static noise while
Radio
listening to the radio.
Disc cannot be ejected.
“IN DISC” appears.
“PLEASE EJECT” appears.
Playback order is not as
intended.
Elapsed playing time is not
correct.
CD/USB
“NOT SUPPORT” appears
and track skips.
“READING” keeps flashing.• Do not use too many hierarchical levels and folders.
“CANNOT PLAY” flashes
and/or connected device
cannot be detected.
•
Adjust the volume to the optimum level.
•
Check the cords and connections.
Turn the power off, then check to be sure the terminals
of the speaker wires are insulated properly. Turn the
power on again.
Send the unit to the nearest service center.
Check the
[SOURCE SELECT]
Connect the antenna firmly.
Press and hold to forcibly eject the disc. Be careful not
to drop the disc when it is ejected.
Make sure nothing is blocking the loading slot when you
eject the disc.
Press , then insert the disc correctly.
The playback order is determined by the file name (USB)
or the order in which files were recorded (disc).
This depends on the recording process earlier.
Check whether the track is a playable format.
•
Reload the disc or reattach the USB device.
•
Check whether the connected device is compatible with
this unit and ensure the files are in supported formats.
( 16)
•
Reattach the device.
setting.
( 6)
( 16)
ENGLISH
17
Page 20
TROUBLESHOOTING
INSTALLATION/CONNECTION
Symptom Remedy
Correct characters are not
displayed.
CD/USB
•
Sound cannot be heard
during playback.
•
Sound output only from
the Android device.
Cannot playback at
[AUTO MODE]
ANDROID
“NO DEVICE” or “READING”
keeps flashing.
Playback is intermittent or
sound skips.
“CANNOT PLAY”
.
If you still have troubles, reset the unit.
•
This unit can only display uppercase letters, numbers, and a
limited number of symbols.
•
Depending on the display language you have selected
( 6)
•
Reconnect the Android device.
•
If in
[AUDIO MODE]
on the Android device and start playback.
•
If in
[AUDIO MODE]
application or use another media player application.
•
Restart the Android device.
•
If this does not solve the problem, the connected Android
device is unable to route the audio signal to unit.
•
Make sure JVC MUSIC PLAY APP is installed on the Android
device.
•
Reconnect the Android device and select the appropriate
control mode.
•
If this does not solve the problem, the connected Android
device does not support
•
Switch off the developer options on the Android device.
•
Reconnect the Android device.
•
If this does not solve the problem, the connected Android
device does not support
Turn off the power saving mode on the Android device.
•
Make sure Android device contains playable audio files.
•
Reconnect the Android device.
•
Restart the Android device.
, some characters may not be displayed correctly.
, launch any media player application
, relaunch the current media player
( 16)
( 8)
( 9)
[AUTO MODE]. ( 16)
[AUTO MODE]. ( 16)
( 3
or
4)
Warning
•
The unit can only be used with a 12V DC power supply, negative ground.
•
Disconnect the battery’s negative terminal before wiring and mounting.
•
Do not connect Battery wire (yellow) and Ignition wire (red) to the car chassis or Ground
wire (black) to prevent a short circuit.
•
To prevent short circuit:
– Insulate unconnected wires with vinyl tape.
– Be sure to ground this unit to the car’s chassis again after installation.
– Secure the wires with cable clamps and wrap vinyl tape around the wires that comes
into contact with metal parts to protect the wires.
Caution
•
For safety’s sake, leave wiring and mounting to professionals. Consult the car audio
dealer.
•
Install this unit in the console of your vehicle. Do not touch the metal parts of this unit
during and shortly after use of the unit. Metal parts such as the heat sink and enclosure
become hot.
•
Do not connect the wires of speakers to the car chassis or Ground wire (black), or
connect them in parallel.
•
Connect speakers with a maximum power of more than 50W. If the maximum power of
the speakers is lower than 50W, change the
speakers.
( 12)
•
Mount the unit at an angle of less than 30º.
•
If your vehicle wiring harness does not have the ignition terminal, connect Ignition wire
(red) to the terminal on the vehicle’s fuse box which provides 12 V DC power supply and
is turned on and off by the ignition key.
•
Keep all cables away from heat dissipate metal parts.
•
After the unit is installed, check whether the brake lamps, blinkers, wipers, etc. on the car
are working properly.
•
If the fuse blows, first make sure the wires are not touching car’s chassis, then replace the
old fuse with one that has the same rating.
[AMP GAIN]
setting to avoid damaging the
18
ENGLISH
Page 21

INSTALLATION/CONNECTION
Part list for installation
(A)
Faceplate
(C)
Mounting sleeve
(E)
Extraction key
(B)
Trim plate
(D)
Wiring harness
Installing the unit (in-dash mounting)
Hook on the top side
Orientate the trim plate
as illustrated before
fitting.
Do the required wiring.
( 20)
Dashboard of
your car
Bend the appropriate tabs to
hold the sleeve firmly in place.
Basic procedure
1
Remove the key from the ignition switch, then
disconnect the
2
Connect the wires properly.
See Wiring connection.
3
Install the unit to your car.
See Installing the unit (in-dash mounting).
4
Connect the terminal of the car battery.
5
Reset the unit.
terminal of the car battery.
( 20)
( 3
or
4)
1
Remove the mounting sleeve and trim plate from the unit.
2
Align the holes in the unit (on both sides) with the
vehicle mounting bracket and secure the unit with screws
(commercially available).
Use only the specified screws. Using wrong screws might damage
the unit.
How to remove the unitWhen installing without the mounting sleeve
ENGLISH
19
Page 22

INSTALLATION/CONNECTION
Wiring connection
IMPORTANT
We recommend installing the unit with a commercially available
custom wiring harness specific for your car and leave this job to
professionals for your safety. Consult your car audio dealer.
Front output
Rear/subwoofer output
Signal cord (not supplied)
JVC Amplifier
1
*
Vehicle
dashboard
Factory wiring
harness (vehicle)
Custom wiring harness
(separately purchased)
Brown (not used)
Recommended connection
20
ENGLISH
Blue:
To power antenna
Blue/white:
To amplifier
To the steering wheel
remote control adapter
Join the same color wires together.
Blue/white: Remote (12V
Orange/white: Illumination
Yellow: Battery 12V
Red: Ignition 12V
Black: Ground
Gray: Front speaker (right)
Gray/black
White: Front speaker (left)
White/black
Purple: Rear speaker (right)
Purple/black
Green: Rear speaker (left) *
Green/black
Antenna terminal
2
*
Light blue/yellow
350mA)
2
Fuse (10A)
Remote wire (not supplied)
Ignition switch
Separate red wire
Car fuse block
Make this connection if your vehicle factory wiring
harness does not have “12V ignition switch” wire.
1
*
Firmly connect the ground wire of the amplifier to the
car’s chassis to avoid damaging the unit.
2
*
You can also connect a subwoofer speaker directly using
this lead without an external subwoofer amplifier. For
setting,
13
.
Page 23

SPECIFICATIONS
Subject to change without notice
FM Frequency Range 87.5MHz — 108.0MHz (50kHz step)
Usable Sensitivity (S/N=26dB) 0.71μV/75Ω (8.2dBf)
Quieting Sensitivity
(DINS/N=46dB)
Frequency Response (±3dB) 30Hz — 15kHz
Tuner
Signal-to-Noise Ratio (MONO) 64dB
Stereo Separation (1kHz) 40dB
AM
Frequency Range 531kHz — 1602kHz (9kHz step)
(MW)
Usable Sensitivity (S/N=20dB) 28.2μV (29dBμ)
Laser Diode GaAIAs
Digital Filter (D/A) 8 times over sampling
Spindle Speed 500rpm — 200rpm (CLV)
Wow & Flutter Below measurable limit
Frequency Response (±1dB) 20Hz — 20kHz
Total Harmonic Distortion (1 kHz) 0.01%
CD player
Signal-to-Noise Ratio (1 kHz) 105dB
Dynamic Range 90dB
Channel Separation 85dB
MP3 Decode Compliant with MPEG-1/2 Audio Layer-3
WMA Decode Compliant with Windows Media Audio
USB Standard USB1.1, USB2.0 (Full speed)
Compatible Devices Mass storage class
USB
File System FAT12/16/32
Maximum Supply Current DC5V
2.0μV/75Ω
1A
Digital Filter (D/A) Converter 24Bit
Frequency Response (±1dB) 20Hz — 20kHz
Signal-to-Noise Ratio (1kHz) 105dB
Dynamic Range 90dB
Channel Separation 85dB
USB
MP3 Decode Compliant with MPEG-1/2 Audio Layer-3
WMA Decode Compliant with Windows Media Audio
WAV Decode Linear-PCM
FLAC Decode FLAC files
Frequency Response (±3dB) 20Hz—20kHz
Input Maximum Voltage 1000mV
Auxiliary
Input Impedance 30kΩ
Maximum Output Power 50W×4 or
Full Bandwidth Power
(at less than 1% THD)
Audio
Speaker Impedance 4Ω—8Ω
Preout Level/Load (CD/USB) 2500mV/10kΩ load
Preout Impedance ≤600Ω
Operating Voltage
(10.5V—16V allowable)
Maximum Current Consumption 10A
Operating Temperature Range –10°C — +60°C
General
Installation Size (W×H×D) 182mm×53mm×158mm
Net Weight (without Trimplate,
Mounting Sleeve)
50W×2 + 50W×1 (Subwoofer = 4Ω)
22W×4
14.4V
g
1.2k
ENGLISH
21
Page 24

CОДЕРЖАНИЕ ПОДГОТОВКА К ЭКСПЛУАТАЦИИ
ПОДГОТОВКА К
ЭКСПЛУАТАЦИИ 2
ОСНОВНЫЕ СВЕДЕНИЯ 3
НАЧАЛО ЭКСПЛУАТАЦИИ 5
1 Отмена демонстрации
2 Установка часов и даты
3 Задание базовых настроек
РАДИОПРИЕМНИК 7
CD/USB/ANDROID 8
AUX 10
ЗВУКОВЫЕ НАСТРОЙКИ 11
НАСТРОЙКИ ДИСПЛЕЯ 14
СПРАВОЧНЫЕ
МАТЕРИАЛЫ 15
Обслуживание
Дополнительная информация
УСТРАНЕНИЕ ПРОБЛЕМ 17
УСТАНОВКА И
ПОДКЛЮЧЕНИЕ 18
ТЕХНИЧЕСКИЕ
ХАРАКТЕРИСТИКИ 21
ВАЖНО
•
В целях обеспечения надлежащей эксплуатации, пожалуйста, перед тем как приступить к эксплуатации данного изделия, внимательно прочтите настоящее
руководство. Особенно важно, чтобы вы прочли и соблюдали все указания в данном руководстве, отмеченные словами Предупреждение и Внимание.
•
Пожалуйста, держите данное руководство в надежном и доступном месте для обращения к нему за справками в будущем.
ПРЕДУПРЕЖДЕНИЕ
•
Не используйте функции, которые отвлекают внимание и мешают безопасному вождению.
•
Не глотайте батарею – опасность химического ожога
Пульт дистанционного управления в комплекте этого изделия содержит аккумулятор кнопочного типа.
В случае проглатывания аккумулятора кнопочного типа он может вызвать сильные внутренние ожоги всего через 2 часа и привести к смерти.
Храните новые и использованные аккумуляторы в недоступном для детей месте.
Если аккумуляторный отсек не закрыт надежно, прекратите использование изделия и поместите его в недоступное для детей место.
Если вы полагаете, что батарея могла быть проглочена или находится внутри любой части тела, немедленно обратитесь за медицинской помощью.
Внимание
Настройка громкости:
•
Отрегулируйте громкость таким образом, чтобы слышать звуки за пределами автомобиля для предотвращения аварий.
•
Уменьшите громкость перед воспроизведением, чтобы предотвратить повреждение динамиков из-за внезапного повышения уровня громкости на выходе.
Общие характеристики:
•
Не используйте внешние устройства, если это может отрицательно повлиять на безопасность движения.
•
Убедитесь в том, что созданы резервные копии всех важных данных. Мы не несем ответственность за потерю записанных данных.
•
Никогда не оставляйте металлические предметы (например, монеты или металлические инструменты) внутри устройства во избежание коротких замыканий.
•
Если ошибка чтения диска возникла из-за образования конденсата на лазерных линзах, извлеките диск и дождитесь, пока влага испарится.
•
В зависимости от типа автомобиля антенна может автоматически выдвигаться при включении устройства, если подключен провод управления антенной
( 20)
. Выключайте устройство при парковке в месте с низким потолком.
Пульт дистанционного управления (RM-RK52):
•
Не оставляйте пульт дистанционного управления в нагреваемых местах, таких как приборная панель.
•
Литиевый аккумулятор может быть взрывоопасным при неправильной замене. Заменяйте только аккумулятором такого же или эквивалентного типа.
•
Блок аккумуляторов или аккумуляторы нельзя подвергать избыточному нагреванию в солнечных лучах, огне и т.п.
Как пользоваться данным руководством
•
Операции объясняются в основном с использованием кнопок на передней панели модели
•
В объяснительных целях используются индикации на английском языке. Вы можете выбрать язык отображения из
меню.
( 6)
•
•
[XX]
( XX)
обозначает выбранные элементы.
означает, что материалы доступны на указанной странице.
KD-R492M
и
KD-R491M
.
2
РУССКИЙ
Page 25

ОСНОВНЫЕ СВЕДЕНИЯ
Передняя панель для KD-R492M
Прикрепление
Загрузочный отсек
Кнопка источника
Кнопка
отсоединения
Ручка регулировки громкости
Задача На передней панели
Включение питания
Настройка громкости
Выберите источник
Изменение отображаемой
информации
Выбор элемента
Нажмите кнопку .
•
Нажмите и удерживайте нажатой, чтобы отключить питание.
Поверните ручку регулировки громкости.
Нажмите ручку регулировки громкости, чтобы выключить звук или приостановить воспроизведение.
•
Нажмите кнопку еще раз, чтобы отменить действие. Уровень громкости вернется на уровень, предшествующий
отключению звука или установке паузы.
•
Нажмите кнопку несколько раз.
•
Нажмите кнопку , затем поверните ручку регулировки громкости в течение 2 секунд.
Нажмите кнопку несколько раз.
1
Поверните ручку регулировки громкости для выбора элемента.
2
Нажмите ручку для подтверждения.
Дисплей
Телеметрический датчик (Не
подвергайте воздействию
прямых солнечных лучей.)
( 16)
Отсоединение
Порядок сброса
Запрограммированные настройки,
кроме сохраненных в памяти
радиостанций, будут удалены.
РУССКИЙ
3
Page 26
ОСНОВНЫЕ СВЕДЕНИЯ
Передняя панель для KD-R491M
Загрузочный отсек Дисплей
Кнопка источника
Телеметрический
датчик (Не
подвергайте
воздействию
прямых солнечных
лучей.)
Задача На передней панели
Включение питания
Настройка громкости
Выберите источник
Изменение отображаемой
информации
Выбор элемента
4
РУССКИЙ
Кнопка отсоединения
Нажмите кнопку .
•
Нажмите и удерживайте нажатой, чтобы отключить питание.
Нажмите кнопку .
•
Нажмите и удерживайте в нажатом положении для последовательного увеличения уровня громкости громкости до
15.
Нажмите кнопку
•
Нажмите кнопку еще раз, чтобы отменить действие. Уровень громкости вернется на уровень, предшествующий
отключению звука или установке паузы.
•
Нажмите кнопку несколько раз.
•
Нажмите , затем нажмите в течение 2 секунд.
Нажмите кнопку несколько раз.
1
Нажмите чтобы выбрать элемент.
2
Нажмите для подтверждения.
Прикрепление
Отсоединение
Порядок сброса
Запрограммированные настройки,
кроме сохраненных в памяти
радиостанций, будут удалены.
, чтобы выключить звук или приостановить воспроизведение.
( 17)
Page 27

ОСНОВНЫЕ СВЕДЕНИЯ
Пульт дистанционного управления (RM-RK52)
Данным устройством можно управлять с помощью дополнительно
приобретенного пульта дистанционного управления.
Направляйте пульт дистанционного управления непосредственно
на датчик дистанционного управления на аппарате.
( 3
или
4)
Перед первым
использованием снимите
защитную пленку.
Замена аккумулятора
Задача На пульте дистанционного управления
Настройка
громкости
Выберите
источник
Нажмите кнопку или .
•
Нажмите и удерживайте в нажатом
положении
увеличения уровня громкости громкости
до 15.
Нажмите кнопку
или приостановить воспроизведение.
•
Нажмите кнопку еще раз, чтобы отменить
действие. Уровень громкости вернется на
уровень, предшествующий отключению
звука или установке паузы.
Нажмите кнопку
для последовательного
, чтобы выключить звук
SOURCE
несколько раз.
НАЧАЛО ЭКСПЛУАТАЦИИ
Информацию о расположении кнопок на передней панели см. на стр.3 или стр.4.
1
Отмена демонстрации
При включении питания впервые (или после сброса устройства) на дисплее отображается
следующая информация:
KD-R492M
:
“CANCEL DEMO”
1 Нажмите ручку регулировки громкости.
В качестве начальной настройки выбрано значение
2 Нажмите ручку регулировки громкости еще раз.
Отображается надпись “DEMO OFF”.
KD-R491M
“CANCEL DEMO”
1 Нажмите кнопку .
В качестве начальной настройки выбрано значение
2 Нажмите кнопку еще раз.
Отображается надпись “DEMO OFF”.
2
1
Нажмите и удерживайте нажатой кнопку .
2 Выполните операцию ‘выбор элемента
3 Выполните операцию ‘выбор элемента
[CLOCKADJUST]
4 Выполните операцию ‘выбор элемента
[DATESET]
5 Нажмите для выхода.
Для возврата к предыдущему элементу настройки нажмите кнопку .
“PRESS” “VOLUME KNOB”
:
“PRESS ENTER”
Установка часов и даты
установите час и минуты
установите день, месяц и год
[YES]
.
[YES]
.
( 3
или
4)’
( 3
[CLOCKFORMAT] [12H]
( 3
, чтобы выбрать
или
4)’
, чтобы настроить часы.
или
4)’
, чтобы установить дату.
или
[CLOCK]
[24H]
.
РУССКИЙ
5
Page 28

НАЧАЛО ЭКСПЛУАТАЦИИ
3
Задание базовых настроек
1
Нажмите и удерживайте нажатой кнопку .
2 Выполните операцию ‘выбор элемента
выбрать элемент (cм. следующую таблицу).
3 Повторяйте действие 2 до тех пор, пока не будет выбран или
активирован необходимый элемент.
4 Нажмите для выхода.
Для возврата к предыдущему элементу настройки нажмите кнопку .
( 3
или
4)’,
чтобы
По умолчанию:
SYSTEM
KEYBEEP
ON
:Включение звука нажатия кнопки.;
OFF
:Выключение.
SOURCESELECT
*
AMSRC
BUILT-IN AUX
ON
:Включение варианта AM при выборе источника.;
( 7)
*
ON
:Включение варианта AUX при выборе источника.;
( 10)
OFF
:Отключение.
OFF
:Отключение.
F/W UPDATE
UPDATESYSTEM
F/WUP xxxx
*
Не отображается, если выбран соответствующий источник.
YES
:Запуск обновления встроенного программного обеспечения.; NO:Отмена
(обновление не запущено).
Подробнее об обновлении встроенного программного обеспечения см.:
<http://www.jvc.net/cs/car/>.
CLOCK
TIMESYNC
CLOCKDISPLAY ON
ENGLISH
РУССКИЙ
ESPANOL
XX
ON
:Время часов автоматически настраивается с помощью данных времени на
часах (CT) в сигнале FM Radio Data System.;
:Даже в выключенном состоянии на дисплее отображается текущее время.;
OFF
:Отмена.
Выберите язык отображения для меню и в применимых случаях информации о
музыке.
По умолчанию выбрано значение
ENGLISH
OFF
:Отмена.
.
6
РУССКИЙ
Page 29
РАДИОПРИЕМНИК
Информацию о расположении кнопок на передней панели см. на стр.3 или
стр.4.
Поиск радиостанции
1
Нажмите кнопку источника несколько раз для выбора FM или AM.
2 Для автоматического поиска станции нажмите (или
нажмите
(или)
Нажмите и удерживайте в нажатом положении
(или нажмите и удерживайте
управления), пока символ “M” не начнет мигать, затем нажмите
несколько раз для поиска радиостанции вручную.
•
Индикатор “ST” или “STEREO” загорается при приеме стереосигнала FMтрансляции достаточного уровня.
Настройки в памяти
Можно сохранять до 18 радиостанций FM и 6 радиостанций AM.
Сохранение радиостанции
При прослушивании радиостанции....
Нажмите и удерживайте нажатой одну из нумерованных кнопок (1–6).
(или)
1 Нажмите и удерживайте нажатой следующую кнопку, пока не
замигает текст “PRESETMODE”.
KD-R492M
KD-R491M
2 Выполните операцию ‘выбор элемента
выбрать запрограммированный номер.
Запрограммированный номер мигает, и отображается надпись “MEMORY”.
Выбор сохраненной радиостанции
Нажмите одну из нумерованных кнопок (1–6).
(или)
1 Нажмите кнопку .
2 Выполните операцию ‘выбор элемента
выбрать запрограммированный номер.
на пульте дистанционного управления).
на пульте дистанционного
: Ручка регулировки громкости
:
( 3
( 3
или4)’, чтобы
или4)’, чтобы
Другие настройки
1
Нажмите и удерживайте нажатой кнопку .
2 Выполните операцию ‘выбор элемента
выбрать элемент
3 Повторяйте действие 2 до тех пор, пока не будет выбран/
активирован желаемый элемент, или следуйте инструкциям,
приведенным для выбранного элемента.
4 Нажмите для выхода.
Для возврата к предыдущему элементу настройки нажмите кнопку .
(
cм. следующую таблицу).
( 3
или 4)’, чтобы
По умолчанию:
TUNERSETTING
RADIO TIMER
SSM
LOCAL SEEK ON
1
*
Дос тупно для выбора, только когда в действии 1 выбран параметр
Включение радио в определенное время независимо от текущего источника.
1
ONCE/DAILY/WEEKLY/OFF
2
FM/AM
:Выбор диапазона частот.
3
01
до 18 (для FM)/01 до 06 (для AM):Выбор запрограммированной радиостанции.
1
4
Установка дня
“
M
Таймер радио не будет включен в следующих случаях.
•
Устройство выключено.
•
Значение
таймера радио для AM.
SSM01–06/SSM07–12/SSM13–18
радиостанций FM. Текст “SSM” перестает мигать после сохранения первых 6 радиостанций.
Выберите
OFF
•
Выполняемые настройки применяются только к выбранному источнику/радиостанции.
После переключения источника/радиостанции, нас тройки требуется выполнить еще
раз.
*
” загорается после завершения.
и времени включения.
[OFF]
выбрано для
SSM07–12/SSM13–18
:Поиск только радиостанций FM-диапазона с хорошим качеством приема.;
:Отмена.
:Выбор частоты включения таймера.
[AMSRC]
в меню
( 6)
[SOURCESELECT]
: Автоматическое программирование до 18
для сохранения следующих 12 радиостанций.
[ONCE]
или
[WEEKLY]
РУССКИЙ
XX
после выбора
.
7
Page 30

РАДИОПРИЕМНИК
CD/USB/ANDROID
IF BAND AUTO
MONO SET ON
*
NEWSSET
*
REGIONAL
2
*
AF SET
TI ON
PTY SEARCH
2
*
Только для источника FM.
Код PTY
NEWS, AFFAIRS, INFO, SPORT, EDUCATE, DRAMA, CULTURE, SCIENCE, VARIED, POP
M
(музыка),
OTHER M
(музыка),
TRAVEL, LEISURE, JAZZ, COUNTRY, NATION M
DOCUMENT
:Повышение избирательности тюнера для устранения интерференционных
помех от соседних FM-радиостанций. (Сопровождается потерей стереоэффекта.);
WIDE
:Могут возникать интерференционные помехи от соседних FM-радиостанций,
но при этом качество звучания не будет ухудшаться и стереоэффект будет сохраняться.
:Улучшение качества приема в FM-диапазоне (при этом стереоэффект может быть
утрачен).;
OFF
:Отмена.
2
ON
:Устройство временно переключается на программу новостей, если она
доступна.;
OFF
:Отмена.
2
ON
: Переключение на другую станцию только в определенном регионе с помощью
элемента управления “AF”.;
ON
: Автоматический поиск другой станции, транслирующей эту же программу в
данной сети Radio Data System с более высоким качеством приема, если текущее
качество приема является неудовлетворительным.;
: Позволяет устройству временно переключаться в режим приема сообщений о
движении на дорогах, когда эти сообщения доступны (загорается индикатор “TI”), во
время прослушивания всех источников, кроме режима AM. ;
2
*
Выберите код PTY (см. ниже).
Если есть радиостанция, передающая в эфир программу того же кода PTY, что был
выбран, осуществляется настройка на эту радиостанцию.
ROCK M
(музыка),
WEATHER, FINANCE, CHILDREN, SOCIAL, RELIGION, PHONE IN
EASY M
OFF
:Отмена.
(музыка),
LIGHT M
(музыка),
OFF
: Отмена.
OFF
(музыка),
OLDIES, FOLK M
:Отмена.
CLASSICS
(музыка),
Начало воспроизведения
Происходит автоматическая смена источника, и начинается воспроизведение.
CD
KD-R491M:KD-R492M:
Извлечение диска
Входной USB-разъем
KD-R492M
Верхняя сторона
USB
Кабель USB 2.0
ANDROID
Входной USB-разъем
KD-R491M
,
,
1
*
Не ос тавляйте кабель в автомобиле, когда он не используется.
2
*
При подк лючении устройства Android отобразится “Press [VIEW] to install JVC MUSIC PLAY APP”. Следуйте
инструкциям на экране, чтобы установить приложение. Вы также можете установить последнюю версию
приложения JVC MUSIC PLAY на ваше устройство Android до его подключения. Для получения дополнительной
информации посетите <http://www.jvc.net/cs/car/>.
Кабель USB
Извлечение диска
1
*
(имеется в продаже)
2
*
1
*
(имеется в продаже)
Верхняя сторона
8
РУССКИЙ
Page 31
CD/USB/ANDROID
Информацию о расположении кнопок на передней панели см. на стр.3 или стр.4.
Чтобы напрямую выбрать источник USB/ANDROID, нажмите
Задача На передней панели
Перемотка назад
или вперед
Выбор дорожки
или файла
Выбор папки
Воспроизведение
в режиме
3
*
повтора
Нажмите и удерживайте нажатой
3
*
кнопку
Нажмите кнопку
4
*
Нажмите кнопку . Нажмите кнопку .
Нажмите кнопку несколько раз.
TRACKREPEAT/ALLREPEAT
.
: Звуковой компакт-
TRACKREPEAT/FOLDERREPEAT/ALLREPEAT
ONEREPEAT/ALLREPEAT/REPEATOFF
Воспроизведение
в случайном
3
*
порядке
Нажмите кнопку несколько раз.
ALLRANDOM/RANDOMOFF
: Звуковой компакт-
FOLDERRANDOM/ALLRANDOM/RANDOMOFF
SONGRANDOM/ALLRANDOM/RANDOMOFF
3
*
Для ANDROID: Применимо, только если выбрано
4
*
Для CD: Только для файлов MP3/WMA. Эта функция не работают для устройства ANDROID.
[AUTO MODE]
.
На пульте
дистанционного
управления
Нажмите и
удерживайте нажатой
кнопку
.
Нажмите кнопку
: Файл MP3/WMA/WAV/
: ANDROID
: ANDROID
.
.
диск
FLAC
диск
: Файл MP3/WMA/
WAV/FLAC
Выбор режима управления
Когда источником является ANDROID, последовательно
.
нажимайте
AUTO MODE
AUDIO MODE
: Управление устройством Android с данного устройства
.
через приложение JVC MUSIC PLAY, установленное на
устройстве Android.
: Управление устройством Android с помощью самого
устройства Android через другие программные
медиаплееры, установленные на устройстве
Android. Однако вы по-прежнему можете запускать
воспроизведение/ставить на паузу или пропускать файлы с
данного устройства.
Выбор музыкального диска
Когда источником является USB, последовательно нажимайте
.
Будут воспроизводиться песни, сохраненные на следующем диске.
•
Выбранная внутренняя или внешняя память смартфона (запоминающее
устройство большой емкости).
•
Выбранный привод устройства с несколькими дисками.
Выбор файла из папки/списка
Для ANDROID применимо, только когда выбрано
1 Нажмите кнопку .
2 Выполните операцию ‘выбор элемента
чтобы выбрать папку/список.
3 Выполните операцию ‘выбор элемента
чтобы выбрать файл.
Быстрый поиск
Если у вас имеется большое количество файлов, вы можете
выполнить быстрый поиск по ним.
Для быстрого просмотра списка выполните следующую операцию.
KD-R492M
: Быстро поверните ручку регулировки громкости
KD-R491M
: Нажмите и удерживайте нажатой кнопку
[AUTO MODE]
( 3
или4)’,
( 3
или 4)’,
.
РУССКИЙ
9
Page 32

CD/USB/ANDROID
AUX
Поиск по алфавиту
Вы можете выполнить поиск файла по первому символу в имени.
1 Нажмите для перехода к поиску по символу.
2 Для выбора желаемого символа выполните следующую
операцию.
KD-R492M
^A^ : Верхний регистр (A – Z)
_A_ : Нижний регистр (a – z)
-0- : Цифры (0 – 9)
: Поверните ручку регулировки громкости
KD-R491M
: Нажмите кнопку
-
OTHERS- : Символ, отличный от A – Z и 0 – 9
(применимо только для источника ANDROID)
3 Нажмите следующее, чтобы начать поиск.
KD-R492M: Ручка регулировки громкости
KD-R491M:
•
Для возврата к предыдущему элементу настройки нажмите кнопку .
•
Для отмены нажмите и удерживайте нажатой кнопку .
Использование портативного аудиопроигрывателя
1
Подключите портативный аудиопроигрыватель (имеется в
продаже).
KD-R492M
:
Мини-стереоразъем 3,5мм с разъемом в форме буквы “L”
(имеется в продаже)
Портативный аудиопроигрыватель
Дополнительный входной разъем
KD-R491M
Дополнительный входной разъем
2 Выберите
3 Нажмите кнопку источника несколько раз для выбора AUX.
4 Включите портативный аудиопроигрыватель и начните
:
Портативный аудиопроигрыватель
Мини-стереоразъем 3,5мм с разъемом в форме буквы “L”
(имеется в продаже)
[ON]
для
[BUILT-INAUX]
воспроизведение.
Используйте мини-стереоразъем с 3 контактами для обеспечения
оптимального качества выходного аудиосигнала.
в
[SOURCESELECT]. ( 6)
10
РУССКИЙ
Page 33

ЗВУКОВЫЕ НАСТРОЙКИ
Информацию о расположении кнопок на передней панели см. на стр.3 или
стр.4.
Выбор запрограммированного эквалайзера напрямую
(для KD-R492M)
Нажмите кнопку несколько раз.
(или)
Нажмите кнопку
громкости в течение 5 секунд.
Запрограммированный эквалайзер:
FLAT
(по умолчанию),
R&B, TALK, USER, VOCAL BOOST, BASS BOOST, CLASSICAL, DANCE
Выбор эквалайзера в зависимости от дорожных условий
напрямую
Эквалайзер в зависимости от дорожных условий усиливает определенные
частоты в звуковом сигнале с целью снижения шума, слышимого извне
автомобиля, или шума шин.
Нажмите кнопку несколько раз.
Эквалайзер в зависимости от дорожных условий:
DRVN1
(для KD-R491M)
Сохранение собственных настроек звука
1
Нажмите и удерживайте следующую кнопку, чтобы перейти к
настройке EASY EQ.
KD-R492M
KD-R491M
2 Выполните операцию ‘выбор элемента
•
Для возврата к предыдущему элементу настройки нажмите кнопку .
•
Нажмите следующую кнопку для выхода.
KD-R492M
KD-R491M
:
:
выполнить настройку.
Для настройки обращайтесь к разделу
в разделе
[USER]
:
:
, затем поверните ручку регулировки
DRVN3, DRVN2, DRVN1, HARD ROCK, HIP HOP, JAZZ, POP
DRVN3
(по умолчанию),
( 3
или4)’, чтобы
[EASYEQ]
.
, настройка будет сохранена
DRVN2
Другие настройки
1
Нажмите и удерживайте нажатой кнопку .
2 Выполните операцию ‘выбор элемента
выбрать элемент
(
cм. следующую таблицу).
( 3
3 Повторяйте действие 2 до тех пор, пока не будет выбран/
активирован желаемый элемент, или следуйте инструкциям,
приведенным для выбранного элемента.
4 Нажмите для выхода.
Для возврата к предыдущему элементу настройки нажмите кнопку .
,
EQSETTING
Выберите предварительно установленный режим эквалайзера, соответствующего
музыкальному жанру.
•
Чтобы использовать настройки, заданные в
[USER]
.
FLAT/DRVN3/DRVN2/DRVN1/HARDROCK/HIPHOP/JAZZ/POP/R&B/TALK
USER/VOCAL BOOST/BASS BOOST/CLASSICAL/DANCE
Настройте собственные параметры звука.
•
Настройки сохраняются в разделе
•
Заданные настройки могут повлиять на текущие настройки
2
*1*
SUB.WSP
SUB.W
BASS
MID
TRE
2
3
*
,
:
( 12)
: От 00
От
–08
От
LVL–06
От
LVL–06
От
LVL–06
до
до
3
*1*
:
:
:
:
[EASYEQ]
[USER]
.
+06
(По умолчанию:
+08 00
до
LVL+06 LVL00
до
LVL+06 LVL00
до
LVL+06 LVL00
,
PRESETEQ
EASYEQ
1
*
*
,
или 4)’, чтобы
По умолчанию:
или
[PROEQ]
[PROEQ]
РУССКИЙ
, выберите
.
XX
/
+03
)
11
Page 34

ЗВУКОВЫЕ НАСТРОЙКИ
PROEQ
1 BASS/MIDDLE/TREBLE
2
Настройте элементы звучания для выбранного тона звука.
•
Настройки сохраняются в разделе
•
Заданные настройки могут повлиять на текущие настройки
BASS
Частота:
Уровень: От
Q:
MIDDLE
Частота:
Уровень: От
Q:
TREBLE
Частота:
Уровень: От
Q:
AUDIOCONTROL
BASSBOOST
LOUDNESS LEVEL01/LEVEL02
SUB.W
LEVEL
SUBWOOFER
3
*
SET
SUBWOOFER
1
*
LPF
SUB.W
PHASE
От
LEVEL+01
частот.;
сбалансированного звучания при низком уровне громкости.;
SPK-OUT
1
*
PRE-OUT
ON
FRQTHROUGH
FRQ55HZ/FRQ85HZ/FRQ120HZ
частотами ниже 55Гц/85Гц/120Гц.
REVERSE
4
*1*
соответствии с выходным сигналом динамика в целях обеспечения оптимальной производительности.
до
OFF
:Отмена.
2
*
3
*
: Включение выходного сигнала низкочастотного динамика.;
:Все сигналы передаются в низкочастотный динамик.;
(180°)/
NORMAL
:Выберите тон звука.
[USER]
.
60HZ/80HZ/100HZ/200HZ
LVL–06
до
Q1.0/Q1.25/Q1.5/Q2.0 Q1.0
0.5KHZ/1.0KHZ/1.5KHZ/2.5KHZ
Q0.75/Q1.0/Q1.25 Q1.25
10.0KHZ/12.5KHZ/15.0KHZ/17.5KHZ
QFIX QFIX
LVL+06 LVL00
LVL–06
до
LVL+06 LVL00
LVL–06
до
LVL+06 LVL00
LEVEL+05(LEVEL+01
:Увеличение низких или высоких частот для получения хорошо
От
SUB.W00
до
выходного сигнала низкочастотного динамика, подсоединенного через
акустические провода.
От
SUB.W–08
выходного сигнала низкочастотного динамика, подсоединенного к разъемам
линейного выхода (REAR/SW) через внешний усилитель.
SUB.W+06(SUB.W+03
( 20)
до
SUB.W+08(SUB.W00
:Низкочастотный динамик воспроизводит аудиосигналы с
(0°):Выбор фазы выходного сигнала низкочастотного динамика в
[EASYEQ]
.
(По умолчанию:
(По умолчанию:
(По умолчанию:
): Выбор предпочитаемого уровня подъема нижних
OFF
:Отмена.
):Регулировка уровня
):Регулировка уровня
( 20)
OFF
: Отмена.
80HZ
)
1.0KHZ
10.0KHZ
FADER
*
BALANCE
VOLUMEADJUST
)
AMPGAIN LOWPOWER
)
D.T.EXPANDER
(Digital Track Expander)
SPK/PREOUT
1
*
О тображается только в том случае, если параметр
[ON]
.
2
*
О тображается только в том случае, если параметр
[SUB.W/SUB.W]. ( 13)
3
*
О тображается только в том случае, если параметр
[REAR/SUB.W]
4
*
Доступно только в том случае, если для параметра
значение, отличное от
5
*
Э та настройка не влияет на выходной сигнал сабвуфера.
От
Настройка выходного баланса передних и задних динамиков.
5
От
Настройка выходного баланса левых и правых динамиков.
От
первоначального уровня громкости для каждого источника (в
сравнении с уровнем громкости FM). Перед настройкой выберите
источник, который необходимо настроить. (Текс т “VOLADJFIX”
отображается, если выбрано “FM”.)
значением 25. (Если максимальная мощность динамика меньше
50Вт, выберите эту настройку, чтобы предотвратить повреждение
динамиков.);
— 35.
ON
высокочастотных компонентов и восстановления времени
достижения максимального эффекта волны, которые были потеряны
при аудиокомпрессии данных.;
В зависимости от способа подключения динамиков, выберите
подходящую настройку для задания желаемого выхода. (
Настройки выхода на динамики
или
[SUB.W/SUB.W]. ( 13)
[FRQTHROUGH]
POSITIONR06
POSITIONL06
LEVEL–15
:Cоздание реалистичного звука путем компенсации
до
POSITIONF06(POSITION00
до
POSITIONR06(POSITION00
до
LEVEL+06(LEVEL00
:Ограничение максимального уровня громкости
HIGHPOWER
:Максимальный уровень громкости
OFF
[SUBWOOFERSET]
[SPK/PREOUT]
[SPK/PREOUT]
[SUBWOOFERLPF]
.
):Программирование
:Отмена.
)
имеет значение
имеет значение
имеет значение
выбрано
):
):
13,
12
РУССКИЙ
Page 35

ЗВУКОВЫЕ НАСТРОЙКИ
Настройки выхода на динамики
Выберите настройку выхода на динамики
подключения динамиков.
[SPK/PRE OUT],
в соответствии с методом
Подсоединение через разъемы линейного выхода
Для подключений через внешний усилитель.
Настройка в
[SPK/PRE OUT]
REAR/REAR
REAR/SUB.W
(по умолчанию)
SUB.W/SUB.W
Выход на передние динамики Выход на задние динамики
Выход на передние динамики Выход сабвуфера
Выход на передние динамики Выход сабвуфера
( 20)
Аудиосигнал через линейный выход
FRONT REAR/SW
Подсоединение через акустические провода
Для подключений без использования внешнего усилителя. Однако данная
настройка также позволяет использовать низкочастотный динамик.
Настройка в
[SPK/PRE OUT]
REAR/REAR
REAR/SUB.W
SUB.W/SUB.W
Если выбрано
–
[FRQ120HZ]
( 12)
–
[POSITIONR01]
[POSITIONR06]
Выход на задние динамики Выход на задние динамики
Выход на задние динамики Выход на задние динамики
Выход сабвуфера (Звук отключен)
[SUB.W/SUB.W]
выбрано в
[SUBWOOFERLPF]
выбрано в
до
[POSITION00]. ( 12)
Аудиосигнал через провод заднего динамика
L (левый) R (правый)
:
[FADER]
и опция
[FRQTHROUGH]
и для выбора доступен диапазон с
( 20)
недоступна.
РУССКИЙ
13
Page 36

НАСТРОЙКИ ДИСПЛЕЯ
Определение зоны для настроек яркости
KD-R492M
(Символьная кнопка)
KD-R491M
Определение зоны для настройки цвета
KD-R491M
1 Нажмите и удерживайте нажатой кнопку .
2 Выполните операцию ‘выбор элемента
выбрать элемент (cм. следующую таблицу).
3 Повторяйте действие 2 до тех пор, пока не будет выбран/активирован
желаемый элемент, или следуйте инструкциям, приведенным для
выбранного элемента.
4 Нажмите для выхода.
Для возврата к предыдущему элементу настройки нажмите кнопку .
Символьная кнопка
( 3
или4)’, чтобы
По умолчанию:
DISPLAY
DIMMER
BRIGHTNESS
TEXTSCROLL
1
*
Необходимо подключение провода регулятора освещенности.
2
*
Некоторые буквы или символы не будут отображаться правильно (или не будут отображаться) на
дисплее.
Затемнение подсветки.
OFF
:Затемнение выключено. Яркость переключается на настройку
ON
:Затемнение включено. Яркость переключается на настройку
(
[BRIGHTNESS]
DIMMER TIME
1
Выполните операцию ‘выбор элемента
отрегулировать время
2
Выполните операцию ‘выбор элемента
отрегулировать время
(По умолчанию:
DIMMERAUTO
выключении и включении фар автомобиля.
Настройка яркости для дневного и ночного времени по отдельности.
1 DAY/NIGHT
2
Выбор зоны. (См. рисунок.)
3
От
LEVEL00
2
*
SCROLLONCE
SCROLLAUTO
SCROLLOFF
)
:Настройка времени включения и выключения затемнения.
[ON]
[OFF]
[ON]: 18:00
:Затемнение включается и выключается автоматически при
:Выбор дневного или ночного времени.
до
LEVEL31
:Однократная прокрутка отображаемой информации.;
:Повторная прокрутка через 5-секундные интервалы.;
:Отмена.
( 3
;
[OFF]: 6:00
( 3
*
1
или4)’, чтобы
или4)’, чтобы
)
.
.
: Задание уровня яркости.
(20)
[DAY]
[NIGHT]
XX
.
.
14
РУССКИЙ
Page 37

НАСТРОЙКИ ДИСПЛЕЯ
COLOR
(для
KD-R491M:
PRESET
DAYCOLOR
NIGHTCOLOR
MENU COLOR
Только символьная кнопка)
Выбор цвета подсветки для символьной кнопки. (См. рисунок на стр. 14.)
•
От
COLOR01
до
•
USER
[NIGHTCOLOR]
•
От
COLORFLOW01
•
Предустановленный цвет:
SUNSET, RELAX
Сохранение собственных цветов подсветки символьной кнопки для дневного и ночного
времени.
1
RED/GREEN/BLUE
2
От 00 до 31:Выбор уровня.
Повторите действия
•
Настройка сохраняется в разделе
•
Цвета
выключения фар автомобиля.
ON
: В режиме меню или при выборе музыкального файла из папки/списка цвет
подсветки символьной кнопки изменяется на белый.;
COLOR49
: Отображается цвет, созданный вами для
.
1
и 2 для всех первичных цветов.
[NIGHTCOLOR]
[DAYCOLOR]
до
COLORFLOW03
CRYSTAL, FLOWER, FOREST, GRADATION, OCEAN
:Выберите основной цвет.
и
[DAYCOLOR]
: Цвет изменяется с разной скоростью.
[USER]
меню
[PRESET]
изменяется путем включения и
OFF
или
.
:Отмена.
СПРАВОЧНЫЕ МАТЕРИАЛЫ
Обслуживание
Чистка устройс тва
В случае загрязнения протрите переднюю панель сухой силиконовой или мягкой тканью.
Очистка разъема
Отсоедините лицевую панель и аккуратно протрите разъем
ватной палочкой. Соблюдайте осторожность, чтобы не
,
повредить разъем.
Разъем (на обратной стороне
Обращение с дисками:
•
Не касайтесь записанной поверхности диска.
•
Не приклеивайте на диск клейкую ленту и т. п. и не используйте диск с приклеенной на него лентой.
•
Не используйте никакие дополнительные принадлежности для диска.
•
Проводите чистку по направлению от центра диска к его краю.
•
Для очистки диска используйте сухую силиконовую или иную мягкую ткань. Не используйте какие-либо
растворители.
•
При извлечении дисков из устройства держите их горизонтально.
•
Перед установкой диска устраните любые неровности центрального отверстия или внешнего края диска.
Дополнительная информация
Для: – Последние обновления встроенного программного обеспечения и последний список поддерживаемых
функций
– Любая другая последняя информация
Посетите <http://www.jvc.net/cs/car/>.
Общие характеристики
•
Данное устройство обеспечивает воспроизведение только следующих компакт-дисков:
•
На данном приемнике возможно воспроизведение дисков с несколькими сеансами записи; однако,
незавершенные сеансы будут пропускаться при воспроизведении.
•
Воспроизведение DualDisc:
“Compact Disc Digital Audio”. Поэтому не рекомендуется на данном устройстве использовать не-DVD сторону
диска “DualDisc”.
•
Чтобы ознакомиться с подробными сведениями и примечаниями относительно доступных для
воспроизведения звуковых файлов, посетите <http://www.jvc.net/cs/car/>.
Сторона диска DualDisc, отличная от DVD, не совместима со стандартом
лицевой панели)
РУССКИЙ
15
Page 38

СПРАВОЧНЫЕ МАТЕРИАЛЫ
Воспроизводимые файлы
•
Воспроизводимый звуковой файл:
Для диска: MP3 (.mp3), WMA (.wma)
Для запоминающего устройства USB большой емкости: MP3 (.mp3), WMA (.wma), WAV (.wav), FLAC (.flac)
•
Воспроизводимые диски: CD-R/CD-RW/CD-ROM
•
Воспроизводимый формат файлов на дисках: ISO 9660, уровень 1/2, Joliet, длинные имена файлов
•
Воспроизводимая файловая система устройств USB: FAT12, FAT16, FAT32
Даже если аудиофайлы соответствуют перечисленным выше стандартам, при некоторых типах или состояниях
носителей воспроизведение может оказаться невозможным.
Диски, которые нельзя воспроизвести на данном устройстве
•
Диски некруглой формы.
•
Диски, записанная поверхность которых окрашена, или диски со следами загрязнений.
•
Записываемые диски, которые не были финализированы.
•
Компакт-диск диаметром 8см. Попытка вставки диска с помощью адаптера может привести к
неисправности устройства.
Об устройс твах USB
•
Запрещается подключать USB-носитель через USB-концентратор.
•
Подключение кабеля, общая длина которого превышает 5 м, может привести к некорректному
воспроизведению.
•
Это устройство не распознает устройства USB с номинальным напряжением, отличным от 5В, и
номинальным током свыше 1А.
Об устройствах Android
•
Данное устройство поддерживает Android OS 4.1 и выше.
•
Некоторые устройства Android (с OS 4.1 и выше) могут не поддерживать полностью Android Open Accessory
(AOA) 2.0.
•
Если устройство Android одновременно поддерживает запоминающие устройства большой емкости и AOA
2.0, данное устройство всегда воспроизводит через AOA 2.0 в качестве приоритета.
Изменение отображаемой информации
Каждое нажатие кнопки переключает отображаемую информацию.
•
Если информация не доступна или не записана, отображается сообщение “NO TEXT”, “NO NAME” или другая
информация (например, название радиостанции) либо экран будет пустым.
Название
Информация на дисплее (для KD-R492M)
источника
FM
или
AM
Частота Часы (обратно к началу)
(Только для FM-радиостанций системы передачи
цифровой информации)
Название радиостанции (PS)/Тип программы (PTY) Радиотекст Радиотекст+
Радиотекст+ название/Радиотекст+ исполнитель Час тота Часы
(обратно к началу)
CD
или
USB (Для CD-DA)
ANDROID
AUX
Название диска/Исполнитель Название дорожкиe/Исполнитель Время
воспроизведения
(Для файлов MP3/WMA/WAV/FLAC)
Название песни/Исполнитель Название альбома/Исполнитель Имя папки
Имя файла
Когда выбрано
Название песни/Исполнитель
воспроизведения
AUX Часы (обратно к началу)
Часы (обратно к началу)
Время воспроизведения Часы (обратно к началу)
[AUTOMODE] ( 9)
Часы (обратно к началу)
:
Название альбома/Исполнитель Время
16
РУССКИЙ
Page 39
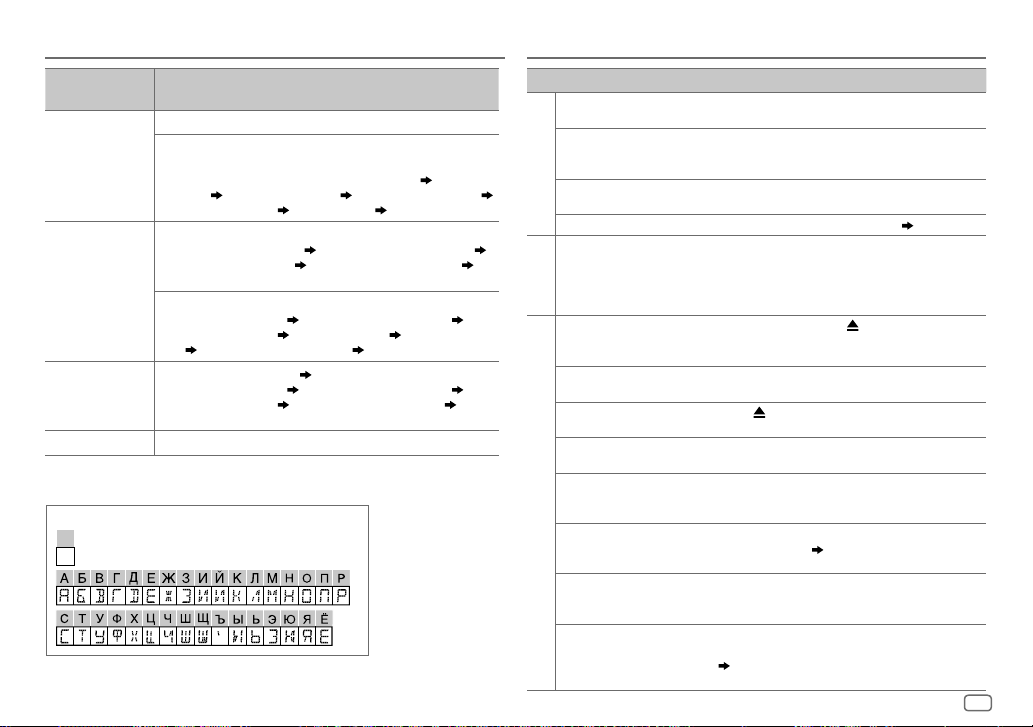
СПРАВОЧНЫЕ МАТЕРИАЛЫ УСТРАНЕНИЕ ПРОБЛЕМ
Название
Информация на дисплее (для KD-R491M)
источника
FM
или
AM
Частота (Дата/Часы)
(Только для FM-радиостанций системы передачи
цифровой информации)
Название радиостанции (PS)/Тип программы (PTY) (Дата/Часы) Радиотекст
CD
или
USB (Для CD-DA)
ANDROID
AUX
(Дата/Часы)
Название песни (Дата/Часы)
Название дорожкиe (Исполнитель) Название дорожкиe (Название диска)
Название дорожкиe (Дата/Часы)
(обратно к началу)
(Для файлов MP3/WMA/WAV/FLAC)
Название песни (Исполнитель) Название песни (Название альбома)
Название песни (Дата/Часы)
Часы)
Когда выбрано
Название песни (Исполнитель)
Название песни (Дата/Часы)
к началу)
AUX (Дата/Часы)
Радиотекст+ (Радиотекст+) Название песни (Исполнитель)
Время воспроизведения (Дата/Часы) (обратно к началу)
[AUTOMODE] ( 9)
Доступные кириллические символы
Допустимые символы
Отображение индикаторов
Частота (Дата/Часы) (обратно к началу)
Время воспроизведения (Дата/Часы)
Имя файла (Имя папки) Имя файла (Дата/
:
Название песни (Название альбома)
Время воспроизведения (Дата/Часы) (обратно
Симптомы Способы устранения
Звук не слышен.
Отображается надпись
“MISWIRING CHECK WIRING THEN
PWR ON”.
Отображается надпись
“PROTECTING SEND SERVICE”.
Общие характеристики
Источник нельзя выбрать.
•
Слабый радиоприем.
•
Статические помехи при
прослушивании радио.
Радиоприемник
Невозможно извлечь диск.
Отображается надпись “IN DISC”.
Отображается надпись “PLEASE
EJECT”.
Неправильный порядок
воспроизведения.
Время от начала
воспроизведения
CD/USB
неправильное.
Отображается сообщение
“NOT SUPPORT”, и дорожка
пропускается.
Продолжает мигать текст
“READING”.
Текст “CANNOT PLAY” мигает и/
или подключенное устройство
нельзя определить.
•
Установите оптимальный уровень громкости.
•
Проверьте кабели и соединения.
Выключите питание, затем выполните проверку, чтобы
убедиться, что контакты проводов динамиков должным образом
изолированы. Снова включите питание.
Отправьте устройство в ближайший сервисный центр.
Проверьте настройку
Плотно вставьте антенну.
Нажмите и удерживайте кнопку для принудительного
извлечения диска. Осторожно, не уроните диск во время
извлечения.
Убедитесь в отсутствии блокирования загрузочного отсека при
вставке диска.
Нажмите и вставьте диск правильно.
Порядок воспроизведения определяется по имени файла (USB)
или в порядке записи файлов (диск).
Это зависит от прежнего процесса записи.
Убедитесь в том, что дорожка имеет формат, поддерживаемый
для воспроизведения.
•
Не используйте многоуровневую иерархическую структуру и
много папок.
•
Перезагрузите диск или повторно подключите USB-устройство.
•
Убедитесь в том, что подключенное устройство совместимо с
данным устройством, и что формат файлов поддерживается.
(16)
•
Повторно подключите устройство.
[SOURCESELECT]. (6)
(16)
РУССКИЙ
17
Page 40

УСТРАНЕНИЕ ПРОБЛЕМ
УСТАНОВКА И ПОДКЛЮЧЕНИЕ
Симптомы Способы устранения
Правильные символы не
отображаются.
CD/USB
•
Во время воспроизведения
не слышен звук.
•
Звук выводится только с
устройства Android.
Не удается воспроизвести в
режиме
[AUTOMODE]
ANDROID
Продолжает мигать текст “NO
DEVICE” или “READING”.
Прерывистое воспроизведение
или пропускается звук.
“CANNOT PLAY”
При повторном возникновении проблем сбросьте устройство.
•
Данное устройство может отображать только буквы верхнего
регистра, цифры и ограниченное число символов.
•
В зависимости от выбранного вами языка отображения
некоторые символы могут отображаться неправильно.
•
Повторно выполните подключение устройства Android.
•
Если работает режим
программный медиаплеер на устройстве Android и начните
воспроизведение.
•
Если работает режим
программный медиаплеер или используйте другой программный
медиаплеер.
•
Перезапустите устройство Android.
•
Если это не решит проблему, подключенное устройство Android
неспособно передавать аудиосигнал на данное устройство.
( 16)
•
Убедитесь в том, что приложение JVC MUSIC PLAY APP установлено на
.
устройство Android.
•
Повторно выполните подключение устройства Android и выберите
соответствующий режим управления.
•
Если это не решит проблему, подключенное устройство Android не
поддерживает
•
Отключите на устройстве Android опции для разработчика.
•
Повторно выполните подключение устройства Android.
•
Если это не решит проблему, подключенное устройство Android не
поддерживает
Выключите режим энергосбережения на устройстве Android.
•
Убедитесь, что устройство Android содержит аудиофайлы, доступные
для воспроизведения.
•
Повторно выполните подключение устройства Android.
•
Перезапустите устройство Android.
( 3
[AUDIOMODE]
[AUDIOMODE]
( 8)
[AUTOMODE]. ( 16)
[AUTOMODE]. ( 16)
или
4)
( 9)
( 6)
, запустите любой
, перезапустите текущий
Предупреждение
•
Устройство можно использовать только с источником питания 12 В постоянного тока с отрицательным
заземлением.
•
,
Отключите отрицательную клемму аккумулятора перед подключением проводов и монтажом.
•
Не подключайте провод аккумулятора (жёлтый) и провод высокого напряжения (красный) к корпусу
машины или проводу заземления (чёрный), чтобы не допустить короткое замыкание.
•
Во избежание короткого замыкания:
– Изолируйте неподсоединенные провода с помощью виниловой ленты.
– Пос ле установки обязательно заземлите данное устройство на корпус автомобиля.
– З акрепите провода с помощью фиксаторов кабеля и оберните провода, контактирующие с
металлическими частями, виниловой лентой, чтобы защитить провода.
Внимание
•
В целях безопасности работа по подключению проводов и монтажу должна выполняться
специалистами. Обратитесь к поставщику автомобильных аудиосистем.
•
Данное устройство подлежит установке в консоль автомобиля. Не прикасайтесь к металлическим
деталям устройства в процессе и на протяжении некоторого времени после завершения эксплуатации
устройства. Температура металлических деталей, таких как радиатор охлаждения и кожух, существенно
повышается.
•
Не подключайте провода динамиков к корпусу машины, проводу заземления (чёрный) или
параллельно.
•
Подключите динамики с максимальной мощностью более 50Вт. Если максимальная мощность
динамиков менее 50Вт, измените значение параметра
( 12)
•
Установите устройство под углом менее 30º.
•
Если в электропроводке транспортного средства нет клеммы зажигания, подключите провод высокого
напряжения (красный) к клемме на блоке плавких предохранителей, которая обеспечивает питание с
напряжением 12 В постоянного тока и которая включается и выключается ключом зажигания.
•
Держите все кабели вдали от тепловыделяющих металлических частей.
•
После установки устройства, убедитесь в том, что все осветительные и электронные приборы вашего
автомобиля работают в прежнем режиме.
•
Если предохранитель сгорел, первым делом убедитесь в том, что кабели не касаются корпуса
автомобиля, после чего замените предохранитель на аналогичный новый.
[AMPGAIN]
, чтобы не повредить динамики.
18
РУССКИЙ
Page 41
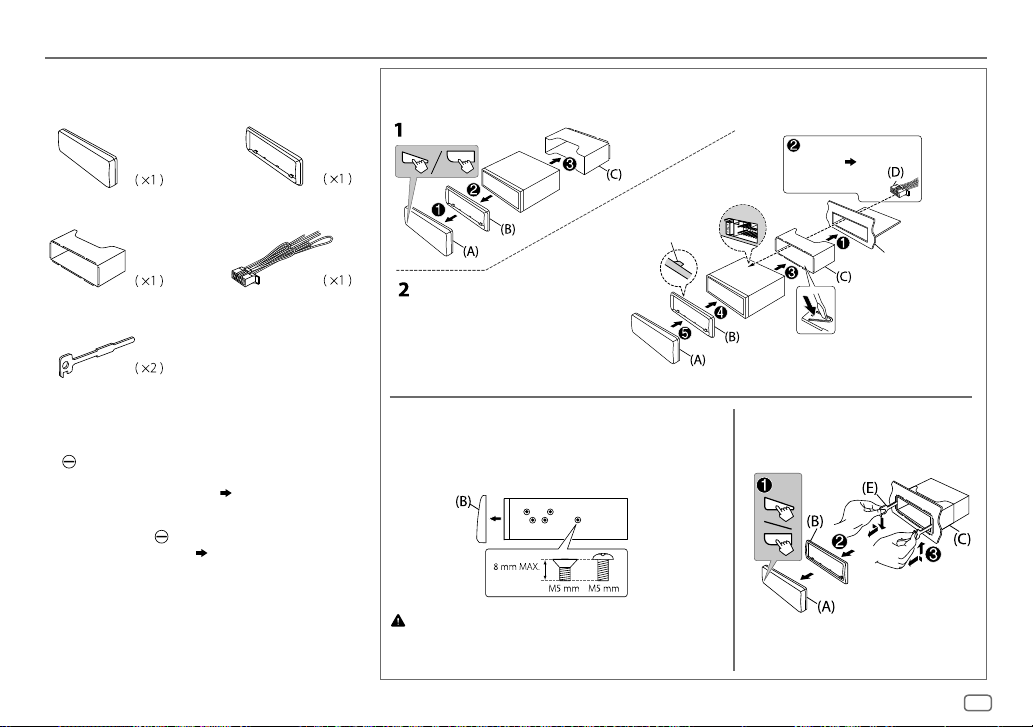
УСТАНОВКА И ПОДКЛЮЧЕНИЕ
Список деталей для установки
(A)
Передняя панель
(C)
Посадочный корпус
(E)
К люч для демонтажа
(B)
Декоративная панель
(D)
Жгут проводов
Установка устройства (установка в приборную панель)
Фиксатор вверху
Перед сборкой расположите
декоративную панель, как
показано.
Отогните соответствующие фиксаторы,
предназначенные для прочной
установки корпуса.
Подключите необходимые
провода.
( 20)
Приборная панель
автомобиля
Стандартная процедура
1
Извлеките ключ из замка зажигания, затем отсоедините разъем
автомобильного аккумулятора.
2
Правильно подключите провода.
См. раздел “Подключение проводов”.
3
Установите устройство в вашем автомобиле.
См. раздел “Установка устройства (установка в приборную панель)”.
4
Подключите клемму автомобильного аккумулятора.
5
Выполните сброс устройства.
( 3
( 20)
или4
)
1
Снимите посадочный корпус и декоративную панель с устройства.
2
Совместите отверстия в устройс тве (с обеих сторон) с монтажной
консолью автомобиля и закрепите устройство винтами (которые можно
приобрести в магазине).
Используйте только специальные винты. Использование неподходящих
винтов может привести к повреждению устройства.
Порядок извлечения устройстваПри установке без посадочного корпуса
РУССКИЙ
19
Page 42
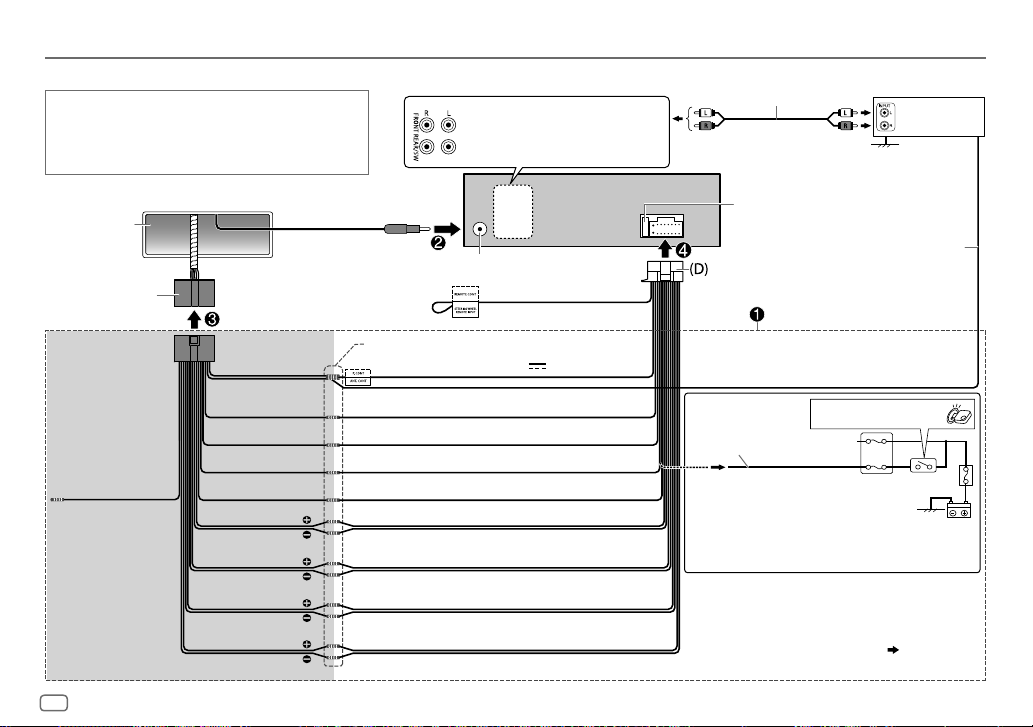
УСТАНОВКА И ПОДКЛЮЧЕНИЕ
Подключение проводов
ВАЖНО
Рекомендуется устанавливать устройство с использованием имеющегося
в продаже жгута проводов, специально предназначенного для вашего
автомобиля, и, в целях вашей безопасности, поручить эту работу
профессионалам. Обратитесь к поставщику автомобильных аудиосистем.
Фронтальный выход
Выходные разъемы задних динамиков/
низкочастотного динамика
Кабель сигнала
(не входит в комплект поставки)
JVC-усилитель
1
*
Приборная панель
транспортного
средства
Заводской жгут проводов
(транспортное средство)
Особый жгут проводов
(приобретается отдельно)
Коричневый
(не используется)
Рекомендуемое подключение
20
РУССКИЙ
Синий:
К антенне с
электроприводом
Синий/белый:
К усилителю
К адаптеру дистанционного
управления с руля
Соедините провода одного цвета вместе.
Синий/белый: Дистанционный (12В
Оранжевый/белый: Подсветка
Жёлтый: Аккумулятор 12В
Kрасный: Зажигание 12В
Чёрный: Заземление
Cерый: Передний динамик (правый)
Серый/чёрный
Белый: Передний динамик (левый)
Белый/чёрный
Фиолетовый: Задний динамик (правый)
Фиолетовый/чёрный
Зелёный: Задний динамик (левый) *
2
Зелёный/чёрный
*
Разъем для антенны
Лампа синяя/жёлтая
2
350мА)
Предохранитель (10 A)
Дистанционный провод
(не входит в комплект поставки)
Замок зажигания
Отделите красный провод
Автомобильный блок
плавких предохранителей
Выполните подключение, если в электропроводке транспортного
средства нет провода зажигания на 12В.
1
*
Прочно подсоедините провод заземления усилителя к корпусу
автомобиля, чтобы предотвратить повреждение устройства.
2
*
Вы также можете подсоединить низкочастотный динамик
напрямую с помощью данного провода, без внешнего усилителя
низкочастотного динамика. Для настройки,
13
.
Page 43

ТЕХНИЧЕСКИЕ ХАРАКТЕРИСТИКИ
Данные могут быть изменены без уведомления
FM Диапазон частот 87,5МГц — 108,0МГц (интервалом 50кГц)
Полезная чувствительность
(отношение сигнал/шум = 26дБ)
Пороговая чувствительность
(ДИН отношение сигнал/шум = 46дБ)
Частотная характеристика (±3 дБ) 30Гц — 15кГц
Тюнер
Отношение сигнал/шум (MONO) 64 дБ
Разделение стереоканалов (1 кГц) 40 дБ
AM
Диапазон частот 531кГц — 1602кГц (интервалом 9кГц)
(MW)
Полезная чувствительность
(отношение сигнал/шум = 20дБ)
Лазерный диод GaAIAs
Цифровой фильтр (D/A) 8-кратная дискретизация
Скорость вращения дисковода 500 об/мин — 200 об/мин (CLV)
Коэффициент детонации Ниже измерительных возможностей
Частотная характеристика (±1 дБ) 20Гц — 20кГц
Суммарное нелинейное искажение (1 кГц) 0,01%
Отношение сигнал/шум (1 кГц) 105 дБ
Динамический диапазон 90 дБ
Проигрыватель компакт-дисков
Разделение каналов 85 дБ
MP3-декодирование В соответствии с аудиоуровнем-3 стандарта MPEG-1/2
WMA-декодирование Совместимо с Windows Media Audio
USB-стандарт USB1.1, USB2.0 (Полноскоростной)
Совместимые устройства Запоминающее устройство большой емкости
USB
Система файлов FAT12/16/32
Максимальный ток источника питания Постоянный ток 5 В
0,71 мкВ/75 Ом (8,2дБф)
2,0 мкВ/75 Ом
28,2 мкВ (29 дБмкВ)
1A
Преобразователь (D/A) с цифровым фильтром 24 бит
Частотная характеристика (±1 дБ) 20Гц — 20кГц
Отношение сигнал/шум (1 кГц) 105 дБ
Динамический диапазон 90 дБ
Разделение каналов 85 дБ
USB
MP3-декодирование В соответствии с аудиоуровнем-3 стандарта MPEG-1/2
WMA-декодирование Совместимо с Windows Media Audio
WAV-декодирование Линейный PCM
FLAC-декодирование Файлы FLAC
Частотная характеристика (±3 дБ) 20Гц — 20кГц
Максимальное напряжение на входе 1000мВ
Полное сопротивление на входе 30 кОм
Вспом. оборуд.
Mаксимальная выходная мощность 50 Bт × 4 или
Полный диапазон частот
(енее чем 1% THD)
Звук
Полное сопротивление катушки
громкоговорителя
Уровень/нагрузка предусилителя (CD/USB) нагрузка 2500 мВ/10 кОм
Полное сопротивление выхода предусилителя ≤600Ом
Рабочее напряжение
(допустимо от 10,5 В—16В)
Максимальное текущее потребление 10A
Диапазон рабочих температур –10°C — +60°C
Установочные размеры (Ш × B × Г) 182 мм × 53 мм × 158 мм
Общие характеристики
Вес нетто (без передней панели и посадочного
корпуса)
50Вт×2 + 50Вт×1 (Низкочастотный динамик =
4Ом)
22 Bт × 4
4Ом—8Ом
14,4В
1,2кг
РУССКИЙ
21
Page 44

İÇİNDEKİLER KULLANIM ÖNCESİ
KULLANIM ÖNCESİ 2
TEMEL BİLGİLER 3
BAŞLARKEN 5
1 Gösterimin iptal edilmesi
2 Saati ve tarihi düzenleyin
3 Temel ayarların yapılması
RADYO 7
CD/USB/ANDROID 8
AUX 10
SES AYARLARI 11
EKRAN AYARLARI 14
REFERANSLAR 15
Bakım
Daha fazla bilgi
SORUN GİDERME 17
KURULUM/BAĞLANTI 18
TEKNİK ÖZELLİKLER 21
ÖNEMLİ
•
Doğru bir kullanım için, lütfen ürünü kullanmadan önce bu kılavuzu tam olarak okuyun. Bu kılavuzdaki Uyarı ve Dikkat kısmını okumanız ve incelemeniz bilhassa önemlidir.
•
İleride tekrar başvurabilmeniz için, kılavuzu lütfen güvenli ve ulaşılabilir bir yerde muhafaza edin.
UYARI
•
Güvenli bir sürüş yapmanıza engel olacak herhangi bir işlevi kullanmayın.
•
Pili yutmayın, Kimyasal Yanık Tehlikesi
Bu ürünle birlikte verilen uzaktan kumanda bir düğme hücre pili içerir.
Eğer düğme hücre pili yutulursa, 2 saat içerisinde ciddi iç yanmalara ve sonrasında ölüme sebep olabilir.
Yeni ve kullanılmış pilleri çocuklardan uzak tutun.
Eğer pil bölmesi güvenli bir şekilde kapanmazsa, ürünü kullanmayı bırakın ve çocuklardan uzak tutun.
Eğer pilin yutulmuş ya da vücudun herhangi bir yerine yerleştirilmiş olduğunu düşünürseniz, acilen tıbbi yardım alın.
Dikkat
Ses ayarı:
•
Olası kazaların önüne geçmek amacıyla sesi, arabanın dışından gelen sesleri duyabileceğiniz şekilde ayarlayın.
•
Çıkış düzeyinin aninden artması sonucunda hoparlörlerin hasar görmesini önlemek için dijital kaynakları oynatmadan önce ses düzeyini düşürün.
Genel:
•
Güvenilir sürüşü engelleyebileceğinden harici cihazı kullanmayınız.
•
Önemli verilerin tümünün yedeklendiğine emin olun. Veri kaybı konusunda herhangi bir sorumluluk kabul etmiyoruz.
•
Kısa devre olmasını engellemek için, ünite içine asla metal nesneler (bozuk para veya metal aletler gibi) bırakmayın.
•
Lazer lensleri üzerinde yoğuşma olması nedeniyle disk hatası gerçekleşirse, diski çıkarın ve nemin buharlaşmasını bekleyin.
•
Araba türüne bağlı olarak, üniteyi açtığınızda anten kontrol kablo bağlantısıyla anten otomatik olarak uzayacaktır
kapatın.
Uzaktan kumanda (RM-RK52):
•
Uzaktan kumandayı, ön konsol gibi sıcak alanlara bırakmayın.
•
Hatalı değiştirilmesi sonucunda lityum pil patlayabilir. Yalnızca aynı veya eşdeğer pil türüyle değiştirin.
•
Pil paketinin veya pillerin güneş ışığı ve ateş gibi yüksek ısılara maruz bırakılmaması gerekir.
Kullanım kılavuzunun okunması
•
İşlemler genel olarak
•
Aydınlatma amacı için İngilizce göstergeler kullanılmaktadır. Görüntüleme dilini menüden seçebilirsiniz.
•
[XX]
seçili öğeleri ifade eder.
•
( XX)
belirtilen sayfada referansların bulunduğunu gösterir.
KD-R492M
ve
KD-R491M
( 20)
. Alçak tavanlı bir yerde park ederken üniteyi
’in ön yüzündeki düğmeler kullanılarak açıklanmıştır.
( 6)
2
TÜRKÇE
Page 45

TEMEL BİLGİLER
KD-R492M ön paneli
Takm a
Yükleme yuvası
Kaynak butonu
Sökme düğmesi
Ses düğmesi
Bunu yapmak için Ön panel üzerinde
Üniteyi açın
Ses düzeyini ayarlayın
Bir kaynak seçin
Ekran bilgilerini değiştirin
Bir öğe seçin
öğesine basın.
•
Gücü kapatmak için basın ve basılı tutun.
Ses düğmesini çevirin.
Sesi kapatmak veya oynatımı duraklatmak için ses düğmesine basın.
•
İptal etmek için düğmeye tekrar basın. Ses seviyesi susturma veya duraklatmadan önceki seviyesine geri döner.
•
öğesine tekrar tekrar basın.
•
öğesine basın ve ardından ses düğmesini 2 saniye içinde çevirin.
öğesine tekrar tekrar basın.
1
Bir öğe seçmek için ses düğmesini çevirin.
2
Onaylamak için düğmeye basın.
Ekran penceresi
Uzaktan kumanda sensörü (Parlak güneş
ışığına maruz bırakmayın.)
( 16)
Sökme
Sıfırlama
Kaydedilen radyo istasyonları hariç
önceden belirlenmiş ayarlarınız
silinecektir.
TÜRKÇE
3
Page 46

TEMEL BİLGİLER
KD-R491M ön paneli
Kaynak butonu
Takm a
Yükleme yuvası Ekran penceresi
Sökme
Uzaktan kumanda
sensörü (Parlak
güneş ışığına maruz
bırakmayın.)
Sökme düğmesi
Bunu yapmak için Ön panel üzerinde
Üniteyi açın
Ses düzeyini ayarlayın
Bir kaynak seçin
Ekran bilgilerini değiştirin
Bir öğe seçin
4
TÜRKÇE
öğesine basın.
•
Gücü kapatmak için basın ve basılı tutun.
öğesine basın.
•
Sesi 15’e kadar sürekli yükseltmek için öğesine basılı tutun.
Sesi kapatmak veya oynatımı duraklatmak için
•
İptal etmek için düğmeye tekrar basın. Ses seviyesi susturma veya duraklatmadan önceki seviyesine geri döner.
•
öğesine tekrar tekrar basın.
•
'ya basın, ardından 2 saniye içinde 'ye basın.
öğesine tekrar tekrar basın.
1
Bir parça seçmek için öğesine basın.
2
Onaylamak için tuşuna basın.
( 17)
öğesine basın.
Sıfırlama
Kaydedilen radyo istasyonları hariç
önceden belirlenmiş ayarlarınız
silinecektir.
Page 47

TEMEL BİLGİLER
Uzaktan kumanda (RM-RK52)
Bu üniteisteğe bağlı olarak satın alınan bir uzaktan kumanda ile uzaktan
kumanda edilebilir.
Uzaktan kumandayı direk olarak ünite üzerindeki kumanda sensörüne
tutun.
( 3
veya
4)
İlk kullanımda yalıtım
parçasını çıkarın.
Pilin değiştirilmesi
Bunu yapmak için Uzaktan kumanda üzerinde
Ses düzeyini
ayarlayın
Bir kaynak seçin
veya öğesine basın.
•
Sesi 15’e kadar sürekli yükseltmek için
öğesine basılı tutun.
Sesi kapatmak veya oynatımı duraklatmak için
öğesine basın.
•
İptal etmek için düğmeye tekrar basın. Ses
seviyesi susturma veya duraklatmadan önceki
seviyesine geri döner.
SOURCE
öğesine tekrar tekrar basın.
BAŞLARKEN
Ön paneldeki tuş yerleşimi için, sayfa 3 veya sayfa 4'ye bakın.
1
Gösterimin iptal edilmesi
Çalıştırma düğmesini ilk kez açtığınızda (ya da üniteyi sıfırladıktan sonra), ekran şunu gösterir:
KD-R492M
:
“CANCEL DEMO”
1 Ses düğmesine basın.
Başlangıç ayarları için
2 Ses düğmesine tekrar basın.
“DEMO OFF” ibaresi görünür.
KD-R491M
“CANCEL DEMO”
1 öğesine basın.
Başlangıç ayarları için
2 öğesine yeniden basın.
“DEMO OFF” ibaresi görünür.
2
1
2
[CLOCK]
3 Saati ayarlamak için ‘bir öğe seçme
[CLOCKADJUST]
4 Tarihi ayarlamak için‘bir öğe seçme
[DATESET]
5 Çıkmak için tuşuna basın.
Önceki ayar öğesine dönmek için, düğmesine basın.
“PRESS” “VOLUME KNOB”
[YES]
öğesi seçilir.
:
“PRESS ENTER”
[YES]
öğesi seçilir.
Saati ve tarihi düzenleyin
düğmesine basın ve basılı tutun.
'u seçmek için ‘bir öğe seçme
saat ve dakikayı ayarla
gün,ay ve yılı ayarlayın
( 3
veya
4)’
( 3
( 3
işlemi gerçekleştirin.
veya
4)’
işlemi gerçekleştirin.
[CLOCKFORMAT] [12H]
veya
4)’
işlemi gerçekleştirin.
veya
[24H]
TÜRKÇE
5
Page 48

BAŞLARKEN
3
Temel ayarların yapılması
1
düğmesine basın ve basılı tutun.
2 Bir öğeyi seçmek için ‘bir öğe seçme
gerçekleştirin (aşağıdaki tabloya bakın).
3 İstenilen öğe seçilene kadar veya aktif olana kadar adım 2’ü tekrarlayın.
4 Çıkmak için tuşuna basın.
Önceki ayar öğesine dönmek için, düğmesine basın.
( 3
veya
4)’
işlemi
Varsayılan:
SYSTEM
KEYBEEP
ON
:Tuşa basma sesini etkinleştirir.;
OFF
:Devreden çıkarı.
SOURCESELECT
*
AMSRC
BUILT-IN AUX
ON
:Kaynak seçimdeki “AM” istasyonunu etkinleştirir.;
( 7)
*
ON
:Kaynak seçimdeki “AUX” istasyonunu etkinleştirir.;
( 10)
OFF
:Devre dışı bırakır.
OFF
:Devre dışı bırakır.
F/W UPDATE
UPDATESYSTEM
F/WUP xxxx
*
İlgili kaynak seçildiğinde görüntülenmez.
YES
:Bellenimin yükseltilmesini başlatır.; NO:İptal eder (yükseltme etkinleştirilmez).
Bellenimin nasıl güncelleneceği hakkında ayrıntılı bilgiler için, aşağıdakilere bakın:
<http://www.jvc.net/cs/car/>.
CLOCK
TIMESYNC
CLOCKDISPLAY ON
ENGLISH
РУССКИЙ
ESPANOL
XX
ON
:Saat zamanı, FM Radio Data System sinyalindeki Clock Time (CT) (Saat Zamanı) verisi
kullanılarak otomatik olarak ayarlanır.;
:Saat zamanı, ünite kapalı olduğunda dahi ekranda gösterilir.;
Müzik bilgisi ve menü için mümkünse görüntüleme dilini seçin.
Varsayılan dil,
ENGLISH
seçildi.
OFF
:İptal eder.
OFF
:İptal eder.
6
TÜRKÇE
Page 49

RADYO
Ön paneldeki tuş yerleşimi için, sayfa 3 veya sayfa 4'ye bakın.
İstasyon arama
1
FM veya AM'i seçmek için arka arkaya kaynak butonuna basın.
2 Otomatik olarak bir kanal aramak için için öğesine basın (veya
uzaktan kumanda üzerindeki
(veya)
“M” harfi yanıp sönene kadar öğesine basılı tutun (veya
uzaktan kumanda üzerindeki
manüel olarak bir kanal aramak için arka arkaya basın.
•
Yeterli sinyal gücüne sahip bir FM stereo yayını alırken “ST” veya “STEREO” yanar.
Hafızadaki ayarlar
FM için 18 adede kadar, AM için ise 6 adede kadar istasyon kaydı yapabilirsiniz.
İstasyon kaydetme
Bir istasyonu dinlerken....
Numara tuşlarından (1 ila 6) bir tanesine basın ve basılı tutun.
(veya)
1 “PRESETMODE” yanıp sönene kadar aşağıdaki butona basın ve basılı
tutun.
KD-R492M
KD-R491M
2 Önceden ayarlanmış bir numarayı seçmek için ‘bir öğe seçme
Önayar numarası yanıp söner ve “MEMORY” ibaresi belirir.
: Ses düğmesi
:
veya
4)
’ işlemi gerçekleştirin.
Kayıtlı bir istasyonu seçme
Numara tuşlarından (1ila6) bir tanesine basın.
(veya)
1 öğesine basın.
2 Önceden ayarlanmış bir numarayı seçmek için ‘bir öğe seçme
veya
4)
’ işlemi gerçekleştirin.
öğesine basın).
öğesine basılı tutun), ardından
( 3
( 3
Diğer ayarlar
1
düğmesine basın ve basılı tutun.
2 Bir öğeyi seçmek için ‘bir öğe seçme
gerçekleştirin
3 İstenilen öğe seçildiğinde veya aktif olduğunda 2 adımlarını tekrar et
veya seçilen öğede belirtilen talimatları izleyin.
4 Çıkmak için tuşuna basın.
Önceki ayar öğesine dönmek için, düğmesine basın.
(
aşağıdaki tabloya bakın).
( 3
veya4)’ işlemi
Varsayılan:
TUNERSETTING
RADIO TIMER
SSM
LOCAL SEEK ON
1
*
Sadece 1. adımda
Geçerli kaynağın ne olduğuna bakmaksızın, belirlenen zamanda radyoyu açar.
1
ONCE/DAILY/WEEKLY/OFF
2
FM/AM
:Bandı seçer.
3
01
ila 18 (FM için)/01 ila 06 (AM için):Önceden ayarlanan istasyonları seçin.
1
4
Etkinleşme günü
Tamamlandığında “
Radyo Zamanlayıcı aşağıdaki durumlarda etkinleşmez.
•
Ünite kapalı olduğunda.
•
AM Radyo Zamanlayıcı seçildikten sonra,
[OFF]
SSM01–06/SSM07–12/SSM13–18
olarak ayarlanır. İlk 6 istasyon kaydedildiğinde “SSM” yanıp sönmeyi durdurur. Sıradaki -12
istasyonu da kaydetmek için
:Yalnızca iyi çeken FM istasyonlarını seçer.;
•
Ayarlar seçilen kaynak/istasyona yalnızca uygulanabilir. Kaynağı/istasyonu bir kez
değiştirdiğinizde ayarları tekrar yapmanız gerekmektedir.
[ONCE]
*
M
” yanar.
olarak belirlendiğinde.
veya
[WEEKLY]
:Zamanlayıcının ne sıklıkla açılacağının seçilmesi.
ve saatini ayarlayın.
[SOURCESELECT]
( 6)
: 18 adede kadar FM istasyonunun otomatik
SSM07–12/SSM13–18
OFF
:İptal eder.
seçili ise seçilebilir..
dahilinde
seçimini yapın.
[AMSRC]
XX
ayarı
TÜRKÇE
7
Page 50

RADYO
CD/USB/ANDROID
IF BAND AUTO
MONO SET ON
*
NEWSSET
*
REGIONAL
2
*
AF SET
TI ON
PTY SEARCH
2
*
S adece FM kaynağı için.
PTY kodu
NEWS, AFFAIRS, INFO, SPORT, EDUCATE, DRAMA, CULTURE, SCIENCE, VARIED, POP
M
(müzik),
M
(müzik),
LEISURE, JAZZ, COUNTRY, NATION M
:Yakın FM istasyonların neden olduğu girişim seslerini azaltmak için radyonun
seçiciliğini arttırır. (Stereo etkisi kaybolabilir.);
girişim seslerine bağlıdır ancak ses kalitesi azalmayacak ve stereo etki kaybolmayacaktır.
:FM alımını güçlendirir ancak stereo etkisi kaybolur.;
2
ON
:Ünite, eğer varsa geçici olarak Haber Programı moduna geçer.;
2
ON
: “AF” kontrolünü kullanarak, yalnızca belirli bir bölgede başka bir istasyona geçer.;
OFF
:İptal eder.
ON
: Geçerli çekim gücü zayıf olduğunda, otomatik olarak, aynı Radyo Veri Sistemi ağı
dahilinde aynı programı yayınlayan ve çekim gücü daha iyi olan başka bir istasyon arar.;
OFF
: İptal eder.
: AM kaynağı hariç diğer tüm kaynaklardan birini dinlerken eğer Trafik bilgi yayını varsa
("TI" yanıp söner) ünitenin geçici olarak trafik yanına geçmesini sağlar. ;
2
*
Bir PTY kodu seçin (aşağıya bakınız).
Seçtiğiniz kodla aynı PTY koduna sahip bir program yayınlayan bir istasyon bulunursa o
istasyon ayarlanır.
ROCK M
(müzik),
EASY M
WEATHER, FINANCE, CHILDREN, SOCIAL, RELIGION, PHONE IN, TRAVEL
(müzik),
(müzik),
WIDE
LIGHT M
(müzik),
OLDIES, FOLK M
:Yakıt FM istasyonlardan kaynaklanan
OFF
:İptal eder.
OFF
:İptal eder.
OFF
:İptal eder.
CLASSICS, OTHER
(müzik),
DOCUMENT
Çalma
Kaynak otomatik olarak değişir ve oynatma işlemi başlar.
CD
KD-R491M:KD-R492M:
Diski çıkar
USB giriş terminali
KD-R492M
Etiketli taraf
USB
USB 2.0 kablo
ANDROID
,
USB giriş terminali
KD-R491M
1
*
Kullanımda değilken, kabloyu aracın içinde bırakmayın.
2
*
Android cihazla bağlantı kurduğunuzda gösterildiği gibi “Press [VIEW] to install JVC MUSIC PLAY APP”. Uygulamayı
yüklemek için kullanma talimatlarını izleyin. Bağlantı kurmadan önce Android cihazınıza JVC MUSIC PLAY
uygulamasının en güncel sürümünü yükleyebilirsiniz. Daha fazla bilgi için, <http://www.jvc.net/cs/car/> adresini
ziyaret edin.
USB kablo
*
Diski çıkar
1
*
(ticari olarak satılır)
2
*
1
(ticari olarak satılır)
Etiketli taraf
8
TÜRKÇE
Page 51

CD/USB/ANDROID
Ön paneldeki tuş yerleşimi için, sayfa 3 veya sayfa 4'ye bakın.
USB/ANDROID kaynağı direkt olarak seçmek için
Bunu yapmak için Ön panel üzerinde Uzaktan kumanda üzerinde
Geri/İleri sarma
Bir parça/dosya
seçin
Bir klasör seçin
Tekrar çalma
*
*
4
*
3
düğmesine basın ve
basılı tutun.
öğesine basın.
öğesine basın. öğesine basın.
öğesine tekrar tekrar basın.
TRACKREPEAT/ALLREPEAT
TRACKREPEAT/FOLDERREPEAT/ALLREPEAT
3
ONEREPEAT/ALLREPEAT/REPEATOFF
3
Rasgele çalma
*
öğesine tekrar tekrar basın.
ALLRANDOM/RANDOMOFF
FOLDERRANDOM/ALLRANDOM/RANDOMOFF
SONGRANDOM/ALLRANDOM/RANDOMOFF
3
*
ANDROID için: Sadece
4
*
CD için: Sadece MP3/WMA dosyaları için. Bu ANDROID için geçerli değildir.
[AUTO MODE]
seçildiğinde geçerlidir.
öğresine basın.
düğmesine basın ve
basılı tutun.
öğesine basın.
: Ses CD’si
: Ses CD’si
: MP3/WMA/WAV/FLAC
dosyası
: ANDROID
: MP3/WMA/WAV/FLAC
dosyası
: ANDROID
Kontrol modunu seç
ANDROID kaynağındayken öğesine arka arkaya basın.
AUTO MODE
AUDIO MODE
: Android cihaza yüklü JVC MUSIC PLAY uygulaması aracılığıyla
bu üniteden Android cihaz kontrolü yapma.
: Android cihaza yüklü diğer medya oynatıcı uygulamaları
aracılığıyla Android cihazın kendisi kullanılarak Android cihaz
kontrolü yapma. Yine de bu üniteden çal/durdur veya dosyayı
atla işlemlerini yapabilirsiniz.
Müzik sürücüsünü seçin
USB kaynağındayken öğesine arka arkaya basın.
Aşağıdaki sürücüde kaydedilmiş şarkılar tekrar oynatılacak.
•
Seçili bir akıllı cep telefonunun dahili veya harici belleği (yığın depolama
sınıfı).
•
Çoklu bir sürücü cihazının seçili sürücüsü.
Klasör veya listeden bir dosya seçin
ANDROID için
1 öğesine basın.
2 Bir klasör/liste seçmek için ‘bir öğe seçme
3 Bir liste seçmek için ‘bir öğe seçme
[AUTO MODE]
işlemi gerçekleştirin.
gerçekleştirin.
Hızlı ara
Çok sayıda dosyanız varsa, bunlar arasında hızlıca arama yapabilirsiniz.
Listeye hızlı bir şekilde göz atmak için aşağıdaki işlemi gerçekleştirin.
KD-R492M
: Ses düğmesini hızlıca çevirin
KD-R491M
: düğmesine basın ve basılı tutun
seçildiğinde yalnızca bu uygulanabilir.
( 3
veya4)’
( 3
veya4)’ işlemi
TÜRKÇE
9
Page 52

CD/USB/ANDROID
AUX
Alfabe ara
İlk karaktere göre bir dosyayı arayabilirsiniz.
1 Karakter seçmek için öğesine basın.
2 İstediğiniz karakteri seçmek için aşağıdaki işlemi gerçekleştirin.
^A^ : Büyük harf (A ila Z)
_A_ : Küçük harf (a ila z)
-0- : Sayılar (0 ila 9)
(yalnızca ANDROID kaynak için geçerlidir)
KD-R492M
: Ses düğmesini çevirin
KD-R491M
: öğesine basın
-
OTHERS- : AilaZ, 0ila9’un dışındaki karakterler
3 Aramayı başlatmak için aşağıda gösterilen tuşa basın.
KD-R492M
KD-R491M
: Ses düğmesi
:
•
Önceki ayar öğesine dönmek için, düğmesine basın.
•
İptal etmek için ’na basın ve bekleyin.
Taşınabilir bir ses çaların kullanılması
1
Taşınabilir bir ses çalar bağlayın (ticari olarak satılır).
KD-R492M
:
“L” şekilli konektöre sahip 3,5mm’lik stereo küçük fiş
(ticari olarak satılır)
Taşınabilir ses oynatıcı
Yardımcı giriş jakı
KD-R491M
:
Yardımcı giriş jakı
Taşınabilir ses oynatıcı
“L” şekilli konektöre sahip 3,5mm’lik stereo küçük fiş
(ticari olarak satılır)
2
[SOURCESELECT]
( 6)
3 AUX'u seçmek için kaynak butonuna arka arkaya basın.
4 Taşınabilir ses çaları açın ve çalmayı başlatın.
içinden
[BUILT-INAUX]
Optimum ses çıkışı elde etmek için 3 çekirdek tapalı head stereo küçük
fiş kullanın.
ayarını
[ON]
olarak belirleyin.
10
TÜRKÇE
Page 53

SES AYARLARI
Ön paneldeki tuş yerleşimi için, sayfa 3 veya sayfa 4'ye bakın.
Önayarlı bir ekolayzerı direk olarak seçin
öğesine tekrar tekrar basın.
(veya)
öğesine basın ve ardından ses düğmesini 5 saniye içinde çevirin.
Ekolayzer ön ayarı :
FLAT
(varsayılan),
TALK, USER, VOCAL BOOST, BASS BOOST, CLASSICAL, DANCE
DRVN3, DRVN2, DRVN1, HARD ROCK, HIP HOP, JAZZ, POP, R&B
Bir sürüş ekolayzerı direk olarak seçin
Drive ekolayzer, otomobilin dışındaki gürültüyü veya dönen tekerleklerin gürültüsünü
azaltmak için ses sinyalindeki belirli frekansları yükseltir.
Drive ekolayzer:
öğesine tekrar tekrar basın.
DRVN3
(varsayılan),
DRVN2, DRVN1
Kendi ses ayarlarınızı kaydedin
1
EASY EQ ayarına girmek için aşağıdaki butona basın.
KD-R492M
KD-R491M
2 Ayar yapmak için ‘bir öğe seçme
•
Önceki ayar öğesine dönmek için, düğmesine basın.
•
Çıkmak için aşağıdaki butona basın.
KD-R492M
KD-R491M
:
:
gerçekleştirin.
Ayar için
[EASYEQ]
:
:
( 3
öğesine bakın ve sonuç
(KD-R492M için)
(KD-R491M için)
veya4)’ işlemi
[USER]
öğesine kaydedilir.
,
Diğer ayarlar
1
düğmesine basın ve basılı tutun.
2 Bir öğeyi seçmek için ‘bir öğe seçme
gerçekleştirin
(
aşağıdaki tabloya bakın).
( 3
veya4)’ işlemi
3 İstenilen öğe seçildiğinde veya aktif olduğunda 2 adımlarını tekrar et
veya seçilen öğede belirtilen talimatları izleyin.
4 Çıkmak için tuşuna basın.
Önceki ayar öğesine dönmek için, düğmesine basın.
Varsayılan:
EQSETTING
PRESETEQ
EASYEQ
1
*
*
,
Müzik türüne uygun olarak önayarlı bir ekolayzer seçer.
•
[EASYEQ]
veya
[PROEQ]
FLAT/DRVN3/DRVN2/DRVN1/HARDROCK/HIPHOP/JAZZ/POP/R&B/TALK
USER/VOCAL BOOST/BASS BOOST/CLASSICAL/DANCE
Kendi ses ayarlarınızı belirleyin.
•
Ayarlar
[USER]
•
Yapılan ayarlar
[PROEQ]
2
*1*
SUB.WSP
3
*1*
SUB.W
:
BASS
:
MID
:
TRE
:
2
3
*
,
:
( 12)
öğesinde yapılan ayarları kullanmak için
öğesine kaydedilir.
’nın güncel ayarlarını etkileyebilir.
:
00
ila
+06
(Varsayılan:
–08
ila
+08 00
LVL–06
ila
LVL+06 LVL00
LVL–06
ila
LVL+06 LVL00
LVL–06
ila
LVL+06 LVL00
[USER]
öğesini seçin.
+03
XX
/
)
TÜRKÇE
11
Page 54

SES AYARLARI
PROEQ
1 BASS/MIDDLE/TREBLE
2
Seçilen ses tonunun ses öğelerini ayarlayın.
•
Ayarlar
[USER]
Frekans:
Düzey:
Q:
Frekans:
Düzey:
Q:
Frekans:
Düzey:
Q:
öğesine kaydedilir.
[EASYEQ]
•
Yapılan ayarlar
BASS
MIDDLE
TREBLE
AUDIOCONTROL
BASSBOOST
LOUDNESS LEVEL01/LEVEL02
SUB.W
LEVEL
SUBWOOFER
3
*
SET
SUBWOOFER
1
*
LPF
SUB.W
PHASE
LEVEL+01
OFF
:İptal eder.
frekansların gücünü arttırır.;
SPK-OUT
1
*
PRE-OUT
ON
: Subwoofer çıkışını açar.;
FRQTHROUGH
FRQ55HZ/FRQ85HZ/FRQ120HZ
sinyalleri subwoofera gönderilir.
REVERSE
4
*1*
derin bas hoparlör çıkışının fazını seçer.
ila
LEVEL+05(LEVEL+01
2
*
3
*
:Tüm sinyaller subwoofer’a gönderilir.;
(180°)/
NORMAL
:Ses tonu seçin.
’nın güncel ayarlarını etkileyebilir.
60HZ/80HZ/100HZ/200HZ
LVL–06
ila
LVL+06 LVL00
Q1.0/Q1.25/Q1.5/Q2.0 Q1.0
0.5KHZ/1.0KHZ/1.5KHZ/2.5KHZ
LVL–06
ila
LVL+06 LVL00
Q0.75/Q1.0/Q1.25 Q1.25
10.0KHZ/12.5KHZ/15.0KHZ/17.5KHZ
LVL–06
ila
LVL+06 LVL00
QFIX QFIX
): Tercih ettiğiniz bass güçlendirme seviyesini seçin.;
:Düşük ses düzeyinde daha dengeli bir ses üretebilmek için düşük veya yüksek
OFF
:İptal eder.
SUB.W00
ila
derin bas hoparlör (subwoofer) çıkış seviyesini düzeltir.
SUB.W–08
SW) vasıtasıyla terminal çıkış hatlarına bağlanarak derin bas hoparlör (subwoofer)
çıkış seviyesini düzeltir.
SUB.W+06(SUB.W+03
ila
SUB.W+08(SUB.W00
( 20)
OFF
: İptal eder.
:55Hz/85Hz/120Hz değerden daha düşük frekanstaki ses
(0°):En iyi performansı elde etmek ve hoperlör çıkışıyla aynı hatta olmak için
(Varsayılan:
80HZ
(Varsayılan:
(Varsayılan:
):Hoparlör kablosu bağlantısıyla
( 20)
):Harici bir ampfilikatör (REAR/
1.0KHZ
10.0KHZ
FADER POSITIONR06
5
*
BALANCE
VOLUMEADJUST LEVEL–15
)
)
AMPGAIN LOWPOWER
)
D.T.EXPANDER
(Dijital Parça Genişletici)
SPK/PREOUT
1
*
Yalnızca
[SUBWOOFERSET] [ON]
2
*
Yalnızca
[SPK/PREOUT] [SUB.W/SUB.W]
( 13)
3
*
Yalnızca
[SPK/PREOUT] [REAR/SUB.W]
görüntülenir.
4
*
[SUBWOOFERLPF]
seçilebilir.
5
*
Ayar subwoofer çıkışını etkilemez.
ila
hoparlör çıkış balansı ayarı.
POSITIONL06
hoparlör çıkış balansı ayarı.
başlangıç ses düzeyini ayarlar (FM ses düzeyine oranla). Ayarlamadan
önce, ayarlamak istediğiniz kaynağı seçin. (FM seçimi yapıldıysa
“VOLADJFIX” ibaresi belirir.)
hasar görmesini engellemek için, her bir hoparlörün güç seviyesi 50 W’tan
daha düşük olduğunda bu ayarı seçin.);
seviyesi 35’dir.
ON
:Yüksek frekanslı bileşenleri dengeleyerek ve ses verisinin sıkıştırılması
sırasında dalgabiçiminin yükselme süresini düzelterek gerçekçi bir ses
oluşturur.;
Hoparlör bağlantı yöntemine bağlı olarak, istenilen çıkışı elde etmek için
uygun ayarı seçin. (
( 13)
için seçilebilir
POSITIONF06(POSITION00
ila
POSITIONR06(POSITION00
ila
LEVEL+06(LEVEL00
:En yüksek ses seviyesini 25 olarak sınırlar. (Hoparlörlerin
):Her bir kaynağın,
HIGHPOWER
OFF
:İptal eder.
13, Hoparlör çıkış ayarları
olarak ayarlandığında görüntülenir.
olarak ayarlandığında görüntülenir.
veya
[SUB.W/SUB.W]
[FRQTHROUGH]
ayarlar bundan başkaysa ancak
):Ön ve arka
):Sol ve sağ
:En yüksek ses
)
olarak ayarlandığında
12
TÜRKÇE
Page 55

SES AYARLARI
Hoparlör çıkış ayarları
Hoparlör bağlantı yöntemine bağlı olarak,
seçin.
[SPK/PRE OUT]
Hat çıkış terminalleri üzerinden bağlantı
Harici bir yükseltici vasıtasıyla bağlantılar için.
Ayar açık
[SPK/PRE OUT]
REAR/REAR
REAR/SUB.W
SUB.W/SUB.W
Ön hoparlörlerin çıkışı Arka hoparlör çıkışı
Ön hoparlörlerin çıkışı Subwoofer çıkışı
(varsayılan)
Ön hoparlörlerin çıkışı Subwoofer çıkışı
( 20)
Hat çıkış terminalleri vasıtasıyla ses sinyali
FRONT REAR/SW
hoparlörleri için çıkış ayarını
Hoparlör uçları üzerinden bağlantı
Harici bir yükseltici kullanılmadan yapılan bağlantılar için. Fakat, bu ayarlarla da
subwoofer çıkışının keyfini sürebilirsiniz.
Ayar açık
[SPK/PRE OUT]
REAR/REAR
REAR/SUB.W
SUB.W/SUB.W
[SUB.W/SUB.W]
–
[SUBWOOFERLPF]
( 12)
–
[FADER]
’de
[POSITION00]
seçildiğinde:
[POSITIONR01]
’e kadardır.
Arka hoparlör çıkışı Arka hoparlör çıkışı
Arka hoparlör çıkışı Arka hoparlör çıkışı
Subwoofer çıkışı (Sessiz)
’de
[FRQ120HZ]
( 12)
( 20)
Arka hoparlör bağlantı kablosu vasıtasıyla ses sinyali
L (sol) R (sağ)
seçilebilir ve
seçilir ve seçilebilirlik oranı
[FRQTHROUGH]
uygulanamaz.
[POSITIONR06]
’den
TÜRKÇE
13
Page 56

EKRAN AYARLARI
Parlaklık ayarları için bölge tanımlaması
KD-R492M
(Sembolik düğme)
KD-R491M
Renk ayarı için bölge tanımlaması
KD-R491M
1 düğmesine basın ve basılı tutun.
2 Bir öğeyi seçmek için ‘bir öğe seçme
gerçekleştirin (aşağıdaki tabloya bakın).
3 İstenilen öğe seçildiğinde veya aktif olduğunda 2 adımlarını tekrar et veya
seçilen öğede belirtilen talimatları izleyin.
4 Çıkmak için tuşuna basın.
Önceki ayar öğesine dönmek için, düğmesine basın.
Sembolik düğme
( 3
veya4)’ işlemi
DISPLAY
DIMMER
BRIGHTNESS
TEXTSCROLL
1
*
Aydınlatma kontrolü kablo bağlantısı gerekir.
2
*
B azı karakterler ya da semboller doğru şekilde görüntülenmez (veya boş görünür).
Aydınlatmayı karartın.
OFF
:Dimmer kapalı. Parlaklık
ON
:Dimmer açık. Parlaklık
(
[BRIGHTNESS]
DIMMER TIME
1 [ON]
süresini ayarlamak için ‘bir öğe seçme
gerçekleştirin.
2 [OFF]
süresini ayarlamak için ‘bir öğe seçme
gerçekleştirin.
(Varsayılan:
DIMMERAUTO
olarak açılır ve kapanır.
Gece ve gündüz için parlaklığı ayrı ayrı ayarlayın.
1 DAY/NIGHT
2
Bir alan seç. (Resme bakın.)
3 LEVEL00
2
*
SCROLLONCE
SCROLLAUTO
SCROLLOFF
[NIGHT]
)
:Dimmer zamanını açmayı ve kapamayı düzenler.
[ON]: 18:00
:Aracın farlarını açtığınızda ya da kapattığınızda, dimmer otomatik
1
*
:Gündüz veya gece arasından seçim yapın.
ila
LEVEL31
:Gösterge bilgilerini bir kez kaydırır.;
:5 saniyelik aralıklarla kaydırmayı tekrarlar.;
:İptal eder.
(20)
[DAY]
ayarı için değişiyor.
ayarı için değişiyor.
( 3
( 3
;
[OFF]: 6:00
)
: Parlaklık ayarını belirleyin.
veya4)’ işlemi
veya4)’ işlemi
Varsayılan:
XX
14
TÜRKÇE
Page 57

EKRAN AYARLARI
COLOR (KD-R491M
PRESET
DAY COLOR
NIGHT COLOR
MENU COLOR
için: yalnızca sembolik düğme)
Sembolik düğme için bir aydınlatma rengi seçin. (Sayfa 14'deki resme bakın)
•
COLOR01
•
USER: [DAYCOLOR]
•
COLORFLOW01
•
Önceden belirlenmiş renk:
SUNSET, RELAX
Sembolik düğme için kendi gece ve gündüz renklerinizi kaydedin.
1
RED/GREEN/BLUE
2 00
ila 31:Seviyeyi seçin.
Tüm ana renkleri ayarlamak için
•
Ayar,
[PRESET]
•
[NIGHTCOLOR]
değişir.
ON
: Bir klasör/listeden müzik dosyası seçtiğinizde veya menü modundayken sembolik buton
aydınlatmasının rengi beyaz renge dönüşür.;
ila
COLOR49
veya
[NIGHTCOLOR]
ila
COLORFLOW03
CRYSTAL, FLOWER, FOREST, GRADATION, OCEAN
:Ana rengi seçin.
1
. ve 2. adımları tekrarlayın.
içinde
[USER]
öğesine kaydedilir.
veya
[DAYCOLOR]
için oluşturduğunuz renk gösterilir.
: Renk farklı hızlarda değişir.
, aracınızın farlarını açıp kapatmanıza göre
OFF
:İptal eder.
REFERANSLAR
Bakım
Ünitenin temizlenmesi
Ön panel üzerindeki kiri, kuru silikon veya yumuşak bir bezle silin.
Konektörün temizlenmesi
Ön paneli sökün ve konektörleri, pamuklu bir bez kullanarak ve
,
konektöre hasar vermemeye dikkat ederek güç kullanmadan
temizleyin.
Konektör (ön panelin arka
Disklerin kullanımı:
•
Diskin kayıt yüzeyine dokunmayın.
•
Diskin üzerine bant vb. yapıştırmayın, üzerine bant yapışmış diskleri kullanmayın.
•
Disk için herhangi bir aksesuar kullanmayın.
•
Diski merkezden dışarıya hareketlerle temizleyin.
•
Diski kuru silikon veya yumuşak bir bezle temizleyin. Herhangi bir çözücü madde kullanmayın.
•
Diskleri bu üniteden çıkarırken, yatay olarak çekin.
•
Bir diski takmadan önce diskin orta deliğindeki ve kenarlarındaki korumaları çıkarın.
Daha fazla bilgi
İçin: – En güncel aygıt yazılımı ve en güncel parça listesi
– Herhangi bir güncel bilgi
<http://www.jvc.net/cs/car/> adresini ziyaret edin.
Genel
•
Bu ünite yalnızca aşağıdaki CD’leri çalabilir:
•
Bu alıcı, çoklu oturumlu diskleri çalabilir; ancak kapanmamış oturumlar çalma sırasında atlanacaktır.
•
DualDisc çalma:
Disk Dijital Ses) standardı ile uyumlu değildir. Bu nedenle, bu üründe DualDisc’in DVD formatında olmayan tarafının
kullanılması tavsiye edilememektedir.
•
Çalınabilir ses dosyaları hakkında ayrıntılı bilgi ve notlar için <http://www.jvc.net/cs/car/> adresini ziyaret edin.
“DualDisc”in (İkili Disk) DVD formatında olmayan tarafı, “Compact Disc Digital Audio” (Kompakt
tarafında)
TÜRKÇE
15
Page 58
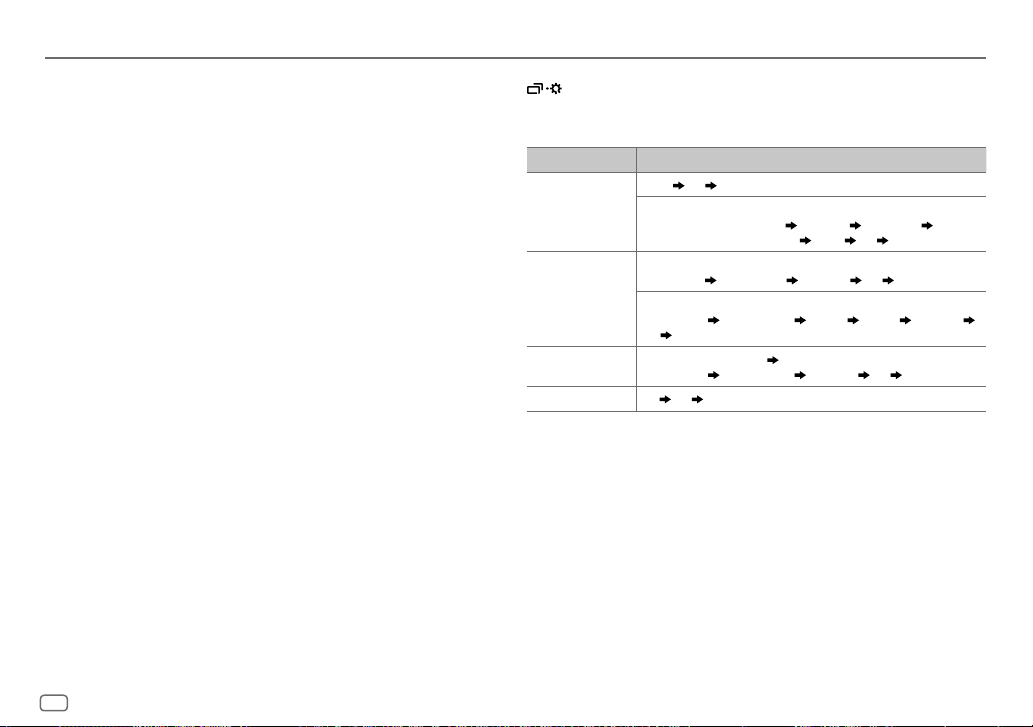
REFERANSLAR
Çalınabilir dosyalar
•
Çalınabilir ses dosyası:
Disk için: MP3(.mp3), WMA(.wma)
USB yığın depolama aygıtı için: MP3 (.mp3), WMA (.wma), WAV (.wav), FLAC (.flac)
•
Çalınabilir medya diski: CD-R/CD-RW/CD-ROM
•
Çalınabilir disk dosya formatı: ISO 9660 Seviyesi 1/2, Joliet, Uzun dosya adı
•
Çalınabilir USB aygıtı dosya sistemi: FAT12, FAT16, FAT32
Ses dosyaları yukarıda listelenen standartlara uysa dahi, medya veya aygıtın türüne veya koşullarına bağlı olarak
kayıttan yürütme imkansız olabilir.
Çalınamayan diskler
•
Yuvarlak olmayan diskler.
•
Kayıt yüzeyinde renklenme olan veya kirli olan diskler.
•
Kapatılmamış Recordable/ReWritable (Kaydedilebilir/Tekrar Yazılabilir) diskler.
•
8 cm CD. Bir adaptör kullanılarak yerleştirmeye çalışmak arızaya neden olabilir.
USB aygıtlar hakkında
•
Bir USB aygıtını bir USB çoklayıcıya bağlayamazsınız.
•
5m’den daha uzun bir kablonun bağlanması normal olmayan çalmaya neden olabilir.
•
Bu ünite elektrik gücü 5 V’den farklı olan ve 1 A’yı geçen bir USB aygıtını tanıyamaz.
Android cihaz hakkında
•
Bu ünite Android OS 4.1 ve üzerini desteklemektedir.
•
Bazı Android cihazlar (4.1 ve üzeri sürüme sahip işletim sistemleri) tam olarak Android Açık Aksesuar (AOA) 2.0 ’ı
desteklemeyebilir.
•
Android cihazı hem yığın depolama sınıfını hemde AOA 2.0 ’ı destekliyorsa bu ünite her zaman AOA 2.0 yoluyla
öncelikli olarak playback yapar.
Ekran bilgilerini değiştirin
öğesine her bastığınızda bilgi ekranı değişir.
•
Eğer bilgi mevcut değilse veya kaydedilmemişse “NO TEXT”, “NO NAME” veya diğer bilgi (ör. istasyon adı) görüntülenir
veya ekran boş olu
Kaynak adı Gösterge bilgileri (KD-R492M için:)
FM
veya
AM
CD
veya
USB (CD-DA için)
ANDROID [AUTO MODE]
AUX
Frekans Saat (başa geri döner)
(Yalnızca FM Radyo Veri Sistemi kullanan istasyonlar için)
İstasyon adı (PS)/Program Türü (PTY) Radyo metni Radyo metni+ R adyo
metni+ parça adı/Radyo metni+ sanatçı
Disk adı/Sanatçı Parça adı/Sanatçı Çalma süresi Saat (başa geri döner)
(MP3/WMA/WAV/FLAC dosyaları için)
Şarkı adı/Sanatçı Albüm adı/Sanatçı Klasör adı Dosya adı Çalma süresi
Saat
(başa geri döner)
Şarkı adı/Sanatçı
AUX Saat (başa geri döner)
seçildiğinde
Albüm adı/Sanatçı Çalma süresi Saat (başa geri döner)
Frekans Saat (başa geri döner)
( 9)
:
16
TÜRKÇE
Page 59
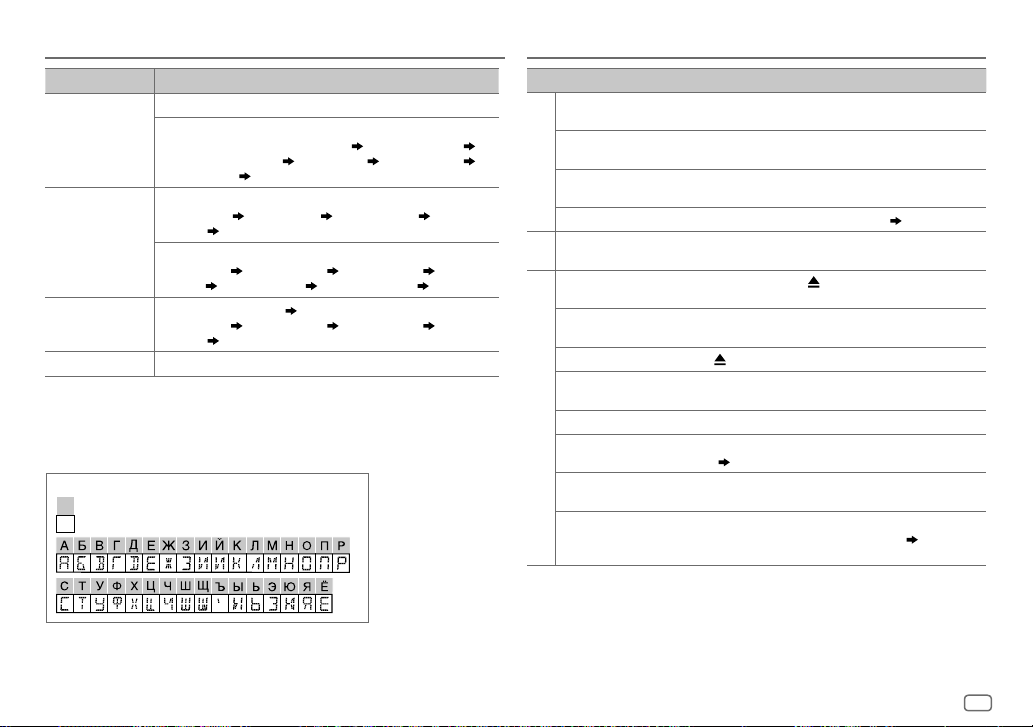
REFERANSLAR SORUN GİDERME
Kaynak adı Gösterge bilgileri (KD-R491M için:)
FM
veya
AM
CD
veya
USB (CD-DA için)
ANDROID [AUTO MODE]
AUX
Frekans (Tarih/Saat)
(Yalnızca FM Radyo Veri Sistemi kullanan istasyonlar için)
İstasyon adı (PS)/Program Türü (PTY) (Tarih/Saat) Radyo metni (Tarih/Saat)
Radyo metni+ (Radyo metni+)
Frekans (Tarih/Saat)
Parça adı (Sanatçı) Parça adı (Disk adı) Parça adı (Tarih/Saat) Çalma süresi
(Tarih/Saat)
(başa geri döner)
(MP3/WMA/WAV/FLAC dosyaları için)
Şarkı adı (Sanatçı) Şarkı adı (Albüm adı) Şarkı adı (Tarih/Saat) Dosya adı
(Klasör adı)
Dosya adı (Tarih/Saat) Çalma süresi (Tarih/Saat) (başa geri döner)
Şarkı adı (Sanatçı)
(Tarih/Saat)
AUX (Tarih/Saat)
seçildiğinde
(başa geri döner)
Şarkı adı (Sanatçı) Şarkı adı (Tarih/Saat)
(başa geri döner)
( 9)
Şarkı adı (Albüm adı) Şarkı adı (Tarih/Saat) Çalma süresi
:
Kullanılabilir Kiril Alfabesi harfleri
Kullanılabilir karakterler
Ekran göstergeleri
Belirti Çözüm
Ses duyulmuyor.
“MISWIRING CHECK WIRING THEN
PWR ON” ibaresi görünür.
Genel
“PROTECTING SEND SERVICE”
ibaresi görünür.
Kaynak seçilemiyor.
•
Radyo alımı zayıf.
Radyo
•
Radyoyu dinlerken parazit var.
Disk çıkartılamıyor.
“IN DISC” ibaresi görünür.
“PLEASE EJECT” ibaresi görünür.
Çalma sırası beklendiği gibi değil.
Geçen çalma süresi doğru değil.
CD/USB
“NOT SUPPORT” ibaresi belirir ve
parçalar atlamaya başlar.
“READING” yanıp sönüyor.
“CANNOT PLAY” yanıp sönüyor ve/
veya bağlı aygıt algılanamıyor.
•
Sesi en uygun düzeye ayarlayın.
•
Kabloları ve bağlantıları kontrol edin.
Gücü kapatın saha sonra hoparlör kablo terminallerinin iyice yalıtılıp
yalıtılmadığından emin olun. Gücü tekrar açın.
Üniteyi en yakın servis merkezine gönderin.
[SOURCESELECT]
Anten bağlantısını gerektiği gibi yapın.
Diski zorla çıkarmak için öğesine basın ve basılı tutun.
Çıkardığınızda diski düşürmemeye özen gösterin.
Diski çıkardığınızda, herhangi bir şeyin yükleme yuvasını
engellemediğinden emin olun.
öğesine basın ve ardından diski doğru şekilde yerleştirin.
Çalma sırası dosya adına (USB) veya dosyaların kayıt sırasına (disk)
göre belirlenir.
Bu, daha önce gerçekleşen kayıt işlemine bağlıdır.
Parçanın çalınabilir bir formatta olup olmadığını kontrol edin.
(16)
•
Çok fazla hiyerarşi seviyesi ve klasör kullanmayın.
•
Diski yeniden yerleştirin veya USB aygıtı yeniden takın.
•
Bağlı aygıtın bu ünite ile uyumlu olup olmadığını ve dosyaların
desteklenen bir formatta olduğunu kontrol edin.
•
Aygıtı yeniden takın.
ayarını kontrol edin. (
6)
(16)
TÜRKÇE
17
Page 60
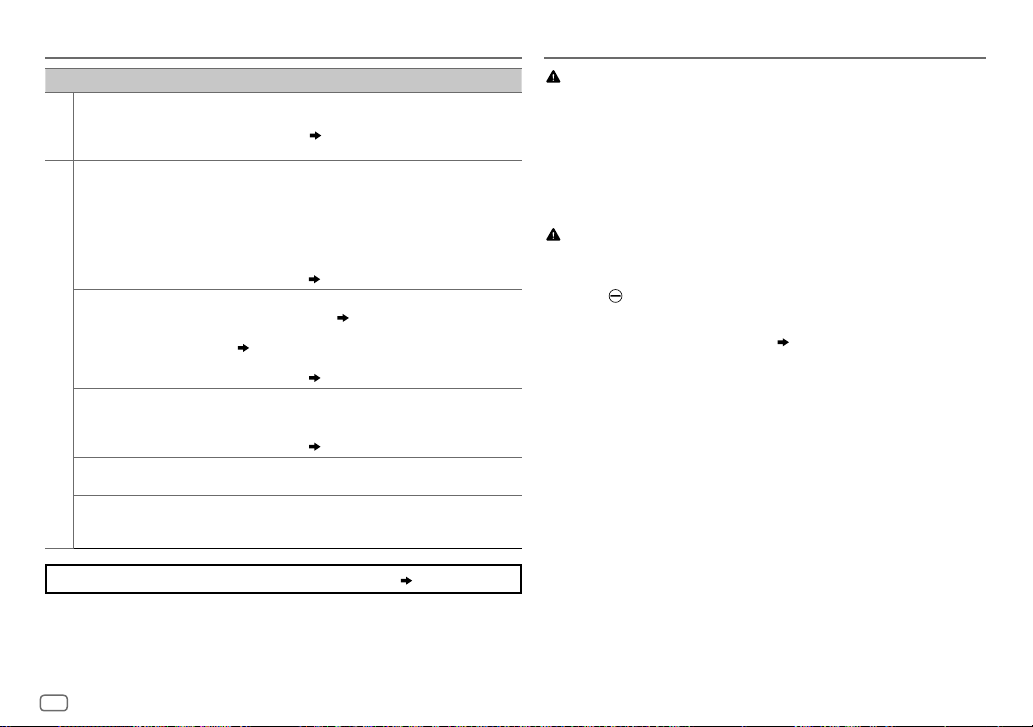
SORUN GİDERME
KURULUM/BAĞLANTI
Belirti Çözüm
Doğru karakterler
görüntülenmiyor.
CD/USB
•
Playback yapılırken ses
duyulamaz.
•
Yalnızca Android cihazdan ses
çıkışı.
[AUTOMODE]
yapılamıyor.
ANDROID
“NO DEVICE” veya “READING”
yanıp sönüyor.
Playback kesintili veya ses atlama
sıkıntısı var.
“CANNOT PLAY”
’de playback
Hala sorun yaşıyorsanız üniteyi yeniden başlatın.
•
Bu ünite yalnızca büyük harfleri, rakamları ve sınırlı sayıda sembolü
görüntüleyebilir.
•
Seçmiş olduğunuz
karakterler doğru bir şekilde görüntülenemeyebilir.
•
Android cihazı tekrar bağlayın.
•
Eğer
[AUDIOMODE]
medya player uygulaması başlatın ve playback’i başlatın.
•
Eğer
[AUDIOMODE]
tekrar başlatın veya başka bir medya player uygulaması kullanın.
•
Android cihazı tekrar başlatın.
•
Eğer bu sorunu çözemiyorsa bağlı Android cihaz ses sinyalini üniteye
gönderemiyordur.
•
Android cihazınızda JVC MUSIC PLAY APP uygulamasının yüklü olup
olmadığından emin olun.
•
Android cihazı tekrar bağlayın ve uygun kontrol modunu seçin.
( 9)
•
Şayet bu sonunu çözemiyorsa bağlı Android cihaz
desteklemiyordur.
•
Android cihaz üzerindeki geliştirici seçeneklerini kapatın.
•
Android cihazı tekrar bağlayın.
•
Şayet bu sonunu çözemiyorsa bağlı Android cihaz
desteklemiyordur.
Android cihaz üzerindeki güç tasarruf modunu kapatın.
•
Android cihazın çalınabilir ses dosyaları içerip içermediğinden emin olun.
•
Android cihazı tekrar bağlayın.
•
Android cihazı tekrar başlatın.
( 6)
görüntüleme diline bağlı olarak, bazı
modundaysa Android cihazda herhangi bir
modundaysa mevcut medya player uygulamasını
( 16)
( 8)
( 3
[AUTOMODE]
[AUTOMODE]
veya
4)
( 16)
( 16)
Uyarı
•
Bu ünite yalnızca, negatif topraklama yapılmış 12V DC’lik güç kaynağı ile kullanılabilir.
•
Kablolama ve montaj öncesinde akünün negatif terminal bağlantısını kesin.
•
Kısa devre olmasını engellemek için Akü kablosunu (sarı) ve Kontak kablosunu (kırmızı) aracın şasisine veya
Topraklama kablosuna (siyah) bağlamayın.
•
Kısa devreyi önlemek için:
– B ağlı olmayan kabloları elektrik bandı ile sarın.
– Montajdan sonra, üniteyi aracın şasisine toprakladığınızdan emin olun.
– Kablo kelepçeleri ile kabloları güvenceye alın ve kabloları korumak için metal parçalara temas eden
kabloların etrafını elektrik bandı ile sarın.
Dikkat
•
Güvenliğiniz için, kablolama ve montaj işlerini profesyonellere bırakın. Araç ses sistemi satıcısına danışın.
•
Bu üniteyi aracınızın konsoluna takın. Ünite kullanımı sırasında ve kullanımın hemen ardından ünitenin metal
kısımlarına dokunmayın. Soğutma plakası ve kaplama gibi metal kısımlar sıcak olabilir.
•
Hoparlörlerin kablolarını araç şasisine veya Şasi kablosuna (siyah) bağlamayın veya bu kabloları paralel
bağlamayın.
•
Maksimum gücü 50 W üzeri hoparlörler kullanın. Hoparlörlerin maksimum gücü 50 W’tan düşükse, hoparlörlerin
hasar görmemesi için
•
Üniteyi 30º’den küçük bir açıyla monte edin.
•
Aracınızın kablo setinde kontak terminali yoksa, Kontak kablosunu (kırmızı) sigorta kutusuna bağlayın. Sigorta
kutusu 12 V DC’lik bir güç kaynağı sağlamalı ve kontak anahtarı ile açılıp kapatılabilmelidir.
•
Tüm kabloları sıcak metal parçalarından uzak tutun.
•
Ünite takıldıktan sonra, fren lambalarının, sinyallerin, sileceklerin, vb. düzgün bir şekilde çalışıp çalışmadığını
kontrol edin.
•
Sigorta atarsa, öncelikle kabloların aracın şasisine temas etmediğinden emin olun ve ardından eski sigortayı,
aynı değerdeki yeni bir sigorta ile değiştirin.
[AMPGAIN]
ayarını değiştirin.
( 12)
18
TÜRKÇE
Page 61
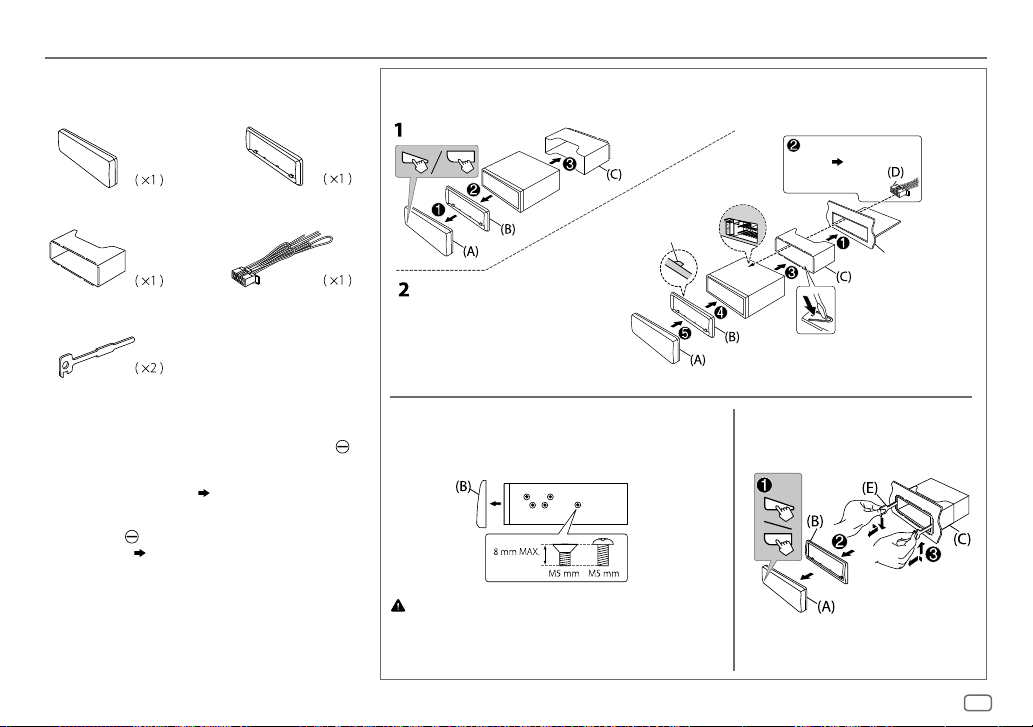
KURULUM/BAĞLANTI
Montaj için parça listesi
(A)
Ön panel
(C)
Montaj kovanı
(E)
Çıkarma tuşu
(B)
(D)
Çerçeve plakası
Kablo seti
Ünitenin monte edilmesi (konsol montajı)
Üst taraftaki kanca
Takmadan önce döşeme
plakasını şekildeki gibi
yönlendirin.
Gerekli kablo bağlantısını
yapın.
( 20)
Aracınızın ön göğüs paneli
Kovanı yerine sabitlemek için
klipsleri kullanın.
Temel prosedür
1
Anahtarı, kontak anahtarından çıkarın ve ardından araç aküsünün
terminalinin bağlantısını kesin.
2
Kabloları doğru şekilde bağlayın.
Kablo bağlantısı bölümüne bakın.
3
Üniteyi aracınıza monte edin.
Ünitenin monte edilmesi (konsol montajı) bölümüne bakın.
4
Araç aküsünün terminalini bağlayın.
5
Birimi sıfırlayın.
( 3
veya4
( 20)
)
1
Montaj kovanını ve çerçeve plakasını üniteden çıkartın.
2
Araç takma desteğiyle ünitedeki (her iki yöndeki) delikleri sıraya dizin ve
üniteyi vidalarla (ticari olarak satılır) sağlamlaştırın.
Sadece belirtilen vidaları kullanın. Yanlış vidaların kullanılması üniteye hasar
verebilir.
Ünitenin çıkarılmasıMontaj kovanı olmadan montaj yapılırken
TÜRKÇE
19
Page 62

KURULUM/BAĞLANTI
Kablo bağlantısı
ÖNEMLİ
Üniteyi ticari olarak kullanışlı ve arabanız için özel kablo demeti ile montaj
yapmanızı ve güvenliğiniz için bu işi profesyonellere bırakmanızı tavsiye
ediyoruz. Araç ses sistemi satıcınıza danışın.
Ön çıkış
Arka çıkış/subwoofer çıkışı
Sinyal kablosu (ürünle birlikte verilmez)
JVC Güçlendirici
1
*
Araç gösterge
paneli
Fabrika kablo seri
Özel kablo seti (ayrıca satın
alınır)
Kahverengi (kullanılmadı)
Önerilen bağlantı
20
TÜRKÇE
(araç)
Mavi:
Güç antenine gider
Mavi/beyaz:
Güçlendiriciye gider
Direksiyon üzerinden uzaktan
kumanda adaptörüne
Aynı kablo setini birlikte bağlayın.
Mavi/beyaz: Uzak (12V
Turuncu/beyaz: Aydınlatma
Sarı: 12 V Batarya
Kırmızı: 12 V Ateşleme
Siyah: Topraklama
Gri: Ön hoparlör (sağ)
Gri/siyah
Beyaz: Ön hoparlör (sol)
Beyaz/siyah
Mor: Arka hoparlör (sağ)
Mor/siyah
Yeşil: Arka hoparlör (sol) *
2
*
Yeşil/siyah
Anten terminali
Açık mavi/sarı
350mA)
2
Sigorta (10A)
Uzaktan kumanda kablosu (ürünle birlikte verilmez)
Ateşleme anahtarı
Ayrı kırmızı tel
Araba sigorta bloku
Eğer cihazınızın fabrika kablo setinde “12 V ateşleme anahtar” teli yoksa
bu bağlantıyı yapın.
1
*
Ampflikatörün topraklama telini üniteye zarar vermeden arabanın
şasisine sıkıca bağlayın.
2
*
Harici subwoofer amplifikatör olmadan bu ucu kullanarak doğrudan
bir subwoofer hoparlörünü de bağlayabilirsiniz. Ayar için,
13
.
Page 63
TEKNİK ÖZELLİKLER
Önceden bildirilmeksizin değişikliğe tabidir
FM Frekans Aralığı 87,5MHz — 108,0MHz (50kHz adımlarla)
Kullanılabilir Hassasiyet (S/N=26dB) 0,71μV/75Ω (8,2dBf)
Sessizleştirme Hassasiyeti
(DIN S/N=46dB)
Frekans Tepkisi (±3dB) 30Hz — 15kHz
Tuner
Sinyal-Parazit Oranı (MONO) 64 dB
Stereo Ayırma (1kHz) 40 dB
AM
Frekans Aralığı 531kHz — 1602kHz (9kHz adımlarla)
(MW)
Kullanılabilir Hassasiyet (S/N=20dB) 28,2μV (29dBμ)
Lazer Diyot GaAIAs
Dijital Filtre (D/A) 8 kere üst örnekleme
Mil Devri 500 dev/dak — 200 dev/dak (CLV)
Wow ve Kırpışma Alt ölçülebilir sınır
Frekans Tepkisi (±1dB) 20Hz — 20kHz
Toplam Harmonik Bozulma (1 kHz) % 0,01
CD oynatıcı
Sinyal-Parazit Oranı (1 kHz) 105 dB
Dinamik Aralık 90 dB
Kanal Ayırma 85 dB
MP3 Çözme MPEG-1/2 Audio Layer-3 uyumlu
WMA Çözme Windows Media Audio uyumlu
USB Standardı USB 1.1, USB 2.0 (Tam Hız)
Uyumlu Aygıtlar Yığın bellek sınıfı
USB
Dosya Sistemi FAT12/16/32
Maksimum Elektrik Akımı DC 5 V
2,0μV/75Ω
1 A
Dijital Filtre (D/A) Dönüştürücü 24 Bit
Frekans Tepkisi (±1dB) 20Hz — 20kHz
Sinyal-Parazit Oranı (1kHz) 105 dB
Dinamik Aralık 90 dB
Kanal Ayırma 85 dB
USB
MP3 Çözme MPEG-1/2 Audio Layer-3 uyumlu
WMA Çözme Windows Media Audio uyumlu
WAV Çözme Doğrusal PCM
FLAC Çözme FLAC dosyaları
Frekans Tepkisi (±3dB) 20 Hz — 20 kHz
Giriş Maksimum Voltajı 1000mV
Yardımcı
Giriş Empedansı 30kΩ
Maksimum Çıkış Gücü 50W×4 veya
Ful band aralık gücü
(% 1 THD min.)
Audio
Hoparlör Empedansı 4Ω—8Ω
Güçlendirilmemiş Çıkış Seviyesi/Yükü (CD/USB) 2500mV/10kΩ yük
Güçlendirilmemiş Çıkış Empedansı ≤600Ω
Çalışma Voltajı
(10,5V—16V arasına izin verilir)
Maksimum Akım Tüketimi 10A
Genel
Çalışma Sıcaklığı Aralığı –10°C — +60°C
Montaj Büyüklüğü (G × Y × D) 182mm×53mm×158mm
Net Ağırlık (ön çerçeve, Montaj Kızağı olmadan)
50W×2 + 50W×1
(Derin bas hoparlör (subwoofer) = 4Ω)
22W×4
14,4V
1,2k
g
TÜRKÇE
21
Page 64

• Microsoft and Windows Media are either registered trademarks or trademarks of Microsoft Corporation
in the United States and/or other countries.
• Android is trademark of Google Inc.
libFLAC
Copyright (C) 2000-2009 Josh Coalson
Copyright (C) 2011-2013 Xiph.Org Foundation
Redistribution and use in source and binary forms, with or without modification, are permitted provided
that the following conditions are met:
- Redistributions of source code must retain the above copyright notice, this list of conditions and the
following disclaimer.
- Redistributions in binary form must reproduce the above copyright notice, this list of conditions and
the following disclaimer in the documentation and/or other materials provided with the distribution.
- Neither the name of the Xiph.org Foundation nor the names of its contributors may be used to endorse
or promote products derived from this software without specific prior written permission.
THIS SOFTWARE IS PROVIDED BY THE COPYRIGHT HOLDERS AND CONTRIBUTORS “AS IS” AND ANY
EXPRESS OR IMPLIED WARRANTIES, INCLUDING, BUT NOT LIMITED TO, THE IMPLIED WARRANTIES OF
MERCHANTABILITY AND FITNESS FOR A PARTICULAR PURPOSE ARE DISCLAIMED. IN NO EVENT SHALL
THE FOUNDATION OR CONTRIBUTORS BE LIABLE FOR ANY DIRECT, INDIRECT, INCIDENTAL, SPECIAL,
EXEMPLARY, OR CONSEQUENTIAL DAMAGES (INCLUDING, BUT NOT LIMITED TO, PROCUREMENT OF
SUBSTITUTE GOODS OR SERVICES; LOSS OF USE, DATA, OR PROFITS; OR BUSINESS INTERRUPTION)
HOWEVER CAUSED AND ON ANY THEORY OF LIABILITY, WHETHER IN CONTRACT, STRICT LIABILITY, OR
TORT (INCLUDING NEGLIGENCE OR OTHERWISE) ARISING IN ANY WAY OUT OF THE USE OF THIS SOFTWARE,
EVEN IF ADVISED OF THE POSSIBILITY OF SUCH DAMAGE.
© 2017 JVC KENWOOD Corporation
0817DTSMDTJEIN
 Loading...