

Page 1
DVD/CD RECEIVER
DVD-/CD-RECEIVER
RECEPTEUR DVD/CD
DVD/CD-RECEIVER
KD-AVX1
KD-AVX1
OK
SOURCE
MENU
T/P
For installation and connections, refer to the separate manual.
Für den Einbau und die Anschlüsse siehe das eigenständige Handbuch.
Pour l’installation et les raccordements, se référer au manuel séparé.
Bijzonderheden over de installatie en aansluiting van het apparaat vindt u in de desbetreffende
handleiding.
BACK
BAND
ENGLISHDEUTSCH
FRANÇAIS
DISP
D
NEDERLANDS
INSTRUCTIONS
BEDIENUNGSANLEITUNG
MANUEL D’INSTRUCTIONS
GEBRUIKSAANWIJZING
LVT1323-001B
[E]
Page 2
Thank you for purchasing a JVC product.
Please read all instructions carefully before operation, to ensure your complete understanding and to
obtain the best possible performance from the unit.
ENGLISH
IMPORTANT FOR LASER PRODUCTS
1. CLASS 1 LASER PRODUCT
2. CAUTION: Do not open the top cover. There are no user serviceable parts inside the unit; leave
all servicing to qualified service personnel.
3. CAUTION: Visible and invisible laser radiation when open and interlock failed or defeated.
Avoid direct exposure to beam.
4. REPRODUCTION OF LABEL: CAUTION LABEL, PLACED OUTSIDE THE UNIT.
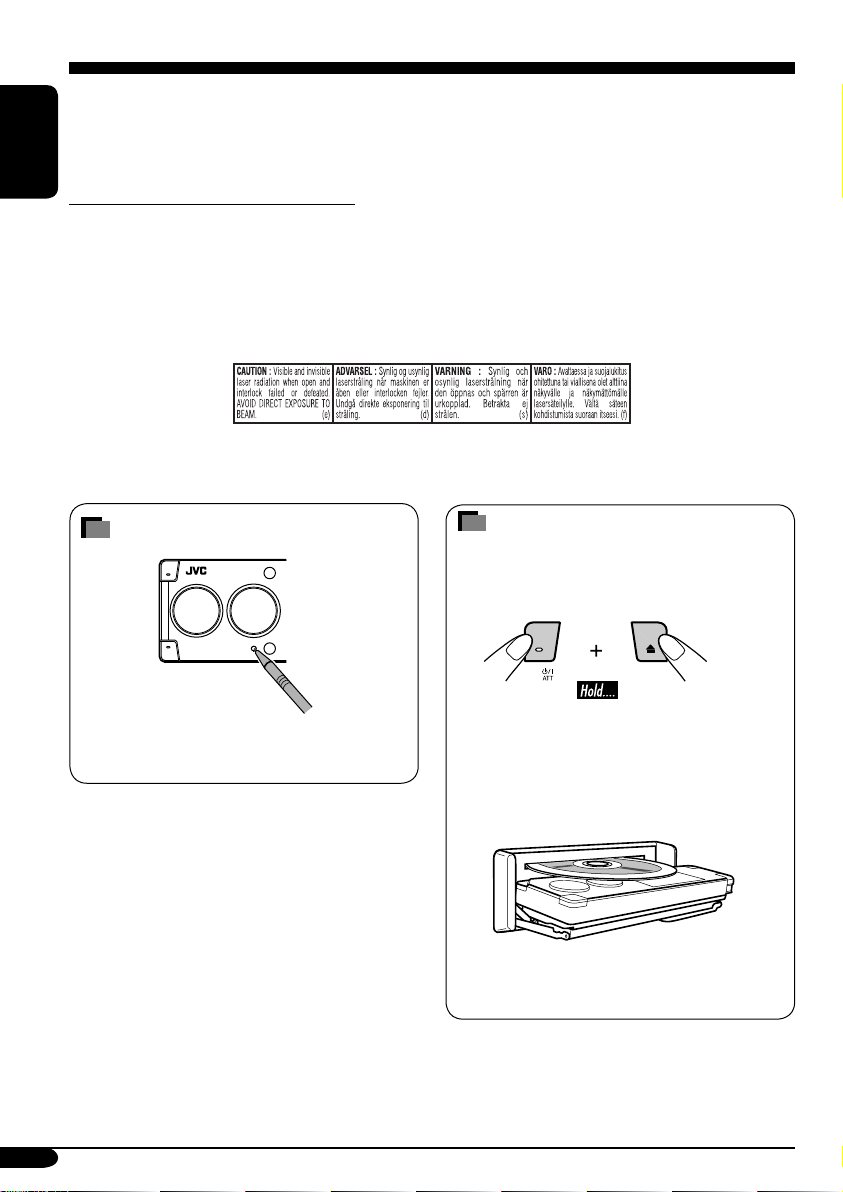
How to reset your unit
This will reset the microcomputer. Your
preset adjustments will also be erased.
For security reasons, a numbered ID card is provided with this receiver, and the same ID number is
imprinted on the receiver’s chassis. Keep the card in a safe place, as it will help the authorities to
identify your receiver if stolen.
How to forcibly eject a disc
If a disc cannot be recognized by the receiver
or cannot be ejected, ejects the disc as
follows.
“NO EJECT?” (or “EJECT OK?”) and
“EMERGENCY EJECT?” appear on the
monitor.
Press 5 / ∞ repeatedly to select
“EMERGENCY EJECT?”, then press OK.
• If this does not work, reset your receiver.
• Be careful not to drop the disc when it
ejects.
2
Page 3
WARNINGS:
• DO NOT install any receiver in
locations where;
– it may obstruct the steering wheel and
gearshift lever operations, as this may
result in a traffic accident.
– it may obstruct the operation of safety
devices such as air bags, as this may
result in a fatal accident.
– it may obstruct visibility.
• DO NOT operate any receiver while
manipulating the steering wheel, as this
may result in a traffic accident.
• The driver must not watch the monitor
while driving.
If the driver watches the monitor while
driving, it may lead to carelessness and
cause an accident.
• The driver must not put on the
headphones while driving. It is
dangerous to shut off the outside sounds
while driving.
• If you need to operate the receiver while
driving, be sure to look ahead carefully
or you may be involved in a traffic
accident.
• If the parking brake is not engaged,
“ParkingBrake” flashes on the monitor,
and no playback picture will be shown.
– This warning appears only when
the parking brake wire is connected
to the parking brake system built
in the car (refer to the Installation/
Connection Manual).
This product incorporates copyright
protection technology that is protected
by U.S. patents and other intellectual
property rights. Use of this copyright
protection technology must be authorized
by Macrovision, and is intended for home
and other limited viewing uses only unless
otherwise authorized by Macrovision.
Reverse engineering or disassembly is
prohibited.
Caution on volume setting:
Discs produce very little noise compared
with other sources. Lower the volume
before playing a disc to avoid damaging
the speakers by the sudden increase of the
output level.
Cautions on the monitor:
• The monitor built in this receiver has
been produced with high precision, but it
may have some ineffective dots. This is
inevitable and is not malfunction.
• Do not expose the monitor to direct
sunlight.
ENGLISH
For safety....
• Do not raise the volume level too much, as
this will block outside sounds, making driving
dangerous.
• Stop the car before performing any
complicated operations.
Temperature inside the car....
If you have parked the car for a long time in
hot or cold weather, wait until the temperature
in the car becomes normal before operating the
unit.
3
Page 4
How to read this manual
The following methods are used to make the
explanations simple and easy-to-understand:
• Some related tips and notes are explained in
ENGLISH
“More about this receiver” (see pages
61 – 65).
• Button operations are mainly explained with
the illustrations as follows:
Press briefly.
Press repeatedly.
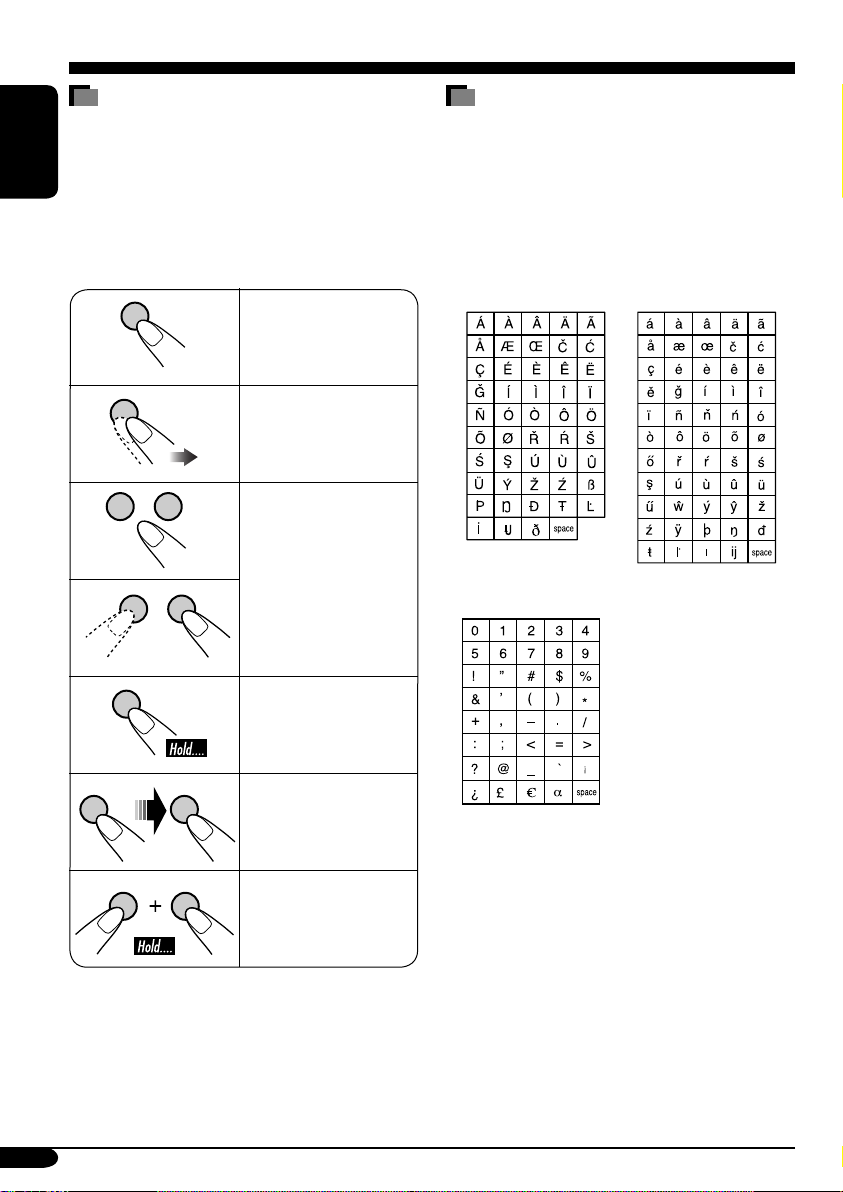
Characters shown on the monitor
In addition to the Roman alphabets (A – Z, a
–z), the following characters will be used to
show the various information on the monitor.
• You can also use the following characters to
assign titles (see page 48).
Accented letters
Upper case Lower case
4
A B
Press either one.
Numbers and symbols
Press and hold until
your desired response
begins.
Press A, then press
B.
Press and hold both
buttons at the same
time.
Page 5

Contents
How to reset your unit ........................... 2
How to forcibly eject a disc ................... 2
How to read this manual ........................ 4
Characters shown on the monitor .......... 4
Introduction — Playable discs ............ 6
Control panel ................................ 7
Parts identification ................................. 7
Remote controller — RM-RK230
Main elements and features ................... 8
....... 8
Getting started .............................. 10
Basic operations ............................. 10
Setting the clock .................................... 11
Radio operations ............................ 12
Listening to the radio .................... 12
Storing stations in memory .................... 14
Listening to a preset station ................... 15
FM RDS operations ........................ 16
Searching for your favorite
FM RDS programme ................ 16
Storing your favorite programmes ......... 17
Using the standby receptions ................. 17
Tracking the same programme
—Network-Tracking Reception ......... 18
Disc operations .............................. 19
Playing a disc in the receiver ....... 19
Basic operations .................................... 21
DVD/VCD special functions ............ 23
Selecting audio languages ..................... 23
Selecting subtitles .................................. 23
Selecting multi-angle views ................... 23
Disc menu operations ............................ 24
Zoom in .................................................. 24
On-Screen disc operations ............... 25
Basic on-screen bar operations .............. 26
Basic control screen operations ............. 28
List screen operations ............................ 29
Monitor adjustments ...................... 34
Other disc operations ..................... 35
Basic operations ..................................... 35
Selecting the playback modes ................ 37
List screen operations ............................ 39
Dual Zone operations ..................... 40
Playing back two sources at a time ........ 40
Sound adjustments ......................... 41
Selecting preset sound modes ....... 41
Storing your own sound adjustments ..... 41
Adjusting the sound ............................... 42
General settings — PSM ................ 44
Basic procedure ..................................... 44
Other main functions ...................... 48
Assigning titles to the sources ............... 48
Detaching the control panel ................... 49
Changing the control panel angle .......... 49
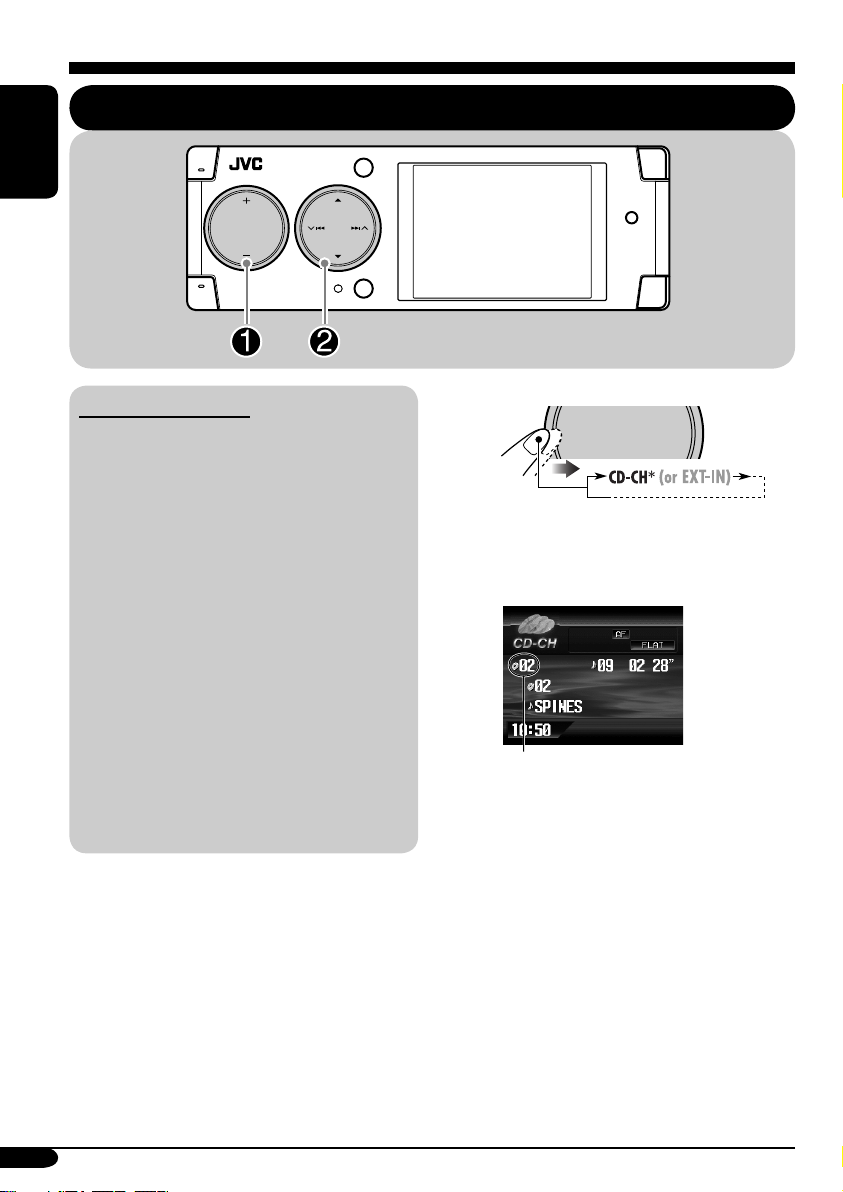
CD changer operations .................... 50
Playing discs in the CD changer
Selecting the playback modes ................ 52
External component operations
Playing an external component .... 53
.... 50
............ 53
DAB tuner operations ..................... 54
Listening to the DAB tuner
Storing DAB services in memory .......... 56
Tuning in to a preset DAB service ........ 56
Using the standby receptions ................. 57
Tracing the same programme
—Alternative Frequency Reception .... 58
........... 54
Maintenance .................................. 59
Language codes .............................. 60
More about this receiver ................. 61
Troubleshooting ............................. 66
ENGLISH
AV setup menu .............................. 30
Basic setting procedure .......................... 30
Specifications ................................. 71
5
Page 6
Introduction — Playable discs
Discs you can play
You can play back the following discs (12 cm
and 8 cm) on this receiver:
• DVD Video: Recorded in PAL color system
ENGLISH
with Region Code “2” (see below).
– DVD-R/DVD-RW recorded in the DVD-
Video format can also be played.
• Video CD (VCD)/audio CD
• MP3/WMA/JPEG: Recorded either in CD-
R/CD-RW or DVD-R/DVD-RW/DVD-ROM.
– CD-R/CD-RW: Compliant with ISO 9660
Level 1, ISO 9660 Level 2, Romeo, and
Joliet.
– DVD-R/DVD-RW/DVD-ROM: Compliant
with UDF-Bridge Format*
1
.
On some discs, the actual operations may be
different from what is explained in this manual.
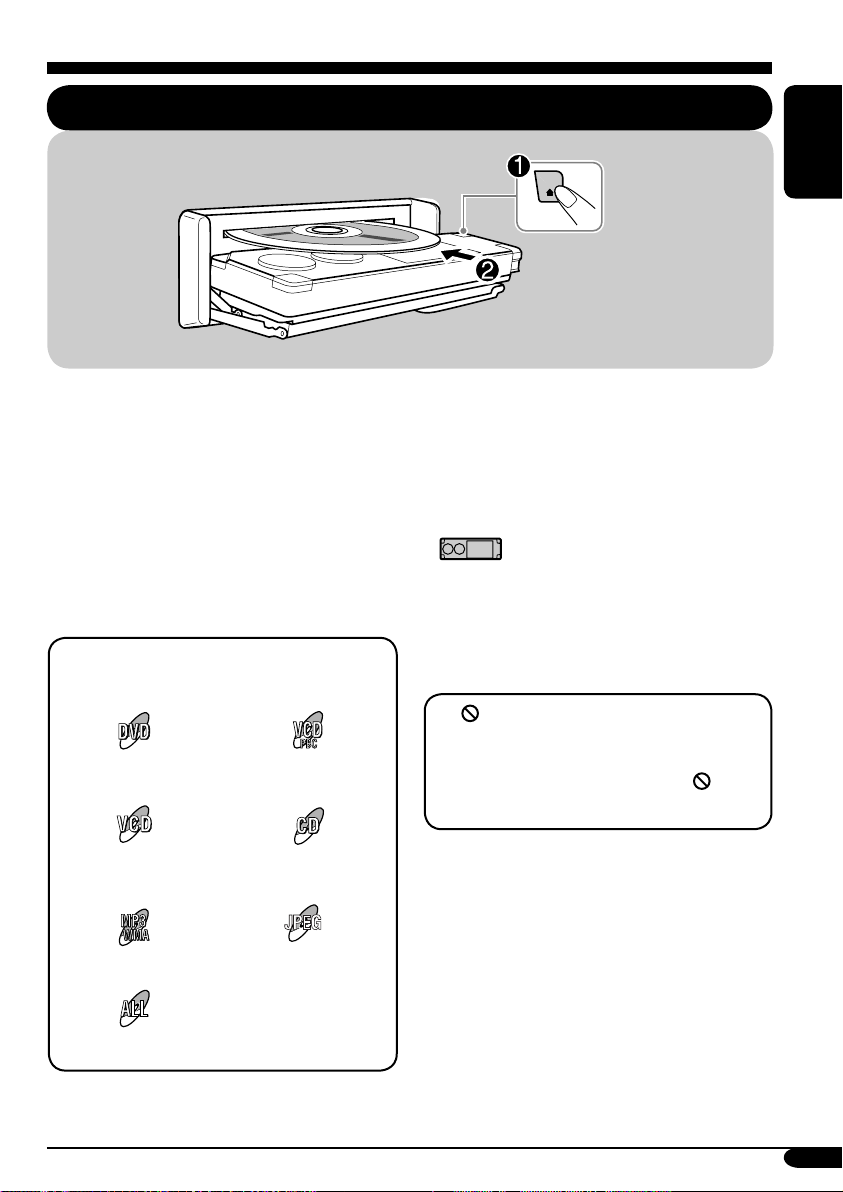
Discs cannot be played back
DVD-Audio, DVD-ROM (data), DVD-RAM,
DVD-R/DVD-RW recorded in the DVD-VR
format, CD-ROM, CD-I (CD-I Ready), Photo
CD, etc.
• Playing back these discs will generate noise
and damage the speakers.
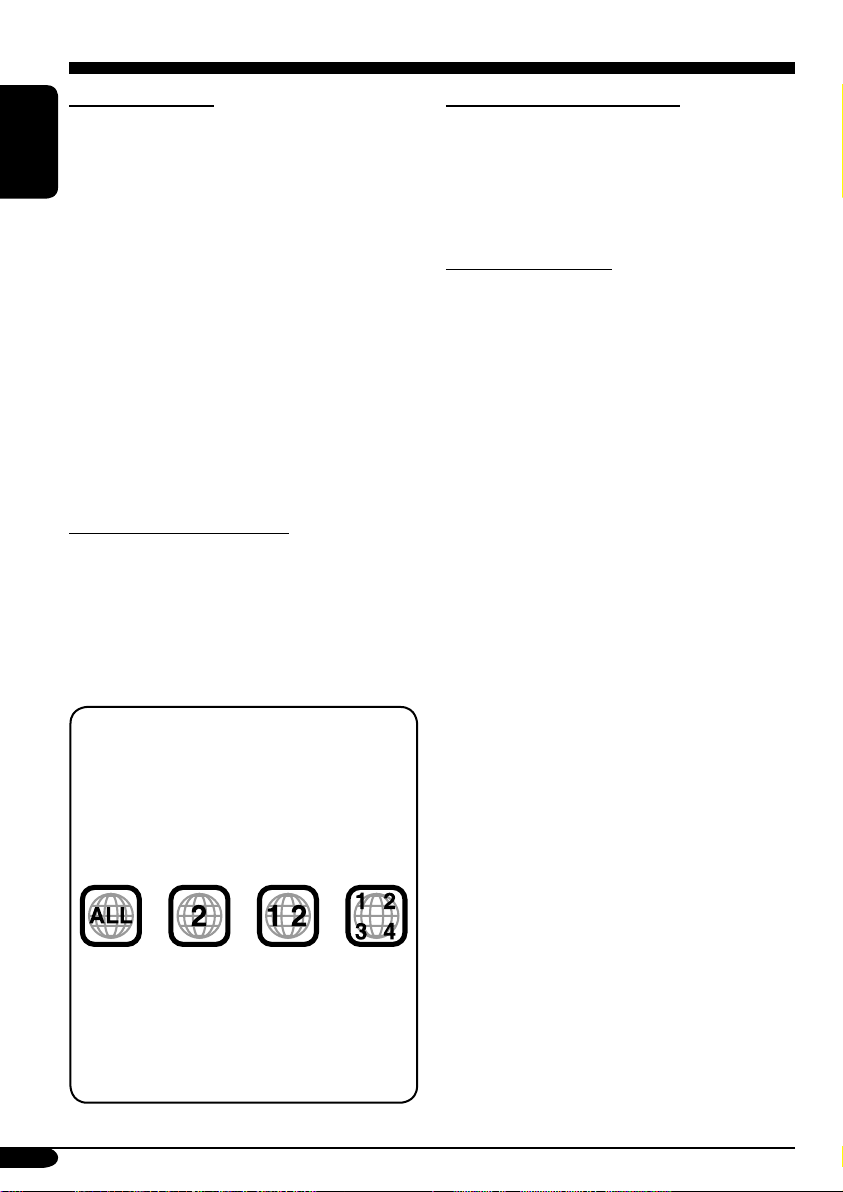
Note on Region Code:
DVD players and DVD Video discs have
their own Region Code numbers. This
receiver can only play back DVD discs
whose Region Code numbers include “2”.
Examples:
If you insert a DVD Video disc of an
incorrect Region Code
“Region Error” appears on the monitor on
the unit.
“REGION CODE ERROR!” appears on the
external monitor.
6
Caution for DualDisc playback
• The Non-DVD side of a “DualDisc” does
not comply with the “Compact Disc Digital
Audio” standard. Therefore, the use of NonDVD side of a DualDisc on this product may
not be recommended.
Digital audio formats
The System can play back the following digital
audio formats.
Linear PCM: Uncompressed digital audio,
the same format used for CDs and most studio
masters.
Dolby Digital *
developed by Dolby Laboratories, which
enables multi-channel encode to create the
realistic surround sound.
3
DTS *
(Digital Theater Systems):
Compressed digital audio, developed by Digital
Theater Systems, Inc., which enables multichannel like Dolby Digital. As the compression
ratio is lower than for Dolby Digital, it provides
wider dynamic range and better separation.
MPEG Audio: Another compressed digital
audio which also enables multi-channel encode
to create the realistic surround sound. However,
this System downmix the multi-channel signals
into 2 channels (decoded PCM) and play it
back.
1
*
A hybrid file system used to provide
compatibility with ISO 9660 for accessing
any type of files on the disc. (UDF stands for
Universal Disk Format.)
2
*
Manufactured under license from Dolby
Laboratories. “Dolby” and the doubleD symbol are trademarks of Dolby
Laboratories.
3
*
“DTS” and “DTS 2.0 + Digital Out” are
registered trademarks of Digital Theater
Systems, Inc.
“DVD Logo” is a trademark of DVD Format/
Logo Licensing Corporation registered in the
US, Japan and other countries.
2
: Compressed digital audio,
Page 7
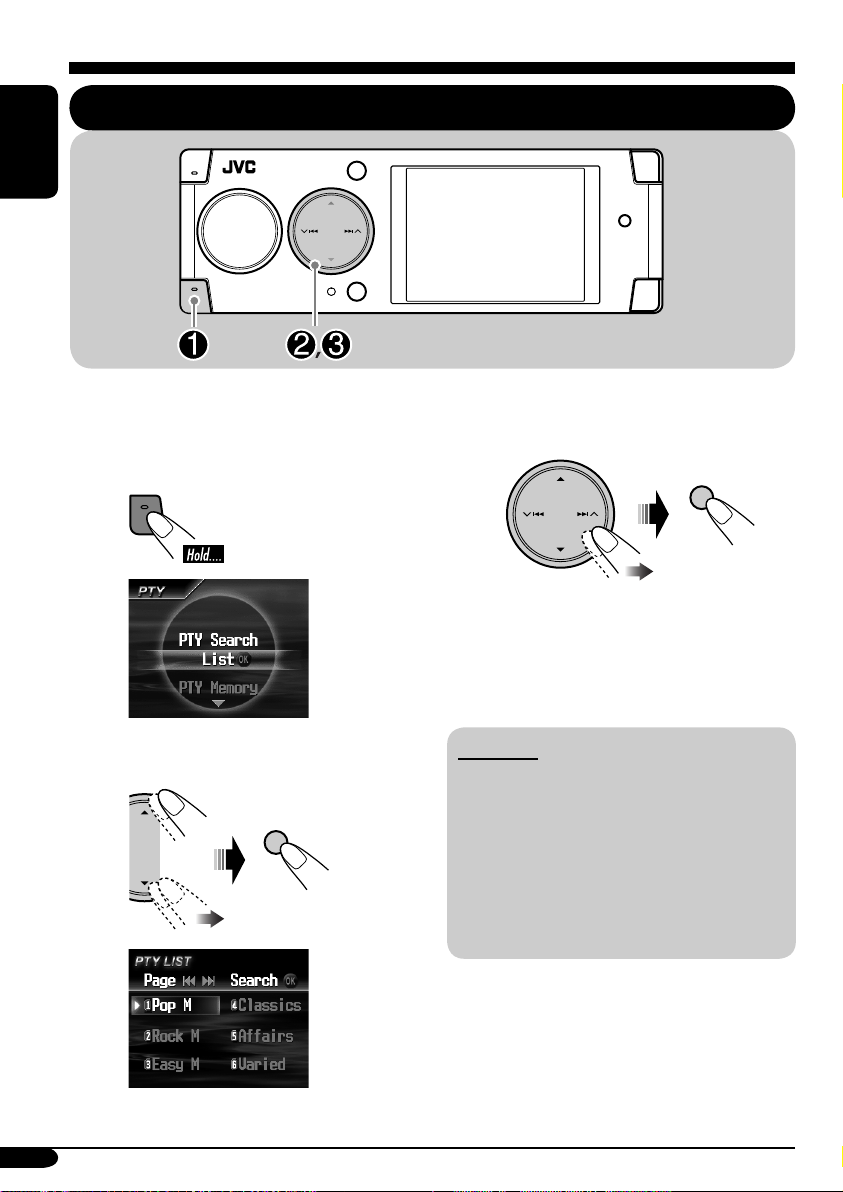
Control panel
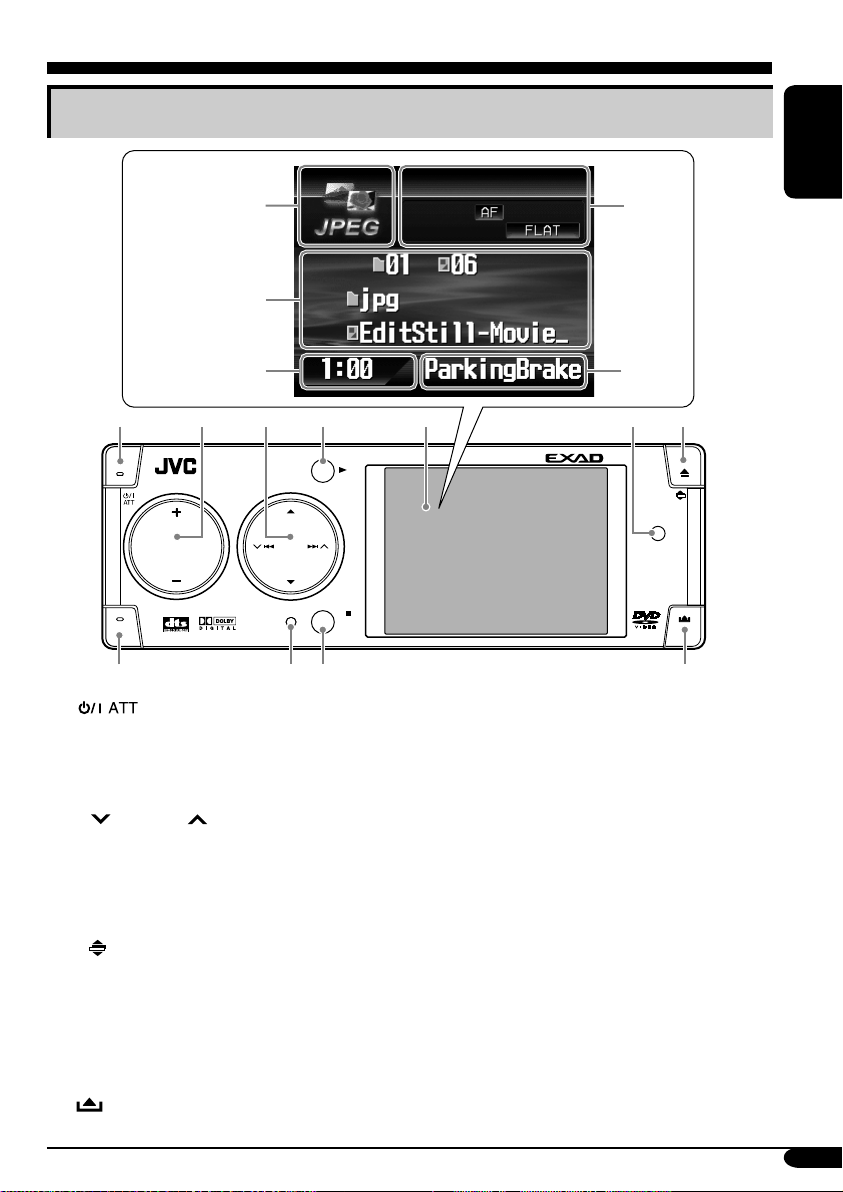
Parts identification
Monitor
indications
Ex.:
Source
screen
on JPEG
playback
1
SOURCE
T/P
8
1 (standby/on attenuator) button
2 • +/– (volume +/–) button
• SOURCE button
• MENU button
3 • 5 (up) / ∞ (down) buttons
•
4 • OK button
• 3 (play) button
5 Monitor
6 D DISP (display) button
7 • 0 (eject) button
•
8 T/P (traffic programme/programme type)
9 Reset button
p • BACK button
• BAND button
• 7 (stop) button
q
4/¢ buttons
(angle) button
button
(control panel release) button
2
MENU
w
e
r
3
4
OK
BACK
BAND
9
p
t
y
5
KD-AVX1
67
DISP
D
q
Monitor indications
w Source indicator
e Main display
r Clock display
Also indicates volume level when adjusting
volume.
t Status indicators
y Alert information area
Also indicates volume level bar when
adjusting volume.
ENGLISH
7
Page 8
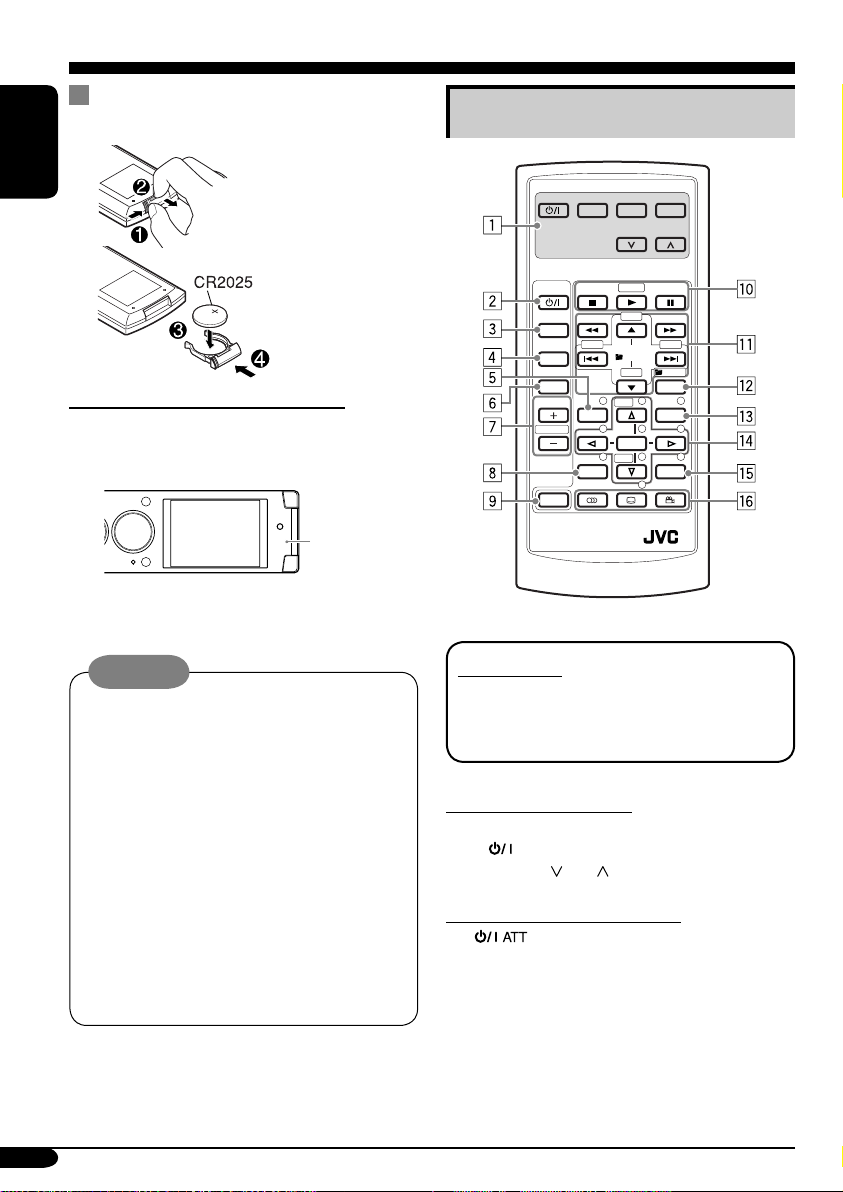
Remote controller — RM-RK230
Installing the lithium coin battery
(CR2025)
ENGLISH
Before using the remote controller:
• Aim the remote controller directly at the
remote sensor on the receiver. Make sure
there is no obstacle in between.
Remote
sensor
• Do not expose the remote sensor to strong
light (direct sunlight or artificial lighting).
Warning:
• Do not install any battery other than
CR2025 or its equivalent; otherwise, it
may explode.
• Store the battery in a place where children
cannot reach to avoid risk of accident.
• To prevent the battery from over-heating,
cracking, or starting a fire:
– Do not recharge, short, disassemble, or
heat the battery or dispose of it in a fire.
– Do not leave the battery with other
metallic materials.
– Do not poke the battery with tweezers or
similar tools.
– Wrap the battery with tape and insulate
when throwing away or saving it.
The receiver is equipped with the steering
wheel remote control function.
• See the Installation/Connection Manual
(separate volume) for connection.
Main elements and features
MONITOR CONTROL
MODE MENU
ASPECT
DVD / RECEIVER CONTROL
ATT
SOURCE
BAND
DUAL
VOL
2nd VOL
SHIFT
RM-RK230
IMPORTANT:
If Dual Zone is activated (see page 40),
the remote controller only functions for
operating the DVD/CD player.
MONITOR CONTROL
1 Monitor control buttons*
• (standby/on), MODE, ASPECT,
MENU,
DVD/RECEIVER CONTROL
2
• Turns on and off the power and also
3 SOURCE button
• Selects the source.
4 BAND button
• Selects the FM/AM/DAB bands.
(standby/on attenuator) button
attenuates the sound.
ZOOM
+10
–100
PRESET
/ TITLE
–10
123
DISC
456
ENTER
7809
DISC
SETUP
and .
+100
/ TITLE
OSD
+
MENUTOP M
–
RETURN
1
8
Page 9

5 TOP M (menu) button*
2
• Display the DVD and VCD*3 disc menu.
6 DUAL button
• Activate and deactivate Dual Zone.
7 VOL + / – buttons
• Adjusts the volume level.
• Also function as 2nd VOL +/– buttons
when pressed with SHIFT button.
8 SETUP button (for DVD/VCD)*
2
9 SHIFT button
p Basic disc operation buttons*
4
:
7 (stop), 3 (play), 8 (pause)
• 3 (play) also function as ZOOM button
when pressed with SHIFT button.
q Advanced disc operation/tuner operation
buttons*
5
For advanced disc operations:
•
/TITLE 5 / ∞
– Select the titles (for DVD) or folders
(for MP3/WMA).
• 4 / ¢ (reverse skip/forward skip)
• 1 / ¡ (reverse search/forward
search)*
6
For FM/AM tuner operations:
• PRESET 5 / ∞
– Changes the preset stations.
• 4 / ¢
– Functions to search for stations.
Press briefly: auto search
Press and hold: manual search
For DAB tuner operations:
• PRESET 5 / ∞
– Changes the preset services.
• 4 / ¢
– Changes the services if pressed briefly.
– Searches the ensembles automatically if
pressed and held.
w OSD button
• Display the on-screen bar.
• Also function as the
/TITLE button
when pressed with SHIFT button.
– You can directly select titles (for DVD)
or folders (for MP3/WMA) using the
number buttons (see page 22).
e MENU button*
2
• Display the DVD and VCD*3 disc menu.
r Menu operation buttons*
2
• Cursor (% , fi , @ , #) and ENTER
• % / fi : Also function as DISC + / –
buttons when the source is “CD-CH”.
t RETURN button*
2
y Special function buttons
• DVD/VCD:
• DVD:
1
*
Controllable only if your monitor is one of
(audio)
(subtitle), (angle)
the JVC monitors — KV-MR9010 or
KV-MH6510.
2
*
These buttons function as the number
buttons when pressed with SHIFT button.
3
*
Only when PBC is not in use.
4
*
Not used for CD changer operations.
5
*
These buttons function as the +10/–10
and +100/–100 buttons when pressed with
SHIFT button.
6
*
Not used for MP3/WMA/JPEG operations.
How to select a number
To select a number from 0 – 9:
To select a number greater than 9:
• +100/–100 buttons used only for searching
MP3/WMA/JPEG tracks number greater
than 99.
ENGLISH
9
Page 10
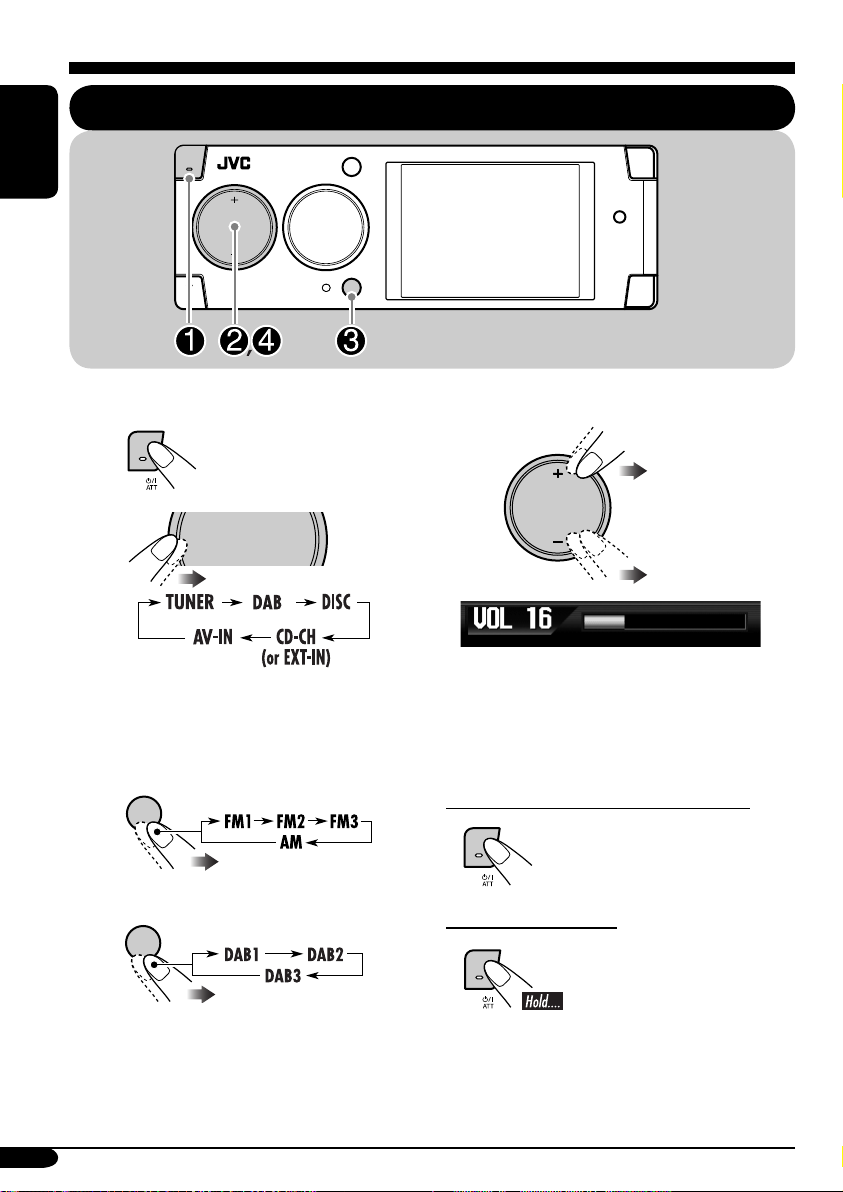
Getting started
ENGLISH
SOURCE
Basic operations
MENU
BACK
BAND
~ Turn on the power.
Ÿ
You cannot select some sources if they
are not ready.
SOURCE
MENU
! For FM/AM tuner only
BACK
BAND
For DAB tuner only
BACK
BAND
⁄ Adjust the volume.
SOURCE
MENU
Volume level indicator
@ Adjust the sound as you want.
(See pages 41 – 43.)
To drop the volume in a moment (ATT)
To restore the sound,
press it again.
To turn off the power
10
Page 11
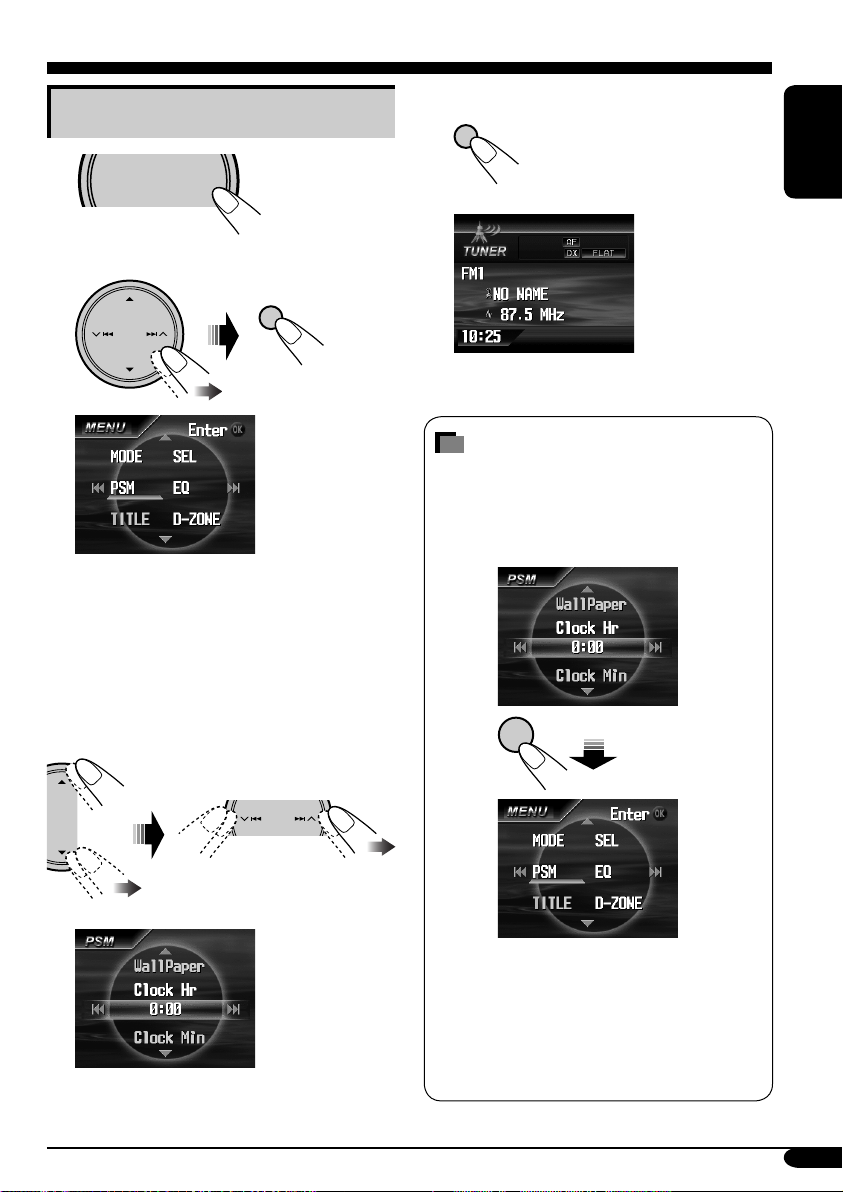
Setting the clock
D
1
SOURCE
2
Select “PSM” menu.
3 Set the hour and minute.
1 Select “Clock Hr” (hour), then
adjust the hour.
2 Select “Clock Min” (minute), then
adjust the minute.
3 Select “24H/12H”, then select
“24Hours” or “12Hours”.
MENU
OK
4 Finish the procedure.
OK
How to go back to the previous
menu
In the menu operations, you can go back
to the previous screens by pressing BACK
repeatedly.
Ex.:
BACK
BAN
ENGLISH
• Press BACK repeatedly to go back to the
previous screens in operations explained
on the following pages when no particular
explanation exists.
• To cancel menu operations and return to
the source screen, press D DISP.
11
Page 12
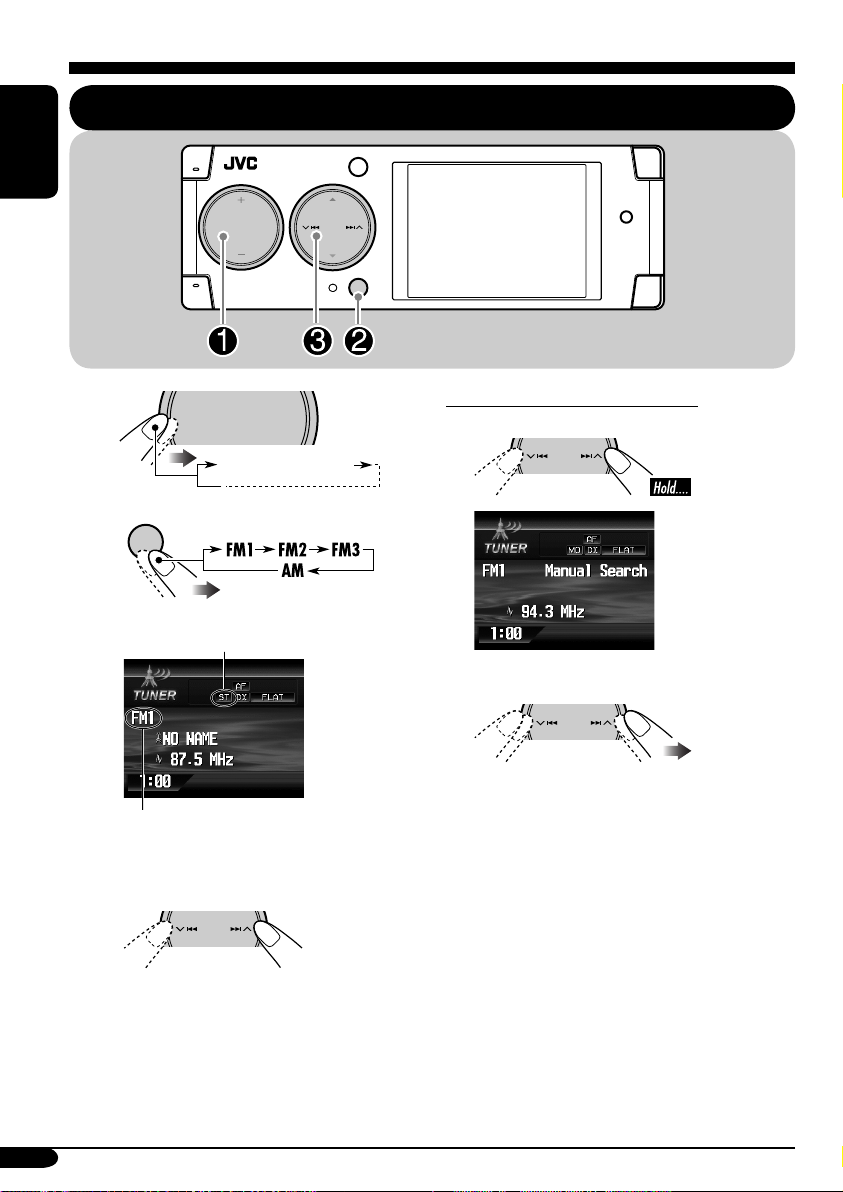
Radio operations
ENGLISH
SOURCE
MENU
Listening to the radio
BACK
BAND
~
Ÿ
Lights up when receiving an FM stereo
broadcast with sufficient signal strength.
Selected band appears.
BACK
SOURCE
TUNER (FM1/2/3,AM)
BAND
MENU
! Start searching for a station.
To tune in to a station manually
In step ! on the left column...
1
2 Select the desired station frequencies.
12
When a station is received, searching
stops.
To stop searching, press the same
button again.
Page 13
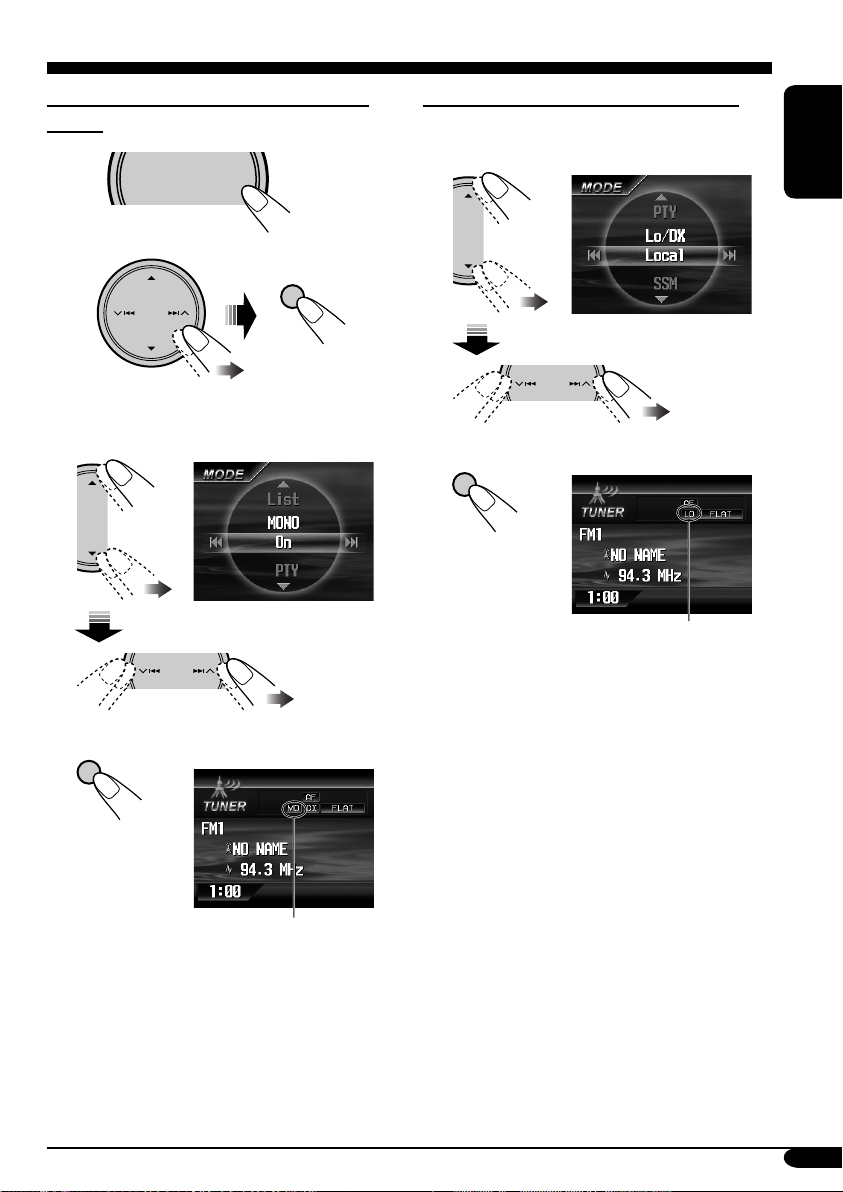
When an FM stereo broadcast is hard to
receive
1
SOURCE
2 Select “MODE” menu.
MENU
OK
To tune in strong-signal FM station only
In step 2 on the left column....
1 Select “Lo/DX”, then set it to “Local”.
ENGLISH
3 Select “MONO”, then set it to “On”.
4 Finish the procedure.
OK
Lights up when monaural mode is activated.
Reception improves, but stereo effect will
be lost.
2 Finish the procedure.
OK
Lights up when “Local” mode is activated.
Only stations with sufficient signal strength
will be detected.
To tune in to all receivable stations, repeat
the same procedure to set “Lo/DX” to “DX”.
The LO indicator goes off and the DX indicator
lights up.
To restore the stereo effect, repeat the same
procedure to set “MONO” to “Off”. The MO
indicator goes off.
13
Page 14
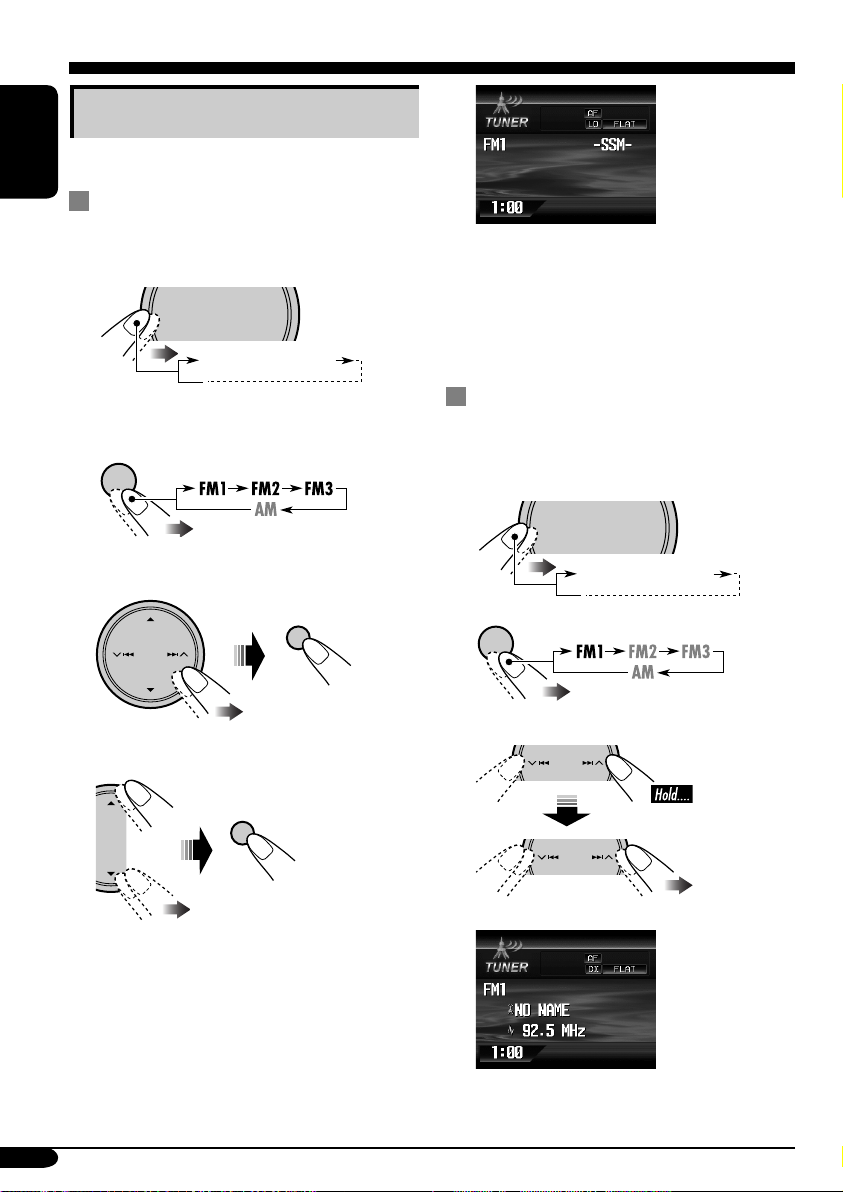
Storing stations in memory
You can preset six stations for each band.
ENGLISH
FM station automatic presetting —
SSM (Strong-station Sequential
Memory)
1
SOURCE
MENU
TUNER (FM1/2/3,AM)
“-SSM-” is shown until automatic presetting
is over.
Local FM stations with the strongest signals are
searched and stored automatically in the FM
band.
2 Select the FM band (FM1 – FM3)
you want to store into.
BACK
BAND
3 Select “MODE” menu.
OK
4 Select “SSM”, then press “OK”.
OK
Manual presetting
Ex.: Storing FM station of 92.5 MHz into the
preset number 1 of the FM1 band.
1
SOURCE
MENU
TUNER (FM1/2/3,AM)
2
BACK
BAND
3
14
Page 15
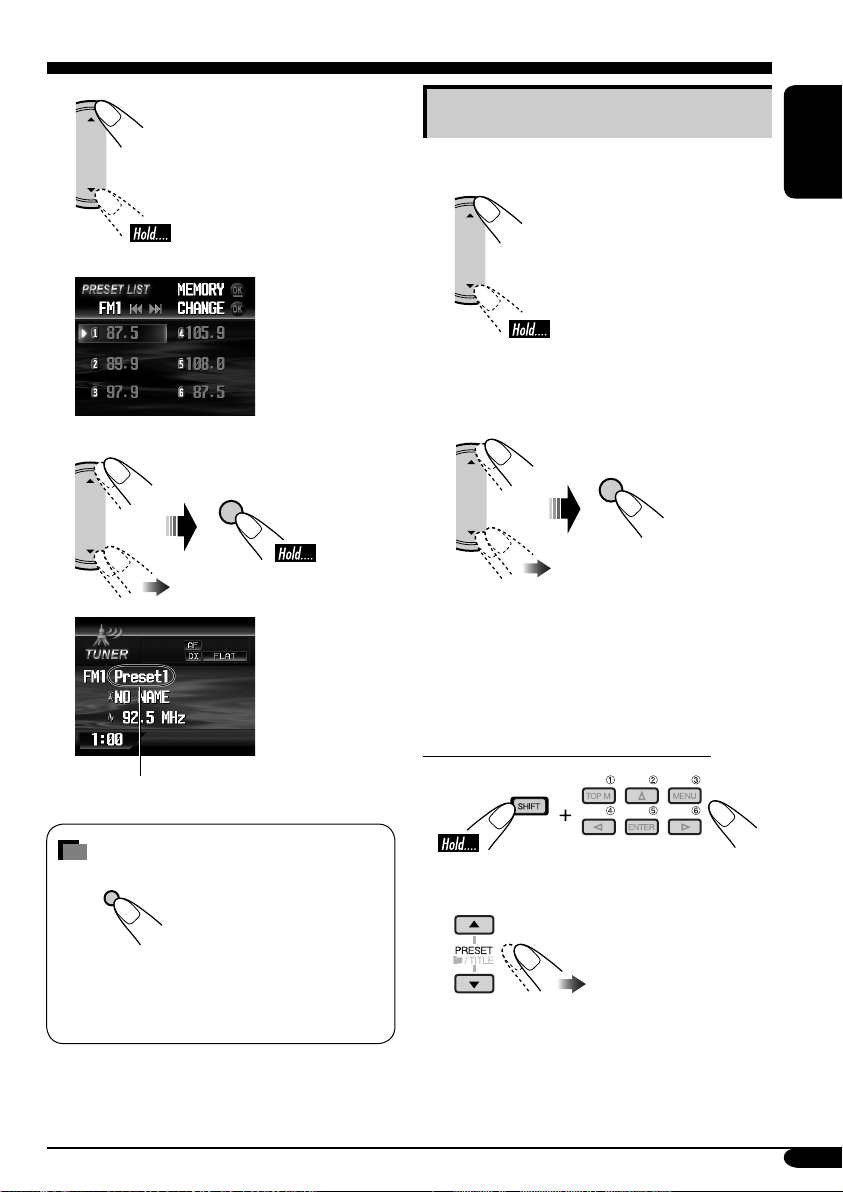
4
PRESET LIST appears.
5
OK
Listening to a preset station
While selecting TUNER as the source....
ENGLISH
1
The preset list appears.
2 Select the preset station (1 – 6) you
want.
OK
• You can also move to the preset list by
selecting “List” on the “MODE” menu. See
“When an FM stereo broadcast is hard to
receive” on page 13 to see how to move into
the “MODE” menu.
“Preset1” flashes for a while.
How to exit from menus or lists
DISP
D
Menu or list operations are canceled and the
screen returns to the source screen or DVD/
VCD/JPEG playback.
When using the remote controller....
or
15
Page 16
FM RDS operations
Searching for your favorite FM RDS programme
ENGLISH
T/P
You can tune in to a station broadcasting your
favorite programme by searching for a PTY code.
•
To store your favorite programme, see page
17.
T/P
BACK
BAND
~
PTY menu appears.
Ÿ Select “PTY Search”.
OK
! Select one of the twenty-nine PTY
codes.
OK
If there is a station broadcasting a
programme of the same PTY code as
you have selected, that station is tuned
in.
PTY codes
News, Affairs, Info, Sport, Educate, Drama,
Culture, Science, Varied, Pop M (music),
Rock M (music), Easy M (music),
Light M (music), Classics, Other M (music),
Weather, Finance, Children, Social, Religion,
Phone In, Travel, Leisure, Jazz, Country,
Nation M (music), Oldies, Folk M (music),
Document
PTY LIST appears.
16
Page 17
What you can do with RDS
RDS (Radio Data System) allows FM
stations to send an additional signal along
with their regular programme signals.
By receiving the RDS data, this receiver can
do the following:
•
Programme Type (PTY) Search (see page 16)
• Temporarily switches to Traffic
Announcement—TA Standby Reception.
(See
the right column
•
Temporarily switches to your favorite
programme—PTY Standby Reception. (See
pages 18 and 45.)
•
Tracing the same programme automatically
—Network-Tracking Reception
(See
page 18
• Programme Search (See page 45.)
.)
.)
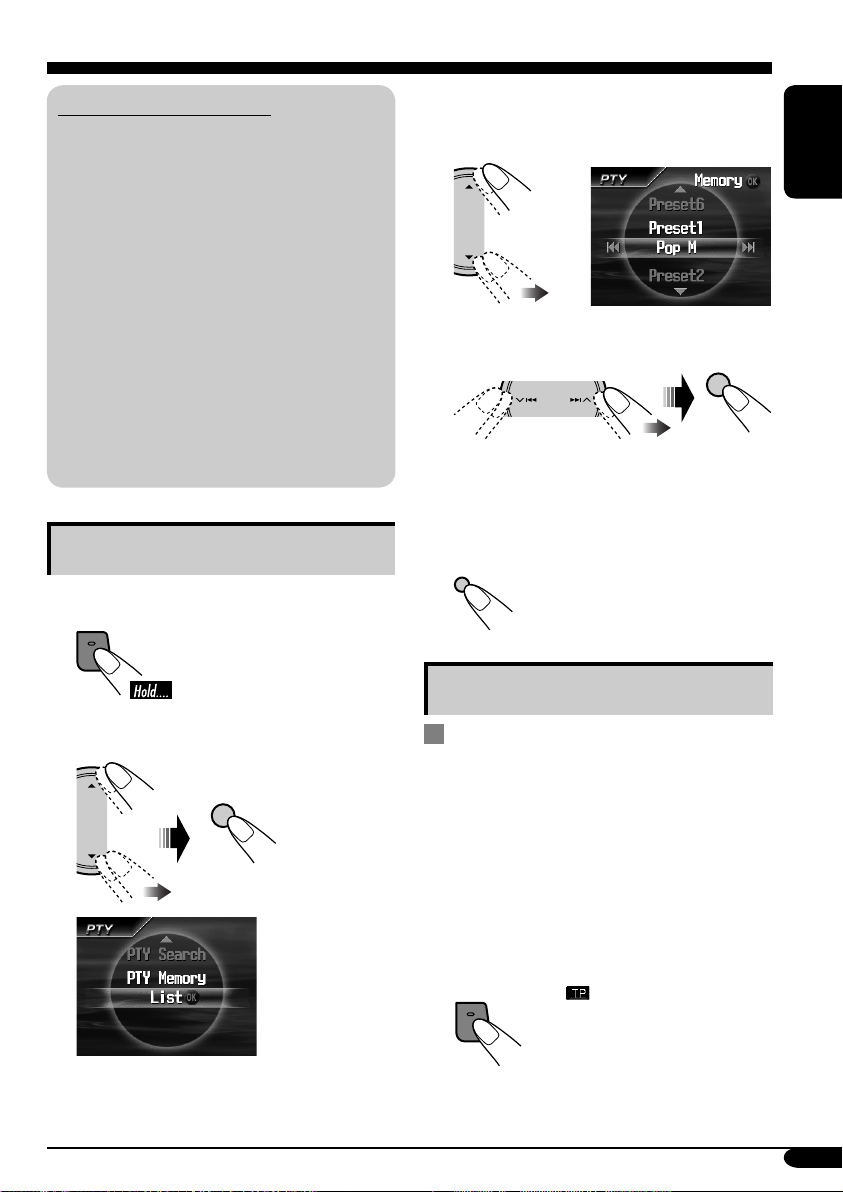
Storing your favorite programmes
You can store six favorite programme types.
T/P
1
3 Select a preset number (Preset1–6)
you want to store the programme
into.
ENGLISH
4 Select a PTY code you want to store.
OK
The selected preset number and PTY code
flash for a while.
5 Finish the procedure.
DISP
D
2 Select “PTY Memory”.
OK
Using the standby receptions
TA Standby Reception
TA Standby Reception allows the receiver to
switch temporarily to Traffic Announcement
(TA) from any source other than AM.
• The volume changes to the preset TA volume
level (see page 45).
• If the DAB tuner is connected, Standby
Reception also works to search for a DAB
service.
To activate TA Standby Reception
T/P
either lights up or
flashes.
To be continued....
17
Page 18
• If lights up, TA Standby Reception is
activated.
• If
flashes, TA Standby Reception is not
yet activated. (This occurs when you are
listening to an FM station without the RDS
ENGLISH
signals required for TA Standby Reception.)
To activate TA Standby Reception, tune in to
another station (or DAB service) providing
these signals.
remain lit.
will stop flashing and
To deactivate the TA Standby Reception
T/P
goes off.
PTY Standby Reception
PTY Standby Reception allows the receiver
to switch temporarily to your favorite PTY
programme from any source other than AM.
• If the DAB tuner is connected, Standby
Reception also works to search for a DAB
service.
To deactivate the PTY Standby Reception,
select “OFF” on “PTY” in the “MODE” menu.
goes off.
• See “When an FM stereo broadcast is hard to
receive” on page 13 to see how to move into
the “MODE” menu.
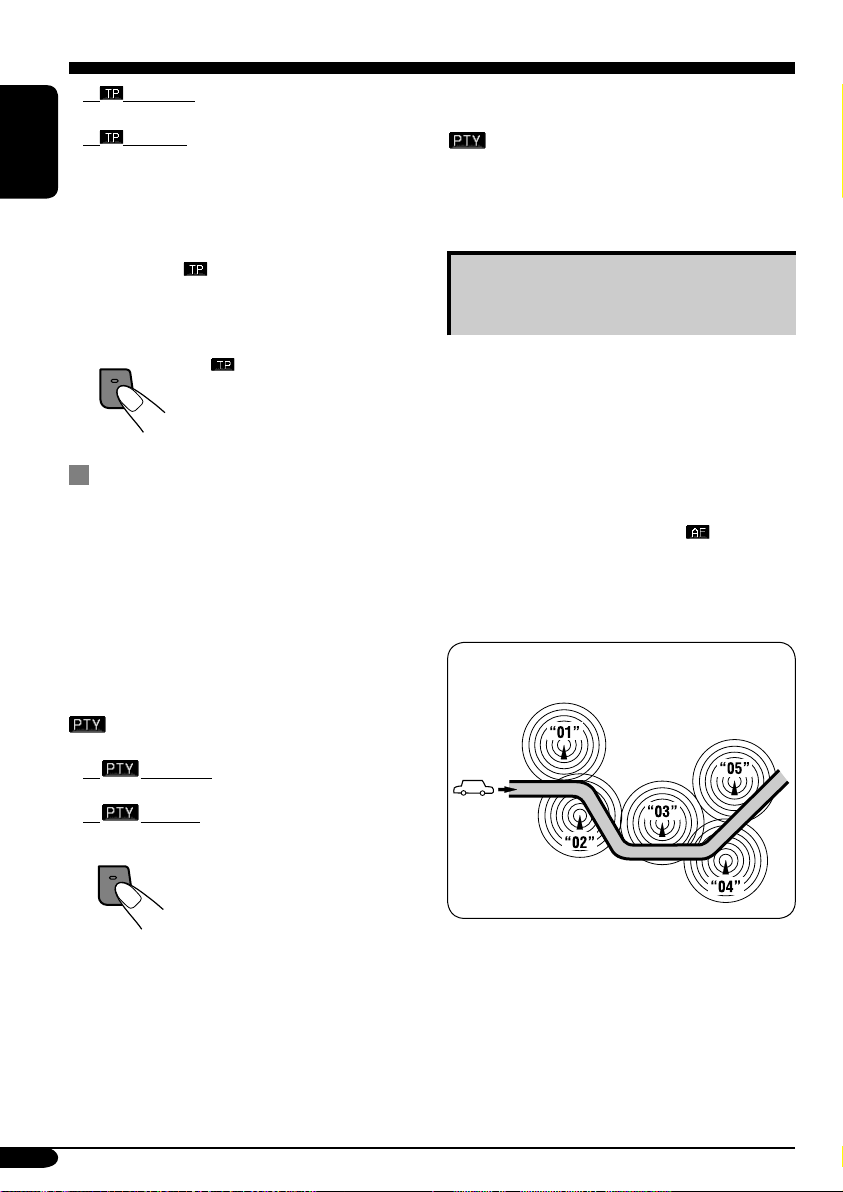
Tracking the same programme—
Network-Tracking Reception
When driving in an area where FM reception
is not sufficient enough, this receiver
automatically tunes in to another FM RDS
station of the same network, possibly
broadcasting the same programme with stronger
signals (see the illustration below).
When shipped from the factory, NetworkTracking Reception is activated (
when the power is turned on for the first time).
To change the Network-Tracking Reception
setting, see “AF-Regn’l” on page 45.
lights up
To activate and select your favorite PTY
code for PTY Standby Reception, see page
45.
either lights up or flashes.
• If
• If
To activate PTY Standby Reception, tune in
to another station (or DAB service) providing
these signals. The PTY indicator will stop
flashing and remain lit.
18
lights up, PTY Standby Reception is
activated.
flashes, PTY Standby Reception is
not yet activated.
T/P
Programme A broadcasting on different
frequency areas (01 – 05)
Page 19
Disc operations
Playing a disc in the receiver
ENGLISH
The disc type is automatically detected, and
playback starts automatically (for DVD:
automatic start depends on its internal program).
If the current disc is an audio CD, CD Text,
MP3/WMA, JPEG, or VCD without PBC,
all tracks will be played repeatedly until you
change the source or eject the disc.
• If a title list or disc menu appears while
playing a DVD or VCD with PBC, see “Disc
menu operations” on page 24.
The following marks are used to indicate
the playable discs....
DVD Video Video CD with PBC
only
Video CD with/without
PBC
Audio CD/
CD Text
JPEG
MP3/WMA disc
JPEG disc
Before performing any operations, make
sure the following....
• For DVD playback, you can change the Setup
Menu setting to your preference. (See pages
30 – 33.)
• The operations explained on pages 21 – 29 are
using the remote controller.
•
use on the unit.
• When you want to operate the DVD/CD
player using the buttons on the control panel,
see “Other disc operations” on pages 35 – 39.
If “
pressing a button, the receiver cannot accept
an operation you have tried to do.
• In some cases, without showing “
• Microsoft and Windows Media are either
registered trademarks or trademarks of
Microsoft Corporation in the United States
and/or other countries.
shows functions which you can also
” appears on the monitor when
”,
operations will not be accepted.
All discs listed here
19
Page 20
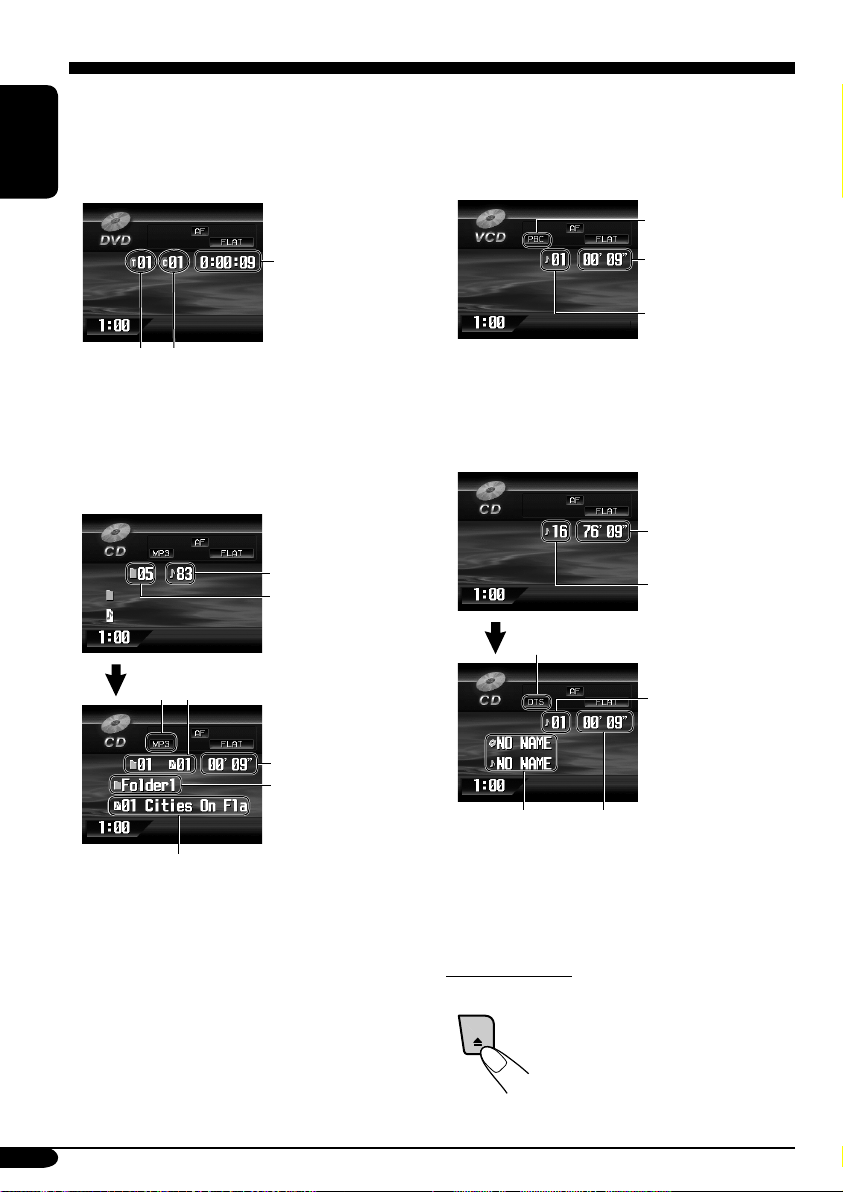
• When inserting a DVD disc:
DVD playback starts automatically on the
monitor when the parking brake is applied.
The screen such as below appears when
pressing D DISP.
ENGLISH
• When inserting a VCD:
VCD playback starts automatically on the
monitor when the parking brake is applied.
The screen such as below appears when
pressing D DISP.
PBC indicator*4
Elapsed
playing time
Current title
number
Current chapter
number
• To return to DVD playback, press D DISP
again.
• When inserting an MP3/WMA/JPEG*1 disc
Ex.: When an MP3 file is detected
Total track number
Total folder number
Current folder/track number
*2
Elapsed
playing time*3
Current folder name
Current track name
1
*
Each time you press D DISP, the monitor
changes between the source screen and
JPEG playback.
2
*
Either the MP3 or WMA indicator lights up
depending on the detected file.
3
*
Does not appear for JPEG disc.
Elapsed
playing time
Current track
number
4
*
Light up when the disc has the PBC function.
• To return to VCD playback, press D DISP
again.
• When inserting a CD Text/audio CD:
:
Total playing time
of the inserted disc
Total track number
of the inserted disc
DTS indicator*5
Current track
number
*6
5
*
Appears when playing back a DTS CD.
6
*
Disc title/performer and track title are
Elapsed
playing time
displayed when playing a CD Text.
To eject the disc
20
Page 21
Basic operations
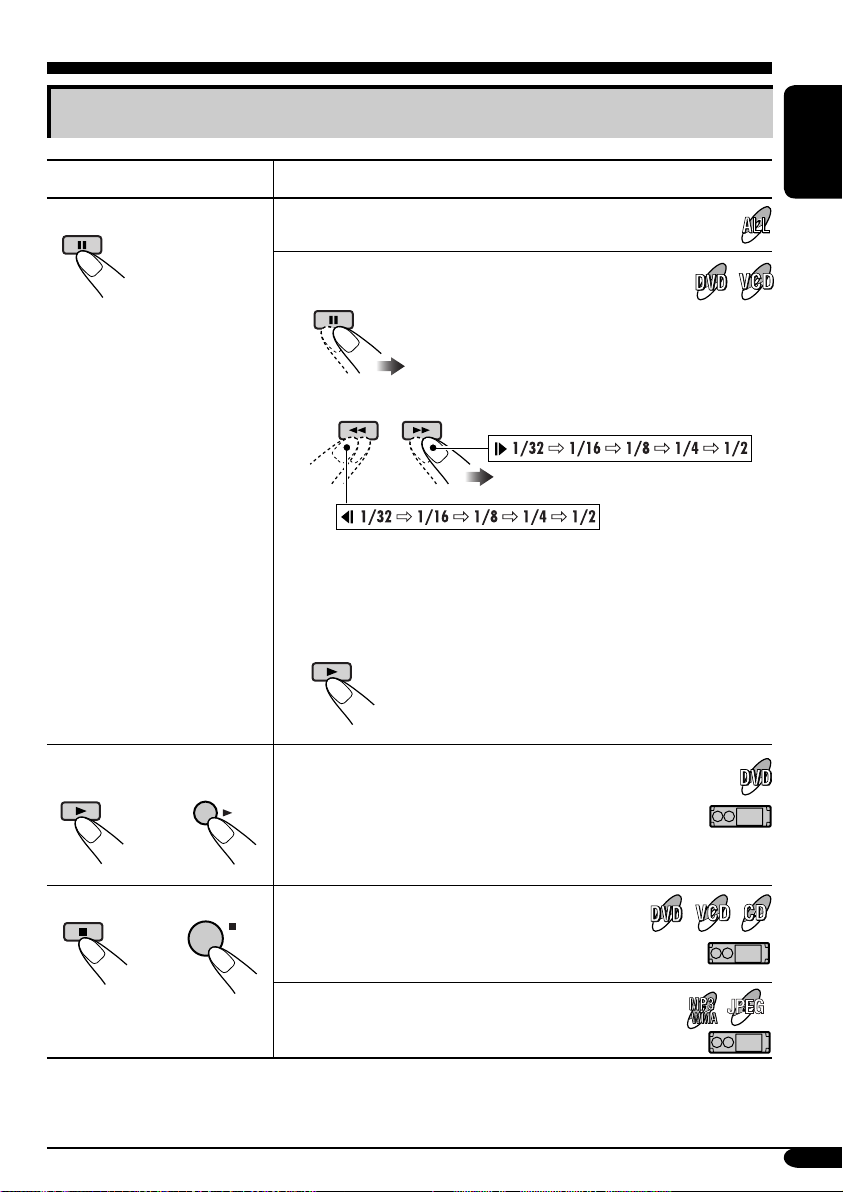
Operations Monitor indication and/or next operation
To stop play temporarily
To replay the previous
scenes—One Touch Replay
OK
Playback is paused.
A still picture appears.
A Frame by frame playback
B Slow motion playback
• No sound comes out during Slow Motion Playback.
• When playing a VCD, Reverse Slow Motion Playback is
prohibited.
To resume normal play:
The playback position moves back about 10 seconds
before the current position.
• This function works only within the same title.
• For some DVDs, this function does not work.
ENGLISH
To stop playback
BACK
When you start playback again, playback
starts from where it has been stopped
BAND
(Resume play).
When you start playback again, playback starts from
the beginning of the last track.
• During play, on-screen guide icons appear on the monitor for a while (see page 64).
To be continued....
JPEG
21
Page 22
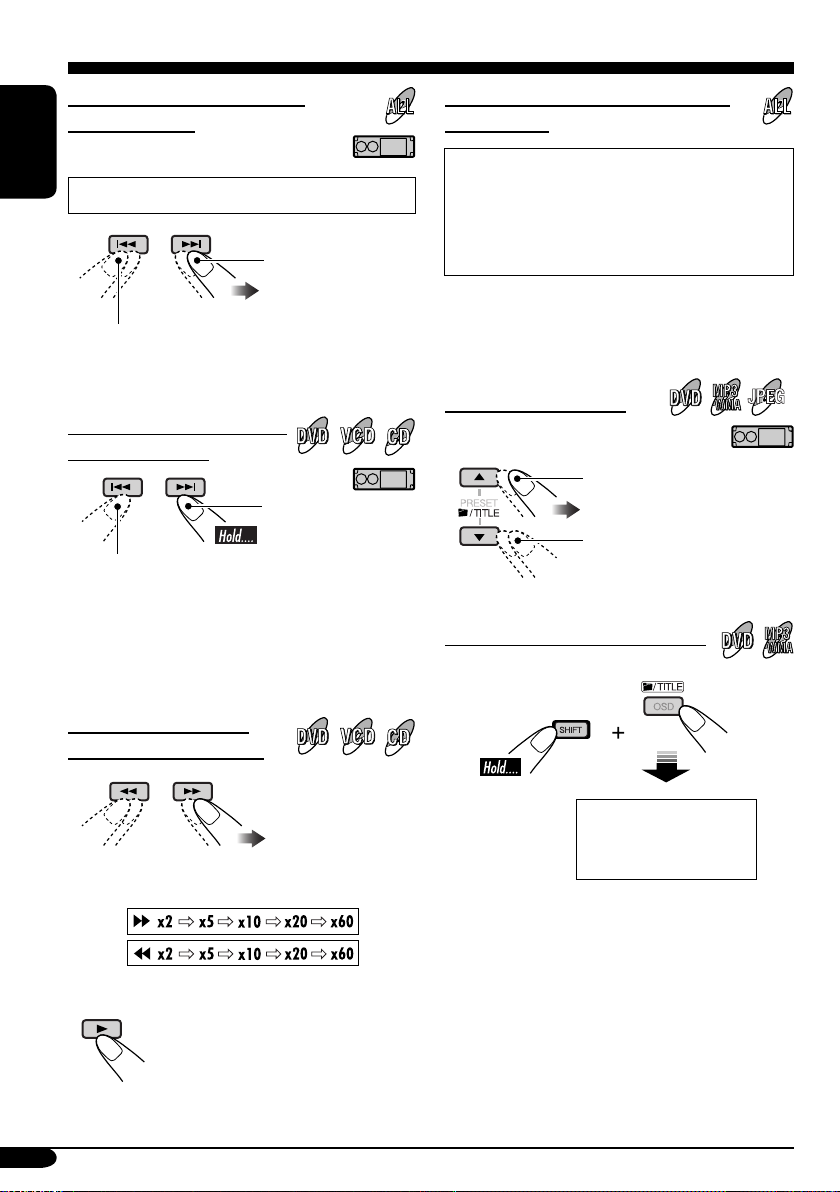
To go to the next or previous
chapters/tracks
To locate a particular title/chapter/
track directly
ENGLISH
• For DVD: During play or pause
To the following
chapters/tracks.
To go back to the beginning of the current
chapter/track, then the previous chapters/tracks.
To fast-forward or reverse
the chapter/track
Fast-forwards.
Reverses.
* The search speed changes to x2 ] x10 for all
discs (DVD, VCD, CD), but the information
shown on the monitor is only for DVD/VCD.
To forward or reverse
search the chapter/track
• For DVD: During play or pause—select a
chapter.
During stop—select a title.
• For MP3/WMA/JPEG: Select a track
within the same folder.
Select the number corresponding to the item
you want (see page 9).
To locate a title/folder
To the next title/folder.
To the previous title/folder.
JPEG
To locate a particular title/folder
The information shown is only for DVD/VCD:
• To resume normal speed
22
Within 10 seconds,
press the number
buttons (see page 9).
IMPORTANT:
• For MP3/WMA discs: It is required that folders are assigned with 2-digit number at the
beginning of their folder names—01, 02, 03,
and so on.
Page 23
DVD/VCD special functions
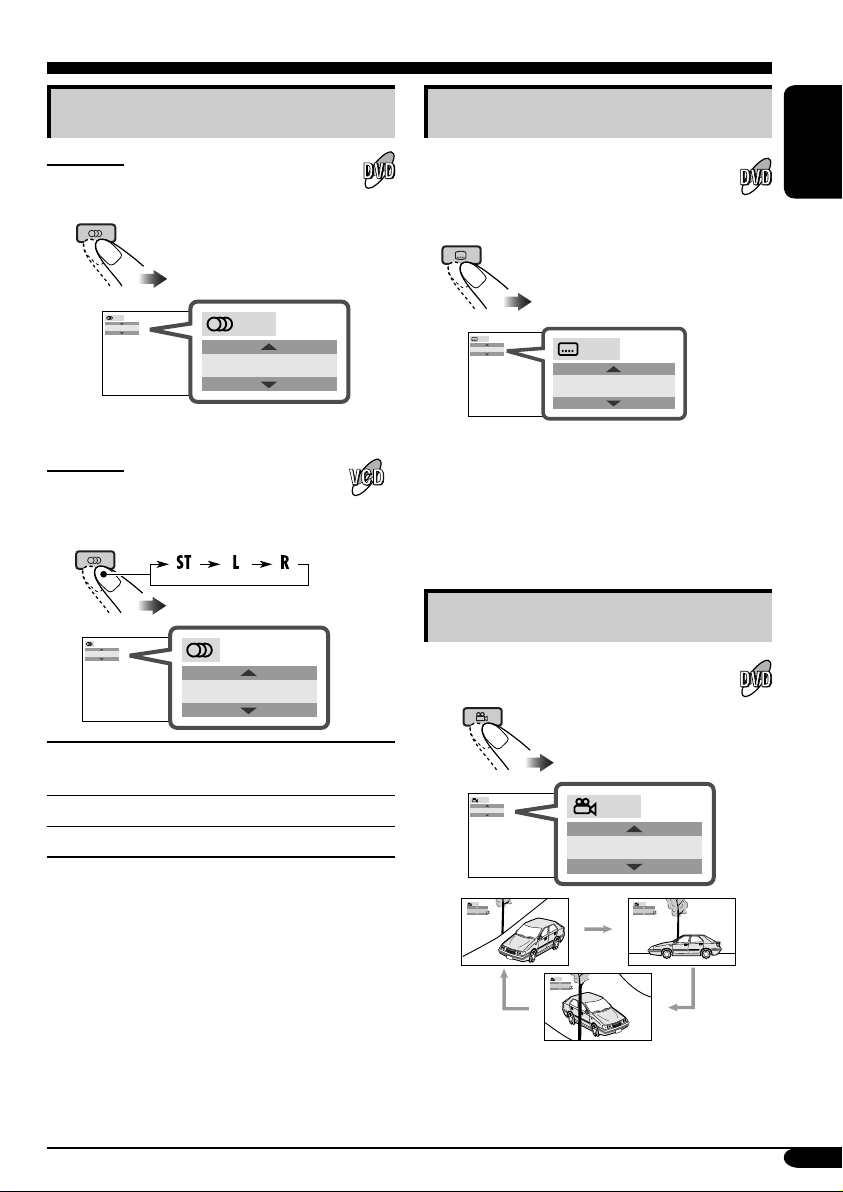
Selecting audio languages
For DVD:
You can select the language to listen to if
the disc has multiple audio languages.
1/3
ENGLISH
Ex.: When the disc has 3 options
For VCD:
You can select the audio channel to
play. (This is convenient when playing a
Karaoke VCD.)
ST
1/3
ENGLISH
ST
Selecting subtitles
You can select the language of the subtitle
to be shown on the monitor.
• You can set the initial subtitle language
using the setup menu (see page 30).
1/3
ENGLISH
1/3
ENGLISH
Ex.: When the disc has 3 options
• For some DVDs and VCDs, changing the
subtitle language, audio language (or audio
channel) without using the disc menu is
prohibited.
Selecting multi-angle views
You can view the same scene at different
angles if the disc has multi-angle views.
ENGLISH
To listen to normal stereo (left/right)
ST:
playback.
To listen to the L (left) audio channel.
L:
To listen to the R (right) audio channel.
R:
1/3
1
1/3
1
1/3
1
1/3
3
Ex.: When the disc has 3 multi-angle views
1/3
2
23
Page 24
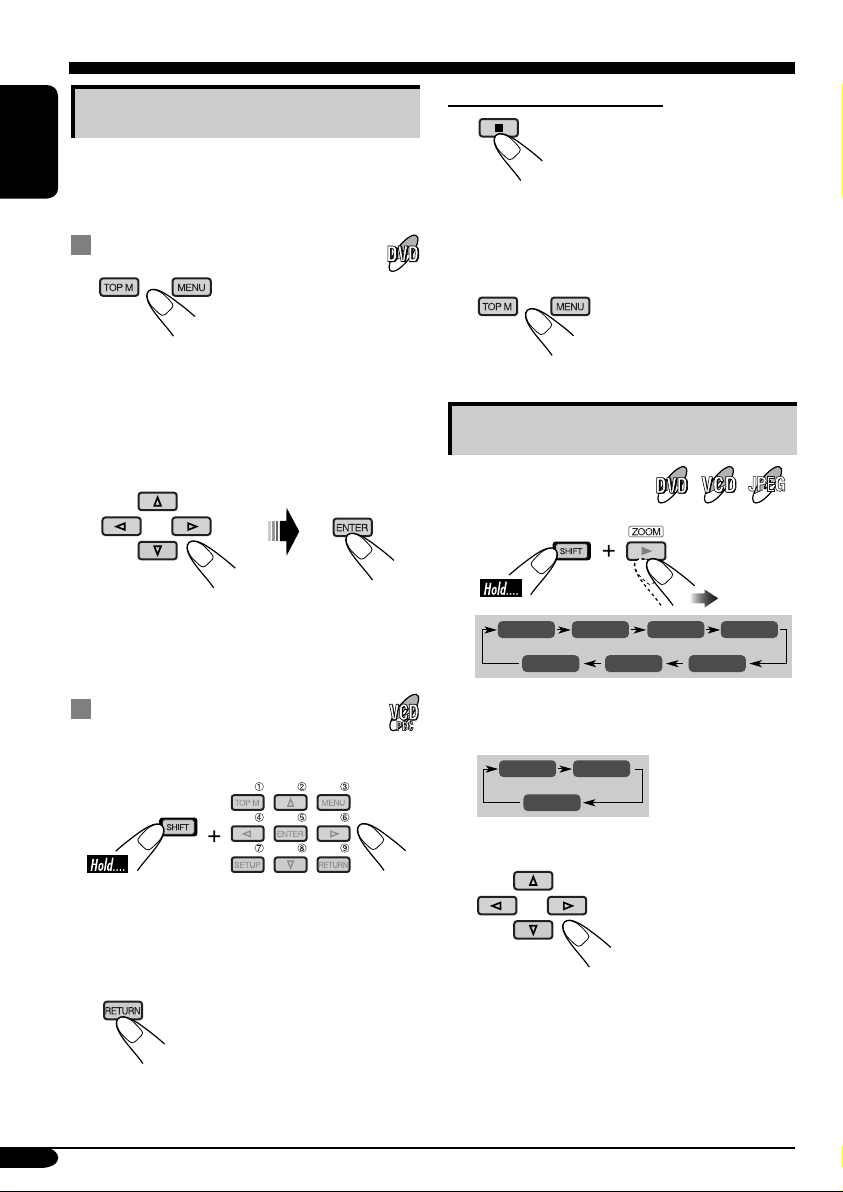
Disc menu operations
Menu-driven playback is possible while playing
back a DVD with menu-driven features or a
ENGLISH
VCD with the PBC (PlayBack Control).
While playing a DVD
1
A title list or disc menu will appear on the
monitor.
Canceling the PBC playback
1
2 Select a track to start normal playback using
the number buttons (see page 9).
To resume the PBC function
2 Select the item you want on the
menu.
Selected item starts playback.
• On some discs, you can also select items
using the corresponding number buttons.
While playing a VCD
• When a list of items is displayed on the
monitor.
• To select a number greater than 9, see “How
to select a number” on page 9.
To return to the previous menus
Zoom in
1
ZOOM 1 ZOOM 2 ZOOM 3 ZOOM 4
ZOOM OFF
• For JPEG disc (effective only when
pausing):
ZOOM 1 ZOOM 2
ZOOM OFF
2 Move the zoomed-in position.
• For JPEG files:
You cannot move the zoomed-in position
when the entire picture is still displayed
on the monitor.
ZOOM 5ZOOM 6
JPEG
24
To cancel zoom, select “ZOOM OFF” in
step 1.
Page 25
On-Screen disc operations
About the On-Screen Bar
You can check the disc information and use
some functions through the on-screen bar.
• For audio CD, CD Text, and MP3/WMA
disc you can use the on-screen bar only
when using an external monitor and Dual
Zone is on (see page 40).
• For audio CD, CD Text, and MP3/WMA
disc you can also use the control screen
and list screen (see pages 28 and 29).
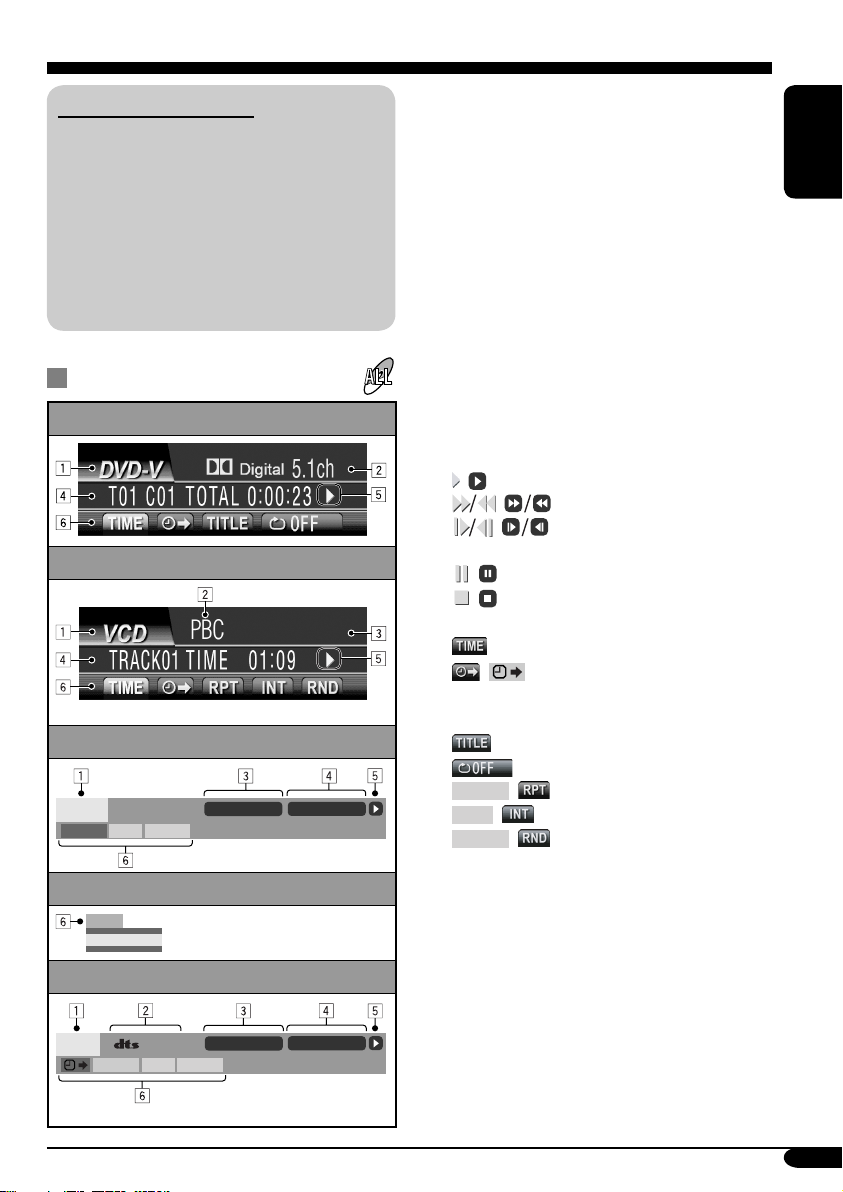
On-Screen bars
DVD
VCD
MP3/WMA
FILE
REPEAT
REPEAT TRACK
RANDOMINTRO
TIME 00:00:36
1 Disc type
2 • Audio signal format type (for DVD and
DTS CD)
• PBC (only for VCD)
3 Current playback mode
4 Playback information
T01 C01 Current title/chapter
TRACK 01 Current track (for VCD)
TOTAL Elapsed playing time of the disc
T. REM
Remaining disc time (for VCD)/
remaining title time (for DVD)
TIME Elapsed playing time of the
current chapter/track
REM Remaining time of the current
chapter/track
5 Playback condition
, Playback
, Forward/reverse search
, Forward/reverse slow-
motion
, Pause
, Stop
6 Operation icons
Time indication
, Time Search—Enter the
elapsed playing time of the
current title or of the disc.
Title Search
Repeat play (for DVD)
REPEAT
, Repeat play
INTRO
, Intro play
RANDOM
, Random play
ENGLISH
JPEG
REPEAT
OFF ‰FOLDER
CD Text/audio CD
*
REPEAT
5. 1ch
RANDOMINTRO
CD
* Only for DTS CD
REPEAT TRACK
TIME 00:36
25
Page 26
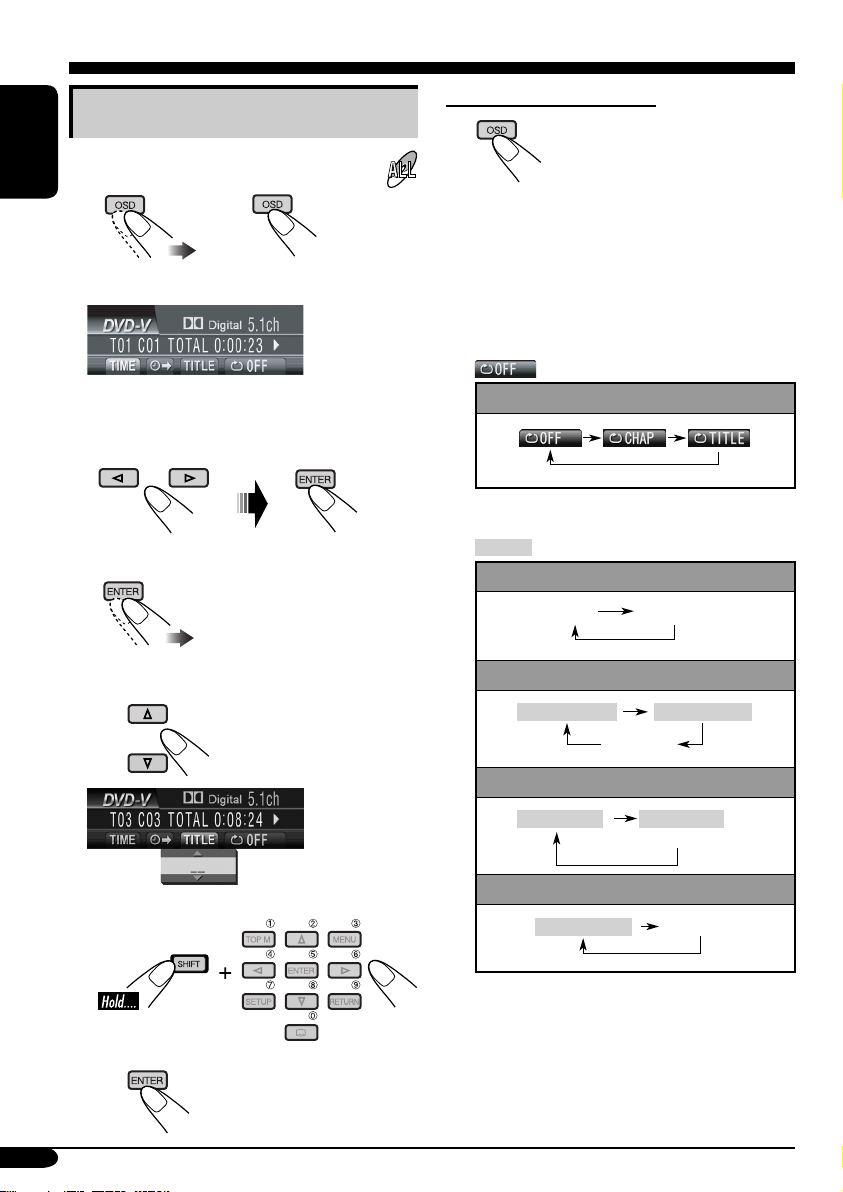
Basic on-screen bar operations
1 Display the on-screen bar.
ENGLISH
or
(twice) (DVD, VCD)
(CD Text/audio CD,
MP3/WMA, JPEG)
To erase the on-screen bar
• The on-screen bar for a CD or MP3/WMA/
JPEG disc automatically disappears in a few
seconds after the last operation.
• The selectable options for Repeat/Intro/
Randam plays:
When a JPEG disc is loaded, skip to step 3.
2 Select an item.
3 Make a selection.
• If pop-up menu appears....
1
or
Repeat play (See page 37.)
DVD:
REPEAT
, REPEAT Repeat play (See page 37.)
VCD (while PBC is not in use):
REPEAT
MP3/WMA:
REPEAT TRACK
(Canceled)
JPEG:
FOLDER ‰ OFF
CD Text/audio CD:
REPEAT TRACK
(Canceled)
REPEAT FOLDER
OFF ‰ FOLDER
(Canceled)
(Canceled)
26
2
Page 27
INTRO
, INTRO Intro play (See page 38.)
VCD (while PBC is not in use):
INTRO
MP3/WMA:
INTRO TRACK
(Canceled)
CD Text/audio CD:
INTRO TRACK
RANDOM
, RANDOM
Random play (See page 38.)
VCD (while PBC is not in use):
RANDOM
MP3/WMA:
RANDOM FOLDER
(Canceled)
CD Text/audio CD:
RANDOM DISC
(Canceled)
INTRO FOLDER
(Canceled)
(Canceled)
RANDOM DISC
(Canceled)
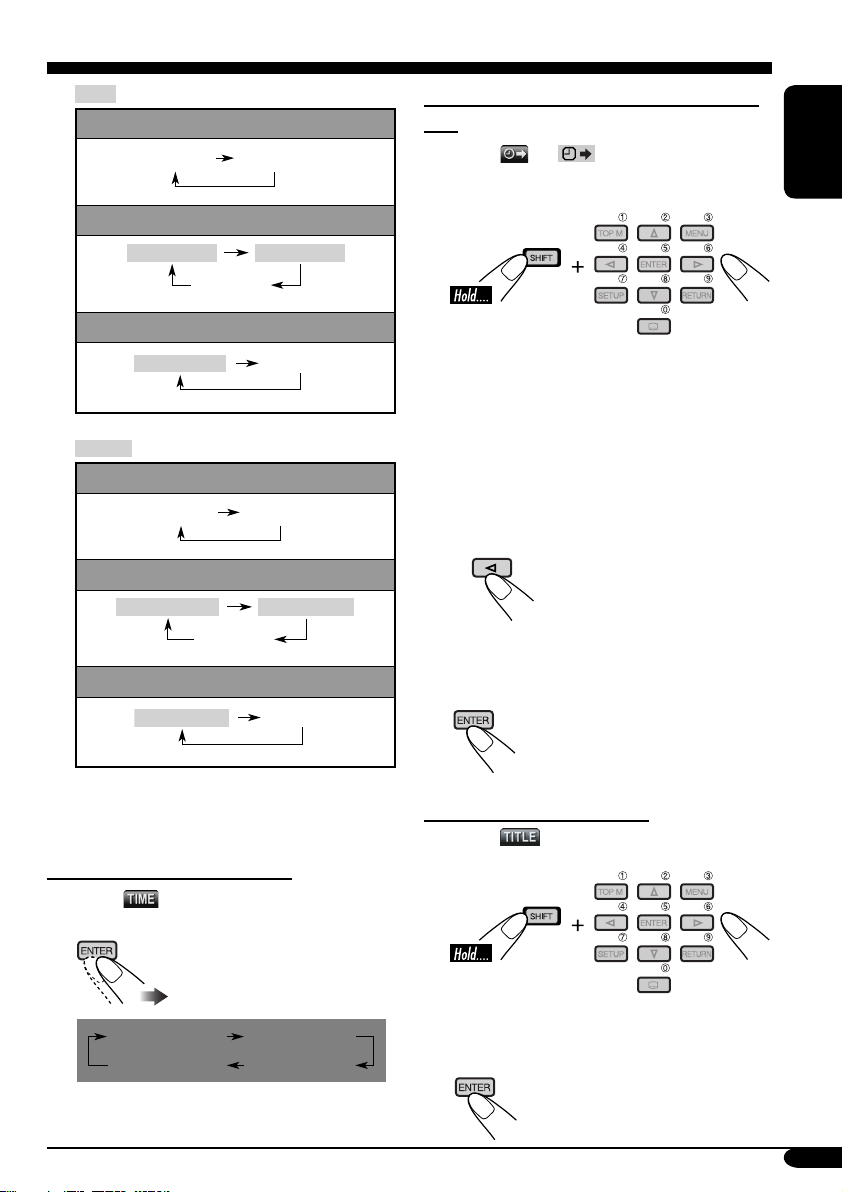
To search for a particular point by playing
time
1 Select (or ).
2 Enter the elapsed playing time of the current
title or of the disc.
Ex.: • To enter 1 (hours): 02 (minutes): 00
(seconds), press 1, 0, 2, 0, then 0.
• To enter 54 (minutes): 00 (seconds),
press 0, 5, 4, 0, then 0.
• It is always required to enter the hour
digit (even “0” hour), but it is not
required to enter trailing zeros (the last
two digits in the examples above).
• To correct a misentry, press....
• You can also specify the elapsed playing
time by using % / fi / @ / #.
3 Finish the procedure.
ENGLISH
Refer also page 25 for the following operations.
To change the time information
1 Select .
2 Change the time information.
TIME 0:00:58
REM 0:11:23
TOTAL 1:01:58T. REM 0:35:24
To search for a particular title
1 Select .
2 Enter the number.
• To correct a misentry, press the number
button until the correct number is entered.
3 Finish the procedure.
27
Page 28
Basic control screen operations
You can search for and play the desired items
through the control screen when using the
ENGLISH
external monitor.
• The control screen automatically appears on
the monitor when you insert a disc (external
monitor only).
• JPEG control screen appears only when
playback stops.
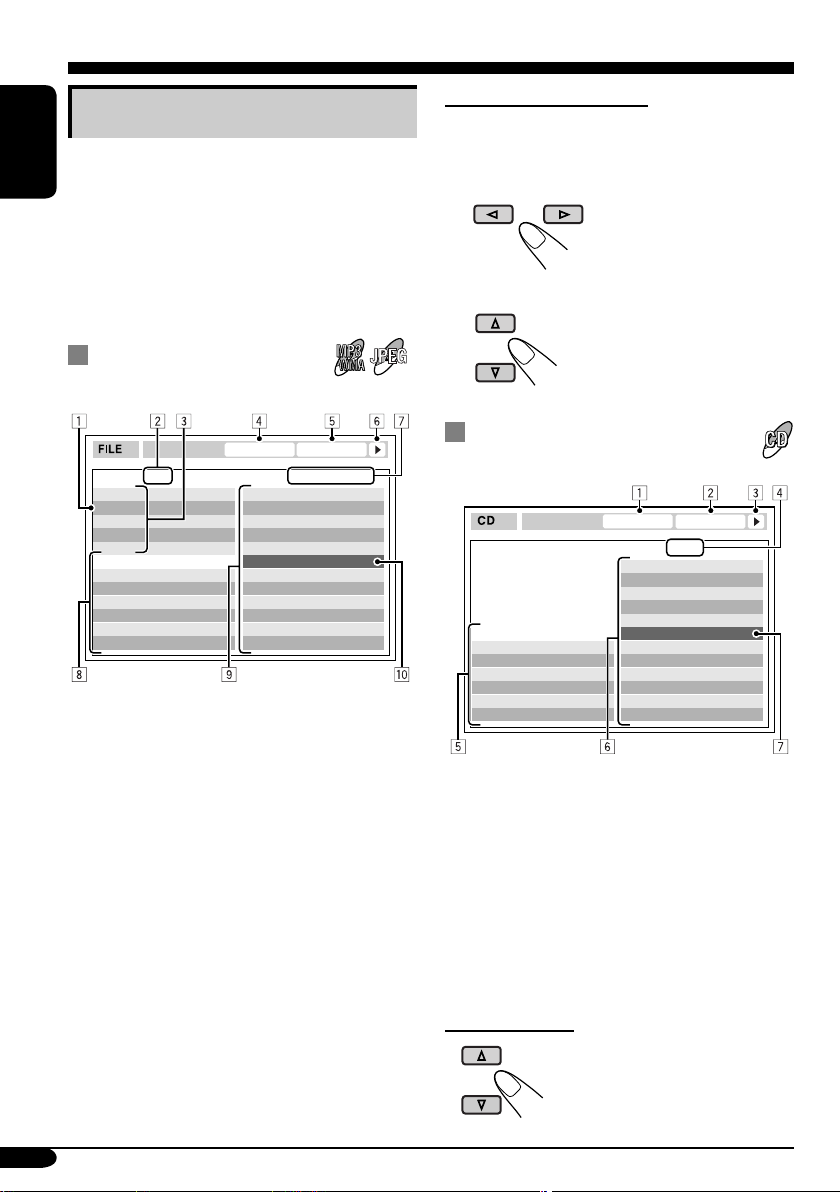
To select a folder or track
While Dual Zone (see page 40) is on....
1 Select “Folder” column or “Track” column
on the control screen.
2 Select a folder or track.
MP3/WMA/JPEG control
JPEG
screen
TIME 00:00:14REPEAT TRACK
Folder : 2 / 3
01 Music
02 Music
03 Music
Track Information
Album
Weather
Artist
Robert M. Smith
Title
Rain
1 Current folder
2 Current folder number/total folder number
3 Folder list
4 Selected playback mode
5 Elapsed playing time of the current track
(MP3/WMA only)
6 Operation mode icon (MP3/WMA only)
‰ (play), 7 (stop), 8 (pause)
7 Current track (file) number/total number
of tracks (files) in the current folder (total
number of tracks/files on the disc)
8 Track information (MP3/WMA only)
9 Track (file) list
p Current track (file) (highlighted bar)
Track : 5 / 14 (Total 41)
Cloudy.mp3
Fair.mp3
Fog.mp3
Hail.wma
Indian summer.mp3
Rain.mp3
Shower.mp3
Snow.mp3
Thunder.wma
Typhoon.mp3
Wind.mp3
Winter sky.mp3
CD Text/audio CD control
screen
REPEAT TRACK
Track Information
Album
Four seasons
Artist
Robert M. Smith
Title
Rain
1 Selected playback mode
2 Elapsed playing time of the current track
3 Operation mode icon
‰ (play), 7 (stop), 8 (pause), ¡ (fast-
forward), 1 (reverse)
4 Current track number/total number of tracks
on the disc
5 Track information
6 Track list
7 Current track (highlighted bar)
To select a track
TIME 00:14
Track : 5 / 14
Cloudy
Fair
Fog
Hail
Indian summer
Rain
Shower
Snow
Thunder
Typhoon
Wind
Winter sky
28
Page 29
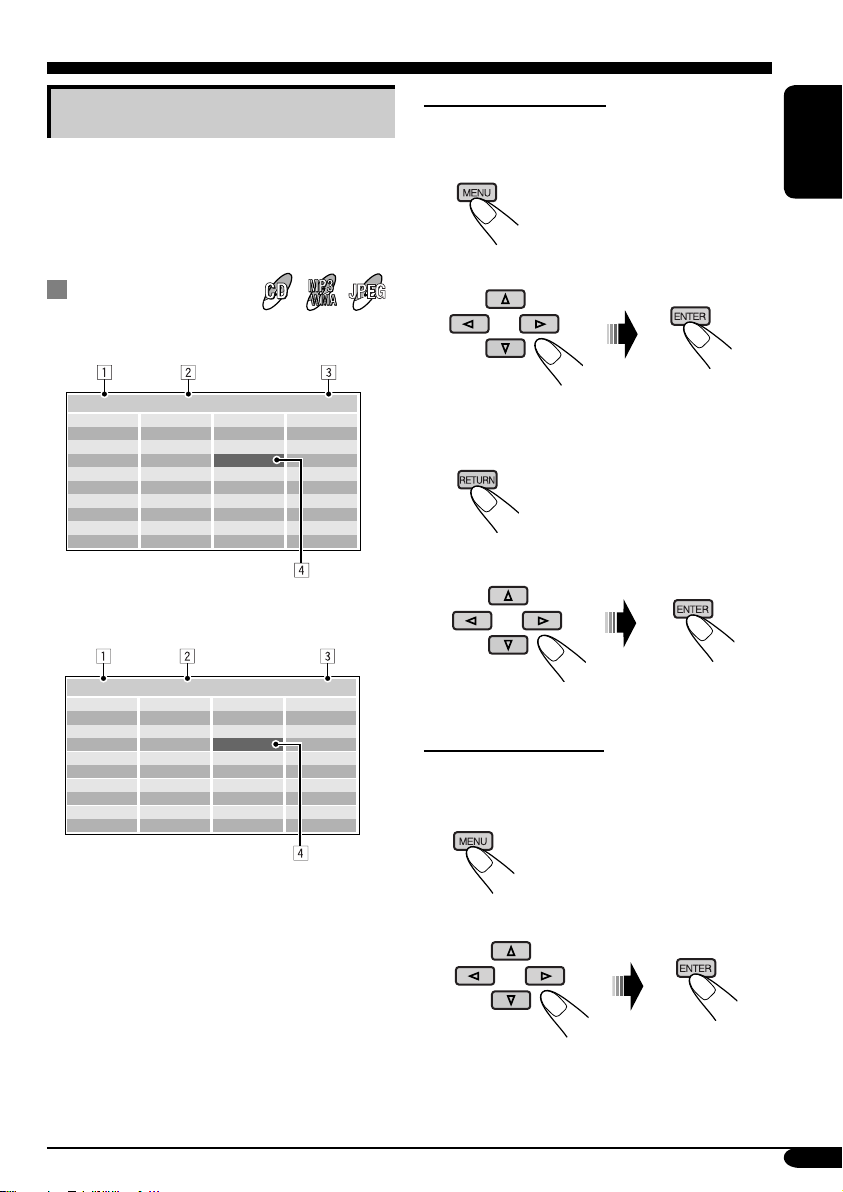
List screen operations
You can display the folder list/track list before
starting play when using the external monitor
and Dual Zone function (see page 40). On this
list, you can confirm the contents and start
playing a disc.
Folder/track list
screens
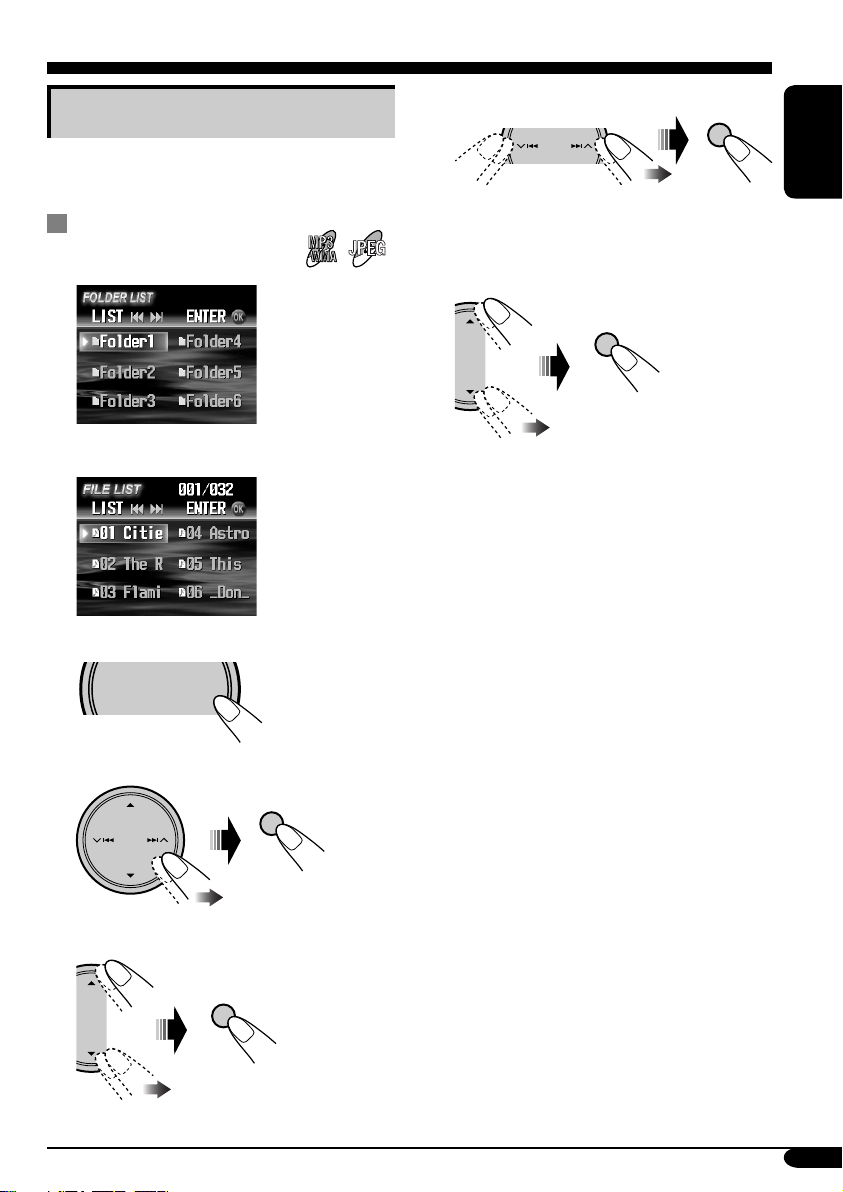
Folder list (MP3/WMA/JPEG)
JPEG
For MP3/WMA/JPEG:
While Dual Zone is on and the disc play stops....
1 Display the folder list.
Each time you press the button,
the list screen comes on and
goes off.
2 Select a folder on the list.
ENGLISH
Folder : 153/240 Track 154/198 Page : 4/6
fol130
fol131
fol132
fol133
fol134
fol135
fol136
fol137
fol138
fol139
fol140
fol141
fol142
fol143
fol144
fol145
fol146
fol147
fol148
fol149
fol150
fol151
fol152
fol153
fol154
fol155
fol156
fol157
fol158
fol159
fol160
fol161
fol162
fol163
fol164
fol165
fol166
fol167
fol168
fol169
Track list (MP3/WMA/JPEG/CD Text/audio
CD)
Folder : 153/240 Track 154/198 Page : 4/6
file0131.mp3
file0132.mp3
file0133.wma
file0134.mp3
file0135.mp3
file0136.wma
file0137.wma
file0138.mp3
file0139.mp3
file0140.wma
file0141.mp3
file0142.mp3
file0143.mp3
file0144.mp3
file0145.wma
file0146.mp3
file0147.wma
file0148.mp3
file0149.wma
file0150.wma
file0151.wma
file0152.mp3
file0153.wma
file0154.mp3
file0155.mp3
file0156.mp3
file0157.mp3
file0158.wma
file0159.wma
file0160.wma
Ex.: Track list for MP3/WMA
file0161.wma
file0162.mp3
file0163.wma
file0164.mp3
file0165.wma
file0166.wma
file0167.wma
file0168.wma
file0169.mp3
file0170.wma
1 Current folder number/total folder number
(only for MP3/WMA/JPEG)
2 Current track number/total number of tracks
in the current folder (for MP3/WMA/JPEG)
or in the disc (for CD Text/audio CD)
3 Current page/total number of the pages
included in the list
4 Current folder/track (highlighted bar)
The track list of the selected folder appears.
To go back to the folder list
3 Select a track on the list.
For CD Text/audio CD:
While Dual Zone is on and the disc play stops....
1 Display the track list.
Each time you press the button,
the list screen comes on and
goes off.
2 Select a track on the list.
29
Page 30
AV setup menu
You can store the initial disc playback status.
• While playing, no change can be made on the
setup menu.
ENGLISH
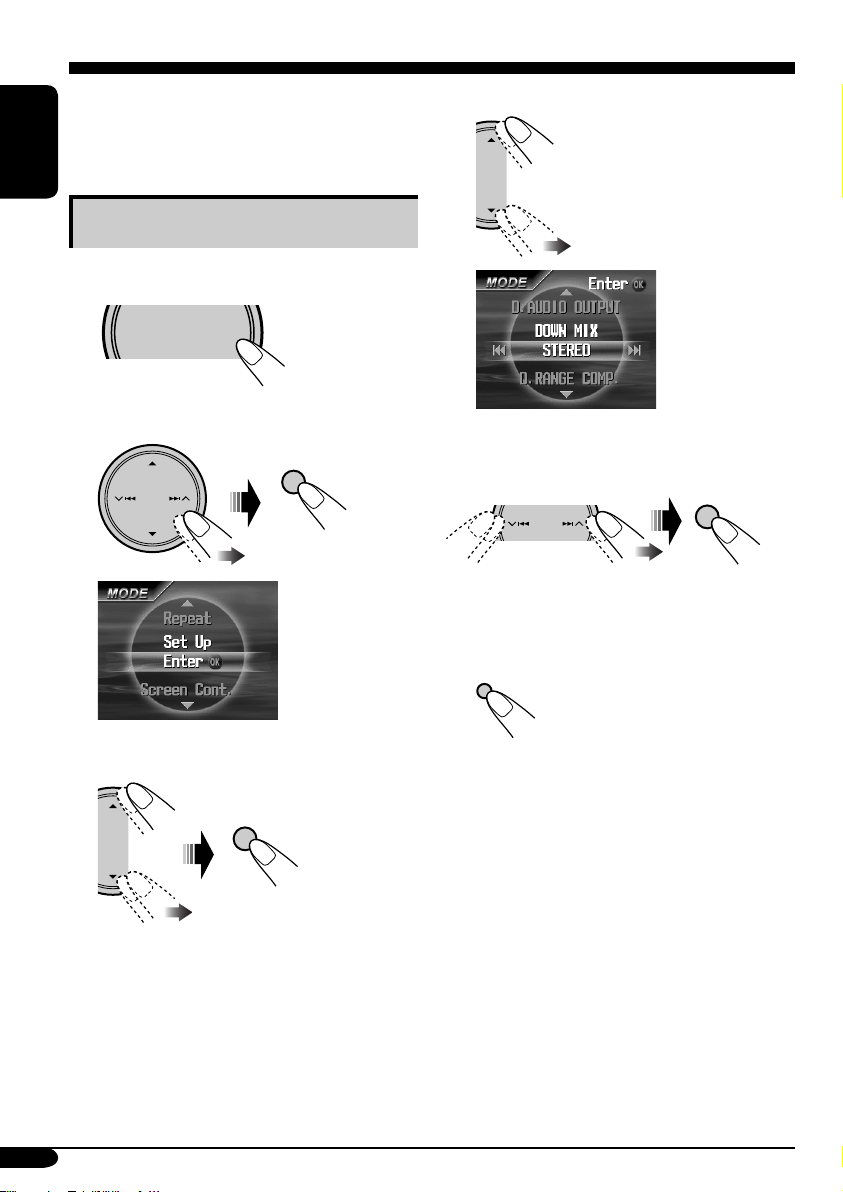
Basic setting procedure
While stop....
1
SOURCE
2 Select “MODE” menu.
MENU
OK
MODE menu
when a DVD is
loaded
4 Select an item you want to set up.
Ex.: When selecting “DOWN MIX”
5 Select an option.
OK
To set other items, repeat steps 4 and 5.
6 Finish the procedure.
DISP
D
3 Select “Set Up”.
30
OK
Page 31
You can also set up from the remote controller
when a DVD or a VCD is inserted.
• While playing, no change can be made on the
setup menu.
• When shipped from the factory, the on-screen
languge is set to English. To change the
language, see page 32.
4
AUDIO
DIGITAL AUDIO OUTPUT
DOWN MIX
D. RANGE COMPRESSION
STREAM/PCM
STEREO
DOLBY SURROUND
STEREO
ON
ENGLISH
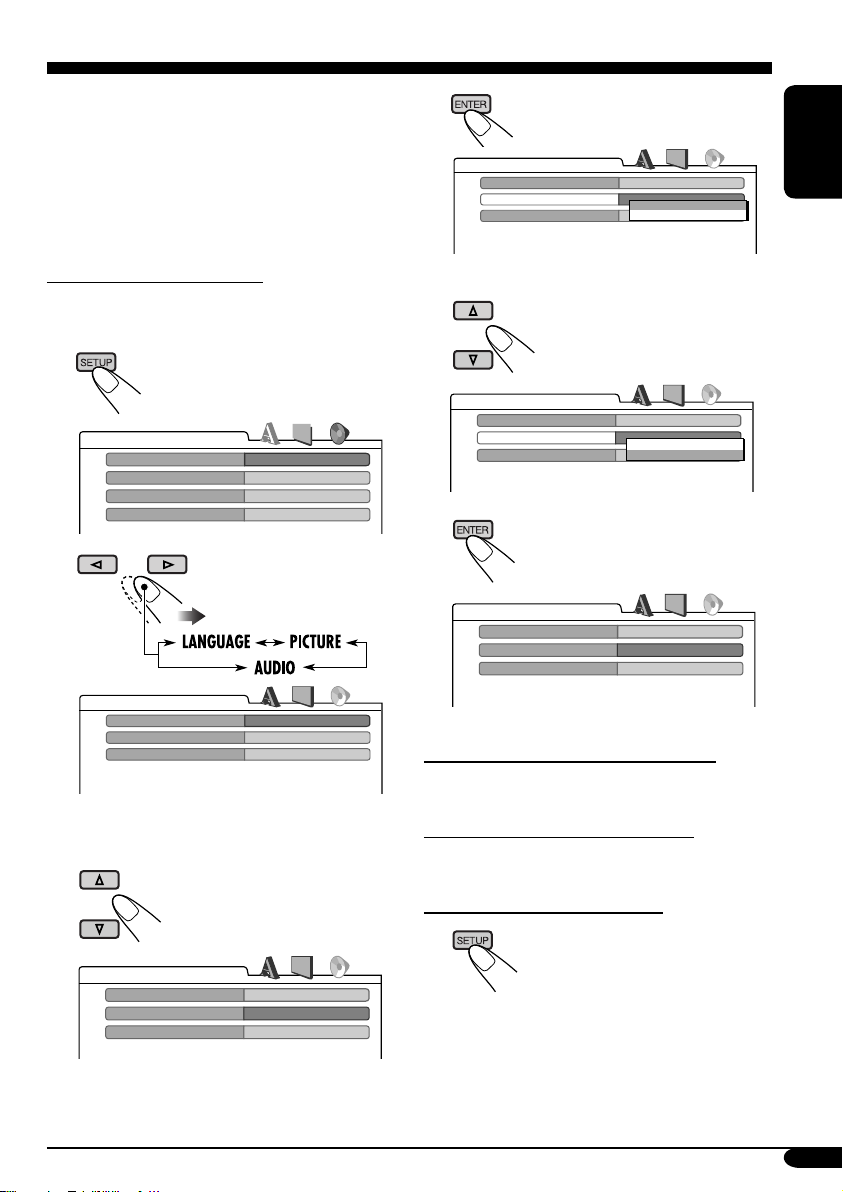
From the remote controller:
While stop....
1
LANGUAGE
MENU LANGUAGE
AUDIO LANGUAGE
SUBTITLE
ON SCREEN LANGUAGE
ENGLISH
ENGLISH
ENGLISH
ENGLISH
2
AUDIO
DIGITAL AUDIO OUTPUT
DOWN MIX
D. RANGE COMPRESSION
Ex.: When selecting the “AUDIO” menu
STREAM/PCM
STEREO
ON
3 Select an item you want to set up.
5 Select an option.
AUDIO
DIGITAL AUDIO OUTPUT
DOWN MIX
D. RANGE COMPRESSION
STREAM/PCM
STEREO
DOLBY SURROUND
STEREO
ON
6
AUDIO
DIGITAL AUDIO OUTPUT
DOWN MIX
D. RANGE COMPRESSION
To set other items on the same menu
Repeat steps 3 to 6.
To set other items on other menus
Repeat steps 2 to 6.
STREAM/PCM
DOLBY SURROUND
ON
AUDIO
DIGITAL AUDIO OUTPUT
DOWN MIX
D. RANGE COMPRESSION
STREAM/PCM
STEREO
ON
Ex.: When selecting “DOWN MIX”
To return to the normal screen
31
Page 32

Item Contents
MENU LANGUAGE
ENGLISH
AUDIO LANGUAGE
SUBTITLE
ON SCREEN LANGUAGE
(OSD LANGUAGE)
MONITOR TYPE
16:9 4:3 LETTER BOX
4:3 PAN SCAN
OSD POSITION
Position 1 Position 2
Select the initial disc menu language.
Select the initial audio language.
Select the initial subtitle language or erase the subtitle (OFF).
Select the language for the Setup menu called up from the remote
controller (see page 31) and some indications shown on the monitor.
• The language for the menus called up from the unit does not
change.
Select the monitor type to watch a wide screen picture on your
monitor.
• 16:9 : Select this when the aspect ratio of your monitor is 16:9.
• 4:3LB [LETTER BOX] : Select this when the aspect ratio of your
monitor is 4:3. While viewing a wide screen picture, the black bars
appear on the top and the bottom of the screen.
• 4:3PS [PAN SCAN] : Select this when the aspect ratio of your
monitor is 4:3.
While viewing a wide screen picture, the black bars do not appear;
however, the left and right edges of the pictures will not be shown
on the screen.
Select the position of the on-screen bar for CD and MP3/WMA (see
page 25) on the external monitor and AV set up menu from the remote
controller (see page 31).
• 1 : Higher position
• 2 : Lower position
The position of other indications than the on-screen bar does not
change.
MP3/JPEG
Select playback file type when a disc contains both MP3 and JPEG
files.
• MP3 : Plays back MP3/WMA files.
• JPEG : Plays back JPEG files.
Eject the disc and insert it again to make the new setting effective.
• For the LANGUAGE settings, see also the language codes list on page 60.
32
Page 33

Item Contents
DIGITAL AUDIO OUTPUT
(D. AUDIO OUTPUT)
DOWN MIX
D. (Dynamic) RANGE
COMPRESSION
(D. RANGE COMP.)
Select the signal format to be emitted through the DIGITAL OUT
(Optical) terminal on the rear. For details, see page 65.
• PCM ONLY (PCM) : Select this when connecting an amplifier or a
decoder incompatible with Dolby Digital, DTS or MPEG Audio, or
connecting to a recording device.
• DOLBY DIGITAL/PCM (DOLBY DIGITAL) : Select this when
connecting an amplifier or a decoder compatible with Dolby Digital.
• STREAM/PCM (STREAM) : Select this when connecting an
amplifier or a decoder compatible with Dolby Digital, DTS, and
MPEG Audio.
When playing back a multi-channel DVD disc, this setting affects the
signals reproduced through the LINE OUT jacks (and through the
DIGITAL OUT terminal when “PCM ONLY (PCM)” is selected for
“DIGITAL AUDIO OUTPUT (D.AUDIO OUTPUT)”).
• DOLBY SURROUND : Select this when you want to enjoy multi-
channel surround audio by connecting an amplifier compatible with
Dolby Surround to this receiver.
• STEREO : Normally select this.
You can enjoy a powerful sound at low or middle volume levels
while playing a Dolby Digital software.
• AUTO : Select this to apply the effect to multi-channel encoded
software (excluding 1-channel and 2-channel software).
• ON : Select this to always use this function.
ENGLISH
33
Page 34

Monitor adjustments
You can adjust color and brightness of the
monitor on the unit.
While selecting disc (DVD, VCD, or JPEG disc
ENGLISH
only) as the source....
1
SOURCE
MENU
2 Select “MODE” menu.
OK
3 Select “Screen Cont.”
5 Adjust the item.
Ex.: When adjusting “BRIGHT”
• Each time you press 4/¢ ,
the menu screen disappears for a few
seconds and you can see the result of the
adjustment.
To adjust other items, repeat steps 4 and 5.
6 Finish the procedure.
DISP
D
4 Select an item to adjust.
34
Adjustable items
BRIGHT: –15 to 0 to +15
Adjust if the picture is too bright or too
dark.
OK
CONTRAST: –15 to 0 to +15
Adjust the contrast of the bright and dark
portion.
COLOR: –15 to 0 to +15
Adjust the color of the picture—lighter or
darker.
• TINT is fixed though appearing on the menu.
Page 35

Other disc operations
D
In this section, you can learn how to use the
buttons on the control panel in order to operate
the DVD/CD player.
Basic operations
To stop a disc
BACK
BAN
To play a disc again
OK
To eject a disc
To fast-forward or
reverse the chapter/track
ENGLISH
Fast-forwards.
Reverses.
• The search speed changes to x2 ] x10 for all
discs (DVD, VCD, CD), but the information
shown on the monitor is only for DVD/VCD.
To go to the next or previous
chapters/tracks
For DVD: During play or pause
To the following chapters/tracks.
To the beginning of the current chapter/track,
then the previous chapters/tracks.
To go to the next or previous title
To next titles.
To previous titles.
35
Page 36

To go to the next or previous
folders
JPEG
Prohibiting disc ejection
You can lock a disc in the loading slot.
ENGLISH
To previous folders.
To next folders.
• To select a particular track in a folder (for
MP3/WMA disc) after selecting a folder:
To change monitor
indication
DISP
D
• Each time you press D DISP, the monitor
changes between the source screen and DVD/
VCD/JPEG playback.
JPEG
1
2 Select “NO EJECT?”.
OK
To scroll the disc information
For CD: Title-assigned CDs (see page 48)
and CD Text
DISP
D
36
JPEG
“No Eject” flashes.
To cancel the prohibition, repeat the same
procedure to select “EJECT OK?”.
Page 37

Selecting the playback modes
You can use only one of the following playback modes at a time.
1
SOURCE
2 Select “MODE” menu.
3 Select your desired playback mode.
MENU
OK
ENGLISH
Playback mode indicator appears.
Repeat
Mode Plays repeatedly
Chapter*1: The current chapter.
• For DVD: During play or pause.
• For VCD: While PBC (see page 24) is
not in use.
•
Title*
•
Trac k*
OK
•
Folder*
•
Off: For DVD: Cancels Repeat play.
For other discs: All tracks of the
Ex.: When “Track” is selected
1
*
Only while playing a DVD disc.
2
*
Except for DVD and JPEG discs.
3
*
Only while playing an MP3, a WMA, or a JPEG disc.
1
: The current title.
lights up.
lights up.
2
: The current track.
lights up.
3
: All tracks of the current folder.
lights up.
disc.
To be continued....
37
Page 38

Random
• For VCD: While PBC (see page 24) is
ENGLISH
Ex.: When “Disc” is selected
Intro
• For VCD: While PBC (see page 24) is
not in use.
not in use.
Mode Plays at random
Folder*4: All tracks of the current folder,
then tracks of the next folder and
so on.
•
OK
Disc: All tracks of the disc.
•
lights up.
lights up.
Off: Cancels.
Mode Plays the first 15 seconds of
Trac k: All tracks of the disc.
•
*4
Folder
: First tracks of all folders.
•
OK
Off: Cancels.
lights up.
lights up.
38
Ex.: When “Track” is selected
*
4
Only while playing an MP3 or a WMA disc.
Page 39
List screen operations
You can display the folder list/file list and select
a folder/file directly while playing back.
Folder/file list screens
Folder list
JPEG
4 Select the list you want to use.
OK
ENGLISH
When “File” is selected, the file list of the
current folder appears.
5 Select the folder/file you want.
OK
File list
While playing...
1
SOURCE
MENU
2 Select “MODE” menu.
3 Select “LIST”.
OK
When selecting a folder from the list, the
playback of the first track in the folder
starts.
• The track list appears when selecting the
current folder on the folder list.
• You can also access the folder list by pressing
and holding 5 / ∞.
OK
39
Page 40

Dual Zone operations
Playing back two sources
at a time
ENGLISH
You can connect external audio equipment
to the 2nd AUDIO OUT plug on the rear,
and play back a disc separately from the
source selected on the unit.
You can activate Dual Zone while listening to
any source.
• When Dual Zone is in use, you can only
operate the DVD/CD player using the remote
controller.
On the remote controller:
On the control panel:
You can also activate and deactivate Dual Zone.
1
SOURCE
2
Select “D-ZONE”.
MENU
OK
1 Activate Dual Zone.
The source automatically changes to
“DISC” and
To select a different source to listen through
the speakers, press SOURCE on the control
panel.
• By using the buttons on the control panel,
you can operate the newly selected source
without affecting Dual Zone operations.
appears on the monitor.
2 Adjust the volume through the 2nd
AUDIO OUT plug.
3 Operate the DVD/CD player using
the remote controller by referring to
the monitor screen.
To cancel Dual Zone operations, repeat step 1.
(
disappears.)
3 Select “On”.
OK
The source automatically changes to
“DISC” when Dual Zone is activated.
To cancel Dual Zone operations, select “Off”
on step
3
.
40
Page 41
Sound adjustments
Selecting preset sound modes
You can select a preset sound mode suitable to
the music genre.
Available sound modes:
Hard Rock/R&B/Pop/Jazz/Dance/Country/
Reggae/Classic
User1/User2/User3
Flat (To cancel the sound mode)
1
SOURCE
Select “EQ” menu.
2
MENU
OK
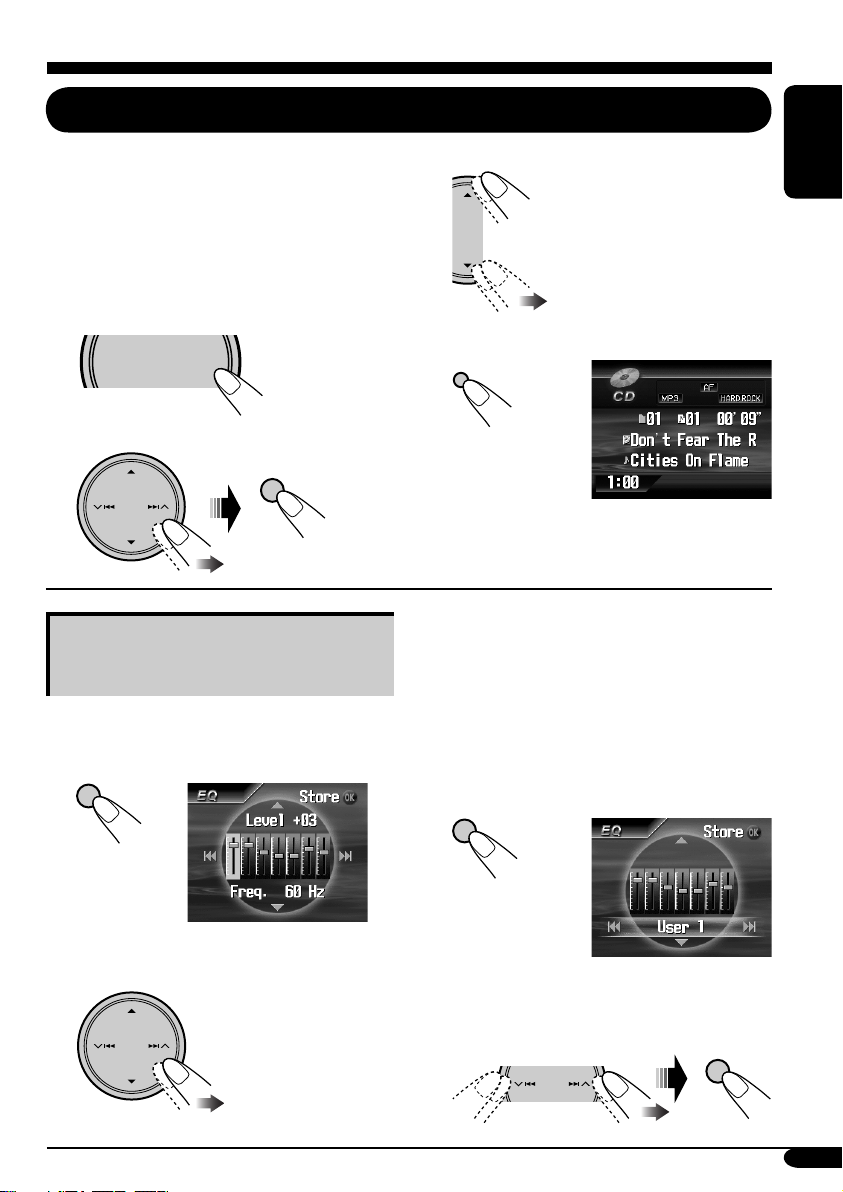
Storing your own sound
adjustments
You can adjust the sound modes and store your
own adjustments in memory.
After step 3 above....
1
OK
3 Select one of the preset sound modes.
ENGLISH
4 Finish the procedure.
DISP
D
Ex.: When “Hard Rock” is selected
1 Select the frequency band to adjust—
60 Hz, 150 Hz, 400 Hz, 1kHz, 2.5kHz,
6.3kHz, 15kHz.
2 Adjust the level of the selected band
(–05 to +05).
3 Repeat steps 1 and 2 to adjust other
frequency bands.
3 Finish adjustment.
OK
2 Make adjustments as you like.
4 Select one of the user sound modes
(User1, User2, User3) you want to
store into.
OK
41
Page 42

Adjusting the sound
You can adjust the sound characteristics to your preference.
ENGLISH
1
SOURCE
2 Select “SEL” menu.
3 Select your desired adjustment item.
Fad/Bal (Fader/Balance)
MENU
OK
OK
Adjust fader—speaker output balance between the
front and rear speakers.
• Upmost—front only
• Downmost—rear only
42
When using a two-speaker system, set the fader
center.
Adjust balance—speaker output balance between
the left and right speakers.
• Leftmost—left only
• Rightmost—right only
Page 43
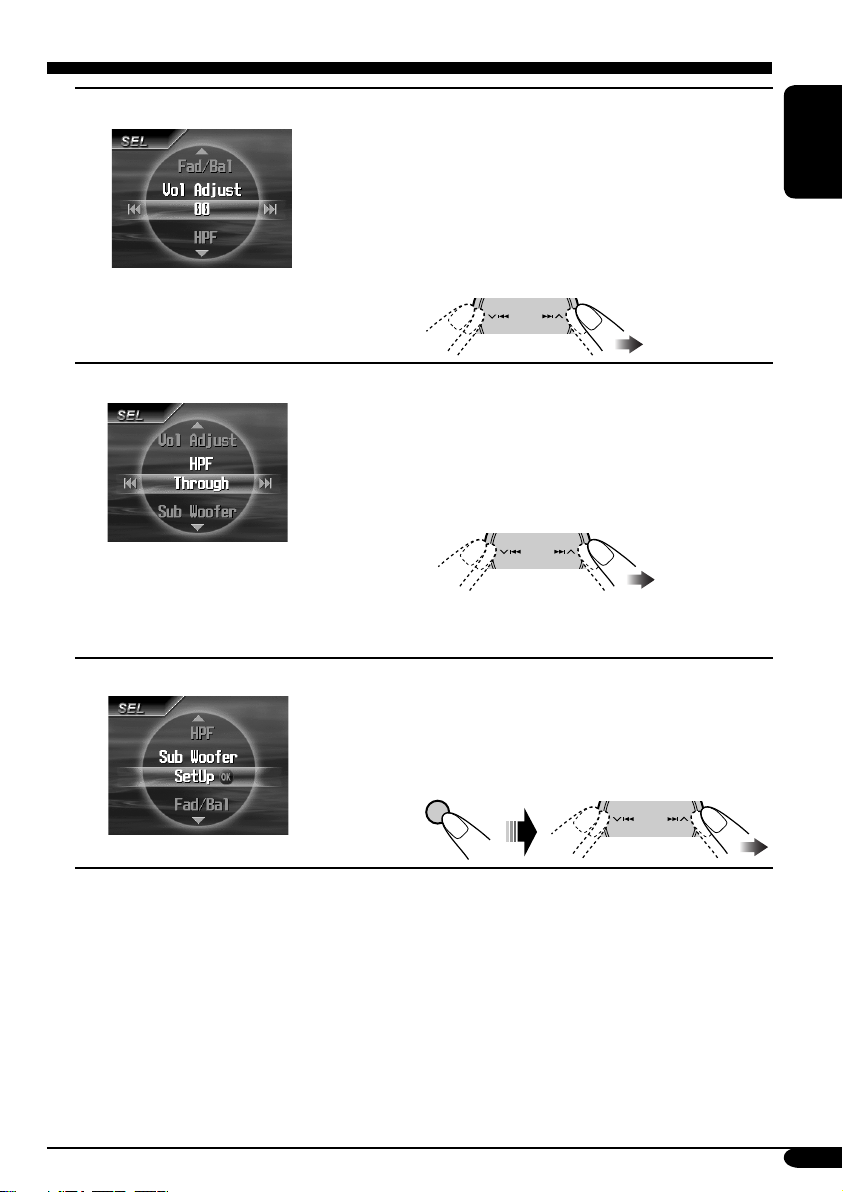
Vol Adjust (volume adjust)
Adjust and store the volume level of each source
except FM.
Once you have made an adjustment, it
is memorized, and the volume level will
automatically increase or decrease by adjusted
level when you change the source.
Adjust to match the input level to the FM sound
level.
• –12 (min) to +12 (max.)
ENGLISH
HPF (High pass filter)
Sub Woofer
Adjust the cut-off frequency to the front/rear
speakers according to the subwoofer setting.
• 55 Hz: Cuts off frequencies lower than 55 Hz.
• 85 Hz: Cuts off frequencies lower than 85 Hz.
• 125 Hz: Cuts off frequencies lower than
125 Hz.
• Through: Cuts off no frequencies.
See the article below for the subwoofer setting.
Adjust the settings below in the SetUp submenu.
• Volume: Subwoofer output level
• Freq.: Subwoofer cut-off frequency
• Phase: Subwoofer phase. Select which
reproduces a better sound from “Normal” and
“Reverse”.
OK
43
Page 44

General settings — PSM
Basic procedure
3 Select a PSM item.
You can change PSM (Preferred Setting Mode)
items listed in the table that follows.
ENGLISH
1
SOURCE
2 Select “PSM” menu.
Indications Selectable settings, [reference page]
WallPaper
MENU
Ex.: When you select “Dimmer”
4 Adjust the PSM item selected.
OK
5 Repeat steps 3 and 4 to adjust the
other PSM items if necessary.
6 Finish the procedure.
OK
You can select the background picture of the monitor from these:
Standard, Red, Amber, Green, SkyBlue, Blue, Purple
.
Clock Hr
Hour adjustment
Clock Min
Minute adjustment
24H/12H
Clock system
CLK Adj
Automatic clock
adjustments
Scroll*
1
*
Some characters or symbols will not be shown (and will be blanked) on the monitor.
44
0 – 23 (1 – 12), [11]
[Initial: 0 (0:00)]
00 – 59, [11]
[Initial: 00 (0:00)]
12Hours – 24Hours, [11]
[Initial: 24Hours]
Auto: [Initial]; The built-in clock is automatically adjusted
using the clock time data in the RDS signal.
Off: Cancels.
1
Once: [Initial]; Scrolls the disc information once.
Auto:
Off: Cancels.
• Even if “Scroll” is set to “Off”, you can scroll the display by
pressing D DISP for more than one second.
Repeats scrolling (5-second intervals in between).
Page 45

Indications Selectable settings, [reference page]
Dimmer Auto: [Initial]; Dims the monitor when you turn on the headlights.
Off: Cancels.
On: Activates dimmer.
Time Set: Sets the Dimmer On/Off time.
ENGLISH
Bright
Brightness
You can adjust the brightness to make the monitor clear and legible.
–15 (darkest) to +15 (brightest)
[Initial]; 0
• You can also adjust the brightness on “Screen Cont.” on the
“MODE” menu when the source is DVD, VCD, or JPEG disc, [34].
ID3 Tag
Tag display
PTY Standby
PTY standby
On: [Initial]; Shows the ID3 tag while playing MP3/WMA tracks.
Off: Cancels.
Activates PTY Standby Reception with one of the 29 PTY codes,
[18].
News [Initial] and 28 PTY codes [16].
AF-Regn’l
Alternative frequency/
When the received signals from the current station become weak....
AF: [Initial]; Switches to another station (the programme
regionalization
reception
•
AF-Reg: Switches to another station broadcasting the same
•
Off: Cancels (not selectable when “DAB AF” is set to
TA Volu m e
[Initial: VOL 15]; VOL 00 — VOL 30 or 50*
Traffic announcement
volume
P-Search
On: Using the AF data, the receiver tunes in to another
Programme search
Off: [Initial]; Cancels.
2
*
Depends on the amplifier gain control.
may differ from the one currently received), [18].
lights up.
programme.
and light up.
“AF On”).
2
, [17]
frequency broadcasting the same programme as the
original preset RDS station is if the preset station signals
are not sufficient.
To be continued....
45
Page 46

Indications Selectable settings, [reference page]
IF Filter
Intermediate frequency
ENGLISH
filter
DAB AF*
1
Alternative frequency
reception
Announce
1
*
Announcement
Standby Reception
EXT INPUT*
2
External input
Beep
In some areas, adjacent stations may interfere with each other. If this
interference occurs, noise may be heard.
Auto: [Initial]; When this type of interference occurs, this
unit automatically increases the tuner selectivity so that
interference noise will be reduced. (But the stereo effect will
also be degraded.)
Wide: Subject to the interference from adjacent stations, but sound
quality will not be degraded and the stereo effect will not be
degraded.
On: [Initial]; Traces the programme among DAB services and
FM RDS stations, [58].
Off: Cancels.
Select one of the 9 announcement types for Announcement Standby
Reception.
Travel [Initial] O Warning O News O Weather O Event O
Special O Rad Inf (Radio Information) O Sports O Finance O
(back to the beginning)
CHANGER: [Initial]; To use a JVC CD changer, [50].
EXT IN: To use any external component, [53].
You can deactivate the key-touch tone if you do not want it to beep
each time you press a button.
On: [Initial]; Activates the key-touch tone.
Off: Cancels.
Rear SPK*
Rear speaker output
Telephone
Telephone muting
1
*
Displayed only when DAB tuner is connected.
2
*
Cannot be selected if the source is “CD-CH” or “EXT-IN”.
3
*
Functions only when Dual Zone is activated (see page 40).
46
3
On: [Initial]; Select this to turn on the rear speaker output.
Off: Cancels.
Muting1/Muting2: Select either one which mutes the sounds while
using the cellular phone.
Off: [Initial]; Cancels.
Page 47

Indications Selectable settings, [reference page]
Amp Gain
Amplifier gain control
You can change the maximum volume level of this receiver.
High Power: [Initial]; VOL 00 – VOL 50
Low Power: VOL 00 – VOL 30 (Select this if the maximum power
of the speaker is less than 50 W to prevent them from
damaging the speaker.)
Off: Deactivates the built-in amplifier.
AV I NPUT
Audio-Video input
You can determine the use of LINE IN and VIDEO IN jacks on this
receiver.
Audio+Video: [Initial]; Select this when connecting an AV
component such as a VCR.
Audio: Select this when connecting an audio component
such as a cassette deck.
Camera*
4
: Select this when connecting the rear view camera.
The rear view through the camera is automatically
displayed on the monitor when you change the gear
to the back position.
Camera Rev.*
4
: The mirror image of the rear view through the
rear view camera is automatically displayed on
the monitor when you change the gear to the back
position. (The monitor on the unit only; the normal
rear view appears on the external monitor.)
4
*
Reverse gear signal connection is needed to change the monitor view automatically. See
Installation/Connection Manual (separate volume).
ENGLISH
47
Page 48

Other main functions
Assigning titles to the sources
You can assign titles to CDs (both in this
receiver and in the CD changer), and change the
ENGLISH
source names of AV-INPUT and EXT-INPUT.
Sources
AV-INPUT/EXTINPUT
DISC/CD-CH Up to 32 characters (up
• You cannot assign a title to a DVD, VCD,
CD Text, an MP3/WMA disc, or a JPEG disc.
1 Select the source.
• For AV-IN/EXT-IN: Select the source.
• For a CD in this receiver: Insert a CD.
• For CDs in the CD changer: Select
“CD-CH”, then select a disc number.
2
SOURCE
3 Select “TITLE”.
Maximum number of
characters
Up to 16 characters
to 30 discs)
MENU
4 Assign a title.
1 Select a character set.
DISP
D
2 Select a character.
• For available characters, see page 4.
3 Move to the next (or previous)
character position.
4 Repeat steps 1 and 2 until you
finish entering the title.
5 Finish the procedure.
OK
48
OK
Ex.: When
you select
“DISC” as
the source
To erase the entire title
In step 3 on the left column....
DISP
D
Page 49

Detaching the control panel
When detaching or attaching the control panel,
be careful not to damage the connectors on
the back of the control panel and on the panel
holder.
Detaching the control panel
Before detaching the control panel, be sure to
turn off the power.
The control panel comes out toward you.
Attaching the control panel
ENGLISH
Changing the control panel angle
The control panel changes its angle as follows.
Angle 1
Angle 4
Angle 2
Angle 3
Caution:
Do not insert your finger behind the control
panel.
49
Page 50
CD changer operations
Playing discs in the CD changer
ENGLISH
SOURCE
MENU
About the CD changer
It is recommended to use the JVC MP3compatible CD changer with your receiver.
• You can also connect other CH-X series
CD changers (except CH-X99 and
CH-X100). However, they are not
compatible with MP3 discs, so you cannot
play back MP3 discs.
• You cannot use the KD-MK series CD
changers with this receiver.
• Disc text information recorded in the CD
Text can be displayed when a JVC CD
Text compatible CD changer is connected.
Before operating your CD changer:
• Refer also to the Instructions supplied
with your CD changer.
• You cannot control and play any DVD,
VCD, WMA or JPEG disc in the CD
changer.
All tracks of the inserted discs in the magazine
will be played repeatedly until you change
the source or eject the magazine from the CD
changer.
~
*
If you have changed “EXT INPUT”
setting to “EXT IN” (see page 46),
you cannot select the CD changer.
Selected disc number
SOURCE
MENU
50
Page 51

Ÿ Select a disc.
1
To fast-forward or reverse the track
DISC LIST appears.
2
OK
• You can move to the other lists by pressing
4 / ¢.
• When the current disc is an MP3 disc, you
can move to FOLDER LIST by selecting it on
DISC LIST.
• You can also access the lists from the “MODE”
menu. See page 39 for the detail of
the list
operations.
Fast-forwards.
Reverses.
To go to the next or previous tracks
To the following tracks.
To the beginning of the current track, then the
previous tracks.
To go to the next or previous folders (only
for MP3 discs)
To next folders.
To previous folders.
When using the remote controller....
ENGLISH
When using the remote controller....
+
DISC
–
DISC
51
Page 52

Selecting the playback modes
You can use only one of the following playback
modes at a time.
ENGLISH
1
SOURCE
2 Select “MODE” menu.
MENU
Selectable modes
Repeat
Mode Plays repeatedly
Trac k: The current track.
•
Folder*: All tracks of the current folder.
•
Disc: All tracks of the current disc.
•
Off: Cancels.
lights up.
lights up.
lights up.
OK
3 Select your desired playback mode.
4 Finish the Procedure.
OK
Random
Mode Plays at random
Folder*: All tracks of the current folder,
then tracks of the next folder
and so on.
•
Disc: All tracks of the current disc.
•
All: All tracks of the inserted discs.
•
Off: Cancels.
lights up.
lights up.
lights up.
Intro
Mode Plays the first 15 seconds of
Trac k: All tracks of the inserted discs.
•
Folder*: First tracks of all folders in the
•
Disc: First tracks of all the inserted
•
Off: Cancels.
lights up.
current disc.
lights up.
discs.
lights up.
52
* Only while playing an MP3 disc
Page 53

External component operations
Playing an external component
SOURCE
MENU
You can connect an external component to
LINE IN plug and VIDEO IN plug on the rear,
or to the CD changer jack on the rear using the
KS-U57 Line Input Adapter (not supplied) or
KS-U58 AUX Input Adapter (not supplied).
• For connection, see Installation/Connection
Manual (separate volume).
Ÿ Turn on the connected component
and start playing the source.
! Adjust the volume.
SOURCE
ENGLISH
MENU
~
AV-IN: For selecting the external
• To change the setting of AV INPUT,
EXT-IN: For selecting the external
• If “EXT-IN” does not appear, see page
SOURCE
component connected to the
LINE IN and/or VIDEO IN
plug.
see page 47.
component connected to the
CD changer jack on the rear.
46 and select the external input (EXTIN).
MENU
EXT-IN AV-IN
• Volume indication does not appear
when the picture from VIDEO IN plug
is displayed on the unit. To check the
volume level, press D DISP before
volume adjustment.
⁄ Adjust the sound as you want.
(See pages 41 – 43.)
53
Page 54

DAB tuner operations
Listening to the DAB tuner
ENGLISH
SOURCE
MENU
BACK
BAND
~
Ÿ
Service
label
SOURCE
BACK
BAND
Current band
Ensemble
label
MENU
! Start searching for an ensemble.
When an ensemble is received,
searching stops.
To stop searching, press the same
button again.
⁄ Select a service (either primary or
secondary) to listen to.
Programme
type
To tune in to an ensemble manually
In step ! ....
Activate “Manual
Search”
54
Select ensemble
frequencies
Page 55
What is DAB system?
DAB can deliver CD quality sound without
any annoying interference and signal
distortion. Furthermore, it can carry text,
pictures, and data. When transmitting,
DAB combines several programmes (called
“services”) to form one “ensemble”. In
addition, each “service”—called “primary
service”—can also be divided into its
components (called “secondary service”).
A typical ensemble has six or more
programmes (services) broadcast at the same
time.
By connecting the DAB tuner, this receiver
can do the following:
• Tracing the same programme automatically
—Alternative Frequency Reception (see
“DAB AF” on page 46).
It is recommended to use DAB (Digital
Audio Broadcasting) tuner KT-DB1000
with your receiver. If you have another
DAB tuner, consult your JVC IN-CAR
ENTERTAINMENT dealer.
• Refer also to the Instructions supplied for
your DAB tuner.
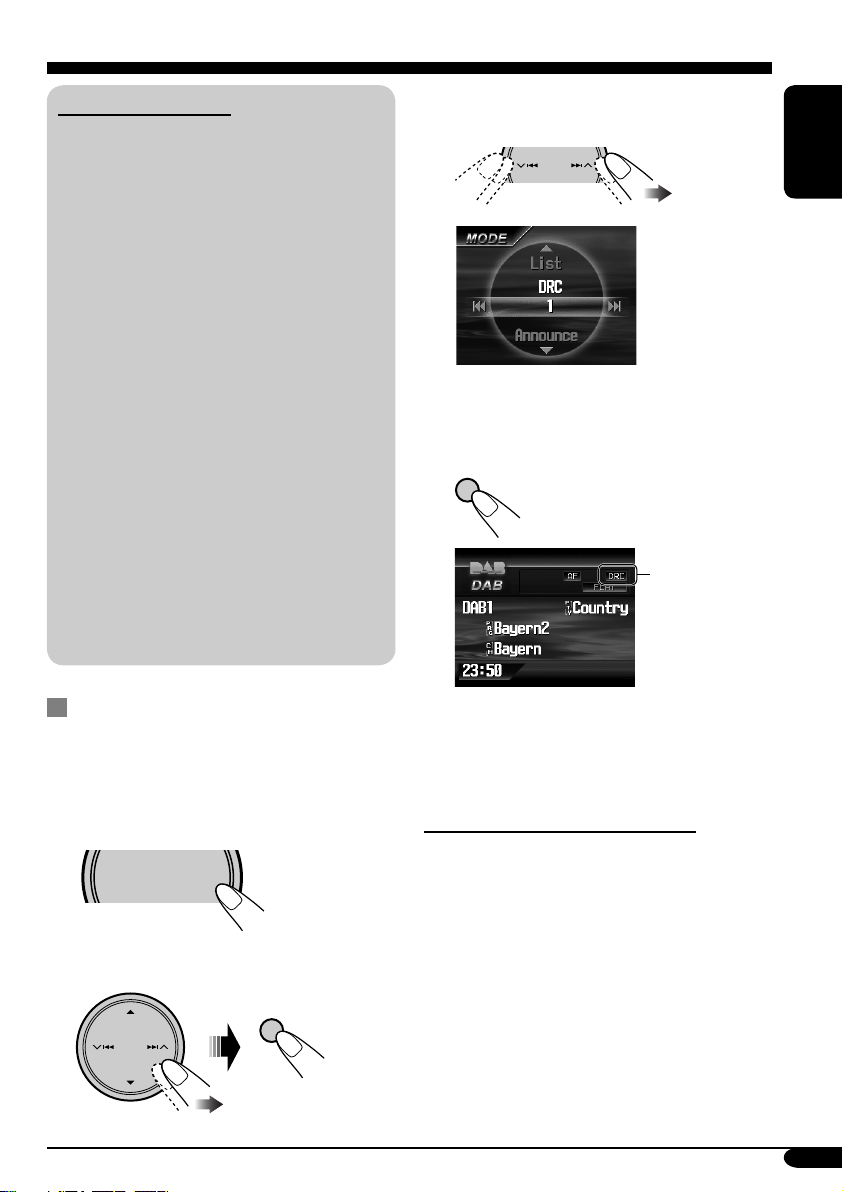
3 Select one of the DRC signals level (1,
2, or 3).
ENGLISH
The reinforcement level increases from 1
to 3.
4 Finish the procedure.
OK
DRC indicator
appears.
When surrounding sounds are noisy
Some service provides Dynamic Range Control
(DRC) signals together with their regular
programme signals. DRC will reinforce the low
level sounds to improve for your listening.
1
SOURCE
MENU
2 Select “MODE” menu.
OK
• The DRC indicator will be highlighted
only when receiving DRC signals from
the tuned service.
To search for your favorite service
You can search for either Dynamic or Static
PTY codes.
• Operations are exactly the same as explained
on page 16 for FM RDS stations.
• You cannot store PTY codes separately for
the DAB tuner and the FM tuner.
• Search will be performed on the DAB tuner
only.
55
Page 56

Storing DAB services in memory
Tuning in to a preset DAB service
You can preset six DAB services (primary) for
each band.
ENGLISH
Ex.: Storing an ensemble (primary service) into
the preset number 4 of the DAB1 band.
When the source is DAB....
1
BACK
BAND
2 Select an ensemble (primary service).
3
PRESET LIST appears.
4 Select a preset number.
When the source is DAB....
1
BACK
BAND
2
3 Select the preset number you want.
OK
• You can move to the lists of the other
DAB bands by pressing 4/¢.
5 Store the service.
OK
56
When using the remote controller....
To directly select the preset service
Preset number flashes
for a while.
Page 57

Using the standby receptions
2 Select “MODE” menu.
TA (Road Traffic News) Standby
Reception
• Operations are exactly the same as explained
on page 18 for FM RDS stations.
• You cannot activate TA Standby Reception
separately for the DAB tuner and for FM
tuner.
• The volume changes to the preset TA volume
level (see page 45).
PTY Standby Reception
• Operations are exactly the same as explained
on page 18 for FM RDS stations.
• PTY Standby Reception for DAB tuner works
only using a dynamic PTY code.
• You can neither store your favorite PTY nor
activate PTY Standby Reception separately
for the DAB tuner and for the FM tuner.
• You can activate and deactivate PTY Standby
Reception when the source is either “FM” or
“DAB”.
Announcement Standby Reception
Announcement Standby Reception allows the
receiver to switch temporarily to your favorite
service (announcement type).
OK
3 Select “Announce”.
4
ANN indicator
appears.
Appears when the service is received.
OK
ENGLISH
To select your favorite announcement type,
see page 46.
To activate the Announcement Standby
Reception
1
SOURCE
MENU
• If the ANN indicator lights up,
Announcement Standby Reception is
activated.
• If the ANN indicator flashes,
Announcement Standby Reception is not
yet activated.
To activate, tune in to another service
providing these signals. The ANN
indicator will stop flashing and remain
lit.
To deactivate the Announcement Standby
Reception
Select “Off” in step 4 above.
The ANN indicator goes off.
57
Page 58

Tracing the same programme—
Alternative Frequency Reception
ENGLISH
You can keep listening to the same programme
by activating the Alternative Frequency
Reception.
• While receiving a DAB service:
When driving in an area where a DAB service
cannot be received, this receiver automatically
tunes in to another ensemble or FM RDS
station, broadcasting the same programme.
• While receiving an FM RDS station:
When driving in an area where a DAB service
is broadcasting the same programme as the
FM RDS station is broadcasting, this receiver
automatically tunes in to the DAB service.
When shipped from the factory, Alternative
Frequency Reception is activated.
To deactivate the Alternative Frequency
Reception, see page 45.
To show the Dynamic Label Segment (DLS)
information
DISP
D
Service frequency
is displayed.
While listening to an ensemble that
supports DLS....
58
*
Dynamic Label
Segment (DLS—
DAB radio text
information) is
displayed.
* Lights up when receiving a service
providing Dynamic Label Segment (DLS)—
DAB radio text information.
Page 59
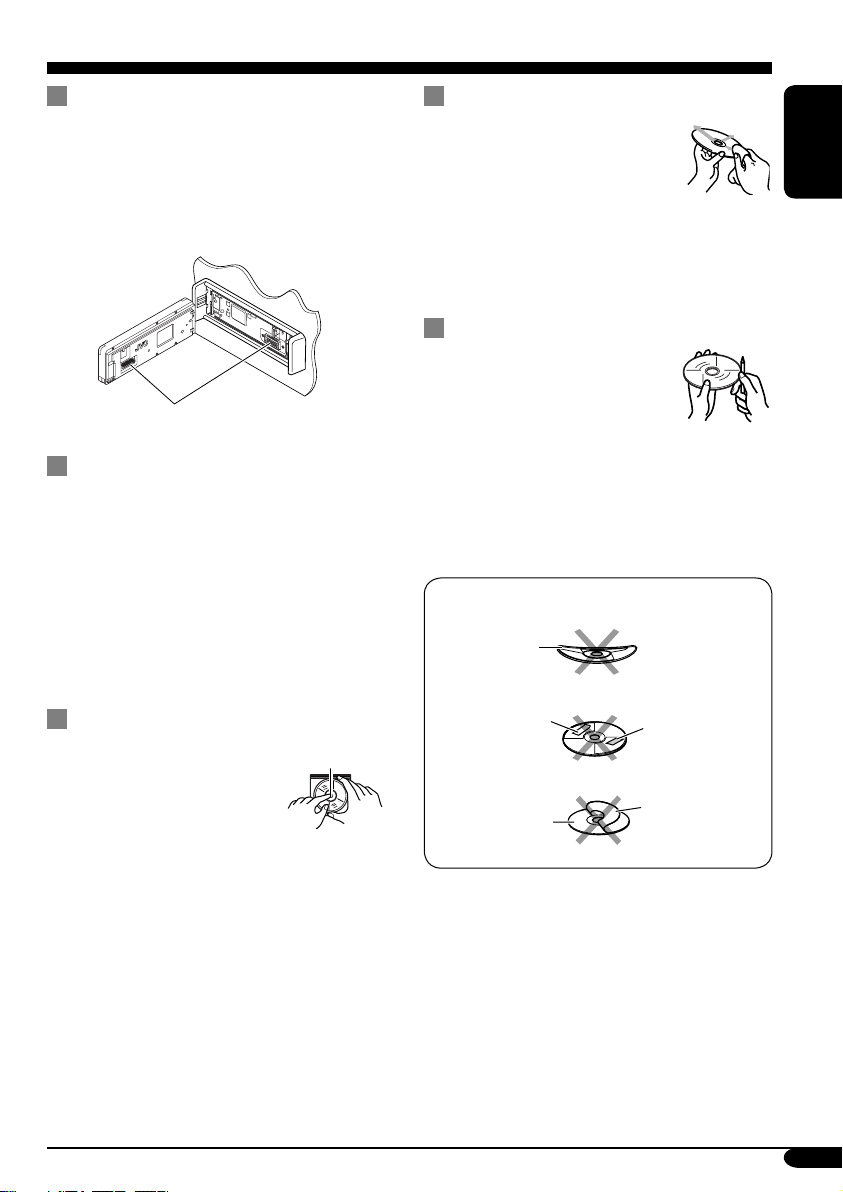
Maintenance
How to clean the connectors
Frequent detachment will deteriorate the
connectors.
To minimize this possibility, periodically wipe
the connectors with a cotton swab or cloth
moistened with alcohol, being careful not to
damage the connectors.
Connector
Moisture condensation
Moisture may condense on the lens inside the
DVD/CD player in the following cases:
• After starting the heater in the car.
• If it becomes very humid inside the car.
Should this occur, the DVD/CD player may
malfunction. In this case, eject the disc and
leave the receiver turned on for a few hours
until the moisture evaporates.
To keep discs clean
A dirty disc may not play correctly.
If a disc does become dirty, wipe
it with a soft cloth in a straight line
from center to edge.
• Do not use any solvent (for example,
conventional record cleaner, spray, thinner,
benzine, etc.) to clean discs.
To play new discs
New discs may have some rough
spots around the inner and outer
edges. If such a disc is used, this
receiver may reject the disc.
To remove these rough spots, rub the edges
with a pencil or ball-point pen, etc.
Do not use the following discs:
Warped
disc
ENGLISH
How to handle discs
When removing a disc from
its case, press down the center
holder of the case and lift the
disc out, holding it by the
edges.
• Always hold the disc by the edges. Do not
touch its recording surface.
When storing a disc into its case, gently insert
the disc around the center holder (with the
printed surface facing up).
• Make sure to store discs into the cases after
use.
Center holder
Sticker
Disc
Sticker
residue
Stick-on
label
59
Page 60

Language codes
Code Language Code Language Code Language
AA
AB
ENGLISH
AF
AM
AR
AS
AY
AZ
BA
BE
BG
BH
BI
BN
BO
BR
CA
CO
CS
CY
DZ
EL
EO
ET
EU
FA
FI
FJ
FO
FY
GA
GD
GL
GN
GU
HA
HI
HR
HU
HY
IA
IE
Afar
Abkhazian
Afrikaans
Ameharic
Arabic
Assamese
Aymara
Azerbaijani
Bashkir
Byelorussian
Bulgarian
Bihari
Bislama
Bengali, Bangla
Tibetan
Breton
Catalan
Corsican
Czech
Welsh
Bhutani
Greek
Esperanto
Estonian
Basque
Persian
Finnish
Fiji
Faroese
Frisian
Irish
Scots Gaelic
Galician
Guarani
Gujarati
Hausa
Hindi
Croatian
Hungarian
Armenian
Interlingua
Interlingue
IK
IN
IS
IW
JI
JW
KA
KK
KL
KM
KN
KO
KS
KU
KY
LA
LN
LO
LT
LV
MG
MI
MK
ML
MN
MO
MR
MS
MT
MY
NA
NE
NO
OC
OM
OR
PA
PL
PS
PT
QU
RM
Inupiak
Indonesian
Icelandic
Hebrew
Yiddish
Javanese
Georgian
Kazakh
Greenlandic
Cambodian
Kannada
Korean (KOR)
Kashmiri
Kurdish
Kirghiz
Latin
Lingala
Laothian
Lithuanian
Latvian, Lettish
Malagasy
Maori
Macedonian
Malayalam
Mongolian
Moldavian
Marathi
Malay (MAY)
Maltese
Burmese
Nauru
Nepali
Norwegian
Occitan
(Afan) Oromo
Oriya
Panjabi
Polish
Pashto, Pushto
Portuguese
Quechua
Rhaeto-Romance
RN
RO
RW
SA
SD
SG
SH
SI
SK
SL
SM
SN
SO
SQ
SR
SS
ST
SU
SW
TA
TE
TG
TH
TI
TK
TL
TN
TO
TR
TS
TT
TW
UK
UR
UZ
VI
VO
WO
XH
YO
ZU
Kirundi
Rumanian
Kinyarwanda
Sanskrit
Sindhi
Sangho
Serbo-Croatian
Singhalese
Slovak
Slovenian
Samoan
Shona
Somali
Albanian
Serbian
Siswati
Sesotho
Sundanese
Swahili
Tamil
Telugu
Tajik
Thai
Tigrinya
Turkmen
Tagalog
Setswana
Tonga
Turkish
Tsonga
Tatar
Twi
Ukrainian
Urdu
Uzbek
Vietnamese
Volapuk
Wolof
Xhosa
Yoruba
Zulu
60
Page 61

More about this receiver
Basic operations
Turning on the power
• By pressing SOURCE on the receiver, you
can also turn on the power.
Selecting the sources
• When no disc is loaded in the receiver and
Dual Zone is off, “DISC” cannot be selected.
• Without connecting to the CD changer or the
DAB tuner, “CD-CH” or “DAB” cannot be
selected.
Turning off the power
• If you turn off the power while listening to a
disc, disc play will start automatically, next
time you turn on the power.
Tuner operations
Storing stations in memory
• During SSM search....
– All previously stored stations are erased and
stations are stored newly.
– Received stations are preset in No. 1
(lowest frequency) to No. 6 (highest
frequency).
– When SSM is over, the station stored in
No. 1 will be automatically tuned in.
• When storing a station manually, a previously
preset station is erased when a new station is
stored in the same preset number.
FM RDS operations
• Network-Tracking Reception requires two
types of RDS signals—PI (Programme
Identification) and AF (Alternative
Frequency) to work correctly. Without
receiving these data correctly, NetworkTracking Reception will not operate.
• If a DAB tuner is connected and Alternative
Frequency Reception for DAB services (DAB
AF) is activated, Network-Tracking Reception
(AF-Regn’l) is also activated automatically.
On the other hand, Network-Tracking
Reception cannot be deactivated without
deactivating Alternative Frequency Reception.
(See pages 45 and 46.)
• TA Standby Reception and PTY Standby
Reception will be temporarily canceled while
listening to an AM station.
Disc operations
General
• In this manual, words “track” and “file” are
interchangeably used when referring to MP3/
WMA/JPEG files and their file names.
• This receiver can also play back 8 cm discs.
• This receiver can only play back audio CD
(CD-DA) files if different type of files are
recorded in the same disc.
– The first track will be skipped if a different
type of file is detected first.
• When a disc has been loaded, selecting
“DISC” for the playback source starts disc
play.
Playing a DVD-R/DVD-RW or CD-R/
CD-RW
• Use only “finalized” discs.
• This receiver can play back only the files of
the same type which is first detected if a disc
includes both audio CD (CD-DA) files and
MP3/WMA files.
• This receiver can play back either MP3/WMA
files or JPEG files if a disc includes both kind
of files. Set the playback file type on AV
setup menu (page 32) before playing back a
disc containing both kind of files.
• Only for CD-R/CD-RW: This receiver can
play back multi-session discs; however,
unclosed sessions will be skipped while
playing.
ENGLISH
To be continued....
61
Page 62

• Some DVD-R/DVD-RW or CD-R/CD-RW
may not play back on this receiver because
of their disc characteristics, and for the
following causes:
– Discs are dirty or scratched.
ENGLISH
– Moisture condensation occurs on the lens
inside the receiver.
– The pickup lens inside the receiver is dirty.
– CD-R/CD-RW on which the files are
written with “Packet Write” method.
– DVD-R/DVD-RW which are not written
in UDF-Bridge Format (eg. UDF format or
ISO format).
– There are improper recording conditions
(missing data, etc.) or media conditions
(stain, scratch, warp, etc.).
• DVD-RW/CD-RW may require a longer
readout time since the reflectance of DVDRW/CD-RW is lower than that of regular
discs.
• Do not use the following DVD-R/DVD-RW
or CD-R/CD-RW:
– Discs with stickers, labels, or protective seal
stuck to the surface.
– Discs on which labels can be directly
printed by an ink jet printer.
Using these discs under high temperatures or
high humidities may cause malfunctions or
damages to discs.
Playing an MP3/WMA disc
• This receiver can play back MP3/WMA files
with the extension code <.mp3> or <.wma>
(regardless of the letter case—upper/lower)
recorded in either CD-R/CD-RW or in
DVD-R/DVD-RW.
• This receiver can show the names of albums,
artists (performer), and ID3 Tag (Version 1.0,
1.1, 2.2, 2.3, or 2.4) for MP3 files and WMA
files.
• This receiver can display only one-byte
characters. No other characters can be
correctly displayed.
• This receiver can play back MP3/WMA files
meeting the conditions below:
– Bit rate: MP3: 32 kbps — 320 kbps
WMA: 32 kbps — 192 kbps
– Sampling frequency:
48 kHz, 44.1 kHz, 32 kHz (for MPEG-1)
24 kHz, 22.05 kHz, 16 kHz (for MPEG-2)
48 kHz, 44.1 kHz, 32 kHz (for WMA)
– Disc format: ISO 9660 Level 1/ Level 2,
Romeo, Joliet, Windows long file name
• The maximum number of characters for file/
folder names vary among the disc format used
(includes 4 extension characters—<.mp3> or
<.wma>).
– ISO 9660 Level 1: up to 12 characters
– ISO 9660 Level 2: up to 31 characters
– Romeo: up to 128 characters
– Joliet: up to 64 characters
– Windows long file name: up to 128
characters
• This receiver can recognize the total of
1100 files, 250 folders (maximum of 999 files
per folder).
• This receiver can play back the files recorded
in VBR (variable bit rate).
The files recorded in VBR have a discrepancy
in elapsed time display, and do not show
the actual elapsed time. Especially, after
performing the search function, this difference
becomes noticeable.
• This receiver cannot play back the following
files:
–
MP3 files encoded with MP3i and MP3 PRO
format.
– MP3 files encoded in an unappropriated
format.
– MP3 files encoded with Layer 1/2.
– WMA files encoded with lossless,
professional, and voice format.
– WMA files which are not based upon
Windows Media
– WMA files copy-protected with DRM.
– WMA files recorded with MBR (Multiple
Bit Rate) format.
– Files which have the data such as WAVE,
ATRAC3, etc.
®
Audio.
62
Page 63

Playing a JPEG disc
• It is recommended that you record a file
at 640 x 480 resolution. (If a file has been
recorded at a resolution of more than 640 x
480, it will take a long time to be shown.)
• This System can play only baseline JPEG
files. Progressive JPEG files or lossless JPEG
files cannot be played.
Baseline JPEG format: Used for digital
cameras, web, etc.
Progressive JPEG format: Used for web.
Lossless JPEG format: An old type and rarely
used now.
• If progressive or lossless JPEG files are
played back, a black screen appears. In this
case, stop playback and select a baseline
JPEG file. Note that it may take a long time to
select another file.
Changing the source
• If you change the source, playback also stops
(without ejecting the disc).
Next time you select “DISC” for the playback
source (without activating Dual Zone), disc
play starts automatically.
Ejecting a disc
• If the ejected disc is not removed within
15 seconds, the disc is automatically inserted
again into the loading slot to prevent it from
dust. (Disc will not play this time.)
DVD setup menu
• When the language you have selected is not
recorded on a disc, the original language is
automatically used as the initial language. In
addition, for some discs, the initial languages
settings will not work as you set due to their
internal disc programming.
• While playing (or pausing), you cannot
change these languages.
After you change any of these language
settings, eject the disc and insert it (or another
disc) again so that your setting takes effect.
• When you select “16:9” for a picture whose
aspect ratio is 4:3, the picture slightly changes
due to the process for converting the picture
width.
• Even if “4:3PS [PAN SCAN]” is selected, the
screen size may become
“4:3LB [LETTER BOX]” with some DVDs.
This depends on how they are recorded.
General settings—PSM
• If you change the “Amp Gain” setting from
“High Power” to “Low Power” while the
volume level is set higher than “VOL 30”, the
receiver automatically changes the volume
level to “VOL 30”.
Other main functions
• If you try to assign a title to a 31st disc,
“Name Full” flashes on the monitor. Delete
unwanted titles before assignment.
• Titles assigned to discs in the CD changer can
also be shown if you play back the disc on the
receiver.
DAB tuner operations
• PTY Standby Reception works for the DAB
tuner only using a Dynamic PTY, but not a
Static PTY.
• TA Standby Reception for FM RDS station
and Road Traffi c News Standby Reception for
DAB cannot be set separately. The T/P button
always work for the both Standby Reception
modes when the DAB tuner is connected.
ENGLISH
63
Page 64
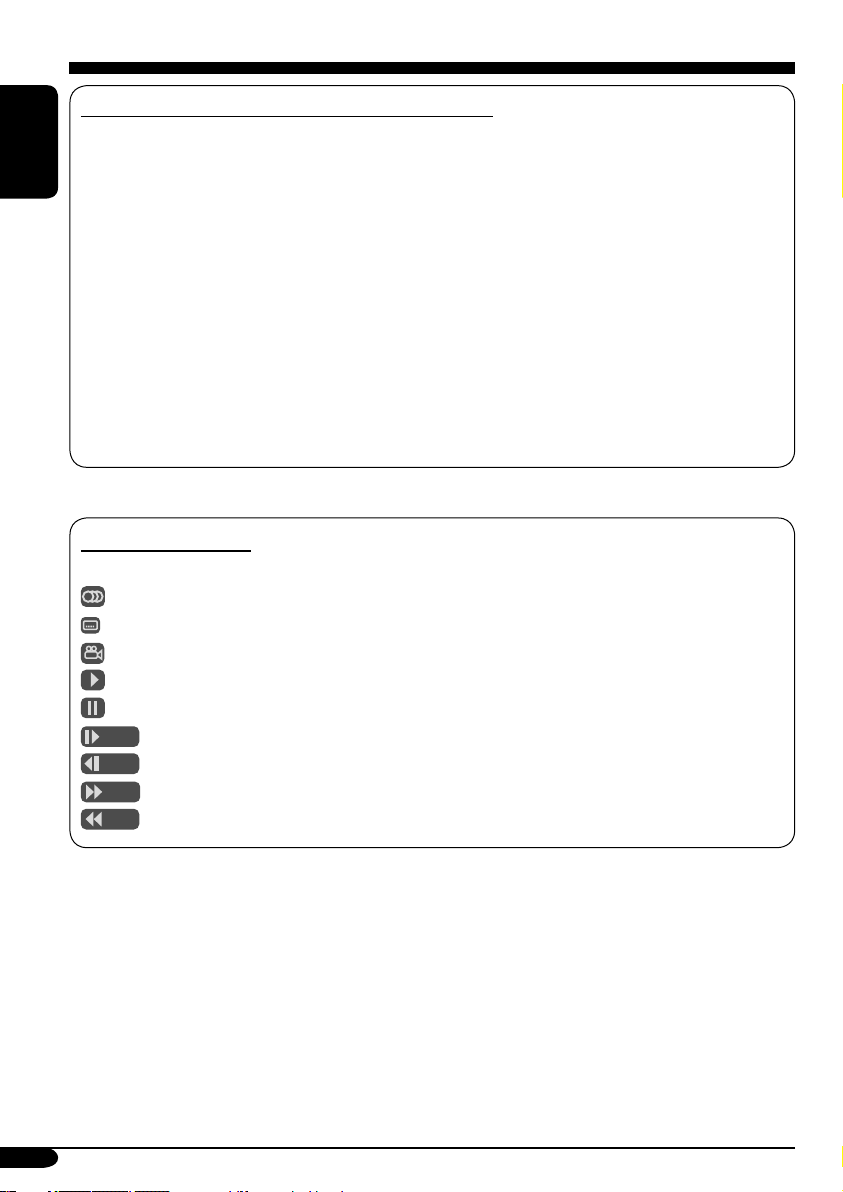
About sounds reproduced through the rear terminals
• Through the analog terminals (Speaker out/LINE OUT/2nd AUDIO OUT): 2-channel signal is
emitted.
When playing a multi-channel encoded disc, multi-channel signals are downmixed.
ENGLISH
(DOWN MIX: see page 33.)
• Through DIGITAL OUT (optical):
Digital signals (Linear PCM, Dolby Digital, DTS, MPEG Audio) are emitted through this
terminal. (For more details, see page 65.)
To reproduce multi-channel sounds such as Dolby Digital, DTS, and MPEG Audio, connect
an amplifier or a decoder compatible with these multi-channel sources to this terminal, and set
“DIGITAL AUDIO OUTPUT (D. AUDIO OUTPUT)” correctly. (See page 33.)
• About Dual Zone
While you are listening to the radio, CD changer, or external component through the speakers
built into your car compartment, you can play back sound of this DVD/CD player connected to
the 2nd AUDIO OUT plug at the same time. (For details, see page 40.)
On-screen guide icons
During play, the following guide icons may appear for a while on the monitor.
: Appears at the beginning of a scene containing multi-audio languages (for DVD only).
: Appears at the beginning of a scene containing multi-subtitle languages (for DVD only).
: Appears at the beginning of a scene containing multi-angle views (for DVD only).
: Playback
: Pause
: Forward Slow Motion Playback (for DVD and VCD only)
: Reverse Slow Motion Playback (for DVD only)
: Forward search
: Reverse search
64
Page 65

Output signals through the DIGITAL OUT terminal
Output signals are different depending on the “DIGITAL AUDIO OUTPUT” setting on the setup
menu (see page 33).
DIGITAL AUDIO OUTPUT
Playback Disc
DVD
48 kHz, 16/20/24 bits Linear PCM
96 kHz, Linear PCM
with DTS DTS bitstream 48 kHz, 16 bits stereo Linear PCM
with Dolby Digital Dolby Digital bitstream
with MPEG Audio MPEG bitstream 48 kHz, 16 bits Linear PCM
Audio CD, Video CD 44.1 kHz, 16 bits stereo Linear PCM
Audio CD with DTS DTS bitstream 44.1 kHz, 16 bits stereo Linear PCM
MP3/WMA
STREAM/PCM DOLBY DIGITAL/PCM PCM ONLY
48 kHz, 16 bits stereo Linear PCM
32/44.1/48 kHz, 16 bits Linear PCM
Output Signals
48 kHz, 16 bits
stereo Linear PCM
Sound modes (preset frequency level settings)
The list below shows the preset frequency level settings for each sound mode (see page 41).
Sound mode
Flat 00 00 00 00 00 00 00
Hard Rock +03 +03 +01 00 00 +02 +01
R&B +03 +02 +02 00 +01 +01 +03
Pop 00 +02 00 00 +01 +01 +02
Jazz +03 +02 +01 +01 +01 +03 +02
Dance +04 +02 00 –02 –01 +01 +01
Country +02 +01 00 00 00 +01 +02
Reggae +03 00 00 +01 +02 +02 +03
Classic +02 +03 +01 00 00 +02 00
60 Hz 150 Hz 400 Hz 1 kHz 2.5 kHz 6.3 kHz 15 kHz
Preset equalizing values
ENGLISH
65
Page 66

Troubleshooting
What appears to be trouble is not always serious. Check the following points before calling a service
center.
ENGLISH
• Sound cannot be heard
• The receiver does not
• Remote controller does not
General
• Nothing appears on the
• SSM automatic presetting
• Static noise while listening
FM/AM
• “No Text” appears on the
Symptoms Causes Remedies
from the speakers.
work at all.
work.
monitor.
does not work.
to the radio.
monitor.
The volume level is set to
the minimum level.
Connections are incorrect. Check the cords and
The built-in microcomputer
may have functioned
incorrectly due to noise, etc.
Dual Zone is activated
(see page 40).
No video signal comes in
when the source is AV-IN.
Signals are too weak. Store stations manually.
The aerial is not connected
firmly.
The station does not support
RDS RT or the reception is
weak.
Adjust it to the optimum
level.
connections.
Reset the receiver
(see page 2).
While Dual Zone is
activated, remote controller
only functions for operating
the DVD/CD player.
• Change the source.
•
Starts playback on the
external compornent
connected to the VIDEO
IN jack.
• Change AV INPUT setting
to “Audio” (see page 47).
Connect the aerial firmly.
Check the Network-Tracking
Reception (see page 18).
66
Page 67

Symptoms Causes Remedies
• Disc cannot be played
back.
• CD-R/CD-RW or DVD-R/
DVD-RW cannot be played
back.
• Tracks on the CD-R/
CD-RW or DVD-R/
DVD-RW cannot be
skipped.
• Disc cannot be recognized. The DVD/CD player may
• “No Disc” appears on the
monitor.
• Sound and picture are
sometimes interrupted or
distorted.
Disc playback
• No playback picture
(DVD, VCD) appears on
the monitor.
• No picture appears on the
external monitor at all.
• The left and right edges of
the picture are missing on
the screen.
Disc is inserted upside
down.
CD-R/CD-RW or DVD-R/
DVD-RW is not finalized.
have functioned incorrectly.
Disc is inserted incorrectly. Insert the disc correctly.
You are driving on rough
roads.
Disc is scratched. Change the disc.
Connections are incorrect. Check the cords and
Parking brake wire is not
connected properly.
The video cord is not
connected correctly.
An incorrect input has
been selected on the TV or
monitor.
“4:3PS [PAN SCAN]” is
selected when viewing on a
conventional TV
(aspect ratio 4:3).
Insert the disc correctly.
• Insert a finalized CD-R/
CD-RW or DVD-R/
DVD-RW.
•
Finalize the
or DVD-R/DVD-RW
the component which you
used for recording.
Eject the disc forcibly
(see page 2).
Stop playback while driving
on rough roads.
connections.
See Installation/Connection
Manual.
Connect the video cord
correctly.
Select a correct input on the
TV or monitor.
Select “4:3LB [LETTER
BOX]”. (See page 32.)
CD-R/CD-RW
with
ENGLISH
To be continued....
67
Page 68

• Disc cannot be played
ENGLISH
• Noise is generated. The track played back is not
MP3/WMA playback
• A longer readout time is
• Tracks cannot be played
• Elapsed playing time is not
• Correct characters are not
displayed (e.g. album name).
Symptoms Causes Remedies
back.
required.
back as you have intended
them to play.
correct.
No MP3/WMA tracks are
recorded on the disc.
MP3/WMA tracks do not
have the extension code
<.mp3> or <.wma> in their
file names.
MP3/WMA tracks are not
recorded in a compliant
format.
MP3/WMA tracks are
recorded in DVD+R/
DVD+RW media.
an MP3/WMA file (although
it has the extension code
<.mp3> or <.wma>).
Readout time varies due to
the complexity of the folder/
file configuration.
Playback order is determined
when the files are recorded.
This sometimes occurs
during play. This is caused
by how the tracks are
recorded on the disc.
This receiver can only
display a limited number
of special characters (see
page 4).
Change the disc.
Add the extension code
<.mp3> or <.wma> to their
file names.
Change the disc.
Record MP3/WMA tracks
using a compliant application
(see page 6).
Change the disc.
Record MP3/WMA tracks
using DVD-R/DVD-RW
media.
Skip to another track or
change the disc. (Do not add
the extension code <.mp3>
or <.wma> to non-MP3 or
WMA tracks.)
Do not use too many
hierarchies and folders.
68
Page 69

Symptoms Causes Remedies
• Disc cannot be played
back.
JPEG playback
• No picture appears on the
external monitor at all.
• “No Disc” appears on the
monitor.
• “No Magazine” appears on
the monitor.
• “Reset08” appears on the
monitor.
CD changer
• “Reset01” – “Reset07”
appears on the monitor.
• The CD changer does not
work at all.
No JPEG files are recorded
on the disc.
JPEG files do not have the
extension code <.jpg> or in
their file names.
JPEG files are not recorded
in a compliant format.
JPEG files are recorded in
DVD+R/DVD+RW media.
The video cord is not
connected correctly.
An incorrect input has
been selected on the TV or
monitor.
No disc is in the magazine.
Disc is inserted upside down.
No magazine is loaded in the
CD changer.
This receiver is not
connected to the CD changer
correctly.
The built-in microcomputer
may function incorrectly due
to noise, etc.
Change the disc.
Add the extension code
<.jpg> to their file names.
Change the disc.
Record JPEG files using a
compliant application (see
page 6).
Change the disc.
Record JPEG files using
DVD-R/DVD-RW media.
Connect the video cord
correctly.
Select a correct input on the
TV or monitor.
Insert disc into the magazine.
Insert disc correctly.
Insert the magazine.
Connect this receiver and the
CD changer correctly and
press the reset button of the
CD changer.
Press the reset button of the
CD changer.
Reset the receiver
(see page 2).
ENGLISH
69
Page 70

Symptoms Causes Remedies
• “No DAB Signal” appears
ENGLISH
• “Reset08” appears on the
• The DAB tuner does not
DAB tuner
• “Antenna Power NG”
on the monitor.
monitor.
work at all.
appears on the monitor.
Signal is too weak.
This receiver is not
connected to the DAB tuner
correctly.
The built-in microcomputer
may function incorrectly due
to noise, etc.
Something is wrong with the
DAB aerial.
Search for another ensemble.
Connect this receiver and
the DAB tuner correctly and
reset the receiver
(see page 2).
Reset the receiver
(see page 2).
Refer to the instructions
supplied for your DAB
tuner.
70
Page 71

Specifications
AUDIO AMPLIFIER SECTION
Maximum Power Output:
Front: 50 W per channel
Rear: 50 W per channel
Continuous Power Output (RMS):
Front: 20 W per channel into 4 Ω, 40 Hz
to 20 000 Hz at no more than 0.8%
total harmonic distortion.
Rear: 20 W per channel into 4 Ω, 40 Hz
to 20 000 Hz at no more than 0.8%
total harmonic distortion.
Load Impedance: 4 Ω (4 Ω to 8 Ω allowance)
Equalizer Control Range:
Frequencies: 60 Hz, 150 Hz, 400 Hz, 1 kHz,
2.5 kHz, 6.3 kHz, 15 kHz
Level: ±10 dB
Signal-to-Noise Ratio: 70 dB
Line-In Level/Impedance:
1.5 V/20 kΩ load
Line-Out Level/Impedance:
5.0 V/20 kΩ load (full scale)
Output Impedance: 1 kΩ
Subwoofer-Out Level/Impedance:
2.0 V/20 kΩ load (full scale)
Color System: PAL
Video Input (composite): 1 Vp-p/75 Ω
Video Output (composite): 1 Vp-p/75 Ω
Other Terminals:
2nd AUDIO OUT, DIGITAL OUT
(optical), CD changer, Steering wheel
remote input (OE REMOTE)
TUNER SECTION
Frequency Range:
FM: 87.5 MHz to 108.0 MHz
AM: (MW) 522 kHz to 1 620 kHz
(LW) 144 kHz to 279 kHz
[FM Tuner]
Usable Sensitivity: 11.3 dBf (1.0 µV/75 Ω)
50 dB Quieting Sensitivity:
16.3 dBf (1.8 µV/75 Ω)
Alternate Channel Selectivity (400 kHz): 65 dB
Frequency Response: 40 Hz to 15 000 Hz
Stereo Separation: 35 dB
Capture Ratio: 1.5 dB
[MW Tuner]
Sensitivity: 20 µV
Selectivity: 35 dB
[LW Tuner]
Sensitivity: 50 µV
DVD/CD PLAYER SECTION
Signal Detection System: Non-contact optical
pickup (semiconductor laser)
Number of Channels: 2 channels (stereo)
Frequency Response:
DVD fs=48 kHz: 16 Hz to 22 000 Hz
fs=96 kHz: 16 Hz to 44 000 Hz
VCD, CD: 16 Hz to 20 000 Hz
Dynamic Range: 93 dB
Signal-to-Noise Ratio: 95 dB
Wow and Flutter: Less than measurable limit
MP3 : Max. Bit Rate: 320 kbps
WMA (Windows Media
Max. Bit Rate: 192 kbps
®
Audio):
MONITOR SECTION
Screen: 3-inch liquid crystal panel
Number of Pixels: 123 200 pixels
Drive Method:
TFT (Thin Film Transistor) active matrix
format
Color System: PAL
GENERAL
Power Requirement:
Operating Voltage:
DC 14.4 V (11 V to 16 V allowance)
Grounding System: Negative ground
Allowable Operating Temperature:
0°C to +40°C
Dimensions (W × H × D):
Installation Size (approx.):
182 mm × 52 mm × 160 mm
Panel Size (approx.):
188 mm × 58 mm × 18 mm
Mass (approx.):
2.0 kg (excluding accessories)
Design and specifications are subject to change
without notice.
ENGLISH
71
Page 72

Wir danken Ihnen für den Kauf eines JVC Produkts.
Bitte lesen Sie die Anleitung vollständig durch, bevor Sie das Gerät in Betrieb nehmen, um
sicherzustellen, daß Sie alles vollständig verstehen und die bestmögliche Leistung des Geräts
erhalten.
WICHTIG FÜR LASER-PRODUKTE
1. LASER-PRODUKT DER KLASSE 1
2. ACHTUNG: Die obere Abdeckung nicht öffnen. Das Gerät enthält keine Teile, die vom
Benutzer gewartet werden können. Wartungen nur von qualifziertem Fachpersonal durchführen
lassen.
DEUTSCH
3. ACHTUNG: Sichtbare und unsichtbare Laserstrahlung bei offenem Gerät und Defekt oder
Umgehen der Verriegelung. Setzen Sie sich dem Strahl nicht direkt aus.
4. ANBRINGEN DES ETIKETTS: WARNHINWEIS-ETIKETT, AUSSEN AM GERÄT
ANGEBRACHT.
Zurücksetzen des Geräts
Zwangsweises Ausschieben
einer Disk
Wenn eine Disk vom Receiver nicht erkannt
wird oder nicht ausgeschoben kann, können Sie
zwangsweisen Ausschub wie folgt ausführen.
Dadurch wird der Mikrocomputer
zurückgesetzt. Ihre vorgegebenen
Einstellungen werden ebenfalls gelöscht.
Aus Sicherheitsgründen wird eine nummerierte ID-Karte mit diesem Receiver mitgeliefert, und die
gleiche ID-Nummer ist auf dem Chassis des Receivers aufgedruckt. Die Karte muss an sicherer
Stelle aufbewahrt werden, da sie den Behörden bei der Identifikation des Receivers im Falle eines
Diebstahls helfen kann.
2
„NO EJECT?“ (oder „EJECT OK?“) und
„EMERGENCY EJECT?“ erscheinen im
Display.
Drücken Sie wiederholt auf 5 / ∞ , um
„EMERGENCY EJECT?“ auszuwählen, und
drücken Sie anschließend OK.
• Wenn das nicht funktioniert, führen Sie
einen Reset am Receiver aus.
• Achten Sie darauf, die ausgeschobene Disk
nicht fallen zu lassen.
Page 73

WARNHINWEISE:
•
Installieren Sie Geräte NICHT an Orten;
– an denen sie die Bewegungen des
Lenkrads und des Ganghebels
behindern könnten. Anderenfalls
führt diese Behinderung
möglicherweise zu ernsten
Verkehrsunfällen.
– an denen sie den Betrieb von
Sicherheitseinrichtungen, z.B.
Airbags, behindern könnten.
Anderenfalls führt diese Behinderung
möglicherweise zu ernsten
Verkehrsunfällen.
– an denen sie die Sicht behindern.
• Betätigen Sie beim Fahren KEINE
Geräte. Anderenfalls führt dies
möglicherweise zu einem ernsten
Verkehrsunfall.
• Der Fahrer darf während der Fahrt auf
keinen Fall auf den Monitor sehen.
Anderenfalls könnte der Fahrer
abgelenkt werden und einen Unfall
verursachen.
• Der Fahrer darf während der
Fahrt keine Kopfhörer tragen. Es
ist gefährlich, die Außengeräusche
während der Fahrt zu blockieren.
• Wenn Sie den Receiver während des
Fahrens bedienen müssen, beobachten
Sie den Verkehr vor Ihnen sehr genau.
Anderenfalls werden Sie möglicherweise
in einen ernsten Verkehrsunfall
verwickelt.
• Ist die Feststellbremse nicht angezogen,
erscheint blinkend die Meldung
„ParkingBrake“ auf dem Monitor, und
es erfolgt keine Bildwiedergabe.
– Diese Warnung wird nur angezeigt,
wenn das Feststellbremskabel an
das in das Fahrzeug eingebaute
Feststellbremssystem angeschlossen
ist (siehe Einbau/Anschlußanleitung).
Dieses Produkt beinhält urheberrechtlich
geschützte Technik mit dem Schutz von
U.S.-Patenten und anderen intellektuellen
Eigentumsrechten. Der Gebrauch dieser
urheberrechtlich geschützten Technik
ist durch Macrovision genehmigen zu
lassen und nur für den Heimgebrauch und
die Betrachtung in begrenztem Ausmaß
vorgesehen, soweit nicht ausdrücklich
von Macrovision genehmigt. Rückwärtige
Entwicklung oder Zerlegung ist verboten.
Achtung bei der Lautstärkeeinstellung:
Disks erzeugen im Vergleich zu anderen
Tonträgern sehr wenig Rauschen. Senken
Sie die Lautstärke vor dem Abspielen einer
Disk, um Beschädigung der Lautsprecher
durch plötzliche Tonspitzen zu vermeiden.
Vorsichtshinweise zum Monitor:
• Der in diesem Receiver eingebaute Monitor
wurde mit hoher Präzision hergestellt. Es
lässt sich jedoch nicht ausschließen, dass
dennoch fehlerhafte Bildpunkte vorhanden
sind. Dies ist unvermeidbar und keine
Fehlfunktion.
• Setzen Sie den Monitor keiner direkten
Sonneneinstrahlung aus.
DEUTSCH
Für die Sicherheit....
• Die Lautstärke nicht zu laut stellen, da
dadurch Außengeräusche überdeckt und das
Autofahren gefährlich wird.
• Das Auto vor dem Durchführen von
komplizierten Bedienschritten anhalten.
Temperatur im Auto....
Wenn Sie das Auto für lange Zeit in heißem
oder kaltem Wetter parken, bitte warten, bis
sich die Temperatur im Auto sich normalisiert
hat, bevor Sie das Gerät einschalten.
3
Page 74

Wie Sie diese Anleitung lesen
Die folgenden Methoden werden eingesetzt, um
die Erklärungen einfach und leichtverständlich
zu gestalten:
• Einige zugehörige Tipps und Hinweise
werden unter „Weitere Informationen zu
Ihrem Receiver“ gegeben (siehe Seiten 61 bis
65).
• Tastenfunktionen werden im Wesentlichen
mit den folgenden Abbildungen erläutert:
DEUTSCH
Kurz drücken.
Wiederholt drücken.
Im Display gezeigte Zeichen
Neben den Buchstaben des lateinischen
Alphabets (A – Z, a – z) können Sie die
folgenden Zeichen zur Anzeige verschiedener
Informationen im Display verwenden.
• Sie können auch die folgenden Zeichen zum
Zuweisen von Betitelungen verwenden (siehe
Seite 48).
Sonderzeichen
Großbuchstaben Kleinbuchstaben
Eine davon drücken.
Gedrückt halten,
bis die gewünschte
Reaktion beginnt.
Drücken Sie A, und
danach B.
Halten Sie die beide
Tasten gleichzeitig
gedrückt.
4
Zahlen und Symbole
Page 75

Inhalt
Zurücksetzen des Geräts ........................ 2
Zwangsweises Ausschieben einer Disk
Wie Sie diese Anleitung lesen ............... 4
Im Display gezeigte Zeichen ................. 4
... 2
Einführung — Abspielbare Disks ......... 6
Bedienfeld .................................... 7
Beschreibung der Teile .......................... 7
Fernbedienung — RM-RK230
Hauptelemente und Merkmale ............... 8
............ 8
Erste Schritte ................................. 10
Grundlegende Bedienung ............. 10
Einstellung der Uhr ................................ 11
Bedienung des Tuners ..................... 12
Rundfunkempfang ........................ 12
Speichern von Sendern .......................... 14
Hören eines Festsenders ........................ 15
UKW-RDS-Funktionen .................... 16
Suche nach bevorzugten UKW-
RDS-Sendungen ......................... 16
Speichern Ihrer Lieblingsprogramme .... 17
Verwenden des Standbyempfangs ......... 17
Verfolgen des gleichen Programms
—Network-Tracking-Empfang ........... 18
Bedienung der Disk ........................ 19
Abspielen einer Disk im
Receiver ...................................... 19
Grundlegende Bedienung ..................... 21
DVD/VCD-Spezialfunktionen .......... 23
Wählen der Audiosprachen ................... 23
Wählen von Untertiteln ......................... 23
Wahl einer von mehreren Ansichten ..... 23
Disk-Menübedienung ............................ 24
Heranzoomen ........................................ 24
Bildschirm-Disk-Bedienung .............. 25
Grundlegende Steuerbildschirm-
Bedienvorgänge .................................. 26
Grundlegende Steuerbildschirm-
Bedienvorgänge .................................. 28
Listen-Bildschirm-Bedienungen ............ 29
AV-Setup-Menü ............................. 30
Grundlegendes Einstellverfahren .......... 30
Monitor-Einstellungen ..................... 34
Andere Disk-Bedienungen ............... 35
Grundlegende Bedienung ...................... 35
Auswählen von Wiedergabemodi .......... 37
Listen-Bildschirm-Bedienungen ............ 39
Dual-Zonen-Betrieb ........................ 40
Wiedergabe von zwei Quellen zur
gleichen Zeit ....................................... 40
Klangeinstellungen ......................... 41
Wählen der vorgegebenen
Klangmodi .................................. 41
Speichern Ihrer eigenen
Klangeinstellungen .............................. 41
Einstellen des Klangs ............................ 42
Allgemeine Einstellungen — PSM .... 44
Grundlegendes Verfahren ...................... 44
Weitere Hauptfunktionen ............... 48
Zuweisung von Betitelungen zu den
Quellen ................................................ 48
Abnehmen des Bedienfelds ................... 49
Ändern des Bedienfeldwinkels .............. 49
Betrieb des CD-Wechslers ............... 50
Abspielen von Disks im
CD-Wechsler
Auswählen von Wiedergabemodi .......... 52
Bedienung von externen Komponenten
Bedienung von externen
Komponenten ............................. 53
............................... 50
... 53
DAB-Tuner-Funktionen .................... 54
DAB-Tuner-Empfang ................... 54
Speichern von DAB-Diensten ............... 56
Abstimmen eines vorgewählten
DAB-Dienstes ..................................... 56
Verwenden des Standbyempfangs ......... 57
Dynamische Programmverfolgung
— Alternativfrequenzempfang ........... 58
Wartung ........................................ 59
Tabelle Der Sprachencodes .............. 60
Weitere Informationen zu Ihrem
Receiver ..................................... 61
Störungssuche ................................ 66
Technische Daten ............................ 71
DEUTSCH
5
Page 76

Einführung — Abspielbare Disks
Disks, die sie abspielen können
Dieser Receiver eignet sich zur Wiedergabe der
folgenden Disks (12 cm und 8 cm):
• DVD Video: Bespielt im PAL-Farbsystem
mit dem Regionscode „2“ (siehe unten).
– DVD-R/DVD-RW, bespielt im DVD-
Video-Format, können ebenfalls abgespielt
werden.
• Video CD (VCD)/audio CD
• MP3/WMA/JPEG: Aufgenommen entweder
auf CD-R/CD-RW oder DVD-R/DVD-RW/
DEUTSCH
DVD-ROM.
– CD-R/CD-RW: Konform mit ISO 9660
Level 1, ISO 9660 Level 2, Romeo und
Joliet.
– DVD-R/DVD-RW/DVD-ROM: Konform
mit UDF-Bridge-Format*
1
.
Bei manchen Disks können die tatsächlichen
Bedienverfahren von den Erläuterung in dieser
Anleitung abweichen.
Nicht abspielbare Disks
Nicht abspielbare Disks DVD-Audio, DVDROM (Daten), DVD-RAM, DVD-R/DVD-RW
bespielt im DVD-VR-Format, CD-ROM, CD-I
(CD-I Ready), Photo CD, usw.
• Das Abspielen solcher Disks führt
zu Rauschen und Beschädigung der
Lautsprecher.
Hinweis zum Regionalcode:
DVD-Spieler und DVD-Videodisks sind
durch spezifische Regionalcode-Nummern
gekennzeichnet. Dieser Receiver kann nur
DVD-Disks mit Regionalcode-Nummer „2“
wiedergeben.
Beispiel:
Bei Einlegen einer DVD-Videodisk mit
einem unzulässigem Regionalcode
„Region Error“ beginnt auf dem Monitor des
Geräts zu blinken.
Die Meldung „LÄNDERCODEFEHLER“
erscheint auf dem Display.
6
Achtung bei DualDisc-Wiedergabe
•
Die Nicht-DVD-Seite einer „DualDisc“
entspricht nicht dem „Compact Disc
Digital Audio“-Standard. Deshalb wird die
Verwendung der Nicht-DVD-Seite einer
DualDisc auf diesem Produkt nicht empfohlen.
Digitale Audioformate
Das System ist zur Wiedergabe der folgenden
digitalen Audioformate ausgelegt.
Linear PCM: Dies ist ein unkomprimiertes
Digital-Audiosignal, wie es auf CDs sowie den
meisten Studio-Mastern verwendet wird.
Dolby Digital *
entwickeltes komprimiertes digitales
Audioformat, das Multikanalcodierung
zur Erzeugung eines realistisch wirkenden
Surroundklangs ermglicht.
3
DTS *
(Digital Theater Systems): Von
Digital Theater Systems, Inc. entwickeltes
komprimiertes digitales Audioformat, das
Multikanalverfahren wie Dolby Digital
ermöglicht. Aufgrund der niedrigeren
Kompressionsrate als bei Dolby Digital ist
ein breiterer Dynamikbereich und damit eine
bessere Kanaltrennung gewährleistet.
MPEG Audio: Weiteres komprimiertes
digitales Audioformat, ebenfalls für
einen realistischen Surroundklang durch
Multikanalcodierung. Das System mischt
aber das Mehrkanalsignal in 2 Kanäle ab
(decodiertes PCM) und spielt es ab.
1
*
Ein Hybrid-Dateisystem, das zur
Kompatibilität mit ISO 9660 zum Zugriff
auf jeden Dateityp auf der Disk dient.
(UDF steht für „Universal Disc Format“
(universelles Disk-Format)).
2
*
Hergestellt unter Lizenz von Dolby
Laboratories. „Dolby“ und das DoppelD-Symbol sind Warenzeichen von Dolby
Laboratories.
3
*
„DTS“ und „DTS 2.0 + Digital Out“ sind
eingetragene Warenzeichen von Digital
Theater Systems, Inc.
„DVD Logo“ ist ein eingetragenes
Warenzeichen von DVD Format/Logo Licensing
Corporation in den USA, Japan und anderen
Ländern.
2
: Von Dolby Laboratories
Page 77
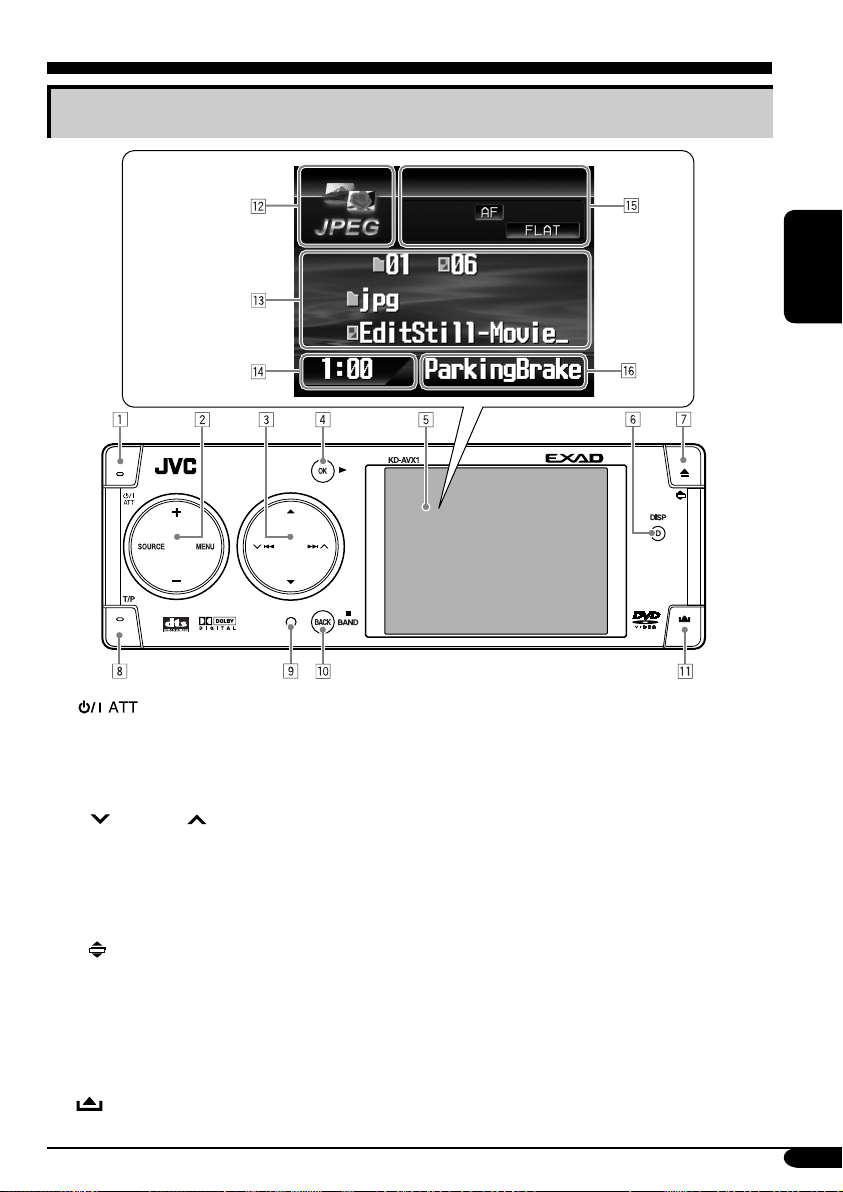
Bedienfeld
Monitoranzeigen
Beschreibung der Teile
Beisp.:
Quellbildschirm
bei JPEGWiedergabe
1
2 • +/– (Lautstärke +/–)-Taste
• SOURCE-Taste
• MENU-Taste
3 • 5 (höher) / ∞ (niedriger)-Tasten
•
4 • OK-Taste
• 3 (Wiedergabe)-Taste
5 Monitor
6 D DISP (Display)-Taste
7 • 0 (Auswurf)-Taste
•
8 T/P (Verkehrsprogramm/Programmtyp)
-Taste
9 Rückstelltaste
p • BACK-Taste
• BAND-Taste
• 7 (Stopp)-Taste
q
(Standby/Ein-Dämpfung)-Taste
4/¢ -Tasten
(Winkel)-Taste
(Bedienfeld-Freigabe)-Taste
DEUTSCH
Monitoranzeigen
w Quellenanzeige
e Hauptdisplay
r Uhranzeige
Zeigt beim Einstellen der Lautstärke auch
die Lautstärke an.
t Statusanzeige
y Informationsbereich für Warnanzeigen
Zeigt beim Einstellen der Lautstärke auch
die Lautstärkeleiste an.
7
Page 78

Fernbedienung — RM-RK230
Einsetzen der Lithiumknopfbatterie
(CR2025)
DEUTSCH
Vor der Verwendung der Fernbedienung:
• Richten Sie die Fernbedienung direkt auf
den Fernbedienungssensor am Receiver.
Stellen Sie sicher, dass sich kein Hindernis
dazwischen befindet.
Fernbedienungssensor
• Setzen Sie den Fernbedienungssensor nicht
intensiven Licht (direkte Sonneneinstrahlung
oder künstliches Licht) aus.
Warnung:
• Keine anderen Batterien als CR2025
oder entsprechende einsetzen; andernfalls
besteht Explosionsgefahr.
• Legen Sie die Batterie an einem Ort ab,
wo sie außer Reichweite kleiner Kinder ist,
um Unfälle zu vermeiden
• Um Überhitzen, Bersten oder Entzünden
der Batterie zu vermeiden:
–
Die Batterie nicht aufladen, kurzschließen
oder erhitzen oder in einem Feuer entsorgen.
– Die Batterie nicht zusammen mit
anderen Metallgegenständen ablegen.
– Die Batterie nicht mit Pinzetten oder
ähnlichen Werkzeugen anstoßen.
– Die Batterie mit Klebeband umwickeln
und isolieren, wenn sie entsorgt oder
aufbewahrt wird.
Der Receiver ist mit LenkradFernbedienungsfunktion ausgestattet.
• Siehe Einbau/Anschlußanleitung (getrennter
Band) zum Anschluss.
8
Hauptelemente und Merkmale
WICHTIG:
Wenn Doppelzone aktiviert ist (siehe Seite
40), arbeitet die Fernbedienung nur zur
Steuerung des DVD/CD-Players.
MONITOR CONTROL
1 Monitor-Steuertasten*
• (Standby/Ein), MODE, ASPECT,
MENU,
DVD/RECEIVER CONTROL
2
• Zum Ein- und Ausschalten des Geräts und
zum Dämpfen des Tons.
3 SOURCE (Quelle)-Tasten
• Wählt die Quelle aus.
4 BAND (Frequenzband)-Taste
• Wählt das Frequenzband für UKW/AM/
DAB.
und .
(Standby/Ein-Dämpfung)-Taste
1
Page 79
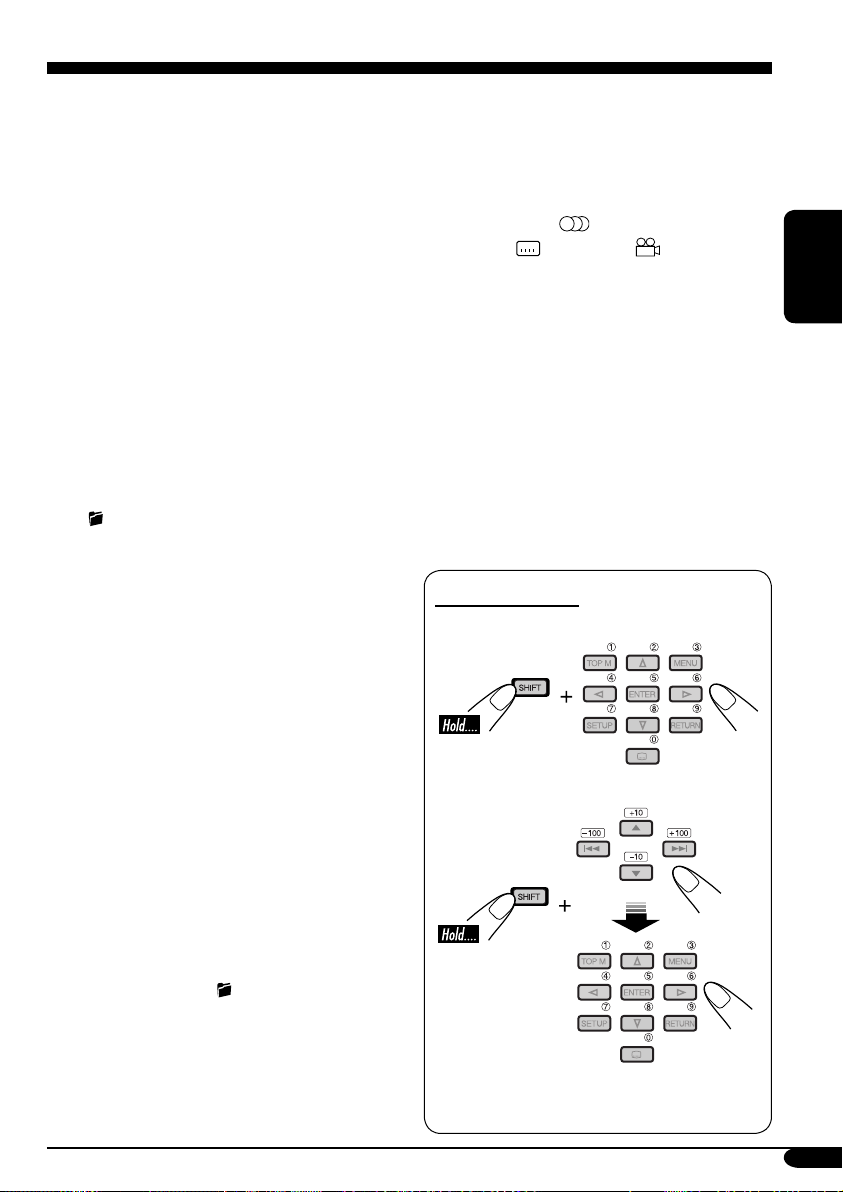
5 TOP M (Menü)-Taste*
2
• Zur Anzeige von DVD- und VCD*3-DiskMenü.
6 DUAL (Doppel)-Taste
• Zum Aktivieren und Deaktivieren der
Doppelzone.
7 VOL (Lautstärke) + /– -Tasten
• Zum Einstellen des Lautstärkepegels.
• Fungieren auch als 2nd VOL +/– -Tasten,
wenn zusammen mit der SHIFT-Taste
gedrückt.
8
SETUP (Einrichten)-Taste (bei DVD/VCD)*
9 SHIFT (Hochstellen)-Taste
p Grundlegende Disk-Bedienungstasten*
4
:
7 (Stopp), 3 (Wiedergabe), 8 (Pause)
• 3 (Wiedergabe) fungiert auch als ZOOMTaste, wenn zusammen mit der SHIFTTaste gedrückt.
q Erweiterte Disk-Bedienungs-/Tuner-
Bedienungstasten*
5
Für erweiterte Disk-Bedienung:
• /TITLE 5 / ∞
– Wählen der Titel (für DVD) oder
Ordner (für MP3/WMA).
• 4 / ¢ (Sprung rückwärts/Sprung
vorwärts)
• 1 / ¡ (Rückwärts-Suche/Vorwärts-
Suche)*
6
Bei UKW/AM-Tunerbedienung:
• PRESET 5 / ∞
– Ändert die Festsender.
• 4 / ¢
– Fungiert zur Suche nach Sendern.
Kurz drücken: Auto-Search
Drücken und halten: Manueller Suchlauf
Bei DAB-Tunerbedienung:
• PRESET 5 / ∞
– Ändert die Vorwahldienstes.
• 4 / ¢
–
Ändert die Dienstes bei kurzem Drücken.
– Sucht die Ensembles automatisch ab,
wenn gedrückt gehalten.
w OSD-Taste
• Zur Anzeige des Bildschirm-Balkens.
• Fungiert auch als
/TITLE-Taste, wenn
zusammen mit der SHIFT-Taste gedrückt.
– Sie können direkt Titel (für DVD)
oder Ordner (für MP3/WMA) mit den
Zifferntasten eingeben (siehe Seite 22).
e MENU-Taste*
2
• Zur Anzeige von DVD- und VCD*3-DiskMenü.
r Menü-Bedienungstasten*
2
• Cursor (% , fi , @ , #), und ENTER
• % / fi : Fungiert auch als DISC + / –
-Taste, wenn die Quelle „CD-CH“ ist.
t RETURN-Taste*
2
y Spezial-Funktionstasten
• DVD/VCD:
• DVD:
1
*
Nur steuerbar, wenn Ihr Monitor einer der
JVC-Monitore ist — KV-MR9010 oder
2
(Audio)
(Untertitel), (Winkel)
KV-MH6510.
2
*
Diese Tasten fungieren auch als
Zifferntasten, wenn zusammen mit der
SHIFT-Taste gedrückt.
3
*
Wenn PBC nicht aktiviert ist.
4
*
Nicht für CD-Wechsler-Bedienung
verwendet.
5
*
Diese Tasten fungieren auch als +10/–10
und +100/–100 Tasten, wenn zusammen mit
der SHIFT-Taste gedrückt.
6
*
Nicht für MP3/WMA/JPEG-Bedienung
verwendet.
Wählen einer Zahl
Zum Wählen einer Zahl von 0 – 9:
Zum Wählen einer Zahl über 9:
• +100/–100 Tasten dienen nur zum Suchen
von MP3/WMA/JPEG-Stücknummern
über 99.
DEUTSCH
9
Page 80

Erste Schritte
DEUTSCH
Grundlegende Bedienung
~ Schalten Sie das Gerät ein.
Ÿ
Sie können bestimmte Quellen nicht
wählen, wenn diese nicht bereit sind.
! Nur für UKW/AM-Tuner
Nur für DAB-Tuner
⁄ Stellen Sie die Lautstärke ein.
Lautstärkepegelanzeige
@ Stellen Sie den Klang nach
Wunsch ein. (Siehe Seiten 41 bis
43).
Zum abrupten Senken der Lautstärke (ATT)
Um die Lautstärke wieder
anzuheben, drücken Sie
die Taste erneut.
Zum Ausschalten des Geräts
10
Page 81

Einstellung der Uhr
1
2
Wählen Sie das „PSM“-Menü.
3 Stellen Sie Stunde, Minute und
Zeitformat ein.
1
Wählen Sie „Clock Hr“ (Stunde),
und stellen Sie dann die Stunde ein.
2 Wähl
und stellen Sie die Minute ein
3
Sie dann „24Hours“ oder „12Hours“.
en Sie „Clock Min“ (Minute),
Wählen Sie „24H/12H“, wählen
4 Beenden Sie den Vorgang.
DEUTSCH
So gelangen Sie zum vorherigen
Menü zurück
In den Menüs können Sie zum vorherigen
Bildschirm zurückgelangen, indem Sie
wiederholt BACK drücken.
Beisp.:
.
• Drücken Sie wiederholt BACK, um
bei den auf den nachfolgenden Seiten
erläuterten Vorgängen zum vorherigen
Schritt zurückzugelangen (sofern keine
besonderen Erläuterungen vorliegen).
• Um die Menüvorgänge abzubrechen und
zum Quellbildschirm zurückzukehren,
drücken Sie D DISP.
11
Page 82

Bedienung des Tuners
Rundfunkempfang
DEUTSCH
~
Ÿ
Leuchtet auf, wenn eine UKWStereosendung mit ausreichender
Signalstärke empfangen wird.
Der gewählte Wellenbereich erscheint.
! Starten Sie den Sendersuchlauf.
So stellen Sie manuell Sender ein
Im Schritt ! links...
1
2 Wählen Sie die gewünschten
Empfangsfrequenzen.
12
Wenn ein Sender gefunden wird, stoppt
der Suchlauf.
Um den Suchlauf zu stoppen,
betätigen Sie die gleiche Taste erneut.
Page 83

Wenn Sie Schwierigkeiten haben, eine
UKW-Sendung in Stereo zu empfangen
1
2 Wählen Sie das Menü „MODE“.
3 Wählen Sie „MONO“, und stellen Sie den
Eintrag auf „On“.
So stellen nur UKW-Sender mit starkem
Signal ein
Im Schritt 2 links...
1 Wählen Sie „Lo/DX“, und stellen Sie den
Eintrag auf „Local“.
DEUTSCH
2 Beenden Sie den Vorgang.
4 Beenden Sie den Vorgang.
Leuchtet auf, wenn Mono-Modus aktiviert ist.
Der Empfang wird besser, jedoch geht der
Stereo-Effekt verloren.
Zum Wiederherstellen des Stereoeffekts,
wiederholen Sie den Vorgang, und setzen Sie
„MONO“ auf „Off“. Die MO-Anzeige erlischt.
Leuchtet auf, wenn „Local“-Modus aktiviert
ist.
Es wird nur nach Sendern mit ausreichender
Signalstärke gesucht.
Um nach allen empfangbaren Sendern zu
suchen, wiederholen Sie den Vorgang, und
setzen Sie „Lo/DX“ auf „DX“. Die LO-Anzeige
erlischt, und die DX-Anzeige leuchtet auf.
13
Page 84

Speichern von Sendern
Sie können für jedes Frequenzband bis zu sechs
Sender voreinstellen.
Automatische Voreinstellung von
UKW-Sendern—SSM (Sequentieller
Speicher für starke Sender)
1
DEUTSCH
„-SSM-“ wird angezeigt, bis die
automatische Voreinstellung ausgeführt ist.
Die lokalen UKW-Sender im ausgewählten
Frequenzband mit den stärksten Signalen
werden automatisch als Festsender gespeichert.
2 Wählen Sie den UKW-
Frequenzbereich (FM1 – FM3), auf
dem Sie speichern möchten.
3 Wählen Sie das Menü „MODE“.
4 Wählen Sie „SSM“, und drücken Sie
„OK“.
Manuelle Voreinstellung
Beisp.: Speichern des UKW-Senders 92,5 MHz
unter der Festsendernummer 1 des
Frequenzbands FM1.
1
2
3
14
Page 85

4
Hören eines Festsenders
Beim Wählen von TUNER als Quelle...
1
DEUTSCH
Die Preset-Liste erscheint.
Die PRESET LIST erscheint.
5
„Preset1“ blinkt für einen Moment auf.
So verlassen Sie Menüs oder
Listen
2 Wählen Sie den gewünschten
Festsender (1 – 6).
• Sie können auch zur Festsenderliste wechseln,
indem Sie im Menü „MODE“ den Eintrag
„List“ wählen. Wie Sie ins Menü „MODE“
gelangen, können Sie unter „Wenn Sie
Schwierigkeiten haben, eine UKW-Sendung
in Stereo zu empfangen“ auf Seite 13
nachlesen.
Bei Verwendung der Fernbedienung....
oder
Alle Menü- oder Listenvorgänge werden
abgebrochen, und das Schirmbild wechselt
zum Quellschirmbild oder zur DVD/VCD/
JPEG-Wiedergabe zurück.
15
Page 86

UKW-RDS-Funktionen
Suche nach bevorzugten UKW-RDS-Sendungen
DEUTSCH
Um eine bestimmte Sendung einzustellen, können
Sie nach deren PTY-Code suchen.
• Zum Speichern Ihres Lieblingsprogramms
siehe Seite 17.
~
! Wählen Sie einen der 29 PTY-
Codes.
Wenn ein Sender eine Sendung mit dem
PTY-Code ausstrahlt, den Sie gewählt
haben, wird dieser Sender eingestellt.
Das PTY-Menü wird angezeigt.
Ÿ Wählen Sie „PTY Search“.
Die PTY LIST erscheint.
16
PTY-Codes
News, Affairs, Info, Sport, Educate, Drama,
Culture, Science, Varied, Pop M (Musik),
Rock M (Musik), Easy M (Musik),
Light M (Musik), Classics, Other M
(Musik), Weather, Finance, Children, Social,
Religion, Phone In, Travel, Leisure, Jazz,
Country, Nation M (Musik), Oldies,
Folk M (Musik), Document
Page 87

Funktionen von RDS
Das RDS-Verfahren (Radio Data System)
ermöglicht UKW-Sendern, außer dem
Programmsignal weitere Informationen zu
versenden.
Beim Empfang von RDS-Daten sind
auf dem Receiver folgende Funktionen
verfügbar:
• Programmtypsuche (PTY-Suchlauf) (siehe
Seite 16)
• Schaltet kurzzeitig auf Verkehrsansagen
um—TA-Standbyempfang. (Siehe rechte
Spalte.)
• Schaltet kurzzeitig auf Ihren bevorzugten
Programmtyp um—PTY-Standbyempfang.
(Siehe Seiten 18 und 45)
• Automatische Verfolgung des gleichen
Programs—Network-Tracking-Empfang
(siehe Seite 18)
• Programmsuche (siehe Seite 45)
Speichern Ihrer
Lieblingsprogramme
Sie können sechs bevorzugte Programmtypen
speichern.
3 Wählen Sie die Festsendernummer
(Preset1–6), unter der gespeichert
werden soll.
DEUTSCH
4 Wählen Sie einen PTY-Code, unter
dem gespeichert werden soll.
Die ausgewählte Festsendernummer und der
PTY-Code blinken für einen Moment.
5 Beenden Sie den Vorgang.
1
2 Wählen Sie „PTY Memory“.
Verwenden des Standbyempfangs
TA-Standbyempfang
Verkehrsdurchsagen-Standby erlaubt es dem
Receiver, von allen Signalquellen außer AM
kurzzeitig auf Verkehrsdurchsagen (TA)
umzuschalten.
• Die Lautstärke schaltet auf den
voreingestellten TA-Lautstärkepegel um
(siehe Seite 45).
• Ist ein DAB-Tuner angeschlossen, so lässt
sich über Standbyempfang auch nach DABDiensten suchen.
So aktivieren Sie den TAStandbyempfang
leuchtet auf oder blinkt.
Fortsetzung nächste Seite....
17
Page 88

• Wenn aufleuchtet, ist der TAStandbyempfang aktiviert.
• Wenn
noch nicht aktiviert. (Dies ist der Fall, wenn
Sie einen UKW-Sender hören, bei dem die für
den TA-Standbyempfang erforderlichen RDSSignale nicht mitgesendet werden).
Zum Aktivieren des TA-Standbyempfangs
müssen Sie einen anderen Sender (oder DABDienst) einstellen, bei dem diese Signale
DEUTSCH
mitgesendet werden.
Dauerleuchten über.
blinkt, ist der TA-Standbyempfang
geht von Blinken auf
So deaktivieren Sie den TAStandbyempfang
erlischt.
PTY-Standbyempfang
PTY-Standby erlaubt es dem Receiver, von der
aktuellen Signalquelle außer AM kurzzeitig auf
Ihr bevorzugtes PTY-Programm umzuschalten.
• Ist ein DAB-Tuner angeschlossen, so lässt
sich über Standbyempfang auch nach DABDiensten suchen.
Zum Aktivieren und Wählen Ihres
bevorzugten PTY-Codes für PTYStandbyempfang siehe Seite 45.
leuchtet auf oder blinkt.
Zum Deaktivieren des PTYStandbyempfangs wählen Sie “OFF” unter
“PTY” im Menü “MODE”
• Wie Sie ins Menü „MODE“ gelangen, können
Sie unter „Wenn Sie Schwierigkeiten haben,
eine UKW-Sendung in Stereo zu empfangen“
auf Seite 13 nachlesen.
erlischt.
Verfolgen des gleichen
Programms—Network-Tracking-
Empfang
Wenn Sie in einem Bereich unterwegs sind,
in dem kein guter UKW-Empfang möglich
ist, sucht dieser Receiver automatisch nach
anderen Frequenzen, auf denen das UKW-RDSProgramm möglicherweise besser empfangen
werden kann (siehe Abbildung unten).
Beim Versand ab Werk ist der NetzwerkTracking-Empfang standardmäßig aktiviert
(
leuchtet beim ersten Einschalten auf).
Zum Ändern der Einstellung des NetzwerkTracking-Empfangs siehe „AF-Regn’l“ auf
Seite 45.
Programm A wird in unterschiedlichen
Frequenzbereichen ausgestrahlt (01 – 05)
• Wenn
Standbyempfang aktiviert.
• Wenn
Standbyempfang noch nicht aktiviert.
Zum Aktivieren des PTY-Standbyempfangs
müssen Sie einen anderen Sender (oder DABDienst) einstellen, bei dem diese Signale
mitgesendet werden. Ist dies der Fall, geht die
PTY-Anzeige von Blinken auf Dauerleuchten
über.
18
aufleuchtet, ist der PTY-
blinkt, ist der PTY-
Page 89

Bedienung der Disk
Abspielen einer Disk im Receiver
DEUTSCH
Der Disk-Typ wird automatisch erkannt,
und die Wiedergabe startet automatisch (bei
DVD: automatischer Start hängt vom internen
Programm ab).
Wenn die aktuelle Disk eine Audio-CD, CDText, MP3/WMA, JPEG oder VCD ohne PBC
ist, werden alle Stück wiederholt abgespielt,
bis Sie die Quelle umschalten oder die Disk
entnehmen.
• Wenn eine Titelliste oder ein Disk-Menü bei
der Wiedergabe einer DVD oder VCD mit
PBC erscheint, siehe „Disk-Menübedienung“
auf Seite 24.
Die folgenden Kennzeichnungen beziehen
sich auf die abspielbaren Disks....
DVD Video Nur Video-CD mit
PBC
Video-CD mit/ohne
PBC
MP3/WMA-Disk
Alle hier aufgeführten
Disks
Audio CD/
CD Text
JPEG-Disk
Vor Ausführen von Bedienvorgängen ist
unbedingt Folgendes sicherzustellen....
• Bei DVD-Wiedergabe können Sie die SetupMenü-Einstellung nach Wunsch ändern.
(Siehe Seiten 30 bis 33).
• Die auf Seiten 21 bis 29 beschriebenen
Bedienverfahren werden mit der
Fernbedienung ausgeführt.
•
Einheit verfügbar sind.
• Wenn Sie den DVD/CD-Player mit den
Tasten am Bedienfeld bedienen wollen, siehe
„Andere Disk-Bedienungen“ auf Seite 35 bis
39.
Erscheint „
Taste gedrückt wird, so ist der Receiver
nicht für den gewünschten Bedienvorgang
ausgelegt.
• In manchen Fällen wird zwar „
angezeigt, aber der Bedienvorgang ist
dennoch nicht möglich.
• Microsoft und Windows Media sind entweder
eingetragene Marken oder Marken der
Microsoft Corporation in den Vereinigten
Staaten und/oder anderen Ländern.
zeigt die Funktionen, die für die
“ auf dem Monitor, wenn eine
“, nicht
19
Page 90
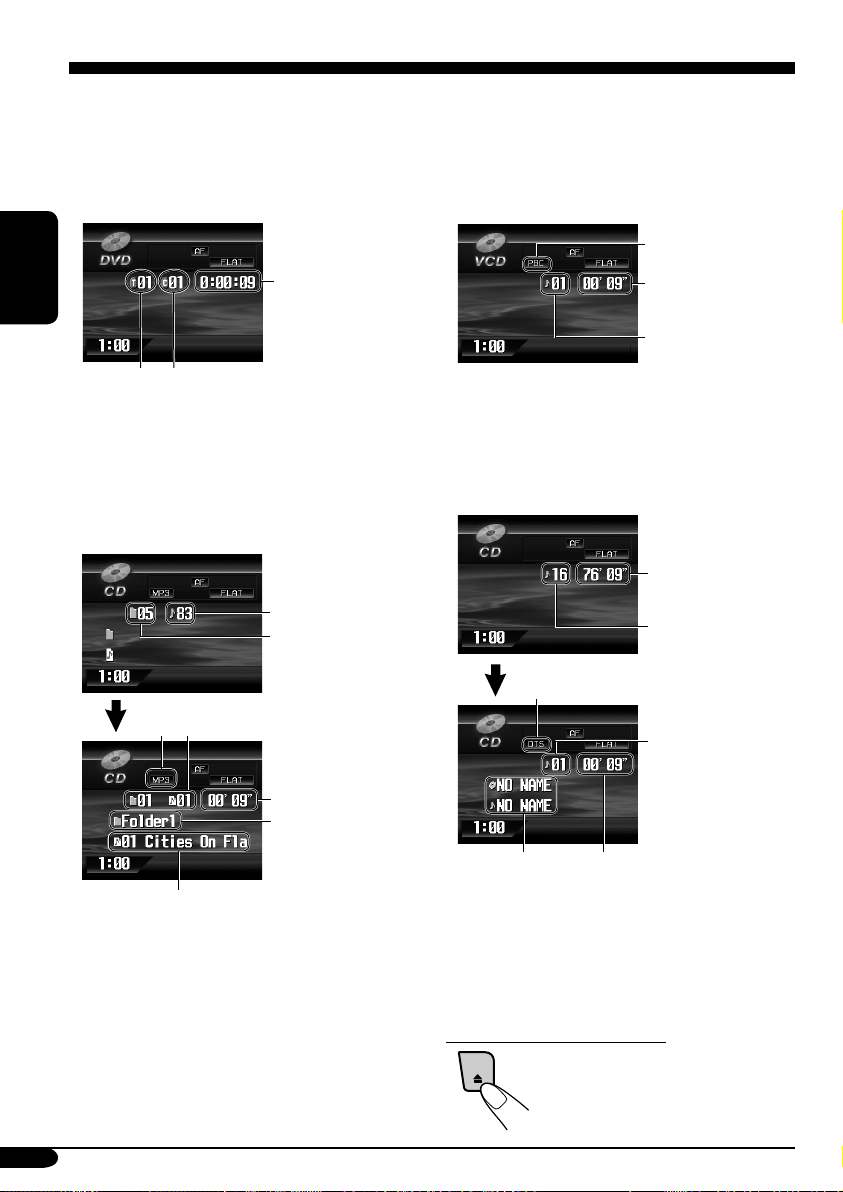
• Beim Einsetzen einer DVD-Disk:
Die DVD-Wiedergabe auf dem Display
startet automatisch, wenn die Feststellbremse
angezogen wird.
Der nachstehende Bildschirm (oder ähnlich)
wird angezeigt, wenn Sie D DISP drücken.
• Beim Einsetzen einer VCD:
Die VCD-Wiedergabe auf dem Display
startet automatisch, wenn die Feststellbremse
angezogen wird.
Der nachstehende Bildschirm (oder ähnlich)
wird angezeigt, wenn Sie D DISP drücken.
Verstrichene
DEUTSCH
Aktuelle TitelNummer
Aktuelle
Kapitelnummer
Spielzeit
• Um zur DVD-Wiedergabe zurückzuschalten,
drücken Sie D DISP erneut.
• Display-Anzeige beim Einlegen von MP3/
WMA/JPEG*
Beisp.: Wenn eine MP3-Datei erkannt wird
Aktueller Stückname
1
*
Bei jedem Drücken von D DISP schaltet der
1
-Disks:
Gesamt-Disktitelzahl
Gesamt-Ordnerzahl
2
Aktuelle(r) Ordner/Stücknummer
*
Verstrichene
Spielzeit*
Aktueller
Ordnername
3
Monitor zwischen dem Quellbildschirm und
der JPEG-Wiedergabe um.
2
*
Entweder die MP3- oder die WMA-Anzeige
leuchtet auf, je nach der ersten erkannten
Datei.
3
*
Erscheint nicht bei JPEG-Disks.
PBC-Anzeige
Verstrichene
Spielzeit
Aktuelle
Stücknummer
4
*
Leuchtet auf, wenn eine Disk mit PBC-
4
*
Funktion eingelegt ist.
• Zum Zurückschalten zur VCD-Wiedergabe
drücken Sie D DISP erneut.
• Beim Einsetzen einer CD Text/Audio CD:
Gesamte Spielzeit
der eingesetzten
Disk
Gesamt-Disktitelzahl
der eingesetzten
Disk
DTS-Anzeige*
6
*
5
*
Leuchtet auf, wenn eine DTS-CD
5
Aktuelle
Stücknummer
Verstrichene
Spielzeit
wiedergegeben wird.
6
*
Bei der Wiedergabe von CD Text-Disks
werden die Disk-Bezeichnung, der Interpret
und der Titel des Stücks angezeigt.
Zum Ausschieben einer Disk
20
Page 91
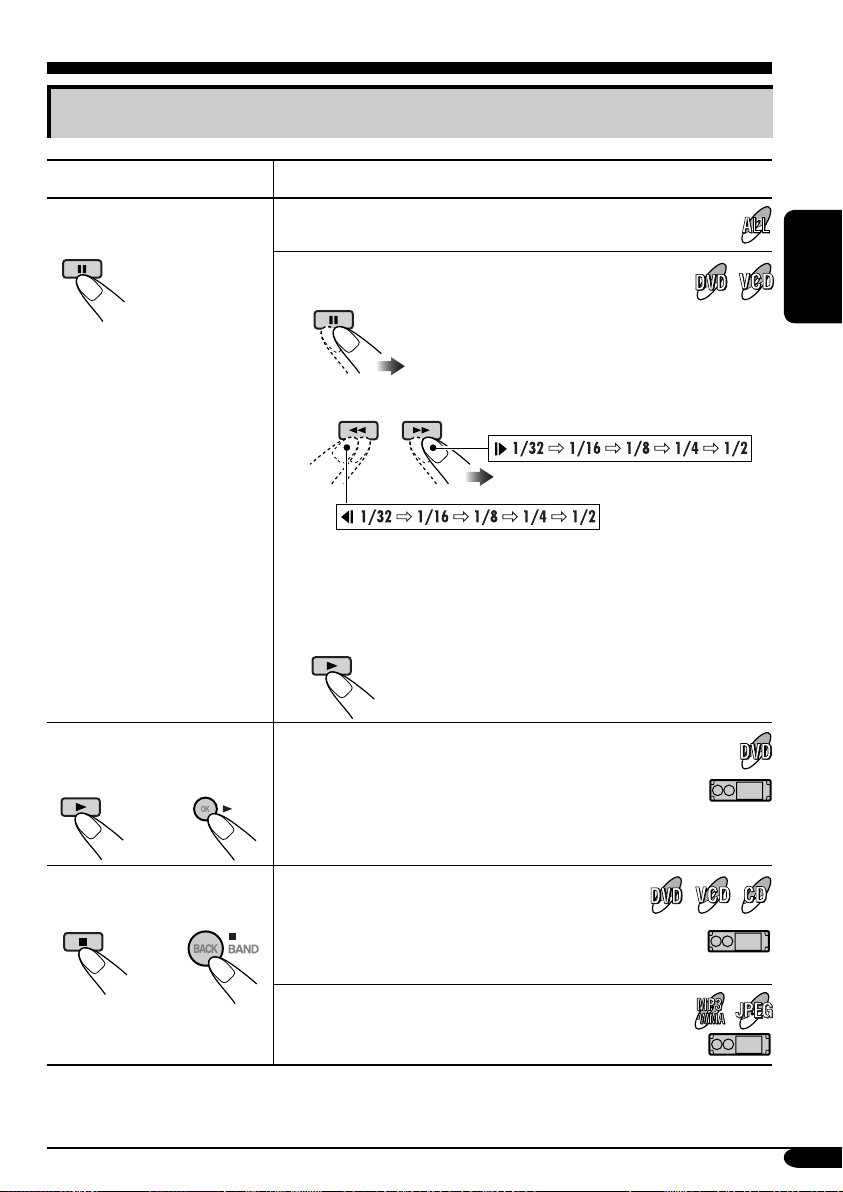
Grundlegende Bedienung
Bedienung Displayanzeige und/oder nächste Bedienung
Zum kurzzeitigen Stoppen
der Wiedergabe
Die Wiedergabe wird angehalten.
Ein Standbild erscheint.
A Wiedergabe mit Einzelbildern
B Zeitlupen-Wiedergabe
• Kein Ton kommt bei Zeitlupen-Wiedergabe.
• Bei der Wiedergabe einer VCD, ist RückwärtsZeitlupenwiedergabe nicht möglich.
Zur Fortsetzung der normalen Wiedergabe:
DEUTSCH
Zur Wiederholung
vorheriger Szenen—SofortReplay
Zum Stoppen der
Wiedergabe
• Während der Wiedergabe erscheinen ggf. die folgenden Hinweissymbole kurze Zeit auf dem
Monitor (siehe Seite 64).
Die Wiedergabeposition bewegt sich um etwa 10 Sekunden
von der aktuellen Position zurück.
• Diese Funktion arbeitet nur innerhalb des gleichen
Titels.
• Bei manchen DVDs arbeitet diese Funktion nicht.
Wenn Sie die Wiedergabe erneut starten,
beginnt die Wiedergabe an der Stelle wo
sie gestoppt wurde
(Fortsetzungswiedergabe).
Wenn Sie die Wiedergabe erneut starten, beginnt die
Wiedergabe vom Anfang des letzten Stücks.
Fortsetzung nächste Seite....
21
Page 92

So springen Sie zum nächsten oder
vorherigen Kapitel/Stück
So suchen Sie einen bestimmten
Disktitel/Kapitel/ein bestimmtes
Stück direkt auf
• Bei DVD: Während Wiedergabe oder
Wiedergabepause
Zu den folgenden
DEUTSCH
Springt zurück zum Anfang des aktuellen
Kapitels/Stücks, und dann zu den
vorhergehenden Kapiteln/Stücke.
Kapiteln/Stücke.
So spulen Sie Kapitel/Stück
vor oder zurück
Vorspulen.
Rückspulen.
* Die Suchgeschwindigkeit wechselt auf x2 ]
x10 für alle Disks (DVD, VCD, CD) um, aber
die im Monitor gezeigte Information gilt nur
für DVD/VCD.
So suchen Sie vorwärts
oder rückwärts durch
Kapitel/Stück
• Bei DVD: Während Wiedergabe oder
ein Kapitel.
Im Stoppbetrieb—wählen Sie
einen Titel.
• Für MP3/WMA/JPEG: Wählen Sie einen
Stück innerhalb des gleichen
Ordners.
Wählen Sie die Nummer, die dem gewünschten
Punkt entspricht (siehe Seite 9).
Wiedergabepause—wählen Sie
So suchen Sie einen
Disktitel/Ordner auf
Zum nächsten Disktitel/
Ordner.
Zum vorherigen Disktitel/
Ordner.
So suchen Sie einen bestimmten
Disktitel/Ordner auf
Die gezeigte Information gilt nur für DVD/
VCD:
• Zum Rückstellen auf normale
Geschwindigkeit
22
Innerhalb von 10
Sekunden drücken Sie
die Zifferntasten
(siehe Seite 9).
WICHTIG:
• Für MP3/WMA-Disks: Es müssen den
Ordnern zweistellige Nummern am Anfang
der Ordnernamen zugewiesen werden—01,
02, 03 usw.
Page 93
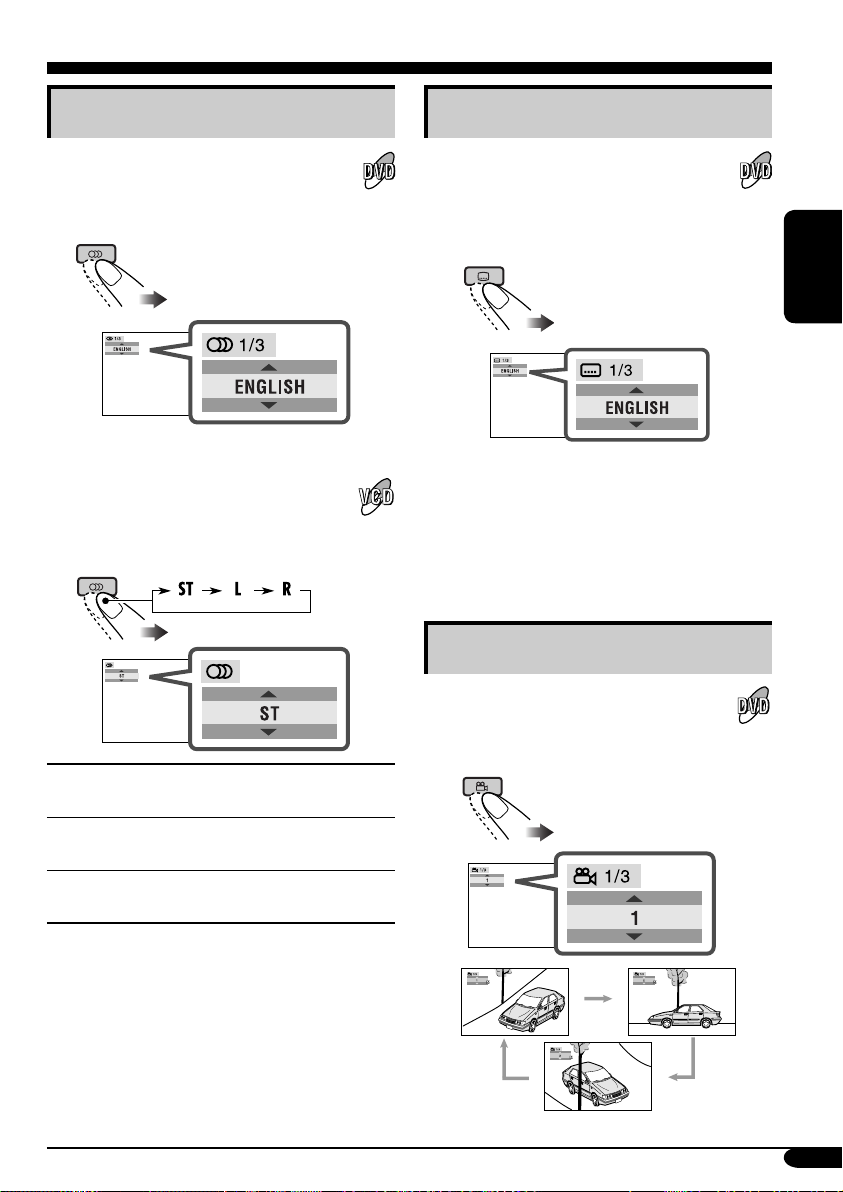
DVD/VCD-Spezialfunktionen
Wählen der Audiosprachen
Bei DVD:
Sie können die zu hören gewünschte
Sprache wählen, wenn die Disk mehrere
Soundtrack-Sprachen hat.
Beisp.: Wenn die Disk 3 Optionen hat
Bei VCD:
Sie können den gewünschten
Audiowiedergabekanal wählen. (Dies ist
bei Wiedergabe einer Karaoke-VCD praktisch).
Normale Stereo-Wiedergabe (linker/
ST:
rechter Kanal)
Wiedergabe auf dem (L) linken
L:
Audiokanal.
Wiedergabe auf dem (R) rechten
R:
Audiokanal.
Wählen von Untertiteln
Sie können die Sprache der Untertitel zur
Anzeige im Monitor wählen.
• Sie können die anfängliche
Untertitelsprache mit dem Setup-Menü
einstellen (siehe Seite 30).
DEUTSCH
Beisp.: Wenn die Disk 3 Optionen hat
• Bei manchen DVDs und VCDs ist Ändern der
Untertitel-Sprache, der Tonsprache (oder des
Audiokanal) ohne Verwendung des DiskMenüs unmöglich.
Wahl einer von mehreren Ansichten
Sie können dieselbe Szene aus
unterschiedlichen Winkeln betrachten,
wenn die Disk mit mehreren Sichtwinkeln
aufgezeichnet ist.
Beisp.: Wenn die Disk 3 Sichtwinkel hat
23
Page 94
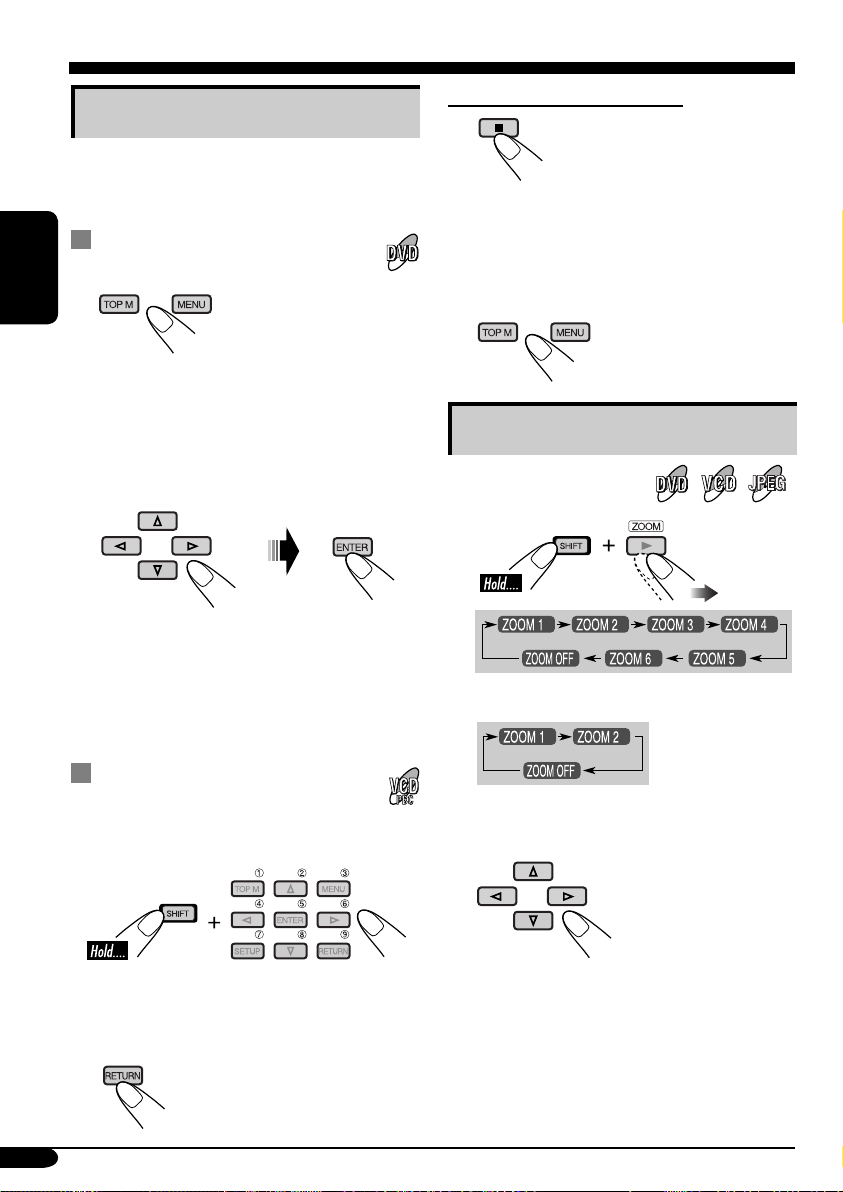
Disk-Menübedienung
Die menügesteuerte Wiedergabe ist möglich
beim Abspielen von DVDs mit Menüsteuerung
oder VCDs mit PBC (PlayBack Control).
Während der Wiedergabe einer
DVD
1
DEUTSCH
Eine Disktitelliste oder ein Diskmenü
erscheint auf dem Monitor.
2 Wählen Sie den gewünschten
Parameter im Menü.
Der gewählte Parameter startet die
Wiedergabe.
• Bei manchen Disks können Sie auch
die Parameter mit den entsprechenden
Zifferntasten wählen.
Beenden der PBC-Wiedergabe
1
2 Wählen Sie einen Stück zum Starten der
normalen Wiedergabe mit den Zifferntasten
(siehe Seite 9).
So setzene Sie PBC-Funktion fort
Heranzoomen
1
• Für JPEG-Disks (nur im Pause-Modus):
Während der Wiedergabe einer
VCD
• Wenn eine Liste von Menüparametern im
Monitor erscheint.
• Zum Wählen einer Zahl über 9 siehe „Wählen
einer Zahl“ auf Seite 9.
So kehren Sie zu vorherigen Menüs zurück
24
2 Verschieben Sie den vergrößerten
Bildteil.
• Für JPEG-Dateien:
Sie können den vergrößerten Bildteil nicht
verschieben, wenn das gesamte Bild noch
im Monitor angezeigt wird.
Zum Aufheben von Zoom wählen Sie „ZOOM
OFF“ in Schritt 1.
Page 95

Bildschirm-Disk-Bedienung
Über den Bildschirm-Balken
Sie können die Disk-Information prüfen und
weitere Funktionen über den BildschirmBalken verwenden.
• Bei Audio-CD, CD-Text und MP3/WMADisks können Sie den On-Screen-Balken
nur mit einem externen Monitor und bei
aktivierter Doppelzone verwenden (siehe
Seite 40).
• Bei Audio-CD, CD-Text und MP3/WMADisks können Sie auch das SteuerungSchirmbild und das Listen-Schirmbild
verwenden (siehe Seiten 28 und 29).
Bildschirm-Balken
DVD
VCD
MP3/WMA
JPEG
REPEAT
OFF ‰FOLDER
CD Text/audio CD
* Nur für DTS CD
1 Disk-Typ
2 • Audiosignalformat-Typ (nur bei DVD und
DTS CD)
• PBC (nur bei VCD)
3 Aktueller Wiedergabemodus
4 Wiedergabe-Information
T01 C01 Aktueller(s) Titel/Kapitel
TRACK 01 Aktuelle Stück (bei VCD)
TOTAL Verflossene Spielzeit der Disk
T. REM
restliche Disktitelzeit (bei DVD)
TIME Bisherige Abspielzeit des
aktuellen Kapitels/Stücks
REM Restliche Abspielzeit des
aktuellen Kapitels/Stücks
5 Wiedergabe-Zustand
, Wiedergabe
Zeitlupe
, Pause
, Stopp
6 Bedienungssymbole
abgelaufene Spielzeit des
aktuellen Titels oder der
Disk ein.
(für DVD)
*
Restliche Diskzeit (bei VCD)/
, Vorwärts-/Rückwärts-Suche
, Vorwärts-/Rückwärts-
Zeitanzeige
, Zeitsuche—Geben Sie die
Disktitel-Suche
Wiederholungswiedergabe
, Wiederholungswiedergabe
, Anspielfunktion
, Zufallswiedergabe
DEUTSCH
25
Page 96

Grundlegende Steuerbildschirm-
Bedienvorgänge
Zum Löschen des On-Screen-Balkens
1 Zur Anzeige des
Bildschirm-Balkens.
oder
DEUTSCH
(zweimal) (DVD,VCD)
Wenn eine JPEG-Disk eingelegt ist, gehen
Sie gleich zu Schritt 3.
(CD Text/audio CD,
MP3/WMA, JPEG)
2 Wählen Sie einen Parameter.
3 Treffen Sie eine Wahl.
• Wenn das Popup-Menü erscheint....
1
• Der On-screen-Balken für eine CD oder MP3/
WMA/JPEG-Disk verschwindet automatisch
einige Sekunden nach dem letzten Vorgang.
• Die wählbaren Optionen für Wiederhol-/
Anspiel-/Zufallswiedergabe:
Wiederholungswiedergabe (Siehe
Seite 37.)
DVD:
, REPEAT Wiederholungswiedergabe
(Siehe Seite 37.)
VCD (wenn PBC nicht aktiviert ist):
MP3/WMA:
REPEAT TRACK
REPEAT FOLDER
26
oder
2
JPEG:
CD Text/audio CD:
REPEAT TRACK
Page 97

, INTRO Anspielfunktion (Siehe Seite 38.)
VCD (wenn PBC nicht aktiviert ist):
MP3/WMA:
INTRO TRACK
Zum Suchen eines bestimmten Punkts nach
Spielzeit
1 Wählen Sie (oder ).
2 Geben Sie die abgelaufene Spielzeit des
aktuellen Titels oder der Disk ein.
INTRO FOLDER
CD Text/audio CD:
INTRO TRACK
, RANDOM Zufallswiedergabe
(Siehe Seite 38.)
VCD (wenn PBC nicht aktiviert ist):
MP3/WMA:
RANDOM FOLDER
RANDOM DISC
CD Text/audio CD:
RANDOM DISC
Siehe auch Seite 25 für die folgenden
Bedienverfahren.
Beisp.: • Zur Eingabe von 1 (Stunden): 02
(Minuten): 00 (Sekunden) drücken Sie
1, 0, 2, 0 und dann 0.
• Zur Eingabe von 54 (Minuten): 00
(Sekunden) drücken Sie 0, 5, 4, 0 und
dann 0.
• Es ist immer erforderlich, die
Stundenstelle (auch „0“ Stunden)
einzugeben, aber es ist nicht
erforderlich, nachfolgende Nullen (die
letzten beiden Stellen in den obigen
Beispielen) einzugeben.
• Zur Korrektur einer Fehleingabe
drücken Sie....
• Sie können auch die abgelaufene
Spielzeit festlegen. Verwenden Sie
dazu % / fi / @ / #.
3 Beenden Sie den Vorgang.
So suchen Sie nach einem bestimmten Titel
1 Wählen Sie .
2 Geben Sie die Nummer ein.
DEUTSCH
Zum Ändern der Zeitinformationen
1 Whlen Sie .
2 Ändern Sie die Zeit-Information.
• Zur Korrektur einer Fehleingabe drücken
Sie die Zifferntaste, bis die korrekte
Nummer eingegeben ist.
3 Beenden Sie den Vorgang.
27
Page 98

Grundlegende Steuerbildschirm-
Bedienvorgänge
Sie können die gewünschten Gegenstände
im Steuerbildschirm suchen und abspielen,
während Sie den externen Monitor verwenden.
• Der Steuerbildschirm erscheint automatisch
im Monitor, wenn Sie eine Disk einsetzen
(nur bei externem Monitor).
• Das JPEG-Steuerschirmbild erscheint nur,
DEUTSCH
wenn die Wiedergabe stoppt.
MP3/WMA/JPEG-
Steuerbildschirm
Zum Wählen eines Ordners oder Stücks
Während Doppelzone (siehe Seite 40) aktiviert
ist
....
1 Wählen Sie die Spalte „Folder“ oder die
Spalte „Track“ im Steuerbildschirm.
2 Wählen Sie einen Ordner oder Stück.
CD-Text/Audio-CD-
Steuerbildschirm
TIME 00:14
1 Aktueller Ordner
2 Aktuelle Ordnernummer/Gesamt-
Ordnerzahl
3 Ordnerliste
4 Gewählter Wiedergabemodus
5 Verflossene Spielzeit des laufenden Stücks
(nur bei MP3/WMA)
6 Bedienungsmodus-Symbol (nur bei MP3/
WMA)
‰ (Wiedergabe), 7 (Stopp), 8 (Pause)
7 Aktuelle Stück-/Dateinummer/Gesamtzahl
der Stücke/Dateien im aktuellen Ordner
(Gesamtzahl der Stücke/Dateien auf der
Disk)
8 Stück-Information (nur bei MP3/WMA)
9 Stück-(Datei) liste
p Aktueller Stück (Datei) (hervorgehobener
Balken)
28
1 Gewählter Wiedergabemodus
2 Verflossene Spielzeit des laufenden Stücks
3 Bedienungsmodus-Symbol
‰ (Wiedergabe), 7 (Stopp), 8 (Pause), ¡
(Vorlauf), 1 (Rücklauf)
4 Aktuelle Stücknummer/Gesamtzahl der
Stücke auf der Disk
5 Stück-Information
6 Stückliste
7 Aktueller Stück (hervorgehobener Balken)
Zum Wählen eines Stücks
Page 99

Listen-Bildschirm-Bedienungen
Sie können die Ordnerliste/Stückliste vor
dem Wiedergabebeginn anzeigen, wenn Sie
den externen Monitor und die DoppelzonenFunktion verwenden (siehe Seite 40). In dieser
Liste können Sie die Inhalte bestätigen und die
Wiedergabe einer Disk beginnen.
Ordner-/Stücklisten-
Bildschirme
Ordnerliste (MP3/WMA/JPEG)
Für MP3/WMA/JPEG:
Wenn Doppelzone aktiviert ist und die Disk
stoppt...
1 Zeigen Sie die Ordnerliste an.
Bei jedem Drücken der Taste
erscheint der Listenbildschirm
und wird wieder ausgeschaltet.
2 Wählen Sie den Ordner auf der
Liste.
Die Stückliste des gewählten Ordners
erscheint.
Zum Zurückschalten zur Ordnerliste
DEUTSCH
Stückliste (MP3/WMA/JPEG/CD Text/
Audio-CD)
Beisp.: Stückliste bei MP3/WMA
1 Aktuelle Ordnernummer/Gesamt-
Ordnerzahl (nur bei MP3/WMA/JPEG)
2 Aktuelle Stücknummer/Gesamtzahl der
Stück im aktuellen Ordner (MP3/WMA/
JPEG) oder auf der Disk (CD Text/AudioCD)
3 Aktuelle Seite/Gesamtzahl der Seiten in der
Liste
4 Aktueller Ordner/Stück (hervorgehobener
Balken)
3 Wählen Sie den Stück in der Liste.
Bei CD-Text/Audio-CD:
Wenn Doppelzone aktiviert ist und die Disk
stoppt...
1 Zeigen Sie die Stückliste an.
Bei jedem Drücken der Taste
erscheint der Listenbildschirm
und wird wieder ausgeschaltet.
2 Wählen Sie den Stück in der Liste.
29
Page 100
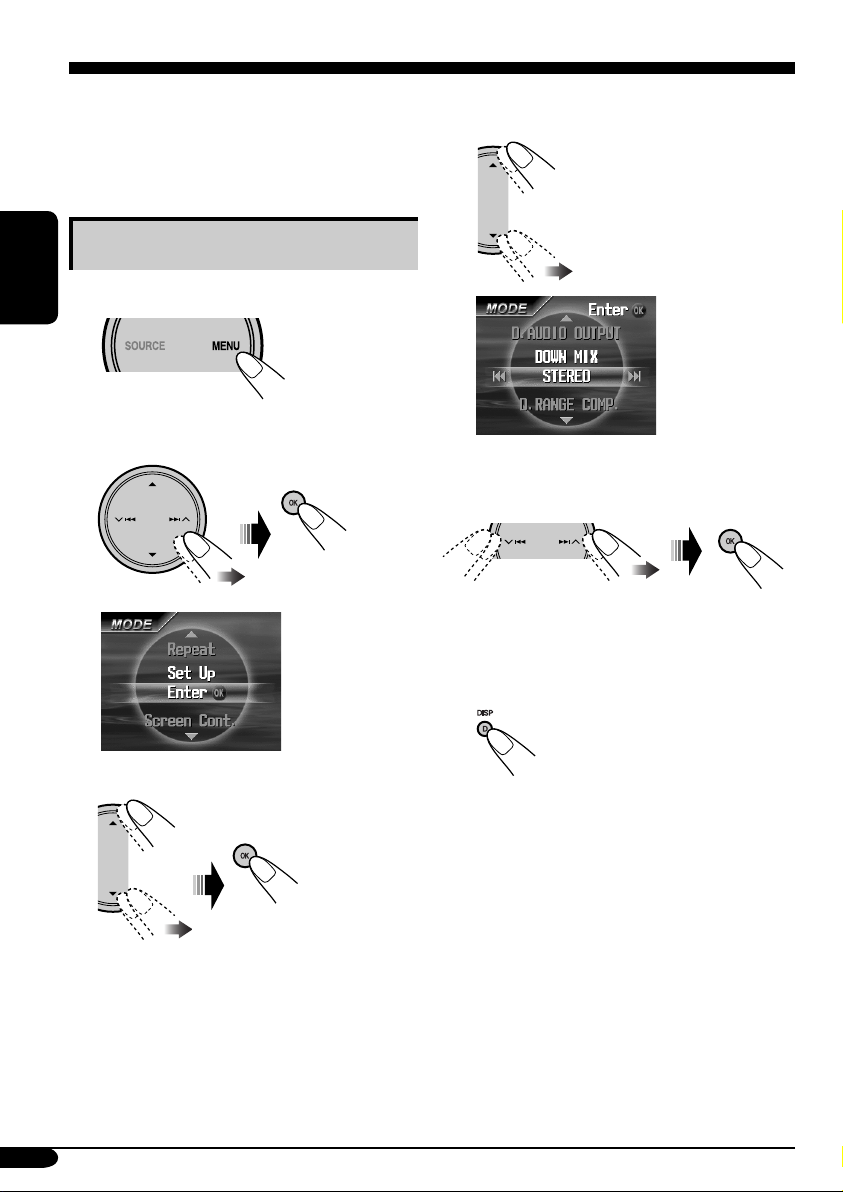
AV-Setup-Menü
Sie können die Anfangsbedingungen für die
Disk-Wiedergabe speichern.
• Während der Wiedergabe sind keine
Änderungen im Setup-Menü möglich.
Grundlegendes Einstellverfahren
Im Stoppbetrieb....
DEUTSCH
1
2 Wählen Sie das Menü „MODE“.
MODE-Menü
bei eingelegter
DVD
4 Wählen Sie eine Parameter zur
Einstellung.
Beisp.: Beim Wählen von „DOWN MIX“
5 Wählen Sie eine Option.
Wiederholen Sie Schritt 4 und 5, um
weitere Einstellungen festzulegen.
6 Beenden Sie den Vorgang.
3 Wählen Sie „Set Up“.
30
 Loading...