

Page 1

DVD/CD RECEIVER
DVD-/CD-RECEIVER
RECEPTEUR DVD/CD
DVD/CD-RECEIVER
KD-AVX1
KD-AVX1
OK
SOURCE
MENU
T/P
For installation and connections, refer to the separate manual.
Für den Einbau und die Anschlüsse siehe das eigenständige Handbuch.
Pour l’installation et les raccordements, se référer au manuel séparé.
Bijzonderheden over de installatie en aansluiting van het apparaat vindt u in de desbetreffende
handleiding.
BACK
BAND
ENGLISHDEUTSCH
FRANÇAIS
DISP
D
NEDERLANDS
INSTRUCTIONS
BEDIENUNGSANLEITUNG
MANUEL D’INSTRUCTIONS
GEBRUIKSAANWIJZING
LVT1323-001B
[E]
Page 2
Thank you for purchasing a JVC product.
Please read all instructions carefully before operation, to ensure your complete understanding and to
obtain the best possible performance from the unit.
ENGLISH
IMPORTANT FOR LASER PRODUCTS
1. CLASS 1 LASER PRODUCT
2. CAUTION: Do not open the top cover. There are no user serviceable parts inside the unit; leave
all servicing to qualified service personnel.
3. CAUTION: Visible and invisible laser radiation when open and interlock failed or defeated.
Avoid direct exposure to beam.
4. REPRODUCTION OF LABEL: CAUTION LABEL, PLACED OUTSIDE THE UNIT.
How to reset your unit
This will reset the microcomputer. Your
preset adjustments will also be erased.
For security reasons, a numbered ID card is provided with this receiver, and the same ID number is
imprinted on the receiver’s chassis. Keep the card in a safe place, as it will help the authorities to
identify your receiver if stolen.
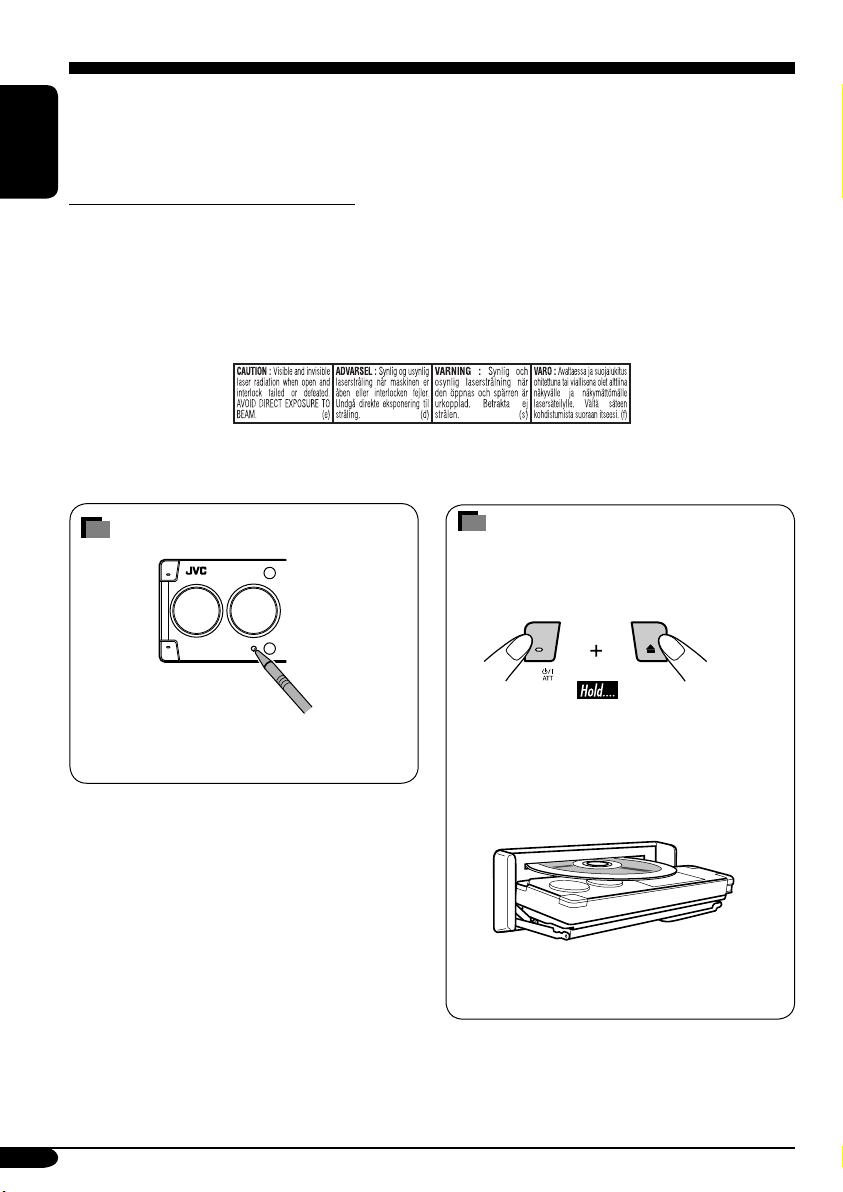
How to forcibly eject a disc
If a disc cannot be recognized by the receiver
or cannot be ejected, ejects the disc as
follows.
“NO EJECT?” (or “EJECT OK?”) and
“EMERGENCY EJECT?” appear on the
monitor.
Press 5 / ∞ repeatedly to select
“EMERGENCY EJECT?”, then press OK.
• If this does not work, reset your receiver.
• Be careful not to drop the disc when it
ejects.
2
Page 3
WARNINGS:
• DO NOT install any receiver in
locations where;
– it may obstruct the steering wheel and
gearshift lever operations, as this may
result in a traffic accident.
– it may obstruct the operation of safety
devices such as air bags, as this may
result in a fatal accident.
– it may obstruct visibility.
• DO NOT operate any receiver while
manipulating the steering wheel, as this
may result in a traffic accident.
• The driver must not watch the monitor
while driving.
If the driver watches the monitor while
driving, it may lead to carelessness and
cause an accident.
• The driver must not put on the
headphones while driving. It is
dangerous to shut off the outside sounds
while driving.
• If you need to operate the receiver while
driving, be sure to look ahead carefully
or you may be involved in a traffic
accident.
• If the parking brake is not engaged,
“ParkingBrake” flashes on the monitor,
and no playback picture will be shown.
– This warning appears only when
the parking brake wire is connected
to the parking brake system built
in the car (refer to the Installation/
Connection Manual).
This product incorporates copyright
protection technology that is protected
by U.S. patents and other intellectual
property rights. Use of this copyright
protection technology must be authorized
by Macrovision, and is intended for home
and other limited viewing uses only unless
otherwise authorized by Macrovision.
Reverse engineering or disassembly is
prohibited.
Caution on volume setting:
Discs produce very little noise compared
with other sources. Lower the volume
before playing a disc to avoid damaging
the speakers by the sudden increase of the
output level.
Cautions on the monitor:
• The monitor built in this receiver has
been produced with high precision, but it
may have some ineffective dots. This is
inevitable and is not malfunction.
• Do not expose the monitor to direct
sunlight.
ENGLISH
For safety....
• Do not raise the volume level too much, as
this will block outside sounds, making driving
dangerous.
• Stop the car before performing any
complicated operations.
Temperature inside the car....
If you have parked the car for a long time in
hot or cold weather, wait until the temperature
in the car becomes normal before operating the
unit.
3
Page 4
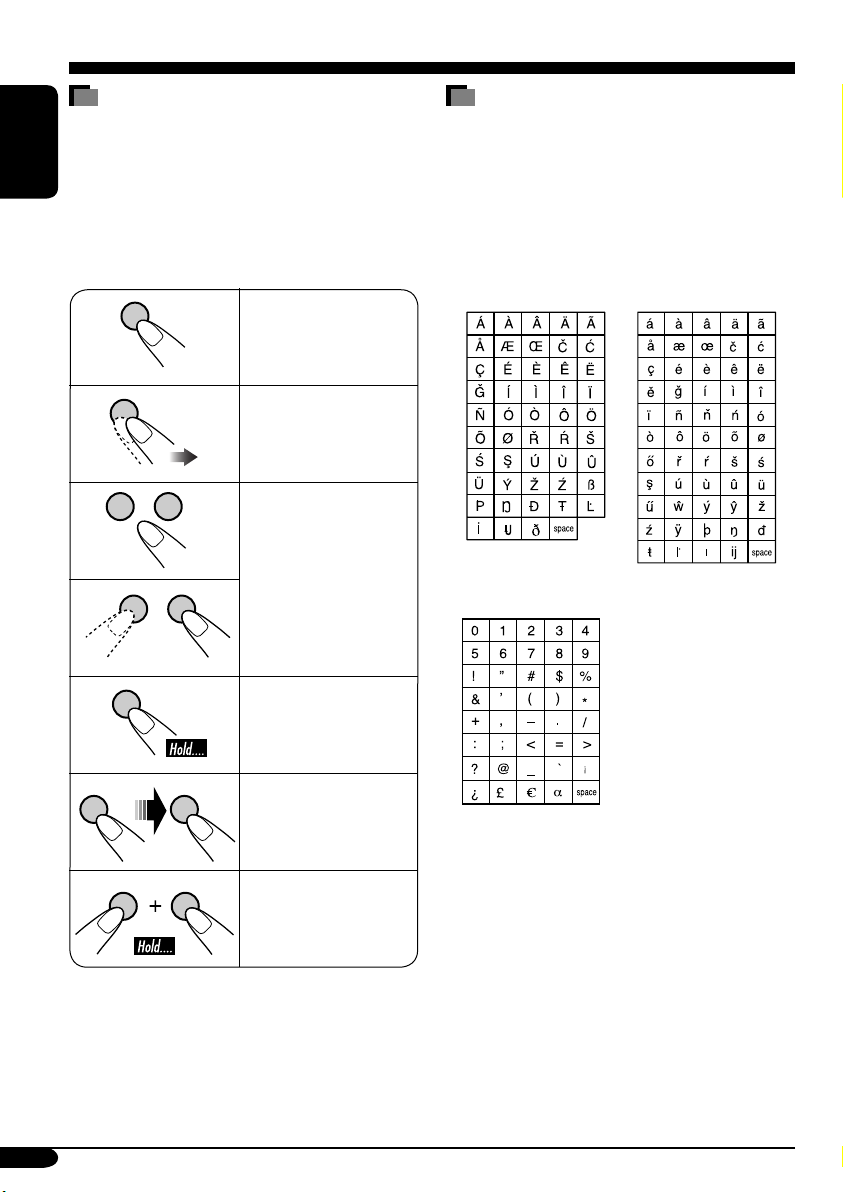
How to read this manual
The following methods are used to make the
explanations simple and easy-to-understand:
• Some related tips and notes are explained in
ENGLISH
“More about this receiver” (see pages
61 – 65).
• Button operations are mainly explained with
the illustrations as follows:
Press briefly.
Press repeatedly.
Characters shown on the monitor
In addition to the Roman alphabets (A – Z, a
–z), the following characters will be used to
show the various information on the monitor.
• You can also use the following characters to
assign titles (see page 48).
Accented letters
Upper case Lower case
4
A B
Press either one.
Numbers and symbols
Press and hold until
your desired response
begins.
Press A, then press
B.
Press and hold both
buttons at the same
time.
Page 5

Contents
How to reset your unit ........................... 2
How to forcibly eject a disc ................... 2
How to read this manual ........................ 4
Characters shown on the monitor .......... 4
Introduction — Playable discs ............ 6
Control panel ................................ 7
Parts identification ................................. 7
Remote controller — RM-RK230
Main elements and features ................... 8
....... 8
Getting started .............................. 10
Basic operations ............................. 10
Setting the clock .................................... 11
Radio operations ............................ 12
Listening to the radio .................... 12
Storing stations in memory .................... 14
Listening to a preset station ................... 15
FM RDS operations ........................ 16
Searching for your favorite
FM RDS programme ................ 16
Storing your favorite programmes ......... 17
Using the standby receptions ................. 17
Tracking the same programme
—Network-Tracking Reception ......... 18
Disc operations .............................. 19
Playing a disc in the receiver ....... 19
Basic operations .................................... 21
DVD/VCD special functions ............ 23
Selecting audio languages ..................... 23
Selecting subtitles .................................. 23
Selecting multi-angle views ................... 23
Disc menu operations ............................ 24
Zoom in .................................................. 24
On-Screen disc operations ............... 25
Basic on-screen bar operations .............. 26
Basic control screen operations ............. 28
List screen operations ............................ 29
Monitor adjustments ...................... 34
Other disc operations ..................... 35
Basic operations ..................................... 35
Selecting the playback modes ................ 37
List screen operations ............................ 39
Dual Zone operations ..................... 40
Playing back two sources at a time ........ 40
Sound adjustments ......................... 41
Selecting preset sound modes ....... 41
Storing your own sound adjustments ..... 41
Adjusting the sound ............................... 42
General settings — PSM ................ 44
Basic procedure ..................................... 44
Other main functions ...................... 48
Assigning titles to the sources ............... 48
Detaching the control panel ................... 49
Changing the control panel angle .......... 49
CD changer operations .................... 50
Playing discs in the CD changer
Selecting the playback modes ................ 52
External component operations
Playing an external component .... 53
.... 50
............ 53
DAB tuner operations ..................... 54
Listening to the DAB tuner
Storing DAB services in memory .......... 56
Tuning in to a preset DAB service ........ 56
Using the standby receptions ................. 57
Tracing the same programme
—Alternative Frequency Reception .... 58
........... 54
Maintenance .................................. 59
Language codes .............................. 60
More about this receiver ................. 61
Troubleshooting ............................. 66
ENGLISH
AV setup menu .............................. 30
Basic setting procedure .......................... 30
Specifications ................................. 71
5
Page 6
Introduction — Playable discs
Discs you can play
You can play back the following discs (12 cm
and 8 cm) on this receiver:
• DVD Video: Recorded in PAL color system
ENGLISH
with Region Code “2” (see below).
– DVD-R/DVD-RW recorded in the DVD-
Video format can also be played.
• Video CD (VCD)/audio CD
• MP3/WMA/JPEG: Recorded either in CD-
R/CD-RW or DVD-R/DVD-RW/DVD-ROM.
– CD-R/CD-RW: Compliant with ISO 9660
Level 1, ISO 9660 Level 2, Romeo, and
Joliet.
– DVD-R/DVD-RW/DVD-ROM: Compliant
with UDF-Bridge Format*
1
.
On some discs, the actual operations may be
different from what is explained in this manual.
Discs cannot be played back
DVD-Audio, DVD-ROM (data), DVD-RAM,
DVD-R/DVD-RW recorded in the DVD-VR
format, CD-ROM, CD-I (CD-I Ready), Photo
CD, etc.
• Playing back these discs will generate noise
and damage the speakers.
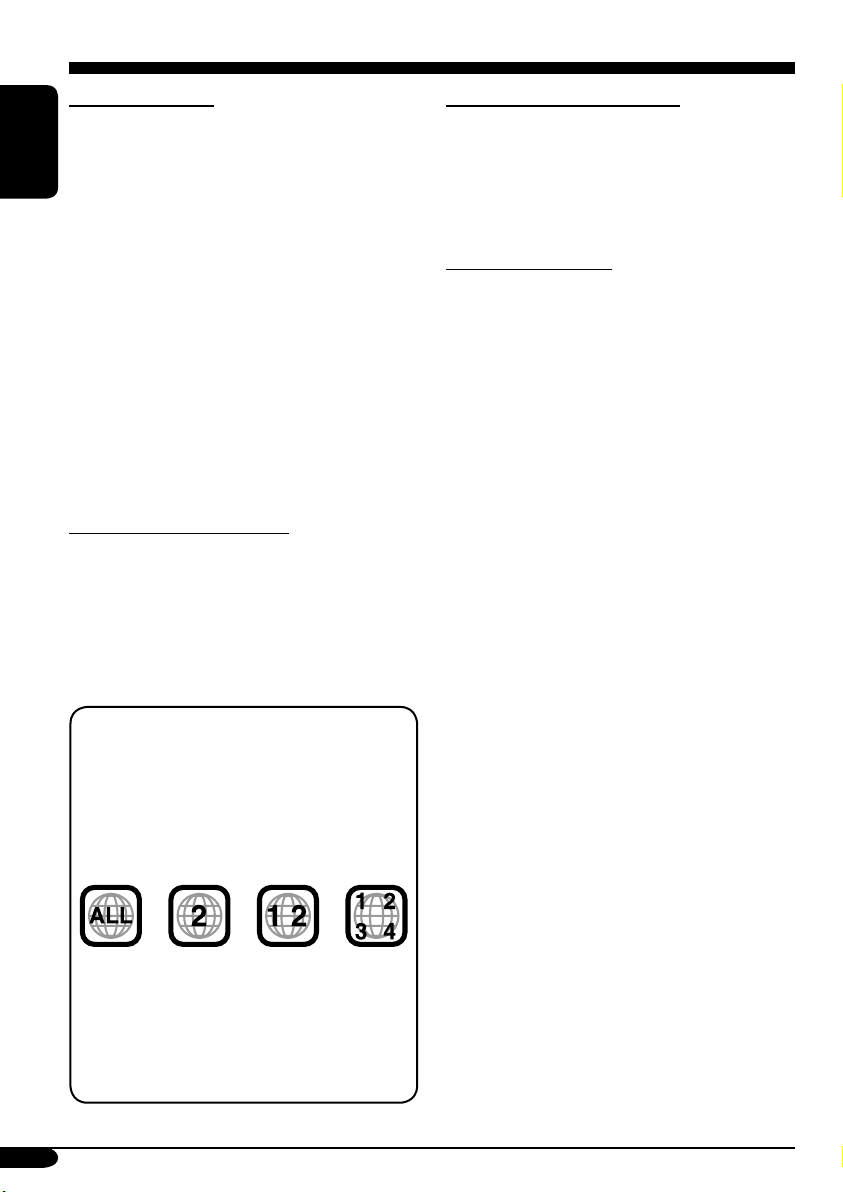
Note on Region Code:
DVD players and DVD Video discs have
their own Region Code numbers. This
receiver can only play back DVD discs
whose Region Code numbers include “2”.
Examples:
If you insert a DVD Video disc of an
incorrect Region Code
“Region Error” appears on the monitor on
the unit.
“REGION CODE ERROR!” appears on the
external monitor.
6
Caution for DualDisc playback
• The Non-DVD side of a “DualDisc” does
not comply with the “Compact Disc Digital
Audio” standard. Therefore, the use of NonDVD side of a DualDisc on this product may
not be recommended.
Digital audio formats
The System can play back the following digital
audio formats.
Linear PCM: Uncompressed digital audio,
the same format used for CDs and most studio
masters.
Dolby Digital *
developed by Dolby Laboratories, which
enables multi-channel encode to create the
realistic surround sound.
3
DTS *
(Digital Theater Systems):
Compressed digital audio, developed by Digital
Theater Systems, Inc., which enables multichannel like Dolby Digital. As the compression
ratio is lower than for Dolby Digital, it provides
wider dynamic range and better separation.
MPEG Audio: Another compressed digital
audio which also enables multi-channel encode
to create the realistic surround sound. However,
this System downmix the multi-channel signals
into 2 channels (decoded PCM) and play it
back.
1
*
A hybrid file system used to provide
compatibility with ISO 9660 for accessing
any type of files on the disc. (UDF stands for
Universal Disk Format.)
2
*
Manufactured under license from Dolby
Laboratories. “Dolby” and the doubleD symbol are trademarks of Dolby
Laboratories.
3
*
“DTS” and “DTS 2.0 + Digital Out” are
registered trademarks of Digital Theater
Systems, Inc.
“DVD Logo” is a trademark of DVD Format/
Logo Licensing Corporation registered in the
US, Japan and other countries.
2
: Compressed digital audio,
Page 7
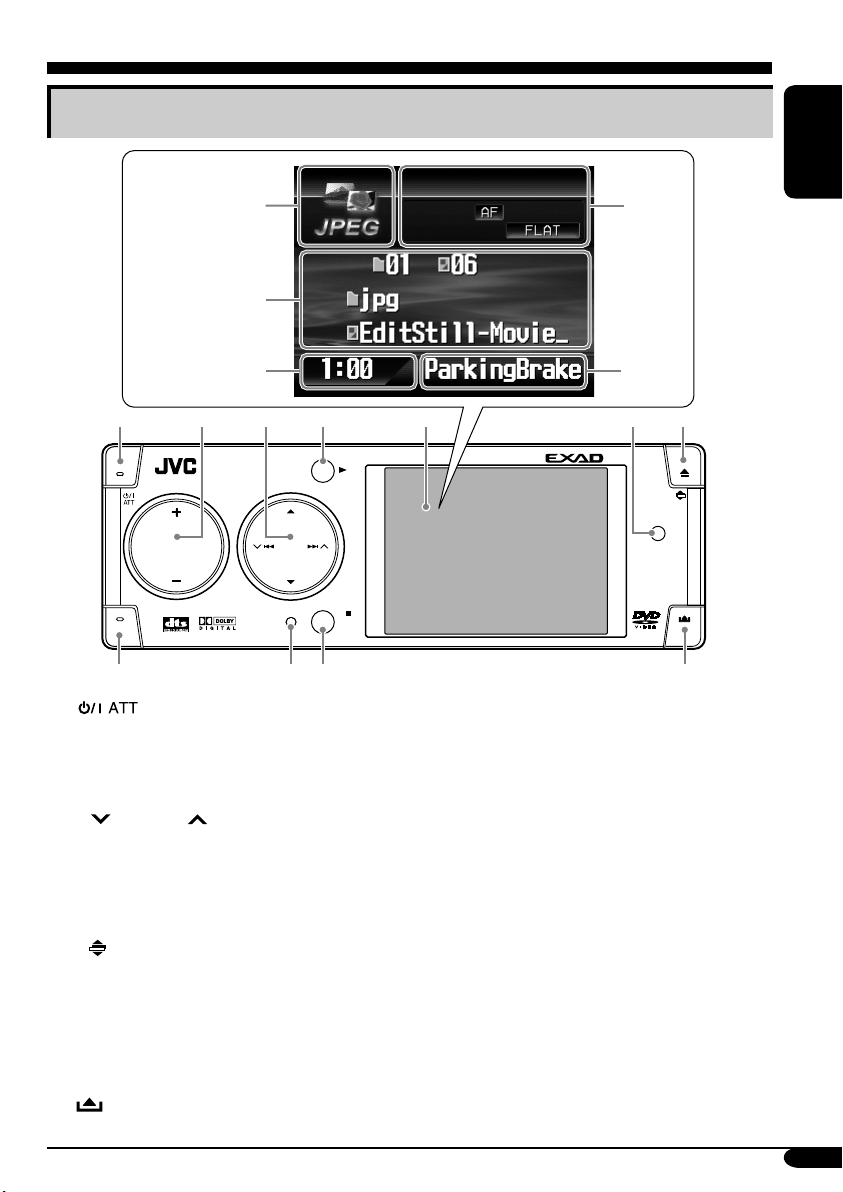
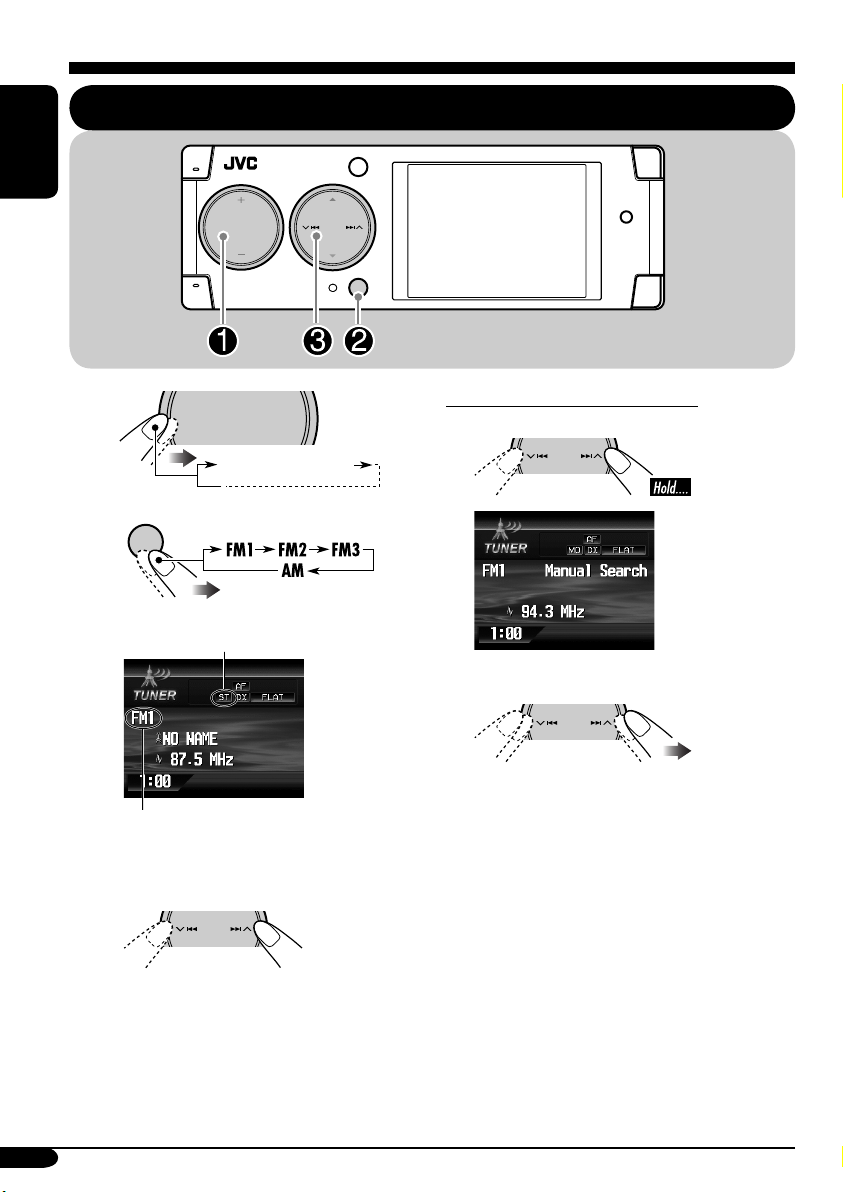
Control panel
Parts identification
Monitor
indications
Ex.:
Source
screen
on JPEG
playback
1
SOURCE
T/P
8
1 (standby/on attenuator) button
2 • +/– (volume +/–) button
• SOURCE button
• MENU button
3 • 5 (up) / ∞ (down) buttons
•
4 • OK button
• 3 (play) button
5 Monitor
6 D DISP (display) button
7 • 0 (eject) button
•
8 T/P (traffic programme/programme type)
9 Reset button
p • BACK button
• BAND button
• 7 (stop) button
q
4/¢ buttons
(angle) button
button
(control panel release) button
2
MENU
w
e
r
3
4
OK
BACK
BAND
9
p
t
y
5
KD-AVX1
67
DISP
D
q
Monitor indications
w Source indicator
e Main display
r Clock display
Also indicates volume level when adjusting
volume.
t Status indicators
y Alert information area
Also indicates volume level bar when
adjusting volume.
ENGLISH
7
Page 8
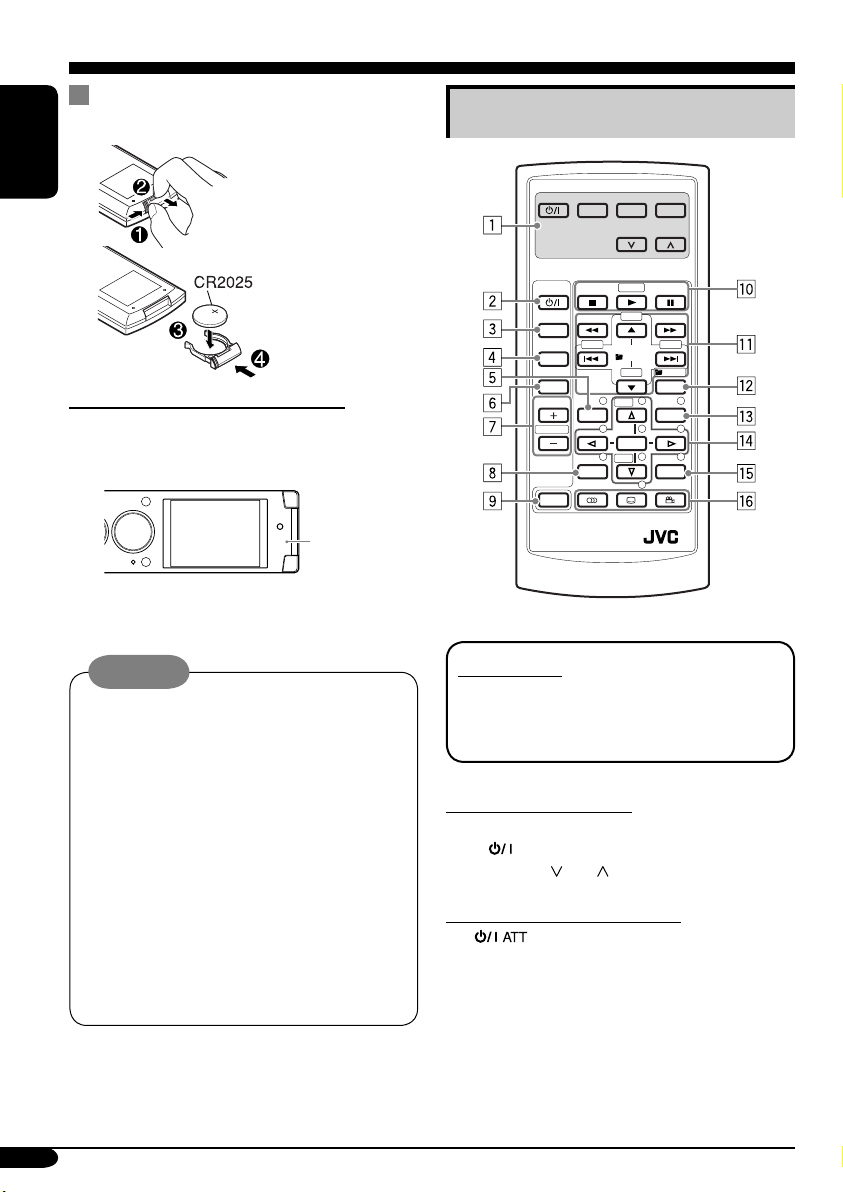
Remote controller — RM-RK230
Installing the lithium coin battery
(CR2025)
ENGLISH
Before using the remote controller:
• Aim the remote controller directly at the
remote sensor on the receiver. Make sure
there is no obstacle in between.
Remote
sensor
• Do not expose the remote sensor to strong
light (direct sunlight or artificial lighting).
Warning:
• Do not install any battery other than
CR2025 or its equivalent; otherwise, it
may explode.
• Store the battery in a place where children
cannot reach to avoid risk of accident.
• To prevent the battery from over-heating,
cracking, or starting a fire:
– Do not recharge, short, disassemble, or
heat the battery or dispose of it in a fire.
– Do not leave the battery with other
metallic materials.
– Do not poke the battery with tweezers or
similar tools.
– Wrap the battery with tape and insulate
when throwing away or saving it.
The receiver is equipped with the steering
wheel remote control function.
• See the Installation/Connection Manual
(separate volume) for connection.
Main elements and features
MONITOR CONTROL
MODE MENU
ASPECT
DVD / RECEIVER CONTROL
ATT
SOURCE
BAND
DUAL
VOL
2nd VOL
SHIFT
RM-RK230
IMPORTANT:
If Dual Zone is activated (see page 40),
the remote controller only functions for
operating the DVD/CD player.
MONITOR CONTROL
1 Monitor control buttons*
• (standby/on), MODE, ASPECT,
MENU,
DVD/RECEIVER CONTROL
2
• Turns on and off the power and also
3 SOURCE button
• Selects the source.
4 BAND button
• Selects the FM/AM/DAB bands.
(standby/on attenuator) button
attenuates the sound.
ZOOM
+10
–100
PRESET
/ TITLE
–10
123
DISC
456
ENTER
7809
DISC
SETUP
and .
+100
/ TITLE
OSD
+
MENUTOP M
–
RETURN
1
8
Page 9

5 TOP M (menu) button*
2
• Display the DVD and VCD*3 disc menu.
6 DUAL button
• Activate and deactivate Dual Zone.
7 VOL + / – buttons
• Adjusts the volume level.
• Also function as 2nd VOL +/– buttons
when pressed with SHIFT button.
8 SETUP button (for DVD/VCD)*
2
9 SHIFT button
p Basic disc operation buttons*
4
:
7 (stop), 3 (play), 8 (pause)
• 3 (play) also function as ZOOM button
when pressed with SHIFT button.
q Advanced disc operation/tuner operation
buttons*
5
For advanced disc operations:
•
/TITLE 5 / ∞
– Select the titles (for DVD) or folders
(for MP3/WMA).
• 4 / ¢ (reverse skip/forward skip)
• 1 / ¡ (reverse search/forward
search)*
6
For FM/AM tuner operations:
• PRESET 5 / ∞
– Changes the preset stations.
• 4 / ¢
– Functions to search for stations.
Press briefly: auto search
Press and hold: manual search
For DAB tuner operations:
• PRESET 5 / ∞
– Changes the preset services.
• 4 / ¢
– Changes the services if pressed briefly.
– Searches the ensembles automatically if
pressed and held.
w OSD button
• Display the on-screen bar.
• Also function as the
/TITLE button
when pressed with SHIFT button.
– You can directly select titles (for DVD)
or folders (for MP3/WMA) using the
number buttons (see page 22).
e MENU button*
2
• Display the DVD and VCD*3 disc menu.
r Menu operation buttons*
2
• Cursor (% , fi , @ , #) and ENTER
• % / fi : Also function as DISC + / –
buttons when the source is “CD-CH”.
t RETURN button*
2
y Special function buttons
• DVD/VCD:
• DVD:
1
*
Controllable only if your monitor is one of
(audio)
(subtitle), (angle)
the JVC monitors — KV-MR9010 or
KV-MH6510.
2
*
These buttons function as the number
buttons when pressed with SHIFT button.
3
*
Only when PBC is not in use.
4
*
Not used for CD changer operations.
5
*
These buttons function as the +10/–10
and +100/–100 buttons when pressed with
SHIFT button.
6
*
Not used for MP3/WMA/JPEG operations.
How to select a number
To select a number from 0 – 9:
To select a number greater than 9:
• +100/–100 buttons used only for searching
MP3/WMA/JPEG tracks number greater
than 99.
ENGLISH
9
Page 10
Getting started
ENGLISH
SOURCE
Basic operations
MENU
BACK
BAND
~ Turn on the power.
Ÿ
You cannot select some sources if they
are not ready.
SOURCE
MENU
! For FM/AM tuner only
BACK
BAND
For DAB tuner only
BACK
BAND
⁄ Adjust the volume.
SOURCE
MENU
Volume level indicator
@ Adjust the sound as you want.
(See pages 41 – 43.)
To drop the volume in a moment (ATT)
To restore the sound,
press it again.
To turn off the power
10
Page 11
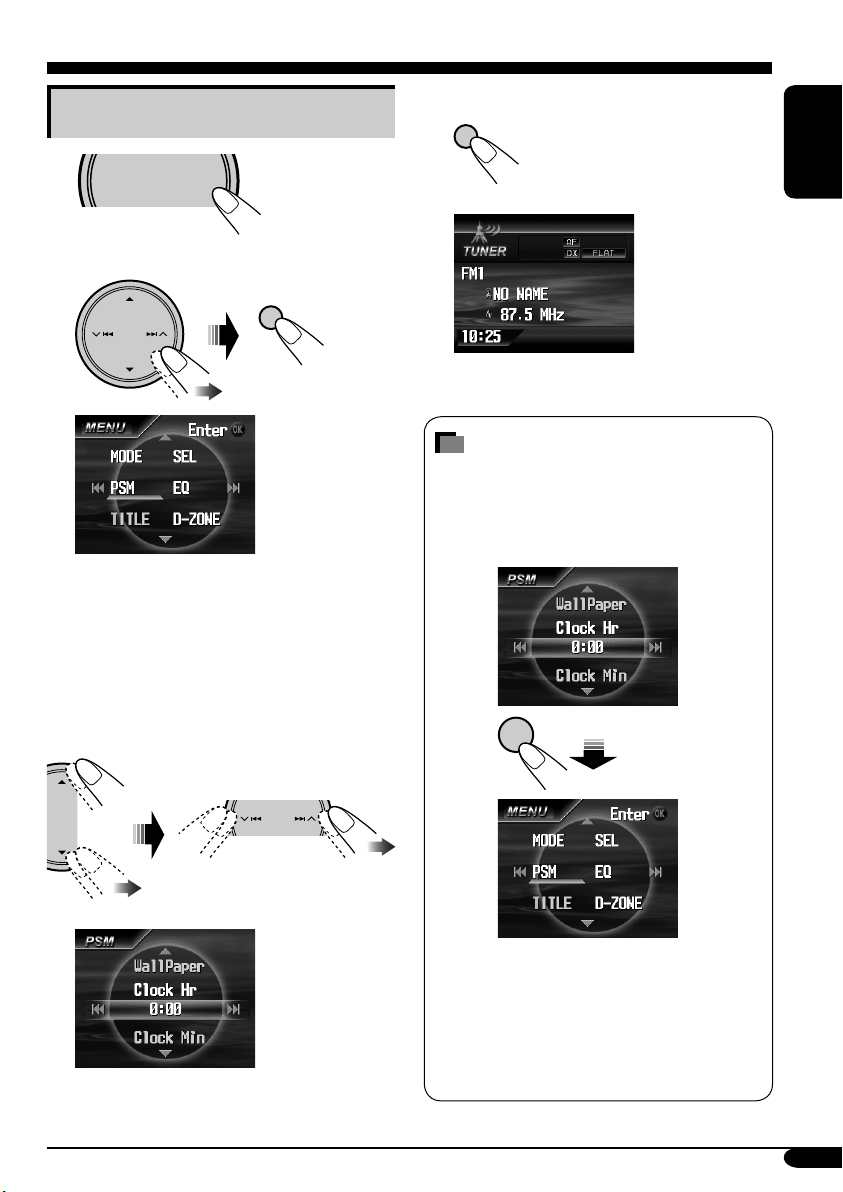
Setting the clock
D
1
SOURCE
2
Select “PSM” menu.
3 Set the hour and minute.
1 Select “Clock Hr” (hour), then
adjust the hour.
2 Select “Clock Min” (minute), then
adjust the minute.
3 Select “24H/12H”, then select
“24Hours” or “12Hours”.
MENU
OK
4 Finish the procedure.
OK
How to go back to the previous
menu
In the menu operations, you can go back
to the previous screens by pressing BACK
repeatedly.
Ex.:
BACK
BAN
ENGLISH
• Press BACK repeatedly to go back to the
previous screens in operations explained
on the following pages when no particular
explanation exists.
• To cancel menu operations and return to
the source screen, press D DISP.
11
Page 12
Radio operations
ENGLISH
SOURCE
MENU
Listening to the radio
BACK
BAND
~
Ÿ
Lights up when receiving an FM stereo
broadcast with sufficient signal strength.
Selected band appears.
BACK
SOURCE
TUNER (FM1/2/3,AM)
BAND
MENU
! Start searching for a station.
To tune in to a station manually
In step ! on the left column...
1
2 Select the desired station frequencies.
12
When a station is received, searching
stops.
To stop searching, press the same
button again.
Page 13
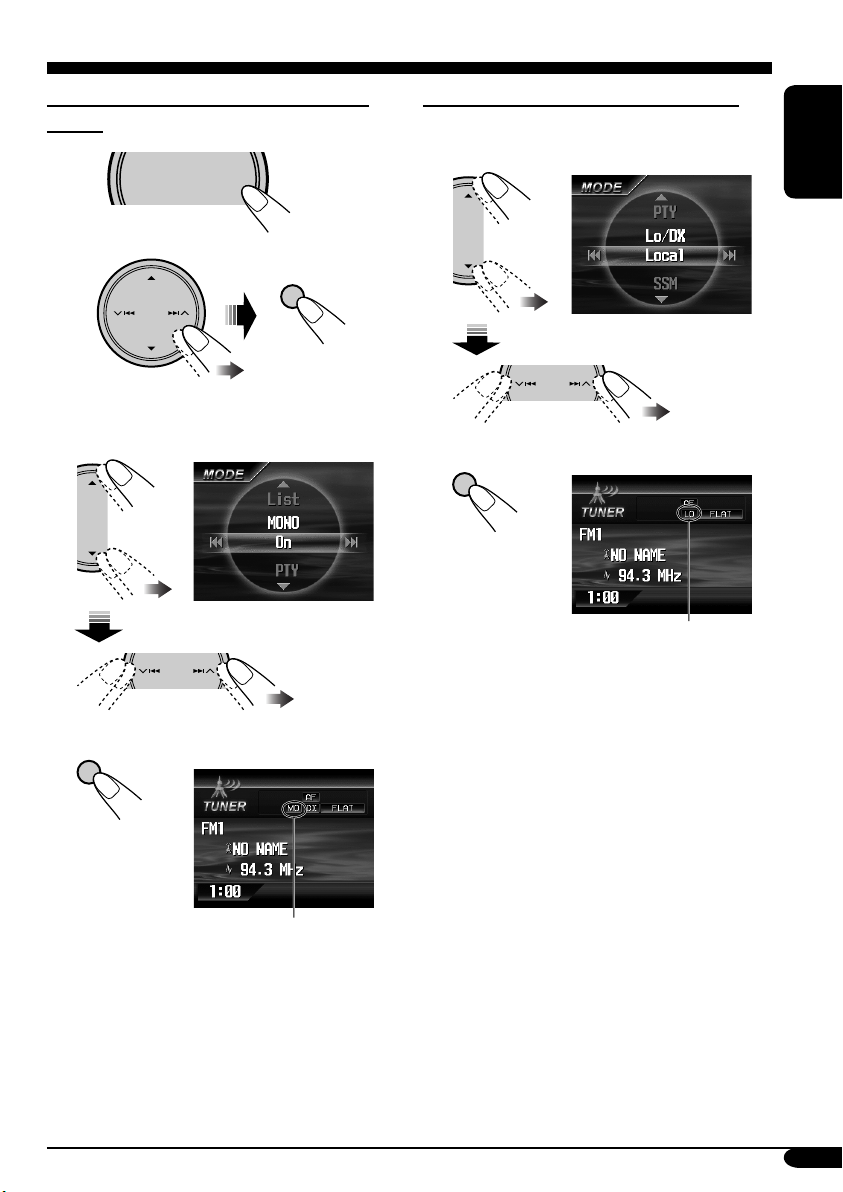
When an FM stereo broadcast is hard to
receive
1
SOURCE
2 Select “MODE” menu.
MENU
OK
To tune in strong-signal FM station only
In step 2 on the left column....
1 Select “Lo/DX”, then set it to “Local”.
ENGLISH
3 Select “MONO”, then set it to “On”.
4 Finish the procedure.
OK
Lights up when monaural mode is activated.
Reception improves, but stereo effect will
be lost.
2 Finish the procedure.
OK
Lights up when “Local” mode is activated.
Only stations with sufficient signal strength
will be detected.
To tune in to all receivable stations, repeat
the same procedure to set “Lo/DX” to “DX”.
The LO indicator goes off and the DX indicator
lights up.
To restore the stereo effect, repeat the same
procedure to set “MONO” to “Off”. The MO
indicator goes off.
13
Page 14
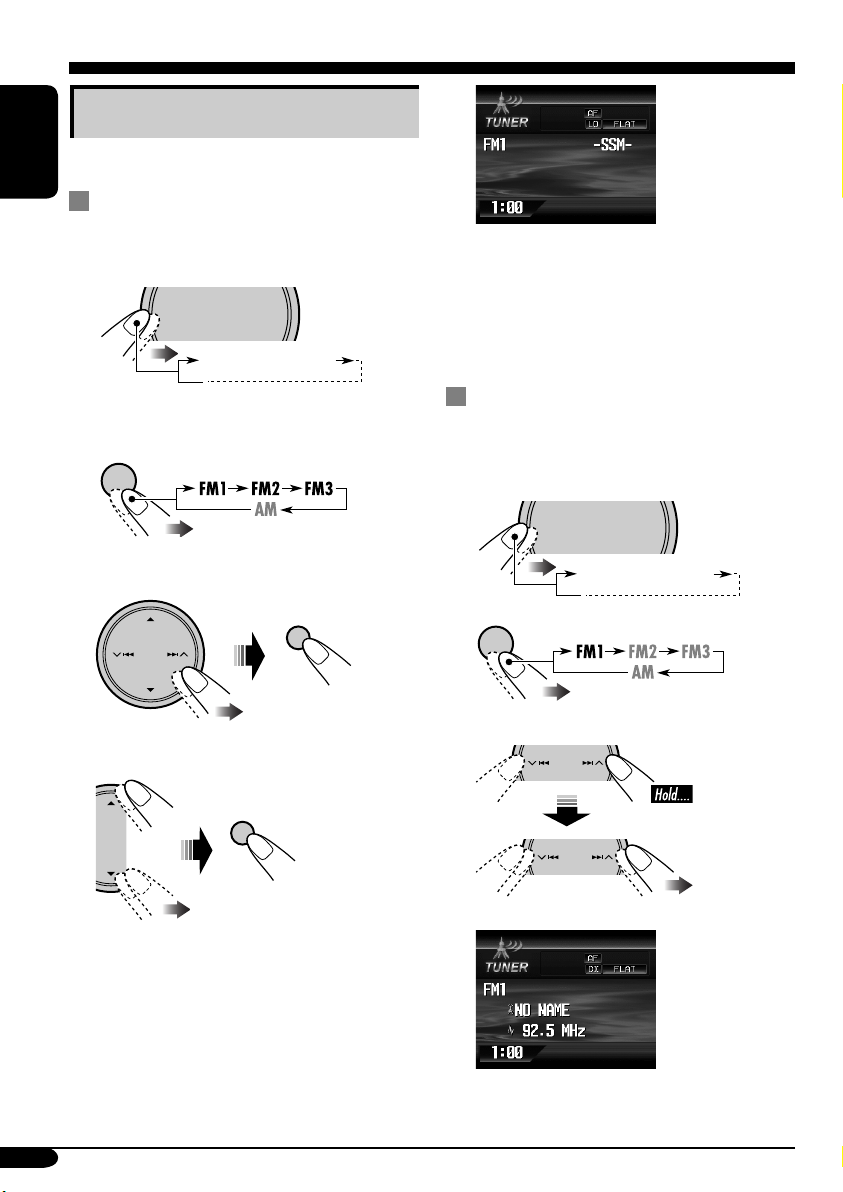
Storing stations in memory
You can preset six stations for each band.
ENGLISH
FM station automatic presetting —
SSM (Strong-station Sequential
Memory)
1
SOURCE
MENU
TUNER (FM1/2/3,AM)
“-SSM-” is shown until automatic presetting
is over.
Local FM stations with the strongest signals are
searched and stored automatically in the FM
band.
2 Select the FM band (FM1 – FM3)
you want to store into.
BACK
BAND
3 Select “MODE” menu.
OK
4 Select “SSM”, then press “OK”.
OK
Manual presetting
Ex.: Storing FM station of 92.5 MHz into the
preset number 1 of the FM1 band.
1
SOURCE
MENU
TUNER (FM1/2/3,AM)
2
BACK
BAND
3
14
Page 15
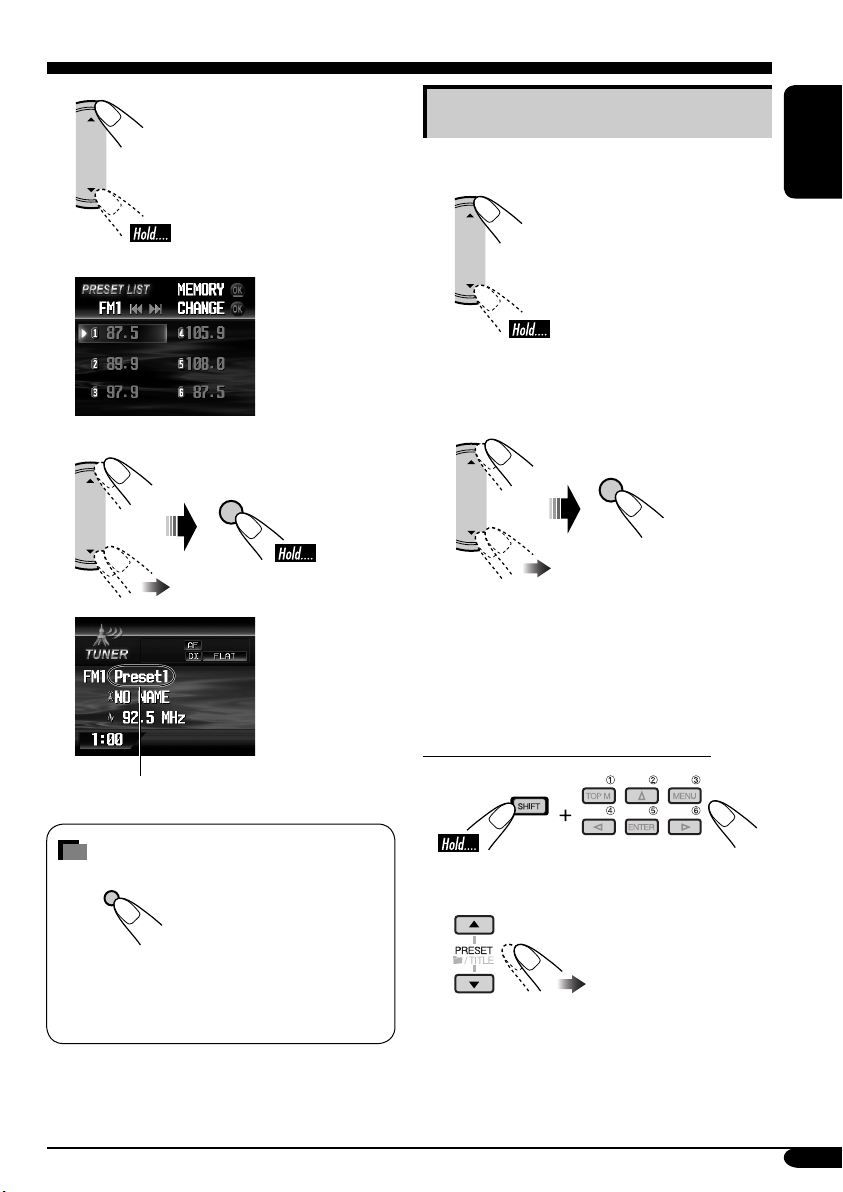
4
PRESET LIST appears.
5
OK
Listening to a preset station
While selecting TUNER as the source....
ENGLISH
1
The preset list appears.
2 Select the preset station (1 – 6) you
want.
OK
• You can also move to the preset list by
selecting “List” on the “MODE” menu. See
“When an FM stereo broadcast is hard to
receive” on page 13 to see how to move into
the “MODE” menu.
“Preset1” flashes for a while.
How to exit from menus or lists
DISP
D
Menu or list operations are canceled and the
screen returns to the source screen or DVD/
VCD/JPEG playback.
When using the remote controller....
or
15
Page 16
FM RDS operations
Searching for your favorite FM RDS programme
ENGLISH
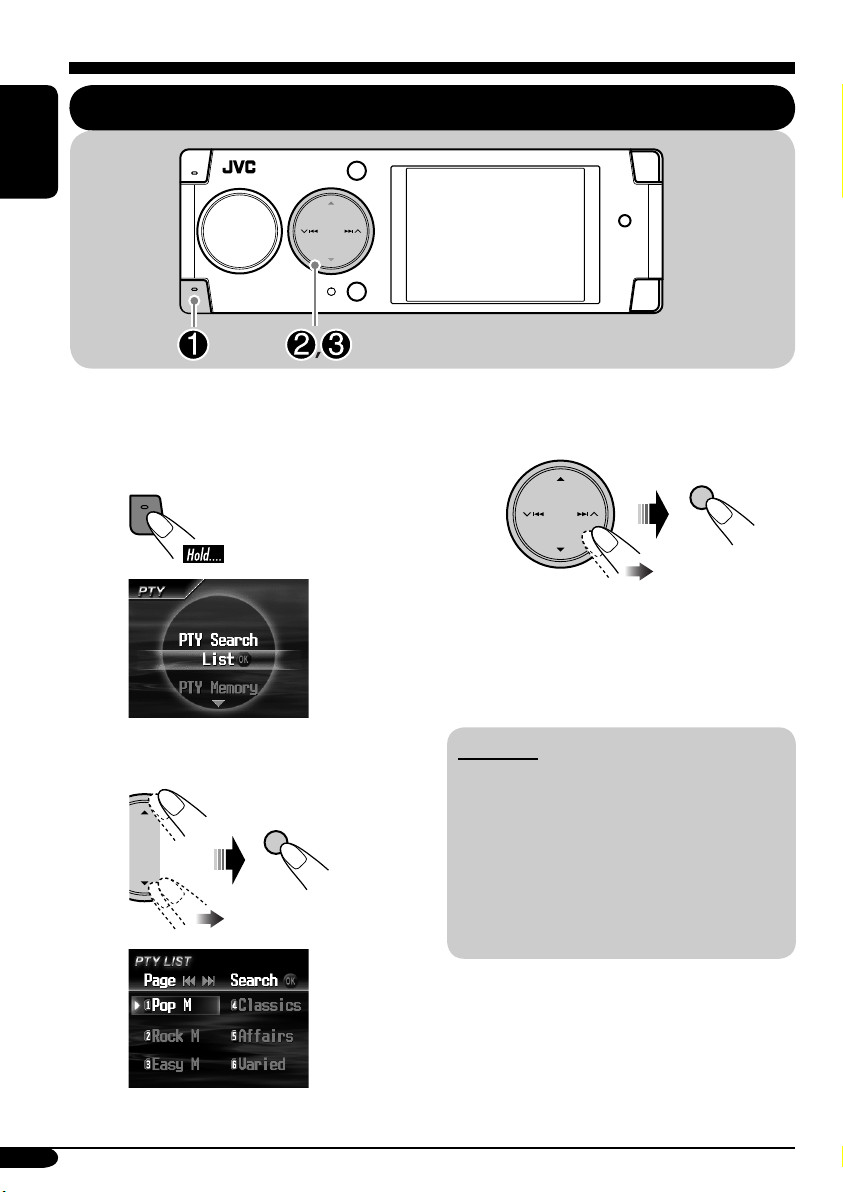
T/P
You can tune in to a station broadcasting your
favorite programme by searching for a PTY code.
•
To store your favorite programme, see page
17.
T/P
BACK
BAND
~
PTY menu appears.
Ÿ Select “PTY Search”.
OK
! Select one of the twenty-nine PTY
codes.
OK
If there is a station broadcasting a
programme of the same PTY code as
you have selected, that station is tuned
in.
PTY codes
News, Affairs, Info, Sport, Educate, Drama,
Culture, Science, Varied, Pop M (music),
Rock M (music), Easy M (music),
Light M (music), Classics, Other M (music),
Weather, Finance, Children, Social, Religion,
Phone In, Travel, Leisure, Jazz, Country,
Nation M (music), Oldies, Folk M (music),
Document
PTY LIST appears.
16
Page 17
What you can do with RDS
RDS (Radio Data System) allows FM
stations to send an additional signal along
with their regular programme signals.
By receiving the RDS data, this receiver can
do the following:
•
Programme Type (PTY) Search (see page 16)
• Temporarily switches to Traffic
Announcement—TA Standby Reception.
(See
the right column
•
Temporarily switches to your favorite
programme—PTY Standby Reception. (See
pages 18 and 45.)
•
Tracing the same programme automatically
—Network-Tracking Reception
(See
page 18
• Programme Search (See page 45.)
.)
.)
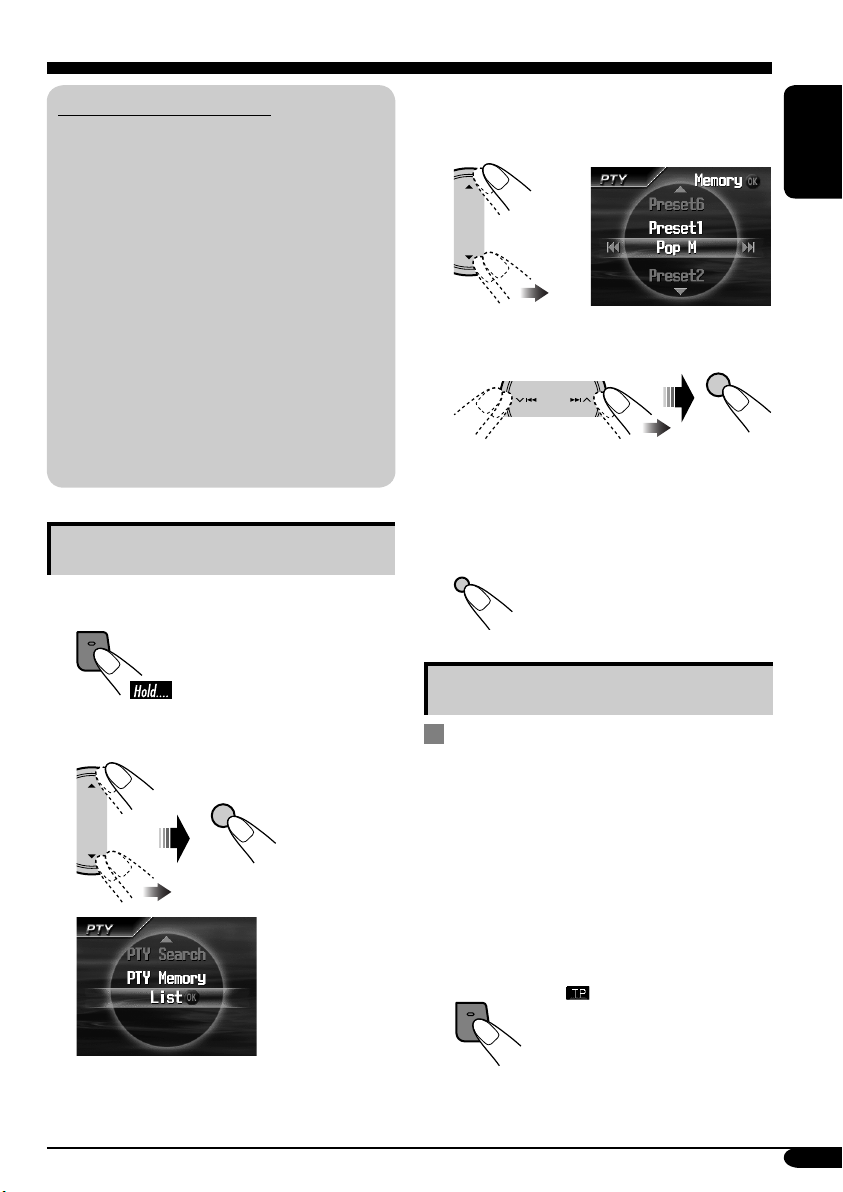
Storing your favorite programmes
You can store six favorite programme types.
T/P
1
3 Select a preset number (Preset1–6)
you want to store the programme
into.
ENGLISH
4 Select a PTY code you want to store.
OK
The selected preset number and PTY code
flash for a while.
5 Finish the procedure.
DISP
D
2 Select “PTY Memory”.
OK
Using the standby receptions
TA Standby Reception
TA Standby Reception allows the receiver to
switch temporarily to Traffic Announcement
(TA) from any source other than AM.
• The volume changes to the preset TA volume
level (see page 45).
• If the DAB tuner is connected, Standby
Reception also works to search for a DAB
service.
To activate TA Standby Reception
T/P
either lights up or
flashes.
To be continued....
17
Page 18
• If lights up, TA Standby Reception is
activated.
• If
flashes, TA Standby Reception is not
yet activated. (This occurs when you are
listening to an FM station without the RDS
ENGLISH
signals required for TA Standby Reception.)
To activate TA Standby Reception, tune in to
another station (or DAB service) providing
these signals.
remain lit.
will stop flashing and
To deactivate the TA Standby Reception
T/P
goes off.
PTY Standby Reception
PTY Standby Reception allows the receiver
to switch temporarily to your favorite PTY
programme from any source other than AM.
• If the DAB tuner is connected, Standby
Reception also works to search for a DAB
service.
To deactivate the PTY Standby Reception,
select “OFF” on “PTY” in the “MODE” menu.
goes off.
• See “When an FM stereo broadcast is hard to
receive” on page 13 to see how to move into
the “MODE” menu.
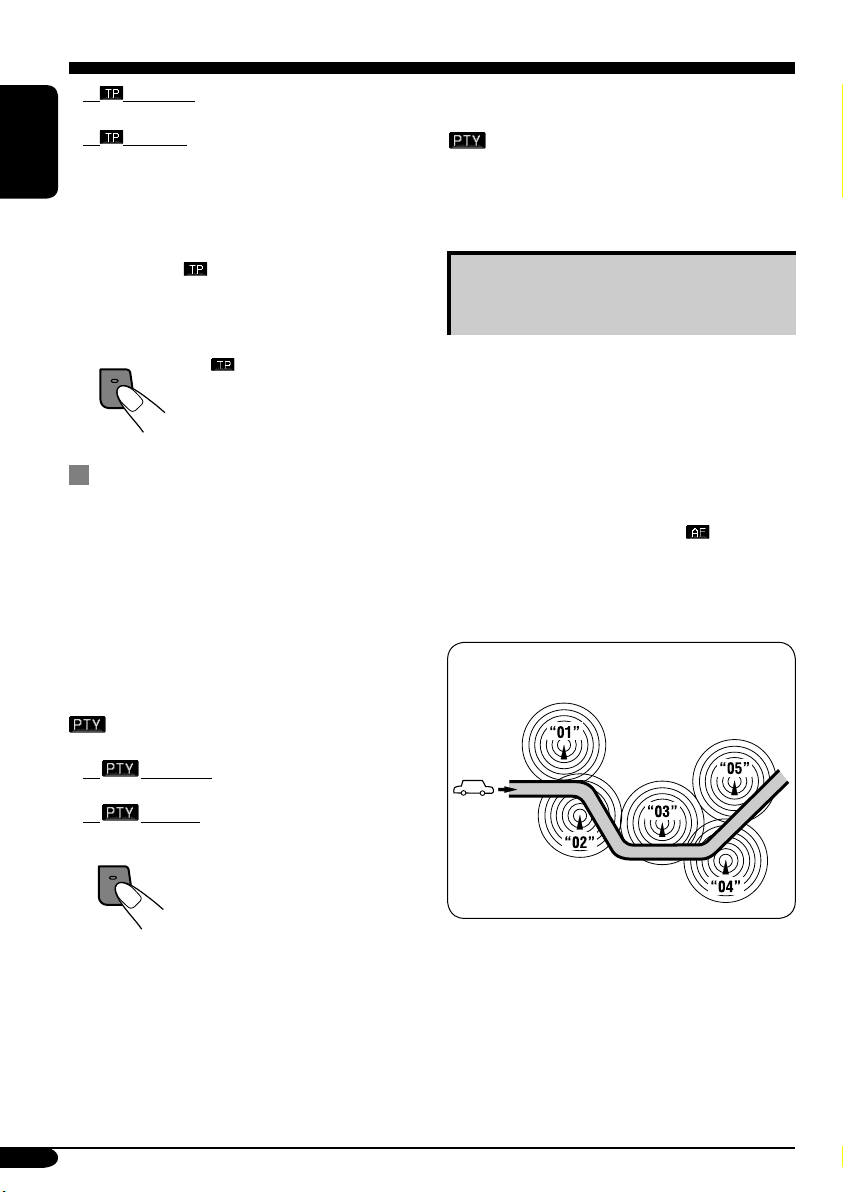
Tracking the same programme—
Network-Tracking Reception
When driving in an area where FM reception
is not sufficient enough, this receiver
automatically tunes in to another FM RDS
station of the same network, possibly
broadcasting the same programme with stronger
signals (see the illustration below).
When shipped from the factory, NetworkTracking Reception is activated (
when the power is turned on for the first time).
To change the Network-Tracking Reception
setting, see “AF-Regn’l” on page 45.
lights up
To activate and select your favorite PTY
code for PTY Standby Reception, see page
45.
either lights up or flashes.
• If
• If
To activate PTY Standby Reception, tune in
to another station (or DAB service) providing
these signals. The PTY indicator will stop
flashing and remain lit.
18
lights up, PTY Standby Reception is
activated.
flashes, PTY Standby Reception is
not yet activated.
T/P
Programme A broadcasting on different
frequency areas (01 – 05)
Page 19
Disc operations
Playing a disc in the receiver
ENGLISH
The disc type is automatically detected, and
playback starts automatically (for DVD:
automatic start depends on its internal program).
If the current disc is an audio CD, CD Text,
MP3/WMA, JPEG, or VCD without PBC,
all tracks will be played repeatedly until you
change the source or eject the disc.
• If a title list or disc menu appears while
playing a DVD or VCD with PBC, see “Disc
menu operations” on page 24.
The following marks are used to indicate
the playable discs....
DVD Video Video CD with PBC
only
Video CD with/without
PBC
Audio CD/
CD Text
JPEG
MP3/WMA disc
JPEG disc
Before performing any operations, make
sure the following....
• For DVD playback, you can change the Setup
Menu setting to your preference. (See pages
30 – 33.)
• The operations explained on pages 21 – 29 are
using the remote controller.
•
use on the unit.
• When you want to operate the DVD/CD
player using the buttons on the control panel,
see “Other disc operations” on pages 35 – 39.
If “
pressing a button, the receiver cannot accept
an operation you have tried to do.
• In some cases, without showing “
• Microsoft and Windows Media are either
registered trademarks or trademarks of
Microsoft Corporation in the United States
and/or other countries.
shows functions which you can also
” appears on the monitor when
”,
operations will not be accepted.
All discs listed here
19
Page 20
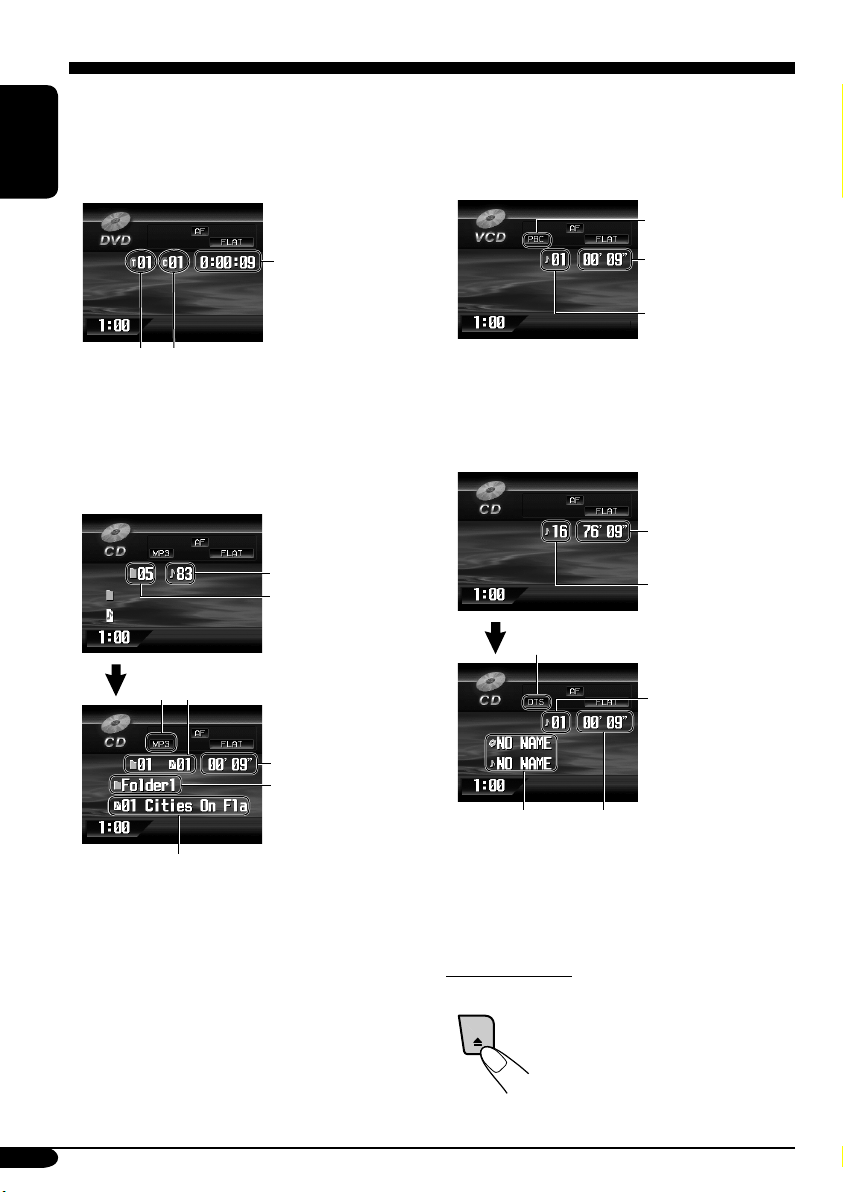
• When inserting a DVD disc:
DVD playback starts automatically on the
monitor when the parking brake is applied.
The screen such as below appears when
pressing D DISP.
ENGLISH
• When inserting a VCD:
VCD playback starts automatically on the
monitor when the parking brake is applied.
The screen such as below appears when
pressing D DISP.
PBC indicator*4
Elapsed
playing time
Current title
number
Current chapter
number
• To return to DVD playback, press D DISP
again.
• When inserting an MP3/WMA/JPEG*1 disc
Ex.: When an MP3 file is detected
Total track number
Total folder number
Current folder/track number
*2
Elapsed
playing time*3
Current folder name
Current track name
1
*
Each time you press D DISP, the monitor
changes between the source screen and
JPEG playback.
2
*
Either the MP3 or WMA indicator lights up
depending on the detected file.
3
*
Does not appear for JPEG disc.
Elapsed
playing time
Current track
number
4
*
Light up when the disc has the PBC function.
• To return to VCD playback, press D DISP
again.
• When inserting a CD Text/audio CD:
:
Total playing time
of the inserted disc
Total track number
of the inserted disc
DTS indicator*5
Current track
number
*6
5
*
Appears when playing back a DTS CD.
6
*
Disc title/performer and track title are
Elapsed
playing time
displayed when playing a CD Text.
To eject the disc
20
Page 21
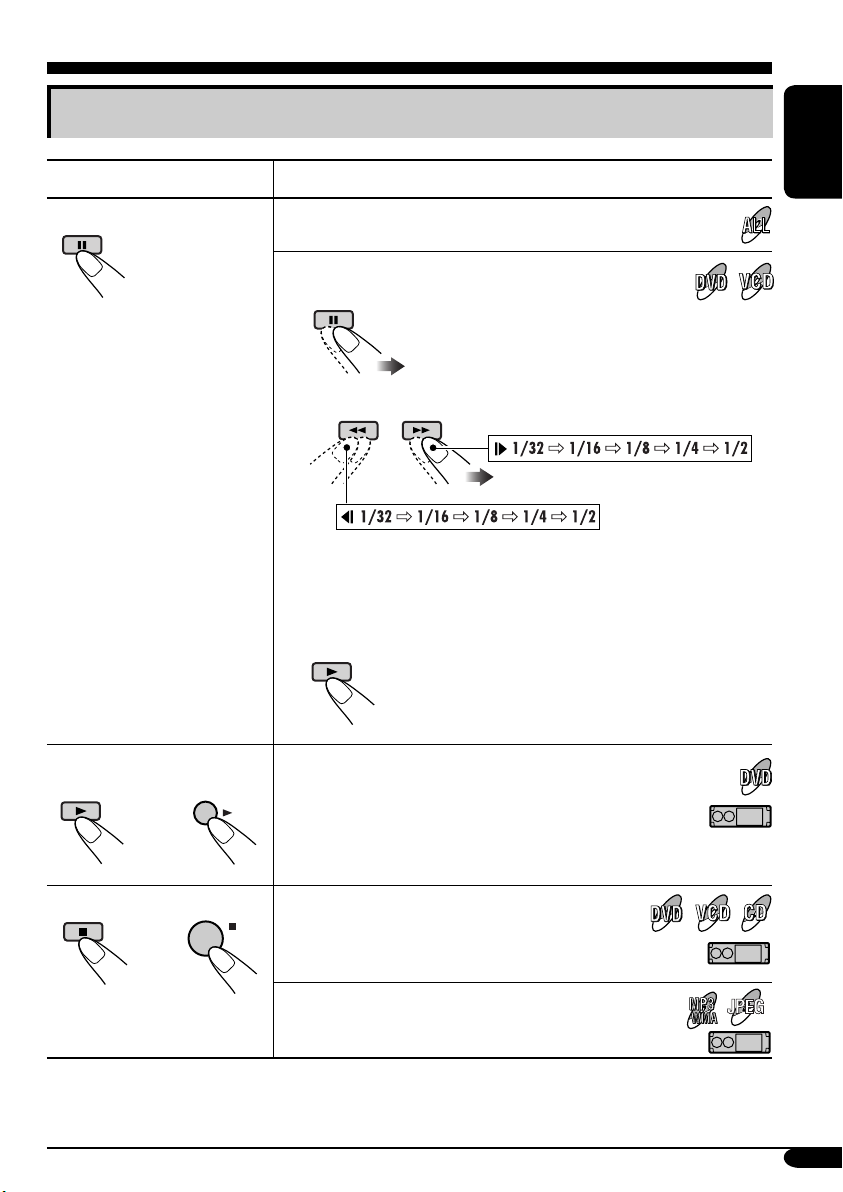
Basic operations
Operations Monitor indication and/or next operation
To stop play temporarily
To replay the previous
scenes—One Touch Replay
OK
Playback is paused.
A still picture appears.
A Frame by frame playback
B Slow motion playback
• No sound comes out during Slow Motion Playback.
• When playing a VCD, Reverse Slow Motion Playback is
prohibited.
To resume normal play:
The playback position moves back about 10 seconds
before the current position.
• This function works only within the same title.
• For some DVDs, this function does not work.
ENGLISH
To stop playback
BACK
When you start playback again, playback
starts from where it has been stopped
BAND
(Resume play).
When you start playback again, playback starts from
the beginning of the last track.
• During play, on-screen guide icons appear on the monitor for a while (see page 64).
To be continued....
JPEG
21
Page 22
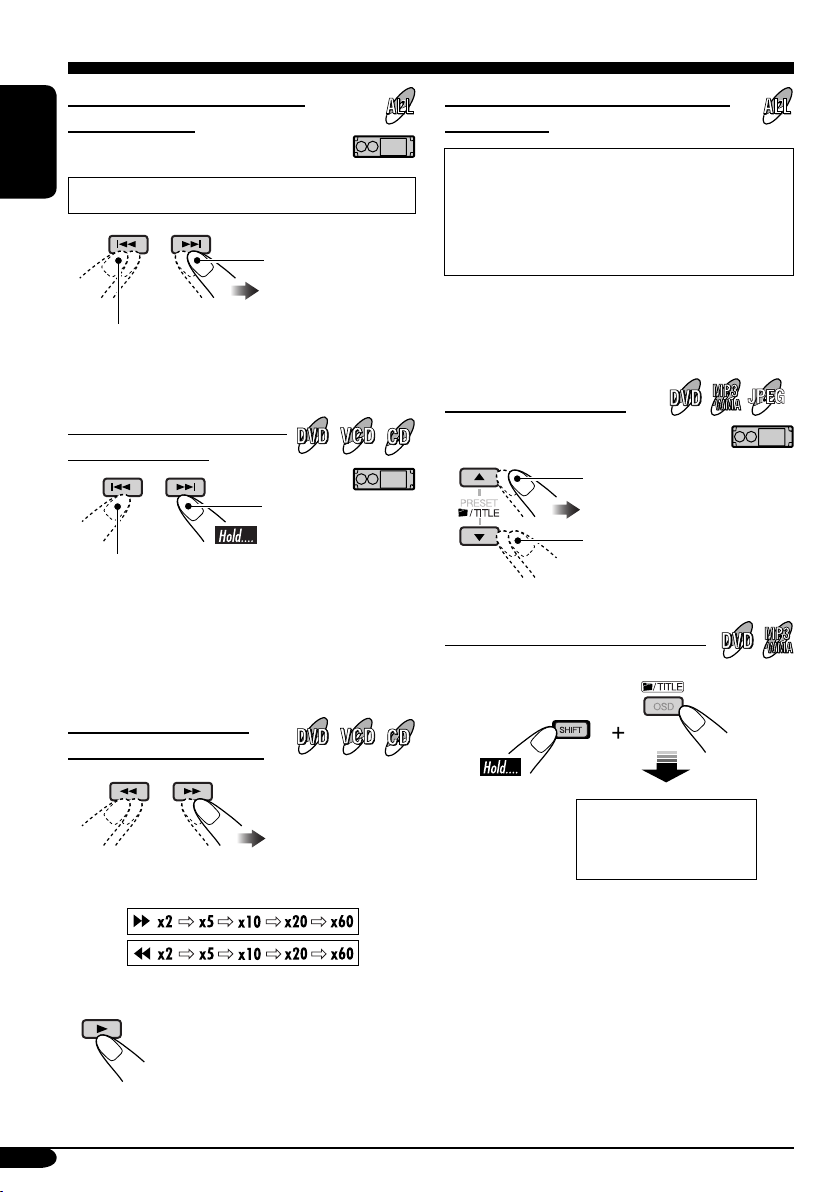
To go to the next or previous
chapters/tracks
To locate a particular title/chapter/
track directly
ENGLISH
• For DVD: During play or pause
To the following
chapters/tracks.
To go back to the beginning of the current
chapter/track, then the previous chapters/tracks.
To fast-forward or reverse
the chapter/track
Fast-forwards.
Reverses.
* The search speed changes to x2 ] x10 for all
discs (DVD, VCD, CD), but the information
shown on the monitor is only for DVD/VCD.
To forward or reverse
search the chapter/track
• For DVD: During play or pause—select a
chapter.
During stop—select a title.
• For MP3/WMA/JPEG: Select a track
within the same folder.
Select the number corresponding to the item
you want (see page 9).
To locate a title/folder
To the next title/folder.
To the previous title/folder.
JPEG
To locate a particular title/folder
The information shown is only for DVD/VCD:
• To resume normal speed
22
Within 10 seconds,
press the number
buttons (see page 9).
IMPORTANT:
• For MP3/WMA discs: It is required that folders are assigned with 2-digit number at the
beginning of their folder names—01, 02, 03,
and so on.
Page 23

DVD/VCD special functions
Selecting audio languages
For DVD:
You can select the language to listen to if
the disc has multiple audio languages.
1/3
ENGLISH
Ex.: When the disc has 3 options
For VCD:
You can select the audio channel to
play. (This is convenient when playing a
Karaoke VCD.)
ST
1/3
ENGLISH
ST
Selecting subtitles
You can select the language of the subtitle
to be shown on the monitor.
• You can set the initial subtitle language
using the setup menu (see page 30).
1/3
ENGLISH
1/3
ENGLISH
Ex.: When the disc has 3 options
• For some DVDs and VCDs, changing the
subtitle language, audio language (or audio
channel) without using the disc menu is
prohibited.
Selecting multi-angle views
You can view the same scene at different
angles if the disc has multi-angle views.
ENGLISH
To listen to normal stereo (left/right)
ST:
playback.
To listen to the L (left) audio channel.
L:
To listen to the R (right) audio channel.
R:
1/3
1
1/3
1
1/3
1
1/3
3
Ex.: When the disc has 3 multi-angle views
1/3
2
23
Page 24
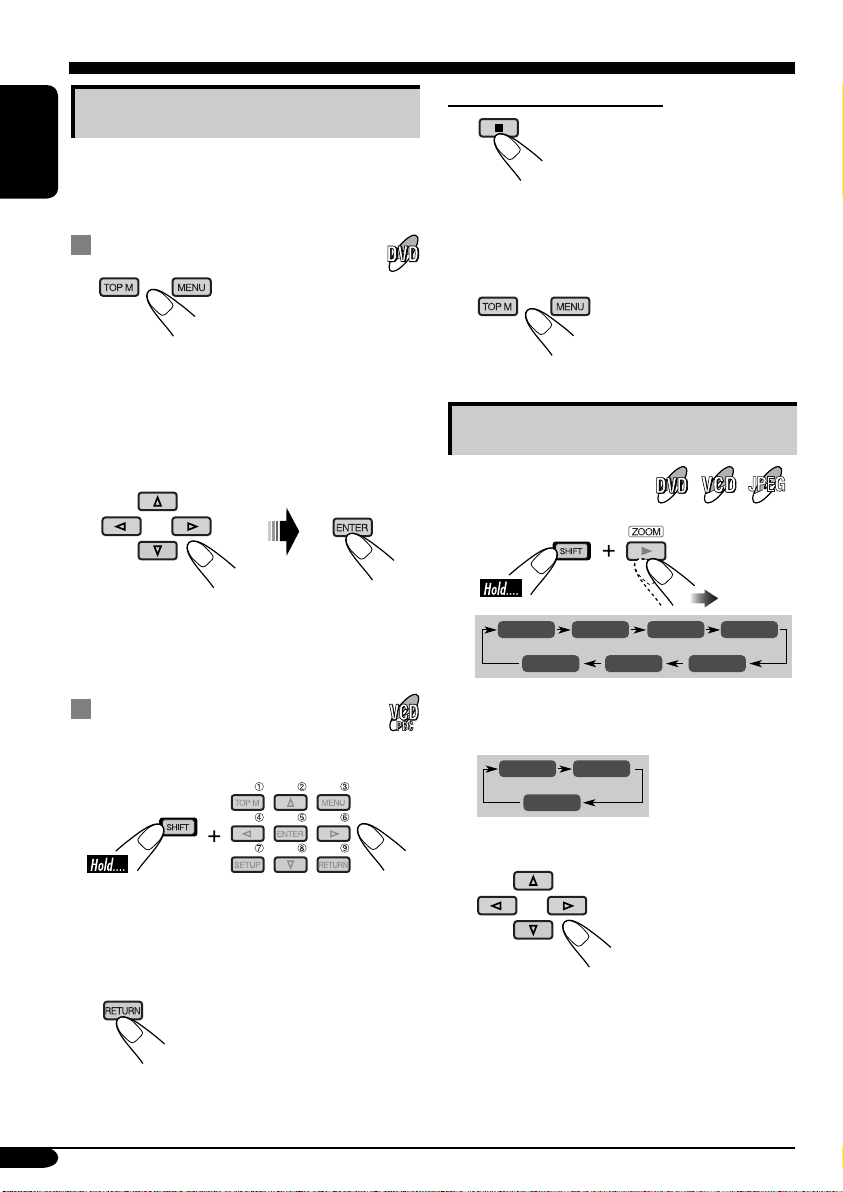
Disc menu operations
Menu-driven playback is possible while playing
back a DVD with menu-driven features or a
ENGLISH
VCD with the PBC (PlayBack Control).
While playing a DVD
1
A title list or disc menu will appear on the
monitor.
Canceling the PBC playback
1
2 Select a track to start normal playback using
the number buttons (see page 9).
To resume the PBC function
2 Select the item you want on the
menu.
Selected item starts playback.
• On some discs, you can also select items
using the corresponding number buttons.
While playing a VCD
• When a list of items is displayed on the
monitor.
• To select a number greater than 9, see “How
to select a number” on page 9.
To return to the previous menus
Zoom in
1
ZOOM 1 ZOOM 2 ZOOM 3 ZOOM 4
ZOOM OFF
• For JPEG disc (effective only when
pausing):
ZOOM 1 ZOOM 2
ZOOM OFF
2 Move the zoomed-in position.
• For JPEG files:
You cannot move the zoomed-in position
when the entire picture is still displayed
on the monitor.
ZOOM 5ZOOM 6
JPEG
24
To cancel zoom, select “ZOOM OFF” in
step 1.
Page 25

On-Screen disc operations
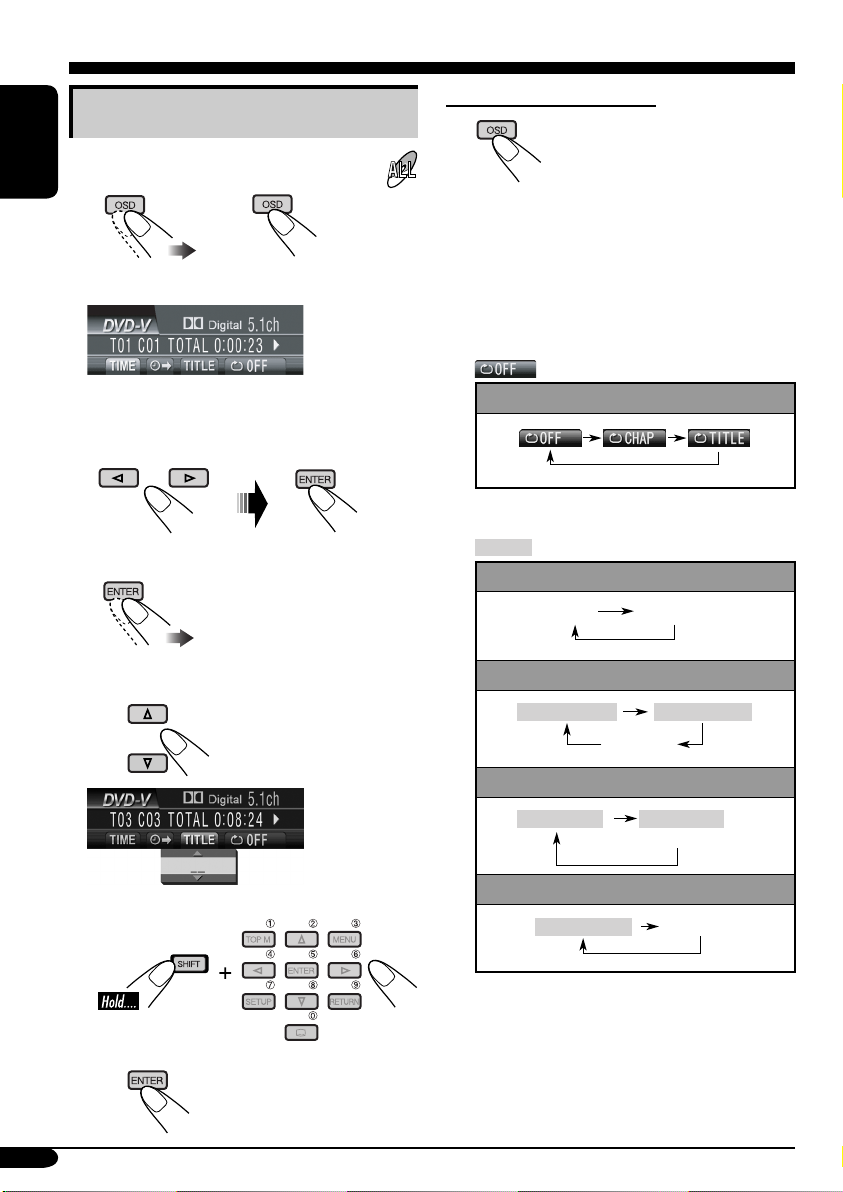
About the On-Screen Bar
You can check the disc information and use
some functions through the on-screen bar.
• For audio CD, CD Text, and MP3/WMA
disc you can use the on-screen bar only
when using an external monitor and Dual
Zone is on (see page 40).
• For audio CD, CD Text, and MP3/WMA
disc you can also use the control screen
and list screen (see pages 28 and 29).
On-Screen bars
DVD
VCD
MP3/WMA
FILE
REPEAT
REPEAT TRACK
RANDOMINTRO
TIME 00:00:36
1 Disc type
2 • Audio signal format type (for DVD and
DTS CD)
• PBC (only for VCD)
3 Current playback mode
4 Playback information
T01 C01 Current title/chapter
TRACK 01 Current track (for VCD)
TOTAL Elapsed playing time of the disc
T. REM
Remaining disc time (for VCD)/
remaining title time (for DVD)
TIME Elapsed playing time of the
current chapter/track
REM Remaining time of the current
chapter/track
5 Playback condition
, Playback
, Forward/reverse search
, Forward/reverse slow-
motion
, Pause
, Stop
6 Operation icons
Time indication
, Time Search—Enter the
elapsed playing time of the
current title or of the disc.
Title Search
Repeat play (for DVD)
REPEAT
, Repeat play
INTRO
, Intro play
RANDOM
, Random play
ENGLISH
JPEG
REPEAT
OFF ‰FOLDER
CD Text/audio CD
*
REPEAT
5. 1ch
RANDOMINTRO
CD
* Only for DTS CD
REPEAT TRACK
TIME 00:36
25
Page 26
Basic on-screen bar operations
1 Display the on-screen bar.
ENGLISH
or
(twice) (DVD, VCD)
(CD Text/audio CD,
MP3/WMA, JPEG)
To erase the on-screen bar
• The on-screen bar for a CD or MP3/WMA/
JPEG disc automatically disappears in a few
seconds after the last operation.
• The selectable options for Repeat/Intro/
Randam plays:
When a JPEG disc is loaded, skip to step 3.
2 Select an item.
3 Make a selection.
• If pop-up menu appears....
1
or
Repeat play (See page 37.)
DVD:
REPEAT
, REPEAT Repeat play (See page 37.)
VCD (while PBC is not in use):
REPEAT
MP3/WMA:
REPEAT TRACK
(Canceled)
JPEG:
FOLDER ‰ OFF
CD Text/audio CD:
REPEAT TRACK
(Canceled)
REPEAT FOLDER
OFF ‰ FOLDER
(Canceled)
(Canceled)
26
2
Page 27

INTRO
, INTRO Intro play (See page 38.)
VCD (while PBC is not in use):
INTRO
MP3/WMA:
INTRO TRACK
(Canceled)
CD Text/audio CD:
INTRO TRACK
RANDOM
, RANDOM
Random play (See page 38.)
VCD (while PBC is not in use):
RANDOM
MP3/WMA:
RANDOM FOLDER
(Canceled)
CD Text/audio CD:
RANDOM DISC
(Canceled)
INTRO FOLDER
(Canceled)
(Canceled)
RANDOM DISC
(Canceled)
To search for a particular point by playing
time
1 Select (or ).
2 Enter the elapsed playing time of the current
title or of the disc.
Ex.: • To enter 1 (hours): 02 (minutes): 00
(seconds), press 1, 0, 2, 0, then 0.
• To enter 54 (minutes): 00 (seconds),
press 0, 5, 4, 0, then 0.
• It is always required to enter the hour
digit (even “0” hour), but it is not
required to enter trailing zeros (the last
two digits in the examples above).
• To correct a misentry, press....
• You can also specify the elapsed playing
time by using % / fi / @ / #.
3 Finish the procedure.
ENGLISH
Refer also page 25 for the following operations.
To change the time information
1 Select .
2 Change the time information.
TIME 0:00:58
REM 0:11:23
TOTAL 1:01:58T. REM 0:35:24
To search for a particular title
1 Select .
2 Enter the number.
• To correct a misentry, press the number
button until the correct number is entered.
3 Finish the procedure.
27
Page 28
Basic control screen operations
You can search for and play the desired items
through the control screen when using the
ENGLISH
external monitor.
• The control screen automatically appears on
the monitor when you insert a disc (external
monitor only).
• JPEG control screen appears only when
playback stops.
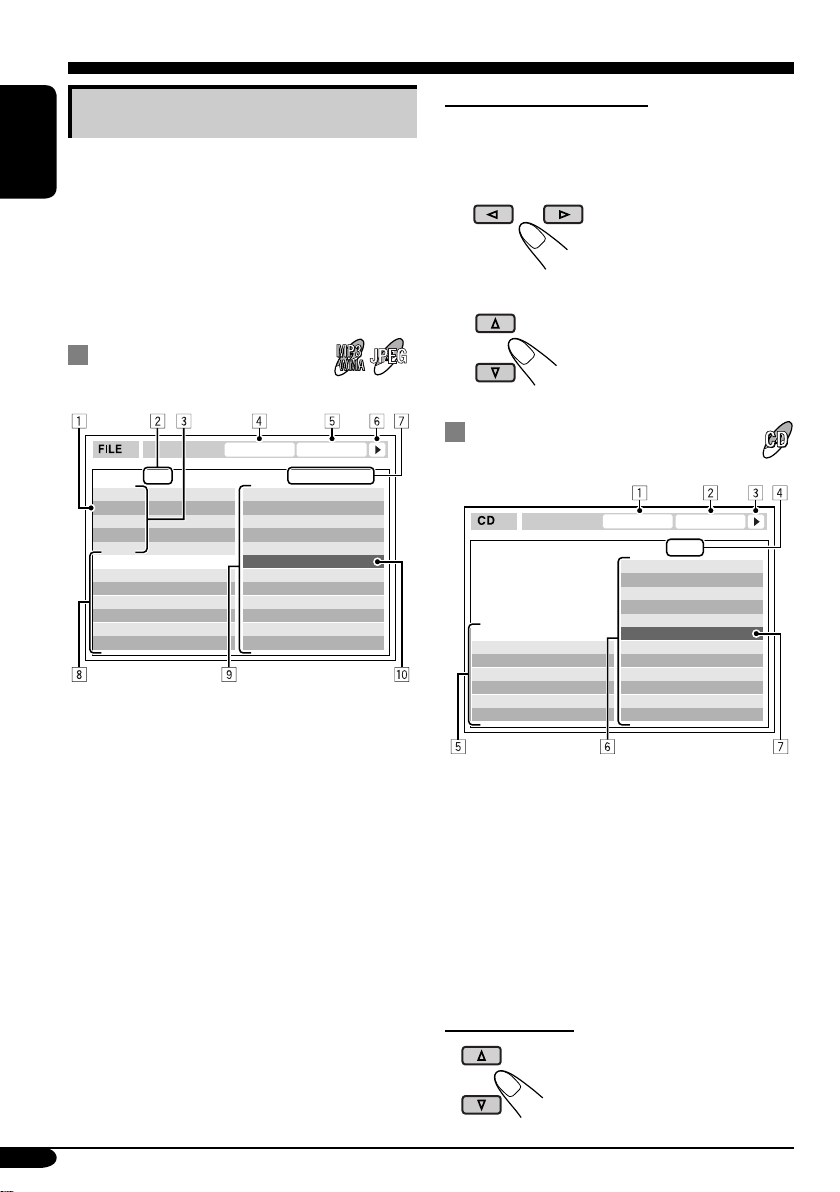
To select a folder or track
While Dual Zone (see page 40) is on....
1 Select “Folder” column or “Track” column
on the control screen.
2 Select a folder or track.
MP3/WMA/JPEG control
JPEG
screen
TIME 00:00:14REPEAT TRACK
Folder : 2 / 3
01 Music
02 Music
03 Music
Track Information
Album
Weather
Artist
Robert M. Smith
Title
Rain
1 Current folder
2 Current folder number/total folder number
3 Folder list
4 Selected playback mode
5 Elapsed playing time of the current track
(MP3/WMA only)
6 Operation mode icon (MP3/WMA only)
‰ (play), 7 (stop), 8 (pause)
7 Current track (file) number/total number
of tracks (files) in the current folder (total
number of tracks/files on the disc)
8 Track information (MP3/WMA only)
9 Track (file) list
p Current track (file) (highlighted bar)
Track : 5 / 14 (Total 41)
Cloudy.mp3
Fair.mp3
Fog.mp3
Hail.wma
Indian summer.mp3
Rain.mp3
Shower.mp3
Snow.mp3
Thunder.wma
Typhoon.mp3
Wind.mp3
Winter sky.mp3
CD Text/audio CD control
screen
REPEAT TRACK
Track Information
Album
Four seasons
Artist
Robert M. Smith
Title
Rain
1 Selected playback mode
2 Elapsed playing time of the current track
3 Operation mode icon
‰ (play), 7 (stop), 8 (pause), ¡ (fast-
forward), 1 (reverse)
4 Current track number/total number of tracks
on the disc
5 Track information
6 Track list
7 Current track (highlighted bar)
To select a track
TIME 00:14
Track : 5 / 14
Cloudy
Fair
Fog
Hail
Indian summer
Rain
Shower
Snow
Thunder
Typhoon
Wind
Winter sky
28
Page 29

List screen operations
You can display the folder list/track list before
starting play when using the external monitor
and Dual Zone function (see page 40). On this
list, you can confirm the contents and start
playing a disc.
Folder/track list
screens
Folder list (MP3/WMA/JPEG)
JPEG
For MP3/WMA/JPEG:
While Dual Zone is on and the disc play stops....
1 Display the folder list.
Each time you press the button,
the list screen comes on and
goes off.
2 Select a folder on the list.
ENGLISH
Folder : 153/240 Track 154/198 Page : 4/6
fol130
fol131
fol132
fol133
fol134
fol135
fol136
fol137
fol138
fol139
fol140
fol141
fol142
fol143
fol144
fol145
fol146
fol147
fol148
fol149
fol150
fol151
fol152
fol153
fol154
fol155
fol156
fol157
fol158
fol159
fol160
fol161
fol162
fol163
fol164
fol165
fol166
fol167
fol168
fol169
Track list (MP3/WMA/JPEG/CD Text/audio
CD)
Folder : 153/240 Track 154/198 Page : 4/6
file0131.mp3
file0132.mp3
file0133.wma
file0134.mp3
file0135.mp3
file0136.wma
file0137.wma
file0138.mp3
file0139.mp3
file0140.wma
file0141.mp3
file0142.mp3
file0143.mp3
file0144.mp3
file0145.wma
file0146.mp3
file0147.wma
file0148.mp3
file0149.wma
file0150.wma
file0151.wma
file0152.mp3
file0153.wma
file0154.mp3
file0155.mp3
file0156.mp3
file0157.mp3
file0158.wma
file0159.wma
file0160.wma
Ex.: Track list for MP3/WMA
file0161.wma
file0162.mp3
file0163.wma
file0164.mp3
file0165.wma
file0166.wma
file0167.wma
file0168.wma
file0169.mp3
file0170.wma
1 Current folder number/total folder number
(only for MP3/WMA/JPEG)
2 Current track number/total number of tracks
in the current folder (for MP3/WMA/JPEG)
or in the disc (for CD Text/audio CD)
3 Current page/total number of the pages
included in the list
4 Current folder/track (highlighted bar)
The track list of the selected folder appears.
To go back to the folder list
3 Select a track on the list.
For CD Text/audio CD:
While Dual Zone is on and the disc play stops....
1 Display the track list.
Each time you press the button,
the list screen comes on and
goes off.
2 Select a track on the list.
29
Page 30

AV setup menu
You can store the initial disc playback status.
• While playing, no change can be made on the
setup menu.
ENGLISH
Basic setting procedure
While stop....
1
SOURCE
2 Select “MODE” menu.
MENU
OK
MODE menu
when a DVD is
loaded
4 Select an item you want to set up.
Ex.: When selecting “DOWN MIX”
5 Select an option.
OK
To set other items, repeat steps 4 and 5.
6 Finish the procedure.
DISP
D
3 Select “Set Up”.
30
OK
Page 31

You can also set up from the remote controller
when a DVD or a VCD is inserted.
• While playing, no change can be made on the
setup menu.
• When shipped from the factory, the on-screen
languge is set to English. To change the
language, see page 32.
4
AUDIO
DIGITAL AUDIO OUTPUT
DOWN MIX
D. RANGE COMPRESSION
STREAM/PCM
STEREO
DOLBY SURROUND
STEREO
ON
ENGLISH
From the remote controller:
While stop....
1
LANGUAGE
MENU LANGUAGE
AUDIO LANGUAGE
SUBTITLE
ON SCREEN LANGUAGE
ENGLISH
ENGLISH
ENGLISH
ENGLISH
2
AUDIO
DIGITAL AUDIO OUTPUT
DOWN MIX
D. RANGE COMPRESSION
Ex.: When selecting the “AUDIO” menu
STREAM/PCM
STEREO
ON
3 Select an item you want to set up.
5 Select an option.
AUDIO
DIGITAL AUDIO OUTPUT
DOWN MIX
D. RANGE COMPRESSION
STREAM/PCM
STEREO
DOLBY SURROUND
STEREO
ON
6
AUDIO
DIGITAL AUDIO OUTPUT
DOWN MIX
D. RANGE COMPRESSION
To set other items on the same menu
Repeat steps 3 to 6.
To set other items on other menus
Repeat steps 2 to 6.
STREAM/PCM
DOLBY SURROUND
ON
AUDIO
DIGITAL AUDIO OUTPUT
DOWN MIX
D. RANGE COMPRESSION
STREAM/PCM
STEREO
ON
Ex.: When selecting “DOWN MIX”
To return to the normal screen
31
Page 32

Item Contents
MENU LANGUAGE
ENGLISH
AUDIO LANGUAGE
SUBTITLE
ON SCREEN LANGUAGE
(OSD LANGUAGE)
MONITOR TYPE
16:9 4:3 LETTER BOX
4:3 PAN SCAN
OSD POSITION
Position 1 Position 2
Select the initial disc menu language.
Select the initial audio language.
Select the initial subtitle language or erase the subtitle (OFF).
Select the language for the Setup menu called up from the remote
controller (see page 31) and some indications shown on the monitor.
• The language for the menus called up from the unit does not
change.
Select the monitor type to watch a wide screen picture on your
monitor.
• 16:9 : Select this when the aspect ratio of your monitor is 16:9.
• 4:3LB [LETTER BOX] : Select this when the aspect ratio of your
monitor is 4:3. While viewing a wide screen picture, the black bars
appear on the top and the bottom of the screen.
• 4:3PS [PAN SCAN] : Select this when the aspect ratio of your
monitor is 4:3.
While viewing a wide screen picture, the black bars do not appear;
however, the left and right edges of the pictures will not be shown
on the screen.
Select the position of the on-screen bar for CD and MP3/WMA (see
page 25) on the external monitor and AV set up menu from the remote
controller (see page 31).
• 1 : Higher position
• 2 : Lower position
The position of other indications than the on-screen bar does not
change.
MP3/JPEG
Select playback file type when a disc contains both MP3 and JPEG
files.
• MP3 : Plays back MP3/WMA files.
• JPEG : Plays back JPEG files.
Eject the disc and insert it again to make the new setting effective.
• For the LANGUAGE settings, see also the language codes list on page 60.
32
Page 33

Item Contents
DIGITAL AUDIO OUTPUT
(D. AUDIO OUTPUT)
DOWN MIX
D. (Dynamic) RANGE
COMPRESSION
(D. RANGE COMP.)
Select the signal format to be emitted through the DIGITAL OUT
(Optical) terminal on the rear. For details, see page 65.
• PCM ONLY (PCM) : Select this when connecting an amplifier or a
decoder incompatible with Dolby Digital, DTS or MPEG Audio, or
connecting to a recording device.
• DOLBY DIGITAL/PCM (DOLBY DIGITAL) : Select this when
connecting an amplifier or a decoder compatible with Dolby Digital.
• STREAM/PCM (STREAM) : Select this when connecting an
amplifier or a decoder compatible with Dolby Digital, DTS, and
MPEG Audio.
When playing back a multi-channel DVD disc, this setting affects the
signals reproduced through the LINE OUT jacks (and through the
DIGITAL OUT terminal when “PCM ONLY (PCM)” is selected for
“DIGITAL AUDIO OUTPUT (D.AUDIO OUTPUT)”).
• DOLBY SURROUND : Select this when you want to enjoy multi-
channel surround audio by connecting an amplifier compatible with
Dolby Surround to this receiver.
• STEREO : Normally select this.
You can enjoy a powerful sound at low or middle volume levels
while playing a Dolby Digital software.
• AUTO : Select this to apply the effect to multi-channel encoded
software (excluding 1-channel and 2-channel software).
• ON : Select this to always use this function.
ENGLISH
33
Page 34

Monitor adjustments
You can adjust color and brightness of the
monitor on the unit.
While selecting disc (DVD, VCD, or JPEG disc
ENGLISH
only) as the source....
1
SOURCE
MENU
2 Select “MODE” menu.
OK
3 Select “Screen Cont.”
5 Adjust the item.
Ex.: When adjusting “BRIGHT”
• Each time you press 4/¢ ,
the menu screen disappears for a few
seconds and you can see the result of the
adjustment.
To adjust other items, repeat steps 4 and 5.
6 Finish the procedure.
DISP
D
4 Select an item to adjust.
34
Adjustable items
BRIGHT: –15 to 0 to +15
Adjust if the picture is too bright or too
dark.
OK
CONTRAST: –15 to 0 to +15
Adjust the contrast of the bright and dark
portion.
COLOR: –15 to 0 to +15
Adjust the color of the picture—lighter or
darker.
• TINT is fixed though appearing on the menu.
Page 35
Other disc operations
D
In this section, you can learn how to use the
buttons on the control panel in order to operate
the DVD/CD player.
Basic operations
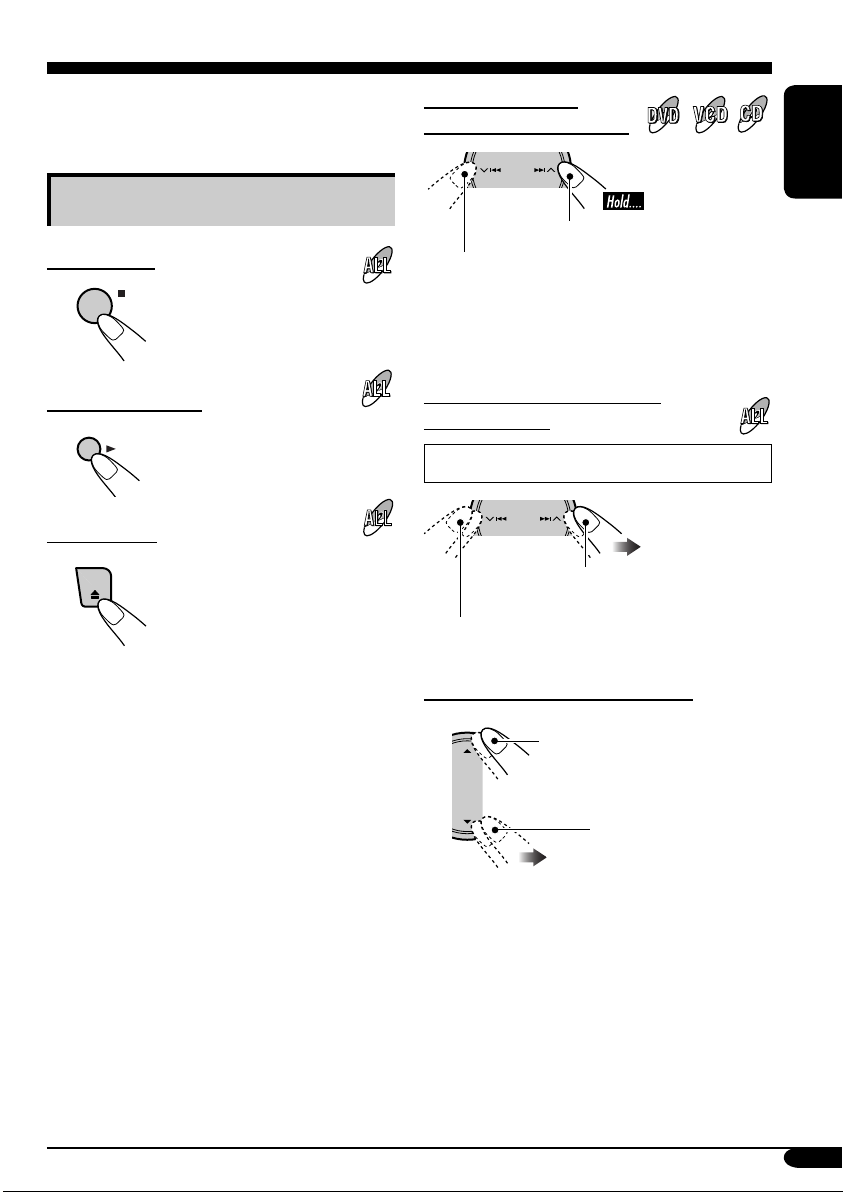
To stop a disc
BACK
BAN
To play a disc again
OK
To eject a disc
To fast-forward or
reverse the chapter/track
ENGLISH
Fast-forwards.
Reverses.
• The search speed changes to x2 ] x10 for all
discs (DVD, VCD, CD), but the information
shown on the monitor is only for DVD/VCD.
To go to the next or previous
chapters/tracks
For DVD: During play or pause
To the following chapters/tracks.
To the beginning of the current chapter/track,
then the previous chapters/tracks.
To go to the next or previous title
To next titles.
To previous titles.
35
Page 36

To go to the next or previous
folders
JPEG
Prohibiting disc ejection
You can lock a disc in the loading slot.
ENGLISH
To previous folders.
To next folders.
• To select a particular track in a folder (for
MP3/WMA disc) after selecting a folder:
To change monitor
indication
DISP
D
• Each time you press D DISP, the monitor
changes between the source screen and DVD/
VCD/JPEG playback.
JPEG
1
2 Select “NO EJECT?”.
OK
To scroll the disc information
For CD: Title-assigned CDs (see page 48)
and CD Text
DISP
D
36
JPEG
“No Eject” flashes.
To cancel the prohibition, repeat the same
procedure to select “EJECT OK?”.
Page 37

Selecting the playback modes
You can use only one of the following playback modes at a time.
1
SOURCE
2 Select “MODE” menu.
3 Select your desired playback mode.
MENU
OK
ENGLISH
Playback mode indicator appears.
Repeat
Mode Plays repeatedly
Chapter*1: The current chapter.
• For DVD: During play or pause.
• For VCD: While PBC (see page 24) is
not in use.
•
Title*
•
Trac k*
OK
•
Folder*
•
Off: For DVD: Cancels Repeat play.
For other discs: All tracks of the
Ex.: When “Track” is selected
1
*
Only while playing a DVD disc.
2
*
Except for DVD and JPEG discs.
3
*
Only while playing an MP3, a WMA, or a JPEG disc.
1
: The current title.
lights up.
lights up.
2
: The current track.
lights up.
3
: All tracks of the current folder.
lights up.
disc.
To be continued....
37
Page 38

Random
• For VCD: While PBC (see page 24) is
ENGLISH
Ex.: When “Disc” is selected
Intro
• For VCD: While PBC (see page 24) is
not in use.
not in use.
Mode Plays at random
Folder*4: All tracks of the current folder,
then tracks of the next folder and
so on.
•
OK
Disc: All tracks of the disc.
•
lights up.
lights up.
Off: Cancels.
Mode Plays the first 15 seconds of
Trac k: All tracks of the disc.
•
*4
Folder
: First tracks of all folders.
•
OK
Off: Cancels.
lights up.
lights up.
38
Ex.: When “Track” is selected
*
4
Only while playing an MP3 or a WMA disc.
Page 39

List screen operations
You can display the folder list/file list and select
a folder/file directly while playing back.
Folder/file list screens
Folder list
JPEG
4 Select the list you want to use.
OK
ENGLISH
When “File” is selected, the file list of the
current folder appears.
5 Select the folder/file you want.
OK
File list
While playing...
1
SOURCE
MENU
2 Select “MODE” menu.
3 Select “LIST”.
OK
When selecting a folder from the list, the
playback of the first track in the folder
starts.
• The track list appears when selecting the
current folder on the folder list.
• You can also access the folder list by pressing
and holding 5 / ∞.
OK
39
Page 40

Dual Zone operations
Playing back two sources
at a time
ENGLISH
You can connect external audio equipment
to the 2nd AUDIO OUT plug on the rear,
and play back a disc separately from the
source selected on the unit.
You can activate Dual Zone while listening to
any source.
• When Dual Zone is in use, you can only
operate the DVD/CD player using the remote
controller.
On the remote controller:
On the control panel:
You can also activate and deactivate Dual Zone.
1
SOURCE
2
Select “D-ZONE”.
MENU
OK
1 Activate Dual Zone.
The source automatically changes to
“DISC” and
To select a different source to listen through
the speakers, press SOURCE on the control
panel.
• By using the buttons on the control panel,
you can operate the newly selected source
without affecting Dual Zone operations.
appears on the monitor.
2 Adjust the volume through the 2nd
AUDIO OUT plug.
3 Operate the DVD/CD player using
the remote controller by referring to
the monitor screen.
To cancel Dual Zone operations, repeat step 1.
(
disappears.)
3 Select “On”.
OK
The source automatically changes to
“DISC” when Dual Zone is activated.
To cancel Dual Zone operations, select “Off”
on step
3
.
40
Page 41

Sound adjustments
Selecting preset sound modes
You can select a preset sound mode suitable to
the music genre.
Available sound modes:
Hard Rock/R&B/Pop/Jazz/Dance/Country/
Reggae/Classic
User1/User2/User3
Flat (To cancel the sound mode)
1
SOURCE
Select “EQ” menu.
2
MENU
OK
Storing your own sound
adjustments
You can adjust the sound modes and store your
own adjustments in memory.
After step 3 above....
1
OK
3 Select one of the preset sound modes.
ENGLISH
4 Finish the procedure.
DISP
D
Ex.: When “Hard Rock” is selected
1 Select the frequency band to adjust—
60 Hz, 150 Hz, 400 Hz, 1kHz, 2.5kHz,
6.3kHz, 15kHz.
2 Adjust the level of the selected band
(–05 to +05).
3 Repeat steps 1 and 2 to adjust other
frequency bands.
3 Finish adjustment.
OK
2 Make adjustments as you like.
4 Select one of the user sound modes
(User1, User2, User3) you want to
store into.
OK
41
Page 42

Adjusting the sound
You can adjust the sound characteristics to your preference.
ENGLISH
1
SOURCE
2 Select “SEL” menu.
3 Select your desired adjustment item.
Fad/Bal (Fader/Balance)
MENU
OK
OK
Adjust fader—speaker output balance between the
front and rear speakers.
• Upmost—front only
• Downmost—rear only
42
When using a two-speaker system, set the fader
center.
Adjust balance—speaker output balance between
the left and right speakers.
• Leftmost—left only
• Rightmost—right only
Page 43

Vol Adjust (volume adjust)
Adjust and store the volume level of each source
except FM.
Once you have made an adjustment, it
is memorized, and the volume level will
automatically increase or decrease by adjusted
level when you change the source.
Adjust to match the input level to the FM sound
level.
• –12 (min) to +12 (max.)
ENGLISH
HPF (High pass filter)
Sub Woofer
Adjust the cut-off frequency to the front/rear
speakers according to the subwoofer setting.
• 55 Hz: Cuts off frequencies lower than 55 Hz.
• 85 Hz: Cuts off frequencies lower than 85 Hz.
• 125 Hz: Cuts off frequencies lower than
125 Hz.
• Through: Cuts off no frequencies.
See the article below for the subwoofer setting.
Adjust the settings below in the SetUp submenu.
• Volume: Subwoofer output level
• Freq.: Subwoofer cut-off frequency
• Phase: Subwoofer phase. Select which
reproduces a better sound from “Normal” and
“Reverse”.
OK
43
Page 44

General settings — PSM
Basic procedure
3 Select a PSM item.
You can change PSM (Preferred Setting Mode)
items listed in the table that follows.
ENGLISH
1
SOURCE
2 Select “PSM” menu.
Indications Selectable settings, [reference page]
WallPaper
MENU
Ex.: When you select “Dimmer”
4 Adjust the PSM item selected.
OK
5 Repeat steps 3 and 4 to adjust the
other PSM items if necessary.
6 Finish the procedure.
OK
You can select the background picture of the monitor from these:
Standard, Red, Amber, Green, SkyBlue, Blue, Purple
.
Clock Hr
Hour adjustment
Clock Min
Minute adjustment
24H/12H
Clock system
CLK Adj
Automatic clock
adjustments
Scroll*
1
*
Some characters or symbols will not be shown (and will be blanked) on the monitor.
44
0 – 23 (1 – 12), [11]
[Initial: 0 (0:00)]
00 – 59, [11]
[Initial: 00 (0:00)]
12Hours – 24Hours, [11]
[Initial: 24Hours]
Auto: [Initial]; The built-in clock is automatically adjusted
using the clock time data in the RDS signal.
Off: Cancels.
1
Once: [Initial]; Scrolls the disc information once.
Auto:
Off: Cancels.
• Even if “Scroll” is set to “Off”, you can scroll the display by
pressing D DISP for more than one second.
Repeats scrolling (5-second intervals in between).
Page 45

Indications Selectable settings, [reference page]
Dimmer Auto: [Initial]; Dims the monitor when you turn on the headlights.
Off: Cancels.
On: Activates dimmer.
Time Set: Sets the Dimmer On/Off time.
ENGLISH
Bright
Brightness
You can adjust the brightness to make the monitor clear and legible.
–15 (darkest) to +15 (brightest)
[Initial]; 0
• You can also adjust the brightness on “Screen Cont.” on the
“MODE” menu when the source is DVD, VCD, or JPEG disc, [34].
ID3 Tag
Tag display
PTY Standby
PTY standby
On: [Initial]; Shows the ID3 tag while playing MP3/WMA tracks.
Off: Cancels.
Activates PTY Standby Reception with one of the 29 PTY codes,
[18].
News [Initial] and 28 PTY codes [16].
AF-Regn’l
Alternative frequency/
When the received signals from the current station become weak....
AF: [Initial]; Switches to another station (the programme
regionalization
reception
•
AF-Reg: Switches to another station broadcasting the same
•
Off: Cancels (not selectable when “DAB AF” is set to
TA Volu m e
[Initial: VOL 15]; VOL 00 — VOL 30 or 50*
Traffic announcement
volume
P-Search
On: Using the AF data, the receiver tunes in to another
Programme search
Off: [Initial]; Cancels.
2
*
Depends on the amplifier gain control.
may differ from the one currently received), [18].
lights up.
programme.
and light up.
“AF On”).
2
, [17]
frequency broadcasting the same programme as the
original preset RDS station is if the preset station signals
are not sufficient.
To be continued....
45
Page 46

Indications Selectable settings, [reference page]
IF Filter
Intermediate frequency
ENGLISH
filter
DAB AF*
1
Alternative frequency
reception
Announce
1
*
Announcement
Standby Reception
EXT INPUT*
2
External input
Beep
In some areas, adjacent stations may interfere with each other. If this
interference occurs, noise may be heard.
Auto: [Initial]; When this type of interference occurs, this
unit automatically increases the tuner selectivity so that
interference noise will be reduced. (But the stereo effect will
also be degraded.)
Wide: Subject to the interference from adjacent stations, but sound
quality will not be degraded and the stereo effect will not be
degraded.
On: [Initial]; Traces the programme among DAB services and
FM RDS stations, [58].
Off: Cancels.
Select one of the 9 announcement types for Announcement Standby
Reception.
Travel [Initial] O Warning O News O Weather O Event O
Special O Rad Inf (Radio Information) O Sports O Finance O
(back to the beginning)
CHANGER: [Initial]; To use a JVC CD changer, [50].
EXT IN: To use any external component, [53].
You can deactivate the key-touch tone if you do not want it to beep
each time you press a button.
On: [Initial]; Activates the key-touch tone.
Off: Cancels.
Rear SPK*
Rear speaker output
Telephone
Telephone muting
1
*
Displayed only when DAB tuner is connected.
2
*
Cannot be selected if the source is “CD-CH” or “EXT-IN”.
3
*
Functions only when Dual Zone is activated (see page 40).
46
3
On: [Initial]; Select this to turn on the rear speaker output.
Off: Cancels.
Muting1/Muting2: Select either one which mutes the sounds while
using the cellular phone.
Off: [Initial]; Cancels.
Page 47

Indications Selectable settings, [reference page]
Amp Gain
Amplifier gain control
You can change the maximum volume level of this receiver.
High Power: [Initial]; VOL 00 – VOL 50
Low Power: VOL 00 – VOL 30 (Select this if the maximum power
of the speaker is less than 50 W to prevent them from
damaging the speaker.)
Off: Deactivates the built-in amplifier.
AV I NPUT
Audio-Video input
You can determine the use of LINE IN and VIDEO IN jacks on this
receiver.
Audio+Video: [Initial]; Select this when connecting an AV
component such as a VCR.
Audio: Select this when connecting an audio component
such as a cassette deck.
Camera*
4
: Select this when connecting the rear view camera.
The rear view through the camera is automatically
displayed on the monitor when you change the gear
to the back position.
Camera Rev.*
4
: The mirror image of the rear view through the
rear view camera is automatically displayed on
the monitor when you change the gear to the back
position. (The monitor on the unit only; the normal
rear view appears on the external monitor.)
4
*
Reverse gear signal connection is needed to change the monitor view automatically. See
Installation/Connection Manual (separate volume).
ENGLISH
47
Page 48

Other main functions
Assigning titles to the sources
You can assign titles to CDs (both in this
receiver and in the CD changer), and change the
ENGLISH
source names of AV-INPUT and EXT-INPUT.
Sources
AV-INPUT/EXTINPUT
DISC/CD-CH Up to 32 characters (up
• You cannot assign a title to a DVD, VCD,
CD Text, an MP3/WMA disc, or a JPEG disc.
1 Select the source.
• For AV-IN/EXT-IN: Select the source.
• For a CD in this receiver: Insert a CD.
• For CDs in the CD changer: Select
“CD-CH”, then select a disc number.
2
SOURCE
3 Select “TITLE”.
Maximum number of
characters
Up to 16 characters
to 30 discs)
MENU
4 Assign a title.
1 Select a character set.
DISP
D
2 Select a character.
• For available characters, see page 4.
3 Move to the next (or previous)
character position.
4 Repeat steps 1 and 2 until you
finish entering the title.
5 Finish the procedure.
OK
48
OK
Ex.: When
you select
“DISC” as
the source
To erase the entire title
In step 3 on the left column....
DISP
D
Page 49

Detaching the control panel
When detaching or attaching the control panel,
be careful not to damage the connectors on
the back of the control panel and on the panel
holder.
Detaching the control panel
Before detaching the control panel, be sure to
turn off the power.
The control panel comes out toward you.
Attaching the control panel
ENGLISH
Changing the control panel angle
The control panel changes its angle as follows.
Angle 1
Angle 4
Angle 2
Angle 3
Caution:
Do not insert your finger behind the control
panel.
49
Page 50

CD changer operations
Playing discs in the CD changer
ENGLISH
SOURCE
MENU
About the CD changer
It is recommended to use the JVC MP3compatible CD changer with your receiver.
• You can also connect other CH-X series
CD changers (except CH-X99 and
CH-X100). However, they are not
compatible with MP3 discs, so you cannot
play back MP3 discs.
• You cannot use the KD-MK series CD
changers with this receiver.
• Disc text information recorded in the CD
Text can be displayed when a JVC CD
Text compatible CD changer is connected.
Before operating your CD changer:
• Refer also to the Instructions supplied
with your CD changer.
• You cannot control and play any DVD,
VCD, WMA or JPEG disc in the CD
changer.
All tracks of the inserted discs in the magazine
will be played repeatedly until you change
the source or eject the magazine from the CD
changer.
~
*
If you have changed “EXT INPUT”
setting to “EXT IN” (see page 46),
you cannot select the CD changer.
Selected disc number
SOURCE
MENU
50
Page 51
Ÿ Select a disc.
1
To fast-forward or reverse the track
DISC LIST appears.
2
OK
• You can move to the other lists by pressing
4 / ¢.
• When the current disc is an MP3 disc, you
can move to FOLDER LIST by selecting it on
DISC LIST.
• You can also access the lists from the “MODE”
menu. See page 39 for the detail of
the list
operations.
Fast-forwards.
Reverses.
To go to the next or previous tracks
To the following tracks.
To the beginning of the current track, then the
previous tracks.
To go to the next or previous folders (only
for MP3 discs)
To next folders.
To previous folders.
When using the remote controller....
ENGLISH
When using the remote controller....
+
DISC
–
DISC
51
Page 52

Selecting the playback modes
You can use only one of the following playback
modes at a time.
ENGLISH
1
SOURCE
2 Select “MODE” menu.
MENU
Selectable modes
Repeat
Mode Plays repeatedly
Trac k: The current track.
•
Folder*: All tracks of the current folder.
•
Disc: All tracks of the current disc.
•
Off: Cancels.
lights up.
lights up.
lights up.
OK
3 Select your desired playback mode.
4 Finish the Procedure.
OK
Random
Mode Plays at random
Folder*: All tracks of the current folder,
then tracks of the next folder
and so on.
•
Disc: All tracks of the current disc.
•
All: All tracks of the inserted discs.
•
Off: Cancels.
lights up.
lights up.
lights up.
Intro
Mode Plays the first 15 seconds of
Trac k: All tracks of the inserted discs.
•
Folder*: First tracks of all folders in the
•
Disc: First tracks of all the inserted
•
Off: Cancels.
lights up.
current disc.
lights up.
discs.
lights up.
52
* Only while playing an MP3 disc
Page 53

External component operations
Playing an external component
SOURCE
MENU
You can connect an external component to
LINE IN plug and VIDEO IN plug on the rear,
or to the CD changer jack on the rear using the
KS-U57 Line Input Adapter (not supplied) or
KS-U58 AUX Input Adapter (not supplied).
• For connection, see Installation/Connection
Manual (separate volume).
Ÿ Turn on the connected component
and start playing the source.
! Adjust the volume.
SOURCE
ENGLISH
MENU
~
AV-IN: For selecting the external
• To change the setting of AV INPUT,
EXT-IN: For selecting the external
• If “EXT-IN” does not appear, see page
SOURCE
component connected to the
LINE IN and/or VIDEO IN
plug.
see page 47.
component connected to the
CD changer jack on the rear.
46 and select the external input (EXTIN).
MENU
EXT-IN AV-IN
• Volume indication does not appear
when the picture from VIDEO IN plug
is displayed on the unit. To check the
volume level, press D DISP before
volume adjustment.
⁄ Adjust the sound as you want.
(See pages 41 – 43.)
53
Page 54

DAB tuner operations
Listening to the DAB tuner
ENGLISH
SOURCE
MENU
BACK
BAND
~
Ÿ
Service
label
SOURCE
BACK
BAND
Current band
Ensemble
label
MENU
! Start searching for an ensemble.
When an ensemble is received,
searching stops.
To stop searching, press the same
button again.
⁄ Select a service (either primary or
secondary) to listen to.
Programme
type
To tune in to an ensemble manually
In step ! ....
Activate “Manual
Search”
54
Select ensemble
frequencies
Page 55

What is DAB system?
DAB can deliver CD quality sound without
any annoying interference and signal
distortion. Furthermore, it can carry text,
pictures, and data. When transmitting,
DAB combines several programmes (called
“services”) to form one “ensemble”. In
addition, each “service”—called “primary
service”—can also be divided into its
components (called “secondary service”).
A typical ensemble has six or more
programmes (services) broadcast at the same
time.
By connecting the DAB tuner, this receiver
can do the following:
• Tracing the same programme automatically
—Alternative Frequency Reception (see
“DAB AF” on page 46).
It is recommended to use DAB (Digital
Audio Broadcasting) tuner KT-DB1000
with your receiver. If you have another
DAB tuner, consult your JVC IN-CAR
ENTERTAINMENT dealer.
• Refer also to the Instructions supplied for
your DAB tuner.
3 Select one of the DRC signals level (1,
2, or 3).
ENGLISH
The reinforcement level increases from 1
to 3.
4 Finish the procedure.
OK
DRC indicator
appears.
When surrounding sounds are noisy
Some service provides Dynamic Range Control
(DRC) signals together with their regular
programme signals. DRC will reinforce the low
level sounds to improve for your listening.
1
SOURCE
MENU
2 Select “MODE” menu.
OK
• The DRC indicator will be highlighted
only when receiving DRC signals from
the tuned service.
To search for your favorite service
You can search for either Dynamic or Static
PTY codes.
• Operations are exactly the same as explained
on page 16 for FM RDS stations.
• You cannot store PTY codes separately for
the DAB tuner and the FM tuner.
• Search will be performed on the DAB tuner
only.
55
Page 56

Storing DAB services in memory
Tuning in to a preset DAB service
You can preset six DAB services (primary) for
each band.
ENGLISH
Ex.: Storing an ensemble (primary service) into
the preset number 4 of the DAB1 band.
When the source is DAB....
1
BACK
BAND
2 Select an ensemble (primary service).
3
PRESET LIST appears.
4 Select a preset number.
When the source is DAB....
1
BACK
BAND
2
3 Select the preset number you want.
OK
• You can move to the lists of the other
DAB bands by pressing 4/¢.
5 Store the service.
OK
56
When using the remote controller....
To directly select the preset service
Preset number flashes
for a while.
Page 57

Using the standby receptions
2 Select “MODE” menu.
TA (Road Traffic News) Standby
Reception
• Operations are exactly the same as explained
on page 18 for FM RDS stations.
• You cannot activate TA Standby Reception
separately for the DAB tuner and for FM
tuner.
• The volume changes to the preset TA volume
level (see page 45).
PTY Standby Reception
• Operations are exactly the same as explained
on page 18 for FM RDS stations.
• PTY Standby Reception for DAB tuner works
only using a dynamic PTY code.
• You can neither store your favorite PTY nor
activate PTY Standby Reception separately
for the DAB tuner and for the FM tuner.
• You can activate and deactivate PTY Standby
Reception when the source is either “FM” or
“DAB”.
Announcement Standby Reception
Announcement Standby Reception allows the
receiver to switch temporarily to your favorite
service (announcement type).
OK
3 Select “Announce”.
4
ANN indicator
appears.
Appears when the service is received.
OK
ENGLISH
To select your favorite announcement type,
see page 46.
To activate the Announcement Standby
Reception
1
SOURCE
MENU
• If the ANN indicator lights up,
Announcement Standby Reception is
activated.
• If the ANN indicator flashes,
Announcement Standby Reception is not
yet activated.
To activate, tune in to another service
providing these signals. The ANN
indicator will stop flashing and remain
lit.
To deactivate the Announcement Standby
Reception
Select “Off” in step 4 above.
The ANN indicator goes off.
57
Page 58

Tracing the same programme—
Alternative Frequency Reception
ENGLISH
You can keep listening to the same programme
by activating the Alternative Frequency
Reception.
• While receiving a DAB service:
When driving in an area where a DAB service
cannot be received, this receiver automatically
tunes in to another ensemble or FM RDS
station, broadcasting the same programme.
• While receiving an FM RDS station:
When driving in an area where a DAB service
is broadcasting the same programme as the
FM RDS station is broadcasting, this receiver
automatically tunes in to the DAB service.
When shipped from the factory, Alternative
Frequency Reception is activated.
To deactivate the Alternative Frequency
Reception, see page 45.
To show the Dynamic Label Segment (DLS)
information
DISP
D
Service frequency
is displayed.
While listening to an ensemble that
supports DLS....
58
*
Dynamic Label
Segment (DLS—
DAB radio text
information) is
displayed.
* Lights up when receiving a service
providing Dynamic Label Segment (DLS)—
DAB radio text information.
Page 59

Maintenance
How to clean the connectors
Frequent detachment will deteriorate the
connectors.
To minimize this possibility, periodically wipe
the connectors with a cotton swab or cloth
moistened with alcohol, being careful not to
damage the connectors.
Connector
Moisture condensation
Moisture may condense on the lens inside the
DVD/CD player in the following cases:
• After starting the heater in the car.
• If it becomes very humid inside the car.
Should this occur, the DVD/CD player may
malfunction. In this case, eject the disc and
leave the receiver turned on for a few hours
until the moisture evaporates.
To keep discs clean
A dirty disc may not play correctly.
If a disc does become dirty, wipe
it with a soft cloth in a straight line
from center to edge.
• Do not use any solvent (for example,
conventional record cleaner, spray, thinner,
benzine, etc.) to clean discs.
To play new discs
New discs may have some rough
spots around the inner and outer
edges. If such a disc is used, this
receiver may reject the disc.
To remove these rough spots, rub the edges
with a pencil or ball-point pen, etc.
Do not use the following discs:
Warped
disc
ENGLISH
How to handle discs
When removing a disc from
its case, press down the center
holder of the case and lift the
disc out, holding it by the
edges.
• Always hold the disc by the edges. Do not
touch its recording surface.
When storing a disc into its case, gently insert
the disc around the center holder (with the
printed surface facing up).
• Make sure to store discs into the cases after
use.
Center holder
Sticker
Disc
Sticker
residue
Stick-on
label
59
Page 60

Language codes
Code Language Code Language Code Language
AA
AB
ENGLISH
AF
AM
AR
AS
AY
AZ
BA
BE
BG
BH
BI
BN
BO
BR
CA
CO
CS
CY
DZ
EL
EO
ET
EU
FA
FI
FJ
FO
FY
GA
GD
GL
GN
GU
HA
HI
HR
HU
HY
IA
IE
Afar
Abkhazian
Afrikaans
Ameharic
Arabic
Assamese
Aymara
Azerbaijani
Bashkir
Byelorussian
Bulgarian
Bihari
Bislama
Bengali, Bangla
Tibetan
Breton
Catalan
Corsican
Czech
Welsh
Bhutani
Greek
Esperanto
Estonian
Basque
Persian
Finnish
Fiji
Faroese
Frisian
Irish
Scots Gaelic
Galician
Guarani
Gujarati
Hausa
Hindi
Croatian
Hungarian
Armenian
Interlingua
Interlingue
IK
IN
IS
IW
JI
JW
KA
KK
KL
KM
KN
KO
KS
KU
KY
LA
LN
LO
LT
LV
MG
MI
MK
ML
MN
MO
MR
MS
MT
MY
NA
NE
NO
OC
OM
OR
PA
PL
PS
PT
QU
RM
Inupiak
Indonesian
Icelandic
Hebrew
Yiddish
Javanese
Georgian
Kazakh
Greenlandic
Cambodian
Kannada
Korean (KOR)
Kashmiri
Kurdish
Kirghiz
Latin
Lingala
Laothian
Lithuanian
Latvian, Lettish
Malagasy
Maori
Macedonian
Malayalam
Mongolian
Moldavian
Marathi
Malay (MAY)
Maltese
Burmese
Nauru
Nepali
Norwegian
Occitan
(Afan) Oromo
Oriya
Panjabi
Polish
Pashto, Pushto
Portuguese
Quechua
Rhaeto-Romance
RN
RO
RW
SA
SD
SG
SH
SI
SK
SL
SM
SN
SO
SQ
SR
SS
ST
SU
SW
TA
TE
TG
TH
TI
TK
TL
TN
TO
TR
TS
TT
TW
UK
UR
UZ
VI
VO
WO
XH
YO
ZU
Kirundi
Rumanian
Kinyarwanda
Sanskrit
Sindhi
Sangho
Serbo-Croatian
Singhalese
Slovak
Slovenian
Samoan
Shona
Somali
Albanian
Serbian
Siswati
Sesotho
Sundanese
Swahili
Tamil
Telugu
Tajik
Thai
Tigrinya
Turkmen
Tagalog
Setswana
Tonga
Turkish
Tsonga
Tatar
Twi
Ukrainian
Urdu
Uzbek
Vietnamese
Volapuk
Wolof
Xhosa
Yoruba
Zulu
60
Page 61

More about this receiver
Basic operations
Turning on the power
• By pressing SOURCE on the receiver, you
can also turn on the power.
Selecting the sources
• When no disc is loaded in the receiver and
Dual Zone is off, “DISC” cannot be selected.
• Without connecting to the CD changer or the
DAB tuner, “CD-CH” or “DAB” cannot be
selected.
Turning off the power
• If you turn off the power while listening to a
disc, disc play will start automatically, next
time you turn on the power.
Tuner operations
Storing stations in memory
• During SSM search....
– All previously stored stations are erased and
stations are stored newly.
– Received stations are preset in No. 1
(lowest frequency) to No. 6 (highest
frequency).
– When SSM is over, the station stored in
No. 1 will be automatically tuned in.
• When storing a station manually, a previously
preset station is erased when a new station is
stored in the same preset number.
FM RDS operations
• Network-Tracking Reception requires two
types of RDS signals—PI (Programme
Identification) and AF (Alternative
Frequency) to work correctly. Without
receiving these data correctly, NetworkTracking Reception will not operate.
• If a DAB tuner is connected and Alternative
Frequency Reception for DAB services (DAB
AF) is activated, Network-Tracking Reception
(AF-Regn’l) is also activated automatically.
On the other hand, Network-Tracking
Reception cannot be deactivated without
deactivating Alternative Frequency Reception.
(See pages 45 and 46.)
• TA Standby Reception and PTY Standby
Reception will be temporarily canceled while
listening to an AM station.
Disc operations
General
• In this manual, words “track” and “file” are
interchangeably used when referring to MP3/
WMA/JPEG files and their file names.
• This receiver can also play back 8 cm discs.
• This receiver can only play back audio CD
(CD-DA) files if different type of files are
recorded in the same disc.
– The first track will be skipped if a different
type of file is detected first.
• When a disc has been loaded, selecting
“DISC” for the playback source starts disc
play.
Playing a DVD-R/DVD-RW or CD-R/
CD-RW
• Use only “finalized” discs.
• This receiver can play back only the files of
the same type which is first detected if a disc
includes both audio CD (CD-DA) files and
MP3/WMA files.
• This receiver can play back either MP3/WMA
files or JPEG files if a disc includes both kind
of files. Set the playback file type on AV
setup menu (page 32) before playing back a
disc containing both kind of files.
• Only for CD-R/CD-RW: This receiver can
play back multi-session discs; however,
unclosed sessions will be skipped while
playing.
ENGLISH
To be continued....
61
Page 62

• Some DVD-R/DVD-RW or CD-R/CD-RW
may not play back on this receiver because
of their disc characteristics, and for the
following causes:
– Discs are dirty or scratched.
ENGLISH
– Moisture condensation occurs on the lens
inside the receiver.
– The pickup lens inside the receiver is dirty.
– CD-R/CD-RW on which the files are
written with “Packet Write” method.
– DVD-R/DVD-RW which are not written
in UDF-Bridge Format (eg. UDF format or
ISO format).
– There are improper recording conditions
(missing data, etc.) or media conditions
(stain, scratch, warp, etc.).
• DVD-RW/CD-RW may require a longer
readout time since the reflectance of DVDRW/CD-RW is lower than that of regular
discs.
• Do not use the following DVD-R/DVD-RW
or CD-R/CD-RW:
– Discs with stickers, labels, or protective seal
stuck to the surface.
– Discs on which labels can be directly
printed by an ink jet printer.
Using these discs under high temperatures or
high humidities may cause malfunctions or
damages to discs.
Playing an MP3/WMA disc
• This receiver can play back MP3/WMA files
with the extension code <.mp3> or <.wma>
(regardless of the letter case—upper/lower)
recorded in either CD-R/CD-RW or in
DVD-R/DVD-RW.
• This receiver can show the names of albums,
artists (performer), and ID3 Tag (Version 1.0,
1.1, 2.2, 2.3, or 2.4) for MP3 files and WMA
files.
• This receiver can display only one-byte
characters. No other characters can be
correctly displayed.
• This receiver can play back MP3/WMA files
meeting the conditions below:
– Bit rate: MP3: 32 kbps — 320 kbps
WMA: 32 kbps — 192 kbps
– Sampling frequency:
48 kHz, 44.1 kHz, 32 kHz (for MPEG-1)
24 kHz, 22.05 kHz, 16 kHz (for MPEG-2)
48 kHz, 44.1 kHz, 32 kHz (for WMA)
– Disc format: ISO 9660 Level 1/ Level 2,
Romeo, Joliet, Windows long file name
• The maximum number of characters for file/
folder names vary among the disc format used
(includes 4 extension characters—<.mp3> or
<.wma>).
– ISO 9660 Level 1: up to 12 characters
– ISO 9660 Level 2: up to 31 characters
– Romeo: up to 128 characters
– Joliet: up to 64 characters
– Windows long file name: up to 128
characters
• This receiver can recognize the total of
1100 files, 250 folders (maximum of 999 files
per folder).
• This receiver can play back the files recorded
in VBR (variable bit rate).
The files recorded in VBR have a discrepancy
in elapsed time display, and do not show
the actual elapsed time. Especially, after
performing the search function, this difference
becomes noticeable.
• This receiver cannot play back the following
files:
–
MP3 files encoded with MP3i and MP3 PRO
format.
– MP3 files encoded in an unappropriated
format.
– MP3 files encoded with Layer 1/2.
– WMA files encoded with lossless,
professional, and voice format.
– WMA files which are not based upon
Windows Media
– WMA files copy-protected with DRM.
– WMA files recorded with MBR (Multiple
Bit Rate) format.
– Files which have the data such as WAVE,
ATRAC3, etc.
®
Audio.
62
Page 63

Playing a JPEG disc
• It is recommended that you record a file
at 640 x 480 resolution. (If a file has been
recorded at a resolution of more than 640 x
480, it will take a long time to be shown.)
• This System can play only baseline JPEG
files. Progressive JPEG files or lossless JPEG
files cannot be played.
Baseline JPEG format: Used for digital
cameras, web, etc.
Progressive JPEG format: Used for web.
Lossless JPEG format: An old type and rarely
used now.
• If progressive or lossless JPEG files are
played back, a black screen appears. In this
case, stop playback and select a baseline
JPEG file. Note that it may take a long time to
select another file.
Changing the source
• If you change the source, playback also stops
(without ejecting the disc).
Next time you select “DISC” for the playback
source (without activating Dual Zone), disc
play starts automatically.
Ejecting a disc
• If the ejected disc is not removed within
15 seconds, the disc is automatically inserted
again into the loading slot to prevent it from
dust. (Disc will not play this time.)
DVD setup menu
• When the language you have selected is not
recorded on a disc, the original language is
automatically used as the initial language. In
addition, for some discs, the initial languages
settings will not work as you set due to their
internal disc programming.
• While playing (or pausing), you cannot
change these languages.
After you change any of these language
settings, eject the disc and insert it (or another
disc) again so that your setting takes effect.
• When you select “16:9” for a picture whose
aspect ratio is 4:3, the picture slightly changes
due to the process for converting the picture
width.
• Even if “4:3PS [PAN SCAN]” is selected, the
screen size may become
“4:3LB [LETTER BOX]” with some DVDs.
This depends on how they are recorded.
General settings—PSM
• If you change the “Amp Gain” setting from
“High Power” to “Low Power” while the
volume level is set higher than “VOL 30”, the
receiver automatically changes the volume
level to “VOL 30”.
Other main functions
• If you try to assign a title to a 31st disc,
“Name Full” flashes on the monitor. Delete
unwanted titles before assignment.
• Titles assigned to discs in the CD changer can
also be shown if you play back the disc on the
receiver.
DAB tuner operations
• PTY Standby Reception works for the DAB
tuner only using a Dynamic PTY, but not a
Static PTY.
• TA Standby Reception for FM RDS station
and Road Traffi c News Standby Reception for
DAB cannot be set separately. The T/P button
always work for the both Standby Reception
modes when the DAB tuner is connected.
ENGLISH
63
Page 64

About sounds reproduced through the rear terminals
• Through the analog terminals (Speaker out/LINE OUT/2nd AUDIO OUT): 2-channel signal is
emitted.
When playing a multi-channel encoded disc, multi-channel signals are downmixed.
ENGLISH
(DOWN MIX: see page 33.)
• Through DIGITAL OUT (optical):
Digital signals (Linear PCM, Dolby Digital, DTS, MPEG Audio) are emitted through this
terminal. (For more details, see page 65.)
To reproduce multi-channel sounds such as Dolby Digital, DTS, and MPEG Audio, connect
an amplifier or a decoder compatible with these multi-channel sources to this terminal, and set
“DIGITAL AUDIO OUTPUT (D. AUDIO OUTPUT)” correctly. (See page 33.)
• About Dual Zone
While you are listening to the radio, CD changer, or external component through the speakers
built into your car compartment, you can play back sound of this DVD/CD player connected to
the 2nd AUDIO OUT plug at the same time. (For details, see page 40.)
On-screen guide icons
During play, the following guide icons may appear for a while on the monitor.
: Appears at the beginning of a scene containing multi-audio languages (for DVD only).
: Appears at the beginning of a scene containing multi-subtitle languages (for DVD only).
: Appears at the beginning of a scene containing multi-angle views (for DVD only).
: Playback
: Pause
: Forward Slow Motion Playback (for DVD and VCD only)
: Reverse Slow Motion Playback (for DVD only)
: Forward search
: Reverse search
64
Page 65

Output signals through the DIGITAL OUT terminal
Output signals are different depending on the “DIGITAL AUDIO OUTPUT” setting on the setup
menu (see page 33).
DIGITAL AUDIO OUTPUT
Playback Disc
DVD
48 kHz, 16/20/24 bits Linear PCM
96 kHz, Linear PCM
with DTS DTS bitstream 48 kHz, 16 bits stereo Linear PCM
with Dolby Digital Dolby Digital bitstream
with MPEG Audio MPEG bitstream 48 kHz, 16 bits Linear PCM
Audio CD, Video CD 44.1 kHz, 16 bits stereo Linear PCM
Audio CD with DTS DTS bitstream 44.1 kHz, 16 bits stereo Linear PCM
MP3/WMA
STREAM/PCM DOLBY DIGITAL/PCM PCM ONLY
48 kHz, 16 bits stereo Linear PCM
32/44.1/48 kHz, 16 bits Linear PCM
Output Signals
48 kHz, 16 bits
stereo Linear PCM
Sound modes (preset frequency level settings)
The list below shows the preset frequency level settings for each sound mode (see page 41).
Sound mode
Flat 00 00 00 00 00 00 00
Hard Rock +03 +03 +01 00 00 +02 +01
R&B +03 +02 +02 00 +01 +01 +03
Pop 00 +02 00 00 +01 +01 +02
Jazz +03 +02 +01 +01 +01 +03 +02
Dance +04 +02 00 –02 –01 +01 +01
Country +02 +01 00 00 00 +01 +02
Reggae +03 00 00 +01 +02 +02 +03
Classic +02 +03 +01 00 00 +02 00
60 Hz 150 Hz 400 Hz 1 kHz 2.5 kHz 6.3 kHz 15 kHz
Preset equalizing values
ENGLISH
65
Page 66

Troubleshooting
What appears to be trouble is not always serious. Check the following points before calling a service
center.
ENGLISH
• Sound cannot be heard
• The receiver does not
• Remote controller does not
General
• Nothing appears on the
• SSM automatic presetting
• Static noise while listening
FM/AM
• “No Text” appears on the
Symptoms Causes Remedies
from the speakers.
work at all.
work.
monitor.
does not work.
to the radio.
monitor.
The volume level is set to
the minimum level.
Connections are incorrect. Check the cords and
The built-in microcomputer
may have functioned
incorrectly due to noise, etc.
Dual Zone is activated
(see page 40).
No video signal comes in
when the source is AV-IN.
Signals are too weak. Store stations manually.
The aerial is not connected
firmly.
The station does not support
RDS RT or the reception is
weak.
Adjust it to the optimum
level.
connections.
Reset the receiver
(see page 2).
While Dual Zone is
activated, remote controller
only functions for operating
the DVD/CD player.
• Change the source.
•
Starts playback on the
external compornent
connected to the VIDEO
IN jack.
• Change AV INPUT setting
to “Audio” (see page 47).
Connect the aerial firmly.
Check the Network-Tracking
Reception (see page 18).
66
Page 67

Symptoms Causes Remedies
• Disc cannot be played
back.
• CD-R/CD-RW or DVD-R/
DVD-RW cannot be played
back.
• Tracks on the CD-R/
CD-RW or DVD-R/
DVD-RW cannot be
skipped.
• Disc cannot be recognized. The DVD/CD player may
• “No Disc” appears on the
monitor.
• Sound and picture are
sometimes interrupted or
distorted.
Disc playback
• No playback picture
(DVD, VCD) appears on
the monitor.
• No picture appears on the
external monitor at all.
• The left and right edges of
the picture are missing on
the screen.
Disc is inserted upside
down.
CD-R/CD-RW or DVD-R/
DVD-RW is not finalized.
have functioned incorrectly.
Disc is inserted incorrectly. Insert the disc correctly.
You are driving on rough
roads.
Disc is scratched. Change the disc.
Connections are incorrect. Check the cords and
Parking brake wire is not
connected properly.
The video cord is not
connected correctly.
An incorrect input has
been selected on the TV or
monitor.
“4:3PS [PAN SCAN]” is
selected when viewing on a
conventional TV
(aspect ratio 4:3).
Insert the disc correctly.
• Insert a finalized CD-R/
CD-RW or DVD-R/
DVD-RW.
•
Finalize the
or DVD-R/DVD-RW
the component which you
used for recording.
Eject the disc forcibly
(see page 2).
Stop playback while driving
on rough roads.
connections.
See Installation/Connection
Manual.
Connect the video cord
correctly.
Select a correct input on the
TV or monitor.
Select “4:3LB [LETTER
BOX]”. (See page 32.)
CD-R/CD-RW
with
ENGLISH
To be continued....
67
Page 68

• Disc cannot be played
ENGLISH
• Noise is generated. The track played back is not
MP3/WMA playback
• A longer readout time is
• Tracks cannot be played
• Elapsed playing time is not
• Correct characters are not
displayed (e.g. album name).
Symptoms Causes Remedies
back.
required.
back as you have intended
them to play.
correct.
No MP3/WMA tracks are
recorded on the disc.
MP3/WMA tracks do not
have the extension code
<.mp3> or <.wma> in their
file names.
MP3/WMA tracks are not
recorded in a compliant
format.
MP3/WMA tracks are
recorded in DVD+R/
DVD+RW media.
an MP3/WMA file (although
it has the extension code
<.mp3> or <.wma>).
Readout time varies due to
the complexity of the folder/
file configuration.
Playback order is determined
when the files are recorded.
This sometimes occurs
during play. This is caused
by how the tracks are
recorded on the disc.
This receiver can only
display a limited number
of special characters (see
page 4).
Change the disc.
Add the extension code
<.mp3> or <.wma> to their
file names.
Change the disc.
Record MP3/WMA tracks
using a compliant application
(see page 6).
Change the disc.
Record MP3/WMA tracks
using DVD-R/DVD-RW
media.
Skip to another track or
change the disc. (Do not add
the extension code <.mp3>
or <.wma> to non-MP3 or
WMA tracks.)
Do not use too many
hierarchies and folders.
68
Page 69

Symptoms Causes Remedies
• Disc cannot be played
back.
JPEG playback
• No picture appears on the
external monitor at all.
• “No Disc” appears on the
monitor.
• “No Magazine” appears on
the monitor.
• “Reset08” appears on the
monitor.
CD changer
• “Reset01” – “Reset07”
appears on the monitor.
• The CD changer does not
work at all.
No JPEG files are recorded
on the disc.
JPEG files do not have the
extension code <.jpg> or in
their file names.
JPEG files are not recorded
in a compliant format.
JPEG files are recorded in
DVD+R/DVD+RW media.
The video cord is not
connected correctly.
An incorrect input has
been selected on the TV or
monitor.
No disc is in the magazine.
Disc is inserted upside down.
No magazine is loaded in the
CD changer.
This receiver is not
connected to the CD changer
correctly.
The built-in microcomputer
may function incorrectly due
to noise, etc.
Change the disc.
Add the extension code
<.jpg> to their file names.
Change the disc.
Record JPEG files using a
compliant application (see
page 6).
Change the disc.
Record JPEG files using
DVD-R/DVD-RW media.
Connect the video cord
correctly.
Select a correct input on the
TV or monitor.
Insert disc into the magazine.
Insert disc correctly.
Insert the magazine.
Connect this receiver and the
CD changer correctly and
press the reset button of the
CD changer.
Press the reset button of the
CD changer.
Reset the receiver
(see page 2).
ENGLISH
69
Page 70

Symptoms Causes Remedies
• “No DAB Signal” appears
ENGLISH
• “Reset08” appears on the
• The DAB tuner does not
DAB tuner
• “Antenna Power NG”
on the monitor.
monitor.
work at all.
appears on the monitor.
Signal is too weak.
This receiver is not
connected to the DAB tuner
correctly.
The built-in microcomputer
may function incorrectly due
to noise, etc.
Something is wrong with the
DAB aerial.
Search for another ensemble.
Connect this receiver and
the DAB tuner correctly and
reset the receiver
(see page 2).
Reset the receiver
(see page 2).
Refer to the instructions
supplied for your DAB
tuner.
70
Page 71

Specifications
AUDIO AMPLIFIER SECTION
Maximum Power Output:
Front: 50 W per channel
Rear: 50 W per channel
Continuous Power Output (RMS):
Front: 20 W per channel into 4 Ω, 40 Hz
to 20 000 Hz at no more than 0.8%
total harmonic distortion.
Rear: 20 W per channel into 4 Ω, 40 Hz
to 20 000 Hz at no more than 0.8%
total harmonic distortion.
Load Impedance: 4 Ω (4 Ω to 8 Ω allowance)
Equalizer Control Range:
Frequencies: 60 Hz, 150 Hz, 400 Hz, 1 kHz,
2.5 kHz, 6.3 kHz, 15 kHz
Level: ±10 dB
Signal-to-Noise Ratio: 70 dB
Line-In Level/Impedance:
1.5 V/20 kΩ load
Line-Out Level/Impedance:
5.0 V/20 kΩ load (full scale)
Output Impedance: 1 kΩ
Subwoofer-Out Level/Impedance:
2.0 V/20 kΩ load (full scale)
Color System: PAL
Video Input (composite): 1 Vp-p/75 Ω
Video Output (composite): 1 Vp-p/75 Ω
Other Terminals:
2nd AUDIO OUT, DIGITAL OUT
(optical), CD changer, Steering wheel
remote input (OE REMOTE)
TUNER SECTION
Frequency Range:
FM: 87.5 MHz to 108.0 MHz
AM: (MW) 522 kHz to 1 620 kHz
(LW) 144 kHz to 279 kHz
[FM Tuner]
Usable Sensitivity: 11.3 dBf (1.0 µV/75 Ω)
50 dB Quieting Sensitivity:
16.3 dBf (1.8 µV/75 Ω)
Alternate Channel Selectivity (400 kHz): 65 dB
Frequency Response: 40 Hz to 15 000 Hz
Stereo Separation: 35 dB
Capture Ratio: 1.5 dB
[MW Tuner]
Sensitivity: 20 µV
Selectivity: 35 dB
[LW Tuner]
Sensitivity: 50 µV
DVD/CD PLAYER SECTION
Signal Detection System: Non-contact optical
pickup (semiconductor laser)
Number of Channels: 2 channels (stereo)
Frequency Response:
DVD fs=48 kHz: 16 Hz to 22 000 Hz
fs=96 kHz: 16 Hz to 44 000 Hz
VCD, CD: 16 Hz to 20 000 Hz
Dynamic Range: 93 dB
Signal-to-Noise Ratio: 95 dB
Wow and Flutter: Less than measurable limit
MP3 : Max. Bit Rate: 320 kbps
WMA (Windows Media
Max. Bit Rate: 192 kbps
®
Audio):
MONITOR SECTION
Screen: 3-inch liquid crystal panel
Number of Pixels: 123 200 pixels
Drive Method:
TFT (Thin Film Transistor) active matrix
format
Color System: PAL
GENERAL
Power Requirement:
Operating Voltage:
DC 14.4 V (11 V to 16 V allowance)
Grounding System: Negative ground
Allowable Operating Temperature:
0°C to +40°C
Dimensions (W × H × D):
Installation Size (approx.):
182 mm × 52 mm × 160 mm
Panel Size (approx.):
188 mm × 58 mm × 18 mm
Mass (approx.):
2.0 kg (excluding accessories)
Design and specifications are subject to change
without notice.
ENGLISH
71
Page 72

Having TROUBLE with operation?
Please reset your unit
Refer to page of How to reset your unit
Haben Sie PROBLEME mit dem Betrieb?
Bitte setzen Sie Ihr Gerät zurück
Siehe Seite Zurücksetzen des Geräts
Vous avez des PROBLÈMES de
fonctionnement?
Réinitialisez votre appareil
Référez-vous à la page intitulée Comment réinitialiser votre appareil
Hebt u PROBLEMEN met de bediening?
Stel het apparaat terug
Zie de pagina met de paragraaf Het apparaat terugstellen
EN, GE, FR, NL
© 2005 Victor Company of Japan, Limited
0205MNMMDWJEIN
Page 73

LVT1323-005A
[E]
KD-AVX1
Installation/Connection Manual
Einbau/Anschlußanleitung
Manuel d’installation/raccordement
Handleiding voor installatie/aansluiting
0205MNMMDWJEIN
EN, GE, FR, NL
ENGLISH
This receiver is designed to operate on 12 V
DC, NEGATIVE ground electrical systems.
If your vehicle does not have this system,
a voltage inverter is required, which can be
purchased at JVC IN-CAR ENTERTAINMENT
dealers.
WARNINGS
• DO NOT install any receiver in locations
where;
– it may obstruct the steering wheel and
gearshift lever operations, as this may
result in a traffic accident.
– it may obstruct the operation of safety
devices such as air bags, as this may result
in a fatal accident.
– it may obstruct visibility.
• DO NOT operate any receiver while
manipulating the steering wheel, as this may
result in a traffic accident.
• The driver must not watch the monitor while
driving.
If the driver watches the monitor while
driving, it may lead to carelessness and
cause an accident.
• The driver must not put on the headphones
while driving. It is dangerous to shut off the
outside sounds while driving.
• If you need to operate the receiver while
driving, be sure to look ahead carefully or
you may be involved in a traffic accident.
• If the parking brake is not engaged,
“ParkingBrake” flashes on the monitor, and
no playback picture will be shown.
– This warning appears only when the
parking brake wire is connected to the
parking brake system built in the car.
DEUTSCH
Dieses Gerät ist für einen Betrieb in
elektrischen Anlagen mit 12 V Gleichstrom
und (–) Erdung ausgelegt. Verfügt Ihr
Fahrzeug nicht über diese Anlage, ist ein
Spannungsinverter erforderlich, der bei JVC
Autoradiohändler erworben werden kann.
WARNHINWEISE
•
Installieren Sie Geräte NICHT an Orten;
– an denen sie die Bewegungen des
Lenkrads und des Ganghebels behindern
könnten. Anderenfalls führt diese
Behinderung möglicherweise zu ernsten
Verkehrsunfällen.
– an denen sie den Betrieb von Sicherheit
seinrichtungen, z.B. Airbags, behindern
könnten. Anderenfalls führt diese
Behinderung möglicherweise zu ernsten
Verkehrsunfällen.
– an denen sie die Sicht behindern.
• Betätigen Sie beim Fahren KEINE Geräte.
Anderenfalls führt dies möglicherweise zu
einem ernsten Verkehrsunfall.
• Der Fahrer darf während der Fahrt auf
keinen Fall auf den Monitor sehen.
Anderenfalls könnte der Fahrer abgelenkt
werden und einen Unfall verursachen.
• Der Fahrer darf während der Fahrt keine
Kopfhörer tragen. Es ist gefährlich, die
Außengeräusche während der Fahrt zu
blockieren.
• Wenn Sie den Receiver während des
Fahrens bedienen müssen, beobachten
Sie den Verkehr vor Ihnen sehr genau.
Anderenfalls werden Sie möglicherweise in
einen ernsten Verkehrsunfall verwickelt.
• Ist die Feststellbremse nicht angezogen,
erscheint blinkend die Meldung
„ParkingBrake“ auf dem Monitor, und es
erfolgt keine Bildwiedergabe.
– Diese Warnung wird nur angezeigt,
wenn das Feststellbremskabel an
das in das Fahrzeug eingebaute
Feststellbremssystem angeschlossen ist.
FRANÇAIS
Cet appareil est conçu pour fonctionner sur
des sources de courant continu de 12 V à
masse NEGATIVE. Si votre véhicule n’offre
pas ce type d’alimentation, il vous faut un
convertisseur de tension, que vous pouvez
acheter chez un revendeur d’autoradios JVC.
AVERTISSEMENTS
• N’INSTALLEZ aucun appareil dans les
endroits suivants;
– où il peut gêner l’accès au volant ou au
levier de vitesse car cela peut entraîner un
accident de la circulation.
– où il peut gêner la manipulation de
dispositifs de sécurité tels que les airbags
car cela peut entraîner un accident fatal.
– où il peut gêner la visibilité.
• NE COMMANDEZ pas l’appareil lors de
la manipulation du volant car cela peut
entraîner un accident de la circulation.
• Le conducteur ne doit pas regarder le
moniteur lorsqu’il conduit.
Regarder le moniteur lorsqu’on est au volant
réduit considérablement la vigilance du
conducteur et multiplie les risques d’accident.
• Le conducteur ne doit pas utiliser un casque
d’écoute quand il est au volant. C’est
dangereux de se couper des sons extérieurs
en conduisant.
• Si vous avez besoin de commander
l’autoradio pendant que vous conduisez,
continuez de regarder droit devant vous ou
vous risquez de causer un accident de la
circulation.
• Si le frein de stationnement n’est pas
engagé, “ParkingBrake” clignote sur le
moniteur et aucune image de lecture
n’apparaît.
– Cet avertissement apparaît uniquement
quand le fil du frein de stationnement
est connecté au système de frein de
stationnement intégré à la voiture.
NEDERLANDS
Dit apparaat mag worden gebruikt bij elektrische
systemen die werken op 12 V g elijkstroom
met negatieve aarding. Als uw auto niet
is uitgerust met een dergelijk systeem, is een
spanningsomzetter vereist. Dit instrument kan
worden aangeschaft bij JVC car audio dealers.
WAARSCHUWING
• Installeer GEEN enkele eenheid op een plaats
waar;
– dit een gevaar vormt voor het bedienen van
het stuur of de versnelling, aangezien elke
belemmering van de juiste werking van het
stuur en de versnelling tot een ongeluk kan
lijden.
– dit een gevaar vormt voor de airbag, aangezien
elke belemmering van de werking van de airbag
tot een dodelijk ongeluk kan lijden.
– dit het uitzicht belemmert.
• Bedien GEEN enkele eenheid terwijl u uw
handen aan het stuur nodig hebt, aangezien dit
anders tot een ongeluk kan lijden.
• De bestuurder moet tijdens het autorijden niet
naar het beeldscherm kijken.
Als de bestuurder tijdens het rijden toch naar het
beeldscherm kijkt, kan dit tot onverantwoord
rijgedrag leiden en ernstige verkeersongelukken
veroorzaken.
• De bestuurder mag geen hoofdtelefoon tijdens
het autorijden opzetten. Autorijden is uitermate
gevaarlijk indien u geluiden van buitenaf niet
kunt hoort.
• Als u de eenheid wilt bedienen terwijl u aan het
rijden bent, is het zaak dat u eerst de weg voor u
verkent, aangezien dit anders tot een ongeluk kan
lijden.
• “ParkingBrake” knippert op de monitor indien de
handrem niet is aangetrokken en er wordt nu geen
beeld getoond.
– Deze waarschuwing verschijnt uitsluitend
indien het handremdraad met het in de auto
ingebouwde handremsysteem is verbonden.
Parts list for installation and
connection
The following parts are provided for this
receiver.
After checking them, please set them
correctly.
A / B
Hard case/Control panel
Etui/Schalttafel
Etui de transport/
Panneau de commande
Behuizing/
Bedieningspaneel
H
Lock nut (M5)
Sicherungsmutter (M5)
Ecrou d’arrêt (M5)
Contra-moer (M5)
I
Mounting bolt (M5 x 20 mm)
Befestigungsschraube (M5 x 20 mm)
Boulon de montage (M5 x 20 mm)
Bevestigingsbout (M5 x 20 mm)
TROUBLESHOOTING
• The fuse blows.
* Are the red and black leads connected
correctly?
• Power cannot be turned on.
* Is the yellow lead connected?
• No sound from the speakers.
* Is the speaker output lead short-circuited?
• Sound is distorted.
* Is the speaker output lead grounded?
* Are the “–” terminals of L and R speakers
grounded in common?
• Noise interfere with sounds.
* Is the rear ground terminal connected to
the car’s chassis using shorter and thicker
cords?
• Receiver becomes hot.
* Is the speaker output lead grounded?
* Are the “–” terminals of L and R speakers
grounded in common?
• This receiver does not work at all.
* Have you reset your receiver?
Teileliste für den Einbau und
Anschluß
Die folgenden Teile werden zusammen mit
diesem Gerät geliefert.
Nach ihrer Überprüfung, die Teile richtig
einsetzen.
C
Sleeve
Halterung
Manchon
Huis
D
Trim plate
Frontrahmen
Plaque d’assemblage
Sierplaat
J
Rubber cushion
Gummipuffer
Amortisseur en
caoutchouc
Rubberdop
FEHLERSUCHE
• Die Sicherung brennt durch.
* Sind die roten und schwarzen Leitungen
richtig angeschlossen?
• Stromversorgung kann nicht
eingeschaltet werden.
* Ist die gelbe Leitung angeschlossen?
• Kein Ton aus den Lautsprechern.
* Ist die Lautsprecherausgangsleitung
kurzgeschlossen?
• To n ve rzerrt.
* Ist die Lautsprecherausgangsleitung geerdet?
* Sind die (–) Anschlußklemmen der linken und
rechten Lautsprecher zusammen geerdet?
• Störgeräusche im Klang.
* Ist die hintere Erdungsklemme mit
kürzeren und dickeren Kabeln an das
Fahrzeugchassis angeschlossen?
• Gerät wird heiß.
* Ist die Lautsprecherausgangsleitung geerdet?
* Sind die (–) Anschlußklemmen der linken und
rechten Lautsprecher zusammen geerdet?
• Dieser Receiver funktioniert überhaupt
nicht.
* Haben Sie einen Reset am Receiver
vorgenommen?
K
Handles
Griffe
Poignées
Hendels
Liste des pièces pour l’installation
et raccordement
Les pièces suivantes sont fournies avec cet
appareil.
Après vérification, veuillez les placer
correctement.
E
Power cord
Stromkable
Cordon d’alimentation
Stroomkabel
L
Remote controller
Fernbedienung
Télécommade
Afstandsbediening
M
Battery
Batterie
Pile
Batterij
EN CAS DE DIFFICULTES
• Le fusible saute.
* Les fils rouge et noir sont-ils racordés
correctement?
• L’ a p p ar eil n e p e u t pas être mise sous
tension.
* Le fil jaune est-elle raccordée?
• Pas de son des enceintes.
* Le fil de sortie d’enceinte est-il court-circuité?
• Le son est déformé.
* Le fil de sortie d’enceinte est-il à la masse?
* Les bornes “–” des enceintes gauche et droit
sont-elles mises ensemble à la masse?
• Interférence avec les sons.
* La prise arrière de mise à la terre est-elle
connectée au châssis de la voiture avec un
cordon court et épais?
• L’ a p p ar eil d e v i e n t c h a u d.
* Le fil de sortie d’enceinte est-il à la masse?
* Les bornes “–” des enceintes gauche et droit
sont-elles mises ensemble à la masse?
• Cet appareil ne fonctionne pas du tout.
* Avez-vous réinitialisé votre appareil?
1
Lijst van onderdelen die u bij
installatie en aansluiting nodig
hebt
De volgende onderdelen worden bij het apparaat
geleverd.
Installeer ze op de juiste wijze, nadat u ze hebt
gecontroleerd.
F
Crimp connectors
Crimpanschlüsse
Raccord à sertir
Krimpaansluitingen
N
Reverse gear signal extension cord
RückwärtsgangsignalVerlängerungskabel
Cordon prolongateur de
signal de marche arrière
Ve rlengsnoer achteruitrijsignaal
G
Washer (ø5)
Unterlegscheibe (ø5)
Rondelle (ø5)
Sluitring (ø5)
PROBLEMEN OPLOSSEN
• De zekering slaat door.
* Zijn de rode en de zwarte draden op de juiste
manier aangesloten?
• De stroom kan niet worden ingeschakeld.
* Is de gele draad aangesloten?
• Er komt geen geluid uit de speakers.
* Is de uitgaande speakerdraad kortgesloten?
• Het geluid wordt vervormd.
* Is de uitgaande speakerdraad geaard?
* Zijn de “–” polen van de linker- en de
rechterspeakers gemeenschappelijk geaard?
• Geluid wordt door ruis gestoord.
* Is de aarde-aansluiting achter met gebruik van
kortere en dikkere snoeren met het chassis van de
auto verbonden?
• Het apparaat raakt verhit.
* Is de uitgaande speakerdraad geaard?
* Zijn de “–” polen van de linker- en de
rechterspeakers gemeenschappelijk geaard?
• Receiver werkt helemaal niet.
* Heeft u de receiver teruggesteld?
Page 74

INSTALLATION
4 mm
4 mm
7 mm
7 mm
5.5 mm
20 mm
EINBAU
INSTALLATION (MONTAGE
INSTALLATIE (INBOUW IN
(IN-DASH MOUNTING)
The following illustration shows a typical
installation. If you have any questions or
require information regarding installation kits,
consult your JVC IN-CAR ENTERTAINMENT
dealer or a company supplying kits.
• If you are not sure how to install this receiver
correctly, have it installed by a qualified
technician.
• Make sure not to block the fan on the rear
panel to maintain proper ventilation when
installed.
• You cannot install the receiver on the car
which has any obstacles in the space shown
in “Required space for installation” below.
(IM ARMATURENBRETT)
Die folgende Abbildung zeigt einen typischen
Einbau. Bei irgendwelchen Fragen oder
wenn Sie Informationen hinsichtlich des
Einbausatzes brauchen, wenden Sie sich
an ihren JVC Autoradiohändler oder ein
Unternehmen das diese Einbausätze vertreibt.
• Sind Sie sich über den richtigen Einbau des
Geräts nicht sicher, lassen Sie es von einem
qualifizierten Techniker einbauen.
• Sicherstellen, dass nicht das Gebläse an
der Rückseite verdeckt wird, um richtige
Ventilation beim Einbau zu gewährleisten.
• Sie können nicht den Receiver in einem
Fahrzeug einbauen, wo sich Hindernisse im
„Erforderlicher Platz für Einbau“ wie unten
gezeigt befinden.
Required space for installation / Erforderlicher Platz für Einbau /
Espace nécessaire pour l’installation / Voor de installatie vereiste ruimte
Dashboard
Armaturenbrett
Tableau de bord
Dashboard
DANS LE TABLEAU DE BORD)
L’illustration suivante est un exemple
d’installation typique. Si vous avez des
questions ou avez besoin d’information sur des
kits d’installation, consulter votre revendeur
d’autoradios JVC ou une compagnie
d’approvisionnement.
• Si l’on n’est pas sûr de pouvoir installer
correctement cet appareil, le faire installer
par un technicien qualifié.
• Assurez-vous de ne pas bloquer le
ventilateur sur le panneau arrière afin
d’assurer une ventilation correcte une fois
l’appareil installé.
• Vous ne pouvez pas installer l’autoradio dans
une voiture avec des obstacles situés dans
HET DASHBOARD)
Op de volgende afbeelding kunt u zien hoe de
installatie, normaal gesproken, in zijn werk gaat.
Neem bij vragen of voor meer bijzonderheden
over inbouwpakketten contact op met uw JVC
car audio dealer of een dealer of een bedrijf dat
inbouwpakketten levert.
• Als u niet zeker weet hoe u dit apparaat moet
installeren, kunt u dit beter door een daartoe
gekwalificeerde technicus laten doen.
• Zorg dat u de ventilator op het achterpaneel niet
blokkeert en zo de werking verhindert.
• U kunt de receiver niet in een auto installeren
als er sprake is van obstakels in de ruimte
aangegeven onder het kopje “Voor de installatie
vereiste ruimte”, hieronder.
la zone marquée en gris dans l’illustration
“Espace nécessaire pour l’installation”
ci-dessous.
Caution when installing / Vorsicht bei der Installation / Précautions lors
de l’installation / Voorzorgen voor het installeren
Control panel
Bedienfeld
Panneau de commande
Bedieningspaneel
Trim plate is detached on this
illustration for explanation.
Die Deckplatte ist in dieser
Zeichnung zur Erklärung
angebracht.
Para fines explicativos, se ha
retirado la placa de guarnición
en esta ilustración.
Op deze afbeelding is de bekleding
verwijdert ter verduidelijking.
*1 When you stand the receiver,
be careful not to damage the
fuse on the rear.
1
*
Beim Aufstellen des Geräts
darauf achten, daß die
Sicherung auf der Rückseite
nicht beschädigt wird.
1
*
Lorsque vous mettez l’appareil
à la verticale, faire attention de
ne pas endommager le fusible
situé sur l’arrière.
1
*
Wanneer u het apparaat rechtop
zet, moet u erop letten dat u de
zekering aan de achterkant niet
beschadigt.
Fit the receiver into the mounting sleeve by using four corners of the trim plate.
• DO NOT press the panel (shaded in the illustration).
Setzen Sie den Receiver in die Montagemanschette, indem Sie die vier Ecken der Deckplatte
verwenden.
• Drücken Sie NICHT auf die Platte selber (in der Abbildung schraffiert).
Fixez l’autoradio sur le manchon de montage en utilisant les quatre coins de la plaque de
garniture.
• NE POUSSEZ PAS sur le panneau (en gris sur l’illustration).
Gebruik de vier hoeken van de afwerkplaat om de receiver in de bevestigingshuls te plaatsen.
• Druk NIET op het paneel zelf (het grijze gedeelte in de afbeelding).
Do the required electrical connections.
Nehmen Sie die erforderlichen
elektrischen Anschlüsse vor.
Réalisez les connexions électriques.
Breng de vereiste elektrische verbindingen
tot stand.
Do not block the fan.
Nicht das Gebläse blockieren.
Ne bloquez pas le ventilateur.
Blokkeer de ventilatie niet.
Bend the appropriate tabs to hold the
sleeve firmly in place.
Die geeigneten Zapfen biegen, um
die Manschette sicher festzuhalten.
Tordez les languettes appropriées
pour maintenir le manchon en place.
Buig de vereiste lipjes zodat de huls goed
op zijn plaats wordt gehouden.
When using the optional stay / Beim Verwenden der
Anker-Option / Lors de l’utilisation du hauban en
option / Wanneer u de steun gebruikt (facultatief)
Stay (option)
Anker (Option)
Hauban (en option)
Steun (facultatief)
Screw (option)
Schraube (Option)
Vis (en option)
Schroef (facultatief)
Dashboard
Armaturenbrett
Tableau de bord
Dashboard
Fire wall
Feuerwand
Cloison
Brandscherm
Install the receiver at an angle of less
than 30˚.
Stellen Sie das Gerät mit einem Winkel
von weniger als 30˚ auf.
Installez l’appareil avec un angle de
moins de 30˚.
Installeer het toestel met een hoek kleiner
dan 30˚.
When installing the receiver without using the sleeve / Beim Einbau des Geräts ohne
Halterung / Lors de l’installation de l’appareil scans utiliser de manchon / Wanneer u
het apparaat zonder huis installeert
In a car having the “Required space for installation” shown above, first remove the car radio and install the receiver
in its place.
In einem Fahrzeug wo der „Erforderlicher Platz für Einbau“ wie oben gezeigt vorhanden ist, bauen Sie zunächst
das Autoradio aus und bauen an seiner Stelle den Receiver ein.
Dans une voiture avec l’ “Espace nécessaire pour l’installation” montré cidessus, retirez d’abord l’ancien autoradio
et installez cet autoradio à sa place.
In een auto met de hierboven getoonde “Voor de installatie vereiste ruimte” moet u eerst de autoradio verwijderen en dan de
receiver op zijn plaats installeren.
Flat type screws (M5 x 6 mm) *
Senkkopfschrauben (M5 x 6 mm) *
Vis à tête plate (M5 x 6 mm) *
Platkopschroeven (M5 x 6 mm) *
2
2
2
2
Bracket *
Konsole *
Support *
Console *
2
2
2
2
Bracket *
Konsole *
Support *
Console *
2
2
2
2
Note : When installing the receiver on the mounting bracket, make sure to use the 6 mm-long screws. If
longer screws are used, they could damage the receiver.
Hinweis : Beim Anbringen des Gerät an der Konsole sicherstellen, daß 6 mm lange Schrauben verwendet
werden. Werden längere Schrauben verwendet, können sie das Gerät beschädigen.
Remarque : Lors de l’installation de l’appareil sur le support de montage, s’assurer d’utiliser des vis d’une
longueur de 6 mm. Si des vis plus longues sont utilisées, elles peuvent endommager l’appareil.
Opmerking : Wanneer u het apparaat aan de bevestigingsklem vastmaakt, moet u de 6 mm lange schroeven
gebruiken. Als u langere schroeven gebruikt, kan het apparaat worden beschadigd.
2
*2 Not included for this receiver.
2
*
Für diesen Receiver nicht mitgeliefert.
2
*
Non fourni avec cet appareil.
2
*
Niet bij deze receiver bijgeleverd.
Flat type screws (M5 x 6 mm) *
Senkkopfschrauben (M5 x 6 mm) *
Vis à tête plate (M5 x 6 mm) *
Platkopschroeven (M5 x 6 mm) *
2
2
2
2
Page 75

Removing the receiver
Before removing the receiver, release the rear
section.
Ausbau des Geräts
Vor dem Ausbau des Geräts den hinteren Teil
freigeben.
Retrait de l’appareil
Avant de retirer l’appareil, libérer la section
arrière.
Insert the two handles, then pull them
as illustrated so that the receiver can be
removed.
Die beiden Handgriffe einsetzen und dann
ziehen wie in der Abbildung gezeigt, so daß
das Gerät entfernt werden kann.
Insérez les deux poignées, puis tirez de la
façon illustrée de façon à retirer l’appareil.
Plaats de twee hendels en trek ze vervolgens zoals
afgebeeld naar voren zodat het toestel kan worden
verwijderd.
Verwijderen van het apparaat
Voordat u het apparaat verwijdert, moet u het
achtergedeelte losmaken.
ELECTRICAL CONNECTIONS
To prevent short circuits, we recommend that
you disconnect the battery’s negative terminal
and make all electrical connections before
installing the receiver.
• Be sure to ground this receiver to the
car’s chassis again after installation.
Notes:
• Replace the fuse with one of the specified
rating. If the fuse blows frequently, consult
your JVC IN-CAR ENTERTAINMENT dealer.
• It is recommended to connect to the
speakers with maximum power of more
than 50 W (both at the rear and at the front,
with an impedance of 4 Ω to 8 Ω). If the
maximum power is less than 50 W, change
“Amp Gain” setting to prevent the speakers
from being damaged (see page 47 of the
INSTRUCTIONS).
• To prevent short-circuit, cover the terminals
of the UNUSED leads with insulating tape.
• The heat sink becomes very hot after use.
Be careful not to touch it when removing this
receiver.
Heat sink
Abstrahlblech
Dissipateur de chaleur
Warmte-opnemer
ELEKTRISCHE ANSCHLÜSSE
Zur Vermeidung von Kurzschlüssen
empfehlen wir, daß Sie den negativen
Batterieanschluß abtrennen und alle
elektrischen Anschlüsse herstellen, bevor das
Gerät eingebaut wird.
• Sicherstellen, daß das Gerät nach dem
Einbau a Chassis des Fahrzeugs geerdet
wird.
Hinweise:
• Die Sicherung mit einer der entsprechenden
Nennleistung ersetzen. Brennt die Sicherung
häufig durch, wenden Sie sich an ihren JVC
Autoradiohändler.
• Es wird empfohlen, Lautsprecher mit
einer Maximalleistung von mehr als 50 W
anzuschließen (sowohl hinten als auch
vorne, mit einer Impedanz von 4 Ω bis 8 Ω).
Wenn die Maximalleistung weniger als
50 W beträgt, stellen Sie „Amp Gain“ anders
ein, um Schäden an den Lautsprechern
zu vermeiden (siehe Seite 47 der
BEDIENUNGSANLEITUNG).
• Zur Vermeidung eines Kurzschlusses
die Anschlußklemmen der NICHT
VERWENDETEN Leitungen mit
Isolierklebeband umwickeln.
• Das Abstrahlblech wird nach dem Gebrauch
sehr heiß. Beim Ausbau des Geräts
darauf achten, das Abstrahlblech nicht zu
berühren.
RACCORDEMENTS ELECTRIQUES
Pour éviter tout court-circuit, nous vous
recommandons de débrancher la borne
négative de la batterie et d’effectuer tous les
raccordements électriques avant d’installer
l’appareil.
• Assurez-vous de raccorder de nouveau
la mise à la masse de cet appareil au
châssis de la voiture après l’installation.
Remarques:
• Remplacer le fusible par un de la valeur
précisée. Si le fusible saute souvent,
consulter votre revendeur d’autoradios JVC.
• Il est recommandé de connecter des
enceintes avec une puissance de plus de
50 W (les enceintes arrière et les enceintes
avant, avec une impédance comprise entre
4 Ω et 8 Ω). Si la puissance maximum est
inférieure à 50 W, changez “Amp Gain” pour
éviter d’endommager vos enceintes (voir
page 47 du MANUEL D’INSTRUCTIONS).
• Pour éviter les court-circuits, couvrir les
bornes des fils qui ne sont PAS UTILISÉS
avec de la bande isolante.
• Le dissipateur de chaleur devient très chaud
après usage. Faire attention de ne pas le
toucher en retirant cet appareil.
ELEKTRISCHE VERBINDINGEN
Om kortsluiting te voorkomen adviseren wij u
om de minpool van de accu los te maken en alle
elektrische verbindingen tot stand te brengen
voordat u het apparaat in de auto installeert.
• Aard dit toestel beslist weer op het
Opmerkingen:
• Vervang de zekering door een exemplaar met
• Sluit bij voorkeur luidsprekers met een hoger
•
• De warmte-opnemer kan na gebruik erg heet
chassis van de auto na het installeren.
het aangegeven vermogen. Als de zekering
vaak doorslaat, moet u uw JVC car audio dealer
raadplegen.
maximaal vermogen dan 50 W (zowel achter als
voor, met een impedantie van 4 Ω t/m
8 Ω) aan. Indien het maximale vermogen lager
dan 50 W is, moet u “Amp Gain” in de andere
stand stellen zodat de luidsprekers niet kunnen
worden beschadigd (zie bladzijde 47 van de
GEBRUIKSAANWIJZING).
Om kortsluiting te voorkomen, moet u de
aansluitklemmen van ONGEBRUIKTE gekleurde
draden met isolatieband bedekken.
worden. Raak de warmte-opnemer niet aan
wanneer u dit apparaat van zijn plaats haalt.
PRECAUTIONS on power supply
and speaker connections:
• DO NOT connect the speaker leads
of the power cord to the car battery;
otherwise, the receiver will be seriously
damaged.
• BEFORE connecting the speaker leads of
the power cord to the speakers, check the
speaker wiring in your car.
About sounds reproduced through
the rear terminals
• Through the analog terminals (Speaker
out/LINE OUT/2nd AUDIO OUT):
2-channel signal is emitted.
When playing a multi-channel encoded
disc, multi-channel signals are downmixed.
(AUDIO—DOWN MIX: see page 33 of the
INSTRUCTIONS.)
• Through DIGITAL OUT (optical):
Digital signals (Linear PCM, Dolby Digital*
4
DTS*
, MPEG Audio) are emitted through
this terminal. (For more details, see page 65
of the INSTRUCTIONS.)
To reproduce multi-channel sounds such
as Dolby Digital and DTS, connect an
amplifier or a decoder compatible with
these multi-channel sources to this terminal,
and set “DIGITAL AUDIO OUTPUT” to
the correct value. (See page 33 of the
INSTRUCTIONS.)
3
*
Manufactured under license from Dolby
Laboratories. “Dolby” and the doubleD symbol are trademarks of Dolby
Laboratories.
4
*
“DTS” and “DTS 2.0 + Digital Out” are
trademarks of Digital Theater Systems, Inc.
3
VORSICHTSMASSREGELN beim
Anschließen der Stromversorgung
und Lautsprecher:
• Die Lautsprecherleitungen des
Netzkabels NICHT an der Autobatterie
anschließen, da sonst das Gerät schwer
beschädigt wird.
• VOR dem Anschließen der
Lautsprecherleitungen des Spannunsgversorgungskabels an die Lautsprecher,
die Lautsprecherverdrahtung in Ihrem Auto
überprüfen.
Über von den Rückseitenbuchsen
ausgegebenen Ton
• Über die Analogbuchsen
(Lautsprecherausgang/LINE OUT/2nd
AUDIO OUT):
2-Kanal-Signal wird ausgegeben.
Beim Abspielen einer mehrkanalig codierten
Disk werden Mehrkanalsignale abgemischt.
(AUDIO—ABWÄRTSMISCHUNG: Siehe
Seite 33 der BEDIENUNGSANLEITUNG).
• Über DIGITAL OUT (optisch):
,
Digitalsignale (Linear PCM, Dolby Digital*
4
DTS*
, MPEG Audio) werden über diese
Buchse ausgegeben. (Einzelheiten siehe
Seite 65 der BEDIENUNGSANLEITUNG).
Zum Reproduzieren von Mehrkanalton
wie Dolby Digital und DTS schließen Sie
einen Verstärker oder Decoder an diese
Buchse an, der mit diesen Mehrkanalquellen
kompatibel ist, und stellen „DIGITAL-AUDIOAUSGANG“ richtig ein. (Siehe Seite 33 der
BEDIENUNGSANLEITUNG).
3
*
In Lizenz von Dolby Laboratories
hergestellt. „Dolby“ und das Doppel-DSymbol sind Warenzeichen der Dolby
Laboratories.
4
*
„DTS“ und „DTS 2.0 + Digital Out“ sind
eingetragene Warenzeichen von Digital
Theater Systems, Inc.
PRECAUTIONS sur l’alimentation et
la connexion des enceintes:
• NE CONNECTEZ PAS les fils d’enceintes
du cordon d’alimentation à la batterie;
sinon, l’appareil serait sérieusement
endommagé.
• AVANT de connecter les fils d’enceintes du
cordon d’alimentation aux enceintes, vérifiez
le câblage des enceintes de votre voiture.
À propos des sons reproduits par
les prises arrière
• Par les prises analogiques (sortie des
enceintes/LINE OUT/2nd AUDIO OUT):
Un signal à 2 canaux est sorti.
Lors de la lecture d’un disque codé
multicanaux, les signaux multicanaux
sont sous mixés. (AUDIO—MIXAGE
DEMULTIPLICATION: voir page 33 du
MANUEL D’INSTRUCTIONS).
• Par la sortie DIGITAL OUT (optique):
3
Les signaux numériques (Linear PCM, Dolby
,
Digital *
par cette prise. (Pour plus de détails, voir
page 65 du MANUEL D’INSTRUCTIONS).
Pour reproduire les sons multicanaux, Dolby
Digital ou DTS par exemple, connectez à
cette prise un amplificateur ou un décodeur
compatible avec ces sources multicanaux,
et réglez “SORTIE AUDIO NUM.”
correctement. (Voir page 33 du MANUEL
D’INSTRUCTIONS).
3
*
Fabriqué sous licence de Dolby
4
*
“DTS” et “DTS 2.0 + Digital Out” sont des
3
3
, DTS *4, MPEG Audio) sont sortis
Laboratories. “Dolby” et le symbole double
D sont des marques de commerce de Dolby
Laboratories.
marques de commerce de Digital Theater
Systems, Inc.
VOORZORGSMAATREGELEN
bij hetverbinden van de
stroomkabeldraad met de
speakers:
• Verbind de speakerdraden van de
stroomkabel NIET met de accu van
de auto; als u dit wel doet, zal het
apparaat ernstige schade oplopen.
• VOORDAT u de speakerdraden van de
stroomkabel met de speakers verbindt, moet
u de bedrading van de speakers in uw auto
controleren.
Meer over het geluid dat via
de achter-aansluitingen wordt
gereproduceerd
• Via de analoge aansluitingen (Speaker
out/LINE OUT/2nd AUDIO OUT):
2-kanaal signalen worden uitgestuurd.
Tijdens weergave van een multikanaal
gecodeerde disc, worden de multikanaalsignalen teruggemengd. (AUDIO—
KANAALREDUCTIE: zie bladzijde 33 van de
GEBRUIKSAANWIJZING).
• Via de DIGITAL OUT (optische)
aansluiting:
Via deze aansluiting worden digitale signalen
(Lineair PCM, Dolby Digital*
Audio) uitgestuurd. (Zie bladzijde 65 van de
GEBRUIKSAANWIJZING voor details).
Voor het reproduceren van multikanaal-geluid,
bijvoorbeeld Dolby Digital en DTS, moet u
met deze aansluiting een versterker of decoder
verbinden die voor deze multikanaal-bronnen
geschikt is en “DIGITALE AUDIO UITVOER”
juist instellen. (Zie bladzijde 33 van de
GEBRUIKSAANWIJZING).
3
*
Vervaardigd in licentie van Dolby Laboratories.
“Dolby” en het dubbel D-symbool zijn
handelsmerken van Dolby Laboratories.
4
*
“DTS” en “DTS 2.0 + Digital Out” zijn
geregistreerde handelsmerken van Digital
Theater Systems, Inc.
3
, DTS*4, MPEG
Page 76

ENGLISH FRANÇAIS
*
*
DEUTSCH NEDERLANDS
If your car is equipped with the ISO
A
connector /
Steckverbinder ausgestattet ist
Wenn Ihr Fahrzeug mit dem ISO-
/ Si votre
voiture est équippée d’un connecteur ISO /
Indien uw auto een ISO-aansluiting heeft
• Connect the ISO connectors as illustrated.
• Schließen Sie die ISO-Steckverbinder an, wie in der Abbildung
gezeigt.
• Connectez les connecteurs ISO comme montré sur l’illustration.
• Verbind de ISO-stekkers zoals afgebeeld.
From the car body
Von der Fahrzeugkarosserie
De la carrosserie de la voiture
Van het chassis van de auto
ISO connector of the supplied power cord
ISO-Stecker des mitgelieferten Stromkabels
Connecteur ISO pour le cordon d’alimentation
fourni
ISO-stekker van het bijgeleverde spanningssnoer
View from the lead side
Von der Kabelseite aus gesehen
Vue à partir du côté des fils
Gezien vanaf de spanningstoevoerkant
For some VW/Audi or Opel (Vauxhall) automobile /
(Vauxhall-) Fahrzeugen
/ Pour certaine voiture VW/Audi ou Opel (Vauxhall) / Voor bepaalde
Bei bestimmten VW-/Audi- order Opel-
VW/Audi en Opel (Vauxhall) auto’s
You may need to modify the wiring of the supplied power cord as illustrated.
• Contact your authorized car dealer before installing this receiver.
Es kann erforderlich sein, die Verdrahtung des mitgelieferten Stromkabels zu modifizieren, wie in der Abbildung gezeigt.
• Wenden Sie sich vor dem Einbau dieses Receivers an Ihre Auto-Fachwerkstatt.
Vous aurrez peut-être besoin de modifier le câblage du cordon d’alimentation fourni comme montré sur l’illustration.
• Contactez votre revendeur automobile autorisé avant d’installer l’appareil.
U moet mogelijk de bedrading van het bijgeleverde spanningssnoer als afgebeeld veranderen.
• Raadpleeg een erkend autogarage alvorens deze receiver te installeren.
Original wiring / Originalverdrahtung / Câblage original /
Oorspronkelijke bedrading
ISO connector
ISO-Steckverbinder
Connecteur ISO
ISO-aansluiting
* Choking coil
Drosselspule
Bobine d’arrêt
Onderbrekingsspoel
Y: Yellow
Gelb
Jaune
Geel
Use modified wiring 2 if the receiver does not turn on.
Verwenden Sie die modifizierte Verdrahtung 2 wenn der Receiver nicht einschaltet.
Utilisez le câblage modifié 2 si l’appareil ne se met pas sous tension.
Gebruik methode 2 voor het veranderen van de bedrading indien de receiver niet wordt ingeschakeld.
R: Red
Rot
Rouge
Rood
Modified wiring 1 / Modifizierte Verdrahtung 1 / Câblage modifié 1 /
Veranderde bedrading 1
Modified wiring 2 / Modifizierte Verdrahtung 2 / Câblage modifi é 2 /
Veranderde bedrading 2
Connections without using the ISO connectors / Anschlüsse ohne Verwendung der ISO-Steckverbinder / Connexions sans l’utilisation des
B
connecteurs ISO / Verbinden zonder gebruik van ISO-stekkers
Before connecting: Check the wiring in the
vehicle carefully. Incorrect connection may
cause serious damage to this receiver.
The leads of the power cord and those of the
connector from the car body may be different
in color.
1 Cut the ISO connector.
2
Connect the colored leads of the power cord
in the order specified in the illustration below.
3 Connect the aerial cord.
4 Finally connect the wiring harness to the
receiver.
Rear ground
terminal
Hintere
Erdungscanschlußklemme
Borne arrière de
masse
Massaklem aan de
achterkant
To CD changer/DAB tuner or
another external component (see
diagram
An CD-Wechsler/DAB-Tuner oder
andere externe Komponente (siehe
Schaltplan )
Au changeur de CD/tuner DAB
ou autre appareil extérieur (voir le
diagramme )
Naar CD-wisselaar/DAB-tuner of
ander extern component (zie schema
)
Line out (see
diagram
Schutz kappen
Signalausgang
(siehe Schaltplan
)
Sortie de ligne
(voir le
diagramme )
Uitgang (zie
schema )
*2 Before checking the operation of this receiver prior to
*2
*2 Pour vérifier le fonctionnement de cet appareil avant
*2 Voordat u controleert of het apparaat werkt (alvorens het te
)
)
installation, this lead must be connected, otherwise
power cannot be turned on.
Vor der Überprüfung der Funktionsfähigkeit des Geräts
vor dem Einbau, muß diese Leitung angeschlossen
werden, da sonst die Stromversorgung nicht
eingeschaltet werden kann.
installation, ce fil doit être raccordé, sinon l’appareil ne
peut pas être mis sous tension.
installeren), moet deze draad aangesloten zijn. Als dit niet het
geval is, kan de stroom niet worden ingeschakeld.
REVERSE GEAR
SIGNAL
(see diagram
/ siehe
Schaltplan
/ voir le
diagramme /
zie schema )
VIDEO OUT
diagram
/ siehe
Schaltplan
/ voir le
diagramme
schema )
Vor dem Anschließen: Die Verdrahtung
im Fahrzeug sorgfältig überprüfen. Falsche
Anschlüsse können ernsthafte Schäden am
Gerät hervorrufen.
Die Leiter des Stromkabels und die Leiter des
Anschlusses im Fahrzeug können sich farblich
unterscheiden.
1 Schneiden Sie den ISO-Steckverbinder auf.
2 Die farbigen Adern des Stromkabels in
der Reihenfolge anschließen, wie in der
Abbildung unten gezeigt.
3 Das Antennenkabel anschließen.
4 Die Kabelbäume am Gerät anschließen.
VIDEO IN (see diagram
LINE IN (see diagram / siehe Schaltplan / voir le diagramme / zie schema )
SUBWOOFER (see diagram / siehe Schaltplan / voir le diagramme / zie schema )
(see
/ zie
/ siehe Schaltplan / voir le diagramme / zie schema )
2nd AUDIO OUT (see diagram / siehe Schaltplan / voir le
diagramme / zie schema )
OE REMOTE
Steering wheel remote input / Lenkrad-Fernbedienungseingang / Entrée
de la télécommande de volant / Invoer afstandsbediening-met-stuurwieltje (see
diagram
15 A fuse
15 A Sicherung
Fusible 15 A
Zekering 15 A
Black
Schwarz
Noir
Zwart
2
Yellow *
2
Gelb *
2
Jaune *
2
Geel *
Red
Rot
Rouge
Rood
Blue with white stripe
Blau mit weißem Streifen
Bleu avec bande blanche
Blauw met witte streep
Orange with white stripe
Orange mit weißem Streifen
Orange avec bande blanche
Oranje met witte streep
Brown
Braun
Marron
Bruin
Light green
Hellgrün
Vert clair
Lichtgroen
To metallic body or chassis of the car
Zur metallenen Karosserie oder zum Fahrwerk des Autos
Vers corps métallique ou châssis de la voiture
Naar metalen ondergrond of chassis van de auto
To a live terminal in the fuse block connecting to the car battery (bypassing
the ignition switch) (constant 12 V)
Zur einer stromführenden Anschlußklemme im Sicherungsblock zum
Anschließen an die Autobatterie (Umgehen des Zündschalters) (konstant 12 V)
A une borne sous tension du porte-fusible connectée à la batterie de la
voiture (en dérivant l’interrupteur d’allumage) (12 V constant)
Naar een onder spanning staande aansluitklem in het zekeringblok die is aangesloten
op de accu van de auto (u passeert de ontstekingsschakelaar) (constant 12 V)
Avant de commencer la connexion: Vérifiez
attentivement le câblage du véhicule. Une
connexion incorrecte peut endommager
sérieusement l’appareil.
Le fil du cordon d’alimentation et ceux des
connecteurs du châssis de la voiture peuvent
être différents en couleur.
1 Coupez le connecteur ISO.
2 Connectez les fils colorés du cordon
d’alimentation dans l’ordre spécifié sur
l’illustration ci-dessous.
3 Connectez le cordon d’antenne.
4 Finalement, connectez le faisceau de fils à
l’appareil.
/ siehe Schaltplan / voir le diagramme / zie schema )
DIGITAL OUT (see diagram
voir le diagramme / zie schema )
To an accessory terminal in the fuse block
Zur einer Zubehöranschlußklemme im Sicherungsblock
Vers borne accessoire du porte-fusible
Naar een aansluitklem in het zekeringblok
To the remote lead of other equipment or power aerial if any (200 mA max.)
Zum Zusatzkabel des anderen Geräts oder der Motorantenne, sofern
vorhanden (max. 200 mA)
Au fil de télécommande de l’autre appareil ou à l’antenne automatique s’il y en a
une (200 mA max.)
Naar afstandsdraad van andere apparatuur of antenne met circuit indien aanwezig
(200 mA max.)
/ siehe Schaltplan /
1
*
Not included for this receiver
1
*
Für diesen Receiver nicht mitgeliefert
1
*
Non fourni avec cet appareil
1
*
Niet bij deze receiver bijgeleverd
To car light control switch
Zum Autobeleuchtungssteuerung-Schalter
À l’interrupteur d’éclairage de la voiture
Naar schakelaar van autoverlichting
To cellular phone system
Zur Mobiltelefon
À un système de téléphone cellulaire
Naar het mobiele-telefoonsysteem
To parking brake (see diagram
An Feststellbremse (siehe Schaltplan )
Au frein de stationnement (voir le diagramme )
Naar handrem (zie schema )
Alvorens de verbindingen tot stand te
brengen: Moet u de bedrading in de auto
zorgvuldig. Het apparaat kan door verkeerde
verbindingen ernstige schade oplopen.
De draden van het stroomsnoer verschillen
mogelijk van kleur metde aansluitingen op het
chassis van de auto.
1 Knip de ISO-stekker af.
2 Verbind de gekleurde draden van het
stroomsnoer in de afbeelding hieronder
aangegeven volgorde.
3 Sluit de antenne aan.
4
Verbind de draadbundel daarna met het apparaat.
Ignition switch
Zündschalter
Interrupteur d’allumage
Ontstekingsschakelaar
Fuse block
Sicherungsblock
Porte-fusible
Zekeringblok
)
White with black stripe
Weiß mit schwarzem
Streifen
Blanc avec bande noire
Wit met zwarte streep
White
Weiß
Blanc
Wit
Left speaker (front)
Linker Lautsprecher (vorne)
Enceinte gauche (avant)
Linkerspeaker (voorin)
Gray with black stripe
Grau mit schwarzem
Streifen
Gris avec bande noire
Grijs met zwarte streep
Gray
Grau
Gris
Grijs
Right speaker (front)
Rechter Lautsprecher (vorne)
Enceinte droit (avant)
Rechterspeaker (voorin)
Green with black stripe
Grün mit schwarzem
Streifen
Vert avec bande noire
Groen met zwarte streep
4
Green
Grün
Vert
Groen
Left speaker (rear)
Linker Lautsprecher (hinten)
Enceinte gauche (arrière)
Linkerspeaker (achterin)
Purple with black stripe
Lila mit schwarzem
Streifen
Violet avec bande noire
Paars met zwarte streep
Purple
Lila
Violet
Paars
Right speaker (rear)
Rechter Lautsprecher (hinten)
Enceinte droit (arrière)
Rechterspeaker (achterin)
Page 77

Connecting the parking brake wire / Anschluss des Handbremsenkabels / Connexion du cordon de frein de stationnement / De parkeerremdraad
AV1-IN
AV2-INPUT
KD-AVX1
R
L
REVERSE GEAR SIGNAL
KD-AVX1
C
aansluiten
Connect the parking brake wire to the
parking brake system built in the car.
Parking brake
Handbremse
Frein de stationnement
Parkeerrem
Parking brake switch (inside the car)
Handbremsenschalter (Fahrzeuginneres)
Commutateur de frein de stationnement
(intérieur de la voiture)
Parkeerremschakelaar (in de auto)
Connecting the back camera lead / Anschließen der Rückfahrkamera / Connexion du fil de la caméra de recul / Verbinden van het draad
D
Anschluss des Handbremsenkabels an das im
Fahrzeug eingebaute Handbremsensystem.
Connectez le fil de frein de stationnement au
système de frein de stationnement.
Parking brake wire (light green)
Handbremsenkabel (hellgrün)
Fil du frein de stationnement (vert clair)
Parkeerremdraad (lichtgroen)
To metallic body or chassis of the car
Zur metallenen Karosserie oder zum Fahrwerk des Autos
Vers corps métallique ou châssis de la voiture
Naar metalen ondergrond of chassis van de auto
Sluit de parkeerremdraad op het
parkeerremsysteem van de auto aan.
van een achteruitkijkcamera (REVERSE GEAR SIGNAL)
Purple with white stripe
Locate the back lamp lead in the trunk.
Suchen Sie die Rückfahrleuchtenleitung
im Kofferraum.
Localisez le fil des feux de recul dans le
coffre.
Zoek het draad van het achterlicht in de
kofferbak.
Back lamp lead
Rückfahrleuchtenleitung
Fil des feux de recul
Achterlichtdraad
To back lamp
An Rückfahrleuchte
Aux feux de recul
Naar achterlicht
Back lamps
Rückfahrleuchten
Feux de recul
Achterlichten
Lila mit weißem Streifen
Violet avec bande blanche
Paars met witte strepen
Back lamp lead
Rückfahrleuchtenleitung
Fil des feux de recul
Achterlichtdraad
To car battery
An Autobatterie
À la batterie de la voiture
Naar auto-accu
Connecting the crimp connector*3 / Anschließen des Crimpanschlusses*3 / Connexion de la cosse sertie*3 / Verbinden van de krimpaansluiting*
E
Wire connecting the battery and the parking brake switch.
Verbinden des Batterie- und des Handbremsenkabelschalters.
Fil connectant la batterie et l’interrupteur de frein de stationnement.
Draad voor aansluiting van de accu op de parkeerremschakelaar.
Attach the parking brake wire to this point.
Legen Sie das Handbremsenkabel hier ein.
Attachez le fil du frein de stationnement ici.
Bevestig op dit punt het draad van de parkeerrem.
Connections for external component playback / Anschlüsse für externe Komponente / Connexions pour un appareil de lecture extérieur /
F
Contact the metallic part of the crimp to the wires inside.
Kontaktieren des Metallteils des Quetschverbinders mit
den Kabeln im Inneren.
Mettez en contact la partie métallique de la cosse à sertir
et des fils intérieurs.
Zorg ervoor dat het metalen gedeelte van de krimp in contact
komt met de interne draden.
Pinch the crimp firmly.
Drücken Sie den Quetschverbinder
fest zusammen.
Pincez la cosse à sertir fermement.
Knijp stevig in de krimp.
Verbinden voor weergave van een extern component
Video cord (not supplied)
Videokabel (nicht mitgeliefert)
Cordon vidéo (non fourni)
Videosnoer (niet meegeleverd)
VIDEO OUT
2nd AUDIO OUT
Digital optical cable (not supplied)
Optisches Digitalkabel (nicht mitgeliefert)
Câble optique numérique (non fourni)
Digitale optische kabel (niet meegeleverd)
3
or / oder / ou / of
KV-MR9010
9-INCH WIDESCREEN MONITOR
(not supplied)
9-ZOLL-BREITBILDMONITOR
(nicht mitgeliefert)
MONITEUR À ÉCRAN LARGE DE 9 POUCES
(non fourni)
9-INCH BREEDBEELD-MONITOR
(niet bijgeleverd)
Rear side
Rückseite
Côté arrière
Achterkant
Camcorder, rear view camera, etc.
Camcorder, Rückfahrkamera, usw.
Caméscope, caméra de recul, etc.
Camcorder, achteruitkijkcamera, etc.
KS-HP2
Cordless headphones (not supplied) *
Drahtlose Kopfhörer (nicht mitgeliefert) *
Casque d’écoute sans fi l (non fourni) *
Snoerloze koptelefoon (niet meegeleverd) *
*4
To listen to disc playback sound while in Dual Zone operations (see page 40 of INSTRUCTIONS).
4
*
Zum Abhören von Disc-Audio im Dual Zone-Betrieb (siehe Seite 40 der BEDIENUNGSANLEITUNG).
*4
Pour écouter le son de lecture des disque lors de l’utilisation du mode Deux Zones (voir page 40 du MANUEL D’INSTRUCTIONS).
4
*
Om in Dual Zone naar een disk te luisteren (zie bladzijde 40 van de GEBRUIKSAANWIJZING).
4
4
VIDEO IN
LINE IN
External component
Externe Komponente
Appareil extérieur
Extern component
4
4
Audio/video control amplifier or the decoder
compatible with the multichannel digital sources
Audio/Video-Verstärker oder mit Mehrkanalquellen
kompatibler Decoder
Amplificateur de commande audio/vidéo ou
décodeur compatible avec les sources numériques
multicanaux
Audio/videoregeling versterker of de decoder compatibel
met meerkanaals digitale bronnen
DIGITAL OUT
See “About sounds reproduced
through the rear terminals.”
Siehe “Über von den
Rückseitenbuchsen
ausgegebenen Ton”.
Référez-vous “À propos des
sons reproduits par les prises
arrière”.
Zie “Meer over het geluid dat via
de achter-aansluitingen wordt
gereproduceerd.”
5
Page 78
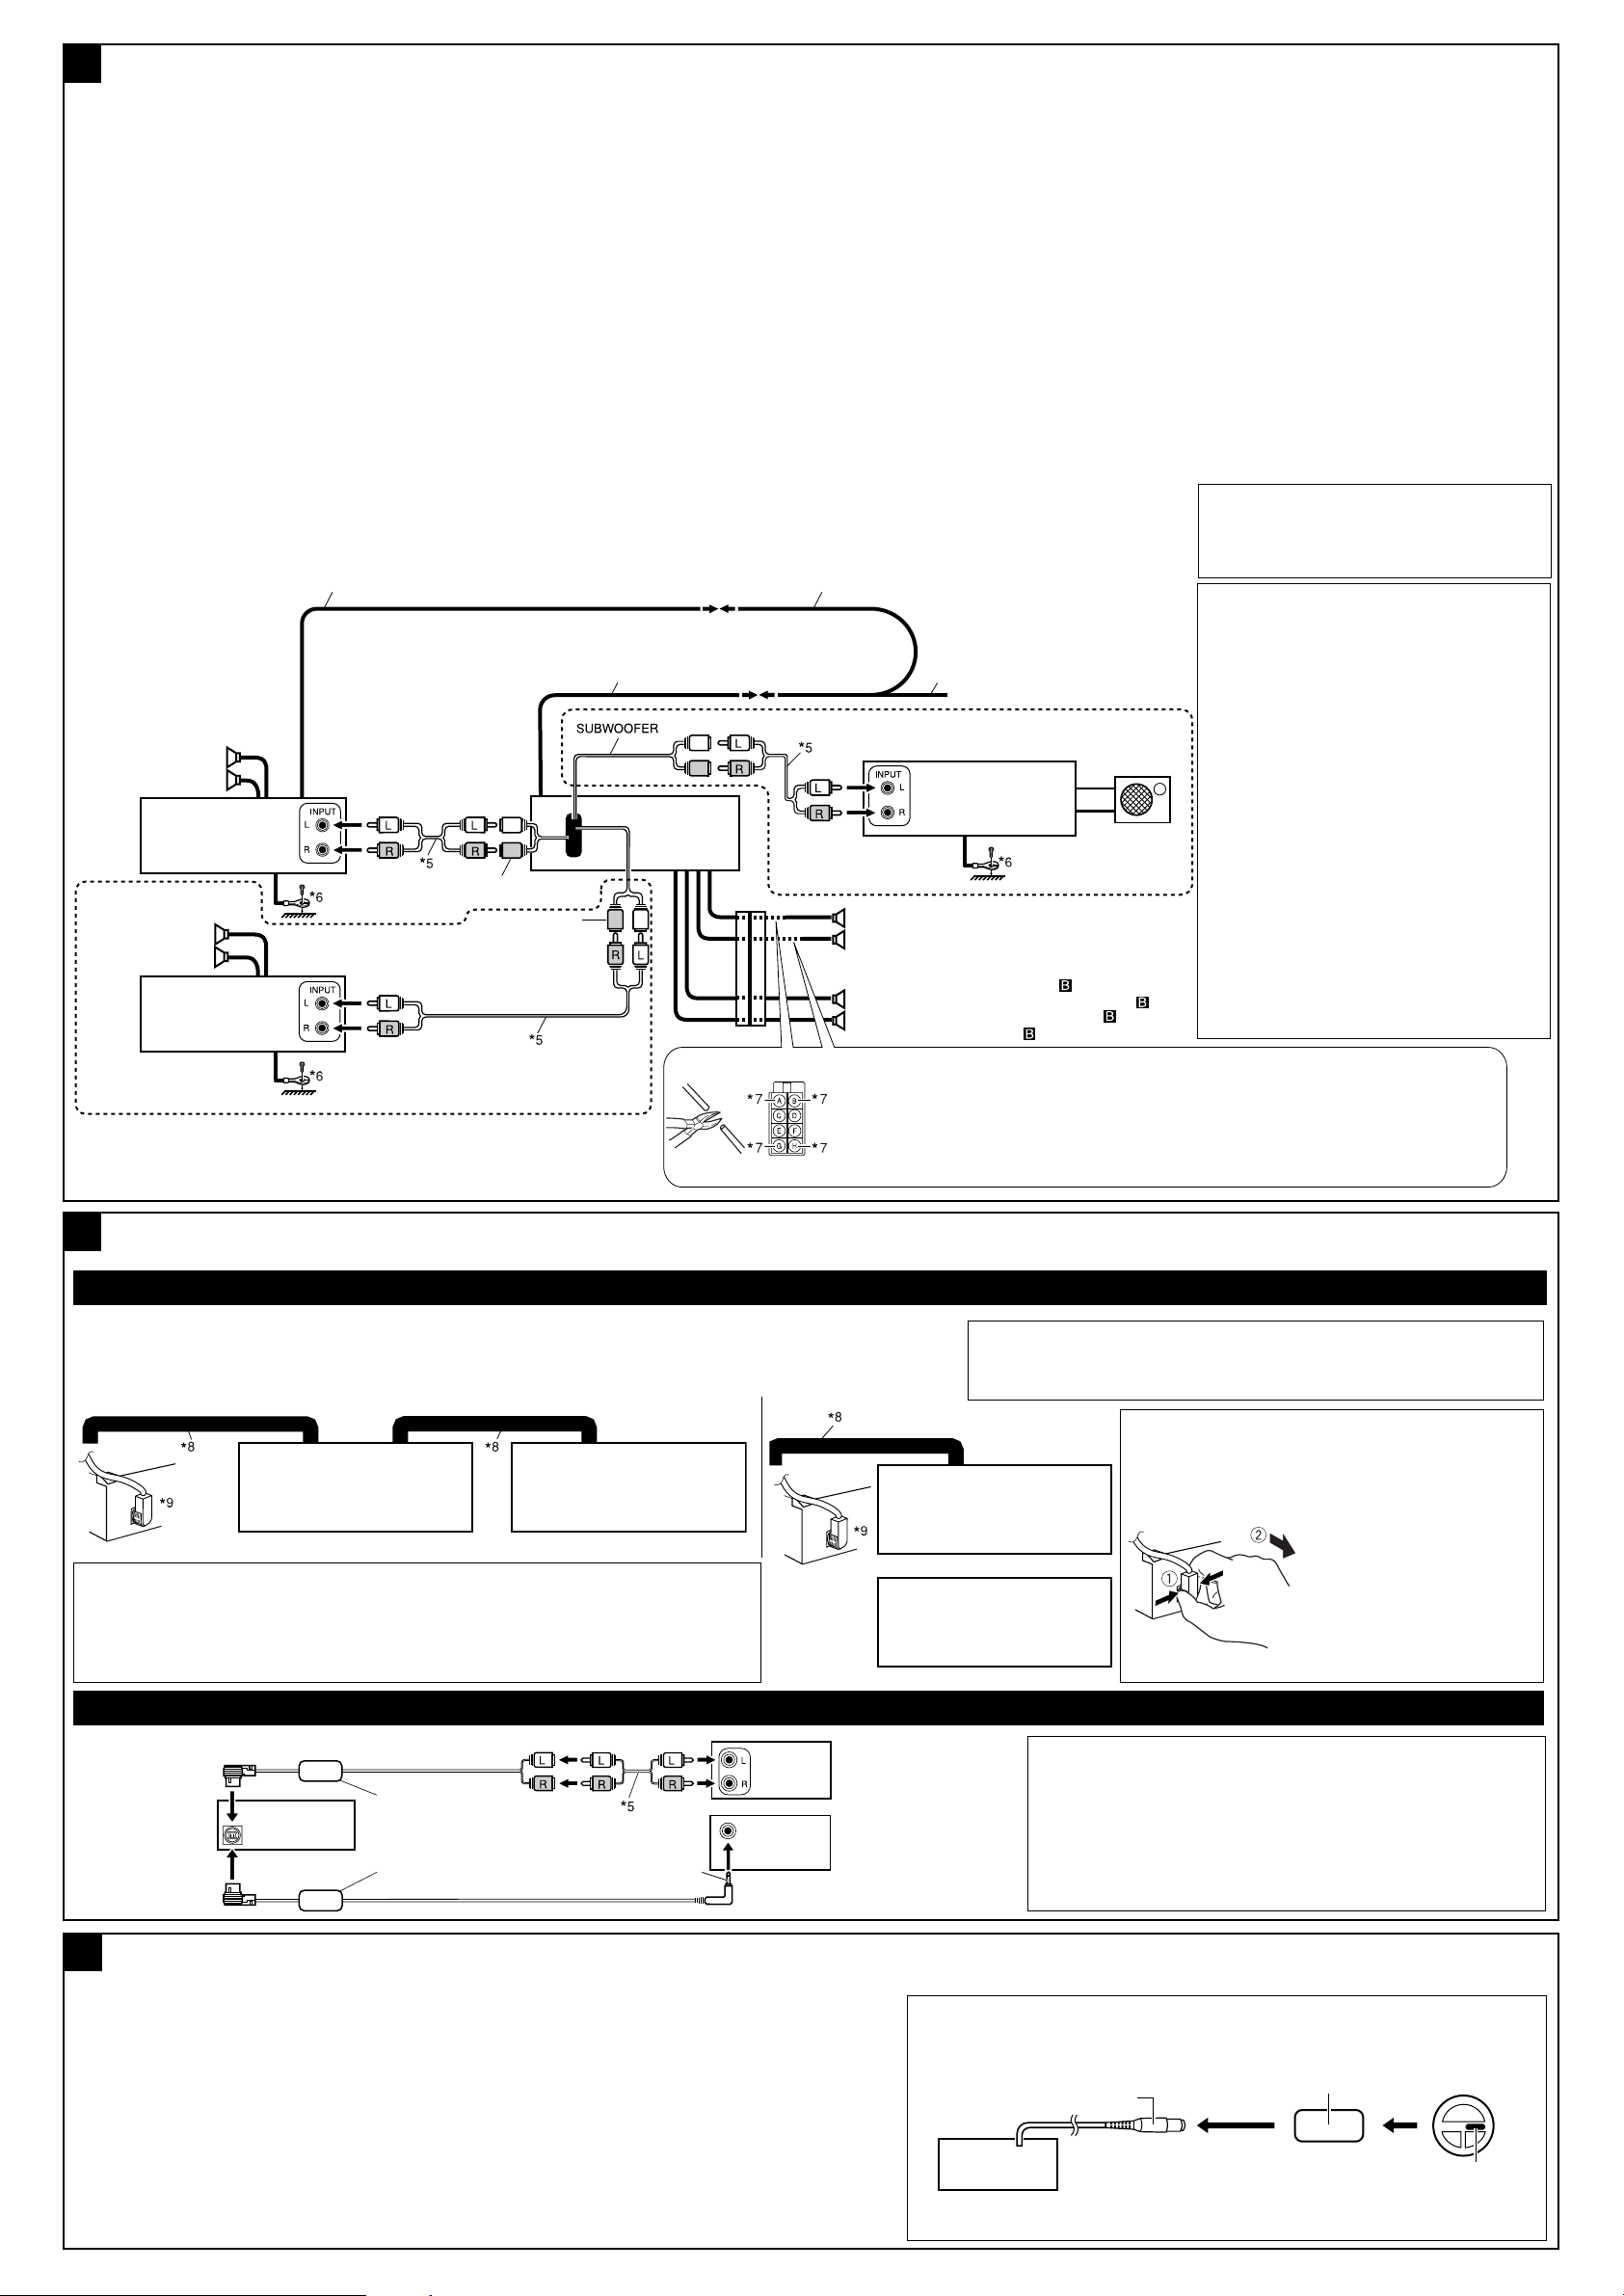
KD-AVX1
Connecting the external amplifiers / Anschließen der externen Verstärker / Connexion d’amplifi cateurs extérieurs / Verbinden van externe
KD-AVX1
LINE OUT (REAR)
LINE OUT (FRONT)
KD-AVX1
KD-AVX1
KD-AVX1
G
versterkers
You can connect amplifiers to upgrade your car
stereo system.
• Connect the remote lead (blue with white stripe)
to the remote lead of the other equipment so that
it can be controlled through this receiver.
• For amplifier only:
– Disconnect the speakers from this
receiver, connect them to the amplifier.
Leave the speaker leads of this receiver
unused.
– You can switch off the built-in amplifier and
send the audio signals only to the external
amplifier(s) to get clear sounds and to prevent
internal heat built-up inside the receiver. See
page 47 of the INSTRUCTIONS (separate
volume).
– The line output level of this receiver is kept
high to maintain the hi-fi sounds reproduced
from this receiver.
When connecting an external amplifier to
this receiver, turn down the gain control
on the external amplifier to obtain the best
performance from this receiver.
Remote lead
Fernbedienungsleitung
Fil d’alimentation à distance
Afstandbedieningsdraad
Rear speakers
Hintere Lautsprecher
Enceintes arrière
Achterspeakers
JVC Amplifier
JVC Verstärker
JVC Amplificateur
JVC Versterker
Front speakers
Vordere
Lautsprecher
Enceintes avant
Voorspeakers
JVC Amplifier
JVC Verstärker
JVC Amplificateur
JVC Versterker
Sie können einen Verstärker anschließen, um Ihre
Autostereoanlage zu erweitern.
• Schließen Sie das Fernbedienungskabel (blau mit
weißem Streifen) an das Fernbedienungskabel
des anderen Geräts an, so daß es über dieses
Gerät gesteuert werden kann.
• Nur für den Verstärker:
– Die Lautsprecher von diesem Gerät
abtrennen und am Verstärker anschließen.
Die Lautsprecherleitungen dieses Geräts
unbenutzt lassen.
–
Sie können den eingebauten Verstärker abschalten
und die Audiosignale nur zu dem(n) externen
Verstärker(n) ausgeben, um scharfen Ton zu erhalten
und Hitzestau im Receiver zu vermeiden. Siehe
Seite 47 der BEDIENUNGSANLEITUNG (separate
Druckschrift).
– Der Ausgangspegel dieses Geräts wird auf
einem hohen Wert gehalten, um den Hifi-Klang
zu unterstützen, den dieses Gerät reproduziert.
Wenn Sie einen externen Verstärker an
dieses Gerät anschließen, stellen Sie den
Verstärkungsregler des externen Verstärkers
herunter, um die bestmögliche Leistung dieses
Geräts zu erzielen.
Y-connector (not supplied for this receiver)
Y-Anschluß (für diesen Receiver nicht mitgeliefert)
Connecteur Y (non fourni avec cet appareil)
Y-connector (niet bij deze receiver bijgeleverd)
Remote lead (Blue with white stripe)
Fernbedienungsleitung (Blau mit weißem Streifen)
Fil d’alimentation à distance (Bleu avec bande blanche)
Afstandbedieningsdraad (Blauw met witte streep)
Vous pouvez connecter des amplificateurs pour
améliorer votre système autoradio.
• Connectez le fil de commande à distance (bleu
avec bande blanche) au fil de commande à
distance de l’autre appareil de façon qu’il puisse
être commandé via cet appareil.
• Pour l’amplificateur seulement:
– Déconnectez les enceintes de cet appareil
et connectez-les à l’amplificateur. Laissez
les fils d’enceintes de cet appareil inutilisés.
–
Vous pouvez désactiver l’amplificateur intégré et
envoyer les signaux audio uniquement à un ou
plusieurs amplificateurs extérieurs afin d’obtenir un
son clair et pour éviter un échauffement interne de
l’appareil. Référez-vous à la page 47 du MANUEL
D’INSTRUCTIONS (volume séparé).
– Le niveau de sortie de ligne de cet appareil est
maintenu à un niveau élevé pour maintenir une
qualité Hi-Fi pour les sons reproduits par cet
appareil.
Lors de la connexion d’un amplificateur extérieur
à cet appareil, diminuez le réglage du gain
sur l’amplificateur extérieur pour obtenir les
meilleures performances de cet appareil.
To the remote lead of other equipment
or power aerial if any
Zum Zusatzkabel des anderen
Geräts oder der Motorantenne, sofern
vorhanden
Au fil de télécommande de l’autre
appareil ou à l’antenne automatique
s’il y en a une
Naar afstandsdraad van andere apparatuur
of antenne met circuit indien aanwezig
JVC Amplifier
JVC Verstärker
JVC Amplificateur
JVC Versterker
Rear speakers
Hintere Lautsprecher
Enceintes arrière
Achterspeakers
Front speakers (see diagram
Vordere Lautsprecher (siehe Schaltplan
Enceintes avant (voir le diagramme
Voorspeakers (zie schema )
7
*
Cut the rear speaker leads of the car’s ISO connector and connect them to the amplifier.
7
*
Schneiden Sie die hinteren Lautsprecherkabel des ISO-Steckverbinders des Fahrzeugs
ab, und schließen diese an den Verstärker an.
7
*
Coupez les fils des enceintes arrière du connecteur ISO de la voiture et connectez-les à
l’amplificateur.
7
*
Knip de achterluidsprekerdraden van de ISO-stekker van de auto en verbind de draden met de
versterker.
Subwoofer
Subwoofer
Caisson de grave
Subwoofer
)
)
Het is mogelijk om uw autostereosysteem uit te breiden
door een versterker aan te sluiten.
• Verbind de externe kabel (blauw met witte streep)
met de externe kabel van het andere apparatuur zodat
deze op afstand vanaf deze apparaat kan worden
bediend.
• Alleen voor een versterker:
– Koppel de speakers van dit apparaat los
en verbind ze aan de versterker. Gebruik
de speakerdraden van dit apparaat niet.
– U kunt de ingebouwde versterker uitschakelen
en de audiosignalen uitsluitend direct naar een
externe versterker(s) sturen voor een helder geluid
en om te voorkomen dat er te veel warmte in de
receiver wordt opgehoopt. Zie bladzijde 47 van de
GEBRUIKSAANWIJZING (afzonderlijk boekje).
– Het uitgangsniveau van het geluid is hoog om het
hifi-geluid van deze eenheid te behouden.
Wanneer u een extern apparaat op deze
eenheid aansluit, moet u erop letten dat u de
versterkingsfactor van de externe versterker laag
houdt, zodat deze eenheid de beste prestaties levert.
5
*
Signal cord (not supplied for this receiver)
5
*
Einzelleitung (für diesen Receiver nicht
mitgeliefert)
5
*
Cordon de signal (non fourni avec cet appareil)
5
*
Signaalkabel (niet bij deze receiver bijgeleverd)
6
*
Firmly attach the ground wire to the metallic
body or to the chasis of the car—to the place
not coated with paint (if coated with paint,
remove the paint before attaching the wire).
Failure to do so may cause damage to the
receiver.
6
*
Verbinden Sie den Erdungsleiter mit der
Karosserie oder dem Rahmen des Fahrzeugs.
Die Kontaktstelle darf nicht lackiert sein (sollte
die Kontaktstelle lackiert sein, entfernen Sie
den Lack der Kontaktstelle, bevor Sie den
Leiter befestigen). Wenn der Erdungsleiter
nicht ordnungsgemäß angeschlossen wird,
kann dieses Gerät beschädigt werden.
6
*
Attachez solidement le fil de mise à la masse
au châssis métallique de la voiture—à un
endroit qui n’est pas recouvert de peinture (s’il
est recouvert de peinture, enlevez d’abord
la peinture avant d’attacher le fil). L’appareil
peut être endommagé si cela n’est pas fait
correctement.
6
*
Bevestig de aardedraad goed met een metalen
onderdeel of het chassis van de auto—bevestig op
een niet-gelakt gedeelte (indien gelakt, schuur dan
)
af alvorens de draad te bevestigen). Het toestel kan
worden beschadigd indien de aardedraad niet goed
is aangesloten.
Connecting the external components / Anschließen der externen Komponenten / Connexion d’un autre appareil extérieur / Verbinden van
H
externe componenten
CD changer and DAB tuner / CD-Wechsler und DAB-Tuner / Changeur de CD et tuner DAB / CD-wisselaar en DAB-tuner
• You can connect both components in series as illustrated below.
• Sie können beide Komponenten in Reihe anschließen, wie in der Abbildung unten gezeigt.
• Vous pouvez connecter les deux appareils en série comme montré sur l’illustration.
• U kunt beide componenten, zoals hieronder afgebeeld, aansluiten.
JVC DAB tuner
DAB-Tuner von JVC
Tuner DAB JVC
JVC DAB-tuner
CAUTION / ACHTUNG / PRECAUTION /
• Before connecting the CD changer and/or DAB tuner, make sure that the receiver is turned off.
• Vor dem Anschließen des CD-Wechslers und/oder DAB-Tuners sicherstellen, dass der Receiver
ausgeschaltet ist.
• Avant de connecter le changeur de CD et/ou le tuner DAB, s’assurer que l’receiveré est éteinte.
• Schakel de receiver beslist uit alvorens een CD-wisselaar en/of DAB-tuner aan te sluiten.
WAARSCHUWING
:
JVC CD changer
CD-Wechsler von JVC
Changeur de CD JVC
JVC CD-wisselaar
DAB-Tuner von JVC
CD-Wechsler von JVC
Changeur de CD JVC
8
*
Connecting cord supplied for your CD changer or DAB tuner
8
*
Anschließen des für CD-Wechsler oder DAB-Tuner mitgelieferten Kabels
8
Cordon de connexion fourni avec votre changeur de CD ou tuner DAB
*
*8 Aansluitsnoer bijgeleverd voor uw CD-wisselaar of DAB-tuner
9
To disconnect the CD/DAB connector
*
*9 Zum Abtrennen des CD/DAB-Steckverbinders
*9 Pour déconnecter le connecteur CD/DAB
JVC DAB tuner
*9 Ontkoppelen van de CD/DAB-stekker
Tuner DAB JVC
JVC DAB-tuner
or / oder / ou / of
JVC CD changer
JVC CD-wisselaar
Hold the connector top tightly
(1), then pull it out (2).
Halten Sie die SteckverbinderOberseite fest (1) und ziehen
Sie ihn heraus (2).
Tenez fermement le connecteur
par-dessus (1) et tirez vers
l’extérieur (2).
Tartu lujasti liittimen päähän (1), ja
vedä se ulos (2).
External component / Externe Komponente / Appareil extérieur / Extern component
10
*
Line Input Adapter KS-U57 (not supplied for this receiver)
CD changer jack
CD-WechslerBuchse
Prise du changeur
de CD
Aansluiting voor
CD-wisselaar
KS-U57 *
or
oder
ou
of
KS-U58 *
10
3.5 mm stereo mini plug
3,5-mm-Stereo-Ministecker
Mini-fiche stéréo de 3,5 mm
11
3,5 mm stereo-ministekker
External component
Externe Komponente
Appareil extérieur
Extern component
*10 Line-Eingangsadapter KS-U57 (für diesen Receiver nicht mitgeliefert)
*10 Adaptateur d’entrée de ligne KS-U57 (non fourni avec cet appareil)
*10 Lijningangsadapter KS-U57 (niet bij deze receiver bijgeleverd)
*11 Aux Input Adapter KS-U58 (optionally purchased)
*11 Aux-Eingangsadapter KS-U58 (getrennt gekauft)
*11 Adaptateur d’entrée auxiliaire KS-U58 (vendu séparément)
*11 Aux-ingangsadapter KS-U58 (los verkrijgbaar)
Connecting to the steering wheel remote controller / Anschluß an die Lenkradfernbedienung / Connexion de la télécommande de volant /
I
Verbinden met de stuurwiel-afstandsbediening
If your car is equipped with the steering wheel remote controller, you can operate this receiver using the
controller. To do it, a JVC’s OE remote adapter (not supplied) which matches with your car is required.
Consult your JVC IN-CAR ENTERTAINMENT dealer for details.
Wenn Ihr Fahrzeug mit einer Lenkradferndienung ausgestattet ist, können Sie damit diesen Receiver
steuern. Hierfür ist ein für Ihr Fahrzeug passender Radio-Lenkrad-Fernbedienungsadaption von JVC
(nicht im Lieferumfang enthalten) erforderlich. Für weitere Einzelheiten wenden Sie sich an Ihren JVC
Autoradiohändler.
OE REMOTE
Steering wheel remote input
Lenkrad-Fernbedienungseingang
Entrée de la télécommande de
volant
Invoer afstandsbediening-metstuurwieltje
OE remote adapter (not supplied)
Radio-Lenkrad-Fernbedienungsadaption
(nicht im Lieferumfang enthalten)
Adaptateur pour télécommande au volant (non fourni)
Adapter voor stuurwiel-afstandsbediening (niet
bijgeleverd)
Si votre voiture est munie d’une télécommande de volant, vous pouvez commander cet autoradio en
utilisant la télécommande. Pour le faire, un adaptateur pour télécommande au volant JVC (non fourni)
correspondant à votre voiture est nécessaire. Consultez votre revendeur d’autoradio JVC pour les détails.
Indien uw auto een stuurwiel-afstandsbediening heeft, kunt u deze receiver met die afstandsbediening bedienen.
Hiervoor heeft u echter een JVC adapter (niet bijgeleverd) nodig die geschikt is voor de stuurwiel-afstandsbediening van
uw auto. Raadpleeg uw JVC car audio dealer voor details.
Steering wheel remote controller (equipped in the car)
Lenkradfernbedienung (im Fahrzeug installiert)
Télécommande de volant (installée dans la voiture)
Stuurwiel-afstandsbediening (in de auto)
6
 Loading...