

Page 1
1
LVT1822-004C
[JW]
KD-AV7100
Installation/Connection Manual
Manual de instalación/conexión
0508MNMMDWSKP
EN, SP
©2008 Victor Company of Japan, Limited
ENGLISH
This unit is designed to operate on 12 V DC , NEGATIVE ground electrical systems. If your vehicle does
not have this system, a voltage inverter is required, which can be purchased at JVC car audio dealers.
WARNINGS
• DO NOT install any unit or wire any cable in a location where;
– it may obstruct the steering wheel and gearshift lever operations, as this may result in a traffic accident.
– it may obstruct the operation of safety devices such as air bags, as this may result in a fatal accident.
– it may obstruct visibility.
• DO NOT operate any unit while manipulating the steering wheel, as this may result in a traffic accident.
• The driver must not watch the monitor while driving. It may lead to carelessness and cause an accident.
• If you need to operate the unit while driving, be sure to look around carefully or you may be involved in
a traffic accident.
• If the parking brake is not engaged, the following warning appears on the monitor, and no playback
picture will be shown.
CAUTION!!!
IT’S UNLAWFUL TO OPERATE A VEHICLE WHILE VIDEO IS DISPLAYED IN THE DRIVERS
VIEWING AREA
ENGAGE EMERGENCY BRAKE TO ENJOY VIDEO
– This warning appears only when the parking brake lead is connected to the parking brake system built
in the car.
Notes on electrical connections:
• Replace the fuse with one of the specified rating. If the fuse blows frequently, consult your JVC car audio
dealer.
• It is recommended to connect speakers with a maximum power of more than 50 W (both at the rear and
at the front, with an impedance of 4 Ω to 8 Ω).
• To prevent short circuits, cover the terminals of the UNUSED leads with insulating tape.
• The heat sink becomes very hot after use. Be careful not to touch it when removing this unit.
ESPAÑOL
Esta unidad está diseñada para funcionar con 12 V de CC , con sistemas eléctricos de masa NEGATIVA.
Si su vehículo no posee este sistema, será necesario un inversor de tensión, que puede ser adquirido en los
concesionarios de JVC de equipos de audio para automóviles.
ADVERTENCIAS
• NO instale ningún receptor o tienda ningún cable en una ubicación donde;
– Donde pueda obstruir la maniobra del volante de dirección y del cambio de engranajes, con el
consiguiente riesgo de accidentes de tráfico.
– Donde pueda obstruir el funcionamiento de dispositivos de seguridad tales como bolsas de aire, pues
podría resultar en un accidente fatal.
– Donde pueda obstruir la visibilidad.
• NO OPERE la unidad mientras está maniobrando el volante de dirección, pues podría producirse un
accidente de tráfico.
• El conductor no debe mirar el monitor mientras conduce. Podría producirse un descuido, y causar un
accidente.
• Si necesita operar la unidad mientras conduce, asegúrese de mirar atentamente a su alrededor pues de lo
contrario, se podría producir un accidente de tráfico.
• Si el freno de estacionamiento no está aplicado, aparecerá la siguiente advertencia en el monitor, y no se
visualizará la imagen reproducida.
CAUTION!!!
IT’S UNLAWFUL TO OPERATE A VEHICLE WHILE VIDEO IS DISPLAYED IN THE DRIVERS
VIEWING AREA
ENGAGE EMERGENCY BRAKE TO ENJOY VIDEO
– Esta advertencia aparece únicamente cuando el cable del freno de estacionamiento se encuentra
conectado al sistema del freno de estacionamiento incorporado al automóvil.
Notas sobre las conexiones eléctricas:
• Reemplace el fusible por otro del régimen especificado. Si el fusible se funde frecuentemente, consulte con su
concesionario de JVC de equipos de audio para automóviles.
• Se recomienda conectar los altavoces con una potencia máxima de más de 50 W (tanto atrás como
adelante, con una impedancia de 4 Ω a 8 Ω).
• Para evitar cortocircuitos, cubra los terminales de los cables NO UTILIZADOS con cinta aislante.
• La unidad estará muy caliente después del uso. Tenga la precaución de no quemarse al efectuar su
desmontaje.
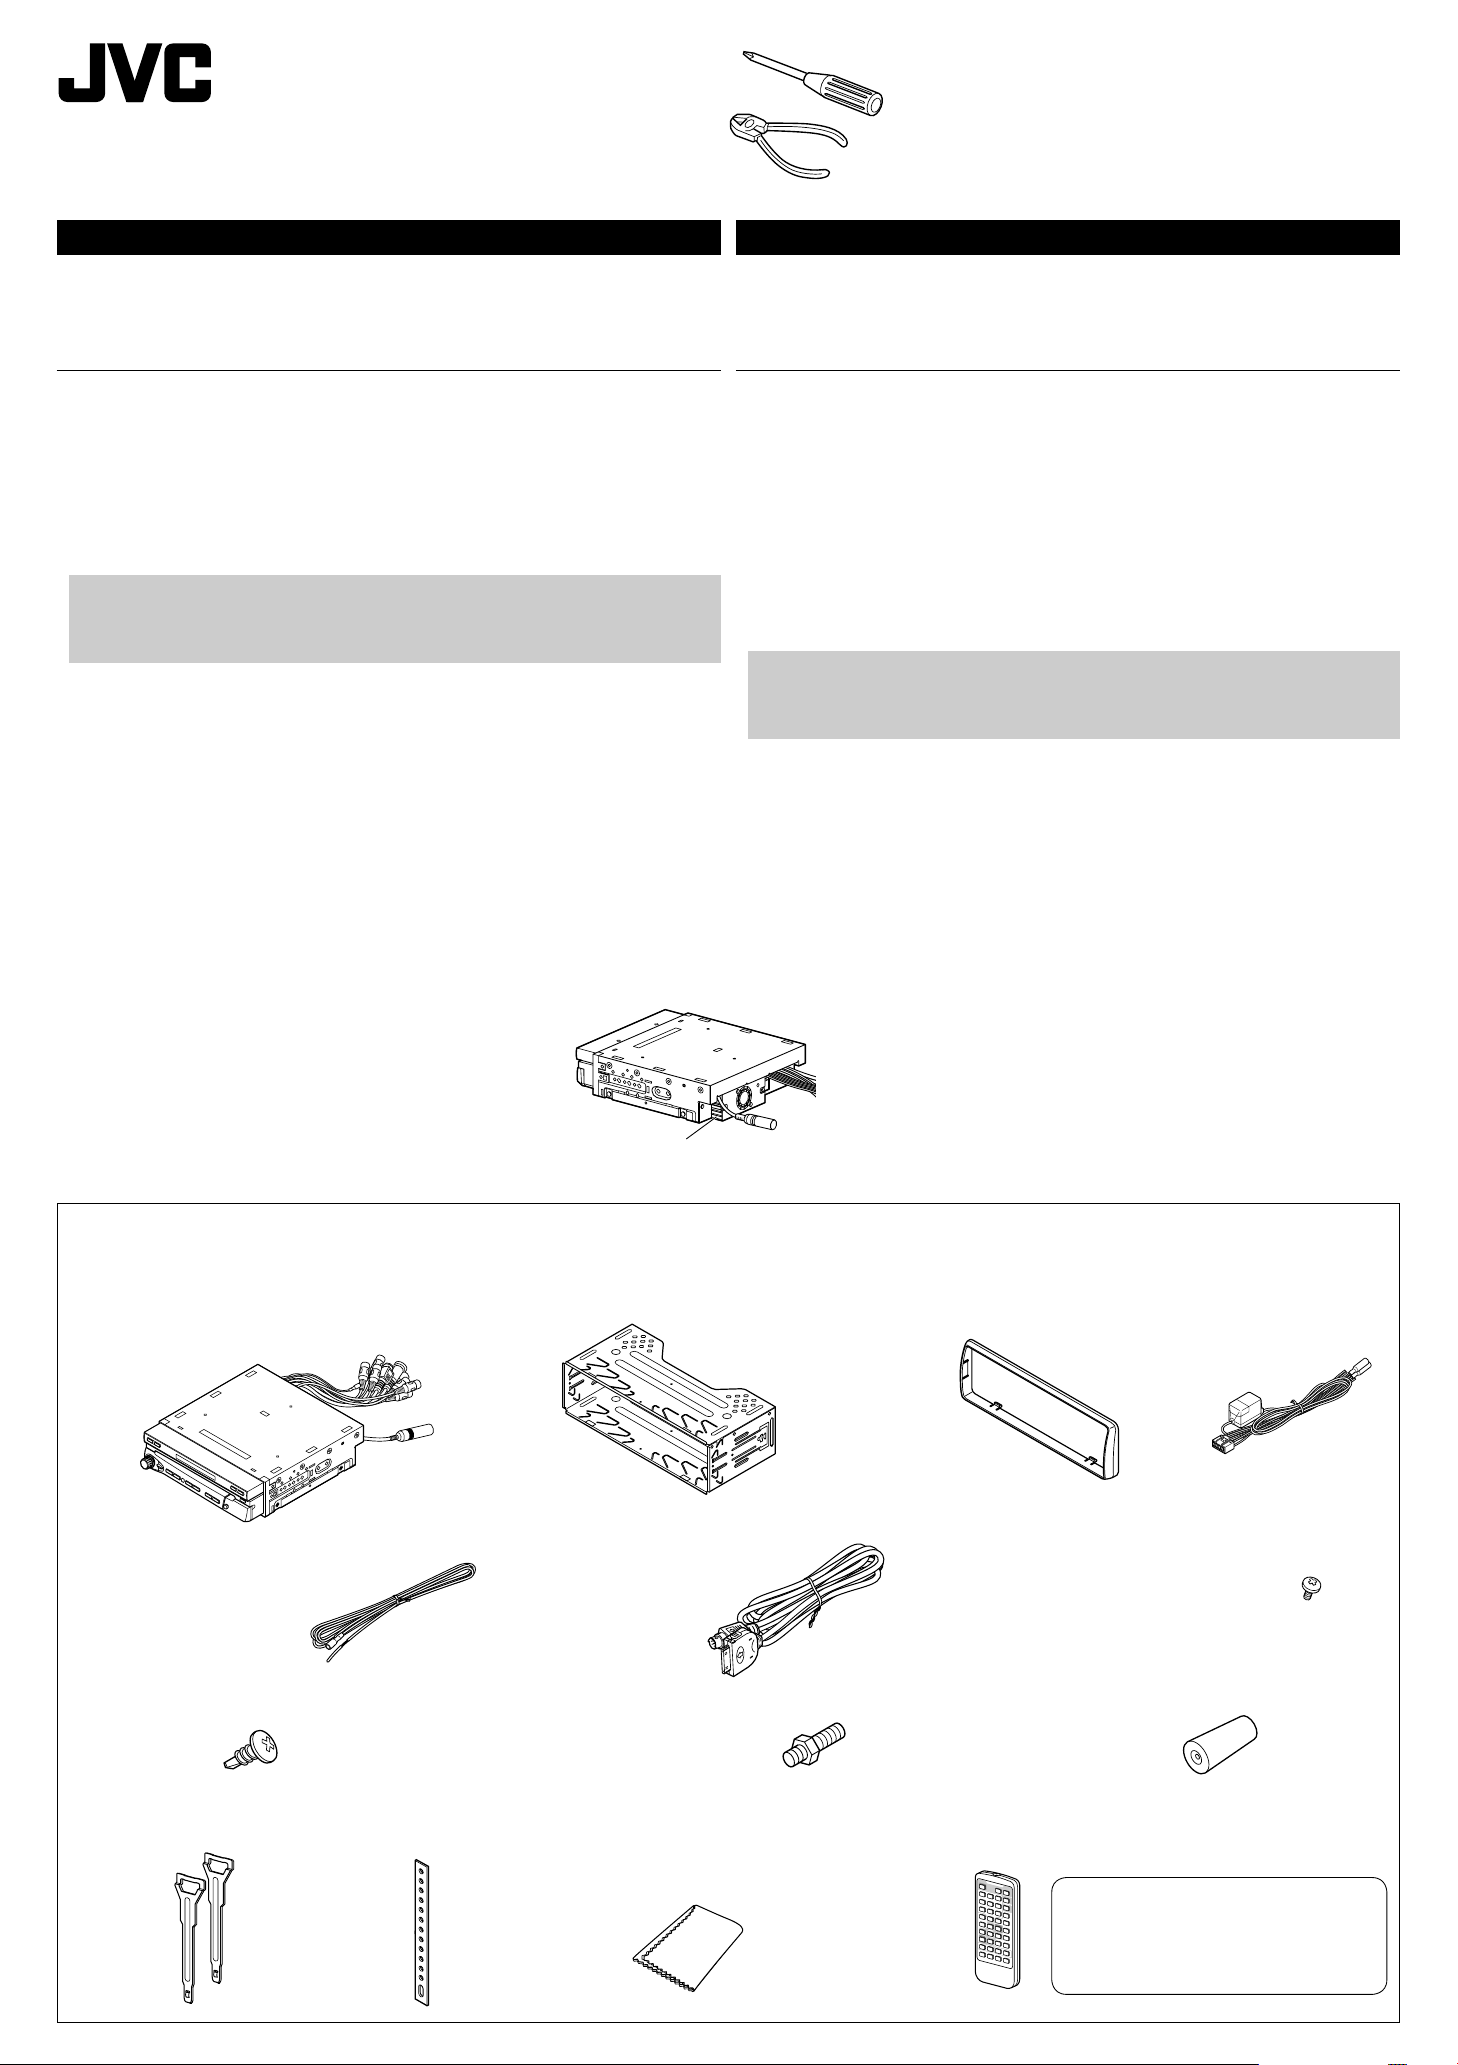
Parts list for installation and connection
The following parts are provided for this unit.
If anything is missing, contact your dealer immediately.
a
Main unit
Unidad principal
e
Parking brake lead
Cable del freno de estacionamient
h
Tapping screw
Tornillo roscador
b
Sleeve
Cubierta
Heat sink / Sumidero térmico
Lista de piezas para instalación y conexión
Con esta unidad se suministran las siguientes piezas.
Si hay algún elemento faltante, póngase inmediatamente en contacto con su concesionario.
f
Special cable for iPod
Cable especial para iPod
i
Mounting bolt (M5 x 20 mm)
Perno de montaje (M5 x 20 mm)
c
Trim plate
Placa de guarnición
d
Power cord
Cable de alimentación
g
Round head screw (M5 x 8 mm)
Tornillos de cabeza esférica (M5 x 8 mm)
j
Rubber cushion
Cojín de goma
k
Handles
Manga
l
Stay
Soporte
m
Cleaning cloth
Paño de limpieza
n
Remote controller
Control remoto
When shipped from the factory, the battery is
installed in the remote controller.
La unidad se expide de fábrica con la pila
instalada en el control remoto.
Page 2
2
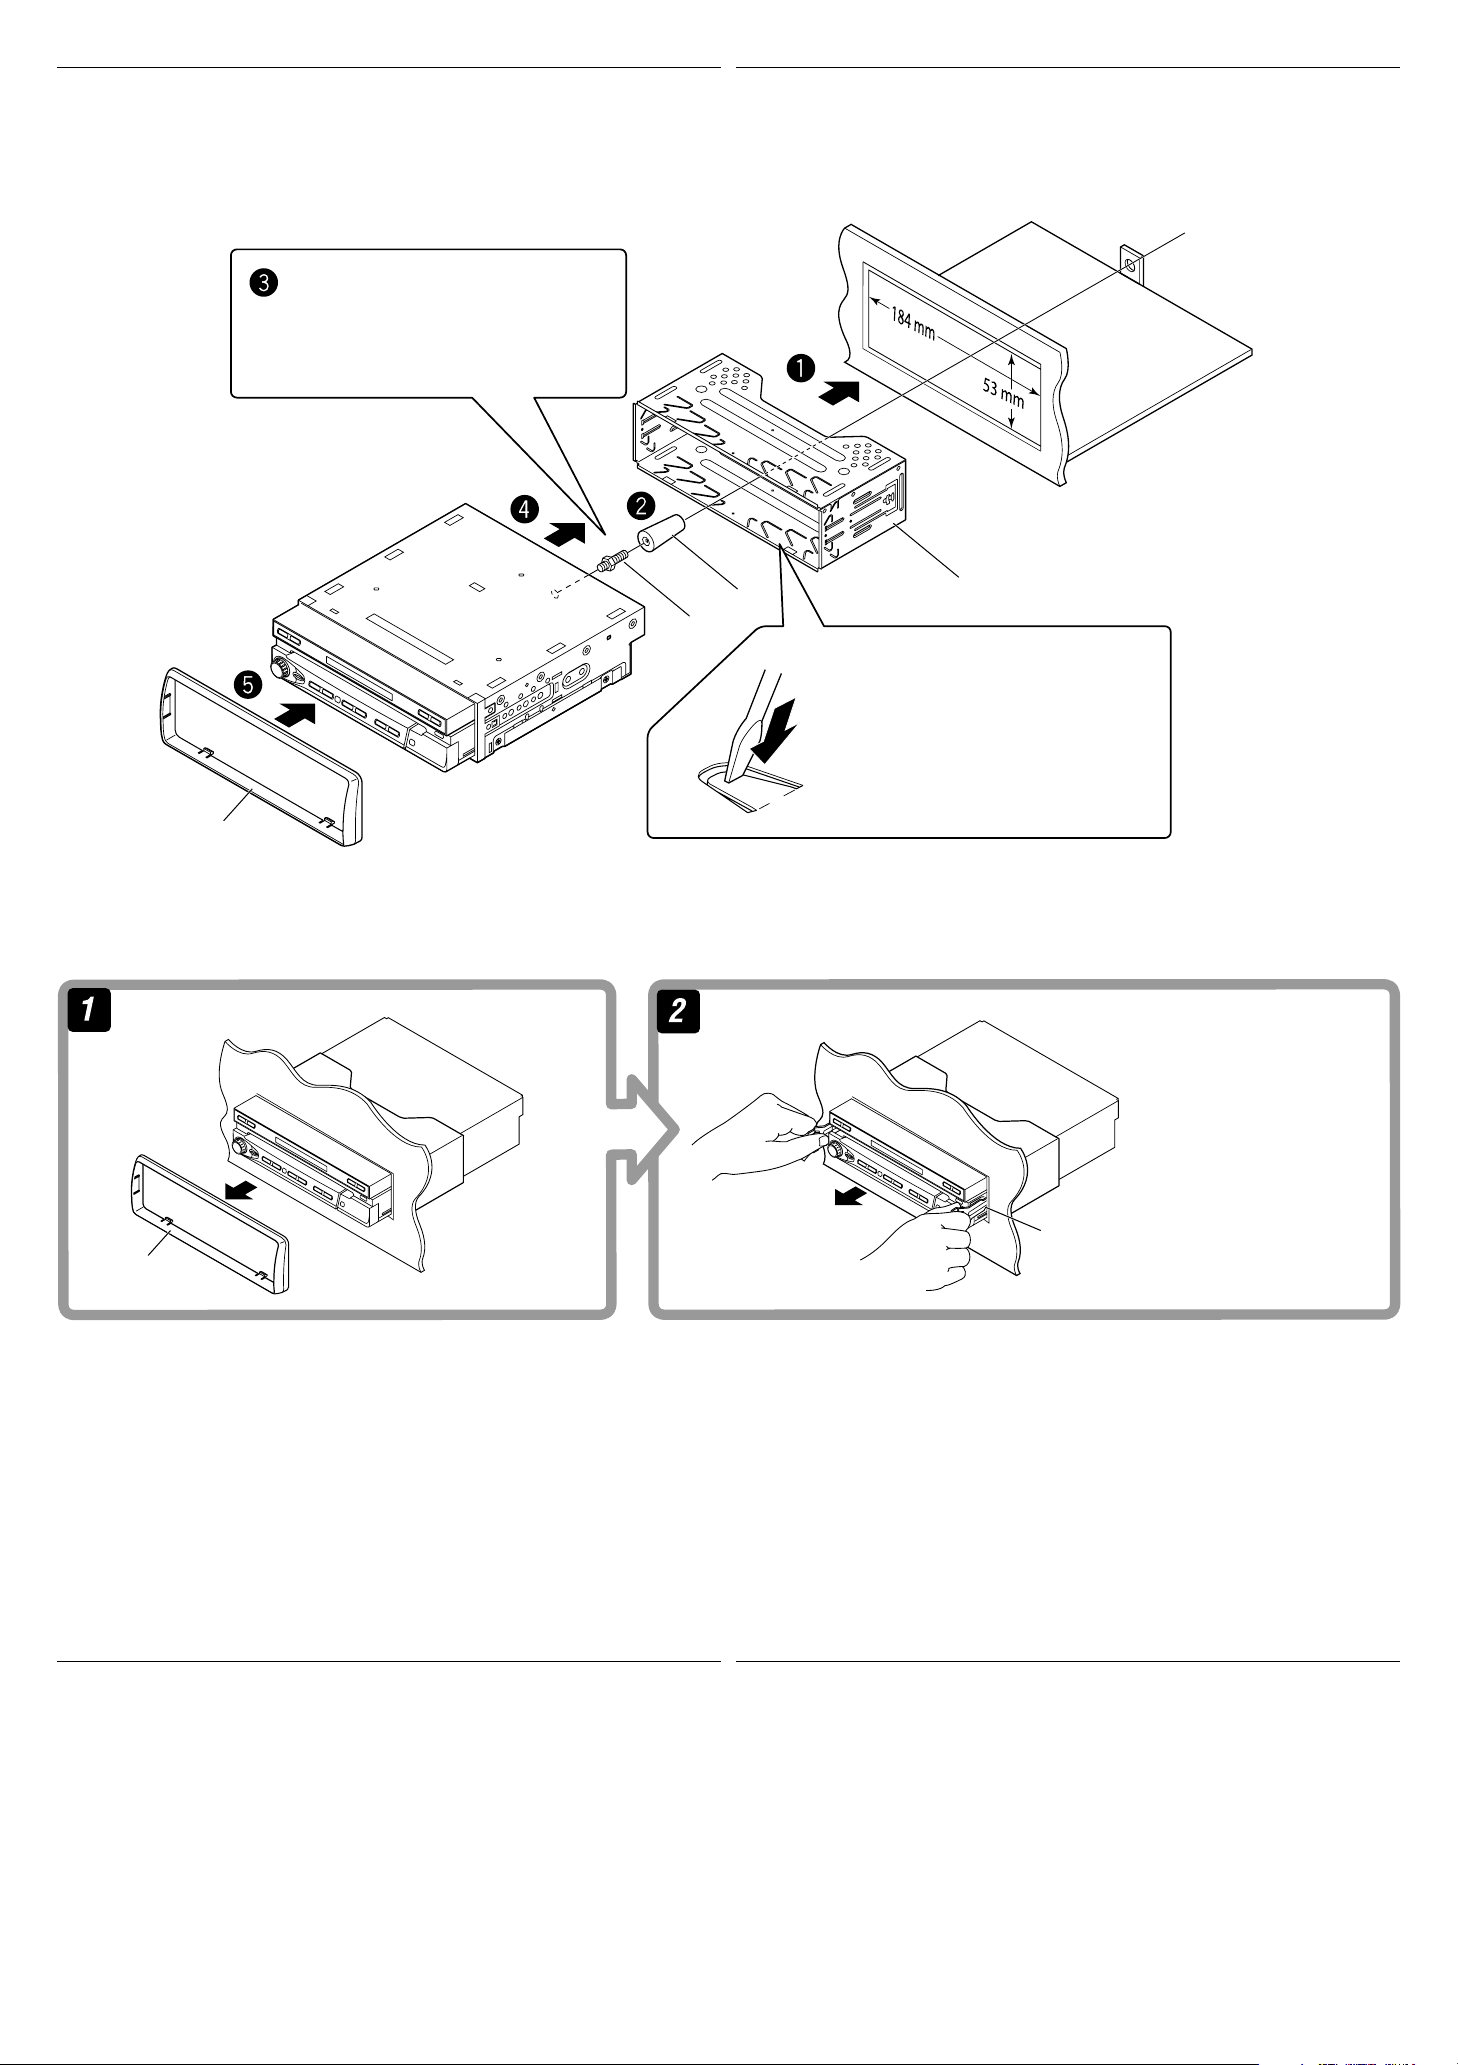
INSTALLATION (IN-DASH MOUNTING)
j
i
b
c
k
c
The following illustration shows a typical installation. However, you should make adjustments
corresponding to your specific car. If you have any questions or require information regarding installation
kits, consult your JVC car audio dealer or a company supplying kits.
• If you are not sure how to install this unit correctly, have it installed by a qualified technician.
Do the required electrical connections.
Realice todas las conexiones eléctricas
necesarias.
INSTALACION (MONTAJE EN EL TABLERO DE INSTRUMENTOS)
La siguiente ilustración muestra una instalación típica. Sin embargo usted deberá efectuar los ajustes
correspondientes a su automóvil. Si tiene alguna pregunta o necesita información acerca de las herramientas
para instalación, consulte con su concesionario de JVC de equipos de audio para automóviles o a una
compañía que suministra tales herramientas.
• Si no está seguro de poder instalar la unidad correctamente, déjela en manos de un técnico cualificado.
Removing the unit
Before removing the unit, release the rear section.
Bend the appropriate tabs to hold the sleeve
firmly in place.
Doble las lengüetas apropiadas para retener
firmemente la manga en su lugar.
Extracción de la unidad
Antes de extraer la unidad, libere la sección trasera.
Insert the two handles, then pull them as
illustrated so that the unit can be removed.
Inserte las dos manijas y, a continuación,
extráigalas de la manera indicada en la
ilustración para poder desmontar la unidad.
TROUBLESHOOTING
• The fuse blows.
* Are the red and black leads connected correctly?
• Power cannot be turned on.
* Is the yellow lead connected?
• No sound from the speakers.
* Is the speaker output lead short-circuited?
• Sound is distorted.
* Is the speaker output lead grounded?
* Are the “–” terminals of L and R speakers grounded in common?
• Unit becomes hot.
* Is the speaker output lead grounded?
* Are the “–” terminals of L and R speakers grounded in common?
• This unit does not work at all.
* Have you reset your unit?
LOCALIZACION DE AVERIAS
• El fusible se quema.
* ¿Están los conductores rojo y negro correctamente conectados?
• No es posible conectar la alimentación.
* ¿Está el cable amarillo conectado?
• No sale sonido de los altavoces.
* ¿Está el cable de salida del altavoz cortocircuitado?
• El sonido presenta distorsión.
* ¿Está el cable de salida del altavoz conectado a masa?
* ¿Están los terminales “–” de los altavoces L y R conectados a una masa común?
• La unidad se calienta.
* ¿Está el cable de salida del altavoz conectado a masa?
* ¿Están los terminales “–” de los altavoces izquierdo y derecho conectados a una masa común?
• Esta unidad no funciona en absoluto.
* ¿Ha reinicializado su unidad?
Page 3

3
50˚
33
136
2.5
43
110˚
167
44
b
g/h
i
l
1234
567 89
When using the stay / Cuando utilice el soporte When installing the unit without using the sleeve / Instalación de la unidad sin
utilizar la cubierta
In a Toyota car for example, first remove the car radio and install the unit in its place.
En un automóvil Toyota, por ejemplo, en primer lugar desmonte el autorradio e instale la unidad en su
lugar.
Flat type screws *
Tornillos tipo plano *
1
1
Dashboard
Tablero de instrumentos
Washer *
Arandela *
1
1
Fire wall
Tabique a prueba
de incendios
Lock nut *
Tuerca de seguridad *
1
1
Bend the supplied stay.
Doble el soporte suministrado.
Install the unit at an angle of less than 30˚, taking it into account that the monitor would eject when
in use (see below).
Instale la unidad a un ángulo de menos de 30º, teniendo en cuenta que el monitor podría ser
expulsado durante el uso (véase debajo).
Required space for the monitor ejection
Espacio requerido para la expulsión del monitor
Unit: mm
Unidad: mm
Flat type screws *
Tornillos tipo plano *
1
1
Pocket
Bolsillo
Bracket *
Ménsula *
1
1
Use the following screws
Utilice los siguientes tornillos
For No.1 – 4
For No.5 – 9
Para N° 1 – 4
Para N° 5 – 9
M4 x 3 mm*
M5 x 8 mm*
M4 x 3 mm*
M5 x 8 mm*
1
1
1
1
Note :
When installing the unit on the mounting bracket, make sure to use screws of proper length referring to
the table above. If longer screws are used, they could damage the unit.
Nota :
Cuando instale la unidad sobre el soporte de montaje, asegúrese de utilizar tornillos del largo adecuado, de
acuerdo con la tabla anterior. El uso de tornillos más largos podría producir daños a la unidad.
1
Not included for this unit. *1 No suministrado con esta unidad.
*
ELECTRICAL CONNECTIONS
To prevent short circuits, we recommend that you disconnect the battery’s negative terminal and make all
electrical connections before installing the unit.
• Be sure to ground this unit to the car’s chassis again after installation.
CONEXIONES ELECTRICAS
Para evitar cortocircuitos, recomendamos que desconecte el terminal negativo de la batería y que efectúe
todas las conexiones eléctricas antes de instalar la unidad.
• Asegúrese de volver a conectar a masa esta unidad al chasis del automóvil después de la
instalación.
PRECAUTIONS on power supply and speaker connections:
• DO NOT connect the speaker leads of the power cord to the car battery; otherwise, the unit
will be seriously damaged.
• BEFORE connecting the speaker leads of the power cord to the speakers, check the speaker wiring in
your car.
PRECAUCIONES sobre las conexiones de la fuente de alimentación y de los altavoces:
• NO conecte los conductores de altavoz del cable de alimentación a la batería de automóvil,
pues podrían producirse graves daños en las unidades.
• ANTES de conectar a los altavoces los conductores de altavoz del cable de alimentación, verifique el
conexionado de altavoz de su automóvil.
Page 4

2
1
2
3
4
5
8
6
7
1
3
A
B
C
A
OE REMOTE
PARKING
AV OUT
SUB WOOFER
CENTER
FRONT
REAR
CAMERA
AV IN
B
iPod
ILLUMI
REVERSE
REMOTE
ACC
MEMORY
GND
P.ANTENNA
FRONT L
+
FRONT L– FRONT R
+
FRONT R– REAR L
+
REAR L– REAR R
+
REAR R–
4
ENGLISH ESPAÑOL
B
A A B C
Typical connections
Before connecting: Check the wiring in the vehicle carefully. Incorrect connection may cause serious
damage to this unit.
The leads of the power cord and those of the connector from the car body may be different in color.
1 Connect the colored leads of the power cord in the order specified in the illustration below.
2 Connect the antenna cord.
3 Finally connect the wiring harness to the unit.
Black
Negro
Yellow *
Amarillo *
Red
Rojo
10 A fuse
4
Fusible de 10 A
4
Blue
Azul
Blue with white stripe
Azul con rayas blancas
Conexiones tipicas
Antes de la conexión: Verifique atentamente el conexionado del vehículo. Una conexión incorrecta
podría producir daños graves en la unidad.
Los cordones del cable de alimentación y los del conector procedentes de la carrocería del automóvil
podrían ser de diferentes en color.
1 Conecte los conductores de color del cable de alimentación en el orden especificado en la ilustración de
abajo.
2 Conecte el cable de antena.
3 Por último, conecte el cable de alimentación a la unidad.
2
*
See each diagram on pages 5 and 6.
Vea cada uno de los diagramas en las páginas 5 y 6.
Ignition switch
3
*
To metallic body or chassis of the car
A un cuerpo metálico o chasis del automóvil
To a live terminal in the fuse block connecting to the car battery
(bypassing the ignition switch) (constant 12 V)
A un terminal activo del bloque de fusibles conectado a la batería
del automóvil (desviando el interruptor de encendido) (12 V
constantes)
To an accessory terminal in the fuse block
A un terminal accesorio del bloque de fusibles
To automatic antenna if any (250 mA max.)
A la antena automática, si hubiere (250 mA máx.)
To the remote lead of other equipment (200 mA max.)
Al conductor remoto del otro equipo (200 mA máx.)
3
*
Interruptor de
encendido
Fuse block
Bloque de fusibles
Orange with white stripe
White with black
stripe
Blanco con rayas
negras
White
Blanco
Left speaker (front)
Altavoz izquierdo (delantero)
Gray with black stripe
Gris con rayas negras
Naranja con rayas blancas
Purple with white stripe
Púrpura con rayas blancas
Right speaker (front)
Altavoz derecho (delantero)
Gray
Gris
2
*
Not used for this unit
3
*
Not included for this unit
4
*
Before checking the operation of this unit prior to installation, this lead must be connected, otherwise
power cannot be turned on.
For dimmer function. See page 11 of the INSTRUCTIONS.
Para el atenuador de luminosidad. Consulte la página 11 del MANUAL DE
INSTRUCCIONES.
To the reverse lamp lead (see B on page 6)
Al conductor de la lámpara de marcha atrás (véase
Green with black stripe
Verde con rayas negras
*
*
*
Left speaker (rear)
Altavoz izquierdo (trasero)
2
No se utiliza para esta unidad.
3
No suministrado con esta unidad
4
Antes de comprobar el funcionamiento de esta unidad previa a de la instalación, es necesario conectar
este cable, de lo contrario no se podrá conectar la alimentación.
Green
Verde
Purple with black stripe
Púrpura con rayas negras
en la página 6)
Purple
Púrpura
Right speaker (rear)
Altavoz derecho (trasero)
Page 5

5
KD-AV7100
KD-AV7100
KD-AV7100
PARKING
A
Connecting the parking brake lead / Conexión del cable del freno de estacionamiento
Connect the parking brake lead to the parking brake system built in the car.
Conecte el cable del freno de estacionamiento al sistema del freno de estacionamiento instalado en el coche.
Parking brake lead (supplied)
Cable del freno de estacionamient (suministrado)
Crimp connector (not supplied)
Parking brake
Freno de estacionamiento
Conector de sujeción
(no suministrado)
Parking brake switch (inside the car)
Interruptor del freno de estacionamiento (dentro del automóvil)
A
Connecting the external amplifiers / Conexión a los amplificadores externos
Parking brake lead (light green)
Cable del freno de estacionamiento (verde claro)
To metallic body or chassis of the car
A un cuerpo metálico o chasis del automóvil
You can connect amplifiers to upgrade surround system in the car compartment.
• Connect the amplifiers to 5.1-ch analog discrete output plugs to enjoy multi-channel source.
• After you have connected the center speaker, make sure to activate the center speaker; otherwise, no
sound comes out of the connected center speaker, see page 43 of the INSTRUCTIONS.
• Disconnect the speakers from the unit, and connect them to the amplifier. Leave the speaker leads of
the unit unused.
Front speakers
Altavoces delanteros
JVC Amplifier
JVC Amplificador
5
*
Rear speakers
Altavoces traseros
JVC Amplifier
JVC Amplificador
Podrá conectar amplificadores para mejorar el sistema de sonido envolvente del habitáculo de su
automóvil.
• Para poder disfrutar de fuentes multicanal, conecte los amplificadores a las clavijas de salida analógica
discreta de 5,1 canales.
• Asegúrese de activar el altavoz central después de conectarlo; de lo contrario, no saldrá sonido a través del
mismo, consulte la página 43 del MANUAL DE INSTRUCCIONES.
• Desconecte los altavoces de la unidad principal y conéctelos al amplificador. Los conductores de los
altavoces de la unidad quedan sin usar.
Center speaker
Altavoz central
JVC Amplifier
JVC Amplificador
5
*
Subwoofer
Subwoofer
JVC Amplifier
JVC Amplificador
5
*
5
*
Firmly attach the ground wire to the metallic body or to the chassis of the car—to the place uncoated
with paint (if coated with paint, remove the paint before attaching the wire). Failure to do so may
cause damage to the unit.
• You can supply the power to the amplifiers by connecting the remote leads (blue with white stripe) of
this unit and amplifiers. (To connect more than one amplifier using the remote leads, Y-connectors
need to be separately purchased.)
Remote lead
Cable remoto
JVC Amplifier
JVC Amplificador
5
*
*5 Fije firmemente el cable de tierra a la carrocería metálica o al chasis—a un lugar no cubierto con
pintura (si está cubierto con pintura, quítela antes de fijar el cable). De lo contrario, se podrían producir
daños en la unidad.
• Puede suministrar alimentación a los amplificadores conectando los conductores remotos (azul con
rayas blancas) de esta unidad y los amplificadores. (Para conectar más de un amplificador usando los
conductores remotos, se deben adquirir separadamente conectores en Y).
Y-connector (not supplied for this unit)
Conector en Y (no suministrado con esta unidad)
To the remote lead of other equipment
Al conductor remoto de otro equipo
Remote lead (Blue with white stripe)
Cable remoto (Azul con rayas blancas)
Page 6

KD-AV7100
REVERSE
L
R
L
R
L
R
L
R
CAMERA
AV IN
AV OUT
6
B
KD-AV7100
iPod
Connecting the audio/video cords / Conexión de los cables de audio/vídeo
KV-CM1
Rear view camera (not supplied)
Cámara de reprovisión (no suministrado)
7
*
6
*
Navigation System or playback source
Sistema de navegación o fuente de reproducción
KV-MR9010
9-INCH WIDESCREEN MONITOR (not supplied)
MONITOR DE PANTALLA ANCHA DE 9 PULGADAS (no suministrado)
6
*
KS- HP2
Cordless headphones
(not supplied)
Auriculares inalámbricos
(no suministrados)
To car battery
A la batería del automóvil
To reverse lamp
A la luz trasera
Reverse lamp lead
Conductor de la luz trasera
Reverse lamps
Luces traseras
6
*6 Audio/video cords (not supplied)
7
*
Required only when connecting a rear view camera to CAMERA plug.
C
Connecting an Apple iPod / Conexión de un Apple iPod
You can connect an iPod to this unit using the supplied special cable for iPod. Puede conectar un iPod a esta unidad mediante el cable especial suministrado para el iPod.
*
Cables de audio/vídeo (no suministrados)
7
*
Requerido sólo al conectar una cámara de retrovisión a la clavija CAMERA.
Apple iPod
Apple iPod
• iPod is a trademark of Apple Inc., registered in the U.S. and
Special cable for iPod
Cable especial para iPod
other countries.
• iPod es una marca comercial de Apple Inc., registrada en los
EE.UU. y otros países.
 Loading...