

Page 1
DR-MV7S
QUICK
IS HERE TO HELP!
TOLL FREE: 1(800)252-5722
START
GUIDE
http://www.jvc.com
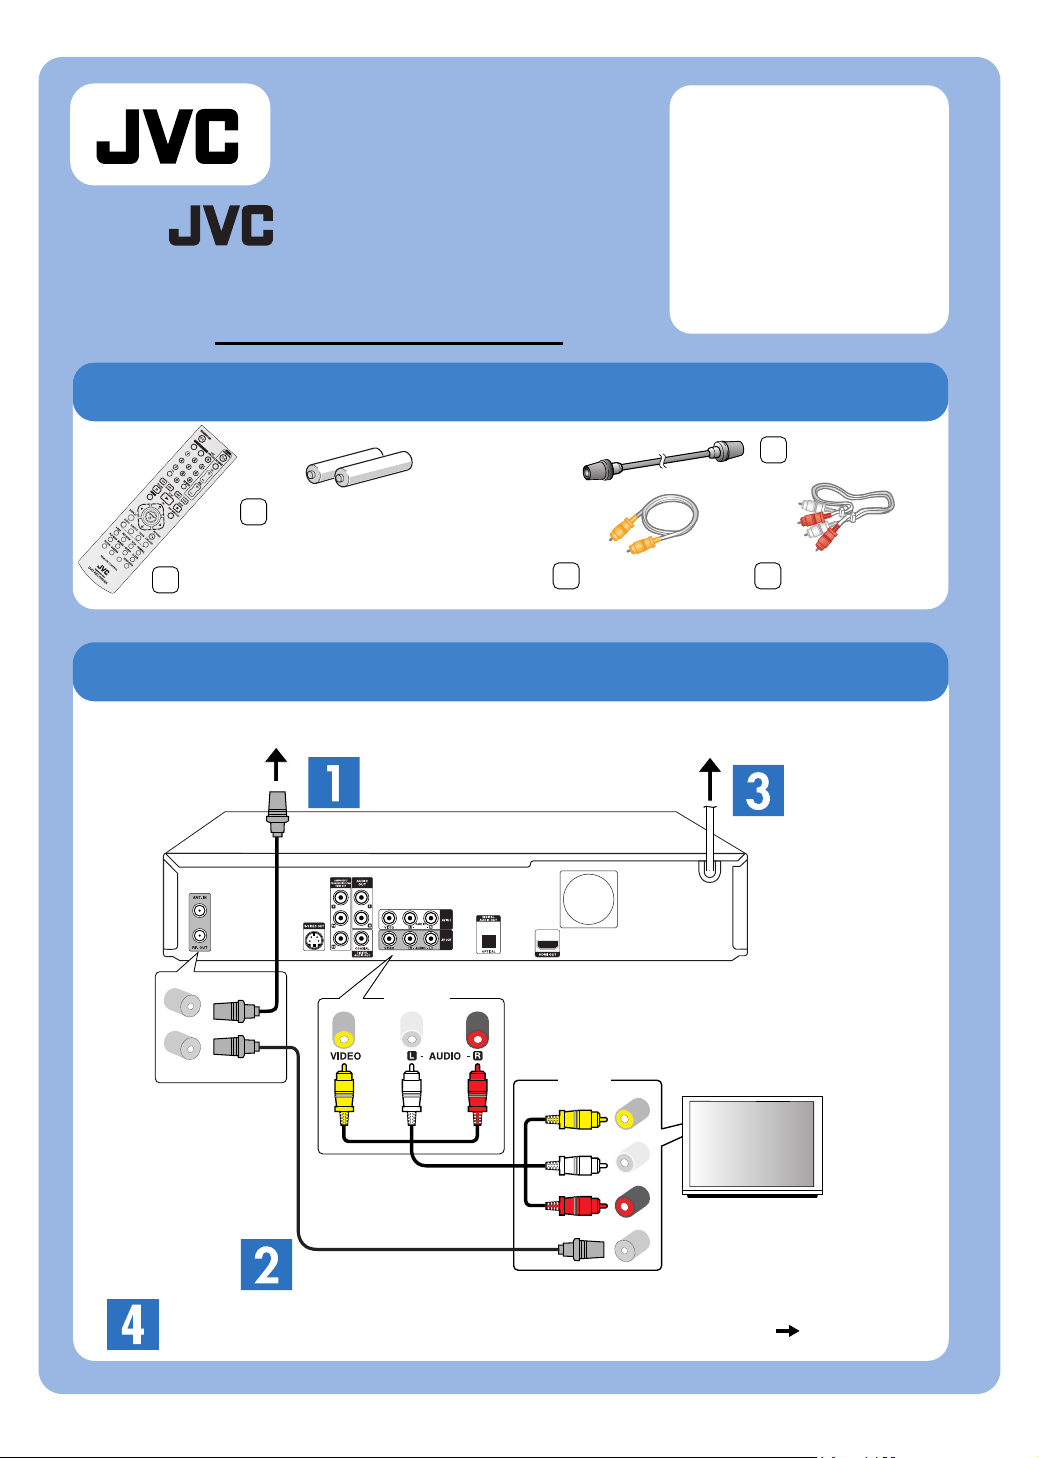
Check Accessories
RF cable
"AAA" battery x 2
(For remote control)
Remote control
Video cable
Audio cable
Connection Without Cable Box Or DBS Receiver
Antenna or cable
Connect the arial.
AC outlet
Plug to the
AC outlet.
Back of unit
ANT. IN
RF. OUT
OUTPUT
(AV OUT)
INPUT
Video
Audio (L)
Audio (R)
RF
TV
Connect your TV.
Set the Channel and Clock setting manually. ( pg.18)
LPT1133-002A3840R-Q090G
0606MNH-LG-LG
Page 2

Connection With Cable Box Or DBS Receiver
(When your TV has only audio/video connectors)
Connection With Cable Box Or DBS Receiver
(When your TV has component video connectors)
ANT. IN
RF. OUT
TV
OUTPUT
(AV OUT)
Video
Audio (L)
Audio (R)
INPUT
Video
Audio (L)
Audio (R)
Back of unit
INPUT
(AV IN1)
Video
Audio (L)
Audio (R)
OUTPUT
Video
Audio (L)
Audio (R)
AC outlet
Connect
the arial.
RF IN
Antenna
or cable
Component video cable
(Not supplied)
ANT. IN
RF. OUT
COMPONENT
VIDEO INPUT
Y
P
B
PR
TV
COMPONENT
/PROGRESSIVE SCAN
VIDEO OUT
Y
P
B
PR
OUTPUT
(AV OUT)
Video
Audio (L)
Audio (R)
INPUT
Video
Audio (L)
Audio (R)
AC outlet
If your TV is HDMI
compatible TV,
connect an HDMI cable
with other connection.
( pg. 15)
INPUT
(AV IN1)
Video
Audio (L)
Audio (R)
OUTPUT
Video
Audio (L)
Audio (R)
AC outlet
Back of unit
Antenna
or cable
Connect
the arial.
RF IN
RF IN
Cable box or
DBS receiver
RF OUT
AC outlet
Set the Channel and Clock setting manually. ( pg.18)
RF IN
Cable box or
RF OUT
DBS receiver
Set the Channel and Clock setting manually. ( pg.18)
8
NOTE: When watching the progressive scan images(480p) with this connection, set the resolution
to 480p using OUTPUT STATUS button. ( pg. 14, "Component Video/Progressive
Scan connection")
Page 3

Recordable Discs
DVD-RW DVD+RW
Can be rewritten
1,000 times.
NOTES :
When you use a DVD-RW disc, format it in "VR MODE" or "VIDEO MODE".
( pg.23, "Disc Settings")
DVD-RAM will not be recognized as recordable media.
DVD-R DVD+R
Playable on other
DVD players or PCs
(after finalized).
They can only be
recorded once.
They cannot be rewrite.
BASIC PLAYBACK
Select TV input/channel first.
DVD
VHS
Inserting Disc
or Cassette
BASIC RECORDING
DVD
Select DVD
1
VHS
Select VCR
1
Select DVD
1
Start Playback Start Playback
2
Stop Playback Stop Playback
3
Select VCR
1
2
3
NOTE :
We recommend you to use
DVD-R/-RW discs in Video mode
for use in other DVD player.
Finalizing is required after
recording. ( pg. 23 Finalize)
Select Channel/
Input
2
For cable box or DBS receiver users,
change the channel to AV1.
Select Mode
3
For the recording mode, see page 36
on the instruction manual.
Start Recording
4
Stop Recording
5
Select Channel/
2
For cable box or DBS receiver users,
change the channel to AV1.
Select Mode
(Tape Speed)
3
For the recording mode, see page 36
on the instruction manual.
Start Recording
4
Stop Recording
5
Input
For more information, see the instruction manual. ( pg. 36, “Basic Recording from a TV”)For more information, see the instruction manual. ( pg. 26 “Playback”)
Page 4

Dubbing from VCR to DVD
VHS
You can copy the contents of a VHS tape to a DVD using the DUBBING
button. This allows you to archive your old VHS tapes to DVD.
Preparation : Set the resolution to 480i using the OUTPUT STATUS button before dubbing.
Press VCR button to set the VCR mode.
Insert Blank Disc
1
and Cassette
DVD
Select the
desired Record
4
Mode, then
select [Dubbing].
Find the place
on the VHS tape
2
from which you
want to start
dubbing.
Start Dubbing.
5
Access the
Dubbing
3
menu screen.
For more information, see the instruction manual. ( pg. 39, "Dubbing from VCR to DVD")
Stop Dubbing.
6
 Loading...