


 Loading...
NetworkandSecurityManagerNSM3000
Quick Start
March 27, 2012
Revision 2
NSM3000 is an appliance version of Network and Security Manager (NSM). NSM3000 simplifies the complexity of network administration by providing a single, integrated management interface that controls device parameters.
This robust hardware management system installs in minutes with full high availability (HA) support, making it easy to scale and deploy. Enterprise customers with limited resources can benefit significantly from NSM3000 because it eliminates the need to have dedicated resources for maintaining a network and security management solution.
NSM3000 makes it easy for administrators to control device configuration, network settings, and security policy settings for multiple families of Juniper devices including:
•IDPSeriesIntrusionDetectionandPreventionAppliancesandFirewallandVPNdevices running ScreenOS.
•Devices running Junos OS, such as J Series Services Routers, SRX Series Services Gateways, EX Series Ethernet Switches, M Series Multiservice Edge Routers, and MX Series Ethernet Services routers.
•SA Series SSL VPN Appliances
•IC Series Unified Access Control Appliances
For a complete list of supported device families and platforms, see the Network and
Security Manager Administration Guide.
Up to 10 administrators can log into NSM3000 concurrently.
ThisquickstartexplainsthefollowingstepsforinstallingandconfiguringNSM3000and for configuring NSM.
1.Install the NSM3000 appliance hardware.
2.Set up the NSM3000 appliance, using the serial port.
Copyright © 2012, Juniper Networks, Inc. |
1 |

NSM3000 Quick Start
3.Configure the NSM software, using the Web interface.
4.ConfiguretheNSMsoftware,whichispreinstalledontotheNSM3000appliance,with site-specific parameters.
Contents |
Hardware Installation . . . . . . . . . . . . . . . . . . . . . . . . . . . . . . . . . . . . . . . . . . . . . . . . |
. 4 |
|
NSM3000 Ports . . . . . . . . . . . . . . . . . . . . . . . . . . . . . . . . . . . . . . . . . . . . . . . . |
. 4 |
|
Installing the NSM3000 Hardware . . . . . . . . . . . . . . . . . . . . . . . . . . . . . . . . . |
. 5 |
|
Initial Setup Configuration . . . . . . . . . . . . . . . . . . . . . . . . . . . . . . . . . . . . . . . . . . . . |
. 7 |
|
Boot NSM3000 . . . . . . . . . . . . . . . . . . . . . . . . . . . . . . . . . . . . . . . . . . . . . . . . . |
. 7 |
|
Set Up Your Appliance . . . . . . . . . . . . . . . . . . . . . . . . . . . . . . . . . . . . . . . . . . . |
. 8 |
|
Web Interface Configuration . . . . . . . . . . . . . . . . . . . . . . . . . . . . . . . . . . . |
. 8 |
|
Configuring the NSM Software . . . . . . . . . . . . . . . . . . . . . . . . . . . . . . . . . . . . . . . . |
. 9 |
|
Configuring Basic Settings . . . . . . . . . . . . . . . . . . . . . . . . . . . . . . . . . . . . . . . . |
. 9 |
|
Configuring High Availability . . . . . . . . . . . . . . . . . . . . . . . . . . . . . . . . . . . . . . . |
. 11 |
|
Advanced Options . . . . . . . . . . . . . . . . . . . . . . . . . . . . . . . . . . . . . . . . . . . . . . . |
14 |
|
Enabling and Configuring Remote Replication of the Database . . . . . . . |
15 |
|
EnablingandConfiguringtheStatisticalReportServer(SRS)(Regional |
|
|
Server Only) . . . . . . . . . . . . . . . . . . . . . . . . . . . . . . . . . . . . . . . . . . . . . |
16 |
|
Installing NSM Software . . . . . . . . . . . . . . . . . . . . . . . . . . . . . . . . . . . . . . . . . . |
17 |
|
Managing NSM Administration . . . . . . . . . . . . . . . . . . . . . . . . . . . . . . . . . . . . . . . . . |
17 |
|
Changing the Superuser Password . . . . . . . . . . . . . . . . . . . . . . . . . . . . . . . . . . |
17 |
|
Downloading NSM MIBS (Regional Server Only) . . . . . . . . . . . . . . . . . . . . . . . |
18 |
|
Exporting Audit Logs . . . . . . . . . . . . . . . . . . . . . . . . . . . . . . . . . . . . . . . . . . . . . |
18 |
|
Exporting Device Logs (Regional Server Only) . . . . . . . . . . . . . . . . . . . . . . . . . |
18 |
|
Generating Reports (Regional Server Only) . . . . . . . . . . . . . . . . . . . . . . . . . . . |
19 |
|
Modifying NSM Configuration Files . . . . . . . . . . . . . . . . . . . . . . . . . . . . . . . . . . |
19 |
|
Backing Up the NSM Database . . . . . . . . . . . . . . . . . . . . . . . . . . . . . . . . . . . . |
20 |
|
Changing the NSM Management IP . . . . . . . . . . . . . . . . . . . . . . . . . . . . . . . . . |
21 |
|
Scheduling Security Updates . . . . . . . . . . . . . . . . . . . . . . . . . . . . . . . . . . . . . . |
21 |
|
Managing System Administration . . . . . . . . . . . . . . . . . . . . . . . . . . . . . . . . . . . . . . |
22 |
|
Rebooting or Shutting Down NSM3000 . . . . . . . . . . . . . . . . . . . . . . . . . . . . . |
22 |
|
Changing the User Password . . . . . . . . . . . . . . . . . . . . . . . . . . . . . . . . . . . . . . |
23 |
|
Configuring the Network . . . . . . . . . . . . . . . . . . . . . . . . . . . . . . . . . . . . . . . . . . |
23 |
|
Network Interfaces . . . . . . . . . . . . . . . . . . . . . . . . . . . . . . . . . . . . . . . . . . . |
23 |
|
Routing and Gateways . . . . . . . . . . . . . . . . . . . . . . . . . . . . . . . . . . . . . . . . |
24 |
|
Hostname and DNS Clients . . . . . . . . . . . . . . . . . . . . . . . . . . . . . . . . . . . |
24 |
|
Host Addresses . . . . . . . . . . . . . . . . . . . . . . . . . . . . . . . . . . . . . . . . . . . . . |
25 |
|
Managing RADIUS Servers . . . . . . . . . . . . . . . . . . . . . . . . . . . . . . . . . . . . . . . . |
25 |
|
Adding a RADIUS Server . . . . . . . . . . . . . . . . . . . . . . . . . . . . . . . . . . . . . . |
26 |
|
Changing the Priority of RADIUS Servers . . . . . . . . . . . . . . . . . . . . . . . . . |
27 |
|
Deleting a RADIUS Server . . . . . . . . . . . . . . . . . . . . . . . . . . . . . . . . . . . . . |
27 |
|
Editing RADIUS Server Parameters . . . . . . . . . . . . . . . . . . . . . . . . . . . . . . |
27 |
|
Monitoring with SNMP . . . . . . . . . . . . . . . . . . . . . . . . . . . . . . . . . . . . . . . . . . . |
28 |
|
SNMP Configuration . . . . . . . . . . . . . . . . . . . . . . . . . . . . . . . . . . . . . . . . . |
28 |
|
SNMP System Information . . . . . . . . . . . . . . . . . . . . . . . . . . . . . . . . . . . . |
29 |
|
SNMP Trap Configuration . . . . . . . . . . . . . . . . . . . . . . . . . . . . . . . . . . . . . |
30 |
2 |
Copyright © 2012, Juniper Networks, Inc. |

Forwarding Syslog Messages . . . . . . . . . . . . . . . . . . . . . . . . . . . . . . . . . . . . . |
. 31 |
Viewing Syslog Receivers . . . . . . . . . . . . . . . . . . . . . . . . . . . . . . . . . . . . . . |
31 |
Adding and Configuring Syslog Receivers . . . . . . . . . . . . . . . . . . . . . . . . . |
32 |
Editing Syslog Receiver Configurations . . . . . . . . . . . . . . . . . . . . . . . . . . . |
34 |
Deleting Syslog Receivers . . . . . . . . . . . . . . . . . . . . . . . . . . . . . . . . . . . . . |
34 |
Changing the System Time . . . . . . . . . . . . . . . . . . . . . . . . . . . . . . . . . . . . . . . |
34 |
Installing Updates . . . . . . . . . . . . . . . . . . . . . . . . . . . . . . . . . . . . . . . . . . . . . . . |
34 |
Managing Users . . . . . . . . . . . . . . . . . . . . . . . . . . . . . . . . . . . . . . . . . . . . . . . . . |
35 |
Creating New NSM3000 Users . . . . . . . . . . . . . . . . . . . . . . . . . . . . . . . . . |
35 |
Deleting a User . . . . . . . . . . . . . . . . . . . . . . . . . . . . . . . . . . . . . . . . . . . . . . |
37 |
Editing User Attributes . . . . . . . . . . . . . . . . . . . . . . . . . . . . . . . . . . . . . . . . |
37 |
Understanding User Profiles . . . . . . . . . . . . . . . . . . . . . . . . . . . . . . . . . . . |
37 |
Configuring the Web Interface . . . . . . . . . . . . . . . . . . . . . . . . . . . . . . . . . . . . . |
39 |
Maintaining NSM3000 . . . . . . . . . . . . . . . . . . . . . . . . . . . . . . . . . . . . . . . . . . . . . . |
39 |
Viewing System Statistics . . . . . . . . . . . . . . . . . . . . . . . . . . . . . . . . . . . . . . . . |
39 |
CPU . . . . . . . . . . . . . . . . . . . . . . . . . . . . . . . . . . . . . . . . . . . . . . . . . . . . . . |
40 |
Log Rate . . . . . . . . . . . . . . . . . . . . . . . . . . . . . . . . . . . . . . . . . . . . . . . . . . . |
40 |
CPU Load . . . . . . . . . . . . . . . . . . . . . . . . . . . . . . . . . . . . . . . . . . . . . . . . . . |
40 |
Memory Data . . . . . . . . . . . . . . . . . . . . . . . . . . . . . . . . . . . . . . . . . . . . . . . |
40 |
Network Data . . . . . . . . . . . . . . . . . . . . . . . . . . . . . . . . . . . . . . . . . . . . . . |
40 |
Process Count . . . . . . . . . . . . . . . . . . . . . . . . . . . . . . . . . . . . . . . . . . . . . . |
40 |
Disk Data . . . . . . . . . . . . . . . . . . . . . . . . . . . . . . . . . . . . . . . . . . . . . . . . . . |
40 |
Tile All Graphs . . . . . . . . . . . . . . . . . . . . . . . . . . . . . . . . . . . . . . . . . . . . . . |
40 |
Upgrading the Recovery Partition . . . . . . . . . . . . . . . . . . . . . . . . . . . . . . . . . . . |
41 |
Troubleshooting . . . . . . . . . . . . . . . . . . . . . . . . . . . . . . . . . . . . . . . . . . . . . . . . . . . . |
42 |
Auditing User Operations . . . . . . . . . . . . . . . . . . . . . . . . . . . . . . . . . . . . . . . . . |
42 |
Error Logs . . . . . . . . . . . . . . . . . . . . . . . . . . . . . . . . . . . . . . . . . . . . . . . . . . . . . |
43 |
Network Utilities . . . . . . . . . . . . . . . . . . . . . . . . . . . . . . . . . . . . . . . . . . . . . . . . |
44 |
Ping . . . . . . . . . . . . . . . . . . . . . . . . . . . . . . . . . . . . . . . . . . . . . . . . . . . . . . |
44 |
Traceroute . . . . . . . . . . . . . . . . . . . . . . . . . . . . . . . . . . . . . . . . . . . . . . . . . |
45 |
Lookup . . . . . . . . . . . . . . . . . . . . . . . . . . . . . . . . . . . . . . . . . . . . . . . . . . . . |
46 |
IP Subnet Calculator . . . . . . . . . . . . . . . . . . . . . . . . . . . . . . . . . . . . . . . . . |
46 |
Tech Support . . . . . . . . . . . . . . . . . . . . . . . . . . . . . . . . . . . . . . . . . . . . . . . . . . . |
47 |
Error Scenario . . . . . . . . . . . . . . . . . . . . . . . . . . . . . . . . . . . . . . . . . . . . . . . . . . |
47 |
Viewing System Information . . . . . . . . . . . . . . . . . . . . . . . . . . . . . . . . . . . . . . . . . . |
47 |
List of Technical Publications . . . . . . . . . . . . . . . . . . . . . . . . . . . . . . . . . . . . . . . . . |
48 |
Requesting Technical Support . . . . . . . . . . . . . . . . . . . . . . . . . . . . . . . . . . . . . . . . |
49 |
Self-Help Online Tools and Resources . . . . . . . . . . . . . . . . . . . . . . . . . . . . . . |
49 |
Opening a Case with JTAC . . . . . . . . . . . . . . . . . . . . . . . . . . . . . . . . . . . . . . . . |
50 |
Revision History . . . . . . . . . . . . . . . . . . . . . . . . . . . . . . . . . . . . . . . . . . . . . . . . . . . . |
50 |
Copyright © 2012, Juniper Networks, Inc. |
3 |

NSM3000 Quick Start
Hardware Installation
WerecommendthatyouinstallNSM3000onyourLANtoensurethatitcancommunicate
withyourapplicableresources,suchasauthenticationservers,DNSservers,internalWeb servers through HTTP/HTTPS, external Web sites through HTTP/HTTPS (optional), the Juniper update server via HTTP, Network File System (NFS) file servers (optional), and client/server applications (optional).
NOTE: If you decide to install NSM3000 in your DMZ, ensure that it can connect to your internal resources.
NSM3000 Ports
Table 1 on page 4 provides required port information on the NSM3000.
Table 1: Required Ports on NSM3000
|
|
|
|
|
Depends on |
Direction |
Port |
Description |
LAN |
Internet |
Configuration |
In |
22 |
SSH command-line management |
Yes |
No |
No |
|
443 |
Web interface for administrator |
Yes |
No |
No |
|
|
login |
|
|
|
|
8443 |
WebinterfaceforlisteningforNSM |
LAN |
Yes |
Yes |
|
|
API messages. |
|
|
|
|
7800 |
Connections from managed |
Yes |
Yes |
No |
|
|
devices to NSM3000 |
|
|
|
|
7808 |
Connections from the NSM GUI |
Yes |
No |
No |
|
|
Client to NSM |
|
|
|
|
7802 |
HeartbeatbetweenpeersinanHA |
Yes |
No |
Yes |
|
|
cluster |
|
|
|
|
7803 |
Connections from managed IDP |
Yes |
Yes |
Yes |
|
|
devices to NSM |
|
|
|
|
7804 |
Connections from devices running |
Yes |
Yes |
Yes |
|
|
Junos, Secure Access devices, or |
|
|
|
|
|
Infranet Controller devices |
|
|
|
4 |
Copyright © 2012, Juniper Networks, Inc. |

Hardware Installation
Table 1: Required Ports on NSM3000 (continued)
|
|
|
|
|
Depends on |
Direction |
Port |
Description |
LAN |
Internet |
Configuration |
Out |
22 |
SSH connection to new managed |
Yes |
Yes |
No |
|
|
device |
|
|
|
|
23 |
Telnet connection to new |
Yes |
No |
Yes |
|
|
managed device |
|
|
|
|
53 |
DNS lookups |
Yes |
No |
No |
|
80 |
System Security Updates from |
No |
Yes |
Yes |
|
|
Juniper Networks |
|
|
|
|
111 |
Shared Disk portmap lookup |
Yes |
No |
Yes |
|
123 |
NetworkTimeProtocol(NTP)time |
Yes |
Yes |
Yes |
|
|
synchronization |
|
|
|
|
2049 |
Shared Disk NFS connection |
Yes |
No |
Yes |
For more information on ports, refer to the Network and Security Manager Installation
Guide.
Installing the NSM3000 Hardware
Follow these steps to unpack the NSM3000 appliance and connect it to your network.
To install NSM3000:
1.Place the shipping container on a flat surface and remove the hardware components with care.
2.Remove the NSM3000 device from the shipping container and place it on a flat surface.
3.Mount NSM3000 in your server rack using the attached mounting brackets.
4.Plug the power cord into the AC receptacle on the rear panel.
Copyright © 2012, Juniper Networks, Inc. |
5 |

NSM3000 Quick Start
Figure 1: Rear Panel of NSM3000
If your NSM3000 contains two power supplies, plug a power cord into each AC receptacle.
5.Plug the other end of the power cord into a wall socket.
If your NSM3000 contains two power supplies, plug each power cord into a separate power circuit to ensure that the NSM3000 continues to receive power if one of the power circuits fails.
6.Plug the Ethernet cable into the port marked ETH0 on the front panel.
Figure 2: Front Panel of NSM3000
7.Plug the null modem serial cable into the console port.
This cable was shipped with your NSM3000. If you do not have this cable, use any other null modem serial cable.
8.Push the power button in the upper left corner of the front panel.
The green LED below the power button turns on. The NSM3000 hard disk LED turns on whenever the appliance reads data from or writes data to an NSM3000 hard disk.
TheinternalportusestwoLEDstoindicatetheLANconnectionstatus,whichisdescribed in Table 2 on page 7.
Table 2 on page 7 provides LED information for the Ethernet ports.
6 |
Copyright © 2012, Juniper Networks, Inc. |

Initial Setup Configuration
Table 2: Ethernet Port LEDs
LAN Status |
LED 1 |
LED2 |
10 Mbps connection |
Off |
Off |
100 Mbps connection |
Green |
Off |
1000 Mbps connection |
Orange |
Off |
Data is being transferred |
Orange, Green, or Off |
Blinking |
No connection |
Off |
Off |
Initial Setup Configuration
When you first turn on an unconfigured NSM3000 appliance, you need to enter basic network and machine information through the serial console to make your appliance accessible to the network. After entering these settings, you can continue configuring the appliance using the CLI or the Web interface. You are not prompted for the initial setup information again.
Thissectiondescribestherequiredserialconsolesetupandthetasksyouneedtoperform when connecting to your NSM3000 for the first time:
•Boot NSM3000 on page 7
•Set Up Your Appliance on page 8
Boot NSM3000
To configure NSM3000 for the first time, you must attach your NSM3000 appliance to a console terminal running an emulation utility such as HyperTerminal.
1.Configure a console terminal or terminal emulation utility to use the following serial connection parameters:
•9600 bits per second
•8-bit no parity (8N1)
•1 stop bit
•No flow control
2.Connect the terminal or laptop to the null modem serial cable plugged into the NSM3000 console port.
3.Turn on the NSM3000 appliance.
When NSM3000 is powered on, the serial console displays diagnostic information beforeproceedingtothebootcountdown.Whencomplete,theserialconsoledisplays the login prompt terminal emulator.
NSMXpress.juniper.net login:
Copyright © 2012, Juniper Networks, Inc. |
7 |

NSM3000 Quick Start
4.Enter admin as your default login name.
5.Enter abc123 as your default password.
6.Change your default password when prompted. Enter the default password first, followed by your new password. All passwords are case-sensitive.
Set Up Your Appliance
Thissectionprovidestheminimuminformationnecessarytomakeyourapplianceactive on the network.
To set up your appliance either as a regional server or a central manager, follow these steps:
1.Enter the IP address for interface eth0 and press Enter.
2.Enter the subnet mask for interface eth0 and press Enter.
3.Enter the default route or default gateway address for interface eth0 and press Enter.
Applying changes...
Re-loading database
ip_tables: (C) 2000–2002 Netfilter core team ip_tables: (C) 2000–2002 Netfilter core team ip_tables: (C) 2000–2002 Netfileter core team Done!
Your NSMXpress is now active on the network.
To configure your system via a web browser, connect to: https://10.150.43.205/administration
To configure your system via command line, type: nsm_setup
For operation of NSM server, switch to user “nsm”.
Please consult NSM product documentation for details.
[admin@NSMXpress ~]$
To configure the NSM software using the CLI, see the NSMXpress and NSM3000 User
Guide. To configure the NSM software using the Web interface, go to “Web Interface
Configuration” on page 8.
Web Interface Configuration
To configure NSM on your system from a Web interface, use the following steps.
1.Copy the URL (starting with https://) from the terminal emulator after installing the NSM3000:
Your NSMXpress is now active on the network.
To configure your system via a web browser, connect to: https//10.150.43.205/administration
2. Open a Web browser and paste the URL into the address text box.
8 |
Copyright © 2012, Juniper Networks, Inc. |

Configuring the NSM Software
3.Press Enter to open the NSM appliance login page.
4.Enter the admin user name and password and then click Login.
5.See “Configuring the NSM Software” on page 9 for details about how to install and configure NSM on your NSM3000 appliance from the Web interface.
Configuring the NSM Software
After you log in as an “admin” user, an initial setup script walks you through additional configurationsystemsettingsbeforefinalizingtheNSMinstallation.Thischapterdescribes that setup process.
YourNSM3000appliancecomespreconfiguredasaregionalserveroracentralmanager. Most installation and configuration steps in this section are identical for both types of server. All exceptions are noted.
AfterloggingintotheNSM3000Webinterface,NSM3000providesyouwiththefollowing installation options:
•Configuring Basic Settings on page 9
•Configuring High Availability on page 11
•Advanced Options on page 14
•Installing NSM Software on page 17
Configuring Basic Settings
To install the regional server or central manager software using the minimum requirements:
1.Install your NSM3000 hardware as described in “Hardware Installation” on page 4.
2.BootandsetupyourNSM3000applianceasdescribedin“InitialSetupConfiguration” on page 7.
3.Enter the https://<ip>/administration URL for your appliance in a Web browser. See “Web Interface Configuration” on page 8 for details.
4.Log into the Web interface. The System Info page opens.
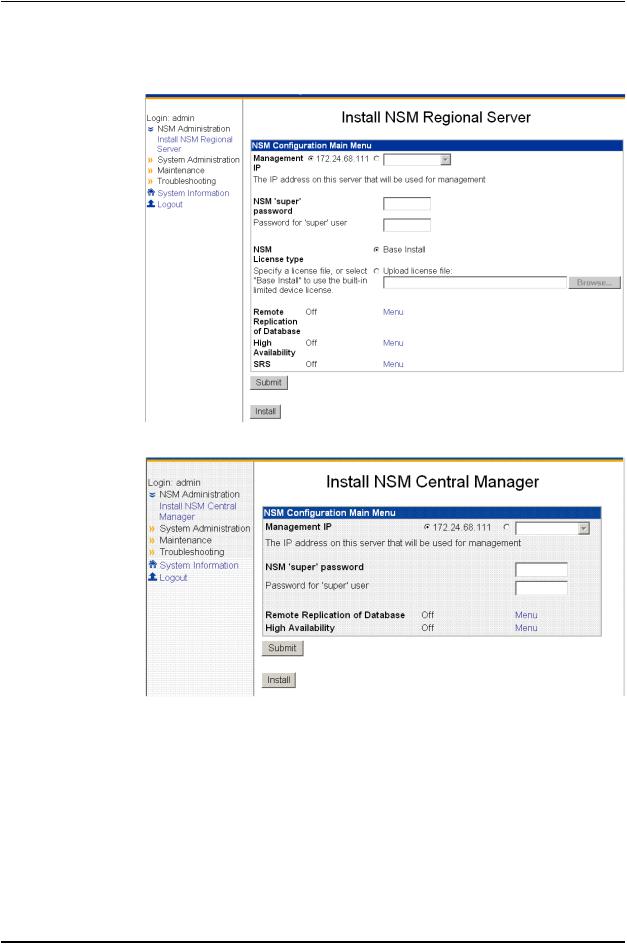
5.Click the link Install NSM Regional Server (see Figure 3 on page 10) to go to the Install RegionalServerwindoworclicktheInstallNSMCentralManager linktoviewtheInstall NSM Central Manager window (see Figure 4 on page 10), as the case may be.
NOTE: The “admin” user default username is admin and the password is the one you created in Step 6 of “Boot NSM3000” on page 7.
Copyright © 2012, Juniper Networks, Inc. |
9 |
NSM3000 Quick Start
Figure 3: Regional Server Configuration Main Menu
Figure 4: Central Manager Configuration Main Menu
6.Enter the primary IP address of your management server for eth0 (the default).
You can use the default IP address next to the first radio button or select the second radiobuttonandthenenteradifferentIPaddress.EachIPaddressyouadd(inaddition to the default IP address) will be available in the drop-down list after you click the second radio button.
7.Enter the NSM superuser password in the top text box, and then reenter it in the text box below it.
10 |
Copyright © 2012, Juniper Networks, Inc. |
Configuring the NSM Software
This password must be at least eight characters long and is case-sensitive. This password is used by the NSM superuser (also referred to as the NSM administrator). This user has the highest level of privileges in NSM.
8.Enter the GUI Server one-time password in the top text box, and then reenter it in the text box below it. This password is used to authenticate this NSM server with other NSM servers with which it communicates. Regional servers use this password to authenticate peer servers in an HA configuration and to authenticate the central manager. The central manager uses this password to authenticate its peer server in an HA configuration and any regional servers it manages. NSM servers must have the same GUI Server one-time password, or the authentication will fail.
9.Select the license option. (This option is available only for regional servers.)
a.Select Base Install to use the built-in limited device license for as many as 25 devices.
b.Click Upload license file to upload the license file you generated using the Juniper License Management System (LMS), which permits you to manage more than 25 devices. This license file must be located on your local hard drive.
SeetheNetworkandSecurityManagerinstallationGuideformoreinformationabout NSM licensing.
10.Click Submit to save any changes, and then click Install to install the software.
Configuring High Availability
To configure high availability (HA) settings:
Copyright © 2012, Juniper Networks, Inc. |
11 |

NSM3000 Quick Start
1.On the NSM Configuration Main Menu, click Menu next to High Availability to access HA options. See Figure 5 on page 12.
Figure 5: High Availability Options
2.Use the High Availability option to turn HA on (y) or off (n). The default is off.
3.Use the Primary Status option to set your NSM3000 appliance as either the primary orsecondaryserverintheHAcluster.Ifyouselecty,itistheprimaryserver(thedefault). If you select n, it is the secondary server.
4.Use the HA Remote IP option to enter the IP address for the HA peer in the HA cluster.
5.Use the HA Link Failure Detection IP option to enter the IP address of a computer outside the HA cluster that you can ping to verify connection status.
6.UsetheHAInter-serverpasswordoptiontoentertheheartbeatpasswordusedbetween the primary and secondary servers.
7.Click Submit to save the changes.
8.Click Menu next to Shared Disk (see Figure 5 on page 12) to configure a shared disk for regional servers (see Figure 6 on page 13) or for central managers (see Figure 7 on page 13.) This step is optional.
12 |
Copyright © 2012, Juniper Networks, Inc. |

Configuring the NSM Software
Figure 6: Shared Disk Options for Regional Servers
Figure 7: Shared Disk Options for Central Managers
NSM3000 supports shared disk via NFS only. Due to the data-intensive nature of NSM, we recommend gigabit speed links (1000 Mbps) for shared disk use. For more information about custom settings, refer to the Network and Security Manager Installation Guide.
9.Click Menu next to HA Links (see Figure 5 on page 12) to configure the second link in the HA cluster (see Figure 8 on page 13). This step is optional.
Figure 8: HA Links Options
Use the options in this menu to set up a redundant link for the HA cluster. If you are going to use a second link, you need to set the IP address for eth1 before configuring thissetting(see“ConfiguringtheNetwork”onpage23fordetails).Settingaredundant link is optional. For more information about custom settings, refer to the Networkand Security Manager Installation Guide.
If you configure HA with just one heartbeat link, then device management traffic and datareplicationtrafficbothusethatlink.Ifyouconfiguretwolinks,devicemanagement traffic uses the first link and data replication uses the second.
Copyright © 2012, Juniper Networks, Inc. |
13 |

NSM3000 Quick Start
If you set the HA link count to 2, an expanded menu appears to configure the second link:
Figure 9: Redundant Links
10.Click Menu next to HA Advanced Settings (see Figure 5 on page 12) to configure HA Advanced settings (see Figure 10 on page 14). This step is optional.
Formoreinformationaboutcustomsettings,refertotheNetworkandSecurityManager Installation Guide.
Figure 10: HA Advanced Settings
11. Click Submit tosavetheHAoptionsandreturntotheNSMConfigurationMainMenu.
Advanced Options
To display the Advanced Options menu, on the NSM Configuration Main Menu, select
Menu next to Advanced Options. The Advanced Options menu appears as shown in
Figure 11 on page 14.
Figure 11: Advanced Options Menu
Advanced installation options include:
14 |
Copyright © 2012, Juniper Networks, Inc. |

Configuring the NSM Software
•httpsportforNBIservice—Allowsyoutoconfigureaporttolistenformessagesforthe NSM API. By default, this value is 8443. You can configure it to any port number from 1025 to 65535.
•Remote Replication of Database—Mirrors the daily backup to an external server. You cantoggleitonoroff.Afteryouturniton,usethemenuoptionstoconfigurethisoption.
•SRS Enabled Options (regional server only)—Opens a menu to enable and configure Statistical Report Server (SRS). These options enable NSM3000 to interface with SRS. You can toggle it on or off. When it is on, a menu with additional options is available.
NOTE: SRS must be installed on a separate server from NSM.
The following sections provide details about the remote replication and SRS options:
•Enabling and Configuring Remote Replication of the Database on page 15
•Enabling and Configuring the Statistical Report Server (SRS) (Regional Server Only) on page 16
Enabling and Configuring Remote Replication of the Database
To configure remote replication of database settings:
1.On the Advanced Options menu, click Menu next to Remote Replication of Database (see Figure 5 on page 12) to configure daily backups (see Figure 12 on page 15).
Figure 12: Remote Replication of Database Options
2.Use the Remote Replication of Database option to turn remote replication on (y) or off (n). The default is off.
3.Use the Hour of day to Replicate Database option to start the backup. The valid range (in hours) is 00 through 23. The default is 2 AM.
4.Usethe RemoteBackupIP optiontoentertheIPaddressoftheremotebackupserver.
Backupinformationiscopiedtothe /var/netscreen/dbbackup directoryontheremote server.The“nsm”usermustexistonbothserversandyoumustestablishanSSHtrust relationship. See the Network and Security Manager Installation Guide, for details.
Copyright © 2012, Juniper Networks, Inc. |
15 |
Loading...