


 Loading...
PC Evaluation Software
PCA3000
B 70.9701.0
Operating Manual
07.06/00420775
H |
An eLearning course on the PC Evaluation software PCA3000 is provided |
|
for you on the Internet. The course gives you step-by-step instructions on |
|
how to use the PCA3000 to evaluate measurement data. The most im- |
|
portant software functions are also illustrated. |
|
The course is available free of charge, and no license is needed. |
|
For more information visit: http://eLearning.jumo.info |

|
|
Contents |
1 |
Introduction |
7 |
1.1 |
Preface .......................................................................................................... |
7 |
1.2 |
Typographical conventions ......................................................................... |
8 |
2 |
PC Evaluation Software |
11 |
2.1 |
General ........................................................................................................ |
11 |
2.2 |
Instruments with FDA compliance ........................................................... |
11 |
2.3 |
Hardware and software requirements ...................................................... |
12 |
3 |
Installation |
13 |
3.1 |
Starting the installation .............................................................................. |
13 |
4 |
Log-in to the program |
17 |
5 |
User interface |
19 |
5.1 |
Elements of the user interface .................................................................. |
19 |
6 |
Guide |
21 |
6.1 |
Introduction ................................................................................................ |
21 |
6.2 |
Reading in data ........................................................................................... |
22 |
6.3 |
Opening the archive ................................................................................... |
24 |
6.3.1 |
Selecting the time period ............................................................................. |
26 |
6.4 |
Backing up data ......................................................................................... |
28 |
6.5 |
Archive and evaluation directory .............................................................. |
31 |
7 |
Evaluation - General |
33 |
8 |
Evaluation - Graphics area |
35 |
9 |
Evaluation - Table area |
41 |
9.1 Switching registers into/out of display .................................................... |
42 |

Contents |
|
|
9.2 |
Channels ..................................................................................................... |
45 |
9.2.1 |
The functions of the left mouse button ........................................................ |
46 |
9.2.2 |
Displays (cannot be altered directly) ............................................................ |
47 |
9.2.3 |
The functions of the right mouse button ...................................................... |
48 |
9.3 |
Report .......................................................................................................... |
49 |
9.3.1 |
The functions of the left mouse button ........................................................ |
49 |
9.3.2 |
The functions of the right mouse button ...................................................... |
51 |
9.4 |
Events .......................................................................................................... |
53 |
9.4.1 |
The functions of the left mouse button ........................................................ |
53 |
9.4.2 |
The functions of the right mouse button ...................................................... |
53 |
9.5 |
Audit trail ..................................................................................................... |
56 |
9.5.1 |
The functions of the left mouse button ........................................................ |
56 |
9.5.2 |
The functions of the right mouse button ...................................................... |
56 |
9.6 |
Batches ....................................................................................................... |
58 |
9.6.1 |
The functions of the left mouse button ........................................................ |
58 |
9.6.2 |
The functions of the right mouse button ...................................................... |
58 |
9.7 |
Batch signature (PC signature for batches) ............................................ |
62 |
9.7.1 |
The functions of the left mouse button ........................................................ |
62 |
9.7.2 |
The functions of the right mouse button ...................................................... |
62 |
9.8 |
Log-off signature (PC signature for time period) .................................... |
64 |
9.8.1 |
The functions of the left mouse button ........................................................ |
64 |
9.8.2 |
The functions of the right mouse button ...................................................... |
64 |
9.9 |
Analog: Group... .......................................................................................... |
65 |
9.9.1 |
The functions of the left mouse button ........................................................ |
65 |
9.9.2 |
The functions of the right mouse button ...................................................... |
65 |
9.10 |
Digital: Group... ........................................................................................... |
66 |
9.11 |
Printing ........................................................................................................ |
67 |
9.12 |
Data export ................................................................................................. |
70 |
10 |
Menu functions and toolbar |
73 |
10.1 |
Archive ......................................................................................................... |
73 |
10.2 |
Editing ......................................................................................................... |
78 |
10.3 |
Zoom ........................................................................................................... |
80 |
10.4 |
View ............................................................................................................. |
81 |
10.5 |
Extras .......................................................................................................... |
81 |

|
|
Contents |
10.6 |
Window ........................................................................................................ |
82 |
10.7 |
Info ............................................................................................................... |
83 |
11 |
Options at program start |
85 |
12 |
Index |
87 |

Contents

1 Introduction
1.1 Preface
B
Please read this operating manual before commissioning the software. Keep the manual in a place that is accessible to all users at all times.
Please assist us to improve this operating manual, where necessary.
Your comments will be appreciated.
H |
However, if any difficulties should arise during start-up, please do |
not carry out any unauthorized manipulations. You could endanger |
|
|
your rights under the instrument warranty! |
|
Please contact the nearest subsidiary or the head office in such a |
|
case. |
7

1 Introduction
1.2 Typographical conventions
Warning signs
A
Note signs
The symbols for Danger and Caution are used in this manual under the following conditions:
Caution
This symbol is used when there may be damage to equipment or data if the instructions are ignored or not followed correctly!
H v
abc1
h
Note
This symbol is used when your special attention is drawn to a remark.
Reference
This symbol refers to further information in other manuals, chapters or sections.
Footnote
Footnotes are remarks that refer to specific points in the text. Footnotes consist of two parts:
A marker in the text, and the footnote text.
The markers in the text are arranged as continuous superscript numbers.
Action
This symbol indicates that an action to be performed is described.
The individual steps are marked by this asterisk, e.g. h Press the hkey
h Confirm with E
8

1 Introduction
Representation
h+ E
Edit ! device data
Keys
Keys are shown in a box. Both symbols and text are possible. If a key has a multiple function, then the text shown is the one that corresponds to the function that is active at the moment.
Menu items
Menu items in the software which are referred to in this manual are shown in italics. Menu name, menu item and submenu item are separated from each other by “!”.
9

1 Introduction
10
2 PC Evaluation Software
2.1 General
The PC Evaluation software (PCA3000) is used for archiving and evaluating data (including device audit trail data, if available). In the software, an electronic signature can be attached to the archived data.
The PCA3000 is on a CD, together with:
-PCA Communications software (PCC),
-Setup software (only for specific instruments) and
-Documentation in the form of PDF files.
H |
PCA3000 can be used for data from different instruments. |
Differences may occur between the operating manual and |
|
|
the individual instrument-specific functions. |
2.2 Instruments with FDA compliance
The CD also contains:
-PC Security Manager software (PCS) and
-PC Audit Trail Manager software (PCAT).
For instruments with an increased security level, the software is freely available on the Internet in “read-only” mode (PCA3000 viewer), for purposes of FDA inspection and checking.
Anybody who has been authorized by the administrator is allowed to start and use PCA3000. The administrator uses the PC Security Manager software (PCS) to allocate authorizations.
PCA3000 is installed in conjunction with the installation of the PC Security Manager software (PCS). In this case, the installation will be different from the installation procedure described in Chapter 3 “Installation”.
11

2 PC Evaluation Software
2.3 Hardware and software requirements
The following hardware and software requirements have to be met for installing and operating the software:
Minimum |
- |
Intel Pentium1 III or higher, |
configuration |
- |
Microsoft Windows2 2000 or XP, |
|
Recommended configuration
-256Mbyte main memory,
-CD drive,
-mouse,
-one free serial interface or network connection or CompactFlash memory cards (depending on the type of data transmission to the recorder) and
-120Mbyte free space on hard disk.
-Intel Pentium 4
-Windows XP
-512Mbyte main memory
-2Gbyte free space on hard disk for data
1.Intel and Pentium are registered trademarks of the Intel Corporation
2.Microsoft and Windows are registered trademarks of the Microsoft Corporation
12
|
|
3 Installation |
|
3.1 Starting the installation |
|||
Running the |
h Start Microsoft Windows |
||
installation |
|
If Microsoft Windows has already been started, all Windows |
|
program |
H |
||
programs have to be shut down before installing the setup |
|||
|
|
program. |
|
|
h Insert CD into the disk drive, then close it. |
||
|
After the CD has been inserted, the installation program starts automatically, if |
||
|
not, proceed as follows: |
||
|
h Start the file “Launch.exe” in the main directory of the CD. |
||
|
Screen messages from the installation program will now lead you through the |
||
|
rest of the installation. |
||
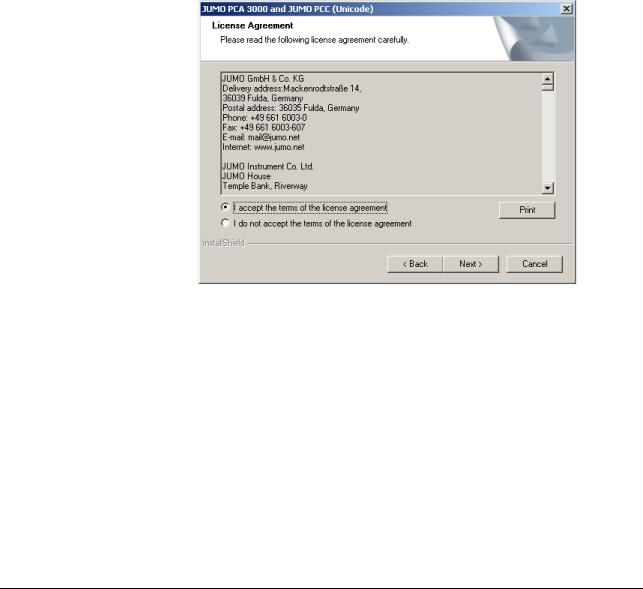
License |
h Read and confirm the license agreement. Accepting the agreement is the |
||
agreement |
basic precondition to be able to install the software. |
||
13
3 Installation
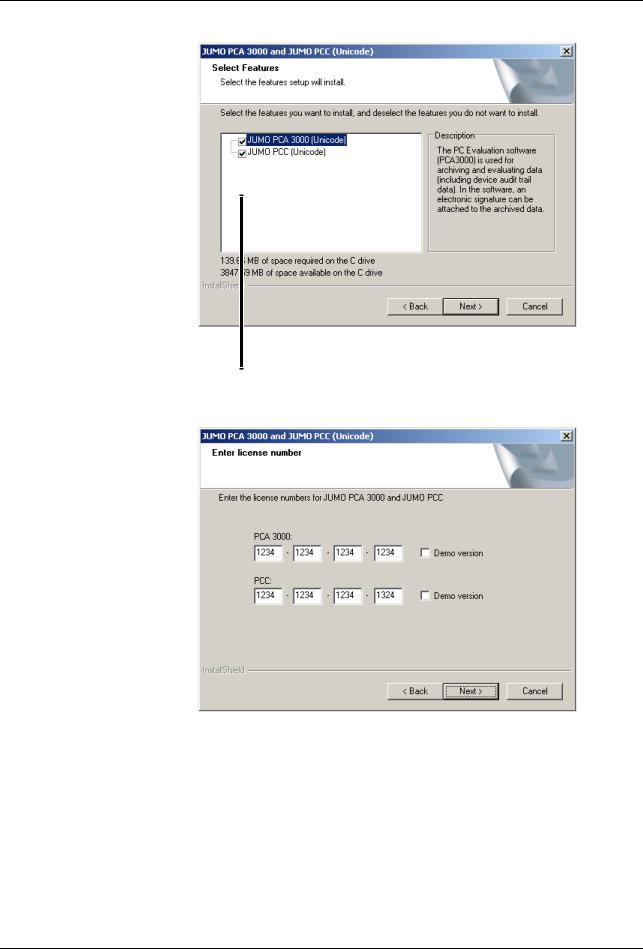
Available |
h Select the components that need to be installed. |
software |
|
Software that is to be installed must be marked by a tick ( ).
).
License number h Now enter the required license numbers.
H |
If the “demo version” option (viewer mode) has been set during |
installation, then some functions of this software (such as data |
|
|
transmission, saving data, printing out) will be disabled. |
|
The software can be licensed at a later stage. |
Program folder Define the program folder into which the icons for starting the software are to be copied. The directory for the program files is determined automatically.
14

|
|
|
3 Installation |
Installing |
h The final action is to click the |
|
button, to initiate the actual |
|
|||
|
installation. |
|
|
Program start The selected software components will now be installed. When the installation has been completed, start the PC Evaluation software (PCA3000) via the Windows start menu.
15

3 Installation
16

4 Log-in to the program
When the program is installed for the first time, there will be no query of the user name and password. The query at the program start can be activated in the Extras menu, by using the function Renew log-in / Alter password.
By activating the log-in function, it is possible to distinguish between the “Specialist” and “Maintenance” users. These users have different authorizations with regard to the functions of the setup program.
v “Renew log-in / alter password” on page 81
When the query has been activated, proceed as follows:
h Log in.
17

4 Log-in to the program
18
5 User interface
5.1 Elements of the user interface
Menu bar
Toolbar
Working area for representation of process data
|
|
|
Details of the currently |
|
|
|
|
|
|
Coordinate bar |
logged-in user |
Menu bar |
The individual functions of the software can be started by using the menu bar. |
||
|
v Chapter 10 “Menu functions and toolbar” |
|
|
Toolbar |
The toolbar contains selected functions from the menu bar. They can be |
||
|
started or activated by pressing the left mouse button. If you rest the mouse |
||
|
pointer on one of the icons (tool tips), you will see the function title after a short |
||
|
while. |
|
|
19
5 User interface
Shift toolbar The position of the toolbar can be changed, if desired.
h Please move the mouse pointer between two icon groups.
h Press the left mouse button.
hKeeping the left mouse button pressed, drag the toolbar to the desired position.
h Now release the mouse button.
Possible positions are:
-the left or right window border (vertical orientation),
-below the menu bar (horizontal orientation),
-at the bottom edge, above the user details (horizontal orientation) or
-any position (in its own window - height and width can be changed using the mouse).
Working area The process data are displayed here.
20
6 Guide
6.1 Introduction
The following pages are intended as a guide to familiarize you with the principle of the PC Evaluation software PCA3000.
For a better understanding, the concept is explained by analogy with conventional pen recorders and paper charts containing process data.
21
6 Guide
6.2 Reading in data
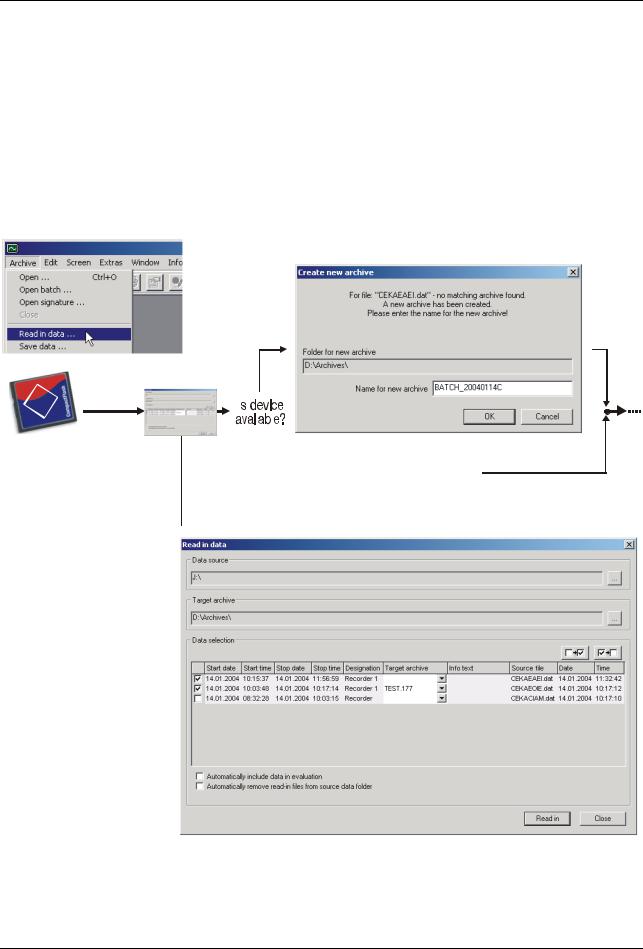
This chapter explains how you can read in and save recorder measurement data from a CompactFlash memory card to your PC. For a faster access during a subsequent visualization, a concept was chosen that is based on an archive and an evaluation.
Accordingly, the archive represents the conventional paper chart deposit, the evaluation the rolled out paper charts.
Practical experience has shown that most users initially only wish to save (archive) their measurement data. Data are taken out of the archive and analyzed only in the event of a fault or similar event.
|
|
|
|
|
|
|
|
|
|
|
|
|
|
|
no |
|
|||
|
Read in |
|
|||||||
|
|
|
|
|
|||||
F |
data |
|
|
|
|
||||
|
|||||||||
C |
|
|
|
|
|
|
|
|
|
|
|
|
|
|
|
|
|
|
|
|
|
|
|
|
|
|
|
|
|
|
|
|
|
|
|
|
|
|
|
|
|
|
|
|
|
|
|
|
|
|
|
|
|
|
yes |
|
|||
|
|
|
|
|
|
|
|
|
|
The recorded measurement data can be read in via the CompactFlash card or the interface.
The PCA communications software is used for reading in via the interface.
(PCC).
Further important information: see “Read in data” on page 75.
22
|
|
|
|
|
|
|
|
|
|
|
|
|
|
|
|
|
|
|
|
|
|
|
|
|
|
|
|
6 Guide |
||||
|
|
|
|
|
|
|
|
|
|
|
|
|
H |
|
In contrast to the preceding PCA version, the archives of the |
|||||||||||||||||
|
|
|
|
|
|
|
|
|
|
|
|
|
|
PCA3000 software are not a directory with several files, but a |
||||||||||||||||||
|
|
|
|
|
|
|
|
|
|
|
|
|
|
|
single file only. This file always carries the file extension “.177”. |
|||||||||||||||||
|
|
|
|
|
|
|
|
|
|
|
|
|
|
|
|
|
|
|
|
|
|
|
|
|
|
|
|
|
|
|
|
|
|
|
|
|
|
|
|
|
|
|
|
|
|
|
|
|
|
|
|
|
|
|
|
|
|
|
|
|
|
|
|
|
|
|
|
|
|
|
|
|
|
|
|
|
|
|
|
|
|
|
|
|
|
|
|
|
|
|
|
|
|
|
|
|
|
|
|
|
|
|
|
|
|
|
|
|
|
|
|
|
|
|
|
|
|
|
|
|
|
|
|
|
|
|
|
|
|
|
|
|
|
|
|
|
|
|
|
|
|
|
|
|
|
|
|
|
|
|
|
|
|
|
|
|
|
|
|
|
|
|
|
|
|
|
|
|
|
|
|
|
|
|
|
|
|
|
|
|
|
|
|
|
|
|
|
|
|
|
|
|
|
|
|
|
|
|
|
|
|
|
|
|
|
|
|
|
|
|
|
|
|
|
|
|
|
|
|
|
|
|
|
|
|
|
|
|
|
|
|
|
|
|
|
|
|
|
|
|
|
|
|
|
|
|
|
|
|
|
|
|
|
|
|
|
|
|
|
|
|
|
|
|
|
|
|
|
|
|
|
|
|
|
|
|
|
|
|
|
|
|
|
|
|
|
|
|
|
|
|
|
|
|
|
|
|
|
|
|
|
|
|
|
|
|
|
|
|
|
|
|
|
|
|
|
|
|
|
|
|
|
|
|
|
|
|
|
|
|
|
|
|
|
|
|
|
|
|
|
|
|
|
|
|
|
|
|
|
|
|
|
|
|
|
|
|
|
|
|
|
|
|
|
|
|
|
|
|
|
|
|
|
|
|
|
|
|
|
|
|
|
|
|
|
|
|
|
|
|
|
|
|
|
|
|
|
|
|
|
|
|
|
|
|
|
|
|
|
|
|
|
|
|
|
|
|
|
|
|
|
|
|
|
|
|
|
|
|
|
|
|
|
|
|
|
|
|
|
|
|
|
|
|
|
|
|
|
|
|
|
|
|
|
|
|
|
|
|
|
|
|
|
|
|
|
|
|
|
|
|
|
|
|
|
|
|
|
|
|
|
|
|
|
|
|
|
|
|
|
|
|
|
|
|
|
|
|
|
|
|
|
|
|
|
|
|
|
|
|
|
|
|
|
|
|
|
|
|
|
|
|
|
|
|
|
|
|
|
|
|
|
|
|
|
|
|
|
|
|
|
|
|
|
|
|
|
|
|
|
|
|
|
|
|
|
|
|
|
|
|
|
|
|
|
|
|
|
|
|
|
|
|
|
|
|
|
|
|
|
|
|
|
|
|
|
|
|
|
|
|
|
|
|
|
|
|
|
|
|
|
|
|
|
|
|
|
|
|
|
|
|
|
|
|
|
|
|
|
|
|
|
|
|
|
|
|
|
|
|
|
|
|
|
|
|
|
|
|
|
|
|
|
|
|
|
|
|
|
|
|
|
|
|
|
|
|
|
|
|
|
|
|
|
|
|
|
|
|
|
|
|
|
|
|
|
|
|
|
|
|
|
|
|
|
|
|
|
|
|
|
|
|
|
|
|
|
|
|
|
|
|
|
|
|
|
|
|
|
|
|
|
|
|
|
|
|
|
|
|
|
|
|
|
|
|
|
|
|
|
|
|
|
|
|
|
|
|
|
|
|
|
|
|
|
|
|
|
|
|
|
|
|
|
|
|
|
|
|
|
|
|
|
|
|
|
|
|
|
|
|
|
|
|
|
|
|
|
|
|
|
|
|
|
|
|
|
|
|
|
|
|
|
|
|
|
|
|
|
|
|
|
|
|
|
|
|
|
|
|
|
|
|
|
|
|
|
|
|
|
|
|
|
|
|
The archive directory and the evaluation directory are set within the PCA3000. |
|
Archive |
The default directory is set via the menu item Archive ! Default settings ! File |
|
|
deposit ! Directory for archives. It can be altered at a later stage when |
|
|
reading in the data. |
|
Evaluation |
The default directory is set via the menu item Archive ! Default settings ! File |
|
|
deposit ! Directory for evaluation. It cannot be altered when reading in data. |
|
|
H |
With extensive measurements, it may take some minutes |
|
for the measurement data to be entered into the archive. |
|
23
6 Guide
6.3 Opening the archive
H |
Archive |
Files with |
raw data |
read in |
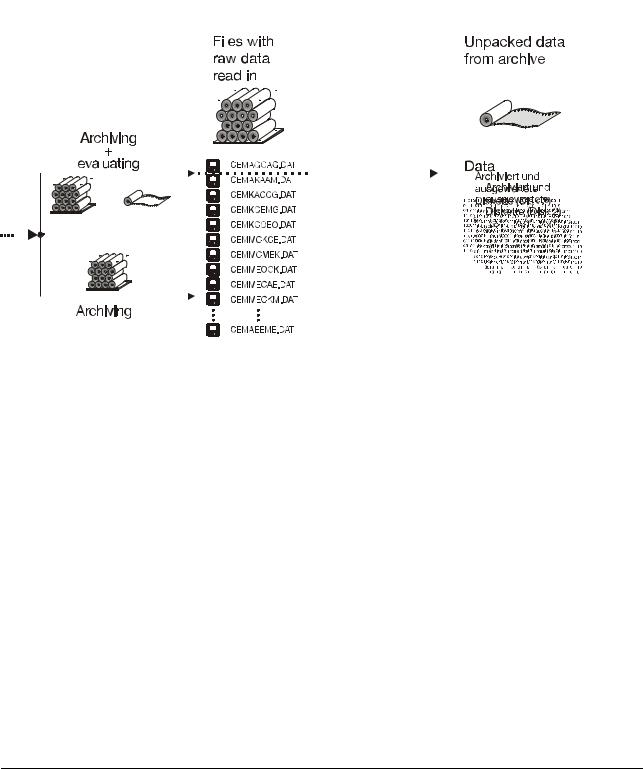
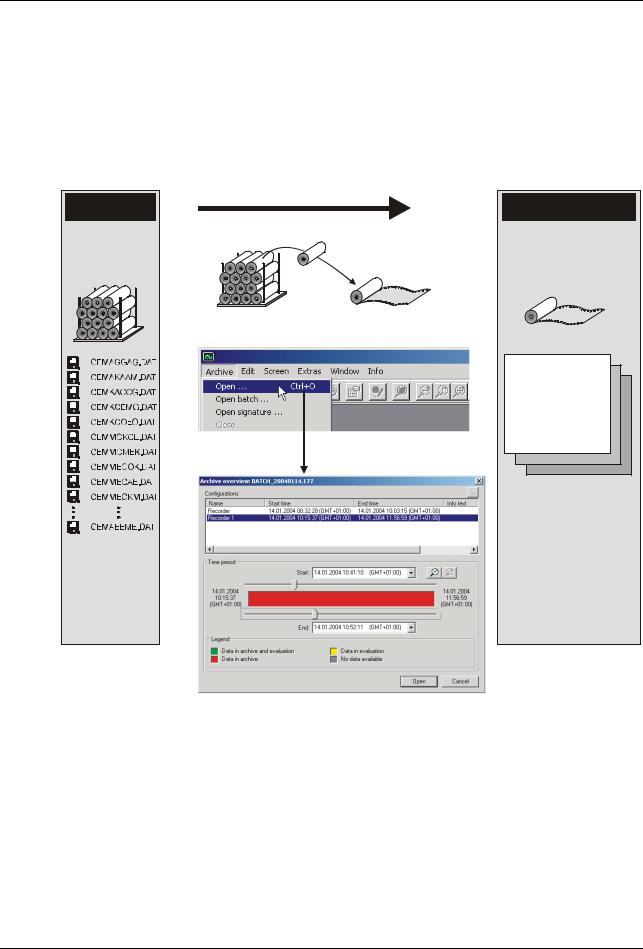
Measurement data which are to be visualized are opened from the evaluation.
If these data are not yet available in the evaluation, they must first be copied from the archive to the evaluation. This procedure is carried out automatically during opening.
Open archive |
Evaluation |
||||
|
|||||
Copy |
Unpacked data |
||||
|
|||||
|
from archive |
|
|||
|
Data |
|
|
|
|
|
Archiviert und |
|
|||
|
|
Archiviert und |
|
||
|
ausgewertete |
|
|||
|
|
ausg wertete |
|
||
|
Diskette (Disk 2) |
|
|||
|
11010011 |
11010011 |
11010011 |
11010011 |
|
|
01111010 |
01111010 |
01111010 |
01111010 |
|
|
|
Diskette (Disk 2) |
|
||
|
0010111011010011001011101101001100101110110100110010111011010011 |
||||
|
1110110101111010111011010111101011101101011110101110110101111010 |
||||
|
10110001 |
10110001 |
10110001 |
10110001 |
|
|
0010111011010011001011101101001100101110110100110010111011010011 |
||||
|
10001110 |
10001110 |
10001110 |
10001110 |
|
|
1110110101111010111011010111101011101101011110101110110101111010 |
||||
|
11011100 |
11011100 |
11011100 |
11011100 |
|
|
1011000100101110101100010010111010110001001011101011000100101110 |
||||
|
110100111000111011010011100011101101001111101101 111011011000111001101110100111000111011101101 |
||||
|
011110101101110001111010110111000111101010110001 10110001110111000111101000011101110010110001 |
||||
|
001011101101001110001110110100111000001011101101001100101110 001011101101001110001110 |
||||
|
111011010111101011101101100011110101110110110001111010111011011000111101011011100 |
||||
|
0010111011010011001011101101001100101110110100110010111011010011 |
||||
|
1110110101111010111011010111101011101101011110101110110101111010 |
||||
|
|
00101110 |
00101110 |
00101110 |
00101110 |
|
|
11101101 |
11101101 |
11101101 |
11101101 |
After Archive ! Open has been selected, the time period is selected.
v Chapter 6.3.1 “Selecting the time period”
24

6 Guide
Open archive
Visualization
When the time period has been selected, the required group (as generated by the paperless recorder) is chosen before the measurement data are displayed. User-defined groups can be compiled in the register “PCA groups” .
Further important information: see “Open” on page 73.
25
6 Guide
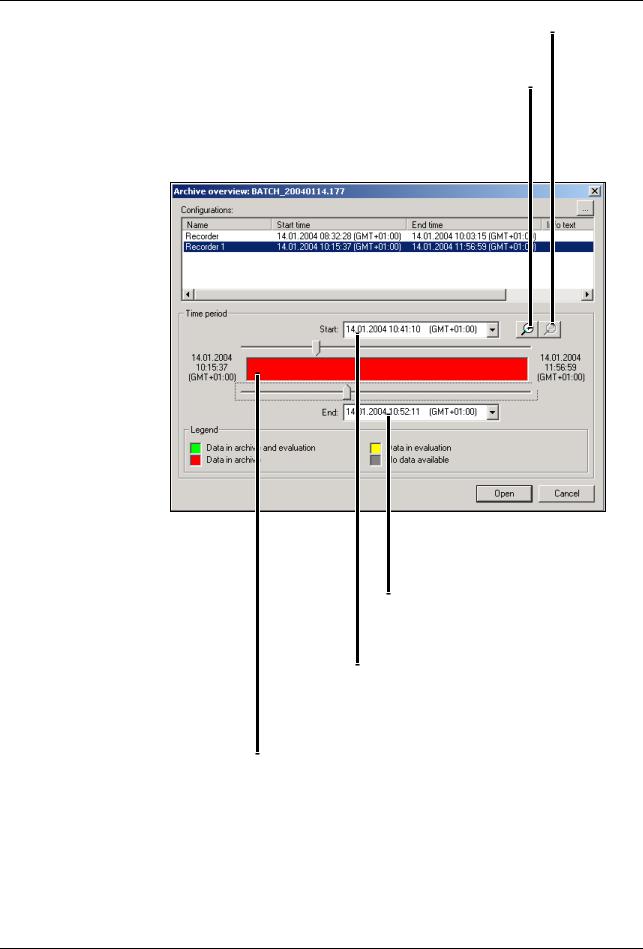
6.3.1 Selecting the time period
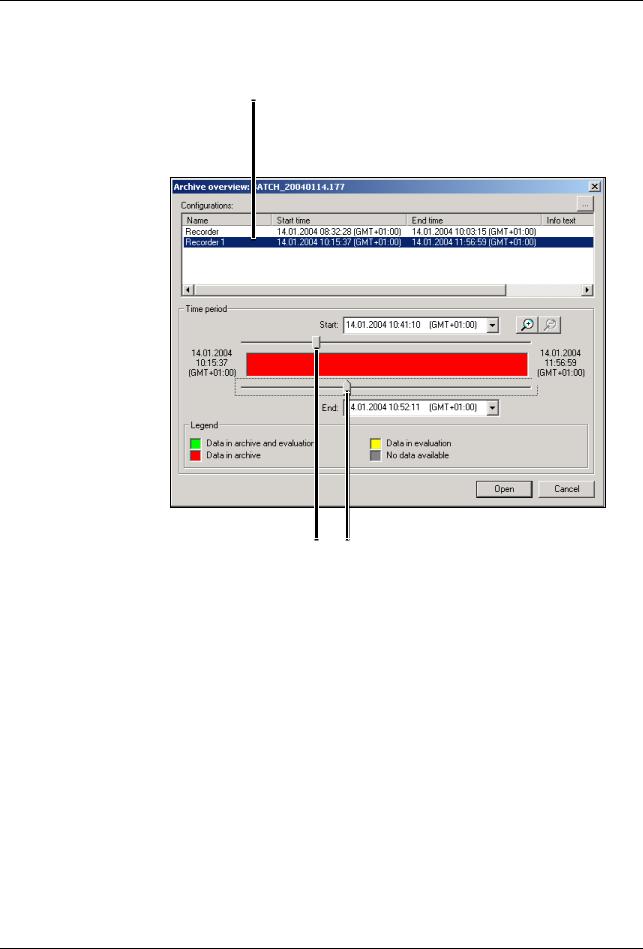
Selecting a data set
Each entry represents a new configuration of a device.
Selecting a time period
The period between the two sliders is shown graphically after activating the “Open” button.
Hold the left mouse button down when shifting the sliders.
26
6 Guide
Back
Set the time period that was last active.
Zoom
Zooms the time period between the sliders over the entire width. The sliders are repositioned.
End time
A dialog box can be used to determine the end time.
Start time
A dialog box can be used to determine the start time.
Data in archive only
The data are only available in the archive. If they are selected for display, then the software will automatically accept them for evaluation.
27
6 Guide
6.4 Backing up data
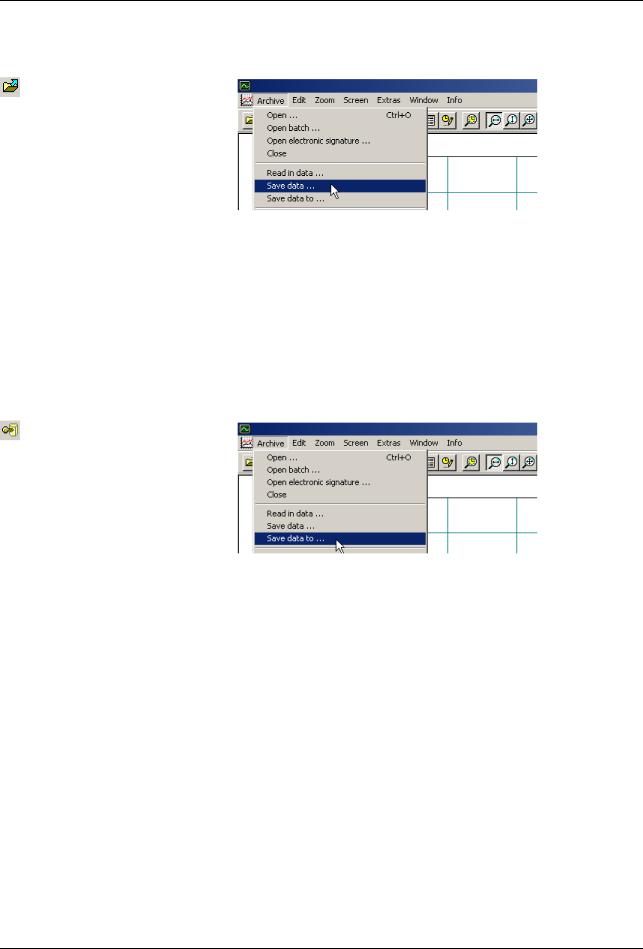
Save data
The Save data function serves to
-copy process data from an archive (e.g. for general data backup),
-copy process data from an archive to a protected archive (e.g. for passing them on for checks) and
-copy process data from an archive and simultaneously delete them (e.g. so that the archived files do not become unnecessarily large).
Save data as
The Save data as function extends the Save data function by the possibility of protecting the records (protected archives). Protected archives differ from the other archives by:
-inhibiting the execution of signatures
-inhibiting the Save function
(a fresh saving of data is prevented).
-a simplified opening of the protected data.
-protected data cannot be extended
(no further read-in or appending of additional data).
H |
The Save data as function is only available if the data are graphi- |
cally displayed. |
28

6 Guide
Save data
Selected archive |
|
|
|
Archive selection |
|||
Select data |
|
|
Select data according to |
||||
|
|
||||||
according to time |
|
|
configuration |
|
|
|
|
|
|
|
Select data |
|
Select data |
|
|
|
|
|
|
|
|||
|
|
|
according to |
|
according to |
|
|
|
|
|
batch |
|
signature |
|
|
|
|
|
|
|
|
|
|
|
|
|
|
|
|
|
|
|
|
|
|
Cancel data |
|
|
|
|
|
||
|
|
|
|
backup |
|
|
|
|
Start data backup |
|
|
|
Selected backup archive |
|
|||
A means that the data |
Select backup |
||||
will be deleted from the |
archive |
||||
archive after backup. |
|
||||
29
Loading...