

Page 1

JOHN DEERE
WORLDWIDE COMMERCIAL & CONSUMER
EQUIPMENT DIVISION
M147682
B2
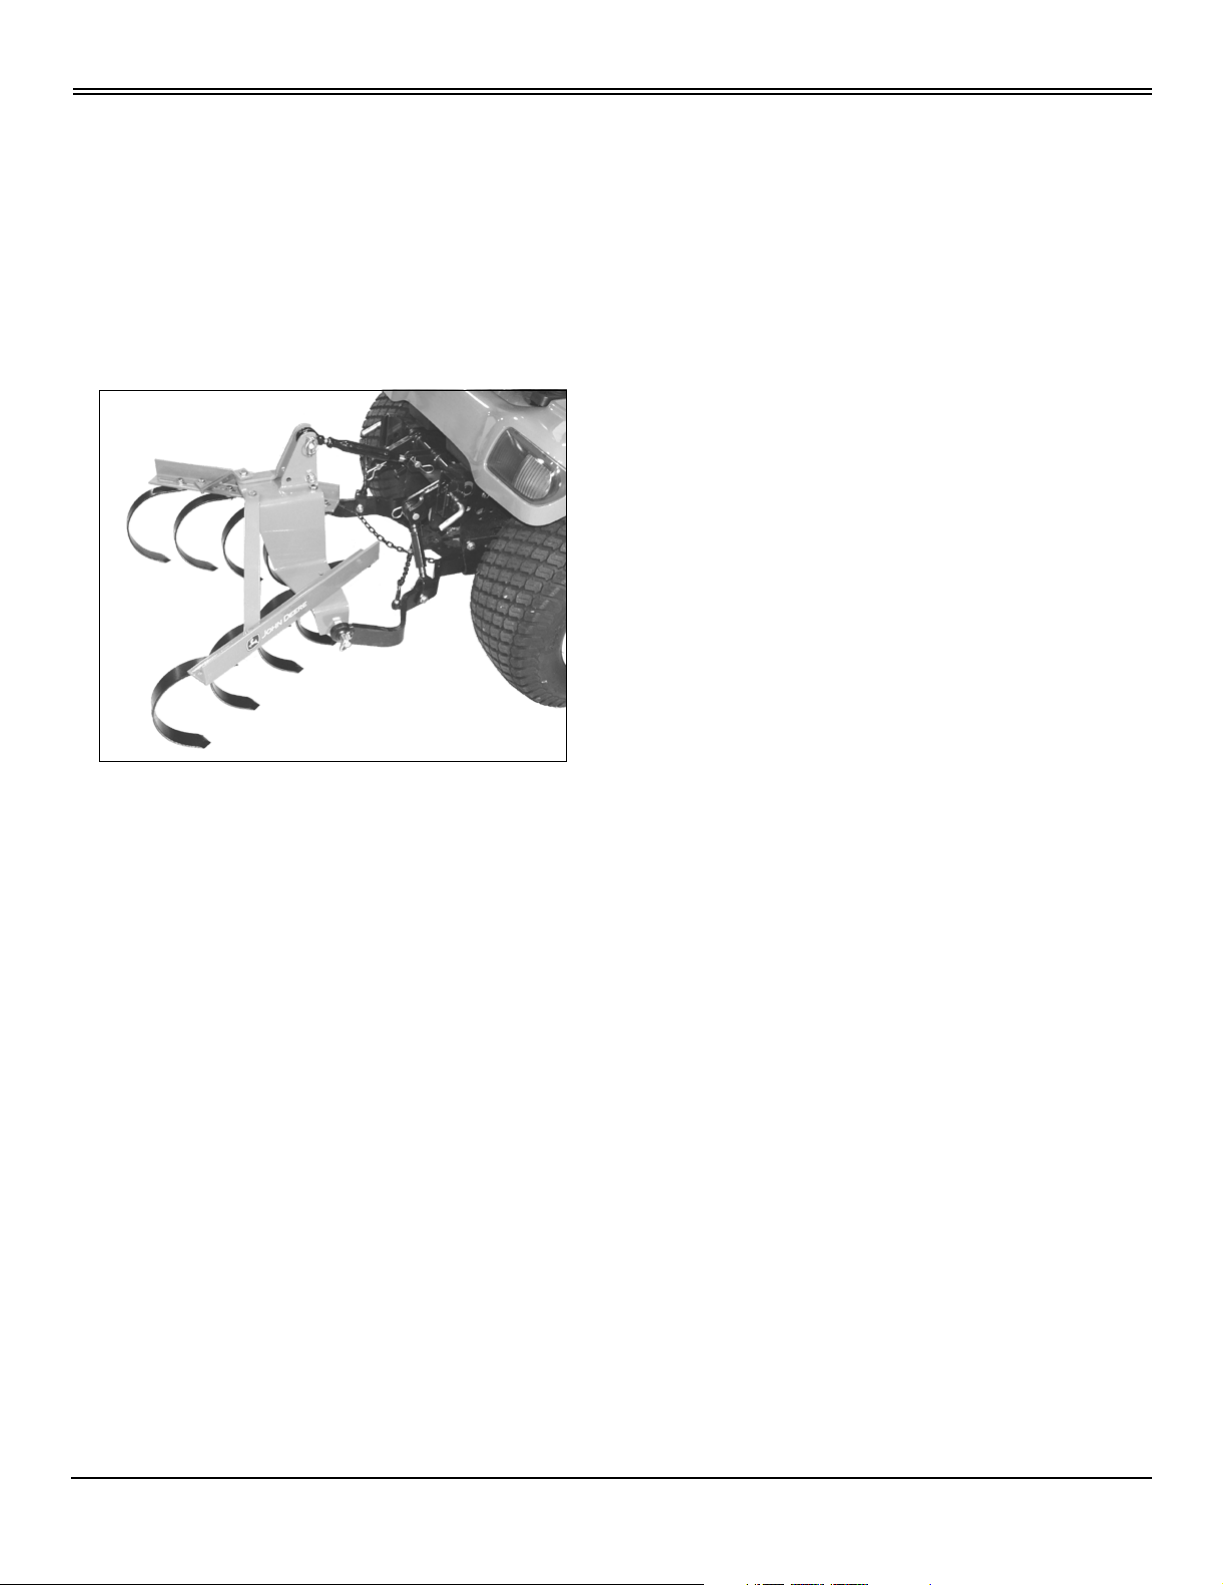
Cultivator
One Row
OMM147682 B2
OPERATOR’S MANUAL
North American Version
Litho in U.S.A.
Page 2

INTRODUCTION
Introduction
Thank You for Purchasing a John Deere Product
We appreciate your business and wish you many years of
safe and satisfied use of your machine.
c CAUTION: Avoid injury! This symbol and text
highlight potential hazards or death to the
operator or bystanders that may occur if the
hazards or procedures are ignored.
Using Your Operator’s Manual
This manual is an important part of your machine and
should remain with the machine when you sell it.
Reading your operator’s manual will help you and others
avoid personal injury or damage to the machine.
Information given in this manual will provide the operator
with the safest and most effective use of the machine.
Knowing how to operate this machine safely and correctly
will allow you to train others who may operate this machine.
If you have an attachment, use the safety and operating
information in the attachment operator’s manual along with
the machine operator’s manual to operate the attachment
safely and correctly.
This manual and safety signs on your machine may also be
available in other languages (see your John Deere Dealer
to order).
Sections in your operator’s manual are placed in a specific
order to help you understand all the safety messages and
learn the controls so you can operate this machine safely.
You can also use this manual to answer any specific
operating or servicing questions. A convenient index
located at the end of this book will help you to find needed
information quickly.
The machine shown in this manual may differ slightly from
your machine, but will be similar enough to help you
understand our instructions.
RIGHT-HAND and LEFT-HAND sides are determined by
facing in the direction the machine will travel when going
forward. When you see a broken line (------), the item
referred to is hidden from view.
IMPORTANT: Avoid damage! This text is used to tell
the operator of actions or conditions that might
result in damage to the machine.
NOTE: General information is given throughout the
manual that may help the operator in the operation or
service of the machine.
Before delivering this machine, your John Deere Dealer
performed a predelivery inspection to ensure best
performance.
Special Messages
Your manual contains special messages to bring attention
to potential safety concerns, machine damage as well as
helpful operating and servicing information. Please read all
the information carefully to avoid injury and machine
damage.
Introduction
Page 3
PRODUCT IDENTIFICATION
Product Identification
Product Compatibility
This cultivator is compatible with tractors, 18.6 kW (25 hp)
and under, equipped with a limited Category 1, rear 3-point
hitch.
Record Purchase Information
Record your purchase information in the spaces provided
below.
MX13247
DATE OF PURCHASE:
_________________________________________
DEALER NAME:
_________________________________________
DEALER PHONE:
_________________________________________
Product Identification
Page 4

TABLE OF CONTENTS
Table of Contents
Safety .....................................................................................................................................................................................1
Installing .................................................................................................................................................................................3
Removing ...............................................................................................................................................................................5
Operating................................................................................................................................................................................ 6
Replacement Parts .................................................................................................................................................................8
Service ...................................................................................................................................................................................9
Storage.................................................................................................................................................................................10
Assembly..............................................................................................................................................................................11
Specifications .......................................................................................................................................................................14
Index..................................................................................................................................................................................... 15
All information, illustrations and
specifications in this manual are based
on the latest information at the time of
publication. The right is reserved to
make changes at any time without
notice.
COPYRIGHT© 2002
Deere & Co.
John Deere Worldwide Commercial and
Consumer Equipment Division
All rights reserved
Previous Editions
COPYRIGHT©
Table of Contents
OMM147682 B2 - English
Page 5

SAFETY
Safety
Understanding the Machine Safety Labels
Safety-Alert Symbol
The machine safety labels shown in this section are placed
in important areas on your machine to draw attention to
potential safety hazards.
On your machine safety labels, the words DANGER,
WARNING and CAUTION are used with this safety-alert
symbol. DANGER identifies the most serious hazards.
The operator’s manual also explains any potential safety
hazards whenever necessary in special safety messages
that are identified with the word, CAUTION, and the safety
alert symbol.
Practice Safe Maintenance
MIF
• Understand service procedure before doing work. Keep
area clean and dry.
• Never lubricate, service or adjust machine while it is
moving. Keep safety devices in place and in working
condition. Keep hardware tight.
• Keep hands, feet, clothing, jewelry and long hair away
from any moving parts, to prevent them from getting
caught.
Before you service, adjust, clean or inspect the attachment:
• Stop the machine engine.
WARNING
MX13350, M133767
To avoid injury, read the operator’s manual. Never carry
riders. Keep hands and feet away from all moving parts.
• Securely support any machine elements that must be
raised for service work.
• Keep all parts in good condition and properly installed.
Fix damage immediately. Replace worn or broken parts.
Remove any buildup of grease, oil or debris.
• Unauthorized modifications to the machine may impair
its function and safety.
Wear Appropriate Clothing
MIF
• Wear close fitting clothing and safety equipment
appropriate for the job.
• Always wear safety goggles or safety glasses with side
Safety - 1
Page 6

SAFETY
shields when operating the machine.
• Loud noise can cause impairment or loss of hearing;
wear a suitable protective device such as earplugs.
• Do not wear radio or music headphones while servicing
the machine. Safe servicing requires your full attention.
Parking Safely
1. Stop machine on a level surface, not on a slope.
2. Disengage Power Take-Off (PTO).
3. Lower attachments to the ground.
4. Lock the park brake.
5. Stop the engine.
6. Remove the key.
7. Wait for engine and all moving parts to stop before you
leave the operator’s seat.
8. Close fuel shut-off valve, if your machine is equipped.
9. Disconnect the negative battery cable or remove the
spark plug wire (for gasoline engines) before servicing the
machine.
in the Operator’s Manual for the machine and on the safety
signs on the equipment before starting.
Before you remove or install the cultivator:
1. Stop the machine.
2. Disengage the PTO.
3. Stop the engine.
Before you back up:
1. Stop the machine.
2. Look behind the machine for children.
Operating Machine Safely
• Check machine brake action before you operate. Adjust
or service brakes as necessary.
• Inspect machine before you operate. Be sure hardware
is tight. Repair or replace damaged, badly worn or missing
parts. Be sure guards and shields are in good condition
and fastened in place. Make any necessary adjustments
before you operate.
• Make repairs before you operate. Keep machine
properly maintained and in good working order.
• Keep children away from working area.
• Do not leave machine unattended when it is running.
• Only operate during daylight or with good artificial light.
• Do not let anyone, especially children, ride on
attachment or machine.
• Only allow responsible adults who are familiar with the
instructions to operate the machine.
• Do not wear radio or music headphones while operating
the machine. Safe operation requires your full attention.
Operating Cultivator Safely
Read, understand and follow all instructions in this manual,
Safety - 2
Page 7

Installing
Preparing the Machine
INSTALLING
IMPORTANT: Avoid damage! Do not install on
tractors with engines larger than 18.6 kW (25 hp).
Remove all attachments before installing the
cultivator.
NOTE: Read and complete the Assembly section at the
back of this operator’s manual if installing the
attachment for the first time.
Required Equipment
• Three-point hitch
Recommend Equipment
• Bar (lug) tires or tire chains
Machine Setup
• Check tire pressure before operating machine.
Installing Ballast
c CAUTION: Avoid injury! When the attachment is
removed, also remove any ballast that was
added to the machine.
A
B
D
C
MX13264
2. With the 3-point hitch in the lowered position, adjust the
lift rod adjuster (A) until the ends of the lower link balls (B
and C) are approximately 20 cm (8 in.) (D) from the ground.
G
H
F
Use only attachments and accessories
recommended by the manufacturer.
The following may be used as appropriate ballast, to
improve maneuverability and traction:
• Four front weights.
• Two Wheel Steer Models: One 33 kg (72 lb) rear starter
wheel weight and one additional 23 kg (50 lb) rear wheel
weight.
• All Wheel Steer Models: Two 23 kg (50 lb) rear wheel
weights.
Attaching the Cultivator
1. Park the machine safely. (See Parking Safely in Safety
section.)
B
C
D
E
MX13247
3. Slide the lower links (B and C) over the link pins (D).
Secure with quick-lock pins (E) supplied with the cultivator.
NOTE: The center link pin and the quick-lock pin are
not supplied with the cultivator.
4. Attach the center link (F) to the cultivator upper
mounting point with a link pin (G) and quick-lock pin (H).
Installing - 3
Page 8

INSTALLING
I
J
MX13268
5. Tighten the stabilizer chains (I and J) to prevent side
sway of the cultivator during operation.
c CAUTION: Avoid injury! Exhaust fumes can
cause sickness or death. If it is necessary to
run the engine in an enclosed area, use an
exhaust pipe extension to remove the fumes.
6. Start the machine, and raise the 3-point hitch.
Installing - 4
Page 9

REMOVING
Removing
Removing the Cultivator
1. Park the machine safely. (See Parking Safely in Safety
section.)
2. Lower the cultivator to the ground.
A
B
C
E
F
G
D
MX13247
3. Remove the quick-lock pin (A), link pin (B), and
disconnect the center link (C).
4. Install the link pin (B) and quick-lock pin (A) in the center
link for storage.
5. Remove the quick-lock pins (D) from the lower links
(E and F).
6. Pull the lower links (E and F) off the lower link pins (G).
7. Install the quick-lock pins (D) into the lower link pins (G)
for storage.
c CAUTION: Avoid injury!
When the attachment is removed, you must
also remove any ballast that was added to the
machine.
Use only attachments and accessories
recommended by the manufacturer.
8. Remove any added ballast from machine.
Removing - 5
Page 10

OPERATING
Operating
Using Cultivator
The most common uses for a cultivator:
1. Weed control in emerging gardens:
• Straddle row cultivation: By straddling the cultivator
over the plant row, weeds on each side of the row of
plants can be dislodged.
• Between row cultivation: Using the full width of the
cultivator, the space between rows of plants can be tilled
to loosen the soil and dislodge weeds (a minimum
space between rows of 1.27-1.40 m (50-55 in.) is
required.
2. Prepare seed beds:
• Scratching the surface: The cultivator can be used to
break the surface of the soil to allow for planting.
• Prepare for field sowing: Large planting beds such as
lawns can be prepared for planting.
3. Garden clean-up in fall:
• Rake: The cultivator can be used to remove vines
and other plant residue after the growing season.
• Level old growth: After plant residue has been
removed, the area can be leveled to prepare the area for
the next season.
Adjusting Frame Width
NOTE: Tine spacing is changed when the frame width
is adjusted.
1. Park the machine safely. (See Parking Safely in Safety
section.)
2. Lower the cultivator until the bottom of the spring tines
are approximately 25 mm (1 in.) off the ground.
A
C
E
B
G
F
H
I
A
C
D
MX13266
3. Loosen the capscrews and nuts (A) at the front A-frame
and at the front of the frame struts (B).
NOTE: To obtain the desired width, it may be necessary
to remove the capscrew, nut and washers, and move
the rear of the frame struts to another mounting hole.
4. Loosen the capscrews and nuts (C) at the rear of the
frame struts.
5. Move the right (D) and left (E) frame angles in or out
until the desired width is obtained.
6. Tighten the capscrews and nuts (C) at the rear of the
frame struts.
7. Move the spring tines (F) until they are parallel with the
direction of travel.
8. Tighten the capscrews and nuts (A) at the front A-frame
and at the front of the frame struts (B).
9. Loosen the capscrews and nuts for each remaining pair
of spring tines (G - I), adjust until parallel with the direction
of travel, and tighten the capscrews and nuts.
Changing Spring Tine Spacing
The spring tine spacing can be changed by moving the
spring tines to any one of the slotted mounting holes in the
frame. Spacing can also be changed by adjusting the frame
width.
1. Park the machine safely. (See Parking Safely in Safety
section.)
2. Lower the cultivator until the bottom of the spring tines
are approximately 25 mm (1 in.) off the ground.
Operating - 6
Page 11

OPERATING
NOTE: Two extra sets of spring tine mounting hardware
are included with the cultivator. This hardware is
needed when the spring tines at position (A) are moved
to another set of open mounting holes in the frame.
A
A
MX13266
3. Remove and/or locate the spring tine(s) to any open
mounting hole to obtain the desired spacing.
Leveling the Cultivator
Leveling Side-to-Side
1. Park the machine safely. (See Parking Safely in Safety
section.)
2. Lower the cultivator to the ground.
Leveling Front-to-Back
NOTE: The normal operating position will be level (all
tines making even contact with the ground).
A
B
MX13267
1. Loosen the center link jam nut (A).
2. Level the cultivator front-to-back:
• Turn the center link adjuster (B) clockwise (as viewed
from the rear) to lower the rear of the cultivator.
• Turn the center link adjuster (B) counterclockwise (as
viewed from the rear) to raise the rear of the cultivator.
3. Tighten the center link jam nut (A).
Operating Tips
• Never use the cultivator when the soil is wet. Pick up a
handful of soil and roll it into a ball. If the soil does not
crumble, it is too wet.
If the soil is too dry, it may be difficult for the cultivator to
penetrate properly.
A
B
MX13268
3. Loosen the adjuster jam nut (A) on the right rockshaft
arm.
4. Level the cultivator side-to-side:
• Turn the adjuster (B) clockwise to lower the right side
of the cultivator.
• Turn the adjuster (B) counterclockwise to raise the
right side of the cultivator.
5. Tighten the adjuster jam nut (A).
Operating - 7
• Avoid low areas, old roadways, paths and other areas
where the soil is overly packed.
• Adjust the frame to the desired width before use.
• Straddle Row Cultivating: Before use, check the spacing
required to clear the plants being cultivated. Adjust the
spring tine spacing to the required width.
• Level the cultivator before use.
• The recommended cultivating depth is 50 mm (2 in.). A
deeper setting will remove excessive moisture from the soil.
• Push and hold the 3-point hitch control lever in the lower
position until the cultivator is digging into the soil at the
desired depth.
• When cultivating an area, keep the machine speed low
3-5 km/h (2-3 mph).
• Always lift the cultivator before turning.
Page 12

REPLACEMENT PARTS
Replacement Parts
Service Literature
If you would like a copy of the Parts Catalog or Technical
Manual for this machine call:
• U.S. & Canada: 1-800-522-7448.
• All Other Regions: Your John Deere dealer.
Replacement Parts
We recommend John Deere quality parts and lubricants,
available at your John Deere dealer.
Part numbers may change, use part numbers listed below
when you order. If a number changes, your John Deere
dealer will have the latest number.
Part Numbers
Item Part Number
Spring Tine M147680
(Part numbers are subject to change without notice. Part
numbers may be different outside the U.S.A.)
Replacement Parts - 8
Page 13

SERVICE
Service
Replacing Spring Tines
1. Park the machine safely. (See Parking Safely in Safety
section.)
2. Remove the cultivator from the machine.
3. Turn the cultivator upside-down.
F
A
B
C
E
D
NOTE: The 1/2 x 1-3/4 x 3/8 in. washer is not used when
a spring tine (G) is installed on the A-frame (H).
H
G
MX13258
4. Remove the nut (A), lockwasher (B), 1/2 x 1-3/4 x 3/8 in.
washer (C), flat washer (D) and capscrew (E).
5. Remove the damaged spring tine (F).
MX13257
6. Install the new spring tine (F) using a capscrew (E), flat
washer (D), 1/2 x 1-3/4 x 3/8 in. washer (C), lockwasher (B)
and nut (A). Do not tighten hardware at this time.
7. Turn the cultivator over.
I
J
K
L
MX13290
8. Adjust the spring tines (I - L) until they are parallel with
the direction of travel. Tighten all spring tine mounting
hardware.
Service - 9
Page 14

STORAGE
Storage
Storing Cultivator Safely
c CAUTION: Avoid injury! Fuel vapors are
explosive and flammable. Engine exhaust
fumes contain carbon monoxide and can cause
serious illness or death:
• Run the engine only long enough to move
the machine to or from storage.
• Do not store vehicle with fuel in the tank
inside a building where fumes may reach an
open flame or spark.
• Allow the engine to cool before storing the
machine in any enclosure.
1. Remove cultivator from the machine.
2. Thoroughly clean the cultivator with soapy water and
brush, or use high-pressure washer.
3. Check the cultivator for worn or damaged parts. Replace
parts as needed.
4. Tighten loose hardware.
5. Apply paint to exposed areas to prevent rust.
6. Apply a thin film of oil the link pins.
7. Apply a thin film of oil to any bare metal on the spring
tines.
8. Store cultivator indoors on a hard, level surface in a
clean, dry place.
9. If cultivator is stored outdoors, put a sheet of plywood or
wood blocks under the cultivator.
10.Put a waterproof cover over the cultivator, if you store
the cultivator outdoors.
Storage - 10
Page 15

Assembly
Identify Parts
ASSEMBLY
Qty. Description
A
B
8 Washer, 1/2 x 1-3/4 x 3/8 in. (J)
17 Lockwasher, 1/2 in. (K)
16 Washer, Flat, 1/2 in. (L)
D
C
E
17 Nut, 1/2 in. (M)
1 Spacer Tube, 1 x 2 in. (N)
1 Capscrew, 1/2 x 3-1/2 in. (O)
F
H
I
K
G
J
L
Assemble Frame
A
B
A
M
N
Qty. Description
1 A-Frame, Right (A)
1 A-Frame, Left (B)
1 Plate, Spacing (C)
2 Frame Strut (D)
2Frame Angle (E)
2 Pin, Quick-Lock (F)
8 Spring Tine (G)
2 Link Pin with Hardware (H)
16 Capscrew, 1/2 x 1-3/4 in. (I)
O
MX13245a
MX13270
1. Assemble lower link pins (A) to A-frame halves (B) using
supplied hardware.
NOTE: To allow for alignment and installation of
components, do not tighten hardware completely until
instructed to do so.
C
D
F
E
MX13271
2. Attach A-frame halves together as shown with spacing
plate (C). Secure with two 1/2 x 1-3/4 in. capscrews (D), 1/2
in. flat washers and 1/2 in. nuts in front holes only.
3. Insert mast spacer (E) inside opening of frame halves,
and attach using 1/2 x 3-1/2 in. capscrew (F), 1/2 in.
lockwasher, and 1/2 in. nut.
Assembly - 11
Page 16

ASSEMBLY
G
H
I
L
M
J
K
MX13251
Picture Note: Left side shown.
4. Install the frame angle (G) on the A-frame, placing the
third slotted hole in the frame angle over the elongated hole
in the A-frame. Secure using one 1/2 x 1-3/4 in. capscrew
(H), 1/2 in. flat washer (I), 1/2 in. lockwasher and 1/2 in. nut.
Install Spring Tines
A
B
MX13255
1. Remove and retain the nut (A) and lockwasher (B)
attaching the frame angle to the A-frame.
NOTE: Two extra sets of spring tine mounting hardware
are included with the cultivator. This hardware is
needed when the spring tines are moved from the
position shown to another set of open mounting holes
in the frame. Save the extra hardware for future use.
NOTE: Install the frame strut with the warning label on
the right side of the cultivator.
5. Install the frame strut (J) on the A-frame at the rear
mounting hole using a 1/2 x 1-3/4 in. capscrew (K), 1/2 in.
lockwasher and 1/2 in. nut.
NOTE: The frame is shown assembled at a cultivating
width of approximately 89 cm (35 in.). The width can be
changed by installing the rear of the frame struts in a
different set of holes.
6. Align the hole in the frame strut with the third slotted
hole in the frame angle. Secure using a 1/2 x 1-3/4 in.
capscrew (L), 1/2 in. flat washer (M), 1/2 in. lockwasher and
1/2 in. nut.
7. Repeat steps 4-6 to install the frame angle and frame
strut on the other side.
8. Adjust the frame angles to the desired width, and tighten
all hardware.
9. Turn the frame assembly upside-down.
A
B
C
MX13256
2. Install a spring tine (C) on the capscrew, and secure
using the retained lockwasher (B) and nut (A) removed in
step 1.
3. Repeat steps 1 and 2 to install the spring tine on the
other side.
Assembly - 12
Page 17

ASSEMBLY
D
P
E
F
6. Tighten all hardware except for the spring tine mounting
Q
R
S
MX13290
hardware.
7. Adjust the spring tines (P - S) until they are parallel with
the direction of travel. Tighten all spring tine mounting
hardware.
MX13257
D
K
J
I
G
H
MX13258
4. Install all remaining spring tines (D, E and F) equally in
the positions shown, using a 1/2 x 1-3/4 in. capscrew (G),
1/2 in. flat washer (H), 1/2 x 1-3/4 x 3/8 in. washer (I),
1/2 in. lockwasher (J) and 1/2 in. nut (K).
5. Turn the cultivator over.
Assembly - 13
Page 18

SPECIFICATIONS
Specifications
Cultivator
Overall Dimensions . . . . . . . . . . . . . . . . . . . . . . . . . . . 1.17 m W x 76 cm L x 65 cm H (46 in. W x 30 in. L x 25.5 in. H)
Mounting . . . . . . . . . . . . . . . . . . . . . . . . . . . . . . . . . . . . . . . . . . . . . . . . . . . . . . . . . . . . Limited Category 1, 3-Point Hitch
Weight . . . . . . . . . . . . . . . . . . . . . . . . . . . . . . . . . . . . . . . . . . . . . . . . . . . . . . . . . . . . . . . . . . . . . . . . . . . . . . . . 36 kg (80 lb)
Frame Width (Adjustable) . . . . . . . . . . . . . . . . . . . . . . . . . . . . . . . . . . . . . . . . . . . . . . . . . . . . . . . . 0.72-1.17 m (30-46 in.)
Normal Working Cultivating Depth . . . . . . . . . . . . . . . . . . . . . . . . . . . . . . . . . . . . . . . . . . . . . . . . . . . . . . . 50 mm (2 in.)
Mast (Emerging Growth) Clearance . . . . . . . . . . . . . . . . . . . . . . . . . . . . . . . . . . . . . . . . . . . . . . . . . . . . . . 51 cm (20 in.)
Number of Tines . . . . . . . . . . . . . . . . . . . . . . . . . . . . . . . . . . . . . . . . . . . . . . . . . . . . . . . . . . . . . . . . . . . . . . . . . . . . . . . . . 8
Specifications - 14
Page 19

INDEX
Index
B
Ballast, Installing .............................................................. 3
C
Clothing, Appropriate ........................................................ 1
Cultivator Storage
Cultivator to Machine, Attach
Cultivator, Assembly
Cultivator, Leveling
Cultivator, Removing
Cultivator, Usage
D
Dealer Set-up ................................................................. 12
F
Frame Width, Adjusting .................................................... 6
L
Literature, Service ............................................................ 9
O
Operate Machine Safely ................................................... 2
Operating Tips
........................................................... 11
........................................... 3
....................................................... 12
........................................................... 7
........................................................ 5
.............................................................. 6
.................................................................. 7
P
Parts, Replacement .......................................................... 9
Preparing the Machine
Psrking Safely
.................................................................. 2
..................................................... 3
S
Safety Signs ..................................................................... 1
Safety, Service
Service Literature
Specifications
Spring Tine Spacing, Changing
Spring Tines, Replace
Storing Cultivator
................................................................. 1
............................................................. 9
................................................................. 16
........................................ 6
.................................................... 10
............................................................ 11
Index - 15
Page 20

JOHN DEERE QUALITY STATEMENT
John Deere Quality State ment
John Deere Quality
MIF
John Deere equipment is more than just a purchase it’s an investment in quality. That quality goes beyond our equipment to
your John Deere Dealer’s parts and service support. This support is needed to keep you as a satisfied customer.
That’s why John Deere has initiated a process to handle your questions or problems, should they arise. The following three
steps will help guide you through the process.
Step 1
Refer to your operator’s manual
A. It has many illustrations and detailed information on the
safe and proper operation of your equipment.
B. It gives troubleshooting procedures and specification
information.
C. It gives ordering information for parts catalogs, service
and technical manuals.
D. If your questions are not answered in the operator’s
manual, then go to Step 2.
Step 2
Contact your dealer
A. Your John Deere Dealer has the responsibility, authority
and ability to answer questions, resolve problems and fulfill
C. If the parts and service people are unable to resolve your
problem, see the dealership manager or owner.
your parts and service needs.
B. First, discuss your questions or problems with your
dealer’s trained parts and service staff.
D. If your questions or problems are not resolved by the
dealer, then go to Step 3.
Step 3
Call the John Deere Customer Communications Center
A. Your John Deere Dealer is the most efficient source in addressing any concern, but if you are not able to resolve your
problem after checking your operator’s manual and contacting your dealer, call the Customer Communications Center.
B. For prompt, effective service, please have the following ready before you call:
The name of the dealer with whom you’ve been working.
Your equipment model number.
Number of hours on machine (if applicable).
Your 13-digit serial number, which you recorded on the
inside front cover of this manual.
If the problem is with an attachment, your attachment
identification number.
C. Then call 1-800-537-8233 and our advisor will work with your dealer to investigate your concern.
John Deere Quality Statement - 16
 Loading...