

Page 1

JOHN DEERE
WORLDWIDE COMMERCIAL & CONSUMER
EQUIPMENT DIVISION
Broadcast Spreader
LPBST-35JD
OMM157122 B7
OMM157122 B7
OPERATOR’S MANUAL
All information, illustrations and
specications in this manual are based on
the latest information at the time of
publication. The right is reserved to make
changes at any time without notice.
COPYRIGHT© 2007
John Deere Worldwide Commercial and
Consumer Equipment Division
COPYRIGHT© 2004, 2005, 2006
Deere & Co.
All rights reserved
Previous Editions
North American Version
Litho in U.S.A.
Page 2

INTRODUCTION
Introduction
Using Your Operator’s Manual
Read this entire operator’s manual, especially the safety information,
before operating.
This manual is an important part of your machine. Keep all manuals in a
convenient location so they can be accessed easily.
Use the safety and operating information in the attachment operator’s
manual, along with the machine operator’s manual, to operate and service
the attachment safely and correctly.
If your attachment manual has a section called Preparing the Machine, it
means that you will have to do something to your tractor or vehicle before
you can install the attachment. The Assembly and Installation sections of
this manual provide information to assemble and install the attachment to
your tractor or vehicle. Use the Service section to make any needed
adjustments and routine service to your attachment.
If you have any questions or concerns with the assembly, installation, or
operation of this attachment, see your local John Deere dealer or call John
Deere Special Services at 1-866-218-8622 for assistance.
Warranty information on this John Deere attachment can be found in the
warranty that came with your John Deere tractor or vehicle.
Safety
Read the general safety operating precautions in your machine operator’s
manual for additional safety information.
Operate Safely
• This attachment is intended for use in lawn care and home applications.
Do not tow behind a vehicle on a highway or in any high speed application.
Do not tow at speeds higher than maximum recommended towing speed.
• Towing speed should always be slow enough to maintain control. Travel
slowly over rough ground.
• Do not let children or an untrained person operate machine.
• Do not let anyone, especially children, ride on machine or attachment.
Riders are subject to injury such as being str uck by foreign objects and
being thrown off. Riders may also obstruct the operator’s view, resulting in
the machine being operated in an unsafe manner.
• Check machine brake action before you operate. Adjust or service
brakes as necessary.
• Keep all parts in good condition and properly installed. Fix damage
immediately. Replace worn or broken parts. Replace all worn or damaged
safety and instruction decals.
• Do not modify machine or safety devices. Unauthorized modifications to
the machine or attachment may impair its function and safety.
• Securely anchor all loads to prevent loads from falling.
• Distribute load evenly for safe travel and unloading of cart.
• Do not obstruct the operator’s view during use.
• Excessive towed load can cause loss of traction and loss of control on
slopes. Reduce towed weight when operating on slopes.
• Never allow children or others in or on towed equipment.
• Use only approved hitches. Tow only with a machine that has a hitch
designed for towing. Do not attach towed equipment except at the
approved hitch point.
• Follow the manufacturer’s recommendations for weight limits for towed
equipment and towing on slopes. Use counterweights or wheel weights as
described in the machine operator’s manual.
• Do not turn sharply. Use additional caution when turning or operating
under adverse surface conditions. Use care when reversing.
• Do not shift to neutral and coast downhill.
Protect Bystanders
• Keep bystanders away when you operate a towed attachment.
• Before you back machine and attachment, look carefully behind
attachment for bystanders.
Keep Riders Off Towed Attachment
Keep riders off of a towed attachment.
Riders on a towed attachment are subject to injury, such as being struck
by objects and being thrown off the attachment during sudden starts,
stops and turns.
Riders obstruct the operator's view, resulting in the attachment being used
in an unsafe manner.
Keep riders off of hitch bracket.
Avoid Injury From Drawbar
Before you disconnect an attachment from machine hitch plate:
• Unload attachment.
• Stop attachment on level ground.
• Stop machine engine.
• Lock machine park brake.
• Block attachment wheels.
• Make sure hands, feet or other body parts are not under drawbar.
Towing Loads Safely
• Stopping distance increases with speed and weight of towed load. Travel
slowly and allow extra time and distance to stop.
• Total towed weight must not exceed limits specified in towing vehicle
operator’s manual.
Introduction - 1
Page 3
ASSEMBLY
Assembly
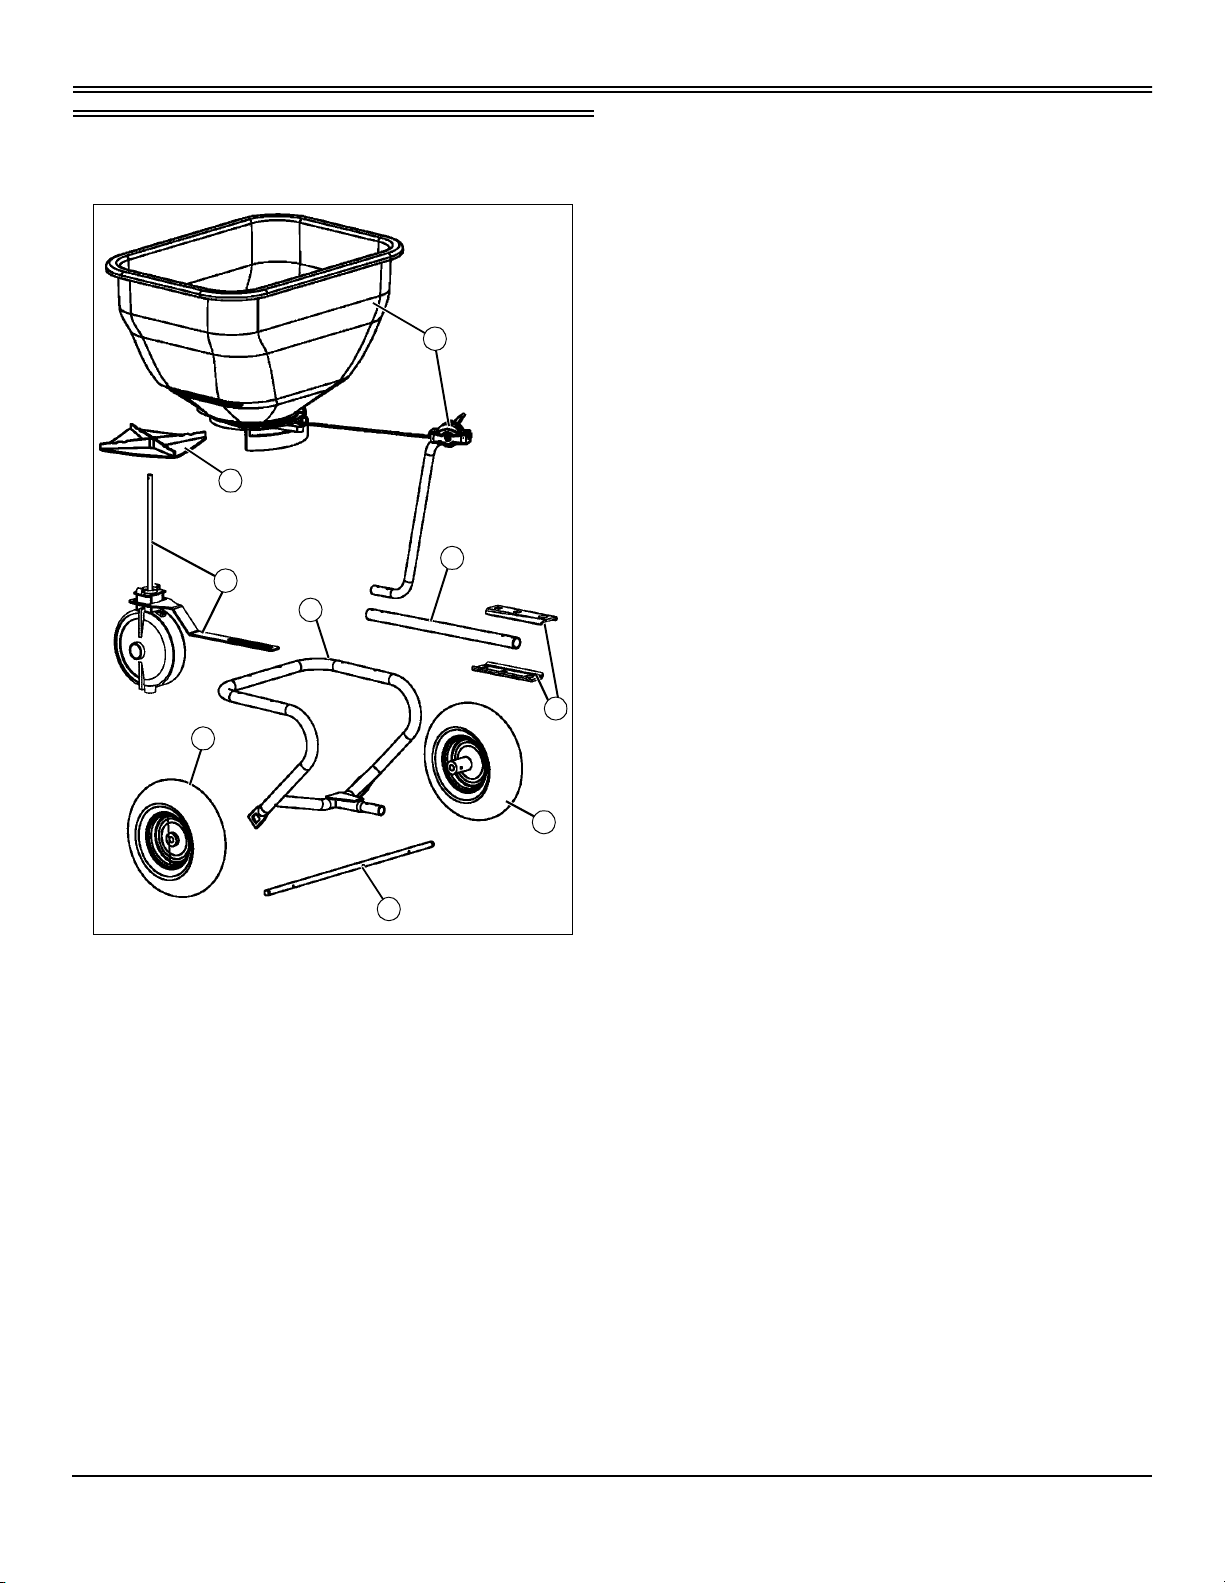
Parts in Kit
Qty. Description
2 Bolt, Hex, 5/16 x 3 in.
2 Carriage Bolt, 5/16 x 2 in.
1 Hitch Pin, 1/2 x 2-1/2 in.
1 Spring Locking Pin, 1/8 in. (Small)
6 Washer, Flat, 5/8 in.
B
A
C
H
G
D
E
1 Spring Locking Pin (Open)
1 Spring Locking Pin (Closed)
6 Locknut, 1/4 in.
6 Bolt, Hex, Stainless, 1/4 x 1-3/4 in.
1 Cotter Pin, 1/8 x 1 in.
2 Bearing, Axle
2 Snap Ring, E-Type
6 Washer, Thrust, 1/4 in.
1 O-Ring, 3/8 in. ID
1 Spring, Agitator (Stainless)
1Lock Clip
1Driver, Fan
F
Qty. Description
1Fan (A)
1 Hopper Assembly and Control Support (B)
1 Tube, Tow (C)
2 Clevis, Hitch (D)
2 Wheel (E)
1Axle (F)
1 Support Frame, Hopper (G)
1 Transmission and Brace (H)
Hardware Pack
Qty. Description
4 Locknut, 5/16 in.
E
MX38959
2 Nut, 5/16 in.
Assembly - 2
Page 4
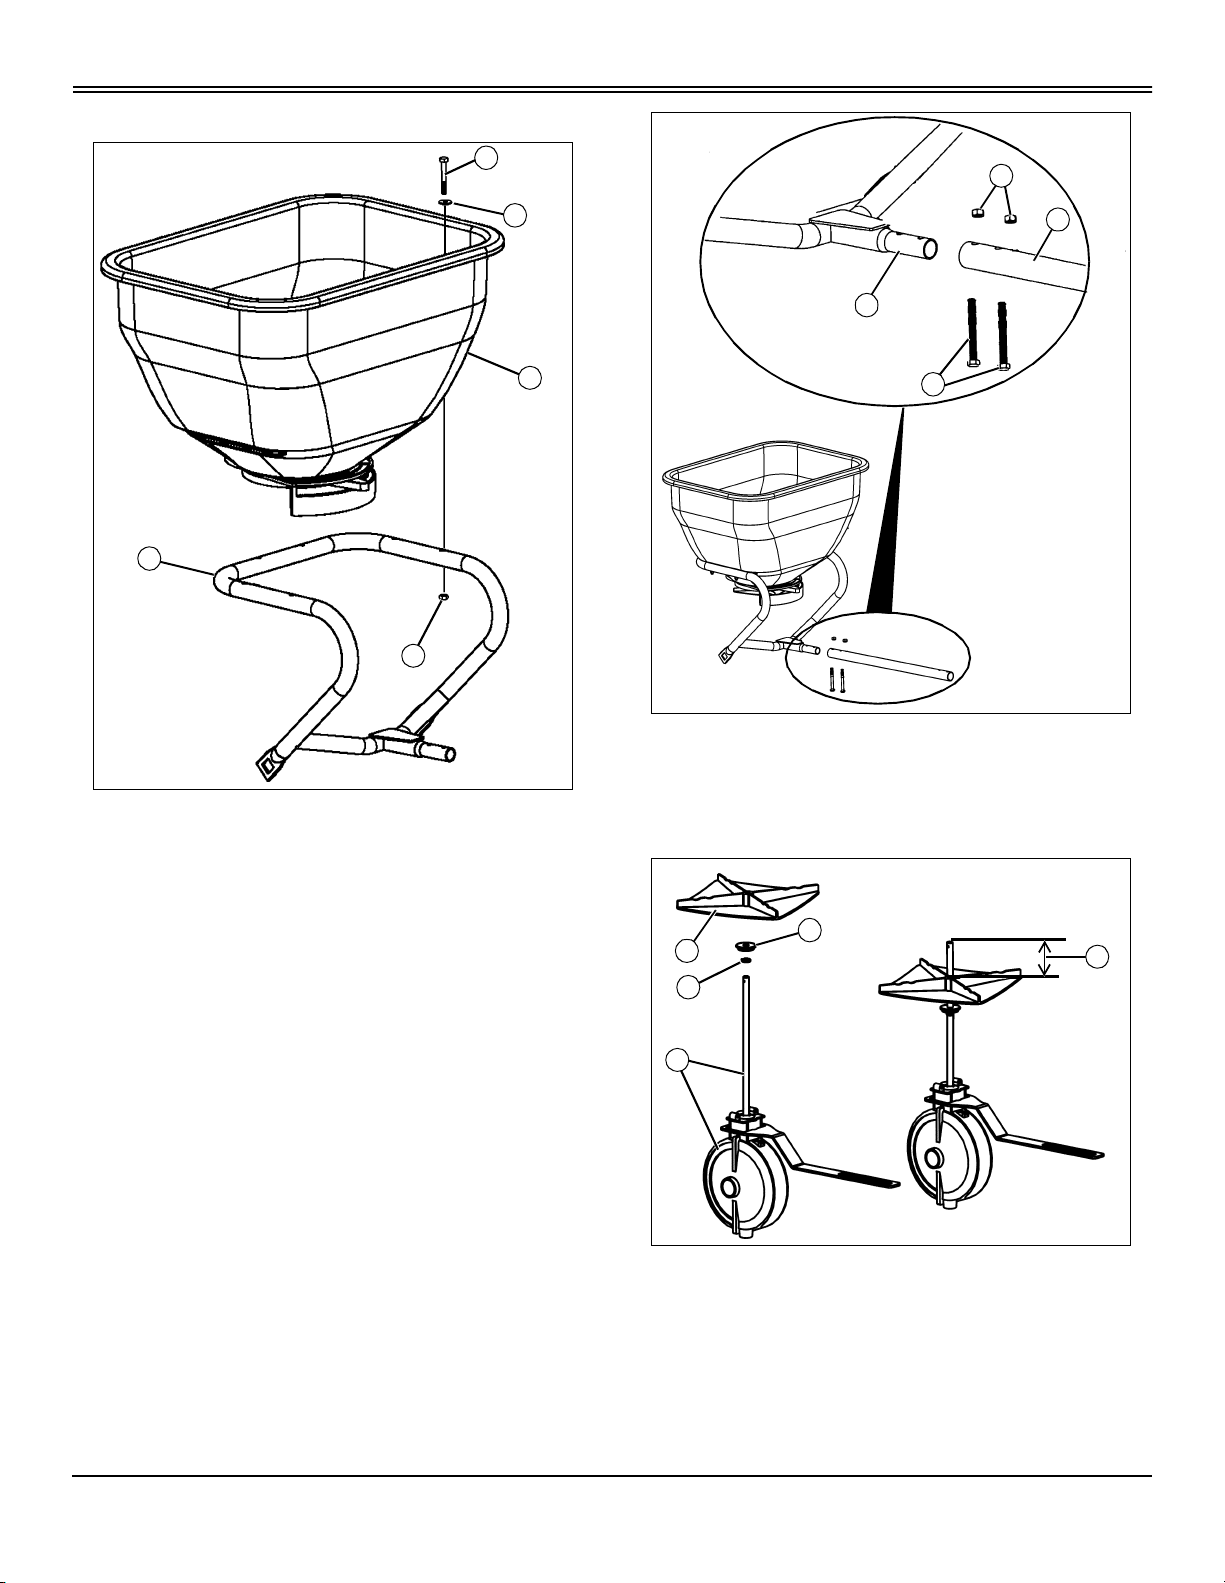
Assemble Hopper to Frame
ASSEMBLY
A
B
C
D
E
MX34596
1. Install six 1/4 x 1-3/4 in. hex bolts (A), and 1/4 in. thrust washer (B)
through top of hopper (C) and through support frame (D), as shown.
Secure bottom of bolt with 1/4 in. locknut (E). To avoid damage to plastic,
do not overtighten hardware.
H
F
D
G
MX38961
2. Install tow tube (F) onto support frame (D) with two 5/16 x 3 in. hex bolts
(G) and 5/16 in. hex nuts (H). Tighten hardware and torque bolts to 30
N•m (22 lb-ft), or one complete turn after finger tight.
Install Transmission and Wheels
1. Install lock clip (A) and fan driver (B), with small diameter lip of driver
toward the bottom, as shown.
2. Slide fan (C) onto transmission assembly (D) shaft over top of fan driver.
Move lock clip, fan driver, and fan downward so top of fan is approximately
12.7 cm (5 in.) (E) from top of transmission shaft.
Assembly - 3
B
C
A
D
E
MX38960
Page 5

ASSEMBLY
NOTE: Add or delete washers (O) to reduce axle side to side
movement.
7. Install two 5/8 in. flat washers (O) onto each side of axle. Lubricate the
axle ends and wheel sleeve bearings. Install wheel (P), 5/8 in. flat washer
(Q), and snap ring (R) onto end of axle.
J
I
H
3. Raise transmission into position by installing transmission fan shaft into
center hole of the control plates on the bottom of the hopper. Lower
transmission bracket (F) onto bolts (G).
4. Install axle (H) through support frame assembly (I) with offset hole near
center of axle installed toward left side (J) of spreader.
M
L
G
F
MX38962
KK
IMPORTANT: Avoid damage! Use only one spring locking pin
(open) to engage the wheels. When using the spreader on ice, the
opposite wheel can be pinned for added traction.
Use of two pins on dry pavement may result in damage to the
unit.
8. Install spring locking pin (open) (S) through inside hole in wheel rim and
axle onto either side of axle.
Install Agitator and Controls
NOTE: The four tabs on the fan should be compressed against the
fan driver. If pressure is not applied, the fan connection will be loose
resulting in poor performance.
D
B
C
A
MX34599, MX21908
Picture Note: View from rear of spreader.
5. Slide axle until lengths (K) are equal, and install spring locking pin
(closed) (L) into left side hole (M).
P
Q
O
P
R
Q
6. Install axle bearing (N) onto each side of axle so square end of bearing
fits into square hole of support frame assembly (I).
I
N
N
O
MX38963, MX21907
R
S
MX34601
1. Adjust fan (A) upwards with fan driver (B) and lock clip (C) on shaft as
close to bottom of hopper (D) without touching during operation. Make
sure fan driver engages the four plastic tabs on the bottom of fan.
Assembly - 4
Page 6

INSTALLING
I
H
F
G
2. Install 3/8 in. ID O-ring (E) on transmission shaft (F) until seated on
bottom of hopper (G).
3. Install agitator (H), and secure with 1/8 x 1 in. cotter pin (I) through top
loop in agitator and hole in transmission shaft, as shown.
E
MX39207
Q
S
O
P
R
T
IMPORTANT: Avoid damage! To avoid transmission damage, do
not adjust slot in transmission bracket forward or rearward. The
slot will self center as hardware is tightened.
N
M
J
L
MX39209
5. Install hitch clevis brackets (O) onto tow tube end (P) with two 5/16 x 2
in. carriage bolts (Q) and 5/16 in. locknuts (R), as shown. Tighten
hardware.
6. Install 1/2 x 2-1/2 in. hitch pin (S) and 1/8 in. spring locking pin (small)
(T) through end of clevis brackets, as shown.
Installing
Installing the Spreader
1. Park machine safely. See “Parking Safely” in Safety section.
B
C
A
K
MX39208
4. Make sure transmission bracket (J) is on top of nuts (K) on hex bolts (L),
and install control support tube (M) onto bolts (L). Secure with 5/16 in.
locknuts (N). Tighten locknuts.
Installing - 5
MX39210
2. Remove 1/8 in. spring locking pin (A) and 1/2 x 2-1/2 in. hitch pin (B)
from hitch clevis (C) of spreader.
3. Pull spreader forward and position hitch clevis to straddle machine rear
hitch plate or drawbar (not shown). Align all hitch pin holes, then install
hitch pin down through hitch clevis and machine hitch, securing with 1/8
in. spring locking pin (small).
Page 7

REMOVING
Removing
Removing the Spreader
1. Park machine safely. See “Parking Safely” in the Safety section.
2. Remove all materials from the hopper before removing spreader from
machine.
c CAUTION: Avoid injury! Keep hands, feet and other body
parts away from under drawbar.
3. Remove 1/8 in. spring locking pin from hitch pin.
4. Hold spreader tow tube to remove pressure from hitch pin, then remove
hitch pin from hitch clevis and rear hitch plate or drawbar on machine.
5. Pull or push spreader backward to disengage hitch clevis from machine
hitch, install hitch pin in hitch clevis for storage and secure with 1/8 in.
spring locking pin.
Storing
The spreader can be tipped upright and stored against a wall using less
space:
1. Remove any loose material from hopper and fan using a brush and
garden hose. The spreader should be clean and dry before storing.
2. Roll spreader to desired storage area, lift hitch clevis to pivot spreader
to vertical position.
Operating
Daily Operating Checklist
❏ Check for loose or missing hardware.
❏ Make sure all connections are tight.
❏ Make sure attachment responds properly to controls.
❏ Check for debris build-up that could obstruct proper motion of the
spreader control components.
Directional Control Settings
Normal Operation (Uniform Spreading)
Fertilizers, insecticides, and grass seed each have different particle size
and weight. This can be referred to as particle density. As the particles are
impacted by the fan, the distribution can be centered or slightly off center
depending on particle density and forward vehicle speed.
A
MX34606
Adjustment can be made by moving the direction control handle to the
right or left. The directional decal located below the directional control
plate handle will aid you in adjusting the spread pattern. For most
applications the handle should be placed close to the center position (A)
described by the label above. If the material is coming out right or left
during operation, adjustment of this lever should be made to center the
material distribution pattern behind the vehicle. Your broadcast spreader
has a patented feature to allow you to adjust for centering.
One Side Only Spreading
Operating the Spreader
The Fan speed and the spread width are controlled by the speed of the
vehicle. The recommended operating speed is slightly faster than that of a
brisk walk, 3 mph. 3 mph is equal to the vehicle traveling 40 ft in nine
seconds.
The flow control assembly operates the flow control plate. The flow control
assembly is marked 0 (closest) to 10 (fully open). The position selected
determine the amount of material to be broadcast. The higher the number,
the heavier the application of material.
Flow control setting for many of the common fertilizers, insecticides, and
grass seeds are provided in the alphabetized table listing flow control
settings. If the product is not listed in the flow control settings table, use
the calibration guide to set the flow control.
The agitator spring located inside the hopper provides consistent material
flow of pelletized materials and seed. It is not designed to break up lumps
of material or seed. Break up any lumps as you fill the hopper.
After determining the correct setting number for your material, move flow
control lock to that position. Move flow control handle to the lock position
to open the flow control plate.
Removing - 6
B
MX34607
The directional control handle can be used for adjusting the material
spread pattern when spreading near sidewalks, planting beds, etc. With
the handle adjusted to t he left side (B), the directional control handle only
operates with 90% shut-off of material to the right side of the vehicle as
shown in the illustration above.
Page 8

SERVICE
Operational Tips
• Always operate your spreader with the speed limit for which it was
designed - 3 mph.
• When backing, carefully back straight to avoid jack knifing, which could
result in damage to equipment.
• Only tow your spreader behind vehicles for which it was designed riders, and lawn and garden tractors.
• Do not load the hopper with more than the maximum weight capacity of
79 kg (175 lb).
• When spreading ice melters, pin both wheel hubs for better traction.
• When spreading seed, fertilizer, etc., insert only one spring locking pin in
either the right or left wheel hub.
• Break up any lumps as you fill the hopper.
• Do not use on windy days, especially when spreading fine grass seed or
herbicides.
• Optimum hitch height is 18 - 23 cm (7- 9 in.).
K
J
L
H
O
N
M
I
G
Service
Maintenance Tips
• The key to years of trouble- free service is to keep your spreader clean
and dry.
• Never allow material to remain in hopper for extended periods of time.
• Should rust develop, sand lightly and then paint area with enamel.
• Periodically check all fasteners for tightness.
• Rinse/dry inside and outside of spreader after each use. Move flow
control as you rinse, to avoid build up of material.
Annual Maintenance
C
E
F
MX39212
2. Remove spring locking pin (F), and slide axle (G) out from support
frame (H).
3. Clean parts.
4. Lightly lubricate both axle bearings.
5. Remove two locknuts (I) and support tube (J) from bolts on frame.
6. Remove 1/8 x 1 in. cotter pin (K), agitator (L), and 3/8 in. ID O-ring (M),
and transmission (N).
7. Clean fan (O).
A
D
B
MX39211
1. Remove snap ring (A), 5/8 in. flat washer (B), wheel (C), washers (D) (if
installed), and axle bearing (E).
Service - 7
Page 9

TROUBLESHOOTING
U
T
S
R
J
Q
V
P
MX39213
8. Remove three screws (P) that secures control plate assembly (Q).
9. Remove 1/4 x 2-1/2 in. bolt (R), 1/4 in. flat washer (S), 1/4 in.
lockwasher (T), and 1/4 in. nut (U) and flow control assembly (V) from
support tube (J).
A
B
D
E
C
MX34612
Picture Note: View from top and rear of spreader.
3. Move the flow control assembly lever to “10” setting (A).
4. Adjust the two nuts (B) on directional control plate (C) in or out
(together) so the flow control plate (D) is fully open (E). Tighten nuts
together.
5. Move flow control assembly back and forth and to the OFF setting. Flow
control plate will move freely and be in closed position.
10. Separate parts as shown.
11. Clean thoroughly using soap and water.
12. Assemble par ts reverse order of removal.
Calibration
1. Move the flow control assembly lever to OFF setting.
2. If parts are disassembled, assemble all par ts.
MX34611
Troubleshooting
Using Troubleshooting Chart
If you are experiencing a problem that is not listed in this chart, see your
authorized dealer for service.
When you have checked all the possible causes listed and you are still
experiencing the problem, see your authorized dealer.
Troubleshooting Chart
IF CHECK
Flow control lever
does not snap into
flow control pointer.
Not enough or too
much fer tilizer
dispensed.
Flow control lever
hard or will not
operate.
Tighten 1/4 x 2- 1/2 in. hex bolt on flow control
lever assembly.
Calibrate the plates.
Loosen 1/4 x 2-1/2 in. hex bolt on flow control
lever assembly.
Take control plates apart, and clean plates out
with water.
Troubleshooting - 8
Page 10

SPECIFICATIONS
IF CHECK
Fan does not turn
when pulling.
Find or replace missing spring locking pin in
wheel or transmission..
Check position of fan, fan driver, and lock clip.
Specifications
LPBST-35JD Broadcast Spreader
Dimensions
Size (maximum weight). . . . . . . . . . . . . . . . . . . . . . . . . . . 79 kg (175 lb)
Capacity . . . . . . . . . . . . . . . . . . . . . . . . . . . . . . . . . 0.10 cu m (3.5 cu ft)
Wheels and Tires . . . . . . . . . . . . . 33.0 x 10.2 cm (13 x 5 in) Turf tread
Tire Inflation. . . . . . . . . . . . . . . . . . . . . . . . . . . . . . . . . . 138 kPa (20 PSI)
(Specifications and design subject to change without notice.)
Flow Control Settings for Specific Products
c CAUTION: Avoid injury! Chemicals can be dangerous.
Avoid injury to operator or bystanders:
• Read chemical container label for mixing and handling
instructions. A Material Safety Data Sheet (MSDS) should be
supplied by the chemical dealer and provides proper safety
information.
• Wear proper clothing and safety equipment while handling or
applying spray chemicals.
• Wear a full covering of clothing, protective goggles and
rubber gloves.
• Prohibit all smoking, drinking, and eating around chemicals.
• When filling tank, never allow end of water hose to contact
chemical mixture.
The following is a list of flow control settings for specific products available
for use with the spreader. Some products may not be available in all areas.
Flow control settings are based on 3 mph forward speed.
lbs/1000
square
feet
3.2 3.5 Bayer Lawn Fertilizer Plus Weed Control II 30-3-4
3.8 3.5 Bayer Season Long Grub Control
2.9 3 Bayer Season Long Grub Control
3.6 3.5 Bayer Lawn Starter Fertilizer 20-27-5
3.2 3.5 Bayer Lawn Fertilizer Plus Crabgrass Preventer
3 3.5 Eliminator Ant, Flea, and Tick Killer Granules
2.5 3 Eliminator Ant, Flea, and Tick Killer Granules
2 3 Eliminator Ant, Flea, and Tick Killer Granules
2 3.5 Eliminator 5% Diazinon Killer Granules
7 5 Howard Johnsons All-Purpose Fertilizer 8-8-8
7 5 Howard Johnsons All-Purpose Fertilizer 10-10-10
7 5 Howard Johnsons All-Purpose Fertilizer 12-12-12
5 4.5 Ironite 1-0-0
4 3.5 Klay Soft Pelletized Gypsum Soil Conditioner
3 3 Klay Soft Pelletized Gypsum Soil Conditioner
2 2.5 Klay Soft Pelletized Gypsum Soil Conditioner
4 4.5 Lesco Pre-M 0.86% Plus Fertilizer 25-0-7
4.2 4 Lesco Starter Fertilizer 18-24-12
4.2 3.5 Lesco Turf Fertilizer 24-2-11
4 3.5 Lesco Weed and Feed
8 6.5 Master Turf Ultimate Tall Fescue Blend
Flow
Control
Setting
at 3
a
mph
Materials
30-3-4
b
lbs/1000
square
feet
10 6 All American All Purpose Fertilizer 10-10-10
3.8 5 Bayer Season Long Grub Control
2.9 4 Bayer Season Long Grub Control
3 3.5 Bayer Complete Insect Killer
2 3 Bayer Complete Insect Killer
3 2.5 Bayer Power Force Multi-Insect Killer
2 2 Bayer Power Force Multi-Insect Killer
3 3 Bayer Grub Control
2 2.5 Bayer Grub Control
Flow
Control
Setting
at 3
a
mph
Materials
b
Specifications - 9
4 5 Master Turf Ultimate Tall Fescue Blend
8 6.5 Milorganite 6-2-0
16 8 Milorganite 6-2-0
3.2 3.5 Miracle-Gro Lawn Fertilizer Plus Weed Control
28-3-3
3.6 3.5 Miracle-Gro STarter Lawn Fertilizer 20-27-5
3.1 3 Miracle-Gro STarter Lawn Fertilizer 29-3-4
9.6 5.5 Ortho Lawn Insect Killer Granules
4.8 3.5 Ortho Lawn Insect Killer Granules
2.4 2 Ortho Lawn Insect Killer Granules
1.2 1.5 Ortho Lawn Insect Killer Granules
4 4 Ortho Max Insect Killer for Lawns
2 3 Ortho Max Insect Killer for Lawns
Page 11

SPECIFICATIONS
lbs/1000
square
feet
1 2 Ortho Max Insect Killer for Lawns
10 6 Parkers Super Soilife Lawn and Garden Fertilizer
6.5 4.5 Parkers Super Soilife Lawn and Garden Fertilizer
3.6 3.5 Pennington Lawn Starter Fertilizer 18-24-6
10 7 Pennington Master Turf High Traffic Lawn Seed
5 5.5 Pennington Master Turf High Traffic Lawn Seed
8 7 Pennington Master Turf Shady Lawn Seed
4 5.5 Pennington Master Turf Shady Lawn Seed
10 7 Pennington Master Turf Sun and Shade Lawn
5 5.5 Pennington Master Turf Sun and Shade Lawn
2 2.5 Real-Kill Multi-Purpose Lawn and Garden Insect
2.5 3 Real-Kill Multi-Purpose Lawn and Garden Insect
10 7 Rebels Supreme Blend Grass Seed for Sun and
Flow
Control
Setting
at 3
a
mph
Materials
10-10-10
16-4-8
Mixture
Mixture
Mixture
Mixture
Seed Mixture
Seed Mixture
Killer
Killer
Shade
b
lbs/1000
square
feet
2.3 3.5 Scotts Grubex Season Long Grub Control
1.4 2.5 Scotts Lawn Fungus Control
2.7 4 Scotts Lawn Fungus Control
2.2 3.5 Scotts Pure Premium Kentucky Bluegrass Mix
1.1 3 Scotts Pure Premium Kentucky Bluegrass Mix
2.5 4 Scotts Pure Premium Sun and Shade Grass Seed
1.25 3 Scotts Pure Premium Sun and Shade Grass Seed
3.6 3.5 Scotts Starter Fertilizer 20-27-5
5.9 4.5 Scotts Starter Fertilizer 20-27-5
2.7 3.5 Scotts Turf Builder 28-3-8
3.1 3 Scotts Turf Builder Lawn Fertilizer 29-3-4
2.7 3.5 Scotts Turf Builder with Summer Guard
2.9 3.5 Scotts Turf Builder Plus Weed Control
3.3 3 Scotts Winter izer 22-4-1
4.6 4.5 Sevin Lawn Insect Granules
2.33 3.5 Sevin Lawn Insect Granules
2.25 3.5 Sevin Lawn Insect Granules
3 4 Spectracide Grub Stop
Flow
Control
Setting
at 3
a
mph
Materials
Mixture
Mixture
b
5 5.5 Rebels Supreme Blend Grass Seed for Sun and
Shade
10 7 Ringer Lawn Restore 10-2-6
12.3 7.5 Sam’s Choice Crabgrass Preventer 30-3-4
8.1 6 Sam’s Choice Crabgrass Preventer 30-3-4
6 5.5 Sam’s Choice Crabgrass Preventer 30-3-4
5.4 5 Sam’s Choice Crabgrass Preventer 30-3-4
3 3 Sam’s Choice Insect Control Plus Fertilizer 28-4-6
3.2 3.5 Sam’s Choice Lawn Food 29-3-4
6 5.5 Sam’s Choice Starter Fertilizer 20-27-5
3.6 4 Sam’s Choice Starter Fertilizer 20-27-5
4 5.5 Scotts Classic Grass Seed Fall Grass Seed Mix
2 3.5 Scotts Classic Grass Seed Fall Grass Seed Mix
2.3 2.5 Scotts Grubex
3.1 4 Scotts Grubex Season Long Grub Control
Specifications - 10
3 2 Spectracide Traizicide Insect Killer Granules
3.6 3.5 Sta-Green Lawn Fertilizer 29-2-5
2 3 Sta-Green Lawn Weed Control
3.2 3.5 Sta-Green 200 Plus Weed and Feed 28-3-3
3.6 3.5 Sta-Green Starter Fertilizer 18-24-10
3.2 3.5 Sta-Green Weed and Feed 28-2-4
10 7 Sun and Shade Grass Seed Mixture
5 5.5 Sun and Shade Grass Seed Mixture
3 2 Vigoro Insect Control Plus Fertilizer
3.6 4.5 Vigoro Starter Fer tilizer
3.5 3.5 Vigoro Turf Fertilizer 29-3-4
3 3 Vigoro Ultra Turf Winterizer 22-3-14
3.2 4.5 Vigoro Weed and Feed
4 5.5 Wal Mar t Gardens Kentucky Bluegrass Grass
Seed
Page 12

GETTING QUALITY SERVICE
lbs/1000
square
feet
2 3.5 Wal Mart Gardens Kentucky Bluegrass Grass
8 7 Wal Mart Gardens Kentucky 31 Tall Fescue
4 5.5 Wal Mar t Gardens Kentucky 31 Tall Fescue
3.2 3.5 Wal Mart Weed and Feed 28-3-3
a. Flow Control Settings are based on 3 mph forward speed.
b. The products listed are the property of their respective owners, and are
not the property of, nor recommended by, Deere and Company.
Flow
Control
Setting
at 3
a
mph
Materials
Seed
b
Calibration Settings
If the product you are using is not listed in the flow control setting table,
use the this calibration guide to set the flow control. Calibration guide
information is also provided on the hopper decal of the spreader.
Using application information on product package, find the calibration
setting in the following guide and set calibration control lever.
Adjust spread pattern.
Calibration settings have been determined using a 3 MPH pace or 40 ft. of
travel in 9 seconds.
Calibration Guide for Flow Control Settings
lbs/1000 square feet Flow Control Setting
John Deere provides a process to handle your questions or problems,
should they arise, to ensure that product quality continues with quality
parts and service suppor t.
Follow the steps below to get answers to any questions you may have
about your product.
1. Refer to your attachment and machine operator manuals.
2. In North America or Canada, call John Deere Special Services at 1866-218-8622 and provide product serial number (if available) and model
number.
0.5 - 0.9 1
1.0 - 1.4 2
1.5 - 2.4 2.5
2.5 - 3.4 3
3.5 - 3.9 3.5
4.0 - 4.4 4
4.5 - 4.9 4.5
5.0 - 5.9 5
6.0 - 7.4 5.5
7.5 - 8.9 6
9.0 - 10.9 6.5
11.0 - 12.9 7
13.0 - 14.9 7.5
15.0 - 17.9 8
18.0 - 20.9 9
21.0 - 24.5 10
Getting Quality Service
John Deere Quality Continues with Quality Service
Getting Quality Service - 11
 Loading...