


 Loading...
TM 5-2420-222-20-3
TECHNICAL MANUAL
ORGANIZATIONAL MAINTENANCE MANUAL
VOLUME 3 OF 3
MAINTENANCE
INSTRUCTIONS -
CONTINUED
PAGE 2-1189
MAINTENANCE
ALLOCATION
CHART (MAC)
PAGE B-1
INDEX
PAGE Index-1
TRACTOR, WHEELED (DED)
LOADER BACKHOE
W/HYDRAULIC IMPACT TOOL AND HYDRAULIC EARTH AUGER ATTACHMENT JOHN DEERE MODEL JD 410 (CCE)
WITH BUCKET, IMPACTOR,
AND EARTH DRILL (NSN 2420-00-567-1035)
APPROVED FOR PUBLIC RELEASE; DISTRIBUTION IS UNLIMITED
This copy is a reprint which includes current pages from Change 1.
Change 1 |
1 SEPTEMBER 1987 |
HEADQUARTERS, DEPARTMENT OF THE ARMY

TM 5-2420-222-20-3
WARNING
When operating loader backhoe, make sure that all personnel are cleared from vehicle and work area. Failure to observe this precaution could cause injury to personnel.
WARNING
Do not operate backhoe controls unless you are in operator’s seat facing backhoe. Backhoe boom cylinder may be accidentally bumped, causing backhoe boom to move suddenly. Failure to observe this precaution could cause serious injury.
WARNING
Do not attempt to disconnect hydraulic lines and fittings while engine is running or before hydraulic system pressure has been released. When engine is running, hydraulic system is under pressure. Hydraulic system pressure should be 0 psi (0 kPa) before lines are disconnected. A line or fitting disconnected under pressure will blow off with a lot of force and could cause serious injury to personnel.
WARNING
Be careful when draining hot fluids. Wear gloves to protect your hands from hot parts and fluids or severe burns could result.
WARNING
Drycleaning solvent P-D-680 is toxic and flammable. Wear protective goggles and gloves and use only in a well ventilated area. Avoid contact with skin, eyes, and clothes and don’t breathe vapors. Do not use near open flame or excessive heat. The flashpoint is 100°F to 138°F (38° to 59°C). If you become dizzy while using cleaning solvent, get fresh air immediately and get medical aid. If contact with eyes is made, wash your eyes with water and get medical aid immediately.
WARNING
Compressed air used for blowing away chips, dirt, etc., must leave nozzle at less than 30 psi (207 kPa) to prevent personal injury. Be certain that nozzle is rated to provide a maximum of 30 psi (207 kPa). Be sure to wear safety goggles when using compressed air. Compressed air and particles moved by compressed air can cause damage to your eyes.
WARNING
Be careful of moving parts when working near engine while it is running. Moving parts could catch on tools, clothing, or extremities causing serious injury.
WARNING
Keep clear of hydraulic components when raised and not supported. Sudden loss of hydraulic pressure could cause components to drop without warning.
Change 1 a

TM 5-2420-222-20-3
WARNING
Surge relief valve plug is under strong spring tension. If plug is not supported, parts may fly off injuring personnel.
WARNING
Valve is under strong spring tension. If valve is not supported when mounting bolts are removed, parts may fly off injuring personnel.
WARNING
Some parts are heavy. Be careful when handling them. Lifting equipment is needed when parts weigh over 50 pounds (23 kg) for a single person lift, over 100 pounds (45 kg) for a two person lift, and over 150 pounds (68 kg) for a three or more person lift. Do not try to handle heavy parts without lifting equipment. Keep clear of heavy parts supported only by lifting equipment. Failure to observe this precaution could cause serious injury or death of personnel.
Change 1 b
|
TM 5-2420-222-20-3 |
|
C1 |
CHANGE |
HEADQUARTERS |
|
DEPARTMENT OF THE ARMY |
NO. 1 |
Washington D.C., 8 April 1992 |
|
ORGANIZATIONAL MAINTENANCE MANUAL |
|
TRACTOR, WHEELED, |
|
DED, LOADER BACKHOE: |
|
WITH HYDRAULIC IMPACT TOOL AND |
|
WITH HYDRAULIC EARTH AUGER ATTACHMENT |
|
JOHN DEERE MODEL JD410 (CCE) |
|
WITH BUCKET, IMPACTOR, |
|
AND EARTH DRILL |
|
(NSN 2420-00-567-0135) |
TM 5-2420-222-20-3, 1 September 1987, is changed as follows:
1.Cover. The manual title is changed to read as shown above.
2.Remove old pages and insert new pages.
3.New or changed material is indicated by a vertical bar in the margin or by a vertical bar adjacent to the TA number.
Remove Pages |
Insert Pages |
a and b |
a and b |
i and ii |
i and ii |
A-1 and A-2 |
A-1 and A-2 |
Appendix B (in its entirety) |
Appendix B (in its entirety) |
C-3 and C-4 |
C-3 and C-4 |
Cover 1 and 2 |
Cover 1 and 2 |
4.File this change sheet in front of the publication for reference purposes.
Approved for public release; distribution Is unlimited.
1

|
*TM 5-2420-222-20-3 |
||
TECHNICAL MANUAL |
HEADQUARTERS |
||
NO. 5-2420-222-20-3 |
DEPARTMENT OF THE ARMY |
||
WASHINGTON, D.C., 1 September 1987 |
|||
|
ORGANIZATIONAL MAINTENANCE MANUAL |
||
|
TRACTOR, WHEELED, |
|
|
|
|
||
|
DED, LOADER BACKHOE: |
|
|
|
WITH HYDRAULIC IMPACT TOOL AND |
|
|
|
WITH HYDRAULIC EARTH AUGER ATTACHMENT |
|
|
|
JOHN DEERE MODEL JD410 (CCE) |
|
|
|
WITH BUCKET, IMPACTOR, |
|
|
|
AND EARTH DRILL |
|
|
|
(NSN 2420-00-567-0135) |
|
|
|
|
||
|
|
|
|
REPORTING ERRORS AND RECOMMENDING IMPROVEMENTS
You can help improve this manual. If you find any mistakes or if you know of a way to improve the procedures, please let us know. Mail your letter, DA Form 2028 (Recommended Changes to Publications and Blank Forms), or DA Form 20282 located in the back of this manual direct to: Commander, US Army Tank-Automotive Command, ATTN: AMSTA-MB, Warren, MI 48397-5000. A reply will be sent to you.
|
TABLE OF CONTENTS |
|
|
VOLUME 3 OF 3 |
|
|
|
Page |
CHAPTER 2 |
MAINTENANCE INSTRUCTIONS - CONTINUED ......................................................... |
2-1189 |
Section XX. |
Hydraulic and Fluid Systems........................................................................................... |
2-1189 |
Section XXI. |
Gages, (Non-Electrical), Weighing and Measuring Devices ........................................... |
2-1785 |
Section XXII. |
Cranes, Shovels, and Earthmoving Equipment Components ......................................... |
2-1795 |
Section XXIII. |
Fire Fighting Equipment Components............................................................................. |
2-1851 |
Section XXIV. |
Parts Peculiar .................................................................................................................. |
2-1855 |
Section XXV. |
Preparation for Storage or Shipment .............................................................................. |
2-1897 |
APPENDIX A |
REFERENCES................................................................................................................ |
A-1 |
*This manual supersedes Organizational portion of TM 5-2420-222-14&P1 and TM 5-2420-222-14&P2 dated October 1982, including all changes.
Approved for public release; distribution is unlimited.
Change 1 i
|
|
*TM 5-2420-222-20-3 |
|
|
TABLE OF CONTENTS - CONTINUED |
|
|
|
VOLUME 3 OF 3 - CONTINUED |
|
|
|
|
Page |
|
APPENDIX B |
MAINTENANCE ALLOCATION CHART........................................................................ |
B-1 |
|
Section I. |
Introduction...................................................................................................................... |
B-1 |
|
Section II. |
.........................................................................................Maintenance Allocation Chart |
B-4 |
|
Section III. |
Tools and Test Equipment Requirements....................................................................... |
B-23 |
|
Section IV. |
Remarks .......................................................................................................................... |
B-25 |
|
APPENDIX C |
EXPENDABLE SUPPLIES AND MATERIALS LIST ....................................................... |
C-1 |
|
Section I. |
Introduction...................................................................................................................... |
C-1 |
|
Section II. |
Expendable Supplies and Materials List ......................................................................... |
C-2 |
|
APPENDIX D |
ILLUSTRATED LIST OF MANUFACTURED ITEMS ...................................................... |
D-1 |
|
APPENDIX E |
TORQUE LIMITS ............................................................................................................ |
E-1 |
|
INDEX |
........................................................................................................................................ |
Index-1 |
|
|
ii |
|
|
TM 5-2420-222-20-3
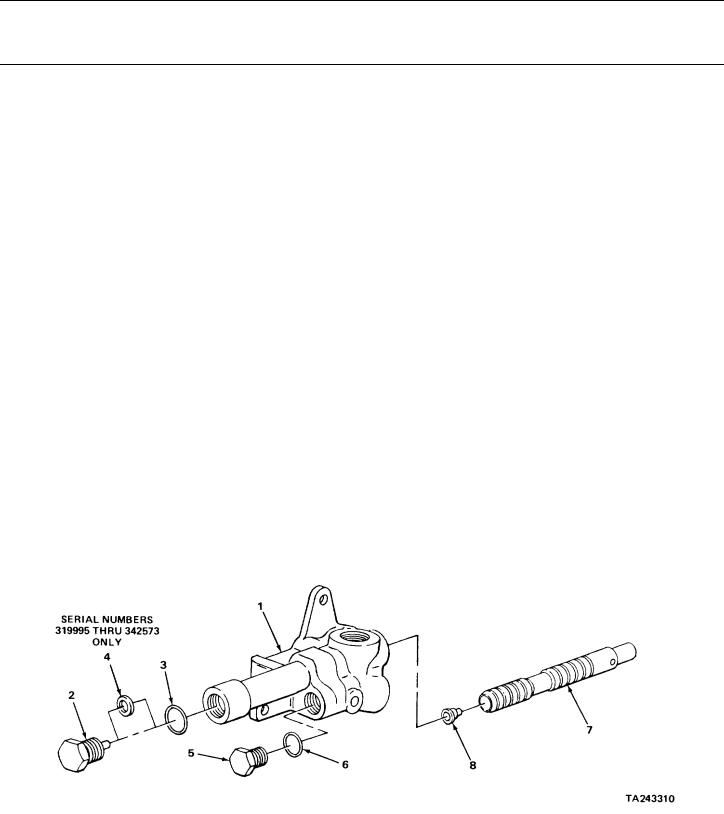
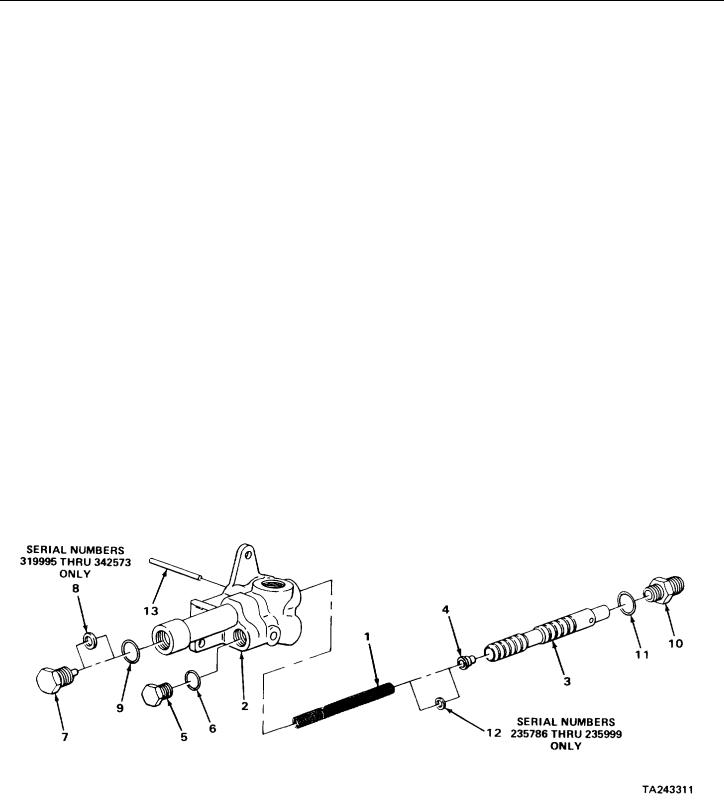
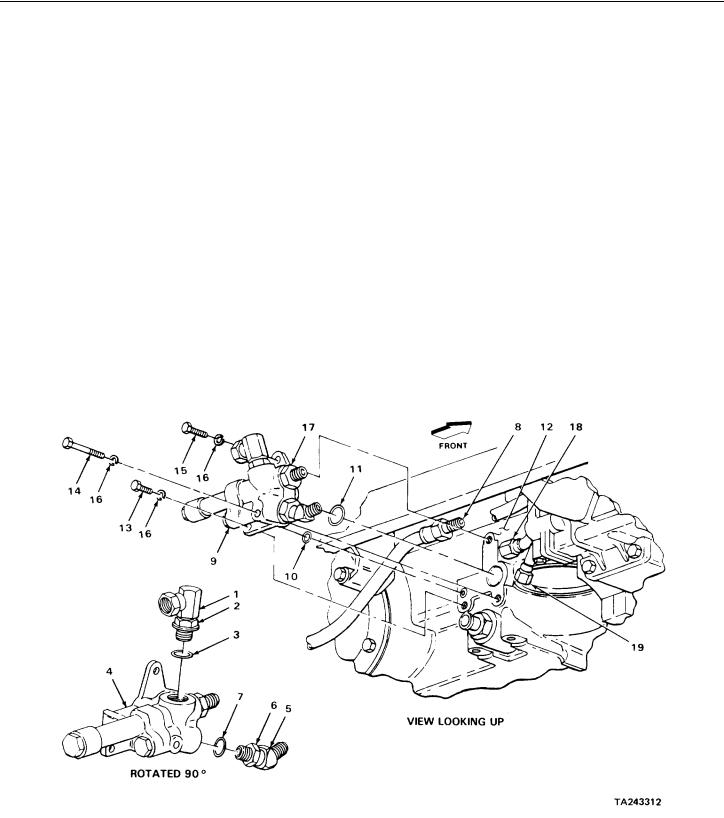
Section XX. HYDRAULIC AND FLUID SYSTEMS
|
Page |
Backhoe Bucket Cylinder .............................. |
2-1726 |
Backhoe Control Valve.................................. |
2-1260 |
Backhoe Control Valve Levers and |
|
Linkage (Serial Numbers 235786 |
|
thru 235999 Only)....................................... |
2-1302 |
Backhoe Control Valve Levers and |
|
Linkage (Serial Numbers 319995 |
|
thru 342573 Only)....................................... |
2-1314 |
Backhoe Control Valve-to-Backhoe |
|
Stabilizer Cylinder Oil Lines........................... |
2-1622 |
Backhoe Control Valve-to-Backhoe |
|
Swing Cylinder Oil Lines ............................ |
2-1636 |
Backhoe Control Valve-to-Jaw |
|
Direct Linear Valve Oil Line |
|
(Serial Numbers 319995 thru |
|
342573 Only).............................................. |
2-1412 |
Backhoe Control Valve-to-Manifold |
|
Block Oil lines................................................ |
2-1558 |
Backhoe Control Valve-to-Manifold |
|
Oil Lines (Serial Numbers 235786 |
|
thru 235999 Only)....................................... |
2-1429 |
Backhoe Crowd Cylinder............................... |
2-1740 |
Backhoe Stabilizer Cylinders......................... |
2-1752 |
Backhoe Swing Cylinders.............................. |
2-1708 |
Boom-to-Backhoe Control Valve |
|
Hydraulic Impactor Return Oil Line |
|
(Serial Numbers 319995 thru |
|
342573 Only).............................................. |
2-1489 |
Boom-to-Bucket Cylinder Oil Lines |
|
(Serial Numbers 235786 thru |
|
235999 Only).............................................. |
2-1598 |
Boom-to-Bucket Cylinder Oil Lines |
|
(Serial Numbers 319995 thru |
|
342573 Only).............................................. |
2-1608 |
Boom-to-Jaw Cylinder Oil Hose Oil |
|
Lines (Serial Numbers 235786 thru |
|
235999 Only).............................................. |
2-1532 |
Boom-to-Jaw Cylinder Oil Hose Oil |
|
Lines (Serial Numbers 319995 thru |
|
342573 Only).............................................. |
2-1538 |
Boom-to-Manifold Hydraulic Impactor |
|
Return Oil Line (Serial Numbers |
|
235786 thru 235999 Only).......................... |
2-1483 |
Clutch Control Valve-to-Hydraulic |
|
Pump Inlet Oil Line..................................... |
2-1352 |
Hydraulic Accumulator Charging................... |
2-1194 |
Hydraulic Earth Drill Bleed Oil |
|
Line............................................................. |
2-1550 |
Hydraulic Impactor Flow |
|
Regulator.................................................... |
2-1237 |
|
Page |
|
Hydraulic Impactor Flow Regulator- |
|
|
to-Boom Oil Line (Serial Numbers |
|
|
235786 thru 235999 Only) .......................... |
2-1499 |
|
Hydraulic Impactor Flow Regulator- |
|
|
to-Boom Oil Line (Serial Numbers |
|
|
319995 thru 342573 Only) .......................... |
2-1505 |
|
Hydraulic Impactor Valve ............................... |
2-1228 |
|
Hydraulic Oil Cooler-to-Clutch |
|
|
Control Valve Oil Line ................................. |
2-1361 |
|
Hydraulic Oil Filter.......................................... |
2-1698 |
|
Hydraulic Oil Filter Relief |
|
|
Valve ........................................................... |
2-1217 |
|
|
||
Hydraulic Oil Filter Relief Valve- |
|
|
to-Clutch Control Valve Adapter |
|
|
Oil Line........................................................ |
2-1346 |
|
Hydraulic Pump Pressure Line Tee- |
|
|
to-Hydraulic Accumulator Oil |
|
|
|
|
|
Line ............................................................. |
2-1384 |
|
Hydraulic Pump-to-Hydraulic Oil |
|
|
Cooler Hose (Serial Numbers |
|
|
319995 thru 342573 Only) .......................... |
2-1338 |
|
Hydraulic Pump-to-Hydraulic Oil |
|
|
Cooler Oil Line (Serial Numbers |
|
|
235786 thru 235999 Only) .......................... |
2-1342 |
|
Hydraulic Pump-to-Pressure |
|
|
Control Valve Oil Line ................................. |
2-1375 |
|
Hydraulic Pump-to-Speed Gear |
|
|
Assembly (Reverser) Seal Drain |
|
|
Line ............................................................. |
2-1369 |
|
Hydraulic System Diagram (Serial |
|
|
Numbers 235786 thru 235999 |
|
|
Only) ........................................................... |
2-1779 |
|
Hydraulic System Diagram (Serial |
|
|
Numbers 319995 thru 342573 |
|
|
Only) ........................................................... |
2-1782 |
|
Hydraulic System Pressure |
|
|
Release....................................................... |
2-1191 |
|
Jaw Control (Direct Linear) Valve |
|
|
Bracket........................................................ |
2-1298 |
|
Jaw Control (Direct Linear) Valve |
|
|
Linkage ....................................................... |
2-1294 |
|
Jaw Control (Direct Linear) Valve- |
|
|
to-Manifold Block Oil Lines ......................... |
2-1513 |
|
Jaw Control (Direct Linear) Valve |
|
|
Tubes and Fittings ...................................... |
2-1391 |
|
Jaw Control Valve (Serial Numbers |
|
|
235786 thru 235999 Only) .......................... |
2-1242 |
|
Jaw Cylinder................................................... |
2-1703 |
|
Jaw Cylinder Oil Hoses .................................. |
2-1544 |
|
2-1189
TM 5-2420-222-20-3
Section XX. HYDRAULIC AND FLUID SYSTEMS - CONTINUED
|
Page |
Jaw Direct Linear Valve (Serial |
|
Numbers 319995 thru 342573 |
|
Only)........................................................... |
2-1250 |
Jaw Direct Linear Valve-to- |
|
Backhoe Control Valve Oil Line |
|
(Serial Numbers 319995 thru |
|
342573 Only).............................................. |
2-1436 |
Jaw Direct Linear Valve-to- |
|
Hydraulic Impactor Valve Oil Line |
|
(Serial Numbers 319995 thru |
|
342573 Only).............................................. |
2-1421 |
Jaw Direct Linear Valve-to- |
|
Hydraulic Oil filter Relief Valve |
|
Oil Line (Serial Numbers 319995 |
|
thru 342573 Only)....................................... |
2-1464 |
Loader Boom Cylinders................................. |
2-1770 |
Loader Bucket Cylinders ............................... |
2-1760 |
Loader Control Valve..................................... |
2-1285 |
Loader Control Valve Handle and |
|
Linkage .......................................................... |
2-1324 |
Loader Control Valve Mounting |
|
Bracket ....................................................... |
2-1282 |
Loader Control Valve-to-Hydraulic |
|
Oil Filter Relief Valve Oil |
|
Line............................................................. |
2-1653 |
Loader Control Valve-to-Loader |
|
Boom Cylinder Head End Oil |
|
Lines........................................................... |
2-1679 |
Loader Control Valve-to-Loader |
|
Boom Cylinder Rod End Oil Lines.............. |
2-1688 |
Loader Control Valve-to-Loader |
|
Bucket Cylinder Head End Oil |
|
Lines........................................................... |
2-1661 |
Loader Control Valve-to-Loader |
|
Bucket Cylinder Rod End Oil |
|
Lines........................................................... |
2-1670 |
Manifold Block ............................................... |
2-1270 |
Manifold Block-to-Boom Bucket |
|
Cylinder Oil Lines ....................................... |
2-1590 |
Manifold Block-to-Boom Jaw Control |
|
Oil Hoses (Serial Numbers 235786 |
|
thru 235999 Only)....................................... |
2-1522 |
|
Page |
Manifold Block-to-Boom Jaw Control |
|
Oil Tubes (Serial Numbers 319995 |
|
thru 342573 Only) ....................................... |
2-1526 |
Manifold Block-to-Crowd Cylinder |
|
Oil Lines (Serial Numbers 235786 |
|
thru 235999 Only ........................................ |
2-1570 |
Manifold Block-to-Crowd Cylinder |
|
Oil Lines (Serial Numbers 319995 |
|
thru 342573 Only) ....................................... |
2-1578 |
Manifold Block-to-Head End Boom |
|
Cylinder Oil Line.......................................... |
2-1565 |
Manifold-to-Hydraulic Oil Filter |
|
Relief Valve Oil Line (Serial |
|
Numbers 235786 thru 235999 |
|
Only) ........................................................... |
2-1450 |
Manifold-to-Hydraulic Impactor |
|
Valve Oil Line (Serial Numbers |
|
235786 thru 235999 Only) .......................... |
2-1440 |
Manifold-to-Jaw Control Valve Oil |
|
Lines (Serial Numbers 235786 thru |
|
235999 Only) .............................................. |
2-1456 |
Pressure Control Valve .................................. |
2-1200 |
Pressure Control Valve-to-Jaw |
|
Direct Linear Valve Oil Line |
|
(Serial Numbers 319995 thru |
|
342573 Only) .............................................. |
2-1405 |
Pressure Control Valve-to-Loader |
|
Control Valve Oil Line ................................. |
2-1647 |
Pressure Control Valve-to-Manifold |
|
Oil Line (Serial Numbers 235786 |
|
thru 235999 Only) ....................................... |
2-1400 |
Pump Stroke Control Valve Filter |
|
Element....................................................... |
2-1196 |
Quick Coupler-to-Boom Oil Lines |
|
(Serial Numbers 235786 thru 235999 |
|
Only) ........................................................... |
2-1472 |
Quick Coupler-to-Boom Oil Lines |
|
(Serial Numbers 319995 thru |
|
342573 Only) .............................................. |
2-1477 |
2-1190

TM 5-2420-222-20-3
HYDRAULIC SYSTEM PRESSURE RELEASE
This task covers:
Hydraulic System Pressure Release (page 2-1191)
INITIAL SETUP
Personnel Required
One
|
|
ACTION |
LOCATION |
ITEM |
REMARKS |
HYDRAULIC SYSTEM PRESSURE RELEASE
NOTE
Hydraulic system pressure must be released before disconnecting hydraulic lines and fittings. A line or fitting disconnected under pressure will blow off with a lot of force and could cause injury to personnel.
When engine is running, hydraulic system is under pressure. In order to release hydraulic system pressure, engine must be shut down.
There are three ways to release hydraulic system pressure. Perform any one of the following three steps to release hydraulic system pressure.
2-1191
|
|
TM 5-2420-222-20-3 |
HYDRAULIC SYSTEM PRESSURE RELEASE - CONTINUED |
|
|
|
|
|
|
|
ACTION |
LOCATION |
ITEM |
REMARKS |
|
|
|
HYDRAULIC SYSTEM PRESSURE RELEASE - CONTINUED |
|
|
1. Operator’s |
Steering wheel (1) |
Turn from side to side until steering is |
|
compartment |
hard. |
|
WARNING |
|
When operating loader backhoe, make sure that all personnel are cleared from vehicle and work area. Failure to observe this precaution could cause injury to personnel.
2. |
Loader bucket |
a. Pull back until loader bucket (3) stops |
|
control lever (2) |
raising. |
|
|
b. Push forward until loader bucket (3) |
|
|
rests on ground. |
|
WARNING |
|
|
Do not operate backhoe controls unless you are in operator’s seat facing backhoe. Backhoe |
|
|
boom cylinder may be accidentally bumped, causing backhoe boom to move suddenly. Failure to |
|
|
observe this precaution could cause serious injury. |
|
3. |
Backhoe boom |
a. Pull back until boom (5) stops |
|
control lever (4) |
raising. |
b. Push forward until backhoe bucket (6) rests on ground.
2-1192

TM 5-2420-222-20-3
HYDRAULIC SYSTEM PRESSURE RELEASE - CONTINUED
TASK ENDS HERE
TA243304
2-1193

TM 5-2420-222-20-3
HYDRAULIC ACCUMULATOR CHARGING
This task covers:
Charging (page 2-1194)
INITIAL SETUP
Tools
Charging kit, accumulator, Nudie ND-925-0 (-W)
Connector, John Deere R40617 Hose, John Deere AR47753 Knife, pocket
Wrench, box, 5/8-inch
Materials/Parts
Nitrogen, technical (item 17, Appendix C) Packing, plug
Personnel Required
One
|
|
|
ACTION |
|
LOCATION |
ITEM |
REMARKS |
|
|
|
|
CHARGING |
|
|
|
1 |
Accumulator (1) |
Plug (2) with assem- |
Using 5/8-inch box wrench, unscrew and |
|
|
bled packing (3) |
take out. |
2 |
Plug (2) |
Packing (3) |
a Using pocket knife, take off. |
|
|
|
b Get rid of. |
CAUTION
Use only dry nitrogen to charge hydraulic accumulator. Using air or any combustible gas may cause damage to internal parts.
When charging accumulator, be careful not to exceed specified pressure or damage to internal parts may occur.
3 Bracket (4) and |
Accumulator (1) |
a |
Using Nuday ND925-0 (-W) accumu- |
clamp (5) |
|
|
lator charging kit, John Deere R40617 |
|
|
|
connector, and John Deere AR47753 |
|
|
|
hose connected to charging port, |
|
|
|
charge. |
|
|
|
Accumulator is charged when gage |
|
|
|
on charging kit reads 475 to 525 psi |
|
|
|
(3275 to 3620 kPa). |
|
|
b. |
If overcharged, use Nuday ND925-0 (-W) |
|
|
|
accumulator charging kit with gage and |
|
|
|
valve disconnected from technical nitrogen |
|
|
|
tank to bleed off any excess pressure. |
2-1194

TM 5-2420-222-20-3
HYDRAULIC ACCUMULATOR CHARGING - CONTINUED
|
|
|
ACTION |
|
LOCATION |
ITEM |
REMARKS |
|
|
|
|
|
|
|
c Disconnect Nuday ND925-0 (-W) |
|
|
|
accumulator charging kit, John Deere |
|
|
|
R40617 connector, and John Deer |
|
|
|
AR47753 hose. |
4 |
Plug (2) |
New packing (3) |
Place in position. |
5 |
Accumulator (1) |
Plug (2) with assem- |
Screw in and tighten using 5/8-inch box |
|
|
bled packing (3) |
wrench. |
TASK ENDS HERE
TA243305
2-1195

TM 5-2420-222-20-3
PUMP STROKE CONTROL VALVE FILTER ELEMENT
This task covers: |
|
|
||
a. |
Removal (page 2-1196) |
c. |
Inspection/Replacement (page 2-1198) |
|
b. |
Cleaning (page 2-1197) |
d. |
Installation (page 2-1198) |
|
|
|
|
||
INITIAL SETUP |
|
|
||
Tools |
Materials/Parts - Continued |
|||
|
Knife, pocket |
|
Rags, wiping (item 21, Appendix C) |
|
|
Pan, drain |
|
Solvent, drycleaning (item 28, Appendix C) |
|
|
Screwdriver, flat-tip, 1/8-inch |
|
|
|
|
Wrench, box and open-end, |
Personnel Required |
||
|
combination, 1 1/4 - inch |
|
Two |
|
Materials/Parts |
|
|||
Equipment Condition |
||||
|
Filter element |
|||
|
|
|
||
|
Packing, filter element |
|
1. Hydraulic system pressure released |
|
|
(two required |
|
(page 2-1191) |
|
|
Packing, filter plug |
|
2. Right side grille removed |
|
|
|
|
(TM 5-2420-222-10) |
|
|
|
|
|
|
|
|
|
ACTION |
|
|
LOCATION |
ITEM |
REMARKS |
|
REMOVAL
WARNING
Do not attempt to disconnect hydraulic lines and fittings while engine is running or before hydraulic system pressure has been released. When engine is running, hydraulic system is under pressure. Hydraulic system pressure should be 0 psi (0 kPa) before lines are disconnected. A line or fitting disconnected under pressure will blow off with a lot of force and could cause serious injury to personnel.
Be careful when draining hot fluids. Wear gloves to protect your hands from hot parts and fluids or severe burns could result.
1. Housing (1) |
Plug (2) with |
a. Place drain pan underneath to catch |
|
assembled |
draining fluid. |
|
packing (3) |
b. Using 1 1/4-inch combination box and |
|
|
open-end wrench, unscrew and take |
|
|
out. |
|
|
2-1196 |
TM 5-2420-222-20-3
PUMP STROKE CONTROL VALVE FILTER ELEMENT - CONTINUED
|
|
|
ACTION |
|
|
LOCATION |
ITEM |
|
REMARKS |
|
|
|
|
|
2. |
|
Filter element (4) |
a. |
Using 1/8-inch flat-tip screwdriver, |
|
|
and two packings (5) |
|
take out. |
|
|
|
b. Get rid of packing (5). |
|
|
|
|
c. Plug housing (1) (page 2-137). |
|
|
|
|
d. Get rid of drained fluid (page 2-137). |
|
3. |
Plug (2) |
Packing (3) |
a. |
Using pocket knife, take off. |
|
|
|
b. |
Get rid of. |
CLEANING
NOTE
For more information on how to clean parts, go to General Maintenance Instructions (page 2-137).
WARNING
Drycleaning solvent P-D-680 is toxic and flammable. Wear protective goggles and gloves and use only in a well ventilated area. Avoid contact with skin, eyes, and clothes and don’t breathe vapors. Do not use near open flame or excessive heat. The flashpoint is 100°F to 138°F (38° to 59°C). If you become dizzy while using cleaning solvent, get fresh air immediately and get medical aid. If contact with eyes is made, wash your eyes with water and get medical aid immediately.
4. |
Plug (2) and |
a. |
Clean in drycleaning solvent. |
|
filter element (4) |
b. |
Using clean, dry rags, wipe dry. |
2-1197

TM 5-2420-222-20-3
PUMP STROKE CONTROL VALVE FILTER ELEMENT - CONTINUED
|
|
ACTION |
LOCATION |
ITEM |
REMARKS |
INSPECTION/REPLACEMENT
NOTE
For more information on how to inspect parts, go to General Maintenance Instructions (page 2- 137).
Replace defective parts as needed.
5. |
|
Plug (1) |
a. |
Look for cracks and breaks. |
|
|
|
b. |
Look for damaged threads. |
6. |
|
Filter element (2) |
a. |
Look for cracks, breaks, bends, and |
|
|
dents. |
b. |
Look for plugged wire mesh which cannot |
|
|
|
||
|
|
|
|
be cleaned. |
|
|
|
c. |
Look for enlarged holes in wire mesh. |
INSTALLATION |
|
|
|
|
7. |
Plug (1) |
New packing (3) |
Place in position. |
|
8. |
Housing (4) |
Filter element (2) |
a. |
Unplug housing (4). |
|
|
and two new |
b. |
Place in position. |
|
|
packings (5) |
|
|
9. |
|
Plug (1) with |
Screw in and tighten using 1 1/4-inch |
|
|
|
assembled |
combination box and open-end wrench. |
|
|
|
packing (3) |
|
|
10. |
Loader backhoe |
Transmission |
Check fluid level and add proper amount |
|
|
|
|
and grade (TM 5-2420-222-10). |
|
11. |
|
Engine |
Start and run at high idle |
|
|
|
|
(TM 5-2420-222-10). |
|
12. |
Housing (4) |
Plug (1) |
a. |
Check for leaks. |
|
|
|
b. |
If leaking, tighten using 1 1/4-inch |
|
|
|
|
combination box and open-end wrench. |
|
|
|
c. |
If leaking does not stop, shut down |
|
|
|
|
engine (TM 5-2420-222-10) and |
|
|
|
|
replace defective packing or plug as |
|
|
|
|
outlined in this task. |
|
|
|
d. |
If found leaking, repeat steps 10 |
|
|
|
|
thru 12. |
13. |
Loader backhoe |
Engine |
If still running, shut down |
|
|
|
|
(TM 5-2420-222-10). |
|
2-1198
TM 5-2420-222-20-3
PUMP STROKE CONTROL VALVE FILTER ELEMENT - CONTINUED
NOTE
FOLLOW-ON MAINTENANCE: Install right side grille (TM 5-2420-222-10).
TASK ENDS HERE
TA 243307
2-1199

TM 5-2420-222-20-3
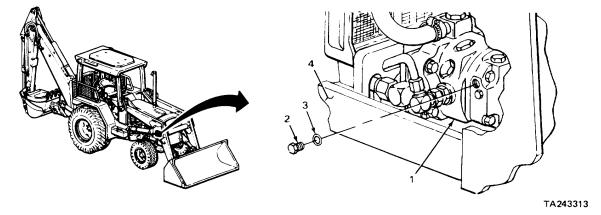
PRESSURE CONTROL VALVE
This task covers: |
|
|
|
|
a. |
Removal (page 2-1200) |
|
e. |
Repair (page 2-1206) |
b. |
Disassembly (page 2-1202) |
|
f. |
Assembly (page 2-1206) |
c. |
Cleaning (page 2-1204) |
|
g. |
Installation (page 2-1208) |
d. |
Inspection/Replacement(page 2-1205) |
h. |
Adjustment (page 2-1210) |
|
|
|
|
|
|
INITIAL SETUP |
|
|
|
|
Tools |
|
Tools - Continued |
||
|
Caliper, micrometer, outside, |
|
|
Wrench, open-end, 1 1/4-inch (two required) |
|
0 to 1-inch |
|
|
Wrench, open-end, 1 3/8-inch |
|
Caps, vise jaw (pair) |
|
|
Wrench, torque, 1/2-inch drive, |
|
Compressor, reciprocating air |
|
|
0 to 150 foot-pound capacity |
|
Extension, 3/8-inch drive, 5-inch |
|
|
|
|
Fitting kit, tube and pipe |
|
Materials/Parts |
|
|
Gage, multi-range, pressure |
|
|
|
|
Gun, air blow |
|
|
Lockwasher, valve screw (three required) |
|
Handle, ratchet, 3/8-inch drive |
|
|
Packing, adapter union-to-valve |
|
Hose, air compressor |
|
|
Packing, connector-to-valve |
|
Knife, pocket |
|
|
Packing, elbow-to-valve |
|
Pan, drain |
|
|
Packing, plug-to-pump |
|
Pliers, long roundnose |
|
|
Packing, plug-to-valve |
|
Press, arbor |
|
|
Packing, plug-to-valve |
|
Remover and installer, 0.250-inch |
|
Packing, valve-to-transmission case |
|
|
outside diameter |
|
|
Packing, valve-to-transmission case |
|
Socket, 3/8-inch drive, 1/2-inch |
|
|
Solvent, drycleaning (item 28, Appendix C) |
|
Socket, 3/8-inch drive, 9/16-inch |
|
|
Tags, marking (item 30, Appendix C) |
|
Tester, spring, 4 to 400-pound |
|
|
|
|
capacity |
|
Personnel Required |
|
|
Thread set, pipe |
|
|
|
|
Vise, machinist’s |
|
|
Two |
|
Universal-joint, 3/8-inch drive |
|
|
|
|
Wrench, open-end, 9/16-inch |
|
Equipment Condition |
|
|
Wrench, open-end, 7/8-inch |
|
|
|
|
Wrench, open-end, 1-inch |
|
|
Right side grille removed |
|
Wrench, open-end, 1 1/16-inch |
|
|
(TM 5-2420-222-10) |
|
|
|
|
|
|
|
|
|
ACTION |
|
LOCATION |
ITEM |
|
REMARKS |
|
|
|
|
|
REMOVAL |
|
|
|
|
1. |
Loader backhoe |
Hydraulic oil filter |
|
Remove (page 2-1217). |
|
|
relief valve |
|
|
2-1200
TM 5-2420-222-20-3
PRESSURE CONTROL VALVE - CONTINUED
|
|
|
ACTION |
|
|
LOCATION |
ITEM |
|
REMARKS |
|
|
|
|
|
2. |
|
Transmission oil |
Remove (page 2-836). |
|
|
|
filter |
|
|
3. |
Elbow (1) |
Line (2) |
a. |
Place drain pan underneath to catch |
|
|
|
|
draining fluid. |
|
|
|
b. Using 1-inch open-end wrench, |
|
|
|
|
|
unscrew and take off. |
|
|
|
c. |
Cap (page 2-137). |
|
|
|
d. |
Tag (page 2-137). |
4. |
Valve assembly (3) |
Nut (4) |
Using 1 1/16 and 1 1/4-inch open-end |
|
|
and elbow (1) |
|
wrenches, loosen. |
|
5. |
Valve assembly (3) |
Elbow (1) with |
a. |
Note relative position for proper |
|
|
assembled parts |
|
placement during installation. |
|
|
|
b. Using 1 1/16-inch open-end wrench, |
|
|
|
|
|
unscrew and take out. |
6. |
Connector (5) |
Line (6) |
a. |
Place drain pan underneath to catch |
|
|
|
|
draining fluid. |
|
|
|
b. Using 1 3/8-inch open-end wrench, |
|
|
|
|
|
unscrew and take off. |
|
|
|
c. |
Cap (page 2-137). |
|
|
|
d. |
Tag (page 2-137). |
2-1201
TM 5-2420-222-20-3
PRESSURE CONTROL VALVE - CONTINUED
|
|
ACTION |
LOCATION |
ITEM |
REMARKS |
REMOVAL - CONTINUED
NOTE
Pressure control valve mounting screws are three different lengths. Note position of screws for proper placement during installation.
7. Valve assembly (1) |
Three screws (3, |
and transmission |
4, and 5) and three |
case (2) |
lockwashers (6) |
a.Place drain pan underneath to catch draining fluid.
b.Using 9/16-inch, 3/8-inch drive socket, 5-inch extension, universal joint, ratchet handle, and 9/16-inch open end wrench, unscrew and take out.
c.Get rid of lockwashers (6).
8. |
Transmission |
Valve assembly (1) |
a. |
Take off. |
|
case (2) |
with assembled parts |
b. |
Allow to drain in drain pan. |
9. |
Valve assembly (1) |
Two packings |
a. |
Using pocket knife, take off. |
|
|
(7 and 8) |
b. |
Get rid of. |
10. |
Union adapter (9) |
Hose (10) |
a. |
Position over drain pan to catch |
|
|
|
|
draining fluid. |
|
|
|
b. |
Using 1 1/16-inch and 1 1/4-inch open- |
|
|
|
|
end wrenches, unscrew and take out. |
|
|
|
c. |
Cap (page 2-137). |
|
|
|
d. |
Tag (page 2-137). |
|
|
|
e. |
Get rid of drained fluid (page 2-137). |
11. |
Elbow (11) |
Packing (12) |
a. |
Using pocket knife, take off. |
|
|
|
b. |
Get rid of. |
DISASSEMBLY |
|
|
|
|
12. |
Pressure housing |
Nut (14) |
a. |
Place housing (13) in machinist’s vise |
|
(13) and union |
|
|
with vise jaw caps. |
|
adapter (9) |
|
b. |
Using two 1 1/4-inch open-end |
|
|
|
|
wrenches, loosen. |
13. |
Pressure |
Union adapter (9) |
a. |
Note relative position for proper |
|
housing (13) |
with assembled parts |
|
placement during assembly. |
|
|
|
b. |
Using 1 1/4-inch open-end wrench, |
|
|
|
|
unscrew and take out. |
14. |
Union adapter (9) |
Packing (15) |
a. |
Using pocket knife, take off. |
|
|
|
b. |
Get rid of. |
2-1202

TM 5-2420-222-20-3
PRESSURE CONTROL VALVE - CONTINUED
|
|
|
ACTION |
|
LOCATION |
ITEM |
REMARKS |
|
|
|
|
15. |
Pressure housing |
Connector (17) with |
Using 1 3/8-inch open-end wrench, |
|
(13) and valve (16) |
assembled |
unscrew and take out. |
|
|
packing (18) |
|
16. |
Connector (17) |
Packing (18) |
a. Using pocket knife, take off. |
|
|
|
b. Get rid of. |
17. |
Pressure housing |
Pin (19) |
a. Depress valve (16) by hand to relieve |
|
(13) and valve (16) |
|
spring tension. |
|
|
|
b. Using long roundnose pliers, take out. |
NOTE
Loader backhoes with Serial Numbers 235786 thru 235999 use one or more washers between spring and orifice. Loader backhoes with Serial Numbers 319995 thru 342573 do not use washers in this position.
18. Pressure |
Valve (16), washers |
housing (13) |
(20), if present, |
|
and spring (21) |
a.Take out.
b.If found, note quantity of washers (20) so same number can be used during assembly.
2-1203

TM 5-2420-222-20-3
PRESSURE CONTROL VALVE - CONTINUED
|
|
|
ACTION |
|
|
LOCATION |
ITEM |
|
REMARKS |
|
|
|
|
|
DISASSEMBLY - CONTINUED |
|
|
|
|
19. |
Pressure |
Plug (2) with |
Using 1-inch open-end wrench, unscrew |
|
|
housing (1) |
assembled parts |
and take out. |
|
20. |
Plug (2) |
Packing (3) |
a. Using pocket knife, take off. |
|
|
|
|
b. |
Get rid of. |
21. |
|
Washers (4) |
a. On loader backhoes with Serial Numbers |
|
|
|
|
|
319995 thru 342573 only, take off. |
|
|
|
b. Note number of washers used for proper |
|
|
|
|
|
spacing of plug (2) during assembly. |
22. |
Pressure |
Plug (5) with |
a. Using 7/8-inch open-end wrench, |
|
|
housing (1) |
assembled |
|
unscrew and take out. |
|
|
packing (6) |
b. Take housing (1) out of machinist’s |
|
|
|
|
|
vise. |
23. |
Plug (5) |
Packing (6) |
a. Using pocket knife, take off. |
|
|
|
|
b. |
Get rid of. |
CAUTION
Do not remove orifice from pressure control valve unless inspection shows need for replacement. Removal will damage parts.
24. Valve (7) |
Orifice (8) |
Using 0.250-inch remover and installer |
|
|
and arbor press, press out. |
CLEANING |
|
|
NOTE
For more information on how to clean parts, go to General Maintenance Instructions (page 2-137).
WARNING
Drycleaning solvent P-D-680 is toxic and flammable. Wear protective goggles and gloves and use only in a well ventilated area. Avoid contact with skin, eyes, and clothes and don’t breathe vapors. Do not use near open flame or excessive heat. The flashpoint is 100°F to 138°F (38° to 59°C). If you become dizzy while using cleaning solvent, get fresh air immediately and get medical aid. If contact with eyes is made, wash your eyes with water and get medical aid immediately.
2-1204
TM 5-2420-222-20-3
PRESSURE CONTROL VALVE - CONTINUED
|
|
ACTION |
LOCATION |
ITEM |
REMARKS |
CLEANING - CONTINUED
WARNING
Compressed air used for blowing away chips, dirt, etc., must leave nozzle at less than 30 psi (207 kPa) to prevent personal injury. Be certain that nozzle is rated to provide a maximum of 30 psi (207 kPa). Be sure to wear safety goggles or lenses when using compressed air. Compressed air and particles moved by compressed air can cause damage to your eyes.
25. |
All parts |
a. |
Clean in drycleaning solvent. |
|
|
b. |
Using reciprocating air compressor, air |
|
|
|
compressor hose, and air blow gun, |
INSPECTION/REPLACEMENT |
|
|
blow dry. |
|
|
|
NOTE
For more information on how to inspect parts, go to General Maintenance Instructions (page 2- 137).
Replace defective parts which cannot be repaired.
26. |
Valve (7) |
a.Look for cracks, breaks, grooves, pits, and deep scratches.
b.Using 0 to 1-inch outside micrometer caliper, measure outside diameter at front and rear.
Outside diameter at front should be 0.7497 to 0.7503 inch (19.0424 to 19.0576 mm). Outside diameter at rear should be 0.7257 to 0.7263 inch (18.4328 to 18.4480 mm).
2-1205

TM 5-2420-222-20-3
PRESSURE CONTROL VALVE - CONTINUED
|
|
ACTION |
LOCATION |
ITEM |
REMARKS |
|
|
|
INSPECTION/REPLACEMENT - CONTINUED |
|
|
27. |
Spring (1) |
28. |
Pressure housing (2) |
a.Look for cracks, breaks, and abnormal bends.
b.Using 4 to 400-pound capacity spring tester, measure free length.
Free length should be approximately 4.625 inches (117.475 mm).
c.Using 4 to 400-pound capacity spring tester and 0 to 150 foot-pound capacity, 1/2-inch drive torque wrench, apply 50 foot-pounds (68 N•m) torque and measure compressed length.
Compressed length should be approximately 3.5 inches (88.9 mm).
a.Look for cracks and breaks.
b.Look for grooves, pits, and deep scratches in valve bore.
29. |
|
All other parts |
Look for cracks and breaks. |
30. |
|
All threaded parts |
Look for damaged threads. |
REPAIR |
|
|
|
31. |
|
Pressure housing (2) |
If threads are damaged, using pipe thread |
|
|
|
set, restore threads. |
ASSEMBLY |
|
|
|
|
|
CAUTION |
|
|
Be careful not to damage orifice during assembly. Damaged orifice may cause pressure control |
||
|
valve to operate improperly. |
|
|
32. |
Valve (3) |
Orifice (4) |
If removed, using 0.250-inch outside |
|
|
|
diameter remover and installer and arbor |
|
|
|
press, press in. |
33. |
Plug (5) |
New packing (6) |
Place in position. |
34. |
Pressure |
Plug (5) with |
a. Place housing (2) in machinist's vise |
|
housing (2) |
assembled |
with vise jaw caps. |
|
|
packing (6) |
b. Screw in and tighten using 7/8-inch |
|
|
|
open-end wrench. |
2-1206
TM 5-2420-222-20-3
PRESSURE CONTROL VALVE - CONTINUED
|
|
|
ACTION |
|
LOCATION |
ITEM |
REMARKS |
|
|
|
|
35. |
Plug (7) |
Washer (8) |
On loader backhoes with Serial Numbers |
|
|
|
319995 thru 342573 only, place same number |
|
|
|
as removed during disassembly in position. |
36. |
|
New packing (9) |
Place in position. |
37. |
Pressure |
Plug (7) with |
Screw in and tighten using 1-inch open- |
|
housing (2) |
assembled parts |
end wrench. |
38. |
Connector (10) |
New packing (11) |
Place in position. |
39. |
Valve (3) |
Washers (12) |
On loader backhoes with Serial Numbers |
|
|
|
235786 thru 235999 only, place same |
|
|
|
number as removed during disassembly |
|
|
|
in position. |
40. |
|
Spring (1) |
Place in position. |
41. |
Pressure |
Valve (3) with |
Place in position. |
|
housing (2) |
assembled parts |
|
42. |
Pressure housing |
Pin (13) |
a. Using long roundnose pliers, depress |
|
(2) and valve (3) |
|
valve (3) until aligned with hole in |
|
|
|
housing (2). |
|
|
|
b. Place in position. |
43. |
Pressure housing |
Connector (10) with |
Screw in and tighten using 1 3/8-inch |
|
(2) and valve (3) |
assembled |
open-end wrench. |
|
|
packing (11) |
|
2-1207

TM 5-2420-222-20-3
PRESSURE CONTROL VALVE - CONTINUED
|
|
|
ACTION |
|
|
LOCATION |
ITEM |
|
REMARKS |
|
|
|
|
|
ASSEMBLY - CONTINUED |
|
|
|
|
44. |
Union adapter (1) |
Nut (2) |
Screw on all the way. |
|
45. |
|
New packing (3) |
Place in position. |
|
46. |
Pressure |
Union adapter (1) |
Screw in and tighten to position noted |
|
|
housing (4) |
with assembled parts |
during disassembly using 1 1/4-inch |
|
|
|
|
open-end wrench. |
|
47. |
Union adapter (1) |
Nut (2) |
a. |
Tighten until seated against housing |
|
and pressure |
|
|
(4) using two 1 1/4-inch open-end |
|
housing (4) |
|
|
wrenches. |
|
|
|
b. |
Take housing (4) out of machinist’s |
|
|
|
|
vise with vise jaw caps. |
INSTALLATION |
|
|
|
|
48. |
Elbow (5) |
Nut (6) |
Screw in all the way. |
|
49. |
|
New packing (7) |
Place in position. |
|
50. |
Union adapter (1) |
Hose (8) |
a. |
Uncap. |
|
|
|
b. |
Take off tag. |
|
|
|
c. |
Screw in and tighten using 1 1/16-inch |
|
|
|
|
and 1 1/4-inch open-end wrenches. |
51. |
Valve assembly (9) |
Two new packings |
Place in position. |
|
|
|
(10 and 11) |
|
|
52. |
Transmission |
Valve assembly (9) |
Place in position. |
|
|
case (12) |
with attached parts |
|
|
NOTE
Pressure control valve mounting screws are three different lengths. Install each screw in position as noted during removal.
53. Transmission case |
Three screws (13, |
Screw in and tighten using 9/16-inch, |
(12) and valve |
14, and 15) and |
3/8-inch drive socket, 5-inch extension, |
assembly (9) |
three new |
universal-joint, ratchet handle, and |
|
lockwashers (16) |
9/16-inch open-end wrench. |
2-1208
TM 5-2420-222-20-3
PRESSURE CONTROL VALVE - CONTINUED
|
|
|
ACTION |
|
|
LOCATION |
ITEM |
|
REMARKS |
|
|
|
|
|
54. |
Connector(17) |
Line (18) |
a. |
Uncap. |
|
|
|
b. |
Takeoff tag. |
|
|
|
c. |
Screw in and tighten using 1 3/8-inch |
|
|
|
|
open-end wrench. |
55. |
Valve assembly (9) |
Elbow (5) with |
Screw in and tighten to position noted |
|
|
|
assembled parts |
during removal using 1 1/16-inch |
|
|
|
|
open-end wrench. |
|
56. |
Valve assembly (9) |
Nut (6) |
Tighten until seated against valve |
|
|
and elbow (5) |
|
assembly (9) using 1 1/16-inch and |
|
|
|
|
1 1/4-inch open-end wrenches. |
|
57. |
Elbow (5) |
Line (19) |
a. |
Uncap. |
|
|
|
b. |
Take off tag. |
|
|
|
c. |
Screw in and tighten using 1-inch |
|
|
|
|
open-end wrench. |
58. |
Loader backhoe |
Transmission oil |
Install (page 2-836). |
|
|
|
filter |
|
|
2-1209

TM 5-2420-222-20-3
PRESSURE CONTROL VALVE - CONTINUED
|
|
ACTION |
LOCATION |
ITEM |
REMARKS |
|
|
|
INSTALLATION - CONTINUED |
|
|
59. Loader backhoe |
Hydraulic oil filter |
Install (page 2-1217). |
|
relief valve |
|
60. |
Transmission |
Check fluid level and add proper amount |
|
|
and grade (TM 5-2420-222-10). |
|
|
Do not shut down engine at this time. |
61. |
Engine |
Run at high idle (TM 5-2420-222-10). |
62. |
Pressure control |
a. Raise and lower loader bucket |
|
valve |
(TM 5-2420-222-10) and check for leaks. |
|
|
b. If leaking at any connection, tighten |
|
|
using 7/8-inch, 1 3/8-inch, 1 1/4- |
|
|
inch, or two 1 1/4-inch open-end |
|
|
wrenches or 1 1/16-inch and 1 1/4- |
|
|
inch open-end wrenches. |
|
|
c. If leaking does not stop, shut down |
|
|
engine (TM 5-2420-222-10) and |
|
|
replace leaking connection packing or |
|
|
fitting or valve component as outlined |
|
|
in this task. |
|
|
d. If found leaking, repeat steps 60 |
|
|
thru 62). |
63. |
Engine |
If still running, shut down |
|
|
(TM 5-2420-222-10). |
ADJUSTMENT |
|
|
WARNING
Do not attempt to disconnect hydraulic lines and fittings while engine is running or before hydraulic system pressure has been released. When engine is running, hydraulic system is under pressure. Hydraulic system pressure should be 0 psi (0 kPa) before lines are disconnected. A line or fitting disconnected under pressure will blow off with a lot of force and could cause serious injury to personnel.
64. |
Hydraulic system |
Release pressure (page 2-1191). |
WARNING
Be careful when draining hot fluids. Wear gloves to protect your hands from hot parts and fluids or severe burns could result.
2-1210
|
|
|
TM 5-2420-222-20-3 |
PRESSURE CONTROL VALVE - CONTINUED |
|
||
|
|
|
|
|
|
|
ACTION |
|
LOCATION |
ITEM |
REMARKS |
|
|
|
|
65. |
Hydraulic pump (1) |
Plug (2) |
a. Place drain pan under pump (1) to |
|
|
with assembled |
catch draining fluid. |
|
|
packing (3) |
b. Using 1/2-inch, 3/8-inch drive |
|
|
|
socket, 5-inch extension, and ratchet |
|
|
|
handle, unscrew and take out.’ |
66. |
Plug (2) |
Packing (3) |
a. Using pocket knife, take off. |
|
|
|
b. Get rid of. |
67. |
Front support (4) |
Hydraulic pump (1) |
Using tube and pipe fitting kit fittings, |
|
|
|
connect multi-range pressure gage. |
|
|
WARNING |
|
|
Be careful of moving parts when working near engine while it is running. Moving parts could |
||
|
catch on tools, clothing, or extremities causing serious injury. |
||
68. |
Loader backhoe |
Engine |
Have assistant start and run at |
|
|
|
1250 rpm (TM 5-2420-222-10). |
|
|
WARNING |
|
|
Keep clear of hydraulic components when raised and not supported. Sudden loss of hydraulic |
||
|
pressure could cause components to drop without warning. |
|
|
69. |
|
Loader bucket |
While assistant raises (TM 5-2420-222- |
|
|
|
10), note multi-range pressure reading. |
|
|
|
Reading should be 1700 to 1800 psi |
|
|
|
(11721 to 12411 kPa), pressure control |
|
|
|
valve setting. |
70. |
|
Engine |
Have assistant shut down |
|
|
|
(TM 5-2420-222-10). |
2-1211
Loading...