

Page 1
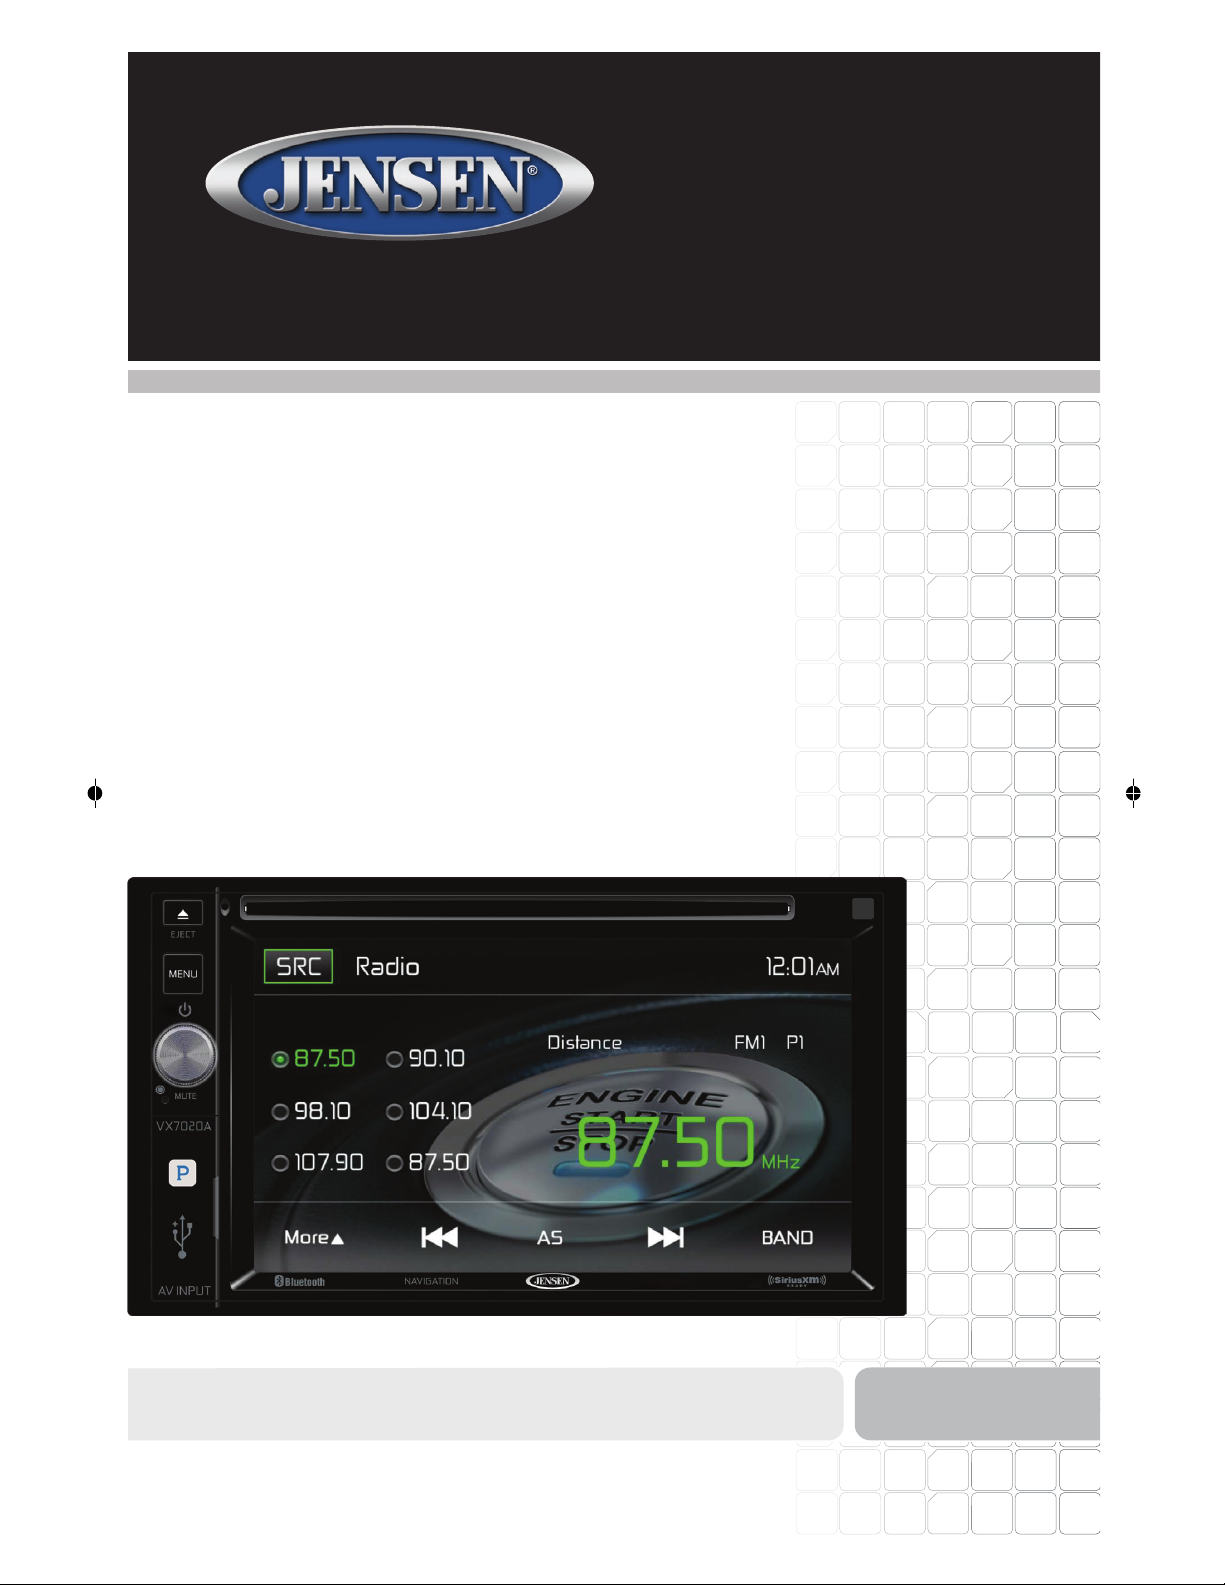
VX7020A
Navigation
Operating Instructions
1
Page 2

Table of contents
1 Warnings and safety information ............................................................................................ 5
2 Getting started ........................................................................................................................... 6
2.1 Initial set-up........................................................................................................................................ 6
2.2 Screen controls ................................................................................................................................... 7
2.2.1 Using the buttons and other controls ........................................................................................................... 8
2.2.2 Usi ng the cursor .......................................................................................................................................... 8
2.2.3 Using the keyboard ..................................................................................................................................... 9
2.2.4 Usi ng touch gestur es ................................................................................................................................. 10
2.2.5 Manipulating the map ............................................................................................................................... 11
2.3 Navigation view ................................................................................................................................ 12
2.3.1 Streets and roads ....................................................................................................................................... 14
2.3.2 GPS position markers .............................................................................................................................. 14
2.3.3 The planned route ..................................................................................................................................... 15
2.3.4 Turn preview and next street .................................................................................................................... 16
2.3.5 Maneuver icons ........................................................................................................................................ 16
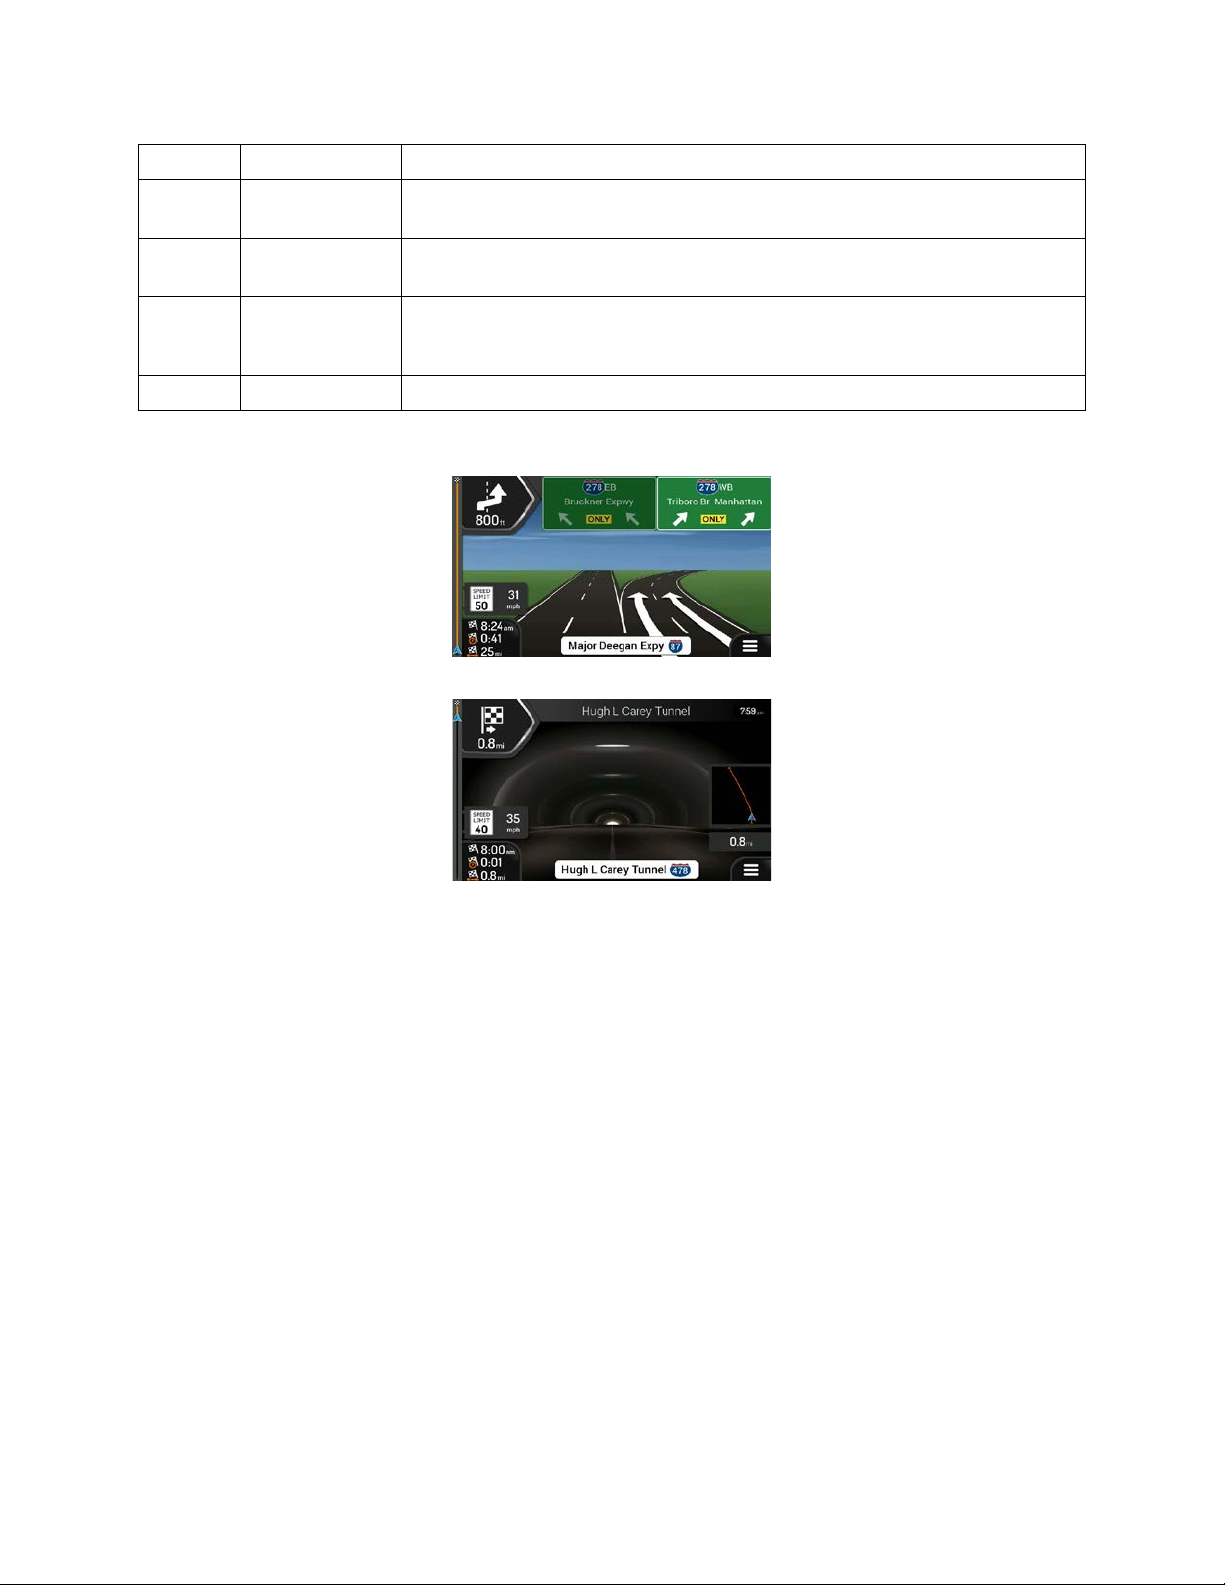
2.3.6 Lane information and signposts ............................................................................................................... 17
2.3.7 Junction view ............................................................................................................................................ 18
2.3.8 Tunnel view .............................................................................................................................................. 18
2.3.9 Freeway services ....................................................................................................................................... 19
2.3.10 3D object types ....................................................................................................................................... 19
2.4 Navigation menu ............................................................................................................................... 20
3 Using the navigation ................................................................................................................ 23
3.1 Selecting a destination ...................................................................................................................... 23
3.1.1 Using combined search ............................................................................................................................. 23
3.1.2 Selecting an address .................................................................................................................................. 26
3.1.2.1 Entering an address with states .......................................................................................................................... 27
3.1.2.2 Entering an address starting with the street name .............................................................................................. 30
3.1.2.3 Selecting a town center ....................................................................................................................................... 32
3.1.2.4 Selecting the midpoint of a street ........................................................................................................................ 33
3.1.2.5 Selecting an intersection in a town ..................................................................................................................... 34
3.1.2.6 Using the ZIP code to select a destination .......................................................................................................... 35
3.1.3 Selecting a Place of Interest ...................................................................................................................... 36
3.1.3.1 Using Quick search categories ........................................................................................................................... 36
3.1.3.2 Searching by category ........................................................................................................................................ 38
3.1.3.3 Searching by name .............................................................................................................................................. 40
3.1.3.4 Finding help nearby ............................................................................................................................................ 42
2
Page 3

3.1.4 Selecting a Saved Location ....................................................................................................................... 43
3.1.5 Selecting a History item ............................................................................................................................ 44
3.1.6 Selecting a saved route .............................................................................................................................. 46
3.1.7 Entering coordinates ................................................................................................................................. 47
3.1.8 Selecting a location on the map ................................................................................................................ 48
3.1.9 Planning a Multipoint Route ..................................................................................................................... 49
3.2 Checking Route Information and Alternatives ................................................................................. 51
3.3 Editing the route ............................................................................................................................... 52
3.3.1 Setting a new starting point ....................................................................................................................... 52
3.3.2 Adding an additional destination .............................................................................................................. 54
3.3.3 Modifying the list of destinations ............................................................................................................. 54
3.3.4 Saving the planned route ........................................................................................................................... 55
3.3.5 Deleting the planned route ........................................................................................................................ 56
3.3.6 Selecting a route alternative when planning the route .............................................................................. 56
3.3.7 Selecting a route alternative for a n existing route ..................................................................................... 57
3.3.8 Pausing guidance ...................................................................................................................................... 58
3.4 Saving a location .............................................................................................................................. 59
3.4.1 Editing a saved location ............................................................................................................................ 60
3.5 Adding an Alert Point ....................................................................................................................... 60
3.6 Running a Simulation ....................................................................................................................... 62
3.7 Off-road navigation .......................................................................................................................... 63
3.7.1 Switching to off-road navigat ion .............................................................................................................. 63
3.7.2 Selecting the destination in o f f-road mode ............................................................................................... 63
3.7.3 Na vigating in off-road mode ..................................................................................................................... 64
4 Reference guide ....................................................................................................................... 65
4.1 Concepts ........................................................................................................................................... 65
4.1.1 2D/3D GPS reception ............................................................................................................................... 65
4.1.2 Natural and TTS voices............................................................................................................................. 65
4.1.3 Road safety cameras and other proximity Alert Points ............................................................................. 65
4.1.4 Route calculation and recalculation .......................................................................................................... 66
4.1.5 Smart Zoom .............................................................................................................................................. 66
4.1.6 Speed limit warning .................................................................................................................................. 67
4.1.7 Intelligent navigation ................................................................................................................................ 67
4.1.7.1 Congestion detour on highways .......................................................................................................................... 67
4.1.7.2 Real-time alternative routes ................................................................................................................................ 68
4.1.7.3 Parking around destination ................................................................................................................................ 69
4.1.7.4 Hints upon detour ............................................................................................................................................... 69
4.2 Useful Information menu .................................................................................................................. 70
3
Page 4

4.2.1 Where Am I .............................................................................................................................................. 71
4.2.2 Trip Monitor ............................................................................................................................................. 72
4.3 Settings menu .................................................................................................................................... 73
4.3.1 Route preferences settings ........................................................................................................................ 74
4.3.1.1 Vehicle profile ..................................................................................................................................................... 75
4.3.1.2 Route Planning Method types ............................................................................................................................. 77
4.3.1.3 Navigation Mode ................................................................................................................................................ 77
4.3.1.4 Road types ........................................................................................................................................................... 77
4.3.2 Sound settings ........................................................................................................................................... 78
4.3.3 Warnings setting s ...................................................................................................................................... 80
4.3.4 Navigation View settings .......................................................................................................................... 81
4.3.5 Regional settings ....................................................................................................................................... 84
4.3.6 Display settings ......................................................................................................................................... 84
4.3.7 Trip Monitor settings ................................................................................................................................ 85
5 Troubleshooting....................................................................................................................... 86
5.1 GPS signal cannot be received ......................................................................................................... 86
5.2 Address cannot be found .................................................................................................................. 86
5.3 The calculated route is not optimal .................................................................................................. 87
5.4 Disabling the speed limit warning .................................................................................................... 87
5.5 Keyboard buttons are grayed out ..................................................................................................... 88
5.6 The map is hidden behind an image of a junction ............................................................................ 88
6 End-user license agreement .................................................................................................... 89
7 Copyright note ......................................................................................................................... 96
4
Page 5

1 Warnings and safety information
The navigation system helps you find your way to your destination with the built-in GPS receiver. The
VX7020A and / or navigation software does not transmit your GPS position; others cannot track you.
s important to look at t he display only when it is safe to do so. If you are the driver of the vehicle, w e
It i
recommend that you plan a nd review your r oute befor e you start your j ourney. Plan the rout e before your
departure and stop if you need to change the route.
5
Page 6
2 Getting started
iGo Primo Next Gen is optimized for in-car use. You can use it easily by tapping the screen buttons and
the map with your fingertips.
2.1 Initial set-up
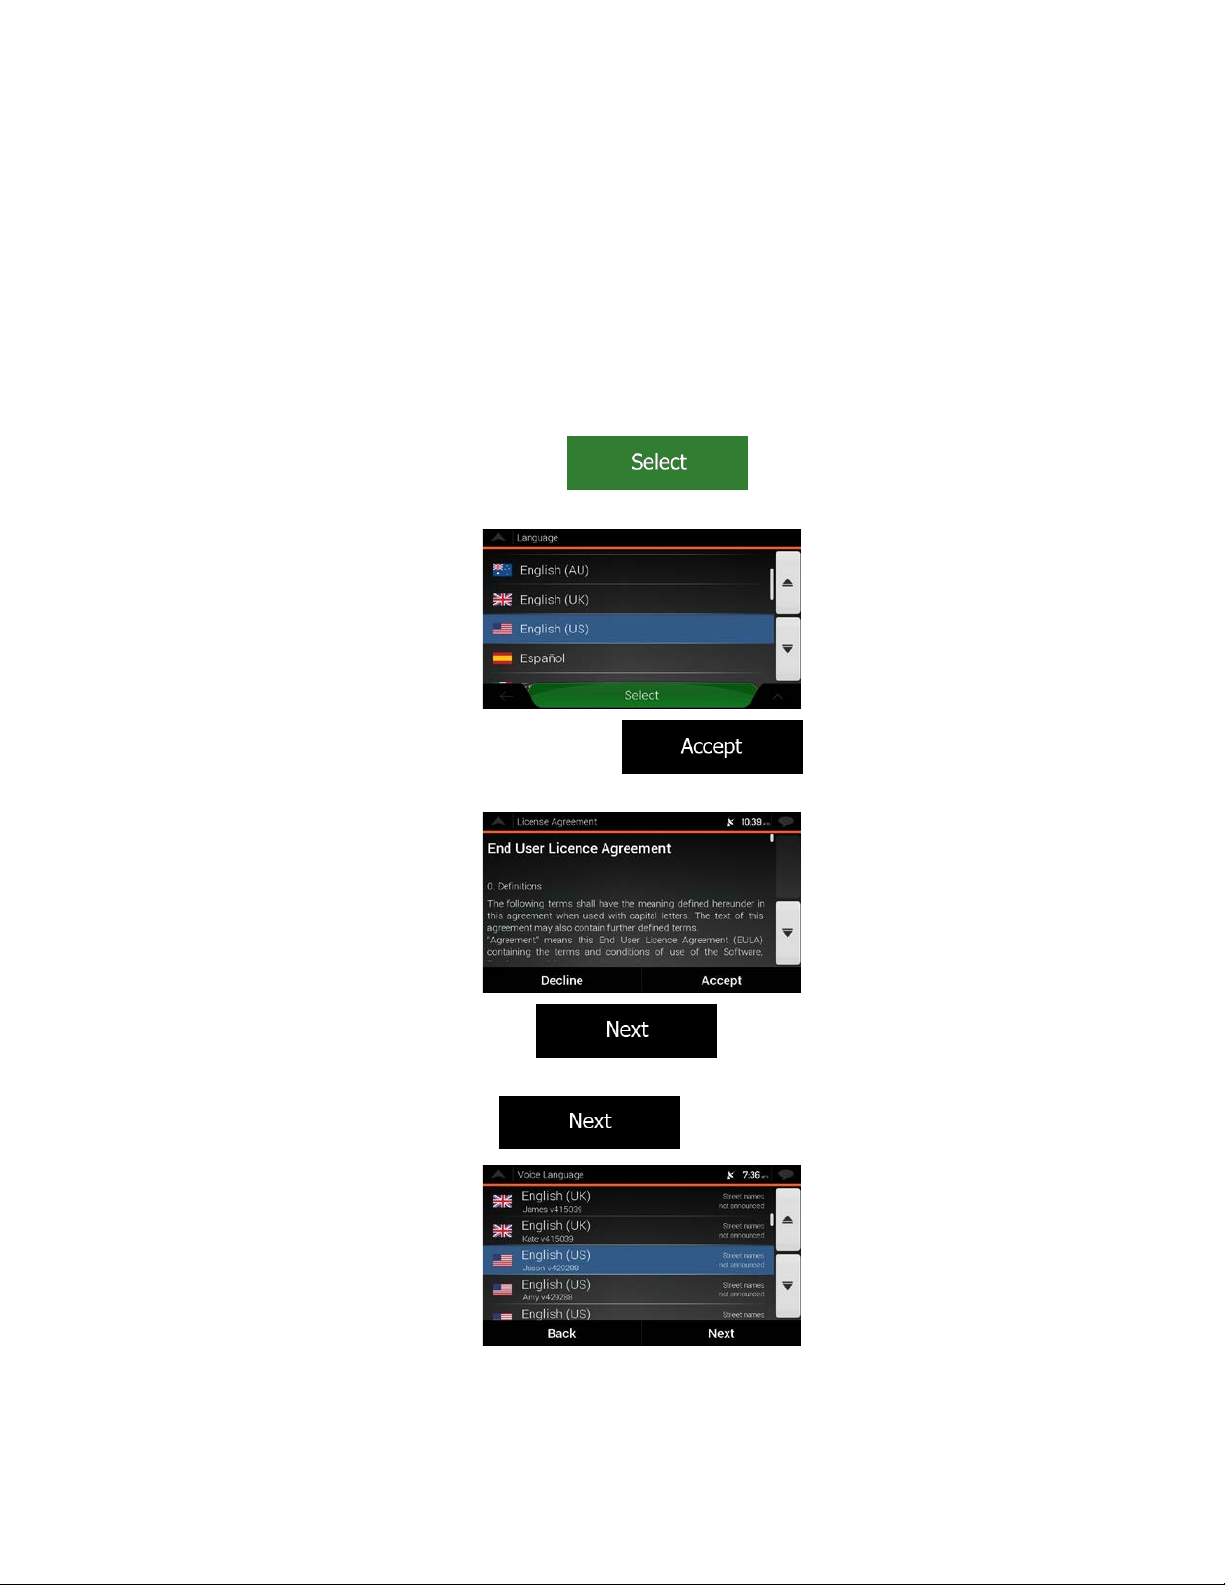
When using the navigation software for the first time, an initial set-up process starts automatically.
1. Select your preferred language, then tap
can change it in Regional settings (page 84).
2. Read t
3. The C
he end-user license agreement, and tap
use.
onfiguration Wizard starts. Tap
to confirm your selection. Later you
if you agree with the terms of
to continue.
4. Select the language and speaker used for voice guidance messages. Later you can change it in
Regional settings (page 78). Tap
6
to continue.
Page 7
5. If
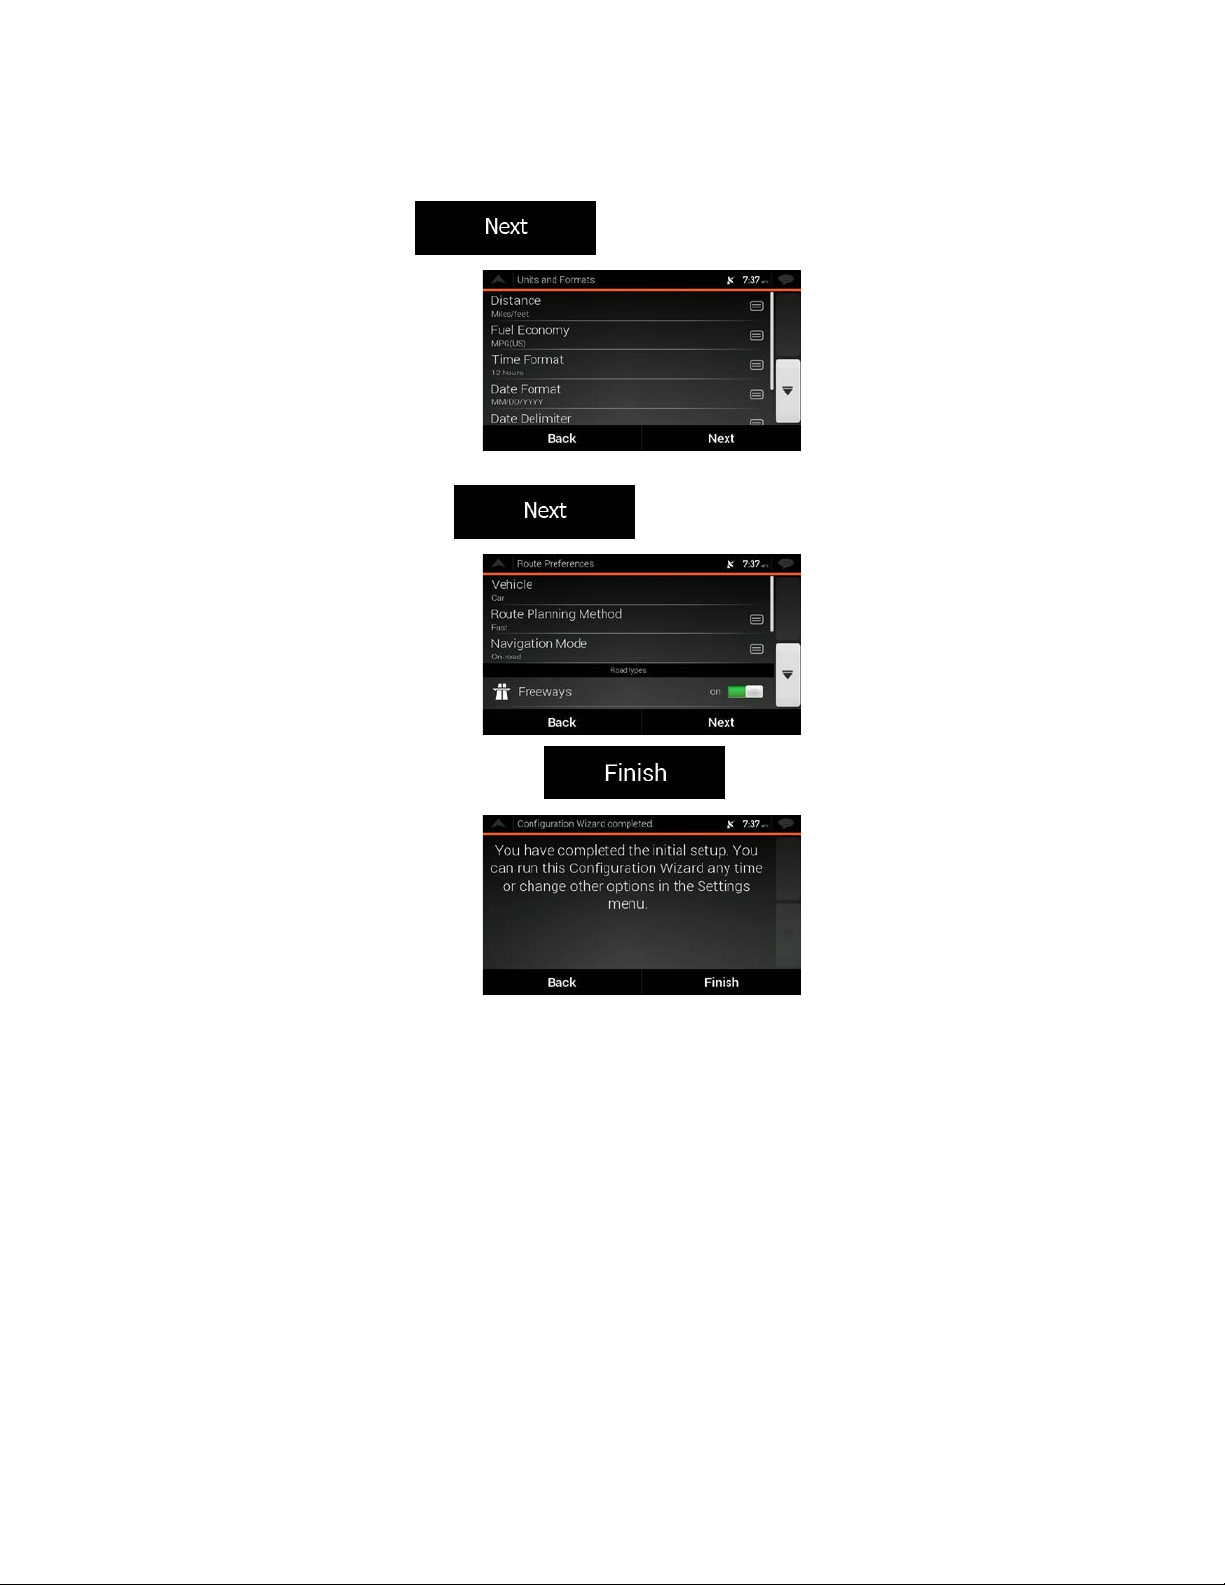
needed, modify the time format and unit settings. Later you can change them in Regional
settings (page 84). Tap
6. If
needed, modify the default route planning options. Later you can change them in Route
Preferences (page 74). Tap
7. Th
e initial set-up is now complete, tap
to continue.
to continue.
to enter the Navigation view.
2.2 Screen controls
The following sections describe the functionality and use of buttons, sliders, and other screen controls.
7
Page 8
2.2.1 Using the buttons and other controls
To operate, tap the buttons on the touch screen.
The Navigation m enu may c ontain severa l menu items on one or m ore pages . To open the ot her pages,
tap the arrows on the side of the screen.
The N
avigation menu may contain s everal m enu items on one or m ore pages . To access the other menu
items, grab the list anywhere and slide your finger up or down.
You need to confirm selections or changes only if the application needs to be restarted, if it needs to
perform a major reconfiguration, or if you are about to lose some of your data or settings. Otherwise,
the VX7020A saves your selections and applies the new settings without confirmation as soon as you
use the controls.
2.2.2 Using the cursor
You can select a map location in the following ways:
• By tapping the map when navigating
• By tapping the map when you are asked to confirm the destination at the end of a search.
When a map location is selected, the cursor (
The location of the cur sor can be used as the destina tion of the rou te or a new Alert Point. You c an also
search for Places around it or add this location to your saved locations.
You can also select som e of the objects on the map. If you tap the map at the icon of a Place or traff ic
event, the object is selected, and you can get information about this object or use it as a route point.
) appears at the selected point on the map.
8
Page 9
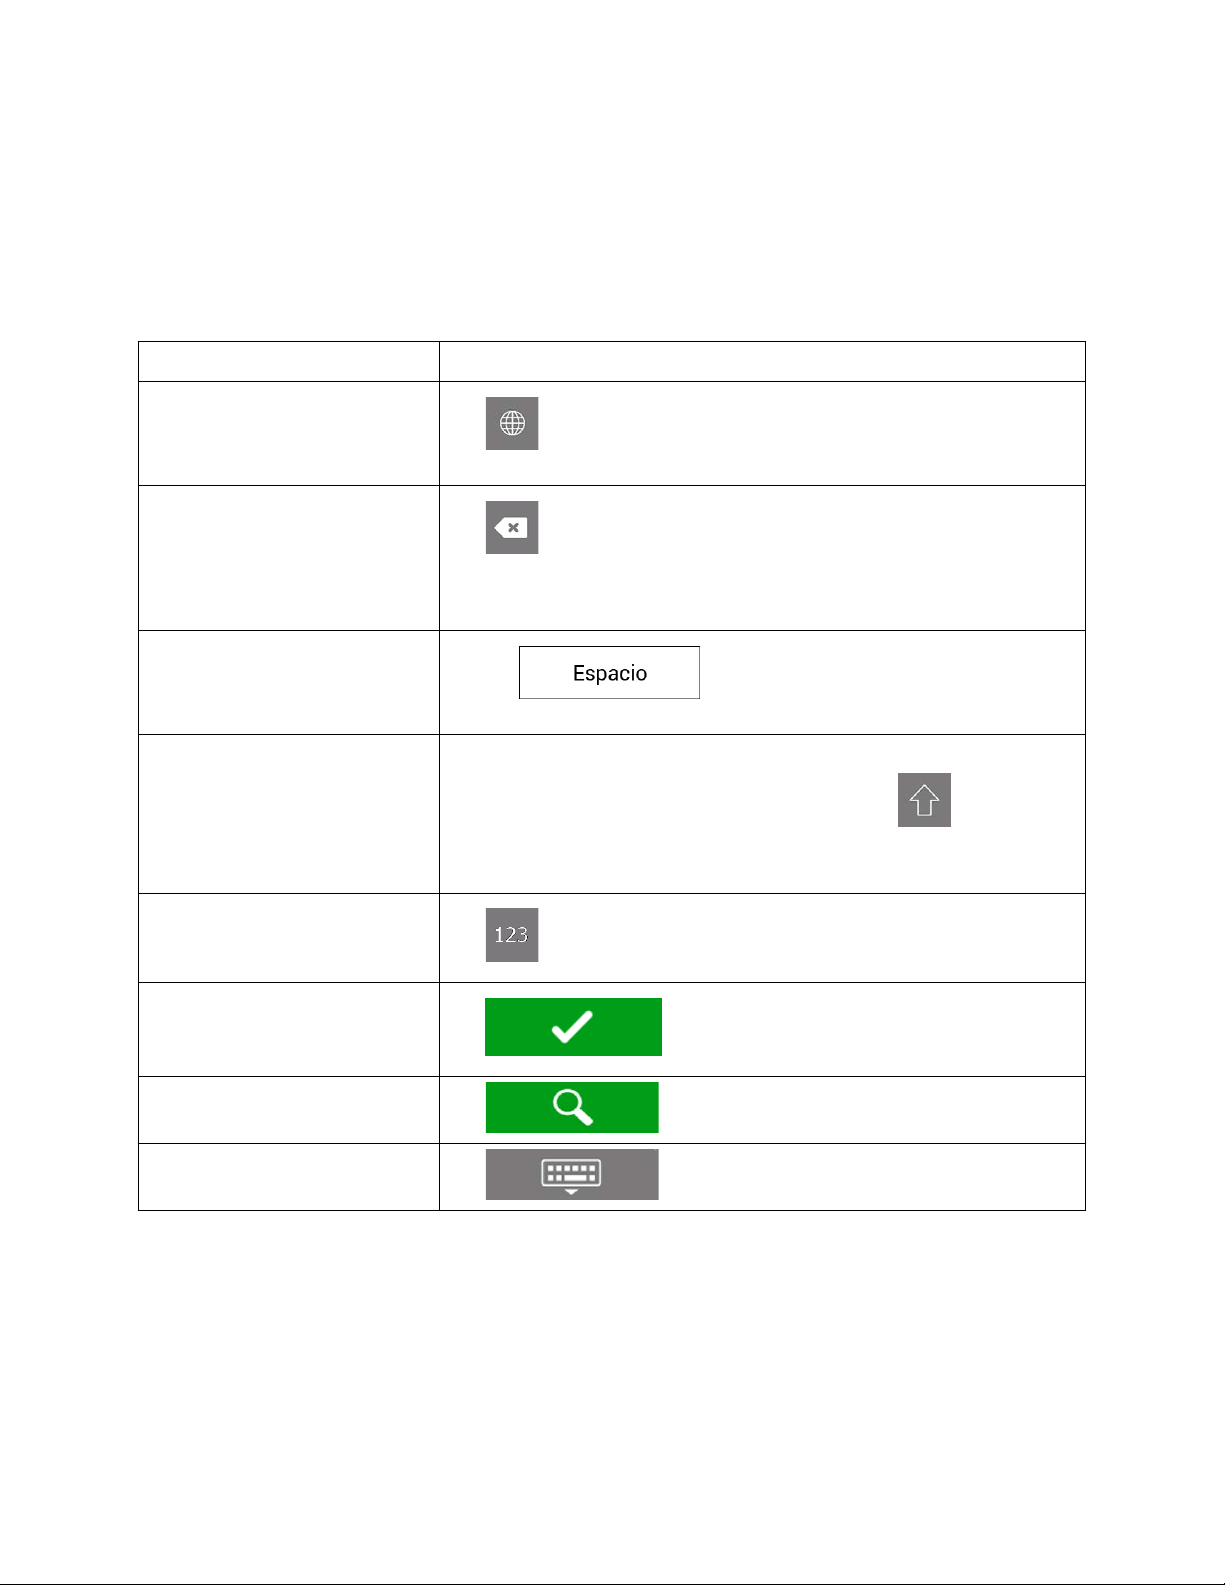
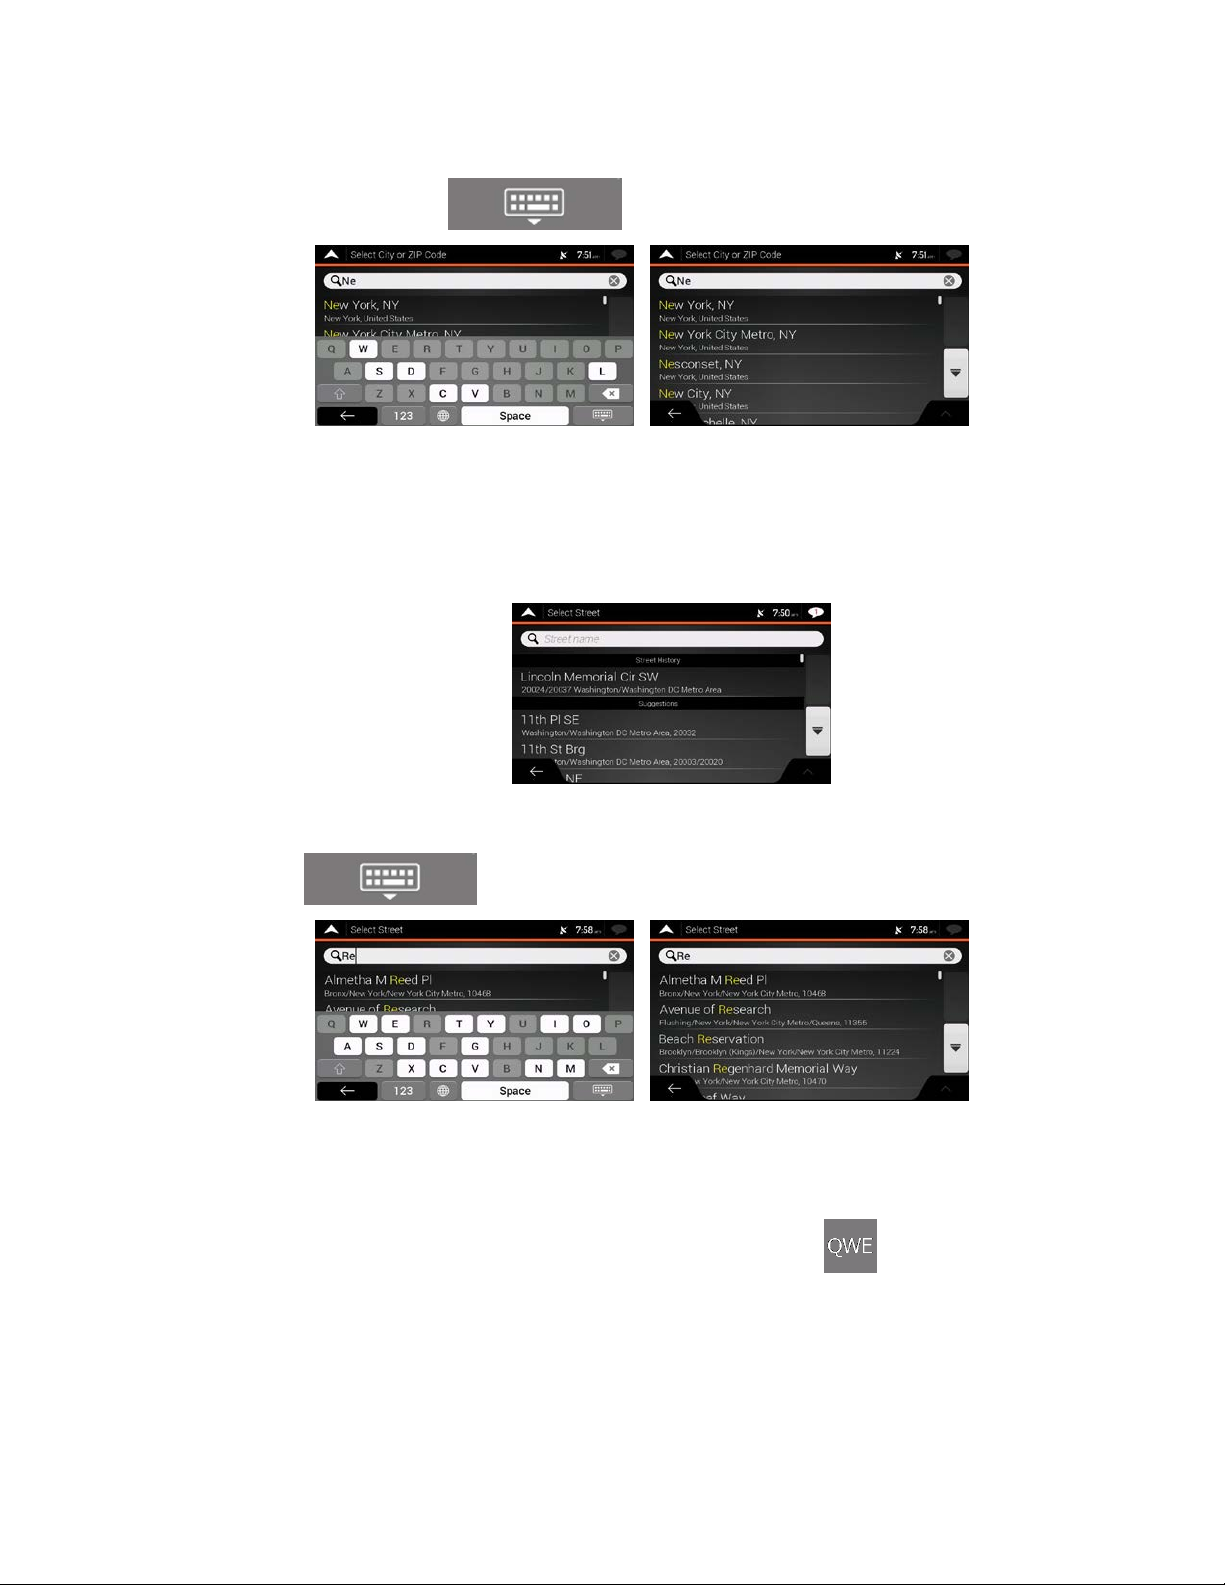
2.2.3 Using the keyboard
Action
Function
Switching to another keyboard
keyboard
Correcting your entry on the
Entering a space, for example
street names
Entering upper and lower case
Entering numbers and symbols
Finalizing the keyboard entry
Starting a search for a keyboard
Tap .
Hiding the keyboard
Tap .
You can type with your fing ertips on th e scr een k eyboar ds and you can switc h be tween v arious k eyboard
layouts, for example English, Greek or numerical. Only those keyboard buttons are active that can be
used to type a name that is available on the map. The other keys are grayed out.
layout, for example from an
English keyboard to a Greek
keyboard
between a first name and a
family name or in multi-word
Tap and select the new keyboard layout from the list.
Tap to remove the unnecessary character(s).
Tap and hold the button to del ete several char acters or the ent ire input
string.
Tap the button at the bottom center of the screen.
letters
entry
By default, when entering a text, the first character appears in upper
case while the rest of the text is in lower case. Tap
upper case letter or tap it twice to turn on Caps Lock. Tap again to use
lower case letters.
Tap to switch to a keyboard offering numbers and symbols.
Tap .
to enter an
9
Page 10
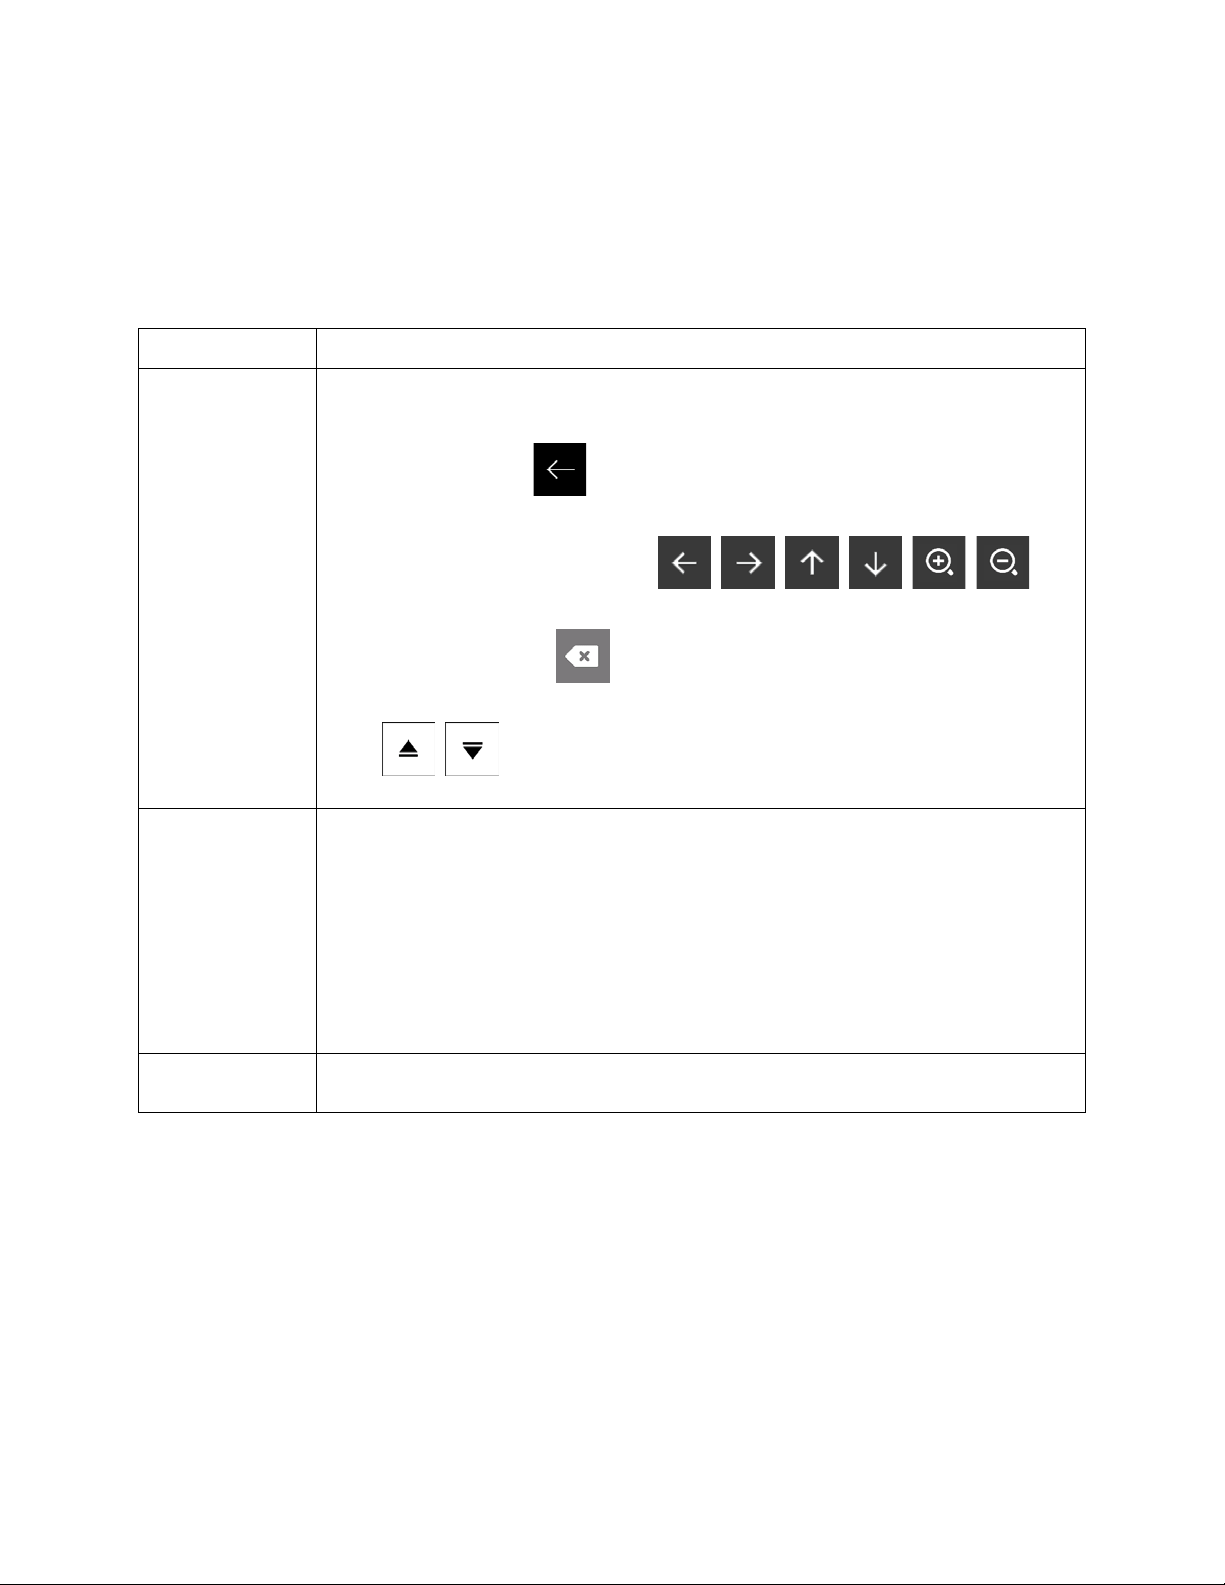
2.2.4 Using touch gestures
Action
Function
Tapping and
Using pinch zoom
Use pinch zoom on the Navigation view to zoom in and out by moving two fingers in a
pinch gesture.
You usually need to tap th e s c reen onl y once. H o wev e r , som e us ef ul featur es can be ac c es sed with other
gestures. See the table below.
holding the screen
Dragging
Tap and keep pressing the following buttons to reach extra functions:
• Tap and hold the following button on list and menu screens to show the
Navigation vie w :
• Tap and hold any of the following buttons on the Navigation view to rotate, tilt,
or scale the map continuously:
• Tap and hold the following button on keyboard screens to quickly delete
several characters:
• Tap and hold the following buttons in long lists to scroll pages continuously:
, .
Drag the screen in the following cases:
• To move the handle on a slider.
• To scroll a list: grab the list anywhere and slide your finger up or down.
Depending on the speed of the sliding, the list scrolls faster or slower, only a
bit or till the end.
.
, , , , , .
.
• To move the map in map browsing mode: grab the map, and move it in the
desired direction.
10
Page 11
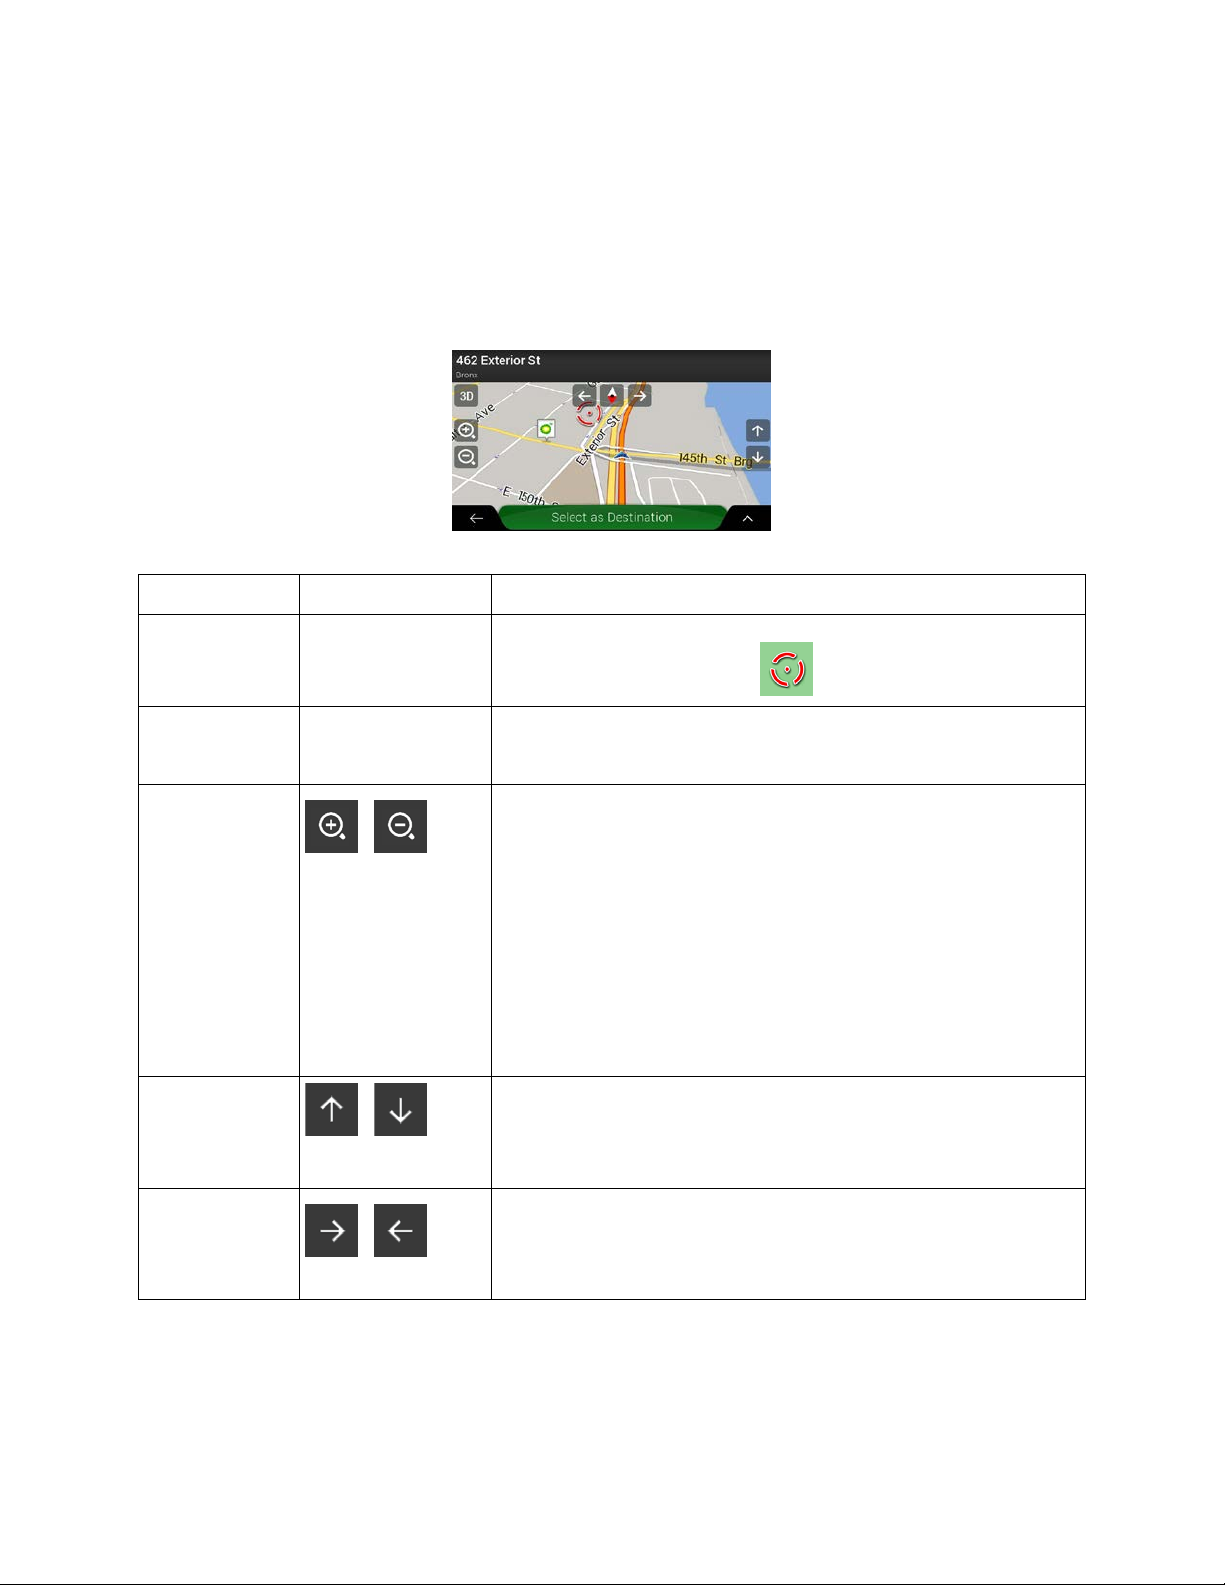
2.2.5 Manipulating the map
Action
Button(s)
Function
Checking
No buttons
The top section of the Navigation view shows information about
the selected point (the cursor ).
Moving the map
No buttons
Move the map in any direction: tap and h old the map and move
Zooming in and
Tap once to modify the view in a larg e step, or tap and hold the
Tilting up and
step, or tap and hold the
Rotating left and
Tap once to modify the view in a larg e step, or tap and hold the
If you tap the map anywhere during navigation, the m ap stops following the current position (the blue
arrow is not locked in a f ix pos it ion o n th e s cr een anymore) and control butt ons a ppear to help you modif y
the map view.
You ca
location
information
by dragging
out
down
n perform the following actions on the map:
,
,
your finger towards the direction you want to move the map.
Change h
VX7020A uses maps that let you examine the locations at
various zoom levels, always with optimized content. It always
displays street names and other text with the same font size,
never upside-down, and you only see the streets and
objects that you need.
Map scaling has a limit in 3D map view mode. If you zoom out
further, the map switches to 2D view mode.
button to modify it continuously and smoothly.
Change t
Tap once to modify the view in a larg e
button to modify it continuously and smoothly.
ow much of the map is displayed on the screen.
he vertical view angle of the map in 3D mode.
right
,
Changes
button to modify it continuously and smoothly.
the horizontal view angle of the map.
11
Page 12
Changing 2D,
3D, or 2D North
erspective, 2D Heading up, and 2D
North up map view modes. In Heading up mode the map is
rotated so its top always points in the current driving direction.
Checking the
Returning to
The map manipulation buttons disappear and the navigation
Selecting
options
Open a list of additional features like saving a location, or
Selecting a
Select the cursor location as a new destination. The route is
Note!
Some buttons, fields, or icons may not be available in your product version.
up views
compass
, ,
Switch between the 3D p
This is the default orienta tion in 3D map view m ode. In North up
mode, the map faces North.
rection of the compass shows North.
The di
normal
navigation
additional
destination
Move the map back to follo w the current G PS positi on. Autom atic
map rotation is also re-enabled.
continues.
searching for Places around the cursor.
automatically calculated.
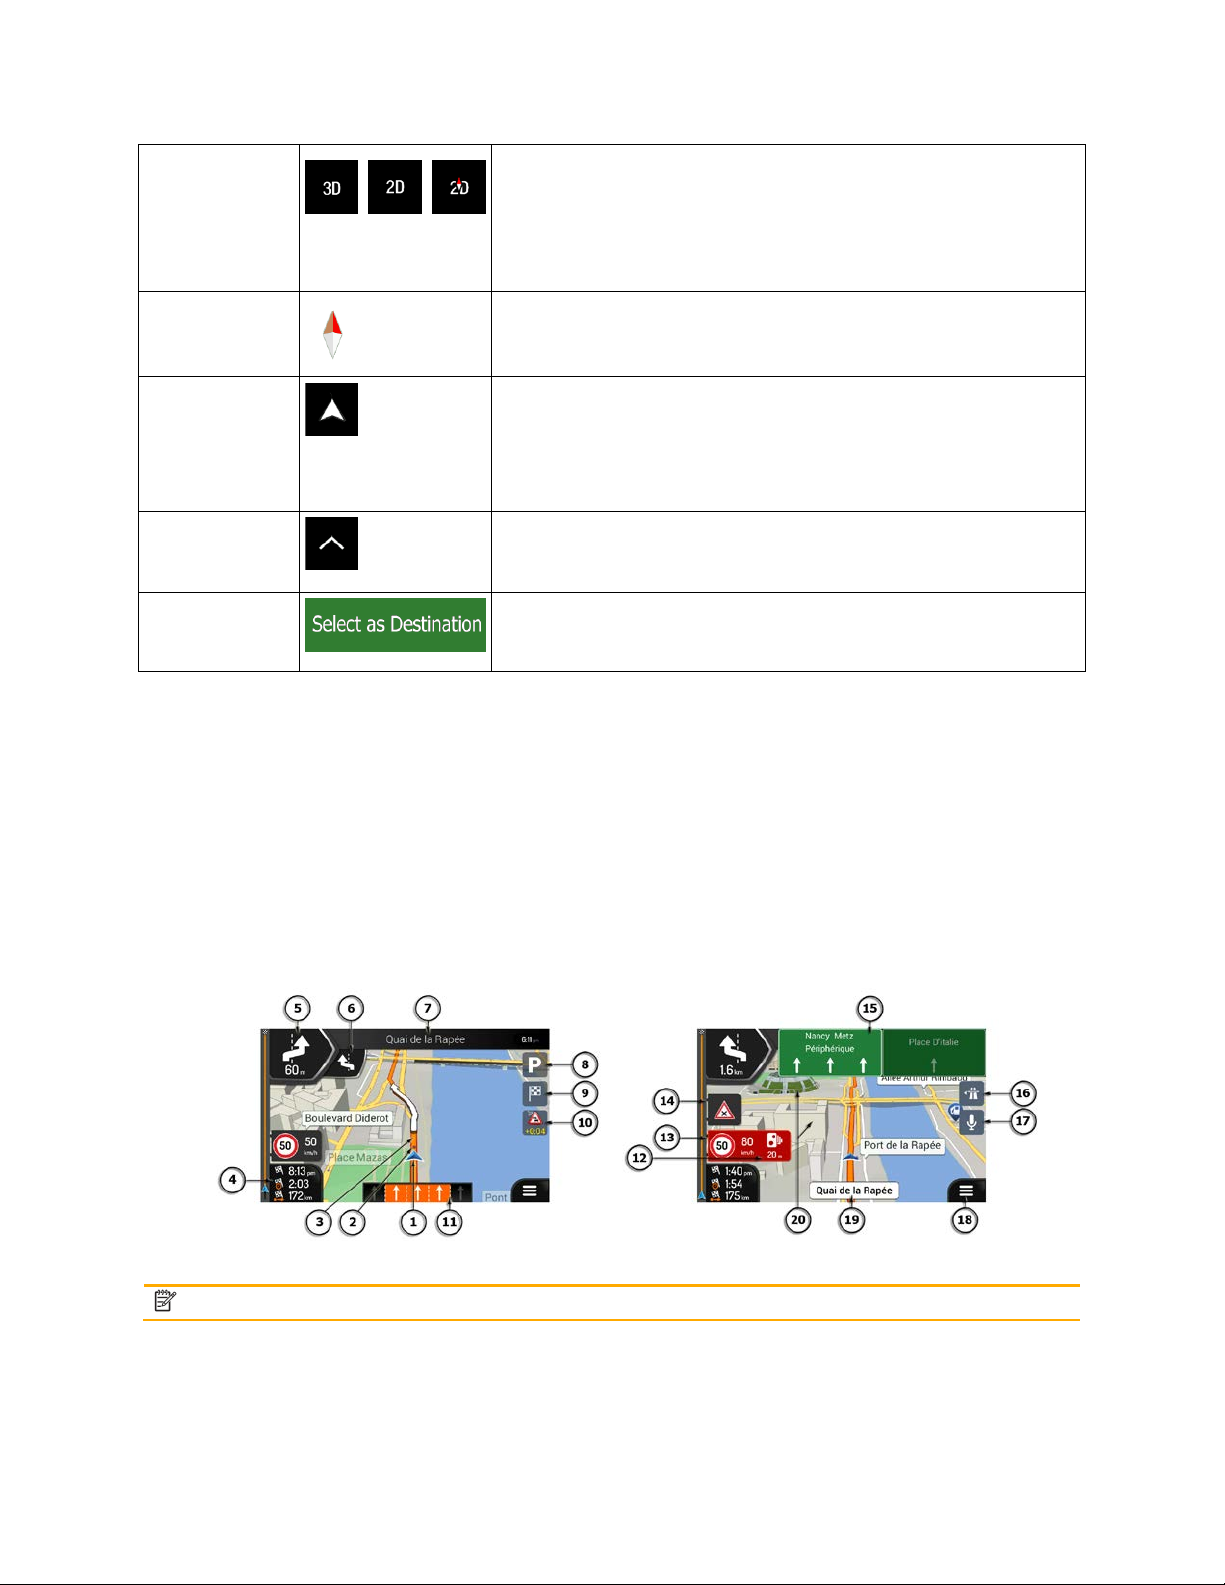
2.3 Navigation view
The navigation view is the main screen of the VX7020A that shows the planned route on a map. The
VX7020A works with digital maps which are not simply the computerized versions of traditional paper
maps. Similarly to paper road maps, the 2D mode of digital maps shows you streets and roads.
Elevation is also illustrated in color.
The
navigation view displays the f ollowing screen buttons, data fields, and route inform ation on the map
during navigation:
12
Page 13

Number
Name
Description
1
Current
position
marker
The current position is displayed as a blue arrow by default. When there is
your last known position. See page 14.
2
GPS position
The dot near the arrow shows the GPS position as perceived by the GPS
receiver. See page 14.
3
Planned route
4
Data fields
) or by tapping and
5
Next turn
preview
It shows the type of the next maneuver and its distance. See page 16.
6
Second next
turn preview
It shows the type of the second next maneuver if it is near the first one. See
page 16.
7
Next street
, you can see nearby house
8
Parking around
destination
It appears near the destination. By tapping it, you can check the available
parking facilities around your destination. See page 69.
9
Destination
It appears near the destination. By tapping it, you can check the trip
location, switch to pedestrian navigationor suspend the navigation.
11
Lane
On multi-lane roads, it shows the lanes ahead and their directions. The
page 17.
12
Alert point
It shows the type of the alert points when approaching a road safety camera
See page 80.
13
Speed limit
warning
It shows the current speed limit of the road. See page 80.
14
Warning road
sign
It shows warning for the current road (for example, dangers, sharp curves).
See page 80.
no GPS position, the current position marker is transparent and it shows
The planned route is displayed as an orange line.
Three data fields show the following information:
• The estimated time of the arrival at the destination
• The remaining time of the trip
• The remaining distance to the destination.
By tapping it, you can access additional information about the current trip on
a dashboard screen and in the Trip Summary.
You can change the d efault values in Settings (page 81
holding the area where the data fields appear.
If you have not se lected a destin ation, you can se e your he ading i nstead of
the three data fields.
It displays the name of the next street. See page 16.
If you have not selected a route destination
numbers.
menu
information
warning
summary, find Places around your final destination, save the current
highlighted arrows represent the lanes and direction you need to take. See
or other Alert Points like school zones or railroad crossings. You must make
sure that using this feature is legal in the country where you intend to use it.
13
Page 14
15
Signpost
It show the available destinations and the road numbers. See page 17.
16
Freeway
services
By tapping it, you can check the details of the next few service stations (gas
stations, restaurants) when traveling on a freeway. See page 19.
18
Navigation
menu
By tapping it, you can open the Navigation menu, where you can reach
19
Street name
By tapping it, you can open the Where Am
20
3D objects
They display hills, mountains, roads, landmarks, and buildings in 3D.
other parts of .
It shows the current street name.
I screen. See page 71.
If you are approaching a freeway exit or a complex intersection and the needed information exists, the
map is replaced with a 3D view of the junction. See page 18.
When enter
ing a tunnel, the map is replaced with a generic tunnel image. See page 18.
2.3.1 Streets and roads
VX7020A shows the streets similarly to paper road maps. Their width and colors correspond to their
importance;
you can easily tell a freeway from a small street.
2.3.2 GPS position markers
When your GPS position is available, the VX7020A marks your current position. By default, this marker
is a blue arrow. The dot near the arrow shows the GPS position as perceived by the GPS
receiver.
The exact location of the current position mark er depends on the veh icle type used f or route calculati on
and the navigation mode. Both can be set in Route preferences (page 74).
• If you choose pedestrian and/or off-road navigation, the position marker is at your exact GPS
position. The direction of the icon shows your current heading.
14
Page 15
• In all other cases, the position marker may not show your exact GPS position and heading. If roads
Symbol
Name
Description
Current GPS position
Waypoint (intermediate
It is an intermediate destinatio n of the route before reaching the final
Route color
on the map, both in daytim e
Streets and roads that
are near, the GPS position is locked on the road and aligned to the nearest road to suppress GPS
position errors, and the direction of the icon is aligned to the direction of the road.
2.3.3 The planned route
The planned route is the currently navigated route. Whenever the destination is set, the route is active
until you delete it, reach your destination or suspend navigation. The VX7020A displays the route in the
following ways:
It is your current position displayed on the map.
and starting point
• In pedestrian mode it is the GPS position.
• If a vehicle is selected for route calculation and roads are near,
the arrow jumps to the nearest road.
• The dot near the arrow shows the exact GPS position.
Normally, if GPS position is available, the route starts from the current
position. If there is no valid GPS position, the VX7020A uses the last
known position as the starting point.
destination)
Destination (end point) It is the final destination of the route.
are excluded from the
navigation
destination.
The route always stands o ut with its color
and night color modes.
You can choose whether you want to use or avoid certain road types
74). However, when the VX7020A cannot avoid such roads,
(page
the route includes them and shows them in a color that is different
from the route color.
15
Page 16
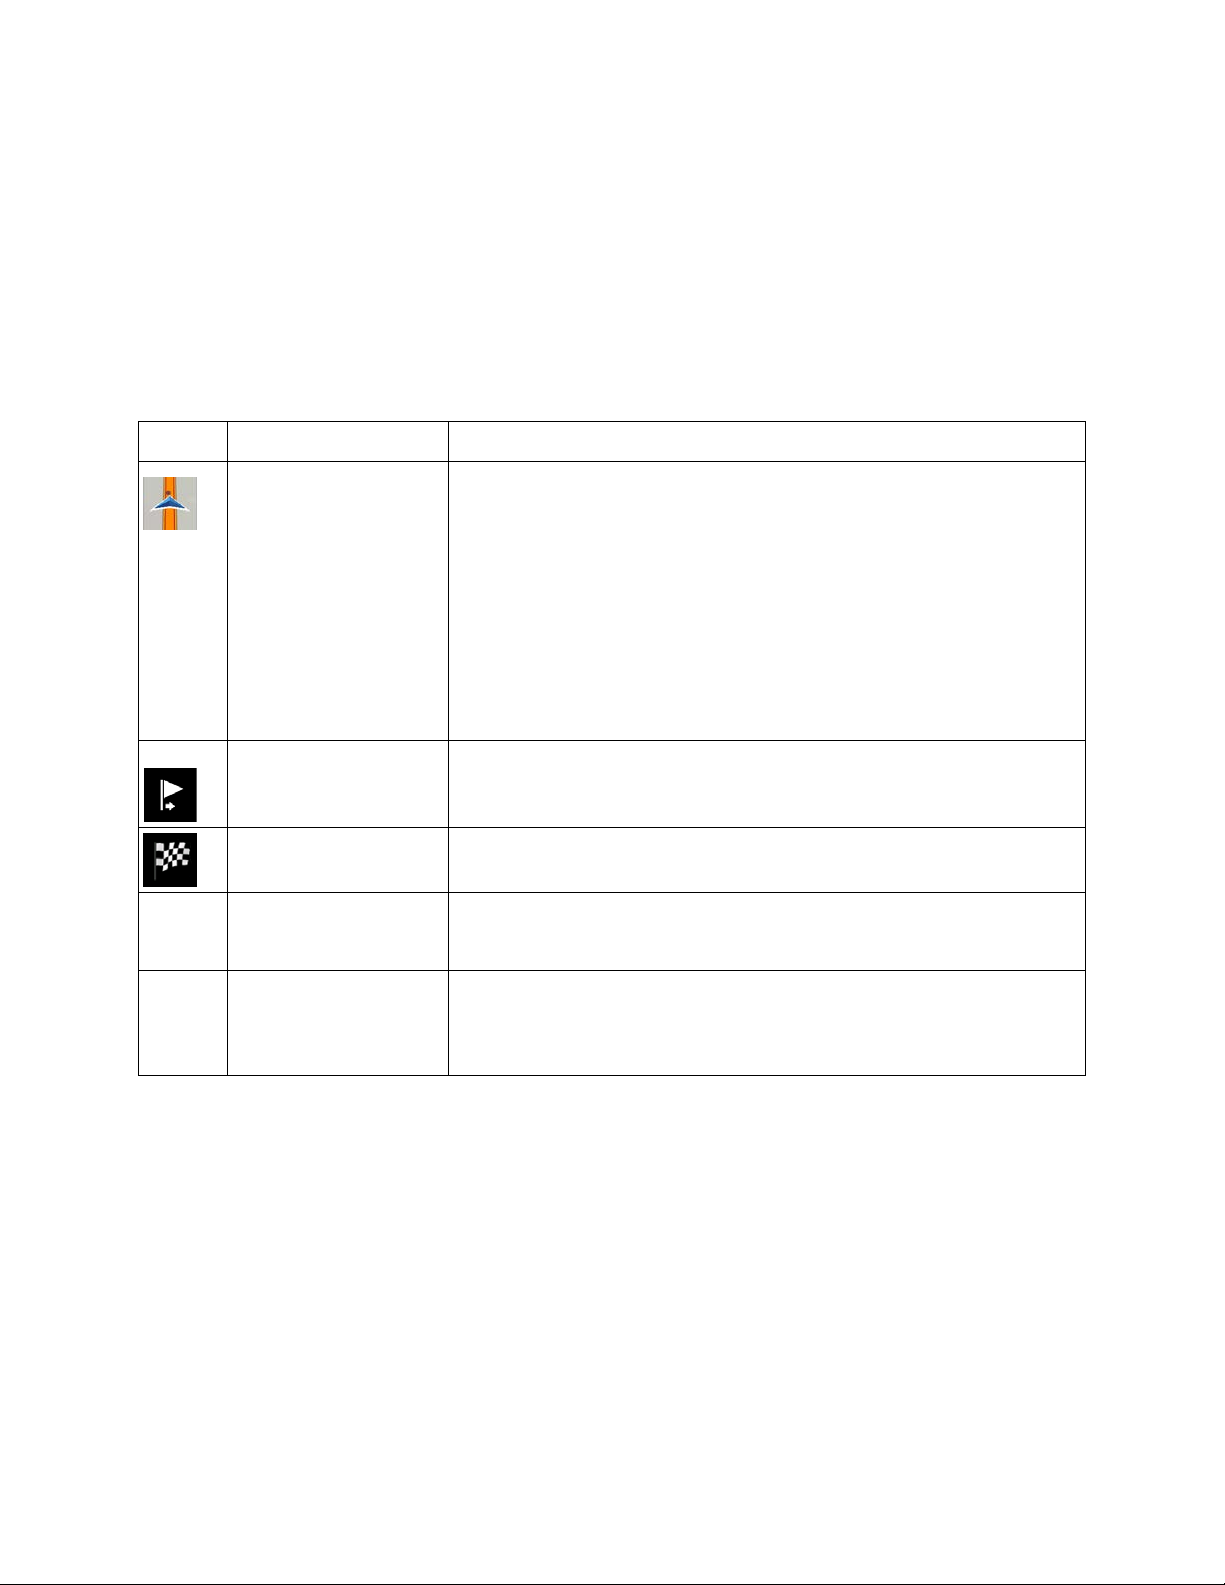
2.3.4 Turn preview and next street
Icon
Function
Turn left.
Turn right.
Turn back.
Bear right.
Turn sharp left.
Keep left.
Continue straight in the intersection.
Enter the traffic circle and take the first exit (next
When navigating a rout e, the top section of the Navigation view shows inf ormation about the next rou te
event (maneuver) and the next street or the next town.
e is a field in the top left corner displa ying the next maneuver. Both the type of the maneuver (turn,
Ther
traffic circle, exiting freeway, and so on) and its distance from the current position are displayed.
A smaller icon shows the type of the s econd next maneuver if it is near the fir st one. Other wise, only the
next maneuver is displayed. Tap the icon of the actual maneuver to open the Itinerary screen.
2.3.5 Maneuver icons
During navigation t he next maneuver is displayed in t he top left corner. Mos t of the maneuver icons are
intuitive. The following table lists some of the frequently shown route events:
maneuver).
16
Page 17
Enter the traffic circle (second next maneuver).
Enter the freeway.
Exit the freeway.
Board the ferry.
Leave the ferry.
Approaching a waypoint on the right.
Approaching the destination.
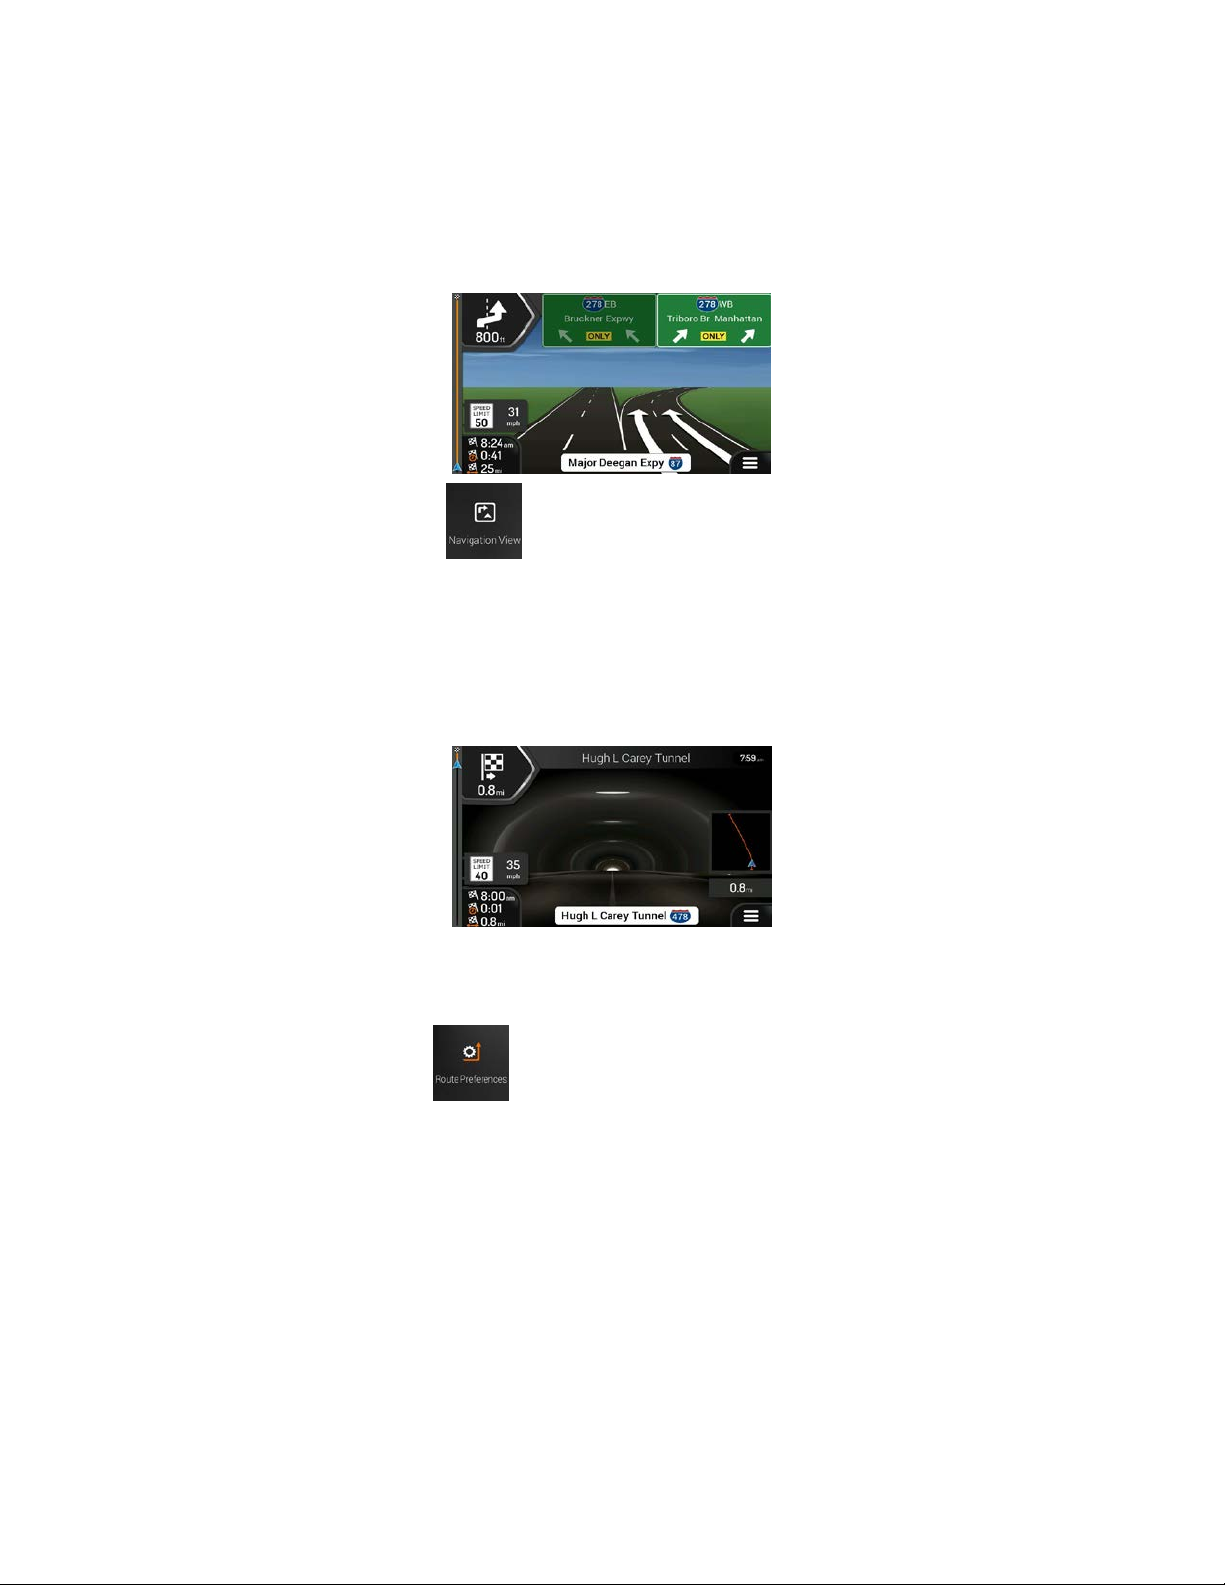
2.3.6 Lane information and signposts
When navigating on multi-lane roads, it is important to take the appropriate lane in order to follow the
planned route. If lane information is available in the map data, the VX7020A displays the lanes and
their directions using small arrows at the bottom of the map. Highlighted arrows represent the lanes and
the direction you need to take.
Wh
ere additional information is av ailable, arrows are replaced by signpost s. Signposts are displayed at
the top of the map. T he color and style of the signp osts are similar to the rea l ones you can see above
roads or by roadsides. They show the available destinations and the road numbers.
All signposts look similar when cruising (when there is no planned route). During navigation only the
signpost that points to the lane(s) to be taken is highlighted; all the others are darker.
If you want to hide the c urrently displayed signposts, tap an y of them and the nor mal Navigation view
returns until new signpost information is received.
You can modify the signpost settings in
(page 81).
17
Page 18
2.3.7 Junction view (Not Supported on VX7020A)
If you are approaching a freeway exit or a c omplex intersection and the needed information exists , the
map is replaced with a 3D vie w of the junction. The lanes you need to take ar e displayed with arr ows. At
the top of the screen, road signs show you additional information.
If you want to hide the currently displayed junction and return to the Navigation view, tap the picture.
Junction view can be turned off in
. See page 81.
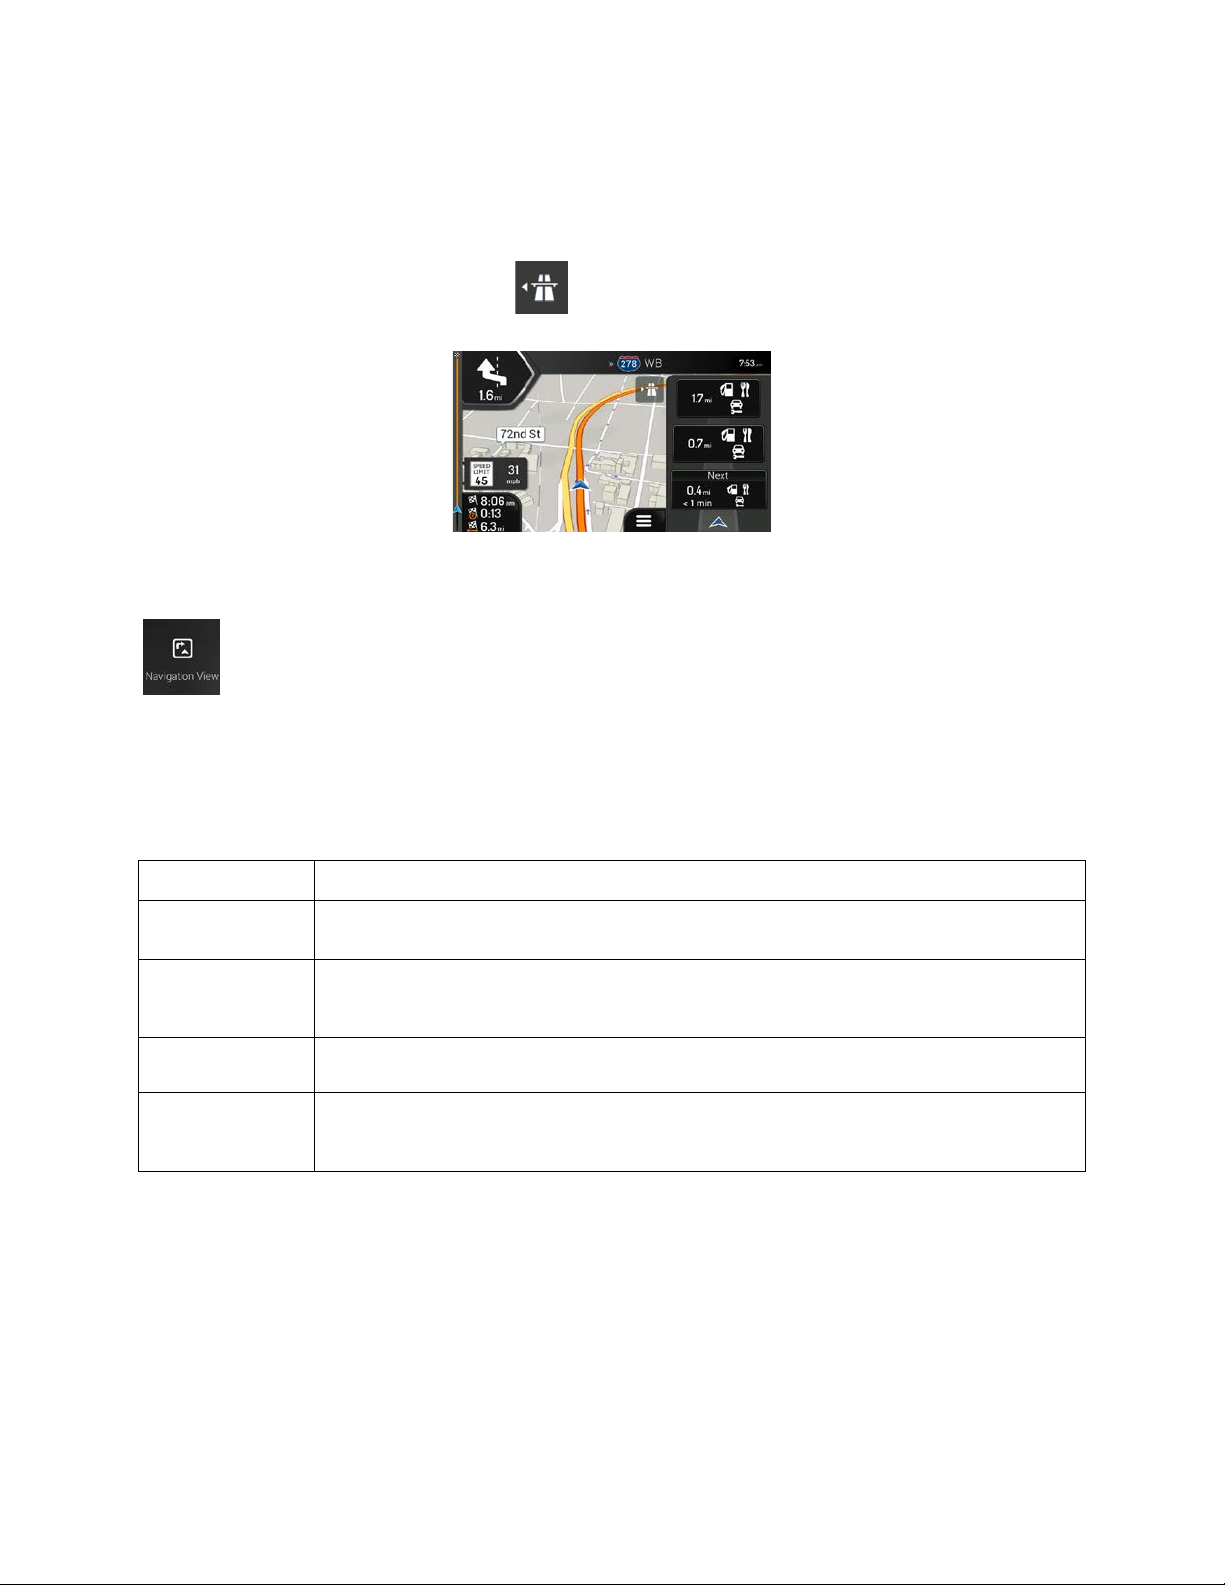
2.3.8 Tunnel view
When entering a tunnel, the map is replaced with a generic tunnel image so that surface roads and
buildings cannot distract you.
op-down overview of the tunnel displayed in a separate window helps you orient yourself. The
The t
remaining distance in the tunnel is also displayed.
After leaving the tunnel, the original map view returns.
Tunnel view can be turned off in
. See page 81.
18
Page 19
2.3.9 Freeway services
Type
Description
3D terrain
Elevated roads
Elevated roads are complex intersections and vertically isolated roads (such as
3D buildings
3D buildings are block representations of full town building data containing actual
When you are driving on a freeway, the button app ears at the top right corner of the Navigation
view. Tap it to open a panel with the details of the next few service stations (gas stations, restaurants).
Tap any
waypoint to your route if necessary.
If you want to displa y other types of Places at the nex t few service s tations, you can change the ic ons in
of them to display the exit area on th e map. You can now easily add t his service station as a
. See page 81.
2.3.10 3D object types (Not Supported on VX7020A)
iGo
Primo Next Gen 3D object types:
Displays 3D hills and mountains in the Navigation view, and illustrates them by
coloring and shading on the 2D map.
overpasses or bridges) displayed in 3D.
3D landmarks Landmarks are 3D representations of prominent or well-known objects.
building sizes and positions on the map.
19
Page 20
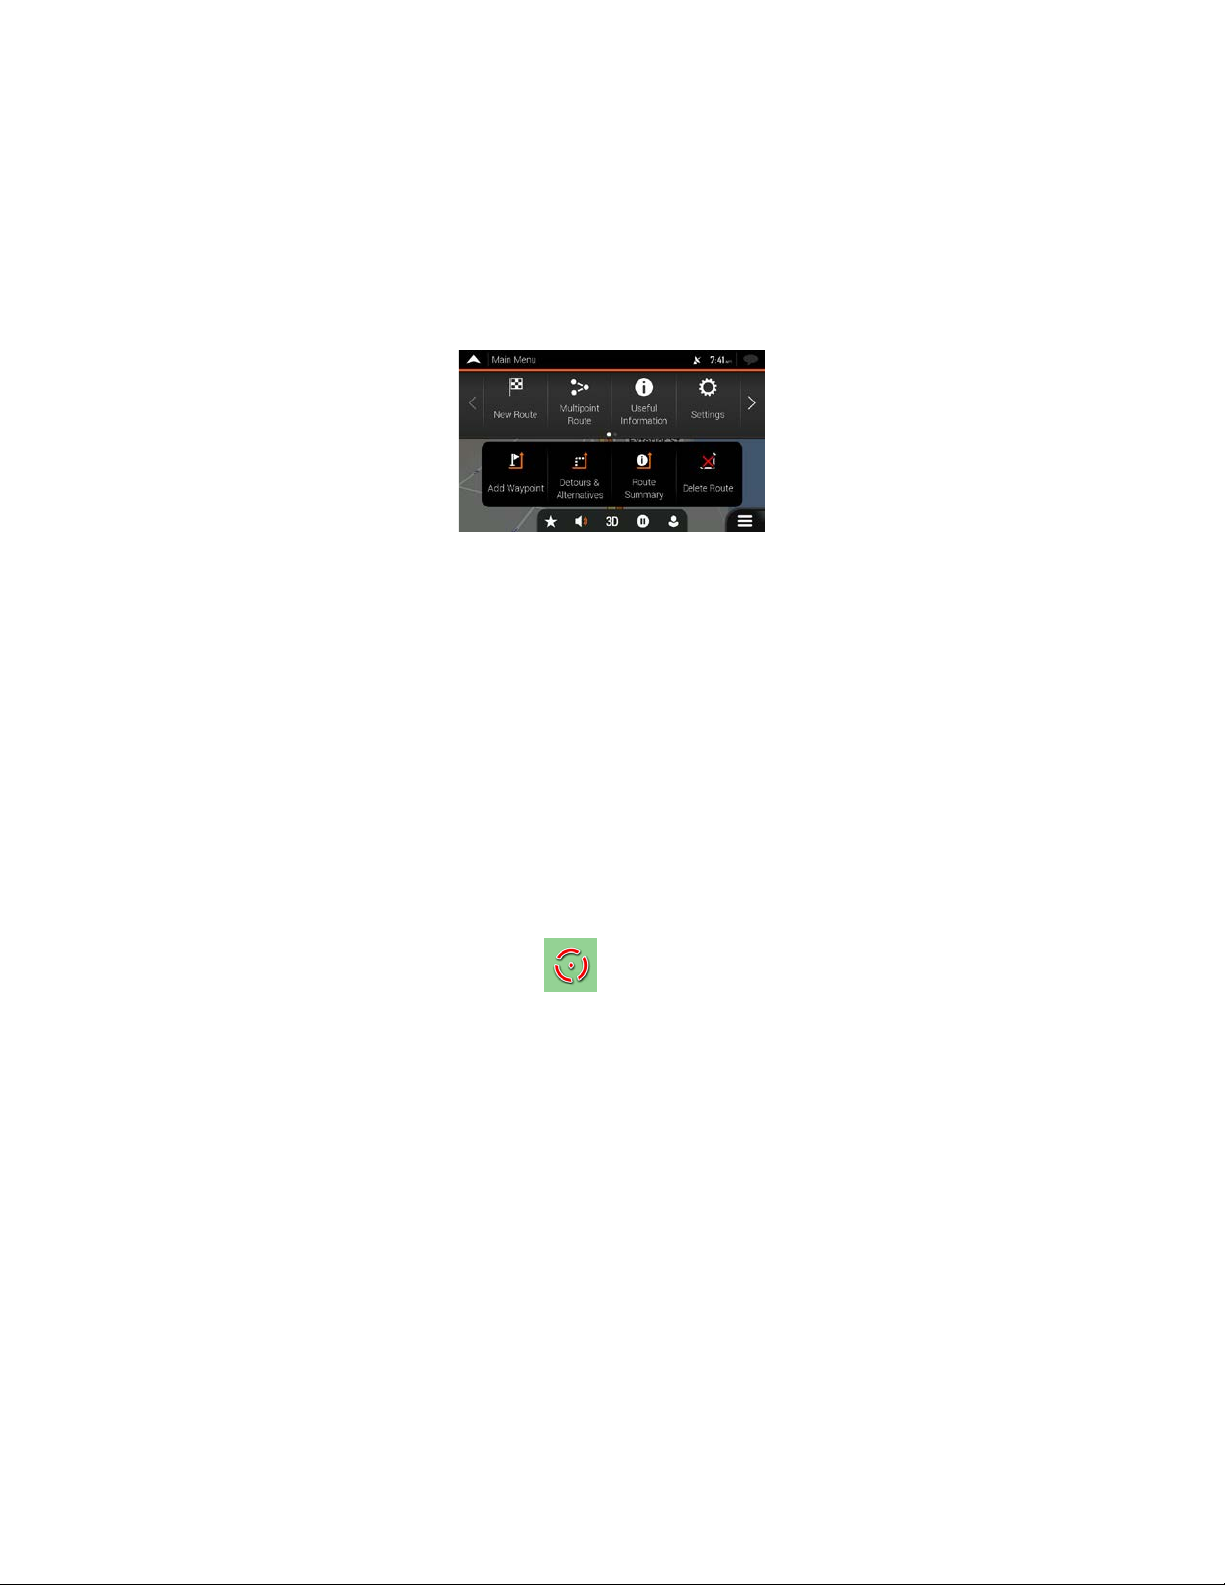
2.4 Navigation menu
Button
Function
Select your destination by entering an address or its coordinate, or by selecting a Place, a
Build your route from one or more route points. You can also plan a route independently of your
Access additional options and check navigation-related information.
Customize the way the navigation software works.
See information about the navigation software.
box to proceed.
On the Navigation view, tap to open the Navigation menu.
You c
an see the following menu options when you are navigating without a planned route:
Saved Location, or a Saved Route. You can also look up your recent destinations from the
History.
current GPS position by setting a new starting point.
Tap to put navigation to the background. Tap in the confirmation message
With a planned route, the following menu options are also available:
20
Page 21
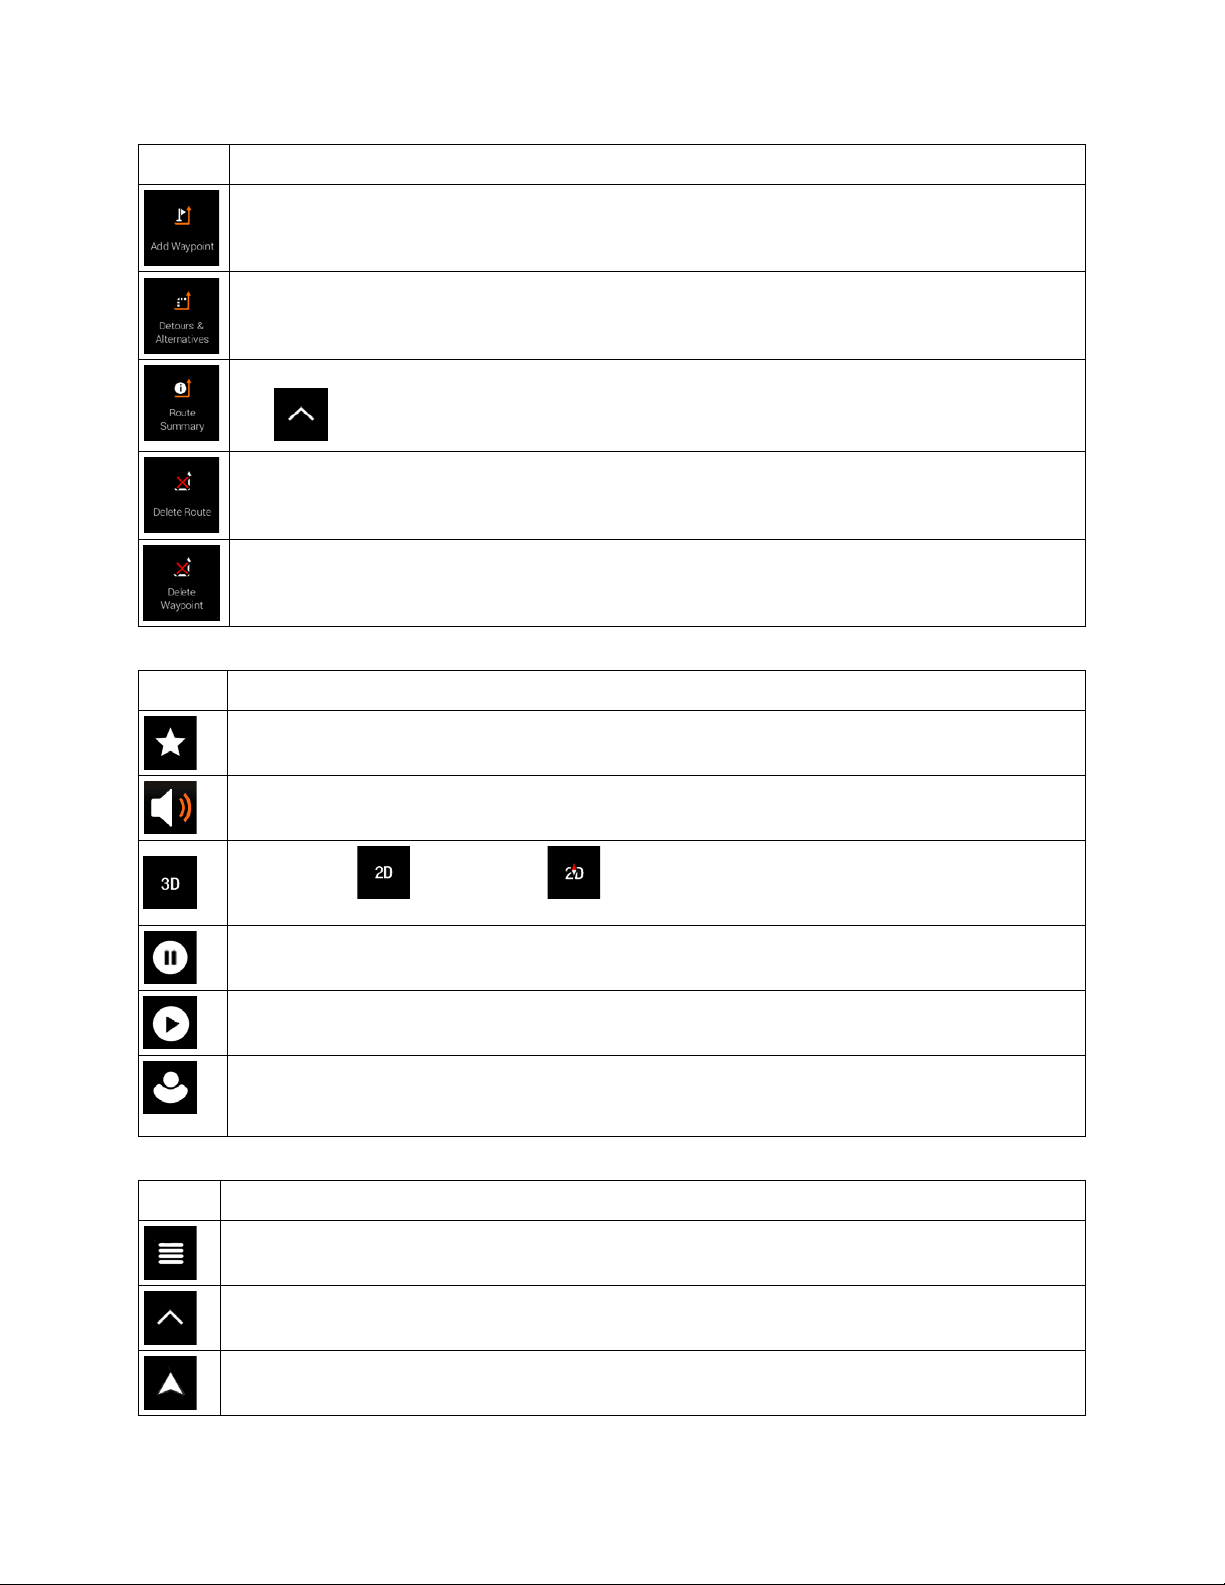
Button
Function
Add an intermediate destination to your route.
See route alternatives to avoid parts of the route, or to avoid a specific road from your planned
route.
View the route in its full length on the map and check route parameters and route alternatives.
Tap to access additional options, like Sim ulation or R oute Pr ef erenc es .
Delete your route.
Delete the next waypoint or the whole route.
Button
Function
Open the Saved Locations screen where you can save a location as a favorite destination or
Set the volume or mute the navigation.
Suspend navigation.
Resume navigation.
Access the User profiles menu where you can create new profiles or edit the existing ones. If
own settings.
Button
Function
The Menu button appears when the Navig ati on vie w is displa yed. T ap it to open the Nav igat ion
The More button appears on the screen to display additional features. Tap it to open the list of
Tap it to return to the map from any menu screen.
In the navigation menu, you have the following additional options:
edit a saved location.
Sw
itch to 2D (
several drivers are using the navigation system, they can create their own profiles with their
The following options are also available on many of the menu screens:
menu.
additional features on certain screens.
), 2D North up ( ) view or back to 3D mode.
21
Page 22

Tap the Back button to return to the previous screen. You can also press and hold this button to
quickly return to the Navigation view from any other screen.
22
Page 23

3 Using the navigation
By default, the VX7020A calculates routes using the road network of the maps provided with the
product.
You can select the destination and start navigating to it right away (normal navigation) if you need a route
for immediate navigation.
can also plan a rou te independently of your curr ent GPS position even without G PS reception. To
You
achieve this, you need to set a new starting point in the Multipoint Route menu. It also sus p ends guidance
so that the route is not recalculated when a new position is received. See Page 52.
You can plan routes with multiple destinations b y selecting a f irst and a seco nd destinati on and adding it
to your route. You can add as many destinations to your route as you like. See Page 49.
You can also use the VX7020A for off-road navigation. See page 63.
3.1 Selecting a destination
You can choose your destination by selecting one of the following options:
• Using combined search to search among different destination types at once, see page 23
• Entering a full address or a part of an address, for example a street name without a house number,
see page 26
• Selec
• Selecting a previously saved location as your destination, see page 43
• Selec
• Selecting a previously saved route, see page 46
• Enter
• Selecting a location on the map, see page 48
• Pla
ting a Place as your destination, see page 36
ting a location from the History of previously used destinations, see page 44
ing the coordinate of the destination, see page 47
nning a multipoint route, see page 49.
3.1.1 Using combined search
There are several ways to select your destination. You can initiate a separate search for addresses,
Places, saved locat ions, or recent destinations , but the fastest wa y to search for any of these is to use
combined search.
Perform the following steps to use combined search:
1. Tap
on the Navigation view to access the Navigation menu.
2. Tap
.
23
Page 24
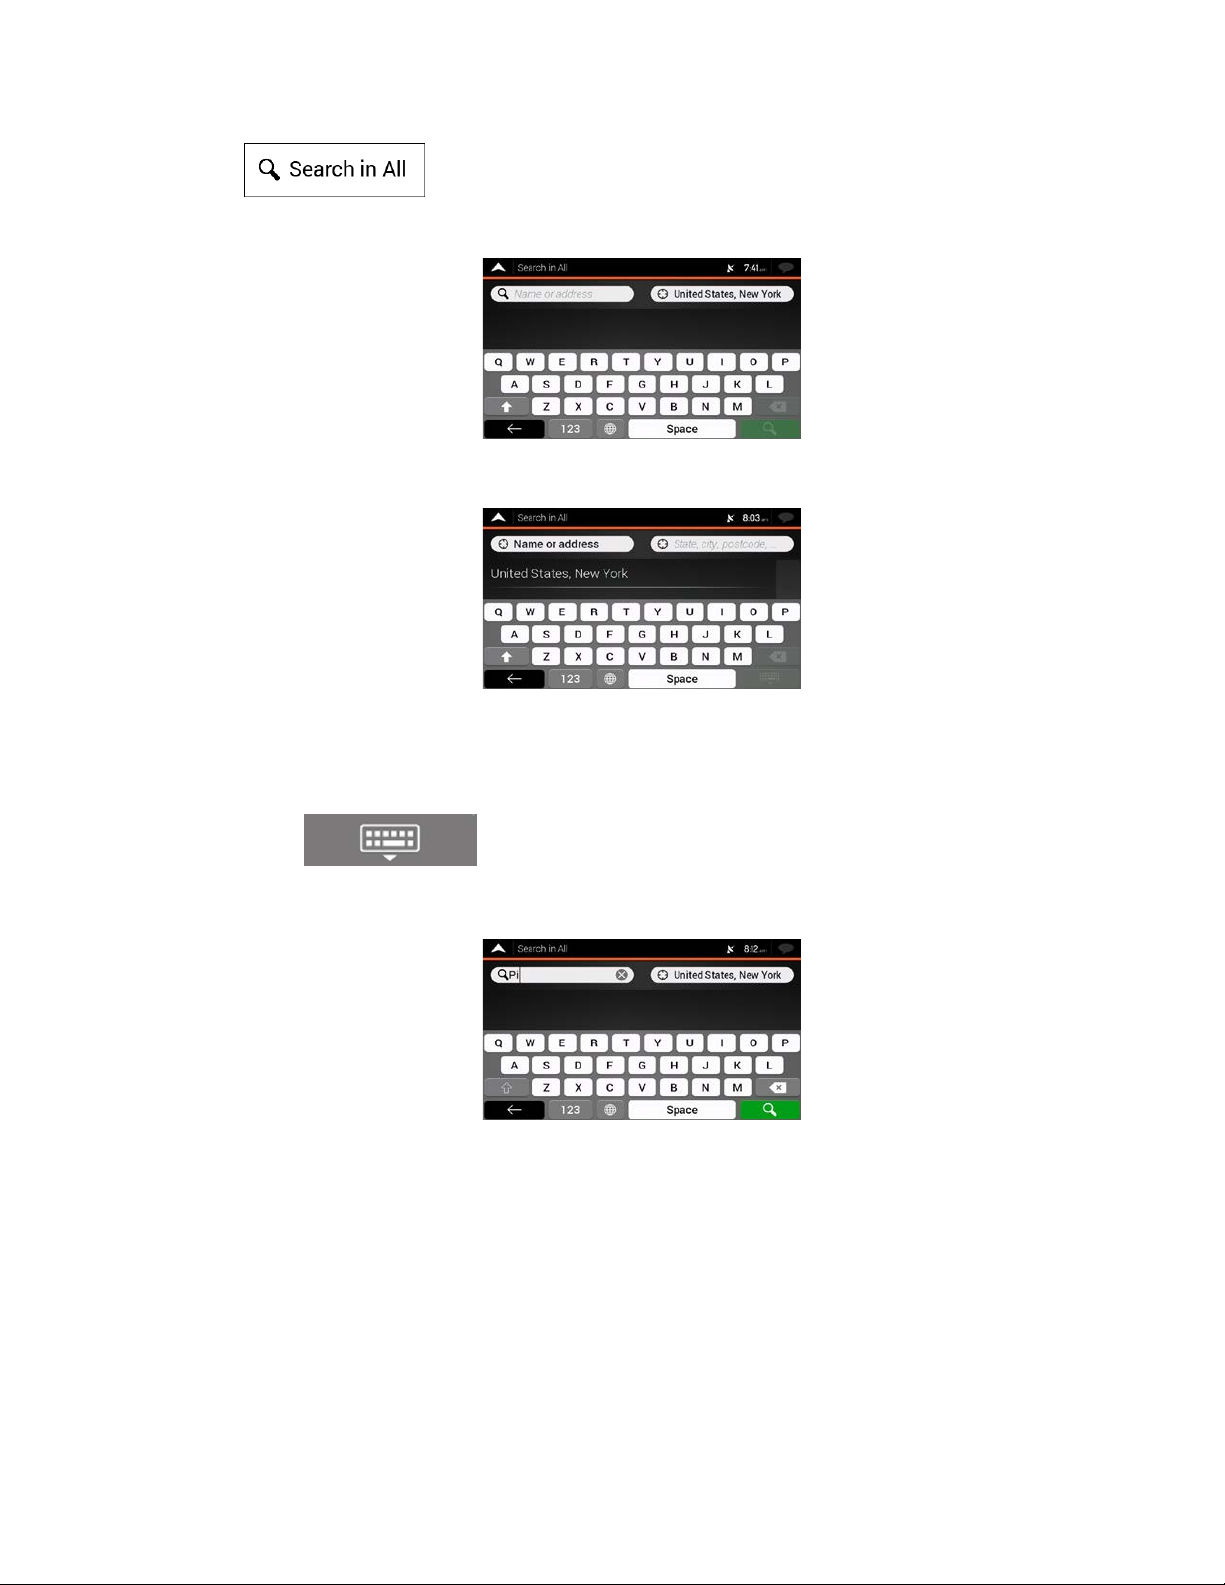
3. Tap . You can see the input field at the top of the screen. Right next to it you
can see the search area, the town around which the search is carried out. The default search area
is the area where you are located. For a local search, skip the next step.
4. (opt
5. With the proper search area displayed, start entering the name, address, or category of the
ional) To search in a different area, tap the input field with the search area, and start entering
the name of the new search area on the keyboard.
You
only need to enter a f ew letters to get a r esult. The m ost likely result appears below the input
field as you enter new letters.
a. If the new search area is in a different country or state, start entering the country/state and
the town.
b. Tap
destination you are looking f or.
to see the whole list of the matching results.
24
Page 25
6. Tap
To search for an intersection i
by the '&' sign. You do not need to use spaces before and after the separator character. For
example you can find the intersection of Collins Street and Douglas Avenue by entering strings,
lik
input string is, the fewer false results are expected. If you enter "Collins St&", you get all the
intersections of Collins Street and you can select the appropriate o
regardless of their type. Addresses, Places, Place categories, Saved locations, and recent
destinations are mixed in one list. You can immediately select the result you want to use as your
destination or narrow the list of results for only one type (for example, Places).
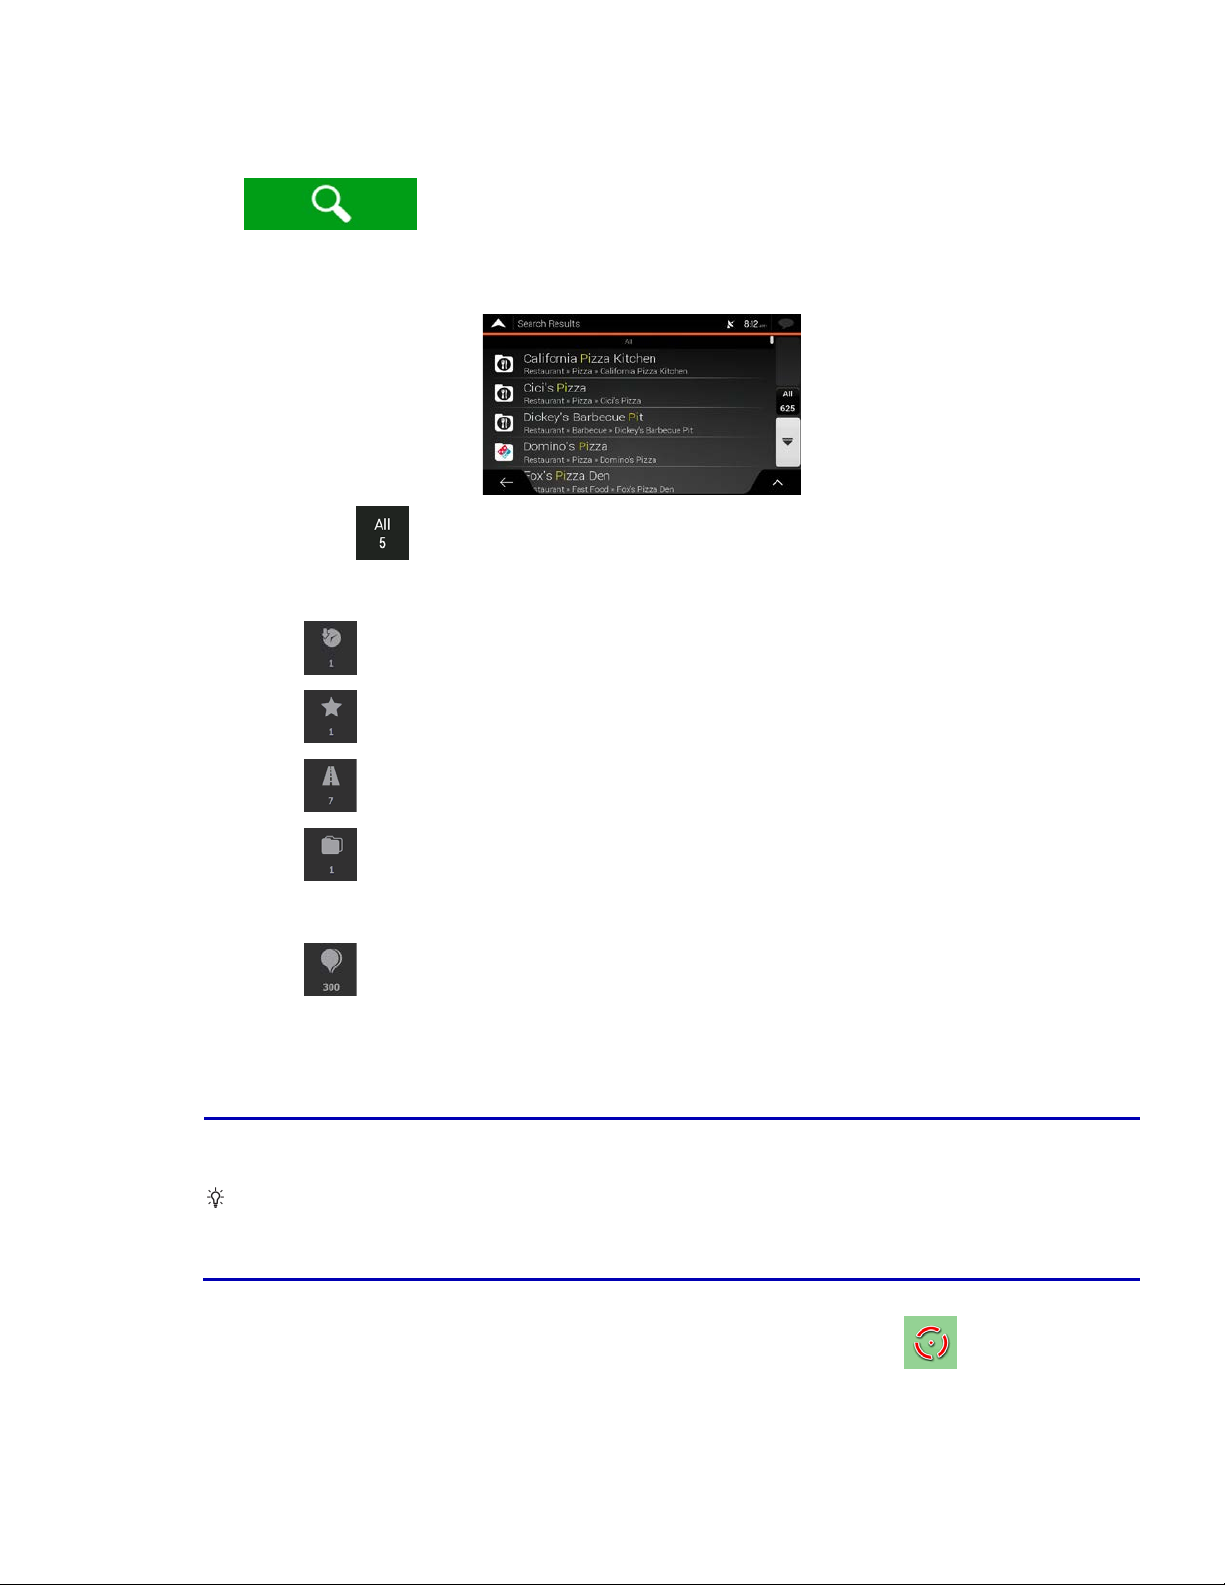
to switch to the result screen. You can see all the results in the list,
necessary, tap
7. If
of search results by type (the number on the related icon shows the number of the matching
results):
• Tap
• Tap
• Tap
• Tap
the categories. You get the list of Places in that category ordered by their distance from your
current position.
• Tap
location.
• (optional) If your product contains Places from different data providers, you can further
narrow the list by showing the results from one provider only. Look for the provider logos.
Tap one of them to see Places from that provider.
on the right side of the list and then tap the related button to narrow the list
to see the list of recent destinations with a matching name or address.
to see the list of your saved locations with a matching name.
to see the list of matching addresses.
to see the list of matching Place category names. Scroll the list and select one of
to see the list of matching Places ordered by their distance from your current
n the combined search, enter the names of the streets connected
Tip!
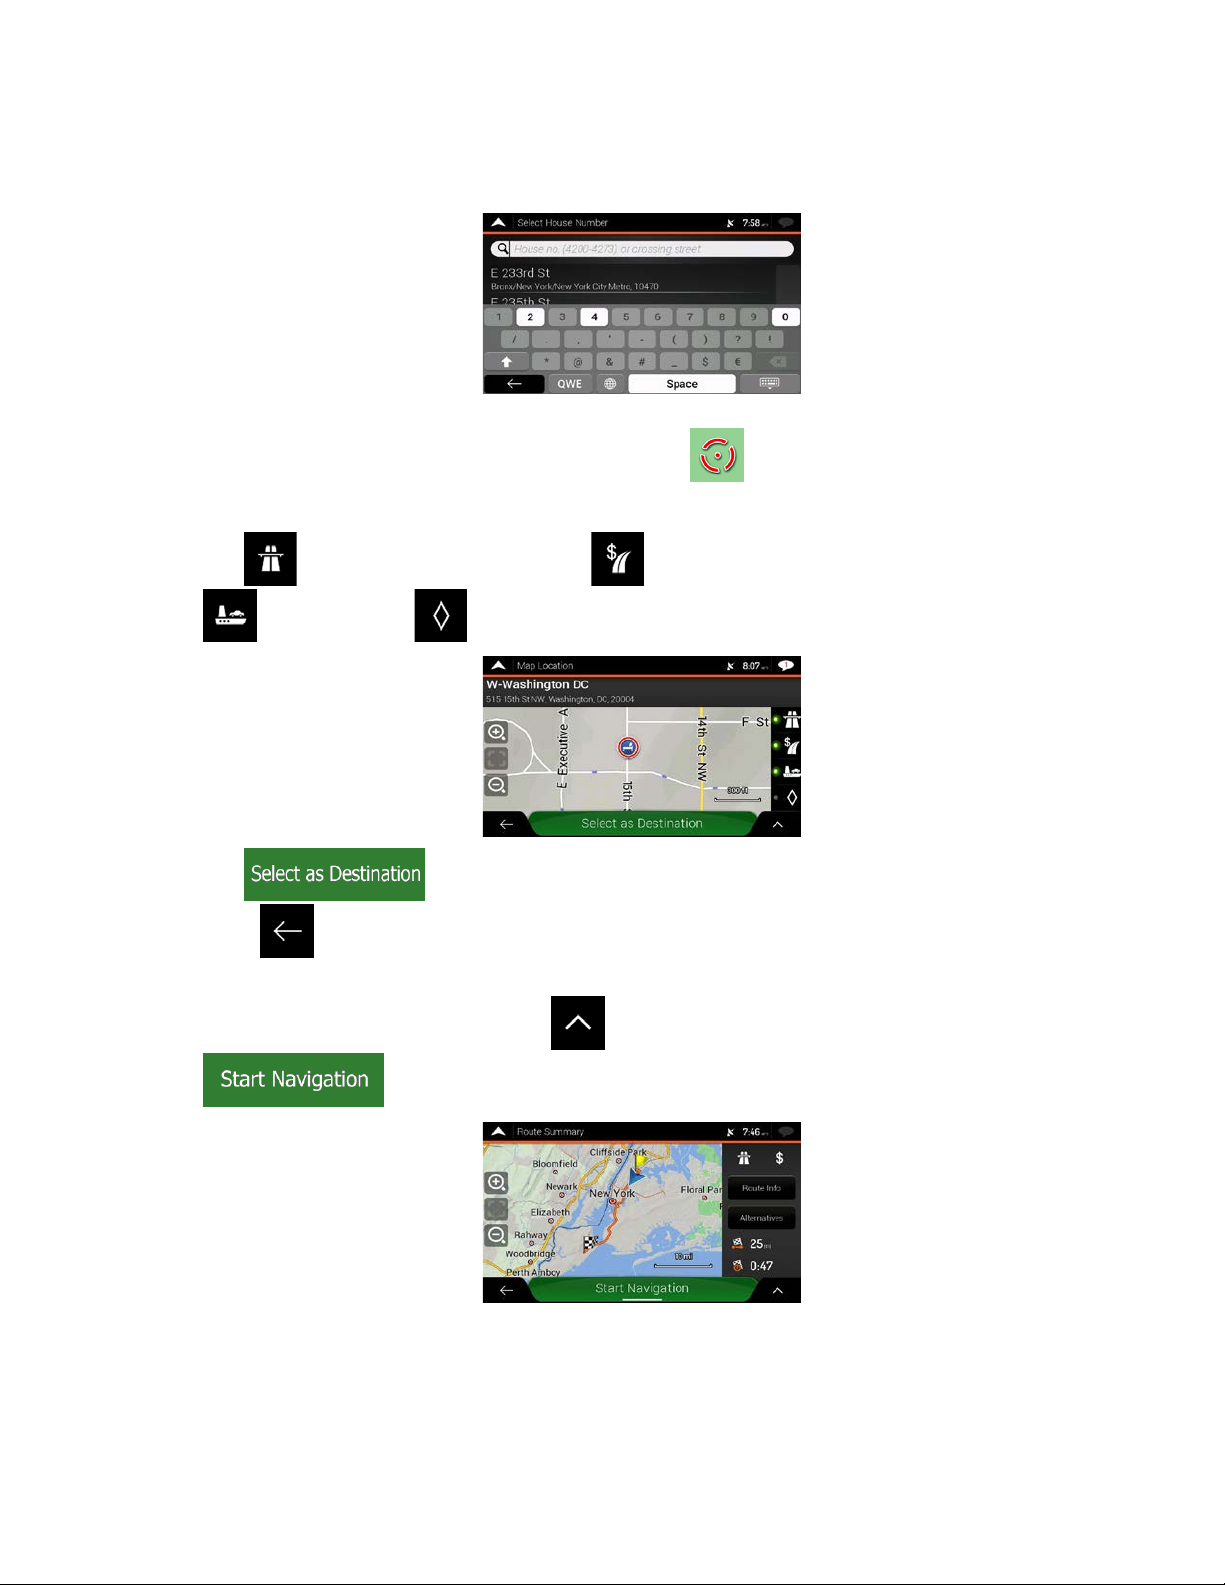
8. Once the destination is selected, a full screen map appears with the selected point in the middle. If
necessary, tap the map somewhere else to modify the destination. The cursor (
the new location.
e "Collins St & Douglas Ave", "Collins & Douglas", "Col&Doug", etc. The more precise the
25
ne from the result list.
) appears in
Page 26
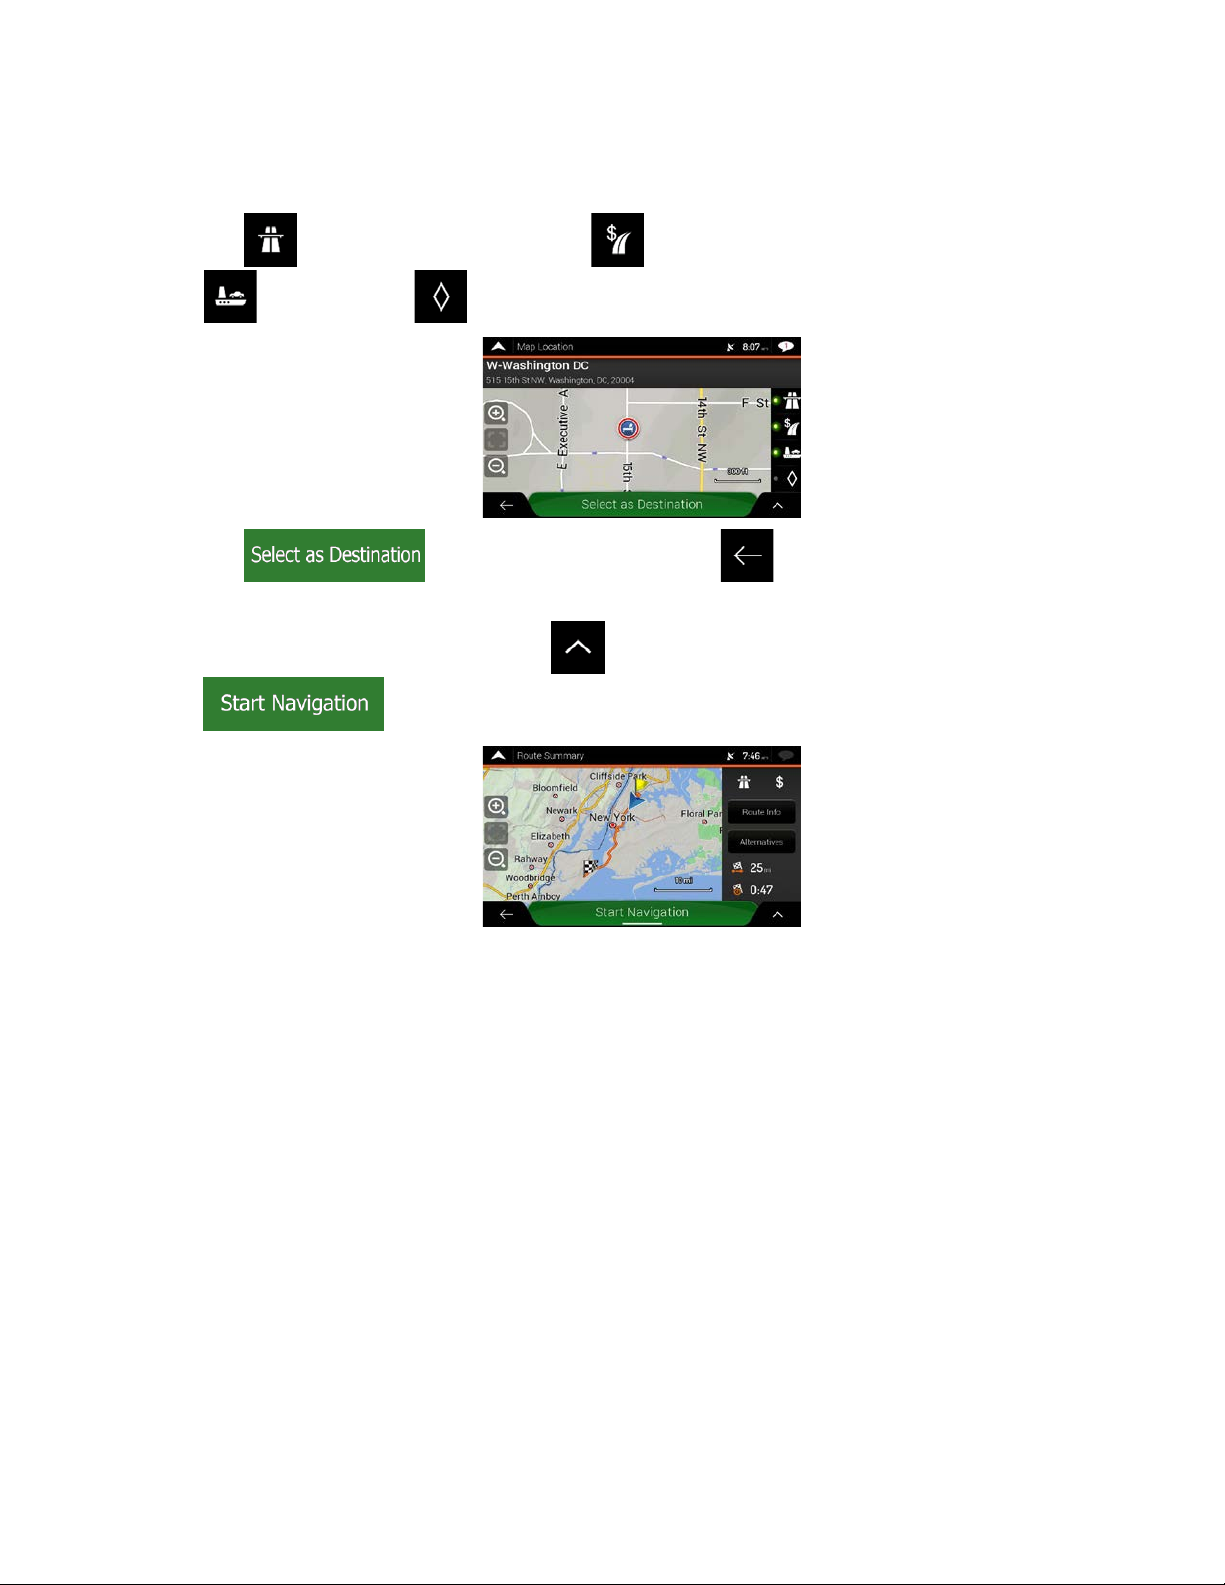
9. Chec
k the settings for road types and change them if necessary.
Tap
10. Tap
11. The route is calculated and the map appears showing the entire route, where you can check route
information and route alternatives. Tap
to enable or avoid freeways, tap for roads with Period Charge or Per-use Toll, tap
for ferries, or tap for carpool lanes.
to confirm the destination, or tap to select a different destination.
to modify the route parameters, or tap
to start your journey.
3.1.2 Selecting an address
If you know at least a part of the address, this is the quickest way to select your destination.
Using the same screen, you can find an address by entering the following information:
• The exact address, including the house number, see page 27
• The addr
• The center of a town, see page 32
• The
• An intersection, see page 34
• An
ess starting with the street name, see page 30
midpoint of a street, see page 33
y of the above, starting the search with the ZIP code, see page 35.
26
Page 27
3.1.2.1 Entering an address with states
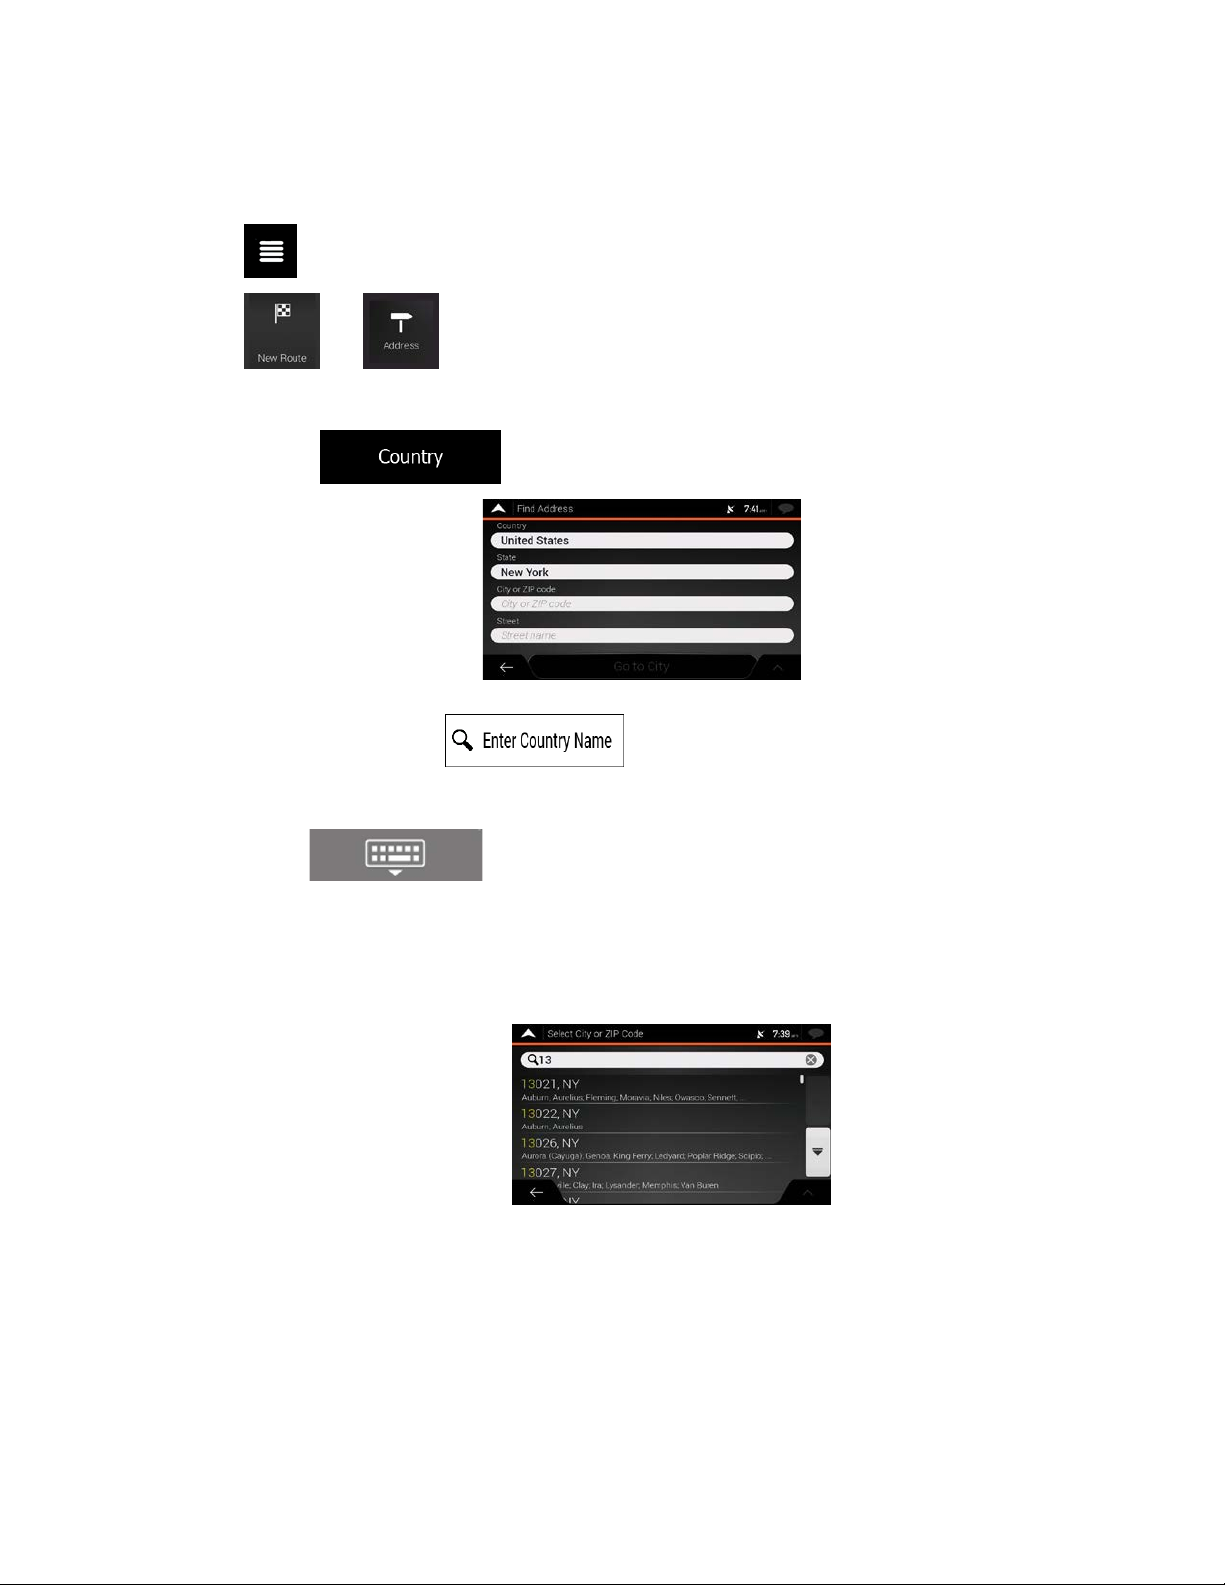
To enter an address as the destination, follow these steps:
1. Tap
2. Tap
By default, the VX7020A proposes the country and state where you are or in case there is no valid
3.
GPS
country. Tap
a. In t
on the Navigation view to access the Navigation menu.
and .
position, the country and state of the last known position. If needed, change the
.
he Select Country screen, you can immediately select a country from the list below the
input field or tap the
country on the keyboard. If you select a country without a state, you can search for a town
in all its states.
button and start entering the first few letters of the
b. Tap
4. If needed, select a new city.
a. Tap the City or ZIP code field.
b. (optional) In the Select City or ZIP code screen, you can immediately select a city from the
list of suggestions.
c. Ot
herwise, start entering the first few letters of the city on the keyboard. The names that
match the string appear in a list.
to open the list of results and select one country from the list.
27
Page 28
d. To open t
his list, tap
and select the city.
5. Ent
er the street name.
a. Tap the Street field.
b. (optional) On the Select Street screen, you can immediately select a street from the list of
suggestions.
c. Ot
herwise, start entering the street name on the keyboard, the names that match the string
appear in a list.
d. Tap
to open the list of results. Select the street from the list.
6. Ent
er the house number by performing the following steps:
a. Tap the House number or crossing street field.
b. Enter the house number on the keyboard. (To enter letters, tap
28
.)
Page 29
c. Tap t
he selected address to finish the address search.
7. A f
8. Check the settings for road types and change them if necessary.
9. Tap
10. The route is calculated and the map appears showing the entire route, where you can check route
ull screen map appears with the selected point in the middle. If necessary, tap the map
somewhere else to modify the destination. The cursor (
Tap
or tap
to enable or avoid freeways, tap for roads with Period Charge or Per-use Toll, tap
for ferries, or tap for carpool lanes.
to confirm the destination. You can also select a nearby point on the map
to select a different destination.
) appears at the new location.
information and route alternatives. Tap
to start your journey.
to modify the route parameters, or tap
29
Page 30

3.1.2.2 Entering an address starting with the street name
After you have selected th e c ountry and state, you can lea ve the c ity or ZIP code field em pt y and start t he
search with the street nam e. This way you can search in all str eets of a state. If you select the countr y
without a state, this function cannot work.
1. Tap
2. Tap
3.
By default, the VX7020A proposes the country and state where you are. If needed, change
the country. Tap
a. In the Select Country screen, you can immediately select a country from the list below the
b. Tap
4. If needed, select a new city.
a. Tap the City or ZIP code field.
b. (optional) In the Select City or ZIP code screen, you can immediately select a city from the
on the Navigation view to access the Navigation menu.
and .
.
input field or tap the
of the country on the keyboard.
to open the list of results and select one country from the list.
list of suggestions.
button and start entering the first few letters
c. Ot
herwise, start entering the first few letters of the city on the keyboard. The names that
match the string appear in a list.
d. To open this list, tap
and select the city.
30
Page 31

5. Ent
er the street name.
a. Tap the Street field.
b. (optional) On the Select Street screen, you can immediately select a street from the list of
suggestions.
c. Ot
herwise, start entering the street name on the keyboard, the names that match the string
appear in a list.
d. Tap
6. Ent
er the house number by performing the following steps:
a. Tap the House number or crossing street field.
b. Enter the house number on the keyboard. (To enter letters, tap
c. Tap the selected address to finish the address search.
to open the list of results. Select the street from the list.
.)
7. A f
8. Check the settings for road types and change them if necessary.
ull screen map appears with the selected point in the middle. If necessary, tap the map
somewhere else to modify the destination. The cursor (
31
) appears at the new location.
Page 32

Tap to enable or avoid freeways, tap for roads with Period Charge or Per-use Toll, tap
for ferries, or tap for carpool lanes.
9. Tap
or tap
10. The route is calculated and the map appears showing the entire route, where you can check route
information and route alternatives. Tap
to select a different destination.
to confirm the destination. You can also select a nearby point on the map
to modify the route parameters, or tap
to start your journey.
3.1.2.3 Selecting a town center
The town center is not the geometric center of the town but an arbitrary point the map creators have
chosen. In towns and vil lages, it is usu all y the m os t important inter secti on and in l arger to wns, it is on e of
the important intersections.
1. Go to
necessary.
2. If necessary, select a new town by performing the following steps:
a. Tap the Town or ZIP code field.
, , and modify the country and state as described earlier (page 27), if
32
Page 33

b. (opt
c. Ot
ional) On the Town of ZIP code screen, you can select a town from the list of
suggestions.
herwise, start entering the first few letters of the town. The names that match the string
appear in a list.
d. To open the list, tap
3. Tap
the route.
. This way the center of the displayed town becomes the destination of
and select the town.
3.1.2.4 Selecting the midpoint of a street
To navigate to the midpoint of a street without entering the house number, perform the following steps:
1. Go to
screen appears.
, , and select the country and town as described earlier. The Select Street
2. Enter the street name by performing the following steps:
a. Tap the Street name field.
b. (optional) On the Select Street screen, you can immediately select a street from the list of
suggestions.
33
Page 34

c. Otherwise, start entering the street name on the keyboard. The names that match the string
appear in a list.
d. Tap
3. Ins
tead of entering the house number, tap
selected as the destination.
to open the list of results. Select the street from the list.
3.1.2.5 Selecting an intersection in a town
To navigate to an intersection, perform the following steps:
1. Go to
2. Enter the street name by performing the following steps:
, , and select the country and city as described earlier.
. The midpoint of the street is
a. Tap the Street name field.
b. (optional) On the Select Street screen, you can immediately select a street from the list of
suggestions.
c. Ot
herwise, start entering the street name on the keyboard. The names that match the string
appear in a list.
d. Tap
to open the list of results. Select the street from the list.
34
Page 35

3. Tap t
he House number or crossing street field and browse the list of crossing streets or start
entering the street name in the field. Select one from the list.
3.1.2.6 Using the ZIP code to select a destination
You can also select an y kind of destination by enterin g the ZIP code instead of the city name. To select
the ZIP code, perform the following steps:
1. Go to
necessary.
2. Tap the Town or ZIP code field.
3. Enter the ZIP code by performing the following steps:
a. Tap
b. Start entering the ZIP code.
c. Tap
d. Find the place you need.
4. Cont
inue the search as described previously (page 27).
, , and modify the country and state as described earlier (page 27), if
to open the numeric keypad.
to open the list of results.
35
Page 36

3.1.3 Selecting a Place of Interest
You can search for Places of Interest (Places) in the menu.
Using the same screen, you can find a Place by selecting one of the following options:
• Finding frequently searched types of Places with the Quick search categories, see page 36
• Sear
• Sear
ase of emergency, you can also find help nearby, see page 42
In c
ching for a Place by its name, see page 40
ching for a Place by its category, see page 38
3.1.3.1 Using Quick search categories
The Quick search f eatur e h elps you quickly find the most frequently selec te d t ype s of Places . Perf or m the
following steps:
1. Tap
2. Tap
on the Navigation view to access the Navigation menu.
and .
ollowing Quick search categories appear:
The f
•
•
destination.
•
•
destination.
: If a planned route exists, gas stations are searched along the route.
: If a planned route exists, accommodation is searched around the
: If a planned route exists, restaurants are searched along the route.
: If a planned route exists, parking lots are searched around the
36
Page 37

If there is no planned route (destination is not selected), the search is carried out around the
current position. If the c urrent pos ition is not a vailable either (no G PS signal), places are searched
around the last known position.
3. Tap any of the quick search buttons to get an instant list of Places.
4. The P
5. (optional) If needed, tap
6. Browse the list and tap one of the list items. A full screen map appears with the selected point in
7. Tap
8. If necessary, tap the map somewhere else to modify the destination. The cursor (
9. Check the settings for road types and change them if necessary.
laces in the list can be ordered by their distance from the current or last known position, from
the destination, or by the length of the necessary detour. If you need to reorder the list, tap
To filter the list of results by providers, tap
screen.
the middle. The name and address of the Place is displayed at the top of the screen.
to see the details of the selected Place, or to save the location.
at the new location.
Tap
to enable or avoid freeways, tap for roads with Period Charge or Per-use Toll, tap
and then the provider logo on the right side of the
to further filter the list of results.
) appears
.
10. Tap
or tap
for ferries, or tap for carpool lanes.
to confirm the destination. You can also select a nearb y point on the map
to select a different destination.
37
Page 38

11. The route is calculated and the map appears showing the entire route, where you can check route
information and route alternatives. Tap
to start your journey.
to modify the route parameters, or tap
3.1.3.2 Searching by category
To search for Places by their categories and subcategories, perform the following steps:
1. Tap
2. Tap
on the Navigation view to access the Navigation menu.
and .
3. Tap
4. Select the area around which you would like to search for the Place by tapping
available, around the last known position). In this case, the following result list is ordered by the
distance from this position.
• Tap
This is useful when you search for a later stopover that results in a minimal detour only,
such as searching for upcoming gas stations or restaurants. (The result list is ordered by the
length of the necessary detour.)
• Tap
(The result list is ordered by the distance from the destination.)
.
. By default, the search area is around the current position (or if it is not
to search along the planned route, and not around a given point.
to search for a place around the destination of the planned route.
38
Page 39

• Tap
ordered by the distance from the center of the selected town.)
to search for a place within a selected town. (The result list is
5. (opt
6. Sel
7. You c
ional) If you have selected
ect one of the main Place categories (for example, Accommodation), then browse the
subcategories (for example, Hotel or Motel) to find your destination.
an turn the Category View off at any level to list all Places around the selected location or
along the route.
, select the town to search in.
8. (opt
ional) The Places in the list can be ordered by the following criteria:
• Name
• Their distance from the current or last known position
• Their distance from the selected town
• Their distance from the destination
• The length of the necessary detour.
39
Page 40

Tap to reorder the list.
To filter the list of r esults b y providers, tap
screen.
9. Browse the list and tap one of the list items. A full screen map appears with the selected point in
the middle.
10. The process continues the same way as in case of any other search for Places. See page 36.
and then the pr o vider lo go on the r i ght s ide of the
3.1.3.3 Searching by name
To search for a Place by name, browse the various Place c ategor ies, or us e th e m ixt ure of the two search
types, perform the following steps:
1. Tap
2. Tap
3. Tap
4. Select the area around which you would like to search for the Place. By default, the search area is
around the current position (or if it is not available, around the last known position). In this case,
on the Navigation view to access the Navigation menu.
and .
to open the Search By Name or Category window.
the result list is ordered by the distance from this position. Tap
the following search areas:
• Tap
ordered by the distance from the center of the selected town.)
• Tap
(The result list is ordered by the distance from the destination.)
• Tap
position. This is useful when you search for a later stopover that results in a minimal detour
only, such as searching for upcoming gas stations or restaurants. (The result list is ordered
by the length of the necessary detour.)
to search for a place within a selected town. (The result list is
to search for a place around the destination of the planned route.
to search along the planned route, and not around a given
to select one of
40
Page 41

5. (optional) If you have selected , select the town to search in.
You can search for the name of a Place in all categories by performing the following steps:
1. Tap
the categories.
ter entering a few letters, tap
2. Af
names containing the entered character sequence.
3. Br
owse the list, if necessary, and tap the desired list item. A full screen map appears with the
selected point in the m iddle. The process continues the sam e way as in case of an y other Places
search. See page 36.
. Using the keyboard, start entering the name of the Place or browse in
to open the list of Places or Place categories with
41
Page 42

3.1.3.4 Finding help nearby
To quickly search for nearby assistance, perform the following steps:
1. Tap
2. Tap
aces in the fol lowing pre-set searc h categories can be searched for ar ound the current position
Pl
(or around the last known position if the current position is not available):
•
•
•
on the Navigation view to access the Navigation menu.
and .
: Car repair and roadside assistance services
: Medical and emergency services
: Police stations
•
3. Tap any of the quick search buttons to get an instant list of those types of Places.
4. (opt
5. Browse the list and tap one of the list items. A full screen map appears with the selected point in
6. The process continues the same way as in case of any other Places search. See page 36.
ional) The Places in the list can be ordered by the following criteria:
• By their distance from the current or last known position
• B y name.
Tap
the middle.
to reorder the list.
: Gas stations
42
Page 43

3.1.4 Selecting a Saved Location
To select a location that you have already saved (page 59), perform the following steps:
1. Tap
2. Tap
3. The list of saved locations is displayed. It contains two pre-set categories: Home and Work.
4. Tap t
results.
5. (optional) If needed, tap
locations or delete any of them.
6. After you have selected a saved location as the destination, a full screen map appears with the
selected point in the middle.
on the Navigation view to access the Navigation menu.
and .
he location that you want to set as your destination. If necessary, browse the list to see more
to enable the editing option so that you can rename the saved
7. If necessary, tap the map somewhere else to modify the destination. The cursor (
the new location.
8. Check the settings for road types and change them if necessary.
Tap
9. Tap
or tap
to enable or avoid freeways, tap for roads with Period Charge or Per-use Toll, tap
for ferries, or tap for carpool lanes.
to confirm the destination. You can also select a nearby point on the map
to select a different destination.
) appears in
43
Page 44

10. The route is calculated and the map appears showing the entire route, where you can check route
information and route alternatives. Tap
to start your journey.
to modify the route parameters, or tap
3.1.5 Selecting a History item
The destinations that you have used e arlier app ear i n the His tor y list. Sm art His tory off ers these locati ons
from your previous desti nations, using param eters like the current tim e of day, the day of week, and th e
current location. The more you use the navigation software, the better it can guess your desired
destination. To select a History item, perform the following steps:
1. Tap
on the Navigation view to access the Navigation menu.
2. Tap
access. You can select one of them as your destination.
3. To open a
with the three most likely destinations that are selected based on your previous routes (Smart
History). The rest of the destinations are ordered by the time they were last selected. If necessary,
scroll the list to see earlier destinations.
4. Select a destination from the list.
5. A full screen map appears with the selected point in the middle. If necessary, tap the map
somewhere else to modify the destination. The cursor (
6. Check the settings for road types and change them if necessary.
. Two of the Smart History Items are displayed in the New Route to... screen for easy
ll the history items, tap
. The list of recent destinations appears. The list begins
) appears at the new location.
44
Page 45

Tap to enable or avoid freeways, tap for roads with Period Charge or Per-use Toll, tap
for ferries, or tap for carpool lanes.
7. Tap
or tap
8. The route is calculated and the map appears showing the entire route, where you can check route
information and route alternatives. Tap
to select a different destination.
to confirm the destination. You can also select a near b y point on the m ap
to modify the route parameters, or tap
to start your journey.
45
Page 46

3.1.6 Selecting a saved route
The routes that you have s aved earlier app ear in a list. T o select a previous rout e, perform t he following
steps:
1. Tap
2. Tap
3. The l
4. Select a route and the Multipoint Route screen appears. If necessary, modify the saved route.
Otherwise, tap
5. The route is calculated and the map appears showing the entire route, where you can check route
information and route alternatives. Tap
on the Navigation view to access the Navigation menu.
and .
ist of saved routes appears. If necessary, scroll the list to see earlier routes.
.
to modify the route parameters, or tap
to start your journey.
46
Page 47

3.1.7 Entering coordinates
(optional) If necessary, tap
format.
To select a destination by entering its coordinates, perform the following steps:
1. Tap
2. Tap
3. You can enter the latitude and longitude values in any of the following formats: decimal degrees,
degrees and decimal minutes, or degrees, minutes and decimal seconds. Tap
.
Tip!
on the Navigation view to access the Navigation menu.
and .
then and enter the coordinate in UTM
4. A full screen map appears with the selected point in the middle. If necessary, tap the map
somewhere else to modify the destination. The cursor (
) appears at the new location.
47
Page 48

5. Chec
k the settings for road types and change them if necessary.
Tap
6. Tap
or tap
7. The route is calculated and the map appears showing the entire route, where you can check route
information and route alternatives. Tap
to enable or avoid freeways, tap for roads with Period Charge or Per-use Toll, tap
for ferries, or tap for carpool lanes.
to confirm the destination. You can also select a nearby point on the map
to select a different destination.
to modify the route parameters, or tap
to start your journey.
3.1.8 Selecting a location on the map
To select a map location, perform the following steps:
1. Locate your destination on the map. Move and scale the map as necessary.
48
Page 49

2. Tap the location that you want to select as your destination. The cursor ( ) appears there.
If you already have a planned route, tap
location to your route.
3. (optional) If needed, tap
Tip!
4. Tap to select the cursor as the destination.
5. The route is calculated and the map appears showing the entire route, where you can check route
information and route alternatives. Tap
to start your journey.
to list the Places near the selected point or to save this location.
and to add the selected
to modify the route parameters, or tap
3.1.9 Planning a Multipoint Route
To build your route destination-by-destination, perform the following steps:
1. Tap
2. Tap
3. Ther
current GPS position.
on the Navigation view to access the Navigation menu.
.
e is only one line in the list of route points, the starting point of the route, which is normally the
49
Page 50

4. Tap to select the destination.
5. The New Route to... screen appears, where you can select the destination of the route the same
way as described in the previous sections.
6. Wh
7. To add m
8. (optional) Tap
9. When you have added all the route points, tap
en the selected location appears on the map, tap
needed, you can add further intermediate destinations.
ore route points, tap
destination. The Add to Route... menu appears again, where you can select the new route point
the same way as you have set the destination before.
to optimize the whole route or the order of waypoints. You can also delete all
the destinations.
automatically calculated.
or tap to change the final
and the list returns. If
and the planned route is
50
Page 51

3.2 Checking Route Information and Alternatives
To get a map o vervie w of t he pla nne d route and ch ec k diff er ent parameters of the p lan ned r ou te, per f or m
the following steps:
1. Tap
2. In the Navigation menu, tap
3. The planned route is displayed in its full length on the map with the following additional information:
• The total length of route
• The total time of route.
4. You
• Tap
on the Navigation view to access the Navigation menu.
.
have the following options on this screen:
to receive detailed information about the route.
If
you tap
information, for example to show only freeway sections or toll roads.
on the right side of the screen, you can narrow the route
51
Page 52

• Tap
to list route alternatives and select the most suitable route for you.
Tap
preferences or display the itinerary.
on the Route Summary screen to carry out additional actions, for example edit your route
3.3 Editing the route
When navigation has a lready started, there are s everal ways to modif y the planned route. You have the
following options:
• Setting a new starting point, see page 52
• Add
• Modi
• Saving the planned route, see page 55
• Del
• Selecting a route alternative when planning the route, see page 56
• Sel
• Pausing guidance, see page 58.
ing an additional destination, see page 54
fying the list of destinations, see page 54
eting the planned route, see page 56
ecting a route alternative for an existing route, see page 57
3.3.1 Setting a new starting point
For normal navigation, all routes are calculated from the cur rent position. You can pause navigat ion to
check future routes, s imulate them or see their length in t ime and dis tance. T hen you can s et the star ting
point of the route to a location other than the current GPS position.
1. Tap
on the Navigation view to access the Navigation menu.
52
Page 53

2. In t
he Navigation menu, tap
.
3. The f
4. The C
5. You c
irst line from the bottom is the start of the route, normally the current GPS position. Tap
, select , and confirm your action at the warning message.
hange Start to... screen appears. Select the starting point of the route the same way you
select a destination.
an see the new starting point on the map. Tap
screen appears where you can continue adding a destination to your route.
and the Multipoint Route
6. Tap
that there is no GPS reception). If a planned route already exists, it is now recalculated starting
from the selected location.
to continue. The map returns with a transparent position marker (showing
53
Page 54

7. To return to normal navigation, tap .
3.3.2 Adding an additional destination
If you already have a plann ed rout e and you s elect a ne w destina tion as des cribe d in the above s ecti ons,
the route to the previous destination is deleted and a new route is calculated.
To add a new intermediate destination to the planned route, perform one of the following actions:
• Tap the map anywhere to browse it. After selecting the location on the map, tap
to add the selected location to your route as an intermediate destination. The
other destinations of the route remain intact.
• Tap
on page 49.
on the Navigation view and tap . Add a destination to your route as described
3.3.3 Modifying the list of destinations
To edit your route, perform the following steps:
1. Tap
2. In the Navigation menu, tap
on the Navigation view to access the Navigation menu.
.
and
have the following options on this screen:
You
• Tap
• Tap the name of the intermediate destination to move it up or down in the list, to save the
location, or to delete it from the list.
to delete all the destinations, or optimize the waypoints or the route.
54
Page 55

• If you have a route with at least one intermediate destination, you can delete the waypoint
from the list right from the Main menu. Tap
3.3.4 Saving the planned route
To save the planned route, perform the following steps:
1. Select a destination as described earlier and tap
2. Tap
3. Type in a name and tap
and .
.
, then confirm the deletion.
.
4. The rout
By selecting a previously saved route, the VX7020A recalculates the route using the saved
destination and/or
e is saved and it is available in
the waypoints.
, .
55
Page 56

3.3.5 Deleting the planned route
You have the following two options to delete the navigated route:
• If you already have a planned route and you select a new destination as described in the above
sections, the route to the previous destination is automatically deleted and a new route is
calculated.
• In the Navigation menu, tap
deleted after a confirmation. If you have waypoints, you can choose to delete the whole route, or
only the next waypoint.
or . If there are no waypoints, the planned route is
3.3.6 Selecting a route alternative when planning the route
To select from diff erent route alter natives or change t he route pl anning m ethod after you have se lected a
new destination, perform the following steps:
1. Select a destination as explained earlier, and go to the route confirmation screen.
2. Tap
3. You can see the basic details of route alternatives. Tap any of them to see it on the map.
.
56
Page 57

4. To v
iew more suggestions, tap
with different route planning methods.
and scroll down for other alternative routes
5. Sel
ect one of the route alternatives and tap
The VX7020A recalculates the route. Tap
orange line now shows the new planned route.
to return to the previous screen.
to start your journey. The
3.3.7 Selecting a route alternative for an existing route
To recalculate the pla nned route with a different route plann ing method and to compare differ ent route
alternatives, perform the following steps:
1. Tap
2. You can access the list of route alternatives from the Navigation menu in one of the following
ways:
• Tap
• Tap
on the Navigation view to access the Navigation menu.
and .
and .
3. You c
an see the basic details of a few route alternatives. Tap any of them to see it on the map.
there are suitable alter nat ives c alcul ate d with t h e rou te pl ann in g method that is selected in Route
If
preferences (page 74), they are shown o n to p of th e l i s t. Rout es with o ther r o ute pla nni ng methods
are shown at the bottom of the list.
57
Page 58

4. If there are more than a few suggestions, you can tap and scroll down for
routes.
5. Sel
ect one of the route alternatives and tap
The VX7020A replaces the original route. Tap The
ange line now shows the new planned route.
or
to return to the previous screen.
to start your journey.
3.3.8 Pausing guidance
When you are driving a planne d route but you do not need gui dance for a certain part of the route, you
can suspend it and continue when it is needed again.
In the Navigation menu, tap
to suspend guidance.
Tap
to resume guidance.
58
Page 59

3.4 Saving a location
To add any location t o the saved loc ations (th e list of f requentl y used des tinations ), perf orm the foll owing
steps:
1. Select a destination as described before. It can be an address, a Place, any location on the map, a
previously used destination from History, and so on.
2. When the map appears with the selected location in the middle, tap
3. Tap
4. (optional) Using the keyboard, you can change the name offered for the Saved Location.
5. Tap
.
to save the location.
.
To add your home and work address to the saved locations, perform the following steps:
1. On the Navigation view, tap
2. Tap
selection.
3. You can search for the address as described on page 23.
Planning a route to one of the saved locations is described on page 43.
or . Tap to confirm your
, , and .
59
Page 60

3.4.1 Editing a saved location
In Saved Locations, Home and Work cannot be renamed. To change your home or work
location, tap or , and confirm the address change.
To edit a location that you have already added as a Saved Location, perform the f ollowing st eps :
1. On the Navigation view, tap
2. The list of Saved locations is displayed.
3. Tap
4. Tap the location you want to edit, tap
the keyboard, then tap
Note!
and .
, , and .
and enter the name of the location on
.
5. Tap .
Adding a location to the list of saved locations is descr i bed on page 59.
3.5 Adding an Alert Point
You can save any map location as an Alert Point, for example a speed camera or a school zone.
1. If you would like to save an Alert Point for the first time, switch on the
Navigation menu, tap
and confirm your selection.
, , then . Switch on
. In the
60
Page 61

Note!
The warning for road safety cameras is disabled when you are in a country where road safety
camera warning is prohibited. However, you must make sure that using this feature is legal in
the cou
1. Return to the Navigation view, and select the Alert Point. The red cursor ( ) appears there.
ntry where you intend to use it.
2. Tap
3. Sc
4. Select the type of the Alert Point, the direction from which you expect the alert, and (if applicable)
5. Tap
roll down the list and tap
the speed limit for this Alert Point.
.
.
to save the location as a new Alert Point.
61
Page 62

3.6 Running a Simulation
To run a simulated navigation that demonstrates the planned route, perform the following steps:
1. Tap
2. In the Navigation menu, tap
3. Tap .
on the Navigation view to access the Navigation menu.
.
4. Tap
through the whole planned route using a realistic speed.
onal) You have the follo wing contr ols dur ing the si m ulation (the contr ol butt ons disappear after
(opti
a few seconds but you can open them again if you tap the map):
•
•
: Jump to the next route event (maneuver).
: Pause the simulation.
. The simulation starts from the starting point of the route and leads you
62
Page 63

• : Jump to the previous route event (maneuver).
•
5. Tap
: Tap to increase the speed of the simulation to 4, 8 or 16 times faster. Tap again to
return to normal speed.
to stop the simulation.
3.7 Off-road navigation
When first started, the VX7020A calculates routes using the road network of the maps provided with
the product. If you want to disregard roads during navigation, you can switch to off-road mode, for
example when driving in a desert.
3.7.1 Switching to off-road navigation
To switch to off-road navigation, perform the following steps:
1. On the Navigation view, tap
2. Tap
Most of the procedur es described for on-roa d n av iga tio n also ap ply to off-road navigat io n. Ho we ver , th er e
are some that are not available in this navigation mode. For example:
and select .
, , and .
• You cannot open the itinerar y as you have no maneuvers just route points and straight lines
between them.
• There are no route alternatives and route planning method.
• Vehicle settings are disabled.
3.7.2 Selecting the destination in off-road mode
Selecting a destinat ion (waypoint or f inal destination) i s the same as descr ibed in the previous sections.
The only differenc e is t hat route points ar e link ed to f orm a route with str aigh t line s r egardles s of the road
network and traffic regulations.
63
Page 64

3.7.3 Navigating in off-road mode
If you do no
The real difference bet ween on-road and off-road modes is the navigation its elf. When you are on the
Navigation view with an off-road route:
• Your position and heading is not aligned to the nearest road.
• There is no turn-by-turn navigation, just a recommended direction.
You can see an orange lin e drawn between your curr ent position and the next d estination to reach. T he
Turn Preview field in the top lef t corner shows a compas s with your bearing and the dista nce of the next
destination.
Wh
en you reach the final destination, the navigation ends.
t want to use off-road navigation, switch back to on-road navigation by tapping
Note!
and .
64
Page 65

4 Reference guide
The following sections describe the different concepts and menu screens of the VX7020A.
4.1 Concepts
The following sections describe and explain navigation-related concepts.
4.1.1 2D/3D GPS reception
The GPS receiver uses satellite signals t o calculate its ( your) position and need s at least four signals to
give a three-dimensional position, including elevation. Because the satellites are moving and because
objects can block the signals, your GPS device might not receive four signals. If three satellites are
available, the receiver c an calculate the horizonta l GPS position but the accurac y is lower and the GPS
device does not give you elevation data; only 2D reception is possible.
Several factors have an impact on the deviat ion bet we en your r ea l pos itio n an d t h e one gi ven b y the G P S
device. For example, signal delay in the ionosphere or reflecting objects near the GPS device have a
different and varying impact on how accurately the GPS device can calculate your position.
4.1.2 Natural and TTS voices (TTS not supported on the VX7020A)
Natural voices are the traditional type of voice instr uctions. Every phrase that occur s in voice guidance
messages is recorded in a studio with a real person. The advantage of pre-recorded voice is that it
sounds really natura l, but the range of instr uctions that c an be given this way is limited. Loc ation-specific
information such as street names cannot be announced.
TTS technology provides a machine-generated way to gi ve voice instructions. The advantag e of TTS is
that it can announce street names, traffic events, route summary, and traffic rules.
4.1.3 Road safety cameras and other proximity Alert Points
There is a special proximity warning for road safety cameras (like speed or red light cameras) and other
proximity Alert Points (like schools or railroad crossings). These Alert Points are not part of the
VX7020A. You can download Alert points from www.naviextras.com or you can upload points in a
specific text file if needed.
You ca
The application can warn you when you appr oach r oad s afet y camer as lik e spee d cam eras or danger ous
areas like school zones or railroad crossings. You can set up the different alert types individual ly in the
Warnings settings, see page 80.
The following warning types are available:
n add your own Alert Points. See page 60.
65
Page 66

• Audio warning: beeps are played (if the voice guidance language that you selected is a natural
The warning for road safety cameras is usually disabled when you are in a country where road
safety camera warnings are prohibited. Make sure that using this feature is legal in the country
where you intend to oper
voice) or the type of the alert can be announced (TTS voice) while you are approaching one of
these points, and an extra alert warns you if you exceed the given speed limit while approaching.
• Visual warning: the type of the Alert Point, its distance and the related speed limit appear on the
Navigation view while you are approaching one of these locations.
For some of the Alert Points, either the enforced or expected speed limit is available. For these points, the
audio alert can be different if you are below or above the given speed limit.
• Onl y when spe edi ng: The a udi o alert is onl y played wh en you exceed the given speed limit.
• When approaching: The audio alert is always played when approaching one of these Alert Points.
In order to draw your attention, the alert is different when you exceed the speed limit.
Note!
ate. Use it on your own responsibility.
4.1.4 Route calculation and recalculation
A route is a sequence of route events , that is, maneuvers (for example, turns and tr affic cir cles) to reac h
the destination. T he route contains on e starting po int and one or m ore destinations . The starting poi nt is
the current (or last kno wn) position b y default. If you need to see a f uture route, the s tarting point ca n be
replaced with any other given point. See page 52.
Once the destination has been selected, the
preferences. These preferences are the route planning method, the vehicle type, and the road types used
or avoided when calculating the route. For detailed information on all the preferences, see Route
preferences settings, page 74.
The VX7020A automatically recalculates the route if you deviate from the proposed itinerary.
VX7020A calculates the route based on your
4.1.5 Smart Zoom
Smart Zoom provides the following features:
• While following a route: When approaching a turn, it zooms in and raises the view angle to let
you easily recognize your next maneuver. If the next turn is at a distance, it zooms out and lowers
the view angle to be flat so you can see the road in front of you.
• While driving without a planned route: Smart Zoom zooms in if you drive slowly and zooms out
when you drive at a high speed.
66
Page 67

4.1.6 Speed limit warning
Maps may contain information about the speed limits of the road segments. The VX7020A is able to
warn you if you exceed the current limit. This information may not be available for your region, or may
not be fully correct for all roads on the map.
The maximum speed set in the vehicle profile (page
alerts you if you exceed the pre-set value even if the legal speed limit is higher.
ed warning can be fine-tuned in Warnings. See page 80.
Spe
You can also set the relative speed tolerance above which the application initiates the warning.
The following warning types are available:
• Audio warning: You receive a verbal warning when you exceed the speed limit with the given
percentage.
• Visual warning: The current speed limit is shown on the map when you exceed it (for example
).
You can also choose to see the speed limit sign on the map all the time.
75) is also used for this warning. The VX7020A
4.1.7 Intelligent navigation
With the help of intellige nt navigation, the planned route can adapt to t raffic and other changes during
navigation. The following sections describe thes e feat ur es .
4.1.7.1 Congestion detour on highways
The VX7020A may offer a detour when you slow down on a highway due to a traffic jam. The
Potential congestion detour window appears and shows the length and duration of the detour.
67
Page 68

You ca
n ignore this message and keep the original route by tapping
or you can
check the suggested route by tapping
tapping the plus/minus signs, you can increase or decrease the distance to avoid on the highway.
By
You can accept the recommended detour by tapping
.
.
4.1.7.2 Real-time alternative routes (Not Supported on the VX7020A)
iGo Primo Next Gen may offer an alternative route on normal roads in case of a traffic jam. The possible
alternative route window appears and shows the length and duration of the detour.
You can ignore this message and keep the original route by tapping
check the suggested r oute b y tapping
tapping
.
68
. You can accept th e recomm ended detour by
or you can
Page 69

4.1.7.3 Parking around destination
If you leave the planned route by exiting a freeway, the VX7020A tries to guess the reason for
making a detour. B y tap pi n g
around the destinat ion. By tapping the arro ws on the sides, you ca n switch between the rec ommended
parking facilities.
tapping
By
destination.
, you can open a top-d o w n map with the recommended parking Places
and , the selected parking place becomes your
4.1.7.4 Hints upon detour
If you leave the planned route by exiting a freeway, the VX7020A tries to guess the reason for making
a detour. The Reason for detour window appears and shows available gas stations, restaurants or other
Places around the current position. Also, if there are avoidable parts of the original route ahead (like a
tunnel, a toll road or a ferry), you can find them in the list, in case you want to bypass them.
By tapping one of the Places, the VX7020A creates a waypoint and navigates you to the selected
place. You can ignore them by tapping
69
.
Page 70

4.2 Useful Information menu
Button
Description
Shows information on the current position (latitude, longitude, nearest town, next crossing
Offers a list of countries with useful driving information about the selected country (for example
page
sunrise and sunset times for all your route points.
seful Information menu provides various additional functions. It can be found in the Navigation
The U
menu. You need an Inter net connection via your cel l phone to access online services, like parking and
weather information.
street, and so on) or the last known position if GPS reception is not available. See page 71.
Offers assistance near your current position. See page 42.
speed limits, maximum blood alcohol level).
Shows statistical data of your trips, like the start time, end time and average speed, see
72. Track logs, the s equen ce of the positions given b y the GPS rec eiver, can b e saved t ogether
with the trip logs. They can later be displayed on the map.
Shows a world map with the sunlit and dark areas of the world. Tap to check the exact
Shows the GPS Information screen with satellite position and signal strength information.
70
Page 71

4.2.1 Where Am I
This screen contains information about the current position (or about the last known position if GPS
reception is not available). You can access it the following two ways:
• By going to the Navigation menu and tapping
• By
tapping the current street name if it is displayed below the current position marker on the map.
The following information is shown on the Where Am I screen:
• Address details (when available) of the current position
• Latitude and Longitude (coordinate of the current position in WGS84 format)
• The nearest town
and .
• Next crossing road/street
• Previous crossing road/street.
You can also perform some actions on this screen.
Tap
country information.
You can also search for assis tance near your current position. Tap
quick search and select a category. For detailed information, see page 42.
and to add the curr ent position to the saved lo cations and to check the
71
to open a new screen for
Page 72

4.2.2 Trip Monitor
Button
Function
of the
You can export all logs into the sdmmc folder.
Trip Monitor logs information about your route.
You can record a new trip by tapping
By tapping
By tapping your record ed tr ip on th e Tr ip Monitor s cr een, you can c heck inform ation suc h as t im e, speed,
altitude and distance.
on the Trip Monitor screen, you can select the following options:
By selecting a recorded trip, you can delete, rename, or change the color
recorded route.
You can access the Trip Monitor Settings, where you can enable saving the trip logs
automatically or you can save the trip logs manually. See page 85.
and stop it by tapping .
By tapping
check the elevation and speed profiles.
on the Trip Data Details screen, you can view the trip on the map, export track logs, and
72
Page 73

4.3 Settings menu
Button
Function
Select the type of vehicle you are driving, the road types used in route planning, and the route
Enable and set up warnings for speed limit, Alert Points (such as speed cameras), and road
Enable the online weather forecast and the automatic download of weather information.
Enable or disable the online fuel price service and select the fuel types to consider.
You can configure the navigation settings, and modify the behavior of the VX7020A, by tapping
and .
Tap the arrows to view the content of other pages.
ettings menu provides the following options:
The S
planning method.
Adjust the different sound volumes.
signs.
Fine-tune the a ppearanc e of the Na vigation vie w or adjus t how the sof t ware he lps you nav igate
with different kinds of route-related information on the Na v iga t io n view.
Change the voice guid ance language, set t he time zone, the m easurement units, the t ime and
date, and formats, and customize the application for your local language.
Enable or disable menu animations.
73
Page 74

Turn the automatic trip log saving on or off and check the current size of the trip database.
Enable or disable services that require Internet connection.
Collects usage information and GPS logs that may be used for improving the application and
the quality and coverage of maps. Tap this button to enable or disable collecting these data.
Modify the basic software parameters set during the initial set-up process. See page 6.
Button
Function
Select your preferred road types for the route. See page 77.
4.3.1 Route preferences settings
The following settings determine how routes are calculated:
Set the type of veh icle you w ant to use to navigate the route. Bas ed on this setting,
some of the road t ypes can be exc luded from the rou te, or some of the restrictions
may not be taken into account in route calculation. See page 75.
Edit the parameters of the vehicle profile. See page 75.
Optimize the ro ute calculati on for differ ent situations a nd vehicle t ypes by changi ng
the planning method. See page 77.
Select on-road or off-road navigation. See page 63.
74
Page 75

4.3.1.1 Vehicle profile
Button
Description
restrictions and directional constraints are taken into account when
used only if the y are inevitable to reach
restrictions nor directional constraints are taken into account
You can select the following vehicle types:
Maneuver
planning a route.
Roads are used only if access for cars is allowed.
Private roads and res ident-only roads are
the destination.
Walkways are excluded from routes.
Neither maneuver
when planning a route.
Roads are used only if access for pedestrians is allowed.
Controlled-access roads are excluded from routes.
A private road is used only if the destination is there.
Speed limits are not used in route calculation and an average walking speed is used
when calculating the estimated time of arrival.
Maneuver restrictions and direc tional constraints (if they are applied to b icycles in
the map data) are taken into account when planning a route.
Roads are used only if access for bicycles or pedestrians is allowed.
Controlled-access roads are excluded from routes.
A private road is used only if the destination is there.
Speed limits are not us ed in rout e calc ulation and an avera ge c ycling spe ed is used
when calculating the estimated time of arrival.
All maneuvers are available in intersections.
One-way streets are tak en into account so that driving in the opposite dir ection is
allowed at low speed.
A private road is used only if the destination is there.
Walkways are excluded from routes.
Maneuver restrictions an d one-way streets ar e taken into ac count when pl anning a
route.
Roads are used only if access for buses is allowed.
Private roads, resident-only roads and walkways are excluded from routes.
75
Page 76

Maneuver restrictions an d one-way streets ar e
taken into account when pl anning a
Button
Function
Set the maximum speed you travel at.
The unit for
The unit for
route.
Roads are used only if access for taxis is allowed.
Private roads, resident-only roads and walkways are excluded from routes.
Maneuver restrictions an d one-way streets ar e taken into ac count when pl anning a
route.
Roads are used only if access for trucks is allowed.
Private roads, resident-only roads and walkways are excluded from routes.
U-turns are excluded fr om routes (turning back on a divided r oad is not consider ed
as a U-turn).
If the map contains dat a on dimens ion, wei ght an d fr eight restr ictions , the y can al so
be taken into account when planning a route.
Creating a profile m akes it possible to set up vehicl e parameters us ed in route planning. You can hav e
several profiles for the same vehicle.
To add a new vehicle profile, perform the following steps:
1. Tap
2. Select the vehicle type and set the parameters below. Depending on the vehicle type, some
parameters may not be available in the list.
3. Tap
You can set the following parameters:
Rename the profile for something meaningful, for example John's car.
Enter the average consumption of your vehicle in built-up areas.
consumption can be set in Regional Settings.
Enter the average consumption of your vehicle on highways.
consumption can be set in Regional Settin gs .
Select the engine and fuel type of your vehicle. It helps estimate the CO2 emission.
, browse the list of vehicles, and tap .
to access additional parameters.
To reset all vehicle profiles to their default settings, tap , , and
.
76
Page 77

4.3.1.2 Route Planning Method types
Button
Description
of the speed, this
You can select from the following route planning method types:
Gives a quick route if you can travel at or near the spe ed limit on all ro ads. Usua lly,
the best selection for fast and normal cars.
Results in a route with fewer turns and no difficult maneuvers. With this option, you
can make the VX7020A take, for example, the freeway instead of a series of smaller
roads or streets.
Gives a short route to minimize the travel dista nce. Usuall y optimal for pedes trians,
cyclists or slow ve hicles. Searching for a short r oute regardless
route type is rarely optimal for normal vehicles.
For vehicle types where Green routing is not available, this method combines the
benefits of Fast and Short. The VX7020A calculates as if it were calculating the
Fast route, but it takes other roads as well to save fuel.
Depending on the vehicle type, some methods may not be available.
4.3.1.3 Navigation Mode
You can switch bet ween on-road and off-road navigation by tapping and selecting
or (page 63).
4.3.1.4 Road types
To let the route fit your needs, you can also set which road types are to be considered for or to be
excluded from the route.
Excluding a road type is a preference. It does not neces sarily mean total prohibition. If your destination
can only be accessed usin g some of the excluded roa d types, the y are used onl y as much as necessar y.
In this case, a warning icon is shown on the Route information screen, and the part of the route not
matching your preference is displayed in a different color on the map.
77
Page 78

The following road types are available:
Button
Description
You might need to avoid freeways when you are driving a slow car or you are
be enabled or disabled s eparately from
in
Button
Function
Adjust the volume or mute the sound played when pressing the button.
towing another vehicle.
Charge roads are pa y roads wher e you can p urchase a pas s or vignette to use t he
road for a longer period of time. They can
toll roads.
Per-use toll roads are pay roads where there is a per-use charge in the routes by
default. If you disable toll roads, the VX7020A plans the best toll-free route.
The VX7020A includes ferries in a planned route by default. However, a map does
not necessarily contain information about the accessibility of temporary ferries. You
might also need to pay a fare on ferries.
Car shuttle trains ar e use d to tr ansportss vehicles for a relati vely s hort dis tance and
they usually connect place s that ar e not eas ily acces sible on a r oad, f or exam ple, in
Switzerland.
Carpool or HOV lanes can be used if a gi ven number of pass engers is traveling
the vehicle. Check whether you are allowe d to use carpool lanes before enabling
this road type.
The VX7020A excludes unpaved roads by default. Unpaved roads can be in a bad
condition and you usually cannot reach the speed limit on them.
4.3.2 Sound settings
You can modify the following settings:
This is the main volume control. Adjust all the sound types below or mute them.
Adjust the volume of the guidance sounds (verbal instructions) or mute it.
Adjust the volume of the non-verbal alert sounds (beeps) or mute it.
Turn off the attention tone preceding verbal instructions or adjust its volume.
78
Page 79

You have the following options for each sound type:
Button
Function
Volume slider
Button
Function
after
the voice instructions, that is ho w much they tell and how
Allow reading out a quick summary of the route whenever a route is calculated.
Allow reading out information about the country you have entered, when you
Adjust the volume of the related sound.
Mute the related sound. The slider becomes inactive. Tap again to re-enable it.
Disable verbal instructions. This function is enabled by default.
Choose from the following options:
• Announce the street names in the native language area of the selected
voice guidance language.
• Announce the road numbers only.
• Announce the maneuvers only.
Street names sound cor r ect only if you use a native voic e profile for the countr y.
Choose from the following options:
• Try to read the street names in a foreign country.
• Announce the road numbers only.
• Announce the maneuver only.
Set whether you want an immediate announc ement for the next maneuver
each turn, or it is enough to receive the information when the turn is near.
Set the verbosity of
often they speak.
• Minimal: the voice instruction is given once right before the next
maneuver.
• Medium: the voice instruction is given when approaching the next
maneuver and it is repeated right before the maneuver.
• Verbose: the voice instruction is given first relatively far from the next
maneuver, it is repeated when approaching the next turn, and it is
repeated again right before the actual maneuver.
cross country borders.
79
Page 80

Allow reading out real-time traffi c messages.
Allow announcing system messages.
4.3.3 Warnings settings
Button
Description
This setting lets you decide whether you wish to receive visible and/or audible
shown
You can also set the relative speed above which the application initiates the
You can enable and modify the following settings:
The VX7020A is able to warn you if you exceed the current speed limit. This
information may not be available in your region, or may not be fully correct for all
roads on the map.
The maximum speed set in the vehicle profile is also used for this warning. The
VX7020A alerts you if you exceed the pre-set value even if the legal speed limit is
higher.
warnings.
The following warning types are available:
• Visual warning: the current speed limit is shown on the map when you
exceed it.
• Audio and Visual warning: besides the current speed limit being shown on
the map, you also receive a verbal warning when you exceed the speed limit
with the set percentage.
If you prefer to see the speed limit sign on the map all the time (normally, it is
only if you exceed the limit), you can set it here.
warning by adjusting a slider. The value can be different within and outside towns.
80
Page 81

Tap it to receive a warning when approaching a ro ad safety camera or other
Alert
life road signs. Tap it to enab le or disable the warning for
For each category
Points like school zon es or railroad crossin gs. You must make s ure that using this
feature is legal in the country where you intend to use it.
You can set the warning type for the different Alert Point categories (alert t ypes)
individually. The following warning types are available:
• Visual warning: the type of the Alert Point, its distance, and the related speed
limit appear on the Navigation view while you are approaching one of these
locations.
• Audio and Visual warning: besides the visual alert, beeps are played (when
using a natural voice) or the type of the alert is announced (in case of a TTS
voice) while you are approaching one of these points, and an extra alert
warns you if you exceed the given speed lim it while appr oac hing.
For some of the Aler t Points, the enf orced or expecte d speed lim it is avail able. For
these points, the audi o alert can be different if you are bel ow or above the given
speed limit.
• Only when speeding: The audio warning is only played when you exceed the
given speed limit.
• When approaching: The audio warning is always played when approaching
one of these Alert Points. In order to draw your attention, the audio alert is
different when you exceed the speed limit.
Maps may contain dri ver alert information th at c an be s ho wn on t h e Na vi gat io n vi e w
in a similar way as realthese road segments (f or example, dangers and sharp curves).
of warning signs, set the warnin g type (visua l or audio and visual) and t he distan ce
from the hazard to receive the warning at.
4.3.4 Navigation View settings
These settings allow you to f ine-t un e th e a ppe ar ance of the Navigation vie w. You c an a lso adjust how the
software helps you navigate with different kinds of route-related information on the Navig ati on vi e w.
Tap
the list for both daytime and nighttime use, show or hide 3D buildings, landmarks, and manage your
Place visibility sets (which Places to show on the map).
to adj ust the navigati on view to your needs , choose suitabl e color themes from
81
Page 82

an modify the following settings:
Button
Function
modes or let the sof tware switch between
s are bright and
s are darker to keep the
known
make
the map crowded so it is a good idea to keep as few of them on the map as
of arrival at
distance to waypoint, time to waypoint, heading, or altitude. Without a planned
the
Turn the Route Progress Bar on or off. If turned on, an orange line is displayed on
stations, restaurants)
exits. Choose from the Places
You c
Adjust the basic zoom and tilt levels to your needs. Three levels are available.
Switch between da ytime and night color
the two modes automatic ally a few minutes before s unrise and a few minutes after
sunset.
Select the color scheme used in daytime mode. Daytime color
similar to paper road maps.
Select the color scheme used in night m ode. Night color
average brightness of the screen low.
Show or hide 3D landmarks (3D representations of prominent or wellobjects).
Show or hide 3D city models (3D block representation of full city building data
containing actual building size and position on the map).
Show or hide the 3D elevation of the terrain.
Turn on Track Logs to show them on the map or turn them off.
Select which Places t o show on the map whi le navigating. Too m any Places
possible. Tap the name of the Place categor y to sho w/ hid e it or t o ope n the list of its
subcategories.
You can modify the following additional settings on the Navigation View screen:
If you are navigating with a planned route, you can set three data fields to be
displayed on the Navigation view. You can choose from the time
destination, distanc e to destination, tim e to destination, tim e of arrival at wa ypoint,
route, there is only one data field that can be set to show the heading or
altitude.
the side of the screen, and a blue arrow on it shows your progress.
Turn it on to get freeway service inform ation (f or example gas
or turn it off if you do not need it.
Select the service types displayed for the freeway
categories.
82
Page 83

Zoom out and show an o ver view of the surr ound ing ar ea if the next maneuver
is far
Whenever adequate information is available, lane information similar to the real
exit or a complex intersection and the needed
3D view of the junction. T ap it to turn
down overview of the
and you are driving on a freeway. When you get close to the e vent, the norm al m ap
view returns.
ones on road signs abo ve the roa d is displa yed at the top of the m ap. Tap it t o turn
this feature on or off.
If you are approaching a freeway
information exists, the m ap is replaced with a
this feature on or let the map be displayed for the whole route.
When entering tunnels , the surf ace roads and bu ildings c an be disturbing. T ap it to
show a generic pictur e of a tunnel instead of the map. A toptunnel and the remaining distance are also displayed.
In certain situations, the VX7020A offers a detour when there is a traffic jam on a
highway. See page 67.
In certain situations, the VX7020A offers an alternative route when there is a traffic
jam on the road. See page 68.
In certain situations, the VX7020A offers parking Places when you approach your
destination.
See page 69.
In certain situations, the VX7020A offers different route alternatives when you
l
eave the planned route and suddenly exit the freeway. See page 69.
83
Page 84

4.3.5 Regional settings
Button
Description
It displays the current written language of the user interface. Tap it to select a new
change this setting and confirm it.
e languages and speakers. Tap any of these to hear a sample voice
By default, the time zone is taken from the map information and adjusted by your
time.
Button
Function
You can modify the following settings:
language from the list of available languages. The application restarts after you
It shows the current voice g uid ance pr of il e. T ap it to s el ect a ne w prof ile fr om the li st
of availabl
prompt. Just tap when you have selected the new spoken language.
Different voice profiles are capable of different levels of service:
• Natural Voice (street names not announced): These pre-recorded sounds
can only tell you basic information about turns and distances.
• TTS Voice (street names announced): These computed voices can read out
complex instructions, street names or system messages.
• TTS Voice with a microphone icon: Besides the above-mentioned profiles, it
can also be used for voice recognition.
You can set the measurement units and time/date format to be used. The
VX7020A may not support all the listed units in some voice guidance languages.
current location. Here you can manually set the time zone and the daylight saving
4.3.6 Display settings
You can modify the following settings:
When animation is turned on, buttons on m enus and k eyboard sc reens, and scr een
transitions are animated.
84
Page 85

4.3.7 Trip Monitor settings
Button
Description
an let the
e sum of
Trip logs contain useful i nformation about your recorded tr ips. You can enable and modif y the following
settings:
Trip monitor can record statistical data of your trips. If you need these logs later, you
can let the application save them automatically for you.
Track logs, the sequenc e of the posit ions given by the GPS receiver, c an be saved
together with trip logs. They can later be displayed on the map. You c
application save track logs whenever it saves a trip.
This is not a button. T his lin e s ho ws th e c ur rent size of the trip data bas e, t h
all trip and track logs saved.
85
Page 86

5 Troubleshooting
This section offers possible solutions to issues that may occur during the operation of the VX7020A.
5.1 GPS signal cannot be received
Issue: The current location is not available, because GPS signal cannot be received.
Cause 1
tunnels as the signal weakens or distorts as it travels through solid material.
Solution 1: Go to a place where there is a c lear sight of the sky or at least a b igger part of the sky is
visible.
Cause 2: It may take several minutes to receive GPS signals when first using the VX7020A, or when
your
Solution 2: Wait a few minutes for the GPS signal.
: GPS signal is weak or may not be available if you are betwe en tall buildings, in garages or
last known position is farther away from your current position.
5.2 Address cannot be found
Issue: The VX7020A cannot find the address you entered.
se: The digital map data may not include every single address.
Cau
Solution 1: If the house number is not known or the VX7020A cannot find it, select only the street name.
This way, the VX7020A will navigate you to the midpoint of the street, where you can find the exact
address more easily.
Sol
ution 2: Search for another address that is close to the destinati on.
Solution 3: Search for the coordinates or a nearby Place of Interest.
86
Page 87

5.3 The calculated route is not optimal
Issue: The planned route is too long or includes several minor roads.
Cause: In
Solution: Select your preferred route planning method by performing the following steps:
1. Tap
2. Tap
, the route planning method is not set to the optimal parameter.
, , and .
and select your preferred route, for example or
. See Page 77.
5.4 Disabling the speed limit warning
Issue: The speed limit warning is signalling even when the actual speed limit is kept.
Cause: The speed limit in the digital map data might differ from the actual speed lim it of your current
location.
Solution: Disable the speed warning by performing the following steps:
1. Tap
2. Tap
, , and . .
, and .
87
Page 88

5.5 Keyboard buttons are grayed out
Issue: Some keyboard buttons are grayed out and cannot be used.
Cause: VX7020A has a smart keyboard for address search, which means that only those buttons are
active that
So
lution: Check if you entered the name correctly. If the name is correct, then the address you are
looking for is not available in the digital map data.
can be used to type a name that is available on the map.
5.6 The map is hidden behind an image of a junction
Issue: The map is not visible because it is hidden behind an image of a junction.
Cause:
exists, the map is replaced with a 3D v iew of the junction. T he lanes you need t o take are displa yed with
arrows.
Solution: If you want to hide the curr ently displayed junction and r eturn to the Navigation view, tap the
picture. To turn off this feature, perform the following steps:
If you are approaching a freeway exit or a complex intersection and the needed information
1. Tap
2. Tap
, , and .
. Now the tunnel view will not appear again.
88
Page 89

6 End-user license a greement
0. Definitions
The following term s shall have the meani ng defined hereun der in this agreem ent when used with c apital
letters. The text of this agreement may also contain further defined terms.
“Agreement” means this En d Us er License Agreem ent ( EULA) containing the ter m s and cond it ions of us e
of the Software, Databases and Services by You as the end user.
“Database” or “Database Content” means geographicall y referenced data such as map data, points of
interest (“POI”), 3D m odels, TMC locat ion tables, phonem es, images , audio or video files and other data,
as well as any data suitable for integration into the Software.
“Device” means the hardware equipment manufactured or distributed by Licensor on which the
Navigation Product is installed.
“Software” means the tur n-by-turn navigat ion software insta lled on the De vice, including t he core engine ,
other software modules and the graphical user interface, capable of processing and/or displaying the
Databases and the S ervices. The term Software shall by def inition include any modifications, u pdates,
upgrades thereto.
“Service” means the pr ovision of dynamically changing infor mation that may be provided by-, displayed
by- or tr ansmitted through the Software, for example, but not lim ited to Traffic Message C hannel (TMC)
service, search, weather information and community based services. Services are usually transmitted
online via the Internet, but may be conve yed via other means (e.g. vi a radiowa ves in case of “RDS T MC”
service).
“Navigation Product” means the Software, the Dat aba s es and t he Serv ices tog et her , as (i) distr ib ute d with
the Device by the Licensor or (ii) otherwise installed on the Device.
1. The contracting parties
1.1 This Agreement has be en entered into by and bet ween You as the end user (herein after: “Us er”) and
the business entity distributing/selling the Device together with the Navigation Product, under its own
name and/or brandi ng (herein after: “Licens or”). This A greement set s out the co nditions and limitations of
use of the Navigation Product. The User and the Licensor are referred together as: “Parties”.
1.2 User represents and warrants that (i) he/she is not located in a country that is subject to a U.S.
Government embargo, or that has been designated by the U. S. Government as a “terrorist suppor ting”
country; and (ii) he/she is not listed on any U.S. Government list of prohibited or restricted parties.
2. Conclusion of the Agreement
2.1 This Agreement is concluded by implicit conduct of the Parties without signing the Agreem ent.
2.2 The User hereby acknowledges that following the lawful acquisition of the Navigation Product
constituting the obj ect of this Agr eem ent, an y of the f ollo wing ac tions of use s hall m ean that th e User h as
accepted the t erms and conditions of this Agreem ent as legall y binding: (i) an y degree of use, installat ion
onto a computer or other Device (cell phone, multi-function device, personal navigation device, in-car
navigation or multi func tion head unit, etc.), ( ii) pressing the “Acc ept” button displa yed by the Navigation
Product during installation or use. The time of conclusion of the present Agreement is the time of
executing the first action of use (commencement of use).
2.3 This Agreement shal l by no means authorize the us age of the Navigation Product b y those persons
having unlawfully acquired the Navigation Product or having unlawfully installed it on a Device or in a
vehicle.
2.4 U.S. Government Us ers. If you acquire the Nav igation Product by or on beh alf of the United States
Government or any other entity seeking or applying rights similar to those customarily claimed by the
United States Governm ent, you are on notice t hat the Navigation Product is a commercial item as th at
89
Page 90

term is defined at 48 C.F .R (“FAR”) 2.101 and that all use of the Navigation Product is subject t o this
Agreement.
3 Applicable law and venue
3.1 This Agreement will be governed by the la ws of the country wher e the Licensor has its statutor y seat
or in the absence of such incorporation where it has its central administration (“country of residence”)
without regard to such country’s choice of law provisions.
3.2 The courts of the co untry of residence s pecified in Section 3.1. above shall have jur isdiction over all
disputes related to this Agreement.
3.3 If the User is a “ consumer” (a natural person wh o purchased and uses the Navig ation Product for
purposes outside its business activities or which can be regarded as being outside his trade or
profession), the above choice of law and choice of venue shall not, have the result of depriving the
consumer of the protection afforded to him by provisions (including any provision regulating the court
having jurisdiction) that cannot be derogated from by agreement by virtue of the law which, in the
absence of choice, would have been applicable.
3.4 The United Nations Co nvention on Contr acts for the International Sa les of Goods is here by excluded
from application to this Agreement.
4. Object of the Agreement and Termination
4.1 The object of this A greement shall be the Naviga tion Product as a whole and the c omponents (the
Software, the Databas es and the Servic es) thereof. Us er acknowledges that all author’s rig hts (including
the economic rights) vested in the Software are owned by NNG Software Dev eloping and Commercial
Ltd. (registered se at: 35-37 Szépvölg yi út, H-1037 Budapes t, Hungary; com pany reg.no.: 01-09-891838,
http://www.nng.com), herein referred to as: Software Owner.
4.2 Any form of displa y, storage, coding, including printed, el ectronic or graphic display, storage, sour ce
or object code, or an y other as yet u ndefined form of display, storage, or coding, or an y medium thereof
shall be deemed parts of the Navigation Product.
4.3 Error corrections, upda tes or upgrades or any oth er modifications to the Na vigation Product used b y
the User following the conclusion of this Agreement shall also be used in accordance with this
Agreement.
4.4 Your rights under this Agreement will terminate immediately without notice from Licensor if you
materially breach th em, or take any action in d erogation of the rights of Lic ensor, any suppliers ho lding
rights in the Navigation Product and/or their suppliers. Licensor may terminate this Agreement if the
Navigation Product as a whole or an y part thereof becomes , or in Licensor’s (or other suppliers holding
rights in the Navigation Pr oduct) reasona ble op inion likel y to becom e, t he subjec t of a c laim of intel lectu al
property infringement or trade secret misappropriation. Upon termination, you will cease use of, and
delete the Navigation Product and confirm compliance in writing to Licensor, if requested.
4.5 Licensor reserves the right to upgrade, modify, withdraw, suspend, or discontinue any Service
offering, functional ity or feature of t he Navigation Product or m ay terminate d istribution of the Navigation
Product in its sole discretion due to reasons such as (but not limited to): the provision is no longer
financially or other wise feasible f or Licensor, t echnology advanc es, or conditions rules chan ge, end user
feedback indicates a change or is needed, agreements with third parties no longer permit us to make their
Databases or Services av ai lab le, or ex ter nal is sues ar i se that make it imprudent or imprac tic al to cont in ue
with the provision.
4.6 Licensor reserves the right to replace any Database or Service with another Database or Service
having the same or similar functionality. Such change may be executed upon the sole discretion of
Licensor.
5. Rights under copyright or other intellectual property rights
5.1 All material cop yrights and other intellectual property rights vested in th e Navigation Product or an y
parts thereof, that are not explicitly granted in this Agreement or by virtue of law, are reserved.
90
Page 91

5.2 Intellectual pr operty rights of Licensor, the Software Owner or other right holders extend to the whole
Navigation Product and to its parts separately as well.
5.3 The owner(s) of the copyrights of the Database(s) is (are) the Licensor, or natural person(s) or
corporate business e ntity(ies) (ref erred to as: “Data base Owner”) who supply th em. In the event that the
copyright owner of the Database is not the Licensor, the Licensor hereby states that it has obtained
sufficient usage and re presentation right s from the Databas e Owners in order to utilize the D atabases in
line with this Agr eement.
5.4 Services availab le through the Software m ay transmit various types of information or c ontent to the
User, which inform ation or content is gathere d and pr ovided by th ird party ser vice provi ders. Theref ore it
is understood and accept ed that neither the Licensor nor the S oftware Owner has the ability or right to
control, alter or m odify such inform ation and content and t he Service itse lf is only a funct ion enabling th e
Software to access, download and display information and content to the User.
5.5 Database Owners , service providers and an y special terms and condit ions regarding their produc ts
contained in- or displayed through the Navigation Produc t may be listed in the “Abo ut” or similar menu
item of the Navigation Pr oduc t, or in in th e De vice doc um entation or at a w ebsite addres s indic ated in t he
“About” section.
6. Rights of the User
6.1 Without prejudice to Section 6.2 below, by default the User is entitled to run the Navigation Product on
the Device the Navigaiton Product came preinstalled before purchase or on the Device in connection
which the Navigation Product was pr ovided by Licens or, and to run and use one copy of the N avigation
Product or a preinsta lled c o p y of the Na vig at ion Prod uct thereon. The Navig ati on Pr oduct is for the User’s
personal purposes only.
6.2 In the event that the Nav igation Product comes preinstall ed on- or otherwise licens ed together with
the Device or acquir ed from Licensor b y the User for a specific De vice, the Navigation Pr oduct shall be
tied to the Device and may not be separated-, transf erred to-, or used with another De vice or sold to
another User without selling the Device itself.
6.3 The Databases and S ervices pr ovided t o the User may onl y be used togeth er with User ’s cop y of the
Software and may not be used separately or with another copy of the Software.
7. Limitations of use
7.1 The User is not entitled:
7.1.1 To duplicate the Navigation Product (to make a copy thereof) or any part of it, except to the
extent allowed by this Agreement or applicable law;
7.1.2 To res
without
7.1.3 To translate the Navigation Product (including translation (compilation) to other
programming languages);
7.1.4
To decompile, disassemble, or reverse engineer the Navigation Product;
7.1.5
protection through technological or by any other means;
such
7.1.6 To modify, extend, transform the Navigation Product (in whole or in part), to separate it into
parts, combine
for the purpose of achieving interoperability with other devices;
7.1.7 To remove, modify or obscure any copyright, trademark notice, or restrictive legend included in
the Navigation Product or any part thereof.
he User may only use the Databases and information from the Services available through the
7.2 T
Navigation Product (including but not lim ited to the traffic data received from the RDS TMC or on-line
TMC traffic information s ervice) for his/her own benefit and at his/her o wn risk. It is strictly prohibited to
ell, sublicense, lease, rent or lend it, or to transfer it to a third person for any reason
transferring the Device on which it was first legally installed on (see section 6.2);
To evade the protection of the Navigation Product or to modify, circumvent or obviate
it with other products, install it in other products, utilize it in other products, not even
91
Page 92

store, to transfer or to distr ibute t hese dat a or c ontents or t o disc lose them in f ull or in par t to th e publ ic in
any format or to download them from the Navigation Product.
8. No warranty, limitation of liabili t y
8.1 The Licensor hereby informs the User that although the greatest care was taken in producing the
Navigation Product, g iven the nature of the Navigati on Product and its technic al limitations, the Licens or
and its suppliers do not prov ide a warranty for the Navigation Product bei ng completely error-free, and
they are not bound b y any obligation whereby the Navigation Product obta ined by the User sh ould be
completely error-free.
8.2 THE LICENSED N AVI GAT IO N PROD UCT , INC LUDING AN Y OF T HE DATAB ASE S, OR SERVIC ES
FORMING PART THEREOF ARE PROVIDED ON AN “AS IS” AND “WITH ALL FAULTS BASIS”
(INCLUDING NO WARRANTY FOR THE CORRECTION OF FAULTS) AND LICENSOR, THE
DATABASE OW NERS, THE SOFTW ARE OWNER, T HE SERVICE PROVIDERS AND THIRD PARTY
SUPPLIERS EXPRESSLY DISC LAIM ALL WARRANTIES, EXPRESS OR IMPLIED, INCLUDING BUT
NOT LIMITED TO, THE IMPLIED WARRANTIES OF NON-INFRINGEMENT, MERCHANTABILITY,
SATISFACTO RY QUALITY, ACCURAC Y, TITLE AND FITN ESS FOR A PARTICULAR PU RPOSE. NO
ORAL OR WRITTEN ADVICE OR INFORMATION PROVIDED BY LICENSOR OR ANY OF ITS
AGENTS, SUPPLIERS, EMPLOYEES, THIRD PARTY PROVIDERS, THE SOFTWARE OWNER OR
THE DATABASE OW NERS AND SER VICE PROVIDERS SHALL CREAT E A WARRANTY, AN D USER
IS NOT ENTITLED TO RELY ON ANY SUCH ADVICE OR INFORMATION. THIS DISCLAIMER OF
WARRANTIES IS AN ESSENTIAL CONDITION OF THE AGREEMENT.
Licensor does not warrant that the Navigation Product is capable of interoperating with any system,
device or product.
8.3 The Licensor does not assume any responsibility for damages incurred due to an error in the
Navigation Product.
8.4 The Licensor does not assume an y respons ibi lity for dam ages incurr ed due t o the N avigati on Produc t
not being applicable for any defined purpose, or due to the error or incompatibility of the Navigation
Product with any other system, device or product.
8.5 NEITHER LICEN SOR NO R ITS SU PPLIER S SH ALL B E LIABLE T O USE R FO R ANY IN CIDENT AL,
CONSEQUENTIAL, SPECIAL, INDIRECT OR EXEMPLARY DAMAGES ARISING OUT OF THIS
AGREEMENT, INCLUDING LOST PROFIT S OR COSTS OF COVER, LOSS OF USE OR BUSINESS
INTERRUPTION OR THE LIKE, REGARDLESS OF WHETHER T HE PARTY WAS ADVISED OF TH E
POSSIBILITY OF SUCH DAMAGES.
NOTWITHSTANDING ANYTHING TO THE CONTRARY CONTAINED HEREIN, THIRD PARTY
SUPPLIERS (E.G. DATABASE OWNERS, MAP PROVIDERS, SERVICE PROVIDERS, THE
SOFTWARE OW NER) OR AGEN TS OF LICEN SOR SHAL L HAVE NO MO NETAR Y LIABILIT Y TO THE
USER FOR ANY CAUSE (REGARDLESS OF THE FORM OF ACTION) UNDER OR RELATING TO
THIS AGREEMENT.
IF YOU HAVE ANY BASIS FOR RECOVERING DAMAGES FROM LICENSOR OR ANY OF ITS
SUPPLIERS, YOU CAN R ECOVER ONLY DI RECT DAMAGE S UP TO T HE AMOUNT THAT YOU PAID
FOR THE NAVIGATION PRODUCT (OR UP TO 10 USD IF THE AMOUNT IS NO T CALCULABLE OR IF
YOU ACQUIRED THE NAVIGATION PRODUCT FOR NO CHARGE). THE DAMAGE EXCLUSIONS
AND LIMITAT IONS IN THIS AGREEM ENT APPLY EVEN IF REPAIR, REP LACEMENT O R A REFUND
FOR THE NAVIGATION PRODUCT DOES NOT FUL L Y COMPEN SATE YOU F OR AN Y LO SSES OR IF
THE LICENSOR OR ITS SU PPLIERS KNEW OR SHOULD H AVE KNOW N ABOUT THE POS SIBILITY
OF THE DAMAGES.
8.6 The Licensor a lso dra ws the att ention of the Us er to t he fact t hat, when usin g the Navigation Product
in any form of vehicle, obse rving the traf f ic regulations and rules (e.g. us e of obligator y and/or r easo nable
and suitable securit y measures, proper and gen erally expected car e and attention in the given situation,
and special care and attention required due to the use of the Navigation Product) is the exclusive
responsibility of the User . The Licensor shall not as sume any respons ibility for any dam ages occurred in
relation to use of the Navigation Product in any vehicle.
92
Page 93

Safety (e.g. speed) cameras are provided for informational purposes only and may not be used to
encourage, facilitate or support the violatio n of any laws . Furtherm ore som e countries prohibit t he displa y
or use of such features. Compliance with country specific laws and any usage or reliance on the
information by user shall be at the User's own risk and sole responsibility.
8.7 Database and Services provided b y third par ties. The Licens or hereb y exclud es an y liabilit y of its own
for the Database or inf ormation obtained through the Serv ices in the Navigation Product. T he Licensor
does not warrant the qualit y, suitability, accuracy, fitnes s for a specific purpose or territor ial coverage or
availability of the Dat abase or information. T he Licensor specifical ly excludes any and al l liability fo r the
suspension or cancellation of any of the Services, and any damage arising due to cancellation of a
Service. User acknowledges that the mapping data in Databases may contain geographical data and
other data.
8.8 The User hereb y acknowledges that (i) in accurate or incomplete inf ormation due to the passage of
time, changing circum s tances, s our ces us ed and the natur e of collec ti ng comprehensive geograp hic dat a,
may each lead to incorrect r es ults; and ( i i) that t he D at abas e or inf or mation obtained thr ou gh th e Services
provided by third part ies may only be used at the risk of the User an d for the benefit of the User . User
acknowledges that the D atabases are t he confident ial inform ation of Database O wners and dis closure of
the Databases to third parties is prohibited.
8.9 USE OF THE NAVIGATION PRODUCT’S REAL TIME ROUTE GUIDANCE FUNCTION IS AT
USER’S SOLE RISK AS LOCATION DATA MAY NOT BE ACCURATE.
8.10 Database Conten t and Services provided b y the Licensor or an agent of the Licensor. For certain
Navigation Products the Licensor or the Software Owner or a contractual partner may offer various
products and services to t he User through the http://www.naviextr as.com or another dedicated website.
The User may onl y use thes e services when the Us er has r ead and u nderstood t he rele vant term s at the
website and the User is obliged to use the services in line with those terms. In the event of conflict
between this Agreement and such additional terms, the additional terms shall prevail.
8.11 Purchase and acquisition of activation license for the use of certain functions, Databases, or
Services may require I nternet connection and no alternative wa y of acquisition is off ered by Licensor or
the supplier of those functions, Databases, or Services.
9. Sanctions
9.1 The Licensor hereb y infor m s the Us er that t he brea c h of c op yrights and re lat e d r ights is a c rime under
numerous jurisdicitons, including in the United States of America and other countries who ratified the
International Convention on Cybercrime.
9.2 Licensor, Software O wner and suppliers of products on the basis of this Agreement are c ontinously
monitoring violation of their intellectual prop er t y rig hts , and i n c as e inf ring in g us e is detec te d, vi ol ators w ill
face criminal and civil procedures initiated against them in any and all jurisdictions.
10. Anonymous data collec tion
10.1 The User hereby ackno wledges that the Software m ay collect, transmit to Licensor or thir d parties,
and in some cases s tores dat a connec ted to the us age of the Sof tware b y the User (e.g. movem ent/r oute
data, user interaction data). Such data collect ion functions m ay be disabl ed or enabled b y User an y time
from within the corresponding menu within the Navigation Product. The collected data is always
anonymous, not associated in an y way with any personal information of the User or with the User itself.
10.2 The collected data m ay be uploade d to the Sof tware O wner’s dat abase or trans m itted periodic all y or
in real time to a third part y partner and us ed exclusivel y for the purpose of enha ncing and impr oving the
precision and rel iabil ity of features and s erv ic es of t h e Na vi gat ion Pro duc t. Uploading is execut ed t hr ou gh
the Sofware Owner ’s special software or by the Device, and the upload ma y be enabled or disabled by
User. After successful data upload, the collected data is deleted from the Navigation Product and the
Device or may be deleted by the User manually.
10.3 Collected data is transm itted, stored and handled anon ymously and no connection of the data with
the User shall be established by Licensor or any third party.
93
Page 94

10.4 Licensor hereb y informs the User, th at if it access es the Internet through mobile data service w hile
abroad or other wise roaming anot her mobile network the transm ission of such d ata may resu lt in speci al
roaming charges. T o avoid s uc h char ges it is the r espo ns ibi lit y of the U ser to disable mobile data serv ices
while roaming or to turn off the data collection functions of the Navigation Product.
11. Auxiliary Terms for Services
11.1 For online Servic es the following auxiliar y terms shall also apply. Inform ation or Database content
(e.g. weather-, traffic inf ormation, locat ion bas ed inf ormation, on line sear ch res ults) m ay be transm itted to
the User’s Device through an Internet connection (“Connected Services” ). Connected Services may be
granted for a fee or free of charge subject to Licensor’s decision.
11.2 Information a nd content thr ough Connec ted Services in general are not avai lable in all c ountries, or
all languages, furthermore different conditions an d s er vice c harac teristics may appl y in differ ent count ri es .
Use of certain Connected Services m ay be prohibite d in certain c ountries. It is t he User's responsibi lity to
comply with country specif ic regulation. Licens or excludes its liabilit y for the consequences of illeg al use
of such functions and User s hall indemnify and hold Licensor harm less from all claims against Licensor
from authorities or third parties due to the illegal use.
11.3 Online information and content are downloaded by the Navigation Product from the Software
Owner’s or other supp liers’ online content servers. The Licensor h ereby excludes any liab ility of its own
for all information and c ontent. As no control may be exercis ed by the Licensor or the Software Owner
over the information or content, neither Licensor nor Software Owner warrants the legality, quality,
suitability, accurac y, fitness for a specif ic purpose or territoria l coverage of the inform ation and content,
furthermore no warranty is offered regarding the availability (e.g. uptime) of online information and
content servers. User acknowledges that in any territory or time, slow- or non-connectivity may be
experienced due to cap acity limitations of the Internet connection or the co ntent servers. T he Navigation
Product may allow the Use r to acces s and communicate t hird part y servers direc tly. In such c ases use of
such servers is for Us er's own risk entir ely. Licensor shal l not undertak e any liability whats oever for suc h
servers and services accessed and received directly form third parties.
Server avail abilit y. No warr ant y is provi ded reg ardi ng t he av ailabil it y of the ser ver s ena bling the Services .
When conducting periodic maintenance and inspection of the servers providing the Service (the
“System”) upon which Ser vices operate, Licensor (or its Supplier) may temporar y suspend all or part of
the Services. In the case of any of the follow ing items , Licensor (or its Sup plier) m ay temporar ily interrupt
all or part of the Service without prior notification to the User:
(i) When conducting emergency maintenance or inspection of the System;
(ii) When it becom es no longer p ossible to provide op erate the System due to an acc ident such as fire or
power outages, natural disasters such as an earthquakes or flooding, war, rioting, industrial disputes, etc.;
(iii) When Licens or deems it n ecessary to tem porarily sus pend operation du e to unavoida ble operational
or technical circumstances; or
(iv) When it becomes no longer possible to provide the Service due dto a System failure, etc.
11.4 User acknowledges that the data or information provided through Connected Services is not updated
in real-time and may not accurately reflect the real life situation or events.
11.5 The User hereby ackno wledges that the Connected Services m ay only be used at the risk of the
User and for the benefit of the Us er. It is the sole responsibility of the User to pr ovide and maintain a
connection to the public Internet network. User accepts that the usage of the Connected Services
generates data traffic (up- and downstream) and may result in increased mobile data service fees
payable by User.
11.6 Connected Services may provide data, information or materials supplied and/or licensed b y third
parties to Licensor. For su ch materials different ter ms and conditions im posed by such third parties m ay
apply. Applicable third par ty terms shall be listed i n the “About” section of the Navigation Produc t, in the
Device documentation, at a website ad dress indicated in the “A bout” sec tion or as part of t his Agreem ent.
When first using / enablin g Connected Services, User accepts complianc e with those third party terms
and conditions.
94
Page 95

11.7. Community Services . Some Connected Services may be based on data and information upload ed
by participating ind ividuals (User s or other persons) or a Datab ase creat ed and m aintai ned b y a group of
such individuals. Such data may not com e from a trusted source and m ay also be intentionall y false or
misleading, as Licensor or Software Owner does not h ave any means to control or verify the credi bility or
accuracy of such data or the indi viduals providing the data. Therefore Us er accepts that comm unity type
Connected Services must be used with extreme care.
By participating in the com m unity by providi ng data or an y inform ation via the N avi gation Pr oduct or oth er
means offered by Licensor (e.g. through a website or other software), User shall accept the following:
(a) Licensor is gra nted a ro yal t y-fr ee r ight to use the data u ploaded, in particular , to modify, display, m ake
available to the public, distribute, copy the data for any purpose;
(b) User warrants that no third party has an y rights that would hinder or render i mpossible the use of the
data as set out in (a) abo ve, and that no third part y rights are infringed by uploa ding the data on those
conditions;
(c) User indemnif ies and holds har mless Licens or from any claim from a third party aga inst Licensor due
to violation of its rights regarding the uploaded data.
12. Third party supplier terms
12.1 Third parties supply Services or Database built into the Navigation Product and such third party
suppliers may have special term s and conditions of us e (“Supplier T erms”), and You as the User accept
those terms together with this Agreement.
12.2 Potential third party suppliers (and their Supplier Terms) may have their Database or Service
distributed as part of the Navigat ion Produc t are lis ted in the “A bout” s ection of th e Navigat ion Prod uct or
at a website address indicated in the “About” section.
12.3 Service specific terms:
12.3.1 Online Search. By using the built in online search functionalit y the User h er eb y ack nowle dges that
during the search pr ocess the geo graphic position of the User’s device ma y be used for providin g better
search results. Also the s earch res ult chosen b y the Us er m ay be processed a non ymousl y by the Serv ice
supllier for statistical purposes.
When using the online search functionality the User may not (i) interfere with the performance of the
Service; (ii) complete mass downloads or bulk feeds of any content or information derived from the
Service or inform ation acq uired t heref rom , us e bench m arking m ethods, e. g., ro bots, to acc ess or anal yze
the Service or information derived therefrom, and (iii) alter or manipulate the Service or information
derived therefrom or modify the default settings operation or look and feel of the Service (including but not
limited to displayed logos, terms and notices); or ( iv) use the Servic e or inform ation derived ther efrom in
connection with any unlawful, offensive, obscene, pornographic, harassing, libelous or otherwise
inappropriate conte nt or materia l, furtherm ore (v) us e search res ults to generate sales lead i nform ation in
the form of ASCII or other text-formatted lists of category-specific business listings which (x) include
complete mailing addres s for each business, and (y) contain a substantial port ion of such listings for a
particular county, city, state, or zip code region.
12.3.2 Traffic. Neither the t raffic information nor an y derivatives thereof shall be used b y the User for (i)
historical data pur poses (including but not lim ited performing storage of t he data in order to enable th e
collection or analysis of inform ation); or f or ( ii) broadc asting or m aking avai lable to an y third p art y; and (ii)
for the purpose of enforcement of traffic laws including but not limited to the selection of potential
locations for the installation of speed cameras, speed traps or other speed tracking devices.
Traffic data may not be archived and may only be delivered for Users’ near term personal use not to
exceed one twenty-four hour period.
13. Third party attribution
Attribution of third parties (e.g. copyright notices) supplying software modules, Databases, Services or
other material to t he Na vig ation Produc t are listed in t he “Abo ut” s ection of t he N avigatio n Pr oduct or at a
website address indicated in the “About” section.
95
Page 96

2602 Marina Drive, Elkhart, IN 46514
WWW.ASAELECTRONICS.COM
© 2015
Printed in China
 Loading...