

Page 1

DOCKING DIGITAL MUSIC SYSTEM WITH
SUB-WOOFER FOR iPod
OWNER' S MA NU AL
PLEASE R EA D TH IS OPERATING MANUAL COMPLETELY BEF OR E OP ERATI NG THIS
UNIT AN D RETAI N TH IS BOOKLET FOR FU TU RE R EFERENCE.
JiMS-2 25
(iP od ® Not I nc lud ed )
Page 2

DEAR JENSEN® CUSTOME R
Selecting fine audio equipment such as the unit you've jus t purchased is only the start of you r musical
enjoyment. N ow it's time to consider ho w you ca n maximize the fun a nd excitement you r equipment offers.
This m anu fac tur er and the Electronic Industries Associatio n's Consumer Electronics Group wa nt you to get
the most out of your equipment by playin g i t a t a sa fe lev el. On e t hat lets the sound come through loud and
clear wi thout an noying blaring or disto rtion an d, mo st im por tan tly, wi tho ut affecting your sensitive hearing.
Sound can be deceivi ng. Over ti me your hea rin g "comfort lev el" adapt s to hig her volumes of sound. So what
sounds "norm al" can act ual ly be lo ud and harm ful to your hearing. Guard against this by setting yo ur
equipment at a safe level BE FOR E your hear ing adapts.
To establish a safe level:
Start your volu me control at a low setting.
Slowly increase th e sound unt il you can hear it comfortably an d clearly, and without distortion.
Once you have establishe d a comfortab le sound leve l:
Set th e dial and leave it there.
Taking a mi nut e to do this now will he lp to pr eve nt hearing dam age or loss in the future. After all, we want you
listening fo r a life tim e.
We Want You Liste ning For a Lifetime
Used wisely, your new so und equip men t will prov ide a li fet ime of fun and enjo yme nt. Since hearing da mag e
from loud noise is often und ete cta ble until it is too late, this manufacture r and th e Electronic Indu str ies
Association's Cons ume r Electronic s Group rec omm end you avo id prolonged exposure to excessive no ise .
Customer's Record:
The serial number of this pr odu ct is fo und on its bottom cove r. You should note the serial nu mbe r of thi s unit in
the space provided as a perm ane nt record of your purc has e to aid in iden tif ication in the event of thef t of loss.
Model Numbe r: JiMS-225 Serial Number: _______ ________ _____
E1
Page 3

IMPORTAN T SAF ETY INSTRUCTIONS
THE IMPO R TA N T SA F E T Y I N S TRUCT I O N S S H A L L I NCLUD E , A S A P PLICA B L E T O TH E
AP P LIA N CE, STAT E MENT S T HAT CONV EY TO TH E U S ER THE IN F ORM AT ION IT E MIZ E D
IN THIS PARAGRA PH :
1.R ead t hes e in s tr uct io ns - All th e s af ety a nd op er a ti ng in str uc tio ns sh ou ld be r ead b efo re th e app li anc e is
operate d
2.Keep the se i ns tr uctions - The s af ety and opera ti ng i ns tructions s ho ul d be k ept for fut ur e re fe rence.
3.Heed all w ar ni ng s - All w arnings o n th e ap pl ia nce and in th e op er at ing instruc ti on s sh ould be adher ed t o.
4.Follow a ll i ns tr uc tions - All op er at io n and use instr uc ti on s should be fol lo we d.
5.D o n ot us e t hi s a pp a ra tus n ear w a te r - T he ap pl i an ce sh o ul d n ot be u sed n ear w a te r; fo r e xa m pl e, ne a r a
bathtub , wa sh bo wl , kitchen s in k, l au ndry tub, in a we t ba se me nt, or near a swi mm in g po ol, and the lik e.
6.Cl ean o n ly wi t h dry c l ot h - T h e app lia nce sh oul d b e cle ane d o nly a s r eco mme nde d b y t he ma nuf act ure r.
7.D o n o t blo c k any ve nti lat i on op e ni n gs. I n st a ll in ac c or d anc e w ith t h e m an u fac tur er' s i nst r uc t ion s. - The
appliance s ho ul d be s ituated s o th at i ts l ocation or po si ti on d oes not inter fe re w it h its proper ve nt il at ion. For
exa m pl e , t he ap p lia nce sh oul d n o t be sit uat e d o n a b ed, so fa, ru g, or sim ila r s urf a ce th a t m ay bl o ck th e
ve nt il at io n opening s; o r pl ac ed in a b ui lt -i n installat io n, s uc h as a bo ok ca se o r cabinet t ha t ma y impede th e
flow of air t hr ou gh t he ventilat io n op en ings.
8.D o no t in stall nea r an y he at s ource s su ch a s radiators , he at r eg isters, s to ve s or o ther ap pa ra tu s (i ncluding
amplifi er s) t ha t produce hea t.
9. Do n o t de fea t th e s af et y p ur po se of t he po la riz ed o r g ro un din g- typ e pl ug. A pola ri zed p lu g has t wo b l ad es
wit h one w ider than the other. A gro unding type has two blade s and a thir d gro unding prong. The wide blade or
the third p ro ng a re p ro vided for y ou r sa fe ty. If the p ro vi de d plug does n ot f it i nt o your outlet , co ns ul t an
electri ci an f or r ep lacemen t of t he o bs olete outle t.
10.Only us e at ta ch ments / acces so ri es s pecified by t he m an uf acturer
11.U se o nl y wi th the cart, st an d, t ri pod, bracke t, o r ta bl e specifi ed b y th e ma nufacture r, or s ol d wi th the
apparat us . Wh en a c art is used, us e ca ut io n when moving t he c ar t/ apparatus
combina ti on t o av oi d injury fr om t ip -o ver.
12.Unplug this apparatus during lightning storms or when unused for a long
periods o f ti me .
13.Power Sources - The appliance should be connected to a power supply
only of the type described in the operating instructions or as marke d on the
appliance . Do n ot o ve rload wal l ou tl et .
14.Wall and Ceiling Mo unting - The appliance should be mounted to a wall
or ceilin g on ly a s re co mmended b y th e ma nu facturer.
15.Power Lines - An outdoor antenna should be located away from power lines.
16.Objec t an d Li qu id E ntry - Care s ho ul d be t aken so that ob je ct s do n ot
fall and li qu id s ar e no t spilled i nt o th e
17.R efe r all servicing to qu ali fied ser vic e per son nel . Ser vic ing i s required when the appa rat us ha s been damaged
in any wa y, such as po wer -supply cord or plug is damag ed, li qui d has been spilled or objects have fallen into th e
apparatus, the apparatus has been expo sed to rain or moisture, does not operate norm ally, or has been dropped.
18.Servi ci ng - The user sho ul d no t at tempt to serv ic e th e ap pliance bey on d th at d escribe d in t he o pe ra ting
instruc ti on s. Al l other servi ci ng s ho uld be referr ed t o qu al ified servi ce p er so nnel.
Enclosu re t hr ou gh o penings .
E2
Page 4

COMPLIANCE WITH FCC REGULATIONS
This devi ce c om pl ie s with Part 1 5 of t he F CC R ules. Opera ti on i s su bject to the fo ll ow in g two condi ti on s:
(1)this de vi ce m ay n ot cause harm fu l in te rference, a nd
(2)this de vi ce m us t accept any in te rf er ence receiv ed , in cl uding inter fe re nc e that may caus e un de si red
operati on .
NOT E : This equipment has been te ste d and found to comply with th e limits for a Class B dig ita l device, purs uan t
t o P ar t 1 5 of t he F CC Ru l es. Th e se lim i ts are de s ign e d t o p rov i de re aso n abl e p r ote c tio n a g ain s t h arm f ul
int er f er enc e i n a r es i de nti al in s ta lla tio n. Th is eq uip men t gen era te s , use s a nd ca n rad iat e r ad io fr e qu enc y
en er gy an d, i f n ot i nst al le d a nd u sed i n acc or da nce w it h the i ns tru ct ions, m ay ca us e har mf ul i n te rf ere nc e to
radio communicati ons . Howeve r, there is no guarant ee that interferenc e will not oc cur i n a particular installation .
If this e qu ipmen t do es caus e ha rmful int er feren ce t o radio or te levisio n re cepti on , which can b e determi ne d by
turni ng t he equi pm ent off a nd on, th e user is e nc ouraged t o try to co rr ect the i nt erfer en ce by one o r mo re of the
followi ng m ea su re s:
- Reorien t or r el oc at e the recei vi ng a nt enna.
- Increas e th e se pa ra tion betw ee n th e eq uipment and r ec ei ve r.
- Connect t he e qu ip me nt into an ou tl et o n a ci rcuit diffe re nt from tha t to w hi ch t he r eceiver i s co nn ec ted.
- Consult t he d ea le r or a n experie nc ed r ad io/TV techn ic ia n fo r help.
CAUT IO N:C ha nges or modific at io ns not expressl y ap pr ov ed by the party res po ns ible for
compli an ce c ould void the use r' s au thority to operat e th e eq uipment.
E3
Page 5
PROTECT YOUR F URN ITU RE
Th is m ode l is eq ui pped wi th n o n- sk id ru bb er 'f ee t' to p rev en t the p ro duct fr om m o vi ng w h en y ou op er ate t he
co ntrols. These ' feet ' a re made from non-migrating r ubbe r mate ri al s pe ci al ly f or mu la te d to a vo id l ea vi ng a ny
marks or sta ins on your fu rnitu re. How ever certa in type s of oi l based f urnit ure polish es, woo d prese rvati ves , or
cl ea nin g spr ay s may c au se th e rub be r ' fe et ' t o so fte n, an d le ave m ar ks or a ru bb er re si due o n the f urn it ur e.
To preven t an y damag e t o you r fu rn iture w e stron gl y re comme nd t hat y ou p ur cha se s ma ll se lf -a dhesi ve f el t
pa ds , av ai la bl e at h ardware sto re s an d ho me i mp ro ve ment centers ev er yw he re , an d ap pl y these pads to t he
bottom of t he r ub be r 'feet' befo re y ou p la ce the produc t on f in e wo oden furnit ur e.
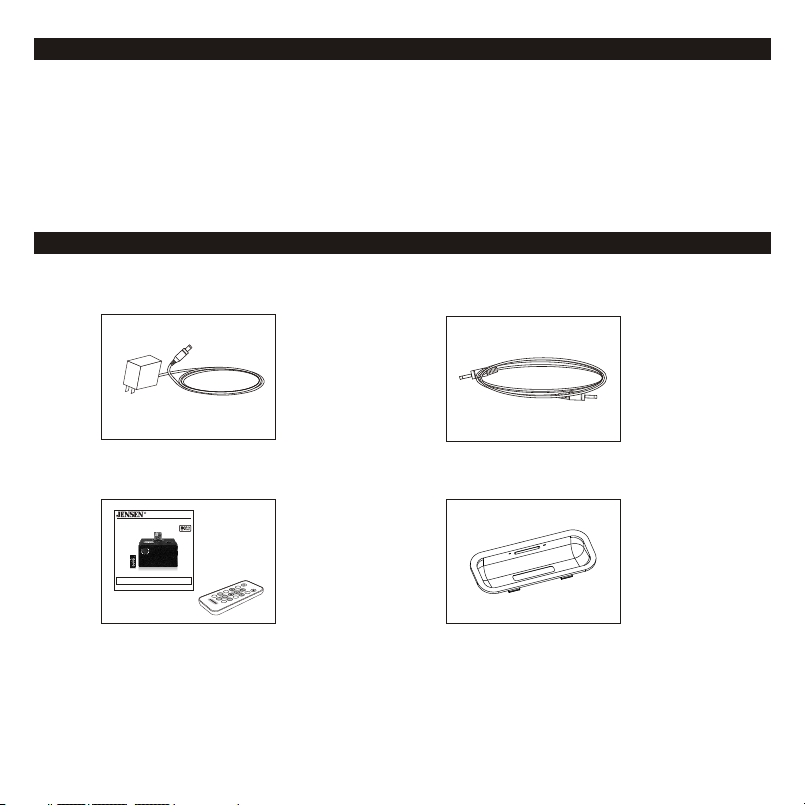
ACCESSORIES INCLUDED
AC Adaptor
Remote co nt ro l an d Ow ner's man ua l
DOCKING DI GITAL MUS IC SYSTE M WITH
SUB-WOOF ER FOR iPo d
OWNER'S MANUAL
JiMS-225
(iPod® Not Included)
PLEASE READ THIS OPER ATING MAN UAL COMP LETELY BEF ORE O PERATIN G THIS
UNIT AND RETAIN THIS BOOKLE T FOR F UTURE RE FERENC E.
T
R
EL
B
E
S
T
TE
R
E
B
L
E
P1
F N
U
N I
C
S
T
P
O
T O
2
/
M
P
4
P
3
S
L
E
E
P
Aux In Cabl e
Adaptor f or 4 0/ 60 GB iPod Photo
E4
Page 6

CONNECTION DIAGRAM
CD/MP3/other audio
device
Power adaptor
Input:AC 100V-240V
50/60Hz
TV S-video jack
FM ANT
NOTE: Thi s un it i s no t magnetica ll y sh ie lded and may ca us e co lo r distortio n on t he s cr een of some TVs o r
video mon it or s. To avoid thi s, y ou m ay n eed to move the u ni t fu rt her away fr om t he TV or monito r if u nn at ural
color shi ft s or i ma ge d istorti on o cc ur s
REMOTE CONTROL BATTERY
To use the remo te c on tr ol, please en su re t he r emote contr ol b at te ry CR2025 (in cl ud ed ) is installe d pr op er ly.
Replace t he r em ot e co ntrol bat te ry w he n it stops work in g. I t is h ighly recom me nd ed t o use a good qual it y
Lithium c el l.
Note :
1. The bat te ry i solator paper m us t be r emoved prior to use .
2. Room li gh ti ng and battery li fe c an a ffect the operati ng r an ge of the remote co nt ro l.
E5
Page 7

LOCATION O F CON TROLS
Main Unit
VOL-
VOL+
RADIO
FUNCTION
Front Vie w Rear Vi ew
1. POWER On /S ta nd by Button: To tur n th e unit power on o r st an db y.
2. RADIO bu tt on : se lect FM radio i ns ta nt ly.
3/4. VOLU ME + /- B ut ton: for incr ea si ng o r decreasin g th e vo lu me level.
5. FUNTIO N Bu tt on : Select iPod , FM r ad io a nd AUX (Auxili ar y in pu t) mode.
6/8. Tune up /d ow n; i Po d / Control b ut to n: Tu ne the FM radio c ha nn el f requency up /d ow n;
iPod Skip / Se ar ch F orward / Back wa rd B ut tons. for Bac kw ar d, f or Forwar d.
7. IPod but to n: i Po d PALY/ PAUSE.
9. Snooze / D im me r Bu tton: Activa te t he s no oze functio n; Ad ju st b acklight le ve l.
10. IPod do ck
11. iP od d oc ki ng connecto r
12. AUX IN Jac k: F or t he c onnection o f ex te rn al audio devi ce .
13. S-VID EO J ac k: S -Vide o si gn al o utput.
14. DC Jack : To con nect to exter na l DC p ow er supply.
15. FM Anten na
S
r
n
e
o
m
o
z
m
i
e
/
D
E6
Page 8

LOCATION O F CON TROLS
Remo te C on tr ol
1) POWER On / St an db y button.
2) Mute Spe ak er s bu tton.
TREBLE
TREBLE
3/4) / TR EB LE l evel Up/Dow n bu tt on .
5/11) / Vol um e Up /Down butto n; Cl oc k hour/minu te a dj us tment.
6/7) / Radi o Tun e up /d own; iPod ski p/ se ar ch forward / ba ck wa rd
button. f or B ac kw ard, for Forw ar d; Cl ock hour/mi nu te s et ting
selecti on .
8) button : iP od P la y/Pause.
SET
9) button : Se t th e cl ock and alarm t im e; a la rm/wake to al ar m mo de
selecti on .
ST/MO
10) butto n: F M St er eo/Mono sel ec ti on .
12)13)1 4) 17 ) bu tton: Save th e FM r ad io p reset stati on s.
FUNCTI ON
15) butto n: S el ec t Function mo de .
SLEEP
16) butto n: S le ep t imer
SNOOZE /DIMME R
18) butto n: S no oz e/Dimmer
LCD Disp la y
P2
P3
P1
P4
1
TREBLE TREBLE
3
6
9
12
15
18
SET ST/MO
P1 P2
FUCTI ON
P4
SNOOZ E/DIMM ER
P3
SLEEP
2
5
4
8
7
11
10
13
14
17
16
iPod
PM
VOLUME
iPod Mode FM radio mo de
PM PM
Clock / Sta nd by m od e
Alarm clo ck m od e
(Back lig ht i s off)
RADIO
PM
MHz
FM
VOLUME VOLUME
E7
AUX
PM
AUX mode
Page 9

SETTING AND OPERATION
This unit o pe ra te s using an AC-DC a da pt or ( included) w it h 12 V DC / 1 500mA output .
1. Firmly i ns er t th e DC plug of the AC- DC a da pt or into the DC ja ck o n th e ba ck of the unit.
2. Plug the a da pt or i nto a conveni en t 12 0V AC /60Hz wall ou tl et .
Basi c Op er at ion
- Turn the uni t ON b y pr es sing the POWE R bu tt on .
- Press the F UN CT IO N button to sel ec t iP od / R adio / Aux modes . Fu nc ti on modes can be c ha ng ed b y
pressin g th e Fu nc tion button o n ei th er t he main unit or o n th e re mo te control.
- The v ol um e of t he unit can be co nt ro ll ed by pressin g th e VO L +/- B ut to ns on the main un it o r on t he r emote.
- The u ni t vo lu me can be muted b y pr es si ng the MUTE but to n on t he r emote con tr ol .
- The u ni t ca n be s witched to St an db y mo de by press the P OW ER b ut ton again .
Note: Dur in g St an db y mode, pre ss in g an y button will t ur n on t he L CD backligh t fo r fe w se conds.
Clock Se tu p
1. In stand by m od e, p ress the SET bu tt on on remote co nt ro ll er, the hour d ig it s ta rts to flash.
2. Press VO L+ o r VO L- t o set the hour;
3. After hou r is s et , pr ess the butto n to s et t he m inutes. The m inutes digi t st ar ts t o flash.
4. Press VO L+ o r VO L- t o set the minut es ;
5. During t he s et ti ng, you may pre ss o r bu tt on to switch be tw ee n ho ur and minute s;
6. After set ti ng t he t ime, it will au to ma ti cally retur n to c lo ck / s tandby mode w it hi n 5 se conds.
Note: The c lo ck only can be se t in s ta nd by mode.
Alar m Cl oc k Se tup
1. In stand by m od e, p ress the SET bu tt on twice on rem ot e co nt roller to e nt er a la rm time setti ng m od e. On the
display, wil l turn on and wil l be gi n fl ashing.
2. Press an d bu tt on t o select the ho ur o r mi nu tes to be adjus te d an d VO L+ or VOL- to i nc re as e or
decreas e th e re sp ec tive valu e.
3. When ala rm t im e se t is complete d, pr es s the SET but to n ag ain to sele ct t he “ wa ke to” alarm mo de .I f th e
unit retu rn s to s ta ndby mode,p re ss t he S ET butt on 3 t im es t o get back to t hi s se tt ing.
4. Press or b ut to n to s elect any one a mo ng i Po d / Radio / AUX / bu zz er a s a “w ake to ”alarm
5.The ala rm w il l so un d for one hou r wh en a la rm time reach ed u nl es s it is turned of f.
6.To cancel t he a la rm i mm idiatel ly, press and hol d th e SN OO ZE button for t hr ee s ec onds or pre ss t he p ow er
button on ce ,t he a la rm will shu t of f until the clo ck r ea ch es the same ala rm t im e on n ext day.
7.To perman en t ca nc el t he alarm, pr es s an d hold the SNOO ZE b ut to n for 3 seconds .T he i co n will
disappe ar o n th e di sp lay.
8.To activi at e th e da il y alarm,p re ss a nd h old the SNOOZ E bu tt on f or 3 seconds. Th e ic on w ill appea r on
the displ ay.
Note: 1. Wh en “ Wake to R ad io ” is s elected , ma ke s ur e that your des ir ed r ad io station is t un ed a nd p roper
volume le ve l is s et .
2. Th e un it w il l automatic al ly “ wa ke to” buzzer a la rm i f “w ake to iPod” is s el ec te d and no iPod i s
docked.
3. When “Wake to AUX” is se le ct ed , please ma ke s ur e yo ur external d ev ic e is t urned on and pl ay in g
continu ou sl y in o rd er for it to co me o n wh en t he alarm time i s re ac he d.
4.Alarm m ay i nt er rupted for a wh il e if y ou d ock the iPod in to d oc ki ng when alarm s ou nd in g.
E8
Page 10

SETTING AND OPERATION
Snooze F un ct ion
- When the al ar m so un ds , it can be tem po ra ri ly stopped by p re ss in g the SNOOZE bu tt on . The dis pl ay w il l
show the in di ca to r “S NOOZE”.
- The a la rm w il l be delayed fo r 10 m in ut es and then com e ag ai n.
- Thi s ma nu al s nooze opera ti on c an b e repeated up t o si x ti me s.
-Press an d ho ld t he S NOOZE/DIM ME R bu tt on for 3 second s an di t wi ll turn off t he a larm clock an d sn oo ze .
-To cancel sn oo ze ,w ai t unit back l ig ht o ff, press t he p ow er b utton once, S NO OZ E wi ll disapp ea r on t he
display.
NOTE:W he n sn oose acti va te d, you must canc el t he s no oze manuall y be fo re s etting new al ar m cl oc k.
Slee p Timer
- The S le ep Ti me r allows you to s et t he u ni t to automati ca ll y po wer off a ft er a s elected sle ep t im e.
- Turn the uni t po we r on a nd p ress the SL EE P button.
- The s le ep t im es availabl e ar e be tw een 10 ~ 90 minut es a nd i nc reases 10 min ut e st ep s. Th e di sp la y will
show the in di ca to r “S LEEP” and c ur re nt s leep time.
- To swit ch o ff the Sleep Tim er, p re ss t he SLEEP bu tt on repeated ly u nt il t he SLEEP in di ca tes OFF or pr es s
the Power O N/ St an dby button on ce .
Note :P re ss t he SLEEP bu tt on twice duri ng s le ep t imer count do wn w il l ad d 10 minute s to t he s le ep timer.
iPod Con tr ol
This mode l in cl ud es a n adaptor f or a 4 0/ 60 GB iPod Photo . If i t is n ot s uitable for y ou r iP od , please us e th e
iPod adap to r th at c am e with your i Po d in t he d ocking area .
1. Carefu ll y do ck y ou r iPod onto t he c on ne ctor locate d in t he d oc king bay.
2. Press th e PO WE R On /Standby bu tt on t o tu rn on the syste m.
3. Press th e FU NC TI ON button rep ea te dl y until the iPo d ic on a pp ears on the LCD d is pl ay.
4. Press th e PL AY/P/PAUS E bu tton to pause o r re su me i Pod playbac k.
5. Press th e VO L +/- but to ns t o ad just your d es ir ed v olume level .
NOTE: Th e vo lu me level cannot b e ad ju sted using the iPod v ol um e control after b ei ng
docked .
6. Press th e SK IP /S earch forwa rd o r ba ck ward button s to s ki p to n ext or prev io us t ra ck.
7. Press an d ho ld t he S KIP/Searc h fo rw ar d or backward b ut to ns t o search du ri ng p la yb ack.
8. Th e iP od i s ch arging even d ur in g pl ayback.
9. To rem ov e yo ur i Pod, press an d ho ld t he P LAY/PAU SE button for t hr ee s ec onds to switc h of f the devic e
and gentl y re mo ve i t from the iPod d oc ki ng c onnector.
Remote co nt ro l - iP od control
- PLAY/PA USE butto n: P re ss t o pause or resu me t he i Po d playback.
- SKIP/Se ar ch F or ward / backwa rd b ut to ns: Press to sk ip t o th e ne xt or previ ou s so ng ; Press and
hold the or b ut to ns t o search duri ng p la yb ack.
-VOL +/ - buttons: Pr es s to a dj ust your de si re d vo lume level.
- TRE BL E +/ - bu ttons: Pres s to a dj us t the treble le ve l of t he u nit.
E9
Page 11

SETTING AND OPERATION
Video Out
The S-vid eo O ut j ac k allows you to c on ne ct t his unit to you r TV a nd watch yo ur v id eo f il es or pictu re t ha t ar e
loaded on you r iP od p ho to, 5th gen er at io n iPod, 3rd gen er at io n iPod nano, iP od c la ss ic or iPod touc h.
1. Dock the c om pa ta bl e iPod on the u ni t an d ma ke sure the uni t is i n iP od m ode.
2. Connec t on e en d of t he S -video ca bl e (n ot i ncluded) to t he S -v id eo jack on the ba ck o f th e un it. Connect
the other e nd o f th e ca ble to the S-vi de o IN j ac k of your TV or d is pl ay device .
3. From the m ai n iP od m enu, select V id eos>Setti ng s> TV O ut and sele ct O N.
4. Switch y ou r iP od b ac k to the movi e li br ar y and play the mo vi e of y ou r choice.
NOTE:F or t he i nitial dockin g of t he i Po d(3Gen) nano, i Po d cl assic and iPod touc h, y ou
may wa it f or t he f inishing of iPo d au th entication proc es s th en the video sign al o ut pu t to
your TV sc ee n or m onitor.
Radio Op er at ion
Import an t: P rior to listeni ng t o th e FM radio, fully ext en d th e FM antenna for th e
maxi mu m re ce ption.
Radio Tuning
1. Press th e PO WE R bu tton to turn on t he u ni t.
2. Press th e FU NC TI ON button rep ea te dl y until the RAD IO i co n ap pears on the LC D di sp la y.
3. To tun e to a d es ir ed station ma nu al ly, press th e or b ut tons repeat ed ly u nt il the statio n is r ea ch ed.
4. To sca n th e st at ion automat ic al ly, pres s an d ho ld t he or buttons o n th e un it . It can also be ch an ge d
by pressi ng t he o r bu ttons on the re mo te c on trol.
5. Stereo a nd m on o ra di o can be sele ct ed b y pr essing the ST / M ON O button on the r em ot e co ntrol.
6. Th e vo lu me l evel can be adj us te d by p ressing the V OL +/ - bu ttons on the un it o r on t he r emote con tr ol .
NOTE:
- Use ma nu al t un ing to select wea ke r st ations that mig ht b e by pa ssed during aut om at ic
tuning .
- If the aut om at ic search does no t st op a t the exact frequ en cy, for e xa mp le, it stops at
100. 9M Hz i ns tead of 100.8MH z, p re ss TUN +/- to finel y tu ne t he e xact frequenc y.
Preset St at io n
The unit al lo ws y ou t o store up to 4 pre se t FM s ta tions in the pr es et m em ories for eas y re ca ll ing any
time.
1. Press th e PO WE R bu tton to turn on t he u ni t.
2. Press th e FU NC TI ON button to se le ct R AD IO.
3. Tune to you r de si re r ad io statio n by p re ss ing Tune UP/DO WN b ut to ns.
4. Select a b ut to n of P 1, P2, P3 or P4 on th e re mo te c ontrol.
5. Press an d ho ld t he b ut ton you wan t to p ro gr am until PRES ET n umber icon ap pe ar s on L CD displa y. The
station i s sa ve d in t he p reset but to n no w.
6. To sto re m or e st ations, rep ea t th e st eps 4 and 5.
E10
Page 12

SETTING AND OPERATION
AUX IN m od e
You ca n al so play non-d oc ki ng i Pods or other M P3 /d ig ital audio pl ay er o n th is unit via t he AU X IN j ac k.
1. Plug one e nd o f th e 3. 5m m audio cab le ( in cl uded) into th e he ad ph one or Line out j ac k of y ou r external
audio devic e. P lu g th e other end o f th e ca bl e into the unit AU X- IN j ac k located on th e ba ck o f th is unit
2. Switch o n th e ex te rnal audio de vi ce .
3. Press th e FU NT IO N button repe at ed ly u ntil the AUX ico n ap pe ar s on the LCD disp la y.
4. Th e vo lu me l evel can now be c on tr ol led through t he m ai n un it. Operate a ll o th er f unction s on t he a ux il iary
device as u su al .
NOTE:
(1) If you co nn ec te d the Line Out Ja ck o f yo ur e xternal dev ic e th en y ou only need to a dj us t th e volume
level of th is u ni t. I f connected t o th e He ad phone Jack of y ou r ex te rnal device t he n yo u ma y need to
adjust bo th t he v ol ume control o f yo ur e xt ernal devic e an d th e vo lume contro l of t hi s un it to find th e mo st
desirab le v ol um e se tting.
(2) Press t he P ow er b utton and tur n of f the unit when y ou f in is h listening . Do n' t fo rget to swi tc h off the power
of your ext er na l de vi ce as well.
CARE AND MAINTENANCE
- Do not subj ec t th e un it to excessi ve f or ce , shock, dust o r ex tr em e temperatu re .
- Do not tamp er t he i nt ernal compo ne nt s of t he unit.
- Clean you r un it w it h a da mp (never w et ) cl ot h. Solvent or d et er ge nt should nev er b e us ed .
- Avo id l ea vi ng your unit in d ir ec t su nlight or in ho t, h um id o r dusty place s.
- Keep your u ni t aw ay f ro m heating a pp li an ces and sourc es o f el ec trical nois e su ch a s fl uorescent l am ps o r
motors.
E11
Page 13

TROUBLESHOOTING GUIDE
Symptom
The un it doe s
not res pon d
(no po wer )
iPod does not
dock properly
iPod does not
respond to the
speaker system
iPod® does not
charge up
Sound is distorted
Unit gets warm
after extended
play at high
volume
Possible Pr ob le m
AC Adaptor is not plugged
into a wall outlet or the
connector is not plugged into
the power supply jack on the
back of the unit.
Wall outlet is not functioning.
Usi ng no/ wro ng i Pod
Adaptor.
iPod does not install properly.
iPod is not installed properly.
Your iPod is locked up.
iPod is not installed properly.
iPod is locked up/ frozen.
iPod battery has problem.
Volume level is set too high. Decrease the volume.
Sound source is distorted.
This is normal.
Plug the AC adaptor into a wall outlet and plug the connector into the supply
jack on the unit.
Plug another device into the same outlet to confirm the outlet is working.
Make sure the doc k insert is the pr oper fit for your i Pod.
Remove your iPod from the dock and check for obstruc tion on t he
connectors in th e dock an d on your iPod. Then reseat i t in the d ock.
Remove your iPod from the dock and check for obstruction on the
connectors in the dock and on your iPod. Then reseat it on the dock.
Please make sure that your iPod is working properly before docking into the
unit. Please refer to your iPod manual for details.
Remove your iPod from the dock and check for obstruction on the
connectors in the dock and on your iPod®. Then reseat it in the dock.
Please make sure your iPod is working properly before docking into the unit.
Please refer to your iPod manual for details.
If the iPod original sound source is of poor quality, distortion and noise are
easily noticed with high-power speakers. Try a different audio source such as
a music CD.
If you are using an external sound source like older generation of iPod, try
reducing the output volume on the device itself. Also try turning bass boost
OFF or change the EQ setting.
Turn the unit off for a period of time or lower volume.
Solution
E12
Page 14

SPECIFICATI ONS
Power Req ui re me nt
Main Unit
DC input DC 1 2V, 1500 mA
Remote Co nt ro l 1 X CR 20 25 Lithiu m Ba tt er y
Frequen cy R an ge
Radio FM 87 -1 08 M Hz, 0.1 MHz tun in g st ep
SERV ICE
Ple a s e r e fer to the ins t r uct ions on the enc lose d w arra n t y c a rd f or r etu r n ing you r u nit f or s erv i c e. W hen
re t u rni n g t he u ni t , p l eas e r e mov e b att e r ies to pr e ven t d ama g e t o t h e u nit in tra n sit an d / or fro m p o ssi b l e
lea kag e. We ar e n ot re s po n sib le fo r b a tt e ri e s ret urn e d wit h t he pr o du c t o r for t h e c os t o f r epl ace men t.
Distrib ut ed b y:
SPECTRA Me rc ha nd is ing Inter na ti on al, Inc.
Chicago Ind us tr y Tech Park
4230 North No rm an dy Avenu e
Chicago, IL 60634, U .S .A .
Please ha ve m od el n um ber ready, f or C ustomer Ser vi ce , ca ll 1-800-77 7- 53 31 .
*The spec if ic at io n and exter na l ap pe arance of the s et a re s ub ject to chang e wi th ou t prior notic e. *
Printed i n Ch in a
E13
 Loading...