

Page 1
010203
1. INTRODUCTION
CONTENTS:
Overview -------------------------------------------------------------------------
04
04
Product Specifications --------------------------------------------------------
Contents/Accessories --------------------------------------------------------
2. FRONT PANEL CONTROL
Panel Control -------------------------------------------------------------------
Input/Output --------------------------------------------------------------------
05
3. REMOTE CONTROL FUNCTION
Controls & Functions ---------------------------------------------------------
0607070708
4. INSTALLATION GUIDE
When Connecting to a Coax Cable ---------------------------------------
Connecting to Other Equipment -------------------------------------------
Input (RCA) from other Equipment ----------------------------------------
08
Output (RCA) to Other AV Equipment ------------------------------------
VGA Input ------------------------------------------------------------------------
Connect Power -----------------------------------------------------------------
0909101010
5. BASIC FUNCTIONS
Power Signal -------------------------------------------------------------------
11
Mode(SOURCE) --------------------------------------------------------------
Volume Setting -----------------------------------------------------------------
Channel Search ---------------------------------------------------------------
OSD Setting --------------------------------------------------------------------
Mute Setting --------------------------------------------------------------------
1214151617
6. OSD SETTINGS
TV Setting ------------------------------------------------------------------------
AV1 Setting ----------------------------------------------------------------------
AV2 Setting ----------------------------------------------------------------------
DTV Setting ---------------------------------------------------------------------
DTV Setting (Adjustment main-item) -------------------------------------
Safety Precautions:
1. E ns ure the plug is s ecure ly plugge d into the main socket before operating
the unit.
2. E nsure the Voltage on the main socket is the same as specified on the unit.
3. Use parts only manufactured by the unit manufacturers.
4. E ns ure the ba tte ry is correc tly ins talled before us ing the unit.
In case of the following emergencies, remove plug from the main socket
The lighting flash with Arrowhead Symbol within an equilateral
triangle is intended to alert the user to the presence of "uninsulated
" dangeros voltage" within the product's enclosure that may be of
sufficient magnitude to consistute a risk of electric shock to persons.
The exclamation point within an equilater triangle is intended to alert
the user to the presence of important operating and maintenace
(servicing) instrucion in the literature accopmpanying the appliance.
DO NOT OPEN
CAUTION
RISK OF ELECTRIC SHOCK
CAUTION: TO REDUCE THE RISK OF ELECTRIC SHOCK,
DO NOT REMOVE COVER (OR BACK).
NO USER - SERVICEABLE PARTS INSIDE. REFER
SERVICING TO QUALIFIED SERVICE PERSONNEL
This device complies with part 15 of the FCC RULES. Operations is subject to
the following two conditions:
(1) This device may not cause harmful interference and
(2) This device must accept any interference received, including interference that
immediately:
1. Plug or cables are damaged.
2. Any form of fore ign objec ts dropped ins ide the enc los ure.
3. Unit is being exposed to rain and/or water.
4. Unit unable to operate under normal operation.
Notices:
1. The changes or modifications not expressly approved by the party
responsible for compliance could void the user's authority to operate the
equipment.
2. To comply with the FCC RF exposure compliance requirments , no change
to the an tenna or the dev ic e is permitte d. A ny c ha nge to the a ntenna or
the device could result in the device exceeding the R F exposure
requirements and void user's authority to operate the device.
may cause undesirable operation.
Page 2
1. INTRODUCTION:
Overview :
New technology in LCD monitors allows the enjoyment of a higher quality picture
display and higher brightness; lighter in weight and slimmer body design, power
saving capabilities and low radiation, giving you a safe, relaxing and environmental-
friendly visual enjoyment.
Our product uses high quality original imported 15.4 inches 16:9 colored
"Active Matrix TFT". The Active Matrix TFT high decoding capabilities enable
display of complicated or high quality images, presenting a vivid visual reproduction
and beautiful visual display. Incorporated with a user-friendly menu, allowing easy
customization to user preferences.
The unit comes with built-in screen display controls when used with the remote
control, allowing you to make changes to the settings. It even support the use of 2
channel wireless headphones, therefore you do not need to worry that the volume
coming out from the monitor will disturb other people.
01
18192021222324252627282930
DTV Setting (Brightness/Contrast/Saturation) --------------------------
CONTENTS:
31
32
DTV Setting (Hue/SPDIF Output) ------------------------------------------
DTV Setting (Channel main-item) ------------------------------------------
DTV Setting (TV Source/Auto Program) ----------------------------------
DTV Setting (Manual Program/Channel List) ---------------------------
DTV Setting (Favorite List) ---------------------------------------------------
DTV Setting (Closed Caption main-item/Caption) ----------------------
DTV Setting (Service Type/options) ---------------------------------------
DTV Setting (V-chip main-item/V-Chip Lock) ----------------------------
DTV Setting (Parental Guide/MPAA Rating/Change PIN) -----------
DTV Setting (Setup main-item) ---------------------------------------------
DTV Setting (OSD Language/Time Zone) -------------------------------
DTV Setting (OSD Opacity/OSD Timeout/All Reset) ------------------
DTV Setting (System Info/Electronic Program Guide/
Audio Language/Video Freezing) ------------------------
PC Adjust Setting -------------------------------------------------------------------
33
8. ANNEX A
LCD Monitor Care & Cleaning Tips/Cleaning the LCD Monitor
Cleaning the Enclosure --------------------------------------------------------
34
----
Remote Control not Working/Unit will not power on w/front Power button
9. ANNEX B
No Picture/Snowy Picture/Picture Flickers/No Sound/
35
10. SPECIFICATIONS ---------------------------------------------------------------
Page 3
Monitor
VOL
( )
DVD
MENU
BAND
MUTE TV
EPG
TV
FREEZE
( )
MUTE DVD
CC
INFO
A/P
SOURCE
POWER/ILL
DISP
SLOW
ZOOM
AS/PS
RECALL
SETUP (DTV)
FAV
AUDIO
SMART
DISC CLK
LANG
EQ
LIST
WIDE
TITLE
EXIT
CH/
SET
ANGLE
SUB-T
SETUP
DASH ( )
Conversion Cable
Component Video
Pub.07-03
Composite Video
Conversion Cable
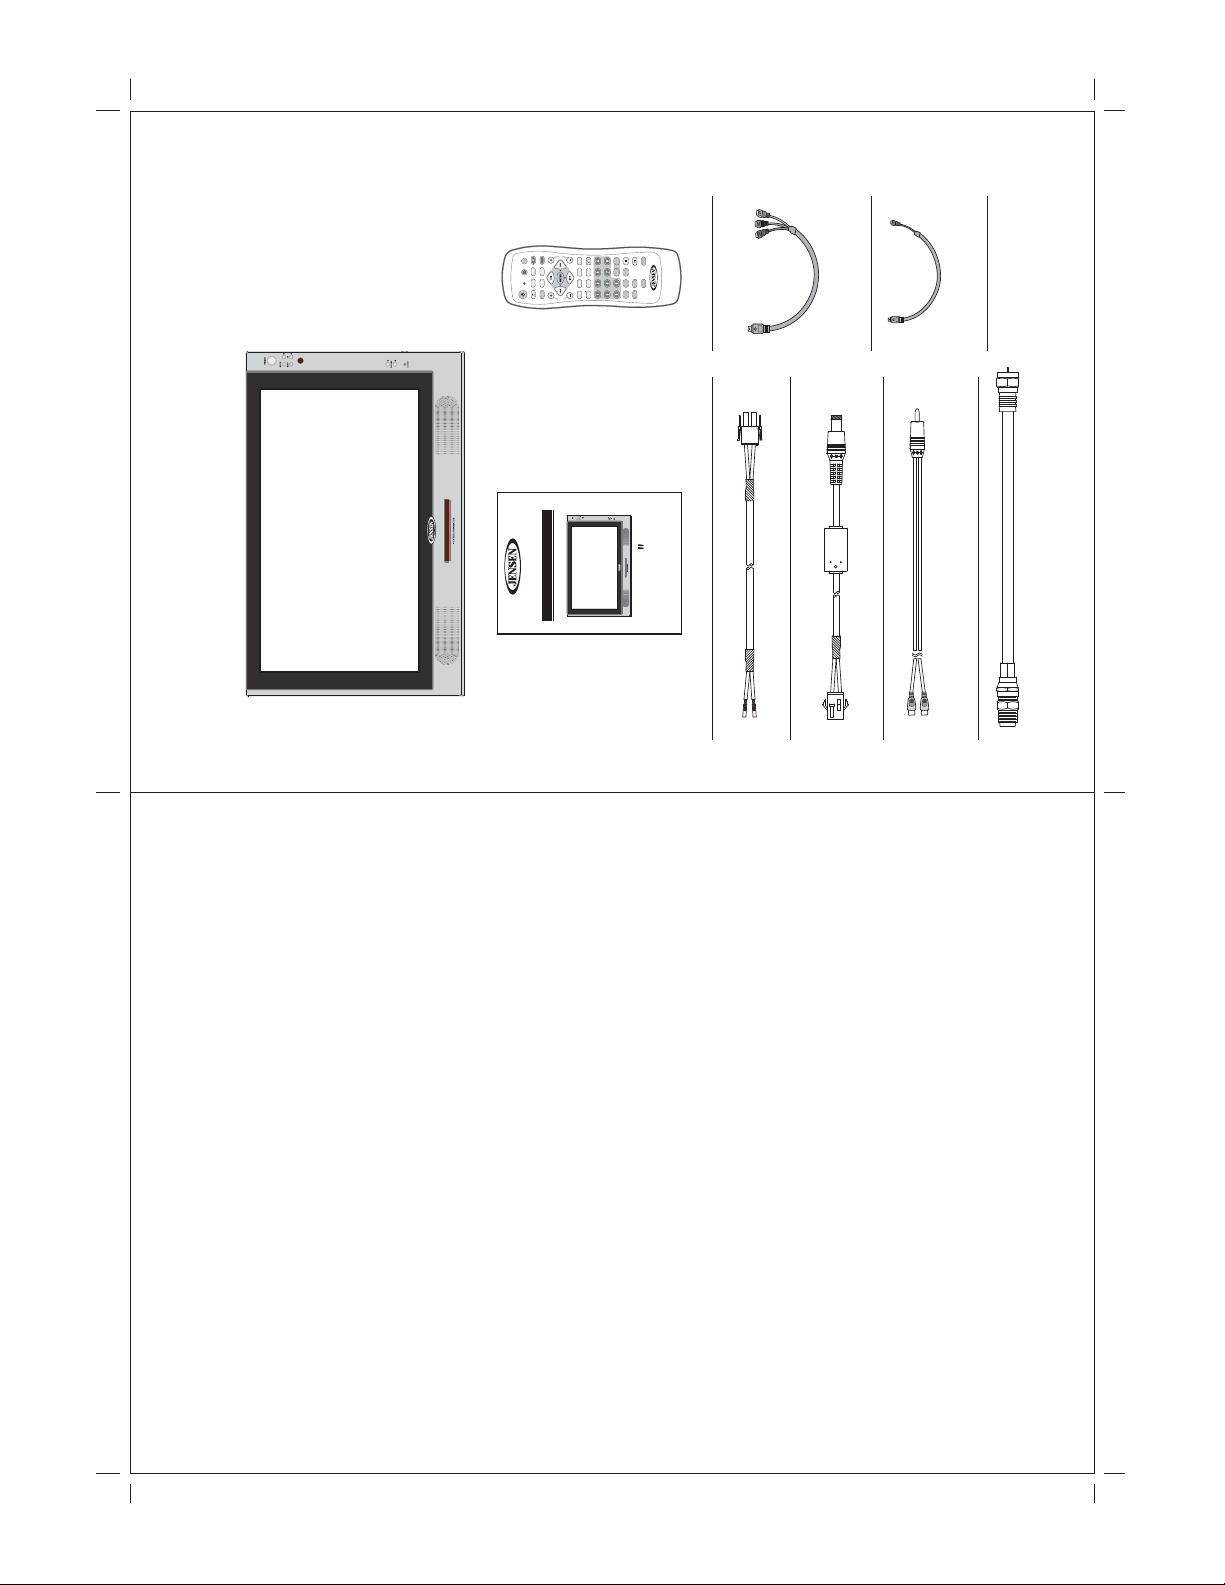
Contents/Accessories :
(Please check the content of the Package.)
JE1510
OPERATING MANUAL
15.4" 16:9 WIDE SCREEN DIGITAL LCD-TV/DTV
15.4
Please keep this operating manual for future references.
Built-in 2-Channel IR Transmitter / Night-time Viewable Remote
Operation Manual Remote Control
DC Power Harness 1
DC Power Harness 2
Antenna coax pigtail cable
IR Transmitter Audio Input Harness
02 03
2. Product Specifications:
1. 15.4" Television / monitor for Mobile use
2. 12V DC Power
3. High Performance, 16:9 LCD Panel
4. High Brightness 500 nit
5. High contrast ratio 500:1
6. Ultra wide viewing angle 170 degrees
7. Front controls
8. Cable ready TV/DTV tuner
9. ATSC - HDTV Tuner
10. Closed Caption and V-Chip
11. High output speakers
10. Built in 2 Channel IR transmitter for optional wireless headphones
11. Wireless Night time viewable remote control included
12. Mounting bracket optional
13. Two auxiliary monitor inputs: One fixed NTSC composite, one selectable
composite, S-Video or component ( HDTV )
Page 4
Dash between major and minor number
):
_
Battery Usage Caution:
18
16
15
14
17
19
( )
DVD
BAND
MUTE TV
EPG
TV
FREEZE
CC
INFO
SOURCE
POWER/ILL
2
1
3
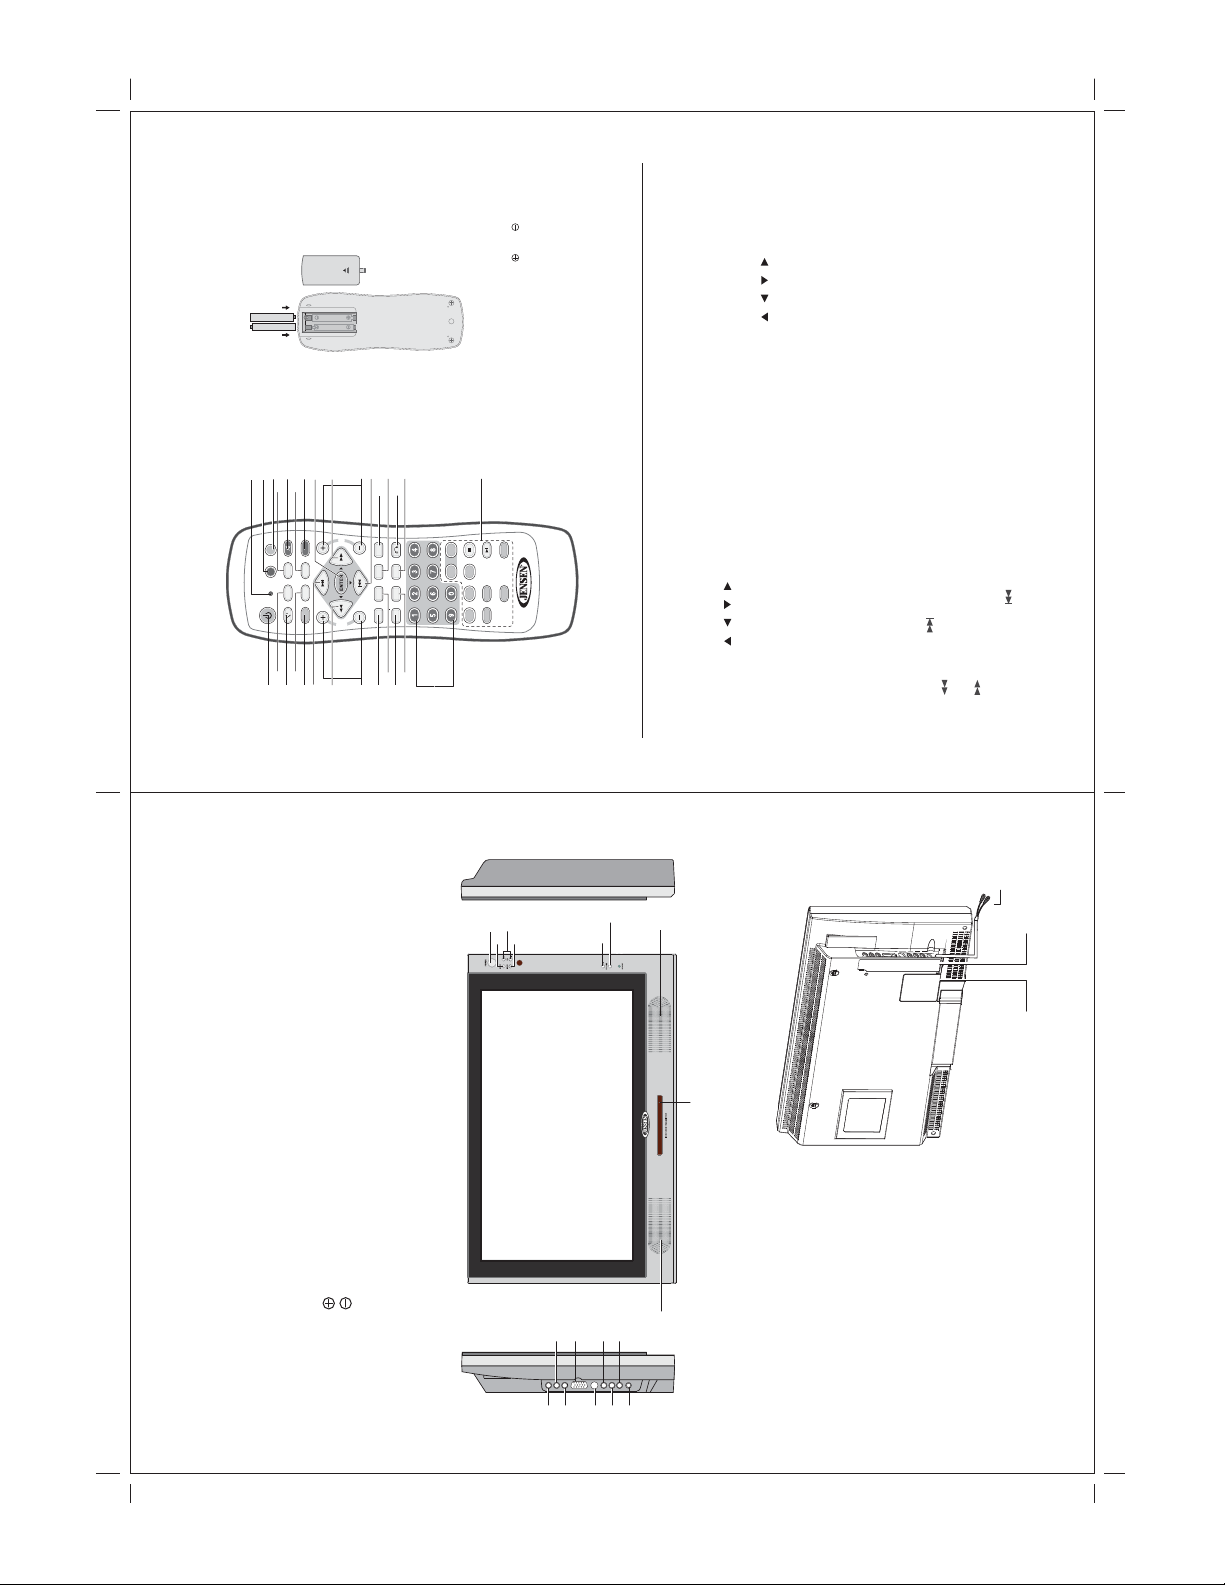
3. Remote Control Function :
(When using the remote control, point it towards the IR sensor.)
2122231324
20
VOL
MENU
( )
MUTE DVD
A/P
CH/
SET
7
546
8
25
SETUP (DTV)
FAV
LIST
EXIT
9
RECALL
LANG
WIDE
DASH ( )
10
POWER : Power On/Off
INFO : Program information display
SOURCE : Signal Button
CC : Hoy key for closed caption function
AUTO PROGRAM : Channel Scanning
/ / / :
Up, Down, Left, Right Button for setting
CH (+/- ) : Channel Up/Channel Down
EXIT : Leave OSD function
LIST : Display the list of channels
DASH (
WIDE : Full
1/2/3/4/5/6/7/8/9/0 : Numbers Button
EPG : EPG function display
MUTE : Mute Button
FREEZE : Video image freeze / play
ENTER : Enter Button
VOLUME (+/- ) : Volume Up/Volume Down
SETUP(DTV) : Display OSE /Return to
previous layer
FAV : List all favorite programs
RECALL : Channel Return
MENU : DVD Root Menu
20.
26.
PREVIOUS TRACK ( ): Select Previous
24.
20
27.
Title/Chapter
19
LANG : Bilingual function
28.
DVD Button : Buttons only for DVD use
29.
To prevent battery leakage which may result
in bodily injury or damage to the remote :
1. Install all batteries correctly, and as
marked on the remote control.
2. Do not mix batteries: (OLD and NEW or
CARBON and ALKALINE, etc.).
3. Remove batteries when the remote is not
used for a long time.
26
28
27
12
11
29
DISP
SLOW
ZOOM
AS/PS
AUDIO
SMART
DISC CLK
EQ
TITLE
ANGLE
SUB-T
SETUP
Note: 1. Some buttons on remote have three functions (for TV/DTV & DVD mode). When press the TV/DTV button, the remote will get into
4
2
3
5
DTV (ATSC) Mode:
1.
2.
3.
4.
5.
POWER : Power On/Off
SOURCE : Signal Button
AUTO PROGRAM : Channel Scanning
/ / / :
TV/DTV function mode, each time when press the TV/DTV function button, the LED will flash "RED" light. When in DVD Mode,
each time when press the DVD function button, the LED will flash "GREEN" light.
2.Some of the buttons are designed for operate single disc DVD player, Please read the DVD manual to operate the DVD player.
TV Mode:
1.
7
8
6
3.
5.
6./7./24./22.
Up, Down, Left, Right Button for setting
6./7./24./22.
8.
9.
10.
11.
12.
13.
CH (+/- ) : Channel Up/Channel Down
1/2/3/4/5/6/7/8/9/0 : Numbers Button
LED : TV/DTV Mode --- Red Flash
: DVD Mode --- Green Flash
TV : TV Mode Selected
ENTER : Enter Button
VOLUME (+/- ) : Volume Up/Volume Down
RECALL : Channel Return
8.
13.
14.
15.
21.
23.
27.
17.
18.
19.
21.
NEXT TRACK ( ): Select Next Title/Chapter
FR( ) : FAST Reverse Play
6.
7.
DVD Mode:
23.
25.
DVD : DVD Mode Selected
FF( ) : FAST Forward Play
16.
22.
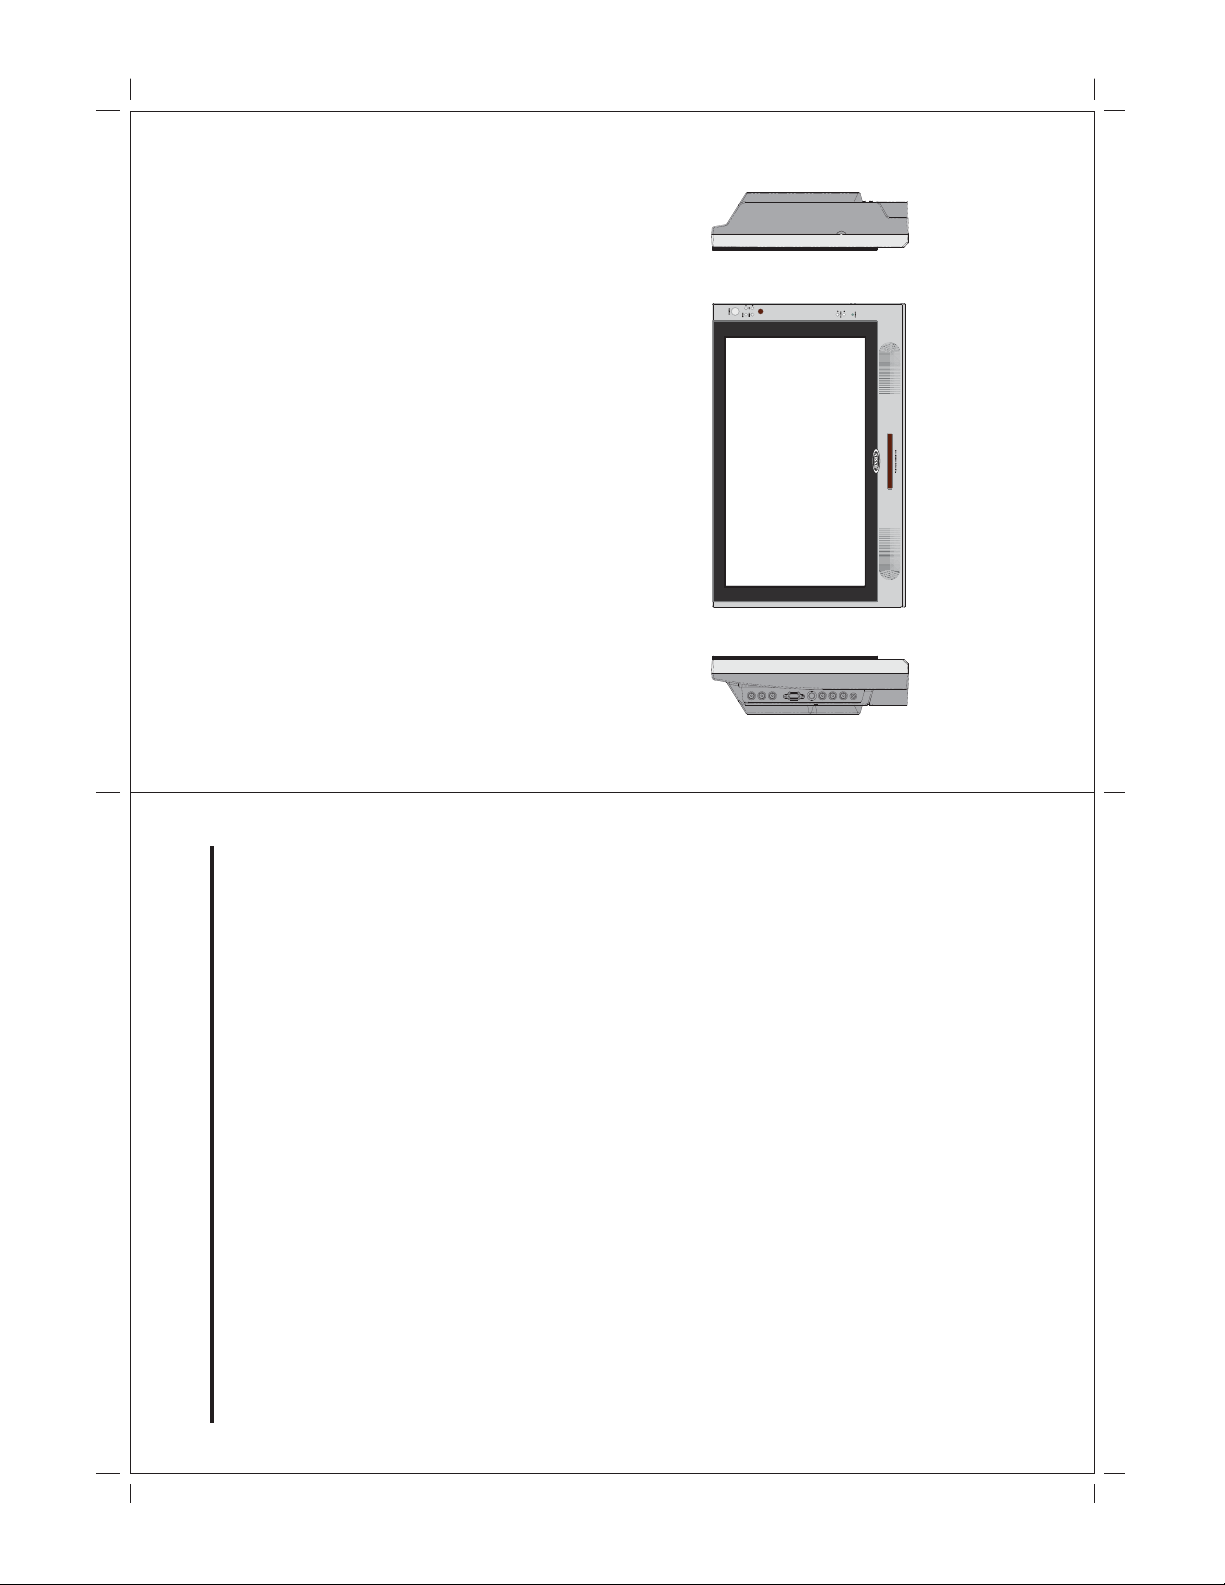
2.FRONT PANEL CONTROLS
1. POWER : Power On/Off
2. MODE : Source Select
PANEL CONTROL :
3. CHANNEL : Channel Select
4. MENU : Menu Setting
5. VOLUME : Increase Volume
6. VOLUME : Decrease Volume
7. SPEAKER : Loud Speaker
8. IR STEREO TRANSMITTER : For Wireless Headphone
21:2322252427
26
18
9
04 05
8
28
INPUT/OUTPUT :
9. AV Out 1 : RCA Video Output
10. AV Out 1 : RCA Left Audio Output
11. AV Out 1 : RCA Right Audio Output
12. VGA : VGA Input (Computer)
13. S-Video (AV) In 1 : S-Video Input
/Component Input
14. AV In 2 : RCA Video Input
15. AV In 2 : RCA Left Audio Input
16. AV In 2 : RCA Right Audio Input
17. AV In 1 : AV 1 Audio Input
18. Antenna Input
19. Power Supply Socket
20. IR Transmitter (Channel 2) Audio Input (L/R)
Page 5

(photo.2)
Output (RCA) to other AV Equipment:
Input (RCA) from other Equipment:
Noted: When connecting Component Video input, please set OSD (AV 1 Select) to "C V" to
Connect to the TV AV IN 2 socket.
view Component-Video source.
Noted: When connecting AV IN 2, please set OS D (AV1 S elect) to "AV" to view AV IN 2
Output the AV Signal using the unit AV output socket.
source.
Noted: When connecting AV OUT 1, please set OSD (AV1 Select) to "AV" to view AV OUT 1
source.
When Connecting to a Coax Cable:
Connect coax cable from your TV antenna or cable to coax pigtail on back of LCD TV.
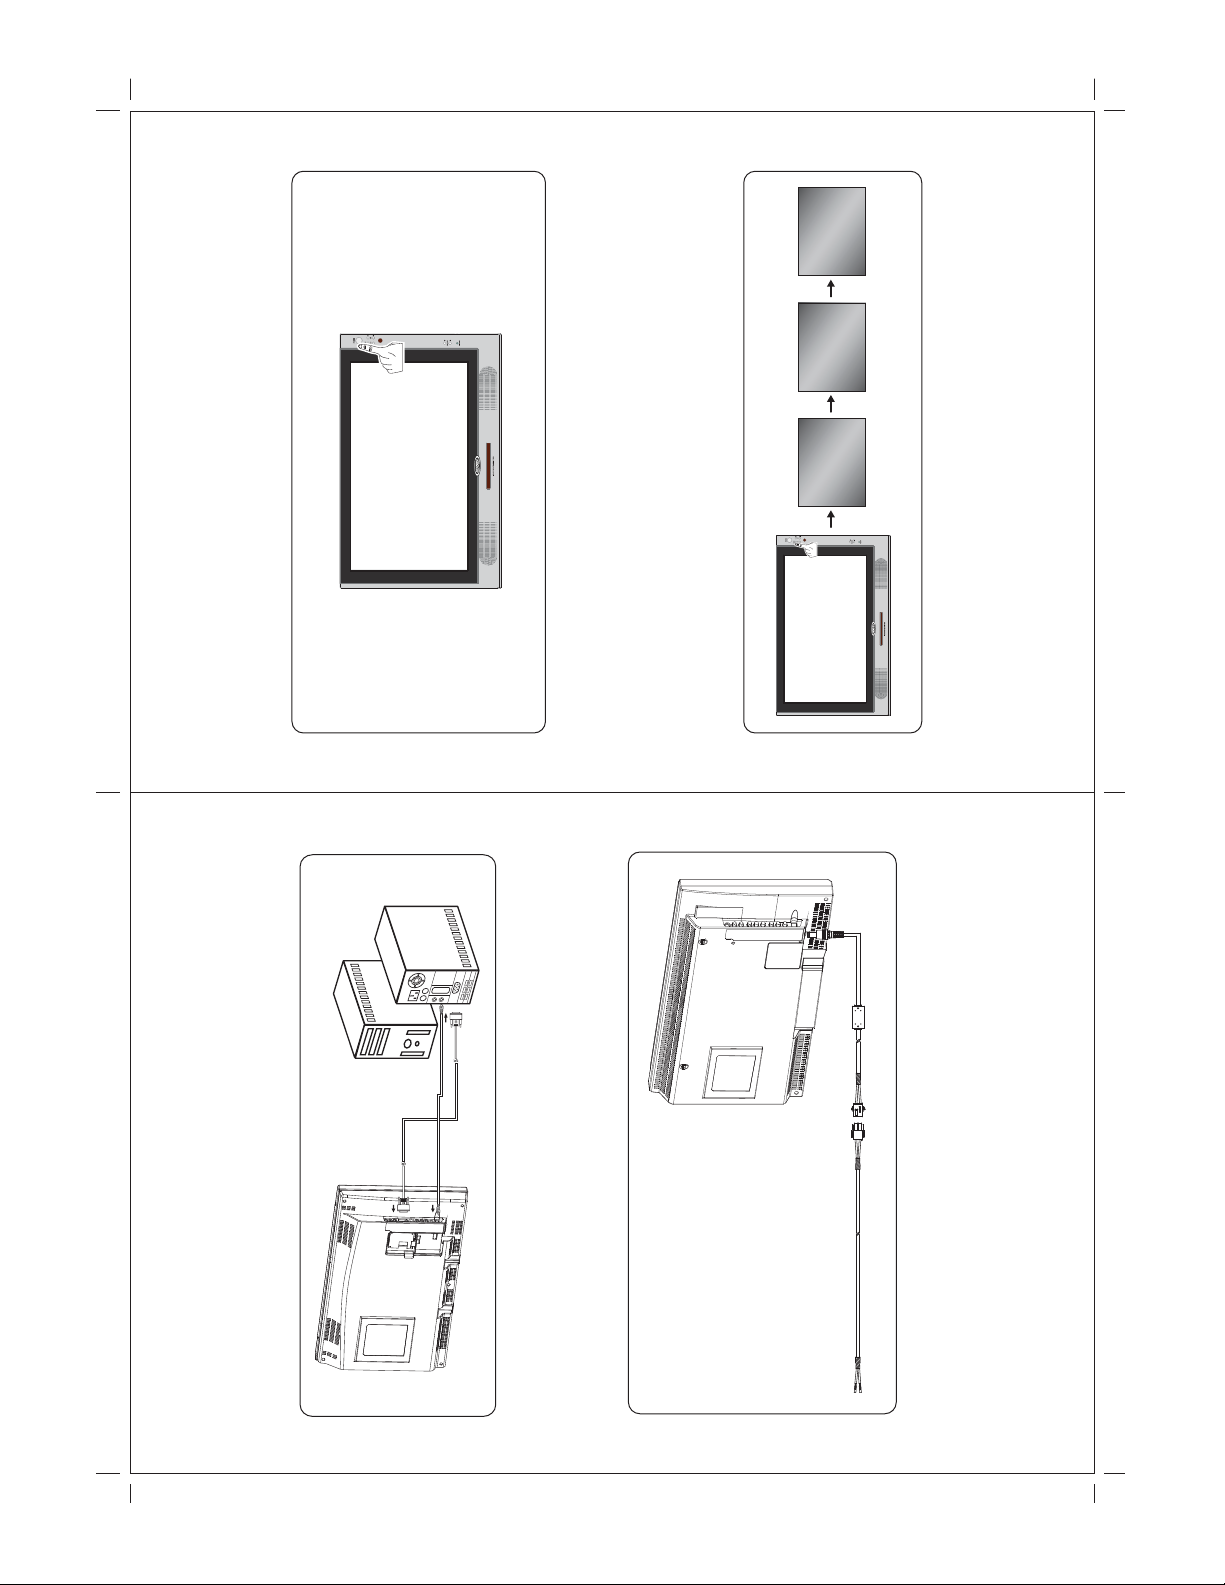
4. INSTALLATION GUIDE:
TV ANTENNA
CATV CABLE
Connecting to Other Equipment :(S-Video cable with optional)
1. This unit is able to support various input settings. You can connect your video recorder,
amplifier, game console etc, to the unit, to enjoy high quality, digital audio-visual effect.
2. Connect AV equipment using S-Video. (photo.1)
3. Using the S-Video cable, connect your equipment to the S-Video/Component socket
on the TV Side Input Panel.
4. Connect your AV cable to the equipment. (photo.2)
(photo.1)
06 07
Note d: W he n c on ne cting S -Vide o input, p le ase s et O S D (A V 1 S ele c t) to "S V " to view
S-VIDEO source.
Page 6
5. Basic Functions :
When POWER indication LED on unit turns RED in color indicating power is connected.
* POWER SIGNAL:
* MODE:
1. Press the "Mode" button on the TV front panel or "SOURCE" button on remote control
to select from the various mode settings.
2. The mode setting status will change each time the "Mode" or "SOURCE" button is
pressed – "AV1/AV2/TV/DTV"
AV1/AV2 DTVTV
AV1
** Pleas e make sure video source has been connected properly.
DC INPUT
SOCKET
Computrer Box
* VGA Input: (Optional VGA connection )
This unit provides VGA (Computer) input connector.
1. Connect computer VGA output to the monitor VGA input using VGA cable.
2. To connect audio source, use audio cable to connect from computer audio output to
VGA audio input.
08 09
E nsure the power supply is connected to the unit. When not using unit for
DC 13.2V
Connect Power:
Note d: W he n c on ne cting VG A inpu t, ple a s e set O S D (A V 1 S ele c t) to "P C " to view V G A
source.
Connect to the power source using the power cable and adapter provided.
a long period of time, remove DC input socket from the main power point.
ATTENTION:
Page 7

* Mute:
1. Press "MUTE" button on remote control to mute speakers. "MUTE" will display on
screen.
2. Press "MUTE" button again or "Volume +/-" button to return sound back to speakers.
VOL
( )
DVD
MENU
BAND
MUTE TV
EPG
TV
FREEZE
CC
INFO
A/P
SOURCE
POWER/ILL
DISP
SLOW
ZOOM
AS/PS
RECALL
SETUP (DTV)
FAV
AUDIO
SMART
DISC CLK
LANG
( )
MUTE DVD
EQ
LIST
WIDE
TITLE
ANGLE
EXIT
SUB-T
SETUP
DASH ( )
CH/
SET
VOL
( )
DVD
MENU
BAND
MUTE TV
EPG
TV
FREEZE
CC
INFO
A/P
SOURCE
POWER/ILL
* Volume Setting:
1. Press "Volume +/- " ( / ) button on TV front control panel or remote control to
adjust volume level.
DISP
SLOW
ZOOM
AS/PS
RECALL
SETUP (DTV)
FAV
AUDIO
SMART
DISC CLK
LANG
( )
MUTE DVD
EQ
LIST
WIDE
TITLE
ANGLE
EXIT
SUB-T
SETUP
DASH ( )
CH/
SET
* Channel Select:
1. Press "Channel / " button on remote control or TV Front Control Panel to
change/select channels.
2. Press Number buttons on remote control to change/select channel directly.
VOL
( )
DVD
MENU
BAND
MUTE TV
EPG
TV
FREEZE
CC
INFO
A/P
SOURCE
POWER/ILL
DISP
SLOW
ZOOM
AS/PS
RECALL
SETUP (DTV)
FAV
AUDIO
SMART
DISC CLK
LANG
( )
MUTE DVD
EQ
LIST
WIDE
TITLE
ANGLE
EXIT
SUB-T
SETUP
DASH ( )
CH/
SET
VOL
( )
DVD
MENU
BAND
MUTE TV
EPG
TV
FREEZE
CC
INFO
A/P
SOURCE
POWER/ILL
DISP
SLOW
ZOOM
AS/PS
RECALL
SETUP (DTV)
FAV
AUDIO
SMART
DISC CLK
LANG
( )
MUTE DVD
EQ
LIST
WIDE
TITLE
ANGLE
EXIT
SUB-T
SETUP
DASH ( )
CH/
SET
10 11
* OSD Menu Setting:
This monitor provides an "OSD" setting, enables you to customize the setting for the monitor.
Press "MENU" button on remote or front control panel to set OSD menu.
Note: Before adjusting settings, ensure all the video sources are in the correct mode.
Page 8

To select the input signal in
IRC/HRC/CATV/ANT by TV Setting
Select " MTS " setup, and select
STEREO/SAP/MONO to set speaker
settings.
of MODE button.
Menu or list operations are Add or Erase
and the screen returns to the source
screen.
To enable or disable captions or subtitles,
select Parental Control and CAPTION.
To change the on-screen display
language, select OSD LANGUAGE.
TV Setting :
Press "MENU" button, OSD menu will display on screen, press "SET / " button to
select "TV setting", and press "ENTER" button to enter TV setting,then press
"SET / / / select course settings. (Please see chart below.)
SAP
MONO
STEREO
TV Setting
MTS
NO
ANT
STEREO
TV Setting
MTS
ANT/CATV
Auto Scan
50
07
Add
Set Channel
Add/Erase
Fine Tune
IRC
ANT
HRC
CATV
TV Setting
ANT/CATV
TV
50
07
NO
Add
ANT
STEREO
TV Setting
MTS
ANT/CATV
Auto Scan
Set Channel
Add/Erase
TV
Fine Tune
Add
Erase
TV Setting
Add/Erase
TV
STEREO
TV Setting
MTS
TV
07
NO
ANT
ANT/CATV
Auto Scan
Set Channel
50
Add
Add/Erase
Fine Tune
TV
TV
Parental Control
Parental Control
OFF
T1~T4
C1~C4
CAPTION
OFF
CAPTION
PARENT CONTROL
ᓄវ
ITALIANO
ESPANOL
DEUTSCH
FRANCAIS
Menu Setting
TV
TV
Language
50
50
Menu Setting
OSD H Position
OSD V Position
10
NO
ENGLISH
OSD Timeout
Language
Recall
OSD Exit
TV
TV
6. OSD Settings:
Management Setting :
This TV provides an "OSD" setting that enables you to customize the monitor settings.
Note: Before adjusting settings, ensure all the video sources are in the correct mode.
Press "MENU" button, OSD menu will display on screen, press "SET / " button to
select "TV setting", and press "ENTER" button to enter management setting,then press
You can adjust the sound characteristics
to your preference.
505050
50
ON
Audio Adjust
Volume
Bass
Treble
Balance
Surround
Picture adjust was show yellowing bar to confirm your selection.
TV Setting :
"SET / / / select course settings. (Please see chart below.)
5050505050
Picture Adjust
Brightness
Contrast
Sharpness
Saturation
Hue
505050
50
OFF
Audio Adjust
Volume
Bass
Treble
Balance
TV
Surround
To select the input signal " TV " mode
by Main display of MODE button.
OFF
Speaker
ON
Speaker
TV
AV1
AV2
Input Select
Main Display
TV
TV
AV
Zoom
Input Select
Main Display
Zoom
TV
AV1 Select
The " Zoom " setup lets you select the
internal FULL/NORMAL/14:9 or ZOOM.
14:9
FULL
ZOOM
NORMAL
Input Select
Zoom
TV
TV
Input Select
Main Display
TV
AV
Zoom
Zoom
AV1 Select
TV
TV
To select the input signal " AV " mode
by AV1 Select of MODE button.
AV
SV
PC
CV
Input Select
AV1 Select
AV1
Input Select
Main Display
AV
Zoom
Zoom
AV1 Select
TV
TV
12 13
Page 9

To select the input signal " AV2 " mode
You can adjust the sound characteristics
to your preference.
505050
50
Audio Adjust
by Main display of MODE button.
ON
OFF
AV2TVAV1
Input Select
To select the input signal " AV " mode
The " Zoom " setup lets you select the
internal FULL/NORMAL/14:9 or ZOOM.
14:9
FULL
ZOOM
NORMAL
Input Select
by AV1 Select of MODE button.
AV
SV
PC
CV
NTSC
Input Select
To change the on-screen display
language, select OSD LANGUAGE.
~
DEUTSCH
FRANCAIS
NTSC
Menu Setting
Menu or list operations are canceled and the
~
ᓄវ
ITALIANO
ESPANOL
screen returns to the source screen.
Yes
Menu Setting
Management Setting :
Press "MENU" button, osd menu will display on screen, press "SET / " button to
This TV provides an "OSD" setting that enables you to customize the monitor settings.
Note: Before adjusting settings, ensure all the video sources are in the correct mode.
7. OSD Settings:
select "AV1 setting", and press "ENTER" button to enter management setting,
Picture Adjust
then press "SET / / / select course settings. (Please see chart below)
AV2 Settings:
5050505050
Brightness
Contrast
Sharpness
Saturation
Volume
Bass
Treble
Balance
Surround
Speaker
AV2
505050
50
ON
OFF
NTSC NTSC
Audio Adjust
Hue
Volume
Bass
Treble
Balance
Surround
AV2 NTSC
You can adjust the sound characteristics
Speaker
AV2
to your preference.
505050
50
ON
OFF
Audio Adjust
Main Display
AV
AV2
Zoom
Input Select
Main Display
Zoom
AV2 Select
To select the input signal " AV1 " mode
by Main display of MODE button.
TV
AV1
AV2
Input Select
Zoom
AV2
AV
AV1
Zoom
NTSC NTSC
Input Select
Main Display
Zoom
AV2 Select
AV2
The " Zoom " setup lets you select the
internal FULL/NORMAL/14:9 or ZOOM.
14:9
FULL
ZOOM
NORMAL
Input Select
AV2 Select
AV2
AV
AV1
Zoom
NTSC
Input Select
Main Display
Zoom
AV2 Select
AV2
To select the input signal " AV " mode
by AV1 Select of MODE button.
AV
SV
PC
CV
NTSC
Input Select
Language
AV2
50
NTSC
Menu Setting
OSD H Position
AV2
To change the on-screen display
language, select OSD LANGUAGE.
FRANCAIS
NTSC
Menu Setting
50
OSD V Position
~
DEUTSCH
ITALIANO
Recall
AV2
50
50
10
NO
ENGLISH
OSD Timeout
Language
Recall
OSD Exit
~
ᓄវ
ESPANOL
10
NO
ENGLISH
NTSC NTSC
Menu Setting
OSD H Position
OSD V Position
OSD Timeout
Language
Recall
AV2
Menu or list operations are canceled and the
OSD Exit
screen returns to the source screen.
Yes
Menu Setting
AV2
NTSC NTSC
AV2
14 15
Management Setting :
Press "MENU" button, OSD menu will display on screen, press "SET / " button to
This TV provides an "OSD" setting that enables you to customize the monitor settings.
Note: Before adjusting settings, ensure all the video sources are in the correct mode.
6. OSD Settings:
select "AV1 setting", and press "ENTER" button to enter management setting,
Volume
Bass
Treble
Balance
Surround
Speaker
505050
Volume
Bass
50
Treble
Balance
ON
OFF
Surround
Speaker
AV1
NTSC NTSC
AV1
Picture adjust was show yellowing bar to confirm your selection. Picture adjust was show yellowing bar to confirm your selection.
5050505050
Picture Adjust
then press "SET / / / select course settings. (Please see chart below)
AV1 Settings:
Brightness
Contrast
Sharpness
Saturation
Hue
Audio Adjust
AV1 NTSC
Main Display
AV
AV1
Zoom
Input Select
Main Display
Zoom
AV1 Select
AV1
NTSC NTSC
AV1
Zoom
AV
AV1
Zoom
Input Select
Main Display
Zoom
AV1 Select
AV1
NTSC
AV1
AV1 Select
AV
AV1
Zoom
Input Select
Main Display
Zoom
AV1 Select
AV1
NTSC
AV1
Language
50
50
Menu Setting
OSD H Position
OSD V Position
10
NO
ENGLISH
OSD Timeout
Language
Recall
OSD Exit
AV1
NTSC NTSC
AV1
Recall
50
50
Menu Setting
OSD H Position
OSD V Position
10
NO
ENGLISH
OSD Timeout
Language
Recall
OSD Exit
AV1
NTSC NTSC
AV1
Page 10

0 ~ 100
0 ~ 100
0 ~ 100
0 ~ 100
Dolby /
PCM / Off
: increase the contrast level
: increase the brightness level
: decrease the brightness level
: decrease the contrast level
ʳ
: increase the saturation level
: decrease the saturation level
: increase the hue level
: decrease the hue level
/ : functions select
key to return
ʳ
ʳ
To adjust the brightness
level of picture on TV.
(fig1.2)
To adjust the contrast level
of picture on TV. (fig1.3)
To change the saturation
level on TV. (fig1.4)
To change the tint level of
picture on TV. (fig1.5)
To select digital audio
output format. (fig1.6)
Using key and or key to select sub-items you want. Press ENTER
Adjustment main-menu.
key or key to enter its sub-function and press MENU
Adjustment main-menu:
Sub-Item Function description Operation Selection
At this menu, you can adjust the level settings related to the picture on TV.
Brightness:
Contrast:
Saturation:
Hue:
SPDIF Output:
First time installation
6. OSD (DTV) Settings: OSD (DTV) Settings:
layer. Please
operate our OSD menu.
16 17
OSD operation tip
There are five main items on the
OSD menu and you can use ʳ˂ʳ ʳkeys
to select these main items. When you
select specific main item, and then the
related sub-items will be shown on
monitor, please useʳʳkeys and ʳ˂ʳ
keys to select sub-items. Almost all
sub-function, and then use
specific
ʳ˂ʳ ʳkeys
sub-items have sub-function; you can
press ENTER key or key to enter
to switch sub- function. After your change, you can press ENTER key
following chapters in order so you can see how to
your setting or just press MENU key to return to sub-items OSD
to see
refer to the
Page 11

Page 12

Page 13

Page 14

Page 15

Fig.4.6 Change PIN menu
Fig.4.4 Parental Guide menu
Fig.4.5 MPAA Rating menu
ʳ
, , or key and then Press ENTER key to activate the function.
Parental Guide:
In this menu, you can set the program for TV rating in TV rating table to block with
item,
On / Off
/ TV-PG / TV-14 /
TV-Y / TV-Y7 / TV-G
ʳ
˂ʳ ʳ˂ʳ / : select the
/ : functions select
choices for TV rating
TV-MA
N/A / G / PG / PG-13
/ : select the choices
In this menu, you can set the program for movie rating which is listed in picture below
to block with or key and then press ENTER key to activate.
MPAA Rating:
/ R / NC-17 / X
Number key(0~9)
ʳ
for movie rating
Number key: input the PIN
code
Change PIN:
In this menu, you can change your PIN code with number key (0 ~ 9). It is necessary to
input two times your new PIN code to confirm. It is invalid for the new PIN code to
press MENU key during changing PIN code.
Fig.4.2 V-chip main-menu
ʳ
ʳ
26 27
Fig.4.3 V-chip Lock menu
Enable / Disable V-Chip
function. (fig4.3)
To set rating dimension
of TV rating system.
OSD (DTV) Settings: OSD (DTV) Settings:
You have to input a correct PIN code before you can enter this item, and at this
V-Chip
Lock:
Parental
Sub-Item Function description Operation Selection
you can set system parameters of digital V-chip function. (fig4.1) (fig4.2)
Guide:
To set rating dimension
of movie rating system
adopted by the Motion
Picture Association of
Rating:
MPAA
America. (fig4.5)
To change system PIN
code. (fig4.6)
V-chip main-menu:
Change
Before enter to V-chip menu you will be requested to input a correct set of
PIN code with number key (0 ~ 9) whose default system PIN code is “1234”.
PIN:
Fig.4.1 V-chip administration
key to execute.
ʳ
V-Chip Lock:ʳ
ENTER
In this menu, you can set On/Off V-Chip channel blocking function with or key,
ʳ
(fig4.4)
ʳ
Page 16

Page 17

Hot-key Introduction
This information is for System firmware version.
System Info:ʳ
Program Information:
INFO
audio language with or key and ENTER key from current program by
LANG key.
This function is digital only. Press key on the remote controller, and you can see
digital information of the program you are watching, such as channel number, system date,
video resolution, etc.
EPG is one of the most important features of digital TV, You can get system time, current
program name/time and program description from this function.
Electronic Program Guide (EPG):
Audio Language:
If the program you are watching contains other language for audio, you can select and
change the
pressing
important information, like phone number, address,
freeze video on TV monitor. This is a useful function when you
me to review some
Video Freezing:
Press FREEZE key on remote controller, then you will see the Icon below on the screen
need more ti
and system will
for example.
or key directly.
OSD (DTV) Settings: OSD (DTV) Settings:
OSD Opacity:
parameter with
In this menu, the transparent level of OSD menu can be set by adjusting the Opacity
ʳ
Fig.5.4 OSD Opacity menu
or key and ENTER key.
OSD Timeoutˍʳ
You can adjust the time (2sec/4sec/6sec) when the OSD menu appears on screen with
Fig.5.5 OSD Timeout menu
ˍʳ
All Reset
Please use this function very carefully; the system will reload default setting if you
execute this function with “Yes” selection.
30 31
Fig.5.6 All Reset menu
ʳ
Page 18

505050
50
OSD Settings:
Management Setting :
Press "MENU" button, OSD menu will display on screen, press "SET / " button to
select "Management setting", and press "ENTER" button to enter management setting,
then press "SET / / / select course settings. (Please see chart below.)
SUB
PIP Setting
PIP Audio
PIP
MAIN
PIP Setting
PIP Mode
PIP Audio
PIP Size
PIP H Position
PIP V Position
HF:48.3KHz VF:59.9Hz
AV1 1024x768 SEP
HF:48.3KHz VF:59.9Hz
AV1 1024x768 SEP
DEUTSCH
FRANCAIS
Menu Setting
Language
50
50
Menu Setting
OSD H Position
OSD V Position
ᓄវ
ITALIANO
ESPANOL
10
NO
ENGLISH
OSD Timeout
Language
Recall
OSD Exit
HF:48.3KHz VF:59.9Hz
AV1 1024x768 SEP
HF:48.3KHz VF:59.9Hz
AV1 1024x768 SEP
8. ANNEX A:
To avoid possible shock hazard, be sure the LCD TV is turn off and unplugged from the
main electrical outlet before cleaning.
LCD Monitor Care & Cleaning Tips:
Do not use any form of solvents on the LCD monitor.
Cleaning the LCD Monitor:
1. Use a soft, clean & dry cloth to gently wipe off the dust on the LCD monitor.
2. Use a clean cloth dampened with water to wipe off the dirt.
PIP
MAIN
PIP Setting
PIP Mode
PIP Audio
PIP Size
PIP H Position
PIP V Position
3. Do not exert force when cleaning the LCD monitor.
HF:48.3KHz VF:59.9Hz
AV1 1024x768 SEP
Cleaning the Enclosure:
1. Use a soft, clean & dry cloth to gently wipe off the dust on the LCD monitor.
2. Use a clean cloth dampened with water to wipe off the dirt.
3. Do not exert force when cleaning the LCD monitor.
Management Setting :
Press "MENU" button, OSD menu will display on screen, press "SET / " button to
This TV provides an "OSD" setting that enables you to customize the monitor settings.
Note: Before adjusting settings, ensure all the video sources are in the correct mode.
7. OSD Settings:
select "Management setting", and press "ENTER" button to enter management setting,
then press "SET / / / select course settings. (Please see chart below.)
PC Settings:
5050505050
Picture Adjust
Brightness
Contrast
H-Position
V-Position
Clock
Phase
50
NO
HF:48.3KHz VF:59.9Hz
Auto Image
505050
50
HF:48.3KHz VF:59.9Hz
AV1 1024x768 SEP
HF:48.3KHz VF:59.9Hz
AV1 1024x768 SEP
TV
AV2
PIP Setting
PIP Source
TV
ON
PIP Setting
PIP Source
PIP Mode
ON
Audio Adjust
Volume
Bass
Treble
505050
Audio Adjust
Volume
Bass
Treble
OFF
Balance
Surround
Speaker
50
ON
OFF
Balance
Surround
Speaker
User
Corlor
HF:48.3KHz VF:59.9Hz
Color Temp.
Red
Green
Blue
AV1 1024x768 SEP
Cool
Neut.
Warm
Corlor
HF:48.3KHz VF:59.9Hz
Color Temp.
AV1 1024x768 SEP
AV1 1024x768 SEP
HF:48.3KHz VF:59.9Hz
AV1 1024x768 SEP
HF:48.3KHz VF:59.9Hz
AV1 1024x768 SEP
ON
PIP Setting
PIP Mode
TV
OFF
PIP Setting
PIP Source
PIP Mode
32 33
HF:48.3KHz VF:59.9Hz
AV1 1024x768 SEP
HF:48.3KHz VF:59.9Hz
AV1 1024x768 SEP
Page 19

Active Matrix LCD-TFT
Panel Type
10. SPECIFICATIONS:
15.4" (Diagonal)
16:9
102,4000 Pixel (1280x800)
16.7 M
Display Size
Aspect Ratio
Resolution
Display Colors
2
500 cd/m
500 :1
Luminance
Contrast Ratio
H:<100 degrees, V: 50 degrees
NTSC / ATSC
View Angle
TV-System
2 x 3W
96 kHz/24-Bit Audio-D/A-Converter
1x (S-Video/Component/CVBS Input <Mini-DIN>),
1x VGA Input, 1x AV-IN (RCA)
1x AV-OUT (RCA)
Channel 1: 2.3Mhz/2.8Mhz, Effective Angle:45°
Effective Range:12 Feet
Channel 2: 3.2Mhz/3.8Mhz, Effective Angle:45°
Effective Range:12 Feet
English, French, Dutch, Spanish, Chinese
Speakers
Audio DAC
Inputs
Outputs
IR-Transmitter
REMOTE RANGE
OSD-Language
(DTV English, French, Spanish)
Monitor,Operating Manual, Remote Control,
Component Video Conversion Cable, DC Power Harness,
Composite Video Conversion Cable,
Accessories
IR Transmitter Audio Input Harness
Antenna Coax Pigtail Cable
Noted: All specifications are subjected to change without prior notification
9. ANNEX B:
Troubleshooting:
If the unit fails to operate normally, try solving the problems using the guide below. If the
problem persists, switch off the unit and ask the dealer or customer services officer for
assistance. Do not attempt to repair the defective unit yourself. Do not endanger yourself
as high voltage is involved.
1. No Picture:
a. Check that the power cord is plugged into the main socket and the power
supply is turned on.
b. Check the contrast and brightness setting.
c. Check the Antenna connection to see if it is properly connected to the
LCD-TV Input Terminal.
d. Be sure you have selected the correct source mode.
2. Snowy Picture:
a. Check to see if the Antenna is correctly connected.
b. Check to see if the picture setting is correctly set.
3. Picture Flickers:
a. Check that the power coming from the main socket is sufficient.
b. Check that unit is not placed near speakers or magnetic objects.
c. Check to see that the unit setting is correctly set.
4. No Sound:
a. Check that mute function is off.
b. Increase the volume.
5. Remote Control not Working:
a. Check batteries are installed correctly, replaced if necessary.
b. Aim the remote controller towards the unit remote sensor.
6. Unit will not power on w/ front Power button:
a. Check the power is connected.
b. Power indication LED on unit is red in color.
34 35
 Loading...