

Page 1
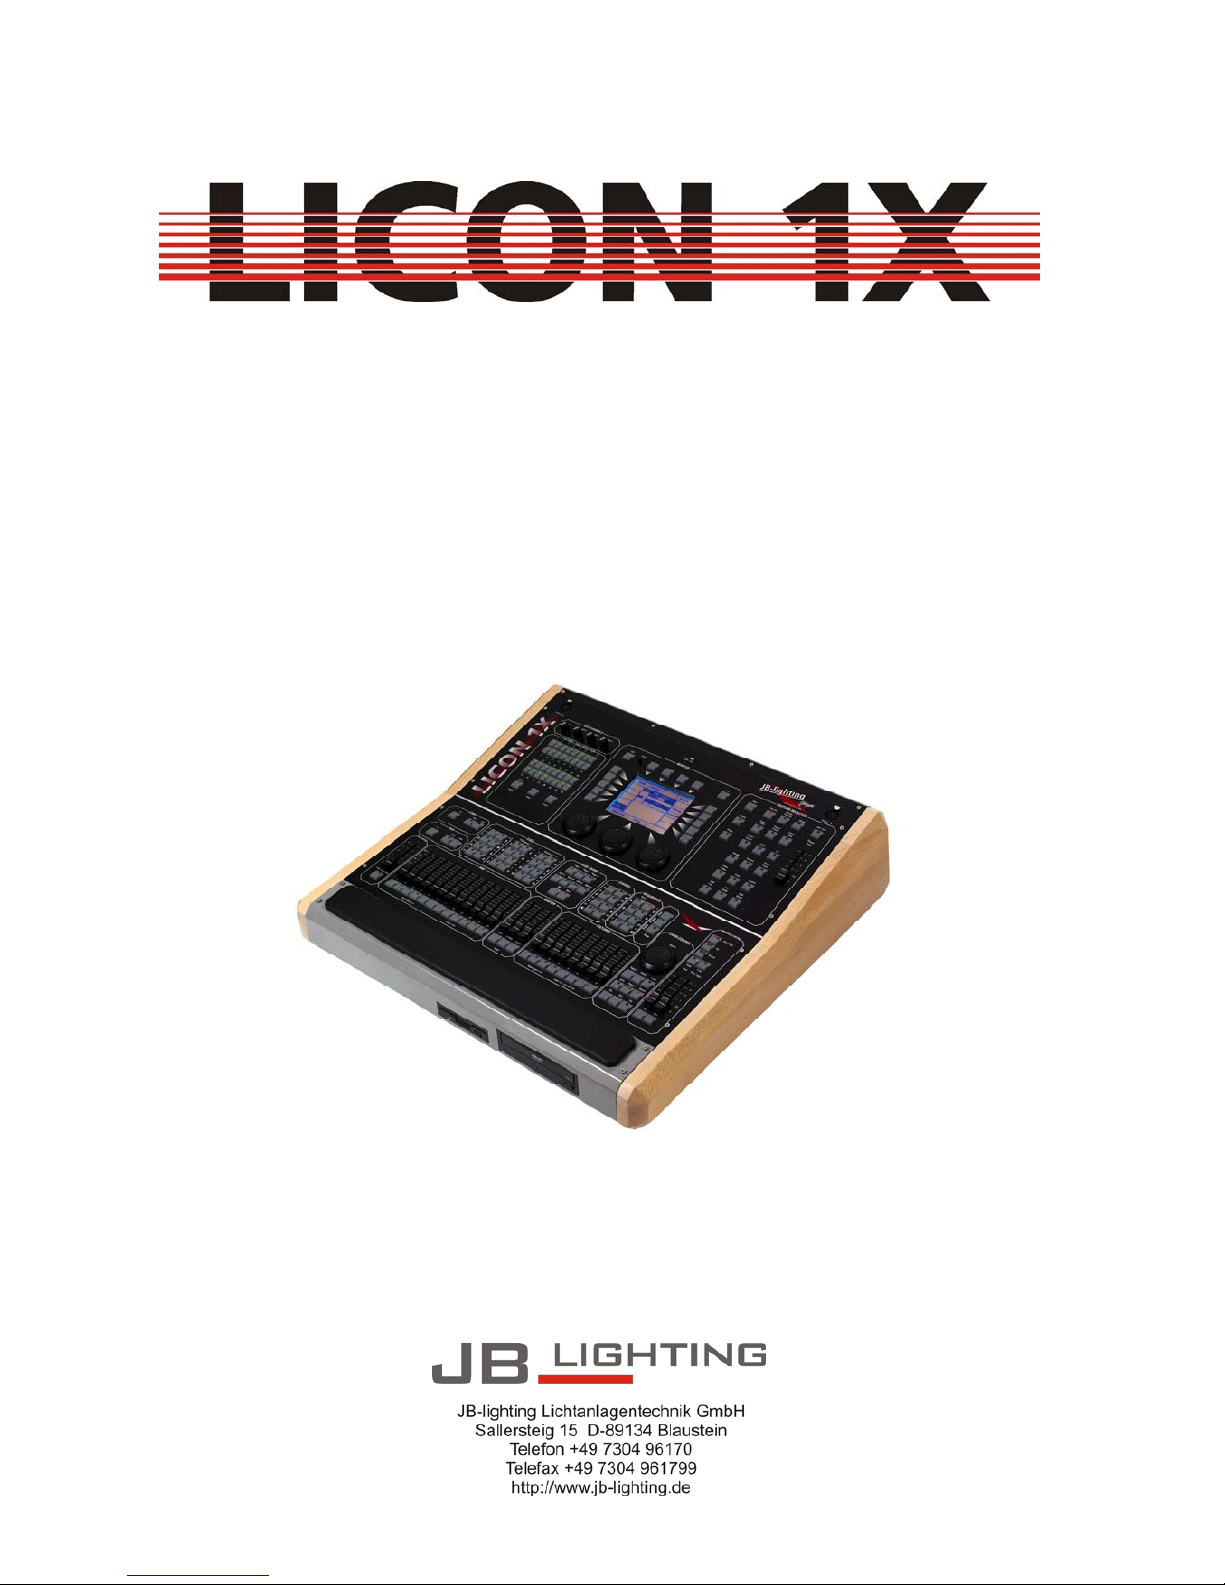
User manual
Version 2.1
Page 2

JB-lighting Lichtanlagen GmbH Sallersteigweg 15 D-89134 Blaustein Telefon ++49(0)7304 9617-0
- 2 -
Page 3

JB-lighting Lichtanlagen GmbH Sallersteigweg 15 D-89134 Blaustein Telefon ++49(0)7304 9617-0
- 3 -
Foreword
Thank you very much for the confidence you have placed in us by purchasing the Licon 1X. The Licon 1X
allows you to control both intelligent light that is presently on the market and up to 96 channels for
conventional light (DMX-controlled dimmers). The Licon 1X comes with a clearly structured operation
design. This user manual will help you to become easily familiarised with the mode of operation of the
Licon 1X. All working steps are described in detail in the user manual, which will allow unexperienced
users to work with the lighting controle console as well. If you have already gained experience with similar
lighting control consoles, however, please have a look at our abbreviated version that will describe only
the most important functions of the Licon 1X.
Enjoy working with your new lighting control console!
Your JB-lighting team
Page 4

JB-lighting Lichtanlagen GmbH Sallersteigweg 15 D-89134 Blaustein Telefon ++49(0)7304 9617-0
- 4 -
General remarks
The Licon 1X by JB-lighting was designed to facilitate and accelerate the control of intelligent fixtures as
well as conventional DMX dimmer channels.
The Licon 1X is capable of controlling up to 32 fixtures with a maximum of 25 control channels and 7
fixed-value channels.
In addition, you have access to 96 conventional DMX channels.
You can control the fixtures by direct selection of the individual fixtures and the corresponding
parameters. The keys on the console are labelled so that even untrained operators will always
find the various functions of the Licon 1X.
Since sequences and chases can be created with the help of presets in the Licon 1X, simple and
effective programming becomes possible.
Moreover, the console comes with a chase generator that allows creation of chases on the basis
of presets. In this way, you can realise effectful sequences in a matter of second s.
Even during a show, you will have access to individual fixtures or fixture groups and their
parameters as well as to the runtimes of chases.
The desk can be synchronised by external signal input such as MIDI, SMPTE or may be run
music-animated. It is possible to link several desks in order to multiply the number of control
channels.
The Licon 1X is equipped with a DMX-In interface for insertion of a DMX desk/console.
The integrated CD-Rom drive allows you to programme shows with commercially available or
self-recorded CDs. The shows will run music-synchronised and do not require additional devices
such as a timecode clock.
4 AUX controllers are available in order to control additonal DMX devices such as fog machine s.
Data are stored on USB memory sticks or 3.5“ floppy-disks.
The software of the Licon 1X is upgraded via PC. The latest software version is available for download on
the Service section of our homepage at www.JB-lighting.de.
Page 5

JB-lighting Lichtanlagen GmbH Sallersteigweg 15 D-89134 Blaustein Telefon ++49(0)7304 9617-0
- 5 -
Table of contents
Foreword .......................................................................................................................................................... 3
General remarks .............................................................................................................................................. 4
Table of contents ............................................................................................................................................. 5
1. First steps ................................................................................................................................................... 10
1.1 Scope of delivery and installation ......................................................................................................... 10
1.2 Changing the input voltage ................................................................................................................... 10
1.3 DMX outputs ......................................................................................................................................... 10
2. Configuration (CONFIG) ............................................................................................................................ 11
2.1 L-USER / Configuring a fixture ............................................................................................................. 11
2.2 SELECT / CONFIG Setting up a fixture list with the help of the fixture library ..................................... 14
2.2.1 Deleting individual fixtures from the fixture list .............................................................................. 14
2.2.2 Deleting the entire fixture list ......................................................................................................... 14
2.3 PATCH / Assigning start adresses to fixtures ...................................................................................... 14
2.3.1 Entering DMX start addresses for fixtures .................................................................................... 15
2.3.2 Deleting a particular start address ................................................................................................ 15
2.3.3 Deleting all start addresses ........................................................................................................... 15
2.4 PATCH / Assigning DMX channels to the dimmer/PAR section .......................................................... 16
2.4.1 Entering DMX start addresses for the dimmer/PAR section ......................................................... 16
2.4.2 Deleting particular DMX start addresses ....................................................................................... 16
2.4.3 Deleting all DMX start addresses .................................................................................................. 16
2.4.4 Selecting the dimmer curve ........................................................................................................... 17
2.5 P-COPY / Copying presets ................................................................................................................... 17
2.6 PANTIL / Inverting Pan and Tilt channels ............................................................................................ 17
2.6.1 Deleting a Pan or Tilt inversion ........................................................................................ ............. 18
2.6.2 Swapping Pan and Tilt channels ................................................................................................... 18
2.7 AUTORUN / Starting the LICON 1X automatically ............................................................................... 18
2.8 DMX / Remote control via external DMX console ................................................................................ 18
2.8.1 Selecting the DMX channels ......................................................................................................... 18
2.9 EXTTRG / Remote control via external trigger input ............................................................................ 19
2.9.1 Assigning keys independent of PAGE/BANK ................................................................................ 19
2.9.2 Assigning softkeys ......................................................................................................................... 20
2.9.3 Assigning keys dependent on PAGE/BANK ..................................................................................... 20
2.10 The MIDI-function ............................................................................................................................... 21
2.10.1 Activating the MIDI section .......................................................................................................... 21
2.10.2 Deactivating the MIDI section ..................................................................................................... 21
2.10.3 Connecting a MIDI device ........................................................................................................... 21
2.10.4 Selecting the MIDI channel ......................................................................................................... 21
2.10.5 Assigning MIDI notes .................................................................................................................. 22
2.10.6 Assigning softkeys ....................................................................................................................... 22
2.10.7 BEATSYNC ................................................................................................................................. 23
2.11 OPTION / Additonal configuration parameters for the Fixture-/PAR selection .................................. 23
2.11.1 The swap function ....................................................................................................................... 23
2.11.1.1 Mode of operation of the swap function ................................................................................ 24
2.11.1.2 Working with the swap function ............................................................................................. 24
2.11.2 Displaying DMX values in percent .............................................................................................. 24
2.11.2.1 Activating the percent function ...................................................................................... ........ 24
2.11.3 CHCTRL / Setting the Chase Control Section ............................................................................ 24
2.11.4 PARNUM / Numbering the PAR section ..................................................................................... 25
2.11.5 PARMUL / Accessing PAR fader banks ...................................................................................... 25
2.11.6 TOUCH / Turning the touchscreen on or off ............................................................................... 26
2.12 ACCESS / Entering passwords .......................................................................................................... 26
2.12.1 Entering the master password .................................................................................................... 26
2.12.2 Entering the user passwords ....................................................................................................... 27
2.12.3 Checking passwords ................................................................................................................... 27
2.12.4 Changing passwords ................................................................................................................... 27
3. Programming in the Combi section ......................................................................................................... 28
3.1 Direct access to fixtures ....................................................................................................................... 28
Page 6

JB-lighting Lichtanlagen GmbH Sallersteigweg 15 D-89134 Blaustein Telefon ++49(0)7304 9617-0
- 6 -
3.2.1 Storing fixture groups .................................................................................................................... 29
3.2.2 Activating fixture groups ................................................................................................................ 29
3.2.3 Switching fixture fader banks ........................................................................................................ 29
3.3 The Highlight/Group key ....................................................................................................................... 30
3.4 Entering fixture parameters with the encoder wheels .......................................................................... 31
3.4.1 Positioning fixtures with 16 Bit ...................................................................................................... 31
4. Presets ........................................................................................................................................................ 32
4.1 Creating and storing presets ................................................................................................................ 32
4.2 Naming a preset ................................................................................................................................... 32
4.3 Recalling presets .................................................................................................................................. 33
4.4 Fading presets ...................................................................................................................................... 33
5. Programming aids for Pan and Tilt values ............................................................................................. 34
5.1 Fan function .......................................................................................................................................... 34
5.1.1 Entering the fan function ............................................................................................................... 34
5.2 Preprogrammed moving patterns ......................................................................................................... 37
5.2.1 The Phase function ....................................................................................................................... 37
6. Cues (scenes) in the combi section ........................................................................................................ 39
6.1 Programming and storing of cues ........................................................................................................ 39
6.1.1 The storage matrix ........................................................................................................................ 40
6.1.2 Selecting features to be stored ..................................................................................................... 40
6.1.3 The cue keys in combination with the page/bank keys ................................................................. 41
6.1.4 Naming cues ................................................................................................................................. 41
6.1.5 Entering the fade time ................................................................................................................... 42
6.1.6 Entering the trigpoint ..................................................................................................................... 42
6.1.7 Entering the release link function (R-Link) .................................................................................... 42
6.1.8 Working with the release link function ........................................................................................... 43
6.1.9 Entering and working with the flash function ................................................................................. 43
7. Editing cues ............................................................................................................................................... 44
7.1 The FLASH function ............................................................................................................................. 44
7.2 AUTFOL / Automatic fixture activation by the Follow key .................................................................... 45
7.2.1 Entering the AUTFOL function ...................................................................................................... 45
7.2.2 Working with the AUTFOL function ............................................................................................... 45
7.2.3 Deactivating the AUTFOL function ................................................................................................ 45
7.3 AUTSEL / Automatic fixture selection .................................................................................................. 46
7.3.1 Activating and deactivating the Autsel function ............................................................................. 46
7.4 Editing the name .................................................................................................................................. 46
7.5 Editing fixture parameters .................................................................................................................... 46
7.6 Copying a cue to another cue key ........................................................................................................ 46
7.7 R-LINK / Setting the release link function ............................................................................................ 47
7.8 Changing the fade time ........................................................................................................................ 47
7.9 Changing the trigpoint .......................................................................................................................... 47
8. Recalling cues in the fade mode .............................................................................................................. 48
9. Freeze function .......................................................................................................................................... 49
9.1 Entering the freeze function ................................................................................................................. 49
9.2 Deleting the freeze function .................................................................................................................. 49
9.2.1 Deleting the freeze function for all parameters ............................................................................. 49
9.2.2 Deleting the freeze function for individual parameters .................................................................. 50
10. The follow function .................................................................................................................................. 51
10.1 Programming the follow function ........................................................................................................ 51
10.1.1 Activating the follow function ....................................................................................................... 51
10.1.2 Deactivating the follow function ................................................................................................... 51
10.1.3 Deleting the follow function ......................................................................................................... 51
11. Chases in the Fixture section ................................................................................................................. 52
11.1 Programming chases from cues......................................................................................................... 52
11.1.2 The chase menu .......................................................................................................................... 53
11.1.3 Entering the chase name ................................................................................................ ............ 53
11.1.4 Entering the runtimes .................................................................................................................. 53
11.1.5 Inserting a chase step ................................................................................................................. 54
11.1.6 Overwriting the chase step .......................................................................................................... 55
11.1.7 Deleting all chase steps (CLEAR) ............................................................................................... 55
11.1.8 Deleting individual steps (DEL ST) ............................................................................................. 55
Page 7

JB-lighting Lichtanlagen GmbH Sallersteigweg 15 D-89134 Blaustein Telefon ++49(0)7304 9617-0
- 7 -
11.1.9 Duplicating a chase step (DUP ST) ............................................................................................ 55
11.1.10 Overwriting (stopping) a chase (R-LINK) .................................................................................. 55
11.1.11 Terminating the loop function (SINGLE) ................................................................................... 55
11.1.12 Working with the block function (BLOCK) ................................................................................. 56
11.1.13 Merging chases (MERGE function) ........................................................................................... 57
11.1.13.1 Entering the MERGE function ............................................................................................. 57
11.1.13.2 Deleting the MERGE function ............................................................................................. 57
11.1.14 Speed groups (SGROUP) ......................................................................................................... 57
11.1.14.1 Combining chases to speed groups (SGROUP) ................................................................. 58
11.1.14.2 Deactivating a speed group ................................................................................................. 58
11.1.15 The Synchronised Start function (SYNCST) ............................................................................. 59
11.1.15.1 Entering the Synchronised Start function ............................................................................ 59
11.1.15.2 Deleting the Synchronised Start function ............................................................................ 59
11.1.16 The Sound function / Entering the beatcount ............................................................................ 59
11.2 Programming chases with the chase generator ................................................................................. 59
11.2.1 Basic programming with the chase generator ............................................................................. 60
11.2.2 The matrix of the chase generator .............................................................................................. 61
11.2.3 Advanced programming with the chase generator (CREATE) ................................................... 62
11.2.3.1 Page 1 of the chase generator (preset selection) ................................................................. 62
11.2.3.2 Page 2 of the chase generator (fixture sequence) ................................................................ 63
11.2.3.3 Programming a fixture sequence .......................................................................................... 64
11.2.3.4 Inserting a step ...................................................................................................................... 65
11.2.3.5 Deleting a step ....................................................................................................................... 65
11.2.3.6 Naming the sequence ............................................................................................................ 65
11.2.4 Pages 3 and 4 of the chase generator (chase patterns) ............................................................. 65
11.2.5 Page 5 of the chase generator (chase switching between more than two parameters) ............. 67
11.2.6 Page 6 of the chase generator (modifying chase patterns) ........................................................ 68
12. The MERGE and SPEEDGROUP function ............................................................................................. 69
12.1. Entering the MERGE function (copying one chase on another) ....................................................... 69
12.1.2 Deleting the MERGE function ..................................................................................................... 69
12.2.1 Assigning chases to speedgroups (SGROUP) ........................................................................... 69
12.2.2 Deactivating a speedgroup.......................................................................................................... 70
12.2.3 The synchronised start function (SYNCST) ................................................................................ 70
13. The Chase Control section ..................................................................................................................... 72
13.1 Activating a chase for speed regulation ............................................................................................. 72
13.2 Changing speed with the encoder wheel (SPEED)............................................................................ 72
13.3 Changing speed with the Learn key ................................................................................................... 72
13.4 Manual stepping of chase steps with the Go keys ............................................................................. 73
13.5 Changing direction ............................................................................................................................. 73
13.6 The Restart function ........................................................................................................................... 73
13.7 The Sync function ............................................................................................................................... 73
13.8 The Sound function ............................................................................................................................ 73
14. Editing a chase in the Combi section .................................................................................................... 75
14.1 The LINK F function ........................................................................................................................... 75
14.2 The SINGLE function ......................................................................................................................... 75
14.3 The FLASH function ........................................................................................................................... 75
14.4 The NAME function ............................................................................................................................ 75
14.5 The MODIFY function ......................................................................................................................... 76
14.6 The TRACE function .......................................................................................................................... 76
14.7 The R-LINK function ........................................................................................................................... 76
14.8 The S-GROUP function ...................................................................................................................... 76
15. Sequences ................................................................................................................................................ 77
15.1 Entering a sequence step ................................................................................................................... 77
15.2 The NAME function ............................................................................................................................ 79
15.3 The SINGLE function ......................................................................................................................... 79
15.4 The LINK F function ........................................................................................................................... 79
15.5 Entering runtimes ............................................................................................................................... 79
15.6 Entering the mode of flow control ....................................................................................................... 80
15.7 The ID function ................................................................................................................................... 80
15.8 The GO-TO function ........................................................................................................................... 80
15.9 The DUP ST function ......................................................................................................................... 80
Page 8

JB-lighting Lichtanlagen GmbH Sallersteigweg 15 D-89134 Blaustein Telefon ++49(0)7304 9617-0
- 8 -
15.10 The DEL ST function ........................................................................................................................ 80
15.11 The CLEAR function ......................................................................................................................... 80
15.12 The BLOCK function ........................................................................................................................ 81
15.13 The LINK function ............................................................................................................................. 81
15.14 The RENUM function ....................................................................................................................... 81
16. Editing sequences ................................................................................................................................... 82
16.1 The BLOCK function .......................................................................................................................... 82
16.2 Linking chases or cues to a sequence step (LINK) ............................................................................ 83
17. Working with sequences ........................................................................................................................ 84
17.1 Switching sequence banks ................................................................................................................. 84
17.2 The Sequence Control section ........................................................................................................... 84
17.2.1 Changing the speed of sequences .............................................................................................. 85
17.3 The ENABLE key ............................................................................................................................... 85
18. Programming in the PAR section .......................................................................................................... 86
18.1 Direct access ...................................................................................................................................... 87
18.2 The ENCODE mode ........................................................................................................................... 88
18.3 The BLOCK mode .............................................................................................................................. 88
18.4 The HILITE mode ............................................................................................................................... 89
18.5 The PAROUT mode ........................................................................................................................... 89
18.6 The numerical block (NUM) ................................................................................................................ 90
18.7 Naming PAR channels (NAME) ......................................................................................................... 91
18.8 Storing presets (PRESET) ................................................................................................................. 92
18.8.1 Recalling PAR presets ................................................................................................................ 92
18.8.2 Fading PAR presets .................................................................................................................... 92
18.9 Storing PAR channels on PAR fader banks ....................................................................................... 93
18.9.1 Storing fixed values on PAR faders (faders 1 - 8) ....................................................................... 93
18.9.2 Storing PAR channels on Chase PAR faders (faders C1 - C4) .................................................. 93
18.10 Storing cues (scenes) in the PAR-section ........................................................................................ 94
18.10.1 Linking of PAR cues to PAR faders .......................................................................................... 94
18.11 Storing chases in the PAR-section ................................................................................................... 95
18.11.1 Linking of PAR chases to PAR faders ....................................................................................... 95
19. The LIST function .................................................................................................................................... 96
20. Storing data (BACKUP) ........................................................................................................................... 98
20.1 Formatting a floppy disk ..................................................................................................................... 98
20.2 Selective data storage (SAVE) ........................................................................................................... 98
20.2.1 Storing data of the All section ..................................................................................................... 98
20.2.2 Storing data of the Timeline section ............................................................................................ 99
20.2.3 Storing data of the Memory section ............................................................................................ 99
20.2.4 Storing data of the Preset section ............................................................................................... 99
20.2.5 Storing data of the Config section ............................................................................................... 99
20.2.6 Storing data of the L-User section ............................................................................................... 99
20.3. The directory (DIR) ............................................................................................................................ 99
20.4 Loading data (LOAD) ......................................................................................................................... 99
20.4.1 Loading all console data ............................................................................................................100
20.4.2 Loading timeline files .................................................................................................................100
20.4.3 Loading memory files (cues, chases, sequences) ....................................................................100
20.4.4 Loading preset files ...................................................................................................................100
20.4.5 Loading config files ....................................................................................................................100
20.4.6 Loading L-user files ...................................................................................................................100
20.5 Deleting a file .................................................................................................................................... 101
21. The Tool section .................................................................................................................................... 102
21.1 The sound function (SOUND) .......................................................................................................... 102
21.2 The remote function in the Tool menu (REMOTE) ........................................................................... 102
21.2.1 Basic configuration of the MIDI function ....................................................................................102
21.2.2 Linking two Licon 1X lighting control consoles (D-LINK) ..........................................................102
21.2.3 Basic configuration of DMX channels .......................................................................................103
21.3 The CD-player (CD) ......................................................................................................................... 103
21.3.1 Inserting a CD ...........................................................................................................................103
21.3.2 Playing the CD ..........................................................................................................................103
21.4 Setting date and time (CLOCK) ........................................................................................................ 103
21.5 The INFO function ............................................................................................................................ 104
Page 9

JB-lighting Lichtanlagen GmbH Sallersteigweg 15 D-89134 Blaustein Telefon ++49(0)7304 9617-0
- 9 -
21.6 Inverting Pan/Tilt channels (PANTIL) ............................................................................................... 104
21.7 The Test function (TEST) ................................................................................................................. 104
21.7.1 Testing the key function ............................................................................................................104
21.7.2 Testing the fader function ..........................................................................................................104
21.8 Adjusting the console lamps (DESKLAMP) ..................................................................................... 104
21.9 Adjusting the display brightness (DISPLAY) .................................................................................... 105
22. Timeline programmierung (TILINE) ..................................................................................................... 106
22.1 Inserting a CD in the Timeline menu ................................................................................................ 106
22.2 SMPTE – Playing an external timeline track .................................................................................... 107
22.3 Entering basic parameters for Timeline programming (LOOP) ........................................................ 107
22.4 Basic timeline programming (RECORD) .......................................................................................... 108
22.4.1 Assigning events .......................................................................................................................109
22.4.2 Moving events ...........................................................................................................................109
22.5 Complex timeline programming ........................................................................................................ 109
22.5.1 The block function .....................................................................................................................111
22.6 Editing in the timeline menu ............................................................................................................. 113
22.6.1 Moving the position of an event ................................................................................................113
22.6.2 Changing the fadetime ..............................................................................................................114
22.6.3 Editing events (cues and chases) .............................................................................................114
22.6.4 Deleting one event ....................................................................................................................114
22.6.5 Deleting all events within a frame .............................................................................................114
22.7 Playing a timeline show .................................................................................................................... 114
23. Trackball ................................................................................................................................................. 115
23.1 The keys of the trackball .................................................................................................................. 115
23.2 Activating a fixture group and entering Pan/Tilt or focus data ......................................................... 115
23.3 Trackball and Highlight function ....................................................................................................... 116
24. Performing a software update (via a PC system) ............................................................................... 117
24.1 Quick installation and configuration guide for the Licon 1X UPDATER ........................................... 117
24.1.1 Installing the Licon 1X Updater programme ..............................................................................117
24.1.2 Recalling the Licon 1X Updater .................................................................................................117
24.2 Updating the Licon 1X ...................................................................................................................... 117
25. Deleting the data of the lighting control console ............................................................................... 118
25.1 Deleting all data ................................................................................................................................ 118
25.2 Deleting Config data ......................................................................................................................... 118
25.3 Deleting the preset data ................................................................................................................... 119
25.4 Deleting data of the Combi section .................................................................................................. 119
25.5 Deleting data of the PAR section ..................................................................................................... 119
25.6 Deleting data in the timeline section ................................................................................................ 119
25.7 Deleting MIDI data ............................................................................................................................ 120
26. Description of control elements and indicators ................................................................................. 121
26.1 AUX CONTROLLERS ...................................................................................................................... 121
26.2 FIXTURE- / PAR SELECTION ......................................................................................................... 121
26.3 Display .............................................................................................................................................. 121
26.4 FEATURE SELECTION ................................................................................................................... 122
26.5 COMBI .............................................................................................................................................. 122
26.6 PAR .................................................................................................................................................. 122
26.7 CUES keypad ................................................................................................................................... 123
26.8 PAGE / BANK ................................................................................................................................... 123
26.9 CHASES ........................................................................................................................................... 123
26.10 SEQUENCES ................................................................................................................................. 124
26.11 FLASH/RELEASE/ENABLE/SWAP ............................................................................................... 124
26.12 FADE-MODE .................................................................................................................................. 124
26.13 PAR faders ..................................................................................................................................... 125
26.14 FIXTURE faders ............................................................................................................................. 125
26.15 CHASE-CONTROL ........................................................................................................................ 126
26.16 SEQUENCE-CONTROL ................................................................................................................ 126
27. Technical dimensions (in mm) ............................................................................................................. 127
28. LICON 1X for hire ................................................................................................................................... 128
29. LICON 1X Customer List ....................................................................................................................... 129
Page 10

JB-lighting Lichtanlagen GmbH Sallersteigweg 15 D-89134 Blaustein Telefon ++49(0)7304 9617-0
- 10 -
1. First steps
1.1 Scope of delivery and installation
Lighting control console
Connecting cable
User manual
USB-cable
Optional accessory:
Desklamps
Flightcase
Dustcover
Trackball
Please check whether delivery is complete
Ensure that the voltage complies with the power unit settings and plug in the power unit. The factory
setting of the console is 230 V. After plugging in the controller, the LED of the ON/OFF key is lit. If this is
not the case, throw master switch of the power unit and activate the control console by pressing the
ON/OFF key.
1.2 Changing the input voltage
The input voltage of the Licon 1X is adjusted with a slider situated beneath the mains plug. You can
choose between 230 V and 115 V. Set the required voltage with a suitable tool (e.g. screwdriver) before
you plug in the console. Move the red slider located between the mains socket and the mains plug to the
right (115 V) until it locks, or move it to the left (230 V) until it locks. If no red slider is present on the
power supply unit of the lighting control console, please contact our service team before you carry out the
voltage setting.
1.3 DMX outputs
The Licon 1X has four DMX output sockets. These are 5-pin sockets with the following occupation:
Pin 1 shield
Pin 2 data –
Pin 3 data +
Pin 4 not occupied
Pin 5 not occupied
Since DMX boosters are generally required for very long DMX lines (where many devices are connected),
the Licon 1X is equipped ex works with a DMX booster. This means that two output sockets are available
per DMX line with 512 channels. The output sockets are designated A1 and A2 or B1 and B2,
respectively.
Page 11
JB-lighting Lichtanlagen GmbH Sallersteigweg 15 D-89134 Blaustein Telefon ++49(0)7304 9617-0
- 11 -
2. Configuration (CONFIG)
In order to operate the Licon 1X properly, all devices you wish to have access to must be configured in
the setup first. For this reason, a comprehensive library is made available to you, from which you can
copy setups of the most prevalent parameters into the CONFIG menu. Switch the Licon 1X on and press
the softkey CONFIG to enter the configuration menu. The following display is shown:
2.1 L-USER / Configuring a fixture
If you will use fixtures, the data of which are not yet stored in the library, you have to configure your
fixtures first.
Enter the main menu and press the softkey CONFIG and afterwards the softkey L-USER.
The following display is shown:
With the left encoder wheel cou can select up to 20 different L-User fixture parameters.
Now consecutively enter data of the fixtures. Activate the corresponding parameters with the softkeys
arranged to the right and left of the display. When the field is displayed inverted, you can enter data with
the double-assigned keys of the following sections: CUES, CHASES and SEQUENCES.
Page 12

JB-lighting Lichtanlagen GmbH Sallersteigweg 15 D-89134 Blaustein Telefon ++49(0)7304 9617-0
- 12 -
Clear the fields with the arrow key first and enter your data.
The individual fields have the following function:
NAME: names the moving light, a maximum of 20 characters is possible.
S-NAME: short name shown on the display later, up to 6 characters are possible.
TYPE: selects between mirror scan ( Mirror) and moving h ead ( HEAD). To select type,
press key TYPE until the desired fixture type is shown on the display. This affects only
moving patterns.
DMXCH: indicates number and configuration of the DMX channels of the fixture. Per fixture, 25
control channels and 7 fixed-value channels are available. Control channels are standard
DMX channels such as pan, tilt, iris, colour, gobo, focus. Fixed-value channels are DMX
channels with a fixed DMX value (cannot be changed during programming). If, for
example, your fixture has a channel for the parameter lamp on/off, which is a constant
value, then this channel is stored under „fixed“ and assigned the corresponding DMX
value.
Press one of the softkeys described above and the menu on the
left appears on the display.
Now assign the individual functions of your fixture to the DMX
channels as follows: turn the middle encoder wheel (FUNC) until
the desired function appears and then turn the left encoder
wheel (DMXCH) to switch to the next DMX channel. The names
of the individual functions correspond to the names of the keys in
the Feature Selection block, where the parameters will be
activated later. The left encoder wheel (DMXCH) can only switch
forward by one DMX channel. If this channel is not occupied in
the fixture, i.e. is not assigned to a function, you can skip this
channel by pressing the the softkey SKIP.
To invert a DMX channel, select the function first and then press the softkey INVERS (this does not apply
to pan and tilt movements).
Since the Licon 1X has a separate dimmer and shutter management, you are required to make an
additional assignment when you enter the dimmer or shutter channel.
Fixtures with dimmers and shutters on one channel:
Assign a DMX channel to the shutter, then press the softkeys BRIGHT and BLACKO to assign the
dimmer and the s hutter function to the same channel. In the line next to the shutter, the letters B and O
will appear in addition on the display.
Page 13
JB-lighting Lichtanlagen GmbH Sallersteigweg 15 D-89134 Blaustein Telefon ++49(0)7304 9617-0
- 13 -
Fixtures with separate channels for dimmers and shutters:
Assign a DMX channel to the shutter and then press the softkey BLACKO. In the line next to the shutter,
the letter O will appear in addition on the display.
Assign a DMX channel to the dimmer and then press the softkey BRIGHT. In the line next to the dimmer,
the letter B will appear in addition on the display.
The entry of these parameters will ensure that you can later control the brightness of your moving lights
with the fixture faders.
When a fixed-value channel is entered, first of all three times a zero will be shown on the display next to
the term „fixed ..“. You can now enter a value with the right encoder wheel (VALUE). This value is fixed
and cannot be changed later during programming of shows (e.g. for lamp on/off commands).
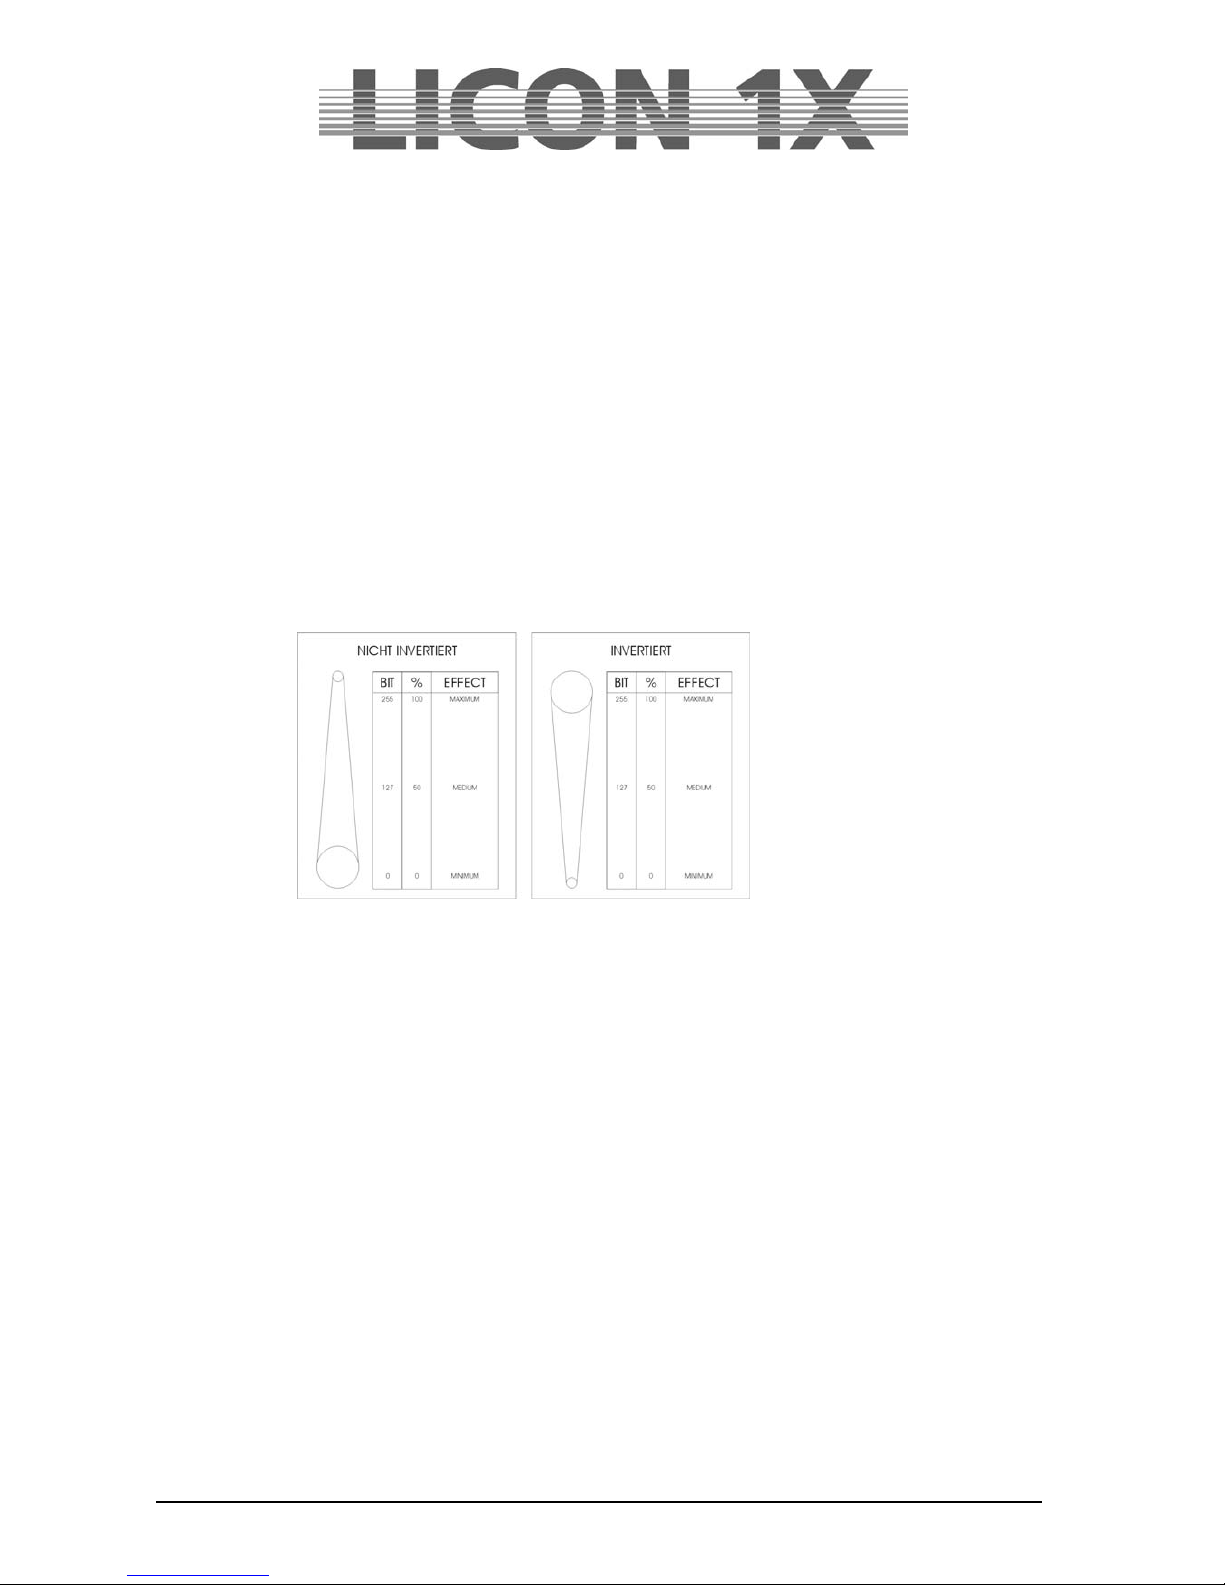
INVERS inverts DMX channels. If, for example, the iris of a fixture is built in such a way that it is
open at a DMX value of 0 and closed at 255, you can invert the entire channel with the
softkey INVERS. After inversion, the iris is closed at a DMX value of 0 and fully open at
255.
Press the softkey CLEAR to delete the entries shown inverted on the display.
Press the ESC key to leave this menu.
P-ANGL enters the maximum deflection angle (pan movement) of the fixture to be configured. Use
the right encoder wheel to enter data. This is an important parameter, if you wish to work
with preprogrammed moving patterns later. Wrong or missing data of the P-ANGL will
possibly affect circular movements of the fixture.
T-ANGL enters the maximum deflection angle (tilt movement) of the fixture to be configured. Use
the right encoder wheel to enter data. This is an important parameter, if you wish to work
with preprogrammed moving patterns later. Wrong or missing data of the T-ANGL will
possibly affect circular movements of the fixture.
BLACK-L enters a value between 0 and 255 with the middle encoder wheel. This value determines
the fader position, at which the blackout will be activated (blackout level).
Important: do not select the DMX value 255!!!
Press the ESC key to leave this menu.
Page 14
JB-lighting Lichtanlagen GmbH Sallersteigweg 15 D-89134 Blaustein Telefon ++49(0)7304 9617-0
- 14 -
2.2 SELECT / CONFIG Setting up a fixture list with the help of the fixture library
Enter the main menu and select the menu item CONFIG by pressing the corresponding softkey. Then
activate the menu item SELECT.
The following display is shown:
Now select the fixtures to be added to the fixture list with the
keys in the Fixture-/PAR Selection block (keys 1-32). (During the
initialising process, only one fixture type at a time can be
selected. Repeat the procedure for each different fixture type.
As soon as the LEDs of the desired fixture storage places (keys
1-32) are lit, use the middle encoder wheel (SELECT) to select
the desired fixture type. On the display, the function fields of the
activated fixture places and the selected fixture type are shown
colour-inverted. Now press the softkey INIT and the selected
fixture will be assigned to the selected fixture storage places.
If you wish to assign additional fixture types to the fixture places
(keys 1-32), deactivate the active keys in the Fixture-/PARSelection block first (LEDs must not be lit). Then select the
desired fixture places and repeat the initialising process as described above.
Caution:
If you copy a fixture type from the library, the PRESET name is copied along with it.
Press the ESC key to leave this menu.
2.2.1 Deleting individual fixtures from the fixture list
If you wish to delete one or several fixtures from the fixture list, activate the fixtures by pressing the
corresponding keys in the Fixture-/PAR Selection block. Press the softkey OPEN in the
CONFIG/SELECT menu to delete the fixtures.
2.2.2 Deleting the entire fixture list
If you wish to delete the entire fixture list, enter CONFIG/SELECT menu and press the softkey CLEAR.
Confirm the process by pressing the softkey YES.
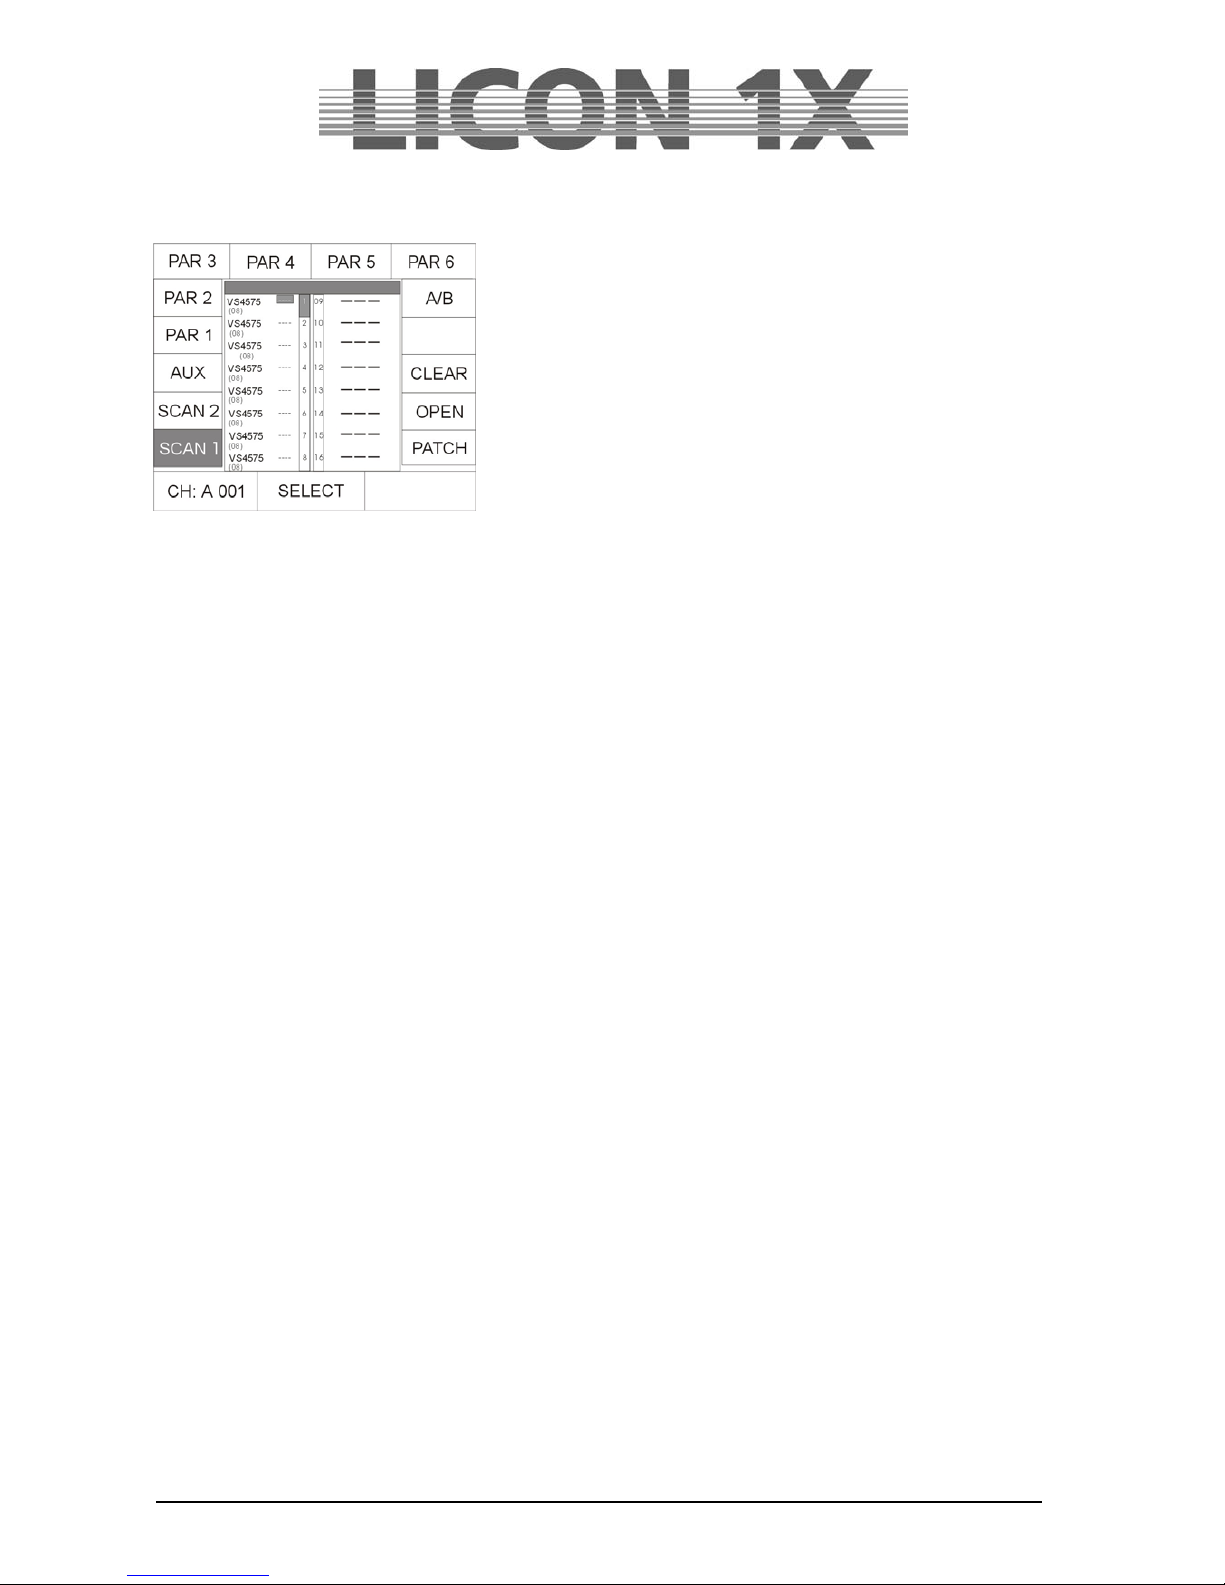
2.3 PATCH / Assigning start adresses to fixtures
When the fixture list is completed, you must assign start adresses to the fixtures. This assignment is
carried out in the CONFIG/PATCH menu.
Enter the main menu and activate the CONFIG menu by pressing the corresponding the softkey.
Then select the menu item PATCH.
The following will be shown on the display:
The fixture list you have entered before is shown. Each fixture is displayed by its short name and the
number of DMX channels of the fixture is specified in brackets below. This menu provides two pages for
the fixture list. You can toggle between page 1 (designated SCAN 1, fixtures 1 to 16) and page 2
(designated SCAN 2, fixtures 17-32) by pressing the corresponding keys. The activated softkey is
displayed inverted.
Page 15
JB-lighting Lichtanlagen GmbH Sallersteigweg 15 D-89134 Blaustein Telefon ++49(0)7304 9617-0
- 15 -
The individual softkeys have the following function:
SCAN 1: enters DMX addresses for fixture no. 1 – 16
SCAN 2: enters DMX addresses for fiixture no. 17-32
AUX: enters DMX addresses for AUX controllers
PAR1: enters DMX addresses for dimmer channel 1-16
PAR2: enters DMX addresses for dimmer channel 17-32
PAR3: enters DMX addresses for dimmer channel 33-48
PAR4: enters DMX addresses for dimmer channel 49-64
PAR5: enters DMX addresses for dimmer channel 64-80
PAR6: enters DMX addresses for dimmer channel 81-96
A/B: selects the DMX output
CLEAR: deletes all DMX addresse s
OPEN: deletes an individual DMX address
PATCH: confirms data input
Left encoder wheel: selects DMX addresses
Middle encoder wheel: moves the cursor up and down
Right encoder wheel: moves the cursor to the left and right
2.3.1 Entering DMX start addresses for fixtures
Press the softkey PATCH. The first fixture in the fixture list is automatically activated and start address
no. 1 or the first not occupied DMX address is recommended by the controller for the patch (DMX
channels cannot be double-assigned). If you wish to control fixture no. 1 with DMX channel 1, DMX line
A, then confirm by pressing the softkey PATCH. Now the second fixture of the list is displayed inverted
and the controller automatically recommends the next not occupied channel for the patch. (The example
above recommends DMX channel 9, since the Varyscan 4 is controlled with 8 DMX channels.) Press the
softkey PATCH again to confirm this start address. If you need a start address other than that
recommended by the controller, select the desired start address with the left encoder wheel and press the
softkey PATCH for confirmation.
Select the fixtures with the middle encoder wheel.
Press the softkey A/B to determine the DMX line of the fixtures.
Press the ESC key to leave this menu.
2.3.2 Deleting a particular start address
To delete a particular start address, press the softkey CONFIG/PATCH to enter the Patch menu. Select
the corresponding fixture with the centre encoder wheel. As soon as the fixture is displayed inverted,
press the softkey OPEN to delete the start address.
Press the ESC key to leave this menu.
2.3.3 Deleting all start addresses
If you wish to delete all start addresses, enter CONFIG/PATCH menu and press the softkey CLEAR. The
following selection appears on the display:
ALL: deletes all DMX start addresses
SCAN: deletes start addresses of moving lights
AUX: deletes start addresses of AUX controllers
PAR: deletes DMX assignment of dimmer/PAR channels
After you have pressed one of the the softkeys ALL, SCAN, AUX or PAR, the corresponding parameters
are deleted without prior confirmation prompt. Press the ESC key if you do not wish to delete a start
address.
Press the ESC key to leave this menu.
Page 16
JB-lighting Lichtanlagen GmbH Sallersteigweg 15 D-89134 Blaustein Telefon ++49(0)7304 9617-0
- 16 -
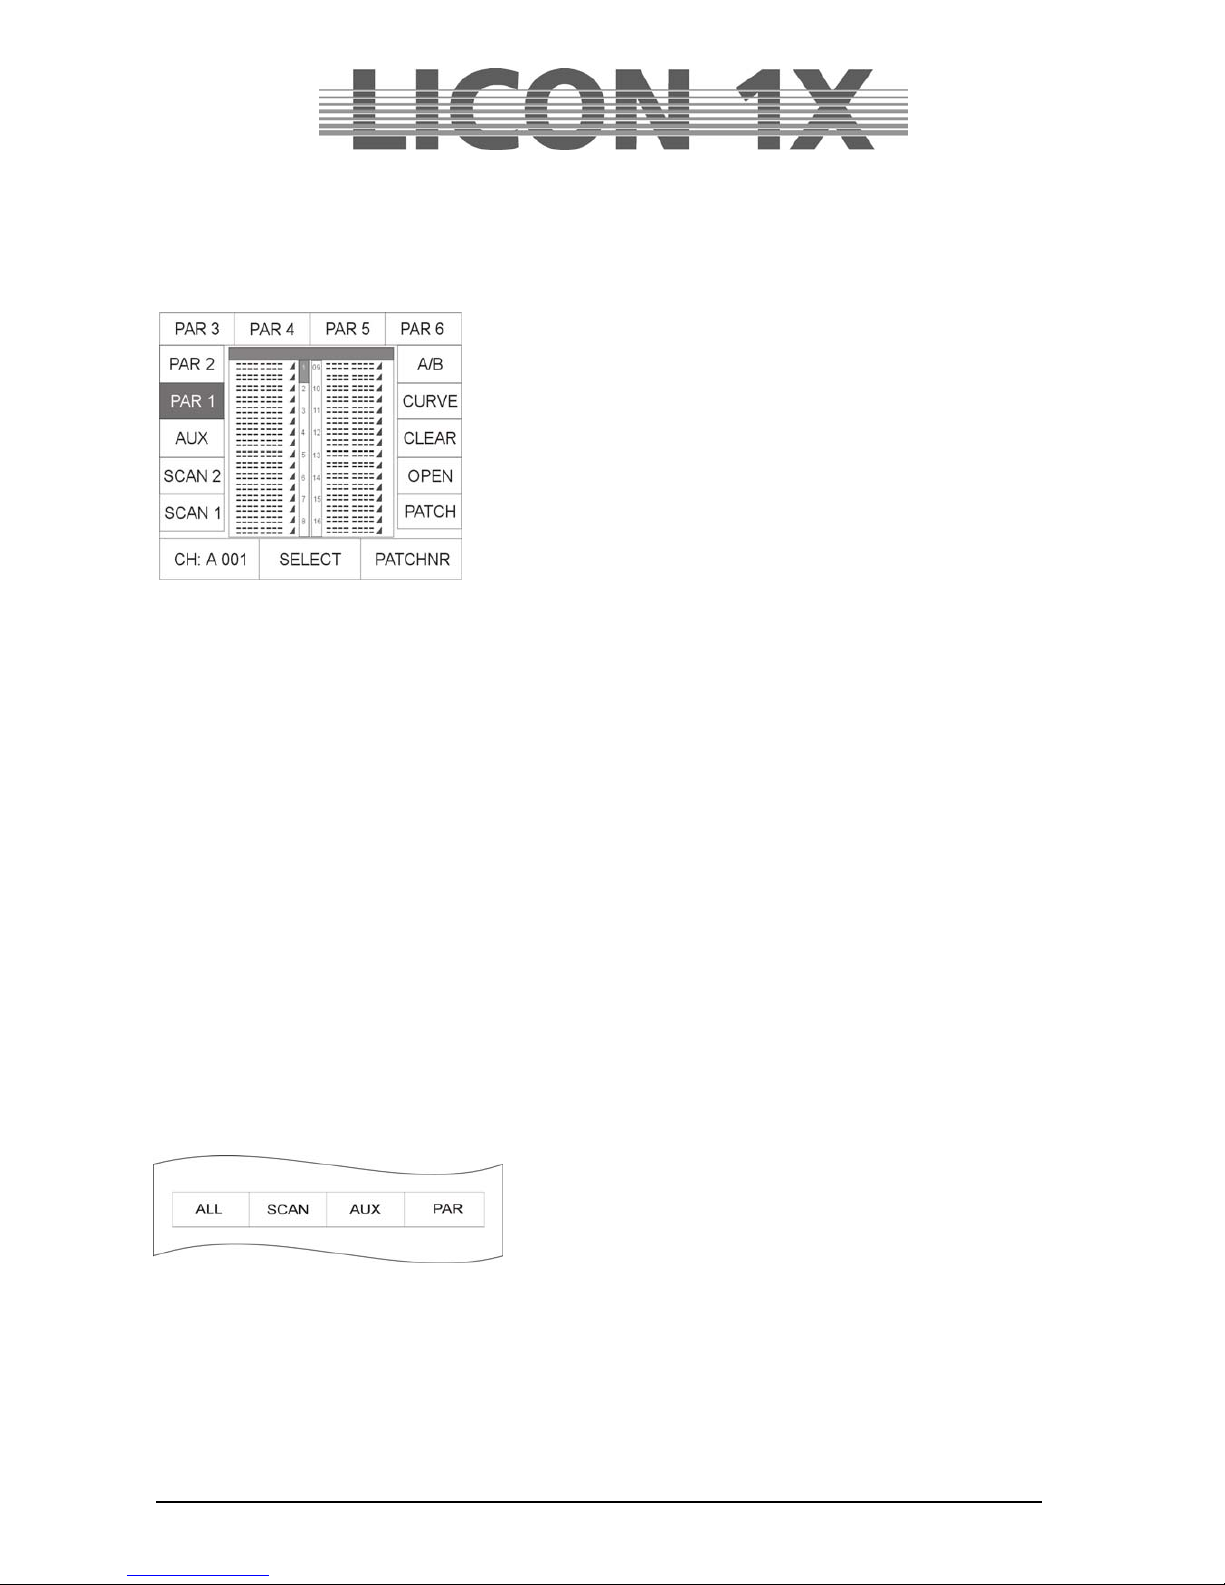
2.4 PATCH / Assigning DMX channels to the dimmer/PAR section
In analogy to the fixture section, the Patch menu is also used to assign DMX channels are assigned to
the dimmer/PAR section. Enter CONFIG menu and select the menu item PATCH. Press the PAR1 key
and the following display is shown:
The softkeys listed below have the following functions:
SCAN 1: enters DMX addresses for fixture no. 1 – 16
SCAN 2: enters DMX addresses for fiixture no. 17-32
AUX: enters DMX addresses for AUX controllers
PAR1: enters DMX addresses for dimmer channel 1-16
PAR2: enters DMX addresses for dimmer channel 17-32
PAR3: enters DMX addresses for dimmer channel 33-48
PAR4: enters DMX addresses for dimmer channel 49-64
PAR5: enters DMX addresses for dimmer channel 64-80
PAR6: enters DMX addresses for dimmer channel 81-96
A/B: selects the DMX output
CURVE: selects the dimmer curve
CLEAR: deletes all DMX addresses
OPEN: deletes an individual DMX address
PATCH: confirms data input
Left encoder wheel: selects DMX addresses
Middle encoder wheel: moves the cursor up and down
Right encoder wheel: moves the cursor to the left and right
2.4.1 Entering DMX start addresses for the dimmer/PAR section
You can assign up to four DMX addresses to each Par key (1-32). Enter Patch menu and select PAR 1.
Use the middle or right encoder wheel to select the key in the Fixture-/PAR Selection, for which you wish
to enter DMX start addresses. Use the left encoder wheel to select DMX addresses.
Since the Licon 1X comes with two separate DMX outputs, select the DMX lines A or B by pressing the
softkey A/B.
Press the softkey PATCH to confirm the assignment of the channel.
After each confirmation with the softkey PATCH, the cursor jumps to the next position and the next not
occupied DMX channel is recommended automatically by the controller. You will only have to confirm with
PATCH.
2.4.2 Deleting particular DMX start addresses
To delete the DMX assignment of one particular key, select this key with the middle encoder wheel and
press the softkey OPEN.
2.4.3 Deleting all DMX start addresses
If you wish to delete all start addresses, enter
CONFIG/PATCH menu and press the softkey CLEAR. The
menu shown on the left appears on the display:
After you have pressed one of the the softkeys ALL, SCAN,
AUX or PAR, the deletion procedure starts immediately
without prior confirmation prompt. Press the ESC key if you do not wish to delete a start address.
ALL: deletes all DMX start addresses
SCAN: deletes start addresses of fixtues
AUX: deletes start addresses of AUX controllers
PAR: deletes DMX assignment of dimmer/PAR channels
Press the ESC key to leave this menu.
Page 17
JB-lighting Lichtanlagen GmbH Sallersteigweg 15 D-89134 Blaustein Telefon ++49(0)7304 9617-0
- 17 -
2.4.4 Selecting the dimmer curve
In the dimmer/PAR section you can choose between the following three modes of operation for each
channel:
Linear dimmer curve
Exponential dimmer curve
Switch mode (switches from a value of 127)
Press the sofkey CURVE to select the mode of operation.
The graph on the display shows, which mode you have chosen for the channel.
Press the ESC key to leave this menu.
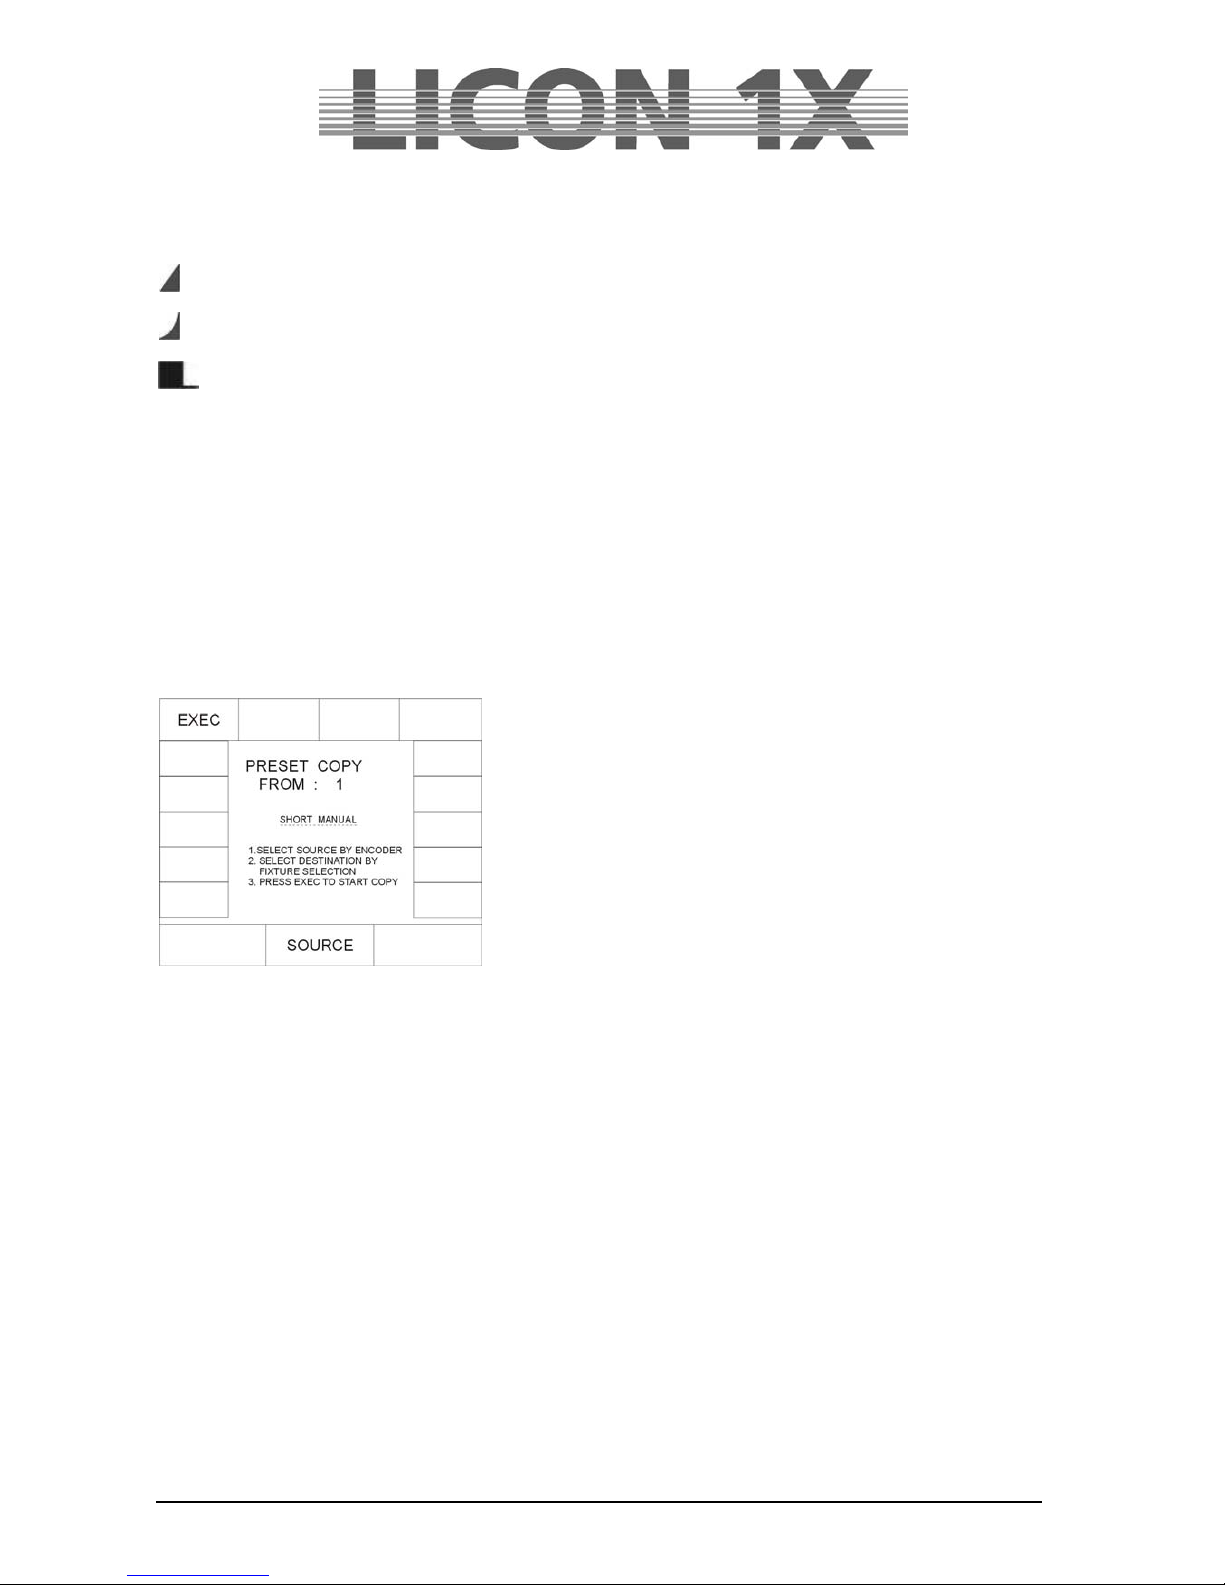
2.5 P-COPY / Copying presets
With this copy function you can copy presets, after you have changed the fixtures list in the CONFIG
menu. It is possible to copy all parameters of the fixtures with the exception of Pan/Tilt and moving
patterns (since it makes no sense to copy position presets).
It is not possible to copy PAR presets.
To enter the Preset Copy menu, press the softkey CONFIG in
the main menu and afterwards the softkey P-COPY.
Use the middle encoder wheel (SOURCE) to select the fixtures,
the presets of which you want to use as source presets.
Then select the keys of the fixtures in the Fixture-/PAR Selection
(keys 1-32), to which you want to copy the presets.
CAUTION: The presets will be copied to all keys in the Fixture/Par selection with lit LEDs.
Press the softkey EXEC to execute the process.
Press the ESC key to leave this menu.
2.6 PANTIL / Inverting Pan and Tilt channels
Pan and Tilt channels can be inverted in two different menus, depending on the purpose of the inversion.
If the inversion should be permanent, channels are inverted in the CONFIG menu.
If the inversion should be deleted again, after the preset is stored, as is usual in live performances,
channels are inverted in the TOOLS menu. Presets inverted in the TOOLS menu are not changed, when
the inversion of Pan and Tilt channels is changed or deleted.
Enter the CONFIG menu and select the PANTIL menu to invert the Pan and Tilt channels.
After activation of the PANTIL menu, the fixture list with all 32 fixture storage places (keys) appears. Now
select the desired fixtures in the Fixture-/PAR Selection (keys 1-32). To invert the channels, press the
softkey INVPAN or INVTIL.
The inversion was successful when the letter combination on the display is shown inverted.
Press the ESC key to leave this menu.
Page 18
JB-lighting Lichtanlagen GmbH Sallersteigweg 15 D-89134 Blaustein Telefon ++49(0)7304 9617-0
- 18 -
2.6.1 Deleting a Pan or Tilt inversion
If a Pan or/and Tilt inversion is no longer necessary, the inversion is deleted in the same order as it was
entered.
Select the fixtures in the Fixture-/PAR Selection (keys 1-32), for which you wish to delete the inversion
and press the softkey INVPAN or INVTIL. When the letter combination on the display is no longer
displayed inverted, the inversion was successfully deleted.
Press the ESC key to leave this menu.
2.6.2 Swapping Pan and Tilt channels
To swap (exchange) Pan and Tilt channels, enter the CONFIG menu and select the menu item PANTIL.
A fixture list with all 32 fixture storage places appears. Select the desired fixtures in the Fixture-/PAR
selection (keys 1-32). Swap the Pan channel and the Tilt channel by pressing the softkey X-CHG.
Swapping was successful when letter combination on the display is shown inverted.
Press the softkey X-CHG again and the swapping will be revoked.
2.7 AUTORUN / Starting the LICON 1X automatically
With the Autorun function, the Licon 1X can be started automatically by a timeline-show, a cue, chase or
sequence, when you switch on the console.
Enter the CONFIG menu and press the softkey AUTORUN. Then select the cue, chase or sequence with
which the Licon 1X is to be started.
Press the softkey TIMELINE in order to select a timeline show. The softkey CDPLAY appears on the
display and you can select the desired track with the middle encoder wheel.
Press the softkey KEYOFF to delete the particular input.
Important!
If the Autorun function is active, the Licon 1X will no longer show the welcome routine on turning the
console on, but will switch directly to the selected function.
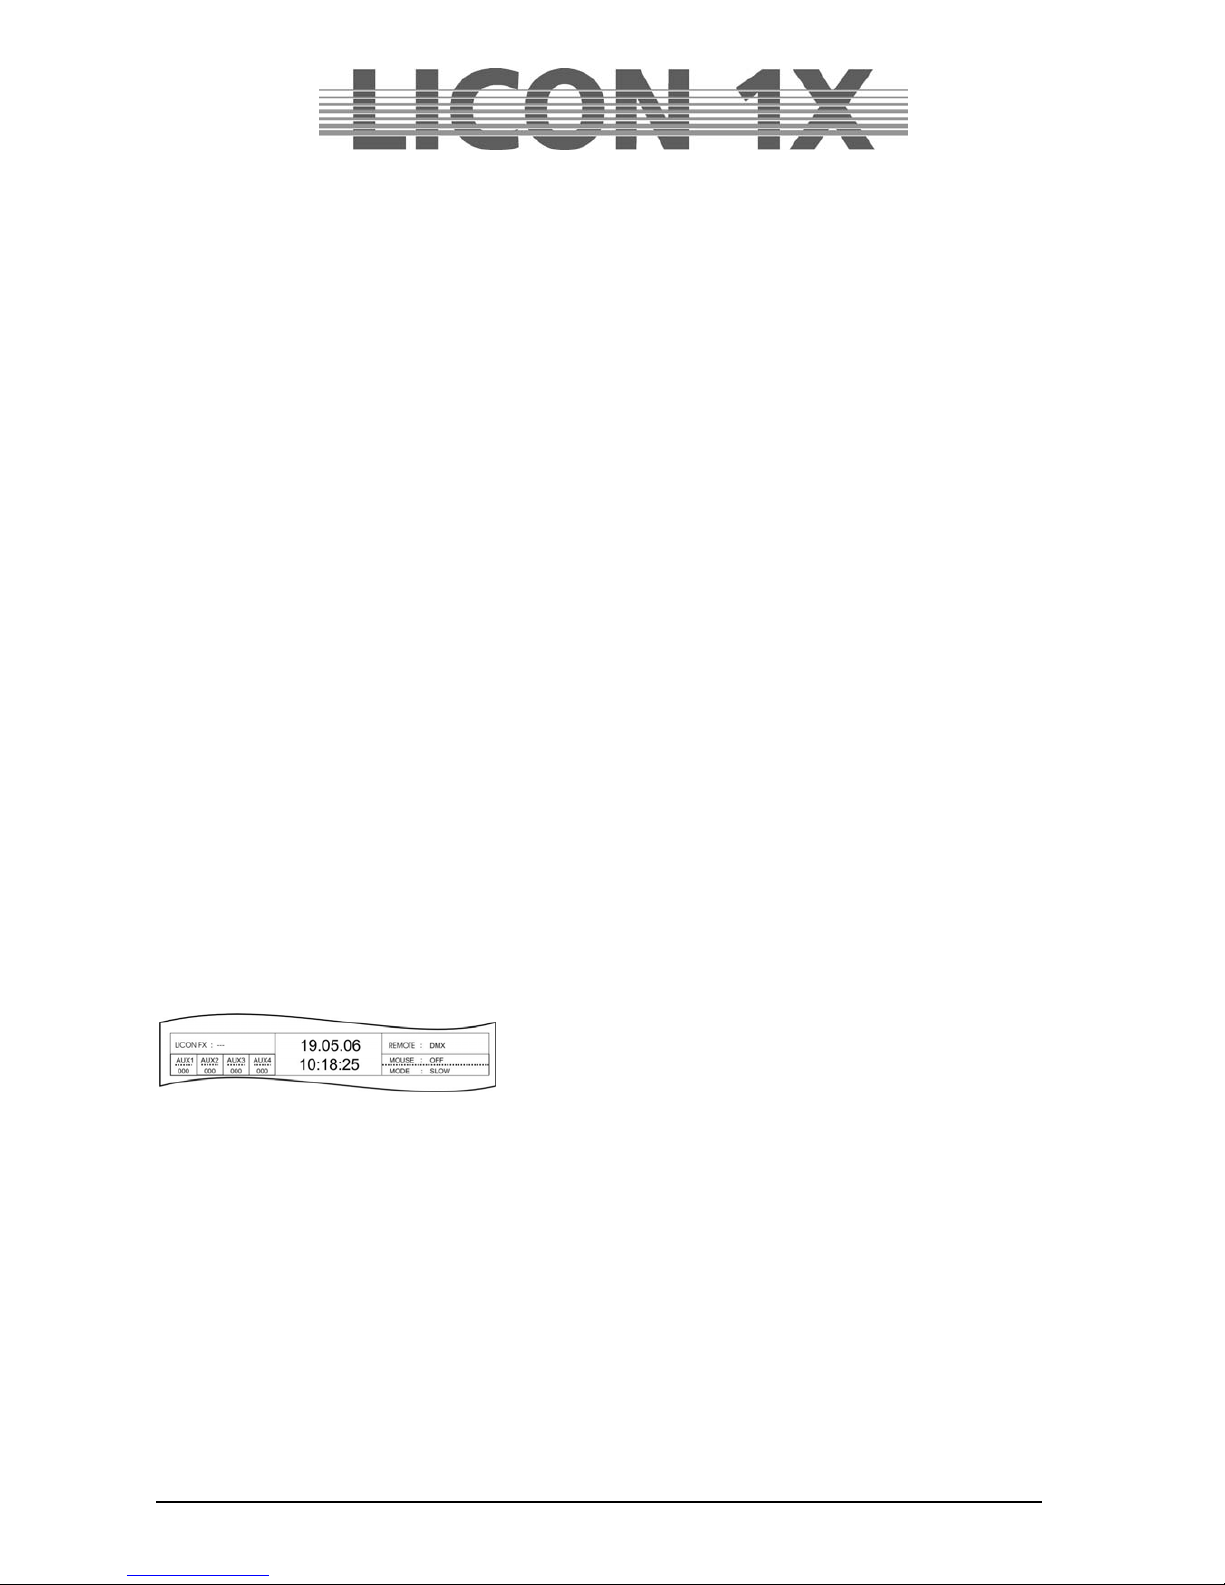
2.8 DMX / Remote control via external DMX console
The DMX function allows remote controlling of the Licon 1X via an external DMX console. The DMX-In
input is located on the rear panel of the Licon 1X. You can assign 32 keys of the Licon 1X for remote
control.
It is important that the DMX section is activated. The current setting is shown in the main menu in the
REMOTE section.
If REMOTE : DMX is shown on the display, the DMX section is
activated.
The DMX section is activated in the REMOTE menu (submenu of the TOOLS menu).
Enter the main menu and press the softkey TOOL. Press the softkey REMOTE in the Tool menu to enter
the Remote menu (responsible for remote settings of the Licon
1X).
Activate the DMX function by pressing the softkey DMX. Deactivate the DMX function again by pressing
the softkey OFF.
2.8.1 Selecting the DMX channels
The DMX channels for remote control are selected in the CONFIG/DMX section. DMX1 must be
displayed inverted if you wish to program the positions 1-16, and DMX2 must be displayed inverted if you
wish to programme the 17-32.
Use the left encoder wheel to select the DMX channel, with which you want to remote-control the Licon
1X.
Then press the corresponding key (cue, chase, sequence), which is to be remote-controlled.
The softkeys (display keys) are designated DISP keys. The softkeys DISP1, DISP2, DISP3 ......DISP13,
DISP14 or the ESC key can only be selected with the softkey S-KEY. Press the softkey S-KEY again and
again until the desired key, e.g. „KEY : DISP 13“ appears. Press the softkey KEYOFF to delete a
position already occupied.
Page 19
JB-lighting Lichtanlagen GmbH Sallersteigweg 15 D-89134 Blaustein Telefon ++49(0)7304 9617-0
- 19 -
In the example to the left, the DMX channel 1 of the external
console controls CUE1 of the Licon 1X.
Important:
If the function field DIRECT is not displayed inverted, access is only possible to Page 1, Bank A, when
cue, chase and sequence keys are assigned.
If the function field DIRECT is displayed inverted, access is also given to cues, chases and sequences
that are stored on the other pages or banks.
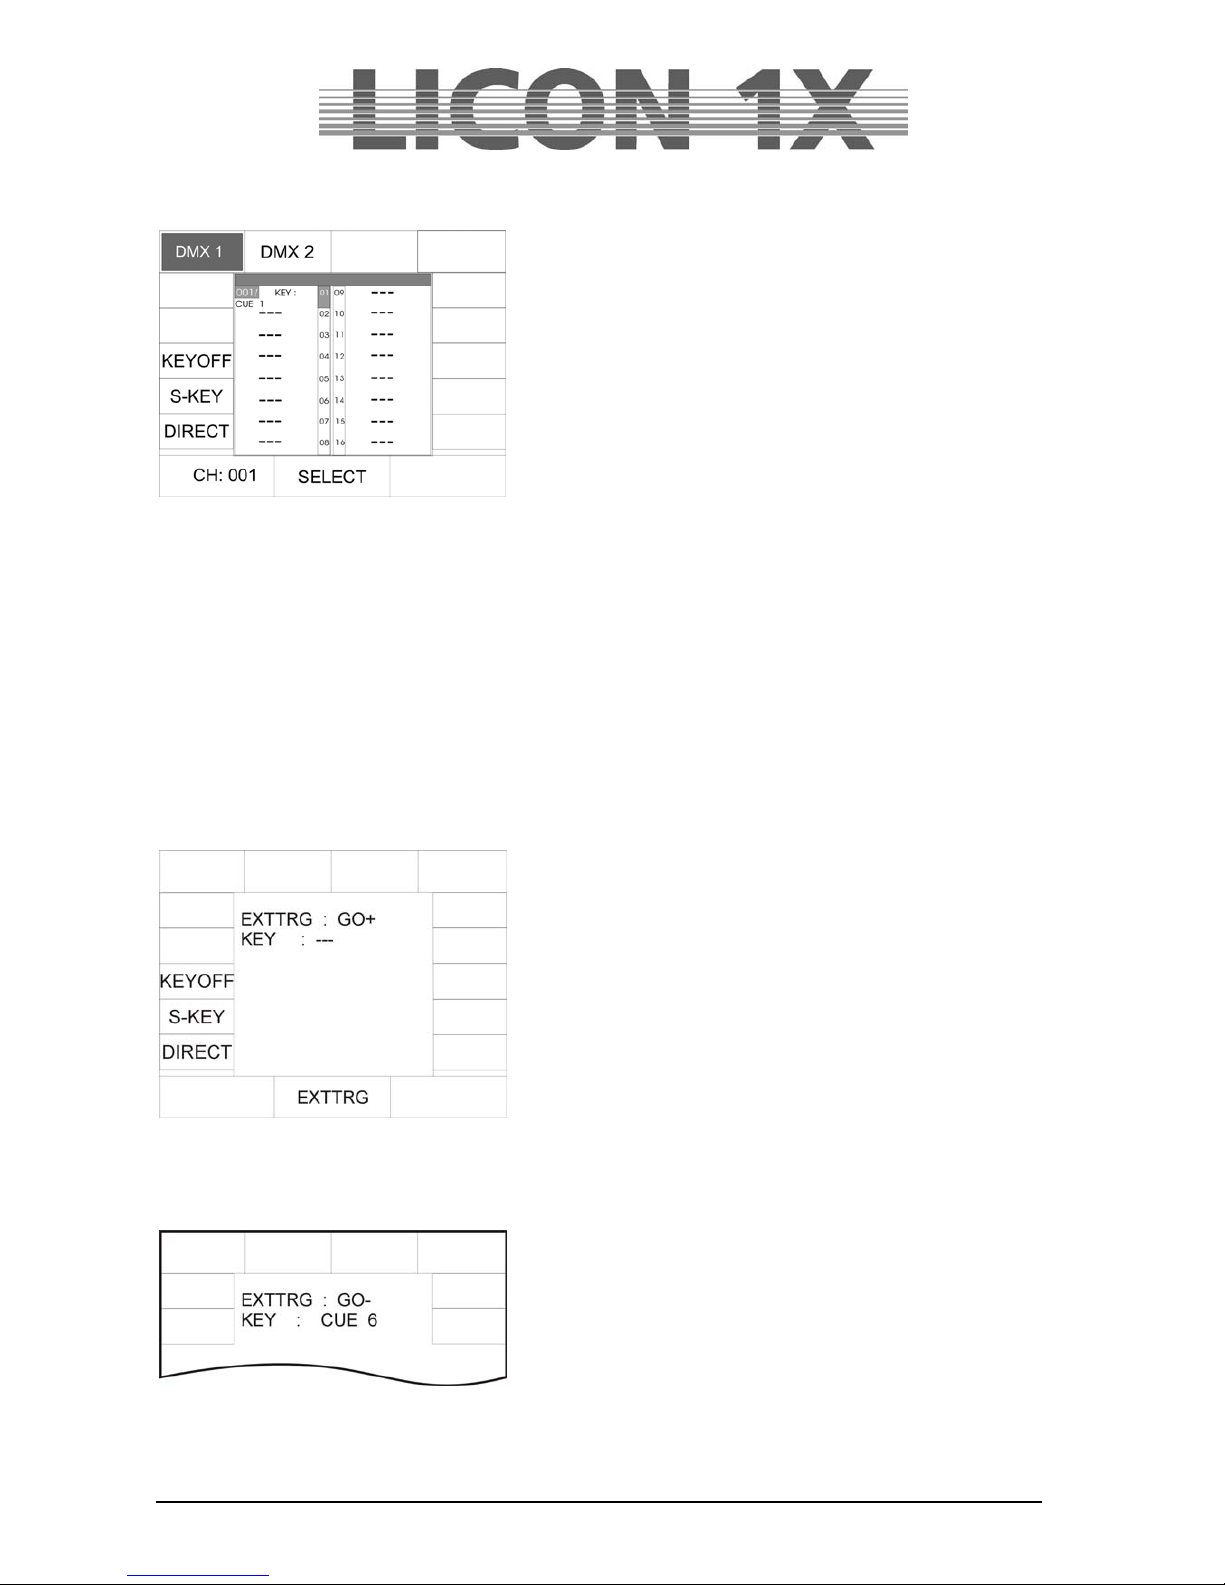
2.9 EXTTRG / Remote control via external trigger input
With the external trigger function, two different keys can be activated by a footswitch. The external trigger
function is only possible in the Combi section.
2.9.1 Assigning keys independent of PAGE/BANK
Press the softkey EXTTRG to activate the corresponding menu. The following display is shown:
Use the middle encoder wheel to select either GO – or GO + .
These designations are placeholders for the key to be
assigned.
When you have selected either GO – or GO + press the key,
which you want to remote-control later, with the footswitch.
The assignment is also shown on the display.
If you have, for example, assigned the Cue key CUE6 to the command GO – , the following is shown on
your display:
If your footswitch is equipped with two switching functions, you can also assign a key to the second GO
function. Use the middle encoder wheel and select the second GO function. Repeat the procedure as
described above.
Page 20
JB-lighting Lichtanlagen GmbH Sallersteigweg 15 D-89134 Blaustein Telefon ++49(0)7304 9617-0
- 20 -
Activating an assigned key with the footswitch:
If you activate a key with assigned remote function during a show, the current PAGE/BANK settings are
applied.
As an example: you have assigned the key Chase 1 to the command GO – .
If e.g. Page 2, Bank D is active during a show and you apply the footswitch (GO-), then the chase is
automatically activated that was stored on Page 2, Bank D, key M1.
If e.g. the PAGE/Bank setting Page 1, Bank C is active, then the chase will be activated that was
previously stored with this setting.
This means that a key is assigned independently of the currently active pages or banks.
Press the ESC key to leave this menu.
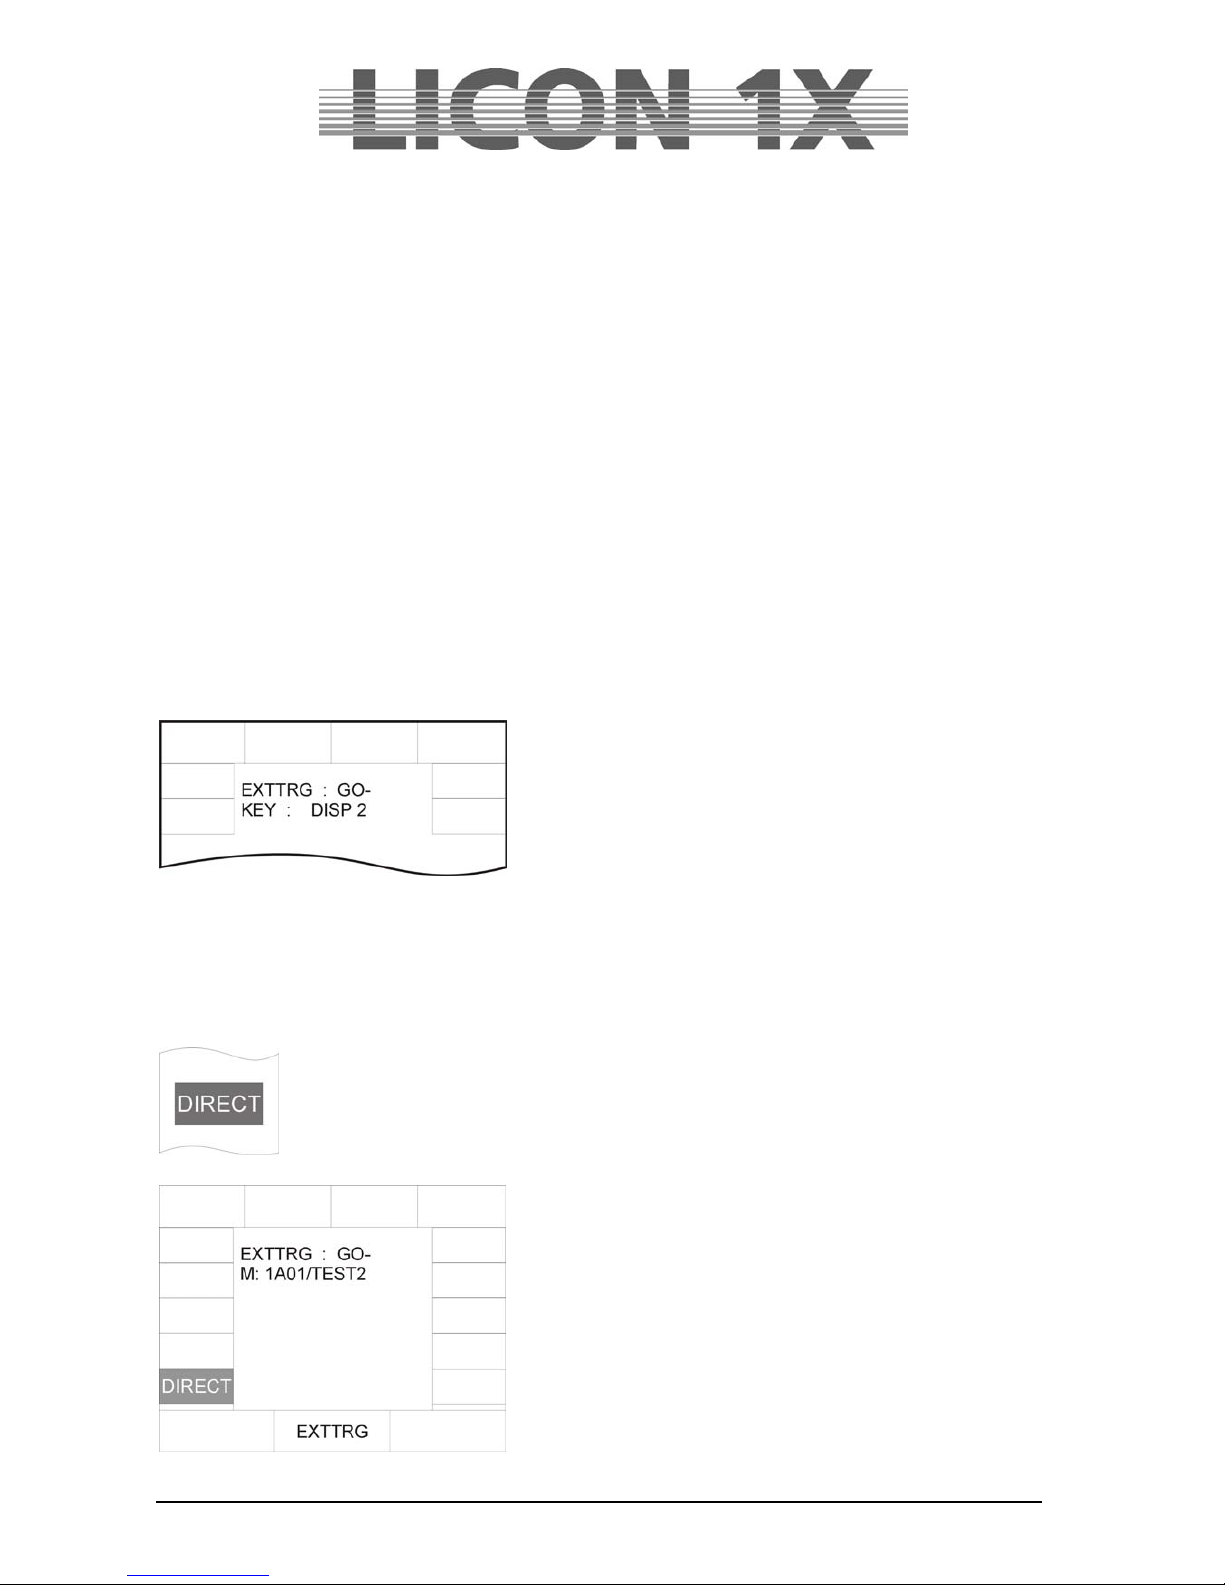
2.9.2 Assigning softkeys
It is also possible to use the footswitch for activation of the softkeys on the display.
For this purpose, select either GO – or GO + with the middle encoder wheel and then press the softkey
that you wish to activate with the footswitch. The softkeys no. 1, no. 2, no. 3, no. 13, no. 14 and the
Escape key cannot be activated by pressing the key directly, but by pressing the softkey S-KEY several
times.
The assignment is shown on the display as follows:
You can repeat the procedure with the second GO function or
assign another key.
Press the ESC key to leave the menu.
2.9.3 Assigning keys dependent on PAGE/BANK
If you wish to assign to the footswitch a particular key with previously programmed
PAGE/BANK settings, proceed as follows:
Use the middle encoder wheel to select either GO+ or GO- .
Press the softkey DIRECT.
Then consecutively press the desired key of Page, Bank and
Cue/Chase/Sequence.
In the display, the corresponding assignment is confirmed.
Press the softkey DIRECT again to leave the menu.
Page 21

JB-lighting Lichtanlagen GmbH Sallersteigweg 15 D-89134 Blaustein Telefon ++49(0)7304 9617-0
- 21 -
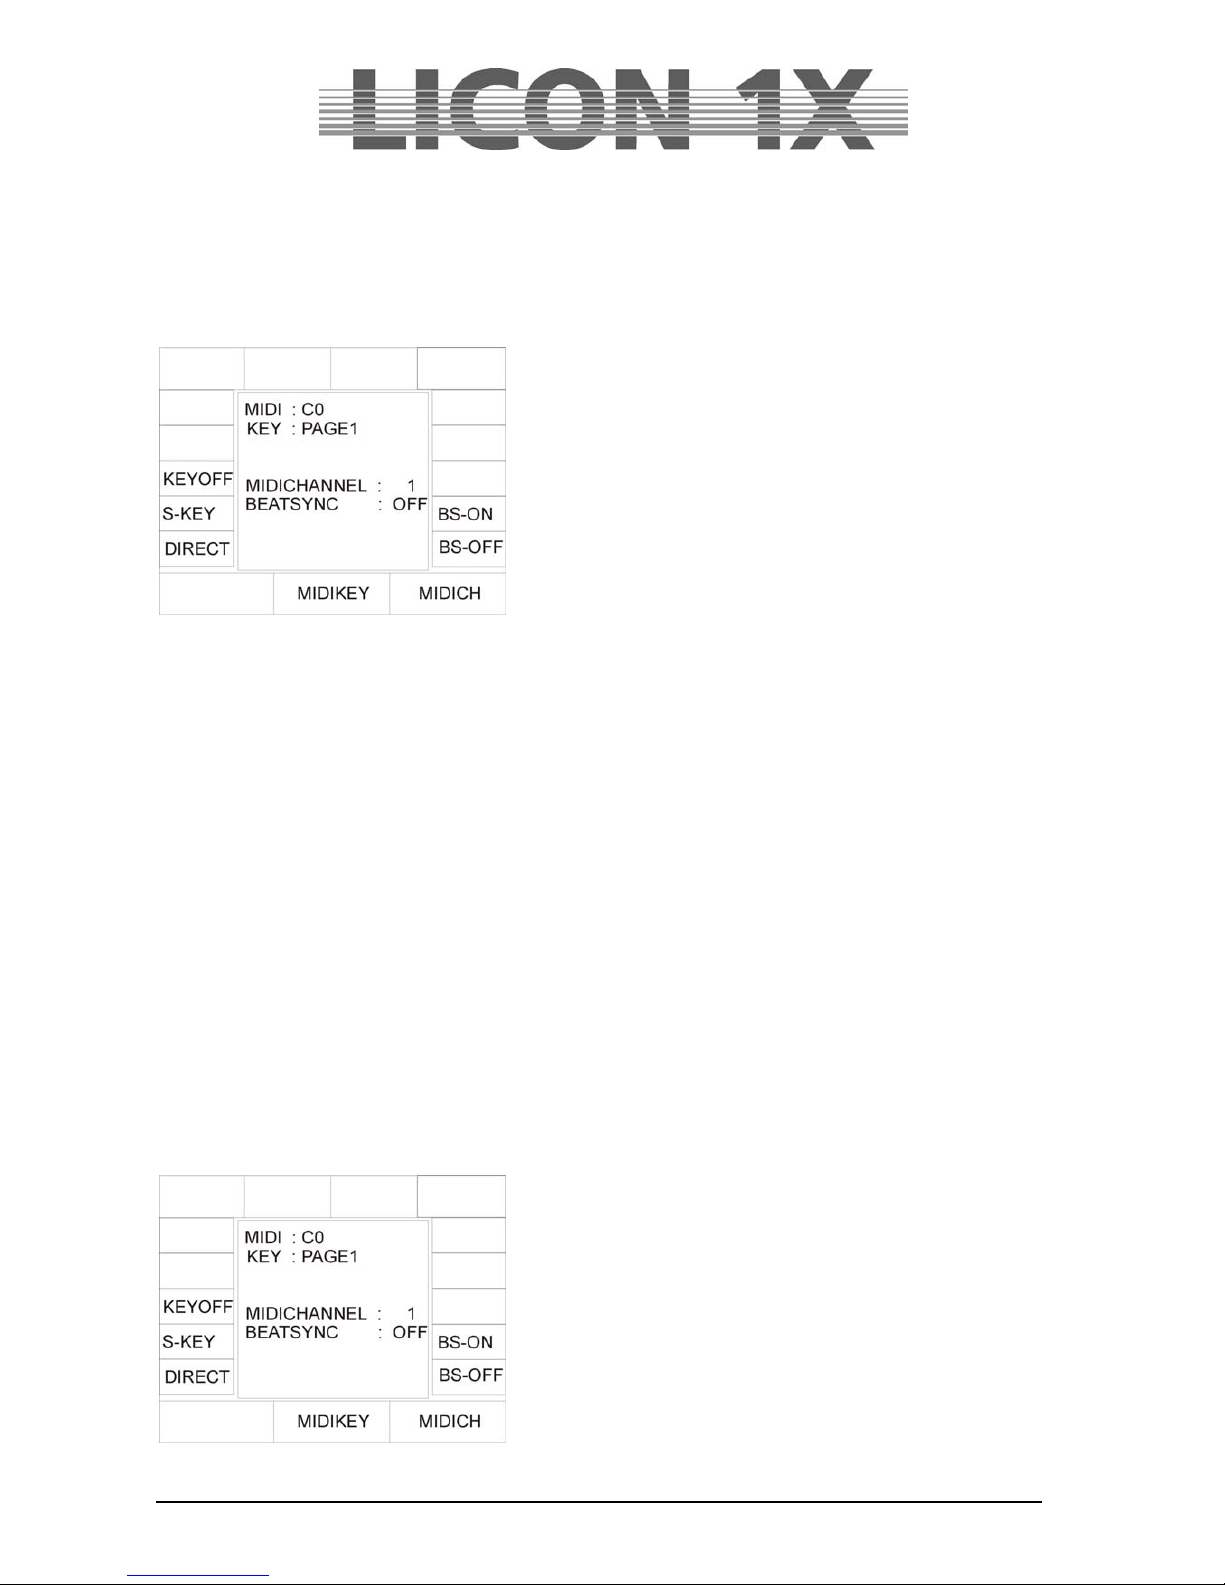
2.10 The MIDI-function
The MIDI function allows complete remote control of the Licon 1X. If you use a MIDI keyboard or a MIDI
sequencer, the mode of operation always remains the same. Each key of the Licon 1X can be assigned a
MIDI note. It is important, however, that the MIDI section is activated. The current MIDI settings are
shown in the main menu in the REMOTE section.
If REMOTE : MIDI is shown on the display, the
MIDI section is activated.
2.10.1 Activating the MIDI section
The MIDI function is activated in the REMOTE menu (submenu of the TOOLS menu).
Enter the main menu and press the softkey TOOL. Press the softkey REMOTE in the Tool menu to enter
the Remote menu (responsible for remote settings of the Licon
1X).
Activate the MIDI function by pressing the softkey MIDI.
2.10.2 Deactivating the MIDI section
The MIDI function is activated in the REMOTE menu (submenu of the TOOLS menu).
Enter the main menu and press the softkey TOOL. Press the softkey REMOTE in the Tool menu to enter
the Remote menu (responsible for remote settings of the Licon
1X).
Deactivate the MIDI function by pressing the softkey OFF.
2.10.3 Connecting a MIDI device
MIDI devices are connected to the Licon 1X with a standard 5-pin MIDI cable. The MIDI sockets are
located on the rear panel of the Licon 1X. Connect your MIDI cable to the MIDI-In socket of the Licon 1X
and to the MIDI-Out socket of your MIDI device.
2.10.4 Selecting the MIDI channel
16 different channels are available for MIDI. The Licon 1X will
only react to MIDI commands that are received on the
selected channel. Press the softkey CONFIG/MIDI to enter
the corresponding menu. Use the right encoder wheel
(MIDICH) to enter the MIDI channel. The corresponding MIDI
channel is also shown on the display (see illustration on the
left).
Page 22
JB-lighting Lichtanlagen GmbH Sallersteigweg 15 D-89134 Blaustein Telefon ++49(0)7304 9617-0
- 22 -
2.10.5 Assigning MIDI notes
Assigning MIDI notes, when the Licon 1X is connected to a MIDI device:
Important:
If the softkey DIRECT is not displayed inverted during assignment of MIDI notes to cue, chase and
sequence keys, access is only obtained to Page 1, Bank A.
If the softkey DIRECT is displayed inverted also cues, chases and sequences can be assign ed that are
stored on the other pages and banks..
Press the softkey CONFIG and then MIDI to activate the MIDI menu. Now press a random key on the
connected keyboard. The display shows the MIDI note (e.g G 5). (A preprogrammed assignment of cues,
chases and sequences to MIDI notes is available, which is not binding, however. You can change this
assignment by selecting another cue, chase or sequence key.)
To assign a cue to the MIDI note, press the cue key, on which you want to store the corresponding cue.
The assignment is shown on the display.
Bear in mind that you will have access to pages 2 and 3 and the banks B, C and D only when the softkey
DIRECT is displayed inverted!
Assigning MIDI notes, when the Licon 1X is not connected to a MIDI device:
If no MIDI device is available to you when you make the assignment of MIDI notes, then you can select
the MIDI notes with the middle encoder wheel. The assignment of the MIDI notes to the cue, chase and
sequence section is carried out by pressing the corresponding keys.
Bear in mind that also here you will have access to pages 2 and 3 and the banks B, C and D only when
the softkey DIRECT is displayed inverted!
2.10.6 Assigning softkeys
The sofkeys are designated DISP. MIDI notes are assigned to
these keys as described under „Assigning MIDI notes, when
the Licon 1X is connected to a MIDI device“.
The softkeys DISP1, DISP2, DISP 3, DISP 13, DISP 14 or the
ECS key can only be selected with the S-KEY. Press the SKEY again and again until the desired key appears (e.g. KEY
: DISP13“).
Page 23
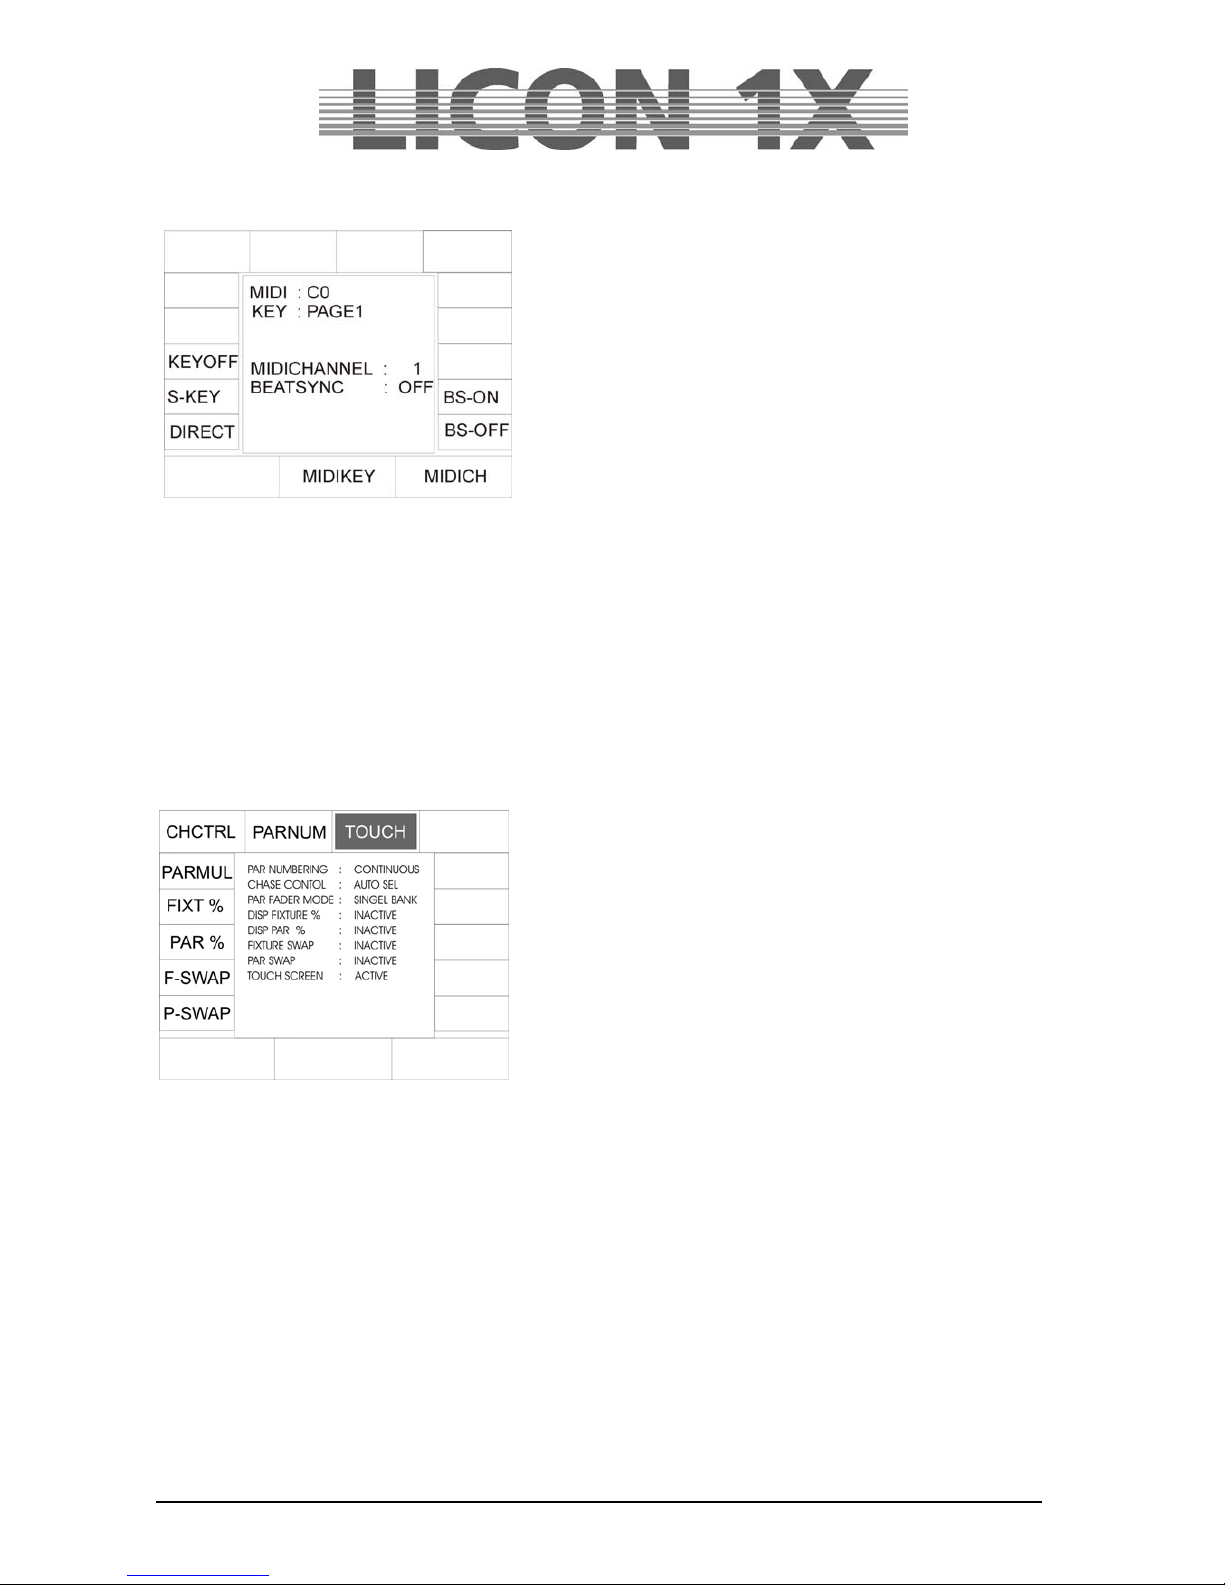
JB-lighting Lichtanlagen GmbH Sallersteigweg 15 D-89134 Blaustein Telefon ++49(0)7304 9617-0
- 23 -
2.10.7 BEATSYNC
Instead of the sound function, you can also assign the
Beatsync function to chases or sequences. For this purpose,
you require e.g. a sequencer that is able to send a beatsync
signal. Beatsync means that your chase or sequence runs at
the beat dictated by the sequencer. To assign the beatsync
function, enter the CONFIG/MIDI menu and press the softkey
BS-ON. The BEATSYNC section of the display shows that
the beatsync is active (BS-ON). If you now switch the chases
and sequences in the sections CHASE CONTROL or
SEQUENCE CONTROL to SOUND, they will react to the
beatsync. Press “BS-OFF” to deactivate the beatsync
function.
2.11 OPTION / Additonal configuration parameters for the Fixture-/PAR selection
2.11.1 The swap function
The swap function accesses the PAR and fixture faders. It is activated in the CONFIG menu. The mode
of operation of the swap function will be described in Chapter 2.11.1.2 Working with the swap function.
The basic configuration of the swap function is made in the CONFIG/OPTIONS menu. Press the softkey
CONFIG and then the softkey OPTION to enter this menu.
The following display is shown:
You can assign the swap function to the PAR and fixture
faders separately or in combination.
To activate the swap function, press the either the softkey FSWAP or P-SWAP).
Three assignments can be made for PAR faders and three
for fixture faders.
Fixture assignment: status (can be seen on the display):
Display representation:
Standard: INACTIVE. Function is deactivated
After pressing the softkey F-SWAP once: FIXTURE: Function accesses the fixture
faders
After pressing the sofkey F-SWAP twice: FIXT + PAR: Function accesses fixture faders and par
faders (if the swap key is pressed
together with a fixture flash key)
PAR assignment: status (can be seen on the display):
Display representation:
Standard: INACTIVE. Function is deactivated
After pressing the softkey P-SWAP once: FIXTURE: Function accesses the fixture
faders
After pressing the sofkey P-SWAP twice: FIXT + PAR: Function accesses fixture faders and par
faders (if the swap key is pressed
together with a PAR flash key)
Page 24

JB-lighting Lichtanlagen GmbH Sallersteigweg 15 D-89134 Blaustein Telefon ++49(0)7304 9617-0
- 24 -
2.11.1.1 Mode of operation of the swap function
The swap function sets to zero the output values of all fixture and PAR faders, with the exception of those
faders, the flash keys of which are pressed in combination with the swap key.
2.11.1.2 Working with the swap function
Brightness output in the Fixture-/ PAR Selection is
controlled with the corresponding faders. If the swap
key is pressed simultaneously with the flash key
located below a fader, then the brightness output of all
other faders is set to zero. Only the values of those
fader(s) with activated flash keys will be output. Depending on the
CONFIG settings, the swap function accesses the PAR faders, the
fixture faders or both fader banks.
2.11.2 Displaying DMX values in percent
The DMX values of the Licon 1X can be entered as values from 000 to 255 or in percent from 000 to 100.
This selection can be made independently of the entry of PAR or fixture values.
2.11.2.1 Activating the percent function
Enter the CONFIG/OPTION menu by pressing the corresponding sofkteys.
The following display is shown:
To activate the percent function, press the softkey FIXT %
or/and PAR %.
The activated function is displayed as shown on the left.
In addition, a percentage sign is displayed:
To deactivate the percent function, repeat the procedure. The deactivation was successful, when the
function field is no longer displayed inverted.
2.11.3 CHCTRL / Setting the Chase Control Section
If the CHCTRL function is not activated (displayed: CHASE CONTROL : MANUAL SEL), the chase
selected last in the COMBI section can be controlled via the Chase Control Section.
If the CHCTRL function is activated (displayed inverted: CHASE CONTROL : MANUAL SEL), a chase
selected by the key combination Select + Chase key can be controlled via the Chase Control Section.
This function applies to the Combi section, since in the PAR section chases are on principle activated by
the key combination Select + Chase key.
Page 25
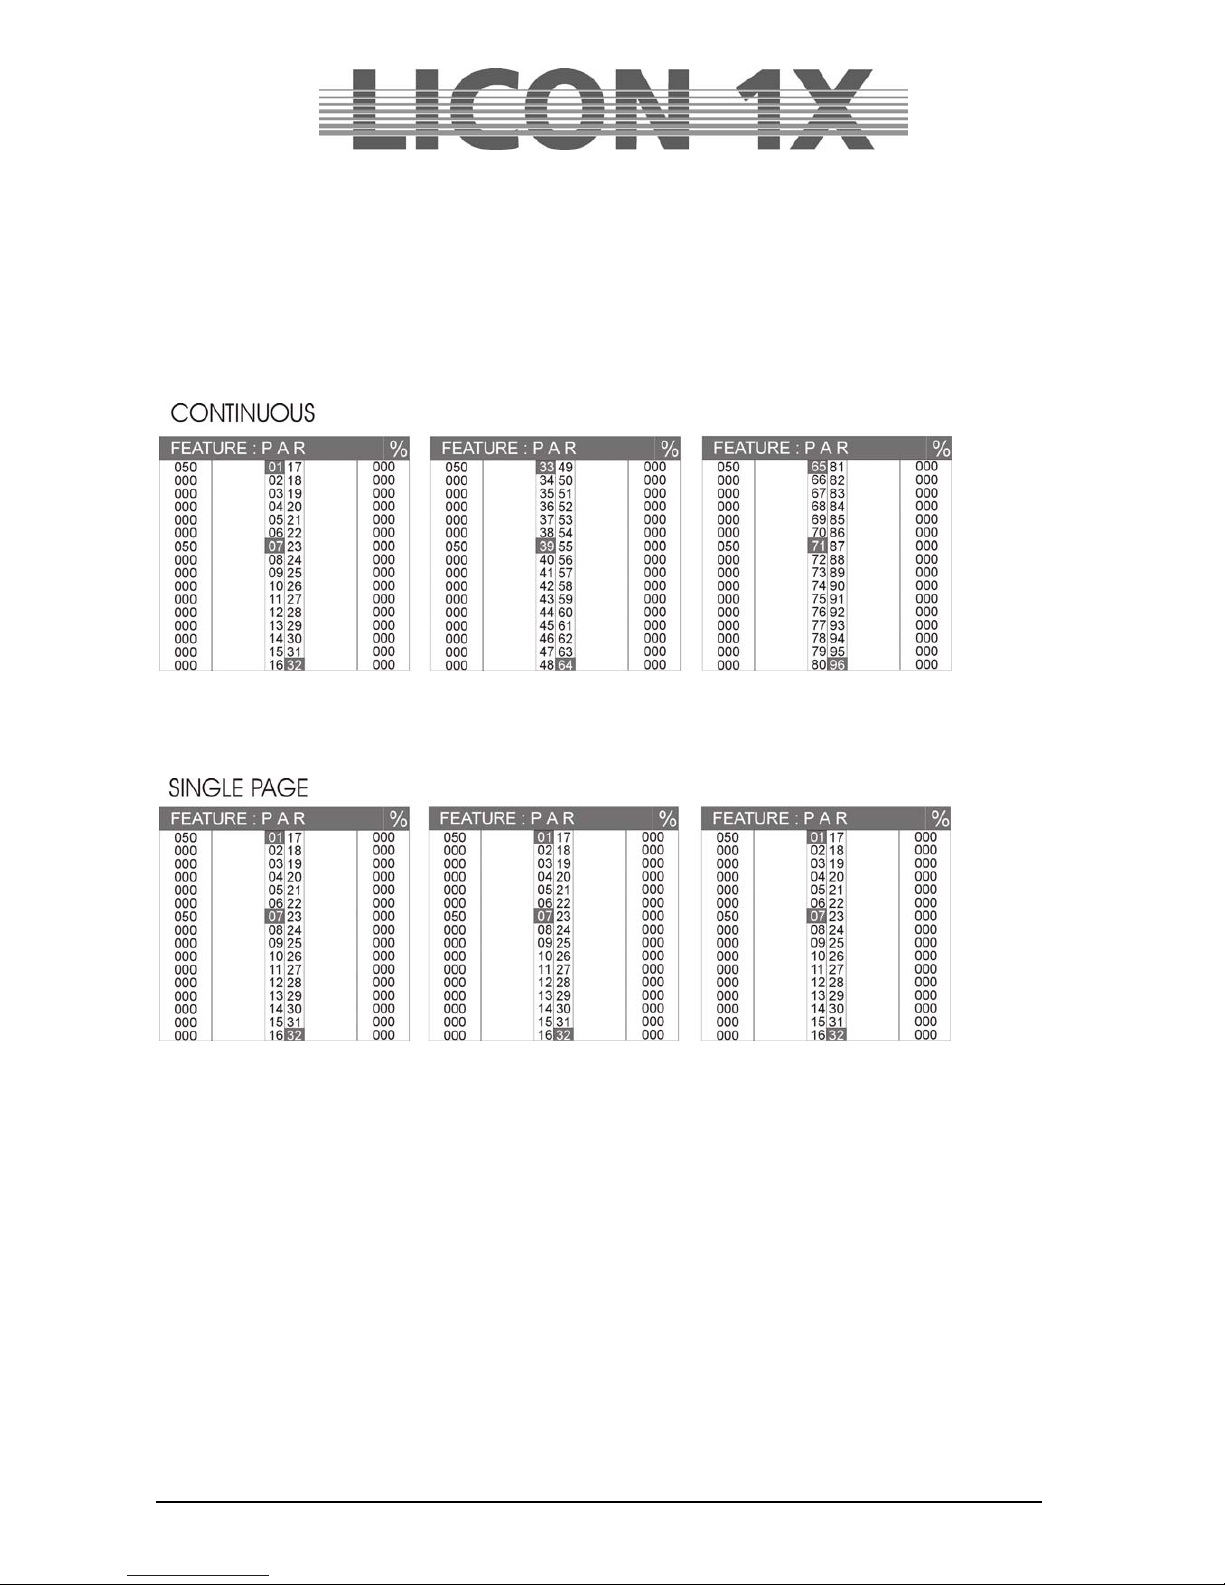
JB-lighting Lichtanlagen GmbH Sallersteigweg 15 D-89134 Blaustein Telefon ++49(0)7304 9617-0
- 25 -
2.11.4 PARNUM / Numbering the PAR section
With the PARNUM function, you can number the PAR channels on the three PAR pages available on the
display either per page from 1 – 32 or consecutively from 1 – 96.
Consecutive numbering:
PARNUM not displayed inverted:
PAR NUMBERING : CONTINUOUS
Display of the PAR channels:
Numbering per page:
PARNUM displayed inverted:
PAR NUMBERING : SINGLE PAGE
2.11.5 PARMUL / Accessing PAR fader banks
The PARMUL function controls the access to the fader banks, which can be switched four times.
PARMUL not displayed inverted:
PAR FADER MODE : SINGLE BANK
If on a bank the value of faders is greater than zero, the faders will be switched to another bank not until
the operator slides the fader back down to zero, i.e. the corresponding fader can never be used by more
than one bank at a time.
PARMUL displayed inverted:
PAR FADER MODE : MULTI BANK
If on a bank the value of faders is greater than zero, the faders will remain active when the operator
switches to another bank. By undershooting the corresponding fader value, the faders can be activated
on the bank switched to, and thus be used four times.
Page 26
JB-lighting Lichtanlagen GmbH Sallersteigweg 15 D-89134 Blaustein Telefon ++49(0)7304 9617-0
- 26 -
2.11.6 TOUCH / Turning the touchscreen on or off
With the softkey TOUCH, the touchscreen function of the display can be turned on or off.
TOUCH displayed inverted (basic configuration): touchscreen is activated.
TOUCH not displayed inverted: touchscreen is deactivated.
2.12 ACCESS / Entering passwords
In the Licon 1X, password can be entered on different password levels.
One master password and four user passwords are available. The individual users may be granted
different access rights.
The master password is superior to all other passwords. It is only possible to change user passwords
after entry of the master password.
2.12.1 Entering the master password
Enter the CONFIG menu and press the softkey ACCESS. The
display shown on the left appears.
Enter the master password first. Use the double-assigned keys of
the cues, chases and sequence sections.
When the master password is entered, the softkey CHECK
appears on the display. By pressing this softkey you can activate
or deactivate the password function. If the password function is
activated, the display confirms with the message CHECK
ACTIVE.
Press the ESC key to leave the menu.
Page 27

JB-lighting Lichtanlagen GmbH Sallersteigweg 15 D-89134 Blaustein Telefon ++49(0)7304 9617-0
- 27 -
2.12.2 Entering the user passwords
After activation of the master password, access is given to
the user profiles. They can be activated by means of the
middle encoder wheel. You can choose between four user
profiles. Select the user profile, for which you want to enter
the acess rights.
Example on the left: USER 1
USER 1 is a DJ. He shall have no access to the
configuration and the storage of presets.
First enter the user password. Then activate the password
by pressing the sofkey STATUS. The fourth line on the left
shows, whether the status is INACTIVE or ACTIVE.
Then you can define the individual access rights. For the access to the CONFIG and Preset menu, you
can choose between the possibilities full (full access) or denied (access denied).
Since a DJ normally does not need to change configurations or presets, enter DENIED. The entry is
made with the softkey of the corresponding item on the right side of the display. Thus press the softkey
CONFIG, until „denied“ will appear on the display.
Enter the access rights for presets as is described for CONFIG.
For the access to the store function, you have the choice between the following three access levels: full,
denied and limited access.
Press the softkey STORE until „limited“ appears on the display. With this limited access your user has the
right to store own cues on Page 3 or Bank D (this section is located next to the cues and chase keys).
This user has access only to Page 4 in the SEQUENCES section and to faders in the Fixture-/PAR
selection.
Press the ESC key to leave the menu.
2.12.3 Checking passwords
As soon as the Licon 1X is switched on, the password prompt appears on the display (when activated in
the access menu).
Enter the password and confirm with the softkey OK.
The master password gives access to all parameters of the lighting control console. The user passwords
1 – 4 will only activate those parameters that are defined in the ACCESS menu as „full“ or „limited“.
If you have forgotten the master password, please contact your local JB-lighting dealer and ask for the
main password.
2.12.4 Changing passwords
Passwords are entered and changed in the CONFIG menu. You have access to the CONFIG menu after
you have entered the master password or a user password. However, access rights to the CONFIG must
previously be given to this user in the ACCESS menu. Change the passwords in the CONFIG menu as
described in chapter 2.12.1 and 2.12.2.
Page 28
JB-lighting Lichtanlagen GmbH Sallersteigweg 15 D-89134 Blaustein Telefon ++49(0)7304 9617-0
- 28 -
3. Programming in the Combi section
The Combi section offers the possibility to store combined cues, chases and sequen ces with fixture as
well as PAR data.
This chapter of the user manual will deal with the Combi section only with regard to fixtures. If you wish to
store combined cues, chases and sequences you must store the data of the corre sponding PAR channels
together with the fixture data on the same key.
The Combi section works according to the LTP principle (Last Takes Precedence). This means that the
value last adjusted or selected has precedence for a channel.
You will find the currently valid PAR values of the Combi section on the corresponding feature pages of
the display.
These values are scaled with the middle master fader (Combi PAR) and output via DMX.
Fields of application of this combined storage are for example:
music-synchronised shows programmed in the timeline editor
complete sequences, e.g. for theatre performances
combined colour states during touring /stage applications
completely remote-controlled shows, e.g. via MIDI
in general: all fields of application, where complete colour or lighting states are already definite at
the beginning the programming phase
3.1 Direct access to fixtures
The Licon 1X allows access to a total of 32 fixtures. The
fixtures are activated with the keys of the Fixture-/PAR
Selection (keys 1-32). The fixtures are activated, when the
corresponding LED is lit.
In order to be able to enter the individual parameters, the
corresponding fixture must be stored at least in one
fixture group and the corresponding master and group
faders must be raised!
Storing and recalling fixture groups.
Fixture groups are a composition of fixtures, the brightness of
which is controlled with the group faders in the Fixture
section.
3.2 Fixture groups
The Licon 1X controls the brightness of fixtures separately. In order to see a beam of light at all, both the
master fader of the Fixture section and the fixture fader of the corresponding group must be raised. A
total of 8 group faders are available, which can be switched four times (so that you have access to a total
of 32 groups).
Page 29
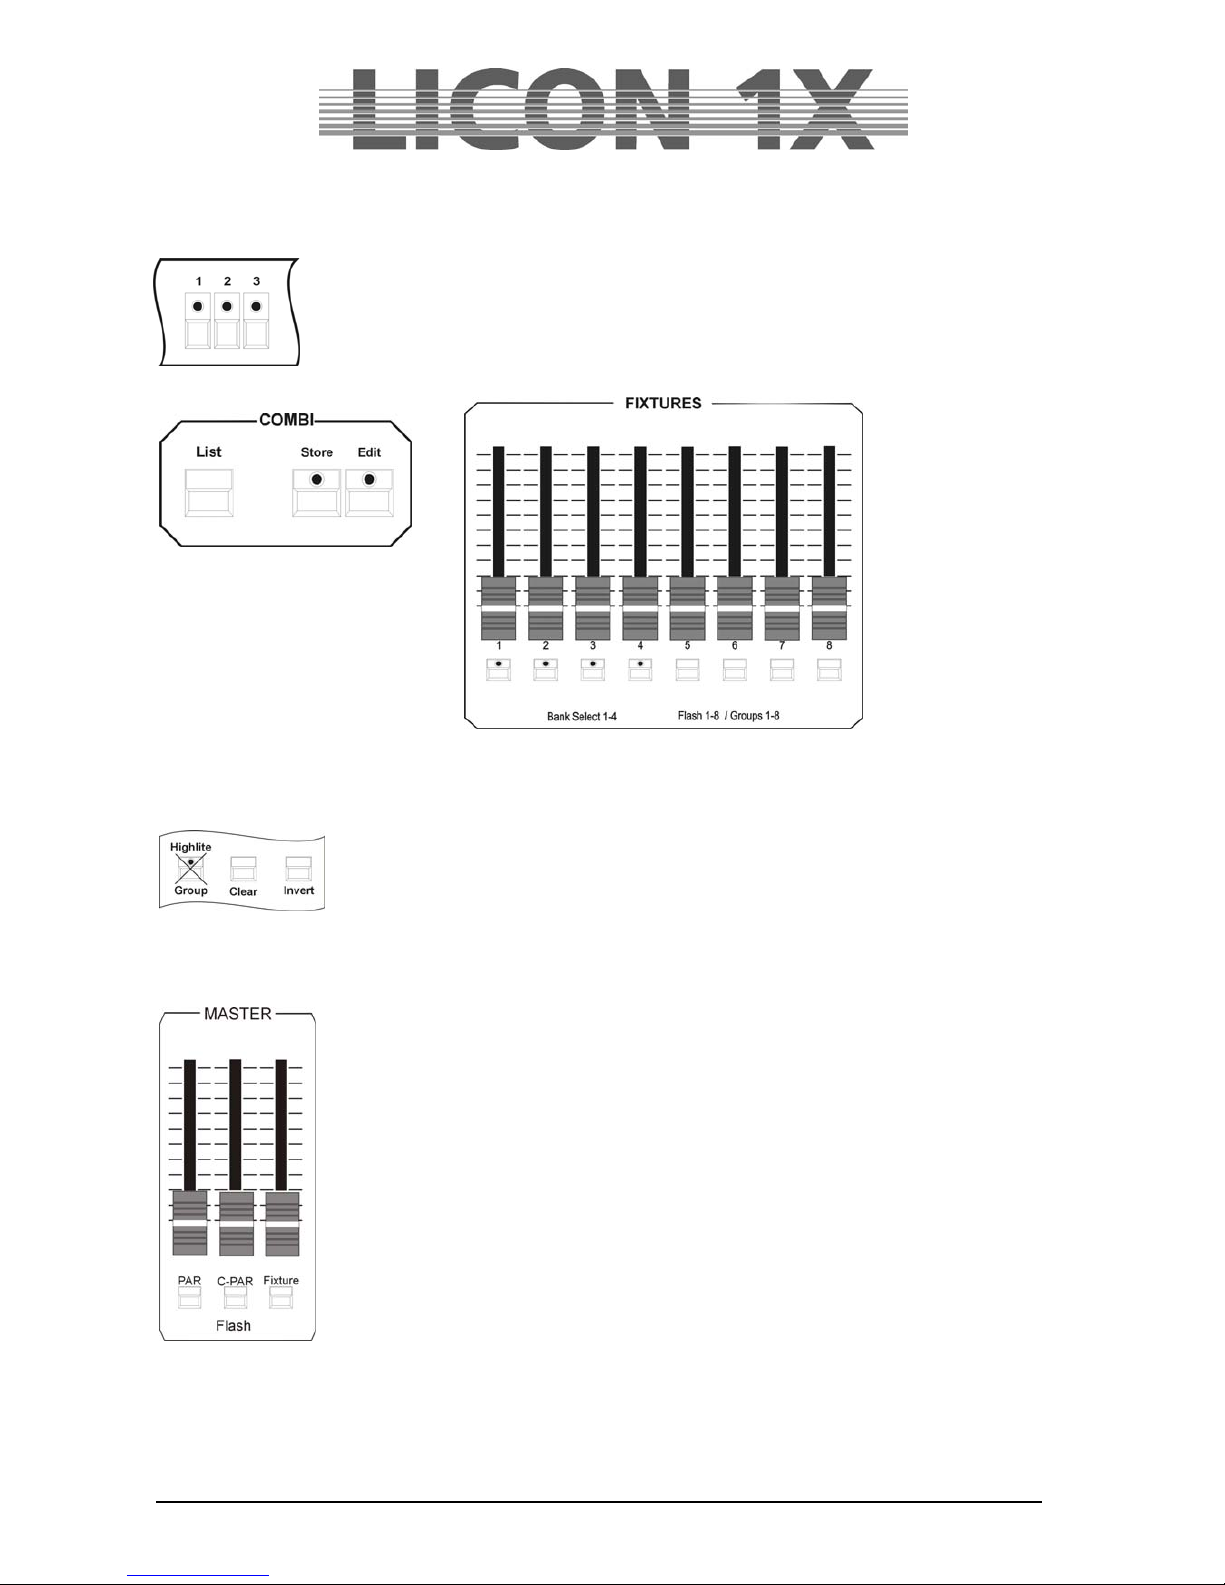
JB-lighting Lichtanlagen GmbH Sallersteigweg 15 D-89134 Blaustein Telefon ++49(0)7304 9617-0
- 29 -
3.2.1 Storing fixture groups
Eight fixture faders are available for the storage of different fixture groups. These fixture faders can be
switched four times. To define a fixture group, activate the desired fixtures with the keys of the Fixture-
/PAR Selection (LEDs must be lit).
Then press and hold the STORE key in the Combi section and simultaneously press
the switch-key in the Fixture section (keys below the fixture faders), on which you want
to store the fixture group (choose between switch-keys 1-8). Then release both keys
again.
Use the 4 switch-keys with incoporated green LEDs in the FIXTURES section to switch the eight faders to
four banks. In order to switch the banks, press and hold the SHIFT key and simultaneously press the
desired bank (switch-key with green LED) in the FIXTURES section.
Note: during the storage of fixture groups the LED of the group key in the
Fixture-/PAR Selection must not be lit!!!
If you wish to alter the composition of the group, repeat this procedure and choose
another combination of fixtures.
3.2.2 Activating fixture groups
First of all press the GROUP key in the Fixture-/PAR Selection (the LED of the
Group/Highlight key is lit). Then activate the stored groups by selection of the
desired switch-keys 1-8 in the Fixtures section. The LEDs of the activated fixtures
are lit.
If you need more than one fixture group at a time, press the corresponding switchkeys in the Fixtures section simultaneously. All fixtures will be activated that are
stored on the corresponding switch keys (group keys).
The brightness of the fixtures is controlled with the faders located above the group
keys.
If you work in the Combi section, the fixture fader, on which you have stored the
group and the Combi master fader must be raised. The master fader for the Combi
section is the right fader in the master section.
3.2.3 Switching fixture fader banks
A total of 8 group faders is available, which can be switched four times. The flash-keys with incorporated
LEDs located below the fixture faders 1-4 indicate the individual banks. In order to switch the banks,
press the SHIFT key in the Page/Bank section and simultaneously one of the flash keys located below
the fixture faders. Faders with a value greater than zero are only switched to the new bank, when the
fader is pulled down to zero.
Page 30

JB-lighting Lichtanlagen GmbH Sallersteigweg 15 D-89134 Blaustein Telefon ++49(0)7304 9617-0
- 30 -
3.3 The Highlight/Group key
This key has two functions:
activating fixture groups
localising fixtures
Activating fixture groups:
There are two different ways of working with the group function: Press the Highlite/Group
key (LED is lit). Now you can activate fixture groups that have been previously stored on
the fixture faders. Press the flash-key located below the corresponding fader. If the
master fader and the fixture fader are raised, the fixtures integrated in the corresponding
fixture group are lit.
In order to flash the moving heads of a fixture group, press and hold the Highlite/Group
key (LED is not lit) and simultaneously press one of the flash-keys located below the
fixture faders. Then release both keys again.
Now flash the just activated fixture group by positioning the fader on the zero value and
pressing the flash-key below the group fader.
Localising fixtures:
In the highlight mode, the GROUP key allows quick and easy localisation of fixtures. If you wish to employ
the programming aid HIGHLIGHT, proceed as follows: press and hold the HIGHLIGHT key and select a
fixture from the Fixture-/PAR Selection by pressing the corresponding key. The DMX values of the
channels speed, gobo, color, prisma and frost of the selected fixture are set to 000, whereas the values of
shutter and dimmer are set to 255. PAN/Tilt, moving patterns, iris and focus remain unchanged. The
fixture now shows an open, white beam of light. The corresponding LED is flashing. For deactivation,
press and hold the HIGHLIGHT key and simultaneously press the fixture key with the flashing LED.
Release both keys and the Highlight function is deactivated.
The Clear key deactivates all activatedcfixtures (LED goes out).
The Invert key inverts all activated fixtures.
The key combination Clear – Invert activates all fixtures.
Page 31

JB-lighting Lichtanlagen GmbH Sallersteigweg 15 D-89134 Blaustein Telefon ++49(0)7304 9617-0
- 31 -
3.4 Entering fixture parameters with the encoder wheels
Fixture parameters can only be entered, when the desired fixtures have been activated before by
pressing the corresponding keys in the Fixture-/PAR Selection (LEDs must be lit).
After that you have access to the individual features (e.g. PAN/TILT or gobo). Activate these features by
pressing the corresponding keys in Feature Selection and enter the values with the encoder wheels.
Caution:
The Licon 1X controls the brightness values separately.
For visual control of the entered parameters, raise the corresponding brightness faders. Then proceed as
described in chapters 3.2.1 and 3.2.2 Storing and activating fixture groups, which means that you have to
define the fixture groups first in order to gain access to the brightness faders.
3.4.1 Positioning fixtures with 16 Bit
Rough positioning of the fixtures is carried out with 8 bit. The display shows this in steps from 0 to 255.
For a more precise positioning of the fixtures, the fine adjustment is carried out in the 16 bit range. (This
is only possible, when the Pan/Tilt parameters of the fixture can be controlled by the Licon 1X with 16 bit
and when this feature was entered during the configuration of the fixture and the Licon 1X.)
You can switch between the 8 bit and 16 bit range with the middle encoder wheel (FINE OFF). The
display will then show values between 000 and 65535.
Page 32

JB-lighting Lichtanlagen GmbH Sallersteigweg 15 D-89134 Blaustein Telefon ++49(0)7304 9617-0
- 32 -
4. Presets
Presets are preprogrammed fixture settings that are often used by the operators. They are the most
important tools for the programming of fixtures. Presets should be stored for all parameters, since they
considerably speed up the programming procedure. The fixtures predefined in the library contain in part
preprogrammed presets.
If you use different types of fixtures, we recommend a uniform classification of presets for all types of
fixtures. If a fixture, for example, does not possess individual functions, or has fewer colours, gobos etc.
than another fixture, then we recommend that you leave out the corresponding entries in the presets.
Thus you can ensure that the designation of the preset is suitable for all presets.
It is also possible to store presets for movements and PAR light (dimmer parameters).
If you work with Pan/Tilt presets, you have the advantage that for the next live performance in another
locality you only have to change the Pan/Tilt to adjust the programme and can otherwise work with the
same fixture configuration. All cues, chases and sequences that you have programmed with the help of
the corresponding presets, will then be output with the changed values.
TIP: Do always work with PAN/TILT presets!!!
4.1 Creating and storing presets
In order to create and store presets, enter the main menu and press the softkey PRESET. Then activate
the desired fixtures. When the corresponding LEDs are lit, you can select the feature in the Feature
Selection section (e.g. Pan/Tilt or Color), for which you want to create and store a preset. (You can only
store one (the selected) feature as PRESET. If you wish to store several features simultaneously, e.g.
Pan/Tilt and color, this is a cue and not a preset.)
Enter the values with the encoder wheels and press the Store key in the Combi section (LED is lit). Now
all fixtures will be activated that you have stored in the Setup. (The numbers of the activated the fixtures
will be displayed inverted.) Select a storage place (key) on the display and press the corresponding
softkey. The particular field is displayed inverted and the LED of the Store key begins flashing. Confirm by
pressing the Store key again. The LED stops flashing and the field will no longer be displayed inverted.
You can name the function field, whenever the field is displayed inverted
Below you will find an illustration of the individual working steps:
1. 2. 3. 4. 5.
4.2 Naming a preset
Before a preset is stored, you can name it with the double-assigned keys of the Cues/Chases/Sequences
section. (For this purpose, a letter of the alphabet is assigned to each of these keys. The letters are
arranged as on a conventional PC keyboard.) Confirm the entry with Store.
Page 33

JB-lighting Lichtanlagen GmbH Sallersteigweg 15 D-89134 Blaustein Telefon ++49(0)7304 9617-0
- 33 -
If you wish to name a preset later, enter the PRESET menu and select the field to be named. As soon as
it is displayed inverted, you can name the field with the keys of the Cues/Chases/Sequences section.
You can change the name of a preset as follows. select the preset as described above.
Delete the previous entry with the arrow key and enter the new name.
Your preset will be stored when you leave the menu with ESCAPE or press the next preset key. The
named field will then no longer be displayed inverted.
4.3 Recalling presets
The presets are shown on the display, when you have activated a parameter with the keys of the Feature
Selection block (e.g. PAN/TILT or gobo). Activate the desired feature by pressing the corresponding
softkey.
The presets of the Feature Selection are stored on page 1 of the keys (press the keys once). The Edit
functions are activated by pressing the keys of the Feature Selection twice.
4.4 Fading presets
The fading of presets requires that the Preset-Fade fader is raised. This fader is
located in the Feature Selection section (below the ON/OFF switch) and has a scale
ranging from 0.0 seconds to 10 seconds.
Parameters are either faded or switched.
Parameters that are faded include: Pan/Tilt positions, iris settings, CMY colour mixing
and focus or zoom settings.
All other parameters are switched.
Raise the Preset-Fade fader and activate a preset. The preset will be faded or
switched according to the time set with the preset fader.
Page 34

JB-lighting Lichtanlagen GmbH Sallersteigweg 15 D-89134 Blaustein Telefon ++49(0)7304 9617-0
- 34 -
5. Programming aids for Pan and Tilt values
Programming aids for Pan and Tilt values are functions that allow simple and quick program ming of
complex sequences. This chapter deals on the one hand with the fan function (Fixture Selection Pan/Tilt)
and on the other hand with preprogrammed moving patterns (Fixture Selection Moving Patterns).
Sequences programmed in these two parameter sections can be stored as presets.
5.1 Fan function
The fan function assigns different deflection angles to a group of fixtures. This will result in fan-shaped
and wavelike cues.
Fan-shaped cues are achieved, when a deflection angle is entered in the Pan section. Wavelike cues are
achieved, when a deflection angle is entered in the Tilt section.
To simplify matters, the following examples are always based on a neutral position of the fixtures in the
Tilt section (50% or DMX value 127). The illustrations will indicate this neutral position always as a line
(as orientation for the user).
Press the Pan/Tilt key in the Feature Selection section twice to activate the fan function. The following
display is shown:
The functions listed below are available:
P-LIN: Linear deflection in the Pan section
P-SIN1: Sine function in the Pan section
P-SIN2: Sine function in the Pan section
P-SIN3: Sine function in the Pan section
P-ABS: Function with absolute values in the Pan
section
P-SYM: Symmetrical deflection in the Pan section
P-INV: Inverse function in the Pan section based on
the neutral position
T-INV: Inverse function in the Tilt section based on
the neutral position
T-SYM: Symmetrical deflection in the Tilt section
T-ABS: Function with absolute valules in the Tilt section
T-SIN3: Sine function in the Tilt section
T-SIN2: Sine function in the Tilt section
T-SIN1: Sine function in the Tilt section
T-LIN: Linear deflection in the Tilt section
5.1.1 Entering the fan function
The following examples will explain the different parameters
on the basis of values entered in the Tilt section.
In order to enter the fan function, press the Pan/Tilt key
twice.
The display as shown on the left appears.
Activate the desired fixtures. Be careful to work with fixture
groups, i.e. either the fixtures of the back truss or of the front
truss or those placed on the floor. If you activate all fixtures
for this function and do not pay attention to the way they
have to be arranged (in line), then no beautiful fan or wave
will result.
Our examples and the respective graphs shown below will always refer to 8 fixtures that are mounted in
one line.
Page 35

JB-lighting Lichtanlagen GmbH Sallersteigweg 15 D-89134 Blaustein Telefon ++49(0)7304 9617-0
- 35 -
The initial graph looks like the one shown on the left. The 8 fixtures are
mounted in one line.
Select one of the functions (e.g. T-LIN) by pressing the corresponding
softkey. Enter the size of the radiation angle (e.g. size: +70) with the
right encoder wheel. The line shown on the the left changes until it
reaches the angle shown on the right.
The following graphs will show all fan functions possible that can be created with 8 fixtures and the basic
setting of the size at +70. Above the graphs, the designation of the currently active function is displayed.
Page 36

JB-lighting Lichtanlagen GmbH Sallersteigweg 15 D-89134 Blaustein Telefon ++49(0)7304 9617-0
- 36 -
In addition, the particular parameters (e.g. line or sine wave) can be combined with a Multi function. The
results of these combinations are shown in graphical form below:
Page 37

JB-lighting Lichtanlagen GmbH Sallersteigweg 15 D-89134 Blaustein Telefon ++49(0)7304 9617-0
- 37 -
5.2 Preprogrammed moving patterns
The Licon 1X offers six different moving patterns. These moving patterns are activated by pressing the
Moving-Pattern key twice. You will find the Moving-Pattern key in the Feature Selection block.
As with all other parameters, you can store moving patterns as presets.
The individual field have the following functions:
OFF: stops the movement of all activated fixtures.
CLRPH: sets a programmed phase shift of the activated fixture to 0.
CLRINV: converts a negative inversion into a positive inversion.
INV: inverts the movement of all activated fixtures.
WAVE: see Phase function (5.2.1).
2-WAVE: see Phase function (5.2.1).
SYM1: inverts the movement of every second fixture.
SYM2: inverts the movement of the second half of the selected fixtures.
O: circul ar movements
: Lissajou (double circle)
: sweeps up - down
: sweeps left - right
: diagonal sweep (left down/right up)
: diagonal sweep (left up/right down)
SIZE : size of the moving patterns.
SPEED: speed of the moving patterns.
PHASE: phase shift.
Before you can enter a moving pattern, activate the desired fixtures first (LED is lit, the fixture is displayed
inverted). Then press the key of the desired moving pattern and enter size and speed with the Size and
Speed encoder. Take care that size and speed are in due proportion. Fixtures of different manufacturers
often diverge in speed and mirror movement. The size/speed ratio must be chosen in such a way that the
fixture is able to carry out the complete movement.
If you have entered speed and size correctly and you are nevertheless not satisfied with the result, check
whether your configuration is correct. If you have configured the fixtures in the L-User setup, it is possible
that the Pan or Tilt deflection angle was entered wrongly.
5.2.1 The Phase function
After you have assigned a moving pattern with regard to size and speed to your fixtures, you can assign a
phase shift in addition. Phase designates the different start positions of the fixtures included in the moving
pattern. You will need this function, for example, if you wish to programme a wave. Each movement
pattern is divided into a maximum of 32 phases (numbers 0-31). When you programme a movement with
phase shift, assign different start positions to each fixture. When you programme a wave movement over
32 fixtures, you must first of all activate all fixtures (LEDs are lit). Then recall the preprogrammed moving
pattern with the Feature-Selection key and select the up/down sweep.
Enter size and speed with the encoder wheel.
The phase shift is shown in the last column on the display.
Since the first fixture is to start without phase shift, „00“ must be indicated in this column. Assign the first
phase to the second fixture ( „01“). For this purpose, activate the fixture first and then enter the value with
the left encoder wheel.
Now deactivate the second fixture again and activate the third. Proceed with all fixtures in this way.
Finally, the following display is shown:
Page 38

JB-lighting Lichtanlagen GmbH Sallersteigweg 15 D-89134 Blaustein Telefon ++49(0)7304 9617-0
- 38 -
Important: Because of the total number of 32 phase steps, the Licon 1X assumes the presence of a sine
wave. If you employ less than 32 moving heads, you must distribute them over the 32 phase steps.
The Licon 1X activates such patterns on its own when the softkeys WAVE and 2-WAVE are pressed.
WAVE: distributes the phase shift always in the optimal distance in proportion to the sine wave
depending on the number of moving heads.
2-WAVE: distributes the phase shift of the first half of the selected moving heads in the opitmal distance
to the sine wave, the second half starts with the final value of the first wave and ends with the
start value.
Movements can also be stored as presets. Proceed as described in chapter 4.1.
Page 39

JB-lighting Lichtanlagen GmbH Sallersteigweg 15 D-89134 Blaustein Telefon ++49(0)7304 9617-0
- 39 -
6. Cues (scenes) in the combi section
Cues or scenes are fixed parameter settings for fixtures and dimmers. A cue consists of DMX values of
one or more functions of one or several fixture.
Cues are stored on the cue keys and acvtivated by pressing these keys. The individual parameters can
be defined as preset or as standard setting. If cue parameters are stored as presets, the settings change
automatically when the presets are modified.
Cues can be stored containing all features (parameters) of a fixture or only a part of the features of a
fixture. If a cue is output by the lighting control console and another cue is activated afterwards, then the
values of the last activated cue are valid (LTP principle). If the cue activated last does not contain
features of the cue activated before, the output remains unchanged.
Example: In Cue 1, DMX values for a certain Pan/Tilt position and DMX values for one gobo are stored.
Cue 2, on the other hand, does only contain the DMX values for a Pan/Tilt position. If now Cue 1 and Cue
2 are activated consecutively, then the Pan/Tilt position of the Cue 1 will change and the values of the
gobo remain unchanged.
Tip: If possible, always use presets when you are programming cues, chases or sequences
(programmes). If you change the presets afterwards, the changes will apply to all cues, chases and
sequences, in which the presets were stored.
6.1 Programming and storing of cues
In order to store cues, you must enter the main menu or the Feature Section (never the Preset Section!).
The following principal steps must be performed, whe cues are programmed and stored:
Select the fixtures with the keys of the Feature-/PAR Selection (keys 1-32).
Select the desired parameters and enter the DMX values either with the encoder
wheels or with the preset keys.
Press the Store key in the Combi section.
Select the parameters from the storage matrix
.
Press the cue key, on which you wish to store the cue.
Press the Store key in the Combi section again for confirmation.
You can store additional features for cues, such as fade time, trigpoint. You can name the cue and set a
release link. These options will be described in the chapters following below.
Page 40

JB-lighting Lichtanlagen GmbH Sallersteigweg 15 D-89134 Blaustein Telefon ++49(0)7304 9617-0
- 40 -
6.1.1 The storage matrix
Activate the desired fixtures and enter the parameters. Then press the Store key in the Combi section. A
similar illustration will appear on the display:
The Illustration shows the storage matrix. The storage matrix is the most important tool, when cues,
chases and sequences are stored. The storage matrix will be activated each time you press the Store key
in the Combi section and afterwards one of the keys of the Cue/Chase and Sequence section.
The storage matrix gives you an overview of all programmed fixtures and dimmer channels. If a hyphen
(-) is shown in the matrix, the corresponding parameter is not available for the fixture, or no fixture has
been configured on this fixture storage place (keys 1-32).
In front of the individual features you will recognise a little triangle. With this triangle you can enter
either a fade or a switch function for different parameters. This triangle represents the cursor within
the matrix and can be moved up and down with the left encoder wheel (SEL FADE).
With the middle encoder wheel (FADE 0/1) you can activate or deactivate the fade function.
Whenever a ramp sign is displayed in the storage matrix, the corresponding features will be faded.
Fading is meaningful parameter for dimmers, iris, Pan/Tilt as well as for zoom or focus.
When features are marked with a „P“, a preset has been adopted. If you will change the preset
data afterwards, then the cue will also be automatically changed.
When features are marked with a dark square, the DMX values (absolute values) entered with the
encoder wheels previously have been adopted.
6.1.2 Selecting features to be stored
In a cue, you can store all parameters available or select only a few for storage.
Selecting all features available:
Make sure that all desired fixtures are activated (LED is lit). Then press the CLEAR key in the
FEATURE-SELECTION block until all features in the matrix are activated (selected fields are
displayed inverted in the matrix).
Selecting particular features:
If all feature fields in the matrix are displayed inverted, you can deselect individual features.
Proceed as follows: deactivate all fixtures first and then press the feature key of those
parameters you do not want to store. The feature is immediately removed from the storage matrix
(field is empty). Then choose the desired storage place (key) for the cue and confirm by pressing
the Store key once more.
Page 41

JB-lighting Lichtanlagen GmbH Sallersteigweg 15 D-89134 Blaustein Telefon ++49(0)7304 9617-0
- 41 -
6.1.3 The cue keys in combination with the page/bank keys
The cue section has 24 keys that are distributed in three blocks of eight keys.
On each key of the first block (each key is labelled with a number from F1 to F8), a single cue can b e
stored. This block is reserved for important cues that are often activated. The cue keys of the first block
cannot be switched with the Page/Bank function.
The keys of the other two blocks (each key is labelled with a number from 1
to 16) can be switched with the page or bank keys of the PAGE/BANK block.
Three pages and four banks (A to D) are available for each key. The page /
bank activated for the cue is signalised by a red LED.
As shown in the illustration, each cue key can be assigned to three pages
and per page to four banks. Thus, a maximum of 192 cues can be stored on
these 16 keys. If the cue keys from the first block (F1 to F8), which cannot be
switched, are added, then a maximum of 200 storage places is available.
Pages and banks are switched by activating the corresponding page or bank
key. The red LED of the particular page or bank keys begins flashing. The
LED stops flashing, if a cue key is pressed in addition.
When a cue was activated or stored, the following menu is shown on the display:
The illustration shows that cue key no. 5 on the third page,
bank D was activated.
6.1.4 Naming cues
Before a cue is stored, a name is assigned to it. The name may have a maximum of 13
characters. Press the softkey NAME until the field in the display is shown inverted and
enter a name for the cue with the double-assigned keys in the cue/chase/sequence
sections.
If the cue is already named, delete the characters with the arrow key.
After deletion, you can enter the cue name as described above.
Page 42

JB-lighting Lichtanlagen GmbH Sallersteigweg 15 D-89134 Blaustein Telefon ++49(0)7304 9617-0
- 42 -
6.1.5 Entering the fade time
Each cue can be assigned a fixed fade time. This fade
time accesses all parameters marked with a fade ramp in
the storage matrix. It determines the speed, at which the
corresponding features are faded in. Enter the fade time
with the left encoder wheel (FADETIME). The maximum
fade time amounts to 1638.3 seconds. The fade time is
entered in one-tenths of a second.
You will find the entered fade time on the display next to
the abbreviation „FT“.
6.1.6 Entering the trigpoint
A trigpoint can be assigned to all switchable features. It
designates the moment, at which all parameters that
cannot be faded are switched. This applies e.g. to gobos,
prisms, etc.
The trigpoint is entered with the right encoder wheel and
is a percentage value. The percentage value depends on
the fade time, where 100% corresponds to the complete
fade time. Now enter the percentage value, at which the
functions should be switched.
You will find the entered trigpoint on the display next to
the abbreviation „TP“ in percent.
6.1.7 Entering the release link function (R-Link)
The Licon 1X offers no possibility to switch off an active cue or chase by simply pressing the
corresponding key again. The active DMX ouput value remains effective, until a new DMX output value
for the active parameters is adjusted. A separate cue, a so-called stop-cue, is necessary, which has a
DMX value of „open“ or „000“ for one or several parameters.
Since a stop-cue is often only programmed for one specific cue, you can assign the stop -cue to this cue.
This assignment is called release link.
The assignment of a release link offers the following advantages, as compared to the separate
management of two cues:
Since the cue and the corresponding stop-cue are activated by the same key, the stop-cues can
be stored to subordinate banks.
The stop-cue activated will always be the suitable stop-cue.
The stop-cue addresses exactly those parameters that are required.
Create a cue as described in chapter 6.1 Programming and storing cues. Then create a stop -cue, which
will set the desired parameters to the DMX value „open“ or „000“.
To assign the release link to the corresponding key, select the Edit key in the Combi section and activate
the cue by pressing the cue key.
On the display, the softkey R-LINK appears
Press the softkey R-LINK. The softkey will be displayed
inverted. Simultaneously another softkey RL-OFF appears
on the display. To assign a stop-cue (release cue), press the
cue key, to which you have stored the stop-cue previously.
Your entry is shown on the display, e.g. RLM: 1A01. This
means that this cue has a release link to the cue of Page 1,
Bank A and Cue key 01.
Delete the release link by pressing the softkey RL-OFF.
Page 43

JB-lighting Lichtanlagen GmbH Sallersteigweg 15 D-89134 Blaustein Telefon ++49(0)7304 9617-0
- 43 -
6.1.8 Working with the release link function
Use the Release-Link key to activate a release link.
Together with the Flash-Release-Enable key, this key is
located to the right of the Sequences block.
By entering the release link, you have assigned two cues
to one cue key.
The first cue is activated by pressing the cue key.
The second cue (stop-cue) is activated when you press
and hold the release key and simultaneously press the
same cue key as before. Release the cue key first and
then the release key.
1. 2. 3.
6.1.9 Entering and working with the flash function
Working with the flash function is only possible, when a
release link was assigned before!
The flash key (as well as the release key and enable key)
is located in the block right to the Sequences section. The
release link can be assigned in the Combi Store or Combi
Edit section according to the procedure described in
Chapter 6.1.7.
The keys of the Cue section are switch-keys. When you
need these keys to apply the flash function (e.g. for strobe
sequences), press the flash key in the release block first
and then press the cue key, to which you have stored the desired cue. The cue wi ll remain active as long
as you are pressing and holding both keys. The cue will be deactivated, when you release both keys.
Page 44

JB-lighting Lichtanlagen GmbH Sallersteigweg 15 D-89134 Blaustein Telefon ++49(0)7304 9617-0
- 44 -
7. Editing cues
All functions and parameters of a cue can be modified separately. You are not required to rewrite the
whole cue.
On principle, the followng working steps are necessary for editing cues:
Enter the Edit menu by pressing the Edit key (LED is lit) in the Combi section.
Select the desired cue by pressing the corresponding cue key and press the
softkey MODIFY. You can now edit the individual parameters.
In order to store the modifications, press the Store key in the Combi section
and the storage matrix appears. Carry out your modifications as planned in the
storage matrix. Press the Store key again to confirm the modifications. Press the Edit key again or the
ESC key to leave the Edit menu.
Activate a cue with the Edit key in the Combi section and the following display appears:
The illustration shown on the left indicates, if parameters are
stored in this cue or not.
Stored parameters:
No parameters stored (storage matrix is empty):
You have no direct access to the following cue parameters: name, fade time, trigpoint and release link.
Press the softkey MODIFY and you can modify all other cue values.
7.1 The FLASH function
The flash function can only be set in combination with a release link and an additional cue. When a flash
function was assigned to a cue, the cue key no longer works as switch-key, but as flash key.
To activate the flash function, press the softkey FLASH. The field on the display is shown inverted.
Simultaneously press the softkey R-LINK and the cue key, on which the Off-Cue was stored. Cf.: 6.1.7
Entering the release link function and 6.1.8 Working with the release link.
Page 45

JB-lighting Lichtanlagen GmbH Sallersteigweg 15 D-89134 Blaustein Telefon ++49(0)7304 9617-0
- 45 -
7.2 AUTFOL / Automatic fixture activation by the Follow key
If the AUTFOL-(Autofollow) function is assigned to a cue and this cue is recalled, all fixtures stored in this
cue are activated by the Follow function and their PAN and TILT values can be directly changed in PAN
with a connected trackball. Simultaneously, all other parameters are frozen.
7.2.1 Entering the AUTFOL function
To activate the Follow function, consecutively press the Edit key in the Combi section and the cue key, on
which the cue to be edited is stored.
Then press the softkey AUTFOL. The activated key will be displayed inverted. Press the Edit key again to
leave the Edit menu.
Illustration: the softkey AUTFOL displayed inverted
7.2.2 Working with the AUTFOL function
When a cue with assigned Autfol function is activated, all PAN and TILT channels of every fixture stored
in this cue are automatically activated on a connected tracking ball and can be moved.
All other parameters of these fixtures are frozen and can be modified exclusivley by presets or with the
encoder. If another cue is recalled, in which the same fixtures are active, the frozen parameters remain
unchanged.
In order to visually check, which fixtures are active in the particular cue, proceed as follows:
Press one of the keys in the Feature Selection block. Then press and hold the Follow key in the Feature
Selection section. The LEDs that are now lit in the Fixture Selection block indicate, which fixtures are
stored in the active cue. At the same time, the function field ACTIVE is displayed inverted.
+ + +
7.2.3 Deactivating the AUTFOL function
To deactivate the assigned Autfol function in an active cue, press a key of the Feature Selection first.
Then press and hold the Follow key in the Feature Selection section, the inverted function field ACTIVE
will appear on the display. Press the assigned softkey and the inversion as well as the Follow function will
be deactivated.
Page 46

JB-lighting Lichtanlagen GmbH Sallersteigweg 15 D-89134 Blaustein Telefon ++49(0)7304 9617-0
- 46 -
7.3 AUTSEL / Automatic fixture selection
If the Autsel function (automatic selection of fixtures) was assiged to a cue and this
cue is activated, the LEDs of those fixtures are lit in the Fixture Selection block, which
are stored on this cue. The moving lights thus selected are active and their
parameters can be modified.
7.3.1 Activating and deactivating the Autsel function
To activate the AUTSEL function, consecutively press the Edit cue in the Combi section and the cue key,
on which the cue to be edited is stored. The following display is shown:
Press the corresponding softkey to activate the AUTSEL
function. When the function is active, the softkey is displayed
inverted.
Press the softkey AUTSEL again and the function is
deactivated.
7.4 Editing the name
Press the softkey NAME. The field on the display is shown inverted. Then delete the
previously entered name with the arrow key. Enter the new name with the double-assigned
keys of the Cues/Chases/Sequences section.
Press the softkey NAME again, the entry is stored and the labelling mode is left.
7.5 Editing fixture parameters
After pressing the softkey MODIFY, all DMX values entered for the fixtures can be modified. When the
field is shown inverted on the display, you have access to the keys of the Feature Selection block The
values stored on these keys can be changed with the encoder wheels or the Preset keys, when the
inidvidual keys have been activated.
To store the mofidications, press the Store key and the storage matrix appears on the display. Modify the
matrix as planned. Press Store key again to confirm the storage (the field MODIFY on the display is no
longer shown inverted).
Press Edit key again or the ESC key to leave the Edit menu.
7.6 Copying a cue to another cue key
Enter the Edit menu of the Combi section. Activate a cue by pressing the corresponding cue key. Press
and hold the softkey COPY and select the storage place (cue key), on which you wish to store the cue.
Release both keys again and the storage process is completed. You can now recall the correspondin g
cue from both cue keys.
Page 47

JB-lighting Lichtanlagen GmbH Sallersteigweg 15 D-89134 Blaustein Telefon ++49(0)7304 9617-0
- 47 -
7.7 R-LINK / Setting the release link function
Cf.: Chapter 6.1.7 Entering the release link function and 6.1.8 Working with the release link function.
Press and hold the softkey R-LINK (R-LINK is displayed inverted).
Then press the cue key (stop-cue), on which the zero values of the desired parameters have been stored.
You can see your entries on the display. Next to the three letters RLM, the storage place and the name of
the cue, on which you have stored the release link, are displayed. If you have set a release link, you can
recall this link with the RELEASE and FLASH key.
7.8 Changing the fade time
Enter the Edit Cue menu and change the fade time by turning the corresponding encoder wheel
(FADETIME).
7.9 Changing the trigpoint
Enter the Edit Cue menu and change the trigpoint by turning the corresponding encoder wheel
(TRIGPOINT).
Page 48

JB-lighting Lichtanlagen GmbH Sallersteigweg 15 D-89134 Blaustein Telefon ++49(0)7304 9617-0
- 48 -
8. Recalling cues in the fade mode
Whether or not you have assigned a fade time to your cues, you can activate a fade time
with the Fade-Mode fader. The Fade-Mode fader has a higher priority than the fade times
you have stored previously. The scale ranges between 0.0 and 10 seconds. The Time/Man
fade key below has two incorporated LEDs.
If the red LED is lit, the fade time set with the Fade-Mode fader is used.
If the green LED is lit, you can manually fade between two cues. The fading process
between two cues (e.g. Cue A / Cue B) will last, until you have raised the fader to 10
seconds. If you slide the fader back, the second cue (cue B) fades out and the first cue
(Cue A) fades in again. However, if the fader has reached the 10 second limit, you can
recall a new cue. Then Cue B fades out and Cue C in while you are sliding the fader back.
Page 49

JB-lighting Lichtanlagen GmbH Sallersteigweg 15 D-89134 Blaustein Telefon ++49(0)7304 9617-0
- 49 -
9. Freeze function
The freeze function is used to lock fixture parameters.
The Freeze key is located in the Fixture Selection block in the middle
of the left column.
All parameters can be locked by the freeze function. Freeze means,
that a parameter remains unchanged, when another cue, chase or
sequence is activated (the freeze function must have been entered
previously for this parameter).
However, it is always possible to overwrite features, to which the
freeze function was assigned, with the help of presets.
9.1 Entering the freeze function
Activation of the freeze function is not possible in the main menu.
Thus press any key of the Feature Selection section. Then activate the fixtures, to which the freeze
function should be assigned. Press and hold the Freeze key and simultaneously press the feature key of
the desired parameter. This function will now be frozen. The storage matrix appears and the frozen
features are marked with a dark square.
Example: Freeze function activated for Gobo1:
1. 2. 3. 4.
You can assign the freeze function to each feature available by newly defining the fixture selection and
pressing the Freeze key once more in combination with the desired Feature Selection key.
9.2 Deleting the freeze function
You can delete the freeze function for individual or all parameters.
9.2.1 Deleting the freeze function for all parameters
Activate all fixtures (LED must be lit).
Press the Freeze key and simultaneously the Clear key in the Feature Selection block.
On the display, the black squares disappear again from the storage matrix.
Page 50

JB-lighting Lichtanlagen GmbH Sallersteigweg 15 D-89134 Blaustein Telefon ++49(0)7304 9617-0
- 50 -
9.2.2 Deleting the freeze function for individual parameters
Disselect all moving lights (LEDs go out). Press and hold the Freeze key. Delete the freeze function for
individual parameters by pressing the desired key in the Feature Selection block.
The corresponding fields on the display are no longer inverted.
Page 51

JB-lighting Lichtanlagen GmbH Sallersteigweg 15 D-89134 Blaustein Telefon ++49(0)7304 9617-0
- 51 -
10. The follow function
The follow function allows you to define and move fixtures as follow spots independent of activated cues,
chases or sequences. The fixtures defined as follow spots will only react to PAN and TILT values
received from a connected trackball.
10.1 Programming the follow function
In order to be able to program the follow function, press any key of the Feature Selection section first.
Then press and hold the Follow key and select the fixtures you wish to use as follow spots (corresponding
LEDs are lit).
+
10.1.1 Activating the follow function
Activate the follow function by pressing and holding the Follow
key in the Feature Selection block. The softkey ACTIVE appears
on the display. Press this softkey to activate the follow function.
The function field on the display is shown inverted when the
function is active.
10.1.2 Deactivating the follow function
Press and hold the Follow key. Press the softkey ACTIVE in addition. The follow function is deactivated
when the function field on the display is no longer shown inverted.
10.1.3 Deleting the follow function
To delete the follow function in a cue, enter the Edit mode and activate the corresponding cue. Press the
Edit key in the Combi section and then the cue key, on which the cue is stored.
The AUTOFOL function field on the display is now shown inverted. Press the corresponding softkey. The
follow function (AUTOFOL) is deleted, when the softkey is no longer displayed inverted.
Page 52

JB-lighting Lichtanlagen GmbH Sallersteigweg 15 D-89134 Blaustein Telefon ++49(0)7304 9617-0
- 52 -
11. Chases in the Fixture section
A chase is defined as a succession of individual cues. All steps of a chase have the same runtimes. The
Licon 1X provides two different possibilities to create chases: a) with the help of previously programmed
cues and b) with the chase generator, which is a quicker and more effective solution. This chase
generator makes available an abundance of different chase patterns, to which you only have to assign
the desired parameters and runtimes.
The Licon 1X has a total of 94 storage places (keys) for chases. 32 chases can run
at the same time.
These eight keys of the Chases section shown on the left are used to store and
recall chases. They are switched by the keys of the Page/Bank section.
11.1 Programming chases from cues
If you wish to programme chases from aleady existing cues (scenes), programme and store these cues
as described in Chapter 6.1 Programming and storing of cues.
In order to create a chase from existing cues, the following working steps must be carried out:
Select the cue key, which shall be the first step of your chase, by pressing the
corresponding key in the Cues block.
Then press the Store key in the Combi section.
Select the desired parameters in the storage matrix.
Select the chase key, on which you wish to store and recall the chase.
IMPORTANT: The LED of the Store key begins flashing!
Activate the function NAME and enter the name with the keys of the
Cue/Chase/Sequence section.
Page 53

JB-lighting Lichtanlagen GmbH Sallersteigweg 15 D-89134 Blaustein Telefon ++49(0)7304 9617-0
- 53 -
Confirm the process by pressing the Store key in the Combi section again.
Repeat these working steps in order to add a further chase step.
11.1.2 The chase menu
First select a cue, press the Store key in the Combi section, select the parameters in the storage matrix
and press the desired chase key, then the chase menu shown below appears on the display.
The fields displayed below have the following function:
LINK F : inverted: specifies fade time in %
not inverted: specifies absolute fade time
SINGLE: inverted: chase runs once
not inverted: chase runs endlessly
CLEAR : deletes all chase d ata
DEL ST : deletes one step of the chase
DUP ST: duplicates a step
NAME : names the chase
BLOCK : creates a block from different steps
R-LINK: enables combination with a release link
MERGE: combines chases
SGROUP: creates a speed group
CREATE: activates the cha se g enerator
FADETIME: enters the fade time for the complete chase
STEP: enables scrolling up and down between the steps
TRIGPOINT: time of switching of all parameters that are not faded
11.1.3 Entering the chase name
To name the chase, press the softkey NAME and enter the name with the keys of the
Cues/Chases/Sequences section (double assignmen of keys).
Then press the softkey NAME again to store the name.
11.1.4 Entering the runtimes
Three different types of runtimes are available, which are designated with the following abbreviations:
SP : speed duration of each step
FT : fade time duration of fade-in/fade-out
TP : trigpoint switch time for all features that
are not faded
Fade time and trigpoint are entered as
percentage values depending on the actual
duration of the step. Advantage: fade time and
trigpoint readjust themselves if the runtime is
changed manually.
You may also enter the fade time in fractions of a second (if the fade time of the chase is changed
manually here, the fade time will not be adjusted/changed automatically).
Page 54

JB-lighting Lichtanlagen GmbH Sallersteigweg 15 D-89134 Blaustein Telefon ++49(0)7304 9617-0
- 54 -
The runtimes of the chases can be changed manually in the Chase Control se ction ( see chapter 13)
Duration of the individual steps (speed)
The duration of a step is entered with the encoder wheel (speed) in the Chase Control
section.
It is also possible, to change the duration later (also in the Chase Control section).
Duration of the fade time / specified in percent
The fade time accesses all parameters that are marked with a fade ramp in the storage matrix (cf.:
Chapter 6.1.1 The storage matrix).
If the fade time is entered as percentage value, this in relation to the duration of the step
(speed). If a chase step lasts 5 seconds and the fade time is entered with 50%, then all
parameters capable of fading are faded in within 2.5 seconds.
If you wish to enter the fade time in percent, make sure that the softkey LINK-F is displayed
inverted. Enter the values with the left encoder wheel.
Duration of the fade time / specified in seconds
You can enter the fade time independent of the duration of the chase steps themselves. Press the softkey
LINK-F. When the field is no longer displayed inverted, you can enter the fade time with the left encoder
wheel. The values are entered in steps of 0.0250 seconds.
Keep in mind that the fade time will not be readjusted automatically, when the duration of the chase is
changed manually. Possible changes must be entered manually for each chase step. It is also important
that the fade time is not longer than the
chase step itself, since otherwise the step
cannot be imaged completely.
Trigpoint
Trigpoint designates the moment, at which
all parameters are switched that are not
faded. These channels are not marked with
a fade ramp in the storage matrix (cf.: 6.1.1
The storage matrix).
The trigpoint is specified in percent of the
total duration of the step. If the duration of a
chase step is 5 seconds and the trigpoint is
set at 75%, parameters such as gobo and prism are switched to the new DMX value after 3.75 seconds.
11.1.5 Inserting a chase step
If not otherwise specified, each new step is added to the existing chase during the storage process.
If you wish to insert the chase step to another position within the chase, use the middle encoder wheel
(STEP) to scroll up and down the existing steps. As soon as the encoder wheel is moved, the softkey
INSERT is shown on the display.
Page 55

JB-lighting Lichtanlagen GmbH Sallersteigweg 15 D-89134 Blaustein Telefon ++49(0)7304 9617-0
- 55 -
Press the softkey INSERT. The cue will be inserted before the chase step, which is shown inverted on the
display. All following steps receive a number increased by a factor of one. Simultaneously, the storage
process is triggered. It is not necessary here to press the Store key in the Combi section again.
11.1.6 Overwriting the chase step
To overwrite an existing step within a chase, scroll with the left encoder wheel until the chase step to be
overwritten is displayed inverted. Confirm by pressing the Store key in the combi section.
11.1.7 Deleting all chase steps (CLEAR)
Enter the Prog Comb Chase menu and press the softkey CLEAR in order to delete all steps of the chase.
Press the ESC key to leave the menu.
If you leave the Prog Comb Chase menu by pressing the Store key again, you have automatically stored
the current setting as your new Step 1!
For visual control: When a step is stored in a chase, the yellow LED is lit or is flashing. If the yellow LED
is not lit, the chase does not contain any steps.
11.1.8 Deleting individual steps (DEL ST)
Press the Store key in the Combi section to activate the desired chase. Select the chase which shall b e
deleted, with the middle encoder wheel. When the chase step is displayed inverted, press the softkey
DEL ST.
The chase step is now deleted and all following steps will be renumbered.
Press the ESC key to leave this menu.
11.1.9 Duplicating a chase step (DUP ST)
Press the Store key in the Combi section to activate the desired chase. Select the chase step to be
duplicated with the middle encoder wheel. Then press the softkey DUP ST. The step is duplicated and
positioned directly after the source step. (If you duplicate step 5, for example, your chase contains one
step more afterwards. Step 5 and step 6 contain the same parameters.)
Press the ESC key to leave this menu.
11.1.10 Overwriting (stopping) a chase (R-LINK)
A chase will run permanently, if not otherwise programmed with the help of the softkey SINGLE. In order
to stop a chase, a stop-cue is required.
This stop-cue is stored as cue and must contain new DMX values for all parameters that are activated in
the chase. When you have stored this stop-cue, you can create a link between the chase and the stopcue with the softkey R-LINK.
Enter the Prog Combi Chase menu and press the softkey R-LINK. When the corresponding field on the
display is inverted, press the cue key to which you have previously stored the stop-cue. You can see now
on the display that the number of the stop-cue is displayed behind the abbreviation RLM.
Press the softkey R-LINK again to leave the menu (cf. Chapter 6.1.7 Entering the release link function (R-
LINK) and 6.1.8 Working with the release link function).
With the release link, you can also create a between two chases, i.e. one chase is replaced by the next
chase.
11.1.11 Terminating the loop function (SINGLE)
If not otherwise defined, a chase program will run endlessly. However, if you activate the
softkey SINGLE, you can determine that the chase will only run once. The Single function is
active when the corresponding field is shown inverted on the display.
Page 56

JB-lighting Lichtanlagen GmbH Sallersteigweg 15 D-89134 Blaustein Telefon ++49(0)7304 9617-0
- 56 -
11.1.12 Working with the block function (BLOCK)
It is possible to group several chase steps into a block. This block can then be eith er deleted or copied.
Defining a block
You can form a block from steps that are arranged consecutively in your chase. Move the cursor (with the
middle encoder wheel) to the first step to be integrated in the block. Press and hold the softkey BLOCK
(the field is displayed inverted). Move the middle encoder wheel to the last step to be integrated in the
block and release the softkey BLOCk again. All steps assigned to the block with be marked with a B on
the display.
A graph on the display will show in addition that the block function is active:
This example shows that the block consists of four steps, step 2 to step 5.
Copying a block (B-COPY)
After you have defined a block, use the middle encoder wheel to choose the position in the chase, where
you want to insert this block. The block will always be inserted before the activated (inverted) step. Now
press the softkey B-COPY. The process is executed immediately, so it is not necessary that you press
the Store key in the Combi section.
Press the ESC key to leave the menu.
Deleting a block (B-DEL)
Define the desired block as as described above. Press the softkey B-DEL. The selected block will be
deleted immediately.
Press the ESC key to leave the menu.
Moving a block (B-MOVE)
Define a block as described above.
Moving a block does not mean that this block
is duplicated (see: Copying a block). Your
block is only moved to another position
within the chase. The block is always
inserted before the step that you have
selected with the cursor.
The illustration on the left shows the
individual steps of the moving procedure.
1: Programme your chase.
2: Define the desired block.
3: Position the cursor on chase step, before
which the block shall be inserted (you can
move the block to every position that is
marked with an arrow (here: Step # 8).
4: Press softkey B-MOVE to confirm the process.
5: The chase will renumber its steps.
Press the ESC key to leave the menu.
Page 57

JB-lighting Lichtanlagen GmbH Sallersteigweg 15 D-89134 Blaustein Telefon ++49(0)7304 9617-0
- 57 -
11.1.13 Merging chases (MERGE function)
“Merging” will combine two chases (that activate different fixture parameters) so that one chase will result.
This illustration shows, how one Gobo chase
and one prism chase are merged. One chase
will result that on the one hand switches
gobos and on the other hand controls a prism.
Precondition for merging of two chases: both
chases must contain an equal number of
chase steps.
11.1.13.1 Entering the MERGE function
Programme the first chase and store it on a chase key. Programme the second chase with an identical
number of chase steps. Press and hold the softkey MERGE and activate the first chase with the
corresponding chase key. Release both keys. Press the Store key to store the entry.
The storage matrix of a chase, in which only one parameter is stored, may look as the
illustration shown on the left.
The storage matrix of a chase, which has been merged and thus contains more than one
parameter, may look as the illustration shown on the left.
If two chases are merged and you activate the first of the two chases, automatically both chases will run.
The second chase adopts the duration of the first chase.
If the second chase is recalled, it will run alone
11.1.13.2 Deleting the MERGE function
The Licon 1X has no special function that will delete the merge function. Activate the chase with the Edit
key in the Combi section and delete all undesired features with the help of the MODIFY function and the
storage matrix.
11.1.14 Speed groups (SGROUP)
The Licon 1X comes with 16 different speed groups to which you may assign fixture chases as well as
PAR chases.
All chases assigned to a speed group have the same runtime (speed). You can also assign chases to a
speed group, which differ in their number of chase steps. If the runtime of one chase of a speed group is
changed, the runtime of all chases belonging to this speed group is automatically changed.
The advantage of speed groups is that each chase can be recalled separately and chase s are not
combined, as is the case with merging.
Page 58

JB-lighting Lichtanlagen GmbH Sallersteigweg 15 D-89134 Blaustein Telefon ++49(0)7304 9617-0
- 58 -
11.1.14.1 Combining chases to speed groups (SGROUP)
Speed groups are assigned to keys 1 to 16 of the Cues section and are activated again with these keys.
Chases are assigned to a speed group either in the Program Combi
Chase menu or in the Edit Combi Chase menu.
Program your chases as usual and store them on the chase keys.
During the storage process, the softkey SGROUP appears on the display.
Press and hold the softkey SGROUP and then press the speed-group keys in the Cues
section, to which you want to assign the chase.
The assignment made is shown on the display as follows:
In the middle part of the display, the name of the speed group is shown,
to which the assignment of the chase was made (here: speed group 1
(G1)). In addition, another function appears on the display, i.e. the
Synchronised Start function (SYNCST).
You can now change the speed of the chase in the Chase Control
section as described previously. Chapter13
11.1.14.2 Deactivating a speed group
If you wish to remove a chase from a speed group, proceed as described below:
Press the Edit key in the Combi section and activate the desired chase with the chase key. Then press
the softkey SGROUP. The assignment is immediately deleted.
The speed of the chase is now displayed in seconds (no speed group) and the softkey SYNCST has
disappeard from the display.
Page 59

JB-lighting Lichtanlagen GmbH Sallersteigweg 15 D-89134 Blaustein Telefon ++49(0)7304 9617-0
- 59 -
11.1.15 The Synchronised Start function (SYNCST)
All chases of a speed group, to which the
Synchronised Start function (SYNCST) is
assigned, will start collectively, when one chase of the
group is activated.
The illustration on the left shall explain the principle of
the Synchronised Start function.
The Synchronised Start function has the same visual
effect as the MERGE function, although they are
managed differently by the lighting control console. While the MERGE function is a fixed connection of
two or more chases, which cannot be dissolved so easily, the Synchronised Start function can be deleted
with only one keystroke.
11.1.15.1 Entering the Synchronised Start function
The softkey SYNCST is displayed, when a chase is assigned to a speed group during the
storage process.
You can activate the Synchronised Start function by pressing the softkey SYNCST. The
function field is shown inverted on the display.
11.1.15.2 Deleting the Synchronised Start function
If the Synchronised Start function is activated, the corresponding field on the display is shown inverted
(see: 11.1.15.1 Entering the Synchronised Start function). Press the softkey SYNCST again to deactivate
the Synchronised Start function. The corresponding function field is no longer displayed inverted.
11.1.16 The Sound function / Entering the beatcount
Chases can run sound-controlled, i.e. the bass beat connected to the sound input of the lighting control
console gives the signal for switching the chase steps.
The input jack for the sound is located on the rear panel of the lighting control console. It is a stereo jack
socket.
The bass frequency is preset by the manufacturer and cannot be changed. However, you can determine
the number of bass counts to be left out until the Licon 1X switches to the next step.
How to programme the Sound function and its mode of operation will be described in detail in Chapter
13.8.
11.2 Programming chases with the chase generator
The chase generator is an effective and fast means to programme chases. The chase generator provides
a number of pre-programmed chase patterns, to which you only have to assign the fixtures and the
desired parameter.
Only one fixuture parameter can be assigned to a chase that is programmed with the help of the chase
generator. This means that you can create either a shutter chase or an iris chase or a Pan chase
(depending on how many features your fixture provides).
You can, however, combine chases with the Merge or the Speed Group function as described above.
If you use these functions in combination with the chase generator, you can programme chases for
individual parameters and then recall these chases simultaneously.
Page 60

JB-lighting Lichtanlagen GmbH Sallersteigweg 15 D-89134 Blaustein Telefon ++49(0)7304 9617-0
- 60 -
The chase generator provides chase patterns for a variety of stage applications. If, for example, your
fixtures hang in alignment (e.g. on the backtruss of a stage), you can apply the chase patterns of Page 1
of the chase generator display.
If you fixtures are arranged symmetrically (e.g. to the left and right side of a stage), Page 2 of the the
chase generator will apply here.
If a double symmetrical stage setting is present (symmetrical arrangement on all four sides of a stage),
the chase pattern on Page 3 of the chase generator should be used here.
11.2.1 Basic programming with the chase generator
The chase generator enables fast programming of chases.
We will explain the mode of operation of the chase generator on the basis of the creation of a shutter
chase. It can be applied, of course, to all other features of your fixture.
Activating the chase generator
Press the Store key in the Combi section.
Then press the chase key, from which the chase shall be recalled later.
The Programme-Combi-Chase menu as displayed on the left
appears.
Now press the softkey CREATE to activate the chase
generator.
The chase generator has the following menu:
In the example on the left, the feature shutter is activated in
the Feature Selection.
(The display varies depending on the selected feature.)
Depending on the feature activated, different presets can be
recalled with the corresponding softkeys.
On the display, you will find a Short Manual on how to create
chases with the chase generator.
Page 61

JB-lighting Lichtanlagen GmbH Sallersteigweg 15 D-89134 Blaustein Telefon ++49(0)7304 9617-0
- 61 -
Adhere to the following order of working steps:
1. Select the feature for which you wish to programme the chase by pressing the corresponding key
in the Feature Selection block.
2. Enter the DMX values for ON and OFF. Use eith er the preset keys or the encoder wheels. Press
the softkey ON until the field ON is displayed inverted. Enter a preset by pressing the
corresponding softkey or enter a DMX value with the encoder wheel. Then press the sofkey OFF
and enter the corresponding value.
3. Select the desired fixtures or dimmer channels that are to be stored in the chase. Apply Page 2 of
the chase generator. Switching of pages is carried out with the softkeys „<<<“ or „>>>“. (Ensure
that the softkey DIRECT on Page 2 of the chase generator is displayed inverted.)
4. Select a chase pattern on Page 3 and 4 of the chase generator.
A variety of chase patterns is available here. They can be
activated with the corresponding softkeys.
On the display, a graph illustrating 32 fixtures is shown. The
inverted fields in the graph indicate activated fixtures.
5. Press the flashing Store key in the Combi section once to start the calculation process (creation
of chase starts).
When the calculation process is finished, the yellow LED in the Chase section starts flashing. The display
returns to the “PROG COMB MENU“.
Press the Store key in the Combi section again to store the chase, the LED of the Store key stops
flashing, whereas the LED of the chase key starts flashing.
11.2.2 The matrix of the chase generator
Chase patterns are displayed in the form of a matrix, which you will find on pages 3 and 4 of the chase
generator. This matrix shows the ON and OFF values of a the features of a chase.
An empty square symbolises the OFF value.
A black square symbolises the ON value.
A chase switches between the ON and OFF value according to the matrix of the chase generator.
The matrix displayed her can be decoded as follows:
Page 62

JB-lighting Lichtanlagen GmbH Sallersteigweg 15 D-89134 Blaustein Telefon ++49(0)7304 9617-0
- 62 -
Example:
The chase addresses 6 fixtures.
ON value: shutter is open.
OFF value: shutter is closed.
In the first chase step, the shutter of fixture 1 is open, whereas the shutter of
the other five fixtures is closed.
In the second chase step, the shutters of fixtures 1, 3, 4, 5 and 6 are closed,
whereas the shutter of fixture 2 is open.
In the third chase step, the shutters of fixtures 1, 2, 4, 5 and 6 are closed,
whereas the shutter of fixture 3 is open, etc.
11.2.3 Advanced programming with the chase generator (CREATE)
The following chapters will deal in more detail with the functions of the chase generator. To simplify
matters for you, we will describe the functions of the chase generator on the basis of its pages 1 to 6.
When the chase generator is activated as described in Chapter 11.1, you can switch the pages with the
softkeys located in the left and right lower part of the display. They are marked with the arrows „>>>“ or
„<<<“. Next to the arrows, the page is indicated that is presently displayed, e.g. 2 (6) means that page 2
of a total of 6 pages is active.
11.2.3.1 Page 1 of the chase generator (preset selection)
The centre of this page displays a Short Manual in English, which specifies the working steps of Chapter
11.1 Basic programming with the chase generator.
In addition, this page displays the presets that were previously
stored for the activated feature (in our example for the shutter).
You can select another feature by pressing the corresponding
key in the Feature Selection block.
The presets are shown in the upper and left fields of the display
and can be activated by pressing the assigned softkeys. If more
presets are stored than can be shown on the display, use the
softkey „<<<“ to switch to the other preset pages.
The chase steps switch from the ON values to the OFF values (according to the chase pattern), which are
described in more detail in Chapter 11.1.1.
Now enter the ON value:
Press the softkey ON until is is displayed inverted.
Then press one of the softkeys, to which a preset is assigned, or enter the DMX data with the encoder
wheels.
Subsequently enter the OFF value:
Press the softkey OFF until it is displayed inverted. (The inversion of the softkey ON is simultaneously
deleted.) Then press one of the softkeys, to which a preset is assigned, or enter the DMX data with the
encoder wheels.
Page 63

JB-lighting Lichtanlagen GmbH Sallersteigweg 15 D-89134 Blaustein Telefon ++49(0)7304 9617-0
- 63 -
11.2.3.2 Page 2 of the chase generator (fixture sequence)
Illustration of the fixture sequence
The chase runs as a combination of a fixture sequence and a chase pattern.
in the Direct-Mode, a step always consists of one fixture/Par moving light
in the SEQ1 – SEQ8 mode, a step consists of one fixtue/Par moving light or a group of
fixture/Par moving lights
If a chase pattern is programmed in the DIRECT
mode, the fixtures are always recalled according
to the sequence of the keys in the Fixture/PAR
selection (see Fig. 1). Every chase step
addresses only one fixture.
However, this mode cannot be applied to all
stage settings, since the fixtures are often not
arranged according to their sequence in the
Fixture/PAR selection (see Fig. 2) or sometimes
more than one fixture (-> a fixture group) should
be addressed.
For this reason, you can determine the fixture
sequence on Page 2 of the chase generator.
Page 64

JB-lighting Lichtanlagen GmbH Sallersteigweg 15 D-89134 Blaustein Telefon ++49(0)7304 9617-0
- 64 -
With the softkeys SEQ1-SEQ8 (names may be changed) you
can programme your own fixture sequences.
Select the softkey from SEQ1 to SEQ8 to which you wish to
store the desired fixture sequence. As soon as the softkey is
displayed inverted, the softkey EDIT appears in addition on
the display.
Press the softkey EDIT to enter the menu where fixture
sequences are programmed.
The individual functions have the following significance:
CLEAR: deletes the sequence (caution: without
confirmation prompt)
DEL ST: deletes a step that was previously selected
with the middle encoder wheel (STEP)
NAME: naming the sequence by keys of the Cues /
Chases or Sequences section
INSERT: inserts a step
STORE: stores a step
11.2.3.3 Programming a fixture sequence
1. Select Page 2 of the chase generator and press the softkey EDIT.
2. Activate one of the possible 8 fixture sequences (softkeys SEQ1 – SEQ8).
3. Press the key of the Fixture-/PAR Selection block (keys 1-32), on which the fixture is
stored that shall be activated as first fixture in the sequence (LED must be lit). If you
press several keys of the Fixture-/PAR Selection block simultaneously, you can
include several fixtures in one step.
4. Press the softkey STORE on the display to store the step.
Each newly programmed step is added to the other steps. You can see on the
display, how many steps you have already programmed. The number of steps of
the sequence already programmed is displayed after the designation LENGTH.
STEP on the display indicates the step, which you are currently programming.
Page 65

JB-lighting Lichtanlagen GmbH Sallersteigweg 15 D-89134 Blaustein Telefon ++49(0)7304 9617-0
- 65 -
11.2.3.4 Inserting a step
1. Select the desired fixture(s) (LED must be lit).
2. Use the middle encoder wheel (STEP) to select the step, before which you wish to
insert the new step.
3. Confirm by pressing the softkey INSERT.
11.2.3.5 Deleting a step
1. Use the middle encoder wheel to select the step to be deleted.
2. Confirm by pressing the softkey DEL ST.
11.2.3.6 Naming the sequence
1. Press the softkey NAME.
2. Delete the designation SEQ with the arrow key.
3. Enter the new name with the keys of the Cue/Cha se/Sequence section.
Press the softkey „ 2 ( 6) >>>“ to leave this
function.
11.2.4 Pages 3 and 4 of the chase generator (chase patterns)
A total of 24 chase patterns are available on pages 3 and 4 of
the chase generator. These are selected with the
corresponding softkeys and combined with the fixture
sequence programmed previously.
Chase patterns are displayed in the form of a matrix that
shows the ON and OFF values of a the features of a chase.
Page 66

JB-lighting Lichtanlagen GmbH Sallersteigweg 15 D-89134 Blaustein Telefon ++49(0)7304 9617-0
- 66 -
An empty square „“ stands for an OFF value and a black square „“
for an ON value. The ON and OFF values are entered on page 1 of
the chase generator.
A chase switches between the ON and OFF value according to the sequence entered in the matrix of the
chase generator.
The matrix displayed her can be decoded as follows:
Example:
The chase addresses 6 fixtures.
ON value: shutter is open.
OFF value: shutter is closed.
In the first chase step, the shutter of fixture 1 is open, whereas the shutter of
the other five fixtures is closed.
In the second chase step, the shutters of fixtures 1, 3, 4, 5 and 6 are closed,
whereas the shutter of fixture 2 is open.
In the third chase step, the shutters of fixtures 1, 2, 4, 5 and 6 are closed,
whereas the shutter of fixture 3 is open, etc.
If a pattern is marked with two arrows, it will run to the end (last step) and back to the first
step again. Patterns not marked with arrows will always run as loop from the first to the
last step.
When you have selected the number and sequence of the desired
fixtures or dimmers, press the corresponding softkey to select the
desired chase pattern. The display will immediately show the number
and the sequence of the chase steps.
After the designation VALUES the number of steps is specified in
brackets. In addition, the DMX values of each step are listed (below
the designation VALUES).
To enter the individual chase parameters press the softkeys „<<<“ or
„>>>“ to switch to page 5.
Press the Store key in the Combi section to confirm and store the data. The display returns to the PROG
COMB CHASE menu.
Page 67

JB-lighting Lichtanlagen GmbH Sallersteigweg 15 D-89134 Blaustein Telefon ++49(0)7304 9617-0
- 67 -
11.2.5 Page 5 of the chase generator (chase switching between more than two parameters)
A standard chase always switches between two parameters
(presets or DMX values). On Page 5 of the chase generator,
you can extend the list of parameters to be assigned to a
chase.
We use a shutter chase as example to explain Page 5 of the
chase generator.
The illustration shows a chase with six steps, which switches
between open and closed.
Step 1: Fixture 1: open
Fixtures 2 – 6: closed
Step 2: Fixtures 1 and 3-6: closed
Fixture 2: open
The shutter switches in each step of the chase between open and closed.
You have now the possibility, for example, to programme an additional color to a colour chase. For this
purpose, use the three softkeys described below:
LIST - : recalls the previous step in the list
LIST+ : recalls the next step in the list
COPY : copies data from one step to another
Use the softkeys LIST- and LIST+ to select the step to which the colour parameter should be added.
Select the desired preset with the corresponding softkey or enter the DMX value with the encoder wheels.
In this example, the colour green was added to chase step 2.
The chase is now structured as follows:
Step 1:
Fixture 1 : colour red
Fixture 2 : colour green
Fixtures 3-6: colour blue
Step 2:
Fixture 1 : colour blue
Fixture 2 : colour red
Fixture 3 : colour green
Fixtures 4-6 : colour blue
Copying the parameters of one step:
Activate the desired chase step with the softkeys LIST- or LIST+. Press and hold the softkey COPY,
select the chase step, on which you want to store the copied step, with the softkeys LIST- or LIST+. The
values are adopted immediately and shown on the display.
You can assign a different DMX value or preset parameters to each step.
Press the STORE key in the Combi section to store the process. After a short time, the display returns to
the PROG COMB CHASE menu. Here you can programme further parameters.
Page 68

JB-lighting Lichtanlagen GmbH Sallersteigweg 15 D-89134 Blaustein Telefon ++49(0)7304 9617-0
- 68 -
11.2.6 Page 6 of the chase generator (modifying chase patterns)
On Page 6 of the chase generator you can modify programmed chase patterns. Press softkey OPTIONS
and the parameters of the chases will be displayed.
The individual fields have the following function:
CH:COMB 1/D04: storage place of the chase
(here: PAGE 1, Bank D, chase key 4)
TYPE: >------------- flow mode of the chase
(symmetrical, asymmetrical, double
symmetrical)
LENGTH: number of chase steps
(in this example: 6)
FADE: ON/OFF
This parameter means that the fadetime ramp was
set in the storage matrix. You can assign a fadetime
to this chase.
DIR---->: The direction of the chase pattern is, for example, from left to right.
FLIPLINE: This parameter indicates that the chase pattern runs to the last step and back again.
TYPE: By pressing the softkey TYPE you can switch the chase patterns between
symmetrical, asymmetrical, double symmetrical, double asymmetrical, four times
symmetrical and four times asymmetrical, which is shown on the display as follows:
>----------- ; >-----------< ; >------>------ ; >---< >---< ; >---->---<-----< ; >->--->->
LENGTH
Length stands for the number of individual chase steps your chase contains. This parameter can be
changed with the middle encoder wheel (LENGTH).
FADE
If the softkey FADE is displayed inverted, a fadetime can be assiged to this chase fader. In order to
switch the chase via the trigpoint time, press the softkey FADE. The softkey is no longer displayed
inverted and the message OFF appears in the Fader section.
DIR
The field DIR will show the direction of the chase. If the softkey DIR is displayed inverted, the chase runs
in one direction. Press the softkey DIR (softkey is no longer displayed inverted) and the chase runs in the
opposite direction.
Confirm the storage process and leave the menu by pressing the Store key in the Combi section again.
Page 69

JB-lighting Lichtanlagen GmbH Sallersteigweg 15 D-89134 Blaustein Telefon ++49(0)7304 9617-0
- 69 -
12. The MERGE and SPEEDGROUP function
As described above, the chase generator can create chases for one parameter per chase only. If you
wish to run different chases simultaneously, you must merge (copy one chase on another) these chases.
Precondition for merging chases is that they possess an identical number of chase steps (length).
The speedgroup function combines several chases in terms of time. Whether the chases are in the Combi
section or in the Par section, if one chase of a chase is stopped by a GO command, every other chase of
the speedgroup, which is active at this moment, is also stopped.
The length of the individual chases is of no significance here.
12.1. Entering the MERGE function (copying one chase on another)
The Merge function is recalled and executed in the Program Combi Chase menu .
Programme the first chase and store it on a chase key. Programme a second chase with an idientical
number of steps as the first one. Then press and hold the softkey MERGE and activate the first chase by
pressing the corresponding chase key. Release both keys again.
Store the process by pressing the Store key.
If you now recall the first of the two steps, the second will start automatically with the first chase and
assumes the same length as the first chase.
If the second chase is recalled, it runs alone without the first chase.
You can check whether your merging was successful with the help of a small diagram from the storage
matrix shown on the display.
The storage matrix of a chase that addresses only one parameter may, for example, be
displayed like the one shown on the left.
The storage matrix of a chase that has been merged and thus addresses more than one
parameter may, for example, be displayed like the one shown on the left.
12.1.2 Deleting the MERGE function
The Licon 1X offers no special function for the deletion of the Merge function. Activate the chase with the
Edit key in the Combi section and delete all undesired parameters manually with the help of the softkey
MODIFY and the storage matrix.
12.2.1 Assigning chases to speedgroups (SGROUP)
The Licon 1X comes with 16 different speedgroups to which both fixture chases and Par chases can be
assigned. All chases that are assigned to a speedgroup run at the
same speed. The chases of a speedgroup may have a different
number of chase steps. If the speed of a chase, which belongs to
a speedgroup, is altered, the speed of all other chases of this
speedgroup will automatically be adjusted.The speedgroup
function has the advantage that each chase of the group can be
recalled and run separately, unlike the merge function, where the
chases can only be recalled and run in combination.
The keys 1 to 16 of the Cue section are used to assign
speedgroups.
Enter the Program Combi Chase menu in order to assign chases
to speedgroups.
Programme your chase as usual and store it on a chase key. Then press the Edit key in the Combi
section and recall the chase by pressing the chase key.
Page 70

JB-lighting Lichtanlagen GmbH Sallersteigweg 15 D-89134 Blaustein Telefon ++49(0)7304 9617-0
- 70 -
In the Edit Combi Chase menu, the function SGROUP is displayed. Press and hold the softkey SGROUP.
Simultaneously press one of the speedgroup keys in the Cue section, to which you want to assign the
chase.
The assignment is shown in the menu on the display.
In the middle of the display, the name of the speedgroup is shown,
to which the chase has been assigned (here: speedgroup 1 (G1)).
Simultaneously, another function, the synchronised start function
(SYNCST) appears on the display.
The speed of the chase can be changed with the keys and the
encoder wheels of the Chase Control section. Chapter 13
12.2.2 Deactivating a speedgroup
If you wish to remove a chase from a speedgroup, proceed as follows:
Press the Edit key in the Combi section and recall the desired chase by pressing the corresponding
chase key. Then press the softkey SGROUP. The assignment is deleted immediately. You will see, that
instead of the name of the speedgroup, the speed is specified in seconds. In addition, the function
SYNCST disappears from the display.
12.2.3 The synchronised start function (SYNCST)
All chases of a speed group, to which the Synchronised Start function was assigned, will start
synchronously, when one chase of the group is activated.
The illustration below shall explain the principle of the Synchronised Start function.
The Synchronised Start function has the
same visual effect as the MERGE function,
although they are managed differently by the
lighting control console. Whereas the MERGE
function is a fixed connection between two or
more chases, which cannot be dissolved so
easily, you can delete the Synchronised Start
function with only one keystroke.
Page 71

JB-lighting Lichtanlagen GmbH Sallersteigweg 15 D-89134 Blaustein Telefon ++49(0)7304 9617-0
- 71 -
Entering the Synchronised Start function
The softkey SYNCST is displayed, when a chase is
assigned to a speed group in the Edit Combi Chase
menu.
You can activate the Syonchronised Start function by
pressing the softkey SYNCST. The function field is
shown inverted on the display.
Deleting the Synchronised Start function
If the Synchronised Start function is activated, the corresponding field on the display is shown inverted.
Press the softkey SYNCST again to deactivate the Synchronised Start function. When the corresponding
function field is no longer displayed inverted, you have deactivated the function.
Page 72

JB-lighting Lichtanlagen GmbH Sallersteigweg 15 D-89134 Blaustein Telefon ++49(0)7304 9617-0
- 72 -
13. The Chase Control section
The Chase Control section allows direct access to active chases and speed groups.
The speed of a chase is indicated by the yellow LED incorporated in the chase key. You can ch ange the
speed of a chase manually in the Chase Control section, indpendent of the speed data previously
programmed. The speed changed by means of the Chase Control Section will overwrite the data
programmed previously. The following control elements are available to enter data:
Encoder-wheel (SPEED): for manual speed regulation.
Restart key: resets chase to the first chase step (when key is
pressed simultaneously with the corresponding chase
key).
Select key: activates chas es .
Learn key: regulates speed by tapping the desired speed with the
key.
Sync key: not occupied.
Direction key: changes chase direction.
Sound key: for music control.
Go - key: manual stepping of the chase, against the direction
of the chase.
Go + key: manual stepping of the chase, in direction of the
chase.
Go key: stops the chase and allows manual stepping with the
Go + und Go - keys.
13.1 Activating a chase for speed regulation
Press and hold the Select key in the Chase Control section. Press the chase key in addition, on which the
desired chase is stored. Now you have direct access to the activated chase and can modify its
parameters with the above listed control elements.
13.2 Changing speed with the encoder wheel (SPEED)
After successful activation of the chase as described in13.1, it is possible to progressively regulate the
speed with the encoder wheel (SPEED). The speed range can be adjusted from 0.0500 seconds to
819.18 seconds.
You can change the speed at intervals of 0.0125 seconds by turning the inner ring of the encoder wheel
(SPEED).
By turning the outer ring of the encoder wheel, the intervals become greater, depending on how far the
ring is turned to the left or right.
13.3 Changing speed with the Learn key
Activate the desired chase as described in 13.1.
Then press the Learn key two times at the speed, at which the steps are intended to run (e.g. to the
rhythm of a music track). The time interval will be adopted that elapses while the LED is blinking. The
chase immediateley runs at the new speed. The blinking intervals of the yellow LED show the speed, at
which the chase runs.
Page 73

JB-lighting Lichtanlagen GmbH Sallersteigweg 15 D-89134 Blaustein Telefon ++49(0)7304 9617-0
- 73 -
13.4 Manual stepping of chase steps with the Go keys
Select the desired chase as described in 13.1. Then press the Go key. As soon as the LED of the Go key
is lit, you can manually step through the chase steps. The Go + key switches to the next chase step and
the Go- key to the previous chase step.
13.5 Changing direction
You can change the direction of a chase, while the chase is running. Select the desired cha s e as
described in 13.1.
Enter the change of direction with the Direction key. The following three functions are availabe, which are
indicated by the particular LED that is lit:
Function 1
:
No LED is lit.
The chase runs according to the stored sequence of chase steps.
Function 2:
The red LED is lit.
The chase changes direction and runs opposite to the stored sequence of chase steps.
Function 3:
The red and the green LED are lit.
The chase runs opposite to the programmed sequence until chase step 1 is reached. Then it changes
direction and runs according to the programmed sequence of chase steps until the last step is reached.
Here, the chase changes direction again.
13.6 The Restart function
Activate the desired chase as described in 13.1 Press the Restart key to run the chase once more from
the beginning.
13.7 The Sync function
Cf. Chapter 12.2.3 The Synchronised Start function
13.8 The Sound function
The Sound function switches chases and sequences with a bass beat. You must connect a sound signal
to the sound input (stereo jack). If the sound signal is connected, the green LED of the sound key will
signalise, when chases or sequences are switched or triggered.
The bass frequency is preprogrammed by the manufacturer and cannot be modified.
However, you can enter the number of beats, after which your chase or sequence shall be switched o r
triggered to the next step. You can choose the number of bass beats between 1 and 16 beats.
Press the Sound key in order to activate the Sound function. The LED of the key must be lit.
On the display, the number to the right of the note sign indicates the number of the
bass beats that must elapse before the chase or sequence is switched forward by one
chase step. In this example, the next chase step is recalled after one bass beat.
Recall the sound function by pressing the Edit key or the Store key in the Combi
section simultaneously with the chase key.
Page 74

JB-lighting Lichtanlagen GmbH Sallersteigweg 15 D-89134 Blaustein Telefon ++49(0)7304 9617-0
- 74 -
In the Prog Chase or Edit Chase menu, you can enter
the number of bass beats by simultaneously pressing
the Sound key in the Chase Control section and one of
the beat-count keys in the Cues section.
The Cue keys 1 to 16 correspond to the number of
bass beats that are counted, until the chase is
switched forward by one chase step. If you wish to
switch the chase after each fourth bass beat, you must
press the cue key 4 / C.
Since many music tracks have passages with a very close succession of bass beats, a gate time (do wn
time) can be entered in addition. The gate time corresponds to a rest period, where bass beat s are not
count. To enter the gate time press the softkey TOOLS in the main menu and afterwards the softkey
SOUND. Use the middle encoder wheel (GATE TIME) to enter the desired gate time. 0.3 seconds is a
figure based on experience that meets the requirements of most music tracks.
Page 75

JB-lighting Lichtanlagen GmbH Sallersteigweg 15 D-89134 Blaustein Telefon ++49(0)7304 9617-0
- 75 -
14. Editing a chase in the Combi section
The parameters of a chase can only be edited in the Edit Chase menu (press Edit key in the Combi
section) with the exception of the manual modification of the chase speed, which is performed in the
Chase Control section.
The Edit Chase menu display has the following structure:
If you have entered the Edit Combi Chase menu, select the
desired chase step with the middle encoder wheel (STEP).
14.1 The LINK F function
Use the softkey LINK F to select whether the fade time is processed in absolute numbers, i.e. in seconds,
or as percentage values depending on the NextTime.
LINK F inverted: in percent
LINK F not inverted: in absolute numbers
14.2 The SINGLE function
Use the softkey SINGLE to enter whether the chase runs permanently as loop or only once.
SINGLE inverted: chase stops after the last chase step
SINGLE not inverted: chase runs permanently as loop
14.3 The FLASH function
The FLASH function can only be used in combination with a release link. If a FLASH function is assigned
to a chase, this chase is only active as long as the chase key is pressed.
Enter the release link as described in Chapters 6.1.7 and 6.1.8.
Use the softkey FLASH to activate the FLASH function.
FLASH inverted: function is active
FLASH not inverted: function is deactivated
14.4 The NAME function
Use the NAME function to name the chase. If the NAME function is activated, name the chase with the
keys of the CUE/CHASE/SEQUENCE section.
NAME inverted: function is active
NAME not inverted: function is deactivated
Page 76

JB-lighting Lichtanlagen GmbH Sallersteigweg 15 D-89134 Blaustein Telefon ++49(0)7304 9617-0
- 76 -
14.5 The MODIFY function
Use the MODIFY function to modify and re-store fixture parameters of individual chase steps.
Press softkey MODIFY to activate this function. If the MODIFY function
is active, the corresponding field on the display is shown inverted.
Select the chase step to be modified with the encoder wheel STEP. When
the MODIFY function is active, the data of the chase steps are always output
via the DMX line.
Activate the fixtures of the chase step to be modified with the keys of the
Fixture Selection block.
Use the keys of the Fixture Selection block in combination with Preset keys
or the encoder wheels to modify the parameters of the chase step..
Press the Store key of the Combi section to store the process.
Press ESC to leave this menu.
14.6 The TRACE function
The TRACE function indicates, which chase step of an activated chase is currently active, i.e. is output. In
order to use the TRACE function, start one or several chases first. Press the Edit key in the Combi
section and then the chase key, the steps of which you wish to follow. Press the softkey TRACE to
activate the TRACE function. Now it is possible to trace the activity of the individual steps on the display.
Press ESC to leave this menu.
14.7 The R-LINK function
Cf. Chapters 6.1.7 and 6.1.8
14.8 The S-GROUP function
Cf. Chapters 11.14, 11.14.1 and 11.14.2
Page 77

JB-lighting Lichtanlagen GmbH Sallersteigweg 15 D-89134 Blaustein Telefon ++49(0)7304 9617-0
- 77 -
15. Sequences
Sequence is referred to as a programmed succession of cues (scenes). Each sequence step can address
different PAR and fixture channels as well as different parameters. The runtimes and the mode of flow
control can also be varied from step to step, unlike chases, where the runtimes and the mode of flow
control entered once for a step are applied to all other steps.
Eight keys are available in the Sequences section to select and store sequences.
They can be switched with the Shift key in combination with the activated sequence
key (with incorporated green LED).
To switch the sequence, press and hold the Shift key and select the
desired bank, where the sequences are stored, by pressing one of the
four sequence keys with incoporated green LED.
The green LED begins flashing, signalising that a preselection was
made. If a sequence is activated on this bank by pressing the
corresponding key, the green LED stops flashing.
15.1 Entering a sequence step
Sequences are programmed in the Combi section. You can use preprogramm ed cues (scenes) or newly
created cues.
Select the fixtures with the keys of the Feature-/PAR Selection (keys 1-32).
Select the desired parameters and enter the values with the encoder wheels or
the preset keys.
Press the Store key in the Combi section.
Choose the parameters from the storage matrix.
Press the sequence key, to which you wish to store the cue.
Confirm the process by pressing the Store key in the Combi section again.
Page 78

JB-lighting Lichtanlagen GmbH Sallersteigweg 15 D-89134 Blaustein Telefon ++49(0)7304 9617-0
- 78 -
If a sequence is recalled by pressing the Store key, the following display is shown:
The individual fields have the following function:
NAME : names the sequence.
SINGLE inverted: the sequence runs once and stops
after the last step.
SINGLE not inverted: the sequence runs endlessly.
LINK F inverted: specifiies the fade time in %.
LINK F nicht invertiert: specifiies the fade time in absolute
values.
FADETIME: enters fade time with the left encoder
wheel (FADETIME).
STEP: selects the desired step with the
middle encoder wheel.
NEXTTIME invertiert: enters step length with the right encoder wheel (NEXTTIME),
inserts intermediate steps with the softkey ID.
TRIGP: enters the trigpoint. When the function is activated (displayed inverted), enter the
data with the right encoder wheel (TRIGPOINT).
ID: numbers intermediate steps. When the function is activated, enter the data with
the right encoder wheel (ID).
GO-TO selections steps directly, when GO-TO key is used in combination with the keys
of the CUES/CHASES/SEQUENCE section.
If you press the softkey MODIFY in addition, the following functions are shown on the display:
DUP ST: duplicaties the active step.
DEL ST: deletes the active step.
CLEAR: deletes the complete sequence
(attention: no confirmation prompt).
BLOCK: forms a block from a several
successive steps.
LINK: links a chase within a sequence.
RENUM: renumbers the sequence steps using
integral numbers.
The following data are related to the example and will vary from sequence to sequence:
L: 2: The sequence has a length of two steps.
A 05: The activated sequence is stored on Bank A key 05.
OFF: The sequence selected is deactivated.
With the following functions, you can determine flow control of a sequence. The functions are activated
with the corresponding keys in the Sequence Control section:
AUTO: The steps run automatically according to preprogrammed time intervals. The
auto-function is activated by pressing the Rate key in the Sequence Control
section.
MFAD: The step is faded with the ManFader fader.
GO: The step is switched with the Go+ and Go- keys.
SOUND: The step is switched with the Sound function.
Page 79

JB-lighting Lichtanlagen GmbH Sallersteigweg 15 D-89134 Blaustein Telefon ++49(0)7304 9617-0
- 79 -
15.2 The NAME function
During the storage process, you can name the sequence. Press the softkey NAME and enter the name
with the double-assigned keys of the Cues/Chases/Sequences section. Press the softkey NAME again to
leave the function.
15.3 The SINGLE function
Use the softkey SINGLE to enter, whether the sequence shall run endlessly as loop or run only once.
SINGLE inverted: Sequence stops after the last step.
SINGLE not inverted: Sequence runs endlessly as loop.
15.4 The LINK F function
Use the softkey LINK F to enter, whether the fade time shall be processed as absolute numbers
(seconds) or as percentage values depending on the NextTime.
LINK F invertied: fade time in percent.
LINK F not inverted: fade time in absolute values.
15.5 Entering runtimes
The following runtimes are available for each
step:
FADETIME: fade-in time of a step
TRIGPOINT: Switching time of all parameters that
are not faded
NEXTTIME: duration of the entire step
The runtimes of a step can be entered as
absolute values (in seconds) or as percentage
values depending on the NextTime (fade time and
trigpoint).
It is useful to enter the runtimes in percent, if the sequence should not only run depending on the
NextTime, but if the speed should also be controlled manually afterwards.
Illustration of the different runtimes:
Length of the individual steps
The NextTime determines the length of the step. Press the softkey NEXTT and enter the NextTime with
the right encoder wheel (NEXTTIME).
Length of the fade time / data in seconds
The fade time is entered with the left encoder wheel (FADETIME). The value is displayed in seconds,
when the softkey LINK F is not displayed inverted.
Length of the fade time / data in percent
The fade time is entered with the left encoder wheel (FADETIME). Press the softkey LINK F. The value is
displayed as percentage value and the function field is displayed inverted.
Switching time (Trigpoint)
The Trigpoint is referred to as switching time for all parameters that are not faded. Press the softkey
TRIGP and enter the Trigpoint data with the right encoder wheel (TRIGPOINT).
Page 80

JB-lighting Lichtanlagen GmbH Sallersteigweg 15 D-89134 Blaustein Telefon ++49(0)7304 9617-0
- 80 -
15.6 Entering the mode of flow control
With the following parameters, you can determine the flow control of a sequence. The param eters are
activated by pressing the desired key on the display in combination with the corresponding key of the
Sequence Control section:
AUTO: The steps run automatically according to preprogrammed time intervals. The
auto-function is activated by pressing the Rate key in the Sequence Control
section.
MFAD: The step is faded with the ManFader fader.
GO: The step is switched with the Go+ and Go- keys.
SOUND: The step is switched with the Sound function.
15.7 The ID function
The function ID is used to assign sub-numbers to steps you have inserted in a sequence.
Insert (duplicate) a step into the sequence and press the softkey ID to enter the sub-numbers with the
right encoder wheel. You can assign numbers between x.1 to x.9. The actual number of steps is shown
on the left side of the display below the storage matrix, whereas a little further to the right the subnumbers are displayed.
15.8 The GO-TO function
With the GO-TO you will have direct access to a step. This function is used above all to leave out some
steps when a sequence is run.
If, for example, the first step of your sequence is active and you wish to activate the eighth step as next
step, press the softkey GO-TO and then enter the number of the desired step either by turning the left
encoder wheel or with the keys of the CUES/CHASE/SEQUENCE section.
Press the softkey EXE-GO to confirm the process.
Important: While you are selecting a step with the GO-TO function, a programmed and activated
sequence is running according to the entered runtimes and mode of flow control.
15.9 The DUP ST function
Use the function DUP ST to duplicate the currently active step.
Select the desired step with the middle encoder wheel and press the softkey DUP ST.
15.10 The DEL ST function
Use the function DEL ST to delete the currently active step.
Select the desired step with the middle encoder wheel and press the softkey DEL ST.
15.11 The CLEAR function
Press the softkey CLEAR to delete the entire sequence.
ATTENTION: There is no additional confirmation prompt!
Page 81

JB-lighting Lichtanlagen GmbH Sallersteigweg 15 D-89134 Blaustein Telefon ++49(0)7304 9617-0
- 81 -
15.12 The BLOCK function
Cf. Chapter 16.1 The BLOCK function
15.13 The LINK function
Cf. Chapter 16.2 The LINK function
15.14 The RENUM function
Use the function RENUM to renumber a sequence. With this function, all sub-numbers are converted into
integral numbers.
Page 82

JB-lighting Lichtanlagen GmbH Sallersteigweg 15 D-89134 Blaustein Telefon ++49(0)7304 9617-0
- 82 -
16. Editing sequences
In order to edit sequences, proceed as described below:
Press the ESC key time and again until you have entered the
main menu.
Then press the EDIT key in the Combi section (LED is lit).
Select the desired sequence by pressing the corresponding
sequence key.
The following display is shown:.
All parameters of this menu have already been dealt with in
Chapter 15. Cf. Chapters 15.1 to 15.14
Press the softkey MODIFY and the following menu is shown on the display:
16.1 The BLOCK function
You can combine several sequence steps to a block that can be either deleted or copied afterwards.
If you have, for example, a sequence that consists of 10 steps, you can define steps 2 to 5 as block and
copy this block to another position within the sequence.
You can use the BLOCK function to delete individual steps of your sequence. Define these steps as block
and then press the Delete key.
Defining a block:
A block can be formed of steps that are arranged consecutively in your sequence. Move the cursor in the
PROG COMB CHASE matrix to the first step you wish to integrate in the block. Press and hold the
softkey BLOCK (field on the display is shown inverted). Turn the middle encoder wheel until you have
reached the last step to be integrated in the block. Release the softkey BLOCK again. All steps integrated
in the block are marked with a B on the display.
This process is additionally shown as graph on the display.
The illustration shows that the block of our example contains a total of your steps (step
2 to step 5).
Page 83

JB-lighting Lichtanlagen GmbH Sallersteigweg 15 D-89134 Blaustein Telefon ++49(0)7304 9617-0
- 83 -
Copying a block (B-COPY):
Define a block (as described above) and use the middle encoder wheel to select the position, before
which you want to insert the block. Press the softkey B-COPY. The command is executed immediately
and does not require confirmation by pressing the Store key in the Combi section. Press the ESC key to
leave the menu.
Deleting a block (B-DEL):
Define a block as described above. Press the softkey B-DEL. The marked block is deleted immediately.
Press the ESC key to leave the menu.
Moving a block (B-MOVE):
Define the desired block as described above.
When a block is moved, this block is not duplicated (see copying a block) but simply appears at another
position of the sequence. The block will always be inserted before the step that you have marked with the
cursor. For this reason, it is not possible to move a step to the immediately pursuant step. You must skip
the first step after the marked block.
This graph will illustrate the individual working steps.
1: Programme a sequence.
2: Define the desired block.
3: Select the step, before which you want to position
the block (possible positions marked with arrows). In
this example, it is step # 8.
4: Press the softkey B-MOVE to confirm the process.
5: The sequence renumbers itself.
Press the ESC key to leave the menu.
16.2 Linking chases or cues to a sequence step (LINK)
A sequence must contain at least one step in order to be able
to link a chase or a cue to this sequence.
Enter the Edit/Combi-SEQ menu and use the middle encoder
wheel to select the step, to which you wish to assign a chase
or a cue. Press the softkey LINK, the softkey is displayed
inverted. Afterwards select the chase or the cue to be linked
to the sequence step. (This LINK function has nothing to do
with the R-LINK function of a chase or a cue.)
If you have selected, for example, a chase, „LC :1A01 /
Shutter“ appears on the display. This means that the linked
chase is stored on PAGE 1 on BANK D, KEY no. 1 and is
designated Shutter. It is now possible to change the runtimes
independently of the programmed length data. It is also
possible to link the same chase several times and enter
different runtimes each time. If you have linked a chase to a sequence, which was part of a speed group,
this chase will be removed from the speed group.
Page 84

JB-lighting Lichtanlagen GmbH Sallersteigweg 15 D-89134 Blaustein Telefon ++49(0)7304 9617-0
- 84 -
17. Working with sequences
Only one sequence can be active at a time.
The sequence keys are numbered from 1 to 8. The left column of keys 1 – 4 has two incorporated LEDs
per key, the right column of keys 5 - 8 has one incorporated LED per key. The red LEDs display the
status of the sequence, the green LEDs indicate the selected bank.
Red LED is lit: The sequence is active.
Red LED is not lit: The sequence is deactivated.
Green LED is lit: The bank is active.
Green LED is flashing: The bank is preselected, but a sequence has not yet been activated.
17.1 Switching sequence banks
Press and hold the Shift key. Simultaneously press the desired bank key in
the Sequences block (key with two LEDs). The green LED of the selected
bank begins flashing. Now press the desired sequence key. As soon as a
sequence is selected, both the red LED of the sequence key and the green
LED of the bank key are lit.
17.2 The Sequence Control section
Each activated sequence will run according to the programmed runtimes and mode
of flow control. However, it is possible to overwrite these times with the keys and
faders of the Sequence Control section. The Sequence Control section has higher
priority than the previously programmed data.
Page 85

JB-lighting Lichtanlagen GmbH Sallersteigweg 15 D-89134 Blaustein Telefon ++49(0)7304 9617-0
- 85 -
17.2.1 Changing the speed of sequences
Man-Fade key:
Red LED: displays current status, sequences can only be faded manually with the Time/Man fader.
Green LED: no function.
Go key:
Red LED: displays current status,sequences can be switched manually with the GO- or GO+ keys.
Green LED: no function.
Sound key:
Red LED: displays current status.
Green LED: indicates the beat count connected to the sound input on the rear panel of the Licon 1X.
Rate key:
Red LED: displays current status, this key overwrites the NextTime of sequences.
Yellow LED: indicates the speed of the rate fader.
Time key:
Red LED: displays current status, the fade time of sequences are overwritten by the time entered with the
fader.
Rate fader:
The rate fader addresses the NextTime of sequence steps. As soon as the red LED of the rate key is lit,
the NextTime of the sequence steps can be overwritten manually with the fader.
Time/Man fader:
The Time/Man fader addresses the fade times of sequence steps.
Time/Man fader in combination with the Man-Fade key:
Enables manual fading of sequence steps. The time, in which the fader is raised from 0 to 10 indicates
the fade time. As soon as the fader is on position 0 or on position 10, the next sequence step will be
activated.
Time/Man fader in combination with the time key:
Activates time scaling of the Time/Man fader. The fade time can be set between 0 and 10 seconds (steps
as shown on the scale).
17.3 The ENABLE key
If the priority of fixtures is taken from an active sequence, e.g. by a preset, cue or chase, these priorities
can be returned without having to start the sequence anew. This function has no effect in the Follow and
Freeze function (see Chapters 9 and 10).
Press the key combination of Enable + key of active sequence.
+
Page 86

JB-lighting Lichtanlagen GmbH Sallersteigweg 15 D-89134 Blaustein Telefon ++49(0)7304 9617-0
- 86 -
18. Programming in the PAR section
In the Licon 1X, you have access to PAR/dimmer channels in two main sections, namely the Combi
section and the PAR section.
The Combi section enables the use of combined cues, chases or sequences, which allow access to
both PAR channels and fixture channels.
The Combi section works exclusivley according to the LTP principle, i.e. the value entered last for a
channel takes precedence.
The currently valid PAR values of the Combi section are shown on the corresponding feature pages.
The brightness values are controlled with the middle master fader (Combi Par) and output via DMX
channels.
Fields of application of the combined storage of PAR and fixture data are for example:
music–synchronised shows, which are programmed in the timeline editor
complete sequences e.g. for theatre applications
combined colour states for live performances
complete remote-controlled shows, e.g. via MIDI
in general: all fields of application, where complete lighting or colour states are already
determined before the time of programming
The data of combined PAR/fixture cues are generally stored with the Store key
in the Combi section.
The Par section enables access to storage functions of cues or chases that only contain PAR/dimmer
data. If cues and chases, which contain only PAR data, are stored on the corresponding cue and chase
keys, 200 cues and 96 PAR storage places are available exclusively for the PAR section.
The DMX output of the currently valid values works on the HTP principle. This means that the currently
highest value for a channel takes precedence.
Cues and Chases of the Par section are exclusively recalled with the keys and faders of the Par section
of the Licon 1X.
The left master fader (PAR) is used to activate the functions of the Par section.
Cues containing only PAR data are stored with the Store key in the Par
section.
Fields of application of the Par section are for example:
front light, which is controlled manually during a show
effect lights, e.g. ACL sets
in general: all fields of application, where the user requires direct access to lighting and colour
states during a show
Thanks to the flexible combined use of both sections, the use of PAR channels with the Licon 1X is
considerably simplified in many fiels of application.
CAUTION !!!
Direct access to PAR channels as well as the programming and editing of all presets, cues,
chases and sequences for the Combi and Par section take exclusively place in the Combi section
(also pure PAR presets can only be stored in the Combi section).
This means for the visual control of PAR channels:
activate middle master fader (Combi PAR)
deactivate left master fader (PAR)
Page 87

JB-lighting Lichtanlagen GmbH Sallersteigweg 15 D-89134 Blaustein Telefon ++49(0)7304 9617-0
- 87 -
The middle master fader (C PAR) is used to scale the values shown on the display.
18.1 Direct access
In order to gain direct access to the edit functions of the PAR section, one of the
three PAR keys in the Feature Selection block must be pressed first.
When one of the PAR keys is pressed, the display shown on the
left appears:
Stored PAR presets can be recalled on this page.
You can select the individual channels with the keys of the
FIXTURE-/PAR-SELECTION and enter the values with the
middle encoder wheel. The channels selected are displayed
inverted.
Caution: The DMX values are entered for all activated channels.
If channels in the range between 33 and 96 are activated (which
cannot be seen on the display all at once), the values of these
channels are also changed.
In practice, however, values are entered in a faster and more
effective manner with the softkeys of the PAR section. Doubleklick one of the PAR keys in the Feature Selection block to enter
the menu shown on the left.
Page 88

JB-lighting Lichtanlagen GmbH Sallersteigweg 15 D-89134 Blaustein Telefon ++49(0)7304 9617-0
- 88 -
There are four different modes of direct access to PAR channels:
18.2 The ENCODE mode
The Encode mode is activated with the softkey ENCODE. This mode is active when the function field
ENCODE is displayed inverted.
In the Encode mode, channel values are changed in analogy
to the change of fixture features.
Activate the channel to be changed with
the keys of the Fixture/Par section. Enter
the DMX values with the encoder wheel
or by recalling presets.
This mode is applied when a channel has
to be adjusted accurately to a certain output value or when
preprogrammed cues, chases or sequences mu st be changed
afterwards.
Here, the current levels of the pure PAR section (without scaling by the left Par master fader) are adopted
as current levels for the Combi section. (This mode requires that you know, which key will activate the
particular PAR fixture.)
18.3 The BLOCK mode
The BLOCK mode is activated with the softkey BLOCK. This mode is active when the function field
BLOCK is displayed inverted.
Blocks of different sizes can be defined in order to edit PAR
channels. The values of the individual channels of the
activated block can only be changed with the faders of the
PAR section. The BLOCK function requires that you slide
back the PAR fader to 0 and raise the C-PAR master fader to
100. If you wish to enter the start position of your block, select
the first position of the block with the left encoder wheel
(POSITION). With the right encoder wheel you can determine
the size of the block. The LEDs lit in the Fixture/PAR
Selection block will show you, which channels are currently
activated.
Since the DMX values of a channel are entered
with the 12 PAR faders, a maximum of 12 PAR
channels can be assigned to a block.
You can change the position of a block with the
left encoder wheel.
Fields of application:
Simple and fast programming of presets, cues,
chase steps and sequence steps.
Page 89

JB-lighting Lichtanlagen GmbH Sallersteigweg 15 D-89134 Blaustein Telefon ++49(0)7304 9617-0
- 89 -
18.4 The HILITE mode
The HILITE mode is activated with the softkey HILITE. It is activated, when the function field HILITE is
displayed inverted.
In the HILITE mode, always one active channel is highlighted
(alternate switching of the channel between 100% and 0%).
Thus, individual channels can be localised. The DMX value
for the active channel can be changed either with the middle
encoder wheel or with the first fader in the PAR section.
This mode requires that the middle master fader (C-PAR) is
raised. In order to avoid confusion, slide the left master fader
(PAR) back to 0.
If the HILITE mode is activated, the channel selected starts
flashing. If a DMX value is entered either with fader 1 of the
PAR section or with the middle encoder wheel (PAR), the
channel stops flashing and assumes the value.
Use the left encoder wheel to select the channel that shall be activated and thus subjected to the HILITE
mode.
Fields of application:
Simple and comfortable subsequent change of DMX values of preprogrammed presets, cues,
chases and sequences by adjustment of individual channels.
This function facilitates working with the lighting control console, if you do not know exactly, on
which key you have stored the individual fixtures.
18.5 The PAROUT mode
The PAROUT mode is activated with the softkey PAROUT. The mode is activated, when the function field
PAROUT is displayed inverted.
In the PAROUT mode you can e.g. take over previously
programmed cues into chases.
Activate the PAROUT mode and select the desired cue by
raising the corresponding fader. The DMX value of the cue is
shown on the display. Now press the Store key in the PAR
section and then one of the flash keys located beneath the
chase faders. Confirm the process by pressing the Store key
again.
Always all values are stored that are shown on the display.
(In this mode it does not matter which of the two master
faders is raised, since all values are stored that are shown on
the display.)
Fields of application:
Visual control of cues or chases of the absolute PAR section important, when you are
programming in the blackout mode (without level output via DMX).
Use of already programmed cues of the absolute PAR section to create other lighting states
composed of several cues.
Use of already programmed cues of the absolute PAR section to create PAR chases.
Page 90

JB-lighting Lichtanlagen GmbH Sallersteigweg 15 D-89134 Blaustein Telefon ++49(0)7304 9617-0
- 90 -
18.6 The numerical block (NUM)
The numerical block is used to activate combinations of PAR channels. Press the softkey NUM to activate
the numerical block. Since this function can be followed on the display, the middle master fader (C-PAR)
must be raised.
Activate the numerical block and the softkeys shown below in the illustration will appear on the display
Combinations of PAR channels can only be entered with the softkeys SEL + , SEL - and SEL together
with the keys of the CUES/CHASES/SEQUENCES section.
SEL +: confirms entry of a single channel number
SEL - : confirms deletion of a single channel number
SEL: confirms selection of a channel block
% : entry of DMX values for the selected channels in percent
Example of how a combination of PAR channels is entered by means of the numeric block:
Important: Make sure that no undesired channels are addressed by deleting the current selection with the
softkey CLRSEL (no LEDs must be lit in the FIXTURE-/PAR-SELECTION section).
The desired block should consist of the channels 1, 7 and 32-46 with a DMX value of 50%.
Enter the data in the following succession:
Press Cue key 1
Confirm with softkey SEL+
Press Cue key 7
Confirm with softkey SEL+
Page 91

JB-lighting Lichtanlagen GmbH Sallersteigweg 15 D-89134 Blaustein Telefon ++49(0)7304 9617-0
- 91 -
Press Cue key 3 and Cue key 2
Confirm with softkey SEL+
Press Cue key 4 and Cue key 6
Confirm with softkey SEL
Press Cue key 5 and Cue key 0
Confirm DMX values with SEL%
When all entries are made, the display is shown as illustrated below:
Display PAR 1-32 Display PAR 33-64 Display PAR 65 - 96
18.7 Naming PAR channels (NAME)
You can name each of the 96 PAR channels separately as
described below:
Select the desired PAR channel with the keys of the Feature/PAR Selection block (LED is lit). Then press the softkey
NAME. Enter the name with the double-assigned keys of the
Cues, Chases and Sequences sections.
If you wish to delete the name, press the softkey CLRNAM
and the names of all keys selected are deleted.
Page 92

JB-lighting Lichtanlagen GmbH Sallersteigweg 15 D-89134 Blaustein Telefon ++49(0)7304 9617-0
- 92 -
18.8 Storing presets (PRESET)
In the PAR section, as in the Fixture section, you can store presets. PAR presets must always be
stored in the Combi section.
Enter the main menu and press the softkey PRESET. Select one of the PAR keys (1-32) (PAR 33-64,
PAR 65-96) in the Feature Selection section and enter the DMX values for the
desired PAR channels.
Press the Store key in the Combi section (the Store LED is lit) and press the
corresponding softkey to select the desired storage place on the display (the
Store LED is flashing).
When the Preset field is displayed inverted,
you can name the Preset with the doubleassigned keys of the Cues, Chases and
Sequences sections.
When presets of the PAR section are stored,
not all channels are activated automatically, as
is the case in the Fixture section. Here, only
those channels are stored in a Preset that
have been activated previously (at least one
LED in the Fixture/PAR selection section must be lit).
Press the Store key in the Combi section again to execute the process.
18.8.1 Recalling PAR presets
Press one of the PAR keys in the Fixture Selection block. Activate the ENCODE function. Then press the
corresponding softkey to recall the desired presets.
18.8.2 Fading PAR presets
Press one of the PAR keys in the Feature Selection block.The stored Presets will be
shown on the display and can be recalled with the corresponding softkeys. The fading
time of PAR presets is controlled with the Preset-Fade fader in the Feature Selection
block. Select a fade time between 0.0 to 10 seconds.
Page 93

JB-lighting Lichtanlagen GmbH Sallersteigweg 15 D-89134 Blaustein Telefon ++49(0)7304 9617-0
- 93 -
18.9 Storing PAR channels on PAR fader banks
The Licon 1X comes with 12 faders for the storage of PAR channels on PAR fader banks. On faders 1-8,
fixed values (permanent cues) can be stored. On faders 9-12, chases can be stored in addition.
These 12 faders can be switched four times by the key combination „SHIFT + Flash keys 1-4 (green
LED). Thus a total of 48 faders can be used to store PAR channels.
18.9.1 Storing fixed values on PAR faders (faders 1 - 8)
Select the desired PAR channels with the help of the individual programming
functions (Chapters 18.1 to 18.6) and press the Store key in the PAR section
(LED of Store key is lit). Then select a fader (1-8) in the PAR section and press
the flash key located below this fader.
The following display appears for the keys 1 to 8 (no chase function):
Press the key NAME and enter the name of the faders with
the keypad. In our example, the name of the fader is “BLAU”
(BLUE).
If you wish to store this step on another fader or to store it as
cue, press and hold the COPY key and simultaneously select
another flash key (1-8) or a Cue key.
Press the Store key in the PAR section again to confirm the storage process (LED of the Store key is no
longer lit).
18.9.2 Storing PAR channels on Chase PAR faders (faders C1 - C4)
Select the desired PAR channels with the help of the individual programming
functions (Chapters 18.1 to 18.6) and press the Store key in the PAR section
(LED of Store key is lit). Then select a fader (C1-C4) in the PAR section and
press the flash key located below this fader.
Note: If the storage process is carried out in the PAR section, these flash keys correspond to the keys
C1-C4 of the Chase section.
Page 94

JB-lighting Lichtanlagen GmbH Sallersteigweg 15 D-89134 Blaustein Telefon ++49(0)7304 9617-0
- 94 -
The following display appears for the keys C1 - C4 (chase function):
LINK F : inverted: enters fade time in %
not inverted: enters fade time as absolute
value
CLEAR : deletes complete chase
DEL ST : deletes a step
DUP ST: duplicates a step
NAME : names the chase
BLOCK : forms a block with different steps
MERGE: combines chases
SGROUP: forms a speed group
CREATE: activates chase generator
FADETIME: enters fade time for entire chase
STEP: enables scrolling up and down between steps
Press the Store key again to confirm the storage process, the LED of the Store key is no longer lit. An
occupied chase fader is signalised by the yellow LED of the flash key situated below the fader. Repeat
this step as often as you like (a maximum of 99 chase steps are possible). If only one step is stored on
the fader, the yellow LED is lit permanently. When several steps (chase) are stored, the yellow LED
flashes at the speed selected in the Chase Control section.
Caution: The chase will be activated, as in the Fixture section (Chapter 11), with the keys of the
Chase Control section. In order to control the particular chase in the PAR section, it must always
be activated with the SELECT key in the Chase Control section.
18.10 Storing cues (scenes) in the PAR-section
As described in Chapter 6 Cues in the Combi section, up to 200 absolute PAR cues can be stored on one
level. The storage of PAR cues is carried out in the PAR section.
You have access to this level exclusively via the PAR fader bank
(faders 1-8).
18.10.1 Linking of PAR cues to PAR faders
Before you can activate the cue to be linked, a fader (1-8) in the PAR Fader section must be selected.
+ +
Press and hold the Store key in the PAR section. Select a PAR fader and press the flash key located
below this fader. Then press the Cue key, on which the desired cue is stored. Release the Store key
again and the cue is linked to the fader.
Note: To get an overview of the cues, it is important that they are named. You can then find the storage
place of your cue on Table 3 of the List function (Chapter 19).
Page 95

JB-lighting Lichtanlagen GmbH Sallersteigweg 15 D-89134 Blaustein Telefon ++49(0)7304 9617-0
- 95 -
18.11 Storing chases in the PAR-section
As described for chases in Chapter 11 Chases in the Fixture section, also 96 absolute PAR chases can
be stored on one level. The storage of PAR chases is carried out in the PAR section. It does not matter
here, whether the chases are stored from cue keys or from the PAR faders (1-8).
You have access to this level exclusively via the PAR fader bank
(faders C1-C4).
18.11.1 Linking of PAR chases to PAR faders
Before you can activate all 96 PAR chases possible in the PAR section, the PAR faders (C1-C4) must be
linked with these 96 chase storage places.
Press the Select key in the Chase Control section and simultaneously a flash key (C1-C4). Release both
keys again and press the Select key again. The following display is shown:
The active chase of our example is indicated as 1A04, i.e.
Fader C4 on Page 1, Bank A.
Use the middle encoder wheel to select the next chase that
shall run on this fader. In our example, this is Chase 07 on
Page 1, Bank B.
Press the Select key again to return to the Standard menu. The chase selected will become active on the
corrsponding fader, as soon as this fader is drawn to zero.
Page 96

JB-lighting Lichtanlagen GmbH Sallersteigweg 15 D-89134 Blaustein Telefon ++49(0)7304 9617-0
- 96 -
19. The LIST function
With the List function, you can have all named cues, chases and sequences
shown on the display. This function is activated with the List key in the Combi or
PAR section.
If the touchscreen is activated, you can recall cues, chases and sequences
directly via the display.
Pess the List key in the Combi section and the following display is shown:
CUES F:
Fixed cues, cannot be switched via Page/Bank
Cue keys F1 to F8
CUES 1A:
Cues that can be switched via Page/Bank
Cue keys 1 to 16
CHASES 1 A:
Chases of selected Page/Bank
SEQ A:
Sequences of selected Page/Bank
Press the List key in the PAR section once and the following display is shown:
The individual faders are displayed indicating their name
and the corresponding output level of the DMX signal.
Page 97

JB-lighting Lichtanlagen GmbH Sallersteigweg 15 D-89134 Blaustein Telefon ++49(0)7304 9617-0
- 97 -
Press the List key twice in the PAR section and the following display is shown:
The upper list shows the occupation of the cue faders, the
lower list the occupation of the chase faders. This list also
indicates, to which key of the cues memory the cue is linked,
e.g. Line 2 : MEM 1A02.
You will see from the description that fader no. 2 accesses
the cue on Page 1, Bank A, key no. 2.
Important: the cue keys and the sequence keys are
completely separated from each other in the Combi and PAR
section, i.e. there are 200 cues and 96 chases possible in the
Combi section and in the PAR section as well.
Press the List key in the PAR section again, and the third list available will appear on the display:
This list shows the level of the cue and chase keys for the
PAR section with corresponding name fields.
Caution: The cues and chases listed in the PAR secton
cannot
be controlled via the touchscreen, as is the case
in the Combi section.
Page 98

JB-lighting Lichtanlagen GmbH Sallersteigweg 15 D-89134 Blaustein Telefon ++49(0)7304 9617-0
- 98 -
20. Storing data (BACKUP)
Data backup is performed on a formatted standard 3.5“ floppy disk or USB stick. The USB stick must be
formatted on a PC system with FAT 32. If the floppy disk is not formatted or contains other data, the disk
can be formatted in the Licon 1X as described in Chapter 20.1 Formatting a floppy disk.
20.1 Formatting a floppy disk
Insert the disk face up into the disk drive.
Enter the main menu, press the softkey BACKUP and select
the function FORMAT. Confirm the process by pressing the
softkey YES.
The process starts and on the display of the console the
individual tracks are counted up (from 0 to 99).
When the disk is successfully formatted, the display confirms with the message COMPLETE.
20.2 Selective data storage (SAVE)
The Licon 1X can store the following groups of data separately:
TILINE: timeline data
MEMORY: cues/chases /sequence data in the Fixture-/
PAR section
PRESET: programmed fixture PRESETS for features
(e.g. gobo, colour, iris parameters)
CONFIG: data of the Config section
L-USER: data of self-defined fixture configurations
ALL: all data of the lighting control console
The storage procedure will always be the same, no matter whether all data or only a group of data are
selected for storage.
Caution: Before data can be stored, you must enter a name for the backup file. You can store the data of
the console several times on the same disk. However, existing files cannot be overwritten.
Insert the formatted disk into the disk drive. Press the softkey SAVE and select the desired data group by
pressing the corresponding softkey.
Enter a name for the file with the double-assigned keys of the Cues/Chases/Sequences section.
After you have assigned a name to the file, the softkey EXEC appears on
the display.
Start the storage process by pressing the softkey EXEC.
During the storage process the message: Writing data .. will be displayed.
20.2.1 Storing data of the All section
If you activate the softkey ALL in the Backup menu, all console data will be stored.
To store all console data, press the softkeys in the following succession: BACKUP/ SAVE/ ALL.
Enter a name for the backup file with the double-assigned keys of the Cues/Chases/Sequences section
and confirm the process by pressing the softkey EXEC.
Page 99

JB-lighting Lichtanlagen GmbH Sallersteigweg 15 D-89134 Blaustein Telefon ++49(0)7304 9617-0
- 99 -
20.2.2 Storing data of the Timeline section
In the Timeline section, shows are programmed that run music-synchronised to a music CD in the CDROM drive.
To store the timeline data, press the softkeys in the following succession: BACKUP/ SAVE/ TILINE.
Enter a name for the backup file with the double-assigned keys of the Cues/Chases/Sequences section
and confirm the process by pressing the softkey EXEC.
20.2.3 Storing data of the Memory section
The memory section manages data of cues, chases and sequences.
To store the Memory data, press the softkeys in the following succession: BACKUP/ SAVE/ MEMORY.
Enter a name for the backup file with the double-assigned keys of the Cues/Chases/Sequences section
and confirm the process by pressing the softkey EXEC.
20.2.4 Storing data of the Preset section
To store the Preset data, press the softkeys in the following succession: BACKUP/ SAVE/ PRESET.
Now you can choose between ALL (all presets) or SINGLE (the presets of a certain fixture).
Enter your choice by pressing the corresponding softkey and enter a name for the backup file with the
double-assigned keys of the Cues/Chases/Sequences section. Confirm the process by pressing the
softkey EXEC.
20.2.5 Storing data of the Config section
To store the Config data, press the softkeys in the following succession: BACKUP/ SAVE/ CONFIG.
Enter a name for the backup file with the double-assigned keys of the Cues/Chases/Sequences section
and confirm the process by pressing the softkey EXEC.
20.2.6 Storing data of the L-User section
To store the L-user data, press the softkeys in the following succession: BACKUP/ SAVE/ L-USER.
Now you can choose between ALL (all L-user configurations) or SINGLE (the configuration of a certain
fixture).
Enter your choice by pressing the corresponding softkey and enter a name for the backup file with the
double-assigned keys of the Cues/Chases/Sequences section. Confirm the process by pressing the
softkey EXEC.
20.3. The directory (DIR)
The directory gives an overview of all files stored on the
inserted disk. Recall the directory as follows:
Enter the main menu and press the softkey BACKUP and
subsequently the softkey DIR.
The file extensions will indicate the data source:
.LDA stands for a file containing all console data
.LDT stands for a file containing timeline data
.LDM stands for a file containing cue data
.LDP stands for a file containing preset data
.LDC stands for a file containing config data
.LDU stands for a file containing user scan data
20.4 Loading data (LOAD)
The loading procedure of console data is always the same, no matter what kind of data are loaded.
Enter the main menu and recall the BACKUP function by pressing the corresponding softkey. Press the
softkey LOAD and then the softkey BACKUP again to select the data group, from which you want to load
a file to the console.
Press the desired softkey and the corresponding directory appears, in which all files are listed that have
been stored in this file group.
Select the file with the middle encoder wheel (SELECT).
Page 100

JB-lighting Lichtanlagen GmbH Sallersteigweg 15 D-89134 Blaustein Telefon ++49(0)7304 9617-0
- 100 -
Press the softkey EXEC and the loading process is started. During the loading process the message:
READING DATA .... is shown on the display.
When the loading process was successful, the message COMPLETE is shown on the displa y.
20.4.1 Loading all console data
Activate the backup menu by pressing the softkey BACKUP in the main menu and press the softkey
LOAD. Then press the softkey ALL. The Licon 1X will list all files that are stored in this file group. Use the
middle encoder wheel (SELECT) to select the file to be loaded. Press the softkey EXEC to start the
loading process. When the loading process was successful, the message COMPLETE is shown on the
display.
20.4.2 Loading timeline files
To load a timeline file from a floppy disk or a USB stick, proceed as follows:
Activate the backup menu by pressing the softkey BACKUP in the main menu and press the softkey
LOAD. Then press the softkey TILINE. The Licon 1X will list all files that are stored in this file group. Use
the middle encoder wheel (SELECT) to select the file to be loaded. Press the softkey EXEC to start the
loading process. When the loading process was successful, the message COMPLETE is shown on the
display.
20.4.3 Loading memory files (cues, chases, sequences)
To load a memory file from a floppy disk or a USB stick, proceed as follows:
Activate the backup menu by pressing the softkey BACKUP in the main menu and press the softkey
LOAD. Then press the softkey MEMORY. The Licon 1X will list all files that are stored in this file group.
Use the middle encoder wheel (SELECT) to select the file to be loaded. Press the softkey EXEC to start
the loading process. When the loading process was successful, the message COMPLETE is shown on
the display.
20.4.4 Loading preset files
To load a preset file from a floppy disk or a USB stick, proceed as follows:
Activate the backup menu by pressing the softkey BACKUP in the main menu and press the softkey
LOAD. Then press the softkey PRESET. The Licon 1X offers two possibilities:
ALL will load all files that are stored in this file group. SINGLE will load the preset files of a certain fixture.
Use the middle encoder wheel (SELECT) to select the file to be loaded. Press the softkey EXEC to start
the loading process. When the loading process was successful, the message COMPLETE is shown on
the display.
20.4.5 Loading config files
To load a config file from a floppy disk or a USB stick, proceed as follows:
Activate the backup menu by pressing the softkey BACKUP in the main menu and press the softkey
LOAD. Then press the softkey CONFIG. The Licon 1X will list all files that are stored in this file group.
Use the middle encoder wheel (SELECT) to select the file to be loaded. Press the softkey EXEC to start
the loading process. When the loading process was successful, the message COMPLETE is shown on
the display.
20.4.6 Loading L-user files
To load anL-user file from a floppy disk or a USB stick, proceed as follows:
Activate the backup menu by pressing the softkey BACKUP in the main menu and press the softkey
LOAD. Then press the softkey L-USER. You can choose between ALL and SINGLE. Select one of the
two possibilities and the Licon 1X will list all files that are stored in this file group. Use the middle encoder
wheel (SELECT) to select the file to be loaded. Press the softkey EXEC to start the loading process.
When the loading process was successful, the message COMPLETE is shown on the displa y.
 Loading...