

Page 1
4CH DMX-CONTROLLER FOR LED
WWW.BEGLEC.COM
Copyright © 2009 by BEGLEC comm.v.a.
‘t Hofveld 2 ~ B1702 Groot-Bijgaarden ~ Belgium
Reproduction or publication of the content in any manner, without express permission of the publisher, is prohibited.
Version: 1.0
Operation Manual
Mode d'emploi
Gebruiksaanwijzing
Bedienungsanleitung
Manual de instrucciones
Manual do utilizador
EN
FR
NL
DE
ES
PT
Page 2
EN - DISPOSAL OF THE DEVICE
Dispose of the unit and used batteries in an environment friendly manner
according to your country regulations.
FR - DÉCLASSER L’APPAREIL
Débarrassez-vous de l’appareil et des piles usagées de manière écologique
Conformément aux dispositions légales de votre pays.
NL - VERWIJDEREN VAN HET APPARAAT
Verwijder het toestel en de gebruikte batterijen op een milieuvriendelijke
manier conform de in uw land geldende voorschriften.
DU - ENTSORGUNG DES GERÄTS
Entsorgen Sie das Gerät und die Batterien auf umweltfreundliche Art und
Weise gemäß den Vorschriften Ihres Landes.
ES - DESHACERSE DEL APARATO
Reciclar el aparato y pilas usadas de forma ecologica conforme a las
disposiciones legales de su pais.
PT - COMO DESFAZER-SE DA UNIDADE
Tente reciclar a unidade e as pilhas usadas respeitando o ambiente e em
conformidade com as normas vigentes no seu país.
Page 3
ENGLISH OPERATION MANUAL
OPERATION MANUAL
Thank you for buying this JB Systems®product. To take full advantage of all possibilities, please read these
operating instructions very carefully.
ENGLISH OPERATION MANUAL
Keep the unit away from children.
Inexperienced persons should not operate this device.
Maximum save ambient temperature is 40°C. Don’t use this unit at higher ambient temperatures.
The electrical installation should be carried out by qualified personal only, according to the regulations for
electrical and mechanical safety in your country.
Check that the available voltage is not higher than the one stated on the rear panel of the unit.
In the event of serious operating problems, stop using the appliance and contact your dealer immediately.
Due to safety reasons it is prohibited to make unauthorized modifications to the unit.
FEATURES
This unit is radio-interference suppressed. This product meets the requirements of the current European and
national guidelines. Conformity has been established and the relevant statements and documents have been
deposited by the manufacturer.
Compact RGB remote control for LED projectors
Extremely user-friendly and easy
2 user programmable scenes.
Sends 4 standard DMX-channels: R + G + B + master dimmer
Easy wall mounting, fits in any standard recessed wall box
Perfect for use in LED installations for hotels, homes, shops, …
Several wall dimmers can be combined together in bigger installations
Comes with 2 different cover plates
3 different working modes for maximum flexibility.
BEFORE USE
Check the contents:
Check that the carton contains the following items:
Wall dimmer
1 extra cover plate
User manual
Some important instructions:
Before you start using this unit, please check if there’s no transportation damage. Should there be any, do
not use the device and consult your dealer first.
Important: This device left our factory in perfect condition and well packaged. It is absolutely necessary
for the user to strictly follow the safety instructions and warnings in this user manual. Any damage caused
by mishandling is not subject to warranty. The dealer will not accept responsibility for any resulting defects
or problems caused by disregarding this user manual.
Keep this booklet in a safe place for future consultation. If you sell the fixture, be sure to add this user
manual.
To protect the environment, please try to recycle the packing material as much as possible.
SAFETY INSTRUCTIONS:
This symbol means: indoor use only
This symbol means: Read instructions
To prevent fire or shock hazard, do not expose this appliance to rain or moisture.
To avoid condensation to be formed inside, allow the unit to adapt to the surrounding temperatures when
bringing it into a warm room after transport. Condense sometimes prevents the unit from working at full
performance or may even cause damages.
This unit is for indoor use only.
Don’t place metal objects or spill liquid inside the unit. No objects filled with liquids, such as vases, shall be
placed on this appliance. Electric shock or malfunction may result. If a foreign object enters the unit,
immediately disconnect the mains power.
No naked flame sources, such as lighted candles, should be placed on the appliance.
Prevent use in dusty environments and clean the unit regularly.
MAINTENANCE
Clean by wiping with a polished cloth slightly dipped with water. Avoid getting water inside the unit. Do not
use volatile liquids such as benzene or thinner which will damage the unit.
INSTALLATION
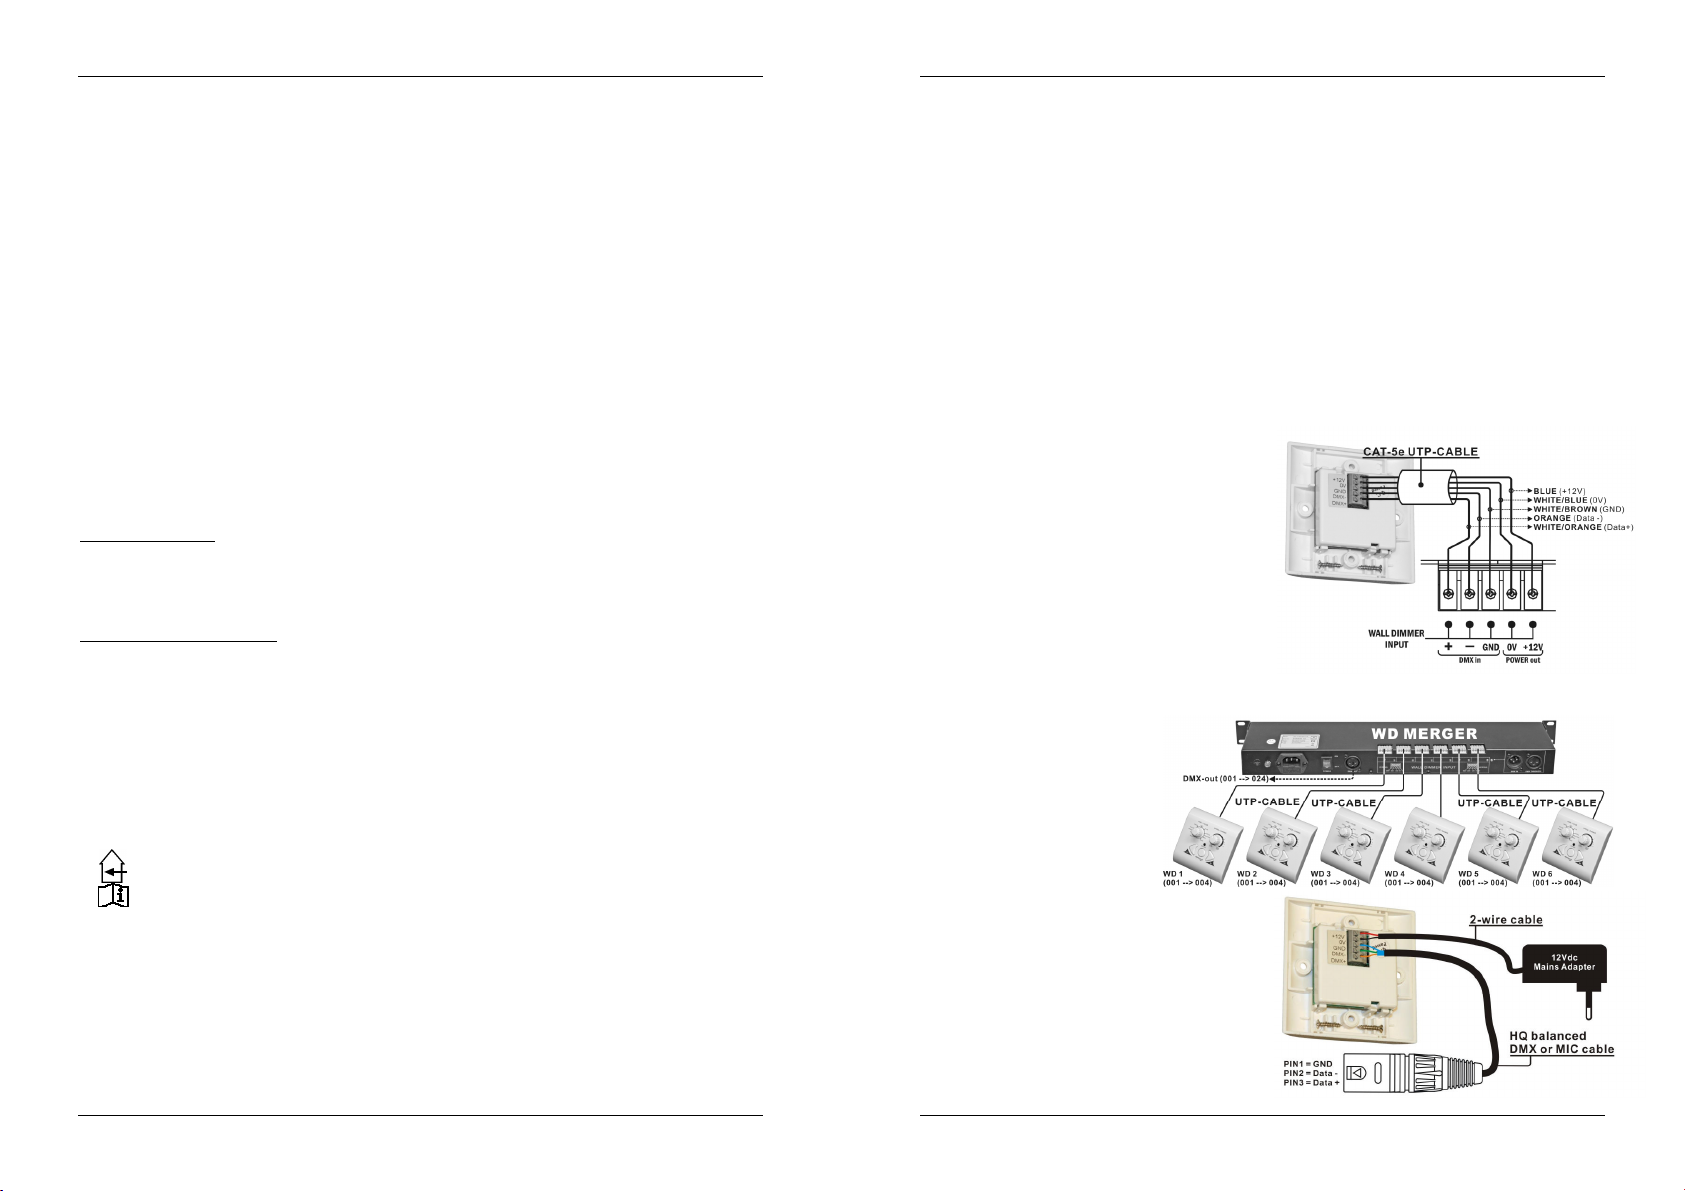
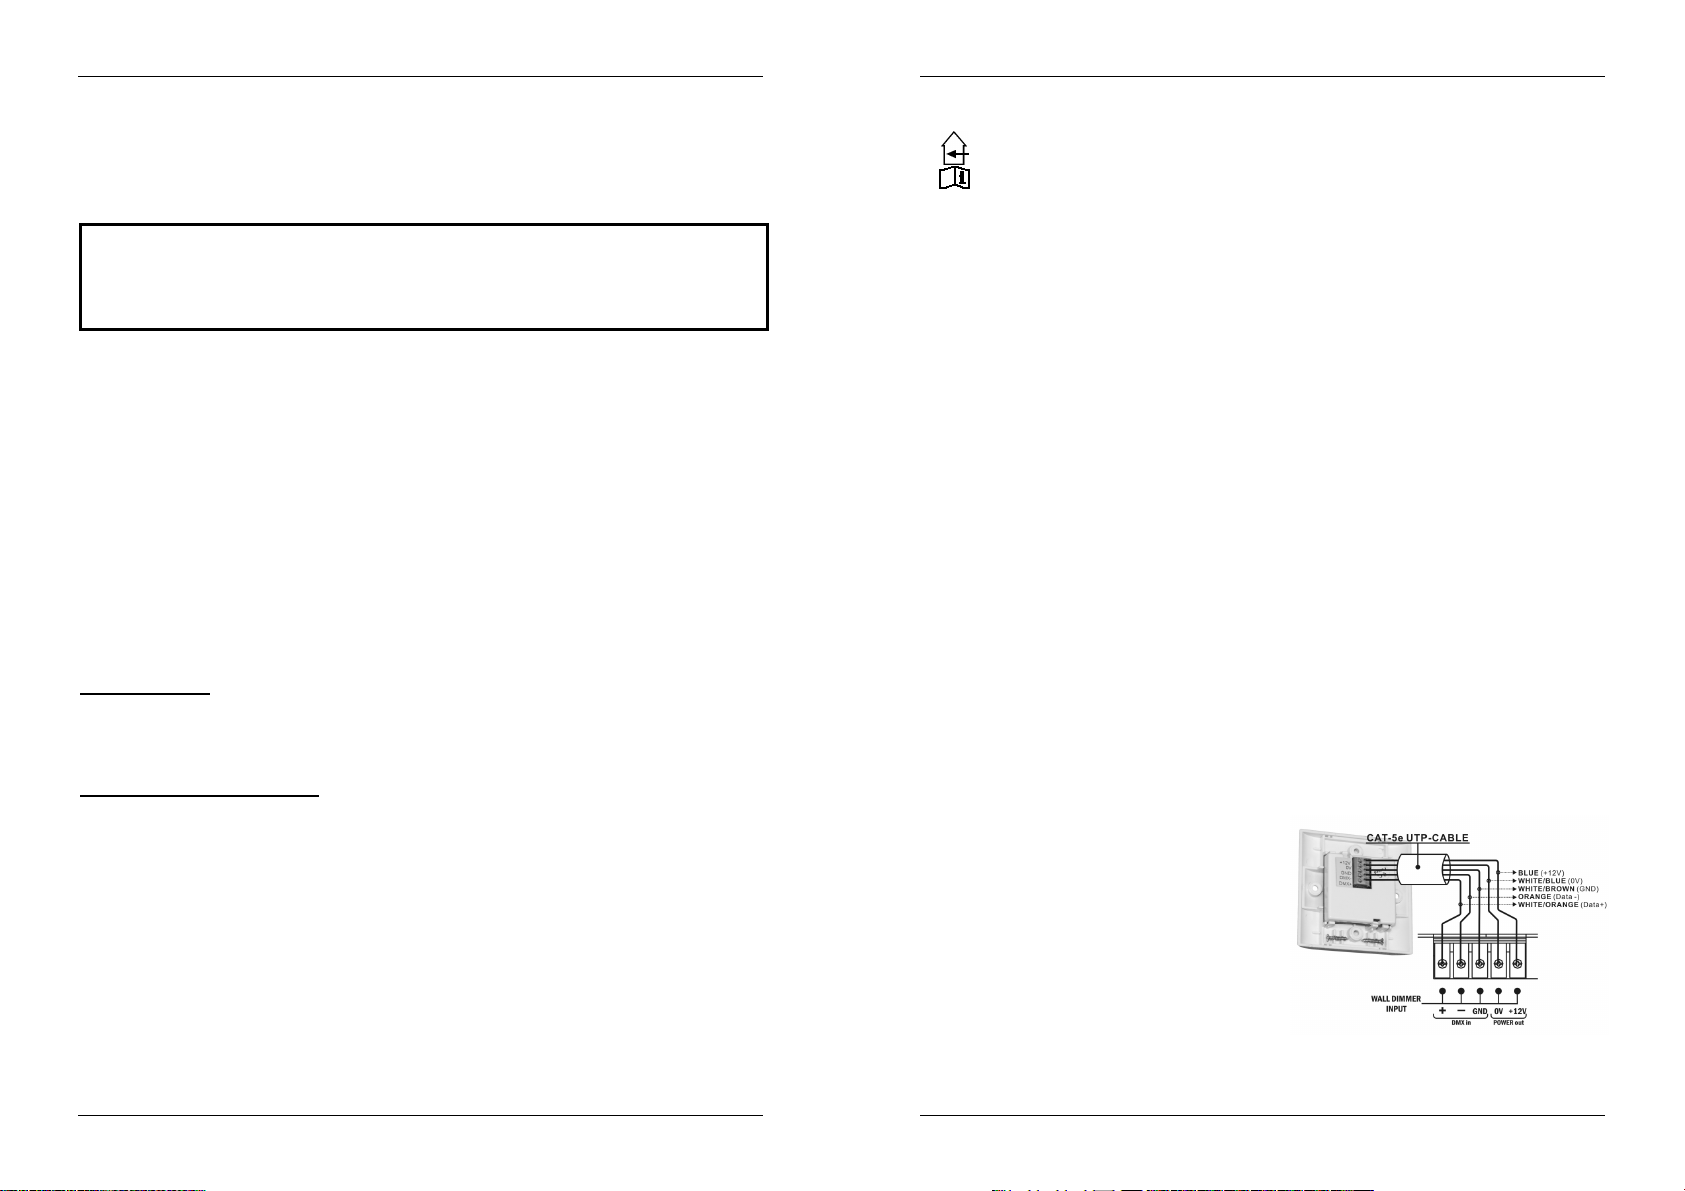
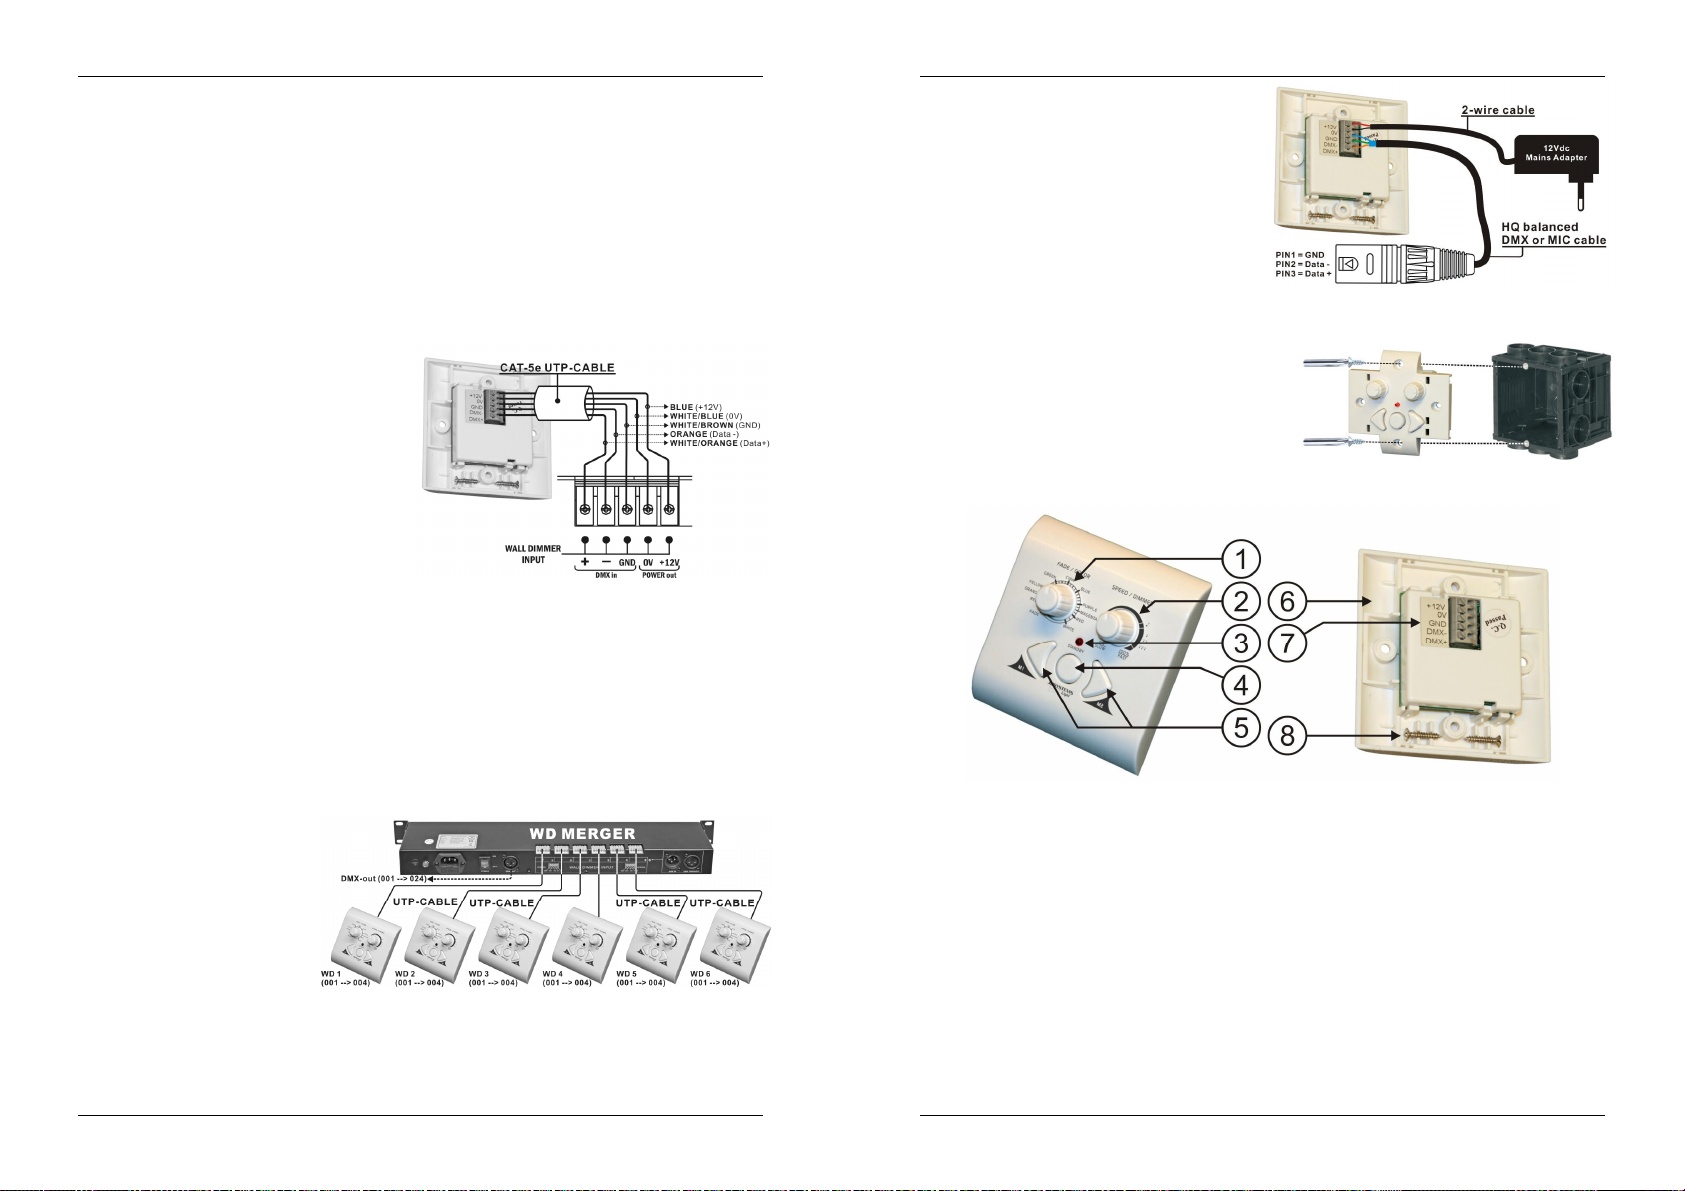
Use CAT5e UTP cable for the connections. This is standard Ethernet computer network cable that you can
easily find in any computer shop. It’s important that you follow the color codes for proper installation:
BLUE = +12V
WHITE/BLUE = 0V
WHITE/BROWN = signal ground
ORANGE = DMX data-
ORANGE/WHITE = DMX data+
Depending on the application the LED Wall Dimmer
can be used with different JB-Systems LED products:
MICRO LED MANAGER / MINI LED MANAGER Mk2:
Unplug the LED Manager from the mains.
Connect the UTP-cable as indicated on the
drawing.
Set the DMX address of the LED Manager to
address 001.
Done!
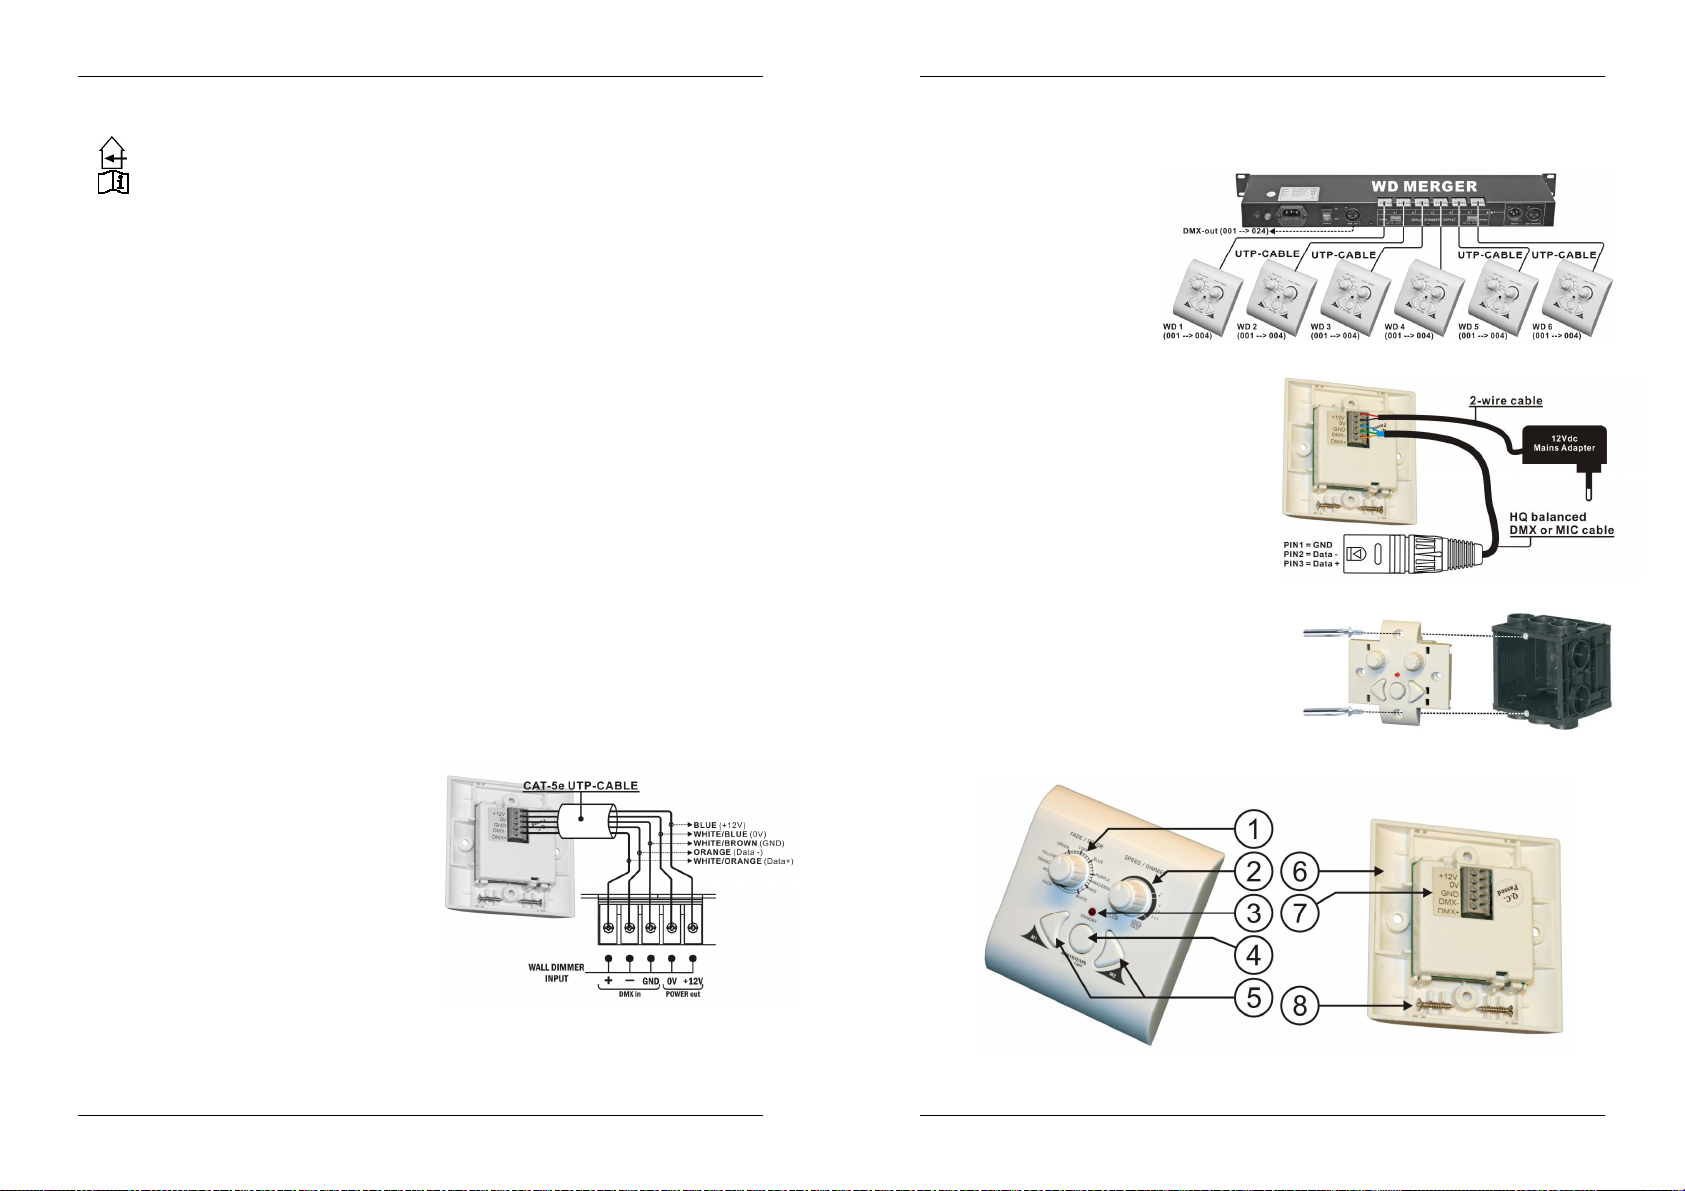
WD MERGER (Wall Dimmer Merger):
The WD Merger makes it possible to connect up to 6 wall dimmers on one DMX line. The DMX-signals from
the 6 LED Wall Dimmers (each 001 to 004) will be merged to one DMX-signal (001 to 024):
Wall Dimmer1 = 001 to 004
Wall Dimmer2 = 005 to 008
Wall Dimmer3 = 009 to 012
Wall Dimmer4 = 013 to 016
Wall Dimmer5 = 017 to 020
Wall Dimmer6 = 021 to 024
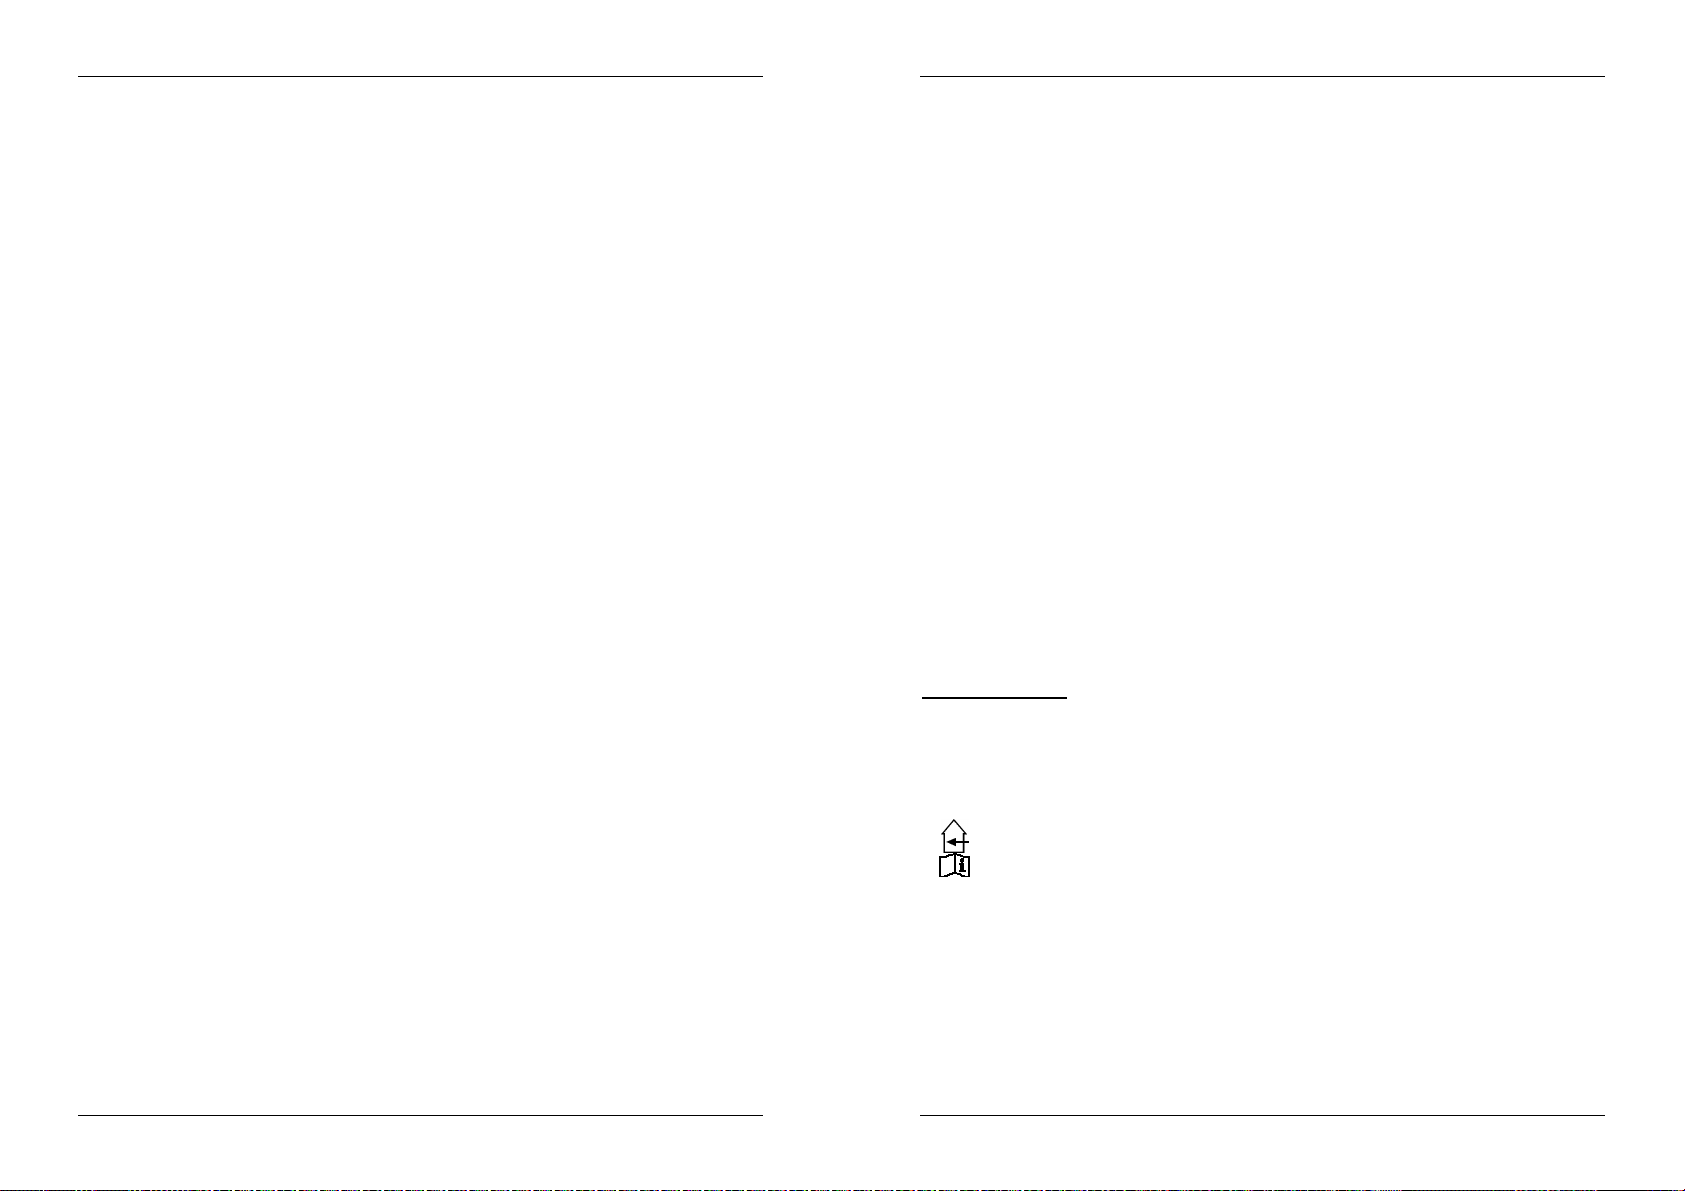
ANY OTHER JB SYSTEMS LED PRODUCT:
You can also use it together with other JB Systems
LED products like LED Ball, LED Par, LED
SPOT/WASH, LED MANAGER 300W, … However in
these cases you will need a separate +12Vdc power
supply connected to the Wall Dimmer. The DMX
outputs will be connected via a good quality balanced
DMX- cable and XLR-connector. The connected LED
product should be assigned to DMX address 001.
®
JB SYSTEMS
®
1/25 LED WALL DIMMER
JB SYSTEMS
®
2/25 LED WALL DIMMER
Page 4
ENGLISH OPERATION MANUAL
ENGLISH OPERATION MANUAL
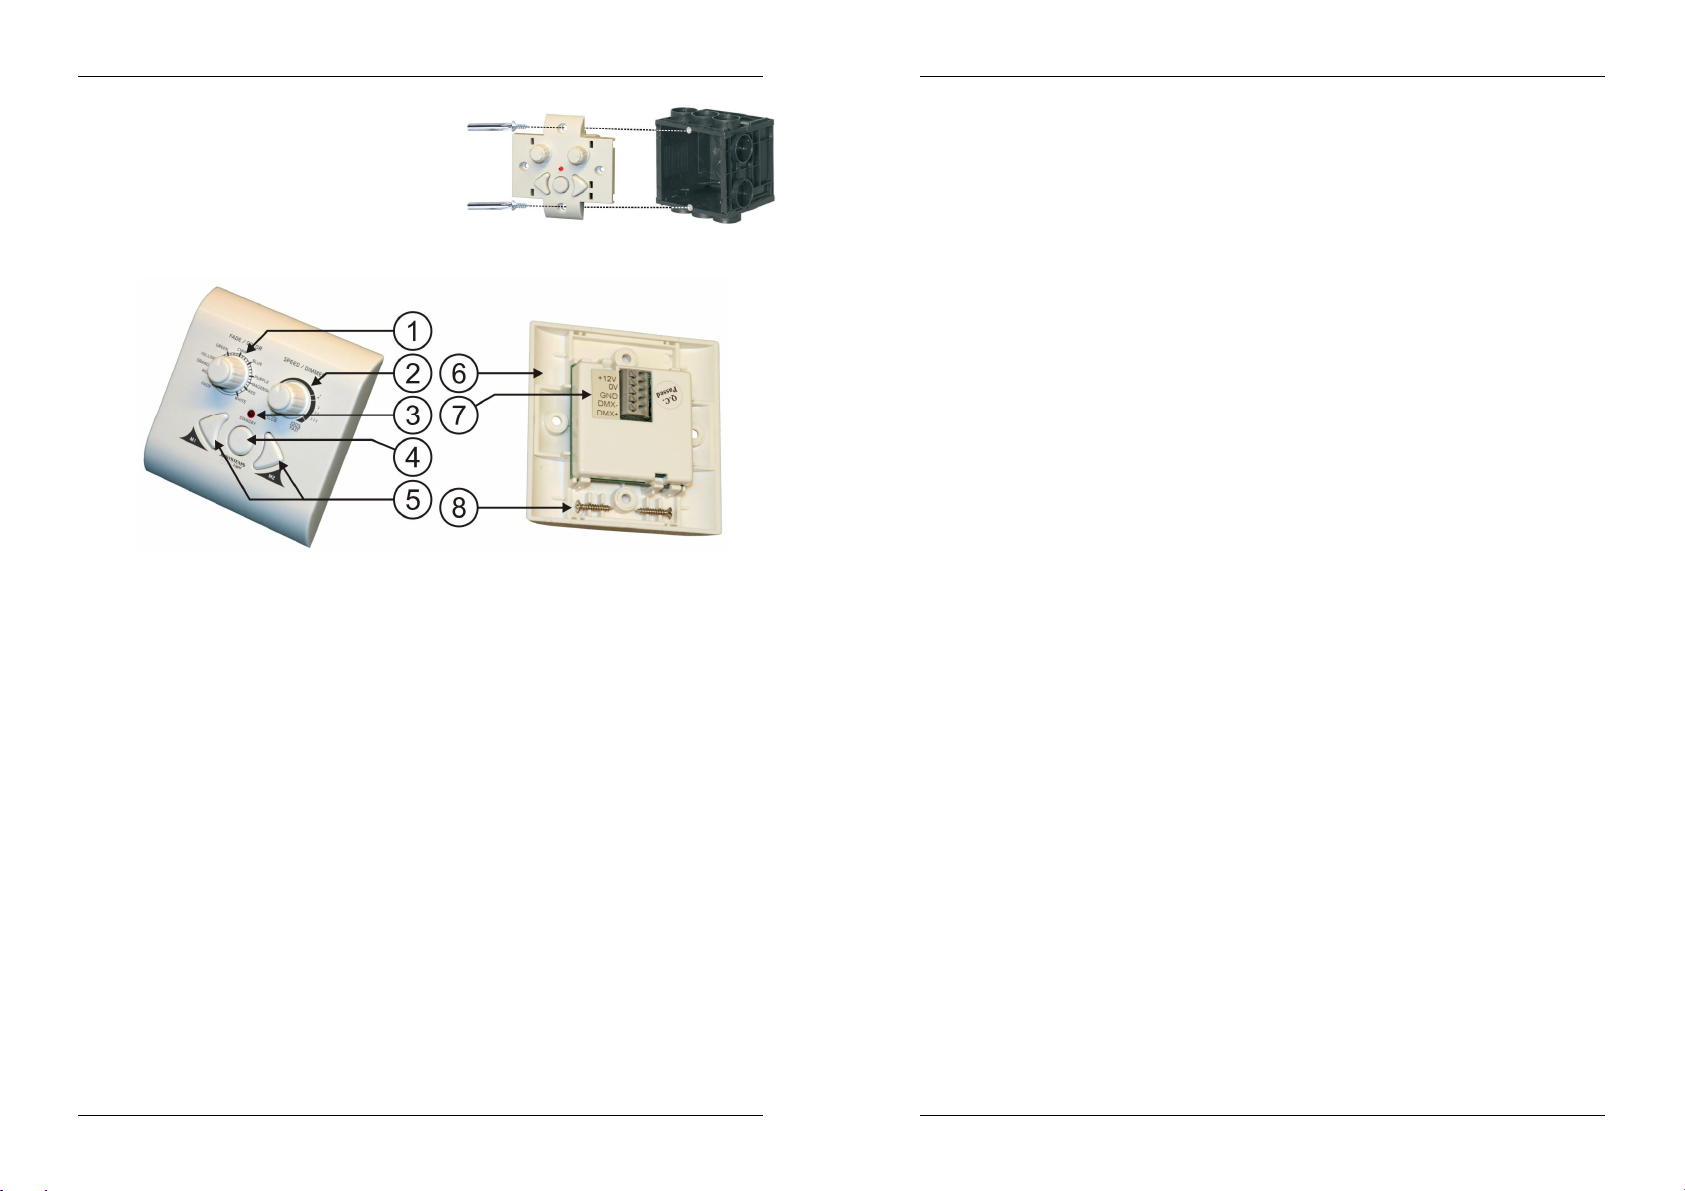
MECHANICAL INSTALLATION IN WALL BOX:
The LED Wall Dimmer can be installed in any standard
recessed wall box with screw fixations:
Take the cover plate off (easy click-on system)
Locate the unit in the recessed wall box and fasten
with the 2 screws.
Click the cover plate back on.
Done!
FUNCTIONS
1. FADE/COLOR KNOB: has different functions, depending on the working mode (see n°5):
RGB1 & RGB2 MODE:
o Used the select one of the many preprogrammed colors. Use the SPEED/DIMMER knob (2)
to adapt the dimming level.
o Turn the knob completely to the left to start the FADE function: you will obtain a nice flow
from one color into another. Use the SPEED/DIMMER knob (2) to change the fading speed,
light output is always at maximum level.
2 CHANNEL MODE: Used to dim DMX-channel 1 from value 000 to 255.
2. SPEED/DIMMER KNOB: has different functions, depending on the working mode (see n°5):
RGB1 MODE: master dimmer (DMX-channel4) can be adapted from 0% to 100%. You can also
select the strobe function (from slow to fast) and music function.
RGB2 MODE: master dimmer (DMX-channel4) can be adapted from 0% to 100%.
2 CHANNEL MODE: Used to dim DMX-channel 2 from value 000 to 255.
3. STANDBY LED: is lit while the output of the Wall dimmer is set to blackout. Makes it easier to find the
wall dimmer in the dark.
4. STANDBY BUTTON: used to switch the output on/off (blackout)
5. MEMORY BUTTONS: buttons M1 and M2 are used to memorize 2 different output settings (scenes).
You can also use these buttons to choose one of the 3 working modes of the wall dimmer:
MEMORIZE A SCENE: use the 2 knobs (1) and (2) to set the right light atmosphere. To memorize
this setting for future use, just press the M1 or M2 button until the STANDBY LED (3) blinks shortly.
You can do the same for the other memory button.
SELECT WORKING MODES: see specifications for the exact DMX-channel distribution.
o RGB1 MODE: this is the standard working mode, nothing special should be done.
o RGB2 MODE: press the STANDBY and M1-buttons together until the STANDBY LED (3)
blinks shortly.
o 2 CHANNEL MODE: press the STANDBY and M2-buttons together until the STANDBY LED
(3) blinks shortly.
6. COVER PLATE: two interchangeable cover plates for the different working modes can be easily clicked
on the wall dimmer.
7. WIRE TERMINALS: easy press-on wire terminals, see chapter “installation” for more information.
8. MOUNTING SCREWS: can be used to fix the wall dimmer in a recessed wall box, see installation for
more information.
SPECIFICATIONS
Power Input: DC 12V / 400mA.
DMX outputs: wire terminals
DMX channels: RGB1 mode:
CH1 = RED (DMX-values : 000 255)
CH2 = GREEN (DMX-values : 000 255)
CH3 = BLUE (DMX-values : 000 255)
CH4 = MASTER DIMMER (DMX-values : 000 255)
RGB2 mode:
CH1 = RED (DMX-values : 000 255)
CH2 = GREEN (DMX-values : 000 255)
CH3 = BLUE (DMX-values : 000 255)
CH4 = MASTER DIMMER (DMX-values : 000 190)
2 CHANNEL mode:
CH1 = DIMMER1 (DMX-values : 000 255)
CH2 = DIMMER2 (DMX-values : 000 255)
Size: cover plate = 83 x 83 mm
Installation depth = 16 mm
Weight: 60 g
Every information is subject to change without prior notice
You can download the latest version of this user manual on our website: www.beglec.com
JB SYSTEMS
®
3/25 LED WALL DIMMER
JB SYSTEMS
®
4/25 LED WALL DIMMER
Page 5
FRANCAIS MODE D’EMPLOI
MODE D’EMPLOI
Nous vous remercions d’avoir acheté ce produit JB Systems®. Veuillez lire ce mode d’emploi très
attentivement afin de pouvoir exploiter toutes les possibilités de cet appareil.
EN VOUS INSCRIVANT POUR LA LETTRE D’INFORMATION VOUS SEREZ TOUJOURS
TENU AU COURANT DES DERNIERES NOUVELLES CONCERNANT NOS PRODUITS:
NOUVEAUTES, ACTIONS SPECIALES, JOURNEES PORTES OUVERTES, ETC.
SURFEZ SUR: WWW.BEGLEC.COM ET INSCRIVEZ-VOUS
CARACTERISTIQUES
Cet appareil ne produit pas d’interférences radio. Il répond aux exigences nationales et européennes. La
conformité a été établie et les déclarations et documents correspondants ont été déposés par le fabricant.
Commande à distance RGB compacte pour projecteurs à LED
Extrêmement conviviale et facile à manier
2 scènes programmables par l'utilisateur
L'appareil émet 4 signaux distincts vers des canaux DMX standard : R + G + B + master dimmer
(gradateur général)
Se monte facilement dans un mur, car il se place dans n'importe quel boîtier mural pour interrupteur
standard
L'appareil est idéal pour les installations basées sur les LED dans les hôtels, les magasins, les habitations
privées, etc …
Plusieurs LED Wall Dimmers peuvent être installés pour fonctionner ensemble dans des installations plus
conséquentes
L'appareil est livré avec 2 caches différents
Il possède 3 modes de fonctionnement afin de permettre une flexibilité maximale
FRANCAIS MODE D’EMPLOI
INSTRUCTIONS DE SECURITE:
Ce symbole signifie: uniquement pour usage à l'intérieur.
Ce symbole signifie : Lire le mode d’emploi.
Afin d’éviter tout risque d’incendie ou de décharge électrique, ne pas exposer cet appareil à la pluie ou
l’humidité.
Pour éviter la formation de condensation à l’intérieur de l’appareil, patientez quelques minutes pour laisser
l’appareil s’adapter à la température ambiante lorsqu’il arrive dans une pièce chauffée après le transport.
La condensation empêche l'appareil de fonctionner manière optimale, et elle peut même causer des
dommages.
Cet appareil est destiné à une utilisation à l’intérieur uniquement.
Ne pas insérer d’objet métallique ou renverser de liquide dans l’appareil. Aucun objet contenant un liquide,
tels que des vases, ne peut être placé sur cet appareil. Cela risquerait de provoquer une décharge
électrique ou un dysfonctionnement. Si un corps étranger est introduit dans l’appareil, déconnectez
immédiatement de la source d’alimentation.
Aucune source de flamme nue, telle que des bougies allumées, ne peut être placée sur l'appareil.
Ne pas utiliser l'appareil dans un environnement poussiéreux et le nettoyer régulièrement.
Ne pas laisser l'appareil à portée des enfants.
Les personnes non expérimentées ne doivent pas utiliser cet appareil.
La température ambiante maximale d’utilisation de l’appareil est de 45°C. Ne pas l’utiliser au-delà de cette
température.
Les installations électriques ne peuvent être faites que par du personnel qualifié et conformément aux
règlements de sécurité électrique et mécanique en vigueur dans votre pays.
Assurez-vous que la tension d’alimentation de la source d’alimentation de la zone dans laquelle vous vous
trouvez ne dépasse pas celle indiquée à l’arrière de l’appareil.
En cas de problèmes de fonctionnement sérieux, arrêtez toute utilisation de l’appareil et contactez votre
revendeur immédiatement.
Pour des raisons de sécurité, il est interdit d’apporter une quelconque modification à l’unité non
spécifiquement autorisée par les parties responsables.
AVANT L’UTILISATION
Vérifiez le contenu:
Vérifiez si l’emballage contient bien les articles suivants:
le LED Wall Dimmer
un cache supplémentaire
le mode d’emploi
Quelques instructions importantes:
Avant d’utiliser cet appareil, assurez-vous de l’absence de dommages liés au transport. En cas de
dommages, n’utilisez pas l’appareil et contactez le vendeur.
Important: Cet appareil a quitté notre usine en parfaite condition et bien emballé. Il est primordial que
l’utilisateur suive les instructions de sécurité et avertissements inclus dans ce manuel. La garantie ne
s’applique pas en cas de dommage lié à une utilisation incorrecte. Le vendeur ne prend pas la
responsabilité des défauts ou de tout problème résultant du fait de n’avoir pas tenu compte des mises en
garde de ce manuel.
Conservez ce manuel dans un endroit sûr pour toute consultation future. Si vous vendez l’appareil,
assurez-vous d’y joindre ce manuel également.
Afin de protéger l’environnement, merci de recycler les emballages autant que possible.
JB SYSTEMS
®
5/25 LED WALL DIMMER
ENTRETIEN
Nettoyez l’appareil à l’aide d’un chiffon doux, légèrement humide. Evitez d’introduire de l’eau à l’intérieur de
l’appareil. N’utilisez pas de produits volatils tels que le benzène ou le 'thinner' qui peuvent endommager
l’appareil.
INSTALLATION
Utilisez du câble UTP, CAT. 5e, pour réaliser les connexions. Il s'agit de câble Ethernet standard pour un
réseau d'ordinateurs que l'on peut aisément trouver dans n'importe quel magasin d'informatique domestique.
Afin de réaliser une installation correcte, il est important de respecter les codes des couleurs :
Bleu = + 12 V
BLANC/BLEU = 0V
BLANC/BRUN = mise à la terre
ORANGE = signaux DMX -
ORANGE/BLANC = signaux DMX +
Selon l'utilisation pour laquelle il est prévu, le LED Wall
Dimmer peut être combiné avec différents produits à
LED dans la gamme de JB Systems :
MICRO LED MANAGER / MINI LED MANAGER Mk2 :
Déconnectez le LED Manager de l'alimentation
secteur.
Connectez le câble UTP comme indiqué sur la
figure ci-contre.
Encodez l'adresse DMX du LED Manager comme étant l'adresse 001.
C'est terminé !
JB SYSTEMS
®
6/25 LED WALL DIMMER
Page 6

FRANCAIS MODE D’EMPLOI
FRANCAIS MODE D’EMPLOI
WD MERGER (Wall Dimmer Merger) :
Le WD Merger permet de connecter jusqu'à 6 W all Dimmers sur une seule chaîne gérée par des signaux
DMX. Les signaux DMX en provenance des 6 LED Wall Dimmers (correspondant aux adresses DMX allant
de 001 à 004) seront mélangés pour devenir une seule source de signaux DMX (de 001 à 024) :
Wall Dimmer 1 = de 001 à 004
Wall Dimmer 2 = de 005 à 008
Wall Dimmer 3 = de 009 à 012
Wall Dimmer 4 = de 013 à 016
Wall Dimmer 5 = de 017 à 020
Wall Dimmer 6 = de 021 à 024
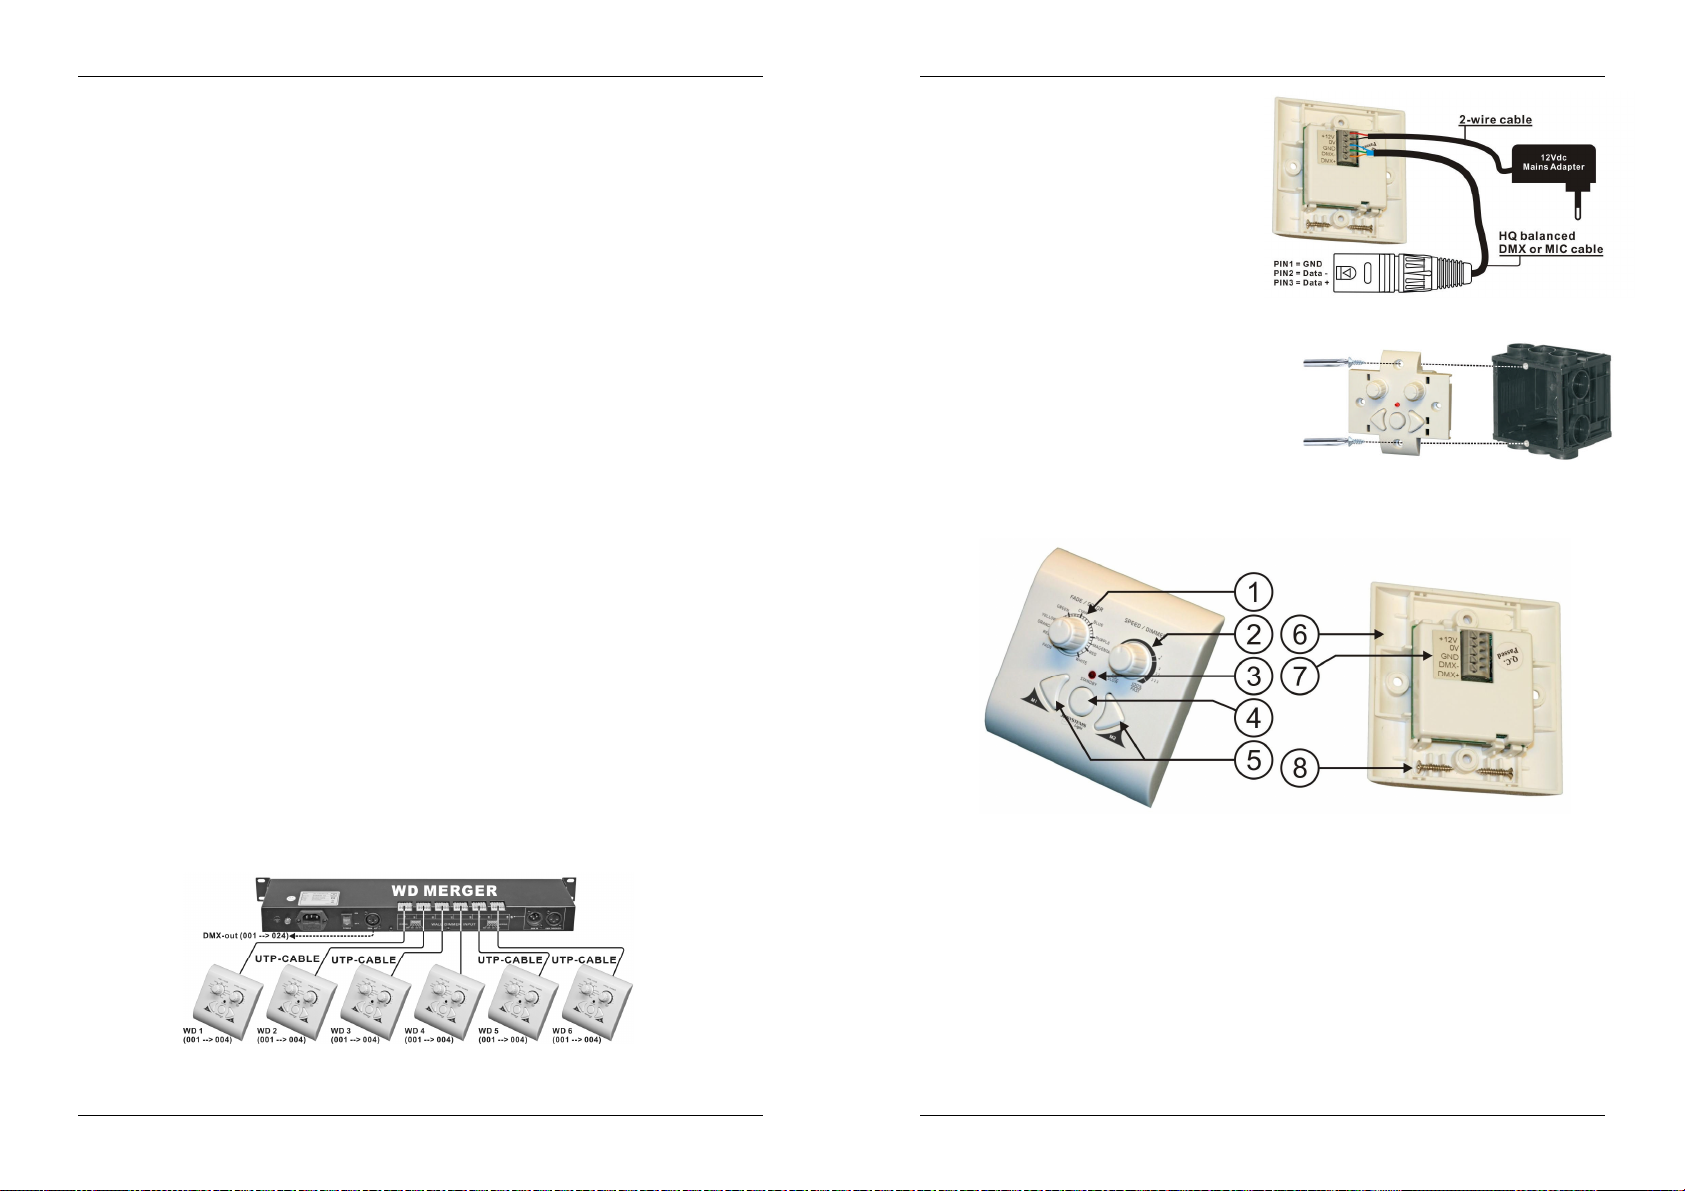
N'IMPORTE QUEL AUTRE PRODUIT A LED JB SYSTEMS :
Vous pouvez aussi utiliser le LED Wall Dimmer avec d'autres produits à LED JB Systems®, comme les
appareils LED Ball, LED Par, LED SPOT/WASH, LED MANAGER 300W, etc … Cependant, dans ce cas, il
vous faudra utiliser un transfo d'alimentation séparé de 12 V CA qui sera connecté au LED Wall Dimmer.
Les sorties DMX devront être raccordées via un câble DMX symétrique de bonne qualité et un connecteur
XLR. L'appareil à LED connecté devrait correspondre à l'adresse DMX 001.
INSTALLATION MECANIQUE DANS UN BOITIER MURAL :
Le LED Wall Dimmer peut être installé dans n'importe quel boîtier plastique standard encastrable dans un
mur avec des vis pour le fixer :
Enlever le cache de l'appareil (système à clips très facile)
Placez l'appareil dans le boîtier encastré dans le mur et fixez-le avec 2 vis.
Replacez le cache en le clipsant sur l'appareil.
C'est terminé !
FONCTIONS
1. Bouton FADE/COLOR : ce bouton assure différentes fonctions selon le mode de fonctionnement (prière
de se reporter au n° 5)
MODES RGB1 & RGB2 :
o Est utilisé pour sélectionner l'une des nombreuses couleurs préprogrammées. Utilisez le
bouton SPEED/DIMMER (2) pour adapter l'intensité du gradateur.
o Tournez le bouton complètement vers la gauche pour faire démarrer la fonction FADE : vous
obtiendrez un fondu enchaîné en douceur d'une couleur à l'autre. Utilisez le bouton
SPEED/DIMMER (2) pour changer la vitesse des fondus enchaînés, la puissance de sortie
lumineuse est toujours à son niveau le plus élevé.
Mode à 2 canaux : Ce mode est utilisé pour faire varier la valeur du canal DMX 1 de la valeur 000 à
la valeur 255.
2. BOUTON SPEED/DIMMER : ce bouton assure différentes fonctions selon le mode de fonctionnement
(prière de se reporter au n° 5)
MODE RGB1 : le gradateur maître (master dimmer, canal DMX 4) peut être adapté de 0 % à 100 %.
Vous pouvez également sélectionner la fonction stroboscopique (de lent à rapide) et la fonction
musicale.
MODE RGB2 : le gradateur maître (master dimmer, canal DMX 4) peut être adapté de 0 % à 100 %.
Mode à 2 canaux : Ce mode est utilisé pour faire varier la valeur du canal DMX 2 de la valeur 000 à
la valeur 255.
3. LED indiquant l'état de STANDBY : cette LED est allumée quand la sortie du LED Wall Dimmer en en
mode "black out". Cela permet de localiser plus facilement le LED W all Dimmer dans le noir.
4. Touche STANDBY : cette touche est utilisée pour mettre l'appareil en ou hors (black out) service.
5. TOUCHES DES MEMOIRES : les touches M1 et M2 sont utilisées pour mémoriser et rappeler 2
ensembles de réglages différents ( appelés 2 'scènes'). On peut aussi utiliser ces touches pour choisir
entre les 3 modes de fonctionnement du LED Wall Dimmer :
MEMORISER UNE SCENE : utilisez les deux boutons (1) et (2) pour arriver à l'atmosphère
lumineuse désirée. Afin de mémoriser cet ensemble de réglages pour une utilisation dans le futur, il
vous suffit d'appuyer sur les touches M1 et M2 jusqu'à ce que la LED témoin de STANDBY (3) se
mette à clignoter brièvement. Vous pouvez procéder exactement de la même manière pour l'autre
bouton de mémorisation.
POUR SELECTIONNER LES MODES DE FONCTIONNEMENT : prière de se reporter aux
spécifications relatives à la distribution exacte des canaux DMX.
o MODE RGB1 : il s'agit du mode de fonctionnement "standard", il n'y a rien de spécial à faire.
o MODE RGB2 : appuyez en même temps sur la touche STANDBY et la touche M1 jusqu'à ce
que la LED témoin de STANDBY se mette à clignoter brièvement.
o Mode à 2 canaux : appuyez en même temps sur la touche STANDBY et la touche M2
jusqu'à ce que la LED témoin de STANDBY se mette à clignoter brièvement.
6. CHACHE DE L'APPAREIL : deux caches interchangeables destinés aux différents modes de
fonctionnement peuvent être aisément clipsés sur le LED Wall Dimmer.
JB SYSTEMS
®
7/25 LED WALL DIMMER
JB SYSTEMS
®
8/25 LED WALL DIMMER
Page 7

FRANCAIS MODE D’EMPLOI
7. BORNES DE CONNEXION : système facile de connexion : il suffit d'appuyez sur les bornes, un ressort
coince les câbles. Prière de se reporter au chapitre "Installation" pour de plus amples informations.
8. VIS DE MONTAGE : elles sont à utiliser pour fixer le LED Wall Dimmer dans un boîtier standard
encastré dans un mur. Prière de se reporter au chapitre "Installation" pour de plus amples informations.
NEDERLANDS HANDLEIDING
GEBRUIKSAANWIJZING
SPÉCIFICATIONS
Power Input: 12 V / 400 mA / CC.
Sorties DMX: sur les bornes de sortie
Canaux DMX: MODE RGB1 :
CH1 = ROUGE (valeurs DMX : 000 255)
CH2 = VERT (valeurs DMX : 000 255)
CH3 = BLEU (valeurs DMX : 000 255)
CH4 = gradateur maître (MASTER DIMMER) (valeurs DMX : 000 255)
MODE RGB2 :
CH1 = ROUGE (valeurs DMX : 000 255)
CH2 = VERT (valeurs DMX : 000 255)
CH3 = BLEU (valeurs DMX : 000 255)
CH4 = gradateur maître (MASTER DIMMER) (valeurs DMX : 000 190)
Mode à 2 canaux :
CH1 = DIMMER1 (valeurs DMX : 000 255)
CH2 = DIMMER2 (valeurs DMX : 000 255)
Dimensions : Cache de recouvrement : 83 x 83 mm
Profondeur nécessaire à l'installation = 16 mm
Poids: 60 g
Chacune de ces informations peut être modifiée sans avertissement préalable. Vous pouvez
télécharger la dernière version de ce mode d’emploi de notre site Web: www.beglec.com
Hartelijk dank voor de aankoop van dit JB Systems®product. Om ten volle te kunnen profiteren van alle
mogelijkheden en voor uw eigen veiligheid, gelieve de aanwijzingen zeer zorgvuldig te lezen voor U begint
het apparaat te gebruiken.
DOOR U OP ONZE MAILINGLIJST IN TE SCHRIJVEN ONTVANGT U STEEDS DE
LAATSTE INFORMATIE OVER ONZE PRODUKTEN: NIEUWIGHEDEN, SPECIALE
ACTIES, OPENDEURDAGEN, ENZ.
SURF NAAR: WWW.BEGLEC.COM
KARAKTERISTIEKEN
In dit apparaat is radio-interferentie onderdrukt. Dit product voldoet aan de gangbare Europese en nationale
voorschriften. Het is vastgesteld dat het apparaat er zich aan houdt en de desbetreffende verklaringen en
documenten zijn door de fabrikant afgegeven.
Compacte RGB controller voor LED projectoren
Uitzonderlijk gebruiksvriendelijk en gemakkelijk
2 zelf programmeerbare scènes.
Stuurt 4 standaard DMX kanalen: R + G + B + master dimmer
Eenvoudige installatie in muren, past in elke elektrische standaard inbouwdoos.
Perfect voor permanente LED installaties in hotels, winkels, thuis, …
Meerdere wall dimmers kunnen bij grotere installaties samen gebruikt worden.
Wordt geleverd met 2 verschillende afdekplaten.
3 verschillende werkmodi voor een optimale flexibiliteit.
EERSTE INGEBRUIKNAME
Controleer de inhoud:
Kijk na of de verpakking volgende onderdelen bevat:
Wall dimmer
1 extra afdekplaat
Gebruiksaanwijzing
Belangrijke instructies:
Controleer voor het eerste gebruik van het apparaat of het tijdens het transport beschadigd werd. Mocht er
schade zijn, gebruik het dan niet, maar raadpleeg eerst uw dealer.
Belangrijk: Dit apparaat verliet de fabriek in uitstekende staat en goed verpakt. Het is erg belangrijk dat
de gebruiker de veiligheidsaanwijzingen en raadgevingen in deze gebruiksaanwijzing uiterst nauwkeurig
volgt. Elke schade veroorzaakt door verkeerd gebruik van het apparaat valt niet onder de garantie. De
dealer aanvaardt geen verantwoordelijkheid voor mankementen en problemen die komen door het
veronachtzamen van deze gebruiksaanwijzing.
Bewaar deze brochure op een veilige plaats om hem in de toekomst nogmaals te kunnen raadplegen.
Indien U het apparaat verkoopt, denkt U er wel aan om de gebruiksaanwijzing bij te voegen.
Om het milieu te beschermen, probeer zoveel mogelijk het verpakkingsmateriaal te recycleren.
JB SYSTEMS
®
9/25 LED WALL DIMMER
JB SYSTEMS
®
10/25 LED WALL DIMMER
Page 8
NEDERLANDS HANDLEIDING
NEDERLANDS HANDLEIDING
VEILIGHEIDSVOORSCHRIFTEN:
Dit symbool betekent: het apparaat mag enkel binnenhuis worden gebruikt.
Dit symbool betekent: Lees de handleiding!
Stel dit apparaat niet bloot aan regen of vocht, dit om het risico op brand en elektrische schokken te
voorkomen.
Om de vorming van condensatie binnenin te voorkomen, laat het apparaat aan de omgevingstemperatuur
wennen wanneer het, na het transport, naar een warm vertrek is overgebracht. Condensatie kan het
toestel soms verhinderen perfect te functioneren. Het kan soms zelfs schade aan het apparaat
toebrengen.
Gebruik dit apparaat uitsluitend binnenshuis.
Plaats geen stukken metaal en mors geen vocht binnen in het toestel om elektrische schokken of storing
te vermijden. Objecten gevuld met water, zoals bvb. Vazen, mogen op dit apparaat worden geplaatst.
Indien er toch een vreemd voorwerp of water in het apparaat geraakt, moet U het direct van het lichtnet
afkoppelen.
Open vuur, zoals brandende kaarsen, mogen niet op het apparaat geplaatst worden.
Zorg dat het toestel niet in een stoffige omgeving wordt gebruikt en maak het regelmatig schoon.
Houd het apparaat uit de buurt van kinderen.
Dit apparaat mag niet door onervaren personen bediend worden.
De maximum veilige omgevingstemperatuur is 40°C. Gebruik het apparaat dus niet bij hogere
temperaturen.
De elektrische installatie behoort uitsluitend uitgevoerd te worden door bevoegd personeel, volgens de in
uw land geldende regels betreffende elektrische en mechanische veiligheid.
Controleer dat de beschikbare spanning niet hoger is dan die aangegeven op de achterzijde van het
toestel.
Ingeval van ernstige problemen met het bedienen van het toestel, stopt U onmiddellijk het gebruik ervan.
Contacteer uw dealer voor een eventuele reparatie.
Om veiligheidsredenen is het verboden om ongeautoriseerde modificaties aan het toestel aan te brengen.
ONDERHOUD
Reinig het toestel met een zacht, lichtjes bevochtigd doek. Vermijd water te morsen in het toestel. Gebruik
nooit vluchtige producten zoals benzeen of thinner, dit kan het toestel beschadigen.
INSTALLATIE
Gebruik CAT5e UTP kabel voor de aansluitingen. Dit is standaard Ethernet computer netwerkkabel welke u
gemakkelijk in de meeste computerwinkels kunt
vinden. Het is zeer belangrijk dat u de kleurencodes
respecteert zodat de installatie ook correct kan
werken:
BLAUW = +12V
WIT/BLAUW = 0V
WIT/BRUIN = signaal grond
ORANJE = DMX data-
ORANJE/WIT = DMX data+
Afhankelijk van de toepassing kan de LED Wall
Dimmer gebruikt worden met verschillende JBSystems LED producten:
MICRO LED MANAGER / MINI LED MANAGER Mk2:
Ontkoppel de LED Manager van het stroomnet.
Verbind de UTP kabels zoals op de afbeelding
weergegeven wordt.
Stel het DMX adres van de LED Manager in op 001.
Klaar!
WD MERGER (Wall Dimmer Merger):
Met de WD Merger is het mogelijk om tot 6 wall dimmers op één enkele DMX lijn aan te sluiten. De DMX
signalen van de 6 LED Wall Dimmers (kanaal 001 tot 004 voor elke dimmer) zullen versmolten worden tot 1
enkel DMX signaal (kanaal 001 tot 024):
Wall Dimmer1 = 001 tot 004
Wall Dimmer2 = 005 tot 008
Wall Dimmer3 = 009 tot 012
Wall Dimmer4 = 0013 tot 016
Wall Dimmer5 = 0017 tot 020
Wall Dimmer6 = 0021 tot 024
ELK ANDER JB SYSTEMS LED PRODUCT:
U kunt de wall dimmer ook gebruiken met om het
even welk JB Systems®LED products zoals de LED
Ball, LED Par, LED SPOT/WASH, LED MANAGER
300W, … In deze gevallen zult u de wall dimmer wel
afzonderlijk moeten voeden met een +12Vdc
voedingsadapter. De DMX uitgangen moeten
verbonden worden met een symmetrische DMX kabel
van goede kwaliteit met een XLR aansluiting. De
verbonden LED producten moeten ingesteld worden
op DMX adres 001.
MECHANISCHE INSTALLATIE IN INBOUWDOZEN:
De LED Wall Dimmer kan in om het even welke standard
inbouwdoos met schroeven bevestigd worden:
Verwijder de afdekplaat (eenvoudig kliksysteem)
Plaats het toestel in de inbouwdoos en bevestig het
met de 2 schroeven.
Klik de afdekplaat weer op het toestel.
Klaar!
FUNCTIES
1. FADE/COLOR KNOP: heeft verschillende functies, afhankelijk van de werkmodus (zie n°5):
RGB1 & RGB2 MODUS:
JB SYSTEMS
®
11/25 LED WALL DIMMER
JB SYSTEMS
®
12/25 LED WALL DIMMER
Page 9
NEDERLANDS HANDLEIDING
o Wordt gebruikt om één van de vele voorgeprogrammeerde kleuren te kiezen. Gebruik de
SPEED/DIMMER knop (2) om het dimniveau in te stellen.
o Draai de knop volledig naar links om de FADE functie te laten starten: zo bekomt u mooie
zachte kleurovergangen. Gebruik de SPEED/DIMMER knop (2) om de overgangssnelheid in
2 KANAALS MODUS: wordt gebruikt om DMX kanaal 1 in te stellen van waarde 000 tot 255.
2. SPEED/DIMMER KNOP: heeft verschillende functies, afhankelijk van de werkmodus (zie n°5):
RGB1 MODUS: master dimmer (DMX kanaal 4) kan ingesteld worden van 0% tot 100%. U kunt ook
RGB2 MODUS: master dimmer (DMX kanaal 4) kan ingesteld worden van 0% tot 100%.
2 KANAALS MODUS: wordt gebruikt om DMX kanaal2 te dimmen met een waarde van 000 tot 255.
3. STANDBY LED: is aan wanneer de uitgang van de Wall dimmer ingesteld is op blackout. Zo vindt u de
wall dimmer ook gemakkelijker terug wanneer het donker is.
4. STANDBY TOETS: wordt gebruikt om de uitgang aan/uit te zetten (blackout)
5. MEMORY TOETSEN: toetsen M1 en M2 worden gebruikt om 2 verschillende instellingen (scenes) in op
te slaan. U kunt deze toetsen ook gebruiken om één van de 3 werkmodi van de wall dimmer te kiezen:
EEN SCENE OPSLAAN: gebruik de 2 knoppen (1) en (2) om de gewenste atmosfeer in te stellen.
KIES DE WERKMODUS: zie de eigenschappen voor de exacte DMX kanaalverdeling.
6. AFDEKPLAAT: 2 verwisselbare afdekplaten voor verschillende werkmodi die gemakkelijk op de wall
dimmer kunnen geklikt worden.
7. DRAADKLEMMEN: gemakkelijke drukklemmen. Zie hoofdstuk “installatie” voor meer info.
8. MONTAGESCHROEVEN: kunnen gebruikt worden om de wall dimmer in een inbouwdoos te
bevestigen.
te stellen, de lichtsterkte staat steeds op maximum.
de strobe functie (van traag tot snel) en de muziekfunctie kiezen.
Om deze instelling op te slaan, zodat u deze later terug kunt oproepen, drukt u gewoon op de M1 of
M2 toets tot de STANDBY LED (3) even knippert. U kunt hetzelfde doen met de andere toets om
een tweede instelling op te slaan.
o RGB1 MODUS: dit is de standaard werkmodus.
o RGB2 MODUS: druk tegelijkertijd op de STANDBY en op de M1 toetsen tot de STANDBY
LED (3) even knippert.
o 2 KANALS MODUS: druk tegelijkertijd op de STANDBY en de M2 toetsen tot de STANDBY
LED (3) even knippert.
EIGENSCHAPPEN
Voeding: DC 12V / 400mA.
DMX uitgangen: Draadklemmen
DMX kanalen: RGB1 modus:
Afmetingen: Afdekplaat = 83 x 83 mm
Gewicht: 60 g
Elke inlichting kan veranderen zonder waarschuwing vooraf.
U kan de laatste versie van deze handleiding downloaden via onze website: www.beglec.com
Kanaal1 = ROOD (DMX waarden : 000 255)
Kanaal2 = GROEN (DMX waarden : 000 255)
Kanaal3 = BLAUW (DMX waarden : 000 255)
Kanaal4 = MASTER DIMMER (DMX waarden : 000 255)
RGB2 modus:
Kanaal1 = ROOD (DMX waarden : 000 255)
Kanaal2 = GROEN (DMX waarden : 000 255)
Kanaal3 = BLAUW (DMX waarden : 000 255)
Kanaal4 = MASTER DIMMER (DMX waarden : 000 190)
2 Kanaals modus:
Kanaal1 = DIMMER1 (DMX waarden : 000 255)
Kanaal2 = DIMMER2 (DMX waarden : 000 255)
Installatiediepte = 16 mm
DEUTSCH BEDIENUNGSANLEITUNG
BEDIENUNGSANLEITUNG
Vielen Dank, dass Sie sich für den Erwerb dieses JBSystems®-Produkt entschieden haben. Bitte lesen Sie
diese Bedienungsanleitung sorgfältig vor der Inbetriebnahme durch, zur vollen Ausschöpfung der
Möglichkeiten, die dieses Gerät bietet, sowie zu Ihrer eigenen Sicherheit.
EIGENSCHAFTEN
Das Gerät ist funkentstört und erfüllt die Anforderungen der europäischen und nationalen Bestimmungen.
Entsprechende Dokumentation liegt beim Hersteller vor.
Kompakte RGB-Fernsteuerung für LED-Scheinwerfer
Äußerst benutzerfreundlich und einfach zu handhaben
2 vom Bediener programmierbare Lichtszenen.
Sendet 4 standard DMX-Kanäle: R + G + B + Master Dimmer
Einfach an der Wand zu befestigen, passt in jede herkömmliche Unterputz-Wanddose
Optimal zum Gebrauch in LED-Anlagen für Hotels, Eigenheimen, Geschäfte, …
Mehrere W anddimmer können in größeren Anlagen aneinandergereiht werden
Wird mit 2 verschiedenen Abdeckplatten geliefert
3 verschiedene Betriebsmodi für maximale Flexibilität
VOR DER ERSTBENUTZUNG
Überprüfen Sie den Inhalt:
Folgende Teile müssen sich in der Geräteverpackung befinden:
Wanddimmer
1 Zusatz-Abdeckplatte
Bedienungsanleitung
Wichtige Hinweise:
Vor der Erstbenutzung bitte das Gerät zuerst auf Transportschäden überprüfen. Sollte das Gerät einen
Schaden aufweisen, Gerät bitte nicht benutzen, sondern setzen Sie sich unverzüglich mit ihrem Händler in
Verbindung.
Wichtiger Hinweis: Das Gerät hat das Werk unbeschädigt und gut verpackt verlassen. Es ist wichtig,
dass der Benutzer sich streng an die Sicherheitshinweise und Warnungen in der Bedienungsanleitung
hält. Schäden durch unsachgemäße Handhabung sind von der Garantie ausgeschlossen. Der Händler
übernimmt keine Verantwortung für Schäden, die durch Nichtbeachtung der Bedienungsanleitung
hervorgerufen wurden.
Die Bedienungsanleitung zum zukünftigen Nachschlagen bitte aufbewahren. Bei Verkauf oder sonstiger
Weitergabe des Geräts bitte Bedienungsanleitung beifügen.
Aus Umweltschutzgründen Verpackung bitte wiederverwenden oder richtig trennen.
SICHERHEITSHINWEISE
Dieses Symbol bedeutet: Nur innerhalb von Räumen verwenden.
Dieses Symbol bedeutet: Achtung! Bedienungsanleitung lesen!
Zur Vermeidung von Stromschlag oder Feuer, Gerät bitte nicht Regen oder Feuchtigkeit aussetzen.
Zur Vermeidung von Kondensation lassen sie das Gerät bitte nach dem Transport in einer warmen
Umgebung einige Zeit zum Temperaturausgleich stehen. Kondensation kann zu Leistungsverlust des
Gerätes oder gar Beschädigung führen.
Gerät nicht im Freien und in feuchten Räumen und Umgebungen verwenden.
Keine Metallgegenstände oder Flüssigkeiten ins Innere des Geräts gelangen lassen. Keine mit Flüssigkeit
gefüllten Gegenstände, z.B. Vasen, auf das Gerät stellen. Kurzschluss oder Fehlfunktion können die Folge
sein. Falls es doch einmal vorkommen sollte, bitte sofort Netzstecker ziehen und vom Stromkreis trennen.
JB SYSTEMS
®
13/25 LED WALL DIMMER
JB SYSTEMS
®
14/25 LED WALL DIMMER
Page 10
DEUTSCH BEDIENUNGSANLEITUNG
DEUTSCH BEDIENUNGSANLEITUNG
Offene Brandquellen, wie z.B. brennende Kerzen, sollten nicht auf das Gerät gestellt werden.
Nicht in staubiger Umgebung verwenden und regelmäßig reinigen.
Für Kinder unerreichbar aufbewahren.
Unerfahrene Personen sollen das Gerät nicht bedienen.
Umgebungstemperatur darf 40ºC nicht überschreiten.
Elektrische Anschlüsse nur durch qualifiziertes Fachpersonal überprüfen lassen.
Sicherstellen, dass Netzspannung mit Geräteaufkleber übereinstimmt.
Bei Fehlfunktion Gerät nicht benutzen und sich mit dem Händler in Verbindung setzen.
Aus Sicherheitsgründen dürfen an dem Gerät keine unbefugten Veränderungen vorgenommen werden.
WARTUNG
Die Reinigung des Geräts erfolgt mit einem leicht mit Wasser angefeuchteten Tuch. Vermeiden Sie, dass
Wasser in das Gerätinnere gelangt. Verwenden Sie keine brennbaren Flüssigkeiten wie Benzin oder
Verdünner, die das Gerät beschädigen würden.
INSTALLATION
Verwenden Sie CAT5e UTP Kabel für die Anschlüsse. Das ist ein gebräuchliches Ethernet Computer
Netzwerkkabel, das Sie leicht in jedem Computer-Geschäft finden können. Es ist wichtig, dass Sie auf die
Farbcodes achten, um eine korrekte Installation zu gewährleisten:
BLAU = +12V
WEIß/BLAU = 0V
WEIß/BRAUN = Betriebserde
ORANGE = DMX Data-
ORANGE/WEIß = DMX Data+
Je nach Anwendung kann der LED Wanddimmer mit verschiedenen JB-Systems LED Produkten verwendet
werden:
MICRO LED MANAGER / MINI LED MANAGER Mk2:
Nehmen Sie den LED Manager vom Netz.
Schließen Sie das UTP-Kabel gemäß der Abbildung an.
Stellen Sie die DMX-Adresse des LED-Managers auf die Adresse 001.
Fertig!
WD MERGER (Wanddimmer Merger):
Der WD Merger ermöglicht es, bis zu 6 W anddimmer auf einer DMX-Leitung anzuschließen. Die DMXSignale von den 6 LED Wanddimmer (jeder 001 bis 004) werden zu einem DMX-Signal (001 bis 024)
zusammengefügt:
Wanddimmer1 = 001 bis 004
Wanddimmer2 = 005 bis 008
Wanddimmer3 = 009 bis 012
Wanddimmer4 = 0013 bis 016
Wanddimmer 5 = 0017 bis 020
Wanddimmer 6 = 0021 bis 024
JEDES ANDERE JB SYSTEMS LED-PRODUKT:
Sie können ihn auch zusammen mit anderen JB
Systems®LED Produkten verwenden wie LED Ball,
LED Par, LED SPOT/WASH, LED MANAGER
300W, … Allerdings benötigen Sie dann eine
getrennte +12V GS-Versorgung, die mit dem
Wanddimmer verbunden ist. Die DMX-Ausgänge
werden über ein hochwertiges symmetrisches DMXKabel und einen XLR-Stecker angeschlossen. Dem
angeschlossenen LED-Produkt muss die DMXAdresse 001 zugewiesen werden.
MECHANISCHE INSTALLATION IN WANDDOSE:
Der LED-Wanddimmer kann in jeder herkömmlichen
Unterputz-Wanddose mit Schrauben eingebaut werden:
Nehmen Sie die Abdeckplatte ab (einfaches
Einklicksystem)
Setzen Sie das Gerät in die Unterputz-Wanddosen
und befestigen Sie es mit den 2 Schrauben.
Klicken Sie die Abdeckplatte wieder ein.
Fertig!
FUNKTIONEN
1. FADE/COLOR KNOPF: hat verschiedene Funktionen abhängig vom Betriebsmodus (siehe Nr. 5):
RGB1 & RGB2 MODUS:
o Zur Auswahl einer der vielen vorprogrammierten Farben. Benutzen Sie den
SPEED/DIMMER Knopf (2), um den Dimmpegel zu regeln.
o Drehen Sie den Knopf ganz nach links, um die FADE-Funktion (Überblendung) zu starten:
Sie erhalten einen schönen Übergang von einer Farbe zur anderen. Benutzen Sie den
SPEED/DIMMER Knopf (2), um die Überblendgeschwindigkeit zu ändern, der Lichtausstoß
ist immer auf maximalem Niveau.
2 KANALMODUS: zum Dimmen des DMX-Kanals 1 vom W ert 000 bis 255.
2. SPEED/DIMMER KNOPF: hat verschiedene Funktionen abhängig vom Betriebsmodus (siehe Nr. 5):
RGB1 MODUS: Master Dimmer (DMX-Kanal 4) kann von 0% bis 100% geregelt werden. Sie können
auch die Strobe-Funktion (von langsam bis schnell) und die Musikfunktion wählen.
RGB2 MODUS: Master Dimmer (DMX-Kanal 4) kann von 0% bis 100% geregelt werden.
2 KANALMODUS: zum Dimmen des DMX-Kanals 2 vom Wert 000 bis 255.
3. STANDBY LED: leuchtet, während der Ausgang des Wanddimmers auf Blackout gestellt ist. Macht es
einfacher, den Wanddimmer im Dunkeln zu finden.
JB SYSTEMS
®
15/25 LED WALL DIMMER
JB SYSTEMS
®
16/25 LED WALL DIMMER
Page 11

DEUTSCH BEDIENUNGSANLEITUNG
4. STANDBY TASTE: zum An-/Ausschalten des Ausgangs (Blackout)
5. MEMORY TASTEN: Die Tasten M1 und M2 dienen zum Speichern von 2 verschiedenen
Ausgangseinstellungen (Lichtszenen). Sie können diese Tasten auch dazu benutzen, um einen der 3
Betriebsmodi des Wanddimmers auszuwählen:
EINE LICHTSZENE SPEICHERN: benutzen Sie die 2 Tasten (1) und (2), um die richtige
Lichtstimmung einzustellen. Um diese Einstellung für künftige Einsätze zu speichern, drücken Sie
einfach die M1 oder M2 Taste, bis die STANDBY LED (3) kurz aufblinkt. Sie können für die andere
Speichertaste in gleicher Weise verfahren.
BETRIEBSMODI AUSWÄHLEN: siehe Datenblatt für die genaue DMX-Kanal-Zuweisung.
o RGB1 MODUS: das ist der Standard-Betriebsmodus, es braucht nichts Besonderes
unternommen zu werden.
o RGB2 MODUS: drücken Sie die STANDBY und M1-Tasten gleichzeitig, bis die STANDBY
LED (3) kurz aufblinkt.
6. ABDECKPLATTE: zwei austauschbare Abdeckplatten für die verschiedenen Betriebsmodi, die sich
7. ANSCHLUSSKLEMMEN: bedienerfreundliche Schnapp-Anschlussklemmen, siehe Kapitel “Installation”
8. MONTAGESCHRAUBEN: können zur Befestigung des W anddimmers in einer Unterputz-Wanddose
o
leicht auf den Wanddimmer aufklicken lassen.
für weitere Erläuterungen.
benutzt werden, siehe Kapitel Installation für weitere Erläuterungen
TECHNISCHE EINZELHEITEN
Netzspannung: GS 12V / 400mA.
DMX-Ausgänge: Anschlussklemmen
DMX-Kanäle: RGB1 Modus:
Abmessungen: Abdeckplatte = 83 x 83 mm
Gewicht: 60 g
Technische Änderungen können auch ohne Vorankündigung vorgenommen werden!
Sie können sich die neueste Version dieses Benutzerhandbuches von unserer Website
CH1 = ROT (DMX-Werte : 000 255)
CH2 = GRÜN (DMX-Werte : 000 255)
CH3 = BLAU (DMX-Werte : 000 255)
CH4 = MASTER DIMMER (DMX-Werte : 000 255)
RGB2 Modus:
CH1 = ROT (DMX-Werte : 000 255)
CH2 = GRÜN (DMX-Werte : 000 255)
CH3 = BLAU (DMX-Werte : 000 255)
CH4 = MASTER DIMMER (DMX-Werte : 000 190)
2-KANAL Modus:
CH1 = DIMMER1 (DMX-Werte : 000 255)
CH2 = DIMMER2 (DMX-Werte : 000 255)
Einbautiefe = 16 mm
herunterladen: www.beglec.com
ESPAÑOL MANUAL DE INSTRUCCIONES
MANUAL DE INSTRUCCIONES
Gracias por la compra de este producto JB Systems®. Para sacar todo el rendimiento de las posibilidades de
este aparato y por su propia seguridad, por favor lea este manual de instrucciones con mucho cuidado antes
de utilizar este producto.
CARACTERÍSTICAS
Este producto interfiere con señales de radio. Este aparato cumple las exigencias Europeas y nacionales de
las normas actuales. Se ha establecido conformidad y las declaraciones y documentos relevantes se han
depositado por el fabricante.
Mando a distancia compacto RVA para proyectores LED
Sumamente fácil al uso
Disponibilidad de 2 escenas programables
Envía 4 canales DMX estándar: R + V + A + master dimerizable
Encastrable facilmente en la pared, mediante cualquier caja estándar empotrable de pared
Perfecto para empleo en instalaciones de LED para hoteles, casas, tiendas, …
Se pueden combinar varios dimerizadores de pared en instalaciones más grandes
Viene previsto de 2 tapas diferentes
3 modos diferentes de funcionamiento para una maxima flexibilidad .
ANTES DEL USO
Verificar el contenido:
Verificar la presencia de las partes siguientes:
Wall Dimmer (dimerizador de pared)
1 tapa suplementaria
Manual de instrucciones
Instrucciones importantes:
Antes de utilizar este producto, por favor compruebe que no hay daños causados por el transporte. En
caso contrario, no utilice este aparato y consulte a su vendedor.
Importante: Este aparato salio de la empresa en perfecto estado y bien empaquetado. Es absolutamente
necesario por parte del usuario de seguir estrictamente las instrucciones de seguridad y las advertencias
de este manual. Cualquier daño causado por manejo inadecuado no estará sujeto a la garantía. El
vendedor no aceptará responsabilidad por ningun defecto o problemas causados por negligencia de este
manual del usuario.
Mantenga este librito en un lugar seguro para consultas futuras. Si vende este aparato, asegúrese de
añadir este manual de usuario.
Para proteger el medio ambiente, intente por favor de reciclar el embalaje lo mas posible.
PRECAUCIONES DE USO
Este símbolo significa : uso para el interior solamente
Este símbolo significa : Lea las instrucciones
Para evitar riesgos de incendio o electrocución, no exponer el aparato a la lluvia o a la humedad.
Para evitar que se forme condensación en el interior, permita que el aparato se adapte a las temperaturas
circundantes cuando lo lleve a una habitación caliente después de transporte. Condensar algunas veces
impide que el aparato funcione a rendimiento pleno o incluso puede causar daños.
Este aparato es sólo para uso interior.
No coloque objetos metálicos o derrame líquidos dentro del producto. No colocar objectos llenos de
liquidos, como jarrónes, encima del aparato. Una descarga eléctrica o mal funcionamiento puede resultar.
Si un objeto extraño entrara en el aparato, desconecte inmediatamente la alimentación.
JB SYSTEMS
®
17/25 LED WALL DIMMER
JB SYSTEMS
®
18/25 LED WALL DIMMER
Page 12
ESPAÑOL MANUAL DE INSTRUCCIONES
ESPAÑOL MANUAL DE INSTRUCCIONES
No colocar fuentes desnudas de llamas, como velas encendidas, sobre el aparato.
Evite su uso en ambientes polvorientos y limpie la unidad regularmente.
Mantenga la unidad alejada de los niños.
Personas sin experiencia no deberían manejar este aparato.
La temperatura máxima del aparato es 40°C. No use este producto a temperaturas más elevadas.
La instalación eléctrica se debe realizar solamente por personal cualificado, según las regulaciones para
la seguridad eléctrica y mecánica en su país.
Compruebe que el voltaje disponible no es superior al que aparece en el panel trasero del producto.
En caso de problemas serios de manejo, deje de usar el aparato y contacte su vendedor inmediatamente.
Debido a motivos de seguridad está prohibido de hacer modificaciones al aparato sin autorización.
MANTENIMIENTO
Limpiar regularmente el aparato con un trapo ligeramente humedo. Recomendamos que la limpieza interna
sea efectuada por profesionales.
INSTALACIÓN
Para las conexiones utilizar el cable CAT5e UTP.
Esto es el cable estándar para la red de ordenador
de Ethernet que usted puede encontrar fácilmente
en cualquier tienda de ordenadores. Es importante
que usted siga las codificaciones con colores para
la instalación apropiada:
AZUL = +12V
BLANCO/AZUL = 0V
BLANCO/MARRÓN = señal de tierra
NARANJA = datos DMX -
NARANJA/BLANCO = datos DMX +
Según el uso el Wall Dimmer LED puede ser
utilizado con diferentes productos LED de JB-Systems:
MICRO LED MANAGER / MINI LED MANAGER Mk2:
Conectar el LED Manager a la red eléctrica.
Conectar el cable-UTP como indicado sobre el dibujo.
Ajustar la dirección DMX del LED Manager en 001.
¡Listo!
WD MERGER (Wall Dimmer Merger):
El WD Merger hace posible la unión de hasta 6 Wall Dimmer en una línea DMX. Las señales DMX de los 6
dimerizadores de pared (cada uno 001 a 004) se combinarán a una señal DMX (001 a 024):
Wall Dimmer1 = 001 a 004
Wall Dimmer2 = 005 a 008
Wall Dimmer3 = 009 a 012
Wall Dimmer4 = 0013 a 016
Wall Dimmer5 = 0017 a 020
Wall Dimmer6 = 0021 a 024
CUALQUIER OTRO PRODUCTO LED de JB
SYSTEMS:
Usted también puede utilizarlos junto con otros
productos LED de JB Systems ® como LED Ball,
LED Par,LED SPOT/WASH, LED MANAGER 300
VATIOS, … Sin embargo en estos casos usted
necesitara una fuente de energía separada +12Vdc
conectada al Wall Dimmer. Se conectaran las
salidas DMX vía un cable DMX balanceado y
conector XLR de buena calidad. Al producto LED
conectado se le asignara la dirección DMX 001.
INSTALACIÓN MECÁNICA EN CAJA DE PARED:
Se fijara el Wall Dimmer en una caja estándar de pared
con los tornillos:
Separar la tapa de la unidad (click fácil de presión)
Sujetar la unidad en la caja empotrada con los 2
tornillos.
Presionar la tapa hasta el click de sujeción.
¡Listo!
FUNCIONES
1. BOTÓN FADE/COLOR : tiene funciones diferentes, dependiendo del modo de funcionamiento (ver n°5):
MODO RVA1 & RVA2 :
o Utilizar uno de los colores preprogramados. Usar el botón SPEED/DIMMER (2) para
adaptar el nivel de dimerización.
o Girar el botón completamente a la izquierda para comenzar la función FADE: usted obtendrá
un bonito fundido de un color en el otro. Use el botón SPEED/DIMMER (2) para cambiar la
velocidad del fundido, la iluminación está en el nivel máximo.
MODO 2 CANALES: Se utiliza para dimerizar el canal DMX1 del valor 000 a 255.
2. BOTÓN SPEED/DIMMER: tiene funciones diferentes, dependiendo del modo de funcionamiento (ver
n°5):
MODO RVA1: se puede adaptar el master dimmer (canal DMX4) del 0 % al 100 %. Usted también
puede seleccionar la función de estroboscopio (de lento a rápido) y la función músical.
MODO RVA2: se puede adaptar el master dimmer (canal DMX4) del 0 % al 100 %.
MODO 2 CANALES: Se utiliza para dimerizar el canal DMX2 del valor 000 a 255.
3. LED STANDBY : Se ilumina cuando el Wall Dimmer está apagado. Es más fácil para encontrar el
dimerizador de pared en la oscuridad.
4. BOTÓN STANDBY : se utiliza para encender y apagar la salida (blackout)
JB SYSTEMS
®
19/25 LED WALL DIMMER
JB SYSTEMS
®
20/25 LED WALL DIMMER
Page 13
ESPAÑOL MANUAL DE INSTRUCCIONES
5. BOTONES DE MEMORIA: los botones M1 y M2 se utilizan para memorizar 2 ajustes de salida
diferentes (escenas). Usted también puede usar estos botones para escoger uno de los 3 modos de
funcionamiento del wall dimmer:
MEMORIZAR UNA ESCENA: usar los 2 botones (1) y (2) para crear la buena atmósfera . Para un
futuro empleo se memoriza este ajuste presionando el M1 o el botón M2 hasta que el LED de
STANDBY(3) parpadee. Usted puede hacer lo mismo con el otro botón de memoria.
SELECCIÓN MODOS de FUNCIONAMIENTO: mirar las especificaciones para la distribución
exacta de los canales DMX.
o MODO RVA1 : esto es el modo estándar de funcionamiento, no hay que hacer nada
especial.
o MODO RVA2: pulsar a la vez los botones STANDBY y M1 hasta que el LED STANDBY (3)
parpadee brevemente.
o MODO 2 CANALES: pulsar a la vez los botones STANDBY y M2 hasta que el LED
STANDBY (3) parpadee brevemente.
6. TAPA: dos tapas permutables para los diferentes modos de funcionamiento se colocaran facilmente
sobre el wall dimmer de pared.
7. TERMINALES: Fácil de cablear, ver el capítulo "la instalación" para más información.
8. MONTAJE TORNILLOS: Se pueden usar para fijar el wall dimmer en una caja encastrada, ver
instalación para más información.
ESPECIFICACIONES
Alimentación: DC 12V / 400mA.
Salidas DMX : Terminales de cable
Canales DMX: Modo RVA:
Canal1 = ROJO (valores DMX : 000 255)
Canal2 = VERDE (valores DMX : 000 255)
Canal3 = AZUL (valores DMX : 000 255)
Canal 4 = MASTER DIMMER (valores DMX: 000 255)
Modo RVA2 :
Canal1 = ROJO (valores DMX : 000 255)
Canal2 = VERDE (valores DMX : 000 255)
Canal3 = AZUL (valores DMX : 000 255)
Canal 4 = MASTER DIMMER (valores DMX: 000 190)
Modo 2 canales:
Canal 1 = DIMMER1 (valores DMX : 000 255)
Canal 2 = DIMMER2 (valores DMX : 000 255)
Tamaño: tapa = 83 x 83 mm
Profundidad de instalación = 16 mm
Peso: 60 g
PORTUGUÊS MANUAL DO UTILIZADOR
MANUAL DO UTILIZADOR
Obrigado por ter adquirido este produto da JB Systems®. De modo a tirar total proveito das possibilidades
deste produto, por favor leia este manual com atenção.
CARACTERÍSTICAS
Esta unidade está protegida contra interferências rádio. Este produto cumpre as exigências impostas pelas
presentes directivas nacionais e europeias. A conformidade deste produto foi comprovada e as declarações
e documentos relevantes foram efectuados pelo fabricante.
Controlo remoto compacto RGB para projectors LED
Extremamente fácil de usar
2 cenas programáveis pelo utilizador
Envia 4 canais DMX standard: R + G + B + controlo intensidade Master
Fácil instalação na parede, encaixa em qualquer caixa de parede
Perfeito para usar em instalações LED para hotés, casas, lojas, …
Vários dimmers de parede podem ser combinados juntos em grandes instalações
Inclui 2 tampas diferentes
3 Modos diferentes de funcionamento para flexibilidade máxima
ANTES DE UTILIZAR
Antes de utilizar esta unidade verifique se existem danos provocados durante o transporte. Caso existam
danos aparentes, não utilize a unidade e contacte o seu revendedor.
Importante: Esta unidade deixou a nossa fábrica em perfeitas condições e devidamente embalada. É
imprescindível que o utilizador siga as instruções de segurança e avisos descritos neste manual.
Quaisquer danos provocados por utilização incorrecta não serão cobertos pela garantia. O revendedor
não será responsável por quaisquer danos ou problemas causados pelo incumprimento das instruções
deste manual.
Guarde este manual num local seguro para consulta futura. Caso venda esta unidade, forneça este
manual.
Verifique o conteúdo:
Certifique-se que a caixa contém os seguintes artigos:
Manual do utilizador
Unidade Wall Dimmer
1 tampa extra
Puede descargar la última versión de este manual desde nuestro sitio web: www.beglec.com
JB SYSTEMS
Toda la información está sujeta a cambios sin previo aviso
®
21/25 LED WALL DIMMER
INSTRUÇÕES DE SEGURANÇA:
Este símbolo significa: utilização unicamente em espaços fechados
Este símbolo significa: Leia instruções
De modo a evitar risco de fogo ou choque eléctrico, não exponha este produto a chuva ou humidade.
De forma a evitar a formação de condensação no interior da unidade, ao transportá-la para ambiente
quente aguarde algum tempo de modo a que haja uma ambientação à temperatura. A condensação
poderá afectar o desempenho da unidade ou até danificá-la.
Esta unidade destina-se unicamente a utilização em espaços fechados.
Não introduza objectos de metal nem verta líquidos no interior do produto, correrá risco de choque
eléctrico ou poderá danificar o produto. Caso algum objecto estranho entre em contacto com o interior da
unidade, desligue-a de imediato da corrente.
Evite locais com poeiras. Limpe a unidade regularmente.
Mantenha esta unidade fora do alcance das crianças.
Esta unidade deverá ser operada unicamente por pessoas experientes.
Temperatura ambiente de funcionamento máxima é de 40ºC. Não utilize esta unidade a temperaturas
JB SYSTEMS
®
22/25 LED WALL DIMMER
Page 14

PORTUGUÊS MANUAL DO UTILIZADOR
PORTUGUÊS MANUAL DO UTILIZADOR
ambientes mais elevadas.
A instalação eléctrica deve ser efectuada unicamente por pessoal qualificado, cumprindo os regulamentos
de segurança em instalações eléctricas e mecânicas do seu pais.
Certifique-se que a voltagem a utilizar não é superior à voltagem indicada no painel traseiro da unidade.
A cobertura e as lentes deverão ser substituídas caso apresentem danos visíveis.
Por motivos de segurança, são proibidas quaisquer alterações não autorizadas à unidade.
MANUTENÇÃO
Limpe usando um pano ligeiramente embebido com água. Evite deixar entrar água dentro da unidade. Não
use líquidos voláteis como benzina o que irá danificar a unidade.
INSTALAÇÃO
Use cabo CAT5 UTP para as ligações. Este é o cabo standard de rede informática Ethernet que pode
facilmente encontrar em qualquer loja de informática. É importante que siga os códigos coloridos para uma
instalação correcta:
AZUL = +12V
BRANCO/AZUL = 0V
BRANCO/CASTANHO = sinal terra
LARANJA = SINAL DMX -
LARANJA/BRANCO = DMX data +
Dependendo da aplicação o LED Wall Dimmer
pode ser usado com diferentes produtos LED JB
Systems:
MICRO LED MANAGER / MINI LED MANAGER
Mk2:
Desligue o LED Manager da corrente.
Conecte o cabo UTP como indicado na
figura.
Coloque o endereço DMX do LED Manager no endereço 001.
Feito!
WD MERGER (Wall Dimmer Merger):
O WD Merger torna possível conectar até 6 Wall Dimmers numa linha DMX. Os sinais DMX dos 6 LED Wall
Dimmers (cada 001 até 004) serão combinados em apenas um sinal DMX (001 a 024):
Wall Dimmer1 = 001 a 004
Wall Dimmer2 = 005 a 008
Wall Dimmer3 = 009 a 012
Wall Dimmer4 = 0013 a 016
Wall Dimmer5 = 0017 a 020
Wall Dimmer6 = 0021 a 024
COM OUTRO PRODUTO LED JB SYSTEMS:
Também pode usá-lo com outros produtos LED JB
Systems®como a LED ball, LED Par, LED SPOT /
WASH, LED MANAGER 300W, … Mas nestes
casos irá precisar de uma fonte de alimentação
separada de 12Vdc ligada ao Wall Dimmer. As
saídas DMX serão conectadas através de um cabo
balanceado DMX de boa qualidade e conector
XLR. O produto LED conectado deverá ser
atribuído ao canal DMX 001.
INSTALAÇÃO MECÂNICA NA CAIXA DE PAREDE:
O LED Wall Dimmer pode ser instalado em qualquer
caixa standard embutida na parede com fixações de
parafuso:
Retire a tampa (sistema fácil click-on)
Instale a unidade na caixa de parede e aperte
com os 2 parafusos.
Coloque a tampa.
Feito!
INSTRUÇÕES DE FUNCIONAMENTO
1. CONTROLO FADE/COLOR: tem diferentes funções dependendo do modo de operação (ver n.5):
MODO RGB1 & RGB2:
o Usado para seleccionar uma das muitas cores pré programadas. Use o controlo
SPEED/DIMMER (2) adaptar o nível de intensidade.
o Rode o controlo totalmente para a esquerda para iniciar a função FADE: irá obter uma bela
transição de uma cor para outra. Use o controlo SPEED/DIMMER (2) para mudar a
velocidade de transição. A potência de saída é sempre no nível máximo.
MODO 2 CHANAIS: Usado para regular a intensidade do canal DMX 1 do valor 000 até 255.
2. CONTROLO SPEED/DIMMER: Tem diferentes funções, dependendo do modo de operação (ver nº5):
MODE RGB1: o controlo de intensidade master (canal DMX 4) pode ser adaptado de 0% to 100%.
Pode também escolher a função strobe (de lenta a rápida) e função música.
MODO RGB2: o controlo de intensidade master (canal DMX 4) pode ser adaptado de 0% to 100%.
MODO 2 CHANNEL: Usado para regular a intensidade do canal DMX 2 do valor 000 até 255.
3. LED STANDBY: está aceso enquanto a saída do Wall Dimmer está colocada em blackout. Torna fácil
encontrar o Wall Dimmer no escuro.
4. BOTÃO STANDBY: Usado para ligar/desligar a saída do aparelho (blackout)
5. BOTÕES DE MEMÓRIA: Os botões M1 e M2 são usados para memorizar 2 configurações de saída
diferentes (cenas). Também pode usar estes botões para escolher um dos 3 modos de operação do
Wall Dimmer:
MEMORIZAR UMA CENA: Use os 2 controlos (1) e (2) para definir a luz correcta de atmosfera.
Para memorizar esta configuração para futuro uso, pressione o botão M1 ou M2 até que o LED
STANDBY (3) pisque brevemente. Pode fazer o mesmo para o outro botão de memória.
ESCOLHER MODOS DE OPERAÇÃO: ver especificações para a distribuição exacta dos canais
DMX.
o MODO RGB1: este é o modo de operação standard, nada de especial deverá ser feito.
o MODO RGB2: pressione os botões STANDBY e M1 em conjunto até que o LED STANDBY
(3) pisque brevemente.
o MODO 2 CANAIS: pressione os botões STANDBY e M2 em conjunto até que o LED
STANDBY (3) pisque brevemente.
JB SYSTEMS
®
23/25 LED WALL DIMMER
JB SYSTEMS
®
24/25 LED WALL DIMMER
Page 15

PORTUGUÊS MANUAL DO UTILIZADOR
6. COVER PLATE: duas tampas substituíveis para diferentes modos de operação que podem ser
facilmente colocadas no Wall Dimmer.
7. TERMINAIS DE LIGAÇÃO: terminais de fácil ligação, ver capitulo “instalação” para mais informação.
8. PARAFUSOS DE MONTAGEM: podem ser usados para fixar o Wall Dimmer numa caixa de parede,
ver instalação para mais informação.
ESPECIFICAÇÕES
Fonte de Alimentação: DC 12V / 400mA.
Saídas DMX: Terminais
Canais DMX: MODO RGB1:
Dimensões: Cobertura = 83 x 83 mm
Peso: 60 g
CH1 = Vermelho (valores DMX: 000 255)
CH2 = Verde (valores DMX: 000 255)
CH3 = Azul (Valores DMX: 000 255)
CH4 = Controlo intensidade Master (valores DMX : 000 255)
MODO RGB2:
CH1 = Vermelho (valores DMX: 000 255)
CH2 = Verde (valores DMX: 000 255)
CH3 = Azul (Valores DMX: 000 255)
CH4 = Controlo intensidade Master (valores DMX : 000 190)
MODO 2 CANAIS:
CH1 = DIMMER1 (valores DMX : 000 255)
CH2 = DIMMER2 (valores DMX: 000 255)
Profundidade da instalação = 16 mm
Pode fazer download da versão mais recente deste manual no nosso site: www.beglec.com
JB SYSTEMS
Estas informações estão sujeitas a alterações sem aviso prévio
®
25/25 LED WALL DIMMER
 Loading...