

Page 1

Instruction Book
Memory Craft 350e
Page 2

IMPORTANT SAFETY INSTRUCTIONS
This sewing machine is not a toy. Do not allow children to play with this machine.
The machine is not intended for use by children or mentally infirm persons without proper supervision.
This sewing machine is designed and manufactured for household use only.
Read all instructions before using this sewing machine.
DANGER— To reduce the risk of electric shock:
1. An appliance should never be left unattended when plugged in. Always unplug this sewing machine from the
electric outlet immediately after using and before cleaning.
2. Always unplug before replacing a sewing machine bulb. Replace bulb with same type rated 12 Volts, 5 Watts.
WARNING— To reduce the risk of burns, fire, electric shock, or injury to persons:
1. Do not allow children to play with the machine. The machine is not intended for use by children or
infirmed persons without proper supervision.
Do not allow to be used as a toy. Close attention is necessary when this sewing machine is used by
or near children.
2. Use this appliance only for its intended use as described in this owner’s manual.
Use only attachments recommended by the manufacturer as contained in this owner’s manual.
3. Never operate this sewing machine if it has a damaged cord or plug, if it is not working properly, if it
has been dropped or damaged, or dropped into water.
Return this sewing machine to the nearest authorized dealer or service center for examination,
repair, electrical or mechanical adjustment.
4. Never operate the appliance with any air opening blocked. Keep ventilation openings of this sewing
machine and foot controller free from accumulation of lint, dust and loose cloth.
5. Never drop or insert any object into any opening.
6. Do not use outdoors.
7. Do not operate where aerosol (spray) products are being used or where oxygen is being
administered.
8. To disconnect, turn all controls to the off (“O”) position, then remove plug from outlet.
9. Do not unplug by pulling on cord. To unplug, grasp the plug, not the cord.
10. Keep fingers away from all moving parts. Special care is required around the sewing machine
needle.
11. Always use the proper needle plate. The wrong plate can cause the needle to break.
12. Do not use bent needles.
13. Do not pull or push fabric while stitching. It may deflect the needle causing it to break.
14. Switch this sewing machine off (“O”) when making any adjustment in the needle area, such as
threading the needle, changing the needle, threading the bobbin or changing the presser foot, and
the like.
15. Always unplug this sewing machine from the electrical outlet when removing covers, lubricating, or
when making any other adjustments mentioned in this owner’s manual.
SAVE THESE INSTRUCTIONS
The design and specifications are subject to change without a prior notice.
Please note that on disposal, this product must be safely recycled in accordance with relevant National legislation relating
to electrical/electronic products. If in doubt please contact your retailer for guidance. (European Union only)
Page 3

KNOW YOUR MACHINE................................................................................................2-4
Names of Parts ..................................................................................................................2
Standard Accessories ........................................................................................................3
Detachable Extension Table .............................................................................................. 4
GETTING READY TO SEW ......................................................................................... 5-18
Connecting the Power Supply............................................................................................ 5
Start/Stop Button................................................................................................................ 5
AutoThread Cutter Button .................................................................................................. 5
Winding the Bobbin ............................................................................................................6
Removing the bobbin .................................................................................................. 6
Setting the spool of thread .......................................................................................... 6
Additional spool pin..................................................................................................... 6
Winding the bobbin ..................................................................................................... 7
Inserting the bobbin .................................................................................................... 8
Raising the Presser Foot.................................................................................................... 9
Threading the Machine ...................................................................................................... 9
Needle Threader .............................................................................................................. 11
Drawing up the Bobbin Thread ........................................................................................ 12
Adjusting the Thread Tension .......................................................................................... 13
Changing Needles............................................................................................................ 14
Embroidery Hoops ........................................................................................................... 15
Templates ........................................................................................................................ 15
Stabilizers.........................................................................................................................16
Types of stabilizers ................................................................................................... 16
Usage........................................................................................................................ 16
Setting the Fabric in an Embroidery Hoop ....................................................................... 17
Attaching the Embroidery Hoop to the Machine............................................................... 18
KEY OPERATIONS ....................................................................................................19-25
Pattern Selection Window ................................................................................................ 19
Mode Setting ....................................................................................................................20
Macine Settings................................................................................................................21
Language Selection ......................................................................................................... 24
On-screen Help ................................................................................................................ 24
Selecting Built-in Designs ........................................................................................... 25-27
EMBROIDERY SEWING ................................................................................................. 28
Starting to Sew Embroidery ............................................................................................. 28
MONOGRAMMING.....................................................................................................29-45
Monogram Selection Window ..................................................................................... 29-30
Monogram Embroidery................................................................................................31-32
2-Letters Monogram......................................................................................................... 33
Correcting the Monogram ................................................................................................ 34
OPTIONAL ITEMS......................................................................................................35-36
PC Card ........................................................................................................................... 35
USB Memory.................................................................................................................... 35
EDITING MODE.......................................................................................................... 37-41
Editing the Embroidery Designs....................................................................................... 38
SAVING AFILE ...........................................................................................................42-44
Creating a new file ........................................................................................................... 43
Assigning the file name .................................................................................................... 43
Deleting the file ................................................................................................................ 44
CREATING AN ORIGINAL DESIGN.......................................................................... 45-46
CARE AND MAINTENANCE......................................................................................47-48
Cleaning the Hook Race .................................................................................................. 47
Replacing the Light Bulb .................................................................................................. 48
Troubleshooting ............................................................................................................... 49
1
Page 4
i
o
!0
!3
!4
!1
u
!2
y
t
r
!5
e
!6
!7
w
!8
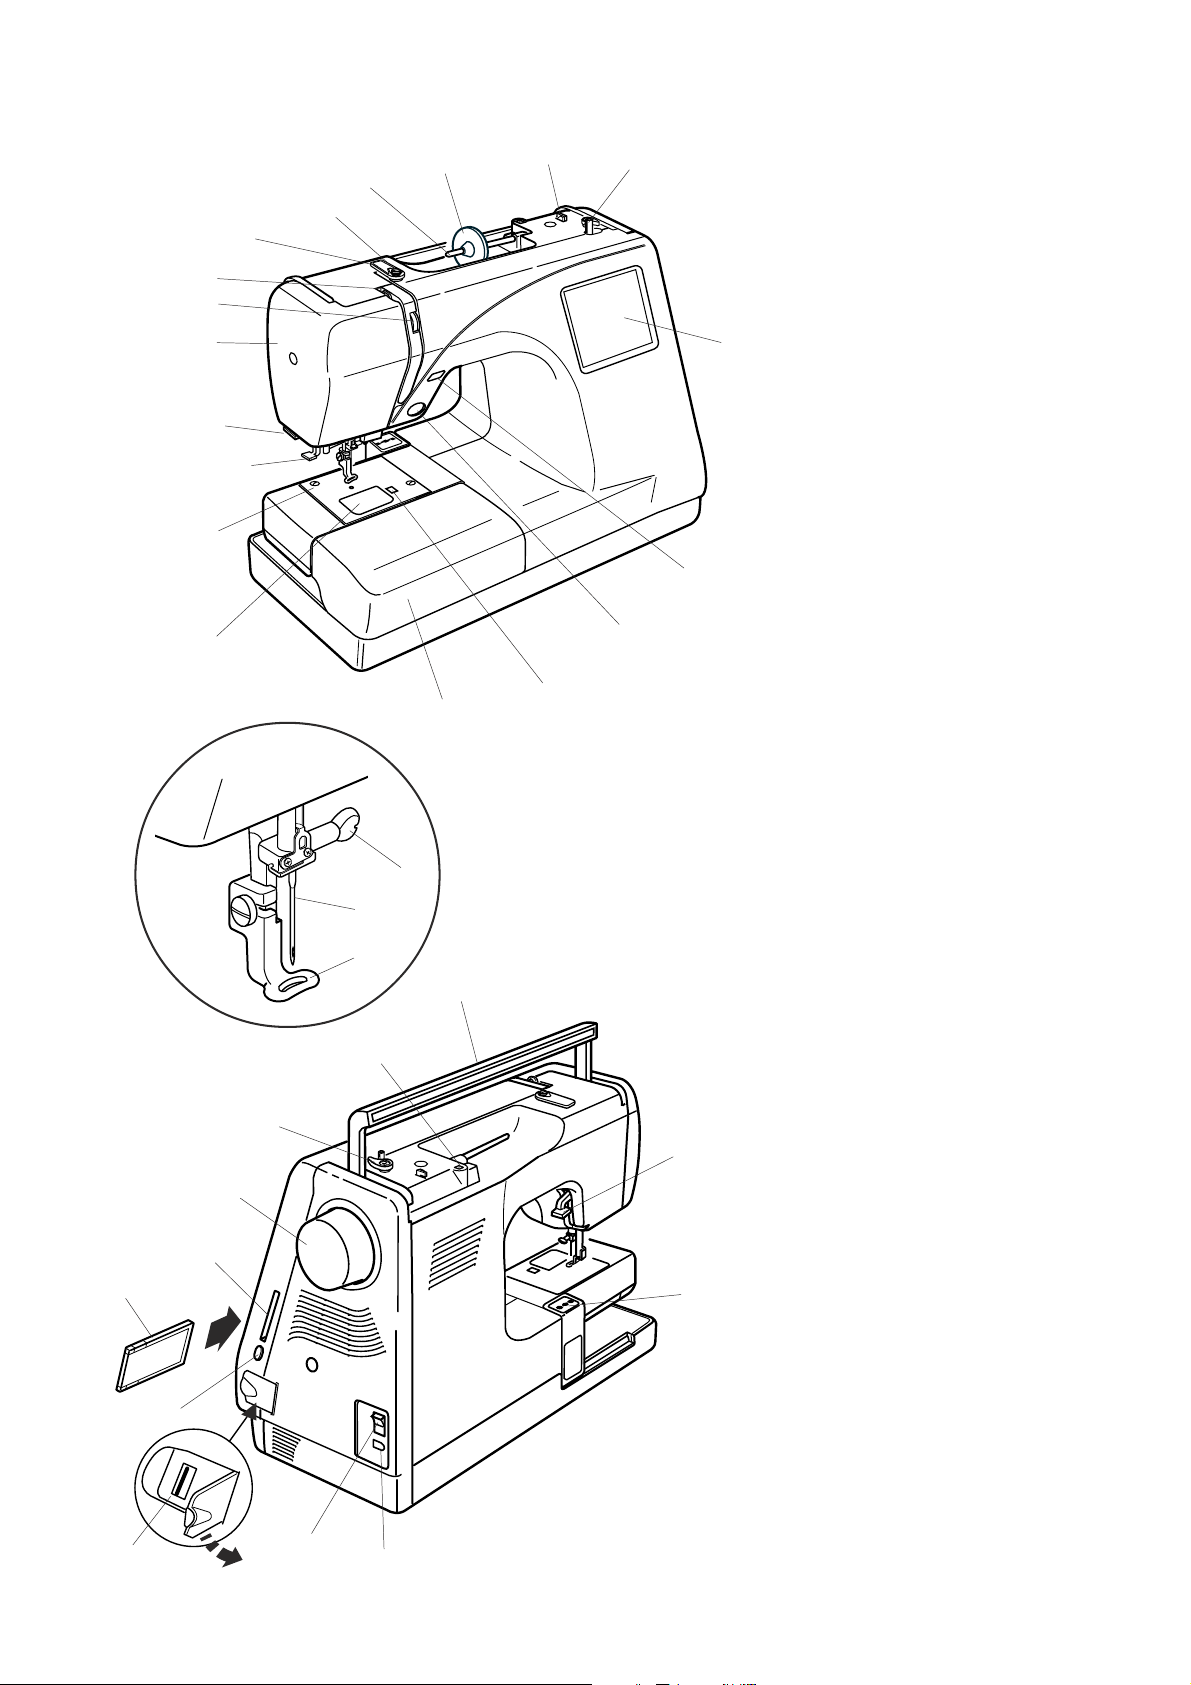
KNOW YOUR MACHINE
Names of Parts
q Visual touch screen
w Bobbin winder spindle
e Bobbin thread cutter
r Spool holder (large)
q
t Spool pin
y Bobbin winding thread guide
u Thread guide plate
i Thread take-up lever
o Thread tension dial
!0 Face plate
!1 Thread cutter & thread holder
!2 Needle threader
!3 Needle plate
!4 Hook cover plate
!5 Extension table (accessory box)
!6 Hook cover plate release button
!7 Start/stop button
!8 Auto thread cutter button
!9 Needle clamp screw
@0 Needle
@1 Embroidery foot
@7
@8
@6
@5
@4
@0
@1
@3
!9
@2
#3
#2
@2 Carrying handle
@3 Hole for additional spool pin
@4 Bobbin winder stopper
@5 Handwheel
@6 PC card slot
@7 PC card (optional item)
@8 Card eject button
@9 USB socket (for usb memory)
#0 Power switch
#1 Machine socket
#2 Carriage (for embroidery)
#3 Presser foot lifter
@9
#0
#1
2
Page 5
q
w
e
r
t
y
u
i
!3
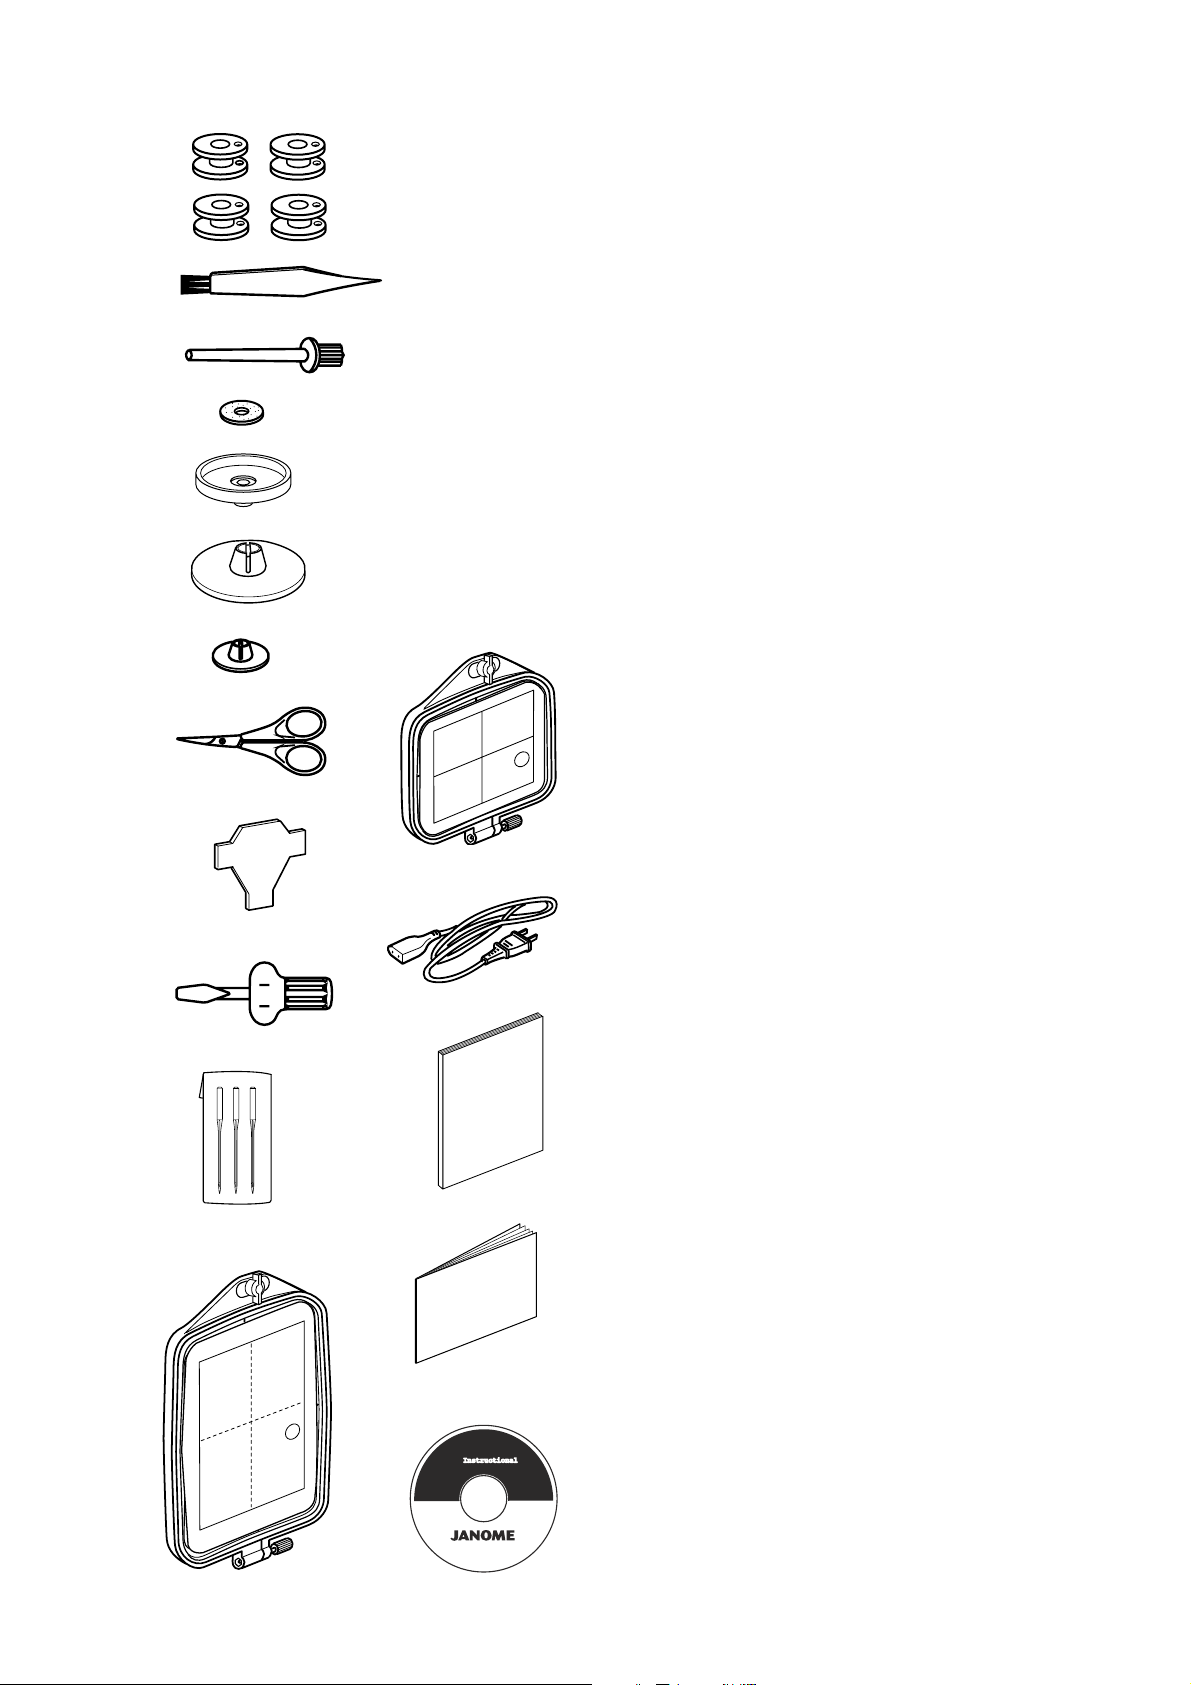
Standard Accessories
q Bobbins
w Lint Brush
e Additional Spool Pin
r Spool Pin Felt
t Spool Stand
y Spool Holder (Large)
u Spool Holder (Small)
i Scissors
o Screwdriver
!0 Screwdriver
!1 Set of Needles
!2 Embroidery hoop B (with template)
!3 Embroidery hoop A (with template)
!4 Power Supply Cord
!5 Instruction Book
!6 Template Sheets (for Built-in Designs)
!7 Instructional movie CD
o
!0
!2
!4
!5
!1
!6
!7
3
Page 6
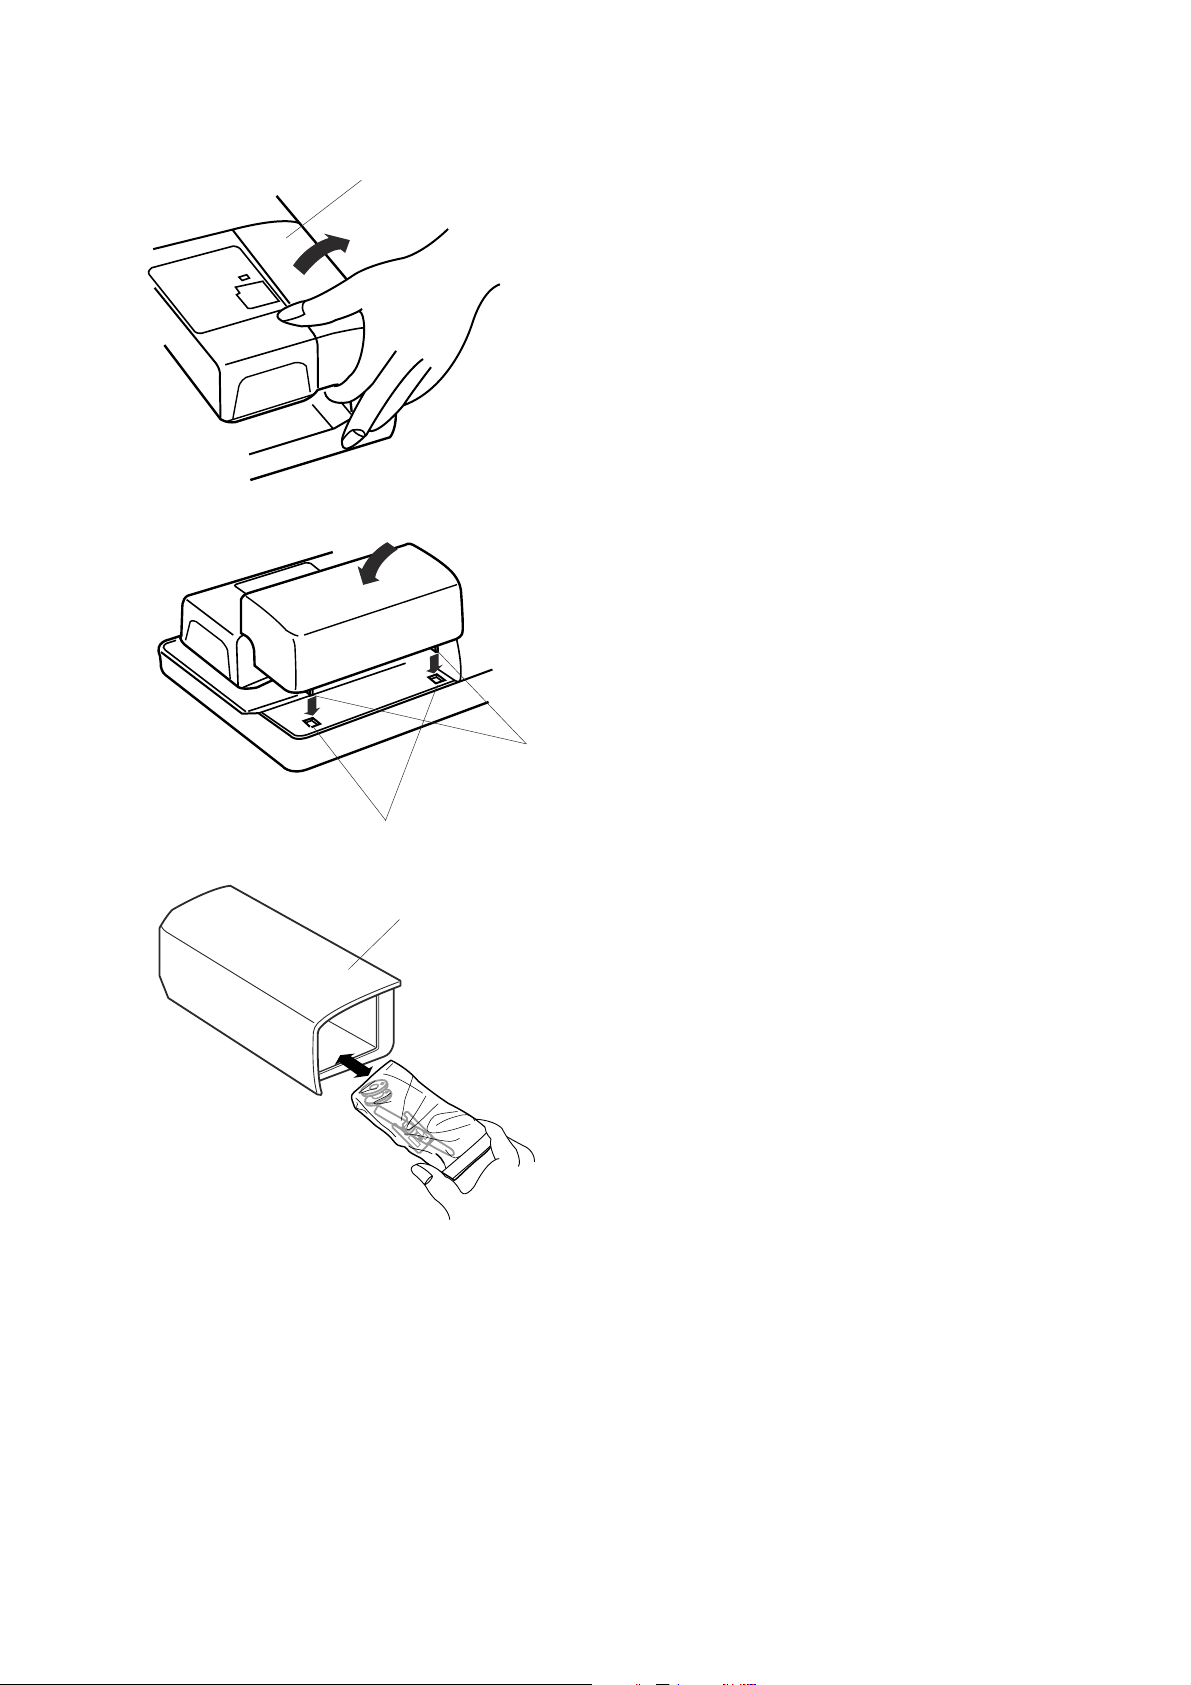
Detachable Extension Table
q
Deatch the extension table when you use the optional
Free arm hoop C.
To remove, lift out the extension table toward you as
illustrated.
To attach, position the tabs on the base tab holes and
push down gently.
q Extension table
w Tabs
e Base tab holes
w
e
Accessories are stored in the extension table.
q
4
Page 7

q
e
w
t
GETTING READY TO SEW
Connecting the Power Supply
Turn off the power switch and insert the machine
plug into the machine socket.
Insert the power supply plug into the wall outlet and
turn the power switch on.
q Power switch
w Machine plug
e Machine socket
r Power supply plug
t Wall outlet
NOTE:
After turning on the power, it takes approximately six
seconds for the pattern selection window to be
displayed on the visual touch screen.
(This is the required boot up time and is not a defect)
r
Operating Instructions:
“The symbol "O" of a switch indicates the "off" position of a
switch.”
“For appliances with a polarized plug (one blade wider
than the other). To reduce the risk of electric shock, this
plug is intended to fit in a polarized outlet only one way. If it
does not fit fully in the outlet, reverse the plug. If it still
does not fit, contact a qualified electrician to install the
proper outlet. Do not modify the plug in any way.” (for the
USA ans Canada only)
START
STOP
w
For Y our Safety:
While in operation, always keep your eyes on the
sewing area, and do not touch any moving parts
such as the thread take-up lever, handwheel or
needle.
Always turn off the power switch and unplug the
power supply:
- when leaving the machine unattended.
- when attaching or removing parts.
- when cleaning the machine.
Start/Stop Button
Press this button to start or to stop the machine. The
color of the button changes each time you press it—
red when the machine is running, and green when it
is stopped.
q Start/stop bbutton
NOTE:
The Memory Craft 350E is equipped with an
automatic shutdown safety feature to prevent
overheating when the machine is running
overloaded. Follow safety instructions that appear on
the visual touch screen if it happens.
q
Auto Thread Cutter Button
Press this button to trim the threads after sewing is
finished (refer to page 28).
w Auto thread cutter button
5
Page 8

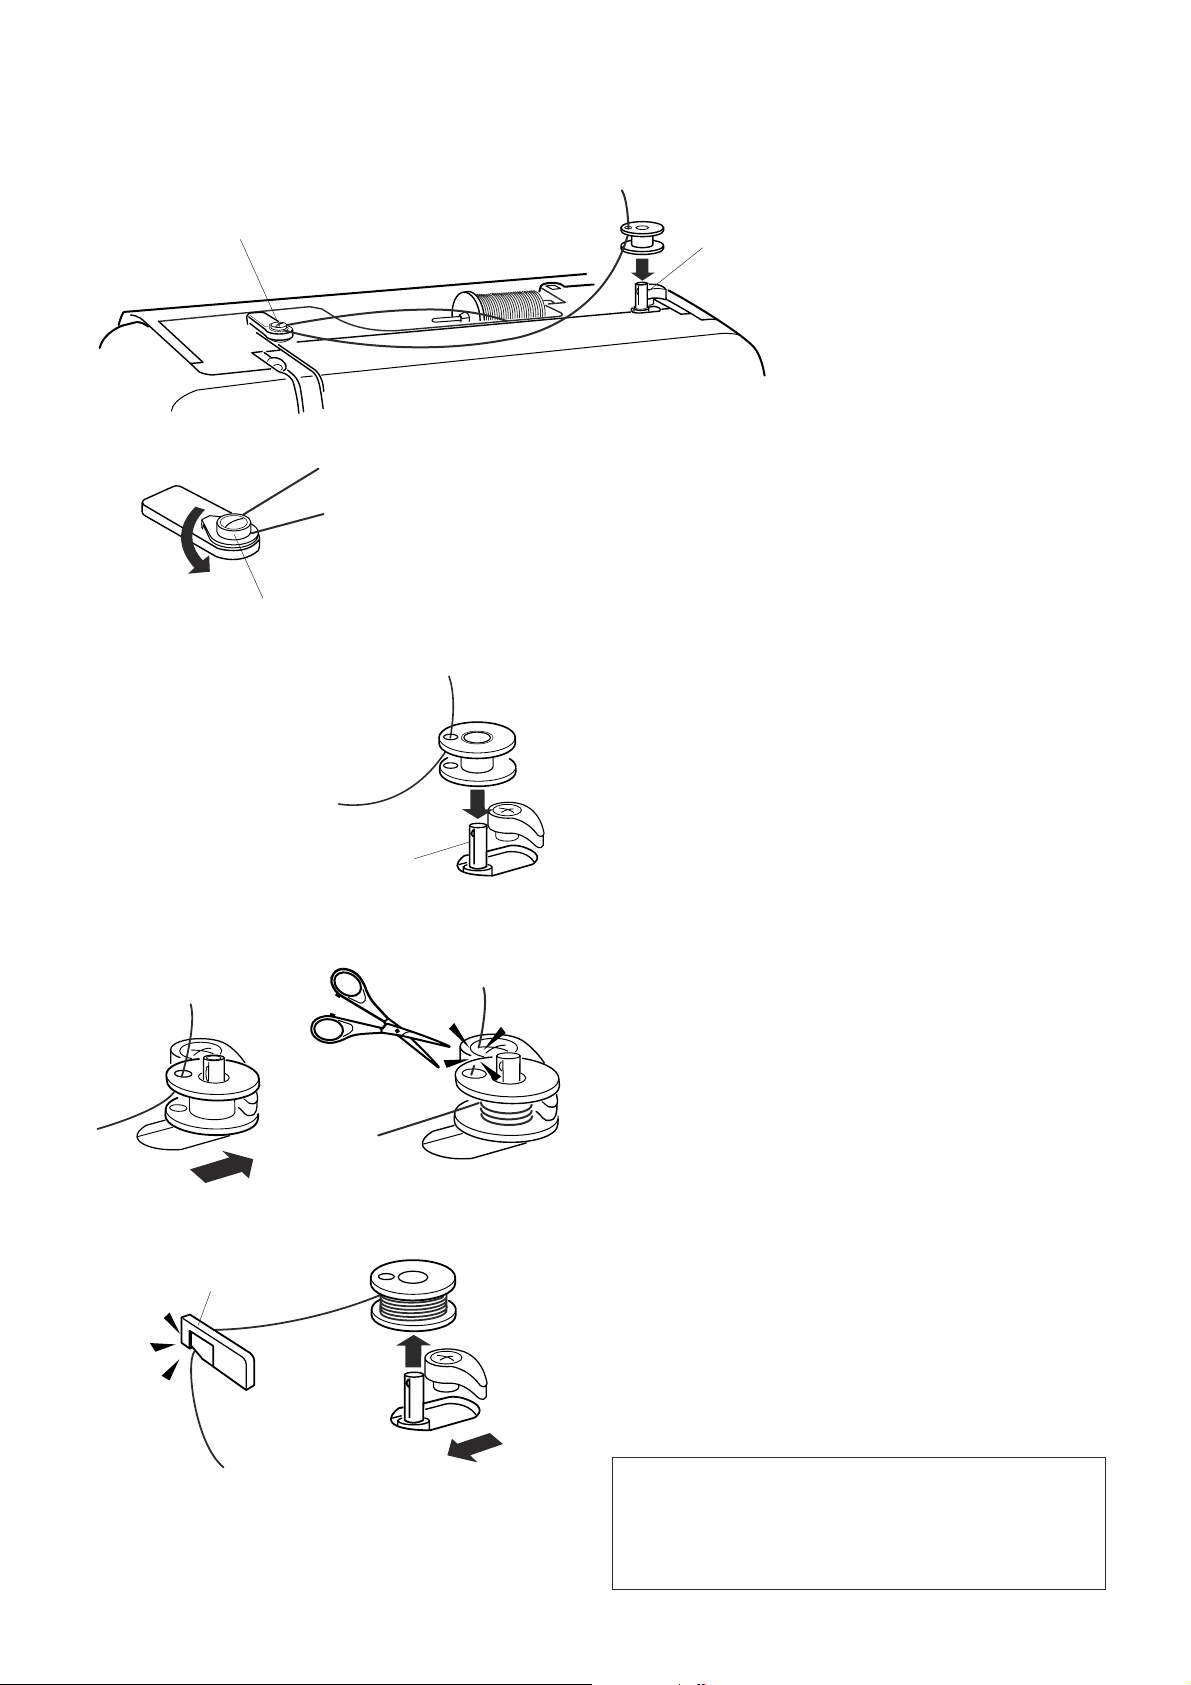
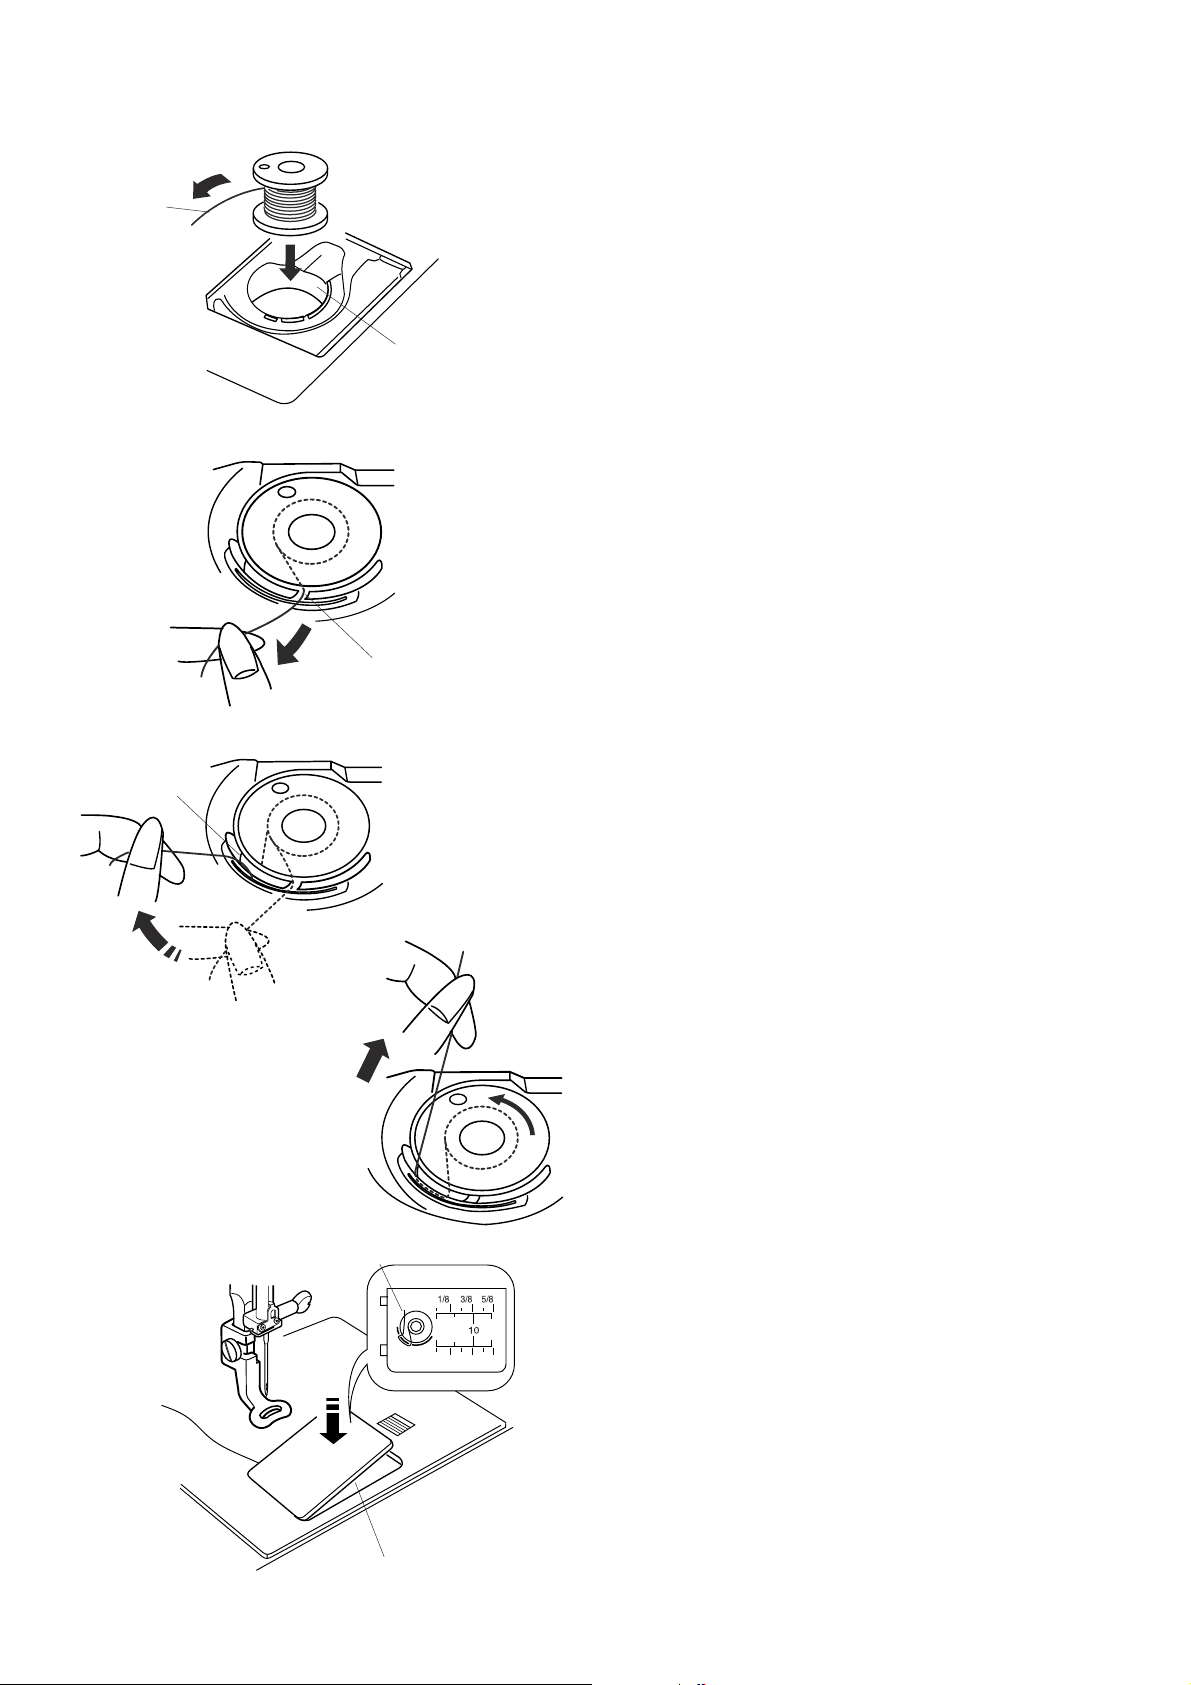
Winding the Bobbin
w
q
Removing the bobbin
Slide the hook cover plate release button to the right,
and remove the hook cover plate. Lift out the bobbin
from the bobbin holder.
q Hook cover plate release button
w Hook cover plate
e Bobbin
e
q
w
r
q
w
e
Setting the spool of thread
Place the spool of thread on the spool pin with the
thread coming off the spool as shown. Attach the large
spool holder, and press it firmly against the spool of
thread.
NOTE:
Use the small spool holder to hold narrow or small
spools of thread.
q Large spool holder
w Small spool holder
Additional spool pin
Use the additional spool pin when you need to wind the
bobbin without unthreading the machine while working
on a sewing project.
Insert the additional spool pin into the spool stand then
into the hole besides the horizontal spool pin.
Place the felt on the spool pin and place a spool of
thread on it as shown.
q Additional spool pin
w Spool stand
e Hole
r Felt
6
Page 9
Winding the bobbin
z
q
q
x
w
z Guide the thread around the bobbin winder thread
guide while holding the thread at the spool.
q Bobbin winder thread guide
x Thread through the hole in the bobbin from the
inside to the outside. Put the bobbin on the bobbin
winder spindle.
w Bobbin winder spindle
c
v
e
w
c Push the spindle to the right. Press the Start/Stop
button while holding the end of the thread. Stop
the machine after the bobbin has made a few
turns. Cut the thread close to the hole in the
bobbin.
v Press the Start/Stop button again. When the
bobbin is fully wound it will stop automatically.
Press the Start/Stop button to stop the machine
then return the bobbin winder spindle to the left.
Remove the bobbin and cut the thread with the
bobbin thread cutter.
e Bobbin thread cutter
NOTES:
Do not move the bobbin winder spindle while the
machine is running.
For safety purposes, the motor will stop automatically
after running for two minutes.
7
Page 10
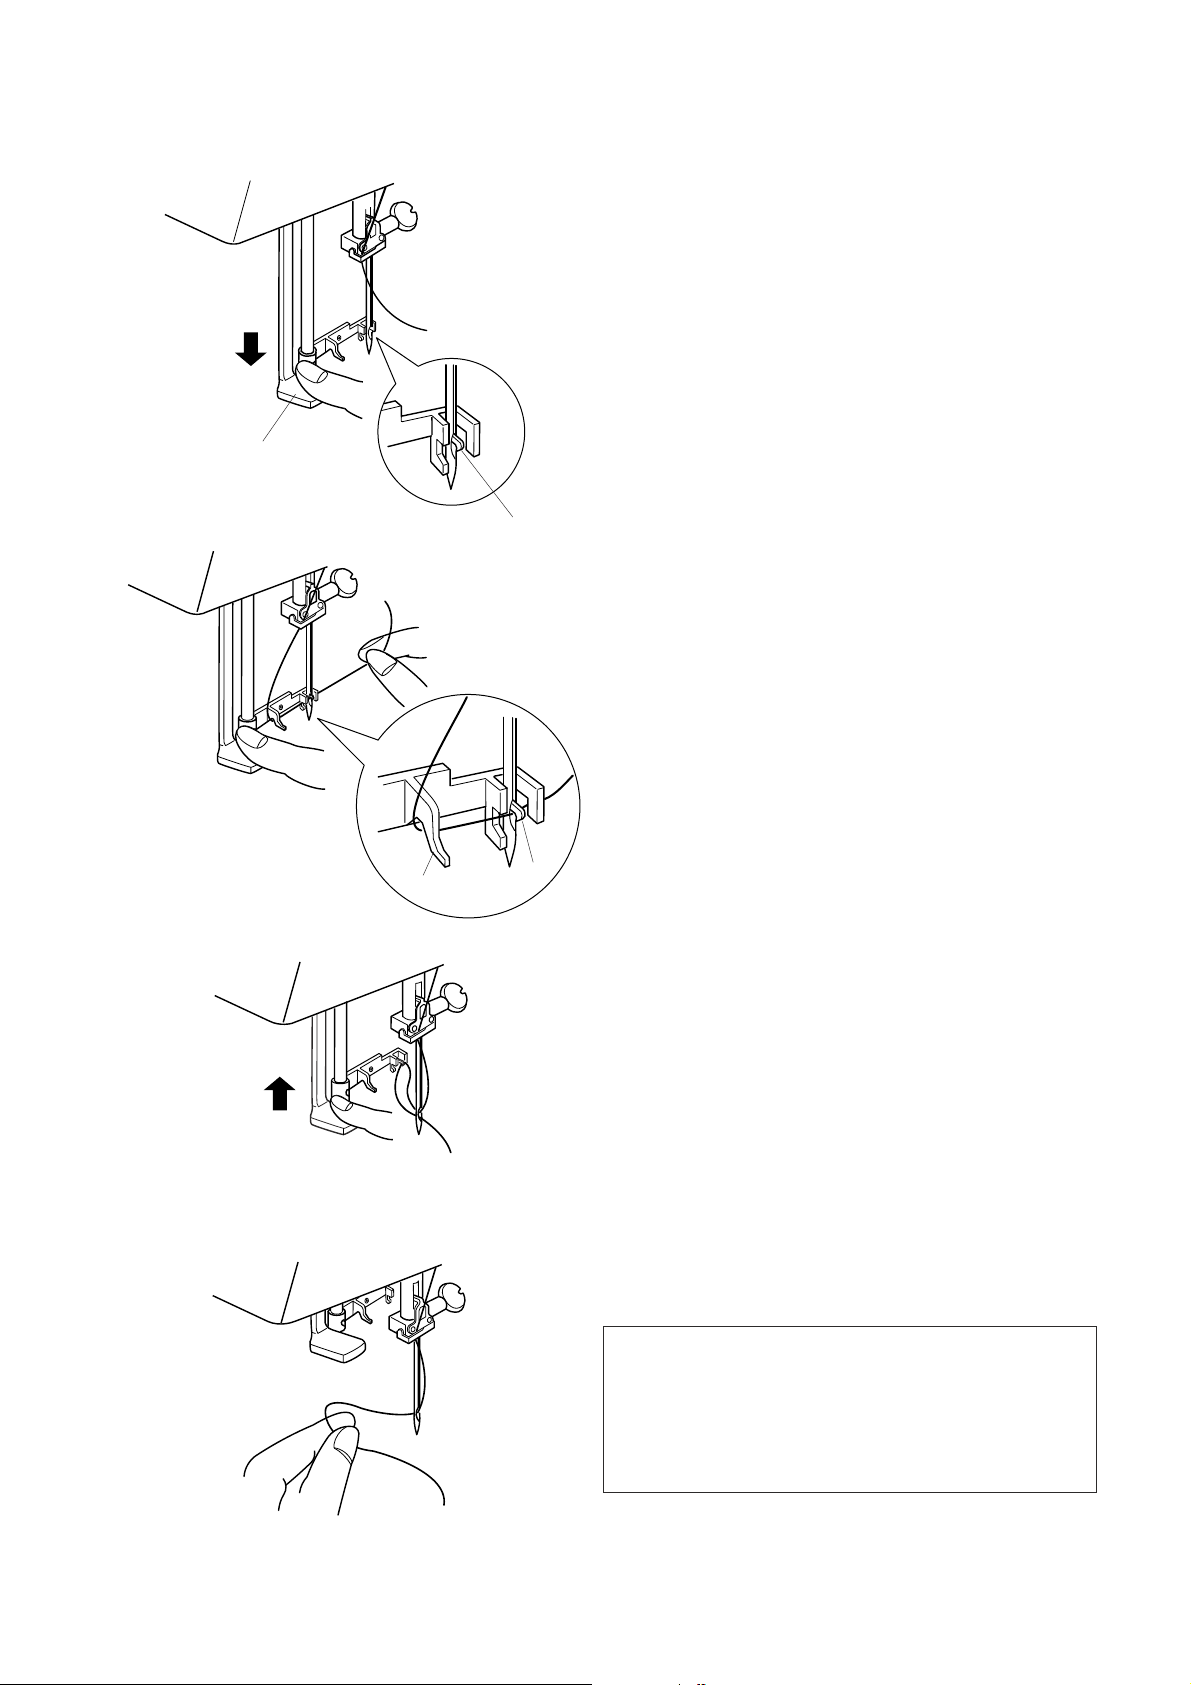
Inserting the bobbin
z
x
c
q
r
z Place the Bobbin in the Bobbin Holder with the
thread running off in the counterclockwise
direction.
q Thread
w Bobbin holder
w
x Guide the thread into front notch on the front of
the bobbin holder.
Draw the thread to the left, sliding it between the
tension spring blades.
e Front notch
e
c Continue to draw the thread lightly until the
thread slips into side notch.
Pull out about 10 cm (4") of thread to the rear.
v
r Side notch
y
v Refer to the threading chart shown on the hook
cover plate.
Reattach the hook cover plate.
t Hook cover plate
y Threading chart
t
8
Page 11

Raising the Presser Foot
The presser foot lifter raises and lowers the presser
foot.
You can raise the presser foot about 6 mm (1/4") higher
than the normal up position by exerting more pressure
when lifting the presser foot lifter.
v
b
c
z
z
Threading the Machine
z Raise the presser foot lifter. Turn the handwheel
to bring the needle to its highest position. Draw
the thread around and under the thread guide
while holding the thread at the spool. Then draw
the thread down through the right channel of the
thread guide plate.
q Presser foot lifter
w Thread guide
q
x
w
x
x Firmly draw the thread around the thread guide
plate and up to the thread take-up lever.
e Thread guide plate
e
9
Page 12
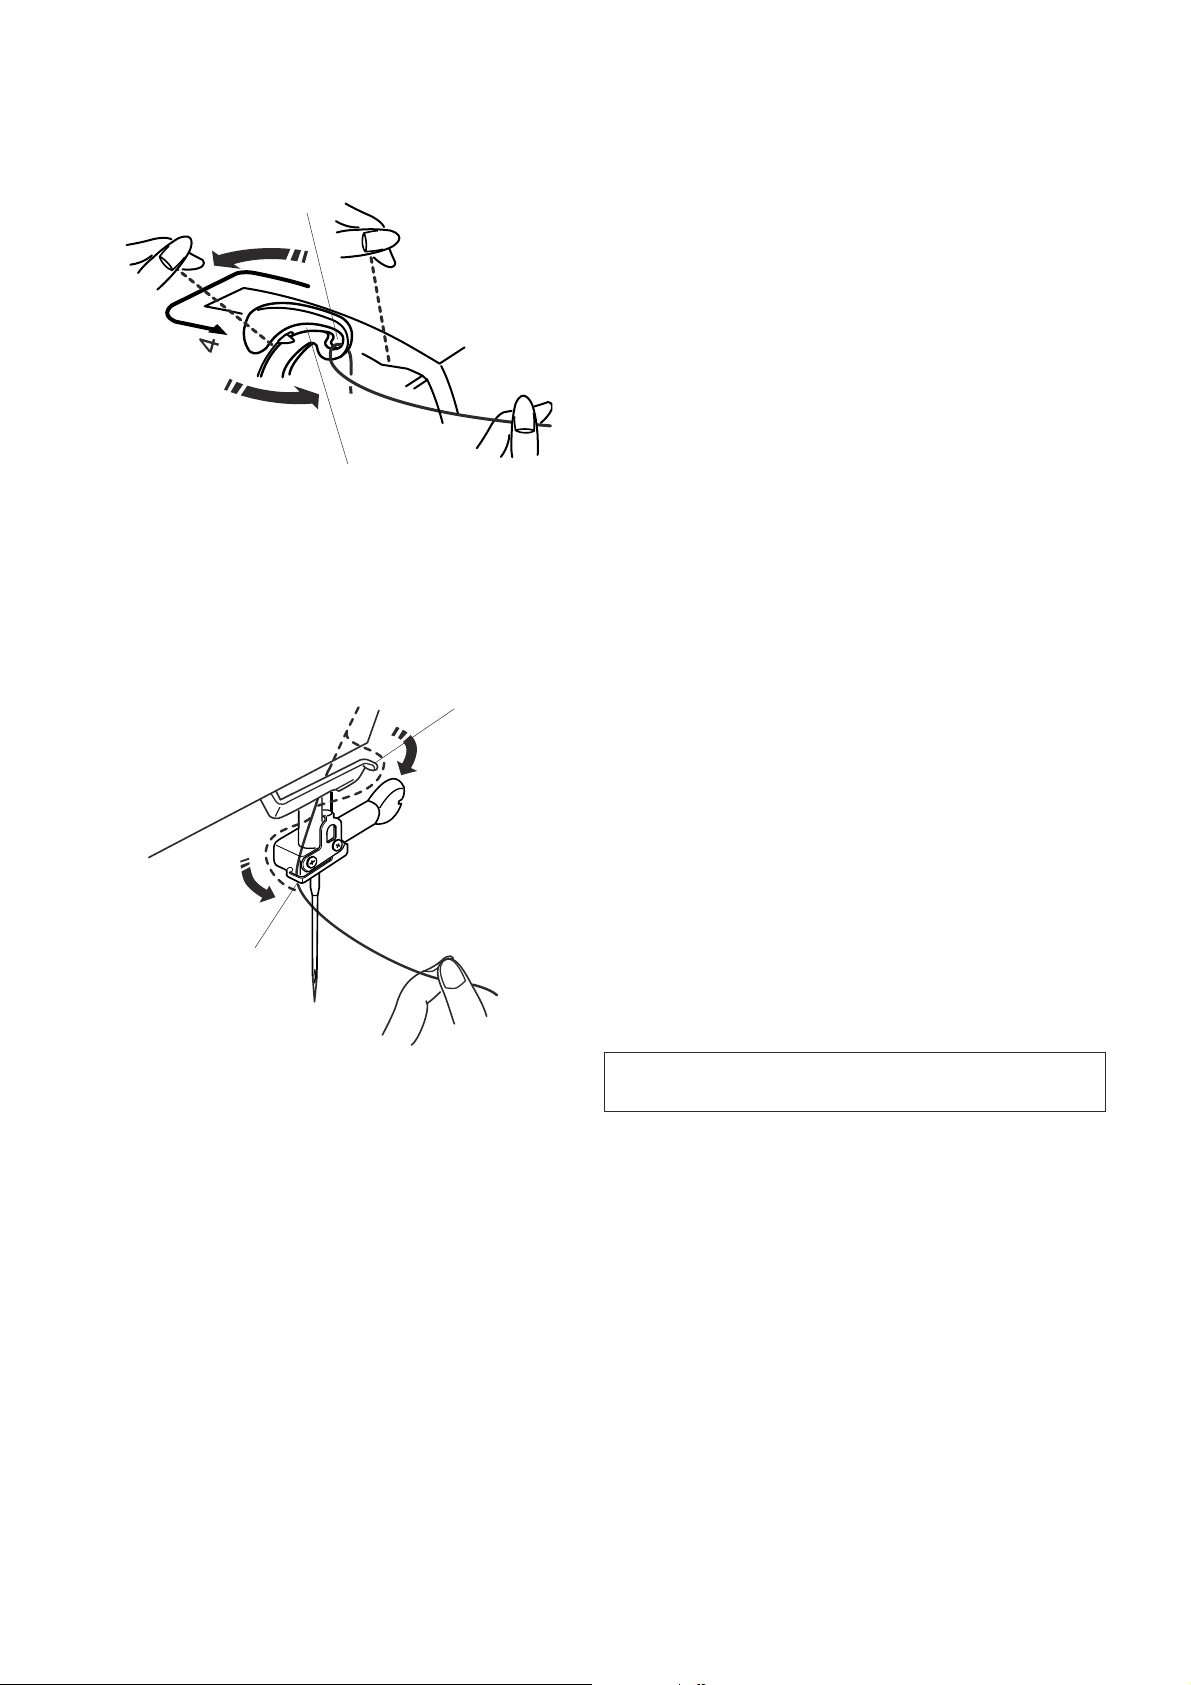
c
t
c Slip the thread through the slit and down into the
eye of the take-up lever as shown. Draw the
thread down through the left channel.
r Slit
t Eye of the take-up lever
r
vb
u
y
v Slip the thread behind the lower thread guide
from the right.
y Lower thread guide
b Slip the thread in the needle bar thread guide
from the left.
u Needle bar thread guide
Thread the needle from front to back by hand or use the
built-in needle threader.
NOTE:
Refer to page 11 for built-in needle threader
10
Page 13
Needle Threader
z
x
q
w
z Lower the presser foot. Depress the needle
threader knob as far as it will go. The hook
comes out through the needle eye from behind.
q Needle threader knob
w Hook
x Draw the thread down around the threader guide
and under the hook.
e Threader guide
c
v
e
w
c Release the threader knob slowly while holding
the thread end with your hand. A loop of the
thread is pulled up through the needle eye.
v Remove the loop from the threader and pull out the
thread end from the needle eye.
NOTES:
The needle threader works well with the threads #50-90
and needles #11-16, the blue tipped needle as well.
If the needle stops too low to use the needle threader
after the automatic thread cutting, raise the needle to
its highest position by turning the handwheel.
11
Page 14
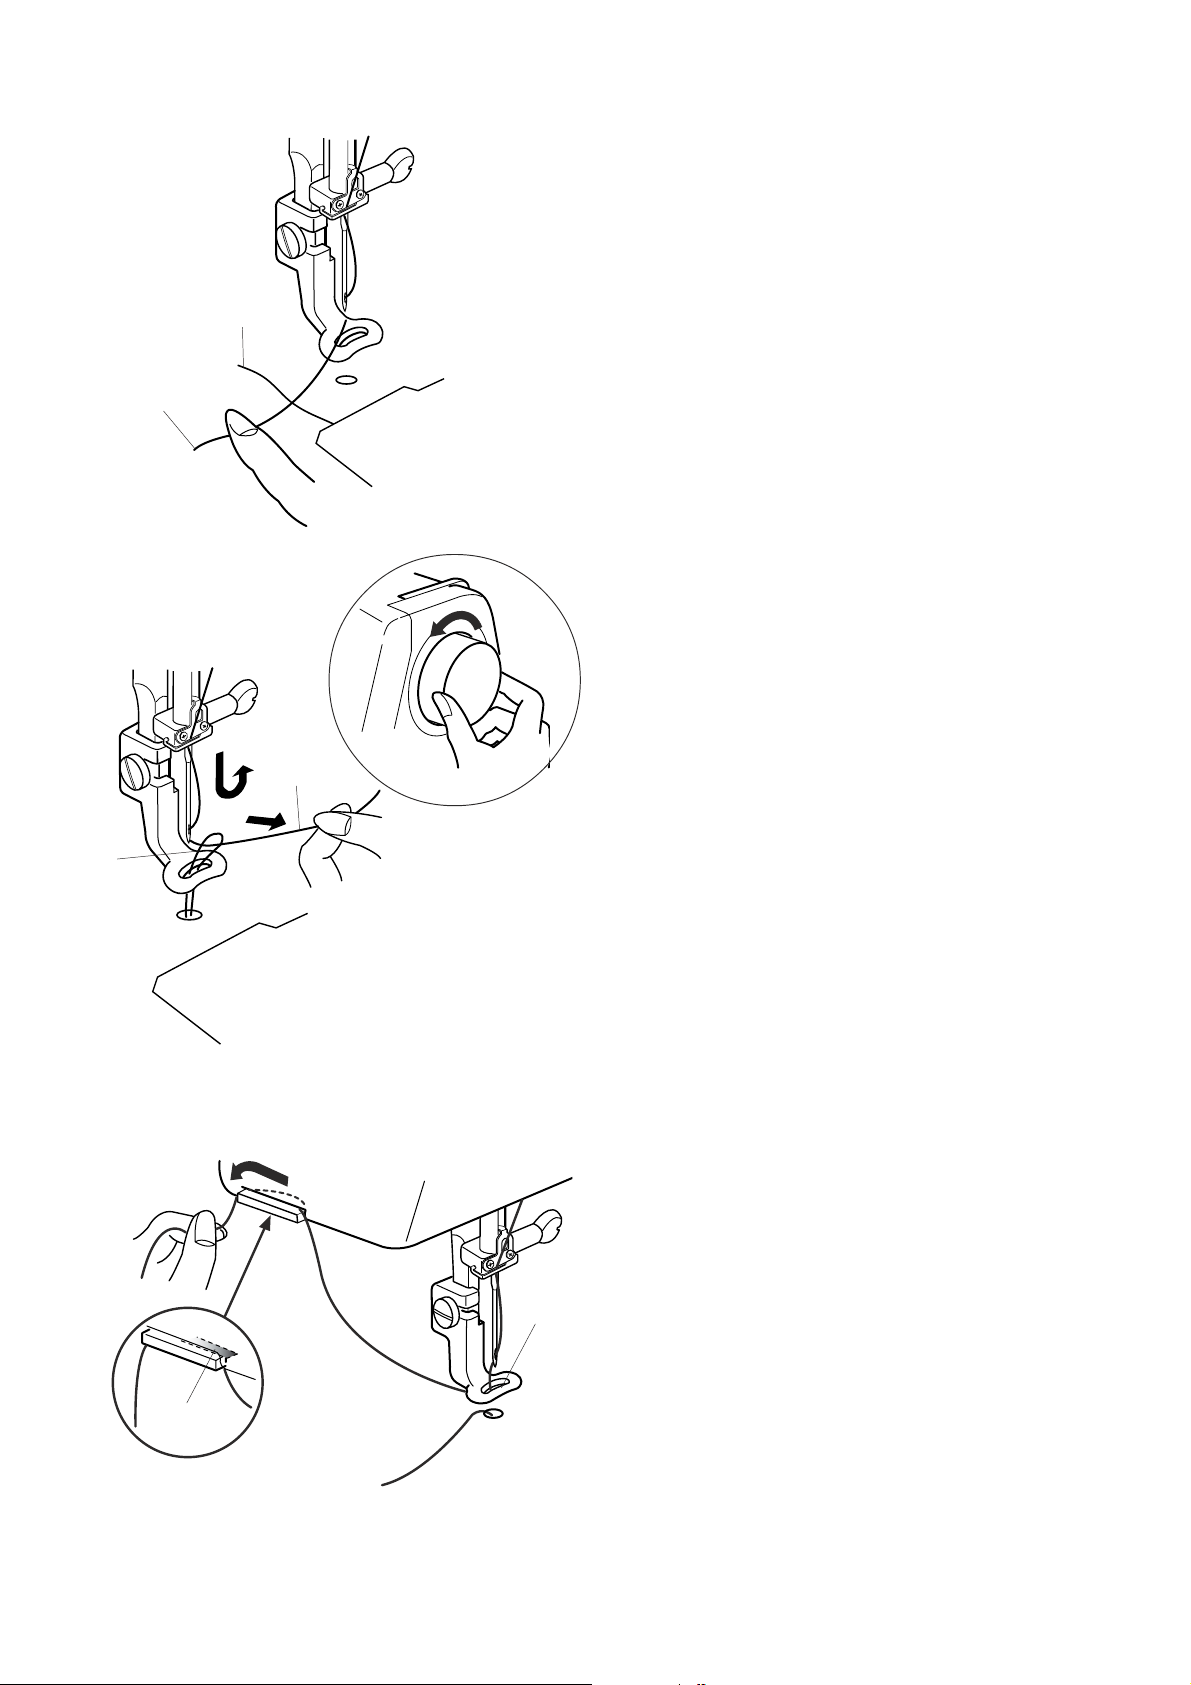
Drawing up the Bobbin Thread
z
q
x
z Raise the presser foot lifter. Hold the needle
thread with your finger.
q Needle thread
w Bobbin thread
w
x Turn the handwheel one complete turn toward
you. Draw the needle thread to bring up a loop of
the bobbin thread.
w
c
q
c Pass the needle thread through the hole in the
embroidery foot and draw it up to the thread
holder leaving an inch of free thread.
e Hole
r Thread holder
e
r
12
Page 15
q
Adjusting the Thread Tension
Balanced thread tension:
Small amount of the needle thread shows on the wrong
side of the fabric.
When the needle thread tension is too tight:
The bobbin thread shows on the right side of the fabric.
Reduce the tension by turning the tension dial to a
lower number.
q Bobbin thread
When the needle tension is too loose:
The needle thread forms loops and the stitches look
shaggy.
Increase the tension by turning the dial to a higher
number.
13
Page 16
w
q
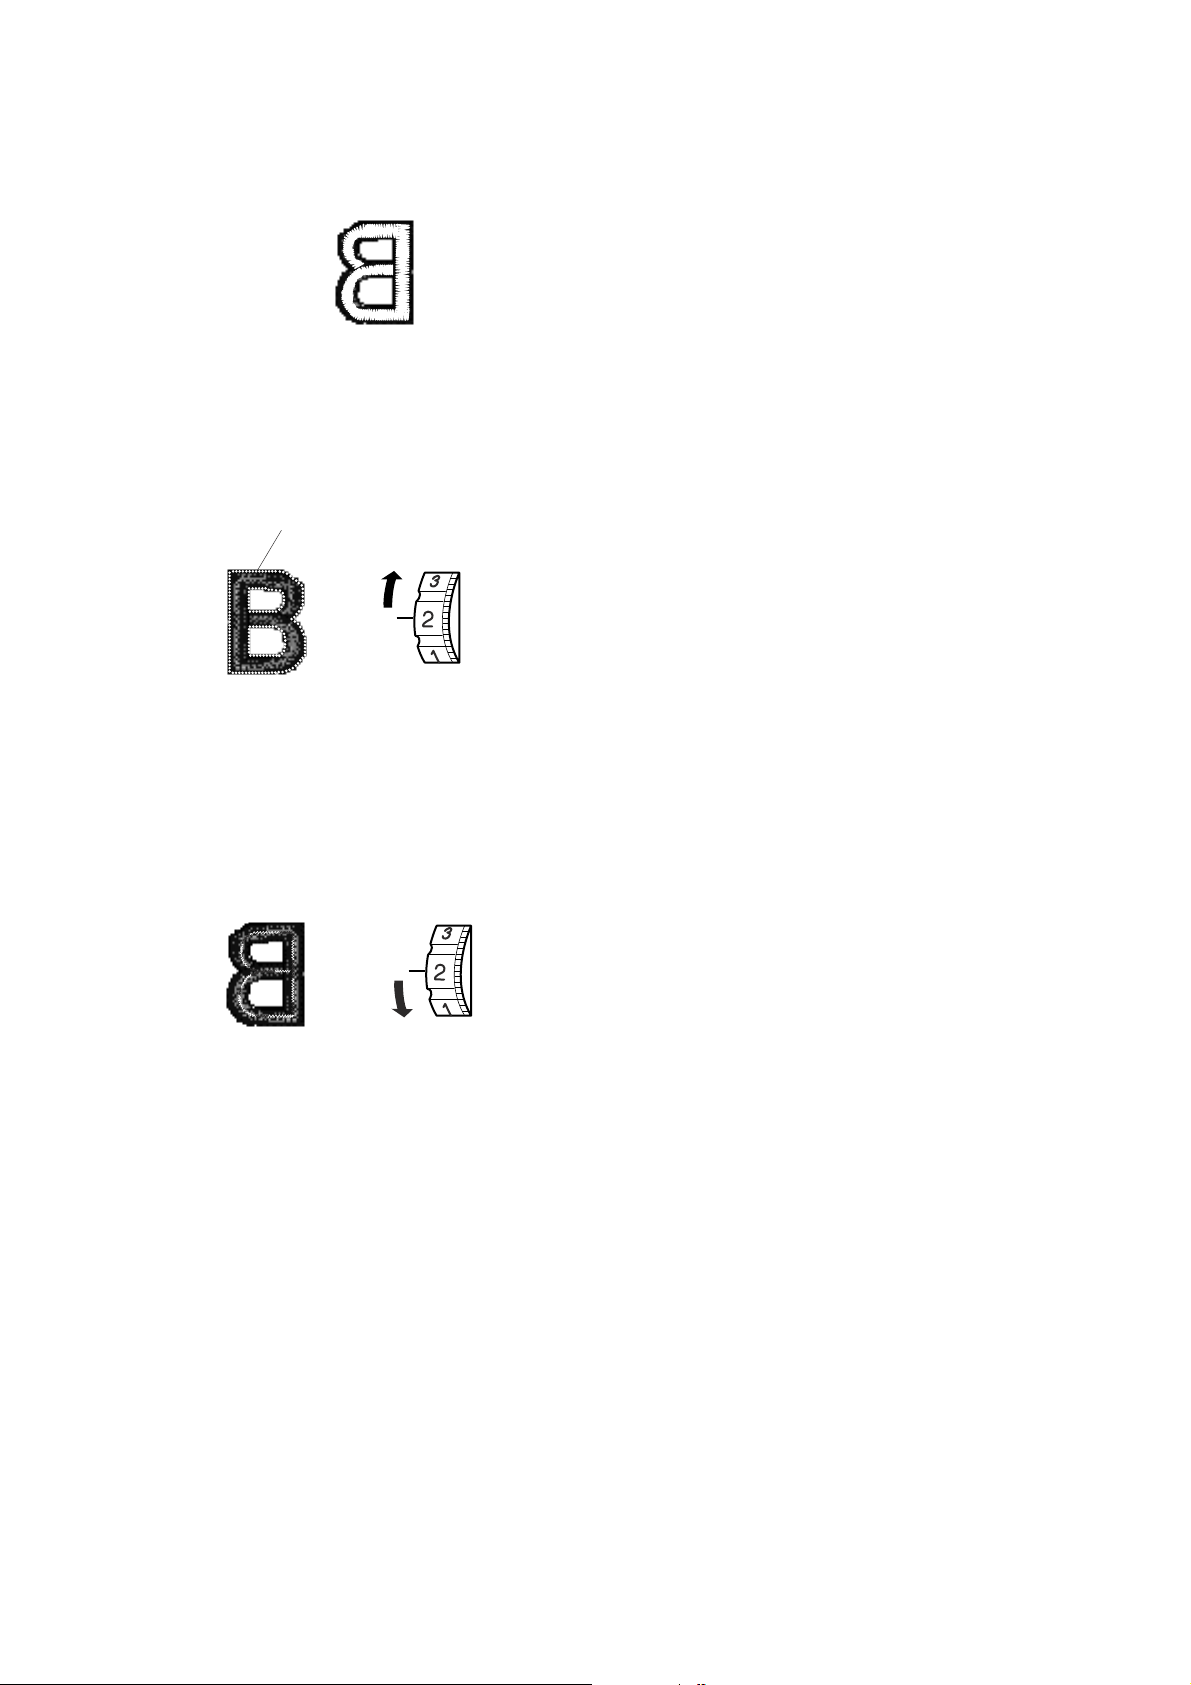
Changing Needle
Turn off the power switch. Raise the needle by turning
the handwheel and lower the presser foot.
Loosen the needle clamp screw by turning it
counterclockwise.
Remove the needle from the clamp.
q
Insert a new needle into the needle clamp with the flat
side of the needle to the rear.
q Needle clamp screw
w Flat side of the needle
e
When inserting the needle into the needle clamp, push
it up as far as it will go and tighten the needle clamp
screw firmly.
To check needle straightness, place the flat side of the
needle onto something flat (a needle plate, glass etc.)
The gap between the needle and the flat surface should
be consistent.
e Gap
Never use a blunt needle.
NOTES:
Use the size 11 Blue Tipped Needles for fine fabrics.
For medium to heavy weight fabrics, use the size 14
needles.
14
Page 17

Embroidery Hoops
(A)
(B)
q
q
w
w
e
e
(A) Embroidery Hoop A:
This is the standard size hoop, with a 12.6 cm (5”) by
11 cm (4 3/8”) embroidery area for sewing PC Card
embroidery designs etc.
r
(B) Embroidery Hoop B:
This is the large-size hoop, with a 20 cm (8”) by 14 cm
(5 1/2”) embroidery area for sewing large-size designs
and combined designs.
q Outer hoop
w Inner hoop
e Attaching knob
r Hoop tightening screw
r
w
e
r
q
y
t
y
Templates
When positioning the fabric into the hoop, use the
template to align the centerlines on the fabric with the
center of the hoop. First mark the centerlines on the
fabric and place the fabric on the outer hoop. Place the
inner hoop and template over the fabric and adjust the
fabric placement.
q Starting point for built-in and PC Card designs
w Starting point for monogramming in horizontal
placement
e Starting point for Memory Card No. 102 and
up for Memory Craft 5700/9000.
r Starting point for monogramming in vertical
placement
t Embroidery boundary for built-in and PC Card
designs.
NOTE:
The four indentations on the template do not
correspond with reference lines.
y Indentations for positioning the template
q
15
Page 18

Adhesive (Iron-on) Stabilizer
Place the Wrong side of fabric and the glossy side of
the stabilizer together. Fold up a corner of the
stabilizer and fuse it with an iron.
NOTES:
Fold up a corner of the stabilizer, to make it easier
to peel off the excess stabilizer after stitching.
Ironing temperatures vary depending on kind of
adhesive type stabilizer.
StabilizerS
To obtain the best quality embroidery, it is important to
use stabilizers.
Types of stabilizer
Tear-away Stabilizer is made from a fiber that will tear
easily. Use tear-away stabilizers for stable woven
fabrics. After stitching, tear away the stabilizer so that
the small portion left in the back of the stitching will not
affect the wear.
Iron-on Stabilizer is an adhesive type stabilizer for knits
and all kinds of unstable fabrics. Fuse it to the wrong
side of the fabrics with an iron.
Cut-away Stabilizer is a non-woven fabric that does not
tear. Cut the excess portion after stitching. Use
cutaway
stabilizers for knits and all kinds of unstable
fabrics.
Water Soluble Stabilizer will dissolve in water. Use this
stabilizer for cutwork or lace embroidery, and also for
the right side of looped fabrics such as towel to avoid
loops coming through the embroidery.
Sticky Stabilizer is a sticky paper used for securing a
small fabric or work that cannot be secured in the
hoop.
It is also used for velvet and other napped fabric that
would be permanently marked by the hoop.
Usage:
The stabilizer should be attached to the wrong side
of fabric.
More than one layer may be required.
Felt or stable fabrics do not need to be stabilized
and you may embroider directly on it.
For firm fabrics, you may place a thin paper under
the fabric.
The non-adhesive type should be used when
embroidering fabric, which cannot be ironed or for
sections, which are difficult to iron.
Cut the stabilizer larger than the embroidery hoop
and set it on the hoop so that the entire piece is
fastened with the hoop to prevent looseness of the
fabric.
16
Page 19

Setting the Fabric in an Embroidery Hoop
z
x
q
t
w
r
z Mark the centerlines on the right side of the
fabric with tailor’s chalk.
q Fabric
w Centerlines
x Loosen the hoop tightening screw of the outer
hoop and lay the fabric and the inner hoop over
the outer hoop.
Place the template over the fabric, matching
centerlines.
e Hoop tightening screw
r Inner hoop
t Template
c
v
y
t
e
e
c Set the inner hoop into the outer hoop and
tighten the hoop tightening screw.
y Outer hooop
v Remove the template.
NOTES:
When placing the fabric on the embroidery hoop,
place the outer hoop on a flat surface.
For thin and stretchy fabrics, use an adhesive type
stabilizer (iron-on type) on the wrong side of the
fabric. More than one layer of the stabilizer may be
required.
The Cloth Setter 10000 (optional Item) is very helpful
when setting a fabric to a hoop in the right position.
17
Page 20

q
w
e
Attaching the Embroidery Hoop to the Machine
Turn the attaching knob so it is parallel with the hoop,
and set it on the carriage.
Attach the hoop by fitting the pins into the carriage
holes.
q Attaching knob
w Carriage holes
e Pins
q
START
STOP
Turn the attaching knob clockwise.
CAUTION:
Always provide sufficient clearance for the embroidery
carriage behind your machine before starting the
machine.
Never try to move the carriage by hand or touch the
carriage while it is moving.
Make sure to return the carriage to the home position
before turning the power off.
18
Page 21

q
Designs
Hoop Size A(F): 126X1 10 mm
1 2 3 4
5 6 7 8
Mode
w
e
Gothic
A
B
IJKL
Q
RST
YZ
Mode
PC Card
Hoop Size A(F):126x110mm
1
DEF
C
A Z
2
KEY OPERATIONS
Pattern Selection Window
A Z
AB
B
G
H
N
AB
V
AB
3
OP
W
L
M
M
U
A Z
X
Font
OK
S
4
A Z
When the machine is turned on, the pattern selection
window of the built-in design appears on the visual
touch screen.
NOTE:
After turning on the power, it takes approximately six
seconds for the pattern selection window to be
displayed on the visual touch screen.
(This is the required boot up time and is not a defect)
The following 5 categories are available in the pattern
selection window:
qq
q Built-in designs
qq
There are 100 ready-to-sew designs available in
this category.
You can also open design files saved in the internal
memory.
ww
w Monogramming
ww
You can sew three styles of lettering (Gothic, Script
and Cheltenham), as well as 3-letter and 2-letter
monogramming.
ee
e PC card
ee
You can sew embroidery designs from the optional
PC Design cards as well as your favorite designs
stored in the Compact flash (optional item).
rr
r USB memory
rr
You can save and open embroidery design files stored
in the USB memory (optional item).
r
t
Mode
USB memory Stick
MyDesign
Mode
Edit
Size
A Z
A Z
tt
t Editing
tt
The editing function allows you to modify and combine
the embroidery designs from various sources.
Press the tab of the desired category to open the
appropriate window.
B: 140x200mm
Mode
OK
Cancel
19
Page 22

Designs
Hoop Size A(F): 126X1 10 mm
1 2 3 4
5 6 7 8
Mode
qw
er
A Z
Mode Setting
Press the Mode key and the mode selection dialog box
will open.
Press one of the following keys to select the desired
opertion.
qq
q SET key
qq
Press this key to open the machine setting window. You
can customize the machine settings to suit your
preference.
ww
w Help key
ww
Press this key to view the help topics for basic
operations.
ee
e Carriage centering key
ee
Press this key to move the carriage to the center
position (starting point for embroidery).
rr
r Return carriage key
rr
Press this key to bring the carriage back to its stored
position after finishing embroidery.
tt
t Return key
tt
Press this key to close the mode selection dialog box
and return to the previous screen.
t
NOTE:
Before you turn the power switch OFF in Embroidery
Mode, always be sure to press the return carriage key
to return the carriage to its stored position.
20
Page 23

e
r
t
y
Screen Contrast
5
Eco Mode
10
min
inch/mm
Register
Machine Settings
Pressing the SET key will open the machine setting
dialog box.
qq
q SET tab
qq
Press the SET tab to customize the machine settings.
ww
w Flag tab (Language selection tab)
ww
Press the Flag tab to select the language for the screen
display. You can select one of 11 languages.
SET
+
+
inch
mm
u
q
ee
e Screen contrast
ee
The visual touch screen contrast can be adjusted.
Press the Plus key, to sharpen the screen contrast.
Press the Minus key, to fade the screen contrast.
w
rr
r Sound control
rr
The buzzer volume can be adjusted. The volume level
can be set from (0 to 10) and the default setting is 5.
Press the Plus key, to increase the buzzer volume.
Press the Minus key, to decrease the buzzer
volume.
When you select 0 the buzzer turns off.
tt
t Eco mode
tt
After turning on the power switch, if you have not used
the machine, after a while, the machine will enter Eco
Mode. The visual touch screen will go dark and the
sewing light will turn off.
Whenever you touch the screen while the machine is in
Eco mode, the screen and sewing light will turn on
again.
You can set the Eco mode timer from 1 minute to 30
minutes. The default setting is 10 minutes.
To set the Eco Mode timer:
Press the Plus key to increase the timer setting.
Press the Minus key to decrease the timer setting.
To turn off the Eco mode, Press the Plus key until
“OFF” shows in the box.
yy
y Inch/Millimeter
yy
You can set your machine’s measuring unit to either
inch or millimeter depending upon your preference.
The default unit setting is millimeter.
Press the inch or mm key to select the unit you
preferred.
uu
u Page key
uu
You can turn the pages by pressing the page keys.
Press the Next page key to view the next page.
Press the Previous page key to view the previous
page.
21
Page 24

i
o
!0
!1
Key Position Adjustment
Maximum speed setting
650spm
Sewing Light
Auto Thread Cutter
Register
(A)
Key Position Adjustment
PRESS MARK ( )
(B)
ii
i Key position adjustment
ii
Yes
SET
+
OFF
ON
X
+
If you think the touch panel keys are out of alignment,
you can correct it in the key position adjustment
window.
When you press the Yes key, the window (A) will be
shown. With your finger, press the Black cross (+)
signs as they appear in order. When you press the last
Black cross (+) sign, the window (B) will be shown.
oo
o Embroidery maximum speed
oo
The maximum sewing speed can be changed from 400
to 650 spm for embroidery sewing.
The default setting is 650 spm.
Press the Minus key to reduce the maximum
sewing speed.
Press the Plus key to increase the maximum sewing
speed.
NOTE:
Reduce the sewing speed when sewing patterns with
narrow zigzag stitches that tend to deform at the high
speed.
!0!0
!0 Sewing light
!0!0
You can turn the sewing light on or off by pressing the
Sewing light key.
Key Position Adjustment
END
!1!1
!1 Auto thread cutter
!1!1
If the auto thread cutter command is enabled, the
machine will stop and cut the threads automatically
when each color section is finished.
Press the ON key to enable auto thread cutter.
Press the OFF key to disable auto thread cutter.
Press the next page key to view the next page.
22
Page 25

!2
Thread selection
Janome
Format
Built-in Memory
RobisonAnton
Madeira
Mettler
Ye s
SET
!2 Thread selection
There are four brands of embroidery threads to
choose from. Press the corresponding key of the
thread you wish to use. The color code of the
selected brand will be shown in the embroidery
screen.
!3
!4
ATA PC Card
USB Memory Stick
Register
Reset all to defaults
Register
!5
!6
Ye s
Ye s
Ye s
SET
!3 Formatting the built-in memory
If the internal memory, ATA PC card or USB
memory does not function due to damage to the
memory bank, you need to re-enable it by
formatting the memory.
To format the memory press the Yes key next to
the memory location.
NOTE:
Formatting will erase all data stored in the memory.
Press the next page key to view the next page.
!4 Reset all to default
Pressing the Yes key will return all settings
except for language to defaults (the same settings
as when you purchased the machine).
!5 Register key
Press this key to register the settings and return to
the previous screen.
Yes
Yes
X
!6 Return key
Press this key to return to the previous screen
without registering the settings.
23
Page 26

Language Selection
q
w
e
r
t
y
i
o
u
!0
!1
You can select one of the following 11 languages by
pressing the corresponding key.
q English
w French
e Spanish
r Italian
t Dutch
y German
u Portuguese
i Swedish
o Russian
!0 Finnish
!1 Japanese
Press the register key to confirm your selection.
On-screen Help
You can view on-screen help for the basic operations of
the machine.
Index
Changing needles
Inserting the bobbin
Threading the machine
Winding the bobbin
Changing needles
Press the Help key and the help index window will
open.
Press the key next to the help topic you wish to
?
view.
?
?
?
?
?
The illustrated help of the selected topic will be
displayed on the screen.
NOTE:
Press the Return key to go back to the previous
screen.
24
Page 27

r
Built-in Designs
Hoop Size A(F): 126X110 mm
1 2 3 4
5 6 7 8
Mode
1/14
A Z
Selecting Built-in Designs
The pattern selection window for the built-in designs will
appear when the machine is turned on.
There are 100 ready-to-sew designs available in
this category.
You can also open design files saved in the internal
memory.
Press the Built-in/Saved key to switch between
the built-in designs and saved designs.
q Built-in/Saved key
To select the embroidery design, press the desired
pattern selection key.
w Pattern selection keys
q
Hoop Size A(F): 126 x 110mm
w
Ready to Sew
e
Press the Next page key to display the designs on the
following pages.
There are 14 pages of designs grouped by the hoop
size.
e Next page key
r Hoop size
When you press the Pattern selection key, the screen
will show a massage advising you the hoop to be used.
Press the Return key and the Ready to Sew screen
will open.
t Return key
y Ready to Sew screen
t
AZ
Mode
y
Jog
ST
25
Page 28

qq
q
qq
Ready to Sew
Mode
Jog
Ready to Sew screen (continued)
ww
w
ww
AZ
ST
A stitch image of the selected design and function keys
as well as information of the selected design are
indicated in the Ready to Sew screen.
qq
q Color section key
qq
Press this key to show the complete image of the
selected design or partial image of each color section.
ww
w Next/Previous section keys
ww
To view the next color section, press the Next section
key. Press the Previous section key to view
the previous color section.
ee
e Color list key
ee
Press this key to display a list of thread colors
employed in the selected design.
rr
r
rr
ee
e
ee
y
t
uu
u
uu
Sewing the specific color (section) by skipping:
You can sew only the specific section of the design by
skipping the sections before it.
Press the next section key until the desired section
is displayed.
rr
r Jog Keys
rr
Adjust the hoop position with the Jog keys so that the
needle drop position comes right above the center of
the centerlines on the fabric.
t Needle drop position
y Centerlines
uu
u Return key
uu
Press this key to return to the pattern selection window.
26
Page 29

Ready to Sew
!1
Mode
Jog
!2
ST
AZ
!3
!4
ii
i Trace key
ii
You can check the size of the sewing area by pressing
this key. The carriage traces the outline of the selected
embroidery pattern without stitching.
The carriage will return to the starting position after
tracing and the screen will return to the previous
display.
To cancel the outline tracing, press the cancel key.
o Cancel key
!0!0
!0 Carriage store key
!0!0
Press the Carriage store key to bring the carriage back
to its stored position after finishing embroidery.
Paused
Trace outline
Cancel
ii
i
ii
!0!0
!0
!0!0
o
AZ
Screen Information
Besides the design image, approximate sewing time in
minutes, number of colors, design size and the hoop
that should be used for the selected design are shown.
!1 Sewing time in minutes
!2 Number of colors
!3 Design size
!4 Hoop
!5!5
!5 Stitch Back/Forward keys
!5!5
When embroidery sewing has started, the screen will
indicate the current stitch counts. The Jog keys will
disappear and the Stitch back/forward keys will be
indicated on the screen. You can use these keys to
move the embroidery hoop to where the thread has
broken or run out.
Press the Minus key to move the hoop back to a
previous sewing point. The hoop will move backward
every 10 stitches when you press this key.
Jog
‒
+
!5!5
!5
!5!5
Mode
!6!6
!6
!6!6
ST
Press the Plus key to move the hoop ahead. The
hoop will move forward every 10 stitches when you
press this key.
!6!6
!6 Jog/ST key
!6!6
Press this key to switch the Jog keys to the Stitch
back/forward keys before sewing.
NOTE:
Before you turn the power switch OFF, always be sure
to return the carriage to its stored position.
27
Page 30

z
Ready to Sew
Mode
Jog
EMBROIDERY SEWING
Starting to Sew Embroidery
z Select the desired pattern.
AZ
ST
x
b
c
v
‒
+
START
STOP
q
Mode
START
STOP
w
Jog
ST
x Lower the presser foot, press the Start/Stop
button and sew 5 to 6 stitches.
Press the Start/Stop button again to stop the
machine.
c Raise the presser foot, cut off the thread tail
close to the beginning of the starting point and
lower the presser foot.
q Thread tail
v Press the Start/Stop button to start sewing again
and the machine stops sewing automatically when
the first color section is finished.
The machine will trim the threads automatically if
you enabled the auto thread cutting command.
NOTE:
If you disabled auto thread cutting, press the Auto
thread cutter button or trim the threads manually.
e
b After finishing embroidery, press the auto thread
cutter button to cut the threads.
Press the Carriage store key to return the
carriage to the stored position.
w Auto thread cutter button
e Carriage store key
r
Sewing results
The embroidery stitch pattern is sewn on the centerlines
on the fabric as shown .
r Centerlines on the fabric
NOTES:
The embroidery stitch pattern position against the
centerlines is indicated on the template sheets.
For embroidery sewing with the PC cards, use the
included template sheets to set correct sewing position.
28
Page 31

MONOGRAMMING
Gothic
A
B
IJKL
Q
RST
YZ
Mode
w
r
DEF
C
A Z
AB
A(F)
G
H
A Z
N
AB
V
AB
OP
X
W
Font
L
M
OK
S
M
U
Monogram Selection Window
In the monogram selection window, you can program
lettering by pressing the alphabet keys directly.
After you press an alphabet key, the letter is memorized
and the cursor is moved to the right side.
Selecting the fonts
q
You can select one of 3 styles of font as well as 2-letters
and 3-letters monogramming.
Press the Font key and the font selection window will
open.
q Font key
e
Pressing one of the following keys to select the desired
font.
w Gothic font
e Script font
r Cheltenham font
t
t 2-Letters
y 3-Letters
y
Mode
A Z
i
AB
AB
L
o
M
u
To cancel your selection, press the Return key.
u Return key
Letter case
Font
You can select upper or lower case letters by pressing
the Letter case key.
OK
S
i Letter case key
European letters
You can select the European letters, such as diaeresis,
by pressing the European letter key.
o European letter key
29
Page 32

Mode
oo
o
oo
ee
e
ee
ii
i
ii
ww
w
ww
qq
q
qq
A Z
uu
u
uu
AB
yy
y
yy
AB
L
M
tt
t
tt
qq
q Number/Symbol key
qq
When you press this key, the number and symbols will
appear. To select the number or symbol, press the
correspondent key.
Font
OK
S
rr
r
rr
Press this key again to return to the letter selection
window.
ww
w Delete key
ww
Characters can be deleted when they are underlined by
the cursor. Move the cursor under the letter, number or
symbol you want to delete and press the Delete key.
ee
e Cursor keys
ee
Slide the cursor to the right or left by pressing either of
the arrow keys. To add letters/numbers/symbols
(character) into a monogram, move the cursor under a
character. Press the new character key and it will be
inserted on the left side of the underlined character.
rr
r OK key
rr
The selected letter/number/symbol monogram
combination is confirmed by pressing the OK key. After
the key is pressed the screen will change to the Ready
to Sew screen.
tt
t Letter Size key
tt
You can choose 3 different sizes of letters: large,
medium and small. Set the size of monogram before
selecting the characters.
!0
Gothic
C
B
A
DE F
IJKL
Q
RST
YZ
A Z
M
U
yy
y Horizontal/Vertical key
yy
You can choose the direction of the monogramming
either horizontal or vertical.
uu
u File Save key
uu
You can save the programmed monogram by pressing
this key. The File Save window will appear (refer to
AB
A(F)
H
G
P
O
N
W
V
Font
L
M
X
OK
S
page 42).
ii
i Magnifier key
ii
Pressing this key enlarges the Letter/Number keys
to make entry easier.
Press the Return key to return to the original screen.
!0 Enlarged keys
!1 Return key
oo
o Mode key
oo
Refer to page 20.
!1
30
Page 33

Monogram Embroidery
Example: “Bear” in Gothic style
z
x
Gothic
A
B
IJKL
Q
RST
YZ
Mode
DEF
C
Gothic
B
A
B
IJKL
Q
RST
YZ
Mode
DEF
C
A Z
A Z
AB
z Press the font key and select the Gothic style
letters. Select “B”.
A(F)
G
H
A Z
N
V
AB
OP
X
W
Font
L
M
OK
S
M
U
AB
x Press the Letter case key to select lower case
AB
A(F)
G
H
A Z
N
V
AB
OP
X
W
Font
L
M
OK
S
M
U
AB
letters.
c
Gothic
B
Mode
v
Ready to Sew
Bear
ear
A Z
AB
A(F):126 x 110mm
Mode
AB
Jog
AB
A(F)
c Select “e”, “a” and “r”. Press the OK key.
NOTE:
If you wish to change the orientation of monogramming,
A Z
press the Horizontal/Vertical key before you press the
OK key.
Font
L
M
OK
S
v The display will change to the Ready to Sew
screen.
A Z
Multi-color monogramming
You can sew a multi-color monogram by changing the
q
thread color of each letter if you press the Color
change key before sewing.
The machine will stop automatically when each letter
has been sewn. Change the thread and start sewing
again.
q Color change key
ST
31
Page 34

b
Ready to Sew
b Use the Jog keys to adjust the position of the hoop
to match the centerlines.
q Jog keys
w Centerlines
n
Bear
q
A(F):126 x 110mm
Jog
Mode
ST
e
A Z
NOTE:
You can select one of the 3 placements of the
monogramming, left justified, center justified or right
justified, by pressing the Justification key.
e Jutification key
n Lower the presser foot, press the Start/Stop button
and sew 5 to 6 stitches.
Press the Start/Stop button again to stop the
machine.
Raise the presser foot, cut off the thread tail
close to the beginning of the starting point and
lower the presser foot.
Press the Start/Stop button to start sewing again
and the machine stops sewing automatically when
the sewing is finished.
r
w
Orientation of monogramming
You can sew the monogramming in horizontal or
vertical orientation.
Press the Horizontal/Vertical key before pressing the
OK key to select the orientation.
r Monogramming in horizontal orientation
t Monogramming in vertical orientation
t
32
Page 35

z
Gothic
A
B
C
IJKL
Q
RST
YZ
Mode
DEF
N
M
U
V
A Z
AB
AB
AB
A(F)
G
H
OP
X
W
Font
L
M
OK
S
2- Letters Monogram
Example: 2-Letters with a crest
A Z
z Press the Font key. Select 2-Letters.
x
c
2
Letters
A
B
C
IJKL
Q
RST
YZ
Mode
2 Letters
A
B
C
IJKL
Q
RST
YZ
DEF
N
M
U
V
A Z
AB
AB
DEF
N
M
U
V
AB
A(F)
G
H
OP
X
W
Font
L
M
OK
S
AB
A(F)
G
OP
W
x Select the crest.
A Z
c Select letters “A” and “B”. Press the OK key.
H
A Z
X
vb
Mode
Ready to Sew
A Z
AB
A(F):126 x 110mm
Mode
AB
Jog
Font
L
M
S
OK
Edit
v The screen will change to the Ready to Sew
screen.
b Press the Start/Stop button to start sewing.
AZ
NOTES:
The 3-Letters monogram will be sewn in the same way
as the 2-Letters monogram.
The starting position for the 2-Letters and 3-Letters is in
the center of the hoop.
ST
33
Page 36

Gothic
BEAT
AB
Correcting the Monogram
Deleting a letter
A(F)
Example: To delete “E” from “BEAT”
z
x
c
Mode
Gothic
BEAT
Mode
Gothic
BAT
A Z
A Z
AB
AB
AB
AB
z Press the key to shift the cursor under the
Font
L
M
OK
S
AB
A(F)
Font
L
M
OK
S
AB
A(F)
letter to delete.
x Press the Delete key.
c The letter “E” will be deleted.
Inserting a letter
z
x
Gothic
BAT
Gothic
BAT
Gothic
BOAT
AB
A(F)
AB
A(F)
AB
A(F)
Example: To insert “O” to “BAT”
z Press the key to shift the cursor under the next
letter where you wish to insert a letter.
x Select the letter “O”.
The letter “O” will be inserted between “B” and “A”.
34
Page 37

w
q
OPTIONAL ITEMS
PC Cards (optional item)
Inserting and ejecting a PC card
Insert the PC card into the slot with the front side facing
toward you.
Push the card in until it clicks, the eject button will pop
out.
q PC card
w Eject button
NOTE:
When the card is properly set, the red bar on the eject
button will show.
Ejecting the PC card
Press the Eject Button to eject the PC card.
Take out the PC card from the machine.
w
PC Card
Hoop Size A(F):126x110mm
1
Mode
2
3
NOTE:
When the power is turned on with a PC card inserted in
the machine, it will take a few moments to get the
machine booted up.
Selecting the PC card designs
4
A Z
Press the PC card tab. The designs contained in the
card are displayed on the pattern selection keys.
Press the Pattern selection key to select the design
you wish to sew.
The Ready to Sew screen will appear.
CAUTION:
Do not turn the power off or eject the card while the
warning sign or hourglass is displayed.
35
Page 38

w
e
q
USB Memory (optional item)
The USB memories can be used to save stitch data and
transfer the embroidery designs between the
MC 350E and your PC.
The USB memory is available at camera shops, PC
supplies stores etc. in various sizes and forms.
Open the small door under the card slot.
Insert the USB memory into the USB socket on the MC350E.
q Small door
w USB memory (optional item)
e USB socket
CAUTION:
Do not turn the power off or disconnect the USB memory
while the warning sign or hourglass is
displayed.
r
USB Memory Stick
MyDesign
Mode
USB Memory Stick
A-001
B-002
C-003
A Z
A Z
Opening the designs on USB memory
Press the USB memory tab.
The folder list is displayed in the window.
Press the desired Folder selection key to select it.
r Folder selection key
The designs contained in the selected folder will be
displayed on the Pattern selection keys.
Press the Pattern selection key to select the desired
pattern.
Mode
Cancel
36
Page 39

EDITING MODE
The editing function allows you to modify and combine
embroidery patterns to create your own original
designs.
Built-in Designs
Hoop Size A(F): 126X110 mm
1 2 3 4
5 6 7 8
Mode
q
w
A(F)
1/14
B: 140x200mm
B
OK
Cancel
C
Editing Screen
Press the Edit tab to open the Editing window.
A Z
The Hoop selection dialog box opens to allow you to
select the hoop you wish to use.
You can select one of the following hoops:
Standard Hoop A: 126 mm by 110 mm
Round Hoop F: 126 mm by 110 mm (Optional item)
Large Hoop B: 140 mm by 200 mm
Free arm Hoop C: 50 mm by 50 mm (Optional item)
q Hoop selection dialog box
w Hoop selection key
e
r
Edit
B: 140x200mm
Edit
Size
Mode
Size
OK
Cancel
A Z
A Z
Press the OK key and the Editing window for the
selected hoop will open.
Press the Cancel key to cancel the selection and
return to the Editing window for the hoop B.
Refer to page 39 for hoop selection after selecting the
embroidery pattern.
e Editing window for the hoop B
r Editing window for the hoop A
OK
Cancel
A(F): 126x110mm
Mode
OK
Cancel
37
Page 40

Importing the designs in the Editing window.
Edit
Size
B: 140x200mm
Mode
Built-in Designs
Hoop Size A(F): 126X110 mm
1 2 3 4
5 6 7 8
OK
1/14
Cancel
A Z
A Z
Press the Built-in design, PC card or USB memory
tab in the editing window.
Press the desired Pattern selection key or enter
characters for monogramming.
The selected pattern will be displayed in the Editing
window.
Mode
Edit
B: 140x200mm
Size
Mode
OK
Cancel
A Z
Editing the Embroidery Designs
To select the pattern to edit, press the image of the
desired pattern on the Editing window. The pattern will
be framed when it is selected.
Moving the selected pattern
To move the embroidery pattern on the Editing window,
press and drag the pattern to a desired location with
your fingertip.
CAUTION:
Do not drag the pattern on the screen with a sharp
pointed object.
38
Page 41

Edit
B: 140x200mm
Size
Mode
OK
Cancel
A Z
Moving the selected pattern (continued)
You can move the selected pattern also by pressing the
Layout keys
Press the Layout keys to move the pattern to the
desired position in the Editing window.
The carriage will not move when you are pressing the
layout keys since pattern position will move relatively to
the hoop, not to the machine.
q Layout keys
NOTES:
The appearance of the Layout keys is the same as the
Jog keys but their function is different.
Use the Jog keys to move the carriage.
Edit
B: 140x200mm
A(F)
qw
e
Size
Mode
OK
Cancel
A(F): 126x110mm
B
C
C
A Z
To cancel any changes that have been made, press the
Cancel key.
w Cancel key
Changing the hoop size
You can change the hoop size by pressing the Hoop
selection key.
e Hoop selection key
Select one of the following hoops:
Standard Hoop A: 126 mm by 110 mm
Round Hoop F: 126 mm by 110 mm (Optional item)
Large Hoop B: 140 mm by 200 mm
Free arm Hoop C: 50 mm by 50 mm (Optional item)
Press the OK key and the Editing window for the
selected hoop will appear.
r OK key
Pres the Cancel key to return to the default setting
(Hoop B).
t Cancel key
OK
Cancel
Edit
A(F): 126x110mm
Size
Mode
OK
r
OK
Cancel
t
Cancel
A Z
Edit
39
Page 42

q
Edit
B: 140x200mm
Edit
A(F): 126x110mm
Size
Size
Mode
100%
Size
Mode
r
OK
OK
Cancel
Cancel
OK
t
Cancel
A Z
A Z
w
e
Resizing the selected pattern
When you press the Size key, the size adjusting dialog
box will open.
You can change the size of the embroidery patterns
from 90% to 120% of the original pattern size.
q Size key
The size will change 1% each time you press the plus
or minus keys.
Press the Plus key to enlarge the pattern size.
Press the Minus key to reduce the pattern size.
To cancel size change, press the Cancel key.
Press the OK key to apply the new size.
OK
Cancel
w Cancel key
e OK key
Flipping the pattern
When you press the Mirror Image keys, you may
embroider a mirror image of the pattern.
Press the Vertical mirror key to flip patterns from
left to right.
Press the Horizontal mirror key to flip from top to
bottom.
r Vertical mirror key
t Horizontal mirror key
Edit
A(F): 126x110mm
u
Edit
Size
Mode
Size
OK
Cancel
Cancel
OK
A Z
A Z
y
Rotating the selected pattern
Each time you press the Rotation key, the embroidery
pattern will rotate 45 degrees clockwise.
y Rotation key
When you press and hold the Rotation key one second
or longer, the Rotation dialog box will open.
u Rotation dialog box
Press the Plus key to rotate the pattern every one
degree clockwise.
Press the Minus key to rotate the pattern every one
degree counterclockwise.
Pressing and holding the Plus or Minus key will rotate
the pattern quickly.
A(F): 126x110mm
Mode
OK
Press the OK key to apply the new angle.
To cancel rotation, press the Cancel key
Cancel
40
Page 43

Edit
Size
A Z
q
w
Deleting the pattern
When you press the Delete key, the selected pattern
will be deleted.
q Delete key
A(F): 126x110mm
r
t
Mode
OK
Cancel
Magnifying the pattern image
Press the Magnifier key to show a magnified image of
the selected pattern.
Press the Return key to return to the previous
screen.
w Magnifier key
e Return key
r Original image
t Magnified image
e
41
Page 44

Edit
SAVING A FILE
A(F): 126x110mm
t
OK
Size
Mode
OK
Save File (Built-in)
M_001
Cancel
u
Cancel
Name
A Z
q
w
e
r
When you press the Save file key, the Save file dialog
box will open.
q Save file key
You can select a memory location from Built-in memory,
ATA PC card or USB memory.
Press one of the following keys to select the desired
location to where you wish to save the file.
w Built-in memory key
e ATA PC card key
r USB memory key
The File list will open if you press the Built-in memory
key, while the Folder list will open if you press the PC
card key or USB memory key.
t File list
y Folder list
When you press the Page keys, you will be able
to see the saved files in the previous and next pages.
u Page keys
y
ABC
OK
M_001
M_002
M_003
M_004
Save File
Cancel
Save File
M_008
M_005
M_006
M_007
Name
Select the desired folder and the file list of the selected
folder will open.
Press the OK key to save the file and the screen will
OK
return to the original screen.
If you do not want to save the file, press the Cancel
Cancel
key to return to the previous window.
i OK key
o Cancel key
NOTE:
The file name will be automatically assigned starting
from M_001 in order.
CAUTION:
Do not turn the power off or eject the card when the
warning sign or hourglass is showing on
the visual touch screen. Otherwise, the data stored in
the memory may be lost or damaged.
OK
i
Cancel
o
42
Page 45

Save File
Creating a new folder
ABC
Cancel
OK
A
B
HI J KLM
OP QR
VWX
012
DEF
C
YZ
3
STU
456
You can create your own folder and assign the desired
name to it.
Press the New folder key and the keyboard window will
open.
q New folder key
q
Enter the folder name and press the OK key.
OK
The new folder will be added to the folder list.
w OK key
To go back to the folder list without creating a file, press
the Cancel key.
Cancel
e Cancel key
NOTES:
Only 8 characters can be entered.
G
N
To delete the last character, press the Backspace key.
r Back space key
789
r
Save File (Built-in)
M_001
Cancel
OK
The same file name exists,
overwrite it?
OK
Cancel
Cancel
OK
we
Name
t
Assigning the file name
Press the File name key if you wish to assign a new
name to the file.
t File name key
The keyboard window will open.
Enter the file name and press the OK key.
OK
The file will be saved with the new name.
If you attempted to save the file using an existing name,
the warning message will appear.
Press the OK key to overwrite the existing file.
Press the Cancel key if you do not wish to overwrite
OK
Cancel
it. You may need to change the file name and save the
file under the different name.
43
Page 46

Deleting the file
q
w
Short of memory space,
the file cannot be saved.
USB Memory Stick
A-001
B-002
B-002
A-001
Mode
C-003
Cancel
C-003
A Z
When the memory is full, a warning message will
appear. Press the OK key and go to the open file
OK
window then delete the file that you do not need.
Press the Built-in design, PC card or USB memory
tab to select the location of the file to delete.
Press the Delete key and the File delete dialog box will
open.
q Delete key
w File delete dialog box
Press the Pattern selection key to select the file you
wish to delete.
If you do not wish to delete the file, press the Cancel
Cancel
key.
Cancel
Are you sure you want
to delete this file?
OK
The Confirmation dialog box will open.
Press the OK key to delete the file.
OK
44
Page 47

z
Designs
17
18 19 20
CREATING AN ORIGINAL DESIGN
Example: To combine the built-in design #23 and
a word “Apple”
A Z
x
c
21 22 23 24
Mode
Ready to Sew
Beige Gray 223
Mode
Edit
Size
Jog
z Select design #23 from the built-in designs.
x Press the Edit tab.
The screen changes to the Editing window with the
selected pattern image.
A Z
ST
c Press the Monogram tab.
A Z
v
b
A(F): 126x110mm
Gothic
A
A
B
C
IJKL
Q
RST
YZ
Mode
Gothic
A
Mode
Mode
DEF
M
A Z
A Z
OK
N
U
V
AB
AB
AB
AB
Cancel
AB
G
H
OP
X
W
Font
L
M
OK
S
AB
Font
L
M
OK
S
v Select “A” (Upper case letter in Gothic style).
B
A Z
b Press the Letter case key to select lower case
letters.
B
B
A Z
45
Page 48

n
Gothic
Apple
AB
B
B
n Select “p”, “p”, “l” and “e”.
Press the OK key.
A Z
m
,
Mode
Edit
Apple
A(F): 126x110mm
Ready to Sew
Apple
A Z
Size
Mode
AB
AB
OK
L
M
S
Cancel
Font
OK
m Lay the patterns out by dragging or
using the Layout keys.
A Z
, Press the OK key and the display will change to the
Ready to Sew screen. Start the machine to sew.
q Sewing result
A Z
q
Beige Gray 223
Mode
Jog
ST
46
Page 49

z
CARE AND MAINTENANCE
x
c
v
q
w
r
r
y
t
e
Cleaning the Hook Race
WARNING:
Turn the power switch off and unplug the machine
before cleaning.
NOTE:
Do not dismantle the machine in any way other than
what is explained in this section.
Clean the outside of the machine with a soft cloth and
mild soap.
z Remove the setscrews with the screwdriver
supplied with the machine. Remove the needle
plate.
x Lift up the bobbin holder and remove it.
q Screwdriver
w Setscrews
e Needle plate
c Clean the bobbin holder with a lint brush.
r Bobbin holder
t Lint brush
b
n
m
!1
i
!1
u
o
!0
v Clean the Auto thread cutter mechanism and hook
race with the lint brush.
y Auto thread cutter mechanism
u Hook race
b Clean the hook race with a dry cloth.
(You may also use a vacuum cleaner.)
i Dry cloth
Assemble the hook race
n Insert the bobbin holder so that the knob fits next to
the stopper in the hook race.
o Knob
!0 Stopper
m Reattach the needle plate, aligning the needle plate
guide pins with the guide holes on the needle plate
and tighten the screw.
!1 Needle plate guide pins
NOTE:
After cleaning the machine, make sure the needle and
presser foot are attached.
47
Page 50

q
Replacing the Light Bulb
WARNINGS:
Turn off the power before replacing the light bulb.
The bulb could be HOT, wait until it has cooled down
before touching it.
To remove:
Remove the cap and setscrew. Remove the faceplate.
Pull out the bulb from the socket.
w
e
r
t
To replace:
Insert a new bulb into the opening of the socket.
Attach the faceplate with the setscrew, and attach the
cap.
q Cap
w Setscrew
e Faceplate
r Lamp Socket
t Light bulb
NOTE:
Do not store the machine in a high humidity area, near
a heat radiator or in direct sunlight.
Store the power supply cable in the extension table.
48
Page 51

Troubleshooting
Problem: Cause: Reference:
The machine is noisy 1 Threads have been caught in the hook mechanism. See page 47.
The needle thread breaks. 1 The needle thread is not threaded properly. See pages 9, 10.
2 The needle thread tension is too tight. See page 13.
3 The needle is bent or blunt. See page 14.
4 The needle is inserted incorrectly. See page 14.
5 The needle thread is not set in the thread holder See page 12.
when starting the machine.
The bobbin thread breaks. 1 The bobbin thread is not threaded properly in the bobbin See page 8.
holder.
2 Lint has collected in the bobbin holder. See page 47.
3 The bobbin is damaged and does not turn smoothly. Replace the bobbin.
The needle breaks. 1 The needle is inserted incorrectly See page 14
2 The needle is bent or blunt. See page 14.
3 The needle clamp screw is loose. See page 14.
4 The needle thread tension is too tight. See page 13.
Visual Touch Screen is 1 The screen contrast of the visual touch screen is not See page 21.
not clear. adjusted correctly.
Skipped stitches. 1 The needle is inserted incorrectly. See page 14.
2 The needle is bent or blunt. See page 14.
3 The needle thread is not threaded properly. See pages 9, 10
4 The defective needle (rusted, burred needle eye) is used. Replace the needle.
5 The embroidery hoop is not set properly. See page 18.
6 The fabric is not tightly pulled on the embroidery hoop. See page 17.
7 A stabilizer is not being used. See page 16.
The machine does not run. 1 A thread is caught in the hook race. See page 47.
2 The control circuit is not working correctly. Turn the switch off and
turn it on again.
3 The machine is not connected to the power supply. See page 5.
Abnormal noise occurs 1 Something is caught between the carriage and the arm. Remove the object.
when the machine is 2 The carriage is touching something around the machine. See page 18.
switched on.
Patterns are distorted. 1 The fabric is not pulled tightly on the embroidery hoop. See page 17.
2 The embroider hoop is not fixed securely. See page 18.
3 The carriage is bumping into something around the See page 18.
machine.
4 The fabric is caught or pulled for some reason when Stop the machine and
sewing embroidery. free the fabric.
5 The needle thread tension is too tight. See page 13.
6 A stabilizer is not used. See page 16.
Pattern selection keys 1 Key position is not adjusted properly. See page 22.
do not work. 2 The control circuit is not working correctly. Turn the switch off and
turn it on again.
3 The bobbin winder spindle is in the winding position. See page 7.
PC card or USB memory 1 The card or USB memory is not inserted correctly See pages 35, 36.
does not work
49
Page 52

852-850-008 (E)
Printed in Japan
 Loading...