

Page 1

Page 2

IMPORTANT SAFETY INSTRUCTIONS
When using an electrical appliance, basic safety precautions should always be followed, including the following:
Read all instructions before using this appliance.
DANGER – To reduce the risk of electric shock:
1. An appliance should never be left unattended when plugged in. Always unplug this sewing machine from the electric
outlet immediately after using and before cleaning.
2. Always unplug before replacing a sewing machine bulb. Replace bulb with same type rated 12 V, 5 Watts.
WARNING – To reduce the risk of burns, fire, electric shock or injury to persons:
1. Do not allow to be used as a toy. Close attention is necessary when this sewing machine is used by or near children.
2. Use this appliance only for its intended use as described in this instruction book.
Use only attachments recommended by the manufacturer as contained in this instruction book.
3. Never operate this se wing machine if it has a damaged cord or plug, if it is not w orking properly, if it has been dropped or
damaged, or dropped into water.
Return this sewing machine to the nearest authorized dealer or service center for examination, repair, electrical or
mechanical adjustment.
4. Never operate the appliance with any air opening blocked. Keep ventilation openings of this sewing machine and foot
controller free from accumulation of lint, dust and loose cloth.
5. Never drop or insert any object into any opening.
6. Do not use outdoors.
7. Do not operate where aerosol (spray) products are being used or where oxygen is being administered.
8. To disconnect, turn all controls to the off (“O”) position, then remove plug from outlet.
9. Do not unplug by pulling on cord. To unplug, grasp the plug, not the cord.
10.Keep fingers away from all moving parts. Special care is required around the sewing machine needle.
11.Always use the proper needle plate. The wrong plate can cause the needle to break.
12.Do not use bent needles.
13.Do not pull or push fabric while stitching. It may deflect the needle causing it to break.
14.Switch this sewing machine off (“O”) when making any adjustment in the needle area, such as threading the needle,
changing the needle, threading the bobbin, changing the presser foot, and the like.
15.Always unplug this sewing machine from the electrical outlet when removing covers, lubricating, or when making any
other adjustments mentioned in this instruction book.
SA VE THESE INSTRUCTIONS
Designs and specifications are subject to change without prior notice.
Page 3

TABLE OF CONTENTS
KNOW Y OUR MACHINE
Name of Parts ............................................................................................................................... 2
Standard Accessories ................................................................................................................... 3
To Attach Knee Lifter ..................................................................................................................... 3
GETTING READY TO SEW
Connecting Machine to Power Supply .......................................................................................... 4
Controlling Sewing Speed............................................................................................................. 4
Up/Down Needle Position Button ..................................................................................................5
Bobbin Winding Button.................................................................................................................. 5
Thread Cutter Button..................................................................................................................... 5
Stitch Length Adjustment Dial ....................................................................................................... 5
Reverse Stitch Lever ..................................................................................................................... 5
Presser Foot Lifter......................................................................................................................... 6
Foot Pressure Dial.........................................................................................................................6
Attaching and Detaching Presser Foot ......................................................................................... 6
To Remove Bobbin Case and Bobbin ........................................................................................... 7
Setting the Spool of Thread........................................................................................................... 7
Winding a Bobbin .......................................................................................................................... 8
Inserting a Bobbin ......................................................................................................................... 9
Inserting the Bobbin Case into the Hook ...................................................................................... 9
Threading the Needle Thread .....................................................................................................10
Built-in Needle Threader ............................................................................................................. 11
Drawing up the Bobbin Thread....................................................................................................12
Changing the Needle for Model 1600P ....................................................................................... 13
Changing the Needle for Model 1600P-DB and 1600P-DBX...................................................... 14
Balancing Needle Thread Tension............................................................................................... 15
Adjusting Bobbin Thread Tension................................................................................................ 15
Adjusting Needle Thread Tension................................................................................................ 15
HOW T O SEW
Test Stitching............................................................................................................................... 16
Securing a Seam......................................................................................................................... 17
Turning a Square Corner............................................................................................................. 18
Using the Cloth Guide ................................................................................................................. 18
Rolled Hem .................................................................................................................................18
CARE & MAINTENANCE
Cleaning the Hook and Feed Dog............................................................................................... 19
Oiling the Machine ......................................................................................................................19
Replacing the Light Bulb ............................................................................................................. 20
Replacing the Light Bulb on the Underside of the Sewing Arm .................................................. 20
Troubleshooting........................................................................................................................... 21
1
Page 4

!5
!4
!8
!7
!6
@6
@7
@0
!9
q
@3
@1
@4
w
@2
!3
e
!2
r
@8
t
!1
!0
KNOW YOUR MACHINE
Name of Parts
q Foot pressure dial
w Thread guide
e Retractable thread guide
r Bobbin winder spindle
t Bobbin winder stopper
y Speed control slider
u Stitch length display
i * Thread cutter button
o Reverse stitch lever
!0 Bobbin winding button
!1 Up/Down needle button
y
!2 Knee lifter socket
!3 Thread tension dial
u
!4 Hook cover
!5 Hook cover plate
i
!6 Needle plate
!7 Thread cutter
o
!8 Face cover
!9 Foot pressure indicator
@0 Thread take-up lever
@1 ** Needle threader
@2 Needle clamp screw
@3 Needle
@4 Screw holes for attachments
@5 Presser foot
@6 Feed dog
@7 Setscrew
@8 Carrying handle
@9 Presser foot lifter
#0 Spool pins
#1 Machine sockets
#2 Power switch
#3 Stitch length adjustment dial
#4 Handwheel
#5 Foot control
#6 Power supply cord
@5
#6
#5
#2
#3
#4
#1
@9
#0
* Model 1600P and 1600-DBX only
** Model 1600P only
2
Page 5

Standard Accessories
Bobbin
Large screwdriver
Small screwdriver
Accessory box
To Attach Knee Lifter
Lint brush
Hemmer foot Spool cap Net
Cloth guide
Needles
Oil
Knee lifter Instruction book
The knee lifter is extremely helpful when sewing
applique, patchwork and quilting since it allows you to
handle the fabric while your knee controls the presser
foot.
Model 1600P
HL x 5 –16...1
HL x 5 –14...1
HL x 5 –11...2
HL x 5 –9.....1
Spool holder
Models:
1600P-DB
1600P-DBX
DB x 1 –14 ..2
DB x 1 –11 ..3
q
e
w
Match the ribs on the knee lifter with the notches in
the knee lifter socket and insert the knee lifter.
q Knee lifter
w Ribs
e Notches
Push the knee lifter with your knee to raise and lower
the presser foot.
NOTE:
Do not touch the knee lifter while sewing, otherwise
the fabric will not be fed smoothly.
3
Page 6

GETTING READY TO SEW
Connecting Machine to Power Supply
i
w
q
CAUTION
Always turn the power switch off and
unplug the sewing machine from the
electrical outlet when the machine is not
in use.
q Machine plug
w Machine socket for power supply plug
e Power supply plug
r Outlet
t Machine socket for foot control
y Foot control plug
r
u Foot control
t
u
Controlling Sewing Speed
y
e
Turn off the power switch.
Insert the foot control plug y into the
machine socket t.
Insert the machine plug q into the
machine socket w.
Insert the power supply plug e into the
wall outlet r.
Turn on the power switch i.
Speed control slider
Sewing speed can be varied with the speed control
slider according to your sewing needs.
To increase sewing speed, slide it to the right.
To decrease sewing speed, slide it to the left.
Foot control
Sewing speed is varied by the foot control.
The harder you press down on the foot control, the
faster the machine runs.
The machine runs at the maximum speed set by the
speed control slider when the foot control is being fully
depressed.
Operating Instructions:
The symbol "O" on a switch indicates the "off" position of a switch.
For appliances with a polarized plug (one blade wider than the other): To reduce the risk of electric shock, this plug is
intended to fit in a polarized outlet only one way. If it does not fit fully in the outlet, reverse the plug. If it still does not fit,
contact a qualified electrician to install the proper outlet. Do not modify the plug in any way.
* Foot control model TJC-005 is used with sewing machine model 1600P.
4
Page 7

Up/Down Needle Position Button
RED LED
Bobbin Winding Button
LED
Thread Cutter Button
*Model 1600P and 1600-DBX only
GREEN LED Press this button to bring the needle bar up or
down. The RED LED will light up when the needle
is down. The GREEN LED will light up when the
needle is up.
The machine will stop with the needle up or down
depending on the needle position determined by
this button.
The machine will always stop with the needle up
after auto thread cutting or buttonhole sewing.
Press this button to wind the bobbin.
The LED will light up when you shift the bobbin
winding stopper toward the bobbin and press this
button.
The LED signal will turn off after bobbin winding is
finished.
Pressing this button after sewing will trim the
threads.
You can continue sewing without pulling the bobbin
thread up after trimming the threads.
Stitch Length Adjustment Dial
3
q
Reverse Stitch Lever
* Use the thread cutter on the face cover if the
thread is thicker than #30.
* The foot control and Up/down needle position
button cannot be used while the machine is
trimming the threads.
You can adjust the stitch length from 0 to 6 mm by
turning this dial. The stitch length will be show on
the stitch length display q.
The machine will sew in reverse while the reverse
stitch lever is pressed down. The machine will sew
forward if the lever is released.
Use the lever to lock the beginning and end of
seams.
5
Page 8
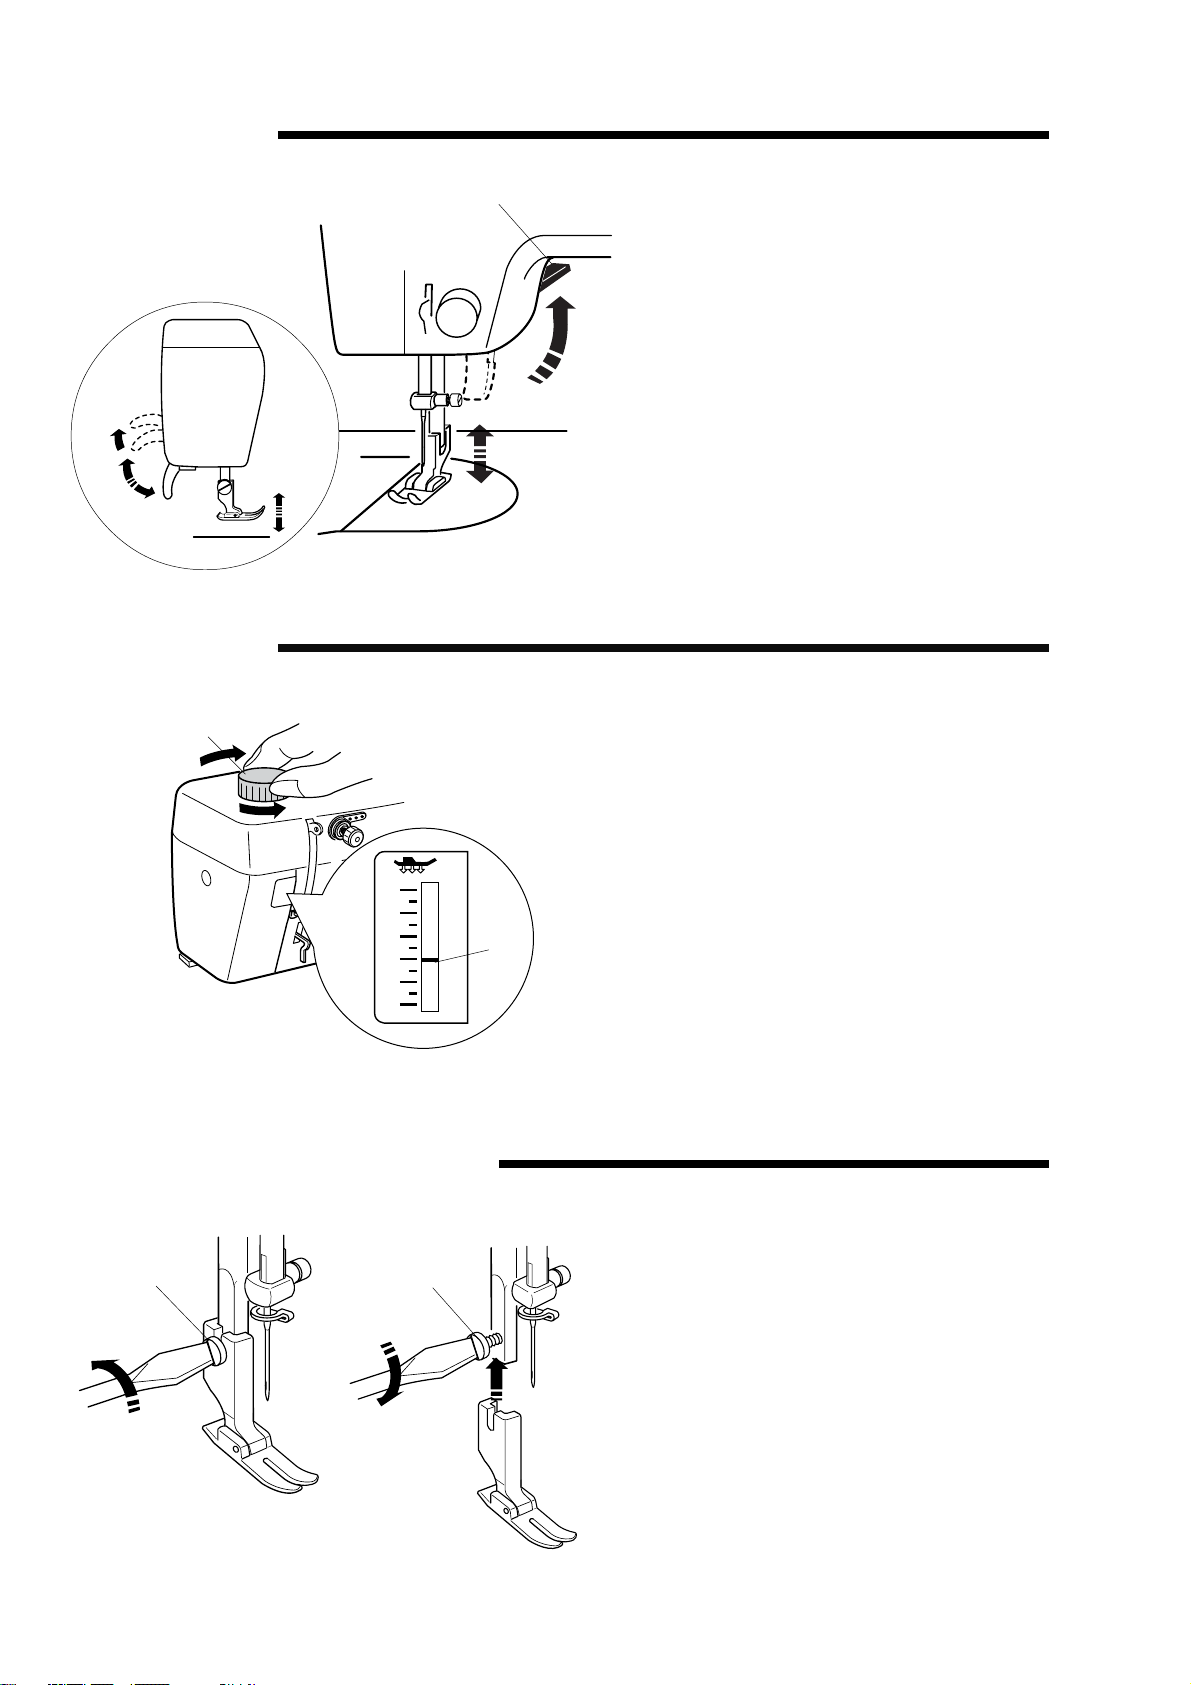
Presser Foot Lifter
e
w
Foot Pressure Dial
q
q
w Normal up position
e Highest position
The presser foot lifter q raises and
lowers the presser foot.
You can raise it higher e than the
normal up position w to help you place
thick material under the foot.
q Foot pressure dial
w Setting indicator
The foot pressure control dial should be
set at “3” for regular sewing.
Reduce the pressure for appliqué,
sewing on fine synthetics and elastic
fabrics.
q Presser foot lifter
0
1
2
3
4
5
w
Set the dial at “1” when sewing extra fine
fabrics.
NOTE:
Do not reduce the foot pressure lower
than “0”.
Attaching and Detaching Presser Foot
qq
q Setscrew
To change the presser foot, raise the
presser foot lifter.
Loosen the setscrew q, choose the
proper foot and insert it from the bottom.
Tighten the setscrew q with the large
screwdriver to secure the foot.
6
Page 9
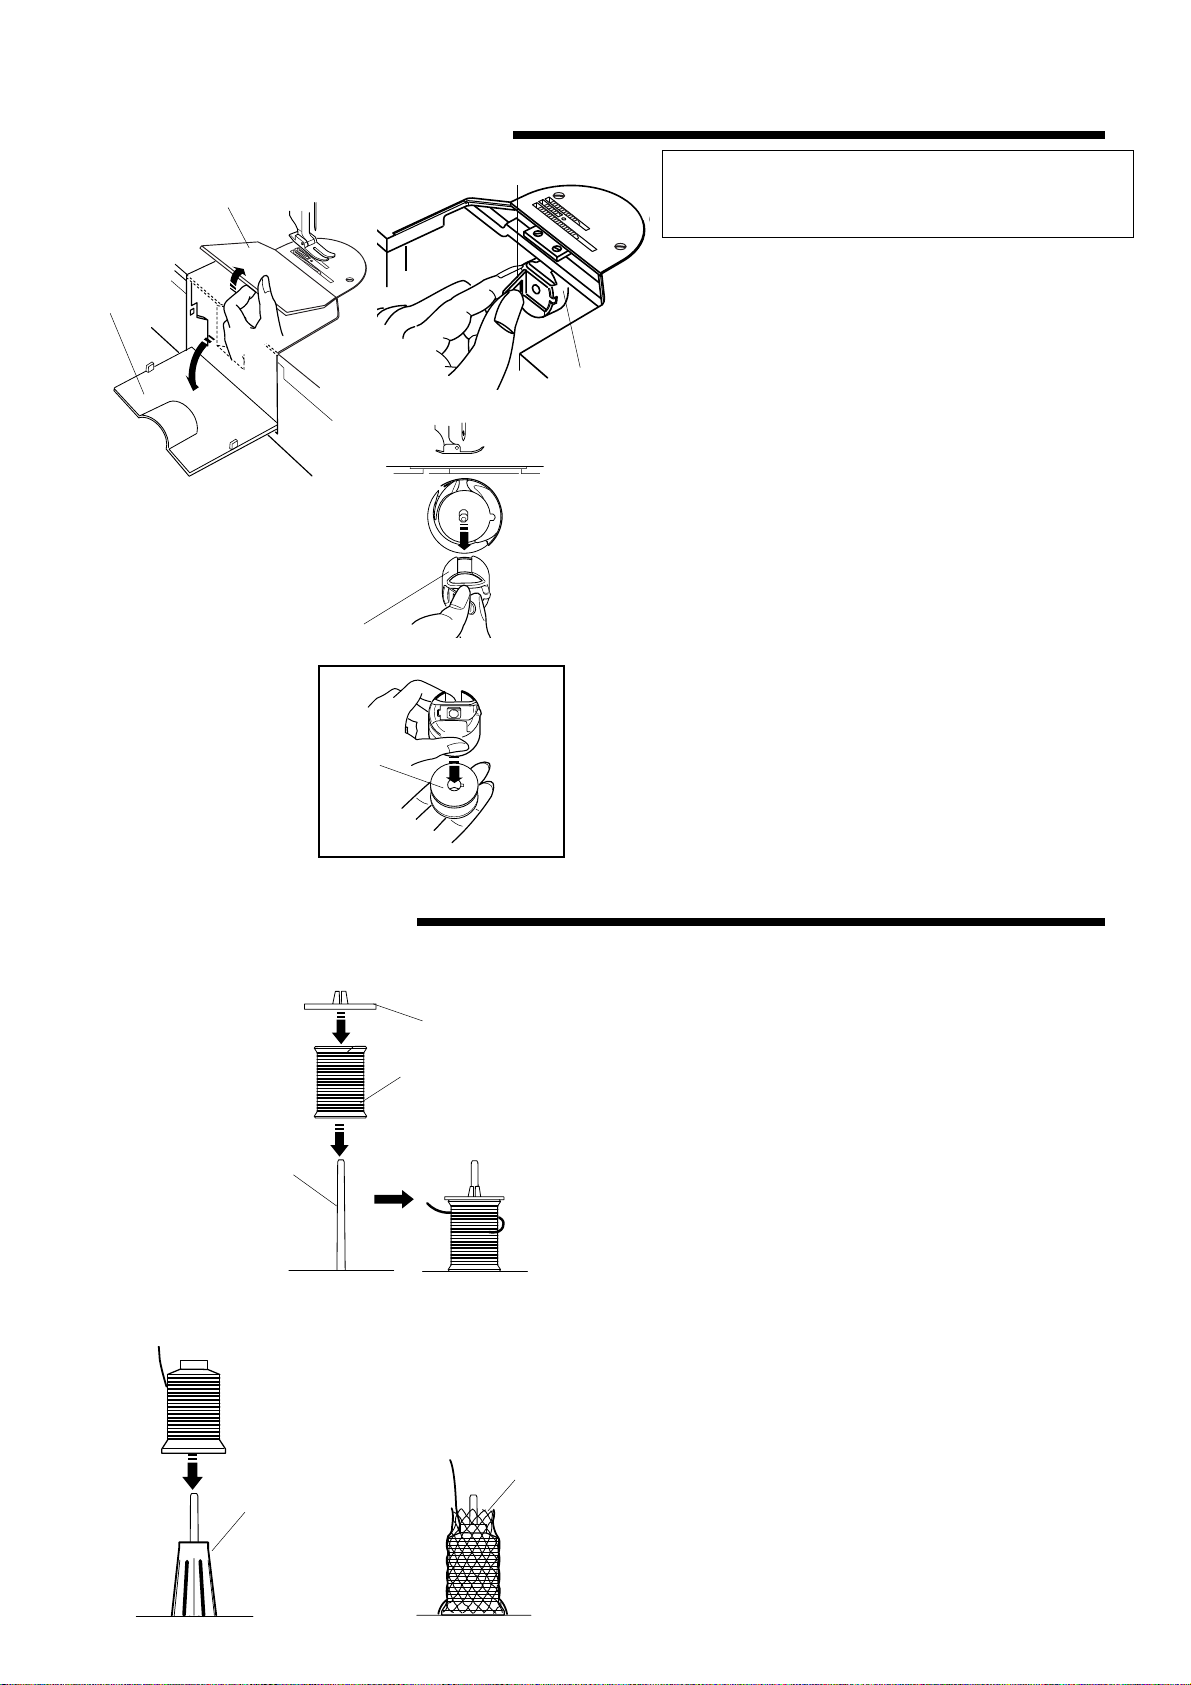
To Remove Bobbin Case and Bobbin
z
q
w
x
r
e
r
CAUTION
Turn the power switch off and unplug the sewing
machine from the electrical outlet
q Hook cover plate
w Hook cover
e Latch
r Bobbin case
t Bobbin
z Raise the needle and presser foot.
Remove the hook cover plate q and open the
hook cover w.
x Pull open the latch e of the bobbin case r. Take
the bobbin case straight out of the hook.
• To remove the bobbin from the bobbin case:
Release the latch, then drop the bobbin t out of
the bobbin case as illustrated.
* Only use this exclusive bobbin for model 1600P.
t
Setting the Spool of Thread
w
q
e
q Spool of thread
w Spool pin
e Spool cap
• Setting a spool of thread:
Place a spool of thread q on the spool pin w
with the thread coming off the spool as shown.
Attach the spool cap e, and press it firmly against
the spool of thread.
r Spool holder
t Net
r
t
• Setting the thread cone:
Place the spool holder r on the spool pin, then
place the thread cone on the spool holder.
Cover the thread cone with the net t if the spool
thread is shaky when sewing.
7
Page 10
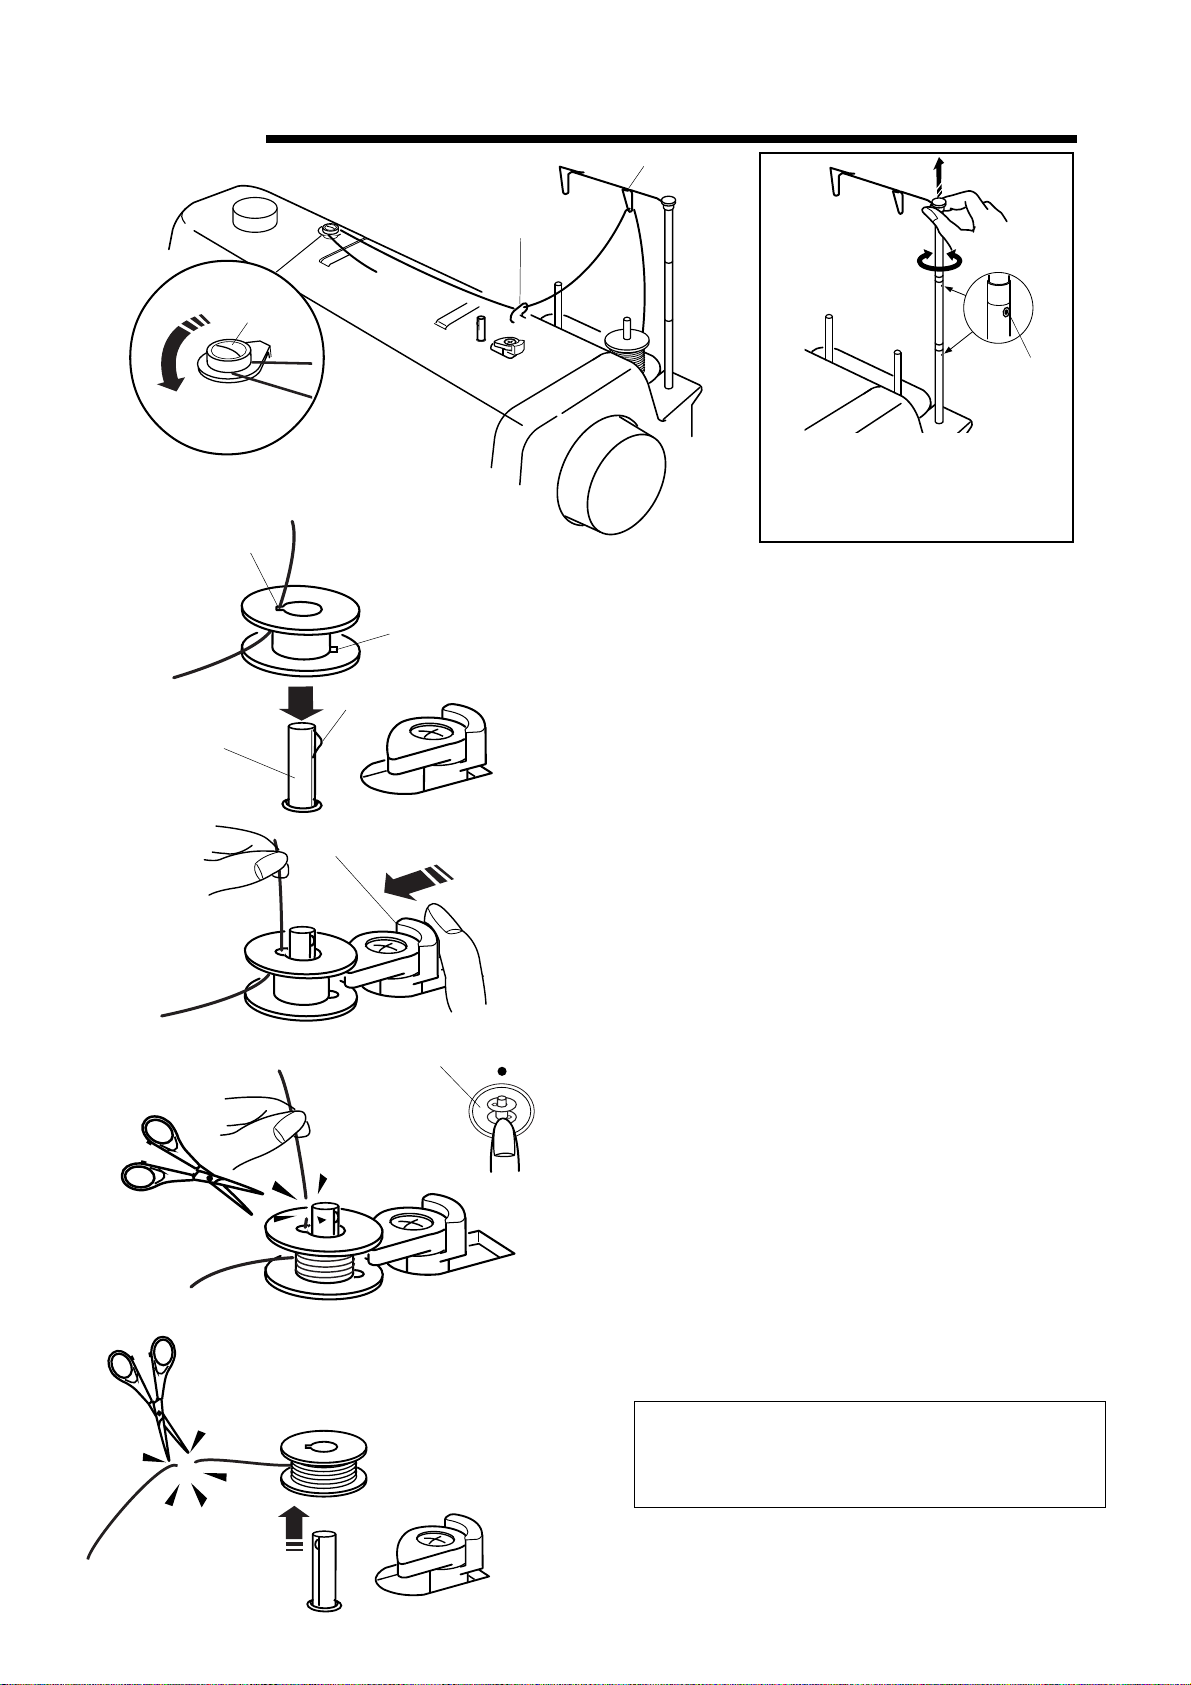
Winding a Bobbin
w
c
e
x
t
r
q
z
Stopper
Pull the thread guide bar up as
far as it will go. Turn the thread
guide bar until the stoppers
click into position.
q Thread guide bar
w Bobbin winding tension disk
e Bobbin hole
r Notch
t Spring
y Bobbin winder spindle
u Bobbin winder stopper
v
b
n
y
u
z Pass the thread through the guide on the
thread guide bar q from behind.
x Pass the thread under the bobbin winding
tension disk w.
c Thread through the hole e in the bobbin from
the inside to the outside.
Match the notch r with the spring t on the
bobbin winder spindle. Then insert the bobbin
on the bobbin winder spindle y.
v Push the bobbin winder stopper to the left u.
i
b Hold the free end of the thread in your hand
and press the bobbin winding button i. Press
the bobbin winding button again to stop the
bobbin when it has made several turns, and
cut the thread close to the hole in the bobbin.
n Press the bobbin winding button again. When
the bobbin is fully wound, the machine will
stop automatically.
Return the bobbin winder stopper to its
original position. Cut the thread with a
scissors. Remove the bobbin from the bobbin
winder spindle.
NOTE:
This machine has an exclusive motor for bobbin
winding, which allows you to wind a bobbin while
stitching.
8
Page 11
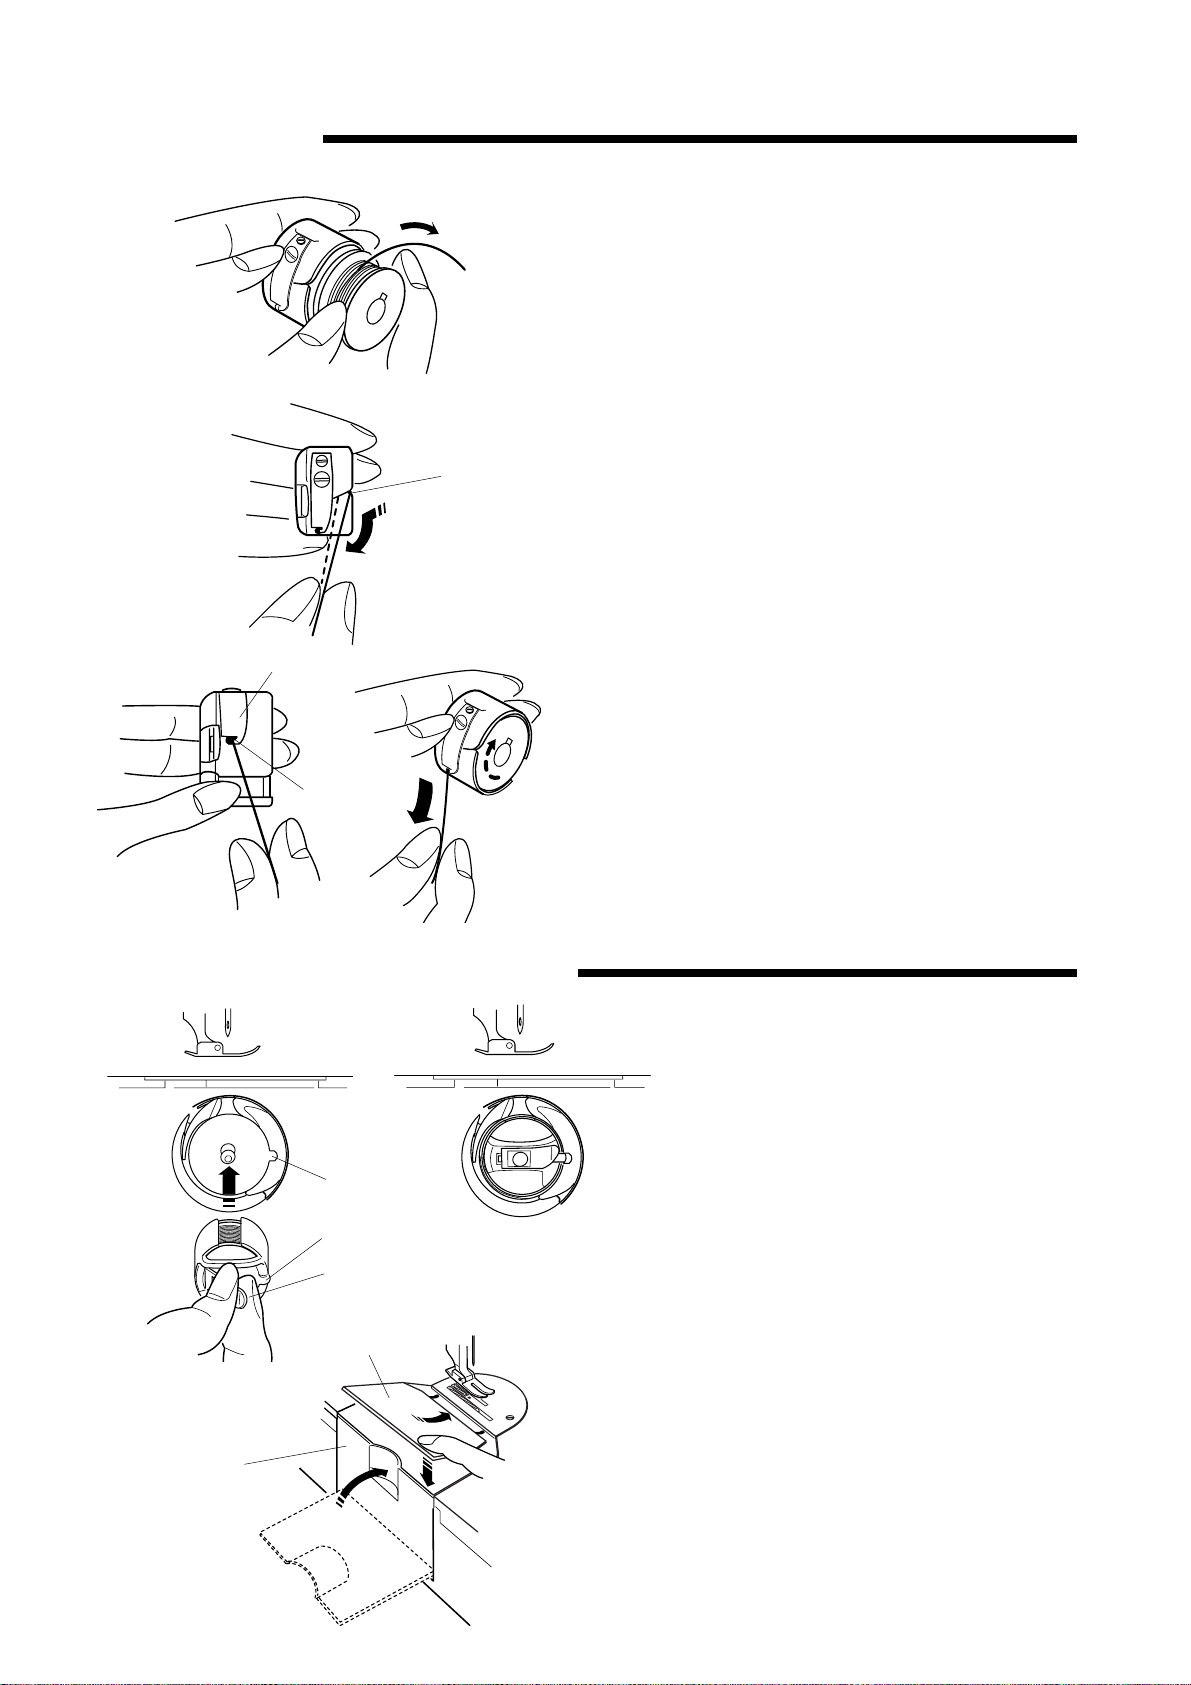
Inserting a Bobbin
z
x
c
w
e
q
z Place a bobbin in the bobbin case making sure the
thread winds clockwise on the bobbin as illustrated.
x Draw the thread through the slit q of the bobbin case.
q slit
c Continue to draw the thread under the tension spring w
and through the opening e.
Pull out about 4˝ (10 cm) of thread.
The bobbin should spin clockwise when the thread is pulled
out of the bobbin case.
w Tension spring
e Opening
Inserting the Bobbin Case into the Hook
z
w
e
q
t
x
r
2
3
1
z Holding the latch q open, position the bobbin case into the
hook aligning the slot w with the rib e.
The bobbin case should lock into place when the latch is
released.
q Latch
w Slot
e Rib
x Close the hook cover r and attach the hook cover plate t
in this order.
r Hook cover
t Hook cover plate
9
Page 12
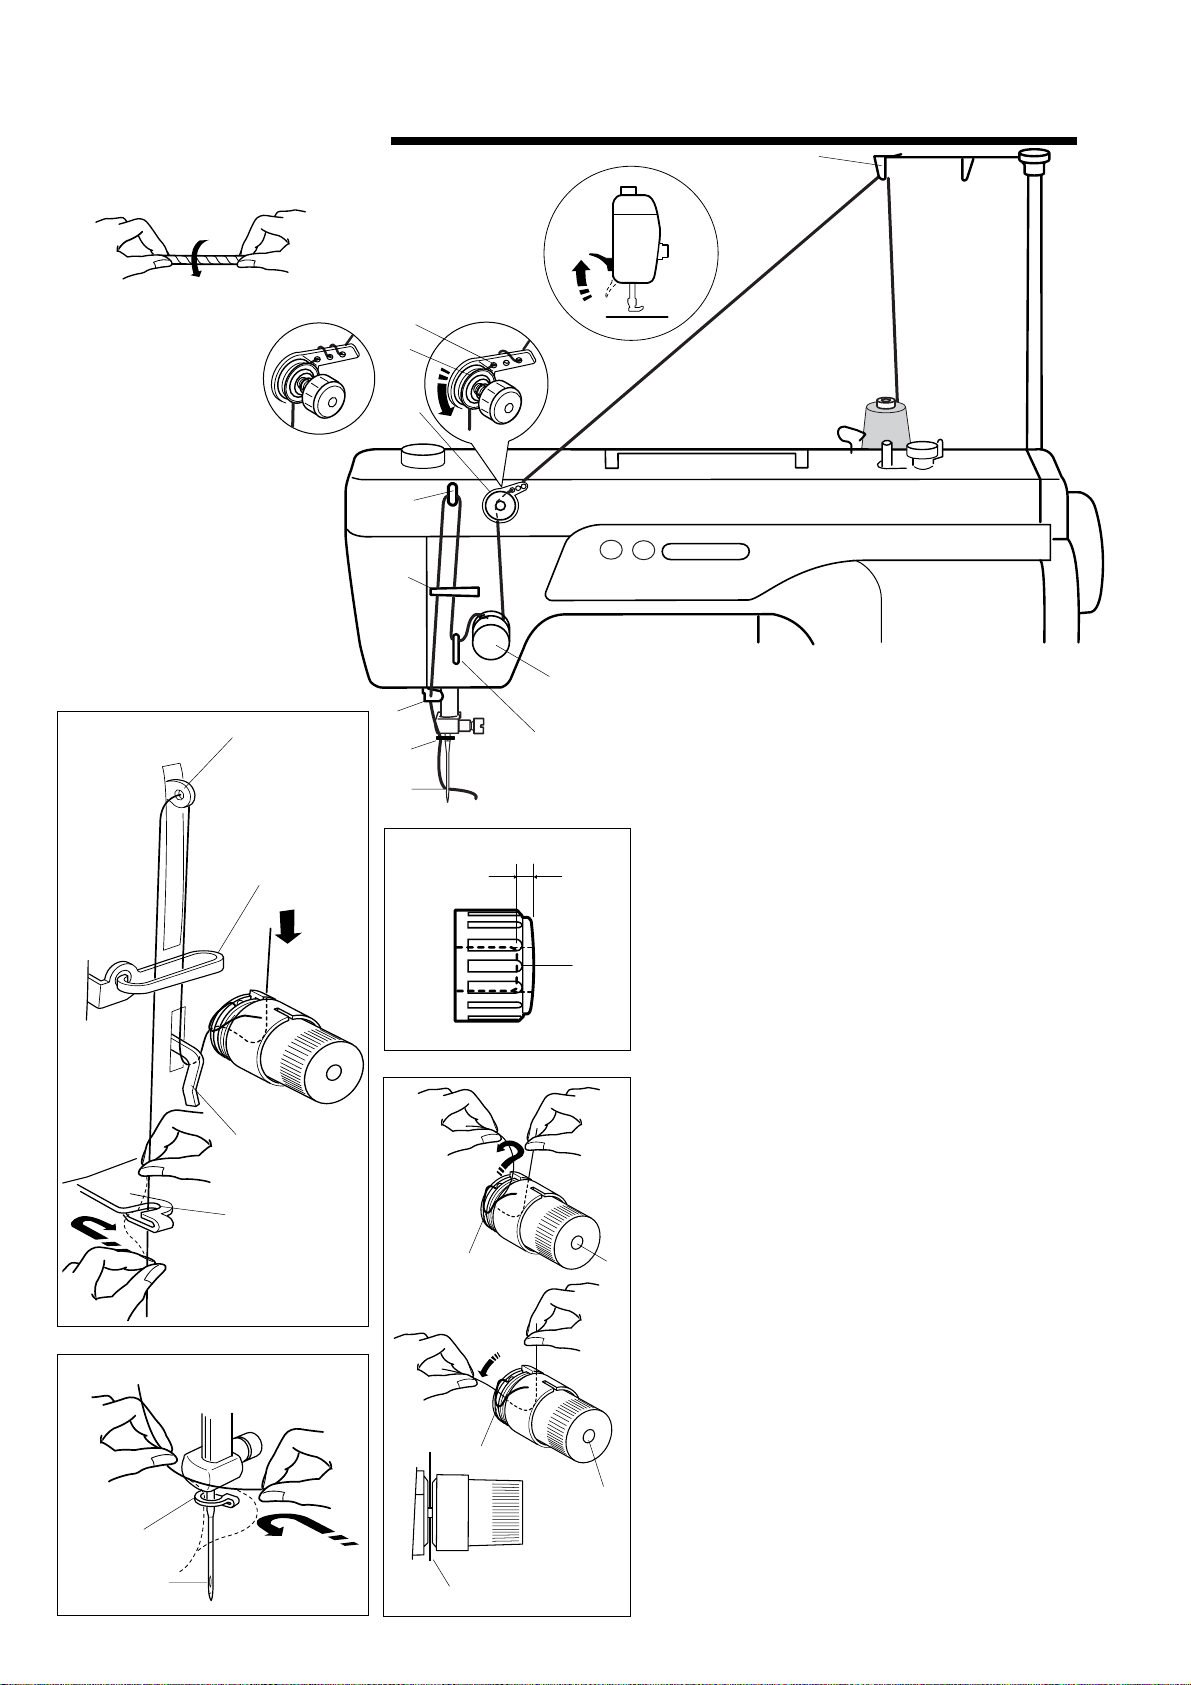
Threading the Needle Thread
* Use only left twist thread
q
z
v
!2
!1
(A)
!3
e
!2
!1
!4
!5
x
w
r
x
y
!0
u
t
z Raise the presser foot lifter. Press the Up/Down
needle button twice to raise the needle to its
highest position. Turn the power switch off.
Set a spool of thread on the spool pin.
Pass the thread through the guide on the thread
guide bar q from the behind.
x Pass the thread through the thread guide plate
w, then draw the thread between the pre-tenison
disks e under the pre-tension dial r.
* If the thread flutters around while sewing,
pass the thread through three holes in the
guide plate as illustrated in fig.(A).
* The standard setting of the pre-tension dial is
that the screw head t sinks about 4 mm (1/8˝
to 3/16˝) y.
b
!4
!5
!3
!0
c
o
i
i
10
c Holding the thread with both hands, draw the
thread down and around the tension dial u from
right to left.
Pull the thread up to insert it between the tension
disks o and pass it over the tail of the check
spring. Then pull the thread down over the loop of
the check spring i.
u
v Draw the thread through the thread guide !0, !1
and eye of the thread take-up lever !2.
Pass the thread through the thread guide !1
again. Holding the thread with both hands, slip the
thread into the thread guide !3 as shown.
b Draw the thread down to the needle bar thread
guide !4, then pass the thread through the
needle !5.
u
For model 1600P, use the built-in needle threader
(see page 11).
Page 13
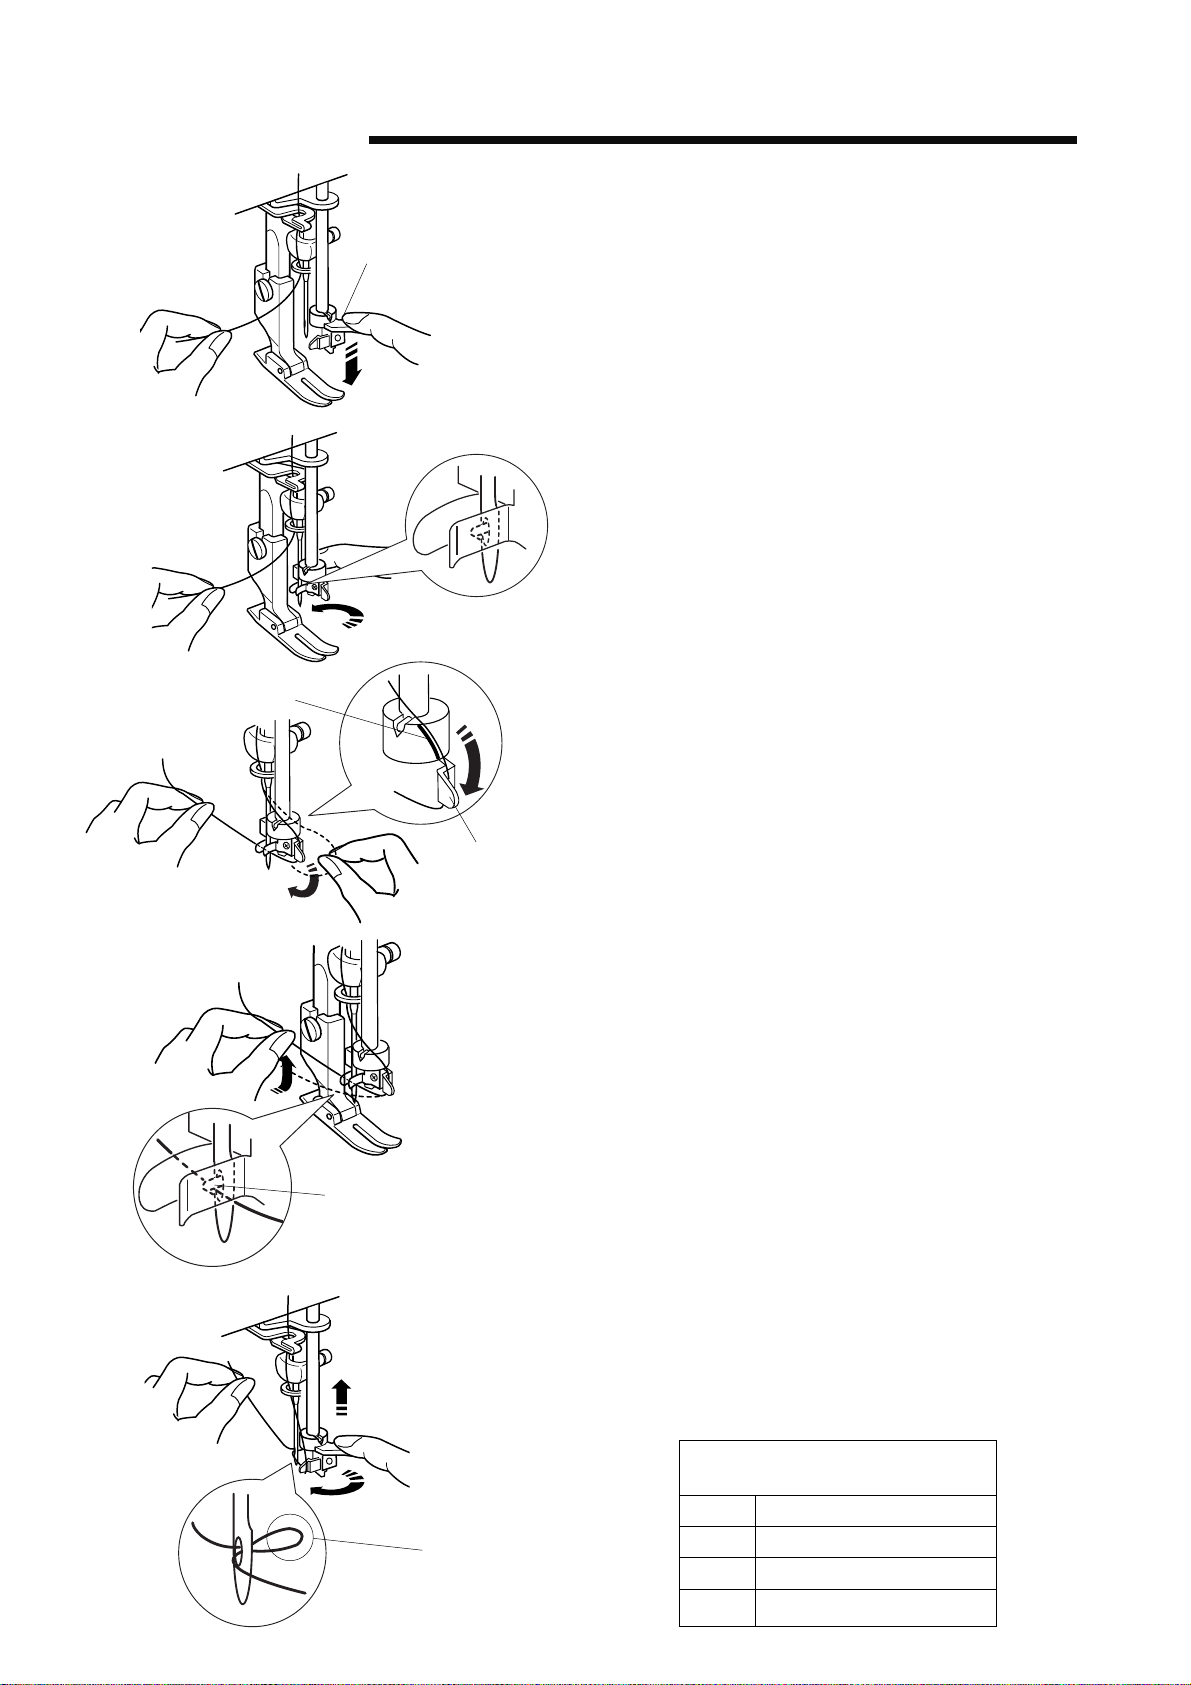
Built-in Needle Threader
*Model 1600P only
z
q
z Lower the presser foot. Press the Up/Down needle
button twice to raise the needle to its highest
position. Turn the power switch off.
Push down the needle threader knob q as far as it
will go.
x
c
v
w
x Turn the knob q in the direction of the arrow to
insert the hook into the needle eye.
The hook r comes out through the needle eye
as illustrated.
c Holding the thread with both hands, draw the
thread along the thread path w.
Then hook the thread around the guide e.
e
v Draw the thread under the hook r.
Hold the end of thread with your hand while pulling
up the thread lightly in the direction of arrow.
b
r
t
b Turn the knob in the direction of the arrow as
shown, drawing the thread loop t through the
needle.
Release the threader knob slowly. Then pull the
thread loop t to the right.
The needle threader may not work
well with these combinations.
Needle
#9 #20, #30, #50, #60
#11 #20, #30
#14 #16, #20, #30
11
Page 14
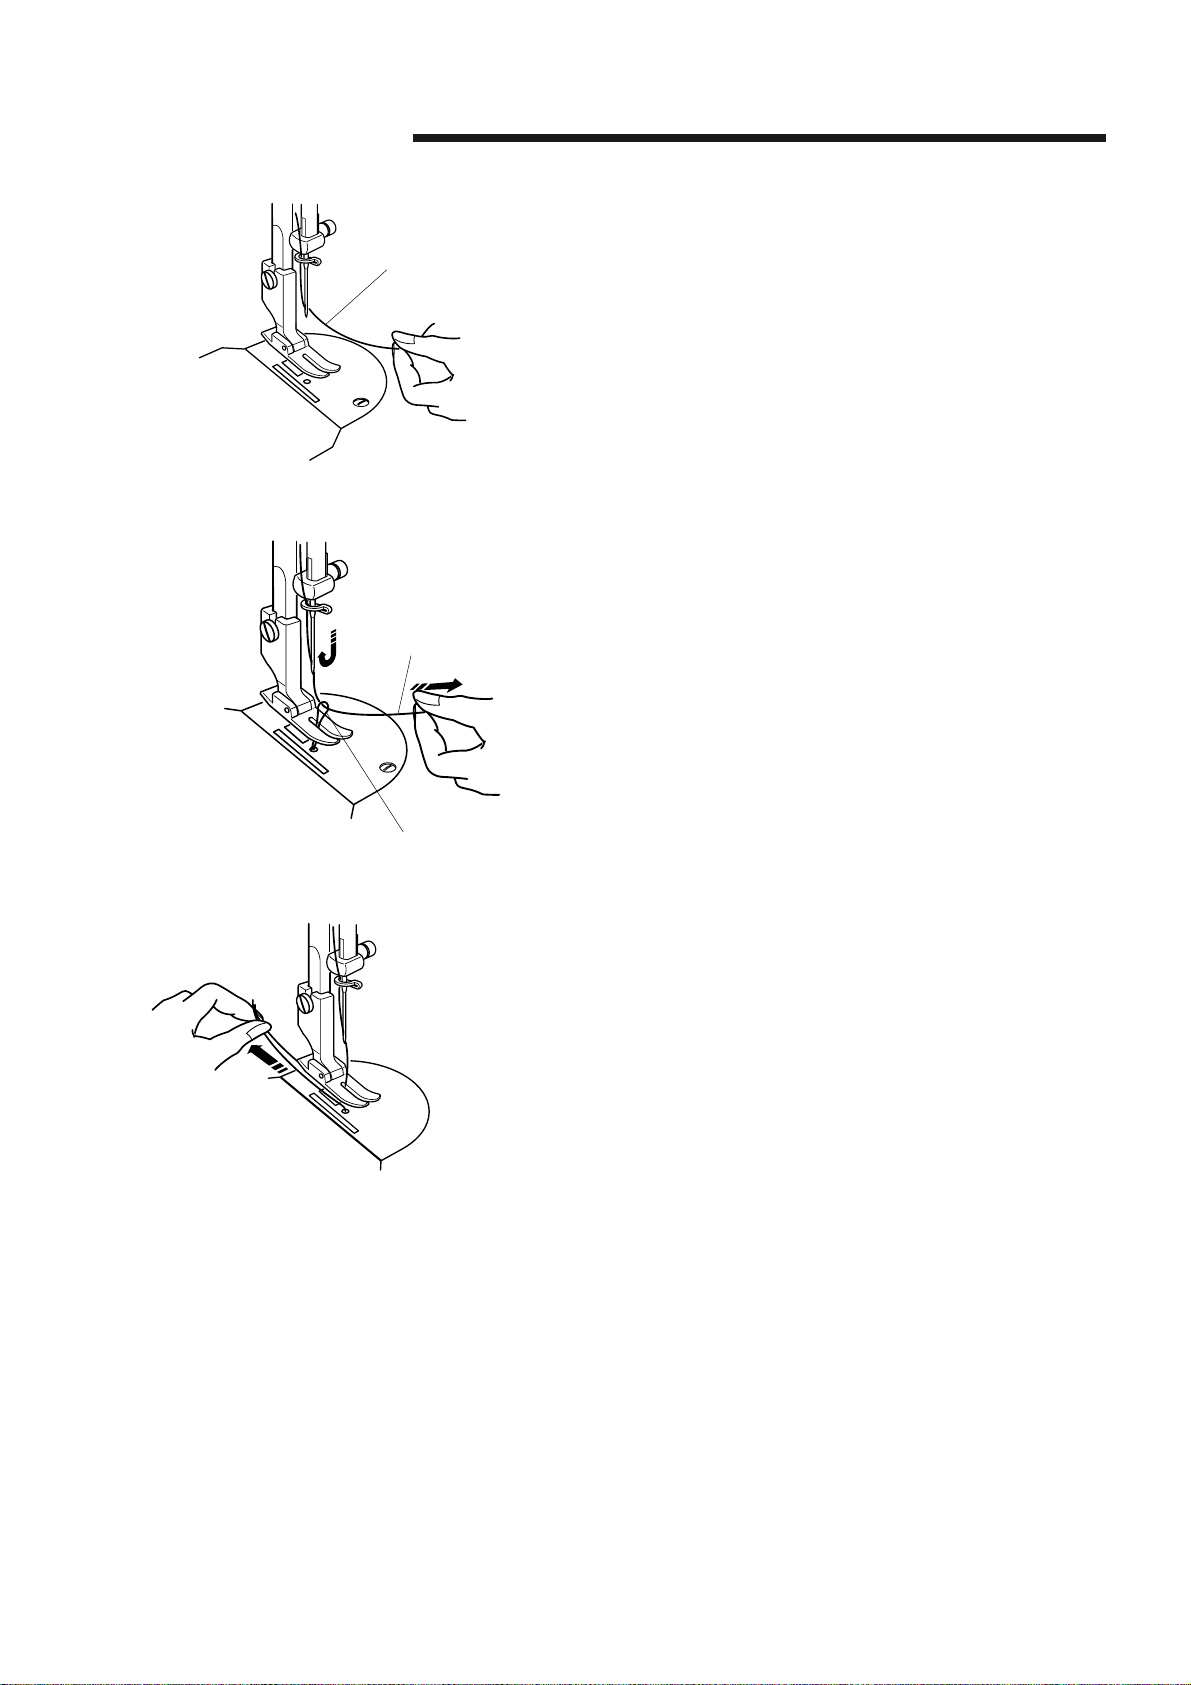
Drawing up the Bobbin Thread
z
x
z Hold the needle thread q lightly with your left
hand.
q
x Turn the switch on. Press the Up/Down needle
position button twice to pick up the bobbin thread w.
Pull the needle thread q to bring up a loop of
bobbin thread w.
q
c
w
c Slide 10 cm (4˝) of both threads to the rear under
the presser foot.
12
Page 15
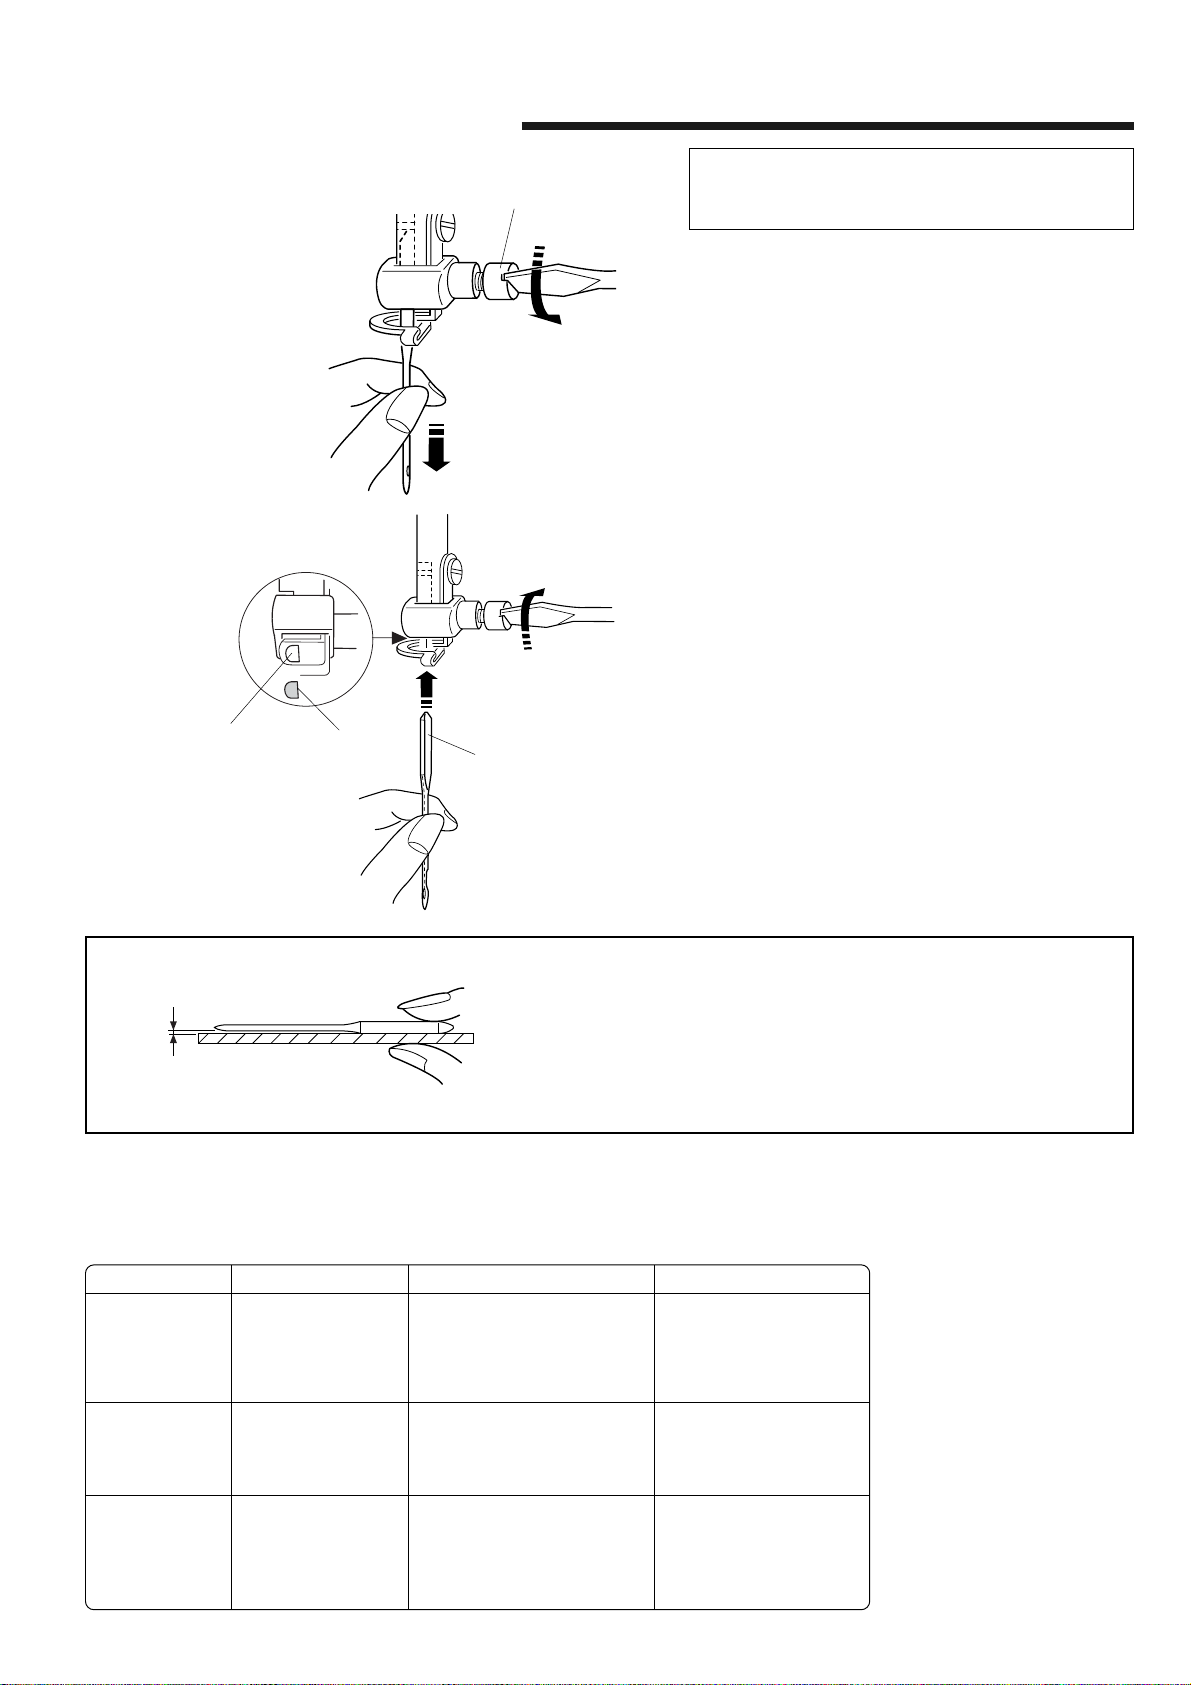
Changing the Needle for Model 1600P
z
q
CAUTION
Turn the power switch off and unplug the
machine before changing the needle.
z Turn the power switch off. Lower the presser
foot. Turn the needle clamp screw q
counterclockwise with the large screwdriver.
Loosen the screw and remove the needle from
the needle clamp.
q Needle clamp screw
x
w
To Check the Needle
e
e
x Insert a new needle into the needle clamp w
with the flat side e to the right, pushing it up
as far as it will go.
Tighten the clamp screw q firmly.
w Needle clamp
e Flat side
* Use an HL x 5 needle
To determine if the needle is defective, place the flat side of
needle on something flat (a needle plate, piece of glass, etc.). The
gap between the needle and the flat surface should be consistent.
Never use a blunt or blunt needle, as it may cause skipped
stitches or thread breakage. Defective needles can ruin the fabric.
Always purchase good quality needles. Change needles often.
Thread and Needle Chart
Fabrics
Light weight
Medium
weight
Heavy weight
Crepe de chine,
Voile, Lawn,
Organdy,
Georgette, Tricot
Linens, Cotton,
Pique, Serge,
Double Knits,
Percale
Denim, Tweed,
Gabardine,
Coating, Drapery
and Upholstery
Fabric
Thread
Fine silk
Fine Cotton
Fine Synthetic
Covered Polyester
50 silk
50 to 80 Cotton
50 to 60 Synthetic
Cotton Covered Polyester
50 silk
40 to 50 Cotton
40 to 50 Synthetic
Cotton Covered Polyester
13
Needle (HL x 5) size
9 or 11
11 or 14
14, 16 or 18
Page 16
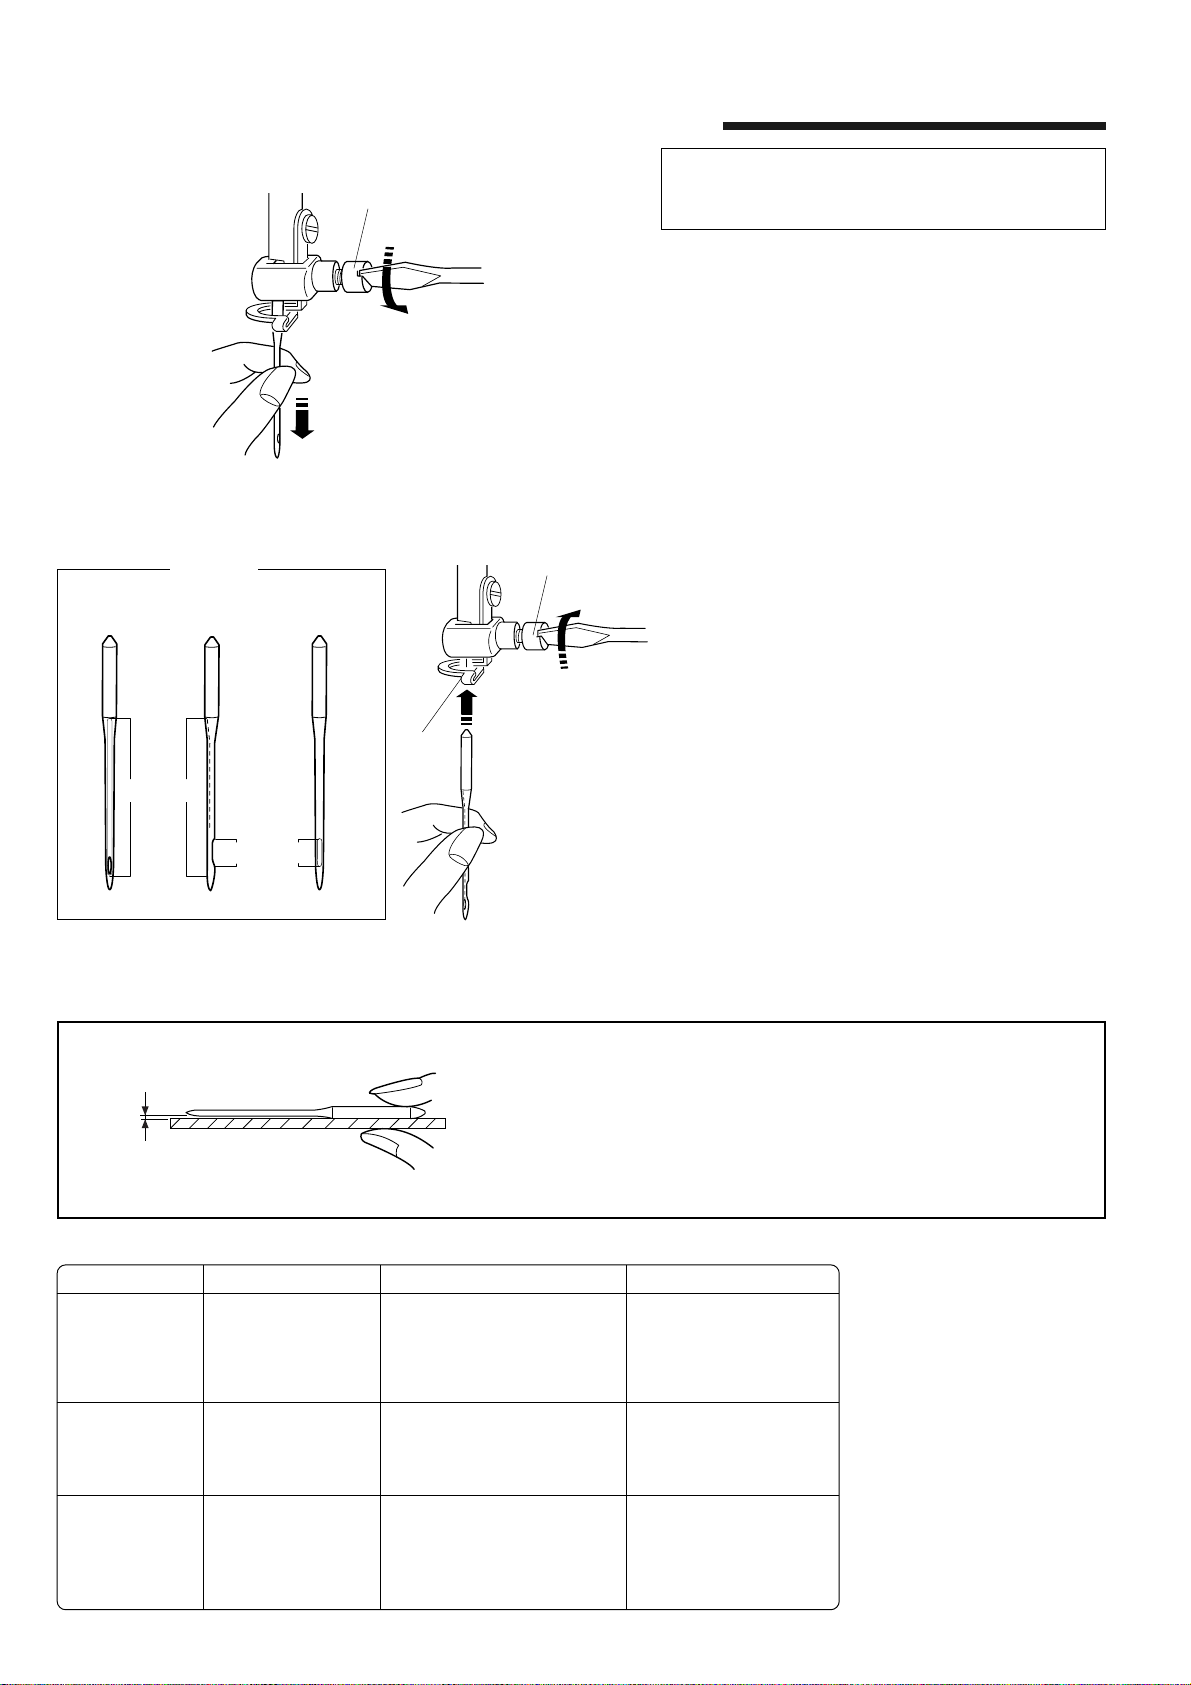
Changing the Needle for Model 1600P-DB and 1600P-DBX
CAUTION
z
q
Turn the power switch off and unplug the
machine before changing the needle.
z Turn the power switch off.
Lower the presser foot.
Turn the needle clamp screw q
counterclockwise with the large screwdriver.
Loosen the screw and remove the needle from
the needle clamp.
q Needle clamp screw
x
Needle
Front Right Back
w
q
x Insert a new needle into the needle clamp w
with the groove e to the left, and the small
scarf r back on the needle to the right.
Push the needle up as far as it will go. Tighten
the clamp screw q firmly.
w Needle clamp
e Groove
r Scarf
ee
rr
To Check the Needle
Thread and Needle Chart
Fabrics
Light weight
Crepe de chine,
Voile, Lawn,
Organdy,
Georgette, Tricot
To determine if the needle is defective, place the needle on
something flat (a needle plate, piece of glass, etc.). The gap
between the needle and the flat surface should be consistent.
Never use a blunt or blunt needle, as it may cause skipped
stitches or thread breakage. Defective needles can ruin the fabric.
Always purchase good quality needles. Change needles often.
Thread
Fine silk
Fine Cotton
Fine Synthetic
Covered Polyester
* Use a DB x 1 needle
Needle (DB x 1) size
9 or 11
Medium
weight
Heavy weight
Linens, Cotton,
Pique, Serge,
Double Knits,
Percale
Denim, Tweed,
Gabardine,
Coating, Drapery
and Upholstery
Fabric
50 silk
50 to 80 Cotton
50 to 60 Synthetic
Cotton Covered Polyester
50 silk
40 to 50 Cotton
40 to 50 Synthetic
Cotton Covered Polyester
14
11 or 14
14, 16 or 18
Page 17
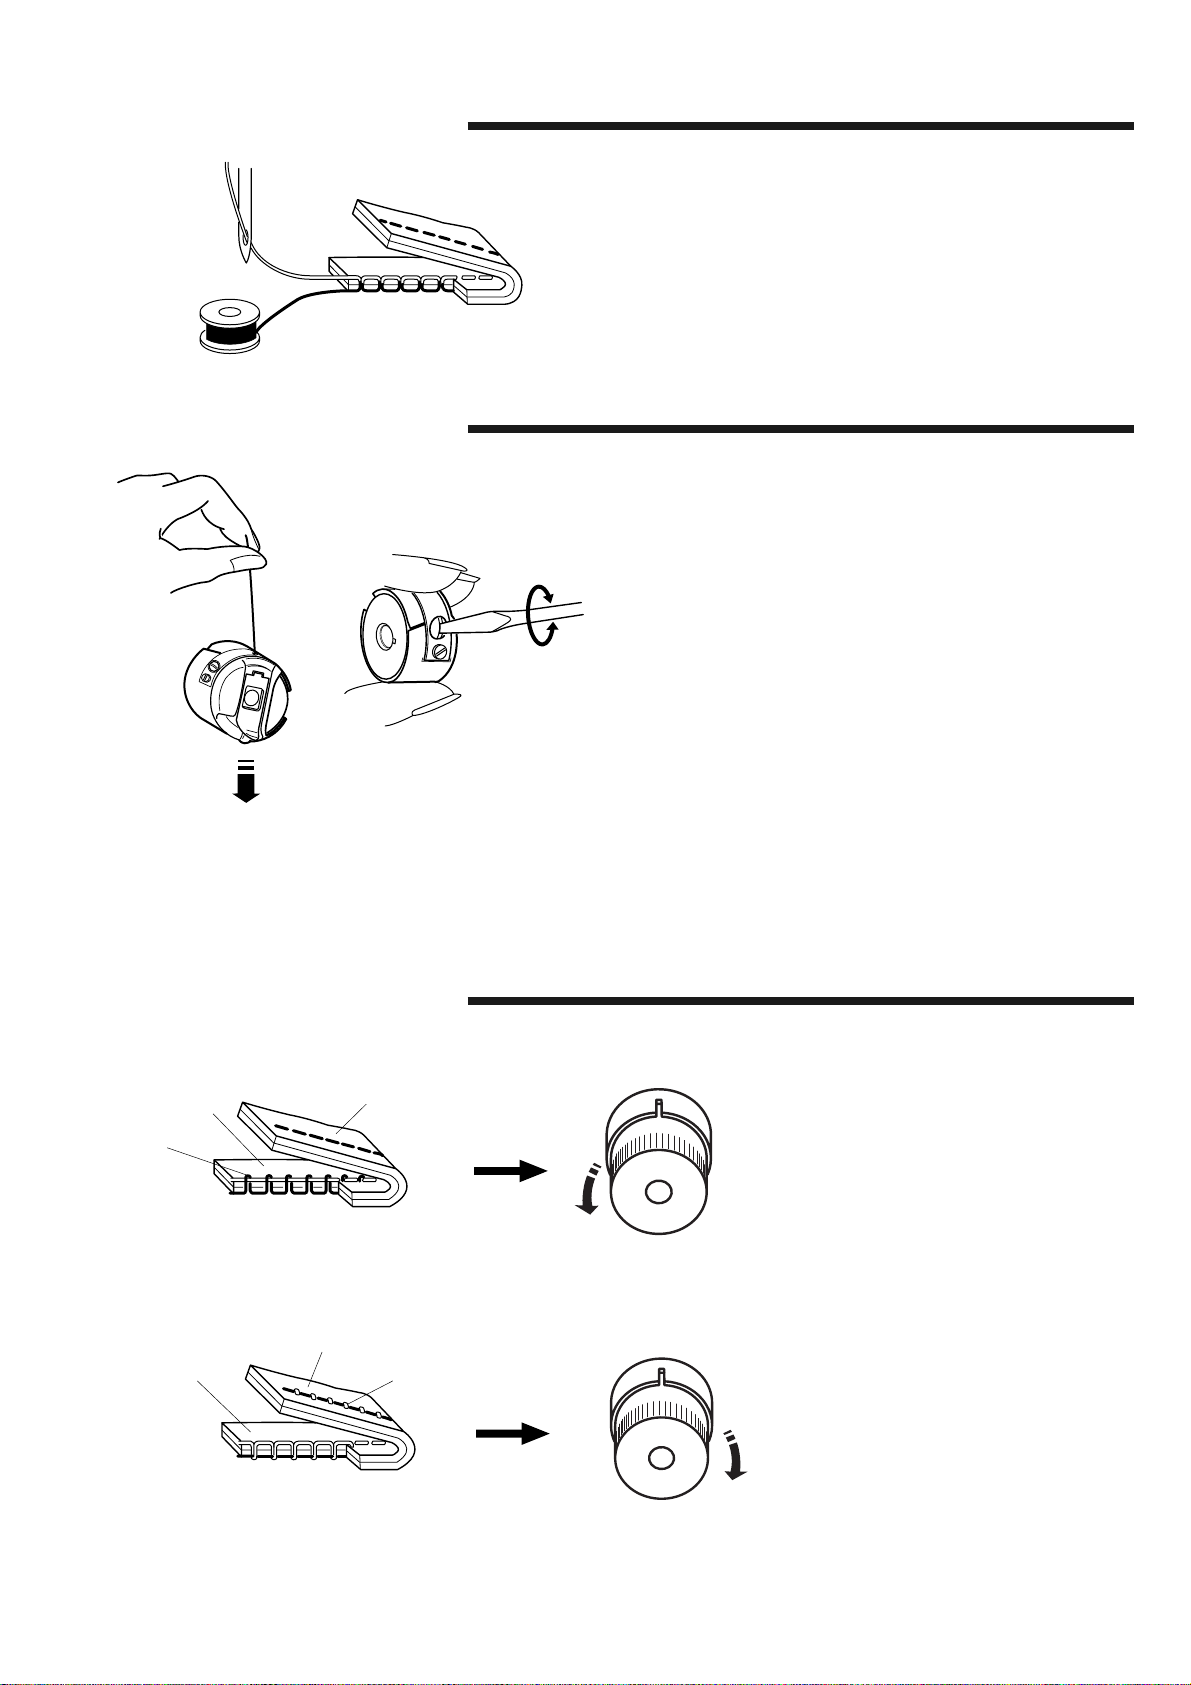
Balancing Needle Thread Tension
Adjusting Bobbin Thread Tension
The needle thread and bobbin thread should interlock
in the center of two layers of the fabric in straight
seams.
Test the bobbin thread tension by holding the end of the
bobbin thread and suspending the bobbin case as
illustrated. Then jerk the bobbin case once by flicking
your wrist.
Adjusting Needle Thread Tension
q
r
w
q
w
If the thread comes out of the bobbin case
continuously, and the bobbin case keeps falling, the
bobbin thread tension is too loose.
Make a slight adjustment by turning the screw
clockwise with the small screwdriver.
q To tighten
If the thread does not come out of the bobbin case at
all, the bobbin thread tension is too tight.
Make a slight adjustment by turning the screw
counterclockwise with the small screwdriver.
w To loosen
Needle thread tension is too tight:
If the bobbin thread r shows through on
the right side of the fabric q and it feels
bumpy, loosen the needle thread tension
by turning the dial to the left.
q
w
e
q Right side of the fabric
w Wrong side of the fabric
e Needle thread
r Bobbin thread
Needle thread tension is too loose:
If the needle thread e loops on the wrong
side of the fabric w, tighten the needle
thread tension by turning the dial to the
right.
15
Page 18
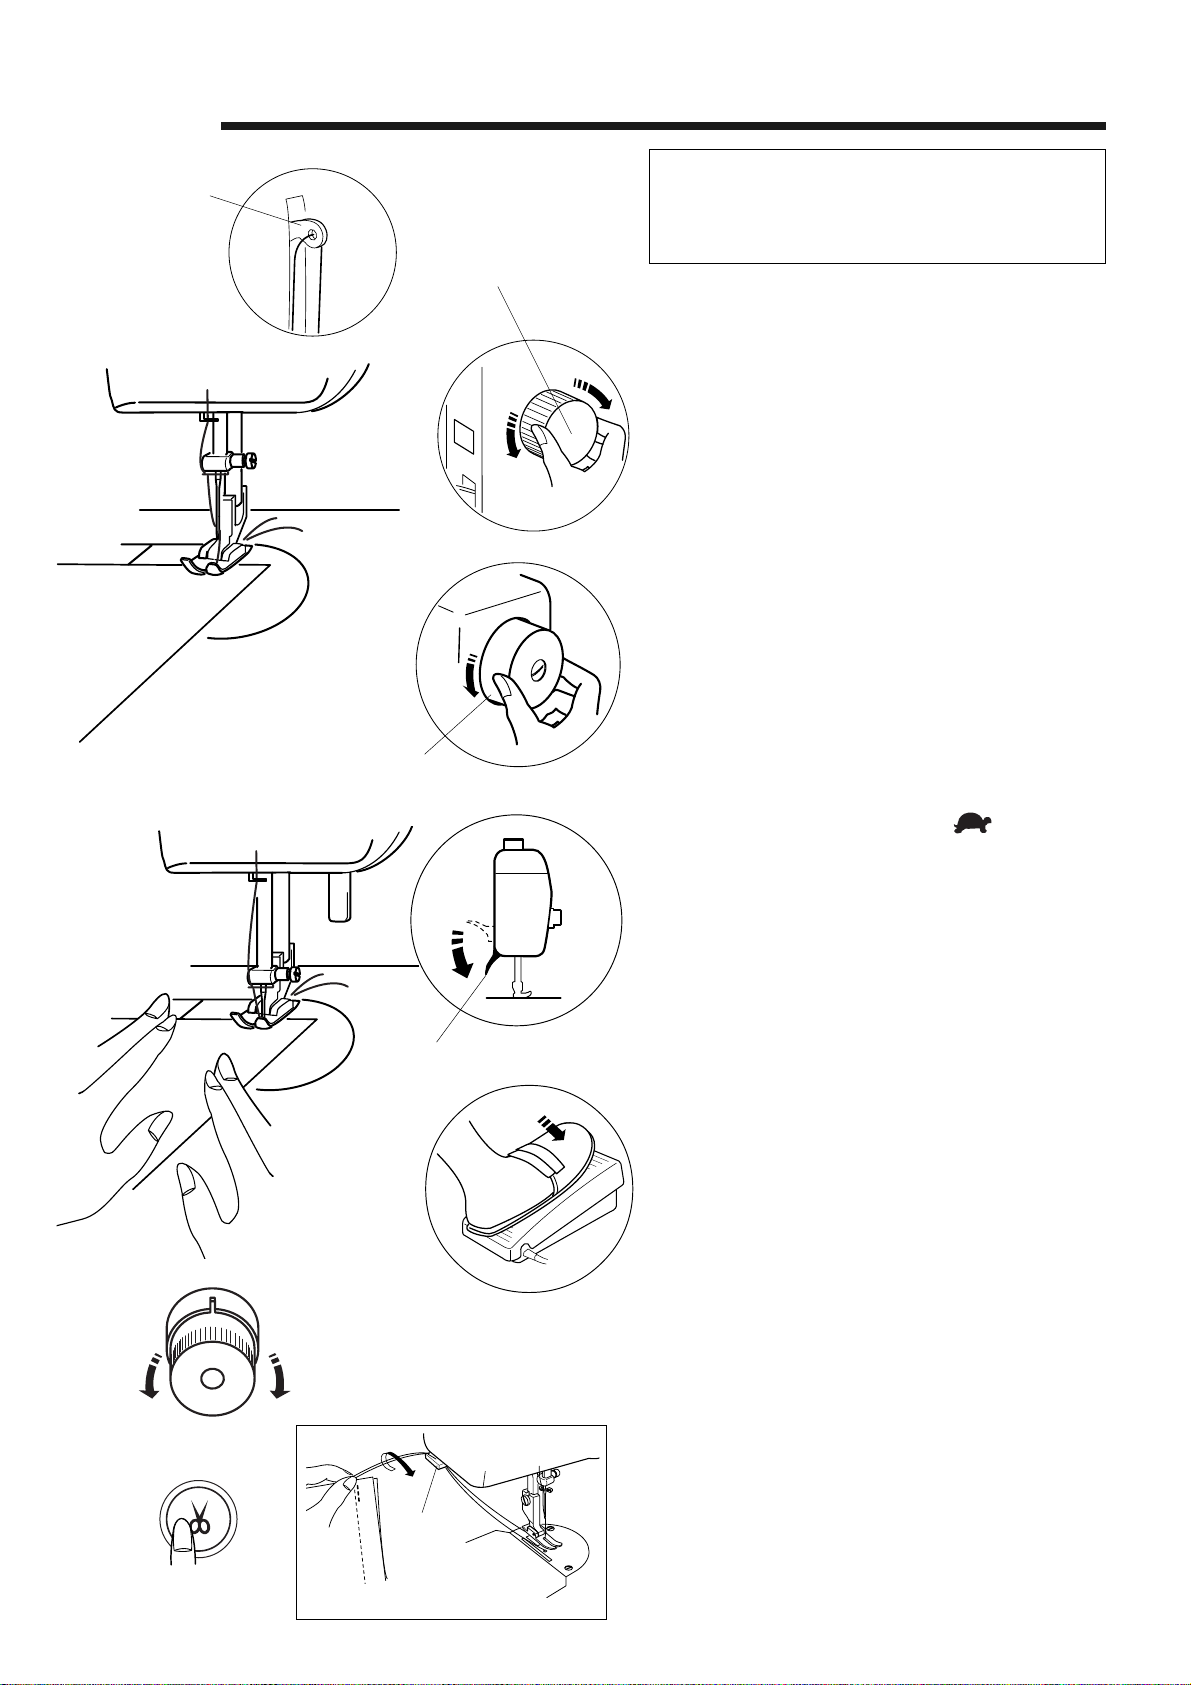
HOW TO SEW
Test Stitching
Thread take-up
lever
NOTE:
Raise the thread take-up lever to its highest
position, otherwise the needle thread may slip
out from the needle eye.
z
c
x
w
q
Before you start sewing your garment, try test
stitching with the same thread and fabric as your
garment.
z Turn the stitch length adjustment dial q to
adjust the stitch length.
Slide the needle and bobbin threads to the back
under the presser foot. Use the same fabric for
actual sewing.
x Turn the handwheel w toward you to lower the
needle into the fabric.
c Set the speed control slider to (slow) until
you get used to the sewing speed.
Lower the presser foot lifter e.
Press the foot control r to start sewing.
v
b
y
t
u
e
r
v Check the sewing result and adjust the needle
thread tension t as necessary.
b Press the auto thread cutter button y to trim the
threads for model 1600P and 1600P-DBX.
You can continue sewing without pulling the
bobbin thread up to the needle plate after
trimming the threads.
* Use the thread cutter u on the face cover if:
– the sewing machine is model 1600P-DB.
– the thread is thicker than #30.
16
Page 19
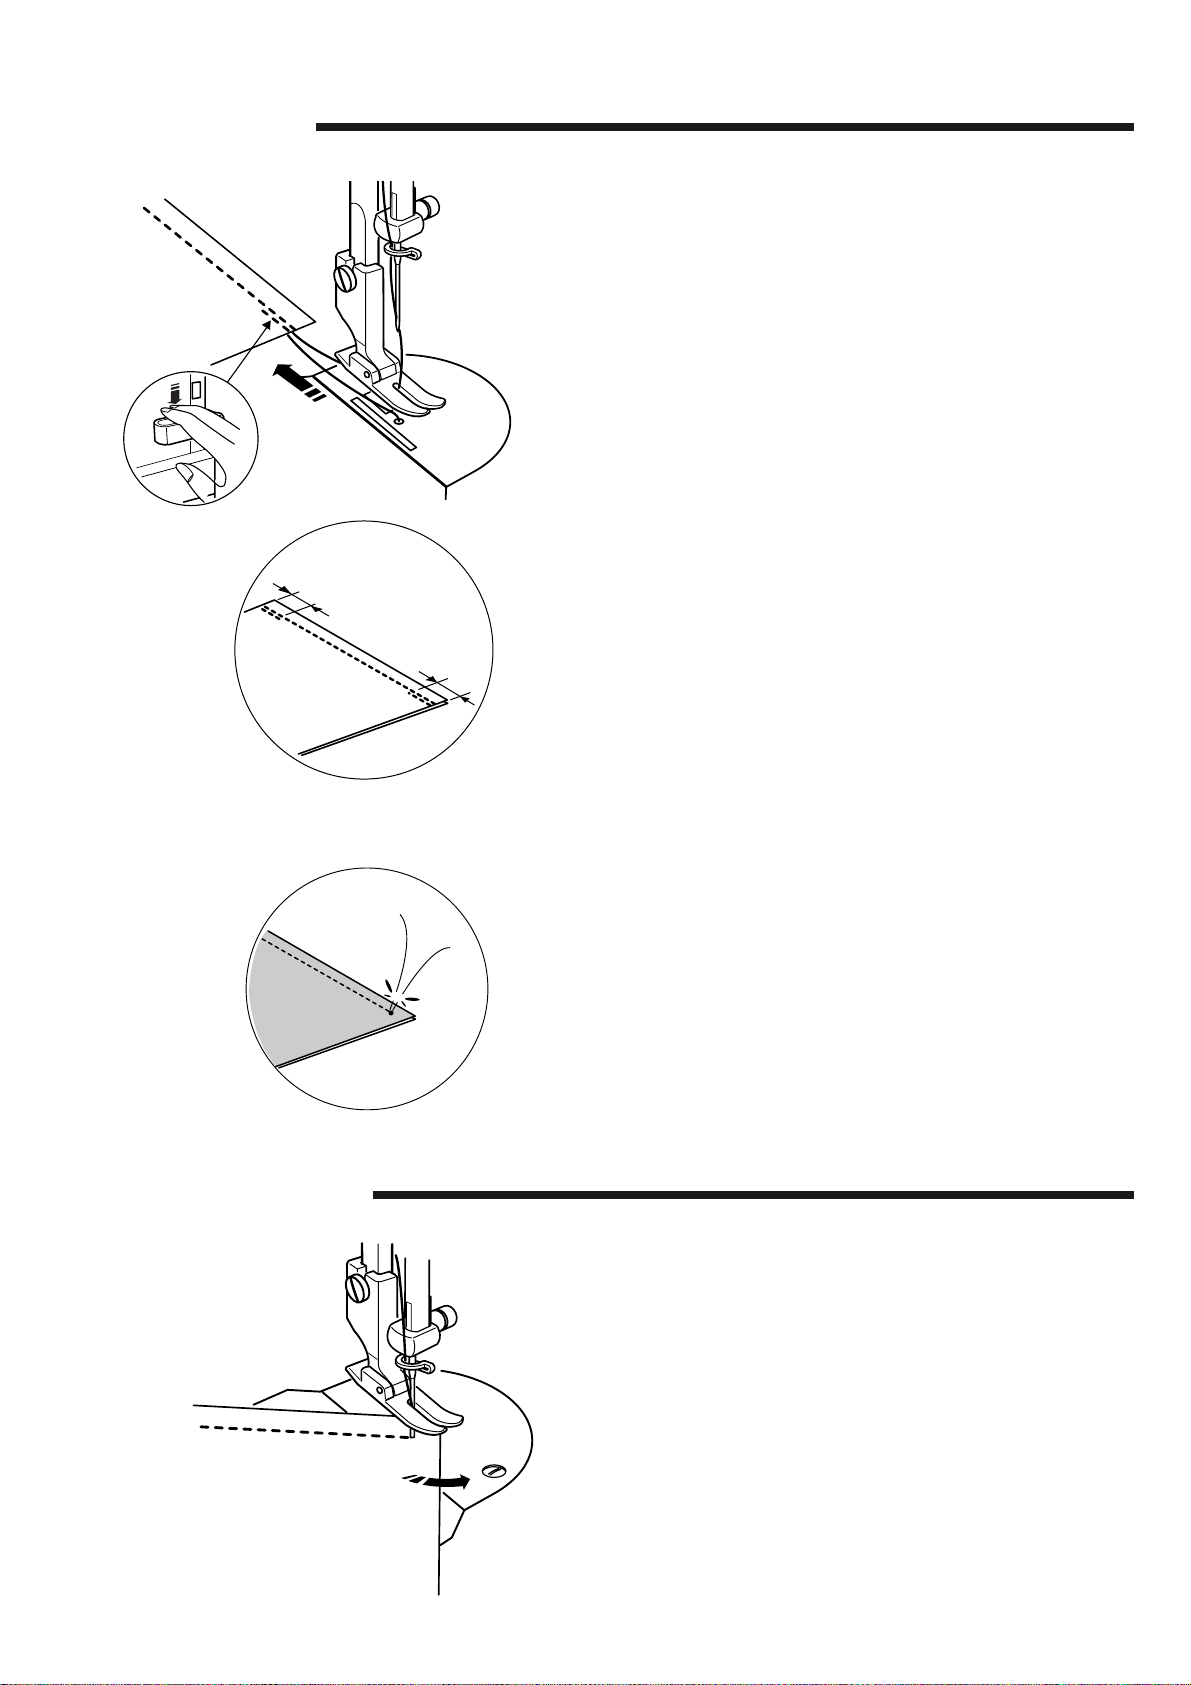
Securing a Seam
• By reverse stitching
The machine will sew in reverse as long as the
reverse stitch lever is pressed.
Secure the beginning and end of a seam by
sewing in reverse for about 1 cm (3/8˝).
1cm
(3/8˝)
1cm
(3/8˝)
• By knotting the threads
Turning a Square Corner
Pull the bobbin thread to bring the needle thread to
the wrong side of fabric.
Tie the threads together. Trim the remaining
threads.
Stop the machine a few stitches before the end of
the seam.
Press the up/down needle button a few times until
the needle falls on the end of the seam.
Raise the presser foot.
17
Pivot the fabric around the needle to change the
sewing direction.
Lower the presser foot and start sewing in a new
direction.
Page 20
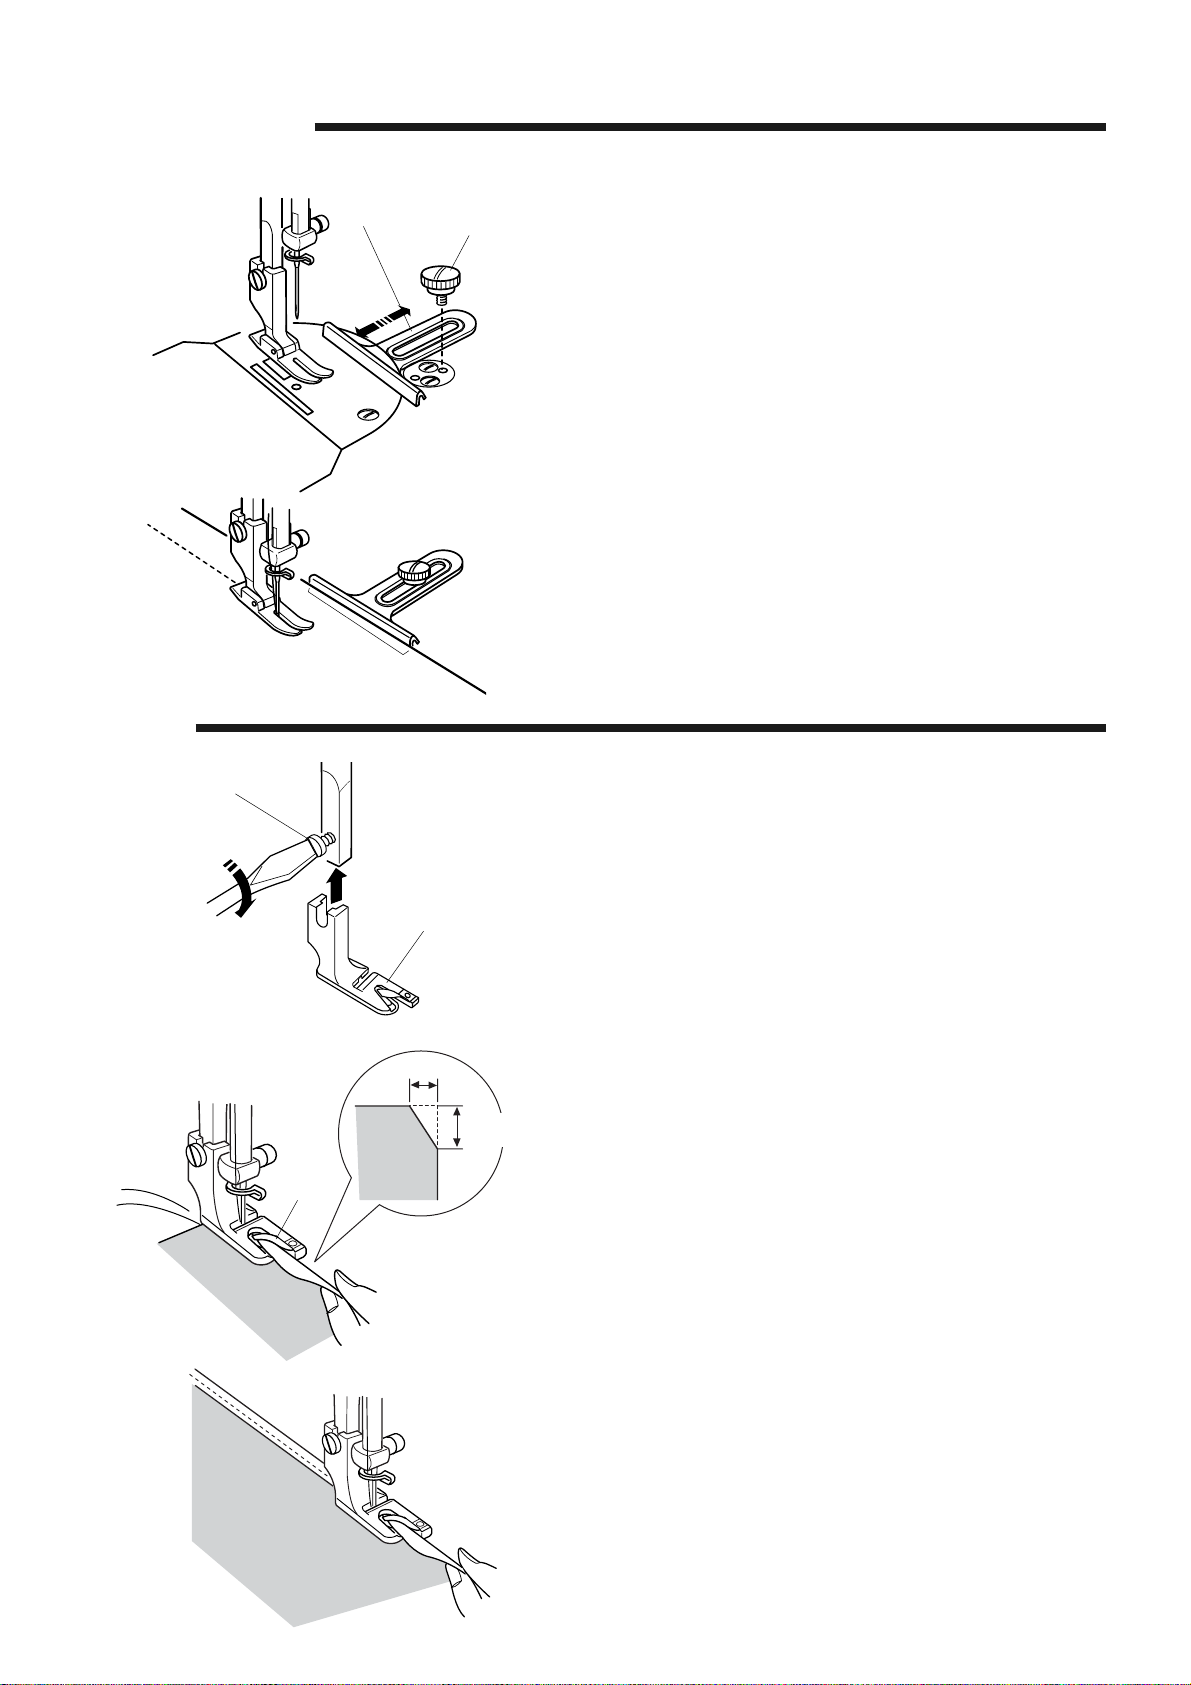
Using the Cloth Guide
Rolled Hem
q
e
w
q
Attach the cloth guide to the needle plate with the
screw q.
Adjust the position of the cloth guide w and tighten
the screw q.
Place the fabric with its edge e against the cloth
guide and sew.
Attach the hemmer foot w to the presser foot bar.
Tighten the setscrew q using the large screwdriver.
q Setscrew
w Rolled hem
e
y
e
r
w
t
Fold the edge of the fabric twice, 6 cm (2 3/8˝) in
length and 0.3 cm (1/8˝) in width.
Trim the corner 0.5 cm (3/16˝) r by 0.8 cm (1/4˝) t
for easier insertion of the hem into the foot.
e Wrong side of the fabric
r 0.5 cm (3/16˝)
t 0.8 cm (1/4˝)
y Curl of the foot
Position the fabric aligning the edge of hem with the
curl of the foot y.
Lower the foot and sew 1–2 cm (1/2˝–1˝) while
pulling both threads to the back.
Stop the machine and lower the needle into the
fabric. Raise the foot and insert the folded portion of
the fabric into the curl of the foot.
Lower the foot, and then sew while lifting up the
edge of the fabric to keep it feeding smoothly and
evenly.
18
Page 21
CARE & MAINTENANCE
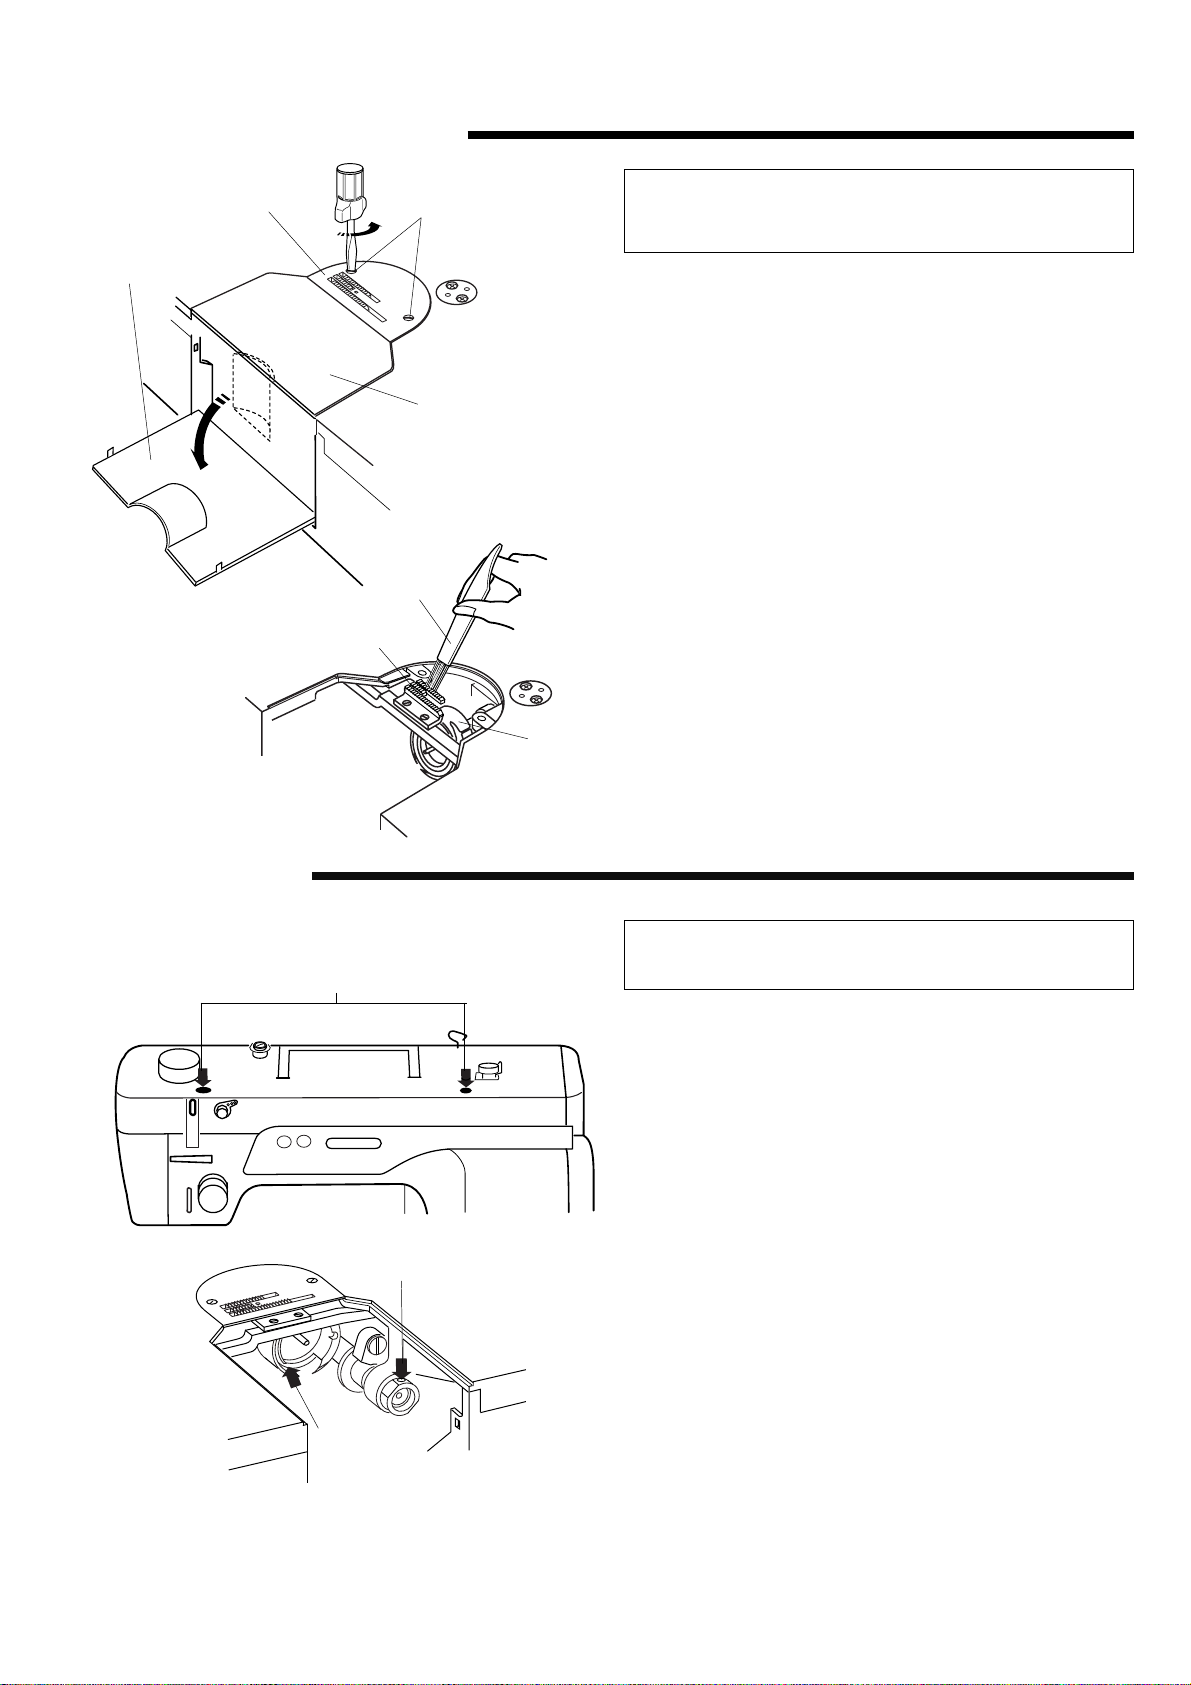
Cleaning the Hook and Feed Dog
r
e
CAUTION:
Turn the power switch off and unplug the machine
before cleaning.
w
y
u
q
z Remove the needle and presser foot.
x Remove the hook cover plate q and open the
hook cover w.
c Loosen the setscrew e and remove the needle plate r.
v Clean the hook t and feed dog y with a lint brush u.
b After cleaning the machine, attach the needle plate r,
needle and presser foot.
q Hook cover plate
w Hook cover
e Setscrew
r Needle plate
t Hook
y Feed dog
u Lint brush
t
Oiling the Machine
w
q
e
NOTE:
Unplug the machine before oiling.
Oil the points as shown (q, w and e) with two or three
drops of oil. Use only sewing machine oil MO-70 for this
sewing machine.
Oil the machine once a day if you use the machine
frequently.
Use a soft, dry cloth to remove excess oil.
Remove the bobbin case from the hook when you oil the
hook race.
After oiling, stitch a piece of waste fabric to absorb excess
oil.
19
Page 22
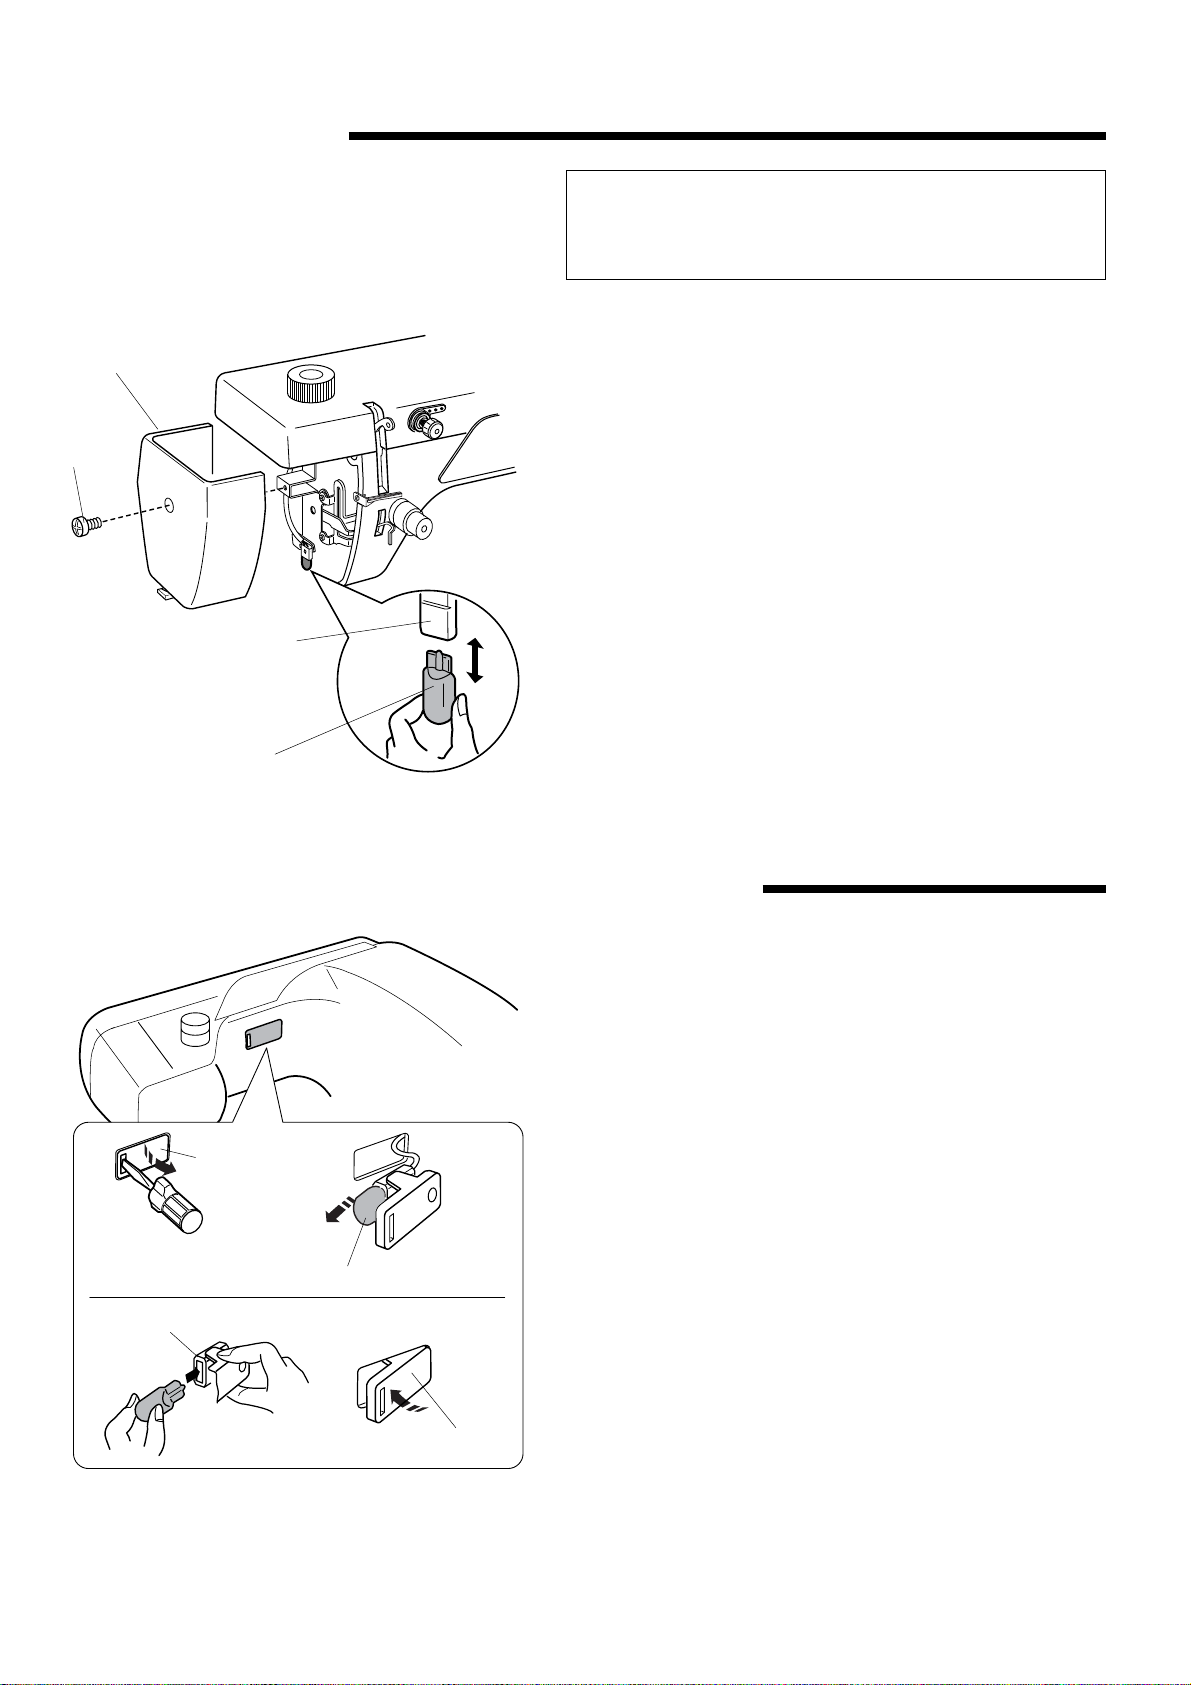
Replacing the Light Bulb
w
q
e
CAUTION:
Turn the power off before replacing the light bulb.
The bulb could be HOT, wait until it has cooled down before
touching it.
q Setscrew
w Face cover
e Lamp socket
r Light bulb
To remove:
Remove the setscrew q.
Remove the f ace co ver w.
Pull out the bulb r from the lamp socket e.
To replace:
Insert a new bulb into the opening of the socket e.
Attach the face cover w with the setscrew and cap.
Replace the bulb with the same type, rated 12 V, 5 W.
r
Replacing the Light Bulb on the Underside of the Sewing Arm
Lay the machine on its back.
Detach the lamp window q from the machine with the
q
screw driver as shown.
Pull out the light bulb e from the socket.
e
w
q
Insert a new bulb into the socket w.
Attach the lamp window q into the opening on the
machine.
q Lamp window
w Lamp socket
e Light bulb
Replace the bulb with the same type, rated 12 V, 5 W.
20
Page 23
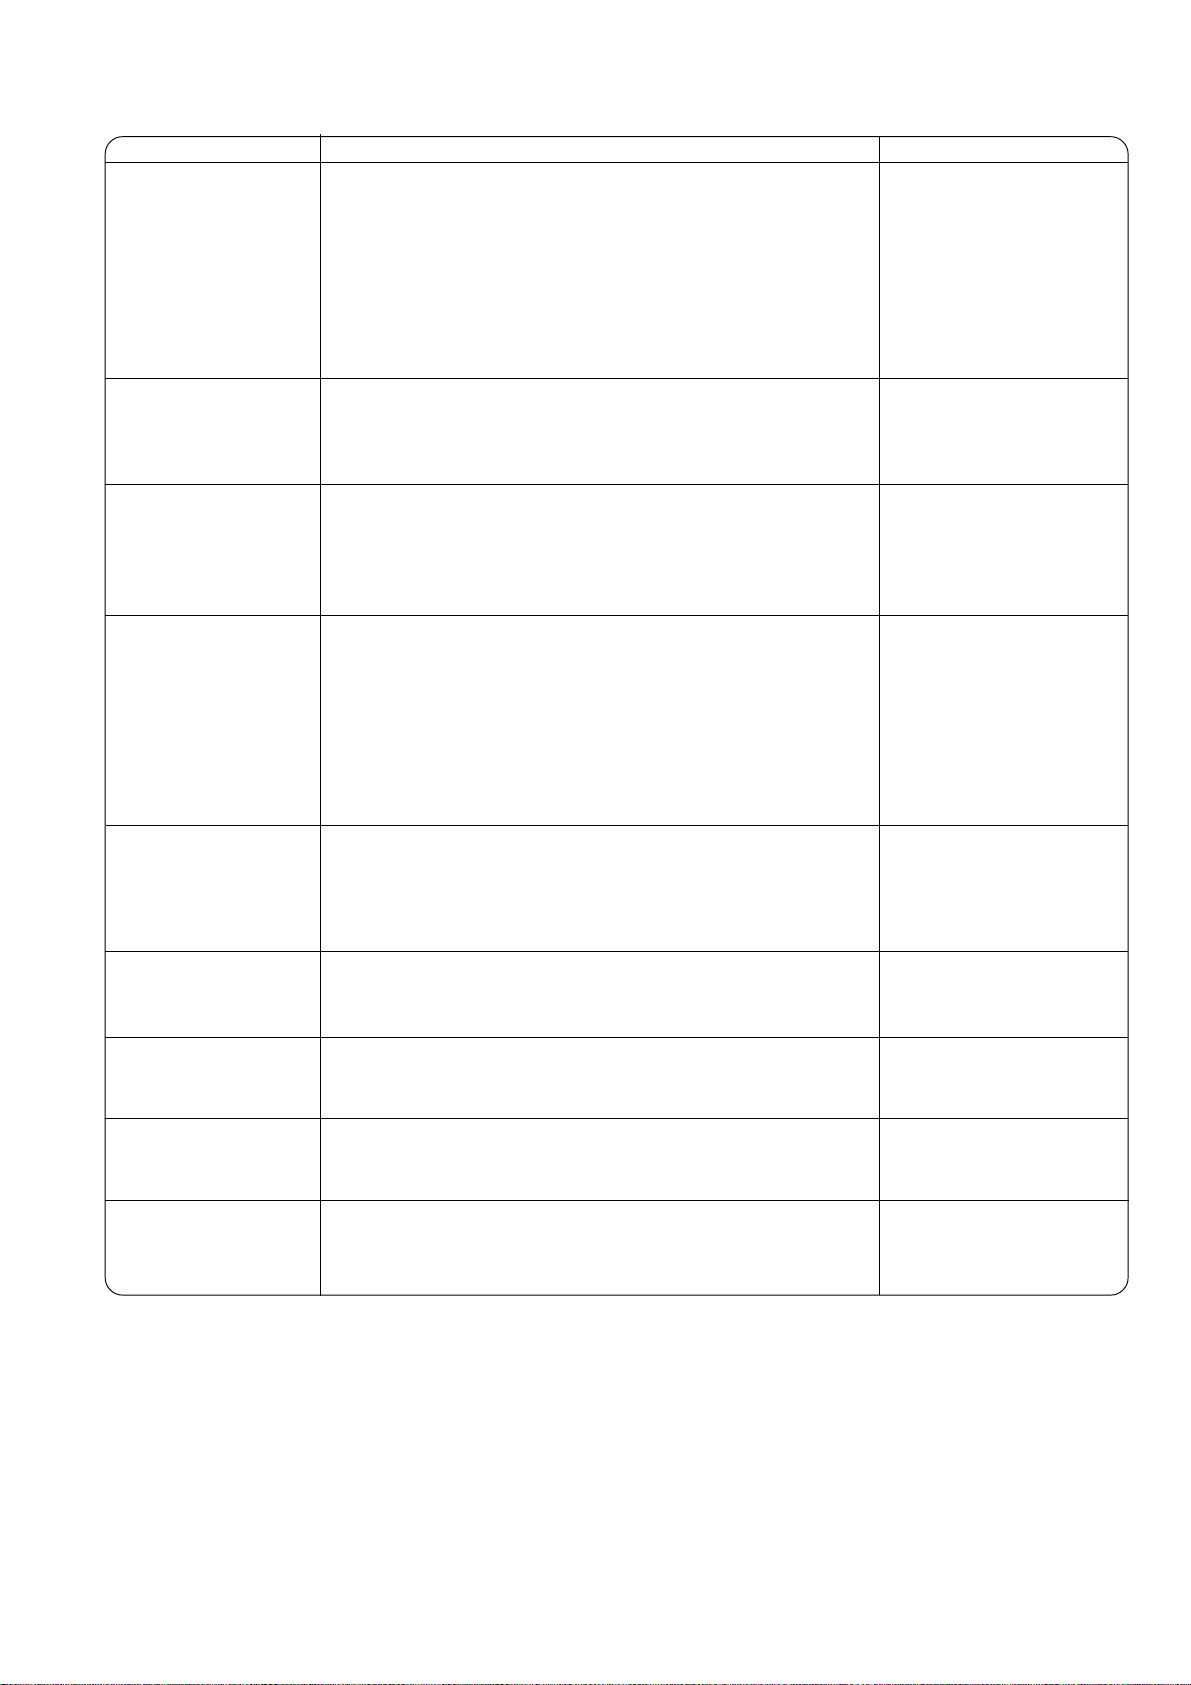
Troubleshooting
Condition
The needle thread
breaks.
Cause
1. The needle thread is not threaded properly.
2. The needle thread tension is too tight.
3. The needle is bent or blunt.
4. The needle is incorrectly inserted.
5. The needle thread and the bobbin thread are not set under the
presser foot when starting sewing.
6. The thread is either too heavy or too fine for the needle.
Reference
See page 10
See page 15
See pages 13, 14
See pages 13, 14
See page 12
See pages 11, 13, 14
The bobbin thread
breaks.
The needle breaks.
Skipped stitches
Seam puckering
1. The bobbin thread is not threaded properly in the bobbin holder.
2. Lint has collected in the hook race.
3. The bobbin is damaged and doesn't turn smoothly.
1. The needle is incorrectly inserted.
2. The needle clamp screw is loose.
3. The needle is too fine for the fabric being used.
1. The needle is incorrectly inserted, bent or blunt.
2. The needle and/or fabrics are not suitable for the work being
sewn.
3. A Blue Tip needle is not used when sewing stretch, very fine
fabrics and synthetics.
4. The needle thread is not threaded properly.
5. A poor quality needle is being used.
1. The needle thread tension is too tight.
2. The needle thread is not threaded properly.
3. The needle is too heavy for the fabric being sewn.
4. The stitch length is too long for the fabric.
See page 9
See page 19
Replace the bobbin.
See pages 13, 14
See pages 13, 14
See pages 13, 14
See pages 13, 14
See pages 11, 13, 14
See page 13
See page 10
Change the needle.
See page 15
See page 10
See pages 11, 13, 14
Make the stitch shorter
The cloth is not
feeding smoothly.
Stitches form loops
below the fabric.
The machine does not
work.
The machine does not
run smoothly and is
noisy.
1. The feed dog is packed with lint.
2. The stitches are too fine.
1. The needle thread tension is too loose.
2. The needle is either too heavy or too fine for the thread.
1. The machine is not plugged in.
2. Thread has been caught in the hook race.
1. Thread has been caught in the hook race.
2. Lint has built up in the hook race or bobbin holder.
3. The machine needs oiling.
See page 19
Make the stitch longer
See page 15
See pages 11, 13, 14
See page 4
See page 19
See page 19
See page 19
See page 19
21
 Loading...