

Page 1
Jabra BT2090
j
a
br
a
User manual
www.jabra.com
Page 2

CONTENTS
THANK YOU . . . . . . . . . . . . . . . . . . . . . . . . . . . . . . . . . . . . . . . . . . . . . . . . . . . . 2
ABOUT YOUR JABRA BT2090 . . . . . . . . . . . . . . . . . . . . . . . . . . . . . . . . . . . 2
WHAT YOUR HEADSET C AN DO . . . . . . . . . . . . . . . . . . . . . . . . . . . . . . . . 3
GETTING STARTED . . . . . . . . . . . . . . . . . . . . . . . . . . . . . . . . . . . . . . . . . . . . . 3
CHARGE YOUR HEADSET . . . . . . . . . . . . . . . . . . . . . . . . . . . . . . . . . . . . . . . 4
TURNING YOUR HEADSET ON AND OFF . . . . . . . . . . . . . . . . . . . . . . . . 4
PAIRING IT WITH YOUR PHONE . . . . . . . . . . . . . . . . . . . . . . . . . . . . . . . . . 4
CONNEC TING WITH YOUR PHONE . . . . . . . . . . . . . . . . . . . . . . . . . . . . . 5
WEAR IT HOW YOU LIKE IT . . . . . . . . . . . . . . . . . . . . . . . . . . . . . . . . . . . . . 6
HOW TO . . . . . . . . . . . . . . . . . . . . . . . . . . . . . . . . . . . . . . . . . . . . . . . . . . . . . . . 6
HOW THE STATUSDISPLAY™ WORKS. . . . . . . . . . . . . . . . . . . . . . . . . . . . 7
TROUBLESHOOTING & FAQ . . . . . . . . . . . . . . . . . . . . . . . . . . . . . . . . . . . . 8
NEED MORE HELP?. . . . . . . . . . . . . . . . . . . . . . . . . . . . . . . . . . . . . . . . . . . . . 9
TAKING CARE OF YOUR HEADSET . . . . . . . . . . . . . . . . . . . . . . . . . . . . .10
WARNING! . . . . . . . . . . . . . . . . . . . . . . . . . . . . . . . . . . . . . . . . . . . . . . . . . . . .10
SAFETY INFORMATION! . . . . . . . . . . . . . . . . . . . . . . . . . . . . . . . . . . . . . . .11
BUILT BATTERY CARE: . . . . . . . . . . . . . . . . . . . . . . . . . . . . . . . . . . . . . . 11
CHARGER CARE: . . . . . . . . . . . . . . . . . . . . . . . . . . . . . . . . . . . . . . . . . . . . . .12
WARRANTY . . . . . . . . . . . . . . . . . . . . . . . . . . . . . . . . . . . . . . . . . . . . . . . . . . . 13
CERTIFICATION . . . . . . . . . . . . . . . . . . . . . . . . . . . . . . . . . . . . . . . . . . . . . . . 15
GLOSSARY . . . . . . . . . . . . . . . . . . . . . . . . . . . . . . . . . . . . . . . . . . . . . . . . . . . .16
ENG LIS H
JABRA B T2080
1
Page 3
THANK YOU
Thank you for purchasing the Jabra BT2090 Bluetooth® headset.
We hope you enjoy it! This instruction manual will get you started
and ready to make the most of your headset.
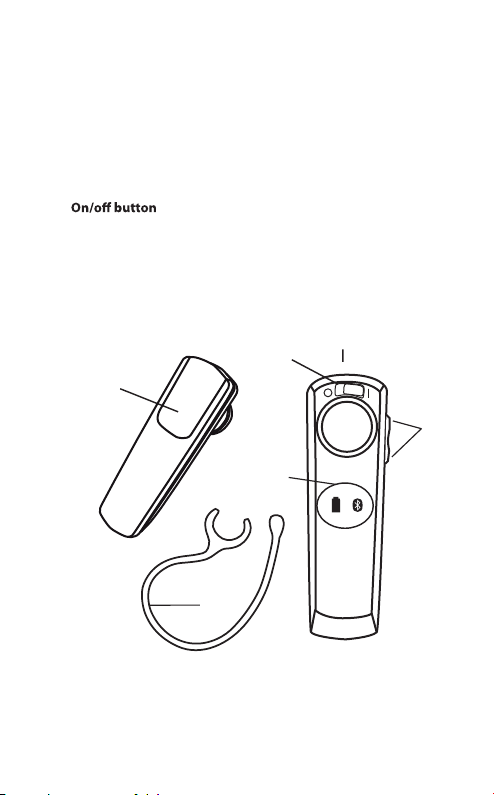
ABOUT YOUR JABRA BT2090
A. Answer/end button
B.
C. StatusDisplay
With battery indicator and Bluetooth connection indicator
D. Charging socket
E. Volume up/down
F. Ear hook
TM
D
j
a
b
A
ra
B
C
F
ENGLIS H
E
JABRA B T2090
2
Page 4
WHAT YOUR HEADSET CAN DO
Your Jabra BT2090 lets you do all this:
- Answer calls
- End calls
- See battery status
- See Bluetooth connection status
- Reject calls*
- Voice dialling*
- Last number redial*
- Mute
- Transfer calls
- Adjust volume
- Talk time 6 hours
- Standby time 8 days
- B
- Weight 8 gram
- Operating range up to 10 meters (approximately 33 feet)
- Supported B
- Internal rechargeable battery charged by wall charger
- Always see your battery and connection status on the
Jabra StatusDisplay™
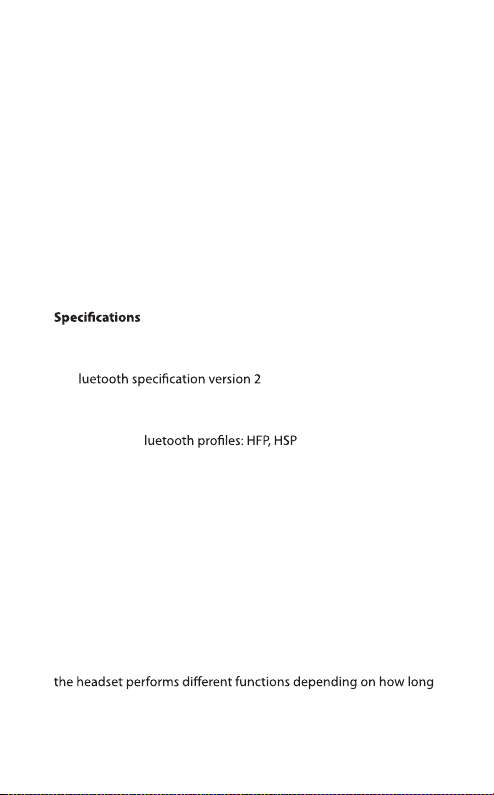
.1 with EDR and eSCO
GET TING STARTED
You should follow three steps before using your headset
1 Charge your headset
2 Activate Bluetooth on your mobile phone (refer to the
manual for your mobile phone)
3 Pair your headset to your mobile phone
The Jabra BT2090 is easy to operate. The answer/end button on
you press it.
ENG LIS H
* Phone dependent
JABRA B T2090
3
Page 5
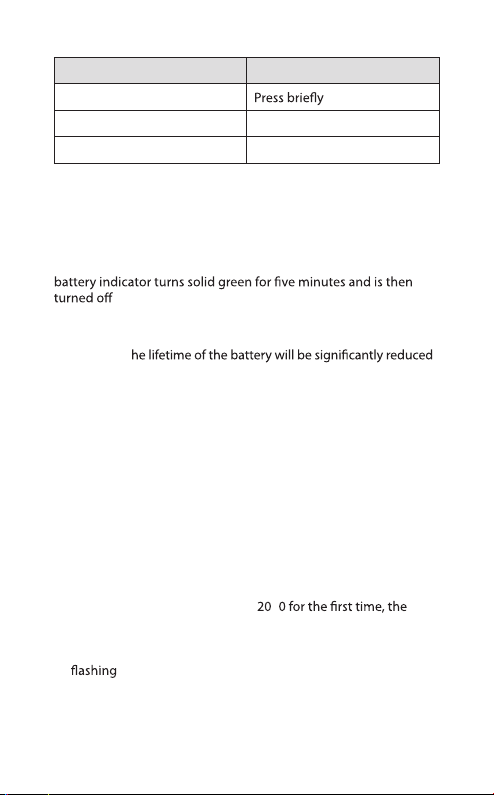
Instruction Duration of press
Tap
Press Approx: 1 second
Press and hold Approx: 5 seconds
CHARGE YOUR HEADSET
Make sure that your headset is fully charged for two hours before
you start using it. Use the AC power supply to charge from a
power socket. When the battery indicator has a solid red light,
your headset is charging. When the headset is fully charged the
.
Use only the charger provided in the box - do not use chargers
from any other devices as this may damage your headset.
Please note: T
if your device is left uncharged for a long period. We therefore
recommend that you recharge your device at least once a month.
TURNING YOUR HEADSET ON AND OFF
Slide the switch to the 'I' position to power on, and to the 'O' position
to power o.
PAIRING IT WITH YOUR PHONE
Headsets are connected to phones using a procedure called
‘pairing’. By following a few simple steps, a phone can be paired
with a headset in a matter of minutes.
1 Put the headset in pairing mode
- When you turn on your Jabra BT
headset will automatically start up on pairing mode – i.e. it is
discoverable for your phone. When the headset is in pairing
mode the Bluetooth status indication on the StatusDisplay™ is
.
9
ENGLIS H
JABRA B T2090
4
Page 6
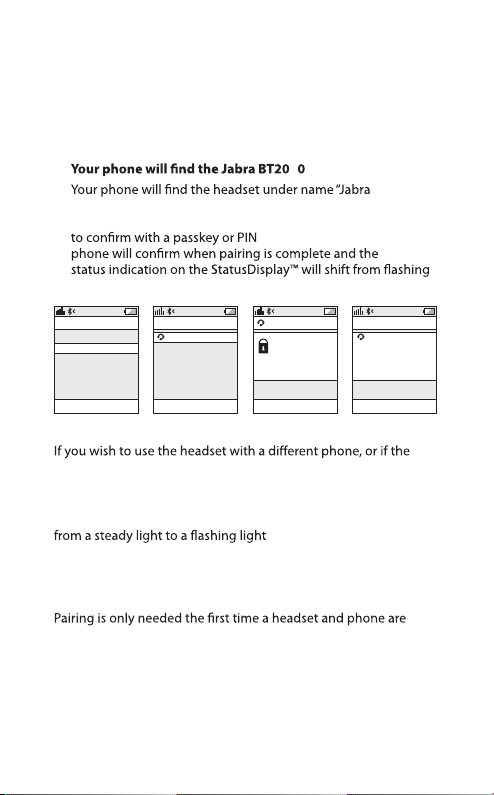
2 Set your Bluetooth phone to ‘discover’ the Jabra BT2090
- Follow your phone’s instruction guide. First make sure that
Bluetooth is activated on your mobile phone. Then set your
phone to discover new devices. This usually involves going
to a ‘setup,’ ‘connect’ or ‘Bluetooth’ menu on your phone and
selecting the option to ‘discover’ or ‘add’ a Bluetooth device.*
3
9
- BT2090”.
Your phone then asks if you want to pair with the headset.
Accept by pressing ‘Yes’ or ‘OK’ on the phone. You may be asked
. Then use 0000 (4 zeros). Your
Bluetooth
light to steady light.
ENG LIS H
CONNECTIVITY
MobilSurf
BLUETOOTH
Infrared port
Wap options
Synchronization
Networks
SELECT
DEVICES FOUND
Jabra BT2090
SELECT
Jabra BT2090
Passkey:
****
OK
HANDSFREE
Jabra BT2090
added.
The handsfree is
now ready for use
SELECT
Manual pairing mode
pairing process was interrupted, you can manually set the headset
to pairing mode.
Make sure the headset is on. Press and hold the answer/end
button for approximately 5 seconds until the Bluetooth icon turns
. Then repeat steps 2 and 3 in
the above pairing guide.
CONNECTING WITH YOUR PHONE
used together. When the headset and phone have been paired
once, they will automatically connect when the headset is on and
Bluetooth is activated on the phone. The headset can be used
when it is “connected” to the phone. If the devices are paired, but
do not immediately connect, tap the answer/end button. When
your headset is connected the Bluetooth connection icon in the
StatusDisplay™ will be constant on for 3 seconds.
* Phone dependent
JABRA B T2090
5
Page 7

WEAR IT HOW YOU LIKE IT
The Jabra BT2090 can be worn on either ear with or without
earhook. Simply remove the earhook if you prefer this wearing
your preference.
HOW TO
Answer a call
- Tap (less than 1 sec) the answer/end button on your headset to
answer a call.
End a call
- Tap the answer/end button to end an active call.
Reject a call*
- Press (approx 1 sec) the answer/end button when the phone
rings to reject an incoming call. Depending on your phone
settings, the person who called you will either be forwarded to
your voice mail or will hear a busy signal.
Make a call
- When you make a call from your mobile phone, the call will
(subject to phone settings) automatically transfer to your
headset. If your phone does not allow this feature, tap on the
Jabra BT2090’s answer/end button to transfer the call to the
headset. Press answer/end button and volume up button at the
same time, you can transfer the call back to phone.
Activate voice dialling*
- Press the answer/end button. For best results, record the voice
dialling tag through your headset. Please consult your phone’s
user manual for more information about using this feature.
Redial last number*
- Double tap the answer/end button when the headset is
connected to your phone.
Adjust sound and volume*
- Tap the volume up or down to adjust the volume.
ENG LIS H
* Phone dependent
JABRA B T2090
6
Page 8

Mute/un-mute
- To mute, press both volume up and down at the same time.
A low beep alert plays during a muted call.
- To un-mute, tap either of the volume buttons.
Call waiting and placing a call on hold*
- This lets you put a call on hold during a conversation and
answer a waiting call.
- Press the answer/end button once to put the active call on hold
and answer the waiting call.
- Press the answer/end button to switch between the two calls.
- Tap the answer/end button to end the active conversation.
HOW THE STATUSDISPLAY™ WORKS
Bluetooth
Indicator
Battery
Indicator
Indicates if your headset is connected to your
phone
- Solid light means headset is connected to your
phone
- Flashing light means headset is in ‘pairing
mode’ and ready to be connected to a new
phone
Indicates battery level and if headset is
turned ON
- Green light indicates that the headset has more
than 10 minutes of talk time remaining
- Red light indicates that the headset has less
than 10 minutes of talk time remaining
ENG LIS H
T
Get an instant status from the Jabra StatusDisplay™ by a tap on
any button on the headset when you are not on a call.
* Phone dependent
JABRA B T2090
.
7
Page 9

TROUBLESHOOTING & FAQ
I hear crackling noises
- Bluetooth is a radio technology, which means it is sensitive to
objects between the headset and the connected device. It is
designed for the headset and the connected device to be used
within 33 feet (10 meters) of each other, with no major objects
in the way (walls, etc.).
I cannot hear anything in my headset
- Increase the volume in the headset.
- Ensure that the headset is paired to the device that you wish to use.
- Make sure your phone is connected to the headset by tapping
the Answer/End button. See the Jabra StatusDisplay™.
I am having pairing problems
- You may have deleted your headset pairing connection in your
mobile phone.
Follow the pairing instructions.
I want to reset the headset
It is possible to reset and test the headset by ’Press and hold’ the
volume down and answer/end buttons at the same time. In the
StatusDisplay
simultaneously. In this mode, the pairing list is reset, and you can
test if the headset works as you will be able to hear audio in the
speaker from the microphone.
T
The next time you power on, the headset will go into pairing
Will the Jabra BT2090 work with other Bluetooth equipment?
- The Jabra BT2090 is designed to work with Bluetooth mobile
I cannot use Reject call, call on hold, Redial or voice dialling
These features are dependent on the ability of your phone to
implemented reject call, call hold and voice dialling are optional
features which are not supported by all devices. Please consult
your device manual for details.
TM
the battery icon and B
. 10 seconds.
BT2090 on.
phones. It can also work with other Bluetooth devices that are
compliant with Bluetooth version 1.1 or higher and support a
.
.
ENG LIS H
JABRA B T2090
8
Page 10

NEED MORE HELP?
1. Web: www.jabra.com
(for the latest support info and online User Manuals)
2. E-mail:
Deutsch support.de@jabra.com
English support.uk@jabra.com
Español support.es@jabra.com
Français support.fr@jabra.com
Italiano support.it@jabra.com
Nederlands support.nl@jabra.com
Polska support.pl@jabra.com
Scandinavian support.no@jabra.com
Россия support.ru@jabra.com
Information: info@jabra.com
3. Phone:
Belgique/Belgie 00800 722 52272
Danmark 702 52272
Deutschland 0800 1826756
Die Schweiz 00800 722 52272
España 900 984572
France 0800 900325
Italia 800 786532
Luxembourg 00800 722 52272
Nederland 0800 0223039
Norge 800 61272
Österreich 00800 722 52272
Polska 0801 800 550
Portugal 00800 722 52272
Suomi 00800 722 52272
Sverige 020792522
United Kingdom 0800 0327026
Россия +7 495 660 71 51
International 00800 722 52272
JABRA B T2090
ENG LIS H
9
Page 11

TAKING CARE OF YOUR HEADSE T
- Always store the Jabra BT
protected
- Avoid storage at extreme temperatures (above 45°C/113°F – including direct sunlight – or below -10°C/14°F). This can shorten
also degrade performance.
- Do not expose the Jabra BT2090 to rain or other liquids.
9
. High temperatures may
WARNING!
EXCESSIVE VOLUME LEVELS CAN CAUSE PERMANENT
HEARING DAMAGE. USE AS LOW A VOLUME AS POSSIBLE.
Headsets are capable of delivering sounds at loud volumes and
high pitched tones which under certain circumstances can result
in permanent hearing loss damage. Avoid prolonged use of the
headset at excessive sound pressure levels. Please read the safety
guidelines below prior to using this headset.
You can reduce the risk of hearing damage by following these
safety guidelines
1. Prior to using this product follow these steps
- Before putting on the headset, turn the volume control to its
lowest level,
- Put the headset on, and then
- Slowly adjust the volume control to a comfortable level.
2. During the use of this product
- Keep the volume at the lowest level possible and avoid using
the headset in noisy environments where you may be inclined
to turn up the volume;
- If increased volume is necessary, adjust the volume control slowly;
- If you experience discomfort or ringing in your ears, immediately
discontinue using the headset and consult a ph
With continued use at high volume, your ears may become
accustomed to the sound level, which may result in permanent
damage to your hearing without any noticeable discomfort.
ysician.
ENG LIS H
JABRA B T2090
10
Page 12

SAFE TY INFORMATION!
- Use of a headset will impair your ability to hear other sounds.
Use caution while using your headset when you are engaging
in any activity that requires your full attention.
- If you have a pace maker or other electrical medical devices,
you should consult your physician before using this device.
- This package contains small parts that may be hazardous to
children and should be kept out of reach from children. The
bags themselves or the many small parts they contain may
cause choking if ingested.
- Never try to dismantle the product yourself. None of the
components can be replaced or repaired by users. Only authorized
dealers or service centers may open the product. If any parts
of your product require replacement for any reason, including
normal wear and tear or breakage, contact your dealer.
- Avoid exposing your product to rain, moisture or other liquids
to protect against damage to the product or injury to you.
- Observe all signs and instructions that require an electrical
device or R
areas such as hospitals or aircrafts.
Remember: Always drive safely, avoid distractions and follow
local laws!
Using the headset while operating a motor vehicle, motorcycle,
watercraft or bicycle may be dangerous, and is illegal in some
jurisdictions, just as use of this headset with both ears covered
while driving is not permitted in certain jurisdictions. Check your
local laws. Use caution while using your headset when you are
engaging in any activity that requires your full attention. Also,
do not take notes or read documents.
BUILT-IN BATTERY CARE:
- Your device is powered by a rechargeable battery.
- The full performance of a new battery is achieved only after
two or tree complete charge and discharge cycles.
- The battery can be charged and discharged hundreds of times,
but will eventually wear out. Recharge your battery only with
the provided approved chargers designated for this device.
ENG LIS H
JABRA B T2090
11
Page 13

- Unplug the charger from the electrical plug and the device
when not in use. Do not leave a fully charged battery connected
to a charger, since overcharging may shorten its lifetime.
- If left unused, a fully charged battery will lose its charge over
time.
- Leaving the device in hot or cold places, such as in a closed car
in the summer and winter conditions, will reduce the capacity
and lifetime of the battery.
- Always try to keep the battery between 15°C and 25°C (59°F and
77°F). A device with a hot or cold battery may not work temporary,
even when the battery is fully charged. Battery performance is
particularly limited in temperatures well below freezing.
- .
- Batteries may also explode if damaged.
Battery warning!
- ”Caution” – The battery used in this device may present a risk of
.
- Do not attempt to open the product or replace the battery. It is
built-in and not changeable.
and the warranty will be terminated.
- Recharge your battery only with the provided approved
chargers designated for this device.
- Dispose of batteries according to local regulations. Please
recycle when possible. Do not dispose as household waste.
- Always store product out of the reach of children.
CHARGER CARE:
- Do not attempt to charge your headset with anything other
than the AC adaptor provided. The use of any other types
may damage or destroy the headset and may invalidate any
approval or warranty, and may be dangerous. For availability
of approved enhancements, please check with your dealer.
ENG LIS H
JABRA B T2090
12
Page 14

Important: The headset cannot be used while charging
Charger warning!
- When you disconnect the power cord or any enhancement,
grasp and pull the plug, not the cord, never use a charger that
is damaged.
- Do not attempt to disassemble the charger as it may expose
you to dangerous electric shock. Incorrect reassembly can cause
.
- Avoid charging your headset in extremely high or low temperatures
and do not use the charger outdoors or in damp areas.
WARRANT Y
Limited One (1) -year Warranty
GN Netcom A/S (“GN”) warrants this Product to be free from
defects in materials and workmanship (subject to the terms set
forth below) for a period of one (1) year from the date of purchase
(“Warranty Period”). During the Warranty Period, GN will repair
or replace (at GN’s discretion) this Product or any defective parts
(“Warranty Service”). If repair or replacement is not commercially
practicable or cannot be timely made, GN may choose to refund
. Repair or
replacement under the terms of this Warranty does not give right
to any extension or a new beginning of the period of Warranty.
Claims under the Warranty
To obtain Warranty Service, please contact the GN dealer from
which you purchased this product or visit www.jabra.com for
further information about customer support. You will need to
return this Product to the dealer or ship it to the dealer or to GN (if
so indicated on www.jabra.com) in either its original packaging or
. You will bear
the cost of shipping the product to GN. If the Product is covered
by the warranty, GN will bear the cost of shipping product back
to you after the completion of service under this warranty. Return
shipping will be charged to you for products not covered by the
warranty or requiring no warranty repair.
ENG LIS H
JABRA B T2090
13
Page 15

The Following information must be presented to obtain Warranty
Service: (a) the product, and (b) proof of purchase, which clearly
indicates the name and address of the seller, the date of purchase
and the product type, which is evidence that this product is
within the Warranty Period. Please further include (c) your return
address. (d) daytime telephone number, and (e) reason for return.
A
you understand that the product may consist of reconditioned
equipment that contains used components, some of which have
been reworked. The used components all live up to GN’s high
quality standards and comply with the GN product performance
. You understand that replaced parts
or components will become the property of GN.
Limitation of Warranty
This Warranty is only valid for the original purchaser and will
automatically terminate prior to expiration, if this Product is sold
or otherwise transferred to another party. The Warranty provided
by GN in this statement applies only to Products purchased for
use, and not for resale. It does not apply to open box purchases,
which are sold “as is” and without any warranty.
exempt from Warranty are limited-life consumable components
subject to normal wear and tear, such as microphone windscreens,
and other accessories. This Warranty is invalid if the factory-applied
serial number, date code label, or product label has been altered
or removed from this Product. This Warranty does not cover
defects or damages that result from: (a) improper storage, misuse
or abuse, accident or neglect, such as physical damage (cracks,
scratches, etc.) to the surface of the Product resulting from misuse;
(b) contact with water, extreme humidity, sand, dirt or the like or
extreme heat; (c) use of the Product or accessories for commercial
purposes or subjecting the Product or accessories to abnormal
usage or conditions; or (d) other acts which are not the fault of GN.
This Warranty does not cover damage due to improper operation,
maintenance or installation, or attempted repair by anyone other
than GN or a GN dealer which is authorized to do GN warranty
work. Any unauthorized repairs will void this Warranty. This
Warranty does not cover defects or damages that result from the
peripheral equipment.
ENG LIS H
JABRA B T2090
14
Page 16

REPAIRS OR REPLACEMENTS AS PROVIDED UNDER THIS
WARRANTY ARE THE EXCLUSIVE REMEDY OF THE CONSUMER.
GNSHALL NOT BE LIABLE FOR ANY INCIDENTAL OR
CONSEQUENTIAL DAMAGES FOR BREACH OF ANY EXPRESS OR
IMPLIED WARRANTY ON THIS PRODUCT. EXCEPT TO THE EXTENT
PROHIBITED BY LAW, THIS WARRANTY IS EXCLUSIVE AND IN
LIEU OF ALL OTHER EXPRESS AND IMPLIED WARRANTIES WHAT
SO EVER, INCLUDING BUT NOT LIMITED TO THE WARRANTY OF
MERCHANTABILITY AND FITNESS FOR A PRACTICAL PURPOSE.
NOTE! T
have other rights which vary from location to location. Some
jurisdictions do not allow the exclusion or limitation of incidental
or consequential damages or implied warranties, so the above
exclusions may not apply to you. T
legal (statutory) rights under your applicable national or local laws.
. You may
CER TIFICATION
CE
This product is CE marked according to the provisions of the R & TTE
Directive (99/5/EC). Hereby, GN Netcom A/S, declares that this product
is in compliance with the essential requirements and other relevant
provisions of Directive 1999/5/EC. For further information please
consult http://www.jabra.com.
Bluetooth
The Bluetooth® word mark and logos are owned by the Bluetooth
SIG, Inc. and any use of such marks by GN Netcom A/S is under
license. Other trademarks and trade names are those of their
respective owners.
Dispose of the product according to local standards and regulations.
www.jabra.com/weee
ENG LIS H
JABRA B T2090
15
Page 17

GLOSSARY
1 Bluetooth is a radio technology that connects devices, such
as mobile phones and headsets, without wires or cords over
a short distance (approx. 10 meters/33 feet). Bluetooth is safe
to use. It is secure too, so once a connection has been made
no-one can listen in and there is no interference from other
Bluetooth devices either. Get more information at
www.bluetooth.com.
2
devices communicate with other devices. Bluetooth phones
implement certain mandatory features within the phone’s
software.
3 Pairing creates a unique and encrypted link between two
Bluetooth devices and lets them communicate with each other.
Bluetooth devices will not work if the devices have not been
paired.
4 Passkey or PIN is a code that you enter on your Bluetooth
enabled device (e.g. a mobile phone) to pair it with your Jabra
BT2090. This makes your device and the Jabra BT2090 recognize each other and automatically work together.
5 Standby mode is when the Jabra BT2090 is passively waiting
for a call. When you ‘end’ a call on your mobile phone, the
headset goes into standby mode.
Bluetooth
. In
ENG LIS H
Dispose of the product according
to local standards and regulations.
www.jabra.com/weee
JABRA B T2090
16
Page 18

© 2009 GN Netcom A/S. All rights reserved. Jabra® is a registered
trademark of GN Netcom A/S. All other trademarks included herein
are the property of their respective owners. The Bluetooth
mark and logos are owned by the Bluetooth SIG, Inc. and any use
®
word
of such marks by GN Netcom A/S is under license. (Design and
specifications subject to change without notice).
MADE IN CHI NA
TYPE: OTE4
www.jabra.com
 Loading...