

Page 1
Bluephase
Licence to cure
®
LED for every use
EN Instructions for Use
Page 2
DE Gebrauchsinformation
Seite 16
FR Mode d’emploi
Page 30
For dental use only!
Caution: U.S. Federal law restricts this device to sale by or on the order of a licensed dentist
Made in Austria
Ivoclar Vivadent AG, FL-9494 Schaan / Liechtenstein
IT Istruzioni d’uso
Pagina 44
ES Instrucciones de uso
Pagina 58
PT Instruções de Uso
Página 72
Appendix
Page / Seite 86
Page 2

Dear Customer,
Optimum polymerization is an important require-
ment for all light cured materials in order to con-
sistently produce high quality restorations.
The polymerization light selected also plays a deci-
sive role in this respect. Therefore, we would like
to thank you for having purchased Bluephase.
Bluephase is a high-quality medical device which
has been designed according to the latest standard
of science and technology in compliance with the
relevant industry standards.
These Instructions for Use will help you safely
start-up the device, make full use of its capabili-
ties, and ensure a long service life.
Should you have any further questions, please do
not hesitate to contact us (see addresses on the
reverse page).
Your Ivoclar Vivadent Team
2
Page 3

Table of Contents
Product overview 4
– List of parts 4
– Indicators on the charging base 5
– Indicators on the handpiece 5
Safety 6
– Intended use 6
– Indication 6
– Signs and symbols 6
– Safety notes 6
Start-up 8
– Charging base 8
– Handpiece 8
– Battery 9
– Click & Cure corded operation 10
Operation 11
– Selecting the curing program and the curing time 11
– Cure Memory function 12
– Start 12
– Acoustic signals 12
– Light intensity 12
– Measuring the light intensity 12
Maintenance and cleaning 13
– Housing 13
– Light probes 13
– Battery contacts 13
– Disposal 13
What if … 14
Warranty / Procedure in case of repair 15
Product specifications 15
– Delivery form 15
– Accessories 15
– Technical data 15
– Operating conditions 15
– Transportation and storage conditions 15
3
Page 4

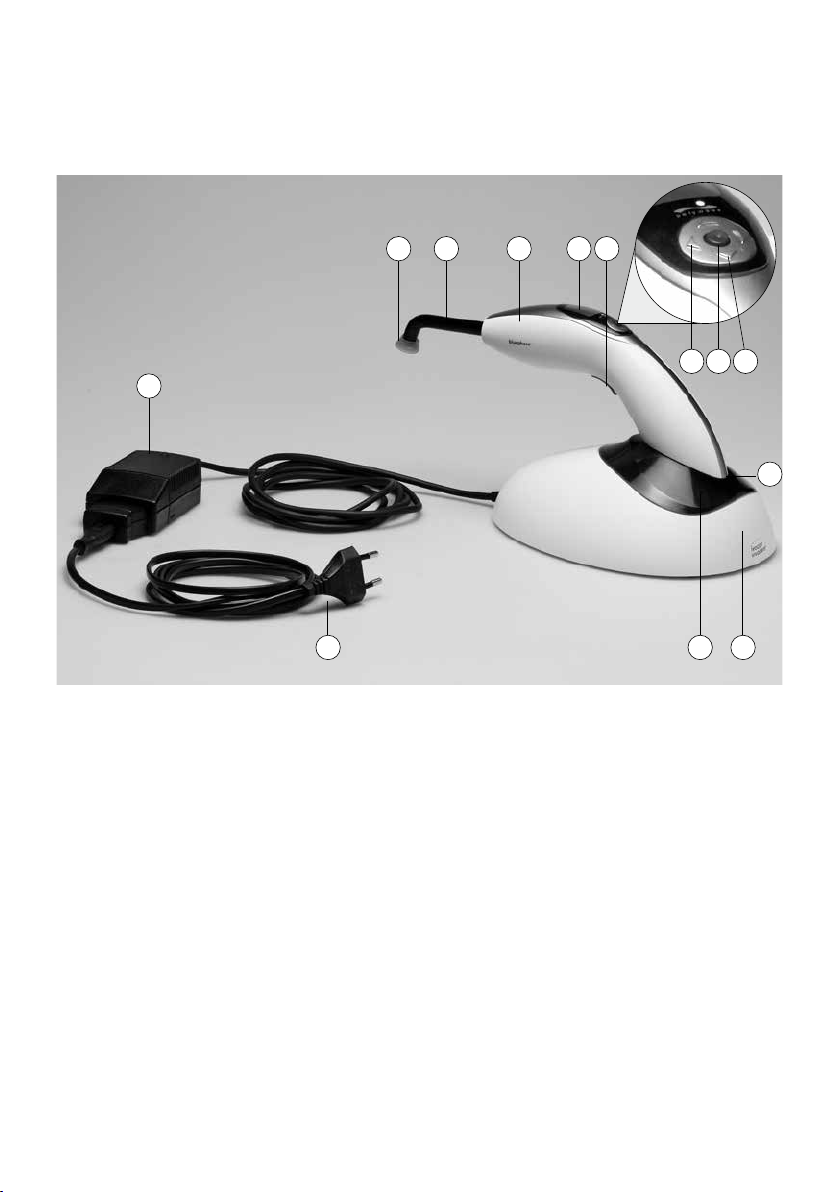
List of parts
10
311213 2
5 6 4
11
9 7 8
1 Handpiece
2 Start button
3 Display
4 Program selection button
5 Time selection button
6 Volume button
7 Power indicator
8 Charging base
9 Power cord
10 Power pack
11 Battery
12 Light probe 10 mm
13 Anti-glare cone
4
Page 5

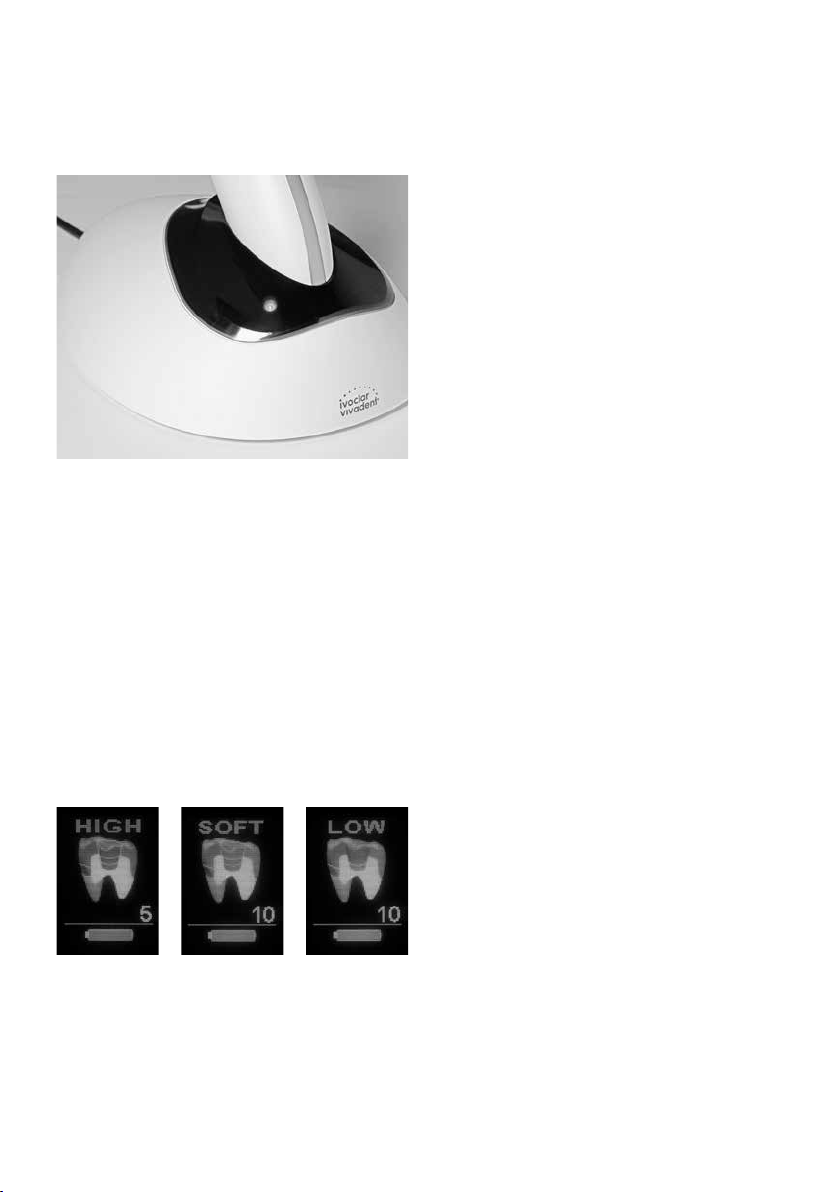
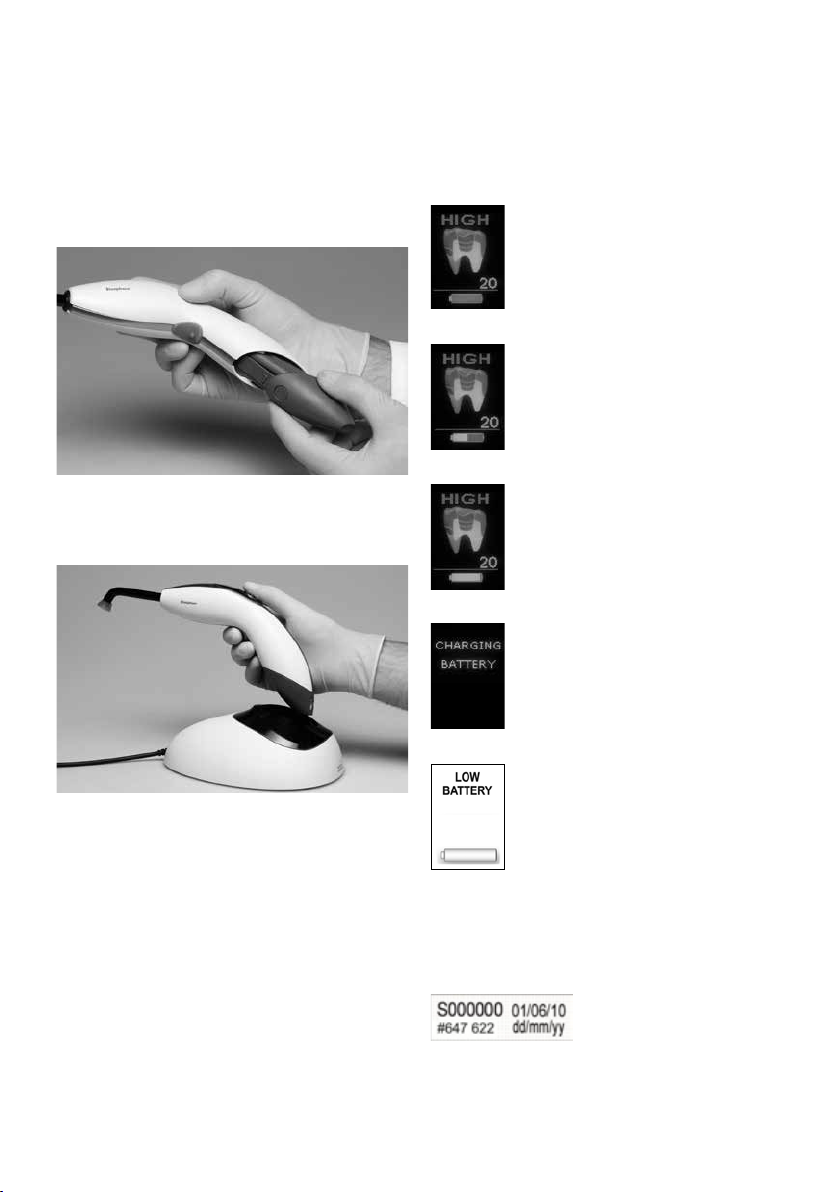
Indicators on the charging base
Indicator lights up in blue - the charging base is
connected to the power supply
Indicators on the handpiece
Curing program and operating state
Selected indications and curing time
Charging status of the battery
5
Page 6
Safety
Intended use
Bluephase is an LED polymerization light that produces
energy-rich blue light. It is used for the polymerization of
light-curing dental materials immediately at the dental
unit. The intended use also includes the observation of
the notes and regulations in these Instructions for Use.
Indication
With its “Polywave®” broadband spectrum, Bluephase is
suitable for the polymerization of all light-curing dental
materials curing in the wavelength range of 385–515 nm.
These materials include restoratives, bonding agents/
adhesives, bases, liners, fissure sealants, temporaries, as
well as luting materials for brackets and dental-lab
materials such as ceramic inlays.
Signs and symbols
Non permissible use
Symbols on the curing light
Double insulation
(device complies with safety class II)
Protection against electrical shock
(BF type apparatus)
Observe Instructions for Use
Safety notes
The Bluephase is is an electronic device and a medical
product which is subject to IEC 60601-1 (EN 60601-1)
and EMC directives, as well as the 93/42/EEC Medical
Device Directive. The appliance complies with the
relevant EU regulations and is classified as an LED
Class 2 product.
NRTL (Nationally Recognized
Testing Laboratory)
The apparatus has been shipped from the manufacturer
in a safe and technically sound condition. In order to
maintain this condition and to ensure risk-free operation,
the notes and regulations in these Instructions for Use
have to be observed. To prevent damage to equipment
and risks for patients, users, and third parties, the
following safety instructions have to be observed.
Materials, the polymerization of which is
activated outside the wavelength range of
385–515 nm (no materials known to date.)
If you are not sure about certain products,
please ask the manufacturer of the corresponding material.
Observe Instructions for Use
Caution
The curing light must not be disposed of in
the normal domestic waste. Information
regarding disposal of the light can be found
on the respective national Ivoclar Vivadent
homepage.
Recyclable
6
Do not charge or use the appliance near
flammable or combustible substances.
Portable and mobile high-frequency communi-
cation devices may interfere with medical
equipment. The use of mobile phones during
operation is not allowed.
Page 7
Usage and liability
– Bluephase must only be employed for the intended
use. Any other uses are contraindicated. Liability cannot be accepted for damage resulting from misuse or
failure to observe the Operating Instructions.
– The user is responsible for testing Bluephase for its use
and suitability for the intended purposes. This is particularly important if other equipment is used in the
immediate vicinity of Bluephase at the same time.
– Use only original spare parts and accessories from
Ivoclar Vivadent (see Accessories). The manufacturer
does not accept any liability for damage resulting from
the use of other spare parts or accessories.
– The light probe is an applied part and may warm up to
a maximum of 45 °C (113 °F) at the interface to the
handpiece during operation.
Operating voltage
Before switching on, make sure that
a) the voltage indicated on the rating plate complies with
the local power supply.
b) the unit has acquired the ambient temperature.
If the battery or power pack are used separately, e.g.
during start-up or Click & Cure corded operation, contact
with patients or third parties must be prevented. Do not
touch the exposed contacts of the battery or connection
plug (power pack).
Assumption of impaired safety
If it has to be assumed that safe operation is no longer
possible, the power must be disconnected and the battery removed to avoid accidental operation. This may be
the case, for example, if the apparatus is visibly damaged or no longer works correctly. A complete disconnection from the power supply is only ensured when the
power cord is disconnected from the power source.
Eye protection
Direct or indirect exposure of the eyes must be prevented. Prolonged exposure to the light is unpleasant for the
eyes and may result in injury. Therefore, using the supplied anti-glare cones is recommended. Individuals who
are generally sensitive to light, who take photosensitizing drugs, have undergone eye surgery, or people who
work with the apparatus or in its vicinity for long periods
of time should not be exposed to the light of this device
and wear protective goggles (orange) that absorb light
below 515 nm.
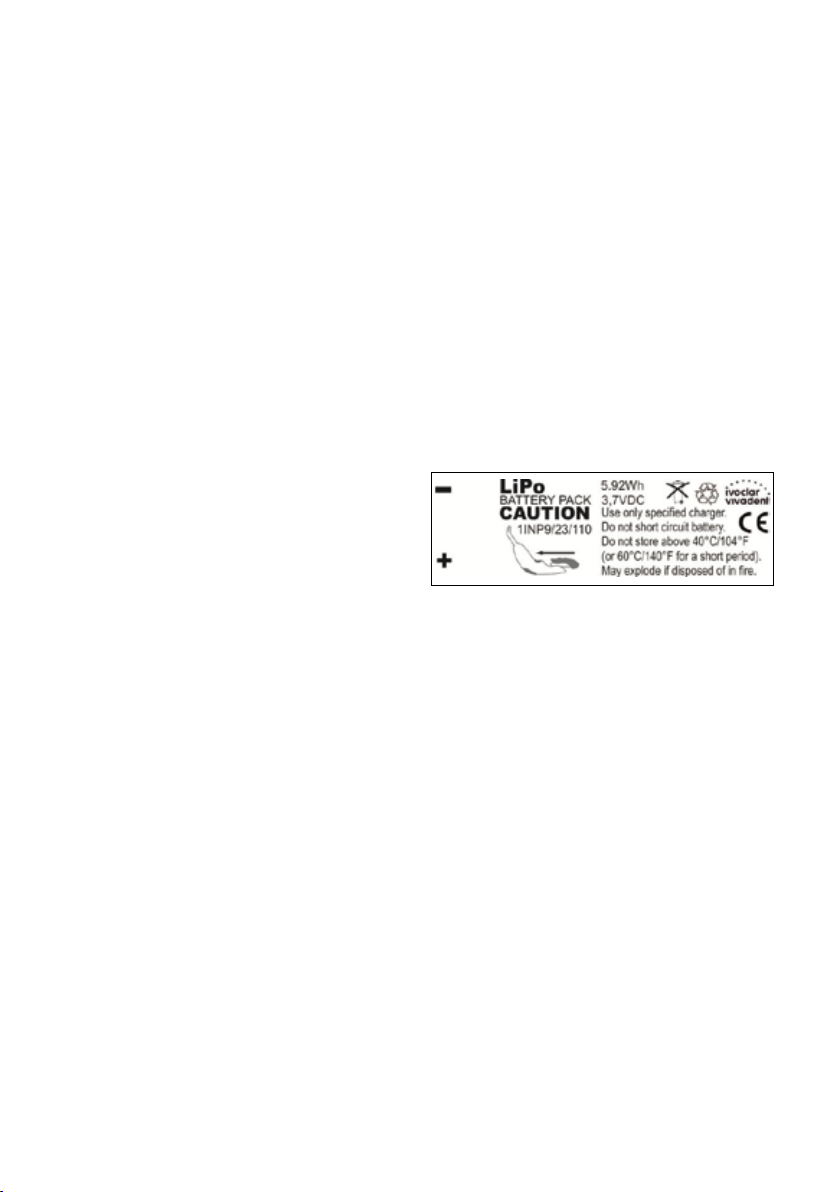
Battery
Caution: Use only original spare parts, particularly Ivoclar
Vivadent batteries and charging bases.
Do not short circuit battery. Do not store at temperatures
above 40 °C / 104 °F (or 60 °C / 140 °F for a short
period). Always store batteries charged. The storage
period must not exceed 6 months. May explode if
disposed of in fire.
Please note that the lithium polymer battery may react
with explosion, fire, and smoke development in case of
inappropriate handling and mechanical damage.
Damaged lithium polymer batteries must no longer be
used.
The electrolytes and electrolyte fumes released during
exlosion, fire, and smoke development are toxic and
corrosive. In case of contact with the eyes and skin,
immediately rinse with copious amounts of water. Avoid
the inhalation of the fumes. See a physician immediately
in case of indisposition.
Heat development
As it is the case with all high-performance lights, the
high light intensity results in a certain heat development.
Prolonged exposure of areas near the pulp and soft
tissues may result in irreversible or reversible damage.
Therefore, the recommended curing times have to be
observed. Uninterrupted curing times of more than
20 seconds on the same tooth surface, as well as direct
contact with the gingiva, oral mucous membrane, or
skin, have to be prevented. If required, polymerize
indirect restorations at intermitting intervals of
20 seconds each or use external cooling with an air
stream.
7
Page 8
Start-up
Check the delivery for completeness and any possible
transportation damage (see delivery form). If components
are missing or damaged, immediately contact your dealer
or your Service Center.
Charging base
Before you switch on the device, make sure that the voltage mentioned on the rating plate complies with your
local power supply. The rating plate is attached to the
underside of the charging base.
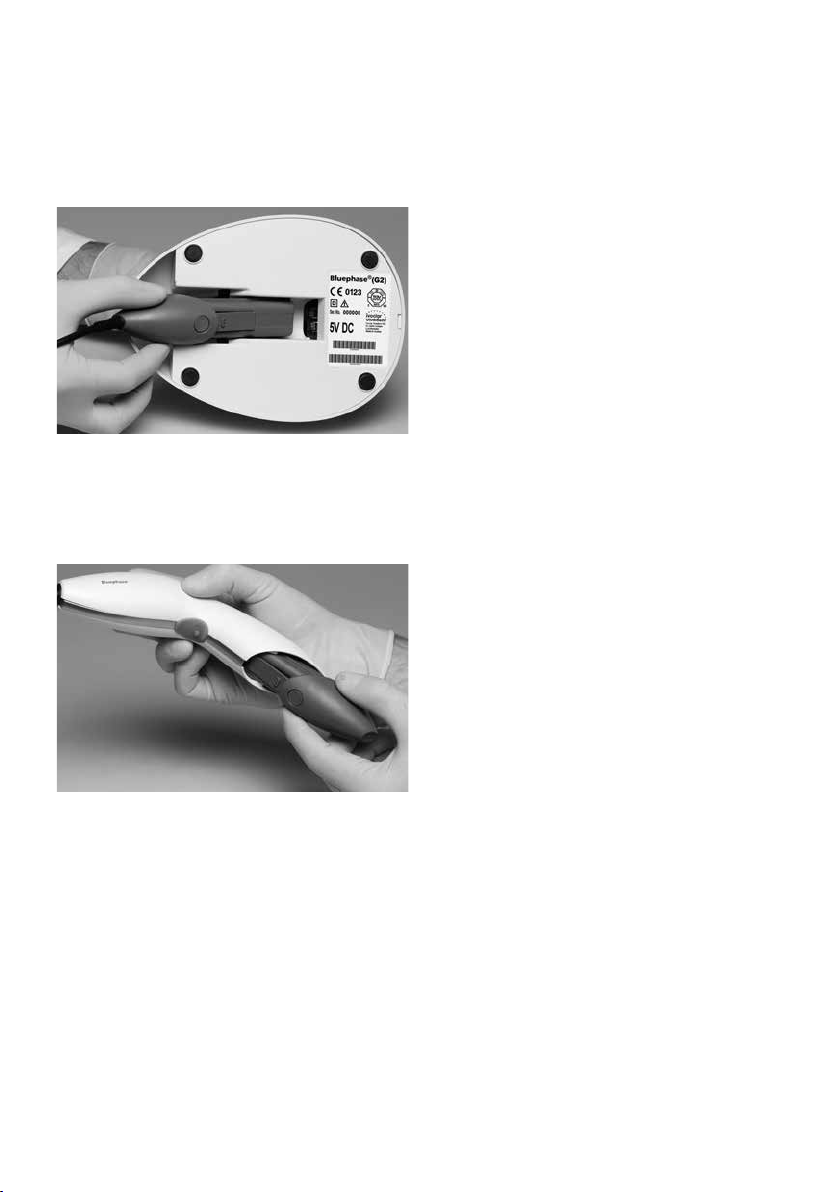
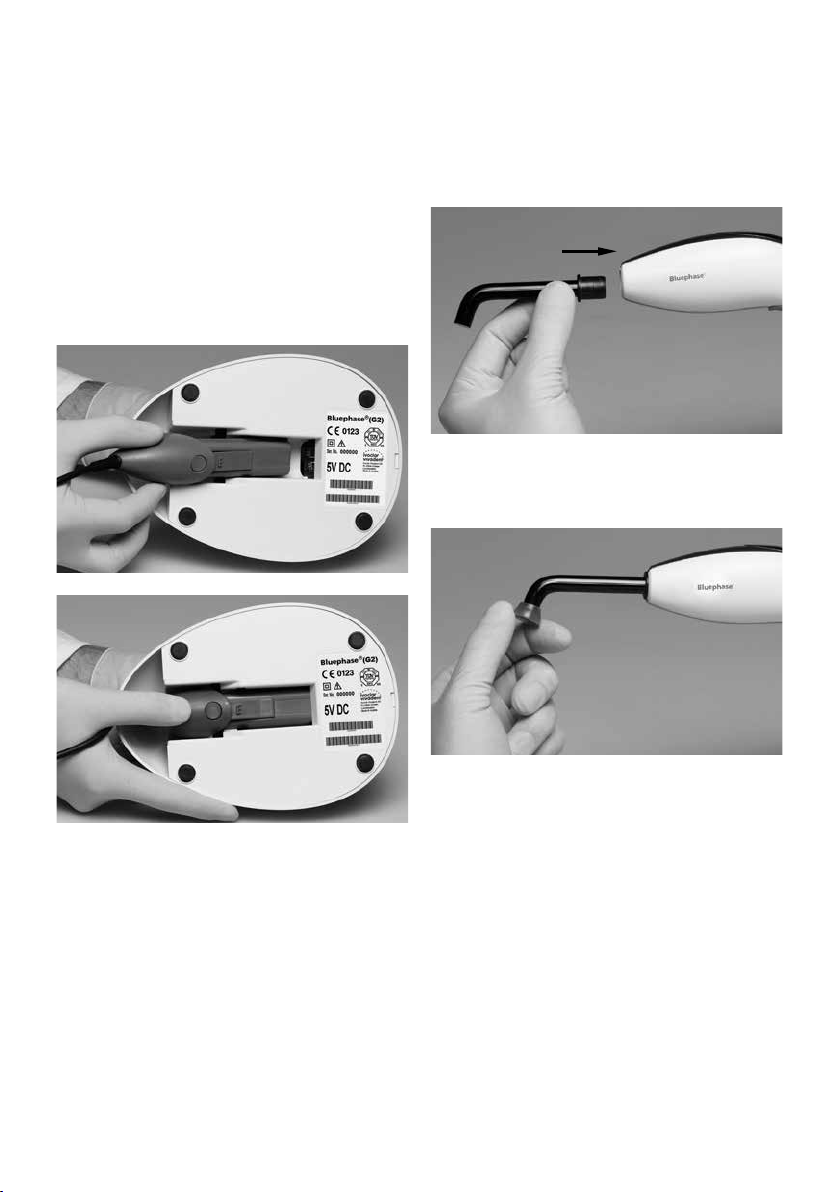
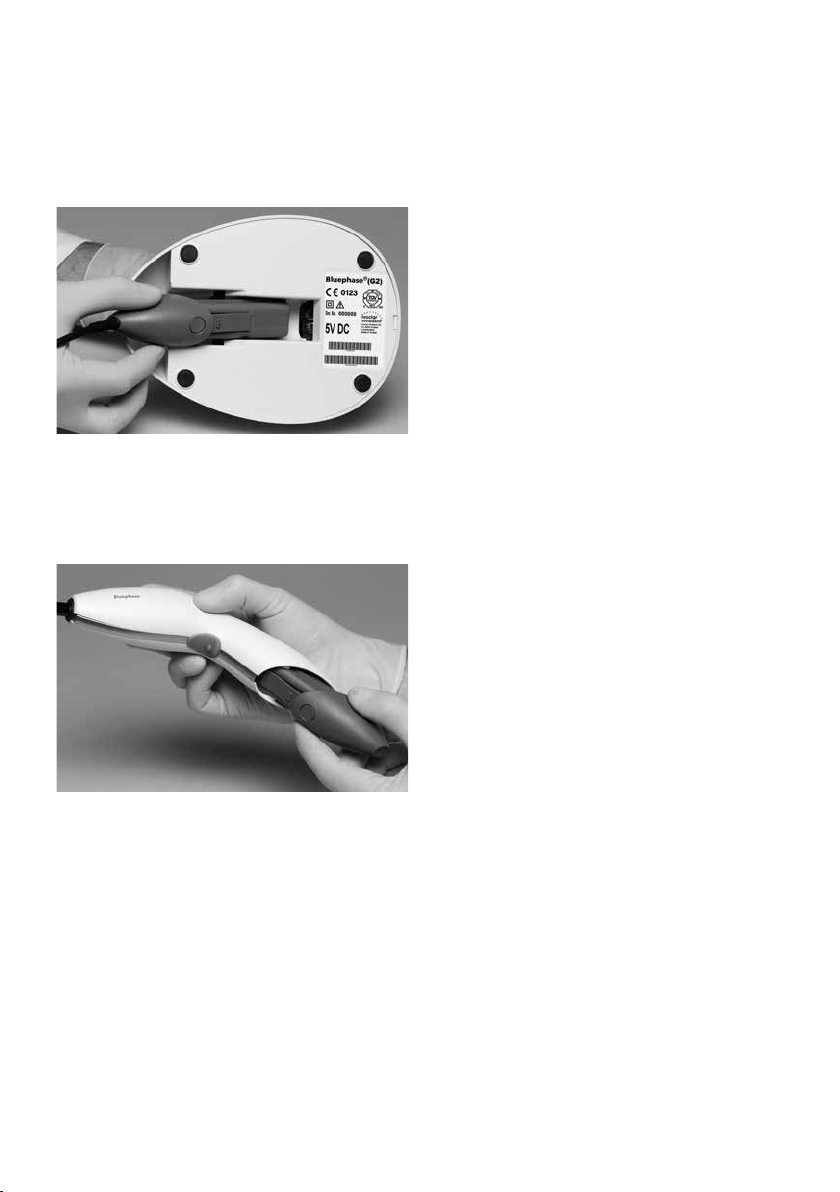
Handpiece
Before you insert the light probe, remove the protective
foil on the corresponding opening of the handpiece.
Slightly turn the light probe while attaching it to the
handpiece.
Place the charging base on a suitable, flat table top.
Remove the protective foil from the connection plug of
the power pack. Slide the connection plug of the power
pack into the socket on the underside of the charging
base. Tilt it slightly and apply slight pressure until you
hear and feel it snap into place.
Connect the power cord with the power supply and the
power pack. The Power ON indicator on the left side of
the housing lights up in blue (see Indicators on the
charging base).
8
After that, mount anti-glare protection on the light
probe.
Page 9

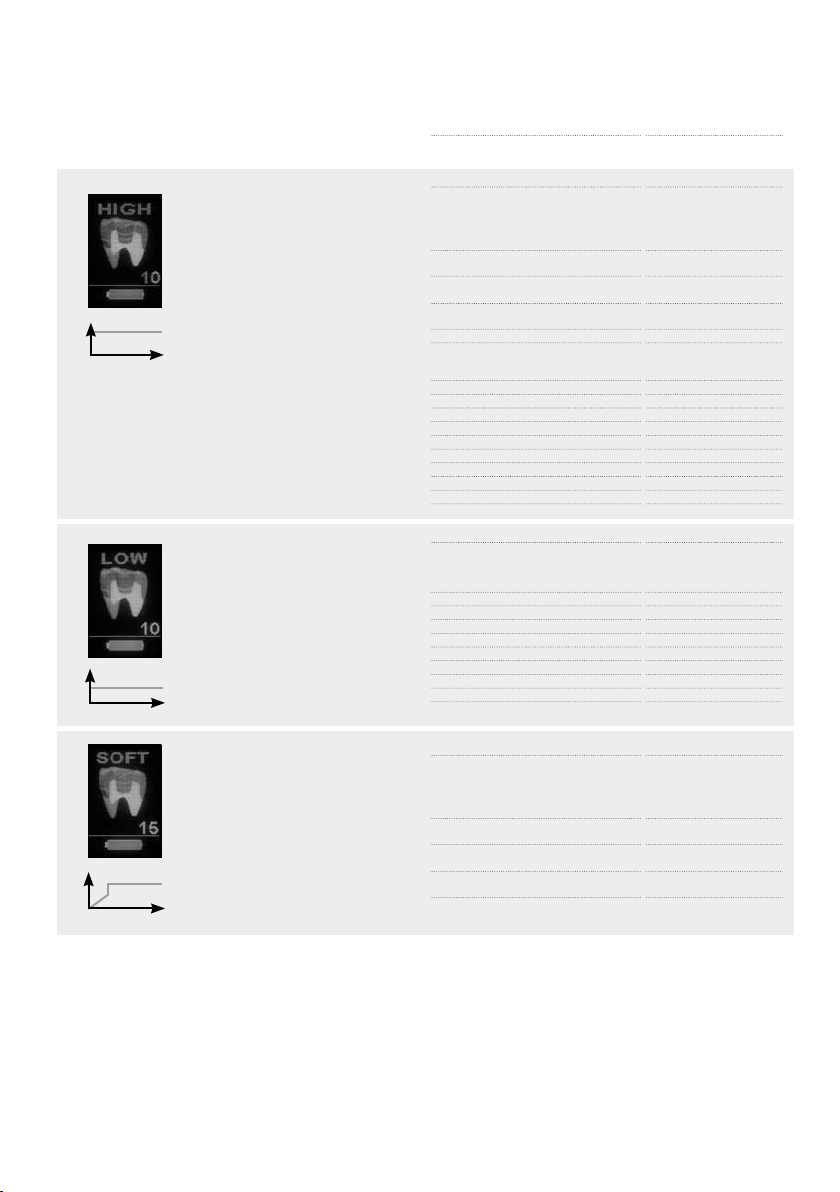
Battery
We recommend fully charging the battery before the first
use.
If the battery is fully charged, it features a curing
capacity of approximately 60 minutes.
Slide the battery straight into the handpiece until you
hear and feel it click into place.
Charging status of the battery
With the handpiece switched on, the current charging
status is shown on the display as follows:
Battery fully charged (curing capacity of
approximately 60 minutes)
Battery half full
Reserve (The last bar in the battery indica-
tor is red in the reserve mode. The battery
has to be charged as soon as possible.)
When the battery is being charged, „Char-
ging Battery“ briefly appears in the display
before the display returns to the stand-by
mode.
Gently place the handpiece in the corresponding rest in
the charging base. If a sleeve is used, please remove it
before you charge the battery.
If possible, use the light always with a fully charged
battery. This will prolong the service life. It is therefore
recommended to place the handpiece into the charging
base after each patient. The charging time for empty
batteries is 2 hours.
If the battery is completely empty, the
handpiece automatically switches to the
stand-by mode. The light can no longer
be called up and the curing program and
curing time can no longer be set. However,
the handpiece can be used in the Click &
Cure corded operation.
Since the battery is a consumable, it has to be replaced
after its typical life cycle has expired after 2½ years.
See battery label for the age of the battery.
9
Page 10
Operation
Click & Cure corded operation
Bluephase can be used in corded operation at any time,
but particularly when the battery is completely empty.
For this purpose, remove the battery from the handpiece.
Then remove the power pack from the underside of the
charging base. Do not pull on the power cord.
Insert the connection plug straight into the handpiece
until you hear and feel it click into place.
During corded operation, the charging base cannot
charge the battery.
The apparatus is only completely disconnected from the
power supply if the power cord has been pulled out of
the plug-in socket.
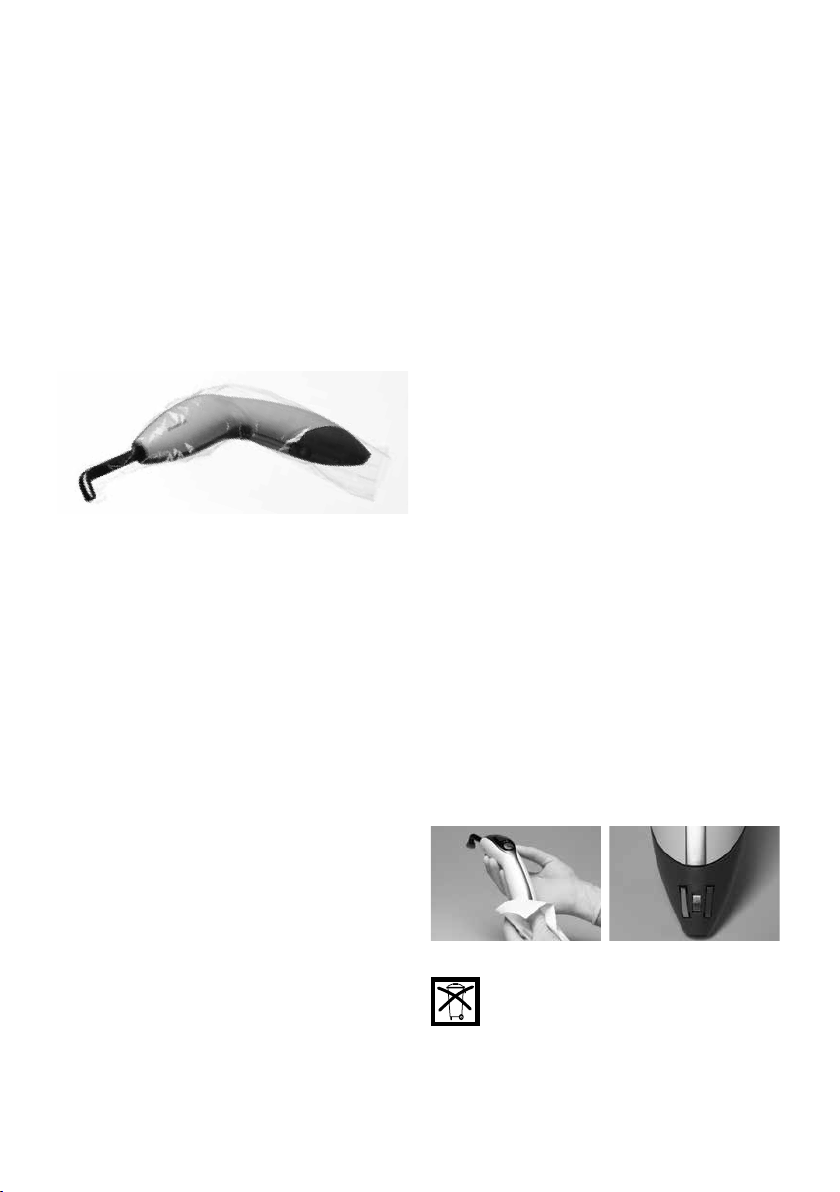
Disinfect or autoclave contaminated surfaces of the
curing light, as well as light probes, and anti-glare cones
before each use. Furthermore, make sure that the stipulated light intensity permits adequate polymerization. For
that purpose, check the light probe for contamination
and damage, as well as the light intensity at regular
intervals (e.g. with the Ivoclar Vivadent radiometer
“Bluephase Meter”).
Selecting the curing program and time
The curing program and the curing time can be
individually set. Bluephase is equipped with the following
3 curing programs for the different indications. The
desired curing program is selected with the program
selection buttons. The display changes accordingly (see
Indicators on the handpiece).
Upon the first start-up, the following settings have been
preset:
– HIGH (High Power): 10 seconds
– LOW (Low Power): 10 seconds
– SOFT (Soft start): 15 seconds
The intended curing time is selected using the time
selection buttons. Users may choose between 5, 10, 15,
20 and 30 seconds.
Observe the Instructions for Use of the material applied
when selecting the curing time.
The curing recommendations for composite materials
apply to all shades and, if not mentioned otherwise in
the Instructions for Use of the relevant material, to a
maximum layer thickness of 2 mm. Generally, these recommendations apply to situations where the emission
window of the light probe is placed directly over the
material to be polymerized. Increasing the distance
between the light source and the material will require
the curing time to be extended accordingly. For instance,
if the distance to the material is 9 mm, the effective light
output is reduced by approx. 50%. In this case, the
recommended curing time has to be doubled.
10
Page 11
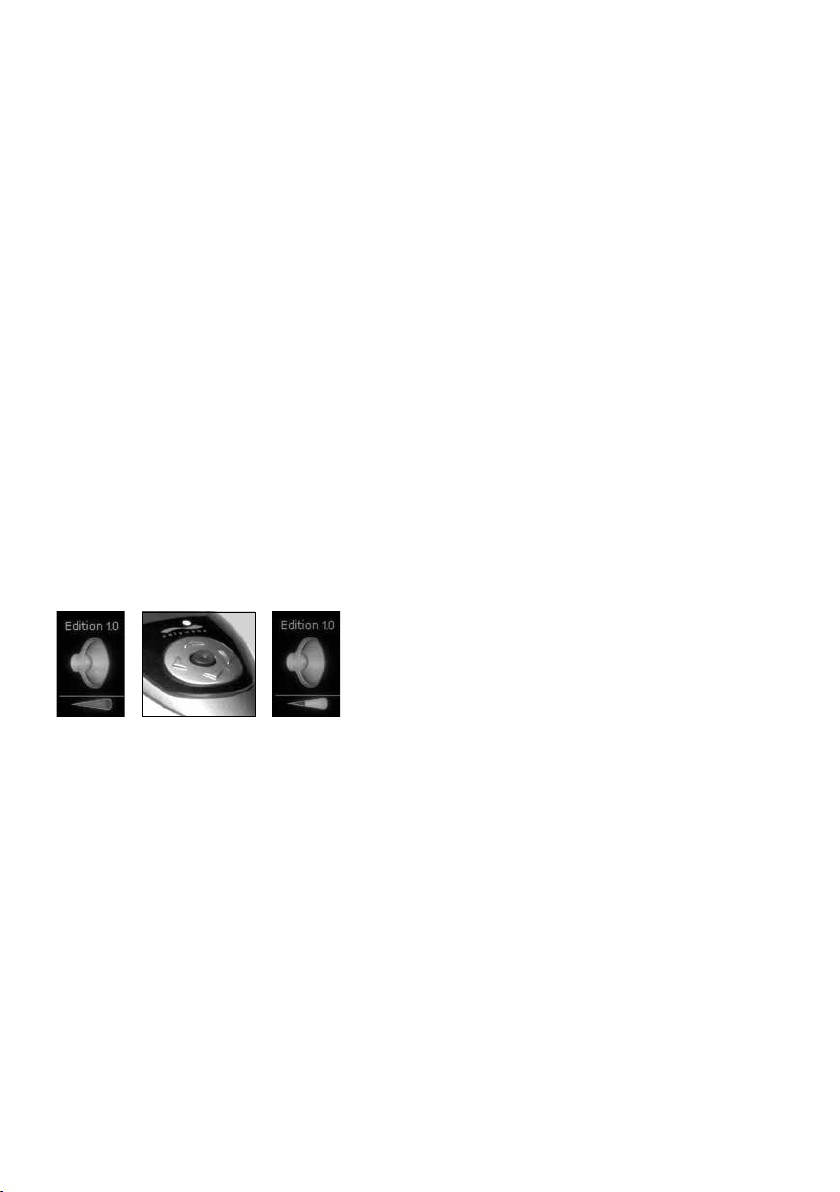
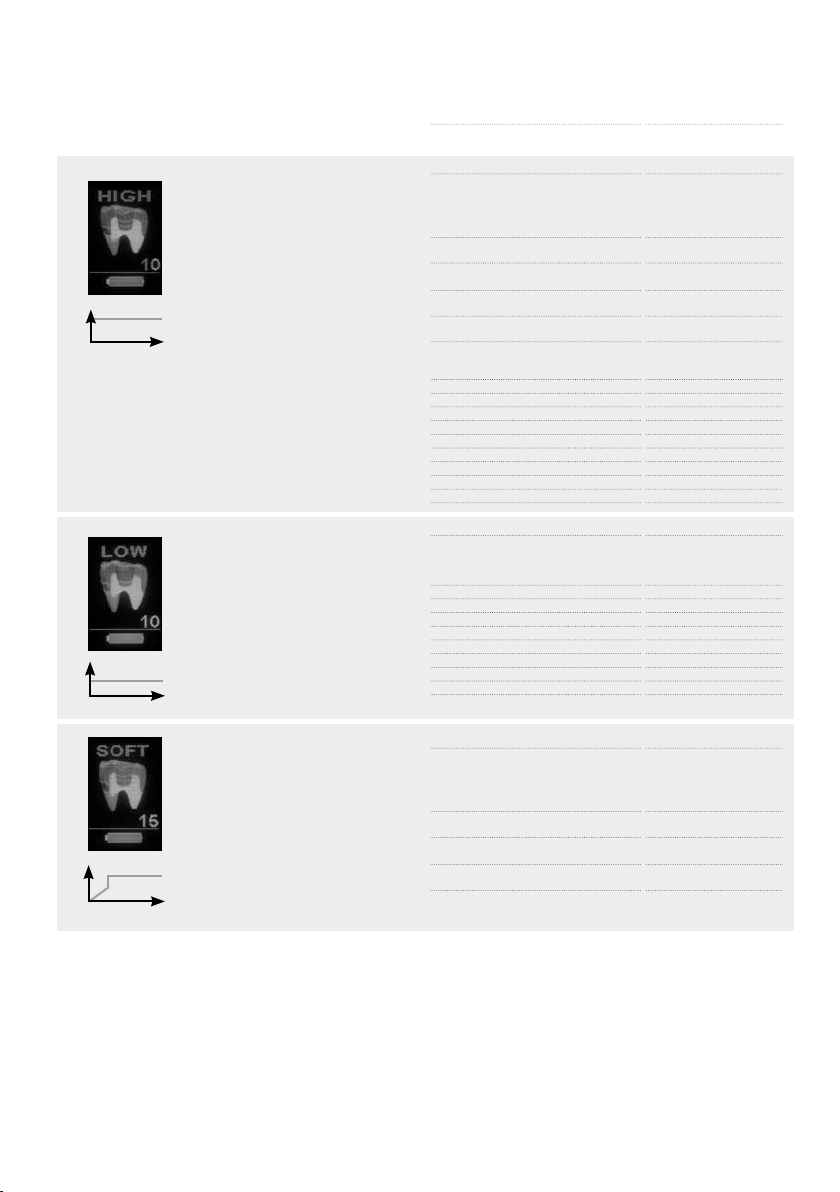
Curing programs
1.200 mW/cm2
0
t [s]
HIGH POWER Program
Consistently high light intensity for
the polymerization of restorative and
cementation materials for direct and
indirect restorations.
Light intensity
Exposure time for composites
Exposure time for Tetric EvoCeram / IPS Empress Direct
Filling materials
Composite
1)
• 2 mm
IPS Empress Direct / IPS Empress Direct Flow /
Tetric EvoCeram / Tetric EvoFlow / Tetric /
Tetric Basic White / Tetric N-Ceram / Tetric N-Flow
Heliomolar / Heliomolar HB / Heliomolar Flow
All conventional composites
2)
• 4 mm
Tetric EvoCeram Bulk Fill / Tetric Basic White
Compomer 3)
Compoglass F / Compoglass Flow
Indirect restorations / Luting materials
Variolink II Base 4) / Variolink Veneer / Variolink N Base
/ Variolink N Clear Veneer / Variolink Ultra 5) /
Dual Cement 5) / Variolink II
Miscellaneous
Helioseal / Helioseal F / Helioseal Clear
Monopaque
MultiCore Flow / Multicore HB
Heliosit Orthodontic
Telio Add-On Flow
Telio Stains
IPS Empress Direct Color
IPS Empress Direct Opaque
5)
1,200 mW/cm
15 s
10 s
Curing time
10 s
15 s
10 s
20 s
4)
per mm ceramic:
10 s per segment
10 s
20 s
20 s
10 s
15 s
10 s
10 s
20 s
2
Adhesive
LOW POWER Program
Reduced light intensity with reduced
heat development for the polymerization of adhesives, liners, and restorative materials in areas near the pulp
when restoring Class V cavities.
650 mW/cm2
0
t [s]
SOFT START Program
Step-by-step increase of the light
intensity with reduced shrinkage
stress and reduced heat development
for the polymerization of restorative
materials.
1.200 mW/cm2
650 mW/cm2
0 5
1) Applies to a maximum layer thickness of 2 mm and provided that the Instructions for Use of the respective material do not state any other recommendation (might be the case, e.g. with dentin shades)
2) Applies to a maximum layer thickness of 4 mm and provided that the Instructions for Use of the respective material do not state any other recommendation (might be the case, e.g. with dentin shades)
3) Applies to a maximum layer thickness of 3 mm 4) Applies to light-curing (use of the base past only) 5) Applies to dual-curing
t [s]
AdheSE / AdheSE One F
ExciTE / ExciTE DSC
Tetric N-Bond / Tetric N-Bond Self-Etch
Heliobond (Syntac)
Temporary materials
Telio CS Inlay/Onlay
Systemp.inlay/onlay
Fermit / Fermit N
Telio CS Link / Systemp.link
Miscellaneous
Heliosit Orthodontic
Vivaglass Liner
Filling materials
Composite
1)
• 2 mm
IPS Empress Direct / IPS Empress Direct Flow /
Tetric EvoCeram / Tetric EvoFlow / Tetric /
Tetric Basic White / Tetric N-Ceram / Tetric N-Flow
Heliomolar / Heliomolar HB / Heliomolar Flow
All conventional composites
2)
• 4 mm
Tetric EvoCeram Bulk Fill / Tetric Basic White
Compomer 3)
Compoglass F / Compoglass Flow
Curing time
10 s
10 s
10 s
10 s
20 s per segment
20 s
20 s
Curing time
15 s
20 s
15 s
20 s
11
Page 12
Cure Memory function
The last settings used, together with the combination of
curing program and curing time, are automatically saved.
Start
The light is switched on by means of the start button.
Once the selected curing time has elapsed, the curing
program is automatically terminated. If desired, the light
can be switched off before the set curing time has
elapsed by pressing the start button again. The fan is
activated simultaneously to the light. Once the curing
time has elapsed, the fan continues to run for a certain
time to cool the apparatus. The battery must not be
removed as long as the fan is still running.
Acoustic signals
Acoustic signals can be heard for the following functions:
– Start (Stop)
– Every 10 seconds
– Program change
– Curing time change
– Connecting the battery to the charging base
– Inserting battery
– Error message
If desired, the volume of the acoustic signals can be
adjusted. For that purpose, press the blue volume button
while the light is off and reduce the volume or turn the
acoustic signals off with the left program selection button. If you want to turn the acoustic signals back on or
increase the volume, press the blue volume button and
then the right program selection button.
Light intensity
The light intensity is maintained at a consistent level
during operation. If the supplied 10 mm light probe is
used, the light intensity has been calibrated to
1200 mW/cm2 ± 10%.
The use of a light probe other than the one provided has
a direct influence on the light intensity emitted.
In parallel-walled light probes (10 mm), the diameter is
equal at both ends. In focussing light probes (10>8 mm
light probe, Pin-Point light probe 6>2 mm), the diameter
of the rear end is larger than that of the light emission
window. The incident blue light is thus bundled to a
smaller surface, which increases the light intensity emitted.
Pin-Point light probes are suitable for the polymerization
of confined areas, such as the attachment of veneers prior
to excess removal. For thorough curing, it is necessary to
change the light probe.
Measuring the light intensity
The light intensity of the Bluephase and the enclosed
10 mm light probe can be checked by means of the
Bluephase Meter.
If the measured value does not correspond with the
expected light intensity, proceed as follows:
– Check the selected curing program.
– Clean possibly dirty light sensor (radiometer).
– Remove the light probe and clean the light emission
window of the handpiece with a cotton swab dipped
in alcohol.
– Clean possibly dirty light probe
(see Maintenance and cleaning).
– Replace a damaged light probe with a new one.
If these measures do not improve the results, please
contact your dealer or your local Service Center.
12
Page 13

Maintenance and cleaning
For reasons of hygiene, we recommend using a disposable
protective sleeve for each pa-tient. Make sure to fit the
protective sleeve closely to the light probe. Disinfect
contaminated surfaces of the device and anti-glare cones
(FD 366/Dürr Dental, Incidin Liquid/Ecolab) and sterilize
the light probe before each use if disposable protective
sleeves are not used. Make sure that no liquids or other
foreign substances enter the handpiece, charging base
and particularly the power pack during cleaning (risk of
electrical shock). Disconnect the charging base from the
power source when cleaning it.
Housing
Wipe the handpiece and handpiece holder with a
customary aldehyde-free disinfecting solution. Do not
clean with highly aggressive disinfecting solutions (e.g.
solutions based on orange oil or with an ethanol content
of more than 40%), solvents (e.g. acetone), or pointed
instruments, which may damage or scratch the plastic.
Clean dirty plastic parts with a soapy solution.
Light probe
Before cleaning and/or disinfecting the light probe,
pretreat it. This applies to both automated and manual
cleaning and disinfection.
Pretreatment
– Remove gross contamination immediately after use or
within 2 hours. For this purpose, thoroughly rinse the
light probe under running water (for at least
10 seconds). Alternatively, use a suitable aldehyde-free
disinfecting solution to prevent the fixation of blood.
– To remove contamination manually, use a soft brush
or soft cloth. Partially polymerized composite can be
removed with alcohol and a plastic spatula, if necessary.
Do not use sharp or pointed objects, as they may
scratch the surface.
Cleaning and disinfection
For cleaning, immerse the light probe in a cleaning solution and ensure that it is sufficiently covered with liquid
(ultrasound or careful brushing with a soft brush may
support the effect). A neutral-enzymatic cleaning agent is
recommended. When cleaning and disinfecting, please
make sure that the agents used are free of:
– organic, mineral and oxidizing acids (the minimum
admissible pH value is 5.5)
– alkaline solution (the maximum admissible pH value
is 8.5)
– oxidizing agent (e.g. hydrogen peroxide)
Afterwards, remove the light probe from the solution and
thoroughly rinse it under running water (for at least
10 seconds). Cleaning in a thermal disinfector is an
effective alternative.
Sterilization
Thorough cleaning and disinfecting is imperative to
ensure that the subsequent sterilization is effective. Use
only autoclave sterilization for this purpose. The sterilization time (exposure time at sterilization temperature) is
4 minutes at 134 °C (273 °F); pressure should be 2 bar
(29 psi). Dry the sterilized light probe using either the
special drying program of your steam autoclave or hot
air. The light probe has been tested for up to 200 sterilization cycles.
After that, check the light probe for damage. Hold it
against light. If individual segments appear black, glass
fibres are broken. If this is the case, replace the light
probe with a new one.
Battery contacts
To ensure reliable conductivity at all times, keep the
battery contacts free from possible contamination (e.g.
composite residue). For this purpose, clean the affected
contacts regularly in the course of the usual wipe
disinfection (after each patient).
Disposal
The curing light must not be disposed of as
urban waste. Dispose unserviceable batteries
and polymerization lights according to the
corresponding legal requirements in your
country. Batteries must not be incinerated.
13
Page 14
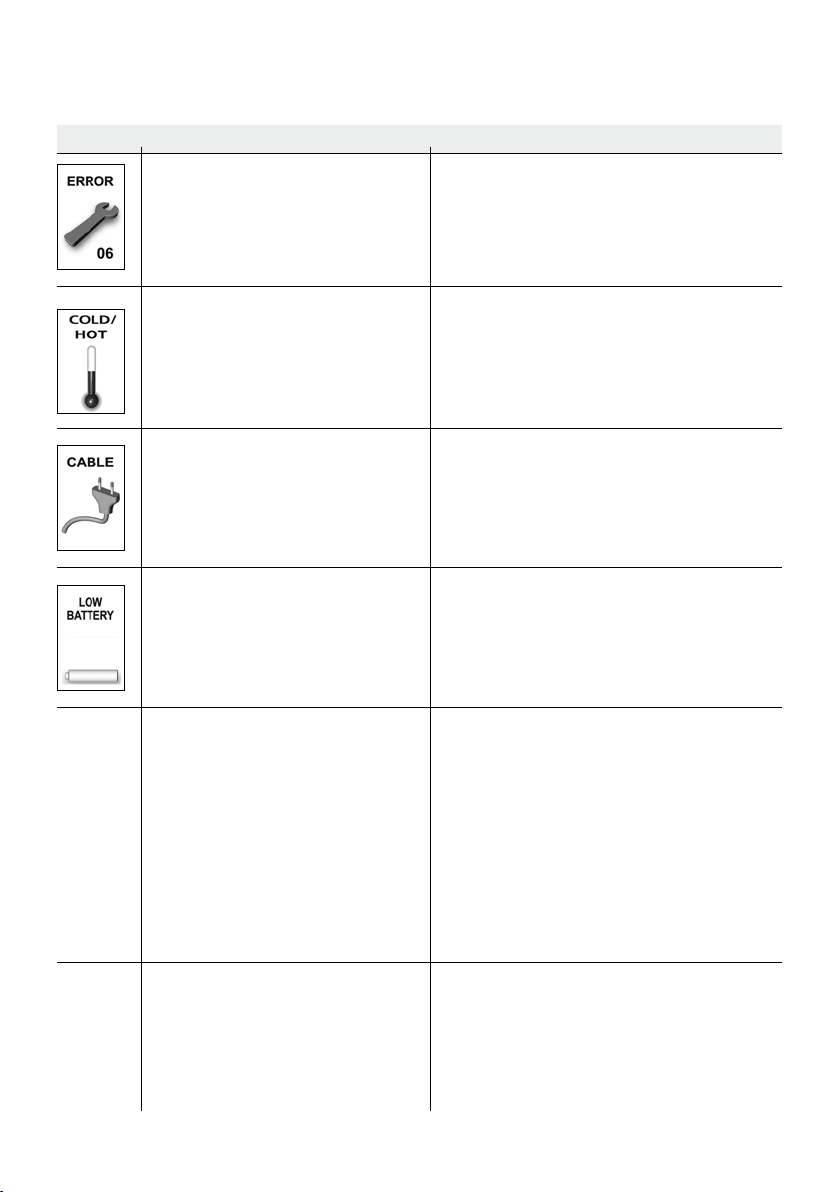
What if....?
Symbol Causes Error Rectification
Electronic defect in the handpiece
or battery
Remove and reinsert the battery. If the error remains,
replace the battery with the power pack (Click & Cure).
If the error remains, please contact your dealer or your
local Service Center.
No display
during
charging
Apparatus is overheated or undercooled
Electronic defect in the battery
Battery empty
Charging contacts contaminated
Battery in safety mode
(integrated protective circuit)
Allow the apparatus to cool down (or assume room
temperature if it is undercooled) and try again after a
certain time. If the error remains, please contact your
dealer or your local Service Center.
Remove and reinsert the battery. If the error remains,
place the apparatus into the charging base.
If the error remains nonetheless, replace the battery
with the power pack (Click & Cure).
Please contact your dealer or your local Service Center.
Position the handpiece in the charging base. „Charging Battery“ briefly appears in the display before the
display returns to the stand-by mode. If the battery is
not charged, the contacts have to be cleaned. If the
error remains, please contact your dealer or your local
Service Center.
Check if the handpiece has been correctly placed into
the charging base. Clean battery contacts. Information:
“Charging Battery“ briefly appears in the display
before the display returns to the stand-by mode.
If cleaning the battery contacts does not improve the
results, remove the battery from the apparatus. Charge
the battery separately from the handpiece in the
charging base for approx. 10 minutes.
If the error remains, please contact your dealer or your
local Service Center.
LED of the
charging
base is not
illuminated
14
Power pack not connected or defective
Check if the power pack is correctly positioned in the
charging base (also check the charging contacts) or if
the power pack is connected to the power supply by
means of the power cord (display on the power pack
lights up in green if it works correctly).
If the error remains, please contact your dealer or your
local Service Center.
Page 15

Warranty /
Procedure in case of repair
The warranty period for Bluephase is 3 years from the
date of purchase (battery 1 year).
Malfunctions resulting from faulty material or
manufacturing errors are repaired free of charge during
the warranty period. The warranty does not provide the
right to recover any material or non-material damage
other than the ones mentioned. The apparatus must only
be used for the intended purposes. Any other uses are
contraindicated. The manufacturer does not accept any
liability resulting from misuse and warranty claims cannot be accepted in such cases. This is particularly valid
for:
– damage resulting from improper handling, especially
incorrectly stored batteries (see Technical data:
Transportation and storage conditions).
– damage to components resulting from wear under
standard operating conditions (e.g. battery).
– damage resulting from external influences, e.g. blows,
drop to the floor.
– damage resulting from incorrect set-up or installation.
– damage resulting from connecting the unit to a power
supply, the voltage and frequency of which do not
comply with the ones stated on the rating plate.
– damage resulting from improper repairs or modifica-
tions that have not been carried out by certified
Service Centers.
In case of a claim under warranty, the complete
apparatus (handpiece, charging base, power cord, and
power pack) must be returned, carriage paid, to the
dealer or directly to Ivoclar Vivadent, together with the
purchase document. Use the original packaging with the
corresponding cardboard inserts for transportation.
Repair work may only be carried out by a certified
Ivoclar Vivadent Service Center. In case of a defect that
cannot be rectified, please contact your dealer or your
local Service Center (see addresses on the reverse side).
A clear description of the defect or the conditions under
which the defect occurred will facilitate locating the
problem. Please enclose this description when returning
the apparatus.
Product specifications
Delivery form
1 Charging base, 1 Power cord, 1 Power pack, 1 Handpiece, 1 Battery
(Li-Po), 1 10 mm light probe, 3 Anti-glare cones, Sleeves, 1 Set of
Instructions for Use
Accessories
The following accessories are available for Bluephase:
REF Description
608537 Light probe 10 mm, black (G2)
608538 Pin-point light probe 6>2 mm, black
551756 Anti-glare cones
592496 Anti-glare shield
608534 Bluephase charging base (G2)
608535 Bluephase battery (G2)
608532 Bluephase handpiece (G2)
607922 Bluephase Meter
608554 Bluephase sleeves (G2)
Technical data
Operating voltage charging base 5 VDC
Operating voltage handpiece 3.7 VDC with battery
Power pack 100–240 VAC / 50-60 Hz /
Output 5 VDC
TYPE 15.2630
Operating conditions
Temperature +10 °C to +35 °C (+50 to +95 °F)
Relative humidity 30% to 75%
Ambient pressure 700 hPa to 1060 hPa
Dimensions of the charging base L=205mm W=150mm H=85mm
Weight of the charging base 250 g
Charging time approx. 2 h (with the battery empty)
Power supply of the handpiece Li-Po battery
Max. battery time approx. 60 min. (with a new, fully
Light source Polywave
Wavelength range 385 – 515 nm
Light intensity max. 1,200 mW/cm
Operating 5 min. on / 6 min. off
(intermittently)
Dimensions of the handpiece: L=260mm W=42mm H=120 mm
Weight of the handpiece (incl. battery) 225 g
Transportation and storage conditions:
Temperature -20 °C to +60 °C (-4 to 140 °F)
Relative humidity 10% to 75%
Ambient pressure 500 hPa to 1060 hPa
Bluephase has to be stored in closed, roofed rooms.
Protect the device from severe jarring.
Battery
– Do not store at temperatures above 40 °C / 104 °F
(or 60 °C / 140 °F for a short period).
Recommended storage temperature 15 – 30 °C (59 – 86 °F).
– Always store the battery charged
– and not for longer than 6 months.
5 VDC with power pack
max. 0.4 A
Manufacturer: Friwo
charged battery)
®
LED
2
± 10 %
15
Page 16

Liebe Kundin, lieber Kunde,
eine optimale Aushärtung ist die Basis für eine
dauerhaft hohe Versorgungsqualität aller lichthär-
tenden Materialien. Hierzu trägt auch entschei-
dend das gewählte Polymerisationsgerät bei.
Deshalb freut es uns, dass Sie sich für die
Bluephase entschieden haben. Hierbei handelt es
sich um ein hochwertiges Medizinprodukt, welches
auf der Basis der gültigen Normen nach dem
heutigen Stand von Wissenschaft und Technik
gefertigt wird.
Die Gebrauchsinformation erklärt Ihnen, wie Sie
das Gerät sicher in Betrieb nehmen, seinen vollen
Leistungsumfang auf einfache Weise nutzen und
für eine lange Verwendung pflegen können.
Bei Fragen stehen wir Ihnen gerne zur Verfügung
(Adressen siehe hintere Umschlagseite).
Ihr Ivoclar Vivadent Team
16
Page 17

Inhaltsverzeichnis
Produktübersicht 18
– Teileverzeichnis 18
– Anzeigen der Ladestation 19
– Anzeigen des Handstücks 19
Sicherheit 20
– Bestimmungsgemässer Gebrauch 20
– Indikation 20
– Zeichenerklärung 20
– Sicherheitshinweise 20
Inbetriebnahme 22
– Ladestation 22
– Handstück 23
– Akku 24
– Kabelbetrieb Click & Cure
Bedienung 24
– Wahl des Belichtungsprogrammes und der Belichtungszeit 24
– Speicherfunktion Cure Memory 26
– Start 26
– Akustische Signale 26
– Lichtintensität 26
– Messen der Lichtintensität 26
Wartung und Reinigung 27
– Gehäuse 27
– Lichtleiter 27
– Akkukontakte 27
– Entsorgung 27
Was ist, wenn …? 28
Garantie / Vorgehen bei einem Reparaturfall 29
Produktspezifikation 29
– Lieferumfang 29
– Zubehör 29
– Technische Daten 29
– Betriebsbedingungen 29
– Transport- und Lagerbedingungen 29
Page 18
Teileverzeichnis
10
311213 2
5 6 4
11
9 7 8
1 Handstück
2 Starttaster
3 Display
4 Programmwahltaster
5 Zeitwahltaster
6 Lautstärketaster
7 Power-Anzeige
8 Ladestation
9 Netzkabel
10 Netzgerät
11 Akku
12 Lichtleiter 10 mm
13 Blendschutzkegel
18
Page 19
Anzeigen der Ladestation
Anzeige leuchtet blau -
Ladestation ist an die Stromversorgung angeschlossen
Anzeigen des Handstücks
Belichtungsprogramm bzw. Betriebszustand
Angewählte Indikation bzw. Belichtungsdauer
Ladezustand Akku
19
Page 20

Sicherheit
Bestimmungsgemässer Gebrauch
Die Bluephase ist ein LED-Polymerisationsgerät zur Erzeugung von energiereichem Blaulicht und dient der Polymerisation von lichthärtenden Dentalwerkstoffen
unmittelbar an der zahnärztlichen Behandlungseinheit.
Zum bestimmungsgemässen Gebrauch gehört auch die
Beachtung der Hinweise der vorliegenden Gebrauchsinformation.
Indikation
Die Bluephase eignet sich mit seinem Breitbandspektrum
„polywave“ für die Polymerisation aller lichthärtenden
Dentalwerkstoffen im Wellenlängenbereich von
385–515 nm. Hierzu zählen Füllungsmaterialien,
Bondings/ Adhäsive, Unterfüllungen, Liner, Fissurenversiegler, Provisorien sowie Befestigungsmaterialien für
Brackets und zahntechnische Werkstücke wie z.B.
keramische Inlays.
Zeichenerklärung
Nicht zulässige Anwendung
Symbole am Gerät
Doppelt isoliert
(Gerät der Schutzklasse II)
Schutz gegen elektrischen Schlag
(Gerätetyp BF)
Gebrauchsinformation beachten
Gebrauchsinformation beachten
Vorsicht
Sicherheitshinweise
Die Bluephase ist ein elektrisches Gerät und ein Medizinprodukt, welches der IEC 60601-1 (EN 60601-1) und der
EMV Richtlinie, sowie der Medizinprodukterichtlinie
93/42/EWG unterliegt. Das Gerät erfüllt die geltenden
EU-Richtlinien und ist in der LED-Klasse 2 klassifiziert.
NRTL (Nationally Recognized
Testing Laboratory)
Das Gerät hat das Werk in sicherem und technisch einwandfreiem Zustand verlassen. Um diesen Zustand zu
erhalten und einen sicheren Betrieb zu ermöglichen, sind
die Hinweise dieser Gebrauchsinformation zu beachten.
Zur Vermeidung von Schäden sowie Gefahren für Patienten, Anwender und Dritte gehören hierzu insbesondere
folgende Sicherheitshinweise:
Bei Materialien deren Polymerisation
ausserhalb des Wellenlängenbereichs von
385–515 nm aktiviert wird (derzeit sind
hier jedoch keine Materialien bekannt.) Bei
fraglichen Produkten wird empfohlen, sich
diesbezüglich beim Materialhersteller zu
erkundigen.
Das Gerät nicht in der Nähe leicht entflamm-
barer oder leicht entzündlicher Stoffe aufladen
oder verwenden.
Das Gerät darf nicht über den normalen
Hausmüll entsorgt werden. Informationen
zur Entsorgung es Gerätes finden Sie auf der
je weiligen nationalen Ivoclar Vivadent
Homepage.
Recycelbar
20
Tragbare und mobile Hochfrequenz-Kom-
munikationseinrichtungen können medizinische Geräte beeinflussen. So ist eine
gleichzeitige Verwendung von Mobiltelefonen
während des Betriebs nicht zulässig.
Page 21
Verwendungs- und Haftungsumfang
– Die Bluephase ist ausschliesslich nach dem bestim-
mungsgemässen Gebrauch zu verwenden. Eine andere
oder darüber hinausgehende Benutzung gilt als nicht
bestimmungsgemäss. Für Schäden, die sich aus einer
nicht bestimmungsgemässen Verwendung oder nicht
sachgemässen Handhabung ergeben, übernimmt der
Hersteller keine Haftung.
– Der Benutzer ist verpflichtet, die Bluephase eigenver-
antwortlich vor Gebrauch auf Eignung und Einsetz-barkeit für die vorgesehenen Zwecke zu prüfen.
Dies gilt insbesondere, wenn in unmittelbarer Nähe
und gleichzeitig andere Geräte betrieben werden.
– Es dürfen nur Originalersatzteile und -zubehör von Ivo-
clar Vivadent eingesetzt werden (siehe Zubehör). Bei
Schäden, die auf Verwendung anderer Ersatzteile
sowie Zubehör zurückzuführen sind, übernimmt der
Hersteller keine Haftung.
– Der Lichtleiter ist ein Anwendungsteil und kann sich im
Betrieb an der Schnittstelle zum Handstück auf max.
45°C erwärmen.
Betriebsspannung
Vor dem Einschalten ist sicherzustellen, dass
a) die angegebene Spannung des Typenschildes mit der
des Versorgungsnetzes übereinstimmt und
b) das Gerät die Umgebungstemperatur angenommen
hat.
Bei separater Handhabung von Akku oder Netzteil – z.B.
bei Inbetriebnahme oder Kabelbetrieb Click & Cure – ist
ein Kontakt mit Patienten oder Dritten zu vermeiden. Die
freiliegenden elektrischen Kontakte von Akku und
Verbindungsstecker (Netzgerät) sind nicht zu berühren.
Annahme beeinträchtigter Sicherheit
Wenn anzunehmen ist, dass ein gefahrloser Betrieb nicht
mehr möglich ist, so ist das Gerät von Akku- und
Netz-spannung zu trennen und gegen unabsichtlichen
Gebrauch zu sichern. Dies kann z.B. bei sichtbarer
Be-schädigung oder eingeschränktem Betrieb der Fall
sein. Eine vollständige Trennung vom Versorgungsnetz
ist nur bei aus der Steckdose gezogenem Netzkabel
gewährleistet.
Augenschutz
Eine direkte oder indirekte Bestrahlung der Augen ist zu
vermeiden. Längere Bestrahlungen sind für das Auge
unangenehm und können Schäden hervorrufen. Es wird
deshalb empfohlen, den mitgelieferten Blendschutz zu
verwenden. Personen, die allgemein lichtempfindlich
reagieren, Medikamente wegen Lichtempfindlichkeit oder
photosensibilisierende Medikamente einnehmen, eine
Augenoperation hinter sich haben oder die sich über längere Zeit mit diesem Gerät oder in seiner Nähe arbeiten,
sollten dem Licht des Gerätes nicht ausgesetzt werden
und Schutzbrillen (orange) tragen, die Licht unterhalb
einer Wellenlänge von 515 nm absorbieren.
Akku
Vorsicht: Nur Originalteile – insbesondere Ivoclar
Vivadent Akkus und Ladestationen – verwenden.
Akku nicht kurzschliessen. Nicht bei Temperaturen über
40°C (bzw. kurzzeitig 60°C) und immer geladen lagern.
Die Lagerzeit darf 6 Monate nicht übersteigen.
Explosionsgefahr bei Entsorgung in offenem Feuer.
Bitte beachten Sie, dass Lithium-Polymer-Akkus bei un sachgemässer Behandlung oder bei mechanischer
Be schädigung mit Explosion, Feuer und Rauchentwicklung reagieren können. Beschädigte Lithium-PolymerAkkus dürfen nicht weiter verwendet werden.
Die bei Explosion, Feuer und Rauchentwicklung freigesetzten Elektrolyte und Elektrolytdämpfe sind toxisch und
ätzend. Bei Augen- und Hautkontakt sofort mit viel
Wasser spülen. Das Einatmen der Dämpfe vermeiden.
Bei Unwohlsein Arzt aufsuchen.
Wärmeentwicklung
Wie bei allen leistungsstarken Lampen ist die hohe
Lichtintensität mit einer Wärmeentwicklung verbunden.
Bei längerer Bestrahlung im pulpanahen Bereich oder
von Weichgewebe können irreversible oder reversible
Schäden auftreten. Deshalb sind die vorgeschriebenen
Belichtungszeiten zu beachten. Ununterbrochene Belichtungszeiten von mehr als 20 Sekunden an derselben
Zahnfläche sowie ein direkter Kontakt mit Gingiva,
Mundschleimhaut oder Haut sind dringend zu vermeiden.
Bei indirekten Restaurationen ist in intermittierenden
Intervallen von je 20 Sekunden oder durch externe
Kühlung mittels Luftstrom zu arbeiten.
21
Page 22
Inbetriebnahme
Prüfen Sie den Lieferumfang auf Vollständigkeit und
eventuelle Transportschäden (siehe Lieferumfang). Falls
Teile fehlen oder beschädigt sind, wenden Sie sich bitte
umgehend an Ihren Händler oder Ihre Service-Stelle.
Ladestation
Vor dem Einschalten ist sicherzustellen, dass die angegebene Spannung des Typenschildes mit der des vorhandenen Versorgungsnetzes übereinstimmt. Das Typenschild
befindet sich an der Unterseite der Ladestation.
Handstück
Vor der Montage des Lichtleiters ist die Schutzfolie an
der zugehörigen Öffnung des Handstücks zu entfernen.
Lichtleiter beim Einstecken in das Handstück leicht
drehen.
Die Ladestation auf eine geeignete, ebene Tischfläche
stellen. Die Schutzfolie von dem Verbindungsstecker des
Netzgerätes entfernen. Den Verbindungsstecker des
Netzgerätes an der Unterseite der Ladestation schräg
einsetzen und mit leichtem Druck einstecken bis er hörund fühlbar einrastet.
Netzkabel an das Versorgungsnetz anschliessen und mit
dem Netzgerät verbinden. Die Power ON Anzeige auf der
linken Gehäuseseite leuchtet blau auf (siehe Anzeigen
der Ladestation).
22
Anschliessend Blendschutz auf Lichtleiter aufstecken.
Page 23
Akku
Vor dem ersten Gebrauch muss der Akku vollständig
geladen werden!
In voll geladenem Zustand hat der Akku eine Belichtungskapazität von ca. 60 Minuten.
Akku geradlinig in das Handstück einschieben bis er hörund fühlbar einrastet.
Akku - Ladezustand
Der jeweilige Ladezustand wird bei eingeschaltetem
Handstück auf dem Display wie folgt angezeigt:
Voll geladener Akku (Belichtungskapazität
von ca. 60 Minuten)
Halbvoll geladener Akku
Reserve (Im Reservemodus ist der letzte
Balken in der Akku-Anzeige rot. Der Akku
ist schnellstmöglich zu laden.)
Wird der Akku geladen, erscheint kurzfris-
tig auf dem Display „Charging Battery“
bevor das Display in den Stand-by Modus
geht.
Handstück ohne Kaftaufwand in die Öffnung der Ladestation einsetzen. Falls ein Hygieneschutz verwendet wird,
muss dieser vor dem Laden des Akkus entfernt werden.
Nach Möglichkeit ist das Gerät stets mit vollgeladenem
Akku zu benutzen - dies dient der Verlängerung der
Lebensdauer. Es wird daher empfohlen nach jedem
Patienten das Handstück in die Ladestation zu stellen.
Bei leerem Akku dauert die Aufladezeit 2 h.
Bei vollständig entladenem Akku geht das
Handstück automatisch in den Stand-by
Modus. Das Licht lässt sich nicht mehr starten und Belichtungsprogramm sowie -zeit
können nicht mehr eingestellt werden. Das
Handstück kann jedoch im Kabelbetrieb
Click & Cure betrieben werden.
Der Akku ist ein Verschleissteil, das typischerweise nach
ca. 2½ Jahren erneuert werden muss. Das Alter des
Akkus kann dem Akkuaufkleber entnommen werden.
23
Page 24
Bedienung
Kabelbetrieb Click & Cure
Die Bluephase kann jederzeit und insbesondere bei vollständig entleertem Akku im Kabelbetrieb betrieben werden.
Hierzu den Akku aus dem Handstück entnehmen.
Anschliessend Netzgerät am Verbindungsstecker von der
Unterseite der Ladestation lösen. Dabei nicht am Netzkabel ziehen.
Verbindungsstecker geradlinig in das Handstück einschieben bis er hör- und fühlbar einrastet.
Mangels Stromversorgung kann die Ladestation während
des Kabelbetriebes den Akku nicht laden.
Eine vollständige Trennung vom Versorgungsnetz ist nur
bei aus der Steckdose gezogenem Netzkabel gewährleistet.
Vor jedem Gebrauch sind kontaminierte Oberflächen des
Gerätes sowie Lichtleiter und Blendschutz zu desinfizieren bzw. zu autoklavieren. Darüber hinaus ist sicherzustellen, dass die abgegebene Lichtintensität eine
ausreichende Aushärtung ermöglicht. Dazu den Lichtleiter auf Verschmutzungen und Beschädigungen prüfen
sowie die Lichtintensität regelmässig kontrollieren (z.B.
mit dem Ivoclar Vivadent Radiometer „Bluephase
Meter“).
Wahl des Belichtungsprogrammes und der
Belichtungszeit
Belichtungsprogramm und Belichtungszeit können individuell eingestellt werden. Für unterschiedliche Anwendungen verfügt die Bluephase über 3 Belichtungsprogramme.
Mit den Programmwahltastern wird das beabsichtigte
Belichtungsprogramm angewählt. Das Display verändert
sich entsprechend (siehe auch Anzeigen des Handstücks).
Das Gerät wird bei der ersten Inbetriebnahme mit folgender Voreinstellung ausgeliefert:
– HIGH (High Power): 10 Sekunden
– LOW (Low Power): 10 Sekunden
– SOFT (Soft start): 15 Sekunden
Die beabsichtigte Belichtungszeit wird mit den Zeitwahltastern angewählt. Zur Auswahl stehen 5, 10, 15, 20 und
30 Sekunden.
Bei der Wahl der Belichtungszeit ist die Gebrauchsinformation des verwendeten Materials zu beachten.
Bei Compositen beziehen sich die genannten Belichtungsempfehlungen auf sämtliche Farben und – sofern
die Gebrauchsinformation des betroffenen Materials
keine abweichende Empfehlung aufweist – auf Schichtstärken von maximal 2 mm. Diese Empfehlungen gelten
allgemein für Belichtungen, bei denen das Lichtaustrittsfenster des Lichtleiters direkt auf dem zu bestrahlenden
Material aufsitzt. Mit zunehmendem Abstand sind die
Belichtungszeiten entsprechend zu verlängern. Bei einem
Abstand von 9 mm reduziert sich die effektive Lichtintensität auf ca. 50 %, so dass die empfohlene Belichtungszeit zu verdoppeln ist.
24
Page 25
Lichtintensität
Belichtungsprogramme
HIGH POWER Programm
Konstant hohe Lichtintensität zur
Polymerisation von Füllungs- und
Befestigungsmaterialien bei direkten
und indirekten Restaurationen.
1.200 mW/cm2
0
t [s]
LOW POWER Programm
Reduzierte Lichtintensität mit verringerter Temperaturentwicklung für
die Polymerisation im pulpanahen
Bereich von Adhäsiven, Linern und
Füllungsmaterialien bei Versorgung
650 mW/cm2
0
von Kavitäten der Klasse V.
t [s]
SOFT START Programm
Stufenweise Steigerung der Lichtintensität mit reduziertem
Schrumpfungsstress und verringerter
Temperaturenwicklung für die Polymerisation von Füllungsmaterialien
1.200 mW/cm2
650 mW/cm2
0 5
1) Gilt für Schichtstärken von maximal 2 mm und soweit die Bedienungsanleitung des betroffenen Materials keine abweichende Empfehlung aufweist (möglich z.B. bei Dentinfarben)
2) Gilt für Schichtstärken von maximal 4 mm und soweit die Bedienungsanleitung des betroffenen Materials keine abweichende Empfehlung aufweist (möglich z.B. bei Dentinfarben)
3) Gilt für Schichtstärken von maximal 3 mm 4) Gilt bei Lichthärtung (ausschliessliche Verwendung der Basepaste) 5) Gilt bei Dualhärtung
t [s]
Aushärtungszeit für Composites
Aushärtungszeit für Tetric EvoCeram / IPS Empress Direct
Füllungsmaterialien
Composite
1)
• 2 mm
IPS Empress Direct / IPS Empress Direct Flow /
Tetric EvoCeram / Tetric EvoFlow / Tetric /
Tetric Basic White / Tetric N-Ceram / Tetric N-Flow
Heliomolar / Heliomolar HB / Heliomolar Flow
Alle klassischen Composites
2)
• 4 mm
Tetric EvoCeram Bulk Fill / Tetric Basic White
Compomer 3)
Compoglass F / Compoglass Flow
Indirekte Restaurationen /
Befestigungsmaterialien
Variolink II Base 4) / Variolink Veneer / Variolink N Base
/ Variolink N Clear Veneer / Variolink Ultra 5) /
Dual Cement 5) / Variolink II
Verschiedenes
Helioseal / Helioseal F / Helioseal Clear
Monopaque
MultiCore Flow / Multicore HB
Heliosit Orthodontic
Telio Add-On Flow
Telio Stains
IPS Empress Direct Color
IPS Empress Direct Opaque
Adhäsive
AdheSE / AdheSE One F
ExciTE / ExciTE DSC
Tetric N-Bond / Tetric N-Bond Self-Etch
Heliobond (Syntac)
Provisorische Materialien
Telio CS Inlay/Onlay
Systemp.inlay/onlay
Fermit / Fermit N
Telio CS Link / Systemp.link
Verschiedenes
Heliosit Orthodontic
Vivaglass Liner
Füllungsmaterialien
Composite
1)
• 2 mm
IPS Empress Direct / IPS Empress Direct Flow /
Tetric EvoCeram / Tetric EvoFlow / Tetric /
Tetric Basic White / Tetric N-Ceram / Tetric N-Flow
Heliomolar / Heliomolar HB / Heliomolar Flow
Alle klassischen Composites
2)
• 4 mm
Tetric EvoCeram Bulk Fill / Tetric Basic White
Compomer 3)
Compoglass F / Compoglass Flow
5)
1'200 mW/cm
15 s
10 s
Belichtungszeit
10 s
15 s
10 s
20 s
4)
pro mm Keramik:
10 s pro Fläche
10 s
20 s
20 s
10 s
15 s
10 s
10 s
20 s
Belichtungszeit
10 s
10 s
10 s
10 s
20 s pro Fläche
20 s
20 s
Belichtungszeit
15 s
20 s
15 s
20 s
2
25
Page 26
Speicherfunktion Cure Memory
Die zuletzt angewendete Einstellung wird in der Kombination Belichtungsprogramm und -zeit automatisch
gespeichert.
Start
Mit dem Starttaster wird das Licht eingeschaltet. Nach
Ablauf der gewählten Belichtungszeit wird das Belichtungsprogramm automatisch beendet. Falls gewünscht,
kann das Licht vorzeitig durch nochmaliges Betätigen des
Starttasters ausgeschaltet werden. Gleichzeitig zur
Lichtaktivierung schaltet sich auch der Ventilator ein.
Nach dem Beenden der Belichtungszeit läuft dieser zur
Kühlung des Gerätes nach. Solange der Ventilator läuft,
darf der Akku nicht entnommen werden.
Akustische Signale
Bei folgenden Funktionen ertönen akustische Signale:
– Start (Stop)
– Alle 10 Sekunden
– Programmwechsel
– Belichtungszeitwechsel
– Akku mit Ladestation verbinden
– Akku einsetzen
– Error-Meldung
Falls gewünscht, können die akustischen Signale in der
Lautstärke geregelt werden. Dazu bei ausgeschaltetem
Licht den blauen Lautstärketaster (siehe Produktübersicht) drücken und mit dem linken Zeitwahltaster die
Lautstärke verringern bzw. den Ton ganz ausschalten.
Sollen die akustischen Signale wieder eingeschaltet bzw.
die Lautstärke erhöht werden, muss der blaue
Lautstärke taster und danach der rechte Zeitwahltaster
gedrückt werden.
Lichtintensität
Die Lichtintensität wird bei Betrieb des Gerätes konstant
gehalten. Bei Verwendung des mitgelieferten 10mm
Lichtleiters wurde die Lichtintensität kalibriert auf
1200 mW/cm2 +/- 10%.
Wird ein anderer als der mitgelieferte Lichtleiter verwendet, hat dies einen direkten Einfluss auf die abgegebene
Lichtintensität.
Bei parallelwandigen Lichtleitern (10 mm) ist der Durchmesser beim Lichteintritt und der am Lichtaustrittsfenster
gleich. Bei der Verwendung von fokussierenden Lichtleitern (10>8 mm Lichtleiter, Pin-Point Lichtleiter 6>2 mm)
ist der Durchmesser beim Lichteintritt grösser als der am
Lichtaustrittsfenster. Das einfallende Blaulicht wird so auf
eine kleinere Fläche gebündelt. Dadurch erhöht sich die
abgegebene Lichtintensität.
Pin-Point Lichtleiter eigenen sich für die punktuelle
Polymerisation z.B. zum Fixieren von Veneers vor der
Überschussentfernung. Für die komplette Aushärtung
muss der Lichtleiter gewechselt werden.
Messen der Lichtintensität
Die Lichtintensität der Bluephase und des mitgelieferten
10mm Lichtleiters kann z.B. mit dem Bluephase Meter
überprüft werden.
Falls der ermittelte Messwert nicht der erwarteten Lichtintensität entspricht:
– Gewähltes Belichtungsprogramm prüfen
– Eventuell verschmutzten Lichtsensor des Radiometers
reinigen
– Lichtleiter entfernen und die Lichtaustrittsöffnung beim
Handstück mit einem von Alkohol benetzten
Wattestäbchen reinigen
– Eventuell verschmutzten Lichtleiter reinigen (siehe
Wartung und Reinigung)
– Eventuell beschädigten Lichtleiter gegen einen neuen
austauschen
Falls diese Massnahmen keinen Erfolg bringen, wenden
Sie sich bitte an Ihren Händler oder Ihre Service-Stelle.
26
Page 27
Wartung und Reinigung
Aus hygienischen Gründen wird empfohlen, bei jedem
Patienten Einmalschutzhüllen zu verwenden. Die
Schutzhülle muss dabei bündig über den Lichtleiter gezogen werden. Kontaminierte Oberflächen des Gerätes und
Blendschutz sind vor jedem Gebrauch zu desinfizieren
(FD 366/Dürr Dental, Incidin Liquid/Ecolab) und der Lichtleiter zu sterilisieren sofern keine Einmalschutzhüllen verwendet werden. Bei Reinigungsarbeiten dürfen keine
Flüssigkeiten oder andere Fremdmaterialien in das Handstück, die Ladestation und insbesondere nicht in das
Netzgerät gelangen (Stromschlaggefahr). Bei Reinigung
der Ladestation ist diese von der Netzspannung zu trennen.
Gehäuse
Handstück und Handstückhalter mit einer handelsüblichen und aldehydfreien Desinfektionslösung ab wischen. Keine hochaggressiven Desinfektionslösungen (z.B.
Lösungen auf Basis von Orangenöl oder Lösungen mit
einem Ethanolanteil von über 40%), Lösungsmittel (z.B.
Aceton) oder spitze Gegenstände verwenden, die den
Kunststoff angreifen oder verkratzen können. Verschmutzte Kunststoffteile mit Seifenlösung reinigen.
Lichtleiter
Bevor Sie den Lichtleiter reinigen und/oder desinfizieren,
sollten Sie ihn vorbehandeln. Das gilt sowohl bei der
maschinellen als auch bei der manuellen Reinigung und
Desinfektion.
Vorbehandlung
– Entfernen Sie grobe Verunreinigungen direkt nach der
Anwendung oder bis spätestens 2 Stunden danach.
Spülen Sie dazu den Lichtleiter gründlich unter fliessendem Wasser ab (mindestens 10 Sekunden). Sie können auch eine geeignete, aldehydfreie
Desinfektionsmittel lösung verwenden um eine
Fixierung von Blut zu verhindern.
– Um Verunreinigungen manuell zu entfernen, verwen-
den Sie am besten eine weiche Bürste oder ein weiches
Tuch. Anpolymerisiertes Composite lässt sich mit
Alkohol entfernen, evtl. auch mit Hilfe eines Kunststoffspatels. Keine scharfen oder spitzen Gegenständen benutzen/einsetzen. Diese könnten die
Oberfläche verkratzen.
Reinigung und Desinfektion
Zur Reinigung legen Sie den Lichtleiter in eine Reinigungslösung, so dass er ausreichend mit Flüssigkeit bedeckt
ist (Ultraschall oder vorsichtiges Bürsten mit einer
weichen Bürste können die Wirkung unterstützen). Empfohlen wird ein neutral-enzymatisches Reinigungsmittel.
Bitte achten Sie beim Reinigen und Desinfizieren darauf,
dass die verwendeten Mittel frei sind von
– organischen, mineralischen und oxidierenden Säuren
(minimal zulässiger pH-Wert 5,5),
– Laugen (maximal zulässiger pH-Wert 8,5),
– Oxidationsmitteln (z. B. Wasserstoffperoxide)
Entnehmen Sie danach den Lichtleiter der Lösung und
spülen Sie gründlich mit fliessendem Wasser nach
(mindestens 10 Sekunden). Eine wirksame Alternative ist
die Reinigung in einem Thermodesinfektor.
Sterilisation
Das intensive Reinigen und Desinfizieren ist unabdingbar
dafür, dass die nachfolgende Sterilisation effektiv wirkt.
Bitte verwenden Sie dafür ausschliesslich die Dampfsterilisation. Die Sterilisationszeit (Expositionszeit bei der
Sterilisationstemperatur) beträgt 4 Minuten bei 134°C;
der Druck sollte 2 bar betragen. Trocknen Sie den sterilisierten Lichtleiter entweder mit dem speziellen
Trocknungsprogramm Ihres Dampfautoklaven-Ofens
oder mit heisser Luft. Der Lichtleiter ist für bis zu
200 Sterilisations zyklen getestet.
Überprüfen Sie danach den Lichtleiter auf Beschädigungen. Halten Sie den Lichtleiter gegen das Licht. Erscheinen einzelne Segmente schwarz, dann sind Glasfasern
gebrochen. Tauschen Sie in diesem Fall den Lichtleiter
gegen einen neuen aus.
Entsorgung
Das Gerät darf nicht über den normalen Haus-
müll entsorgt werden. Unbrauchbare Akkus
und Polymerisationsgeräte sind den jeweiligen
nationalen gesetzlichen Bestimmungen entsprechend zu entsorgen. Akkus nie ins Feuer
werfen!
27
Page 28

Was ist, wenn …?
Symbol Problemursache Fehlerbehebung
Elektronikdefekt im Handstück oder im
Akku
Akku entfernen und wieder einstecken. Wenn der Fehler bestehen bleibt, Akku durch Netzteil (Click & Cure)
ersetzen.
Falls der Fehler weiterhin bestehen bleibt, kontaktieren
Sie bitte Ihren Händler oder Ihre Service Stelle.
Beim Laden
erscheint
keine
Display-an-
zeige.
Gerät ist überhitzt oder unterkühlt
Elektronikdefekt Akku
Akku leer
Ladekontakte verschmutzt
Akku im Sicherheitsmodus
(Integrierte Schutzschaltung)
Gerät auskühlen lassen (bzw. bei unterkühltem Gerät
auf Raumtemperatur bringen) und nach einiger Zeit
nochmals versuchen. Falls der Fehler bestehen bleibt,
kontaktieren Sie bitte Ihren Händler oder Ihre Service
Stelle.
Akku entfernen und wieder einstecken. Wenn die Fehleranzeige bleibt, Gerät in die Ladestation stellen.
Falls der Fehler trotzdem bestehen bleibt, Akku durch
Netzteil (Click & Cure) ersetzen.
Bitte kontaktieren Sie Ihren Händler oder Ihre Service
Stelle.
Handstück in die Ladestation stellen. Auf dem Display
erscheint kurzzeitig „Charging Battery“ bevor das Display in den Stand-by Modus geht. Wird der Akku nicht
geladen, müssen die Kontakte gereinigt werden. Falls
der Fehler bestehen bleibt, kontaktieren Sie bitte Ihren
Händler oder Ihre Service Stelle.
Kontrolle ob das Handstück richtig in die Ladestation
gestellt wurde. Akkukontakte reinigen. Zur Info: Auf
dem Display erscheint kurzfristig „Charging Battery“
bevor das Display in den Stand-by Modus geht.
Bringt die Reinigung der Akkukontakte keinen Erfolg,
sollte der Akku aus dem Gerät entfernt werden.
Anschliessend den Akku getrennt vom Handstück für
ca. 10 Minuten in der Ladestation aufladen.
Falls der Fehler bestehen bleibt, kontaktieren Sie bitte
Ihren Händler oder Ihre Service Stelle.
LED der
Ladestation
leuchtet
nicht.
28
Netzgerät nicht angeschlossen oder Netzgerät defekt.
Kontrolle ob Netzgerät in der Ladestation richtig eingesetzt ist (auch die Ladekontakte kontrollieren) oder ob
Netzgerät am Netz mittels Netzkabel angeschlossen ist
(Anzeige am Netzgerät leuchtet grün bei richtiger
Funktion).
Falls der Fehler bestehen bleibt, kontaktieren Sie bitte
Ihren Händler oder Ihre Service Stelle.
Page 29

Garantie / Vorgehen bei einem
Reparaturfall
Die Garantie für die Bluephase beträgt ab Kaufdatum
3 Jahre (Akku 1 Jahr). Bei auftretenden Störungen, die
durch Material- und Herstellungsfehler verursacht sind,
umfasst die Garantie die kostenlose Reparatur des Gerätes. Darüber hinaus gibt die Garantie kein Anrecht auf
Ersatz von eventuellen materiellen oder ideellen Schäden.
Dabei ist das Gerät ausschliesslich nach dem bestimmungsgemässen Gebrauch zu verwenden. Eine andere
oder darüber hinausgehende Benutzung gilt als nicht
bestimmungsgemäss – für hieraus resultierende Schäden
wird jede Haftung bzw. Garantie ausgeschlossen. Hierzu
zählen insbesondere:
– Schäden, die durch unsachgemässe Handhabung ver-
ursacht wurden. Insbesondere gilt dies für nicht richtig
gelagerte Akkus (siehe Technische Daten: Transportund Lagerbedingungen).
– Schäden an Teilen, die während des normalen
Betriebes einer Abnützung unterliegen (z. B. Akku).
– Schäden durch äussere Einwirkungen, z. B. Schlag, Fall
zu Boden
– Schäden durch fehlerhafte Aufstellung bzw. Installation
– Schäden durch Anschluss an eine andere Spannung
oder Frequenz als auf dem Typenschild angegeben.
– Schäden durch unsachgemässe Reparaturen und Ände-
rungen, die von nicht autorisierten Stellen vorgenom-
men wurden
Bei einem Garantiefall ist das vollständige Gerät (Handstück, Ladestation, Akku, Netzkabel und Netzgerät)
zusammen mit dem Kaufbeleg in der Original-Verpackung mit den entsprechenden Kartoneinlagen frachtfrei
an das Lieferdepot oder direkt an Ivoclar Vivadent zu
schicken.
Sämtliche Reparaturarbeiten dürfen nur von einer qualifizierten Ivoclar Vivadent Servicestelle durchgeführt werden. Bei einem Defekt, der nicht von Ihnen behoben
werden kann, wenden Sie sich bitte an Ihren Händler
oder Ihre Service-Stelle (Adressen siehe hintere
Umschlagseite). Eine klare Beschreibung des Defektes
oder der Umstände, die zum Defekt geführt haben,
erleichtert die Fehlersuche. Bitte legen Sie diese Beschreibung Ihrem Gerät bei.
Produktspezifikation
Lieferumfang
1 Ladestation, 1 Netzkabel, 1 Netzgerät, 1 Handstück, 1 Akku (Li-Po),
1 10mm Lichtleiter, 3 Blendschutzkegel, Schutzhüllen,
1 Gebrauchsinformation
Zubehör
Für Ihre Bluephase ist folgendes Zubehör erhältlich:
REF Bezeichnung
608537 Lichtleiter 10mm schwarz (G2)
608538 Lichtleiter Pin-Point 6/2 mm schwarz (G2)
551756 Blendschutz (-kegel)
592496 Blendschutzschild
608534 Ladestation (G2)
608535 Akku Bluephase (G2)
608532 Bluephase Handstück (G2)
607922 Bluephase Meter
608554 Bluephase Schutzhüllen (G2)
Technische Daten
Betriebsspannung Ladestation 5 VDC
Betriebsspannung Handstück 3.7 VDC mit Akku
Netzgerät 100–240 VAC / 50-60 Hz /
Output 5 VDC
TYP 15.2630
Betriebsbedingungen
Temperatur +10°C bis +35°C
Relative Feuchte 30 % bis 75 %
Luftdruck 700 hPa bis 1060 hPa
Abmessungen Ladestation L=205 mm; B=150 mm; H=85 mm
Gewicht Ladestation 250 g
Ladezeit ca. 2 h (bei leerem Akku)
Stromversorgung Handstück Li-Po Akku
Max. Akkuzeit ca. 60 Min. (bei neuem,
Lichtquelle Polywave
Wellenlängenbereich 385–515 nm
Lichtintensität max. 1'200 mW/cm
Betrieb 5 Min. ein / 6 Min. aus
Abmessungen Handstück: L=260 mm; B=42 mm; H=120 mm
Gewicht Handstück (inkl. Akku) 225 g
Transport- und Lagerbedingungen:
Temperatur –20 °C bis +60 °C
Relative Feuchte 10 % bis 75 %
Luftdruck 500 hPa bis 1060 hPa
Die Bluephase in geschlossenen oder überdachten Räumen lagern.
Das Gerät keinen starken Erschütterungen aussetzen.
Akku
– nicht bei Temperaturen über 40°C (bzw. kurzzeitig 60°C lagern,
empfohlen wird eine Lagerung bei 15 – 30°C.
– immer aufgeladen und
– nicht länger als 6 Monate lagern
5 VDC mit Netzteil
max. 0.4 A
Hersteller: Friwo
voll geladenem Akku)
®
LED
(intermittierend)
2
± 10 %
29
Page 30

Cher client,
Une polymérisation optimale est une condition
importante pour tous les matériaux photopoly-
mérisables de manière à produire de façon
constante et reproductible des restaurations de
haute qualité. La lampe à polymériser choisie a,
elle aussi, un rôle décisif de ce point de vue.
C‘est pour cela que nous tenons à vous remercier
d‘avoir acheté la lampe Bluephase.
La lampe Bluephase est un dispositif médical de
haute qualité correspondant aux dernières normes
scientifiques et technologiques ainsi qu‘aux
normes industrielles.
Ce mode d‘emploi va vous permettre de mettre en
marche votre appareil en toute sécurité, de profiter
de toutes ses possibilités, et de lui assurer une
longue durée de vie. Pour une identification facile
des composants individuels, la vue générale du
produit est présentée sous la forme d‘une carte.
Pour toute question supplémentaire,
nous vous remercions de nous contacter
(adresse sur le verso).
Votre équipe Ivoclar Vivadent
30
Page 31

Sommaire
Vue générale 32
– Listes des pièces 32
– Indicateurs sur la base de chargement 33
– Indicateurs sur la pièce à main 33
Sécurité 34
– Usage habituel 34
– Indication 34
– Signes et symboles 34
– Notes de sécurité 34
Première mise en marche 36
– Base de chargement 36
– Pièce à main 36
– Batterie 37
– Cordon Click & Cure 38
Utilisation 39
– Sélection du programme et du temps de polymérisation 39
– Fonction de mémoire de programme de polymérisation 40
– Démarrage 40
– Signaux acoustiques 40
– Intensité lumineuse 40
– Mesurer l’intensité lumineuse 40
Maintenance et nettoyage 41
– Logement 41
– Conducteurs de lumiére 41
– Contacts de la batterie 41
– Elimination des pièces usagées 41
Que faire en cas de …? 42
Garantie / Procédure en cas de réparation 43
Spécifications 43
– Présentation 43
– Accessoires 43
– Données techniques 43
– Conditions de fonctionnement 43
– Transport et conditions de stockage 43
31
Page 32

Liste des pièces détachées
10
9 7 8
311213 2
5 6 4
11
1 Pièce à main
2 Bouton de mise marche
3 Affichage
4 Bouton de sélection des programmes
5 Bouton de sélection du temps
6 Bouton de réglage du volume
7 Indicateur de puissance
8 Base de chargement
9 Cordon d‘alimentation
10 Power pack
11 Batterie
12 Conducteur de lumière 10 mm
13 Embout de protection oculaire
32
Page 33

Indicateurs sur la base de chargement
Les voyants s‘allument en bleu – la base de chargement
est reliée au courant électrique.
Indicateurs sur la pièce à main
Programme de polymérisation, temps de polymérisation,
état de marche
Indications spécifiques du programme de polymérisation
sélectionné
Témoin de charge de la batterie
33
Page 34

Sécurité
Usage habituel
Bluephase est une lampe à photopolymériser LED de
haute performance qui produit une lumière bleue dense
de haute énergie. Elle est utilisée pour la polymérisation
de matériaux dentaires au fauteuil. L‘utilisation requise
inclut aussi l‘observation des recommandations et réglementations du mode d‘emploi.
Indications
Grâce à son spectre à large longueur d‘ondes, Bluephase
est particulièrement recommandée pour la polymérisation de matériaux dentaires photopolymérisables dans
une longueur d‘onde de 385–515 nm. Ces matériaux
incluent les matériaux de restauration, les bondings/
adhésifs, les bases, les liners, les scellements de sillons et
fissures, les matériaux provisoires ainsi que les colles
pour brackets orthodontiques, les matériaux de
laboratoire dentaire tels que les inlays céramiques.
Signes et symboles
Contre-indication
Symboles sur la lampe à photopolymériser
Double protection (l‘appareil répond aux
normes de sécurité de classe II)
Protection contre les décharges électriques
(type d‘appareil BF)
Respecter le mode d‘emploi
Respecter le mode d‘emploi
Mise en garde
Ne pas jeter la lampe avec les ordures
ménagères. Concernant l‘élimintation de
votre appareil, veuillez contacter votre
distributeur habituel de produits Ivoclar
Vivadent.
Recyclable
Notes de sécurité
Bluephase est un appareil médical électronique fabriqué
conformément à la norme IEC 60601-1 (EN 60601-1 et
répondant aux Directives CEM, ainsi qu‘aux Directives
des Dispositifs Médicaux 93/42/EEC. L’appareil est conforme aux normes européennes en vigueur et il est
répertorié comme un produit LED de Classe 2.
NRTL (Nationally Recognized
Testing Laboratory)
La lampe est expédiée par le fabricant dans des
conditions de sécurité et des conditions techniques
optimales. Pour maintenir ces conditions et assurer des
opérations sans risque, il est nécessaire de respecter les
recommandations et les réglementations du mode
d‘emploi. Pour prévenir les dommages sur l‘appareil et
tout risque pour les patients, les utilisateurs et les tiers,
les instructions de sécurité suivantes doivent être
respectées.
Ne pas utiliser l‘appareil pour photopoly-
mériser les matériaux dont la polymérisation
est activée dans une longueur d‘onde en
dehors de 385–515 nm (aucun matériau
connu à ce jour). Si vous avez un doute sur
certains produits, contacter le fabricant du
matériau.
Ne pas charger ou utiliser cet appareil à
proximité de substances inflammables ou
combustibles.
Les téléphones portables et autres appareils
de communication HF (Haute Fréquence)
peuvent interférer les équipements médicaux.
L‘utilisation d‘un téléphone portable pendant
le fonctionnement de la lampe est interdite.
34
Page 35

Manipulation et responsabilité
– Bluephase ne doit être utilisée que pour les usages
recommandés. Toute autre utilisation est contreindiquée. Nous rejetons toute responsabilité pour des
dommages liés à un usage inadapté ou une panne
pour non-respect du présent mode d‘emploi.
– De plus, l‘utilisateur est responsable de l‘usage de la
lampe Bluephase de façon appropriée en respectant
les indications recommandées, et ce particulièrement
si d‘autres équipements sont utilisés à proximité
pendant le fonctionnement de la lampe.
– N‘utiliser que les pièces détachées et accessoires
fournis par Ivoclar Vivadent (voir Accessoires). Nous
rejetons toute responsabilité pour les dommages
causés par l‘utilisation d‘autres pièces détachées ou
accessoires.
– L’embout lumineux est une pièce appliquée et,
pendant le fonctionnement, peut chauffer jusqu’à
45 °C maximum au niveau de l’interface avec la pièce
à main.
Voltage
Avant la mise en marche, assurez-vous que :
a) le voltage indiqué sur la base est conforme à l‘énergie
délivrée par l‘alimentation électrique.
et
b) l‘appareil se trouve à température ambiante.
Si la batterie ou le cordon d‘alimentation sont utilisés
séparément, par exemple lors de la mise en marche ou
lors de l‘opération Click & Cure raccordée au courant, les
contacts avec les patients ou les tiers doivent être évités.
Ne pas toucher les contacts accessibles de la batterie ou
les connexions électriques (power pack).
recommandée. Les personnes sensibles à la lumière, qui
prennent des médicaments photosensibles ou qui ont
subi une chirurgie oculaire, les personnes qui travaillent
avec l‘appareil ou à proximité pendant de longues
périodes ne doivent pas être exposées à la lumière de
cette lampe et doivent porter des lunettes de protection
qui absorbent la lumière en dessous de 515 nm.
Batterie
Attention : N‘utiliser que les pièces d‘origine. En particulier,
n‘utiliser que les batteries et bases de chargement
d‘origine Ivoclar Vivadent. Ne pas mettre la batterie en
court-circuit. Ne pas stocker la batterie à une température
supérieure à 60°C, ni pendant plus de 6 mois sans être
rechargée. Ne pas brûler (risque d‘explosion).
Notez que toute flamme, explosion ou dégagement
de fumée dus à une mauvaise manipulation ou à un
problème mécanique peut provoquer une réaction de la
batterie Lithium Polymère. Les batteries Lithium Polymère
endommagées ne doivent plus être utilisées.
Les electrolytes et les fumées d‘électrolytes libérés par
une explosion, une flamme ou un dégagement de fumée
sont toxiques et corrosifs. En cas de contact avec les yeux
ou la peau, rincer immédiatement et abondamment à
l‘eau. Eviter d‘inhaler les fumées. Consulter rapidement
votre médecin en cas d‘indisposition.
Conditions de sécurité
Si un usage en toute sécurité ne peut être garanti, la
prise de courant doit être débranchée et la batterie
retirée pour éviter tout fonctionnement accidentel. Ceci
peut être le cas, si l‘appareil est visiblement endommagé
ou ne fonctionne plus correctement. Ne pas toucher les
connexions exposées des batteries ou du cordon
d‘alimentation. La déconnexion complète n‘est assurée
que lorsque le cordon d‘alimentation est débranché.
Protection oculaire
Eviter toute exposition directe ou indirecte avec les yeux.
Une exposition prolongée à la lumière peut être inconfortable et provoquer des dommages. C‘est pour cela, que
l‘utilisation des embouts de protection oculaire est
Dégagement de chaleur
Comme cela est le cas avec toutes les lampes à haute
performance, une haute énergie lumineuse a pour
résultat un certain dégagement de chaleur. Une exposition prolongée sur la pulpe ou sur les tissus mous peut
engendrer des dommages. Il est donc conseillé de
respecter les recommandations de polymérisation liées
au programme et au temps de polymérisation. De plus,
une polymérisation continue de plus de 20 secondes sur
la même zone, ainsi qu‘un contact direct sur la gencive,
les muqueuses, ou la peau, doivent être évités. Si
nécessaire, polymériser les restaurations indirectes par
intervalles de 20 secondes ou utiliser un jet d‘air qui
permettra le refroidissement.
35
Page 36

Mise en marche
Contrôler la livraison afin de vérifier qu‘il ne manque rien
et qu‘aucun dommage n‘est survenu lors du transport
(voir livraison). Si des composants manquent ou sont
endommagés, contacter immédiatement votre revendeur
ou centre de service.
Base de chargement
Avant de mettre en marche l‘appareil, assurez-vous que
le voltage inscrit sur la base de chargement est conforme
à votre alimentation électrique. Les indications sont
portées sur la plaque d‘identification qui se trouve sous
la base de chargement.
Pièce à main
Avant d‘insérer la fibre de verre conductrice de lumière,
retirer le film de protection sur l‘ouverture de la pièce à
main.
Tourner légèrement le conducteur de lumière dès que
celui-ci est fixé sur la pièce à main, puis positionner
l‘embout de protection oculaire sur le conducteur de
lumière.
Poser la base de chargement sur une surface plate et stable. Mettre en place la prise de connexion au niveau du
compartiment sous la base de chargement. L‘incliner
légèrement et exercer une légère pression jusqu‘à sentir
et entendre un clic.
Connecter le cordon d‘alimentation à la prise de courant.
L‘indicateur Power On sur le côté gauche du capot de la
base de chargement s‘allume en vert (voir “Indicateurs
sur la base de chargement”).
36
Page 37

Batterie
Il est conseillé d‘effectuer une charge complète de la
batterie avant la première utilisation.
Une batterie complètement chargée a une capacité de
polymérisation d‘environ 60 minutes.
Faire glisser la batterie dans la pièce à main jusqu‘à
l‘obtention du clic de mise en place.
Reposer délicatement la pièce à main sur la base de
chargement, à l‘emplacement prévu à cet effet. Si vous
utilisez une housse de protection, n‘oubliez pas de la
retirer avant de mettre la batterie en charge.
Si possible, toujours utiliser la lampe avec une batterie
complètement chargée, afin d‘en prolonger la durée de
vie. Il est conseillé de replacer la pièce à main sur la base
de chargement après chaque patient. Le temps de charge
d‘une batterie vide est de 2 heures.
Etat de charge de la batterie
Lorsque la pièce à main est allumée, l‘état de la charge
est affiché sur l‘écran d‘affichage comme suit
(voir “Indicateurs sur la pièce à main”) :
Batterie complètement chargée (capacité
de polymérisation d‘environ 60 minutes)
Batterie à moitié chargée
Réserve (la dernière barre de l‘indicateur de
la batterie devient rouge en mode reserve.
La batterie doit être mise en charge dès
que possible).
Lorsque la batterie est mise en charge,
„Charging Battery“ s‘affiche brièvement
avant le retour en mode stand-by de
l‘écran.
Batterie vide
Si la batterie est complètement vide, la
pièce à main se met automatiquement en
mode stand-by. La lumière ne s‘allume
plus, le programme de polymérisation et le
temps de polymérisation ne peuvent être
réglés. Cependant, la pièce à main peut
être utilisée avec le cordon Click & Cure.
La batterie est un consommable et doit, de ce fait, être
remplacée environ tous les 2½ ans, cycle de vie d‘une
batterie. Voir l‘âge de la batterie sur l‘étiquette.
37
Page 38

Utilisation
Cordon Click & Cure
La pièce à main Bluephase peut être branchée au courant
à n‘importe quel moment, plus particulièrement en cas
d‘urgence alors que la batterie est vide.
Pour cela, retirer la batterie de la pièce à main. Puis
retirer le cordon de branchement „power pack“ de son
logement sous le socle de la base de chargement. Ne pas
tirer sur le cordon.
Insérer le cordon de branchement “power pack” dans la
pièce à main jusqu‘à sentir et entendre un clic.
Pendant que la pièce à main est connectée au courant, la
base de chargement ne peut charger la batterie.
Désinfecter ou passer à l‘autoclave les différentes surfaces de la lampe ainsi que les conducteurs de lumière et
l‘embout de protection oculaire avant chaque utilisation.
Par ailleurs, assurez-vous que l‘intensité lumineuse
obtenue permet une polymérisation adéquate. Pour cela,
vérifier que le conducteur de lumière n‘est ni souillé ni
endommagé, puis contrôler l‘intensité régulièrement
(par ex. avec le radiomètre “Bluephase Meter”
d‘Ivoclar Vivadent).
Sélection du programme et du temps de
polymérisation
Le programme et le temps de polymérisation peuvent
être programmés individuellement. Bluephase est
équipée des 3 programmes suivants pour les différentes
indications. Le programme de polymérisation souhaité
est sélectionné à l‘aide du bouton de sélection du
programme. L‘affichage change en conséquence (voir
“Indicateurs sur la pièce à main”).
Les programmes suivants sont pré-enregistrés :
– HIGH (Haute énergie) : 10 secondes
– LOW (Basse énergie) : 10 secondes
– SOFT (Polymérisation progressive) : 15 secondes
Le temps de polymérisation souhaité est sélectionné à
l‘aide du bouton de sélection du temps. Les utilisateurs
ont le choix entre 5, 10, 15, 20 et 30 secondes.
Respecter le mode d‘emploi des matériaux utilisés lors de
la sélection du programme.
Les recommandations de polymérisation des matériaux
composites s‘appliquent à toutes les teintes. Sauf indication contraire dans le mode d‘emploi du matériau utilisé,
photopolymériser par couche de 2 mm maximum.
Généralement, ces recommandations s‘appliquent dans
les situations où le conducteur de lumière est orienté
directement sur le matériau à polymériser. Augmenter la
distance entre la source de lumière et le matériau
demande d‘augmenter le temps de polymérisation en
conséquence. Par exemple, si la distance avec le
matériau est de 5 mm, l‘intensité lumineuse réelle est
réduite d‘environ 50%. Dans ce cas, il convient de
doubler le temps de polymérisation.
La déconnexion complète n‘est assurée que lorsque le
cordon d‘alimentation est débranché.
38
Page 39

Programmes de polymérisation
HIGH POWER (Haute énergie)
Haute énergie régulière pour la
polymérisation de matériaux de
restauration et de collage dans le
cas de restaurations directes et
indirectes.
1.200 mW/cm2
0
t [s]
LOW POWER
Basse énergie, élévation de
température réduite pour la polymérisation des adhésifs, des liners et des
matériaux de restauration pour les
cavités de classe V dans les zones
650 mW/cm2
0
proches de la pulpe.
t [s]
SOFT START
Augmentation progressive de
l‘intensité lumineuse avec une
réduction du stress de polymérisation et de la température pour la
polymérisation des matériaux de
1.200 mW/cm2
650 mW/cm2
0 5
1) Valable pour une épaisseur de 2 mm maximum et dans la mesure où le mode d‘emploi du
matériau utilisé n‘indique pas d‘autre recommandation (comme cela peut être le cas par
exemple avec les teintes Dentine)
2) Valable pour une épaisseur de 4 mm maximum et dans la mesure où le mode d‘emploi du
matériau utilisé n‘indique pas d‘autre recommandation (comme cela peut être le cas par
exemple avec les teintes Dentine)
restauration.
t [s]
Intensité
Temps d‘exposition pour les composites
Temps d‘exposition pour Tetric EvoCeram / IPS Empress Direct
Matériaux de restaurations
Composite
1)
• 2 mm
IPS Empress Direct / IPS Empress Direct Flow /
Tetric EvoCeram / Tetric EvoFlow / Tetric /
Tetric Basic White / Tetric N-Ceram / Tetric N-Flow
Heliomolar / Heliomolar HB / Heliomolar Flow
tous les composites conventionnels
2)
• 4 mm
Tetric EvoCeram Bulk Fill / Tetric Basic White
Compomère 3)
Compoglass F / Compoglass Flow
Restaurations indirectes /
Colles
Variolink II Base 4) / Variolink Veneer / Variolink N Base
/ Variolink N Clear Veneer / Variolink Ultra 5) /
Dual Cement 5) / Variolink II
Divers
Helioseal / Helioseal F / Helioseal Clear
Monopaque
MultiCore Flow / Multicore HB
Heliosit Orthodontic
Telio Add-On Flow
Telio Stains
IPS Empress Direct Color
IPS Empress Direct Opaque
Adhesifs
AdheSE / AdheSE One F
ExciTE / ExciTE DSC
Tetric N-Bond / Tetric N-Bond Self-Etch
Heliobond (Syntac)
Matériaux temporaires
Telio CS Inlay/Onlay
Systemp.inlay/onlay
Fermit / Fermit N
Telio CS Link / Systemp.link
Divers
Heliosit Orthodontic
Vivaglass Liner
Matériaux de restaurations
Composite
1)
• 2 mm
IPS Empress Direct / IPS Empress Direct Flow /
Tetric EvoCeram / Tetric EvoFlow / Tetric /
Tetric Basic White / Tetric N-Ceram / Tetric N-Flow
Heliomolar / Heliomolar HB / Heliomolar Flow
tous les composites conventionnels
2)
• 4 mm
Tetric EvoCeram Bulk Fill / Tetric Basic White
Compomére 3)
Compoglass F / Compoglass Flow
3) Valable pour une épaisseur de 3 mm maximum
4) Valable pour la photopolymérisation (utilisation de la pâte base uniquement)
5) Valable pour la polymérisation duale
5)
1'200 mW/cm
15 secondes
10 secondes
Temps de polymérisation
10 secondes
15 secondes
10 secondes
20 secondes
4)
Par mm de céramique :
10 secondes par face
10 secondes
20 secondes
20 secondes
10 secondes
15 secondes
10 secondes
10 secondes
20 secondes
Temps de polymérisation
10 secondes
10 secondes
10 secondes
10 secondes
20 secondes par face
20 secondes
20 secondes
Temps de polymérisation
15 secondes
20 secondes
15 secondes
20 secondes
2
39
Page 40

Fonction mémoire de polymérisation
Les derniers réglages utilisés, programme de polymérisation et temps de polymérisation, sont automatiquement
mémorisés.
Démarrage
La lampe est allumée avec le bouton de démarrage. Une
fois le temps de polymérisation écoulé, le programme de
polymérisation s‘arrête automatiquement. La polymérisation peut être interrompue avant la fin du temps complet
en appuyant sur le bouton de démarrage. Le ventilateur
se déclenche en même temps que la lumière. Une fois la
polymérisation terminée, le ventilateur continue à fonctionner un certain temps pour refroidir la lampe. La batterie ne doit pas être retirée tant que le ventilateur
continue à fonctionner.
Signaux acoustiques
Des signaux acoustiques sont émis lors des fonctions
suivantes :
– Démarrage (Arrêt)
– Toutes les 10 secondes
– Changement de programme
– Changement du temps de polymérisation
– Connexion de la batterie à la base de chargement
– Insertion de la batterie
– Message d‘erreur
Le volume des signaux acoustiques peut être réglé. Pour
cela, presser le bouton de volume bleu lorsque la lampe
est éteinte et réduire ou couper le volume à l‘aide du
bouton gauche de sélection du programme. Pour
réactiver les signaux acoustiques ou augmenter le
volume, presser le bouton de volume bleu, puis le bouton
droit de sélection du programme.
Intensité lumineuse
L‘intensité lumineuse est maintenue à un niveau
cons-tant pendant l‘utilisation. Si le conducteur de
lumière 10mm fourni avec la lampe est utilisé, l‘intensité
lumineuse est d‘environ 1200 mW/cm2 ± 10%.
L‘utilisation d‘embouts lumineux autres que ceux fournis
a une influence directe sur l‘intensité lumineuse émise.
Dans les embouts lumineux standards aux parois
parallèles (10 mm), le diamètre est égal aux deux
extrémités. Dans les embouts lumineux turbo rétrécis à
leur extrémité (10>8 mm, 6>2 mm Pin-Point), le diamètre de la partie arrière est plus large que celui de la
fenêtre d‘émission de lumière. La lumière bleue incidente
est ainsi concentrée sur une plus petite surface, ce qui
augmente l‘intensité lumineuse émise.
Les embouts lumineux Pin-Point conviennent pour la
polymérisation de petites surfaces, comme par ex. la
fixation de facettes avant l‘élimination des excès. Pour
des polymérisations de zones plus larges, il est nécessaire
de changer l‘embout lumineux.
Mesurer l‘intensité lumineuse
L‘intensité lumineuse de la Bluephase et son conducteur
de lumière 10 mm peuvent être contrôlés à l‘aide du
radiomètre Bluephase Meter.
Si la valeur mesurée ne correspond pas à l‘intensité
lumineuse attendue, procéder de la façon suivante :
– Contrôler le programme de polymérisation sélectionné
– Nettoyer le radiomètre avec un chiffon humide
– Retirer le conducteur de lumière et nettoyer la fenêtre
d‘émission de lumière de la pièce à main à l‘aide d‘un
coton imbibé d‘alcool.
– Nettoyer si possible les conducteurs de lumières
souillés (voir “Maintenance et nettoyage”)
– Remplacer tout conducteur de lumière endommagé par
un nouveau
Si ces mesures n‘améliorent pas le résultat, veuillez
contacter votre distributeur ou le service après-vente
Ivoclar Vivadent.
40
Page 41

Maintenance et nettoyage
Pour des questions d’hygiène, il est recommandé d’utiliser
une gaine de protection jetable pour chaque patient. Les
surfaces contaminées du dispositif ainsi que les embouts de
protection oculaire doivent être désinfectés (par exemple
FD333, FD366/Dürr Dental, Incidin Liquid/ Ecolab) et
l’embout lumineux stérilisé avant chaque utilisation si le
dispositif est utilisé sans une gaine de protection jetable.
Assurez-vous qu‘aucun liquide ni autre substance ne pénètre
dans la pièce à main ou la base de chargement pendant le
nettoyage (risque d‘électrocution). Déconnecter la base de
chargement du courant lors des opérations de nettoyage.
Entourage plastique
Essuyer la pièce à main avec une solution sans aldéhyde.
Ne pas utiliser de solutions corrosives (ex. solutions à
base d‘essence d‘orange ou contenant plus de 40%
d‘éthanol), de solvants (ex. l‘acétone), ou d‘instruments
pointus, qui risqueraient d‘endommager ou d‘abîmer le
plastique. Nettoyer le plastique souillé avec une solution
savonneuse.
Conducteur de lumière
Avant de nettoyer et/ou de désinfecter le conducteur de
lumière, celui-ci doit subir un traitement préalable. Ceci est
valable aussi bien pour un nettoyage et une désinfection
mécaniques que manuels.
Traitement préalable
– Éliminer toute contamination immédiatement après
utilisation ou dans les 2 heures suivantes. Pour ce faire,
rincer minutieusement le conducteur de lumière sous
l‘eau courante (pendant au moins 10 secondes). Il est
également possible d‘utiliser une solution de désinfection
sans aldéhyde adaptée pour éviter la fixation de sang.
– Pour éliminer la contamination manuellement, utiliser
un pinceau ou un chiffon doux. Un composite
partiellement polymérisé peut être éliminé avec de
l‘alcool et à l‘aide d‘une spatule en plastique. Ne pas
utiliser d‘objets coupants ou pointus, ceux-ci
pour raient endommager la surface.
Nettoyage et désinfection
Pour le nettoyage, immerger l’embout lumineux dans une
solution de nettoyage de manière à ce qu’il soit
suffisamment recouvert par le liquide (des ultrasons ou un
brossage délicat avec un pinceau doux peuvent renforcer
le nettoyage). Un agent de nettoyage neutre-enzymatique
est recommandé. Lors du nettoyage et de la désinfection,
vérifier que les agents utilisés sont exempts :
– d‘acides organique, minéral et oxydant (la valeur pH
minimum admissible est 5,5)
– de solutions alcalines (la valeur pH maximum
admissible est 8,5)
– d‘agents oxydants (par ex. peroxydes d‘hydrogène).
Enlever ensuite l’embout lumineux de la solution et le
rincer minutieusement à l’eau courante (pendant au
moins 10 secondes). Un nettoyage dans un stérilisateur
thermique est une alternative efficace.
Stérilisation
Un nettoyage et une désinfection intensifs sont les
préalables indispensables pour assurer une stérilisation
efficace. Utiliser pour cela la stérilisation en autoclave. Le
temps de stérilisation (temps d’exposition à température
de stérilisation) est de 4 minutes à 134 °C; la pression
doit être de 2 bar. Sécher l’embout lumineux stérilisé en
utilisant soit le programme de séchage spécial de l’autoclave, soit de l’air chaud. L’embout lumineux a été testé
pour résister jusqu’à 200 cycles de stérilisation.
Vérifier ensuite que le conducteur de lumière n‘ait subi
aucun dommage. Le tenir à contre-jour. Si certains
segments deviennent noirs, c‘est que les fibres de verre
sont cassées. Dans ce cas, remplacer le conducteur de
lumière par un neuf.
Contacts de la batterie
Pour garantir une conductivité fiable et constante, éviter
toute contamination des contacts de la batterie (par
exemple par des résidus de composite). Pour cela, nettoyer
régulièrement les contacts lors de la désinfection
habituelle (après chaque patient).
Élimination des pièces usagées
Ne pas jeter la lampe à photopolymériser avec
les ordures ménagères. Le recyclage doit se
faire conformément à la réglementation et
aux dispositions nationales. Ne pas incinérer
les batteries.
41
Page 42

Que faire en cas de…?
Symbole Causes Rectification de l‘erreur
Défaut d‘électronique dans la pièce à
main ou la batterie
Retirer et réinsérer la batterie. Si l‘erreur persiste, remplacer
la batterie par le power pack (Click & Cure).
Si l‘erreur persiste, veuillez contacter votre distributeur ou le
service après-vente local.
Pas
d‘affichage
pendant le
chargement
L‘appareil a surchauffé ou a subi une
température trop basse
Défaut électronique dans le batterie
Batterie vide
Les contacts sont contaminés
Batterie en mode sécurité
(circuit de protection intégré)
Laisser l‘appareil refroidir (ou le laisser remonter à température ambiante s‘il est trop froid) et essayer de nouveau
après un certain délai.
Si l‘erreur persiste, veuillez contacter votre distributeur ou le
service après-vente local.
Retirer et réinsérer la batterie. Si l‘erreur persiste, placer la
pièce à main sur la base de chargement.
Si malgré cela, l‘erreur persiste toujours, remplacer la
batterie par le power pack (Click & Cure). Veuillez contacter
votre distributeur ou le service après-vente local.
Positionner la pièce à main correctement dans la base de
chargement. „Charging Battery“ s‘affiche brièvement avant
le retour en mode stand-by de l‘écran. Si la batterie n‘est
pas mise en charge, nettoyer les contacts. Si l‘erreur
persiste, veuillez contacter votre distributeur ou le service
après-vente local.
Vérifier que la pièce à main est correctement en place dans
la base de chargement. Nettoyer les contacts. Information :
„Charging Battery“ s‘affiche brièvement avant le retour en
mode stand-by de l‘écran.
Si nettoyer les contacts n‘améliore pas les résultats, retirer
la batterie de la pièce à main. Séparer la batterie de la
pièce à main et la mettre en charge dans la base de
chargement.
Si l‘erreur persiste, veuillez contacter votre distributeur ou le
service après-vente local.
La LED
de la base
de charge-
ment ne
s‘allume
pas
42
Le Power pack n‘est pas connecté ou
est défectueux.
Vérifier que le power pack est correctement positionné dans
la base de chargement (vérifier également la position des
contacts), et qu‘il est raccordé à la prise de courant par le
cordon électrique (le témoin lumineux sur le power pack
s‘allume en vert s‘il fonctionne correctement).
Si l‘erreur persiste, veuillez contacter votre distributeur ou le
service après-vente local.
Page 43

Garantie /
Procédure en cas de réparation
La lampe Bluephase est garantie 3 ans à partir de la date
d‘achat (batterie 1 an).
Des pannes dues à un matériel défectueux ou à des vices
de fabrication sont réparées gratuitement pendant la
durée de la garantie. La garantie ne couvre aucun
dommage, matériel ou non, autre que ceux mentionnés.
L‘appareil doit être utilisé exclusivement pour les indications définies. Tout autre usage est contre-indiqué. Le
fabricant rejette toute responsabilité quant à un mauvais
usage de l‘appareil. Aucune demande de garantie ne
peut être acceptée dans ce genre de cas. Ceci est
particulièrement valable en cas de :
– dommage lié à un usage inadapté, spécialement dans
le cas de batteries mal conservées (voir Batterie);
– dommage de composant lié à l‘usure dans les
conditions d‘utilisation normale (voir Batterie);
– dommage lié à des facteurs externes, exemple un
choc, une chute sur le sol;
– dommage lié à des réglages ou à une installation
incorrects;
– dommage survenant lors du branchement de la lampe
sur une source d‘énergie dont le voltage et la
fréquence ne sont pas conformes à ceux inscrits sur
le socle de la lampe.
– dommage lié à des réparations inadaptées ou à des
modifications réalisées par des réparateurs non
certifiés.
En cas de réclamation sous garantie, la lampe complète
(pièce à main, base de chargement, cordon électrique, et
le power pack) doivent être retournés en port dû au
distributeur ou directement à Ivoclar Vivadent, avec la
facture d‘achat. Utiliser le conditionnement d‘origine et
le carton correspondant pour le transport.
Les réparations doivent être réalisées uniquement par un
service certifié par le service après-vente Ivoclar
Vivadent. En cas de défaut ne pouvant être rectifié,
veuillez contacter votre distributeur ou le service aprèsvente local (voir les adresses au dos). Une description
claire du défaut ou des conditions de sa survenue
pourront faciliter l‘identification du problème. Veuillez
joindre ce descriptif quand vous retournez l‘appareil.
Spécifications du produit
Présentation
1 Base de chargement,1 Cordon électrique, 1 Pièce à main,
1 Batterie (Li-Po), 1 Conducteur de lumière 10 mm, 3 Embouts de
protection oculaire, Housses, 1 Mode d‘emploi
Accessoires
Les accessoires suivants sont disponibles pour la Bluephase :
REF Description
608537 Conducteur de lumière 10 mm, noir (G2)
608538 Conducteur de lumière Pin-point 6>2 mm, noir
551756 Embouts de protection oculaire
592496 Disque de protection oculaire
608534 Base de chargement Bluephase (G2)
608535 Batterie Bluephase (G2)
608532 Pièce à main Bluephase (G2)
607922 Radiomètre Bluephase Meter
608554 Housses de protection Bluephase (G2)
Données techniques
Voltage base de chargement 5 VDC
Voltage pièce à main 3.7 VDC avec la batterie
5 VDC avec le power pack
Power pack 100–240 VAC / 50-60 Hz /
Puissance 5 VDC
TYPE 15.2630
Conditions de fonctionnement
Température +10 °C à +35 °C
Humidité relative 30% à 75%
Pression ambiante 700 hPa à 1060 hPa
Dimensions de la base de chargement L = 205 x W = 150 x H = 85 (mm)
Poids de la base de chargement 250 g
Temps de chargement env. 2 h (avec une batterie vide)
Source électrique de la pièce à main Batterie Li-Po
Temps de batterie maximum env. 60 min.
(avec une batterie neuve et
totalement chargée)
Source lumineuse Polywave
Spectre 385 – 515 nm
Intensité lumineuse max. 1'200 mW/cm
Fonctionne 5 min. on / 6 min. off
(par intermittence)
Dimensions de la pièce à main L = 260 x W = 42 x H = 120 (mm)
Poids de la pièce à main (batterie incluse) 225 g
Transport et conditions de stockage :
Température -20 °C à +60 °C
Humidité relative 10% à 75%
Pression ambiante 500 hPa à 1060 hPa
Bluephase, doit être rangée en hauteur et dans une pièce fermée.
Protéger l‘appareil des chocs importants.
Batterie
– Ne pas stocker à des températures supérieures à 40 °C (ou 60 °C
pour une courte période). Température de stockage recommandée
15 – 30 °C.
– Toujours stocker une batterie chargée
– et jamais pendant plus 6 mois.
max. 0.4 A
Fabricant: Friwo
®
LED
2
± 10 %
43
Page 44

Gentile Cliente,
una polimerizzazione efficace di tutti i materiali
fotopolimerizzabili costituisce il presupposto fon-
damentale per realizzare restauri qualitativamente
eccellenti e durevoli nel tempo. Anche la lampada
fotopolimerizzatrice svolge un ruolo decisivo in
questo senso, pertanto La ringraziamo per aver
scelto Bluephase: un apparecchio medicale ideato
e sviluppato secondo i più innovativi standard
scientifici e tecnologici, in conformità alle normative
di qualità vigenti in materia.
Le presenti Istruzioni d’uso La guideranno a un
utilizzo sicuro dell’apparecchio, consentendoLe di
sfruttare appieno ogni sua caratteristica e garan-
tendo al contempo la massima longevità della
lampada Bluephase.
Non esiti a contattarci per qualsiasi informazione
(indirizzi posti sul retro delle presenti istruzioni
d’uso).
Ivoclar Vivadent
44
Page 45

Indice
Presentazione prodotto 46
– Elenco componenti 46
– Indicatori sulla base di ricarica 47
– Indicatori sul manipolo 47
Sicurezza 48
– Utilizzo previsto 48
– Indicazioni 48
– Segni e simboli 48
– Norme di sicurezza 48
Messa in funzione 50
– Base di ricarica 50
– Manipolo 50
– Batteria 51
– Modalità Click & Cure con lampada collegata al cavo di alimentazione elettrica 52
Operazioni d’uso 53
– Selezione del programma e del tempo di polimerizzazione 53
– Funzione Memoria di polimerizzazione 54
– Avvio 54
– Segnali acustici 54
– Radianza 54
– Misurazione della radianza 54
Manutenzione e pulizia 55
– Alloggiamento 55
– Conduttori ottici 55
– Contatti batteria 55
– Smaltimento 55
Cosa fare se....? 56
Garanzia 57
Procedura in caso di riparazione 57
Specifiche prodotto 57
– Confezionamento 57
– Accessori 57
– Dati tecnici 57
– Condizioni operative 57
– Condizioni di trasporto e immagazzinamento 57
45
Page 46

Elenco componenti
10
311213 2
5 6 4
11
9 7 8
1 Manipolo
2 Tasto di accensione
3 Display
4 Tasto di selezione programma
5 Tasto di selezione tempo
6 Tasto volume
7 Indicatore alimentazione
8 Base di ricarica
9 Cavo di alimentazione
10 Alimentatore
11 Batteria
12 Conduttore ottico 10 mm
13 Cono antiriflesso
46
Page 47

Indicatori sulla base di ricarica
Indicatore blu illuminato – la base di ricarica è collegata
alla rete elettrica.
Indicatori sul manipolo
Programma di polimerizzazione e stato operativo
Indicazione selezionata e tempo di polimerizzazione
Stato di carica della batteria
47
Page 48

Sicurezza
Utilizzo previsto
Bluephase è una lampada fotopolimerizzatrice LED con
luce blu a elevata energia. Essa è indicata per la polimerizzazione di materiali dentali fotosensibili direttamente
alla poltrona. Per un corretto utilizzo dell’apparecchio è
indispensabile attenersi anche alle note e norme contenute nelle presenti istruzioni d’uso.
Indicazioni
Grazie al suo ampio spettro a banda larga “Polywave®“,
Bluephase è indicata per la polimerizzazione di tutti i
materiali dentali fotopolimerizzabili in uno spettro di
lunghezza d‘onda tra i 385–515 nanometri. Più precisamente: materiali da restauro, adesivi/bonding, sottofondi,
liner, sigillanti per fessure, materiali per provvisori,
cementi di fissaggio per bracket ortodontici e per manufatti dentali indiretti, p.es. inlay ceramici.
Segni e simboli
Impiego non ammesso
Simboli sull’apparecchio
Doppio isolamento (Apparecchio della
classe di sicurezza II)
Protezione da scossa elettrica (apparecchio
di tipo BF)
Attenersi alle istruzioni d’uso
Attenersi alle istruzioni d’uso
Attenzione!
Norme di sicurezza
Bluephase è un apparecchio elettromedicale e dispositivo
medico soggetto alle direttive IEC 60601-1 (EN 60601-1)
ed EMC, nonché alla Direttiva dispositivi medici 93/42/
CEE. L’apparecchio è conforme alle norme UE applicabili
ed è classificato come prodotto LED di Classe 2.
NRTL (Nationally Recognized
Testing Laboratory)
L‘apparecchio ha lasciato la fabbrica in perfetto stato dal
punto di vista tecnico e della sicurezza. Per conservare
l’apparecchio in questo stato e garantire un’operatività
priva di rischi, osservare le note e le regole contenute
nelle presenti istruzioni d’uso. Per prevenire danni
all’attrezzatura e rischi ai pazienti, utilizzatori e terzi,
osservare le presenti istruzioni di sicurezza.
Sono controindicati tutti i materiali che non
polimerizzano nello spettro di lunghezza
d’onda compreso tra 385–515 nanometri (ad
oggi non noti). In caso di dubbi sul prodotto
si consiglia di informarsi direttamente presso
il produttore del materiale utilizzato.
Non ricaricare o utilizzare l’apparecchio
in prossimità di sostanze infiammabili o
combustibili.
L‘apparecchio non può essere smaltito come
normale rifiuto urbano. Sulla homepage
Ivoclar Vivadent si trovano informazioni
dettagliate in merito allo smaltimento
dell’apparecchio.
Riciclabile
48
I dispositivi di comunicazione portatili e
mobili ad alta frequenza possono interferire con il funzionamento della presente
apparecchiatura. E‘ vietato l‘uso di cellulari
quando si opera con questa lampada.
Page 49

Utilizzo e responsabilità
– Bluephase è destinata esclusivamente al campo d’uti-
lizzo indicato. Qualsiasi altro impiego è controindicato.
Il Produttore non risponde per danni derivanti da un
utilizzo diverso da quello specificato e dall’inosservanza delle presenti istruzioni d’uso.
– E‘ responsabilità dell‘utilizzatore testare l’apparecchio
prima del suo impiego per verificarne l‘idoneità e l‘utilizzabilità per gli scopi previsti. Ciò è particolarmente
importante se contemporaneamente all‘utilizzo di
Bluephase vengono impiegati altri dispositivi nelle
immediate vicinanze.
– Utilizzare esclusivamente pezzi di ricambio e accessori
originali Ivoclar Vivadent (cfr. Accessori). Il Produttore
non risponde per danni derivanti dall‘utilizzo di parti di
ricambio o accessori diversi da quelli originali.
– Il conduttore ottico è una parte applicata e durante il
funzionamento può riscaldarsi fino ad un massimo di
45 °C all’interfaccia con il manipolo.
Voltaggio operativo
Prima di accendere l’apparecchio verificare quanto segue:
a) che il voltaggio indicato sulla targhetta di alimenta-
zione con l‘apparecchio corrisponda al voltaggio della
rete elettrica locale
b) che l’apparecchio si trovi a temperatura ambiente.
Qualora la batteria o l’alimentatore vengano utilizzati
separatamente, p.e. in fase di avviamento o in modalità
Click&Cure con l’apparecchio collegato al cavo di alimentazione elettrica, evitare qualsiasi contatto con i pazienti
o terze parti. Non toccare i contatti scoperti della batteria
o della spina dell‘alimentatore.
Quando non è più possibile operare in condizioni di sufficiente sicurezza
Qualora si riconosca che non è più possibile operare con
l’apparecchio in condizioni di sufficiente sicurezza, scollegarlo dalla rete elettrica e rimuovere la batteria per evitare un’accidentale accensione dello stesso. Condizioni
d’insicurezza operativa possono presentarsi per esempio
quando la lampada è visibilmente danneggiata o non
funziona più correttamente. L’apparecchio è completamente scollegato dalla rete elettrica solo quando il cavo
di alimentazione elettrica viene staccato dalla presa di
corrente.
Protezione degli occhi
Evitare qualsiasi esposizione diretta o indiretta degli
occhi alla luce della lampada. Un‘esposizione prolungata
alla luce dell‘apparecchio e può arrecare danno alla vista.
Si consiglia pertanto l’utilizzo del cono antiriflesso fornito
con la lampada stessa. Soggetti generalmente sensibili
alla luce, in cura con medicinali fotosensibili o sottoposti
a interventi alla vista, nonché soggetti che operano con
l’apparecchio o nelle sue immediate vicinanze per lunghi
periodi, devono assolutamente evitare di esporsi alla luce
della lampada e indossare occhiali protettivi (di colore
arancio) in grado di assorbire lo spettro luminoso
inferiore a 515 nanometri.
Batteria
Attenzione! Utilizzare soltanto pezzi di ricambio originali.
Nello specifico: batterie e basi di ricarica Ivoclar Vivadent.
Non mettere in cortocircuito la batteria. Non conservare
la batteria a temperature superiori i 40 °C (o 60 °C per
un periodo breve). Conservare la batteria sempre carica e
comunque non oltre i 6 mesi. Pericolo di esplosione se la
batteria viene smaltita nel fuoco.
In considerazione che le batterie LiPo in caso di trattamento improprio oppure in caso di danno meccanico,
possono reagire con esplosione, fuoco o sviluppo di
fumo. Non si devono riutilizzare batterie Li-Po
danneggiate.
Gli elettroliti ed i vapori di elettrolite liberati in caso di
esplosione, fuoco e sviluppo di fumo sono tossici e corrosivi. In caso di contatto con gli occhi e la cute, sciacquare
immediatamente con molta acqua. Evitare di inalare i
vapori. In caso di malessere consultare il medico.
Sviluppo di calore
Come per tutte le lampade fotopolimerizzatrici ad elevata
prestazione, ad un‘alta radianza corrisponde uno sviluppo
di calore. L’esposizione prolungata di zone in prossimità
pulpare e dei tessuti molli può causare danni reversibili
o irreversibili delle parti interessate. E‘ pertanto necessario attenersi ai tempi di fotopolimerizzazione raccomandati. Evitare di fotopolimerizzare la medesima superficie
dentaria ininterrottamente per tempi superiori a
20 secondi. Evitare altresì il contatto diretto con gengiva,
mucosa orale, cute. Se necessario, polimerizzare i restauri
indiretti a intervalli di 20 secondi ciascuno o raffreddare
mediante l‘ausilio esterno di un soffio d’aria.
49
Page 50

Messa in funzione
Controllare che la confezione sia completa di ogni sua
parte e che durante il trasporto non siano stati arrecati
danni all‘apparecchiatura (cfr. Confezionamento). In caso
di parti mancanti o danneggiate, contattare immediatamente il proprio rivenditore o Centro di Assistenza
Ivoclar Vivadent di fiducia.
Base di ricarica
Prima di collegare la base di ricarica alla rete, assicurarsi
che il voltaggio indicato sulla targhetta di alimentazione
dell‘apparecchio corrisponda al voltaggio della rete elettrica locale. La targhetta di alimentazione è posta sulla
parte inferiore della base di ricarica.
Manipolo
Prima di montare il conduttore ottico, rimuovere la pellicola protettiva dal corrispondente foro di attacco posto
sul manipolo.
Inserire il conduttore ottico sul manipolo con un leggero
movimento rotatorio.
Posizionare la base di ricarica su una superficie piana
idonea allo scopo. Rimuovere la pellicola protettiva dal
connettore di alimentazione. Inserire il connettore di alimentazione nell’attacco posto sulla parte inferiore della
base di ricarica, inclinandolo leggermente ed esercitando
una lieve pressione fino ad avvertire uno scatto.
Collegare il cavo di alimentazione alla rete elettrica e
all‘alimentatore. L‘indicatore Power ON (acceso) sul lato
sinistro dell‘alloggiamento (base di ricarica) emette una
luce blu (cfr. Indicatori sulla base di ricarica).
50
Successivamente, montare il corrispondente cono antiriflesso sul conduttore ottico.
Page 51

Batteria
Al suo primo utilizzo, si consiglia una carica completa
della batteria. Con batteria completamente carica,
l‘autonomia operativa dell’apparecchio corrisponde a
60 minuti circa.
Inserire la batteria direttamente nel manipolo fino ad
avvertire uno scatto, segno che la batteria è stata
alloggiata correttamente
Posizionare cautamente il manipolo nella base di ricarica,
senza esercitare forza. Qualora venisse usata una pellicola di protezione, rimuovere la stessa prima di procedere
con la ricarica della batteria.
Stato di carica della batteria
Con il manipolo acceso, lo stato di carica della batteria
apparirà sul display come segue:
Batteria completamente carica
(autonomia operativa di 60 minuti circa)
Batteria carica a metà
Riserva
(l’ultima tacca dell’indicatore batteria è
rosso e segnala lo stato di riserva.
La batteria deve essere ricaricata quanto
prima.)
Quando la batteria viene ricaricata, sul
display appare brevemente „Charging
Battery“ prima che il display passi alla
modalità Stand-by.
Batteria scarica
Quando la batteria è completamente
scarica, il manipolo passa automaticamente
in modalità stand-by. Non è più possibile
riaccendere la lampada o impostare programma e tempo di polimerizzazione.
L’apparecchio può comunque essere utilizzato in modalità Click & Cure collegato
direttamente al cavo di alimentazione
elettrica.
E‘ consigliabile utilizzare la lampada il più possibile con
batteria completamente carica. In tal modo si prolungherà
la vita dell’apparecchio. Al termine di ogni seduta, si raccomanda pertanto di riporre il manipolo nella base di
ricarica. A batteria scarica il tempo di ricarica ammonta a 2 h.
La batteria è soggetta a un naturale deperimento, essa
va pertanto sostituita trascorso il suo normale ciclo
vitale, ossia ogni 2½ anni. Controllare la durata della
batteria sulla relativa targhetta.
51
Page 52

Operazioni d’uso
Modalità Click & Cure con lampada collegata
al cavo di alimentazione elettrica
Bluephase può essere utilizzata in qualsiasi momento
collegata al cavo di alimentazione elettrica, e in particolare quando la batteria è completamente scarica.
A tal fine, rimuovere la batteria dal manipolo. Quindi
staccare l’alimentatore dall’alloggiamento posto sul lato
inferiore della base di ricarica, evitando di tirare il filo di
alimentazione elettrica.
Inserire l’alimentatore sui contatti posti nell’alloggiamento
del manipolo finché non si sente uno scatto, che indica
che è stata alloggiata correttamente.
Durante il funzionamento della lampada in modalità
“Click & Cure”, la base di ricarica non può caricare la
batteria in quanto non è collegata alla corrente elettrica.
L’apparecchio è completamente spento solo se il cavo
dell’alimentazione è stato staccato dalla presa di
corrente
Prima di ogni utilizzo, disinfettare o autoclavare le superfici contaminate dell’apparecchio nonchè i conduttori
ottici e i coni antiriflesso. Assicurarsi inoltre che la
radianza dichiarata nelle istruzioni d’uso della lampada
consenta una polimerizzazione adeguata del restauro. A
tal fine accertarsi a intervalli regolari che il conduttore
ottico non sia imbrattato o danneggiato e verificare regolarmente la costanza dell’intensità luminosa della lampada (p.e. con il radiometro Ivoclar Vivadent “Bluephase
Meter”).
Selezione del programma e del tempo di
polimerizzazione
Il programma e il tempo di polimerizzazione possono
essere impostati individualmente. Bluephase dispone di
3 programmi di polimerizzazione per differenti situazioni
cliniche. Selezionare il programma di polimerizzazione
desiderato mediante i tasti di selezione programma. Il
display varierà corrispondentemente. (cfr. Indicatori sul
manipolo).
Alla prima accensione la lampada presenta le seguenti
preimpostazioni:
– HIGH (High Power): 10 secondi
– LOW (Low Power): 10 secondi
– SOFT (Soft start): 15 secondi
Impostare il tempo di polimerizzazione desiderato con i
tasti di selezione tempo. L‘operatore può scegliere tra 5,
10, 15, 20 e 30 secondi.
Selezionare il tempo di polimerizzazione secondo le istruzioni d’uso del materiale utilizzato.
I tempi di polimerizzazione indicati per i compositi
valgono per tutti i colori e, quando non diversamente
specificato nelle istruzioni d’uso del materiale corrispondente, si riferiscono a un unico strato di spessore massimo di 2 mm. Normalmente, i tempi indicati si riferiscono
a situazioni in cui il conduttore ottico è posto direttamente sul materiale da polimerizzare. Una distanza
crescente tra conduttore ottico e materiale da restauro
aumenterà di conseguenza i tempi di polimerizzazione.
Se, per esempio, la distanza dal materiale è di 9 mm,
l‘effettiva radianza si ridurrà del 50%. In tal caso,
il tempo di polimerizzazione consigliato deve essere
raddoppiato.
52
Page 53

Programma di polimerizzazione
Programma HIGH POWER
Intensità luminosa elevata e costante:
per la polimerizzazione di materiali
da restauro e cementi nella tecnica
diretta e indiretta.
1.200 mW/cm2
0
t [s]
Programma LOW POWER
Intensità luminosa ridotta con ridotto
sviluppo di calore: per la polimerizzazione di adesivi e liner in prossimità pulpare e materiali da restauro
nel restauro di cavità di Classe V.
650 mW/cm2
0
t [s]
Programma SOFT START
Graduale aumento dell‘intensità
luminosa con ridotto stress da
contrazione e ridotto sviluppo di
calore: per la polimerizzazione di
materiali da restauro.
1.200 mW/cm2
650 mW/cm2
0 5
1) Vale per spessori di max. 2 mm e qualora le istruzioni d’uso del materiale impiegato non riporti
indicazioni diverse (possibile p.es. per colori dentinali)
2) Vale per spessori di max. 4 mm e qualora le istruzioni d’uso del materiale impiegato non riporti
indicazioni diverse (possibile p.es. per colori dentinali)
t [s]
Intensità luminosa
Tempo di indurimento per compositi
T. di indurimento per Tetric EvoCeram / IPS Empress Direct
Materiali da restauro
Compositi
1)
• 2 mm
IPS Empress Direct / IPS Empress Direct Flow /
Tetric EvoCeram / Tetric EvoFlow / Tetric /
Tetric Basic White / Tetric N-Ceram / Tetric N-Flow
Heliomolar / Heliomolar HB / Heliomolar Flow
Tutti i compositi convenzionali
2)
• 4 mm
Tetric EvoCeram Bulk Fill / Tetric Basic White
Compomeri 3)
Compoglass F / Compoglass Flow
Materiali da restauro indiretti /
Cementi
Variolink II Base 4) / Variolink Veneer / Variolink N Base
/ Variolink N Clear Veneer / Variolink Ultra 5) /
Dual Cement 5) / Variolink II
Diversi
Helioseal / Helioseal F / Helioseal Clear
Monopaque
MultiCore Flow / Multicore HB
Heliosit Orthodontic
Telio Add-On Flow
Telio Stains
IPS Empress Direct Color
IPS Empress Direct Opaque
Adesivi
AdheSE / AdheSE One F
ExciTE / ExciTE DSC
Tetric N-Bond / Tetric N-Bond Self-Etch
Heliobond (Syntac)
Materiali per provvisori
Telio CS Inlay/Onlay
Systemp.inlay/onlay
Fermit / Fermit N
Telio CS Link / Systemp.link
Diversi
Heliosit Orthodontic
Vivaglass Liner
Materiali da restauro
Compositi
1)
• 2 mm
IPS Empress Direct / IPS Empress Direct Flow /
Tetric EvoCeram / Tetric EvoFlow / Tetric /
Tetric Basic White / Tetric N-Ceram / Tetric N-Flow
Heliomolar / Heliomolar HB / Heliomolar Flow
Tutti i compositi convenzionali
2)
• 4 mm
Tetric EvoCeram Bulk Fill / Tetric Basic White
Compomeri 3)
Compoglass F / Compoglass Flow
3) Vale per spessori di max. 3 mm
4) Vale per fotopolimerizzazione (uso della sola pasta base)
5) Vale per l’indurimento duale
5)
2
1'200 mW/cm
15 sec.
10 sec.
Tempo di polimerizzazione
10 sec.
15 sec.
10 sec.
20 sec.
4)
per mm ceramica:
10 sec. per superficie
10 sec.
20 sec.
20 sec.
10 sec.
15 sec.
10 sec.
10 sec.
20 sec.
Tempo di polimerizzazione
10 sec.
10 sec.
10 sec.
10 sec.
20 sec. per superficie
20 sec.
20 sec.
Tempo di polimerizzazione
15 sec.
20 sec.
15 sec.
20 sec.
53
Page 54

Funzione Memoria di polimerizzazione
L’apparecchio salva automaticamente le ultime impostazioni utilizzate, nella combinazione programma-tempo di
polimerizzazione.
Avvio
Accendere la lampada mediante il tasto di accensione.
Esaurito il tempo di polimerizzazione selezionato, il programma di polimerizzazione si disattiverà automaticamente. La lampada può essere spenta anche prima dello
scadere del tempo di polimerizzazione selezionato, premendo nuovamento il tasto di accensione. Contemporaneamente all’accensione della lampada si attiverà la
ventola di raffreddamento. Trascorso il tempo di polimerizzazione, la ventola continuerà a funzionare per qualche tempo al fine di raffreddare l’apparecchio. Non
rimuovere la batteria quando la ventola è in funzione.
Segnali acustici
Le seguenti funzioni vengono segnalate mediante segnali
acustici:
– Avvio (Stop)
– Ogni 10 secondi
– Cambio di programma
– Cambio tempo di polimerizzazione
– Collegamento della batteria alla base di ricarica
– Inserimento della batteria
– Messaggio di errore
E‘ possibile variare il volume dei segnali acustici. A tal
fine, premere il tasto blu del volume quando la lampada
è spenta. Abbassare il volume o disattivare i segnali
acustici mediante il tasto di selezione programma di
sinistra. Per ripristinare i segnali acustici o aumentarne
il volume, premere il tasto blu volume e poi il tasto di
selezione programma di destra.
Intensità luminosa
La radianza della lampada rimane costante durante
l’intera fotopolimerizzazione. Se si utilizza il conduttore
ottico da 10 mm fornito con la lampada, la radianza è
calibrata al valore di 1200 mW/cm2 ± 10%.
L’utilizzo di un conduttore ottico diverso da quello
fornito, influisce sull’intensità luminosa indicata.
Nei conduttori ottici a pareti parallele (10 mm) il diametro
dell’entrata luminosa e quello dell’emissione luminosa
sono uguali. In caso di conduttori ottici focalizzanti
(10>8 mm, Pin-Point 6>2 mm) il diametro all’entrata
luminosa é maggiore di quello di emissione. La luce blu
viene pertanto concentrata su una superficie minore. In
tal modo aumenta l’intensità luminosa indicata.
I conduttori ottici Pin-Point sono indicati per la polimerizzazione a punti p.es. per il fissaggio di faccette prima
della rimozione delle eccedenze. Per il completo indurimento é necessario sostituire il conduttore ottico.
Misurazione dell‘intensità luminosa
La radianza di Bluephase e del conduttore ottico di
10 mm incluso nella confezione possono essere
monitorati mediante il radiometro “Bluephase Meter”.
Qualora il valore risultante dalla misurazione non
corrispondesse alla radianza dichiarata, procedere come
segue:
– Controllare il programma di polimerizzazione
selezionato.
– Detergere ogni possibile contaminazione dal sensore
(radiometro)
– Rimuovere il conduttore ottico e detergere il puntale
ottico con un panno imbibito di alcool.
– Detergere il conduttore ottico eventualmente
contaminato (cfr. Manutenzione e Pulizia).
– Sostituire il conduttore ottico danneggiato con
uno nuovo.
Se queste azioni non dovessero migliorare l‘esito della
fotopolimerizzazione, si consiglia di contattare il proprio
rivenditore o Centro Assistenza Ivoclar Vivadent di fiducia.
54
Page 55

Manutenzione e pulizia
Per motivi di igiene, si raccomanda di utilizzare una guaina di protezione monouso per ogni paziente. Assicurarsi
che la guaina di protezione sia aderente al conduttore
ottico. Se non si usano le guaine di protezione monouso,
disinfettare le superfici contaminate dell’apparecchio e i
cappucci antiriflesso (FD 366/Dürr Dental, Incidin Liquid/
Ecolab) e sterilizzare il conduttore ottico prima di ogni
utilizzo. Durante la pulizia prestare attenzione che liquidi
o altri materiali non si infiltrino nel manipolo, nella base
di ricarica e in particolare nel trasformatore (pericolo di
scosse elettriche). Quando si effettua la pulizia della base
di ricarica, staccarla dalla corrente.
Alloggiamento
Pulire il manipolo e la base del manipolo strofinando con
una normale soluzione disinfettante non aldeidica. Per la
detersione non utilizzare soluzioni molto aggressive (ad
esempio soluzioni a base di olio d’arancia o soluzioni con
contenuto di etanolo superiore al 40%), solventi (ad
esempio acetone) o strumenti appuntiti che possono
danneggiare o graffiare la plastica. Pulire le parti di
plastica sporche con soluzione saponata.
Conduttore ottico
Il conduttore ottico deve essere pretrattato prima di
pulirlo e/o disinfettarlo. Questo vale per la pulizia e la
disinfezione sia manuali che meccaniche.
Pretrattamento
– Eliminare la contaminazione grossolana immediata-
mente dopo l’uso o comunque entro 2 ore. A tale
scopo, sciacquare accuratamente il conduttore ottico
sotto acqua corrente (per almeno 10 secondi). In alternativa, usare una soluzione disinfettate priva di
aldeide in modo da prevenire il fissaggio del sangue.
– Per rimuovere manualmente la contaminazione, usare
un pennellino o un panno morbidi. Il composito parzialmente polimerizzato può essere rimosso con alcol ed
eventualmente una spatola in plastica. Non utilizzare
oggetti taglienti o appuntiti che potrebbero graffiare la
superficie.
Pulizia e disinfezione
Per la detersione, immergere il conduttore ottico nella
soluzione detergente in modo che sia sufficientemente
coperto da liquido (il lavaggio ad ultrasuoni o lo spaz-
zolamento con uno spazzolino morbido possono essere
di aiuto). Si raccomanda l’uso di un detergente enzimatico
neutro. Per la detersione e disinfezione, assicurarsi che i
materiali impiegati siano privi di:
– acidi organici, minerali e ossidanti (il pH minimo
ammesso è 5,5)
– soluzioni alcaline (il pH massimo ammesso è 8,5)
– agenti ossidanti (ad esempio perossido di idrogeno)
Successivamente togliere il conduttore ottico dalla soluzione e risciacquare accuratamente con acqua corrente
(per almeno 10 secondi). Una valida alternativa è la disinfezione in un apparecchio per disinfezione termica.
Sterilizzazione
Un’accurata detersione e disinfezione sono indispensabili
per assicurare l’efficacia della successiva sterilizzazione.
A tale scopo utilizzare esclusivamente la sterilizzazione in
autoclave. Il tempo di sterilizzazione (tempo di esposizione alla temperatura di sterilizzazione) è di 4 minuti a
134 °C, a 2 bar di pressione. Asciugare il conduttore
ottico sterilizzato utilizzando lo specifico programma di
asciugatura dell’autoclave a vapore, oppure con aria
calda. Il conduttore ottico è stato testato fino a 200 cicli
di sterilizzazione.
Oltre questo limite, controllare l’eventuale presenza di
danni nel conduttore ottico osservandolo in controluce.
Se alcuni segmenti appaiono neri, vi sono fibre di vetro
rotte. In questo caso sostituire il conduttore ottico con
uno nuovo.
Contatti della batteria
Per garantire una conduttività affidabile in ogni momento,
mantenere i contatti della batteria liberi da eventuale
contaminazione (ad esempio da residui di composito). A
tale scopo pulire regolarmente i contatti interessati in
occasione della consueta detersione e disinfezione (dopo
ogni paziente).
Smaltimento
L’apparecchio non deve essere smaltito nei nor-
mali rifiuti urbani. Le batterie e gli appa r ecchi
fotopolimerizzanti inutilizzabili devono essere
smaltiti secondo le disposizioni di legge
nazionali. Non gettare le batterie nel fuoco!
55
Page 56

Cosa fare se....?
Simbolo Cause Soluzione
Difetto elettronico nel manipolo
o nella batteria
Rimuovere e reinserire la batteria. Se l‘errore persiste,
sostituire la batteria con l’alimentatore (Click & Cure).
Se l‘errore persiste, contattare il proprio rivenditore o
entro Assistenza Ivoclar Vivadent di fiducia.
Non appare
il display
durante la
carica
L’apparecchio è surriscaldato o
troppo freddo
Difetto elettronico nella batteria
Batteria scarica
Contatti batteria sporchi
Batteria in modalità Sicurezza
(Collegamento di protezione
integrato)
Far raffreddare l’apparecchio (o portarlo a temperatura ambiente se troppo freddo) e riprovare dopo un certo intervallo.
Se l‘errore persiste, contattare il proprio rivenditore o Centro
Assistenza Ivoclar Vivadent di fiducia.
Rimuovere e reinserire la batteria. Se l‘errore persiste, riporre
l’apparecchio nella base di ricarica. Se l’errore persiste ancora,
sostituire la batteria con l’alimentatore (Click & Cure). Contattare il proprio rivenditore o Centro Assistenza di fiducia.
Posizionare il manipolo nella base di ricarica. Sul display appare
brevemente „Charging Battery“ prima di passare alla modalità
Stand-by. Se la batteria non si ricarica, detergere i contatti. Se
l’errore persiste, contattare il proprio rivenditore o Centro Assistenza Ivoclar Vivadent di fiducia.
Controllare che il manipolo sia stato riposto correttamente nella
base di ricarica. Detergere i contatti della batteria. Info: sul
display appare brevemente „charging battery“ prima che il
displays passi alla modalità Stand-by.
Se dopo aver pulito i contatti della batteria il risultato non
migliora, rimuovere la batteria dell‘apparecchio. Infine caricare
l’accumulatore la batteria separatamente dal manipolo nella
base di ricarica per ca. 10 minuti. Se l’errore persiste, contattare
il proprio rivenditore o Centro Assistenza Ivoclar Vivadent di
fiducia.
Il LED della
base di
ricarica non
è acceso
56
L‘alimentazione non è collegato
o è difettoso.
Controllare se che l’alimentatore é sia stato inserito correttamente nella base di ricarica (controllare anche controllare inoltre
i contatti di ricarica) oppure see che l’alimentatore é sia collegato alla rete con il cavo di alimentazione (display dell’alimentatore appare verde, se la funzione é corretta il display
dell’alimentatore appare verde).
Se l‘errore persiste, contattare il proprio rivenditore o Centro
Assistenza Ivoclar Vivadent di fiducia.
Page 57

Garanzia / Procedura in caso
di riparazione
La garanzia di Bluephase ha validità di tre anni a partire
dalla data di acquisto (1 anno di garanzia per la
batteria).
Durante il periodo di garanzia, qualsiasi malfunzionamento risultante da materiale difettoso o errori di produzione sarà riparato gratuitamente. La garanzia non dà
diritto ad alcuna copertura per danni materiali e non
materiali diversi da quelli menzionati.
L’apparecchio deve essere destinato esclusivamente agli
usi previsti. Qualsiasi altro utilizzo è controindicato. Il
Produttore non risponde di qualsiasi uso improprio
dell’apparecchio. In tali casi decadrà la stessa copertura
di garanzia. Ciò vale nello specifico per:
– danni derivanti da un uso improprio dell’apparecchio,
in particolare batterie conservate scorrettamente
(Cfr. Dati tecnici: Condizioni di trasporto e immagazzinamento)
– danni alle parti dell’apparecchio risultanti da usura in
normali condizioni operative (p.e. batteria)
– danni derivanti da agenti esterni, p.e. colpi, cadute
– danni derivanti da un assemblaggio o un’installazione
errati
– danni derivanti dalla connessione dell’apparecchio alla
rete di alimentazione elettrica con voltaggio e fre-
quenza non conformi ai valori riportati sulla targhetta
di alimentazione
– danni derivanti da riparazioni o modifiche improprie
non realizzate dai Centri di Assistenza certificati.
In caso di reclamo in garanzia, l’intera apparecchiatura
(manipolo, base di ricarica, batteria e cavo di alimentazione elettrica e alimentatore) deve essere inviata porto
franco al rivenditore o direttamente a Ivoclar Vivadent,
con bolla di acquisto acclusa. A tal fine utilizzare l’imballaggio originale con gli appositi inserti per il trasporto.
Qualsiasi riparazione deve essere eseguita esclusivamente da un Centro di Assistenza certificato Ivoclar Vivadent.
Qualora il difetto non fosse risolvibile, contattare il proprio rivenditore o Centro Assistenza di fiducia (indirizzi
posti sul retro delle presenti istruzioni d’uso). Una chiara
descrizione del problema, o delle condizioni in cui esso si
manifesta, ne faciliterà il riconoscimento. La preghiamo
pertanto di accludere detta descrizione al prodotto nel
momento della spedizione.
Specifiche prodotto
Confezionamento
1 Base di ricarica, 1 Cavo di alimentazione, 1 Alimentatore, 1 Manipolo,
1 Batteria (Li-Po), 1 Conduttore ottico 10 mm, 3 Coni antiriflesso,
Guaine di protezione, 1 Istruzioni d‘uso
Accessori
Per la lampada Bluephase sono disponibili i seguenti accessori:
REF Description
608537 Conduttore ottico 10 mm, nero (G2)
608538 Conduttore Ottico Pin-point 6>2 mm, nero (G2)
551756 Coni antiriflesso
592496 Schermo antiriflesso
608534 Base di ricarica Bluephase (G2)
608535 Batteria Bluephase (G2)
608532 Manipolo Bluephase (G2)
607922 Radiometro Bluephase Meter
608554 Guaine protettive monouso Bluephase (G2)
Dati tecnici
Voltaggio operativo della base
di ricarica 5 VDC
Voltaggio operativo del manipolo 3.7 VDC con batteria
5 VDC con alimentatore
Alimentatore 100–240 VAC / 50-60 Hz /
Uscita 5 VDC
TIPO 15.2630
Condizioni operative
Temperatura da +10°C a +35°C
Umidità relativa da 30% a 75%
Pressione ambiente da 700 hPa a 1060 hPa
Dimensione della base di ricarica Lung. = 205 x Larg. = 150 x
Alt. = 85 (mm)
Peso della base di ricarica 250 g
Tempo di ricarica 2 ore circa (a batteria
completamente scarica)
Alimentazione del manipolo batteria Li-Po
Autonomia operativa della batteria Max. 60 min. circa (con batteria
nuova completamente carica)
Fonte luminosa LED Polywave
Lunghezza d‘onda 385 – 515 nm
Radianza luminosa max. 1'200 mW/cm
Operatività 5 min. accesa / 6 min. spenta
Dimensione del manipolo Lung. = 260 x Larg. = 42 x
Alt. = 120 (mm)
Peso del manipolo (batteria incl.) 225 g
Condizioni di trasporto e immagazzinamento:
Temperatura da -20°C a +60°C
Umidità relativa da 10% a 75%
Pressione ambiente da 500 hPa a 1060 hPa
Conservare Bluephase in luogo chiuso e asciutto.
Proteggere da forti scossoni.
Batteria
– Non conservare a temperature superiori i 40°C (o 60°C per un
breve periodo di tempo). Temperatura di conservazione raccoman-
data 15 – 30 °C.
– Conservare le batterie sempre cariche
– e comunque non oltre i 6 mesi.
max. 0.4 A
Produttore: Friwo
®
(a intermittenza)
2
± 10 %
57
Page 58

Estimado cliente,
Una óptima polimerización es un requisito import-
ante para todos los materiales fotopolimerizables
con el fin de realizar duraderas restauraciones de
alta calidad. La lámpara de polimerización seleccio-
nada también juega un papel decisivo a este res-
pecto. Por ello, nos gustaría agradecerle el que
usted haya comprado Bluephase. Bluephase es un
dispositivo médico de alta calidad que ha sido dis-
eñado de acuerdo con los últimos estándares de la
ciencia y tecnología en conformidad con importan-
tes estándares industriales.
Estas instrucciones de uso le ayudarán a poner en
marcha la lámpara de forma segura, aprovechar
todas sus posibilidades y asegurar una larga vida
útil.
Si tuviera usted alguna pregunta adicional, no
dude en contactarnos (consulte las direcciones en
la página del reverso).
Su equipo de Ivoclar Vivadent
58
Page 59

Índice
Producto 60
– Despiece 60
– Indicadores en la base de carga 61
– Indicadores en la pieza de mano 61
Seguridad 62
– Uso previsto 62
– Indicaciones 62
– Aclaración de símbolos 62
– Avisos de seguridad 62
Puesta en marcha 64
– Base de carga 64
– Pieza de mano 64
– Batería 65
– Funcionamiento con cable Click&Cure 66
Funcionamiento 67
– Selección del programa de polimerización y tiempo de polimerización 67
– Función de memoria de polimerización 68
– Inicio 68
– Señales acústicas 68
– Intensidad lumínica 68
– Medición de la intensidad lumínica 68
Mantenimiento y limpieza 69
– Carcasa 69
– Conductos de luz 69
– Contactos de la batería 69
– Desecho 69
¿Qué sucede si…? 70
Garantía 71
Procedimiento en caso de reparación 71
Especificaciones del producto 71
– Forma de suministro 71
– Accesorios 71
– Datos técnicos 71
– Condiciones de funcionamiento 71
– Condiciones de transporte y almacenamiento 71
59
Page 60

Despiece
10
311213 2
5 6 4
11
9 7 8
1 Pieza de mano
2 Interruptor de puesta en marcha
3 Pantalla
4 Tecla de selección de programa
5 Tecla de selección de tiempo
6 Tecla de volumen
7 Indicador de potencia
8 Base de carga
9 Cable eléctrico
10 Unidad de alimentación
11 Batería
12 Conducto de luz 10 mm
13 Cono antideslumbrante
60
Page 61

Indicadores en la base de carga
Indicador se ilumina azul – la base de carga está
conectada a la red
Indicadores en la pieza de mano
Programa de polimerización y estado de funcionamiento
respectivamente
Indicaciones seleccionadas y tiempo de polimerización
respectivamente
Estado de carga de la batería
61
Page 62

Seguridad
Uso previsto
Bluephase es una lámpara de polimerización LED que
produce luz azul de alta energía. Se utiliza para la polimerización de los materiales dentales fotopolimerizables
directamente en el sillón dental. El uso previsto también
incluye la observación de estas instrucciones de uso.
Indicaciones
Con su espectro de banda ancha “multiondas”, Bluephase
está indicada para la polimerización de todos los materiales dentales fotopolimerizables en la franja de longitud
de onda de 385–515 nm. Estos materiales incluyen materiales de restauración, agentes adhesivos, bases, liners,
selladores de fisuras, provisionales, así como materiales
de cementación para brackets y trabajos de laboratorio
tales como inlays de cerámica.
Aclaración de símbolos
Uso no permitido
Símbolos en la lámpara
Doble aislamiento (El dispositivo cumple con
la Clase de Seguridad II)
Protección frente al choque eléctrico
(aparato tipo BF)
Observar las instrucciones de uso
Observar las instrucciones de uso
Precaución
El aparato no se puede eliminar con la
basura doméstica normal. Por favor, visite
la página Web de Ivoclar Vivadent de su
país, para información más detallada sobre
la manera de desechar las lámparas.
Reciclable
Notas de seguridad
Bluephase es un dispositivo electrónico y un producto
sanitario sujeto a las directivas IEC 60601-1 (EN 60601-
1) y EMC, además de las Directivas de Disposi tivos Médicos 93/42/EEC. El aparato cumple con las normas
vigentes de la UE y está clasificado como producto LED
de Clase 2.
NRTL (Nationally Recognized
Testing Laboratory)
El aparato has sido enviado desde el fabricante en condiciones técnicas y de seguridad optimas. Para mantener
dichas condiciones y asegurar un funcionamiento seguro,
se deben tener en cuenta las notas y regulaciones de
estas instrucciones de uso. Para evitar daños al equipo y
riesgos para los pacientes, los usuarios y terceras personas, deben tener en cuenta las siguientes instrucciones
de seguridad.
Los materiales que se polimerizan fuera de la
franja de longitud de onda de 385–515 nm
(hasta la fecha no se conocen). Si usted no
está seguro acerca de cierto productos, por
favor pregunte al fabricante del correspondiente material.
No cargar ni utilizar el aparato cerca de
sustancias inflamables o combustibles.
Los dispositivos de comunicación portátiles o
móviles de alta frecuencia pueden interferir
con el equipamiento médico. No está permitido el uso de teléfonos móviles durante el
funcionamiento de la lámpara.
62
Page 63

Uso y Responsabilidad
– Bluephase solo se puede utilizar para el uso previsto y
cualquier otro uso está contraindicado. No se puede
aceptar responsabilidad por daños que resulten de un
uso inadecuado o de la no observancia de las instrucciones de uso.
– El usuario tiene la responsabilidad de revisar
Bluephase en cuanto a su uso e idoneidad para los
usos previstos. Ello es especialmente importante si se
utilizan al mismo tiempo otros equipos en inmediata
proximidad de Bluephase.
– Utilice únicamente piezas de repuesto y accesorios
originales de Ivoclar Vivadent (ver accesorios). El fabricante no acepta responsabilidad alguna por los daños
que se puedan producir si se utilizan piezas de repuestos y accesorios de otros fabricantes.
– El conducto de luz es una pieza aplicada y puede
alcanzar una temperatura máxima de 45 °C (113 °F)
en el punto de contacto con la pieza de mano durante
su funcionamiento.
Voltaje de funcionamiento
Antes de la conexión, asegúrese de que:
a) el voltaje indicado en la placa de características
cumpla con el suministro energético local.
b) la unidad haya alcanzado la temperatura ambiente.
Si se utilizan por separado la batería y la unidad alimentadora, e.g. durante la puesta en marcha o el funcionamiento con cable Click&Cure, se debe evitar el contacto
con los pacientes o terceras partes. No toque los contactos expuestos de la batería o de la clavija de conexión
(unidad alimentadora).
Supuesto de seguridad perjudicial
Si se sospecha que el funcionamiento ya no puede ser
seguro, se debe desenchufar de la red eléctrica para
evitar un funcionamiento accidental. Esto se podría dar,
por ejemplo, si el aparato está visiblemente dañado o ya
no funciona correctamente. La interrupción completa de
electricidad solo queda asegurada desenchufando el
mismo de la red.
Protección ocular
Se debe evitar la exposición directa o indirecta de los
ojos. La exposición prolongada de las lámparas es desagradable para la vista y puede producir daños. Por ello,
se recomienda el uso de los conos antideslumbrantes
incluidos. Los individuos que por lo general sean sensibles a la luz, los que tomen medicamentos fotosensibili-
zantes o los que se hayan sometido a cirugía ocular, o
las personas que trabajen con el aparato o en su proximidad durante largos períodos de tiempo no deberán
exponerse a la luz de este dispositivo y llevar gafas protectoras (naranjas) que absorben la luz por debajo de los
515 nm.
Batería
Protección: Utilice únicamente piezas de repuestos originales, especialmente baterías de Ivoclar Vivadent y bases
de carga. No cortocircuite la batería. No lo almacene a
temperaturas por encima de los 40º C/104º F (o 60º C/
140º F durante un corto período de tiempo). Siempre
almacene las baterías cargadas. El período de almacenamiento no debe exceder los 6 meses. Puede explotar si
se elimina en fuego.
Por favor, tenga en cuenta que la bateria de polímero de
litio puede reaccionar con explosión, fuego, y producir
humo en caso de una manipulación inapropiada y daños
mecánicos. Baterias de polímero de litio dañadas, no
deben volver a utilizarse
Los electrolitos y gases de electrolitos liberados durante
explosión, fuego y desarrollo de humo son tóxicos y
corrosivos. En caso de contacto con los ojos y piel lavar
inmediatamente con abundante cantidad de agua. Evitar
la inhalación de humos. Acudir a un especilaista inmeditamente en caso de indisposición.
Desarrollo térmico
Al igual que sucede con todas las lámpara de alto rendimiento, la alta intensidad lumínica provoca cierto desarrollo térmico. La prolongada exposición de áreas
próximas a pulpa y tejidos blandos puede provocar
daños irreversibles o reversibles. Por ello, se deben tener
en cuenta los tiempos de polimerización recomendados y
se deben evitar tiempos de polimerización ininterrumpidos de más de 20 segundos sobre la misma superficie
dental, así como el contacto directo con la gingiva, membrana mucosa dental o piel. Si fuera necesario, polimerice
restauraciones indirectas en intervalos intermitentes de
20 segundos cada vez o utilice refrigeración externa con
pistola de aire.
63
Page 64

Puesta en marcha
Revise el suministro en cuanto a su integridad y cualquier posible daño de transporte (ver forma de suministro). Si faltaran componentes o estuvieran dañados,
contacte inmediatamente con su distribuidor o su servicio
técnico local.
Base de carga
Antes de conectar el dispositivo, asegúrese de que el voltaje indicado en la placa de características cumpla con el
suministro energético local. La placa de características
está situada en la parte inferior de la base de carga.
Pieza de mano
Antes de insertar el conducto de luz, retire el folio protector en la correspondiente apertura de la pieza de
mano.
Gire ligeramente el conducto de luz mientras se inserta
en la pieza de mano.
Coloque la estación de carga encima de una mesa adecuada y plana. Retire el folio protector de la clavija de
conexión de la unidad de alimentación. Conecte la clavija
de conexión de la unidad de alimentación en el enchufe
en la parte inferior de la base de carga. Inclínela ligeramente y aplique una ligera presión hasta que escuche
como encaja correctamente.
Conecte el cable eléctrico al suministro energético y a la
unidad de alimentación. El indicador de potencia ON en
el lado izquierdo de la carcasa se ilumina en azul (ver
indicadores en la base de carga).
64
Seguidamente, coloque el cono antideslumbrante en el
conducto de luz.
Page 65

Batería
Recomendamos cargar completamente la batería antes
de su primer uso. Si la batería está completamente cargada, presenta una capacidad de polimerización de aproximadamente 60 minutos.
Deslice la batería recta en la pieza de mano hasta que
escuche que encaja perfectamente.
Colocar la pieza de mano con suavidad en el apoyo
correspondiente de la base de carga. Si se utilizó la
funda, por favor retírela antes de cargar la bateria.
Si fuera posible, utilice la lámpara siempre con una batería completamente cargada, ya que ello prolongará la
vida útil. Por ello se recomienda colocar la pieza de
mano en la base de carga después de cada paciente. El
tiempo de carga para baterias vacias es de 2 horas.
Estado de carga de la batería
Con la pieza de mano conectada, se muestra el actual
estado de carga en la pantalla como sigue:
Batería completamente cargada
(capacidad de polimerización de aproximadamente 60 minutos)
Batería medio llena
Reserva (La última barra en el indicador de
batería está rojo en modo de reserva. La
batería se debe cargar lo antes posible.)
Cuando la bateria se está cargando, aparece
brevemente en el display „Charging Battery“
antes de que la pantalla regrese al modo
stand-by
Batería vacía
Si la batería está completamente vacía, la
pieza de mano se desconecta automáticamente a modo stand-by. La lámpara ya no
se puede conectar y el programa y tiempo
de polimerización tampoco se pueden
ajustar. Sin embargo, la pieza de mano se
puede utilizar en modo de funcionamiento
con cable Click&Cure.
Ya que la batería es un consumible, ésta se debe
re emplazar después de su típico ciclo útil de 2½ años.
Ver etiqueta en la batería para comprobar la edad de la
misma.
65
Page 66

Funcionamiento
Funcionamiento con cable Click&Cure
En cualquier momento se puede utilizar Bluephase con
funcionamiento con cable, pero especialmente si la batería está completamente vacía.
Para dicho fin, retire la batería de la pieza de mano y
seguidamente retire la unidad alimentadora de la parte
inferior de la base de carga. No tire del cable eléctrico.
Inserte la clavija de conexión en la pieza de mano hasta
que oiga y sienta que ha encajado en su posición.
Durante la operación con cable, la base de carga no puede
cargar la batería, ya que no está conectada a una fuente
de energía.
El aparato está completamente desconectado del suministro de alimentación sólo cuando el cable eléctrico ha
sido desconectado del enchufe.
Desinfecte o autoclave las superficies contaminadas de la
lámpara de polimerización, así como los conductos de luz
y conos antirreflectantes antes de cada uso. Además,
asegúrese de que la intensidad lumínica estipulada permita una adecuada polimerización. Para ello, revise el
conducto de luz en cuanto a contaminación o daños, así
como la intensidad lumínica en intervalos regulares (e.g.
con el radiómetro de Ivoclar Vivadent “Bluephase
Meter”).
Selección del programa y tiempo
de polimerización
El programa de polimerización y el tiempo de polimerización se pueden ajustar individualmente. Bluephase está
equipada con los tres siguientes programas de polimerización para las diferentes indicaciones. El programa de
polimerización deseado se selecciona con las teclas de
selección de programa. La pantalla cambia como corresponde (ver indicadores en la pieza de mano).
Después de la primera puesta en marcha, se han predeterminado los siguientes ajustes:
– HIGH (Potencia alta): 10 segundos
– LOW (Potencia baja): 10 segundos
– SOFT (Inicio suave): 15 segundos.
El tiempo de polimerización deseado se elige utilizando
las teclas de selección de tiempo. Los usuarios pueden
elegir entre 5, 10, 15, 20 y 30 segundos.
Tenga en cuenta las instrucciones de uso del material
aplicado a la hora de seleccionar el tiempo de polimerización. Las recomendaciones de polimerización para los
materiales de composites se aplican para todos los colores y, si no se indica lo contrario en las instrucciones de
uso del material pertinente, a un grosor de capa máximo
de 2 mm. Por lo general, estás recomendaciones se aplican a situaciones en las que el extremo del conducto de
luz se coloca directamente sobre el material que se va a
polimerizar. Si se aumenta la distancia entre la fuente de
luz y el material, el tiempo de polimerización se ampliará
de forma correspondiente. Por ejemplo, si la distancia al
material es de 9 mm, la salida efectiva de luz se reduce
en aproximadamente un 50%. En este caso, el tiempo de
polimerización recomendado se debe duplicar.
66
Page 67

Programas de polimerización
Programa HIGH POWER
Consistente alta intensidad lumínica
para la polimerización de materiales
de restauración y cementación para
restauraciones directas e indirectas.
1.200 mW/cm2
0
t [s]
Programa LOW POWER
Reducida intensidad lumínica con
reducido desarrollo térmico para la
polimerización de adhesivos, liners, y
materiales de restauración en áreas
próximas a pulpa al restaurar cavi-
650 mW/cm2
0
dades Clase V.
t [s]
Programa SOFT START
Aumento gradual de la intensidad
lumínica con reducida tensión de
polimerización y reducido desarrollo
térmico para la polimerización de
materiales de restauración.
1.200 mW/cm2
650 mW/cm2
0 5
1) Aplicar hasta un máximo de 2 mm si en las instrucciones de uso no recomiendan ninguna otra
acción (como es el caso, ej. de colores de dentina)
2) Aplicar hasta un máximo de 4 mm si en las instrucciones de uso no recomiendan ninguna otra
acción (como es el caso, ej. de colores de dentina)
t [s]
Intensidad de luz
Tiempo de exposición para composites
Tiempo de exposición para Tetric EvoCeram / IPS Empress Direct
Materiales de restauración
Composite
1)
• 2 mm
IPS Empress Direct / IPS Empress Direct Flow /
Tetric EvoCeram / Tetric EvoFlow / Tetric /
Tetric Basic White / Tetric N-Ceram / Tetric N-Flow
Heliomolar / Heliomolar HB / Heliomolar Flow
Todos los composites convencionales
2)
• 4 mm
Tetric EvoCeram Bulk Fill / Tetric Basic White
Compómeros 3)
Compoglass F / Compoglass Flow
Restauraciones indirectas /
Materiales de cementación
Variolink II Base 4) / Variolink Veneer / Variolink N Base
/ Variolink N Clear Veneer / Variolink Ultra 5) /
Dual Cement 5) / Variolink II
Otros
Helioseal / Helioseal F / Helioseal Clear
Monopaque
MultiCore Flow / Multicore HB
Heliosit Orthodontic
Telio Add-On Flow
Telio Stains
IPS Empress Direct Color
IPS Empress Direct Opaque
Adhesivos
AdheSE / AdheSE One F
ExciTE / ExciTE DSC
Tetric N-Bond / Tetric N-Bond Self-Etch
Heliobond (Syntac)
Materiales provisionales
Telio CS Inlay/Onlay
Systemp.inlay/onlay
Fermit / Fermit N
Telio CS Link / Systemp.link
Otros
Heliosit Orthodontic
Vivaglass Liner
Materiales de restauración
Composite
1)
• 2 mm
IPS Empress Direct / IPS Empress Direct Flow /
Tetric EvoCeram / Tetric EvoFlow / Tetric /
Tetric Basic White / Tetric N-Ceram / Tetric N-Flow
Heliomolar / Heliomolar HB / Heliomolar Flow
Todos los composites convencionales
2)
• 4 mm
Tetric EvoCeram Bulk Fill / Tetric Basic White
Compómeros 3)
Compoglass F / Compoglass Flow
3) Aplicar a un grosor de capa máximo de 3mm
4) Aplicar fotopolimerización (solo en pasta base)
5) Aplicar a polimerización dual
5)
2
1.200 mW/cm
15 seg.
10 seg.
Tiempo de polimerización
10 seg.
15 seg.
10 seg.
20 seg.
4)
por mm cerámica:
10 seg. por segmento
10 seg.
20 seg.
20 seg.
10 seg.
15 seg.
10 seg.
10 seg.
20 seg.
Tiempo de polimerización
10 seg.
10 seg.
10 seg.
10 seg.
20 seg. por segmento
20 seg.
20 seg.
Tiempo de polimerización
15 seg.
20 seg.
15 seg.
20 seg.
67
Page 68

Función de memoria de polimerización
Los últimos ajustes utilizados, junto con la combinación
del programa y tiempo de polimerización, se almacenan
automáticamente.
Inicio
La lámpara se conecta con la tecla “Start”. Una vez
transcurrido el tiempo de polimerización seleccionado, el
programa de polimerización finaliza automáticamente.
Si se desea, la lámpara se puede desconectar antes de
finalizar el tiempo de polimerización ajustado, volviendo
a pulsar la tecla “Start”. El ventilador se activa al mismo
tiempo que la lámpara. Una vez transcurrido el tiempo
de polimerización, el ventilador sigue funcionando durante cierto tiempo para refrigerar el aparato. La batería no
se debe retirar mientras el ventilador siga funcionando.
Señales acústicas
Las señales acústicas son audibles para las siguientes
funciones:
– Inicio (Parada)
– Cada 10 segundos
– Cambio de programa
– Cambio de tiempo de polimerización
– Conexión de la batería a la base de carga
– Inserción de la batería
– Mensaje de error
Si se desea, se puede ajustar el volumen de las señales
acústicas. Para ello, pulse la tecla de volumen azul mientras que la lámpara está apagada y reduzca el volumen o
desconecte las señales acústicas con la tecla de programa izquierda. Si desea conectar de nuevo las señales
acústicas o incrementar el volumen, pulse la tecla azul
de volumen y entonces, pulse la tecla derecha de selección de programa.
Intensidad lumínica
La intensidad lumínica se mantiene a un nivel consistente durante el funcionamiento. Si se utiliza el conducto de
luz adjunto de 10 mm, la intensidad lumínica debe calibrarse a 1200 mW/cm2 ± 10%.
La utilización de otros conductos de luz diferentes de los
suministrados tiene una influencia directa sobre la intensidad lumínica emitida.
En conductos de luz de paredes paralelas (10 mm), el
diámetro es igual en ambos extremos. En conductos de
luz que focalizan (conducto de luz 10>8 mm, conducto
Pin Point 6>2 mm), el diámetro del extremo interior es
mayor que el de la ventana de emisión de luz. Así, el haz
de luz azul incidente se reduce a una superficie más
pequeña, lo que aumenta la intensidad lumínica emitida.
Los conductos de luz Pin-Point están indicados para la
polimerización de zonas reducidas, tales como la fijación
de carillas antes de la eliminación del sobrante de material. Para una polimerización correcta completa, es necesario cambiar el conducto de luz.
Medición de la intensidad lumínica
La intensidad lumínica de Bluephase y el conducto de luz
adjunto de 10 mm se pueden revisar con Bluephase
Meter.
Si el valor medido no se corresponde a la intensidad
lumínica esperada, siga los siguientes pasos:
– Revise el programa de polimerización seleccionado
– Limpie la posible suciedad del fotosensor (radiómetro)
– Retire el conducto de luz y limpie la boquilla de emi-
sión de luz de la pieza de mano con una torunda de
algodón humedecida en alcohol.
– Limpie la posible suciedad del conducto de luz (consultar
mantenimiento y limpieza)
– Reemplace el conducto de luz dañado con uno nuevo.
Si estas medidas no mejoran los resultados, por favor
póngase en contacto con su distribuidor o con su servicio
técnico local.
68
Page 69

Mantenimiento y limpieza
Por razones de higiene, se recomienda utilizar un protector
plástico desechable para cada paciente. Asegúrese de
colocar el protector bien ajustado al conducto de luz. Si no
utiliza protectores plásticos desechables, des infecte las
superficies contaminadas del dispositivo y los conos
antideslumbrantes (FD 366/Dürr Dental, Incidin Liquid/
Ecolab) y esterilice el conducto de luz antes de cada uso.
Durante la limpieza del dispositivo, asegúrese de que
ningún líquido ni sustancia externa penetra en la pieza de
mano, la base de carga y especialmente al transformador
(riesgo de descarga eléctrica). Desconecte la base de carga
de la fuente de alimentación para limpiarla.
Cubierta
Limpie la pieza de mano y el soporte de la pieza de mano
con una solución desinfectante común, libre de aldehídos.
No limpie con soluciones desinfectantes alta mente agresivas (por ejemplo, soluciones a base de aceite de naranja
o con un contenido de etanol superior al 40 %), solventes
(por ejemplo, acetona) o instrumentos punzantes que
podrían dañar o rayar el plástico. Limpie las piezas plásticas
con una solución jabonosa.
Conducto de luz
Antes de limpiar y/o desinfectar el conducto de luz, es
ne cesario realizar un tratamiento previo. Esto se aplica
tanto a la limpieza como a la desinfección, ya sea
automática o manual.
Tratamiento previo
– Quite la suciedad visible inmediatamente después del
uso o dentro de las 2 horas posteriores. Para ello,
enjuague abundantemente el conducto de luz con
agua corriente (durante, por lo menos, 10 segundos).
También puede utilizar una solución desinfectante
libre de aldehídos para evitar que se adhiera la sangre.
– Para eliminar la suciedad en forma manual, utilice un
cepillo de cerdas blandas o un paño suave. Los compuestos parcialmente polimerizados pueden eliminarse
con alcohol y una espátula de plástico, si es necesario.
No utilice objetos afilados o puntiagudos, ya que
podrían rayar la superficie.
Limpieza y desinfección
Para limpiar, sumerja el conducto de luz en una solución
de limpieza y asegúrese de cubrirlo por completo con el
líquido (el ultrasonido o un ligero cepillado con un cepillo
de cerdas blandas podría mejorar el efecto). Se recomienda
utilizar un agente de limpieza enzimático neutro. Al limpiar
y desinfectar, asegúrese de que los agentes utilizados no
contengan:
– ácidos orgánicos, minerales y oxidantes (el valor de pH
mínimo admitido es de 5,5)
– solución alcalina (el valor de pH máximo admitido es
de 8,5)
– agente oxidante (por ejemplo, peróxido de hidrógeno)
Luego, retire el conducto de luz de la solución y enjuáguelo
con abundante agua corriente (durante por lo menos
10 segundos). La limpieza con un desinfectante térmico es
una alternativa eficaz.
Esterilización
Durante la fase de limpieza y desinfección, es imprescindible asegurarse de que la posterior esterilización sea
eficaz. Para ello, utilice únicamente el método de esterilización por autoclave. El tiempo de esterilización (tiempo
de exposición a temperatura de esterilizado) es de
4 minutos, a 134 °C (273 °F); la presión debe ser de
2 bares (29 psi). Seque el conducto de luz esterilizado
con el programa de secado especial del autoclave a vapor
o aire caliente. El conducto de luz ha sido probado para
hasta 200 ciclos de esterilización. Luego, controle que el
conducto de luz no esté dañado. Sujételo a contraluz. Si
los segmentos individuales se ven negros, las fibras de
vidrio están quebradas. En ese caso, cambie el conducto
de luz por uno nuevo.
Contactos de la batería
Para asegurar una conductividad confiable en todo
momento, mantenga los contactos de la batería libres de
posibles agentes contaminantes (por ejemplo, residuos
de composite). Para ello, limpie los contactos utilizados
regularmente durante la desinfección de limpieza normal
(después de cada paciente).
Eliminación
La lámpara de polimerización no debe
desecharse junto con los residuos urbanos.
Elimine las baterías fuera de uso y las lámparas de poli merización de acuerdo con las normas legales correspondientes de su país. Las
baterías no deben incinerarse.
69
Page 70

Mantenimiento y limpieza
Símbolo Causas Subsanar el error
Defecto electrónico en la pieza de
mano o batería
Retire y vuelva a colocar la batería. Si el error persiste,
reemplace la batería con la unidad alimentadora (Click & Cure).
Si el error persiste, por favor contacte con su distribuidor o su
servicio técnico local.
No Display
durante la
carga
El aparato está sobrecalentado o
sobre enfriado
Defecto electrónico en la batería
Batería vacía
Los contactos de carga están
contaminados
Bateria en modo seguridad
(circuito de protección integrado)
Deje que el aparato se refrigere (o que alcance temperatura
ambiente si estuviera sobre enfriado) y vuelva a intentarlo después de un tiempo. Si el error persiste, por favor contacte con
su distribuidor o servicio técnico local.
Retire y vuelva a colocar la batería. Si el error persiste, coloque
el aparato en la base de carga.
Si a pesar de ello, el error persiste, reemplace la batería con la
unidad alimentadora (Click & Cure). Por favor, contacte con su
proveedor o servicio técnico local.
Posición de la pieza de mano en la base de carga.
Aparece brevemente en el display „Charging Battery“ antes de
que la pantalla regrese al modo stand-by. Si la batería no se
carga, se deben limpiar los contactos. Si el error persiste, por
favor contacte con su distribuidor o servicio técnico local.
Revise si la pieza de mano está correctamente colocada en la
base de carga. Limpie los contactos de la batería. Información:
Aparece „Charging Battery“ brevemente en el display antes
que la pantalla regrese al modo stand-by.
Si al limpiar los contactos de la batería no mejoran los resultados, retire la batería del aparato. Cargue la batería independientemente de la pieza de mano en la base de carga durante
aproximadamente 10 minutos. Si el error persiste, por favor
contacte con su distribuidor o su servicio técnico local.
No se
ilumina el
LED de la
base de
carga
70
La unidad alimentadora no está
conectada o está defectuosa
Revise si el cargador está correctamente colocado en la base de
carga (revise también los contactos de carga) o si el cargador
está conectado con el cable a la corriente eléctrica (si funciona
correctamente, los indicadores del cargador están en verdes).
Si el error persiste, por favor contacte con su distribuidor o su
servicio técnico local.
Page 71

Garantía /
Procedimiento en caso de reparación
Forma de suministro
El período de garantía de Bluephase es de 3 años desde
la fecha de compra (1 año para la batería).
Las averías que se produzcan por material defectuoso o
fallos de fabricación se reparan gratis durante el período
de garantía. La garantía no otorga el derecho a recuperar
cualquier daño de material o no material distinto de los
mencionados. El aparato solo se debe utilizar para los
fines previstos. Cualquier otro uso está contraindicado. El
fabricante no acepta responsabilidad derivada de un uso
inadecuado y, en tales casos no se puede aceptar las
reclamaciones de la garantía. Ello es particularmente
válido para:
– daños producidos por una manipulación inadecuada,
especialmente de baterías almacenadas incorrectamente (ver datos técnicos: Condiciones de transporte y
almacenamiento).
– daños de los componentes resultado de utilización
por debajo de los estandares de las condiciones de
funcionamiento (ej baterias)
– daños producidos por influencias externas,
e.g. explosiones, caídas al suelo
– daños producidos de una incorrecta puesta en
marcha o instalación
– daños producidos por conectar el dispositivo a una
red eléctrica cuyo voltaje y frecuencia no cumplan
con las indicadas en la placa de características
– daños producidos por reparaciones inadecuadas o
modificaciones que no hayan sido realizadas por
servicios técnicos autorizados
En caso de reclamación bajo garantía, el aparato completo (pieza de mano, base de carga, cordón eléctrico y unidad alimentadora) se debe enviar portes pagados a su
distribuidor o directamente a Ivoclar Vivadent, junto con
el justificante de compra. Utilice el envase original con
los correspondientes cartones de embalaje para su transporte.
Los trabajos de reparación sólo se pueden realizar en un
servicio técnico autorizado por Ivoclar Vivadent. En el
caso de una avería que no se pueda corregir, por favor
contacte con su distribuidor o servicio técnico local (consultar direcciones en el reverso). Una clara descripción de
la avería o las condiciones bajo las cuales se ha producido la misma, facilitará el diagnóstico del problema. Por
favor, incluya dicha descripción cuando envíe el aparato.
1 Base de carga, 1 Cable eléctrico, 1 Unidad de alimentación, 1 Pieza
de mano, 1 Batería (Li-Po), 1 Conducto de luz de 10 mm, 3 conos antideslumbrantes, Fundas protectoras, 1 juego de instrucciones de uso
Accesorios
Se dispone de los siguientes accesorios para Bluephase
REF Descripción
608537 Conducto de luz 10 mm, negro (G2)
608538 Conducto de luz Pin Point 6>2 mm, negro
551756 Conos antideslumbrantes
592496 Pantalla antideslumbrante
608534 Bluephase base de carga (G2)
608535 Bluephase batería (G2)
608532 Bluephase handpiece (G2)
607922 Bluephase Meter
608554 Bluephase fundas (G2)
Datos técnicos
Voltaje de funcionamiento base de carga 5 VDC
Voltaje de funcionamiento pieza de mano 3.7 VDC con batería
5 VDC con unidad alimentadora
Unidad alimentadora 100-240 VAC / 50-60 Hz / máx. 0.4 A
Fabricante Friwo
Salida 5 VDC
TIPO 15.2630
Condiciones de funcionamiento
Temperatura + 10º C a 35º C (+50 a + 95º F)
Humedad relativa 30% a 75%
Presión ambiente 700 hPa a 1060 hPa
Dimensiones de la base de carga Longitud = 205 x Ancho = 150 x
Altura = 85 (mm)
Peso de la base de carga 250 g
Tiempo de carga apróx. 2 horas (con la batería vacía)
Suministro eléctrico de la pieza de mano batería Li-Po
Máximo tiempo de batería apróx. 60 min. (con una batería
ueva completamente cargada).
Fuente de luz Polywave
Franja de longitud de onda 385–515 nm
Intensidad lumínica máx. 1.200 mW/cm
Funcionamiento 5 min. en funcionamiento /
6 minutos desconectado
(intermitentemente)
Dimensiones de la pieza de mano Longitud = 260 x Ancho = 42 x
Alto = 120 (mm)
Peso de la pieza de mano (batería incl.) 225 g
Condiciones de transporte y almacenamiento:
Temperatura -20º C a +60º C (-4 a 158º F)
Humedad relativa 10% a 75%
Presión ambiente 500 hPa a 1060 hPa
Bluephase se debe almacenar un estancias cerradas y techadas.
Proteja la lámpara de golpes fuertes.
Batería
– No almacenar a temperaturas por encima de 40º C / 104º F
– Almacene siempre la batería cargada
– y nunca más de 6 meses
Especificaciones del
producto
®
LED
2
± 10%
(o 60º C /140º F durante cortos períodos de tiempo). Temperatura
de almacenamiento recomendada 15 – 30 °C (59 – 86 °F).
71
Page 72

Caro cliente,
um endurecimento perfeito constitui a base para
uma restauração de elevada qualidade e de longa
duração de todos os materiais fotopolimerizáveis.
Para esse facto contribui, decisivamente, o aparel-
ho de polimerização escolhido. Por isso, constata-
mos com satisfação que escolheu o Bluephase.
Trata-se de um produto médico de elevada quali-
dade que é fabricado com base nas normas vigen-
tes e segundo os conhecimentos técnicos e
científicos actuais.
As instruções de Uso explicam como se coloca o
aparelho em funcionamento com segurança, como
se podem aproveitar facilmente todas as suas
possibilidades e como se faz uma boa conservação
para poder usá-lo durante muito tempo.
Estamos à sua disposição para qualquer questão
que nos queira colocar (endereços na contracapa)
A sua equipa Ivoclar Vivadent
72
Page 73

Índice
Vista geral de produtos 74
– Lista de peças 74
– Indicações da estação de carregamento 75
– Indicações da peça de mão 75
Segurança 76
– Utilização prevista 76
– Indicação 76
– Símbolos 76
– Recomendações relativas à segurança 76
Colocação em funcionamento 78
– Estação de carregamento 78
– Peça de mão 78
– Bateria 79
– Modo de cabo Click & Cure 80
Operação 81
– Selecção do programa e do tempo de exposição 81
– Função de memória Cure Memory 82
– Iniciar 82
– Sinais acústicos 82
– Intensidade da luz 82
– Medição da intensidade da luz 82
Manutenção e limpeza 83
– Corpo 83
– Condutor de luz 83
– Contactos da bateria 83
– Eliminação 83
E se …. ? 84
Garantia / Procedimento em caso de necessidade de reparação 85
Especificação do produto 85
73
Page 74

Lista de peças
10
311213 2
5 6 4
11
9 7 8
1 Peça de mão
2 Botão de ligar
3 Visor
4 Tecla de selecção do programa
5 Tecla de selecção do tempo
6 Tecla de intensidade sonora
7 Indicador de alimentação eléctrica
8 Estação de carregamento
9 Cabo de ligação à rede
10 Unidade de alimentação
11 Bateria
12 Condutor de luz 10 mm
13 Cone anti-encandeamento
74
Page 75

Indicações da estação de carregamento
IIndicador mostra uma luz azul - A estação de
carregamento está ligada à alimentação eléctrica
Indicações da peça de mão
Programa de exposição ou estado de serviço
Indicação seleccionada ou duração da exposição
Estado de carregamento da bateria
75
Page 76

Segurança
Utilização prevista
O Bluephase é um aparelho de polimerização LED para a
produção de luz azul de alta energia, destinando-se à
polimerização de materiais dentários polimerizáveis
directamente na unidade de tratamento dentária. A
utilização prevista deste aparelho inclui também a
observação das notas e regras que constam destas
instruções de Uso.
Indicação
Com o seu espectro de banda ampla “Polywave®”, o
Bluephase é adequado para a polimerização de todos os
materiais dentários polimerizáveis na faixa de comprimentos de onda de 385 a 515 nm. Destes fazem parte
materiais de obturação, bondings/adesivos, forramentos
da base, forramentos, selantes de fissuras, provisórios
bem como materiais de fixação para brackets e peças
técnico-dentárias como, por exemplo, inlays cerâmicos.
Símbolos
Contra-indicação
Símbolos da luz de polimerização
Isolamento duplo (de acordo com Classe II
de segurança)
Proteção contra choque elétrico (aparelho
tipo BF)
Observe as Instruções de Uso
Recomendações relativas à segurança
O Bluephase é um dispositivo eletrônico e um produto
médico que é sujeito a IEC 60601-1 (EN 60601-1) e às
diretivas da EMC, bem como a Diretiva de Dispositivo
Médico 93/42/EEC. O aparelho está em conformidade
com as normas pertinentes da UE e é classificado como
um produto LED Classe 2.
NRTL (Nationally Recognized
Testing Laboratory)
A lâmpada de cura foi transportada sob condição tecnicamente segura. Para manter esta condição e assegurar
uma operação segura, todas as notas e os regulamentos
destas Instruções de Uso devem ser observados. Para
poder evitar danos ao equipamento e riscos aos
pacientes, usuários e terceiros, as seguintes instruções de
segurança devem ser obedecidas.
Materiais cuja polimerização é activada fora
da faixa de comprimentos de onda de 385 a
515 nm (actualmente não há conhecimento
deste tipo de materiais). Quando não houver
certeza sobre algum produto, por favor, contacte o fabricante do respectivo material.
Observe as Instruções de Uso
Advertência
A lâmpada de cura nunca deve ser descarta-
da no lixo doméstico normal. A informação
relativa ao descarte da luz poderá ser
encontrada na homepage local da Ivoclar
Vivadent.
Reciclável
76
Não carregar ou usar o aparelho perto de
substâncias inflamáveis ou combustíveis.
Equipamentos de comunicação de alta fre-
quência portáteis ou móveis podem interferir
com o equipamento médico. Durante a operação não é permitido o uso de telefones
móveis.
Page 77

Utilização e responsabilidade
– O Bluephase deve ser usado apenas para a finalidade
para a qual foi projectado. Uma utilização diferente
desta ou para além desta é considerada contrária à
utilização prevista. O fabricante não se responsabiliza
por danos resultantes de qualquer utilização que não a
prevista ou de uma manipulação incorrecta.
– Para além disso, o utilizador deverá, ele próprio, veri-
ficar antes da utilização do Bluephase, se este é uti-
lizável e adequado para os fins previstos. Isto é par-
ti-cularmente importante quando, ao mesmo tempo,
for usado na vizinhança um outro equipamento.
– Só podem ser usadas peças sobresselentes e
acessórios originais da Ivoclar Vivadent (ver
acessórios). O fabricante não se responsabiliza por
danos resultantes da utilização de outras peças sobres-
selentes ou outros acessórios.
– A ponteira de luz é uma parte aplicada e pode
aquecer-se a um máximo de 45°C na interface com a
peça de mão durante a operação.
Tensão de serviço
Antes de ligar o aparelho, verifique se
a) a tensão indicada na placa de características
corresponde à tensão da rede de alimentação e
b) o aparelho adquiriu a temperatura ambiente.
Em caso de manuseamento de bateria ou fonte de
alimentação em separado - por exemplo, durante a
colocação em funcionamento ou o trabalho no modo de
cabo Click & Cure - o contacto com o paciente ou terceiros deve ser evitado. Os contactos eléctricos expostos da
bateria e da ficha de ligação (unidade de alimentação)
não devem ser tocados.
Suspeita de segurança afectada
Caso se suspeite que uma operação segura do aparelho
não é possível, desligue o aparelho da bateria ou da rede
e tome as medidas necessárias para prevenir uma
utilização acidental. Este pode ser o caso, por exemplo,
quando o aparelho está visivelmente danificado ou
quando não está a trabalhar correctamente. O aparelho
só está completamente desligado da rede de alimentação
quando o cabo está desligado da tomada.
Protecção dos olhos
Uma exposição direta ou indireta aos olhos deve ser evitada.
A exposição prolongada à luz torna-se desagradável para
os olhos e pode resultar em dano. Assim, o uso dos
escudos anti-ofuscantes, que são fornecidos, é sempre
recomendado. Os indivíduos que são normalmente
sensíveis à luz, que tomam drogas que são fotosensibilizantes, que sofreram cirurgias oculares, ou as
pessoas que trabalham com o aparelho em sua vizinhança,
durante longos períodos de tempo, não devem ficar
expostos à luz deste dispositivo e devem usar óculos de
proteção (laranja), que absorvem luz abaixo de 515 nm.
Bateria
Atenção: Use apenas peças originais, nomeadamente, as
baterias e as estações de carregamento devem ser da
Ivoclar Vivadent.
Não coloque a bateria em curto-circuito. Não guarde a
bateria a temperaturas superiores a 40°C (ou durante um
curto espaço de tempo a 60°C) e guarde-a sempre carregada. Não deve ser guardada mais de 6 meses. Perigo de
explosão quando eliminado no fogo aberto.
Favor observar que a bateria de polímero de lítio pode
reagir com explosão, fogo e desenvolvimento de fumaça,
nos casos de manuseio impróprio e de danos mecânicos.
Baterias de polímero de lítio danificadas não deveriam
mais ser usadas.
Os eletrólitos e vapores de eletrólitos liberados durante a
explosão, o fogo e a fumaça desenvolvida são tóxicos e
corrosivos. No caso de contato com os olhos e pele, lavar
imediatamente com grande quantidade de água. Evitar a
inalação da fumaça. Procurar o médico, em caso de
indisposição.
Formação de calor
Como em todas lâmpadas de potência elevada, a elevada intensidade da luz provoca calor. Uma exposição
prolongada da área próxima da polpa ou do tecido mole
pode provocar danos irreversíveis ou reversíveis. Por isso,
os tempos de exposição devem ser cumpridos. Uma
polimerização contínua superior a 20 segundos na
mesma área e contactos directos com a gengiva, a
mucosa oral e a pele devem ser evitados a todo o custo.
As restaurações indirectas devem ser executadas com
intervalos intermitentes de 20 segundos ou com uma
refrigeração externa por jacto de ar.
77
Page 78

Colocação em funcionamento
Verifique se o aparelho está completo e não sofreu
danos provocados pelo transporte (ver volume de fornecimento). Caso faltem peças ou estejam danificadas, contacte imediatamente o vendedor ou o centro de
assistência da sua área.
Estação de carregamento
Antes de ligar o aparelho, verifique se a tensão indicada
na placa de características corresponde à tensão da rede
de alimentação existente. A placa de características
encontra-se no lado inferior da estação de carregamento.
Peça de mão
Antes da montagem do condutor de luz remova a folha
de protecção da respectiva abertura da peça de mão.
Rode o condutor de luz ligeiramente para introduzi-lo na
peça de mão.
Coloque a estação de carregamento numa superfície
plana adequada.
Remova a folha de protecção da ficha de ligação da unidade de alimentação. Introduza a ficha de ligação da
unidade de alimentação no lado inferior da estação de
carregamento de forma inclinada e exerça uma ligeira
pressão sobre ela até ouvir e sentir que encaixou.
Ligue o cabo de rede à rede de alimentação e à unidade
de alimentação. O indicador de “Power ON” no lado
esquerdo do corpo acende com luz azul (ver indicações
da estação de carregamento).
78
A seguir, coloque o cone anti-encandeamento no
condutor de luz.
Page 79

Bateria
Antes da primeira utilização a bateria deve ser totalmente carregada!
No estado totalmente carregado, a bateria tem uma
capacidade de exposição de aproximadamente 60 minutos.
Introduza a bateria direita na peça de mão até ouvir e
sentir que encaixou.
De um modo suave, colocar a peça de mão no respectivo
descanso da estação de carregamento. Se uma bucha
protetora for usada, é necessário removê-la, antes de
carregar a bateria.
Se possível, use o aparelho sempre com a bateria totalmente carregada - assim irá prolongar a sua vida útil.
Por isso recomenda-se que coloque a peça de mão na
estação de carregamento após cada paciente. O tempo
de carregamento para baterias vazias é de 2 horas.
Estado de carregamento da bateria
O respectivo estado de carregamento é indicado no visor
com a peça de mão activada, da seguinte forma:
Bateria totalmente carregada
(capacidade de exposição de
aproximadamente 60 minutos)
Bateria meia carregada
Reserva
(no modo de reserva a última barra da
indicação de bateria está vermelha.
A bateria deve ser carregada o mais
rapidamente possível.)
Quando a bateria está sendo carregada a
informação: „Charging Battery“ aparece
brevemente no display, antes do display
retornar ao modo „stand-by“.
Bateria descarregada
Quando a bateria estiver totalmente
descarregada, a peça de mão passa automaticamente para o modo standby. A luz
não acende, e nem o programa nem o
tempo de exposição podem ser ajustados.
Mas a peça de mão pode ser usada em
modo de cabo Click & Cure.
A bateria é uma peça de desgaste que, normalmente,
tem de ser substituída passado aproximadamente
2½ anos. A idade da bateria consta no autocolante na
bateria.
79
Page 80

Operação
Modo de cabo Click & Cure
O Bluephase pode trabalhar sempre e, nomeadamente,
em caso de bateria totalmente descarregada, em modo
de cabo.
Para esse efeito, retire a bateria da peça de mão. A
seguir desligue a unidade de alimentação, tirando a ficha
de li-gação do lado inferior da estação de carregamento.
Não puxe pelo cabo de rede.
Insira a ficha directamente na peça de mão até ouvir e
sentir o encaixe correcto.
Durante a operação a estação de carregamento não pode
carregar a bateria.
O aparelho só estará desligado totalmente da corrente
quando o cabo estiver fora da tomada.
As superfícies contaminadas do aparelho, como os condutores da luz e os cones anti-encandeamento, devem ser
desinfectadas ou autoclavadas, antes de cada utilização.
Além disso, verifique se a intensidade da luz permite uma
polimerização satisfatória. Inspeccione o condutor de luz
regularmente, para detectar eventuais sujidades ou danificações, e verifique a intensidade da luz (por exemplo, com
o radiómetro “Bluephase Meter” da Ivoclar Vivadent).
Selecção do programa e do tempo
de exposição
O programa e o tempo de exposição podem ser ajustados
individualmente. O Bluephase dispõe de 3 programas de
exposição que permitem fazer aplicações diferentes.
O programa de exposição pretendido é seleccionado
através dos botões de selecção do programa. O visor
muda o seu aspecto (ver também indicações na peça de
mão).
Da primeira vez que o aparelho é colocado em serviço, ele
irá apresentar a seguinte configuração, pré-ajustada na
fábrica:
– HIGH (High Power): 10 segundos
– LOW (Low Power): 10 segundos
– SOFT (Soft start): 15 segundos
O tempo de exposição pretendido é seleccionado com os
botões de selecção do tempo. Podem ser seleccionados 5,
10, 15, 20 e 30 segundos.
Para seleccionar o tempo de polimerização, consulte o
folheto informativo do material aplicado.
Nos compósitos os tempos de exposição recomendados
referem-se a todas as cores e a camadas com espessuras
máx. de 2 mm, salvo recomendação diferente nos
folhetos informativos do material em questão. Estas
recomendações são aplicáveis, de uma maneira geral, a
exposições em que a janela de emissão da luz do condutor da luz esteja directamente sobre o material que se
pretende polimerizar. Conforme aumenta a distância, os
tempos de exposição têm de ser mais prolongados. Com
uma distância de 9 mm a intensidade efectiva da luz fica
reduzida para aproximadamente 50 %, de modo que o
tempo de exposição recomendado tem de ser duplicado.
80
Page 81

Programas de Cura
Programa HIGH POWER
Intensidade de luz permanentemente
elevada para a polimerização de
materiais de obturação e fixação
em caso de restaurações directas e
indirectas
1.200 mW/cm2
0
t [s]
Programa LOW POWER
Intensidade de luz reduzida com
temperatura mais baixa para a polimerização de adesivos, liner e materiais de obturação na área
próxima da polpa, para o tratamento
650 mW/cm2
0
de cavidades da classe V
t [s]
Programa SOFT START
Aumento gradual da intensidade de
luz com uma tensão de contracção
reduzida e temperatura mais baixa
para a polimerização de materiais de
obturação
1.200 mW/cm2
650 mW/cm2
0 5
1) Válido para camadas com espessura máxima de 2 mm contanto que as Instruções de Uso
do respectivo material não registram outra recomendação (poderá ser o caso, p.ex., com as
cores de dentina).
2) Válido para camadas com espessura máxima de 4 mm contanto que as Instruções de Uso
do respectivo material não registram outra recomendação (poderá ser o caso, p.ex., com as
cores de dentina).
t [s]
Intensidade de luz
Tempo de exposição para compósitos
Tempo de exposição para Tetric EvoCeram
Materiais de restauração
Compósitos
1)
• 2 mm
IPS Empress Direct / IPS Empress Direct Flow /
Tetric EvoCeram / Tetric EvoFlow / Tetric /
Tetric Basic White / Tetric N-Ceram / Tetric N-Flow
Heliomolar / Heliomolar HB / Heliomolar Flow
Todos os compósitos convencionais
2)
• 4 mm
Tetric EvoCeram Bulk Fill / Tetric Basic White
Compômeros 3)
Compoglass F / Compoglass Flow
Restaurações indiretas /
Materiais de Cimentação
Variolink II Base 4) / Variolink Veneer / Variolink N Base
/ Variolink N Clear Veneer / Variolink Ultra 5) /
Dual Cement 5) / Variolink II
Diversos
Helioseal / Helioseal F / Helioseal Clear
Monopaque
MultiCore Flow / Multicore HB
Heliosit Orthodontic
Telio Add-On Flow
Telio Stains
IPS Empress Direct Color
IPS Empress Direct Opaque
Adhesive
AdheSE / AdheSE One F
ExciTE / ExciTE DSC
Tetric N-Bond / Tetric N-Bond Self-Etch
Heliobond (Syntac)
Materiais provisórios
Telio CS Inlay/Onlay
Systemp.inlay/onlay
Fermit / Fermit N
Telio CS Link / Systemp.link
Diversos
Heliosit Orthodontic
Vivaglass Liner
Materiais de restauração
Compósitos
1)
• 2 mm
IPS Empress Direct / IPS Empress Direct Flow /
Tetric EvoCeram / Tetric EvoFlow / Tetric /
Tetric Basic White / Tetric N-Ceram / Tetric N-Flow
Heliomolar / Heliomolar HB / Heliomolar Flow
Todos os compósitos convencionais
2)
• 4 mm
Tetric EvoCeram Bulk Fill / Tetric Basic White
Compômeros 3)
Compoglass F / Compoglass Flow
3) Válido para camadas com espessura máxima de 3 mm.
4) Válido para fotopolimerização (usar somente a pasta base).
5) Para polimerização dual.
/ IPS Empress Direct
4)
5)
2
1.200 mW/cm
15 seg.
10 seg.
Tempo de cura
10 seg.
15 seg.
10 seg.
20 seg.
por mm cerâmica
:
10 seg.
por segmento
10 seg.
20 seg.
20 seg.
10 seg.
15 seg.
10 seg.
10 seg.
20 seg.
Tempo de cura
10 seg.
10 seg.
10 seg.
10 seg.
20 seg. por segmento
20 seg.
20 seg.
Tempo de cura
15 seg.
20 seg.
15 seg.
20 seg.
81
Page 82

Função memória e cura
A última regulação usada é guardada automaticamente
na combinação programa e tempo de exposição.
Inicio
A lâmpada é ligada com o botão Iniciar. Decorrido o
tempo de exposição seleccionado, o programa de
exposição termina automaticamente. Se desejar desligar
a luz antes de ter decorrido o tempo fixado, pressione
novamente o botão de ligar. O ventilador é activado
simultaneamente com a luz. No fim do tempo de
exposição, este ainda continua activo, para arrefecer o
aparelho. Enquanto estiver a funcionar o ventilador, a
bateria não deve ser retirada.
Sinais acústicos
Sinais acústicos são emitidos nas seguintes funções:
– Iniciar (Parar)
– De 10 em 10 segundos
– Mudança de programa
– Mudança do tempo de exposição
– Ligação da bateria à estação de carregamento
– Inserção da bateria
– Mensagem de erro
Se desejado, o volume de som dos sinais acústicos pode
ser regulado. Para esse efeito, com a luz desligada,
prima o botão azul do nível sonoro (ver Vista geral de
produtos), e com o botão de selecção do tempo (lado
esquerdo) reduza o volume de som ou desligue o som
totalmente. Para ligar os sinais acústicos novamente ou
para aumentar o volume de som, prima o botão azul do
nível sonoro e, a seguir, o botão de selecção do tempo
(lado direito).
Intensidade da luz
A intensidade da luz mantém-se constante durante a
operação do aparelho. No condutor de luz de 10 mm
ornecido, a intensidade da luz foi calibrada em
1200 mW/cm2 +/- 10%.
O uso do condutor de luz diferente daquele que foi
fornecido tem uma influência direta na intensidade de
luz emitida.
Nos condutores de luz de paredes-paralelas (10 mm), o
diâmetro é igual nas duas extremidades. Nos condutores
de focagem de luz (condutor de luz 10>8 mm, condutor
de luz Pin-Point 6>2 mm), o diâmetro da extremidade
traseira do condutor é maior que aquele da janela de
emissão de luz. Deste modo, a luz azul incidente será
empacotada em uma superfície menor. Isto promove o
aumento da intensidade da luz que será emitida.
Os condutores de luz Pin-Point são adequados para a
cura em áreas confinadas, como na fixação de facetas,
antes da remoção dos excessos. Para completar a polimerização, entretanto, será necessário trocar o condutor
de luz.
Medição da intensidade de luz
A intensidade de luz do Bluephase e do condutor de luz
de 10 mm fornecido pode ser controlada, por exemplo,
com o radiómetro “Bluephase Meter”.
Se o valor medido não corresponder à intensidade de luz
esperada:
– Verifique o programa de exposição seleccionado
– Limpe o sensor óptico do radiómetro que eventual-
mente pode estar sujo
– Remova o condutor de luz e limpe a abertura de saída
da luz na peça de mão com um cotonete embebido em
álcool
– Limpe o condutor de luz eventualmente sujo (ver
manutenção e limpeza)
– Substitua o condutor de luz eventualmente danificado
por um novo
Se estas medidas não produzirem o resultado desejado,
contacte o seu vendedor ou o centro de assistência da
sua área.
82
Page 83

Manutenção e limpeza
Por razões de higiene, recomendamos o uso de uma
barreira de proteção descartável para cada paciente.
Certifique-se de ajustar a barreira protetora perfeitamente
à ponteira de luz. Desinfetar superfícies contaminadas do
dispositivo e dos cones anti-dispersão (uma solução
alcoólica, sem aldeídos ou fenóis por ex. FD 366/Dürr Dental, Incidin Liquid/Ecolab) e esterilize a ponteira de luz
antes de cada uso se luvas protetoras descartáveis não
forem utilizadas. Certifique-se de que líquidos e outras substâncias estranhas não entrem na peça de mão, no porta
peça de mão e, particularmente, na fonte de energia
durante a limpeza (risco de choque elétrico). Desconecte a
base de recarga da tomada quando for limpála.
Carcaça
Limpe a peça de mão e o suporte da peça de mão com
um lenço com uma solução desinfetante sem aldeído
usual. Não limpe com soluções desinfetantes altamente
agressivas (por exemplo, soluções à base de óleo de laranja ou com um teor de etanol superior a 40%), solventes
(por exemplo, acetona), ou instrumentos de pontas, os
quais podem danificar ou arranhar o plástico. Limpe as
peças plásticas sujas com uma solução de sabão.
Ponteira de luz
Antes de limpar e/ou desinfetar a ponteira de luz, ela
deverá ser prétratada. Isso se aplica tanto à limpeza e
desinfecção automática quanto manual.
Pré-tratamento
– Remover a contaminação grosseira imediatamente
após a sua utilização, ou no prazo de 2 horas. Para
este fim, enxaguar bem a ponteira de luz em água cor-
rente (por pelo menos 10 segundos). Como alternativa,
usar uma solução desinfetante sem aldeído adequada
para impedir a fixação do sangue.
– Para eliminar a contaminação manualmente, use um
pincel ou pano macios. Compósito parcialmente poli-
merizado pode ser removido com álcool e espátula
plástica, se necessário. Não use objetos pontiagudos
ou cortantes, pois podem riscar a superfície.
Limpeza e desinfecção
Para a limpeza, coloque a ponteira de luz em uma solução
de limpeza e certifique-se que ela esteja suficientemente
coberta com líquido (ultra-som ou escove cuidadosamente
com uma escova macia possa potencializar o efeito). Um
agente de limpeza enzimático neutro é recomendado. Ao
limpar e desinfetar, por favor, certifique-se de que os
agentes utilizados não contenham:
– ácidos orgânicos, minerais e oxidantes (o valor de
pH mínimo admissível é 5,5)
– soluções alcalinas (o valor de pH máximo admissível é
8,5)
– agentes oxidantes (por ex. peróxido de hidrogênio)
Depois, remova a ponteira de luz da solução e lave bem
com água corrente fresca (por pelo menos 10 segundos).
Limpar em um desinfetador térmico é uma alternativa
eficaz.
Esterilização
Uma limpeza e desinfecção minuciosa são imperativas
para garantir que a esterilização subsequente seja eficaz.
Utilize apenas esterilização em autoclave para esta finalidade. O tempo de esterilização (tempo de exposição à
temperatura de esterilização) é de 4 minutos a 134 ° C, a
pressão deverá ser de 2 bar. Seque a ponteira de luz
esterilizada utilizando o programa de secagem especial
da sua autoclave a vapor ou ar quente. A ponteira de luz
foi testada até 200 ciclos de
esterilização.
Depois disso, verifique a ponteira de luz quanto a danos.
Segure-a contra a luz. Se os segmentos individuais aparecem em preto, fibras de vidro estão partidas. Se este
for o caso, substitua a ponteira de luz por uma nova.
Contatos da bateria
Para assegurar uma condutividade confiável em todo
momento, mantenha os contatos da bateria sem
qualquer contaminação possível (por ex. resíduos de
compósitos). Para esta finalidade, limpe os contatos
afetados regularmente durante a desinfecção usual com
lenços umedecidos (após cada paciente).
Descarte
A lâmpada de cura não deve ser descartada
como lixo urbano. Descarte as baterias e lâmpadas de polimerização inutilizáveis de acordo
com os requisitos legais correspondentes em
seu país. Baterias não podem ser incineradas.
83
Page 84

E se …. ?
Símbolo Causa do problema Solução
Defeito electrónico na peça de
mão ou na bateria
Remova a bateria e introduza-a novamente. Se o defeito persistir, substitua a bateria pela fonte de alimentação (Click & Cure).
Se o defeito ainda continuar, contacte o seu vendedor ou o
centro de assistência da sua área.
O carregamento não
é indicado
no visor.
O aparelho está demasiado
quente ou demasiado frio
Defeito electrónico bateria
Bateria descarregada
Os contactos de carregamento
estão sujos.
Bateria em modo de segurança
(circuito protetor integrado).
Deixe arrefecer o aparelho (ou se este estiver demasiado frio,
deixe-o adquirir temperatura ambiente), espere algum tempo e
tente novamente. Se o defeito persistir, contacte o seu vendedor
ou o centro de assistência da sua área.
Remova a bateria e introduza-a novamente. Se o aparelho
continuar a indicar um defeito, coloque-o na estação de
carregamento.
Se, mesmo assim, o defeito persistir, substitua a bateria pela
alimentação (Click & Cure). Por favor, contacte o seu vendedor ou o
centro de assistência da sua área.
Posicionar a peça de mão na base de carga. A informação:
„Charging Battery“ aparece brevemente no display, antes do
display retornar ao modo „stand-by“.
Se a bateria não carregar, limpe os contactos. Se o defeito
persistir, contacte o seu vendedor ou o centro de assistência da
sua área.
Verifique se a peça de mão se encontra correctamente inserida
na estação de carregamento. Limpe os contactos da bateria.
Informação: „Charging Battery“ aparece brevemente no display,
antes do display retornar ao modo „stand-by“.
Se a limpeza dos contactos da bateria não der os resultados
desejados, retire a bateria do aparelho. Separada da peça de
mão, carregar a bateria na estação de carregamento, durante
aprox. 10 minutos. Se o defeito persistir, contacte o seu vendedor
ou o centro de assistência da sua área.
fonte de
O LED da
estação de
carrega-
mento não
acende.
84
A unidade de alimentação não
está ligada ou tem algum
defeito.
Verificar se a unidade de alimentação está corretamente posicionada na estação de carregamento (também confira os contatos
de carregamento) ou se a unidade de alimentação está conectada ao suprimento de força através do cabo de força (display da
unidade de alimentação acende a luz verde quando está
trabalhando de modo correto).
Se o defeito persistir, contacte o seu vendedor ou o centro de
assistência da sua área.
Page 85

Garantia / Procedimento em caso
de necessidade de reparação
A garantia para o Bluephase é de 3 anos (bateria 1 ano),
a partir da data de compra.
Em caso de avarias provocadas por defeitos de material
ou fabrico, a garantia abrange a reparação gratuita do
aparelho. Para além disso, a garantia não concede o
direito à indemnização de eventuais danos materiais ou
morais. O aparelho deve ser usado apenas para a finalidade para a qual foi projectado. Uma utilização diferente
desta ou para além desta é considerada contrária à utilização prevista. Os danos daí resultantes não são
abrangidos pela garantia ou pela responsabilidade civil.
Nestes danos incluem-se, nomeadamente:
– Danos provocados por um manuseamento incorrecto,
o que se aplica, nomeadamente, a baterias não cor-
rectamente guardadas (ver Dados Técnicos: Condições
de transporte e armazenagem)
– Danos em peças que durante o funcionamento normal
estão sujeitas ao desgaste (por exemplo, a bateria).
– Danos provocados por influências exteriores, por
exemplo, impacto, queda ao chão
– Danos provocados por uma montagem ou instalação
errada
– Danos provocados pela ligação a uma tensão ou
frequência diferente daquela que é indicada na placa
de características.
– Danos provocados por modificações e reparações
incorrectas que não foram realizadas por uma entidade
autorizada.
Num caso de garantia, envie o aparelho completo (peça
de mão, estação de carregamento, bateria, cabo de rede
e unidade de alimentação) dentro da embalagem
original, juntamente com a prova de compra, isento
de custos de envio, ao revendedor ou directamente à
Ivoclar Vivadent.
Qualquer tipo de reparação deve ser executado, exclusivamente, por um centro de assistência Ivoclar Vivadent
qualificado. Se o aparelho tiver um defeito que não pode
resolver, contacte o seu vendedor ou o centro de
assistência da sua área (endereços na contracapa). Uma
descrição clara do defeito ou das circunstâncias que
levaram ao defeito facilita a localização da avaria. Por
favor, junte esta descrição ao seu aparelho.
Especificação do produto
Forma de apresentação
1 estação de carregamento, 1 cabo de rede, 1 unidade de alimentação, 1 peça de mão, 1 bateria (LiPo), 1 condutor de luz de 10 mm,
3 cones anti-encandeamento, Buchas de proteção, 1 conjunto de
instruções de Uso
Acessórios
Para o seu Bluephase existem os seguintes acessórios:
REF Designação
608537 Condutor de luz 10 mm preto (G2)
608538 Condutor de luz Pin-Point 6/2 mm preto (G2)
551756 (Cones) anti-encandeamento
592496 Escudo anti-encandeamento
608534 Estação de carregamento (G2)
608535 Bateria Bluephase (G2)
608532 Peça de mão Bluephase (G2)
607922 Radiómetro Bluephase Meter
608554 Invólucros de protecção Bluephase (G2)
Dados técnicos
Tensão de serviço estação de carregamento 5 VDC
Tensão de serviço peça de mão 3.7 VDC com bateria
5 VDC com fonte de alimentação
Unidade de alimentação 100–240 VAC / 50-60 Hz / máx. 0.4 A
Fabricante Friwo
Saída 5 VDC
Tipo 15.2630
Condições de operação
Temperatura +10 °C a +35 °C
Humidade relativa 30 % a 75 %
Pressão atmosférica 700 hPa a 1060 hPa
Dimensões da estação de carregamento C = 205 mm; L = 150 mm;
A = 85 mm
Peso da estação de carregamento 250 g
Tempo de bateria aprox. 2 horas (com bateria
descarregada)
Alimentação eléctrica peça de mão bateria LiPo
Tempo de exposição máx. aprox. 60 minutos
(com bateria nova e totalmente
carregada)
Fonte de luz „Polywave
Faixa de comprimentos de onda 385 – 515 nm
Intensidade de luz máx. 1.200 mW/cm
Operação 5 min. ligado /
6 min. desligado (intermitente)
Dimensões da peça de mão C = 260 mm; L = 42 mm,
A = 120 mm
Peso da peça de mão (inc. bateria) 225 g
Condições de transporte e armazenagem:
Temperatura -20 °C a +60 °C
Humidade relativa 10 % a 75 %
Pressão atmosférica 500 hPa a 1060 hPa
Guarde o Bluephase em ambientes fechados ou cobertos.
Não exponha o aparelho a fortes vibrações.
Bateria
– não guardar a temperaturas superiores a 40°C (ou durante um
curto espaço de tempo a 60°C), recomenda-se a conservação a
15 – 30 °C.
– sempre carregada
– e não mais que 6 meses
®
“ LED
2
± 10 %
85
Page 86

Appendix
Guidance and manufacturer‘s declaration - electromagnetic emission
The “Bluephase (G2)” is intended for use in the electromagnetic environment specified below. The customer or the user of the “Bluephase (G2)”
should assure that it is used in such an environment.
Emission test
RF emissions CISPR 11
RF emissions CISPR 11
Harmonic emissions IEC 61000-3-2
Voltage fluctuations / flicker emissions
IEC 61000-3-3
Compliance
Group 1
Class B
Class A
Complies
Guidance and manufacturer‘s declaration - electromagnetic immunity
The “Bluephase (G2)” is intended for use in the electromagnetic environment specified below. The customer or the user of the “Bluephase (G2)”
should assure that it is used in such an environment.
Immunity test
Electrostatic
discharge (ESD)
IEC 61000-4-2
Electrical fast
transient/burst
IEC 61000-4-4
Surge
IEC 61000-4-5
Voltage dips, short
interruptions and
voltage variations
on power supply
input lines
IEC 61000-4-11
Power frequency
(50/60 Hz) magnetic
field IEC 61000-4-8
NOTE: UT is the a.c. mains voltage prior to application of the test level.
IEC 60601 test level
± 6 kV contact
± 8 kV air
± 2 kV for power supply lines
± 1 kV for input/output lines
± 1 kV line - line
± 2 kV line - earth
<5 % U
T
(>95 % dip in UT) for 0.5 cycle
40 % U
T
(60 % dip in UT) for 5 cycles
70 % U
T
(30 % dip in UT) for 25 cycles
<5 % U
T
(>95 % dip in UT) for 5 sec
3 A/m
Electromagnetic environment - guidance
The “Bluephase (G2)” uses RF energy only for its internal function. Therefore, its RF emissions are very low
and are not likely to cause any interference in nearby electronic equipment.
The “Bluephase (G2)” is suitable for use in all establishments, including domestic establishments and
those directly connected to the public low-voltage power supply network that supplies buildings used for
domestic purposes.
P < 75W (pass without test)
P < 75W (pass without test)
Compliance level
± 6 kV contact
± 8 kV air
± 2 kV for power supply lines
± 1 kV for input/output lines
± 1 kV line - line
no prot. earth
<5 % U
T
(>95 % dip in UT) for 0.5 cycle
40 % U
T
(60 % dip in UT) for 5 cycles
70 % U
T
(30 % dip in UT) for 25 cycles
<5 % U
T
(>95 % dip in UT) for 5 sec
30 A/m
Electromagnetic environment - guidance
Floors should be concrete or ceramic tile. If floors are covered with synthetic material,
the relative humidity should be at least 30%.
Mains power quality should be that of typical commercial or dental environment.
Mains power quality should be that of typical commercial or dental environment.
Mains power quality should be that of typical commercial or dental environment. If the
user of the „Bluephase (G2)“ requires continued operation during power mains interrup
tions, it is recommended that the „Bluephase (G2)“ be powered from an uninterruptible
power supply or battery.
Power frequency magnetic fields should be at levels characteristic of a typical location in
a typical commercial or dental environment.
-
86
Page 87

Guidance and manufacturer‘s declaration - electromagnetic immunity
The “Bluephase (G2)” is intended for use in the electromagnetic environment specified below. The customer or the user of the “Bluephase (G2)”
should assure that it is used in such an environment.
Immunity test
Conducted RF
IEC 61000-4-6
Radiated RF
IEC 61000-4-3
IEC 60601 test level
3 V
rms
150 kHz to 80 MHz
3 V/m
80 MHz to 2.5 GHz
Compliance level
10 V
10 V/m
Electromagnetic environment - guidance
Portable and mobile RF communications equipment should not be used closer to any part
of the „Bluephase (G2)“, including cables, than the recommended separation distance
caculated from the equation applicable to the frequency of the transmitter.
Recommended separation distance
d = 0.35
P
d = 0.35 P 80 MHz to 800 MHz
d = 0.70P 800 MHz to 2.5 GHz
where P is the maximum output power rating of the transmitter in watts (W) according to
the transmitter manufacturer and d is the recommended separation distance in meters (m).
Field strengths from fixed RF transmitters, as determined by an electromagnetic site
a
survey,
should be less than the compliance level in each frequency range.
Interference may occur in the vicinity of equipment marked with the following symbol:
b
NOTE 1: At 80 MHz and 800 MHz, the higher frequency range applies.
NOTE 2: These guidelines may not apply in all situations. Electromagnetic propagation is
affected by absorption and reflection from structures, objects and people.
a
Field strengths from fixed transmitters, such as base stations for radio (cellular/cordless)
telephones and land mobile radios, amateur radio, AM and FM radio broadcast and TV
broadcast cannot be predicted theoretically with accuracy. To assess the electromagnetic
Recommended separation distances between portable and mobile RF communications
environment due to fixed RF transmitters, an electromagnetic site survey should be
considered. If the measured field strength in the location in which the „Bluephase (G2)“
is used exceeds the applicable RF compliance level above, the „Bluephase (G2)“ should
be observed to verify normal operation. If abnormal performance is observed, additional
measures may be necessary, such as reorienting or relocating the „Bluephase (G2)“.
b
Over the frequency range 150 kHz to 80 MHz, field strength should be less than 10 V/m.
equipment and the “Bluephase (G2)”
The “Bluephase (G2)” is intended for use in the electromagnetic environment in which radiated RF disturbances are controlled.
The customer or the user of the “Bluephase (G2)” can help prevent electromagnetic interference by maintaining a miminum distance between portable
and mobile RF communications equipment (transmitters) and the „Bluephase (G2)“ as recommended below,
according to the maximum output power of the communication equipment.
Rated
maximum
output power
of transmitter
W
0.01
0.1
1
10
100
For transmitters rated at a maximum output power not listed above, the recommended
separation distance d in metres (m) can be determined using the equation applicable to
the frequency of the transmitter, where P is the maximum output power rating of the
transmitter in watts (W) according to the transmitter manufacturer.
NOTE 1: At 80 MHz and 800 MHz, the separation distance for the higher frequency
range applies.
NOTE 4: These guidelines may not apply in all situations. Electromagnetic propagation is
affected by absorption and reflection from structures, objects and people.
Separation distance according to
frequency of transmitter
m
150 kHz to
80 MHz
d = 0.4 P
0.04
0.13
0.40
1.3
4.0
80 MHz to
800 MHz
d = 0.4 P
0.04
0.13
0.40
1.3
4.0
800 MHz to
2.5 GHz
d = 0.7 P
0.07
0.22
0.70
2.2
7.0
87
Page 88

Ivoclar Vivadent – worldwide
Ivoclar Vivadent AG
Bendererstrasse 2
FL-9494 Schaan
Liechtenstein
Tel. +423 235 35 35
Fax +423 235 33 60
www.ivoclarvivadent.com
Ivoclar Vivadent Pty. Ltd.
1 – 5 Overseas Drive
P.O. Box 367
Noble Park, Vic. 3174
Australia
Tel. +61 3 979 595 99
Fax +61 3 979 596 45
www.ivoclarvivadent.com.au
Ivoclar Vivadent Ltda.
Alameda Caiapós, 723
Centro Empresarial Tamboré
CEP 06460-110 Barueri – SP
Brazil
Tel. +55 11 2424 7400
Fax +55 11 3466 0840
www.ivoclarvivadent.com.br
Ivoclar Vivadent Inc.
1-6600 Dixie Road
Mississauga, Ontario
L5T 2Y2
Canada
Tel. +1 905 670 8499
Fax +1 905 670 3102
www.ivoclarvivadent.us
Ivoclar Vivadent (Shanghai)
Trading Co., Ltd.
2/F Building 1, 881 Wuding Road,
Jing An District
200040 Shanghai
China
Tel. +86 21 6032 1657
Fax +86 21 6176 0968
www.ivoclarvivadent.com
Ivoclar Vivadent Marketing Ltd.
Calle 134 No. 7-B-83, Of. 520
Bogotá
Colombia
Tel. +57 1 627 33 99
Fax +57 1 633 16 63
www.ivoclarvivadent.co
Ivoclar Vivadent SAS
B.P. 118
F-74410 Saint-Jorioz
France
Tel. +33 450 88 64 00
Fax +33 450 68 91 52
www.ivoclarvivadent.fr
Ivoclar Vivadent GmbH
Dr. Adolf-Schneider-Str. 2
D-73479 Ellwangen, Jagst
Germany
Tel. +49 (0) 79 61 / 8 89-0
Fax +49 (0) 79 61 / 63 26
www.ivoclarvivadent.de
Wieland Dental + Technik
GmbH & Co. KG
Schwenninger Strasse 13
D-75179 Pforzheim
Germany
Tel. +49 (0) 72 31 / 37 05-0
Fax +49 (0) 72 31 / 35 79 59
www.wieland-dental.com
Ivoclar Vivadent Marketing
(India) Pvt. Ltd.
503/504 Raheja Plaza
15 B Shah Industrial Estate
Veera Desai Road, Andheri (West)
Mumbai, 400 053
India
Tel. +91 (22) 2673 0302
Fax +91 (22) 2673 0301
www.ivoclarvivadent.in
Ivoclar Vivadent s.r.l.
Via Isonzo 67/69
40033 Casalecchio di Reno (BO)
Italy
Tel. +39 051 611 35 55
Fax +39 051 611 35 65
www.ivoclarvivadent.it
Ivoclar Vivadent K.K.
1-28-24-4F Hongo
Bunkyo-ku
Tokyo 113-0033
Japan
Tel. +81 3 6903 3535
Fax +81 3 5844 3657
www.ivoclarvivadent.jp
Ivoclar Vivadent Ltd.
12F W-Tower, 1303-37
Seocho-dong, Seocho-gu,
Seoul 137-855
Republic of Korea
Tel. +82 (2) 536 0714
Fax +82 (2) 596 0155
www.ivoclarvivadent.co.kr
Ivoclar Vivadent S.A. de C.V.
Av. Insurgentes Sur No. 863,
Piso 14, Col. Napoles
03810 México, D.F.
México
Tel. +52 (55) 50 62 10 00
Fax +52 (55) 50 62 10 29
www.ivoclarvivadent.com.mx
Ivoclar Vivadent Ltd.
12 Omega St, Rosedale
PO Box 303011 North Harbour
Auckland 0751
New Zealand
Tel. +64 9 914 99 99
Fax +64 9 914 99 90
www.ivoclarvivadent.co.nz
Ivoclar Vivadent Polska Sp.
z o.o.
Al. Jana Pawla II 78
00-175 Warszawa
Poland
Tel. +48 22 635 54 96
Fax +48 22 635 54 69
www.ivoclarvivadent.pl
Ivoclar Vivadent Marketing Ltd.
Prospekt Andropova 18 korp. 6/
office 10-06
115432 Moscow
Russia
Tel. +7 499 418-03-00
Fax +7 499 418-03-10
www.ivoclarvivadent.ru
Ivoclar Vivadent Marketing Ltd.
Qlaya Main St.
Siricon Building No.14, 2
Office No. 204
P.O. Box 300146
Riyadh 11372
Saudi Arabia
Tel. +966 1 293 83 45
Fax +966 1 293 83 44
www.ivoclarvivadent.com
Ivoclar Vivadent Pte. Ltd.
171 Chin Swee Road
#02-01 San Centre
Singapore 169877
Tel. +65 6535 6775
Fax +65 6535 4991
www.ivoclarvivadent.com
nd
Floor
Ivoclar Vivadent S.L.U.
c/ Emilio Muñoz Nº 15
Entrada c/ Albarracin
E-28037 Madrid
Spain
Tel. + 34 91 375 78 20
Fax + 34 91 375 78 38
www.ivoclarvivadent.es
Ivoclar Vivadent AB
Dalvägen 14
S-169 56 Solna
Sweden
Tel. +46 (0) 8 514 93 930
Fax +46 (0) 8 514 93 940
www.ivoclarvivadent.se
Ivoclar Vivadent Liaison Office
: Tesvikiye Mahallesi
Sakayik Sokak
Nisantas’ Plaza No:38/2
Kat:5 Daire:24
34021 Sisli – Istanbul
Turkey
Tel. +90 212 343 08 02
Fax +90 212 343 08 42
www.ivoclarvivadent.com
Ivoclar Vivadent Limited
Ground Floor Compass Building
Feldspar Close
Warrens Business Park
Enderby
Leicester LE19 4SE
United Kingdom
Tel. +44 116 284 78 80
Fax +44 116 284 78 81
www.ivoclarvivadent.co.uk
Ivoclar Vivadent, Inc.
175 Pineview Drive
Amherst, N.Y. 14228
USA
Tel. +1 800 533 6825
Fax +1 716 691 2285
www.ivoclarvivadent.us
Date information prepared: 2013-04 / Rev. 5
611502/WE1
 Loading...