

Page 1

User Manual
Questions?
Need Some Help?
This manual should help you
understand your new product.
If you still have questions,
visit our website:
www.ioncamera.com
Link Us:
www.facebook.com/ioncamera
Tweet Us:
www.twitter.com/ioncamera
Page 2

FCC STATEMENT
Caution Statement
“Modifications not approved by the party responsible for compliance could void the user’s
authority to operate the equipment.”
Instruction Statement
NOTE: This equipment has been tested and found to comply with the limits for a Class B
digital device, pursuant to Part 15 of the FCC Rules. These limits are designed to provide
reasonable protection against harmful interference in a residential installation. This
equipment generates, uses and can radiate radio frequency energy and, if not installed and
used in accordance with the instructions, may cause harmful interference to radio or
television reception, which can be determined by turning the equipment off and on, the user
is encouraged to try to correct the interference by one or more of the following measures:
• Reorient or relocate the receiving antenna.
• Increase the separation between the equipment and receiver.
• Connect the equipment into an outlet on a circuit different from that to which the receiver is
connected.
• Consult the dealer or an experienced radio/ TV technician for help.
WARNING: THE MANUFACTURER IS NOT RESPONSIBLE FOR ANY RADIO OR TV
INTERFERENCE CAUSED BY UNAUTHORIZED MODIFICATIONS TO THE DEVICE. ANY
SUCH MODIFICATIONS COULD VOID THE USER’S AUTHORITY TO OPERATE THE
EQUIPMENT.
For EU only
www.ioncamera.com EN - 2
Page 3

READ THIS FIRST
Trademark Information
Microsoft® and Windows® are U.S. registered trademarks of Microsoft Corporation.
Pentium® is a registered trademark of Intel Corporation.
iPhone, iPad, Macintosh is a trademark of Apple Inc.
MicroSDTM is a trademark.
Other names and products may be trademarks or registered trademarks of their respective
owners.
Product Information
Product design and specifications are subject to change without notice. This includes primary
product specifications, software, and user's manual. This User Manual is a general reference
guide for the product.
The product and accessories that come with your iON camera may be different from those
described in this manual. This is due to the fact that different retailers often specify slightly
different product inclusions and accessories to suit their market requirements, customer
demographics, and geographical preferences. Products very often vary between retailers
especially with accessories such as chargers, memory cards, cables, pouches, mounting
accessories and language support. Occasionally a retailer will specify a unique product color
and appearance. Contact your dealer for precise product definition and included accessories.
The illustrations in this manual are for the purpose of explanation and may differ from the
actual design of your iON
The manufacturer assumes no liability for any errors or discrepancies in this user manual.
camera.
www.ioncamera.com EN - 3
Page 4

SAFETY INSTRUCTIONS
Read and understand all Warnings and Cautions before using this product.
Warnings:
__________________________________________
Make sure the PODZ is completely sealed before use. If foreign objects or
water have entered the camera, turn the power off.
Continued use may cause an injury. Please call our customer services department
for assistance.
__________________________________________
If the camera has been dropped or its case has been damaged, turn the power
off.
Continued use may cause an injury. Please call our customer services department
for assistance.
__________________________________________
There are no user serviceable parts for the camera: DO NOT DISSASSEMBLE!
For repair, please call our customer services department for assistance.
__________________________________________
Do not place the camera on unstable surfaces.
This may cause the camera to fall or tilt over, causing damage.
__________________________________________
www.ioncamera.com EN - 4
Page 5

Cautions:
__________________________________________
A camera is a precision instrument. Do not drop, strike, or use excessive
force when handling the camera.
This may cause damage to the camera.
__________________________________________
Do not use the camera in humid, steamy, smoky, or dusty places.
This may cause fire or electric shock.
__________________________________________
Do not leave the camera in places where the temperature may rise
significantly such as inside a car.
This may adversely affect the case or the parts inside.
__________________________________________
Before you move the camera, disconnect cords and cables.
Failure to do this may damage cords and cables.
__________________________________________
This is an extreme sports video product.
Please be careful when using this product, falling on the camera may cause bodily
injury
__________________________________________
www.ioncamera.com EN - 5
Page 6
CONTENT
INTRODUCTION................................................................................................. 8
Overview........................................................................................................ 9
Package Contents ....................................................................................... 11
GETTING TO KNOW YOUR CAMERA............................................................ 12
GETTING STARTED ........................................................................................ 12
Charging the Battery.................................................................................... 12
Inserting MicroSD Card ............................................................................... 13
Setting Date & Time……………………………………………………… ......... 14
CAR MODE....................................................................................................... 15
Attach the Camera to the Suction Mount..................................................... 15
Install the Suction Mount &Camera in a vehicle .......................................... 16
Recording in Car Mode (Power on/off) ...................................................... 17
Car Mode Files and Recording Details........................................................ 18
Car Mode File Protection ............................................................................. 19
VIDEO CAMERA (DV) MODE .......................................................................... 20
Power on and off in DV Mode...................................................................... 20
Recording Videos in DV Mode..................................................................... 20
Still Photos in DV Mode ............................................................................... 21
Mounting Your Camera................................................................................ 21
RESETTING THE CAMERA............................................................................. 22
USING THE PODZ............................................................................................ 22
AUTO ROTATION ............................................................................................ 23
GPS................................................................................................................... 24
SEALING YOUR CAMERA TO PREVENT WATER DAMAGE....................... 24
CONNECTING CAMERA TO A COMPUTER .................................................. 25
Running the iON Software ........................................................................... 25
Browsing the Files & Transferring Them to A PC ........................................ 26
Changing the Camera Settings.................................................................... 27
Linking to iON Websites and Cloud Service ................................................ 30
Firmware Update & Installation.................................................................... 31
CONNECTIING THE CAMERA TO A TV......................................................... 33
Connecting the Camera to TV in Car mode................................................. 33
Connecting the Camera to TV in DV mode ................................................. 34
Recording Video with TV in DV mode ......................................................... 35
www.ioncamera.com EN - 6
Page 7

Playing Back Video Files with TV in DV mode ............................................ 36
Changing TV Language............................................................................... 37
Deleting Video Files with TV........................................................................ 38
Formatting the MicroSD Card with TV ......................................................... 39
SIGNING UP FOR FREE iON CLOUD STORAGE.......................................... 40
USING KINOMAP SOFTWARE ....................................................................... 42
Installing the Software ................................................................................. 42
Explanation of the Main Screen................................................................... 46
Starting Up................................................................................................... 48
Importing a Video......................................................................................... 50
Playing a Video............................................................................................ 54
Creating a New Project................................................................................ 56
Saving the Current Video as a Project......................................................... 58
Opening a Project ........................................................................................ 59
Changing Map View and Checking Map Information................................... 62
Introduction of Statistic Chart....................................................................... 66
Synchronizing the Video and GPS .............................................................. 67
Changing the Software Language ............................................................... 69
Uploading a Track to Kinomap Webpage .................................................... 70
SPECIFICATION .............................................................................................. 74
SYSTEM REQUIREMENTS ............................................................................. 76
TROUBLESHOOTINGS ................................................................................... 77
www.ioncamera.com EN - 7
Page 8

INTRODUCTION
Overview
Thank you for purchasing the iON Adventure camera. The Adventure is a dual
purpose camera for both in car and action video use. The in car function allows
you to record whilst driving and capture your journey whilst also recording your
location information using the built in GPS. The in car function also allows you to
use the camera for “incident capture”. When in DV mode your camera can be used
as a camcorder or sports video camera for your in-or outdoor activities. With iON's
unique CamLOCK™ mounting system, you can easily detach the camera from your
car and carry it along for your adventure or sport activities.
Accepts two MicroSD cards
HD recording – Up to 1080p resolution
Simple operation with one press capture.
Records excellent videos in low light environment
Waterproof to 10m or 30ft
Long battery life approx. 2 hrs when fully charged at 720p.
120 degree wide-angle field of view.
Approx.139g weight.
Captures high resolution photos
Compatible with all types of iON PODZ accessories, including Wi-Fi and
Remote
Built-in GPS adds geo-information to your files.
Incident capture functionality.
www.ioncamera.com EN - 8
Page 9
Loop recording mode.
8GB FREE iON Cloud storage
Compatible with other iON mounting systems
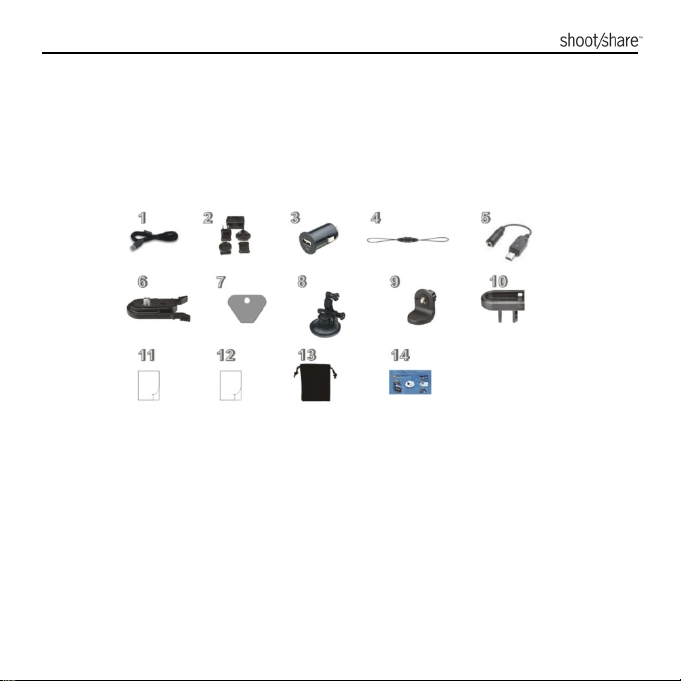
Package Contents
Carefully unpack the iON Adventure and ensure that you have the following items:
1. USB Cable
2. Universal Power Adapter
3. Dual USB Car Adapter
4. Secure Strap
5. USB to AV Adapter
6. CamLOCK™
7. CamLOCK™ Key
8. Suction Mount
9. L-Tripod Adapter
10. CamLOCK™ Slot-Car
11. Warranty Card
12. Quick User Guide
13. Pouch
14. Mi-media Card
www.ioncamera.com EN - 9
Page 10

Common (Optional) Accessories:
MicroSD or MicroSDHC card up to 128 GB (Class 6 or higher recommended.)
The memory card is required to have at least 8GB free space. A 32GB or above
card is recommended for the car recording features.
Note: Please check your computer to make sure a card larger than 32GB can be
read.
www.ioncamera.com EN - 10
Page 11

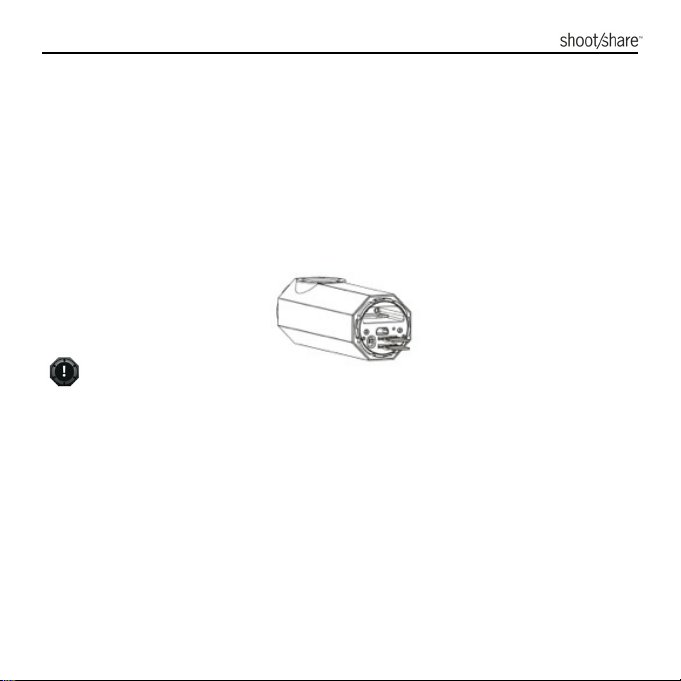
GETTING TO KNOW YOUR CAMERA
1. LED Light Guide
2. REC/STOP Button
3. Wide Angle Lens
4. PODZ
5. Strap vent
6. Tripod Socket
7. PODZ Socket
8. Reset Button
9. MicroSD Slot for CAR
10. MicroSD Slot for DV
11. Mini USB Slot
12. Mode Switch
13. PODZ Latch
www.ioncamera.com EN - 11
Page 12

GETTING STARTED
Charging the Battery
The embedded 1200mAh Li-Polymer Battery in the Adventure camera can be
recharged quickly allowing you hours of recording time.
To charge the battery
1. Charge your camera through the USB cable connected to a USB2.0 computer
port, the AC adapter (included) on wall socket power, DC Car adapter
(included) or any 5V 1A AC/DC adapter.
2. The LED indicator lights RED when the camera is charging.
3. The Red LED will turn OFF once the battery is fully charged. It takes about 2
hours to initially charge the camera. Subsequent charges take approximately
2 hours.
When the battery power is low, the camera will vibrate three times to indicate
the low battery.
The camera will vibrate for 2 seconds to indicate it’s out of power. The camera
will automatically save the file if it is recording and turn off.
If the camera does not charge, please contact our help line for assistance as
you should not attempt to remove the internal battery. Doing so, will void your
warranty coverage and can possibly damage the camera.
www.ioncamera.com EN - 12
Page 13
Inserting MicroSD Card (not included)
The Adventure supports MicroSD cards up to 128GB (Class 6 or higher cards are
recommended) which allows you to take High Definition (HD) Video for
approximately 4 hours (1080p 30 fps or 720p 60 fps). If there is no MicroSD card in
the camera, the Red and Blue LED will flash alternatively and continuously.
To insert a MicroSD card
The camera has two MicroSD card slots, one for CAR mode and the other for DV
mode. A MicroSD card (not included) must be inserted in at least one of the slots
to use your camera.
There is only one direction to insert the MicroSD card into the slot. Do not force
the card into the card slot as it may damage both the camera and the MicroSD
card.
Camera power must be OFF when inserting or removing a card. Files or the
card may be corrupted if a card is inserted or ejected whilst power is on.
A new MicroSD card should be formatted before use. For instructions on how
to format the card, please refer to the Section “CONNECTING CAMERA TO A
TV” or use your computer’s native formatting facilities.
www.ioncamera.com EN - 13
Page 14

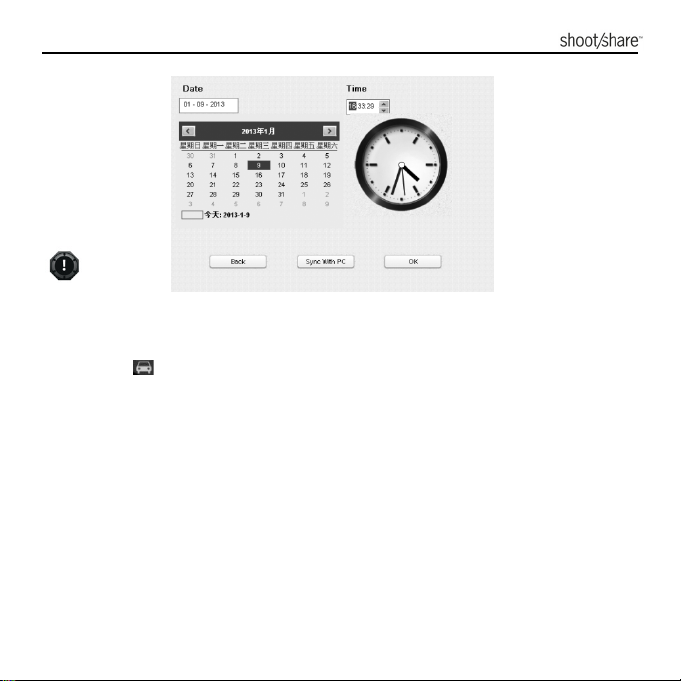
Setting Date & Time
You can set the camera’s clock with the iON application software (resident on the
camera) to ensure that your video and photo files are saved with the correct date/
time information.
To set up the camera clock
1. Turn the camera power on.
2. Connect the camera to a Mac or Windows computer USB 2.0 port using the
USB cable.
3. 3 new Removable Devices will be added to MS Windows “Computer” or Mac
“Finder.” Open the device named “ION (X)” and run iON_win.exe on Windows
or the device named “ION” and run iON_mac.app on Mac.
(The letter “X” depends upon what other devices are already attached to your
computer.)
4. Find the “Date & Time” at the bottom of the Settings Window and click “Set”.
5. Adjust the date and time manually or click “Sync with PC” to set the camera
time to the same time as your PC clock.
6. Click “OK” to save the settings.
7. Disconnect your camera from the PC immediately after setting date/time to
ensure the date & time is set correctly.
www.ioncamera.com EN - 14
Page 15
Please note the user interface may vary with further firmware upgrades.
CAR MODE
CAR mode ( ) lets you capture the scenery along your drive as well as preserve a
record of any unexpected incidents. Recording operates in a loop, overwriting the
oldest files once the card is full. Files can be manually protected from delete and are
automatically protected if the G-Sensor detects a hard brake or collision.
Attach the Camera to the Suction Mount
1. Fit the screw of the CamLOCK™ to the tripod socket on the camera.
2. Tighten the CamLOCK™ screw.
3. Loosen and remove the top screw from the car mount.
4. Attach the CamLOCK™ Slot to the top of the car mount and reinstall the screw.
5. Slip the CamLOCK™ (on the camera) into the CamLOCK™ Slot.
6. Press the CamLOCK™ sides to release and slide the camera off the suction
mount for on the go use.
www.ioncamera.com EN - 15
Page 16

Installing the Suction Mount & Camera into a Vehicle
1. Stop the engine and make sure your car is parked in a safe location.
2. Press the car mount onto the windshield and push the PRESS button to remove
the air between the windshield and car mount.
3. Pull down on the handle of the car mount to tighten
the seal.
4. The camera is designed to mount behind or under the
rear view mirror. The lens of camera should be
positioned at the center of the front windshield. Take
care not to block the driver’s visibility.
5. Connect the camera to the DC Power jack in your car
with included USB cable and USB car adapter.
Secure the cable if it is too loose so it will not interfere
with driver motion.
6. Loosen and retighten the screws on the car mount to adjust the camera’s
orientation.
Caution When Installing the Camera
Installing or operating the product while you are driving may cause an accident.
Stop your car in a safe location to install or operate the product.
Dust in the cigarette jack may cause excessive heat or fire. Clean it
periodically.
Frequently check whether the camera and mount are installed securely. The
camera or mount may fall due to vibrations and result in personal injury or
damage to the product.
The manufacturer is not liable for any product damage or personal injuries that
occur due to accident or carelessness.
www.ioncamera.com EN - 16
Page 17
Recording in CAR Mode (Power on/off)
1. Slide the Mode Switch to the Car
2. Make sure a MicroSD card has been installed into the CAR slot. The memory
card is required to have at least 8GB free space. A 32GB or above card is
recommended for the car recording features.
Note: Please check your computer to make sure a card larger than 32GB can
be read.
3. Press and hold the PWR/REC/STOP
the camera on and start recording.
4. When connected to the car’s power supply, the camera will detect the
movement of your car to power on and start recording automatically.
Note: You can turn on the camera manually by pressing and holding
case it cannot be powered on automatically.
5. When the camera is not connected to any power supply or if you want to start
recording before driving, press and hold PWR/REC/STOP
and start recording.
6. The camera is always recording when ON in CAR mode.
7. A short vibration indicates recording has started. The LED indicator
illuminates in RED throughout the recording.
position to set it to CAR mode.
button until the LED lights up to turn
in
to power on
www.ioncamera.com EN - 17
Page 18
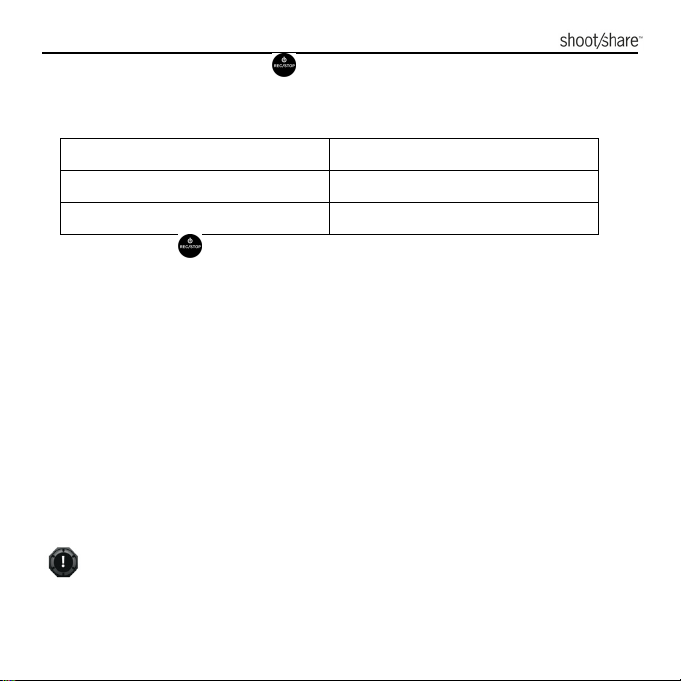
8. To take a still shot, press once. The camera will take either a 1MP or
2MP still photo depending on the current video resolution setting. Still
photos are saved in the folder 100EMERG.
Video Resolution Setting Corresponding Photo Resolution
1080p 2MP
720p 1MP
9. Press and hold to stop the recording and turn the camera off.
Car Mode Files and Recording Details
Video file recording in CAR mode operates in a loop, creating successive files of 5
minutes in 720p and 3 minutes in 1080p. When the camera detects a memory full
situation with only enough space for protected files remaining, the next file will
overwrite the oldest file to make sure the recording function is always on.
1. The default video resolution for CAR Mode is 720p. You can change the
resolution through the iON Application Software.
2. Files recorded in CAR Mode are saved in the DCMI\10XMOTOR folder on the
memory card.
3. The files are named with the format YYYYMMDD_XXXX.MP4 or JPG. YYYY,
MM, DD represent the year, month and day of the recording. XXXX is 4
successive numeric digits.
You can playback video with GPS information using the Kinomap software
www.ioncamera.com EN - 18
Page 19

(downloaded separately). Please refer to section “USING KINOMAP
SOFTWARE” for details on how to use the Kinomap software.
Please visit http://ion.kinomap.com/ to download the Kinomap software.
Car Mode File Protection
Files will be protected from the looping delete if the G-sensor detects a hard brake
or collision. You can adjust the sensitivity of the G-sensor through the software. The
current recording file can be protected manually by pressing
1. Protected files are saved in the 100EMERG folder.
2. Protected files are also named as YYYYMMDD_XXXX.MP4 or JPG. YYYY, MM,
DD represent the year, month and day of the recording. XXXX represents 4
successive numeric digits.
3. The maximum space for storing protected videos and photos is 4GB. When the
upper limit is reached, file protection and the still photo function are disabled
unless some or all files are cleared from the 100EMERG folder.
4. If the file protection function is triggered, the camera is able to preserve at least
3GB of space for protected files when recording regular Car Mode looping
video files.
5. The camera will flash twice every 10 seconds to indicate the space for protected
files is about to be full. Clear or back up files immediately to make space for
new files.
6. If you notice unexpected protected files, adjust the G-Sensor sensitivity using
the iON Application Software.
twice quickly.
www.ioncamera.com EN - 19
Page 20

VIDEO CAMERA (DV) MODE
In DV mode ( ) your camera operates as a regular HD action camera. With iON’s
unique CamLOCK™ system, optional attachments and waterproof casing, it is
ready for all your sports activities. Unlike Car mode, Video file recording in DV mode
does not operate in a loop. DV mode has a Standby ON state and video recording
does not start as soon as the camera is turned on.
Power on and off in DV Mode
1. Slide the mode switch to the camera
2. Make sure a MicroSD card has been installed into the DV slot. You will need a
minimum Class 6 MicroSD card for HD recording
3. Press and hold the PWR/REC/STOP
the Blue LED lights up.
4. To turn the camera off, press and hold the PWR/REC/STOP
camera will vibrate for two seconds and the Blue LED will turn off.
Recording Videos in DV Mode
1. Press and hold
in BLUE to show the camera is on and in standby mode
2. Quick press
the LED indicator illuminates RED throughout recording.
3. Press
4. The default video resolution is 1080p. You can change the resolution through
www.ioncamera.com EN - 20
button during recording to stop the recording. Or, press and hold
button to stop the recording and turn the camera off.
button to turn the camera on. The LED indicator illuminates
button once to start recording. The camera will vibrate once and
position to set the camera to DV mode.
button until the camera vibrates and
button. The
Page 21

the iON application software.
There will be around 1-2 seconds delay before the camera starts recording.
You can playback the video with GPS information using the Kinomap software
(to be downloaded separately). Please refer to section “USING KINOMAP
SOFTWARE” for details about how to use the Kinomap software.
Please visit http://ion.kinomap.com/ to download the Kinomap software.
Still Photos in DV Mode
When the camera is in DV mode, still Photo capture is only possible when the
camera is under the control of the iON Remote & Remote PODZ or a Wi-Fi
connected iON App & Wi-Fi PODZ. The Remote PODZ Kit and Wi-Fi PODZ
Connect Kit are sold separately.
Please refer to the User Guides of these products for detailed operation instructions
or visit www.ioncamera.com
The Still Photo function is disabled during video recording.
The default photo mode is “single shot”. Burst mode gives you a continuous 10
photo shots to capture that “can’t miss” moment. Time Lapse mode takes a
series of photos at 5, 10, 30 or 60-second intervals. To change the still photo
mode, please refer to section“CONNECTING CAMERA TO A COMPUTER”.
Mounting Your Camera
Use the included L-Tripod Adapter to change the tripod socket direction to suit your
www.ioncamera.com EN - 21
Page 22

mounting purpose.
The camera is also compatible with most of the other iON
CamLOCK™ mounts for individual sports activities. View the full
line of kits and review their User Guides, for complete
information, visit www.ioncamera.com
.
RESETTING THE CAMERA
Press the Reset button with a thin and blunt object to reset the camera.
USINGTHE PODZ
PODZ is a series of accessories that work with your camera and provide additional
functions. Insert the PODZ into the PODZ
PODZ
– Basic back cover to seal your camera
Wi-Fi PODZ – Provides wireless capability to your camera. (Sold Separately)
Remote PODZ
– Control your camera via a remote. (Sold Separately)
Battery PODZ – Extends the battery time of your camera. (Sold Separately)
www.ioncamera.com EN - 22
socket of the camera for immediate use.
Page 23
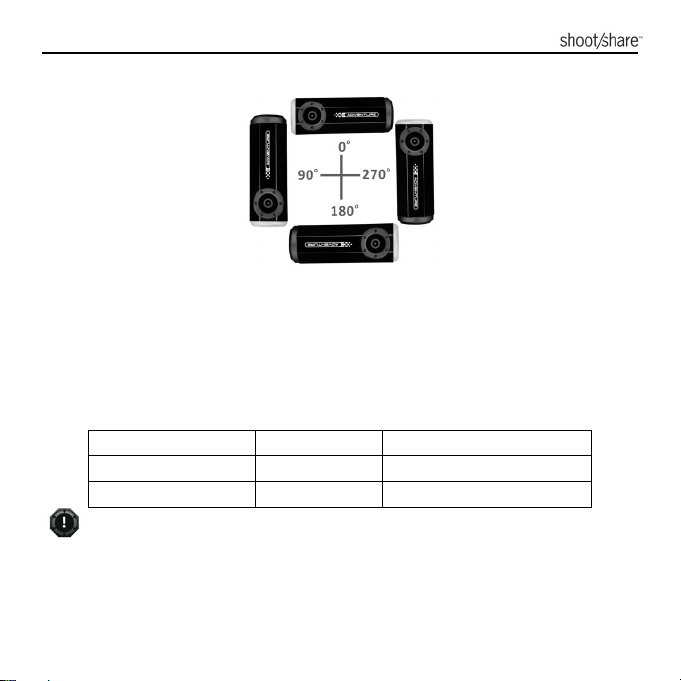
AUTO ROTATION
The camera has a built-in G-sensor that detects the camera’s orientation. When
Auto Rotation is ON, you can rotate your camera before recording begins to 90
o
180
or 270o from the default position (refer to the table) and the recorded view will
be rotated in the same angle. This lets you mount the camera in a different
orientation without recording a rotated or inverted view. Video resolution is adjusted
when rotated in 90
Video Resolution 0
The 90
Auto Rotation affects video only, not still photos.
Adjust your camera orientation before you start video recording. Orientation
detection cannot be activated during recording.
www.ioncamera.com EN - 23
o
or 270o.
o
or 180o 90o or 270o (DV only)
1080P 1920x1080 608x1080
720P 1280x720 416x720
o
and 270o auto rotation functions are available in DV mode only.
o
,
Page 24

Auto Rotation is ON by default. You can turn it OFF through the “General
settings” in the iON Application Software, please refer to the Section
“CONNECTING CAMERA TO A COMPUTER.
GPS
The camera has built-in GPS to capture geo-information in photo and video files.
GPS data capture in video/photo files is always on and is not configurable. The first
time you use your camera it will take around 30 to 60 seconds to capture the
satellite signal. After the initial use it will only take about 10 seconds to locate the
satellite signal at power on. Trees, buildings or any high constructions may block
the GPS reception and affect its accuracy. The GPS signal may be completely
blocked indoors or in shielded areas.
SEALING YOUR CAMERA TO PREVENT WATER DAMAGE
The waterproof housing allows you to operate the camera up to 10 meters or 30 feet
under water. You must seal the camera with the basic PODZ (included) or another
PODZ accessory to protect the camera when using it in wet or moist conditions.
The rubber seal on the PODZ forms the waterproof
barrier to protect the camera in wet and underwater
conditions. You must keep this seal clean as a
single strand of hair or grain of sand can cause a
leak into the product.
After every use in salt water, make sure to rinse the
outside of the product and the seal with clean fresh
water and dry thoroughly. Failure to do so will result
in product corrosion and seal decay leading to permanent product damage and
failure.
www.ioncamera.com EN - 24
Page 25

Please ensure you install and lock the PODZ correctly before using the camera to
avoid water damage. Failure to properly seal your camera can result in leaks that
damage or destroy your camera. Your warranty does not cover water damage
resulting from user's misuse or neglect.
1. Attach the PODZ to the back of the camera and rotate clockwise until the dots
are aligned as the picture.
2. Slide the latch on the PODZ to lock it.
CONNECTING CAMERA TO A COMPUTER
Running the iON Software
The camera is Plug & Play compatible with Windows & Mac for connection as a
mass storage device, allowing you to easily transfer photo/video files to the
computer. Run the on board iON Application Software to change the camera’s
settings.
Both the Windows iON.exe and Mac iON_mac.app Software Application come
installed on the camera.
1. Turn the camera on.
2. Connect the camera to a Mac or Windows computer USB 2.0 port using the
USB cable.
3. If you are a windows user, three new Removable Devices will be added to MS
Windows “Computer”. Open the drive named “ION (X)” and find iON_win.exe,
double click it to run the app;
(The letter “X” depends upon what other devices are already attached to your
computer.)
www.ioncamera.com EN - 25
Page 26

If you are a Mac user, Use “Finder” to locate and open the drive named “ION”
and find iON_mac.app, double click it to run the .app.
If you cannot find the mass storage locations on your PC, try unplugging the
cable from the computer, turn the camera on and off once and reconnect it to
computer. Most Windows computers will activate an auto play wizard. Mac
Computers may cause Finder to bounce.
Browsing the Files & Transferring Them to A PC
The camera has two MicroSD card slots, one for CAR mode and the other for DV
mode. Please make sure at least one of the two card slots of your camera have
been installed a MicroSD card with 2MB free space.
1. Windows Software Application
1) Click the “Browse Files” icon
a) If both of the two slots are installed with MicroSD cards. Three new
Removable Devices window will pop up. Double click the 2nd drive to
browse the files stored on the SD card located in the CAR slot or the 3rd
Drive to browse the files stored on the SD card located in the DV slot.
b) If only one of the two slots have been installed with a MicroSD card. The
file folders in the MicroSD card will pop up directly.
c) If no card is installed in the camera, it will open the “ION (X)” drive.
2) Click the corresponding folder, the saved photo or video files will be displayed
on the browser. Double click a photo or video file to preview the content.
3) Copy or Move the files to your PC hard drive to store them on your computer or
share them with social media websites or via email.
www.ioncamera.com EN - 26
Page 27

2. Mac Software Application
Click “Browse Files” icon, it will enter file folder selection box, you can locate and
open your targeted file stored on your computer.
Changing the Camera Settings
The iON Adventure’s camera settings can be changed by utilizing the iON software.
Simply click on the options in the DV, Car
or General menus.
Set up on DV menu
Click the “DV” menu to select the desired
Video resolution, Photo resolution and
Photo mode. The active mode will be
highlighted.
Note: When the photo mode is “Burst”, the
photo resolution is fixed at 3MP and cannot
be changed to 8MP.
www.ioncamera.com EN - 27
Mode Options
Video Resolution 1080p, 720p60, 720p30
Time Lapse 5, 10, 30, 60 seconds
Photo Resolution
Photo Mode
8MP, 3MP
Single, Burst, Time Lapse
Page 28

Set up on Car menu
Click the “Car” menu to select the desired video resolution. The active mode will be
highlighted.
When the “Video Resolution” is 1080p, “Video Length” is fixed at “3 min”.
When the “Video Resolution” is 720p, both “3 min” and” 5 min” are available for the
video length options.
www.ioncamera.com EN - 28
Page 29

Setting up the General menu
Click the “General” menu to select various general settings for the camera. The
active mode will be highlighted.
Mode Options
Video Resolution 1080p, 720p
Photo Resolution
Video Length
Sensitivity low, medium, high
2MP, 1MP
3min, 5 min (Only available for
720p)
www.ioncamera.com EN - 29
Page 30

Resetting the camera to the default settings:
Clicking “Reset All” the camera will return to all default settings.
Mode Option
TV Type PAL, NTSC
English, French , German, Italian ,
Language
Auto Power Off Off, 1, 3 Minutes
Auto Rotation On ,Off
Date & Time Date, Time, Sync with PC
Japanese, Spanish, Korean,
Simplified Chinese and Traditional
Chinese
Linking to iON Websites and Cloud Service
You can access more iON information by clicking the icons at the top
iON Official Website
iON Cloud Website
www.ioncamera.com EN - 30
Page 31

iON Facebook Page
Twitter Page
iON
iON Kinomap Page
Firmware Update and Installation
In order to keep your camera performance at its best, regularly check for new
firmware updates and install them on your camera. Before you update the firmware,
make sure your camera is connected to an internet accessible computer.
To perform a firmware check and update
1. Open the iON software.
2. The iON software will automatically detect if a new firmware version is available.
When a new firmware version is detected,
a) If you are a Windows user, the notification “New Firmware version detected”
will pop up. Click the “OK button”, the details on the version number and points
of enhancement will be displayed.
b) If you are a Mac user, the “What’s new” dialogue box will pop up displaying
the details on the version number and points of enhancement.
3. Click the “Download” button and the new firmware will be downloaded to the
“ION(X)” disk if you are a Windows user or to the “ION” disk if you are a Mac
user.
(The letter “X” depends upon what other devices are already attached to your
computer.)
4. A notification will be given when download is completed, click the “Install”
button to confirm that you want to install the new firmware.
5. Unplug the USB cable from the camera and the camera will automatically install
www.ioncamera.com EN - 31
Page 32

the latest firmware. The Blue LED illuminates to show that the firmware is
installing. The process will take approximately 20 seconds. Do not power off the
camera during this time as the power interruption can lead to potential camera
damage.
6. The Blue LED will turn off once the installation of the new firmware is
completed.
7. The camera will turn off when the upgrade is done. You can power on the
camera and the new firmware will be effective.
Place your camera on a stable position throughout the firmware update process.
Ensure that you do not reset the camera or remove the MicroSD card until the full
update process is completed. Any interruption, such as a sudden interruption of
power supply, will lead to potential damage to the camera due to firmware update
failure.
www.ioncamera.com EN - 32
Page 33

CONNECTING THE CAMERA TO A TV
Connect your iON camera to a TV via the USB-to-AV adapter (included) and an AV
cable (not included). You can slide the mode switch to change between DV and Car
mode.
When sliding the mode switch from
as on the TV screen, while sliding the mode switch from
symbol will be presented as .
Connecting the Camera to TV in Car mode
Slide the mode switch to position to enter into CAR mode. Install a MicroSD into
the CAR slot.
When the camera is connected to the TV under CAR mode, it will enter the preview
mode, showing the contents being recorded. The camera will start recording as
normal. The TV display as shown in the picture below will pop up.
Press
www.ioncamera.com EN - 33
once during the recording to take a photo.
to , the SD card symbol will be presented
to , the SD card
Page 34

Connecting the Camera to TV in DV mode
Slide the mode switch to position to enter into DV mode. Install a MicroSD into
the DV slot.
When the camera is connected to the TV in DV mode, you can preview files,
playback, delete files and format the MicroSD card through your TV screen, the TV
menu as shown in the picture below will pop up.
In order to turn off the camera, you will first need to disconnect the camera from
the TV
Please make sure a MicroSD card has been inserted into the corresponding
card slot of the selected mode, or a“No card”message will be displayed on the
TV screen and the background color of the SD card icon will turn from white to
grey.
www.ioncamera.com EN - 34
Page 35

No file will be displayed on the TV screen if you do not have any file on the
MicroSD card.
Recording Video with TV in DV mode
1. Slide the mode switch to
2. Install a MicroSD into the DV card slot.
3. Press and hold
4. Quick press
5. Press
6. Press
Mode Switch to
button to start recording, and press it again to stop or slide the
button until the TV menu appears.
button to select the Preview mode.
button twice to enter Video Preview mode.
position to stop recording and enter into CAR mode.
position to enter into DV mode.
www.ioncamera.com EN - 35
Page 36

Playing Back Video Files with TV in DV mode
1. Slide the mode switch to
2. Install a MicroSD into the DV slot.
3. Press and hold
4. Quick press
5. Press
The latest recorded video will be displayed on the TV screen.
6. Quick press
want to view.
7. Press
8.
button once again to continue.
www.ioncamera.com EN - 36
button twice to enter the Play Video mode.
button twice to start playing back the video.
During video playback, quick press button to pause and press
button until the TV menu appears.
button to select the Play Video mode.
button to view the next file. Select the desired video file you
position to enter into DV mode.
Page 37

9. Press and hold button to enter the Edit menu.
Changing TV Language in DV mode
There are 9 different languages for you to select.
To change TV language in DV mode, it is not necessary to have a MicroSD card
installed into the camera.
To change the language setting
1. Slide the mode switch to
2. Press and hold
3. Quick press
4. Press
5. Quick press
button twice to enter the language setting mode.
button until the TV menu appears.
button to select language mode.
button to select the desired language.
position to enter into DV mode.
www.ioncamera.com EN - 37
Page 38

6. Press button twice to enter TV menu and the language will be
changed
Deleting Video Files w/ TV inDVmode
You can delete a single or all video file(s) in the MicroSD card.
To delete the files
1. Slide the mode switch to
2. Install a MicroSD into the DV slot.
3. Press and hold
4. Quick press
5. Press
6. Press
7. Press and hold
button twice to enter the Video Playback mode.
button to select the video file to be deleted.
button until the TV menu appears.
button to select Video mode.
button to enter the Edit menu.
position to enter into DV mode.
www.ioncamera.com EN - 38
Page 39

8. Quick press button shortly to select “DELETE” or “DELETE All”.
9. Press
10. Quick press
11. Press
twice to enter to “Delete this file” or “Delete all files”.
button to select “Yes”.
button twice to confirm.
Formatting the MicroSD Card with TV
1. Slide the mode switch to position to enter into DV mode.
2. Install a MicroSD into the DV slot.
3. Press and hold
4. Quick press
5. Press button twice to enter Video Playback mode.
www.ioncamera.com EN - 39
button until the TV menu appears.
button to select Video mode
inDVmode
Page 40

6. Press and hold button to enter the Edit menu.
7. Quick press
8. Press
9. Quick press
formatting. The MicroSD will be formatted.
button to select “Format”
button twice to enter “Format” mode.
button to select “Yes” and press button twice to confirm
SIGNING UP FOR FREE iON CLOUD STORAGE
8GB of free Cloud storage will be provided for storing and sharing of video and photo
content. Please visit www.ioncamera.com/ioncloud
and sign up as a free member.
www.ioncamera.com EN - 40
Page 41

www.ioncamera.com EN - 41
Page 42

USING KINOMAP SOFTWARE
Installing the Software
1. Visit http://ion.kinomap.com/ to enter Kinomap software download interface.
2. Click the link to download the Kinomap software from the webs
www.ioncamera.com EN - 42
Page 43

3. Click “Run” to start the download.
www.ioncamera.com EN - 43
Page 44

4. Install the Kinomap software on your computer by double clicking the
“KinomapUploader_X_XX. EXE.
5. Choose a Language and click the [OK] button to confirm.
6. Follow the simple instructions on the "Setup Wizard dialogue box", read the
explanation, click the [Next] button to complete the software installation
process.
7. When the installation is complete, click the [Done] button to exit.
www.ioncamera.com EN - 44
Page 45

www.ioncamera.com EN - 45
Page 46

Explanation of the Main Screen
www.ioncamera.com EN - 46
Page 47

1
Project Menu
2
Video Path
3
Import Button
4
Track Length Shows the length of the track
5
Map Form
6
GPS Path
7
Software Language
8
Refresh Button
9
Play/Pause Button
Click this button to create,
open, save project
Shows the path of the video
file stored in your computer
Click this button to call out the
file folder checkbox, select a
video or photo file and import
it into the Kinomap software.
Displays the track on the map
in different view
Shows the temporary path of
the GPS file stored in your
computer
Shows the current software
language
Use this button to
synchronize the video and
GPS when they are not
recorded at the same time
Press here to play or pause
the video
New project
Open project …
Save as…
Save
Recent project
Map
Satellite
Hybrid
Terrain
English
French
www.ioncamera.com EN - 47
Page 48

Current Video Playing
10
Time
Total Video
11
Recording Time
12
Full Screen Button
13
Flip Video Button
Volume Adjustable
14
Button
15
Mute Button
16
Start//End Bar
17
Progress Bar
Shows the elapsed playing
time of the current video
Shows the whole video
recording time
Click this button to display the
video in full screen. Double
click the screen to exit full
screen.
Click this button to get a
reversed view of the video
Click this button to adjust the
volume during video playback
Eliminates the volume by
marking the checkbox
Selects only a part of the
video by trimming at the
beginning (start bar) and end
(end bar) before uploading the
track to Kinomap.
Shows the progress of the
video being played
Starting Up
Please make sure your computer is accessible to internet when using the Kinomap
software.
Open the Kinomap software on your computer.
www.ioncamera.com EN - 48
Page 49

Notes:
1. The first time you import a video into the software, there will be a pop-up
message reminding you to download a software named FF Show. Follow the
prompt message to download and install the software onto your computer.
2. The version number may vary due to software upgrades.
3. You can see the current software version at the top left corner of the interface.
4. When the software detects a new version, a message “A new version is
available” will appear at the top of the window. Click it to upgrade your current
software version to a newer version.
www.ioncamera.com EN - 49
Page 50

Importing a Video
1. Press
to import a video into the Kinomap software.
2. In the “Select a file…” dialogue box that pops up, select your targeted video file
from your computer, click the [Open] button to import the file.
www.ioncamera.com EN - 50
Page 51

If you are importing a new video while you are playing the current video. A
confirmation message will pop up on the warning dialogue box. ” A GPS track is
already been loaded, do you want to replace it?” Click “Yes” to confirm and import a
new video.
www.ioncamera.com EN - 51
Page 52

3. In the “Non stop tracks” window that pops up, the video Start time, video End
time and video Duration will be displayed in the window.
Click the [Select] button to confirm.
www.ioncamera.com EN - 52
Page 53

4. The video will then be imported successfully into the Kinomap software.
www.ioncamera.com EN - 53
Page 54

Playing a Video
Click
accordingly. The video on the left side of the window will start playing.
a. Date and Time information will be displayed on the video. Meanwhile, the
www.ioncamera.com EN - 54
to start playing the video, the button will then be changed to
corresponding track of the video will be shown simultaneously on the Map on the
right side and the statistics chart of the video will also be displayed at the bottom
of the window.
Page 55

b. The arrow on the track of the map will react to the playing of the video.
When the subject in the video is moving, the arrow in the map will move;
When the subject in the video is stationary, the arrow will remain still.
c. The Progress bar on the bottom of the statistics chart is always in line with the
progress of the video playing.
www.ioncamera.com EN - 55
Page 56

To pause the video, press the Pause button
Play button
Creating a New Project
By creating a new project, you can clear the current project to get ready for
importing new videos. The upload information of the current video will be cleared.
.
, the button will then change to the
www.ioncamera.com EN - 56
Page 57

www.ioncamera.com EN - 57
Page 58

Saving the Current Video as a Project
By saving the current video as a project, you can easily reopen the video next time.
1. Click the [Menu] button and select “Save as …” option,
2. Select the targeted save location, input file name for the project, click [Save]
button.
www.ioncamera.com EN - 58
Page 59

3. The current video will then be saved as a Project. You can use the same
method to save more videos as projects.
Opening a Project
1. Click the [Menu] button and select “Open project …” option.
www.ioncamera.com EN - 59
Page 60

2. Click one of the projects already saved and then click the [Open] button to play
it.
www.ioncamera.com EN - 60
Page 61

To open a recent project
1. Click the [Menu] button and select the “Recent projects” option.
www.ioncamera.com EN - 61
Page 62

2. Click one of the recent projects to directly open it.
Changing Map View and Checking Map Information
1. You can select different forms of map by selecting the options in the drop-down
box.
www.ioncamera.com EN - 62
Page 63

Select an option from “Map”: Satellite, Hybrid and Terrain. Different Map views will
be presented accordingly
www.ioncamera.com EN - 63
Page 64

2. You can check the speed, altitude, latitude, longitude and bearing degree of the
ongoing track.
www.ioncamera.com EN - 64
Page 65

www.ioncamera.com EN - 65
Page 66

Introduction of the Statistics Chart
When hovering your mouse over the curves in the center section of the chart, a
legend will appear for the chart.
1. The Yellow line represents the speed, Blue line represents the elevation, White
line represent the X acceleration, Green line represents Y acceleration while
the Red line represents the Z acceleration.
2. Select only a part of the video by trimming at the beginning (Start bar) and at
the end (End bar) before uploading the track to the Kinomap website.
3. The grey area in the Statistics chart implies no GPS signal has been recorded
in that video track section.
www.ioncamera.com EN - 66
Page 67

Synchronizing the Video and GPS
This software is used to associate a video file with a GPS file recorded at the same
time. Both can be started and stopped at a different moment but they need to be
overlapped for a few seconds. When the video and GPS data are not recorded at
the same time exactly, you can define the offset.
You can synchronize them by clicking the Refresh button: in this mode you can drag
and drop the arrow on the map to match the location of the video. You can use a
cross light, a stop sign, or whatever you can see both in the satellite view and in the
video view, as a location marker to synchronize the video. When you are done, exit
this mode by clicking on the refresh button again.
www.ioncamera.com EN - 67
Page 68

1. Click the Refresh button. In the warning message box that pops up, click “Yes”
to confirm. The arrow on the map will no longer react to the playing of the
video.
2. Drag and drop the arrow on the map to match the location of the video. Click
the Refresh button again to synchronize and resume the movement of the
arrow.
www.ioncamera.com EN - 68
Page 69

Changing the Software Language
Select the software language in the drop-down box.
www.ioncamera.com EN - 69
Page 70

Uploading a Track to Kinomap Webpage
1. Click the [Upload] button to enter the Upload interface.
www.ioncamera.com EN - 70
Page 71

2. Complete the upload information below and click the [Convert] button to
prepare a lighter version of the video for faster transfer. Cut the beginning and
end if required (refer to section “Introduction of the Statistics Chart”, point 2)
and then upload to transfer the files for integration on www.kinomap.com.
www.ioncamera.com EN - 71
Page 72

Note: After conversion, the file will be compressed to a smaller size and a lower
resolution
3. You need to login before conversion. Enter your Login and password
accordingly; click the [Connect] button.
Note: If you do not have an account yet, please register first and then login.
4. The information of the video will be added automatically on the right side of
the interface. The conversion process will start.
www.ioncamera.com EN - 72
Page 73

5. After completing the converting step, the software will start uploading the video.
When the transfer is complete, click the [OK] button to confirm. Then your file
has been successfully uploaded to the Kinomap.com website.
www.ioncamera.com EN - 73
Page 74

SPECIFICATION
Sensor 3.0 Mega pixel CMOS sensor
Lens 120º wide angle field of view
Focus range 0.5m - ∞
Video Resolution in DV mode 1080P: 1920x1080 pixels ,30fps
www.ioncamera.com EN - 74
Page 75

720P: 1280x720 pixels ,30 fps
720P: 1280x720 pixels,60 fps
Resolution in CAR mode
Format: H.264 compression, saved as MPEG4 (.mp4) file
Resolution in DV mode
Photo
Audio
Storage
www.ioncamera.com EN - 75
Resolution in CAR mode
Format: JPG
Capture Modes: Single, Burst-shot, Time lapse
Built-in high quality microphone
AAC Compression, Automatic Gain Control
MicroSD/MicroSDHC with minimum Class 6
A 32GB or above memory size of card is recommended for car
recording function
Average Recording Times: about 4 hours (using 32GB mSD
card in 1080p30/720p60)
1080P: 1920x1080 pixels,30 fps
720P: 1280x720 pixels,30 fps
8MP(3264 x2448)
3MP (2048x1536)
2MP (1920x1080) on 1080p
1MP (1280x720) on 720p
Page 76

Other features GPS, G-sensor, Vibration status indication
Memory slot MicroSD card × 2
Connection
Power
Waterproof
Language
Dimension 38.0x38.0x109.0mm
Weight 139.0g(w/ PODZ)
USB2.0 port for data transfer,battery charging and AV-output
Built-in 1200 mAH Rechargeable Li-Polymer Battery
Battery Life: Approx. 2 hours
Durable plastic housing
Depth up to 30 feet / 10 meters
English, German, French, Italian, Spanish, Japanese, Korean,
S.Chinese & T.Chinese
SYSTEM REQUIREMENTS
Operating system Windows® XPSP3/Vista/7/8 and Mac 10.5 or above
CPU Pentium III or above
RAM At least 64MB
Interface
USB
2.0port
www.ioncamera.com EN - 76
Page 77

A
TROUBLESHOOTINGS
Problems Causes Solutions
1.LED flashes and
camera turns off
2.Cannot turn on
the camera
Red LED flashes
during recording
Cannot take photos
or videos (Blue
LED flashes
rapidly)
Cannot take photos
or video (Blue and
Red LED flashes
alternatively)
Cannot find the
removable disk
after connecting the
camera to the
computer
Battery is depleted Recharge the camera
Low battery Recharge the camera
1. The memory is full in
DV mode
2.The memory is
insufficient to operate in
CAR mode
1. MicroSD card is not
inserted
2. MicroSD card has a
card error
Connection failure
Delete unnecessary photos or videos
on the current memory card or replace it
with a new one
1. Insert a MicroSD card
2. Format the MicroSD card at PC or on
TV
1. Make sure all cable connections are
secured and restart the computer if
necessary
2. Make sure the computer port is USB
2.0
3. Try a different USB port
void Hub and Keyboard USB ports
www.ioncamera.com EN - 77
 Loading...