


User's Guide
EasyCoder PL4
Printer

Intermec Technologies Corporation
6001 36th Avenue West
Everett, WA 98203
U.S. service and technical support: 1-800-755-5505
U.S. media supplies ordering information: 1-800-227-9947
Canadian service and technical support: 1-800-668-7043
Canadian media supplies ordering information: 1-800-268-6936
Outside U.S.A. and Canada: Contact your local Intermec service
supplier.
The information contained herein is proprietary and is provided solely
for the purpose of allowing customers to operate and/or service
Intermec manufactured equipment and is not to be released,
reproduced, or used for any other purpose without written permission
of Intermec.
Information and specifications in this manual are subject to change
without notice.
2003 by Intermec Technologies Corporation
All Rights Reserved
The word Intermec, the Intermec logo, MobileLAN, JANUS, Trakker
Antares, EZBuilder, Data Collection Browser, dcBrowser, EasyCoder,
EasyLAN, TE 2000, Universal Access Point, UAP, IRL, and CrossBar
are either trademarks or registered trademarks of Intermec
Corporation.
Bluetooth is a trademark owned by Bluetooth SIG, Inc., U.S.A.
Throughout this manual, trademarked names may be used. Rather
than put a trademark ( or ) symbol in every occurrence of a
trademarked name, we state that we are using the names only in an
editorial fashion, and to the benefit of the trademark owner, with no
intention of infringement.
There are U.S. and foreign patents pending.

Contents
Introducing the EasyCoder PL4 Printer......................................... 5
Learning About the Printer............................................................ 6
Installing the Battery..................................................................... 7
Charging the Battery..................................................................... 8
Understanding the Control Panels............................................... 13
Loading the Media...................................................................... 17
Loading Fanfold Media............................................................... 21
Unpacking and Inspecting .............................................. 5
Reporting Damage.......................................................... 5
Using the Single Battery Charger .................................... 8
Using the 4-Pack Charger ............................................. 10
Standard Control Panel................................................. 13
LCD Control Panel ...................................................... 14
Verifying the Printer Is Working................................................. 22
Establishing Communications With a Terminal.......................... 27
Serial Cable Communications....................................... 27
Bluetooth Communications.......................................... 30
Wireless Local Area Network (WLAN)
Communications ..................................................... 32
Setting Up the Software .............................................................. 44
Downloading Firmware............................................................... 45
Using the Accessories .................................................................. 46
Using the Belt Clip ....................................................... 47
Using the Adjustable Shoulder Strap............................. 48
Maintaining the Printer............................................................... 49
Extending Battery Life .................................................. 49
Cleaning the Printer...................................................... 50
EasyCoder PL4 Printer User’s Guide iii

Troubleshooting..........................................................................52
Understanding the Standard Control Panel LEDs ......... 53
Understanding the LCD Control Panel Icons................53
Troubleshooting Printer Problems................................. 54
Using Communications Diagnostics Mode ................... 57
Specifications...............................................................................58
Printing Specifications...................................................58
Memory/Communications Specifications...................... 58
Label Specifications....................................................... 59
Font/Bar Code Specifications........................................ 60
Physical/Environmental/Electrical Specifications........... 60
Communications Port................................................... 61
Accessories ....................................................................62
iv EasyCoder PL4 Printer User’s Guide

Introducing the EasyCoder PL4 Printer
Thank you for choosing the Intermec EasyCoder® PL4 Printer.
This rugged printer is sure to become a productive and efficient
addition to your workplace thanks to its innovative design.
Intermec ensures world-class support for all of your bar code
printers, software, and supplies.
This user’s guide gives you all the information necessary to
operate the PL4 printer.
The PL4 uses the CPL programming language. To create and
print labels using the CPL language, refer to the EasyCoder
PL-Series Printer Programmer’s Reference Manual (P/N 073210).
You can also use our Intermec PL-Series Utility Software
™
(PLUS
manual and Intermec PLUS are available on the CD that came
with your printer and on our web site at www.intermec.com.
Unpacking and Inspecting
Inspect the printer for possible shipping damage:
• Check all exterior surfaces for damage.
) to create labels and send files to your printer. The
™
• Open the media cover (refer to “Loading the Media” later in
this guide) and inspect the media compartment for damage.
In case shipping is required, save the carton and all packing
material.
Reporting Damage
If you discover shipping damage:
• Immediately notify and file a damage report with the
shipping company. Intermec is not responsible for any
damage incurred during shipment of the printer and will not
cover the repair of this damage under its warranty policy.
• Keep the carton and all packing material for inspection.
• Notify your authorized Intermec reseller or sales
representative.
EasyCoder PL4 Printer User’s Guide 5

Learning About the Printer
The EasyCoder PL4 printer is a rugged, portable label and
receipt printer that provides:
• Print resolution of 203 dpi
• Print speeds up to 7.62 cm (3 inches) per second
• Serial or wireless communications options
Use the next two illustrations to familiarize yourself with the
printer.
Media
cover
Media support
disks (2 places)
Platen
roller
Black mark
sensor
Media rollers
(2 places)
Rear
media slot
Printhead
Latch
Control
panel
"D" rings
Front view of the EasyCoder PL4
6 EasyCoder PL4 Printer User’s Guide
release
button
Media support
(2 places)
Self-strip
bar
Latch
PL4U002.eps

Communications
port
Belt clip
Charger
jack
Back view of the EasyCoder PL4
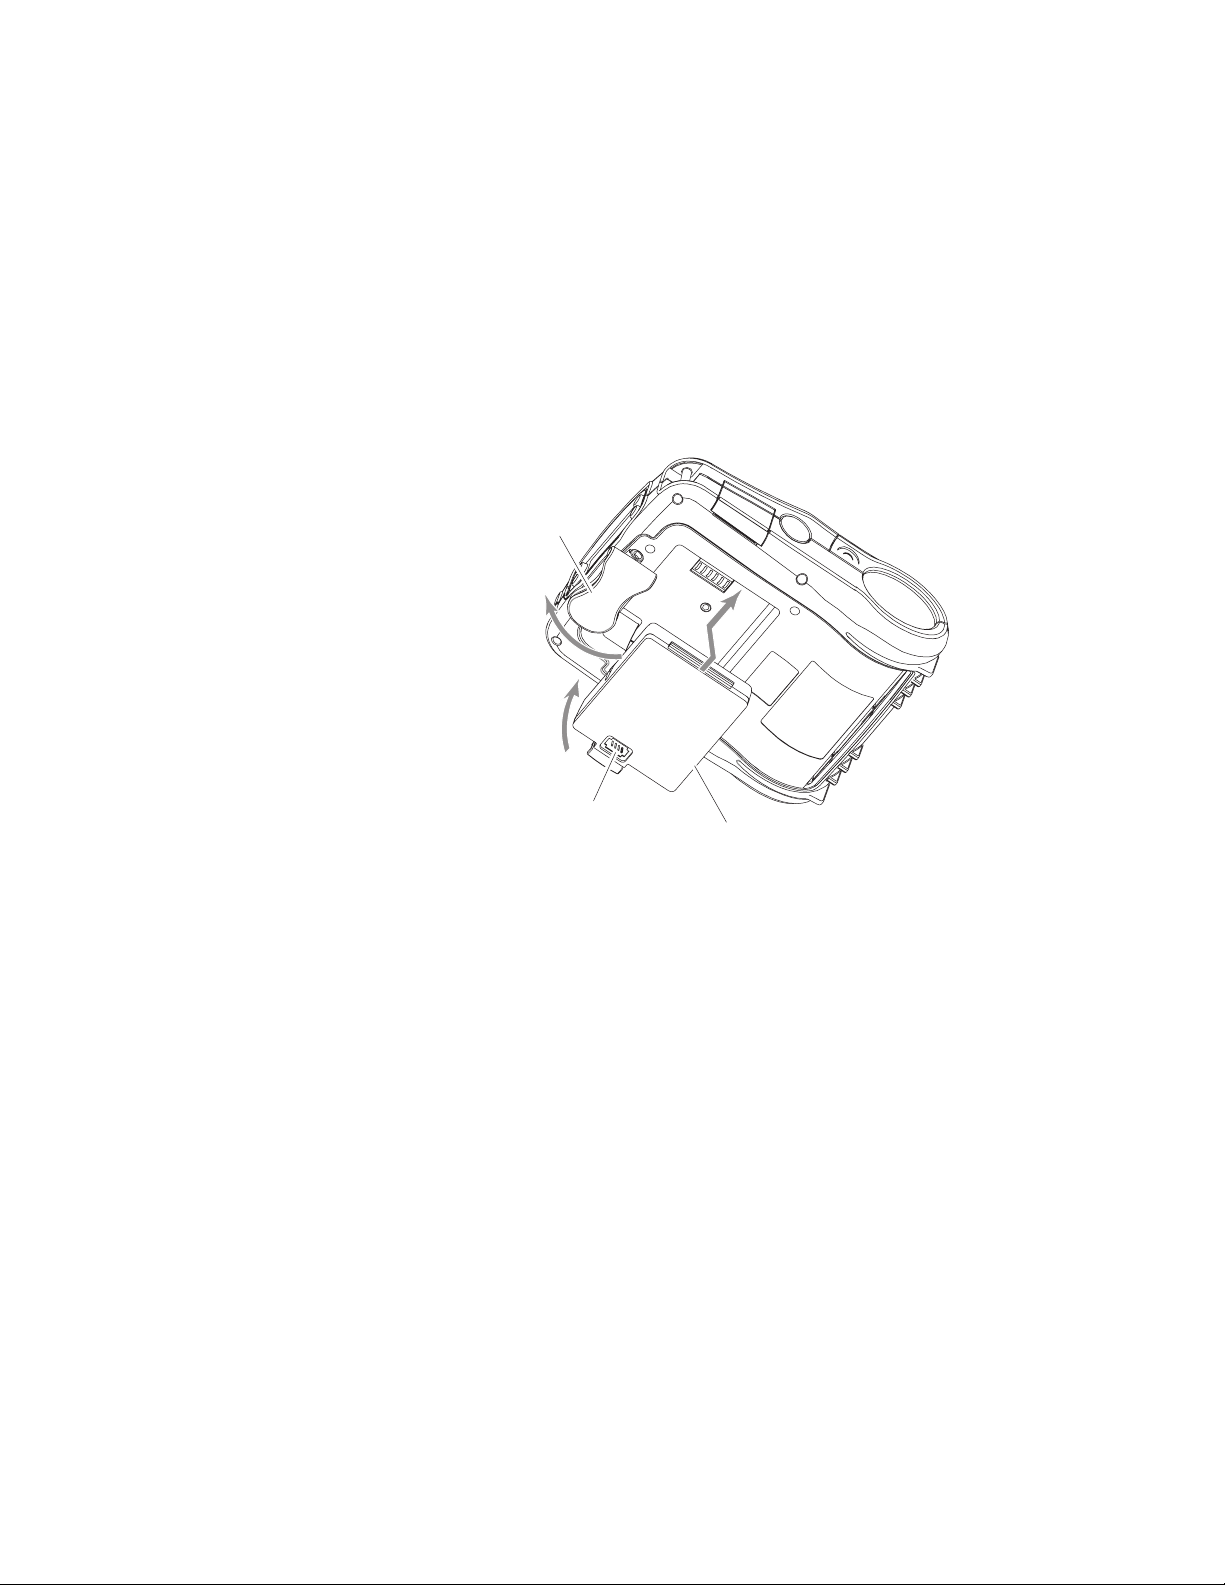
Installing the Battery
Note: Batteries are shipped uncharged.
1 Unwrap the battery.
2 Rotate the belt clip to allow access to the battery
compartment.
3 Insert the battery into the printer.
Battery
PL4U003.eps
EasyCoder PL4 Printer User’s Guide 7
Belt clip
Charger
jack
4 Press the battery into the printer until it locks in place.
When the battery is first installed, the Control Panel indicators
may briefly turn on and then go off which indicates the battery
is not fully charged. For help, see “Using the Single Battery
Charger” and “Understanding the Control Panels” later in this
guide.
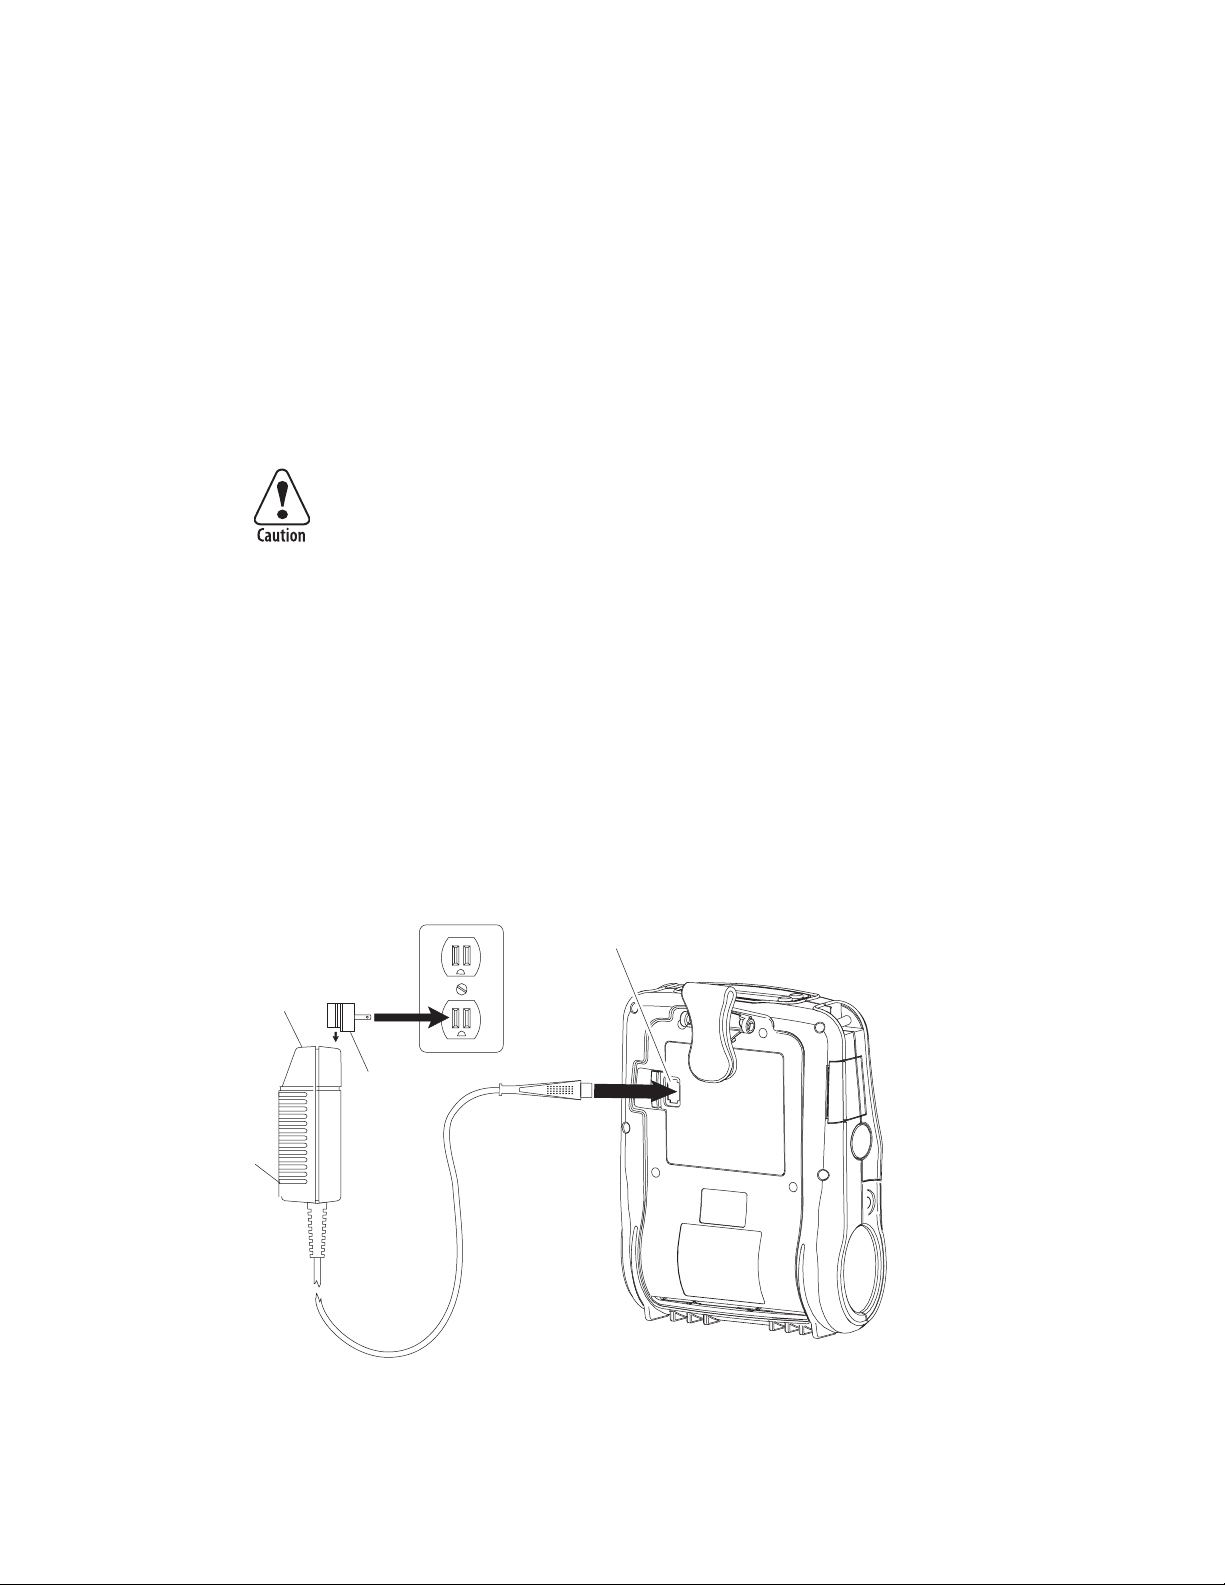
Charging the Battery
This section explains how to use the following chargers:
• Single battery charger (P/N AT15759-1) that comes with an
AC contact adapter for the U.S.A. (110V). You can also order
a set of international contact adapters (P/N AN16740-1).
• 4-pack battery charger (P/N AT16305-2) that is designed to
charge up to four PL4 batteries simultaneously. You must
remove the batteries from the printer to charge them.
Using the Single Battery Charger
Using the single battery charger, you can charge the battery
while it is in the printer or when it is removed. If the battery is
in the printer, the printer must be turned off to charge the
battery.
Battery
PL4U006.eps
8 EasyCoder PL4 Printer User’s Guide
Do not attempt to charge batteries with the charger while
printing. Attempting to print while charging can result in
improperly charged batteries.
Attention: Ne pas essayer de charger des batteries à l’aide du
chargeur pendant l’impression. Toute tentative d’impression
pendant le processus de charge risque de produire des
batteries mal chargées.
To use the single battery charger
1 (Optional) Install the battery in the printer. For help, see the
previous section.
2 Insert the AC contact adapter into the single battery charger.
3 Plug the single battery charger into an AC wall receptacle.
4 Insert the charge cable into the charger jack.
Charger
jack
Single
battery
charger
AC
contact
adapter
Charger
LED
PL4U008.eps
EasyCoder PL4 Printer User’s Guide 9

5 The charger LED will indicate the status of the charger as
follows:
Charger LED Status Description
Steady on light The battery is undergoing a fast charge.
Slow blinking light The charger is in trickle mode. The battery
Rapidly blinking light There is a problem with the battery. It may
Using the 4-Pack Charger
Please follow these guidelines when situating the 4-pack charger:
• Do not place the charger in locations where liquids or
metallic objects may be dropped into the charging bays.
• Do not block the ventilating slots on the top and bottom
covers.
• Make sure the charger is plugged into a power source that
stays on for overnight charging.
To charge the battery with the 4-pack charger
is ready for use.
have an internal short or its charge
monitoring circuitry may be
malfunctioning. Do not use the battery.
1 Make sure the charger has been installed properly. See the
guide that came with your 4-pack charger for help. The
power indicator on the front panel should be on.
10 EasyCoder PL4 Printer User’s Guide

Power
supply
F
a
s
t C
h
a
rg
e
F
u
ll C
h
a
F
r
a
g
ult
e
R
e
a
d
y
F
a
s
t C
h
a
r
g
e
F
u
ll C
h
a
F
r
a
g
u
e
lt
R
e
a
d
y
F
a
s
t C
h
ar
g
e
F
u
ll C
h
a
F
rg
a
u
e
Amber
indicator
Green
indicator
Charger
bay
lt
R
e
a
d
y
Power
indicator
F
a
s
t C
h
ar
g
e
F
u
ll C
h
a
Fa
rg
u
e
lt
R
e
a
d
y
P
o
w
e
r
PL4U009.eps
2 Plug a battery into any one of the four charger bays, noting
the orientation of the battery.
3 Slide the battery into the charging bay until it stops and then
rock the battery back until it snaps into place. The amber
indicator directly under the battery being charged will turn
on if the battery is properly installed.
The indicators under the battery will allow you to monitor the
charging process per the next table.
Amber Green Battery Status
On Off Charging
On Flashing 80% charged (OK to use)
Off On Completely charged
Flashing Off Fault
EasyCoder PL4 Printer User’s Guide 11

Note: A fault condition is caused by a problem with the
battery. The charger may indicate a fault because the battery
is too hot or cold to charge reliably. Charge batteries between
0°C to 45°C (32°F to 113°F). If the amber indicator starts
flashing on the second attempt, the battery should be
discarded.
4-Pack Charger Cycle Times for PL4 Batteries
Percentage Charged Time
Battery 80% Charged 2.5 hrs.
Battery Fully Charged 5 hrs.
These times are for completely discharged batteries. Batteries
that are only partially discharged will take less time to reach their
charged state. You can use batteries that have reached 80% of
their charge capacity, but we recommend you allow the batteries
to reach a full charge to maintain maximum battery life.
The 4-pack battery charger has a safety feature that stops
charging a battery after 6 hours regardless of its charge state.
Do not allow your battery charger to come in contact with
any conductive material. It creates a short circuit that
could cause burns and other injuries or could start a fire.
Use of any charger not approved specifically by Intermec
for use with its batteries could cause damage to the
battery pack or the printer and will void the warranty.
Attention: Le chargeur de batterie ne doit pas entrer en
contact avec un matériel conducteur. Dans le cas
contraire, un court-circuit risque d’entraîner des brûlures
et d’autres blessures ou de provoquer un incendie.
L’emploi d’un chargeur non approuvé de façon spécifique
par Intermec pour utilisation avec ses batteries risque
d’endommager le bloc-batterie ou l’imprimante et
annulera la garantie.
12 EasyCoder PL4 Printer User’s Guide

Understanding the Control Panels
The EasyCoder PL4 comes with one of two possible control
panels:
• The standard control panel
• The LCD control panel
Standard Control Panel
The next illustration shows the standard control panel with its
three buttons and two LEDs.
Power
button
Green
LED
Function
button
Yellow
LED
Feed
button
PL4U016.eps
Standard Control Panel Functions
Button or LED Function
Power button Turns the printer on and off.
Green LED Steady on light indicates power on or an established
RF link.
Fast blinking light indicates no RF link (on RF
equipped printers only).
Slow blink indicates a low battery.
For more information, see “Understanding the
Standard Control Panel LEDs” later in this guide.
EasyCoder PL4 Printer User’s Guide 13

Standard Control Panel Functions (continued)
Button or LED Function
Yellow LED Steady on light indicates an out of media or media
cover not closed error condition.
Fast blink indicates RF activity (on RF equipped
printers only).
Fast blink with a chime indicates that no application is
loaded.
For more information , see “Understanding the
Standard Control Panel LEDs” later in this guide.
Feed button Advances the media out one label or a software
determined length of media.
Function button Performs functions controlled by the printer
application such as:
• Print a battery level report
• Print the Local Area Network (LAN) status
• Print a Bluetooth radio status
• Print a media supply report
For information on printer applications, see the
EasyCoder PL-Series Printer Programmer’s Reference
Manual.
LCD Control Panel
The LCD control panel has buttons for the power on/off and
media feed functions just as in the standard control panel. In
addition, it has two keys that allow easy navigation and selection
of menu options affecting many printer functions.
14 EasyCoder PL4 Printer User’s Guide
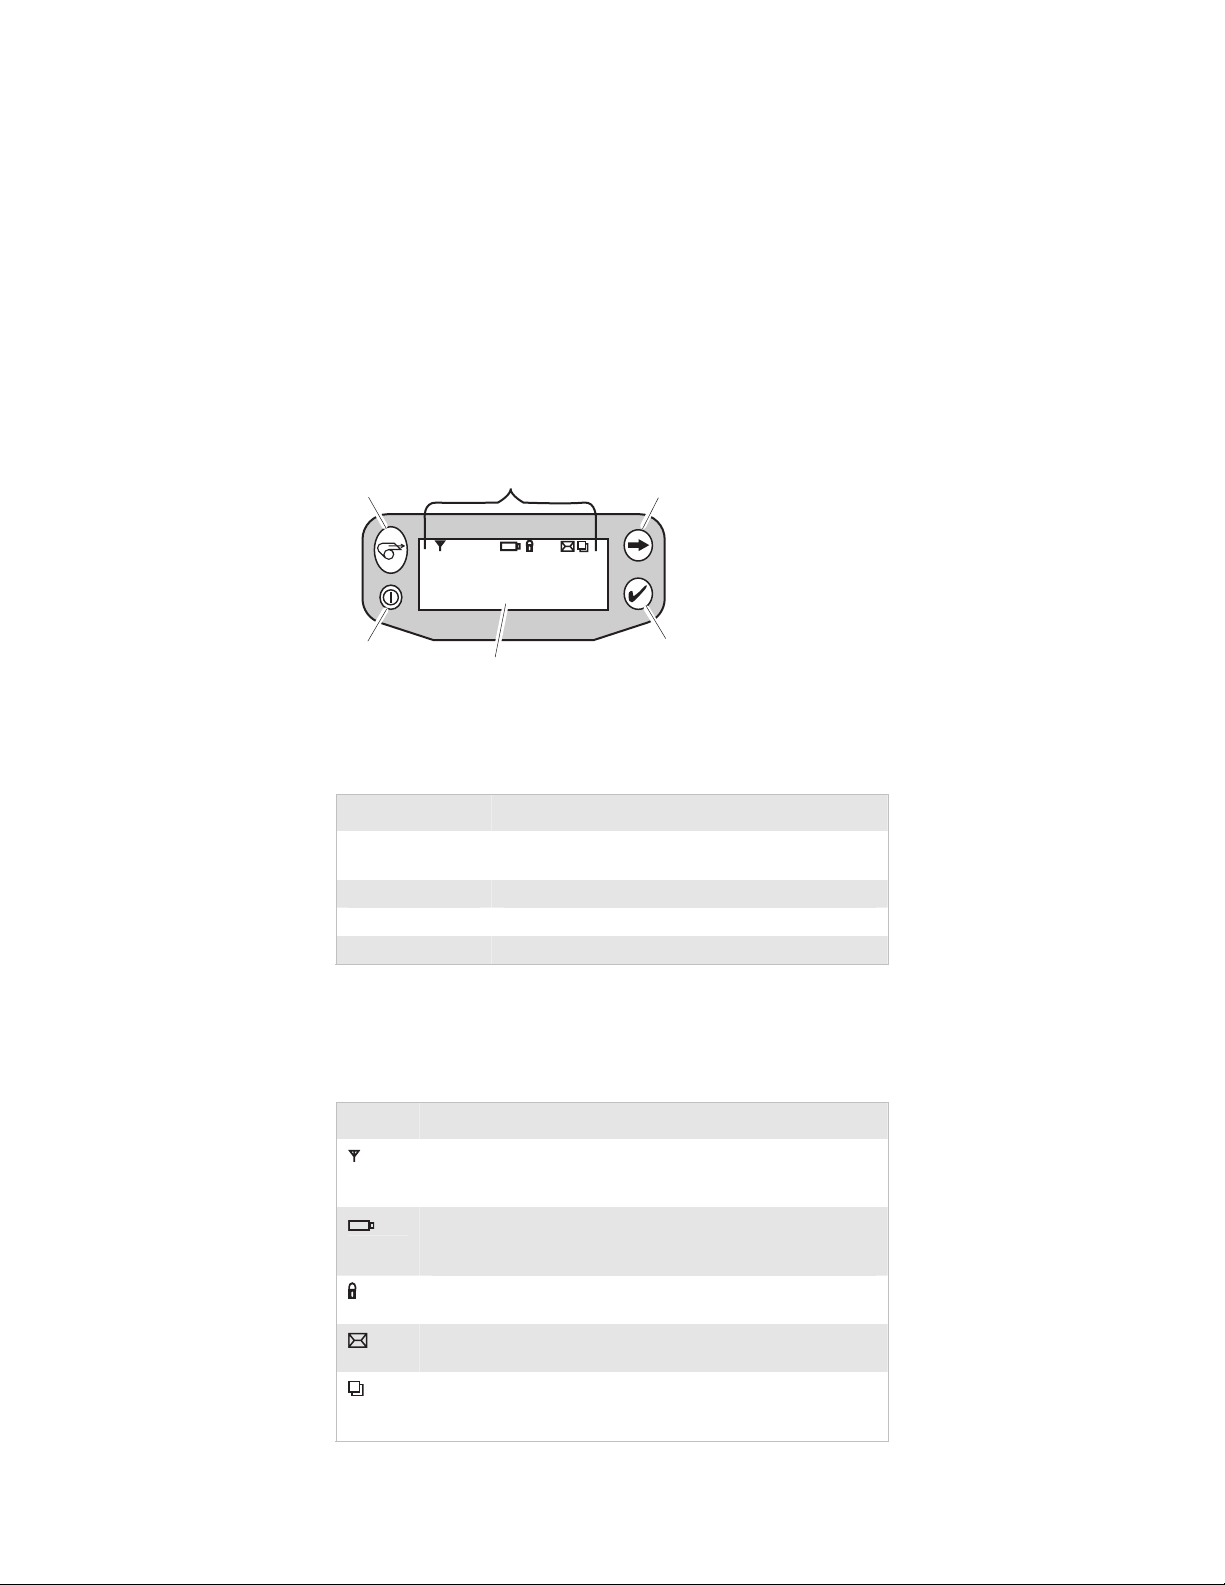
Feed
button
Power
button
Printer status icons
LCD
Scroll
button
Select
button
PL4U017.eps
LCD Control Panel Functions
Button or LED Function
Feed Advances the media out one label or a software
determined length of media.
Scroll Scrolls through the options and settings.
Select Selects an option or setting.
Power Turns the printer on and off.
The top of the screen has a row of status icons that indicate the
state of various printer functions.
Status Icon Functions
Icon Function
EasyCoder PL4 Printer User’s Guide 15
Indicates the printer is associated with a wireless Local Area
Network (LAN). This icon is functional only with PL4
network printers.
A flashing icon indicates low battery status. You should
suspend any printing operations and recharge or replace the
battery pack as soon as possible.
A flashing icon indicates that the media cover is open or not
properly latched.
A flashing icon indicates that a file is being downloaded to the
printer.
A flashing icon indicates that the printer does not detect any
media. This could indicate an out of media condition or
improperly loaded media.

In addition to the status icons, the LCD control panel can
display many of the printer’s settings and functions as text. Refer
to the next table, “LCD Functions,” for the full set of printer
features that are available with the LCD panel. To set these
functions, see the EasyCoder PL-Series Printer Programmer’s
Reference Manual.
LCD Functions
Function Default Setting Options
Sensor Type Gap Black mark
Gap
Baud Rate 19200 9600
19200
38400*
57600
115200
Data Bits 8 7
8
WLAN ID** Factory Set Value N/A
Label Top-ofForm
Left Position 000 Increase (+120 dots max)
LCD Contrast 0 Increase
No activity
Timeout**
Tear-off Position 00 Increase (+120 dots max)
Media Type Label Label
LCD Backlight Off On
Factory Reset No No
000 Increase (+120 dots max)
Decrease (-120 dots max)
Decrease (-120 dots max)
Decrease
60 sec. 60 sec.
5 min.
10 min.
30 min.
Custom
Decrease (-120 dots max)
Continuous
Off
Momentary on with time
delay
Yes
16 EasyCoder PL4 Printer User’s Guide

* The highest baud rate with consistent results is 38400.
** Some parameters, such as the WLAN ID number and non-standard no-
activity time out values can be set using a PC running Intermec PLUS and
a data cable link to the printer.
The LCD has a backlight option that allows viewing of the
screen in a dark environment or provides better contrast in a
very bright environment. Using the backlight decreases the time
the printer runs between charges. Refer to the section
“Extending Battery Life” for more information.
Loading the Media
You can operate this printer in one of two different modes:
Tear-Off or Self-Strip. Tear-Off mode allows you to tear off
each label (or a strip of labels) after it is printed. In Self-Strip
mode, the backing material is peeled away from the label as it is
printed. After you remove this label, the next one is printed.
The PL4 printer supports direct thermal receipt, label, or tag
media.
Note: To print a configuration label, you need to load
continuous media (media with no black marks or gaps) into
the printer. The printer shipped with a sample roll of
continuous media. For help printing a configuration label, see
“Verifying the Printer Is Working” later in this guide.
To load the media
1 Press the latch release button on the side of the printer. The
latch assembly flips open automatically.
2 Rotate the media cover back to expose the media
compartment and the adjustable media supports.
EasyCoder PL4 Printer User’s Guide 17

3 Pull the media supports apart, insert the roll of media
between them, and let the media supports close. Make sure
the media pulls off the core in the direction shown in the next
illustration.
Media
supports
PL4U011.eps
18 EasyCoder PL4 Printer User’s Guide
PL4U013.eps
The supports adjust themselves to the width of the media.
The media should be able to spin freely on the supports.
4 If you want to use the printer in Tear-Off mode, go to the
next step.
If you want to use the printer in Self-Strip mode, peel a few
labels off of the media.
5 Close the media cover.
6 If you want to use the printer in Tear-Off mode, flip the
self-strip bar down away from the latch assembly.
If you want to use the printer in Self-Strip mode, slide the
self-strip bar up with your thumbs until it locks into place on
the latch assembly.
Tear-Off mode
Media
cover
Self-strip
bar shown
in tear-off
position
Label
Latch
assembly
Self-Strip mode
Self-strip
bar shown
in self-strip
position
PL4U045.eps
EasyCoder PL4 Printer User’s Guide 19
Backing
Latch
assembly
Media
cover

7 Rotate the latch assembly until it locks in place.
8 Turn on the printer or press the Feed button if the printer is
already on. The printer advances the media.
Tear-Off mode
Media
cover
Latch
assembly
Self-Strip mode
Media
cover
PL4U044.eps
The printer advances the media to the next label, if printing
labels. If you are printing on continuous media, the printer will
advance a short strip of media and will then be ready for
printing.
To switch from Self-Strip mode to Tear-Off mode
Latch
assembly
1 Turn off the printer.
2 Press the latch release button on the side of the printer. The
latch assembly flips open automatically.
3 Pull the self-strip bar slightly forward and then push it down.
20 EasyCoder PL4 Printer User’s Guide

y
Self-strip
bar
PL4U046 .eps
4 Rotate the latch assembly until it locks in place.
Loading Fanfold Media
The PL4 has a loading slot in the rear of the media
compartment that allows you to use standard 101.6-mm
(4-inch) wide fanfold media from an external supply. It is
important to place the external media supply in a location that
allows the media to feed easily through the printer.
To load fanfold media
1 Press the latch release button on the side of the printer. The
latch assembly flips open automatically.
2 Rotate the media cover back to expose the media
compartment and the adjustable media supports.
3 Pull the media supports apart, insert a media spacer such as a
label roll core or other cardboard tube between them, and let
the media supports close.
4 Insert the media from the external supply through the rear
feed slot, between the media guides, and up through the
media compartment. Make sure the side of the media you will
be printing on faces the printhead.
Latch
assembl
EasyCoder PL4 Printer User’s Guide 21

Rear
p
media
slot
Media
spacer
PL4U015.eps
Surface of media
rinted
to be
5 Close the media cover and then rotate the latch assembly
until it locks in place.
6 Turn on the printer or press the Feed button if the printer is
already on.
The printer advances the media to the next label, if printing
labels. If you are printing on continuous media, the printer will
advance a short strip of media and will then be ready for
printing.
Verifying the Printer Is Working
Before you connect the printer to your computer or portable
data terminal, make sure that the printer is in proper working
order. You can do this by printing a configuration label using
the next procedure. If you cannot get this label to print, refer to
“Troubleshooting” later in this guide.
22 EasyCoder PL4 Printer User’s Guide

To print a configuration label
1 Turn the printer off. Load the media compartment with
continuous media (media with no black marks printed on the
back).
2 Press and hold the Feed button.
3 Press and release the Power button and keep the Feed button
pressed. When printing starts, release the Feed button.
The printer prints a line of interlocking “x” characters to make
sure all elements of the printhead are working, prints out the
version of software loaded in the printer, and then prints two
reports.
The first report indicates model, firmware version, serial
number, baud rate, and other printer information. The second
report prints out more detailed information on the printer’s
configuration and parameter settings. If no second report
appears, there is no application loaded.
The Wireless Communications report appears if the printer has
a Bluetooth radio or 802.11b radio option. If no radio options
are installed, the Wireless Communications Section consists of a
blank line.
The Label section shown in the second report reports the
maximum size label that can be printed, based on a printer
resolution of 8 dots per mm (203 dots per inch or dpi).
XXXXXXXXXXXXXXXXXXXXXXXXXXXXXXXXXX
Intermec PL4
CHK: FFFF
HTSE7940 /18
Testing Memory...
Memory tested and OK
Baud Rate: 19200 BPS
In-activity Timeout: 120 Secs
Low battery Shut-down: 170
End of report.
Example of first report
EasyCoder PL4 Printer User’s Guide 23
V79.40 12/23/02
Printhead Test

s
1
2 3
4 5 6
7 8 9 10
11 12 13 14 15
1234567890
Intermec PL4 V79/00 08/24/01
Serial Number:
XXEC00-10-0042
xxQF00-10-0042
Name: xxQF00-10-0042
Program:
Firmware:HTQ47940 /18
Chksum:F18A
Software:HTK44L
Chksum:5C8F
Ver:L4.R79.40.U176.B19.T19.A00
Cable Communications:
19200 BPS, N,8,1
Handshake:hardware
DSR: 1
Bridge mode: off
Wireless Communications:
Unit serial number
Application number
Report appears only
on units with wireless
options installed. Units
with no wireless option
will print an empty line
and resume the report.
Beginning of second report
24 EasyCoder PL4 Printer User’s Guide

Cable Communications:
115200 BPS, N,8,1
Handshake:Hardware
Wireless Communications:
NO LINK ATTEMPTED
SRRF Version: 5.17.12W
Release Date: 05/08/00
Src Address: 1140850687
Dest Address: 0
Data Retries: 5
Packet Size: 1000
RF Baud: 9600
Max RF Baud: 9600
Manchester: Enabled
Sleep Mode: Enabled
CC Threshold: 10
Extra CCF: Disabled
Busy Mode: Disabled
Low Battery: Shutdown
Debug Mode: Disabled
Bluetooth section of report
PCMCIA/CF Adapter 1.0
Build Date: Jan 15 2003
Build Time: 12:09:01
Bluetooth Software Version
Bluetooth settings
Card Detected.
Spectrum24 802.11b
MAC Adress: 00:a0:f8:a3:50:99
Operating Mode: infrastructure
Preamble Length: long
Power Save: best
Encryption: 128-bit
Authentication: open system
Kerberos: off
Stored ESSID: TJX_2100
Associated ESSID: TJX_2100
802.11b settings
802.11b section of report
EasyCoder PL4 Printer User’s Guide 25

Peripherals:
MCR 2.00
LCD: Installed
Expansion module: 0x1D
802.11/b PCMCIA 5V
Other : 0F
Power Management:
In-activity Timeout:120 Secs
Low-battery Timeout:60 Secs
Remote(DTR) pwr-off:Enabled
Voltage :6.98(179)
Low-bat Warning :6.86(176)
Low-bat Shut-down:6.55(168)
Memory(0):
Flash :2097151 Bytes
RAM :2097151 Bytes
Label:
Width :800 dots, 100 mm
Height:15095 dots, 1886 mm
Sensors: (Adj)
Pres [DAC:143,Thr:120,Cur: 13]
Label Present
Media [ 8 (384 dots)]
Gap [DAC: 0,Thr: 30,Cur: 6]
Bar [DAC: 0,Thr: 70,Cur: 11]
Temperature :165
Voltage :6.94(178)
Resident Fonts:
Font Sizes Chars
0 0-6 20-FF
1 0 20-80
2 0-1 20-59
4 0-7 20-FF
5 0-3 20-FF
6 0 20-44
7 0-1 20-FF
File Directory:
File Size
DIAGS .BAT 1427
INDEX .WML 4723
1226000 Bytes Free
Command Language:
CCL Key '!'[21]
Flash memory size
Maximum label size
Files loaded in printer memory
(includes pre-scaled or
scalable fonts)
Amount of memory available
End of report.
Continuation of second report
26 EasyCoder PL4 Printer User’s Guide

Establishing Communications With a Terminal
The printer must establish communications with a host terminal
that sends the data to be printed. The PL4 printer provides three
ways to communicate with a terminal:
• Serial cable between the printer and the host terminal
• Bluetooth
• Wireless Local Area Network (WLAN) per 802.11b
specifications
Serial Cable Communications
All EasyCoder PL4 printers can communicate by serial cable.
One end of the serial cable is an 8-pin circular DIN connector
that plugs into the serial communications port on the side of the
PL4 printer. A weather resistant flap protects the
communications port. The connector is keyed to ensure correct
alignment; do not try to force the cable if it does not plug in.
Plug the other end of the cable into the host terminal or the
serial port on a computer as shown in the next illustrations.
Communications between the terminal and the printer are
controlled by the applications running on the terminal and the
printer.
™
radio link
Note: Turn off the printer power before you connect the
serial cable.
Before you can make a serial connection, the serial
communications settings for the terminal or PC must match the
settings on the printer. The next table shows the default serial
communications settings for the printer. The printer must be set
to the default serial settings in order to communicate with
Intermec PLUS.
Parameter Default Setting
Baud rate 19200
Data bits 8
Parity None
Stop bit 1
EasyCoder PL4 Printer User’s Guide 27

0
2
0
5
Communications
port
Communications
cable to terminal
PL4U019.eps
Connecting the printer to a terminal
Serial communications
cable to computer
PL4U021.eps
Connecting the printer to a PC
The next table indicates the Intermec terminals that have been
tested with the PL4 printer and the part number for the cable
you need to connect the terminal and printer.
28 EasyCoder PL4 Printer User’s Guide

Terminals and Cables
Terminal Cable Part Number
Trakker Antares 2415
Trakker Antares 2425
Trakker Antares 2435
Trakker Antares 2455/2475 BL16816-1
Trakker Antares 248X BL11757-000
502X BL11757-000
5055 BL11757-000
6110 BL11757-000
6400 BL11757-000
6640 and 665X BL11757-000
700 Series Mobile
Computers
RT1100/1700 Series
RT1700 Series
RT5900 Series BL12803-1
BL11757-000 with the communications
dock (P/N TD2410A) or serial adapter
cable (P/N 069591)
BL11757-000 with the optical link adapter
(P/N 064021)
BL11537-1
BL11537-2
BL16815-1
BL11537-1
BL11537-2
BL13309-1
BL12804-1
BL13298-1
EasyCoder PL4 Printer User’s Guide 29

Bluetooth Communications
Note: The following section only applies when the Bluetooth
Module is installed in the PL4 printer.
The radiated output power of this internal wireless radio
is far below the FCC radio frequency exposure limits.
Nevertheless, this Bluetooth radio must be used in such a
manner that the antenna is 2.5 cm (1 inch) or further
from the human body such as with a belt clip or shoulder
strap. Do not use the printer in an unauthorized manner.
Attention: La puissance de sortie émise par ce module sans
fil interne se situe bien au-dessous des limites d’exposition
à la radiofréquence stipulées par la FCC. Toutefois, ce
module Bluetooth doit être utilisé de façon à ce que
l’antenne se situe à 2,5 cm ou plus du corps humain, avec
une pince de ceinture ou une courroie par exemple.
Utiliser seulement l’imprimante de façon autorisée.
“Bluetooth” is a worldwide standard for the exchange of data
between two devices via radio frequencies. Bluetooth radios are
relatively low powered to help prevent interference with other
devices running at similar radio frequencies. This low power
limits the range of a Bluetooth device to about 10 meters
(approximately 32 feet).
To exchange data, two Bluetooth enabled devices must establish
a connection. Bluetooth software is always running in the
background, ready to respond to connection requests. One
device (known as the master or the client) must request a
connection with another. The second device (the slave or the
server) then accepts or rejects the connection. A Bluetooth
enabled PL4 normally acts as a slave, but in theory any
Bluetooth device can be either a master or a slave. This
miniature network is sometimes referred to as a “piconet” and
can consist of several Bluetooth enabled devices.
Each Bluetooth PL4 has a unique Bluetooth Device Address
(BDA) loaded into its module when manufactured.
30 EasyCoder PL4 Printer User’s Guide

Note: If the printer times out, sending a print request
through the Bluetooth connection will not turn the printer
on. Make sure the printer is on before sending your print
request.
To print labels from a Bluetooth-enabled device
1 Create a label file with a .LBL extension, and load it on your
device. You can use Intermec PLUS to create your label file.
For help, see the online help.
2 Load the Bluetooth print utility for your processor on your
device:
Processor Bluetooth Print Utility
ARM BTPrintUtilityARM.exe
MIPS BTPrintUtilityMIPS.exe
SH3 BTPrintUtilitySH3.exe
These utilities are on the CD that came with your printer.
For help loading the utilities, see the device’s manual.
3 Turn on the printer.
4 Using either Intermec PLUS or CPL, set Bluetooth
authentication On or Off. When you set Bluetooth
authentication to On, the passkey is created using an
algorithm based on the friendly name.
5 On the device, find the Bluetooth COM port setting for the
device. For example, to find the COM port on a 700 Series
Mobile computer, select My Bluetooth Device and then
COM Ports.
6 Search for the printer and establish a connection. For help,
see the device’s manual.
7 Open the Bluetooth print utility on your device.
8 On the Print Utility screen, make sure the serial port matches
the port the Bluetooth connection is using.
9 From File Name, select the label file you loaded.
10 Click Print (1). The printer prints the label.
EasyCoder PL4 Printer User’s Guide 31

11 Close the Bluetooth print utility, or print another label.
Wireless Local Area Network (WLAN) Communications
This section provides information about the Compact Flash
radio and PCMCIA card radio and procedures for the following
setup scenarios:
• LPD and TCP printing
• WEP encryption
• POP3 e-mail printing
• Ad Hoc mode
WLAN Module Using a Compact Flash Radio
Note: The following section only applies when the CF
(Compact Flash) WLAN module is installed in the PL4
printer. The FCC ID number label is on the bottom of the
printer.
Use of the PL4 with the CF radio module meets the FCC
requirements for radio frequency radiation exposure when
worn in the standard configuration. In this configuration,
which applies whether you use the belt clip or shoulder
strap, the face of the printer where the media comes out is
facing away from you. You must use the standard
configuration when wearing the printer.
Avertissement: L’utilisation du PL4 avec le module radio
CF est conforme aux exigences de la FCC en termes
d’irradiation à la radiofréquence lorsque porté selon la
configuration standard. Sous cette configuration, qui
s’applique selon que vous portiez une pince de ceinture ou
une courroie, le côté de l’imprimante d’où sort le support
ne fait pas face à l’utilisateur. Il faut utiliser la
configuration standard lors du port de l’imprimante.
Printers equipped for WLAN communications use the industry
standard 802.11b protocols. These printers allow wireless
communication as a node within a LAN, and its wireless
capabilities allow communications from any point within the
32 EasyCoder PL4 Printer User’s Guide

LAN’s perimeter. Methods of establishing communications to
the PL4 vary with each LAN application.
WLAN Module Using a PCMCIA Card Radio
Note: The following section only applies when the PCMCIA
card WLAN module is installed in the PL4 printer. The FCC
ID number label is on the bottom of the printer.
Use of the PL4 with the PCMCIA card radio module
meets the FCC requirements for radio frequency radiation
exposure when worn in the standard configuration. In
this configuration, which applies whether you use the belt
clip or shoulder strap, the face of the printer where the
media comes out is facing away from you. You must use
the standard configuration when wearing the printer.
Avertissement: L’utilisation du PL4 avec le module radio
PCMCIA est conforme aux exigences de la FCC en termes
d’irradiation à la radiofréquence lorsque porté selon la
configuration standard. Sous cette configuration, qui
s’applique selon que vous portiez une pince de ceinture ou
une courroie, le côté de l’imprimante d’où sort le support
ne fait pas face à l’utilisateur. Il faut utiliser la
configuration standard lors du port de l’imprimante.
EasyCoder PL4 printers can be equipped with a radio in the
standard PCMCIA footprint using the industry standard
802.11b protocol. These printers allow wireless communication
as a node within a LAN and its wireless capabilities allow
communications from any point within the LAN’s perimeter.
Methods of establishing communications to the PL4 vary with
each LAN application.
General information on establishing WLAN communications
can be found in the EasyCoder PL-Series Printer Programmer’s
Reference Manual available on the CD that came with your
printer and online at www.intermec.com.
More information and LAN configuration utilities may also be
found in the Intermec PLUS program. You can also download
PLUS from the Intermec web site.
EasyCoder PL4 Printer User’s Guide 33

Setting Up LPD or TCP Printing
Access
point
PL4 printer
Laptop
Host
PC
PL4U049.eps
You use LPD printing in most Unix environments. LPD
printing requires an LPD daemon to be running on the Unix
server. TCP sockets printing is supported on most platforms,
including Windows and Unix.
Before setting up the printer, you need to know the following
information about your wireless network. If you are not familiar
with this information, please contact your network administrator
for assistance.
• You will need to know whether your network supports
dynamic host configuration protocol (DHCP). DHCP is a
method used for automatically assigning an IP address to a
network device.
• If DHCP is not supported on your network or if you are not
using DHCP, you need to assign the IP address, network
mask, and gateway address for your printer.
• You need the eSSID of the wireless network. The eSSID is
the unique identifier for your wireless network.
• You need to know whether your wireless network is using
encryption. In the following procedure, it is assumed that
encryption is disabled on your access point and wireless
network. If encryption is enabled on your wireless network,
please refer to “Setting Up WEP Encryption” later in this
guide.
34 EasyCoder PL4 Printer User’s Guide

For more information on using and sending commands to your
printer, see the EasyCoder PL-Series Printer Programmer’s
Reference Manual.
Note: If the printer times out, sending a print request
through the 802.11b connection will not turn the printer on.
Make sure the printer is on before sending your print request.
To set up for LPD or TCP printing
1 Print a configuration label. For help, see “Verifying the
Printer Is Working” earlier in this guide.
2 Connect to the printer via the serial cable and a
communications program (such as HyperTerminal). Ensure
your communications software matches the baud rate
displayed in the configuration label generated in Step 1. For
help connecting the printer to a PC, see “Serial Cable
Communications” earlier in this guide.
3 Reset the printer to the factory network defaults by typing the
following two commands in the serial communication
program window:
! U1 DO “device.restore_defaults” “wlan”
! U1 DO “device.restore_defaults” “ip”
4 Set the eSSID of the printer to match your wireless network
by issuing the following command:
! U1 SETVAR “wlan.essid” “my essid”
where “my essid” is the eSSID of your wireless network. Please
note the values must be enclosed in double quotes. If you do
not know what the eSSID of your network is, please contact
your network administrator for assistance.
5 If your network uses DHCP, issue the following command to
enable DHCP on the printer:
! U1 SETVAR “ip.dhcp.enable” “on”
If your network does not use DHCP, you need to issue the
following commands to disable DHCP and provide the
proper IP settings:
! U1 SETVAR “ip.dhcp.enable” “off”
! U1 SETVAR “ip.netmask” “xxx.xxx.xxx.xxx”
EasyCoder PL4 Printer User’s Guide 35

! U1 SETVAR “ip.gateway” “xxx.xxx.xxx.xxx”
! U1 SETVAR “ip.addr” “xxx.xxx.xxx.xxx”
where “xxx.xxx.xxx.xxx” will be replaced with valid values for
your network. If you are unsure what values to enter, please
contact your network administrator for assistance.
6 Turn the printer off and on.
7 Test the configuration. For help, see the next procedure.
To test that the printer is ready for LPD or TCP printing
1 Print a configuration label. For help, see “Verifying the
Printer Is Working” earlier in this guide.
2 Ping the IP address of the printer and verify
acknowledgement (from a DOS prompt on Windows
platforms).
3 Print a test label via Intermec PLUS. Test using TCP sockets
(port 6101) and LPD.
Setting Up WEP Encryption
p
y
t
r
i
o
c
n
n
E
P
E
W
Access
point
E
n
P
c
E
r
y
W
p
t
i
o
n
Host
PL4 printer
Laptop
PC
PL4U051.eps
Before setting up the printer, you need to know the WEP key
that your wireless network is using. If 40-bit encryption is
enabled, the key is 10 hexadecimal (0 to 9, A to F) characters;
otherwise, if 128-bit encryption is enabled, the key is 26
hexadecimal characters.
36 EasyCoder PL4 Printer User’s Guide

For more information on using and sending commands to your
printer, see the EasyCoder PL-Series Printer Programmer’s
Reference Manual.
To set up WEP encryption
1 Print a configuration label. For help, see “Verifying the
Printer Is Working” earlier in this guide.
2 Connect to the printer via the serial cable and a
communications program (such as HyperTerminal). Ensure
your communications software matches the baud rate
displayed in the configuration label generated in Step 1.
3 Reset the printer to the factory network defaults by typing the
following two commands in the serial communication
program window:
! U1 DO “device.restore_defaults” “wlan”
! U1 DO “device.restore_defaults” “ip”
4 Set the eSSID of the Printer to match your wireless network
by issuing the following command:
! U1 SETVAR “wlan.essid” “my essid”
where “my essid” is the eSSID of your wireless network. Please
note the values must be enclosed in double quotes. If you do
not know what the eSSID of your network is, please contact
your network administrator for assistance.
5 Set the encryption mode of the printer via the following
command:
! U1 SETVAR “wlan.encryption_mode” “mode”
where mode is off, 40-bit, or 128-bit depending on your
wireless network’s WEP encryption mode.
6 Set the encryption index of the printer via the following
command:
! U1 SETVAR “wlan.encryption_index” “index”
where index is 1, 2, 3, or 4 depending on which key index is
being used. The index must match the wireless network’s
WEP key index setting.
EasyCoder PL4 Printer User’s Guide 37

7 Set the encryption key of the printer via the following
command:
! U1 SETVAR “wlan.encryption_keyN”
“encryptionkey”
where the N is 1, 2, 3, or 4 depending on which index is
being used, and encryptionkey is 10 or 26 hexadecimal (0 to 9,
A to F) characters depending on whether 40-bit or 128-bit
encryption is enabled. The key must match your wireless
network’s WEP encryption key.
8 Set the authentication type of the printer via the following
command:
! U1 SETVAR “wlan.auth_type” “type”
where type is open or shared depending on whether your
wireless network is using Open System or Shared Key
authentication. The authentication type must match your
wireless network’s authentication type setting.
9 If your network uses DHCP, issue the following command to
enable DHCP supported on the printer:
! U1 SETVAR “ip.dhcp.enable” “on”
If your network does not use DHCP, you will need to issue
the following commands to disable DHCP and provide the
proper IP settings:
! U1 SETVAR “ip.dhcp.enable” “off”
! U1 SETVAR “ip.netmask” “xxx.xxx.xxx.xxx”
! U1 SETVAR “ip.gateway” “xxx.xxx.xxx.xxx”
! U1 SETVAR “ip.addr” “xxx.xxx.xxx.xxx”
where “xxx.xxx.xxx.xxx” are valid IP addresses. If you are
unsure what values to enter, please contact your network
administrator for assistance.
10 Turn the printer off and on.
11 Test the WEP setup. For help, see the next procedure.
To test the WEP setup
1 Print a configuration label. For help, see “Verifying the
Printer Is Working” earlier in this guide.
38 EasyCoder PL4 Printer User’s Guide

2 Ping the IP address of the printer and verify
acknowledgement (from a DOS prompt on Windows
platforms).
3 Print a test label via Intermec PLUS. Test using TCP sockets
(port 6101) and LPD.
Setting Up for POP3 E-mail Printing
Email
To:
From:
PL4 printer
Laptop
Access
point
Host
PC
PL4U053.eps
The PL4 printer is capable of connecting to a POP3 mailbox.
With POP3 enabled, you can configure the printer to print out
any mail messages in a designated POP3 mailbox account along
with saving to its file system any e-mail file attachments.
The procedures in this section assume you already have your
printer properly configured to operate on your wireless network.
If you have not yet configured your printer for basic wireless
operation, please refer to “Setting Up for LPD or TCP Printing”
or “Setting Up for WEP Encryption” earlier in this guide.
To enable POP3 support on your printer, you need access to a
POP3 server on your network. You need to have a dedicated
POP3 mailbox created specifically for the printer. If you are not
familiar with creating POP3 accounts, please contact your
network administrator for assistance. Because the printer deletes
the e-mail messages after it processes them, it is highly
recommended that you do use an e-mail account specifically set
aside for the printer and is not shared for any other use. For
example, you should not use your own personal POP3 account.
EasyCoder PL4 Printer User’s Guide 39

To successfully configure the printer for POP3 support, you
need the following information:
• The IP address of the POP3 server
• The username of the POP3 account
• The password of the POP3 account
• The poll frequency for the printer. The poll frequency tells
the printer how often to check for e-mail.
If you are unfamiliar with any of the above parameters and
settings, please contact your network administrator for
assistance.
For more information on using and sending commands to your
printer, see the EasyCoder PL-Series Printer Programmer’s
Reference Manual.
Note: If the printer times out, sending a print request
through the 802.11b connection will not turn the printer on.
Make sure the printer is on before sending your print request.
To set up for POP3 e-mail printing
1 Verify that the printer is connected to your wireless network.
If it is not connected, please refer to “Setting Up for LPD or
TCP Printing” or “Setting Up for WEP Encryption” earlier
in this guide.
2 Set the POP3 server IP address on the printer by issuing the
following command via the serial port:
! U1 SETVAR “ip.pop3.server_addr”
“xxx.xxx.xxx.xxx”
where “xxx.xxx.xxx.xxx” is the IP address of the POP3 server.
3 Set the POP3 username via the command:
! U1 SETVAR “ip.pop3.username” “my username”
where “my username” is the POP3 account name.
4 Set the POP3 account password via the command:
! U1 SETVAR “ip.pop3.password” “my password”
where “my password” is the password for the POP3 account.
40 EasyCoder PL4 Printer User’s Guide

5 Set the poll frequency of the printer. The poll frequency
determines how often the printer checks for new e-mail. It is
recommended that you choose a value greater than 10
seconds; otherwise the printer may be unresponsive to other
activity. Set the poll frequency using the following command:
! U1 SETVAR “ip.pop3.poll” “xxx”
where “xxx” is the desired time in seconds for how often the
printer should check for new e-mail.
6 Enable POP3 via the command:
! U1 SETVAR “ip.pop3.enable” “on”
7 If you want the printer to display the headers of the e-mail
messages when they are printed, issue the following
command:
! U1 SETVAR “ip.pop3.print_headers” “on”
8 Test the POP3 e-mail printing. For help, see the next
procedure.
To test the POP3 e-mail printing
1 Print a configuration label and check that the POP3 line
reads on. For help, see “Verifying the Printer Is Working”
earlier in this guide.
2 From your PC, send an e-mail to the POP3 mail account that
the printer is monitoring.
3 Turn the printer off and then back on.
Within 10 seconds, the printer should print out the e-mail
message you just sent.
EasyCoder PL4 Printer User’s Guide 41

Setting Up for Ad Hoc Mode
PL4 printer
Laptop
Hand-held
computer
PL4 printer
This section explains how to set up your printer for Ad Hoc
mode. You use Ad Hoc mode to communicate with a wireless
device without using an access point.
Before setting up the printer, you need to know the following
information about your wireless network. If you are not familiar
with this information, please contact your network administrator
for assistance.
• You need to assign the IP address and network mask for your
printer.
• You need the eSSID of the ad hoc wireless network. The
eSSID is the unique identifier for your wireless network.
PL4U055.eps
• You need to know whether your wireless network is using
encryption. In the following procedure, it is assumed that
encryption is disabled on your wireless network. If encryption
is enabled on your wireless network, please refer to “Setting
Up for WEP Encryption” earlier in this guide.
For more information on using and sending commands to your
printer, see the EasyCoder PL-Series Printer Programmer’s
Reference Manual.
Note: The Trakker Antares terminals and 700 Series
Monochrome Mobile Computers do not support Ad Hoc mode.
To set up for Ad Hoc mode
1 Print a configuration label. For help, see “Verifying the
Printer Is Working” earlier in this guide.
42 EasyCoder PL4 Printer User’s Guide

2 Connect to the printer via the serial cable and a
communications program (such as HyperTerminal). Ensure
your communications software matches the baud rate
displayed in the configuration label generated in Step 1. For
help connecting the printer to a PC, see “Serial Cable
Communications” earlier in this guide.
3 Reset the printer to the factory network defaults by typing the
following two commands in the serial communication
program window:
! U1 DO “device.restore_defaults” “wlan”
! U1 DO “device.restore_defaults” “ip”
4 Set the eSSID of the printer to match your wireless network
by issuing the following command:
! U1 SETVAR “wlan.essid” “my essid”
where “my essid” is the eSSID of your wireless network. Please
note the values must be enclosed in double quotes. If you do
not know what the eSSID of your network is, please contact
your network administrator for assistance.
5 Set the printer’s operating mode to ad hoc by issuing the
following command:
! U1 SETVAR “wlan.operating_mode” “ad hoc”
6 Set the encryption mode of the printer to off via the following
command:
! U1 SETVAR “wlan.encryption_mode” “off”
7 If a unit in your ad hoc network is acting as a DHCP server,
issue the following command to enable DHCP supported on
the printer:
! U1 SETVAR “ip.dhcp.enable” “on”
If your network does not use DHCP, you need to issue the
following commands to disable DHCP and provide the
proper IP settings:
! U1 SETVAR “ip.dhcp.enable” “off”
! U1 SETVAR “ip.netmask” “xxx.xxx.xxx.xxx”
! U1 SETVAR “ip.addr” “xxx.xxx.xxx.xxx”
EasyCoder PL4 Printer User’s Guide 43

where “xxx.xxx.xxx.xxx” is replaced with valid IP address
values for your network. If you are unsure what values to
enter, please contact your network administrator for
assistance.
8 Test the ad hoc connection. For help, see the next procedure.
To test the ad hoc connection
1 Print a configuration label. For help, see “Verifying the
Printer Is Working” earlier in this guide.
2 Ping the IP address of the printer and verify
acknowledgement (from a DOS prompt on Windows
platforms).
3 Print a test label via Intermec PLUS. Test using TCP sockets
(port 6101) and LPD.
Setting Up the Software
The PL4 uses the CPL programming language that was designed
for portable printing applications. CPL is fully described in the
EasyCoder PL-Series Printer Programmer’s Reference Manual,
available online from the Intermec web site at
www.intermec.com
You can also use Intermec PLUS, the Windows
creation program that uses a graphical interface to create and
edit labels in the CPL language. PLUS is available either online
at the Intermec web site or on the CD that ships with the
printer.
™
-based label
To install Intermec PLUS
1 Insert the CD that came with your printer into the CD drive
of your computer. The CD welcome screen appears.
2 Click Software. The Software screen appears.
3 To start the installation wizard, click the icon or text for the
Intermec PLUS application.
4 Follow the instructions that appear on your screen.
5 Open Intermec PLUS. For help, see the following procedure.
44 EasyCoder PL4 Printer User’s Guide

To open Intermec PLUS
1 Install Intermec PLUS. For help, see the previous procedure.
2 Click Start.
3 Select Programs and then Intermec PLUS.
4 Click Intermec PLUS. The Intermec PLUS main screen
appears.
Downloading Firmware
Use Intermec PLUS to download firmware upgrades to your
PL4 printer.
To download firmware
1 Connect the PL4 printer to the serial port of your PC.
2 On your PC, open Intermec PLUS. For help, see the previous
section.
3 From the Intermec PLUS main screen, click Printer and
select 1 Send File. The Send File dialog box appears.
EasyCoder PL4 Printer User’s Guide 45

4 Click Browse to select the firmware file (.HEX file) you want
to download.
5 Click Send to download the firmware.
6 Close Intermec PLUS.
Using the Accessories
There are several accessories available for use with the PL4
printer. This section shows you how to use the belt clip and the
shoulder strap.
46 EasyCoder PL4 Printer User’s Guide

Using the Belt Clip
The PL4 is equipped with a belt clip. To use the belt clip, hook
the clip over your belt and ensure that the clip is securely
attached to the belt. The belt clip will pivot to allow you to
move freely while wearing the printer.
Clip printer
to belt
Printer can
pivot freely
EasyCoder PL4 Printer User’s Guide 47
PL4U025.eps

Using the Adjustable Shoulder Strap
The PL4 comes with a shoulder strap (P/N BT11132-1) for
your convenience. To use the shoulder strap, snap each end of
the shoulder strap into the shoulder strap rings on the top of the
printer. Slide the buckle away from or toward the printer until
you achieve the desired length.
Pull here
to shorten
Pull here
to lengthen
Hold
buckle
Snap into shoulder strap
rings on printer
48 EasyCoder PL4 Printer User’s Guide
PL4U027.eps

Maintaining the Printer
The easiest way to maintain your printer is to extend the battery
life for as long as possible and to perform routine cleaning of the
printer parts.
Extending Battery Life
• Never expose the battery to direct sunlight or temperatures
over 40°C (104°F).
• Only use the following chargers. Use of any other kind of
charger may damage the battery.
• Intermec single battery charger (P/N AT15759-7)
• 4-pack battery charger (P/N AT16305-2)
• Vehicle-mount unit (VMU) running charger: DC/DC 12
VDC (P/N CC16614-1)
• VMU running charger: DC/DC 9 to 30 VDC
(P/N CC16614-2)
• VMU running charger: DC/DC 30 to 60 VDC
(P/N CC16614-3)
• VMU running charger: DC/DC 100 to 240 VDC
(P/N CC16614-4)
• Choose the media that is easiest to “burn.” An Intermec sales
representative can help you determine the optimum media for
your application. For contact information, see the media
brochure that came with your printer.
• If you print the same text or graphic on every label, consider
using a pre-printed label.
• Choose the correct print darkness and print speed for your
media.
• Use software handshaking (XON/XOFF) whenever possible.
• Select Tear-Off mode whenever possible (Self-Strip mode
uses more power).
• If your printer has the optional LCD, use the display
backlight only when necessary. Turn it off whenever it is not
needed.
EasyCoder PL4 Printer User’s Guide 49

• Pull the battery out of the printer if you will not be using the
• Consider purchasing an extra battery (P/N AT16293-2).
• Remember that any rechargeable battery loses its ability to
Cleaning the Printer
Use only cleaning agents specified below. Intermec is not
responsible for damage caused by any other cleaning
materials used on this printer. Clean the printer with a
cotton swab saturated with alcohol.
Attention: Utiliser seulement les produits de nettoyage
précisés ci-dessous. Intermec n’est pas responsable des
dommages causés par tout autre produit de nettoyage
utilisé pour cette imprimante. Nettoyer l’imprimante à
l’aide d’un coton-tige imbibé d’alcool.
To avoid possible personal injury or damage to the
printer, never insert any pointed or sharp objects into
the printer.
Avertissement: Pour éviter des blessures corporelles ou
des dommages à l’imprimante, il ne faut jamais insérer
un objet pointu ou tranchant dans l’imprimante.
printer for a day or more and you are not performing a
maintenance charge.
maintain a charge over time. It can only be recharged a finite
number of times before it must be replaced.
50 EasyCoder PL4 Printer User’s Guide

Cleaning the PL4 Printer
Printer Part Cleaning Method Cleaning Interval
Printhead Use the cleaning pen that came with your printer or
70% isopropyl alcohol on a cotton swab to clean the
print elements from end to end (the print elements are
located in the thin gray line on the printhead).
Platen roller Rotate the platen roller and clean it thoroughly with
the cleaning pen that came with your printer or 70%
isopropyl alcohol and a cotton swab.
Printers with linerless platens: Rotate platen and clean
bearing points only. Avoid use of alcohol on the
surface of linerless platens.
Self-strip bar Clean thoroughly with 70% isopropyl alcohol and a
cotton swab.
Tear bar Clean thoroughly with 70% isopropyl alcohol and a
cotton swab.
Media rollers Clean thoroughly with 70% isopropyl alcohol and a
cotton swab.
Printers with linerless platens: Rotate media rollers and
clean bearing points only. Avoid the use of alcohol on
the surface of the media rollers.
Exterior Clean with a water-dampened cloth. As needed.
Interior Brush or air blow. Make sure the bar sensor, gap
sensor, and label taken sensor windows are free of dust.
Printers with linerless platens: Clean inside surfaces of
edge guides and media support rollers with 70%
isopropyl alcohol and a cotton swab.
After every five rolls of media
or more often if necessary.
Linerless media requires
more frequent cleaning.
After every five rolls of media
or more often if necessary.
Linerless media requires
more frequent cleaning.
As needed.
As needed.
After every five rolls of media
or more often if necessary.
After every five rolls of media
or more often if necessary.
EasyCoder PL4 Printer User’s Guide 51

Platen
surface
Identifying the parts for cleaning
Troubleshooting
Printhead
elements
Self-strip
bar
Black mark
sensor
Tear
bar
Media
rollers
(2 places)
Self-strip
rollers
Bearing
points
(2 places)
Label taken
sensor
Edge guides,
inner
PL4U029.eps
Gap
sensor
You may have printer operation, print quality, or printer
communications problems at some time during the life of the
printer. It is easy to fix most of the problems and not delay
operation of the printer for very long. Use the following tables to
understand what the control panel is indicating and to help
troubleshoot your printer problem.
If you cannot find a solution to your problem, contact an
Intermec customer service representative. In the U.S.A. call
1.800.755.5505, and in Canada call 1.800.668.7043. If you are
an international customer, contact your local Intermec
representative.
52 EasyCoder PL4 Printer User’s Guide

Understanding the Standard Control Panel LEDs
If the printer is not functioning properly, refer to the table below
to find the state of the two LEDs on the control panel. Use the
“Printer Problems” table later in this guide to find your
symptom and solution.
Understanding the LEDs
Green LED Yellow LED Indication
Steady Off Normal operation or RF link
Off Off No power
Fast blink Off No RF link
Slow blink Off Low battery
Steady Steady Out of media or media cover not
Steady Fast blink Normal RF activity
Steady Fast blink,
beeper sounds
established
closed
No application
Understanding the LCD Control Panel Icons
The top of the screen shows several icons that indicate various
printer functions.
Understanding the Status Icons
Status Icon Condition Indication
Blank screen N/A No application
EasyCoder PL4 Printer User’s Guide 53
Steady RF link established
Off No RF Link
Flashing Low battery
Flashing Head latch not closed
Flashing Printer is receiving a file
Flashing Out of media

Troubleshooting Printer Problems
If you are having a problem with your printer, look for your
symptom in the Printer Problems table below and then try the
solutions in the order they are listed.
Printer Problems
Symptom Solution
The printer has no
power.
Media is not feeding
through the printer.
Print quality is poor
flashing.
or
Printing is garbled. Check the baud rate.
The printer is not
printing.
Make sure the battery is installed properly.
Recharge or replace the battery as necessary.
Make sure the printhead is closed and latched.
Make sure the media is not binding anywhere
in the printer.
If the printer has a label present sensor, make
sure the most recent label is removed. Also,
make sure the sensor is clean.
Clean the printhead.
Check media alignment.
Make sure the printhead is properly closed and
latched.
Check the battery and recharge or replace as
necessary.
Check the quality of the media. Use only
Intermec media to ensure superior print
quality and product performance.
Check the baud rate.
Replace the battery.
Check the cable to the terminal.
Establish an RF link or restore association
with the LAN.
Invalid label format or command structure.
Put printer in Communications Diagnostic
(Dump) mode to diagnose the problem.
54 EasyCoder PL4 Printer User’s Guide

Printer Problems (continued)
Symptom Solution
The battery life is
reduced.
The printer is
skipping labels.
The printer is not
communicating
properly.
Labels are jamming. Open the media cover, remove the jammed
The LCD screen is
blank.
Check the battery date code. If the battery is 1
to 2 years old, the short life may be due to
normal aging.
Recondition the battery.
Replace the battery.
Check the media for top of form sense mark
or label gap.
Make sure the maximum print field has not
been exceeded on the label.
Make sure the label gap sensor is not blocked
or malfunctioning.
Make sure media is loaded, the printhead is
closed, and the error light is off.
Check the baud rate.
Replace the cable to the terminal.
labels, and generously apply isopropyl alcohol
to the printer in the area of the jammed label.
No application is loaded or the application is
corrupted. Reload the application. For help
loading applications on your printer, see the
Intermec PLUS help.
EasyCoder PL4 Printer User’s Guide 55

Printer Problems (continued)
Symptom Solution
The printer is not
communicating with
the network.
Print a configuration label to check the
following settings:
• eSSID
•
Operating mode
• Preamble length
• IP address
• Network mask
•
Gateway
•
Encryption
•
Authentication
•
LPD
•
TCP
•
TCP/UDP port
Check with your network administrator to
make sure that the previous settings are
configured correctly for your network. For
help printing a configuration label, see
“Verifying the Printer Is Working” earlier in
this guide. For help configuring the printer for
your network, see “Establishing
Communications With a Terminal” earlier in
this guide.
On the configuration label, make sure “Card
Detected” appears in the PCMCIA/CF
Adapter section. If “Card Not Detected”
appears, contact your Intermec technical
support representative.
Make sure that the printer is within range of
the access point.
The printer does not
print POP3 e-mail
messages.
Make sure the printer is correctly configured
for your POP3 settings. For help, see “Setting
Up for POP3 E-mail Printing” earlier in this
guide. For help getting the POP3 settings
from the printer, see the EasyCoder PL-Series
Printer Programmer’s Reference Manual.
56 EasyCoder PL4 Printer User’s Guide

Printer Problems (continued)
Symptom Solution
The printer prints
POP3 e-mail but does
not respond to other
tasks.
When you open the
Print dialog box in
Intermec PLUS, the
printer advances the
media.
When you print the
two-key report, the
triangle and numbers
(see page 24) do not
appear.
On the LCD control
panel, no menus
appear when you turn
on the printer.
The poll frequency is set to low. Make sure the
poll frequency is set to more than 10 seconds.
For help, see “Setting Up for POP3 E-mail
Printing” earlier in this guide.
The Windows operating system is sending a
signal to the printer to advance media. For
information on correcting this symptom, see
Microsoft Knowledge Base Article 317279.
The DIAGS.BAT file has been deleted. You can
find this file on the CD that came with your
printer. Use Intermec PLUS to load this file
on your printer.
The INDEX.WML file has been deleted. You
can find this file on the CD that came with
your printer. Use Intermec PLUS to load this
file on your printer.
Using Communications Diagnostics Mode
If there’s a problem transferring data between the computer and
the printer, try putting the printer in the Communications
Diagnostics mode (also referred to as the Dump mode). The
printer prints the ASCII characters and their text representation
(or the period [.], if not a printable character) for any data
received from the host computer.
To enter Communications Diagnostics mode
1 Print a configuration label.
After printing the configuration label, the printer prints:
“Press Feed button to enter Dump mode.”
2 Press the Feed button. The printer prints: “Entering Dump
mode.”
EasyCoder PL4 Printer User’s Guide 57

Note: If you do not press the Feed button within 3
seconds, the printer prints “Dump mode not entered” and
resumes normal operation.
3 At this point, the printer is in Dump mode and prints the
ASCII hex codes of any data sent to it and their text
representation (or [.] if not a printable character).
Additionally, a file with a .DMP extension containing the ASCII
information is created and stored in the printer’s memory. You
can view, clone, or delete the file using the Intermec PLUS
application.
To exit Communications Diagnostics mode and return the printer to
normal operations
1 Turn the printer off.
2 Wait 5 seconds.
3 Turn the printer on.
Specifications
Printing Specifications
Print density 8 dots/mm (203 dots/inch)
Print width Up to 103.8 mm (4.09 inches)
Print speed 76.2 mm (3 inches) per second
Printhead life, calculated 50 km (1,964,160 inches) nominal
Distance from print element to
top of form
14.5 mm (0.571 inch) or 116 dots
Memory/Communications Specifications
Flash memory 2 MB flash (standard)
SRAM memory 2 MB SRAM (standard)
Standard
communications
58 EasyCoder PL4 Printer User’s Guide
Configurable baud rate (from 9600 to 115.2 Kbps),
parity and data bits. The highest baud rate with
consistent results is 38.4 Kbps.
Software (XON/XOFF) or hardware (DTR/STR)
communication handshake protocols.

Memory/Communications Specifications (continued)
Label Specifications
Optional wireless
communications
Label/tag width 50.8 mm to 104.1 mm (2 inches to 4.1 inches)
Maximum
label/tag length
Inter-label gap 2 mm to 4 mm (3 mm preferred)
Label thickness 0.064 mm to 0.165 mm (0.0025 inch to 0.0065
Tag thickness 0.152 mm (0.0060 inch) maximum
Label roll size:
maximum
diameter
Inner core
diameter
Media
requirements
Bluetooth compatible 2.4 GHz link
Wireless LAN capabilities comply with 802.11b
protocols
508 mm (20 inches) with standard memory
0.08 inch to 0.16 inch (0.12 inch preferred)
inch)
66.7 mm (2.625 inch) O.D.
19 mm (0.75 inch) minimum; 35.05 mm (1.38 inch)
minimum diameter for linerless media
Use Intermec-brand direct thermal media that is
outside wound. Media may be reflective (black mark)
sensing or transmissive (gap) sensing, die-cut,
continuous, fanfold, or linerless.
For die-cut labels, use only full auto dies.
The reflective media black marks should extend past
the centerline of the roll.
Minimum Black Mark Dimensions:
Mark width: 12.7mm (0.5 inch) perpendicular to
edge of media, centered within the width of the roll.
Mark length: 2.4 mm (0.094 inch) parallel to edge of
media.
EasyCoder PL4 Printer User’s Guide 59

Font/Bar Code Specifications-
Fonts Available
1D Bar Codes Available
2D Bar Codes Available
Rotation Angles 0°, 90°, 180°, and 270°
Five resident scalable and rotatable fonts
available from 12 to 48 pt.
Downloadable pre-scaled fonts via Intermec
PLUS application.
Optional international character sets.
Codabar
UCC/EAN 128
Code 39
Code 93
EAN 8/JAN 8, 2 and 5 digit extensions
EAN 13/JAN 13, 2 and 5 digit extensions
lnterleaved 2 of 5
MSI/Plessey
FIM/POSTNET
UPC-A, 2 and 5 digit extensions
UPC-E, 2 and 5 digit extensions
MaxiCode
PDF 417
Physical/Environmental/Electrical Specifications
76.2 mm
(3.0 inches)
89 mm
(3.5 inches)
208 mm
(8.2 inches)
147.3 mm
(5.8 inches)
60 EasyCoder PL4 Printer User’s Guide
PL4U030.eps
190.5 mm
(7.5 inches)

Physical/Environmental/Electrical Specifications
(continued)
Weight with battery,
excluding media &
wireless options
Temperature
Operating
Storage
Relative humidity
Operation
Storage
Electrical Battery: 7.2V (nominal) Lithium-Ion
Communications Port
Pin #
1 RXD input Receive Data
2 TXD output Transmit Data
3 CTS input Clear To Send from host
4 RTS output Request To Send
5 GND Ground
6 NC No Connect
7 DSR input Data Set Ready
8 DTR output Data Terminal Ready
Signal
Name
0.9 kg. (2.0 lbs.)
-15°C to 50°C (5°F to 122°F)
-25°C to 70°C (-13°F to 158°F)
10% to 80% (non-condensing)
10% to 40% for Bluetooth printer
10% to 90% (non-condensing)
Chargers: External single battery charger, 120 to
230 VAC depending on connector selected.
External 4-pack charger, 100 to 240V
Type
Description
set high when printer is ready
to accept command /data
low to high transition turns
printer on, high to low
transition turns printer off (if
enabled)
set high when printer is on (set
to battery voltage for “S”
versions)
EasyCoder PL4 Printer User’s Guide 61

2
4
1
5
3
Accessories
6
PL4U031.eps
Communications Port 8-pin Circular DIN
7
8
You can order the following accessories for the PL4:
• Adjustable shoulder strap (P/N BT11132-1)
• Extra battery (P/N AT16293-2)
• Vehicle-mount unit (VMU) bracket (P/N DC16620-2)
• Chargers:
• Single battery charger (P/N AT15759-7)
• 4-Pack battery charger (P/N AT16305-2)
• VMU running charger: DC/DC 12 VDC
(P/N CC16614-5)
• VMU running charger: DC/DC 9 to 30 VDC
(P/N CC16614-6)
• VMU running charger: DC/DC 30 to 60 VDC
(P/N CC16614-7)
• VMU running charger: DC/DC 100 to 240 VDC
(P/N CC16614-8)
• Set of international contact adapters (P/N AN16740-1)
• Package of ten cleaning pens (P/N AN11209-1)
• Soft case (P/N DA16473-1)
• Printer stand (P/N DA16269-1)
• Data cables (for a list of available data cables, see “Serial Cable
Communications” earlier in this guide)
62 EasyCoder PL4 Printer User’s Guide

For details about accessories, contact your local Intermec
representative.
EasyCoder PL4 Printer User’s Guide 63

64 EasyCoder PL4 Printer User’s Guide

Corporate Headquarters
6001 36th Avenue West
Everett, Washington 98203
U.S.A.
tel 425.348.2600
fax 425.355.9551
www.intermec.com
EasyCoder PL4 Printer User's Guide
*073204-001*
*073204-001*
 Loading...