

Page 1
PD
Commercial Printer
43
| PD
43c
User Manual
Page 2

Intermec by Honeywell
6001 36th Ave. W.
Everett, WA 98203
U.S.A.
www.intermec.com
The information contained herein is provided solely for the purpose of allowing customers to
operate and service Intermec-manufactured equipment and is not to be released, reproduced, or
used for any other purpose without written permission of Intermec by Honeywell.
Information and specifications contained in this document are subject to change without prior
notice and do not represent a commitment on the part of Intermec by Honeywell.
© 2014 Intermec by Honeywell. All rights reserved.
The word Intermec, the Intermec logo, Norand, ArciTech, Beverage Routebook, CrossBar,
dcBrowser, Duratherm, EasyADC, EasyCoder, EasySet, Fingerprint, i-gistics, INCA (under license),
Intellitag, Intellitag Gen2, JANUS, LabelShop, MobileLAN, Picolink, Ready-to-Work, RoutePower,
Sabre, ScanPlus, ShopScan, Smart Mobile Computing, SmartSystems, TE 2000, Trakker Antares,
and Vista Powered are either trademarks or registered trademarks of Intermec by Honeywell.
For patent information, please refer to www.hsmpats.com.
Wi-Fi is a registered certification mark of the Wi-Fi Alliance.
Microsoft, Windows, and the Windows logo are registered trademarks of Microsoft Corporation
in the United States and/or other countries.
Bluetooth is a trademark of Bluetooth SIG, Inc., U.S.A.
The products described herein comply with the requirements of the ENERGY STAR. As an
ENERGY STAR partner, Intermec Technologies has determined that this product meets the
ENERGY STAR guidelines for energy efficiency. For more information on the ENERGY STAR
program, see www.energystar.gov. The ENERGY STAR does not represent EPA endorsement of
any product or service.
ii PD43 and PD43c Commercial Printer User Manual
Page 3

Document Change Record
This page records changes to this document. The document was
originally released as Revision 001.
Version
Number
002 9/2014 Added new sections :
Date Description of Change
• Using the Label Dispenser
• Calibrating the Label Taken Sensor
• Exporting a Configuration File to a USB Device
• Installing a Configuration File from a USB Device
PD43 and PD43c Commercial Printer User Manual iii
Page 4

iv PD43 and PD43c Commercial Printer User Manual
Page 5

Contents
Before You Begin. . . . . . . . . . . . . . . . . . . . . . . . . . . . . . . . . . . . . . . . . . . . . . . . . . . . . . . . . . . . . . . . . xi
Safety Information . . . . . . . . . . . . . . . . . . . . . . . . . . . . . . . . . . . . . . . . . . . . . . . . . . . . . . . xi
Safety Precautions . . . . . . . . . . . . . . . . . . . . . . . . . . . . . . . . . . . . . . . . . . . . . . . . . . . . . . . xi
Global Services and Support . . . . . . . . . . . . . . . . . . . . . . . . . . . . . . . . . . . . . . . . . . . . . . xii
Warranty Information. . . . . . . . . . . . . . . . . . . . . . . . . . . . . . . . . . . . . . . . . . . . xii
Web Support . . . . . . . . . . . . . . . . . . . . . . . . . . . . . . . . . . . . . . . . . . . . . . . . . . . . xii
Send Feedback. . . . . . . . . . . . . . . . . . . . . . . . . . . . . . . . . . . . . . . . . . . . . . . . . . xiii
Telephone Support . . . . . . . . . . . . . . . . . . . . . . . . . . . . . . . . . . . . . . . . . . . . . xiii
Who Should Read This Manual . . . . . . . . . . . . . . . . . . . . . . . . . . . . . . . . . . . . . . . . . . xiii
Related Documents . . . . . . . . . . . . . . . . . . . . . . . . . . . . . . . . . . . . . . . . . . . . . . . . . . . . . xiii
Patent Information . . . . . . . . . . . . . . . . . . . . . . . . . . . . . . . . . . . . . . . . . . . . . . . . . . . . . xiv
About the Printers . . . . . . . . . . . . . . . . . . . . . . . . . . . . . . . . . . . . . . . 1
1
About the PD43 . . . . . . . . . . . . . . . . . . . . . . . . . . . . . . . . . . . . . . . . . . . . . . . . . . . . . . . . . . . . . . . . . . 2
Printer Features. . . . . . . . . . . . . . . . . . . . . . . . . . . . . . . . . . . . . . . . . . . . . . . . . . . . . . . . . . . . . . . . . . . 2
About the Front Panel . . . . . . . . . . . . . . . . . . . . . . . . . . . . . . . . . . . . . . . . . . . . . . . . . . . . . . . . . . . . . 9
About the Ready-to-Work Indicator . . . . . . . . . . . . . . . . . . . . . . . . . . . . . . . . . . . . . . . . 9
About the Icon Front Panel . . . . . . . . . . . . . . . . . . . . . . . . . . . . . . . . . . . . . . . . . . . . . . . 10
About the LCD Front Panel . . . . . . . . . . . . . . . . . . . . . . . . . . . . . . . . . . . . . . . . . . . . . . . 11
About the Ready Screen . . . . . . . . . . . . . . . . . . . . . . . . . . . . . . . . . . . . . . . . . . 12
View Basic Printer and Connection Information . . . . . . . . . . . . . . . . . . . . 14
About the Main Menu. . . . . . . . . . . . . . . . . . . . . . . . . . . . . . . . . . . . . . . . . . . . 15
Navigate in the Main Menu . . . . . . . . . . . . . . . . . . . . . . . . . . . . . . . . . . . . . . . 16
About the Onscreen Keypads . . . . . . . . . . . . . . . . . . . . . . . . . . . . . . . . . . . . . 17
About the Printer Wizards . . . . . . . . . . . . . . . . . . . . . . . . . . . . . . . . . . . . . . . . 18
Use a Wizard . . . . . . . . . . . . . . . . . . . . . . . . . . . . . . . . . . . . . . . . . . . . . . . . . . . . 20
Contents
About Printer Command Languages . . . . . . . . . . . . . . . . . . . . . . . . . . . . . . . . . . . . . . . . . . . . . . . 20
About Fingerprint . . . . . . . . . . . . . . . . . . . . . . . . . . . . . . . . . . . . . . . . . . . . . . . . . . . . . . . 21
About Direct Protocol . . . . . . . . . . . . . . . . . . . . . . . . . . . . . . . . . . . . . . . . . . . . . . . . . . . . 21
About IPL . . . . . . . . . . . . . . . . . . . . . . . . . . . . . . . . . . . . . . . . . . . . . . . . . . . . . . . . . . . . . . . 21
About ESim . . . . . . . . . . . . . . . . . . . . . . . . . . . . . . . . . . . . . . . . . . . . . . . . . . . . . . . . . . . . . 21
About ZSim . . . . . . . . . . . . . . . . . . . . . . . . . . . . . . . . . . . . . . . . . . . . . . . . . . . . . . . . . . . . . 22
About DSim . . . . . . . . . . . . . . . . . . . . . . . . . . . . . . . . . . . . . . . . . . . . . . . . . . . . . . . . . . . . . 22
About Smart Printing . . . . . . . . . . . . . . . . . . . . . . . . . . . . . . . . . . . . . . . . . . . . . . . . . . . . 22
About ESim/ZSim Auto-Configuration . . . . . . . . . . . . . . . . . . . . . . . . . . . . . . . . . . . . 22
PD43 and PD43c Commercial Printer User Manual v
Page 6

Contents
How to Set the Printer Command Language. . . . . . . . . . . . . . . . . . . . . . . . . . . . . . . . 23
Set the Command Language from the Printer Web Page. . . . . . . . . . . . . 23
Set the Command Language from the Main Menu. . . . . . . . . . . . . . . . . . 24
Set the Command Language with the Print Button . . . . . . . . . . . . . . . . . 24
Printer Options and Accessories . . . . . . . . . . . . . . . . . . . . . . . . . . . . . . . . . . . . . . . . . . . . . . . . . . . 25
Set Up the Printer . . . . . . . . . . . . . . . . . . . . . . . . . . . . . . . . . . . . . . . 29
2
About Media . . . . . . . . . . . . . . . . . . . . . . . . . . . . . . . . . . . . . . . . . . . . . . . . . . . . . . . . . . . . . . . . . . . . 30
About Linerless Media. . . . . . . . . . . . . . . . . . . . . . . . . . . . . . . . . . . . . . . . . . . . . . . . . . . . 30
About Tag Media . . . . . . . . . . . . . . . . . . . . . . . . . . . . . . . . . . . . . . . . . . . . . . . . . . . . . . . . 30
About Tear-Off Printing . . . . . . . . . . . . . . . . . . . . . . . . . . . . . . . . . . . . . . . . . . . . . . . . . . 30
Load Media for Tear-Off Printing . . . . . . . . . . . . . . . . . . . . . . . . . . . . . . . . . . . . . . . . . 31
About Cut-Off Printing . . . . . . . . . . . . . . . . . . . . . . . . . . . . . . . . . . . . . . . . . . . . . . . . . . 35
Load Media for Cut-Off Printing . . . . . . . . . . . . . . . . . . . . . . . . . . . . . . . . . . . . . . . . . . 36
About the Label Dispenser . . . . . . . . . . . . . . . . . . . . . . . . . . . . . . . . . . . . . . . . . . . . . . . . 40
Load Media for the Label Dispenser . . . . . . . . . . . . . . . . . . . . . . . . . . . . . . . . . . . . . . . 40
Load External Media for the PD43. . . . . . . . . . . . . . . . . . . . . . . . . . . . . . . . . . . . . . . . .46
Set the PD43c Rear Feed Guides. . . . . . . . . . . . . . . . . . . . . . . . . . . . . . . . . . . . . . . . . . . 47
Load External Media Rolls for the PD43c . . . . . . . . . . . . . . . . . . . . . . . . . . . . . . . . . . 48
Load Boarding Passes for the PD43c . . . . . . . . . . . . . . . . . . . . . . . . . . . . . . . . . . . . . . . 49
Load Airline Media. . . . . . . . . . . . . . . . . . . . . . . . . . . . . . . . . . . . . . . . . . . . . . . . . . . . . . . 50
Adjust the Label Stop Sensor. . . . . . . . . . . . . . . . . . . . . . . . . . . . . . . . . . . . . . . . . . . . . . 52
About Ribbon . . . . . . . . . . . . . . . . . . . . . . . . . . . . . . . . . . . . . . . . . . . . . . . . . . . . . . . . . . . . . . . . . . . 53
Load Ribbon. . . . . . . . . . . . . . . . . . . . . . . . . . . . . . . . . . . . . . . . . . . . . . . . . . . . . . . . . . . . . . . . . . . . . 54
Change the Ink Direction. . . . . . . . . . . . . . . . . . . . . . . . . . . . . . . . . . . . . . . . . . . . . . . . . 58
Use the Notchless Ribbon Core Adapter. . . . . . . . . . . . . . . . . . . . . . . . . . . . . . . . . . . . . . . . . . . .59
Connect the Printer to Power . . . . . . . . . . . . . . . . . . . . . . . . . . . . . . . . . . . . . . . . . . . . . . . . . . . . . 62
Use the Setup Wizard. . . . . . . . . . . . . . . . . . . . . . . . . . . . . . . . . . . . . . . . . . . . . . . . . . . . . . . . . . . . . 64
How to Set Up an Icon Printer . . . . . . . . . . . . . . . . . . . . . . . . . . . . . . . . . . . . . . . . . . . . . . . . . . . . 64
Set Up an Icon Printer without a Network Option . . . . . . . . . . . . . . . . . . . . . . . . . .65
Set Up an Icon Printer with Ethernet . . . . . . . . . . . . . . . . . . . . . . . . . . . . . . . . . . . . . . 66
Set Up an Icon Printer with Wi-Fi . . . . . . . . . . . . . . . . . . . . . . . . . . . . . . . . . . . . . . . . . 66
Calibrate the Media Feed and Print Test Labels on the Icon Printer. . . . . . . . . . .67
Set the Command Language with the Print Button . . . . . . . . . . . . . . . . . . . . . . . . .67
Calibrate the Label Taken Sensor . . . . . . . . . . . . . . . . . . . . . . . . . . . . . . . . . . . . . . . . . . . . . . . . . . 68
vi PD43 and PD43c Commercial Printer User Manual
Page 7

About Test Labels . . . . . . . . . . . . . . . . . . . . . . . . . . . . . . . . . . . . . . . . . . . . . . . . . . . . . . . . . . . . . . . . 69
Print a Test Label in Start Up Mode. . . . . . . . . . . . . . . . . . . . . . . . . . . . . . . . . . . . . . . .69
Print a Test Label in Idle Mode . . . . . . . . . . . . . . . . . . . . . . . . . . . . . . . . . . . . . . . . . . . .70
Print a Test Label from the Main Menu . . . . . . . . . . . . . . . . . . . . . . . . . . . . . . . . . . . .70
Pause or Cancel a Batch Print Job on the LCD Printer . . . . . . . . . . . . . . . . . . . . . . . . . . . . . . . 71
Pause a Batch Print Job on the Icon Printer. . . . . . . . . . . . . . . . . . . . . . . . . . . . . . . . . . . . . . . . . 72
Cancel a Batch Print Job on the Icon Printer . . . . . . . . . . . . . . . . . . . . . . . . . . . . . . . . 72
How to Print on RFID Media . . . . . . . . . . . . . . . . . . . . . . . . . . . . . . . . . . . . . . . . . . . . . . . . . . . . . 73
About RFID Tag Position. . . . . . . . . . . . . . . . . . . . . . . . . . . . . . . . . . . . . . . . . . . . . . . . . 73
Run the RFID Calibration Wizard . . . . . . . . . . . . . . . . . . . . . . . . . . . . . . . . . . . . . . . . . 74
Calculate RFID Tag Position . . . . . . . . . . . . . . . . . . . . . . . . . . . . . . . . . . . . . . . . . . . . . . 75
Connect the Printer. . . . . . . . . . . . . . . . . . . . . . . . . . . . . . . . . . . . . . 77
3
About Printer Drivers . . . . . . . . . . . . . . . . . . . . . . . . . . . . . . . . . . . . . . . . . . . . . . . . . . . . . . . . . . . . 78
Install Printer Drivers . . . . . . . . . . . . . . . . . . . . . . . . . . . . . . . . . . . . . . . . . . . . . . . . . . . . . . . . . . . . 78
How to Connect the Printer to Your PC . . . . . . . . . . . . . . . . . . . . . . . . . . . . . . . . . . . . . . . . . . . . 79
Connect the Printer Using a USB Cable . . . . . . . . . . . . . . . . . . . . . . . . . . . . . . . . . . . . 79
Connect the Printer Using a Serial or Parallel Cable . . . . . . . . . . . . . . . . . . . . . . . . . 81
Contents
How to Connect the Printer to Your Network. . . . . . . . . . . . . . . . . . . . . . . . . . . . . . . . . . . . . . . 82
Connect the Printer to an Ethernet Network . . . . . . . . . . . . . . . . . . . . . . . . . . . . . . . 82
About Wi-Fi Communications . . . . . . . . . . . . . . . . . . . . . . . . . . . . . . . . . . . . . . . . . . . . 84
Connect the Printer to a Wireless Network . . . . . . . . . . . . . . . . . . . . . . . . . 85
Configure Wi-Fi Communications from the Printer Web Page . . . . . . .87
About Bluetooth Communications . . . . . . . . . . . . . . . . . . . . . . . . . . . . . . . . . . . . . . . . . . . . . . . . 88
Connect to a Bluetooth Device by Reading a Bar Code . . . . . . . . . . . . . . . . . . . . . .89
Connect to a Bluetooth Device Using a Wizard . . . . . . . . . . . . . . . . . . . . . . . . . . . . . 89
Configure Bluetooth Communications from the Main Menu . . . . . . . . . . . . . . . .90
Configure Bluetooth Communications from the Web Page . . . . . . . . . . . . . . . . . .90
About the USB Host Port . . . . . . . . . . . . . . . . . . . . . . . . . . . . . . . . . . . . . . . . . . . . . . . . . . . . . . . . . 91
Connect a USB Device . . . . . . . . . . . . . . . . . . . . . . . . . . . . . . . . . . . . . . . . . . . . . . . . . . . . . . . . . . . . 92
Configure the Printer . . . . . . . . . . . . . . . . . . . . . . . . . . . . . . . . . . . . 93
4
About Printer Configuration Settings. . . . . . . . . . . . . . . . . . . . . . . . . . . . . . . . . . . . . . . . . . . . . .94
PD43 and PD43c Commercial Printer User Manual vii
Page 8

Contents
How to Configure the Printer . . . . . . . . . . . . . . . . . . . . . . . . . . . . . . . . . . . . . . . . . . . . . . . . . . . . . 95
View the Configuration Summary . . . . . . . . . . . . . . . . . . . . . . . . . . . . . . . . . . . . . . . . . 95
Configure the Printer from the Web Page . . . . . . . . . . . . . . . . . . . . . . . . . . . . . . . . . . 96
Configure the Printer from the Main Menu . . . . . . . . . . . . . . . . . . . . . . . . . . . . . . . . 98
Configure the Printer with PrintSet 5 . . . . . . . . . . . . . . . . . . . . . . . . . . . . . . . . . . . . . . 98
How to Configure the Printer with Programming Commands . . . . . . . . . . . . . . . 99
How to Configure the Printer with SmartSystems . . . . . . . . . . . . . . . . . . . . . . . . . . 99
About Printer Profiles . . . . . . . . . . . . . . . . . . . . . . . . . . . . . . . . . . . . . . . . . . . . . . . . . . . . . . . . . . .100
Save a Printer Profile from the Web Page . . . . . . . . . . . . . . . . . . . . . . . . . . . . . . . . . .100
Load a Printer Profile from the Web Page . . . . . . . . . . . . . . . . . . . . . . . . . . . . . . . . .101
Manage Printer Profiles from the Web Page . . . . . . . . . . . . . . . . . . . . . . . . . . . . . . .102
Save a Printer Profile from the Main Menu . . . . . . . . . . . . . . . . . . . . . . . . . . . . . . . .103
Load a Printer Profile from the Main Menu . . . . . . . . . . . . . . . . . . . . . . . . . . . . . . .103
How to Load a Printer Profile with Programming Commands . . . . . . . . . . . . . .104
About USB Storage Device Directories . . . . . . . . . . . . . . . . . . . . . . . . . . . . . . . . . . . . . . . . . . . .104
Print a File from a USB Storage Device. . . . . . . . . . . . . . . . . . . . . . . . . . . . . . . . . . . . . . . . . . . .105
Upload Applications and Files from a USB Storage Device . . . . . . . . . . . . . . . . . . . . . . . . . .105
Export Applications and Files to a USB Storage Device . . . . . . . . . . . . . . . . . . . . . . . . . . . . .106
Export a Configuration File to a USB Storage Device. . . . . . . . . . . . . . . . . . . . . . . . . . . . . . .106
Install a Configuration File from a USB Storage Device . . . . . . . . . . . . . . . . . . . . . . . . . . . .107
Upload or Delete Applications and Resources from the Printer Web Page . . . . . . . . . . . .108
Troubleshoot the Printer . . . . . . . . . . . . . . . . . . . . . . . . . . . . . . . . 111
5
Call Product Support. . . . . . . . . . . . . . . . . . . . . . . . . . . . . . . . . . . . . . . . . . . . . . . . . . . . . . . . . . . .112
Locate the Printer Configuration and Serial Numbers. . . . . . . . . . . . . . . . . . . . . . . . . . . . . .113
Problems and Possible Solutions . . . . . . . . . . . . . . . . . . . . . . . . . . . . . . . . . . . . . . . . . . . . . . . . .113
How to Restore Default Settings . . . . . . . . . . . . . . . . . . . . . . . . . . . . . . . . . . . . . . . . . . . . . . . . .118
Restore Defaults from the Printer Web Page. . . . . . . . . . . . . . . . . . . . . . . . . . . . . . .118
Restore Defaults from the Main Menu . . . . . . . . . . . . . . . . . . . . . . . . . . . . . . . . . . . .119
How to Upgrade the Printer Firmware . . . . . . . . . . . . . . . . . . . . . . . . . . . . . . . . . . . . . . . . . . . .120
Download the Printer Firmware Update . . . . . . . . . . . . . . . . . . . . . . . . . . . . . . . . . .120
viii PD43 and PD43c Commercial Printer User Manual
Page 9

Upgrade Firmware from the Printer Web Page . . . . . . . . . . . . . . . . . . . . . . . . . . . . .121
Upgrade Firmware from a USB Storage Device . . . . . . . . . . . . . . . . . . . . . . . . . . . .121
Upgrade Firmware from the USB Menu. . . . . . . . . . . . . . . . . . . . . . . . . . . . . . . . . . .122
About Alerts . . . . . . . . . . . . . . . . . . . . . . . . . . . . . . . . . . . . . . . . . . . . . . . . . . . . . . . . . . . . . . . . . . . .123
Configure Alerts . . . . . . . . . . . . . . . . . . . . . . . . . . . . . . . . . . . . . . . . . . . . . . . . . . . . . . . .123
Maintenance and Error Alert Messages. . . . . . . . . . . . . . . . . . . . . . . . . . . . . . . . . . . .124
About Printer System Information . . . . . . . . . . . . . . . . . . . . . . . . . . . . . . . . . . . . . . . . . . . . . . .126
View Printer Statistics . . . . . . . . . . . . . . . . . . . . . . . . . . . . . . . . . . . . . . . . . . . . . . . . . . .127
Check the Printer Odometer . . . . . . . . . . . . . . . . . . . . . . . . . . . . . . . . . . . . . . . . . . . . .128
Maintain the Printer. . . . . . . . . . . . . . . . . . . . . . . . . . . . . . . . . . . . 129
6
Clean the Printhead . . . . . . . . . . . . . . . . . . . . . . . . . . . . . . . . . . . . . . . . . . . . . . . . . . . . . . . . . . . . .130
Replace the Printhead . . . . . . . . . . . . . . . . . . . . . . . . . . . . . . . . . . . . . . . . . . . . . . . . . . . . . . . . . . .131
Clean the Platen Roller . . . . . . . . . . . . . . . . . . . . . . . . . . . . . . . . . . . . . . . . . . . . . . . . . . . . . . . . . .133
Clean the Exterior of the Printer. . . . . . . . . . . . . . . . . . . . . . . . . . . . . . . . . . . . . . . . . . . . . . . . . .134
Specifications . . . . . . . . . . . . . . . . . . . . . . . . . . . . . . . . . . . . . . . . 135
A
Contents
Printer Specifications . . . . . . . . . . . . . . . . . . . . . . . . . . . . . . . . . . . . . . . . . . . . . . . . . . . . . . . . . . .136
Supported Bar Code Symbologies . . . . . . . . . . . . . . . . . . . . . . . . . . . . . . . . . . . . . . . . . . . . . . . .139
Test Labels . . . . . . . . . . . . . . . . . . . . . . . . . . . . . . . . . . . . . . . . . . . . . . . . . . . . . . . . . . . . . . . . . . . . .143
Print Quality Labels . . . . . . . . . . . . . . . . . . . . . . . . . . . . . . . . . . . . . . . . . . . . . . . . . . . . . . . . . . . . .147
Default Settings . . . . . . . . . . . . . . . . . . . . . . . . . . . . . . . . . . . . . . . .151
B
Default Configuration . . . . . . . . . . . . . . . . . . . . . . . . . . . . . . . . . . . . . . . . . . . . . . . . . . . . . . . . . .152
Bluetooth Settings . . . . . . . . . . . . . . . . . . . . . . . . . . . . . . . . . . . . . . . . . . . . . . . . . . . . . .152
Display and Audio Settings . . . . . . . . . . . . . . . . . . . . . . . . . . . . . . . . . . . . . . . . . . . . . .153
Error, Information, and Warning Alert Settings. . . . . . . . . . . . . . . . . . . . . . . . . . . .154
Error Alerts. . . . . . . . . . . . . . . . . . . . . . . . . . . . . . . . . . . . . . . . . . . . . . . . . . . . .156
Information Alerts . . . . . . . . . . . . . . . . . . . . . . . . . . . . . . . . . . . . . . . . . . . . . .156
Warning Alerts . . . . . . . . . . . . . . . . . . . . . . . . . . . . . . . . . . . . . . . . . . . . . . . . .156
Ethernet Settings . . . . . . . . . . . . . . . . . . . . . . . . . . . . . . . . . . . . . . . . . . . . . . . . . . . . . . .157
General System Settings . . . . . . . . . . . . . . . . . . . . . . . . . . . . . . . . . . . . . . . . . . . . . . . . .158
PD43 and PD43c Commercial Printer User Manual ix
Page 10

Contents
Media Settings. . . . . . . . . . . . . . . . . . . . . . . . . . . . . . . . . . . . . . . . . . . . . . . . . . . . . . . . . .159
Print Quality Settings . . . . . . . . . . . . . . . . . . . . . . . . . . . . . . . . . . . . . . . . . . . . . . . . . . .162
Serial Port Settings. . . . . . . . . . . . . . . . . . . . . . . . . . . . . . . . . . . . . . . . . . . . . . . . . . . . . .163
Virtual COM Settings . . . . . . . . . . . . . . . . . . . . . . . . . . . . . . . . . . . . . . . . . . . . . . . . . . .164
System I/O Settings . . . . . . . . . . . . . . . . . . . . . . . . . . . . . . . . . . . . . . . . . . . . . . . . . . . . .165
System Network Services . . . . . . . . . . . . . . . . . . . . . . . . . . . . . . . . . . . . . . . . . . . . . . . .166
System Maintenance Alert Settings . . . . . . . . . . . . . . . . . . . . . . . . . . . . . . . . . . . . . . .167
Wireless 802.11 General Settings . . . . . . . . . . . . . . . . . . . . . . . . . . . . . . . . . . . . . . . . .168
Wireless 802.11 Network Settings . . . . . . . . . . . . . . . . . . . . . . . . . . . . . . . . . . . . . . . .169
Wireless 802.11 Security Settings . . . . . . . . . . . . . . . . . . . . . . . . . . . . . . . . . . . . . . . . .170
Print Labels with INPrint . . . . . . . . . . . . . . . . . . . . . . . . . . . . . . . .173
C
About the INPrint Page. . . . . . . . . . . . . . . . . . . . . . . . . . . . . . . . . . . . . . . . . . . . . . . . . . . . . . . . . .174
Print INPrint Labels . . . . . . . . . . . . . . . . . . . . . . . . . . . . . . . . . . . . . . . . . . . . . . . . . . . . . . . . . . . . .174
Predefined INPrint Label Formats . . . . . . . . . . . . . . . . . . . . . . . . . . . . . . . . . . . . . . . . . . . . . . . .175
x PD43 and PD43c Commercial Printer User Manual
Page 11

Before You Begin
This section provides you with safety information, technical support
information, and sources for additional product information.
Safety Information
Your safety is extremely important. Read and follow all warnings and
cautions in this document before handling and operating Intermec
equipment. You can be seriously injured, and equipment and data can
be damaged if you do not follow the safety warnings and cautions.
This section explains how to identify and understand warnings,
cautions, and notes that are in this document.
Warning: A warning alerts you of an operating procedure,
practice, condition, or statement that must be strictly observed to
avoid death or serious injury to the persons working on the
equipment.
Caution: A caution alerts you to an operating procedure, practice,
condition, or statement that must be strictly observed to prevent
equipment damage or destruction, or corruption or loss of data.
Before You Begin
Note: Notes either provide extra information about a topic or contain
special instructions for handling a particular condition or set of
circumstances.
Safety Precautions
• Read and review this manual carefully before connecting the
printer.
• Because moving parts are exposed when the cover is open, ensure
that the cover is closed before you operate the printer.
• Do not put your fingers inside the print mechanism when the
power is on.
• Place the printer on an even surface which can safely support its
weight and supplies.
PD43 and PD43c Commercial Printer User Manual xi
Page 12

Before You Begin
• Do not spray the printer with water. If you are using a hose to
clean the premises in an industrial environment, remove the
printer or carefully protect it from spray and moisture.
• You must implement both hardware and software safety
precautions to prevent the possibility of undefined system states.
• You must ensure that dangerous conditions cannot occur under
any circumstances, even for a brief period of time.
• Observe all safety and accident prevention regulations applicable
to your specific region and application.
• Before you use a cleaning card, carefully read the warning text on
the envelope.
• Replace only with same type and rating of fuse to ensure
continued protection against risk of fire.
Note: This equipment may be used on an IT power system.
Global Services and Support
Warranty Information
To understand the warranty for your Intermec product, visit the
Intermec web site at www.intermec.com and click Support >
Returns and Repairs > Warranty.
Disclaimer of warranties: The sample code included in this document
is presented for reference only. The code does not necessarily
represent complete, tested programs. The code is provided “as is with
all faults.” All warranties are expressly disclaimed, including the
implied warranties of merchantability and fitness for a particular
purpose.
Web Support
Visit the Intermec website at www.intermec.com to download our
current manuals (in PDF).
xii PD43 and PD43c Commercial Printer User Manual
Page 13

Visit the Intermec technical knowledge base (Knowledge Central) at
www.intermec.com and click Support > Knowledge Central to
review technical information or to request technical support for your
Intermec product.
Send Feedback
Your feedback is crucial to the continual improvement of our
documentation. To provide feedback about this manual, please
contact the Intermec Technical Communications department directly
at ACSHSMTechnicalCommunications@Honeywell.com.
Telephone Support
In the U.S.A. and Canada, call 1-800-755-5505.
Outside the U.S.A. and Canada, contact your local Intermec
representative. To search for your local representative, from the
Intermec web site, click About Us > Contact Us.
Who Should Read This Manual
This user manual is for the person who is responsible for installing,
configuring, operating, and maintaining the PD43 and PD43c
printers.
Before You Begin
This document provides you with information about the features of
the printer, and how to install, configure, operate, maintain, and
troubleshoot it.
Before you work with the printer, you should be familiar with your
printer command language and general printing setup. If you are
going to use the printer in a network, you should be familiar with
your network and general networking terms, such as IP address.
Related Documents
The Intermec website at www.intermec.com contains our documents
(as .pdf files) that you can download for free.
To downloa d documents
1 Visit the Intermec website at www.intermec.com.
2 Click the Products tab.
PD43 and PD43c Commercial Printer User Manual xiii
Page 14

Before You Begin
3 Using the Products menu, navigate to your product page. For
example, to find the PD43 product page, click Printers >
Industrial Printers > PD43.
4 Click the Manuals tab.
If your product does not have its own product page, click Support >
Manuals. Use the Product Category, the Product Family, and
Product to find your documentation.
Patent Information
For patent information, see http://www.hsmpats.com.
xiv PD43 and PD43c Commercial Printer User Manual
Page 15

1
About the Printers
This chapter introduces the PD43 printers, and includes
descriptions of printer features and basic operation.
1
Page 16

Chapter 1 — About the Printers
About the PD43
The PD43 and PD43c printers are compact, rugged industrial printers
intended for use in commercial or warehouse applications. The
printers can be connected to a single desktop PC for stand-alone
operation, or to a wired or wireless network for ease of connectivity.
Both printers are available in direct thermal (DT) models. The PD43 is
also available in a thermal transfer (TTR) model for printing with a
ribbon.
Features of both printers include:
• Print speeds of up to 8 ips (with 203-dpi printhead) or 6 ips (with
300-dpi printhead)
• Multiple selectable printer languages including Intermec Smart
Printing, Fingerprint, Direct Protocol, Intermec Printer Language
(IPL), DSim, ESim, and ZSim
• Ethernet option
• Wi-Fi/Bluetooth and RFID options (PD43 only)
• USB port for storage devices, keyboards, or scanners, and for
connections to a PC (including serial or parallel connections with
appropriate adapters)
• LCD or Icon interface
• Complete range of accessories
Printer Features
Use the next illustrations to locate printer features.
2 PD43 and PD43c Commercial Printer User Manual
Page 17
Chapter 1 — About the Printers
1
3
5
6
7
8
2
4
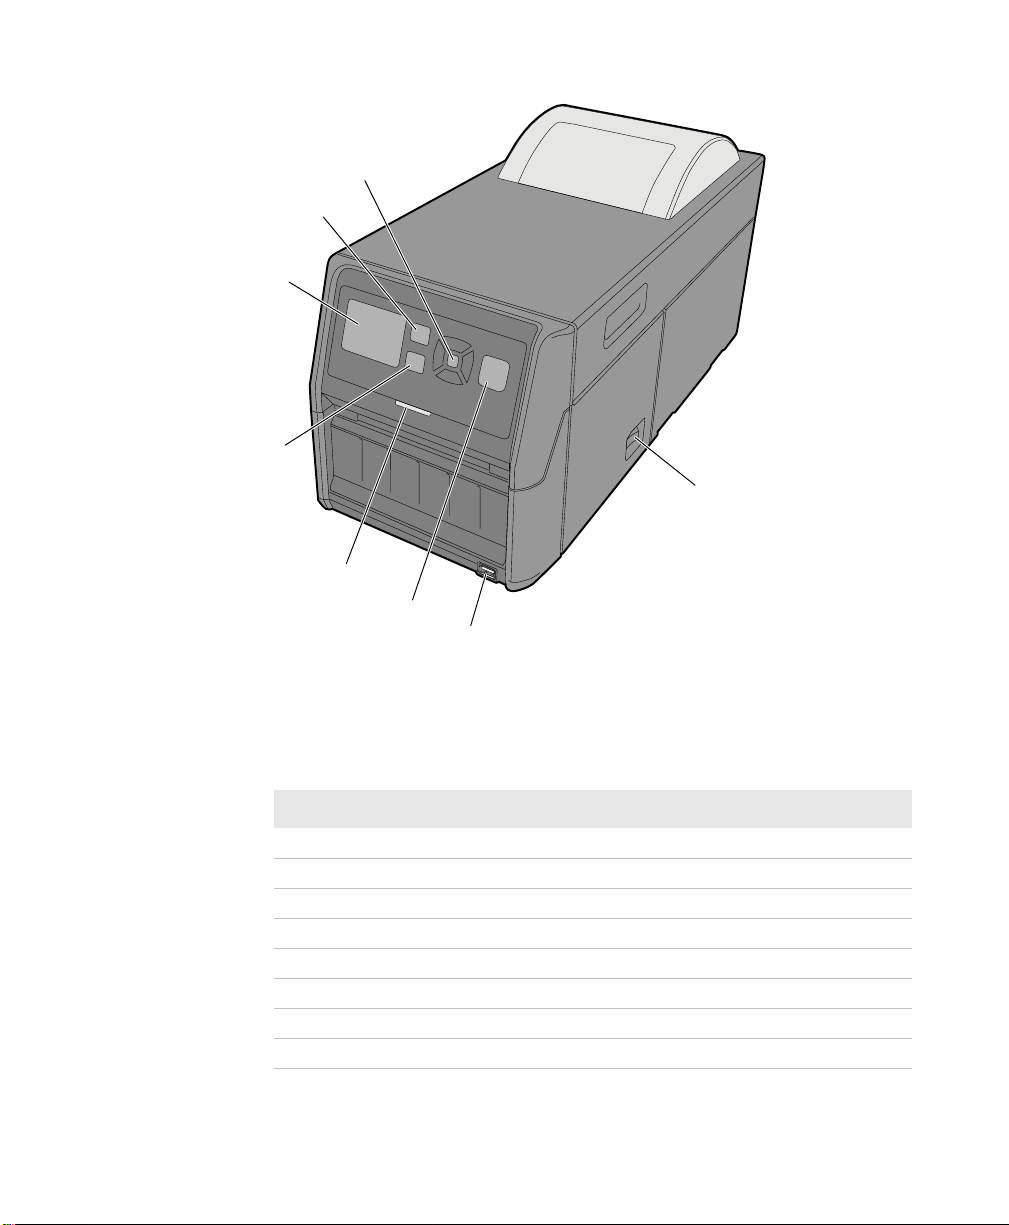
PD43 and PD43c Front Panel
PD43 and PD43c Front Panel and Side Feature Descriptions (LCD
Model)
Feature Description
PD43 and PD43c Commercial Printer User Manual 3
1 Directional pad
2 Home button
3 LCD screen
4 Back button
5Ready-to-Work LED
6 Print/Feed button
7USB host port
8 Power switch
Page 18

Chapter 1 — About the Printers
PD43 and PD43c Front Panel Features and Descriptions (Icon Model)
PD43 and PD43c Front Panel and Side Feature Descriptions (Icon
Model)
Feature Description
1 Icon front panel
2 Ready-to-Work LED
3 Print/Feed button
4USB host port
5 Power switch
4 PD43 and PD43c Commercial Printer User Manual
Page 19

PD43 Rear Panel
1
2
3
6
7
5
4
Chapter 1 — About the Printers
PD43 Rear Panel Feature Descriptions
Feature Description
1 Dome top window
2 Wi-Fi antenna (optional)
3 Media compartment door
4 Configuration label
5 Media lock location
6 External media feed slot
7 AC power connector
PD43 and PD43c Commercial Printer User Manual 5
Page 20
Chapter 1 — About the Printers
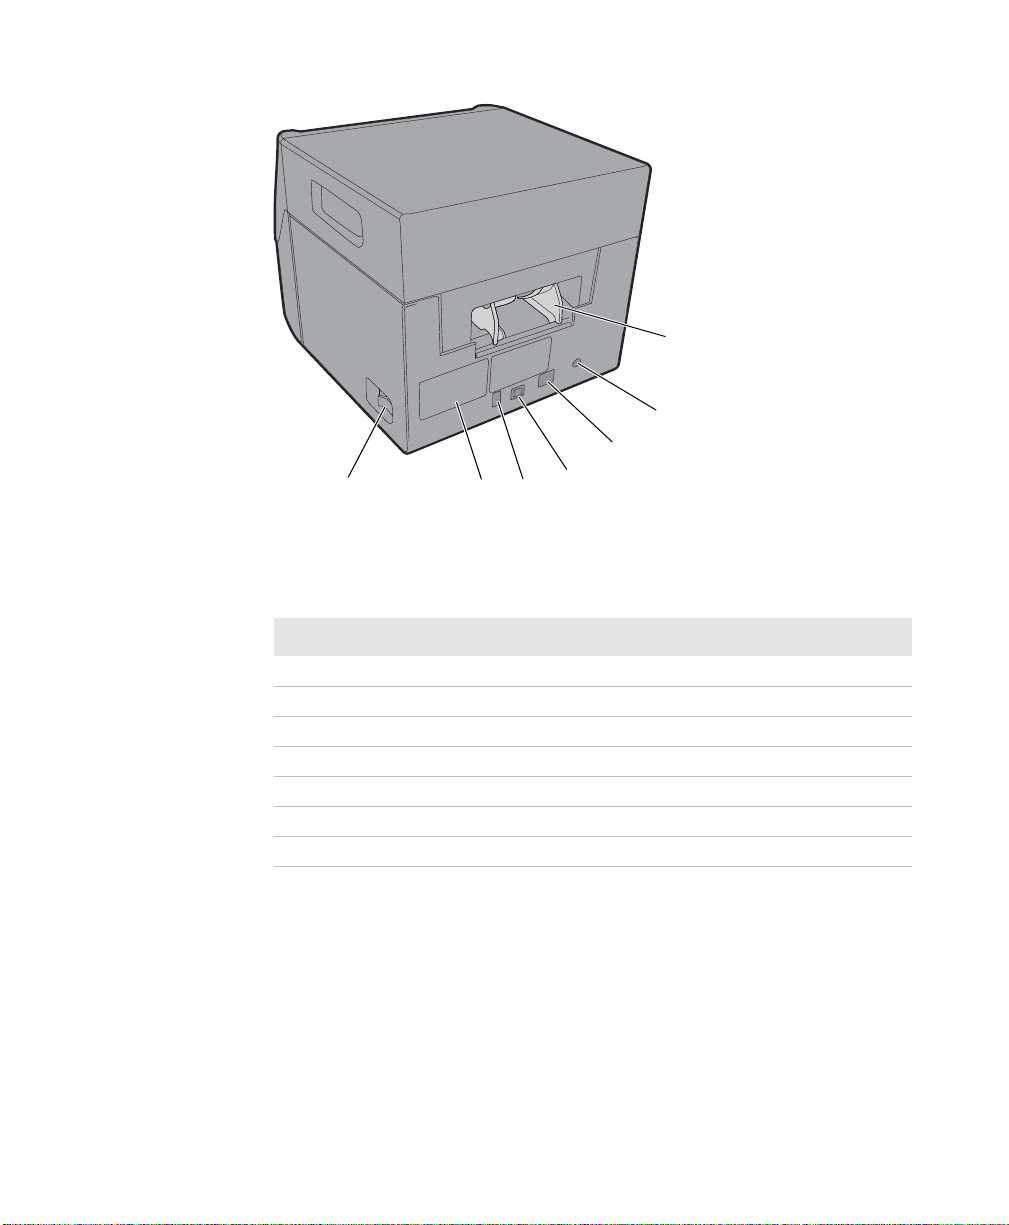
PD43c Rear Panel
PD43c Rear Panel Feature Descriptions
Feature Description
7
6
5
1
2
4
3
1 Power switch
2 Configuration label
3USB host port
4 USB device port
5 Ethernet port (optional)
6 Power connector
7 Rear media feed guides (optional)
6 PD43 and PD43c Commercial Printer User Manual
Page 21

Chapter 1 — About the Printers
1
2
3
4
PD43 Bottom Panel
PD43 Bottom Panel Feature Descriptions
Feature Description
1Cable guide
2 USB device port
3USB host port
4 Ethernet connector (optional)
PD43 and PD43c Commercial Printer User Manual 7
Page 22

Chapter 1 — About the Printers
4
5
6
3
2
1
7
8
PD43 Media Compartment Features
PD43 Media Compartment Feature Descriptions
Feature Description
1 Ribbon takeup roller (PD43 TTR models only)
2 Print mechanism release button
3 Media holder guides
4Printhead
5Sensor bar
6 Media guides
7 Platen roller
8 Label stop sensor
8 PD43 and PD43c Commercial Printer User Manual
Page 23
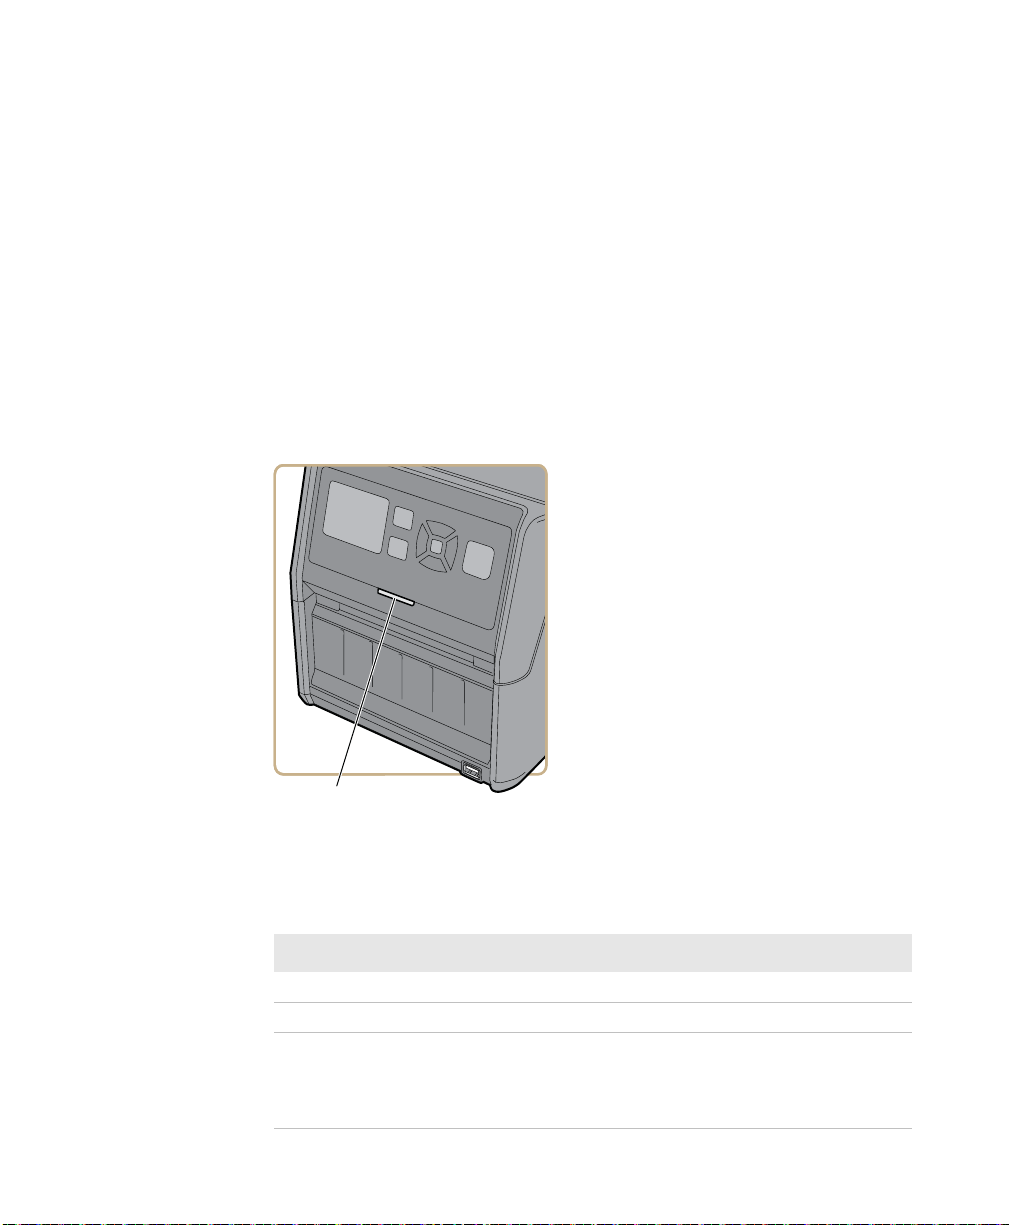
About the Front Panel
Ready-to-Work
indicator
There are two front panels available for the printers:
• LCD (liquid crystal display)
• Icon (no display)
Both versions of the front panel include the Print button and the
Ready-to-Work™ indicator. All printers include a USB host port on
the front panel.
About the Ready-to-Work Indicator
The Ready-to-Work indicator on the front of the printer turns on
when the printer is ready to print.
Chapter 1 — About the Printers
PD43 and PD43c Commercial Printer User Manual 9
Ready-to-Work Indicator Location
Ready-to-Work Indicator Status
Ready-to-Work Indicator Status Description
On Printer is ready for a print job.
Blinking Printer is not ready for a print job.
Off Printer is turned off, not communicating,
or not ready to print. For example, the
printer may still be starting up, or a
firmware upgrade is underway.
Page 24

Chapter 1 — About the Printers
1%
4FSJFT
About the Icon Front Panel
The icon front panel includes a graphical panel and a Print button.
As you use the printer, the icons turn on or off to indicate printer
status.
Icon Front Panel - Status Icons
Icon Color and Description Printer Models
Steady: Maintenance needed; odometer
setting reached; Firmware upgrade in
progress
Flashing: Firmware is currently resetting all
defaults, or printer in calibration mode
On: Bluetooth is enabled
Off: Bluetooth is not enabled, or
Wi-Fi/Bluetooth module is not installed
Flashing: Sending or receiving data
Steady: No data in motion through the
network connection
Off: No connection
On: Wi-Fi is enabled
Off: Wi-Fi is not enabled, or
Wi-Fi/Bluetooth module is not installed
On: Printer is paused
Off: Printer is not paused
On: General error
Off: No errors
All
With
Wi-Fi/Bluetooth
module
All
With
Wi-Fi/Bluetooth
module
All
All
10 PD43 and PD43c Commercial Printer User Manual
Page 25

Icon Front Panel - Status Icons (Continued)
PD
Series
Icon Color and Description Printer Models
On: Ribbon is jammed or empty
Off: No error
On: Media is jammed or empty
Off: No error
On: Print mechanism is open or not latched
properly
Off: Print mechanism is closed correctly
On: Printhead too hot
Off: Printhead temperature OK
About the LCD Front Panel
The printer LCD interface includes a screen, navigation buttons, and a
Print button.
Chapter 1 — About the Printers
TTR only
All
All
All
LCD Interface Navigation Button Descriptions
Button Description
Menu/Home button. Press to toggle between the Ready
screen and the printer Main Menu.
Directional pad: Press , , , or to move the selection
highlight to another item. Press to select the highlighted
item and to save settings in a menu or list.
Back button. Press to return to the previous menu or page, or
to break from a running Fingerprint application.
Print button. Press to begin printing, or to feed a single label.
PD43 and PD43c Commercial Printer User Manual 11
Page 26
Chapter 1 — About the Printers
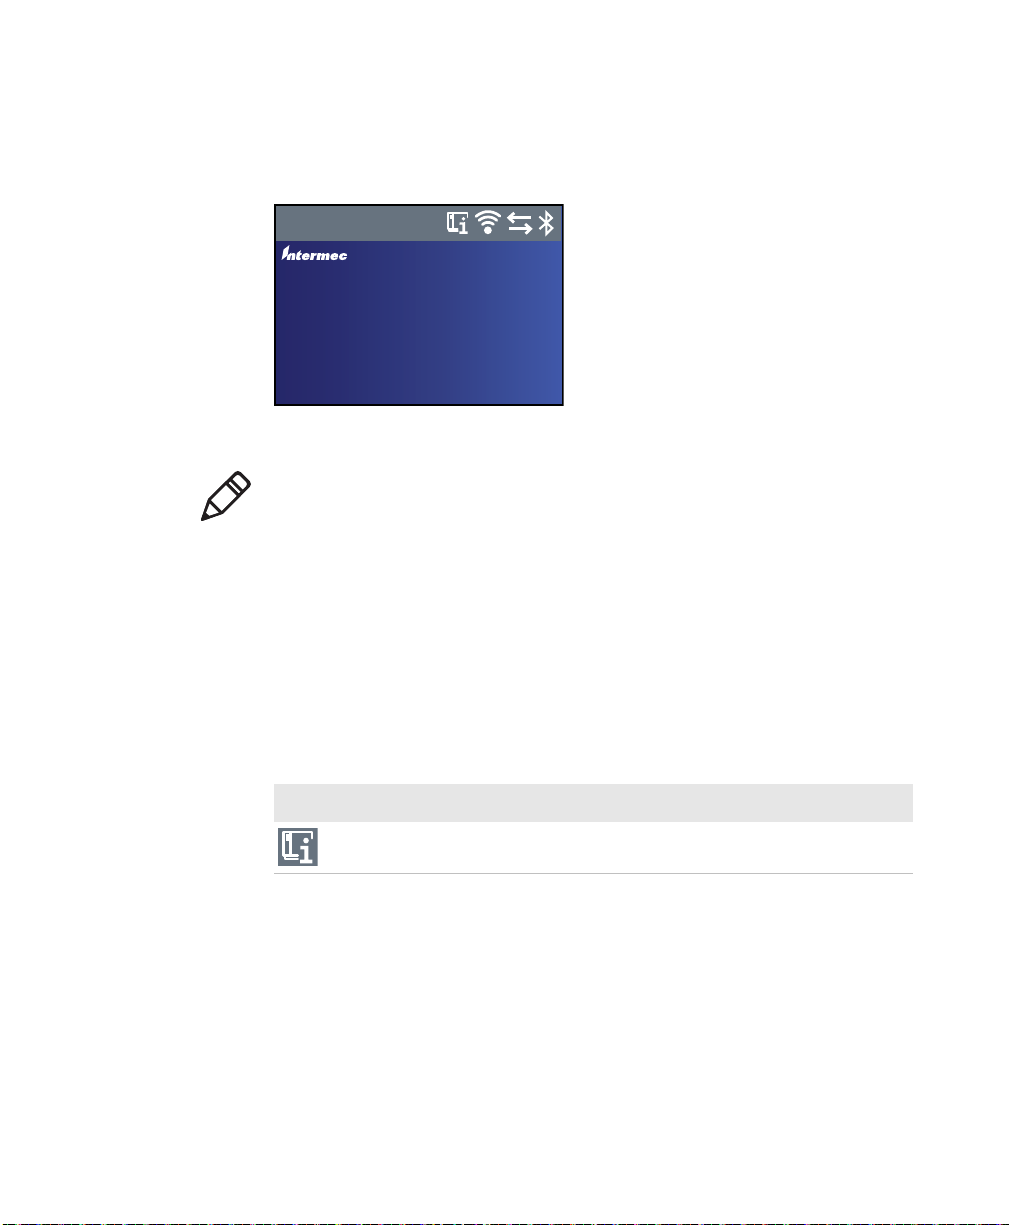
About the Ready Screen
After you turn the printer on, the Ready screen appears when the
printer finishes starting up.
Ready
Fingerprint
10.200.27.89
Ready Screen
01/04/2014
12:00
Note: Icons for Wi-Fi and Bluetooth status appear only when the
optional Wi-Fi/Bluetooth module is installed. The IP address appears
when the printer is connected to an Ethernet or wireless network and
the Idle Information parameter is set to IPv4 address.
By default, the bottom of the screen shows the printer command
language, the IP address, and the time and date. You can customize the
screen as necessary to show different kinds of information.
The status bar at the top of the screen includes these information and
status icons:
Information and Status Icon Descriptions
Icon Description
Printer Information icon. Select this icon to view basic printer
information.
12 PD43 and PD43c Commercial Printer User Manual
Page 27

Chapter 1 — About the Printers
Information and Status Icon Descriptions (Continued)
Icon Description
Wi-Fi Connection icon. This icon appears when the Wi-Fi/Bluetooth
module is installed in the printer and shows the strength of the
Wi-Fi connection:
- Strong.
- Good.
- Weak.
- No signal.
- Wi-Fi is disabled.
Connectivity icon. Blinks when data is moving through a wired or
wireless connection to the printer.
Bluetooth icon. This icon appears when the Wi-Fi/Bluetooth
module is installed:
- Bluetooth is enabled.
- Bluetooth is disabled.
PD43 and PD43c Commercial Printer User Manual 13
Page 28
Chapter 1 — About the Printers
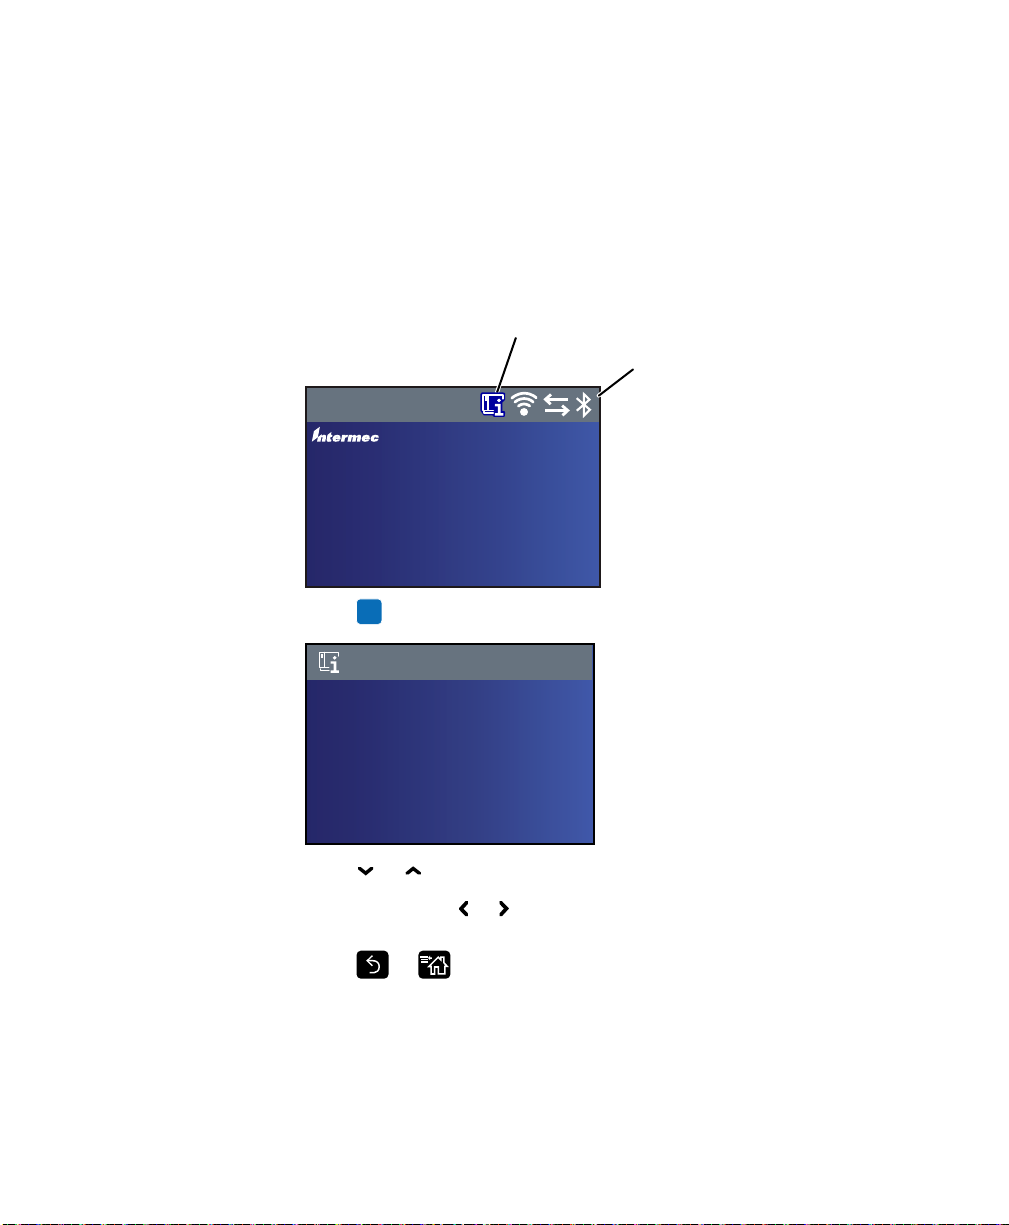
View Basic Printer and Connection Information
In the Ready screen, use the control panel buttons to select an icon in
the status bar at the top of the screen to view printer or connection
information.
1 Press any arrow key to select the one of the icons in the status bar
at the top of the Ready screen.
1SJOUFSJOGPSNBUJPO
JDPOTFMFDUFE
4UBUVTCBS
Ready
Fingerprint
10.200.27.89
01/04/2014
12:00
2 Press . A list of basic printer or connection information appears.
Printing
Printer Configuration Number
PD43A03000000200
Printer Serial Number:
313C1350001
Product Name:
PD43
Firmware Version:
3 Press or to scroll through the list.
(Optional) Press or to view information for one of the other
icons.
4 Press or to return to the Ready screen.
14 PD43 and PD43c Commercial Printer User Manual
Page 29

Chapter 1 — About the Printers
About the Main Menu
In the printer Ready screen, press to view the Main Menu.
Main Menu
Programs
Settings
Tools
Wizards
Press and to highlight Main Menu items, and then press to
select that item:
• Select Programs to see a list of programs installed on the printer.
This list includes utility programs provided as part of the printer
firmware, and programs you have installed on the printer.
The Programs item appears in the Main Menu only if the printer
is using Fingerprint or Direct Protocol as the command language.
• Select Settings to view and change printer settings.
• Select Tools to print test labels, manage a connected USB storage
device, restore printer default settings, or save and load printer
profiles.
• Select Wizards to see a list of wizards that help you configure
printing or communication settings, or calibrate the media
sensors.
Note: The printer cannot print while the Main Menu is on the screen.
You need to exit the Main Menu and return to the Ready screen to
begin printing.
PD43 and PD43c Commercial Printer User Manual 15
Page 30
Chapter 1 — About the Printers
Navigate in the Main Menu
Use the navigation buttons to select menus and menu items.
In the Main Menu:
• Press to toggle between the Main Menu and the Ready screen.
• Press to return to the Ready screen.
In the Programs, Settings, Tools, or Wizards menus:
• Press and to change the item in the list, and then press (the
center of the directional pad) to select the item. Another menu or a
list of items appears.
• Press to return to the previous screen or menu.
• Press to return to the Ready screen.
In any list of items, press or to select another item in the list, and
then press .
• If the item you selected requires you to select an option from a
preset list, press or to scroll through the list items.
• If the item you selected requires alphabetic or numeric input, such
as Network Name, press and use the alphanumeric or numeric
keypad on the screen to type a value.
• If you changed the value for an item, press to save your changes.
A “Saving...” message briefly appears to confirm that your changes
have been saved.
• Press to return to the previous screen. If you made changes
without saving them, you are prompted to save your changes:
• Select Yes to save your changes and return to the previous
screen.
• Select No to abandon your changes and return to the previous
screen.
• Select Cancel to abandon your changes and remain on the
current screen.
16 PD43 and PD43c Commercial Printer User Manual
Page 31

Chapter 1 — About the Printers
Y
bihgfedcj
srqponm
l
k
t
u
vwxy
z
.@
123
a
Password
a
1 2
9
8
7654
30
1
Password
Y
]
\
}
=
-)
&%
@
;
>
,
`
/
#
!
.
abc
[
|
{
+
_
(
*
^
:<
“
~
?$
1
Y
98
7
6
54
321
-
.
0
1
Password
1
About the Onscreen Keypads
When you are changing settings, you may need to use the
alphanumeric or numeric keypads on the screen.
Alphanumeric Keypad - Alphabetic Characters
Alphanumeric Keypad - Numeric Characters and Punctuation
Numeric Keypad
PD43 and PD43c Commercial Printer User Manual 17
Page 32

Chapter 1 — About the Printers
For either keypad:
• Press , , , or to select a character, and then press to enter
that character.
• Press to delete the last character you entered.
For the alphanumeric keypad only:
• Select 123 or ABC and then press to toggle between the
alphabetic and numeric keys.
• In the alphabetic keypad, select and then press to toggle
between uppercase and lowercase letters.
• In the numeric keypad, select and then press to toggle
between shifted and unshifted key characters. For example, do this
to toggle between $ and # in the numeric keypad.
When you are finished typing characters, press to return to the list
of items.
About the Printer Wizards
The printer firmware includes several wizards you can use to quickly
set up printing and communications. You can start the wizards from
the Main Menu.
Y
Wizards
Printing
Communications
Calibration
Printing Wizards
Name Description
Media Setup Select media and printing type (DT or TTR), media width,
length, and X-margin, Start and Stop Adjust values, and
print speed.
Print Quality Prints a series of labels to test print quality.
Loading Media Shows how to load media.
18 PD43 and PD43c Commercial Printer User Manual
Page 33

Chapter 1 — About the Printers
Printing Wizards (Continued)
Name Description
Loading Ribbon (TTR printers only) Shows how to load a roll of ribbon.
Communications Wizards
Name Description
Line Analyzer Logs all incoming data on all
communications channels and saves the
data to a log file. For experienced users.
Wireless 802.11 Looks for wireless networks and sets up
Wi-Fi communications. This item
appears in the Communications wizards
list when the optional Wi-Fi/Bluetooth
module is installed.
Bluetooth Looks for discoverable Bluetooth devices
and sets up Bluetooth communications.
This item appears in the
Communications wizards list when the
optional Wi-Fi/Bluetooth module is
installed.
Calibration Wizard
Name Description
Media Calibrates the label stop sensor and
shows current print settings.
RFID Calibrates the RF power setting for the
RFID module and adjusts RFID tag
media settings for best performance. This
item appears in the Calibration wizards
list when the optional RFID module is
installed in the printer.
Label Taken Sensor Calibrates the label taken sensor. This
item appears in the Calibration wizards
list when the label dispenser or cutter
accessory is installed.
PD43 and PD43c Commercial Printer User Manual 19
Page 34

Chapter 1 — About the Printers
Use a Wizard
The available wizards depend on the hardware you have installed in the
printer.
1 From the Ready screen, press . The Main Menu appears.
2 Select Wizards and press .
3 Select a category and press .
4 Select a wizard from the list and press . The wizard begins.
5 In a wizard:
• Use or to select items in a list.
• Press to select the highlighted item.
• Select and press to continue to the next screen.
About Printer Command Languages
A printer command language is a set of instructions that controls
printer functions:
• Configure the printer.
• Return the status of the printer.
• Control peripheral devices.
• Format a label or receipt for printing.
The printer supports these command languages and language
simulator support options:
• Fingerprint
• Direct Protocol (DP)
• IPL (Intermec Printer Language)
• ZSim (ZPL command language simulator)
• DSim (DPL command language simulator)
• Smart Printing
20 PD43 and PD43c Commercial Printer User Manual
Page 35

About Fingerprint
Fingerprint is a BASIC-inspired general purpose printer language. Use
Fingerprint to design custom label formats and write printer
application software. If you plan to run Smart Printing applications
directly on the printer, without connecting to a PC, select Fingerprint
as your printer command language. For more information, see the
Intermec Fingerprint Command Reference Manual.
The printer uses the Fingerprint printer command language by
default.
About Direct Protocol
Direct Protocol (DP) is a subset of Fingerprint that uses a more
intuitive English-like syntax. This flexible host-based printer
command language can also be used with Smart Printing applications.
Direct Protocol lets you combine predefined layouts and variable data
to create labels, tickets, and tags. If you are using bar code software, like
BarTender, select Direct Protocol as your printer command language.
About IPL
Chapter 1 — About the Printers
IPL (Intermec Printer Language) is a host-based printer command
language. Use IPL to design, modify, and download label formats;
write printer application software; and configure the printer. If you are
sending IPL label files to the printer, select IPL as your printer
command language. For more information, see the IPL Command
Reference Manual.
About ESim
ESim (EPL command language simulator) interprets Eltron®
programs without requiring any host programming changes. If you are
sending EPL label files to the printer, select ESim as your printer
command language. For more information, see the ESim Command
Reference Manual.
PD43 and PD43c Commercial Printer User Manual 21
Page 36

Chapter 1 — About the Printers
About ZSim
ZSim (ZPL command language simulator) interprets Zebra™
programs (ZPL II or later) without requiring any host programming
changes. If you are sending ZPL label files to the printer, select ZSim as
your printer command language. For more information, see the ZSim
Command Reference Manual.
About DSim
DSim (DPL command language simulator) interprets Datamax™ data
streams without requiring any host programming changes. If you are
sending DPL label files to the printer, select DSim as your printer
command language. For more information, see the DSim Command
Reference Manual.
About Smart Printing
Smart Printing refers to the ability of the printer to independently run
printing operations without being connected to a host computer. If
you are running printer-based applications written in C#, select Smart
Printing as your printer command language.
For help creating Smart Print applications, go to the Intermec
Developer Center at www.intermec.com/developer.
About ESim/ZSim Auto-Configuration
Use the ESim/ZSim auto-configuration feature when you are
replacing another printer whose command language is unknown.
When the printer command language is set to ESim/ZSim, on its first
run the printer automatically calibrates the media, identifies the
command language of the first incoming print job, configures the
printer for the appropriate language (ESim or ZSim), and prints the
label.
Note: Load media before you turn the printer on, since the printer
automatically calibrates the media when it starts in ESim/ZSim
auto-configuration mode.
The data stream must be at least 10 bytes long. Command language
identification is activated after a 2-second timeout, or when the data
buffer is full (1 MB).
22 PD43 and PD43c Commercial Printer User Manual
Page 37

Chapter 1 — About the Printers
The printer command language is saved to memory, and remains set to
ESim/ZSim until you change this setting.
How to Set the Printer Command Language
You can use one of these methods to change the printer command
language:
• Printer web page
• Main Menu
• PrintSet 5. For more information, see the PrintSet 5 online help.
Set the Command Language from the Printer Web Page
To set the command language from the printer web page, you need to
turn on the printer and connect to your Ethernet or Wi-Fi network.
1 Make sure that the printer has media and ribbon (if necessary)
installed.
2 On your PC, open a browser.
3 In the Location or Address bar, type the printer IP address and
press Enter. The printer web page appears.
4 Click Login. The Login page appears.
5 Type your Username and Password and click Login. The default
username is itadmin and the default password is pass.
6 Click the Configure tab.
7 Click System Settings > General.
8 Select a different printer command language from the Command
Language list, and then click Save.
9 Click the Services tab.
10 Click Reboot Printer, and then click Reboot. The printer restarts
in the command language you selected.
PD43 and PD43c Commercial Printer User Manual 23
Page 38

Chapter 1 — About the Printers
Set the Command Language from the Main Menu
If you have an LCD printer, you can change the printer command
language from the Main Menu.
1 Make sure that the printer has media and ribbon (if necessary)
installed.
2 From the Ready screen, press . The Main Menu appears.
3 In the Main Menu, select Settings > System Settings > General.
4 In the General settings list, press to scroll to Command
Language.
5 Press or to select a different command language.
6 Press or .
7 Press to save your changes.
If you are prompted to enter a password for DSim or ZSim, the
password is 1138. To return to the Fingerprint menu system from
DSim or ZSim, the password is 8311.
Set the Command Language with the Print Button
If you have an icon printer, you can use the Print button to set the
printer command language.
1 Make sure that the printer has media and ribbon (if necessary)
installed.
2 Turn off the printer.
3 Turn the printer back on. All the LEDs light up. As the printer
starts up, the LEDs turn off one by one, starting with the bottom
right LED.
4 When the last two LEDs (Maintenance and Bluetooth) are lit, press
and hold . The printer feeds a few labels as it automatically
adjusts the media feed, and then the test labels start to print.
5 Continue to hold . The available printer command languages
start to print.
24 PD43 and PD43c Commercial Printer User Manual
Page 39

6 When you see the language you want to use, release .
7 The printer automatically reboots and starts in the command
language you selected.
Printer Options and Accessories
You can use these printer options and accessories (sold and ordered
separately) with the PD43 and PD43c printers. Most options are either
installed at the factory or can be installed by factory service technicians
in the field. Accessories are designed to be installed by the customer.
Note: Some printer configurations do not support all accessories. For
more information, contact your local sales representative.
PD43 Printer Options and Accessories
Option or Accessory Description
Ethernet (Factory-installed only) Factory-installed option. Provides IEEE
802.3 Ethernet connection. Supports
10BaseT and 100BaseTx. Ethernet and
Wi-Fi/Bluetooth modules can be
installed at same time.
Wi-Fi/Bluetooth
(Factory-installed only)
UHF RFID (Factory-installed
only)
HF RFID (Factory-installed only) Adds capability of printing on RFID
Rear media guides
(Factory-installed only)
Radio module provides Wi-Fi and
Bluetooth connectivity. Wi-Fi/Bluetooth
and Ethernet modules can be installed at
same time.
• Wi-Fi supports static and dynamic
WEP, WPA, WPA2, EAP-PEAP,
EAP-TTLS, LEAP, EAP-FAST, and
EAP-TLS security protocols
• Bluetooth v2.1+EDR supported
Adds capability of printing on RFID
media. Supports EPCglobal Class 1 Gen 2
and ISO 18000-6C V1 2.0 protocols.
media. Supports ISO 15693 protocol.
Supports auto-feed feature for airline
media such as boarding passes. For
PD43c only.
Chapter 1 — About the Printers
PD43 and PD43c Commercial Printer User Manual 25
Page 40

Chapter 1 — About the Printers
PD43 Printer Options and Accessories (Continued)
Option or Accessory Description
Cutter Provides automatic cutting as labels are
Cutter Tray Holds up to 20 labels as they are cut.
Boarding Pass Tray Holds airline boarding pass media.
Label Dispenser Removes paper backing and presents
Label Taken Sensor Detects when a label is printed and
Linerless Media Roller Non-stick platen roller dispenses printed
Thick Media Springs Heavier-gauge springs increase printhead
Notchless Ribbon Core Adapter Enables use of ribbon with notchless core
USB-to-Serial Adapter USB to RS-232 adapter. Connects to
USB-to-Parallel Adapter USB to IEEE 1284 adapter. Connects to
Extension cables Cables provide access to the USB Host,
Flat top window Replaces the PD43 dome window for use
External media holder Provides support for media up to 21.27
printed.
Installs on Cutter.
Installs on Cutter.
labels one at a time for pickup. Includes
Label Taken Sensor.
pauses printing until the printed label is
removed.
labels when you use linerless media stock.
pressure for best results when printing on
tag media.
of less than 2.5 mm (1 in) diameter or
10.16 cm (4 in) wide. For thermal transfer
printing.
printer USB Host port and provides serial
connectivity to a PC.
printer USB Host port and provides
DB25 connectivity to a PC or other
equipment.
USB Device, and Ethernet ports without
the need to access the PD43 bottom
panel.
with 12.5 cm (5 in) media. For PD43 only.
cm (8.375 in) for the PD43c.
26 PD43 and PD43c Commercial Printer User Manual
Page 41

Chapter 1 — About the Printers
PD43 Printer Options and Accessories (Continued)
Option or Accessory Description
Ticket shelf Shelf holds fanfold boarding pass media
(up to 500). Installs on external media
holder for PD43c.
Replacement parts Replacement parts include:
• 203-dpi printhead
• 300-dpi printhead
• Platen roller
• Dome window
PD43 and PD43c Commercial Printer User Manual 27
Page 42

Chapter 1 — About the Printers
28 PD43 and PD43c Commercial Printer User Manual
Page 43

2
Set Up the Printer
This chapter explains how to load media and ribbon, print test
labels, and adjust the print quality.
29
Page 44

Chapter 2 — Set Up the Printer
About Media
The printers can print on labels, tickets, tags, and continuous stock.
The procedure you use to load media depends on how you are
operating the printer and the options you have installed.
About Linerless Media
If you are printing on linerless media, follow these guidelines for best
results:
• You must install the linerless roller accessory before printing. For
more information on this accessory, contact your local sales
representative.
• When removing printed labels on linerless media, tear the label up
towards the top of the printer to prevent media jams.
• Do not use linerless media with the cutter accessory.
About Tag Media
If you are printing on tag media, follow these guidelines for best
results:
• Install the optional thick media springs before printing. For more
information on this accessory, contact your local sales
representative.
• After you install the thick media springs, adjust the Media
Sensitivity and Darkness settings for best print quality.
• To extend the life of the printhead, Intermec recommends that you
install the original springs when printing on other types of media.
About Tear-Off Printing
In tear-off printing, you manually tear printed labels, tickets,
wristbands, and other printed media from the front of the printer.
After you load media, you need to configure the feed adjust settings.
These settings allow for printing from the top edge of the label. You
may need to adjust the recommended values slightly depending on
your media type, supply method, and roll sizes, or because of
individual differences between printers.
30 PD43 and PD43c Commercial Printer User Manual
Page 45

Note: Feed adjust values for simulator command languages like ESim,
ZSim, and DSim are preset.
Recommended Feed Adjust Values for Tear-Off Printing
Printer Setting 203 dpi 300 dpi Distance
PD43 Start Adjust -133 -197 -16.7 mm (0.66 in)
Stop Adjust 0 0 0 mm (0 in)
PD43c Start Adjust -133 -197 -16.7 mm (0.66 in)
Stop Adjust 0 0 0 mm (0 in)
Load Media for Tear-Off Printing
Depending on the type of media you use, you may also need to install
a printer accessory. If you need to print on tag media, Intermec
recommends installing the optional thick media springs before
printing. If you need to print on linerless media, you must install the
linerless media roller accessory before printing.
Note: When removing printed labels on linerless media, tear the label
up towards the top of the printer to prevent media jams.
Chapter 2 — Set Up the Printer
1 Open the top of the printer first and then open the media
compartment door.
PD43 and PD43c Commercial Printer User Manual 31
Page 46

Chapter 2 — Set Up the Printer
2 If there is an empty media core in the media compartment, remove
and discard the core.
3 Place the media between the guides on the media bar. If necessary,
slide the guides apart to adjust for the media width.
4 Slide the guides to the sides of the media roll. The guides move
togther automatically to center the roll on the media bar.
32 PD43 and PD43c Commercial Printer User Manual
Page 47

Chapter 2 — Set Up the Printer
External media
feed slot
If you are using media stored outside the printer, feed the media
through the external media feed slot.
5 Press the release button and raise the print mechanism.
PD43 and PD43c Commercial Printer User Manual 33
Page 48

Chapter 2 — Set Up the Printer
6 Slide the media below the sensor bar and between the media guides.
7 If necessary, adjust the label stop sensor to line up with the marks
on the media.
8 Slide the guides to the side edges of the media.
9 Press the print mechanism down to lock it in place.
10 Close the media compartment door and then close the top of the
printer.
34 PD43 and PD43c Commercial Printer User Manual
Page 49

11 Press the Print button to advance the media.
If you have not yet calibrated the media feed, press and hold the
Print button. The printer feeds one label and then prints a media
configuration test label. If you are using small labels, the printer
may feed more than one before printing the configuration label.
12 Configure the feed adjust settings.
About Cut-Off Printing
In cut-off printing, each label is automatically cut from the media roll
immediately after the label is printed. You can print on non-adhesive,
continuous label stock. You can also use self-adhesive labels with a
liner, but you must cut only the liner.
Caution: You must not use the cutter to cut through any kind of
adhesive, or other soft material, that may stick to the cutting parts
and render the cutter inoperable or even damage the electric
motor.
The cutter module includes the top of form sensor. You can also install
the optional cutter tray accessory, which holds up to 20 labels or
tickets.
Chapter 2 — Set Up the Printer
After you load media, you need to configure the cutter and the feed
adjust settings. You may need to adjust the recommended values
slightly depending on your media type, supply method, and roll sizes,
or because of individual differences between printers.
Recommended Feed Adjust Values for Cut-Off Printing
Printer Setting 203 dpi 300 dpi Distance
PD43 Start Adjust -280 -414 -35.1 mm (-1.38 in)
Stop Adjust 147 217 18.4 mm (0.72 in)
PD43c Start Adjust -280 -414 -35.1 mm (-1.38 in)
Stop Adjust 147 217 18.4 mm (0.72 in)
PD43 and PD43c Commercial Printer User Manual 35
Page 50

Chapter 2 — Set Up the Printer
Load Media for Cut-Off Printing
Cut-off printing is supported when the optional media cutter
accessory is installed in the printer.
1 Open the top of the printer first and then open the media
compartment door.
2 If there is an empty media core in the media compartment, remove
and discard the core.
3 Place the media between the guides on the media bar. If necessary,
slide the guides apart to adjust for the media width.
36 PD43 and PD43c Commercial Printer User Manual
Page 51

Chapter 2 — Set Up the Printer
External media
feed slot
4 Slide the guides to the sides of the media roll. The guides move
togther automatically to center the roll on the media bar.
If you are using large rolls of media stored outside the printer, such
as in an external media holder, feed the media through the external
media feed slot.
PD43 and PD43c Commercial Printer User Manual 37
Page 52

Chapter 2 — Set Up the Printer
5 Press the release button and raise the print mechanism.
6 Slide the media below the sensor bar and between the media guides.
38 PD43 and PD43c Commercial Printer User Manual
Page 53

Chapter 2 — Set Up the Printer
7 If necessary, adjust the label stop sensor to line up with the marks
on the media.
8 Slide the guides to the side edges of the media.
9 Slide the media through the cutter.
10 Press the print mechanism down to lock it in place.
11 Close the media compartment door and then close the top of the
printer.
12 Turn the printer on and configure the cutter:
• If you have an icon printer, use PrintSet 5 to configure the
cutter. If you already know the printer IP address, you can
configure the cutter using the printer web page.
• If you have an LCD printer, continue with the next step.
13 After the printer finishes starting up, press .
14 Select Settings > Printing > Cutter.
15 In the Cutter Control options, select Automatic.
16 Press or . A “Save Changes?” message appears.
17 Press to save your changes and exit the Settings menu.
18 Configure the feed adjust settings.
PD43 and PD43c Commercial Printer User Manual 39
Page 54

Chapter 2 — Set Up the Printer
About the Label Dispenser
The label dispenser accessory, which includes the Label Taken Sensor,
removes the liner from self-adhesive label stock as each label is printed.
You manually remove the label at the front of the printer.
After you load media, you need to configure the feed adjust settings.
You may need to adjust the recommended values slightly depending
on your media type, supply method, and roll sizes, or because of
individual differences between printers.
Recommended Feed Adjust Values for the Label Dispenser
Printer Setting 203 dpi 300 dpi Distance
PD43 Start Adjust -109 -161 -13.7 mm (0.54 in)
Stop Adjust -24 -35 -3.0 mm (0.19 in)
PD43c Start Adjust -109 -161 -13.7 mm (0.54 in)
Stop Adjust -24 -35 -3.0 mm (0.19 in)
Load Media for the Label Dispenser
To use the label dispenser accessory for printing, you print labels on
self-adhesive label stock with a liner. As each label is printed, the label
is automatically peeled from the liner and is presented at the front of
the printer for manual removal.
The label dispenser includes a label taken sensor. After you load media,
perform a test feed or calibrate the sensor before you begin printing.
Note: Some media types will not work successfully with the label
dispenser. For best results, use media types with high label stiffness
and low liner release force. High heat and high temperature can
degrade media performance when used with the label dispenser.
40 PD43 and PD43c Commercial Printer User Manual
Page 55

Chapter 2 — Set Up the Printer
1 Open the top of the printer first and then open the media
compartment door.
2 If there is an empty media core in the media compartment, remove
and discard the core.
3 Place the media between the guides on the media bar. If necessary,
slide the guides apart to adjust for the media width.
PD43 and PD43c Commercial Printer User Manual 41
Page 56

Chapter 2 — Set Up the Printer
External media
feed slot
4 Slide the guides to the sides of the media roll. The guides move
together automatically to center the roll on the media bar.
If you are using media stored outside the printer, feed the media
through the external media feed slot.
42 PD43 and PD43c Commercial Printer User Manual
Page 57

Chapter 2 — Set Up the Printer
5 Press the release button and raise the print mechanism.
6 Slide the media below the sensor bar and between the media guides.
PD43 and PD43c Commercial Printer User Manual 43
Page 58

Chapter 2 — Set Up the Printer
7 If necessary, adjust the label stop sensor to line up with the marks
or gaps on the media.
8 Slide the guides to the side edges of the media.
9 Press the side buttons on the label dispenser to open the front door.
10 Remove the label closest to the end of the liner.
44 PD43 and PD43c Commercial Printer User Manual
Page 59

Chapter 2 — Set Up the Printer
11 Route the liner through the slot in the front door of the label
dispenser. Do not pull on the media to take up the slack. The liner
should be over the roller in the printer and under the roller in the
front door of the label dispenser.
12 Close the label dispenser front door.
13 Press the print mechanism down to lock it in place.
14 Close the media compartment door and then close the top of the
printer.
15 Press and hold for two seconds to begin a test feed. The printer
dispenses two labels at the front of the printer as it calibrates the
media feed.
16 If necessary, adjust media settings . You can also use the Main
Menu wizards to help calibrate the media feed and the label taken
sensor.
In the Main Menu, select Wizards > Calibration and then select
Media or Label Taken Sensor.
PD43 and PD43c Commercial Printer User Manual 45
Page 60

Chapter 2 — Set Up the Printer
External media
feed slot
Load External Media for the PD43
To use large rolls of media or tag stock, you can load the media from
outside the printer.
1 Place the media behind the printer and feed the media into the
printer through the external media feed slot.
2 Thread the media through the media guides as you would for
media installed inside the printer.
46 PD43 and PD43c Commercial Printer User Manual
Page 61

Set the PD43c Rear Feed Guides
Locking screw
for guides
Note: This section applies to the PD43c printer with the rear feed
guides option installed.
If you use the same media width all the time in the PD43c printer, you
can lock the rear feed guides in place to make loading media easier. To
lock the feed guides in place, you need a #1 Phillips screwdriver.
1 Open the printer lid.
2 Slide the feed guides to adjust them to the width of your media.
3 Tighten the adjustment screw in the center of the guide plate to
lock the guides in place. Do not overtighten.
Chapter 2 — Set Up the Printer
4 If necessary, adjust the printer media guides to the width of your
media.
5 If necessary, press the release button to raise the print mechanism,
and adjust the label stop sensor.
PD43 and PD43c Commercial Printer User Manual 47
Page 62

Chapter 2 — Set Up the Printer
Load External Media Rolls for the PD43c
If you have the external media roll holder for the PD43c, follow this
procedure to load media rolls on the holder.
1 Place the media on the bar between the guides, and then slide the
guides to the sides of the media roll.
2 Slide the media into the external media feed slot.
3 Thread the media through the printer as usual.
48 PD43 and PD43c Commercial Printer User Manual
Page 63

Load Boarding Passes for the PD43c
If you have the ticket shelf accessory, follow this procedure to load
boarding pass media for the PD43c printer.
1 Place the media in the ticket shelf.
2 Feed the media over the top guide of the ticket shelf and into the
printer external media feed slot.
Chapter 2 — Set Up the Printer
3 Thread the media through the printer as usual.
PD43 and PD43c Commercial Printer User Manual 49
Page 64

Chapter 2 — Set Up the Printer
Load Airline Media
If your PD43c printer includes the optional rear feed guides, follow
this procedure to load media for airline use such as bag tags or
boarding passes.
1 Position the media at the rear of the printer.
If you have the optional boarding pass ticket shelf, place the media
on the shelf and feed it over the top of the guide into the printer.
If you have the optional external media holder, place the media on
the bar between the guides, and then slide the guides to the sides of
the roll to hold it in place.
50 PD43 and PD43c Commercial Printer User Manual
Page 65

Chapter 2 — Set Up the Printer
Guides
2 Adjust the feed guides by sliding the guides to match the width of
your media.
3 Slide the media into the printer.
4 If this is the first time you have used this media width, open the
printer top and slide the media guides to match the media width.
You do not need to raise the print mechanism to adjust the guides.
5 Thread the media all the way through the printer as usual.
6 Close the printer top and press the Feed button.
PD43 and PD43c Commercial Printer User Manual 51
Page 66

Chapter 2 — Set Up the Printer
Adjust the Label Stop Sensor
For best performance, adjust the label stop sensor to line up with the
black marks on your media.
1 Open the top of the printer.
2 Press the release button and raise the print mechanism.
3 Slide the label stop sensor to line up with the black marks on your
media.
52 PD43 and PD43c Commercial Printer User Manual
Page 67

About Ribbon
*OLPVU
*OLJO
Thermal transfer printing provides a durable printout that is less
vulnerable to chemicals, heat, and sunlight than direct thermal
printing. Make sure you select a ribbon type that matches the media
you are using and that you configure the printer for thermal transfer
media.
The printer supports thermal transfer ribbon rolls with the ink-coated
side facing either inward or outward. To determine which type of
ribbon you have, use a pen or other sharp object to scratch through the
ribbon against a piece of paper. If you see a mark on the paper, your
ribbon is wound ink out.
Chapter 2 — Set Up the Printer
Determining Whether Your Ribbon is Wound Ink In or Ink Out
PD43 and PD43c Commercial Printer User Manual 53
Page 68

Chapter 2 — Set Up the Printer
INK OUT
Load Ribbon
1 Open the top of the printer and the media compartment door.
2 Press the release button and raise the printhead.
By default, the printer is set to “ink out” operation when you use
ribbon. To change the printer to “ink in” operation, use a ballpoint
pen or other tool to slide the ink direction switch towards the rear
of the printer.
3 If there is an empty ribbon core in the media supply position,
remove the core and set it aside.
4 Remove and discard the full ribbon takeup core.
54 PD43 and PD43c Commercial Printer User Manual
Page 69

Chapter 2 — Set Up the Printer
5 Place the new ribbon roll between the rear ribbon holders.
• For “ink out” operation (default), the ribbon should come off
the back of the roll.
• For “ink in” operation, the ribbon should come off the front of
the roll.
6 Place the takeup core between the front takeup core holders.
PD43 and PD43c Commercial Printer User Manual 55
Page 70

Chapter 2 — Set Up the Printer
7 Press the release button and raise the print mechanism.
8 Route the ribbon under the print mechanism and up to the takeup
core.
9 Press the printhead down to lock it in place.
56 PD43 and PD43c Commercial Printer User Manual
Page 71

Chapter 2 — Set Up the Printer
10 Attach the end of the ribbon to the takeup core and turn the
slack-wheel to take up slack in the ribbon.
11 Close the media door and the top of the printer.
12 If you have already configured the printer for thermal transfer
printing, continue with the next step. Otherwise, from the printer
Main Menu, select Settings > Printing > Media > Print Method >
Ribbon (TTR).
For an icon printer, you must use the printer web page or Intermec
PrintSet 5 to configure print settings. You can also hold the Print
button as the printer starts up to automatically calibrate the media
and ribbon feed, and print test labels.
13 Save your changes.
PD43 and PD43c Commercial Printer User Manual 57
Page 72

Chapter 2 — Set Up the Printer
INK OUT
Change the Ink Direction
By default, the printer is set to “ink out” operation. Follow this
procedure to set the printer to “ink in” operation.
1 Open the top of the printer.
2 Open the media compartment door.
3 Press the release button and raise the print mechanism. The ink
direction switch is located under the print mechanism.
By default, the printer is set to “ink out” operation when you use
ribbon. To set the printer to “ink in” operation, use a ballpoint pen
or other tool to slide the ink direction switch towards the rear of
the printer.
To set the printer to “ink out” operation, slide the ink direction
switch towards the front of the printer.
58 PD43 and PD43c Commercial Printer User Manual
Page 73

Chapter 2 — Set Up the Printer
Use the Notchless Ribbon Core Adapter
Use the optional ribbon core adapter to load media without notches in
the core. The ribbon core adapter is sold separately. For information
on purchasing this accessory, contact your local sales representative.
1 Insert one adapter into the media core and one adapter into the
takeup core.
2 Center the media roll and takeup core on the adapter.
PD43 and PD43c Commercial Printer User Manual 59
3 Press the release button and raise the print mechanism.
Page 74

Chapter 2 — Set Up the Printer
4 Place the ribbon roll and adapter into the rear media holders.
• For “ink out” operation (default), the ribbon should come off
• For “ink in” operation, the ribbon should come off the front of
5 Place the takeup core and adapter between the front media holders.
the back of the roll.
the roll.
6 Route the ribbon under the print mechanism and up to the takeup
core.
60 PD43 and PD43c Commercial Printer User Manual
Page 75

Chapter 2 — Set Up the Printer
7 Attach the ribbon to the takeup core.
8 Turn the slack-wheel to take up slack in the ribbon.
PD43 and PD43c Commercial Printer User Manual 61
Page 76

Chapter 2 — Set Up the Printer
AC power connector
Connect the Printer to Power
The PD43 printer connects directly to AC power. The PD43c uses an
external AC adapter.
Caution: Use only the AC power adapter supplied with the printer.
The use of a power adapter not approved by Intermec voids the
product warranty and may damage the printer.
1 For the PD43, connect the AC power cable from the printer to an
AC power source.
62 PD43 and PD43c Commercial Printer User Manual
Page 77

Chapter 2 — Set Up the Printer
AC power connector
For the PD43c:
a Connect the AC power adapter to the power connector on the
printer.
b Connect the power adapter to AC power. When the adapter is
connected to AC power, the green LED in the adapter connector
turns on and stays on.
2 Press the power switch to turn the printer on. As the printer starts
up:
• a progress bar appears on the LCD printer screen. When the
printer has finished starting up, the Ready screen appears, and
the blue Ready-to-Work™ indicator turns on and stays on.
• the icons turn on and then turn off one at a time on the icon
panel. When the printer has finished starting up, the blue
Ready-to-Work indicator turns on and stays on.
If a condition occurs that will prevent printing, the Ready-to-Work
light blinks.
PD43 and PD43c Commercial Printer User Manual 63
Page 78

Chapter 2 — Set Up the Printer
Use the Setup Wizard
This section explains how to use the Setup Wizard to configure the
LCD printer. You must configure the printer this way after turning it
on for the first time, after upgrading the firmware, or after resetting all
defaults.
1 Connect the printer to power and press the Power switch. When the
printer is ready, the Setup Wizard starts.
2 Select the settings you want from the menus in the Setup Wizard.
• Use or to select different items in a list.
• If the item you selected requires you to select an option from a
preset list, press or to scroll through the list items.
• Press to select a highlighted item.
• Select and press to continue to the next screen.
How to Set Up an Icon Printer
If your printer has the icon front panel, follow these guidelines for
connecting and setting up the printer. The way you set up an icon
printer depends on whether you plan to connect the printer to your
network or to a single PC.
If your network automatically assigns communications parameters
(such as IP addresses) to devices, you can set up the printer through the
printer web page. The printer web page allows you to configure all
settings, print test labels, and perform other management and setup
tasks.
If your network does not automatically assign communications
parameters to devices, or if you plan to connect the printer to a single
PC, you must use the PrintSet 5 application to set up the printer.
64 PD43 and PD43c Commercial Printer User Manual
Page 79

Chapter 2 — Set Up the Printer
Set Up an Icon Printer without a Network Option
Follow this procedure to set up an icon printer that does not have the
Ethernet or Wi-Fi network options. You configure printer settings
through the Windows print driver.
Note: Before you begin, use InterDriver to install the driver for the
printer on your desktop PC.
1 Make sure the printer is turned on and connected to your desktop
PC with a USB cable.
2 On your desktop PC, select Start > Devices and Printers.
3 In the Printers and Faxes section, right-click the printer and select
Printing preferences.
You can change printer settings in the Printing Preferences dialog
box. For more information on the Windows print driver settings,
click Help.
PD43 and PD43c Commercial Printer User Manual 65
Page 80

Chapter 2 — Set Up the Printer
Set Up an Icon Printer with Ethernet
If your icon printer includes the Ethernet network option, follow this
procedure to obtain the printer IP address and configure settings
through the web page interface.
Note: Before you begin, use InterDriver to install the driver for the
printer on your desktop PC.
1 Connect the printer to your Ethernet network and turn the printer
on. Wait until all the icons turn off.
2 Press and hold the Feed button. The printer feeds one label. When
the printer starts feeding a second label, release the Feed button.
The printer prints two configuration labels.
3 Find the IP address on the second configuration label.
4 On your desktop PC, open a web browser and browse to the IP
address. The printer web page appears.
You can configure printer settings through the web page interface.
Set Up an Icon Printer with Wi-Fi
If your icon printer includes the Wi-Fi network option, follow this
procedure to enable Wi-Fi communications, obtain the printer IP
address and configure settings through the web page interface.
Note: Before you begin, use InterDriver to install the driver for the
printer on your desktop PC.
1 Make sure the printer is turned on and connected to your desktop
PC through a USB cable.
2 On your desktop PC, start PrintSet 5 and use the application to
determine the printer IP address.
For help, see the PrintSet online help.
3 Open a web browser and browse to the IP address. The printer web
page appears.
You can configure printer settings using the web page interface.
66 PD43 and PD43c Commercial Printer User Manual
Page 81

Chapter 2 — Set Up the Printer
Calibrate the Media Feed and Print Test Labels on the Icon Printer
For the icon printer, follow this procedure to automatically calibrate
the media feed and print test labels.
1 Make sure that the printer has media and ribbon (if necessary)
installed.
2 Turn off the printer.
3 Turn the printer back on. All the LEDs light up. As the printer
starts up, the LEDs turn off one by one, starting with the bottom
right LED.
4 When the last two LEDs (Maintenance and Bluetooth) are lit, press
and hold . The printer feeds a few labels as it automatically
adjusts the media feed, and then prints two test labels with media
and communications settings.
Set the Command Language with the Print Button
If you have an icon printer, you can use the Print button to set the
printer command language.
1 Make sure that the printer has media and ribbon (if necessary)
installed.
2 Turn off the printer.
3 Turn the printer back on. All the LEDs light up. As the printer
starts up, the LEDs turn off one by one, starting with the bottom
right LED.
4 When the last two LEDs (Maintenance and Bluetooth) are lit, press
and hold . The printer feeds a few labels as it automatically
adjusts the media feed, and then the test labels start to print.
5 Continue to hold . The available printer command languages
start to print.
6 When you see the language you want to use, release .
7 The printer automatically reboots and starts in the command
language you selected.
PD43 and PD43c Commercial Printer User Manual 67
Page 82

Chapter 2 — Set Up the Printer
Sensor
Sensor
Calibrate the Label Taken Sensor
If your printer has the optional label taken sensor or the label
dispenser (which includes the sensor), use the wizard to calibrate the
sensor for your media.
Note: For best results, calibrate the sensor each time you load media
or move the printer to a different environment. If you installed the
label taken sensor module or the label dispenser in the printer,
calibrate the sensor before you begin printing.
Label Taken Sensor Location
Label Taken Sensor Location (with Label Dispenser)
68 PD43 and PD43c Commercial Printer User Manual
Page 83

Before you calibrate the sensor, load media and ribbon in the printer
as necessary.
1 In the Main Menu, select Wizards > Calibration > Label Taken
Sensor.
2 Follow the prompts to calibrate the sensor.
About Test Labels
You can print a test label to check print quality and get configuration
information, including lists of the fonts, images, and applications
installed on the printer. Use one of these methods to print a test label:
• In Start Up mode
• In Idle mode
• From the Main Menu
• From PrintSet 5
You can also print test labels from the printer web page, which requires
a network connection to a desktop PC. You need to know the printer
IP address to view the printer web page.
Chapter 2 — Set Up the Printer
Print a Test Label in Start Up Mode
You can print a test label when you first turn on the printer.
1 Make sure that the printer has media and ribbon (if necessary)
installed.
2 Connect the printer to power and turn on the printer.
3 On the icon printer, when the last two LEDs are lit (Maintenance
and Bluetooth), press and hold until the test label starts to
print.
On the LCD printer, when the status bar appears, press and hold
until the Media Calibration Wizard appears. Select and
press to print a label with the current print settings.
PD43 and PD43c Commercial Printer User Manual 69
Page 84

Chapter 2 — Set Up the Printer
Print a Test Label in Idle Mode
You can print a test label when the printer is in Idle mode.
1 Make sure that the printer has media and ribbon (if necessary)
installed.
2 On the icon printer, press and hold until the test label starts to
print.
On the LCD printer, press and hold until the Media
Calibration Wizard appears. To print a label with the current print
settings, select and press .
Print a Test Label from the Main Menu
If you have an LCD printer, you can print a test label from the Main
Menu.
1 Make sure that the printer has media and ribbon (if necessary)
installed.
2 From the Ready screen, press .
3 Press to select Tools and then press . The Tools menu appears
with Test Labels selected.
4 Press .
Test Labels
Print Quality
Resources
Printer Information
Printer Settings
5 Select Print Quality, Printer Information, or Printer Settings,
and then press . A list of available labels appears.
6 Select a label to print, and then press .
70 PD43 and PD43c Commercial Printer User Manual
Page 85

Chapter 2 — Set Up the Printer
Pause or Cancel a Batch Print Job on the LCD Printer
During a batch print job, a Pause button appears on the LCD printer
screen:
2 of 5
Fingerprint
10.200.27.89
01/04/2014
12:00
You can pause a batch print job by pressing the Print button. You can
also cancel a batch print job from the front panel.
1 During a batch print job, press . The printer stops printing and
these icons appear:
2 of 5
Fingerprint
10.200.27.89
01/04/2014
12:00
2 To resume printing, press .
To cancel printing, press to select , and then press . The
print job is cancelled.
To view information, press to select a status icon, and then press
.
PD43 and PD43c Commercial Printer User Manual 71
Page 86

Chapter 2 — Set Up the Printer
PD
Series
Pause icon
Pause a Batch Print Job on the Icon Printer
During a batch print job, press to pause the print job. When a print
job is paused, the Pause icon flashes.
Press to resume printing.
Cancel a Batch Print Job on the Icon Printer
There are several ways to cancel a batch print job that you sent to an
icon printer:
• Cancel the job from the Windows print spooler on the PC.
• Depending on the printer command language you are using, you
may be able to send a “cancel job” command to the printer. For
more information, see the command information for your printer
language.
• Turn off power to the printer.
72 PD43 and PD43c Commercial Printer User Manual
Page 87

How to Print on RFID Media
If you have an LCD printer with the optional RFID module installed,
you can print on RFID media. Media containing RFID tags is slightly
thicker where the RFID tag is located. The slight thickness of this part
of the label may affect print quality. For thermal transfer labels,
Intermec recommends using high-quality ink ribbon.
To achieve the best possible print quality, follow these guidelines:
• Run the RFID calibration wizard to determine the best Tag
Position and Output Power for RFID media.
• If necessary, modify the Tag Position (TAGADJUST variable) to
make sure the RFID labels are properly aligned with the antenna.
• Avoid printing on the thickest part of the label when possible.
For help configuring RFID parameters, see the Intermec Fingerprint
Command Reference Manual or the IPL Command Reference
Manual.
About RFID Tag Position
Tag Position, also referred to as TAGADJUST, specifies the distance (in
dots/mm/in) to move the label to align the tag with the RFID antenna.
Positive values move the label forward, and negative values move the
label back.
Chapter 2 — Set Up the Printer
Use one of these methods to calculate Tag Position:
• Run the RFID wizard.
• Manually calculate the Tag Position.
PD43 and PD43c Commercial Printer User Manual 73
Page 88

Chapter 2 — Set Up the Printer
Run the RFID Calibration Wizard
Run the RFID calibration wizard to determine the best Tag Position
and Output Power (UHF inlays, only) for RFID media.
Note: After you determine the correct RFID media settings, you can
save these settings to a printer profile and load the profile when you
need to print on the specific RFID media.
1 Make sure the media type and media length are properly
configured.
2 From the Main Menu, select Wizard > Calibration > RFID
Calibration.
3 To enable the RFID module, select Enable.
4 Load the RFID media.
5 Select OK.
When the calibration is complete, the printer displays the RFID
Tag Position and Output Power (UHF inlays, only).
74 PD43 and PD43c Commercial Printer User Manual
Page 89

Calculate RFID Tag Position
Z$IJQ
/FYUMBCFM
3'*%DIJQ
.FEJBFEHF
BMJHOFEXJUI
UFBSCBS
-BCFMUPQ
PGGPSN
You can perform a manual calculation to come up with an estimate of
the RFID Tag Position. Because this value is an estimate, you may need
to slightly adjust the calculated value to achieve the best results.
1 Make sure Start Adjust and Stop Adjust are set to 0.
2 Measure the yChip value, which is the distance between the RFID
chip and the media edge aligned with the tear bar.
Chapter 2 — Set Up the Printer
3 Note the yAntDist value for your printer:
• UHF RFID: 277 dots, 34.6 mm, 1.362 in
• HF RFID: 293 dots, 36.6 mm, 1.441 in
4 Use this formula to calculate the estimated Tag Position:
TagPosition=yChip - yAntDist
PD43 and PD43c Commercial Printer User Manual 75
Page 90

Chapter 2 — Set Up the Printer
76 PD43 and PD43c Commercial Printer User Manual
Page 91

3
Connect the Printer
This chapter explains how to connect the PD43 printers to a PC
and to an Ethernet or wireless network.
77
Page 92

Chapter 3 — Connect the Printer
About Printer Drivers
Before you can use the printer with Microsoft Windows printing
applications, you need to install printer driver software on the PC.
Drivers enable the printer to communicate with your PC and with
software applications such as Honeywell PrintSet 5.
Note: Although Windows may auto-detect the printer when you
connect it to a PC through a USB port, you must still install printer
drivers on the PC for correct printer operation.
Install Printer Drivers
Use InterDriver to install printer driver software on your PC.
InterDriver is included on the PrinterCompanion CD that shipped
with your printer. If you have not yet installed drivers on your PC, run
the PrinterCompanion CD and follow the instructions to connect
your printer and install the drivers.
If you do not have access to the PrinterCompanion CD but you still
need to install driver software, follow this procedure to download
InterDriver from the Intermec website and install the drivers.
1 Open a web browser and go to www.intermec.com.
2 Select Support > Downloads.
3 Select these items:
a In the Product Category list, select Printers.
b In the Product Family list, select Fixed Printer.
c In the Product list, select PD43, PD43c Commercial Printer
and then click Submit.
4 In the downloads page, click Intermec InterDriver X.X.X M-X
ver. X.XX. If a Security Warning dialog box appears, click Run.
5 When asked if you want the program to make changes to your
computer, click Yes.
6 Follow the onscreen instructions in the InterDriver InstallShield
wizard.
78 PD43 and PD43c Commercial Printer User Manual
Page 93

Chapter 3 — Connect the Printer
7 When you reach the InstallShield Wizard Complete page, click
Next. The InterDriver Wizard appears.
8 From the Welcome to InterDriver Wizard page, make sure Install
printer drivers is selected and then click Next.
9 Follow the onscreen instructions in the InterDriver Wizard.
10 When you reach the Completing the InterDriver Wizard page, click
Finish.
11 When the InterDriver Wizard Completed Successfully page
appears, click Next.
12 Follow the onscreen instructions to complete the Post-Setup
Tasks.
13 When the Installation Complete! page appears, click Finish.
The installer unpacks and installs the InterDriver files in the
Intermec\InterDriver folder in your program files directory and
creates two shortcuts in the Windows Start menu:
• Intermec > InterDriver > InterDriver Wizard
• Intermec > InterDriver > Check for Updates
How to Connect the Printer to Your PC
You can connect the printer to your PC using one of these cables:
• USB cable
• USB-to-Serial adapter cable
• USB-to-Parallel adapter cable
Connect the Printer Using a USB Cable
The printer supports USB connections to a desktop PC. You do not
need to set up any parameters for USB communications.
Note: You must install InterDriver to use a USB connection to a
Windows PC. For more information, see the PrinterCompanion CD
that came with your printer.
1 Download and install the InterDriver software on your PC.
PD43 and PD43c Commercial Printer User Manual 79
Page 94

Chapter 3 — Connect the Printer
64#EFWJDFQPSU
To PC
USB port
USB device port
2 Connect one end of the USB cable to the USB device port on the
back of the printer, and connect the other end to your PC. A “USB
Host Connected” message appears on the printer screen.
For the PD43, use the cable guides on the underside of the printer
for cable strain relief.
80 PD43 and PD43c Commercial Printer User Manual
Page 95

Chapter 3 — Connect the Printer
USB host port
To PC
serial or
parallel port
Connect the Printer Using a Serial or Parallel Cable
If you have the optional USB-to-Serial adapter cable or USB-to-Parallel
adapter cable for the printer, you can connect the printer to the serial
or parallel port on a PC.
1 Connect the adapter cable to the USB host port on the printer.
64#IPTUQPSU
For the PD43 printer, use the cable guides on the underside of the
printer for cable strain relief.
PD43 and PD43c Commercial Printer User Manual 81
Page 96

Chapter 3 — Connect the Printer
2 For a USB-to-Serial adapter, connect the adapter cable to the serial
port on your PC. Continue with the next step.
For a USB-to-Parallel adapter, connect the adapter cable to the
parallel port on your PC. The printer is ready to communicate with
your PC.
3 If you are using an LCD printer, from the printer Main Menu select
Settings > Communications > Serial and change settings as
necessary.
If you are using an icon printer, you need to configure settings
through an application such as PrintSet 5.
How to Connect the Printer to Your Network
You can connect the printer to your network using the:
• Ethernet interface.
• Wi-Fi + Bluetooth wireless interface.
These network interfaces provide features such as security, FTP server,
web page, and Alert handling.
Connect the Printer to an Ethernet Network
If your printer has an Ethernet module, you can connect it to your
wired network.
By default, the printer supports DHCP networks. If you are not using
a DHCP network, you need to configure wired Ethernet settings by
using Intermec PrintSet 5 through a USB connection to the printer.
82 PD43 and PD43c Commercial Printer User Manual
Page 97

Chapter 3 — Connect the Printer
Ethernet port
Ethernet port
To PC
Ethernet port
1 Connect an Ethernet cable to the Ethernet port on the rear of the
printer and to your network.
For the PD43, use the cable guides on the underside of the printer
for cable strain relief.
PD43 and PD43c Commercial Printer User Manual 83
Page 98

Chapter 3 — Connect the Printer
2 Get the IP address for your printer:
• For an LCD printer, from the Main Menu select Settings >
Communications > Ethernet and find the IP address.
• For an icon printer, press and hold until the test label with
the IP address starts to print.
3 Configure the necessary Ethernet settings:
• For an LCD printer, from the Main Menu select Settings >
Communications > Ethernet.
• For an icon printer, configure the Ethernet settings through
PrintSet 5 or the printer web page.
About Wi-Fi Communications
The printer supports Wi-Fi communications when the optional
Wi-Fi/Bluetooth module is installed.
You can configure Wi-Fi communications:
• by using the wireless wizard in the printer Main Menu.
• from the printer web page. You need to know the printer IP
address.
• from the printer Main Menu if your printer has a graphical
interface.
By default, the printer supports DHCP networks. If you are not using
a DHCP network and you do not know the printer IP address, you need
to configure Wi-Fi settings by using PrintSet 5 through a USB
connection to the printer, or by sending commands through a serial
connection.
84 PD43 and PD43c Commercial Printer User Manual
Page 99

Chapter 3 — Connect the Printer
Connect the Printer to a Wireless Network
Before you begin, you should be familiar with the settings you need for
your network.
If you are using a DHCP network, turn the printer on. The printer
automatically connects to the wireless network.
For a printer with the LCD interface, the Wi-Fi Connection icon shows
the status of the connection.
8J'J$POOFDUJPOJDPO
Ready
Fingerprint
10.200.27.89
Wi-Fi Connection Icon on LCD Interface
01/04/2014
12:00
For a printer with the icon interface, the Wi-Fi icon turns on to show
that Wi-Fi is enabled.
Wi-Fi icon
Series
PD
Wi-Fi Icon on Icon Interface
If you are not using a DHCP network, follow the next procedure to
manually assign network settings (such as the printer IP address) to a
printer with the LCD interface.
Note: If you are using an icon printer and you do not know the printer
IP address, you need to use PrintSet 5 with a USB connection to a PC
to configure wireless network settings for a non-DHCP network.
PD43 and PD43c Commercial Printer User Manual 85
Page 100

Chapter 3 — Connect the Printer
1 From the printer Ready screen, press . The Main Menu appears.
2 Select Settings > Communications > Wireless 802.11.
General
Security
Network
3 Select General to configure these wireless network settings:
Main Menu
Programs
Settings
Tools
Wizards
Wireless 802.11
• Network Name (SSID)
• Network Type
• Roaming
• Power Mode
• Channel (for Ad Hoc mode only)
• Hidden SSID
Select Network to configure these settings:
• IP Assignment Method (for IPv4 or IPv6 networks)
• IP address
• Subnet mask and default router
Select Security to configure all wireless network security settings.
4 Change settings as needed for your network.
5 When you are finished, save your changes. The printer immediately
attempts to connect to your network.
86 PD43 and PD43c Commercial Printer User Manual
 Loading...