

Page 1

MicroJack
EYES Pro
Digital Video Surveillance System
User’s Manual
300AAA9K/400/0404
Page 2

MicroJack User’s Manual
EYES Pro/MP2016/MP3000/MP5000
FCC NOTICE
This device has been tested and found to comply with the
limits for a Class A digital device, pursuant to Part 15 of the
FCC Rules. These limits are designed to provide reasonable
protection against harmful interference in a commercial,
industrial or business environment. This equipment can
generate, use and radiate radio frequency energy and, if not
installed and used in accordance with the instruction, may
cause harmful interference to radio communications. However,
there is no guarantee that interference will not occur in a
particular installation. If this equipment does cause harmful
interference to radio or television reception, which can be
determined by turning the equipment off and on, the user is
encouraged to try to correct the interference by one or more of
the following measures:
• Reorient or relocate the receiving antenna.
• Increase the separation between the equipment and receiver.
• Connect the equipment into an outlet on a circuit different
from that to which the receiver is connected.
• Consult the dealer or an experienced radio/TV technician for
help.
This device complies with Part 15 of the FCC Rules. Operation
is subject to the following two conditions: (1) this device may
not cause harmful interference, and (2) this device must accept
any interference received, including interference that may
cause undesired operation.
CAUTION ON MODIFICATIONS
MicroJack User’s Manual
EYES Pro/MP2016/MP3000/MP5000
To comply with the limits for the Class A digital device,
pursuant to Part 15 of the FCC Rules, this device must be
installed in computer equipment certified to comply with the
Class A limits. All cables used to connect the computer and
peripherals must be shielded and grounded. Operation with
non-certified computers or non-shielded cables may result in
interference to radio or television reception.
Any changes or modifications not expressly approved by the
grantee of this device could void the user's authority to
operate the equipment.
CE NOTICE
This is a Class A product.
ENG 02
Page 3
MicroJack User’s Manual
EYES Pro/MP2016/MP3000/MP5000
Table of Contents
CHAPTER 1 INTRODUCTION....................................................... 1
1.1 Manual Conventions ........................................................... 1
MicroJack User’s Manual
EYES Pro/MP2016/MP3000/MP5000
3.3 Special Consideration ........................................................33
CHAPTER 4 SYSTEM CONFIGURATION AND OPERATION.......... 34
4.1 System Configuration ........................................................34
1.2 Video Card Specification ..................................................... 2
1.3 Package Contents .............................................................. 2
1.4 Hardware Recommendations ............................................... 3
1.5 Installing the Video Cards ................................................... 5
1.6 Connecting the MicroJack Video C ards .................................. 8
1.7 Attaching Cameras............................................................. 8
1.8 Connecting External Sensor/Relay........................................ 9
CHAPTER 2 DRIVER INSTALLATION ......................................... 13
2.1 Installing the Driver in Windows 98SE/Me ............................13
2.2 Installing the Driver in Windows 2000 .................................18
2.3 Installing the Driver in Windows XP.....................................23
2.4 Remove Your Video Card Driver.......................................... 26
CHAPTER 3 SOFTWARE INSTALLATION.................................... 27
System .....................................................................37
Cameras ....................................................................42
Audio ........................................................................45
Monitoring..................................................................47
Sensors .....................................................................50
Relays........................................................................51
Alarms......................................................................53
Networking.................................................................58
Scheduler....................................................................61
Backup .....................................................................67
E-Map ....................................................................72
Users Information.........................................................74
4.2 System Operation .............................................................78
3.1 Installing MicroJack EYES Pro /MP2016/MP3000/MP5000
Software ...............................................................................27
3.2 Product Update.................................................................32
i
ii
Start / Stop Monitoring ..........................................83
Start / Stop Audio Recording.............83
Page 4
MicroJack User’s Manual
EYES Pro/MP2016/MP3000/MP5000
MicroJack User’s Manual
EYES Pro/MP2016/MP3000/MP5000
E-Map..................................................................84
Load / Close Network Server .................................. 85
System Configuration.............................................85
Log Viewer........................................................... 8 6
PTZ Controller.......................................................95
Status Monitoring .............................................................98
Exit / Re-login EYES Pro/MP2016/MP3000/MP5000.....101
CHAPTER 5 USING THE WEBCAM............................................ 102
5.1 Enable WebCam..............................................................102
6.3.1 Center Management.......................................1 16
6.3.2 Playback.......................................................119
6.3.3 PTZ Co ntrol ..................................................123
6.4 Start Recording .....................................................126
6.5 Exit RemoteManager .............................................. 126
APPENDIX A REMOTE LOGIN WITH AN MODEM-TO-MODEM
CONNECTION ......................................................................... 127
A.1 Windows 98SE / Windows Me...........................................127
A.2 Windows 2000................................................................ 132
A.3 Windows XP ...................................................................139
5.2 Use the WebCam ............................................................ 104
CHAPTER 6 REMOTEMANAGER ............................................... 106
6.1 Accessing RemoteManager ...............................................106
6.2 Setup ................................................................... 108
6.3 Operating the RemoteManager .........................................116
iii
APPENDIX B REGISTERING DOMAIN NAME ON DDNS SERVER148
iv
Page 5
MicroJack User’s Manual
EYES Pro/MP2016/MP3000/MP5000
Chapter 1 Introduction
Welcome to the realm of MicroJack. MicroJack EYES Pro /MP2016/
MP2016/MP3000/MP5000, composed of one 32-bit PCI video capture
card, works as a digital video surveillance system. It allows you to
capture true color images and real-time videos from 4/8/16 camera
input(s) simultaneously.
MicroJack User’s Manual
EYES Pro/MP2016/MP3000/MP5000
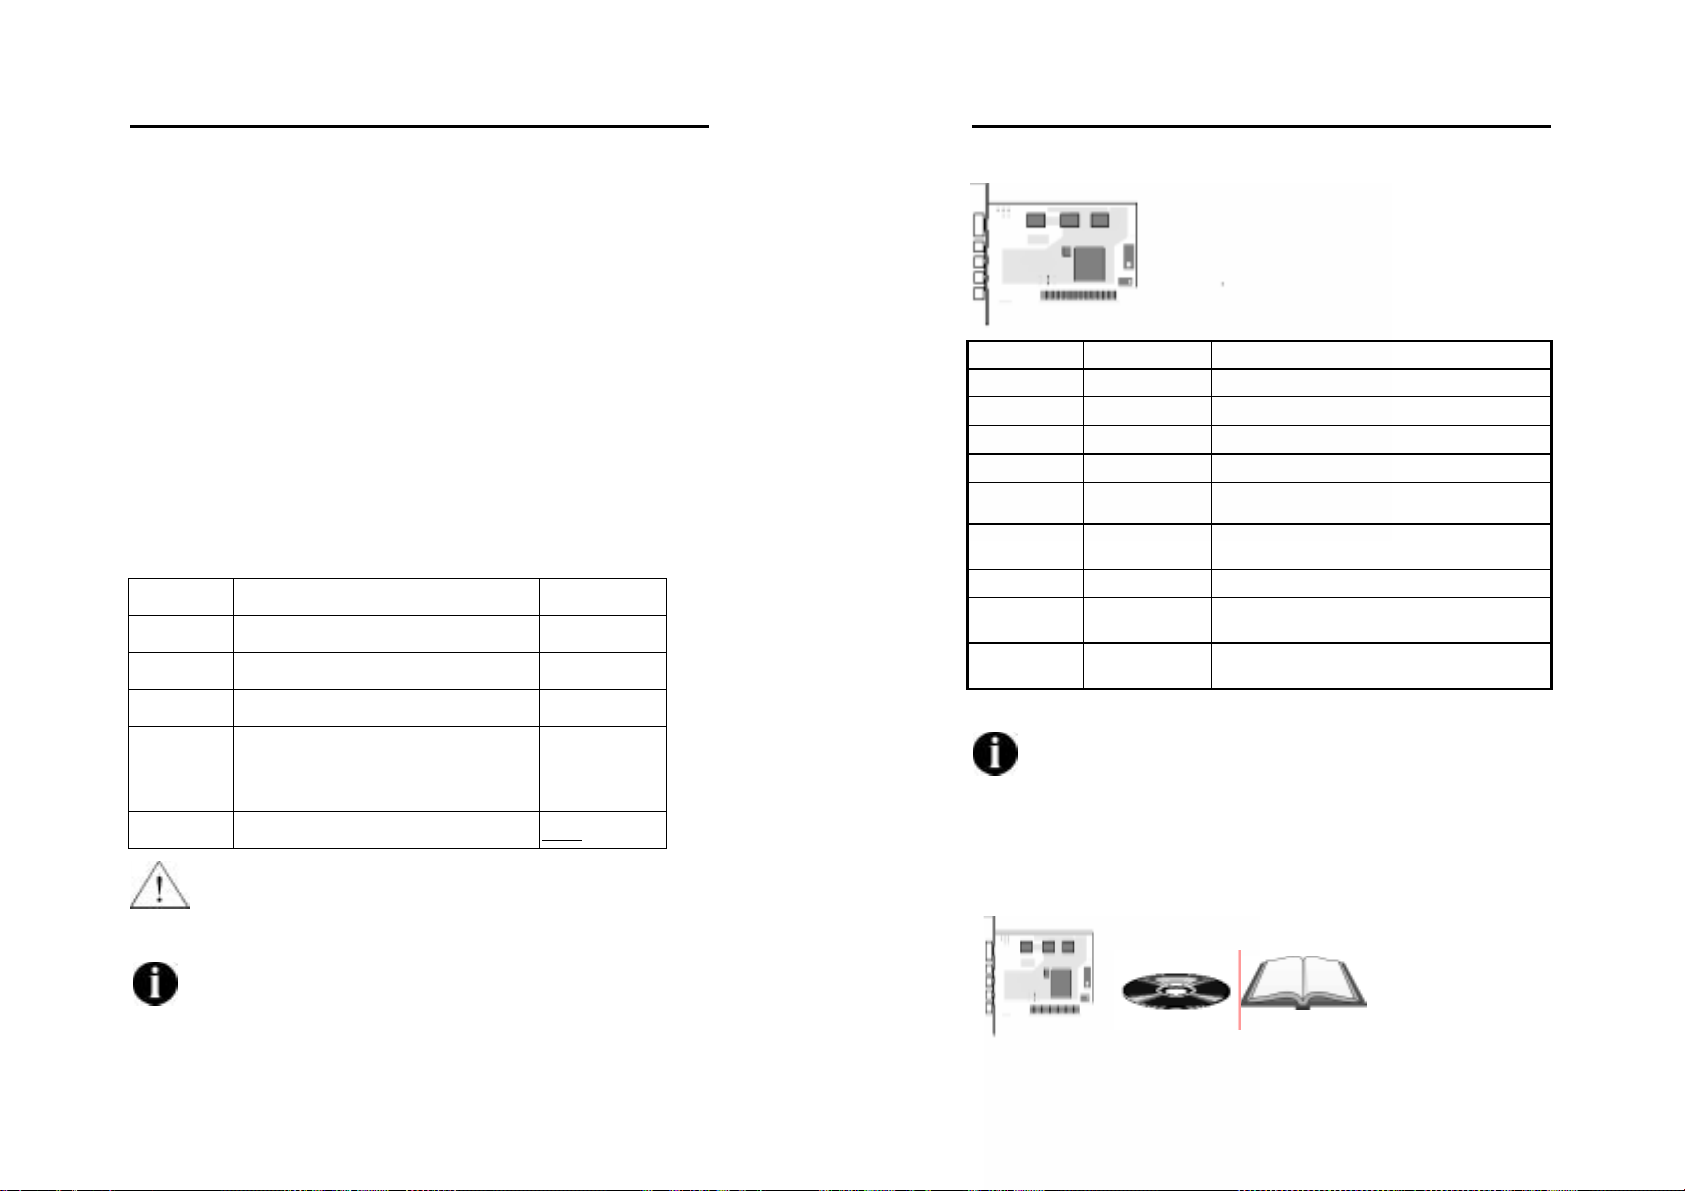
1.2 Video Card Specification
4 ports
With the latest Motion Detection technology, once any movement
detected in the monitoring area, MicroJack EYES Pro/MP2016/MP3000/
MP5000 automatically starts recording and triggers the alarm. You
don’t need to keep your eyes on the monitor all day long anymore; the
system will alert you automatically when specified events occur.
1.1 Manual Conventions
The following conventions are used throughout this manual.
Type Stands for Example
[paren.] Keys on the keyboard [Enter]
“Quotes” Words to be typed in “MicroJack”
Italic User in each authorization level Administrator
Bold Name of a dialog box,
Sections/Option title in the dialo g
box/Field names/Buttons
Underlined Table columns Start
Caution Message: These messages are to advise you to
proceed carefully. Failure to pay attention could result in
damage to the system and may put personnel and
environment at risk.
Informational Message: These messages are intended to
provide additional inform atio n for the purpose of clarification.
Schedule
Backup
Product Video Card Specifications
4 EYES Pro 1 card Each video capture card with 4 video inputs
8 EYES Pro 2 cards Each video capture card with 4 video inputs
16 EYES Pro 4 cards Each video capture card with 4 video inputs
MP 3004 1 card Each video capture card with 4 video inputs.
MP 3008
MP 2016/
MP 3016
MP 5004 1 card Each video capture card with 4 video inputs.
MP 5008
MP 5016
1 card w/ 1
daughter card
1 card w/ 3
daughter cards
1 card w/ 1
daughter card
2 cards w/2
daughter cards
Each video capture card with 4 vide o inputs .
Each Video capture card with 4 video inputs
Each video capture card with 4 vide o inputs .
Each video capture card with 4 vide o inputs .
MicroJack has been dedicated to innovating the technology of
digital video surveillance system. We have had a significant
innovation on promoting hardware that is presented as the par t
of MP series above.
1.3 Package Contents
Your MicroJack EYES Pro/MP2016/MP3000/MP5 000 pac kage inc lud es the
following:
1
2
Page 6
MicroJack User’s Manual
EYES Pro/MP2016/MP3000/MP5000
• 1 / 2 / 4 MicroJack Video Card(s) for EYES Pro
• 1/2 MicroJack Video Card(s) and 1/3 daughter card(s) for
MP2016/MP3000/MP5000
• Micro Jack EYES Pro/MP2016/MP3000/MP5000 So ftware CD (Including
Driver, Application Software, and User’s Manual)
• MicroJack EYES Pro/MP2016/MP3000/MP5000
User’s Manual
• Optional exter nal I/O Box and 15-pin
D-type Connector Cable
1.4 Hardware Recommendati ons
CPU
Motherboard
Pentium
Intel 815E/815EP (PIII), 845 (P4), 845D(P4),
845E(P4), 845G(P4)
List of motherboards tested:
• ASUS P4B
• ASUS P4B266
• ASUS P4B533
• ASUS P4B533-V
• GIGABYTE 8IRX
• GIGABYTE 8IEX
• GIGABYTE 8IEXP
• GIGABYTE 8IGX
• MSI 845 E Max2
• MSI 84 5G Max
(VIA/SiS/ALi chipset motherboards
temporarily not supported)
OS Microsoft Windows 98SE/Me/2000 Pr o. /XP Pro.
Expansion Slots 1 / 2 / 3 / 4 × 32-bit PCI 2.1 compliant slots
Transcend DDR 256MB (DDR-266)
RAM
KingSton DDR 256MB (DDR-266)
KingMax SD RA M 256MB (PC-133)
KingMax DD R 256MB(DDR-333)
III 800MHz or above recommended
MicroJack User’s Manual
EYES Pro/MP2016/MP3000/MP5000
Hard disk
HDD
Media
40 GB of free hard disk space, at least 6GB free
space for each partition.
Seagate ST340016A (40G 72000rp m )
Seagate ST380021A (80G 7200rpm)
CD-ROM drive
16-bit high color SVGA graphic card with
DirectDraw capability
List of VGA Cards tested:
• Leadtek WinFast GeForce2 MX400
VGA
• Leadtek WinFast A170 DDR TDH
• Leadtek WinFast 3D S325 32MB
• Leadte k W inFast A250 TD 128MB
• ATI RADEON 8500 64MB/128MB
• ELSA GLADIAC 525 128MB
• ELSA GLADIAC 517 VIVO 64MB
Audio Sound card and speakers
Modem
List of modems tested:
Modem2modem feature
Internal:
• USR 569 9A (Chipset: 3COM)
• Creative Lab DI5630 (Chipset: Broadxent)
• SmartLink 5634PSV-R
• QDK Speedcom+ VPI56SP (Chipset: Conexant)
• GVC 56K V.90 Voice/Fax (Chipset: Motorola)
• Cyber Marmo t Rock Modem (Chipset: Ambient)
• Lemel MD-56 KVR4 (C hips et: Conexant)
External:
• USR 568 6D (Chipset: USR)
• GVC 56Kbps (Chipset: Rockwell)
• Atrie Explore (Chipset: Conexant)
• Zyxel Omni 56K Data/Voice (Chipset: Zyxel)
• SmartLink 56TS (Chip s e t: TI)
• SmartLink 56TPC (Chipset: IC+)
• ART NET V1456VQE (Chipset: TOPIC)
• Well USB Soft Modem FM-56USB-ST (USB
interface)
3
4
Page 7
MicroJack User’s Manual
EYES Pro/MP2016/MP3000/MP5000
Modem
For the current update information, please check our website.
Alarm call out feature
Internal:
• Creative Lab DI5630 (Chipset: Broadxent)
• Creative Lab DI5630-5 (Chipset: Broadxent)
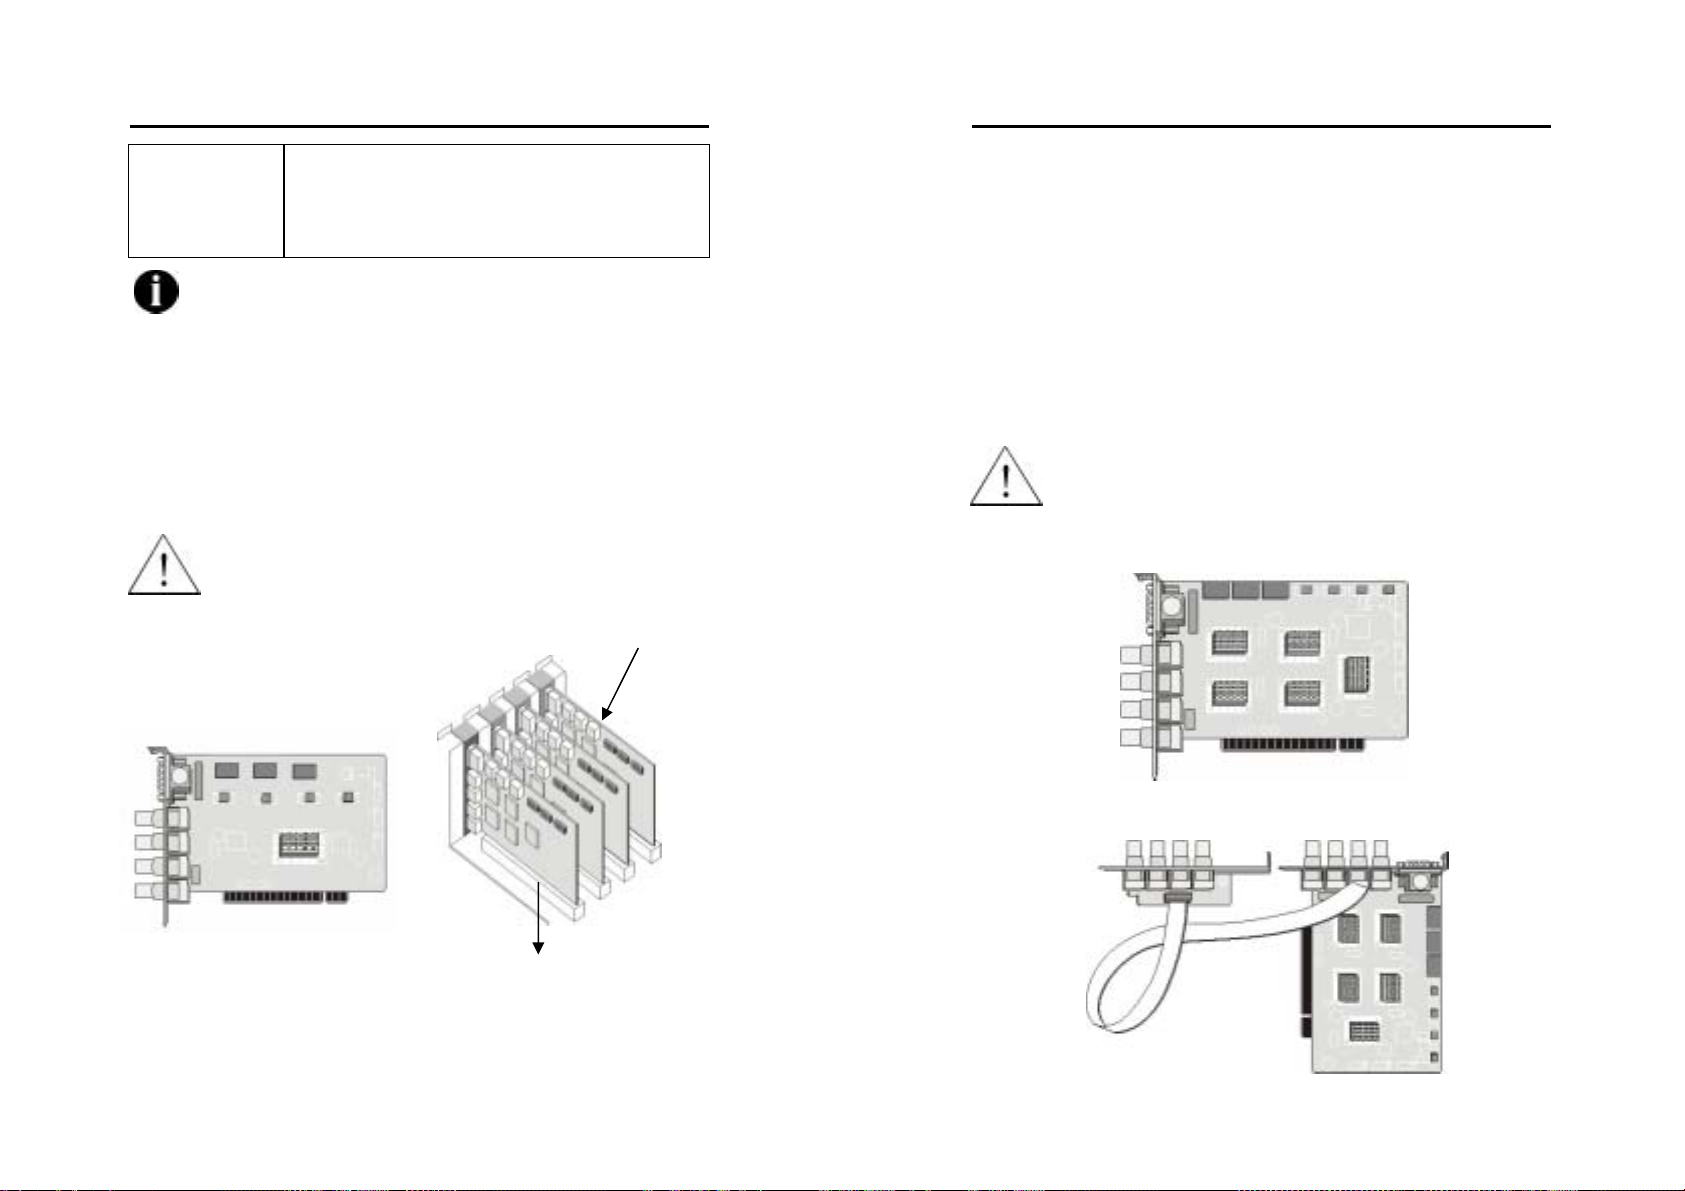
1.5 Installing the Video Cards
1.5.1 Installing the MicroJack EYES Pro Video Cards
The following instructions are for installing video cards into the
MicroJack EYES Pro system.
Before installing the video c ard, turn off the computer’s power,
unplug the power cable and disconnect all other cables
attached to the back of the computer.
Video card
Video Card
PCI Slot
MicroJack User’s Manual
EYES Pro/MP2016/MP3000/MP5000
1. Remove the computer cover.
2. Remove the I/O brackets for the four PCI expansion slot s. Save the
screws.
3. Insert the MicroJack video cards into the available PCI expansion
slots.
4. Replace the computer cover and rec onnect all cables.
1.5.2 Installing the MicroJack MP2016/MP3000/MP5000 Video
Cards
The following instructions are for installing video cards into the
MicroJack MP2016/MP3000/MP5000 syste m.
Before installing the video card, turn off the comp uter ’s power,
unplug the power cable and disconnect all other cables
attached to the back of the computer.
MP3004/MP5004/MP5008
Video card
MP3008/MP5016
Video card
5
6
Page 8
MicroJack User’s Manual
p
EYES Pro/MP2016/MP3000/MP5000
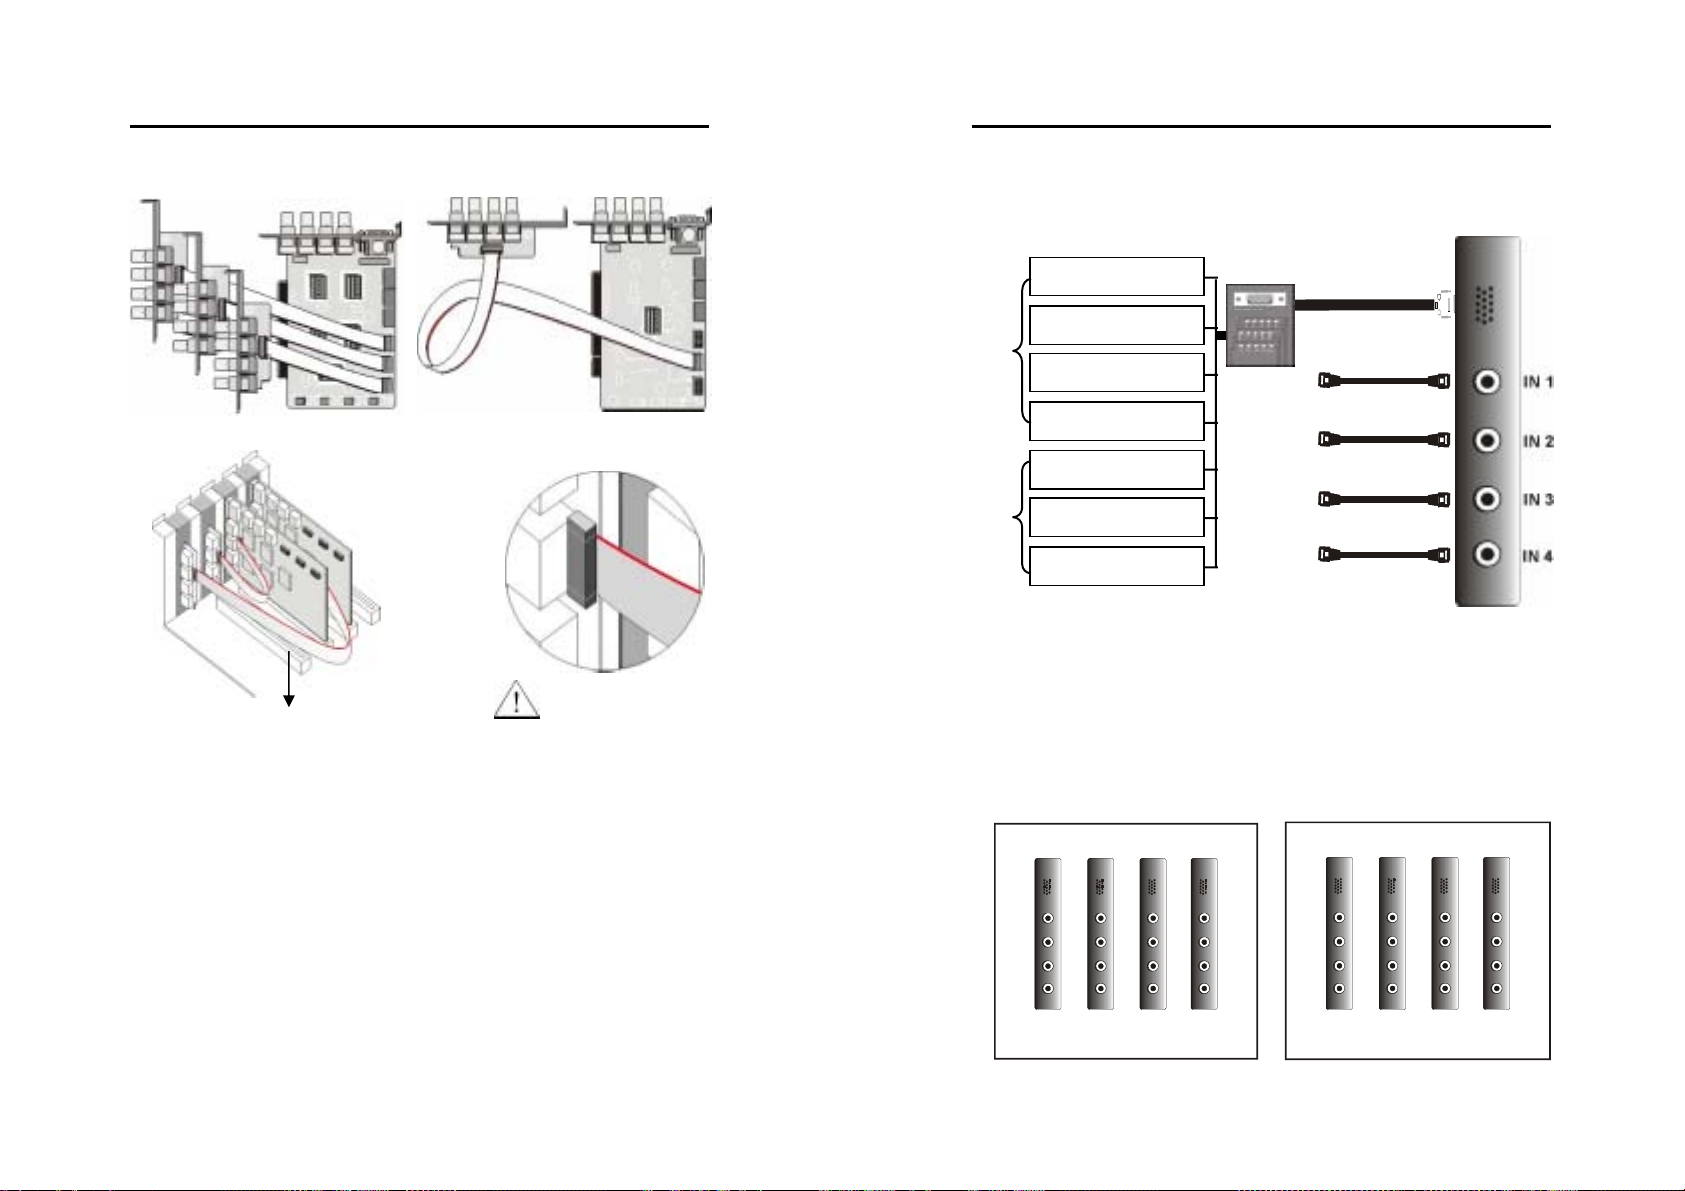
MP3016 Video card MP2016 Video card
MicroJack User’s Manual
EYES Pro/MP2016/MP3000/MP5000
1.6 Connecting the MicroJack Vide o Cards
Up to four cameras can be connected to each MicroJack video card one camera per BNC terminal.
NOTE: Orient the
PCI Slot
Fig. 1 Fig. 2
1. Remove t he computer cover.
2. Remo ve t he I/ O bra cke ts fo r the fo ur PC I exp an sio n sl ots . Save t he
screws.
3. Align AVerMedia video card connector with the available PCI slots.
4. Screw AVerMedia video card and the 3 daughter cards respectively
into the rear panel with the screws. See the Fig .1.
5. Connect the 3 daughter cards to AVerMedia video card with ribbon
cables. See the Fig.2.
6. Replace the computer cover and reconnect all cables.
red mark u
ward.
Sensor Inputs
Infrared Sensor
Proximity Sensor
Smoke Detector
Reed Switch
Camera 1
Camera 2
D-type 15-pin
Connector Cable
(Optional)
Relay Control
Relay Outputs
1.7 Attaching Cameras
Cameras must be attached to the BNC connectors of the server video
cards in a specific order to avoid transmission problems. Video cards
are stacked vertically into the chassis. If all four video cards are
installed, the rear panel of the server will appear as shown in the
diagrams below.
Burglar Alarm
Access Control Lock
EYES Pro MP2016/MP3000/MP5000
1
2
3
5
6
7
9
10
11
13
14
15
4
8
12
16
Camera 3
Camera 4
Coaxial Cable
(Not Supplied)
1
5
2
6
3
7
4
8
9
13
10
14
11
15
12
16
7
8
Page 9
MicroJack User’s Manual
EYES Pro/MP2016/MP3000/MP5000
Cameras need to be installed according to the numerical order displayed
on the diagrams above. Whether you have one, two, three or four
video cards, the pattern is the same - cameras will be installed from
left to right starting with the t op row for EYES Pro and from top
to bottom beginning with the left-most column for
MP2016/MP3000/MP5000.
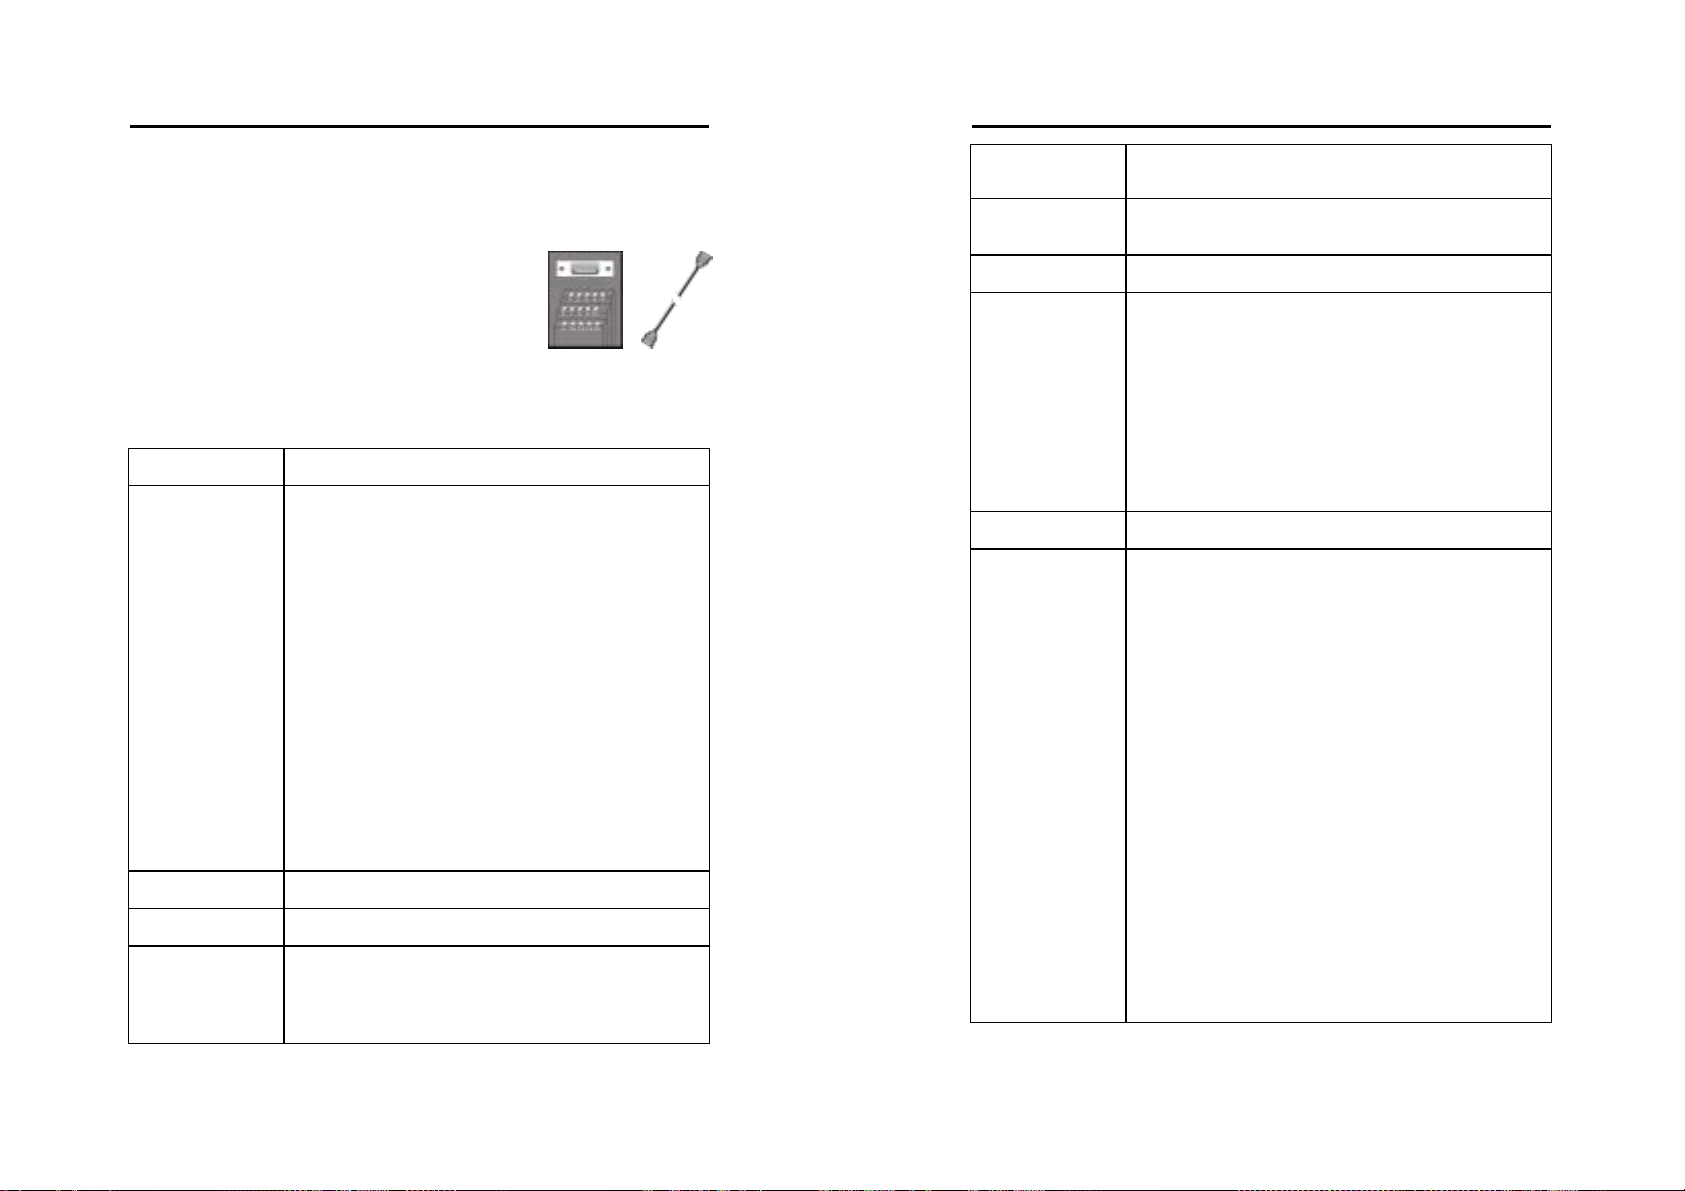
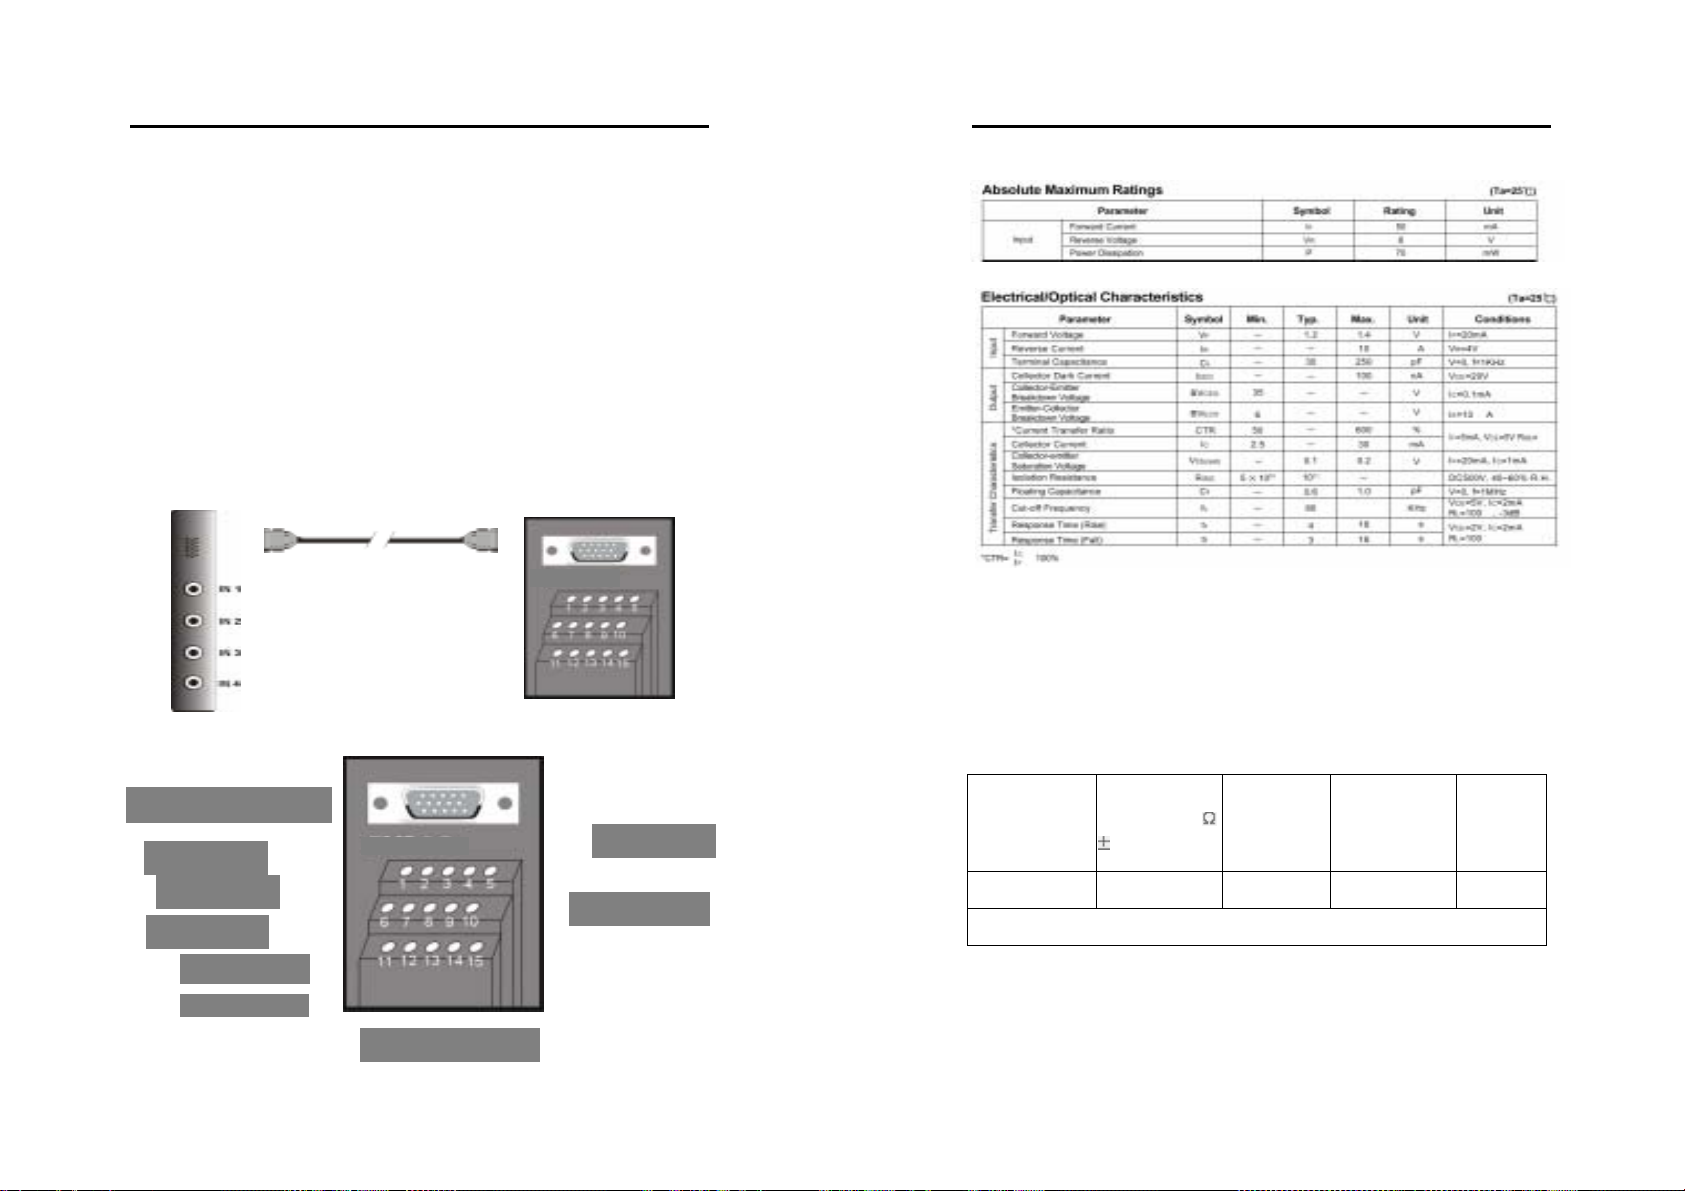
1.8 Connecting External Sensor/ Relay
Each system can come with optional External I/O Boxes and D-type 15pin connector cables enabling you to connect sensor inputs and relay
outputs. The pin signals and specifications for the external I/O Box and
the D-type 15-pin connectors are described below.
D-type 15-pin Connector Cable
Video Card
External I/O Box
MicroJack User’s Manual
EYES Pro/MP2016/MP3000/MP5000
Sensor Input Specification
Relay Output Specification
Surge strength: 1500 VAC
Nominal power 200mw ~ 360mw
Operating power 110mw ~ 200mw
COIL RATINGS (at 20
o
C)
D-type 15-pin conn ector
Sensor Input 2
Sensor Input 1
Sensor Input 3
Relay Output 1
Relay Output 2
External I/O Box
Sensor Input 4
Relay Outputs 3
Coil Nominal
Voltage
(VDC)
5 125 3.75 0.5 40
* Max Continuous Voltage at 20oC : 110% of Coil Nominal Voltage
9
10
Coil
Resistance (
10% )
Pick-up
Voltage
(VDC)
Drop-Out
Voltage
(VDC)
Nominal
Current
(mA)
Page 10

EYES Pro/MP2016/MP3000/MP5000
CONTACT RATINGS
MicroJack User’s Manual
MicroJack User’s Manual
EYES Pro/MP2016/MP3000/MP5000
Sensor Inputs
Contact Arrangement 1 Form C (SPDT)
max. Switch Power
max. Switch voltage
max. Switch current
125VA 60W
125VAC 30VDC
2A
Contact Resistance 100m
Resistive Load 1A/125VAC
2A/30VDC
Contact Material AgNi10
External I/O Box Pin Signals
Pin # Definition
1 INPUT SIGNAL 1+
2 INPUT SIGNAL 2+
3 INPUT SIGNAL 3+
4 INPUT SIGNAL 4+
5 OUTPUT 3 – N ormally Closed
6 INPUT SIGNAL 1-(GND)
7 INPUT SIGNAL 2-(GND)
8 INPUT SIGNAL 3-(GND)
9 INPUT SIGNAL 4-(GND)
10 OUTPUT 3 – Common
11 OUTPUT 1 – Normal l y Open
12 OUTPUT 1 – Common
13 OUTPUT 2 – Normal l y Open
14 OUTPUT 2 – Common
15 OUTPUT 3 – Normal l y Open
External sensors such as infrared sensors, smoke detectors, proximity
sensors, door sensors, etc., can be attached to the MicroJack EYES Pro/
MP2016/MP3000/MP5000’s input-signal connectors on the External I/O
Box. These devices trigger the system to respond with a predefined
action (e.g. record video)
Relay Outputs
The MicroJack EYES Pro/MP2016/MP3000/MP5000’s output connectors
(relay output) can be attached to external output contr ol devices such
as alarms. The system can be configured to activate or deactivate
these devices. Each MicroJack video card supports three relay outputs.
Two of them are normally open relays with one being a toggle switch.
11
12
Page 11
MicroJack User’s Manual
EYES Pro/MP2016/MP3000/MP5000
Chapter 2 Driver Installation
MicroJack EYES Pro/MP2016/MP3000/MP5000 are Plug-and-Play digital
surveillance systems that supp ort Windows 98SE/Me /2000/XP. To start
using this system, first ins tall the drivers and applic ation software from
the Software CD that comes with MicroJack EYES Pro/MP2016/MP3000/
MP5000 system.
Check Your Windows Version
Before you install the driver, check to see whether you are using
Windows 98SE, Windows Me, Windows 2000 or Windows XP. To
do this, click Start Æ Settings Æ Control Panel on the
Window’s toolbar, and then double-click System. You will see
the Windows version under the General tab.
Depending on the version you use, yo u will encounter different dialog
boxes when installing the driver. Those listed in the following sections
are for installing drivers in Windows 98SE/Me, Windows 2000 and
Windows XP.
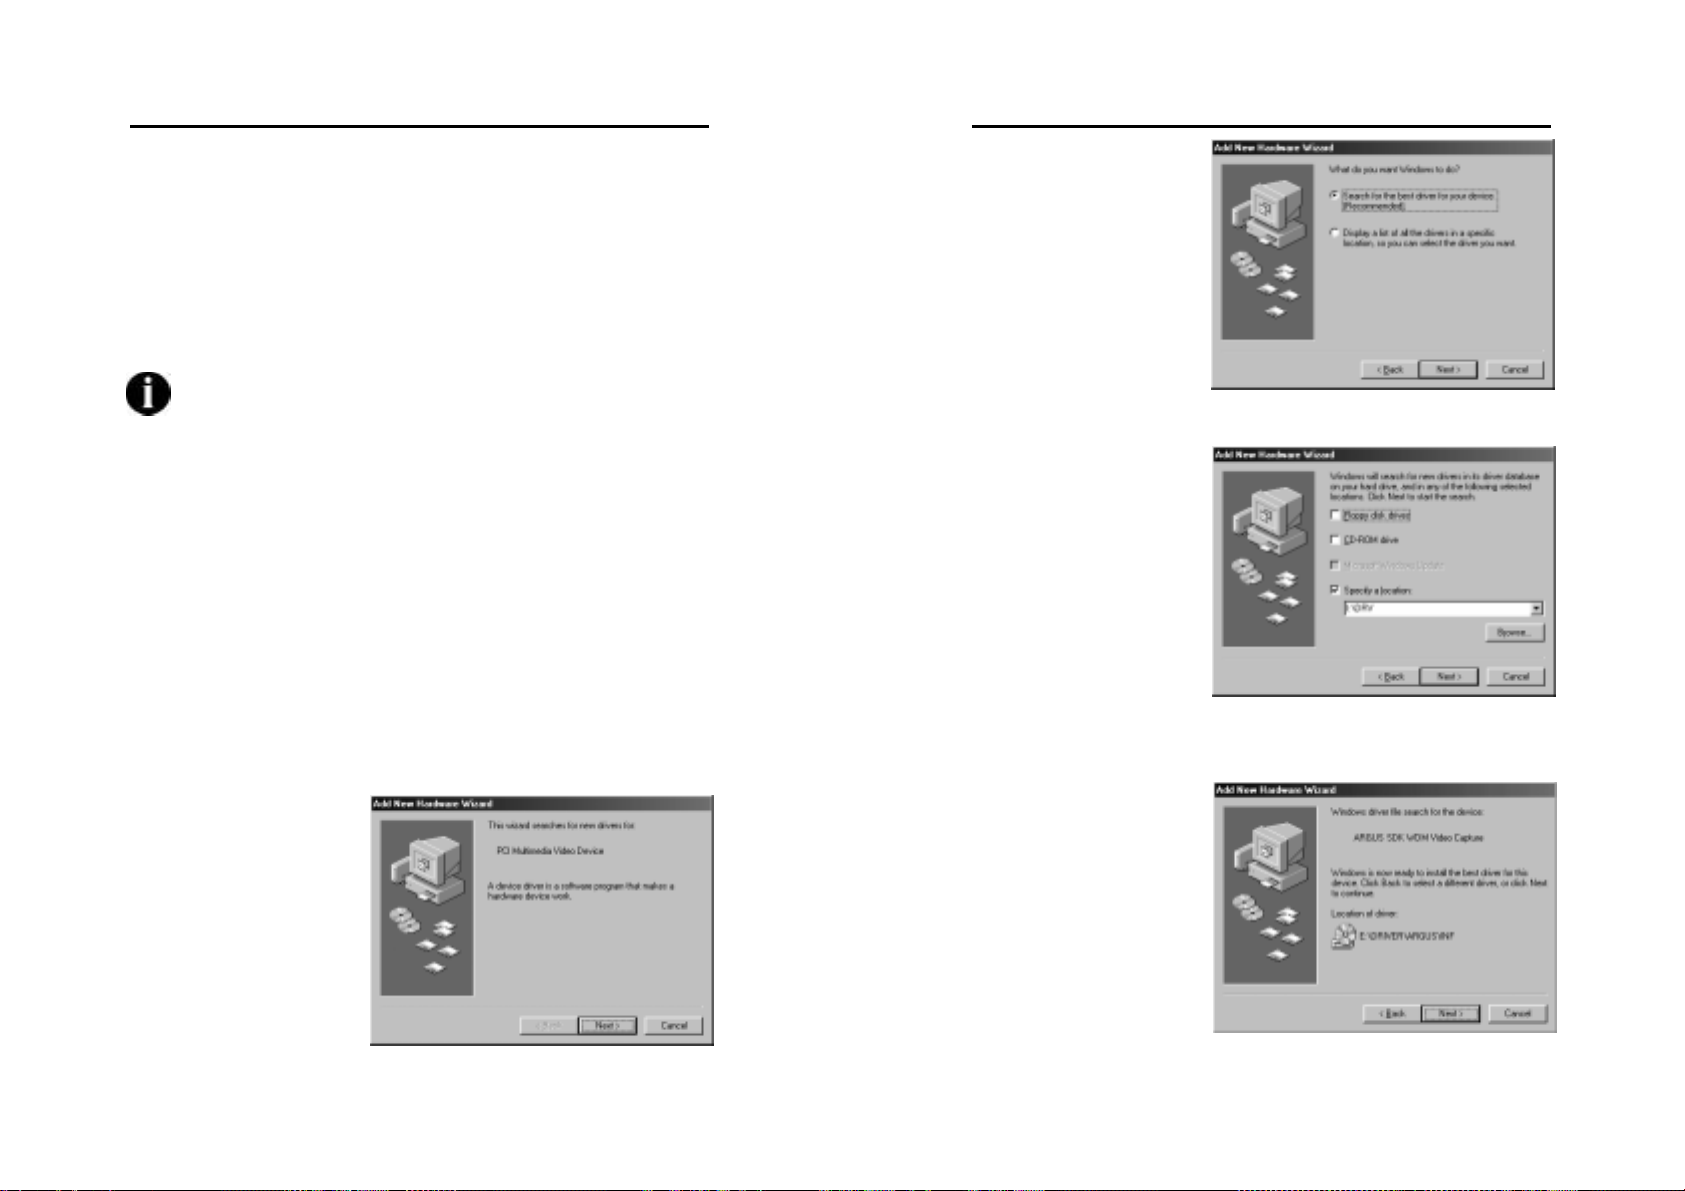
2.1 Installing the Driver in Windows 98SE/Me
After you have properly installed the MicroJack video card in your
computer, power on your computer and start Windows 98SE/Me.
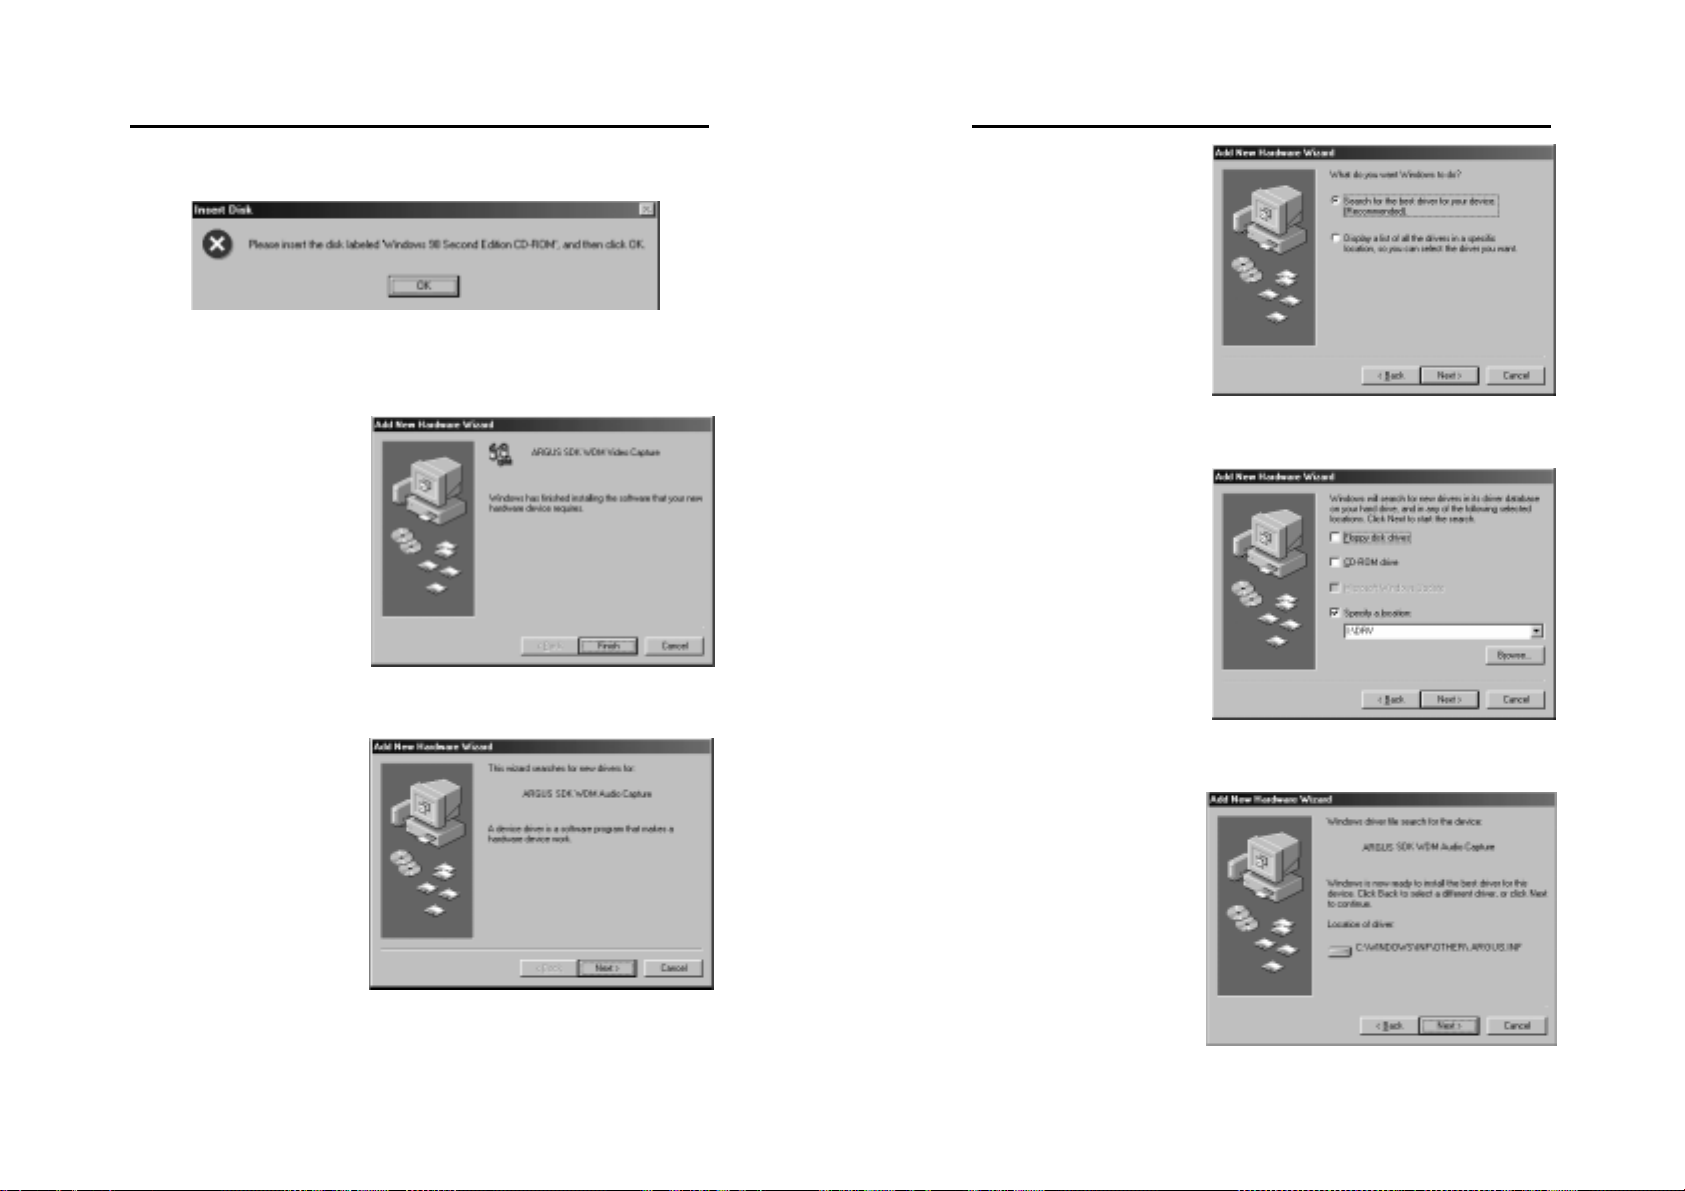
1. The first time you
install the
MicroJack video
card driver, you
will see the Add
New Hardware
Wizard. Insert
the Software CD
and click the
Next button.
MicroJack User’s Manual
EYES Pro/MP2016/MP3000/MP5000
2. Select Search
for the best
driver for your
device.
(Recommended)
and then click the
Next button.
3. Choose Specify a
location and
click the Browse
button to find the
drivers in the
[driver] folder of
the EYES Pro
/MP2016/MP3000
/MP5000
Software CD.
Click the Next
button.
4. The Add Hardware
Wizard will find
ARGUS.inf from the
folder you specified.
Click the Next button
to continue.
13
14
Page 12
MicroJack User’s Manual
EYES Pro/MP2016/MP3000/MP5000
5. (For Windows 98SE only) Insert the Windows 98SE CD-ROM to
start installing the driver.
6. Click the Finish button
to complete the
installation of video
driver.
7. Next you need to
install the audio driver.
Click the Next button
to proceed.
MicroJack User’s Manual
EYES Pro/MP2016/MP3000/MP5000
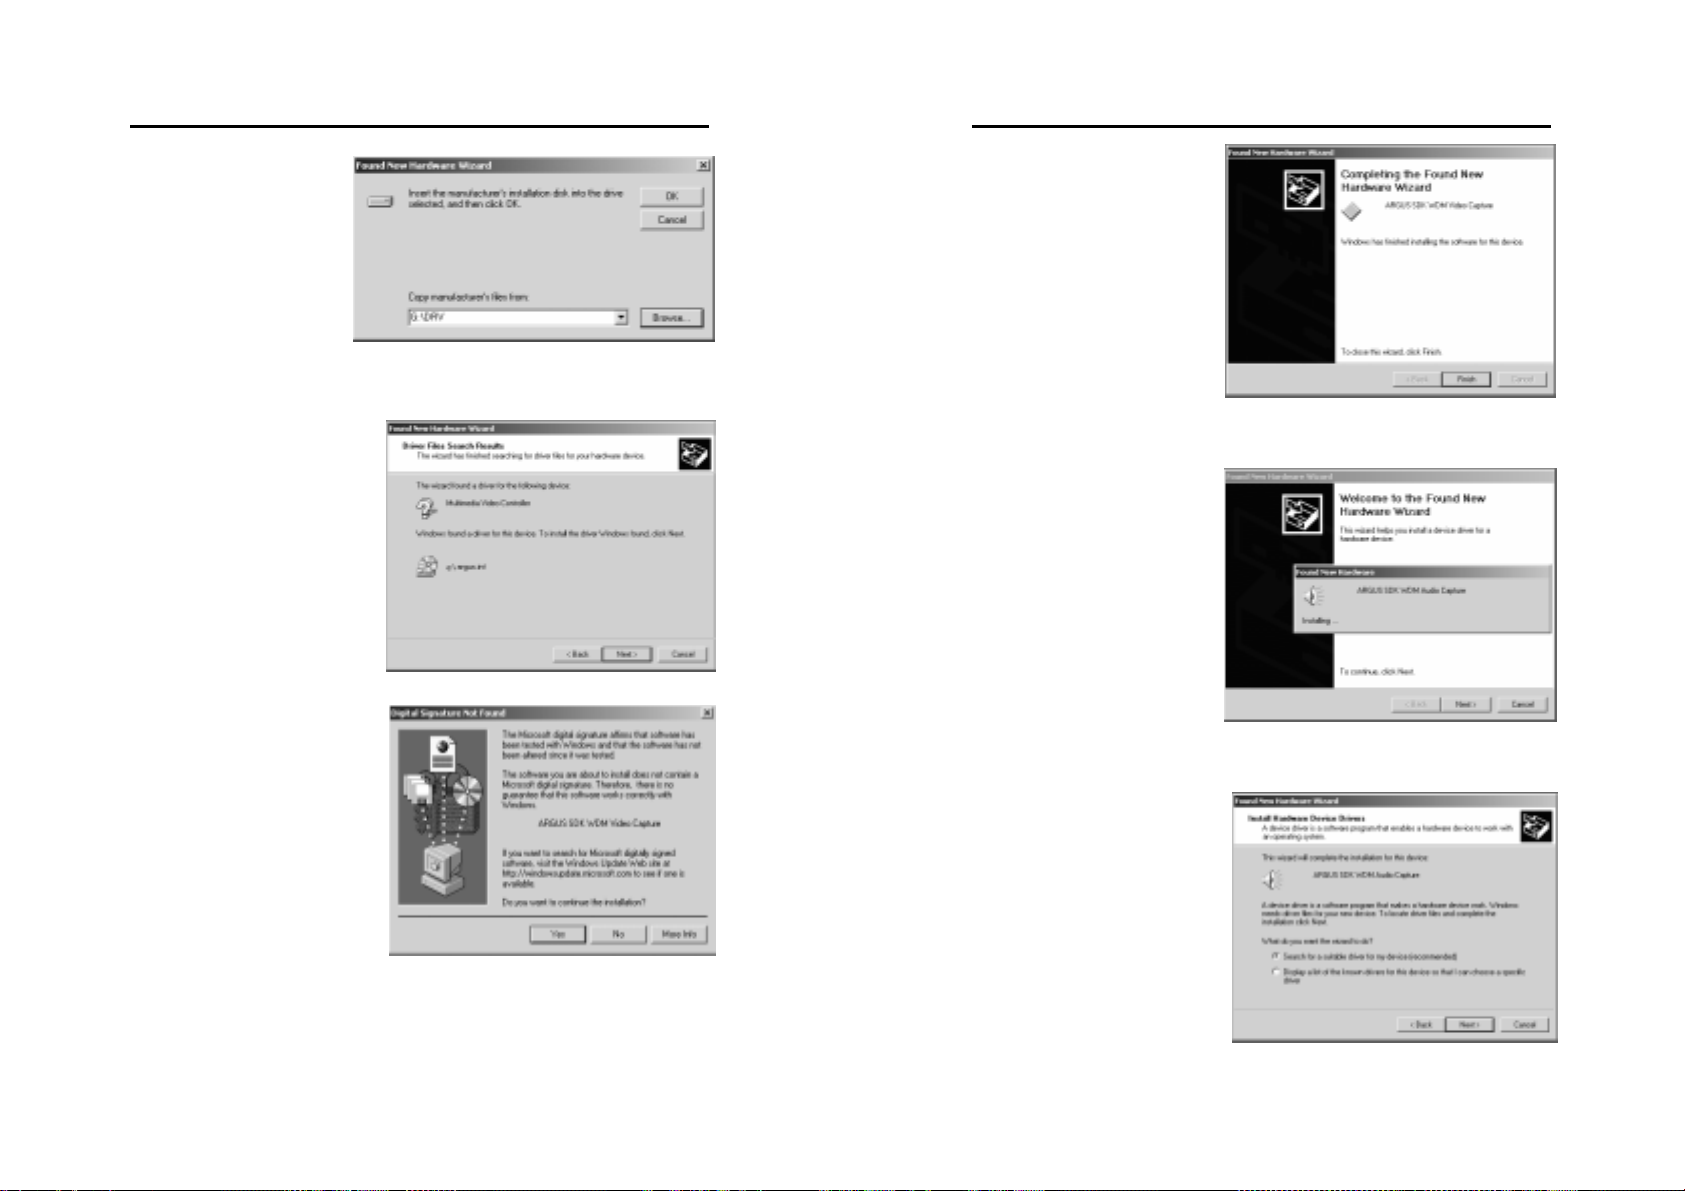
8. Select Search
for the best
driver for your
device.
(Recommended)
and click the
Next button.
9. Select Specify a
location and
click the Next
button.
10. The system will find
the video driver you
just installed because
the audio driver is the
same as the video
driver. Click the Next
button to continue.
15
16
Page 13

MicroJack User’s Manual
EYES Pro/MP2016/MP3000/MP5000
11. Click the Finish button
to complete the audio
driver installation and
reboot your PC.
For EYES Pro, you need to take the procedures (1~14) once for each
video card. For MP3000, you are asked to repeat the procedures 4
times; for MP2016/MP5000 8 times at most. If you have installed 4
video cards, you will find the sy stem’s device manager looking like the
following figure .
MicroJack User’s Manual
EYES Pro/MP2016/MP3000/MP5000
2.2 Installing the Driver in Windows 2000
After you have properly installed the video card in your computer,
power on your computer and start Windows 20 00.
1. The first time you
install the video
card, you will see
the Found New
Hardware
Wizard. Insert
the EYES Pro/
MP2016/MP3000/
MP5000 Software
CD and click the
Next button.
2. Select Search
for a suitable
driver for my
device
(recommended)
and click the
Next button.
3. Select Specify a
location and
click the Next
button.
17
18
Page 14
MicroJack User’s Manual
EYES Pro/MP2016/MP3000/MP5000
4. You‘ll be
prompted to
enter or browse
the location of the
video card driver.
Set the right path
and click the OK
button.
5. The system will find
argus.inf from the folder
you specified. Click the
Next button to continue.
6. Click the Yes button to
proceed with the
installation.
MicroJack User’s Manual
EYES Pro/MP2016/MP3000/MP5000
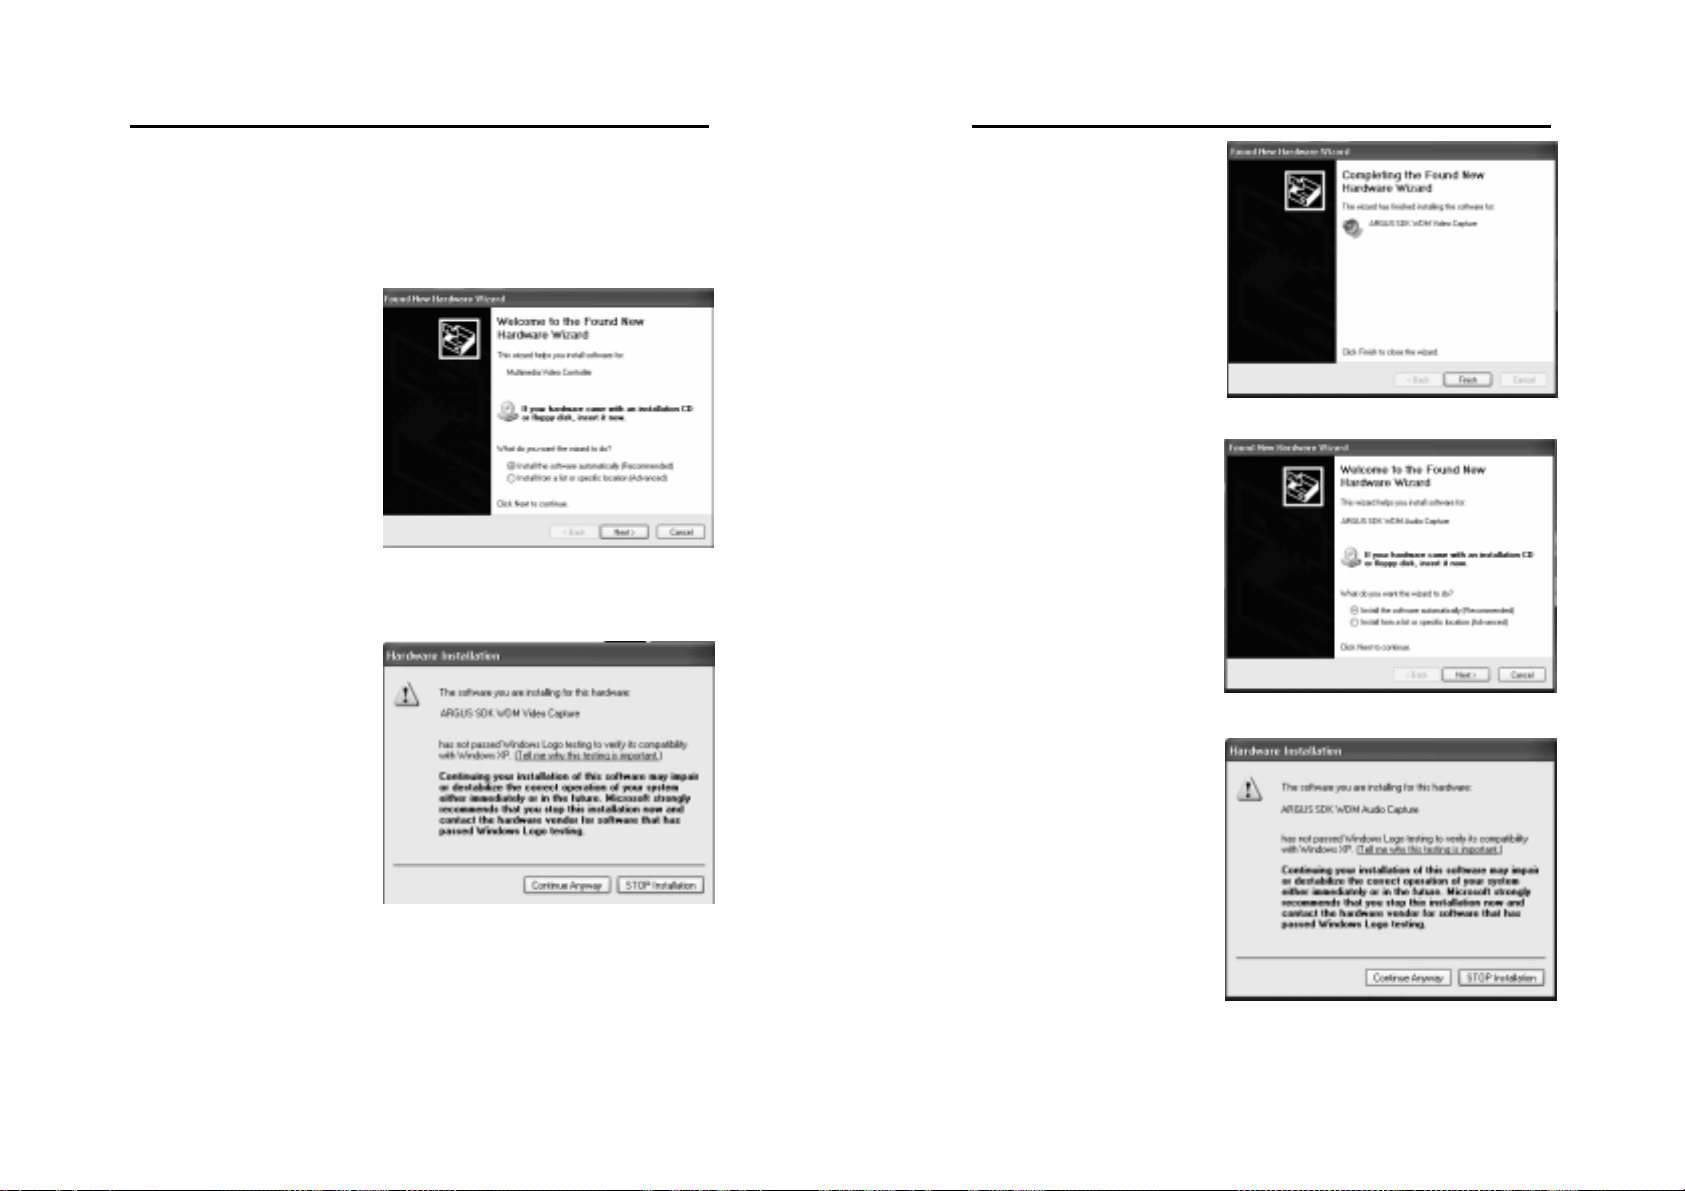
7. The system will soon
show that it has finished
the video driver
installation. Click the
Finish button.
8. Next you need to install
the audio driver. Click
the Next button to
proceed.
9. Select Search for a
suitable driver for my
device (recommended)
and click the Next
button.
19
20
Page 15

MicroJack User’s Manual
EYES Pro/MP2016/MP3000/MP5000
10. Check Specify a
location and click the
Next button.
11. You‘ll be
prompted to
enter or browse
the location of the
MicroJack video
card driver. Set
the right path and
click the OK
button.
12. The system will find the
video driver you just
installed because the
audio driver is the same
as the video drive r.
Click the Next button to
start installing.
MicroJack User’s Manual
EYES Pro/MP2016/MP3000/MP5000
13. Click the Yes button
to proceed with the
installation.
14. Click the Finish button
to complete the
installation and reboot
your PC.
For EYES Pro, you need to take the
procedures (1~14) once for each
video card. For MP3000, you are
asked to repeat the procedures 4
times; for MP2016/MP50 00 8 times
at most. If you have installed 4
video cards, you will find the
system’s device manager looking
like the following figure.
21
22
Page 16
MicroJack User’s Manual
EYES Pro/MP2016/MP3000/MP5000
2.3 Installing the Driver in Windows XP
After you have properly installed the video card in your computer,
power on your computer and start Windows XP.
1. The first time you
install the video card,
you will see the
Found New Hardware
Wizard. Insert the
EYES Pro/ MP2016/
MP3000/MP5000
Software CD and
select Install the
software
automatically
(recommended).
Click the Next button.
2. The system will then
find the driver argus.inf
in the Software CD and
start installing. When
this dialog box shows up,
click the Continue
Anyway button to
proceed.
MicroJack User’s Manual
EYES Pro/MP2016/MP3000/MP5000
3. After the installation
finished, click the Finish
button.
4. You need to continue
installing the audio
driver. Select Install
the software
automatically
(recommended) and
click the Next button.
5. Because the audio
capture uses the same
driver as the video
capture, the system will
find the video driver you
just installed and start
installing. When this
dialog box appea rs, click
the Continue Anyway
button.
23
24
Page 17
MicroJack User’s Manual
EYES Pro/MP2016/MP3000/MP5000
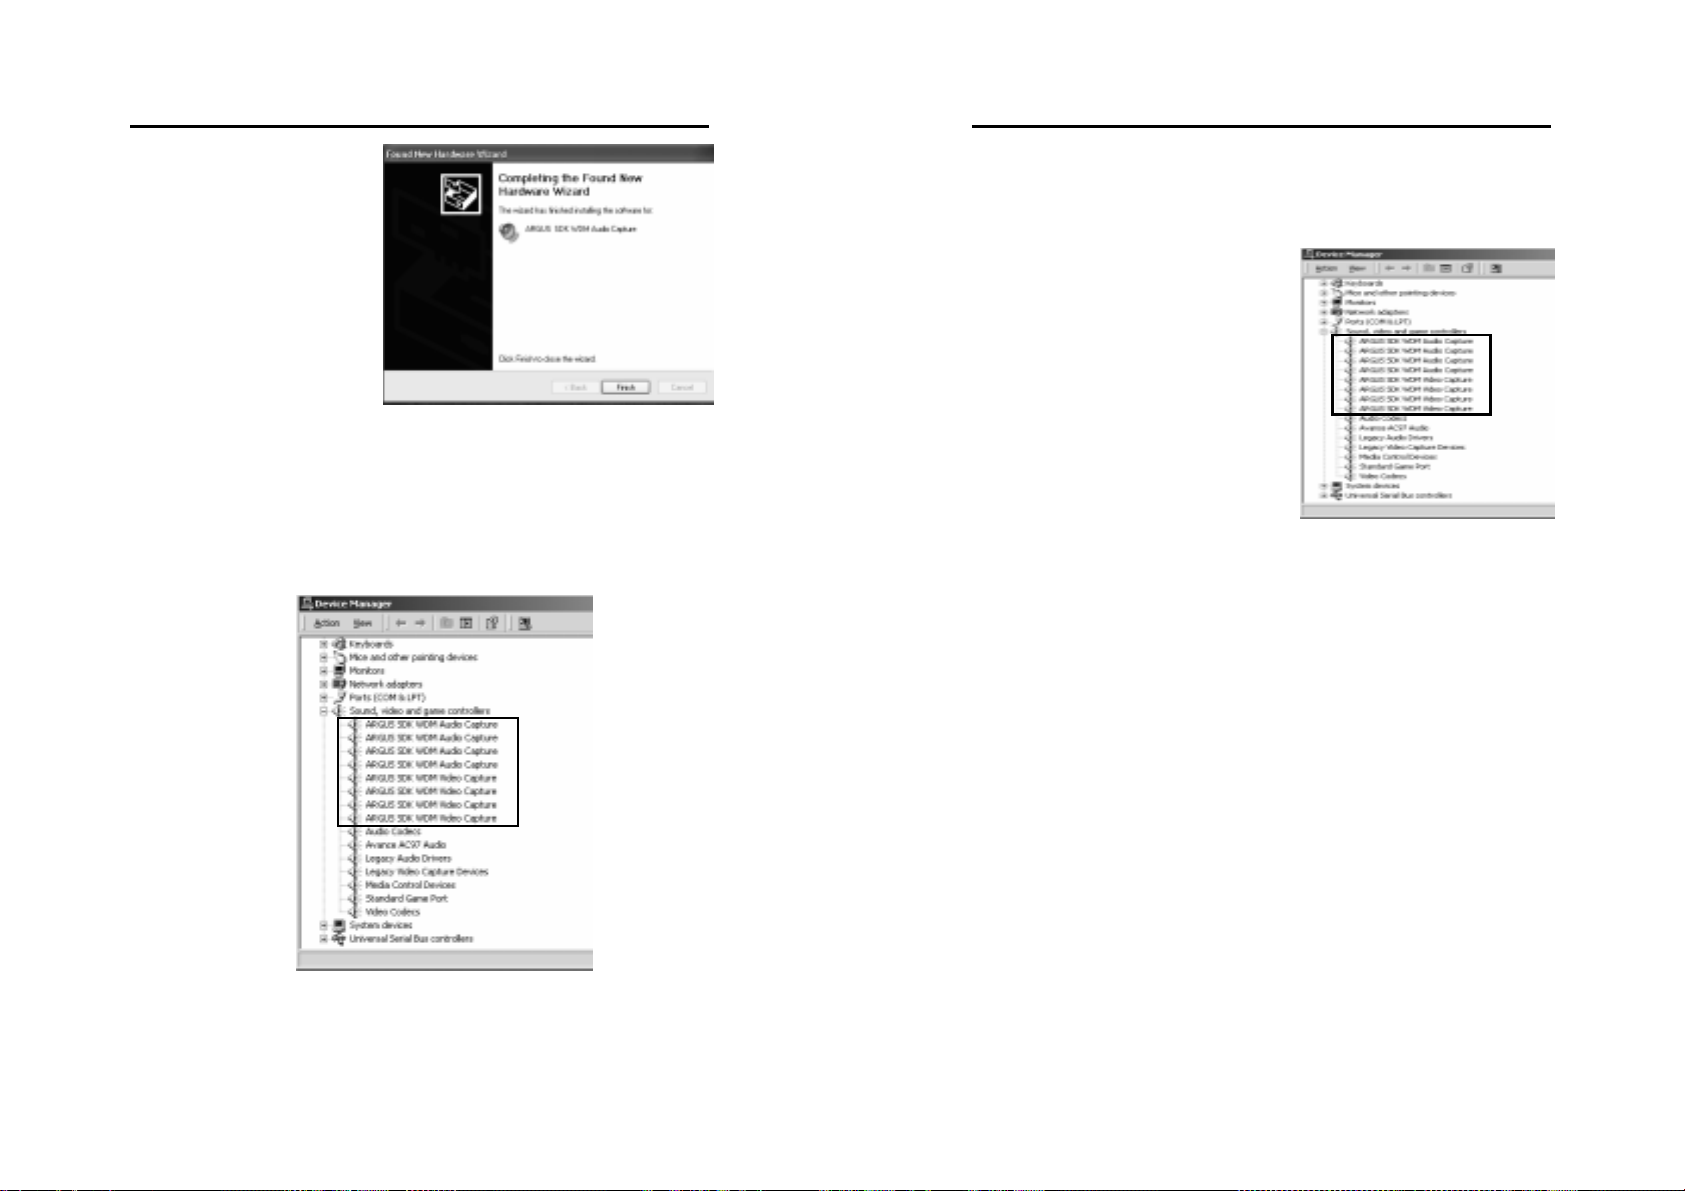
6. After the installation
finished, click the
Finish button.
For EYES Pro, you need to take the procedures (1~14) once for each
video card. For MP3000, you are asked to repeat the procedures 4
times; for MP2016/MP5000 8 times at most. If you have installed 4
video cards, you will find the sy stem’s device manager lookinglike the
following figure .
MicroJack User’s Manual
EYES Pro/MP2016/MP3000/MP5000
2.4 Remove Your Video Card Driver
While removing your video card driver, you need to follow the steps
described below.
1. Find the system’s Device
Manager, ungroup Sound,
video and game controllers,
and remove all the drivers by the
names of “ARGUS WDM Audio
Capture” and “ARGUS WDM
Video Capture”
2. Delete the following files in the
specified paths.
• Windows 98/Me:
C:\WINDOWS\INF\OTHER\ DVR\ARGUS.inf
C:\WINDOWS\SYSTEM32\DRIVERS\argus.sys
• Windows 2000:
*C:\WINNT\INF\oemX.inf
*C:\WINNT\INF\oemX.pnf
C:\WINNT\SYSTEM32\DRIVERS\argus.sys
• Windows XP:
*C:\WINDOWS\INF\oemX.inf
*C:\WINDOWS\INF\oemX.pnf
C:\WINDOWS\SYSTEM32\DRIVERS\argus.sys
* For the files “oemX.inf” and “oemX.pnf,” “X” stands for numbers.
Open each of the oemX.inf and locate the [Manufacturer] section. If
the value is DVR, then this is the file you need to delete. For
oemX.pnf, delete the one that has the same number (X) as the
oemX.inf you deleted. For example, if oem0.inf has DVR in the
[Manufacturer] section, then you need to dele te both oem0.inf and
oem0.pnf.
3. Please reboot your computer to complete the re move.
25
26
Page 18
MicroJack User’s Manual
EYES Pro/MP2016/MP3000/MP5000
Chapter 3 Software Installation
MicroJack User’s Manual
EYES Pro/MP2016/MP3000/MP5000
3. The system will then start preparing to install the Micro Jack EYES
Pro/MP2016/MP3000/MP5000 application software.
3.1 Installing MicroJack EYES
Pro/MP2016/MP3000/MP5000 Sof t ware
After you successfully install the video card driver, you then are ready to
install the EYES Pro/MP2016/MP30 00/MP50 00 app lication so ftware. You
can easily complete the installation of MicroJack EYES Pro/MP2016/
MP3000/MP5000 by follow ing the simp le instructions below.
During the installation, you will be asked to key in a user
name and a password. You must remember them
because you will be prompted for entering the same
user name and password later when entering the
MicroJack EYES Pro/MP2016/MP3000/MP5000
surveillance system.
It’s recommended that you exit all other Windows programs
before you install MicroJack EYES Pro/MP2016/MP3000/
MP5000 surveillance system.
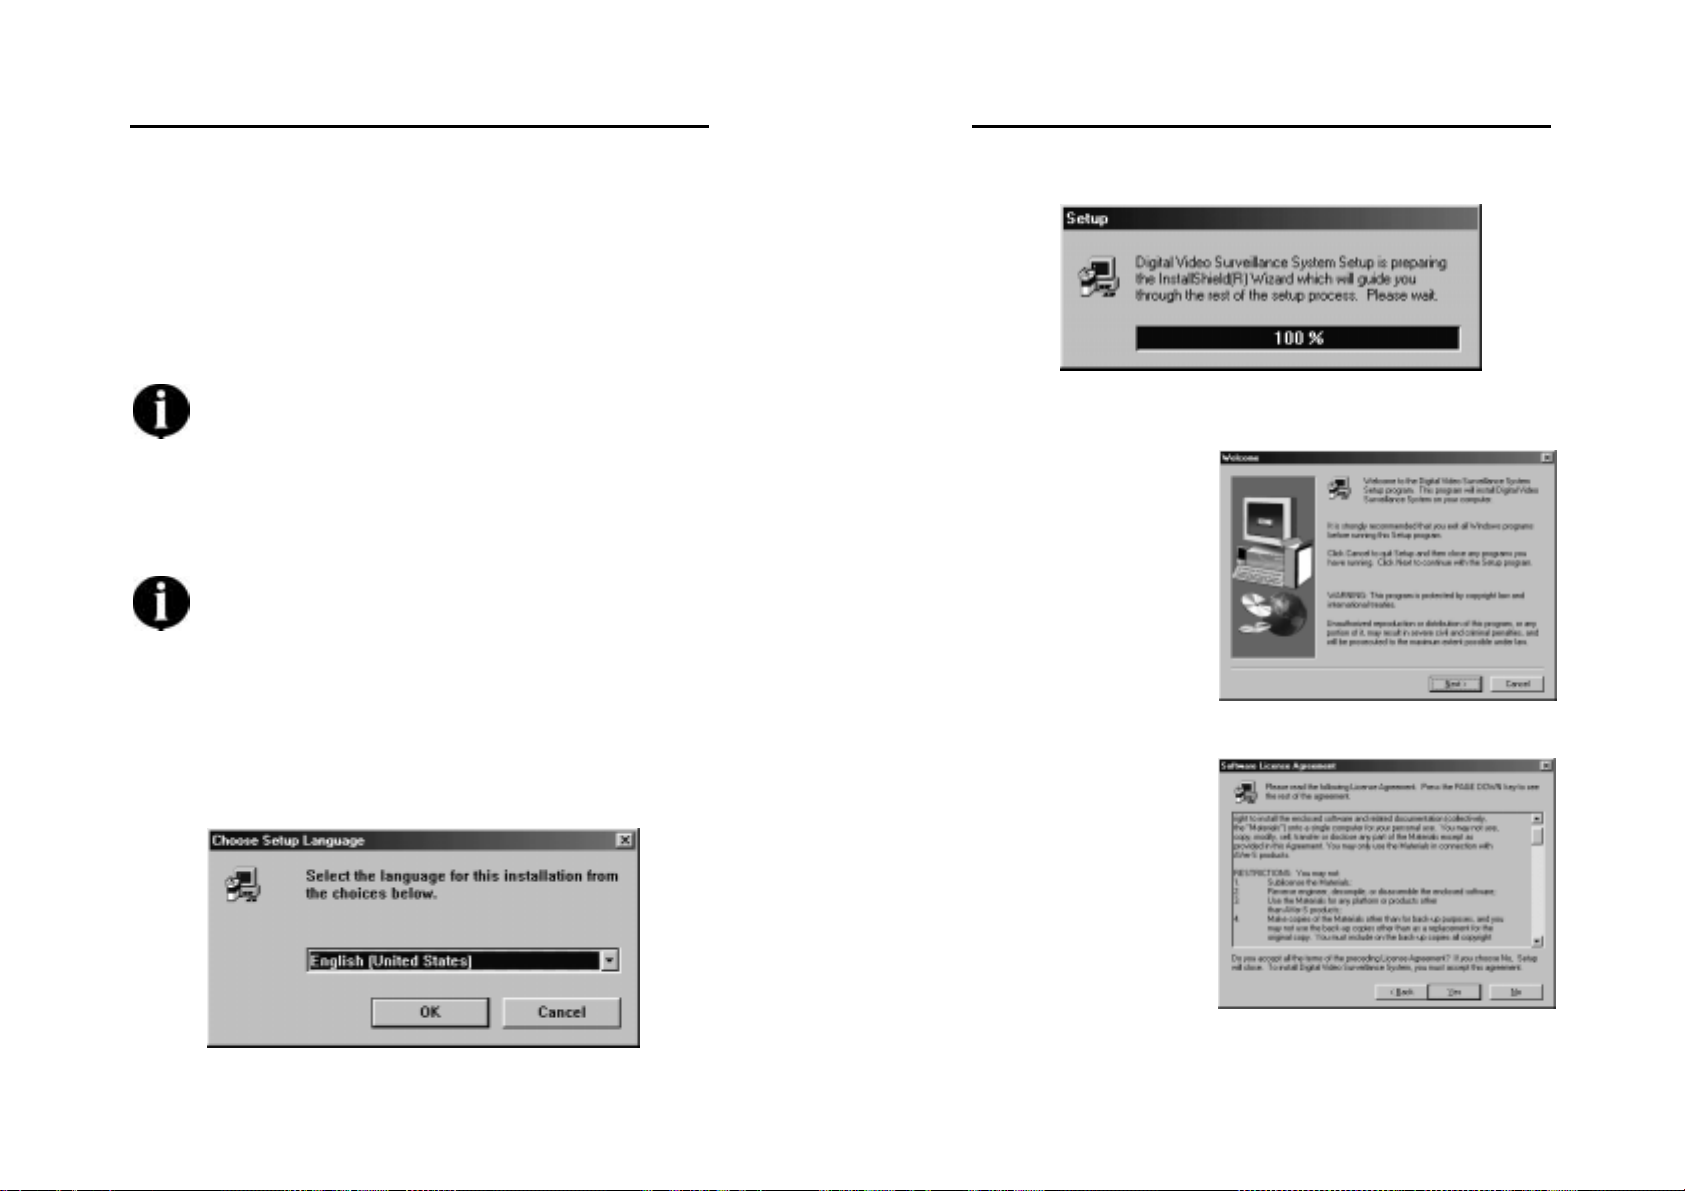
1. Insert the MicroJack EYES Pro/MP2016/MP3000/MP5000 CD into
the CD-ROM drive and wait for it to auto-run.
2. Click the text “MicroJack EYES Pro”, “MicroJack MP2016”,
MicroJack MP3000”, or “MicroJack MP5000” and choose the
language version you would like to install.
4. Click the Next
button to continue.
5. Read the License
Agreement and
click the Yes
button if you
accept it; otherwise
click the No button
to exit the setup
program.
27
28
Page 19
EYES Pro/MP2016/MP3000/MP5000
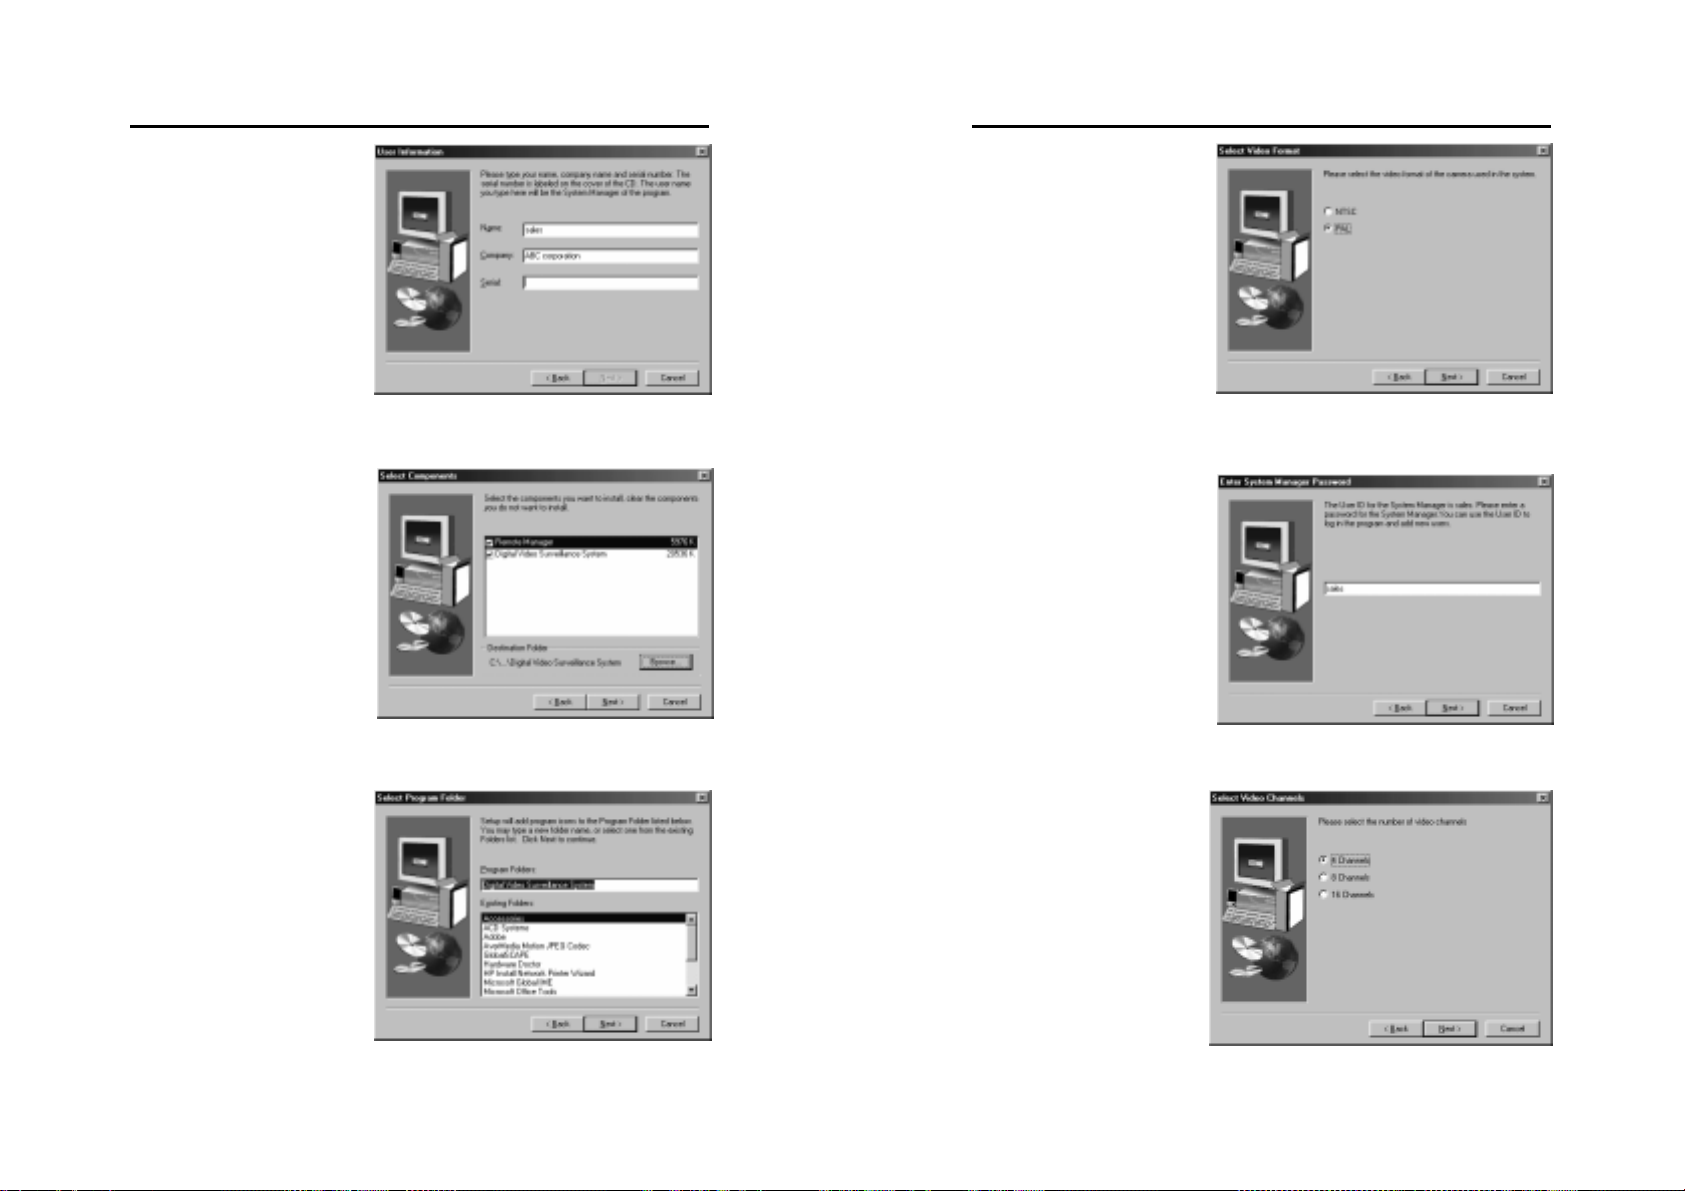
6. Enter your Name,
Company Name,
and the Serial No.
(printed on the CD
cover) and click the
Next button. The
name you enter
here will be used
as the System
Manager when
operating t h e
software.
7. Choose the
components you
need and then
designate the
destination folder
for the software to
be installed. Click
the Next button to
continue.
8. Specify the folder
name to store the
MicroJack EYES
Pro/MP2016/3000/
MP5000 program or
choose an existing
folder from the list.
Click the Next
button.
MicroJack User’s Manual
MicroJack User’s Manual
EYES Pro/MP2016/MP3000/MP5000
9. Select the video
format of the camera
used in your country.
If you don’t know the
correct format,
contact your local
camera supplier.
Click the Next button.
10. Set a password for the
System Manager. You
need to use this
password when
entering the EYES Pro/
MP2016/MP3000/
MP5000 system. Click
the Next button to
continue. The system
then starts to install
the software.
11. Select the n u mber
of video channels
you will use on this
system and click
the Next button.
29
30
Page 20
MicroJack User’s Manual
EYES Pro/MP2016/MP3000/MP5000
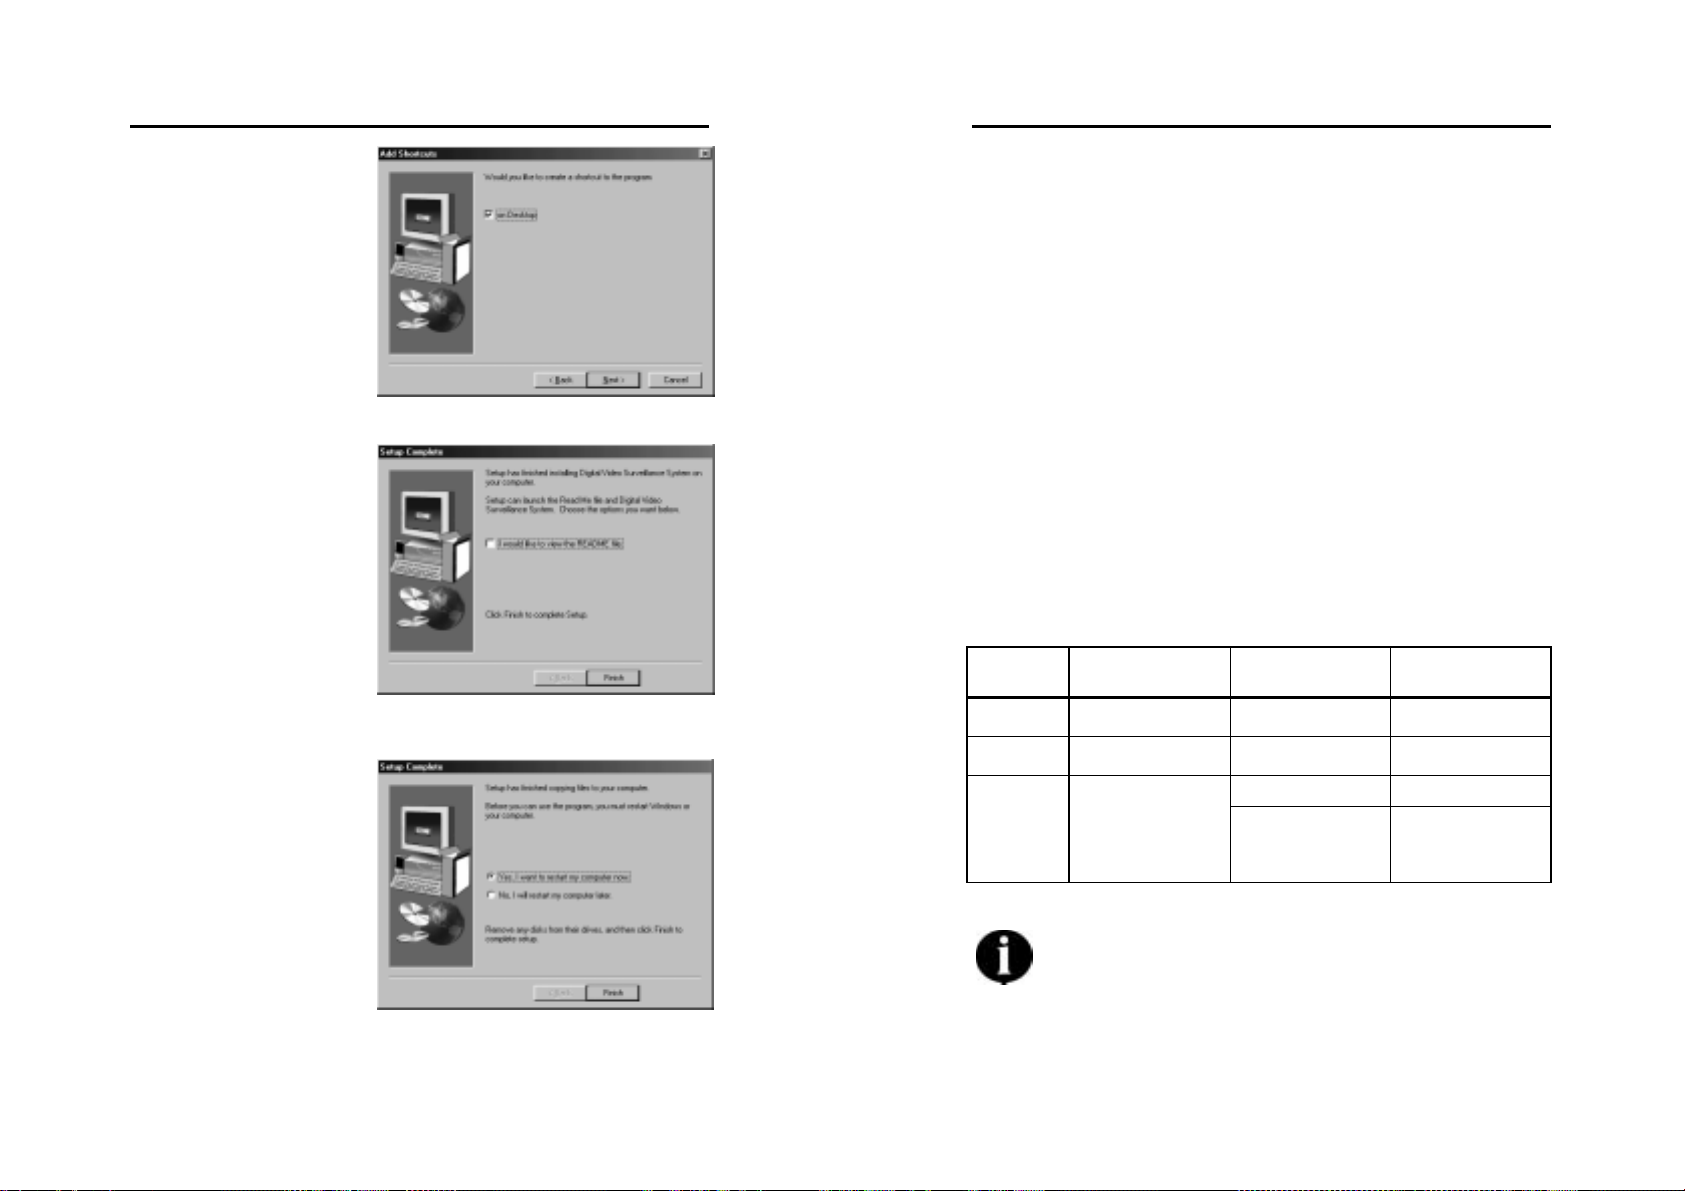
12. After the installation
finishes, you can
choose to create a
shortcut of EYES
Pro/MP2016/
MP3000/MP5000
program and click
the Next button.
13. Before you exit the
setup program, you
can choose to view
the README file.
After you click the
Finish button, a
text file will show
up.
14. Choose whether
you like to restart
your computer now
or later and click
the Finish button
to complete the
installation.
MicroJack User’s Manual
EYES Pro/MP2016/MP3000/MP5000
3.2 Product Update
Contact your distributor s to ob tain the latest software of MicroJack EYES
Pro/MP2016/MP300 0/MP5000 system. After you successfully downloa d
the file, follow the procedur es below to upd ate yo ur so ftware.
1. First you need to remove the older-version software from your
computer. Go to Control Panel and double-click on Add/Remove
Programs. Select “Uninstall Digital Video Surveillance
System” and click the Add/Remove button. You will need to
reboot the system afterwards.
2. Update your new MicroJack software. Refer to section 3.1 –
Software Installation. It is unnecessary to update a new driver
manually because the system will execute the procedure
automatically during installation.
If your MP3000 series video card driver is beyond version 3.5, notice
that the innovation on hardware in V 3.5 has restrained you to update
the entire services, which is described as follows:
Product Present H/W
MP 3004 1 card 1 card
MP 3008 2 cards 1 card 4 chs
2 sets of
MP 3016
After finishing updating, select the desired channel numbers
and disable the unselected channels for keeping the efficiency
of the system while reinstalling vid eo c ard dr iver.
1 card w/ 1
extended card
Update Solution
H/W
1 card
1 card w/ 1
extended card
Update Solution
S/W
4 chs
4 chs
8 chs
31
32
Page 21
MicroJack User’s Manual
EYES Pro/MP2016/MP3000/MP5000
3.3 Special Consideration
Defrag Your Hard Disk
Files on your hard disk will unavoidably become fragmented.
Fragmentation occurs when the operating system must split files into
parts and fit each part into different free segment of the hard disk to
make full use of the hard disk space. If files on your hard disk become
excessively fragmented, your system would have to work very hard to
maintain all the necessary information about the files locations. This
results in slow and bogged-down performance and it gets more and
more seri ous as the time goes on . Therefore, it is recommended tha t
you regularly run a defragment utility pro gram on your hard disk such
as Windows Disk Defragmenter especially before you start saving
recorded videos to the har d d isk .
MicroJack User’s Manual
EYES Pro/MP2016/MP3000/MP5000
Chapter 4 System Configuration and
Operation
Before you start running the EYES Pro/MP2016/MP3000/
MP5000 system, please set your monitor resolution to
1024 x 768 and the color to 16-bit true color or above.
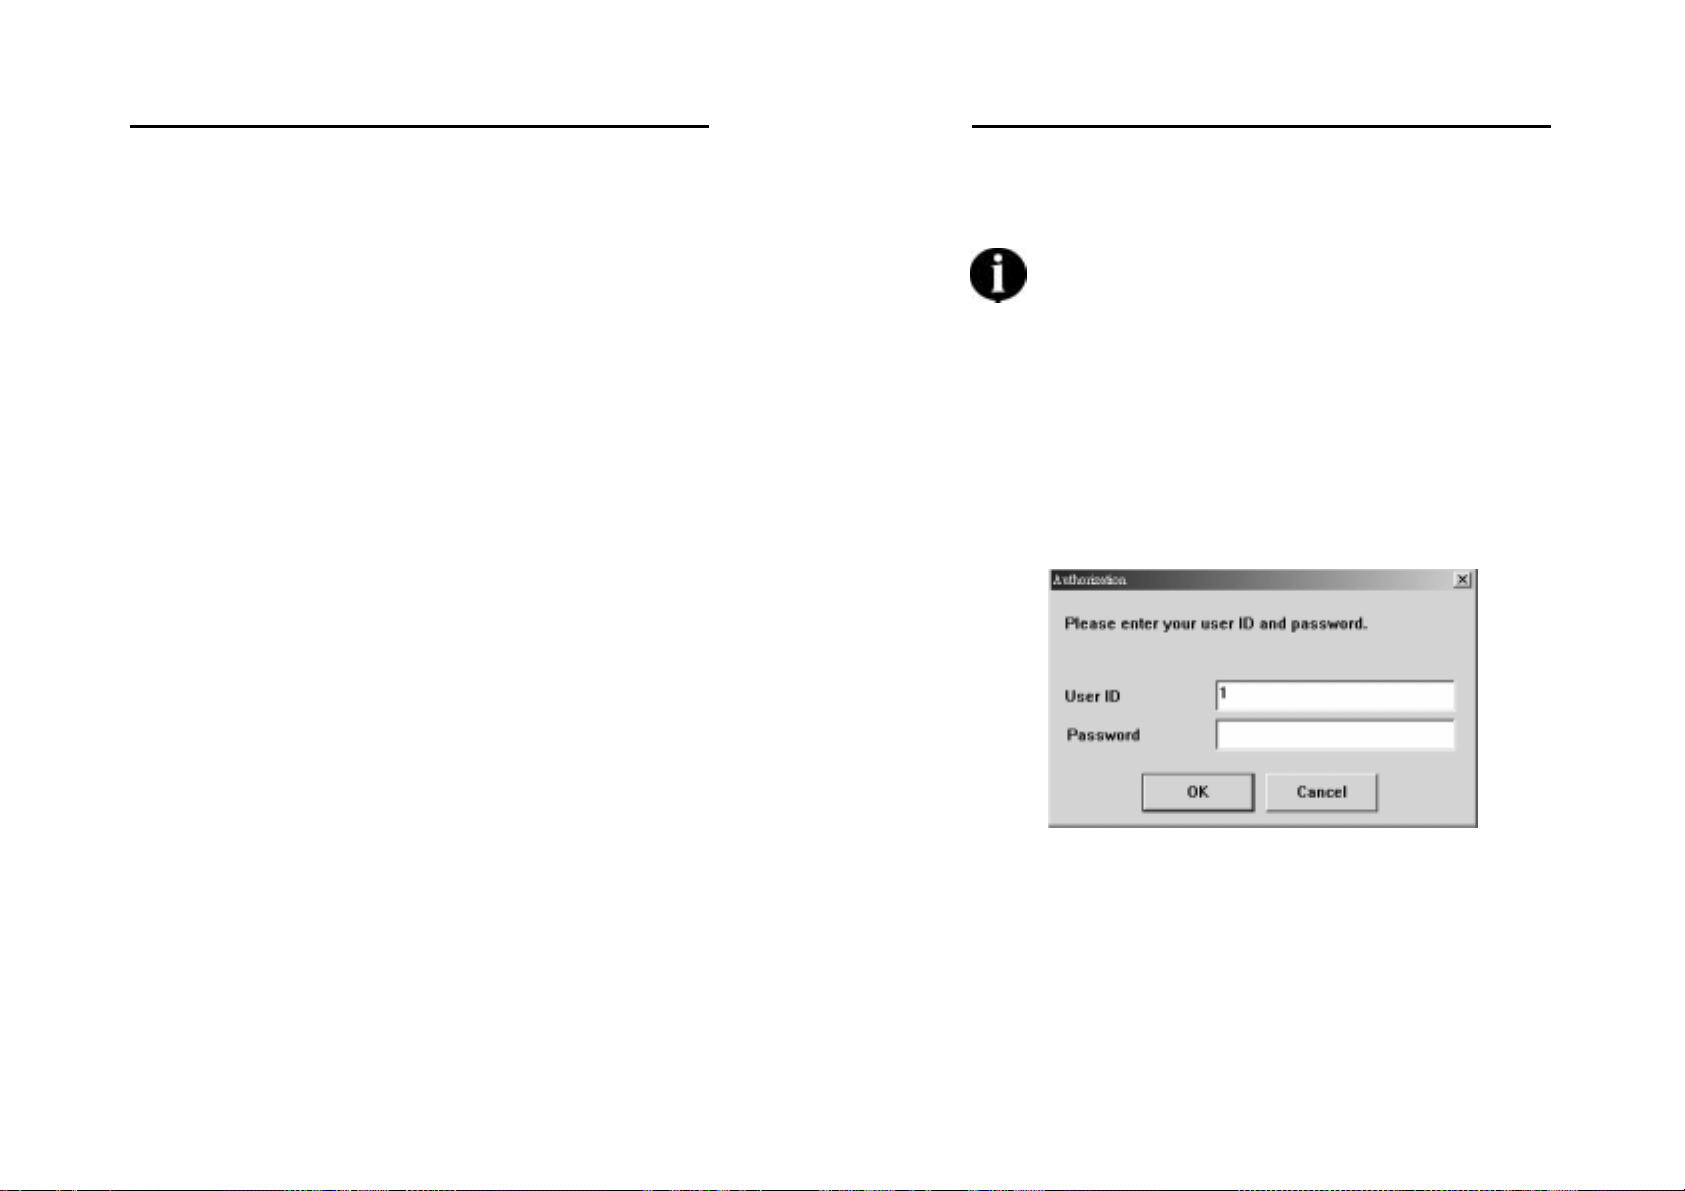
4.1 System Configuration
When you first start up the MicroJack EYES Pro/MP2016/MP3000/
MP5000, the system will reque st you to enter user ID and passwo rd to
login surveillance system. Key in the user name and password you
entered during the EYES Pro/MP2016/MP3000/MP5000
installation.
Upon the success of authentication, you will see the following main
screen of EYES Pro/MP2016/MP3000 /MP5000 Digital Video Surveillance
System.
33
34
Page 22
MicroJack User’s Manual
a
/
op
u
o
a
oad
/
o
o
a
/
op
o
o
g
a
/
op
ud
o
o
d
g
EYES Pro/MP2016/MP3000/MP5000
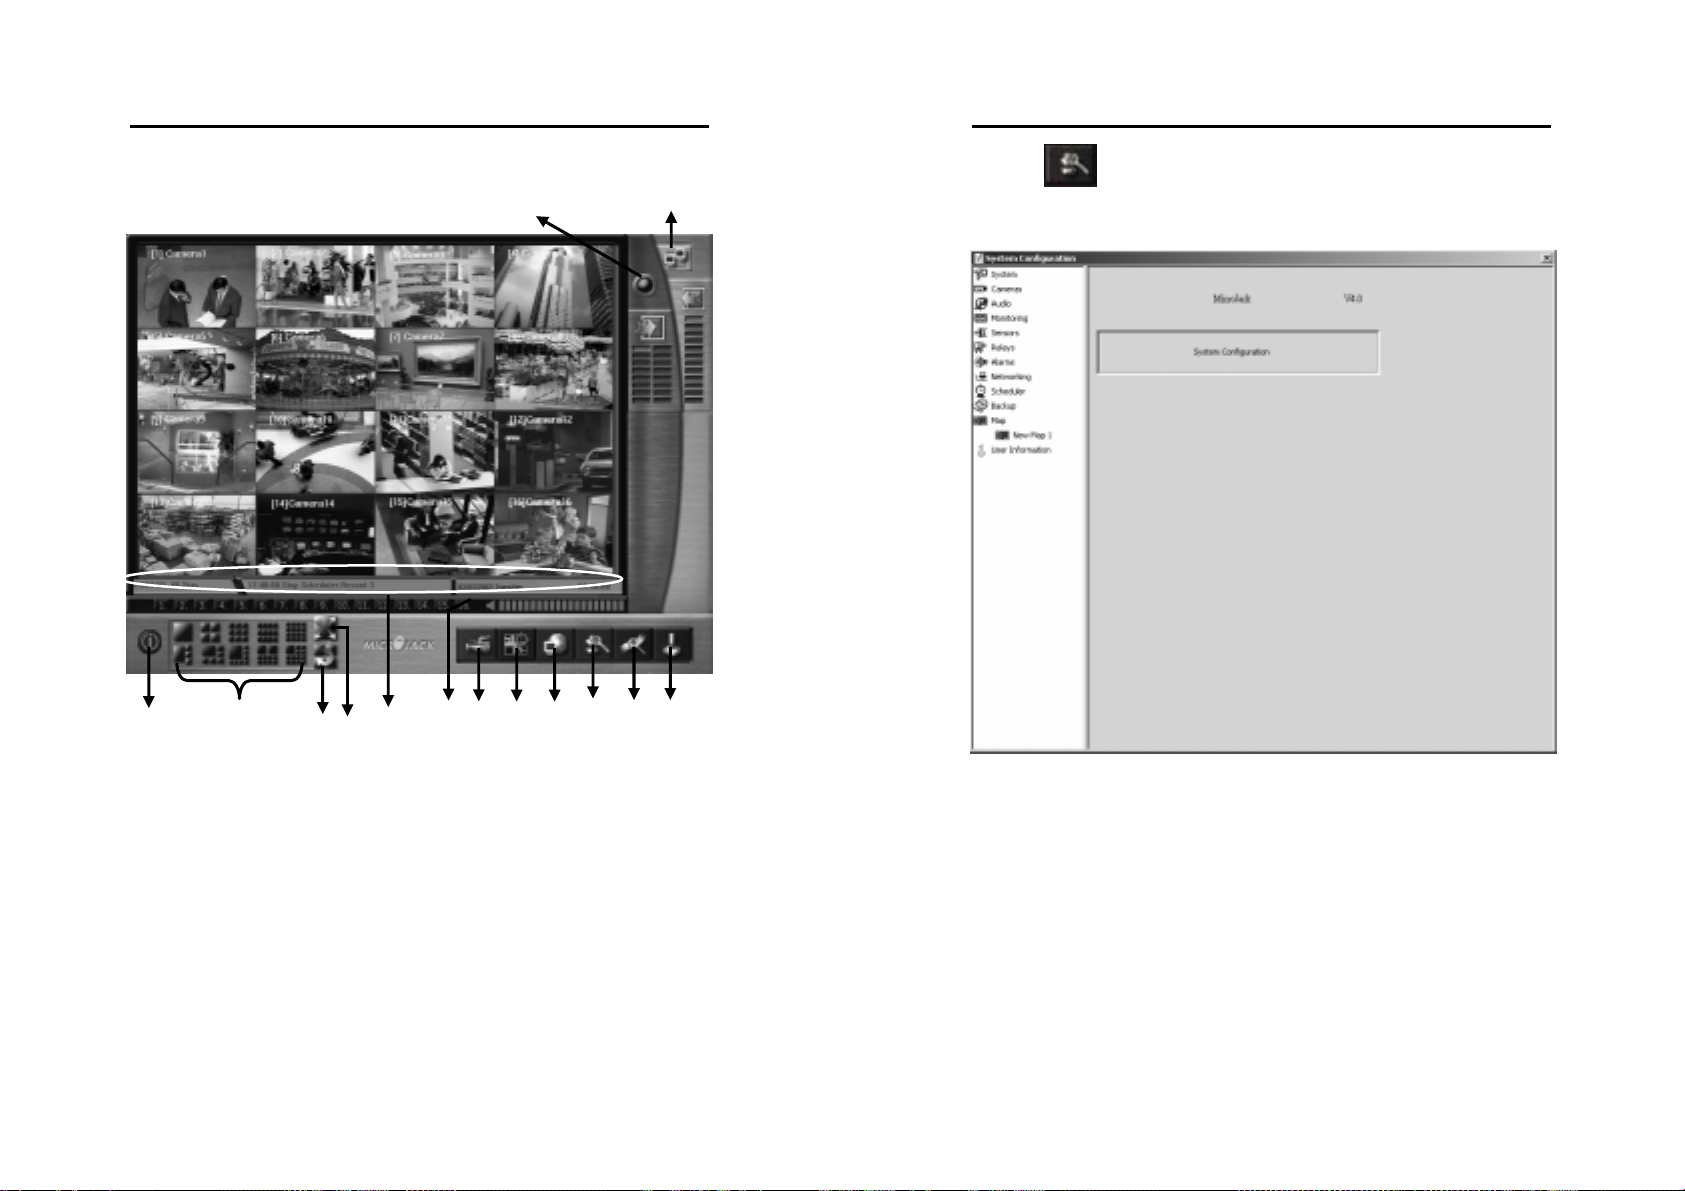
EYES Pro/MP2016/MP3000/MP5000 Main Screen
Alarm & Relay Status
Network Status
MicroJack User’s Manual
EYES Pro/MP2016/MP3000/MP5000
Click the System Configuration button to enter the
configuration dialog. You need to first set up your surveillance system
before you start using it.
Exit / Login
Split Screen Display
St
Status Bar (Hard
Disk/Network/Date &Time)
Full Screen
rt
St
A
t
Sc
n
St
rt
St
A
i
Rec
r
St
rt
St
M
nit
rin
E-Map
L
Cl
se Netw
rk Server
System Configuration
Log Viewer
PTZ Controller
After entering the System Configuration page, you can set up the
system, cameras, audio, monitoring, sensors, relays, alarms,
networking, scheduler, backup, e-map, and user information.
in
35
36
Page 23
MicroJack User’s Manual
EYES Pro/MP2016/MP3000/MP5000
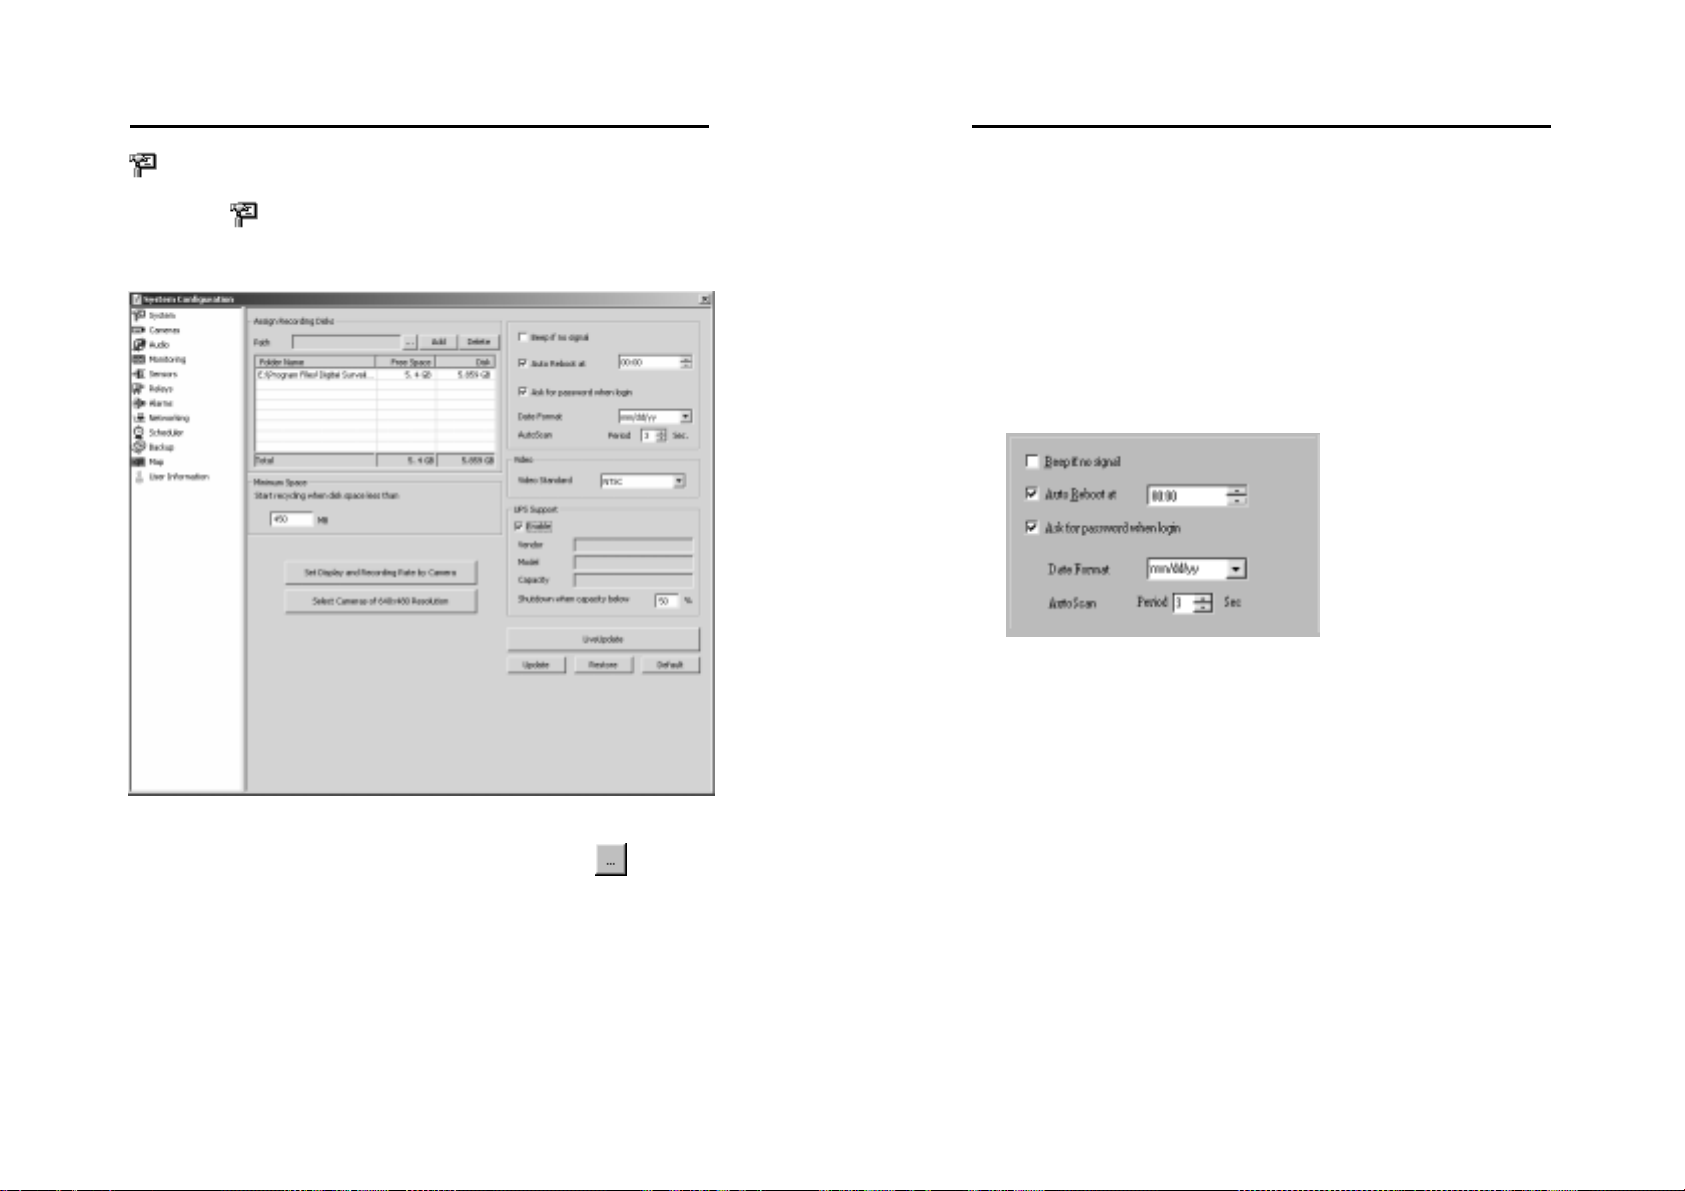
System
Clicking on
System brings you to the following dialog box for
system information. Here you need to provide some basic information
for the monitoring and recording operation.
MicroJack User’s Manual
EYES Pro/MP2016/MP3000/MP5000
2. Minimum Space
Next you need to provide the minimum space for hard disk
recycling. During hard disk recycling, the new ly recorded files will
overwrite the old ones. This way the system will not run out of
hard disk space to save the recorded videos.
The system will start hard disk rec ycling when the hard disk free
space is less than a user-defined number. The user-defined
number has to be greater than 450MB, the system defaults to
450MB.
3. Miscellaneous
Beep if no signal:
Check this box to have the system start beeping whenever a video
loss from a camera occurs.
1. Assign Recording Disks
First you need to assign the recording disks. Click
to browse
for the folder to save the recorded videos and click the Add button.
You can click the Delete button to remove any of the recording
disks, as long as there is at least 1 disk left to save the recording
data.
37
Auto Reboot:
For better system performance and stability, it is recommended for
you to check the Auto Reboot box and the system will reboot
everyday at a user-defined hour that least interferes with your
surveillance operation.
Ask for password when login:
Check this box to enable the password protection when users login
the surveillance system.
Date Format:
Here you can choose to show the date information in the ord er of
mm/dd/yy, yy/mm/dd, or dd/mm/yy.
38
Page 24
MicroJack User’s Manual
,2,3,
,10,11,
,7,11,
,
EYES Pro/MP2016/MP3000/MP5000
AutoScan:
This function allows you to view each camera image in numerical
sequence under 1-Cam Display mode. Check AutoScan to enable
this function and define the scan interval from 1 to 60 seconds
(defaults 3 seconds). When in this function is enabled, you need to
return to the main menu and click
to start the AutoScan
function. During AutoScan, you can click
Focus Camera to jump to any camera. To stop the AutoScan
function, click
again.
4. Video
For Video Standard, you need to choose from NTSC and PAL
according to the system you are using.
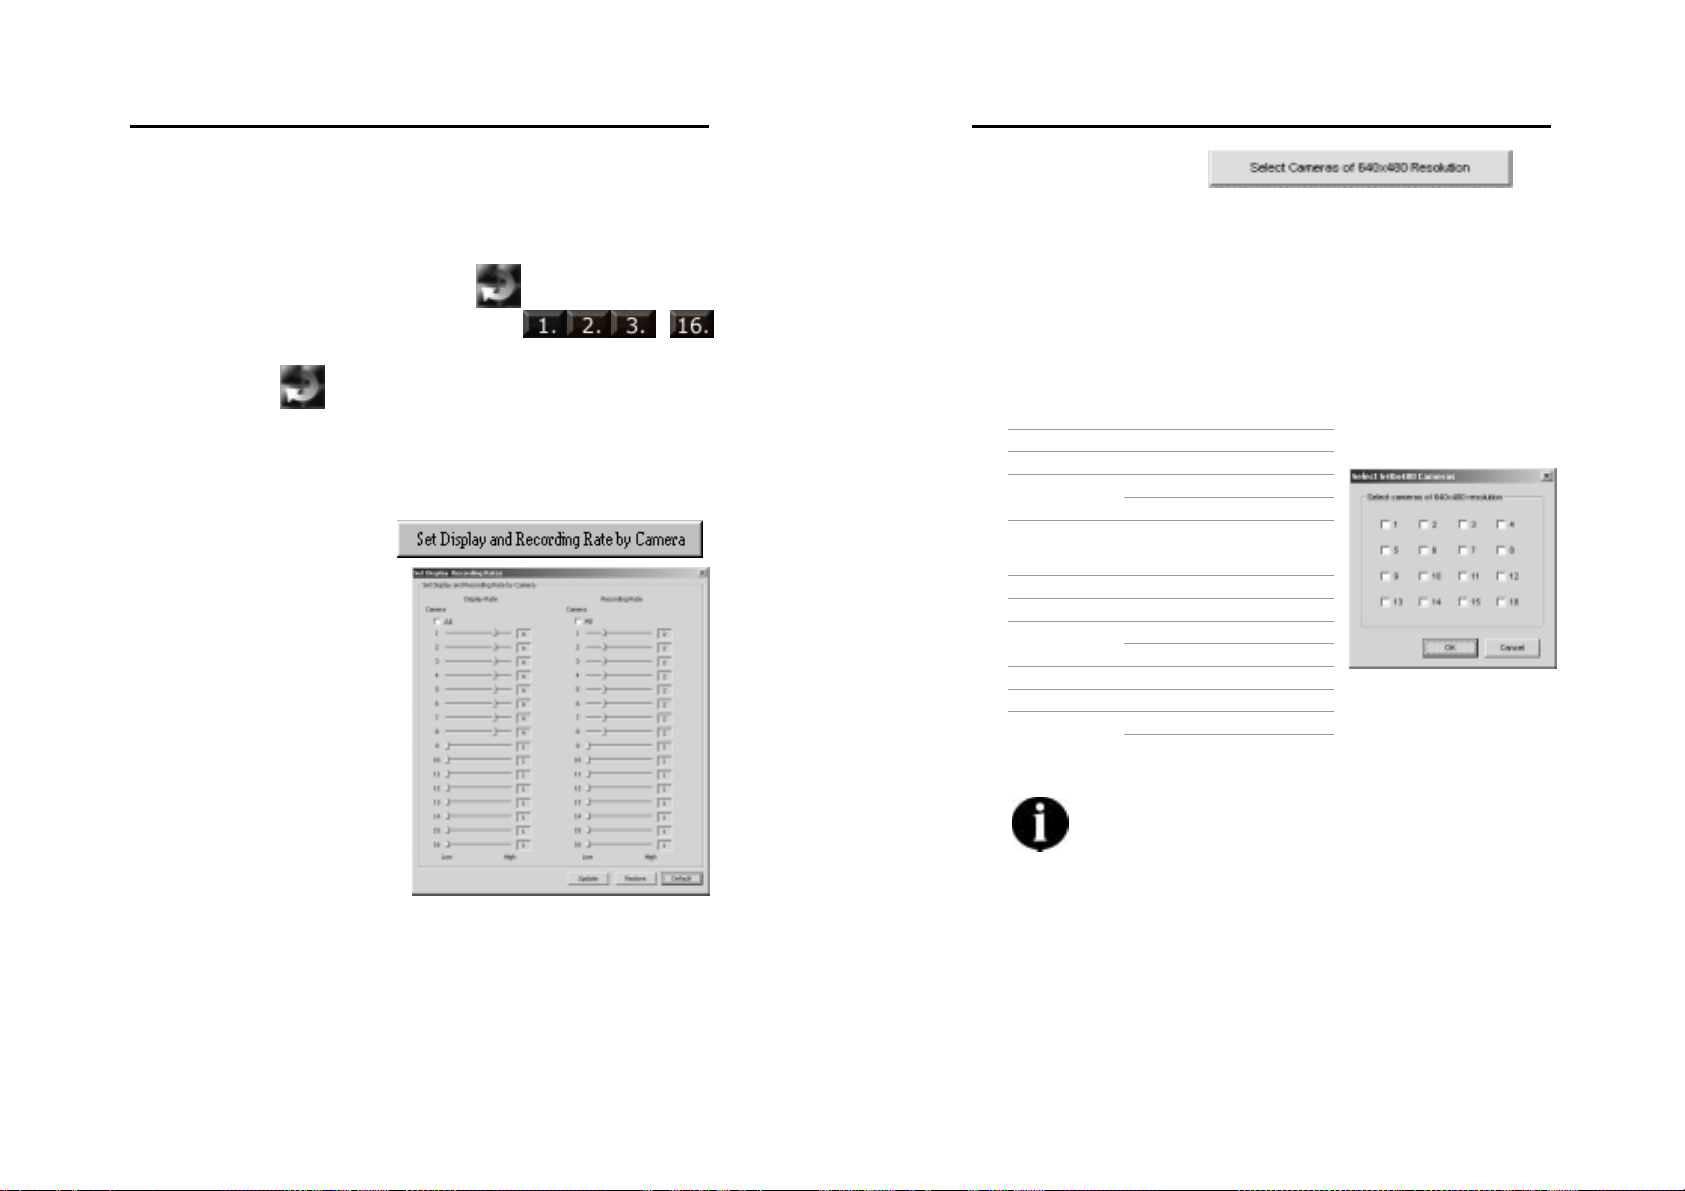
5. Display & Recording Rate
With this button you can set
display and recording rate
by camera. You will see the
following dialog box when
you click this button. There
are 5 levels of display and
recording rate. Drag the
bar to adjust the display/
recording rate for each
camera.
In case All is checked, you will see that while you’re adjusting the
rate for one camera, the rate of other cameras will be adjusted at
the same time. Cameras that are adjusted together use the same
video chip on the video capture card.
…
MicroJack User’s Manual
EYES Pro/MP2016/MP3000/MP5000
6. 640 x 480 Resolution
The utility provides your particular demand on the better 640 x
480 resolution for the specific cameras. For EYES Pro/MP2016/
MP3000, you can check the cameras to perform the better
resolution by clicking this button. Note that the cameras are
arranged to be sets according to the same video chip on the video
capture card. For MP5000, you can set all cameras randomly to
perform 640 x 480 resolution. The arranged camera sets are liste d
as follows:
Product Camera Sets
4 EYES Pro 1
4
8 EYES Pro 1,2,3,4 5,6,7,8
16 EYES Pro
MP2016
1,2,3,4 5,6,7,8
9
12 13,14,15,16
1,2,3,4,5,6,7,8,9,10,11,
12,13,14,15,16
MP3004 1, 2, 3, 4
MP3008 1,5 2,6 3,7 4,8
MP3016
1,5,9,13 2,6,10,14
15 4,8,12,16
3
MP5004 1 2 3 4
MP5008 1, 2, 3, 4, 5, 6, 7, 8
MP5016
1,9 2,10 3,11 4,12
5,13
14 7,15 8,16
6
That too many cameras were selected to be 640 x 480
resolution will result in overloading for system. For the
further information please refer to our website contact
your distribution.
7. UPS (Uninterruptible Power Supply)
It enhances the security for system to warn administrators and
users if AC power fails and proceeds with system shutdown before
the end of battery backup power is reached. The UPS device should
be connected to your computer (refer to your UPS user’s guide)
before the presetting of this task .
39
40
Page 25

MicroJack User’s Manual
EYES Pro/MP2016/MP3000/MP5000
A. Check Enable to activate UPS meanwhile the Vendor as well as
Model of your UPS will show up in the individual boxes if your
UPS is completely connected to.
B. Determine a limited value for capacity to shutdown your
computer. The value is ranged between 10 and 90%. It is
unavailable to be set lower than 10% or higher than 90%.
UPS application must meet Window NT or above. Windows
2000 or Windows XP are recommended.
8. Update
Cameras
Double-click
configure.
MicroJack User’s Manual
EYES Pro/MP2016/MP3000/MP5000
Cameras and choose the camera you want to
Whenever the above settings are modified, click
update.
10. Restore
Click
restore your last settings.
11. Default
Click
to abort all the changes you made so far and
to change all values to their default settings.
to
1. Camera ID
In the No. field, you can see the c amera numb er you p ick o ut fr om
the left list.
2. Card No. / Port No.:
This section indicates the card number and the BNC connector
number that this camera is connected to. It is configured by the
system automatically and you cannot change otherwise.
41
42
Page 26

MicroJack User’s Manual
g
EYES Pro/MP2016/MP3000/MP5000
3. Enable
Check Enable to enable this camera for
Figure 1.
Gray-scale image
monitoring. If a camera is not enabled,
the image from this camera will show as
Figure 1 (gray scal e) on th e screen . Th i s
camera’s sign in the menu will change to
.
If a camera input is not physically connected to a camera, you
need to de-select Enable, or the system will not reach its best
performance.
4. Camera
Display:
Check Display to display the image from
this camera on the screen. If you check
Figure 2.
Color ima
e
Enable without checking Display, the
image from this camera will show as
Figure 2 (color) on the screen. Although
the image is not shown on the screen,
this camera is still performing Record
When Motion Detected, Record
When Start Monitoring, or Don’t
Record, depending on which one you
chose in the
Monitoring section of
the System Configuration.
Name:
In the Name field, you can set the name for the camera.
Comment:
This field allows you to add any remarks you have for this camera.
Any comment left can serve as a reminder for system manager.
Image Properties:
You may set the following properties for the image of this camera.
brightness contrast color saturation
MicroJack User’s Manual
EYES Pro/MP2016/MP3000/MP5000
Settings for the image properties are configured fo r the designate d
card, which may also connect to other cameras. That means, the
settings you make for this camera will apply to other cameras that
connect to the same card.
The adjustment of image properties will result in
inefficiency as the video format is set to be PAL for the
unsupported hardware temporarily
5. PTZ Camera
PTZ Camera Setup
A. Select a Com Port where PTZ camera connector co nnected and
the PTZ Model you use (refer to your PTZ camera spec.) by the
pull-down lists. And click Set to place your setting.
B. To control PTZ camera with server’s camera by entering PTZ
Camera ID at the range of 2~22 5.
Preset Position Setup
A. Choose a position number by the pull-down list to set the
monitoring position with the right side direction interface.
Meanwhile the display you adjust will be shown on the upside.
B. Determine a Position Name for the position.
C. During AutoPan, Dwell determines the time for the camera to
stay (1~60 seconds) at one position before rotating to the next
position.
D. You can set the Speed (5~255 deg/s) with which the camera
rotates from its current position to the nex t pr e set po sition.
E. Click Set to involve into the setting.
6. Update
Click this button to update the setting.
7. Restore
Click this button to abort all the changes you made so far and
restore your last settings.
8. Default
Click this button to change all values to their default se ttings .
43
44
Page 27

Audio
MicroJack User’s Manual
EYES Pro/MP2016/MP3000/MP5000
MicroJack User’s Manual
EYES Pro/MP2016/MP3000/MP5000
2. Detection Sensitivity
Click Audio to enter the audio page as below.
1. Enable
You can click
as a reference when adjusting the se nsitivity. The system defaults
the sensitivity to 30%.
3. Properties
You can set the length of time for the system to continue recording
the audio once activated. The s ystem defaults to 5 seconds . The
length of time you set determines the size of the .WAV file. (1
second long roughly takes up 8 K of space.) The .WAV file format is
PCM 8KHz, 16bit, mono. To playback the audi o files, you need
to go to
4. Update
Click this button to update the setting.
5. Restore
Click
restore your last settings.
6. Default
Click
to test the volume of your current environment
Log Viewer.
to abort all the changes you made so far and
to change all values to their default settings.
Check here to enable the automatic sound detection. The system
will start recording upon detected volume greater than the
sensitivity you set. Note that this function only works while
the system is recording videos.
45
46
Page 28

MicroJack User’s Manual
EYES Pro/MP2016/MP3000/MP5000
Monitoring
In this section you can configure how the cameras perform
monitoring/recording and the related properties. Double-click on
Monitoring and choose the camera you want to configure.
MicroJack User’s Manual
EYES Pro/MP2016/MP3000/MP5000
Beep upon detected motion:
By checking Beep upon detected motion, you can enable the
alarm to start beeping once motion detected. You can do an
instant test it by clicking
and the following two signs
represent different situations.
: Motion detected in the detecting area
: No motion detected in the detecting area
2. Recording
You can choose the suitable recording mode among these three:
Record when start monitoring:
The system starts recording once the monitoring starts.
Record when motion detected:
The system starts recording on l y when mot ion is det ect ed, and
continues recording for 1~120 (user-defined) seconds after the
motion stops. The user-defined le ngth of time (d efault to 1 seco nd)
is set in the Stop recording after sec. section.)
Don’t record:
The system doesn’t record no matter what happ e ns.
1. Motion Detection
Sensitivity:
In this area, you can adjust the motion detec tion sensitivity fr om 0
to 100 (system default: 70). The highe r the value is, the better the
sensitivity the system can detect.
Record with Time Stamp:
You can also add time information on the recorded video by
checking Record with time stamp and choose the color of the
time display.
47
3. Quality
This section allows you to choose the compressed program and
adjust the image quality from 0 to 100 (default 50 ). The highe r the
value is, the lower the compression ratio gets, and the larger disk
space is required. You can also decide the recorded file size
by changing the compression ratio. If you select Fast
Recording with MJEPG format (lower compression ratio), the
system record faster, and therefore, the file size is bigger. On the
contrary, if you select High Compression Ratio with MPEG4, the
recorded file size will be smaller for they are highly co mpr essed.
48
Page 29

MicroJack User’s Manual
EYES Pro/MP2016/MP3000/MP5000
4. Motion Detection Mask
Mask
Mask a specific area to leave the rest area for the motion detection.
A. First check Mask in the Enable field to edit the mask area.
B. Check Show Mask to make masked area visible.
C. To add or cut any masked areas, simply click
Add or Cut, an d
then draw the area you want to add to or cut from the masked
area. To clear all masked areas, click Clear. And click Invert
to invert the masked areas into unmasked ones and vise versa.
D. Choose a mask color out of from red, green, and blue.
Shield
To e n a b le Shield provides you to protect so me private areas fr om
the entire surveillance contro l into a black shie ld, ex: a fitting r oom
in a department store.
A. First check Shield in the Enable field to edit the shield area.
B. Refer to Mask step C.
5. Edit
Click on either the radio button for mask or shield to spe cify the
working ar e a by Add/ Cut/ Invert/ Clear in Motion Detection
Mask field.
MicroJack User’s Manual
EYES Pro/MP2016/MP3000/MP5000
Sensors
Double-click on
Right-click the mouse on
Sensors to list the sensors already been configured.
Sensors to add a new sensor. Click
any desired sensor to enter the setup scr e e n of that sens or.
6. Update
Click this button to update the setting.
7. Restore
Click this button to abort all the changes you made so far and
restore your last settings.
8. Default
Click this button to change all values to their default se ttings .
9.
Start/ Stop Monitoring
After the settings are placed comple te ly, click on the button
activate the functions above when you are back to the main screen.
to
49
1. Sensor ID
In the No. field, you can see the sensor number. In the Name field,
you can set the name for the sensor.
2. Content
Since each card can connect to one external I/O Box, and each I/O
box supports 4 sensor inputs, yo u can easily determine the Card
No. and Input No. as to where this sensor is connected. In the
Comment field you can add any remarks you have for this sensor.
Any comment left can serve as a reminder for the system manager.
50
Page 30

MicroJack User’s Manual
EYES Pro/MP2016/MP3000/MP5000
3. Test
You can test the sensor immediately after you install it. Click
, and if the test area turns red , it indicates the sensor is
Closed/ON. If it turns green, it indicates the sens or is Open/Off.
4. Enable
Check Enable box to activate the previous setting .
5. Update
Click this button to update the setting.
6. Restore
Click Restore to abort all the changes you made so far and restore
your last settings.
Relays
Double-click on
Right-click the mouse on
Relays to list the relays already been configured.
Relays to add a new relay. Click any
desired relay to enter the setup screen of that relay.
MicroJack User’s Manual
EYES Pro/MP2016/MP3000/MP5000
1. Relay ID
In the No. field, you can see the relay number. In the Name field,
you can set the name for the relay.
2. Content
Since each card can connect to one External I/O Box, and each box
supports 3 relay outputs, you can eas ily determine the Card No.
and Output No. as to w here this r e lay is connec te d.
In the Comment field you can add any remarks you have for this
relay. Any comment you left can serve as a reminder for the
system manager.
3. Test
You can test the relay immediately after you install it. Click
, and if the test area turns red, it indicates the relay is
ON/HIGH and generates an output signal. If it turns green, it
indicates the relay is OFF/LOW.
4. Enable
Check Enable box to activate the previous setting .
5. Update
Click this button to update the setting.
6. Restore
Click
to abort all the changes you made so far and
restore your last settings.
After the sensors and relays are co nfigured, you can go to
Alarm
to create alarms that will alert you when specifie d events take p lace.
51
52
Page 31
MicroJack User’s Manual
EYES Pro/MP2016/MP3000/MP5000
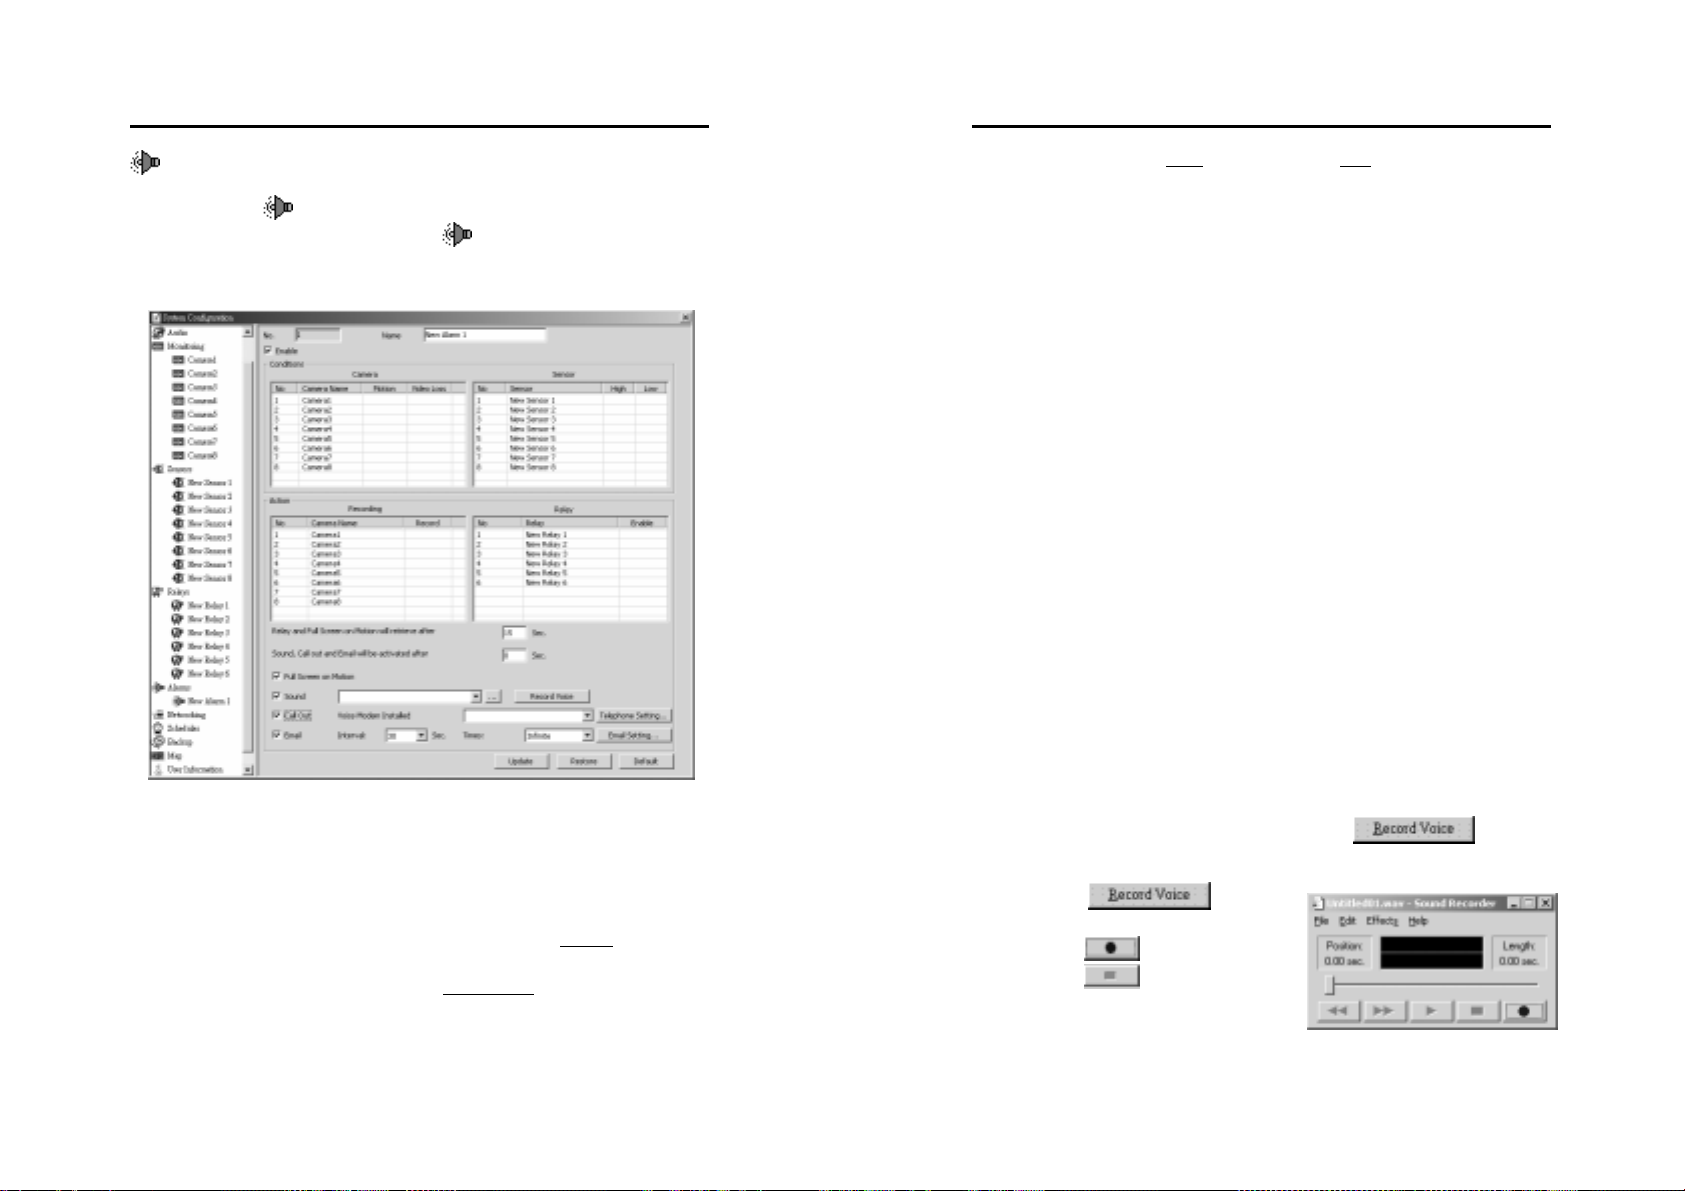
Alarms
Double-click on
You may right-click the mouse on
Alarm to list the alarm already been configured.
Alarm to add a new alarm
up to 64 alarms. Click any desired alarm to enter the setup screen of
that alarm.
MicroJack User’s Manual
EYES Pro/MP2016/MP3000/MP5000
For sensors, select High (Closed/ON) or Low (Open/OFF) to be the
event condition. Note that for the alarm to be triggered, both
event conditions for the camera and the sensor have to be
met.
3. Action
Recording & Relay Output:
To set actions, check the Recording column of the desired camera
to start recording, and check the Enabled column of the desired
relay to generate outputs when both the event conditions for
cameras and sensors are met.
Relay and Full Screen on Motion retrieve
After an input is triggere d, the output of relay and full screen on
motion will revert to normal status after the time you set.
Sound, Call out and Email will be activated
The output ways you designate after an alarm is generated offer
you to decide the deferment once an alarm is trig ge r ed .
Full Screen on Motion:
During surveillance, you ca n have the system to instantly pop up
the image (1-camera display mode) that has motion detected for a
user-defined length of time.
1. Alarm ID
In the No. field, yo u can see th e ala rm numb er. Also, you c an set
up the alarm name in the Name field.
2. Conditions
To set the event condition for cameras, check Motion
field of the
desired cameras to make their detected motion as an event to
trigger the alarm. And check Video Loss
field of the desired
cameras to make their weak signal or video loss as events to
trigger the alarm.
53
Sound Alarm:
Check Sound to play a .WAV file when an alarm is triggered. You
can assign the path of a specific .WAV file for the system play, or
you can record a new .WAV file by clicking
. To do so,
follow the steps below:
A. Click
and the
recording utility pops up.
B. Click
C. Click
to start recording.
to stop recording.
D. Save it as the .wav file.
54
Page 32

MicroJack User’s Manual
EYES Pro/MP2016/MP3000/MP5000
Call Out:
If you have a voice modem installed, you can make the sy stem to
call out to landline/mobile phone or pag er (maximum 5 sets in total)
once an alarm is triggered. Follow the following instructions.
A. Check Call Out to enable this function.
B. Select a corr ect model for your voice modem from the drop -
down menu of Voice Modem Installed.
C. Click
to bring up the dialog bo x below to set
up the telephone information. Here you should follow the
steps described below to set the landline/mobile phone or the
pager number.
MicroJack User’s Manual
EYES Pro/MP2016/MP3000/MP5000
clicking . After you complete the pager
or phone information, click
to add this
number to the table.
c. Select Dial next line if busy or Dial All. In the
former case, the system will dial the next number
when the current one is busy. But if the call enters
the voice mail of the mobile phone or gets picked up
by an answering machine, the system will act as if the
call-out is completed and won’t dial the next line.
Therefore, it is recommended for you to select the
latter one, in which case the system will dial all
numbers and send the warning message.
d. The
/ buttons allow you to
update/delete a pager or a landline/mobile phone
number. To update, you need to first select the target
Email:
number, key in the updated information, and then
click
number and click
. To delete, simply select the target
.
You can email alarm messages once an alarm is triggered. Follow
the instructions below.
A. Check Email to enable this function.
B. Se t the inte rval period and time to send the emergency e-mail.
a. Select Pager or Phone.
b. Key in the numbers for the landline/mobile phone or
C. Click
up the email information.
to bring up the dialog box below to set
the pager, whichever you selected in step a. If you’re
setting up a pager info., you can compose a text
message you wish to send to a pager by using
numbers, *, and # in the Message field. If you’re
setting up a phone info., you can browse for a .WAV
file by clicking
or create a new .WAV file by
55
56
Page 33

MicroJack User’s Manual
EYES Pro/MP2016/MP3000/MP5000
MicroJack User’s Manual
EYES Pro/MP2016/MP3000/MP5000
Networking
Provide information for each field.
• SMTP Server: The domain name of your mail server or IP
address. (eg. microjack.com.tw)
• From: The sender’s email address.
• To: The receiver’s email address. Use “;” (semicolon) to
separate each email address.
• Cc: The email addr ess to which you want to send a copy.
• Subjec t: The sub ject of this alar m mes sa ge.
• Alarm Message: The content of this email message.
D. You can click
4. Restore
Click
restore your last settings.
to clear all the inputs. Click
to save the email settings or click
to exit the dialog box without saving.
to abort all the changes you made so far and
Click
1. General
Networking to enter the networking setup page.
Server IP:
In this filed, enter the IP address of the server for remote clients to
access. Or you can choose from the drop-down menu where lists
all the available IP for your computer.
Event Log:
This file, “history.log” keeps a record of all IP addresses of the
client’s computer during a remote transmission. You can click
to change it’s location.
57
58
Page 34

MicroJack User’s Manual
EYES Pro/MP2016/MP3000/MP5000
2. Transmitting Cameras
Here you can select cameras allowed for remote monitoring.
3. Enable WebCam Server
Check here to enable WebCam Server for remote monitoring.
Port:
Set the port no. (default 80) for remote transmiss ion.
Ask for password when remote clients login:
Check here if you need remote clients to pro vide passwords when
they login the WebCam server.
Web Root:
In this field, you need to browse for the path where the WebCam
home page is stored. When the remote client login the WebCam
server, it will link to the WebCam home page from this path.
MicroJack User’s Manual
EYES Pro/MP2016/MP3000/MP5000
5. Dynamic DNS
In case a dynamic server is severed, please register a domain
name with the IP address: ddns.dss.com.tw on line. Refer to
Appendix B for the further information.
Domain Name & Password
Enter the domain name and password given in the process of
registering a domain name or obtain them by asking network
administrator.
6. Update
Whenever the above settings are modified, click
update.
7. Restore
to
The WebCam server doesn’t work under servers with IIS
(Internet Information Servic e ) installed.
4. Enable Remote View server (Multicast server) via TCP/IP
If you want to transmit images for remote surveillance via TCP/IP,
first check the checkbox to enable this func tion. Determine a port
in Port box to connect client to a server with TCP port (default
9090). In addition, a fir ewall NAT function should be configured to
enable the mutual transmission.
The following is the detailed illustration to co nfigure the connection:
59
Click
restore your last settings.
8. Default
Click
60
to abort all the changes you made so far and
to change all values to their default settings.
Page 35

MicroJack User’s Manual
EYES Pro/MP2016/MP3000/MP5000
Scheduler
Click Scheduler to enter the setup page for scheduler. You can
schedule for monitoring, recording, or enabling network server by date
or by weekday. Depending on your needs, after you set all the
schedules, you can only enable the ones you currently need and disable
the rest, which might be used later.
MicroJack User’s Manual
EYES Pro/MP2016/MP3000/MP5000
2. Schedule Recording
You can choose to set the schedule by date or by weekday by
selecting By Date or By Weekday.
By Date:
If you set the schedule by date, you can key in the date directly or
choose from the drop-down menu and click
to add it to the
column. You can set multiple dates (max 60 days) for
a single task. To take off a date from the column, click on the date
you wish to delete and press [Delete] or [Backspace] on the
keyboard.
By Weekday:
If you set the schedule by weekday, directly choose any day in a
week. Multiple days for a single task are also acceptable.
1. Enable
Check this to enable a schedule. Note that you still need to click
after you enable a schedule. Enabled schedules to
monitor/record/enable netwo rk server are shown in
whereas disabled schedules are shown in
/ / .
/ / ,
61
You can only set future dates to for a schedule. Dates
in the past are not a cceptable.
3. Time
You can key in the start and ending time for the task in the
following order: hour, minute, and AM/PM. Or use the up/down
button to adjust the time. The start time must be earlier than
the ending time. That means you can’t span the time to the next
day. To schedule a task that covers more than 1 day, you need to
separate it into 2 or more schedules for the sa me task .
62
Page 36

MicroJack User’s Manual
EYES Pro/MP2016/MP3000/MP5000
4. Task
Here you can select the task you’re scheduling for.
Monitor
If you select Monitor, the system will activate this button
on the main menu when the scheduled time is due. The system
will act according to the recording mode set in the
Monitoring
section. Meanwhile, the system will also monitor the eve nt
conditions you set in the
Alarm section for the cameras and
sensors and trigger the alarm accordingly.
Record
If you select Record as the task, the system will have the chosen
cameras to start recording at the scheduled time. The task you set
here enjoys higher priority than the recording mode you set for
each camera. That means, even if you have set the camera to
Record when motion detected or Don’t record in the
Monitoring section, the camera will still start recording at the
scheduled time.
Enable Network Server
When this is selected to be the task, the system will load network
MicroJack User’s Manual
EYES Pro/MP2016/MP3000/MP5000
If the time of the schedule you set for a task overlaps with the
time of an existing schedule for the same task, the system will
give you a warning message below. In short, the time of 2
schedules for the same task cannot overlap.
5. Cameras
When you select Record to be the task, you need to select the
recording cameras here.
6. Comment
Put your remarks here as a reminder of any schedule.
7. Add
Click
to add a new schedule to the table after all the
necessary information is filled in this p age .
8. Delete
You can select any task you want to remove from the table and
click
.
9. Update
server
based on your settings in the Networking
section and start the remote monitoring for transmitting cameras.
Alarm
If Alarm box is checked, the Alarm will execute according to the
Alarm section you plan as long as the Time is due. To exercise the
prior privilege of Scheduler, the Alarm will perform by the
scheduled time even though it is not enabled in Alarm section of
System Configuration.
63
To update a schedule, select it from the table, revise the
information, and then click
to verify.
10. Restore
Click
to abor t all the changes made so far for a schedule
and restore its last settings.
64
Page 37

MicroJack User’s Manual
EYES Pro/MP2016/MP3000/MP5000
11. Table
This table lists all the schedules you have set. You can arrange the
order of the schedules by clicking d ifferent buttons.
MicroJack User’s Manual
EYES Pro/MP2016/MP3000/MP5000
Click to
view each camera’s schedules for the task Record.
Click
to view all the scheduled tasks.
Click
to view all schedules for the task Monitor.
Click
Server.
to view all schedules for the task Enable Network
65
66
Page 38

Backup
Double-click on
MicroJack User’s Manual
EYES Pro/MP2016/MP3000/MP5000
Backup to view two backup methods:
MicroJack User’s Manual
EYES Pro/MP2016/MP3000/MP5000
1. Operation
There are three ways to
backup your files:
Manual Backup and Schedule Backup. Click either to enter
the setup page for each backup method.
Manual Backup
Click
to enter the setup page for manual backup.
Move:
Simply move files from
their original folders to the destination folders you assigned in
the Location field.
Copy:
Copy files to the destination you assigne d in the Location field.
Delete all. Don’t make copies.:
Simply delete all the files and leave no copies.
2. Device
Select your backup device (CD-R or
Hard Disk/ZIP) here. If you choose
CD-R, you need to specify the size of
the CD-R, which will limit the size of
each recording folders. After finishing
the backup, run a CD-R burning
program to burn the folders into CDs
3. From/ To
Here you need to set the start and ending date/time.
4. Cameras
Select the cameras whose files you want to backup. Check
Audio to backup the recorded sound files.
5. Statistic
files and their total size.
6. Backup
Click
Click
67
68
to calculate the number of the selected
to start the manual backup.
Page 39

MicroJack User’s Manual
EYES Pro/MP2016/MP3000/MP5000
Schedule Backup
Click to enter the setup page for schedule backup. Depending on
your needs, after you set all the schedules, you can only enable the
ones you currently need and disable the rest, which might be used later.
MicroJack User’s Manual
EYES Pro/MP2016/MP3000/MP5000
You can set the schedule backup by date or by weekday by
selecting By Date or By Weekday.
By Date:
If you set the schedule backup by date, you can key in the date
directly or choose from the drop-down menu and click
to
1. Enable
Check this to enable a schedule for a backup. You still need to click
after you check to enable a schedule.
2. Schedule Backup
add it to the
(max 60 days) for a backup schedule. To take off a date
from the column, click on the date you wish to delete and press
[Delete] or [Backspace] on the keyboard.
By Weekday:
If you set the schedule backup by weekday, directly choose any
day in a week. Multiple days for a backup schedule are also
acceptable.
3. Location
You need to specify a destination here to move the backup files if
you check Move To. If you check Delete all. Don’t make
copies., the system will delete all the files and leave no copies.
4. Start Time
Set the start time of the backup schedule.
5. Files betwee n the time
Start & End:
The system will look for files of the selected cameras between
the Start and End time you set here. Adjust the time by
hour/minute and AM/PM with the up/dow n button. Note that
the start time cannot be later than the ending time. That
means you can’t span the time to the next d ay. To backup files
that cover more than 1 day, you need to separate the files into 2
or more backup schedules.
Days before schedule d da te s:
You can also backup files X days (user-defined) before the
scheduled dates you put in the Schedule Backup section.
Example:
If you schedule for 2003/03/03 and 2003/03/06, and you enter
“2” in the number of days before scheduled dates field, then the
column. You can set multi p le da tes
69
70
Page 40

MicroJack User’s Manual
EYES Pro/MP2016/MP3000/MP5000
system will backup on 2003/03 /01 and 2003/03/04. So if you
want the system to perform backup on the exact dates you
scheduled, simply input “0” as the number of days before
scheduled dates.
6. Camera
Select the cameras whose files you want to backup. Check
Audio to backup the sound files from the selected cameras.
7. Comment
Put your remarks here to serve as a reminder of a schedule.
8. Add
After all the necessary information is filled in this page, click
to add a new schedule for a certain task to the table.
All the schedules you have set will show up in the follow ing table.
9. Delete
Select the schedule you want to remove from the table and click
to delete.
10. Update
MicroJack User’s Manual
EYES Pro/MP2016/MP3000/MP5000
E-Map
Here provides a completely configured map where all cameras, sensors ,
and relays are set.
Double-click on
Right-click the m ouse on
E-Map to list the e-maps already been configured.
E-Map to add a new e-map. Click
any desired e-maps to enter the setup screen of that e-map.
Select the schedule you want to update, revise the information,
and then click
to verify the update.
11. Restore
Click
to abort all the changes made so far for a
schedule and restore its last settings.
71
1. Fir s t define the name of e-map.
2. Configure e-map
Import
If an image of m a p (bmp./jpg. forma t s are supported) has existed,
click Import button to input the image which will be shown on the
right side screen.
72
Page 41
MicroJack User’s Manual
EYES Pro/MP2016/MP3000/MP5000
Edit
If you don’t have an image of map in hand or need to modify the
image, click Edit button to bring out the bmp. or jpg. programs to
create an one or revise it.
3. Arrange Cameras, Sensors, and Relays
To add a new event, drag the button of Camera, Sensor, or Relay in
the left side field and drop in the desired position of the map. The
buttons not be set up will be disabled. The chosen butto ns will be
disabled. To delete, drag and drop it in any positions out of the map.
Whichever camera you click on, the monitoring status of which will
be displayed in the left bottom field.
4. Information
Put in some information for each event to be reference during
operation. Each edit box is limited in 32 bytes.
5. Click Update button to save your current setup.
6. Click Restore button to recover the previous setup.
7. Click Default button to change the setup to default settings.
MicroJack User’s Manual
EYES Pro/MP2016/MP3000/MP5000
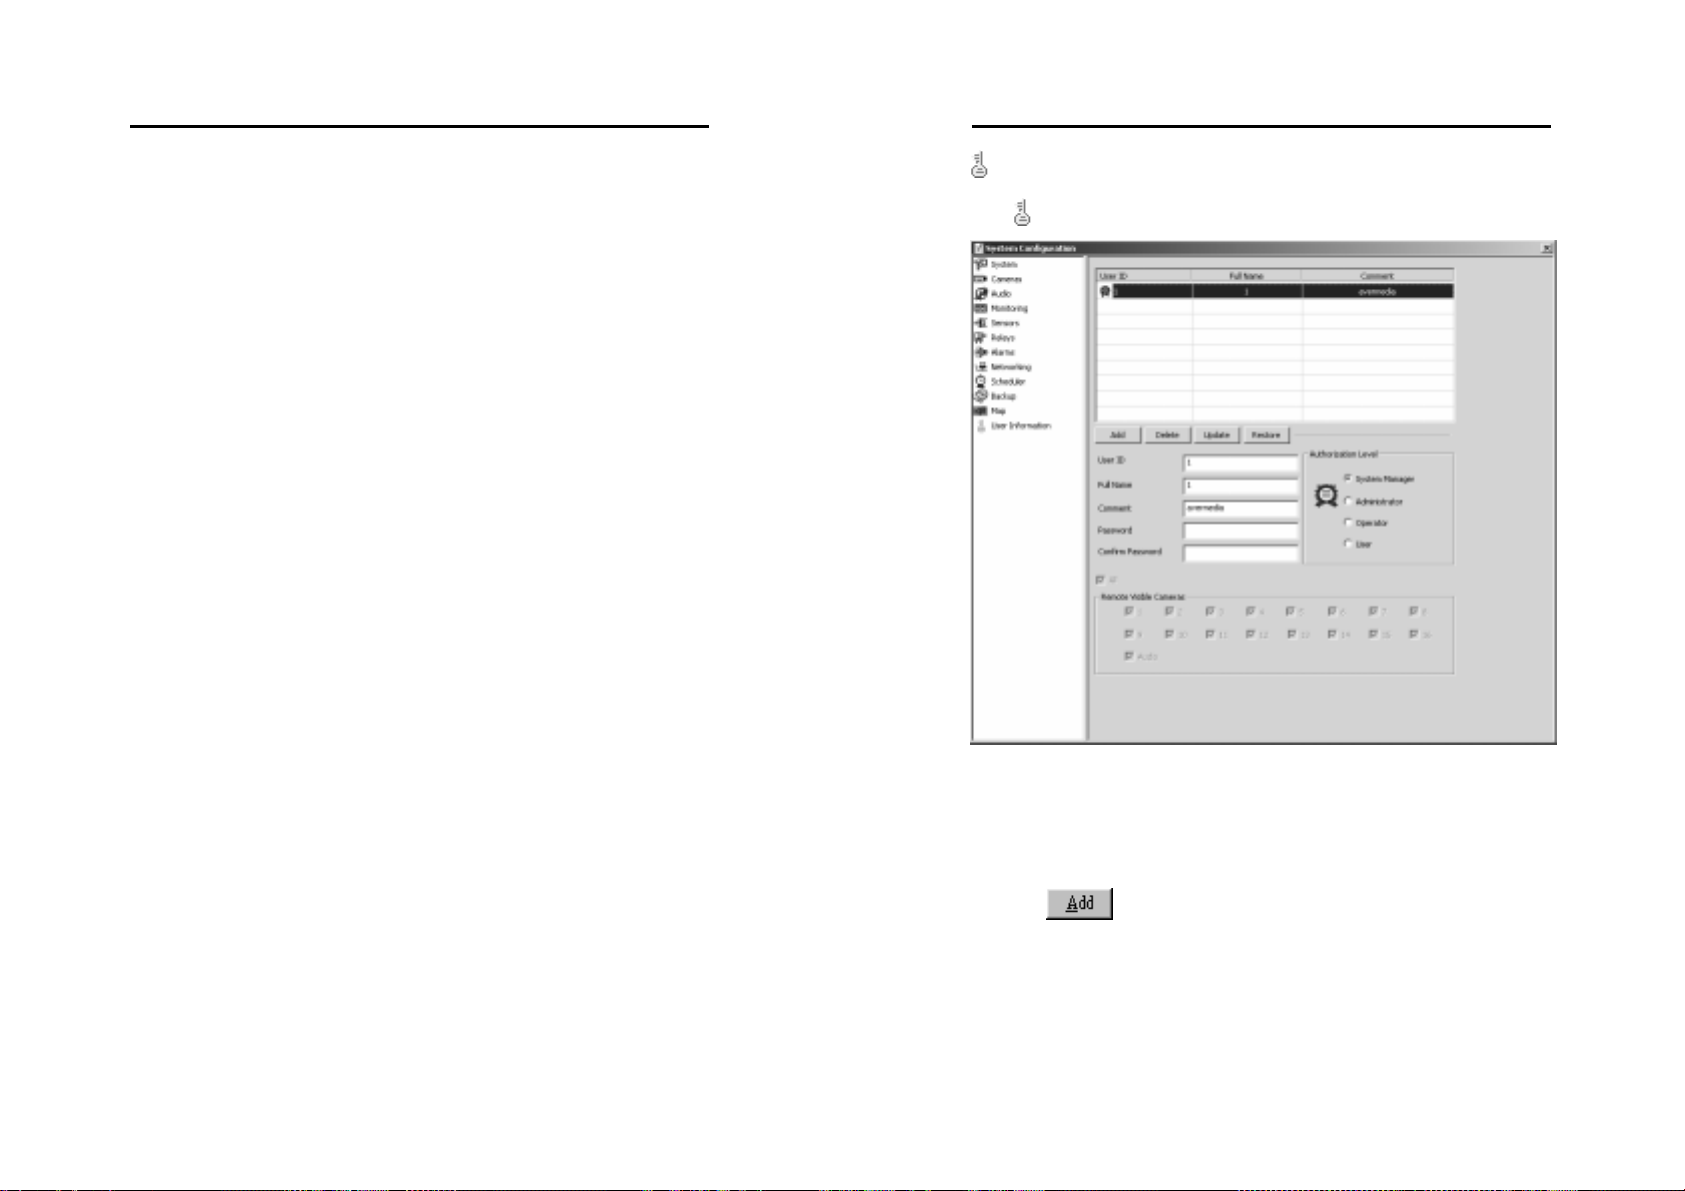
Users Information
Click to enter the setup page for user information.
1. Add New Users
To add a new user, first fill the User ID, Full Name, Comment,
Password, Confirm Password, and Authorization Level
(System Manager, Administrator, Operator and User) f ields. Nex t
select the cameras that can be remotely viewe d by this user and
click
2. Remote Visible Camera section
You need to select which cameras and whether the audio files are
accessible remotely for the user you are going to add. You can
check All Cameras to select all, including the audio.
73
74
.
Page 42

MicroJack User’s Manual
EYES Pro/MP2016/MP3000/MP5000
3. Delete
To delete a user, selec t that user and click Delete.
4. Update
You can update a user’s information by selecting that user, key in
the latest information, and click Update.
5. Restore
During the modification of a user’s information, you can click
Restore to abort all the changes made so far and restore the last
settings.
MicroJack User’s Manual
EYES Pro/MP2016/MP3000/MP5000
Load / Stop Network Server
System Configuration
System
V V V
V V
V V
Cameras V V
Audio
V V
Monitoring V V
6. Authorization Level
The EYES Pro/MP2016/MP3000/MP5000 surveillance system uses
the following 4 authorization levels to classify users through
password control.
System Manager Administrator
Operator User
You need to enter your ID and password to identify your
authorization level when you login/logo ut, stop/start monitor ing, or
load/stop network server. The table below illustrates the privilege
of users from different levels when accessing each function.
4-Level User
Control
Function / Setup
Start / Stop Monitoring
System
Admin. Oper. User
Manager
V V V
V V
Start / Stop Audio R ecording
Sensor V V
Relays
Alarms
V V
V V
Networking V V
Scheduler
Backup
E-Map
User Information
Log Viewer
PTZ Controller
V V
V V
V V V V
V
V V
V V V
V V V V
1-Camera Display
V V V V
2-Camera Display
V V V V
4-Camera Display
75
76
Page 43

MicroJack User’s Manual
EYES Pro/MP2016/MP3000/MP5000
V V V V
9-Camera Display
12-Camera Display
V V V V
MicroJack User’s Manual
EYES Pro/MP2016/MP3000/MP5000
4.2 System Operation
This section describes how to operate EYES Pro/MP2016/MP3000/
MP5000 surveillance system.
16-Camera Display
1-Camera Enlarged Display
6-Camera Display
8-Camera Display
10-Camera Display
13-Camera Display
Full Screen Display
Start / Stop AutoScan
…
Focus Camera
The System Manager is allowed to operate all functions and to
configure all settings for the system. The Administrator possesses
all the rights as the System Manager except to set the
Information section of System Configuration. Operator has no
rights to enter System Configuration. The User can only view the
monitoring screen.
V V V V
V V V V
V V V V
V V V V
V V V V
V V V V
V V V V
V V V V
V V V V
User
Product Models
4 EYES Pro/MP3004/MP5004
4 EYES Pro/MP3004/MP5004 provid es
Camera Enlarged Display,
Display and
Start/Stop AutoScan.
4-Camera Display, Full-Screen
1-Camera Display, 1-
77
78
Page 44

MicroJack User’s Manual
EYES Pro/MP2016/MP3000/MP5000
MicroJack User’s Manual
EYES Pro/MP2016/MP3000/MP5000
8 EYES Pro/MP3008/MP5008
8 EYES Pro/MP3008/MP5008 provides
Camera Enlarged Display,
Display,
Screen Display an d
16 EYES Pro/MP2016/MP3016/MP5016 provides
Display,
6-Camera Display,
10-Camera Display,
16-Camera Display, Full-Screen Display and Start/Stop
AutoScan.
Display Modes
Each display mode is illustrated in the grids below. Numbers in the
grids represent the camera number.
1-Camera Display
Click this button to view image from a single camera. If you have
more than one camera installed, you can click any number
camera.
8-Camera Display, 9-Camera Display, Full-
Start/Stop AutoScan.
16 EYES Pro/MP2016/MP3016/MP5016
1-Camera Enlarged Display, 4-Camera Display,
8-Camera Display, 9-Camera Display,
12-Camera Display, 13-Camera Display,
… (Focus Camera) to switch to a specific
4-Camera Display , 6-Camera
1-Camera Display, 1-
1-Camera
4-Camera Display
Click this button to split the screen into a 4-camera display. The
screen will first display cameras 1~4. Click it again changes the
display to cameras 5~8. Furthe r clicking will change the d isplay to
cameras 9~12, 13~16, 1~4, and so on. See the followi n g sequence.
1 2
3 4
9-Camera Display
Click this button to split the screen into a 9-camera display. The
screen will first display the camera 1~9. Click it again changes the
display to camera 5~13. Further clicking will c hange the display to
cameras 9~1, 13~5, 1 ~9, an d so on . See the fol l o wi n g sequence.
1 2 3
4 5 6
7 8 9
9 10 11
12 13 14
15 16 1
5 6
7 8
9 10
11 12
5 6 7
8 9 10
11 12 13
13 14 15
16 1 2
3 4 5
13 14
15 16
79
80
Page 45

MicroJack User’s Manual
EYES Pro/MP2016/MP3000/MP5000
MicroJack User’s Manual
EYES Pro/MP2016/MP3000/MP5000
12-Camera Display
Click this button to split the sc reen into a 12-camera display. The
screen will first display the camera 1~12. Click it again changes the
display to camera 5~16. Further clicking will c hange the display to
cameras 9~4, 13~8, 1~12, and so on. See the following sequence.
1 2 3 4
5 6 7 8
5 6 7 8
9 10 11 12
9 10 11 12
13 14 15 16
9 10 11 12
5 6 7 8
13 14 15 16
1 2 3 4
9 10 11 12
13 14 15 16
16-Camera Display
Click this button to split the screen into a 16-camera display.
1-Camera Enlarged Display
Click this button to split the screen into a 1-camera enlarged d isplay.
Further clicking will change the enlarge d imag e to the next came ra.
1
2
3
4
2
3
4
5
6/8/10/13-Camera Display
Click this button to split the s creen into a 6/8 /10/13-camera display.
Further clicking will change the enlarge d imag e to the next came ra.
Full Screen Display
Click this button to switch to full scre e n from all display modes.
1 2 3 4
5 6 7 8
9 10 11 12
13 14 15 16
Start / Stop AutoScan
AutoScan allows you to view each camera image in numerical sequence
under 1-Cam Display mode. To enable this function, you need to go to
the
System section of System Configuration to check AutoScan
and define the scan interval. After this function is enabled, return to
the main menu and click this button to start/stop the AutoScan function.
Duri ng A uto S ca n, you c an c li ck
… Focus C am era to
jump to any camera.
81
82
Page 46

MicroJack User’s Manual
EYES Pro/MP2016/MP3000/MP5000
… Focus Camera
The number on each button represents the camera number. These
buttons show the status (
enabled / disabled) of each
camera. Under all display modes, when you click any of the camera
number from the focus camera buttons, that particular camera will be
switched to the first camera in display.
Start / Stop Monitoring
MicroJack User’s Manual
EYES Pro/MP2016/MP3000/MP5000
E-Map
After the configuring in the
E-Map section of System
Configuration, click this button to view the e-maps .
Camera
Image
Click
to start/stop monitoring. If the system is recording videos
from a camera, a red triangle will appear in the upper left corner of the
image frame. If you set this camera image to be recorded upon
detected motion, a green triangle will show up together with the red
one when you click
to start monitoring.
While monitoring, the system simultaneously mo nitors the cameras and
sensors for the conditions you set in the
Alarms section of System
Configuration. Once both conditions for cameras and sensors are met,
the corresponding alarm will be triggered.
Start / Stop Audio Recording
Click this button to start/stop re co rd ing audio. Here it shows the
volume of the current environment. According to the settings in the
Audio section of System Configuration, once the detected volume is
greater than the sensitivity, the system will start to record the sound for
a user-defined length of time. It will then save the .WAV file to the path
you specified. Note that the auto s ound detection only works while the
system is recording images from the camera.
1. Chose a map to view by clicking the map button
2. Check out Cameras, Sensors, Relays on the map
Focus on the desired event by clicking on the event button on the
map.
3. Monitoring Cameras, Sensors, and Relays.
If any event is focused, the relative informatio n will pre sent in the
information field; otherwis e , you c an monito r the s tatus of the
camera in the right upper window. The different colors of the
icons on the map window will turn to different flashing colors
accounting for as follows:
Information
Area
… .
83
84
Page 47

MicroJack User’s Manual
EYES Pro/MP2016/MP3000/MP5000
Icon Color Status Icon Color Status
Camera
Camera
Camera
Yellow Normal
Blue Video Loss
Green
Motion
Detection
Sensor
Sensor
Relay
Yellow
Yellow Normal
Normal
Red Activated
MicroJack User’s Manual
EYES Pro/MP2016/MP3000/MP5000
Log Viewer
Log viewer allows you to playback log files from single channel as well
as from 4/9/16 channels simultaneo usly. All the functions here will be
introduced in operational order.
Click this button to enter the follow ing lo g v iewer page.
Video Search
Event Search
Relay
Red Activated
4. Click Exit to leave for main menu.
Load / Close Network Server
Click this button to load/close the network server, which allows for
remote surveillance (Web Cam/RemoteManager). You will need to
provide a password to identify your authorization level before the
system actually loads/closes the network server. To configure the
network settings, go to the
Configuration.
System Configuration
Refer to section 4.1 - System Configuration.
Networking section of System
Event Indicator
End time of the file
Start time of the file search
Time of the cu rrently play ing file
Playback Speed Control
Playback Control Panel
Search/Stop buttons
Intelligent Search
Exit
Enable/Disable
Audio Playback
Playback
Display
Mode
Image
Adjustment,
Zoom In,
Zoom Out,
Print, and
Save
Search Result
85
86
Page 48

MicroJack User’s Manual
EYES Pro/MP2016/MP3000/MP5000
1. Select Display Mode
When you enter this page, first select the d isplay mode by clicking
(1 Channel), (4 Channels), (9 Channels), and
MicroJack User’s Manual
EYES Pro/MP2016/MP3000/MP5000
B. Play
Click the
Playback button to play files from start to
end. You can also manually drag the slide bar in the directly to
(16 Channels). You can also click these buttons to switch
display mode during playback. To switch to a specific camera, click
… to play videos of that camera.
2. Audio Playback
If you also want to play audio files, click
to enable audio
playback.
3. Select Files to Play
Next you need to choose files that you want to playback.
A. Select Time
Click
to select the date & time for
the start time (on the left) and end time (on the right)
respectively. The system will instantly show video data that
has motion (default event) detected during the specified time
frame in the event indicator below.
the frame you want to play and click the
Playback
button. The lines in the event indicator represent time points
where the specified event has taken place.
4. Playback Control
Once you start to playback videos, you can use the following
function buttons during playback.
Previous Frame
Pause
Next Frame
Move to Start
Reverse Playback
Playback
Move to End
5. Playback Speed Control
You can click the up and down buttons from
to adjust the
playback speed. You can choose from 8, 4, 2, 1, 1/2, 1/4, and 1/8
times of the normal speed.
6. Image Quality
Click
to adjust the image quality. You can adjust the
brightness, contrast, color and saturation.
87
88
Page 49

MicroJack User’s Manual
EYES Pro/MP2016/MP3000/MP5000
7. Zoom
Click
/ to zoom in/out the image.
8. Print & Save
During playback, you can click the
Print or Save
buttons to print or save the current image.
Note that every image you save with the format of
bmp. provides the functions of anti-counterfeit and
anti-destruction. You can access Image Verify from
Programs to make verification for the saved images.
Video Search
Searches the recorded files shown in tree diagram by year/ month/
date/ hour/ minute/ second consequence.
To enable this function, complete the following tasks:
A. Click Video S ear ch and the Video Table searching list will pop up
such as the following window:
MicroJack User’s Manual
EYES Pro/MP2016/MP3000/MP5000
B. Click … the camera no. button to select the
camera no. which is switchable during searching.
C. Select the required recorded file from the Video Table list and
click Close to hide the window.
D. Once the Video Table hides, the initial and end time and status of
the chosen file will be shown on the left bottom of the window
where the start and end time of the files and event indicator locate.
E. Click
Playback button to display the recorded file. During
playing, the indicator in event indicato r will move with the display
going and show the playing time in the field of the start time of
the file.
F. Click Search Result to pop up the previous Video Table
searching list and take the steps above to review the recorded file .
Note that the searched peaks in Event indicato r field in this
section denote the time points o f starting recording instead of
the file positions. Therefore, a peak (not everyone) is likely to
be displayed by clicking on a showed peak directly in Event
indicator field.
89
90
Page 50

MicroJack User’s Manual
EYES Pro/MP2016/MP3000/MP5000
Event Search
Searches the recorded files by the alarm condition and action within a
specified period of time.
To make the function workable, complete the following steps:
A. Click Event Search and the playback control panel will turn into
the condition search panel as follow s :
MicroJack User’s Manual
EYES Pro/MP2016/MP3000/MP5000
G. Select the desired recorded files and click OK to hide Event Table.
Meanwhile, the status of the files will be seen on event indicator
and the playback control panel pops up to replace the condition
search panel.
H. Click
otherwise move the indicator on event indic ator directly to display
the files. During playing, the indicato r will move with the display
going and show the displaying time of the file in the field of the
start time of the file.
I. Click Search Result to pop up the previous Event Table
searching list and take the steps above to review the recorded file .
Playback button on the playback control panel, or,
Note that the searched purplish red peaks in Event indicator
field denote the recorded files that can be displayed on
clicking them. However, the other searched peaks with other
colors indicate the generations by the selected events that
can’t be displayed on clicking them.
B. Choose the camera display mode … (1, 4, 9, 16 ch)
from playback di spl ay mode.
C. Set up the initial and end time for searching in the time fields on
the left bottom of the window.
D. Choose the search condition as the specified condition to search
the file from the condition search panel; Motio n detections, video
loss, sensor inputs, relay outputs, audio, system call out, alarm
recording.
E. Click Search Result to start searching and the coincident
recorded files will be shown on the pop-up Event Table searching
list.
F. Click Stop Search to stop searching if necessary.
91
92
Page 51

MicroJack User’s Manual
EYES Pro/MP2016/MP3000/MP5000
Intelligent Search
Searches t he recor ded fi les by Mask Area and Search Interval within
a specified period of time.
To enable this function, complete the steps below:
A. Click Intelligent Search and the playback control panel will be
replaced by the search condition setting panel such as the
following window:
MicroJack User’s Manual
EYES Pro/MP2016/MP3000/MP5000
G. Select the desired file and click OK to hide Intelligent Table.
Meanwhile, the status of the file will be seen on Event indicator
and the playback panel pops up to replace the search condition
setting panel.
H. Click
Playback on the playback control panel, or, otherwise
move the indicator in event indicator directly to display the file.
During playing, the indicator will move with the display going and
show the displaying time of the file in the field of the start time of
the file.
I. Click Search Result to pop up the previous Intelligent Table
searching list and take the steps above to review the recorded file .
9. Exit
B. Click
… the camera no. button to select the camera
no. which is switchable during searching.
C. Set up the initial and end time for searching in the time fields.
D. Determine a time value for Search Interval.
E. Drag out a mask area with Mask Area and color box devices for
the specified detecting area.
F. Click Search Result to start searching and the coincidently
recorded files will show the searching list on pop-up Intelligent
Table.
93
94
Click the
Exit button to exit log viewer.
Page 52

MicroJack User’s Manual
EYES Pro/MP2016/MP3000/MP5000
PTZ Controller
When you click this button, the PTZ control interface will pop up and
allows you to control your PTZ cameras. Click this button again to hide
this interface.
MicroJack User’s Manual
EYES Pro/MP2016/MP3000/MP5000
Focus
Press the + and – buttons any time during surveillance to
increase/decrease the fo c al leng th to get a clearer image.
Direction buttons
Speed buttons
Zoom In/Out
AutoPan
Focus In/Out
AutoPan Path Group
Preset Positi on No.
1. PTZ Control
Direction & Speed
You may click the buttons on the outer circle to adjust the camera’s
direction during surveillance. The inner c ircle contains buttons for
4 levels of PTZ rotating speed. Click on them to change the speed.
Zoom
Press the + and – buttons any time during surveillance to zoom
in/out the object.
Preset Position No.
Anytime during the surveillance you can turn the camera to any
desired position by directly clicking on buttons 1~16.
AutoPan Path Group
These buttons allow you to select the path of the AutoPan. For
example, if you click
and then click the
AutoPan button, the AutoPan will do a s can from preset position
5Æ6, 6Æ7, 7Æ8, 8Æ5, 5Æ6 …… until you click the
AutoPan
You need to first choose the group of the AutoPan paths, and then
click this button to run the Auto Pan. If you don’t choose a path
before you click the
AutoPan button, the following
warning will show up.
again.
95
96
Page 53

MicroJack User’s Manual
EYES Pro/MP2016/MP3000/MP5000
Status Monitoring
MicroJack User’s Manual
EYES Pro/MP2016/MP3000/MP5000
The PTZ camera will run AutoPan based on your preset position
settings. For example, if
is chosen and the Dwell/Speed
of preset position 1 and 2 are 3 seconds/30°per second and 6
seconds/90°per secon d.
Therefore, once you click the
AutoPan button, the camera
first turns at a speed of 30°/sec from its current position to position
1 and stays for 3 seconds, then from position 1 to 2 at a speed of
90°/sec and stays for 6 seconds. The camera continues to go
around in such a fashion (2Æ3, 3Æ4, 4Æ1, 1Æ2, …..)
PTZ cameras of different makes can have different ways to
run the AutoPan function and might differ from the above.
Refer to the res pective user’s manual of the PT Z camera.
2. Exit PTZ Controller
Alarm / Relay /Sensor Status
On the right side of the main surveillance
window is a panel that shows alarm, relay and
sensor status. Installed sensors are shown in
bright color while not installed ones remain
dark. Once a sensor is activated, the color will
turn yellow. For relays, installed ones are
shown in bright color and activated one s turn
yellow color.
When an alarm is triggered, the
will turn
red color. Double-clicking on this button will bring up the following
dialog box.
Simply click
to exit from PTZ controller interface .
97
98
Page 54

MicroJack User’s Manual
EYES Pro/MP2016/MP3000/MP5000
The red dot next to the camera/sensor number indicates that the event
condition for this particular camera/sensor has been met. The green
dot indicates no event occurs. And the blue dots means the video
signal is too weak or the video cable has been disconnected (video loss.)
The list below lists all events in time order.
You may click the Reset button to clear the triggered alarms including
camera recording, siren or other relay outputs. However, this action
requires a password to confirm your authorization le vel. Click the Save
button to save all alarm records. Click the Close button to close the
dialog box.
MicroJack User’s Manual
EYES Pro/MP2016/MP3000/MP5000
Network Status
This area presents you the curr ent network status. You can also click
in the upper-right corner of the main surveillance window to get a
full list of network related events.
Hard Disk Status
This area shows the remaining hard disk space and time (in hours) for
video recording. When you double-click on this area, a dialog box that
lists all recording-related events and disk spac e will po p up.
You can click the Save button to save the events. Or click the Recycle
button for the system to check if the har d disk needs to start recyc ling.
Click the Cancel button to exit.
Note that
will flash in maroon color during data transmission.
Here shows the date and time.
Date / Time
99
100
Page 55
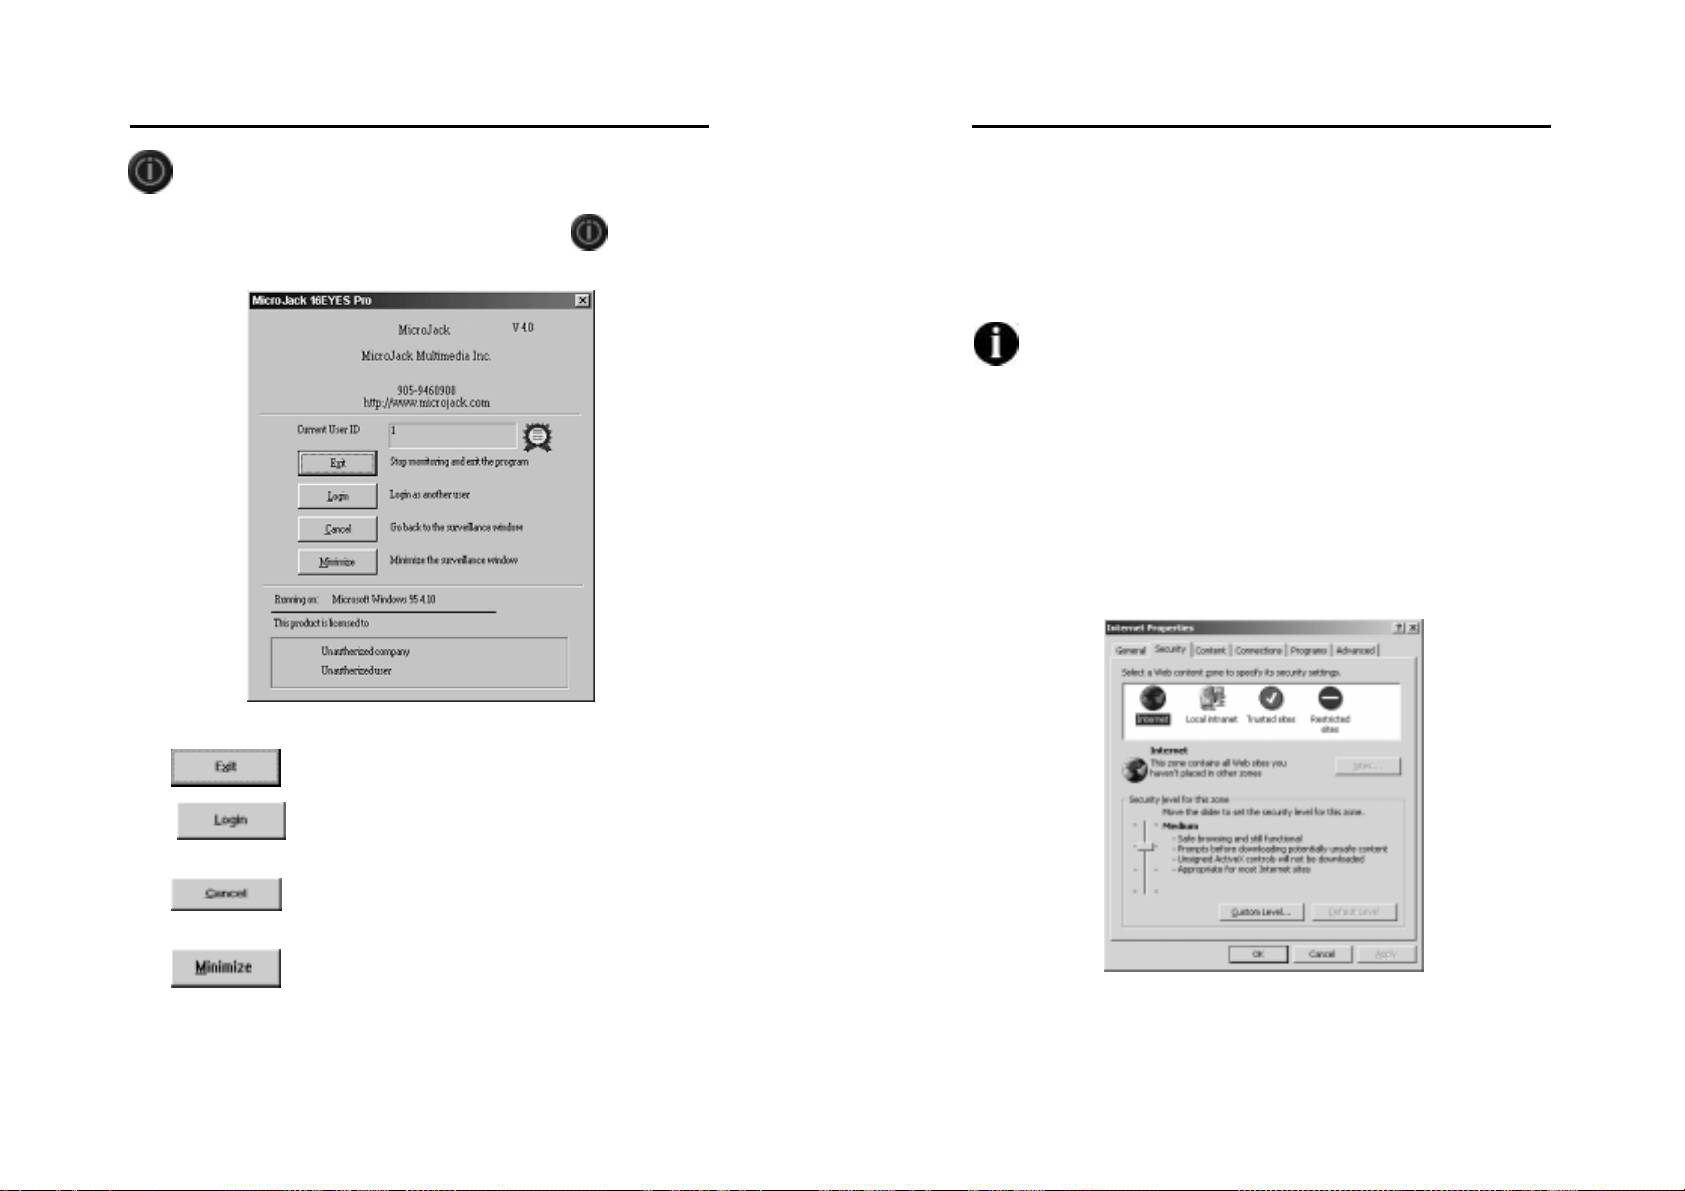
MicroJack User’s Manual
EYES Pro/MP2016/MP3000/MP5000
Exit / Re-login EYES Pro/MP2016/MP3000/MP5000
When you want to exit or re-login the system, c lick
logout screen below:
to enter the
MicroJack User’s Manual
EYES Pro/MP2016/MP3000/MP5000
Chapter 5 Using the WebCam
You can monitor images from the MicroJack EYES Pro/MP2016/
MP3000/MP5000 server using Internet Explorer browser. The MicroJack
EYES Pro/MP2016/MP3000/MP5000 system has built in HTTP protocol
and web server services.
Note that WebCam function must be running in Internet
Explorer with version 6.0 SP1 (6.0.28) or above.
5.1 Enable WebCam
Before you start monitoring from the remote browser, verify that the
MicroJack EYES Pro/MP2016/MP3000/MP5000 server has finished the
following settings.
1. IE setting
Access Internet Options setting from Control Panel as the
following dialog.
Click
Click
surveillance system as another user.
Click
window.
Click
to stop monitoring and logout.
to login the EYES Pro/MP2016/MP3000/MP5000
to cancel the logout and go back to the surveillance
to minimize the surveillance window.
a. Select Security page to configure Internet and Local
internet sectors respect i v e ly.
101
102
Page 56

MicroJack User’s Manual
EYES Pro/MP2016/MP3000/MP5000
b. Click Custom Level button to pup up the following dialog.
Check Enable or Prompt radio button both in Download
signed ActiveX controls and Download unsigned ActiveX
controls. Click OK to save the setting.
2. Enable Web Cam (see
• Verify IP address.
• Select cameras to perform remote transmission.
• Check Enable WebCam server.
• Click the Update button and exit the dialog box.
Networking)
MicroJack User’s Manual
EYES Pro/MP2016/MP3000/MP5000
3. Load Network Server
Click
networking function.
at the bottom of the main menu to enable the
5.2 Use the WebCam
You can browse the home page of WebCam with Microsoft IE or
Netscape Navigator to access desired server by key in the IP or domain
name of which.
When you enter the home page, you can see the system defaults to 1Camera display. You can click these buttons to change different
numbers of split display:
1-Camera Display (640x480)
4-Camera Display (320x240)
6-Camera Display (320x240)
8-Camera Display (Enlarged : 480x360, Small: 160x120)
9-Camera Display (320x240)
10-Camera Display (Enlarg ed: 320x240, Small: 160x120)
16-Camera Display (160x120)
103
104
Page 57

MicroJack User’s Manual
g
g
g
g
g
o
a
ag
g
EYES Pro/MP2016/MP3000/MP5000
When the remote transmitting cameras are more than the split display
number, you can click
to switch the screen to display the following
cameras. For example, the server has assigned camera 1, 2, 3, 5, 7, 10,
13, and 16, in total 8 cameras for remote transmission.
If you select 4-Camera Display,
1 2
Downloadin
3
Downloading
Images…
Downloading
Images…
Images…
10
Downloadin
Images…
Click
Click
Downloading
Images…
5
7
13
Downloadin
Images…
Downloadin
Images…
Downloadin
Images…
16
Click
If you select 6-Camera Display,
1 2 3
Downloadin
g Images…
5
Downloadin
g Images…
Click
7
10
Downloadin
g Images…
Downloadin
g Images…
Downloadin
g Images…
Downloadin
g Images…
Click
13
Downloading
Images…
Downloading
Images…
16 1 2
You can also change the display sequence by assigning different
cameras to different channels. Click
drop down menu
in Server Channel No. corresponding
to select a channel from the
to camera no. If the selected cameras are not remote v iewable, then
the image on the screen will not change.
MicroJack User’s Manual
EYES Pro/MP2016/MP3000/MP5000
Chapter 6 RemoteManager
6.1 Accessing RemoteManager
You need to install the remote surveillance program RemoteManager
from the CD-ROM (See Chapter 3 - Software Installation.)
Note that the operation system of Microsoft
and XP are recommended for RemoteManager program.
The RemoteManager program allows you to manage the server from a
workstation almost as if you were working from the server console. This
will allow you to be able to configure the server from a remote loc ation.
Exit Rem
Start Recording
Setup
Playback
Center Mana
PTZ Control
Screen Split
te M
n
er
ement
Windows 2000
Alarm
Report
Channel
Status
Time
Date
Rest / Total
HDD Space
105
106
Page 58

MicroJack User’s Manual
g
g
g
g
g
EYES Pro/MP2016/MP3000/MP5000
Login
Once you first start the program by
clicking the shortcut of Remote Manager
on your desktop, a Login dialog right side
will prompt you to enter the user ID and
password to access to the program. Note
that only “root” is the acceptable user ID
for the initial access. And a User
Management window for permitting the
beginning into the system will be seen. To set the setting of the
permission, refer to the 6.3.1 Center Management for the detailed
description.
Alarm Report
The image will turn into red and be flashing once an alarm is trigger ed.
An alarm message with the detailed alarm status will be seen after you
click on it. It will help you control the situation of sur veillance.
Channel Status
An area where the status of all the channels will be shown as the
following description and is with a tip of channel’s, server’s, camera’s
names while your cursor points the button:
Dark Gray All Disabled
Flashing Pale Gray Video loss
Azure Normal and the image is displayed on the screen
Dull Blue Normal but the image had been disabled to display
Pink Red Recording and the image is displayed on the scre e n
Dark Red Recording but the image had been disabled to display
If a camera is not enabled,
the ima
will show as the ima
e from this camera
e above
(gray scale) on the screen .
MicroJack User’s Manual
EYES Pro/MP2016/MP3000/MP5000
If a camera is disconnected to the
server or the si
nal from the
server is disconnected to the local
camera, the ima
above on the screen. The si
e will show as
nal
will be picked up at an interval of
one minute until it is received.
Display Mode
Select a display mode to arrange the presentation of the screen.
Full Screen
1-Cam Display
4-Cam Display 9-Cam Display 16-Cam Display
No matter what channel mode you choose, you can assemble the
channels as you wish by clicking Channel Status
to me et the
amount of the mode. For example, if you choose 4-Cam display mode,
you can click 4-Cam display (1,4, 8, 13), (3, 5, 7, 8), or other groups of
the channels to meet the quantity of 4 channels mode.
6.2 Setup
107
108
Page 59

MicroJack User’s Manual
EYES Pro/MP2016/MP3000/MP5000
MicroJack User’s Manual
EYES Pro/MP2016/MP3000/MP5000
6.2.1 User Management
User Management provides the easy management to safeguard the
system from the unidentified users. Only the root is authorized to
configure this section.
To achieve the setting, complete the following steps:
1. Click User Management. The following windo w will app e ar:
2. Use Add/Delete/Rename button to arrange User field.
3. Determine a password and make a confirmation.
4. Click Save to save the setup of password.
5. Click OK to save or Cancel to de le te the pr ev ious arrangement.
6. Back to main menu by clicking
6.2.2 Storage Configuration
Assign Recording Disks
First you need to assign the recording disks for your folders’ storage.
Click
to browse for the folder to save the recorded videos in a
specific path and click Add button to create it. Pay a particular attention
on the path definition, the path where the recording files locate has
built-in a “\USER\ your ID\” folder., i.e., an indicated
path ”C:\Surveillance\record ing” by a root should be searched with the
path “C:\Surveillance\recording\USER\root.” You can click Delete
button to remove anyone of the recording disks, as long as there is at
least 1 disk left to save the recording data.
Minimum Space & Safe ty Q uo t a
Next you need to provide the minimum space and safety quota for hard
disk recycling. During hard disk rec ycling, the newly recorded files will
overwrite the old ones. This way the system will not run out of hard
disk space to save the recorded videos.
Minimum Space:
The system will start hard disk recycling when the hard disk fr ee sp ac e
is less than a user-defined number. The user-defined number has to be
greater than 450MB, the system defaults to 450 MB.
109
110
Page 60

MicroJack User’s Manual
EYES Pro/MP2016/MP3000/MP5000
Safety Quota:
Once the hard disk starts recycling, the system won’t stop until the hard
disk free space becomes more than a user-defined number, say 6000MB
(default value). Safety quota should be at least 5550 MB more
than the minimum sp ac e you ass igned.
6.2.3
Camera Setup
The setting is placed according to the privilege of every server for the
cameras corresponding to the 16 channels respectively.
Follow the tasks below to finish this section:
1. Click Camera Setup. It will show a window like the following:
2. Change channel’s names by directly click on .
3. Arrow down the list to selec t the Server’s and Camera’s names for
each channel.
4. Check Display to show the images on the screen and Recording to
enable the recording functi on fo r each chan n el .
5. Click OK to save or Cancel to de le te the pr ev ious arrangement.
The listed servers and cameras in the pull-down menu are
decided by the settings of the each of the servers.
MicroJack User’s Manual
EYES Pro/MP2016/MP3000/MP5000
6.2.4 Schedule Recording
The function allows you to plan the recording schedule by date or
weekday for all the channels.
Do the steps following:
1. Click Schedule Recording
to get the window besides:
2. Check the recording by date or
by weekday and choose the
time by clicking the arrow of
the box
. The
following window will show as:
3. Click on the yy/mm position directly and use the upper left and
upper right arrows and the red circle in the bottom left corner
window to specify a date to be an operating time.
111
112
Page 61

MicroJack User’s Manual
EYES Pro/MP2016/MP3000/MP5000
4. Click to confirm the time setting. A settled time will appear
on the right blank box. Click Delete to delete the previous time
setting.
5. Set the Start and End time by the up and down arrows
in
Time field.
6. Check the desired cameras to be involved into the schedule in
Camera field.
7. Mentioned comment is allowed by using Add/ Delete/ Update/
Restore buttons for the further information while reco rd ing.
8. Click Ok to save or Cancel to delete the previous arrang ement.
Once the recording has been generated as the schedule, the r ecording
status is observed in Channel Status field.
MicroJack User’s Manual
EYES Pro/MP2016/MP3000/MP5000
server for connecting. Bes ides, establish another f ixed UDP
port (9191) for transmitting images fro m server to client. In
addition, a firewall NAT function should be configured to
enable the mutual transmission.
The following is the detailed illustration to configure the connection:
6.2.5
Network Setup
If you want to transmit images for remote surveillance via TCP/IP,
first click this button to pop up the follow ing dialo gue.
1. First determine a UD P por t (Default 9190) to re c eive the
images from server.
2. Select TCP port connecting to server via Auto
assignment or specify at least 32 ports at a range from 1025 to
65535 for transferring image and receiv ing commands.
3. Click OK to save the setting or Cancel to quit the dialogue without
saving.
Make sure leaving a free port (9091 recommended) in
6.2.6
Sensor Status
The sensor status is viewed on the
consequent window by clicking this
button.
6.2.7
Relay Status
The relay status is viewed on the
consequent window by clicking this
button. Otherwise, you can set the
duration of the relay output after a relay
triggered. Note that the duration
value ”0” denotes the incessant relay
output.
113
114
Page 62

MicroJack User’s Manual
EYES Pro/MP2016/MP3000/MP5000
6.2.8 Alarm Control
MicroJack User’s Manual
EYES Pro/MP2016/MP3000/MP5000
6.3 Operating the RemoteManager
It is available to choose the server and
decide to enable or disable the
corresponding alarms.
1. Click Alarm Control to see the
window for alarm status.
2. To enable an alarm, simply click on
in the Status column and
change the status to
3. Click the OK button to save the
setting.
6.2.9
Back to the main menu by clicking this button.
Back to Main Menu
.
6.3.1
Users can take advantage of this section to manage the connectable
servers’ detailed informatio n. The setting should be placed before you
commence configuring the system at the first time.
There are two ways to connect server:
1.
First you should connect to the server manually via modem before
accessing RemoteManager. Then, it is allowed to add a new server
as a dial-up server is installed by server and a dial-up networking
established by client.
2.
Once the function “Enable Remote View server via TCP/IP” in
the setting of Networking section in system configuration has been
checked, you are allowed to add a new server via TCP/IP.
Center Management
Connection via Modem to Modem (refer to Appendix A for the
connection):
Connection via TCP/IP
115
116
Page 63

MicroJack User’s Manual
EYES Pro/MP2016/MP3000/MP5000
Before arranging center manager section, ple ase make sure
RemoteView server enabled in networking section of
System Configuration.
To offer the complete information, finish the steps below:
1. Click Center Manager button and the following window appears:
2. Click Add to include
an available server to
server list. The Add
Server window will
show as follows or
click Delete or
Update to modify the
setting.
3. The multicast servers in LAN will be listed automatically on the left
side of the dialog. You can highlight the server which you want to
add and click OK or directly double click the server to add a new
multicast server.
MicroJack User’s Manual
EYES Pro/MP2016/MP3000/MP5000
5. The following pop-up window of Add Server will show the Server
Name automatically if the IP Address is correct and has been
connected. In that case the ser ver name doesn’t show up, please
check the connection between ser ver and remote client.
If the port number has been changed in server end, please
delete the server and set a new one.
User
Finish the user’s information given by the specifie d s erver.
Conneting quality
Here allows user to pick a proper conneting speed for each server
to adjust the network quaility. Drag the slide bar to select one
connecting speed out of 11 levels. Namely, if the update of the
image is almost failed, you sould to increase the connectining
speed. Note that the higher quality needs the higher baud rate.
Click OK to save to add the new server in center management or
Cancel to quit the setting.
4. In order to add a new server in WAN, enter the IP Address or
domain name of the desired server and the same port number as
the setting in Networking section of the server (default 9090).
Check Use Dial-Up Networking to configure the further setting of
network if the network connectio n is via modem to modem. Click
OK to start connecting or Cancel to quit the dialog.
117
Note that the connecting speed in remote client had better
meet with that in server.
6. You will be prompted to click OK in the following window to into the
Camera Setup window once one of the users of server has been
deleted. About the instruction
of the Camera Setup, please
refer to 6.2.3 Camera Setup
section.
7. Repeat the steps above to add a new server. The maximum
numbers of server are limited in 16 for the 16 channels.
118
Page 64

MicroJack User’s Manual
EYES Pro/MP2016/MP3000/MP5000
6.3.2 Playback
Once in the playback mode, users can view log files recorded in the
local/remote hard disks. Click this button and select the kind of f ile you
want for playback: Local Playback or Remote Playback.
Local Playback
MicroJack User’s Manual
EYES Pro/MP2016/MP3000/MP5000
3. Highlight the file you want to review and use the buttons below to
control the video pl ayback.
Playback
Click this button to playback the selec t ed file .
Reverse Playback.
Pause
Move to Start Move to End
Previous Frame Next Frame
Slide Bar
You can drag the slide bar directly to the frame you want to play.
/ Zoom In/Out
Click the buttons to zoom in or out the images.
1. Click Playback to display the screen below.
2. From the cameras’ list shown in time diagram, choose the desired
camera folder first and the time folder by yy/mm/dd then.
Consequently, the files ranged within the selected time will be listed
in time sequence in the file directory.
The files are located on the local computer so that only the
enabled cameras by local user will be found in the file list.
119
Image Quality
You can adjust the brightness, contrast, hue and saturation.
Print
Click the button to print the current image.
Save
Use the playback panel to choose a desired frame and then click Save
button.
Delete
Click the button to delete the current file and make sure by clicking Ok
button on the pop-up window.
120
Page 65

MicroJack User’s Manual
EYES Pro/MP2016/MP3000/MP5000
Backup
When you review the log files, you can click this button to save the files
onto your local disk.
Remote Playback
1. Select Remote Playback to configure the further setting
Time
MicroJack User’s Manual
EYES Pro/MP2016/MP3000/MP5000
3. Refer to the 2~3 steps in the previous Local playback section to
view the files.
Determine a start time and the duration (up to 60 minutes) by
clicking on the arrows.
Channel
Check the desired channels to display while playback.
2. Click OK to save the setup or Cancel without any saving to enter
remote playback window below:
121
4. Back to the main menu by clicking
122
.
Page 66

MicroJack User’s Manual
EYES Pro/MP2016/MP3000/MP5000
MicroJack User’s Manual
EYES Pro/MP2016/MP3000/MP5000
6.3.3 PTZ Control
Once you have installed a PTZ camera, the functional utility will help
you to exert the control on the surveillance.
To enable the function, follow with the steps below:
1. Click PTZ Control to show the following window:
2. Designate a channel ... connected with PTZ camera
for the further setting.
Preset Position Setup
Each PTZ camera can set 16 preset positions. You can move the camera
to a desired preset position simply by clicking on the number of the
preset position. To set a preset position, first select the number of the
preset position and set the direction speed. Then configure the
camera’s position with the directional contr o l buttons, f ocus in/fo cus o ut
buttons, and zoom in/zoom out buttons. Finally set the stay time,
rotation speed, and click the Save button.
Direction Control
Adjust the camera’s direction with the following eight buttons; Up /
Down / Left / Right / Upper Left / Bottom Left / Upper Right / Bottom
Right.
Direction Speed
There are four speeds to decide the moving speed of the PTZ camera
during adjusting Direction Control
Focus in
Decrease the focal length of the camera to focus on the image.
Focus out
Increase the focal length of the camera to focus on the image.
Zoom in
Zoom in to enlarge the image of the object.
Zoom out
Zoom out to reduce the image of the object.
123
124
Page 67

MicroJack User’s Manual
EYES Pro/MP2016/MP3000/MP5000
MicroJack User’s Manual
EYES Pro/MP2016/MP3000/MP5000
Dwell (Sec)
During AutoPan, this button determines the time for the camera to stay
(1~60 seconds) at one position before rotating to the next position.
Rotation Speed (deg/s)
You can set the speed (5~255 deg/s) by the left and right arrows at
which the camera rotates from its curr ent position to the next preset
position.
Save
After you finish setting a preset posi tio n, you need to click this button to
save it and go on to set the next preset position.
Clear
Click this button to clear the setting for the current preset position.
Group
Each PTZ camera has 4 groups to comply with the position sequences
as follows:
Group 1: 1~4 positions Group 2: 5~8 positions
Group 3: 9~12 positions Group 4:13~16 positions
6.4 Start Recording
Manually enable the recording setting arranged in the Schedule
Recording section by clicking this button. Meanwhile, the recording
status is visible in the Channel Status field and Start Recording
button will turn into transparent red.
6.5 Exit RemoteManager
Click this button to exit RemoteManager. First a password control
window will prompt you to enter the password to make sure your
authorization. Then a window below will appear to confirm the quit.
Click OK to ex it or Cancel to bac k to the sy s te m
AutoPan
Choose a group number first, and click this button to enable this
function.
Back to Main Menu
Click here to back to main menu.
125
126
Page 68

MicroJack User’s Manual
EYES Pro/MP2016/MP3000/MP5000
Appendix A Remote Login with an
Modem-to-Modem Connection
To run RemoteManager over a direct Modem-to-Modem connection
between the MicroJack EYES Pro/MP2016/MP3000/MP5000 server and
the remote client, follow the instruc tions in the section of the operating
system you are using.
When using Modem-to-Modem connectio n, if the MicroJack EYES
Pro/MP2016/MP300 0/MP5000 server is running on a Windows 98
system, the client cannot login from a Windows 2000 or
Windows XP system. The client can only login from a
Windows 98 system when the server is running on a
Windows 98 syst em. It is suggested that the server ru n
with Windows 2000 or Windows XP system.
A.1 Windows 98SE / Windows Me
1. Server:
A. Install the Dial-up Server. Go to Control Panel and double-
click Add/Remove Programs. Select the Windows Setup
tab.
MicroJack User’s Manual
EYES Pro/MP2016/MP3000/MP5000
B. Select Communication and click . The
Communication dialog box will show up. Check the box next
to Dial-up Server and click the OK button.
C. Click the OK button in the Add/Remove Programs
Properties dialog box and the system will start to install the
Dial-up Server. If you’re using Windows 98SE, you will be
prompted to insert the Windows 98SE CD -ROM.
127
128
Page 69

MicroJack User’s Manual
EYES Pro/MP2016/MP3000/MP5000
D. After finished installing the Dial-up Server, you need to enable
the Dial-up Server. Go to
StartÆProgramsÆAccessoriesÆCommunications and click
Dial-up Networking. You will enter the window below.
E. Click the Connections tab and select Dial-up Server to enter
the setup page.
MicroJack User’s Manual
EYES Pro/MP2016/MP3000/MP5000
F. Check Allow caller access to enable the Dial-up Server. Click
to set the login password and then click
to change the server type. Select PPP
from the drop-down menu and then click the OK button to
finish the ISDN setup for the server end.
2. Client:
A. Go to StartÆProgramsÆAccessoriesÆCommunications
and click Dial-up Networking. Double-click Make New
Connection to bring up the Make New Connection wizard.
Enter the server’s name and select the ISDN device you are
using. Click the Next button to continue.
129
130
Page 70

MicroJack User’s Manual
EYES Pro/MP2016/MP3000/MP5000
B. Provide the server’s telephone number, including the area code,
and click the Next button to finish creating the new connection.
C. Go back to the Dial-up Networking window and double-click
the connection you just created. In the Connect to dialog box,
enter any User name and the Password set in step F of the
server’s ISDN setup procedure. Click
connecting to the MicroJack EYES
Pro/MP2016/MP3000/MP5000 server.
D. After you get connected, access Start Æ Programs Æ Digital
Video Surveillance System Æ RemoteManager to launch
RemoteManager. Refer to Chapter 6 RemoteManager to login.
(Default IP address: 192.168.55.1)
to start
MicroJack User’s Manual
EYES Pro/MP2016/MP3000/MP5000
A.2 Windows 2000
1. Server:
A. Go to StartÆProgramsÆAccessoriesÆCommunications
Wizard. Click the Next button. and click Network and Dialup Connections. In the Network and Dial-up Connections
window, double-click Make New Connection to bring up the
Network Connection
B. Select Accept incoming connections and click the Next
button.
131
132
Page 71

MicroJack User’s Manual
EYES Pro/MP2016/MP3000/MP5000
C. Select the ISDN device you’re using and click the Next button.
D. Select Allow virtual private connections and click the Next
button.
MicroJack User’s Manual
EYES Pro/MP2016/MP3000/MP5000
E. Select users allow ed to connect to this computer from the list
or click
click
to create new users. For each user,
to set the user’s password, which is
required when the user login the server. After you finish, click
the Next button to continue.
F. Make sure that Internet Protocol (TCP/IP) is selected and
click
to enter the Incoming TCP/IP
Properties dialog box.
133
134
Page 72

MicroJack User’s Manual
EYES Pro/MP2016/MP3000/MP5000
G. Check the boxes next to Allow callers to access my local
area network and Specify TCP/IP addresses. Set the
From IP as 192.168.55.1 and the To IP as 192.168.55.2.
Click the OK button and then click the Next button in the
Network Connection Wizard.
H. Click the Finish button to complete the ISDN setup for the
server end.
MicroJack User’s Manual
EYES Pro/MP2016/MP3000/MP5000
2. Client:
A. Go to StartÆProgramsÆAccessoriesÆCommunications
and click Network and Dial-up Connections. In the
Network and Dial-up Connections window, double-click
Make New Connection to bring up the Network Connection
Wizard. Click the Next button.
B. Select Dial-up to private network and click the Next button.
135
136
Page 73

MicroJack User’s Manual
EYES Pro/MP2016/MP3000/MP5000
C. Provide the server’s telephone number, including the area code,
and click the Next button.
D. Select For all users and click the Next button.
MicroJack User’s Manual
EYES Pro/MP2016/MP3000/MP5000
E. Click the Finish button to complete the connection setup.
F. Go back to the Network and Dial-up Connections window
and double-click the connection you just created. In the dialog
box, enter any User name and the Password set in step E of
the server’s ISDN setup procedure. Click
connecting to the MicroJack EYES Pro/MP2016/MP3000/
MP5000 server.
G. After you get connected, access Start Æ Programs Æ Digital
Video Surveillance System Æ RemoteManager to launch
RemoteManager. Refer to Chapter 6 RemoteManager to login.
to start
137
138
Page 74

MicroJack User’s Manual
EYES Pro/MP2016/MP3000/MP5000
A.3 Windows XP
1. Server:
A. Go to StartÆProgramsÆAccessoriesÆCommunications
and click New Connection Wizard. Click the Next button.
B. Select Set up an advanced connection and click the Next
button.
MicroJack User’s Manual
EYES Pro/MP2016/MP3000/MP5000
C. Select Accept incoming connections and click the Next
button.
D. Select the ISDN device you’re using and clic k the Next button.
139
140
Page 75

MicroJack User’s Manual
EYES Pro/MP2016/MP3000/MP5000
E. Select Allow virtual private connections and click the Next
button.
F. Selec t users allowed to connect to this computer from the list
or click
click
to create new users. For each user,
to set the user’s password, which is
required when the user login the server. After you finish, click
the Next button to continue.
MicroJack User’s Manual
EYES Pro/MP2016/MP3000/MP5000
G. Make sure that Internet Protocol (TCP/IP) is selected and
click
to enter the Incoming TCP/IP
Properties dialog box.
H. Check the boxes next to Allow callers to access my local
area network and Specify TCP/IP addresses. Set the
From IP as 192.168.55.1 and the To IP as 192.168.55.2.
Click the OK button and then click the Next button in the
Network Connection Wizard.
141
142
Page 76

MicroJack User’s Manual
EYES Pro/MP2016/MP3000/MP5000
I. Click the Finish button to complete the ISDN setup for the
server end.
2. Client:
A. Go to StartÆProgramsÆAccessoriesÆCommunications
and click New Connection Wizard. Click the Next button.
MicroJack User’s Manual
EYES Pro/MP2016/MP3000/MP5000
B. Select Connect to the Internet and click the Next button.
C. Select Set up my connection manually and click the Next
button.
143
144
Page 77

MicroJack User’s Manual
EYES Pro/MP2016/MP3000/MP5000
D. Select Connect using a dial-up modem and click the Next
button.
E. Enter the name of this connection and c lick the Next button.
MicroJack User’s Manual
EYES Pro/MP2016/MP3000/MP5000
F. Provid e the server’s telep hone number, including the area code,
and click the Next button.
G. Enter any User name and the Password set in step F of the
server’s ISDN setup procedure. Click the Next button to
continue.
145
146
Page 78

MicroJack User’s Manual
EYES Pro/MP2016/MP3000/MP5000
H. Click the Finish button to complete the connection setup.
I. Go to StartÆProgramsÆAccessoriesÆCommunications
and click Network Connections. Double-click the connection
you just created. In the dialog box, enter any User name and
the Password set in step F of the server’s ISDN setup
procedure. Click
MicroJack EYES Pro /MP2016/MP3000/MP5000 se rver.
to start connecting to the
MicroJack User’s Manual
EYES Pro/MP2016/MP3000/MP5000
Appendix B Registering Domain
Name on DDNS Server
DDNS (Dynamic Domain Name Service), a data query service chiefly
used on Internet for translating hostnames into Interne t address es. I t is
allowed the remote clients intelligently searc h dynamic servers without
any previous enquiring for servers’ Internet addresses.
In order to take advantage of the intelligent service, please first regis ter
your domain name on the website: ddns.dss.com.tw
1. User Login
Browse the website ddns.dss.com.tw
Navigator to access the following dialog ue.
First input the serial number of your product and select the
product name. Then click OK to login or Reset to clear the
previous input.
with Microsoft IE or Netscape
J. After you get connected, access Start Æ Programs Æ Digital
Video Surveillance System Æ RemoteManager to launch
RemoteManager. Refer to Chapter 6 RemoteManager to login.
147
2. Pas sword
Set a password to secure your identification.
148
Page 79

MicroJack User’s Manual
EYES Pro/MP2016/MP3000/MP5000
3. User Information
Please provide the following user information, Host Name,
Password, E-mail, Company, and Country to complete the
registration procedures.
Note that Host Name and Domain Name (ex:
microjack.dss.com.tw) are the replacement for Internet
address while a remote client tends to search a dynamic
server in RemoteManager 6.3.1.
149
 Loading...