

Intel 512AN_MMW, 533AN_HMW, 533AN_MMW, 512AN_HMW, PROSet/Wireless WiFi Connection Utility User Manual
Page 1

Intel® PROSet/Wireless WiFi Connection Utility User's Guide
Intel® PROSet/Wireless WiFi Connection Utility User's Guide
Supported wireless adapters:
Intel® Centrino® Ultimate-N 6300
Intel® Centrino® Advanced -N + WiMAX 6250
Intel® Centrino® Advanced -N 6200
Intel® Centrino® Wireless- N 1000
Intel® WiMAX/WiFi Link 5350
Intel® WiFi Link 5300
Intel® WiMAX/WiFi Link 5150
Intel® WiFi Link 5100
Intel® Wireless WiFi Link 4965AGN
Intel® Wireless WiFi Link 4965AG_
Intel® PRO/Wireless 3945ABG Network Connection
Intel® PRO/Wireless 3945_BG Network Connection
With your WiFi network card, you can access WiFi networks, share files or printers, or even share your Internet
connection. All of these features can be explored using a WiFi network in your home or office. This WiFi network
solution is designed for both home and business use. Additional users and features can be added as your
networking needs grow and change.
Depending on the model of your Intel WiFi adapter, your adapter is compatible with 802.11a, 802.11b, 802.11g,
and 802.11n (draft 2.0) wireless standards. Operating at 5 GHz or 2.4 GHz frequency at data rates of up to 450
Mbps, you can now connect your computer to existing high-speed networks that use multiple access points within
large or small environments. Your WiFi adapter maintains automatic data rate control according to the access point
location and signal strength to achieve the fastest possible connection. All of your wireless network connections
are easily managed by the WiFi connection utility. Profiles that are set up through the WiFi connection utility
provide enhanced security measures with 802.1X network authentication.
Table of Contents
Use the Intel® PROSet/Wireless WiFi Connection Utility
Connect to a Network
Use Wi -Fi Protected Setup*
Use Profiles
Set up Security
WiFi Network Overview
Administrator Tool
Create Administrator Packages
Create Profiles
Security Overview
Safety and Regulatory Information
Specifications
Troubleshooting
Glossary
Customer Support
Warranty
Information in this document is subject to change without notice.
© 2004–2009 Intel Corporation. All rights reserved. Intel Corporation, 5200 N.E. Elam Young Parkway,
Hillsboro, OR 97124-6497 USA
The copying or reproducing of any material in this document in any manner whatsoever without the written
permission of Intel Corporation is strictly forbidden. Intel® is a trademark or registered trademark of Intel
Corporation or its subsidiaries in the United States and other countries. Other trademarks and trade names may
Page 2

be used in this document to refer to either the entities claiming the marks and names or their products. Intel
Intel® PROSet/Wireless WiFi Connection Utility User's Guide
disclaims any proprietary interest in trademarks and trade names other than its own. Microsoft and Windows are
registered trademarks of Microsoft Corporation. Windows Vista is either a registered trademark or trademark of
Microsoft Corporation in the United States and/or other countries.
*Other names and brands may be claimed as the property of others.
Intel Corporation assumes no responsibility for errors or omissions in this document. Nor does Intel make any
commitment to update the information contained herein.
"IMPORTANT NOTICE FOR ALL USERS OR DISTRIBUTORS:
Intel wireless LAN adapters are engineered, manufactured, tested, and quality checked to ensure that they meet
all necessary local and governmental regulatory agency requirements for the regions that they are designated
and/or marked to ship into. Because wireless LANs are generally unlicensed devices that share spectrum with
radars, satellites, and other licensed and unlicensed devices, it is sometimes necessary to dynamically detect,
avoid, and limit usage to avoid interference with these devices. In many instances Intel is required to provide test
data to prove regional and local compliance to regional and governmental regulations before certification or
approval to use the product is granted. Intel's wireless LAN's EEPROM, firmware, and software driver are designed
to carefully control parameters that affect radio operation and to ensure electromagnetic compliance (EMC). These
parameters include, without limitation, RF power, spectrum usage, channel scanning, and human exposure.
For these reasons Intel cannot permit any manipulation by third parties of the software provided in binary format
with the wireless LAN adapters (e.g., the EEPROM and firmware). Furthermore, if you use any patches, utilities, or
code with the Intel wireless LAN adapters that have been manipulated by an unauthorized party (i.e., patches,
utilities, or code (including open source code modifications) which have not been validated by Intel), (i) you will be
solely responsible for ensuring the regulatory compliance of the products, (ii) Intel will bear no liability, under any
theory of liability for any issues associated with the modified products, including without limitation, claims under
the warranty and/or issues arising from regulatory non -compliance, and (iii) Intel will not provide or be required to
assist in providing support to any third parties for such modified products.
Note: Many regulatory agencies consider Wireless LAN adapters to be "modules", and accordingly, condition
system-level regulatory approval upon receipt and review of test data documenting that the antennas and system
configuration do not cause the EMC and radio operation to be non-compliant."
August 14 , 2009
Page 3

Back to Contents
Intel® PROSet/Wireless WiFi Connection Utility User's Guide
Use the Intel® PROSet/Wireless WiFi Connection Utility
Use Intel® PROSet/Wireless WiFi Connection Utility as your Wireless Manager
Start Intel® PROSet/Wireless WiFi Connection Utility
Start Intel® PROSet/Wireless WiFi Connection Utility from the Taskbar
Taskbar Icons
Tool Tips and Desktop Alerts
Intel® PROSet/Wireless WiFi Connection Utility Main Window
First Time Connection
WiFi Networks list
Connection Status Icons
Network Properties
Connection Details
Intel® PROSet/Wireless WiFi Software Menus
Tools Menu
Application Settings
Intel® Wireless Troubleshooter
Manual Diagnostics Tool
Administrator Tool
Advanced Menu
Adapter Settings
Advanced Statistics
Use Windows to Manage WiFi
Profiles Menu
Manage Profiles
Manage Exclusions
Use Intel® PROSet/Wireless WiFi Connection Utility Profile Features
Turn Wireless Radio On or Off
Installing Intel® PROSet/Wireless WiFi Connection Utility
Install Additional Software Features
Remove Intel® PROSet/Wireless WiFi Connection Utility
Use Intel® PROSet/Wireless WiFi Connection Utility as Your Wireless
Manager
Intel® PROSet/Wireless WiFi Software is used to set up, edit, and manage WiFi network profiles to connect to WiFi
networks. It also includes advanced settings such as power management and channel selection for setting up adhoc WiFi networks.
If you use Microsoft* Windows* XP Wireless Zero Configuration as your wireless manager, you can disable it from
the Microsoft Windows Wireless Network tab.
To disable Microsoft Windows* XP Wireless Zero Configuration as your wireless manager:
1. Click Start > Control Panel.
2. Double-click Network Connections.
3. Right-click Wireless Network Connection.
4. Click Properties.
5. Click WiFi Networks.
6. Verify that the Use Windows to configure my wireless network settings is not selected. If it is, clear it.
7. Click OK. This confirms that the Intel® PROSet/Wireless WiFi Connection Utility is configured to manage
Page 4

your network profiles.
Intel® PROSet/Wireless WiFi Connection Utility User's Guide
NOTE: Verify that the Application Settings
adapter is selected. This option prompts you when Microsoft Windows* XP Wireless Zero Configuration
starts to manage your network profiles.
option Notify when another application uses the WiFi
Start Intel® PROSet/Wireless WiFi Connection Utility
To start the WiFi connection utility, use one of the following methods:
Click Start > Programs > Intel PROSet Wireless > WiFi Connection Utility.
Right -click the Taskbar icon located in the lower right corner of your Windows Desktop to open the
Taskbar menu. Click Configure WiFi.
Double-click the Taskbar icon.
To close the WiFi connection utility from the main window, use one of the following:
Select File > Exit from the main window.
Click Close.
Click the Close button (X) at the top right corner of the window.
Intel® PROSet/Wireless WiFi Connection Utility Main Window
The WiFi Connection Utility Main Window lets you:
View the current connection details (signal quality, speed and current network name).
Scan for available WiFi networks.
Manage profiles.
Auto- connect profiles to available networks in a specific order defined in the Profile list.
Connect to Infrastructure and Device to Device (ad hoc) networks.
Configure adapter settings.
Troubleshoot wireless connection problems.
Page 5
Connection Details
Intel® PROSet/Wireless WiFi Connection Utility User's Guide
On the main window, click Details to view detailed parameters of the access point and network adapter. The
Connection Details window displays the current network connection information. See
complete description.
Connection Details for a
The Taskbar icon also indicates the current connection status. See
Taskbar Icons .
Main Window Connection Status Icons
The connection status icons indicate the current connection status of your WiFi adapter. The connection status icon
displays in the WiFi connection utility main window See
Connection Status Icons .
Profile Management
On the WiFi connection utility main window, click Connect on a WiFi network. Once connected, a profile is created
in the Profiles list. The Profiles List displays the current user profiles in the order that they are to be applied. Use
the up and down arrows to arrange profiles in a specific order to automatically connect to a WiFi network.
Page 6

You can also add, edit, and remove profiles from the Profiles list. Click Profiles on the WiFi connection utility main
Intel® PROSet/Wireless WiFi Connection Utility User's Guide
window.
Different profiles can be configured for each wireless network. Profile settings can include, the network name
(SSID), operating mode, and security settings. See
Profile Management for more information.
Menus
Use the File, Tools, Advanced, Profiles and Help menus to configure your network settings.
Name Description
File Exit: Closes the WiFi connection utility main window.
Tools Application Settings: Use to set system wide connection preferences. See Application Settings
information.
Intel® Wireless Troubleshooter: Use to resolve wireless network connection problems. See Intel®
Wireless Troubleshooter for more information.
Manual Diagnostics Tool: The Manual Diagnostics Tool lets you run a set of diagnostics tests that
verify the functionality of your WiFi adapter. See Manual Diagnostics Tool
Administrator Tool: Used by administrators or the person who has administrator privileges on this
computer to configure shared profiles (Pre-logon/Common, Persistent, and Voice over IP [VoIP]). The
Administrator Tool can also be used by an Information Technology department to configure user
settings within the WiFi connection utility and to create custom install packages
systems. See Administrator Tool
for more information.
for more information.
to export to other
for
NOTE: The Administrator Tool is available only if it installed during a custom installation of the
Intel® PROSet/Wireless WiFi Software. See Install Additional Software Features
on custom installation.
Advanced Adapter Settings: Displays Adapter Settings that are equivalent to the settings in the Microsoft
Windows Advanced settings. See Adapter Settings
To access Adapter Settings from Microsoft Windows:
Double-click Network Connections from the Windows Control Panel.
Right -click the Wireless Network Connection.
Select Properties from the menu.
Click Configure to display the Advanced settings for the adapter.
Advanced Statistics: Select to view detailed information about the WiFi adapter and connection.
See Advanced Statistics
Use Windows to Manage WiFi: Select to enable Microsoft Windows* XP as the wireless manager.
See Microsoft Windows* XP Wireless Zero Configuration
Profiles Manage Profiles: Select to create or edit profiles.
Manage Exclusions: Select to exclude networks from automatic connection. See Manage Exclusions
for more information.
Help Help: Starts the online help.
About: Displays version information for the currently installed application components.
for more information.
for information.
for more information.
for more information
Administrator Tool (Tools menu)
The Administrator tool is for administrators or the person who has administrator privileges on this computer. This
tool allows the administrator to restrict what level of control the users of this computer have over their wireless
connections. This tool is used also to configure common (shared) profiles.
Page 7

Users cannot modify Administrator settings or profiles unless they have the password for this tool. A password
Intel® PROSet/Wireless WiFi Connection Utility User's Guide
should be chosen that is secure and not easily guessed.
You can export these settings and profiles as one package to other computers on your network. For more
information, See the
Name Description
Administrator
Packages
Application
Settings
Administrator
Profiles
Adapter
Settings
EAP-FAST AID Groups
Change
Password
Close Closes the page.
Help? Provides help information for this page.
Administrator Tool section.
The Administrator Packages are used to save administrative profiles and other settings. For
Windows* XP, you can copy or send this self -extracting executable to clients on your network.
When it is run, the contents are installed and configured on the destination computer. See
Administrator Tool Packages
An administrator can configure the WiFi connection utility Application Settings to control how the
application behaves on the user's computer, and to select what level of control users have over
various aspects of their wireless connections. See Administrator Tool Application Settings
Enable or disable Persistent or Pre-logon/Common profiles and configure Voice over IP (VoIP)
settings on the computer. See Administrator Tool Profiles
An administrator can select which level of control that users have over their wireless network
connections. See Administrator Tool Adapter Settings
An administrator can select which Authority Identifier (A -ID) RADIUS server to provision
Protected Access Credentials (PACs) for profiles that use EAP-FAST authentication. A -ID groups
are shared by all users of the computer and allow EAP- FAST profiles to support multiple PACs
from multiple A -IDs. See Administrator Tool EAP-FAST A-ID Groups
Change the password for the Administrator Tool. See Change Password
.
.
.
.
.
for more information.
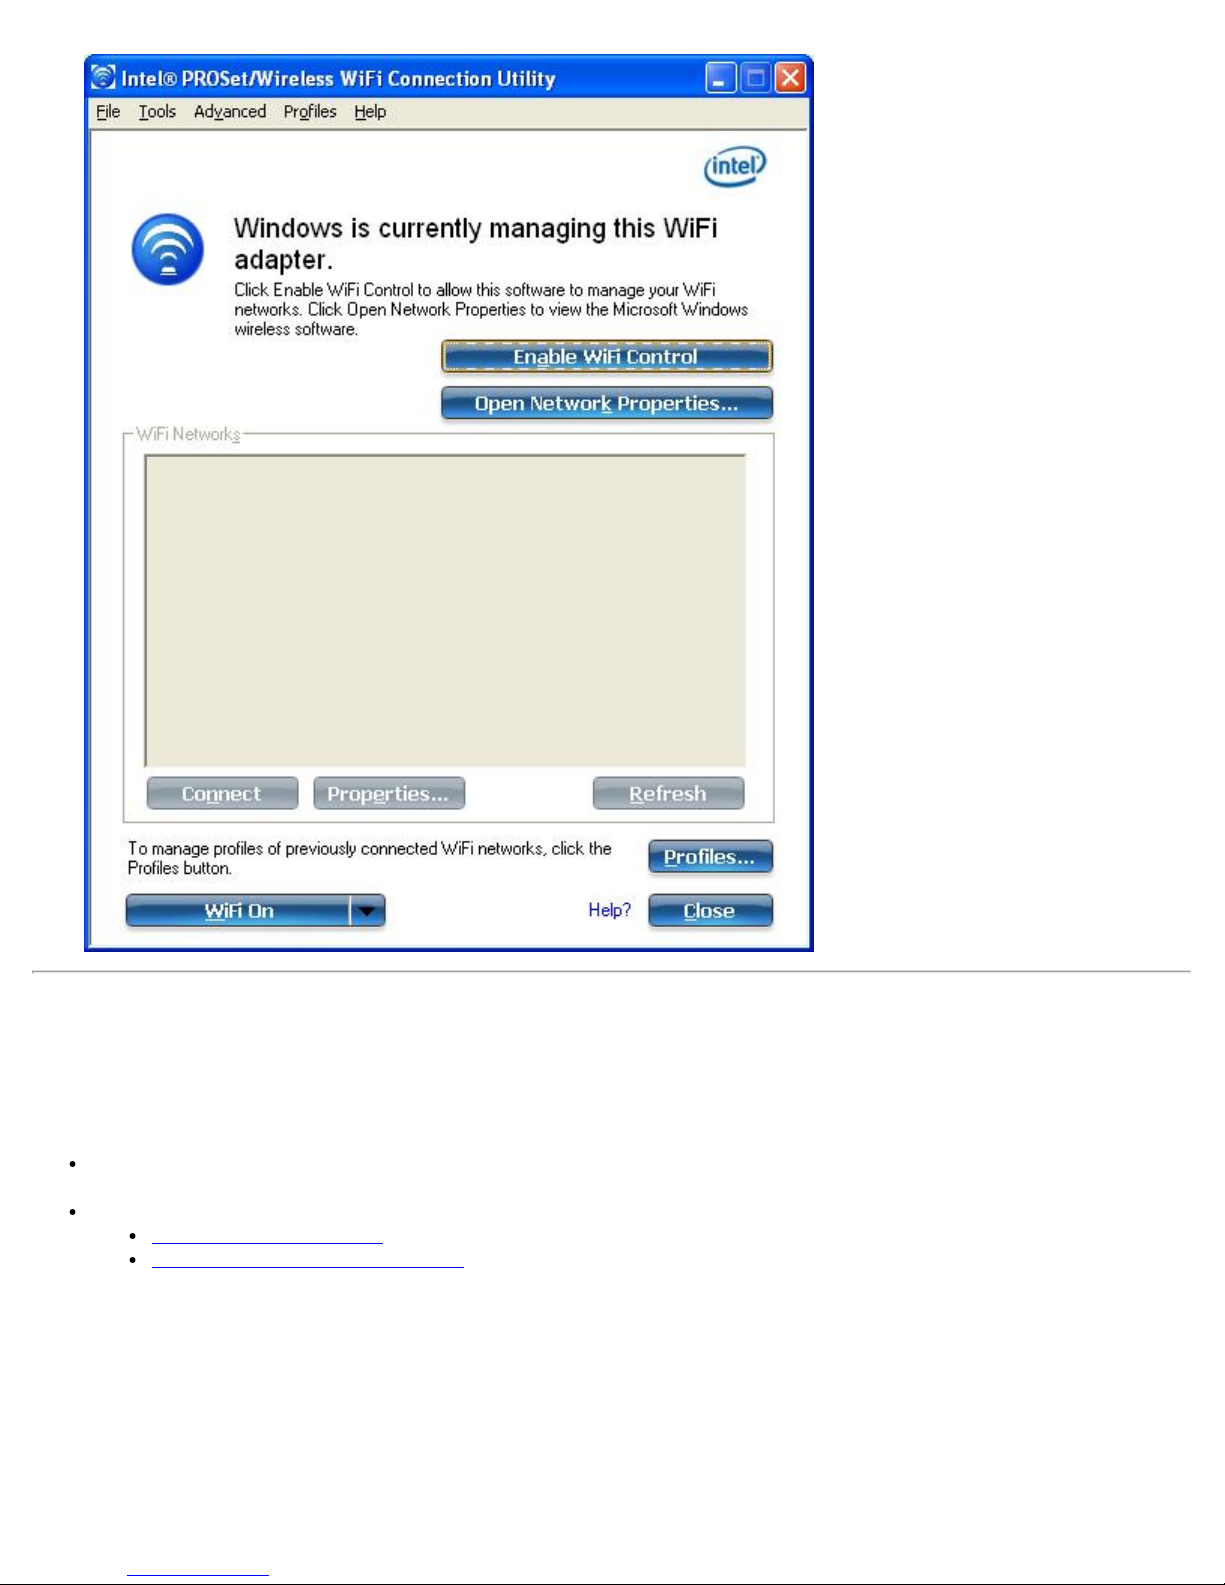
Use Windows to Manage WiFi (Advanced menu)
The Microsoft Windows* XP Wireless Zero Configuration feature provides a built -in wireless configuration utility.
This feature can be enabled and disabled within the WiFi connection utility. Click Use Windows to manage WiFi
on the Advanced menu. If Windows* XP Wireless Zero Configuration is enabled, the features in the WiFi
connection utility are disabled. To let the WiFi connection utility manage your WiFi connections, click Enable WiFi
Control on the main window.
Page 8
Installing Intel® PROSet/Wireless WiFi Connection Utility
Intel® PROSet/Wireless WiFi Connection Utility User's Guide
Typical Installation
The following components are installed in a Typical installation.
The WiFi connection utility driver. You can choose to install the driver only if desired. This is the minimal
installation.
The WiFi connection utility. For a Typical installation, this includes the following:
Wi-Fi Protected Setup*
Intel® Wireless Troubleshooter
NOTE: If you plan to use Novell Client* for Windows, it should be installed prior to installation of the
WiFi connection utility. If the WiFi connection utility is already installed, you should remove it prior to
installation of Novell Client for Windows.
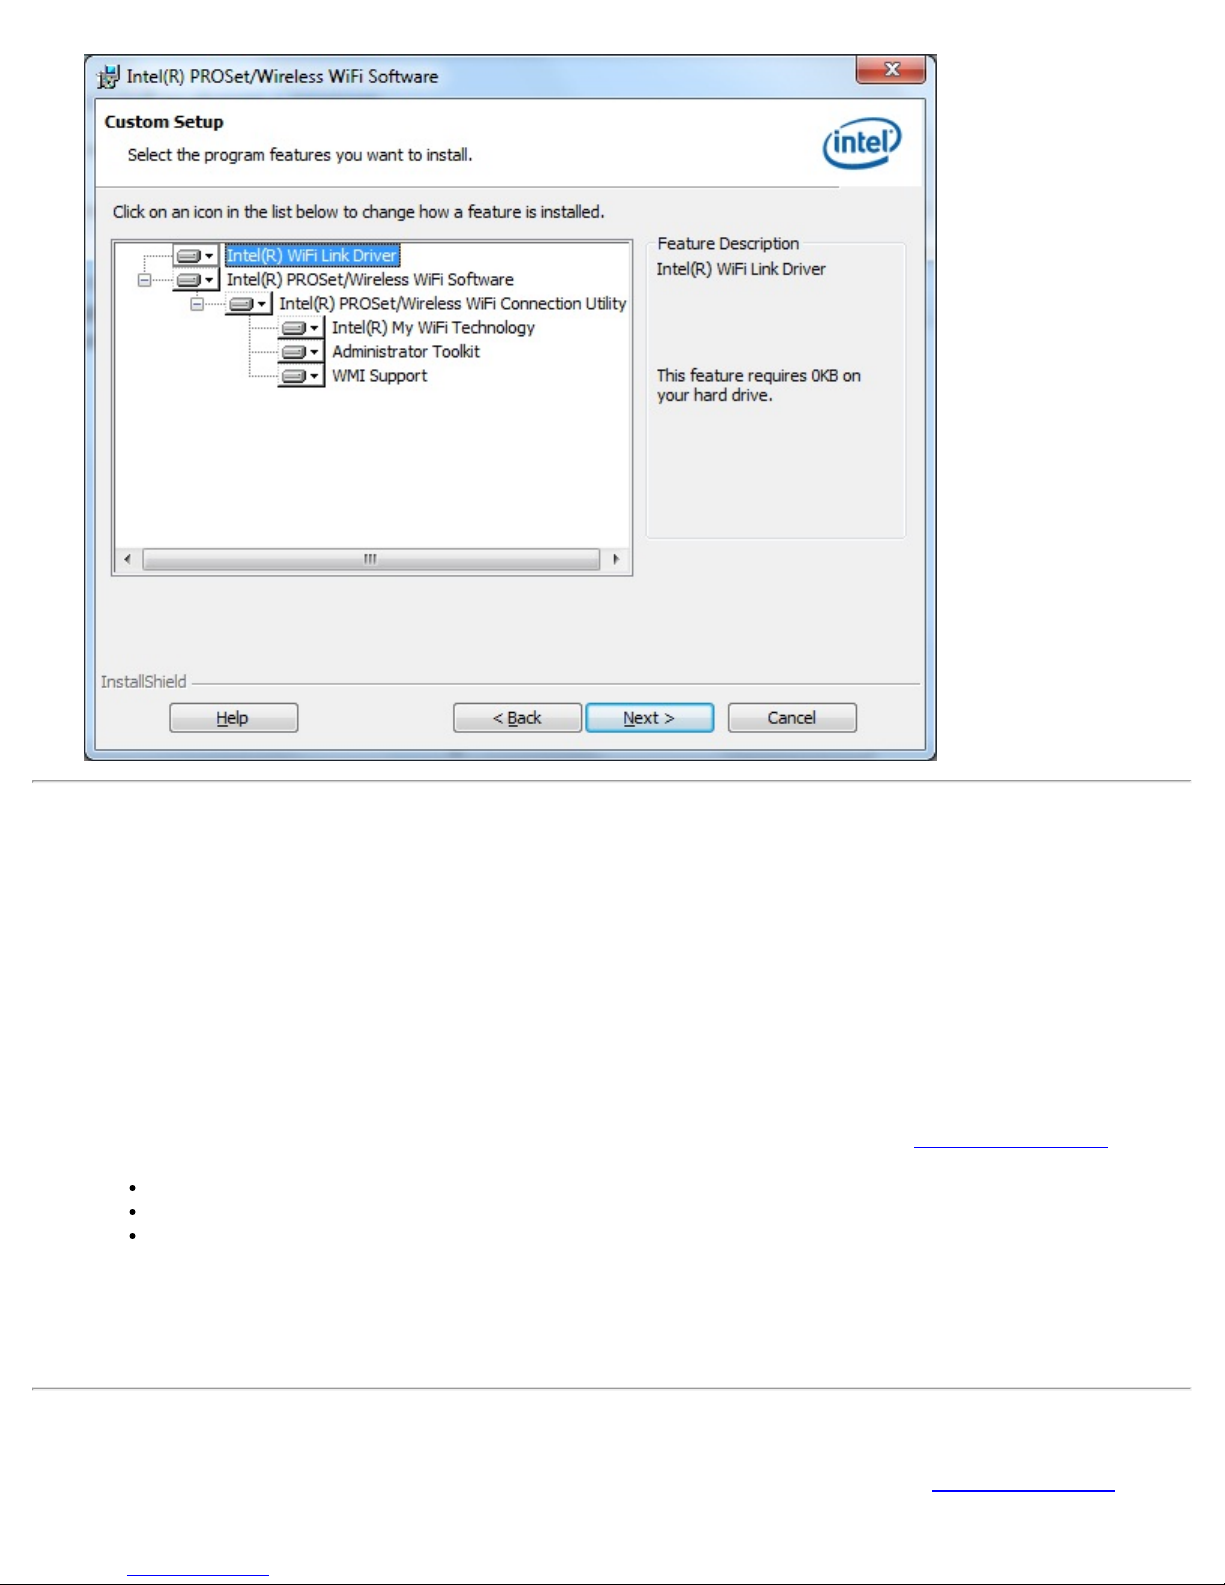
Custom Installation
The following features are available to install during a Custom installation. Of these, Wi -Fi Protected Setup* and
Intel® Wireless Troubleshooter are also installed in a typical installation.
Page 9

Administrator Tool
Intel® PROSet/Wireless WiFi Connection Utility User's Guide
WMI Support
Single Sign On
Pre- logon Connect
WiFi Protected Setup
Intel® Wireless Troubleshooter
Administrator Tool: Installs the Administrator Tool to the Tools menu. This tool is used to configure common
(shared) profiles. The Administrator Tool is also used by an Information Technology department to enable or
disable features within the WiFi connection utility.
WMI Support: Windows Management Instrumentation functionality allows administrators who do not have the
WiFi connection utility installed to manage remotely clients that do have the WiFi connection utility installed.
Single Sign On: Installs the Single Sign On Pre -Login Connect feature. This tool is used to configure common
(shared) profiles with the Administrator Tool. Single Sign On is targeted to the enterprise environment where
users log on to their computer with a user name, password, and typically a domain. Fast User Switching does not
support domain log on. The Fast User Switching and the Windows* XP Welcome Screen are disabled when Single
Sign On support is installed.
NOTE: Windows Fast User Switching is enabled by default if you use Windows* XP Home Edition. It is
targeted for the home user. Fast User Switching is also available on Windows* XP Professional if you
install it on a stand-alone or workgroup -connected computer. If a computer running Windows* XP
Professional is added to a domain, then Fast User Switching option is not available.
Pre-logon Connect: A Pre-logon/Common profile is active once a user logs onto the computer. Pre-logon Connect
establishes a wireless connection prior to user logon to Windows. This feature is installed with Single Sign On.
WiFi Protected Setup: Installed as part of a Typical installation, this feature detects when a compatible wireless
router is present and provides easy connection to it.
Intel® Wireless Troubleshooter: Provides valuable assistance in resolving wireless WiFi connection problems.
To install these features, select Custom during installation. Follow the instructions below to install features. If the
WiFi connection utility is already installed, see the
post-installation instructions.
Page 10
Install Intel® PROSet/Wireless WiFi Connection Utility
Intel® PROSet/Wireless WiFi Connection Utility User's Guide
1. Insert the Installation CD in your CD drive.
2. The installer presents the message:
Welcome to the Intel® PROSet Wireless Tools Installation Wizard. Click Next.
3. The next message displays:
Welcome to the InstallShield Wizard for Intel® PROSet/Wireless WiFi Software. Click Next.
4. Read the license agreement.
5. Click I accept the terms in the license agreement. You can click Print if you want a printed copy of the
agreement. Then click Next.
6. Click Next to accept the default install destination folder. Otherwise, click Change to specify a different
location. Then click OK and Next.
7. Click Typical or Custom. If you click Typical, proceed to step 9.
8. If performing a Custom installation, select from the list of features to install. See Custom Installation
explanation of the available features. For each feature, you can select:
This feature will be installed on the local hard drive.
This feature, and all subfeatures, will be installed on the local hard drive.
The feature will not be available.
9. Click Next.
10. The installation may take several minutes. When the installation completes, the message InstallShield
Wizard Completed displays. Click Finish.
11. You may be asked to reboot the computer. If so, you should reboot you computer now. Click Yes to do so,
or No to reboot later.
for an
Install Additional Software Features
If the WiFi connection utility is already installed, follow the instructions below to add the Administrator Tool and
Page 11

Pre- logon Connect:
Intel® PROSet/Wireless WiFi Connection Utility User's Guide
1. Click Start > Control Panel > Add or Remove Programs > Intel PROSet/Wireless WiFi Software.
2. Click Change.
3. The next message displays:
Welcome to the InstallShield Wizard for Intel® PROSet/Wireless WiFi Software. Click Next.
4. Click Modify. Then click Next.
5. Click the red X next to any of the features not currently installed that you want to install.
6. For each feature you want to install, click one of the following choices, as appropriate:
This feature will be installed on the local hard drive.
This feature, and all subfeatures, will be installed on the local hard drive.
7. Click Next.
8. The installation may take several minutes. When the installation completes, the message InstallShield
Wizard Completed displays. Click Finish.
9. You may be asked to reboot the computer. If so, you should reboot you computer now. Click Yes to do so,
or No to reboot later.
Remove Intel® PROSet/Wireless WiFi Connection Utility
To uninstall the WiFi connection utility:
1. Click Start > Control Panel > Add or Remove Programs.
2. Click Intel PROSet/Wireless WiFi Software.
3. Click Change.
4. The next message displays:
Welcome to the InstallShield Wizard for Intel® PROSet/Wireless WiFi Software. Click Next.
5. Click Remove.
6. Click Next.
7. The next message appears. Make your selection from the list and click Next.
Save User Defined Settings. Choose what to do with your current application settings:
Save. Save settings and files applicable to the current version of the application.
Convert and Save. Save settings and files in the format compatible with Intel® PROSet/Wireless
versions 10 and 11.
Remove. Do not save application settings.
8. The removal may take several minutes. After the software is removed, the message InstallShield Wizard
Completed displays. Click Finish.
9. You may be asked to reboot the computer. If so, you should reboot you computer now. Click Yes to do so,
or No to reboot later.
Back to Top
Back to Contents
Trademarks and Disclaimers
Page 12
Back to Contents
Intel® PROSet/Wireless WiFi Connection Utility User's Guide
Taskbar Icon
Taskbar Menu Options
Taskbar Icons
Tool Tips and Desktop Alerts
Start Intel® PROSet/Wireless WiFi Connection Utility from Taskbar
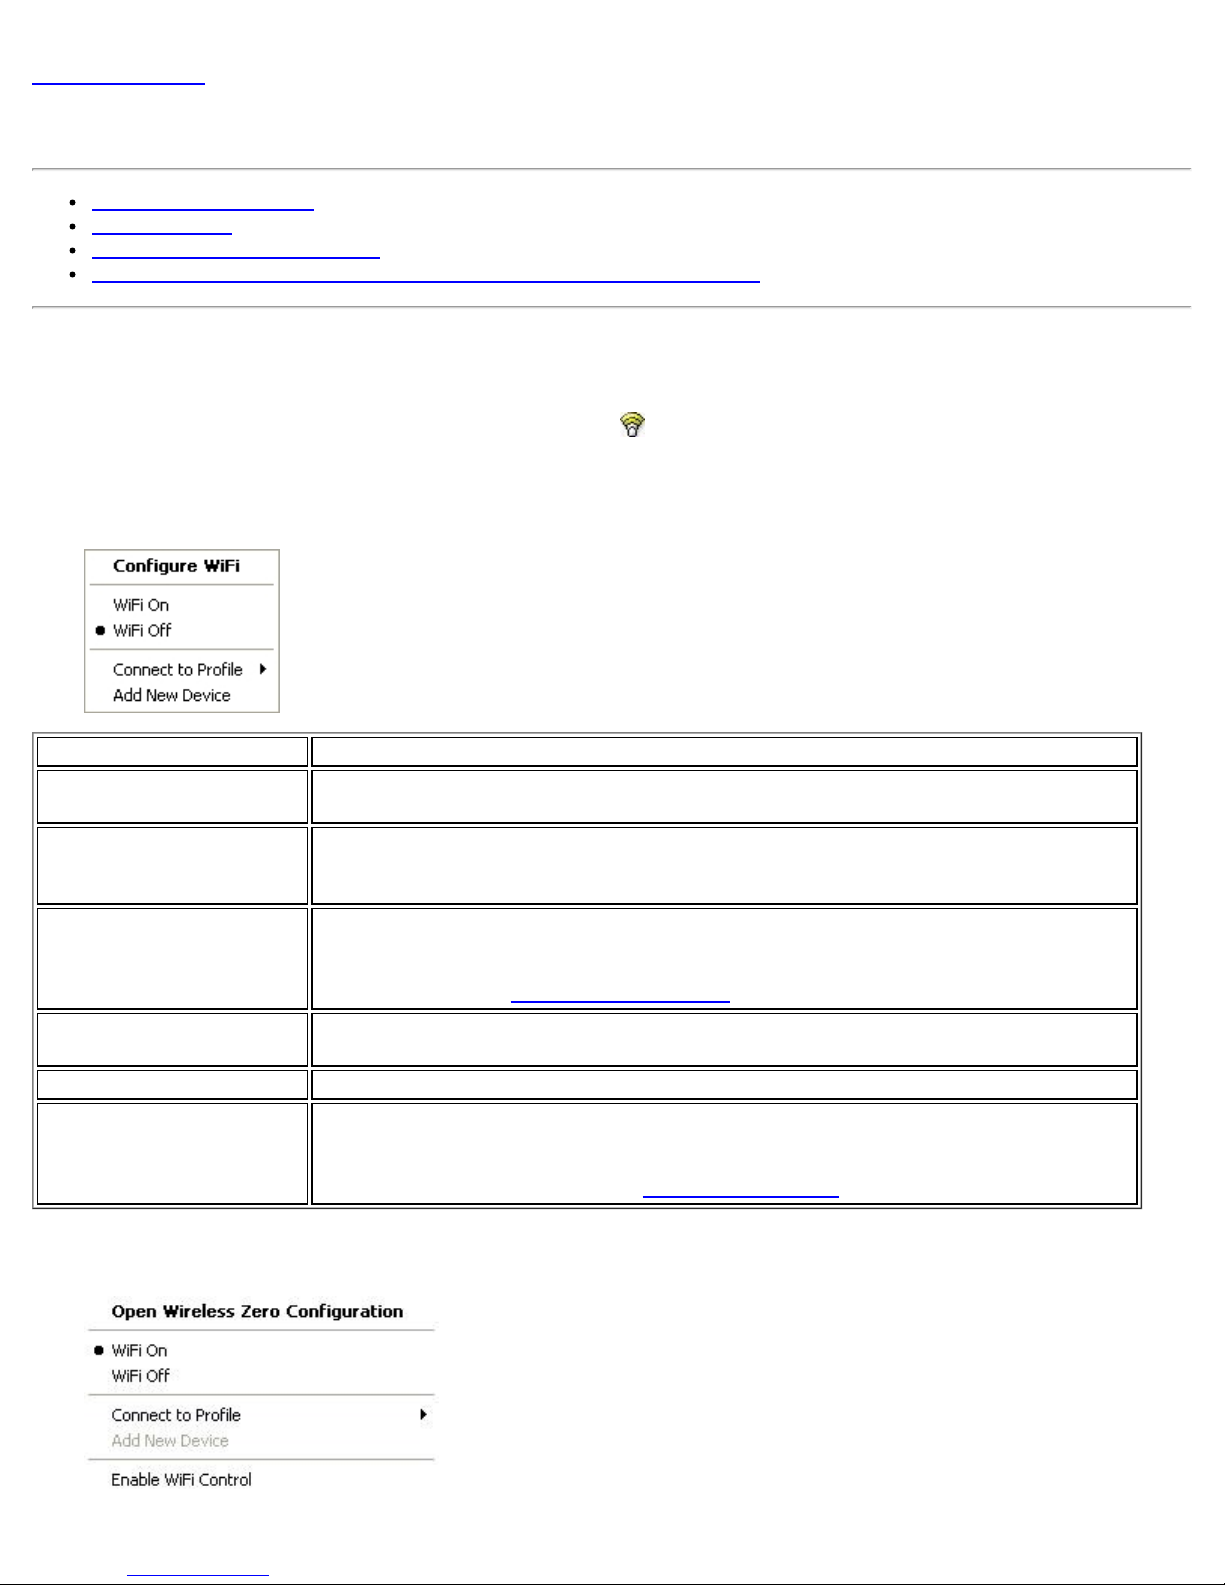
Taskbar Menu Options
The Intel® PROSet/Wireless WiFi Connection Utility status icon displays on the Taskbar located in the lower right
corner of your Windows desktop. This icon looks like this:
Right -click the status icon to display the menu options.
If the WiFi connection utility is managing your WiFi connections, then the following menu options appear.
Name Description
Configure WiFi Click to open the Intel® PROSet/Wireless WiFi Connection Utility and configure
your WiFi connections.
WiFi On Click to turn on the Intel WiFi adapter. The adapter will conduct a search for
networks and may connect to a specific network, depending on the application
settings.
WiFi On, 802.11a Off This optional menu item may be present, depending on the computer
manufacturer and whether the WiFi adapter supports band 802.11a or not. If
present, this lets you turn on the WiFi radio (band b or g), but turn off the
802.11a band. See Turn Radio On or Off
WiFi Off Click to turn off the Intel WiFi adapter. If you are currently connected to a WiFi
network and you click WiFi Off, your WiFi network connection will be closed.
Connect to Profile Displays the current profiles in the Profiles list. Click on a profile to connect to it.
Add New Device This command lets you add a new device (for example, a laptop) using Wi-Fi
Protected Setup*. The availability of this command on your computer means that
your computer is already configured as a Wi-Fi Protected Setup registrar (using
the WiFi connection utility). See Add an New Device .
If Windows Zero Configuration manager is managing your WiFi connections, then the following menu options
appear.
for more information.
Page 13

Name Description
Intel® PROSet/Wireless WiFi Connection Utility User's Guide
Open
Wireless
Zero
Configuration
WiFi On Click to turn on the Intel WiFi adapter. The adapter will conduct a search for networks and
WiFi Off Click to turn off the Intel WiFi adapter. If you are currently connected to a WiFi network and
Connect to
Profile
Add New
Device
Enable WiFi
Control
Click to open Windows Zero Configuration, the wireless connections manager provided by
Windows*. Only available if you have selected Use Windows to Manage WiFi at the Intel®
PROSet/Wireless WiFi Connection Utility, Advanced menu.
may connect to a specific network, depending on the application settings.
you click WiFi Off, your WiFi network connection will be closed.
Displays the current profiles in the Profiles list. Click on a profile to connect to it.
This command lets you add a new device (for example, a laptop) using Wi-Fi Protected
Setup*. The availability of this command on your computer means that your computer is
already configured as a Wi - Fi Protected Setup registrar (using the WiFi connection utility).
See Add an New Device
Click to assign management of your WiFi connections to the WiFi connection utility. Wireless
Zero Configuration manager will no longer manage your connections. If you want to assign
management of your WiFi connections back to Wireless Zero Configuration manager, open
the Intel® PROSet/Wireless WiFi software, and under the Advanced menu, click Use
Windows to Manage WiFi.
.
Taskbar Icons
The Taskbar icon provides visual indication of the current WiFi connection state. The connection status icon is
located on the lower right corner of your Windows desktop. The Taskbar icon can be set to display or be hidden in
the Tools Menu
Name Description
Application Settings.
WiFi Off: The WiFi adapter currently is off. The WiFi adapter does not
transmit or receive while it is off. Click WiFi On to enable the adapter.
The icon is white and static.
Searching for WiFi networks: The WiFi adapter searches for any
available WiFi networks. The icon is white with animation.
No WiFi networks found: There are no available WiFi networks
found. Intel® PROSet/Wireless WiFi Connection Utility periodically
scans for available networks. If you want to force a scan, double-click
the icon to launch Intel® PROSet/Wireless WiFi Connection Utility and
click Refresh. The icon is red.
WiFi networks found: An available WiFi network is found. Double click the icon to display the WiFi Networks list. Select the network.
Click Connect. The icon is yellow.
Authentication failed: Unable to authenticate with WiFi network. The
icon is green with a yellow warning triangle.
Connecting to a WiFi network: Flashes while an IP address is being
obtained or if an error occurs.
Connected to a WiFi network: Connected to a WiFi network. Tool tip
displays network name, speed, signal quality and IP address. The icon
is green with waves that reflect signal quality. The more waves, the
better the signal quality.
Page 14

Tool Tips and Desktop Alerts
The Tool Tips and Desktop Alerts provide feedback and interaction. To display Tool Tips, move your mouse pointer
Intel® PROSet/Wireless WiFi Connection Utility User's Guide
over the icon. Desktop alerts are displayed when your WiFi network changes state. For example, if you are out of
range of any WiFi networks, a desktop alert is displayed when you come into range.
Select Show Information Notifications in the
Application Settings to enable desktop alerts.
Tool Tips
Tool tips display when the mouse pointer rolls over the icon. The tool tips display text for each of the connection
states.
Desktop Alerts
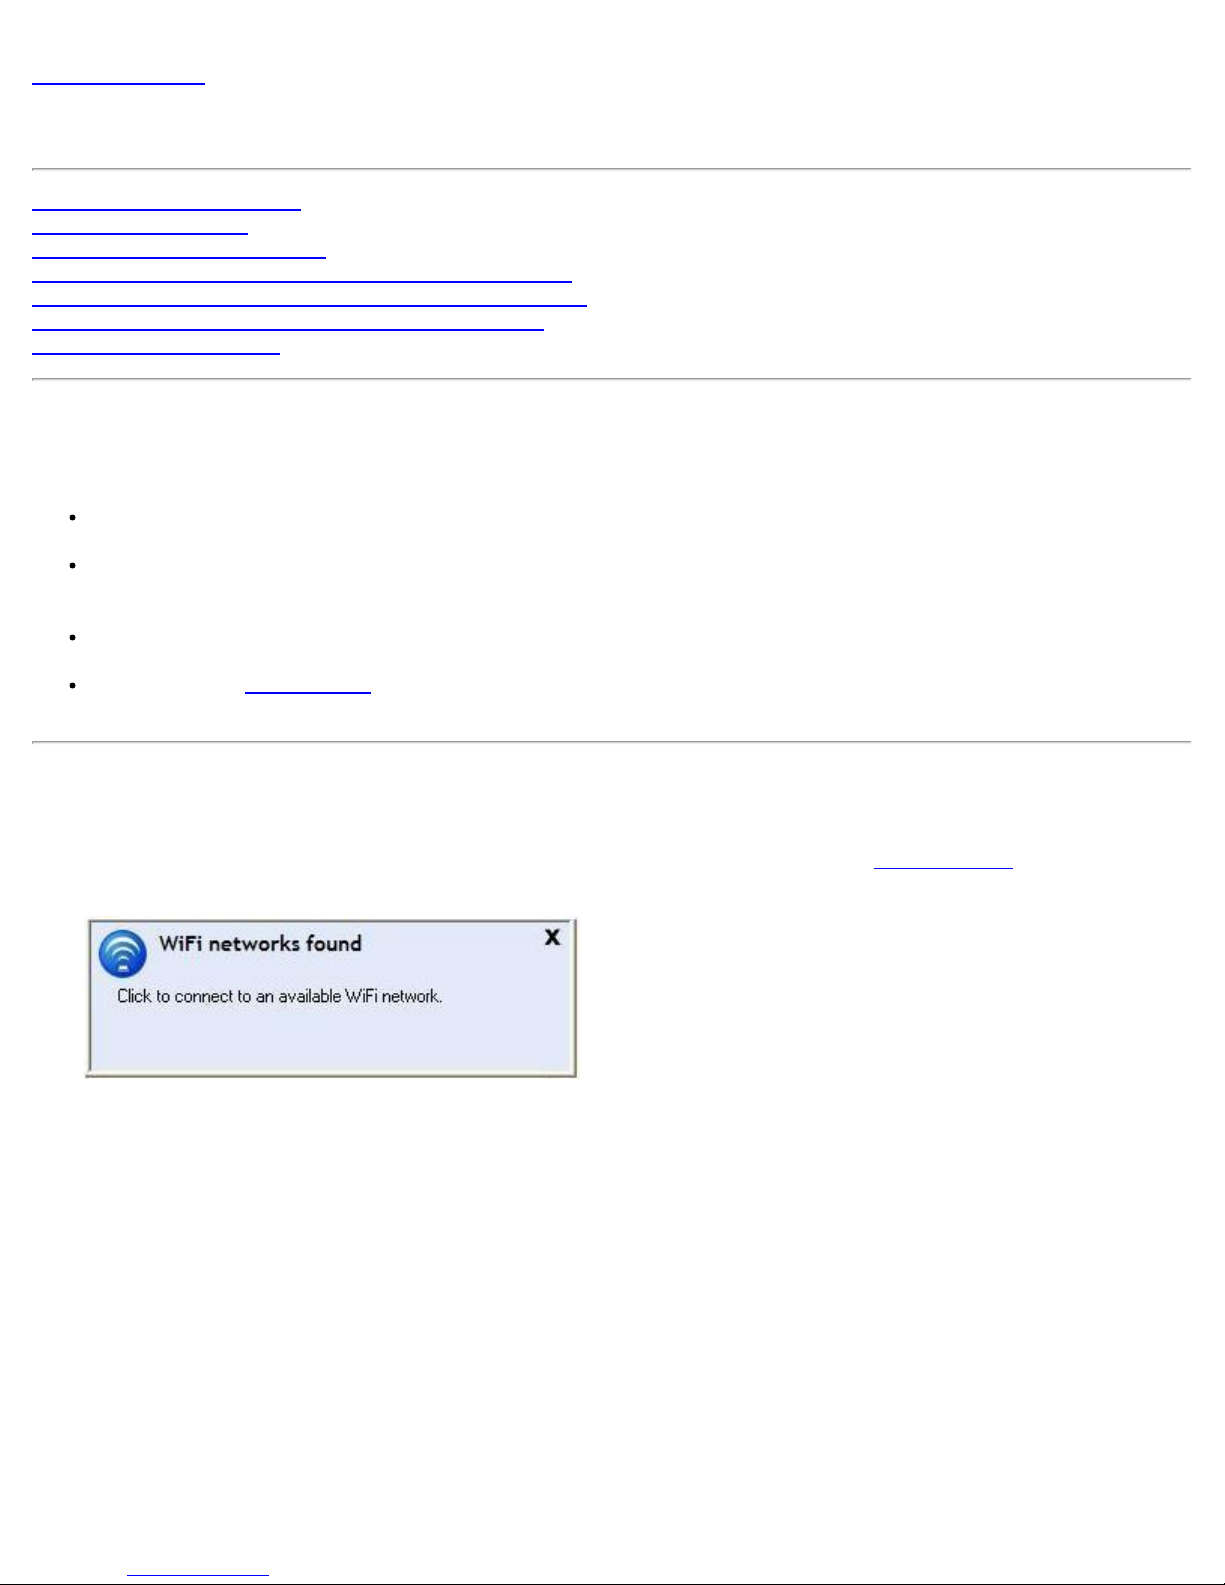
When user action is required, a desktop alert displays. If you click the alert, then an appropriate action is taken.
For example when WiFi networks are found, the following alert displays:
Action: Click the desktop alert to connect to a network in the WiFi Networks list.
Once connected, the alert displays the WiFi network that you are connected to, the speed of the connection, signal
quality and IP address.
Desktop alerts are also used to indicate if there is a connection problem. Click the alert to open the Intel®
Wireless Troubleshooter .
Start Intel® PROSet/Wireless WiFi Software from Taskbar
Page 15

To start Intel® PROSet/Wireless WiFi Software:
Intel® PROSet/Wireless WiFi Connection Utility User's Guide
Double-click the Taskbar icon located in the lower right corner of your Windows desktop, or
Right -click the Taskbar icon , and select Configure WiFi.
Back to Top
Back to Contents
Trademarks and Disclaimers
Page 16
Back to Contents
Intel® PROSet/Wireless WiFi Connection Utility User's Guide
Get Connected
Connect to a WiFi Network
First Time Connection
Using Wi-Fi Protected Setup*
Configure an Access Point and set up a WiFi Network
Connect an Enrollee to a WiFi Network or Access Point
Add an Enrollee to a WiFi Network at the Registrar
Other Wireless Managers
Connect to a WiFi Network
You can connect to a WiFi network with one of the following methods.
Automatic connection: If an existing profile matches an available network, you are automatically
connected to that wireless network.
Configure a new profile: Select a wireless network from the list of WiFi networks in the Intel®
PROSet/Wireless WiFi Connection Utility main window. Click Connect. If you successfully connect, a profile is
created in the Profiles list for future use.
Connect to a profile in the Profiles list: You can select a profile from the Profiles list. To activate it, click
Connect. This lets you connect to a network that is lower in the list (if it is available).
Right -click the Taskbar icon located in the lower right corner of your Windows desktop. Click Connect to
Profile. A list of previously configured profiles is listed. Select a profile.
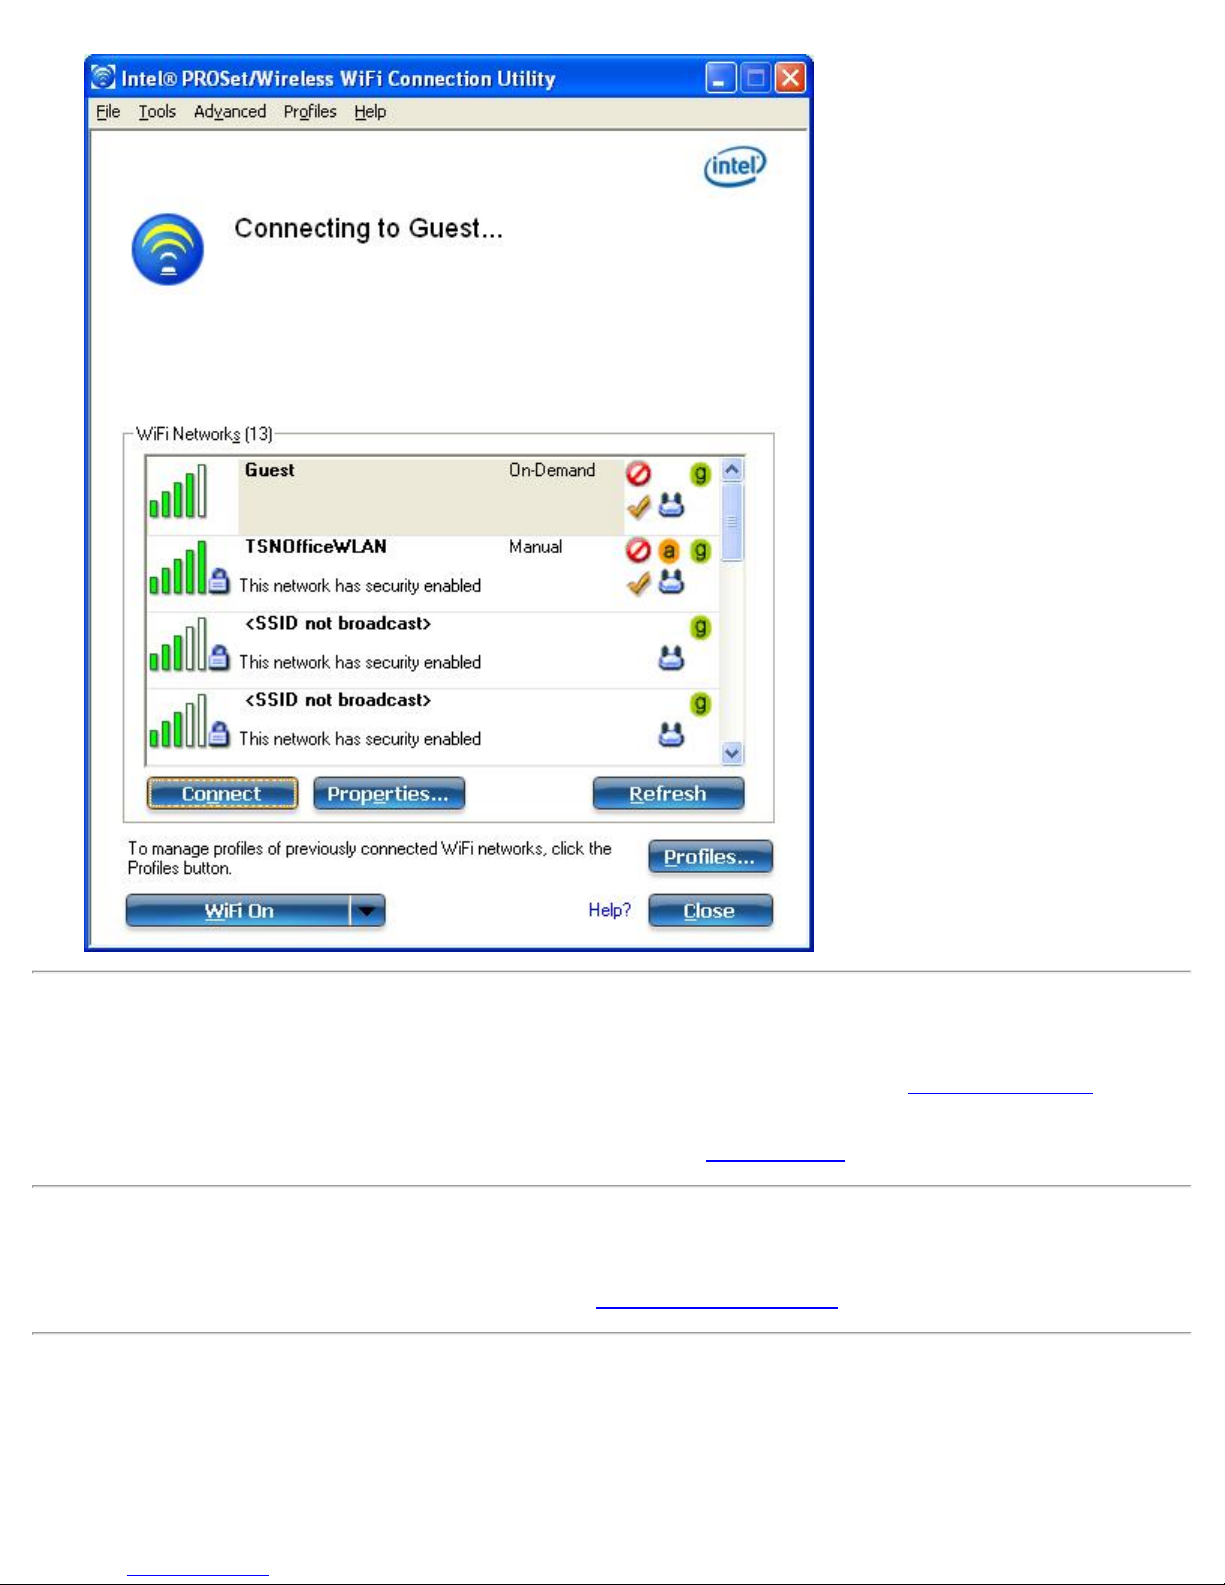
First Time Connection
The WiFi connection utility automatically detects WiFi networks that are within range of your WiFi adapter. When a
network is found, a desktop alert notification displays: WiFi networks found. See
information.
1. Double-click the desktop alert to open the WiFi connection utility main window.
2. Select a network from the WiFi Networks list.
Taskbar Icons for more
Page 17
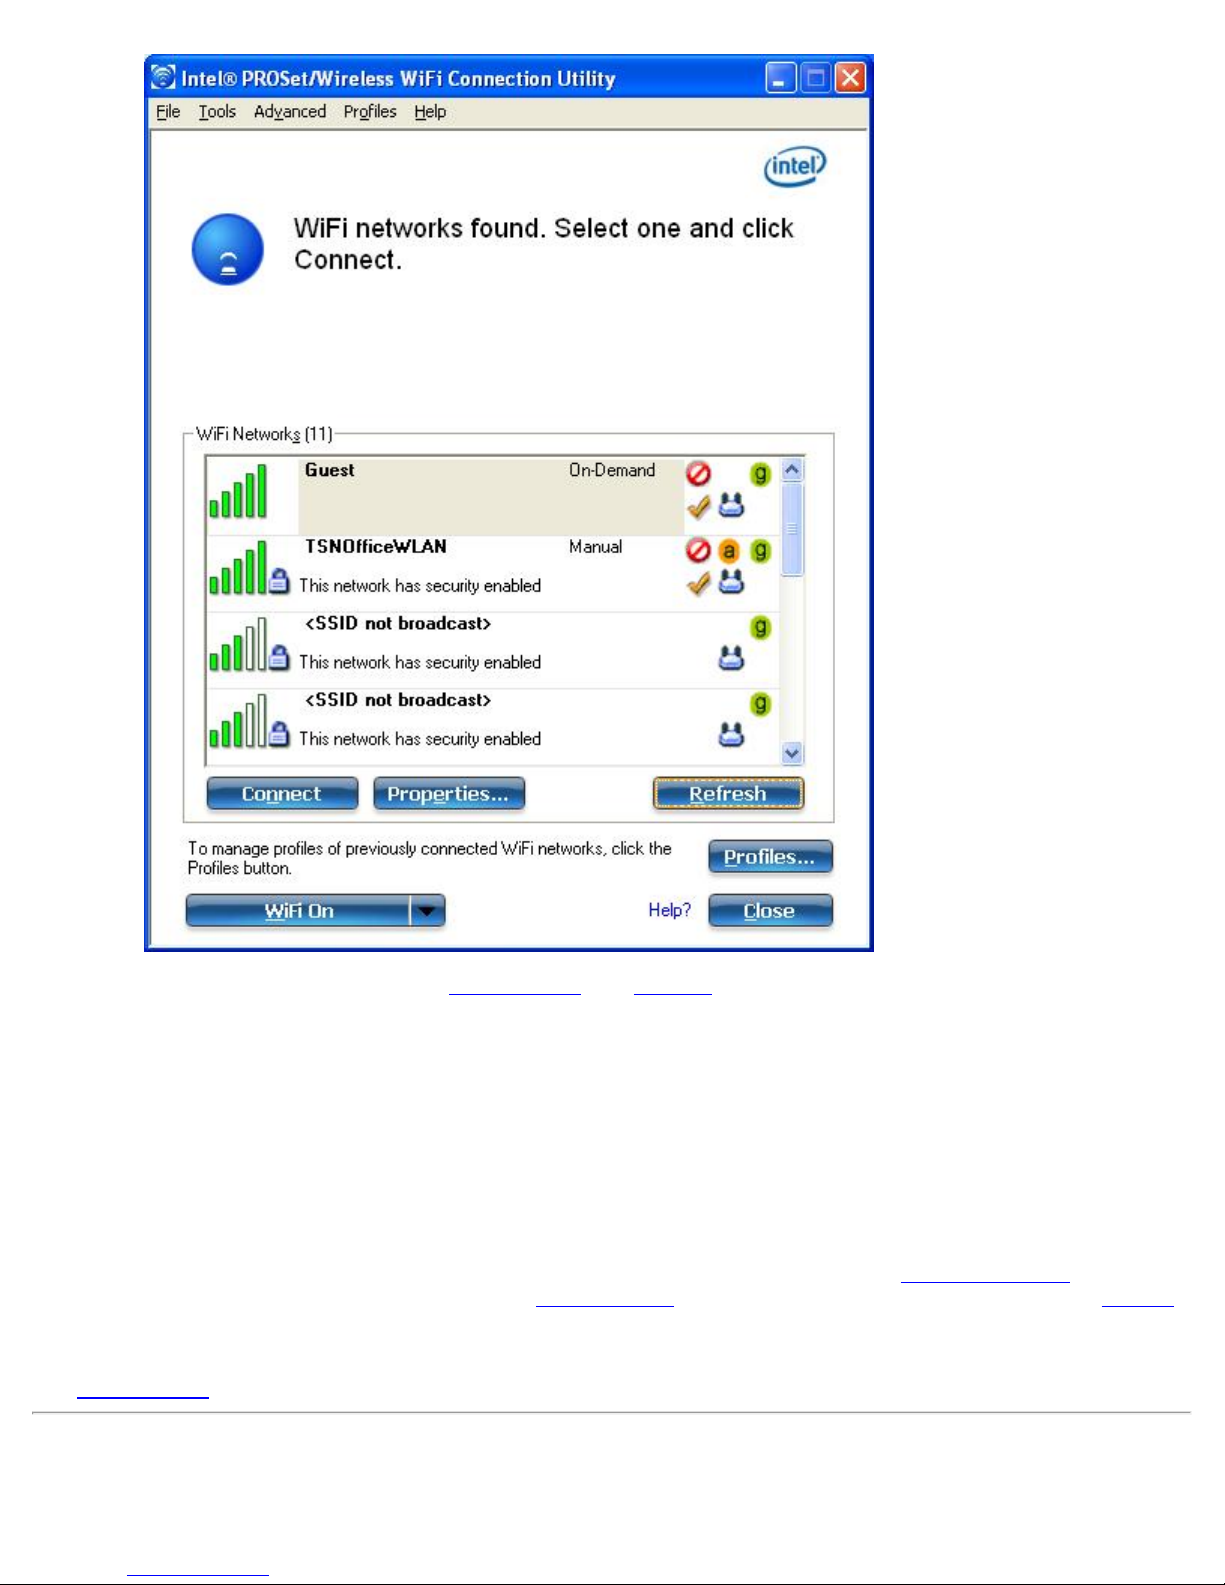
3. Click Connect. If the network does not require security authentication, a desktop alert notifies you that you
Intel® PROSet/Wireless WiFi Connection Utility User's Guide
are connected to the network. See Main Window
and icons.
4. If the network has security enabled, the Profile Wizard opens the Configure WiFi Settings window. This
guides you through the process of creating a WiFi profile for this network. After a profile is created,
connecting to this network in the future will be much easier.
5. You are requested to specify a Profile Name. The Profile Name is your name for this network. You can
accept the existing profile name if present, or enter one. The profile name can be anything that helps you
identify this network. For example, My Home Network, Coffee Shop on A Street.
6. You are requested to specify WiFi Network Name (SSID): This contains the network identifier name. This
is a unique identifier that differentiates one WiFi network from another. If one is already entered, you can
keep that.
7. Click Next. The Profile Wizard then detects the security settings of this network. The information you enter
depends on those security settings. For information about security settings, see Security Settings
information about keys and passwords, see Network Keys
You may need to contact the network administrator for the information needed to log into this network.
8. After entering the required information, click OK to connect to the wireless network.
and Taskbar for more information about the taskbar menu
. For more
. For more information about profiles, see Profiles.
See Main Window
for more information.
Using Wi-Fi Protected Setup* to Configure or Join a Network
Page 18

Configure an access point and set up a network
Intel® PROSet/Wireless WiFi Connection Utility User's Guide
Connect an enrollee (computer) to a network or access point
Add an enrollee to a network at the registrar
Intel® PROSet/Wireless WiFi Connection Utility implements Wi -Fi Protected Setup* to permit easy and secure set
up and management of a WiFi network. You can use this capability to initially set up a wireless network and to
introduce new devices to the network. Wi - Fi Protected Setup simplifies the set up process and at same time helps
ensure that the network is configured securely. The following terms are used in this discussion.
Access Point: A device that connects wireless devices to a network. The access point is configured with the
necessary network name (SSID) and security credentials.
Enrollee: A device that seeks to join an access point or wireless network, but does not have the password
or key for the access point or network. Once the computer obtains the valid password or key, it becomes a
member of the wireless network. The WiFi connection utility can be configured to operate as an enrollee for
a supported access point.
Registrar: A registrar is a logical entity (usually a computer) that allows other devices (usually computers)
to join the wireless network. The WiFi connection utility can be configured to operate as a registrar for a
supported access point(s). The registrar securely transfers the access point key or password automatically.
A new wireless network is established by configuring the access point, connecting the desired computers equipped
with WiFi adapters, and optionally attaching external network connectivity (i.e. the Internet, typically by connecting
the access point to a DSL or cable modem, or equivalent).
Configure an Access Point and Set up a WiFi Network
The following steps will configure this computer as a registrar for a secure network or access point.
1. Locate the device ownership password for the access point. This is set by the manufacturer of the access
point. The password is often located on a label on the bottom of the device.
2. Turn on the network access point.
3. At the computer that you want to establish as the registrar, turn on the WiFi connection utility.
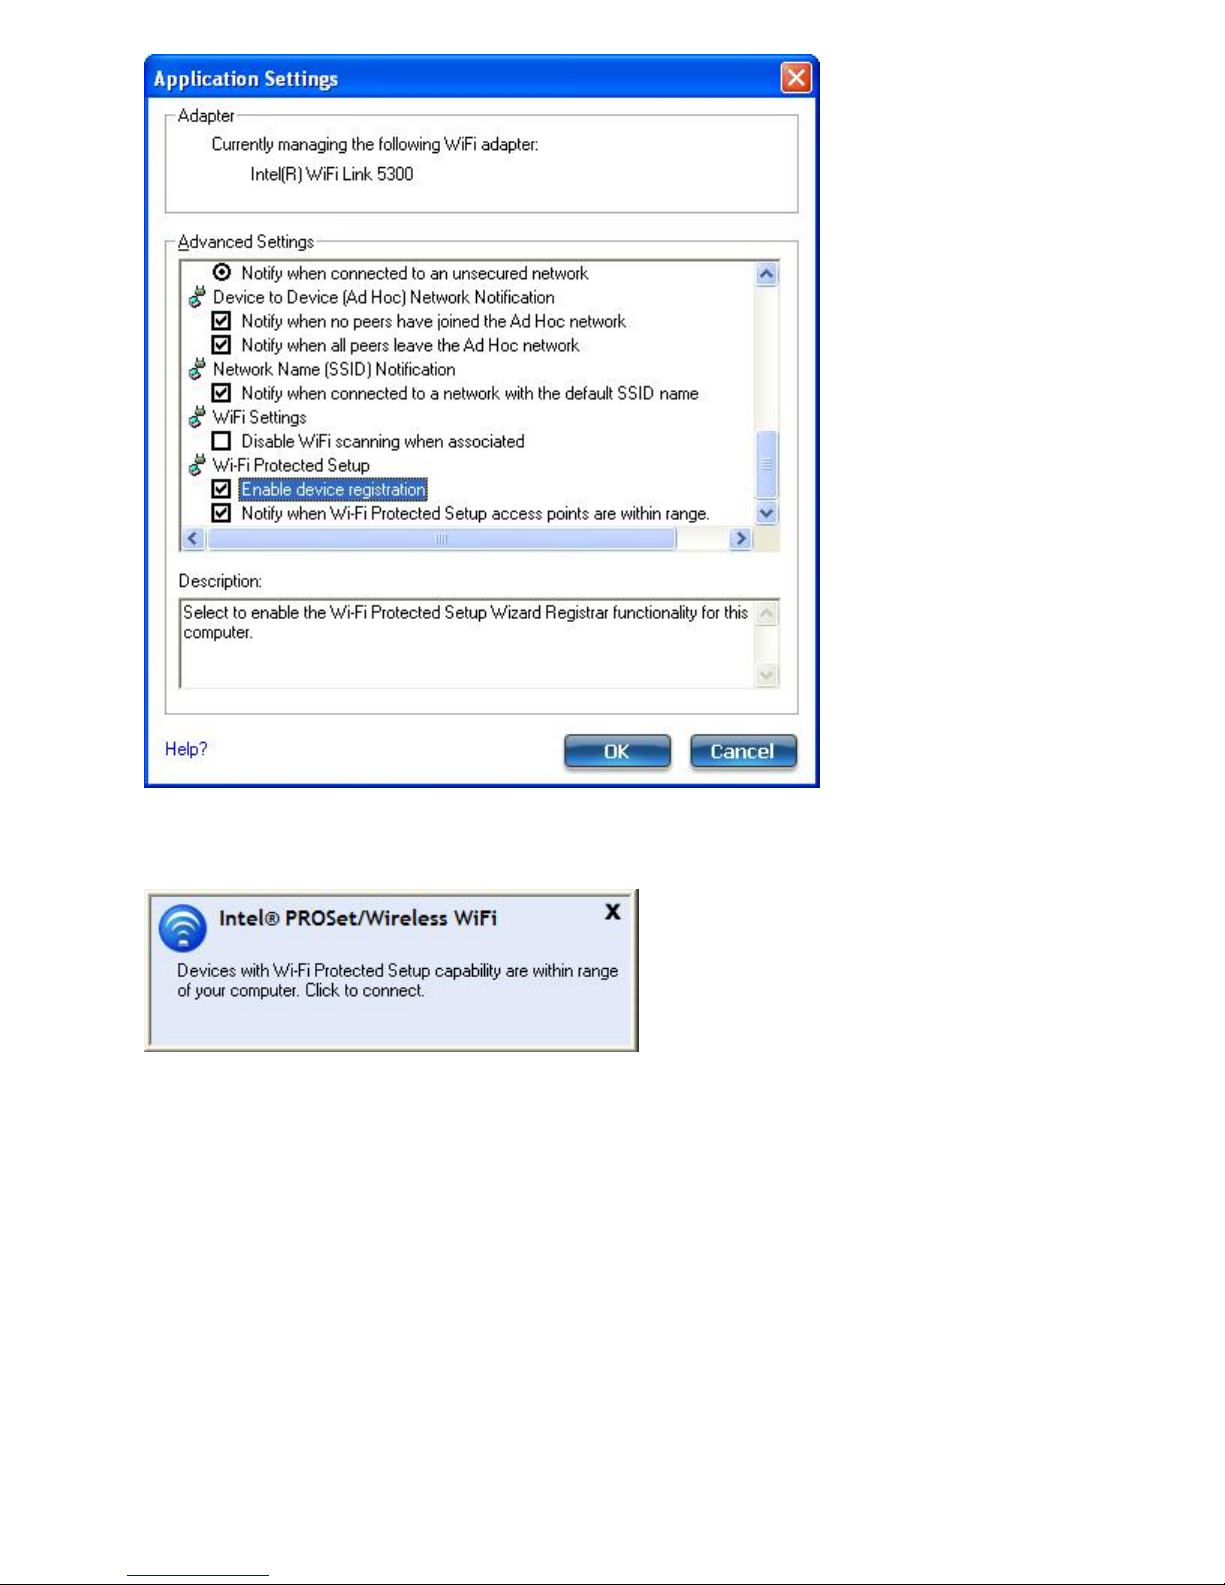
4. In the WiFi connection utility, click Tools > Application Settings.
5. In the Application Settings area under Wi -Fi Protected Setup, turn on Enable device registration.
Page 19
Intel® PROSet/Wireless WiFi Connection Utility User's Guide
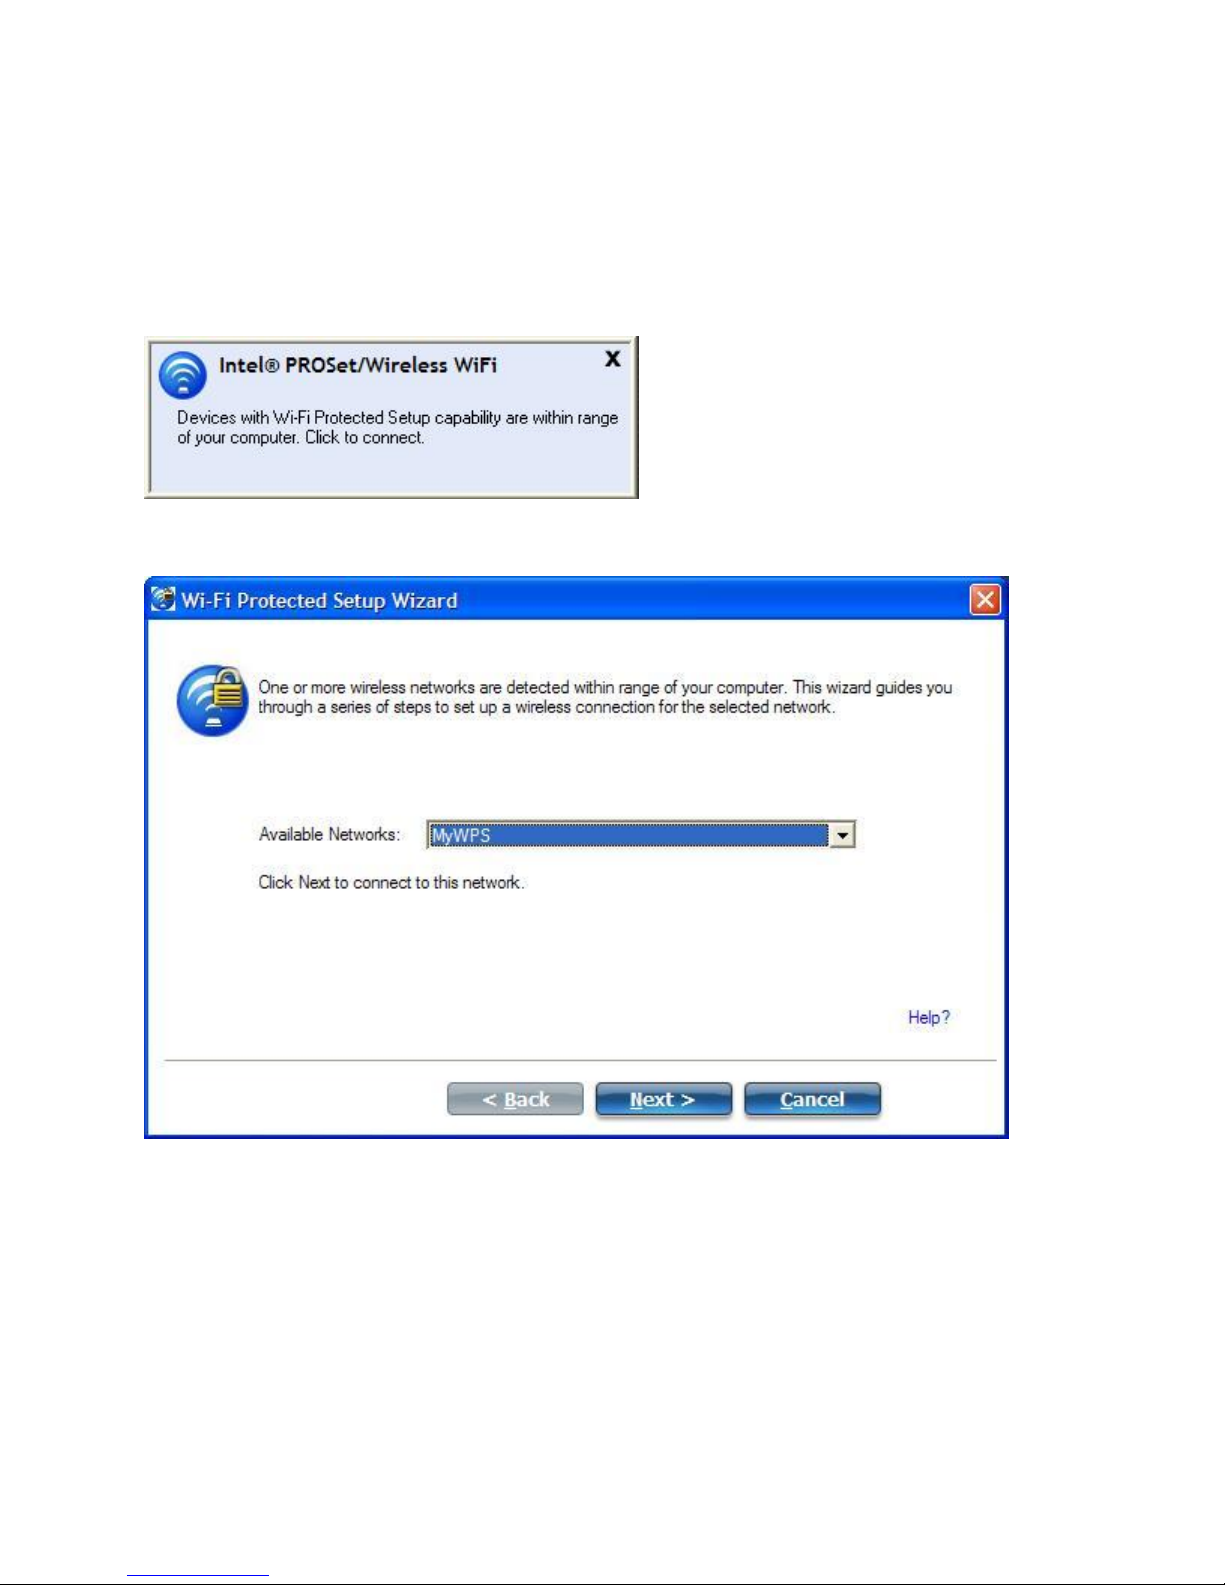
6. The next message tells you that one or more compatible devices are within range of your computer. Click
this message. (Or, you can select the network from the WiFi Networks list in the WiFi connection utility main
window.)
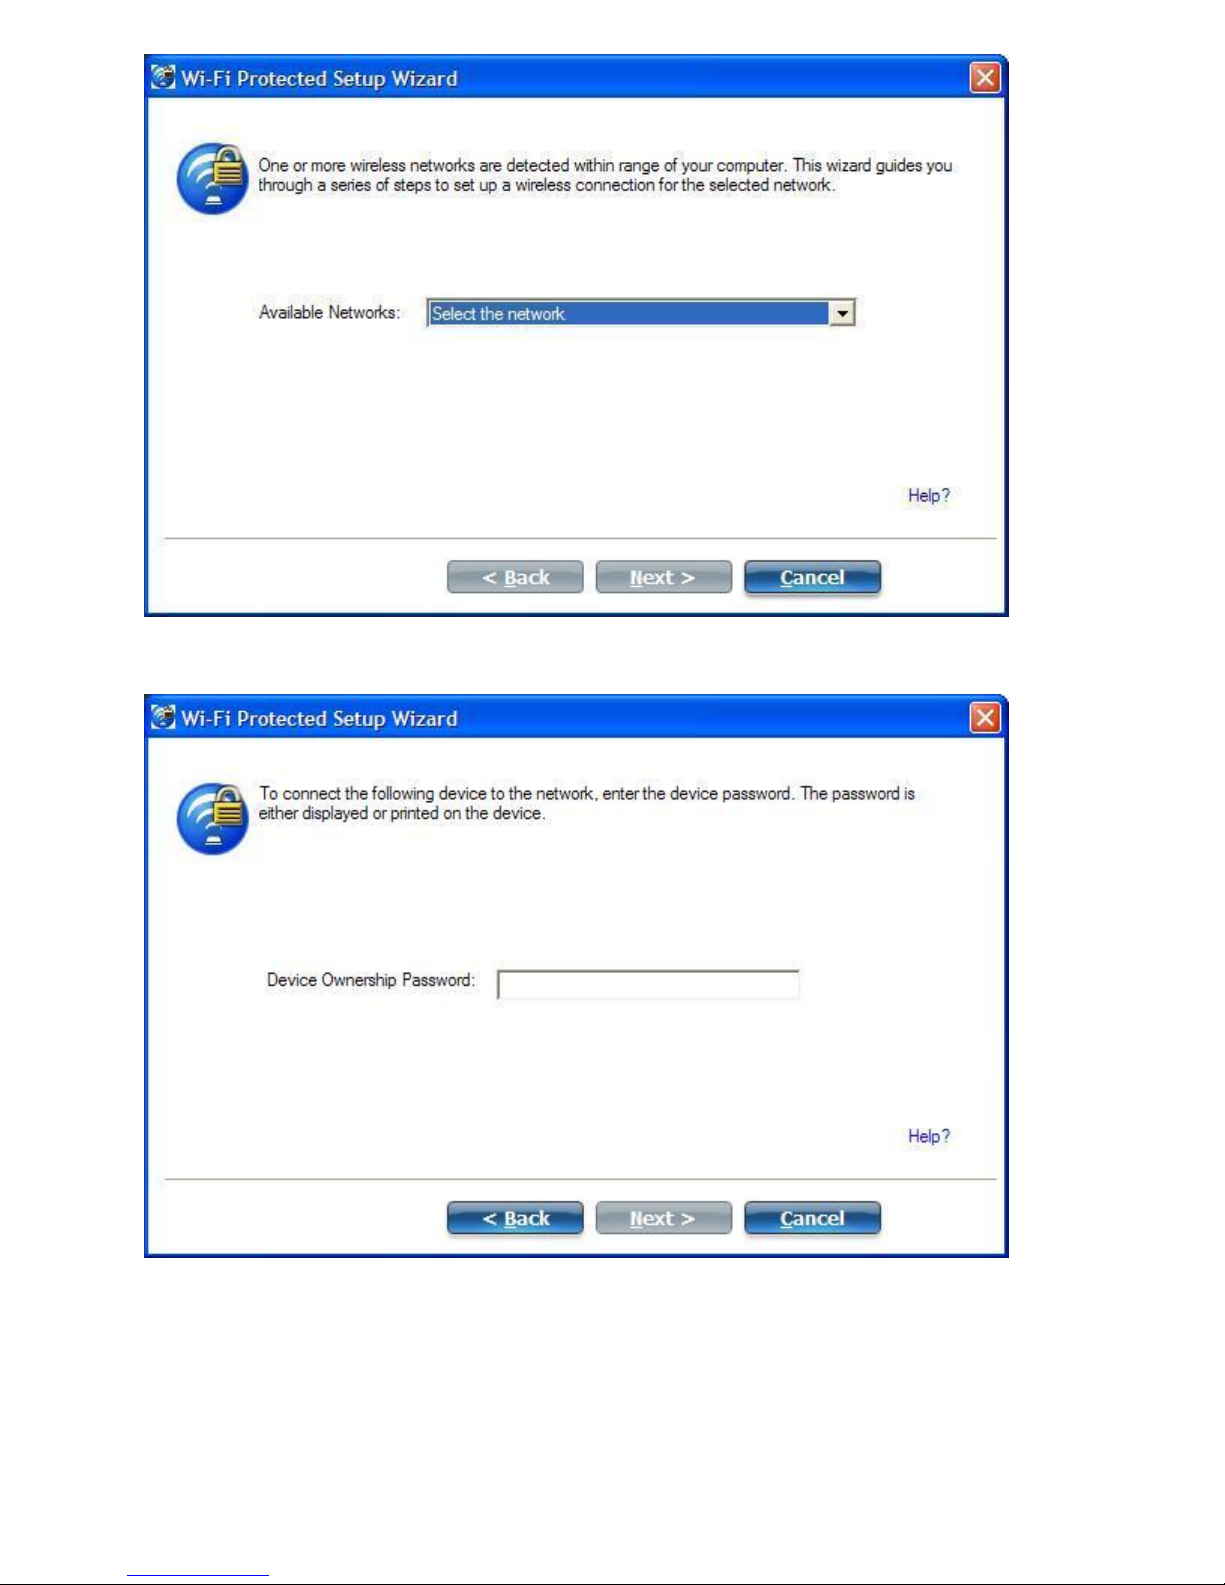
7. At the next window, on the Available Networks list, select the network that you want to connect to. The
listed networks depends on what is detected. Click Next.
Page 20
Intel® PROSet/Wireless WiFi Connection Utility User's Guide
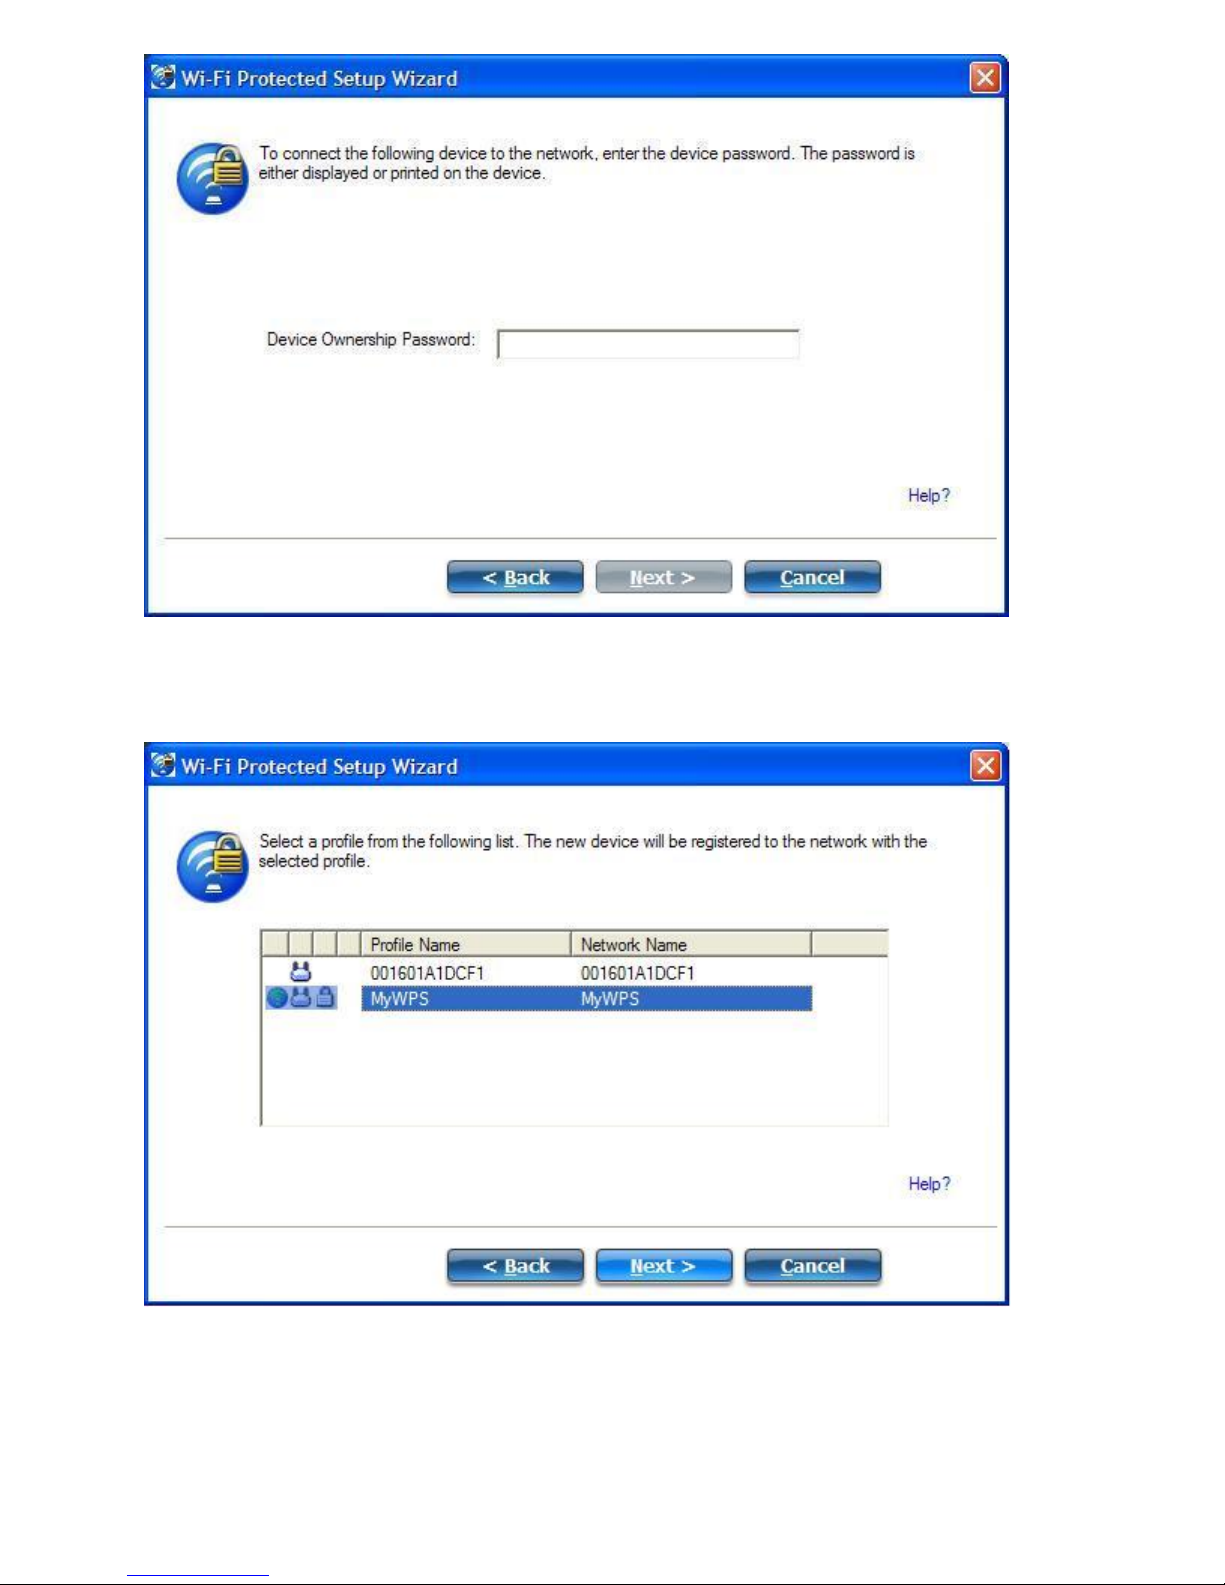
8. At the next window, enter the Device Ownership Password that you retrieved from the access point in step
1. Click Next to continue.
9. The next window shown displays the Network Name, Security Type, and Password. If the access point is
already configured , it is grayed out; proceed to step 10. If the access point is not configured (fields are not
grayed out), proceed to step 11.
10. After a few seconds the following message is displayed:
The access point is already configured. Do you want to reconfigure it?
If you do not want to reconfigure the access point, select No. The software joins the network, makes the
connection, and creates a profile. It then exits and this procedure is completed. If you want to reconfigure
the access point, select Yes.
Page 21
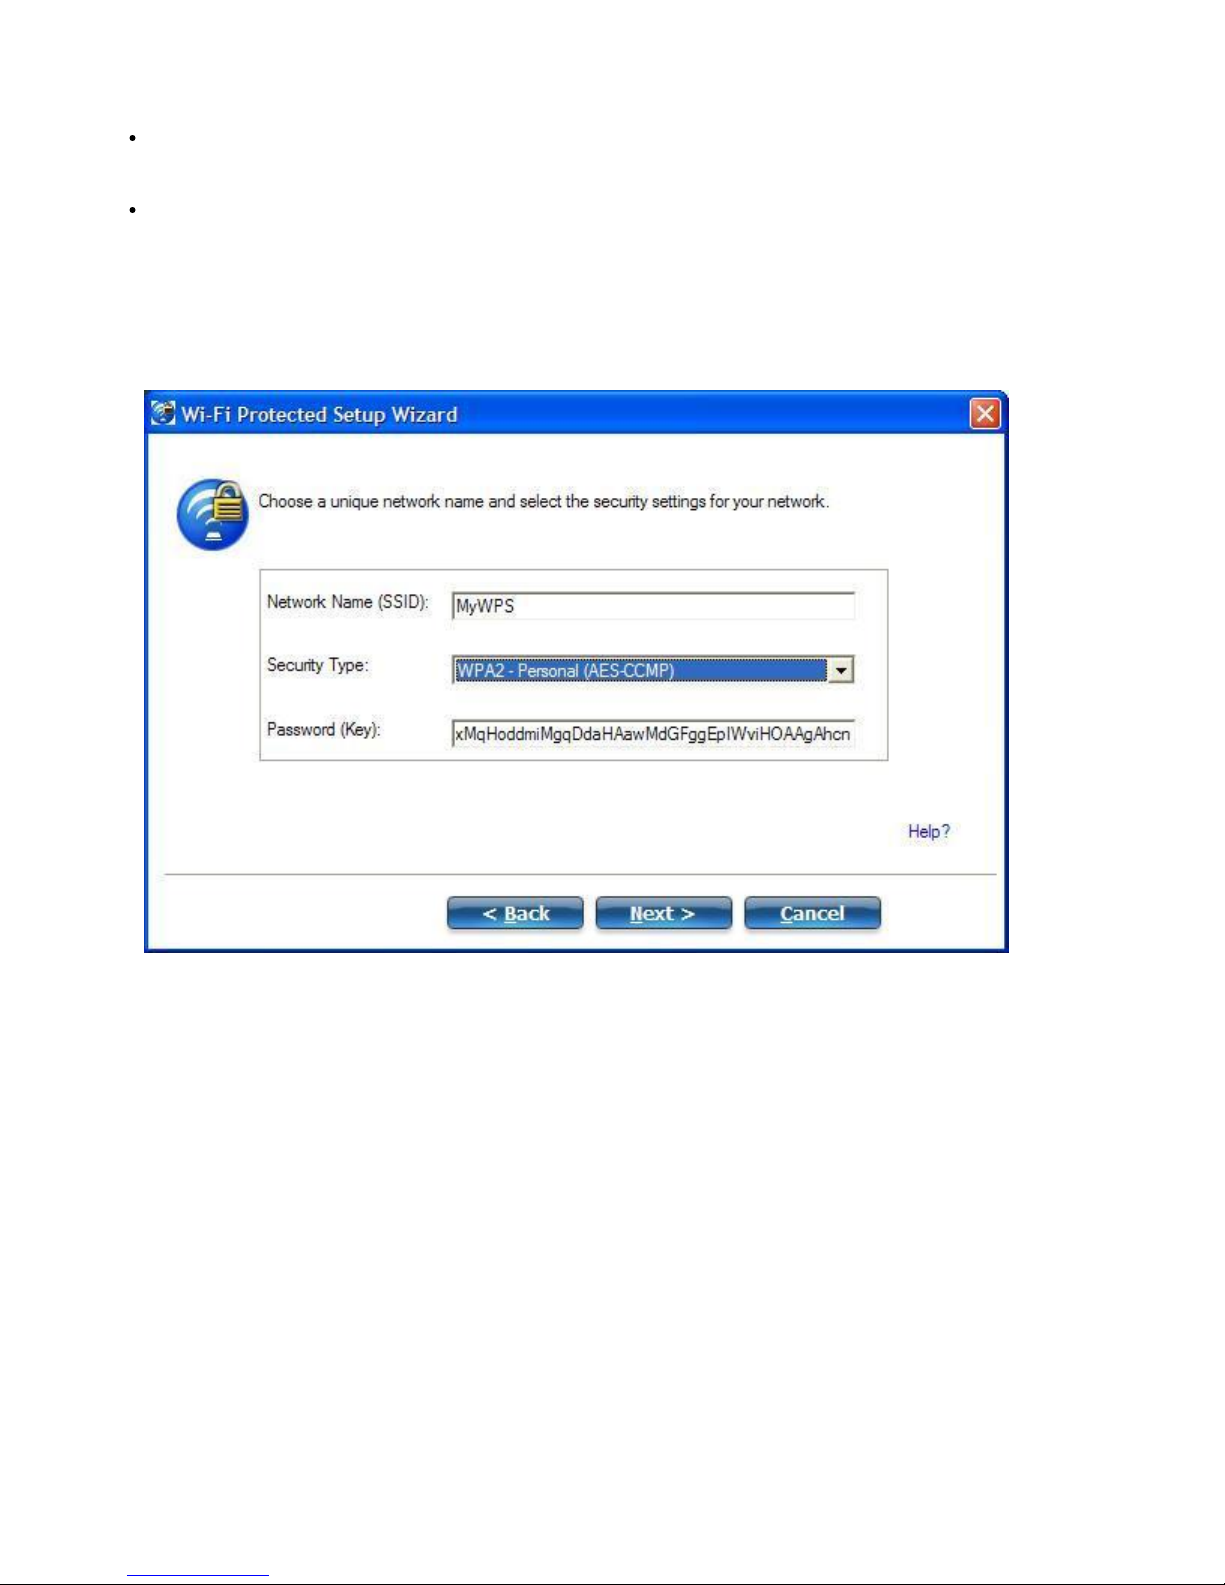
11. The next window is displayed. The first field shows the name of the access point. This is by default the
Intel® PROSet/Wireless WiFi Connection Utility User's Guide
Network Name (SSID). In this example we have reset it to MyWPS. You can name it whatever you want.
12. In the Security Type field, select the security type you want.
WPA* Personal requires manual configuration of a pre -shared key (PSK) on the access point and
clients. This PSK authenticates a password or identifying code, on both the client station and the
access point. An authentication server is not needed.
WPA2* is the second generation of WPA security that provides enterprise and consumer wireless users
with a high level of assurance that only authorized users can access their WiFi networks. Here we have
selected WPA2 Personal security. You can use Intel® PROSet/Wireless WiFi Connection Utility profiles
to obtain the WiFi network name (SSID) and WPA2-Personal pass phrase to use for a legacy device.
13. The third field is the Password (Key). The password shown is randomly generated or pre-configured, you
can change it to whatever password you want. However you should use a robust key for improved security.
It must have between 8 and 63 characters. When you have completed this step, click Next.
The following windows show the configuration of the access point and the registrar.
Page 22
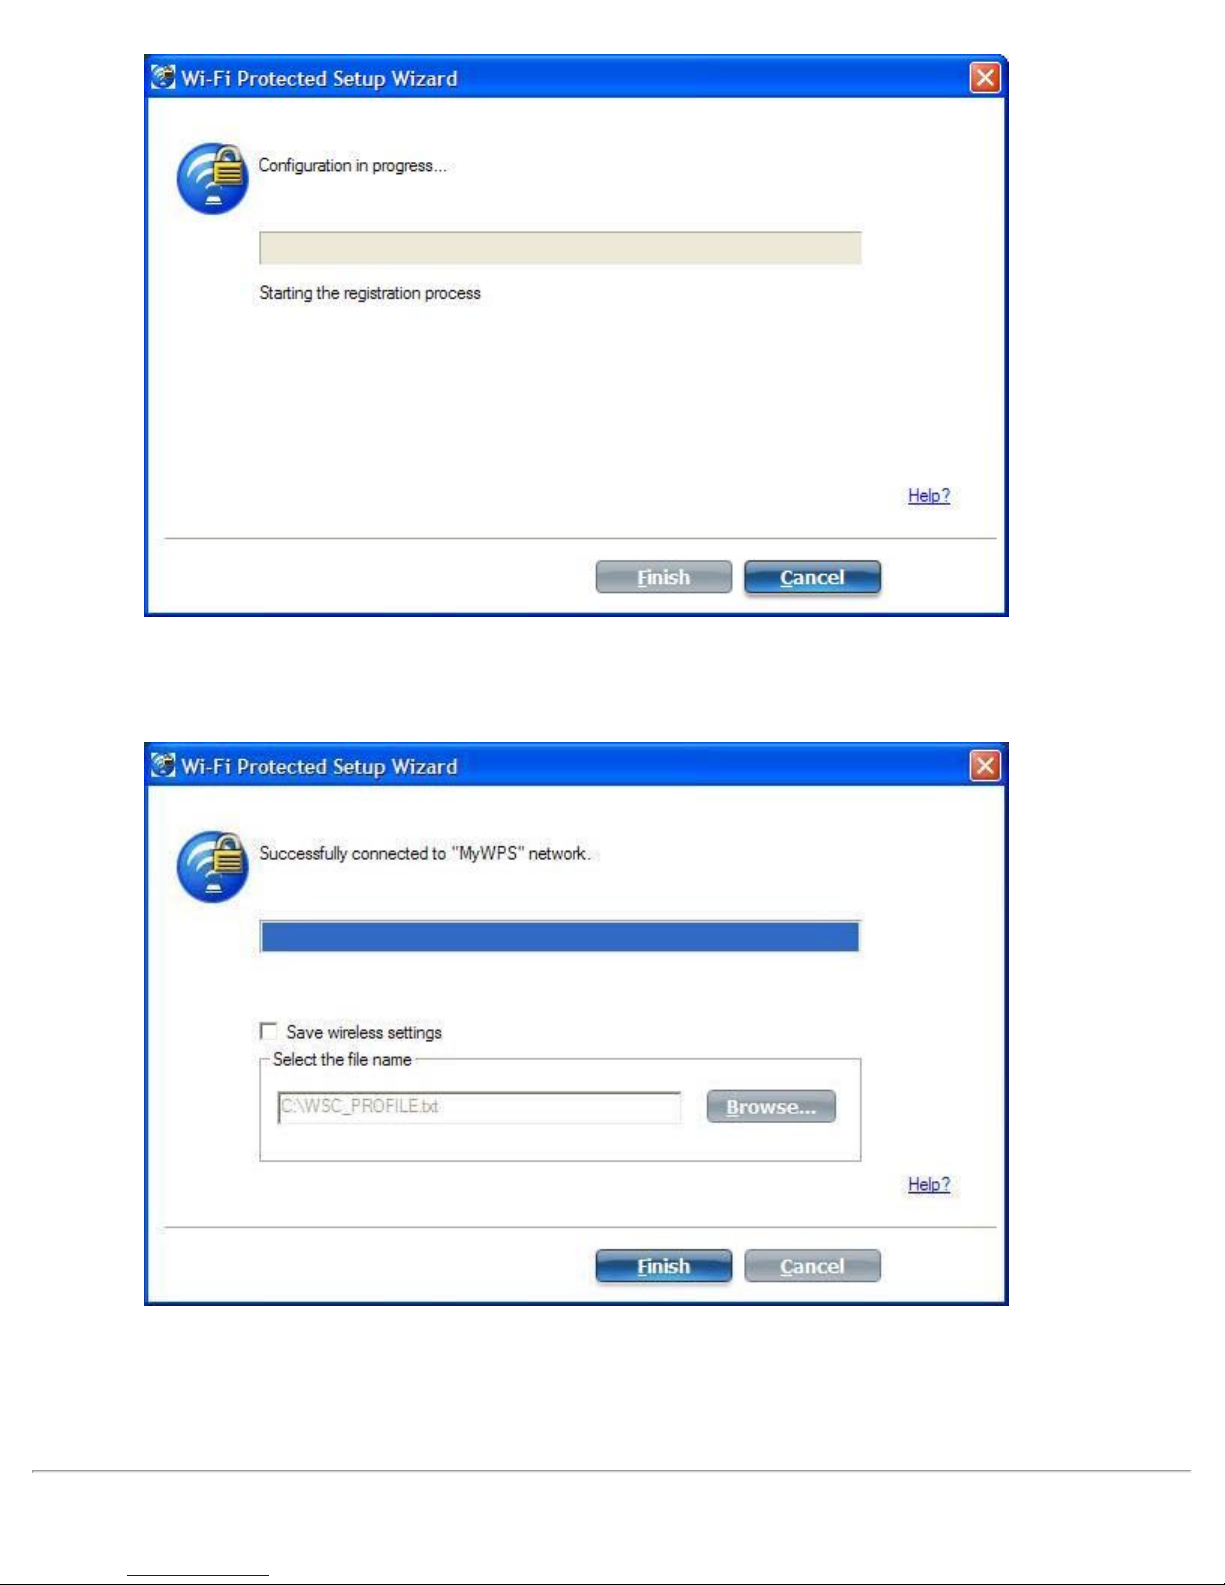
Intel® PROSet/Wireless WiFi Connection Utility User's Guide
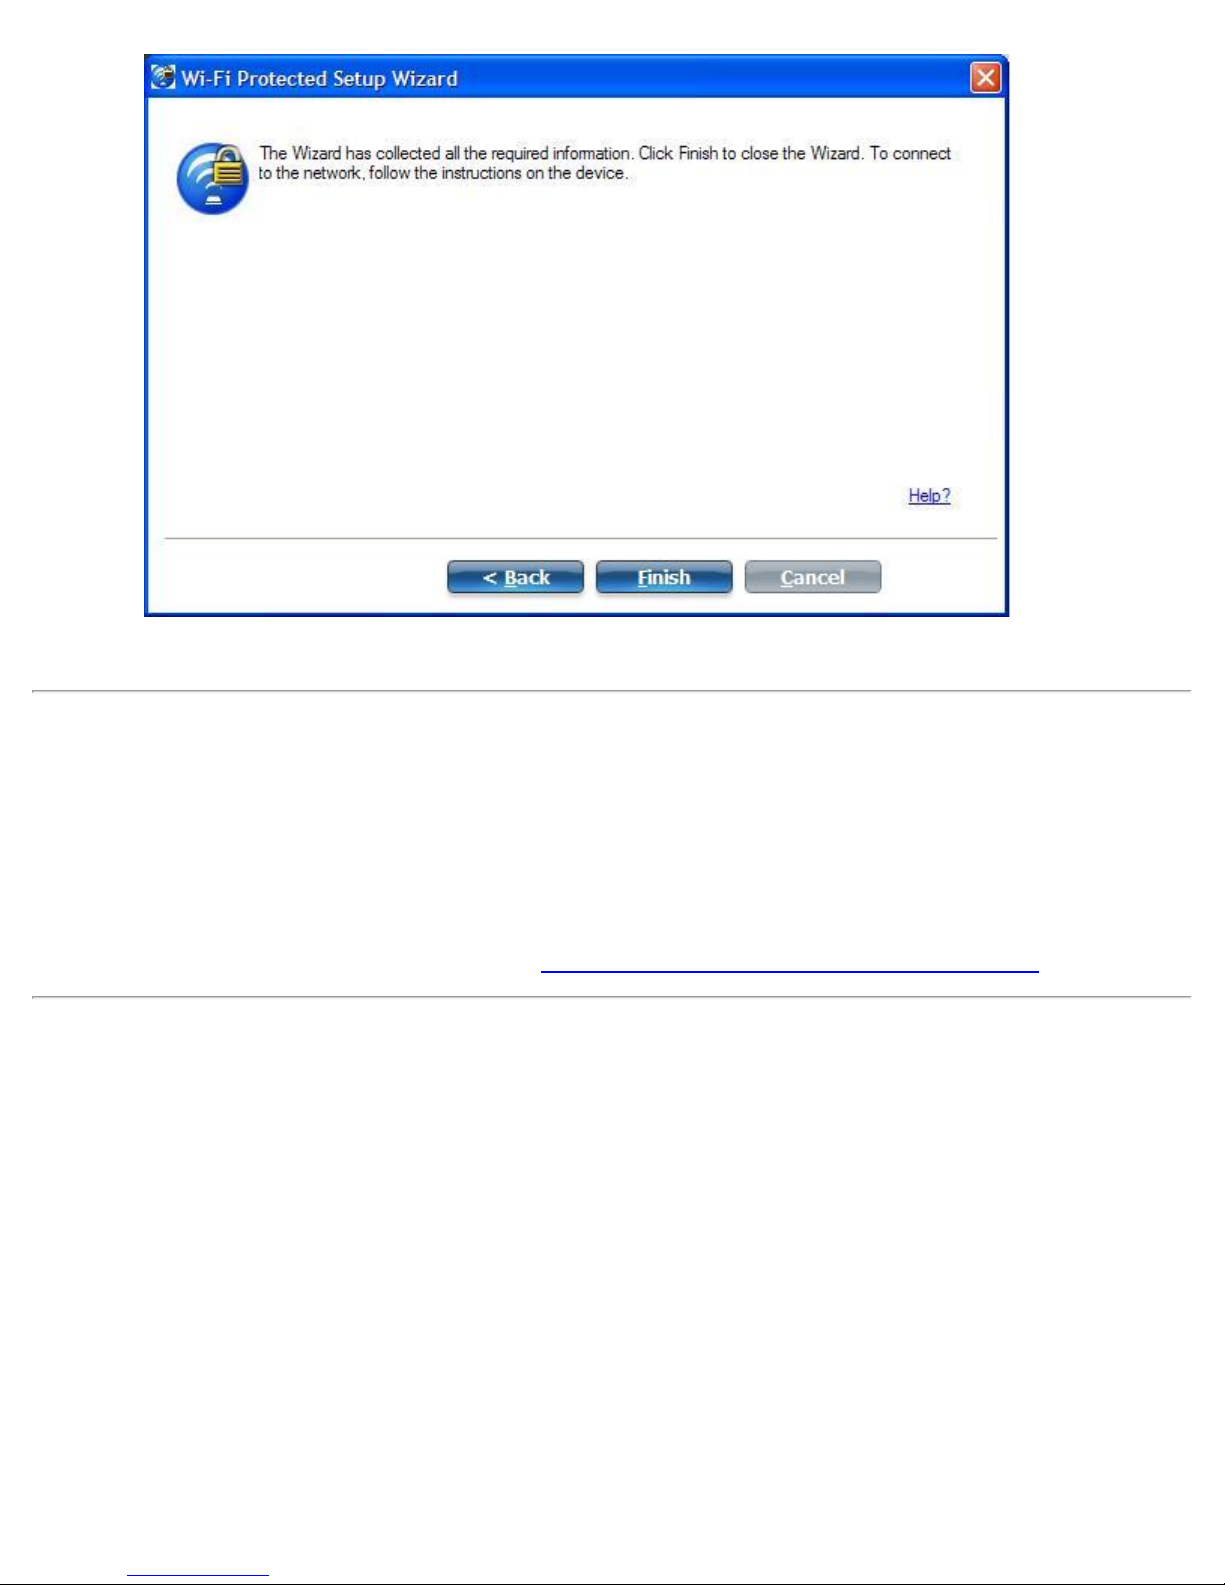
14. After the network receives the Ownership Password, you are notified that you have Successfully connected
to <name of wireless network>. Click Finish. This process completes configuration of the access point
and the registrar.
15. If you want to save these settings to a profile for future use by a legacy client, click Save wireless
settings. The profile settings are saved to a text file (txt) on your local hard drive. The file is saved to your
local C:\ drive by default. Accept the default save location or click Browse to choose another location on
your computer.
Next, you can connect an enrollee (computer) to the network using the registrar.
Page 23
Connect an Enrollee to a WiFi Network or Access Point
Perform these steps to connect an enrollee to the network you just created. This assumes that the registrar
Intel® PROSet/Wireless WiFi Connection Utility User's Guide
computer is running the WiFi connection utility.
NOTE: To achieve transfer rates greater than 54 Mbps on 802.11n connections, WPA2-AES security must be
selected. No security (None) can be selected to enable network setup and troubleshooting.
1. At the enrollee you want to connect the network, a message tells you that one or more access points with
Wi-Fi Protected Setup capability is within range of your wireless computer. Click on this message. (Or, you
can select the network from the WiFi Networks list in the WiFi connection utility main window.)
2. The WiFi Protected Setup Wizard start up page opens. Use the Available Networks list to select the
network that you want to connect to (in this example it is MyWPS). Then click Next.
3. The Discovery window opens. The enrollee that you want to connect to the network discovers the registrar
for the network. Assuming that the Discovery process succeeds, the name of the registrar or access point is
displayed.
Page 24
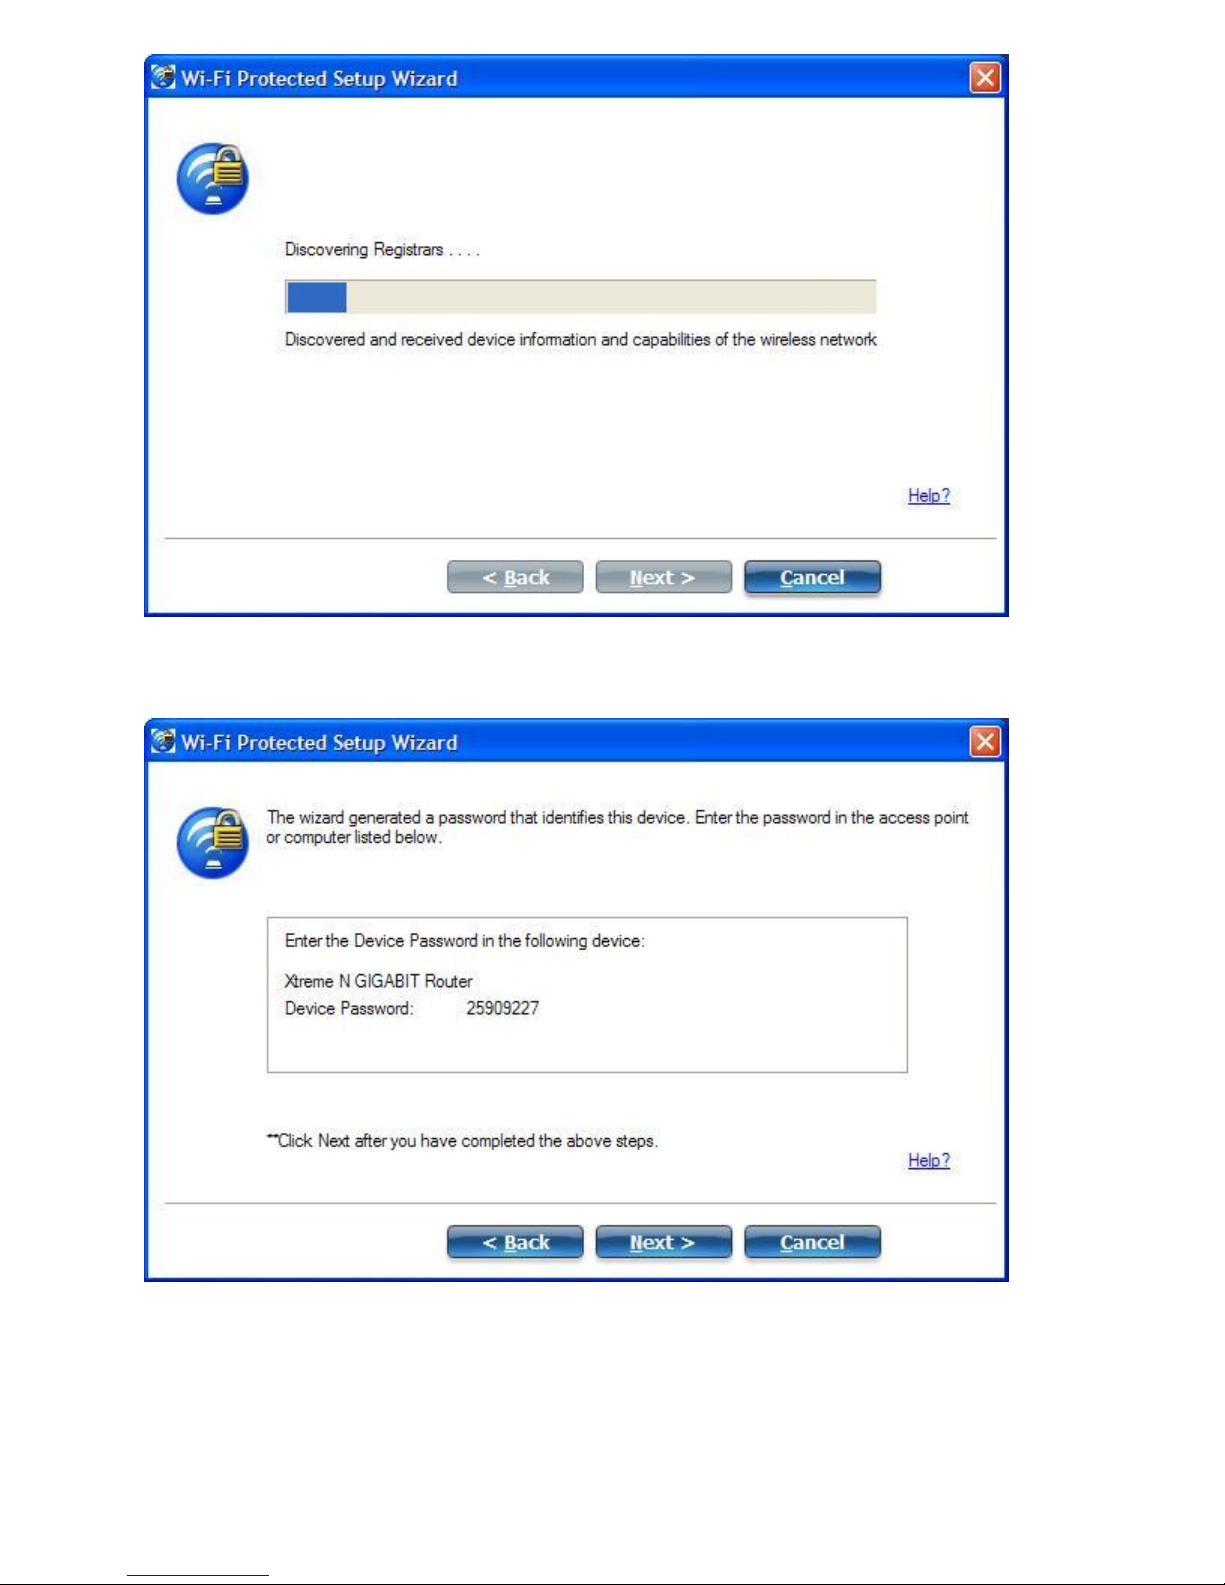
Intel® PROSet/Wireless WiFi Connection Utility User's Guide
4. The next window appears, displaying the Device Password (enrollee password). The password displayed at
the enrollee is a unique, randomly generated temporary password for the enrollee. This password is used to
ask permission to connect to the network access point. (The password shown below is an example only.).
5. At the registrar, enter the password provided by the enrollee. Then click Next.
NOTE: This process assumes that the registrar is running the WiFi connection utility; the process and
windows displayed at the registrar may be different for software from other vendors. Some access points
may have a built in registrar.
Page 25
Intel® PROSet/Wireless WiFi Connection Utility User's Guide
6. The next window lists the profile for this network. The selected profile will be sent to the enrollee, granting it
access to the network. Only supported profiles are displayed. Supported profiles are those based on WPA PSK, WPA2-PSK, and Open (None) security. Select the profile and click Next to finalize the enrollment
process.
7. The last window shows that the enrollee registration with the registrar is complete. Click Finish.
Page 26
Intel® PROSet/Wireless WiFi Connection Utility User's Guide
8. At the enrollee, click Next. At the enrollee, you are notified when you have Successfully connected to
<name of wireless network>. Click Finish.
Add an Enrollee to an Existing WiFi Network at the Registrar
This following procedure lets you add an enrollee to an existing WiFi network, where the access point is already
configured and the registrar has already joined the AP.
NOTE: This process assumes that the registrar is running the WiFi connection utility; the process and windows
displayed at the registrar may be different for software from other vendors.
1. Get the Device Password for the enrollee computer that you want to add to the network.
2. At the task tray icon for the WiFi connection utility, right - click and select Add New Device.
3. Perform steps 5 through 8 of the procedure Connect an Enrollee to a Network or Access Point
.
Other Wireless Managers
If the WiFi connection utility detects another software application trying to communicate with the wireless device,
you are notified of this behavior.
Microsoft Windows* XP Wireless Zero Configuration
To switch from the Intel® PROSet/Wireless WiFi Connection Utility to the Microsoft Windows* XP Wireless Zero
Configuration, perform these steps:
1. At the Intel® PROSet/Wireless WiFi Connection Utility main window, under the Advanced menu, select Use
Windows to Manage WiFi.
2. At the prompt window, you are queried: Do you want Windows to manage your WiFi network connections ?
Click Yes.
3. Click Close to close the Intel® PROSet/Wireless WiFi Connection Utility.
4. Right -click on the taskbar icon and select Open Wireless Zero Configuration.
NOTE: Any wireless profiles created in the WiFi connection utility are not visible in Microsoft Windows*
XP Wireless Zero Configuration. If you want to use your Intel wireless profiles, click Enable WiFi
control on the main window.
Page 27

When you are finished using the Microsoft Windows* XP Wireless Zero Configuration, you can switch back to the
Intel® PROSet/Wireless WiFi Connection Utility User's Guide
WiFi connection utility To do this, click Enable WiFi control on the WiFi connection utility main window.
Third-Party Wireless Software
If you use software provided by a hotspot location (coffee shop, airport terminal), the WiFi connection utility
notifies you and then disables itself. It cannot manage the wireless device when another wireless manager
communicates with the wireless device. To take advantage of the WiFi connection utility features, you want to
disable or remove this software when you leave the hotspot.
Back to Top
Back to Contents
Trademarks and Disclaimers
Page 28

Back to Contents
Intel® PROSet/Wireless WiFi Connection Utility User's Guide
WiFi Networks list
The WiFi Networks list displays a list of WiFi networks within range of the adapter. To update the list, click
Refresh to rescan for WiFi networks.
How to Access
The available network list is shown on the main window.
Name Description
WiFi
Networks ( )
Network
Name
The number within the parentheses designates the number of wireless network found within range
of your wireless network adapter.
The signal strength of the wireless network access point or computer (Device to Device [ad hoc]
mode). The signal strength icon bars indicate that the wireless network or computer is available
for connection but is still not associated with an access point or computer (Device to Device [ad
hoc] mode).
Network Name (SSID): The name of the network that the adapter is connected to. The Network
Name (SSID) must be the same as the SSID of the access point.
If an access point does not broadcast its network name (SSID) or the WiFi adapter receives a
hidden network name from a stealth access point, <SSID not broadcast> is displayed in the
WiFi Networks list. To associate with an <SSID not broadcast> network entry, a new profile must
be created before connection. After connection, the <SSID not broadcast> is still displayed in the
WiFi Networks list. The associated SSID profile is viewed in the Profiles list.
Status Notification that the adapter is connecting to the WiFi network. Once connected, the status is
changed to Connected.
Profiles: Identifies a network in the WiFi Networks list that is connected and has a profile in the
profiles list.
The WiFi network uses Network (Infrastructure) mode.
The WiFi network uses Device to Device (ad hoc) mode.
The WiFi network uses Security encryption.
The band frequency being used by the wireless network (802.11a, 802.11b, 802.11g, or 802.11n).
The WiFi network is on the Exclude list or the profile is configured for Manual connection. When
set to Manual in the profile, connection to network or an access point is not automatic. Double click on the network in the list to connect to it.
Connect
(Disconnect)
Click to connect to a WiFi network. Once connected, the button changes to Disconnect.
Lists the network names of the available networks and profiles. The network status icons
the current connection status.
indicate
If the selected network has 802.1X authentication, the Profile Wizard General Settings
opens. If the network has no WEP security (Open), WEP 64 -bit or 128-bit encryption, or
pre-shared key (PSK), click Connect.
If a PSK or WEP password are required, you are prompted to enter this information prior to
connection. If you need to add security settings, click Advanced to access the Create WiFi
Profile General Settings. See First Time Connection
Properties Provides detailed information about the connected network and its access points. See Network
Properties for information.
for more information.
Page 29

Refresh Refreshes the list of available networks. If any new networks are available within range of the
Intel® PROSet/Wireless WiFi Connection Utility User's Guide
adapter, the list is updated to show the new network name.
Profiles Opens the Profiles
WiFi On /
Switch the WiFi radio off and on. See Turn WiFi On or Off
window, from where you can manage profiles.
for more information.
WiFi Off
Close Closes the Intel® PROSet/Wireless WiFi Connection Utility main window.
Help? Provides help information for this page.
Back to Top
Back to Contents
Trademarks and Disclaimers
Page 30

Back to Contents
Intel® PROSet/Wireless WiFi Connection Utility User's Guide
Connection Status Icons
The connection status icons indicate the current connection status of your WiFi adapter. The connection status icon
displays in the Intel® PROSet/Wireless WiFi Connection Utility main window. The Taskbar icon also indicates the
current connection status. See
Icon Description
WiFi turned off: The WiFi adapter radio is turned off. Click the WiFi On button to turn on the
radio.
Indicates connection problems including authentication failures.
Searching for WiFi networks: The WiFi adapter is scanning for any available WiFi networks.
Animated Icons:
Taskbar Icons for more information.
Network
Name
Signal
Quality
No WiFi networks found: The adapter does not find any available WiFi networks.
WiFi network found: An available WiFi network is found. You can choose to connect to available
networks displayed in the WiFi Networks list
Connecting to a WiFi network: You are connecting to a WiFi network. The crescent shaped curves
switch between green and white until an IP Address is obtained or if a connection error occurs.
Connected to a WiFi network: You are connected to a WiFi network. The network name, speed,
signal quality, and IP address display the current connection status. Click the Details
display details of the current network connection.
Name (Profile Name or SSID): The name of the network that the adapter is connected to. The
Name column displays the SSID or the Profile name if a profile for the network is available.
The signal strength icon bars indicate the quality of the transmit and receive signals between your
WiFi adapter and the access point or computer in Device to Device (ad hoc) mode. The number of
vertical green bars indicates the strength of the transmit and receive signals.
NOTE: The signal strength is displayed for the closest AP for networks that contains multiple APs.
The signal strength ranges from excellent to out of range. The following factors affect signal
strength:
.
button to
Signal quality decreases with distance and is affected by metal and concrete barriers.
Metal objects can reflect signals and cause interference.
Other electrical devices can cause interference.
Properties Provides adapter connection status information. See Network Properties
WiFi On/
WiFi
Indicates the state of the WiFi radio, on or off. This drop- down also lets you switch the radio on or
off. Depending on the WiFi adapter and the OEM computer manufacturer, this drop -down may have
for information.
Page 31

Off/WiFi
Intel® PROSet/Wireless WiFi Connection Utility User's Guide
On,
a third choice: WiFi On, 802.11a Off. If present, this lets you turn on the WiFi radio (band b or g),
but turn off the 802.11a band. See Turn Radio On or Off
802.11a
Off
Help? Provides help information for this page.
Close Closes the main window.
Back to Top
Back to Contents
Trademarks and Disclaimers
for more information.
Page 32

Back to Contents
Intel® PROSet/Wireless WiFi Connection Utility User's Guide
Network Properties
Network Properties
Manage Exclusions
This Network Properties window provides detailed information about the selected network.
How to Access
Click Properties at the Intel® PROSet/Wireless WiFi Connection Utility main window to see detailed information
about the selected network and its access points. This screen shows you information about this network,
information about the access points, and also lets you open up the Exclude List Management screen. On the
Exclude List
Network Properties Details
Name Description
Network Name Displays the WiFi network name.
Band Current band and frequency being used. Displays Out of Range if no band and frequency are
Management screen, you can add profiles to be excluded from automatic connection.
displayed.
Operation
Mode
Authentication
Level
The following bands are listed:
802.11a
802.11b
802.11g
802.11n
Displays the current mode:
Network (Infrastructure)
A wireless network centered around an access point. In this environment, the
access point not only provides communication with the wired network, but also
mediates wireless network traffic in the immediate neighborhood.
Device to Device (ad hoc)
A communication configuration in which every computer has the same capabilities,
and any computer can initiate a communication session. Also known as a peer-topeer network or a computer-to- computer network.
Displays the current authentication security mode for the network being used.
The following network authentication levels are listed:
Open
Shared
WPA-Enterprise
WPA2-Enterprise
WPA-Personal
WPA2-Personal
Displays the authentication used by the currently used network. See to Security Overview
more information.
for
Page 33

Data
Intel® PROSet/Wireless WiFi Connection Utility User's Guide
Encryption
The following Data Encryption settings are listed:
None
WEP
TKIP
CKIP
AES-CCMP
for more information.
Access Points
in this
See to Security Overview
Signal Strength: The signal strength icon bars indicate the strength of the transmit and
receive signals between your WiFi adapter and the nearest access point.
Network <050>
Displays one of the following icons: . Indicates the band being used
(802.11a, 802.11b, 802.11g or 802.11n).
Channel: Displays the current transmit and receive channel being used for a particular
wireless network.
BSSID (Infrastructure operating mode): Displays the twelve -digit MAC address of the
access point of the selected network.
Manage
Exclusions
See Manage Exclusions
for more information. If network exclusion is enabled (see Application
Settings), then the Network Properties also indicates if the network is excluded from automatic
connection.
Close Closes the Network Properties.
Help? Provides help information for this page.
Back to Top
Back to Contents
Trademarks and Disclaimers
Page 34

Back to Contents
Intel® PROSet/Wireless WiFi Connection Utility User's Guide
Network Connection Details
When you are connected to a WiFi network, click the Details button on the Intel® PROSet/Wireless WiFi
Connection Utility main window to display the Connection Details.
WiFi Connection Details
Name Description
Profile Name Name of the WiFi profile.
Network
Name
Signal Quality A radio frequency (RF) signal can be assessed by two components:
Signal
Strength
Network Name (SSID) of the current connection.
signal strength (quantity)
signal quality
The quality of the signal is determined by a combination of factors. Primarily it is composed of
signal strength and the ratio of the RF noise present. RF noise occurs both naturally and
artificially by electrical equipment. If the amount of the RF noise is high, or the signal strength
is low, it results in a lower signal to noise ratio, which causes poorer signal quality. With a low
signal to noise ratio, it is difficult for the radio receiver to discern the data information
contained in the signal from the noise itself.
The signal strength icon bars indicate the quality of the transmit and receive signals between
your WiFi adapter and the access point or computer in Device to Device (ad hoc) mode. The
number of vertical green bars indicates the strength of the transmit and receive signals.
NOTE: The signal strength is displayed for the closest AP for networks that contains multiple
APs.
Page 35

The signal strength ranges from excellent to out of range. The following factors affect signal
Intel® PROSet/Wireless WiFi Connection Utility User's Guide
strength:
Signal quality decreases with distance and is affected by metal and concrete barriers.
Metal objects can reflect signals and cause interference.
Other electrical devices can cause interference.
IP Address IPv4 Address: Internet Protocol (IP) address for the current connection.
IPv6 Address: The next generation IP address is backward compatible and is designed to fix
data security problems with IPv4. IPv6 increases the address space from 32 to 128 bits,
providing for an unlimited number of networks and systems. It also supports quality of service
(QoS) parameters for real -time audio and video.
Adapter MAC
Media Access Control (MAC) address for the WiFi adapter.
Address
Band Indicates the wireless band of the current connection.
802.11a
802.11b
802.11g
802.11n
Number of
Antennas in
Use
This indicates the number of antennas currently in use. This number depends on the band(s)
that the various networks are currently using, the transmit/receive modes in use on those
bands, the signal strength, and the capabilities of the access point(s). The user has no direct
control over this parameter.
Supported
Data Rates
Rates at which the WiFi adapter can send and receive data. Displays the speed in Mbps for the
frequency being used.
802.11a: 6, 9, 12, 18, 24, 36, 48, and 54
802.11b: 1, 2, 5.5, and 11
802.11g: 1, 2, 5.5, 6, 9, 11, 12, 18, 24, 36, 48, and 54
802.11n: 450, 300, 270, 243, 240, 180, 150, 144, 135, 130, 120, 117, 115.5, 90,
86.667, 72.2, 65, 60, 57.8, 45, 43.3, 30, 28.9, 21.7, 15, 14.4, 7.2
Radio
Displays the frequency of the current wireless connection.
Frequency
802.11a: 5.15 GHz to 5.85 GHz
802.11b/g: 2.400 GHz to 2.4835 GHz (dependent on country)
802.11n: 2.400 GHz to 5.00 GHz
Channel
Displays the transmit and receive channel.
Number
Network
Authentication
Displays Open, Shared, WPA*-Personal, WPA2*-Personal, WPA-Enterprise and WPA2- Enterprise.
Displays the authentication used by the currently used profile. See Security Overview
information.
Data
Displays None, WEP, TKIP or AES-CCMP. See Security Overview
for more information.
Encryption
802.1X
Authentication
Displays None, EAP-SIM, TLS, TTLS, PEAP, LEAP, or EAP-FAST. See Security Overview
information.
Type
802.1X
Authentication
Displays None, PAP
more information.
, GTC, CHAP, MS-CHAP, MS-CHAP-V2 or TLS. See Security Overview for
Protocol
CCX Version Version of the Cisco Compatible Extensions on this wireless connection.
Current Tx
The power level at which the WiFi adapter is currently transmitting, in milliwatts.
Power
for more
for more
Page 36

Supported
Intel® PROSet/Wireless WiFi Connection Utility User's Guide
Power Levels
Access Point
These are the power levels that the WiFi adapter is capable of transmitting. This information is
presented in a range and is dependent on the adapter.
The Media Access Control (MAC) address for the associated access point.
MAC Address
Mandatory
Access Point
Displays None, if not enabled. If enabled, from the Mandatory Access Point setting
, the access
point MAC address is displayed. This option directs the WiFi adapter to connect to an access
point that uses a specific MAC address (48 -bit 12 hexadecimal digits, for example,
00:06:25:0E:9D:84).
AP Name The name of the access point. This name is set by the person configuring the access point and
is typically limited to 32 characters.
NOTE: This parameter is only visible if IPv6 support is installed on Windows* XP.
AP IPv4/IPv6
Address
The Interconnect Protocol address (IPv4 or IPv6) for the access point. IPV6 is the next
generation IP address and is backward compatible and is designed to fix data security problems
with IPv4. IPv6 increases the address space from 32 to 128 bits, providing for an unlimited
number of networks and systems. It also supports quality of service (QoS) parameters for realtime audio and video.
NOTE: This parameter is only visible when connected to a Cisco Systems access point.
AP Signal
Strength
The strength of the signal received from the access point, at the adapter. This value is given in
milliwatts (mW) and may actually be in the picowatts range. This value varies, based on the
distance between the AP and the adapter, obstacles that may interfere with the signal, and the
power level at which the AP is transmitting.
NOTE: This parameter is only visible when connected to a Cisco Systems access point.
AP Noise Level The radio frequency (RF) noise level present in the environment that will tend to interfere with
the signal from the access point. RF noise comes from natural and electrical sources.
NOTE: This parameter is only visible when connected to a Cisco Systems access point.
Repair Renews the IP Address. If you have trouble accessing the network, verify if the IP address is
valid. If it is 0.0.0.0 or 169.x.x.x then it is probably not valid. If your network is set up for
automatic network address assignment, then click Repair and request a new IP address.
Close Closes the page.
Help? Provides help information for this page.
Back to Top
Back to Contents
Trademarks and Disclaimers
Page 37

Back to Contents
Intel® PROSet/Wireless WiFi Connection Utility User's Guide
General Troubleshooting
Basic Troubleshooting
Intel® Wireless Troubleshooter
Wireless Event Viewer
Manual Diagnostics Tool
Resolving Errors
Basic Troubleshooting
Problem or Symptom Possible Solution
The wireless network card cannot
connect to the access point.
The wireless card drops
connection occasionally.
Ensure that your access point is turned on, and that you have a profile for the
wireless network. The security settings in your profile must match your access
point’s settings.
Ensure that 802.1X is disabled on both your access point and your wireless
card.
1. Move closer to the access point.
2. Power cycle access point.
Your wireless connection is
slower than expected.
The name of my wireless
network is not displayed in the
list of available networks.
For XP users: The computers
seem to be connected to the
network, but printers and/or file
shares do not appear in My
Computer or in My Network
Places.
3. Update access point firmware from access point vendor support site.
4. Update the wireless LAN driver.
1. Move closer to the access point.
2. Power cycle access point.
3. Update access point firmware from access point vendor support site.
4. Update the wireless LAN driver.
Ensure that your access point is functioning correctly.
Check the SSID (network name) of the wireless network and ensure that the
access point is set to broadcast the SSID.
Verify that File and Printer Sharing is enabled on all the computers on your
network.
1. Click Start.
2. Click Control Panel.
3. Click Switch to Classic View, if available in the left pane.
4. Double-click Network Connections.
5. Right-click Wireless Network Connection.
6. Click Properties.
7. Click the General tab.
8. Under This connection uses the following items, verify that the File
Page 38

and Printer Sharing for Microsoft Networks is selected.
Intel® PROSet/Wireless WiFi Connection Utility User's Guide
9. If cleared, click to select File and Printer Sharing for Microsoft
Networks.
10. If this item is not present, perform the following steps:
Click Install.
Select Service
Click Add.
Select File and Printer Sharing for Microsoft Networks.
Click OK
11. Close OK to close Wireless Network Connection Properties.
12. Close Network Connections.
For Windows Vista* and
Windows* 7 users: The
computers seem to be connected
to the network, but printers
and/or file shares do not appear
in Computer.
Data transfer is sometimes very
slow.
Data transfer is always very
slow.
Computers are not
communicating with the network.
Verify that File and Printer Sharing are enabled in the Network and Sharing
Center.
1. Click Start.
2. Click Control Panel.
3. Click Network and Internet.
4. Under Network and Sharing Center, click View network computers
and devices.
5. If no resources are displayed, network discovery and file sharing may be
turned off. This is indicated by a message by the top of the window:
Network discovery and file sharing are turned off. Network
computers and devices are not visible. Click to change... Click this
message.
6. Click Turn on network discovery and file sharing. The instructions
will guide you through the process.
Microwave ovens, some baby monitors, cordless game controllers, and some
cordless phones operate at the same radio frequency as the installed wireless
card. When these devices are in use, they interfere with the wireless network.
For optimum performance, keep wirelessly -connected computers at least 20
feet away from devices that operate at a frequency of 2.4 GHz.
Some homes and most offices are steel-framed structures. The steel in such
buildings may interfere with your network's radio signals, thus causing a
slowdown in the data transmission rate. Try moving your computer to different
locations in the building to see if performance improves.
Verify that all of the wireless network properties settings are correct.
Make sure that your computer is receiving a good signal from the access
point or router.
Verify with the network administrator that installed the wireless card in
your portable computer is compatible with the IEEE 802.11 WLAN
standard under which the wireless network is operating.
You may need to disable or uninstall firewall software to connect.
If your network uses access points or routers, check all cables and make
Page 39

sure the power LED on the front of the access point or router is green.
Intel® PROSet/Wireless WiFi Connection Utility User's Guide
I cannot connect to any wireless
network.
Intel® PROSet/Wireless WiFi
software asks me for a key when
I try to connect to a wireless
network.
No WiFi networks are displayed
in the list of available networks.
How do I configure roaming
identity for multiple users?
Radio may be disabled. See: Turn on/Turn off Radio
Network has security enabled. See Security Overview
for more information.
for more information.
Computer is too far from wireless network or there are no WiFi networks in the
area.
Configure Roaming Identity to support multiple users:
If you use a Pre-logon/Common
profile that requires the roaming identity to be
based on the Windows logon credentials, the creator of the profile can add a
roaming identity that uses %username% and %domain%. The roaming
identity is parsed and the appropriate log on information is substituted for the
keywords. This allows maximum flexibility in configuring the roaming identity
while allowing multiple users to share the profile.
Please see your authentication server user guide for directions about how to
format a suitable roaming identity. Possible formats are:
%domain%\%username%
%username%@%domain%
%username%@%domain%.com
%username%@mynetwork.com
Back to Top
Back to Contents
Trademarks and Disclaimers
If Roaming Identity is cleared, %domain%\%username% is the default.
NOTE: Credentials: This user name and domain must match the user name
that is set in the authentication server by the administrator prior to client
authentication. The user name is case-sensitive. This name specifies the
identity supplied to the authenticator by the authentication protocol operating
over the TLS tunnel. This user identity is securely transmitted to the server
only after an encrypted channel has been verified and established.
Page 40

Back to Contents
Intel® PROSet/Wireless WiFi Connection Utility User's Guide
Application Settings (Tools menu)
The Application Settings control the behavior of the Intel® PROSet/Wireless WiFi Connection Utility.
How to Access
At the main window, at the Tools menu, click Application Settings.
Application Settings Description
Name Description
Adapter Presented at the top of the window, this lists the WiFi adapter. It may be any one of the
following:
Intel® Centrino® Ultimate-N 6300
Intel® Centrino® Advanced -N + WiMAX 6250
Intel® Centrino® Advanced -N 6200
Intel® WiMAX/WiFi Link 5350
Intel® WiFi Link 5300
Intel® WiMAX/WiFi Link 5150
Intel® WiFi Link 5100
Intel® Centrino® Wireless- N 1000
Page 41

Intel® Wireless WiFi Link 4965AGN
Intel® PROSet/Wireless WiFi Connection Utility User's Guide
Intel® Wireless WiFi Link 4965AG_
Intel® PRO/Wireless 3945ABG Network Connection
Intel® PRO/Wireless 3945_BG Network Connection
Advanced Settings: The following settings control how the WiFi connection utility behaves and displays
information.
Taskbar Show icon on the taskbar: Select to display the Taskbar status icon. This icon resides on the
Windows Taskbar (Notification Area). This icon provides the status of your wireless connection.
Clear to not display the Taskbar status icon.
The Taskbar Status Icon provides several functions:
Visual feedback for the connection state and wireless activity of your wireless network. The
icon changes color and animation for different wireless activity. See Taskbar Icons
for more
information.
Menu: A menu is displayed when you right -click the icon. From this menu you perform
tasks such as turn the radio on or off or launch the WiFi connection utility. See: Taskbar
Menu Options for more information.
Tool tips and desktop alerts. See: Tool Tips and Desktop Alerts for more information.
Notifications Show Alert Notifications: Select to display desktop alerts next to the taskbar icon. When your
action is required, a message displays. Only events of high importance trigger a desktop alert. If
the desktop alert is selected, then the appropriate action is taken. Clear to not display desktop
alerts. See Tool Tips and Desktop Alerts
for more information.
Auto
Connect
Select one of the following options:
Information Notifications: These desktop alerts are of lower importance. They do not require
your interaction but can greatly improve the wireless experience.
Show Information Notifications: Selected by default. All informational desktop alerts are
displayed next to the taskbar status icon. These desktop alerts improve your wireless
experience with notifications when available wireless networks are within range. They also
inform you when a wireless connection has been made or has been lost. See Tool Tips and
Desktop Alerts for more information.
Show a list of available networks when not connected: When Show Information
Notifications is cleared, you can select this item. When the desktop alerts are disabled,
this option lets you continue to be notified of available networks when the WiFi adapter is
not connected.
Notify when another application uses the WiFi adapter: When selected, a message is
displayed when other applications are trying to manage your WiFi adapter. This is helpful if you
use software provided by a hotspot location (coffee shop, airport terminal). To take advantage of
the WiFi connection utility features, disable this software when you leave the hotspot.
Connect to available network using profiles only: (Default) Connect the WiFi adapter to an
available network with a matching profile from the Profiles List
you are notified (see Notifications
). The wireless device remains disconnected until a matching
. If no matching profile is found,
profile is found or you configure a new matching profile.
Connect to any available network if no matching profile found: Select to connect to a
network automatically if you have not configured a profile and are at a location that has an open,
unsecured wireless network. NOTE: Open networks have no security. You would need to provide
your own security for this wireless connection. One way to secure an open wireless connection is
with Virtual Private Networking (VPN) software.
Connect to any network based on profiles only (Cisco mode): Select to try every profile in
preferred order. This signifies that you are in the vicinity of an access point which has more than
one SSID but only advertises one.
Do not automatically connect. User will connect manually: Select to turn off automatic
Page 42

Manage
Intel® PROSet/Wireless WiFi Connection Utility User's Guide
Exclusions
WiFi
Networks
List
Shared
Folder
Notification
connection.
Enable automatic exclude list feature: Select to enable the automatic exclude list feature. This
feature provides a way to exclude access points from automatic connection. See Manage
Exclusions for more information.
Enable manual exclude list feature: Select to enable the manual exclude list feature. This
feature provides a way to exclude networks from automatic connection. See Manage Exclusions
for
more information.
Show column sort headers: Select to display the column names in the WiFi Networks list. Click
a column header to sort the column in either ascending or descending order.
File and printer sharing enables other computers on a network to access resources on your
computer. You should be cautious when you use your wireless notebook computer with file and
printer sharing enabled.
Use this feature to receive notifications when you connect to a wireless network with shared
folders that meet one of the following conditions:
The Microsoft Windows firewall is disabled
File and Printer Sharing are enabled as an exception to the Microsoft Windows firewall
settings.
Unshare shared folders automatically when connected to an unsecured network.
Select to unshare shared folders automatically, each time you connect to an unsecured network.
This feature provides some additionally security.
Device to
Device (ad
hoc)
Network
Notification
Network
Name
(SSID)
Notification
WiFi
Settings
Wi-Fi
Protected
Setup*
Disable this notification
Select to maintain your current shared folder settings each time you connect to an open,
unsecured network.
Notify when connected to an unsecured network.
Select to receive notification each time you are connected to an open, unsecured network.
Receive alerts dependent on the following settings when connected to an ad hoc network. You are
alerted every two minutes, with a maximum of five alerts.
Notify when no peers have joined the ad hoc network
Select to receive notification if no peers join the ad hoc network.
Notify when all peers leave the ad hoc network
Select to receive an alert when all the peers leave the ad hoc network.
Notifies you when the default network name (SSID) is used to connect to a network. Common
examples of pre -defined, default network names are: wireless, WLAN, linksys, default.
Connecting to an access point that has the default network name (SSID) can be a security
problem. This access point usually uses all the default security and, management settings (for
example, Open authentication; default IP address, user name, or password). If this is a personal
network, change the network name and security settings to improve the security of the network.
Notify when connected to a network with the default SSID name
Select to receive an alert when connected to a network with the default network name.
Disable WiFi scanning when associated: This setting disables scanning for additional WiFi
access points after the adapter connects to an access point (network). Disabling scanning when
already connected can improve the connection performance.
Enable device registration
Turn this on to let the computer act as an external registrar. In this capacity, the computer can
set up an unconfigured access point or join a configured access point. After the access point has
been configured, the computer, as an external registrar, can add new computers (enrollees) to
the network. Default state is OFF.
Turn Enable device registration off to let the computer detect and connect to a network as an
Page 43

enrollee.
Intel® PROSet/Wireless WiFi Connection Utility User's Guide
Notify when Wi-Fi Protected Setup access points are within range
Turn to on to let you know when an access point equipped with Wi-Fi Protected Setup* is within
range of your computer. This is necessary if you want to enroll (connect) this computer to the
access point. Default state is On.
OK Saves settings and return to the previous page.
Cancel Closes and cancels changes.
Help? Provides help information for this page.
Back to Top
Back to Contents
Trademarks and Disclaimers
Page 44

Back to Contents
Intel® PROSet/Wireless WiFi Connection Utility User's Guide
Turn WiFi Radio On or Off
To switch the WiFi radio on or off, use one of the following methods:
The optional hardware radio switch on your computer
Intel® PROSet/Wireless WiFi Connection Utility
Microsoft Windows
NOTE: When your computer is switched on, the radio is constantly transmitting signals. Use the
following methods if you need to turn off the radio and use your notebook without emitting radio
signals.
Use the Optional Computer Radio on or off Switch
If your computer has hardware radio switch, you can use it to quickly turn the radio on or off. See the computer
manufacturer's documentation for more information about this switch. The state of the hardware radio switch radio
(on or off) displays in the WiFi connection utility main window and on the Taskbar
the WiFi radio with the hardware radio switch, then you must turn that switch back on before the WiFi radio will
operate again.
Use Intel® PROSet/Wireless WiFi Connection Utility
. Also note that if you turned off
You can turn on or off the WiFi radio at the Intel® PROSet/Wireless WiFi Connection Utility main window. The
status icon on main window displays the current state of the radio. At the main window, click WiFi On or WiFi
Off to turn the radio on or off.
Switch the radio on or off at the Taskbar Icon
Right -click the Taskbar icon and select WiFi On or WiFi Off.
Use Windows to turn on or off the Radio
You can turn the WiFi radio on or off using Windows.
NOTE: If you turned off the radio from Microsoft Windows, then you must use Microsoft Windows to
turn the radio on. You cannot use a hardware switch or the WiFi connection utility to enable the radio
if the radio has been turned off using Windows.
Windows* XP
1. At the Start Menu, click Connect to. Right click Wireless Network Connection and select Disable.
2. Or if you have more than one WiFi adapter, at the Start Menu, click Connect to > Show all connections.
Right click the desired adapter and select Disable.
You can use the same method to turn the radio back on.
Back to Top
Back to Contents
Trademarks and Disclaimers
Page 45

Back to Contents
Intel® PROSet/Wireless WiFi Connection Utility User's Guide
Adapter Settings
The Advanced tab displays the device properties for the WiFi adapter installed on your computer. This version of
Intel® PROSet/Wireless WiFi software is compatible with the following adapters:
Intel® Centrino® Ultimate-N 6300
Intel® Centrino® Advanced -N + WiMAX 6250
Intel® Centrino® Advanced -N 6200
Intel® WiMAX/WiFi Link 5350
Intel® WiMAX/WiFi Link 5150
Intel® WiFi Link 5300
Intel® WiFi Link 5100
Intel® Centrino® Wireless- N 1000
Intel® Wireless WiFi Link 4965AGN
Intel® Wireless WiFi Link 4965AG_
Intel® PRO/Wireless 3945ABG Network Connection
How to Access
For Windows* XP users: At the Intel® PROSet/Wireless WiFi Connection Utility, Advanced Menu click Adapter
Settings. Select the Advanced tab.
Open the Device Manager and click on the WiFi network adapter. Then select the Advanced tab.
Page 46

WiFi Adapter Settings Description
Intel® PROSet/Wireless WiFi Connection Utility User's Guide
Name Description
802.11n
Channel Width
(2.4 GHz)
Set high throughput channel width to maximize performance. Set the channel width to Auto or
20MHz. Use 20MHz if 802.11n channels are restricted.This setting applies to 802.11n capable
adapters only.
NOTE: This setting is does not apply to the following adapters:
Intel® Wireless WiFi Link 4965AGN (uses 20 MHz channel width only)
802.11n
Channel Width
(5.2 GHz)
802.11n Mode The 802.11n standard builds on previous 802.11 standards by adding multiple -input multiple -
Ad Hoc
Channel
Set high throughput channel width to maximize performance. Set the channel width to Auto or
20MHz. Use 20MHz if 802.11n channels are restricted. This setting applies to 802.11n capable
adapters only.
NOTE: This setting is does not apply to the following adapters:
Intel® Centrino® Wireless- N 1000
Intel® Wireless WiFi Link 4965AGN
output (MIMO). MIMO increases data throughput to improve transfer rate. Select Enabled or
Disabled to set the 802.11n mode of the WiFi adapter. Enabled is the default setting. This
setting applies to 802.11n capable adapters only.
NOTE: To achieve transfer rates greater than 54 Mbps on 802.11n connections, WPA2*-AES
security must be selected. No security ( None) can be selected to enable network setup and
troubleshooting.
An administrator can enable or disable support for high throughput mode to reduce powerconsumption or conflicts with other bands or compatibility issues.
Unless the other computers in the ad hoc network use a different channel from the default
channel, there is no need to change the channel.
Value: Select the permitted operating channel from the list.
Ad Hoc Power
Management
Ad Hoc QoS
Mode
Fat Channel
Intolerant
802.11b/g: Select this option when 802.11b and 802.11g (2.4 GHz) ad hoc band
frequency is used.
802.11a: Select this option when 802.11a (5 GHz) ad hoc band frequency is used. This
setting is does not apply to the Intel® Centrino® Wireless -N 1000 adapter.
NOTE: When an 802.11a channel is not displayed, initiating ad hoc networks is not supported
for 802.11a channels.
Set power saving features for device to device (ad hoc) networks.
Disable: Select when connecting to ad hoc networks that contain stations that do not
support ad hoc power management
Maximum Power Savings: Select to optimize battery life.
Noisy Environment: Select to optimize performance or connecting with multiple clients.
Quality of Service (QoS) control in ad hoc networks. QoS provides prioritization of traffic from
the access point over a wireless LAN based on traffic classification. WMM (Wi-Fi Multimedia) is
the QoS certification of the Wi - Fi Alliance (WFA). When WMM is enabled, the WiFi adapter uses
WMM to support priority tagging and queuing capabilities for Wi - Fi networks.
WMM Enabled (Default)
WMM Disabled
This setting communicates to surrounding networks that this WiFi adapter is not tolerant of
40MHz channels in the 2.4GHz band. The default setting is for this to be turned off (disabled),
Page 47

so that the adapter does not send this notification.
Intel® PROSet/Wireless WiFi Connection Utility User's Guide
NOTE: This setting is does not apply to the following adapters:
Intel® Wireless WiFi Link 4965AG_
Intel® PRO/Wireless 3945ABG Network Connection
Mixed mode
protection
Power
Management
Roaming
Aggressiveness
Throughput
Enhancement
Use to avoid data collisions in a mixed 802.11b and 802.11g environment. Request to
Send/Clear to Send (RTS/CTS) should be used in an environment where clients may not hear
each other. CTS-to- self can be used to gain more throughput in an environment where clients
are in close proximity and can hear each other.
Lets you select a balance between power consumption and WiFi adapter performance. The WiFi
adapter power settings slider sets a balance between the computer's power source and the
battery.
Use default value: (Default) Power settings are based on the computer's power source.
Manual: Adjust the slider for the desired setting. Use the lowest setting for maximum
battery life. Use the highest setting for maximum performance.
NOTE: Power consumption savings vary based on Network (Infrastructure) settings.
This setting lets you define how aggressively your wireless client roams to improve connection
to an access point.
Default: Balanced setting between not roaming and performance.
Lowest: Your wireless client will not roam. Only significant link quality degradation
causes it to roam to another access point.
Highest: Your wireless client continuously tracks the link quality. If any degradation
occurs, it tries to find and roam to a better access point.
Changes the value of the Packet Burst Control.
Enable: Select to enable throughput enhancement.
Disable: (Default) Select to disable throughput enhancement.
Transmit
Default Setting: Highest power setting.
Power
Lowest: Minimum Coverage.: Set the adapter to the lowest transmit power. Enables you to
expand the number of coverage areas or confine a coverage area. Reduces the coverage area
in high traffic areas to improve overall transmission quality and avoids congestion and
interference with other devices.
Highest: Maximum Coverage: Set the adapter to a maximum transmit power level. Select
for maximum performance and range in environments with limited additional WiFi radio
devices.
NOTE: The optimal setting is for a user to always set the transmit power at the lowest possible
level that is still compatible with the quality of their communication. This allows the maximum
number of wireless devices to operate in dense areas and reduce interference with other
devices that it shares the same radio spectrum with.
NOTE: This setting takes effect when either Network (Infrastructure) or Device to Device (ad
hoc) mode is used.
Wireless Mode Select which mode to use for connection to a wireless network:
802.11a only: Connect the wireless WiFi adapter to 802.11a networks only. Not
applicable for all adapters.
802.11b only: Connect the wireless WiFi adapter to 802.11b networks only. Not
applicable for all adapters.
802.11g only: Connect the wireless WiFi adapter to 802.11g networks only.
802.11a and 802.11g: Connect the WiFi adapter to 802.11a and 802.11g networks
only. Not applicable for all adapters.
Page 48

802.11b and 802.11g: Connect the WiFi adapter to 802.11b and 802.11g networks
Intel® PROSet/Wireless WiFi Connection Utility User's Guide
only. Not applicable for all adapters.
802.11a, 802.11b, and 802.11g: (Default) - Connect to either 802.11a, 802.11b or
802.11g wireless networks. Not applicable for all adapters.
NOTE: These wireless modes (Modulation type) determine the discovered access points
displayed in the WiFi Networks list
OK Saves settings and returns to the previous page.
Cancel Closes and cancels any changes.
Microsoft Windows* Advanced Options (Adapter Settings)
To access the Windows* XP Advanced options:
1. Start Windows and log on with administrative privileges.
2. From your desktop, right -click My Computer and click Properties.
3. Click the Hardware tab.
4. Click Device Manager.
5. Double-click Network adapters.
6. Right -click the name of the installed WiFi adapter that is in use.
7. Click Properties.
8. Select the Advanced tab.
9. Select the Property you want (for example, Mixed Mode Protection, Power Management).
10. To select a new value or setting, click Use default value to clear the checkbox. Then select a new value or
setting. To return to the default value, click the Use default value checkbox. (The Use default value box
is not present for all properties, for example, Ad Hoc Channel. In this case, simply select the setting you
want.)
11. To save your settings and exit the window, click OK.
Back to Top
Back to Contents
Trademarks and Disclaimers
Page 49

Back to Contents
Intel® PROSet/Wireless WiFi Connection Utility User's Guide
Advanced Statistics (Advanced menu)
The Advanced Statistics provides current adapter connection information. This information defines how the adapter
communicates with an access point.
How to Access
At the Advanced menu, click Advanced Statistics.
Advanced Statistics Description
Name Description
Statistics Tab Advanced Statistics: This information pertains to how the adapter communicates with an
access point.
Association: If the adapter finds an access point to communicate with, the value is in
range. Otherwise, the value is out of range.
AP MAC Address: The twelve-digit MAC address (00:40:96:31:1C:05) of the access
point.
Number of associations: The number of times the access point has found the
adapter.
AP count: The number of available access points within range of the WiFi adapter.
Number of full scans: The number of times the adapter has scanned all channels for
receiving information.
Number of partial scans: The number of scans that have been terminated.
Roaming: This information contains counters that are related to reasons for the adapter
roaming. Roaming occurs when an adapter communicates with one access point and then
communicates with another for better signal strength.
Roaming count: The number of times that roaming occurred.
AP did not transmit: The adapter did not receive radio transmission from the access
point. You may need to reset the access point.
Poor beacon quality: The signal quality is too low to sustain communication with the
access point. Either you have moved the adapter outside the coverage area of the
access point or the access point's device address information has been changed.
AP load balancing: The access point ended its association with the adapter based on
the access point's inability to maintain communication with all its associated adapters.
Too many adapters are trying to communicate with one access point.
AP RSSI too low: The Receive Signal Strength Indicator (RSSI) is too low to maintain
an association with the adapter. You may have moved outside the coverage area of
the access point or the access point could have increased its data rate.
Poor channel quality: The quality of the channel is low and caused the adapter to
look for another access point.
AP dropped mobile unit: The access point dropped a computer from the list of
recognizable mobile devices. The computer must re - associate with an access point.
Miscellaneous: Use this information to determine if an association with a different access
point increases performance and helps maintain the highest possible data rate.
Received beacons: Number of beacons received by the adapter.
Percent missed beacons: Percent value for missed beacons.
Percent transmit errors: The percentage of data transmissions that had errors.
Page 50

Signal Strength: Signal strength of the access point that the adapter communicates
Intel® PROSet/Wireless WiFi Connection Utility User's Guide
with displayed in decibels (dBm).
Transmit/Receive
Displays percent values for non -directed and directed packets.
(Tx/Rx)
Statistics Tab
Total host packets: The total number of directed and non -directed packets counts.
Transmit - (Mbps)
Receive - (Mbps)
Non-directed packets: The number of received packets broadcast to the wireless
network.
Directed packets: The number of received packets sent specifically to the WiFi
adapter.
Total Bytes: The total number of bytes for packets received and sent by the WiFi
adapter.
Logging Tab Set the duration that you want to record statistical data for your WiFi adapter.
Configure logging settings: Click Settings to set how frequently you want to log the
statistics. You can set the number of seconds and how many hours you want the statistics
to be logged.
To change the storage location of the log file.
1. Click Browse to specify a new log file location. The current path is displayed. The
default location is in the C:\Program Files\Intel\WiFi directory.
2. Click Open to close and apply the new file path.
3. Click Close to exit Advanced Statistics.
Start/Stop Logging: Click this button to start and stop logging. When you click Start
logging, statistical information (described above) is accumulated. When you click Stop
Logging, the accumulation ends and this information is saved to a file that you can open and
view.
View Log File...: Click this button to open the WiFi folder under Program Files\Intel (this
is the default location). Log files are named using the month, day, and year, plus the
number of the log created on that day. For example: 03122007_001.htm. The log file
provides:
Date and Time
Adapter Information
Connection Information
Transmit/Receive Statistics
NOTE: An administrator can disable this feature.
Reset Stats Resets the adapter statistical counters back to zero and begins making new data
measurements.
Close Closes and returns to the main window.
Help? Provides help information for this page.
For information about importing/exporting user-created profiles, see
Import or Export Profiles .
Back to Top
Back to Contents
Trademarks and Disclaimers
Page 51

Back to Contents
Intel® PROSet/Wireless WiFi Connection Utility User's Guide
Profile Management
NOTE: This section describes profiles created with Intel® PROSet/Wireless WiFi Connection Utility. These profiles
are not used by Microsoft Windows* XP Wireless Zero Configuration.
NOTE: Throughout this Help, the terms "wireless" and "WiFi" are used interchangeably.
What is a Profile?
Profiles Types
Profiles List
Profile Icons
Connect to a Profile
Create a New Profile
Edit an Existing Profile
Remove a Profile
Set a Profile Password
Export or Import Profiles
What is a Profile?
A profile is a saved group of network settings. Profiles are displayed in the Profiles List. Profiles are useful when
moving from one wireless network to another. Different profiles can be configured for each wireless network.
Profile settings include the network name (SSID), operating mode, and security settings.
A profile is created when you connect to a wireless network.
1. Select a network from the WiFi Networks list.
2. Click Connect.
3. If the wireless network requires a WEP password or encryption key, you are prompted to enter this
information prior to connection. To change the security options, click Advanced to open the Configure WiFi
Settings.
4. Click OK to connect. A profile is created and added to the Profiles list.
The Create WiFi Profile Wizard guides you through the settings required to connect with the wireless network. At
completion, the profile is saved and added to the Profiles list. Since these wireless settings are saved, the next
time you are in range of this wireless network you are automatically connected.
Profile Types
There are two basic types of profiles that can be used to connect to a wireless network. The profile types are:
User Profiles: These profiles are created by individual users. If there is more than one user on a computer,
each user needs to create their own set of user profiles. User - created wireless profiles are not accessible by
other users of a computer.
Administrator Profiles: If one or more profiles need to be shared among users on a computer, the
Administrator Tool must be installed to create Administrator profiles. For more information, see
Administrator Profiles
.
Profiles List
The Profiles list displays a list of existing profiles. When you come in range of a wireless network, the WiFi
connection utility software scans the Profiles list to see if there is a match. If a match is found, you are
automatically connected to the network.
Page 52

Profiles List Priority Arrows
Intel® PROSet/Wireless WiFi Connection Utility User's Guide
Use the up-arrow to move the position of a selected profile up in the profiles list.
Use the down-arrow to move the position of a selected profile down in the profiles list.
Profile Icons
The network profile status icons indicate whether the adapter is associated with a network, the type of operating
mode being used, and whether security encryption is enabled. These icons display next to the profile name in the
Profiles list.
Name Description
Profile
Name
Network
Name
Connection Icons: The network profile status icons indicate the different connection states of the adapter with
a wireless network, the type of operating mode being used, and whether network security is being used.
The Profile Name is your name for this network. It can be anything that helps you identify this
network. For example, My Home Network, Coffee Shop on A Street.
Name of the wireless network (SSID) or computer.
Blue circle: The WiFi adapter is associated with an access point or computer (Device to Device [ad
hoc] mode). If a profile has 802.1X security enabled, this indicates that the WiFi adapter is
associated and authenticated.
Indicates Network (infrastructure) mode.
Indicates Device to Device (ad hoc) mode.
Indicates an Administrator profile.
The wireless network uses Security encryption.
Indicates that this network is on the Exclude list
connection. When on the Exclude list, to connect the user must connect manually.
, e.g. is set for manual rather than automatic
Page 53

Arrows Use the arrows to position profiles in a preferred order for auto-connection.
Intel® PROSet/Wireless WiFi Connection Utility User's Guide
Up-arrow: Move the position of a selected profile up in the Profiles list.
Down-arrow: Move the position of a selected profile down in the Profiles list.
Connect Connect the selected profile for the wireless network.
Add Opens the Create WiFi Profile General Settings, which are used to create a new profile. See
Create a New Profile
Remove Removes a selected profile from the Profiles list. See Remove a Profile
Properties Used to edit the contents of an existing profile. You can also double -click a profile in the Profiles list
to edit the profile. See Edit an Existing Profile
Export/Import: Imports and exports user -based profiles to and from the Profiles list. Wireless
profiles can be automatically imported into the Profiles list. See Export or Import Profiles
information.
Close Closes the profile management window.
Help? Provides help information for this page.
for more information.
for more information.
for more information.
for more
Connect to a Profile
When you are in range of a wireless network that has a matching profile you are automatically connected to that
network. If a network with a lower priority profile is also in range you can force the connection to that lower
profile. This is achieved the from the WiFi connection utility or from the Taskbar icon.
Manually connect to a profile from the Intel® PROSet/Wireless WiFi Software:
1. Double-click the Taskbar icon to open the main window.
2. Click Profiles to open the Profiles list.
3. Select the profile from the Profiles list.
4. Click Connect. Remember that the connection is only made if the wireless network is in range.
Manually connect to a profile from the Taskbar:
1. Right -click the taskbar icon.
2. Click Connect to Profile.
3. Select a profile.
4. Click to start the connection.
Create a New Profile
Select a network from the WiFi Networks list. Click Connect. The Create WiFi Profile manager guides you
through the necessary steps to create a profile and connect to the network. During this process, the Create WiFi
Profile Security Settings attempts to detect the appropriate security settings for you.
To create a new profile and connect to a wireless network:
1. From the Intel® PROSet/Wireless WiFi Connection Utility main window, click Profiles.
2. On the Profiles page, click Add to open the Create WiFi Profile General Settings. (See General Settings
for more information.)
Page 54

3. Profile Name: Enter a descriptive profile name.
Intel® PROSet/Wireless WiFi Connection Utility User's Guide
4. WiFi Network Name (SSID): Enter the network name of the WiFi network
5. Select the Operating Mode: Network (Infrastructure) or Device to Device (ad hoc).
6. Click Advanced
for the following options:
Auto Connect: Select to automatically or manually connect to a profile.
Auto Import : Network administrator can export a profile on another computer.
Band Selection : Select the band(s) over which to make network connections.
Mandatory Access Point : Select to associate the WiFi adapter with a specific access point.
Password Protection : Select to password protect a profile.
Application Auto Launch : Specify a program to be started when a wireless connection is made.
Maintain Connection : Select to remain connected to a user profile after log off.
Page 55

7. From the General Settings, click Next to open the Security Settings.
Intel® PROSet/Wireless WiFi Connection Utility User's Guide
8. Select either Personal Security
or Enterprise Security to select the Network Authentication and Data
Encryption options. Enter the encryption key settings and configure the 802.1X settings as required.
Page 56

Intel® PROSet/Wireless WiFi Connection Utility User's Guide
9. Click OK when you have completed the profile settings. To change or verify the profile settings, click Back.
10. If you are not currently connected to a network, Intel® PROSet/Wireless WiFi Connection Utility detects that
a new profile has been added and automatically attempts to connect to this new profile.
11. If you want to manually connect to this profile, click Connect. The connection icon
connection status. The network name, transmit and receive speeds, and signal quality are also displayed.
displays the current
Edit an Existing Profile
To edit an existing profile:
1. Click Profiles on the Intel® PROSet/Wireless WiFi Connection Utility main window.
2. Select the profile to edit from the Profiles List.
3. Click Properties to open the WiFi Profile Properties General Settings.
4. Click Next and Back to navigate through the WiFi Profile Properties' General and Security Settings:
General Settings: See General Settings for more information.
Security Settings: See Security Settings for more information.
5. Click OK to save the current settings and exit. Click Cancel to exit without saving changes.
Remove a Profile
To remove a profile:
1. Click Profiles on the Intel® PROSet/Wireless WiFi Connection Utility main window.
2. Select the profile from the list.
Page 57

3. Click Remove. You are notified that Selected profiles will be permanently removed. Do you want to
Intel® PROSet/Wireless WiFi Connection Utility User's Guide
continue?
4. Click Yes. The profile is removed from the Profiles list.
If you are still connected to the network:
1. Click Profiles on the Intel® PROSet/Wireless WiFi Connection Utility main window.
2. Select the profile from the list.
3. Click Remove. You are notified that Selected profiles will be permanently removed. Do you want to
continue?
4. Click Yes. You are notified that <profile name> is active and will be permanently removed. Do you
want to continue?
5. Click Yes. The profile is removed from the Profiles list.
NOTE: If the profile is protected by a password, you cannot remove or edit the profile settings without entering
the password. If the administrator or you do not know the password, there is no process available to reset the
password.
Set a Profile Password
To password protect an existing profile:
1. Click Profiles on the Intel® PROSet/Wireless WiFi Connection Utility main window.
2. Select the profile from the list.
3. Click Properties to open the WiFi Profile Properties' General Settings.
4. Click Advanced to open the Advanced Settings
5. Click Password Protection to open the Password Protection settings.
6. Click Password protect this profile (maximum 10 characters)
7. Password: Enter the password.
8. Confirm Password: Reenter the password.
9. Click OK to save the setting and return to the General Settings page.
10. Click OK to return to the main window.
.
Import or Export Profiles
This feature lets you import and export user -based profiles to and from the Profiles list. Wireless profiles can be
automatically imported into the Profiles list.
An administrator can set profiles to be imported automatically into the Profiles list. Intel® PROSet/Wireless WiFi
Connection Utility monitors the import folder on your hard disk for new profile files. Only profiles that have been
enabled through Enable Auto-Import in the
same name already exists in the Profiles list, you are notified to either reject the imported profile or accept it. If
accepted, the existing profile is replaced. All imported user-based profiles are placed at the bottom of the Profiles
List.
NOTE: To export Administrator profiles, see Administrator Packages
Advanced Settings are automatically imported. If a profile of the
.
Page 58

Import Profiles into the Profiles List
Intel® PROSet/Wireless WiFi Connection Utility User's Guide
To import profiles manually:
1. Click Import on the Profiles page.
2. Select the profile files to import.
3. Click Import.
4. You are notified that the profile has been successfully imported.
Export Profiles from the Profiles List
1. Select individual or multiple profiles from the list.
2. Select Export to export one or more profiles from the Profiles list.
3. Select the destination folder. Click Browse to search your hard disk for the destination directory. The C:\
drive is the default directory.
4. Click OK to export the selected profile. You are notified: Successfully exported selected profiles to the
destination folder: C:\.
To select multiple profiles:
1. Use your mouse to highlight a profile.
2. Press Ctrl.
3. Click each profile that you want selected. Follow the instructions from Step 2 above to export multiple
profiles.
Password Protected Profiles
Import and export password- protected user -based profiles automatically to remote systems. If a profile is
password protected, the assigned password must be entered before it can be edited. See
for more information.
Back to Top
Set a Profile Password
Page 59

Back to Contents
Intel® PROSet/Wireless WiFi Connection Utility User's Guide
Trademarks and Disclaimers
Page 60

Back to Contents
Intel® PROSet/Wireless WiFi Connection Utility User's Guide
Profile Wizard General Settings
The General Settings page is the first page in the Create WiFi Profile Wizard.
See Profile Management
NOTE: Throughout this Help, the terms "wireless" and "WiFi" are used interchangeably.
for a description of when the Create WiFi Profile General Settings is launched.
How to Access
1. If you are creating or editing an administrator profile, open the Administrator Tool. Or if you are creating or
editing a personal profile, at the main window, click Profiles.
2. At the Profiles window or tab, for an existing profile, click Properties. For a new profile click Add.
While you configure a profile, you can use the left pane to navigate to the General and Security Settings pages.
The Back and Next buttons located at the bottom of the Profile Wizard can also be used for the same functions.
General Settings Page Description
Name Description
Profile Name Name of the wireless network profile. When you configure a wireless network that was selected
from the WiFi Networks list, the profile name is the same as the WiFi Network Name SSID). This
name can be changed to be more descriptive or customized for your personal use.
Examples: My Office Network, Bob's Home Network, ABC Company Network
WiFi Network
Name (SSID)
Name of the wireless network access point used by the WiFi adapter for connection. The network
name must match exactly the name of the wireless access point. It is case sensitive.
Operating
Mode
Administrator
Profile Type
(Visible only in
Administrator
Tool)
When you configure a wireless network that was selected from the WiFi Networks list, the
network name is taken from the wireless network list. You cannot and should not change it.
<SSID not broadcast>: If an access point does not broadcast its network name (SSID) or the
WiFi adapter receives a hidden network name from a stealth access point, it is displayed in the
WiFi Networks list. To associate with an <SSID not broadcast> network entry, a new profile
must be created before connection. Provide the actual SSID for the access point. After
connection, the <SSID not broadcast> is still displayed in the WiFi Networks list. The associated
SSID profile is viewed in the Profiles list.
Network (Infrastructure): Connect to an access point. An Infrastructure network consists of
one or more access points and one or more computers with WiFi adapters. This connection is the
type used in home networks, corporate networks, hotels, and other areas that provide access to
the network and/or the internet.
NOTE: Only Network (Infrastructure) is available for administrator profiles (Prelogon/Common and Persistent profiles). See the Administrator Tool
Device to Device (ad hoc): Connect directly to other computers in an ad hoc wireless network.
This type of connection is useful for connections between two or more computers only. It does
not provide access to network resources or the internet.
Persistent: Persistent profiles are applied at boot time or whenever no one is logged on the
computer. After a user logs off, a Persistent profile maintains a wireless connection either until
the computer is turned off, or a different user logs on.
Pre-logon/Common: These profiles are only available using the Administrator Tool. Prelogon/Common profiles are applied once a user logs on. The connection is made as part of the
for more information.
Page 61

Windows log -on sequence (Pre-logon/Common). This profile is shared by all users.
Intel® PROSet/Wireless WiFi Connection Utility User's Guide
Advanced Click Advanced to access the Advanced Settings
. Use the Advanced Settings to set Maintain
Connection, User Name Format, Auto Connect or Auto Import options, launch an application
(Application Auto Launch), set a profile password (Password Protection), specify a certain access
point address for adapter connection (Mandatory Access Point), and set Pre-logon Connect
options.
Next Proceeds to the Security Settings
page.
OK Finishes creation of the new profile with the current settings.
Cancel Closes the Create WiFi Profile Wizard and cancel any changes.
Help? Provides help information for this page.
Back to Top
Back to Contents
Trademarks and Disclaimers
Page 62

Back to Contents
Intel® PROSet/Wireless WiFi Connection Utility User's Guide
Using the Administrator Tool
Overview
Administrator Packages
Create a New Package
Open an Existing Package
Set Administrator Password
Administrator Tool Settings
Administrator Profiles
Single Sign-on Considerations for Windows Vista* and Windows* 7
Persistent Profile
Pre- logon Connect
Exclude Networks
Voice over IP (VoIP) Connection
Application Settings
Adapter Settings
EAP-FAST A -ID Groups
Overview
The Administrator Tool is used to create custom install packages that can be exported to client systems running
Microsoft Windows* XP, Windows Vista* and Windows* 7. The Administrator Tool is used to configure user settings
and common (shared) WiFi network profiles. The tool is used by the person who has administrator privileges on
this computer.
The feature must be selected during a custom installation of the Intel® PROSet/Wireless WiFi Connection Utility or
the feature is not displayed.
Administrator Packages
An Administrator Package is a self -extracting executable file that contains administrative profiles and other user
settings. You can copy or send an administrative package to clients on your network. When the executable runs,
the contents are installed and configured on the destination computer. If a profile is part of the package, the
profile governs how the destination computer connects to a specific WiFi network. For information about profiles,
Administrator Profiles.
see
Create a New Package
1. For Windows* XP users: on the Tools menu, click Administrator Tool.
2. Enter your password to access the Administrator Tool.
3. Click Create a new package.
Page 63

Name Description
Intel® PROSet/Wireless WiFi Connection Utility User's Guide
Create a
new
package
Create a package that can be exported to a client computer. The client computer can run
Windows* XP, Windows Vista*, or Windows* 7. The package capabilities will vary,
depending on the client OS. This package allows export of 802.1X authentication EAP- type,
Pre- logon/Common and Persistent profiles. However, there are exceptions for Single Signon profiles that will be exported to Windows Vista* and Windows* 7 clients. See
.
Open an
Administrator Profiles
Select to browse for and open an existing package.
existing
package
4. Click OK.
5. Configure the following options to be included in the package:
Name Description
Profiles
Application
Settings
Adapter
Settings
Click Include Profiles in this package (this should already be checked). Profiles can be
shared with other users. Click Profiles
here for more information and instructions.
Click the Application Settings tab. Click Include Application Settings in this
package (this should already be checked). Specify application settings to be enabled.
Click Application Settings
here for more information and instructions.
Click the Adapter Settings tab. Click Include Adapter Settings in this package.
Specify initial values for adapter settings used on this computer. Click Adapter Settings
here for more information and instructions.
EAP-FAST
A-ID
Groups
Click the EAP-FAST A-ID Groups tab. Click Include A-ID Groups. Add A- ID Group to
support multiple PACs from multiple A-IDs. Click EAP-FAST A-ID Groups
information and instructions.
here for more
6. Click Close.
7. You are notified: The current package is changed. Would you like to save the changes?
8. Click Yes. Save the executable file to a directory on the local disk drive.
9. Click Save. The file is created.
10. Click Finished to view the package contents.
Click Apply this package to this computer if you want to use the package configuration on the
Administrator's computer.
Copy the executable file to any user's computer to install the configuration that has been saved in the
package. When you execute the package file, it is a silent install.
11. Click OK.
Page 64
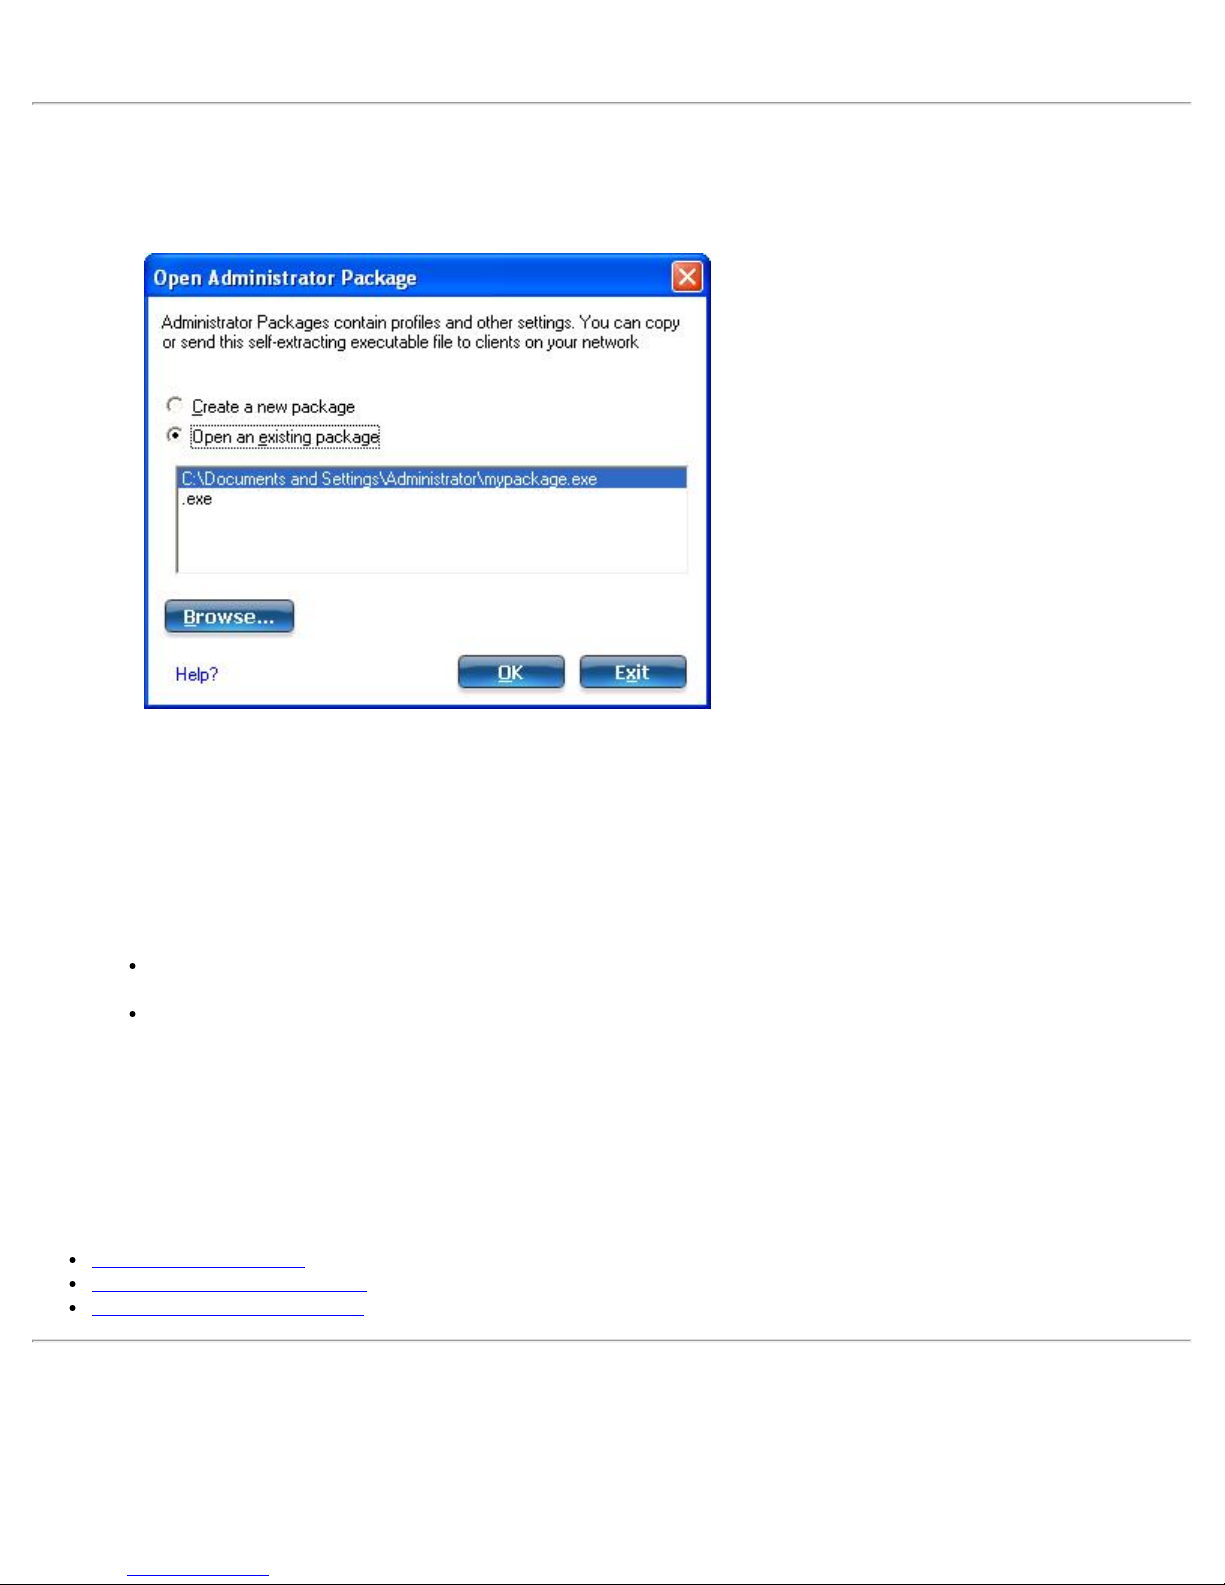
NOTE: You can also select Save Package on the File menu to save the package.
Intel® PROSet/Wireless WiFi Connection Utility User's Guide
Open an Existing Package
1. For Windows* XP users: on the Tools menu, click Administrator Tool.
2. Enter your password to access the Administrator Tool.
3. On the Open Administrator Package window, click Open an existing package to edit an existing package.
4. Click Browse.... Locate the package's executable file.
5. Click Open. Make your updates for package settings.
6. Here you can Add, Remove and Copy profiles. You can also click Properties to update the security
settings for a profile.
7. Click Close.
8. You are notified: The current package is changed. Would you like to save the changes?
9. Click Yes. Save the executable file to a directory on the local disk drive.
10. Click Save. The file is created.
11. Click Finished to view the package contents.
Click Apply this package to this computer if you want to use the package configuration on the
Administrator's computer.
Copy the executable file to any user's computer to install the configuration that has been saved in the
package. When you execute the package file, it is a silent install.
12. Click OK.
NOTE: You can also select Open Package on the File menu to edit an Administrator Package.
NOTE: If you create an Administrator Package for a Windows* XP Professional x64 Edition system, the
language files are located in the \XP\Docs and the \XP\x64\Install\Lang folders on that system.
See:
Administrator Profiles
Set Administrator Password
Administrator Tool Settings
Administrator Profiles
Administrator Profiles are owned and managed by the network administrator or the administrator of this computer.
These profiles are shared by all users on this computer. However, end users cannot modify these profiles. They
can only be modified from the Administrator Tool, which is password protected. There are two types of
Page 65

Administrator Profiles: Persistent or Pre-logon/Common. You can also configure Voice over IP (VoIP) settings for
Intel® PROSet/Wireless WiFi Connection Utility User's Guide
export to a soft - phone application.
Single Sign-On Considerations for Windows Vista* and Windows* 7
The following information applies only to Single Sign -On (SSO) profiles created for Windows Vista* and Windows*
7* clients.
Persistent profiles are not supported. Persistent profiles are ignored during package import.
Saved credentials in profiles that are both Persistent and Pre-logon/Common are not supported.
Saved credential profiles become prompt for credentials profiles.
Profiles that are Persistent -plus -Pre-logon/Common, use machine credentials, with an exception of
TTLS profiles.
Profiles that are Persistent -plus -Pre-logon/Common with TTLS, are not supported. Only Prelogon/Common with TTLS profiles are supported.
There is no pre-logon support for TLS profiles (including profiles with TLS as tunnel method).
No connection attempt during user log-in; TLS uses user certificates after user logon.
Machine certificates for user connection is not supported.
Machine certificate setting will become user certificate setting on import.
For specific information about each profile type, see the following:
SSO TTLS profiles
SSO EAP-SIM profiles
SSO EAP-AKA profiles
SSO LEAP profiles
SSO EAP-FAST profiles
SSO PEAP-GTC profiles
SSO PEAP-MS -CHAP -V2
SSO PEAP-TLS profiles
SSO TLS profiles
Persistent Profile
Persistent profiles are applied at boot time or whenever no one is logged on the computer. After a user logs off, a
Persistent profile maintains a wireless connection either until the computer is turned off, or a different user logs
on.
NOTE: Persistent profiles are not supported for Windows Vista* or Windows* 7. See Single Sign- on Considerations
for Windows Vista* and Windows* 7.
Persistent profile key points:
The following types of profiles can be created as Persistent Profiles:
All profiles that do not require 802.1X authentication (for example, Open authentication with WEP
encryption, Open authentication with no encryption).
All profiles with 802.1X authentication that have the credentials saved: LEAP or EAP-FAST.
Profiles with security settings that include "Use the following user name and password" option.
Profiles that use the machine certificate to authenticate.
WPA-Enterprise profiles that do not use a user certificate.
WPA-Personal profiles.
Persistent profiles are applied at system power up and after a user logs off.
NOTE: The WiFi connection utility supports machine certificates. However, they are not displayed in
the certificate listings.
Create a Persistent Profile for a Client Package
Following are general instructions for this type of Administrator profile. For more detailed information and
Page 66

restrictions, see Create Profiles for Windows*.
Intel® PROSet/Wireless WiFi Connection Utility User's Guide
1. For Windows* XP users: on the Tools menu, click Administrator Tool.
2. Enter your password to access the Administrator Tool.
3. Select Create new package or Open existing package. For existing packages, you may browse to locate
it. Then click OK.
4. Click Include Profiles in this package.
5. Click Persistent.
6. Click Add to open the General Settings.
7. Profile Name: Enter a descriptive profile name.
8. WiFi Network Name (SSID): Enter the network identifier.
9. Operating Mode: Network (Infrastructure) is selected by default.
10. Administrator Profile Type: Persistent: Active when no users are logged on is selected.
11. Click Next.
12. Click Enterprise Security to open the Security Settings. See TLS
, TTLS, PEAP, LEAP, or EAP-FAST for
802.1X security configuration information.
13. Click OK.
Remove a Persistent Profile from a Package
1. On the Persistent tab, click the profile.
2. Click Remove.
Copy a Persistent Profile for a Package
You can copy an existing profile, giving the copy a new name. You may want to do this in order to have two
similar profiles. To copy a profile:
1. Select the profile.
2. Click Copy.
3. Enter a new profile name.
4. Click OK.
The new profile is saved. This new profile has the same properties as the original.
Edit a Persistent Profile for a Package
1. Select the profile.
2. Click Properties.
3. Edit the properties of the new profile using the same instructions given under Create a Persistent Profile.
Pre-logon/Common Profiles
Pre- logon/Common profiles are applied once a user logs on. If Single Sign On support is installed, the connection
is made prior to the Windows log- on sequence (Pre-logon/Common). If Single Sign On support is not installed,
the profile is applied once the user session is active. Pre - logon/Common profiles always appear at the top of the
Profiles list. Users can still prioritize profiles that they have created but they cannot reprioritize Pre-logon/Common
profiles. Because these profiles appear at the top of the Profiles list, the WiFi connection utility automatically
attempts to connect to the Administrator profiles first before any user-created profiles.
NOTE: Only administrators can create or export Pre-logon/Common profiles.
Pre- logon Connect key points are:
Pre- logon Connect is active only at the Windows log on.
The following types of profiles can be created as Pre-logon/Common profiles:
802.1X PEAP, TTLS or EAP-FAST profiles that use either the "Use Windows Logon user name and
password" or "Use the following user name and password" credentials when configuring the profile's
security settings.
LEAP profiles that use the "Prompt for the user name and password." credentials when configuring the
Page 67

profile's security settings.
Intel® PROSet/Wireless WiFi Connection Utility User's Guide
802.1X PEAP or TTLS profiles with user or machine certificates (the user must have administrative
rights to use machine certificates).
TLS profiles that use digital certificates to verify the identity of a client and a server.
EAP-SIM profiles that use a Subscriber Identity Module (SIM) card to validate your credentials with the
network.
All non -802.1X (Open and WEP) Common or User Based profiles.
A Pre -logon/Common profile is applied at Windows user log -on time.
Pre-logon/Common Connection Status
Pre- logon/Common profiles support is installed during a Custom install of the WiFi connection utility. See Install or
Uninstall the Single Sign On Feature for more information.
NOTE: If the Single Sign On or Pre - logon Connect features are not installed, an administrator is still
able to create Pre-logon/Common profiles for export to a user's computer.
The following describes how the Pre-logon Connect feature functions from system power- up. The assumption is
that a saved profile exits. This saved profile has valid security settings marked with "Use Windows Logon user
name and password" that are applied at the time of Windows log on.
1. After a system power-up, enter your Windows log on domain, user name, and password.
2. Click OK. The Pre-logon/Common Profile Status page displays the progress of the network connection. After
the WiFi adapter is connected to the network access point, the Status page closes and the Windows user
logs on.
If the corresponding access point rejects your credentials during the Common connection, the profile
credentials prompt you for your user credentials.
Enter your credentials.
Click OK. The profile is applied and the Status page displays the progress of the connection status
until you are logged onto Windows.
Click Cancel on the Credentials page to select another profile.
NOTE: A user certificate can only be accessed by a user that has been authenticated on the computer.
Therefore, a user should log onto the computer once (using either a wired connection, alternate profile
or local log in) before using a Pre-logon/Common profile that authenticates with a user certificate.
When you log off, any wireless connection is disconnected and a Persistent profile (if one is available) is applied.
Under certain circumstances, it is desirable to maintain the current connection (for example, if user -specific data
needs to be uploaded to the server post -logoff or when roaming profiles are used). Create a profile that is marked
as both Pre-logon/Common and Persistent to achieve this functionality. If such a profile is active when the user
logs off, the connection is maintained.
Create a Pre-logon/Common Profile for a Client Package
Following are general instructions for this type of Administrator profile. For more detailed information and
restrictions, see
Create Profiles for Windows* .
1. For Windows* XP users: on the Tools menu, click Administrator Tool.
2. Enter your password to access the Administrator Tool.
3. Select Create new package or Open existing package. For existing packages, you may browse to locate
it. Then click OK.
4. Click Include Profiles in this package.
5. Click Pre-logon/Common.
6. Click Add to open the General Settings.
7. Profile Name: Enter a descriptive profile name.
8. WiFi Network Name (SSID): Enter the network identifier.
9. Operating Mode: Network (Infrastructure) is selected by default.
10. Administrator Profile Type: Pre-logon/Common: Active when a user is logged on. This profile is
shared by all users. This profile type is already selected.
11. Click Next.
12. Click Advanced to open the Advanced Settings
. Configure Advanced Settings and then return to these
Page 68

instructions.
Intel® PROSet/Wireless WiFi Connection Utility User's Guide
13. Click OK to close the Advanced Settings.
14. Click Enterprise Security to open the Security Settings. See EAP-SIM
for 802.1X security configuration information.
15. Click OK to save the profile and add it to the Administrator profiles list.
NOTE: If a Persistent connection was already established, a Pre-logon/Common profile is ignored
unless the profile is configured with both Pre-logon/Common and Persistent connection options.
Remove a Pre-logon/Common Profile from a Package
1. On the Persistent tab, click the profile.
2. Click Remove.
Copy a Pre-logon/Common Profile for a Package
You can copy an existing profile, giving the copy a new name. You can edit the new profile. You may want to do
this in order to have two similar profiles. To copy a profile:
1. Select the profile.
2. Click Copy.
3. Enter a new profile name.
4. Click OK.
The new profile is saved. This new profile has the same properties as the original.
, TLS, TTLS, PEAP, LEAP, EAP-FAST
Edit a Pre-logon/Common Profile for a Package
1. Select the profile.
2. Click Properties.
3. Edit the properties of the new profile using the same instructions given under Create a Persistent Profile.
Creating Administrator Profiles for Enterprise Security for more information.
Click
Exclude Networks
Administrators can designate networks to be excluded from connection. Once a network is excluded, only an
administrator can remove the network from the Exclude list. The excluded network is displayed in the Exclude List
Management, and is indicated by this icon:
NOTE: Unavailable for Windows Vista* and Windows* 7 packages.
To exclude a network:
1. Click Include Profiles in this package.
2. Click Exclude.
3. Click Add to open the Exclude Network (SSID).
4. Network Name: Enter the network name of the network that you want to exclude.
5. Click OK to add the network name to the Exclude list.
To remove a network from exclusion:
1. Select the network name in the Exclude list.
2. Click Remove. The network is deleted from the Exclude list.
Voice over IP (VoIP) Connection
The WiFi connection utility supports VoIP third -party soft -phone applications. Third -party VoIP applications support
Page 69

Voice Codecs. Codecs generally provide a compression capability to save network bandwidth. The WiFi connection
Intel® PROSet/Wireless WiFi Connection Utility User's Guide
utility supports the following International Telecommunications Union (ITU) codec standards:
Codec Algorithm
ITU G.711 PCM (Pulse Code Modulation)
ITU G.722 SBADPCM (Sub-Band Adaptive Differential Pulse Code Modulation)
ITU G.723 Multi- rate Coder
ITU G.726 ADPCM (Adaptive Differential Pulse Code Modulation)
ITU G.727 Variable - Rate ADPCM
ITU G.728 LD -CELP (Low-Delay Code Excited Linear Prediction)
ITU G.729 CS-ACELP (Conjugate Structure Algebraic-Code Excited Linear Prediction)
An administrator can export VoIP settings to configure various codec data rates and frame rates to improve voice
quality in VoIP transmissions. To create a VoIP profile:
NOTE: Check that Voice over IP
default.
1. Click Include Profiles in this package.
2. Click VoIP.
3. Click Add to open the Create VoIP Profiles page.
4. Select the Codec bandwidth, application usage, and frame rate. For Voice Data:
G711 has 10ms frame rate with 64kbps bit rate
G722 has 10ms frame rate with 64kbps bit rate
G723 has 30ms frame rate with either 5.3kbps or 6.4kbps bit rate
G726-32 has 10ms frame rate with 32kbps bit rate
G728 has 2.5ms frame rate with 16kbps bit rate
G729 has 10ms frame rate with 10kbps bit rate
Select parameters from the drop down menus.
Codec Usage Frame Rate
G711_64kbps
G722_64kbps
G722_56kbps
G722_48kbps
G722_1_32kbps
G722_1_24kbps
G722_1_16kbps
G726_16kbps
G726_24kbps
G726_32kbps
G726_40kbps
G728_16kbps
G729a_8kbps
G729e_11_8kbps
GIPS_iPCM_VARIABLE
G722_2_VARIABLE
is not disabled in the Administrator Tool Application Settings . It is enabled by
Interactive voice
Audio conference
Voice data
Video
Streaming audio
20
30
5. Click OK to return to the Profiles list.
6. Click Close to save the profile settings to a package
Application Settings
.
Page 70

An administrator can configure the WiFi connection utility Application Settings to control how the application
Intel® PROSet/Wireless WiFi Connection Utility User's Guide
behaves on the user's computer, and to select what level of control users have over various aspects of their
wireless connections. See
Application Settings.
Adapter Settings
An administrator can configure the adapter settings for the WiFi adapter installed on the user's computer. See
Adapter Settings .
EAP-FAST A-ID Groups
NOTE: This feature is unavailable if CCXv4 is not selected in the Administrator Tool Application Settings.
An Authority Identifier (A -ID) is the RADIUS server that provisions Protected Access Credentials (PACs) A-ID
groups. A-ID groups are shared by all users of the computer and allow EAP- FAST profiles to support multiple PACs
from multiple A -IDs. The A-ID groups can be pre - configured by the administrator and set up through an
Administrator Package on a user's computer. When a wireless network profile encounters a server with an A-ID
within the same group of the A-ID specified in the wireless network profile, it uses this PAC without a prompt to
the user.
To add an A-ID Group:
1. Select Include A-ID Groups.
2. Click Add.
3. Enter a new A- ID group name.
4. Click OK. The A-ID group is added to the A-ID Group list.
If the A-ID group is locked, then additional A-IDs cannot be added to the group.
To add an A-ID to an A- ID group:
1. Select a group from the A-ID Groups list.
2. Click Add in the A-IDs section.
3. Select an A- ID.
4. Click OK. The A-ID is added to the list.
Back to Top
Back to Contents
Trademarks and Disclaimers
Page 71

Back to Contents
Intel® PROSet/Wireless WiFi Connection Utility User's Guide
Wireless Network Overview
About Wireless Networks
What do I need to Set up a Wireless Network ?
Wireless Networking Basics
What is a Wireless Network Management Utility ?
Network Name
Profiles
Security
Identify a Wireless Network
Select a Wireless Network Mode
How do I Turn My Radio On and Off?
NOTE: Throughout this Help, the terms "wireless" and "WiFi" are used interchangeably.
About Wireless Networks
A Wireless Local Area Network (WLAN) connects computers without network cables. Instead, computers use radio
communications to send data between each other. In a WLAN, a radio communications device called an access
point or wireless router connects network computers and provides Internet or network access. You can
communicate directly with other wireless computers, or connect to an existing network through a wireless access
point.
When you set up your WiFi adapter, you select the operating mode for the kind of wireless network you want. You
can use your Intel® PRO/Wireless Network Connection adapter to connect to other similar wireless devices that
comply with the 802.11 standard for wireless networking. In this Help, a wireless network is also referred to as a
WiFi network.
What do I need to Set up a Wireless Network?
The most common type of wireless network is an infrastructure network. To set up an infrastructure network, you
need the following:
A wireless router.
A wireless network adapter for each computer that you want to connect to the wireless network.
If you want internet access for your WLAN, you also need broadband internet service such as cable or DSL.
This includes a broadband modem.
Wireless Networking Basics
What is a Wireless Network Management Utility?
The WiFi connection utility is a wireless network management utility. It helps you manage your wireless
connections. It can help you initially set up your wireless connections and then easily manager those connections,
opening and closing connections and managing security as required. Some computers also ship with Microsoft
Windows Zero Configuration, which is another wireless network management utility, and you should not use both
of these tools. This is because network settings you create with one utility are not applied if the other utility is
managing wireless connections. We recommend that you pick one tool to manage wireless connections, and stay
with that.
See Use Microsoft Windows* to Manage WiFi*
Network Name (SSID)
and also see Get Connected.
Page 72

Every wireless local area network (WLAN) uses a unique network name to identify the network. This name is also
Intel® PROSet/Wireless WiFi Connection Utility User's Guide
called the Service Set Identifier (SSID). When you set up your WiFi adapter, you specify the SSID. If you want to
connect to an existing WLAN, you must use the name for that network. If you set up your own WLAN, you can
make up your own name and use it on each computer. The name can be up to 32 characters long and contain
letters and numbers. The SSID or network name is assigned at the access point or wireless router.
Profiles
A profile is used to manage your computer's connection to a WLAN. A profile is a collection of settings that
determines how your computer connects to the WLAN. These settings (the profile) are saved on your computer
and are used each time you connect to that WLAN. The profile includes all of the network information and security
settings. Different profiles are created for different WLANs. For your computer, each WLAN will have its own profile
to manage connection to that WLAN. Using the Intel® PROSet/Wireless WiFi Software, the profiles for your
computer are displayed in the Profiles list. With the utility, you can create, edit, and remove profiles.
Security
Some WLANs are open or unsecure networks, and some are secure networks. A secure WLAN limits who can
access the network. There are different levels methods of security. The WiFi connection utility can easily help you
set up a security method for your WLAN.
Common security methods for WLANs use keys or passwords, where the computer requesting access must provide
the key or password to get access. WLANs can also use encryption to encode the data. With encryption, before a
computer transmits data it uses a secret encryption key to scramble the data. The receiving computer uses this
same key to unscramble the data. If you connect to an existing network, use the encryption key provided by the
administrator of the wireless network. If you set up your own network, you can make up your own key and use it
on each computer. The WiFi connection utility can help you do this. The security method used by your computer to
get WLAN access is stored in the profile. See Security
for more helpful information.
Identify a Wireless Network
Depending on the size and components of a wireless network, there are different ways to identify a wireless
network:
The Network Name or Service Set Identifier (SSID): Identifies a wireless network. All wireless devices
on the network must use the same SSID. This is probably the most common method.
Basic Service Set (BSS): Consists of two or more wireless nodes, or stations, which have recognized each
other and have established communications.
Broadcast SSID: An access point can respond to computers sending probe packets with the broadcast
SSID. If this feature is enabled on the access point, any wireless user can associate with the access point by
using a blank (null) SSID.
Basic Service Set Identifier (BSSID): A unique identifier for each wireless device. The BSSID is the
Ethernet MAC address of the device.
Extended Service Set Identifier (ESSID): A special case of SSID used to identify a wireless network that
includes access points.
Independent Basic Service Set (IBSS): A mode of operation in an 802.11 system that allows direct
communication between 802.11 devices without the need to set up a communication session with an access
point.
Independent Basic Service Set Identifier (IBSSID): A special case of SSID used to identify a network of
wireless computers configured to communicate directly with one another without using an access point.
Select a Wireless Network Mode
Wireless networks can operate with or without access points, depending on the number of users in the network.
Infrastructure mode uses access points to allow wireless computers to send and receive information. Wireless
computers transmit to the access point, the access point receives the information and rebroadcasts it to other
computers. The access point can also connect to a wired network or to the Internet. Multiple access points can
work together to provide coverage over a wide area.
Device-to-Device mode, also called ad hoc mode, works without access points and allows wireless computers to
Page 73

send information directly to other wireless computers. You can use Device -to-Device mode to network computers
Intel® PROSet/Wireless WiFi Connection Utility User's Guide
in a home or small office or to set up a temporary wireless network for a meeting.
How do I turn my Radio on and off?
You will need to turn the WiFi adapter radio off (and on) on different occasions. For example, you may be
required to turn the radio off when boarding an airplane. You can also turn it off to conserve battery power.
There are three methods to turn the radio on and off:
Using the wireless radio hardware switch (may not be present on all computers).
Using the WiFi On / WiFi Off button in the WiFi connection utility.
Using Windows.
Remember that to connect to wireless networks, the wireless radio needs to be turned back on. If you are unable
to connect to a wireless network, verify that your radio is turned on at both the hardware switch and the WiFi On
/ WiFi Off button in the WiFi connection utility.
See Turn the Radio on or off
Back to Top
Back to Contents
Trademarks and Disclaimers
for more information.
Page 74

Back to Contents
Intel® PROSet/Wireless WiFi Connection Utility User's Guide
Personal Security
Use Personal Security if you are a home or small business user who can use a variety of simple security
procedures to protect your WiFi connection. You may want to select from the list of security settings that are easy
to configure, for your WiFi network. See Personal Security Settings
RADIUS
or AAA server is not required.
Review the Set up Data Encryption and Authentication information to learn about the different security
types.
To add or change the required security settings, click Security Settings for information to set security for the
selected WiFi network.
See Profile Management for a description of when to use the Profile Wizard.
See Security Overview for more information about the different security options for WiFi networks.
If you want to verify the security settings, select a WiFi network in the WiFi Networks list. See Network
Properties to review the operating mode, authentication level, and data encryption.
See Enterprise Security to set 802.1X authentication security.
Personal Security Settings
Personal Security Settings Description
for a description of each of the options. A
Name Setting
General
Settings
Security
Settings
Select to open the Personal Security Settings. The security settings that are available are dependent
on the Operating Mode selected in the Create WiFi Profile Security Settings
Device to Device (ad hoc): In device to device mode, also called ad hoc mode, wireless computers
send information directly to other wireless computers. You can use ad hoc mode to connect multiple
computers in a home or small office, or to set up a temporary wireless network for a meeting.
NOTE: Device to Device (ad hoc) networks are identified with a notebook image (
the WiFi Networks and Profiles list.
Network (Infrastructure): An infrastructure network consists of one or more access points and one
or more computers with WiFi adapters installed. At least one access point should also have a wired
connection. For home users, this is usually a broadband or cable network.
NOTE: Infrastructure networks are identified with an access point image (
Networks and Profiles list.
If you are configuring a Device to Device (ad hoc) profile, select one of the following data encryption
settings:
None: No authentication required.
WEP-64 bit or WEP-128 bit: A network key or password is used for encryption.
.
) in
) in the WiFi
If you are configuring a Network (Infrastructure) profile, select:
WPA*-Personal (TKIP) or WPA2*-Personal (TKIP) : WPA - Personal uses the Temporal Key
Integrity Protocol (TKIP) for data encryption.
WPA-Personal (AES-CCMP) or WPA2- Personal (AES-CCMP) : WPA -Personal uses a new method
for privacy protection of wireless transmissions specified in the IEEE 802.11i standard.
Advanced
button
Click to access the Advanced Settings
Auto Connect: Select to automatically or manually connect to a profile.
and configure the following options:
Page 75

Auto Import : Network administrator can export a profile on another computer.
Intel® PROSet/Wireless WiFi Connection Utility User's Guide
Band Selection : Select the band to use for this connection profile.
Mandatory Access Point : Select to associate the WiFi adapter with a specific access point.
Password Protection : Select to password protect a profile.
Application Auto Launch : Specify a program to be started when a wireless connection is made.
Maintain Connection : Select to remain connected to a user profile after log off.
Back View the prior page in the Profile Wizard.
OK Closes the Profile Wizard and saves the profile.
Cancel Closes the Profile Wizard and cancels any changes made.
Help? Provides the help information for the current page.
Set up Data Encryption and Authentication
In a home WiFi network you can use a variety of simple security procedures to protect your wireless connection.
These include:
Enable Wi -Fi Protected Access (WPA*).
Change your password.
Change the network name (SSID).
Wi-Fi Protected Access (WPA) encryption provides protection for your data on the network. WPA uses an
encryption key called a Pre-Shared Key (PSK) to encrypt data before transmission. Enter the same password in all
of the computers and access point in your home or small business network. Only devices that use the same
encryption key can access the network or decrypt the encrypted data transmitted by other computers. The
password automatically initiates the Temporal Key Integrity Protocol (TKIP) or AES-CCMP protocol for the data
encryption process.
Network Keys
WEP encryption provides two levels of security:
64-bit key (sometimes referred to as 40 -bit)
128-bit key (also known as 104 -bit)
For improved security, use a 128-bit key. If you use encryption, all wireless devices on your wireless network must
use the same encryption keys.
You can create the key yourself and specify the key length (64 -bit or 128-bit) and key index (the location that a
specific key is stored). The greater the key length, the more secure the key. When the length of a key is increased
by one character, the number of possible keys doubles.
Key Length: 64-bit
Pass phrase (64-bit): Enter five (5) alphanumeric characters, 0 - 9, a-z or A-Z.
Hex key (64-bit): Enter 10 hexadecimal characters, 0-9, A-F.
Key Length: 128-bit
Pass phrase (128-bit): Enter 13 alphanumeric characters, 0 -9, a -z or A-Z.
Hex key (128-bit): Enter 26 hexadecimal characters, 0-9, A-F.
With WEP data encryption, wireless station can be configured with up to four keys (the key index values are 1, 2,
3, and 4). When an access point or a wireless station transmits an encrypted message that uses a key stored in a
specific key index, the transmitted message indicates the key index that was used to encrypt the message body.
The receiving access point or wireless station can then retrieve the key that is stored at the key index and use it
to decode the encrypted message body.
Page 76

Set up a Client with Open Authentication and No Data Encryption (None)
CAUTION: WiFi networks using no authentication or encryption are highly vulnerable to access by unauthorized
Intel® PROSet/Wireless WiFi Connection Utility User's Guide
users.
On the Intel® PROSet/Wireless WiFi Connection Utility main window, use one of the following methods to connect
to a device to device network:
Double-click a Device to Device (ad hoc) network in the WiFi Networks list.
Select a Device to Device (ad hoc) network in the WiFi Networks list. Click Connect. The Intel®
PROSet/Wireless WiFi Connection Utility automatically detects the security settings for the WiFi adapter.
To create a profile for a WiFi network connection with no encryption perform these steps:
1. Click Profiles on the WiFi connection utility main window.
2. On the Profiles list, click Add to open the Create WiFi Profile General Settings.
3. Profile Name: Enter a descriptive profile name.
4. WiFi Network Name (SSID): Enter the name of your wireless network.
5. Operating Mode: Click Device to Device (ad hoc).
6. Click Next to open the Security Settings. Personal Security is selected by default.
7. Security Settings: The default setting is None, which indicates that there is no security on this wireless
network.
8. Click OK. The profile is added to the Profiles list and connects to the wireless network.
Set up a Client with WEP 64-bit or WEP 128-bit Data Encryption
When WEP data encryption is enabled, a network key or password is used for encryption.
A network key is provided for you automatically (for example, it might be provided by your wireless network
adapter manufacturer), or you can enter it yourself and specify the key length (64 -bit or 128-bit), key format
(ASCII characters or hexadecimal digits), and key index (the location where a specific key is stored). The greater
the key length, the more secure the key.
To add a network key for an infrastructure network connection:
1. On the WiFi connection utility main window, double -click an infrastructure network in the WiFi Networks list
or select the network and click Connect.
2. Click Profiles to access the Profiles list.
3. Click Properties to open the Create WiFi Profile General Settings. The Profile name and WiFi Network
Name (SSID) display. Network (Infrastructure) should be selected as the Operating Mode.
4. Click Next to open the Security Settings. Personal Security is selected by default.
5. Security Settings: The default data encryption setting is None, which indicates that there is no security on
this wireless network.
To add a password or network key:
1. Security Settings: Select either WEP 64-bit or WEP 128-bit to configure WEP data encryption with a 64 -
bit or 128 -bit key.
When WEP encryption is enabled on an access point, the WEP key is used to verify access to the
network. If the wireless device does not have the correct WEP key, even though authentication is
successful, the device is unable to transmit data through the access point or decrypt data received
from the access point.
Name Description
Password Enter the Wireless Security Password (Pass phrase) or Encryption Key (WEP
key).
Pass phrase (64-bit)Enter five (5) alphanumeric characters, 0-9, a- z or A -Z.
WEP key (64-bit) Enter 10 hexadecimal characters, 0-9, A-F.
Page 77

Pass phrase (128-
Intel® PROSet/Wireless WiFi Connection Utility User's Guide
bit)
WEP key (128-bit) Enter 26 hexadecimal characters, 0 - 9, A-F.
2. Key Index: Change the Key Index to set up to four passwords.
3. Click OK to return to the Profiles list.
To add more than one password:
1. Select the Key Index number: 1, 2, 3, or 4.
2. Enter the Wireless Security Password.
3. Select another Key Index number.
4. Enter another Wireless Security Password.
5. Click OK to return to the Profiles list.
Enter 13 alphanumeric characters, 0 -9, a -z or A-Z.
Set up a Client with WPA*-Personal (TKIP) or WPA2*-Personal (TKIP) Security
Settings
WPA* Personal Mode requires manual configuration of a pre -shared key (PSK) on the access point and clients. This
PSK authenticates a user's password or identifying code, on both the client station and the access point. The
access point performs the authentication. WPA Personal Mode is targeted to home and small business
environments.
WPA2* is the second generation of WPA security that provides enterprise and consumer wireless users with a high
level of assurance that only authorized users can access their wireless networks. WPA2 provides a stronger
encryption mechanism through Advanced Encryption Standard (AES), which is a requirement for some corporate
and government users.
NOTE: To achieve transfer rates greater than 54 Mbps on 802.11n connections, WPA2-AES security must be
selected. No security (None) can be selected to enable network setup and troubleshooting.
To configure a WiFi network profile with WPA-Personal network authentication and TKIP data encryption:
1. On the WiFi connection utility main window, double -click an infrastructure network in the WiFi Networks list
or select the network and click Connect.
2. Click Profiles to access the Profiles list.
3. Click Properties to open the WiFi Profile Properties General Settings. The Profile name and WiFi
Network Name (SSID) display. Network (Infrastructure) should be selected as the Operating Mode.
4. Click Next to open the Security Settings.
5. Select Personal Security.
6. Security Settings: Select WPA-Personal (TKIP) to provide security to a small business network or home
environment. A password, called a pre -shared key (PSK), is used. The longer the password, the stronger the
security of the wireless network.
If your wireless access point or router supports WPA2 -Personal, then you should enable it on the access
point and provide a long, strong password. The longer the password, the stronger the security of the
wireless network. The same password entered in the access point needs to be used on this computer and all
other wireless devices that access the wireless network.
NOTE: WPA-Personal and WPA2 -Personal are interoperable.
7. Wireless Security Password (Encryption Key): Enter a text phrase with eight to 63 characters. Verify
that the network key matches the password in the wireless access point.
8. Click OK to return to the Profiles list.
Set up a Client with WPA*-Personal (AES-CCMP) or WPA2*-Personal (AES-CCMP)
Security Settings
Page 78

Wi-Fi Protected Access (WPA*) is a security enhancement that strongly increases the level of data protection and
Intel® PROSet/Wireless WiFi Connection Utility User's Guide
access control to a wireless network. WPA enforces 802.1X authentication and key-exchange and only works with
dynamic encryption keys. For a home user or small business, WPA -Personal uses either Advanced Encryption
Standard - Counter CBC-MAC Protocol (AES- CCMP) or Temporal Key Integrity Protocol (TKIP).
NOTE: To achieve transfer rates greater than 54 Mbps on 802.11n connections, WPA2-AES security must be
selected. No security (None) can be selected to enable network setup and troubleshooting.
To create a WiFi network profile with WPA2*-Personal network authentication and AES-CCMP data encryption:
1. On the WiFi connection utility main window, double -click an infrastructure network from the WiFi Networks
list or select the network and click Connect.
2. If these are being transmitted, the Profile name and WiFi Network Name (SSID) should display on the
General Settings screen. Network (Infrastructure) should be selected as the Operating Mode. Click Next
to open the Security Settings.
3. Select Personal Security.
4. Security Settings: Select WPA2-Personal (AES-CCMP) to provide this level of security in the small
network or home environment. It uses a password, also called a pre-shared key (PSK). The longer the
password, the stronger the security of the wireless network.
AES-CCMP (Advanced Encryption Standard - Counter CBC-MAC Protocol) is a newer method for
privacy protection of wireless transmissions specified in the IEEE 802.11i standard. AES-CCMP provides
a stronger encryption method than TKIP. Choose AES-CCMP as the data encryption method whenever
strong data protection is important.
If your Wireless access point or router supports WPA2 -Personal, then you should enable it on the
access point and provide a long, strong password. The same password entered into the access point
needs to be used on this computer and all other wireless devices that access the wireless network.
NOTE: WPA-Personal and WPA2 -Personal are interoperable.
5. Password: Wireless Security Password (Encryption Key): Enter a text phrase (length is between eight
and 63 characters). Verify that the network key used matches the wireless access point key.
6. Click OK to return to the Profiles list.
Back to Top
Back to Contents
Trademarks and Disclaimers
Page 79

Back to Contents
Intel® PROSet/Wireless WiFi Connection Utility User's Guide
Enterprise Security
The Security Settings window is shown when creating or editing a profile. At the Security Settings page, you can
enter the required security settings for the selected WiFi network. See Personal Security
security in a non -enterprise environment (home, small business). See
802.1X security authentication options.
Use Enterprise Security if your network environment requires 802.1X authentication.
802.1X authentication methods include passwords, certificates and smart cards.
802.1X authentication types are: EAP-SIM, EAP-AKA, LEAP, TLS, TTLS, PEAP, EAP-FAST.
See Profile Management for a description of when the Profile Wizard is launched.
See Security Overview for more information about the different security options for wireless networks.
Enterprise Security Settings to set up
Enterprise Security Settings
Name Setting
Enterprise
Security
Network
Authentication
Select to open the Enterprise Security settings. The security settings that are available are
dependent on the Operating Mode selected: Device to Device (ad hoc)
(Infrastructure).
If you configure a profile for Device to Device (ad hoc) networking, the default setting is Open
authentication.
to set basic WEP or WPA
or Network
Data
Encryption
Enable 802.1X
(Authentication
Type)
If you configure a profile for an infrastructure network, select:
Open: Any wireless station can request authentication.
Shared: Uses an encryption key known only to the receiver and sender of data.
WPA-Personal or WPA2 -Personal : Uses a password also called a pre-shared key (PSK).
WPA-Enterprise or WPA2-Enterprise : Use on enterprise networks with an 802.1X RADIUS
server.
NOTE: WPA-Enterprise and WPA2-Enterprise are interoperable.
Click to open the following data encryption types:
None: No encryption.
WEP: WEP encryption provides two levels of security that use a 64 -bit key (sometimes
referred to as 40 - bit) or a 128-bit key (also known as 104 -bit). If you use encryption, all
wireless devices on your wireless network must use the same encryption keys.
CKIP: Cisco Key Integrity Protocol is a Cisco proprietary security protocol for encryption
in 802.11 media. CKIP uses Key Permutation (KP) and Message Sequence Number to
improve 802.11 security in infrastructure mode.
TKIP: Provides per -packet key mixing, a message integrity check and a rekeying
mechanism.
AES-CCMP: (Advanced Encryption Standard - Counter CBC-MAC Protocol) Used as the
data encryption method whenever strong data protection is important.
Click to open the following 802.1X authentication types:
TLS
TTLS
PEAP
LEAP
EAP-FAST
EAP-SIM: If in administrator mode, this only available for Pre-logon/Common profiles,
not Persistent.
EAP-AKA: If in administrator mode, this only available for Pre-logo/Common profiles, not
Page 80

Persistent.
Intel® PROSet/Wireless WiFi Connection Utility User's Guide
Certain Authentication Types require that you obtain and install a client certificate. See Set up
a Client with TLS authentication or consult your administrator.
Authentication
Protocols
Authentication Protocols apply only when Network Authentication is set to WPA -Enterprise or
WPA2-Enterprise and Authentication Type is set to TTLS or PEAP.
PAP
CHAP
MS-CHAP
MS-CHAP-V2
GTC
TLS
Cisco Options Click to view the Cisco Compatible Extensions Options.
NOTE: Cisco Compatible Extensions are automatically enabled for CKIP and LEAP profiles.
Advanced Click to access the Advanced Settings
and configure the following options listed.
Auto Connect: Select to automatically or manually connect to a profile.
Auto Import : Allows a network administrator to move this profile to other computers.
(Visible on user profiles only.)
Band Selection : Select the band to use for this connection profile.
Mandatory Access Point : Select to associate the WiFi adapter with a specific access point.
Password Protection : Select to password protect a profile.
Application Auto Launch : Specify a program to be started when a wireless connection is
made.
Maintain Connection : Select to remain connected to a user profile after log off. (Visible
on user profiles only.)
User Name Format : Select the user name format for the authentication server. (Visible
on administrator profiles only.)
PLC Domain Check : Select to verify the domain server's presence before the user login
process is finished. (Visible on administrator profiles only.)
User
Credentials
A profile configured for TTLS, PEAP, or EAP-FAST authentication requires one of the following
log on authentication methods:
Use Windows logon: The 802.1X credentials match your Windows user name and
password. Before connection, you are prompted for your Windows logon credentials.
NOTE: For LEAP profiles, this option is listed as Use Windows logon user name and
password.
Prompt each time I connect: Prompt for your user name and password every time
you log onto the wireless network.
NOTE: For LEAP profiles, this option is listed as Prompt for the user name and password.
Use the following: Use your saved credentials to log onto the network.
User Name: This user name must match the user name that is set in the
authentication server by the administrator prior to client authentication. The user
name is case-sensitive. This name specifies the identity supplied to the
authenticator by the authentication protocol operating over the TLS tunnel. This
identity is securely transmitted to the server only after an encrypted channel has
been established.
Domain: Name of the domain on the authentication server. The server name
identifies a domain or one of its sub - domains (for example, zeelans.com, where
the server is blueberry.zeelans.com).
Password: Specifies the user password. The password characters appear as
asterisks. This password must match the password that is set in the authentication
server.
Page 81

Confirm Password: Reenter the user password.
Intel® PROSet/Wireless WiFi Connection Utility User's Guide
Roaming Identity: A Roaming Identity may be populated in this field or you can
use %domain%\%username% as the default format for entering a roaming
identity. When 802.1X Microsoft IAS RADIUS is used as an authentication server,
the server authenticates the device using the Roaming Identity from Intel®
PROSet/Wireless WiFi Software, and ignores the Authentication Protocol MS-
CHAP-V2 user name. Microsoft IAS RADIUS accepts only a valid user name
(dotNet user) for the Roaming Identity. For all other authentication servers, the
Roaming Identity is optional. Therefore, it is recommended to use the desired
realm (for example, anonymous@myrealm) for the Roaming Identity rather than a
true identity.
NOTE: Contact your administrator to obtain the domain name.
NOTE: For LEAP profiles, this option is listed as Use the following user name and
password.
Server Options Select one of the following credential retrieval methods:
Validate Server Certificate: Select to verify the server certificate.
Certificate Issuer: The server certificate received during TLS message exchange must be
issued by this certificate authority (CA). Trusted intermediate certificate authorities and root
authorities whose certificates exist in the system store are available for selection. If Any
Trusted CA is selected, any CA in the list is acceptable. Click Any Trusted CA as the default
or select a certificate issuer from the list.
Certificate
Options
Specify Server or Certificate Name: Enter the server name.
The server name or domain to which the server belongs, depends on which of the following
options has been selected.
Server name must match the specified entry exactly: When selected, the server
name must match exactly the server name found on the certificate. The server name
should include the complete domain name (for example, Servername.Domain name). The
server name can include all characters, including special characters.
Domain name must end with the specified entry: When selected, the server name
identifies a domain, and the certificate must have a server name that belongs to this
domain or to one of its subdomains (for example, zeelans.com, where the server is
blueberry.zeelans.com).
NOTE: These parameters should be obtained from the administrator.
To obtain a certificate for TLS authentication, select one of the following:
Use my smart card: Select if the certificate resides on a smart card.
Use the certificate issued to this computer: Selects a certificate that resides in the
machine store.
Use a user certificate on this computer: Click Select to choose a certificate that
resides on this computer.
NOTE: The Intel® PROSet/Wireless WiFi Connection Utility supports machine certificates.
However, they are not displayed in the certificate listings.
Notes about Certificates: The specified identity should match the Issued to identity in the
certificate and should be registered on the authentication server (for example, RADIUS server)
that is used by the authenticator. Your certificate must be valid with respect to the
authentication server. This requirement depends on the authentication server and generally
means that the authentication server must know the issuer of your certificate as a Certificate
Authority. Use the same user name you used to log in when the certificate was installed.
Back View the prior page in the Profile Wizard.
Next View the next page in the Profile Wizard. If more security information is required then the next
step of the Security Settings is displayed.
Page 82

OK Closes the Profile Wizard and saves the profile.
Intel® PROSet/Wireless WiFi Connection Utility User's Guide
Cancel Closes the Profile Wizard and cancels any changes made.
Help? Provides the help information for the current page.
Back to Top
Back to Contents
Trademarks and Disclaimers
Page 83

Back to Contents
Intel® PROSet/Wireless WiFi Connection Utility User's Guide
Security Overview
This section describes the various security methods used to help protect WiFi networks.
Protecting Your WiFi Network
Authentication
Encryption
SSID Broadcasting
Personal Security Methods
Open and Shared Key authentication
WEP Encryption
WPA-Personal
WPA2-Personal
802.1X Authentication (Enterprise Security)
Overview
What is RADIUS ?
How 802.1X Authentication Works
802.1X Features
Network Authentication Types
Open
Shared
WPA-Personal
WPA2-Personal
WPA-Enterprise
WPA2-Enterprise
Data Encryption Types
AES-CCMP
TKIP
CKIP
Authentication Types
TLS
TTLS
PEAP
LEAP
EAP-SIM
EAP-FAST
EAP-AKA
Authentication Protocols
PAP
CHAP
MS-CHAP
MS-CHAP-V2
GTC
TLS
Cisco Features
Page 84

Cisco LEAP
Intel® PROSet/Wireless WiFi Connection Utility User's Guide
Cisco Rogue Access Point Security Feature
802.11b and 802.11g Mixed Environment Protection Protocol
CKIP
Fast Roaming (CCKM)
Radio Management
Protecting Your WiFi Network
Your wireless network, if left unprotected, is vulnerable to access from other computers. You can easily protect
your home and small business network from nearly all forms of unauthorized access with the security methods
described in this section.
Authentication
Authentication is the process of identifying and approving a request from a client (usually a laptop) to access a
network at a network access point. Once authentication is completed and access is granted, the client has access
to the network.
Encryption
You can select encryption algorithms to encrypt the information and data that is sent across your wireless
network. Only computers equipped with pre-shared keys can encrypt and decrypt the data being transmitted.
Encryption keys are available with two levels of security, 64 -bit and 128-bit. Use 128- bit keys for greater security.
SSID Broadcasting
A simple way to improve network security is to set your network access point to not broadcast the Service Set
Identifier (SSID). The SSID is needed to gain access. Only those computers with knowledge of the SSID can
access the network. (This is not set at the adapter using the Intel® PROSet/Wireless WiFi Connection Utility, it is
set at the access point.)
Personal Security Methods
Open and Shared Network Authentication
IEEE 802.11 supports two types of network authentication methods: Open System and Shared Key.
When open authentication is used, any wireless station can request authentication. The station that needs to
authenticate with another wireless station sends an authentication management request that contains the
identity of the sending station. The receiving station or access point grants any request for authentication.
Open authentication allows any device to gain network access. If no encryption is enabled on the network,
any device that knows the Service Set Identifier (SSID) of the access point can gain access to the network.
When shared key authentication is used, each wireless station is assumed to have received a secret shared
key over a secure channel that is independent from the 802.11 wireless network communications channel.
You can share this secret key via a wired Ethernet connection, or by physically using a USB memory stick or
CD. Shared key authentication requires that the client configure a static WEP key. The client access is
granted only if it passes a challenge -based authentication.
WEP
Wired Equivalent Privacy (WEP) uses encryption to help prevent unauthorized reception of wireless data. WEP uses
an encryption key to encrypt data before transmitting it. Only computers that use the same encryption key can
access the network and decrypt the data transmitted by other computers. WEP encryption provides for two levels
of security, using a 64 -bit key (sometimes referred to as 40 -bit) or a 128 -bit key (also known as 104- bit). For
stronger security, you should use a 128 -bit key. If you use encryption, all wireless devices on your wireless
network must use the same encryption keys.
Page 85

With WEP data encryption, a wireless station can be configured with up to four keys (the key index values are 1,
Intel® PROSet/Wireless WiFi Connection Utility User's Guide
2, 3, and 4). When an access point (AP) or a wireless station transmits an encrypted message that uses a key
stored in a specific key index, the transmitted message indicates the key index that was used to encrypt the
message body. The receiving AP or wireless station can then retrieve the key that is stored at the key index and
use it to decode the encrypted message body
Because the WEP encryption algorithm is vulnerable to network attacks, you should consider using WPA -Personal
or WPA2-Personal security.
WPA-Personal
WPA-Personal Mode is targeted to home and small business environments. WPA Personal requires manual
configuration of a pre-shared key (PSK) on the access point and clients. No authentication server is needed. The
same password entered at the access point needs to be used on this computer and all other wireless devices that
access the wireless network. Security depends on the strength and secrecy of the password. The longer the
password, the stronger the security of the wireless network. If your wireless access point or router supports WPA Personal and WPA2-Personal then you should enable it on the access point and provide a long, strong password.
WPA-Personal makes available the TKIP and AES-CCMP data encryption algorithms.
WPA2-Personal
WPA2-Personal requires manual configuration of a pre -shared key (PSK) on the access point and clients. No
authentication server is needed. The same password entered at the access point needs to be used on this
computer and all other wireless devices that access the wireless network. Security depends on the strength and
secrecy of the password. The longer the password, the stronger the security of the wireless network. WPA2 is an
improvement over WPA and implements the full IEEE 802.11i standard. WPA2 is backward compatible with WPA.
WPA2-Personal makes available the TKIP and AES-CCMP data encryption algorithms.
NOTE: WPA-Personal and WPA2 -Personal are interoperable.
802.1X Authentication (Enterprise Security)
This section describes security common used by larger companies.
Overview
What is Radius ?
How 802.1X Authentication Works
802.1X Features
Overview
The 802.1X authentication is independent of the 802.11 authentication process. The 802.11 standard provides a
framework for various authentication and key-management protocols. There are different 802.1X authentication
types and each provides a different approach to authentication, but all employ the same 802.11 protocol and
framework for communication between a client and an access point. In most protocols, after completion of the
802.1X authentication process, the client receives a key that it uses for data encryption. See
authentication works for more information. With 802.1X authentication, an authentication method is used between
the client and a server (for example a Remote Authentication Dial -In User Service (RADIUS) server) connected to
the access point. The authentication process uses credentials, such as a user's password, that are not transmitted
over the wireless network. Most 802.1X types support dynamic per -user, per-session keys to strengthen the key
security. The 802.1X authentication benefits from the use of an existing authentication protocol known as the
Extensible Authentication Protocol (EAP).
How 802.1X
The 802.1X authentication for wireless networks has three main components:
The authenticator (the access point)
The supplicant (the client software)
The authentication server
Page 86

The 802.1X authentication security initiates an authorization request from the wireless client to the access point,
Intel® PROSet/Wireless WiFi Connection Utility User's Guide
which authenticates the client to an Extensible Authentication Protocol (EAP) compliant RADIUS server. This
RADIUS server may authenticate either the user (via passwords or certificates) or the system (by MAC address).
In theory, the wireless client is not allowed to join the networks until the transaction is complete. (Not all
authentication methods use a RADIUS server. WPA -Personal and WPA2-Personal use a common password that
must be entered at the access point and at all devices requesting access to the network.)
There are several authentication algorithms used with 802.1X. Some examples are:
PEAP), and EAP Cisco Wireless Light Extensible Authentication Protocol ( LEAP). These are all methods for the
EAP (
wireless client to identify itself to the RADIUS server. With RADIUS authentication, user identities are checked
against databases. RADIUS constitutes a set of standards that addresses Authentication, Authorization, and
Accounting (AAA). RADIUS includes a proxy process to validate clients in a multi-server environment. The IEEE
802.1X standard provides a mechanism for controlling and authenticating access to port -based 802.11 wireless
and wired Ethernet networks. Port -based network access control is similar to a switched local area network (LAN)
infrastructure that authenticates devices attached to a LAN port and prevents access to that port if the
authentication process fails.
What is RADIUS?
RADIUS is the Remote Authentication Dial-In User Service, an Authorization, Authentication, and Accounting (AAA)
client -server protocol that is used when a AAA dial-up client logs in or out of a Network Access Server. Typically, a
RADIUS server is used by Internet Service Providers (ISP) to perform AAA tasks. AAA phases are described as
follows:
Authentication phase: Verifies a user name and password against a local database. After credentials are
verified, the authorization process begins.
Authorization phase: Determines whether a request is allowed access to a resource. An IP address is
assigned for the dial - up client.
Accounting phase: Collects information on resource usage for the purpose of trend analysis, auditing,
session-time billing, or cost allocation.
EAP-TLS, EAP-TTLS, Protected
How 802.1X Authentication Works
Following is a simplified description of how 802.1X authentication works.
1. A client sends a "request to access" message to an access point. The access point requests the identity of
the client.
2. The client replies with its identity packet, which is passed along to the authentication server.
3. The authentication server sends an "accept" packet to the access point.
4. The access point places the client port in the authorized state and data traffic is allowed to proceed.
802.1X Features
The following authentication methods are supported on Windows* XP:
802.1X supplicant protocol support
Support for the Extensible Authentication Protocol (EAP) - RFC 2284
Supported Authentication Methods on Windows* XP:
EAP TLS Authentication Protocol - RFC 2716 and RFC 2246
EAP Tunneled TLS (TTLS)
Cisco LEAP
PEAP
EAP-SIM
EAP-FAST
EAP-AKA
Network Authentication
Page 87

Open
Intel® PROSet/Wireless WiFi Connection Utility User's Guide
See
Open Authentication .
Shared
See
Shared Authentication .
WPA-Personal
See
WPA-Personal.
WPA2-Personal
See
WPA2-Personal.
WPA Enterprise
Enterprise Mode authentication is targeted to corporate or government environments. WPA Enterprise verifies
network users through a
session keys to ensure your wireless network's privacy and enterprise security. An authentication type is selected
to match the authentication protocol of the 802.1X server.
WPA2 Enterprise
RADIUS or other authentication server. WPA uses 128- bit encryption keys and dynamic
WPA Enterprise authentication is targeted to corporate or government environments. WPA2 Enterprise verifies
network users through a
session keys to ensure your wireless network's privacy and enterprise security. An authentication type is selected
to match the authentication protocol of the 802.1X server. Enterprise Mode is targeted to corporate or government
environments. WPA2 is an improvement over WPA and implements the full IEEE 802.11i standard.
RADIUS or other authentication server. WPA2 uses 128 -bit encryption keys and dynamic
Data Encryption
AES-CCMP
Advanced Encryption Standard - Counter CBC-MAC Protocol. The new method for privacy protection of wireless
transmissions specified in the IEEE 802.11i standard. AES-CCMP provides a stronger encryption method than TKIP.
Choose AES-CCMP as the data encryption method whenever strong data protection is important. AES-CCMP is
available with WPA/WPA2 Personal/Enterprise network authentication.
NOTE: Some security solutions may not be supported by your computer's operating system and may require
additional software or hardware as well as wireless LAN infrastructure support. Check with your computer
manufacturer for details.
TKIP
Temporal Key Integrity Protocol provides per -packet key mixing, a message integrity check, and a rekeying
mechanism. TKIP is available with WPA/WPA2 Personal/Enterprise network authentication.
CKIP
See
CKIP.
WEP
Wired Equivalent Privacy (WEP) uses encryption to help prevent unauthorized reception of wireless data. WEP uses
an encryption key to encrypt data before transmitting it. Only computers that use the same encryption key can
access the network and decrypt the data transmitted by other computers. Enterprise WEP is not exactly the same
Page 88

as personal WEP, in that you can select Open network authentication and then click Enable 802.1X and be able
Intel® PROSet/Wireless WiFi Connection Utility User's Guide
to choose from all client authentication types. The selection of authentication types are not available under
personal WEP.
Authentication Types
TLS
A type of authentication method using the Extensible Authentication Protocol (EAP) and a security protocol called
the Transport Layer Security (TLS). EAP-TLS uses certificates which use passwords. EAP-TLS authentication
supports dynamic WEP key management. The TLS protocol is intended to secure and authenticate communications
across a public network through data encryption. The TLS Handshake Protocol allows the server and client to
provide mutual authentication and to negotiate an encryption algorithm and cryptographic keys before data is
transmitted.
TTLS
These settings define the protocol and the credentials used to authenticate a user. In TTLS (Tunneled Transport
Layer Security), the client uses EAP- TLS to validate the server and create a TLS-encrypted channel between the
client and server. The client can use another authentication protocol. Typically, password -based protocols challenge
over a non -exposed TLS encrypted channel. TTLS implementations today support all methods defined by EAP, as
well as several older methods (
new protocols by defining new attributes to support new protocols.
PAP, CHAP, MS-CHAP and MS-CHAP-V2). TTLS can easily be extended to work with
PEAP
PEAP is a new Extensible Authentication Protocol (EAP) IEEE 802.1X authentication type designed to take
advantage of server-side EAP-Transport Layer Security (EAP-TLS) and to support various authentication methods,
including users' passwords, one-time passwords, and Generic Token Cards.
LEAP
A version of Extensible Authentication Protocol (EAP). Light Extensible Authentication Protocol (LEAP) is a
proprietary extensible authentication protocol developed by Cisco that provides a challenge-response authentication
mechanism and dynamic key assignment.
EAP-SIM
Extensible Authentication Protocol Method for GSM Subscriber Identity (EAP-SIM) is a mechanism for
authentication and session key distribution. It uses the Global System for Mobile Communications (GSM)
Subscriber Identity Module (SIM). EAP -SIM uses a dynamic session -based WEP key, which is derived from the
client adapter and RADIUS server, to encrypt data. EAP- SIM requires you to enter a user verification code, or PIN,
for communication with the Subscriber Identity Module (SIM) card. A SIM card is a special smart card that is used
by Global System for Mobile Communications (GSM) based digital cellular networks. RFC 4186 describes EAP-SIM.
EAP-AKA
EAP-AKA (Extensible Authentication Protocol Method for UMTS Authentication and Key Agreement) is an EAP
mechanism for authentication and session key distribution, using the Universal Mobile Telecommunications System
(UMTS) Subscriber Identity Module (USIM). The USIM card is a special smart card used with cellular networks to
validate a given user with the network.
Authentication Protocols
PAP
Password Authentication Protocol is a two -way handshake protocol designed for use with PPP. Password
Page 89

Authentication Protocol is a plain text password used on older SLIP systems. It is not secure. Only available for
Intel® PROSet/Wireless WiFi Connection Utility User's Guide
TTLS Authentication Type.
CHAP
Challenge Handshake Authentication Protocol is a three - way handshake protocol that is considered more secure
than Password Authentication Protocol. Only available for
MS-CHAP (MD4)
Uses a Microsoft version of RSA Message Digest 4 challenge -and-reply protocol. This only works on Microsoft
systems and enables data encryption. To select this authentication method causes all data to be encrypted. Only
available for
MS-CHAP-V2
Introduces an additional feature not available with MS -CHAP -V1 or standard CHAP authentication, the change
password feature. This feature allows the client to change the account password if the RADIUS server reports that
the password has expired. Available for
Generic Token Card (GTC)
Carries user -specific token cards for authentication. The main feature in GTC is Digital Certificate/Token Card based authentication. In addition, GTC includes the ability to hide user name identities until the TLS encrypted
tunnel is established, which provides additional confidentiality that user names are not being broadcast during the
authentication phase. Only available for
TTLS authentication type.
TTLS and PEAP authentication types.
PEAP authentication type.
TTLS authentication Type.
TLS
The TLS protocol is intended to secure and authenticate communications across a public network through data
encryption. The TLS Handshake Protocol allows the server and client to provide mutual authentication and to
negotiate an encryption algorithm and cryptographic keys before data is transmitted. Only available for
authentication type.
PEAP
Cisco Features
Cisco LEAP
Cisco LEAP (Cisco Light EAP) is a server and client 802.1X authentication through a user - supplied logon password.
When a wireless access point communicates with a Cisco LEAP-enabled RADIUS (Cisco Secure Access Control
Server [ACS]), Cisco LEAP provides access control through mutual authentication between client WiFi adapters and
the wireless networks and provides dynamic, individual user encryption keys to help protect the privacy of
transmitted data.
Cisco Rogue Access Point Security Feature
The Cisco Rogue access point feature provides security protection from an introduction of a rogue access point that
could mimic a legitimate access point on a network in order to extract information about user credentials and
authentication protocols that could compromise security. This feature only works with Cisco's LEAP authentication.
Standard 802.11 technology does not protect a network from the introduction of a rogue access point. See
Authentication for more information.
LEAP
802.11b and 802.11g Mixed Environment Protection Protocol
Some access points, for example Cisco 350 or Cisco 1200, support environments in which not all client stations
support WEP encryption; this is called Mixed-Cell Mode. When these wireless networks operate in "optional
encryption" mode, client stations that join in WEP mode, send all messages encrypted, and stations that use
standard mode send all messages unencrypted. These access points broadcast that the network does not use
Page 90

encryption but allow clients that use WEP mode. When "Mixed-Cell" is enabled in a profile, it lets you connect to
Intel® PROSet/Wireless WiFi Connection Utility User's Guide
access points that are configured for "optional encryption."
CKIP
Cisco Key Integrity Protocol (CKIP) is Cisco proprietary security protocol for encryption in 802.11 media. CKIP uses
the following features to improve 802.11 security in infrastructure mode:
Key Permutation (KP)
Message Sequence Number
NOTE: CKIP is not used with WPA/WPA2 Personal/Enterprise network authentication.
NOTE: CKIP is only supported through the use of the WiFi connection utility on Windows* XP.
Fast Roaming (CCKM)
When a wireless LAN is configured for fast reconnection, a LEAP-enabled client device can roam from one access
point to another without involving the main server. Using Cisco Centralized Key Management (CCKM), an access
point configured to provide Wireless Domain Services (WDS) takes the place of the RADIUS server and
authenticates the client without perceptible delay in voice or other time-sensitive applications.
Radio Management
When this feature is enabled your WiFi adapter provides radio management information to the Cisco infrastructure.
If the Cisco Radio Management utility is used on the infrastructure it configures radio parameters, detects
interference and rogue access points.
EAP-FAST
EAP-FAST, like EAP-TTLS and PEAP, uses tunneling to protect traffic. The main difference is that EAP-FAST does
not use certificates to authenticate. Provisioning in EAP-FAST is negotiated solely by the client as the first
communication exchange when EAP-FAST is requested from the server. If the client does not have a pre -shared
secret Protected Access Credential (PAC), it is able to initiate a provisioning EAP-FAST exchange to dynamically
obtain one from the server.
EAP-FAST documents two methods to deliver the PAC: manual delivery through an out-of -band secure mechanism
and automatic provisioning.
Manual delivery mechanisms are any delivery mechanism that the administrator of the network considers
sufficiently secure.
Automatic provisioning establishes an encrypted tunnel to protect the authentication of the client and the
delivery of the PAC to the client. This mechanism, while not as secure as a manual method may be, is more
secure than the authentication method used in LEAP.
The EAP-FAST method is divided into two parts: provisioning and authentication. The provisioning phase involves
the initial delivery of the PAC to the client. This phase only needs to be performed once per client and user.
Back to Top
Back to Contents
Trademarks and Disclaimers
Page 91

Back to Contents
Intel® PROSet/Wireless WiFi Connection Utility User's Guide
Set Administrator Password
A user cannot modify Administrator settings or profiles unless they have the password for this tool. When you first
access the Administrator Tool, you are required to enter a password. The password must not exceed 100
characters (although the field will only display up to 56 characters). Null passwords are not allowed.
1. Password: Create a password (maximum 100 characters).
2. Confirm Password: Reenter the password.
3. Click OK. The
To Change the Existing Password
1. On the Tools menu, click Administrator Tool.
2. Click Change Password on the password entry form.
3. Old Password: Enter the existing password.
4. New Password: Enter the new password.
5. Confirm Password: Reenter the new password again.
6. Click OK to save the new password and enter the Administrator Tool.
Back to Top
Open Administrator Package displays.
Back to Contents
Trademarks and Disclaimers
Page 92

Back to Contents
Intel® PROSet/Wireless WiFi Connection Utility User's Guide
Application Settings (Administrator Tool)
An administrator can configure the Intel® PROSet/Wireless WiFi Connection Utility settings to control how the
application behaves on the user's computer, and to select what level of control users have over various aspects of
their WiFi connections. These settings are configured using the Administrator Tool, and are not the same as those
listed under the Tools Menu.
NOTE: Many of these settings are only applicable for packages running on Windows* XP Client.
How to Access
1. Open the Administrator Tool.
2. Select to Create a new package or Open an existing package.
3. Click the Application Settings tab and click Include Application Settings in this package.
4. Select the settings that you want. Some settings require more information.
Application Settings Description
Name Description
802.1X
Authentication
Allow the user to create profiles or connect to networks that support the following
802.1X authentication EAP types.
AAA In
Control
Adapter
Switching
Administrator
Tool
Application
Auto Launch
Application On
Radio Toggle
Select which 802.1X authentication EAP types you want enabled on a user's computer: EAP
LEAP, EAP PEAP, EAP TLS, EAP SIM, EAP TTLS, EAP FAST, EAP AKA.
NOTE: This setting is only applicable for packages running on Windows* XP Client.
Notify when another application uses the WiFi adapter
NOTE: This setting is only applicable for packages running on Windows* XP Client.
Enable Adapter Switching
If enabled, then whenever a valid wired Ethernet connection is detected, the WiFi connection
utility will automatically close any WiFi network connections. If the system looses its wired
Ethernet connection, the WiFi connection utility will automatically attempt to connect to the last
connected profile. If the last connected network is not available, the WiFi connection utility will
attempt to connect to the first available wireless network based on the preferred Profile List.
NOTE: This behavior is for the system as a whole and is not specific to any user.
Allow user to access the Administrator Tool.
Leaving the box checked allows the user to access the Administrator Tool on their computer
when the tool is installed. Uncheck the box to remove their ability to access the Administrator
tool.
Allow the user to start an application on connection.
Enabling this feature lets the user specify an application that will start up whenever a particular
network profile connects. The user selects the profile and can then specify an application, batch
file, or script. For example, the user may want a Virtual Private Network (VPN) session to start
automatically whenever the laptop connects to a specific wireless network. If this feature is
unchecked (disabled), then the user cannot specify any application to startup automatically
when a given network profile connects.
WiFi On Toggle
Page 93

Enables a third -party application to disable the Intel® PROSet/Wireless WiFi Connection Utility,
Intel® PROSet/Wireless WiFi Connection Utility User's Guide
WiFi On / WiFi Off switch.
NOTE: This setting is only applicable for packages running on Windows* XP Client.
CCXv4 Cisco Compatible Extensions, version 4, includes enhancements to EAP -FAST. Among these are
options for user prompts and warnings.
Select Enable CCXv4 to Enable Cisco Compatible Extensions, version 4 (CCXv4) features for
EAP-FAST profiles.
NOTE: The EAP-FAST Authority Identifier (A -ID) Groups feature in the Administrator Tool is
unavailable if CCXv4 is not enabled.
Select which of the following prompts to enable or disable on a user's computer for EAP-FAST
PAC provisioning:
Turn off prompts and warnings for unauthenticated provisioning: Option to turn off
prompts and warnings for PAC auto-provisioning if there is no PAC or there is no PAC that
matches the A-ID sent by the server that it is connected to.
Turn off prompts when switching default server (A-ID): Option to turn off prompts when a
client encounters a server that has provisioned a PAC before but is not currently selected as the
default server.
Turn off unauthenticated provisioning after PAC is provisioned: Option to turn off autoprovisioning automatically after a PAC for that A- ID has been provisioned.
Cache
Credentials
Certificate
Expiration
Warning
Device to
Device Ad
Hoc)
Networking
NOTE: This setting is only applicable for packages running on Windows* XP Client.
Select to save credentials after a user logs on. If the wireless connection temporarily
disconnects, the saved credentials are used upon reconnection. The credentials are cleared
when the user logs off.
NOTE: if cleared, the Prompt each time I connect option is unavailable when creating
profiles.
Enable Certificate Expiration Warning
If checked, the WiFi connection utility will warn users when the certificates are going to expire.
The provided URL will allow them to update their certificates from a certificate server. When
checked, the following fields become active:
Number of days to update certificate: This is the number of days before expiration
that the user receives the warning.
Certificate Update URL
NOTE: This setting is only applicable for packages running on Windows* XP Client.
Enable or disable whether a user is able to either create Device to Device (ad hoc) profiles or
join Device to Device (ad hoc) networks.
Select one of the following to enable or disable whether the user can connect to device to
device networks:
Enable device to device networking
Enable only secure device to device networking
Disable device to device networking
Select to either allow a user to configure profiles with device to device (ad hoc) settings or
prevent configuration of Device to Device (ad hoc) profiles.
Show device to device application settings
Page 94

Driver Event
Intel® PROSet/Wireless WiFi Connection Utility User's Guide
Logging
Hide device to device application settings
To remove the Device to Device (ad hoc) operating mode from the Create WiFi Profile General
Settings, select both Disable device to device networking and Hide device to device
application settings. This prevents a user from creating profiles that support Device to Device
(ad hoc) network.
NOTE: This setting is only applicable for packages running on Windows* XP Client.
Driver event logging captures and logs events that are specific to the driver. These events can
be viewed on the Wireless Event Viewer. Here you can select to enable standard logging or
troubleshooting logging. See Wireless Event Viewer Settings
Enable Driver Event Logging
Standard Logging
Troubleshooting Logging
Import and
Export
Intel® Active
Management
Technology
Settings
Intel® My
WiFi
Technology
(MWT)
Maintain
Connection
Enable profiles to be imported and exported
Select to allow profiles to be imported from or exported to a user's computer. If enabled here,
then profiles that are placed in the auto import folder will be imported automatically.
Username
Password
Enter the Username and Password to override the default names used by Intel® Active
Management Technology to synchronize Intel® PROSet/Wireless WiFi Connection Utility profiles.
Enable Intel® MWT Cell Forwarding API.
Click to enable a third - party application to use Intel® MWT Cell Forwarding of IP Packet API for
the purpose of bridging an Intel® MWT network that uses a BSS connection.
NOTE: This setting is not applicable for Windows* XP Client. This setting is also not applicable
for a client equipped with one of the following adapters:
Intel® PRO/Wireless 3945ABG Network Connection
Intel® Wireless WiFi Link 4965AGN
Intel® Wireless WiFi Link 4965AG_
Hide the Maintain Connection setting for user profiles
Select to hide the Maintain Connection option in the Create WiFi Profile Advanced Settings
. This
Maintain Connection option maintains the WiFi connection with a user profile after log off.
NOTE: The Maintain Connection option may be used with Nortel VPN client when it is configured
to Logoff on Connect.
NOTE: This setting is only applicable for packages running on Windows* XP Client.
Maintain
Maintain connection if smart card is unavailable
Smart Card
Connection
Select to maintain the connection if the smart card is removed while the wireless device is
connected to a network that uses smart card credentials. The default behavior for the WiFi
connection utility is to close the connection that uses smart card credentials if the smart card is
removed. Turning this feature On will cause the connection to remain connected (unless re -
authentication is required for another reason). Select to maintain a connection if the smart card
is removed while the computer is connected to a network using smart card/SIM credentials.
NOTE: This setting is only applicable for packages running on Windows* XP Client.
Message On
Enable WiFi On Toggle Message on a user's computer
Radio Toggle
Select to enables a third -party application to notify a user that the Intel® PROSet/Wireless WiFi
Connection Utility WiFi On / Off switch is disabled.
Page 95

Microsoft
Intel® PROSet/Wireless WiFi Connection Utility User's Guide
Windows* XP
Coexistence
Persistent
Connection
Pre-logon
Cisco Mode
Profile
Connectivity
NOTE: This setting is only applicable for packages running on Windows* XP Client.
Enable Microsoft Wireless Zero Configuration and Intel® PROSet/Wireless WiFi
Software to coexist on this system.
Select to prevent Microsoft Windows* XP Wireless Zero Configuration Service from being
disabled when the Intel® PROSet/Wireless WiFi Connection Utility is enabled. Select to allow
coexistence.
NOTE: This setting is only applicable for packages running on Windows* XP Client.
Select to Ensure that persistent connection and computer policies are updated prior to
user log on.
NOTE: Updating policies may delay the log on screen for up to two minutes.
NOTE: This setting is only applicable for packages running on Windows* XP Client.
Enable Cisco Mode during a Pre-logon
Cisco access points have the capability to support multiple WiFi network names (SSIDs), but
only broadcast one of these. In order to connect to such an access point, an attempt is made to
connect with each profile. This mode of connecting to each profile is referred to as Cisco Mode.
Default is enabled. Uncheck to disable.
NOTE: If enabled, the Pre-logon connection may increase the connection time.
NOTE: This setting is only applicable for packages running on Windows* XP Client.
Disable user-profile switching
This provides control over user connection to administrator profiles. Leaving this setting Off lets
the user connect to both user and administrator profiles. When turned On, the user can only
connect to administrator profiles, and the administrator chooses which administrator profiles are
available to the user, as follows:
Allow the user to connect to All administrator profiles
Allow the user to only connect to the First administrator profile
NOTE: This setting is only applicable for packages running on Windows* XP Client.
Security Level Select the security level on a user's computer.
Users are able to connect to profiles only with this security level.
Allow the user to connect to networks with Personal Security only.
NOTE: This setting is only applicable for packages running on Windows* XP Client.
Shared Folder
Select the shared folder notification setting on a user's computer.
Notification
Unshare shared folders automatically when connected to an unsecured network.
Disable this notification.
Notify when connected to an unsecured network (default).
NOTE: This setting is only applicable for packages running on Windows* XP Client.
Single Sign On Select which Administrator Profile types are enabled on a user computer.
Single Sign On:
Persistent Connection: Profiles are active during start up and when no user is logged
onto the computer.
Pre-logon or Common Connection: Profiles are active immediately after a user logs
Page 96

onto the computer.
Intel® PROSet/Wireless WiFi Connection Utility User's Guide
If Pre-Logon features are installed, the profile is active during the logon process. If Pre-Logon
features are not installed, the profile is Common and becomes active at the beginning of the
user's session.
Administrator profiles are placed at the top (or bottom) of the user's profile list. They cannot be
changed or deleted by the user.
NOTE: This setting is only applicable for packages running on Windows* XP Client.
Support
Specify the support information displayed in the About box of the WiFi connection utility.
Information
Support URL: Enter the support center web site that you want your customers to access
for technical support.
Support Phone Number: Enter the telephone number that you want your customers to
call for technical support.
Voice over IP Enables third-party software to use the VoIP application on a user's computer. The default
setting enables this feature.
Wi-Fi
Protected
Setup*
The WiFi connection utility can be configured to operate as a registrar for access points that
support Wi- Fi Protected Setup* The registrar securely transfers the access point key or
password automatically or manually with a USB flash drive or other external device.
Enable registering other devices (default).
Hide Enable Device Registration application setting.
Select Enable registering other devices to enable the WiFi connection utility to register other
devices.
You can also select Hide Enable Device Registration application setting in the WiFi
connection utility application settings to block user to change the settings.
NOTE: This setting is only applicable for packages running on Windows* XP Client.
WiFi Manager Select which WiFi manager controls a user's wireless connections. Use either the previous
logged on user's WiFi manager or allow each user to select their preferred WiFi manager.
Allow all users to switch between Intel® PROSet/Wireless WiFi software and Microsoft
Windows* XP Wireless Zero Configuration, after log on.
The WiFi manager at log on is determined by the active WiFi manager when the last user
logged off.
NOTE: This setting is only applicable for packages running on Windows* XP Client.
WiFi On/Off Control the wireless radio.
No change: The radio is not turned on or off.
Turn WiFi Off: This administrator profile turns the radio off.
Turn WiFi On: This administrator profile turns the radio on.
Turn off 802.11a radio only: This becomes selectable if Turn WiFi On is enabled.
Disable WiFi On/Off selection: Select to prevent a user from accessing the WiFi
On/Off control on the WiFi connection utility main window or Taskbar menu. A user is
notified that The feature is disabled by the administrator if they attempt to turn on or
off the radio control.
Add 802.11a Radio On/Off selection: Select to allow the user to turn on/off the
802.11a radio separately from the 802.11b/g radio. If you select this, the Disable
802.11a Radio On/Off selection becomes available. Select this to show the 802.11a
radio On/Off control, but disable it. This lets you give the user individual control over the
radios.
Once this feature is installed on a user's computer, follow these instructions to turn on or off
Page 97

Wireless
Intel® PROSet/Wireless WiFi Connection Utility User's Guide
Event Viewer
Settings
the 802.11a radio control:
To turn off the 802.11a radio:
1. On the WiFi connection utility main window, click the WiFi On button. The list of radio
options is displayed.
2. Select 802.11a Radio Off. The 802.11a radio is now inactive.
To turn on the 802.11a radio:
1. On the WiFi connection utility main window, click the 802.11a Radio Off button. The list
of radio options is displayed.
2. Select WiFi On. The 802.11a radio is now active.
NOTE: This setting is only applicable for packages running on Windows* XP Client.
Wireless Event Viewer Settings
Enable Wireless Event Logging
This feature creates log files of wireless events on the client system, which then may be copied
to a network file server or elsewhere. Default is for Wireless Event Logging to be turned off.
After you click Enable Wireless Event Logging, then Settings is enabled.
Click Settings to open a window to Log File Settings.
General Tab
Specify the folder to write the wireless log file to: Specify an absolute location on the
client system.
Log file name prefix: This is the name of the log file. The name is:
<ComputerName_UserDomain>.
Maximum Log File Size: To prevent log files from growing too large, new log files are
created when the current log file exceeds the specified size in MB. The default file size in
1 megabyte. You can select a file size of up to ten megabytes, in one- megabyte
increments.
Log File Copy Tab
Enable log file copying: This feature allows you to have the client log files copied to
another location.
Copy log files to the following location: Indicate where the log files will be copied. This
is typically an admin server.
Select copy frequency from the following: You have the following two options for the
copy frequency.
Copy all previous log files when a new log file is created.
Copy all previous log files every specified number of days: Select the number
of days; this number can range from 1 to 30 days. The default is seven days.
Log File Deletion Tab
Select from the following when to delete old log files:
Never delete old log files.
Delete old log when any of the selected conditions are met:
Delete old log files every specified number of days: This number can range
from 1 to 30.
Delete old log files when the total size of the log files exceeds: This number
can range from 1 to 10 megabytes (MB) in one- megabyte increments.
Delete old log files after each successful log file copy.
Close Closes the Administrator Tool.
Help? Provides help information for this page.
Page 98

Back to Top
Intel® PROSet/Wireless WiFi Connection Utility User's Guide
Back to Contents
Trademarks and Disclaimers
Page 99

Back to Contents
Intel® PROSet/Wireless WiFi Connection Utility User's Guide
Adapter Settings (Administrator)
The Adapter Settings screen controls and displays the device properties for the WiFi adapter installed on a
computer. Not all settings listed here apply to all adapters, see the setting description.
This version of Intel® PROSet/Wireless WiFi software is compatible with the following adapters:
Intel® Centrino® Ultimate-N 6300
Intel® Centrino® Advanced -N + WiMAX 6250
Intel® Centrino® Advanced -N 6200
Intel® WiMAX/WiFi Link 5350
Intel® WiMAX/WiFi Link 5150
Intel® WiFi Link 5300
Intel® WiFi Link 5100
Intel® Centrino® Wireless- N 1000
Intel® Wireless WiFi Link 4965AGN
Intel® Wireless WiFi Link 4965AG_
Intel® PRO/Wireless 3945ABG Network Connection
How to Access
1. Open the Administrator Tool.
2. Select to Create a new package or Open an existing package.
3. Click the Adapter Settings tab and click Include Adapter Settings in this package.
Configure Adapter Settings
1. From within the Administrator tool, click Include Adapter Settings in this package.
2. For each setting listed in the table below, select one of the following options:
Use default value: Resets the setting on the user machine to the default value.
No change: (For Windows* XP users only.) Maintains the user selected value. The administrator
decides not to enforce all the settings on a user's computer. The user can change the WiFi adapter
setting values from the Advanced menu in the Intel® PROSet/Wireless WiFi Connection Utility.
No change: (For Windows Vista* and Windows* 7 users only.) Maintains the user selected value. The
administrator decides not to enforce all the settings on a user's computer. The user can change the
WiFi adapter setting values at the Device Manager.
Select the value: The administrator selects the value that is to be used on the user's computer.
WiFi Adapter Settings Description
Following are descriptions of the WiFi adapter settings.
Name Description
802.11n
Channel Width
(2.4 GHz)
Set high throughput channel width to maximize performance. Set the channel width to Auto or
20MHz. 20MHz is the default setting. Use 20MHz if 802.11n channels are restricted. This
setting applies to 802.11n capable adapters only.
NOTE: This setting is does not apply to the following adapters:
Intel® Wireless WiFi Link 4965AGN (20 MHz channel width only)
802.11n
Channel Width
Set high throughput channel width to maximize performance. Set the channel width to Auto or
20MHz. Auto is the default setting. Use 20MHz if 802.11n channels are restricted. This setting
Page 100

(5.2 GHz) applies to 802.11n capable adapters only.
Intel® PROSet/Wireless WiFi Connection Utility User's Guide
NOTE: This setting is does not apply to the following adapters:
Intel® Centrino® Wireless- N 1000
Intel® Wireless WiFi Link 4965AGN
802.11n Mode The 802.11n standard builds upon previous 802.11 standards by adding multiple -input
multiple-output (MIMO). MIMO increases data throughput to improve transfer rate. Select
Enabled or Disabled to set the 802.11n mode of the WiFi adapter. Enabled is the default
setting. This setting applies to 802.11n capable adapters only.
NOTE: To achieve transfer rates greater than 54 Mbps on 802.11n connections, WPA2*-AES
security must be selected. No security ( None) can be selected to enable network setup and
troubleshooting.
An administrator can enable or disable support for high throughput mode to reduce powerconsumption or conflicts with other bands or compatibility issues.
Ad Hoc
Channel
Unless the other computers in the ad hoc network use a different channel from the default
channel, there is no need to change the channel.
Value: Select the allowed operating channel from the list.
802.11b/g: Select this option when 802.11b and 802.11g (2.4 GHz) ad hoc band
frequency is used. For this band, the default channel is 11.
802.11a: Select this option when 802.11a (5 GHz) ad hoc band frequency is used. For
this band, the default channel is 36. This setting is does not apply to the Intel®
Centrino® Wireless -N 1000 adapter.
Ad Hoc Power
Management
Ad Hoc QoS
Mode
Fat Channel
Intolerant
NOTE: When an 802.11a channel is not displayed, initiating ad hoc networks is not supported
for 802.11a channels.
Set power saving features for Device to Device (ad hoc) networks.
Disable: Select when connecting to ad hoc networks that contain stations that do not
support ad hoc power management.
Maximum Power Savings: Select to optimize battery life.
Noisy Environment: Select to optimize performance or connecting with multiple clients.
Quality of Service (QoS) control in ad hoc networks. QoS provides prioritization of traffic from
the access point over a wireless network based on traffic classification. WMM* (Wi -Fi
Multimedia*) is the QoS certification of the Wi-Fi Alliance* (WFA). When WMM* is enabled, the
WiFi adapter uses WMM to support priority tagging and queuing capabilities for Wi-Fi*
networks.
WMM Enabled
WMM Disabled (default)
This setting communicates to surrounding networks that this WiFi adapter is not tolerant of
40MHz channels in the 2.4GHz band. The default setting is for this to be turned off (disabled),
so that the adapter does not send this notification.
NOTE: This setting is does not apply to the following adapters:
Intel® Wireless WiFi Link 4965AG_
Intel® PRO/Wireless 3945ABG Network Connection
Mixed Mode
Protection
Use to avoid data collisions in a mixed 802.11b/11g/11a/11n environment. Request to
Send/Clear to Send (RTS/CTS) should be used in an environment where clients may not hear
each other. CTS-to- self can be used to gain more throughput in an environment where clients
are in close proximity and can hear each other. (CTS-to-self is not supported for 802.11n.)
Power When creating an administrator package, Power Management lets you select a balance between
 Loading...