

Page 1

Intel® 3210 and 3200 Chipset
Thermal/Mechanical Design Guide
November 2007
Reference Number: 318465 Revision: 001
Page 2

INFORMATION IN THIS DOCUMENT IS PROVIDED IN CONNECTION WITH INTEL
BY ESTOPPEL OR OTHERWISE, TO ANY INTELLECTUAL PROPERTY RIGHTS IS GRANTED BY THIS DOCUMENT. EXCEPT AS
PROVIDED IN INTEL'S TERMS AND CONDITIONS OF SALE FOR SUCH PRODUCTS, INTEL ASSUMES NO LIABILITY WHATSOEVER,
AND INTEL DISCLAIMS ANY EXPRESS OR IMPLIED WARRANTY, RELATING T O SALE AND/OR USE OF INTEL PRODUCT S INCLUDING
LIABILITY OR WARRANTIES RELA TING T O FITNES S FOR A PARTICULAR PURPOSE, MERCHANT ABILITY, OR INFRINGEMENT OF ANY
PATENT, COPYRIGHT OR OTHER INTELLECTUAL PROPERTY RIGHT. Intel products are not intended for use in medical, life saving,
®
PRODUCTS. NO LICENSE, EXPRESS OR IMPLIED,
life sustaining applications.
Intel may make changes to specifications and product descriptions at any time, without notice.Designers must not rely on the
absence or characteristics of any features or instructions marked "reserved" or "undefined." Intel reserves these for future
definition and shall have no responsibility whatsoever for conflicts or incompatibilities arising from future changes to them.
The Intel 3210 and 3200 Chipset, Dual Core Intel Xeon processor 3000 Sequence, and Intel Xeon processor 3200 Sequence may
contain design defects or errors known as errata which may cause the product to deviate from published specifications. Current
characterized errata are available on request.
Contact your local Intel sales office or your distributor to obtain the latest specifications and before placing your product order.
Copies of documents which have an order number and are referenced in this document, or other Intel literature, may be obtained
by calling 1-800-548-4725, or by visiting http://www.intel.com
Intel, Xeon, Intel I/O Controller, and the Intel logo are trademarks of Intel Corporation in the U.S. and other countries.
Copyright © 2007, Intel Corporation. All rights reserved.
* Other brands and names may be claimed as the property of others.
2 Intel® 3210 and 3200 Chipset Thermal/Mechanical Design Guide
Page 3

Contents
1Introduction..............................................................................................................7
1.1 Design Flow........................................................................................................8
1.2 Definition of Terms..............................................................................................8
1.3 Reference Documents......................... ......................... .. .......................... .. ..........9
2 Packaging Technology.............................................................................................11
2.1 Non-Critical to Function Solder Joints...................................................................13
2.2 Package Mechanical Requirements................................................ .......................13
3 Thermal Specifications ............................................................................................15
3.1 Thermal Design Power (TDP) ..............................................................................15
3.2 Thermal Specification.........................................................................................15
4 Thermal Simulation .................................................................................................17
5 Thermal Metrology ..................................................................................................19
5.1 MCH Case Measurement.....................................................................................19
5.1.1 Supporting Test Equipment......................................................................19
5.1.2 Thermal Calibration and Controls..............................................................20
5.1.3 IHS Groove ...........................................................................................20
5.1.4 Thermocouple Attach Procedure...............................................................22
6 Reference Thermal Solution.....................................................................................35
6.1 Operating Environment.......................................... .. .. .. ......................................35
6.2 Heatsink Performance........................................................................................35
6.3 Mechanical Design Envelope ...............................................................................36
6.4 Thermal Solution Assembly.................................................................................36
6.4.1 Extruded Heatsink Profiles.......................................................................37
6.4.2 Retention Mechanism Responding in Shock and Vibration.............................38
6.4.3 Thermal Interface Material.......................................................................38
6.4.4 Reference Thermal Solution Assembly Process........ ....................................39
6.5 Reliability Guidelines.......................................................................................... 40
A Thermal Solution Component Suppliers ...................................................................43
A.1 Heatsink Thermal Solution..................................................................................43
B Mechanical Drawings...............................................................................................45
Figures
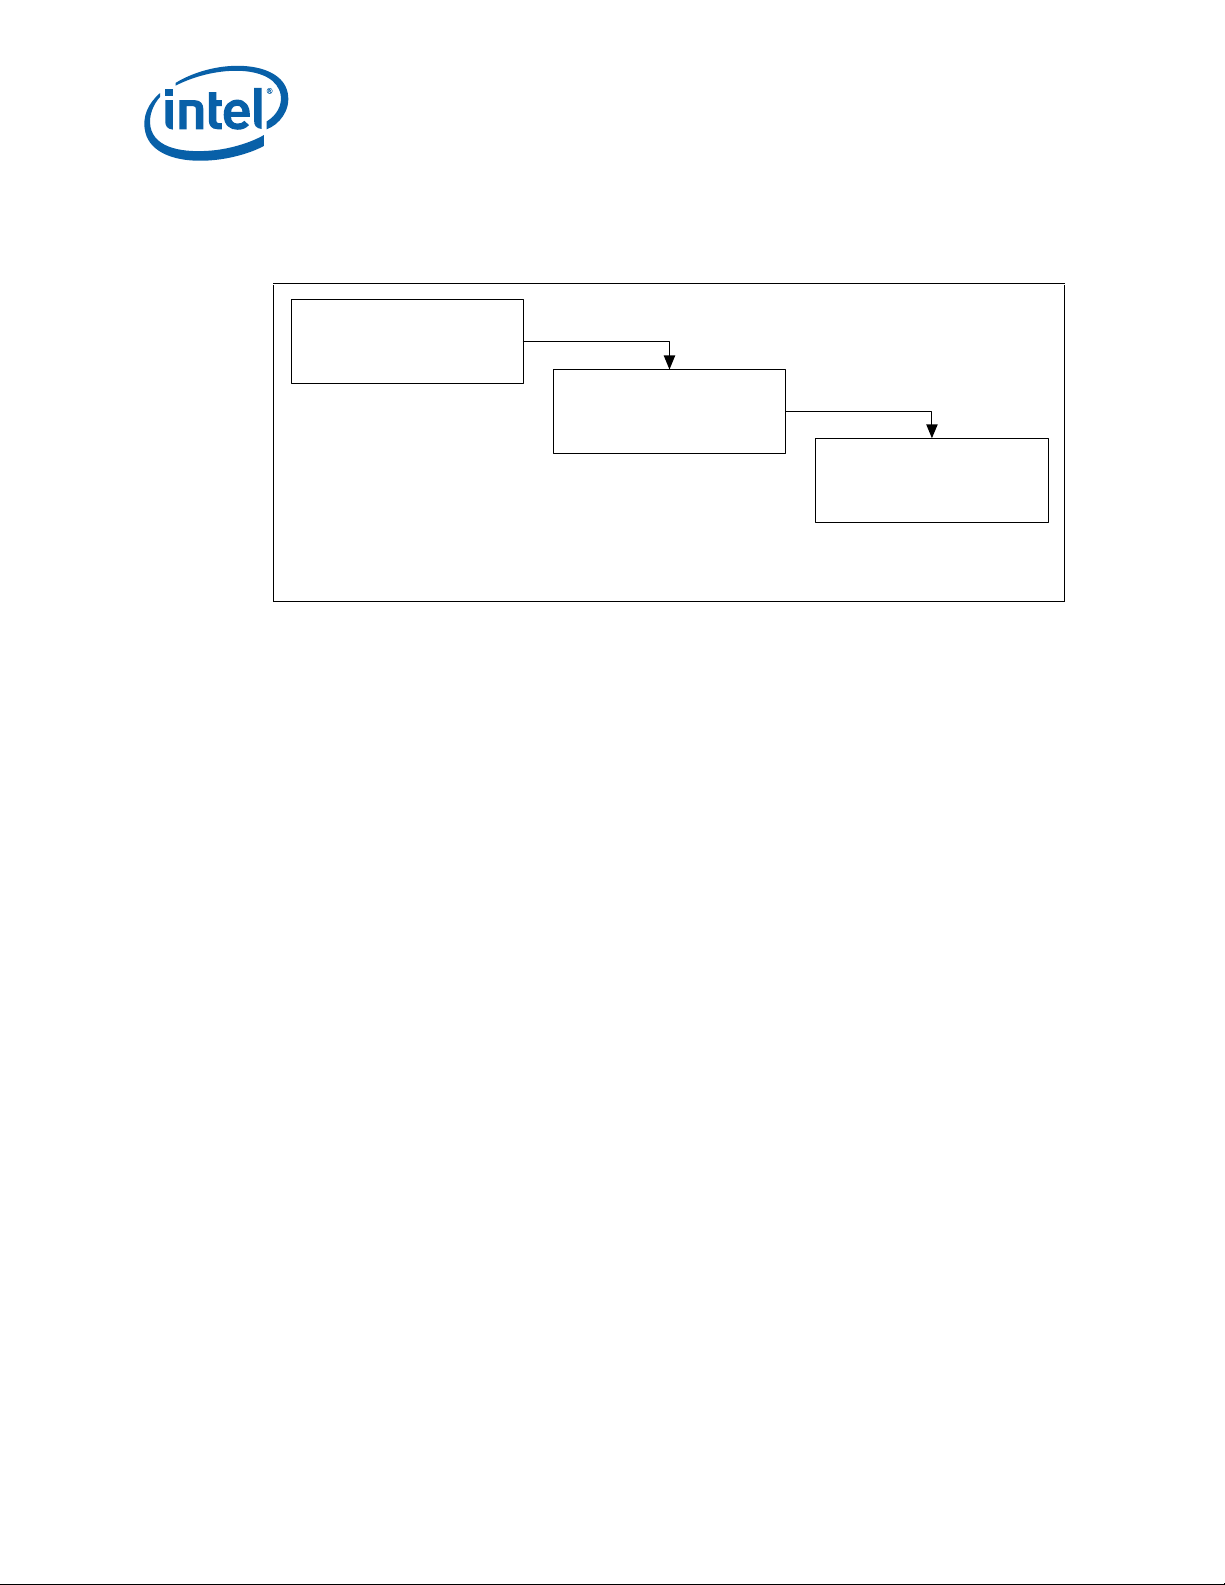
1-1 Thermal Design Process .......................................................................................8
2-1 MCH Package Dimensions (Top View)................................................ ...................11
2-2 MCH Package Height..........................................................................................11
2-3 MCH Package Dimensions (Bottom View)..............................................................12
2-4 Non-Critical to Function Solder Joints...................................................................13
2-5 Package Height.......................... .. .................................................. .. ... .. ............14
5-1 Omega Thermocouple........................................................................................20
5-2 FCBGA7 Chipset Package Reference Groove Drawing..............................................21
5-3 IHS Groove on the FCBGA7 Chipset Package on the Live Board................................21
5-4 The Live Board on the Fixture Plate......................................................................22
5-5 Inspection of Insulation on Thermocouple.............................................................23
5-6 Bending the Tip of the Thermocouple...................................................................23
5-7 Extending Slightly the Exposed Wire over the End of Groove ................................... 24
5-8 Securing Thermocouple Wire with Kapton* Tape Prior to Attach............................. ..24
Intel® 3210 and 3200 Chipset Thermal/Mechanical Design Guide 3
Page 4

5-9 Detailed Thermocouple Bead Placement................................................................25
5-10 Tapes Installation ..............................................................................................25
5-11 Placing Thermocouple Bead into the Bottom of the Groove......................................26
5-12 Second Tape Installation.....................................................................................26
5-13 Measuring Resistance between Thermocouple and IHS............................................27
5-14 Adding a Small Amount of Past Flux to the Bead for Soldering .................................27
5-15 Cutting Solder...................................................................................................28
5-16 Positioning Solder on IHS....................................................................................28
5-17 Solder Block Setup.............................. .. .. ................................................... .. .. ....29
5-18 Observing the Solder Melting...............................................................................30
5-19 Pushing Solder Back into the End of Groove ..........................................................30
5-20 Remove Excess Solder....................... .. .. ........................... ..................................31
5-21 Thermocouple Placed into Groove ........................................................................32
5-22 Remove Excess Solder....................... .. .. ........................... ..................................32
5-23 Fill Groove with Adhesive....................................................................................33
5-24 Finished Thermocouple Installation.......................................................................34
6-1 Reference Heatsink Measured Thermal Performance vs. Approach Velocity ................36
6-2 Design Concept for Reference Thermal Solution.....................................................37
6-3 Heatsink Extrusion Profiles..................................................................................37
6-4 Reference Thermal Solution Assembly Process - Heatsink Sub-Assembly (Step 1).......39
6-5 Reference Thermal Solution Assembly Process - Heatsink Assembly (Step 2) .............40
B-1 Intel® 3210 and 3200 Chipset Package Drawing........................................... .........46
B-2 Intel® 3210 and 3200 Chipset Motherboard Component
Top-Side Keep-Out Restrictions ...........................................................................47
B-3 Intel® 3210 and 3200 Chipset Motherboard Component
Back-Side Keep-Out Restrictions..........................................................................48
B-4 Intel® 3210 and 3200 Chipset Reference Thermal Solution Assembly.......................49
B-5 Intel® 3210 and 3200 Chipset Reference Thermal Solution - Heatsink Drawing..........50
B-6 Intel® 3210 and 3200 Chipset Reference Thermal Solution - Spring Preload Clip........51
B-7 Intel® 3210 and 3200 Chipset Reference Thermal Solution - Fastener Nut................52
B-8 Intel® 3210 and 3200 Chipset Reference Thermal Solution - Bracket (1 of 2)............53
B-9 Intel® 3210 and 3200 Chipset Reference Thermal Solution - Bracket (2 of 2)............54
B-10 Intel® 3210 and 3200 Chipset Reference Thermal Solution - Backplate Assembly ......55
B-11 Intel® 3210 and 3200 Chipset Reference Thermal Solution - Backplate.....................56
B-12 Intel® 3210 and 3200 Chipset Reference Thermal Solution - Insulator......................57
B-13 Intel® 3210 and 3200 Chipset Reference Thermal Solution - Flush Mount Stud ..........58
Tables
3-1 Intel® 3210 Chipset Thermal Specifications ....................... ...................................15
3-2 Intel® 3200 Chipset Thermal Specifications ....................... ...................................15
5-1 Thermocouple Attach Support Equipment..............................................................19
6-1 Honeywell PCM45F* TIM Performance as a Function of Attach Pressure.....................38
6-2 Reference Thermal Solution Environmental Reliability Guidelines..............................41
4 Intel® 3210 and 3200 Chipset Thermal/Mechanical Design Guide
Page 5

Revision History
Document
Number
318465 001 • Initial release of the document. November 2007
Revision
Number
Description Date
§
Intel® 3210 and 3200 Chipset Thermal/Mechanical Design Guide 5
Page 6

6 Intel® 3210 and 3200 Chipset Thermal/Mechanical Design Guide
Page 7

Introduction
1 Introduction
As the complexity of computer systems increases, so do the power dissipation
requirements. Care must be taken to ensure that the additional power is properly
dissipated. Typical methods to improve heat dissipation include selective use of
ducting, and/or passive heatsinks.
The goals of this document are to:
• Outline the thermal and mechanical operating limits and specifications for
• Describe a reference thermal solution that meets the specification of
Properly designed thermal solutions provide adequate cooling to maintain Intel® 3210
and 3200 Chipsets die temperatures at or below thermal specifications. This is
accomplished by providing a low local-ambient temperature, ensuring adequate local
airflow, and minimizing the die to local-ambient thermal resistance. By maintaining
Intel
system designer can ensure the proper functionality, performance, and reliability of the
chipset. Operation outside the functional limits can degrade system performance and
may cause permanent changes in the operating characteristics of the component.
®
Intel
Intel® 3210 and 3200 Chipsets.
3210 and 3200 Chipsets.
®
3210 and 3200 Chipsets die temperature at or below the specified limits, a
The simplest and most cost-effective method to improve the inherent system cooling
characteristics is through careful chassis design and placement of fans, vents, and
ducts. When additional cooling is required, component thermal solutions may be
implemented in conjunction with system thermal solutions. The size of the fan or
heatsink can be varied to balance size and space constraints with acoustic noise.
This document addresses thermal design and specifications for Intel
Chipsets components only. For thermal design information on other chipset
components, refer to the respective component datasheet. F or the Intel® ICH9, refer to
the Intel
Note: Unless otherwise specified, the term “MCH” refers to the Intel
Chipsets.
®
I/O Controller Hub9 (ICH9) Thermal Design Guidelines.
®
3210 and 3200
®
3210 and 3200
Intel® 3210 and 3200 Chipset Thermal/Mechanical Design Guide 7
Page 8
1.1 Design Flow
Figure 1-1. Thermal Design Process
Step 1: Thermal
Simulation
y Thermal Model
y Thermal Model User's Guide
1.2 Definition of Terms
FC-BGA Flip Chip Ball Grid Array. A package type defined by a plastic
substrate where a die is mounted using an underfill C4
(Controlled Collapse Chip Connection) attach style. The primary
electrical interface is an array of solder balls attached to the
substrate opposite the die. Note that the device arrives at the
customer with solder balls attached.
BLT Bond line thickness. Final settled thickness of the thermal
interface material after installation of heatsink.
MCH Memory controller hub. The chipset component contains the
processor interface, the memory interface, the PCI Express*
interface and the DMI interface.
ICH I/O controller hub. The chipset component contains the MCH
interface, the SATA interface, the USB interface, the IDE
interface, the LPC interface, and so forth.
IHS Integrated Heat Spreader. A thermally conductive lid integrated
into the package to improve heat transfer to a thermal solution
through heat spreading.
T
case_max
T
case_min
TDP Thermal design power. Thermal solutions should be designed to
TIM Thermal Interface Material. Thermally conductive material
T
LA
Maximum die or IHS temperature allowed. This temperature is
measured at the geometric center of the top of the package die
or IHS.
Minimum die or IHS temperature allowed. This temperature is
measured at the geometric center of the top of the package die
or IHS.
dissipate this target power level. TDP is not the maximum power
that the chipset can dissipate.
installed between two surfaces to improve heat transfer and
reduce interface contact resistance.
The local ambient air temperature at the component of interest.
The local ambient temperature should be measured just
Introduction
Step 2: Heatsink Selection
y Thermal Reference
y Mechanical Reference
Step 3: Thermal Validation
y Thermal Testing Software
y Software User's Guide
001239
8 Intel® 3210 and 3200 Chipset Thermal/Mechanical Design Guide
Page 9

Introduction
upstream of airflow for a passive heatsink or at the fan inlet for
an active heatsink.
Ψ
Case-to-ambient thermal solution characterization parameter
CA
(Psi). A measure of thermal solution performance using total
package power. Defined as (T
source size should always be specified for Ψ measurements.
1.3 Reference Documents
The reader of this specification should also be familiar with material and concepts
presented in the following documents:
Document Title Document Number / Location
®
Intel
I/O Controller Hub9 (ICH9) Thermal Design Guidelines Contact your Intel Field Sales
®
Intel
3210 and 3200 Chipset Datasheet www.developer.intel.com
®
Intel
3210 and 3200 Chipset Specification Update www.developer.intel.com
Dual-Core Intel
Quad-Core Intel
BGA/OLGA Assembly Development Guide Contact your Intel Field Sales
Various system thermal design suggestions http://www.formfactors.org
®
Xeon® Processor 3000 Series Datasheet www.developer.intel.com
®
Xeon® Processor 3200 Series Datasheet www.developer.intel.com
- TLA)/T otal Package Power. Heat
C
Representative
Representative
Note: Contact your Intel field sales representative for the latest revision and order number of this document.
§
Intel® 3210 and 3200 Chipset Thermal/Mechanical Design Guide 9
Page 10

Introduction
10 Intel® 3210 and 3200 Chipset Thermal/Mechanical Design Guide
Page 11
Packaging Technology
2 Packaging Technology
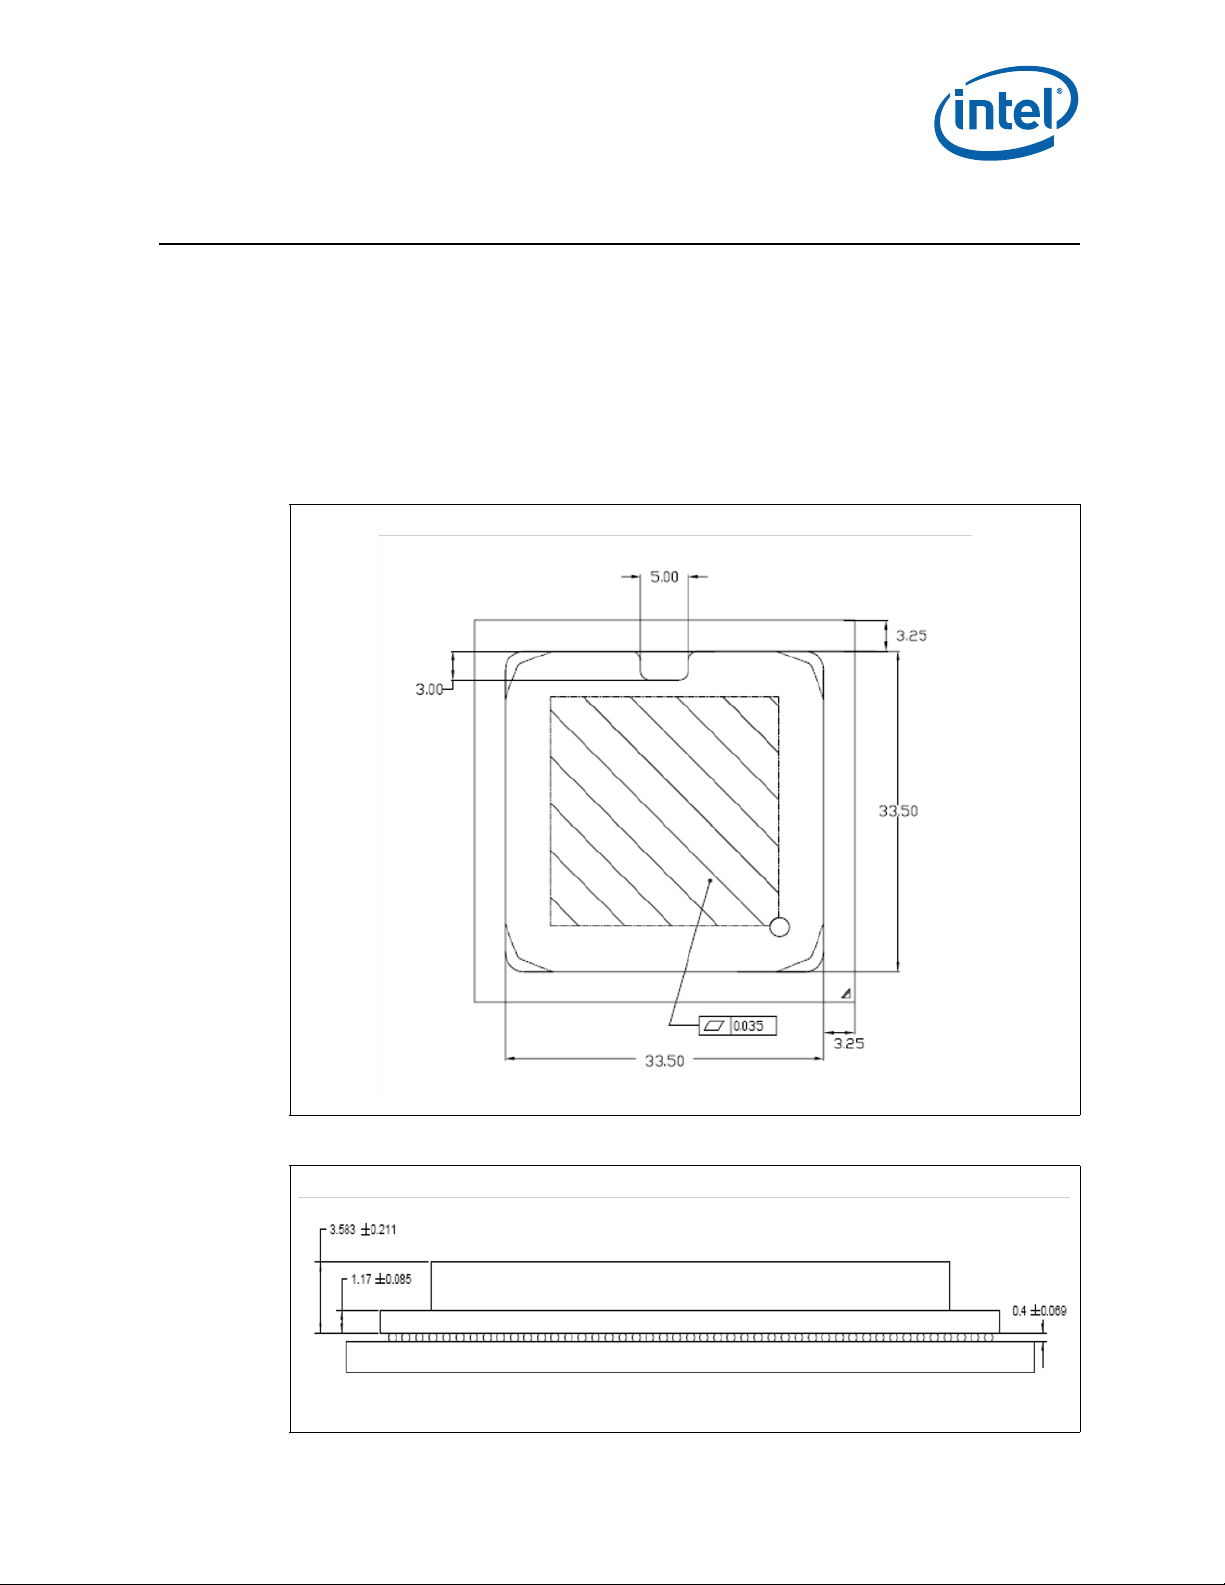
The Intel® 3210 and 3200 Chipset consists of two individual components: the Memory
Controller Hub (MCH) and the Intel® I/O Controller (Intel® ICH9). The Intel® 3210 and
3200 Chipset MCH component uses a 40 mm [1.57 in] x 40 mm [1.57 in] Flip Chip Ball
Grid Array (FC-BGA) package with an integrated heat spreader (IHS) and 1300 solder
balls. A mechanical drawing of the package is shown in Figure 2-1. For information on
the Intel
Design Guidelines.
Figure 2-1. MCH Package Dimensions (Top View)
®
ICH9 package, refer to the Intel® I/O Controller Hub9 (ICH9) Thermal
Figure 2-2. MCH Package Height
Intel® 3210 and 3200 Chipset Thermal/Mechanical Design Guide 11
Page 12
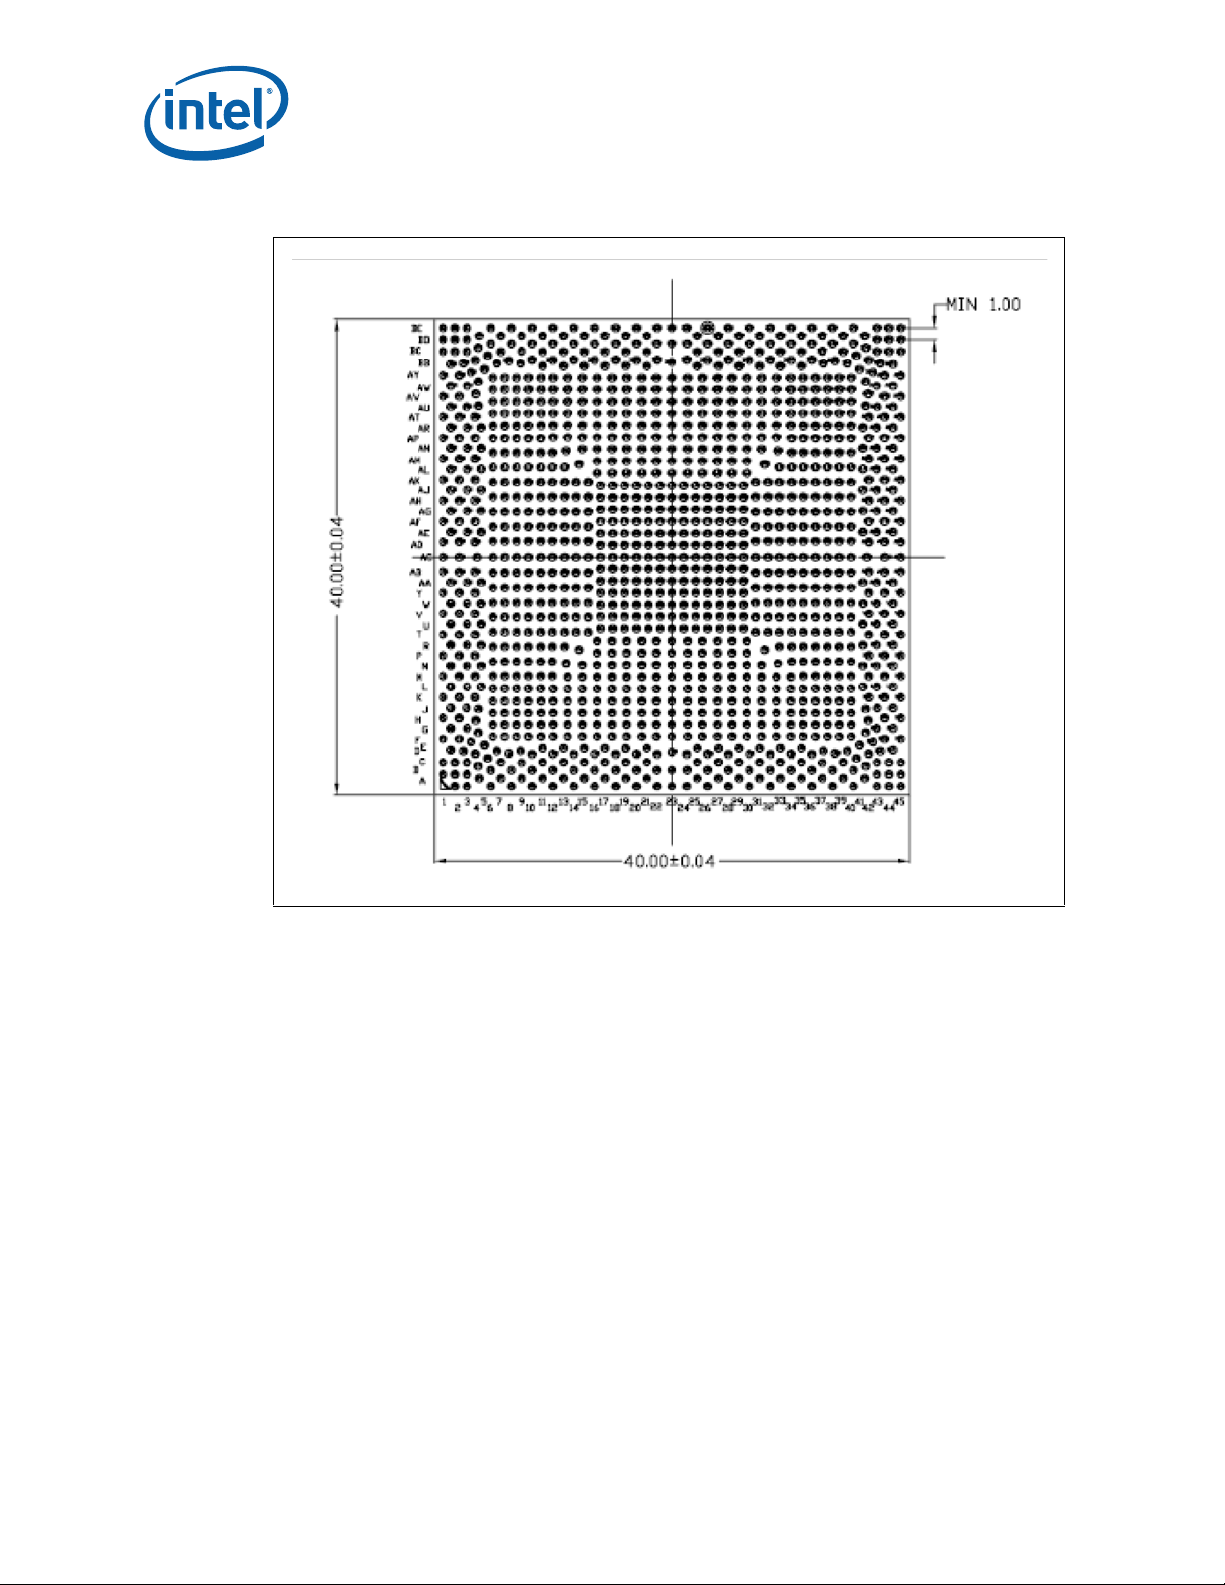
Figure 2-3. MCH Package Dimensions (Bottom View)
Packaging Technology
Notes:
1. All dimensions are in millimeters.
2. All dimensions and tolerances conform to ANSI Y14.5 - 1994.
12 Intel® 3210 and 3200 Chipset Thermal/Mechanical Design Guide
Page 13

Packaging Technology
2.1 Non-Critical to Function Solder Joints
Figure 2-4. Non-Critical to Function Solder Joints
Intel has defined selected solder joints of the MCH as non-critical to function (NCTF)
when evaluating package solder joints post environmental testing. The MCH signals at
NCTF locations are typically redundant ground or no-critical reserved, so the loss of the
solder joint continuity at end of life conditions will not affect the overall product
functionality. Figure 2-4 identifies the NCTF solder joints of the MCH package.
2.2 Package Mechanical Requirements
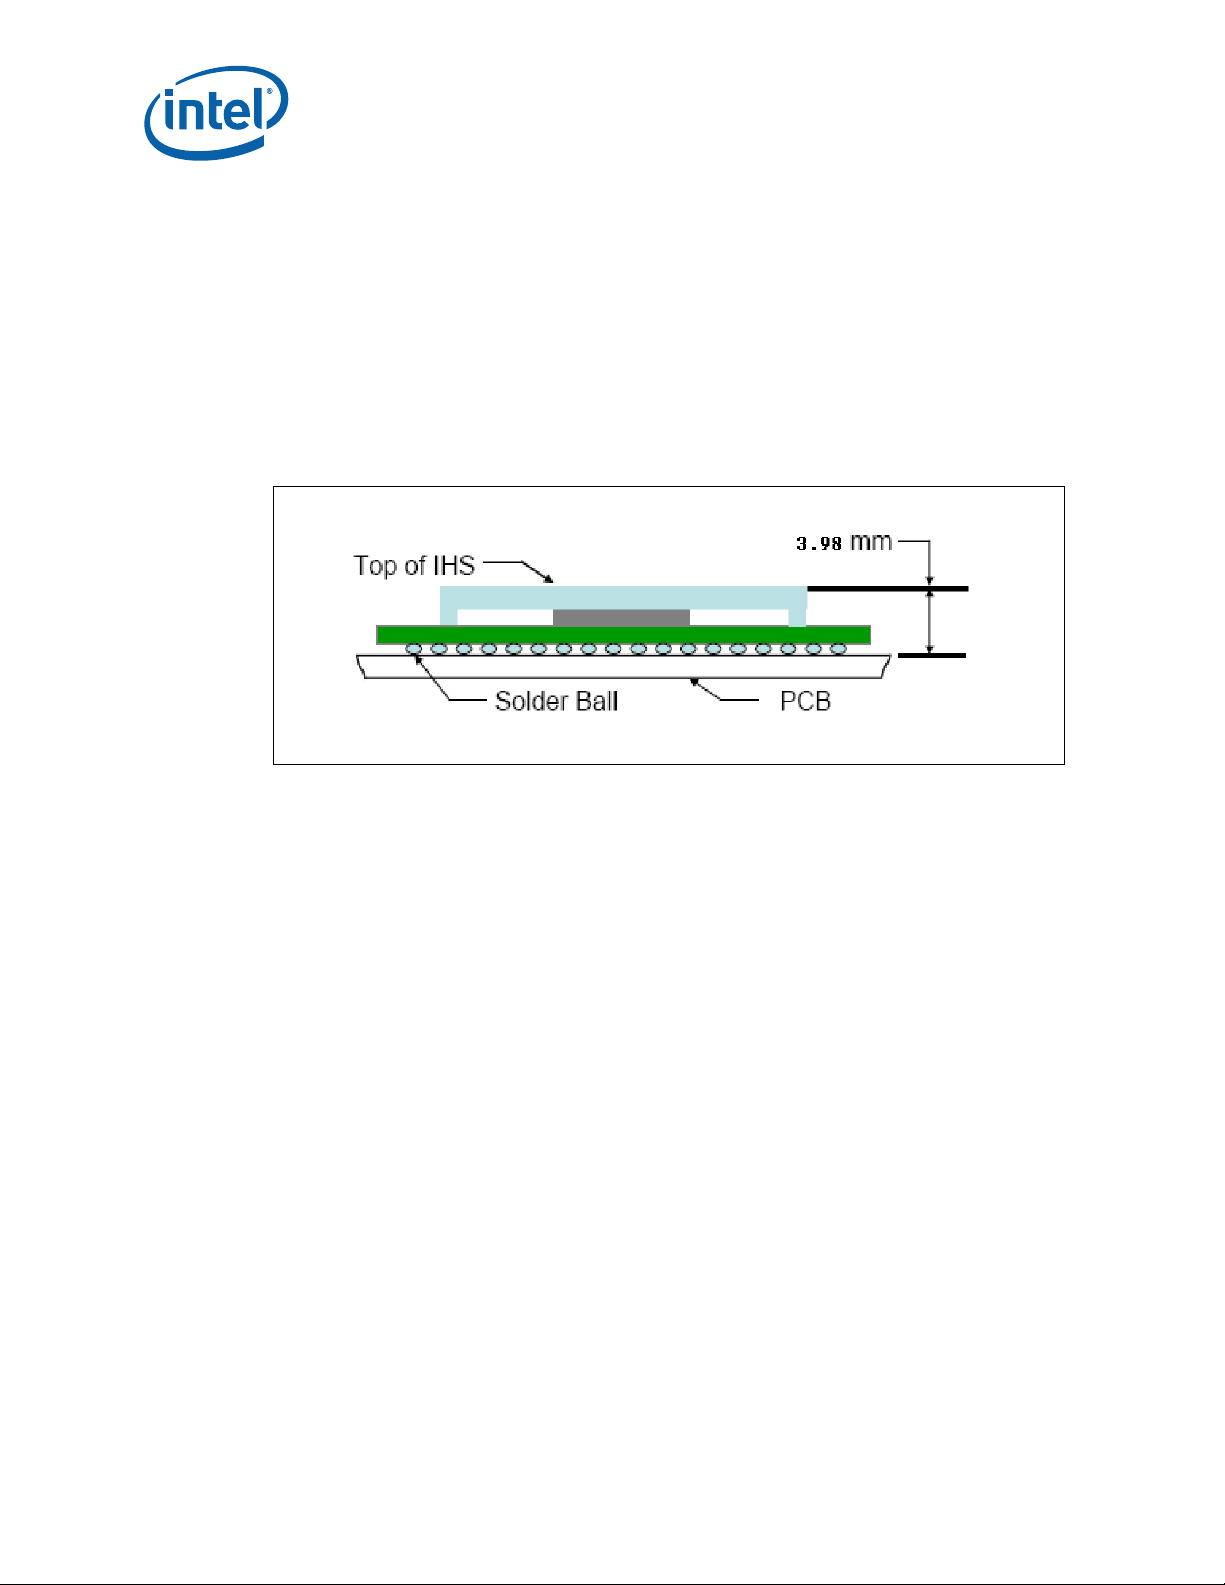
The Intel® 3210 and 3200 Chipset package has an Integrated Heat Spreader (IHS)
which is capable of sustaining a maximum static normal load of 15-lbf. This mechanical
maximum load limit should not be exceeded during heatsink assembly, shipping
conditions, or standard use conditions. Also, any mechanical system or component
testing should not exceed the maximum limit. The package substrate should not be
used as a mechanical reference or load-bearing surface for the thermal and mechanical
solution.
Notes:
1. These specifications apply to uniform compressive loading in a direction normal to
the package.
Intel® 3210 and 3200 Chipset Thermal/Mechanical Design Guide 13
Page 14
2. This is the maximum force that can be applied by a heatsink retention clip. The clip
must also provide the minimum specified load of 7.6 lbf on the package to ensure
TIM performance assuming even distribution of the load.
3. These specifications are based on limited testing for design characterization.
Loading limits are for the package only.
To ensure that the package static load limit is not exceeded, the designer should
understand the post reflow package height shown in Figure 2-5. The following figure
shows the nominal post-reflow package height assumed for calculation of a heatsink
clip preload of the reference design. Please refer to the package drawing in Figure 2-1
to perform a detailed analysis.
Figure 2-5. Package Height
Packaging Technology
§
14 Intel® 3210 and 3200 Chipset Thermal/Mechanical Design Guide
Page 15

Thermal Specifications
3 Thermal Specifications
3.1 Thermal Design Power (TDP)
Analysis indicates that real applications are unlikely to cause the MCH component to
consume maximum power dissipation for sustained time periods. Therefore, in order to
arrive at a more realistic power level for thermal design purposes, Intel characterizes
power consumption based on known platform benchmark applications. The resulting
power consumption is referred to as the Thermal Design Power (TDP). TDP is the target
power level that the thermal solutions should be designed to. TDP is not the maximum
power that the chipset can dissipate.
®
For TDP specifications, see Table 3-1 for Intel
3200. FC-BGA packages have poor heat transfer capability into the board and have
minimal thermal capability without a thermal solution. Intel recommends that system
designers plan for a heatsink when using the Intel
3.2 Thermal Specification
3210 Chipset and Table 3-2 for Intel®
®
3210 and 3200 Chipset.
To ensure proper operation and reliability of the Intel® 3210 and 3200 Chipset, the
case temperatures must be at or between the maximum/minimum operating
temperature ranges as specified in Table 3-1 and Table 3-2. System and/or component
level thermal solutions are required to maintain these temperature specifications. Refer
to Chapter 5 for guidelines on accurately measuring package die temperatures.
Table 3-1. Intel® 3210 Chipset Thermal Specifications
Parameter Value Notes
T
case_max
T
case_min
TDP
dual channel
TDP
dual channel
P
Idle_max
Notes:
1. The above specifications are based on post-si analysis.
2. The maximum idle power is the worst-case idle power with L1 ASPM state.
96 °C
5 °C
20.2 W DDR2-667
21.3 W DDR2-800
11.3 W
Table 3-2. Intel® 3200 Chipset Thermal Specifications
Parameter Value Notes
T
case_max
T
case_min
TDP
dual channel
TDP
dual channel
P
Idle_max
97 °C
5 °C
18.9 W DDR2-667
20.0 W DDR2-800
11.3 W
Notes:
1. The above specifications are based on post-silicon analysis.
2. The maximum idle power is the worst case idle power with L1 ASPM state.
§
Intel® 3210 and 3200 Chipset Thermal/Mechanical Design Guide 15
Page 16

Thermal Specifications
16 Intel® 3210 and 3200 Chipset Thermal/Mechanical Design Guide
Page 17

Thermal Simulation
4 Thermal Simulation
Intel provides thermal simulation models of the Intel® 3210 and 3200 Chipset and
associated user's guides to aid system designers in simulating, analyzing, and
optimizing their thermal solutions in an integrated, system-level environment. The
models are for use with the commercially available Computational Fluid Dynamics
(CFD)-based thermal analysis tool FLOTHERM* (version 5.1 or higher) by Flomerics,
Inc. Contact your Intel field sales representative for the information of the thermal
models and user's guides.
§
Intel® 3210 and 3200 Chipset Thermal/Mechanical Design Guide 17
Page 18

Thermal Simulation
18 Intel® 3210 and 3200 Chipset Thermal/Mechanical Design Guide
Page 19

Thermal Metrology
5 Thermal Metrology
The system designer must make temperature measurements to accurately determine
the thermal performance of the system. Intel has established guidelines for proper
techniques to measure the MCH IHS temperatures. Section 5.1 provides guidelines on
how to accurately measure the MCH case temperature.
5.1 MCH Case Measurement
Intel® 3210 and 3200 Chipset cooling performance is determined by measuring the
case temperature using a thermocouple. For case temperature measurements, the
attached method outlined in this section is recommended for mounting a
thermocouple.
Special case is required when measuring case temperature (Tc) to ensure an accurate
temperature measurement. Thermocouples are often used to measure Tc. When
measuring the temperature of a surface that is at a different temperature from the
surrounding local ambient air, errors may be introduced in the measurements. The
measurement errors can be caused by poor thermal contact between the thermocouple
junction and the surface of the integrated heat spreader, heat loss by radiation,
convection, by conduction through thermocouple leads, or by contact between the
thermocouple cement and the heatsink base. To minimize these measurement errors,
the approach outlined in the next section is recommended.
5.1.1 Supporting Test Equipment
T o apply the reference thermocouple attach procedure, it is recommended that you use
the equipment (or equivalent) given in Table 5-1.
Table 5-1. Thermocouple Attach Support Equipment (Sheet 1 of 2)
Item Description Part Number
Measurement and Output
Microscope Olympus* Light microscope or equivalent SZ-40
DMM Digital Multi Meter for resistance
Thermal Meter Hand held thermocouple meter Multiple Vendors
Special Modified Tip Solder
Block Fixture
Solder Indium Corp. of America
Flux Indium Corp. of America 5RMA
Loctite* 498 Adhesive Super glue w/ thermal characteristics 49850
Adhesive Accelerator Loctite 7452 for fast glue curing 18490
Kapton* Tape for holding thermocouple in place
Thermocouple Omega*, 36 gauge, T type
measurement
Test Fixtures (see notes for ordering information)
40 W 120 V~60 Hz modified soldering
iron
Miscellaneous Hardware (see notes for ordering information)
Alloy 57BI/42SN/1AG 0.010 Diameter
(see note 2 for ordering information)
Fluke 79 Series
Weller SP40L solder tool
52124
OSK2K1280/5SR TC-TT-T-36-72
Intel® 3210 and 3200 Chipset Thermal/Mechanical Design Guide 19
Page 20

Table 5-1. Thermocouple Attach Support Equipment (Sheet 2 of 2)
Item Description Part Number
Calibration and Control
Ice Point Cell Omega, stable 0°C temperature source
Hot Point Celll Omega, temperature source to control
Notes:
1. The Special Modified Tip Solder Block Fixture is available from Test Equipment Depot 800-517-8431.
2. The Alloy 57BI/42SN/1AG 0.010 Diameter solder and the solder flux are available from Indium Corp. of
America 315-853-4900.
3. The Loctite* 498 Adhesive and Adhesive Accelerator are available from R.S. Hughes 916-737-7484.
4. This part number is a custom part with the specified insulation trimming and packaging requirements
necessary for quality thermocouple attachment, See Figure 16. Order from Omega Eng +1-800-826-6342.
for calibration and offset
and understand meter slope gain
TRCIII
CL950-A-110
Figure 5-1. Omega Thermocouple
Thermal Metrology
5.1.2 Thermal Calibration and Controls
It is recommended that full and routine calibration of temperature measurement
equipment be performed before attempting to perform case temperature
measurements. Intel recommends checking the meter probe set against know
standard. This should be done at 0 °C (using ice bath or other stable temperature
source) and at an elevated temperature, around 80 °C (using an appropriate
temperature source).
Wire gauge and length should also be considered, as some less expensive
measurement systems are heavily impacted by impedance. There are numerous
resources available throughout the industry to assist with implementation of proper
controls for thermal measurements.
Note: 1. It is recommended to follow company-standard procedures and wear safety items
like glasses for cutting the IHS and gloves for chemical handling.
2. Please ask your Intel field sales representative if you need assistance to groove
and/or install a thermocouple according to the reference process.
5.1.3 IHS Groove
Cut a groove in the package IHS according to the drawing given in Figure 5-2.
20 Intel® 3210 and 3200 Chipset Thermal/Mechanical Design Guide
Page 21

Thermal Metrology
Figure 5-2. FCBGA7 Chipset Package Reference Groove Drawing
The orientation of the groove relative to the package pin 1 indicator (gold triangle in
one corner of the package) is shown in Figure 5-3 for the FCBGA7 chipset package IHS.
Figure 5-3. IHS Groove on the FCBGA7 Chipset Package on the Live Board
Intel® 3210 and 3200 Chipset Thermal/Mechanical Design Guide 21
Page 22

Select a machine shop that is capable of holding drawing-specified tolerances. IHS
groove geometry is critical for repeatable placement of the thermocouple bead,
ensuring precise thermal measurements. A fixture plate should be used to machine the
IHS groove on the FCBGA7 Chipset Package on the Live Board. Refer to Figure 5-4.
Figure 5-4. The Live Board on the Fixture Plate
Thermal Metrology
5.1.4 Thermocouple Attach Procedure
In order to accomplish the thermocouple attach procedure, the following steps are
required:
1. Thermocouple conditioning and preparation
2. Thermocouple attach to the IHS
3. Soldering process
4. Cleaning and completion of the thermocouple installation
5.1.4.1 Thermocouple Conditioning and Preparation
1. Use a calibrated thermocouple, as specified in Section 5.1.3.
2. Under a microscope verify the thermocouple insulation meets the quality
requirements. The insulation should be about 1/16 inch (0.062 ± 0.030) from the
end of the bead. Refer to Figure 5-5.
22 Intel® 3210 and 3200 Chipset Thermal/Mechanical Design Guide
Page 23

Thermal Metrology
Figure 5-5. Inspection of Insulation on Thermocouple
3. Measure the thermocouple resistance by holding both contacts on the connector on
one probe and the tip of thermocouple to the other probe of the DMM
(measurement should be about ~3.0 ohms for 36-gauge type T thermocouple).
4. Straighten the wire for about 38 mm [1.5 inch] from the bead.
5. Using the microscope and tweezers, bend the tip of the thermocouple at
approximately 10 degree angle by about 0.8 mm [.030 inch] from the tip. Refer to
Figure 5-6.
Figure 5-6. Bending the Tip of the Thermocouple
5.1.4.2 Thermocouple attach to the IHS
6. Clean groove and IHS with Isopropyl Alcohol (IPA) and a lint free cloth removing all
residues prior to thermocouple attachment.
7. Place the Thermocouple wire inside the groove and let the exposed wire extend
slightly over the end of groove. Refer to Figure 5-7.
Intel® 3210 and 3200 Chipset Thermal/Mechanical Design Guide 23
Page 24

Figure 5-7. Extending Slightly the Exposed Wire over the End of Groove
8. Bend the wire at the edge of the IHS groove and secure it in place using Kapton*
tape. Refer to Figure 5-8.
Thermal Metrology
Figure 5-8. Securing Thermocouple Wire with Kapton* Tape Prior to Attach
9. Verify under the microscope that the Thermocouple bead is still slightly bent, if not,
use a fine point tweezers to put a slight bend on the tip. The purpose of this step is
to ensure that the Thermocouple tip is in contact with the bottom of groove. Refer
to Figure 5-9.
24 Intel® 3210 and 3200 Chipset Thermal/Mechanical Design Guide
Page 25

Thermal Metrology
Figure 5-9. Detailed Thermocouple Bead Placement
10.Place the device under the microscope to continue with the process.
11.Using tweezers or a finger, slightly press the wire down inside the groove for about
5 mm from tip and place small piece of Kapton* tape to hold the wire inside the
groove. Refer to Figure 5-10.
Figure 5-10. Tapes Installation
12.Thermocouple bead is placed into the bottom of the groove (Refer to Figure 5-11)
and a small piece of tape is installed to secure it under the microscope to perform
this task.
Intel® 3210 and 3200 Chipset Thermal/Mechanical Design Guide 25
Page 26

Figure 5-11. Placing Thermocouple Bead into the Bottom of the Groove
13.Place a second small piece of Kapton* tape on top of the IHS where it narrows at
the tip. This tape will create a solder dam and keep solder from flowing down the
IHS groove during the melting process. Refer to Figure 5-12.
Thermal Metrology
Figure 5-12. Second Tape Installation
14.Measure resistance from the Thermocouple connector (hold both wires to a DMM
probe) to the IHS surface, this should display the same value as read during
Thermocouple conditioning Section 5.1.4.1 step 3. This step insures the bead is still
making good contact to the IHS. Refer to Figure 5-13.
26 Intel® 3210 and 3200 Chipset Thermal/Mechanical Design Guide
Page 27

Thermal Metrology
Figure 5-13. Measuring Resistance between Thermocouple and IHS
15.Using a fine-point device such as a toothpick, place a small amount of Indium paste
flux on the Thermocouple bead. Refer to Figure 5-14.
Figure 5-14. Adding a Small Amount of Past Flux to the Bead for Solder ing
Note: Make sure you are careful to keep solder flux from spreading on the IHS surface or down the groove. It
should be contained to the bead area and only the tip (narro w section of the g roov e). This will k ee p the
solder from flowing onto the top of the device or down the groove to the insulation area.
16.Cut two small pieces of solder 1/16 inch (0.065 inch/ 1.5 mm) from the roll using
tweezers to hold the solder while cutting with a fine blade. Refer to Figure 5-15.
Intel® 3210 and 3200 Chipset Thermal/Mechanical Design Guide 27
Page 28

Figure 5-15. Cutting Solder
17.Place the two pieces of solder in parallel, directly over the thermocouple bead.
Refer to Figure 5-16.
Thermal Metrology
Figure 5-16. Positioning Solder on IHS
18.Measure the resistance from the thermocouple end wires again using the DMM
(Refer to Section 5.1.4.1 step 3) to ensure that the bead is still properly contacting
the IHS.
5.1.4.3 Solder Process
19.Turn on the Solder Block station and heat it up to 170 °C±5 °C.
Note: The heater block temperature must be set at a greater temperature to ensure that the
solder on the IHS can reach 150 °C - 155 °C. Make sure to monitor the Thermocouple
meter when waiting for solder to flow. Damage to the package may occur if a
temperature of 155 °C is exceeded on the IHS.
28 Intel® 3210 and 3200 Chipset Thermal/Mechanical Design Guide
Page 29

Thermal Metrology
20.Attach the tip of the thermocouple to the solder block (perform this before turning
on the solder station switch) and connect to a Thermocouple meter to monitor the
temperature of the block. Refer to Figure 5-17.
21.Connect (Thermocouple being installed) to a second thermocouple meter to
monitor the IHS temperature and make sure this doesn’t exceed 155 °C at any
time during the process. Refer to Figure 5-17.
Figure 5-17. Solder Block Setup
Note: Device in place; Two temper ature monitoring meters; Heater block fixtu re. The heate r block is cu rrently
reading 157 °C and the Thermocouple inside IHS is reading 23 °C.
22.Place the solder fixture on the IHS device. Refer to Figure 5-18.
Intel® 3210 and 3200 Chipset Thermal/Mechanical Design Guide 29
Page 30

Figure 5-18. Observing the Solder Melting
Thermal Metrology
Note: Do not touch the copper block at any time as it is hot.
23.Move a magnified lens light close to the device to get a better view when the solder
starts melting. Manually assist this if necessary as the solder sometimes tends to
move away from the end of the groove. Use fine tip tweezers to push solder into
the end of groove until a solder ball is built up. Refer to Figure 5-19.
Figure 5-19. Pushing Solder Back into the End of Groove
30 Intel® 3210 and 3200 Chipset Thermal/Mechanical Design Guide
Page 31

Thermal Metrology
Note: The target IHS temperature during reflow is 150°C ±3°C. At no time should the IHS temperature
exceed 155 °C during the solder process as damage to the device may occur.
24.Lift the solder block and magnified lens, quickly rotate the device 90 degrees
clockwise and use the back side of the tweezers to press down on the solder. This
will force out excess solder. Refer to Figure 5-20.
Figure 5-20. Remove Excess Solder
25.Allow the device to cool down. Blowing compressed air on the device can accelerate
the cooling time. Monitor the device IHS temperature with a handheld meter until it
drops below 70 °C before moving it to the microscope for the final steps.
5.1.4.4 Cleaning and Completion of Thermocouple Installation
26.Remove the Kapton* tape with tweezers (avoid damaging the wire insulation) and
straighten the wire to insert the remaining portion in the groove for the final gluing
process.
Note: The wire needs to be straighten in order to keep it at or below the IHS surface. Refer to
Figure 5-21.
Intel® 3210 and 3200 Chipset Thermal/Mechanical Design Guide 31
Page 32

Figure 5-21. Thermocouple Placed into Groove
Thermal Metrology
27.Using a blade, carefully shave the excess solder above the IHS surface. Only shave
in one direction until solder is flush with the groove surface. Refer to Figure 5-22.
Figure 5-22. Remove Excess Solder
Notes:
1. Always insure tools are very sharp and free from any burrs that may scratch the IHS surface. It is a good
practice to minimize any surface scratching or other damage during this process.
2. Shaving excess solder to insure the IHS surface is flat and will mate properly with the heatsink surface.
Scratches and protrusions may impact the thermal transfer from IHS.
28.Clean the surface of the IHS with Alcohol and wipes, use compressed air to remove
any remaining contaminants.
29.Fill the test of the groove with Loctite* 498 Adhesive. Verify under the microscope
that the Thermocouple wire is below the surface along the entire IHS groove. Refer
to Figure 5-23.
32 Intel® 3210 and 3200 Chipset Thermal/Mechanical Design Guide
Page 33

Thermal Metrology
Figure 5-23. Fill Groove with Adhesive
30.T o speed up the curing process apply Loctite* Accelerator on top of the Adhesive
and let it set for a couple of minutes.
31.Using a blade carefully shave any Loctite* left above the IHS surface; take into
consideration instructions from step 27.
Note: The adhesive shaving process should be performed when the glue is partially cured but
still soft (about 1 hour after applying). This will keep the adhesive surface flat and
smooth with no pits or voids. If you have void areas in the groove, refill them and
shave the surface a second time.
32.Clean the IHS surface with Alcohol and keep the Thermocouple wire properly
managed to avoid insulation damage kinks and tangling.
33.Once again, measure resistance from the Thermocouple connector (hold both wires
to a DMM probe) to the IHS surface, this should display the same value as read
during Thermocouple conditioning Section xxx. This step insures the bead is still
making good contact to the IHS after attachment is complete.
34.Wind the thermocouple wire into loops and now it’s ready to be used for thermal
testing use. Refer to Figure 5-24.
Intel® 3210 and 3200 Chipset Thermal/Mechanical Design Guide 33
Page 34

Figure 5-24. Finished Thermocouple Installation
Thermal Metrology
§
34 Intel® 3210 and 3200 Chipset Thermal/Mechanical Design Guide
Page 35

Reference Thermal Solution
6 Reference Thermal Solution
The design strategy of the reference thermal solution for the Intel® 3210 and 3200
Chipset uses backing plate stiffness/design to show significant improvement in MB
strain and BGA forces. The thermal interface material and extrusion design
requirements are being evaluated for changes necessary to meet the Intel
3200 Chipset thermal requirements. The Keep Out Zone (KOZ) will have the
requirements of heatsink mounting hole with Intel® 3210 and 3200 Chipset. Refer to
Figure B-2 and Figure B-3 for details. Other chipset components may or may not need
attached thermal solutions, depending on the specific system local-ambient operating
conditions. For information on the Intel
®
I/O Controller Hub9 (ICH9) Thermal Design Guidelines.
Intel
6.1 Operating Environment
The reference thermal solution will be designed assuming a maximum local-ambient
temperature of 55 °C. The minimum recommended airflow velocity through the crosssection of the heatsink fins is 350 linear feet per minute (lfm) for 1U system and 450
linear feet per minute (lfm) for 2U+ system. The approaching airflow temperature is
assumed to be equal to the local-ambient temperature. The thermal designer must
carefully select the location to measure airflow to obtain an accurate estimate. These
local-ambient conditions are based on a 35 °C external-ambient temperature at sea
level. (External-ambient refers to the environment external to the system.)
®
ICH9, refer to thermal specification in the
®
3210 and
6.2 Heatsink Performance
Figure 6-1 depicts the measured thermal performance of the reference thermal solution
versus approach air velocity. Since this data was measured at sea level, a correction
factor would be required to estimate thermal performance at other altitudes.
Intel® 3210 and 3200 Chipset Thermal/Mechanical Design Guide 35
Page 36

Reference Thermal Solution
Figure 6-1. Reference Heatsink Measured Thermal Performance vs. Approach Velocity
6.3 Mechanical Design Envelope
While each design may have unique mechanical volume and height restrictions or
implementation requirements, the height, width, and depth constrains typically placed
on the Intel® 3210 and 3200 Chipset thermal solution are shown in Appendix B.
The location of hole patens and keepout zones for the reference thermal solution are
shown in Figure B-2 and Figure B-3.
6.4 Thermal Solution Assembly
The reference thermal solution for the Intel® 3210 and 3200 Chipset is a passive
extruded heatsink with thermal interface. Figure 6-2 shows the reference thermal
solution assembly and associated components.
Full mechanical drawings of the thermal solution assembly and the heatsink are
provided in Appendix B.
36 Intel® 3210 and 3200 Chipset Thermal/Mechanical Design Guide
Page 37

Reference Thermal Solution
Figure 6-2. Design Concept for Reference The rmal Solution
6.4.1 Extruded Heatsink Profiles
The reference thermal solution uses an extruded heatsink for cooling the chipset MCH.
Figure 6-3 shows the heatsink profile. Other heatsinks with similar dimensions and
increased thermal performance may be available. A full mechanical drawing of this
heatsink is provided in Appendix B.
Figure 6-3. Heatsink Extrusion Profiles
Intel® 3210 and 3200 Chipset Thermal/Mechanical Design Guide 37
Page 38

Reference Thermal Solution
6.4.2 Retention Mechanism Responding in Shock and Vibration
The lead-free process, large package and Integrated Heat Spreader (IHS) application
on the Intel® 3210 and 3200 Chipset changed the mechanical responses during shock
and vibration comparing with the legacy generation MCH chipset.
The Intel reference thermal solution uses a back plate design that adequately protects
®
the Solder Ball Joint Reliability (SBJR) of the Intel
3210 and 3200 Chipset. Analysis
data indicates that the back plate design provides measurable improvement in SBJR of
®
the Intel
3210 and 3200 Chipset in ATX form factors (1U ATX-like system is included)
where processor heatsink is attached to the motherboard. Hence, Intel recommends
using the back plate design on chipset heatsink in such a circumstance to protect the
SBJR.
For customized form factors where the processor heatsink is Direct Chassis Attach
(DCA), customers are recommended to do shock and vibration analysis and test to
determine whether a back plate design is needed or not, which probably will benefit the
customer in controlling the heatsink cost.
6.4.3 Thermal Interface Material
A Thermal Interface Material (TIM) provides improved conductivity between the IHS
and heatsink. The reference thermal solution uses Honeywell PCM45 F*, 0.25mm
(0.010 in.) thick, 20mm x 20mm (0.79 in. x 0.79 in.) square.
Note: Unflowed or “dry“ Honeywell PCM45F has a material thickness of 0.010 inch. The
flowed or “wet“ Honeywell PCM45F has a material thickness of ~0.003 inch after it
reaches its phase change temperature.
6.4.3.1 Effect of Pressure on TIM Performance
As mechanical pressure increases on the TIM, the thermal resistance of the TIM
decreases. This phenomenon is due to the decrease of the bond line thickness (BLT).
BLT is the final settled thickness of the thermal interface material after installation of
heatsink. The effect of pressure on the thermal resistance of the Honeywell PCM45F
TIM is shown in Table 6.1.
Intel provides both End of Line and End of Life TIM thermal resistance values of
Honeywell PCM45F. End of Line and End of Life TIM thermal resistance values are
®
obtained through measurement on a Test Vehicle similar to Intel
3210 and 3200
Chipset’s physical attributes using an extruded aluminum heatsink. The End of line
value represents the TIM performance post heatsink assembly while the End of Life
value is the predicted TIM performance when the product and TIM reaches the end of
its life. The heatsink clip provides enough pressure for the TIM to achieve End of Line
2
thermal resistance of 0.345 °C inch
2
/W.
inch
/W and End of Life thermal resistance of 0.459 °C
Table 6-1. Honeywell PCM45F* TIM Performance as a Function of Attach Pressure
2
Pressure on Psi
Thermal Resistance (°C x in
End of Line End of Life
2.18 0.391 0.551
4.35 0.345 0.459
38 Intel® 3210 and 3200 Chipset Thermal/Mechanical Design Guide
)/W
Page 39

Reference Thermal Solution
6.4.4 Reference Thermal Solution Assembly Process
1. Snap the preload clip spring onto the bracket. Assemble the bracket with heatsink,
as shown in Figure 6-4.
Figure 6-4. Reference Thermal Solut ion Assembly Process - Heatsink Sub-Assembly
(Step 1)
2. Populate the backplate to the motherboard and align the nuts with the studs on the
backplate, as shown in Figure 6-5.
Intel® 3210 and 3200 Chipset Thermal/Mechanical Design Guide 39
Page 40

Reference Thermal Solution
Figure 6-5. Reference Thermal Solution Assembly Process - Heatsink Assembly (Step 2)
3. To assemble the heatsink with the backplate, screw in the nuts with 8 in-lb.
6.5 Reliability Guidelines
The environmental reliability requirements for the reference thermal solution are
shown in Table 6-2. These should be considered as general guidelines. Each
motherboard, heatsink and attach combination may vary the mechanical loading of the
component. Based on the end-user environment, the user should define the
appropriate reliability test criteria and carefully evaluate the completed assembly prior
to use in high volume.
The testing will be performed with the sample board mounted on a test fixture. The test
profiles are unpacked board level.
40 Intel® 3210 and 3200 Chipset Thermal/Mechanical Design Guide
Page 41

Reference Thermal Solution
Table 6-2. Reference Thermal Solution Environmental Reliability Guidelines
(1)
Test
Mechanical Shock 3 drops for + and – directions in each of 3
Random Vibration Duration: 10 min/axis, 3 axes
Temperature Life 85 °C, 2000 hours total, checkpoints at 168, 500,
Thermal Cycling -40 °C to +70 °C, 50 cycles Visual Check
Notes:
1. It is recommended that the above tests be performed on a sample size of at least twelve assemblies from
three lots of material.
2. Additional pass/fail criteria may be added at the discretion of the user.
perpendicular axes
Profile: 50 G, Trapezoidal waveform, 4.3 m/s [170
in/s] minimum velocity change
Frequency Range: 5 Hz to 500 Hz
Power Spectral Density (PSD) Profile: 3.13 g RMS
1000, and 2000 hours
Requirement Pass/Fail Criteria
Visual Check and Electrical
Functional Test
Visual Check and Electrical
Functional Test
Visual Check
§
(2)
Intel® 3210 and 3200 Chipset Thermal/Mechanical Design Guide 41
Page 42

Reference Thermal Solution
42 Intel® 3210 and 3200 Chipset Thermal/Mechanical Design Guide
Page 43

Thermal Solution Component Suppliers
A Thermal Solution Component
Suppliers
A.1 Heatsink Thermal Solution
Part
Heatsink Assembly D96730-001 Monika Chih
Heatsink D96729-001 1
Retainer D92698-001 1
Nuts-Inserts D92621-001 4
Bracket E 11663-001 1
Stiffener-backplate D94244-001 1
Intel Part
Number
Quantity Contact Information
monika_chih@ccic.com.tw
886-2-29952666-1131
§
Intel® 3210 and 3200 Chipset Thermal/Mechanical Design Guide 43
Page 44

Thermal Solution Component Suppliers
44 Intel® 3210 and 3200 Chipset Thermal/Mechanical Design Guide
Page 45

Mechanical Drawings
B Mechanical Drawings
The following table lists the mechanical drawings available in this document.
Drawing Name Page Number
Intel® 3210 and 3200 Chipset Package Drawing page 46
Intel® 3210 and 3200 Chipset Motherboard Component Top-Side Keep-Out Restrictions page 47
Intel® 3210 and 3200 Chipset Motherboard Component Back-Side Keep-Out Restrictions page 48
Intel® 3210 and 3200 Chipset Reference Thermal Solution Assembly page 49
Intel® 3210 and 3200 Chipset Reference Thermal Solution - Heatsink Drawing page 50
Intel® 3210 and 3200 Chipset Reference Thermal Solution - Spring Preload Clip page 51
Intel® 3210 and 3200 Chipset Reference Thermal Solution - Fastener Nut page 52
Intel® 3210 and 3200 Chipset Reference Thermal Solution - Bracket (1 of 2) page 53
Intel® 3210 and 3200 Chipset Reference Thermal Solution - Bracket (2 of 2) page 54
Intel® 3210 and 3200 Chipset Reference Thermal Solution - Backplate Assembly page 55
Intel® 3210 and 3200 Chipset Reference Thermal Solution - Backplate page 56
Intel® 3210 and 3200 Chipset Reference Thermal Solution - Insulator page 57
Intel® 3210 and 3200 Chipset Reference Thermal Solution - Flush Mount Stud page 58
Intel® 3210 and 3200 Chipset Thermal/Mechanical Design Guide 45
Page 46

Figure B-1. Intel® 3210 and 3200 Chipset Package Drawing
Mechanical Drawings
46 Intel® 3210 and 3200 Chipset Thermal/Mechanical Design Guide
Page 47

Mechanical Drawings
Figure B-2. Intel® 3210 and 3200 Chipset Motherboard Component Top-Side Keep-Ou t
Restrictions
B
1 HOLE PLACEMENT FABRICATION
NOTES:
TOLERANCE PER INTEL 454979, CLASS 1,2,3
2. HEATSINK COMPONENT HEIGHT NOT TO EXCEED
38.1MM ABOVE MOTHERBOARD SURFACE.
DETAIL A
SCALE 8
2200 MISSION COLLEGE BLVD.
R
DESCRIPTIONPART NUMBERITEM NO
DEPARTMENT
PARTS LIST
DATEDESIGNED BY
DRAWING,KO,MCH,BEARLAKEC,BONE TRAILD94910TOP
-001-002-003
QTY PER ASSY
UNLESS OTHERWISE SPECIFIED
INTERPRET DIMENSIONS AND TOLERANCES
A
REVDRAWING NUMBERCAGE CODESIZE
P.O. BOX 58119
SANTA CLARA, CA 95052-8119
CORP.
HEAT SINK KEEP OUT
ATX BEARLAKE MCH
PST
TITLE
03/15/07K.CEURTER
DATEAPPROVED BY
DATECHECKED BY
DATECHECKED BY
THIRD ANGLE PROJECTION
IN ACCORDANCE WITH ASME Y14.5M-1994
DIMENSIONS ARE IN MILLIMETERS
TOLERANCES:
LINEAR 0.1MM
1
D94910D
FINISH:NAMATERIAL:
COMPONENT CENTER
MAX 25 [1.000]
COMPONENT HEIGHT
13
REVISION HISTORY
D94910 1 1
DWG. NO SHT. REV
ZONE REV DESCRIPTION DATE APPROVED
4
PRELIMINARY RELEASE 03/15/07
***
D
C
.4134[]
NO COMPONENTS THIS AREA
4X 10.5
4X 5.06 TRACE KEEPOUT
AROUND HOLES
1
.1591[]
4X THROUGH HOLE4.04
EAST
2.9134[]
74
SHEET 1 OF 2DO NOT SCALE DRAWINGSCALE: NONE
NA
123
4
.1575[]
135
4
MAX 1.27 [.050]
COMPONENT HEIGHT
(NON-MCH COMPONENTS)
5678
5678
DETAIL A
2.386[]
1.890[]
60.6
48
1.055[]
26.79
NORTH
PRIMARY SIDE KEEPOUTS
1.803[]
45.79
2.638[]
67
THIS DRAWING CONTAINS INTEL CORPORAT ION CONFIDENTIAL INFORMATION. IT IS DISCLOSED IN CONFIDENCE AND ITS CONT ENTS
MAY NOT BE DISCLOSED, REPRODUCED, DI SPLAYED OR MODIFIED, WITHOUT THE PRI OR WRITTEN CONSENT OF INTEL CORPORATION.
D
3.189[]
81
C
B
A
Intel® 3210 and 3200 Chipset Thermal/Mechanical Design Guide 47
Page 48

Mechanical Drawings
Figure B-3. Intel® 3210 and 3200 Chipset Motherboard Component Back-Side Keep-O ut
Restrictions
D
C
13
D94910 2 1
DWG. NO SHT. REV
4
COMPONENT CENTER
B
3.1890[]
81
1.4980[]
38.05
A
1D94910XD
REVDRAWING NUMBERCAGE CODESIZEDEPARTMENT
SHEET 2 OF 2DO NOT SCALE DRAWINGSCALE: 1
2200 MISSION COLLEGE BLVD.
P.O. BOX 58119
SANTA CLARA, CA 95052-8119
CORP.
R
TMD
123
4
5678
.7500[]
2.3858[]
19.05
60.6
5678
SECONDARY SIDE KEEPOUTS
NO COMPONENTS THIS AREA
THIS DRAWING CONTAINS INTEL CORPORAT ION CONFIDENTIAL INFORMATION. IT IS DISCLOSED IN CONFIDENCE AND ITS CONT ENTS
MAY NOT BE DISCLOSED, REPRODUCED, DI SPLAYED OR MODIFIED, WITHOUT THE PRI OR WRITTEN CONSENT OF INTEL CORPORATION.
D
C
B
A
48 Intel® 3210 and 3200 Chipset Thermal/Mechanical Design Guide
Page 49

Mechanical Drawings
Figure B-4. Intel® 3210 and 3200 Chipset Reference Thermal Solution Assembly
Intel® 3210 and 3200 Chipset Thermal/Mechanical Design Guide 49
Page 50

Mechanical Drawings
Figure B-5. Intel® 3210 and 3200 Chipset Reference Thermal Solution - Heatsink Drawing
50 Intel® 3210 and 3200 Chipset Thermal/Mechanical Design Guide
Page 51

Mechanical Drawings
Figure B-6. Intel® 3210 and 3200 Chipset Reference Thermal Solution - Spring Preload
Clip
D92698 1 1
DWG. NO SHT. REV
REVISION HISTORY
ZONE REV DESCRIPTION DATE APPROVED
H
1 PRODUCTION RELEASE 06/20/07 KJC
- A INITIAL DV RELEASE 03/09/07 KJC
G
F
E
53.8 0.1
D
A
4.2 0.25
C
B
2200 MISSION COLLEGE BLVD.
R
DEPARTMENT
DATEDESIGNED BY
UNLESS OTHERWISE SPECIFIED
A
1
OF
1
SHEET
P.O. BOX 58119
SANTA CLARA, CA 95052-8119
DO NOT SCALE DRAWING
PST
DATEDRAWN BY
03/09/07K.CEURTER
INTERPRET DIMENSIONS AND TOLERANCES
IN ACCORDANCE WITH ASME Y14.5M-1994
4
BONE TRAIL,SPRING CLIP,PRELOAD
SIZE DRAWING NUMBER REV
A1 D92698 1
TITLE
SCALE:
SEE NOTESSEE NOTES
FINISHMATERIAL
03/09/07P.BORNEMANN
DATEAPPROVED BY
03/09/07R.AOKI
03/09/07A.VALPIANI
DATECHECKED BY
03/09/07K.CEURTER
ANGLES ±1
DIMENSIONS ±0.3
ALL UNTOLERANCED LINEAR
THIRD ANGLE PROJECTION
DIMENSIONS ARE IN MILLIMETERS
5 . CRITICAL TO FUNCTION DIMENSION/FEATURE
NOTES:
1. DIMENSIONS ARE IN MILLIMETERS
2. BREAK ALL SHARP EDGES AND CORNERS, GRIND PUNCH MARKS FLAT, NO BURS FROM PUNCH
3. MATERIAL: AISI TYPE 301 1/2 HARD FOR MIN YIELD STRENGTH OF 760 MPa OR INTEL APPROVED EQUIVALENT
CRITICAL MATERIAL PROPERTIES: MIN YIELD STRENGTH = 760 MPa
4. FINISH: ZINC OR ELECTROLYTIC NICKEL PLATING PLUS CLEAR CHROMATE COLORLESS PER ASTM B 633
8 7 6 5 4 3 2
THIS DRAWING CONTAINS INTEL CORPORAT ION CONFIDENTIAL INFORMATION. IT IS DISCLOSED IN CONFIDENCE AND ITS CONT ENTS
MAY NOT BE DISCLOSED, REPRODUCED, DI SPLAYED OR MODIFIED, WITHOUT THE PRI OR WRITTEN CONSENT OF INTEL CORPORATION.
IF NON STAINLESS STEEL ALTERNATE CHOSEN
H
8
C
1.9
51.2 0.05
G
F
E
9.651
A
5
Cpk TARGET = 1.0
ACCEPTABLE
0.451 0.15
B543.7 0.25
8 7 6 5 4 3 2 1
D
C
B
A
Intel® 3210 and 3200 Chipset Thermal/Mechanical Design Guide 51
Page 52

Mechanical Drawings
Figure B-7. Intel® 3210 and 3200 Chipset Reference Thermal Solution - Fastener Nut
D92621 1 1
DWG. NO SHT. REV
REVISION HISTORY
ZONE REV DESCRIPTION DATE APPROVED
H
1 PRODUCTION RELEASE 06/20/07 KJC
- A INITIAL DV RELEASE 03/09/07 KJC
B3 B CHANGED COLLAR HT FROM 2 TO 4 05/09/07 KJC
G
B
F
A A
E
B
D
C
5 0.1
B
A
4 0.1
A
A
1
OF
1
SHEET
2200 MISSION COLLEGE BLVD.
P.O. BOX 58119
SANTA CLARA, CA 95052-8119
R
DO NOT SCALE DRAWING
BONE TRAIL, FASTNER, NUT
SIZE DRAWING NUMBER REV
TITLE
03/09/07P.BORNEMANN
DATEAPPROVED BY
03/09/07R.AOKI
03/09/07A.VALPIANI
DATECHECKED BY
03/09/07K.CEURTER
ANGLES ±0.5
DIMENSIONS ±0.1
ALL UNTOLERANCED LINEAR
THIRD ANGLE PROJECTION
15
A1 D92621 1
SCALE:
SEE NOTESSEE NOTES
FINISHMATERIAL
PST
DEPARTMENT
DATEDRAWN BY
03/09/07K.CEURTER
DATEDESIGNED BY
UNLESS OTHERWISE SPECIFIED
DIMENSIONS ARE IN MILLIMETERS
INTERPRET DIMENSIONS AND TOLERANCES
IN ACCORDANCE WITH ASME Y14.5M-1994
SECTION B-B
A
0.13 A B
8 7 6 5 4 3 2
NOTES:
1. USE PEM PART NUMBER = OR INTEL APPROVED ALTERNATE
2. DIMENSIONS ARE IN MILLIMETERS
3. MATERIAL:
- LOW CARBON STEEL
4. FINISH:
THIS DRAWING CONTAINS INTEL CORPORAT ION CONFIDENTIAL INFORMATION. IT IS DISCLOSED IN CONFIDENCE AND ITS CONT ENTS
MAY NOT BE DISCLOSED, REPRODUCED, DI SPLAYED OR MODIFIED, WITHOUT THE PRI OR WRITTEN CONSENT OF INTEL CORPORATION.
- ZINC PLUS CLEAR CHROMATE PER ASTM B633 COLORLESS
H
6 0.25
()62
RECESS FOR #2 PHILLIPS DRIVER
6-32 UNC - 2B TAP 5
5 . CRITICAL TO FUNCTION
6. REFERENCE AND NON-DIMENSIONED FEATURES MAY BE MODIFIED PER INTEL APPROVAL
G
F
E
D
#36 DRILL ( 2.71 ) THRU -( 1 ) HOLE
C
2.71
0.13 A B
SECTION A-A
B 57 0.01
8 7 6 5 4 3 2 1
B
A
52 Intel® 3210 and 3200 Chipset Thermal/Mechanical Design Guide
Page 53

Mechanical Drawings
Figure B-8. Intel® 3210 and 3200 Chipset Reference Thermal Solution - Bracket (1 of 2)
H
03/23/07 KJC
05/16/07 KJC
E11663 1 1
DWG. NO SHT. REV
REVISION HISTORY
REMOVED ROUNDS
NUT LATCH SIZE IN SEC II
PART NUMBER CHANGED FROM D92625-001;
REMOVED Z-STOP FROM SEC III; INCREASED
CHANGED DRAFT ANGLE FROM 0.5 TO 1 DEG
B
1
- A INITIAL DV RELEASE 03/09/07 KJC
ZONE REV DESCRIPTION DATE APPROVED
S1-C3
S2-B7
4X 10
G
C
5
A
F
66.4 0.018
63
60
2X 4
E
D
4X 1.84
TYP 2
REV B
REMOVED ROUNDS
C
B
REV B
4X REM ROUNDS
A
2200 MISSION COLLEGE BLVD.
P.O. BOX 58119
SANTA CLARA, CA 95052-8119
R
DO NOT SCALE DRAWING
BONE TRAIL,FRAME,TOP
PST
SIZE DRAWING NUMBER REV
DEPARTMENT
DATEDESIGNED BY
UNLESS OTHERWISE SPECIFIED
INTERPRET DIMENSIONS AND TOLERANCES
A1 E11663 1
TITLE
FINISHMATERIAL
03/12/07K.KOEPSELL
DATEAPPROVED BY
03/12/07R.AOKI
03/12/07A.VALPIANI
DATECHECKED BY
03/09/07K.CEURTER
DATEDRAWN BY
03/09/07K.CEURTER
ANGLES ±0.5
DIMENSIONS ±0.1
ALL UNTOLERANCED LINEAR
THIRD ANGLE PROJECTION
DIMENSIONS ARE IN MILLIMETERS
IN ACCORDANCE WITH ASME Y14.5M-1994
2
OF
1
SHEET
3
SCALE:
SEE NOTESSEE NOTES
63.7 0.1
0.15 A H
4X
44
0.1
0.1 A H C
38
IV
8 7 6 5 4 3 2
THIS DRAWING CONTAINS INTEL CORPORAT ION CONFIDENTIAL INFORMATION. IT IS DISCLOSED IN CONFIDENCE AND ITS CONT ENTS
MAY NOT BE DISCLOSED, REPRODUCED, DI SPLAYED OR MODIFIED, WITHOUT THE PRI OR WRITTEN CONSENT OF INTEL CORPORATION.
H
610.2 0.12
0.15 A H
4X
IV
I
I
4X 7.438 0.12
G
66
33
H
1.5
C
23.5
2X 3
47
III
III
47.6 0.1
II
II
22.2
5 MARK PART WITH INTEL P/N, REVISION, CAVITY NUMBER AND DATE CODE APPROX WHERE SHOWN PER INTEL MARKING STANDARD 164997
NOTES:
1. THIS DRAWING TO BE USED IN CONJUNCTION WITH SUPPLIED 3D DATABASE FILE. ALL DIMENSIONS AND TOLERANCES ON THIS DRAWING TAKE
PRECEDENCE OVER SUPPLIED FILE AND ARE APPLICABLE AT PART FREE, UNCONSTRAINED STATE UNLESS INDICATED OTHERWISE.
2. TOLERANCES ON DIMENSIONED AND UNDIMENSIONED FEATURES UNLESS OTHERWISE SPECIFIED:
DIMENSIONS ARE IN MILLIMETERS.
FOR FEATURE SIZES < 10MM: LINEAR .07
FOR FEATURE SIZES BETWEEN 10 AND 25 MM: LINEAR .08
FOR FEATURE SIZES BETWEEN 25 AND 50 MM: LINEAR .10
FOR FEATURE SIZES > 50MM: LINEAR .18
ANGLES: 0.5
3. MATERIAL:
A) TYPE: ENVIRONMENTALLY COMPLIANT THERMOPLASTIC OR
EQUIVALENT UPON INTEL APPROVAL (REF. GE LEXAN 500ECR-739)
B) CRITICAL MECHANICAL MATERIAL PROPERTIES
FOR EQUIVALENT MATERIAL SELECTION:
TENSILE YIELD STRENGTH (ASTM D638) > 57 MPa
F
E
D
C
6 CRITICAL TO FUNCTION DIMENSION
FLEXURAL YIELD STREGTH (ASTM D638) > 99 MPa
TENSILE ELONGATION AT BREAK (ASTM D638) >= 46%
FLEXURAL MODULUS (ASTM D638) 3116 MPa 10%
SOFTENING TEMP (VICAT, RATE B): 154 C
C) COLOR: APPROXIMATING BLACK, (REF GE 739)
D) REGRIND: 25% PERMISSIBLE.
7. ALL DIMENSIONS SHOWN SHALL BE MEASURED FOR FAI
8. DEGATE: FLUSH TO 0.35 BELOW STRUCTURAL THICKNESS (GATE WELL OR GATE RECESS ACCEPTABLE)
9. FLASH: 0.15 MAX.
10. SINK: 0.25 MAX.
11. EJECTOR MARKS: FLUSH TO -0.25
12. PARTING LINE MISMATCH NOT TO EXCEED 0.25.
B
8 7 6 5 4 3 2 1
13. EJECTION PIN BOSSES, GATING, AND TOOLING INSERTS REQUIRE INTEL'S APPROVAL PRIOR TO TOOL CONSTRUCTION.
ALL EJECTION PIN BOSSES AND GATE FEATURES SHOWN ARE FOR REFERENCE ONLY.
14. EDGES SHOWN AS SHARP R 0.1 MAX.
15. TOOLING REQUIRED TO MAKE THIS PART SHALL BE THE PROPERTY OF INTEL, AND SHALL BE PERMANENTLY MARKED
WITH INTEL'S NAME AND APPROPRIATE PART NUMBER.
16. ALL SECONDARY UNIT DIMENSIONS ARE FOR REFERENCE ONLY.
A
Intel® 3210 and 3200 Chipset Thermal/Mechanical Design Guide 53
Page 54

Mechanical Drawings
Figure B-9. Intel® 3210 and 3200 Chipset Reference Thermal Solution - Bracket (2 of 2)
H
E11663 2 1
DWG. NO SHT. REV
G
2.55
F
A
E
2
SECTION II-II
SCALE 10
D
1.5
C
A
SECTION IV-IV
4
B
SCALE 10
A
2
OF
2
SHEET
DO NOT SCALE DRAWING
3
SIZE DRAWING NUMBER REV
A1 E11663 1
SCALE:
2200 MISSION COLLEGE BLVD.
P.O. BOX 58119
SANTA CLARA, CA 95052-8119
R
PST
DEPARTMENT
8 7 6 5 4 3 2
THIS DRAWING CONTAINS INTEL CORPORAT ION CONFIDENTIAL INFORMATION. IT IS DISCLOSED IN CONFIDENCE AND ITS CONT ENTS
MAY NOT BE DISCLOSED, REPRODUCED, DI SPLAYED OR MODIFIED, WITHOUT THE PRI OR WRITTEN CONSENT OF INTEL CORPORATION.
H
A
7.5
TYP 2.8
SECTION III-III
SCALE 10
2X 4.5 0.07
G
F
E
D
C
A
8
2
REV B
TYP ( )
SECTION I-I
SCALE 10
8 7 6 5 4 3 2 1
B
A
54 Intel® 3210 and 3200 Chipset Thermal/Mechanical Design Guide
Page 55

Mechanical Drawings
Figure B-10. Intel® 3210 and 3200 Chipset Reference Thermal Solution - Backplate
Assembly
D94244 1 1
DWG. NO SHT. REV
REVISION HISTORY
ZONE REV DESCRIPTION DATE APPROVED
H
1 PRODUCTION RELEASE 06/20/07 KJC
- A INITIAL DV RELEASE 03/09/07 KJC
G
F
E
D
1
3
C
B
2200 MISSION COLLEGE BLVD.
P.O. BOX 58119
SANTA CLARA, CA 95052-8119
R
DESCRIPTIONPART NUMBERITEM NOQTY
PST
DEPARTMENT
TITLE
PARTS LIST
03/09/07K.CEURTER
DATEDRAWN BY
03/09/07K.CEURTER
DATEDESIGNED BY
BONE TRAIL,INSULATOR,BACK PLATED92624-00131
BONE TRAIL,STUD,SELF-CLINCHING, DOG POINTD92622-00124
ASSY,STIFFENER,BD,BONE TRAILD94244-001TOP
BONE TRAIL, MCH, STIFFENER, PLATED92620-00111
ALL UNTOLERANCED LINEAR
UNLESS OTHERWISE SPECIFIED
DIMENSIONS ARE IN MILLIMETERS
INTERPRET DIMENSIONS AND TOLERANCES
IN ACCORDANCE WITH ASME Y14.5M-1994
A
1
OF
1
SHEET
DO NOT SCALE DRAWING
2
BONE TRAIL,MCH,STIFFENER,PLATE
SIZE DRAWING NUMBER REV
A1 D94244 1
SCALE:
SEE NOTESSEE NOTES
FINISHMATERIAL
03/12/07K.KOEPSELL
DATEAPPROVED BY
03/12/07R.AOKI
03/12/07A.VALPIANI
DATECHECKED BY
ANGLES ±1
DIMENSIONS ±0.1
THIRD ANGLE PROJECTION
()2.127
0.13
4
2
PLATE PUNCH/BURR DIRECTION
3
4
D
C
B
8 7 6 5 4 3 2 1
A
8 7 6 5 4 3 2
THIS DRAWING CONTAINS INTEL CORPORAT ION CONFIDENTIAL INFORMATION. IT IS DISCLOSED IN CONFIDENCE AND ITS CONT ENTS
MAY NOT BE DISCLOSED, REPRODUCED, DI SPLAYED OR MODIFIED, WITHOUT THE PRI OR WRITTEN CONSENT OF INTEL CORPORATION.
3 INSTALL STUDS FLUSH TO THIS SURFACE +0.1 / -0.25 MM
4 INSULATOR WILL OVERHANG EDGE UPON PLACEMENT AND IS ACCEPTABLE
NOTES:
1. DIMENSIONS ARE IN MILLIMETERS
2. REMOVE OILS-GREASE FROM PLATE PRIOR TO INSULATOR (3) INSTALLATION.
H
1
1
G
F
E
Intel® 3210 and 3200 Chipset Thermal/Mechanical Design Guide 55
Page 56

Mechanical Drawings
Figure B-11. Intel® 3210 and 3200 Chipset Reference Thermal Solution - Back plate
D92620 1 A
DWG. NO SHT. REV
REVISION HISTORY
ZONE REV DESCRIPTION DATE APPROVED
H
- A INITIAL DV RELEASE 03/09/07 KJC
+0.08
G
53.48
0
0.25 A B C
0.125 A B
4X
F
B
A
39.75
E
D
79.5 0.25
40
C
C
B
52 0.05
A
1
OF
1
SHEET
2200 MISSION COLLEGE BLVD.
P.O. BOX 58119
SANTA CLARA, CA 95052-8119
R
DO NOT SCALE DRAWING
PST
DEPARTMENT
DATEDRAWN BY
03/09/07K.CEURTER
DATEDESIGNED BY
UNLESS OTHERWISE SPECIFIED
DIMENSIONS ARE IN MILLIMETERS
INTERPRET DIMENSIONS AND TOLERANCES
IN ACCORDANCE WITH ASME Y14.5M-1994
3
BONE TRAIL, MCH, STIFFENER, PLATE
SIZE DRAWING NUMBER REV
A1 D92620 A
TITLE
SCALE:
SEE NOTESSEE NOTES
FINISHMATERIAL
03/09/07P.BORNEMANN
DATEAPPROVED BY
03/09/07R.AOKI
03/09/07A.VALPIANI
DATECHECKED BY
03/09/07K.CEURTER
ANGLES ±1
DIMENSIONS ±0.3
ALL UNTOLERANCED LINEAR
THIRD ANGLE PROJECTION
B
29.5
47
21
TYP R2
8 7 6 5 4 3 2 1
C
B
A
8 7 6 5 4 3 2
5 . CRITICAL TO FUNCTION DIMENSION/FEATURE
NOTES:
1. DIMENSIONS ARE IN MILLIMETERS
2. BREAK ALL SHARP EDGES AND CORNERS, GRIND PUNCH MARKS FLAT, NO BURRS FROM PUNCH
3. MATERIAL: AISI 1020 COLD ROLLED STEEL OR INTEL APPROVED EQUIVALENT
CRITICAL MATERIAL PROPERTIES: MIN YEILD STRENGTH = 250 MPa
4. FINISH: ZINC OR ELECTROLYTIC NICKEL PLATING PLUS CLEAR CHROMATE
THIS DRAWING CONTAINS INTEL CORPORAT ION CONFIDENTIAL INFORMATION. IT IS DISCLOSED IN CONFIDENCE AND ITS CONT ENTS
MAY NOT BE DISCLOSED, REPRODUCED, DI SPLAYED OR MODIFIED, WITHOUT THE PRI OR WRITTEN CONSENT OF INTEL CORPORATION.
PER ASTM B 633 COLORLESS
H
59 0.25
TYP R1
G
F
66
E
D
56 Intel® 3210 and 3200 Chipset Thermal/Mechanical Design Guide
Page 57

Mechanical Drawings
Figure B-12. Intel® 3210 and 3200 Chipset Reference Thermal Solution - Insulator
D92624 1 1
DWG. NO SHT. REV
REVISION HISTORY
ZONE REV DESCRIPTION DATE APPROVED
H
1 PRODUCTION RELEASE 06/20/07 KJC
- A INITIAL DV RELEASE 03/09/07 KJC
G
F
A
44.2 0.2
E
THICK0.127
D
C
B
2200 MISSION COLLEGE BLVD.
R
DEPARTMENT
DATEDESIGNED BY
UNLESS OTHERWISE SPECIFIED
A
1
OF
1
SHEET
P.O. BOX 58119
SANTA CLARA, CA 95052-8119
DO NOT SCALE DRAWING
PST
DATEDRAWN BY
03/09/07K.CEURTER
DIMENSIONS ARE IN MILLIMETERS
INTERPRET DIMENSIONS AND TOLERANCES
IN ACCORDANCE WITH ASME Y14.5M-1994
3
SIZE DRAWING NUMBER REV
A1 D92624 1
BONE TRAIL,INSULATOR,BACK PLATE
TITLE
SCALE:
SEE NOTESSEE NOTES
FINISHMATERIAL
03/09/07P.BORNEMANN
DATEAPPROVED BY
03/09/07R.AOKI
03/09/07A.VALPIANI
DATECHECKED BY
03/09/07K.CEURTER
ANGLES ±1
DIMENSIONS ±0.3
ALL UNTOLERANCED LINEAR
THIRD ANGLE PROJECTION
8 7 6 5 4 3 2
4 . CRITICAL TO FUNCTION FEATURE.
NOTES:
1. DIMENSIONS ARE IN MILLIMETER
2. MATERIAL: POLYPROPYLENE SHEET( ITW FORMEX GK-5BK) .127MM NOMINAL THICKNESS
ONE SIDE PRESSURE SENSITIVE ADHESIVE APPLIED; TOTAL THICKNESS= .178MM.
THIS DRAWING CONTAINS INTEL CORPORAT ION CONFIDENTIAL INFORMATION. IT IS DISCLOSED IN CONFIDENCE AND ITS CONT ENTS
MAY NOT BE DISCLOSED, REPRODUCED, DI SPLAYED OR MODIFIED, WITHOUT THE PRI OR WRITTEN CONSENT OF INTEL CORPORATION.
3: FLAMMABILITY: UL 94-V0 OR VTM-0 RATING
H
0.2 A C B
4X
B
TYP R2
C459.5 0.25
TYP R1
480.5
0.25
40
47
21
66
8 7 6 5 4 3 2 1
G
F
E
D
C
B
A
Intel® 3210 and 3200 Chipset Thermal/Mechanical Design Guide 57
Page 58

Mechanical Drawings
T
Figure B-13. Intel® 3210 and 3200 Chipset Reference Thermal Solution - Flush Mount Stud
D92622 1 1
DWG. NO SHT. REV
REVISION HISTORY
ZONE REV DESCRIPTION DATE APPROVED
H
1 PRODUCTION RELEASE 06/20/07 KJC
- A INITIAL DV RELEASE 03/09/07 KJC
G
F
E
D
C
B
2200 MISSION COLLEGE BLVD.
R
DEPARTMENT
DATEDESIGNED BY
UNLESS OTHERWISE SPECIFIED
A
1
OF
1
SHEET
P.O. BOX 58119
SANTA CLARA, CA 95052-8119
DO NOT SCALE DRAWING
PST
DATEDRAWN BY
03/09/07K.CEURTER
INTERPRET DIMENSIONS AND TOLERANCES
IN ACCORDANCE WITH ASME Y14.5M-1994
20
SIZE DRAWING NUMBER REV
A1 D92622 1
BONE TRAIL,STUD,SELF-CLINCHING, DOG POIN
TITLE
SCALE:
SEE NOTESSEE NOTES
FINISHMATERIAL
03/09/07P.BORNEMANN
DATEAPPROVED BY
03/09/07R.AOKI
03/09/07A.VALPIANI
DATECHECKED BY
03/09/07K.CEURTER
ANGLES ±1
DIMENSIONS ±0.3
ALL UNTOLERANCED LINEAR
THIRD ANGLE PROJECTION
DIMENSIONS ARE IN MILLIMETERS
8.525 0.35
AREA
3.78
()
REFERENCE FOR
LOWEST THREADED
6
()4
2.2
1.58
()
()
NOMINAL BACK PLATE
+ INSULATOR THICKNESS
NOMINAL DT PCB THICKNESS
B
( )5.8
0.05 A B
3.51 0.08
A
8 7 6 5 4 3 2 1
A
8 7 6 5 4 3 2
NOTES:
1. USE PEM PART NUMBER (TBD) OR INTEL APPROVED ALTERNATE
2. DIMENSIONS ARE IN MILLIMETERS
3. MATERIAL:
- LOW CARBON STEEL
4. FINISH:
THIS DRAWING CONTAINS INTEL CORPORAT ION CONFIDENTIAL INFORMATION. IT IS DISCLOSED IN CONFIDENCE AND ITS CONT ENTS
MAY NOT BE DISCLOSED, REPRODUCED, DI SPLAYED OR MODIFIED, WITHOUT THE PRI OR WRITTEN CONSENT OF INTEL CORPORATION.
- ZINC PLUS CLEAR CHROMATE PER ASTM B633 COLORLESS
H
B2.2
5 . CRITICAL TO FUNCTION
6 . FEATURE DETAIL PER VENDOR SPECIFICATION
- FLUSH MOUNT HEAD
- PUSHOUT FORCE > 250LBS
- TORQUE OUT FORCE > 18 IN-LBS
- SHEET METAL HOLE SIZE = 4 +0.08 -0MM
- SHEET METAL THICKNESS = 2.2 0.05MM
7. REFERENCE AND NON-DIMENSIONED FEATURES MAY BE MODIFIED
PER INTEL APPROVAL
G
F
E
1 0.25
"DOG POINT" TO
ASSIST BLING ASSEMBLY
4.745
()
UNC #6-32
THREADED SECTIONS
(THREADS SHOWN FOR REFERENCE ONLY)
D
C
§
58 Intel® 3210 and 3200 Chipset Thermal/Mechanical Design Guide
 Loading...