

Page 1

User Guide
10 Megapixel Digital Camera
NS-DSC1110A
Page 2

Contents
Important safety instructions . . . . . . . . . . . . . . . . . . . . . . . . . . . . . . . . . . . . .1
Introduction . . . . . . . . . . . . . . . . . . . . . . . . . . . . . . . . . . . . . . . . . . . . . . . . . . . . .2
Features . . . . . . . . . . . . . . . . . . . . . . . . . . . . . . . . . . . . . . . . . . . . . . . . . . . . . . . . .2
Package contents . . . . . . . . . . . . . . . . . . . . . . . . . . . . . . . . . . . . . . . . . . . . . . . . 2
Main features . . . . . . . . . . . . . . . . . . . . . . . . . . . . . . . . . . . . . . . . . . . . . . . . . . . . 2
System requirements . . . . . . . . . . . . . . . . . . . . . . . . . . . . . . . . . . . . . . . . . . . . 2
Front . . . . . . . . . . . . . . . . . . . . . . . . . . . . . . . . . . . . . . . . . . . . . . . . . . . . . . . . . . . . 2
Back . . . . . . . . . . . . . . . . . . . . . . . . . . . . . . . . . . . . . . . . . . . . . . . . . . . . . . . . . . . . . 2
Top . . . . . . . . . . . . . . . . . . . . . . . . . . . . . . . . . . . . . . . . . . . . . . . . . . . . . . . . . . . . . 3
Right and left . . . . . . . . . . . . . . . . . . . . . . . . . . . . . . . . . . . . . . . . . . . . . . . . . . . . 3
Bottom . . . . . . . . . . . . . . . . . . . . . . . . . . . . . . . . . . . . . . . . . . . . . . . . . . . . . . . . . . 3
Setting up your camera . . . . . . . . . . . . . . . . . . . . . . . . . . . . . . . . . . . . . . . . . .3
Installing the batteries . . . . . . . . . . . . . . . . . . . . . . . . . . . . . . . . . . . . . . . . . . . 3
Attaching the wrist strap . . . . . . . . . . . . . . . . . . . . . . . . . . . . . . . . . . . . . . . . . 4
Understanding camera memory and file names . . . . . . . . . . . . . . . . . . . 4
Installing a memory card . . . . . . . . . . . . . . . . . . . . . . . . . . . . . . . . . . . . . . . . . 4
Navigating menus . . . . . . . . . . . . . . . . . . . . . . . . . . . . . . . . . . . . . . . . . . . . . . . 4
Initial settings . . . . . . . . . . . . . . . . . . . . . . . . . . . . . . . . . . . . . . . . . . . . . . . . . . . 5
Understanding camera modes . . . . . . . . . . . . . . . . . . . . . . . . . . . . . . . . . . . 5
Understanding the LCD . . . . . . . . . . . . . . . . . . . . . . . . . . . . . . . . . . . . . . . . . . 5
Changing the LCD configuration . . . . . . . . . . . . . . . . . . . . . . . . . . . . . . . . . 7
Using your camera . . . . . . . . . . . . . . . . . . . . . . . . . . . . . . . . . . . . . . . . . . . . . . .8
Turning your camera on and off . . . . . . . . . . . . . . . . . . . . . . . . . . . . . . . . . . 8
Turning on your camera for the first time . . . . . . . . . . . . . . . . . . . . . . . . . 8
Changing camera modes . . . . . . . . . . . . . . . . . . . . . . . . . . . . . . . . . . . . . . . . 8
Turning Simple mode on or off . . . . . . . . . . . . . . . . . . . . . . . . . . . . . . . . . . . 8
Taking photos . . . . . . . . . . . . . . . . . . . . . . . . . . . . . . . . . . . . . . . . . . . . . . . . . . . 9
Using the zoom . . . . . . . . . . . . . . . . . . . . . . . . . . . . . . . . . . . . . . . . . . . . . . . . . . 9
Using the flash . . . . . . . . . . . . . . . . . . . . . . . . . . . . . . . . . . . . . . . . . . . . . . . . . . . 9
Using the self-timer . . . . . . . . . . . . . . . . . . . . . . . . . . . . . . . . . . . . . . . . . . . . . 10
Using the macro feature . . . . . . . . . . . . . . . . . . . . . . . . . . . . . . . . . . . . . . . . 10
Using face tracking . . . . . . . . . . . . . . . . . . . . . . . . . . . . . . . . . . . . . . . . . . . . . 10
Recording video . . . . . . . . . . . . . . . . . . . . . . . . . . . . . . . . . . . . . . . . . . . . . . . . 11
Viewing photos and videos . . . . . . . . . . . . . . . . . . . . . . . . . . . . . . . . . . . . . 11
Viewing photos . . . . . . . . . . . . . . . . . . . . . . . . . . . . . . . . . . . . . . . . . . . . . . . . . 11
Viewing videos . . . . . . . . . . . . . . . . . . . . . . . . . . . . . . . . . . . . . . . . . . . . . . . . . 11
Zooming photos in Playback mode . . . . . . . . . . . . . . . . . . . . . . . . . . . . . . 12
Using the thumbnail view . . . . . . . . . . . . . . . . . . . . . . . . . . . . . . . . . . . . . . . 12
Erasing photos and videos . . . . . . . . . . . . . . . . . . . . . . . . . . . . . . . . . . . . . 12
Erasing photos or videos using the delete button . . . . . . . . . . . . . . . . 12
Using the Record menu . . . . . . . . . . . . . . . . . . . . . . . . . . . . . . . . . . . . . . . . 12
Setting the quality . . . . . . . . . . . . . . . . . . . . . . . . . . . . . . . . . . . . . . . . . . . . . . 12
Setting the resolution . . . . . . . . . . . . . . . . . . . . . . . . . . . . . . . . . . . . . . . . . . . 13
Setting ISO . . . . . . . . . . . . . . . . . . . . . . . . . . . . . . . . . . . . . . . . . . . . . . . . . . . . . 14
Setting the color balance . . . . . . . . . . . . . . . . . . . . . . . . . . . . . . . . . . . . . . . 14
Turning the stabilizer function on or off . . . . . . . . . . . . . . . . . . . . . . . . . 15
ii
www.insigniaproducts.com
Page 3

Contents
Turning the focus light on or off . . . . . . . . . . . . . . . . . . . . . . . . . . . . . . . . . 15
Setting the metering function . . . . . . . . . . . . . . . . . . . . . . . . . . . . . . . . . . . 16
Turning burst mode on or off . . . . . . . . . . . . . . . . . . . . . . . . . . . . . . . . . . . . 16
Using the Playback menu . . . . . . . . . . . . . . . . . . . . . . . . . . . . . . . . . . . . . . 17
Erasing photos and videos . . . . . . . . . . . . . . . . . . . . . . . . . . . . . . . . . . . . . . 17
Copying photos and videos to a memory card . . . . . . . . . . . . . . . . . . . 17
Viewing a slideshow of photos . . . . . . . . . . . . . . . . . . . . . . . . . . . . . . . . . . 18
Using the Setup menu . . . . . . . . . . . . . . . . . . . . . . . . . . . . . . . . . . . . . . . . . 19
Turning alert sounds on or off . . . . . . . . . . . . . . . . . . . . . . . . . . . . . . . . . . . 19
Turning Quick View on or off . . . . . . . . . . . . . . . . . . . . . . . . . . . . . . . . . . . . 19
Imprinting the date and time on photos . . . . . . . . . . . . . . . . . . . . . . . . . 19
Setting the date and time . . . . . . . . . . . . . . . . . . . . . . . . . . . . . . . . . . . . . . . 20
Turning Power Save on or off . . . . . . . . . . . . . . . . . . . . . . . . . . . . . . . . . . . . 20
Using the Tools menu . . . . . . . . . . . . . . . . . . . . . . . . . . . . . . . . . . . . . . . . . . 21
Setting the menu language . . . . . . . . . . . . . . . . . . . . . . . . . . . . . . . . . . . . . 21
Setting the battery type . . . . . . . . . . . . . . . . . . . . . . . . . . . . . . . . . . . . . . . . . 21
Turning help text on or off . . . . . . . . . . . . . . . . . . . . . . . . . . . . . . . . . . . . . . 22
Resetting settings to the factory defaults . . . . . . . . . . . . . . . . . . . . . . . . 22
Transferring files to a computer . . . . . . . . . . . . . . . . . . . . . . . . . . . . . . . . . 23
Troubleshooting . . . . . . . . . . . . . . . . . . . . . . . . . . . . . . . . . . . . . . . . . . . . . . . 23
Specifications . . . . . . . . . . . . . . . . . . . . . . . . . . . . . . . . . . . . . . . . . . . . . . . . . . 24
Legal notices . . . . . . . . . . . . . . . . . . . . . . . . . . . . . . . . . . . . . . . . . . . . . . . . . . . 24
One-year limited warranty . . . . . . . . . . . . . . . . . . . . . . . . . . . . . . . . . . . . . . 25
www.insigniaproducts.com
iii
Page 4

Contents
iv
www.insigniaproducts.com
Page 5

Important safety instructions
Battery information
Caution
Danger of explosion if battery is incorrectly replaced. Replace
only with the same or compatible type.
The exclamation point within an equilateral triangle is
intended to alert you to the presence of important
operating and maintenance (servicing) instructions in the
literature accompanying your camera.
1 Read these instructions.
2 Keep these instructions.
3 Heed all warnings.
4 Follow all instructions.
5 Do not use this apparatus near water.
6 Clean only with a dry cloth.
7 Do not install near any heat sources such as
radiators, heat registers, stoves, or other
apparatus (including amplifiers) that produce
heat.
8 Only use attachments/accessories specified by
the manufacturer.
9 Refer all servicing to qualified service personnel.
Servicing is required when the apparatus has
been damaged in any way, such as liquid has
been spilled or objects have fallen into the
apparatus, the apparatus has been exposed to
rain or moisture, does not operate normally, or
has been dropped.
10 To reduce the risk of fire or electric shock, do not
expose this device to rain, moisture, dripping, or
splashing, and no objects filled with liquids,
such as vases, shall be placed on it.
• Batteries should not be exposed to excessive heat
such as sunshine, fire, or the like.
• Turn off the camera before inserting or removing
batteries.
• Use only the provided batteries or the types of
batteries specified in this manual with your
camera. Using other types of batteries may
damage the camera and invalidate the warranty.
• Make sure that batteries are inserted correctly.
Inserting batteries upside down can cause
damage to the product and possibly cause an
explosion.
• When the camera is used for an extended period
of time, it is normal for the camera body to feel
warm.
• Download all pictures and remove the battery
from the camera if you are going to store the
camera for a long period of time.
• If battery power runs down while the lens is
extended, the camera may not have enough
power to retract the lens. Replace the batteries,
and then press the power button twice until the
lens retracts.
www.insigniaproducts.com
1
Page 6
NS-DSC1110A 10 Megapixel Camera
10 Megapixel Camera
Introduction
Congratulations on your purchase of a high-quality
Insignia product. Your NS-DSC1110A is designed for
reliable and trouble-free performance.
Features
Package contents
•Digital camera
• AA batteries (2)
• Wrist strap
•USB cable
•CD with User Guide
• Quick Setup Guide
Main features
• 10 megapixel resolution
• 3x optical zoom and 5x digital zoom
• 1/2.3 inch image sensor
• 2.7-inch color LCD
• 32 MB internal flash memory (approximately
20 MB is available for photo and video capture)
• Supports SD cards up to 4 GB, and SDHC cards up
to 32 GB
• Simplified user menus
• USB connector to transfer photos and videos to
your PC
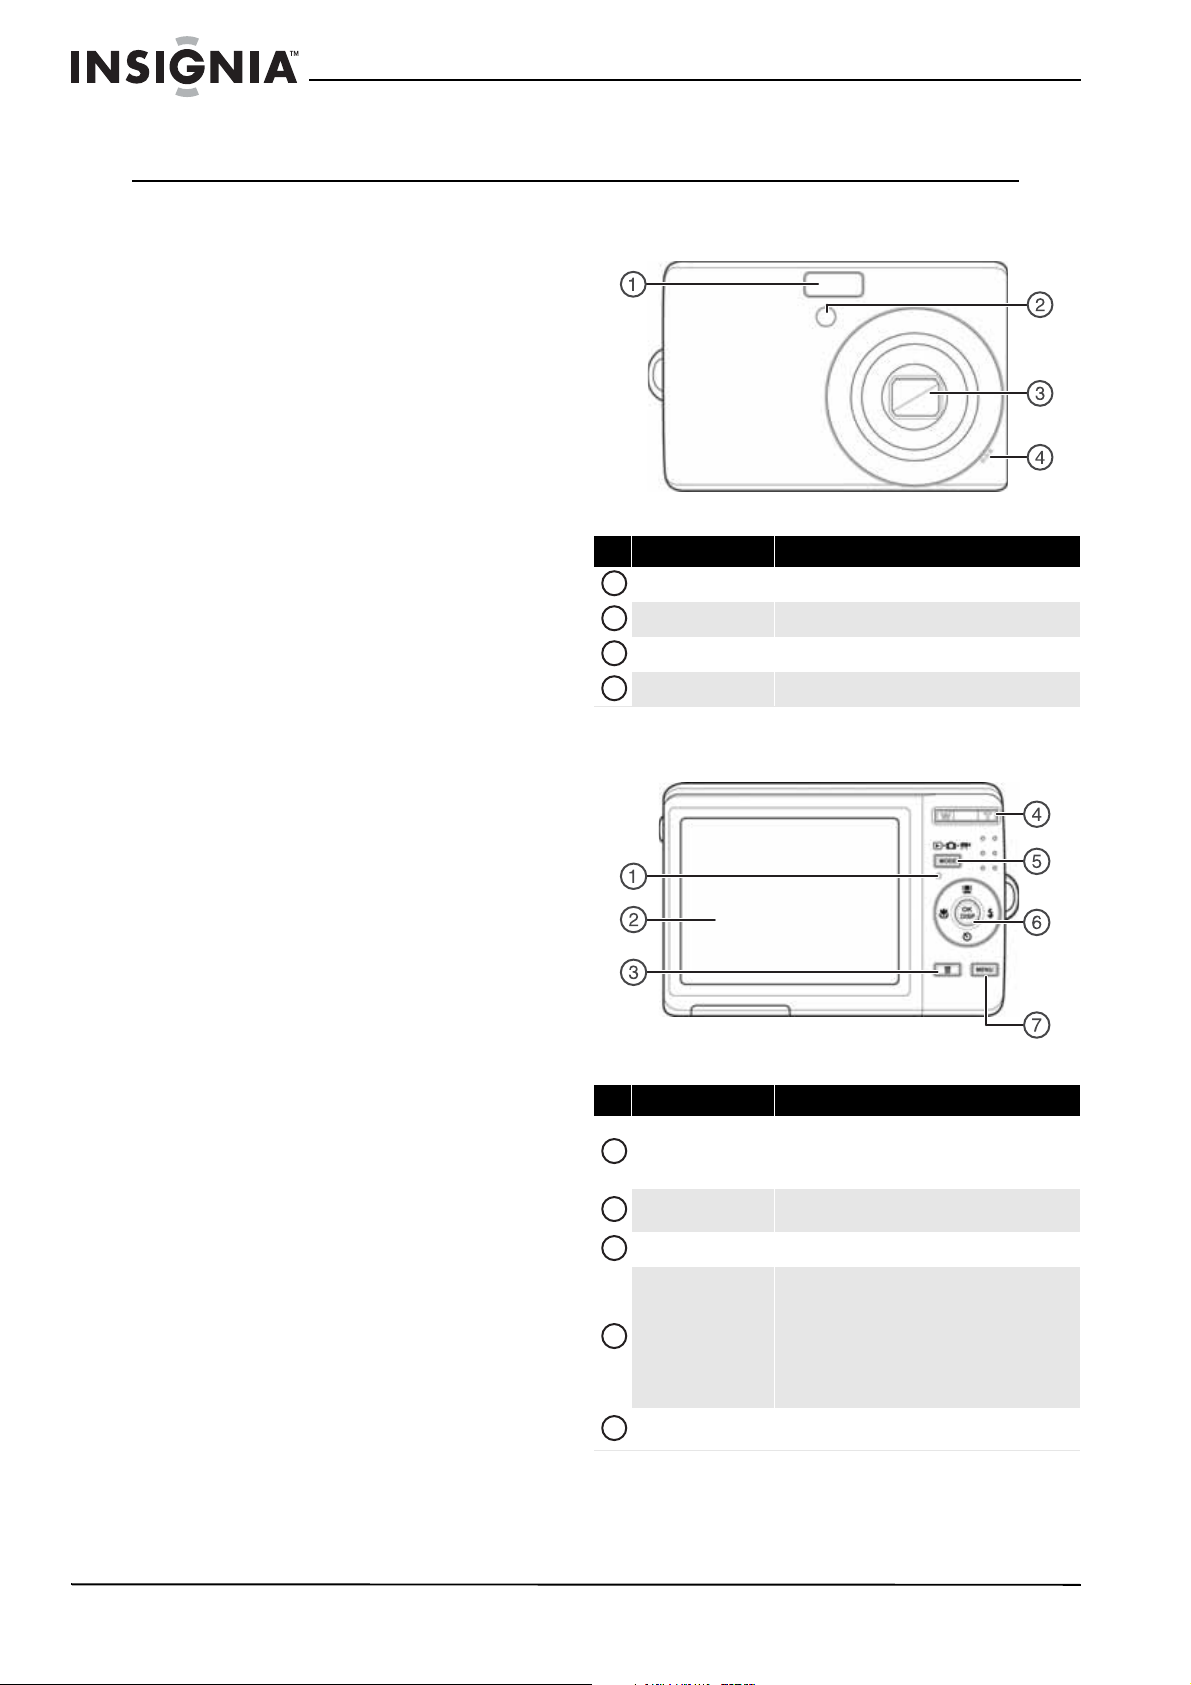
Front
# Item Description
1
Flash Lets you take photos in low-light conditions.
2
Self-timer LED Flashes to indicate that the self-timer is activated.
3
Zoom lens Used for photo/video capture.
4
Microphone Records audio during video capture.
Back
System requirements
For Windows:
• Operating system: Windows XP, Windows Vista,
Windows 7
• Processor: Pentium II 450 MHz or above
• Memory: 256 MB or above
• Hard drive space: 200 MB or above
• 16-bit color display monitor
• USB connector and CD drive
For Macintosh
• Operating system: Mac OS 10.x or higher
•Power Mac G3 or later
• Memory: 64 MB or above
• Hard drive space: 110 MB or above
• 16-bit color display monitor
• USB connector and CD-ROM drive
# Item Description
1
Operation lamp
2
LCD
3
Delete button Press to delete a photo or video.
4
Zoom button
5
MODE button
Lights green when the camera is on.
Flashes when your camera is processing photos or
capturing video.
Use to compose your photos and to view the various
menus.
Press T to zoom in on a subject for telephoto
photos/video, or press W to zoom out for wide-angle
photos/video.
In Photo Playback mode, press T to zoom in on a
photo, or press W to zoom out on a photo.
In Video Playback mode, press T to increase the
volume, or press W to decrease the volume.
Press to switch between Record mode, Photo mode,
and Playback mode.
2
www.insigniaproducts.com
Page 7
10 Megapixel Camera
# Item Description
The Macro, Face Tracking, Self-Timer, and Flash
4-way navigation
6
button
7
MENU button Press to open or close the on-screen menu.
buttons are also used to navigate through the
on-screen menus.
See “Navigating menus” on page 4.
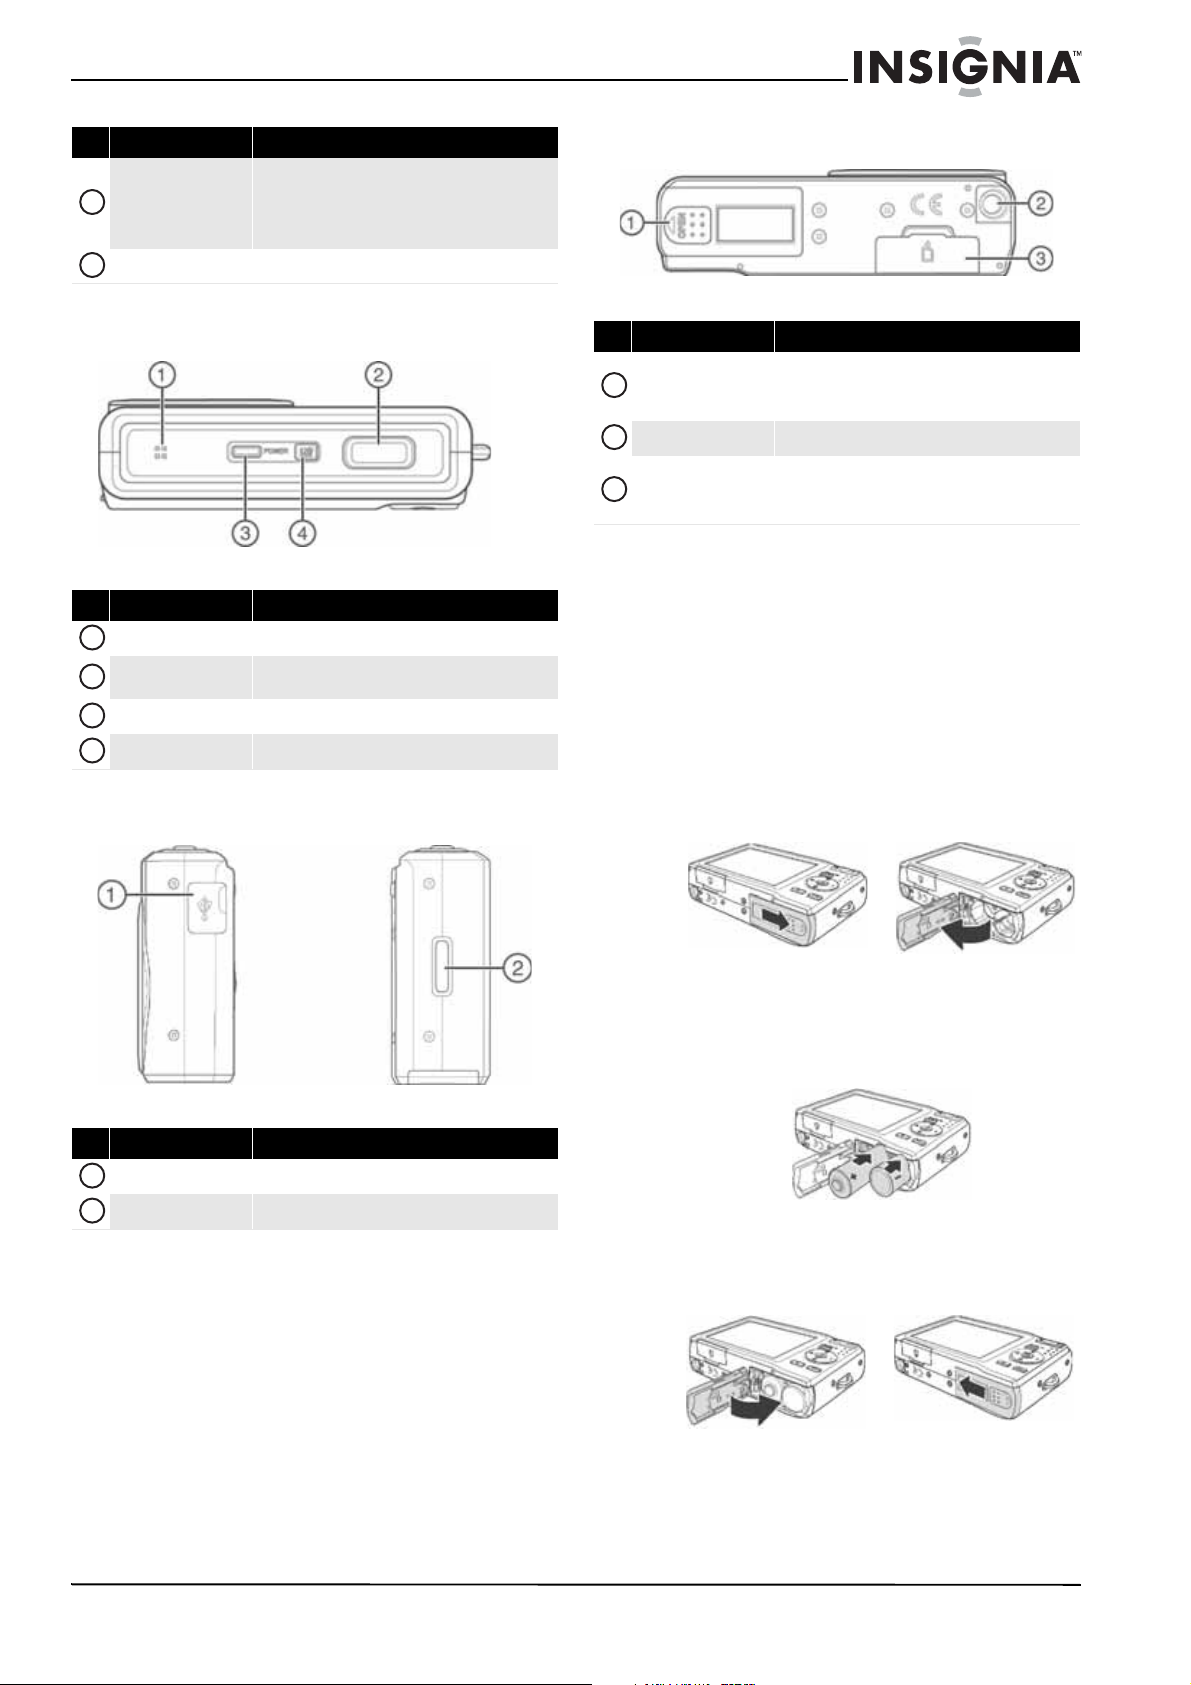
To p
# Item Description
1
Speaker Lets you hear audio recorded during video capture.
2
Shutter button
3
POWER button Press to turn your camera on or off.
4
LCD backlight button Press to increase the LCD brightness for 10 seconds.
Press to take a photo or to start or stop a video
recor ding.
Right and left
Bottom
# Item Description
1
Battery compartment
2
Tri pod soc ket Use to mount the camera to a tripod.
SD/SCHC card
3
compartment
Insert two AA batteries into this compartment. For
more information, see “Installing the batteries” on
page 3.
Insert an SD or SDHC memory card (not included) into
this compartment. For more information, see
“Installing a memory card” on page 4.
Setting up your camera
Installing the batteries
Make sure that you read and follow the battery
cautions in “Battery information” on page 1.
To install the batteries:
1 Make sure your camera is turned off.
2 Slide the cover in the direction of the arrow,
then lift the cover away from the battery
compartment.
# Item Description
1
USB connector Lets you connect your camera to a computer.
2
Strap ring Attach the wrist strap (included) to this ring.
3 Insert two AA batteries (included) into the
battery compartment. Make sure that the +
and – symbols on the batteries align with the +
and – symbols in the battery compartment.
4 Close the battery compartment cover, then slide
the cover in the direction of the arrow to lock it
in place.
www.insigniaproducts.com
3
Page 8
NS-DSC1110A 10 Megapixel Camera
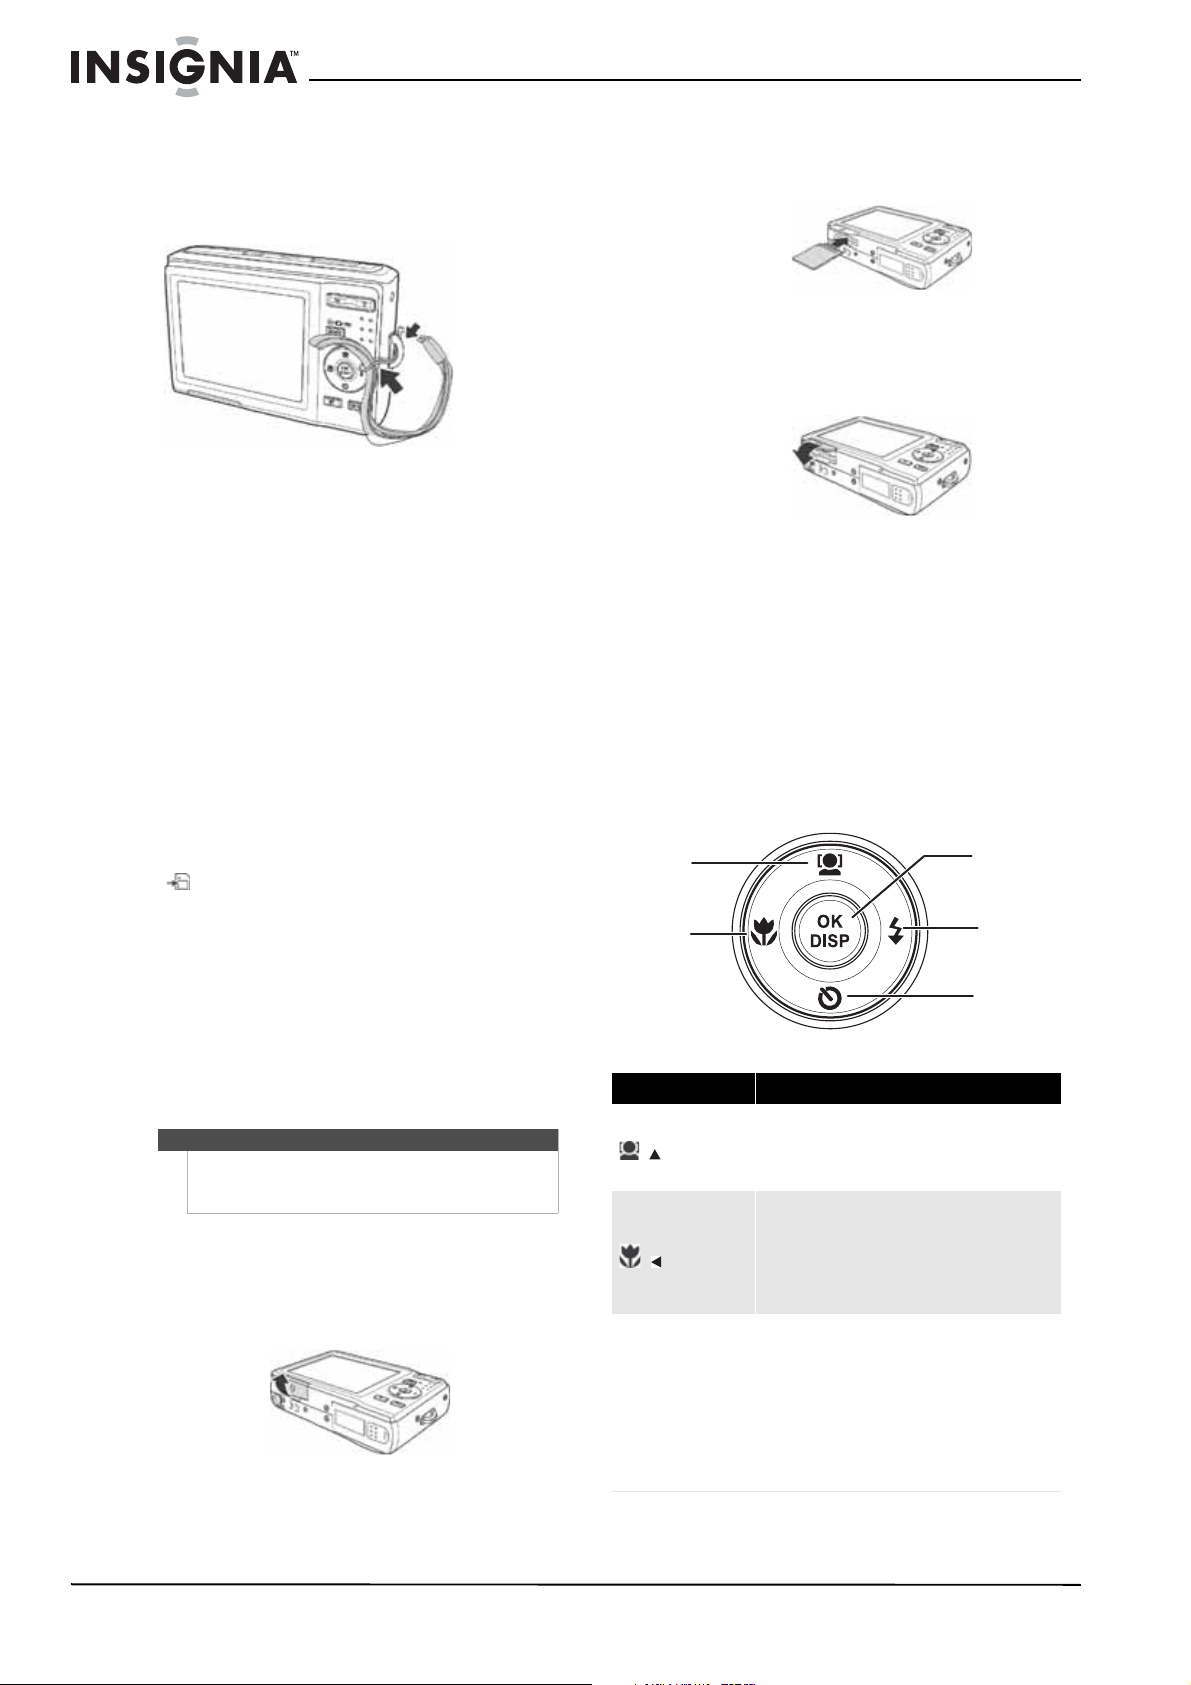
Attaching the wrist strap
To attach the wrist strap:
1 Insert the short loop on the strap through the
strap ring.
2 Thread the large loop through the short loop,
then pull tight.
Understanding camera memory and file names
Internal memory
Your camera is equipped with 32 MB of internal
memory. Approximately 20 MB of the internal
memory is available for photo and video storage. If
no memory card is inserted in the memory card
compartment, all photos and videos captured are
automatically stored in the internal memory.
External memory
Your camera supports SD cards up to 4 GB and
SDHC cards up to 32 GB. If there is a memory card
inserted in the card slot, your camera automatically
saves all photos and videos in the memory card.
The icon indicates your camera is using the
memory card.
File names
File names begin with “DSCI” and are followed by a
four-digit number that increases in sequence. File
numbering starts from 0001 when a new folder is
created.
If the highest folder number is 999 and the highest
file number exceeds 9999, your camera will display
the warning message “Folder cannot be created.”
When this happens, insert in a new memory card.
Caution
Do n ot chan ge the folder and fil e name s in you r camer a’s intern al
memory or the memory card using your PC. Your camera may be
unable to play back the files.
Installing a memory card
To install a memory card:
1 Open the memory card compartment on the
bottom of your camera.
2 Insert the SD or SDHC memory card into the
card slot with the metallic part facing the back
of the camera.
3 Push the SD or SDHC memory card into the slot
until it clicks into place.
4 Close the compartment.
To remove the SD/SDHC card:
1 Open the memory card compartment.
2 Gently push the card until it pops out.
3 Carefully pull out the card, then close the
compartment.
Navigating menus
The 4-way navigation control and the OK/DISP
button let you access the various menus available
from the on-screen display (OSD). You can
configure a wide range of settings to ensure
optimal results from your photos and videos.
Fac e tr ack ing /Up
Macro/Left
Item Description
• In menu mode, press to navigate up through
/
/
OK/DISP
menu and submenu selections.
• In video Playback mode, press to start/pause
video playback.
• In Playback mode, press to view the previous
image or video clip. Press and hold down to
scroll rapidly through images and video clips.
• In video Playback mode, press to rewind
video playback.
• In menu mode, press to exit a submenu.
• In menu mode, press to confirm selections.
• In photo Playback mode, press to display or
hide detailed information about the photo.
• In slideshow mode, press to exit.
• In thumbnail mode, press to show a selected
image or video clip full-screen.
• In video Playback mode, press to show or
hide the volume bar, time bar, and
navigation control icon.
OK/DISP
Flash/R ight
Self-Timer/Down
4
www.insigniaproducts.com
Page 9
10 Megapixel Camera
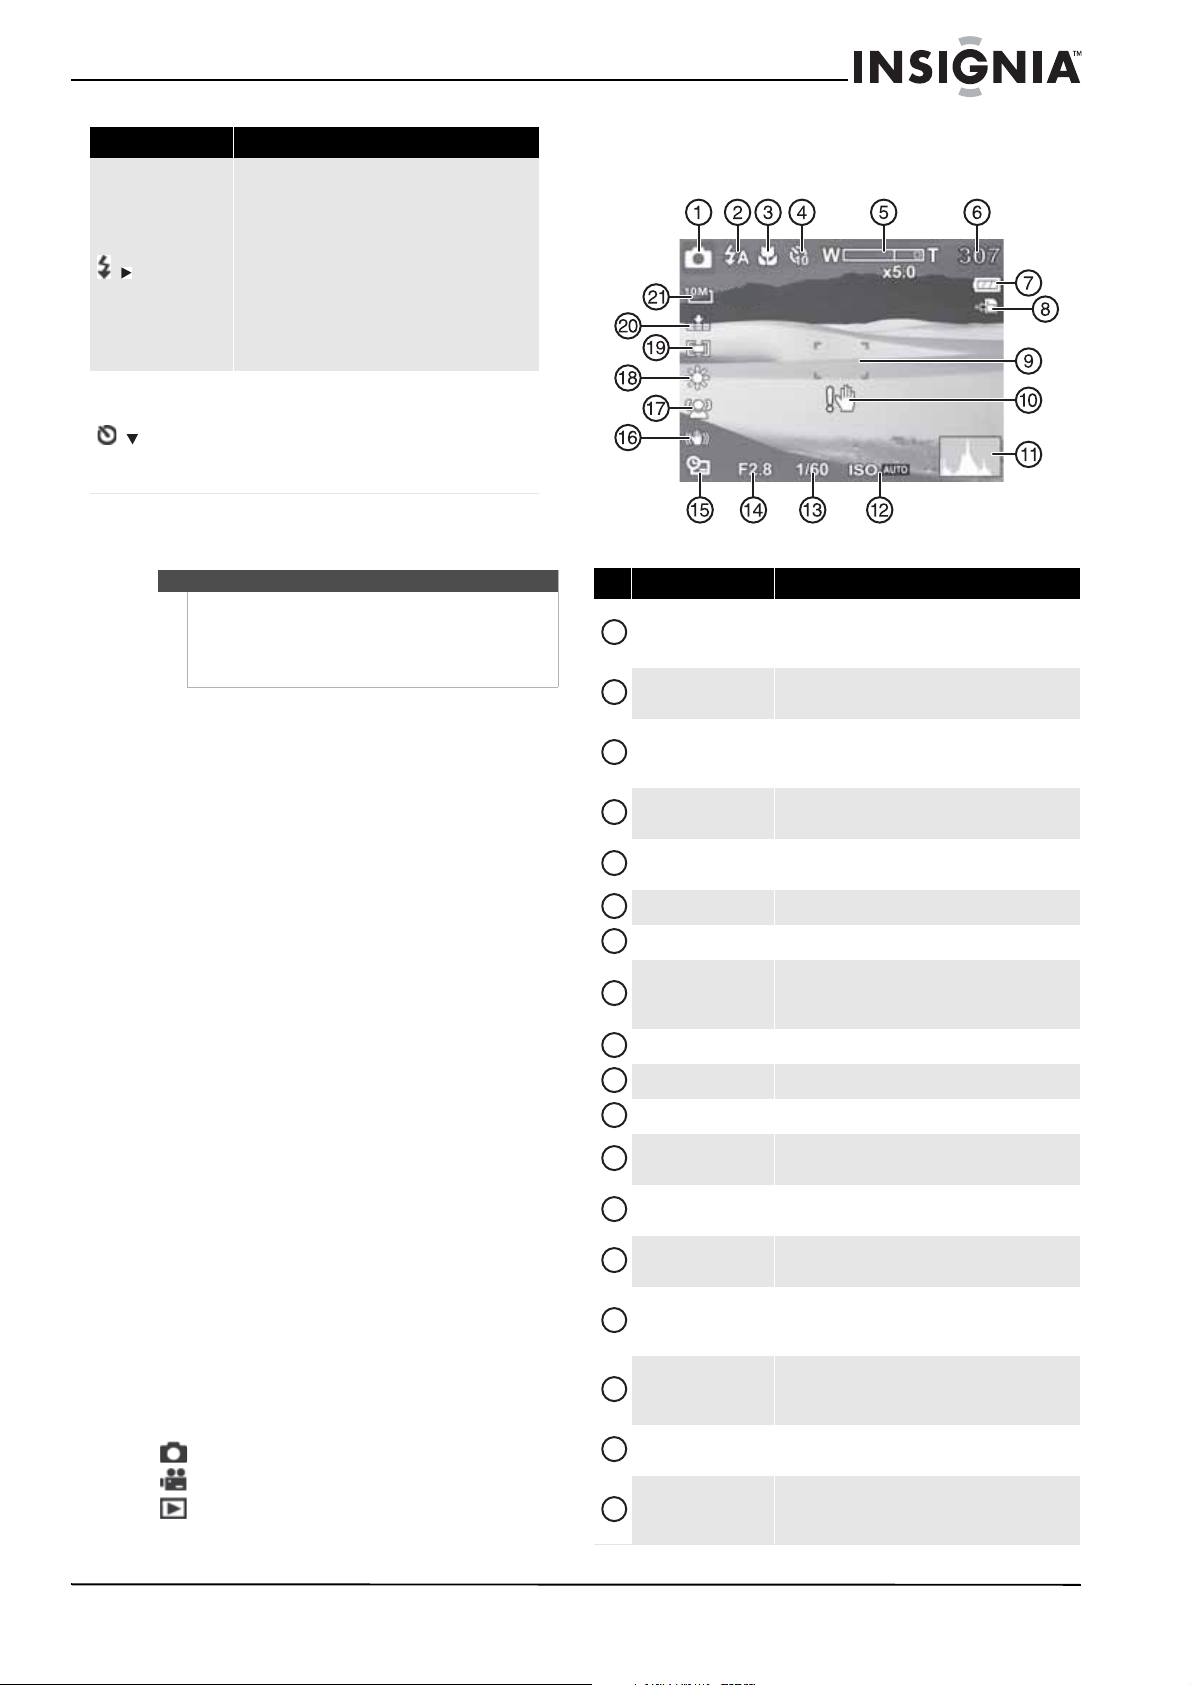
Item Description
• In Photo mode, press to toggle the flash
mode (Auto, Red-eye Reduction, For ced
On, Slow Sync, and Forc ed Of f).Flash
modes are only available for photos.
• In Playback mode, press to view the next
/
/
image or video clip. Press and hold down to
scroll rapidly through images and video clips.
• In video Playback mode, press to
fast-forward video playback.
• In menu mode, press to e nter t he submenu
or to navigate through the menu selections.
• In Photo mode, press to turn the self-timer
on or off.
• In video Playback mode, press to stop video
playback.
• In menu mode, press to navigate down
through menu and submenu selections.
Initial settings
Note
• If the batteries are removed for longer than 48
hours, the date and time must be reset.
• If you reset your camera to the default settings,
you will have to select the menu language and
set the date and time again.
When you turn on your camera for the first time,
your camera will be in Simple Mode. Simple Mode
hides advanced settings and makes your camera
easier to operate.
Your camera’s default settings are:
• Quality: Fine
• Resolution: High (10 megapixels)
• ISO: Auto
• Color Balance: Auto.
• Stabilizer: Off. Image stabilization is ideal for
reducing blurred images that may be caused by
shaky hands or low-light conditions. Turn off
Stabilization when using a tripod.
• Self-timer: Off.
• Focus Light: On.
• Metering Function: Multi.
• Burst Mode: Off.
• Beep: On. When beeps are turned on, an alert is
heard when key functions are accessed.
• Quick View: On.
• Date Stamp: Off.
• Power Save: On.
• Battery Type: Alkaline.
• Help Text: On. A brief description of what the
advanced settings do is provided by viewing the
help text at the bottom of the screen. To view the
help text, highlight any menu option.
• Simple Mode: On. Turn off Simple Mode to access
advanced settings.
Understanding camera modes
Your camera has three modes: Photo, Video, and
Playback.
—Photo mode is for capturing still images.
—Video mode is for capturing video.
—Playback mode is for playing captured
images and videos.
Understanding the LCD
Photo mode
# Item Description
1
Mode indicator
2
Flash
3
Macro
4
Self-timer
5
Zoom indicator
6
Shots remaining Shows the number of remaining shots.
7
Battery Shows the battery level.
8
Storage media
9
Focus area Frames the area to be captured.
10
Shake warning Appears when the camera is shaking.
11
Histogram Shows the light level for the current image.
12
ISO
13
Shutter speed
14
Aperture value
15
Date stamp
16
Stabilizer
17
Face track ing
18
Color Balance
A camera icon appears when your camera is in Photo
mode. For more information, see “Understanding
camera modes” on page 5.
Shows the flash setting. For more information, see
“Using the flash” on page 9.
Appears when Macro mode is turned on. For more
information, see “Using the macro feature” on
page 10.
Appears when the self-timer is turned on. For more
information, see “Using the self-timer” on page 10.
Shows the zoom setting. For more information, see
“Using the zoom” on page 9.
A camera icon appears when no memory card is
inserted. A memory card icon appears when a memory
card is inserted.
Shows the ISO setting. For more information, see
“Setting ISO” on page 14.
Shows the shutter speed automatically selected by
your camera .
Shows the aperture value automatically selec ted by
your camera .
Appears when the date stamp feature is turned on. For
more information, see “Imprinting the date and time
on photos” on page 19.
Appears when the stabilizer feature is turned on. For
more information, see “Turning the stabilizer function
on or off” on page 15.
Appears when face tracking is turned on. For more
information, see “Using face tracking” on page 10.
Shows the color balance setting. For more
information, see “Setting the color balance” on
page 14.
www.insigniaproducts.com
5
Page 10

NS-DSC1110A 10 Megapixel Camera
# Item Description
19
20
21
Metering
Quality
Resolution
Shows the metering setting. For more information, see
“Setting the metering function” on page 16.
Shows the quality setting. For more information, see
“Setting the quality” on page 12.
Shows the image resolution setting. For more
information, see “Setting the resolution” on page 13.
Video mode
# Item Description
1
Mode indicator
2
Macro
3
Zoom indi cator
4
Video remaining
5
Battery Shows the battery level.
A movie icon appears when your camera is in Video
mode. For more information, see “Understanding
camera modes” on page 5.
Appears when Macro mode is turned on. For more
information, see “Using the macro feature” on
page 10.
Shows the zoom setting. For more information, see
“Using the zoom” on page 9.
Shows the length of video that can be captured with
the available camera memory (or memory card
memory, if inserted).
Playback mode (Photo)
# Item Description
1
Mode indicator
2
Current file/Total files
3
Battery Shows the battery level.
4
Storage media Appears when a memory card is inserted.
5
Histogram Shows the light level when the photo was taken.
6
Recording information Shows the settings used when the photo was taken.
A playback icon appears when your camera is in
Playback mode. For more information, see
“Understanding camera modes” on page 5.
Shows the current file number and the total number of
files.
6
Storage media
7
Focus area Frames the area to be recorded.
8
Color Balance
9
Metering
10
Resolution
A camera icon appears when no memory card is
inserted. A memory card icon appears when a memory
card is inserted.
Shows the color ba lance setting. For more
information, see “Setting the color balance” on
page 14.
Shows the metering setting. For more information, see
“Setting the metering function” on page 16.
Shows the image resolution setting. For more
information, see “Setting the resolution” on page 13.
6
www.insigniaproducts.com
Page 11

10 Megapixel Camera
Playback mode (Video)
Changing the LCD configuration
You can change the type of information that is
displayed on the LCD.
Notes
• If the Face tracking, Flash, Self-timer, Macro, and
Stabilizer features are turned on in Photo mode,
or the Macro feature is turned on in Video mode,
the icons are displayed even when the OSD is
turned off.
• You cannot change the LCD configuration when
recording or playing videos.
To change the LCD configuration:
• Press OK/DISP one or more times. Each time you
press this button, the information displayed
changes.
Photo mode
OSD on
OSD on full
# Item Description
1
Mode indicator
2
Video clip Shows that the current file is a video.
3
Current file/ Total files
4
Battery Shows the battery level.
5
Storage media
6
Recording information Shows settings used when the video was recorded.
7
Button indicator Shows the buttons to press to control video playback.
8
Volu me Shows the current volume level.
9
Played time Shows the amount of time the video has been playing.
10
Playback status
A playback icon appears when your camera is in
Playback mode. For more information, see
“Understanding camera modes” on page 5.
Shows the current file number and the total number of
files.
A camera icon appears when no memory card is
inserted. A memory card icon appears when a memory
card is inserted.
Shows the current playback status, such as playing or
paused.
Video mode
OSD on
OSD off
OSD off
www.insigniaproducts.com
7
Page 12

NS-DSC1110A 10 Megapixel Camera
Playback mode
OSD on
OSD off
Full OSD on
Using your camera
Turning your camera on and off
To turn on your camera:
• Press and hold POWER until the Insignia startup
image appears. The zoom lens extends, and if
sounds are turned on, a startup sound plays.
To turn off your camera:
• Press POWER.
Turning on your camera for the first time
When you turn on your camera for the first time,
you need to choose a menu language and set the
date and time.
To choose a menu language and set the date and
time:
1 Turn on your camera. The Select Language
screen opens.
2 Press / or /
press OK/DISP. The Select Time and Date screen
opens.
3 Press / or / to set the hour, then press
/ to move to the minute field.
Tip
You can press and hold a navigation button to
change the values continuously.
4 Repeat Step 3 to select AM or PM and to enter
the month, day, and year.
Note
If the batteries are removed for longer than 48 hours,
the date and time must be reset.
to select a language, then
Changing camera modes
To change camera modes:
• Press MODE repeatedly to select a mode. The icon
for the current mode appears in the upper-left of
the LCD.
—Photo mode icon.
—Video mode icon.
—Playback mode icon.
Turning Simple mode on or off
When you turn on your camera the first time, it will
be in Simple mode. Simple mode hides advanced
user settings and less frequently used menu
options, while still letting you take high quality
images and video.
To turn Simple mode on or off:
1 Turn on your camera.
2 Press MODE repeatedly to select Photo
mode or Video mode. The mode icon
appears on the upper-left of the LCD.
3 Press MENU. The on-screen menu opens.
4 Press / or / to highlight . The Setup
menu opens.
8
www.insigniaproducts.com
Page 13

10 Megapixel Camera
5 Press / or / to highlight Simple Mode,
then press OK/DISP to open the submenu.
6 Press / or /
press OK/DISP to save the setting and exit to
the previous menu.
7 Press MENU again to exit the on-screen menu
and begin taking photos or video.
Taking photos
To take pho t o s:
1 Turn on your camera.
2 Press MODE one or more times until the Photo
mode icon appears in the upper-left of the
LCD.
to highlight Off or On, then
4 Press the shutter button down halfway. Your
camera automatically adjusts the focus and
expo sure. W hen your camera is ready to tak e the
photo, the focus bracket turns green, and the
aperture value, shutter speed, and ISO setting
are displayed.
Note
If the shake warning icon appears on the LCD,
hold the camera steady, with your arms at your sides,
or use a tripod to stabilize the camera in order to
prevent blurred images.
5 Fully press the shutter button to capture the
image.
Using the zoom
Your camera features 3x optical zoom and 5x digital
zoom.
3 Frame the image using the focus bracket on the
LCD.
To use the zoom:
• Press the zoom buttons to zoom in (T ) or zoom
out (W).
The zoom indicator appears on the LCD. The section
of the zoom indicator on the right side indicates
that digital zoom is being used.
Using the flash
When taking pictures in difficult lighting
conditions, use the flash to get correct exposure.
This function cannot be activated for recording
video.
To activate the flash:
• Press on the navigation control repeatedly until
the flash mode you want is displayed on the LCD.
Flash icon
www.insigniaproducts.com
9
Page 14

NS-DSC1110A 10 Megapixel Camera
Your camera is equipped with five flash modes:
Auto flash—Flash fires automatically when shooting
conditions require extra lighting.
Red-eye reduction—Flash fires twice--once to let the
subject’s eyes adjust to the flash, then again to take the
actual image.
Force on—Flash fires every time you take a photo,
regardless of lighting conditions.
Slow sync (fill flash)—Flash fires with a slow shutter
speed. Ideal for situations where additional lighting is
SL
needed for subjects in the foreground.
Flash off—The flash never fires, regardless of lighting
conditions.
Notes
• Flash charging time may increase when the
battery is low.
• Hold the camera steady, or mount it on a tripod,
to reduce blurring when using the slow sync
flash mode.
Using the self-timer
Self-timer lets you take photos after a 10-second
delay. This function is available only when
capturing still images. When the self-timer is turned
on, the icon is displayed on the LCD.
The self-timer setting is automatically set to Off
when you turn your camera on or off.
To turn on the self-timer:
1 Press on the navigation control to turn on
the self-timer. When the self-timer is turned on,
the shutter release is delayed for 10 seconds.
Self-timer icon
Using the macro feature
Your camera is equipped with a macro feature that
lets you focus on very close subjects.
To use the macro feature:
1 Press on the navigation control. The macro
icon appears on the LCD.
Macro icon
2 Aim your camera at the subject you want to
capture.
3 Half-press the shutter button to focus.
4 Fully press the shutter button to capture the
image.
Using face tracking
The face tracking mode detects faces and sets the
camera to focus on detected faces. This function
can detect several faces at the same time. However,
the camera sets the focus on the person closest to
the center of the LCD screen.
To use face tracking:
1 Press on the navigation control. The face
tracking icon appears on the LCD.
10
2 Press the shutter button to take the photo. Your
camera will take the photo 10 seconds later.
Notes
When using the self-timer, make sure that you use a
tripod or place your camera on a level, stable surface.
www.insigniaproducts.com
Facing tracking
icon
White
frame
2 Aim your camera at the subject you want to
capture. White frames appear around faces that
are detected.
3 Half-press the shutter button to focus. The white
frame closest to the center of the screen turns
green.
4 Fully press the shutter button to capture the
image.
Note
When capturing an image with several faces, face
tracking may take more time to detect faces than it
does when the image has only one face.
Page 15

10 Megapixel Camera
Recording video
You can record videos with your camera. The
available recording time depends on the available
capacity of the internal memory or the memory
card in use. Videos can be recorded until the
maximum memory capacity has been reached.
About 15 minutes of video can be recorded for
every gigabyte of memory space.
To record video:
1 Press MODE to switch to Video mode.
2 Focus your camera on the subject that you want
to record.
3 Press the shutter button to start recording.
Viewing photos and videos
Playback mode lets you view the photos and videos
you have captured with your camera. Photos are
displayed on the LCD one by one. If the file is a
video, the first frame of the video is displayed.
Viewing photos
To view photos:
1 Press MODE to switch to Playback mode.
The LCD displays an image. For information
about the screen icons, see “Playback mode
(Photo)” on page 6.
2 Press / or / to view the previous or next
photo.
Viewing videos
To view videos:
1 Press MODE to switch to Playback mode.
Video playback icon
4 Press the zoom button (T) to zoom in or the
zoom (W ) button to zoom out.
5 Press / to pause recording. Press again to
continue recording.
6 Press the shutter button to stop recording.
Note
• When the maximum capacity for a single video
has been reached, press the shutter button
again to continue recording.
• Your camera will automatically stop recording
when the memory capacity is full.
• When recording videos, the audio recording
mutes during zoom operation.
2 Press / to play the video.
3 During playback:
• Press / or / to rewind or fast-forward
the video at 2× speed.
• Press the zoom (T) button to increase the
volume or the zoom (W) button decrease the
volume.
• Press / to pause or resume playback.
• To forward or rewind the video frame by
frame, press / to pause playback, then
press / or /.
• Press /
the first frame of the video.
to stop playback. The LCD displays
www.insigniaproducts.com
11
Page 16

NS-DSC1110A 10 Megapixel Camera
Zooming photos in Playback mode
The zoom view function works with photos only.
To zoom photos in Playback mode:
1 Use standard procedures to select the photo
you want to view, then press the zoom button
(T) to zoom in or the zoom (W) button to zoom
out. You can zoom in on an image up to 5×.
2 Press /, /, /, or /
different sections of the zoomed image.
3 Press MENU to close the zoom view.
to view
Using the thumbnail view
The thumbnail view lets you view saved photos and
videos in 3 × 3 thumbnails.
To use the thumbnail view:
1 In Playback mode, press Zoom W to enter the
thumbnail view.
2 To view an image or video in full screen, press
/, /, /, or /
video, then press OK/DISP or Zoom T.
to select a photo or
Erasing photos and videos
There are two ways to delete an image or video:
• Using the delete button
•Using the Erase Pictures option in the Playback
menu. For more information, see “Erasing photos
and videos” on page 17. The Erase Pictures
option lets you erase single photos or videos or all
photos or videos.
3 Press the delete button. A confirmation
message appears on the LCD.
4 Press / or /
OK/DISP to delete. The next photo or video is
displayed.
5 Repeat Step 2 through Step 4 to delete
additional photos or videos.
6 To close the delete function, press / or /
to select Cancel, then press OK/DISP, or press
the delete button.
Note
To erase all photos or videos, see “Erasing photos and
videos” on page 17.
to select Ye s , then press
Using the Record menu
Setting the quality
The Quality function lets you adjust the quality
settings of your photos before you capture them.
Quality determines the amount of compression
applied to your photos. More compression results
in a less detailed image. However, the higher the
quality, the greater the memory required for each
image captured.
To set the quality:
1 Press MODE to switch to Photo .
2 Press MENU to open the Record menu.
Erasing photos or videos using the delete button
To erase photos or videos using the delete
button:
1 Press MODE to switch to Playback mode.
2 Press / or / to select the photo or video
you want to erase.
12
www.insigniaproducts.com
Page 17

10 Megapixel Camera
3 Press / or / to highlight Quality, press
OK/DISP to open the submenu.
4 Press / or /
to select the setting you
want, then press OK/DISP. You can select:
Super Fine
Fine
Normal
4x compression rate
8x compression rate
12x compression rate
Photo mode
Video mode
5 Press MENU again to close the menu.
Setting the resolution
The Resolution function is used to set the resolution
before you capture an image or a video clip.
Changing the resolution affects the number of
photos or videos that can be stored in your storage
media. The higher the resolution, the more memory
space is required. High resolution images are ideal
for printing and other applications.
High resolution video is ideal for playing back on
your own computer or for creating a DVD. Low
resolution images and video are ideal for e-mailing
and sharing online.
Note
Video resolution can only be changed when Simple
mode is set to Off.
To set the resolution:
1 Press MODE to switch to Photo or Video
mode.
2 Press MENU to open the Record menu.
4 Press / or /
to select the setting you
want, then press OK/DISP. You can select:
Photo mode (Simple mode on)
Icon Setting Image size
10M
5M
3M
High 3648 x 2736 (10 megapixels)
Medium 2592 x 1944 (5 megapixels)
Low 2048 x 1536 (3 megapixels)
Photo mode (Simple mode off)
Icon Setting Image size
10M
8M
5M
3M
16:9
10M 3648 x 2736 (10 megapixels)
8M 3264 x 2448 (8 megapixels)
5M 2592 x 1944 (5 megapixels)
3M 2048 x 1536 (3 megapixels)
Wide 3648 x 2048
3 Press / or /
to highlight Resolution,
then press OK/DISP to open the submenu.
Video mode
Icon Setting Image size
www.insigniaproducts.com
Wide 16:9 (720 x 400)
VGA VGA (640 x 480)
QVGA QVGA (320 x 240)
13
Page 18

NS-DSC1110A 10 Megapixel Camera
A
5 Press MENU again to close the menu.
Setting ISO
The ISO function lets you adjust the ISO sensitivity
for recording still images, based on the light levels
of your surroundings.
• Use a higher ISO setting in dim conditions and a
lower ISO setting in brighter conditions.
• As you move through the selections, the preview
on the LCD monitor changes accordingly.
To set IS O :
1 Press MODE to switch to Photo mode.
2 Press MENU to open the Record menu.
Setting the color balance
The color balance function controls the white
balance in capturing still images or videos.
As you move through the selections, you can see
the preview on the LCD accordingly.
Note
Color balance can only be adjusted when Simple
mode is set to Off.
To set the color balance:
1 Press MODE to switch to Photo or Video
mode.
2 Press MENU to open the Record menu.
3 Press / or /
to highlight ISO, then press
OK/DISP to open the submenu.
4 Press / or /
to select the setting you
want, then press OK/DISP. You can select:
• Simple mode off—Auto, 1600, 800, 400, 200,
100, or 50
• Simple mode on—Auto, High, Medium, or
Low
5 Press MENU again to close the menu.
Note
• If the stabilizer function is turned on, ISO is
automatically set to Auto and cannot be
adjusted. To adjust ISO, turn off the stabilizer
function first.
• The higher the ISO setting, the grainier the
photo will be. This is normal.
3 Press / or /
to highlight Color Balance,
then press OK/DISP to open the submenu.
4 Press / or /
to select the setting you
want, then press OK/DISP. You can select:
Icon Item Description
Auto
uto
Sunny Ideal for bright, sunny conditions.
Cloudy Ideal for cloudy conditions.
Tun gst en
Fluorescent
The camera automatically adjusts the
white balance.
Ideal for indoor photos with tungsten
or halogen lighting without a flash.
Ideal for indoor photos with
fluorescent lighting.
14
5 Press MENU again to close the menu.
www.insigniaproducts.com
Page 19

10 Megapixel Camera
Turning the stabilizer function on or off
The stabilizer function helps prevent blurred
photos. This function is only available for capturing
photos.
If the stabilizer function is turned on, the stabilizer
icon appears on the LCD, and the ISO setting is
automatically set to Auto.
To turn the stabilizer feature on or off:
1 Press MODE to switch to Photo mode.
2 Press MENU to open the Record menu.
3 Press / or /
press OK/DISP to open the submenu.
to highlight Stabilizer, then
Turning the focus light on or off
The focus light is only available for recording still
photos. When the focus light is turned on and the
lighting is dim, the camera emits amber light until
the focus is locked.
Note
The focus light setting can only be adjusted when
Simple mode is set to Off.
To turn the focus light on or off:
1 Press MODE to switch to Photo mode.
2 Press MENU to open the Record menu.
3 Press / or /
then press OK/DISP to open the submenu.
to highlight Focus Light,
4 Press / or /
press OK/DISP.
When the stabilizer function is turned on, an
icon will appear on the left side of the LCD.
Stabilizer
icon
5 Press MENU again to close the menu.
to select On or Off, then
4 Press / or /
press OK/DISP.
5 Press MENU again to close the menu.
to select On or Off, then
www.insigniaproducts.com
15
Page 20

NS-DSC1110A 10 Megapixel Camera
Setting the metering function
This feature controls exposure metering in
recording still images.
Note
The metering function can only be set when Simple
mode is set to Off.
To set the metering function:
1 Press MODE to switch to Photo mode.
2 Press MENU to open the Record menu.
3 Press / or /
press OK/DISP to open the submenu.
to highlight Metering, then
An icon that corresponds to the metering
mode selected will appear on the left side of
the LCD.
Metering
icon
5 Press MENU again to close the menu.
Turning burst mode on or off
Burst mode allows for continuous shooting of
photos. Burst mode is not available in Video mode.
Note
The burst mode setting can only be adjusted when
Simple mode is set to Off.
To turn burst mode on or off:
1 Press MODE to switch to Photo mode.
2 Press MENU to open the Record menu.
4 Press / or /
to select the setting you
want, then press OK/DISP. You can select:
• Center—Averages the light metered from the
entire frame, but gives greater weight to the
subject matter at the center.
• Multi—Divides the image into several zones
and measures the light in each zone for a
balanced exposure reading. Your camera
determines shooting conditions according to
the measured lighting pattern, and makes
exposure settings accordingly.
• Spot—Locks the spot metering frame to the
center of the LCD.
3 Press / or /
to highlight Burst Mode,
then press OK/DISP to open the submenu.
4 Press / or /
to select On or Off, then
press OK/DISP.
16
www.insigniaproducts.com
Page 21

10 Megapixel Camera
When Burst Mode is turned on, an icon appears
on the screen.
Burst mode icon
5 Press MENU again to close the menu.
6 To use burst mode, hold down the shutter
button. Photos are captured in rapid succession.
Note
Burst mode is automatically set to Off when you turn
your camera off.
Using the Playback menu
Erasing photos and videos
If a memory card is inserted, you can only erase
photos or videos in the memory card. To erase
photos and videos in your camera’s internal
memory, remove the memory card.
To erase photos and videos:
1 Press MODE to switch to Playback mode.
2 Press MENU to open the Playback menu.
4 Press / or /
want, then press OK/DISP. You can select:
• Single—Erases the currently selected photo
or video.
• All—Erases all photos and videos. If you select
this option, a message appears. Press / or
/ to highlight Yes, then press OK/DISP.
Caution
Selecting All will erase all files on the inserted card, not just
photos and videos. Make sure that you back up any files you want
to save before you select this option.
• Cancel—Cancels the erase function
If you select All, a screen will appear that
indicates there are no stored photos or videos.
5 Press MENU again to close the menu.
to select the option you
Copying photos and videos to a memory card
You can copy a single photo or video or all photos
and videos from internal memory to a memory
card. When you copy photos or videos to a memory
card, they are still stored in internal memory.
Note
Files cannot be copied from a memory card to your
camera’s internal memory.
3 Press / or /
then press / or OK/DISP to open the
submenu.
to highlight Erase Pictures,
To copy a single photo or video to a memory
card:
1 Press MODE to switch to Playback mode.
2 Press MENU to open the Playback menu.
www.insigniaproducts.com
17
Page 22

NS-DSC1110A 10 Megapixel Camera
3 Press / or / to highlight Copy to Card,
then press / or OK/DISP to open the
submenu.
4 Press / or /
press OK/DISP.
5 Press / or / to select the photo or video
you want to copy.
to highlight Single, then
3 Press / or /
then press / or OK/DISP to open the
submenu.
4 Press / or /
OK/DISP. A confirmation message appears.
to highlight Copy to Card,
to highlight All, then press
6 When the photo or video you want to copy
appears on the LCD, press / or /
highlight Yes , then press OK/DISP.
7 To copy additional photos or videos, repeat
Steps 5 and 6.
8 Press / or / to select
OK/DISP to exit.
9 Press MENU to close the menu.
To copy all photos or videos to a memory card:
1 Press MODE to switch to Playback mode.
2 Press MENU to open the Playback menu.
Cancel, then press
to
5 Press / or /
OK/DISP.
6 Press MENU to close the menu.
to highlight Ye s , then press
Viewing a slideshow of photos
Note
If a memory card is inserted, photos stored in your
camera’s internal memory will not be shown in the
slideshow. To view a slideshow of photos stored in
internal memory, remove the memory card.
To view a slideshow of photos:
1 Press MODE to switch to Playback mode.
2 Press MENU to open the Playback menu.
18
www.insigniaproducts.com
Page 23

10 Megapixel Camera
3 Press / or / to highlight Slideshow,
then press / or OK/DISP to open the
submenu.
4 Press / or /
OK/DISP. A slideshow of photos begins. When
all the photos have been viewed, the slideshow
function automatically turns off.
5 Press MENU to close the menu.
to highlight On, then press
Using the Setup menu
Turning alert sounds on or off
To turn alert sound on or off:
1 Turn on your camera, then press MODE to
switch to Photo or Video mode.
2 Press MENU. The on-screen menu opens.
3 Press / or / to select the (setup) tab.
The Setup menu opens.
Turning Quick View on or off
The Quick View function lets you view a captured
image right after shooting it. If Quick View is turned
on, your camera will display the captured image for
one second on the LCD. This function can only be
turned on or off when Simple mode is set to Off.
To turn Quick View on or off:
1 Turn on your camera, then press MODE to
switch to Photo mode.
2 Press MENU. The on-screen menu opens.
3 Press / or / to select the (setup) tab.
The Setup menu opens.
4 Press / or /
then press / or OK/DISP to open the
submenu.
to highlight Quick View,
4 Press / or /
press / or OK/DISP to open the submenu.
5 Press / or /
press OK/DISP.
6 Press MENU to close the menu.
to highlight Beep, then
to select On or Off, then
www.insigniaproducts.com
5 Press / or /
press OK/DISP.
6 Press MENU to close the menu.
to select On or Off, then
Imprinting the date and time on photos
The Date Stamp function lets you add the recording
date or date and time on your photos. When this
function is turned on, the icon is displayed on
the LCD.
The recording date and time are based on your
camera's Date & Time settings. After the date or
date and time are stamped on a photo, they cannot
be edited or deleted.
Limitations of the Date Stamp function are as
follows:
• Available for photos only.
• On vertically captured photos, the date stamp still
appears horizontally.
19
Page 24

NS-DSC1110A 10 Megapixel Camera
To imprint the date and time on photos:
1 Turn on your camera, then press MODE to
switch to Photo mode.
2 Press MENU. The on-screen menu opens.
3 Press / or / to select the (setup) tab.
The Setup menu opens.
4 Press / or /
to highlight Date Stamp,
then press / or OK/DISP to open the
submenu.
4 Press / or /
to highlight Date & Time,
then press / or OK/DISP to open the date
and time screen.
5 Press / or / to set the hour, then press
/ to move to the minutes field.
Tip
You can press and hold a navigation button to
change the values continuously.
6 Repeat Step 4 to select AM or PM and to enter
the year, month, and day.
Note
If the batteries are removed for longer than 48 hours,
the date and time must be reset.
5 Press / or /
to select Off, Date, or
Date & Time, then press OK/DISP.
6 Press MENU to close the menu.
Setting the date and time
Note
• The date and time can only be set when Simple
mode is set to Off.
To set the date and time:
1 Turn on your camera, then press MODE to
switch to Photo or Video mode.
2 Press MENU. The on-screen menu opens.
3 Press / or / to select the (setup) tab.
The Setup menu opens.
7 Press MENU to close the menu.
Turning Power Save on or off
Note
The power save function can only be accessed when
Simple mode is set to Off.
The Power Save function automatically turns off
your camera after being idle for a specified period
of time to save power.
This function is turned off when:
• Recording and playing a video
•Erasing or copying files
• Using the USB connector
Note
Connecting your camera to a computer using the
USB connector will not recharge your camera's
batteries or enhance battery life. Make sure that you
disconnect your camera from the computer and
power down your camera when you are finished
transferring files to your computer.
To turn Power Save on or off:
1 Turn on your camera, then press MODE to
switch to Photo or Video mode.
2 Press MENU. The on-screen menu opens.
20
www.insigniaproducts.com
Page 25

10 Megapixel Camera
3 Press / or / to select the (setup) tab.
The Setup menu opens.
4 Press / or /
then press / or OK/DISP to open the
submenu.
to highlight Power Save,
4 Press / or /
then press / or OK/DISP to open the
submenu.
5 Press / or /
you want, then press OK/DISP.
6 Press MENU to close the menu.
to highlight Language,
to highlight the language
Setting the battery type
The battery type function lets you set the type of
battery in use. Selecting the correct battery type
will let your camera more accurately reflect the
amount of power remaining in the inserted
batteries.
Note
The battery type function can only be accessed when
Simple mode is set to Off.
5 Press / or /
press OK/DISP.
6 Press MENU to close the menu.
to select On or Off, then
Using the Tools menu
Setting the menu language
To set the menu language:
1 Turn on your camera, then press MODE to
switch to Photo or Video mode.
2 Press MENU. The on-screen menu opens.
3 Press / or / to select the (tools) tab.
The Tools menu opens.
To set the battery type:
1 Turn on your camera, then press MODE to
switch to Photo or Video mode.
2 Press MENU. The on-screen menu opens.
3 Press / or / to select the (tools) tab.
The Tools menu opens.
4 Press / or /
then press / or OK/DISP to open the
submenu.
to highlight Battery Type,
www.insigniaproducts.com
21
Page 26

NS-DSC1110A 10 Megapixel Camera
5 Press / or / to highlight the battery type
you are using, then press OK/DISP.
6 Press MENU to close the menu.
Turning help text on or off
Turn on the help text function to display the help
information for a highlighted menu option.
Note
The help text function can only be accessed when
Simple mode is set to Off.
To turn help text on or off:
1 Turn on your camera, then press MODE to
switch to Photo or Video mode.
2 Press MENU. The on-screen menu opens.
3 Press / or / to select the (tools) tab.
The Tools menu opens.
3 Press / or / to select the (tools) tab.
The Tools menu opens.
4 Press / or /
to highlight Factory Reset.
4 Press / or /
press / or OK/DISP to open the submenu.
5 Press / or /
press OK/DISP.
6 Press MENU to close the menu.
to highlight Help Text, then
to highlight On or Off, then
Resetting settings to the factory defaults
The factory reset function resets your camera to its
factory default settings without deleting any
captured photos or videos.
Note
The factory reset function can only be accessed when
Simple mode is set to Off.
5 Press / or OK/DISP. A confirmation message
appears.
6 Press / or /
OK/DISP.
7 Press MENU to close the menu.
to highlight Ye s , then press
To reset settings to the factory defaults:
1 Turn on your camera, then press MODE to
switch to Photo or Video mode.
2 Press MENU. The on-screen menu opens.
22
www.insigniaproducts.com
Page 27

10 Megapixel Camera
Transferring files to a computer
You can transfer photos and video files to your
computer.
To transfer files to a computer:
1 Connect the camera to a camera using the
supplied USB cable.
2 Turn on the camera. The computer detects the
connection. Your camera's internal memory and
memory card display as removable drives in the
file manager. No image is displayed on the LCD.
Note
You can also use a card reader to access the memory
card contents of your camera.
Troubleshooting
Problem Cause and/or Action
Camera does not turn on The batteries may be exhausted. Charge or replace
Camera turns off automatically Press any button except POWER button to turn on
LCD turns blank Press any button except POWER to turn on the LCD.
Empty battery icon is displayed
on the LCD, then the camera
turns off.
LCD screen displays “No image” No images have been stored in the memory media
LCD screen displays “Not available for this file”
LCD screen displays “Memory
full”
LCD screen displays “Card
locked”
LCD screen displays “Format
error”
LCD screen displays “Copy
error”
The lens does not retract Do not force the le ns to go back. The type of the
the batteries.
the camera.
Batteries are exhausted. Replace or recharge the
batteries.
currently in use.
The image file format stored on a memory card
may not be supported.
Function is only available for specific file types.
File format is not supported.
Memory card is full. Replace the memory card with
a new one or delete unnecessary files.
The memory card is protected. Remove the card
and slide the write-protect switch to its unlocked
position.
The memory card is protected. Remove the card
and slide the write-protect switch to its unlocked
position.
The memory card is protected. Remove the card
and slide the write-protect switch to its unlocked
position.
The memory card is full. Replace card or delete
unnecessary files.
battery used may be incorrect or the battery power
level is too low. Change the battery or charge the
battery before using your camera.
www.insigniaproducts.com
23
Page 28

NS-DSC1110A 10 Megapixel Camera
Specifications Legal notices
Sensor 10 Megapixels, Type: 1/2.3
Lens Focal Length: F = 6.3 - 18.9 mm (optical zoom
range 35.5 - 106.5 mm), 3× optical zoom, 5×
digital zoom
LCD 2.7-inch color LCD
Focusing ran ge Normal mode: Wide/Tele: 31.5 in. ~ infinity
(80 cm ~ infinity)
Macro mode: Wide: 3.9 in. 39.4 in.
(10 cm ~ 100 cm), Tele: 23.6 in. ~39.4 in.
(60cm~100cm)
Aperture f/2.9 (W) ~ f/5.4 (T)
Shutter Type: Mechanical and Electronic Shutter
Speed: 1 - 1/2,000 sec.
File format Still Image: EXIF 2.2 compatible JPEG
Video: Motion JPEG
Resolution (still image) 10 megapixels (3648 × 2736)
8 megapixels (3264 × 2448)
5 megapixels (2592 × 1944)
3 megapixels (2048 × 1536)
Wide (3648 × 2048)
Sensitivity Simple mode off: Auto, 50, 100, 200, 400, 800,
1600
Simple mode on: Auto, Low (100), Medium (400),
High (800)
Color balan ce Auto, Sunny, Cloudy, Tungsten, Fluorescent
Exposure compensation -2EV to + 2EV (1/3EV steps), Auto exposure
Exposure control Metering: Multi fixed
Face Recognition AE & AF
Self-timer 10 sec., Off
Flash Auto, Red-eye Reduction, Forced On, Slow Sync,
Forced Of f
Storage Internal memory: 32 MB flash memory
Available capacity for photo/video storage:
approximately 20 MB External memory: SD (up to
4 GB), SDHC card (up to 32 GB)
OSD language English, French, Spanish, Simplified Chinese,
Japanese
Interface USB
Battery Type: 2 x AA Alkaline batteries
Operating temperature 32°F ~ 104°F (0ºC ~ 40ºC)
Operating humidity 0% - 90%
Microphone Built-in
Speaker Built-in
Dimensions 0.98 × 2.38 × 3.62 in. (25.03 × 60.5 × 92 mm)
Wei ght 4.41 oz. (125 g) without battery
FCC Part 15
This device complies with Part 15 of the FCC Rules. Operation of
this product is subject to the following two conditions: (1) this
device may not cause harmful interference, and (2) this device
must accept any interference received, including interference
that may cause undesired operation.
This equipment has been tested and found to comply within the
limits for a class B digital device, pursuant to Part 15 of the FCC
Rules. These limits are designed to provide reasonable
protection against harmful interference in a residential
installation. This equipment generates, uses, and can radiate
radio frequency energy and, if not installed and used in
accordance with the instructions, may cause harmful
interference to radio communications. However, there is no
guarantee that interference will not occur in a particular
installation. If this equipment does cause harmful interference to
radio or television reception, which can be determined by
turning the equipment off and on, the user is encouraged to try
to correct the interference by one or more of the following
measures:
• Reorient or relocate the receiving antenna.
• Increase the separation between the equipment and
receiver.
• Connect the equipment into an outlet on a circuit different
from that to which the receiver is connected.
• Consult the dealer or an experienced technician for help.
FCC warning
Changes or modifications not expressly approved by the party
responsible for compliance with the FCC Rules could void the
user’s authority to operate this equipment.
Canada ICES-003 statement
This Class B digital apparatus complies with Canadian ICES-003.
24
www.insigniaproducts.com
Page 29

10 Megapixel Camera
One-year limited warranty
Insignia Products (“Insignia”) warrants to you, the original
purchaser of this new product (“Product”), that the Product shall
be free of defects in the original manufacture of the material or
workmanship for a period of one (1) year from the date of your
purchase of the Product (“Warranty Period”). This Product must
be purchased from an authorized dealer of Insignia brand
products and packaged with this warranty statement. This
warranty does not cover refurbished Product. If you notify
Insignia during the Warranty Period of a defect covered by this
warranty that requires service, terms of this warranty apply.
How long does the coverage last?
The Warranty Period lasts for 1 year (365 days) from the date you
purchased the Product. The purchase date is printed on the
receipt you received with the Product.
What does this warranty cover?
During the Warranty Period, if the original manufacture of the
material or workmanship of the Product is determined to be
defective by an authorized Insignia repair center or store
personnel, Insignia will (at its sole option): (1) repair the Product
with new or rebuilt parts; or (2) replace the Product at no charge
with new or rebuilt comparable products or parts. Products and
parts replaced under this warranty become the property of
Insignia and are not returned to you. If service of Products or
parts are required after the Warranty Period expires, you must
pay all labor and parts charges. This warranty lasts as long as you
own your Insignia Product during the Warranty Period. Warranty
coverage terminates if you sell or otherwise transfer the Product.
How to obtain warranty service?
If you purchased the Product at a retail store location, take your
original receipt and the Product to the store you purchased it
from. Make sure that you place the Product in its original
packaging or packaging that provides the same amount of
protection as the original packaging. If you purchased the
Product from an online web site, mail your original receipt and
the Product to the address listed on the web site. Make sure that
you put the Product in its original packaging or packaging that
provides the same amount of protection as the original
packaging.
To obtain in-home warranty service for a television with a screen
30 inches or larger, call 1-888-BESTBUY. Call agents will diagnose
and correct the issue over the phone or will have an
Insignia-approved repair person dispatched to your home.
Should the Insignia-approved repair person not correct the issue
on the first call, an Insignia television (size and features to be
determined by Insignia) will be loaned to you until your TV is
repaired and returned, at no charge to you. This feature is only
available to Insignia television consumers residing in the United
States.
Where is the warranty valid?
This warranty is valid only to the original purchaser of the
product in the United States, Canada, and Mexico.
What does the warranty not cover?
This warranty does not cover:
• Customer instruction
•Installation
•Set up adjustments
•Cosmetic damage
• Damage due to acts of God, such as lightning strikes
•Accident
•Misuse
•Abuse
•Negligence
•Commercial use
• Modification of any part of the Product, including the
antenna
• Plasma display panel damaged by static (non-moving)
images applied for lengthy periods (burn-in).
This warranty also does not cover:
• Damage due to incorrect operation or maintenance
• Connection to an incorrect voltage supply
• Attempted repair by anyone other than a facility
authorized by Insignia to service the Product
• Products sold as is or with all faults
• Consumables, such as fuses or batteries
• Products where the factory applied serial number has been
altered or removed
REPAIR REPLACEMENT AS PROVIDED UNDER THIS WARRANTY IS
YOUR EXCLUSIVE REMEDY. INSIGNIA SHALL NOT BE LIABLE FOR
ANY INCIDENTAL OR CONSEQUENTIAL DAMAGES FOR THE
BREACH OF ANY EXPRESS OR IMPLIED WARRANTY ON THIS
PRODUCT, INCLUDING, BUT NOT LIMITED TO, LOST DATA, LOSS
OF USE OF YOUR PRODUCT, LOST BUSINESS OR LOST PROFITS.
INSIGNIA PRODUCTS MAKES NO OTHER EXPRESS WARRANTIES
WITH RESPECT TO THE PRODUCT, ALL EXPRESS AND IMPLIED
WARRANTIES FOR THE PRODUCT, INCLUDING, BUT NOT LIMITED
TO, ANY IMPLIED WARRANTIES OF AND CONDITIONS OF
MERCHANTABILITY AND FITNESS FOR A PARTICULAR PURPOSE,
ARE LIMITED IN DURATION TO THE WARRANTY PERIOD SET
FORTH ABOVE AND NO WARRANTIES, WHETHER EXPRESS OR
IMPLIED, WILL APPLY AFTER THE WARRANTY PERIOD. SOME
STATES, PROVINCES AND JURISDICTIONS DO NOT ALLOW
LIMITATIONS ON HOW LONG AN IMPLIED WARRANTY LASTS, SO
THE ABOVE LIMITATION MAY NOT APPLY TO YOU. THIS
WARRANTY GIVES YOU SPECIFIC LEGAL RIGHTS, AND YOU MAY
ALSO HAVE OTHER RIGHTS, WHICH VARY FROM STATE TO STATE
OR PROVINCE TO PROVINCE.
Contact Insignia:
For customer service please call 1-877-467-4289
www.insigniaproducts.com
Distributed by Best Buy Purchasing, LLC
7601 Penn Avenue South, Richfield, Minnesota, U.S.A.
55423-3645
© 2010 BBY Solutions, Inc.
All rights reserved. INSIGNIA is a trademark of BBY Solutions, Inc.
Registered in some countries. All other products and brand
names are trademarks of their respective owners.
www.insigniaproducts.com
25
Page 30

TM
www.insigniaproducts.com (877) 467-4289
Distributed by Best Buy Purchasing, LLC
7601 Penn Avenue South, Richfield, MN USA 55423-3645
© 2010 BBY Solutions, Inc.
All rights reserved. INSIGNIA is a trademark of BBY Solutions, Inc. Registered in some countries.
All other products and brand names are trademarks of their respective owners.
ENGLISH
10-0197
 Loading...