

Insignia NS-DSC10B - Digital Camera -, NS-DSC10A Compact User Manual

10 Megapixel Digital Camera
NS-DSC10A and NS-DSC10B
User Guide
NS-DSC10A-10B_09-0323_MAN_V2.book Page 0 Monday, April 27, 2009 8:42 AM

ii
www.insigniaproducts.com
Contents
Welcome . . . . . . . . . . . . . . . . . . . . . . . . . . . . . . . . . . . . . . . . . . . . . . . . . . . . . . . .1
Safety information . . . . . . . . . . . . . . . . . . . . . . . . . . . . . . . . . . . . . . . . . . . . . . .1
Features . . . . . . . . . . . . . . . . . . . . . . . . . . . . . . . . . . . . . . . . . . . . . . . . . . . . . . . . .1
Included . . . . . . . . . . . . . . . . . . . . . . . . . . . . . . . . . . . . . . . . . . . . . . . . . . . . . . . . . 1
Main features . . . . . . . . . . . . . . . . . . . . . . . . . . . . . . . . . . . . . . . . . . . . . . . . . . . . 1
Front . . . . . . . . . . . . . . . . . . . . . . . . . . . . . . . . . . . . . . . . . . . . . . . . . . . . . . . . . . . . 1
Back . . . . . . . . . . . . . . . . . . . . . . . . . . . . . . . . . . . . . . . . . . . . . . . . . . . . . . . . . . . . . 2
Top, bottom and side . . . . . . . . . . . . . . . . . . . . . . . . . . . . . . . . . . . . . . . . . . . . 2
LED and sound indicators . . . . . . . . . . . . . . . . . . . . . . . . . . . . . . . . . . . . . . . . 3
Setting up your camera . . . . . . . . . . . . . . . . . . . . . . . . . . . . . . . . . . . . . . . . . .3
Installing the batteries . . . . . . . . . . . . . . . . . . . . . . . . . . . . . . . . . . . . . . . . . . . 3
Installing the wrist strap . . . . . . . . . . . . . . . . . . . . . . . . . . . . . . . . . . . . . . . . . . 3
Understanding camera memory . . . . . . . . . . . . . . . . . . . . . . . . . . . . . . . . . . 4
Navigating the menus . . . . . . . . . . . . . . . . . . . . . . . . . . . . . . . . . . . . . . . . . . . 4
Simple mode . . . . . . . . . . . . . . . . . . . . . . . . . . . . . . . . . . . . . . . . . . . . . . . . . . . . 5
Initial settings . . . . . . . . . . . . . . . . . . . . . . . . . . . . . . . . . . . . . . . . . . . . . . . . . . . 5
Understanding the camera modes . . . . . . . . . . . . . . . . . . . . . . . . . . . . . . . 5
Understanding the LCD . . . . . . . . . . . . . . . . . . . . . . . . . . . . . . . . . . . . . . . . . . 5
Changing the LCD monitor configuration . . . . . . . . . . . . . . . . . . . . . . . . . 7
Using your camera . . . . . . . . . . . . . . . . . . . . . . . . . . . . . . . . . . . . . . . . . . . . . . .7
Basic operation . . . . . . . . . . . . . . . . . . . . . . . . . . . . . . . . . . . . . . . . . . . . . . . . . . 7
Taking still photos . . . . . . . . . . . . . . . . . . . . . . . . . . . . . . . . . . . . . . . . . . . . . . . 7
Setting the zoom . . . . . . . . . . . . . . . . . . . . . . . . . . . . . . . . . . . . . . . . . . . . . . . . 8
Using the flash . . . . . . . . . . . . . . . . . . . . . . . . . . . . . . . . . . . . . . . . . . . . . . . . . . . 8
Using the self-timer . . . . . . . . . . . . . . . . . . . . . . . . . . . . . . . . . . . . . . . . . . . . . . 8
Using the macro feature . . . . . . . . . . . . . . . . . . . . . . . . . . . . . . . . . . . . . . . . . 9
Using face tracking . . . . . . . . . . . . . . . . . . . . . . . . . . . . . . . . . . . . . . . . . . . . . . 9
Changing the mode . . . . . . . . . . . . . . . . . . . . . . . . . . . . . . . . . . . . . . . . . . . . . 9
Recording video . . . . . . . . . . . . . . . . . . . . . . . . . . . . . . . . . . . . . . . . . . . . . . . . . 9
Using the menus . . . . . . . . . . . . . . . . . . . . . . . . . . . . . . . . . . . . . . . . . . . . . . . . .9
Using the Record menu . . . . . . . . . . . . . . . . . . . . . . . . . . . . . . . . . . . . . . . . . . 9
Viewing photos and video . . . . . . . . . . . . . . . . . . . . . . . . . . . . . . . . . . . . . . 11
Viewing photos . . . . . . . . . . . . . . . . . . . . . . . . . . . . . . . . . . . . . . . . . . . . . . . . . 11
Zooming images in Playback mode . . . . . . . . . . . . . . . . . . . . . . . . . . . . . 11
Playing videos . . . . . . . . . . . . . . . . . . . . . . . . . . . . . . . . . . . . . . . . . . . . . . . . . . 11
Deleting an image or video . . . . . . . . . . . . . . . . . . . . . . . . . . . . . . . . . . . . . 12
Deleting files . . . . . . . . . . . . . . . . . . . . . . . . . . . . . . . . . . . . . . . . . . . . . . . . . . . 12
Using the Playback menu . . . . . . . . . . . . . . . . . . . . . . . . . . . . . . . . . . . . . . 12
Deleting images and videos . . . . . . . . . . . . . . . . . . . . . . . . . . . . . . . . . . . . . 12
Copying images or videos to a memory card . . . . . . . . . . . . . . . . . . . . . 12
Using the Setup and Tools menus . . . . . . . . . . . . . . . . . . . . . . . . . . . . . . 13
Using the Setup menu . . . . . . . . . . . . . . . . . . . . . . . . . . . . . . . . . . . . . . . . . . 13
Setting power save . . . . . . . . . . . . . . . . . . . . . . . . . . . . . . . . . . . . . . . . . . . . . 14
Using the Tools menu . . . . . . . . . . . . . . . . . . . . . . . . . . . . . . . . . . . . . . . . . . . 15
NS-DSC10A-10B_09-0323_MAN_V2.book Page ii Monday, April 27, 2009 8:42 AM

iii
Contents
www.insigniaproducts.com
Making connections . . . . . . . . . . . . . . . . . . . . . . . . . . . . . . . . . . . . . . . . . . . . 16
Connecting the camera to a computer . . . . . . . . . . . . . . . . . . . . . . . . . . 16
Troubleshooting . . . . . . . . . . . . . . . . . . . . . . . . . . . . . . . . . . . . . . . . . . . . . . . 17
Specifications . . . . . . . . . . . . . . . . . . . . . . . . . . . . . . . . . . . . . . . . . . . . . . . . . . 17
Appendix . . . . . . . . . . . . . . . . . . . . . . . . . . . . . . . . . . . . . . . . . . . . . . . . . . . . . . 18
Understanding folder and file names . . . . . . . . . . . . . . . . . . . . . . . . . . . . 18
Legal notices . . . . . . . . . . . . . . . . . . . . . . . . . . . . . . . . . . . . . . . . . . . . . . . . . . . 18
FCC Part 15 . . . . . . . . . . . . . . . . . . . . . . . . . . . . . . . . . . . . . . . . . . . . . . . . . . . . . 18
FCC warning . . . . . . . . . . . . . . . . . . . . . . . . . . . . . . . . . . . . . . . . . . . . . . . . . . . . 18
Canada ICES-003 statement . . . . . . . . . . . . . . . . . . . . . . . . . . . . . . . . . . . . . 18
One-year limited warranty . . . . . . . . . . . . . . . . . . . . . . . . . . . . . . . . . . . . . . 19
NS-DSC10A-10B_09-0323_MAN_V2.book Page iii Monday, April 27, 2009 8:42 AM

iv
Contents
www.insigniaproducts.com
NS-DSC10A-10B_09-0323_MAN_V2.book Page iv Monday, April 27, 2009 8:42 AM
1
www.insigniaproducts.com
Insignia NS-DSC10A and NS-DSC10B
10 Megapixel Digital Cameras
Welcome
Congratulations on your purchase of a high-quality
Insignia product. Your NS-DSC10A or NS-DSC10B is
designed for reliable and trouble-free performance.
Safety information
Before using the camera, please read and
understand the safety precautions described below.
Always make sure that you operate the camera
correctly.
• Do not aim the camera directly into the sun or
other intense light sources that could damage
your eyesight.
• Do not try to open the camera body or attempt to
modify this camera in any way. High-voltage
internal components create the risk of electric
shock when exposed. Maintenance and repairs
should be carried out only by authorized service
providers.
• Do not fire the flash too close to the eyes of
animals or people, especially young children. Eye
damage may result. Remain at least three feet
(one meter) away from infants when using flash.
• Keep the camera away from water and other
liquids. Do not use the camera with wet hands.
Never use the camera in the rain or snow.
Moisture creates the danger of electric shock.
• Keep the camera and its accessories out of the
reach of children and animals to prevent
accidents or damage to the camera.
• If you notice smoke or a strange odor coming
from the camera, turn the power off immediately.
Contact I nsignia Customer Service at
1-877-467-4289 for assistance. Never attempt to
repair the camera yourself.
• Use only the recommended power accessories.
Use of power sources not expressly
recommended for this equipment may lead to
overheating, distortion of the equipment, fire,
electrical shock, or other hazards.
• Do not swing the camera around by the strap.
Features
Included
• 10 megapixel digital camera
• 2 AA Alkaline batteries
• Wrist strap
•USB cable
•User Guide CD
•Quick Start Guide
Main features
• 10 megapixel resolution
• 3x optical zoom and 4x digital zoom
•1/2.3 inch image sensor
• 2.5 inch color LCD monitor
• 32MB internal flash memory (about 20 MB
available for photo/video storage)
• Supports SD cards up to 4GB, and SDHC cards up
to 16GB
• Simplified user menus
• Slideshow feature to review your pictures and
video
• USB port to transfer photos and video to your PC
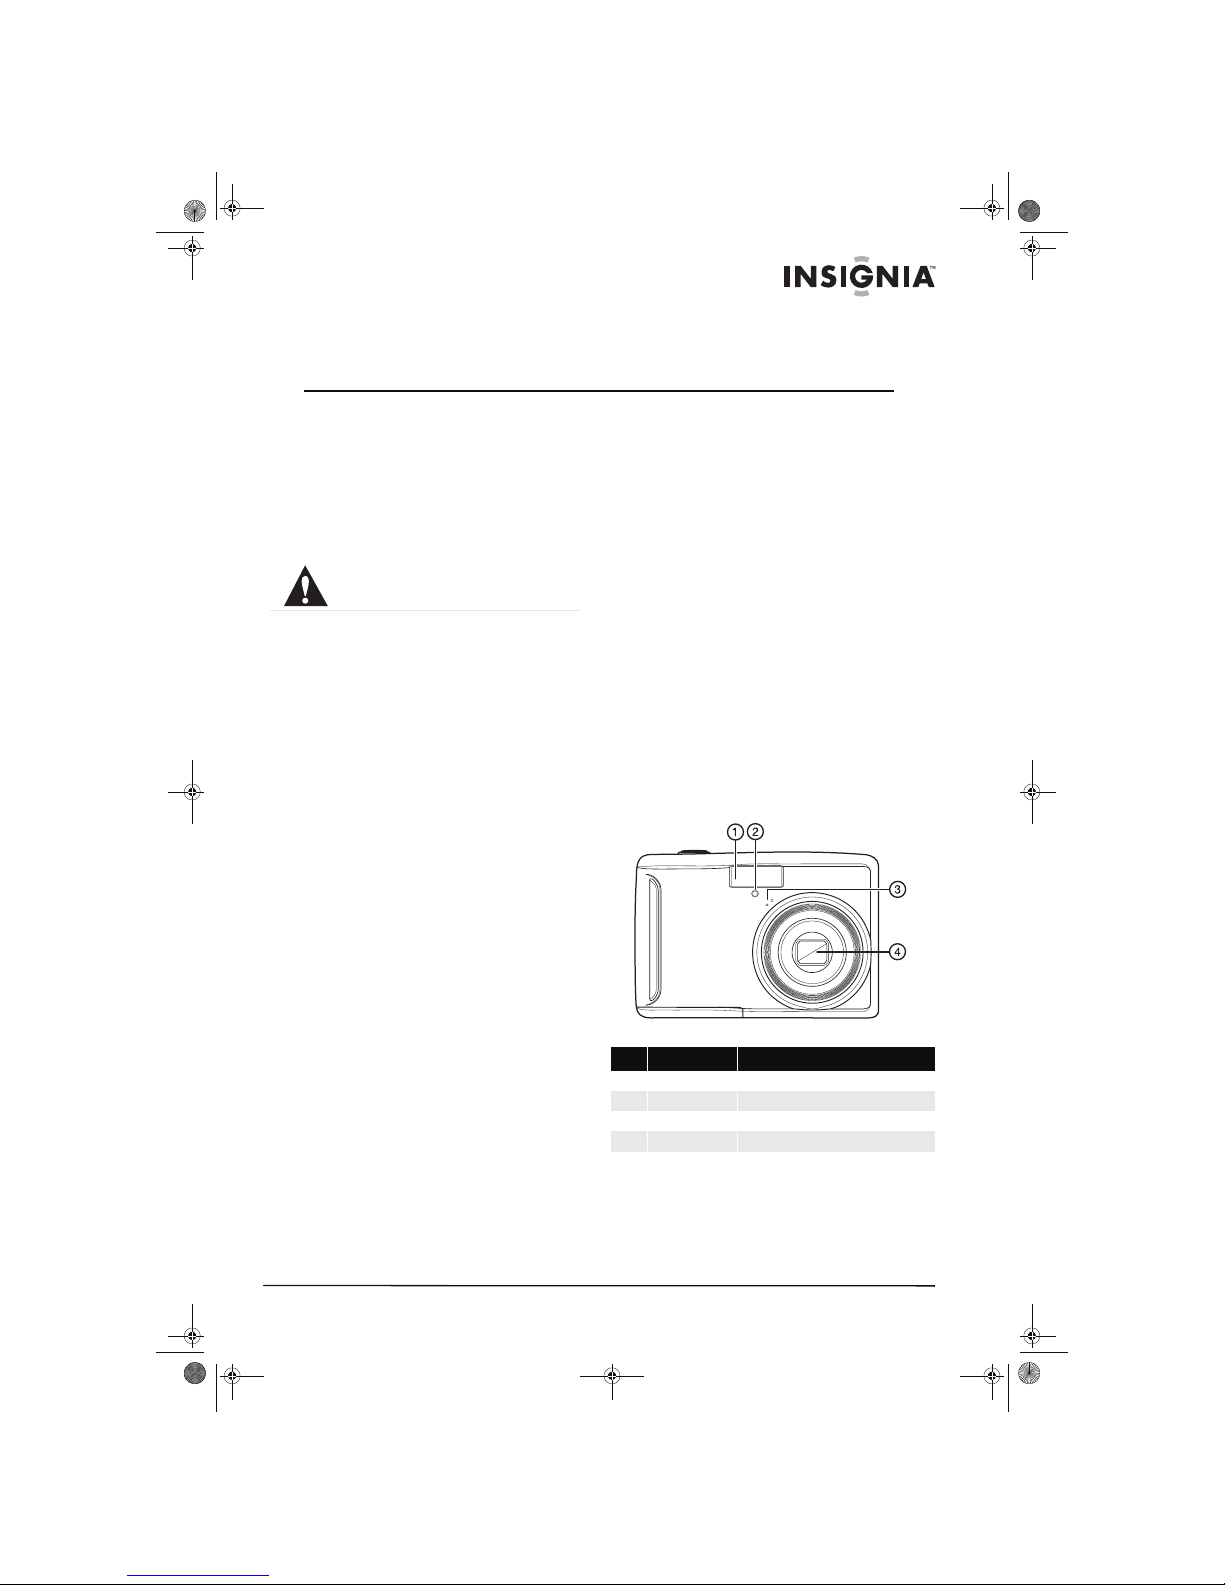
Front
The exclamation point within an equilateral triangle is intended
to alert you to the presence of important operating and
maintenance (servicing) instructions in the literature
accompanying your camera.
# Component Description
1 Flash Lets you take photos in low-light conditions.
2 Self-timer LED Flashes to indicate that the self-timer is activated.
3 Microphone Used for recording audio during video capture.
4 Lens Used for photo/video capture.
NS-DSC10A-10B_09-0323_MAN_V2.book Page 1 Monday, April 27, 2009 8:42 AM
2
Insignia NS-DSC10A and NS-DSC10B 10 Megapixel Digital Cameras
www.insigniaproducts.com
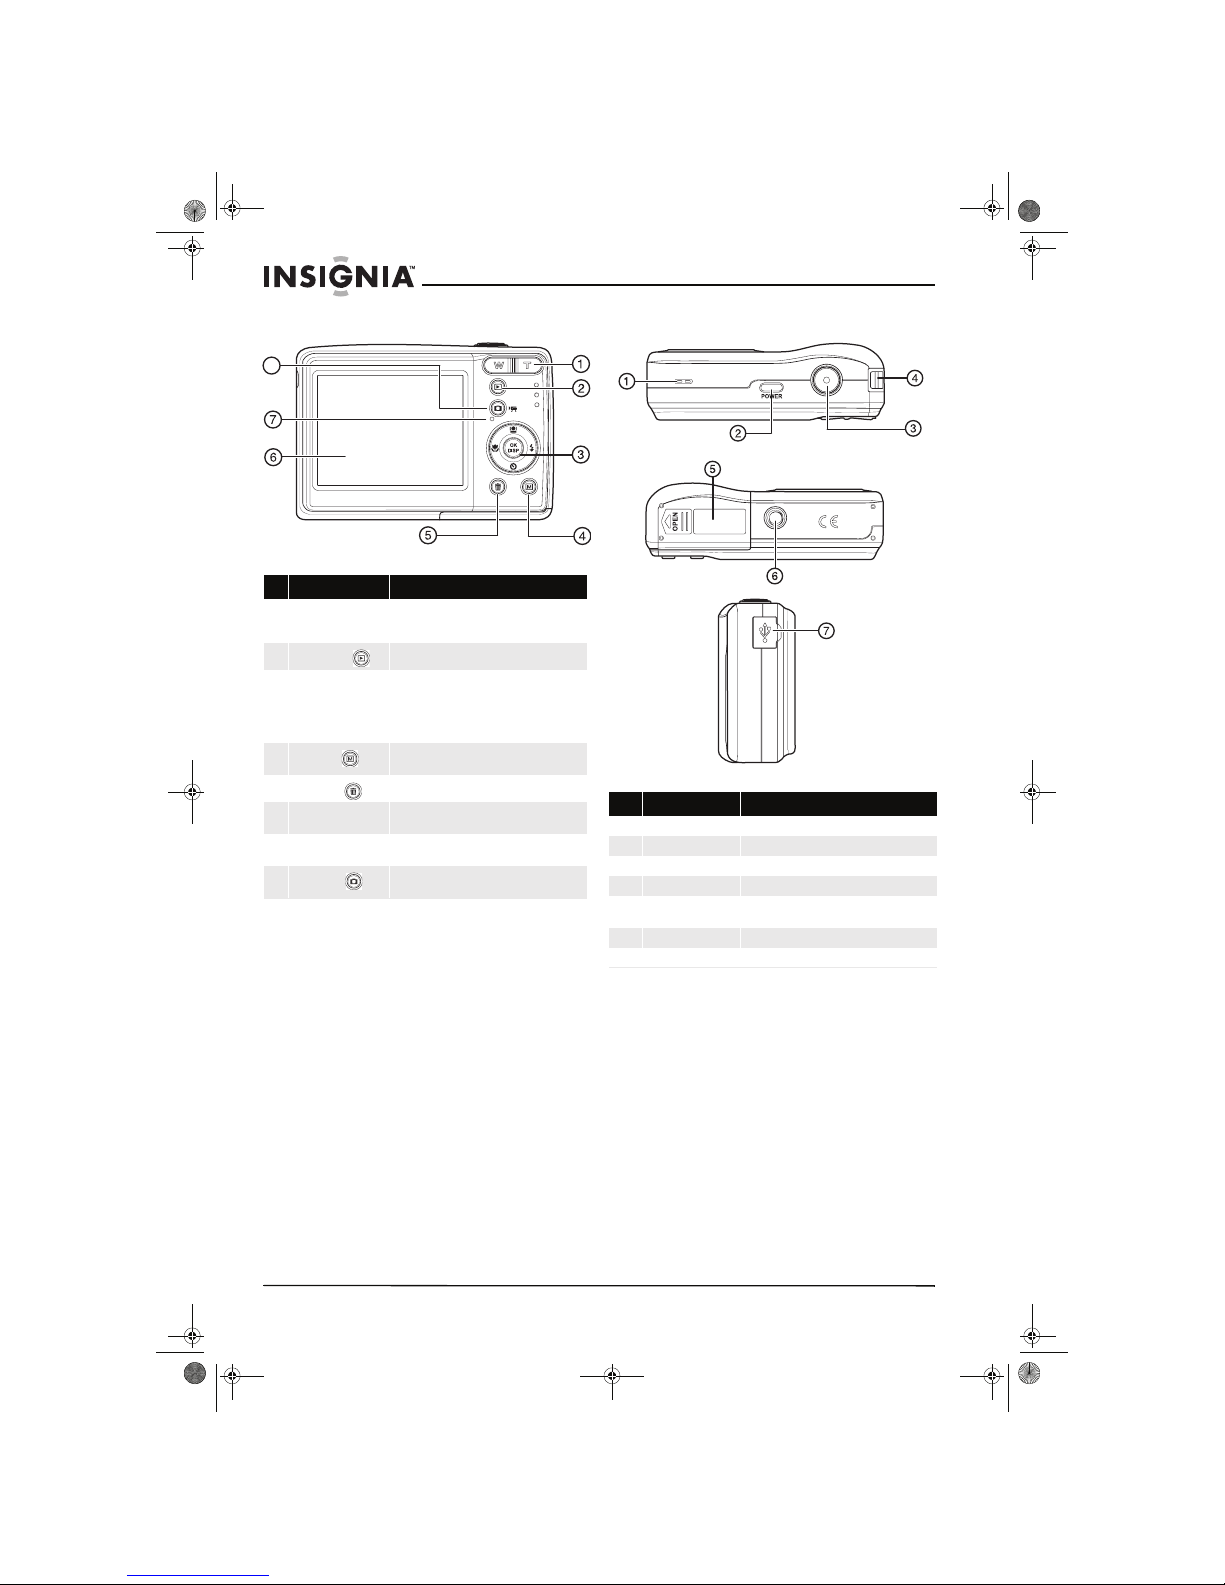
Back Top, bottom and side
# Component Description
1 Zoom button Press T to zoom in on a subject for telephoto
photos/video, or press W to zoom out for wide-angle
photos/video.
2
Playback button
Press to view the photos/video you have taken.
3 OK/DISP and direction
buttons
In RECORD or PLAYBACK mode, press to change the
LCD mo nito r view.
In menu mode, press to confirm your settings.
Press the direction buttons to navigate the menus
and change settings.
4
Menu button
Press to open the camera menu system to let you
change camera settings.
5
Delete button
Press to delete a photo or video.
6 LC D Use to compose your photos and to view the various
menus.
7 O peration LED Lights green when the camera is on. See “LED and
sound indicators” on page 2.
8
Record button
Press to toggle between recording still images and
videos.
8
# Button Description
1 Speaker Lets you hear audio recorded during video capture.
2 Pow er butto n Press to turn on your camera.
3 Shutter button Press to take a photo or capture video.
4 Strap ri ng Attach the carrying strap (included) to this ring.
5 Batter y cover Open to install batteries and an optional memor y
card.
6 Tr ipod soc ket Use to mount the camera to a tripod.
7 USB jack Lets you connect the camera to a computer.
NS-DSC10A-10B_09-0323_MAN_V2.book Page 2 Monday, April 27, 2009 8:42 AM
3
Insignia NS-DSC10A and NS-DSC10B 10 Megapixel Digital Cameras
www.insigniaproducts.com
LED and sound indicators
Your camera gives feedback to users in two ways:
•LED Indicators
•Sound indicators
LED Indicators
Your camera is equipped with two LED indicators:
• An operation LED, located on the back of your
camera. See “Back“on page 2 to locate the
operation LED,
• A self-timer LED, located on the front of the
camera. See “Front“on page 1 to locate the
Self-timer LED.
Sound indicators
Your camera is equipped with a buzzer to provide
sound indicators.
Setting up your camera
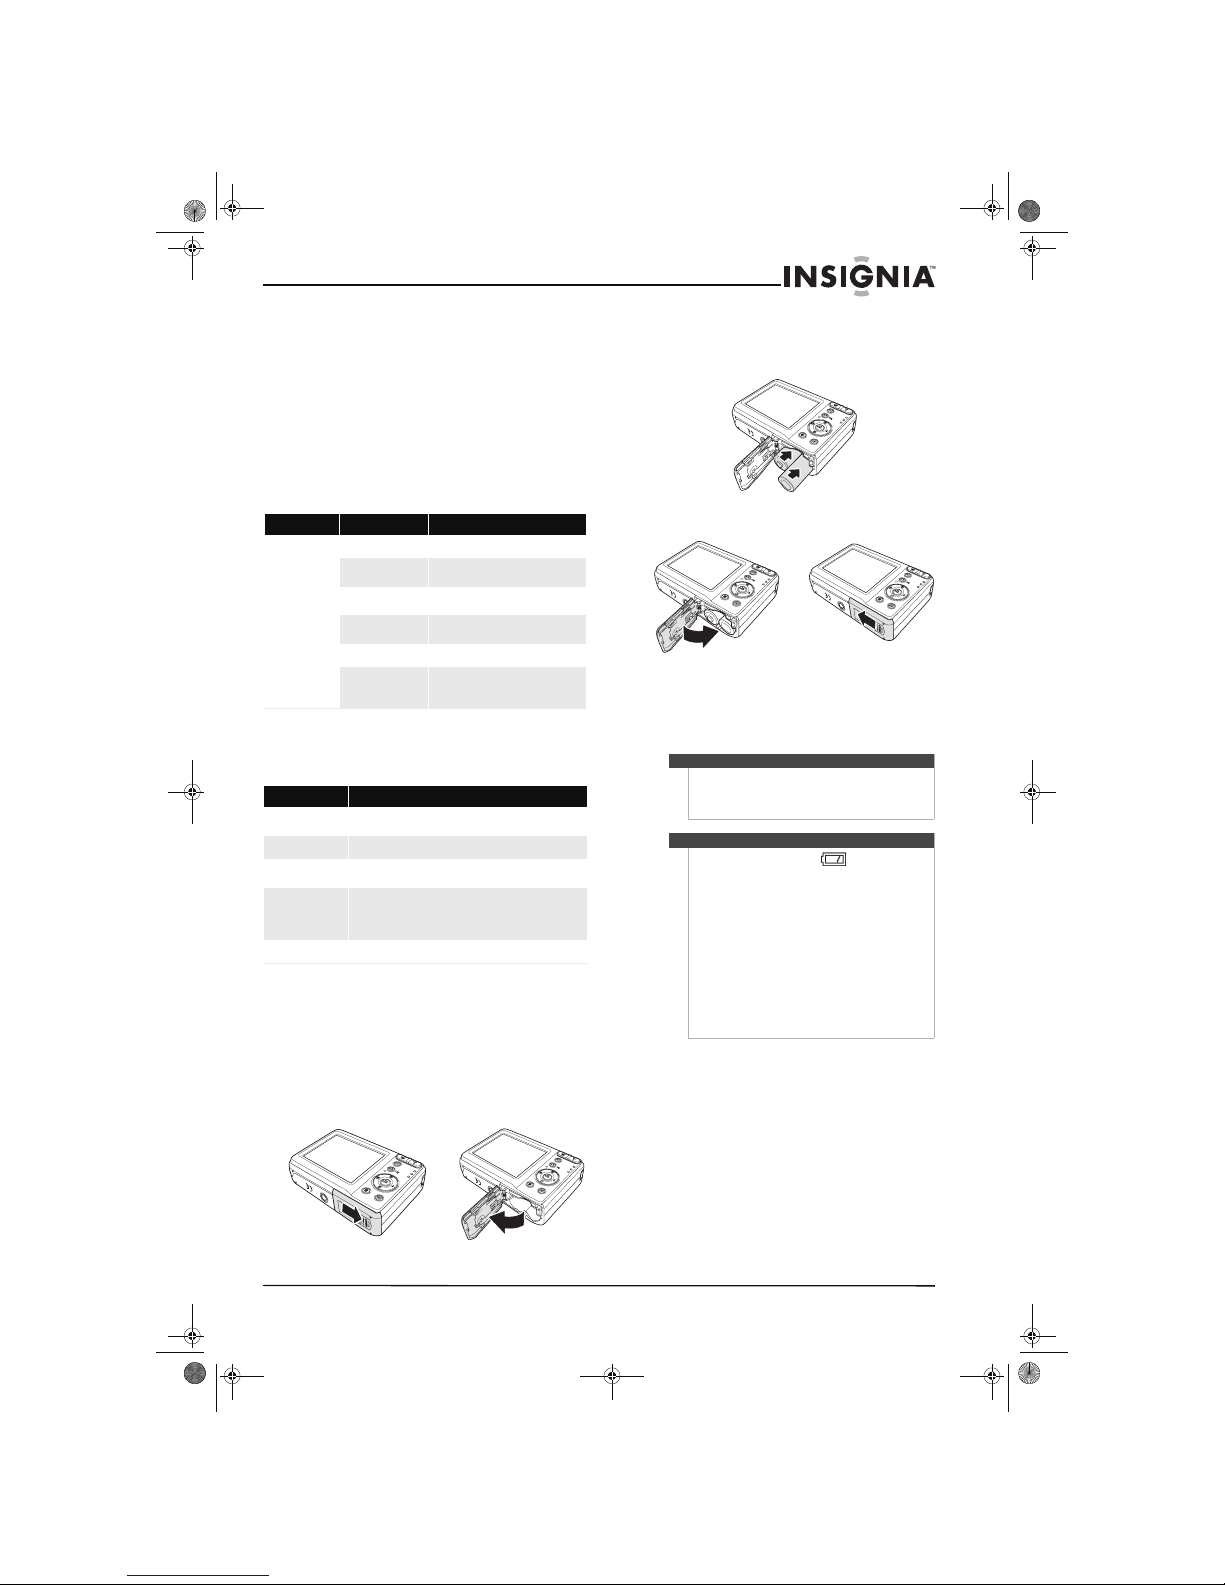
Installing the batteries
To install the batteries:
1 Make sure that your camera is turned off.
2 Open the battery cover by sliding it in the
direction indicated in the illustration.
3 Insert two AA batteries into the battery
compartment. Make sure that you match the +
and – symbols on the batteries with the + and –
symbols in the battery compartment.
4 Close the batter y cover.
5 If you are replacing the batteries, go to the Setup
menu and make sure the battery type selected
matches the type of batteries you inserted in
the camera. (See “Using the Setup and Tools
menus” on page 13)
LED LED status Camera status
Operation
Off
Power of f
Green (steady)
Power on, ready to take pictures, record,
or playback.
Green (fast blink)
Camera busy or deleting/copying/
recording/transferring data.
Green (slow blink)
In Record mode, flash is charging, or AF
error.
Self-timer
Off
Self-timer off.
Amber (blinking)
Self-timer countdown is set. The LED
blinks faster as the countdown reaches its
end.
Sound indicator Camera status
One beep
An oper ation, such a s record ing, has starte d. Also indic ates us ing
a menu and setting properties.
Two beeps
An operation is complete.
Three beeps
A low battery or other warn ing. Also indicates error messages,
such as memory full or card error.
Continuous beep
When the self-timer is set, the camera beeps every second of the
countdown between ten and four seconds left. It beeps every
half second when the countdown reaches three seconds. The
beep stops after the countdown completes.
Shutter sound
The shutter is pressed to record an image.
Warning
Be sure to use only alkaline, NiMH , or lithium
batteries with your camera. Failure to do so may
damage your camera or cause risk of injury to
yourself and others.
Notes
• A low battery indicator appears on the
LCD when the batteries are nearly exhausted.
Batteries should be replaced promptly when
this indicator appears.
• Do not mix batteries of different types.
• Do not mix old and new ba tteries.
• Remove batteries when the charge is depleted.
• Battery chemicals can cause a rash. If the
batteries leak, clean the battery compartment
with a cloth. If chemicals touch your skin, wash
immediately.
• If the camera is not going to be used for an
extended period of time, remove the batteries.
• The camera body may feel warm to the touch
after extended use. This is normal.
NS-DSC10A-10B_09-0323_MAN_V2.book Page 3 Monday, April 27, 2009 8:42 AM
4
Insignia NS-DSC10A and NS-DSC10B 10 Megapixel Digital Cameras
www.insigniaproducts.com
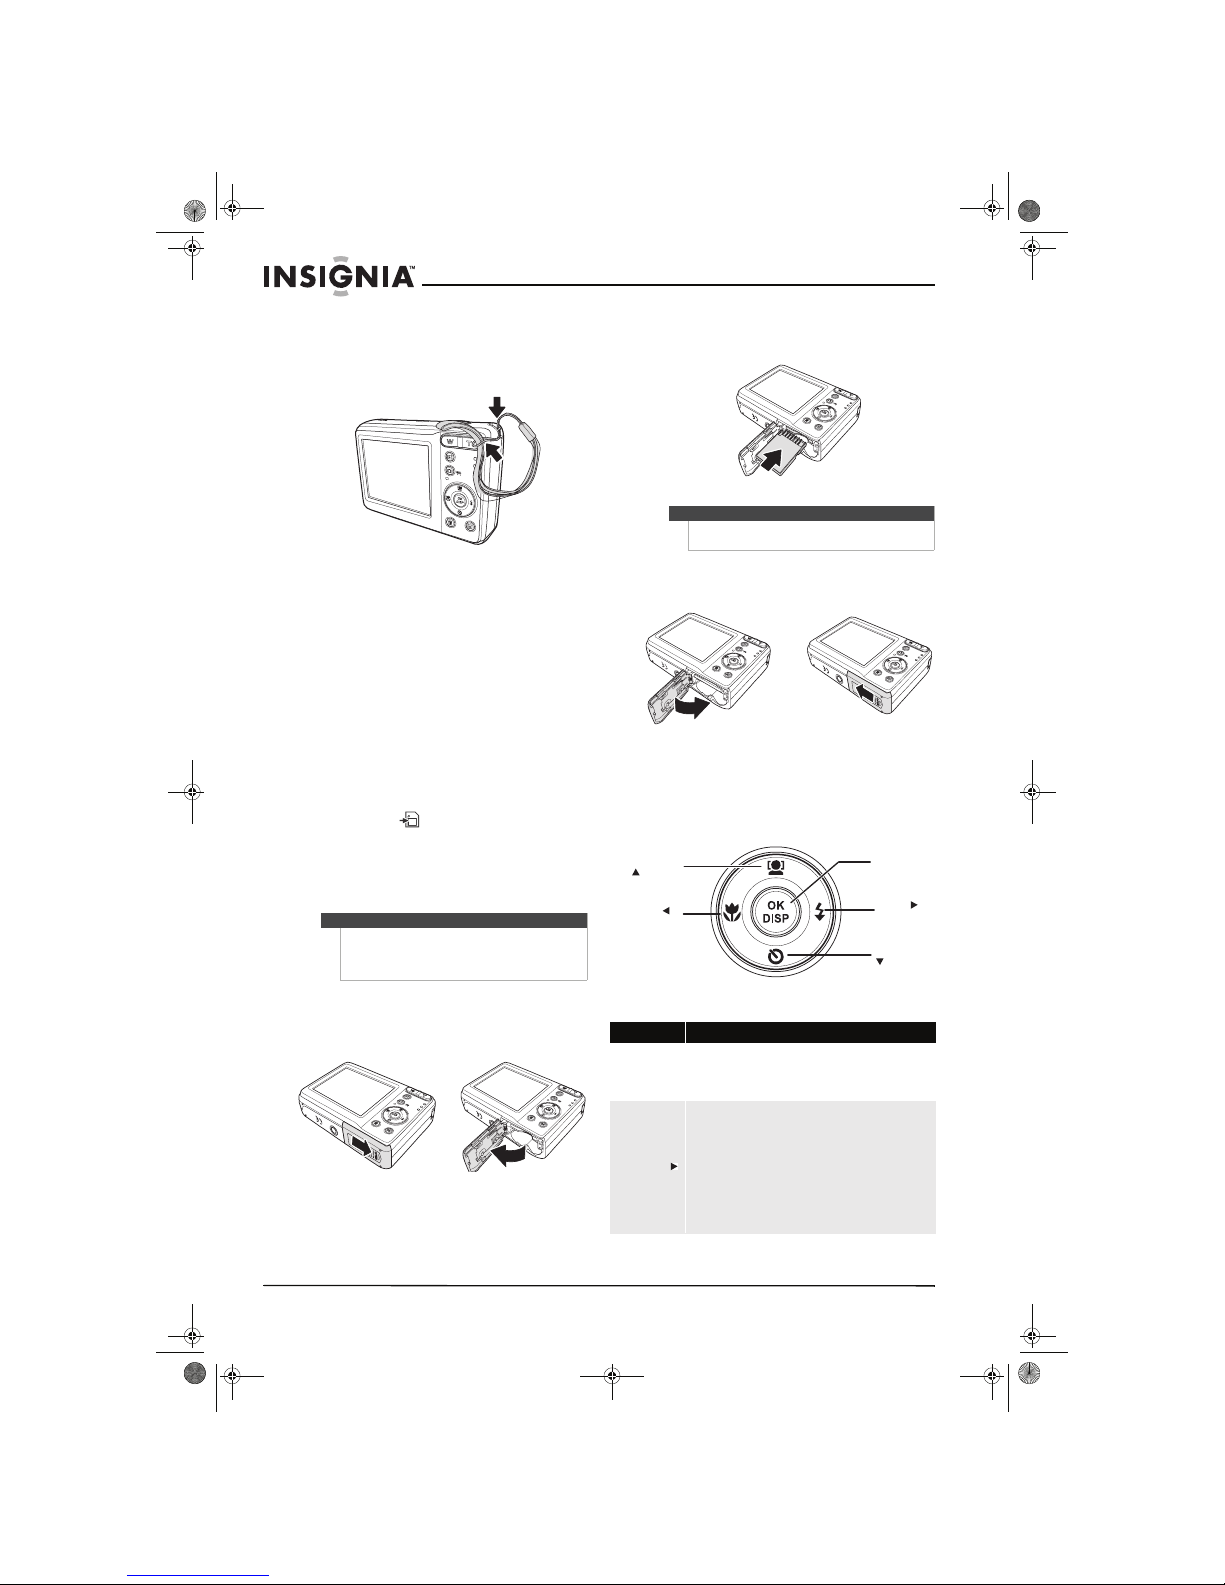
Installing the wrist strap
To install the wrist strap:
1 Insert the short loop of the strap in the strap
eyelet.
2 Thread the larger loop of the strap though the
short loop and pull tight.
Understanding camera memory
Internal memory
This camera is equipped with 32 MB of internal
memory and approximately 20 MB of that me mory
is available for photo/video storage. If no memory
card is inserted in the camera, all images and movie
clips recorded by the camera will be stored in the
internal memory.
External memory
Your camera supports SD cards up to 4GB and
SDHC cards up to 16GB. If there is a storage card
inserted in the memor y slot, the camera
automatically saves all images and videos to the
storage card. The icon indicates that your
camera is using a memory card.
Installing the memory card
You can use an SD or SDHC memory card with this
camera. The memory card slot is inside the battery
cover, adjacent to the battery compartment.
To install the memory card:
1 Turn off the ca mera .
2 Open the battery cover by sliding it in the
direction indicated in the illustration.
3 Insert the memory card with the metallic part
facing the back of the camera until it clicks into
place.
4 Close the batter y cover.
Navigating the menus
The 4-way navigation control and the OK/DISP
button let you access the various menus available
from the On Screen Display (OSD). You can
configure a wide range of settings to ensure
optimal results from your photos and videos.
Further functions of these buttons are as follows:
Caution
• The memory card may be damaged if it is
removed while t he camera is on.
• Do not touch the contacts on the back of the
memory card.
Tip
To remove the memory card, push the card in slightly
to release it, then pull the card out of the card slot.
Button Func tions
OK / DISP
• Press to confirm a selection when using the OSD menus.
• In Playback and Record mode, press to change the LCD
screen display to show or hide OS D icons.
Note: The OK/DISP button is disabled during video playback.
Flash/right ( )
• In Record mode, press to scroll through the flash mode
options. (Auto, Red-eye Re duction, Forced On, Slow Sync
and Off)
Note: Flash modes are only available for still images.
• In Playback mode, press to view the next image, video
clip.
• In Playback Video mode, press to fast forward video
playback.
• In Menu mode, press to enter submenus or to navigate
through menu selections.
OK/DISP button
Flash/rig ht
button
Self-timer/down
button
Face t racki ng/u p
button
Macro/left
button
NS-DSC10A-10B_09-0323_MAN_V2.book Page 4 Monday, April 27, 2009 8:42 AM
 Loading...