

Page 1

User Guide
Clock Radio with LCD Photo Viewer
NS-DPFC01
Page 2

Page 3

Insignia NS-DPFC01
Clock Radio with LCD Photo Viewer
Contents
Welcome . . . . . . . . . . . . . . . . . . . . . . . . . . . . . . . . . . . . . . . . . . . . . . . . . . . . . . . . 3
Important safety instructions . . . . . . . . . . . . . . . . . . . . . . . . . . . . . . . . . . . . . 3
Features . . . . . . . . . . . . . . . . . . . . . . . . . . . . . . . . . . . . . . . . . . . . . . . . . . . . . . . . .4
Setting up your clock radio . . . . . . . . . . . . . . . . . . . . . . . . . . . . . . . . . . . . . .10
Using your clock radio. . . . . . . . . . . . . . . . . . . . . . . . . . . . . . . . . . . . . . . . . . .14
Troubleshooting . . . . . . . . . . . . . . . . . . . . . . . . . . . . . . . . . . . . . . . . . . . . . . . .22
Legal notices. . . . . . . . . . . . . . . . . . . . . . . . . . . . . . . . . . . . . . . . . . . . . . . . . . . .22
90-day limited warranty . . . . . . . . . . . . . . . . . . . . . . . . . . . . . . . . . . . . . . . . .25
Welcome
Congratulations on your purchase of a high-quality Insignia product. Your
NS-DPFC01 represents the state of the art in clock radios and is designed
for reliable and trouble-free performance.
Important safety instructions
1 Read these instructions.
2 Keep these instructions.
3 Heed all warnings.
4 Follow all instructions.
5 Do not use this apparatus near water.
6 Clean only with dry cloth.
7 Do not block any ventilation openings. Install in accordance with the
manufacturer's instructions.
8 Do not install near any heat sources such as radiators, heat registers,
stoves, or other apparatus (including amplifiers) that produce heat.
9 Do not defeat the safety purpose of the polarized or grounding-type
plug. A polarized plug has two blades with one wider than the other. A
grounding type plug has two blades and a third grounding prong. The
wide blade or the third prong are provided for your safety. If the
provided plug does not fit into your outlet, consult an electrician for
replacement of the obsolete outlet.
www.insigniaproducts.com
3
Page 4

Insignia NS-DPFC01 Clock Radio with LCD Photo Viewer
10 Protect the power cord from being walked on or pinched particularly
at plugs, convenience receptacles, and the point where they exit from
the apparatus.
11 Only use attachments/accessories specified by the manufacturer.
12 Use only with the cart, stand, tripod, bracket, or table
specified by the manufacturer, or sold with the apparatus.
When a cart is used, use caution when moving the cart/
apparatus combination to avoid injury from tip-over.
13 Unplug this apparatus during lightning storms or when
unused for long periods of time.
14 Refer all servicing to qualified service personnel. Servicing is required
when the apparatus has been damaged in any way, such as
power-supply cord or plug is damaged, liquid has been spilled or
objects have fallen into the apparatus, the apparatus has been
exposed to rain or moisture, does not operate normally, or has been
dropped.
15 To reduce the risk of fire or electric shock, do not expose this device to
rain, moisture, dripping, or splashing, and no objects filled with liquids,
such as vases, shall be placed on it.
16 An apparatus with a three-prong, grounding-type plug is a Class I
apparatus, which needs to be grounded to prevent possible electric
shock. Make sure that you connect this Class I device to a
grounding-type, three-prong outlet.
17 The wall plug is the disconnecting device. The plug must remain
readily operable.
18 Batteries should not be exposed to excessive heat such as sunshine,
fire, or the like.
Warni ng
Danger of explosion if battery is incorrectly replaced. Replace
only with the same or equivalent type.
Features
Package contents:
• Clock radio with LCD Photo Viewer
•AC Adapter
• Remote control with bracket
• Battery (CR2032 x 1)
•USB Cable
• User Guide
•QSG (Quick Setup Guide)
4
www.insigniaproducts.com
Page 5

Insignia NS-DPFC01 Clock Radio with LCD Photo Viewer
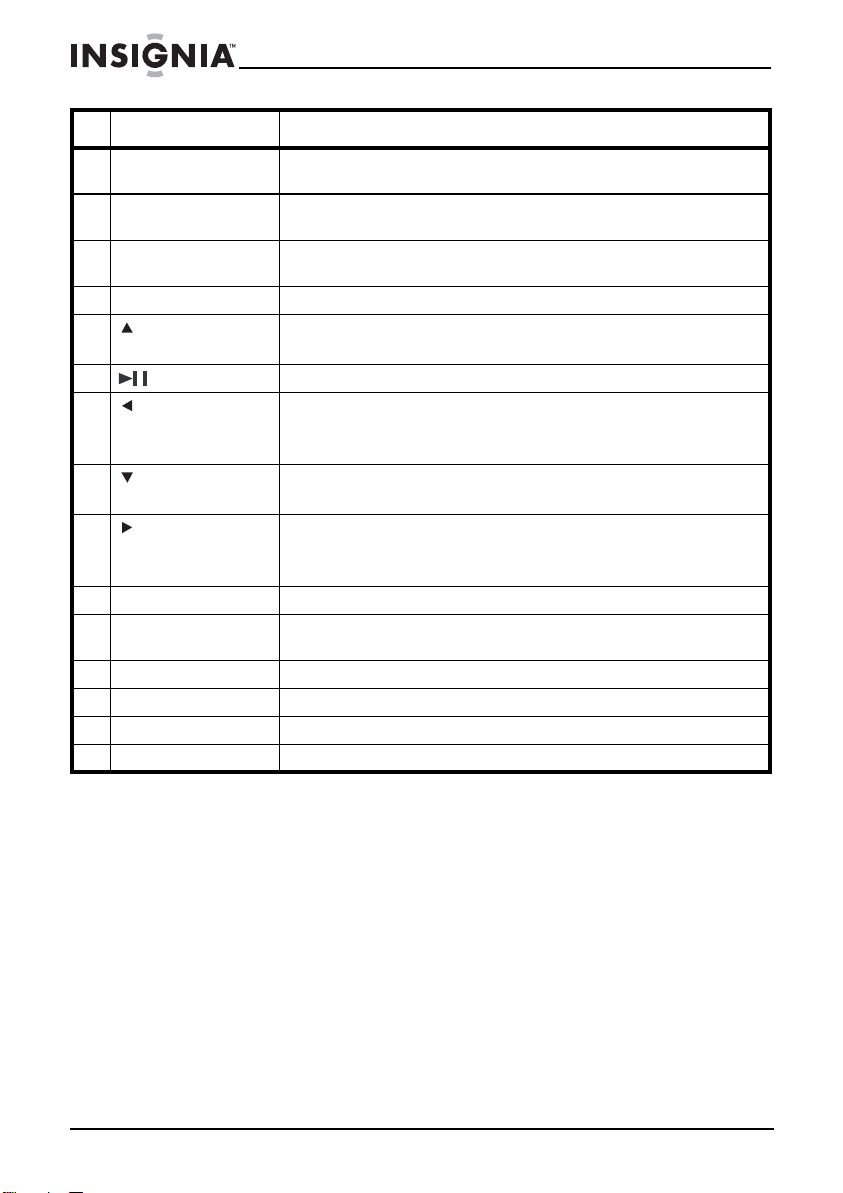
Top v iew
9
11
13
15
16
19
21
23
8
10
12
14
17
18
20
22
2
1
VOL+ PRESET+ PHOTO
PREV NEX T
VOL-
3 4
PHOTO MENU ZOOM DEL/COPY
SLEEP ALARM 1
DISPLAY
TUNE+
ENTER
TUNE-
RADIO
MEMORYPRESET- TIME SET ALARM 2
5
6
7
SNOOZE/DIMMER
# Description Function
1 Photo display LCD screen where photos are displayed.
2 Remote sensor Receives the infrared signal from the remote control. Poi nt the remote control at this
sensor.
3 PHOTO MENU
Press to display the photo menu on the LCD.
button
4 ZOOM button Press to zoom in on the photo being displayed.
5 DEL/COPY button Press to delete or copy photos while in thumbnail picture mode.
6 RADIO button Press once to turn the radio on. Press again to turn the radio off.
7 SNOOZE/DIMMER
button
Press to temporarily turn off the alarm (snooze), when the alarm is sounding. Press to
set the backlight level to high, middle, or low, when the alarm is off.
8 ALARM 1 button Press to set Alarm 1.
www.insigniaproducts.com
5
Page 6
Insignia NS-DPFC01 Clock Radio with LCD Photo Viewer
# Description Function
9 SLEEP button Press to set the sleep timer, which automatically turns off the radio after the time
10 PHOTO DISPLAY
button
11 PRESET+ button In radio mode, press to select the next preset station. In memory mode, press to select
12 VOL+ button Press to increase the radio volume.
13 TUNE+ button In radio mode, press to tune the radio to a higher station.
14
15
16
17
18 VOL
19 PRESET
20 MEMORY button Press to set radio station presets.
21 TIME SET button Press and hold briefly to set the time.
22 ALARM 2 button Press to set Alarm 2.
23 Clock display Displays the current time, radio, and alarm information.
ENTER button Press to confirm your selection in photo menu mode.
PREV button In photo playback mode, press to select the previous photo.
TUNE– button In radio mode, press to tune the radio to a lower station.
NEXT button In photo playback mode, press to select the next photo.
– button Press to decrease the radio volume.
– button In radio mode, press to select the previous preset station. In memory mode, press to
duration selected. Press repeatedly to select the duration.
Press once to turn the photo display on. Press again to turn the photo display off.
the preset number for the station.
In photo zoom mode, press to pan up in the photo.
In photo zoom mode, press to pan left in the photo.
In photo menu mode, press to move the cursor.
In photo zoom mode, press to pan down in the photo.
In photo zoom mode, press to pan right in the photo.
In photo menu mode, press to move the cursor.
select the preset number for the station.
6
www.insigniaproducts.com
Page 7
Insignia NS-DPFC01 Clock Radio with LCD Photo Viewer
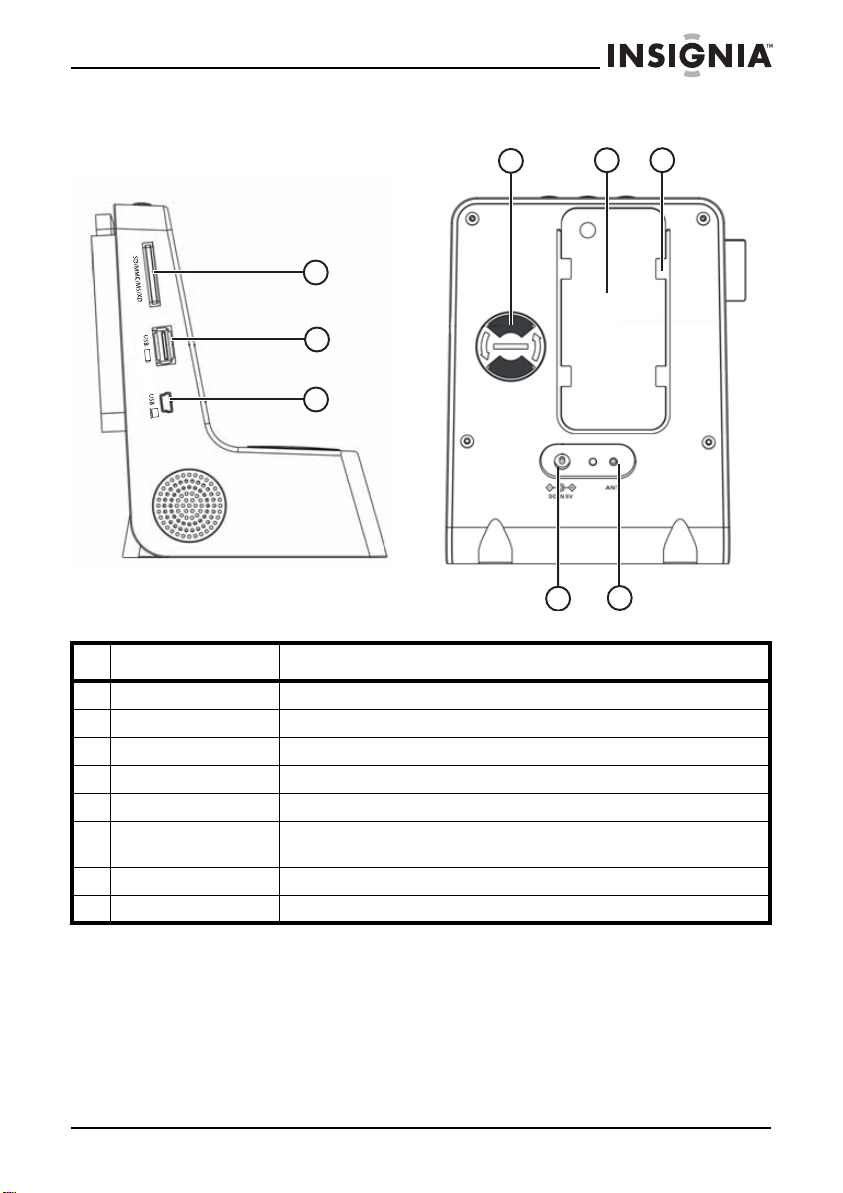
Side and back views
4
1
2
3
7
# Description Function
1 Card slot Plug an SD, MMC, MS, or XD card into this slot.
2 USB port Plug an external USB device into this port.
3 USB cable port Plug a USB cable from a computer into this port.
4 Backup battery slot Insert a backup battery into this opening.
5 Remote control Remotely control your radio with this remote control.
6 Remote control storage
bracket
7 DC IN jack Plug the output cable of the AC adapter into this jack.
8 ANT The FM antenna to improve reception.
Store your remote control in this bracket.
5 6
8
www.insigniaproducts.com
7
Page 8

LCD display
Insignia NS-DPFC01 Clock Radio with LCD Photo Viewer
1
2 3
4
5
8
7
6
9
# Description Function
1 Alarm 1 status icon Indicates the status of Alarm 1. The icon to the right of the status icon indicates your
2 Alarm 2 status icon Indicates the status of Alarm 2. The icon to the right of the status icon indicates your
3 Main display Shows the current time, radio frequency, sleep time setting, or alarm ring time.
4 FM Lights when radio is on.
5 SNOOZE Lights when snooze is on.
6 SLEEP Lights when the sleep timer is set.
7 VOL (volume) Shows the volume setting of the radio.
8 Preset station number Indicates the preset number selected.
9 MEM icon Indicates a preset is selected.
selection.
• Bell icon–wake to buzzer
• Music note icon–wake to radio
• No icon–alarm 1 off
selection.
• Bell icon–wake to buzzer
• Music note icon–wake to radio
• No icon–alarm 2 off
8
www.insigniaproducts.com
Page 9

Insignia NS-DPFC01 Clock Radio with LCD Photo Viewer
Remote control
1
2
3
PHOTO
MENU
PREV
TUNE
ENTER
TUNE
PHOTO
DISPLAY
+
NEXT
-
4
+
5
ROTATE
ZOOM
DEL/
COPY
# Description Function
1 PHOTO MENU button Press to display the photo menu on the LCD.
2
PREV button
In photo playback mode, press to select the previous photo.
In photo zoom mode, press to pan left in the photo.
In photo menu mode, press to move the cursor.
6
7
TUNE+ button
In radio mode, press to tune the radio to a higher station.
In photo zoom mode, press to pan up in the photo.
NEXT button
In photo playback mode, press to select the next photo.
In photo zoom mode, press to pan right in the photo.
In photo menu mode, press to move the cursor.
TUNE– button
In radio mode, press to tune the radio to a lower station.
In photo zoom mode, press to pan down in the photo.
3
ENTER button In Press to confirm your selection in photo menu mode.
4 ZOOM button Press to zoom in on the photo being displayed.
5 ROTATE button Press to rotate the displayed photo in 90° steps.
6 PHOTO DISPLAY button Press once to turn the photo display on. Press again to turn the photo display off.
www.insigniaproducts.com
9
Page 10

Insignia NS-DPFC01 Clock Radio with LCD Photo Viewer
# Description Function
7 DEL/COPY button Press to delete or copy photos while in thumbnail picture mode.
Setting up your clock radio
Supplying power
Your clock radio is powered by an AC adapter.
Plugging in your clock radio
To plug in your clock radio:
1 Place your clock radio in a convenient place and find an AC power
outlet within range of the AC adapter.
2 Plug the AC adapter into the AC power outlet.
3 Plug the AC adapter into the DC IN socket on the radio.
Caution
To protect your clock radio during thunderstorms, unplug the AC
power adapter from the AC power outlet.
Installing the backup battery
You can install a backup battery (included) to provide temporary power in
case the AC power fails. The backup battery only maintains the correct
time.
10
To install a backup battery:
1 Unplug your clock radio, then turn it around to the back and remove
the circular backup battery cover by unscrewing it.
2 Insert one (1) CR2032 button cell battery (included) into the battery
compartment. Make sure that the + symbol on the battery is facing up.
3 Reinstall the backup battery slot cover.
www.insigniaproducts.com
Page 11

Insignia NS-DPFC01 Clock Radio with LCD Photo Viewer
4 Plug in your radio.
Cautions
Follow these precautions when using a battery in this device:
• Use only the size and type of battery specified.
• Make sure that you follow the correct polarity as indicated
in the battery compartment when installing the battery. A
reversed battery may cause damage to the clock radio.
• If your clock radio is not to be used for a long period of
time, remove the battery to prevent damage or injury from
possible battery leakage.
• The battery should not be exposed to excessive heat, such
as sunshine, fire, or the like. Dispose of the used battery as
hazardous waste.
• There is a danger of explosion if the battery is incorrectly
replaced. Replace only with the same or equivalent type.
Installing the remote control and remote control bracket
To install the remote control and remote control bracket:
1 Put the remote control bracket onto the bracket holder (at the back of
the clock radio).
2 Push the bracket downward until it clicks into place.
3 Insert the remote control into the bracket.
Removing the remote control and remote control bracket
To remove the remote control and remote control bracket:
1 Remove the remote control as shown below.
www.insigniaproducts.com
11
Page 12

2 Push the bracket upward from the bottom until it can be removed.
Setting up the LCD
To set up the LCD:
1 While in Photo mode, press PHOTO MENU to display the photo
menu OSD (on-screen display). The following menu opens.
Insignia NS-DPFC01 Clock Radio with LCD Photo Viewer
Caution
• We suggest that you keep the bracket installed.
• If you decide to remove the bracket, you may need to
push bracket hard to remove it
• When you remove the bracket, keep your fingers and
body clear above the bracket to avoid possible impact by
the bracket, when it pops out.
12
www.insigniaproducts.com
Page 13

Insignia NS-DPFC01 Clock Radio with LCD Photo Viewer
2 Press PREV or NEXT to highlight Photo Setup, then press
ENTER to confirm. The Photo Setup menu opens.
3 Press TUNE+, or TUNE– to select LCD Setup, then press
ENTER. The LCD Setup menu opens.
4 Press TUNE+, or TUNE– to select Brightness, Contrast, or
Color.
5 Press PREV or NEXT to adjust your selection, then press
ENTER when you are through to save your settings.
www.insigniaproducts.com
13
Page 14

Insignia NS-DPFC01 Clock Radio with LCD Photo Viewer
Using your clock radio
Using the clock and alarm
To set the clock:
1 Press and hold TIME SET until the hour blinks on the display.
2 Press TUNE+ or TUNE– to set the hour.
3 Press TIME SET. The minutes blink on the display.
4 Press TUNE+ or TUNE– to set the minutes.
5 Press TIME SET to store the setting.
To set the alarm:
1 Press and hold ALARM 1 (or ALARM 2, depending on the alarm you
want) until the hour blinks.
2 Press TUNE+ or TUNE– to set the hour.
3 Press ALARM 1 (or ALARM 2, depending on the alarm you want).
The minutes blink on the display.
4 Press TUNE+ or TUNE- to set the minutes.
5 Press ALARM 1 (or ALARM 2) to store the setting.
6 Press ALARM 1 (or ALARM 2) repeatedly to set the alarm mode.
Settings include:
• Wake to buzzer–Bell icon appears to the right of the alarm icon
• Wake to radio–Music note icon appears to the right of the alarm icon
• Alarm off–Alarm icon disappears.
To turn the alarm off:
• Press any button other than SNOOZE/DIMMER to turn off the alarm
while the alarm is sounding. The alarm will be set for the same time the
following day.
• If you do not want to set the alarm for the next day, press ALARM 1 or
ALARM 2 repeatedly until the alarm icon disappears from the display.
To use the snooze:
• While the alarm is sounding, press SNOOZE/DIMMER. The alarm turns
back on automatically 9 minutes later.
• To cancel snooze (the alarm will not turn back on), press any button other
than SNOOZE/DIMMER. The alarm will be set for the same time the
following day.
14
www.insigniaproducts.com
Page 15

Insignia NS-DPFC01 Clock Radio with LCD Photo Viewer
Playing the radio
To play the radio:
1 Press RADIO to turn on your clock radio.
• To tune the radio up or down and select the station you want,
press TUNE+ or TUNE–.
• To auto search for stations, press and hold TUNE+ or
TUNE– for more than two seconds.
• To adjust the volume to a comfortable level, press either the
VOL+ or VOL– button.
• To tune to the next preset station, press PRESET+.
• To tune to the previous preset station, press PRESET–.
2 Press RADIO to turn off the clock radio.
Note
Standby mode is when only the clock is displayed. The radio
defaults to standby mode when the AC adapter is first
connected.
Setting and using radio presets
To use presets:
1 Press RADIO to turn on your clock radio.
2 Press TUNE+ or TUNE– to tune the radio up or down and select
the station you want.
3 To save the station as a preset, press MEMORY. “MEM” and “01” blink
on the display.
4 Press PRESET+ or PRESET- to select the preset number you want
to designate for that station.
5 Press MEMORY again to confirm the setting. The station is stored in
memory.
6 Repeat Steps 2 to 5 to store as many as 20 presets.
7 To select a preset station, briefly press PRESET+ or PRESET–
repeatedly until you reach the station you want. “MEM” appears on the
display, along with the preset number selected and the station
frequency.
Setting the sleep timer
To set the sleep timer:
1 Press SLEEP once when the radio is on. The “SLEEP” indicator
appears in the display, and “90” appears (blinking) on the display
(indicating that the clock radio will turn off after 90 minutes).
www.insigniaproducts.com
15
Page 16

Insignia NS-DPFC01 Clock Radio with LCD Photo Viewer
2 Repeatedly press SLEEP to decrease the sleep timer in 10 minute
increments.
3 To cancel the sleep function, repeatedly press SLEEP until “00” shows
on the display.
Adjusting the backlight
To set the backlight level:
1 Make sure the power is connected.
2 Press SNOOZE/DIMMER to set the display backlight to a
comfortable level, except when the alarm is on. Your choices include
High, Middle, or Low.
Displaying photos
You can view photos on your clock radio from three sources:
1. A compatible USB device connected to the USB port.
2. A memory card (SD/MMC/MS/XD) plugged into the memory card slot
on the side of your clock radio.
3. The clock radio’s internal memory (approximately 128 MB).
Connecting your clock radio to your computer
Photos can be transferred to your clock radio using your personal
computer.To connect to a computer you need a USB cable (provided).
Note
Your clock radio may not work with all versions of Microsoft
Window s.
16
To connect your clock radio to your computer:
1 Plug in your clock radio (refer to “Plugging your clock radio”).
2 Plug the small end of the USB cable into the USB cable port on the
clock radio, then plug the large USB connector into a USB port on your
computer.
www.insigniaproducts.com
Page 17

Insignia NS-DPFC01 Clock Radio with LCD Photo Viewer
3 When the computer recognizes the clock radio as a drive you can
operate the clock radio as a USB drive.
Notes
• When your clock radio is connected to the computer with
the USB cable,the large USB port of your clock radio cannot
be used at the same time.
• Your clock radio appears as a removable drive.The letters
of the drives may be different on your computer,depending
on how many drives already exist.
• Files can be transferred from your computer to your clock
radio by draggin the files from a folder on you computer to
your clock radio.
To display photos:
1 Press PHOTO DISPLAY (see “Top view” on page 5) in radio or standby
mode. The pictures playback automatically (if Slideshow Auto Play is
ON).
Note
The default seeting of Slideshow Auto Play is ON when you have
photos in internal memory, a memory card containing photos is
plugged into the memory card slot, or a USB device containing
photos is plugged into the USB port.
2 Press PREV to select the previous photo, or NEXT to select the
next photo.
3 Press PHOTO DISPLAY again to turn off photo display.
www.insigniaproducts.com
17
Page 18

Insignia NS-DPFC01 Clock Radio with LCD Photo Viewer
Changing the display
To use the photo menu:
1 While in Photo mode, press PHOTO MENU to display the photo
menu OSD (on-screen display). The following menu opens.
18
2 Press PREV or NEXT to highlight Photo Source, then press
ENTER to confirm. The Photo Source menu opens.
www.insigniaproducts.com
Page 19

Insignia NS-DPFC01 Clock Radio with LCD Photo Viewer
3 Press PREV or NEXT to highlight the photo source you want, then
press ENTER to confirm.The Thumbnails menu opens.
4 Press PREV, NEXT, TUNE+, or TUNE– to select the photo
you want, then press ENTER to view the photo in full screen.
Showing a slideshow
To show a slideshow:
1 While in Photo mode, press PHOTO MENU to display the photo
menu OSD (on-screen display). The following menu opens.
www.insigniaproducts.com
19
Page 20

Insignia NS-DPFC01 Clock Radio with LCD Photo Viewer
2 Press PREV or NEXT to highlight Photo Setup, then press
ENTER to confirm. The Photo Setup menu opens.
3 Press TUNE+, or TUNE– to select the slideshow/playback mode
you want.
4 Press ENTER or NEXT to open the submenu.
5 Press TUNE+, or TUNE– to select the setting you want, then
press ENTER to confirm.
6 Press PHOTO MENU to exit the onscreen menus. The slideshow starts
automatically if the setting of Slideshow Auto Play is ON.
Zooming in on a photo
To zoom in on a photo:
1 In photo mode, press ZOOM to zoom in on a photo.
2 Press ZOOM repeatedly to cycle through available settings.
3 Press PREV, NEXT, TUNE+, or TUNE– to pan around the
photo.
Deleting or copying photos
To delete photos or copy photos (to internal memory):
1 In the Thumbnails menu, press PREV, NEXT, TUNE+, or
TUNE– to select the photo you want to delete.
20
www.insigniaproducts.com
Page 21

Insignia NS-DPFC01 Clock Radio with LCD Photo Viewer
2 Press DEL/COPY. The DEL/COPY popup appears on the screen.
3 Press TUNE+, or TUNE– to select Copy select or Copy all (for
Memory Card or USB Device), or Delete select or Delete all (for
Internal Memory) then press NEXT to display the options (No or
Ye s) .
Note
When you select Internal Memory as the source, your only
choices are Delete select or Delete all. When you select
Memory Card or USB Device as the source, your only choices
are Copy select or Copy all.
4 Press TUNE+, or TUNE– to select No or Yes, then press ENTER
to confirm.
www.insigniaproducts.com
21
Page 22

Insignia NS-DPFC01 Clock Radio with LCD Photo Viewer
Troubleshooting
Note
Do not try to repair the clock radio yourself. Doing so will
invalidate your warranty.
Problem Solution
The display is off Make sure that the AC power adapter is connected to radio and that the AC
No sound Increase the volume.
The sound has interference Make sure that the radio is not too close to a TV or other appliance.
No photo is displayed on the LCD Make sure that photo mode is on and that a compatible memory card or
The remote control does not work Make sure the remote control battery is fresh.
power adapter is plugged into an AC power outlet.
Make sure that the radio is on and tuned to a radio station.
USB Device with jpeg photos is connected.
Make sure the distance between the remote control and the radio is less
than approximately 9 ft. (3 m).
Make sure the remote cont rol can “see” the remote sensor on the clock
radio.
Specifications
Power supply DC IN 5 V/1.5 A
FM band 87.5 - 107.9 MHz in 200 KHz steps (USA)
Photo format JPEG (no progressive)
Memory cards SD, MMC, MS, XD, up to 4 GB
Output power 2 x 1 Watt
Speaker 1.25” 8 Ohm x 2
Operating temp. (Max) 14 - 104°F (-10 - 40°C)
Legal notices
FCC Part 15
This device complies with Part 15 of the FCC Rules. Operation of this product is subject to the
following two conditions: (1) this device may not cause harmful interference, and (2) this
device must accept any interference received, including interference that may cause
undesired operation.
FCC warning
Changes or modifications not expressly approved by the party responsible for compliance
with the FCC Rules could void the user’s authority to operate this equipment.
22
www.insigniaproducts.com
Page 23

Insignia NS-DPFC01 Clock Radio with LCD Photo Viewer
NOTE: This equipment has been tested and found to comply within the limits for a class B
digital device, pursuant to Part 15 of the FCC Rules. These limits are designed to provide
reasonable protection against harmful interference in a residential installation. This
equipment generates, uses, and can radiate radio frequency energy and, if not installed and
used in accordance with the instructions, may cause harmful interference to radio
communications. However, there is no guarantee that interference will not occur in a
particular installation. If this equipment does cause harmful interference to radio or
television reception, which can be determined by turning the equipment off and on, the
user is encouraged to try to correct the interference by one or more of the following
measures:
• Reorient or relocate the receiving antenna.
• Increase the separation between the equipment and receiver.
• Connect the equipment into an outlet on a circuit different from that to which the
receiver is connected.
• Consult the dealer or an experienced technician for help.
www.insigniaproducts.com
23
Page 24

Insignia NS-DPFC01 Clock Radio with LCD Photo Viewer
90-day limited warranty
Insignia Products (“Insignia”) warrants to you, the original purchaser of this new NS-DPFC01
(“Product”), that the Product shall be free of defects in the original manufacture of the
material or workmanship for a period of 90 days from the date of your purchase of the
Product (“Warranty Period”). This Product must be purchased from an authorized dealer of
Insignia brand products and packaged with this warranty statement. This warranty does not
cover refurbished Product. If you notify Insignia during the Warranty Period of a defect
covered by this warranty that requires service, terms of this warranty apply.
How long does the coverage last?
The Warranty Period lasts for 90 days from the date you purchased the Product. The
purchase date is printed on the receipt you received with the Product.
What does this warranty cover?
During the Warranty Period, if the original manufacture of the material or workmanship of
the Product is determined to be defective by an authorized Insignia repair center or store
personnel, Insignia will (at its sole option): (1) repair the Product with new or rebuilt parts; or
(2) replace the Product at no charge with new or rebuilt comparable products or parts.
Products and parts replaced under this warranty become the property of Insignia and are
not returned to you. If service of Products or parts are required after the Warranty Period
expires, you must pay all labor and parts charges. This warranty lasts as long as you own your
Insignia Product during the Warranty Period. Warranty coverage terminates if you sell or
otherwise transfer the Product.
How to obtain warranty service?
If you purchased the Product at a retail store location, take your original receipt and the
Product to the store you purchased it from. Make sure that you place the Product in its
original packaging or packaging that provides the same amount of protection as the original
packaging. If you purchased the Product from an online web site, mail your original receipt
and the Product to the address listed on the web site. Make sure that you put the Product in
its original packaging or packaging that provides the same amount of protection as the
original packaging.
To obtain in-home warranty service for a television with a screen 30 inches or larger, call
1-888-BESTBUY. Call agents will diagnose and correct the issue over the phone or will have
an Insignia-approved repair person dispatched to your home.
Where is the warranty valid?
This warranty is valid only to the original purchaser of the product in the United States,
Canada, and Mexico.
What does the warranty not cover?
This warranty does not cover:
• Customer instruction
• Installation
•Set up adjustments
•Cosmetic damage
• Damage due to acts of God, such as lightning strikes
• Accident
• Misuse
•Abuse
•Negligence
• Commercial use
• Modification of any part of the Product, including the antenna
www.insigniaproducts.com
25
Page 25

Insignia NS-DPFC01 Clock Radio with LCD Photo Viewer
• Plasma display panel damaged by static (non-moving) images applied for lengthy
periods (burn-in).
This warranty also does not cover:
• Damage due to incorrect operation or maintenance
• Connection to an incorrect voltage supply
• Attempted repair by anyone other than a facility authorized by Insignia to service the
Product
• Products sold as is or with all faults
• Consumables, such as fuses or batteries
• Products where the factory applied serial number has been altered or removed
REPAIR REPLACEMENT AS PROVIDED UNDER THIS WARRANTY IS YOUR EXCLUSIVE REMEDY.
INSIGNIA SHALL NOT BE LIABLE FOR ANY INCIDENTAL OR CONSEQUENTIAL DAMAGES FOR
THE BREACH OF ANY EXPRESS OR IMPLIED WARRANTY ON THIS PRODUCT, INCLUDING, BUT
NOT LIMITED TO, LOST DATA, LOSS OF USE OF YOUR PRODUCT, LOST BUSINESS OR LOST
PROFITS. INSIGNIA PRODUCTS MAKES NO OTHER EXPRESS WARRANTIES WITH RESPECT TO
THE PRODUCT, ALL EXPRESS AND IMPLIED WARRANTIES FOR THE PRODUCT, INCLUDING,
BUT NOT LIMITED TO, ANY IMPLIED WARRANTIES OF AND CONDITIONS OF
MERCHANTABILITY AND FITNESS FOR A PARTICULAR PURPOSE, ARE LIMITED IN DURATION
TO THE WARRANTY PERIOD SET FORTH ABOVE AND NO WARRANTIES, WHETHER EXPRESS
OR IMPLIED, WILL APPLY AFTER THE WARRANTY PERIOD. SOME STATES, PROVINCES AND
JURISDICTIONS DO NOT ALLOW LIMITATIONS ON HOW LONG AN IMPLIED WARRANTY
LASTS, SO THE ABOVE LIMITATION MAY NOT APPLY TO YOU. THIS WARRANTY GIVES YOU
SPECIFIC LEGAL RIGHTS, AND YOU MAY ALSO HAVE OTHER RIGHTS, WHICH VARY FROM
STATE TO STATE OR PROVINCE TO PROVINCE.
Contact Insignia:
For customer service please call 1-877-467-4289
www.insigniaproducts.com
Distributed by Best Buy Purchasing, LLC
7601 Penn Avenue South, Richfield, Minnesota, U.S.A. 55423-3645
© 2009 Best Buy Enterprise Services, Inc.
All rights reserved. INSIGNIA is a trademark of Best Buy Enterprise Services, Inc. Registered in
some countries. All other products and brand names are trademarks of their respective
owners.
26
www.insigniaproducts.com
Page 26

www.insigniaproducts.com (877) 467-4289
Distributed by Best Buy Purchasing, LLC
7601 Penn Avenue South, Richfield, MN USA 55423-3645
© 2009 Best Buy Enterprise Services, Inc.
All rights reserved. INSIGNIA is a trademark of Best Buy Enterprise Services, Inc.
Registered in some countries.
All other products and brand names are trademarks of their respective owners.
ENGLISH
09-0621
 Loading...