

Page 1
OWNER’S
MANUAL
COLOR TV/DVD
IS-TV040921
(20 inch)
If you need additional operating assistance after reading this owner’s
manual or to order replacement accessories, please call
TOLL FREE : 1-877-467-4289.
Or visit our WEB SITE at http://www.insignia-products.com
Please read before using this equipment
Page 2
WARNING: TO REDUCE THE RISK OF FIRE OR ELECTRIC SHOCK, DO NOT EXPOSE THIS APPLIANCE
TO RAIN OR MOISTURE.
CAUTION
RISK OF ELECTRIC SHOCK
DO NOT OPEN
CAUTION: TO REDUCE THE RISK OF ELECTRIC
SHOCK, DO NOT REMOVE COVER (OR BACK). NO
USER SERVICEABLE PARTS INSIDE. REFER
SERVICING TO QUALIFIED SERVICE PERSONNEL.
The caution marking is located on the rear of the cabinet.
IMPORTANT SAFEGUARDS
1. Read instructions - All the safety and operating instruc-
tions should be read before the appliance is operated.
2. Retain Instructions - The safety and operating instruc-
tions should be retained for future reference.
3. Heed Warnings - All warnings on the appliance and in
the operating instructions should be adhered to.
4. Follow Instructions - All operating and use instructions
should be followed.
5. Cleaning - Unplug the unit from the wall outlet before
cleaning. Do not use liquid cleaners or aerosol cleaners.
Use a damp cloth for cleaning.
EXCEPTION: A product that is meant for uninterrupted
service and, that for some specific reason, such as the
possibility of the loss of an authorization code for a
CATV converter, is not intended to be unplugged by the
user for cleaning or any other purpose, may exclude the
reference to unplugging the appliance in the cleaning
description otherwise required in item 5.
6. Attachments - Do not use attachments not recommend-
ed by the unit manufacturer as they may cause hazards.
7. Water and Moisture - Do not use this unit near water-
for example, near a bath tub, wash bowl, kitchen sink, or
laundry tub, in a wet basement, or near a swimming
pool, and the like.
8. Accessories - Do not place this unit on an unstable cart,
stand, tripod, bracket, or table. The unit may fall, causing serious injury to someone, and serious damage to the
appliance. Use only with a cart, stand, tripod, bracket, or
table recommended by the manufacturer, or sold with the
unit. Any mounting of the appliance should follow the
manufacturer’s instructions and should use a mounting
accessory recommended by the
manufacturer. An appliance and
cart combination should be
moved with care. Quick stops,
excessive force, and uneven surfaces may cause the appliance
and cart combination to overturn.
PORTABLE CART WARNING
S3126A
THIS SYMBOL INDICATES THAT
DANGEROUS VOLTAGE
CONSTITUTING A RISK OF ELECTRIC
SHOCK IS PRESENT WITHIN THIS UNIT.
THIS SYMBOL INDICATES THAT THERE
ARE IMPORTANT OPERATING AND
MAINTENANCE INSTRUCTIONS IN THE
LITERATURE ACCOMPANYING THE
APPLIANCE.
9. Ventilation - Slots and openings in the cabinet and the
back or bottom are provided for ventilation and to
ensure reliable operation of the unit and to protect it
from overheating, and these openings must not be
blocked or covered. The openings should never be
blocked by placing the unit on a bed, sofa, rug, or other
similar surface. This unit should never be placed near or
over a radiator or heat register. This unit should not be
placed in a built-in installation such as a bookcase or
rack unless proper ventilation is provided or the manufacturer’s instructions have been adhered to.
10. Power Sources - This unit should be operated only from
the type of power source indicated on the marking label.
If you are not sure of the type of power supply to your
home, consult your appliance dealer or local power company. For the units intended to operate from battery
power, or other sources, refer to the operating instructions.
11.Grounding or Polarization - This unit is equipped with
a polarized alternating-current line plug(a plug having
one blade wider than the other). This plug will fit into
the power outlet only one way. This is a safety feature. If
you are unable to insert the plug fully into the outlet, try
reversing the plug. If the plug should still fail to fit, contact your electrician to replace your obsolete outlet. Do
not defeat the safety purpose of the polarized plug.
12. Power-Cord Protection - Power-supply cords should
be routed so that they are not likely to be walked on or
pinched by items placed upon or against them, paying
particular attention to cords at plugs, convenience receptacles, and the point where they exit from the appliance.
- 2 - EN
Page 3
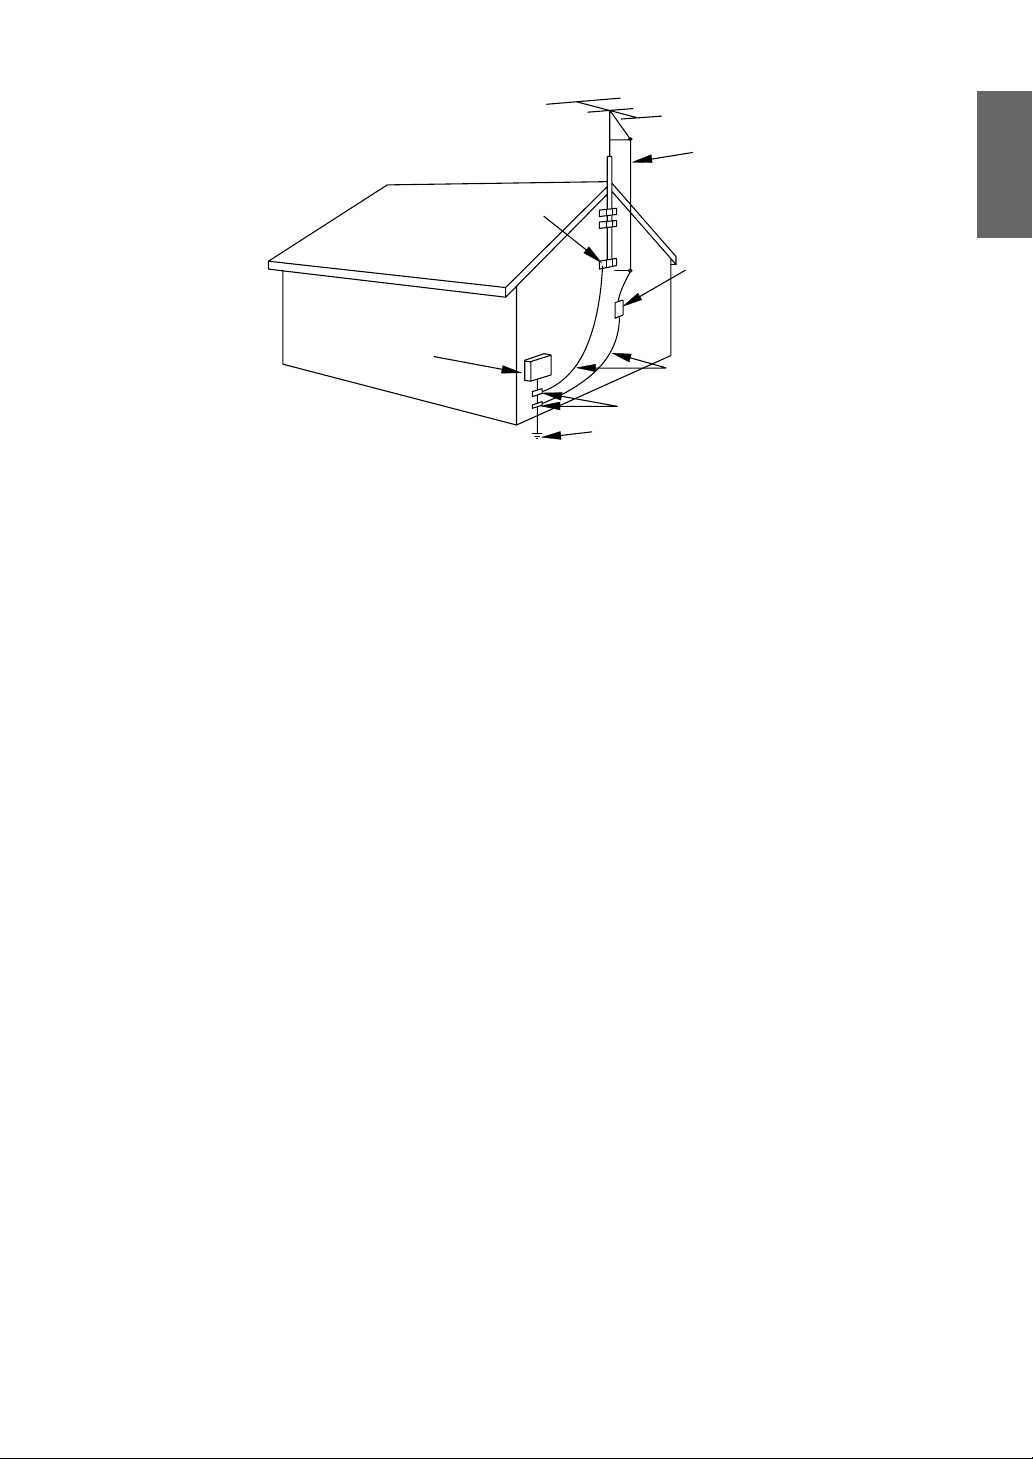
EXAMPLE OF ANTENNA GROUNDING AS PER
NATIONAL ELECTRICAL CODE
S2898A
FIGURE A
ELECTRIC
SERVICE
EQUIPMENT
NEC - NATIONAL ELE CTRI CAL CO DE
GROUND
CLAMP
ANTENNA
LEAD IN
WIRE
ANTENNA
DISCHARGE UNI T
(NEC SECTION 810-20)
GROUNDING CONDUCTORS
(NEC SECTION 810-21)
GROUND CLAMPS
POWER SERVICE GROUNDI NG
ELECTRODE SYSTEM
(NEC ART 250, PART H)
ENGLISH
13. Outdoor Antenna grounding - If an outside antenna or
cable system is connected to the unit, be sure the antenna or cable system is grounded so as to provide some
protection against voltage surges and built-up static
charges. Article 810 of the National Electrical Code,
ANSI/NFPA No. 70, provides information with respect
to proper grounding of the mast and supporting structure, grounding of the lead-in wire to an antenna discharge unit, size of grounding conductors, location of
antenna-discharge unit, connection to grounding electrodes, and requirements for the grounding electrode.
(Fig. A)
14. Lightning - For added protection for this unit receiver
during a lightning storm, or when it is left unattended
and unused for long periods of time, unplug it from the
wall outlet and disconnect the antenna or cable system.
This will prevent damage to the unit due to lightning and
power-line surges.
15. Power Lines - An outside antenna system should not be
located in the vicinity of overhead power lines or other
electric light or power circuits, or where it can fall into
such power lines or circuits. When installing an outside
antenna system, extreme care should be taken to keep
from touching such power lines or circuits as contact
with them might be fatal.
16. Overloading - Do not overload wall outlets and exten-
sion cords as this can result in a risk of fire or electric
shock.
17. Object and Liquid Entry - Never push objects of any
kind into this unit through openings as they may touch
dangerous voltage points or short out parts that could
result in a fire or electric shock. Never spill liquid of any
kind on the unit.
18. Servicing - Do not attempt to service this unit yourself
as opening or removing covers may expose you to dangerous voltage or other hazards. Refer all servicing to
qualified service personnel.
19. Damage Requiring Service - Unplug this unit from the
wall outlet and refer servicing to qualified service personnel under the following conditions:
a. When the power-supply cord or plug is damaged or
frayed.
b. If liquid has been spilled, or objects have fallen into the
unit.
c. If the unit has been exposed to rain or water.
d. If the unit does not operate normally by following the
operating instructions. Adjust only those controls that are
covered by the operating instructions, as improper
adjustment of other controls may result in damage and
will often require extensive work by a qualified techni-
cian to restore the unit to its normal operation.
e. If the unit has been dropped or damaged in any way.
f. When the unit exhibits a distinct change in performance,
this indicates a need for service.
20. Replacement Parts - When replacement parts are
required, be sure the service technician has used replace-
ment parts specified by the manufacturer that have the
same characteristics as the original part. Unauthorized
substitutions may result in fire, electric shock, injury to
persons or other hazards.
21. Safety Check - Upon completion of any service or
repairs to this unit, ask the service technician to perform
routine safety checks to determine that the unit is in
proper operating condition.
22. Heat - This unit product should be situated away from
heat sources such as radiators, heat registers, stoves, or
other products (including amplifiers) that produce heat.
- 3 - EN
Page 4

PRECAUTIONS
IMPORTANT COPYRIGHT INFORMATION
Unauthorized copying, broadcasting, public performance and lending of discs are prohibited.
This product incorporates copyright protection technology that is protected by U.S. patents and other
intellectual property rights. Use of this copyright
protection technology must be authorized by
Macrovision, and is intended for home and other
limited viewing uses only unless otherwise authorized by Macrovision. Reverse engineering or disassembly is prohibited.
FCC WARNING- This equipment may generate or use radio frequency energy. Changes or
modifications to this equipment may cause
harmful interference unless the modifications
are expressly approved in the instruction manual. The user could lose the authority to operate this equipment if an unauthorized change
or modification is made.
RADIO-TV INTERFERENCE
This equipment has been tested and found to comply with the limits for a Class B digital device, pursuant to Part 15 of the FCC Rules. These limits are
designed to provide reasonable protection against
harmful interference in a residential installation.
This equipment generates, uses, and can radiate
radio frequency energy and, if not installed and
used in accordance with the instructions, may cause
harmful interference to radio communications.
However, there is no guarantee that interference
will not occur in a particular installation. If this
equipment does cause harmful interference to
radio or television reception, which can be determined by turning the equipment off and on, the
user is encouraged to try to correct the interference by one or more of the following measures:
1) Reorient or relocate the receiving antenna.
2) Increase the separation between the equipment
and receiver.
3) Connect the equipment into an outlet on a circuit different from that to which the receiver is
connected.
4) Consult the dealer or an experienced radio/TV
technician for help.
LASER SAFETY
This unit employs a laser. Only a qualified service
person should remove the cover or attempt to service this device, due to possible eye injury.
CAUTION: USE OF CONTROLS OR ADJUSTMENTS OR PERFORMANCE OF PROCEDURES OTHER THAN THOSE SPECIFIED
HEREIN MAY RESULT IN HAZARDOUS
RADIATION EXPOSURE.
CAUTION: VISIBLE AND INVISIBLE LASER
RADIATION WHEN OPEN AND INTERLOCK
DEFEATED. DO NOT STARE INTO BEAM.
LOCATION: INSIDE, NEAR THE DECK
MECHANISM.
This Class B digital apparatus complies with
Canadian ICES-003.
CAUTION: TO PREVENT ELECTRIC SHOCK,
MATCH WIDE BLADE OF PLUG TO WIDE
SLOT, FULLY INSERT.
A NOTE ABOUT RECYCLING
Batteries should never be thrown away or incinerated but disposed of in accordance with your local
regulations concerning chemical wastes.
The serial number of this product may be found on the back of the unit. No other unit has the same serial
number as yours. You should record the number and other vital information here and retain this book as a permanent record of your purchase to aid identification in case of theft. Serial numbers are not kept on file.
Date of Purchase
Dealer Purchase from
Dealer Address
Dealer Phone No.
Model No.
Serial No.
- 4 - EN
Page 5
LOCATION
Owner's Manual
For safe operation and satisfactory performance of
your unit, keep the following in mind when selecting
a place for its installation:
Shield it from direct sunlight and keep it away from
•
sources of intense heat.
Avoid dusty or humid places.
•
Avoid places with insufficient ventilation for proper
•
heat dissipation. Do not block the ventilation holes at
the top or bottom of the unit. Do not place the unit
on a carpet because this will block the ventilation
holes.
Install unit in a horizontal position.
•
Avoid locations subject to strong vibration.
•
Do not place the unit near strong magnetic fields.
•
Avoid moving the unit to locations where tempera-
•
ture differences are extreme.
Be sure to remove disc and unplug the AC power
•
cord from the output before carrying the unit.
AV OID THE HAZARDS OF
ELECTRICAL SHOCK AND FIRE
Do not handle the power cord with wet hands.
•
Do not pull on the power cord when disconnecting
•
it from an AC wall outlet. Grasp it by the plug.
If by accident, water is spilled on your unit, unplug
•
the power cord immediately and take the unit to our
Authorized Service Center for servicing.
Do not put your fingers or objects into the unit disc
•
loading tray.
Do not place anything directly on top of the unit.
•
WARNING
Moisture condensation may occur inside the unit
when it is moved from a cold place to a warm place
or after heating a cold room or under conditions of
high humidity. If a DVD is played in a unit which has
moisture, it may damage the DVD and the unit.
Therefore when the condensation occurs inside the
unit, turn the unit on and allow at least 2 hours for the
unit to dry out.
SYMBOLS USED IN THIS MANUAL
The following symbols below appear in some headings and notes in this manual, with the following
meanings.
TV
: Description refers to TV operation (in the TV mode).
DVD-V
: Description refers to playback of DVD video discs
(in the DVD mode).
CD
: Description refers to playback of Audio CDs
(in the DVD mode).
QUICK
: Description refers to the items to be set by the
QUICK mode (in the DVD mode).
ENGLISH
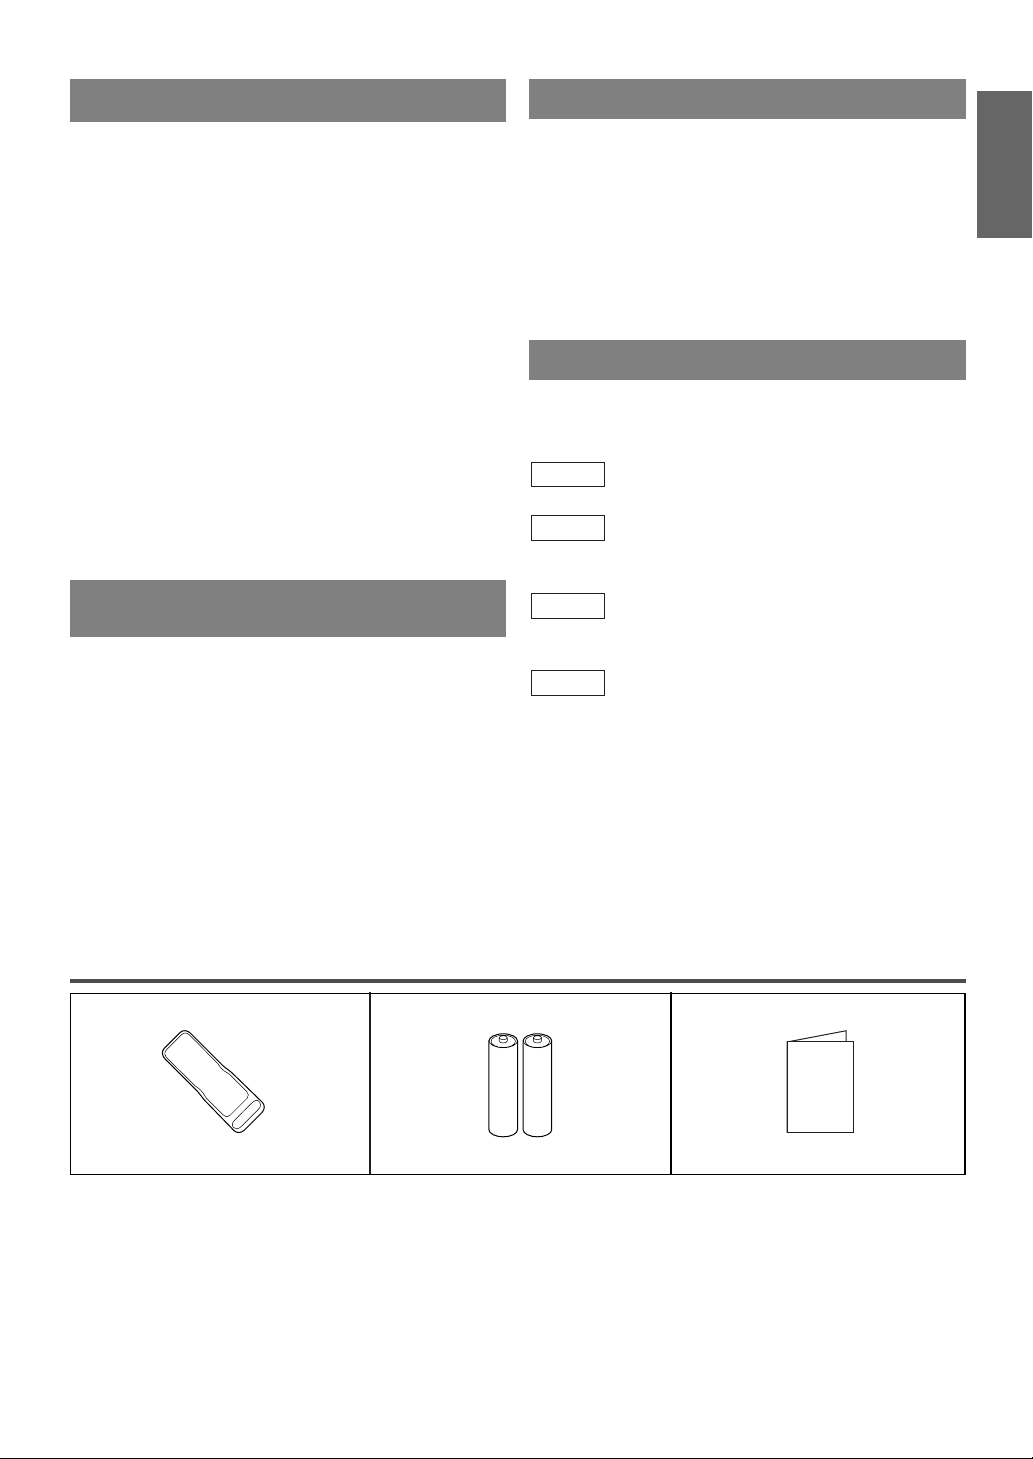
SUPPLIED ACCESSORIES
BatteriesRemote Control Unit
2 AA Batteries(NE207UD)
If you need to replace these accessories, please refer to the PART NO. under the illustrations and call our
•
help line mentioned on the front page.
Depending on your antenna system, you may need different types of Combiners (Mixer) or Separators
•
(Splitter). Contact your local electronics store for these items.
- 5 - EN
Owner’s Manual
(1EMN20276)
Page 6

TABLE OF CONTENTS
C IMPORTANT SAFEGUARDS . . . . .2
C PRECAUTIONS . . . . . . . . . . . . . . . .4
LOCATION . . . . . . . . . . . . . . . . . . .5
AVOID THE HAZARDS OF
ELECTRICAL SHOCK AND FIRE .5
WARNING . . . . . . . . . . . . . . . . . . . .5
SYMBOLS USED IN THIS
MANUAL . . . . . . . . . . . . . . . . . . . . .5
C SUPPLIED ACCESSORIES . . . . . . .5
C TABLE OF CONTENTS . . . . . . . . . .6
C FEATURES . . . . . . . . . . . . . . . . . . . .7
C OPERATING CONTROLS AND
FUNCTIONS . . . . . . . . . . . . . . . . . . .8
C PREPARATION FOR USE . . . . . . .10
ANTENNA/CABLE
CONNECTION . . . . . . . . . . . . . . . .10
CONNECTING TO FRONT A/V
INPUT JACKS . . . . . . . . . . . . . . . .11
CONNECTING TO A STEREO
AMPLIFIER EQUIPPED WITH
DIGITALINPUT JACKS (for DVD) .11
CONNECTING TO A DOLBY
DIGITAL DECODER (for DVD) . .12
INSTALLING THE BATTERIES . .12
TV SECTION
C TV OPERATION AND SETTINGS .13
WATCHING A TV PROGRAM . . .13
DEGAUSSING . . . . . . . . . . . . . . . .13
PICTURE CONTROL . . . . . . . . . . .13
SLEEP TIMER . . . . . . . . . . . . . . . .14
CLOSED CAPTION SYSTEM . . . .14
CHANNEL SET UP . . . . . . . . . . . .15
V-CHIP SET UP . . . . . . . . . . . . . . .16
TV RATING SET UP . . . . . . . . .16
MPAA RATING SET UP . . . . . .17
CHANGE ACCESS CODE . . . . .17
MENU LANGUAGE . . . . . . . . . . .17
C CABLE CHANNEL
DESIGNATIONS . . . . . . . . . . . . . .18
DVD SECTION
C ABOUT THE DISCS . . . . . . . . . . . .19
PLAYABLE DISCS . . . . . . . . . . . .19
UNPLAYABLE DISCS . . . . . . . . . .19
C PLAYING A DISC . . . . . . . . . . . . . .20
BASIC PLAYBACK . . . . . . . . . . . .20
GENERAL FEATURES . . . . . . . . .20
DISC MENU . . . . . . . . . . . . . . . . .20
TITLE MENU . . . . . . . . . . . . . . . . .20
RESUME . . . . . . . . . . . . . . . . . . . .21
PAUSE . . . . . . . . . . . . . . . . . . . . . .21
STEP BY STEP PLAYBACK . . . . .21
FAST FORWARD /
FAST REVERSE . . . . . . . . . . . . . .21
SLOW FORWARD /
SLOW REVERSE . . . . . . . . . . . . . .21
ZOOM . . . . . . . . . . . . . . . . . . . . . .21
C SEARCH FUNCTION . . . . . . . . . . .22
TRACK SEARCH . . . . . . . . . . . . .22
TITLE / CHAPTER SEARCH . . . .22
TIME SEARCH . . . . . . . . . . . . . . .22
MARKER SETUP SCREEN . . . . . .22
C
SPECIAL PLAYBACK FUNCTION
REPEAT . . . . . . . . . . . . . . . . . . . . .23
PROGRAM . . . . . . . . . . . . . . . . . . .23
RANDOM PLAYBACK . . . . . . . . .23
C CHANGING THE SETTINGS . . . .24
SUBTITLE LANGUAGE . . . . . . . .24
AUDIO LANGUAGE . . . . . . . . . . .24
STEREO SOUND MODE . . . . . . . .24
CAMERA ANGLE . . . . . . . . . . . . .24
BLACK LEVEL SETTING . . . . . . .24
VIRTUAL SURROUND . . . . . . . . .25
C
THE ON-SCREEN INFORMATION
. . .23
. .25
C CHANGING THE DVD SET UP
ITEMS . . . . . . . . . . . . . . . . . . . . . . .26
CUSTOM MENU . . . . . . . . . . . . . .26
LANGUAGE SETTING . . . . . . . .26
DISPLAY SETTING . . . . . . . . . .27
AUDIO SETTING . . . . . . . . . . . .27
PARENTAL CONTROL . . . . . . . .28
OTHER SETTINGS . . . . . . . . . . .28
INITIALIZE . . . . . . . . . . . . . . . . . .28
C TROUBLESHOOTING GUIDE . . .29
C MAINTENANCE . . . . . . . . . . . . . . .32
DISC HANDLING . . . . . . . . . . . . .32
C SPECIFICATIONS . . . . . . . . . . . . .33
- 6 - EN
Page 7

FEATURES
TV Mode
Infrared remote control
•
Trilingual on screen TV setup display selectable
•
in English, Spanish or French
181 channel capability PLL frequency synthesiz-
•
er tuner with direct station call
be necessary to view scrambled cable channels.)
Closed Caption Decoder–You may view specially
•
labeled (cc) TV programs, movies, news, etc. with
either a dialogue caption or text display added to
the program.
DVD Mode
¡Dolby Digital sound
This unit can handle Dolby Digital surround sound
having 5.1 channels when connected to a Dolby
Digital decoder.
¡Still / fast / slow / step playback
Various playback modes are available including
still pictures, fast forward/reverse, slow motion and
step frames.
¡Random playback for Audio CD
This unit can shuffle the order of tracks to play
them in random order.
¡Program playback for Audio CD
You can program the order of tracks to play them in
any desired order.
¡DVD menus in a desired language
You can display DVD menus in a desired language,
if available on a DVD.
¡Screen saver / Auto power-off functions
The screen saver program starts when there is no
input from the unit for 5 minutes in the stop mode.
After the screen saver program is activated for 15
minutes, the power automatically turns off.
¡Subtitles in a desired language
You can select a desired language for the display
subtitles, if that language is available on a disc.
¡Selecting a camera angle
You can select the desired camera angle, if a disc
contains sequences recorded from different angles.
¡Choices for audio language and sound mode
You can select the desired audio language and
sound mode, if different languages and modes are
available on a disc.
(A converter may
Auto power off system–If there is no air signal
•
input from the antenna terminal and no operation
for 15 minutes, the unit will turn itself off automatically.
Sleep timer–Allows you to have the unit automati-
•
cally turn off at a desired time.
V-CHIP–Enables parents to prevent their children
•
from watching inappropriate material on TV.
¡Parental lock
You can set the control level to limit playback of
discs which may not be suitable for children.
¡Automatic detection of discs
This unit automatically detects if the loaded disc is
DVD or Audio CD.
¡On-screen display
Information about the current operation can be
displayed on a TV screen, allowing you to confirm
the currently active functions (such as program
playback), on the TV screen using the remote
control.
¡Search
Chapter search / Title search / Track search / Time
search
¡Repeat
Chapter / Title / Track / All / A-B
¡Zoom
Magnified screen can be displayed.
¡Marker
The part designated by user can be called back.
¡Resume Play
User can resume to playback from the part at which
the play was stopped.
¡Virtual Surround
¡Bit rate indication
¡DRC (Dynamic range control)
You can control the range of sound volume.
ENGLISH
- 7 - EN
Page 8
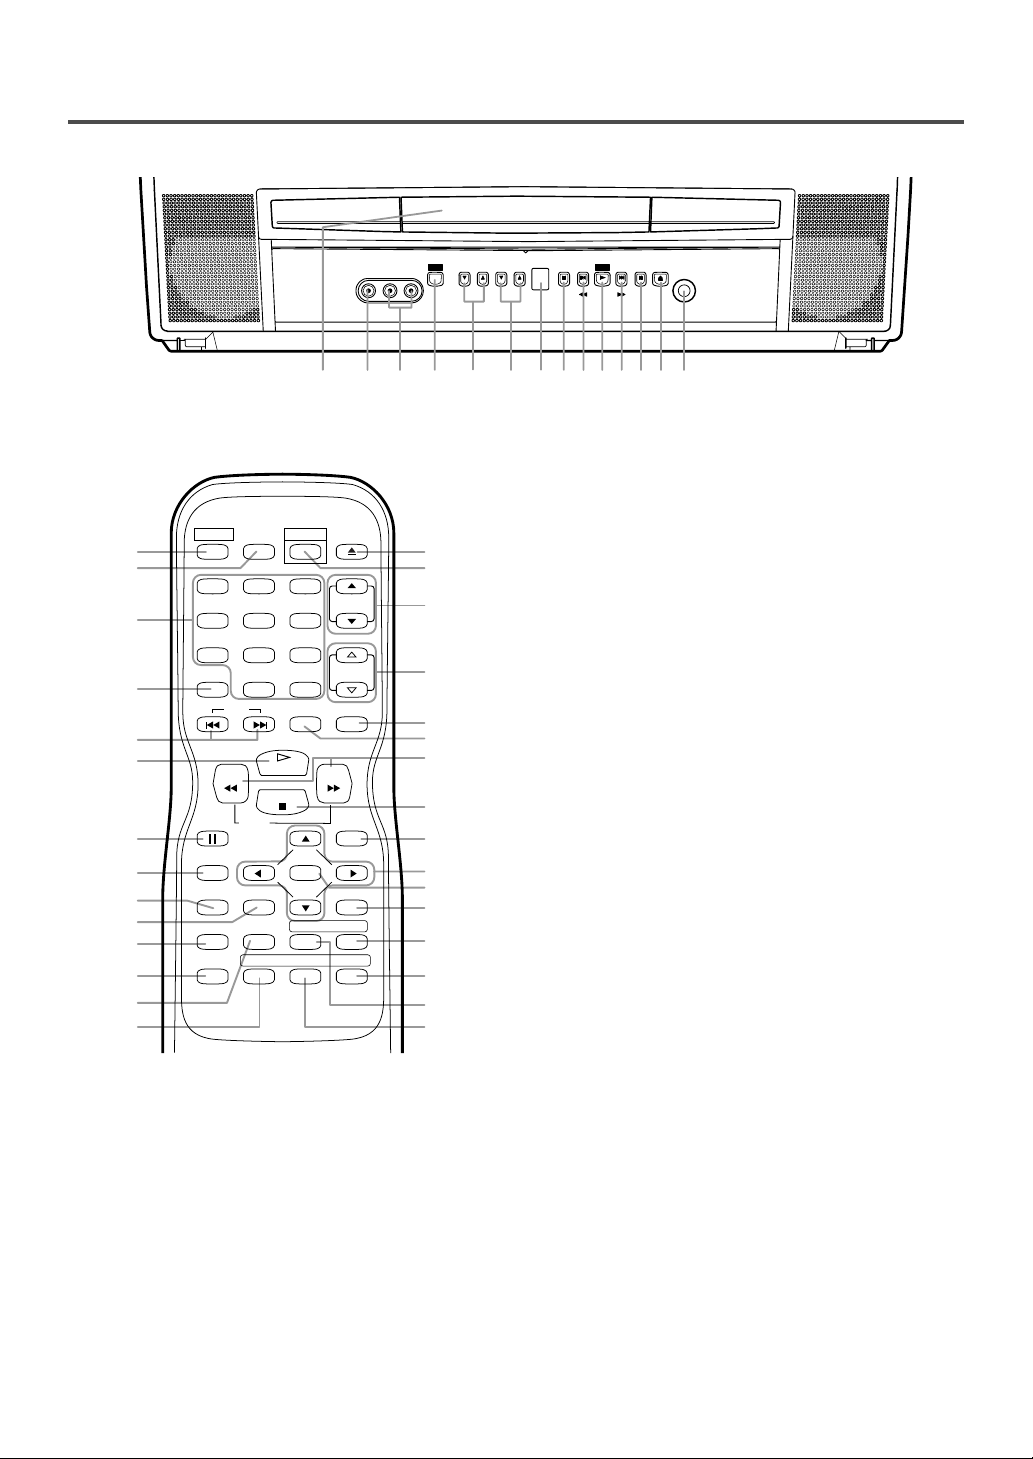
OPERATING CONTROLS AND FUNCTIONS
VIDEO L–AUDIO–R
VOLUME CHANNEL STOP SKIP SKIP PAUSE
HEADPHONE
–SEARCH–
OPEN/
CLOSE
PLAY
POWER
742 891091112 136531
- FRONT PANEL -
- REMOTE CONTROL -
SELECT
+100
ENTER
REPEATSEARCH MODE
FWD
OPEN/
CLOSE
CH.
VOL.
MUTEZOOM
DISC
MENU
RETURNTITLESETUP
A
ANGLESUBTITLEAUDIO
12
35
6
5
34
33
32
8
31
30
29
-
B
28
27
26
25
24
14
15
16
10
11
17
18
19
20
21
22
23
4
POWER PICTURE
123
456
789
SLEEP
0 +10
SKIP
9
PLAY
REV
STOP
SLOW
PAUSE
DISPLAY
CLEAR
MODE
1.Disc loading tray
2.VIDEO input Jack
Connect to the video output jack of a video camera or
VCR.
3.AUDIO L/R input Jacks
Connect to the audio output jacks of a video camera or
VCR.
4.POWER Button
[P.13]
Press to turn the power on and off.
5.VOLUME (VOL.) K / L Buttons
[P.13]
Press to control the volume level for the DVD and TV.
6.CHANNEL (CH.) K / L Buttons
Press to select memorized channels.
[P.13]
7.Remote sensor window
8.STOP C Button
[P.20]
Stops operation of the disc.
9.SKIP H / G Buttons
[P.22]
Press once to skip chapters or tracks to a desired
point.
SEARCH h / g Buttons (Front panel) [P.21]
Press and hold to change forward or reverse
playback speed.
10. PLAY B Button
[P.20]
Starts playback of the disc.
11. PAUSE F Button
[P.21]
Pauses the current disc operation.
12. OPEN/CLOSE A Button
[P.20]
Press to insert a disc into or remove it from the
tray.
13. HEADPHONE Jack
To connect headphone (not supplied) for personal
listening.
14. PICTURE Button
[P.13]
Press to adjust the picture.
15. Number Buttons
TV Mode:
[P.13]
Press two digits to directly access the desired
channel.
Remember to press [0] before a single digit channel.
+100 Button–
Press to select cable channels which are higher
than 99.
DVD Mode:
[P.22]
Press to enter the desired number.
+10 Button–
Press to enter the desired numbers which are
higher than 9.
16. SLEEP Button
[P.14]
Sets the Sleep Timer.
17. DISPLAY Button
TV Mode:
Displays the current channel number on the TV
screen.
DVD Mode:
- 8 - EN
Displays the current status on the TV screen.
[P.25]
Page 9

COAXIAL
ANT.
38
3736
- REAR PANEL -
ENGLISH
18. SETUP Button
[P.26]
Press to enter or exit the setup menu of TV or
DVD.
19. TITLE Button
[P.20]
Displays the title menu.
20. CLEAR Button
[P.22]
Press to clear or cancel a setting currently
entered.
21. MODE Button
[P.23, 24, 25]
Press to call up the program screen or the random screen in the stop mode.
Press to call up the Black Level Setting screen or
the Virtual Surround screen during playback.
22. SEARCH MODE Button
[P.22]
Press to locate a desired point.
23. AUDIO Button
[P.24]
Press to select a desired audio language or sound
mode.
24. SUBTITLE Button
[P.24]
Press to select a desired subtitle language.
25. REPEAT Button
[P.23]
Repeats playback of the current disc, title, chapter, or track.
26. ANGLE Button
[P.24]
Press to change the camera angle to see the
sequence being played back from a different angle
(if available).
27. A-B Button
[P.23]
Repeats playback of a selected section.
28. RETURN Button
[P.22]
Returns to the previous screen in the setup menu.
29. ENTER Button
[P.15]
Press to accept a setting.
30. K / L / { / B Buttons
TV Mode:
[P.13]
Press to select a setting mode from the menu on
the TV screen.
Press to select or adjust from a particular menu.
DVD Mode:
[P.20]
Press to select a menu item.
31. DISC MENU Button
[P.20]
Calls up the DVD menu.
32. REV h Button [P.21]
Press to view the DVD picture in fast reverse or
slow reverse motion.
FWD g Button [P.21]
Press to view in fast or slow forward motion.
33. ZOOM Button
[P.21]
Enlarges part of a DVD-reproduced image.
34. MUTE Button
[P.13]
Mutes the sound. Press it again to restore sound.
35. SELECT Button
[P.11]
Press to change to TV mode, external input mode
or DVD mode.
36. COAXIAL Jack
[P.11]
Connect to the digital input of an external
amplifier or decoder (for DVD Audio only).
37. ANT(ENNA). Jack
[P.10]
Connect to an antenna, cable system or satellite
system.
38. Power cord
[P.13]
Connect to a standard AC outlet (120V/60Hz).
NOTE:
Remove the power cord from the hook to avoid
•
breaking a wire before you connect to a standard AC outlet.
NOTE:
We do not recommend the use of universal remote controls. Not all of the functions may be controlled with
•
a universal remote control.
If you decide to use a universal remote control with this unit, please be aware that the code number given
may not operate this unit. In this case, please call the manufacturer of the universal remote control.
- 9 - EN
Page 10
PREPARATION FOR USE
COAXIAL
ANT.
ANT.
UHF
VHF
VHF/UHF
VHF
or
UHF
VHF
or
UHF
OUT IN
ANTENNA/CABLE CONNECTION
Cables used here are commercially available.
[ANTENNA CONNECTION]
[CATV/SATELLITE CONNECTION]
75-ohm
Coaxial Cable
VHF/UHF
OR
CATV Box or
Satellite Box *
Combiner
From Cable System or
Satellite Antenna
Flat twinlead cable
OR
OR
75-ohm
Coaxial Cable
From Cable System
Adaptor
*Some cable TV systems use scrambled signals and
require a special converter to receive these channels.
Consult your local cable company.
Note to CATV system installer:
This reminder is provided to call the CATV system installer’s attention to Article 820-40 of the NEC that provides
guidelines for proper grounding and in particular, specifies that the cable ground shall be connected to the grounding
system of the building as close to the point of cable entry as practical.
NOTE:
Before plugging the antenna into the ANT. jack of the unit, check that the pin is
•
not bent. If it is bent, straighten the pin as illustrated, then plug the pin into the
ANT. jack of the unit.
Bent pin
Cable
Plug
(Needs to be
straightened)
(Straight pin)
VHF/UHF COMBINED ANTENNA
A VHF UHF 75 ohm combination antenna can be
connected to ANT. jack of the unit.
VHF/UHF SEPARATE ANTENNAS
In some areas it will be necessary to use an outdoor
antenna.
CABLE WITHOUT CONVERTER/
DESCRAMBLER BOX
Use this connection if your cable system connects
directly to the unit without a converter box.
NOTE:
For your safety and to avoid damages to the unit, unplug the antenna cable from the ANT. jack
•
before moving the unit.
CABLE WITH CONVERTER/DESCRAMBLER BOX OR SATELLITE BOX
If your cable service supplies you with a converter
box or if you use a satellite system, you can use the
basic connection shown above.
Channel selection must be made with the converter
box or satellite box. This means that channels cannot
be changed using the remote control of this unit.
- 10 - EN
Page 11
CONNECTING TO FRONT A/V INPUT JACKS
COAXIAL
ANT.
To COAXIAL jack
(Only DVD AUDIO OUT)
ex.
MD deck, DAT deck, etc.
To Coaxial digital
Audio input jack
Audio coaxial digital cable
(commercially available)
When you watch a program recorded on another source (VCR or video camera), use the
AUDIO/VIDEO input jacks on the front of the unit.
Connect the Audio/Video output jacks of another source to the AUDIO L/R and VIDEO
jacks of this unit.
Then press [SELECT] or [CH. KK/ LL] until “AUX” appears on the screen.
–SEARCH–
OPEN/
PLAY
CLOSE
HEADPHONE
ex.
VCR or video camera
(OUT)
(OUT)
(IN)
VIDEO L–AUDIO–R
[Front of the unit]
(IN)
VIDEO L–AUDIO–R
POWER
VOLUME CHANNEL STOP SKIP SKIP PAUSE
To the Audio output jacks
Audio Cable
(commercially available)
To the Video output jack
Video Cable
(commercially available)
NOTE:
When you connect a monaural VCR (another source) to this unit, connect the Audio output jack of the
•
monaural VCR (another source) to the AUDIO L jack of this unit. The audio will output in both L and R
channel equally.
AUX
ENGLISH
, etc.
CONNECTING TO A STEREO AMPLIFIER EQUIPPED WITH
DIGITAL INPUT JACKS (for DVD)
Use an audio coaxial digital cable (commercially available) for the audio connections.
Connect to an amplifier equipped with digital input jacks such as MD Deck or DAT Deck.
(OUT)
(IN)
NOTES:
The audio source on a disc in a 5.1 channel Dolby Digital surround format cannot be recorded as digital
•
sound by an MD or DAT deck.
Be sure to turn off the power to all components in the system before connecting another component.
•
Refer to the Owner’s Manuals for the components to be connected to the unit.
•
Set “DOLBY DIGITAL” to “PCM” for audio output in the setup mode. Playing a unit using incorrect set-
•
tings may generate noise distortion and may also damage the speakers. (Refer to page 27.)
- 11 - EN
Page 12
COAXIAL
ANT.
Front speaker
(left)
Center
speaker
Front speaker
(right)
Surround
speaker
(left)
Surround
speaker
(right)
Subwoofer
To COAXIAL jack
(Only DVD AUDIO OUT)
To Coaxial digital
Audio input jack
Dolby Digital
decoder
Audio Coaxial digital cable
(commercially available)
CONNECTING TO A DOLBY DIGITAL DECODER (for DVD)
If using this unit to play a DVD disc in a 5.1 channel Dolby Digital surround format, the unit outputs a
DOLBY DIGITAL Data stream from its COAXIAL jack. By hooking the unit up to a Dolby Digital decoder,
you can enjoy a more convincing, realistic ambience with powerful and high-quality surround sound as
enjoyed in movie theaters.
Use audio coaxial digital cables (commercially available) for the audio connections.
(OUT)
(IN)
NOTES:
Be sure to turn off the power to all components in the system before connecting another component.
•
Refer to the Owner’s Manuals for the components to be connected to the unit.
•
If connected to a Dolby Digital decoder, set “DOLBY DIGITAL” to “BITSTREAM” for audio output in the
•
setup mode. (Refer to page 27.)
Unless connected to a Dolby Digital decoder, set “DOLBY DIGITAL” to “PCM” for audio output in the
•
setup mode. Playing a unit using incorrect settings may generate noise distortion and may also damage the
speakers. (Refer to page 27.)
Manufactured under license from Dolby Laboratories.“Dolby” and the double-D symbol are
trademarks of Dolby Laboratories.
INSTALLING THE BATTERIES
1)Open the battery compartment cover by pressing
the cover on the remote unit in the direction of the
arrow.
2)Insert 2 “AA” penlight batteries into the battery
compartment in the direction indicated by the
polarity (+/-) markings.
3)Replace the cover.
[BATTERY PRECAUTIONS]
Be sure to follow the correct polarity as indicated
•
in the battery compartment. Reversed batteries
may cause damage to the device.
Do not mix different types of batteries together
•
(e.g. Alkaline and Carbon-Zinc) or old batteries
with fresh ones.
If the device is not to be used for a long period of
•
time, remove the batteries to prevent damage or
injury from possible battery leakage.
Do not try to recharge batteries not intended to be
•
recharged; they can overheat and rupture.
- 12 - EN
Page 13
TV OPERATION AND SETTINGS
TV SECTION
WATCHING A TV PROGRAM
TV
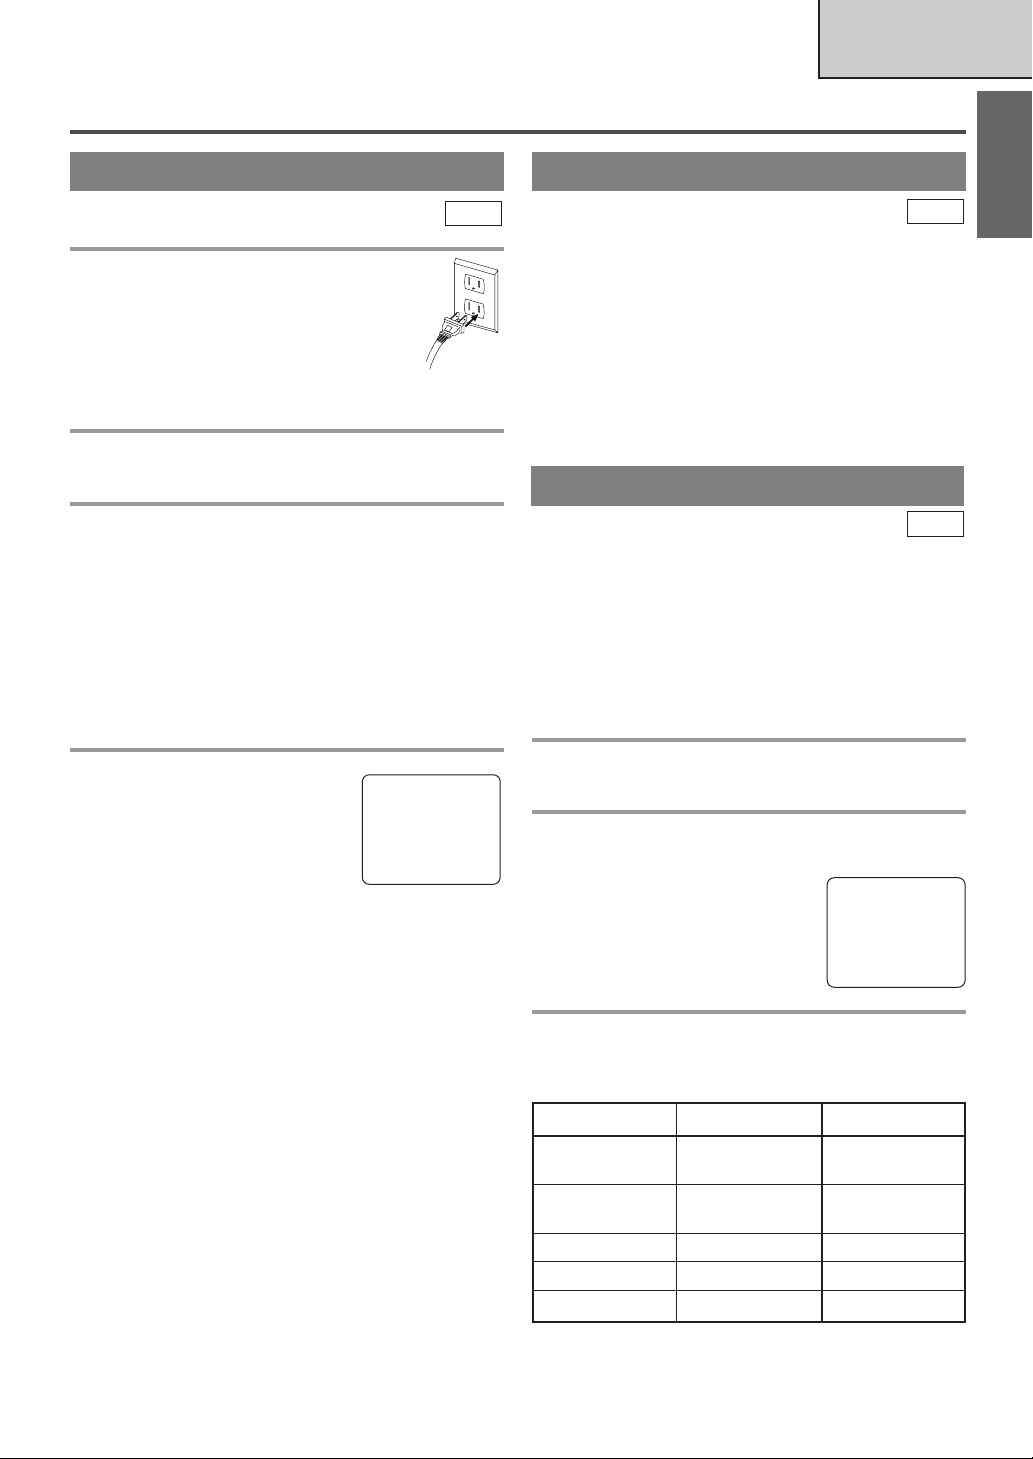
1 Plug in the unit power cord
Plug the unit power cord into a standard
AC outlet.
NOTE:
If any digits appear in the corner of the
•
screen, press [POWER] without
unplugging the power cord.
2 Turn on the unit
Press [POWER] to turn on the unit.
3 Select the channel number
Press [CH. K / L] or the Number buttons to select
your desired channel number.
Notes for using the Number buttons:
¡You must precede single-digit channel numbers
with a zero (for example: 02, 03, 04 and so on).
¡When selecting cable channels which are higher
than 99, press [+100] first, then press the last two
digits. (Example: to select channel 125, first press
[+100] then press [2] and [5].)
DEGAUSSING
TV
This television has a degaussing circuit that will clear
up color errors on the TV screen that are caused by
any excess magnetism which happens to get too close
to the TV. This circuit is designed to operate once
when the set is first plugged in. If minor color
errors are seen in some locations on the screen,
please unplug the TV for approximately 30 minutes. When the TV is plugged back in, the degauss-
ing circuit will operate once to clear them up. Repeat
this procedure any time the TV screen is accidentally
magnetized or when the TV is moved or relocated.
PICTURE CONTROL
TV
The unit’s picture controls – BRIGHT, CONTRAST, COLOR, TINT and SHARPNESS – are
preset to factory specifications. Although they are
usually the best, you may need to make some further
adjustments for a more natural looking image.
Make sure ...
The unit must be turned on.
•
ENGLISH
4 Adjust sound
Press [VOL.XX/ YY] to adjust the
volume.
[MUTE] to instantly mute
Press
the sound.
Press it again to restore the previous sound level.
NOTE:
If you press [CH. K / L] in the DVD mode, you
•
can change the TV channels. Even if you turn off
the unit in the DVD mode, when you turn it on
again, it will go into the TV mode.
VOLUME 20
C C C C C C C C C C C C C C C C
TO WATCH CABLE OR SATELLITE
CHANNEL
If the unit is connected to a cable box or satellite
•
box, press [CH. K / L] to select CH3 or CH4
according to the output channel setting of the
device and select desired channel on that device.
TO WATCH EXTERNAL INPUT
When an external equipment is connected to the
•
front AUDIO/VIDEO input jacks, press
[SELECT] or [CH. K / L] repeatedly until
“AUX” appears on the screen.
1 Call up the menu
Press [PICTURE].
2 Select item you want to adjust
Press [K / L] until desired control is displayed.
BRIGHT
CONTRAST
COLOR
TINT
SHARPNESS
BRIGHT
PP PP PP PP PP PP PP CC PP PP PP PP PP PP PP
–
3 Adjust the setting
Press [s/ B]to adjust to your desired level within 5
seconds.
sB
BRIGHT to decrease to increase
brightness brightness
CONTRAST to decrease to increase
contrast contrast
COLOR to pale to brilliant
TINT to purple to green
SHARPNESS to soft to clear
Even if there is a power failure of any kind, the
•
unit will retain its memory for this feature.
+
- 13 - EN
Page 14
SLEEP TIMER
TV
The Sleep Timer function turns off the unit without
using [POWER] after a desired period of time.
1 Call up the Sleep Timer Setting
Press [SLEEP] so that “SLEEP 0 MINUTE” appears.
2 Set sleep time
Press [SLEEP] repeatedly until
your desired sleep time appears.
Each additional press will increase
the time by 30 minutes up to 120
minutes.
SLEEP 120 MINUTE
After 5 seconds, the Sleep Timer setting will disappear automatically.
TO CANCEL THE SLEEP TIMER
Press [SLEEP] to call up the Sleep Timer Setting.
Press [SLEEP] repeatedly until
“SLEEP 0 MINUTE” appears.
CLOSED CAPTION SYSTEM
TV
You can view specially labeled (cc) TV programs,
movies, news and pre-recorded tapes with either a
dialogue caption or text display.
CAPTION mode: You can watch dramas, movies and
news while captioning the dialogues and the contents
of news.
TEXT mode: You can watch half screen text informa-
tion if you want.
1-2: You may get these captions or text information
by selecting either “1” or “2”. Caption “2” is
usually used for a second language if available.
NOTES:
Not all programs are broadcast with closed cap-
•
tions. Your unit is designed to provide error free
closed captions from high quality antenna, cable
and VCR signals. Conversely, poor quality signals
are likely to result in caption errors or no captions
at all. Common signal conditions which may cause
caption errors are listed below:
Automobile ignition noise
•
Electric motor brush noise
•
Weak snowy reception on TV screen
•
Multiplex signal reception displaying picture
•
ghosts or airplane flutter
If the unit displays a black box
•
on the TV screen, this means that
the unit is set to the TEXT mode.
To clear screen, select [CAPTION1], [CAPTION2] or [OFF].
Make sure ...
The unit must be turned on.
•
1 Select “CAPTION”
Press [SETUP].
Press
[K / L] to point to “CAP-
TION”.
- TV SETUP -
CHANNEL SET UP
V-CHIP SET UP
LANGUAGE [ENGLISH]
B CAPTION [OFF]
2 Select your desired caption mode
Press [ENTER] repeatedly until
your desired caption menu appears.
([CAPTION1], [CAPTION2],
[TEXT1] or [TEXT2])
- TV SETUP -
CHANNEL SET UP
V-CHIP SET UP
LANGUAGE [ENGLISH]
B CAPTION [CAPTION1]
3 Exit the caption setting mode
Press [SETUP] to exit the menu.
NOTE:
Even if there is a power failure of any kind, the
•
unit will retain its memory for this feature.
TO CANCEL THE CLOSED CAPTION
SYSTEM
Repeat steps 1 to 2 and select [OFF] using
[ENTER]. Then press [SETUP] to return to TV
mode.
- 14 - EN
Page 15

CHANNEL SET UP
Make sure ...
The unit must be turned on.
•
TV
ADDING/DELETING CHANNELS
The channels you no longer receive or seldom watch
can be deleted from the memory. (Of course, you can
add the deleted channel into the memory again.)
AUTO CHANNEL PROGRAMMING
As the initial setting, this unit has memorized all
channels, including the ones not available in your
area. This feature automatically puts only available
channels into the memory.
1 Select “CHANNEL SET UP”
Press [SETUP].
Press
[K / L]
to point to
- TV SETUP -
B CHANNEL SET UP
V-CHIP SET UP
LANGUAGE [ENGLISH]
CAPTION [OFF]
“CHANNEL SET UP”, then press
[ENTER].
2 Begin channel scanning
Press
[K / L]
CH PROGRAMMING”, then press
to point to “AUTO
– CHANNEL SET UP –
ADD / DELETE CH (CATV)
B AUTO CH PROGRAMMING
[ENTER].
The tuner scans and memorizes all
the active channels in your area.
3 After scanning
The tuner stops on the lowest memorized channel.
NOTES:
When “AUTO CH PROGRAM-
•
MING” is activated where there
is no TV signal input, “NO TV
SIGNALS” will appear on the
display after the completion of
channel scanning.
The unit may recognize CATV channels to be TV
•
channels if reception condition is poor. In this case,
check the antenna connection and try “AUTO CH
PROGRAMMING” again when reception conditions are better.
Channel memory programming is NOT neces-
•
sary when connected to a cable box or satellite
box. Just select the channel for cable box or
satellite input (e.g. CH3) on the unit, then select
your desired channel on the cable box or satellite box.
NO TV SIGNALS
1 Select “CHANNEL SET UP”
Press [SETUP].
Press
[K / L]
to point to “CHAN-
- TV SETUP -
B CHANNEL SET UP
V-CHIP SET UP
LANGUAGE [ENGLISH]
CAPTION [OFF]
NEL SET UP”, then press
[ENTER].
2 Select “ADD/DELETE CH”
Press
[K / L]
“ADD/DELETE CH”, then press
to point to
– CHANNEL SET UP –
B ADD / DELETE CH (CATV)
AUTO CH PROGRAMMING
[ENTER].
3 Enter the desired channel number
Press [CH. K / L] or the Number
buttons until your desired channel
number appears. (You can also
press [K / L] to enter it.)
You must precede single-digit
•
channel numbers with a zero
ADD / DELETE
(Example: CH8)
(e.g. 02 ... 09).
When selecting cable channels which are higher
•
than 99, press [+100] first, then press the last two
digits. (e.g.: to select channel 125, first press
[+100] then press [2] and [5].)
4 Delete (or add) it from (or into) memory
Press [ENTER]. The channel number changes to
light red. The channel is deleted from memory.
To delete another channel, repeat steps 3 to 4.
•
If you press [ENTER] again, the channel is memo-
•
rized again.
Added channel : Light blue
Deleted channel : Light red
5 Exit the channel setup mode
Press [SETUP] to exit the menu.
NOTE:
To confirm that channel(s) has been deleted or
•
added, press [CH. K / L].
ENGLISH
08
- 15 - EN
Page 16

V-CHIP SET UP
TV
This feature enables parents to prevent their children
from watching inappropriate material on TV. When
you try to access a program which is blocked,
“PROTECTED PROGRAM by ...” message appears
on the TV screen.
NOTES:
When you select a rating and set
•
it to [BLOCK], the higher ratings
will be blocked automatically.
The lower ratings will be avail-
TV–Y [VIEW]
TV–Y7 ( ) [VIEW]
B TV–G [BLOCK]
TV–PG (DLSV ) [BLOCK]
TV–14 (DLSV) [BLOCK]
TV–MA ( LSV) [BLOCK]
able for viewing.
When you set the lowest rating to
•
[VIEW], all other ratings will automatically be
available for viewing.
V-CHIP SET UP
Make sure ...
The unit must be turned on.
•
1 Select “V-CHIP SET UP”
Press [SETUP].
Press
[K / L] to select “V-CHIP
- TV SETUP -
CHANNEL SET UP
B V-CHIP SET UP
LANGUAGE [ENGLISH]
CAPTION [OFF]
SET UP”, then press [ENTER].
2 Enter Access code
Press the Number buttons to
enter the access code.
For the first time set-up or in the
•
ACCESS CODE
_ _ _ _
event the unit has lost power,
enter the default code of 0000.
3 Select the desired item
Press [K / L] to select “TV RATING”,
“MPAA RATING” or “CHANGE CODE”, then
press [ENTER].
Refer to the pages below to set up each item.
– V-CHIP SET UP –
B TV RATING
MPAA RATING
CHANGE CODE
A
TV RATING SET UP
A
P16 Step
B
P17 Step
C
P17 Step
4
4
4
5 Setting “Sub-Ratings”
When you select the ratings of TVY7, TV-PG, TV-14 or TV-MA you
will have the option of setting sub
rating categories.
Press
[K / L] to select a rating with
sub-ratings you wish to block, then
press [ENTER] twice.
Press
[K / L] to select a sub-rating,
then press [ENTER] to set it to
[BLOCK] or [VIEW].
Selection Rating Category Explanations
TV-Y7
FV Fantasy Violence
TV-PG, TV-14, TV-MA
D Suggestive Dialog
L Coarse Language
S Sexual Situation
VViolence
NOTE:
The blocked sub-ratings will
•
appear next to the rating category
in the “TV RATING” menu.
TV–Y [VIEW]
B TV–Y7 ( ) [VIEW]
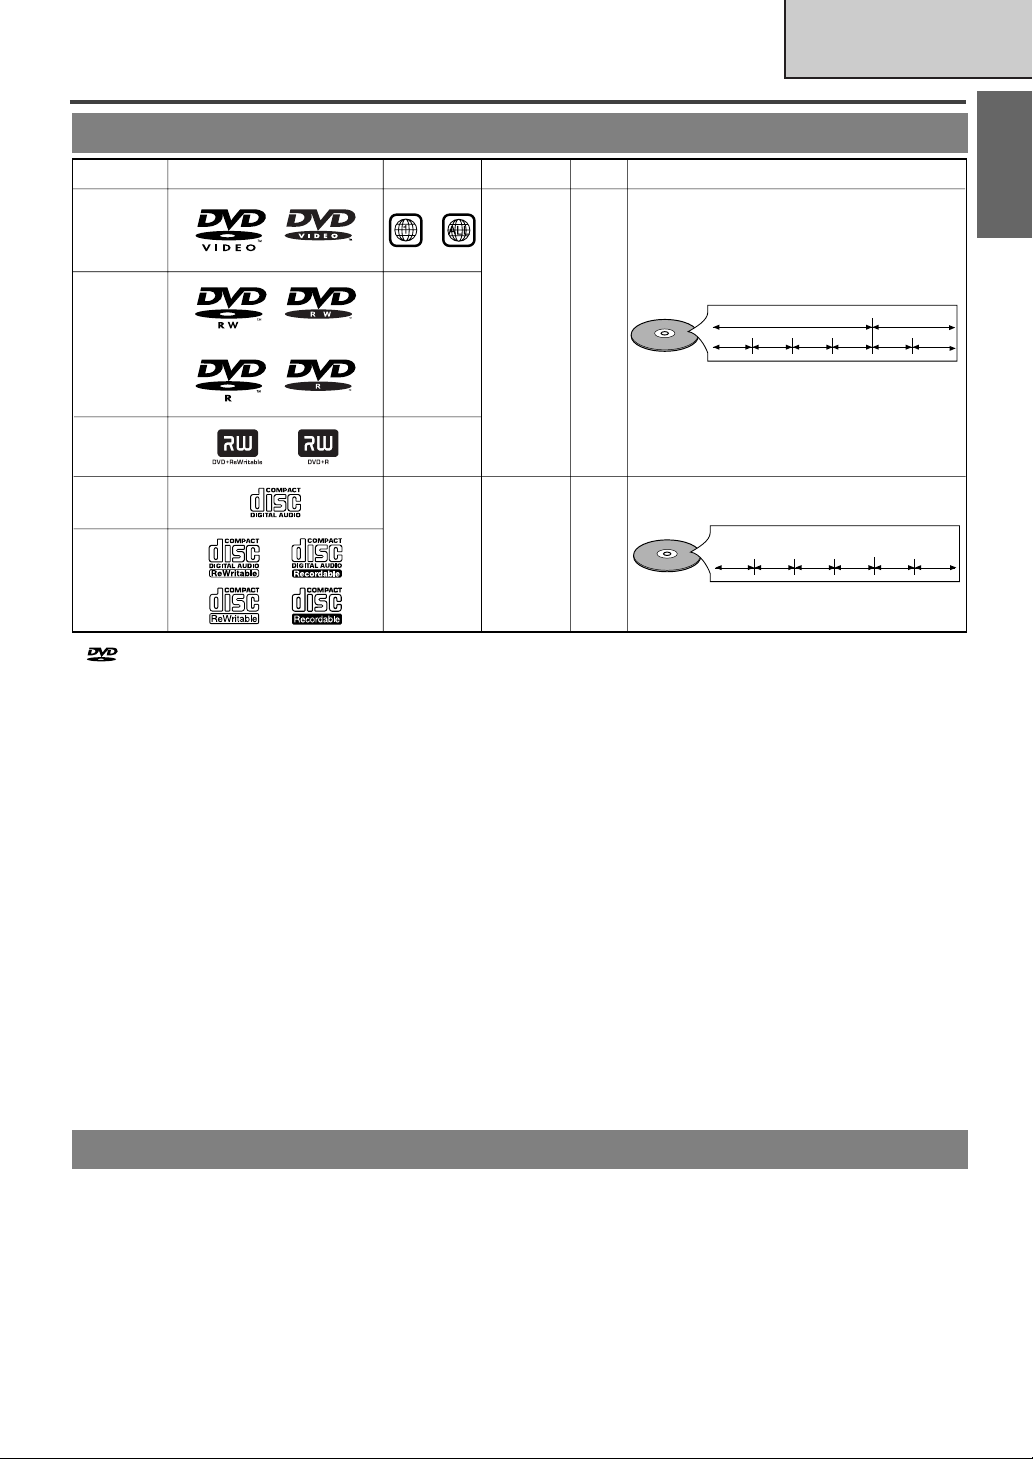
TV–G [VIEW]
TV–PG ( ) [VIEW]
TV–14 ( ) [VIEW]
TV–MA( ) [VIEW]
TV–Y7 [BLOCK]
B FV [BLOCK]
TV–PG [BLOCK]
B D[BLOCK]
L[BLOCK]
S[BLOCK]
V[BLOCK]
(TV-PG, TV-14 only)
TV–Y [VIEW]
TV–Y7 ( ) [VIEW]
TV–G [VIEW]
B TV–PG (DLSV ) [BLOCK]
TV–14 (DLSV) [BLOCK]
TV–MA ( LSV) [BLOCK]
Follow steps 1to 3in the “V-CHIP SET UP” section above.
4 Blocking TV programs
Press [K / L] to select a rating that
you wish to block.
Press
[ENTER] repeatedly to set it
to [BLOCK] or [VIEW].
Selection Rating Category Explanations
TV-Y Appropriate for all children
TV-Y7 Appropriate for children seven and older
TV-G General Audience
TV-PG Parental Guidance suggested.
TV-14 Unsuitable for children under 14
TV-MA Mature audience only
B TV–Y [VIEW]
TV–Y7 ( ) [VIEW]
TV–G [VIEW]
TV–PG ( ) [VIEW]
TV–14 ( ) [VIEW]
TV–MA( ) [VIEW]
6 Exit the V-Chip setting mode
Press [SETUP] to exit the menu.
NOTE:
To change the rating, the TV must
•
be turned to an unprotected program. If “PROTECTED PROGRAM by ...” appears on the
screen, please change the channel
to a station that is not protected.
- 16 - EN
PROTECTED PROGRAM
by TV-Y
Page 17
B
MPAA RATING SET UP
MENU LANGUAGE
Follow steps 1to 3in the “V-CHIP SET UP” section on page 16.
4 Select your desired item
Press [K / L] to point to your
desired item, then press [ENTER]
to select [BLOCK] or [VIEW].
Selection Rating Category Explanations
G General Audience
PG Parental Guidance suggested.
PG-13 Unsuitable for children under 13
R Restricted; under 17 requires accompa-
nying parent or adult guardian
NC-17 No one under 17 admitted
X Mature audience only
When you select a rating and set it to [BLOCK],
•
the higher ratings will be blocked automatically.
The lower ratings will be available for viewing.
When you set the lowest rating to [VIEW], all
•
other ratings will automatically be available for
viewing.
G[VIEW]
PG [VIEW]
PG–13 [VIEW]
B R[BLOCK]
NC–17 [BLOCK]
X[BLOCK]
5 Exit the V-Chip setting mode
Press [SETUP] to exit the menu.
TV
1 Select “LANGUAGE”
Press [SETUP].
Press
[K / L] to point to “LAN-
GUAGE”.
- TV SETUP -
CHANNEL SET UP
V-CHIP SET UP
B LANGUAGE [ENGLISH]
CAPTION [OFF]
2 Select “ENGLISH”, “ESPAÑOL” or “FRANÇAIS”
Press [ENTER] repeatedly to select “ENGLISH”,
“ESPAÑOL”= Spanish or “FRANÇAIS”= French.
3 Exit the Language mode
Press [SETUP] to exit the menu.
NOTES:
This function effects only the language on the
•
screen menu and not the audio source.
If for some reason the menu is in Spanish or
•
French, press [SETUP], press [K / L] to point to
“IDIOMA [ESPAÑOL]” or “LANGAGE
[FRANÇAIS]”, then press [ENTER] repeatedly to
select desired language, then press [SETUP].
ENGLISH
C
CHANGE ACCESS CODE
Follow steps 1to 3in the “V-CHIP SET UP” section on page 16.
4 Enter New code
Press the Number buttons to enter
your desired access code in the
NEW CODE
CONFIRM CODE
_ _ _ _
X X X X
“NEW CODE” space, then enter
the same code in the “CONFIRM
CODE” space. When completed, the menu will
return to “V-CHIP SET UP”.
Make sure you enter exactly the same new code in
•
the “CONFIRM CODE” space as one in the
“NEW CODE” space. If they are different, the
“NEW CODE” space is cleared for redoing.
5 Exit the V-Chip setting mode
Press [SETUP] to exit the menu.
NOTE:
Your personal access code will be erased and will
•
return to the default (0000) when a power failure
occurs or when you turn off the power using a
wall switch. If you have forgotten the code, unplug
the power cord for 10 seconds to restore the access
code to 0000.
- 17 - EN
Page 18
CABLE CHANNEL DESIGNATIONS
W+80 W+81 W+82 W+83 W+84
W+65 W+66 W+67 W+68 W+69 W+70 W+71 W+72 W+73 W+74 W+75 W+76 W+77 W+78 W+79
W+55 W+56 W+57 W+58 A-4 A-3 A-2 A-1 W+59 W+60 W+61 W+62 W+63 W+64
W+40 W+41 W+42 W+43 W+44 W+45 W+46 W+47 W+48 W+49 W+50 W+51 W+52 W+53 W+54
W+25 W+26 W+27 W+28 W+29 W+30 W+31 W+32 W+33 W+34 W+35 W+36 W+37 W+38 W+39
W+10 W+11 W+12 W+13 W+14 W+15 W+16 W+17 W+18 W+19 W+20 W+21 W+22 W+23 W+24
A-5
RSTUVWW+1 W+2 W+3 W+4 W+5 W+6 W+7 W+8 W+9
CDEFGH I JKLMNOPQ
5A 2 3 4 5 6 7 8 9 10 11 12 13 A B
1234567891011 12 13 14 15
16 17 18 19 20 21 22 23 24 25 26 27 28 29 30
31 32 33 34 35 36 37 38 39 40 41 42 43 44 45
46 47 48 49 50 51 52 53 54 55 56 57 58 59 60
61 62 63 64 65 66 67 68 69 70 71 72 73 74 75
76 77 78 79 80 81 82 83 84 85 86 87 88 89 90
91 92 93 94 95 96 97 98 99 100 101 102 103 104 105
106 107 108 109 110 111 112 113 114 115 116 117 118 119 120
121 122 123 124 125
TV Display
TV Display
TV Display
TV Display
TV Display
TV Display
TV Display
TV Display
CATV channel
TV Display
CATV channel
CATV channel
CATV channel
CATV channel
CATV channel
CATV channel
CATV channel
CATV channel
If you subscribe to cable TV, the channels are displayed as 1-125. Cable companies often designate channels
with letters or letter-number combinations. Please check with your local cable company. The following is a
chart of common cable channel designations.
- 18 - EN
Page 19
ABOUT THE DISCS
DVD-Video
* 1,2,4,6,10,11
* 4,6,10
* 4,5,6,9,10
* 1,3,4,5,6
7,9,10
DVD-RW
DVD-R
* 1,3,4,5,6,8,9,10
DVD+RW
DVD+R
Audio CD
CD-RW
CD-R
Digital video
(MPEG2)
-
-
-
Digital audio
Region code
Mark (logo)
Playable
discs
Recorded
signals
Disc size
Disc types
12 cm
or
8 cm
12 cm
or
8 cm
Example
Title 1 Title 2
Chapter 1 Chapter 2 Chapter 1
Chapter 2
Chapter 3 Chapter 4
Example
Tra c k 1
Tra c k 2
Tra c k 5
Tra c k 6
Tra c k 3
Tra c k 4
or
Audio CD
is a trademark of DVD Format/Logo Licensing Corporation.
PLAYABLE DISCS
DVD SECTION
ENGLISH
If you cannot play back a disc which bears one of the marks above, check the following notes.
*1: This unit conforms to the NTSC color system. Discs recorded in other color systems such as PAL cannot
be played back.
*2:
Certain DVD-Video discs do not operate as described in this manual due to the intentions of the disc’s producers.
*3: Discs recorded in the VR (Video Recording) format cannot be played back.
*4: Scratched or stained discs may not be played back.
*5: Some discs cannot be played back because of incompatible recording conditions, characteristics of the
recorder or special properties of discs.
*6: You can play back discs which bear the marks above. If you use nonstandardized discs, this unit may not
play them back. Even if they are played back, the sound or video quality will be compromised.
*7: You may play back the unfinalized DVD-R/RW disc recorded in the video format on our brand’s DVD
recorder. However, depending on the recording status of a disc, the disc may not be played back at all or
normally (the picture or sound may not be smooth, etc.). In this case, you need to finalize the disc with
the DVD recorder. Refer to the manual accompanying the DVD recorder.
*8: Only the discs recorded in the video format and finalized can be played back.
Unfinalized discs cannot be played back. Depending on the recording status of a disc, the disc may not be
played back at all or normally (the picture or sound may not be smooth, etc.).
*9: If there is too much recording space left on a disc (the used portion is less than 55mm across), it may not
play back properly.
Do not glue paper or put stickers on to the disc. These may damage the disc and the unit may not read it correctly.
*10:
*11: The number inside the symbol refers to a region of the world and a disc encoded in a specific region for-
mat can only be played back on unit with the same region code.
¡
NEVER play back the following discs. Otherwise, malfunction may result!
DVD-RAM / CD-I / Photo CD / Video CD / DVD with region codes other than 1 or ALL /
DTS-CD / DVD-ROM for personal computers / CD-ROM for personal computers / MP3
¡
On the following disc, the sound MAY NOT be heard.
Super Audio CD
NOTE: Only the sound recorded on the normal CD layer can be delivered.
The sound recorded on the high density Super Audio CD layer cannot be delivered.
¡
Any other discs without compatibility indications
UNPLAYABLE DISCS
- 19 - EN
Page 20
PLAYING A DISC
BASIC PLAYBACK
DVD-V
Getting started
¡Turn on the power of amplifier and any other com-
ponents, if necessary.
1 Press [POWER].
¡The power will turn on.
2 Press [OPEN/CLOSE A] to open disc load-
ing tray.
3 Place the chosen disc in the tray, with the
label facing up.
4 Press [PLAY O].
¡The tray will close automatically and playback will
then start from the first chapter or track of the disc.
¡Closing the disc tray manually or by pressing
[OPEN/CLOSE A] also starts playback.
¡If the playback does not start automatically, press
[PLAY O].
¡When you playback a DVD which features a title
menu, it may appear on the screen. In this case, refer
to “TITLE MENU” on this page.
5 Press [STOP C] to stop playback.
CD
GENERAL FEATURES
DVD-V
D
VD may contain menus to navigate the disc and
access special features. Press the appropriate
Number buttons or [K / L / s / B] to highlight
your selection in the DVD main menu and press
[ENTER] to confirm.
NOTES:
¡Select DVD mode by pressing [SELECT], then
operate the DVD functions.
¡Unless stated, all operations described are based on
remote control use. Some operations can be carried
out using the menu bar on the TV screen.
DISC MENU
DVD-V
1 Press [DISC MENU].
¡The DVD main menu will appear.
¡If the feature is not available, symbol may
appear on the TV screen.
¡If disc menu is available on the disc, audio lan-
guage, subtitle options, chapters for the title and
other options will appear for selection.
2 Press [K / L / s / B] to select an item and
press [ENTER] to confirm selection.
TITLE MENU
DVD-V
NOTES:
¡When the DVD mode has been switched to the TV
mode, the DVD mode shuts down first and then the
TV picture and sound appears in about 4 seconds.
Similarly, when
DVD mode, this mode shuts down first and then the
unit is turned off.
¡A “prohibited icon” may appear at
the top-right on the TV screen during operation, warning that a prohibited operation has been encountered by the DVD or the disc.
¡With DVDs that use titles for playback program sig-
nals, playback may start from the second title or it
may skip these titles.
¡During the playback of a two layered disc, pictures
may stop for a moment. This happens when the 1st
layer switches to the 2nd layer. This is not a malfunction.
[POWER] is press to turn off in the
1 Press [TITLE].
¡The title menu will appear.
¡If the feature is not available, symbol may
appear on the TV screen.
2 Press [K / L / s / B] to select an item, and
hit [ENTER] to confirm selection.
CALLING UP A MENU SCREEN
DURING PLAYBACK
¡Press [DISC MENU] to call up the DVD menu.
¡Press [TITLE] to call up the title menu.
NOTE:
¡Contents of menu and corresponding menu opera-
tions may vary between discs. Refer to the manual
accompanying the disc for details.
- 20 - EN
Page 21
RESUME
DVD-V
1 During playback, press [STOP C].
¡Resume message will appear on the TV screen.
2 Press [PLAY O], playback will resume from the
point at which playback was stopped.
¡To cancel resume, press [STOP C] twice.
¡The resume information stays on even when the
power is turned off.
CD
PAUSE
DVD-V
1 During playback, press [PAUSE F].
¡Playback will pause and sound will be muted.
CD
SLOW FORWARD /
SLOW REVERSE
DVD-V
1 During playback, press [PAUSE F].
2 Press [FWD g] or [REV h ] .
¡“ 1” or “ 1” appears on the screen.
3 To select another speed, repeat step 2 until
your required speed number appears on the
screen.
¡Slow forward or reverse speed varies with the disc.
Approximate speed is 1(1/16), 2(1/8) and 3(1/2).
¡
When you press buttons on the front panel, press and
hold [SEARCH h / g] for a few seconds.
4
To return to normal playback, press [PLAY O].
ENGLISH
2 To continue playback, press [PLAY O].
STEP BY STEP PLAYBACK
DVD-V
1 During playback, press [PAUSE F].
¡Playback will pause and sound will be muted.
2 The disc goes forward by one frame each
time [PAUSE
3
To exit step by step playback, press [PLAY O].
F] is pressed.
FAST FORWARD /
FAST REVERSE
DVD-V
1 During playback, press [FWD g] or
[REV
h ].
¡“ g 1” or “h 1” appears on the screen.
2 To select another speed, repeat step 1 until
your required speed number appears on the
screen.
¡For DVDs, fast forward/reverse search speed is dif-
ferent depending on the disc. Approximate speed is
1(×2), 2(×8), 3(×20), 4(×50) and 5(×100).
¡For Audio CDs approximate speed is 1(×2), 2(×8)
and 3(
×30).
¡
When you press buttons on the front panel, press and
[SEARCH h / g] for a few seconds.
hold
CD
ZOOM
DVD-V
The Zoom function allows you to enlarge the video
image and to pan through the enlarged image.
1 Press [ZOOM] during playback.
¡Playback will continue.
2 Press [ZOOM] repeatedly to select the
required zoom factor: ZOOM1, ZOOM2,
ZOOM3 or OFF.
3 Press [K / L / s / B] to move the zoomed
picture across the screen.
4 To exit zoom mode, press [ZOOM] to OFF.
NOTES:
¡Zooming function does not work while disc menu is
shown.
¡Zooming function is not available on some discs.
¡It may take several seconds to slide the zoomed pic-
ture.
¡The picture may be distorted if you operate other
functions repeatedly (ex. [PAUSE FF] or [REVh],
etc.) in the zoom mode.
3
To return to normal playback, press [PLAY O]
.
- 21 - EN
Page 22
SEARCH FUNCTION
_/2
TRACK SEARCH
CD
There are three ways to begin playback on an Audio
CD at a specific track.
Using the Number buttons
1 Press the Number buttons to enter the
desired track number.
¡Playback will start at the selected track.
¡For single digit tracks (1-9), press a single number
(eg. track 3, press [3]).
¡To play track 26, press [+10], [2], [6].
Using [SEARCH MODE]
1 Press [SEARCH MODE].
¡The track search display appears.
2 Within 30 seconds, select the desired track
number using the Number buttons.
¡For single digits press [0] first, if the total track of
the disc is 10 tracks or more.
¡Playback will start at the selected track.
Using [SKIP
During playback, press [SKIP G] to move the next
track. Press it repeatedly to skip subsequent tracks.
Press [SKIP H] to go back to beginning of the current
track. Press it repeatedly to go to the previous tracks.
¡If [SKIP H / G ] is pressed while the playback
is paused, the playback will be paused again after
skipping to the next track.
NOTE:
¡[SKIP H / G ] are not operative when playback
is stopped.
H/ G
]
TIME SEARCH
DVD-V
1 During playback, press [SEARCH MODE]
three times (CD: twice) to display the Time
Search on the TV screen.
2 Within 30 seconds, enter a desired disc
time using the Number buttons.
¡Playback will start at the specified time.
¡Press [CLEAR] to erase the incorrect input.
¡When there is no need to enter a number, “0”
appears automatically. For example, “ 0 : 0 - :
appears in the Time Search display if the total time
of the track or title is less than 10 minutes.
CD
- -
”
MARKER SETUP SCREEN
DVD-V
Use markers to memorize your favorite places on a
disc.
1 Press [SEARCH MODE] four times (CD:
three times) during playback.
¡The display screen and Markers will appear on the
TV screen.
2 Press [s / B] to select 1, 2, 3, 4, 5, 6, 7, 8, 9,
or 10 and ensure that “
appears in the display.
- - - - :- - :- -
3 When you reach the desired point, press
[ENTER].
¡The Title or Track and elapsed playing time will
appear in the TV screen.
CD
”
TITLE / CHAPTER SEARCH
DVD-V
1 Press [SEARCH MODE] once for the
Chapter search, twice for the Title search
during playback.
2 Enter the desired chapter/title number using
the Number buttons.
¡Playback will start at the selected chapter or title.
¡Press [CLEAR] to erase the incorrect input.
¡For single digits press [0] first, if the total number of
chapter or title of the disc is 10 or more.
4 To return to the Marker later, press
[SEARCH MODE] four times (CD: three
times) during playback and press [
to choose the desired marker, then press
[ENTER].
NOTES:
¡Operations which erase all Markers:
– Opening the disc tray.
– Turning off the power.
– Pressing [SELECT].
– Selecting “AC” at step
¡To clear a marker:
– Press [s / B] to select a cursor on to the marker
number and press
¡You can mark up to 10 points.
2 and pressing [ENTER].
[CLEAR].
s / B]
5 Press [SEARCH MODE] or [RETURN] to
exit.
- 22 - EN
Page 23
SPECIAL PLAYBACK FUNCTION
REPEAT
REPEAT is available only during playback.
REPEAT TITLE / CHAPTER
DVD-V
To activate the repeat function, press [REPEAT]
during playback.
¡The repeat mode changes as described below every
time you press the button.
CHAPTER TITLE OFF
(current chapter repeat) (current title repeat)
NOTES:
¡Repeat Title/Chapter is not available with some
scenes.
¡The REPEAT setting will be cleared when moving
to other title or chapter.
REPEAT TRACK
To activate the repeat function, press [REPEAT]
during playback.
¡The repeat mode changes as described below every
time you press the button.
TRACK ALL OFF
(current track repeat) (entire disc repeat)
NOTES:
¡Repeat setting will be cleared when moving to other
track.
¡Repeat playback does not function during A-B
repeat playback.
A-B REPEAT
DVD-V
(repeat
CD
(repeat
CD
off)
off)
PROGRAM
CD
You may determine the order in which tracks will play.
1 In the stop mode, press [MODE].
¡The “PROGRAM” screen will appear.
2 Press [▲ / ▼] to select a track, then press
[ENTER].
¡Press [CLEAR] to erase the
most recently entered track.
¡If the entire Program cannot be
displayed at once on a screen,
“G” appears to go to the next
PROGRAM
ENTER
PLAY
CLEAR
CD-DA
1 3:30
2 4:30
3 5:00
4 3:10
5 5:10
6 1:30
7 2:30
1 3:30
1/4
TOTAL 1:03:30
1 3:30
5 5:10
10 4:20
11 3:00
12 3:20
17 4:10
22 2:50
2/3
page and “H” appears to go
back to the previous page.
3 Repeat step 2 until you have selected all the
tracks you want to play in the program.
4
Press [PLAYO] to play the programmed tracks.
NOTES:
¡While the program is being played back, pressing
[STOP C] works as follows.
¡Press [STOP C] once and then [PLAY O] again,
playback will restart from the point where
[STOP C] was pressed. (Program continued)
¡Press [STOP C] twice and then [PLAY O] again,
playback will restart from the track in the usual
way. (Program canceled)
¡Up to 99 tracks can be entered.
¡To erase all tracks in the program at once, select
“ALL CLEAR” at the bottom of the list at step 2.
¡If you like to repeat the current track in the pro-
gram, press [REPEAT] several times until “
TRACK” appears during playback. If you like to
repeat the entire program press [REPEAT] several
times until “ ALL” appears during playback.
RANDOM PLAYBACK
ENGLISH
1 Press [A-B] at your chosen starting point.
¡“ A-” appears briefly on the TV screen.
2 Press [A-B] again at your chosen end point.
¡“ A-B” appears briefly on the TV screen, and the
repeat sequence begins.
3 To exit the sequence, press [A-B].
NOTES:
¡The A-B repeat section can only be set within the
current title (for DVDs) or current track
(for Audio CDs).
¡A-B repeat is not available with some scenes in
DVD.
¡To cancel the A point which was set, press
[CLEAR].
¡A-B repeat playback does not function during title,
chapter, track or all repeat playback.
CD
This function shuffles the playing order of tracks
instead of playback in the sequence.
1 In the stop mode, press [MODE] twice.
¡“RANDOM” screen appears.
RANDOM
CD-DA TOTAL 0:45:55
PLAY
RANDOM PROGRAM
- - no indication - -
2 Press [PLAY O] to start random playback.
NOTE:
¡
If you like to repeat the current track in the random
selection, press
TRACK” appears during playback. If you like to repeat
the entire random selection press
times until “ ALL” appears during playback.
- 23 - EN
[REPEAT] several times until “
[REPEAT] several
Page 24
CHANGING THE SETTINGS
SUBTITLE LANGUAGE
DVD-V
The unit allows you to select a language for subtitles
during DVD disc (if available) playback.
1 Press [SUBTITLE] during playback.
¡The subtitle language will
appear on the display bar at
the top of the TV screen.
2 Press [SUBTITLE] repeatedly to select your
desired subtitle language.
3 To turn off subtitles, press [SUBTITLE]
repeatedly until “OFF” appears.
NOTES:
¡Pressing [SUBTITLE] may not work on some
DVDs with multiple subtitle languages. In this
case, set it on the disc menu. (Operation varies
between discs. Refer to the manual of the disc.)
¡If the desired language is not shown after pressing
[SUBTITLE] several times, the disc does not have
subtitles in that language.
¡When “NOT AVAILABLE”
appears on the TV screen, it
means no subtitle is recorded
on the scene.
¡If you choose a language that has a 3 letter lan-
guage code, the code will be displayed every time
you change the Subtitle language setting. If you
choose any other languages, “---” will be displayed
instead. (Refer to page 26.)
1.ENG/6
NOT AVAILABLE
STEREO SOUND MODE
CD
1 Press [AUDIO] repeatedly during playback to
select between “STEREO”, “L-ch” or “R-ch”.
STEREO
¡
STEREO - both right and left channels are active (stereo)
L-ch - only left channel is active
R-ch - only right channel is active
CAMERA ANGLE
DVD-V
Some DVD discs contain scenes which have been shot
simultaneously from various angles. You can change
the camera angle when the “ ” icon appears on the
screen.
1 Press [ANGLE] during playback.
¡The selected angle will be displayed on the display
bar at the top of the screen.
¡If the “ANGLE ICON” setting is “OFF” in the
1 / 8
“OTHERS” menu, the “ ” icon will not appear.
(Refer to page 28.)
2 Press [ANGLE] repeatedly to select your
desired angle.
BLACK LEVEL SETTING
AUDIO LANGUAGE
DVD-V
The unit allows you to select a language during DVD
disc (if multi languages are available) playback.
1 Press [AUDIO] during playback.
1.ENG Dolby D 3/2.1ch 48k/3
2 Press [AUDIO] repeatedly to select your
desired language.
NOTE:
¡Pressing [AUDIO] may not work on some DVDs with
multiple audio languages (e.g. DVDs which allow
audio language setting on the disc menu).
DVD-V
Adjust the Black Level Settings to make the black
parts of the picture brighter.
1 Press [MODE] during playback.
OFF
2 Press [ENTER] to switch “ON/OFF”.
ON: Makes the dark parts brighter.
OFF: Shows the original picture as recorded.
(Initial setting)
3 Press [MODE] twice or [RETURN] to exit.
NOTE:
¡The setting will be saved even if the unit is turned
off.
- 24 - EN
Page 25

VIRTUAL SURROUND
OFF
9/49 0:00:00 -0:03:30
4/12 0:03:21 - 0:02:15
T
4/12 0:13:45 - 0:45:40
T
1/3 0:00:00 - 1:23:45
TL1
PROGRAM
DVD-V
CD
You can enjoy surround-sound effect over two speakers on this unit.
1 Press [MODE] twice (CD: once) during play-
back.
2 Press [ENTER] to set it “1” (Natural effect),
“2” (Emphasized effect) or “OFF”.
3 Press [MODE] to exit.
¡You can also exit the menu by pressing [RETURN].
NOTE: (for CD play only)
¡Virtual Surround will not be effective if the sound
mode is set to something other than STEREO.
ENGLISH
THE ON-SCREEN INFORMATION
You can check the information about the current disc by pressing [DISPLAY].
For DVD-Vs
1 Press [DISPLAY] during playback to show
current Chapter.
¡The elapsed and remaining
playing time of the current
chapter will be displayed.
2
Press [DISPLAY] again to show current Title.
¡The elapsed and remaining
playing time of the current title
will be displayed.
3 Press [DISPLAY] again.
¡The bit rate and the current
repeat setting will be displayed.
¡If you are playing a dual layered disc, the layer num-
ber will also be displayed (L0: Layer 0 is playing.
L1: Layer 1 is playing).
4 Press [DISPLAY] again to exit.
For Audio CDs
1 Press [DISPLAY] during playback to show
the current Track.
¡The elapsed and remaining playing time of the cur-
rent track will be displayed.
2 Press [DISPLAY] again to show current Total
Track.
¡The elapsed and remaining playing time of the total
track will be displayed.
3 Press [DISPLAY] again to exit.
NOTE:
¡When you are playing a disc in PROGRAM or
RANDOM mode, “ PROGRAM” (or RANDOM) will be displayed at step 2.
DVD-V
CD
- 25 - EN
Page 26
CHANGING THE DVD SET UP ITEMS
SUBTITLE
OFF
ENGLISH
FRENCH
SETUP LANGUAGE
DISC MENU
ENGLISH
FRENCH
SPANISH
SETUP LANGUAGE
AUDIO
ORIGINAL
ENGLISH
FRENCH
SETUP LANGUAGE
CUSTOM MENU
You can change the DVD player’s settings.
1 Press [SETUP] twice in the stop mode so
that the DVD SETUP menu appears.
¡Press [L] to select “CUSTOM”
then press [ENTER].
NOTE:
¡
If the menu does not appear, press [PLAYO] first,
then press
mode, then slowly press
[STOP C]. Make sure the disc is in the stop
[SETUP] twice.
2 Select the desired item.
¡Press
Refer to the pages below to set up each item.
A
Follow steps 1to 2in the “CUSTOM MENU” section above.
[
K / L]to select the desired item then press
[ENTER] to confirm.
SETUP CUSTOM
LANGUAGE
DISPLAY
AUDIO
PARENTAL
OTHERS
LANGUAGE SETTING
3 Press [K / L] to select the desired item then
press [ENTER].
AUDIO:
Sets the audio language.
SUBTITLE:
Sets the subtitle language.
DISC MENU:
Sets the language for DVD menu.
4 Press [K / L]to select a setting then press
[ENTER].
¡If “OTHER” is selected on
the “AUDIO”, “SUBTITLE”
or “DISC MENU” screen,
press four-digit number to
enter the code for the
desired language. (Refer to
the language code list.)
¡Only the languages support-
ed by the disc can be selected.
5 Press [SETUP] to exit the menu.
NOTES:
¡Language Setting for Audio and Subtitle are not
valid for some discs due to default setting of the
disc. In this case, set them by pressing
and [SUBTITLE]. (Refer to page 24.)
¡If you select a language that is not supported by the
disc, subtitle will automatically be set OFF and the
first item of the audio languages will be automatically set.
SETUP
QUICK
CUSTOM
INITIALIZE
A
P26 Step
B
P27 Step
C
P27 Step
D
P28 Step
E
P28 Step
SETUP LANGUAGE
AUDIO
SUBTITLE
DISC MENU
DVD-V
3
3
3
3
3
ORIGINAL
OFF
ENGLISH
[AUDIO]
Language Code
Abkhazian 4748
Afar 4747
Afrikaans 4752
Albanian 6563
Amharic 4759
Arabic 4764
Armenian 5471
Assamese 4765
Aymara 4771
Azerbaijani 4772
Bashkir 4847
Basque 5167
Bengali;Bangla 4860
Bhutani 5072
Bihari 4854
Bislama 4855
Breton 4864
Bulgarian 4853
Burmese 5971
Byelorussian 4851
Cambodian 5759
Catalan 4947
Chinese [CHI] 7254
Corsican 4961
Croatian 5464
Czech 4965
Danish [DAN] 5047
Dutch [DUT] 6058
English [ENG] 5160
Esperanto 5161
Estonian 5166
Faroese 5261
Fiji 5256
Finnish [FIN] 5255
French [FRE] 5264
Frisian 5271
Galician 5358
Georgian 5747
German [GER] 5051
Greek [GRE] 5158
Greenlandic 5758
Guarani 5360
Gujarati 5367
Hausa 5447
Hebrew 5569
Hindi 5455
Hungarian [HUN] 5467
Icelandic [ICE] 5565
Indonesian 5560
Interlingua 5547
Interlingue 5551
Inupiak 5557
Irish [IRI] 5347
Italian [ITA] 5566
Japanese [JPN] 5647
Javanese 5669
Kannada 5760
Kashmiri 5765
Kazakh 5757
Kinyarwanda 6469
Kirghiz 5771
Kirundi 6460
Korean [KOR] 5761
Kurdish 5767
A-B
C-E
F-H
I-K
Language Code
Laothian 5861
Latin 5847
Latvian;Lettish 5868
Lingala 5860
Lithuanian 5866
Macedonian 5957
Malagasy 5953
Malay 5965
Malayalam 5958
Maltese 5966
Maori 5955
Marathi 5964
Moldavian 5961
Mongolian 5960
Nauru 6047
Nepali 6051
Norwegian [NOR] 6061
Occitan 6149
Oriya 6164
Oromo(Afan) 6159
Panjabi 6247
Pashto;Pushto 6265
Persian 5247
Polish 6258
Por tuguese [POR] 6266
Quechua 6367
Rhaeto-Romance 6459
Romanian [RUM] 6461
Russian [RUS] 6467
Samoan 6559
Sangho 6553
Sanskrit 6547
Scots Gaelic 5350
Serbian 6564
Serbo-Croatian 6554
Sesotho 6566
Setswana 6660
Shona 6560
Sindhi 6550
Singhalese 6555
Siswat 6565
Slovak 6557
Slovenian 6558
Somali 6561
Spanish [SPA] 5165
Sundanese 6567
Swahili 6569
Swedish [SWE] 6568
Tagalog 6658
Tajik 6653
Tamil 6647
Tatar 6666
Telugu 6651
Thai 6654
Tibetan 4861
Tigrinya 6655
Tonga 6661
Tsonga 6665
Tu rkish [TUR] 6664
Tu rkmen 6657
Tw i 6669
Ukrainian 6757
Urdu 6764
Uzbek 6772
Vietnamese 6855
Volapuk 6861
Welsh 4971
Wolof 6961
Xhosa 7054
Yiddish 5655
Yo r uba 7161
Zulu 7267
L-N
O-R
S
T
U-Z
If you choose a language that has a 3 letter language
code, the code will be displayed every time you change
the AUDIO or SUBTITLE language setting above. If
you choose any other languages, ‘---’ will be displayed
instead. (3 letter language code is written in bracket.)
- 26 - EN
Page 27
B
DISPLAY SETTING
Follow steps 1to 2in the “CUSTOM MENU” section on page 26.
3 Press [K / L] to select the below items then
press [ENTER].
TV MODE:
You can change certain aspects of the DVD display
screens and on-screen messages on the TV screen.
¡4:3 LETTER BOX (default):
To show black bars on top
and bottom of the screen.
¡4:3 PAN & SCAN: To show a full height picture
with both sides trimmed.
STILL MODE
This function allows you to
adjust picture resolution and
quality in the still mode.
¡AUTO (default):
Automatically select the best
resolution setting (FRAME or FIELD) based on the
data characteristics of the pictures.
¡FIELD: Select “FIELD” when the pictures are still
unstable even if “AUTO” is selected.
FIELD stabilizes the pictures, although the picture
quality may become coarse due to the limited
amount of data.
¡FRAME: Select “FRAME” to display relatively
motionless pictures in higher resolution.
FRAME improves the picture quality, although it
may unstabilizethe pictures due to simultaneous
output of two field data.
QUICK
:
SETUP DISPLAY
TV MODE
AUTO
STILL MODE
SETUP DISPLAY
TV MODE
AUTO
STILL MODE
4:3 LETTER BOX
4:3 LETTER BOX
C
AUDIO SETTING
Choose the appropriate Audio settings for your equipment as it only affects during the playback of DVD
discs.
Follow steps 1to 2in the “CUSTOM MENU” sec-
tion on page 26.
3 Press [K / L] to select the below items then
press [ENTER].
DRC (Dynamic Range Control):
¡To compress the range of soft
to loud sound.
¡The default setting is “ON”.
SETUP AUDIO
DRC ON
DOWN SAMPLING
DOLBY DIGITAL BITSTREAM
ON
DOWN SAMPLING:
¡ON : Output in 48 kHz.
(default)
¡OFF : Output the original
SETUP AUDIO
DRC ON
DOWN SAMPLING
DOLBY DIGITAL BITSTREAM
ON
sound.
When playing disc with
copyright Protection
¡If you select “OFF”, copyright protection will be
activated and sound will be down sampled at 48kHz.
DOLBY DIGITAL:
QUICK
Set to “BITSTREAM” when
the unit is connected to a
SETUP AUDIO
DRC ON
DOWN SAMPLING
DOLBY DIGITAL BITSTREAM
ON
Dolby Digital Decoder.
¡BITSTREAM: Output a Dolby Digital signal
(default)
¡PCM: Convert the Dolby Digital to PCM
(2 channel stereo)
4 Press [SETUP] to exit the menu.
ENGLISH
4 Press [SETUP] to exit the menu.
QUICK MENU
¡You can select the “TV MODE” or “DOLBY DIGITAL” from the QUICK menu quickly. To access the
QUICK menu, select “QUICK” instead of “CUSTOM” at step 1on page 26.
LANGUAGE SETTING FOR THE ON-SCREEN MENUS
¡You can access the TV SETUP menu by pressing [SETUP] from the DVD mode. Refer to
“MENU LANGUAGE” on page 17 to change the language for the on-screen menus.
- 27 - EN
Page 28
D
PARENTAL CONTROL
Parental Control limits the disc viewing that exceed
your setting (with a password or playback will stop).
This feature allows you to prevent discs with alternative scenes from being played by your children.
PARENTAL LEVEL
Parental Level allows you to set the rating level of
your DVD discs. Playback will stop if the disc’s ratings exceed the level you set.
Follow steps 1 to 2 in the “CUSTOM MENU” sec-
tion on page 26.
3 Enter your four-digit password then press
[ENTER].
SETUP PARENTAL
PASSWORD
Enter current password.
4 Press [K / L] to select “PARENTAL LEVEL”
then press [ENTER].
SETUP PARENTAL
PARENTAL LEVEL ALL
PASSWORD CHANGE
5 Press [K / L]to select the desired level
then press [ENTER].
SETUP PARENTAL
PARENTAL LEVEL
ALL
8
7 [NC-17]
6 [R]
IF YOU FORGET THE PASSWORD
1 Press the Number buttons [4], [7], [3], [7] at
step 3. Then enter your new password.
¡Password will be cleared and parental level will be
set to “ALL”.
2 Proceed with steps 4 to 6 again.
E
OTHER SETTINGS
Follow steps 1to 2in the “CUSTOM MENU” section on page 26.
3 Press [K / L] to select the below items,
then press [ENTER].
ANGLE ICON:
¡Press [ENTER] repeatedly to turn Angle icon “ON”
or “OFF”.
¡The default setting is “ON”.
AUTO POWER OFF:
¡Press [ENTER] repeatedly to turn Auto Power off
“ON” or “OFF”.
¡
The default setting is “ON” and the screen saver program starts when there is no input from the unit for 5
minutes in the stop mode. After the screen saver program is activated for 15 minutes, the power is automatically turned off.
4 Press [SETUP] to exit the menu.
SETUP OTHERS
ANGLE ICON
AUTO POWER OFFONON
6 Press [SETUP] to exit the menu.
NOTES:
¡
When doing this for the first time, enter any 4 digits.
(except for 4737) That number will be used as the password.(in the event you forget the password, see below)
¡To change the password, press [K / L] to select
“PASSWORD CHANGE” at step 4 then press
[ENTER]. Enter the four-digit password, then
press [ENTER].
¡With some DVDs, it may be difficult to find if they
are compatible with parental lock. Be sure to check
if the parental lock function operates in the way that
you have set.
¡Record the password in case you forget it.
CONTROL LEVELS
¡
ALL
All parental lock is cancelled.
¡
Level 8
DVD software of any grade (adult/general/children)
can be played back.
¡
Levels 7 to 2
Only DVD software intended for general use and
children can be played back.
¡
Level 1
Only DVD software intended for children can be
played back, with those intended for adult and general use prohibited.
INITIALIZE
DVD-V
This allows you to return all selections of SETUP
(except for “PARENTAL” and menu language) to
their default settings.
1 Press [SETUP] twice in the stop mode so
that the “INITIALIZE” menu appears.
2 Press [K / L] to select “INITIALIZE” then
press [ENTER].
3 Press [K / L] to select “YES” then press
[ENTER] twice.
All the settings (except for
“PARENTAL” and
language
¡To cancel the initialization,
) will be cleared.
menu
select “NO”.
4 Press [SETUP] to exit the menu.
SETUP
QUICK
CUSTOM
INITIALIZE
SETUP INITIALIZE
Initialize?
NO
YES
- 28 - EN
Page 29
TROUBLESHOOTING GUIDE
If the unit does not perform properly when operated as instructed in this Owner’s Manual, check the unit, consulting the following checklist.
PROBLEM CORRECTIVE ACTION
No power
No operation by infrared remote
control
TV Mode
Sometimes a performance problem can be easily solved by checking seemingly apparent but often overlooked
possibilities. Before arranging for service, check these items. It could save your time and money.
PROBLEM CORRECTIVE ACTION
No picture or sound
No picture or poor picture on the
unit
No sound or poor sound
Bars On Screen
Picture Distorted or Blurred
Picture Rolls Vertically
Lines or Streaks in Picture
No Color
Poor Reception on Some Channels
Ghosts in Picture
Weak Picture
Sound OK, Picture Poor
Make sure the power plug is connected to an AC outlet.
•
Make sure the power is turned on.
•
Check if the power plug is connected to an AC outlet.
•
Check the batteries in the remote control.
•
Aim the remote control directly at the remote sensor. If necessary,
•
remove all the obstacles between the sensor and the remote control.
You have to be within 23 feet of the unit.
•
Check if the correct mode is selected. If not switch the mode by
•
pressing [SELECT], whichever you need.
Make sure the AC cord is connected to an AC outlet.
•
Check antenna connection.
•
Press [SELECT] to select TV mode.
•
Then try other TV feature.
Let the unit program its tuner memory.
•
Adjust direction or replace antenna.
•
Adjust picture controls.
•
Check for broken pin of the antenna cable.
•
Adjust volume control on remote control or main unit.
•
Press [MUTE] to restore sound.
•
If outside antenna is being used, check for broken wire.
•
Check for local interference.
•
Try a new channel, if OK, then possible station trouble.
•
If outside antenna is being used, check for broken wire.
•
Try a new channel, if OK, then possible station trouble.
•
If outside antenna is being used, check for broken wire.
•
Check for local interference.
•
Try a new channel, if OK, then possible station trouble.
•
Is antenna connected to jack on the back of the set?
•
If outside antenna is being used, check for broken wire.
•
Adjust “COLOR” control.
•
Try a new channel, if OK, then possible station trouble.
•
Is antenna connected to jack on the back of the set?
•
If outside antenna is being used, check for broken wire.
•
Check for local interference.
•
Try a new channel, if OK, then possible station trouble.
•
Is antenna connected to jack on the back of the set?
•
If outside antenna is being used, check for broken wire.
•
Adjust “CONTRAST” & “BRIGHT” control.
•
Try a new channel, if OK, then possible station trouble.
•
Is antenna connected to jack on the back of the set?
•
If outside antenna is being used, check for broken wire.
•
Check for local interference.
•
Adjust “CONTRAST” & “BRIGHT” control.
•
- 29 - EN
ENGLISH
Page 30

PROBLEM CORRECTIVE ACTION
Picture OK, Sound Poor
No operation by infrared remote
control
Different color marks on screen
CLOSED CAPTION PROBLEM POSSIBLE REMEDY
Misspelling in captions
Text is not shown in its entirety or
a delay occurs from what is being
said • exceeds that rate, selective editing is used to insure that the captions
Captions scrambled with white
boxes
No captions in a program which
must contain closed caption
Black box in the TV screen
Try a new channel, if OK, then possible station trouble.
•
Check for local interference.
•
Make sure the AC cord is connected to an AC outlet.
•
Check batteries in remote control.
•
Magnetism from nearby appliances and geomagnetism might affect
•
the color of the TV picture. Move the unit away from the appliances,
the unit can repair itself automatically. If you want to repair immediately,
unplug the power cord, then plug it in again 30 minutes later or
so. This automatically resets the unit.
Error committed by the closed captioning production company.
•
• Possible in a live broadcast. Not in case of a prerecorded program.
A few seconds of delay is common for live broadcast.
•
Display capacity may not exceed 220 words per minute. If a dialogue
•
• remain up-to-date with the current TV screen dialogue.
Caused by interferences of building, power lines, thunderstorms, etc.
•
The broadcast may use a time compression process to speed up the
•
• program. The decoder cannot read the compressed information and
• captions will be lost.
You are in TEXT mode. Select a CAPTION mode (“C1”, “C2”) or
•
• Caption “OFF”.
- 30 - EN
Page 31

DVD Mode
PROBLEM CORRECTIVE ACTION
No picture
Disc cannot be played
No sound
No DTS audio is output
Distorted picture
Audio or subtitle language
does not match the set up DVD. (This is not a malfunction.)
The camera angle cannot be changed•The DVD does not contain sequences recorded from different cam-
Audio or subtitle language cannot be
changed language. (This is not a malfunction.)
“Prohibited icon” appears on the
screen, prohibiting an operation (This is not a malfunction.)
CD sound dropout
No CD reproduction
DVD picture dropout
DVD picture freeze
DVD picture in mosaic
No DVD reproduction
Insert a correct video disc that plays on this unit.
•
Press [SELECT] to select DVD mode, then try other DVD feature.
•
Insert the disc.
•
Clean the disc.
•
Place the disc correctly, with the label side up.
•
Cancel the parental lock or change the control level.
•
Connect the audio cables firmly.
•
Turn the power of the audio component on.
•
Correct the audio output settings.
•
Correct the input settings on the audio component.
•
This unit does not support DTS audio. This is not a malfunction.
•
There are some cases where pictures may be slightly distorted,
•
which are not a sign of a malfunction.
Although pictures may stop for a moment, this is not a malfunction.
•
The selected language is not available for audio or subtitles on the
•
era angles. (This is not a malfunction.)
The DVD does not contain audio source or subtitles in the selected
•
That operation is prohibited by the unit or the disc.
•
Scratched disc. Replace the disc with an unscratched one.
•
ENGLISH
NOTES:
Some functions are not available in specific modes, but this is not a malfunction. Read the description in
•
this Owner’s Manual for details on correct operations.
Playback from a desired track and random playback are not available during program playback.
•
- 31 - EN
Page 32

MAINTENANCE
CABINET CLEANING
Wipe the front panel and other exterior surfaces of
•
the unit with a soft cloth immersed in lukewarm
water and wrung dry.
Never use a solvent or alcohol. Do not spray insec-
•
ticide liquid near the unit. Such chemicals may
cause damage and discoloration to the exposed surfaces.
SERVICING
Should your unit become inoperative, do not try to
•
correct the problem by yourself. There are no userserviceable parts inside. Turn off, unplug the power
cord and please call our help line mentioned on
the front page, to locate an Authorized Service
Center.
IF THE LASER OPTICAL PICKUP UNIT IS DIRTY
If the unit still does not perform properly when it is operated, while referring to the relevant sections and to
•
“TROUBLESHOOTING GUIDE” in this Owner’s Manual, the laser optical pickup unit may be dirty.
Consult your dealer or an Authorized Service Center for inspection and cleaning of the laser optical pickup
unit.
DISC HANDLING
Handle the discs so that fingerprints and dust do
•
not adhere to the surfaces of the discs.
To clean-off, use a soft cloth.
•
Do not use a hard cloth since this will mar the disc.
•
Wipe the disc in a straight line from center to edge.
•
Never wipe with a circular motion.
•
Do not use detergent or abrasive cleaning agents.
•
Always store the disc in its protective case when it
•
is not used.
- 32 - EN
Page 33

SPECIFICATIONS
GENERAL SPECIFICATIONS ELECTRICAL SPECIFICATIONS
TV
CRT: 20 inch in-line gun,
90˚ deflection tube
Television system: NTSC-M
Closed caption system: §15.119/FCC
Channel coverage:
VHF: 2 ~ 13
UHF: 14 ~ 69
CATV: 2 ~13, A ~ W,
W+1 ~ W+84,
A-5 ~ A-1, 5A
Tuning System: 181 channel
frequency synthesized
tuning system
Channel access: Direct access keyboard,
programmable
scan and up/down
DVD
Product type: DVD Player
Discs: DVD video, Audio CD
Output signal format: NTSC color
Sound output: 2 speakers, 1W, 8 ohm
OTHER SPECIFICATIONS
Terminals
Antenna input: VHF/UHF/CATV
75 ohm unbalanced (F-type)
Video input: RCA connector [ 1
Audio L/R input: RCA connector [ 2
Headphone: 1/8" stereo (3.5 mm)
Coaxial digital
audio output: One pin jack,
500m Vpp (75 ohm)
Remote control: Digital encoded
infrared light system
Operating
temperature: 5°C to 40°C
(41°F~104°F)
Power requirements: AC 120V, 60Hz
Power consumption
(Maximum): 80W
Picture tube: 20" PF
Dimensions: H : 20.22" (514mm)
W: 20.16" (512mm)
D: 19.80" (503mm)
Weight: 46.3 lbs. (21.0kg)
ENGLISH
Designs and specifications are subject to change without notice.
•
If there is a discrepancy between languages, the default language will be English.
•
- 33 - EN
Page 34

CUSTOMER SERVICE CENTER
Tel :1-877-467-4289
http://www.insignia-products.com
Insignia Products, Richfield, Minnesota, U.S.A.
Page 35

MANUAL DEL
USUARIO
TV/DVD A COLOR
IS-TV040921
(20 pulgadas)
Si necesita ayuda adicional para operar el equipo después de leer este
manual del usuario o para ordenar accesorios de reemplazo, llame
SIN CARGO al: 1-877-467-4289.
O visite nuestro SITIO WEB http://www.insignia-products.com
Lea antes de usar este equipo
Page 36

ADVERTENCIA: PARA REDUCIR EL RIESGO DE INCENDIO O CHOQUE ELÉCTRICO, NO EXPONGA
ESTE EQUIPO A LA LLUVIA O HUMEDAD.
PRECAUCIÓN
RIESGO DE CHOQUE
ELÉCTRICO NO ABRIR
PRECAUCIÓN: PARA REDUCIR EL RIESGO DE
CHOQUE ELÉCTRICO, NO RETIRE LA CUBIERTA (O PARTE
POSTERIOR). NO EXISTEN PARTES REPARABLES POR EL
USUARIO EN EL INTERIOR. LAS REPARACIONES DEBEN
REALIZARSE POR PERSONAL DE SERVICIO CALIFICADO.
El símbolo de precaución se encuentra en la parte posterior del gabinete.
IMPORTANTE PARA SU SEGURIDAD
1.
Lea las instrucciones - Se deberán leer todas las
instrucciones de seguridad y operación antes de operar el
aparato.
2. Conserve las instrucciones- Las instrucciones de
seguridad y de operación deberán conservarse para
referencia futura.
3. Tome en cuenta las advertencias- Deberán seguirse
todas las advertencias en la unidad y en las instrucciones
de operación.
4. Siga las instrucciones- Deberán seguirse todas las
instrucciones de operación y uso.
5. Limpieza- Desconecte la unidad del tomacorriente
antes de limpiarla. No use limpiadores líquidos o en
aerosol. Use un paño húmedo para limpiar.
EXCEPCIÓN: Los productos que requieren el uso de
servicio ininterrumpido y que, por alguna razón
específica, como la posibilidad de pérdida del código de
autorización del convertidor CATV, no permiten que el
usuario los desconecte para limpiarlos o por cualquier
otra razón, no requieren seguir las instrucciones que
indican desconectar el aparato en la descripción de
limpieza necesaria en el punto 5.
6. Accesorios- No use accesorios que no hayan sido
recomendados por el fabricante de la unidad ya que
podrían causar problemas peligrosos.
7. Agua y humedad- No use esta unidad cerca del agua;
por ejemplo, cerca de una bañera, lavabo, fregadero de
cocina, o lavadero; en un sótano mojado o cerca de una
piscina, o en lugares similares.
8. Accesorios- No coloque esta
unidad sobre una carretilla,
trípode, plataforma o mesa
inestable. La unidad podría
caerse y causar lesiones graves
a alguna persona y daños
graves al aparato. Use sólo con
carretillas, trípodes,
plataformas, o mesas
recomendadas por el fabricante
o que se vendan con la unidad. Cualquier montaje del
aparato deberá seguir las instrucciones del fabricante y
ADVERTENCIA SOBRE
LA CARRETILLA PORTÁTIL
S3126A
- 2 - SP
deberán usarse accesorios de montaje recomendados por
el fabricante. La combinación de este equipo y carretilla
debe moverse con cuidado. Las paradas repentinas, la
fuerza excesiva y las superficies irregulares pueden
causar que el equipo y la carretilla se volteen de lado.
9.
Ventilación - Las ranuras y aberturas en el gabinete y en
la parte posterior o inferior se proporcionan para fines de
ventilación, para asegurar la operación confiable de la
unidad y para protegerla contra el sobrecalentamiento;
estas aberturas no deberán bloquearse o cubrirse. Las
aberturas no deberán bloquearse nunca al colocar la
unidad sobre una cama, sofá, alfombra u otra superficie
similar. Este unidad no deberá colocarse nunca cerca o
sobre un radiador o registro de calefacción. Esta unidad
no deberá colocarse en una instalación integrada, como
un librero o estantería, a menos que se proporcione
ventilación apropiada o se hayan seguido las
instrucciones del fabricante.
10.
Fuentes de energía - Esta unidad debe operarse
únicamente con el tipo de fuente de energía que se indica
en la etiqueta de marcaje. Si no esta seguro del tipo de
fuente de energía que usa en el hogar, consulte con el
distribuidor del equipo o con la compañía local de
energía eléctrica. Para unidades diseñadas para funcionar
con pilas, u otras fuentes, consulte las instrucciones de
operación respectivas.
11. Conexión a tierra o polarización- Esta unidad está
equipada con un enchufe polarizado de corriente alterna
(un enchufe que tiene una lamina más ancha que la otra).
Este enchufe se conecta al tomacorriente de una sola
forma. Esta es una característica de seguridad. Si no
puede insertar completamente el enchufe en el
tomacorriente, intente dar vuelta al enchufe. Si aún así el
enchufe no entra, comuníquese con su electricista para
que reemplace el tomacorriente obsoleto. No anule el
propósito de seguridad del conector a tierra polarizado.
12. Protección del cable de alimentación- Los cables de
alimentación eléctrica deben colocarse de tal forma que
no se pisen o queden aplastados por objetos colocados
contra ellos; preste atención especial a los cables
conectados a tomacorrientes y al lugar de donde salen
del equipo.
ESTE SÍMBOLO INDICA QUE DENTRO DE
ESTA UNIDAD SE ENCUENTRA PRESENTE
VOLTAJE PELIGROSO QUE CONSTITUYE
UN RIESGO DE CHOQUE ELÉCTRICO.
ESTE SÍMBOLO INDICA QUE EXISTEN
IMPORTANTES INSTRUCCIONES DE
OPERACIÓN Y MANTENIMIENTO EN LA
LITERATURA QUE ACOMPAÑA ESTE
APARATO.
Page 37

FIGURA A
EJEMPLO DE CONEXIÓN A TIERRA DE LA ANTENA
SEGÚN EL CÓDIGO NACIONAL DE ELECTRICIDAD
EQUIPO DE
SERVICIO
ELÉCTRICO
ABRAZADERA
DE CONEXIÓN A TIERRA
CÓDIGO NACIONAL DE ELECTRICIDAD - NEC SISTEMA DEL ELECTRODO A TIERRA DEL SERVICIO
DE ENERGÍA (NEC ARTÍCULO 250 PARTE H)
S2898A
ABRAZADERAS DE CONEXIÓN A TIERRA
CONDUCTORES DE CONEXIÓN
A TIERRA (NEC SECCIÓN 810-21)
UNIDAD DE DESCARGA
DE ANTENA
(NEC SECCIÓN 810-20)
CABLE PRINCIPAL
DE LA ANTENA
ESPAÑOL
13. Conexión a tierra de la antena al aire libre- Sí una
antena externa o un sistema de cable esta conectado al
equipo, asegúrese de que la antena o el sistema de cable
esté conectado a tierra, para proporcionar algo de
protección contra sobretensiones de voltaje y la
acumulación de cargas estáticas. El artículo 810 del
código nacional eléctrico, ANSI/NFPA No. 70
proporciona información con respecto a la conexión a
tierra del poste y la estructura de soporte, la conexión a
tierra del alambre principal de una unidad de descarga de
antena, el tamaño de los conductores de la conexión a
tierra y la conexión del electrodo de conexión a tierra.
(Fig. A)
14. Relámpagos- Para protección adicional de esta unidad
durante una tormenta con relámpagos, o cuando no se
use durante largos periodos, desconéctela del
tomacorriente y desconecte la antena o el sistema de
cable. Esto evitará daños al unidad debido a sobretensión
en las líneas de alto voltaje o relámpagos.
15. Líneas de alto voltaje- El sistema de antena exterior no
deberá estar ubicado cerca de líneas de alto voltaje u otros
circuitos de luz eléctrica o de energía, o donde pueda caer
sobre dichos circuitos o líneas de alto voltaje. Al instalar
un sistema de antena externa, se debe tener cuidado
extremo para no tocar los circuitos o líneas de alto voltaje
ya que el contacto con ellos podría ser fatal.
16. Sobrecarga- No sobrecargue los tomacorrientes y los
cables de extensión ya que esto podría resultar en riesgo
de incendio o choque eléctrico.
17. Introducción de objetos y líquidos- Nunca inserte
objetos de ningún tipo en esta unidad a través de las
aberturas, ya que podrían tocar puntos de voltaje
peligrosos o hacer corto circuito con otros componentes
que podrían resultar en incendio o choque eléctrico.
Nunca derrame líquidos de ninguna clase sobre la
unidad.
18. Reparaciones- No trate de reparar esta unidad usted
mismo, ya que abrir o retirar las cubiertas puede
exponerlo a voltajes peligrosos u otros riesgos. Remita
todas las reparaciones al personal de servicio calificado.
19. Daños que requieren reparación- Desconecte esta
unidad del tomacorriente y refiera la reparación a
personal calificado bajo las siguientes condiciones:
a. Cuando el cable de alimentación o enchufe esté dañado
o raído.
b. Si se ha derramado líquido o han caído objetos dentro de
la unidad.
c. Si la unidad se ha expuesto a lluvia o agua.
d. Si la unidad no opera normalmente al seguir las
instrucciones de operación. Ajuste sólo los controles que
se cubren en las instrucciones de operación, ya que el
ajuste incorrecto de otros controles podría resultar en
daños y con frecuencia requerirá trabajo intensivo con
un técnico calificado para restaurar la operación normal
de la unidad.
e. Si la unidad se ha caído o dañado de cualquier forma.
f. Cuando la unidad muestra un cambio evidente en el
funcionamiento, esto indica que necesita reparación.
20. Repuestos- Cuando se requieren repuestos, asegúrese
de que el técnico de reparación use repuestos
especificados por el fabricante o que tengan las mismas
características que la parte original. Las substituciones
no autorizadas pueden resultar en incendio, choque
eléctrico, lesiones a personas u otros peligros.
21.
Verificación de seguridad- Después de completar la
reparación de esta unidad, pida al técnico de servicio que
realice verificaciones de seguridad para determinar que la
unidad se encuentra en condiciones de operación
apropiada.
22.
Calor - Esta unidad deberá situarse lejos de fuentes de
calor como radiadores, registros de calefacción, estufas u
otros aparatos (incluso amplificadores) que produzcan
calor.
- 3 - SP
Page 38

PRECAUCIONES
INFORMACIÓN IMPORTANTE SOBRE
DERECHOS DE AUTOR
Se prohíbe copiar, transmitir, ejecutar públicamente o
prestar discos. Esta unidad incorpora tecnología de
protección del copyright que a su vez está protegida por
patentes y otros derechos de la propiedad intelectual de
los EE.UU. El uso de esta tecnología de protección del
copyright deberá contar con la autorización de
Macrovision, y ésta se limitará a casas y otros lugares de
visión limitada a menos que Macrovision autorice lo
contrario. La inversión de la ingeniería o el desmontaje
de la unidad están prohibidos.
ADVERTENCIA FCC (comisión federal de
comunicaciones) - Este equipo podría general o usar
energía de radiofrecuencia. Los cambios o
modificaciones que se realicen a este equipo podrían
causar interferencia perjudicial a menos que las
modificaciones estén expresamente autorizadas en el
manual de instrucciones. El usuario podría perder
la autoridad de operar este equipo si se realiza un
cambio o modificación no autorizada.
INTERFERENCIA DE RADIO-TV
Este equipo ha sido sometido a pruebas y se ha
determinado que satisface los límites establecidos para
clasificarlo como dispositivo digital de Clase B de
acuerdo con la Parte 15 del reglamento FCC. Estos
límites se han establecido para proporcionar una
protección razonable contra interferencias perjudiciales
en una instalación residencial. Este equipo genera, usa y
puede emitir energía de radiofrecuencia. Si no se instala
y usa de acuerdo con las instrucciones, este aparato
puede causar interferencias perjudiciales a las
comunicaciones de radio. Sin embargo, no se puede
garantizar que no ocurrirán interferencias en una
instalación determinada. Sí el equipo causa
interferencias perjudiciales en la recepción de la señal
de radio o televisión, lo cual puede comprobarse
encendiéndolo y apagándolo alternativamente, se
recomienda al usuario corregir la interferencia mediante
uno de los siguientes procedimientos:
1) Cambiar la orientación o ubicación de la antena
receptora.
2)
Aumentar la distancia entre el equipo y el receptor.
3) Conectar el equipo al tomacorriente de un
circuito distinto al que esta conectado el receptor.
4) Consultar al distribuidor o a un técnico experto
en radio/TV para obtener ayuda.
Podrá encontrar el número de serie correspondiente en la parte trasera de la unidad. Ninguna otra unidad tiene
el mismo número de serie que la suya. Deberá registrar aquí el número y otra información importante, y
conservar este libro como registro permanente de su compra para ayudarle a identificar la unidad en caso de
robo. Los números de serie no se conservan en el archivo.
Fecha de compra
Distribuidor donde realizó la compra
Dirección del distribuidor
Teléfono del distribuidor
Modelo núm.
Núm. de serie
SEGURIDAD DEL LÁSER
Esta unidad usa un láser. Sólo el personal de
servicio calificado puede retirar la cubierta o
intentar dar servicio a este dispositivo, ya que existe
la posibilidad de que se lesionen los ojos.
PRECAUCIÓN: EL USO DE LOS CONTROLES
O AJUSTES O LLEVAR A CABO
PROCEDIMIENTOS QUE NO SEAN LOS
ESPECIFICADOS AQUÍ PUEDEN RESULTAR
EN EXPOSICIÓN PELIGROSA A LA
RADIACIÓN.
PRECAUCIÓN: RADIACIÓN LÁSER VISIBLE
E INVISIBLE CUANDO EL GABINETE ESTÁ
ABIERTO Y SE ANULA EL BLOQUEO DE
PROTECCIÓN. NO MIRE DIRECTAMENTE EL
HAZ DE LUZ.
LUGAR: DENTRO, CERCA DEL MECANISMO
DE LA CUBIERTA.
Este aparato digital de Clase B cumple con el
código ICES-003 canadiense.
PRECAUCIÓN: PARA EVITAR CHOQUES
ELÉCTRICOS, CONECTE LA LÁMINA
ANCHA DEL ENCHUFE EN LA RANURA
ANCHA DE LA TOMA DE CORRIENTE;
INSERTE POR COMPLETO.
NOTA SOBRE RECICLADO
Las pilas no deben tirarse o incinerarse, sino
descartarse de acuerdo con las normativas locales
concernientes a desechos químicos.
- 4 - SP
Page 39

LUGAR
MANUAL DEL
USUARIO
Para obtener una operación segura y desempeño
satisfactorio de su unidad, tenga en mente lo siguiente
cuando seleccione el lugar donde hará la instalación:
Proteja la unidad del contacto directo con la luz solar
•
y manténgala alejada de fuentes de calor intenso.
Evite lugares polvorientos o húmedos.
•
Evite lugares con ventilación insuficiente que evite
•
la disipación correcta de calor. No bloquee los
orificios de ventilación en la parte superior o inferior
de la unidad. No coloque la unidad sobre la alfombra
ya que esto bloqueará los orificios de ventilación.
Instale la unidad en posición horizontal.
•
Evite lugares sujetos a vibraciones fuertes.
•
No coloque la unidad cerca de campos magnéticos
•
intensos.
Evite mover la unidad a lugares con diferencias
•
extremas de temperatura.
Asegúrese de sacar el disco y desenchufar el cable
•
eléctrico de CA del tomacorriente antes de
transportar la unidad.
EVITE LOS PELIGROS DE CHOQUE
ELÉCTRICO E INCENDIO
No manipule el cable de alimentación con manos
•
húmedas.
No jale el cable de alimentación cuando lo desconecte
•
del tomacorriente de CA. Sujete el enchufe.
Si se derrama accidentalmente agua sobre la
•
unidad, desconecte el cable de alimentación de
inmediato y lleve la unidad a nuestro Centro de
Servicio Autorizado para que la reparen.
No introduzca dedos u objetos en la bandeja de
•
carga de discos.
No coloque nada directamente sobre la parte
•
superior de la unidad.
ADVERTENCIA
Podría presentarse condensación de humedad dentro
de la unidad si se le mueve de un lugar frío a un lugar
caliente o después de calentar una habitación fría o
bajo condiciones de alta humedad. Si se reproduce un
DVD en una unidad con humedad, esto podría dañar
el DVD y la unidad. Por lo tanto, si se presenta
condensación dentro del aparato, encienda la unidad
y permita que transcurran por lo menos dos horas
para que permitir que se seque.
SÍMBOLOS QUE SE USAN EN
ESTE MANUAL
Los siguientes símbolos aparecen en algunos
encabezados y notas en este manual, con los
significados siguientes:
TV
: Se refiere a la operación del televisor
(en el modo TV).
DVD-V
: Se refiere a la reproducción de discos de video
DVD (en el modo DVD).
CD
: Se refiere a la reproducción de audio CD
(en el modo DVD).
QUICK
: Se refiere a las opciones que pueden configurarse
con el modo QUICK (en el modo DVD).
ESPAÑOL
ACCESORIOS SUMINISTRADOS
PilasUnidad de control remoto
2 pilas AA(NE207UD)
Si necesita cambiar estos accesorios, consulte el NO. de PIEZA debajo la figura y llame a nuestra línea de
•
asistencia mencionado en la página delantera.
Dependiendo del sistema de su antena, es posible que necesite diferentes tipos de combinadores
•
(mezcladora) o separadores (divisor). Comuníquese con la tienda local de electrónica para adquirir estos
artículos.
- 5 - SP
Manual del usuario
(1EMN20276)
Page 40

ÍNDICE DE CONTENIDO
C IMPORTANTE PARA SU
SEGURIDAD . . . . . . . . . . . . . . . . . .2
C PRECAUCIONES . . . . . . . . . . . . . . .4
LUGAR . . . . . . . . . . . . . . . . . . . . . .5
EVITE LOS PELIGROS DE CHOQUE
ELÉCTRICO E INCENDIO . . . . . . .5
ADVERTENCIA . . . . . . . . . . . . . . .5
SÍMBOLOS QUE SE USAN EN ESTE
MANUAL . . . . . . . . . . . . . . . . . . . . .5
C ACCESORIOS SUMINISTRADOS .5
C ÍNDICE DE CONTENIDO . . . . . . . .6
C CARACTERÍSTICAS . . . . . . . . . . . .7
C FUNCIONES Y CONTROLES DE
OPERACIÓN . . . . . . . . . . . . . . . . . .8
C PREPARACIÓN PARA USO . . . . . .10
CONEXIÓN DE LA ANTENA /
CABLE . . . . . . . . . . . . . . . . . . . . .10
CONEXIÓN EN LOS
CONECTORES DE ENTRADA
A/V DELANTEROS . . . . . . . . . . . .11
CONEXIÓN A UN AMPLIFICADOR
ESTÉREO EQUIPADO CON
CONECTORES DE ENTRADA
DIGITAL (para DVD) . . . . . . . . . . .11
CONEXIÓN A UN
DESCODIFICADOR DOLBY
DIGITAL (para DVD) . . . . . . . . . . .12
INSTALACIÓN DE LAS PILAS . .12
SECCIÓN DE TV
C OPERACIÓN Y CONFIGURACIÓN
DE TV . . . . . . . . . . . . . . . . . . . . . . .13
PARA VER UN PROGRAMA
DE TV . . . . . . . . . . . . . . . . . . . . . .13
DESMAGNETIZACIÓN . . . . . . . .13
CONTROL DE IMAGEN . . . . . . . .13
TEMPORIZADOR DE APAGADO
AUTOMÁTICO . . . . . . . . . . . . . . .14
SISTEMA DE SUBTÍTULOS . . . . .14
AJUSTE DE CANAL . . . . . . . . . . .15
AJUSTE DE V-CHIP . . . . . . . . . . .16
CONFIGURACIÓN DE
CLASIFICACIÓN PARA TV . . .16
CONFIGURACIÓN DE
CLASIFICACIÓN PARA
PELÍCULAS . . . . . . . . . . . . . . . .17
CAMBIO DE CÓDIGO DE
ACCESO . . . . . . . . . . . . . . . . . .17
IDIOMA DE MENÚ . . . . . . . . . . . .17
C DESIGNACIONES DE CANAL
DE CABLE . . . . . . . . . . . . . . . . . . .18
SECCIÓN DE DVD
C SOBRE LOS DISCOS . . . . . . . . . . .19
DISCOS QUE PUEDEN
REPRODUCIRSE . . . . . . . . . . . . . .19
DISCOS QUE NO PUEDEN
REPRODUCIRSE . . . . . . . . . . . . . .19
C REPRODUCCIÓN DE DISCO . . . .20
REPRODUCCIÓN BÁSICA . . . . . .20
CARACTERÍSTICAS
GENERALES . . . . . . . . . . . . . . . . .20
MENÚ DE DISCO . . . . . . . . . . . . .20
MENÚ DE TÍTULO . . . . . . . . . . . .20
REANUDACIÓN . . . . . . . . . . . . . .21
PAUSA . . . . . . . . . . . . . . . . . . . . . .21
REPRODUCCIÓN PASO A PASO .21
AVANCE RÁPIDO /
RETROCESO RÁPIDO . . . . . . . . .21
AVANCE LENTO /
RETROCESO LENTO . . . . . . . . . .21
ACERCAMIENTO . . . . . . . . . . . . .21
C FUNCIÓN DE BÚSQUEDA . . . . .22
BÚSQUEDA POR PISTA . . . . . . . .22
BÚSQUEDA POR TÍTULO O
CAPÍTULO . . . . . . . . . . . . . . . . . . .22
BÚSQUEDA POR TIEMPO . . . . . .22
PANTALLA DE CONFIGURACIÓN
DE MARCADOR . . . . . . . . . . . . . .22
C
FUNCIÓN DE REPRODUCCIÓN
ESPECIAL . . . . . . . . . . . . . . . . . . . . . . .
REPETICIÓN . . . . . . . . . . . . . . . . .23
PROGRAMA . . . . . . . . . . . . . . . . .23
REPRODUCCIÓN ALEATORIO . .23
C CAMBIO DE CONFIGURACIÓN .24
IDIOMA DE SUBTÍTULOS . . . . . .24
IDIOMA DE AUDIO . . . . . . . . . . .24
MODO DE SONIDO ESTÉREO . .24
ÁNGULO DE CÁMARA . . . . . . . .24
CONFIGURACIÓN DE NIVEL
DE NEGRO . . . . . . . . . . . . . . . . . .24
SONIDO ENVOLVENTE
VIRTUAL . . . . . . . . . . . . . . . . . . . .25
C
INFORMACIÓN EN PANTALLA . . . .
23
25
C CAMBIO DE OPCIONES DE
AJUSTE DE DVD . . . . . . . . . . . . . .26
MENÚ PERSONALIZADO . . . . . .26
AJUSTE DE IDIOMA . . . . . . . . .26
AJUSTE DE PANTALLA . . . . . .27
AJUSTE DE AUDIO . . . . . . . . . .27
CONTROL PATERNAL . . . . . . . .28
OTROS AJUSTES . . . . . . . . . . . .28
INICIALIZAR . . . . . . . . . . . . . . . .28
C GUÍA DE SOLUCIÓN
DE PROBLEMAS . . . . . . . . . . . . . .29
C MANTENIMIENTO . . . . . . . . . . . .32
MANIPULACIÓN DEL DISCO . . .32
C ESPECIFICACIONES . . . . . . . . . .33
- 6 - SP
Page 41

Modo de TV
CARACTERÍSTICAS
Control remoto infrarrojo
•
Visualización trilingüe de configuración de TV
•
en pantalla que puede seleccionar en inglés,
español o francés
Sintonizador sintetizador de frecuencia PLL con
•
capacidad para 181 canales con identificación
directa de estación
convertidor para ver los canales codificados de cable.)
Descodificador de subtítulos – Podrá ver
•
películas, noticias, programas de TV, etc.
especialmente identificados (cc) ya sea con
subtítulos del diálogo o con visualización de texto
agregados al programa.
(Es posible que requiera un
Modo DVD
¡Sonido Dolby Digital
Esta unidad puede manejar sonido envolvente
Dolby Digital con 5,1 canales al conectarlo a un
descodificador Dolby Digital.
¡Reproducción fija / rápida/ paso a paso
Se encuentran disponibles varios modos de
reproducción incluidas imágenes fijas, avance
rápido / reversa, cámara lenta y cuadros paso a
paso.
¡Reproducción aleatoria para CD de audio
Esta unidad puede mezclar las pistas para
reproducirlas en orden aleatorio.
¡Reproducción de programas para CD de audio
Puede programar el orden de las pistas para
reproducirlas en cualquier orden que desea.
¡Menús de DVD en el idioma que desea
Puede desplegar menús de DVD en el idioma que
desea, si está disponible en el DVD.
¡Funciones de protector de pantalla / apagado
automático
El programa protector de pantalla inicia cuando no
hay entrada de información de la unidad durante 5
minutos en el modo detener. Después de que el
programa protector de pantalla esté activo durante
15 minutos, la unidad se apagará automáticamente.
¡Subtítulos en el idioma que desea.
Puede seleccionar el idioma que desea para los
subtítulos desplegados, si se encuentra disponible
en el disco.
¡Selección de ángulo de cámara
Puede seleccionar el ángulo de cámara que desea,
si el disco contiene secuencias grabadas desde
ángulos diferentes.
¡Opciones para idioma de audio y modo de
sonido
Puede seleccionar el idioma de audio y modo de
sonido que desea, si están disponibles en el disco.
Sistema de apagado automático – Si no se recibe
•
entrada de señal desde la terminal de antena y no
hay operación durante 15 minutos, la unidad se
apagará automáticamente.
Temporizador de apagado automático – Le
•
permite apagar la unidad automáticamente a una
hora determinada.
V-CHIP – Permite que los padres eviten que sus
•
niños vean programas de televisión que contienen
material inapropiado.
¡Bloqueo paternal
Puede definir el nivel de control para limitar la
reproducción de discos que podrían contener
material no apropiado para niños.
¡Detección automática de discos
Esta unidad detecta automáticamente si el disco
cargado es DVD o CD de audio.
¡Visualización en pantalla
Se puede desplegar en la pantalla del televisor
información sobre la operación actual para
permitirle confirmar las funciones activas actuales
(como reproducción de programas) mediante el
control remoto.
¡Búsqueda
Búsqueda por capítulo / Búsqueda por título /
Búsqueda por pista / Búsqueda por tiempo
¡Repetir
Capítulo / Título / Pista / Todo / A-B
¡Zoom
Se puede desplegar una pantalla magnificada.
¡Marcador
Puede reproducirse la parte designada por el
usuario.
¡Reanudar reproducción
El usuario puede reanudar la reproducción desde la
parte donde se detuvo la reproducción.
¡Sonido envolvente virtual
¡Indica velocidad de bits
¡DRC (control de rango dinámico)
Puede controlar el rango de volumen de sonido.
- 7 - SP
ESPAÑOL
Page 42

FUNCIONES Y CONTROLES DE OPERACIÓN
VIDEO L–AUDIO–R
VOLUME CHANNEL STOP SKIP SKIP PAUSE
HEADPHONE
–SEARCH–
OPEN/
CLOSE
PLAY
POWER
742 891091112 136531
- PANEL DELANTERO -
SKIP
REV
0 +10
SLOW
-
PLAY
STOP
SELECT
+100
ENTER
REPEATSEARCH MODE
FWD
OPEN/
CLOSE
CH.
VOL.
MUTEZOOM
DISC
MENU
RETURNTITLESETUP
A
ANGLESUBTITLEAUDIO
12
35
6
5
34
33
32
8
31
30
29
-
B
28
27
26
25
24
- CONTROL REMOTO
4
POWER PICTURE
14
15
123
456
789
SLEEP
16
9
10
11
PAUSE
17
DISPLAY
18
19
20
CLEAR
MODE
21
22
23
1.Bandeja de carga de discos
2.Conector de entrada de VIDEO
Conecte el conector de salida de video a una
videocámara o VCR.
3.Conectores de entrada de AUDIO L/R
Conecte los conectores de salida de audio a una
videocámara o VCR.
4.Botón POWER [P.13]
Presione para encender o apagar la unidad.
5.
Botones VOLUME (VOL.) K / L [P.13]
Presione para controlar el nivel de volumen del
DVD y televisor.
6.Botones CHANNEL (CH.)
Presione para seleccionar los canales memorizados.
7.Ventana de sensor remoto
K / L
[P.13]
8.Botón STOP C [P.20]
Detiene la operación del disco.
9.Botones SKIP H / G [P.22]
Presione una vez para saltar capítulos o pistas
hasta el punto que desea.
Botones SEARCH h / g (panel delantero) [P.21]
Mantenga presionado para cambiar la velocidad
de avance o retroceso de la reproducción.
10. Botón PLAY B [P.20]
Inicia la reproducción del disco.
11. Botón PAUSE F [P.21]
Hace una pausa en la operación actual del disco.
12. Botón OPEN/CLOSE A [P.20]
Presione para insertar o retirar un disco de la
bandeja.
13. Conector HEADPHONE
Para conectar audífonos (no se incluyen) y
escuchar con privacidad.
14. Botón PICTURE [P.13]
Presione para ajustar la imagen.
15. Botones numéricos
Modo de TV:
[P.13]
Presione dos dígitos para acceder directamente el
canal que desea.
Recuerde presionar [0] antes de los canales con
un solo dígito.
Botón +100–
Presione para seleccionar canales de cable más
altos que 99.
Modo DVD: [P.22]
Presione para ingresar el número que desea.
Botón +10–
Presione para ingresar los números que desea que
sean más altos que 9.
16. Botón SLEEP [P.14]
Configura el temporizador de apagado automático.
17. Botón DISPLAY
Modo de TV:
Muestra el número de canal actual en la pantalla
del televisor.
Modo DVD: [P.25]
Muestra el estado actual en la pantalla del televisor.
18. Botón SETUP [P.26]
- 8 - SP
Page 43

COAXIAL
ANT.
38
3736
- PANEL TRASERO -
Presione para entrar o salir del menú de
configuración de TV o DVD.
19. Botón TITLE [P.20]
Muestra el menú de títulos.
20. Botón CLEAR [P.22]
Presione para borrar o cancelar la configuración
actual.
21. Botón MODE [P.23, 24, 25]
Presione para llamar la pantalla de programa o la
pantalla de aleatorio en el modo de parada.
Presione para llamar la pantalla de Ajuste de
Nivel del Negro o la pantalla de Envolvente
Virtual durante la reproducción.
22. Botón SEARCH MODE [P.22]
Presione para localizar el punto que desea.
23. Botón AUDIO [P.24]
Presione para seleccionar el idioma de audio o
modo de sonido que desea.
24. Botón SUBTITLE [P.24]
Presione para seleccionar el idioma de los
subtítulos.
25. Botón REPEAT [P.23]
Repite la reproducción del disco, título, capítulo
o pista actual.
26. Botón ANGLE [P.24]
Presione para cambiar el ángulo de la cámara
para ver la secuencia reproducida desde un
ángulo diferente (si se encuentra disponible).
27. Botón A-B [P.23]
Repite la reproducción de la selección
seleccionada.
28. Botón RETURN [P.22]
Regresa a la pantalla anterior en el menú de
configuración.
29. Botón ENTER [P.15]
Presione para aceptar la configuración.
30. Botones K / L / { / B
Modo de TV: [P.13]
Presione para seleccionar el modo de
configuración del menú en la pantalla del
televisor.
Presione para seleccionar o ajustar desde un menú
en particular.
Modo DVD: [P.20]
Presione para seleccionar un elemento del menú.
31. Botón DISC MENU [P.20]
Llama al menú de DVD.
32. Botón REV h [P.21]
Presione para ver la imagen de DVD en retroceso
rápido o retroceso en cámara lenta.
Botón FWD g [P.21]
Presione para ver en avance rápido o avance en
cámara lenta.
33. Botón ZOOM [P.21]
Aumenta parte de la imagen reproducida con
DVD.
34. Botón MUTE [P.13]
Silenciar el sonido. Presione de nuevo para
restaurar el sonido.
35. Botón SELECT [P.11]
Presione para cambiar a modo de TV, modo de
entrada externa o modo DVD.
36. Conector COAXIAL [P.11]
Conecte a la entrada digital de un amplificado o
descodificador externo (para Audio DVD
únicamente).
37. Conector ANT. [P.10]
Conecte a una antena, sistema de cable o sistema
vía satélite.
38. Cable de alimentación [P.13]
Conecte a un tomacorriente estándar de CA
(120V/60Hz).
NOTA:
Retire el cable de alimentación del gancho para
•
evitar romper el alambre antes de conectarlo a
NOTA:
No recomendamos el uso de controles remotos universales. No todas las funciones pueden controlarse con
•
un control remoto universal.
un tomacorriente de CA estándar.
Si decide usar un control remoto universal con esta unidad, tenga en cuenta que el número de código que se
proporciona podría no operar esta unidad. En ese caso, comuníquese con el fabricante del control remoto
universal.
- 9 - SP
ESPAÑOL
Page 44

PREPARACIÓN PARA USO
UHF
VHF
VHF/UHF
VHF
or
UHF
VHF
or
UHF
COAXIAL
ANT.
ANT.
CONEXIÓN DE LA ANTENA / CABLE
Los cables que se usan aquí están disponibles comercialmente.
[CONEXIÓN DE LA ANTENA]
Cable coaxial
de 75 ohmios
Combinador
O
VHF/UHF
[CONEXIÓN DE CATV/SATÉLITE]
Equipo CATV o
equipo vía satélite *
OUT
IN
Desde el sistema de
cable o antena vía
satélite
O
Cable coaxial
O
de 75 ohmios
Desde el sistema
Cable
plano de
doble línea
Adaptador
*Algunos sistemas de TV de cable usan señales
codificadas y requieren un convertidor especial
de cable
para recibir estos canales. Consulte con su
compañía de cable local.
Nota para el instalador del sistema CATV:
Este recordatorio se proporciona para que el instalador del sistema CATV preste atención al Artículo 820-40 del NEC
el cual proporciona pautas para una correcta conexión a tierra y, en particular, especifica que la conexión a tierra del
cable debe estar conectada al sistema de tierra del edificio, tan cerca al punto de entrada del cable como sea práctico.
NOTA:
Antes de conectar la antena al conector ANT. de la unidad, verifique que la
•
clavija no esté doblada. Si está doblada, enderece la clavija como se ilustra y
luego conecte la clavija en el conector ANT. de la unidad.
Clavija doblada
Cable
Enchufe
(Necesita
enderezarse)
(Clavija recta)
ANTENA COMBINADA VHF/UHF
Se puede conectar una antena de combinación VHF
UHF de 75 ohmios al conector ANT. de la unidad.
ANTENAS SEPARADAS VHF/UHF
En algunas áreas será necesario usar una antena
exterior.
CABLE SIN EQUIPO CONVERTIDOR /
DESCODIFICADOR
Use esta conexión si el sistema de cable se conecta
directamente a la unidad sin equipo convertidor.
NOTA:
Por su seguridad y para evitar daños a la unidad, desconecte el cable de la antena del conector
•
ANT. antes de mover la unidad.
CABLE CON EQUIPO CONVERTIDOR /
DESCODIFICADOR O EQUIPO VÍA
SATÉLITE
Si el servicio de cable le suministra un equipo
convertidor o si usa un sistema vía satélite, puede
usar la conexión básica que se muestra arriba.
La selección de canales debe hacerse con el equipo
convertidor o equipo vía satélite. Esto significa que
los canales no pueden cambiarse mediante el control
remoto de esta unidad.
- 10 - SP
Page 45

CONEXIÓN EN LOS CONECTORES DE ENTRADA A/V
COAXIAL
ANT.
Al conector COAXIAL
(sólo salida de audio DVD)
Ej.
Conecte a un amplificador equipado con
conectores de entrada digital como unidad
MD o unidad DAT etc.
Al conector de entrada de
audio digital coaxial
Cable digital coaxial de audio
(disponible comercialmente)
DELANTEROS
Cuando vea un programa grabado en otra fuente (VCR o videocámara), use los conectores
de entrada AUDIO/VIDEO en la parte delantera de la unidad.
Conecte los conectores de salida de audio/video de otra fuente en los conectores de
AUDIO L/R y VIDEO de esta unidad.
Luego presione [SELECT] o [CH. KK/ LL] hasta que aparezca “AUX” en la pantalla.
AUX
–SEARCH–
OPEN/
PLAY
CLOSE
HEADPHONE
ej.
VCR o videocámara, etc.
(ENTRADA)
POWER
VIDEO L–AUDIO–R
VOLUME CHANNEL STOP SKIP SKIP PAUSE
A los conectores de salida de audio
Cable de audio
(disponible comercialmente)
VIDEO L–AUDIO–R
(SALIDA)
Al conector de
[Parte delantera de la unidad]
(ENTRADA)
Cable de video
(disponible comercialmente)
salida de video
(SALIDA)
NOTA:
Al conectar un VCR monoaural (otra fuente) a esta unidad, conecte el conector de salida de audio del VCR
•
monoaural (otra fuente) al conector AUDIO L de esta unidad. El audio saldrá por igual en ambos canales
izquierdo y derecho L y R.
CONEXIÓN A UN AMPLIFICADOR ESTÉREO EQUIPADO CON
CONECTORES DE ENTRADA DIGITAL (para DVD)
Utilice un cable digital coaxial de audio (vendido en los comercios) para las conexiones de audio.
Conecte a un amplificador con conectores de entrada digital tales como los reproductores de MD Deck o DAT Deck.
ESPAÑOL
(SALIDA)
(ENTRADA)
NOTAS:
La fuente de audio en un disco en un formato envolvente Dolby Digital de 5,1 canales no puede grabarse
•
como sonido digital en una unidad MD Deck o DAT Deck.
Asegúrese de apagar todos los componentes en el sistema antes de conectar otro componente.
•
Consulte el manual del usuario para obtener información sobre los componentes que se conectarán a la
•
unidad.
Defina “DOLBY DIGITAL” a “PCM” para salida de audio en el modo de configuración. Usar una unidad
•
con configuraciones incorrectas puede generar distorsión de ruido y también podría dañar los altavoces.
(Consulte la página 27.)
- 11 - SP
Page 46

COAXIAL
ANT.
Altavoz delantero
(izquierdo)
Altavoz
central
Altavoz delantero
(derecho)
Altavoz
envolvente
(izquierdo)
Altavoz
envolvente
(derecho)
Altavoz
para graves
Al conector COAXIAL
(sólo salida de audio DVD)
Al conector de entrada
de audio digital coaxial
Descodificador
Dolby Digital
Cable digital coaxial de audio
(disponible comercialmente)
CONEXIÓN A UN DESCODIFICADOR DOLBY DIGITAL (para DVD)
Si se usa esta unidad para reproducir discos DVD en un formato envolvente Dolby Digital de 5,1 canales, la
unidad produce una secuencia de datos DOLBY DIGITAL de este conector COAXIAL. Al enganchar la
unidad a un descodificador Dolby Digital, puede disfrutar de un ambiente más convincente y realista con
poderoso sonido envolvente de alta calidad como el que se disfruta en las salas cinematográficas.
Utilice los cables digitales coaxiales de audio (vendido en los comercios) para las conexiones de audio.
(SALIDA)
(ENTRADA)
NOTAS:
Asegúrese de apagar todos los componentes en el sistema antes de conectar otro componente.
•
Consulte el Manual del Usuario para obtener información sobre los componentes que se conectarán a la
•
unidad.
Si se conecta a un descodificador Dolby Digital, ajuste “DOLBY DIGITAL” a “BITSTREAM” para la
•
salida de audio en el modo de configuración. (Consulte la página 27.)
A menos que se conecte a un descodificador Dolby Digital, defina “DOLBY DIGITAL” a “PCM” para
•
salida de audio en el modo de configuración. Usar una unidad con configuraciones incorrectas puede
generar distorsión de ruido y también podría dañar los altavoces. (Consulte la página 27.)
Fabricado bajo licencia de Dolby Laboratories. “Dolby” y el símbolo de la doble D son
marcas comerciales de Dolby Laboratories.
INSTALACIÓN DE LAS PILAS
1)Para abrir la cubierta del compartimiento de las
pilas presione la cubierta de la unidad de control
remoto en la dirección que indica la flecha.
2)Inserte 2 pilas “AA” para linterna de bolsillo en el
compartimiento de las pilas en la dirección que
indican las marcas de polaridad (+/-).
3)Vuelva a colocar la cubierta.
[PRECAUCIONES RELACIONADAS CON LAS
PILAS]
Asegúrese de respetar la polaridad correcta como
•
se indica en el compartimiento de las pilas. Si
invierte las pilas puede causar daño al dispositivo.
No combine tipos diferentes de pilas. (por ej.,
•
alcalinas y carbón-zinc) o pilas usadas con pilas
nuevas.
Sí el dispositivo no se usará por un periodo largo,
•
se deben retirar las pilas para evitar daños o
lesiones causadas por el posible derrame del
ácido en su interior.
No intente recargar pilas que no están diseñadas
•
para ese fin, ya que pueden sobrecalentarse y
agrietarse.
- 12 - SP
Page 47

SECCIÓN DE TV
OPERACIÓN Y CONFIGURACIÓN DE TV
PARA VER UN PROGRAMA DE TV
TV
1 Enchufe el cable de alimentación de
la unidad
Enchufe el otro extremo del cable de
alimentación en el tomacorriente de CA.
NOTA:
Si aparece cualquier dígito en la esquina de la
•
pantalla, presione [POWER] sin desconectar el
cable de alimentación.
2 Encienda la unidad
Presione [POWER] para encender la unidad.
3 Seleccione el número de canal
Presione [CH. K / L] o los botones numéricos para
seleccionar el número de canal que desea.
Notas para usar los botones numéricos:
¡Debe preceder los números de canal de un solo
dígito con un cero (por ejemplo: 02, 03, 04 y así
sucesivamente).
¡Cuando seleccione canales de cable más altos que
99, presione [+100] primero, luego presione los
últimos dos dígitos. (Ejemplo: para seleccionar el
canal 125, presione primero [+100] luego presione
[2] y [5].)
4 Ajuste el sonido
Presione [VOL.XX/ YY] para ajustar el volumen.
Presione
instantáneamente el sonido.
Presione de nuevo para restaurar el
nivel de sonido anterior.
NOTAS:
•
PARA VER CANALES DE CABLE O VÍA
SATÉLITE
•
PARA VER ENTRADA EXTERNA
•
[MUTE] para silenciar
VOLUMEN 20
C C C C C C C C C C C C C C C C
Si presiona [CH. K / L] en el
modo DVD, puede cambiar los canales del
televisor. Incluso si apaga la unidad en el modo
DVD, volverá al modo de TV cuando la encienda
de nuevo.
Si la unidad está conectada a un equipo de cable o
vía satélite, presione [CH. K / L] para seleccionar
CH3 o CH4 de acuerdo con la configuración del
canal de salida del dispositivo y seleccione el canal
que desea en ese dispositivo.
Cuando se conecta un equipo externo en los
conectores de entrada AUDIO/VIDEO de la parte
delantera, presione [SELECT] o [CH. K / L] varias
veces hasta que aparezca “AUX” en la pantalla.
DESMAGNETIZACIÓN
TV
Este televisor tiene un circuito desmagnetizador que
despejará errores de color en la pantalla causados por
cualquier exceso de magnetismo que se acerque
demasiado al televisor. Este circuito está diseñado para
operar una vez cuando el aparato se conecta por primera
vez. Si se observan errores menores de color en
algunos lugares en la pantalla, desconecte el televisor
durante aproximadamente 30 minutos. Cuando se
conecte de nuevo el televisor, el circuito
desmagnetizador operará una vez para despejarlos.
Repita este procedimiento en cualquier momento en que
la pantalla del televisor se magnetice accidentalmente o
cuando se mueva o cambie de lugar el televisor.
CONTROL DE IMAGEN
TV
Los controles de imagen de la unidad – CLARIDAD,
CONTRASTE, COLOR, MATIZ y AGUDEZA –
están preestablecidos con las especificaciones del
fabricante. Aunque habitualmente son las mejores, es
posible que necesite hacer algunos ajustes adicionales
para obtener una imagen más natural.
Asegúrese de que...
La unidad debe estar encendida.
•
1 Despliegue el menú
Presione [PICTURE].
2 Seleccione la opción que desea ajustar
Presione [K / L] hasta que se
muestre el control que desea.
CLARIDAD
CONTRASTE
COLOR
MATIZ
AGUDEZA
3 Ajuste la configuración
Presione [s/ B]para ajustar al nivel deseado en el
transcurso de 5 segundos.
sB
CLARIDAD para disminuir para aumentar
el brillo el brillo
CONTRASTE para disminuir para disminuir
el contraste el contraste
COLOR
MATIZ para aumentar el para aumentar
AGUDEZA para suavizar para aclarar
Incluso si existe una falla de energía de cualquier
•
clase, la unidad memorizará esta característica.
- 13 - SP
para empalidecer
color púrpura el color verde
CLARIDAD
PP PP PP PP PP PP PP CC PP PP PP PP PP PP PP
–
para abrillantar
ESPAÑOL
+
Page 48

TEMPORIZADOR DE APAGADO
AUTOMÁTICO
TV
La función del temporizador de apagado automático
apaga la unidad sin usar [POWER] después del
periodo deseado.
1 Despliegue del temporizador de apagado
automático
Presione [SLEEP] para que aparezca “REPOSAR 0
MINUTO”.
2
Defina el temporizador de apagado automático
Presione [SLEEP] varias veces
hasta que aparezca la hora de
apagado automático que desea.
Cada vez que lo presione,
aumentará el tiempo 30 minutos
hasta un máximo de 120 minutos.
REPOSAR 120 MINUTO
Después de 5 segundos, la configuración del
temporizador de apagado automático desaparecerá.
PARA CANCELAR EL TEMPORIZADOR
DE APAGADO AUTOMÁTICO
Presione [SLEEP] para desplegar el temporizador de
apagado automático. Presione
hasta que aparezca “REPOSAR 0 MINUTO”.
[SLEEP] varias veces
SISTEMA DE SUBTÍTULOS
NOTAS:
No todos los programas se transmiten con
•
subtítulos. Su unidad está diseñada para
proporcionar subtítulos gratuitos de señales de
antena, cable y VCR de alta calidad. Por otra
parte, es posible que las señales de mala calidad
den como resultado errores en los subtítulos o
ningún subtítulo en absoluto. Las condiciones
comunes de señal que podrían causar errores en
los subtítulos se enumeran abajo:
Ruido de encendido de automóviles
•
Ruido de motor eléctrico
•
Recepción débil con nieve en la pantalla del
•
televisor
Recepción de señal multiplex que muestra
•
fantasmas o vibraciones
Si la unidad muestra un cuadro
•
negro en la pantalla del televisor,
esto significa que la unidad está
configurada en el modo TEXT.
Para despejar la pantalla,
seleccione [SUBTÍT1],
[SUBTÍT2] o [OFF].
Asegúrese de que...
La unidad debe estar encendida.
•
1 Seleccione “TÍTULO”
Presione [SETUP].
Presione [K / L] para señalar hacia
- TV PREP. -
AJUSTE DE CANAL
AJUSTE DE V-CHIP
IDIOMA [ESPAÑOL]
B TÍTULO [OFF]
“TÍTULO”.
TV
Podrá ver películas, noticias, programas de TV, etc.
especialmente identificados (cc) ya sea con subtítulos
del diálogo o con visualización de texto agregados al
programa.
Modo de TÍTULO: Puede ver dramas, películas y
noticias mientras se muestran los subtítulos de los
diálogos y el contenido de las noticias.
Modo de TEXTO: Puede ver información de texto en
la mitad de la pantalla, si lo desea.
1-2: Puede obtener estos subtítulos o información de
texto al seleccionar ya sea “1” o “2”. El subtítulo “2”
habitualmente se usa para un segundo idioma si está
disponible.
2 Seleccione el modo de subtítulos que desea.
Presione [ENTER] varias veces
hasta que aparezca el menú de
subtítulos que desea.
([SUBTÍT1], [SUBTÍT2],
[TEXTO1] or [TEXTO2])
- TV PREP. -
AJUSTE DE CANAL
AJUSTE DE V-CHIP
IDIOMA [ESPAÑOL]
B TÍTULO [SUBTÍT1]
3 Para salir del modo de configuración de
subtítulos
Presione [SETUP] para salir del menú.
NOTA:
Incluso si existe una falla de energía de
•
cualquier clase, la unidad memorizará esta
característica.
PARA CANCELAR EL SISTEMA DE
SUBTÍTULOS
Repita los pasos 1 a 2 y seleccione [OFF] al usar
[ENTER]. Presione [SETUP] para volver al modo
de TV.
- 14 - SP
Page 49

AJUSTE DE CANAL
Asegúrese de que...
La unidad debe estar encendida.
•
PROGRAMACIÓN AUTOMÁTICA DE
CANALES
Como configuración inicial, esta unidad ha
memorizado todos los canales incluidos los que no
están disponibles en su área. Esta característica
coloca automáticamente sólo los canales disponibles
en la memoria.
TV
AGREGAR / BORRAR CANALES
Los canales que ya no recibe o que rara vez ve se
pueden eliminar de la memoria. (Por supuesto, se
pueden agregar de nuevo a la memoria los canales
eliminados).
1 Seleccione “AJUSTE DE
CANAL”
Presione [SETUP].
Presione
“AJUSTE DE CANAL”, luego
presione [ENTER].
[K / L]
para señalar hacia
- TV PREP. -
B AJUSTE DE CANAL
AJUSTE DE V-CHIP
IDIOMA [ESPAÑOL]
TÍTULO [OFF]
1 Seleccione “AJUSTE DE
CANAL”
Presione [SETUP].
Presione
[K / L]
para señalar hacia
- TV PREP. -
B AJUSTE DE CANAL
AJUSTE DE V-CHIP
IDIOMA [ESPAÑOL]
TÍTULO [OFF]
“AJUSTE DE CANAL”, luego
presione [ENTER].
AJUSTE DE CANAL
2 Inicie el rastreo de canales
Presione
“AUTOPROGRAMACIÓN DE
[K / L]
para señalar hacia
–
AGREGAR / BORRAR (CATV)
B
AUTOPROGRAMACIÓN DE CA.
CA.”, luego presione [ENTER].
El sintonizador rastreará y
memorizará todos los canales activos en su área.
3 Después de rastrear
El sintonizador se detiene en el canal memorizado
más bajo.
NOTAS:
Cuando se activa
•
“AUTOPROGRAMACIÓN DE
CA.” donde no hay entrada de
señal de TV, aparecerá “NO HAY
SEÑAL DE TV” en la pantalla
después de que termine el rastreo
de canales.
La unidad podría reconocer canales CATV como
•
canales de TV si las condiciones de recepción son
deficientes. En ese caso, compruebe la conexión de
la antena e intente de nuevo
“AUTOPROGRAMACIÓN DE CA.” cuando
mejoren las condiciones de recepción.
La programación de memoria de canales NO es
•
necesaria cuando está conectado a una caja de
cable o caja de satélite. Seleccione el canal para
la caja de cable o entrada de satélite (por
ejemplo, CH3) en la unidad y seleccione su
canal deseado en la caja de cable o caja de
satélite.
NO HAY SEÑAL DE TV
2 Seleccione “AGREGAR /
BORRAR”
Presione
[K / L]
para señalar hacia
“AGREGAR / BORRAR”, luego
presione [ENTER].
–
3 Ingrese el número de canal
que desea.
Presione [CH. K / L] o los botones
numéricos hasta que aparezca el
número de canal que desea.
(También puede presionar [K / L]
para ingresarlo.)
Debe preceder los números de canal de un solo
•
dígito con un cero (p. ej. 02 ... 09).
Cuando seleccione canales de cable más altos que
•
99, presione [+100] primero, luego presione los
últimos dos dígitos. (p. ej.: para seleccionar el
canal 125, presione primero [+100] luego presione
[2] y [5].)
4 Elimine (o agregue) de (o hacia) la memoria
Presione [ENTER]. El número de canal cambia a luz
roja. El canal se elimina de la memoria.
Para borrar otro canal, repita los pasos 3 a 4.
•
Si presiona [ENTER] de nuevo, el canal se
•
volverá a memorizar.
Canal agregado: Azul claro
Canal borrado: Rojo claro
5 Salir del modo de canal
Presione [SETUP] para salir del menú.
NOTA:
Para confirmar que los canales se han eliminado o
•
agregado, presione
[CH. K / L].
AJUSTE DE CANAL
–
B AGREGAR / BORRAR (CATV)
AUTOPROGRAMACIÓN DE CA.
AGREGAR / BORRAR
–
08
(Ejemplo: CH8)
ESPAÑOL
- 15 - SP
Page 50

AJUSTE DE V-CHIP
TV
Esta característica permite que los padres eviten que
sus niños vean programas de televisión que
contienen material inapropiado. Cuando trata de
seleccionar un programa que está bloqueado,
Aparecerá en la pantalla del televisor el mensaje
“PROGRAMA PROHIBIDO por ...”.
AJUSTE DE V-CHIP
Asegúrese de que...
La unidad debe estar encendida.
•
1 Seleccione “AJUSTE DE V-
CHIP”
Presione [SETUP].
Presione [K / L] para seleccionar
“AJUSTE DE V-CHIP”, luego
presione [ENTER].
2 Ingresar código de acceso
Presione los botones numéricos
para ingresar el código de acceso.
Para configurar por primera vez o
•
en caso de que la unidad pierda
alimentación, ingrese el código
predeterminado 0000.
3 Seleccione el elemento que desea
Presione [K / L] para seleccionar “CLASE DE TV”,
“CLASE DE MPAA” o “CAMBIAR CODIGO”,
luego presione [ENTER].
Consulte las páginas a continuación para configurar
cada elemento.
AJUSTE DE V-CHIP
–
B CLASE DE TV
CLASE DE MPAA
CAMBIAR CODIGO
CONFIGURACIÓN
A
–
A
P16 Paso
B
P17 Paso
C
P17 Paso
DE
CLASIFICACIÓN PARA TV
- TV PREP. -
AJUSTE DE CANAL
B AJUSTE DE V-CHIP
IDIOMA [ESPAÑOL]
TÍTULO [OFF]
CODIGO DE ACCESO
_ _ _ _
4
4
4
NOTAS:
Cuando seleccione la clasificación
•
y la defina como [BLOQ.], la
clasificación más alta quedará
bloqueada automáticamente. Las
clasificaciones más bajas
TV–Y [MIRAR]
TV–Y7 ( ) [MIRAR]
B TV–G [BLOQ.]
TV–PG (DLSV ) [BLOQ.]
TV–14 (DLSV ) [BLOQ.]
TV–MA ( LSV ) [BLOQ.]
quedarán disponibles para verlas.
Al definir la clasificación más baja como
•
[MIRAR], las otras clasificaciones estarán
disponibles automáticamente para verlas.
5 Configuración “Sub
clasificaciones”
Cuando seleccione las
clasificaciones de TV-Y7, TV-PG,
TV-14 o TV-MA tendrá la opción de
configurar categorías de
subclasificaciones.
Presione
[K / L] para seleccionar la
clasificación con subclasificaciones
que desea bloquear y luego presione
[ENTER] dos veces.
Presione
[K / L] para seleccionar la
subclasificación y luego presione
[ENTER] para definirla como
[BLOQ.] o [MIRAR].
Opciones
Explicación de clasificación de categorías
TV-Y7
FV Violencia de Fantasía
TV-PG, TV-14, TV-MA
D Diálogo Sugerente (TV-PG, TV-14
únicamente)
L Lenguaje Vulgar
S Situaciones Sexuales
VViolencia
NOTA:
Las subclasificaciones bloqueadas
•
aparecerán junto a la categoría de
clasificación en el menú “CLASE
DE TV”.
TV–Y [MIRAR]
B TV–Y7 ( ) [MIRAR]
TV–G [MIRAR]
TV–PG ( ) [MIRAR]
TV–14 ( ) [MIRAR]
TV–MA( ) [MIRAR]
TV–Y7
B FV
TV–PG
B D
L
S
V
TV–Y [MIRAR]
TV–Y7 ( ) [MIRAR]
TV–G [MIRAR]
B TV–PG (DLSV )
TV–14 (DLSV)
TV–MA ( LSV)
[BLOQ.]
[BLOQ.]
[BLOQ.]
[BLOQ.]
[BLOQ.]
[BLOQ.]
[BLOQ.]
[BLOQ.]
[BLOQ.]
[BLOQ.]
Siga los pasos 1a 3en la sección “AJUSTE DE VCHIP” que se indica arriba.
4 Bloqueo de programas de TV
Presione [K / L] para seleccionar la
clasificación que desea bloquear.
Presione [ENTER] varias veces
para definirlo como [BLOQ.] o
[MIRAR].
Opciones
Explicación de clasificación de categorías
TV-Y Apropiado para todos los niños
TV-Y7
Apropiado para niños de siete años o más.
TV-G Público en general
TV-PG Se sugiere guía paterna.
TV-14 No apto para menores de 14 años
TV-MA Público maduro únicamente
B TV–Y [MIRAR]
TV–Y7 ( ) [MIRAR]
TV–G [MIRAR]
TV–PG ( ) [MIRAR]
TV–14 ( ) [MIRAR]
TV–MA( ) [MIRAR]
6 Salga del modo de configuración V-Chip
Presione [SETUP] para salir del menú.
NOTA:
Para cambiar la clasificación, el
•
televisor debe estar encendido en
un programa no protegido. Si
“PROGRAMA PROHIBIDO por
...” aparece en la pantalla, cambie
el canal a una estación que no
esté protegida.
- 16 - SP
PROGRAMA PROHIBIDO
por TV-Y
Page 51

CONFIGURACIÓN DE
B
CLASIFICACIÓN PARA
PELÍCULAS
Siga los pasos 1a 3en la sección
“AJUSTE DE V-CHIP” en la
página 16.
4 Seleccione el elemento que
desea
Presione [K / L] para señalar la
opción que desea, luego presione [ENTER] para
seleccionar [BLOQ.] o [MIRAR].
G[MIRAR]
PG [MIRAR]
PG–13 [MIRAR]
B R
NC–17
X
[BLOQ.]
[BLOQ.]
[BLOQ.]
5 Salir del modo de configuración V-Chip
Presione [SETUP] para salir del menú.
NOTA:
Su código de acceso personal se borrará y
•
regresará a la configuración predeterminada
(0000) si ocurre una falla de alimentación o si
apaga la unidad con un interruptor de pared. Si
olvida el código, desconecte el cable de
alimentación durante 10 segundos para restablecer
el código de acceso a 0000.
Opciones
Explicación de clasificación de categorías
G Público en general
PG Se sugiere guía paterna.
PG-13 No apto para menores de 13 años
R Restringido; los menores de 17 años
requieren la compañía de un padre o
guardián adulto
NC-17
No se permite a nadie menor de 17 años
X Público maduro únicamente
Cuando seleccione una clasificación y definirla
•
como [BLOQ.], la clasificación más alta quedará
bloqueada automáticamente. Las clasificaciones
más bajas quedarán disponibles para verlas.
Al definir la clasificación más baja como
•
[MIRAR], las demás clasificaciones estarán
automáticamente disponibles para verlas.
5 Salir del modo de configuración V-Chip
Presione [SETUP] para salir del menú.
CAMBIO DE CÓDIGO DE ACCESO
C
Siga los pasos 1a 3en la sección “AJUSTE DE VCHIP” en la página 16.
4 Ingresar código nuevo
Presione los botones numéricos
para ingresar el código de acceso
que desea en el espacio “CODIGO
NUEVO” y luego ingrese el mismo
código en el espacio “CODIGO
CONFIRMADO”. Cuando esté
completo, el menú regresará a “AJUSTE DE VCHIP”.
Asegúrese de ingresar exactamente el mismo
•
código nuevo en el espacio “CODIGO
CONFIRMADO” que ingresó en el espacio
“CODIGO NUEVO”. Si son diferentes, el espacio
“CODIGO NUEVO” se borrará para intentarlo de
nuevo.
CODIGO NUEVO
X X X X
CODIGO CONFIRMADO
_ _ _ _
IDIOMA DE MENÚ
1 Seleccione “LANGUAGE”
Presione [SETUP].
Presione
[K / L] para señalar hacia
“LANGUAGE”.
2 Seleccione “ENGLISH”, “ESPAÑOL” o
“FRANÇAIS”
Presione [ENTER] varias veces para seleccionar
“ENGLISH” = inglés, “ESPAÑOL” o
“FRANÇAIS”= francés.
3 Salga del modo de idioma
Presione [SETUP] para salir del menú.
NOTAS:
Esta función sólo afecta el idioma en el menú de la
•
pantalla y no la fuente de audio.
Si por alguna razón el menú está en español o en
•
francés, presione [SETUP], presione [K / L] para
señalar hacia “IDIOMA [ESPAÑOL]” o
“LANGAGE” [FRANÇAIS]”, luego presione
[ENTER] varias veces para seleccionar el idioma
que desea y luego presione [SETUP].
- TV SETUP -
CHANNEL SET UP
V-CHIP SET UP
B LANGUAGE [ENGLISH]
CAPTION [OFF]
TV
ESPAÑOL
- 17 - SP
Page 52

DESIGNACIONES DE CANAL DE CABLE
Visualización de TV
Visualización de TV
Visualización de TV
Visualización de TV
Visualización de TV
Visualización de TV
Visualización de TV
Visualización de TV
Canal CATV
Visualización de TV
W+80 W+81 W+82 W+83 W+84
W+65 W+66 W+67 W+68 W+69 W+70 W+71 W+72 W+73 W+74 W+75 W+76 W+77 W+78 W+79
W+55 W+56 W+57 W+58 A-4 A-3 A-2 A-1 W+59 W+60 W+61 W+62 W+63 W+64
W+40 W+41 W+42 W+43 W+44 W+45 W+46 W+47 W+48 W+49 W+50 W+51 W+52 W+53 W+54
W+25 W+26 W+27 W+28 W+29 W+30 W+31 W+32 W+33 W+34 W+35 W+36 W+37 W+38 W+39
W+10 W+11 W+12 W+13 W+14 W+15 W+16 W+17 W+18 W+19 W+20 W+21 W+22 W+23 W+24
A-5
RSTUVWW+1 W+2 W+3 W+4 W+5 W+6 W+7 W+8 W+9
CDEFGH I JKLMNOPQ
5A 2 3 4 5 6 7 8 9 10 11 12 13 A B
1234567891011 12 13 14 15
16 17 18 19 20 21 22 23 24 25 26 27 28 29 30
31 32 33 34 35 36 37 38 39 40 41 42 43 44 45
46 47 48 49 50 51 52 53 54 55 56 57 58 59 60
61 62 63 64 65 66 67 68 69 70 71 72 73 74 75
76 77 78 79 80 81 82 83 84 85 86 87 88 89 90
91 92 93 94 95 96 97 98 99 100 101 102 103 104 105
106 107 108 109 110 111 112 113 114 115 116 117 118 119 120
121 122 123 124 125
Canal CATV
Canal CATV
Canal CATV
Canal CATV
Canal CATV
Canal CATV
Canal CATV
Canal CATV
Si está suscrito al servicio de cable, los canales se muestran como 1 a 125. Las compañías proveedoras de
cable con frecuencia designan canales con letras o combinaciones alfanuméricas. Consulte con su compañía de
cable local. La siguiente tabla es un listado de designaciones comunes de canales de cable.
- 18 - SP
Page 53

SECCIÓN DE DVD
Ejemplo
Título 1 Título 2
Capítulo 1 Capítulo 2 Capítulo 1
Capítulo 2
Capítulo 3 Capítulo 4
Ejemplo
Pista 1 Pista 2 Pista 5
Pista 6
Pista 3 Pista 4
CD de audio
DVD-Video
* 1,2,4,6,10,11
* 4,6,10
* 4,5,6,9,10
* 1,3,4,5,6
7,9,10
DVD-RW
DVD-R
* 1,3,4,5,6,8,9,10
DVD+RW
DVD+R
Audio CD
CD-RW
CD-R
Video digital
(MPEG2)
-
-
-
Audio digital
Código de región
Marca (logotipo)
Discos que
pueden
reproducirse
Señales
grabadas
Tamaño
del disco
Tipos de disco
12 cm
o
8 cm
12 cm
o
8 cm
o
es una marca comercial de DVD Format/Logo Licensing Corporation.
SOBRE LOS DISCOS
DISCOS QUE PUEDEN REPRODUCIRSE
ESPAÑOL
Si no puede reproducir un disco que tenga las marcas que se indican arriba, verifique las notas siguientes.
*1: Esta unidad cumple con el sistema de color NTSC. Los discos grabados en otros sistemas de color, como
PAL, no pueden reproducirse.
*2: Ciertos discos DVD-Video no operan como se describe en este manual debido a las intenciones de los
productores del disco.
*3: Los discos grabados en el formato VR (Videograbación) no pueden reproducirse.
*4: Es posible que los discos con rayones o manchas no puedan reproducirse.
*5: Algunos discos no pueden reproducirse debido a condiciones de grabación incompatibles, características
de la grabadora o propiedades especiales de los discos.
*6:
Puede reproducir discos que tengan las marcas que se indican arriba. Si decide usar discos no estandarizados, es posi-
ble que esta unidad no los reproduzca. Incluso si se reproducen, la calidad del sonido o video quedará comprometida.
*7:
Podrá reproducir el disco DVD-R/RW sin finalizar grabado en el formato de video de la grabadora de DVD
de nuestra marca. Sin embargo, dependiendo de las condiciones de grabado, el disco podría no reproducirse
en absoluto o normalmente (la imagen o el sonido podrían no ser tersos, etc.). En ese caso, necesita
finalizar el disco con la grabadora de DVD. Consulte el manual que acompaña a la grabadora de DVD.
*8: Sólo los discos grabados en el formato de video y finalizados se podrán reproducir.
Los discos no finalizados no podrán reproducirse. Sin embargo, dependiendo de las condiciones de grabado,
el disco podría no reproducirse en absoluto o normalmente (la imagen o el sonido podrían no ser tersos, etc.).
*9: Si aún queda mucho espacio de grabado en el disco (la porción que se ha usado tiene menos de 55 mm
de lado a lado), es posible que no se reproduzca correctamente.
*10: No pegue papel o coloque etiquetas engomadas sobre el disco ya que se podría dañar y es posible que la
unidad o lo lea correctamente.
*11: El número dentro del símbolo se refiere a la región del mundo y un disco codificado en un formato
específico de región sólo puede reproducirse en una unidad con el mismo código de región.
DISCOS QUE NO PUEDEN REPRODUCIRSE
¡
NUNCA reproduzca los discos siguientes. ¡De otra forma, podría resultar en un mal funcionamiento!
DVD-RAM / CD-I / CD de fotografías / Video CD / DVD con códigos de región diferentes de 1 o ALL /
DTS-CD / DVD-ROM para computadoras personales / CD-ROM para computadoras personales / MP3
¡
En los discos siguientes, ES POSIBLE QUE NO se escuche el sonido
Super CD de audio
NOTA: Sólo el sonido grabado en la capa CD normal puede reproducirse.
El sonido grabado en la capa Super CD de audio de alta densidad no puede reproducirse.
¡
Cualquier otro disco sin indicaciones de compatibilidad
- 19 - SP
Page 54

REPRODUCCIÓN DE DISCO
REPRODUCCIÓN BÁSICA
DVD-V
Primeros pasos
¡Encienda el amplificador y cualquier otro
componente, si fuera necesario.
1 Presione [POWER].
¡La unidad se encenderá.
2 Presione [OPEN/CLOSE A] para abrir la
bandeja de carga del disco.
3 Coloque el disco elegido en la bandeja con
la etiqueta hacia arriba.
4 Presione [PLAY O].
¡
La bandeja se cerrará automáticamente y la reproducción
iniciará a partir del primer capítulo o pista del disco.
¡
Cerrar manualmente la bandeja del disco o presionar
[OPEN/CLOSE A] también inicia la reproducción.
¡Si la reproducción no inicia de forma automática,
presione [PLAY O].
¡Cuando reproduzca un DVD con un menú de títulos,
este podría aparecer en la pantalla. En ese caso,
consulte “MENÚ DE TÍTULO” en esta página.
CD
CARACTERÍSTICAS GENERALES
DVD-V
El DVD podría contener menús para navegar el disco y
acceder características especiales. Presione los botones
numéricos apropiados o
su selección en el menú principal de DVD y presione
[ENTER] para confirmar.
NOTAS:
¡Presione [SELECT], para seleccionar el modo
DVD y luego opere las funciones de DVD.
¡A menos que así se indique, todas las operaciones
descritas están basadas en el uso del control remoto.
Algunas operaciones podrían llevarse a cabo al usar
la barra de menú en la pantalla del televisor.
[K / L / s / B] para resaltar
MENÚ DE DISCO
DVD-V
1 Presione [DISC MENU].
¡Aparecerá el menú principal de DVD.
¡Si la función no está disponible, el símbolo
podría aparecer en la pantalla del televisor.
¡Si está disponible el menú del disco, aparecerán las
opciones de idioma de audio, subtítulos, capítulos
para el título y otras opciones para seleccionarlas.
2 Presione [K / L / s / B] para seleccionar
una opción y presione [ENTER] para confirmar la selección.
5 Presione [STOP C] para detener la
reproducción.
NOTAS:
¡Cuando el modo DVD se cambia a modo de TV, el
modo DVD se apaga primero y luego la imagen y
sonido de TV aparecen en alrededor de 4 segundos.
De forma similar, cuando se presiona [POWER]
para apagar la unidad en modo DVD, este modo se
apagará primero y luego la unidad se apagará.
¡
Podría aparecer un “icono de
prohibido” en el extremo superior
derecho de la pantalla del televisor
durante la operación para advertir
que se ha encontrado una operación
prohibida en el DVD o disco.
¡Con DVD que usan títulos para reproducir señales
de programas, la reproducción podría iniciar a
partir del segundo título o podría saltarse esos
títulos.
¡Durante la reproducción de un disco con dos capas,
las imágenes podrían detenerse por un momento.
Esto sucede cuando la primera capa cambia a la
segunda capa: Esto no es un mal funcionamiento.
MENÚ DE TÍTULO
DVD-V
1 Presione [TITLE].
¡Aparecerá el menú de títulos.
¡Si la función no está disponible, el símbolo
podría aparecer en la pantalla del televisor.
2 Presione [K / L / s / B] para seleccionar
una opción y presione [ENTER] para confirmar la selección.
DESPLIEGUE DE PANTALLA DE
MENÚ DURANTE LA REPRODUCCIÓN
¡Presione [DISC MENU] para desplegar el menú de
DVD.
¡Presione [TITLE] para desplegar el menú de títulos.
NOTA:
¡El contenido del menú y las operaciones de menú
correspondientes podrían variar entre los discos.
Consulte el manual que acompaña al disco para
obtener más detalles.
- 20 - SP
Page 55

REANUDACIÓN
DVD-V
1 Durante la reproducción, presione
[STOP
C].
¡Aparecerá el mensaje de reanudación en la pantalla
del televisor.
2 Presione [PLAY O], la reproducción se
reanudará a partir del punto en el que se
detuvo la reproducción.
¡Para cancelar la reanudación, presione [STOP C]
dos veces.
¡La información de reanudación permanece incluso
cuando se apaga la unidad.
CD
PAUSA
DVD-V
1
Durante la reproducción, presione [PAUSE F].
¡
La reproducción hace una pausa y el sonido enmudece.
2
Para continuar la reproducción, presione [PLAY O].
CD
REPRODUCCIÓN PASO A PASO
DVD-V
1
Durante la reproducción, presione [PAUSE F].
¡
La reproducción hace una pausa y el sonido enmudece.
2 El disco avanza un cuadro cada vez que se
presiona [PAUSE
3
Para salir de la reproducción paso a paso,
presione [PLAY
F].
O].
AVANCE RÁPIDO /
RETROCESO RÁPIDO
DVD-V
1 Durante la reproducción, presione
[FWD
¡“ g 1” o “h 1” aparecerá en la pantalla.
g] o [REV h ].
2 Para seleccionar otra velocidad, repita el
paso
1 hasta que el número de velocidad
requerida aparezca en la pantalla.
¡Para DVD, la velocidad de búsqueda de avance
rápido / retroceso es diferente según el disco. La
velocidad aproximada es de 1(
4(
×50) y 5(×100).
¡Para CD de audio, la velocidad aproximada es de
×2), 2(×8) y 3(×30).
1(
¡
Al presionar los botones en el panel delantero,
mantenga presionado [SEARCH h / g] durante
unos segundos.
×2), 2(×8), 3(×20),
CD
AVANCE LENTO /
RETROCESO LENTO
DVD-V
1 Durante la reproducción, presione
[PAUSE
F].
2 Presione [FWD g] o [REV h ] .
¡“ 1” o “ 1” aparecerá en la pantalla.
3 Para seleccionar otra velocidad, repita el
paso
2 hasta que el número de velocidad
requerida aparezca en la pantalla.
¡La velocidad de avance o retroceso varía con el
disco. La velocidad aproximada es de 1(1/16),
2(1/8) y 3(1/2).
¡
Al presionar los botones en el panel delantero,
mantenga presionado [SEARCH h / g] durante
unos segundos.
4 Para regresar a reproducción normal,
presione
[PLAY O]
.
ACERCAMIENTO
DVD-V
La función de acercamiento permite aumentar la
imagen en la pantalla del televisor y moverse a través
de la imagen aumentada.
1 Presione [ZOOM] durante la reproducción.
¡La reproducción continuará.
2 Presione [ZOOM] varias veces para
seleccionar el factor de acercamiento que
se require: ZOOM1, ZOOM2, ZOOM3 o OFF.
3 Presione [K / L / s / B] para mover la
imagen aumentada por la pantalla.
4 Para salir del modo de acercamiento,
presione [ZOOM] hacia OFF.
NOTAS:
¡La función de acercamiento no funciona mientras
se muestra el menú del disco.
¡La función de acercamiento no está disponible en
algunos discos.
¡Podría tomar varios segundos deslizar la imagen
aumentada.
¡La imagen podría distorsionarse si opera otras
funciones de forma repetida (p. ej. [PAUSE FF] o
[REVh], etc.) en el modo de acercamiento.
ESPAÑOL
3
Para regresar a reproducción normal,
presione [PLAY
O]
.
- 21 - SP
Page 56

FUNCIÓN DE BÚSQUEDA
_/2
BÚSQUEDA POR PISTA
CD
Existen tres formas de empezar la reproducción en un
CD de audio en una pista específica.
Uso de los botones numéricos
1 Presione los botones numéricos para
ingresar el número de pista que desea.
¡La reproducción iniciará en la pista que seleccione.
¡Para pistas con un solo dígito (1-9), presione un
solo número (p. ej., para la pista 3, presione [3]).
¡Para reproducir la pista 26, presione [+10], [2], [6].
Uso de [SEARCH MODE]
1 Presione [SEARCH MODE].
¡Aparecerá la pantalla de búsqueda por pistas.
2 En el transcurso de 30 segundos, use los
botones numéricos para ingresar el tiempo
de disco.
¡
Para números con un solo dígito, presione [0] primero,
si el total de pistas en el disco es de 10 o más.
¡La reproducción iniciará en la pista que seleccione.
Uso de [SKIP
Durante la reproducción, presione [SKIP G] para
moverse a la pista siguiente. Presione varias veces para
saltar a las pistas subsecuentes. Presione [SKIP H ]
para regresar al inicio de la pista actual. Presione
varias veces para saltar a las pistas anteriores.
¡
Si [SKIP H / G ] se presiona mientras la
reproducción hace una pausa, la reproducción hará una
pausa de nuevo después de saltar a la pista siguiente.
NOTE:
¡[SKIP H / G] no funcionarán cuando se
detiene la reproducción.
H/ G
]
BÚSQUEDA POR TIEMPO
DVD-V
1 Durante la reproducción, presione [SEARCH
MODE] tres veces (CD: dos veces) para
mostrar la búsqueda por tiempo en la
pantalla del televisor.
2
En el transcurso de 30 segundos, use los botones
numéricos para ingresar el tiempo de disco.
¡La reproducción iniciará a la hora que seleccione.
¡
Presione [CLEAR] para eliminar la entrada incorrecta.
¡Cuando no existe necesidad de ingresar un número,
“0” aparecerá automáticamente. Por ejemplo,
“0 : 0 - :
por tiempo si el tiempo total de la pista o título es
menor que 10 minutos.
” aparece en la pantalla de búsqueda
- -
CD
PANTALLA DE CONFIGURACIÓN
DE MARCADOR
DVD-V
Use marcadores para memorizar sus lugares favoritos
en el disco.
1 Presione [SEARCH MODE] cuatro veces
(CD: tres veces) durante la reproducción.
¡La pantalla de visualización y los marcadores
aparecerán en la pantalla del televisor.
2 Presione [s / B] para seleccionar 1, 2, 3, 4,
5, 6, 7, 8, 9, o 10 y asegúrese de que “
” aparezca en la pantalla.
- - :- -
3 Cuando alcance el punto que desee,
presione [ENTER].
¡El Título o Pista y el tiempo de reproducción
transcurrido aparecerán en la pantalla del televisor.
CD
- - - -
:
BÚSQUEDA POR TÍTULO
O CAPÍTULO
DVD-V
1 Presione [SEARCH MODE] una vez para la
búsqueda por capítulo, dos veces para la
búsqueda por título durante la reproducción.
2 Ingrese el número de capítulo/títulos que se
desea mediante los botones numéricos.
¡
La reproducción iniciará en el capítulo o título seleccionado.
¡
Presione [CLEAR] para eliminar la entrada incorrecta.
¡Para números con un solo dígito, presione [0]
primero, si el número total de capítulos o títulos en
el disco es 10 o más.
4 Para regresar al marcador más tarde,
presione [SEARCH MODE] cuatro veces
(CD: tres veces) durante la reproducción y
presione [
deseado y luego presione [ENTER].
NOTAS:
¡Operaciones que borran todos los marcadores:
– Abrir la bandeja del disco.
– Apagar la unidad.
– Presionar [SELECT].
– Seleccionar “AC” en el paso
[ENTER].
¡Para borrar un marcador:
– Presione
número de marcador y presione [CLEAR].
¡Puede marcar hasta 10 puntos.
s / B] para elegir el marcador
2 y presionar
[s / B] para seleccionar un cursor en el
5 Presione [SEARCH MODE] o [RETURN] para
- 22 - SP
salir.
Page 57

FUNCIÓN DE REPRODUCCIÓN ESPECIAL
PLAY
CD-DA TOTAL 0:45:55
PROGRAMA ALEATORIO
- - SIN INDICACIÓN - -
ALEATORIO
REPETICIÓN
REPETICIÓN sólo está disponible durante la reproducción.
REPETICIÓN TÍTULO / CAPÍTULO
Para activar la función de repetición, presione
[REPEAT] durante la reproducción.
¡El modo de repetición cambia como se describe
abajo cada vez que presiona el botón.
CAPÍTULO TÍTULO APDO.
(capítulo actual repetir) (título actual repetir)
NOTAS:
¡Repetir Título / Capítulo, no está disponible en
algunas escenas.
¡La configuración REPEAT se borrará al moverse a
otro título o capítulo.
REPETICIÓN UNA PISTA
Para activar la función de repetición, presione
[REPEAT] durante la reproducción.
¡El modo de repetición cambia como se describe
abajo cada vez que presiona el botón.
PISTA TODO APDO.
(pista actual repetir) (todo el disco repetir) (repetir
NOTAS:
¡La configuración repetición se borrará al moverse a
otra pista.
¡La reproducción repetida no funciona durante la
reproducción de repetición A-B.
REPETICIÓN A-B
1 Presione [A-B] en el punto elegido de inicio.
¡“ A-” aparecerá brevemente en la pantalla del televisor.
2 Presione [A-B] de nuevo en el punto final
elegido.
¡“ A-B” aparecerá brevemente en la pantalla del
televisor e iniciará la secuencia de repetición.
3 Para salir de la secuencia, presione [A-B].
NOTAS:
¡La sección de repetición A-B sólo se puede definir
dentro del título actual (para DVD) o pista actual
(para CD de audio).
¡ La repetición A-B no está disponible con algunas
escenas de DVD.
¡
Para cancelar el punto A que se definió, presione [CLEAR].
¡La reproducción de repetición A-B no funciona
durante título, capítulo, pista o todas las
reproducciones repetidas.
(repetir
DVD-V
PROGRAMA
Puede determinar el orden en el cual se reproducen las pistas.
DVD-V
apagado)
CD
apagado)
CD
1 En el modo detener, presione [MODE].
¡Aparecerá la pantalla “PROGRAMA”.
2 Presione [▲ / ▼] para seleccionar una pista,
luego presione [ENTER].
¡Presione [CLEAR] para
eliminar la pista ingresada
más recientemente.
¡Si no se puede mostrar todo el
programa a la vez en una
pantalla, “G” aparecera para ir
a la página siguiente y “H” aparecerá para
regresar a la página anterior.
3
Repita el paso 2 hasta que seleccione todas las
pistas que desea reproducir en el programa.
4 Presione [PLAY O] para reproducir las
pistas programadas.
NOTAS:
¡Si presiona [STOP C] mientras está reproduciendo
el programa, funciona de la siguiente forma.
¡Presione [STOP C] una vez y luego [PLAY O] de
nuevo, la reproducción volverá a iniciar a partir del punto
donde se presionó [STOP C]. (el programa continua)
¡Presione [STOP C] dos veces y luego [PLAY O]
de nuevo, la reproducción volverá a iniciar desde la
pista en la forma habitual. (el programa se cancela)
¡Se pueden ingresar hasta 99 pistas.
¡Para borrar todas las pistas en el programa a la vez,
seleccione “BORRA TODO” en la parte inferior de
la lista en el paso 2.
¡Si desea repetir la pista actual en el programa,
presione [REPEAT] varias veces hasta que “
PISTA” aparezca durante la reproducción. Si desea
repetir todo el programa, presione [REPEAT]
varias veces hasta que “ TODO” aparezca
durante la reproducción.
REPRODUCCIÓN ALEATORIO
Esta función mezcla el orden de reproducción de las
pistas en lugar de reproducirlas secuencialmente.
1
En el modo detener, presione
[MODE] dos veces.
¡Aparecerá la pantalla
“ALEATORIO”
2 Presione [PLAY O] para iniciar la
reproducción aleatoria.
NOTA:
¡
Si desea repetir la pista actual en la selección
aleatoria, presione [REPEAT] varias veces hasta que
“ PISTA” aparezca durante la reproducción. Si
desea repetir la selección aleatoria completa, presione
[REPEAT] arias veces hasta que “ TODO”
aparezca durante la reproducción.
- 23 - SP
PROGRAMA
ENTER
PLAY
CLEAR
CD-DA
1 3:30
2 4:30
3 5:00
4 3:10
5 5:10
6 1:30
7 2:30
1 3:30
1/4
CD
TOTAL 1:03:30
1 3:30
5 5:10
10 4:20
11 3:00
12 3:20
17 4:10
22 2:50
2/3
CD
ESPAÑOL
Page 58

CAMBIO DE CONFIGURACIÓN
IDIOMA DE SUBTÍTULOS
DVD-V
La unidad le permite seleccionar el idioma de los subtítulos
durante la reproducción de discos DVD (si está disponible).
1
Presione [SUBTITLE] durante la reproducción.
¡El idioma de los subtítulos
aparecerá en la barra de
visualización en la parte
superior de la pantalla del
televisor.
2
Presione [SUBTITLE] varias veces para
seleccionar el idioma de subtítulos que desee.
3 Para apagar los subtítulos, presione
[SUBTITLE] varias veces hasta que
aparezca “APDO.”.
NOTAS:
¡Es posible que presionar [SUBTITLE] no funcione
en algunos DVD con idiomas múltiples para
subtítulos. En ese caso, configúrelo en el menú del
disco. (La operación varía entre discos. Consulte el
manual del disco.)
¡Si no se muestra el idioma deseado después de
presionar [SUBTITLE] varias veces, el disco no
tiene subtítulos en ese idioma.
¡Cuando “NO DISPONIBLE”
aparece en la pantalla del
televisor, esto significa que no
se grabaron subtítulos en la escena.
¡Si eligió una idioma que tiene un código de 3
letras, el código se mostrará cada vez que cambie
la configuración del idioma de los subtítulos. Si
elige cualquier otro idioma, “---” se mostrará en su
lugar. (Consulte la página 26.)
IDIOMA DE AUDIO
La unidad le permite seleccionar el idioma de los
subtítulos durante la reproducción de discos DVD (si
están disponibles varios idiomas).
1.ENG/6
NO DISPONIBLE
DVD-V
¡ESTÉREO - ambos canales,
Algunos discos DVD contienen escenas que se
filmaron simultáneamente desde diferentes ángulos.
Puede cambiar el ángulo de la cámara cuando aparece
el icono “ ” en la pantalla.
¡El ángulo seleccionado se mostrará en la barra de
¡Si la configuración “ ICONO DE ÁNGULO” está
Ajuste la configuración de nivel de bandas negras para
que las partes oscuras de la imagen se vean más brillantes.
MODO DE SONIDO ESTÉREO
CD
1 Presione [AUDIO] varias veces durante la
reproducción para seleccionar entre
“ESTÉREO”, “L-ch” o
“R-ch”.
izquierdo y derecho, están activos (estéreo)
L-ch - sólo el canal izquierdo está activo
R-ch - sólo el canal derecho está activo
ESTÉREO
ÁNGULO DE CÁMARA
DVD-V
1 Presione [ANGLE] durante la reproducción.
visualización en la parte superior de la pantalla.
1 / 8
“APDO.” en el menú “OTROS”, el icono “ ” no
aparecerá. (Consulte la página 28.)
2 Presione [ANGLE] varias veces para
seleccionar el ángulo que desee.
CONFIGURACIÓN DE NIVEL
DE NEGRO
DVD-V
1 Presione [MODE] durante la reproducción.
APDO.
1 Presione [AUDIO] durante la reproducción.
1.ENG Dolby D 3/2.1ch 48k/3
2 Presione [AUDIO] rvarias veces para
seleccionar el idioma que desea.
NOTA:
¡Es posible que presionar [AUDIO] no funcione en
algunos DVD con idiomas múltiples para subtítulos
(p. ej., DVD que permiten configuración de idioma de
audio en el menú del disco).
2 Presione [ENTER] para intercambiar
“ENC./APDO.”.
ENC.: Hace que las partes oscuras se vean más
brillantes.
APDO.: Muestra la imagen original como se
grabó.(Configuración inicial)
3 Presione [MODE] dos veces o [RETURN]
para salir.
NOTA:
¡La configuración se guardará incluso si la unidad
se apaga.
- 24 - SP
Page 59

SONIDO ENVOLVENTE VIRTUAL
APDO.
9/49 0:00:00 -0:03:30
4/12 0:03:21 - 0:02:15
T
4/12 0:13:45 - 0:45:40
T
1/3 0:00:00 - 1:23:45
TL1
PROGRAMA
DVD-V
CD
Puede disfrutar el efecto de sonido envolvente con dos
altavoces en esta unidad.
1 Presione [MODE] dos veces (CD: una vez)
durante la reproducción.
2 Presione [ENTER] para definir “1” (efecto
natural), “2” (efecto enfatizado) o “APDO.”.
3 Presione [MODE] para salir.
¡También puede salir del menú al presionar
[RETURN].
NOTA: (sólo para reproducción de CD)
¡El sonido envolvente virtual no será efectivo si el
modo de sonido no se define como estéreo.
INFORMACIÓN EN PANTALLA
Puede verificar la información acerca del disco actual al presionar [DISPLAY].
DVD-V
ESPAÑOL
CD
Para DVD-Vs
1
Presione [DISPLAY] durante la reproducción
para mostrar el capítulo actual.
¡Se mostrará el tiempo de
reproducción transcurrido y
por transcurrir del capítulo
actual.
2
Presione [DISPLAY] de nuevo para mostrar el
título actual.
¡
Se mostrará el tiempo de
reproducción transcurrido y por
transcurrir del título actual.
3 Presione [DISPLAY] de nuevo.
¡Se mostrará la velocidad de
bits y la configuración de
repetición actual.
¡Si reproduce un disco con capa doble, el número de
capa también se mostrará (L0: La capa 0 se está
reproduciendo. L1: La capa 1 se está
reproduciendo).
4 Presione [DISPLAY] de nuevo para salir.
Para CD de audio
1 Presione [DISPLAY] durante la
reproducción para mostrar la pista actual.
¡Se mostrará el tiempo de reproducción transcurrido y
por transcurrir de la pista actual.
2 Presione [DISPLAY] de nuevo para mostrar
el total actual
¡Se mostrará el tiempo de reproducción transcurrido y
por transcurrir de la pista total.
3 Presione [DISPLAY] de nuevo para salir.
NOTA:
¡Cuando reproduzca un disco en modo de
PROGRAMA o ALEATORIO, se mostrará
“ PROGRAMA” (o ALEATORIO) en el paso 2.
- 25 - SP
Page 60

CAMBIO DE OPCIONES DE AJUSTE DE DVD
SUBTÍTULO
APDO.
INGLÉS
FRANCÉS
AJUSTE IDIOMA
MENÚ DE DISCO
INGLÉS
FRANCÉS
ESPAÑOL
AJUSTE IDIOMA
AUDIO
ORIGINAL
INGLÉS
FRANCÉS
AJUSTE IDIOMA
MENÚ PERSONALIZADO
Puede cambiar la configuración del reproductor de DVD.
1 Presione [SETUP] dos veces en el modo
detener para que aparezca el menú de
configuración de DVD.
¡Presione [L] para seleccionar “PERSNALIZ.”,
luego presione [ENTER].
NOTA:
¡Si el menú no aparece,
presione [PLAY O] primero,
luego presione [STOP C].
Asegúrese de que el disco esté en el modo detener,
luego presione lentamente [SETUP] dos veces.
2 Seleccione el elemento que desea.
¡Presione [K / L] para seleccionar el elemento que
desea y luego presione [ENTER] para confirmar.
Consulte las páginas a continuación para configurar
cada elemento.
AJUSTE PERSNALIZ.
IDIOMA
PANTALLA
AUDIO
PATERNO
OTROS
A
AJUSTE DE IDIOMA
Siga los pasos 1 a 2 en la sección “MENÚ
PERSONALIZADO” de arriba.
3 Presione [K / L] para seleccionar el ítem
deseado y presione [ENTER].
AUDIO:
Define el idioma de audio.
SUBTÍTULO:
Define el idioma de los
subtítulos.
MENÚ DE DISCO:
Define el idioma del menú del DVD.
4 Presione [K / L]para
seleccionar un ajuste y
presione [ENTER].
¡
Si selecciona “OTRO” en la
pantalla “AUDIO”, “SUBTÍTULO”
o “MENÚ DE DISCO”, presione
el número de cuatro dígitos para
ingresar el código del idioma que
desee. (Consulte la lista de códigos
de idioma.)
¡
Sólo se pueden seleccionar los
idiomas que soporte el disco.
5 Presione [SETUP] para salir del menú.
NOTAS:
¡La configuración del idioma para audio y subtítulos
no son válidos para algunos discos debido a la
configuración predefinida del disco. En ese caso,
presione [AUDIO] y [SUBTITLE]. para definirlos.
(Consulte la página 24.)
¡Si selecciona un idioma que el disco no soporta, el
subtítulo se apagará automáticamente y el primer
elemento de los idiomas de audio se definirá
automáticamente.
AJUSTE
RÁPIDO
PERSNALIZ.
INICIALIZAR
A
P26 Paso
B
P27 Paso
C
P27 Paso
D
P28 Paso
E
P28 Paso
AJUSTE IDIOMA
AUDIO
SUBTÍTULO
MENÚ DE DISCO
DVD-V
3
3
3
3
3
ORIGINAL
APDO.
INGLÉS
Idioma Código
Abkhazian 4748
Afar 4747
Afrikaans 4752
Albanés 6563
Amhárico 4759
Árabe 4764
Armenio 5471
Assamese 4765
Aymará 4771
Azerbaiyaní 4772
Bashkir 4847
Vasco 5167
Bengalí;Bangla 4860
Bhutani 5072
Bihari 4854
Bislama 4855
Bretón 4864
Búlgaro 4853
Burmés 5971
Bielorruso 4851
Camboyano 5759
Catalán 4947
Chino [CHI] 7254
Córsico 4961
Croata 5464
Checo 4965
Danés [DAN] 5047
Neerlandés [DUT] 6058
Inglés [ENG] 5160
Esperanto 5161
Estonio 5166
Faroese 5261
Fiji 5256
Finlandés [FIN] 5255
Francés [FRE] 5264
Frisio 5271
Gallego 5358
Georgiano 5747
Alemán [GER] 5051
Griego [GRE] 5158
Groenlandés 5758
Guaraní 5360
Gujarati 5367
Hausa 5447
Hebreo 5569
Hindi 5455
Húngaro [HUN] 5467
Islandés [ICE] 5565
Indonesio 5560
Interlingua 5547
Interlingue 5551
Inupiak 5557
Irlandés [IRI] 5347
Italiano [ITA] 5566
Japonés [JPN] 5647
Javanés 5669
Kannada 5760
Kashmiri 5765
Kazakh 5757
Kinyarwanda 6469
Kirghiz 5771
Kirundi 6460
Coreano [KOR] 5761
Kurdo 5767
A-B
C-E
F-H
I-K
Idioma Código
Laosiano 5861
Latín 5847
Letón;Lettish 5868
Lingala 5860
Lituano 5866
Macedonio 5957
Madagascarí 5953
Malayo 5965
Malayalam 5958
Maltés 5966
Maori 5955
Marathi 5964
Moldaviano 5961
Mongol 5960
Nauru 6047
Nepalés 6051
Noruego [NOR] 6061
Occitano 6149
Oriya 6164
Oromo (Afan) 6159
Punjabi 6247
Pashto;Pushto 6265
Persa 5247
Polaco 6258
Por tugués [POR] 6266
Quechua 6367
Rhaeto-Romance 6459
Rumano [RUM] 6461
Ruso [RUS] 6467
Samoano 6559
Sangho 6553
Sánscrito 6547
Gaélico escocés 5350
Serbio [sr] 6564
Serbocroata 6554
Sesotho 6566
Setswana 6660
Shona 6560
Sindhi 6550
Singalés 6555
Siswat 6565
Eslovaco 6557
Esloveno 6558
Somalés 6561
Español [SPA] 5165
Sudanés 6567
Swahili 6569
Sueco [SWE] 6568
Tagalogo 6658
Tajik 6653
Tamil 6647
Tatar 6666
Telugu 6651
Tailandés 6654
Tibetano 4861
Tigrinya 6655
Tonga 6661
Tsonga 6665
Turco [TUR] 6664
Tu rkmen 6657
Tw i 6669
Ucraniano 6757
Urdu 6764
Uzbeco 6772
Vietnamita 6855
Volapuk 6861
Galés 4971
Wolof 6961
Xhosa 7054
Yiddish 5655
Yo r uba 7161
Zulú 7267
L-N
O-R
S
T
U-Z
Si eligió una idioma que tiene un código de 3 letras, el
código se mostrará cada vez que cambie la configuración AUDIO o SUBTÍTULO del idioma de los subtítulos como se indica arriba. Si elige cualquier otro
idioma, “---” se mostrará en su lugar. (el código de
idioma de 3 letras se mostrará entre corchetes.)
- 26 - SP
Page 61

B
AJUSTE DE PANTALLA
Siga los pasos 1a 2en la sección “MENÚ
PERSONALIZADO” en la página 26.
3 Presione [K / L] para seleccionar los
elementos siguientes y luego presione
[ENTER].
MODO TV:
Puede cambiar ciertos aspectos
de las pantallas de
visualización de DVD y los
mensajes en la pantalla del
televisor.
¡4:3 LETTER BOX (de fábrica): Para mostrar
barras negras arriba y abajo de la pantalla.
¡4:3 PAN & SCAN: Para mostrar una imagen de
altura total con ambos lados cortados.
MODO DE IMAGEN FIJA
Esta función permite ajustar la
resolución de la imagen y la
calidad en el modo fijo.
¡AUTO (de fábrica):
Selecciona automáticamente el ajuste de mejor
resolución (CUADRO o IMAGEN) basado en las
características de los datos de la imagen.
¡IMAGEN: Selecciona “IMAGEN” cuando las
imágenes están inestables incluso cuando se
selecciona “AUTO”.
IMAGEN estabiliza las imágenes, aunque la
calidad de la imagen puede volverse áspera debido
a la limitada cantidad de datos.
¡CUADRO: Seleccione “CUADRO” para mostrar
imágenes con poco movimiento a mayor
resolución. CUADRO mejora la calidad de la
imagen aunque las imágenes pueden
desestabilizarse debido a la salida simultánea de
dos datos de campo.
QUICK
:
AJUSTE PANTALLA
MODO TV
MODO VISTA FIJA
AJUSTE PANTALLA
MODO TV
MODO VISTA FIJA
AUTO
4:3 LETTER BOX
AUTO
4:3 LETTER BOX
C
AJUSTE DE AUDIO
Elija la configuración de audio apropiada para su
equipo ya que sólo se afecta durante la reproducción
de discos DVD.
Siga los pasos 1a 2en la sección “MENÚ
PERSONALIZADO” en la página 26.
3 Presione [K / L] para seleccionar los
elementos siguientes y luego presione
[ENTER].
DRC (control de rango dinámico):
¡Para comprimir el rango de
sonido suave a alto.
¡La configuración predefinida
AJUSTE AUDIO
DRC ENC.
SUB MUESTREO
DOLBY DIGITAL BITSTREAM
ENC.
es “ENC.”.
MUESTREO INFERIOR:
¡ENC. : Salida de 48 KHz.
(valor predeterminado)
¡APDO. : Salida de sonido
AJUSTE AUDIO
DRC ENC.
SUB MUESTREO
DOLBY DIGITAL BITSTREAM
ENC.
original.
Cuando se reproduce un disco con protección de
derechos de autor
¡Si selecciona “APDO.”, la protección de derechos
de autor se activará y el muestreo de sonido se hará
a 48kHz.
DOLBY DIGITAL:
QUICK
Establezca “BITSTREAM”
cuando la unidad esté
AJUSTE AUDIO
DRC ENC.
SUB MUESTREO
DOLBY DIGITAL BITSTREAM
ENC.
conectada al descodificador
Dolby Digital.
¡BITSTREAM: Salida a señal Dolby Digital (valor
predeterminado)
¡PCM: Convierta la señal Dolby Digital a PCM
(estéreo de 2 canales)
4 Presione [SETUP] para salir del menú.
ESPAÑOL
4 Presione [SETUP] para salir del menú.
MENU RÁPIDO
¡
Puede seleccionar rápidamente el “MODE TV” o “DOLBY DIGITAL” del menú RÁPIDO. Para tener
acceso al menú RAPIDO, seleccione “RÁPIDO” en lugar de “PERSNALIZ.” en el paso 1de la página 26.
AJUSTE DE IDIOMA PARA LOS MENÚS EN PANTALLA
¡Puede acceder el menú de configuración de TV al presionar [SETUP] desde el modo DVD. Consulte
“IDIOMA DE MENÚ” en la página 17 para cambiar el idioma de los menús en pantalla.
- 27 - SP
Page 62

D
CONTROL PATERNAL
El control paternal limita que se vea el disco más allá de
la configuración que defina (con una contraseña o la
reproducción se detendrá). Esta característica le permite
evitar que los niños vean discos con escenas alternativas.
NIVEL PATERNO
El nivel de control paternal le permite determinar el
nivel de clasificación de sus discos DVD. La
reproducción se detendrá si la clasificación excede el
nivel que determine.
Siga los pasos 1 a 2 en la sección “MENÚ
PERSONALIZADO” en la página 26.
3 Escriba la contraseña de cuatro dígitos y
luego presione [ENTER].
AJUSTE PANTERNO
CÓDIGO DE ACCESO
Ingrese su código de acceso.
4 Presione [K / L] para seleccionar “NIVEL
PATERNO” y luego presione [ENTER].
AJUSTE PATERNO
NIVEL PATERNO TODO
CAMB. CONTRAS.
5 Presione [K / L] para seleccionar el nivel
que desee y luego presione [ENTER].
AJUSTE PATERNO
NIVEL PATERNO
TODO
8
7 [NC-17]
6 [R]
SI OLVIDA LA CONTRASEÑA
1
Presione los botones numéricos [4], [7], [3], [7]
en el paso 3. Luego ingrese la contraseña.
¡La contraseña se borrará y el nivel de control
paternal se cambiará a todos “TODO”.
2 Proceda con los pasos 4 a 6 de nuevo.
E
OTROS AJUSTES
Siga los pasos 1a 2en la sección “MENÚ
PERSONALIZADO”en la página 26.
3 Presione [K / L] para seleccionar los
elementos siguientes y luego presione
[ENTER].
ICONO DEL ÁNGULO:
¡Presione [ENTER] varias veces para encender
“ENC.” o apagar “APDO.”el icono de ángulo.
¡La configuración predefinida es “ENC.”.
AUTO APAGATO:
¡
Presione [ENTER] varias veces para encender
“ENC.” o apagar “APDO.” el encendido automático.
¡
El valor predeterminado es “APDO” y el programa
protector de pantalla inicia cuando no hay entrada de
información de la unidad durante 5 minutos en el
modo detener. Después de que el programa protector
de pantalla esté activo durante 15 minutos, la unidad
se apagará automáticamente.
4 Presione [SETUP] para salir del menú.
AJUSTE OTROS
ICONO DE ÁNGULO
AUTO A PAGATO
ENC.
ENC.
6 Presione [SETUP] para salir del menú.
NOTAS:
¡
Cuando haga esto por primera vez, ingrese sólo 4
dígitos. (excepto por 4737) El número se usará como
contraseña. (en el caso de olvidarse de la contraseña,
vea abajo)
¡Para cambiar la contraseña, presione [K / L] para
seleccionar “CAMB. CONTRAS” en el paso 4 y
luego presione [ENTER]. Escriba la contraseña de
cuatro dígitos, luego presione [ENTER].
¡Con algunos DVD, podría ser difícil determinar si
son compatibles con el bloqueo paternal.
Asegúrese de verificar que la función de bloqueo
paternal opere en la forma en que lo desea.
¡Registre la contraseña en caso de que la olvide.
NIVEL DE CONTROL
¡
TODO
La función de bloqueo paternal quedará cancelada.
¡
Nivel 8
Los programas en DVD para cualquier grado (adulto
/ general / niños) se pueden reproducir.
¡
Niveles 7 a 2
Sólo se pueden reproducir programas en DVD para
público en general y para niños.
¡
Nivel 1
Sólo se pueden reproducir programas en DVD para
niños. Los programas para adultos y para público
en general, están prohibidos.
INICIALIZAR
DVD-V
Esto le permite regresar todas las secciones de
configuración “AJUSTE” (excepto ‘PATERNAL’ e
idioma del menú) a su valor predeterminado.
1 Presione [SETUP] dos veces en el modo de
parada para que aparezca el menú
“INICIALIZAR”.
2 Presione [K / L] para seleccionar
“INICIALIZAR” y presione [ENTER].
AJUSTE
RÁPIDO
PERSNALIZ
INICIALIZAR
3 Presione [K / L] para seleccionar “SÍ” y
presione [ENTER] dos veces.
Todas las configuraciones
(excepto para “PATERNAL” e
idioma del menú) se borrarán.
¡Para cancelar la
inicialización, seleccione
“NO”.
4 Presione [SETUP] para salir del menú.
- 28 - SP
AJUSTE INICIALIZAR
¿
Ejecuta la inicialización?
NO
SÍ
Page 63

GUÍA DE SOLUCIÓN DE PROBLEMAS
Si la unidad no se desempeña correctamente al operarla como se indica en el Manual del usuario, revise la
unidad mediante la siguiente lista de verificación.
PROBLEMA ACCIÓN CORRECTIVA
No enciende
El control remoto infrarrojo no
funciona
Modo de TV
Algunas veces un problema de rendimiento se puede solucionar fácilmente al verificar posibilidades
aparentemente obvias pero que se omiten con frecuencia. Antes de llamar para solicitar servicio, verifique estos
puntos. Puede ahorrarle tiempo y dinero.
PROBLEMA ACCIÓN CORRECTIVA
No hay imagen o sonido
Imagen deficiente o no hay imagen
en la unidad
No hay sonido o sonido deficiente
Barras en la pantalla
Imagen distorsionada o borrosa
La imagen se desplaza verticalmente•Intente con un canal nuevo, si funciona, entonces es posible que se
Líneas o bandas en la imagen trate de problemas con la emisora.
Sin color
Recepción deficiente en algunos
canales trate de problemas con la emisora.
Fantasmas en la imagen
Imagen débil
Asegúrese de que el cable de alimentación esté conectado al
•
tomacorriente de CA.
Asegúrese de que esté encendido.
•
Verifique que el cable de alimentación esté conectado al tomacorriente de CA.
•
Revise las pilas en el control remoto.
•
Dirija el control remoto directamente al sensor remoto. Si es
•
necesario, retire los obstáculos entre el sensor y el control remoto.
Debe estar a 23 pies de la unidad.
•
Verifique que se haya seleccionado el modo correcto. Si no es así,
•
presione [SELECT], para cambiar el modo.
Asegúrese de que el cable de CA esté conectado al tomacorriente de CA.
•
Verifique la conexión de la antena.
•
Presione [SELECT] para seleccionar el modo de TV.
•
Luego intente otra característica del televisor.
Permita que la unidad programe la memoria del sintonizador.
•
Ajuste la dirección o reemplace la antena.
•
Ajuste los controles de imagen.
•
Verifique que el cable de la antena no tenga clavijas rotas.
•
Ajuste el control de volumen en el control remoto o la unidad principal.
•
Presione [MUTE] para restaurar el sonido.
•
Si está en uso la antena exterior, verifique que el alambre no esté roto.
•
Verifique que no exista interferencia local.
•
Intente con un canal nuevo, si funciona, entonces es posible que se
•
trate de problemas con la emisora.
Si está en uso la antena exterior, verifique que el alambre no esté roto.
•
Si está en uso la antena exterior, verifique que el alambre no esté roto.
•
Verifique que no exista interferencia local.
•
Intente con un canal nuevo, si funciona, entonces es posible que se
•
trate de problemas con la emisora.
Está conectada la antena al conector en la parte trasera del aparato?
•
Si está en uso la antena exterior, verifique que el alambre no esté roto.
•
Ajuste el control “COLOR”.
•
Intente con un canal nuevo, si funciona, entonces es posible que se
•
Está conectada la antena al conector en la parte trasera del aparato?
•
Si está en uso la antena exterior, verifique que el alambre no esté roto.
•
Verifique que no exista interferencia local.
•
Intente con un canal nuevo, si funciona, entonces es posible que se
•
trate de problemas con la emisora.
Está conectada la antena al conector en la parte trasera del aparato?
•
Si está en uso la antena exterior, verifique que el alambre no esté roto.
•
Ajustar el control “CONTRASTE” y “CLARIDAD”.
•
- 29 - SP
ESPAÑOL
Page 64

PROBLEMA ACCIÓN CORRECTIVA
El sonido está bien pero la imagen •Intente con un canal nuevo, si funciona, entonces es posible que se
es deficiente trate de problemas con la emisora.
Está conectada la antena al conector en la parte trasera del aparato?
•
Si está en uso la antena exterior, verifique que el alambre no esté roto.
•
Verifique que no exista interferencia local.
•
Ajuste el control “CONTRASTE” y “CLARIDAD”.
•
Imagen aceptable, sonido deficiente
El control remoto infrarrojo no
funciona
Diferentes marcas de color en la
pantalla podrían afectar el color de la imagen del televisor. Aleje la unidad
PROBLEMA CON SUBTÍTULOS POSIBLE REMEDIO
Faltas de ortografía en los subtítulos •Error cometido por la compañía de producción de los subtítulos.
El texto no se muestra en su
totalidad o los diálogos no están en vivo.
sincronizados con la imagen
Subtítulos revueltos con blanco
No aparecen subtítulos en un
programa que debe contenerlos
Cuadro negro en la pantalla del
televisor “C2”) o Caption “OFF”.
Intente con un canal nuevo, si funciona, entonces es posible que se
•
trate de problemas con la emisora.
Verifique que no exista interferencia local.
•
Asegúrese de que el cable de CA esté conectado al tomacorriente de CA.
•
Verifique las pilas en el control remoto.
•
El magnetismo de los aparatos cercanos y el geomagnetismo
•
de otros aparatos; la unidad puede repararse automáticamente. Si
desea repararla de inmediato, desconecte el cable de alimentación y
luego vuelva a conectarlo alrededor de 30 minutos más tarde. Esto
reconfigura automáticamente a la unidad.
• Posiblemente en una transmisión en vivo. No en caso de unprograma
pregrabado.
Es común tener unos cuantos segundos de retraso en transmisiones
•
La capacidad de la pantalla no debe exceder de 220 palabras por minu
•
to. Si un diálogo excede ese parámetro, la edición selectiva se usa
para asegurar que los subtítulos estén sincronizados con el diálogo
actual de la pantalla del televisor.
Causado por interferencias de edificios, líneas de alta tensión,
•
tormentas eléctricas, etc.
La transmisión podría usar un proceso de compresión de tiempo para
•
acelerar el programa. El descodificador no puede leer la información
comprimida y los subtítulos se perderán.
Está en modo de texto. Seleccione un modo de subtítulos (“C1”,
•
- 30 - SP
Page 65

Modo DVD
PROBLEMA ACCIÓN CORRECTIVA
No hay imagen
El disco no se puede reproducir
No hay sonido
No sale ningún audio DTS
Imagen distorsionada
El idioma de audio o de subtítulos
no coincide con la configuración no corresponde a la configuración del DVD. (Esto no es un mal fun
No se puede cambiar el ángulo de
la cámara de cámara. (Esto no es un mal funcionamiento.)
No se puede cambiar el idioma de
audio o de subtítulos. que seleccionó. (Esto no es un mal funcionamiento.)
“Icono de prohibido” aparece en la
pantalla para prohibir una operación (Esto no es unmal funcionamiento.)
Sin caída de sonido de CD
Sin reproducción de CD
Interrupción de imagen de DVD
Imagen de DVD congelada
Imagen de DVD en mosaico
Sin reproducción de DVD
Inserte un disco de video correcto que se pueda reproducir en esta
•
unidad.
Presione [SELECT] para seleccionar el modo de DVD y luego
•
intente otra característica de DVD.
Inserte el disco.
•
Limpie el disco.
•
Coloque el disco correctamente, con el lado de la etiqueta hacia arriba.
•
Cancele el bloqueo paternal o cambie el nivel de control.
•
Conecte los cables de audio firmemente.
•
Encienda el componente de audio.
•
Corrija la configuración de salida de audio.
•
Corrija la configuración de salida en el componente de audio.
•
Esta unidad no soporta audio DTS. Esto no es un mal funcionamiento.
•
En algunos casos la imagen puede aparecer ligeramente
•
distorsionada. Esto no es una señal de mal funcionamiento.
Aunque las imágenes podrían detenerse por un momento, esto no es
•
un mal funcionamiento.
El idioma seleccionado no está disponible para audio o subtítulos y
•
cionamiento.)
El DVD no contiene secuencias grabadas desde diferentes ángulos
•
El DVD no contiene fuente de audio o subtítulos en el otro idioma
•
Esa operación está prohibida por la unidad o el disco.
•
Disco dañado. Reemplace el disco con uno que no esté dañado.
•
ESPAÑOL
NOTAS:
Algunas funciones no están disponibles en modos específicos, pero esto no es un mal funcionamiento. Lea
•
la descripción en este Manual del Usuario para obtener más detalles sobre la operación correcta.
No está disponible la reproducción de una pista determinada y la reproducción aleatoria no está disponible
•
durante la reproducción del programa.
- 31 - SP
Page 66

Spray
limpiador
de disco
Disolvente
Solvente
volátil
MANTENIMIENTO
LIMPIEZA DEL GABINETE
Limpie el panel delantero y otras superficies
•
exteriores de la unidad con un paño suave inmerso
en agua tibia y bien exprimido.
Nunca use solventes o alcohol. No rocié insecticida
•
líquido cerca de la unidad. Ese tipo de productos
químicos podrían dañar y decolorar las superficies
expuestas.
REPARACIONES
En caso de que la unidad deje de funcionar, no
•
intente corregir el problema usted mismo. No
existen partes reparables por el usuario en el
interior. Apague, desenchufe el cable eléctrico y
llame la línea de ayuda mencionada en la página
frontal para localizar un Centro de Servicio
Autorizado.
SI LA UNIDAD DE LECTURA ÓPTICA LÁSER ESTÁ SUCIA
Si la unidad no se desempeña correctamente al operarla como se indica en las secciones relevantes y en la
•
“GUÍA DE SOLUCIÓN DE PROBLEMAS” en este Manual del usuario, la unidad de lectura óptica láser
podría estar sucia. Consulte a su distribuidor o Centro de Servicio Autorizado para que inspeccionen y
limpien la unidad de lectura óptica láser.
MANIPULACIÓN DEL DISCO
Maneje los discos de manera que las huellas
•
digitales y el polvo no se adhieran a la superficie
de los discos.
Para limpiarlo, use un paño suave.
•
No use un paño duro, ya que esto podría estropear
•
el disco.
Limpie el disco en línea recta desde el centro hasta
•
el borde.
No lo limpie nunca en un movimiento circular.
•
No use detergente o agentes limpiadores abrasivos.
•
Almacene siempre el disco en su estuche protector
•
cuando no esté en uso.
- 32 - SP
Page 67

ESPECIFICACIONES
ESPECIFICACIONES GENERALES ESPECIFICACIONES ELÉCTRICAS
TV
Salida de sonido: 2 parlantes, 1W, 8 ohm
CRT: Cañón en línea de 20
pulgadas,
Tubo deflector de 90°
Sistema de televisor: NTSC-M
Sistema de subtítulos: §15.119/FCC
Cobertura de canales:
VHF: 2 ~ 13
UHF: 14 ~ 69
CATV: 2 ~13, A ~ W,
W+1 ~ W+84,
A-5 ~ A-1, 5A
Sistema de
sintonización: Sistema de sintonización
sintetizado por frecuencia de
181 canales
Acceso de canales: Teclado con acceso directo,
rastreo programable y arriba /
abajo
DVD
Tipo de producto: Reproductor de DVD
Discos: Video DVD, CD de audio
Formato de señal
de salida: Color NTSC
OTRAS ESPECIFICACIONES
Terminales
Entrada de antena: VHF/UHF/CATV
75 ohm no equilibrado (tipo F)
Entrada de video: 1 [ connector RCA
Entrada de audio L/R
Audífonos: Estéreo 1/8 pulg. (3,5 mm)
Salida de audio
digital coaxial: Conector de una clavija,
Control remoto: Sistema de luz infrarroja
Temperatura de
operación: 5°C a 40°C
Requisitos de
alimentación: AC 120V, 60Hz
Consumo de energía
(Máximo): 80W
Tubo de imagen: 20 pulg. PF
Dimensiones: H : 20,22 pulg. (514mm)
Peso: 46,3 lbs. (21,0kg)
:2 [ connector RCA
500 m Vpp (75 ohm)
digital codificada
(41°F a 104°F)
W: 20,16 pulg. (512mm)
D: 19,80 pulg. (503mm)
ESPAÑOL
Los diseños y especificaciones están sujetos a cambio sin previo aviso.
•
Si existe discrepancia entre los idiomas, el idioma predeterminado será inglés.
•
- 33 - SP
Page 68

CENTRO DE SERVICIO AL CLIENTE
Tel :1-877-467-4289
http://www.insignia-products.com
Insignia Products, Richfield, Minnesota, U.S.A..
Page 69

MANUEL DE
L’OPÉRATEUR
TÉLÉVISEUR COULEUR/DVD
IS-TV040921
(20 pouces)
Si, après avoir lu ce manuel de l’opérateur, vous avez besoin
d’une aide supplémentaire pour faire fonctionner l’appareil ou pour
commander des accessoires de rechange, veuillez appeler
GRATUITEMENT le : 1-877-467-4289.
Ou consultez notre site Internet à l’adresse suivante :
http://www.insignia-products.com
Prière de lire avant d’utiliser cet appareil
Page 70

AVERTISSEMENT : AFIN D’ÉVITER UN INCENDIE OU UN CHOC ÉLECTRIQUE, CET APPAREIL NE
DOIT PAS ÊTRE EXPOSÉ À L’HUMIDITÉ OU À DE L’EAU.
ATTENTION
RISQUE DE CHOC
ÉLECTRIQUE, NE PAS OUVRIR
ATTENTION:
CHOC ÉLECTRIQUE, NE PAS ENLEVER LE CAPOT (OU LA
PA RTIE ARRIÈRE). NE CONTIENT AUCUNE PIÈCE RÉPARABLE
PAR L’UTILISATEUR. TOUTE RÉPARATION DOIT ÊTRE
RÉALISÉE PAR UN TECHNICIEN SPÉCIALISÉ.
AFIN DE RÉDUIRE LE RISQUE DE
CE SYMBOLE INDIQUE QU’UNE TENSION
DANGEREUSE, CONSTITUANT UN
RISQUE DE CHOC ÉLECTRIQUE, EST
PRÉSENTE DANS CET APPAREIL.
CE SYMBOLE INDIQUE QUE D’IMPORTANTES
INSTRUCTIONS CONCERNANT LE
FONCTIONNEMENT ET LA MAINTENANCE
FIGURENT DANS LA DOCUMENTATION QUI
ACCOMPAGNE L’APPAREIL.
L’étiquette de mise en garde est située à l’arrière du boîtier.
MESURES DE SÉCURITÉ IMPORTANTES
1. Lire les instructions – Toutes les instructions relatives à
la sécurité et au fonctionnement de l’appareil doivent
être lues avant utilisation.
2. Conserver les instructions – Les instructions relatives à
la sécurité et au fonctionnement doivent être conservées
pour référence ultérieure.
3. Respecter les avertissements – Observer tous les
avertissements figurant sur l’appareil et dans les
instructions de fonctionnement.
4. Respecter les instructions – Observer toutes les
instructions relatives au fonctionnement et à l’utilisation
de l’appareil.
5. Nettoyage – Débrancher l’appareil de la prise murale
avant tout nettoyage. Ne pas utiliser de nettoyants
liquides ou en aérosol. Utiliser un chiffon humide pour
le nettoyage.
EXCEPTION: Un produit qui est destiné à un service
ininterrompu et qui, pour une raison spécifique (comme
par exemple le risque de perdre un code d’autorisation
pour un convertisseur de TV câblée) ne doit pas être
débranché par l’utilisateur pour le nettoyage ou pour
toute autre raison, pourra ne pas comporter la référence
au débranchement de l’appareil dans la description du
nettoyage qui est sinon requise dans la rubrique 5.
6. Périphériques – Ne pas utiliser de périphériques qui ne
sont pas recommandés par le fabricant de l’appareil et
qui pourraient être dangereux.
7. Eau et humidité – Ne pas utiliser cet appareil à
proximité de l’eau, comme par exemple à côté d’une
baignoire, d’un lavabo, d’un évier, d’un bac à laver, dans
une cave humide ou à côté d’une piscine, etc.
8. Accessoires – Ne pas placer cet appareil sur un meuble à
roulettes, un pied, un trépied, un support ou une table
instable. L’appareil risque de tomber et, dans sa chute,
de provoquer des blessures graves et de subir des
dommages importants.
N’utiliser qu’avec le meuble
à roulettes, le pied, le
trépied, le support ou la table
recommandé(e) par le
fabricant ou vendu(e) avec
l’appareil. Tout montage de
l’appareil doit observer les
instructions du fabricant,
AVERTISSEMENT SUR TABLE ROULANTE
S3126A
- 2 - FR
notamment la recommandation de ce dernier en matière
d’accessoire de montage. Pour une installation sur un
meuble à roulettes, déplacer l’ensemble avec précaution.
Un arrêt brusque, l’utilisation d’une force excessive et
des surfaces irrégulières risquent de déstabiliser
l’ensemble et de le renverser.
9. Ventilation – Les fentes et ouvertures au dos et au bas
du boîtier sont prévues pour la ventilation, pour assurer
un fonctionnement fiable de l’appareil et le protéger
contre toute surchauffe. Ces ouvertures ne doivent être
ni bloquées ni obstruées. Elles ne doivent jamais être
bloquées en installant l’appareil sur un lit, un sofa, une
moquette ou toute autre surface semblable. Il ne doit
jamais être positionné à proximité ou sur un radiateur, ou
une bouche de chauffage. Ne pas installer l’appareil dans
un meuble encastré comme une bibliothèque ou sur une
étagère, sauf si une ventilation adéquate a été prévue ou
si les instructions du fabricant ont été respectées.
10. Sources d’alimentation – Cet appareil doit fonctionner
uniquement à partir de la source d’alimentation indiquée
sur l’étiquette. En cas d’incertitude sur la tension
d’alimentation électrique de la maison, consulter le
revendeur ou la compagnie d’électricité. Pour les
appareils fonctionnant sur piles ou d’autres sources
d’alimentation électrique, consulter les instructions
d’utilisation.
11. Mise à la terre ou polarisation – Cet appareil est
équipé d’une prise de courant CA polarisée (à deux
plots, un plus large que l’autre). Cette fiche ne s’insère
dans une prise murale que d’une seule façon. Il s’agit
d’une caractéristique de sécurité. S’il est impossible
d’introduire à fond la fiche dans la prise murale, essayer
de retourner la prise. Si la fiche ne s’adapte toujours pas
à la prise murale, contacter un électricien afin qu’il
remplace la prise inadéquate. Ne pas chercher à modifier
le dispositif de sécurité de la prise polarisée.
12. Protection du cordon d’alimentation – Acheminer le
cordon d’alimentation de telle manière qu’on ne puisse
marcher dessus ou qu’il ne soit pincé par des objets
placés dessus ou tout contre ; prêter particulièrement
attention au point de raccordement du cordon à la prise
murale / à la plaque multiprises et au port de l’appareil
dans lequel il est branché.
Page 71

FIGURE A
EXEMPLE DE MISE À LA TERRE D'UNE
ANTENNE EN CONFORMITÉ AVEC LE CODE
NATIONAL DE L'ÉLECTRICITÉ
ÉQUIPEMENT DE LA
COMPAGNIE D’ÉLECTRICITÉ
SERRE-FIL DE
MISE À LA
TERRE
CNE – CODE NATIONAL DE L’ÉLECTRICITÉ SYSTÈME DE MISE À LA MASSE DES
ÉLECTRODES DE SYSTÈME DE PRISE
DE TERRE (CNE ARTICLE 250, PARTIE H)
S2898A
SERRE-FIL DE MISE À LA TERRE
CONDUCTEURS DE MISE
À LA MASSE
(CNE SECTION 810-21)
UNITÉ DE DÉCHARGE
DE L’ANTENNE
(CNE SECTION 810-20)
FIL CONDUCTEUR
DE L’ANTENNE
13. Mise à la terre d’une antenne externe – Si l’appareil
est connecté à une antenne extérieure ou à un réseau
câblé, s’assurer que l’antenne ou la connexion au réseau
câblé est mise à la terre afin de bénéficier d’une certaine
protection contre les sautes de courant et les charges
électrostatiques L’article 810 du Code national de
l’électricité (CNE), ANSI/NFPA Nº 70, fournit des
informations relatives à la mise à la terre correcte du mât
et du support, la mise à la terre du fil conducteur de
l’antenne à l’unité de décharge de l’antenne, la taille des
conducteurs de mise à la terre, l’emplacement de l’unité
de décharge de l’antenne, la connexion aux conducteurs
de terre ainsi que les normes en matière de prise de terre.
(Fig. A)
14. Foudre – Pour favoriser la protection du récepteur de
cet appareil pendant un orage, ou s’il se trouve inutilisé
et sans surveillance pendant de longues périodes, le
débrancher de la prise murale et débrancher l’antenne ou
la connexion au réseau câblé. Ceci évitera
d’endommager l’appareil en cas de foudre et de
variations de tension du secteur.
15. Lignes d’alimentation électrique – L’antenne externe
ne doit pas être située près de lignes électriques
aériennes ou d’autres circuits d’alimentation et
électriques, ni à un emplacement où elle pourrait tomber
sur de tels circuits ou lignes électriques. Lors de
l’installation d’une antenne externe, faire très attention
de ne pas toucher de telles lignes électriques ou circuits
car tout contact peut être mortel.
16. Surcharge – Les prises murales et les rallonges ne
doivent pas être surchargées, ce qui pourrait provoquer
des risques d’incendie et de choc électrique.
17. Pénétration d’objets ou de liquides – N’insérer en
aucun cas un objet dans les orifices de cet appareil, étant
donné qu’il pourrait entrer en contact avec des tensions
dangereuses ou provoquer un court-circuit à l’origine
d’un incendie ou d’un choc électrique. Ne jamais
répandre un liquide sur l’appareil.
18. Entretien – Ne pas essayer de réparer cet appareil soi-
même car l’ouverture ou le démontage des capots de
l’appareil peut exposer l’utilisateur à des tensions
dangereuses et à d’autres dangers. Toutes les réparations
doivent être réalisées par du personnel qualifié.
19. Dégâts nécessitant une intervention – Débrancher
l’appareil de la prise murale et utiliser les services d’un
technicien qualifié dans les conditions suivantes :
a. Lorsque le cordon d’alimentation est effiloché ou la
prise endommagée.
b. En cas d’infiltration de liquide ou de pénétration
d’objets dans l’appareil.
c. Si le produit a été exposé à la pluie ou à l’eau.
d. Si l’appareil fonctionne anormalement malgré
l’application des instructions d’utilisation. Ne régler que
les commandes décrites dans les instructions
d’utilisation ; en effet, le réglage intempestif d’autres
commandes pourrait provoquer des anomalies, entraînant
souvent d’importantes réparations par un technicien
qualifié pour rétablir le fonctionnement normal de
l’appareil.
e. Si l’appareil est tombé ou qu’il est endommagé de
quelque façon que ce soit.
f. Lorsque l’appareil présente d’importants changements
en termes de performance, il devra faire l’objet d’un
entretien.
20. Pièces de rechange – Si des pièces doivent être
remplacées, s’assurer que le technicien a utilisé des
pièces spécifiées par le fabricant ayant les mêmes
caractéristiques que celles d’origine. Toute substitution
par des pièces non autorisées risque de provoquer un
incendie, un choc électrique, des blessures de personnes
ou d’autres dangers.
21. Contrôle de sécurité – Les réparations ou la
maintenance ayant été effectuées, demander au
technicien de réaliser les contrôles de sécurité de routine
afin de déterminer que l’appareil est en bon état de
fonctionnement.
22. Chaleur – Installer cet appareil à l’écart de sources de
chaleur, telles que radiateurs, bouches de chaleur, fours
ou autres appareils (y compris les amplificateurs) qui
produisent de la chaleur.
- 3 - FR
FRANÇAIS
Page 72

PRÉCAUTIONS
INFORMATIONS IMPORTANTES
CONCERNANT LES DROITS D’AUTEUR
La copie, la diffusion, la représentation publique et le prêt non
autorisés de disques sont interdits. Ce produit incorpore une
technologie de protection des droits d'auteur protégée par une
patente U.S. et autres droits à la propriété intellectuelle.
L'utilisation de cette technologie de protection des droits
d'auteur doit être autorisée par Macrovision et concerne
seulement le foyer et autres usages de visionnage à moins
d'une autorisation différente par Macrovision. Le démontage
ou le désassemblage sont interdits.
AVERTISSEMENT DE LA FCC – Cet appareil peut
générer ou utiliser de l’énergie radiofréquence. Les
changements ou modifications apportés à cet appareil
peuvent donner lieu à des interférences nuisibles, à moins
que les modifications ne soient expressément approuvées
dans le manuel d’instruction. L’utilisateur pourrait
perdre le droit de faire fonctionner cet appareil s’il a subi
un changement ou une modification non autorisée.
INTERFÉRENCES RADIO-TV
Cet équipement a été testé et déclaré conforme aux
limitations prévues dans le cadre de la catégorie B des
appareils numériques, définie par l’article 15 du règlement
de la FCC. Ces limites ont été établies pour fournir une
protection raisonnable contre les interférences nuisibles lors
d’une installation résidentielle. Cet équipement génère,
utilise et diffuse des ondes radio et, s’il n’est pas installé et
utilisé conformément aux instructions dont il fait l’objet, il
peut provoquer des interférences indésirables avec les
communications radio. Il est cependant impossible de
garantir qu’aucune interférence ne se produira dans le cadre
d’une installation particulière. Si cet équipement cause des
interférences gênant la réception d’ondes radio ou télévisées
(déterminé en éteignant et en rallumant l’équipement), il est
recommandé que l’utilisateur tente de corriger le problème
en suivant au moins l’une des mesures suivantes :
1)
Réorienter ou déplacer l’antenne réceptrice.
2)
Augmenter la distance entre l’équipement et le
récepteur.
3)
Brancher l’équipement dans une prise électrique d’un
circuit différent de celui auquel le récepteur est relié.
4)
Contacter le revendeur ou un technicien
radio/télévision qualifié.
SÉCURITÉ DU LASER
Cet appareil utilise un laser. Seul un technicien
qualifié doit retirer le capot ou entreprendre une
réparation sur cet appareil, compte tenu du risque
de lésions oculaires.
ATTENTION : L’UTILISATION DE
COMMANDES ET RÉGLAGES OU
L’EXÉCUTION DE PROCÉDURES AUTRES
QUE CEUX DÉCRITS DANS CE MANUEL
POURRAIT PROVOQUER UNE EXPOSITION
À UN RAYONNEMENT DANGEREUX.
ATTENTION : RAYONNEMENT LASER
VISIBLE ET INVISIBLE LORSQUE
L’ APPAREIL EST OUVERT ET QUE LE
SYSTÈME DE SÉCURITÉ EST NEUTRALISÉ.
NE PAS REGARDER DIRECTEMENT DANS
L’AXE DU FAISCEAU.
EMPLACEMENT : À L’INTÉRIEUR, À CÔTÉ
DU MÉCANISME DU LECTEUR.
Cet appareil numérique de la classe B est
conforme à la norme NMB-003 du Canada.
ATTENTION: POUR ÉVITER LES CHOC
ÉLECTRIQUES, INTRODUIRE LA LAME LA
PLUS LARGE DE LA FICHE DANS LA
BORNE CORRESPONDANTE DE LA PRISE
ET POUSSER JUSQU’AU FOND.
REMARQUE CONCERNANT LE
RECYCLAGE
Les piles ne doivent jamais être mises au rebut ni
incinérées, mais éliminées de façon conforme aux
réglementations locales concernant les déchets
chimiques.
Le numéro de série de ce produit se trouve au dos de l’appareil. Aucun autre appareil n’a le même numéro de série que le
vôtre. Noter ici ce numéro, ainsi que toute autre information importante, et conserver ce manuel en tant que registre
permanent de votre achat pour aider à l’identification en cas de vol. Les numéros de série ne sont pas enregistrés sur fichier.
Date d’achat
Revendeur
Adresse du revendeur
Nº de téléphone du revendeur
Nº de modèle Nº de série
Nº de série
- 4 - FR
Page 73

EMPLACEMENT
MANUEL DE
L’OPÉRATEUR
Pour assurer la sécurité du fonctionnement de
l’appareil et obtenir des performances optimales, tenir
compte de facteurs suivants lors du choix d’un
endroit pour son installation :
Le protéger des rayons directs du soleil et le garder
•
à l’abri des sources de chaleur intense.
Éviter les endroits poussiéreux ou humides.
•
Éviter les endroits où la ventilation est insuffisante
•
pour assurer une dissipation correcte de la chaleur.
Ne pas obstruer les ouvertures d’aération qui se
trouvent au-dessus ou en dessous de l’appareil. Ne
pas placer l’appareil sur le tapis ; ceci obstruerait
les ouvertures d’aération.
Installer l’appareil en position horizontale.
•
Éviter les emplacements soumis à de fortes vibrations.
•
Ne pas placer l’appareil à proximité de champs
•
magnétiques forts.
Éviter de déplacer l’appareil d’un endroit à l’autre
•
lorsque les différences de température sont importantes.
Bien retirer le disque et débrancher le cordon
•
d’alimentation de la prise avant de transporter
l’appareil.
ÉVITER LES RISQUES DE CHOC
ÉLECTRIQUE ET D’INCENDIE
Ne pas manipuler le cordon d’alimentation avec les
•
mains mouillées.
Ne pas tirer sur le cordon d’alimentation pour le
•
débrancher d’une prise murale. Saisir la fiche.
Si, par accident, de l’eau est renversée sur
•
l’appareil, débrancher immédiatement le cordon
d’alimentation et amener l’appareil à notre centre
agréé de service après-vente pour le réparer.
Ne mettre ni les doigts, ni aucun autre objet dans le
•
plateau de chargement de disque de l’appareil.
Ne rien poser directement sur l’appareil.
•
AVERTISSEMENT
Une condensation d’humidité peut se produire à
l’intérieur de l’appareil lorsqu’il est transporté d’un
endroit froid à un endroit chaud, lorsqu’une pièce
froide est réchauffée ou dans des conditions
d’humidité élevée. La lecture d’un DVD dans un
appareil contenant de l’humidité risque
d’endommager le DVD et l’appareil. Par conséquent,
lorsque de la condensation se produit à l’intérieur de
l’appareil, allumer l’appareil et le laisser sécher
pendant au moins 2 heures.
SYMBOLES UTILISÉS DANS CE
MANUEL
Les symboles suivants apparaissent dans certains
en-têtes et remarques de ce manuel, avec la
signification suivante.
TV
: La description concerne le fonctionnement du
téléviseur (en mode TV).
DVD-V
: La description concerne la lecture de disques vidéo
DVD (en mode DVD).
CD
: La description concerne la lecture de CD audio
(en mode DVD).
RAPIDE
: La description concerne des éléments à définir en
mode RAPIDE (en mode DVD).
FRANÇAIS
ACCESSOIRES FOURNIS
PilesTélécommande
2 piles AA(NE207UD)
Pour remplacer ces accessoires, consulter No. PIÈCE sous les illustrations et appeler la ligne d’assistance
•
téléphonique indiquée sur la couverture.
Selon le système d’antenne, différents types de combinateurs (mélangeur) ou séparateurs (répartiteur)
•
peuvent être nécessaires. Contacter un magasin local d’articles électroniques pour obtenir ces éléments.
- 5 - FR
Manuel de l’opérateur
(1EMN20276)
Page 74

TABLE DES MATIÈRES
C MESURES DE SÉCURITÉ
IMPORTANTES . . . . . . . . . . . . . . . .2
C PRÉCAUTIONS . . . . . . . . . . . . . . . .4
EMPLACEMENT . . . . . . . . . . . . . . .5
ÉVITER LES RISQUES DE CHOC
ÉLECTRIQUE ET D’INCENDIE . . .5
AVERTISSEMENT . . . . . . . . . . . . . .5
SYMBOLES UTILISÉS DANS CE
MANUEL . . . . . . . . . . . . . . . . . . . . .5
C ACCESSOIRES FOURNIS . . . . . . . .5
C TABLE DES MATIÈRES . . . . . . . . .6
C CARACTÉRISTIQUES . . . . . . . . . . .7
C COMMANDES ET FONCTIONS . . .8
C PRÉPARATION À L’EMPLOI . . . .10
CONNEXION DE L’ANTENNE /
DU CÂBLE . . . . . . . . . . . . . . . . . .10
CONNEXION AUX PRISES
D’ENTRÉE AUDIO /
VIDÉO AVANT . . . . . . . . . . . . . . . .11
CONNEXION À UN
AMPLIFICATEUR STÉRÉO ÉQUIPÉ
DE PRISES D’ENTRÉE
NUMÉRIQUE (pour DVD) . . . . . . .11
CONNEXION À UN DÉCODEUR
DOLBY DIGITAL (pour DVD) . . . .12
INSTALLATION DES PILES . . . . .12
SECTION TV
C FONCTIONNEMENT ET
RÉGLAGES DU TÉLÉVISEUR . . .13
VISUALISATION D’UN
PROGRAMME TÉLÉVISÉ . . . . . .13
DÉMAGNÉTISATION . . . . . . . . . .13
CONTRÔLE DE L’IMAGE . . . . . .13
TEMPORISATEUR D’ARRÊT
AUTOMATIQUE . . . . . . . . . . . . . .14
SYSTÈME DE SOUS-TITRES . . . .14
CONFIGURATION DES
CANAUX . . . . . . . . . . . . . . . . . . . .15
CONFIGURATION DE LA PUCE
ANTIVIOLENCE . . . . . . . . . . . . . .16
CONFIGURATION DU
CLASSEMENT DES ÉMISSIONS
DE TÉLÉVISION . . . . . . . . . . . .16
CONFIGURATION DU
CLASSEMENT MPAA . . . . . . . .17
MODIFICATION DU CODE
D’ACCÈS . . . . . . . . . . . . . . . . . .17
LANGUE DES MENUS . . . . . . . . .17
C DÉSIGNATION DES CHAÎNES PAR
CÂBLE . . . . . . . . . . . . . . . . . . . . . .18
SECTION DVD
C À PROPOS DES DISQUES . . . . . .19
DISQUES QUI PEUVENT ÊTRE
LUS . . . . . . . . . . . . . . . . . . . . . . . .19
DISQUES QUI NE PEUVENT PAS
ÊTRE LUS . . . . . . . . . . . . . . . . . . .19
C LECTURE D’UN DISQUE . . . . . . .20
LECTURE NORMALE . . . . . . . . .20
CARACTÉRISTIQUES
GÉNÉRALES . . . . . . . . . . . . . . . . .20
MENU DU DISQUE . . . . . . . . . . . .20
MENU DES TITRES . . . . . . . . . . .20
REPRISE . . . . . . . . . . . . . . . . . . . .21
PAUSE . . . . . . . . . . . . . . . . . . . . . .21
LECTURE PAS À PAS . . . . . . . . . .21
AVANCE RAPIDE /
RETOUR RAPIDE . . . . . . . . . . . . .21
AVANCE LENTE /
RETOUR LENTE . . . . . . . . . . . . . .21
ZOOM . . . . . . . . . . . . . . . . . . . . . .21
C RECHERCHE D’UNE PISTE . . . .22
RECHERCHE DE PISTE . . . . . . . .22
RECHERCHE DE TITRE /
CHAPITRE . . . . . . . . . . . . . . . . . . .22
RECHERCHE HORAIRE . . . . . . . .22
ÉCRAN DE CONFIGURATION DES
MARQUEURS . . . . . . . . . . . . . . . .22
C FONCTIONS SPÉCIALES DE
LECTURE . . . . . . . . . . . . . . . . . . . .23
RÉPÉTITION . . . . . . . . . . . . . . . . .23
PROGRAMMATION . . . . . . . . . . .23
LECTURE ALÉATOIRE . . . . . . . . .23
C MODIFICATION DES
RÉGLAGES . . . . . . . . . . . . . . . . . . .24
LANGUE DES SOUS-TITRES . . . .24
LANGUE AUDIO . . . . . . . . . . . . . .24
MODE DE SON STÉRÉO . . . . . . .24
ANGLE DE LA CAMÉRA . . . . . . .24
RÉGLAGE DU NIVEAU DES
NOIRS . . . . . . . . . . . . . . . . . . . . . .24
AMBIOPHONIE VIRTUELLE . . . .25
C INFORMATIONS À L’ÉCRAN . . . .25
C MODIFICATION DES
ÉLÉMENTS DE CONFIGURATION
DU DVD . . . . . . . . . . . . . . . . . . . . .26
MENU PERSONNALISÉ . . . . . . . .26
RÉGLAGE DE LA LANGUE . . .26
RÉGLAGE DE
L’AFFICHAGE . . . . . . . . . . . . . .27
RÉGLAGE AUDIO . . . . . . . . . . .27
CONTRÔLE PARENTAL . . . . . .28
AUTRES RÉGLAGES . . . . . . . .28
INITIALISATION . . . . . . . . . . . . . .28
C GUIDE DE DÉPANNAGE . . . . . . .29
C ENTRETIEN . . . . . . . . . . . . . . . . . .32
MANIPULATION DES
DISQUES . . . . . . . . . . . . . . . . . . . .32
C CARACTÉRISTIQUES
TECHNIQUES . . . . . . . . . . . . . . . .33
- 6 - FR
Page 75

CARACTÉRISTIQUES
Mode TV
Télécommande à infrarouge
•
Affichage de configuration du téléviseur à
•
l’écran trilingue, sélectionnable en anglais,
espagnol ou français
Synthétiseur de fréquence PLL à capacité de
•
181 canaux, avec appel direct de station
convertisseur pourra être nécessaire pour voir les
chaînes par câble qui sont cryptées.)
Décodeur de sous-titres – Il est possible de
•
visualiser les programmes de télévision, les films,
les journaux télévisés, etc. affichant le logo (cc)
avec le dialogue en sous-titre ou un affichage de
texte ajouté au programme.
Mode DVD
¡Son Dolby Digital
Cet appareil peut prendre en charge un son
ambiophonique Dolby Digital avec 5,1 canaux
lorsqu’il est connecté à un décodeur Dolby Digital.
¡
Arrêt sur image / lecture rapide / lente / pas à pas
Divers modes de lecture sont disponibles, dont :
arrêt sur image, avance / retour rapide, ralenti et
défilement pas à pas des images.
¡Lecture aléatoire pour les CD audio
Cet appareil peut modifier l’ordre des pistes pour
les lire dans un ordre aléatoire.
¡Lecture programmée pour les CD audio
Permet de programmer l’ordre de pistes pour les
lire dans l’ordre souhaité.
¡Menus des DVD dans la langue souhaitée
Permet d’afficher les menus d’un DVD dans la langue
souhaitée, si celle-ci est disponible sur le DVD.
¡Fonctions d’économiseur d’écran / mise hors
tension automatique
Le programme d’économiseur d’écran se met en
route lorsqu’il n’y a aucune entrée provenant de
l’appareil pendant 5 minutes en mode Arrêt. Une
fois que le programme d’économiseur d’écran a été
activé pendant 15 minutes, l’appareil se met
automatiquement hors tension.
¡Sous-titres dans la langue souhaitée
Permet de sélectionner la langue que vous
souhaitez pour l’affichage des sous-titres, si cette
langue est disponible sur le disque.
¡Choix d’un angle de la caméra
Permet de choisir l’angle de la caméra souhaité, si
un disque contient des séquences enregistrées sous
différents angles.
¡Choix de la langue audio et du mode de son
Permet de sélectionner la langue audio et le mode
de son souhaités, si plusieurs langues et modes sont
disponibles sur un disque.
(Un
Mise hors tension automatique du système –
•
S’il n’y a aucune entrée de signal radiodiffusé
provenant de la borne de l’antenne ni aucune
activité pendant 15 minutes, l’appareil se mettra
automatiquement hors tension.
Temporisateur d’arrêt automatique – Permet que
•
l’appareil se mette automatiquement hors tension à
une heure souhaitée.
Puce antiviolence – Permet aux parents
•
d’empêcher leurs enfants de regarder des
programmes télévisés inappropriés.
¡Verrouillage parental
Permet de régler le niveau de contrôle pour limiter
la lecture des disques qui peuvent ne pas être
destinés aux enfants.
¡Détection automatique des disques
Cet appareil détecte automatiquement si le disque
chargé est un DVD ou un CD audio.
¡Affichage à l’écran
Des informations relatives au fonctionnement
actuel peuvent être affichées à l’écran d’un
téléviseur, permettant à l’utilisateur de confirmer
les fonctions actuellement actives (telles que la
lecture programmée) à l’écran du téléviseur à l’aide
de la télécommande.
¡Recherche
Recherche de chapitre / Recherche de titre /
Recherche de piste / Recherche horaire
¡Répétition
Chapitre / Titre / Piste / Tout / A-B
¡Zoom
Il est possible de grossir l’affichage à l’écran.
¡Marqueur
La partie désignée par l’utilisateur peut être
rappelée.
¡Reprise de la lecture
L’utilisateur peut reprendre la lecture à partir de
l’endroit où elle a été arrêtée.
¡Ambiophonie virtuelle
¡Indication du débit binaire
¡DRC (Dynamic range control)
Il est possible de contrôler la plage de volume du
son.
- 7 - FR
FRANÇAIS
Page 76

VIDEO L–AUDIO–R
VOLUME CHANNEL STOP SKIP SKIP PAUSE
HEADPHONE
–SEARCH–
OPEN/
CLOSE
PLAY
POWER
742 891091112 136531
- PANNEAU AVANT -
COMMANDES ET FONCTIONS
- TÉLÉCOMMANDE -
POWER PICTURE
SELECT
OPEN/
CLOSE
4
14
15
16
123
456
789
SLEEP
SKIP
+100
0 +10
CH.
VOL.
MUTEZOOM
9
10
PAUSE
REV
SLOW
PLAY
STOP
FWD
DISC
MENU
11
17
18
19
20
DISPLAY
CLEAR
MODE
ENTER
REPEATSEARCH MODE
RETURNTITLESETUP
A
-
B
ANGLESUBTITLEAUDIO
21
22
23
1.Plateau de chargement de disque
2.Prise d’entrée VIDÉO
Connecter à la prise de sortie vidéo d’une caméra
vidéo ou d’un magnétoscope.
3.Prises d’entrée AUDIO L/R
Connecter aux prises de sortie audio d’une caméra
vidéo ou d’un magnétoscope.
4.Touche POWER [P.13]
Appuyer pour allumer et éteindre l’appareil.
5.Touches VOLUME (VOL.) K / L [P.13]
Appuyer pour contrôler le volume sonore pour le
DVD et le téléviseur.
6.Touches CHANNEL (CH.) K / L [P.13]
Appuyer pour sélectionner les canaux mémorisés.
12
35
6
5
34
33
32
8
31
30
29
28
27
26
25
24
7.Fenêtre du capteur de télécommande
8.Touche STOP C [P.20]
Arrête le fonctionnement du disque.
9.Touches SKIP H / G [P.22]
Appuyer une fois pour sauter des chapitres ou des
pistes jusqu’à l’endroit souhaité.
Touches SEARCH
h / g
(Panneau avant)
Appuyer et maintenir la touche enfoncée pour
changer la vitesse de lecture vers l’avant ou vers
l’arrière.
10. Touche PLAY B [P.20]
Commence la lecture du disque.
11. Touche PAUSE F [P.21]
Met en pause l’action en cours avec le disque.
12. Touche OPEN/CLOSE A [P.20]
Appuyer pour insérer un disque dans le plateau
ou pour l’en retirer.
13. Prise HEADPHONE
Pour connecter un casque (non fourni) pour une
écoute personnelle.
14. Touche PICTURE [P.13]
Appuyer pour régler l’image.
15. Touches numériques
Mode TV:
[P.13]
Appuyer sur deux chiffres pour accéder
directement au canal souhaité.
Ne pas oublier d’appuyer sur [0] avant un numéro
de canal à un seul chiffre.
Touche +100 –
Appuyer pour sélectionner des chaînes par câble
dont le numéro est supérieur à 99.
Mode DVD: [P.22]
Appuyer pour saisir le nombre souhaité.
Touche +10 –
Appuyer pour saisir les nombres souhaités
supérieurs à 9.
16. Touche SLEEP [P.14]
Règle le temporisateur d’arrêt automatique.
17. Touche DISPLAY
Mode TV:
Affiche à l’écran du téléviseur le numéro du
canal actuel.
Mode DVD: [P.25]
- 8 - FR
Affiche l’état actuel à l’écran du téléviseur.
[P.21]
Page 77

COAXIAL
ANT.
38
3736
- PANNEAU ARRIÈRE -
18. Touche SETUP [P.26]
Appuyer pour saisir ou sortir du menu de
configuration du téléviseur ou du DVD.
19. Touche TITLE [P.20]
Affiche le menu des titres.
20. Touche CLEAR [P.22]
Appuyer pour effacer ou annuler un réglage
actuellement en vigueur.
21. Touche MODE [P.23, 24, 25]
Appuyer pour appeler l’écran de programme ou
l’écran aléatoire en mode d’arrêt.
Appuyer pour appeler l’écran Réglage du Niveau
du Noir ou l’écran Réglage Virtuel pendant la
lecture.
22. Touche SEARCH MODE [P.22]
Appuyer pour localiser le point souhaité.
23. Touche AUDIO [P.24]
Appuyer pour sélectionner la langue audio ou le
mode de son souhaité.
24. Touche SUBTITLE [P.24]
Appuyer pour sélectionner la langue souhaitée
pour le sous-titrage.
25. Touche REPEAT [P.23]
Répète la lecture du disque, du titre, du chapitre
ou de la piste en cours.
26. Touche ANGLE [P.24]
Appuyer pour changer l’angle de la caméra et
revoir la séquence sous un angle différent (si
disponible).
27. Touche A-B [P.23]
Répète la lecture d’une section sélectionnée.
28. Touche RETURN [P.22]
Retourne à l’écran précédent dans le menu de
configuration.
29. Touche ENTER [P.15]
Appuyer pour accepter un réglage.
30. Touches K / L / { / B
Mode TV: [P.13]
Appuyer pour sélectionner un mode de réglage du
menu à l’écran du téléviseur.
Appuyer pour effectuer une sélection ou un
réglage à partir d’un menu particulier.
Mode DVD: [P.20]
Appuyer pour sélectionner un élément de menu.
31. Touche DISC MENU [P.20]
Affiche le menu DVD.
32. Touche REV h [P.21]
Appuyer pour visionner l’image du DVD en
lecture vers l’arrière rapide ou lente.
Touche FWD g [P.21]
Appuyer pour visionner en lecture vers l’avant
rapide ou lente.
33. Touche ZOOM [P.21]
Agrandit une partie d’une image reproduite à
partir d’un DVD.
34. Touche MUTE [P.13]
Met le son en sourdine. Appuyer de nouveau pour
rétablir le son.
35. Touche SELECT [P.11]
Appuyer pour passer en mode TV, en mode
d’entrée externe ou en mode DVD.
36. Prise COAXIAL [P.11]
Connecter à l’entrée numérique d’un
amplificateur ou décodeur externe (pour un DVD
audio uniquement).
37. Prise ANT. [P.10]
Connecter à une antenne, à un réseau câblé ou à
un système par satellite.
38. Cordon d’alimentation [P.13]
Connecter à une prise secteur normale
(120 V/60 Hz).
REMARQUE:
Retirer le cordon d’alimentation du crochet
•
pour éviter de casser un fil avant la connexion à
une prise secteur normale.
REMARQUE :
Nous ne recommandons pas l’emploi de télécommandes universelles. Certaines des fonctions ne peuvent pas
•
être contrôlées au moyen d’une télécommande universelle.
En cas d’utilisation d’une télécommande universelle avec cet appareil, il est possible que le numéro de code
donné puisse ne pas fonctionner pour cet appareil. Dans ce cas, appeler le fabricant de la télécommande
universelle.
- 9 - FR
FRANÇAIS
Page 78

PRÉPARATION À L’EMPLOI
COAXIAL
ANT.
ANT.
UHF
VHF
VHF/UHF
VHF
or
UHF
VHF
or
UHF
CONNEXION DE L’ANTENNE / DU CÂBLE
Les câbles utilisés ici sont disponibles dans le commerce.
[CONNEXION DE L’ANTENNE] [CONNEXION TV CÂBLÉE / SATELLITE]
Câble coaxial
75 ohms
Boîtier pour TV câblée ou
boîtier pour satellite *
OU
Combineur
VHF/UHF
OUT
IN
En provenance du
réseau câblé ou de
Câble plat à deux
conducteurs
Adaptateur
OU
OU
l’antenne satellite
Câble coaxial 75 ohms
En provenance du
réseau câblé
*Certains réseaux de TV câblée utilisent des signaux cryptés
et exigent un convertisseur spécial pour recevoir ces canaux.
Consulter la société de TV câblée locale.
Avis à l’installateur de TV câblée :
Le présent avis a pour objet de rappeler à l’installateur de systèmes de télévision par câble que l’article 820-40 du Code
national de l’électricité contient des recommandations relatives à la mise à la masse de l’appareil et, en particulier,
stipule que la terre du câble doit être connectée au système de mise à la terre de l’immeuble, aussi prêt que possible du
point d’entrée du câble.
REMARQUE :
Avant de brancher l’antenne dans la prise ANT. de l’appareil, vérifier que la
•
broche n’est pas tordue. Si elle est tordue, la redresser de la manière illustrée,
puis la brancher dans la prise ANT. de l’appareil.
Broche tordue
Câble
Fiche
(Doit être
redressée)
(Broche droite)
ANTENNE COMBINÉE VHF / UHF
Une antenne combinée VHF / UHF de 75 ohms peut
être connectée à la prise ANT. de l’appareil.
ANTENNES VHF / UHF SÉPARÉES
Dans certaines régions, il sera nécessaire d’utiliser
une antenne extérieure.
CÂBLE SANS CONVERTISSEUR /
DÉSEMBROUILLEUR
Utiliser cette connexion si le réseau câblé se
CÂBLE AVEC CONVERTISSEUR /
DÉSEMBROUILLEUR OU BOÎTIER
SATELLITE
En cas de fourniture d’un décodeur par la compagnie
de TV par câble ou d’utilisation d’un système par
satellite, utiliser la connexion de base illustrée cidessus.
La sélection des canaux doit être effectuée au moyen
du convertisseur ou du boîtier satellite. Ceci signifie
qu’il n’est pas possible de changer de canal à l’aide
de la télécommande de cet appareil.
connecte directement à l’appareil sans convertisseur.
REMARQUE :
Pour la sécurité de l’utilisateur et pour éviter d’endommager l’appareil, débrancher le câble de
•
l’antenne de la prise ANT. avant de déplacer l’appareil.
- 10 - FR
Page 79

CONNEXION AUX PRISES D’ENTRÉE AUDIO/VIDÉO AVANT
COAXIAL
ANT.
Pour la visualisation d’un programme enregistré sur une autre source (magnétoscope ou
caméra vidéo), utiliser les prises d’entrée AUDIO/VIDÉO à l’avant de l’appareil.
Connecter les prises de sortie audio/vidéo d’une autre source aux prises AUDIO L/R et
VIDEO de cet appareil.
Ensuite, appuyer sur [SELECT] ou [CH. KK/ LL] jusqu’à ce que « AUX » apparaisse à
l’écran.
AUX
VIDEO L–AUDIO–R
POWER
VOLUME CHANNEL STOP SKIP SKIP PAUSE
–SEARCH–
OPEN/
PLAY
CLOSE
HEADPHONE
par exemple :
magnétoscope ou
caméra vidéo, etc.
(SORTIE)
Vers les prises de sortie audio
Câble audio
(ENTRÉE)
(disponible dans le commerce)
VIDEO L–AUDIO–R
[Avant de l’appareil]
(SORTIE)
Vers la prise de sortie vidéo
Câble vidéo
(ENTRÉE)
(disponible dans le commerce)
REMARQUE :
En cas de connexion d’un magnétoscope (ou une autre source) mono à cet appareil, connecter la prise de
•
sortie audio du magnétoscope (ou de l’autre source) mono à la prise AUDIO L de cet appareil. Le signal
audio sera transmis à la fois au canal gauche (L) et au canal droit (R).
CONNEXION À UN AMPLIFICATEUR STÉRÉO ÉQUIPÉ DE PRISES
D’ENTRÉE NUMÉRIQUE (pour DVD)
Utiliser un câble audio coaxial (disponible dans le commerce) pour les raccordements audio.
Connecter à un amplificateur équipé d’une prise d’entrée numérique comme une lecteur MD ou DAT.
FRANÇAIS
par exemple :
lecteur MD, lecteur DAT, etc.
(SORTIE)
Vers la prise COAXIAL
(sortie audio DVD uniquement)
Vers une prise d’entrée
audio numérique coaxiale
(ENTRÉE)
Câble audio numérique coaxial
(disponible dans le commerce)
REMARQUES :
La source audio provenant d’un disque au format Dolby Digital Surround 5,1 canaux ne peut pas être
•
enregistrée en tant que son numérique par un lecteur MD ou DAT.
Veiller à mettre tous les composants du système hors tension avant de connecter un autre périphérique.
•
Se reporter au manuel de l’opérateur pour la connexion des composants à l’appareil.
•
Régler « DOLBY DIGITAL » sur « PCM » pour la sortie audio dans le mode de configuration. Une lecture
•
avec des réglages incorrects peut générer une distorsion du son et peut également endommager les hautparleurs. (Voir la page 27.)
- 11 - FR
Page 80

COAXIAL
ANT.
CONNEXION À UN DÉCODEUR DOLBY DIGITAL (pour DVD)
En cas de lecture d’un disque DVD en format Dolby Digital Surround 5,1 canaux, l’appareil envoie un flux
de données DOLBY DIGITAL par sa prise COAXIAL. En branchant l’appareil à un décodeur Dolby Digital,
il est possible d’obtenir une ambiance plus réaliste et convaincante, avec un son ambiophonique puissant et de
haute qualité semblable à celui offert dans une salle de cinéma.
Utiliser des câbles audio coaxiaux (disponibles dans le commerce) pour les raccordements audio.
Haut-parleur
Haut-parleur avant
(gauche)
central
Haut-parleur avant
(droit)
Haut-parleur
ambiophonique
(gauche)
Décodeur
Dolby Digital
Vers une prise
d’entrée audio
numérique coaxiale
Haut-parleur
ambiophonique
(droit)
Caisson
d’extrêmes graves
(SORTIE)
(ENTRÉE)
Câble audio numérique coaxial
(disponible dans le commerce)
Vers la prise COAXIAL
(sortie audio DVD uniquement)
REMARQUES :
Veiller à mettre tous les composants du système hors tension avant de connecter un autre composant.
•
Se reporter au manuel de l’opérateur pour la connexion des composants à connecter à l’appareil.
•
En cas de connexion à un décodeur Dolby Digital, régler « DOLBY DIGITAL » à « TRAIN BINAIRE »
•
pour la sortie audio en mode de configuration. (Voir la page 27.)
Si l’appareil n’est pas connecté à un décodeur Dolby Digital, régler « DOLBY DIGITAL » sur « PCM »
•
pour la sortie audio dans le mode de configuration. Une lecture avec des réglages incorrects peut générer
une distorsion du son et peut également endommager les haut-parleurs. (Voir la page 27.)
Fabriqué sous licence de Dolby Laboratories. Le terme « Dolby»et le sigle double D sont
des marques commerciales de Dolby Laboratories.
INSTALLATION DES PILES
1)Ouvrir le couvercle du compartiment des piles en
appuyant sur le couvercle de la télécommande dans
le sens de la flèche.
2)Insérer 2 piles AA dans le compartiment des piles,
en respectant le sens indiqué par le schéma de
polarité (+/-).
3)Remettre le couvercle en place.
[PRÉCAUTIONS RELATIVES AUX PILES]
Veiller à observer la polarité correcte, telle
•
qu’indiquée dans le compartiment des piles.
L’inversion accidentelle des piles peut
endommager le dispositif.
Ne pas mélanger différents types de pile (par
•
exemple : alcalines et au carbone-zinc) ni des
piles usagées avec des piles neuves.
S’il est prévu de ne pas utiliser l’appareil pendant
•
une longue durée, retirer les piles afin d’éviter
tout épanchement d’acide éventuel.
Ne pas essayer de recharger des piles qui ne sont
•
pas prévues pour cela ; elles pourraient
surchauffer et éclater.
- 12 - FR
Page 81

SECTION TV
FONCTIONNEMENT ET RÉGLAGES DU TÉLÉVISEUR
VISUALISATION D’UN
PROGRAMME TÉLÉVISÉ
TV
1
Brancher le cordon d’alimentation de l’appareil
Brancher le cordon d’alimentation de
l’appareil dans une prise secteur standard.
REMARQUE :
Si des chiffres s’affichent dans le coin
•
de l’écran, appuyer sur
débrancher le cordon d’alimentation.
2 Mettre l’appareil sous tension
Appuyer sur [POWER] pour mettre l’appareil sous
tension.
3 Sélectionner le numéro du canal
Appuyer sur [CH. K / L] ou sur les touches
numériques pour sélectionner le numéro du canal
souhaité.
Remarques concernant l’utilisation des touches
numériques :
¡
Précéder les numéros de canal à un seul chiffre d’un
zéro (par exemple : 02, 03, 04, etc.).
¡Pour sélectionner des chaînes par câble dont le
numéro est supérieur à 99, appuyer d’abord sur
[+100], puis sur les deux derniers chiffres. (Par
exemple : pour sélectionner le canal 125, appuyer
d’abord sur [+100], puis appuyer sur [2] et [5].)
4 Régler le son
Appuyer sur [VOL.XX/ YY] pour régler
le volume.
Appuyer sur
immédiatement le son.
Appuyer de nouveau sur cette touche
pour rétablir le volume sonore antérieur.
REMARQUE :
Il est possible de changer de canal TV en appuyant sur
•
[CH. K / L] en mode DVD Même si le téléviseur est
éteint en mode DVD, lil se mettra automatiquement en
mode TV à la mise sous tension suivante.
[MUTE] pour couper
VISUALISATION D’UN CANAL DIFFUSÉ
PAR CÂBLE OU PAR SATELLITE
Si l’appareil est connecté à un boîtier pour câble ou
•
satellite, appuyer sur [CH. K / L] pour
sélectionner CH3 or CH4, selon le réglage de canal
de sortie du dispositif en question, et sélectionner
le canal souhaité sur ce dispositif.
VISUALISATION D’UNE ENTRÉE EXTERNE
Lorsqu’un équipement périphérique est connecté
•
aux prises d’entrée AUDIO/VIDEO avant, appuyer
plusieurs fois sur [SELECT] ou [CH. K / L],
jusqu’à ce que « AUX » apparaisse à l’écran.
[POWER] sans
C C C C C C C C C C C C C C C C
VOLUME 20
- 13 - FR
DÉMAGNÉTISATION
TV
Ce téléviseur a un circuit de démagnétisation qui
corrigera les erreurs de couleurs à l’écran résultant
d’un champ magnétique excessif se trouvant trop
près du téléviseur. Ce circuit est conçu pour
fonctionner une fois lors du branchement de
l’appareil. Si des erreurs de couleurs mineures
sont observées à certains endroits de l’écran,
débrancher le téléviseur pendant environ 30
minutes. Lorsque le téléviseur sera rebranché, le
circuit de démagnétisation fonctionnera une fois pour
les corriger. Répéter cette procédure à chaque fois
que l’écran du téléviseur est accidentellement
magnétisé, ou lorsque le téléviseur est déplacé.
CONTRÔLE DE L’IMAGE
TV
Les contrôles de l’image de l’appareil –
LUMINOSITÉ, CONTRASTE, COULEUR,
TEINTE et NETTETÉ – sont préréglés
conformément aux spécifications de l’usine. Bien
qu’ils soient généralement les meilleurs, quelques
ajustements supplémentaires pourront être
nécessaires pour obtenir une image plus naturelle.
Attention …
L’appareil doit être allumé.
•
1 Afficher le menu
Appuyer sur [PICTURE].
2 Sélectionner l’élément à régler
Appuyer sur [K / L] jusqu’à ce que le contrôle
souhaité soit affiché.
LUMINOSITÉ
CONTRASTE
COULEUR
TEINTE
NETTETÉ
3 Ajuster le réglage
Appuyer sur [s/ B] pour ajuster au niveau souhaité
dans les 5 secondes.
s
LUMINOSITÉ
CONTRASTE
COULEUR
TEINTE
NETTETÉ
Même en cas de coupure de courant, l’appareil
•
gardera ces réglages en mémoire.
s
pour réduire la
luminosité
pour réduire le
contraste
plus pâle
plus violet
plus douce
LUMINOSITÉ
PP PP PP PP PP PP PP CC PP PP PP PP PP PP PP
–
B
pour augmenter
la luminosité
pour augmenter
le contraste
plus vive
plus vert
plus nette
FRANÇAIS
+
Page 82

TEMPORISATEUR D’ARRÊT
AUTOMATIQUE
TV
La fonction de temporisateur d’arrêt automatique
permet de mettre l’appareil hors tension sans utiliser
[POWER] après un délai souhaité.
1 Afficher l’écran de réglage du temporisateur
d’arrêt automatique
Appuyer sur [SLEEP] pour afficher « SOMMEIL 0
MINUTE ».
2 Régler le temporisateur d’arrêt automatique
Appuyer plusieurs fois sur
[SLEEP] jusqu’à ce qu’apparaisse
le délai d’arrêt automatique
souhaité. Chaque pression
supplémentaire augmentera le délai
de 30 minutes, jusqu’à un
maximum de 120 minutes.
Après 5 secondes, le réglage du temporisateur d’arrêt
automatique disparaîtra automatiquement.
POUR DÉSACTIVER LE
TEMPORISATEUR D’ARRÊT
AUTOMATIQUE
Appuyer sur [SLEEP] pour afficher l’écran de
réglage du temporisateur d’arrêt automatique.
Appuyer plusieurs fois sur
qu’apparaisse « SOMMEIL 0 MINUTE ».
[SLEEP] jusqu’à ce
SOMMEIL 120 MINUTE
REMARQUES :
Tous les programmes ne sont pas diffusés avec des
•
sous-titres. Cet appareil est conçu pour fournir des
sous-titres sans erreur à partir de signaux de haute
qualité provenant de l’antenne, du câble et du
magnétoscope. Cependant, il est probable que des
signaux de mauvaise qualité donneront lieu à des
erreurs, voire à l’absence complète, des sous-titres.
Les facteurs courants qui affectent les signaux et
pourraient donner lieu à des erreurs dans les soustitres sont indiqués ci-dessous :
Bruit d’allumage des automobiles
•
Bruit de balais de moteurs électriques
•
Faible réception, image neigeuse sur l’écran du
•
téléviseur
Réception de signal multiplex donnant lieu à un
•
affichage d’images fantômes ou de scintillement
Si l’appareil affiche un cadre noir
•
à l’écran du téléviseur, cela
signifie qu’il est réglé en mode
TEXTE. Pour effacer l’écran,
sélectionner [S-TIT1], [S-TIT2]
ou [HF] (Arrêt).
Attention …
L’appareil doit être allumé.
•
1 Sélectionner « S-TITRES »
Appuyer sur [SETUP].
Appuyer sur
[K / L] pour
sélectionner « S-TITRES ».
- RÉG. TV -
RÉGLAGE DES CANAUX
RÉGLAGE CIRCUIT V
LANGAGE [FRANÇAIS]
B S-TITRES [HF]
SYSTÈME DE SOUS-TITRES
TV
Il est possible de visualiser des programmes de
télévision, des films, des journaux télévisés et des
programmes pré-enregistrés affichant le logo (cc)
avec le dialogue en sous-titre ou un affichage de
texte.
Mode SOUS-TITRES : Il est possible de visualiser
des feuilletons, des films et des journaux télévisés en
affichant en sous-titres les dialogues et le contenu des
actualités.
Mode TEXTE : Il est possible, au choix, d’afficher
des informations sous forme de texte sur la moitié de
l’écran.
1-2 : Il est possible d’obtenir ces sous-titres ou ces
informations textuelles en sélectionnant « 1 » ou
« 2 ». Sous-titres « 2 » est généralement utilisé pour
une deuxième langue, si disponible.
2 Sélectionner le mode de sous-titres
souhaité
Appuyer plusieurs fois sur
[ENTER] jusqu’à ce qu’apparaisse
le menu de sous-titres souhaité.
([S-TIT1], [S-TIT2], [TEXT1] ou
[TEXT2])
- RÉG. TV -
RÉGLAGE DES CANAUX
RÉGLAGE CIRCUIT V
LANGAGE [FRANÇAIS]
B S-TITRES [S-TIT1]
3 Quitter le mode de configuration des sous-
titres
Appuyer sur [SETUP] pour quitter le menu.
REMARQUE :
Même en cas de coupure de courant, l’appareil
•
gardera ces réglages en mémoire.
POUR ANNULER LE SYSTÈME DE
SOUS-TITRAGE
Répéter les étapes 1 à 2 et sélectionner [HF] à l’aide
de la touche [ENTER]. Puis appuyer sur [SETUP]
pour revenir au mode TV.
- 14 - FR
Page 83

CONFIGURATION DES CANAUX
TV
Attention …
L’appareil doit être allumé.
•
PROGRAMMATION AUTOMATIQUE
DES CANAUX
Dans sa configuration initiale, cet appareil a tous les
canaux en mémoire, y compris ceux qui ne sont pas
disponibles dans votre région. Cette fonction met
automatiquement en mémoire uniquement les canaux
disponibles.
1 Sélectionner « RÉGLAGE DES CANAUX ».
Appuyer sur [SETUP].
Appuyer sur
[K / L] pour
sélectionner « RÉGLAGE DES
CANAUX », puis appuyer sur
[ENTER].
2 Commencer le balayage des canaux
Appuyer sur [K / L] pour
sélectionner « AUTOPROG. DES
CANAUX », puis appuyer sur
[ENTER].
Le syntoniseur balaie et mémorise
tous les canaux actifs dans votre
région.
3 Après le balayage
Le syntoniseur s’arrête sur le premier canal
mémorisé.
REMARQUES :
Si la fonction « AUTOPROG.
•
DES CANAUX » est activée à un
endroit où aucun signal TV n’est
disponible, le message « PAS DE
SIGNAL TV » s’affiche à l’écran
une fois le balayage des canaux
terminé.
L’appareil peut reconnaître les canaux de TV
•
câblée comme étant des canaux de télévision si les
conditions de réception sont mauvaises. Dans ce
cas, vérifier la connexion de l’antenne et essayer de
nouveau la fonction « AUTOPROG. DES
CANAUX » lorsque les conditions de réception
sont meilleures.
La programmation en mémoire des canaux n’est
•
PAS nécessaire quand l’appareil est raccordé à
un boîtier du câble ou satellite. Simplement
sélectionner le canal pour l’entrée du boîtier du
câble ou satellite (à savoir CH3) sur l’appareil,
puis sélectionner le canal souhaité sur le boîtier
du câble ou satellite.
- RÉG. TV -
B RÉGLAGE DES CANAUX
RÉGLAGE CIRCUIT V
LANGAGE [FRANÇAIS]
S-TITRES [HF]
– RÉGLAGE DES CANAUX –
AJOUT/SUPP. (CATV)
B AUTOPROG. DES CANAUX
PAS DE SIGNAL TV
AJOUT / SUPPRESSION DE CANAUX
Les canaux qui ne sont plus disponibles ou qui sont
visualisés rarement peuvent être supprimés de la
mémoire. (Bien sûr, il est toujours possible de
remettre en mémoire un canal supprimé).
1 Sélectionner « RÉGLAGE DES CANAUX »
Appuyer sur [SETUP].
Appuyer sur
[K / L] pour
sélectionner « RÉGLAGE DES
CANAUX », puis appuyer sur
[ENTER].
- RÉG. TV -
B RÉGLAGE DES CANAUX
RÉGLAGE CIRCUIT V
LANGAGE [FRANÇAIS]
S-TITRES [HF]
2 Sélectionner « AJOUT/SUPP. ».
Appuyer sur [K / L] pour
sélectionner « AJOUT/SUPP. »,
puis appuyer sur [ENTER].
– RÉGLAGE DES CANAUX –
B AJOUT/SUPP. (CATV)
AUTOPROG. DES CANAUX
3 Saisir le numéro de canal souhaité
Appuyer sur [CH. K / L] ou sur les
touches numériques jusqu’à ce
qu’apparaisse le numéro de canal
souhaité. (Il est également possible
d’appuyer sur [K / L] pour le
saisir).
Les numéros de canal à un chiffre
•
(Exemple : CH8)
08
AJOUT/SUPP.
doivent être précédés d’un zéro (à savoir : 02, ...
09).
Pour sélectionner des chaînes par câble dont le
•
numéro est supérieur à 99, appuyer d’abord sur
[+100], puis appuyer sur les deux derniers chiffres.
(Par exemple : pour sélectionner le canal 125,
appuyer d’abord sur [+100], puis appuyer sur [2] et
[5]).
4 Le supprimer (ou l’ajouter) de (ou dans) la
mémoire
Appuyer sur [ENTER]. Le numéro du canal apparaît
en rouge clair. Le canal est supprimé de la mémoire.
Pour supprimer un autre canal, répéter les étapes 3
•
à 4.
Le canal est remis en mémoire en appuyant de
•
nouveau sur [ENTER].
Canal ajouté : bleu clair
Canal supprimé : rouge clair
5 Quitter le mode de configuration des canaux
Appuyer sur [SETUP] pour quitter le menu.
REMARQUE :
Pour confirmer que le ou les canaux ont été
•
supprimés ou ajoutés, appuyer sur [CH. K / L].
FRANÇAIS
- 15 - FR
Page 84

CONFIGURATION DE LA PUCE
ANTIVIOLENCE
TV
Cette fonctionnalité permet aux parents d’empêcher
leurs enfants de regarder des programmes télévisés
inappropriés. En cas de tentative d’accès à un
programme bloqué, le message « ÉMISSION
PROTÉGÉE par… » (Programme protégé par...)
apparaît à l’écran du téléviseur.
CONFIGURATION DE LA PUCE
ANTIVIOLENCE
Attention…
L’appareil doit être allumé.
•
1 Sélectionner « RÉGLAGE CIRCUIT V ».
Appuyer sur [SETUP].
Appuyer sur
[K / L] pour
sélectionner « RÉGLAGE
CIRCUIT V », puis appuyer sur
[ENTER].
2 Saisir le code d’accès
Appuyer sur les touches
numériques pour saisir le code
d’accès.
S’il s’agit de la première
•
configuration, ou si l’appareil a
subi une coupure de courant,
saisir le code par défaut : 0000.
- RÉG. TV -
RÉGLAGE DES CANAUX
B RÉGLAGE CIRCUIT V
LANGAGE [FRANÇAIS]
S-TITRES [HF]
CODE D’ACCES
_ _ _ _
Sélection Explication du classement
TV-Y Approprié pour les enfants de tous âges
TV-Y7
Approprié pour les enfants âgés de sept ans et plus
TV-G Tout public
TV-PG Surveillance parentale suggérée
TV-14
Inapproprié pour les enfants âgés de moins de 14 ans
TV-MA Adultes seulement
REMARQUES :
En cas de sélection d’un classement et de
•
réglage sur [BARRÉ], les classements
plus élevés seront automatiquement
bloqués. Les classements inférieurs
TV–Y [
TV–Y7 ( ) [
B TV–G [
TV–PG (DLSV) [
TV–14 (DLSV) [
TV–MA ( LSV) [
pourront être visualisés.
En cas de réglage du classement le plus bas sur
•
[VISION], tous les autres classements pourront
automatiquement être visualisés.
5 Configuration de « Sous-Cotes »
En cas de sélection des classements
TV-Y7, TV-PG, TV-14 ou TV-MA,
la possibilité existe de définir des
catégories de sous-classements.
Appuyer sur
[K / L] pour
sélectionner un classement avec des
sous-classements à bloquer, puis
appuyer deux fois sur [ENTER].
Appuyer sur
[K / L] pour
sélectionner un sous-classement,
puis appuyer sur [ENTER].
[BARRÉ] ou [VISION].
TV–Y [
B TV–Y7 ( ) [
TV–G [
TV–PG ( ) [
TV–14 ( ) [
TV–MA( ) [
TV–Y7 [
B FV [
TV–PG [
B D[
L[
S[
V[
VISION
VISION
BARRÉ
BARRÉ
BARRÉ
BARRÉ
VISION
VISION
VISION
VISION
VISION
VISION
BARRÉ
BARRÉ
BARRÉ
BARRÉ
BARRÉ
BARRÉ
BARRÉ
]
]
]
]
]
]
]
]
]
]
]
]
]
]
]
]
]
]
]
3 Sélectionner l’élément souhaité
Appuyer sur [K / L] pour sélectionner « COTE TV »,
« COTE MPAA » ou « CHANGER CODE », puis
appuyer sur [ENTER].
Se reporter aux pages ci-dessous pour configurer
chaque élément.
– RÉGLAGE CIRCUIT V –
B COTE TV
COTE MPAA
CHANGER CODE
A
CONFIGURATION DU CLASSEMENT
A
P16 Étape
B
P17 Étape
C
P17 Étape
4
4
4
DES ÉMISSIONS DE TÉLÉVISION
Suivre les étapes 1à 3de la section « RÉGLAGE
CIRCUIT V » ci-dessus.
4 Blocage de programmes télévisés
Appuyer sur [K / L] pour
sélectionner un classement à bloquer.
Appuyer plusieurs fois sur
[ENTER]
pour le régler sur [BARRÉ] ou
[VISION].
B TV–Y [
TV–Y7 ( ) [
TV–G [
TV–PG ( ) [
TV–14 ( ) [
TV–MA( ) [
VISION
VISION
VISION
VISION
VISION
VISION
Sélection Explication du classement
TV-Y7
FV Violence fictive
TV-PG, TV-14, TV-MA
D Dialogue suggestif (TV-PG, TV-14 seulement
L Langage grossier
S Situations à caractère sexuel
VViolence
REMARQUE :
Les sous-classements bloqués
•
apparaîtront en face de la
catégorie de classement dans le
TV–Y [
TV–Y7 ( ) [
TV–G [
B TV–PG (DLSV ) [
TV–14 (DLSV) [
TV–MA ( LSV) [
VISION
VISION
VISION
BARRÉ
BARRÉ
BARRÉ
]
]
]
menu « COTE TV ».
6
Quitter le mode de configuration de la puce antiviolence
Appuyer sur [SETUP] pour quitter le menu.
REMARQUE :
Pour changer le classement, le téléviseur
]
•
]
]
doit être réglé sur un programme non
]
]
]
protégé. Si le message « ÉMISSION
ÉMISSION PROTÉGÉE
par TV-Y
PROTÉGÉE par … » apparaît à l’écran,
changer de canal pour recevoir une
station qui n’est pas protégée.
- 16 - FR
)
]
]
]
Page 85

CONFIGURATION DU
B
CLASSEMENT MPAA
Suivre les étapes 1à 3de la section « RÉGLAGE
CIRCUIT V » à la page 16.
4
Sélectionner l’élément souhaité
Appuyer sur [K / L] pour
sélectionner l’option souhaitée, puis
appuyer sur [ENTER] pour
sélectionner [BARRÉ] ou [VISION].
Sélection Explication du classement
GTout public
PG Surveillance parentale suggérée
PG -13
R
Inapproprié pour les enfants âgés de moins de 13 ans
Les enfants de moins de 17 ans doivent être
accompagnés par un parent ou un tuteur adulte
NC-17 Interdit aux moins de 17 ans
X Adultes seulement
En cas de sélection et de réglage d’un classement
•
sur [BARRÉ], les classements plus élevés seront
automatiquement bloqués. Les classements
inférieurs pourront être visualisés.
En cas de réglage du classement le plus bas sur
•
[VISION], tous les autres classements pourront
automatiquement être visualisés.
5
Quitter le mode de configuration de la puce antiviolence
Appuyer sur [SETUP] pour quitter le menu.
G[
PG [
PG–13 [
B R [
NC–17 [
X [
VISION
VISION
VISION
BARRÉ
BARRÉ
BARRÉ
LANGUE DES MENUS
1 Sélectionner « LANGUAGE »
Appuyer sur [SETUP].
]
]
Appuyer sur
]
]
]
vers “LANGUAGE”.
]
2 Sélectionner « ENGLISH », « ESPAÑOL »
Appuyer plusieurs fois sur [ENTER] pour
sélectionner « ENGLISH » (Anglais), « ESPAÑOL »
(Espagnol) ou « FRANÇAIS ».
3 Quitter le mode de langue
Appuyer sur [SETUP] pour quitter le menu.
REMARQUES :
Cette fonction affecte seulement la langue des
•
menus à l’écran, et non la source audio.
Si, pour une raison quelconque, le menu est en
•
anglais ou en espagnol, appuyer sur [SETUP],
appuyer sur [K / L] pour sélectionner « IDIOMA
[ESPAÑOL] » ou « LANGAGE [FRANÇAIS] »,
appuyer plusieurs fois sur [ENTER] pour
sélectionner la langue souhaitée, puis appuyer sur
[SETUP].
[K / L] pour pointer
ou « FRANÇAIS ».
CHANNEL SET UP
V-CHIP SET UP
B LANGUAGE [ENGLISH]
CAPTION [OFF]
TV
- TV SETUP -
FRANÇAIS
MODIFICATION DU CODE D’ACCÈS
C
Suivre les étapes 1à 3de la section « RÉGLAGE
CIRCUIT V » à la page 16.
4 Saisir le nouveau code
Appuyer sur les touches
numériques pour saisir le code
d’accès souhaité dans l’espace
« NOUVEAU CODE », puis saisir
le même code dans l’espace «
CONFIRMER CODE ». Une fois terminé, le menu
de « RÉGLAGE CIRCUIT V » s’affiche de
nouveau.
Veiller à saisir dans l’espace « CONFIRMER CODE
•
» exactement le même code que dans l’espace
« NOUVEAU CODE ». S’ils sont différents, l’espace
« NOUVEAU CODE » s’efface pour recommencer.
NOUVEAU CODE
X X X X
CONFIRMER CODE
_ _ _ _
5 Quitter le mode de configuration de la puce
antiviolence
Appuyer sur [SETUP] pour quitter le menu.
REMARQUE :
Le code d’accès personnel est effacé et reprend la
•
valeur par défaut (0000) en cas de panne de
courant ou d’arrêt de l’alimentation électrique à
l’aide d’un interrupteur mural. En cas d’oubli du
code, débrancher le cordon d’alimentation pendant
10 secondes pour ramener le code d’accès à 0000.
- 17 - FR
Page 86

DÉSIGNATION DES CHAÎNES PAR CÂBLE
Affichage TV
Affichage TV
Affichage TV
Affichage TV
Affichage TV
Affichage TV
Affichage TV
Affichage TV
Canal de télévision par câble
Affichage TV
W+80 W+81 W+82 W+83 W+84
W+65 W+66 W+67 W+68 W+69 W+70 W+71 W+72 W+73 W+74 W+75 W+76 W+77
W+55 W+56 W+57 W+58 A-4 A-3 A-2 A-1 W+59 W+60 W+61 W+62
W+40 W+41 W+42 W+43 W+44 W+45 W+46 W+47 W+48 W+49 W+50 W+51 W+52
W+25 W+26 W+27 W+28 W+29 W+30 W+31 W+32 W+33 W+34 W+35 W+36 W+37
W+10 W+11 W+12 W+13 W+14 W+15 W+16 W+17 W+18 W+19 W+20 W+21 W+22
A-5
RSTUVWW+1 W+2 W+3 W+4 W+5 W+6 W+7
CDEFGH I JK LMNO
5A 2345678910111213
12345678910111213
16 17 18 19 20 21 22 23 24 25 26 27 28
31 32 33 34 35 36 37 38 39 40 41 42 43
46 47 48 49 50 51 52 53 54 55 56 57 58
61 62 63 64 65 66 67 68 69 70 71 72 73
76 77 78 79 80 81 82 83 84 85 86 87 88
91 92 93 94 95 96 97 98 99 100 101 102 103
106 107 108 109 110 111 112 113 114 115 116 117 118
121 122 123 124 125
Canal de télévision par câble
Canal de télévision par câble
Canal de télévision par câble
Canal de télévision par câble
Canal de télévision par câble
Canal de télévision par câble
Canal de télévision par câble
Canal de télévision par câble
W+79
W+64
W+54
W+39
W+24
W+9
Q
B
15
30
45
60
75
90
105
120
W+78
W+63
W+53
W+38
W+23
W+8
P
A
14
29
44
59
74
89
104
119
En cas d’abonnement à la télévision par câble, les canaux sont affichés de 1 à 125. Les câble-opérateurs
désignent souvent les canaux par des lettres ou par des combinaisons de lettres et de chiffres. Consulter le
câble-opérateur local. Ci-dessous figure un tableau des désignations courantes des chaînes par câble.
- 18 - FR
Page 87

À PROPOS DES DISQUES
* 4,6,10
* 4,5,6,9,10
CD Audio
CD-RW
CD-R
Vidéo
numérique
(MPEG2)
-
Audio
numérique
Code de région
Marque (logo)
Disques qui
peuvent être lus
Signaux
enregistrés
Taille du
disque
Types de disque
12 cm
ou
8 cm
12 cm
or
8 cm
Exemple
Titre 1 Titre 2
Chapitre 1 Chapitre 2 Chapitre 1
Chapitre 2
Chapitre 3 Chapitre 4
Exemple
Piste 1
Piste 2
Piste 5
Piste 6
Piste 3
Piste 4
CD Audio
DVD-Video
* 1,2,4,6,10,11
* 1,3,4,5,6
7,9,10
DVD-RW
DVD-R
* 1,3,4,5,6,8,9,10
DVD+RW
DVD+R
-
-
ou
est une marque de DVD Format/Logo Licensing Corporation.
DISQUES QUI PEUVENT ÊTRE LUS
SECTION DVD
S’il est impossible de lire un disque qui porte l’une des marques ci-dessus, lire les remarques suivantes.
*1: Cet appareil est conforme au standard couleur NTSC. Les disques enregistrés sous d’autres standards couleur,
*2: Certains disques DVD-Vidéo ne fonctionnent pas de la manière décrite dans ce manuel, en raison des
*3: Les disques enregistrés en format VR (Video Recording) ne sont pas lisibles.
*4: Les disques rayés ou tachés peuvent être illisibles.
*5: Certains disques ne peuvent pas être lus à cause d’incompatibilités au niveau des conditions d’enregistrement,
*6:
*7: Vous pouvez lire des disques DVD-R/RW non-finalisés enregistrés en format vidéo sur l’enregistreur DVD de
*8:
*9:
*10: Ne pas coller de papier ou d’autocollant sur le disque. Ceux-ci peuvent endommager le disque et empêcher
*11: Le numéro à l’intérieur du symbole fait référence à une région du monde, et un disque codé au format d’une
¡
¡
¡
tels que PAL, ne peuvent pas être lus.
intentions des producteurs de disques.
des caractéristiques du dispositif d’enregistrement ou de propriétés spéciales des disques.
Il est possible de lire des disques qui portent les marques ci-dessus. En cas d’utilisation de disques non standard, il est possible
que cet appareil ne puisse pas les lire. Même s’ils peuvent être lus, la qualité du son ou de la vidéo sera moins bonne.
votre marque. Mais selon les conditions d’enregistrement du disque, le disque peut ne pas être lu du tout ou
normalement (l’image ou le son peuvent ne pas être réguliers etc.). Dans ce cas, vous devez finaliser le disque
avec l’enregistreur DVD. Voir le manuel accompagnant l’enregistreur DVD.
Seuls les disques enregistrés en format vidéo et finalisés peuvent être lus.
Les disques non finalisés ne peuvent pas être lus. Suivant l’état d’enregistrement d’un disque, il est possible que le
disque ne puisse pas être plus du tout ou ne puisse pas être lu normalement (l’image ou le son pourra être haché, etc.).
S’il reste trop d’espace vierge sur un disque (si la partie utilisée est inférieure à 55 mm), sa lecture pourra poser des problèmes.
l’appareil de le lire correctement.
région spécifique peut seulement être lu sur un appareil portant le même code de région.
DISQUES QUI NE PEUVENT PAS ÊTRE LUS
Ne JAMAIS lire les disques suivants. Ceux-ci pourraient entraîner un mauvais fonctionnement du lecteur !
DVD-RAM / CD-I / CD Photo / CD Vidéo / DVD avec un code de région autre que 1 ou TOUT / DTS-CD /
DVD-ROM pour ordinateurs personnels / CD-ROM pour ordinateurs personnels / MP3
Sur les disques suivants, le son PEUT être inaudible.
Super Audio CD
REMARQUE : Seul le son enregistré sur la couche CD normale est accessible.
Le son enregistré sur la couche à haute densité du Super Audio CD n’est pas accessible.
Tout autre disque sans indication de compatibilité
- 19 - FR
FRANÇAIS
Page 88

LECTURE D’UN DISQUE
LECTURE NORMALE
DVD-V
Informations générales
¡Mettre sous tension l’amplificateur et, le cas
échéant, tous les autres composants.
1 Appuyer sur [POWER].
¡L’appareil se mettra sous tension.
2 Appuyer sur [OPEN/CLOSE A] pour ouvrir
le tiroir de chargement de disque.
3 Placer le disque choisi dans le tiroir, avec
l’étiquette tournée vers le haut.
4 Appuyer sur [PLAY O].
¡Le tiroir se ferme automatiquement et la lecture
commence à partir du premier chapitre ou de la
première piste du disque.
¡
Fermer le tiroir manuellement ou en appuyant sur
[OPEN/CLOSE A] lance également la lecture.
¡Si la lecture ne commence pas automatiquement,
appuyer sur [PLAY O].
¡
Lors de la lecture d’un DVD qui contient un menu de titres,
celui-ci peut apparaître à l’écran. Dans ce cas, se reporter à
la rubrique « MENU DES TITRES » sur cette page.
CD
CARACTÉRISTIQUES GÉNÉRALES
DVD-V
Les DVD peuvent contenir des menus permettant de
naviguer sur le disque d’accéder à des fonctions
spéciales. Appuyer sur les touches numériques
appropriées ou sur [K / L / s / B] pour mettre la
sélection en surbrillance dans le menu principal du
DVD et appuyer sur [ENTER] pour confirmer.
REMARQUES :
¡Sélectionner le mode DVD en appuyant sur
[SELECT], puis utiliser les fonctions du DVD.
¡
Sauf mention contraire, toutes les opérations décrites
ici sont fondées sur l’utilisation de la télécommande.
Certaines opérations peuvent être exécutées en
utilisant la barre de menus sur l’écran du téléviseur.
MENU DU DISQUE
DVD-V
1 Appuyer sur [DISC MENU].
¡Le menu principal du DVD apparaît.
¡Si la fonction n’est pas disponible, il se peut que le
symbole apparaisse à l’écran du téléviseur.
¡
Si un menu de disque est disponible sur le disque, la
langue audio, les options de sous-titres, les chapitres pour
le titre d’autres options apparaissent pour la sélection.
2 Appuyer sur [K / L / s / B] pour
sélectionner un élément, puis sur [ENTER]
pour confirmer la sélection.
5 Appuyer sur [STOP C] pour interrompre la
lecture.
REMARQUES :
¡Lors du passage du mode DVD au mode TV, le
mode DVD s’arrête d’abord, puis l’image et le son
du téléviseur apparaissent au bout d’environ quatre
secondes. De même, lorsque l’utilisateur appuie sur
la touche [POWER] pour éteindre l’appareil en
mode DVD, ce mode s’arrête d’abord, puis
l’appareil s’éteint.
¡Une « icône d’interdiction » peut
s’afficher dans le coin supérieur
droit de l’écran du téléviseur au
cours du fonctionnement,
avertissant qu’une opération
interdite a été rencontrée par le
DVD ou le disque.
¡
Avec les DVD qui utilisent des titres pour la lecture des
signaux de programmes, la lecture peut commencer à
partir du second titre ou peut sauter ces titres.
¡Lors de la lecture de disques à deux couches, les
images peuvent s’immobiliser pendant un moment.
Cela se produit lors du passage de la première
couche à la seconde. Ceci est normal.
MENU DES TITRES
DVD-V
1 Appuyer sur [TITLE].
¡Le menu des titres apparaît.
¡Si la fonction n’est pas disponible, il se peut que le
symbole apparaisse à l’écran du téléviseur.
2 Appuyer sur [K / L / s / B] pour
sélectionner un élément, puis sur [ENTER]
pour confirmer la sélection.
APPELER UN ÉCRAN DE MENU
PENDANT LA LECTURE
¡Appuyer sur [DISC MENU] pour afficher le menu
du DVD.
¡Appuyer sur [TITLE] pour afficher le menu des
titres.
REMARQUE :
¡Le contenu des menus et les opérations de menu
correspondantes peuvent varier d’un disque à
l’autre. Se reporter au manuel qui accompagne le
disque pour plus de détails.
- 20 - FR
Page 89

REPRISE
AVANCE LENTE / RETOUR LENTE
DVD-V
CD
1 Pendant la lecture, appuyer sur [STOP C].
¡
Une invite à la reprise apparaît à l’écran du téléviseur.
2 Appuyer sur [PLAY O], la lecture reprend
depuis le point où elle s’était arrêtée.
¡Pour annuler la reprise de la lecture, appuyer deux
fois sur [STOP C].
¡
Les informations de reprise de lecture restent en
mémoire même lorsque l’appareil est mis hors tension.
PAUSE
DVD-V
1 Pendant la lecture, appuyer sur [PAUSE F].
¡La lecture sera mise en pause et le son sera coupé.
2 Pour continuer la lecture, appuyer sur
[PLAY
O].
CD
LECTURE PAS À PAS
DVD-V
1 Pendant la lecture, appuyer sur [PAUSE F].
¡La lecture sera mise en pause et le son sera coupé.
2 Le disque avance d’une image à chaque
pression de la touche [PAUSE
F].
3 Pour sortir du mode de lecture pas à pas,
appuyer sur [PLAY
O].
AVANCE RAPIDE /
RETOUR RAPIDE
DVD-V
1 Pendant la lecture, appuyer sur [FWD g]
ou [REV
¡« g 1 » ou « h 1 » apparaît à l’écran.
h ].
2 Pour sélectionner une autre vitesse, répéter
l’étape 1 jusqu’à ce que la valeur souhaitée
pour la vitesse apparaisse à l’écran.
¡Pour les DVD, la vitesse d’avance rapide /
recherche arrière varie en fonction du disque. Les
vitesses approximatives sont 1(x2) 2(x8), 3(x20),
4(x50) et 5(x100).
¡Pour les CD audio, les vitesses approximatives sont
1(x2), 2(x8) et 3(x30).
¡En cas d’utilisation des touches du panneau avant,
appuyer sur [SEARCH h / g] et maintenir la
touche enfoncée pendant quelques secondes.
CD
DVD-V
1 Pendant la lecture, appuyer sur [PAUSE F].
2 Appuyer sur [FWD g] ou [REV h ].
¡« 1 » ou « 1 » apparaît à l’écran.
3 Pour sélectionner une autre vitesse, répéter
l’étape
pour la vitesse apparaisse à l’écran.
¡La vitesse d’avance ou de retour lent varie en
fonction du disque. Les vitesses approximatives
sont 1(1/16), 2(1/8) et 3(1/2).
¡En cas d’utilisation des touches du panneau avant,
appuyer sur [SEARCH h / g] et maintenir la
touche enfoncée pendant quelques secondes.
2 jusqu’à ce que la valeur souhaitée
4 Pour revenir à la lecture normale, appuyer
sur [PLAY
O].
ZOOM
DVD-V
La fonction de zoom vous permet d’agrandir l’image
vidéo et de vous déplacer dans l’image agrandie.
1 Appuyer sur [ZOOM] pendant la lecture.
¡La lecture continue.
2 Appuyer plusieurs fois sur [ZOOM] pour
sélectionner le facteur d’agrandissement
requis : ZOOM1, ZOOM2, ZOOM3 ou HF.
3 Appuyer sur [K / L / s / B] pour déplacer
l’image agrandie à travers l’écran.
4 Pour quitter le mode de zoom, appuyer sur
[ZOOM] jusqu’à HF.
REMARQUES :
¡La fonction de zoom ne fonctionne pas pendant
l’affichage du menu de disque.
¡La fonction de zoom n’est pas disponible sur
certains disques.
¡Il peut falloir plusieurs secondes pour déplacer
l’image agrandie.
¡Une distorsion de l’image est possible en cas
d’utilisation d’autres fonctions à plusieurs reprises
(par exemple : [PAUSE FF] ou [REVh], etc.) en
mode de zoom.
FRANÇAIS
3 Pour revenir à la lecture normale, appuyer
sur [PLAY
O].
- 21 - FR
Page 90

RECHERCHE D’UNE PISTE
RECHERCHE DE PISTE
CD
Il existe trois manières de commencer la lecture
d’une piste spécifique sur un CD audio.
En utilisant les touches numériques
1 Appuyer sur les touches numériques pour
saisir le numéro de piste souhaité.
¡La lecture commencera à la piste sélectionnée.
¡Pour les pistes à un chiffre (1-9), appuyer sur un seul
numéro (par exemple : piste 3, appuyer sur [3]).
¡Pour lire la piste 26, appuyer sur [+10], [2], [6].
En utilisant [SEARCH MODE]
1 Appuyer sur [SEARCH MODE].
¡L’écran de recherche de piste apparaît.
2
Dans les 30 secondes qui suivent, sélectionner un
numéro de piste à l’aide des touches numériques.
¡Pour les numéros à un chiffre, appuyer d’abord sur
[0] si le disque contient au total 10 pistes ou plus.
¡La lecture commencera à la piste sélectionnée.
En utilisant [SKIP
Pendant la lecture, appuyer sur [SKIPG] pour passer à
la piste suivante. Appuyer dessus de manière répétée pour
sauter les pistes suivantes. Appuyer sur [SKIPH] pour
retourner au début de la piste en cours. Appuyer dessus de
manière répétée pour aller aux pistes précédentes.
¡En appuyant sur [SKIP H / G] alors que la
lecture est en pause, la lecture sera de nouveau mise
en pause après avoir sauté jusqu’à la piste suivante.
REMARQUE :
¡Les touches [SKIP H / G ] ne sont pas
disponibles lorsque la lecture est arrêtée.
HH/ GG
]
RECHERCHE DE TITRE /
CHAPITRE
DVD-V
1 Appuyer sur [SEARCH MODE] une fois pour
la recherche de chapitre et deux fois pour la
recherche de titre pendant la lecture.
_/2
2 Saisir le numéro de chapitre / titre souhaité
à l’aide des touches numériques.
¡La lecture commencera au chapitre ou titre
sélectionné.
¡
Appuyer sur [CLEAR] pour effacer une entrée incorrecte.
¡Pour les numéros à un chiffre, appuyer d’abord sur
[0] si le nombre total de chapitres ou de titres sur le
disque est de 10 ou plus.
- 22 - FR
RECHERCHE HORAIRE
DVD-V
1
Pendant la lecture, appuyer sur [SEARCH
MODE] trois fois (CD : deux fois) pour afficher
la recherche horaire à l’écran du téléviseur.
2 Dans les 30 secondes qui suivent,
sélectionner l’heure souhaitée sur le disque
à l’aide des touches numériques.
¡La lecture commencera à l’heure spécifiée.
¡
Appuyer sur [CLEAR] pour effacer une entrée incorrecte.
¡
Si la saisie d’un chiffre n’est pas nécessaire, « 0 »
apparaît automatiquement. Par exemple, « 0 : 0 - :
apparaît dans l’écran de recherche horaire si la durée
totale de la piste ou du titre est inférieure à 10 minutes.
CD
- -
ÉCRAN DE CONFIGURATION
DES MARQUEURS
DVD-V
Utiliser des marqueurs pour mémoriser les passages
favoris sur un disque.
1 Appuyer sur [SEARCH MODE] quatre fois
(CD : trois fois) pendant la lecture.
¡L’écran d’affichage et les marqueurs apparaissent à
l’écran du téléviseur.
2 Appuyer sur [s / B] pour sélectionner 1, 2,
3, 4, 5, 6, 7, 8, 9 ou 10 et veiller à ce que
«
- - - - :- - :- -
» apparaisse à l’écran.
3 Une fois le point souhaité atteint, appuyer
sur [ENTER].
¡Le titre ou la piste et le temps de lecture écoulé
s’affichent à l’écran du téléviseur.
4
Pour revenir ultérieurement au marqueur, appuyer
sur [SEARCH MODE] quatre fois (CD : trois fois)
pendant la lecture et sur [
marqueur souhaité, puis appuyer sur [ENTER].
REMARQUES :
¡Opérations qui effacent tous les marqueurs :
– Ouvrir le tiroir à disque.
– Mettre l’appareil hors tension.
– Appuyer sur [SELECT].
– Sélectionner « AC » à l’étape 2 et appuyer sur
[ENTER].
¡Pour effacer un marqueur :
– Appuyer sur [s / B] pour positionner le curseur
sur le numéro du marqueur à supprimer et
appuyer sur [CLEAR].
¡Il est possible de marquer jusqu’à 10 points.
s/B
] pour choisir le
5 Appuyer sur [SEARCH MODE] ou [RETURN]
pour quitter.
CD
»
Page 91

FONCTIONS SPÉCIALES DE LECTURE
PLAY
CD-DA DURÉE 0:45:55
PROGRAMME ALÉATOIRE
- - PAS D'INDICATION - -
ALÉATOIRE
RÉPÉTITION
La RÉPÉTITION est disponible uniquement pendant la lecture.
RÉPÉTITION DE TITRE / CHAPITRE
DVD-V
Pour activer la fonction de répétition, appuyer
sur [REPEAT] pendant la lecture.
¡
Le mode de répétition change de la manière décrite cidessous à chaque fois que l’on appuie sur la touche.
CHAPITRE TITRE HF
(
répétition du
chapitre en cours)
REMARQUES :
¡La fonction de répétition de Titre / Chapitre n’est
pas disponible avec certaines scènes.
¡Le réglage RÉPÉTITION est effacé lorsque l’on
passe à un autre titre ou chapitre.
(répétition du
titre en cours)
(répétition
désactivée)
RÉPÉTITION DE PISTE
CD
Pour activer la fonction de répétition, appuyer
sur [REPEAT] pendant la lecture.
¡
Le mode de répétition change de la manière décrite cidessous à chaque fois que l’on appuie sur la touche.
PISTE TOUT HF
(répétition de la
piste en cours)
REMARQUES :
¡Le réglage de répétition est effacé lorsque l’on
passe à une autre piste.
¡La lecture répétée ne fonctionne pas pendant la
lecture répétée de A-B.
(répétition du
disque entier)
(répétition
désactivée)
RÉPÉTITION A-B
DVD-V
CD
L’utilisateur peut déterminer l’ordre dans lequel écouter les pistes.
1 En mode arrêt, appuyer sur [MODE].
¡L’écran « PROGRAMME » apparaît.
2 Appuyer sur [▲ / ▼] pour sélectionner une
¡
Appuyer sur [CLEAR] pour
effacer la dernière piste entrée.
¡
Si la totalité du programme ne peut
pas être affichée sur un même écran,
« G» apparaît pour passer à la
page suivante et « H» apparaît
pour revenir à la page précédente.
3 Répéter l’étape 2 pour chacune des pistes à
4
REMARQUES :
¡Pendant la lecture du programme, la pression de
[STOP C] a les effets suivants.
¡
Appuyer sur [STOPC] une fois, puis de nouveau sur [PLAY
O
], pour redémarrer la lecture au point où la touche [STOPC]
avait été enfoncée. (Suite du programme)
¡Appuyer sur [STOP C] deux fois, puis de nouveau
sur [PLAY O], pour redémarrer la lecture à partir
de la piste de façon normale. (Programme effacé)
¡Il est possible de saisir jusqu’à 99 pistes.
¡Pour effacer toutes les pistes du programme à la
fois, sélectionner « ANNUL TOUT » (Effacer tout)
en bas de la liste à l’étape 2.
¡
Pour répéter la piste en cours dans le programme, appuyer
plusieurs fois sur [REPEAT] , jusqu’à ce que « PISTE
» apparaisse pendant la lecture. Pour répéter le programme
tout entier, appuyer sur [REPEAT] de manière répétée,
jusqu’à ce que « TOUT » apparaisse pendant la lecture.
PROGRAMMATION
CD
piste, puis appuyer sur [ENTER].
PROGRAMME
ENTER
PLAY
CLEAR
inclure dans le programme.
Appuyer sur [PLAY O] pour lire les pistes programmées.
CD-DA
1 3:30
2 4:30
3 5:00
4 3:10
5 5:10
6 1:30
7 2:30
1 3:30
1/4
DURÉE 1:03:30
1 3:30
5 5:10
10 4:20
11 3:00
12 3:20
17 4:10
22 2:50
2/3
LECTURE ALÉATOIRE
FRANÇAIS
1 Appuyer sur [A-B] au point de départ choisi.
¡« A- » apparaît brièvement à l’écran du
téléviseur.
2 Appuyer de nouveau sur [A-B] au point de
fin choisi.
¡« A-B » apparaît brièvement à l’écran du
téléviseur, et la séquence de répétition commence.
3 Pour quitter la séquence, appuyer sur [A-B].
REMARQUES :
¡La section A-B à répéter ne peut être définie qu’à
l’intérieur du titre en cours (pour les DVD) ou de la
piste en cours (pour les CD audio).
¡La répétition A-B n’est pas disponible avec
certaines scènes des DVD.
¡Pour annuler le point A qui a été défini, appuyer
sur [CLEAR].
¡La répétition A-B ne fonctionne pas pendant la
répétition de titre, chapitre, piste ou tout.
CD
Cette fonction mélange l’ordre de lecture des pistes
au lieu de les lire dans l’ordre d’origine.
1
En mode arrêt, appuyer deux
fois sur [MODE].
¡L’écran « ALÉATOIRE »
apparaît.
2 Appuyer sur [PLAY O] pour commencer la
lecture aléatoire.
REMARQUE :
¡
Pour répéter la piste en cours dans la sélection
aléatoire, appuyer plusieurs fois sur [REPEAT],
jusqu’à ce que « PISTE » apparaisse pendant la
lecture. Pour répéter la sélection aléatoire tout entière,
appuyer sur [REPEAT] de manière répétée, jusqu’à
ce que « TOUT » apparaisse pendant la lecture.
- 23 - FR
Page 92

MODIFICATION DES RÉGLAGES
LANGUE DES SOUS-TITRES
DVD-V
L’appareil permet à l’utilisateur de sélectionner une
langue pour les sous-titres lors de la lecture d’un
disque DVD (si disponible).
1 Appuyer sur [SUBTITLE] pendant la lecture.
¡La langue des sous-titres
apparaît dans la barre
d’affichage en haut de l’écran
du téléviseur.
1.ENG/6
2 Appuyer sur [SUBTITLE] plusieurs fois pour
sélectionner la langue souhaitée pour le
sous-titrage.
3 Pour désactiver les sous-titres, appuyer
plusieurs fois sur [SUBTITLE] jusqu’à ce
que « HF » s’affiche.
REMARQUES :
¡Il est possible que la touche [SUBTITLE] ne
fonctionne pas avec certains DVD offrant des soustitres en plusieurs langues. Dans ce cas, régler la
langue à partir du menu de disque. (Le
fonctionnement varie selon les disques ; se reporter
au manuel du disque).
¡Si la langue souhaitée n’est pas indiquée après
plusieurs pressions de [SUBTITLE], le disque n’a
pas de sous-titres dans cette langue.
¡
Lorsque « NON DISPONIBLE »
apparaît à l’écran du téléviseur,
cela signifie qu’aucun sous-titre
n’a été enregistré pour cette scène.
¡En cas de sélection d’une langue dont le code est
constitué de 3 lettres, le code s’affichera à chaque
changement du réglage pour la langue des soustitres. En cas de sélection d’une autre langue, « --- »
s’affichera à la place. (Voir la page 26.)
NON DISPONIBLE
LANGUE AUDIO
DVD-V
L’appareil vous permet de sélectionner une langue
pendant la lecture de disques DVD (si plusieurs
langues sont disponibles).
1 Appuyer sur [AUDIO] pendant la lecture.
1.ENG Dolby D 3/2.1ch 48k/ 3
MODE DE SON STÉRÉO
CD
1 Appuyer plusieurs fois sur [AUDIO] pendant
la lecture pour sélectionner entre
« STÉRÉO », « L-ch »
ou « R-ch ».
¡STÉRÉO – le canal droit et le canal gauche sont
tous deux actifs (stéréo)
L-ch – seul le canal gauche est actif
R-ch – seul le canal droit est actif
STÉRÉO
ANGLE DE LA CAMÉRA
DVD-V
Certains disques DVD contiennent des scènes ayant
été filmées simultanément sous différents angles. Il
est possible de changer d’angle de caméra quand
l’icône « » apparaît à l’écran.
1 Appuyer sur [ANGLE] pendant la lecture.
¡L’angle sélectionné s’affiche dans la barre
d’affichage en haut de l’écran.
1 / 8
¡Si le réglage « ICÔNE DE L’ANGLE » est « HF »,
au menu « AUTRES », l’icône
« » n’apparaîtra pas. (Voir la page 28.)
2 Appuyer sur [ANGLE] plusieurs fois pour
sélectionner l’angle souhaité.
RÉGLAGE DU NIVEAU DES NOIRS
DVD-V
Ajuster le réglage du niveau des noirs pour
augmenter la luminosité des parties noires de l’image.
1 Appuyer sur [MODE] pendant la lecture.
HF
2 Appuyer sur [ENTER] pour « EF/HF ».
EF: Rend les parties sombres plus lumineuses.
HF: Montre l’image originale telle qu’elle a été
enregistrée. (Réglage initial)
2 Appuyer sur [AUDIO] plusieurs fois pour
sélectionner la langue souhaitée.
REMARQUE :
¡Il est possible que la touche [AUDIO] ne fonctionne
pas avec certains DVD offrant plusieurs langues
audio (par exemple : DVD qui permettent le réglage
de la langue audio sur le menu du disque).
3 Appuyer deux fois sur [MODE] ou sur
[RETURN] pour quitter.
REMARQUE :
¡Le réglage sera conservé même si l’appareil est mis
hors tension.
- 24 - FR
Page 93

AMBIOPHONIE VIRTUELLE
HF
DVD-V
CD
Il est possible de créer un effet de son ambiophonique
avec deux haut-parleurs sur cet appareil.
1 Appuyer sur [MODE] deux fois (CD : une
fois) pendant la lecture.
2
Appuyer sur [ENTER] pour sélectionner « 1 »
(effet naturel), « 2 » (effet accentué) ou « HF ».
3 Appuyer sur [MODE] pour quitter.
¡Il est également possible de quitter le menu en
appuyant sur [RETURN].
REMARQUE : (pour la lecture de CD uniquement)
¡Virtual Surround (Ambiophonie virtuelle) n’aura
aucun effet si le mode de son n’est pas réglé sur
STÉRÉO.
INFORMATIONS À L’ÉCRAN
DVD-V
Il est possible de vérifier les informations concernant le disque en cours en appuyant sur [DISPLAY].
Pour les DVD-V
1 Appuyer sur [DISPLAY] pendant la lecture
pour afficher le chapitre en cours.
¡Les temps de lecture écoulé
et restant s’affichent pour le
chapitre en cours.
9/49 0:00:00 -0:03:30
Pour les CD audio
1 Appuyer sur [DISPLAY] pendant la lecture
pour afficher la piste en cours.
¡Les temps de lecture écoulé et restant s’affichent
pour la piste en cours.
4/12 0:03:21 - 0:02:15
FRANÇAIS
CD
T
2 Appuyer de nouveau sur [DISPLAY] pour
afficher le titre en cours.
¡Les temps de lecture écoulé
et restant s’affichent pour le
1/3 0:00:00 - 1:23:45
titre en cours.
3 Appuyer de nouveau sur [DISPLAY].
¡Le débit binaire et le réglage
de répétition actuel
s’affichent.
¡Lors de la lecture d’un disque à double couche, le
numéro de couche sera également affiché (L0 :
lecture de la couche 0. L1 : lecture de la couche 1).
TL1
4 Appuyer de nouveau sur [DISPLAY] pour
quitter.
2 Appuyer de nouveau sur [DISPLAY] pour
afficher le total en cours.
¡Les temps de lecture écoulé et restant s’affichent
pour le total des pistes.
4/12 0:13:45 - 0:45:40
T
3 Appuyer de nouveau sur [DISPLAY] pour
quitter.
REMARQUE :
¡Lors de la lecture d’un disque en mode
PROGRAM ou RANDOM, « PROGRAMME »
(ou ALÉATOIRE) s’affichera à l’étape 2.
PROGRAMME B
- 25 - FR
Page 94

MODIFICATION DES ÉLÉMENTS DE CONFIGURATION DU DVD
MENU PERSONNALISÉ
DVD-V
Il est possible de changer les réglages du lecteur de DVD.
1 Appuyer deux fois sur [SETUP] en mode arrêt
pour afficher le menu CONFIGURATION DVD.
¡Appuyer sur [L] pour
sélectionner « PERSONNAL »,
puis appuyer sur [ENTER].
REMARQUE :
¡Si le menu n’apparaît pas, appuyer d’abord sur [PLAY
puis sur [STOPC]. Veiller à ce que le disque soit en mode
arrêt, puis appuyer lentement deux fois sur [SETUP] .
2 Sélectionner l’élément souhaité.
¡Appuyer sur
souhaité, puis sur [ENTER] pour confirmer.
Se reporter aux pages ci-dessous pour configurer chaque élément.
A
RÉGLAGE DE LA LANGUE
Suivre les étapes 1à 2de la section « MENU
PERSONNALISÉ » ci-dessus.
[
K / L] pour sélectionner l’élément
RÉGLAGE PERSONNAL.
LANGUE
AFFICHAGE
SON
PARENT
AUTRES
3 Appuyer sur [K / L] pour sélectionner
l’article souhaité, puis sur [ENTER].
SON:
Définit la langue audio.
SOUS-TITRE:
Définit la langue des sous-titres.
MENU DU DISQUE:
Définit la langue du menu DVD.
4 Appuyer sur [K / L] pour sélectionner un
réglage, puis sur [ENTER].
¡
Si « AUTRE » est sélectionné
dans l’écran « SON », « SOUSTITRE » ou « MENU DU
DISQUE », saisir un nombre à
quatre chiffres pour le code de la
langue souhaitée. (Reportez-vous
à la liste des codes de langues).
¡Seules les langues supportées
par le disque peuvent être
sélectionnées.
RÉGLAGE
RAPIDE
PERSONNAL.
INITIALISER
A
P26 Étape
B
P27 Étape
C
P27 Étape
D
P28 Étape
E
P28 Étape
RÉGLAGE LANGUE
SON
SOUS-TITRE
MENU DU DISQUE
RÉGLAGE LANGUE
SON
ORIGINAL
ANGLAIS
FRANÇAIS
RÉGLAGE LANGUE
SOUS-TITRE
HF
ANGLAIS
FRANÇAIS
RÉGLAGE LANGUE
MENU DU DISQUE
ANGLAIS
FRANÇAIS
ESPAGNOL
ORIGINAL
HF
ANGLAIS
Langue Code
Abkhaze 4748
Afar 4747
Afrikaans 4752
Albanais 6563
Amharique 4759
Arabe 4764
Arménien 5471
Assamais 4765
Aymara 4771
Azéri 4772
Bachkir 4847
Basque 5167
Bengali 4860
Bhoutanais 5072
Bihari 4854
O
],
Bichelamare 4855
Breton 4864
Bulgare 4853
Birman 5971
Biélorusse 4851
Cambodgien 5759
Catalan 4947
Chinois [CHI] 7254
Corse 4961
Croate 5464
Tchèque 4965
Danois [DAN] 5047
3
Néerlandais [DUT] 6058
3
Anglais [ENG] 5160
Espéranto 5161
3
Estonien 5166
3
Féroïen 5261
3
Fidji 5256
Finnois [FIN] 5255
Français [FRE] 5264
Frison 5271
Galicien 5358
Géorgien 5747
Allemand [GER] 5051
Grec [GRE] 5158
Groenlandais 5758
Guarani 5360
Goujrati 5367
Haoussa 5447
Hébreu 5569
Hindi 5455
Hongrois [HUN] 5467
Islandais [ICE] 5565
Indonésien 5560
Interlingua 5547
Interlingue 5551
Inupiaq 5557
Irlandais [IRI] 5347
Italien [ITA] 5566
Japonais [JPN] 5647
Javanais 5669
Kannada 5760
Cachemiri 5765
Kazakh 5757
Rwanda 6469
Kirghiz 5771
Kirundi 6460
Coréen [KOR] 5761
Kurde 5767
5 Appuyer sur [SETUP] pour quitter le menu.
REMARQUES :
¡
Le réglage de la langue pour les paramètres audio et soustitres n’est pas disponible sur certains disques en raison de
la configuration par défaut du disque. Dans ce cas, utiliser
les touches [AUDIO] et [SUBTITLE]. (Voir la page 24.)
¡Si vous sélectionnez une langue non supportée par le
disque, les sous-titres seront automatiquement réglés
à HF et le premier paramètre des langues son sera
automatiquement réglé.
En cas de sélection d’une langue dont le code est
constitué de 3 lettres, le code s’affichera à chaque
changement du réglage de langue AUDIO ou
SOUS-TITRES ci-dessus. En cas de choix d’une
autre langue, « --- » s’affichera à la place. (le code
de langue à 3 lettres est écrit entre parenthèses.)
- 26 - FR
A-B
C-E
F-H
I-K
Langue Code
Laotien 5861
Latin 5847
Letton 5868
Lingala 5860
Lituanien 5866
Macédonien 5957
Malgache 5953
Malais 5965
Malayalam 5958
Maltais 5966
Maori 5955
Marathe 5964
Moldave 5961
Mongol 5960
Nauruan 6047
Népalais 6051
Norvégien [NOR] 6061
Occitan 6149
Oriya 6164
Oromo 6159
Pendjabi 6247
Pachtou 6265
Iranien 5247
Polonais 6258
Por tugais [POR] 6266
Quetchua 6367
Rhéto-roman 6459
Roumain [RUM] 6461
Russe [RUS] 6467
Samoan 6559
Sango 6553
Sanskrit 6547
Gaélique écossais 5350
Serbe 6564
Serbo-croate 6554
Southo 6566
Setswanais 6660
Shona 6560
Sindhi 6550
Cinghalais 6555
Siswat 6565
Slovaque 6557
Slovène 6558
Somali 6561
Espagnol [SPA] 5165
Soundanais 6567
Souahili 6569
Suédois [SWE] 6568
Tagalog 6658
Tadjik 6653
Tamoul 6647
Tatar 6666
Telougou 6651
Thaï 6654
Tibétain 4861
Tigréen 6655
Tonga 6661
Tsonga 6665
Turc [TUR] 6664
Tu rkmène 6657
Tw i 6669
Ukrainien 6757
Ourdou 6764
Ouzbek 6772
Vietnamien 6855
Volapük 6861
Gallois 4971
Wolof 6961
Xhosa 7054
Yiddish 5655
Yorouba 7161
Zoulou 7267
L-N
O-R
S
T
U-Z
Page 95

B
RÉGLAGE DE L’AFFICHAGE
Suivre les étapes 1à 2de la section « MENU
PERSONNALISÉ » à la page 26.
3 Appuyer sur [K / L] pour sélectionner les
éléments ci-dessous, puis appuyer sur
[ENTER].
MODE TV:
Vous pouvez modifier certains aspects des écrans
d’affichage DVD et les messages à l’écran.
¡4:3 LETTER BOX
(par défaut) : Pour indiquer
des barres noires en haut et
en bas de l’écran.
¡4:3 PAN & SCAN : Pour montrer une image pleine
hauteur avec les deux côtés coupés.
RAPIDE
RÉGLAGE AFFICHAGE
MODE TV
ARRÊT SUR IMAGE
4:3 LETTER BOX
AUTO
C
RÉGLAGE AUDIO
Choisir les réglages audio adaptés à l’équipement
considéré parce qu’ils affectent seulement la lecture
de disques DVD par le lecteur de DVD.
Suivre les étapes 1à 2de la section « MENU
PERSONNALISÉ » à la page 26.
3 Appuyer sur [K / L] pour sélectionner les
éléments ci-dessous, puis appuyer sur
[ENTER].
DRC (Dynamic Range Control) :
¡Pour comprimer la plage
allant des sons faibles aux
sons forts.
¡Le réglage par défaut est
« EF ».
RÉGLAGE SON
DRC EF
SOUS ÉCHANTILLON
DOLBY DIGITAL TRAIN BINAIRE
EF
ARRÊT SUR IMAGE:
Cette fonction permet d’ajuster la résolution et la
qualité de l’image en mode d’arrêt sur image.
¡AUTO (par défaut) :
Sélectionne
automatiquement le meilleur
RÉGLAGE AFFICHAGE
MODE TV
ARRÊT SUR IMAGE
4:3 LETTER BOX
AUTO
réglage de résolution
(IMAGE ou TRAME) selon
les caractéristiques des données de l’image.
¡TRAME : Sélectionner « TRAME » quand les
images restent instables même si « AUTO » est
pressé. TRAME stabilise les images, bien que la
qualité de l’image puisse devenir grossière à cause
du nombre limité de données.
¡IMAGE : Sélectionner « IMAGE » pour afficher
des images relativement sans mouvement à une
meilleure résolution. IMAGE améliore la qualité de
l’image, mais déstabilise les images à cause de la
sortie simultanée de deux données de trame.
4 Appuyer sur [SETUP] pour quitter le menu.
DOWN SAMPLING :
¡EF : Sortie en 48 kHz.
(par défaut)
¡HF : Produit le son original.
RÉGLAGE SON
DRC EF
SOUS ÉCHANTILLON
DOLBY DIGITAL TRAIN BINAIRE
EF
Lors de la lecture d’un
disque possédant une protection des droits
d’auteur
¡En sélectionnant « HF », la protection des droits
d’auteur sera activée et le son sera souséchantillonné à 48 kHz.
DOLBY DIGITAL :
RAPIDE
Régler sur « TRAIN BINAIRE » lorsque l’appareil
est connecté à un décodeur Dolby Digital.
¡TRAIN BINAIRE : Produit
un signal Dolby Digital (par
défaut)
¡PCM: Convertit le signal
RÉGLAGE SON
DRC EF
SOUS ÉCHANTILLON
DOLBY DIGITAL TRAIN BINAIRE
EF
Dolby Digital en PCM (stéréo à 2 canaux)
4 Appuyer sur [SETUP] pour quitter le menu.
FRANÇAIS
MENU RAPIDE
¡Sélectionner « MODE TV » ou « DOLBY DIGITAL » rapidement au menu RAPIDE. Pour accéder au
menu RAPIDE, sélectionner « RAPIDE » au lieu de « PERSONNAL » à l’étape 1de la page 26.
RÉGLAGE DE LANGUE POUR LES MENUS À L’ÉCRAN
¡Il est possible d’accéder au menu RÉGLAGES TV en appuyant sur [SETUP] à partir du mode DVD.
Reportez-vous à la section « LANGUE DES MENUS », à la page 17, pour changer la langue des menus
à l’écran.
- 27 - FR
Page 96

D
CONTRÔLE PARENTAL
Le contrôle parental empêche la visualisation de
disques qui dépassent vos réglages (avec un mot de
passe ou la lecture s’arrêtera). Cette fonction permet
d’éviter que les enfants regardent des disques
contenant des scènes scabreuses.
NIVEAU PARENTAL
Le niveau parental permet de définir le niveau de
restriction des disques DVD. La lecture sera
interrompue si le disque dépasse le niveau de
restriction préalablement défini.
Suivre les étapes 1à 2de la section « MENU
PERSONNALISÉ » à la page 26.
3 Saisir le mot de passe à 4 chiffres, puis
appuyer sur [ENTER].
RÉGLAGE PARENT
MOT DE PASSE
Entrez le mot de passe.
4 Appuyer sur [K / L] pour sélectionner
« NIVEAU PARENTAL », puis appuyer sur
[ENTER].
RÉGLAGE PARENT
NIVEAU PARENTAL TOUT
CHANGE PASSWORD
5 Appuyer sur [K / L] pour sélectionner le
niveau souhaité, puis appuyer sur [ENTER].
RÉGLAGE PARENT
NIVEAU PARENTAL
TOUT
8
7 [NC-17]
6 [R]
6 Appuyer sur [SETUP] pour quitter le menu.
REMARQUES :
¡La première fois, saisir 4 chiffres quelconques (sauf
4737). Ce nombre servira de mot de passe (en cas
d’oubli du mot de passe, voir ci-dessous).
¡Pour changer le mot de passe, appuyer sur [K / L]
pour sélectionner « CHANGE PASSWORD » à
l’étape 4, puis appuyer sur [ENTER]. Saisir le mot
de passe à 4 chiffres, puis appuyer sur [ENTER].
¡
Avec certains DVD, il peut être difficile de savoir s’ils sont
compatibles avec le verrouillage parental. Vérifiez si le
verrouillage parental fonctionne comme vous l’avez réglé.
¡Notez le mot de passe pour ne pas l’oublier.
NIVEAUX DE CONTORÔLE
¡TOUT
Tout verrouillage parental est annulé.
¡Niveau 8
La lecture des disques DVD de tout niveau
(adulte/général/enfant) est possible.
¡Niveaux 7 à 2
Seule la lecture des disques DVD à usage général
et pour enfants est possible.
¡Niveau 1
Seule la lecture des disques DVD pour enfants est
possible ; celle des disques prévus pour les adultes
et l’usage général est impossible.
- 28 - FR
EN CAS D’OUBLI DU MOT DE PASSE
1 Appuyer sur les touches numériques [4],
[7], [3], [7] à l’étape 3. Ensuite, saisir le
nouveau mot de passe.
¡Le mot de passe sera effacé et le niveau de
restriction sera réglé sur « TOUT ».
2 Répéter les étapes 4 à 6.
E
AUTRES RÉGLAGES
Suivre les étapes 1à 2de la section « MENU
PERSONNALISÉ » à la page 26.
3 Appuyer sur [K / L] pour sélectionner les
éléments ci-dessous, puis appuyer sur
[ENTER].
RÉGLAGE AUTRES
ICÔNE DE L'ANGLE
ARRÊT AUTO.EFEF
ICÔNE DE L’ANGLE:
¡Appuyer plusieurs fois sur [ENTER] pour activer /
désactiver l’icône des angles.
¡Par défaut, l’icône est activée.
ARRÊT AUTO.:
¡Appuyer plusieurs fois sur [ENTER] pour activer /
désactiver la mise hors tension automatique.
¡
Par défaut, la mise hors tension automatique est activée et le
programme d’économiseur d’écran se met en route lorsque
aucune entrée ne se produit en provenance de l’appareil
pendant 5 minutes en mode Arrêt. Une fois que le
programme d’économiseur d’écran a été activé pendant 15
minutes, l’appareil se met automatiquement hors tension.
4 Appuyer sur [ENTER] pour quitter le menu.
INITIALISATION
DVD-V
Ceci permet de rétablir les valeurs par défaut pour toutes
les options de CONFIGURATION (à l’exception du
« PARENT » et de la langue des menus).
1 Appuyer deux fois sur [SETUP] en mode
d’arrêt pour faire apparaître le menu
« INITIALISER ».
2 Appuyer sur [K / L] pour sélectionner
« INITIALISER », puis appuyer sur [ENTER].
RÉGLAGE
RAPIDE
PERSONNAL.
INITIALISER
3 Appuyer sur [K / L] pour sélectionner
« OUI », puis appuyer deux fois sur [ENTER].
Tous les réglages (à l’exception du « PARENT » et
de la langue des menus)
seront annulés.
¡Pour annuler l’initialisation,
sélectionner « NON ».
4 Appuyer sur [SETUP] pour quitter le menu.
RÉGLAGE INITIALISER
Initialiser ?
NON
OUI
Page 97

GUIDE DE DÉPANNAGE
Si l’appareil ne fonctionne pas correctement lorsqu’il est utilisé comme décrit dans ce Manuel de l’opérateur,
vérifier l’appareil en consultant la liste de vérification suivante.
PROBLÈME ACTION CORRECTIVE
Pas d’alimentation électrique
La télécommande à infrarouge ne
fonctionne pas
Mode TV
Parfois, un problème de fonctionnement peut être facilement résolu en examinant des possibilités qui peuvent
sembler évidentes, mais qui sont souvent ignorées. Avant de contacter le service après-vente, effectuer les
vérifications suivantes. Elles pourraient vous économiser du temps et de l’argent.
PROBLÈME ACTION CORRECTIVE
Absence d’image et de son
Absence d’image ou image de
mauvaise qualité sur l’appareil
Absence de son ou son de mauvaise
qualité
Barres à l’écran
Image déformée ou floue
L’image défile verticalement
Lignes ou stries dans l’image
Absence de couleur
Vérifiez si la fiche de courant est branchée sur une prise murale CA.
•
Vérifiez si l’appareil est allumé.
•
Vérifier que le cordon d’alimentation est branché dans une prise
•
secteur.
•
Vérifier les piles dans la télécommande.
•
Pointer la télécommande directement vers le capteur de
•
télécommande. Le cas échéant, éliminer tous les obstacles entre le
capteur et la télécommande.
Se tenir à moins de 7 mètres de l’appareil.
•
Vérifier que le mode correct est sélectionné. Sinon, changer de mode
•
en appuyant sur [SELECT], jusqu’à obtention du mode souhaité.
Vérifier que le cordon d’alimentation est branché à une prise secteur.
•
Vérifier la connexion de l’antenne.
•
Appuyer sur [SELECT] pour sélectionner le mode TV.
•
Ensuite, essayer une autre fonction du téléviseur.
Attendre que l’appareil programme la mémoire de son syntoniseur.
•
Ajuster la direction de l’antenne ou la remplacer.
•
Régler les contrôles de l’image.
•
Vérifier que la broche du câble d’antenne n’est pas cassée.
•
Régler le volume sur la télécommande ou sur l’appareil.
•
Appuyer sur [MUTE] pour rétablir le son.
•
Si une antenne extérieure est utilisée, vérifier que le fil n’est pas
•
cassé.
Vérifier qu’il n’y a pas d’interférences locales.
•
Essayer un autre canal ; si l’image est bonne, le problème provient
•
peut-être de la station.
Si une antenne extérieure est utilisée, vérifier que le fil n’est pas
•
cassé.
Essayer un autre canal ; si l’image est bonne, le problème provient
•
peut-être de la station.
•
Si une antenne extérieure est utilisée, vérifier que le fil n’est pas
•
cassé.
Vérifier qu’il n’y a pas d’interférences locales.
•
Essayer un autre canal ; si l’image est bonne, le problème provient
•
peut-être de la station.
Est-ce qu’une antenne est connectée à la prise au dos du téléviseur?
•
Si une antenne extérieure est utilisée, vérifier que le fil n’est pas
•
cassé.
Ajuster le réglage de « COULEUR ».
•
FRANÇAIS
- 29 - FR
Page 98

PROBLÈME ACTION CORRECTRICE
Mauvaise réception sur certains
canaux
Fantômes dans l’image
Image faible
Bon son, mauvaise image
Bonne image, mauvais son
La télécommande à infrarouge ne
fonctionne pas
Marques de différentes couleurs à
l’écran
Essayer un autre canal ; si l’image est bonne, le problème provient
•
peut-être de la station.
•
Est-ce qu’une antenne est connectée à la prise au dos du téléviseur?
•
Si une antenne extérieure est utilisée, vérifier que le fil n’est pas
•
cassé.
Vérifier qu’il n’y a pas d’interférences locales.
•
Essayer un autre canal ; si l’image est bonne, le problème provient
•
peut-être de la station.
Est-ce qu’une antenne est connectée à la prise au dos du téléviseur?
•
Si une antenne extérieure est utilisée, vérifier que le fil n’est pas
•
cassé.
Ajuster les réglages de « CONTRASTE » et « LUMINOSITÉ ».
•
Essayer un autre canal ; si l’image est bonne, le problème provient
•
peut-être de la station.
Est-ce qu’une antenne est connectée à la prise au dos du téléviseur ?
•
Si une antenne extérieure est utilisée, vérifier que le fil n’est pas
•
cassé.
Vérifier qu’il n’y a pas d’interférences locales.
•
Ajuster les réglages de « CONTRASTE » et « LUMINOSITÉ ».
•
Essayer un autre canal ; si l’image est bonne, le problème provient
•
peut-être de la station.
Vérifier qu’il n’y a pas d’interférences locales.
•
Vérifier que le cordon d’alimentation est branché à une prise secteur.
•
Vérifier les piles dans la télécommande.
•
Le géomagnétisme et le magnétisme d’appareils électroménagers se
•
trouvant à proximité peuvent affecter la couleur de l’image TV.
•
Éloigner le téléviseur des appareils électroménagers ; le téléviseur
peut se réparer automatiquement. Pour une réparation immédiate,
débrancher le cordon d’alimentation, puis le rebrancher après 30
minutes environ. Ceci réinitialise automatiquement l’appareil.
PROBLÈME DE SOUS-TITRES REMÈDE POSSIBLE
Fautes d’orthographe dans les
sous-titres Possible lors d’une diffusion en direct. Pas dans le cas d’un
Le texte n’apparaît pas en entier ou
est en retard sur le dialogue parlé
Les sous-titres sont entremêlés de
carrés blancs
Pas de sous-titres dans un program
me qui doit contenir des sous-titres•temporelle pour accélérer le programme. Le décodeur ne peut pas
Cadre noir à l’écran du téléviseur
Erreur commise par la société de production des sous-titres.
•
programme pré-enregistré.
Un retard de quelques secondes est courant pour une diffusion en
•
direct.
•
La capacité d’affichage ne doit pas dépasser 220 mots par minute. Si
•
un dialogue dépasse ce débit, une édition sélective est utilisée pour
assurer la synchronisation entre les sous-titres et le dialogue en cours
sur l’écran du téléviseur.
Provoqué par des interférences dues à des bâtiments, des lignes à
•
haute tension, des orages, etc.
•
Il est possible que la diffusion utilise un processus de compression
•
lire les informations compressées et les sous-titres seront perdus.
Le mode TEXTE est activé. Sélectionner un mode de SOUS-TITRE
•
(« S-TIT1 », « S-TIT2 ») ou désactiver les sous-titres.
- 30 - FR
Page 99

Mode DVD
PROBLÈME ACTION CORRECTIVE
Absence d’image
Le disque ne peut pas être lu
Pas de son
Pas de sortie audio DTS
Image déformée
La langue audio ou des sous-titres
ne correspondent pas au réglage
Impossible de modifier l’angle de la
caméra
Impossible de changer la langue
audio ou des sous-titres
Une « icône d’interdiction »
apparaît à l’écran, interdisant une
opération
Perte de son des CD
Lecture du CD impossible
Perte d’image du DVD
Arrêt sur image du DVD
L’image du DVD apparaît sous
forme de mosaïque
Lecture du DVD impossible
Insérer un disque vidéo correct qui peut être lu sur cet appareil.
•
Appuyer sur [SELECT] pour sélectionner le mode DVD, puis
•
essayer une autre fonction du DVD.
Insérer le disque.
•
Nettoyer le disque.
•
Placer le disque correctement, avec l’étiquette tournée vers le haut.
•
Annuler le verrouillage parental ou changer le niveau de contrôle.
•
Bien connecter les câbles audio.
•
Mettre le composant audio sous tension.
•
Corriger les réglages de sortie audio.
•
Corriger les réglages d’entrée du composant audio.
•
Cet appareil ne supporte pas l’audio DTS. Ceci est normal.
•
Il peut arriver que les images soient légèrement déformées ; ceci est
•
normal.
Bien que les images puissent se figer pendant un moment, ceci est
•
normal.
La langue sélectionnée n’est pas disponible pour l’audio ou les
•
sous-titres sur le DVD. (Ceci est normal.)
•
Le DVD ne contient pas de séquences enregistrées sous différents
•
angles de caméra. (Ceci est normal.)
•
Le DVD ne contient pas de source audio ou de sous-titres dans la
•
langue sélectionnée. (Ceci est normal.)
•
Cette opération est interdite par l’appareil ou le disque.
•
(Ceci est normal.)
•
Disque rayé. Remplacer le disque par un disque non rayé.
•
FRANÇAIS
REMARQUES :
Certaines fonctions ne sont pas disponibles dans des modes spécifiques, mais ceci est normal. Lire la
•
description dans ce Manuel de l’opérateur pour plus de détails sur le fonctionnement correct.
La lecture à partir d’une piste souhaitée et la lecture aléatoire ne sont pas disponibles pendant la lecture
•
programmée.
- 31 - FR
Page 100

Atomiseur
nettoyant
de disque
Diluant
Solvant
volatil
ENTRETIEN
NETTOYAGE DU MEUBLE
Essuyer le panneau avant et les autres surfaces
•
extérieures de l’appareil avec un chiffon doux
imbibé d’eau tiède et essoré.
Ne jamais utiliser de solvant ni d’alcool. Ne pas
•
vaporiser de liquide insecticide à proximité de
l’appareil. Ces produits chimiques peuvent
endommager et décolorer les surfaces exposées.
RÉPARATIONS
Si l’appareil cesse de fonctionner, ne pas essayer
•
de corriger vous-même le problème. Aucune pièce
interne de l’appareil ne peut être réparée par
l’utilisateur. Mettre l’appareil hors tension,
débrancher le cordon d’alimentation et appeler la
ligne d’assistance téléphonique indiquée sur la
couverture pour localiser un centre agréé de
service après-vente.
SI LA CELLULE OPTIQUE DU LASER EST SALE
Si l’appareil ne fonctionne toujours pas correctement, alors qu’il est utilisé conformément aux sections
•
pertinentes et au « GUIDE DE DÉPANNAGE » de ce Manuel de l’opérateur, il est possible que la cellule
optique du laser soit sale. Consulter le revendeur ou un centre agréé de service après-vente pour inspecter et
nettoyer la cellule optique du laser.
MANIPULATION DES DISQUES
Manipuler les disques de sorte que les traces de
•
doigts et la poussière n’adhèrent pas à leur surface.
Pour les nettoyer, utiliser un chiffon doux.
•
Ne pas utiliser un tissu rêche : cela abîmerait le
•
disque.
Essuyer le disque du centre vers la périphérie.
•
Ne jamais essuyer avec un mouvement circulaire.
•
Ne pas utiliser de détergent, ni d’agent de
•
nettoyage abrasif.
Ranger toujours les disques dans leur boîtier de
•
protection quand ils ne sont pas utilisés.
- 32 - FR
 Loading...