

Indesit IUPS 17 series Operating Instructions Manual

IUPS 17xx F J
Contents
Operating Instructions, 1
Assistance, 3
Description of the appliance, 5
Installation,8
Start-up and use,8
Maintenance and care, 9
Precautions and tips, 9
Troubleshooting, 10
English English
English English
English
Operating Instructions
FREEZER
Oversigt
Brugervejledning,1
Servicecenter, 3
Beskrivelse af apparatet,5
Installation, 11
Start og brug, 11
Vedligeholdelse, 12
Forholdsregler og gode råd, 12
Fejlfinding og afhjælpning,13
Yhteenveto
Käyttöohjeet, 1
Huoltoapu,3
Laitteen kuvaus, 6
Asennus, 14
Käynnistys ja käyttö, 14
Huolto ja hoito, 15
Varotoimet ja suosituksia, 15
Häiriöt ja korjaustoimet, 16
Innehållsförteckning
Bruksanvisning, 1
Kundservice, 3
Beskrivning av apparaten,6
Installation, 17
Start och användning, 17
Underhåll och skötsel, 18
Säkerhetsföreskrifter och råd, 18
Fel och åtgärder, 19
Innhold
Bruksanvisning, 1
Teknisk assistanse, 4
Beskrivelse av apparatet, 7
Installasjon, 20
Oppstart og bruk, 21
Hvordan vedlikeholde og ta vare på skapet,21
Forholdsregler og gode råd, 22
Feil og løsninger,22
Svenska Svenska
Svenska Svenska
Svenska
Bruksanvisning
FRYS
Dansk Dansk
Dansk Dansk
Dansk
Brugervejledning
FRYSEN
Suomi Suomi
Suomi Suomi
Suomi
Käyttöohjeet
PAKASTIN
Norsk Norsk
Norsk Norsk
Norsk
Bruksanvisning
FRYSESKAP

Inhaltsverzeichnis
Gebrauchsanleitungen, 2
Kundendienst,5
Beschreibung Ihres Gerätes,7
Installation, 23
Inbetriebsetzung und Gebrauch, 23
Wartung und Pflege, 24
Vorsichtsmaßregeln und Hinweise, 24
Störungen und Abhilfe, 25
Deutsch Deutsch
Deutsch Deutsch
Deutsch
Gebrauchsanleitungen
EINBAUTIEFHÜHLGERÄTE

3
Huoltoapu
Ennen Huoltoapuun yhteyden ottamista:
• Tarkista, voidaanko häiriö poistaa omin voimin (
katso Häiriöt ja
korjaustoimet
).
• Jos kaikista tarkistuksista huolimatta laite ei toimi ja
havaitsemasi vika on olemassa edelleen, soita lähimpään
Huoltoapuun.
Ilmoita:
• häiriön tyyppi
• koneen malli (Mod.)
• sarjanumero (S/N)
Nämä tiedot löytyvät jääkaappiosaston alavasemmalla olevasta
tietolaatasta.
Älä käytä koskaan valtuuttamattomia teknikoita ja kieltäydy
aina muiden kuin alkuperäisten varaosien käytöstä.
Kundservice
Innan du kontaktar kundservice:
• Kontrollera om du kan åtgärda felet på egen hand (
se Fel och
åtgärder
).
• Om apparaten inte fungerar och felet inte kan åtgärdas trots
alla kontroller kan du ringa till närmaste servicecenter.
Uppge:
• typ av fel
• maskinmodell (Mod.)
• serienummer (S/N)
Denna information anges på märkskylten som sitter i kylutrymmet
nedan till vänster.
Vänd dig aldrig till ej auktoriserade tekniker och tillåt inte att
reservdelar som inte är original monteras.
Assistance
Before calling for Assistance:
•
Check if the malfunction can be solved on your own (
see
Troubleshooting
).
• If after all the checks, the appliance still does not operate or the
problem persists, call the nearest Service Centre
Communicating:
• type of malfunction
• appliance model (Mod.)
• serial number (S/N)
This information can be found on the data plate located on the
bottom left side of the refrigerator compartment.
Never call on unauthorized technicians and always refuse
spare parts which are not originals.
Servicecenter
Inden Servicecentret kontaktes:
•
Kontrollér, om du selv kan løse fejlen (
se Fejlfinding og
afhjælpning
).
• Hvis apparatet stadig ikke fungerer, og hvis fejlen stadig
findes, skal man kontakte nærmeste Servicecenter.
Man skal oplyse:
• Fejlens art
• Apparatets model (Mod.)
• Serienummer (S/N)
Disse oplysninger findes på skiltet inden i køleskabet nederst til
venstre.
Ret aldrig henvendelse til ikke-autoriserede teknikere, og
benyt ikke uoriginale reservedele.
- model
- model
- malli
- modell
- modell
- modell
- serial number
- serienummer
- serjanumero
- serienummer
- serienummer
- modellnummer

4
Teknisk assistanse
Før du kontakter Teknisk assistanse:
•
Kontroller om feilen kan løses på egen hånd (
se Feil og
løsninger
).
• Dersom man til tross for alle kontroller ikke får apparatet til å
fungere og feilen fortsatt er tilstede, må dere kontakte
nærmeste senter for teknisk assistanse.
Man må oppgi
• type feil
• Modellen på på apparatet (Mod.)
• serienummeret (S/N)
Denne informasjonen finner du på informasjonsskiltet som er
plassert i kjølerommet nede til venstre.
Bruk aldri teknikere uten offentlig godkjenning, og si alltid nei
til reparasjoner med deler som ikke er originale.
Kundendienst
Bevor Sie sich an den Kundendienst wenden:
•
Prüfen Sie, ob die Störung selbst behoben werden kann (
siehe
Störungen und Abhilfe
).
• Sollte trotz aller Kontrollen das Gerät nicht funktionieren und der
von Ihnen festgestellte Fehler weiter bestehen bleiben, dann
fordern Sie bitte den nächstgelegenen technischen
Kundendienst an und teilen Sie dort zusammen mit Ihrer
Fehlerbeschreibung folgende Daten mit:
Geben Sie bitte Folgendes an:
• die Art der Störung
• das Gerätemodell (Mod.)
• die Modellnummer (S/N).
Entnehmen Sie diese Daten bitte dem Typenschild (befindlich im
Kühlraum unten links).
Beauftragen Sie auf keinen Fall einen nicht befugten
Kundendienst und lassen Sie ausschließlich OriginalErsatzteile einbauen.
- model
- model
- malli
- modell
- modell
- modell
- serial number
- serienummer
- serjanumero
- serienummer
- serienummer
- modellnummer
5
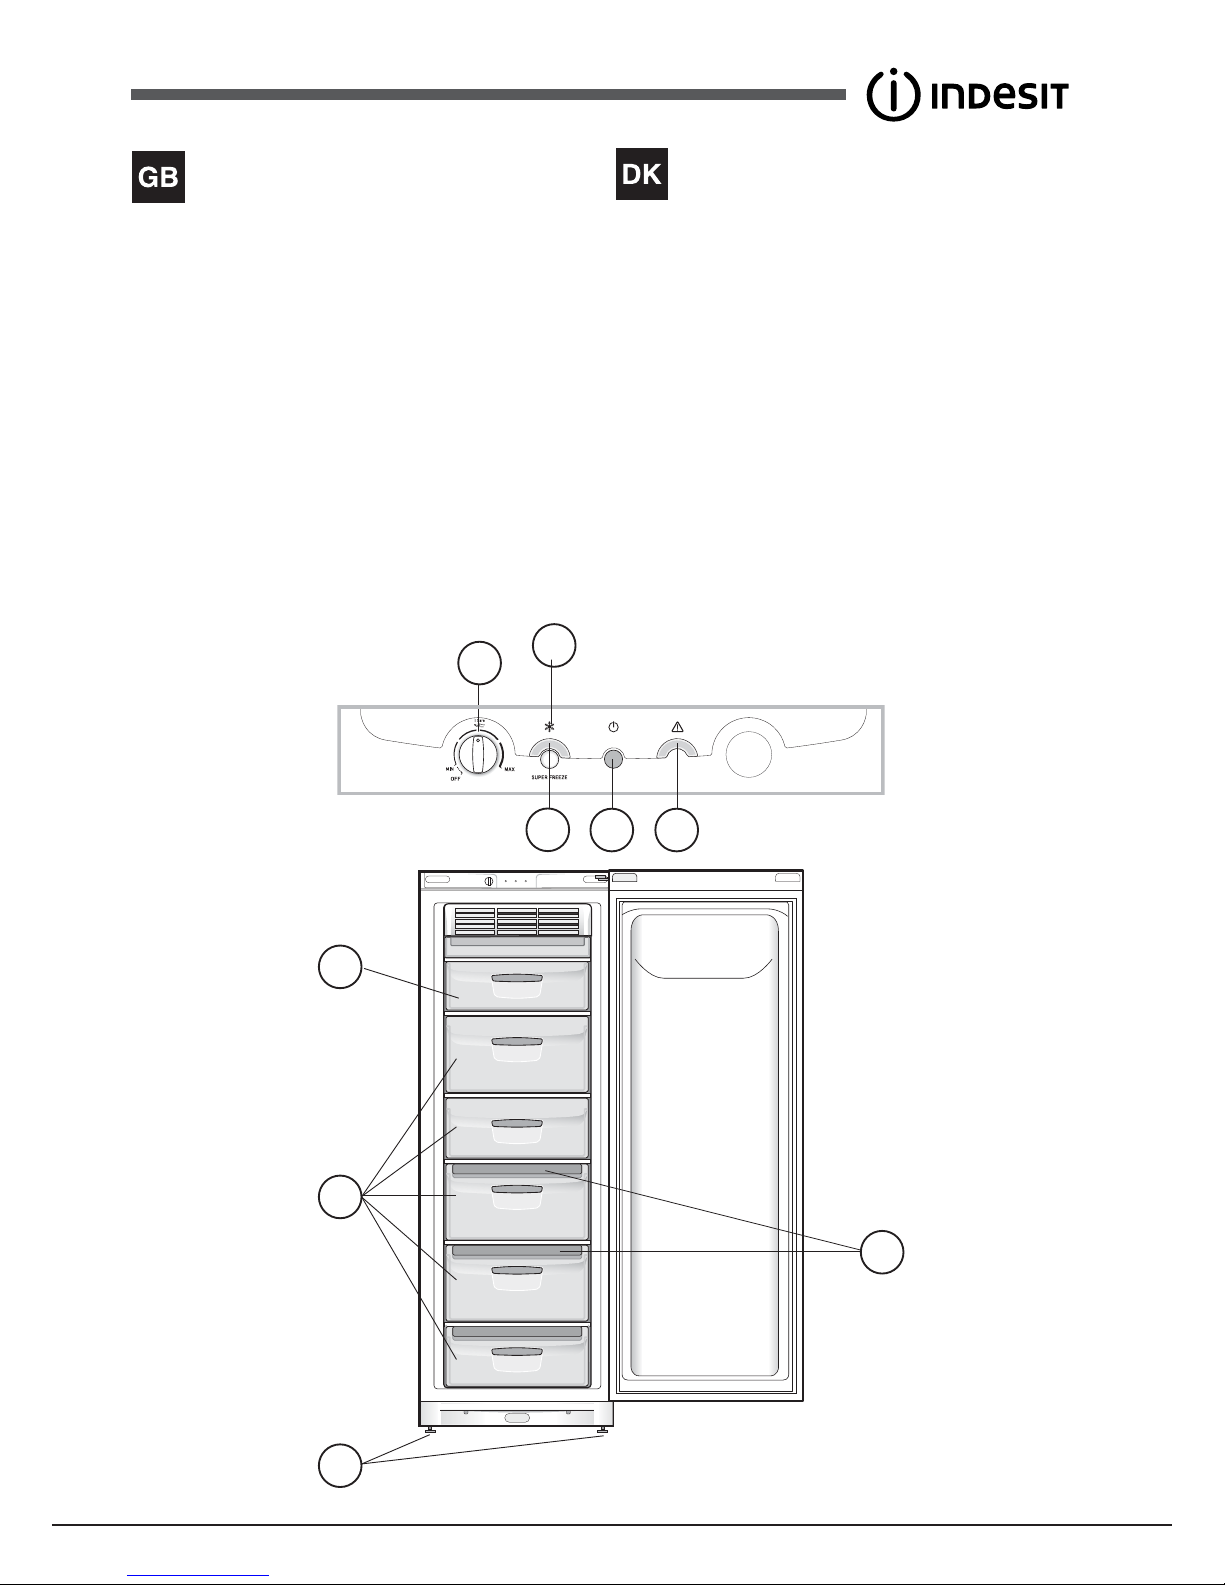
Description of the appliance
Overall view
The instructions contained in this manual are applicable to different
model refrigerators. The diagrams may not directly represent the
appliance purchased. For more complex features, consult the
following pages.
1 Levelling FEET
2 STORAGE Compartment
3 Flap FREEZING and STORAGE Compartment
4 SUPER FREEZE Button
5 SUPER FREEZE Indicator light
6 POWER Indicator light
7 WARNING Indicator light
8 TEMPERATUE CONTROL Knob
9 Ice3 ice tray •
• Varies by number and/or position.
Beskrivelse af apparatet
Komplet oversigt
Brugervejledningen gælder for de forskellige modeller og derfor er
det muligt, at visse funktioner på figuren er anderledes end på det
købte apparat. Der findes en mere omfattende beskrivelse af de
enkelte funktioner på de efterfølgende sider.
1 INDSTILLINGSBEN.
2 FRYSERUM.
3 FRYSE- og OPBEVARINGSRUM
4 Tast til SUPER FREEZE.
5 Kontrollampe for SUPER FREEZE.
6 Kontrollampe for STRØMFORSYNING.
7 Kontrollampe for ALLARME.
8 Knap til REGULERING AF TEMPERATUREN.
9 Isterningebakke Ice3•.
• Kan varieres i antal og/eller placering.
1
3
331eps
2
4
5
6
7
8
9

6
Beskrivning av apparaten
Översiktsvy
Anvisningarna angående användning gäller för flera olika modeller
och därför kan delar i figuren skilja sig åt i förhållande till din inköpta
apparat. Beskrivning av mer komplicerade delar finns på följande
sidor.
1 JUSTERFOT
2 Utrymme för FÖRVARING
3 Utrymme för INFRYSNING och FÖRVARING
4 Knapp för SUPER FREEZE
5 Kontrollampa för SUPER FREEZE
6 Kontrollampa för NÄTANSLUTNING
7 Kontrollampa för LARM
8 TEMPERATURVREDET
9 Islåda Ice3•
• Variabler för nummer och/eller position.
Laitteen kuvaus
Kokonaiskuva
Käyttöohjeet on tarkoitettu eri malleille ja siten on mahdollista, että
kuvan tietyt yksityiskohdat poikkeavat ostetusta laitteesta.
Tärkeimpien osien kuvaus löytyy seuraavilta sivuilta.
1 SÄÄTÖJALKA
2 SÄILYTYSLAATIKKO
3 PAKASTUS- ja SÄILYTYSLAATIKKO
4 Painike SUPER FREEZER
5 Merkkivalo SUPER FREEZER
6 Merkkivalo VIRRANSYÖTTÖ
7 Merkkivalo HÄLYTYKSEN
8 LÄMPÖTILAN SÄÄTÖNAPPULA
9 Jääkuutioastia Ice3•
• Määrä ja/tai asento voivat vaihdella.
1
3
331eps
2
4
5
6 7
8
9
7
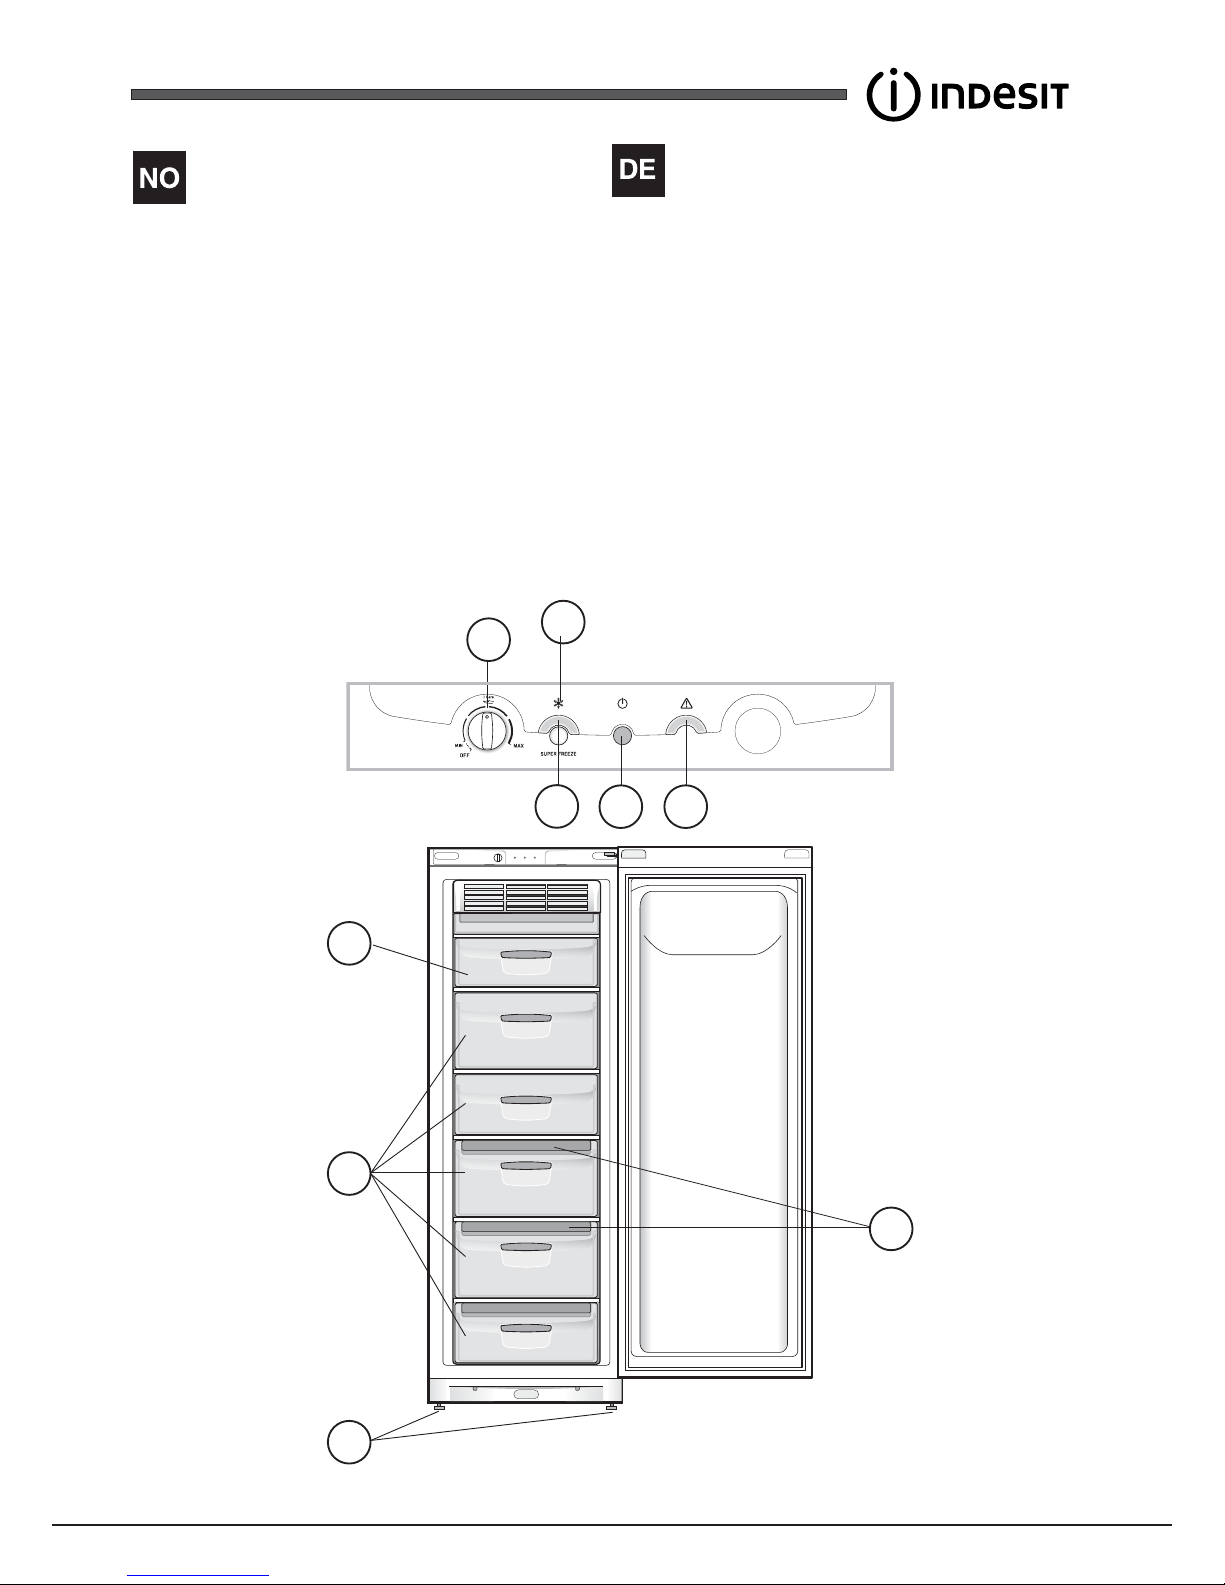
Beskrivelse av apparatet
Oversikt
Bruksanvisningen gjelder flere modeller slik at det er mulig at
figuren inneholder detaljer som er forskjellig fra det apparatet man
har anskaffet. Beskrivelsen av de mer komplekse enhetene finner
man på de følgende sidene.
1 FOT for nivåregulering
2 Rommet OPPBEVARING
3 Rommet INNFRYSING og OPPBEVARING
4 Tasten SUPER FREEZE
5 Varsellampen SUPER FREEZE
6 Varsellampen STRØMFORSYNING
7 Varsellampen ALARM
8 Bryteren for TEMPERATURREGULERING
9 Isbøtte Ice3•
• Varierer med hensyn til antall og/eller posisjon.
1
3
331eps
2
4
5
6 7
8
9
Beschreibung Ihres Gerätes
Geräteansicht
Die Gebrauchsanleitungen gelten für mehrere Gerätemodelle.
Demnach ist es möglich, dass die Abbildung Details enthält, über
die Ihr Gerät nicht verfügt. Die Beschreibung weiterer
Komponenten ersehen Sie auf nachfolgender Seite.
1 STELLFÜSSE.
2 Fach zum LAGERN
3 Fach zum GEFRIEREN und LAGERN
4 Schalter SUPER FREEZE
5 Kontrollleuchte SUPER FREEZE
6 Kontrollleuchte STROMVERSORGUNG
7 Kontrollleuchte ALARM
8 TEMPERATURSCHALTER
9 Eisschale ICE3•
• Unterschiedliche Anzahl und Platzierung.
8
GB
Installation
! Before placing your new appliance into operation
please read these operating instructions carefully. They
contain important information for safe use, for installation
and for care of the appliance.
! Please keep these operating instructions for future
reference. Pass them on to possible new owners of the
appliance.
Positioning and connection
Positioning
1. Place the appliance in a well-ventilated humidity-free room.
2. Do not obstruct the rear fan grills. The compressor and
condenser give off heat and require good ventilation to operate
correctly and save energy.
3. Leave a space of at least 10 cm between the top part of the
appliance and any furniture above it, and at least 5 cm between
the sides and any furniture/side walls.
4. Ensure the appliance is away from any sources of heat (direct
sunlight, electric stove, etc.).
5. In order to maintain the correct distance between the appliance
and the wall behind it, fit the spacers supplied in the installation
kit, following the instructions provided.
Levelling
1. Install the appliance on a level and rigid floor.
2. If the floor is not perfectly horizontal, adjust the refrigerator by
tightening or loosening the rear feet.
Electrical connections
After the appliance has been transported, carefully place it
vertically and wait at least 3 hours before connecting it to the
electricity mains. Before inserting the plug into the electrical socket
ensure the following:
• The appliance is earthed and the plug is compliant with the law.
• The socket can withstand the maximum power of the appliance,
which is indicated on the data plate located inside the freezer
(e.g. 150 W).
• The voltage is in the range of values indicated on the data plate
located inside the freezer (e.g. 220-240V).
• The socket is compatible with the plug of the appliance. If the
socket is incompatible with the plug, ask an authorised
technician to replace it (
see Assistance
). Do not use extension
cords or multiple sockets.
! Once the appliance has been installed, the power supply cable
and the electrical socket must be easily accessible.
! The cable must not be bent or compressed.
! The cable must be checked regularly and replaced by authorised
technicians only (see Assistance).
!
The manufacturer declines any liability should these safety
measures not be observed.
Start-up and use
Starting the appliance
! Before starting the appliance, follow the installation
instructions (
see Installation
).
! Before connecting the appliance, clean the compartments and
accessories well with lukewarm water and bicarbonate.
! The appliance comes with a motor protection control system
which makes the compressor start approximately 8 minutes after
being switched on. The compressor also starts each time the
power supply is cut off whether voluntarily or involuntarily
(blackout).
1. Insert the plug into the socket and make sure that the green
POWER indicator light illuminates (the TEMPERATURE
ADJUSTMENT knob must be in the OFF position).
2. Turn the TEMPERATURE ADJUSTMENT knob to an average
value and press the SUPER FREEZE button (rapid freezing):
the SUPER FREEZE indicator light
will illuminate. It will switch
off once the freezer has reached its optimal temperature. At this
point food may be placed inside the appliance.
Using the freezer to its full potential
• Use the TEMPERATURE CONTROL knob to adjust the
temperature.
MIN = warmest
MAX = coldest
is the optimal temperature for energy saving levels.
We recommend, however, a medium position.
• Do not re-freeze food that is defrosting or that has already
been defrosted. These foods must be cooked and eaten
(within 24 hours).
• Fresh food that needs to be frozen must not come into contact
with food that has already been defrosted. Fresh food must be
stored in the top FREEZER and STORAGE compartment.
• Do not place glass bottles which contain liquids, and which are
corked or hermetically sealed in the freezer because they
could break.
• The maximum quantity of food that may be frozen daily is
indicated on the plate containing the technical properties located
within the freezer (for example: Kg/24h: 4).
• To freeze (if the freezer is already operating):
- for small quantities which are less than those indicated on the
data plate, press the rapid freezing SUPER FREEZE button
(corresponding indicator light
illuminates), insert the food
and close the door. The function is disabled automatically after
24 hours or when optimal temperatures have been reached
(indicator light goes out);
! Do not open the door during freezing.
! If there is a power cut or malfunction, do not open the freezer
door. This will help maintain the temperature inside the freezer,
ensuring that foods are conserved for at least 9 -14 hours.
!In order to obtain a greater amount of space in the freezer
compartment, you may remove the bins (except the lowest bin and
the special COOL CARE ZONE bin, which has an
adjustabletemperature) and place the food directly onto the racks/
glass shelves supplied [where present].
Ice
3
ice tray
The fact that they are situated on the top part of the freezer
drawers ensures greater cleanliness: the ice no longer comes into
contact with the food placed inside the freezer compartment;
furthermore, the dripping of the water during filling is avoided (a lid
to cover up the hole after filling with water is also provided).
1. Pull out the tray by pushing it up. Check that the tray is completely
empty and fill it with water through the opening provided.

GB
9
2. Take care not to exceed the level indicated (MAX WATER
LEVEL). Excess water prevents the ice cubes from dispensing
(if this happens, wait for the ice to melt and empty the tray).
3. Turn the tray 90°: due to the connected compartments each
mould fills with water (
see diagram
).
4. Close the opening with the lid provided and put the tray back,
placing the top part in the corresponding housing and allowing it
to drop in again.
5. When the ice has formed (minimum time approximately 8 hours)
knock the tray against a hard surface and wet the outside so
that the ice cubes come loose and take them out through the
opening.
WATER LEVEL
MAX
WATER LEVEL
MAX
WATER LEVEL
MAX
Maintenance and care
Switching the appliance off
During cleaning and maintenance it is necessary to
disconnect the appliance from the electricity supply:
1. set the TEMPERATURE CONTROL Knob on OFF;
2. pull the plug out of the socket.
! If this procedure is not followed, the alarm may sound. This alarm
does not indicate a malfunction. To restore normal operation, turn
the TEMPERATURE ADJUSTMENT knob to the OFF position and
then turn it back to the desired value. To disconnect the appliance,
follow point 1 and 2.
Cleaning the appliance
• The external and internal parts, as well as the rubber seals may
be cleaned using a sponge that has been soaked in lukewarm
water and bicarbonate of soda or neutral soap. Do not use
solvents, abrasive products, bleach or ammonia.
• The removable accessories may be soaked in warm water and
soap or dishwashing liquid. Rinse and dry them carefully.
• The back of the appliance may collect dust which can be
removed by delicately using the hose of a vacuum cleaner set
on medium power. The appliance must be switched off and the
plug must be pulled out before cleaning the appliance.
Avoiding mould and unpleasant odours
• The appliance is manufactured with hygienic materials which are
odour free. In order to maintain an odour free refrigerator and to
prevent the formation of stains, food must always be covered or
sealed properly.
• If you want to switch the appliance off for an extended period of
time, clean the inside and leave the doors open.
Precautions and tips
! The appliance was designed and manufactured in compliance
with international safety standards. The following warnings are
provided for safety reasons and must be read carefully.
This appliance complies with the following Community Directives:
- 73/23/EEC of 19/02/73 (Low Voltage) and subsequent amendments;
-89/336/EEC of 03.05.89 (Electromagnetic Compatibility) and
subsequent amendments;
- 2002/96/CE.
General safety
• The appliance was designed for domestic use inside the home
and is not intended for commercial or industrial use.
• The appliance must be used to store and freeze food products
by adults only and according to the instructions in this manual.
• The appliance must not be installed outdoors, even in covered
areas. It is extremely dangerous to leave the appliance
exposed to rain and storms.
• Do not touch the appliance with bare feet or with wet or moist
hands and feet.
• WARNING: do not damage the refrigerant circuit.
• Do not touch the internal cooling elements: this could cause
skin abrasions or frost/freezer burns.
• When unplugging the appliance always pull the plug from the
mains socket, do not pull on the cable.
• Before cleaning and maintenance, always switch off the
appliance and disconnect it from the electrical supply. It is not
sufficient to set the temperature adjustment knobs on OFF
(appliance off) to eliminate all electrical contact.
• In the case of a malfunction, under no circumstances should you
attempt to repair the appliance yourself. Repairs carried out by
inexperienced persons may cause injury or further
malfunctioning of the appliance.
• Do not use utensils other than the scraper provided, or electrical
equipment which is not of the type specified by the
manufacturer, inside the frozen food storage compartments.
• Do not put ice cubes taken directly from the freezer into your
mouth.
• This appliance is not intended for use by persons (including
children) with reduced physical, sensory or lack of experience
and knowledge unless they have been given supervision or
instruction concerning use of the appliance by a person
responsible for their safety. Children should be supervised to
ensure that they do not play with the appliance.
• Keep packaging material out of the reach of children! It can
become a choking or suffocation hazard.
Disposal
• Observe local environmental standards when disposing
packaging material for recycling purposes.
• The European Directive 2002/96/EC on Waste Electrical and
Electronic Equipment (WEEE), requires that old household
electrical appliances must not be disposed of in the normal
unsorted municipal waste stream. Old appliances must be
collected separately in order to optimise the recovery and
recycling of the materials they contain and reduce the impact on
human health and the environment. The crossed out “wheeled
 Loading...