

Page 1

Instructions for use
WASHING MACHINE
GB
English,1
IWB 5065
RO
Românã,13
Contents
GB
Installation, 2-3
Unpacking and levelling
Connecting the electricity and water supplies
The first wash cycle
Technical data
Description of the washing machine
and starting a wash cycle, 4-5
Control panel
Indicator lights
Starting a wash cycle
Wash cycles, 6
Table of wash cycles
Personalisation, 7
Setting the temperature
Functions
Detergents and laundry, 8
Detergent dispenser drawer
Bleach cycle
Preparing the laundry
Garments requiring special care
Load balancing system
Precautions and tips, 9
General safety
Disposal
Opening the porthole door manually
Care and maintenance, 10
Cutting off the water or electricity supply
Cleaning the washing machine
Cleaning the detergent dispenser drawer
Caring for the door and drum of your appliance
Cleaning the pump
Checking the water inlet hose
Troubleshooting, 11
Service, 12
1
Page 2

Installation
GB
This instruction manual should be kept in a safe
place for future reference. If the washing machine is
sold, transferred or moved, make sure that the
instruction manual remains with the machine so that
the new owner is able to familiarise himself/herself
with its operation and features.
Read these instructions carefully: they contain vital
information relating to the safe installation and
operation of the appliance.
Unpacking and levelling
Unpacking
1. Remove the washing machine from its packaging.
2. Make sure that the washing machine has not been
damaged during the transportation process. If it has
been damaged, contact the retailer and do not
proceed any further with the installation process.
3. Remove the 3
protective screws (used
during transportation) and
the rubber washer with
the corresponding
spacer, located on the
rear part of the appliance
(see figure).
4. Close off the holes using the plastic plugs provided.
5. Keep all the parts in a safe place: you will need
them again if the washing machine needs to be
moved to another location.
Levelling the machine correctly will provide it with
stability, help to avoid vibrations and excessive noise
and prevent it from shifting while it is operating. If it is
placed on carpet or a rug, adjust the feet in such a
way as to allow a sufficient ventilation space
underneath the washing machine.
Connecting the electricity and water
supplies
Connecting the water inlet hose
1. Connect the supply
pipe by screwing it to a
cold water tab using a ¾
gas threaded connection
(see figure).
Before performing the
connection, allow the
water to run freely until it
is perfectly clear.
2. Connect the inlet hose
to the washing machine
by screwing it onto the
corresponding water inlet
of the appliance, which is
situated on the top righthand side of the rear part
of the appliance (see
figure).
3. Make sure that the hose is not folded over or bent.
Packaging materials should not be used as toys for
children.
Levelling
1. Install the washing machine on a flat sturdy floor,
without resting it up against walls, furniture cabinets
or anything else.
2. If the floor is not
perfectly level, compensate for any unevenness
by tightening or loosening
the adjustable front feet
(see figure); the angle of
inclination, measured in
relation to the worktop,
must not exceed 2°.
2
The water pressure at the tap must fall within the
values indicated in the Technical details table (see
next page).
If the inlet hose is not long enough, contact a
specialised shop or an authorised technician.
Never use second-hand hoses.
Use the ones supplied with the machine.
Page 3

Connecting the drain hose
65 - 100 cm
Connect the drain hose,
without bending it, to a
drainage duct or a wall
drain located at a height
between 65 and 100 cm
from the floor;
Do not use extension cords or multiple sockets.
GB
The cable should not be bent or compressed.
The power supply cable must only be replaced by
authorised technicians.
Warning! The company shall not be held responsible
in the event that these regulations are not respected.
The first wash cycle
alternatively, rest it on
the side of a washbasin
or bathtub, fastening the
duct supplied to the tap
(see figure). The free end
of the hose should not
be underwater.
We advise against the use of hose extensions; if it is
absolutely necessary, the extension must have the
same diameter as the original hose and must not
exceed 150 cm in length.
Electrical connections
Before plugging the appliance into the electricity
socket, make sure that:
the socket is earthed and complies with all
applicable laws;
the socket is able to withstand the maximum power
load of the appliance as indicated in the Technical
data table (see opposite);
the power supply voltage falls within the values
indicated in the Technical data table (see opposite);
Once the appliance has been installed, and before
you use it for the first time, run a wash cycle with
detergent and no laundry, using the wash cycle 2.
Technical data
Model
Dimensions
Capacity
Electrical
connections
Water connections
Spin speed
IWB 5065
width 59.5 cm
height 85 cm
depth 52,5 cm
from 1 to 5 kg
please refer to the technical data
plate fixed to the machine
maximum pressure 1 MPa (10 bar)
minimum pressure 0.05 MPa (0.5 bar)
drum capacity 46 litres
up to 600 rotations per minute
the socket is compatible with the plug of the
washing machine. If this is not the case, replace
the socket or the plug.
The washing machine must not be installed
outdoors, even in covered areas. It is extremely
dangerous to leave the appliance exposed to rain,
storms and other weather conditions.
When the washing machine has been installed, the
electricity socket must be within easy reach.
Energy rated
programmes
according to
regulation
EN 60456
programme 2; temperature 60°C;
using a load of 5 kg.
This appliance conforms to the
following EC Directives:
- 89/336/EEC dated 03/05/89
(Electromagnetic Compatibility) and
subsequent modifications
- 2002/96/EC
- 2006/95/EC Low Voltage)
3
Page 4

Description of the washing machine
and starting a wash cycle
GB
Control panel
Detergent dispenser drawer
ON/OFF
button
WASH CYCLE
knob
TEMPERATURE
knob
WASH CYCLE PROGRESS/
DELAY TIMER
FUNCTION
buttons with
indicator lights
DOOR LOCKED
indicator light
indicator lights
START/
PAUSE
button with
indicator light
Detergent dispenser drawer: used to dispense
detergents and washing additives (see Detergents
and laundry).
ON/OFF button: switches the washing machine on
and off.
WASH CYCLE knob: programmes the wash cycles.
During the wash cycle, the knob does not move.
FUNCTION buttons with indicator light: used to
select the available functions. The indicator light
corresponding to the selected function will remain lit.
TEMPERATURE knob: sets the temperature or the
cold wash cycle (see Personalisation).
WASH CYCLE PROGRESS/DELAY TIMER
indicator light
wash cycle.
The illuminated indicator light shows which phase is in
progress.
If the Delay Timer function has been set, the time
remaining until the wash cycle starts will be indicated
(see next page).
s: used to monitor the progress of the
DOOR LOCKED indicator light: indicates whether
the door may be opened or not (see next page).
START/PAUSE button with indicator light: starts or
temporarily interrupts the wash cycles.
N.B. To pause the wash cycle in progress, press this
button; the corresponding indicator light will flash
orange, while the indicator light for the current wash
cycle phase will remain lit in a fixed manner. If the
DOOR LOCKED
door may be opened.
To start the wash cycle from the point at which it was
interrupted, press this button again.
Standby mode
This washing machine, in compliance with new
energy saving regulations, is fitted with an automatic
standby system which is enabled after a few minutes
if no activity is detected. Press the ON-OFF button
briefly and wait for the machine to start up again.
indicator light is switched off, the
4
Page 5

Indicator lights
The indicator lights provide important information.
This is what they can tell you:
Wash cycle phase indicator lights
Once the desired wash cycle has been selected and has
begun, the indicator lights switch on one by one to
indicate which phase of the cycle is currently in progress.
GB
Delayed start
If the DELAY TIMER function has been activated (see
Personalisation), after the wash cycle has been
started the indicator light corresponding to the
selected delay period will begin to flash:
As time passes, the remaining delay will be displayed
and the corresponding indicator light will flash:
The set programme will start once the selected time
delay has expired.
Wash
Rinse
Spin
Drain
End of wash cycle
Function buttons and corresponding indicator lights
When a function is selected, the corresponding
indicator light will illuminate.
If the selected function is not compatible with the
programmed wash cycle, the corresponding indicator
light will flash and the function will not be activated.
If the selected function is not compatible with another
function which has been selected previously, the
indicator light corresponding to the first function
selected will flash and only the second function will be
activated; the indicator light corresponding to the
enabled option will remain lit.
Door locked indicator light
When the indicator light is on, the porthole door is
locked to prevent it from being opened; make sure
the indicator light is off before opening the door (wait
approximately 3 minutes). To open the door during a
running wash cycle, press the START/PAUSE button;
the door may be opened once the DOOR LOCKED
indicator light turns off.
Starting a wash cycle
1. Switch the washing machine on by pressing the ON/OFF button. All indicator lights will switch on for a few
seconds, then they will switch off and the START/PAUSE indicator light will pulse.
2. Load the laundry and close the door.
3. Set the WASH CYCLE knob to the desired programme.
4. Set the washing temperature (see Personalisation).
5. Measure out the detergent and washing additives (see Detergents and laundry).
6. Select the desired functions.
7. Start the wash cycle by pressing the START/PAUSE button and the corresponding indicator light will remain lit
in a fixed manner, in green.
To cancel the set wash cycle, pause the machine by pressing the START/PAUSE button and select a new cycle.
8. At the end of the wash cycle the
LOCKED
drum dries completely. Switch the washing machine off by pressing the ON/OFF button.
indicator light turns off. Take out your laundry and leave the appliance door ajar to make sure the
indicator light will switch on. The door can be opened once the DOOR
5
Page 6

Wash cycles
GB
Table of wash cycles
Description of the wash cycle
Wash cycles
Daily
1
Cotton with prewash:
2
Cotton:
extremely soiled whites.
2
Cotton (1):
2
Cotton (2):
3
Cotton:
4
Coloured Cottons (3):
5
Synthetics:
6
Synthetics:
Special
7
Wool:
8
Silk/Curtains:
9
Jeans
Express:
10
wool, silk and clothes which require washing by hand).
Sport
11
Sport Intensive
12
Sport Light
13
Sport Shoes
Partial wash cycles
Rinse
Spin
Drain
heavily soiled whites and resistant colours.
heavily soiled whites and delicate colours.
heavily soiled whites and resistant colours.
heavily soiled resistant colours.
lightly soiled delicate colours.
for wool, cashmere, etc.
for garments in silk and viscose, lingerie.
to refresh lightly soiled garments quickly (not suitable for
extremely soiled whites.
lightly soiled whites and delicate colours.
.
Max
temp.
speed
(°C)
(rpm)
90° 600
90° 600
60° 600
40° 600
60° 600
40° 600
60° 600
40° 600
40° 600
30° 0
40° 600
30° 600
30° 600
30° 600
30° 600
-
-
-
Max.
600
600
0
Detergents
Pre-
Wash Bleach
wash
ll
-
-
-
-
-
-
-
-
-
-
-
-
-
-
- -
-
ll l
ll l
ll l
ll l
ll l
ll l
ll l
l
-
l
-
l
-
l
-
l
-
l
-
l
-
ll
- - - -
- - - -
Fabric
softener
l
l
l
l
l
l
l
l
Max. load
(kg)
Normal
Max. 2
Eco
Time
5
5
5
5
53,25130104
53,259271
2,5 2 85 72
2,5 2 70 60
1
1
3
1,5
3
3
pairs
5
5
5
-
-
-
-
-
-
-
-
-
-
-
-
-
-
Cycle
duration
Normal
171
155
133
147
55
55
70
15
78
68
50
36
16
2
Eco
Time
-
-
-
-
-
-
-
-
-
-
-
-
-
-
The information contained in the table is intended as a guide only.
For all Test Institutes:
1) Test wash cycle in compliance with regulation EN 60456: set wash cycle 2 with a temperature of 60°C.
2) Long wash cycle for cottons: set wash cycle 2 with a temperature of 40°C.
3) Short wash cycle for cottons: set wash cycle 4 with a temperature of 40°C.
Specials wash cycles
Express (wash cycle 10) this wash cycle was designed to wash lightly soiled garments quickly: it lasts just 15 minutes
and therefore saves both energy and time. By selecting this wash cycle (10 at 30°C), it is possible to wash different
fabrics together (except for wool and silk items), with a maximum load of 1.5 kg.
Sport Intensive (
wash cycle
11) is for washing lightly soiled sports clothing fabrics (tracksuits, shorts, etc.); for best
results, we recommend not exceeding the maximum load indicated in the "Table of wash cycles". We recommend
using a liquid detergent and dosage suitable for a half-load.
Sport Light (
wash cycle
12) is for washing lightly soiled sports clothing fabrics (tracksuits, shorts, etc.); for best
results, we recommend not exceeding the maximum load indicated in the "Table of wash cycles". We recommend
using a liquid detergent and dosage suitable for a half-load.
Sport Shoes (
wash cycle
13) is for washing sports shoes; for best results, do not wash more than 2 pairs
simultaneously.
6
Page 7

Personalisation
Setting the temperature
Turn the TEMPERATURE knob to set the wash temperature (see Table of wash cycles).
The temperature may be lowered, or even set to a cold wash
The washing machine will automatically prevent you from selecting a temperature which is higher than the
maximum value set for each wash cycle.
.
Functions
The various wash functions available with this washing machine will help to achieve the desired results, every time.
To activate the functions:
1. Press the button corresponding to the desired function;
2. the function is enabled when the corresponding indicator light is illuminated.
Note: If the indicator light flashes rapidly, this signals that this particular function may not be selected in
conjunction with the selected wash cycle.
Selecting this option enables you to suitably adjust drum rotation, temperature and water to a reduced load of
lightly soiled cotton and synthetic fabrics (refer to the
time thereby saving water and electricity. We suggest using a liquid detergent suitably measured out to the load
quantity.
"Table of wash cycles"
This function may not be used in conjunction with wash cycles 1, 2, 7, 8, 9, 10, 11, 12, 13, , , .
Stain removal
Bleaching cycle designed to remove the toughest stains. Please remember to pour the bleach into extra
compartment 4 (see Bleach cycle).
This function may not be used in conjunction with wash cycles 1, 7, 8, 9, 10, 11, 12, 13, , .
). enables you to wash in less
GB
No spin
The washing machine will not carry out the spin cycle, but rather a drum spin at medium speed to assist water
draining. Recommended when washing garments which are difficult to iron.
This function may not be used in conjunction with wash cycles 8, .
Delay timer
This timer delays the start time of the wash cycle by up to 12 hours.
Press the button repeatedly until the indicator light corresponding to the desired delay time switches on. The fifth time
the button is pressed, the function will be disabled.
N.B. Once the START/PAUSE button has been pressed, the delay time can only be modified by decreasing it until launching
the set programme.
This option is enabled with all programmes.
7
Page 8

Detergents and laundry
GB
Detergent dispenser drawer
Good washing results also depend on the correct
dose of detergent: adding too much detergent will not
necessarily result in a more efficient wash, and may in
fact cause build up on the inside of your appliance
and contribute to environmental pollution.
Do not use hand washing detergents because these
create too much foam.
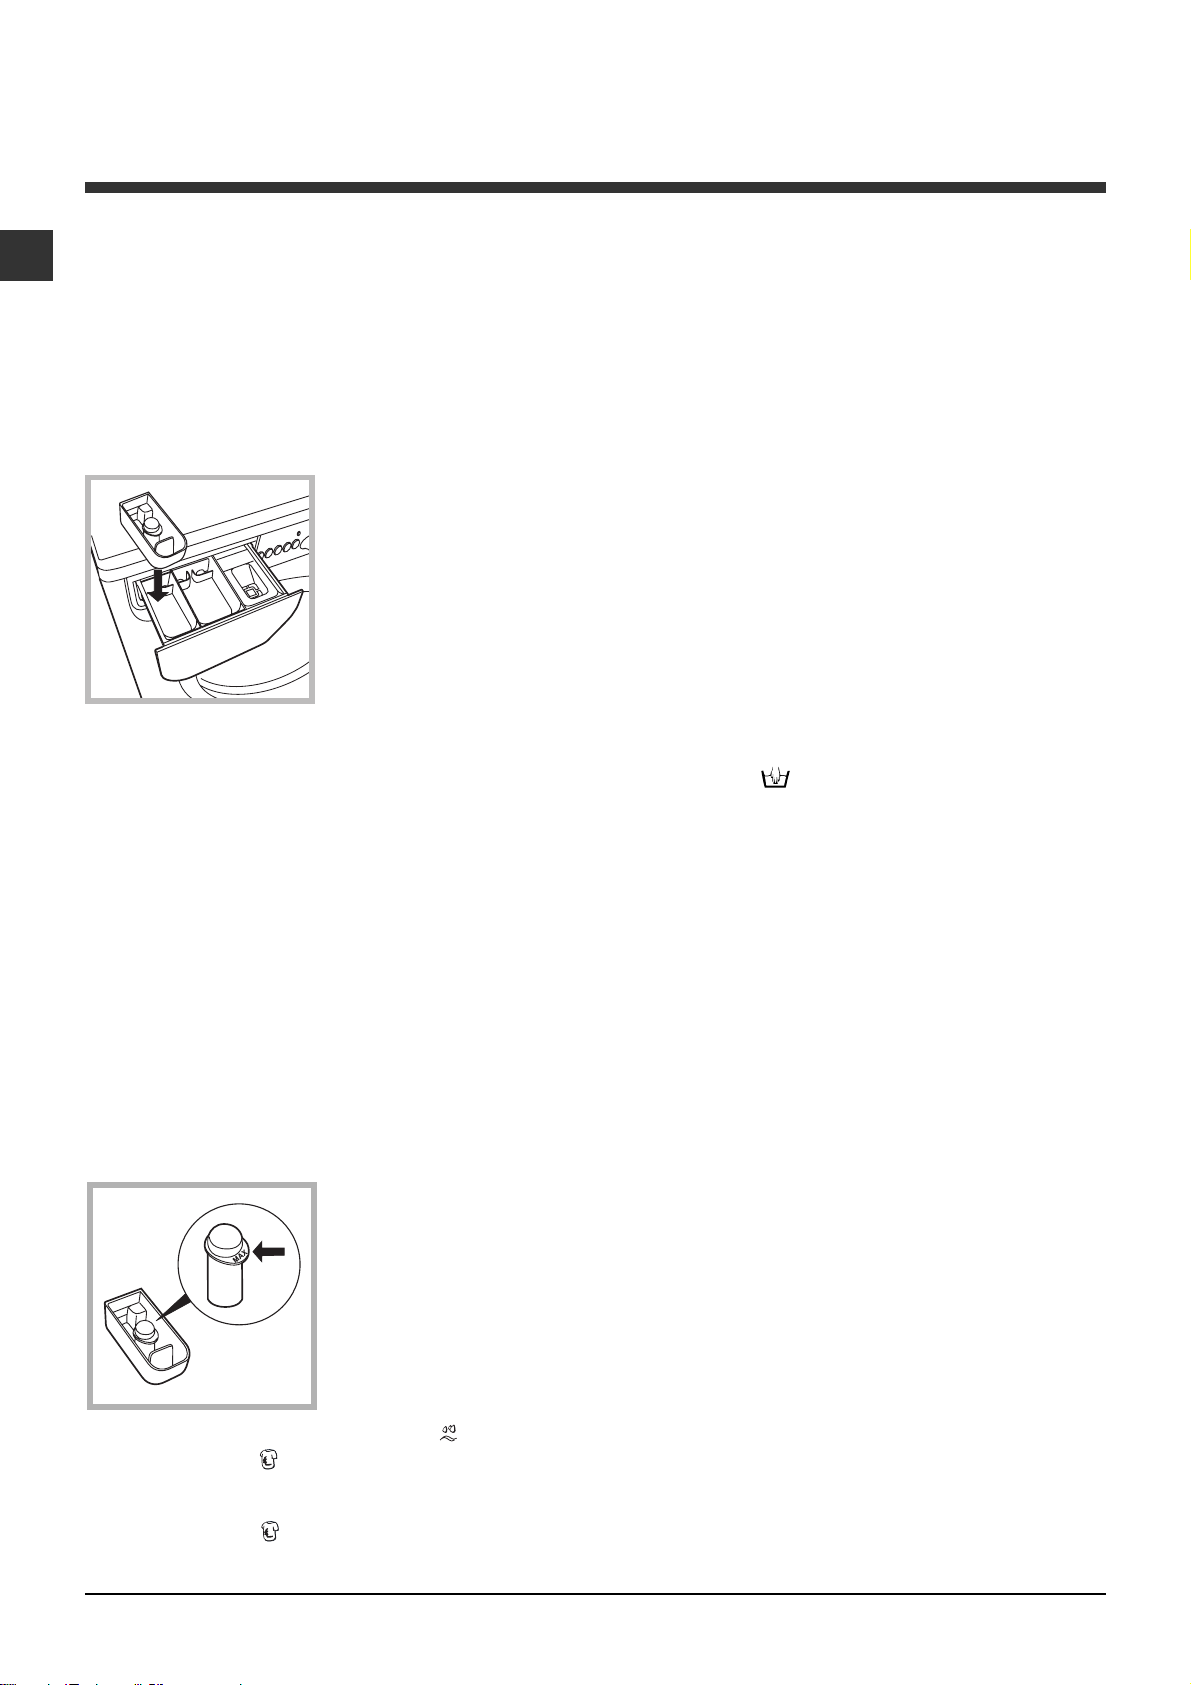
Open the detergent
4
3
dispenser drawer and
pour in the detergent or
washing additive, as
follows.
2
1
ompartment 1: Pre-wash detergent (powder)
Before pouring in the detergent, make sure that extra
compartment 4 has been removed.
compartment 2: Detergent for the wash cycle
(powder or liquid)
Liquid detergent should only be poured in immediately
prior to the start of the wash cycle.
compartment 3: Additives (fabric softeners, etc.)
The fabric softener should not overflow the grid.
extra compartment 4: Bleach
Bleach cycle
Traditional bleach should be used on sturdy white
fabrics, and delicate bleach for coloured fabrics,
synthetics and for wool.
This option is particularly
useful for the removal of
stubborn stains. Place
extra compartment 4
(supplied) into
compartment 1.
When pouring in the
bleach, be careful not to
exceed the "max" level
marked on the central
pivot (see figure).
To run the bleach cycle on its own, pour the bleach into
extra compartment 4, set the "Rinse"
and activate the "Stain removal"
To bleach during a wash cycle, pour in the detergent
and any fabric softener you wish to use, set the desired
wash cycle and enable the "Stain removal"
The use of extra compartment 4 excludes the Prewash option.
programme
option.
option.
Preparing the laundry
Divide the laundry according to:
- the type of fabric/the symbol on the label
- the colours: separate coloured garments from
whites.
Empty all garment pockets and check the buttons.
Do not exceed the listed values, which refer to the
weight of the laundry when dry:
Durable fabrics: max. 5 kg
Synthetic fabrics: max. 2,5 kg
Delicate fabrics: max. 2 kg
Wool: max. 1 kg
Silk: max. 1 kg
How much does your laundry weigh?
1 sheet 400-500 g
1 pillow case 150-200 g
1 tablecloth 400-500 g
1 bathrobe 900-1200 g
1 towel 150-250 g
Garments requiring special care
Wool: all wool garments can be washed using
programme 7, even those carrying the "hand-wash
only"
detergents and do not exceed 1 kg of laundry.
Silk: use special wash cycle 8 to wash all silk
garments. We recommend the use of special
detergent which has been designed to wash delicate
clothes.
Curtains: fold curtains and place them in a pillow
case or mesh bag. Use wash cycle 8.
Jeans: Turn garments inside-out before washing and
use a liquid detergent. Use programme 9.
label. For best results, use special
Load balancing system
Before every spin cycle, to avoid excessive vibrations
and to distribute the load in a uniform manner, the
drum rotates continuously at a speed which is slightly
greater than the washing rotation speed. If, after
several attempts, the load is not balanced correctly,
the machine spins at a reduced spin speed. If the
load is excessively unbalanced, the washing machine
performs the distribution process instead of spinning.
To encourage improved load distribution and balance,
we recommend small and large garments are mixed
in the load.
8
Page 9
Precautions and tips
This washing machine was designed and
constructed in accordance with international safety
regulations. The following information is provided for
safety reasons and must therefore be read carefully.
General safety
This appliance was designed for domestic use only.
The washing machine must only be used by adults, in
accordance with the instructions provided in this manual.
Do not touch the machine when barefoot or with
wet or damp hands or feet.
Do not pull on the power supply cable when
unplugging the appliance from the electricity
socket. Hold the plug and pull.
Do not open the detergent dispenser drawer while
the machine is in operation.
Do not touch the drained water as it may reach
extremely high temperatures.
Never force the porthole door. This could damage
the safety lock mechanism designed to prevent
accidental opening.
If the appliance breaks down, do not under any
circumstances access the internal mechanisms in
an attempt to repair it yourself.
Always keep children well away from the appliance
while it is operating.
The door can become quite hot during the wash cycle.
If the appliance has to be moved, work in a group
of two or three people and handle it with the utmost
care. Never try to do this alone, because the
appliance is very heavy.
Before loading laundry into the washing machine,
make sure the drum is empty.
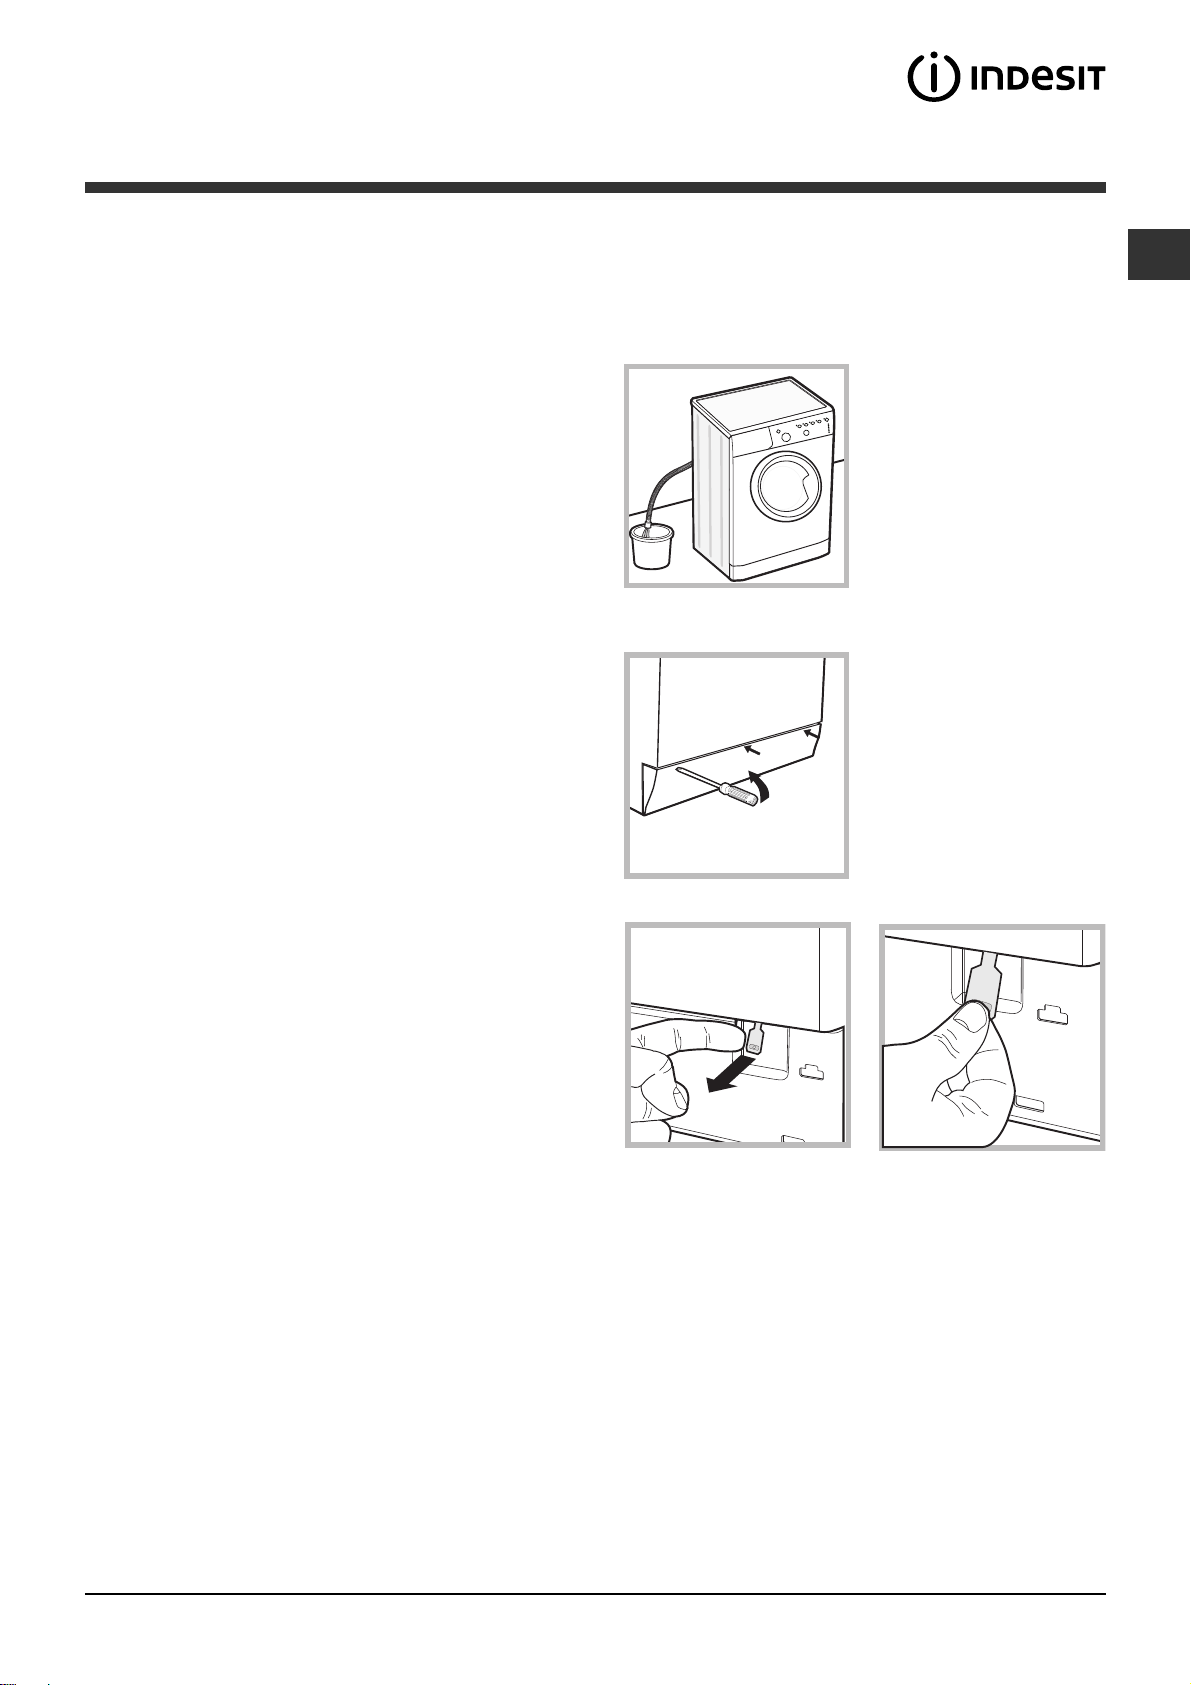
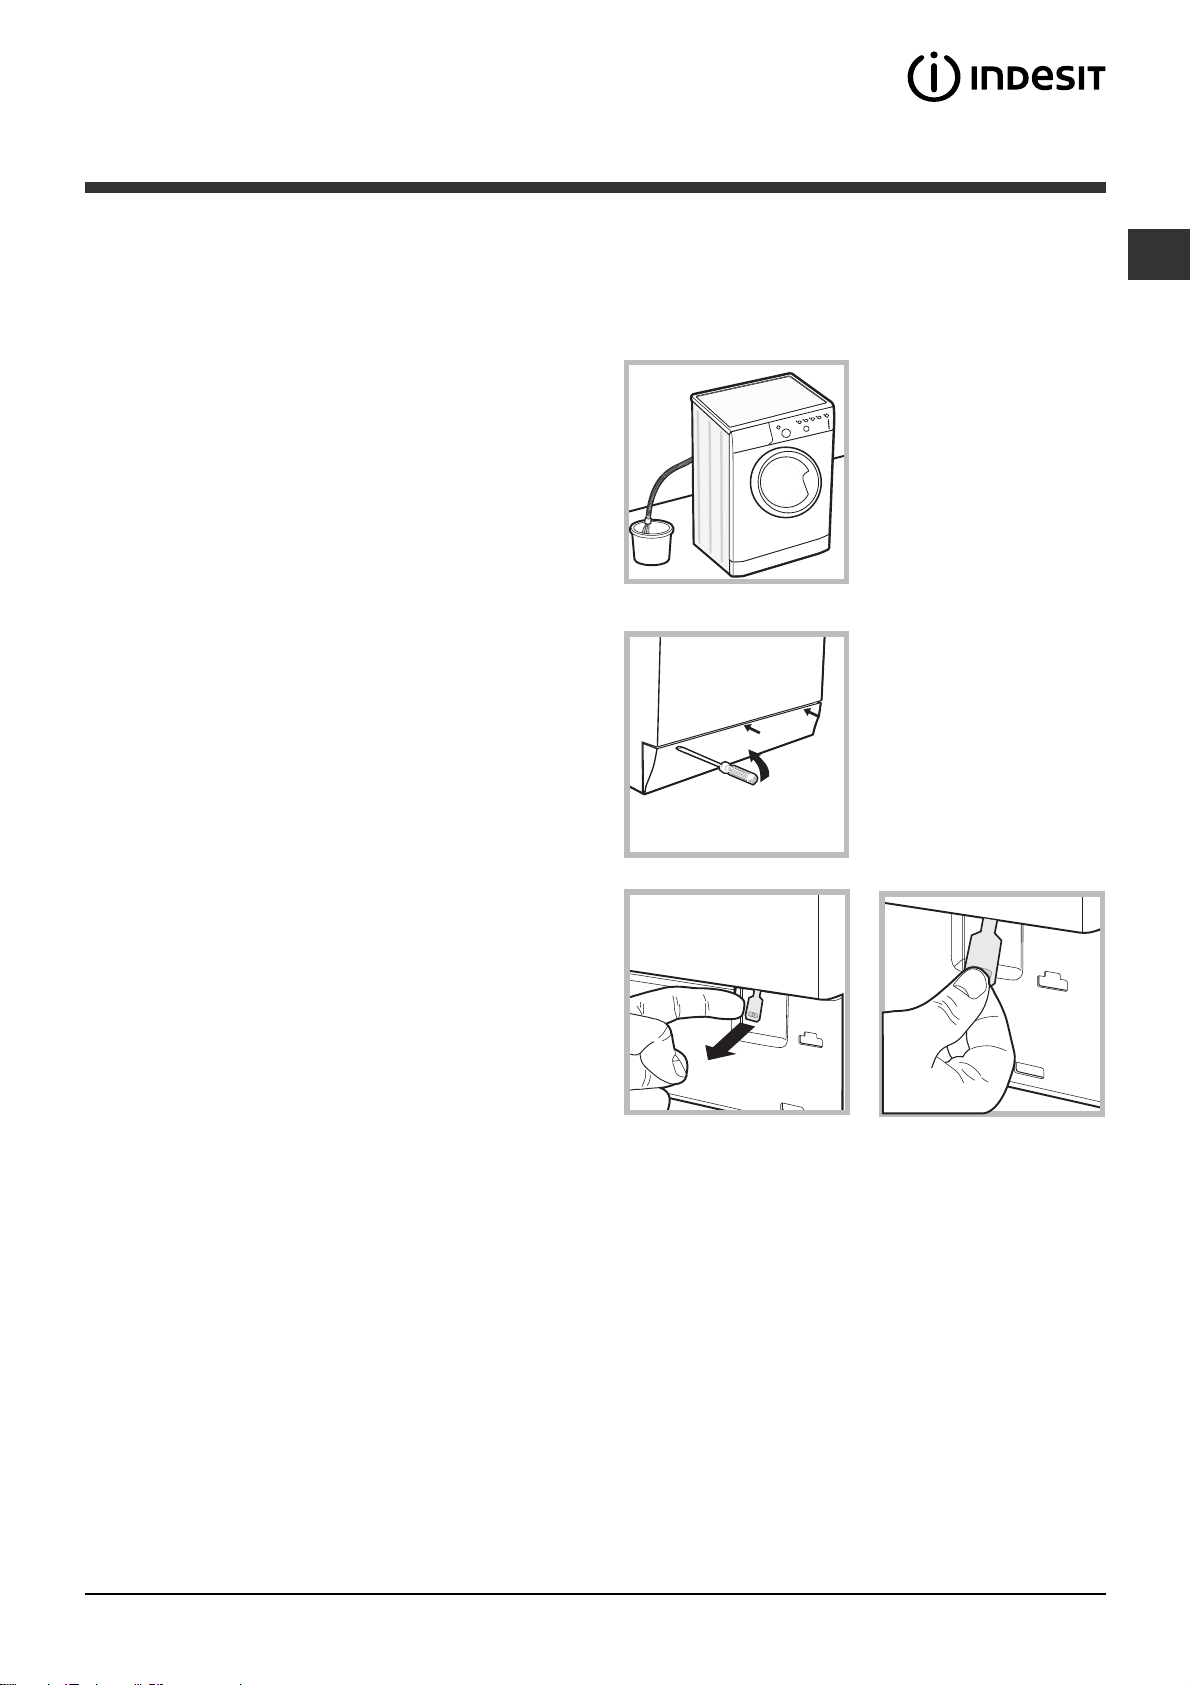
Opening the porthole door manually
In the event that it is not possible to open the
porthole door due to a powercut, and if you wish to
remove the laundry, proceed as follows:
1. remove the plug from
the electrical socket.
2. make sure the water
level inside the machine is
20
lower than the door
opening; if it is not, remove
excess water using the
drain hose, collecting it in a
bucket as indicated in the
figure.
3. using a screwdriver,
remove the cover panel on
the lower front part of the
washing machine (see
figure).
GB
Disposal
Disposing of the packaging materials: observe local
regulations so that the packaging may be re-used.
The European Directive 2002/96/EC on Waste
Electrical and Electronic Equipment, requires that
old household electrical appliances must not be
disposed of in the normal unsorted municipal waste
stream. Old appliances must be collected
separately in order to optimise the recovery and
recycling of the materials they contain and reduce
the impact on human health and the environment.
The crossed out "wheeled bin" symbol on the
product reminds you of your obligation, that when
you dispose of the appliance it must be separately
collected.
Consumers should contact their local authority or
retailer for information concerning the correct
disposal of their old appliance.
4. pull outwards using the tab as indicated in the
figure, until the plastic tie-rod is freed from its stop
position; pull downwards and open the door at the
same time.
5. reposition the panel, making sure the hooks are
securely in place before you push it onto the
appliance.
9
Page 10
Care and maintenance
GB
Cutting off the water and electricity
supplies
Turn off the water tap after every wash cycle. This
will limit wear on the hydraulic system inside the
washing machine and help to prevent leaks.
Unplug the washing machine when cleaning it and
during all maintenance work.
Cleaning the washing machine
The outer parts and rubber components of the
appliance can be cleaned using a soft cloth soaked
in lukewarm soapy water. Do not use solvents or
abrasives.
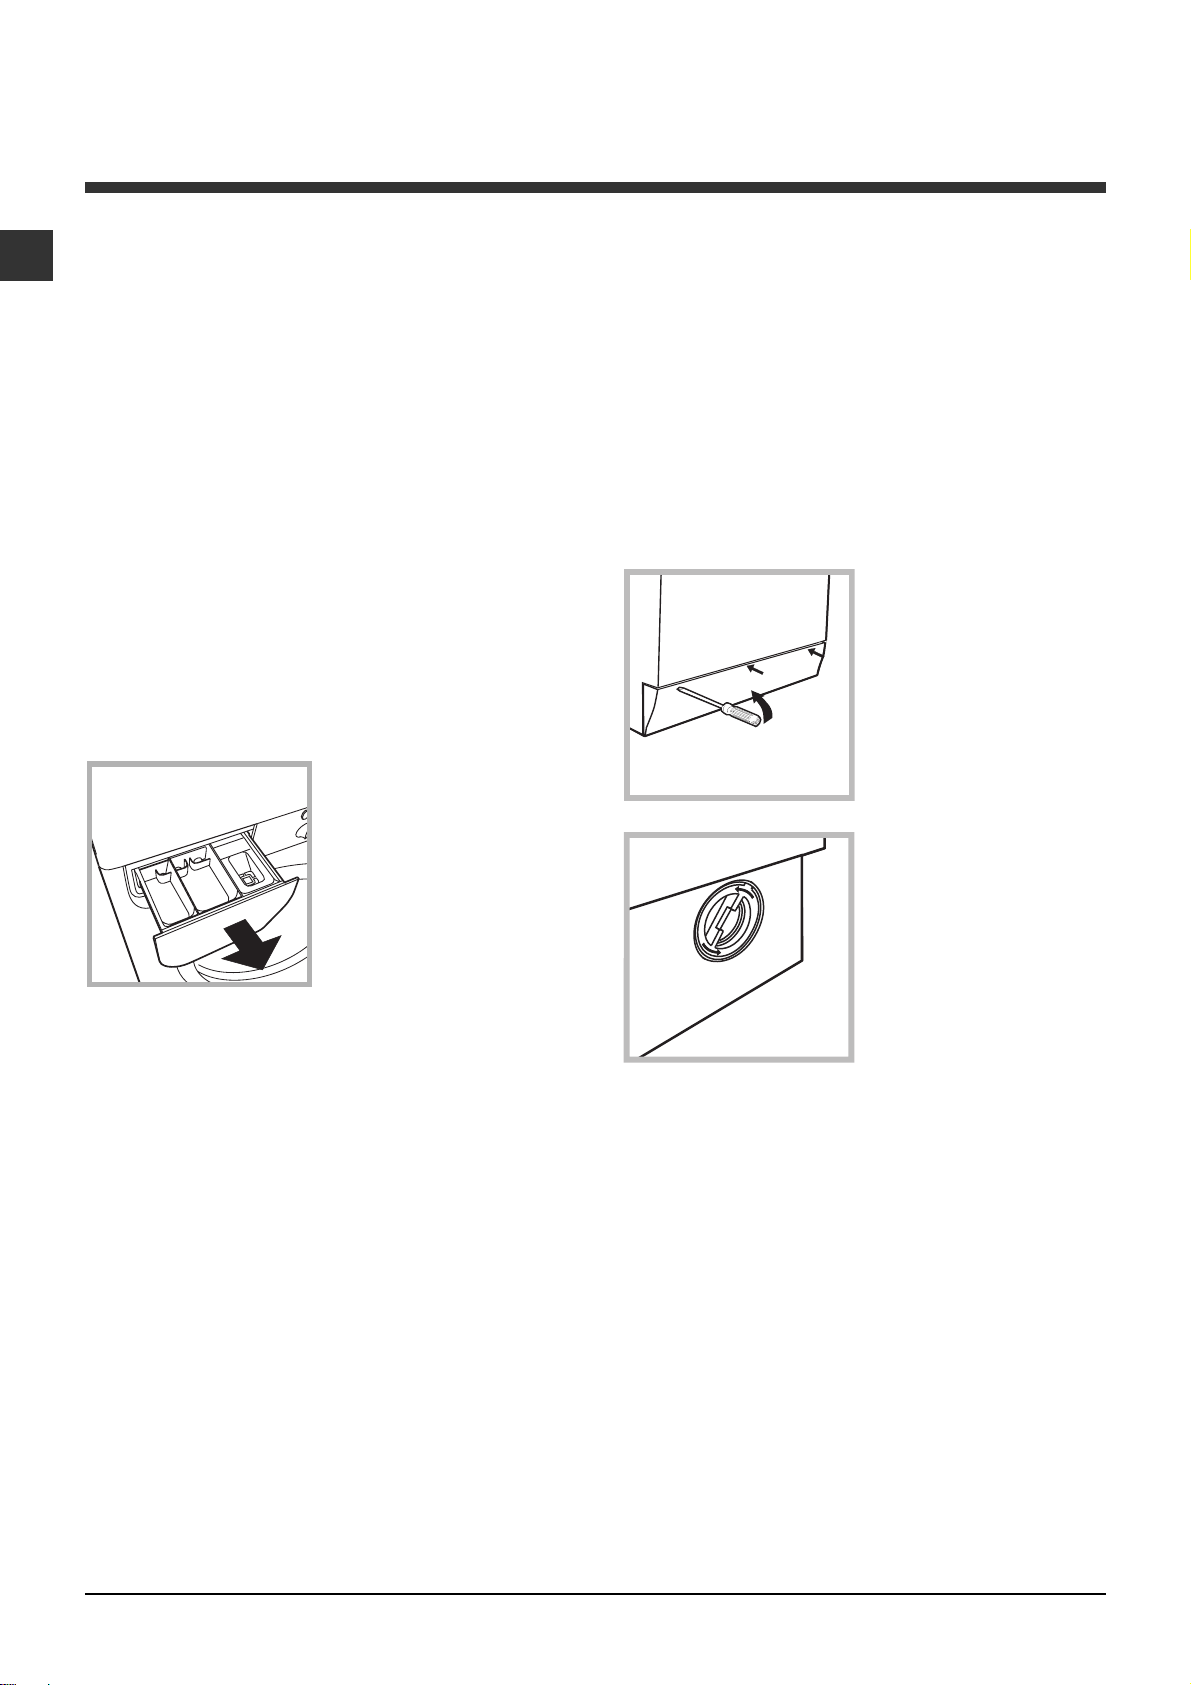
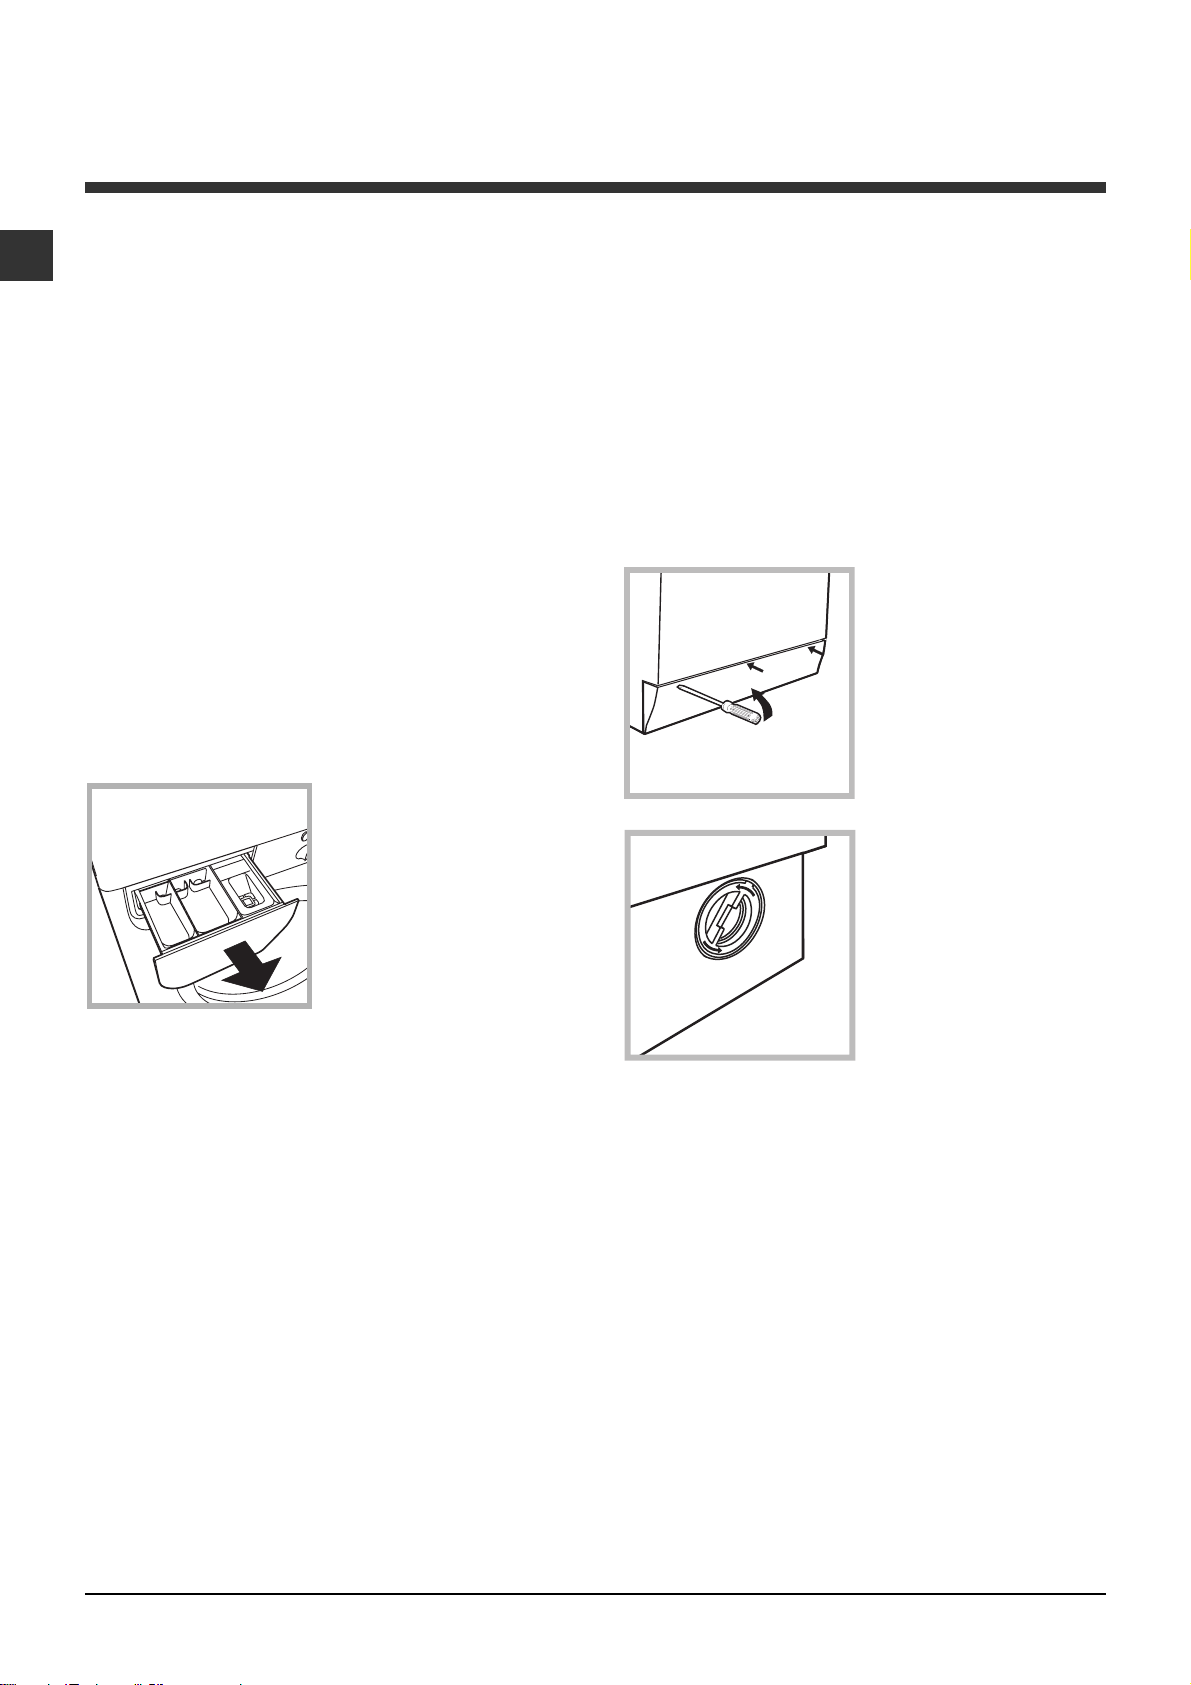
Cleaning the detergent dispenser
drawer
Remove the dispenser
by raising it and pulling it
out (see figure).
Wash it under running
water; this operation
should be repeated
frequently.
Cleaning the pump
The washing machine is fitted with a self-cleaning
pump which does not require any maintenance.
Sometimes, small items (such as coins or buttons)
may fall into the pre-chamber which protects the
pump, situated in its bottom part.
Make sure the wash cycle has finished and unplug
the appliance.
To access the pre-chamber:
1. using a screwdriver,
remove the cover panel
on the lower front part of
the washing machine
(see figure);
2. unscrew the lid by
rotating it anti-clockwise
(see figure): a little water
may trickle out. This is
perfectly normal;
Caring for the door and drum of your
appliance
Always leave the porthole door ajar in order to
prevent unpleasant odours from forming.
3. clean the inside thoroughly;
4. screw the lid back on;
5. reposition the panel, making sure the hooks are
securely in place before you push it onto the
appliance.
Checking the water inlet hose
Check the inlet hose at least once a year. If there are
any cracks, it should be replaced immediately: during
the wash cycles, water pressure is very strong and a
cracked hose could easily split open.
Never use second-hand hoses.
10
Page 11

Troubleshooting
Your washing machine could fail to work. Before contacting the Technical Assistance Centre (see Assistance),
make sure that the problem cannot be not solved easily using the following list.
Problem:
The washing machine does not
switch on.
The wash cycle does not start.
The washing machine does not
take in water (the indicator light
for the first wash cycle stage
flashes rapidly).
The washing machine
continuously takes in and drains
water.
Possible causes / Solutions:
The appliance is not plugged into the socket fully, or is not making contact.
There is no power in the house.
The washing machine door is not closed properly.
The ON/OFF button has not been pressed.
The START/PAUSE button has not been pressed.
The water tap has not been opened.
A delayed start has been set (see Personalisation).
The water inlet hose is not connected to the tap.
The hose is bent.
The water tap has not been opened.
There is no water supply in the house.
The pressure is too low.
The START/PAUSE button has not been pressed.
The drain hose is not fitted at a height between 65 and 100 cm from
the floor (see Installation).
The free end of the hose is under water (see Installation).
The wall drainage system is not fitted with a breather pipe.
If the problem persists even after these checks, turn off the water tap,
switch the appliance off and contact the Assistance Service. If the
dwelling is on one of the upper floors of a building, there may be problems
relating to water drainage, causing the washing machine to fill with water
and drain continuously. Special anti-draining valves are available in shops
and help to avoid this inconvenience.
GB
The washing machine does not
drain or spin.
The washing machine vibrates a
lot during the spin cycle.
The washing machine leaks.
The "option" indicator lights and
the "start/pause" indicator light
flash, while one of the "phase in
progress" indicator lights and the
"door locked" indicator light will
remain lit in a fixed manner.
There is too much foam.
The wash cycle does not include draining: some wash cycles require
the drain phase to be started manually.
The drain hose is bent (see Installation).
The drainage duct is clogged.
The drum was not unlocked correctly during installation (see Installation).
The washing machine is not level (see Installation).
The washing machine is trapped between cabinets and walls (see Installation).
The water inlet hose is not screwed on properly (see Installation).
The detergent dispenser drawer is blocked (for cleaning instructions, see
Care and maintenance).
The drain hose is not fixed properly (see Installation).
Switch off the machine and unplug it, wait for approximately 1 minute
and then switch it back on again.
If the problem persists, contact the Technical Assistance Service.
The detergent is not suitable for machine washing (it should display the
text for washing machines or hand and machine wash, or the like).
Too much detergent was used.
11
Page 12

Service
GB
Before calling for Assistance:
Check whether you can solve the problem alone (see Troubleshooting);
Restart the programme to check whether the problem has been solved;
If this is not the case, contact an authorised Technical Assistance Centre using the telephone number
provided on the guarantee certificate.
Always request the assistance of authorised technicians.
Have the following information to hand:
the type of problem;
the appliance model (Mod.);
the serial number (S/N).
This information can be found on the data plate applied to the rear of the washing machine, and can also
be found on the front of the appliance by opening the door.
12
Page 13

Instrucþiuni de folosire
MAªINÃ DE SPÃLAT RUFE
RO
Românã
IWB 5065
Sumar
RO
Instalare, 14-15
Despachetare ºi punere la nivel
Racorduri hidraulice ºi electrice
Primul ciclu de spãlare
Date tehnice
Descrierea maºinii de spãlat ºi activarea
unui program, 16-17
Panoul de control
Indicatoare luminoase
Activarea unui program
Programe, 18
Tabel de programe
Personalizare, 19
Reglarea temperaturii
Funcþii
Detergenþi ºi rufe albe, 20
Compartimentul pentru detergenþi
Ciclu de albire
Pregãtirea rufelor
Articole delicate
Sistemul de echilibrare a încãrcãturii
Precauþii ºi sfaturi, 21
Norme de protecþie ºi siguranþã generale
Aruncarea reziduurilor
Deschiderea manualã a uºii
Întreþinere ºi curãþare, 22
Întreruperea alimentãrii cu apã ºi curent electric
Curãþarea maºinii de spãlat
Curãþarea compartimentului pentru detergent
Îngrijirea uºii ºi a tamburului
Curãþarea pompei
Controlarea furtunului de alimentare cu apã
Anomalii ºi remedii, 23
Asistenþã, 24
13
Page 14
Instalare
RO
Este important sã pãstraþi acest manual pentru a-l
putea consulta în orice moment. În caz de vânzare,
de cesiune sau de schimbare a locuinþei, acesta
trebuie sã rãmânã împreunã cu maºina de spãlat
pentru a informa noul proprietar cu privire la
funcþionare ºi la respectivele avertismente.
Citiþi cu atenþie instrucþiunile: veþi gãsi informaþii
importante cu privire la instalare, la folosire ºi la
siguranþã.
Despachetare ºi punere la nivel
Despachetare
1. Scoaterea din ambalaj a maºinii de spãlat.
2. Controlaþi ca maºina de spãlat sã nu fi fost
deterioratã în timpul transportului. Dacã este
deterioratã nu o conectaþi ºi luaþi legãtura cu
vânzãtorul.
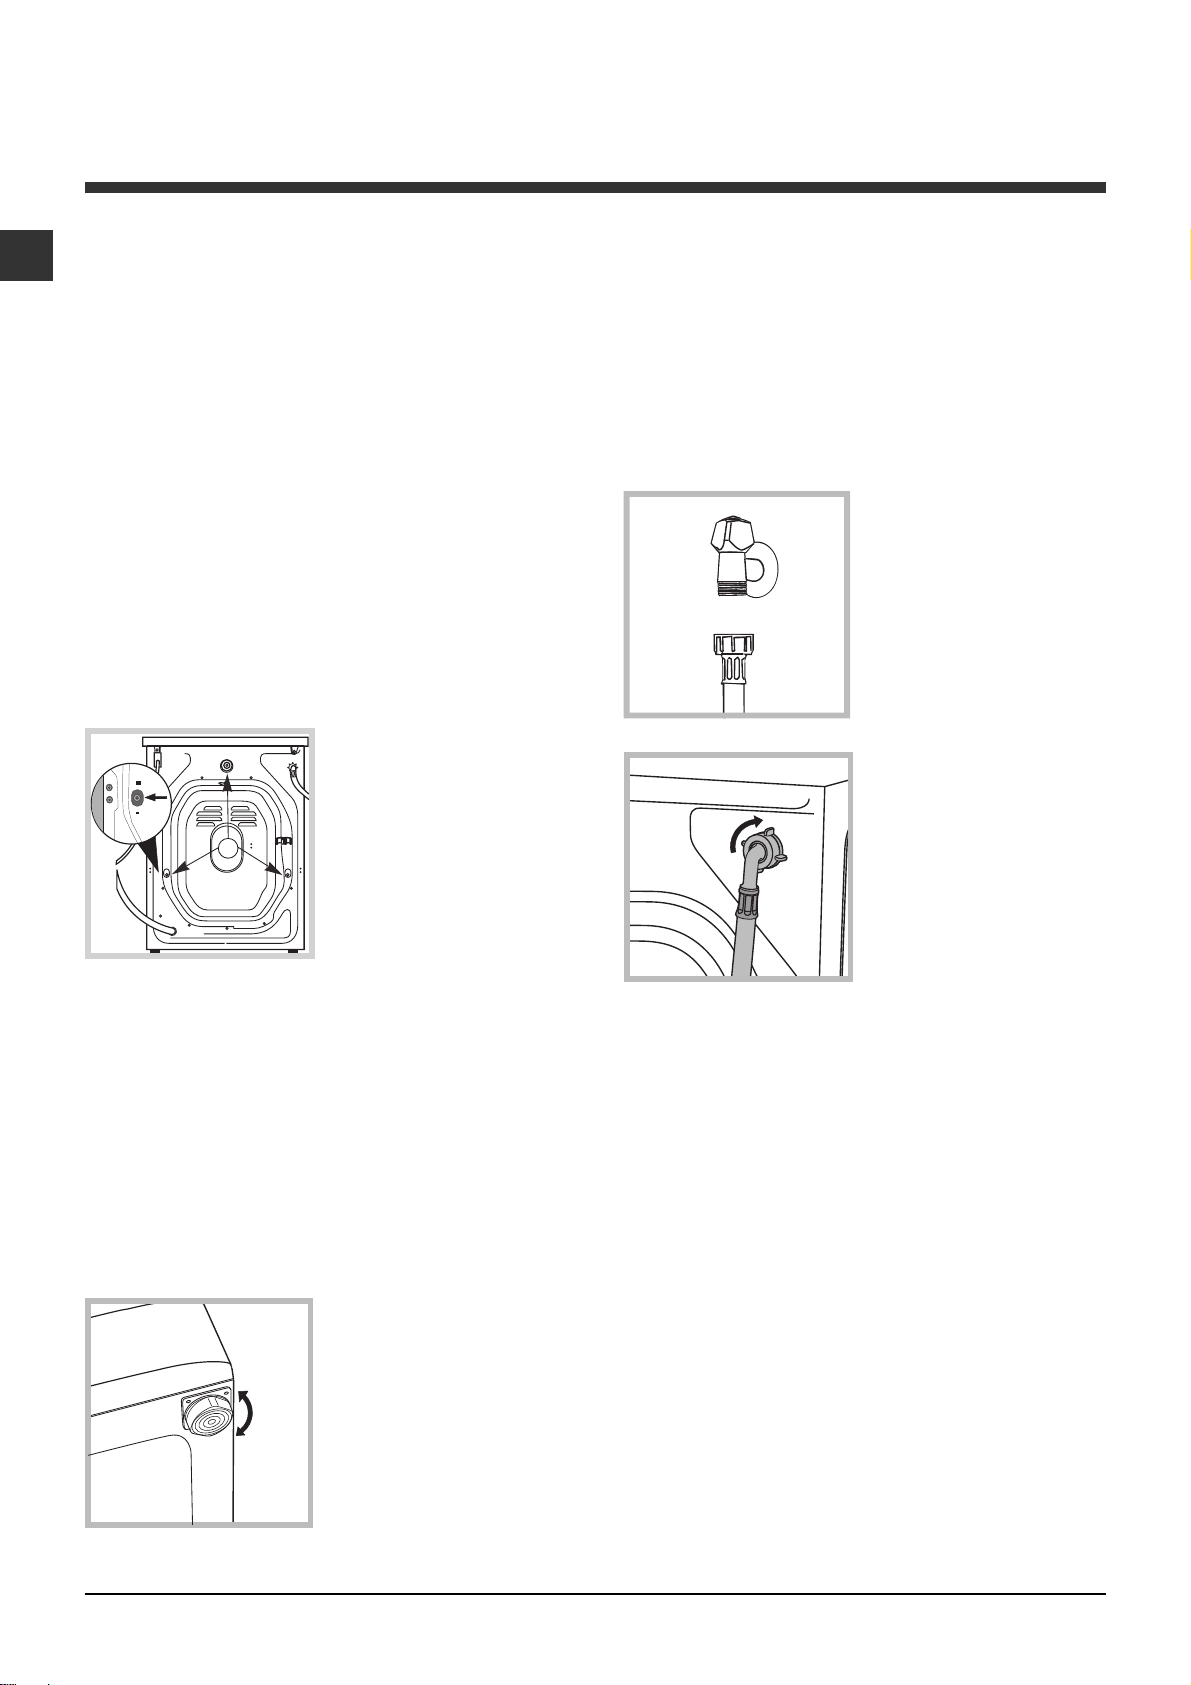
3. Scoateþi cele 3
ºuruburi de protecþie
pentru transport ºi
cauciucul cu respectivul
distanþier, situate în
partea posterioarã
(a se vedea figura).
O nivelare precisã conferã stabilitate maºinii ºi evitã
vibraþii, zgomote ºi deplasãri pe timpul funcþionãrii.
În cazul mochetelor sau a unui covor, reglaþi
picioruºele astfel încât sã menþineþi sub maºina de
spãlat un spaþiu suficient pentru ventilare.
Racorduri hidraulice ºi electrice
Racordarea furtunului de alimentare cu apã
1. Conectaþi tubul de
alimentare, înºurubându-l
la un robinet de apã rece
cu gura filetatã de 3/4
gaz (a se vedea figura).
Înainte de conectare,
lãsaþi apa sã curgã pânã
când nu a devine
limpede.
2. Conectaþi tubul de
alimentare la maºina de
spãlat, înºurubându-l la
sursa de apã respectivã,
amplasatã în partea
posterioarã, sus în
dreapta (a se vedea
figura).
4. Închideþi orificiile cu dopurile din plastic aflate în
dotare.
5. Pãstraþi toate piesele: pentru cazul în care
maºina de spãlat va trebui sã fie transportatã,
piesele vor trebui montante din nou.
Ambalajele nu sunt jucãrii pentru copii!
Punere la nivel
1. Instalaþi maºina de spãlat pe o suprafaþã planã ºi
rigidã, fãrã a o sprijini de ziduri, mobilã sau altceva.
2. Dacã podeaua nu este
perfect orizontalã,
compensaþi
neregularitãþile
deºurubând sau
înºurubând picioruºele
anterioare (a se vedea
figura); unghiul de
înclinare, mãsurat pe
planul de lucru, nu trebuie
sã depãºeascã 2°.
3. Fiþi atenþi ca furtunul sã nu fie nici pliat nici îndoit.
Presiunea apei de la robinet trebuie sã fie cuprinsã
în valorile din tabelul Date tehnice (a se vedea
pagina alãturatã).
Dacã lungimea furtunului de alimentare nu este
suficientã, adresaþi-vã unui magazin specializat sau
unui instalator autorizat.
Nu folosiþi niciodatã tuburi folosite deja.
Utilizaþi tuburile furnizate împreunã cu maºina.
14
Page 15
Conectarea furtunului de golire
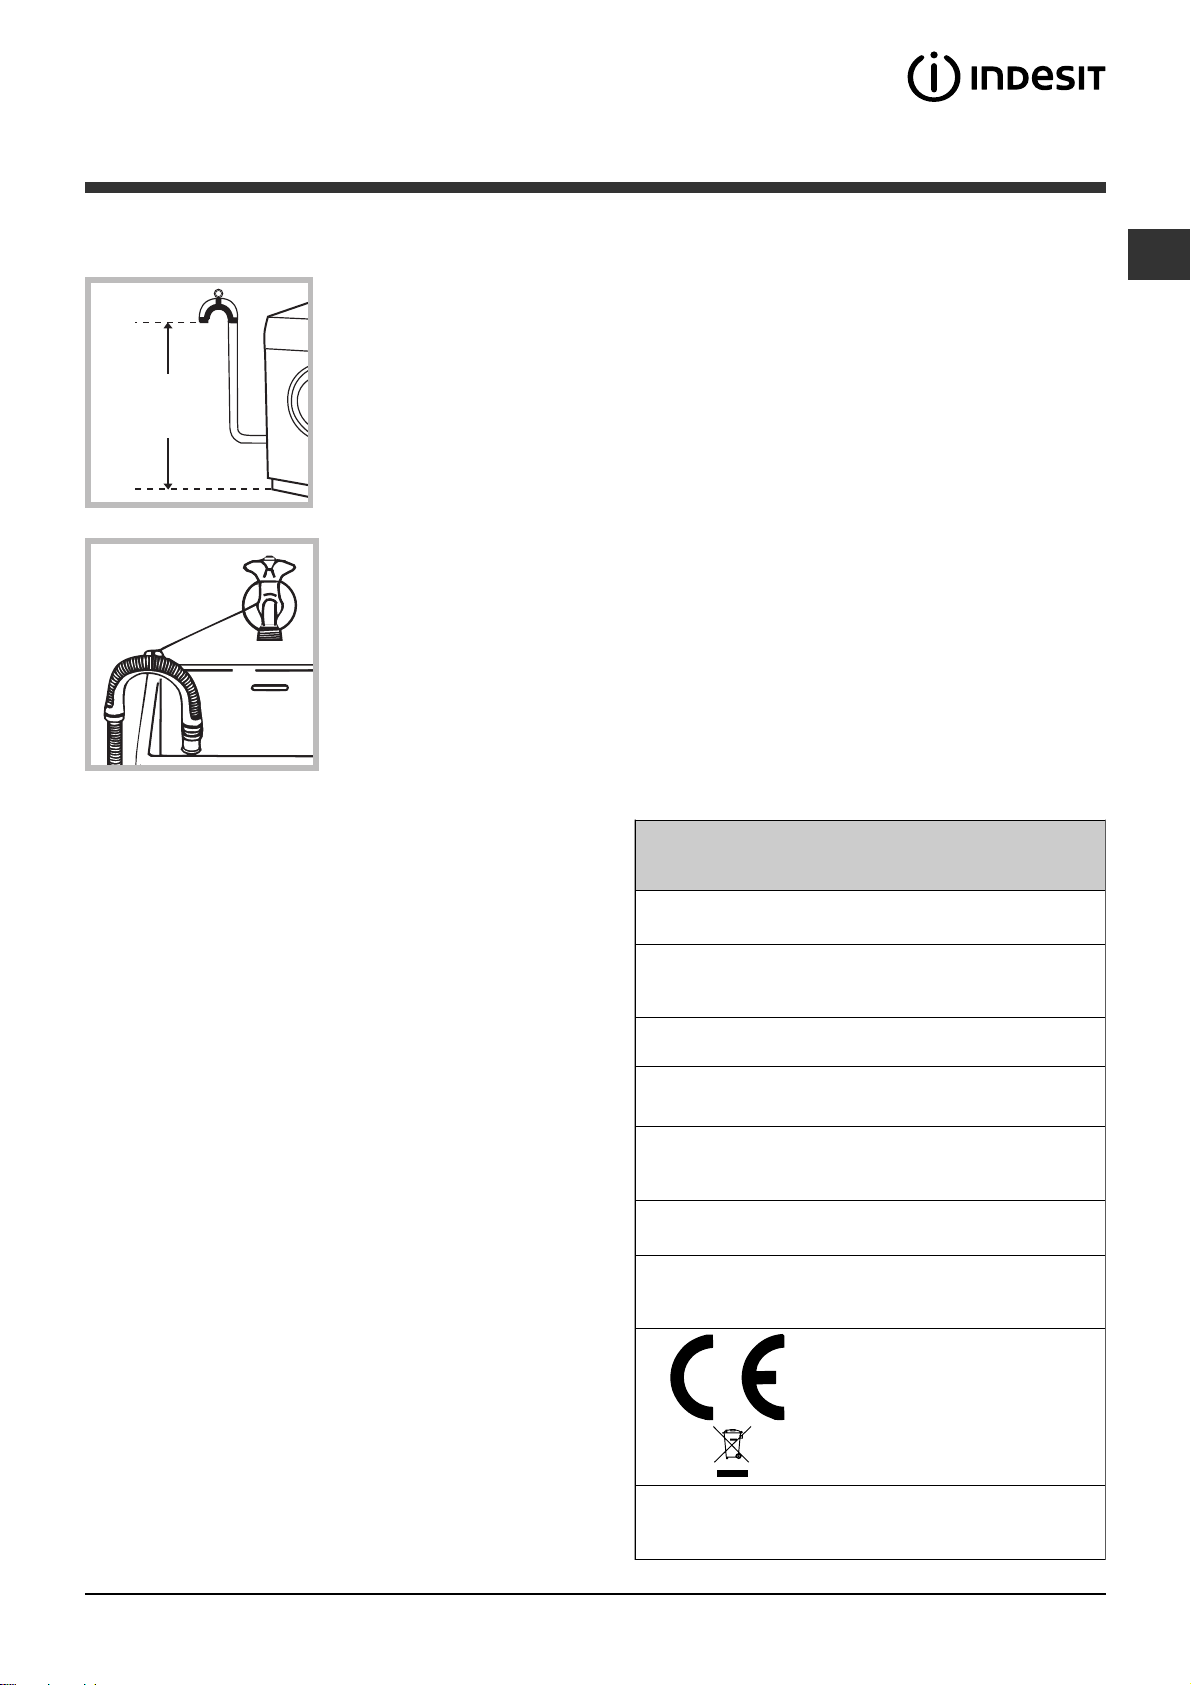
65 - 100 cm
Conectaþi furtunul de
golire - fãrã a-l îndoi - la
canalizare sau la
racordul de golire
prevãzut pe perete, la o
înãlþime de 65 - 100 cm
de sol;
Nu folosiþi prelungitoare ºi prize multiple.
RO
Cablul nu trebuie sã fie îndoit sau comprimat.
Cablul de alimentare trebuie sã fie înlocuit doar de
tehnicieni autorizaþi ai centrului de service ce apare
scris pe certificatul de garantie emis de producator.
Atenþie! Producãtorul îºi declinã orice
responsabilitate în cazul în care aceste norme nu se
respectã.
Sprijiniþi-l de marginea
cãzii sau chiuvetei ºi
racordaþi ºina de ghidare
din dotare la robinet (a
se vedea figura).
Capãtul liber al
furtunului de golire nu
trebuie sã rãmânã
cufundat în apã.
Nu se recomandã folosirea furtunurilor
prelungitoare; dacã este indispensabil, acestea
trebuie sã aibã acelaºi diametru ca ºi furtunul
original ºi nu trebuie sã depãºeascã 150 cm
lungime.
Racordarea electricã
Înainte de a introduce stecherul în prizã, asiguraþi-vã ca:
priza sã fie cu împãmântare ºi conform
prevederilor legale;
priza sã poatã suporta sarcina maximã de putere
a maºinii, indicatã în tabelul Date Tehnice
(a se vedea alãturi);
tensiunea de alimentare sã fie cuprinsã în valorile
indicate în tabelul Date Tehnice (a se vedea
alãturi);
priza sã fie compatibilã cu stecherul maºinii de
spãlat. În caz contrar înlocuiþi stecherul.
Maºina de spãlat nu trebuie instalatã afarã, nici
chiar în cazul în care spaþiul este adãpostit,
deoarece este foarte periculoasã expunerea maºinii
la ploi ºi furtuni.
Primul ciclu de spãlare
Dupã instalare, înainte de folosire, efectuaþi un ciclu
de spãlare cu detergent ºi fãrã rufe, selectând
programul 2.
Date tehnice
Model
Dimensiuni
Capacitate
Legãturi electrice
Legãturi hidrice
Turaþia de
centrifugare
Programe de control
în baza normei
EN 60456
IWB 5065
lãrgime: 59,5 cm
înãlþime: 85 cm
profunzime: 52,5 cm
de la 1 la 5 kg
vezi eticheta cu caracteristicile tehnice,
aplicatã pe maºinã
presiune maximã: 1 MPa (10 bari)
presiune minimã: 0,05 MPa (0,5 bari)
capacitatea cuvei: 46 litri
pânã la 600 de rotaþii pe minut
programul 2; temperatura 60°
efectuatã cu 5 kg de rufe.
Acest aparat este conform cu
urmãtoarele Directive Comunitare:
- 89/336/CEE din data de 03/05/89
(Compatibilitate Electromagneticã) ºi
modificãri succesive
- 2002/96/CE
- 2006/95/CE (Tensiuni Joase)
C;
Dupã instalarea maºinii de spãlat, priza de curent
trebuie sã fie uºor accesibilã.
Zgomot
(dB(A) re 1 pW)
Spãlare: 66
Turaþie de centrifugare: 70
15
Page 16
Descrierea maºinii de spãlat ºi
activarea unui program
RO
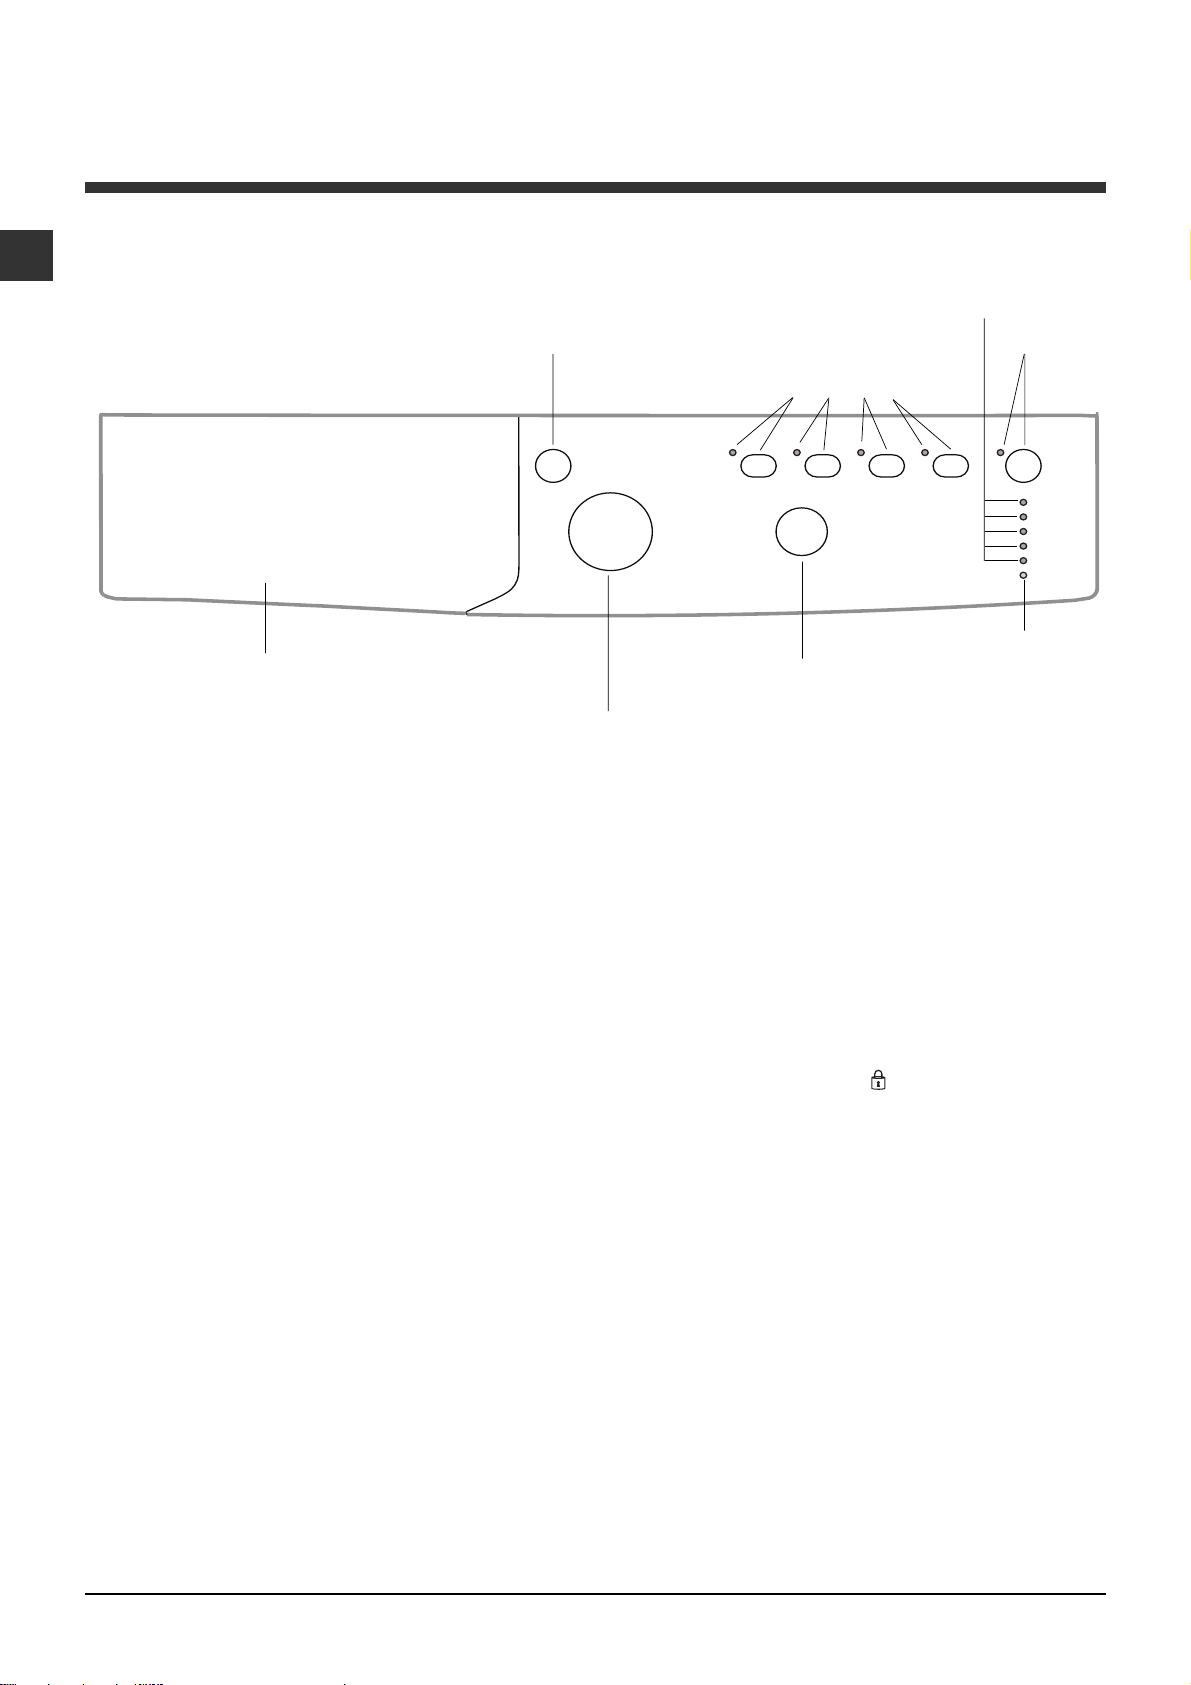
Panoul de control
Sertarul detergenþilor
PORNIRE/OPRIRE
Tasta
PROGRAME
Selector
TEMPERATURÃ
Selector
Indicatoare
DESFêURARE CICLU/
PORNIRE ÎNTÂRZIATÃ
Taste cu led
FUNCÞII
Tastã cu led
START/
PAUZÃ
Indicator
UªÃ BLOCATÃ
Sertarul detergenþilor: pentru a introduce
detergenþi sau aditivi (a se vedea Detergenþi ºi rufe
albe).
Tasta PORNIRE/OPRIRE: pentru a porni ºi opri
maºina.
Selector PROGRAME: pentru a selecta programele.
Pe durata desfãºurãrii programului selectorul rãmâne
în aceeaºi poziþie.
Taste cu led FUNCÞII: pentru a selecta funcþiile
disponibile. Indicatorul corespunzãtor funcþiei alese
va rãmâne aprins.
Selector TEMPERATURÃ: pentru a selecta temperatura sau spãlarea la rece (a se vedea Personalizare).
Indicatoare DESFêURARE CICLU/PORNIRE
ÎNTÂRZIATÃ: pentru a putea urmãri avansarea
programului de spãlare.
Indicatorul aprins aratã faza în curs de desfãºurare.
Dacã a fost selectatã funcþia Pornire întârziatã, va
fi indicat timpul care lipseºte pânã la pornirea
programului (a se vedea pag. alãturatã).
Indicator UªÃ BLOCATÃ: pentru a înþelege dacã uºa
se poate deschide sau nu (a se vedea pag. alãturatã).
Tastã cu led START/PAUZÃ: pentru a activa / opri
momentan programele.
N.B.: pentru a întrerupe momentan un ciclu apãsaþi
aceastã tastã; ledul se va aprinde intermitent
(culoare portocalie) în timp ce ledul corespunzãtor
fazei în curs de desfãºurare va rãmâne aprins. Dacã
indicatorul UªÃ BLOCATÃ
se poate deschide.
Pentru a continua spãlarea, de unde a fost
întreruptã, apãsaþi din nou tasta.
Modalitatea de stand by
Aceasta masina de spalat rufe, conform noilor
norme legate de economia de curent electric, este
dotata cu un sistem de oprire automat (stand-by)
care intra în functiune dupa câteva minute de
neutilizare. Apasati scurt tasta ON-OFF si asteptati
repunerea în functiune a masinii.
este stins, atunci uºa
16
Page 17
Indicatoare luminoase
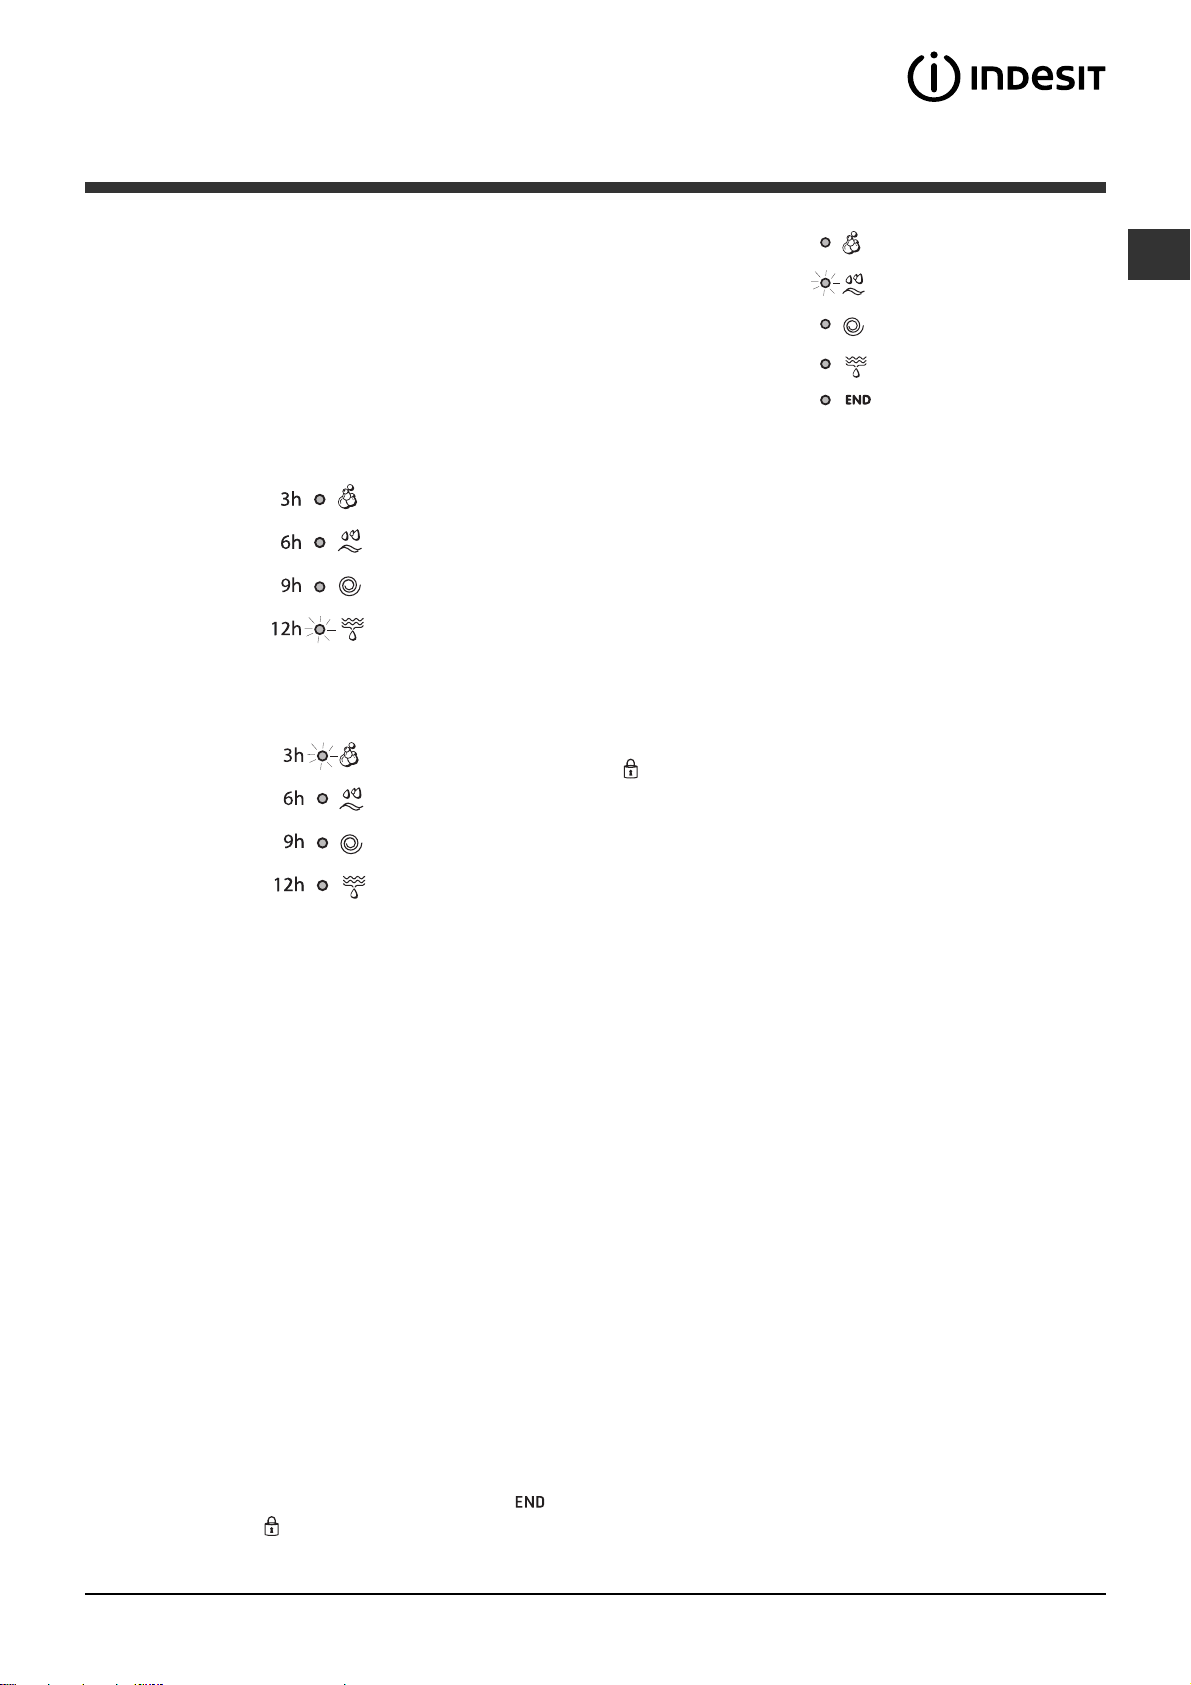
Ledurile furnizeazã informaþii importante.
Iatã ce indicã:
Pornire întârziatã
Dacã a fost activatã funcþia Pornire întârziatã (a se
vedea Personalizare), dupã activarea programului, se
va aprinde intermitent ledul corespunzãtor
întârzieriiselectate:
Cu trecerea timpului, se va vizualiza întârzierea
restantã, prin aprinderea intermitentã a ledului
respectiv.
Dupã trecerea intervalului de întârziere programat, va
începe programul.
Spãlare
Clãtire
Centrifugã
Golire
Sfârºit Spãlare
Tastele de funcþii ºi ledurile corespunzãtoare
Alegerea unei funcþii implicã aprinderea ledului
corespunzãtor.
Dacã funcþia selectatã nu este compatibilã cu
programul ales, ledul corespunzãtor se va aprinde
intermitent iar funcþia nu se va activa.
Dacã funcþia aleasã nu este compatibilã cu o funcþie
selectatã anterior, indicatorul care corespunde
primei funcþii va emite un semnal intermitent iar
indicatorul celei de a doua se va aprinde: acest lucru
înseamnã cã se va activa numai a doua funcþie
(ultima aleasã).
Indicator uºã blocatã:
Aprinderea ledului indicã faptul cã hubloul s-a
blocat, pentru a împiedica deschiderea sa; pentru a
putea deschide hubloul, aºteptaþi aproximativ 3
minute, pânã la stingerea ledului. Pentru a deschide
hubloul în timpul executãrii unui ciclu, apãsaþi tasta
PORNIRE/PAUZÃ; dacã ledul UªÃ BLOCATà este
stins, atunci puteþi deschide hubloul.
RO
Indicatoare de fazã
Dupã alegerea ºi activarea ciclului dorit, indicatoarele
luminoase se vor aprinde unul dupã altul, ceea ce vã
indicã starea de avansare a programului:
Activarea unui program
1. Porniþi maºina de spãlat apãsând pe tasta PORNIRE/OPRIRE. Toate indicatoarele se aprind câteva secunde,
apoi se sting; indicatorul START/PAUZÃ se va aprinde intermitent.
2. Introduceþi rufele ºi închideþi uºa.
3. Selectaþi programul dorit cu ajutorul selectorului de PROGRAME.
4. Reglaþi temperatura de spãlare (a se vedea Personalizare).
5. Adãugaþi detergentul ºi aditivii (a se vedea Detergenþi ºi rufe).
6. Alegeþi funcþiile dorite.
7. Activaþi programul apãsând tasta START/PAUZÃ; indicatorul luminos se va aprinde (culoare verde).
Pentru a anula un ciclu selectat, apãsaþi tasta START/PAUZÃ pentru a întrerupe momentan ciclul ºi alegeþi un
nou program.
8. La încheierea programului, indicatorul luminos
de UªÃ BLOCATA
putea usca cuva si tamburul. Opriti maºina de spãlat apãsând pe tasta PORNIRE/OPRIRE.
, este posibilã deschiderea hubloului. Scoateþi rufele ºi lãsaþi uºa întredeschisã pentru a se
se va aprinde. Dupã stingerea ledului corespunzãtor avertizãrii
17
Page 18
Programe
RO
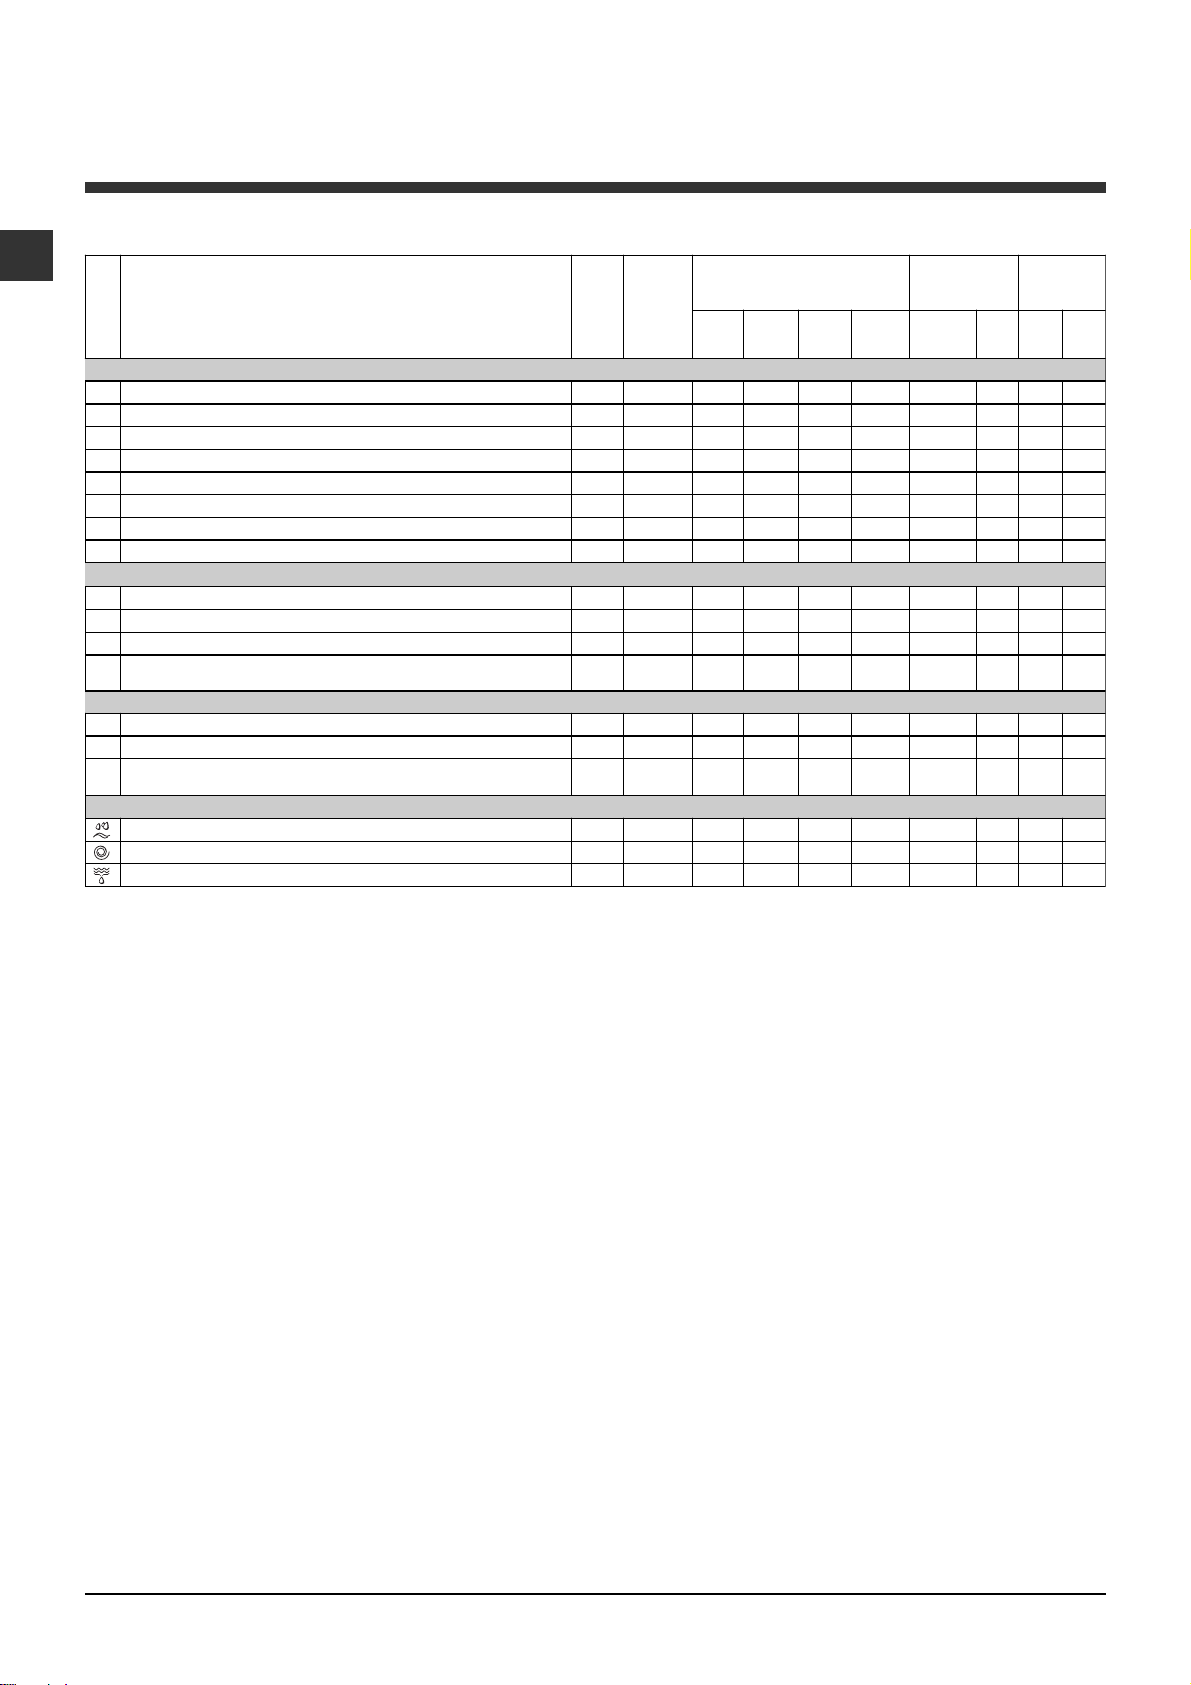
Tabel de programe
Descrierea Programului
Programe
Programe zilnice
PRESPALARE BUMBAC:
1
RUFE ALBE BUMBAC:
2
RUFE ALBE BUMBAC (1):
2
RUFE ALBE BUMBAC (2):
2
RUFE ALBE BUMBAC:
3
COLORATE BUMBAC (3):
4
SINTETICE:
5
SINTETICE:
6
Programe Speciale
LÂNÃ:
7
MÃTASE /PERDELE:
8
JEANS
9
EXPRESS:
10
indicat pentru lânã, mãtase ºi articole de spãlat cu mâna).
Sport
Sport Intensive
11
Sport Light
12
Sport Shoes
13
Programe parþiale
CLÃTIRE
CENTRIFUGARE
EVACUARE
Colorate rezistente foarte murdare.
Colorate delicate putin murdare.
Pentru articole din lânã, caºmir.
Pentru a împrospãta rapid articolele puþin murdare (nu este
Rufe albe foarte murdare.
Rufe albe foarte murdare.
Albe ºi colorate rezistente foarte murdare.
Albe ºi colorate delicate foarte murdare.
Albe ºi colorate rezistente foarte murdare.
Albe puþin murdare ºi colorate delicate.
Pentru articolele din mãtase, viscozã, lenjerie.
Te mp .
max.
(°C)
90°
90°
60°
40°
60°
40°
60°
40°
40°
30°
40°
30°
30°
30°
30°
-
-
-
Viteza
max.
(rotaþii pe
minu t)
600
600
600
600
600
600
600
600
600
0
600
600
600
600
600
600
600
0
Detergenþi
Pres-
pãlare
ll
-
-
-
-
-
-
-
-
-
-
-
-
-
-
- -
- - - -
- - - -
Decolo-
Spãlare
rant
-
ll l
ll l
ll l
ll l
ll l
ll l
ll l
l
-
l
-
l
-
l
-
l
-
l
-
l
-
ll
Balsam
rufe
l
l
l
l
l
l
l
l
Eco
Time
-
-
-
-
-
-
-
-
-
-
-
-
-
-
Durata
ciclului de
spãlare
Normalã
Time
171
155
133
147
55
55
70
15
78
68
50
36
16
2
Sarcina Max.
(Kg)
Normalã
5
5
5
5
53,25130104
53,259271
2,5 2 85 72
2,5 2 70 60
1
1
3
1,5
3
3
Max 2
(
perechi.)
5
5
5
Eco
-
-
-
-
-
-
-
-
-
-
-
-
-
-
Datele specificate în tabel au valoare indicativã.
Pentru toate Instituþiile de Testare:
1) Programul de control conform normei EN60456: selectaþi programul 2 ºi temperatura de 60°C.
2) Program pentru bumbac, prelungit: selectaþi programul 2 ºi temperatura de 40°C.
3) Program
pentru
bumbac, rapid: selectaþi programul 4 ºi temperatura de 40°C.
Programe speciale
Express (programul 10) a fost studiat pentru a spãla articolele foarte puþin murdare, în mod rapid: dureazã doar
15 de minute ceea ce economiseºte energie ºi timp. Selectând programul (10 la 30°C) este posibilã spãlarea
articolelor din materiale diferite (excluse lâna ºi mãtasea) cu o greutate maximã de 1,5 kg.
Sport Intensive (programul 11) a fost studiat pentru spãlarea þesãturilor utilizate la confecþionarea hainelor
sportive (echipamente, pantaloni scurþi etc.) foarte murdare; pentru cele mai bune rezultate, se recomandã sã
nu depãºiþi cantitatea maximã admisã indicatã în Tabel de programe.
Sport Light (programul 12) a fost studiat pentru spãlarea þesãturilor utilizate la confecþionarea hainelor sportive
(echipamente, pantaloni scurþi etc.) puþin murdare; pentru cele mai bune rezultate, se recomandã sã nu depãºiþi
cantitatea maximã admisã indicatã în Tabel de programe. Se recomandã utilizarea detergentului lichid într-o
cantitate adecvatã unei încãrcãri pe jumãtate a maºinii.
Sport Shoes (programul 13) a fost studiat pentru spãlarea pantofilor de sport; pentru cele mai bune rezultate,
nu spãlaþi mai mult de 2 perechi deodatã.
18
Page 19
Personalizare
Reglarea temperaturii
Rotind selectorul de TEMPERATURÃ se fixeazã temperatura de spãlare (a se vedea Tabelul programelor).
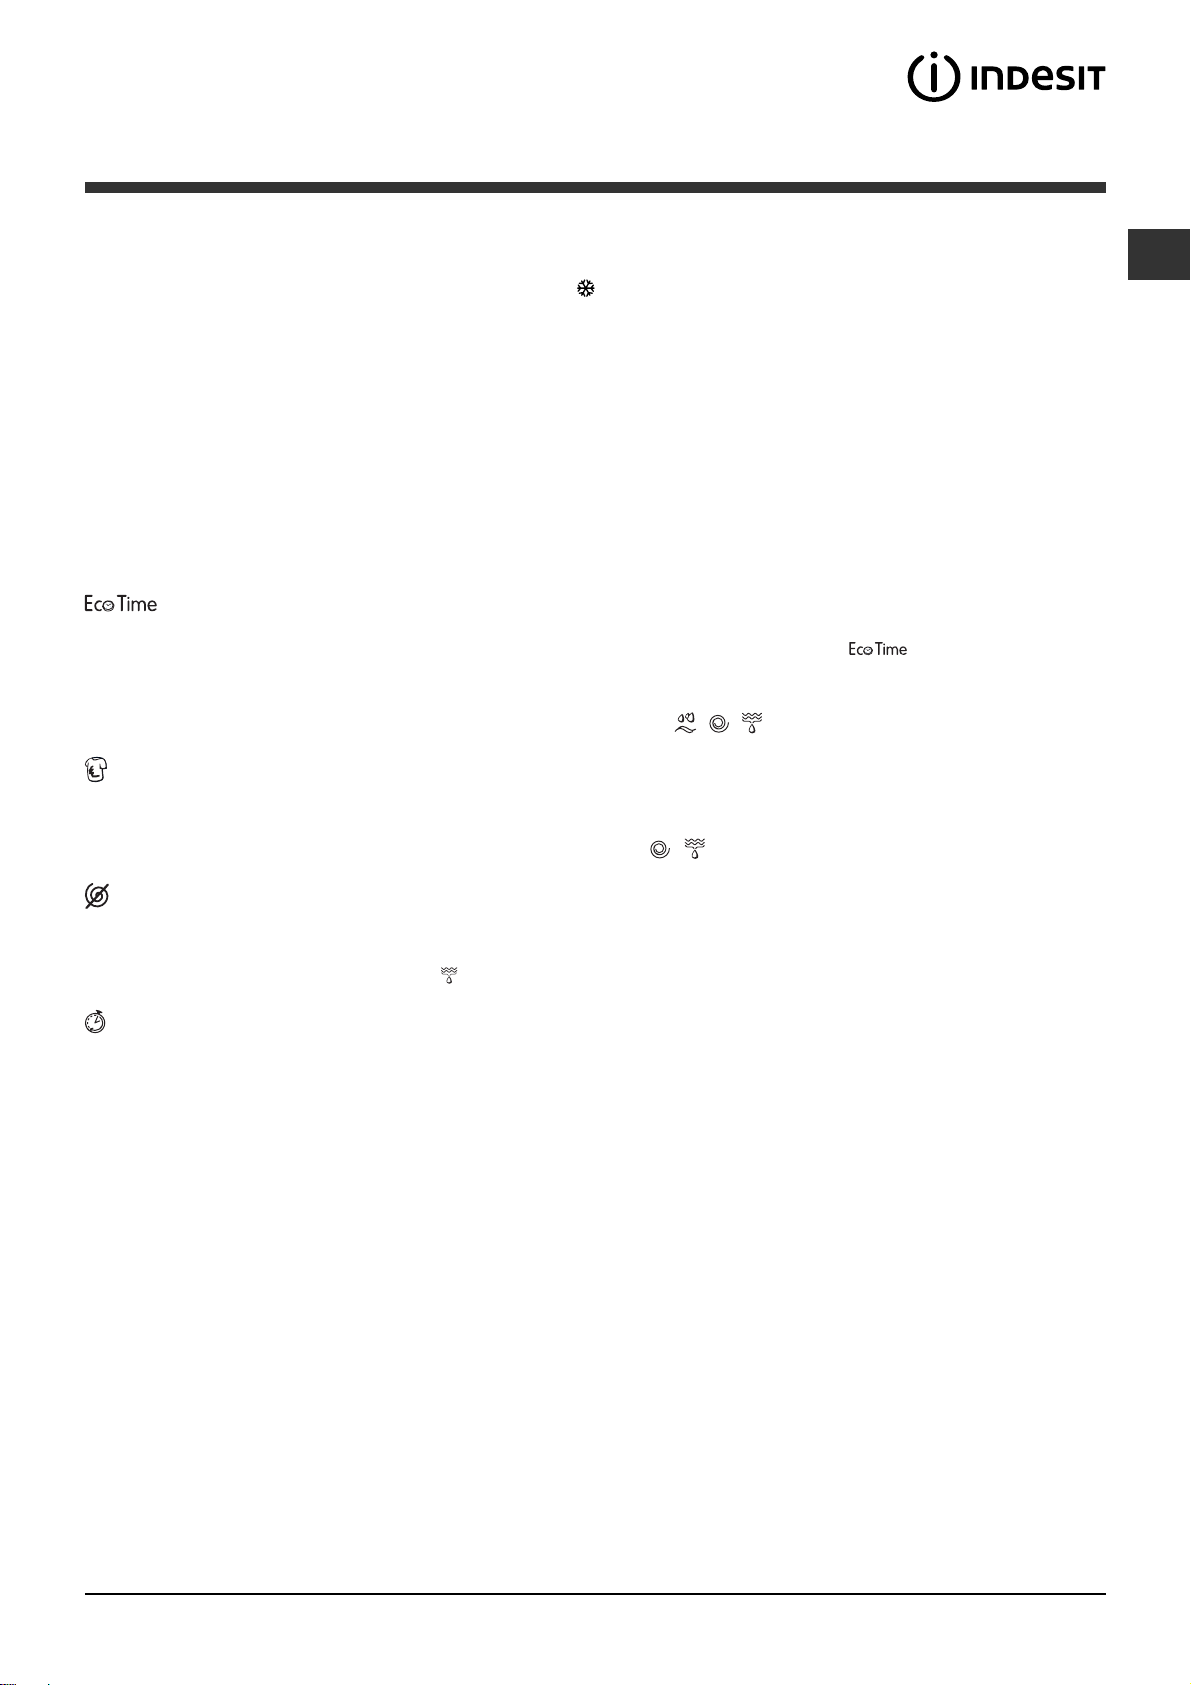
Temperatura poate fi redusã pânã la spãlarea la rece (
Maºina va împiedica în mod automat de a alege o temperaturã mai mare decât maxima admisã pentru fiecare program.
).
Funcþii
Diferitele funcþii de spãlare prevãzute pentru maºina de spãlat, permit obþinerea unor rufe curate ºi albe, dupã
dorinþã.
Pentru a activa funcþiile:
1. apãsaþi tasta corespunzãtoare funcþiei dorite;
2. aprinderea ledului respectiv indicã activarea funcþiei.
Notã: Semnalul luminos intermitent, rapid, indicã faptul cã funcþia respectivã nu este compatibilã cu programul
ales.
Prin selectarea acestei opþiuni, miºcarea mecanicã, temperatura ºi apa sunt optimizate pentru o cantitate
scãzutã de þesãturi de bumbac ºi sintetice puþin murdare Tabel de programe. Cu
mai scurt, economisind apã ºi energie. Se recomandã utilizarea unei cantitãþi de detergent lichid adecvatã
cantitãþii de rufe.
Nu poate fi activatã pe programele 1, 2, 7, 8, 9, 10, 11, 12, 13, , , .
Antipatã
Ciclu de decolorare adecvat pentru eliminarea petelor mai rezistente. A se vãrsa decolorantul în sertarul
adiþional 4 (a se vedea Ciclu de albire).
Nu se poate activa pe programele 1, 7, 8, 9, 10, 11, 12, 13, , .
puteþi spãla în timp
RO
Excluderea Centrifugii
Maºina de spãlat nu efectueazã centrifugarea, ci o rotire a tamburului la o vitezã moderatã pentru a facilita
evacuarea apei. Este recomandatã când se spalã rufe greu de cãlcat.
Nu poate fi activatã pe programele 8, .
Pornirea întârziatã
Întârzie pornirea maºinii cu pânã la 12 de ore.
Apãsaþi de mai multe ori pânã la aprinderea butonului cu întârzierea doritã. La a cincea apãsare a tastei, funcþia se
va dezactiva.
N.B.: Dupã apãsarea butonului START/PAUZÃ, se va putea modifica întârzierea doar diminuând-o, pânã la pornirea
programului dorit.
Se poate activa pe toate programele.
19
Page 20
Detergenþi ºi rufe albe
RO
Compartimentul pentru detergenþi
Un rezultat bun la spãlare depinde ºi de dozarea
corectã a detergentului: excesul de detergent nu
garanteazã o spãlare mai eficientã, ci contribuie la
deteriorarea pãrþilor interne ale maºinii de spãlat ºi
la poluarea mediului înconjurãtor.
Nu introduceþi în maºinã detergenþii pentru
spãlarea manualã deoarece formeazã prea multã
spumã.
Deschideþi
4
3
compartimentul pentru
detergenþi ºi introduceþi
detergentul sau aditivul
dupã cum urmeazã:
2
1
compartiment 1: Detergent pentru prespãlare
(sub formã de praf)
Înainte de a adãuga detergentul verificaþi ca sertarul
adiþional 4 sã nu fie introdus.
compartiment 2: Detergent pentru spãlare
(sub formã de praf sau lichid)
Detergentul lichid trebuie vãrsat doar înainte de pornire.
compartiment 3: Aditivi
(soluþie de înmuiat, balsam rufe etc.)
Soluþia de înmuiat nu trebuie sã iasã deasupra
grãtarului.
compartiment adiþional 4: Decolorant (Inãlbitor)
Pregãtirea rufelor
Sortaþi rufele în funcþie de:
- tipul de material / simbolul de pe etichetã.
- culori: separaþi rufele colorate de cele albe.
Goliþi buzunarele ºi controlaþi nasturii.
Nu depãºiþi valorile indicate, referitoare la
greutatea rufelor uscate:
Þesãturi rezistente: max 5 kg
Materiale sintetice: max 2,5 kg
Þesãturi delicate: max 2 kg
Lânã: max 1 kg
Cât cântãresc rufele?
1 cearceaf 400-500 g.
1 faþã de pernã 150-200 g.
1 faþã de masã 400-500 g.
1 halat de baie 900-1.200 g.
1 prosop 150-250 g.
Articole delicate
Lânã: cu programul 7 se pot spãla cu maºina toate
hainele de lânã, inclusiv cele cu eticheta a se spãla
numai manual
rezultate, folosiþi un detergent specific ºi nu depãºiþi
1 kg de rufe.
Mãtase: utilizaþi programul special 8 pentru spãlarea
articolelor din mãtase. Se recomandã folosirea unui
detergent special pentru articole delicate.
Perdele:
sau într-un sac de tip plasã. Utilizaþi programul 8.
Jeans: întoarceþi pe dos rufele înainte de spãlare ºi
utilizaþi un detergent lichid. Utilizaþi programul 9.
împãturiþi-le ºi aºezaþi-le într-o faþã de pernã
. Pentru a obþine cele mai bune
Ciclu de albire
Decolorantul tradiþional se foloseºte pentru
þesãturi rezistente albe, cel delicat pentru þesãturi
colorate, sintetice ºi pentru lânã.
Introduceþi sertarul adiþional 4, aflat în dotare, în
sertarul 1.
Când dozaþi decolorantul
nu depãºiþi nivelul max
indicat pe pivotul central
(vezi figura).
Pentru efectuarea doar a
decolorãrii, vãrsaþi
decolorantul în sertarul
adiþional 4, selectaþi programul Clãtire
opþiunea Antipatã
Pentru albirea în timpul spãlãrii, vãrsaþi detergentul
ºi aditivii, selectaþi programul dorit ºi activaþi
opþiunea Antipatã
Folosirea sertarului adiþional 4 exclude prespãlarea.
.
.
ºi activaþi
Sistemul de echilibrare a încãrcãturii
Pentru a evita trepidaþiile excesive, înainte de
stoarcere, cuva maºinii va distribui cantitatea de rufe
în mod uniform, centrifuga efectuând câteva rotaþii la
o vitezã mai mare decât viteza de spãlare. Dacã,
dupã numeroase încercãri, maºina nu reuºeºte sã
echilibreze greutatea, stoarcerea rufelor se va face
la o vitezã mai micã decât cea prevãzutã în program.
Dacã instabilitatea este prea mare, maºina va
distribui greutatea în locul centrifugei. Pentru a
favoriza o mai bunã repartizare a rufelor ºi
echilibrarea corectã a maºinii, se recomandã sã
introduceþi în maºinã atât articole mari cât ºi mici.
20
Page 21
Precauþii ºi sfaturi
Maºina de spãlat a fost proiectatã ºi construitã
conform normelor internaþionale de protecþie. Aceste
avertizãri sunt furnizate din motive de siguranþã ºi
trebuie sã fie citite cu atenþie.
Norme de protecþie ºi siguranþã generale
Acest aparat a fost conceput exclusiv pentru
utilizarea în locuinþe unifamiliale.
Maºina de spãlat trebuie sã fie folositã doar de
persoane adulte care respectã instrucþiunile din acest
manual.
Nu atingeþi maºina când sunteþi desculþi sau cu
mâinile sau picioarele ude sau umede.
Nu scoateþi stecherul din prizã trãgând de cablu.
Nu deschideþi compartimentul pentru detergent în
timp ce maºina se aflã în funcþiune.
Nu atingeþi apa golitã din maºinã: poate avea o
temperaturã ridicatã.
Nu forþaþi în nici un caz uºa: s-ar putea deteriora
mecanismul de siguranþã care evitã deschiderea
accidentalã.
În caz de defecþiune, nu umblaþi în nici un caz la
mecanismele din interior ºi nu încercaþi sã o reparaþi
singuri.
Controlaþi mereu ca în apropierea maºinii aflate în
funcþiune, sã nu se afle copii.
Pe durata spãlãrii uºa se poate încãlzi.
Dacã trebuie sã deplasaþi maºina, cereþi ajutor unei
alte (sau 2) persoane ºi fiþi foarte atenþi. Niciodatã nu
deplasaþi maºina singuri deoarece aceasta este
foarte grea.
Înainte de a introduce rufele, controlaþi cuva sã fie
goalã.
Deschiderea manualã a uºii
Dacã nu este posibil sã deschideþi uºa din cauza
întreruperii curentului electric ºi doriþi totuºi sã
întindeþi rufele, procedaþi dupã cum urmeazã:
1. scoateþi stecherul din
prizã.
2. verificaþi ca nivelul de
apã din maºinã sã fie sub
20
marginea uºii; în caz
contrar, scoateþi apa în
exces cu ajutorul
furtunului de golire,
punând-o într-un vas, dupã
indicaþiile din figura.
3. scoateþi panoul de
acoperire din partea din
faþã a maºinii de spãlat
folosind o ºurubelniþã
(a se vedea figura).
RO
Aruncarea reziduurilor
Eliminarea ambalajelor: respectaþi normele locale, în
acest fel ambalajele vor putea fi utilizate din nou.
Directiva Europeanã 2002/96/CE cu privire la deºeurile
care provin de la aparatura electricã sau electronicã
prevede ca aparatele electrocasnice sã nu fie colectate
împreunã cu deºeurile urbane solide, obiºnuite.
Aparatele scoase din uz trebuie sã fie colectate
separat atât pentru a optimiza rata de recuperare ºi de
reciclare a materialelor componente cât ºi pentru a
evita pericolele care pot duce la dãunarea sãnãtãþii
omului sau poluarea mediului înconjurãtor. Simbolul
tomberonului tãiat care apare pe toate produsele vã
aminteºte tocmai obligaþia de a le colecta separat.
Pentru informaþii suplimentare cu privire la scoaterea
din uz a electrocasnicelor, deþinãtorii acestora pot
apela la centrele de colectare a deºeurilor sau la
vânzãtorii de la care au achiziþionat produsele
respective.
4. utilizând dispozitivul indicat în figurã, trageþi spre
dumneavoastrã pânã când eliberaþi tirantul de plastic
din opritor; trageþi apoi în jos ºi, în acelaºi timp,
deschideþi uºa.
5. montaþi din nou panoul verificând, înainte de a-l
împinge spre maºinã, de a fi introdus cârligele în
orificiile respective.
21
Page 22
Întreþinere ºi curãþare
RO
Întreruperea alimentãrii cu apã ºi
curent electric
Închideþi robinetul de apã dupã fiecare spãlare.
Se limiteazã astfel uzura instalaþiei hidraulice a
maºinii de spãlat ºi se eliminã pericolul
scurgerilor.
Scoateþi stecherul din priza de curent atunci
când curãþaþi maºina de spãlat ºi când se
efectueazã lucrãri de întreþinere.
Curãþarea maºinii de spãlat
Partea externã ºi pãrþile din cauciuc pot fi curãþate
cu o lavetã înmuiatã în apã cãlduþã ºi sãpun. Nu
folosiþi solvenþi sau substanþe abrazive.
Curãþarea compartimentului pentru
detergent
Trageti afara
compatimentul
ridicându-l si tragându-l
spre exterior (a se
vedea figura).
Spãlaþi-l sub un jet de
apã; aceastã operaþie
trebuie efectuatã cât
mai des posibil.
Curãþarea pompei
Maºina de spãlat este dotatã cu o pompã de
autocurãþare care nu are nevoie de întreþinere. Se
poate întâmpla însã ca unele obiecte mici (monede,
nasturi) sã cadã în anticamera care protejeazã
pompa, situatã în partea inferioarã a acesteia.
Verificaþi ca ciclul de spãlare sã fie încheiat ºi
scoateþi stecherul din prizã.
Pentru a avea acces la anticamerã:
1. scoateþi panoul de
acoperire din partea din
faþã a maºinii de spãlat
folosind o ºurubelniþã
(a se vedea figura);
2. deºurubaþi capacul
rotindu-l în sens invers
acelor de ceasornic (a
se vedea figura). Este
normal sã iasã puþinã
apã;
Îngrijirea uºii ºi a tamburului
Lãsaþi mereu uºa întredeschisã pentru a evita
formarea de mirosuri neplãcute.
22
3. curãþaþi cu grijã interiorul;
4. înºurubaþi la loc capacul;
5. montaþi din nou panoul verificând, înainte de a-l
împinge spre maºinã, de a fi introdus cârligele în
orificiile respective.
Controlarea furtunului de alimentare cu apã
Controlaþi tubul de alimentare cel puþin o datã pe an.
Dacã prezintã crãpãturi sau fisuri trebuie înlocuit: pe
parcursul spãlãrilor, presiunea puternicã ar putea
provoca crãpãturi neaºteptate.
Nu folosiþi niciodatã tuburi folosite deja.
Page 23

Anomalii ºi remedii
Se poate întâmpla ca maºina de spãlat sã nu funcþioneze. Înainte de a apela serviciul de Service
(a se vedea Asistenþã), verificaþi dacã nu este vorba de o problemã uºor de rezolvat:
Anomalii:
Maºina de spãlat nu porneºte.
Ciclul de spãlare nu porneºte.
Maºina de spãlat nu se
alimenteazã cu apã (ledul primei
faze de spãlare se aprinde
intermitent ºi rapid).
Maºina de spãlat încarcã ºi
descarcã apã continuu.
Cauze posibile / Rezolvare:
Stecherul nu este introdus în priza de curent, sau nu face contact.
Aveþi o panã de curent la domiciliu.
Uºa nu este bine închisã.
Tasta PORNIRE/OPRIRE nu a fost apãsatã.
Tasta START/PAUZÃ nu a fost apãsatã.
Robinetul de apã nu este deschis.
A fost fixatã o întârziere de pornire (a se vedea Personalizare).
Furtunul de alimentare cu apã nu este racordat la robinet.
Furtunul este îndoit.
Robinetul de apã nu este deschis
Apa la domiciliul dumneavoastrã.
Apa nu are presiune suficientã.
Tasta START/PAUZÃ nu a fost apãsatã.
Furtunul de golire nu a fost instalat la o înãlþime cuprinsã între 65 ºi
100 cm de pãmânt (a se vedea Instalare).
Capãtul furtunului de evacuare este cufundat în apã (a se vedea Instalare).
Evacuarea din perete nu are rãsuflare pentru aer.
Dacã dupã aceste verificãri problema nu se rezolvã, închideþi robinetul de apã,
opriþi maºina de spãlat ºi chemaþi Service-ul. Dacã locuinþa se aflã la ultimele
etaje ale unui edificiu, este posibil sã aibã loc fenomene de sifonare, motiv
pentru care maºina de spãlat încarcã ºi descarcã apã încontinuu. Pentru a
elimina acest inconvenient, se gãsesc în comerþ supape anti-sifonare.
RO
Maºina de spãlat nu se goleºte
sau nu stoarce.
Maºina de spãlat vibreazã foarte
mult în timpul stoarcerii.
Maºina de spãlat pierde apã.
Indicatoarele de "optiuni" si "start/
pauza" sunt intermitente; unul din
indicatoarele ptr. "faza în curs" si
"usa blocata" sunt aprinse.
Se formeazã prea multã spumã.
Programul nu prevede golirea apei: în cazul anumitor programe, este
necesarã activarea manualã.
Furtunul de golire este îndoit (a se vedea Instalare).
Conducta de descãrcare este înfundatã.
Cuva, în momentul instalãrii, nu a fost deblocatã în mod
corespunzãtor (a se vedea Instalare).
Maºina de spãlat este în pantã (a se vedea Instalare).
Maºina de spãlat este prea aproape de pereþi ºi mobilier (a se vedea
Instalare).
Furtunul de alimentare cu apã nu este bine înºurubat (a se vedea Instalare).
Compartimentul de detergenþi este înfundat (pentru a-l curãþa a se vedea
Întreþinere ºi curãþare).
Furtunul de golire nu este bine fixat (a se vedea Instalare).
Opriþi maºina ºi scoateþi stecherul din prizã; aºteptaþi aproximativ 1
minut înainte de a o reaprinde.
Dacã nu obþineþi nici un rezultat, apelaþi Centrul de service pentru
asistenþã.
Detergentul nu este compatibil cu maºina de spãlat (trebuie sã fie
scris pentru maºina de spãlat, de mânã sau în maºina de spãlat,
sau ceva asemãnãtor).
Dozajul a fost excesiv.
23
Page 24

Asistenþã
195073450.01
11/2008 - Xerox Business Services
RO
Înainte de a lua legãtura cu Service-ul:
Verificaþi dacã puteþi rezolva singuri problema (a se vedea Anomalii ºi remedii);
Porniþi din nou programul pentru a controla dacã inconvenientul a fost eliminat;
În caz negativ, luaþi legãtura cu asistenþa tehnicã autorizatã la numãrul telefonic indicat pe certificatul de
garanþie.
Nu apelaþi niciodatã la persoane neautorizate.
Comunicaþi:
tipul de anomalie;
modelul maºinii (Mod.);
numãrul de serie (S/N).
Aceste informaþii sunt specificate pe plãcuþa cu date tehnice, lipitã în partea din spate a maºinii de spãlat
precum ºi în partea anterioarã, dupã ce deschideþi uºa.
24
 Loading...