

Page 1

Instructions for use
WASHING MACHINE
GB
English,1
IWB 6065
I
ЕЛЛЗНЙКБ,13GRItaliano,25
Contents
GB
Installation, 2-3
Unpacking and levelling
Connecting the electricity and water supplies
The first wash cycle
Technical data
Description of the washing machine
and starting a wash cycle, 4-5
Control panel
Indicator lights
Starting a wash cycle
Wash cycles, 6
Table of wash cycles
Personalisation, 7
Setting the temperature
Functions
Detergents and laundry, 8
Detergent dispenser drawer
Bleach cycle
Preparing the laundry
Garments requiring special care
Load balancing system
Precautions and tips, 9
General safety
Disposal
Opening the porthole door manually
Care and maintenance, 10
Cutting off the water or electricity supply
Cleaning the washing machine
Cleaning the detergent dispenser drawer
Caring for the door and drum of your appliance
Cleaning the pump
Checking the water inlet hose
Troubleshooting, 11
Service, 12
1
Page 2
Installation
GB
This instruction manual should be kept in a safe
place for future reference. If the washing machine is
sold, transferred or moved, make sure that the
instruction manual remains with the machine so that
the new owner is able to familiarise himself/herself
with its operation and features.
Read these instructions carefully: they contain vital
information relating to the safe installation and
operation of the appliance.
Unpacking and levelling
Unpacking
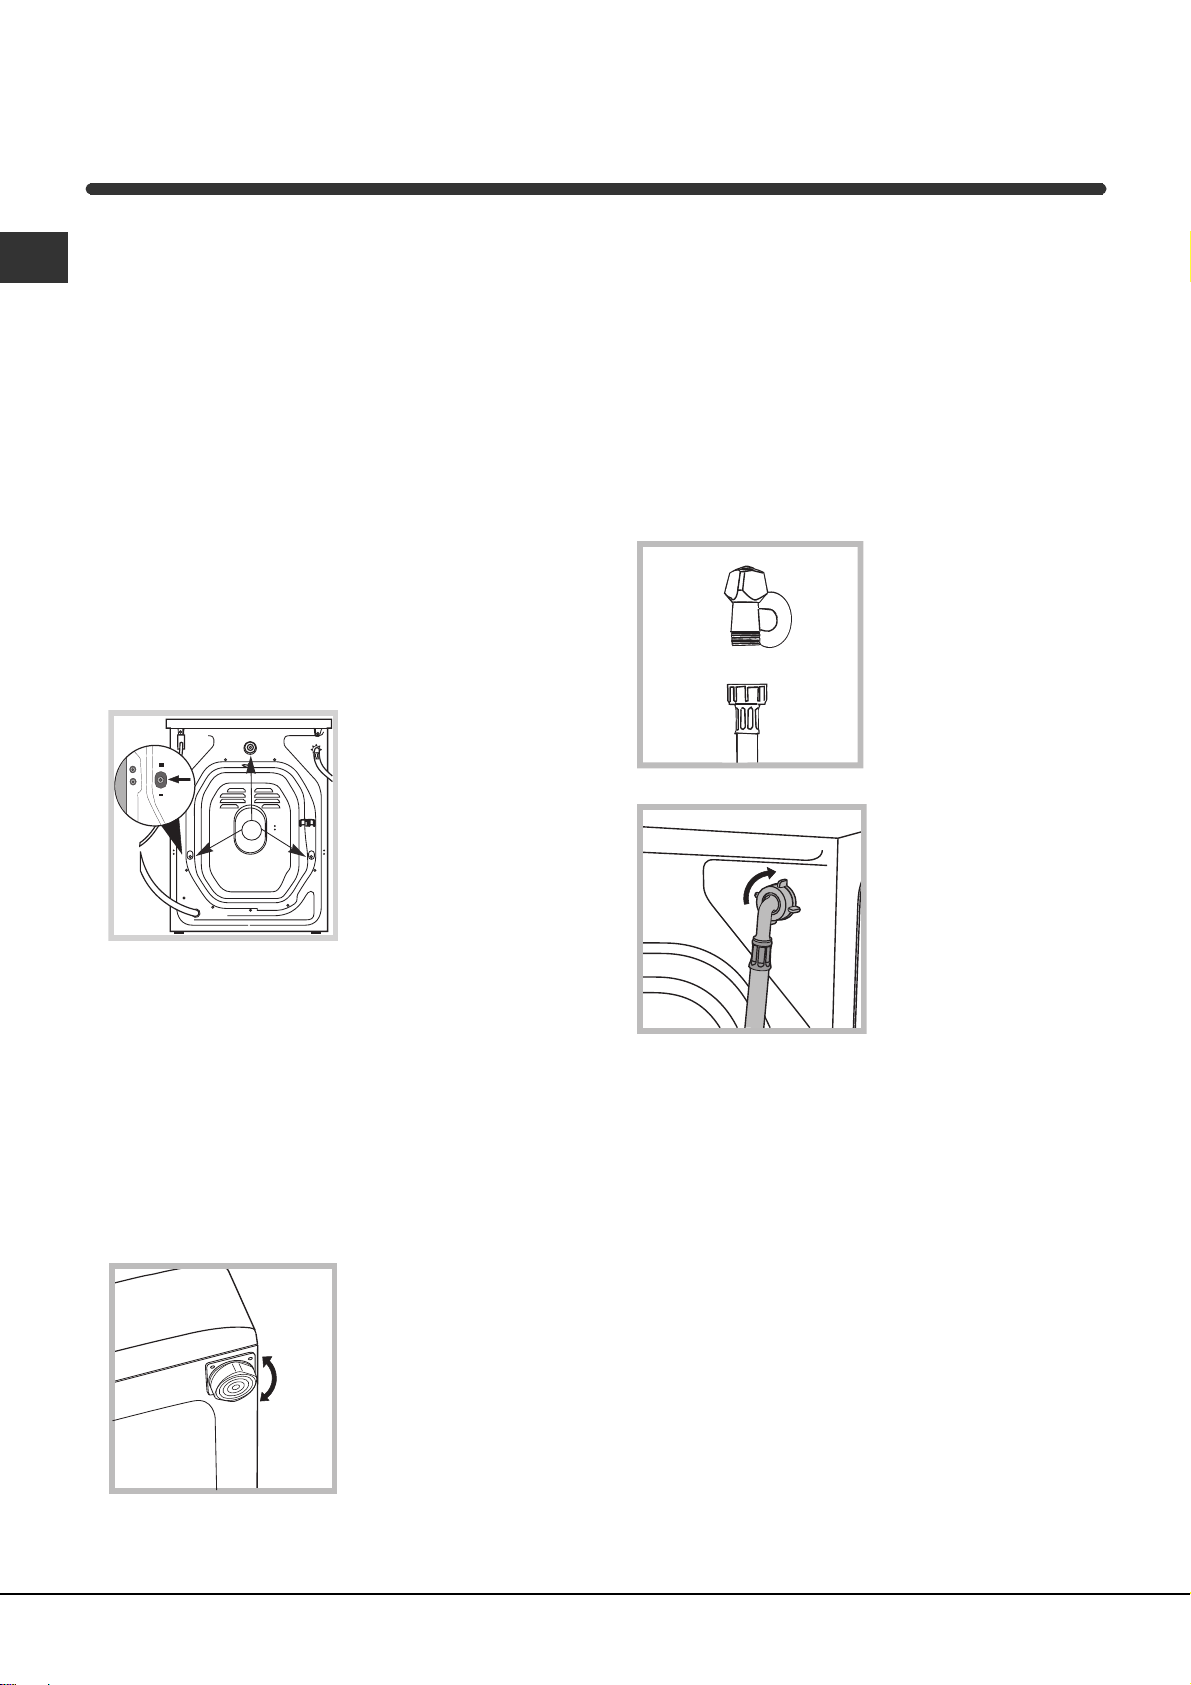
1. Remove the washing machine from its packaging.
2. Make sure that the washing machine has not been
damaged during the transportation process. If it has
been damaged, contact the retailer and do not
proceed any further with the installation process.
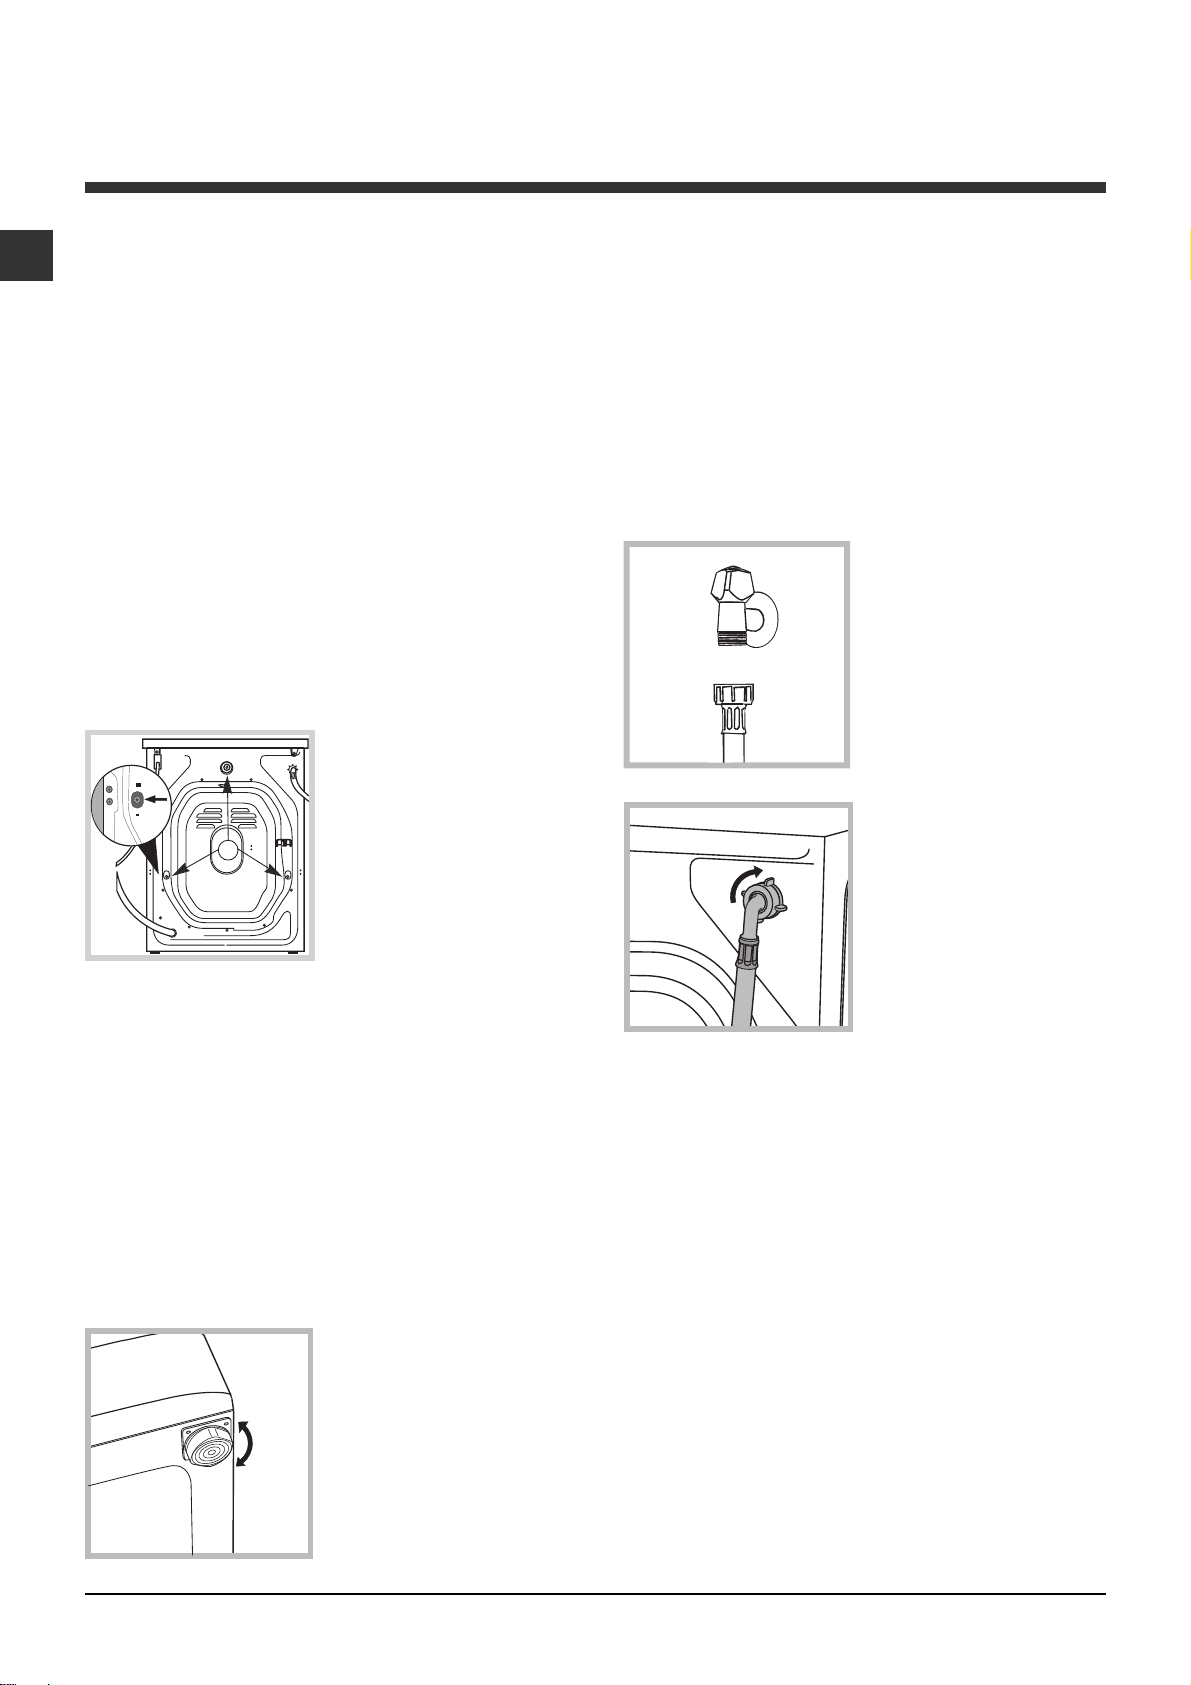
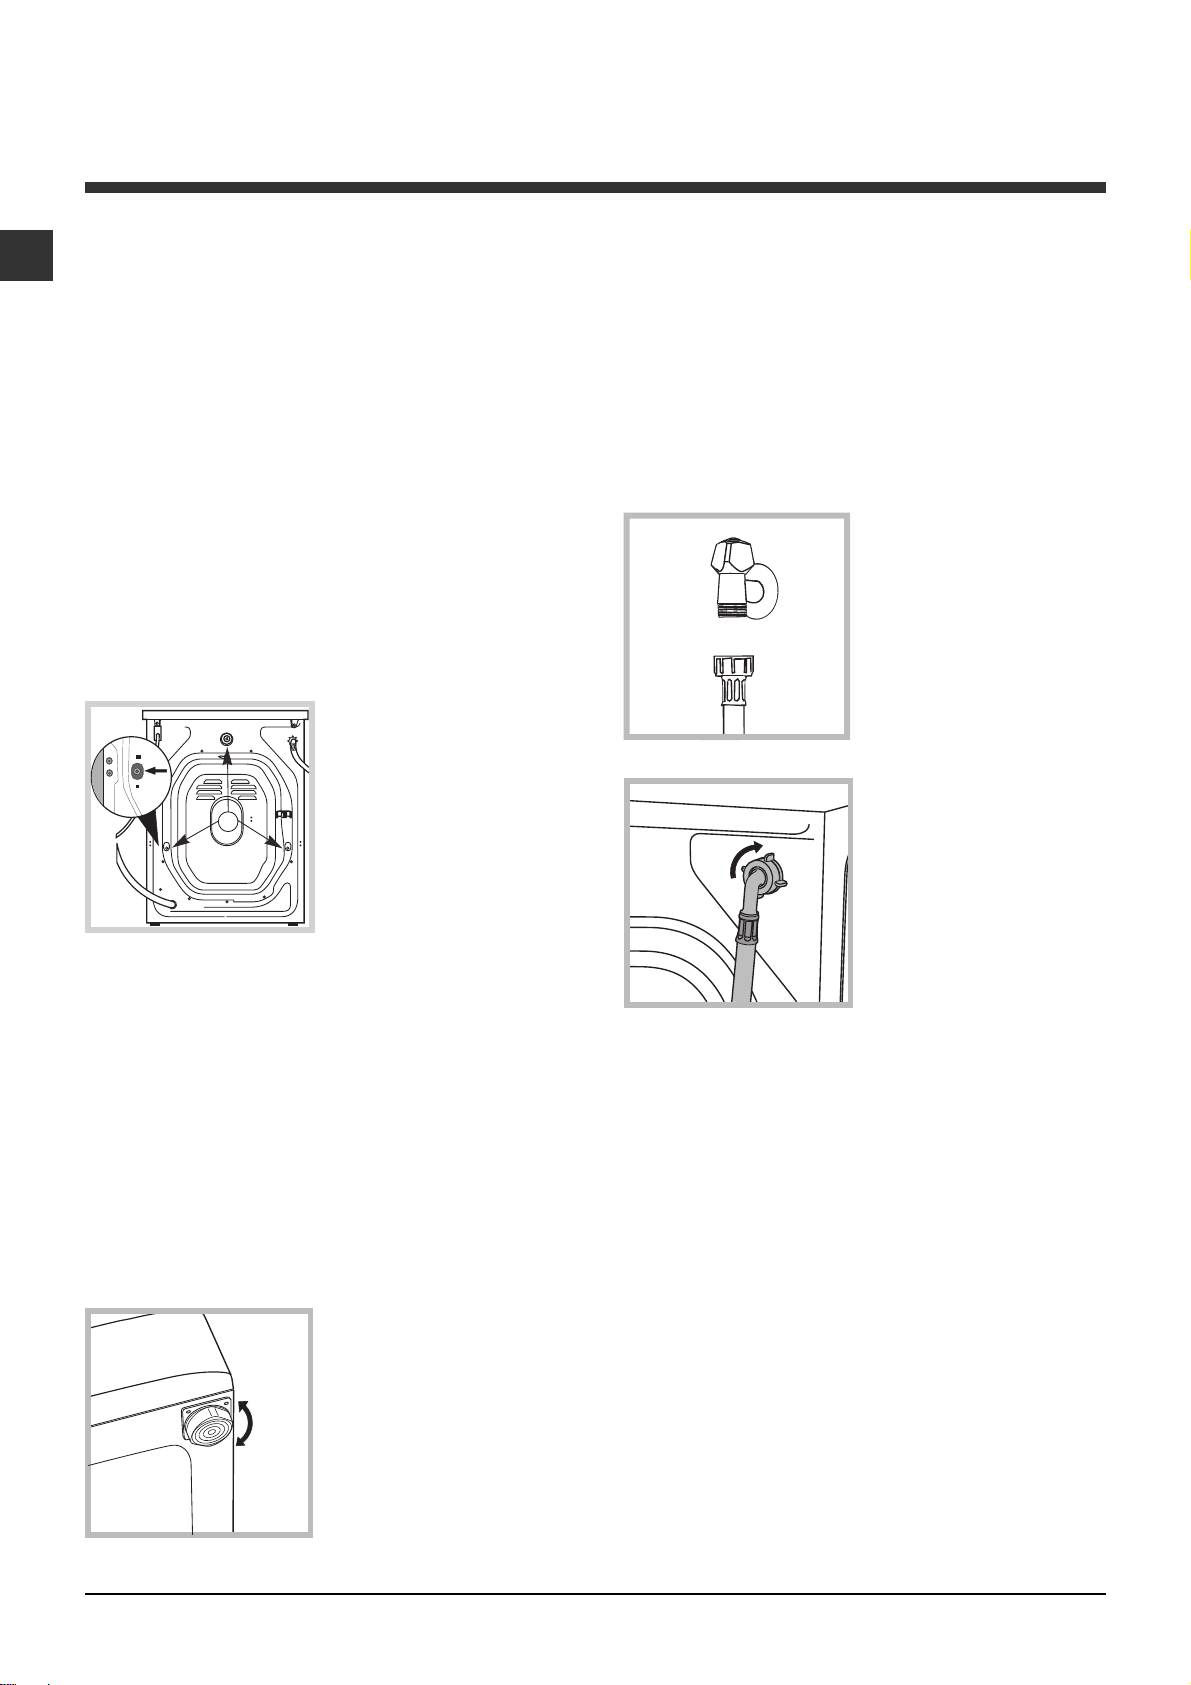
3. Remove the 3
protective screws (used
during transportation) and
the rubber washer with
the corresponding
spacer, located on the
rear part of the appliance
(see figure).
4. Close off the holes using the plastic plugs provided.
5. Keep all the parts in a safe place: you will need
them again if the washing machine needs to be
moved to another location.
Levelling the machine correctly will provide it with
stability, help to avoid vibrations and excessive noise
and prevent it from shifting while it is operating. If it is
placed on carpet or a rug, adjust the feet in such a
way as to allow a sufficient ventilation space
underneath the washing machine.
Connecting the electricity and water
supplies
Connecting the water inlet hose
1. Connect the supply
pipe by screwing it to a
cold water tab using a ¾
gas threaded connection
(see figure).
Before performing the
connection, allow the
water to run freely until it
is perfectly clear.
2. Connect the inlet hose
to the washing machine
by screwing it onto the
corresponding water inlet
of the appliance, which is
situated on the top righthand side of the rear part
of the appliance (see
figure).
3. Make sure that the hose is not folded over or bent.
Packaging materials should not be used as toys for
children.
Levelling
1. Install the washing machine on a flat sturdy floor,
without resting it up against walls, furniture cabinets
or anything else.
2. If the floor is not
perfectly level, compensate for any unevenness
by tightening or loosening
the adjustable front feet
(see figure); the angle of
inclination, measured in
relation to the worktop,
must not exceed 2°.
2
The water pressure at the tap must fall within the
values indicated in the Technical details table (see
next page).
If the inlet hose is not long enough, contact a
specialised shop or an authorised technician.
Never use second-hand hoses.
Use the ones supplied with the machine.
Page 3
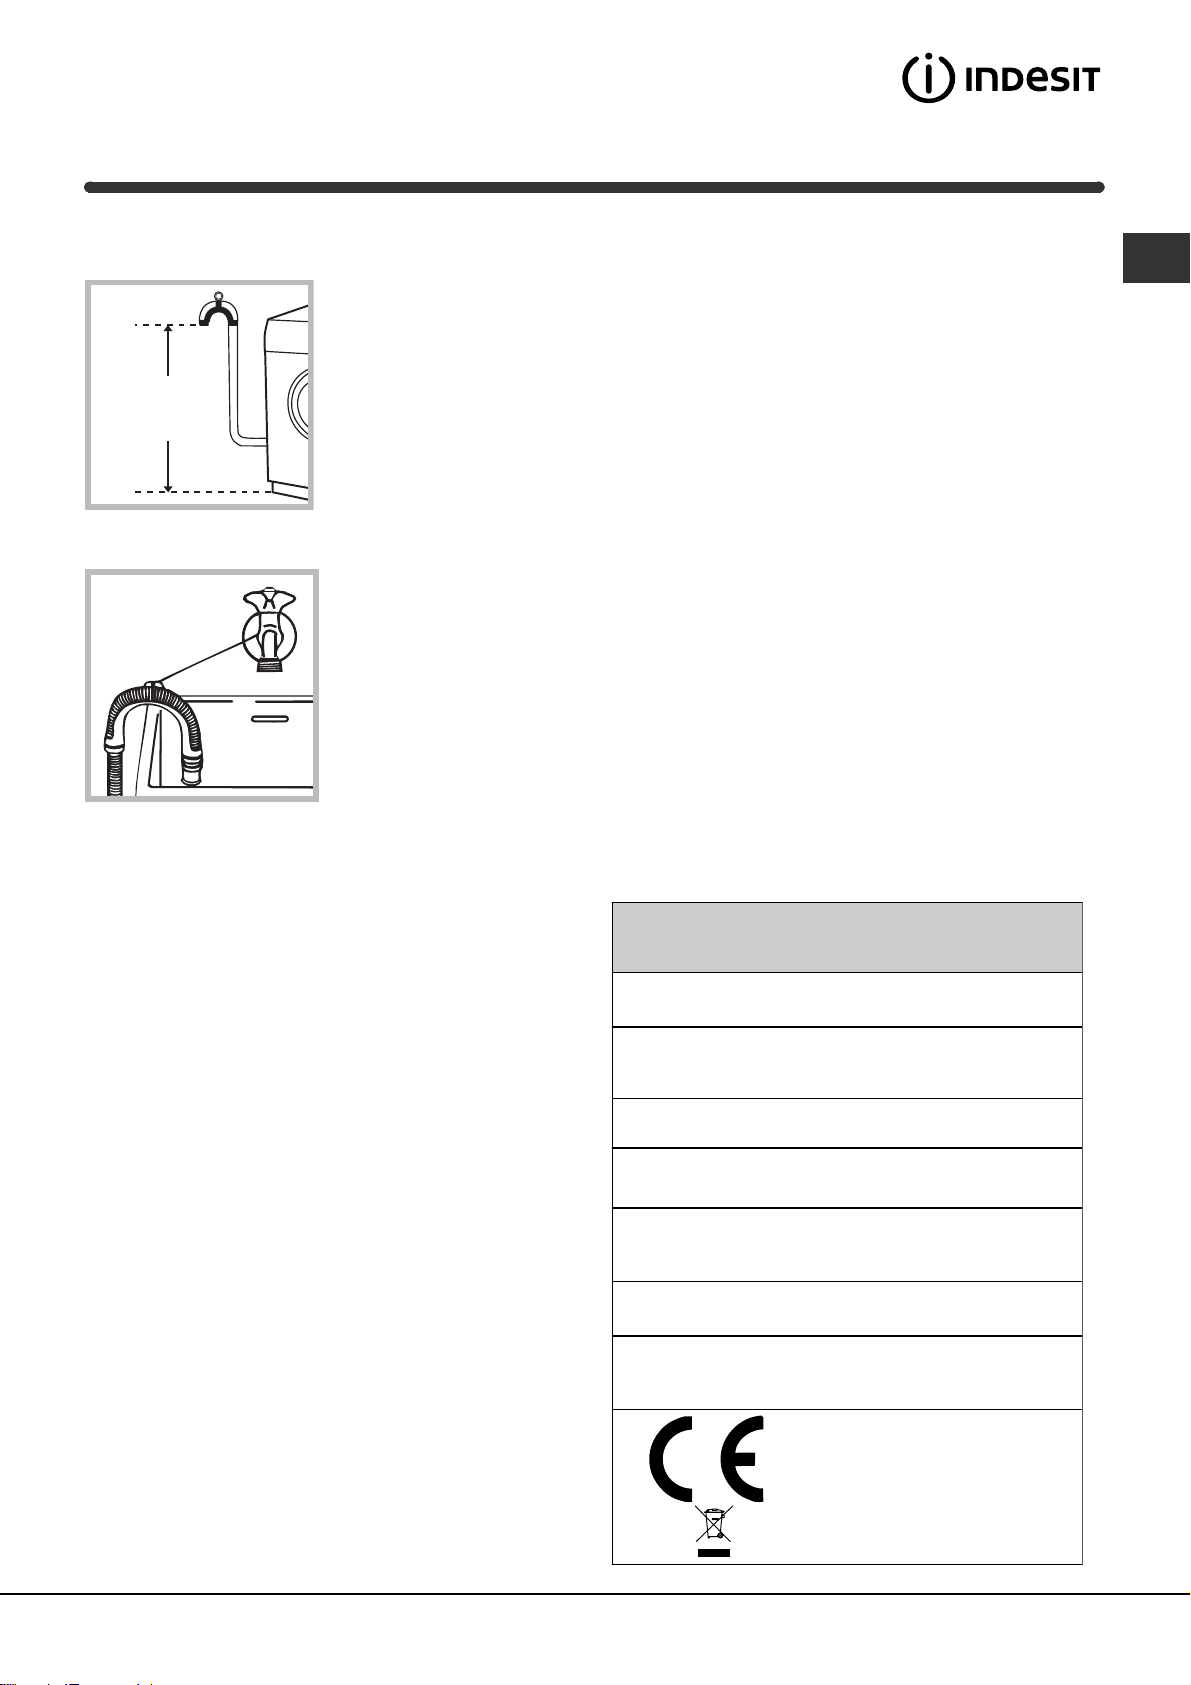
Connecting the drain hose
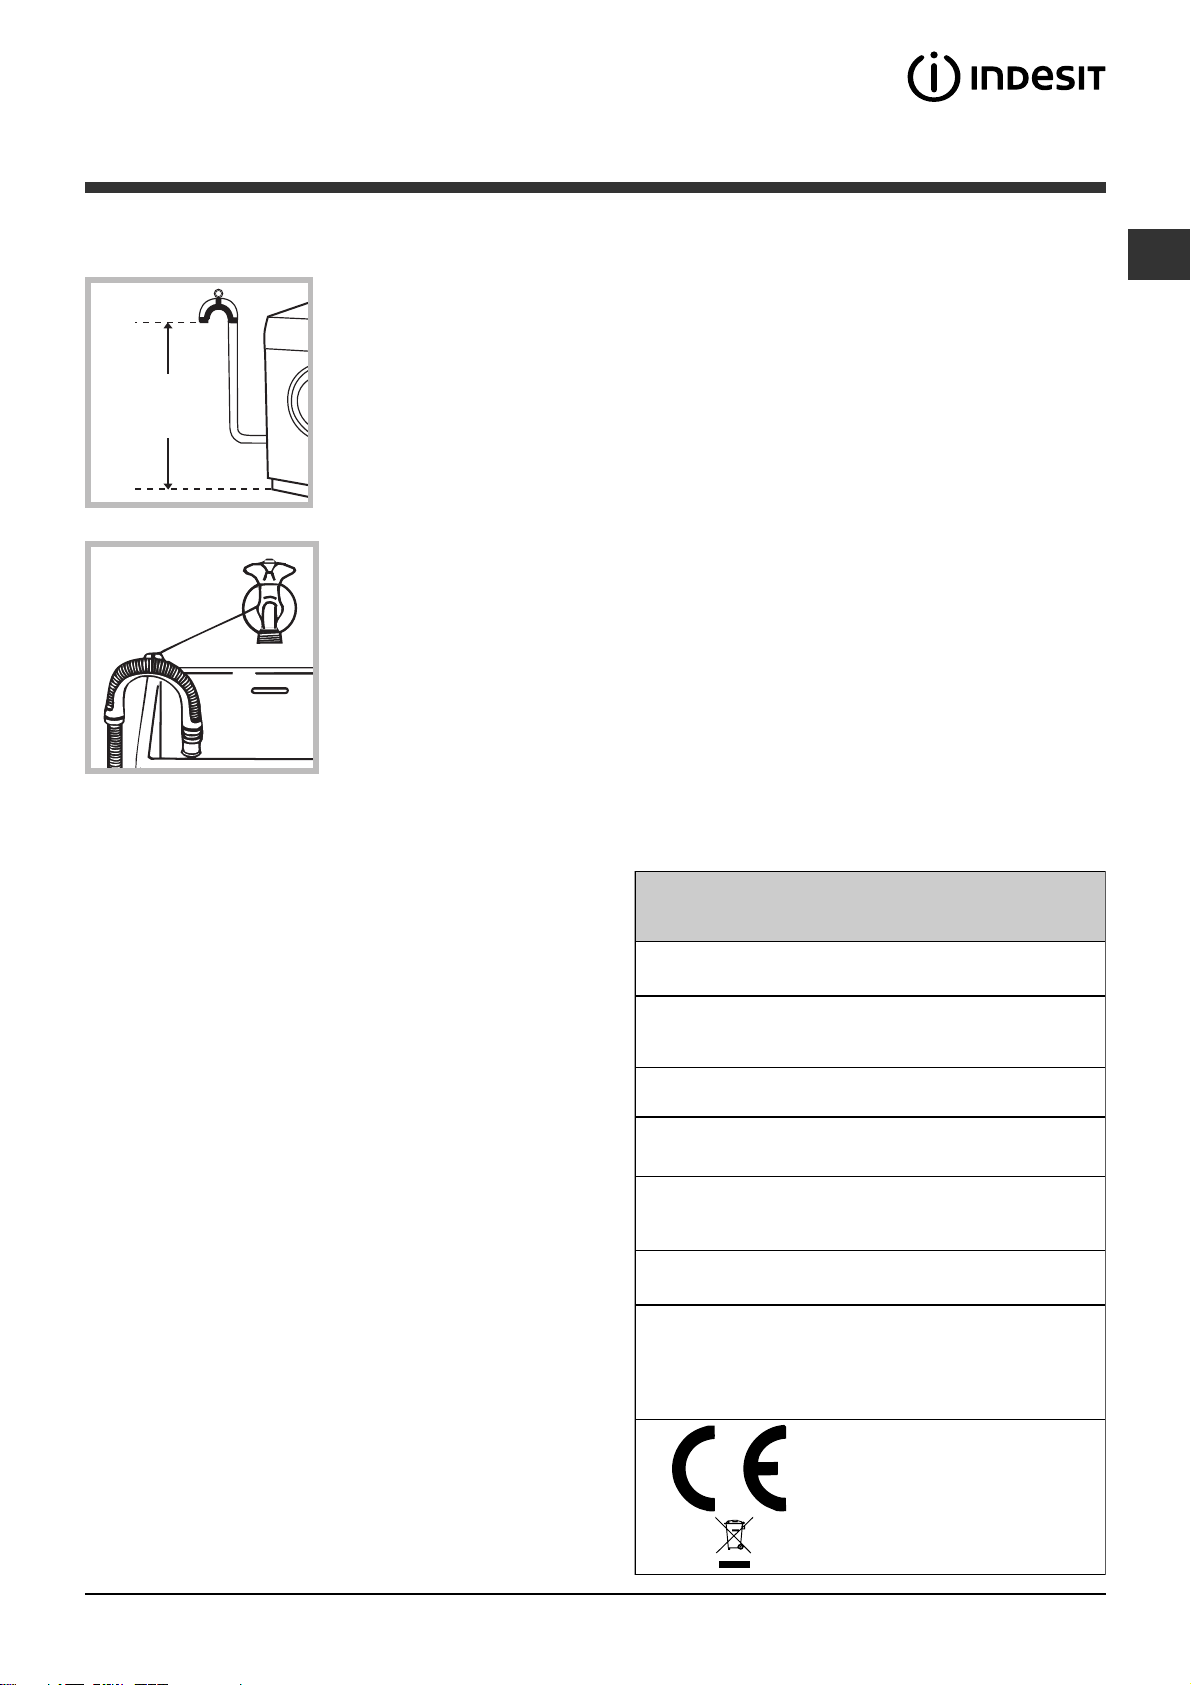
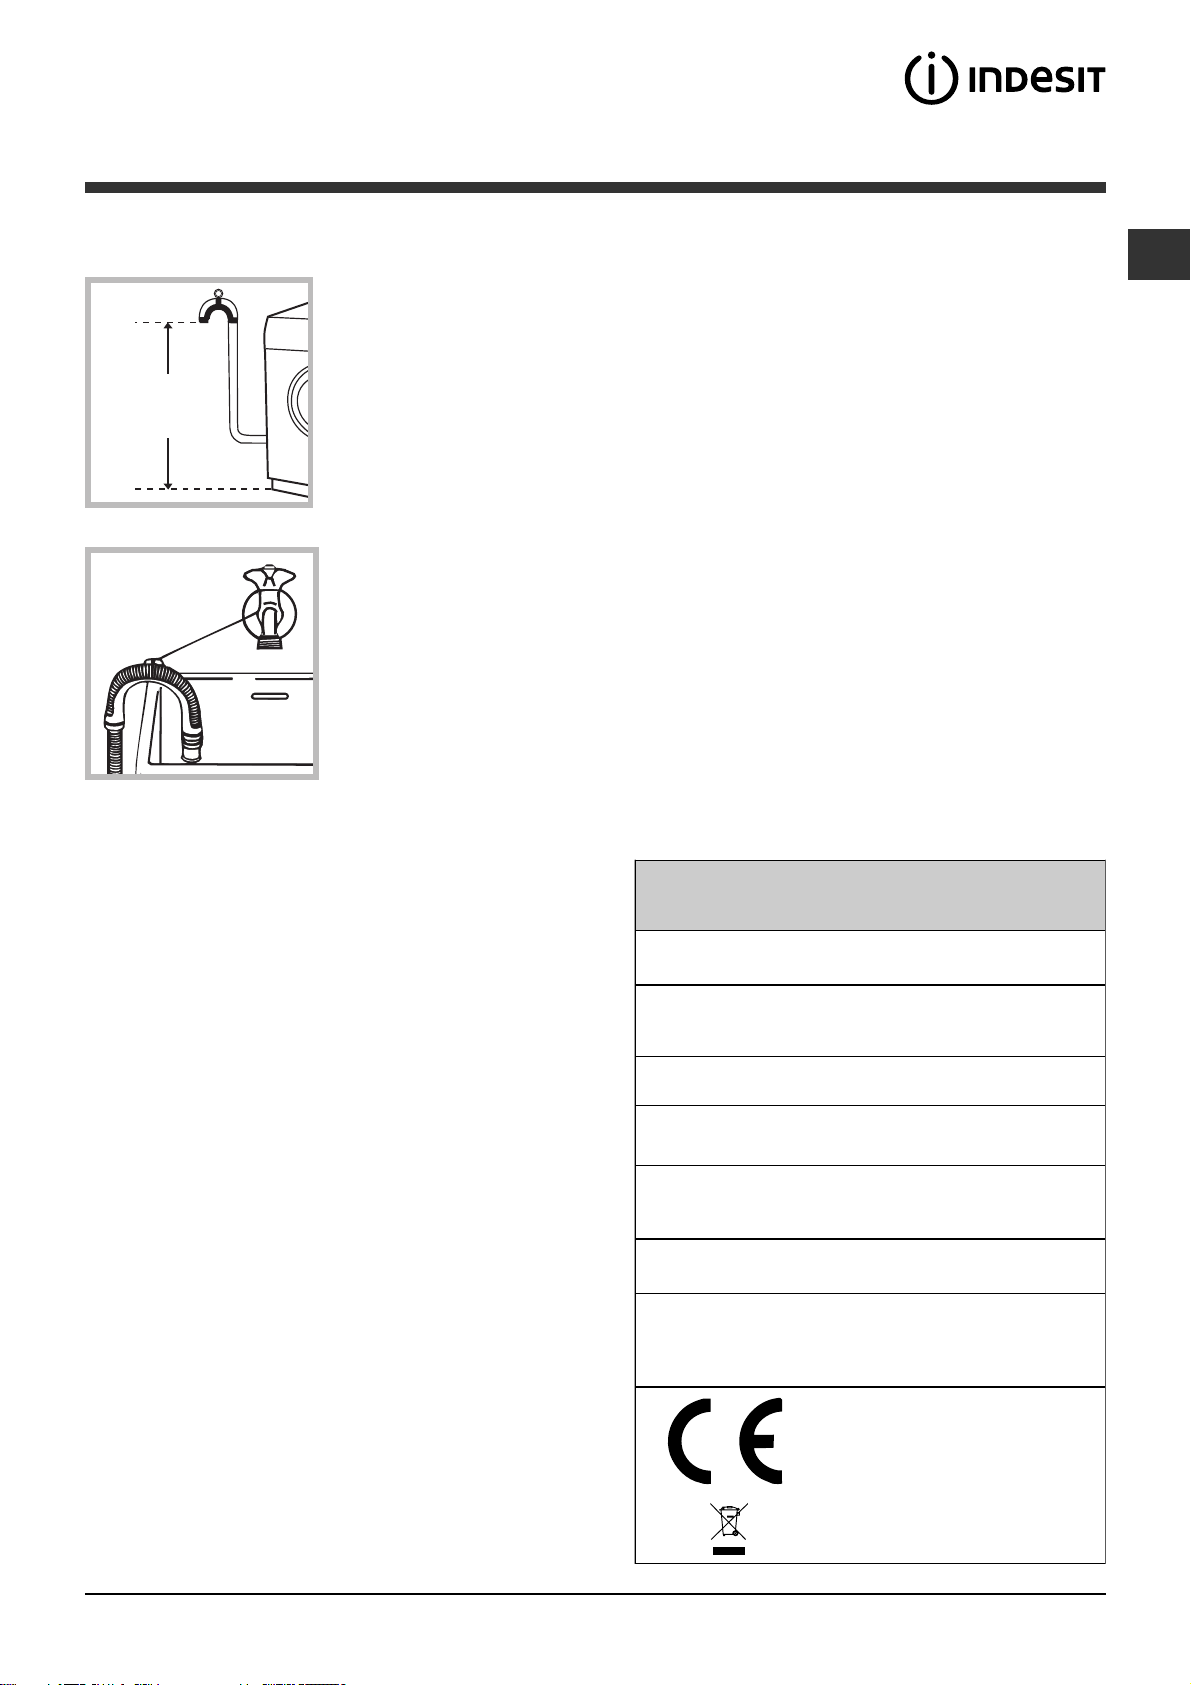
65 - 100 cm
Connect the drain hose,
without bending it, to a
drainage duct or a wall
drain located at a height
between 65 and 100 cm
from the floor;
Do not use extension cords or multiple sockets.
GB
The cable should not be bent or compressed.
The power supply cable must only be replaced by
authorised technicians.
Warning! The company shall not be held responsible
in the event that these regulations are not respected.
The first wash cycle
alternatively, rest it on
the side of a washbasin
or bathtub, fastening the
duct supplied to the tap
(see figure). The free end
of the hose should not
be underwater.
We advise against the use of hose extensions; if it is
absolutely necessary, the extension must have the
same diameter as the original hose and must not
exceed 150 cm in length.
Electrical connections
Before plugging the appliance into the electricity
socket, make sure that:
the socket is earthed and complies with all
applicable laws;
the socket is able to withstand the maximum power
load of the appliance as indicated in the Technical
data table (see opposite);
the power supply voltage falls within the values
indicated in the Technical data table (see opposite);
Once the appliance has been installed, and before
you use it for the first time, run a wash cycle with
detergent and no laundry, using the wash cycle 2.
Technical data
Model
Dimensions
Capacity
Electrical
connections
Water connections
Spin speed
IWB 6065
width 59.5 cm
height 85 cm
depth 52,5 cm
from 1 to 6 kg
please refer to the technical data
plate fixed to the machine
maximum pressure 1 MPa (10 bar)
minimum pressure 0.05 MPa (0.5 bar)
drum capacity 46 litres
up to 600 rotations per minute
the socket is compatible with the plug of the
washing machine. If this is not the case, replace
the socket or the plug.
The washing machine must not be installed
outdoors, even in covered areas. It is extremely
dangerous to leave the appliance exposed to rain,
storms and other weather conditions.
When the washing machine has been installed, the
electricity socket must be within easy reach.
Energy rated
programmes
according to
regulation
EN 60456
programme 2; temperature 60°C;
using a load of 6 kg.
This appliance conforms to the
following EC Directives:
- 89/336/EEC dated 03/05/89
(Electromagnetic Compatibility) and
subsequent modifications
- 2002/96/EC
- 2006/95/EC Low Voltage)
3
Page 4
Description of the washing machine
and starting a wash cycle
GB
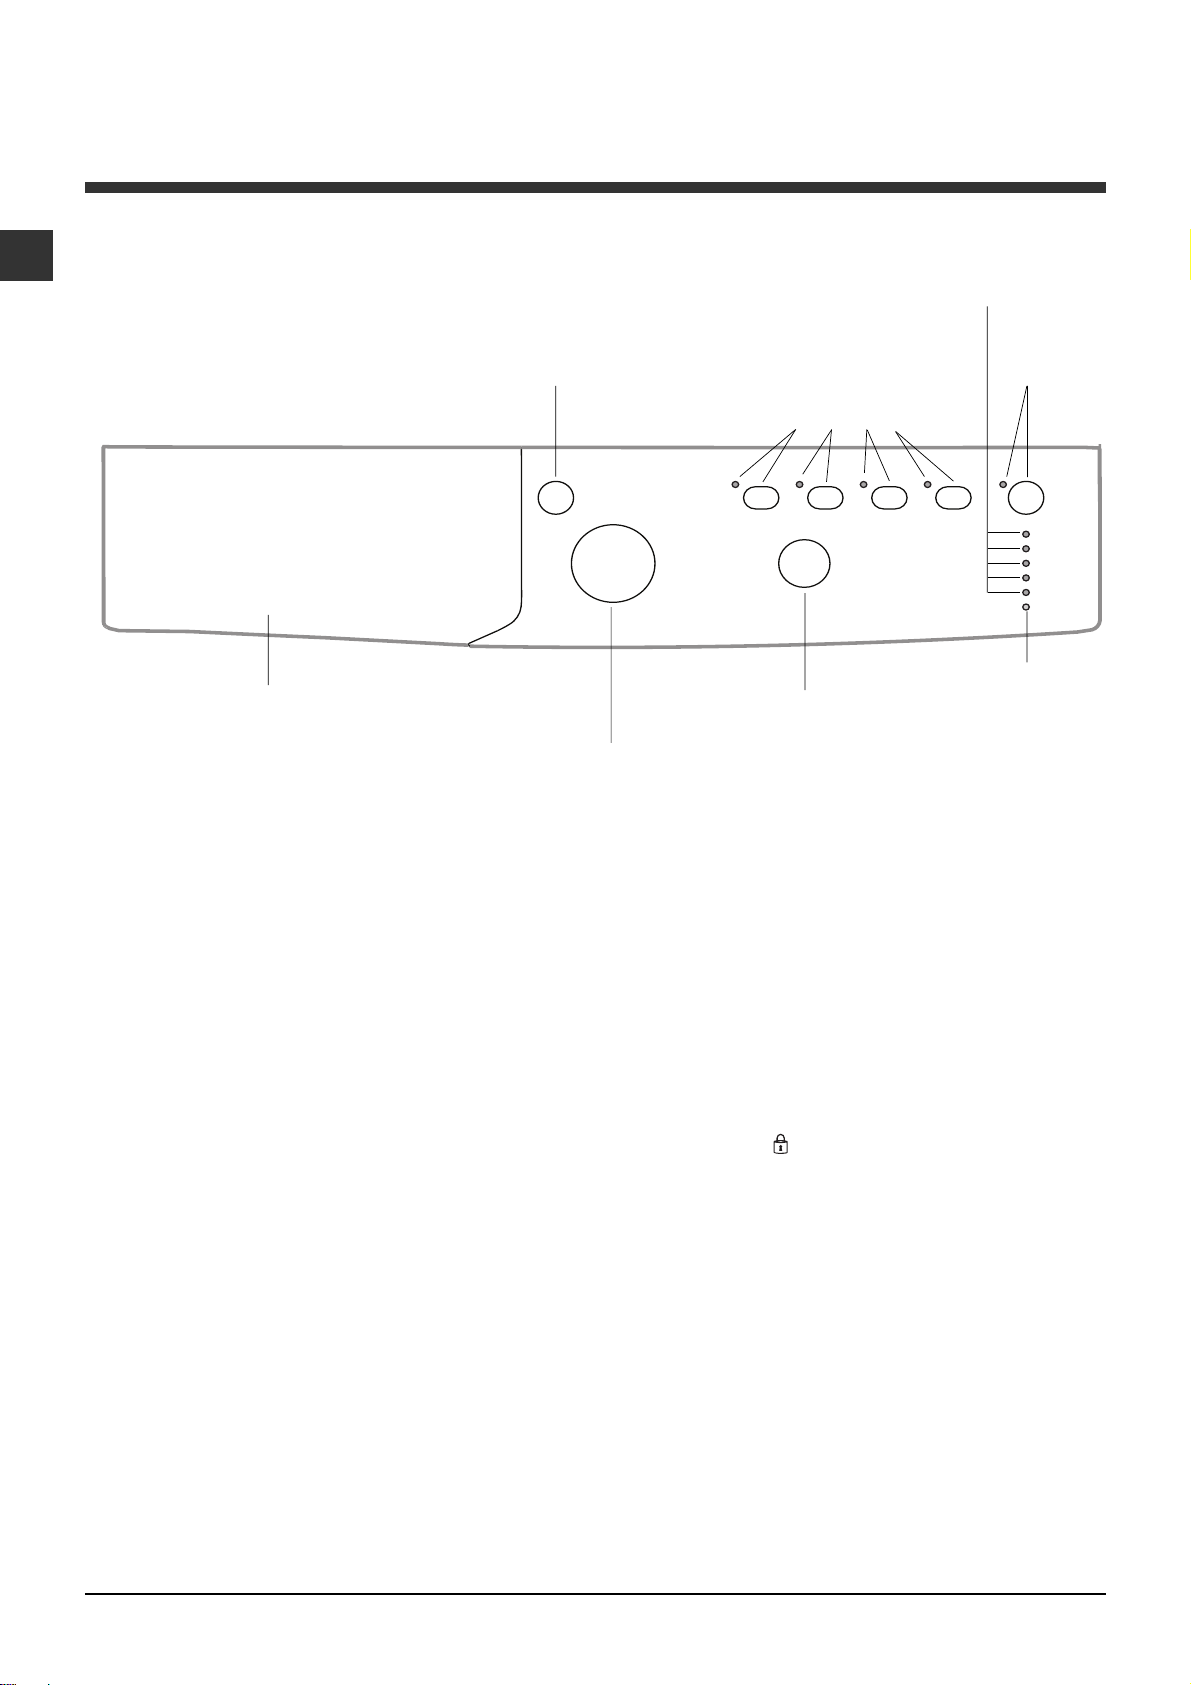
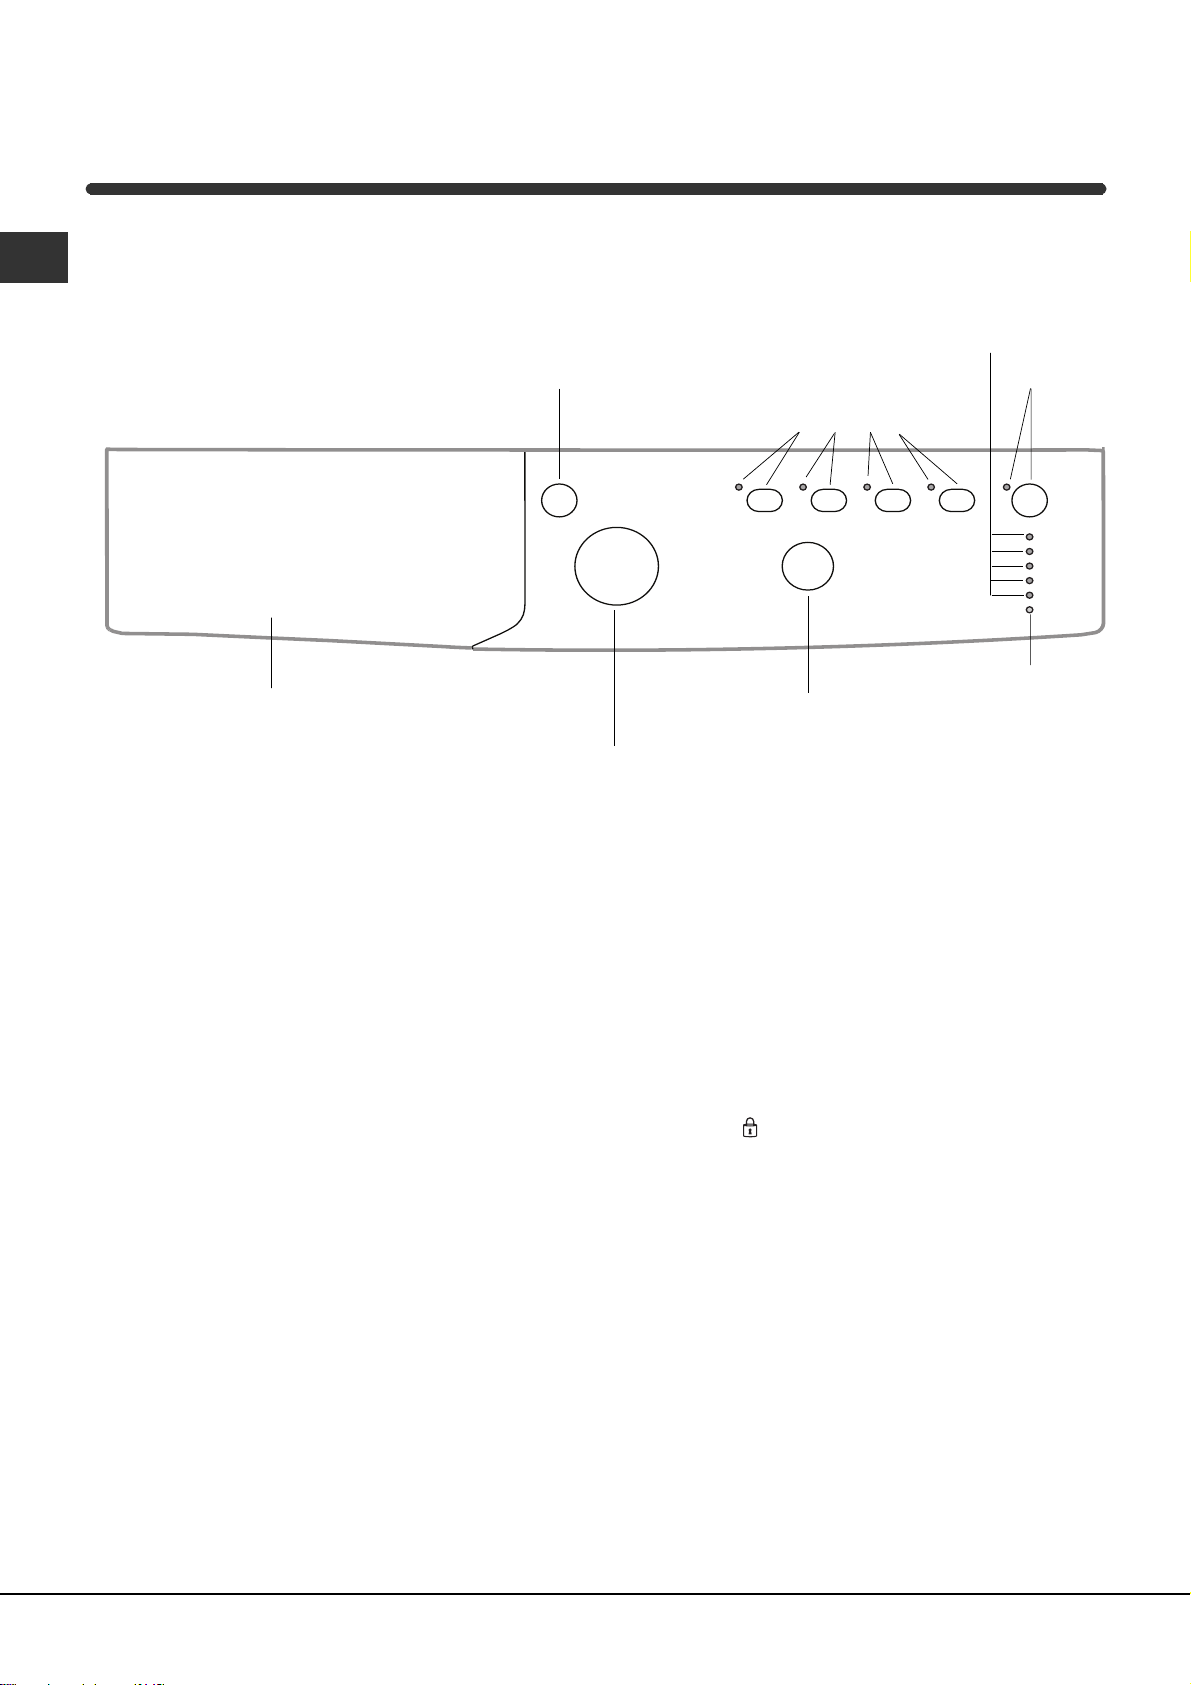
Control panel
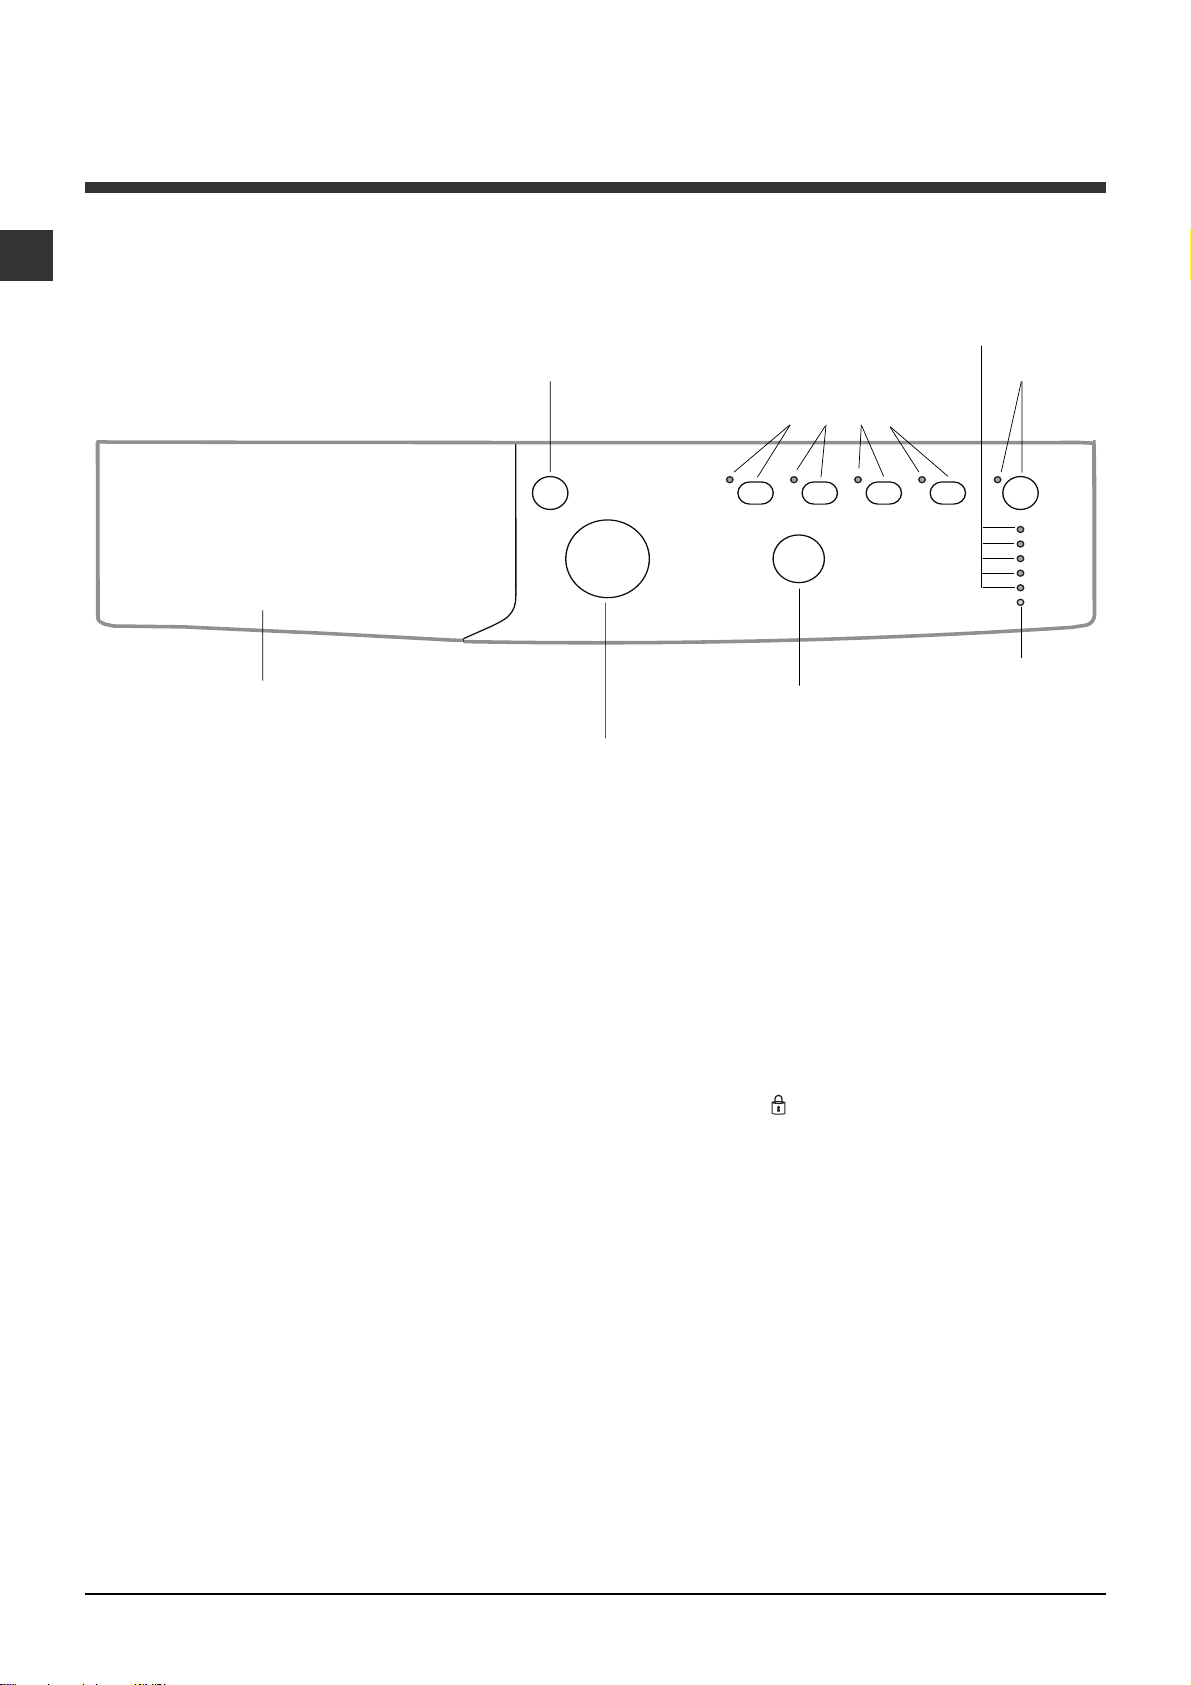
Detergent dispenser drawer
ON/OFF
button
WASH CYCLE
knob
TEMPERATURE
knob
WASH CYCLE PROGRESS/
DELAY TIMER
FUNCTION
buttons with
indicator lights
DOOR LOCKED
indicator light
indicator lights
START/
PAUSE
button with
indicator light
Detergent dispenser drawer: used to dispense
detergents and washing additives (see Detergents
and laundry).
ON/OFF button: switches the washing machine on
and off.
WASH CYCLE knob: programmes the wash cycles.
During the wash cycle, the knob does not move.
FUNCTION buttons with indicator light: used to
select the available functions. The indicator light
corresponding to the selected function will remain lit.
TEMPERATURE knob: sets the temperature or the
cold wash cycle (see Personalisation).
WASH CYCLE PROGRESS/DELAY TIMER
indicator light
wash cycle.
The illuminated indicator light shows which phase is in
progress.
If the Delay Timer function has been set, the time
remaining until the wash cycle starts will be indicated
(see next page).
s: used to monitor the progress of the
DOOR LOCKED indicator light: indicates whether
the door may be opened or not (see next page).
START/PAUSE button with indicator light: starts or
temporarily interrupts the wash cycles.
N.B. To pause the wash cycle in progress, press this
button; the corresponding indicator light will flash
orange, while the indicator light for the current wash
cycle phase will remain lit in a fixed manner. If the
DOOR LOCKED
door may be opened.
To start the wash cycle from the point at which it was
interrupted, press this button again.
Standby mode
This washing machine, in compliance with new
energy saving regulations, is fitted with an automatic
standby system which is enabled after a few minutes
if no activity is detected. Press the ON-OFF button
briefly and wait for the machine to start up again.
indicator light is switched off, the
4
Page 5
Indicator lights
The indicator lights provide important information.
This is what they can tell you:
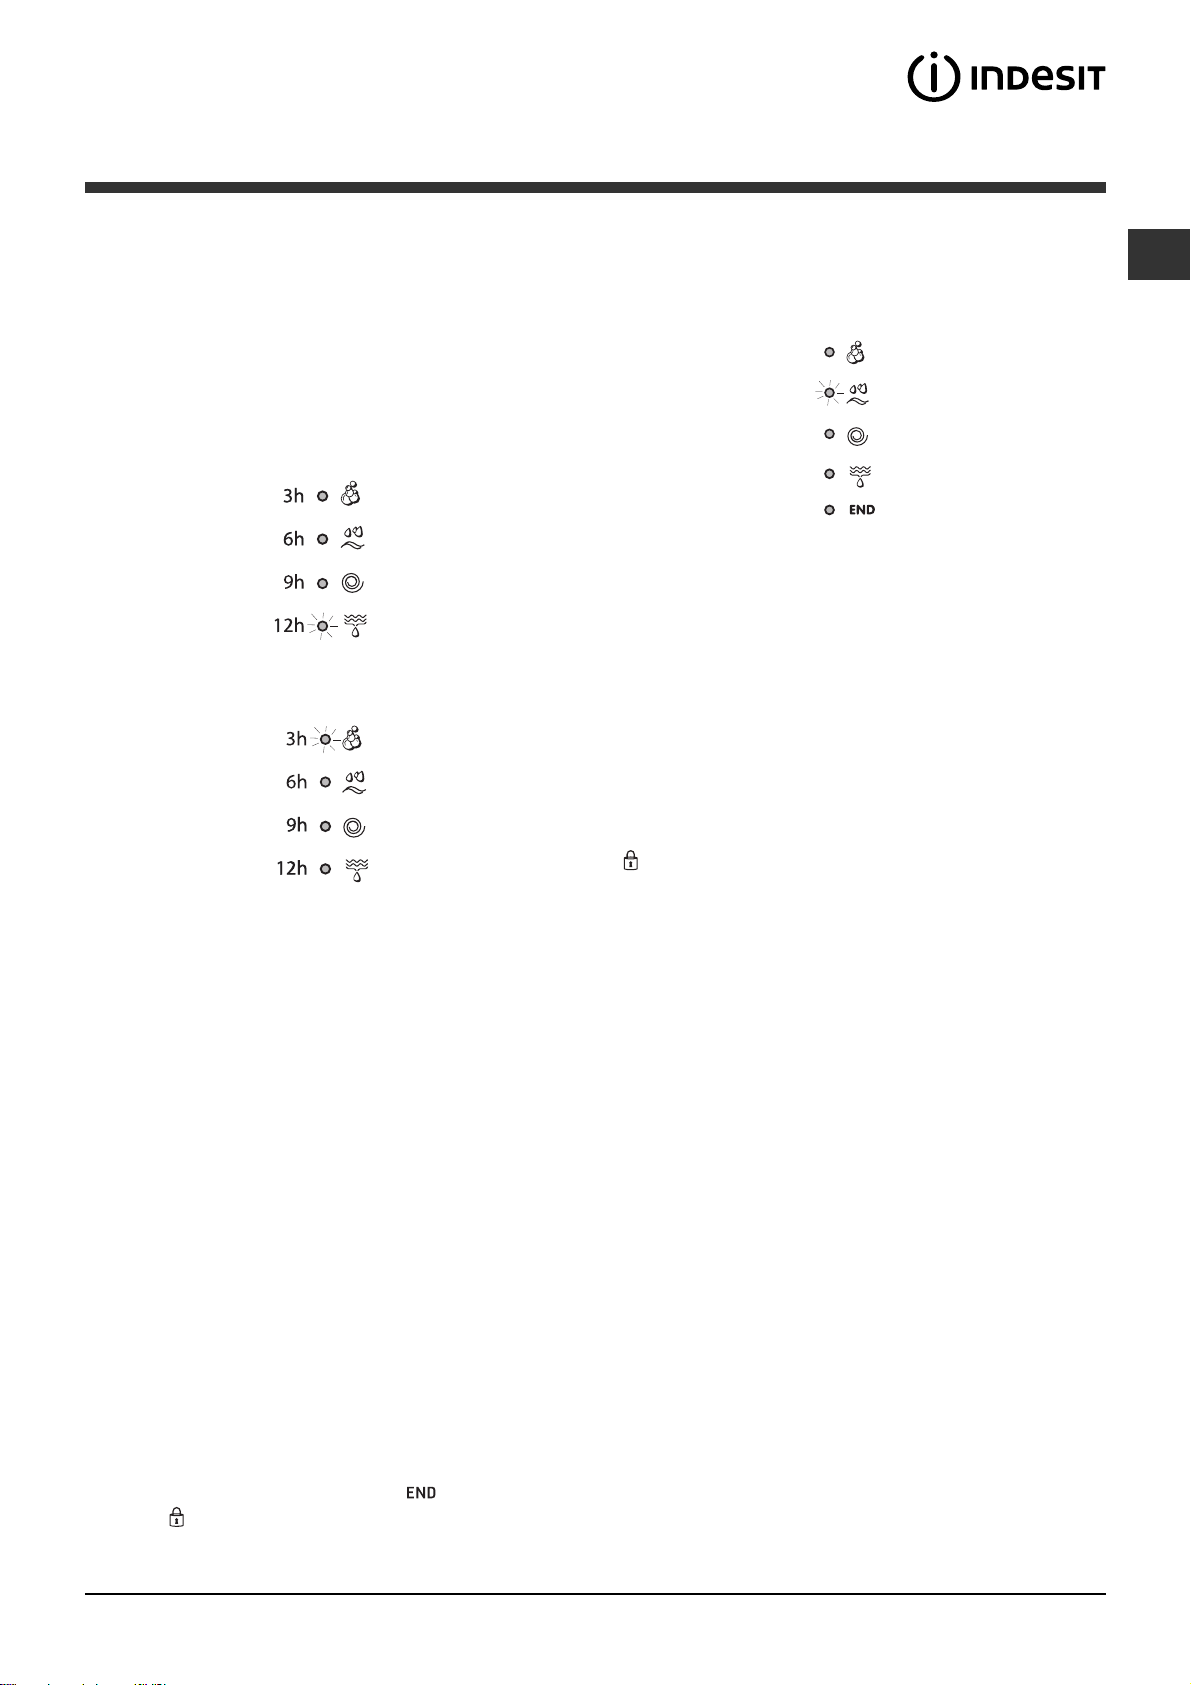
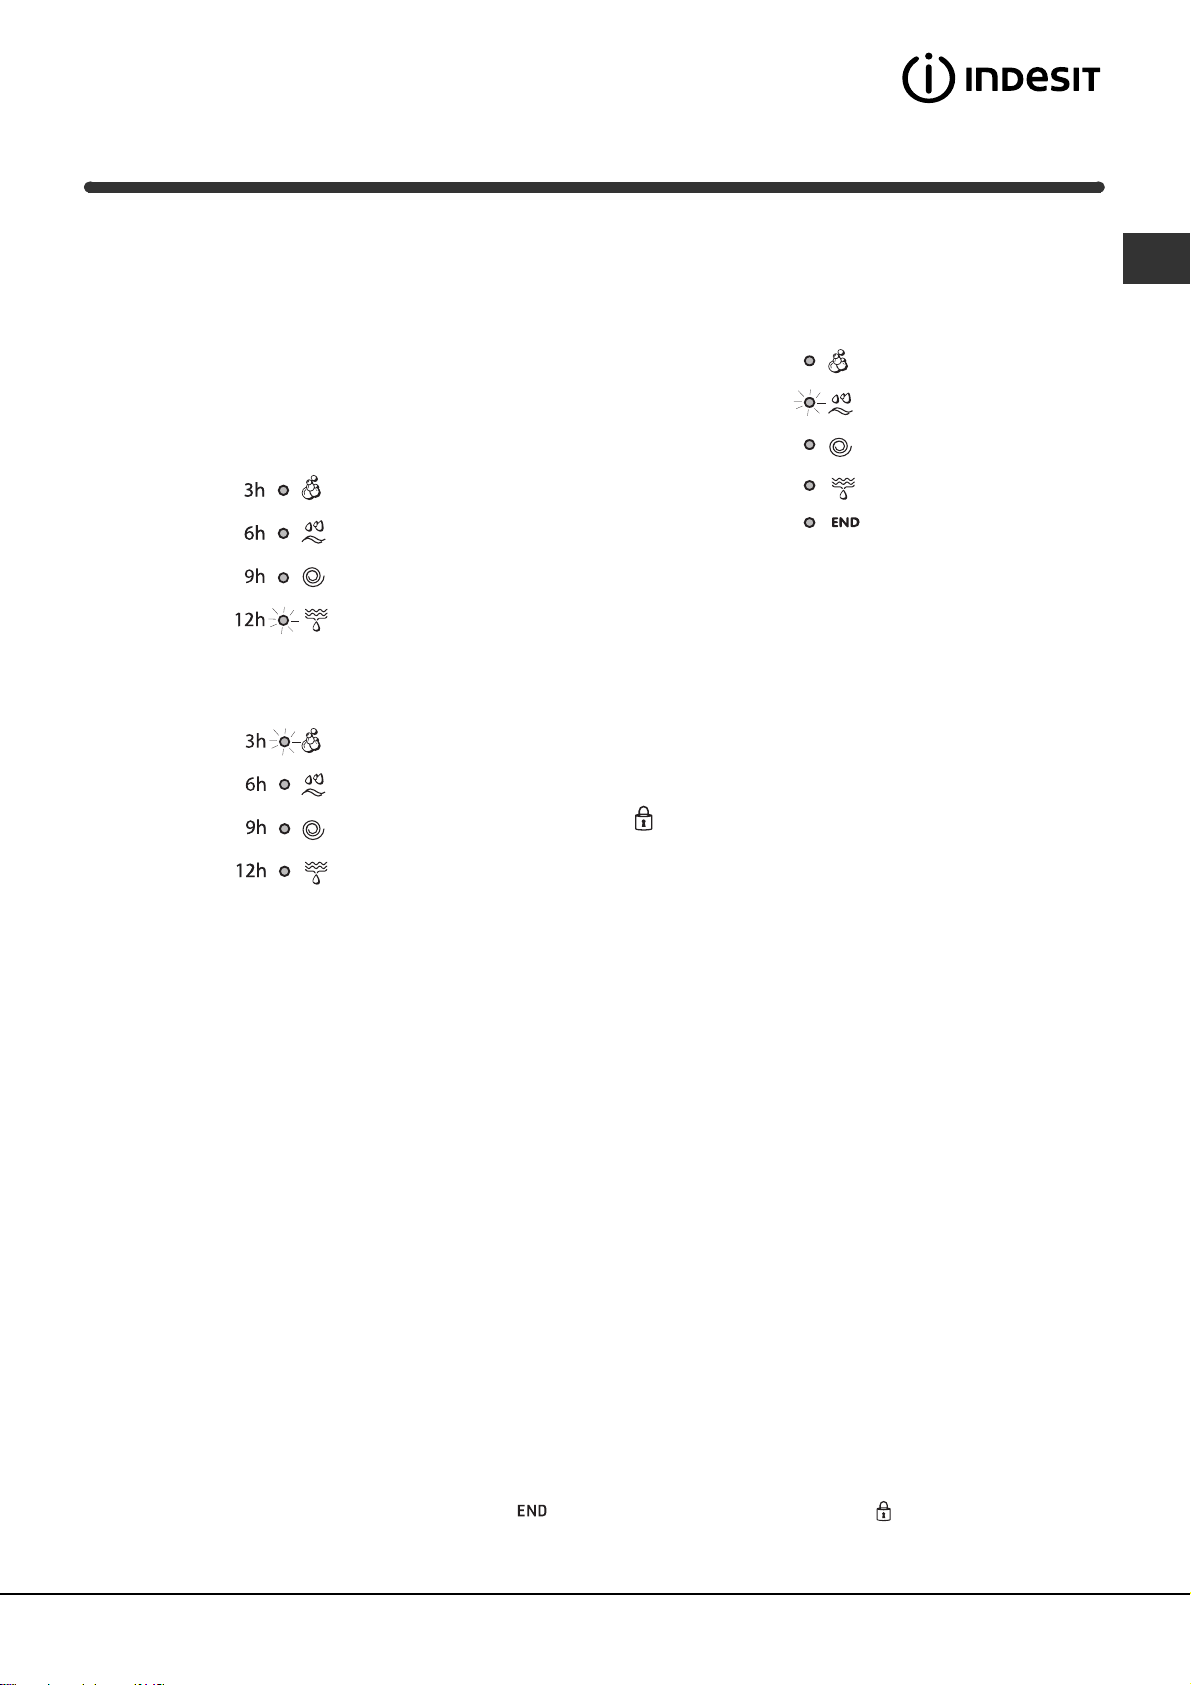
Wash cycle phase indicator lights
Once the desired wash cycle has been selected and has
begun, the indicator lights switch on one by one to
indicate which phase of the cycle is currently in progress.
GB
Delayed start
If the DELAY TIMER function has been activated (see
Personalisation), after the wash cycle has been
started the indicator light corresponding to the
selected delay period will begin to flash:
As time passes, the remaining delay will be displayed
and the corresponding indicator light will flash:
The set programme will start once the selected time
delay has expired.
Wash
Rinse
Spin
Drain
End of wash cycle
Function buttons and corresponding indicator lights
When a function is selected, the corresponding
indicator light will illuminate.
If the selected function is not compatible with the
programmed wash cycle, the corresponding indicator
light will flash and the function will not be activated.
If the selected function is not compatible with another
function which has been selected previously, the
indicator light corresponding to the first function
selected will flash and only the second function will be
activated; the indicator light corresponding to the
enabled option will remain lit.
Door locked indicator light
When the indicator light is on, the porthole door is
locked to prevent it from being opened; make sure
the indicator light is off before opening the door (wait
approximately 3 minutes). To open the door during a
running wash cycle, press the START/PAUSE button;
the door may be opened once the DOOR LOCKED
indicator light turns off.
Starting a wash cycle
1. Switch the washing machine on by pressing the ON/OFF button. All indicator lights will switch on for a few
seconds, then they will switch off and the START/PAUSE indicator light will pulse.
2. Load the laundry and close the door.
3. Set the WASH CYCLE knob to the desired programme.
4. Set the washing temperature (see Personalisation).
5. Measure out the detergent and washing additives (see Detergents and laundry).
6. Select the desired functions.
7. Start the wash cycle by pressing the START/PAUSE button and the corresponding indicator light will remain lit
in a fixed manner, in green.
To cancel the set wash cycle, pause the machine by pressing the START/PAUSE button and select a new cycle.
8. At the end of the wash cycle the
LOCKED
drum dries completely. Switch the washing machine off by pressing the ON/OFF button.
indicator light turns off. Take out your laundry and leave the appliance door ajar to make sure the
indicator light will switch on. The door can be opened once the DOOR
5
Page 6
Wash cycles
GB
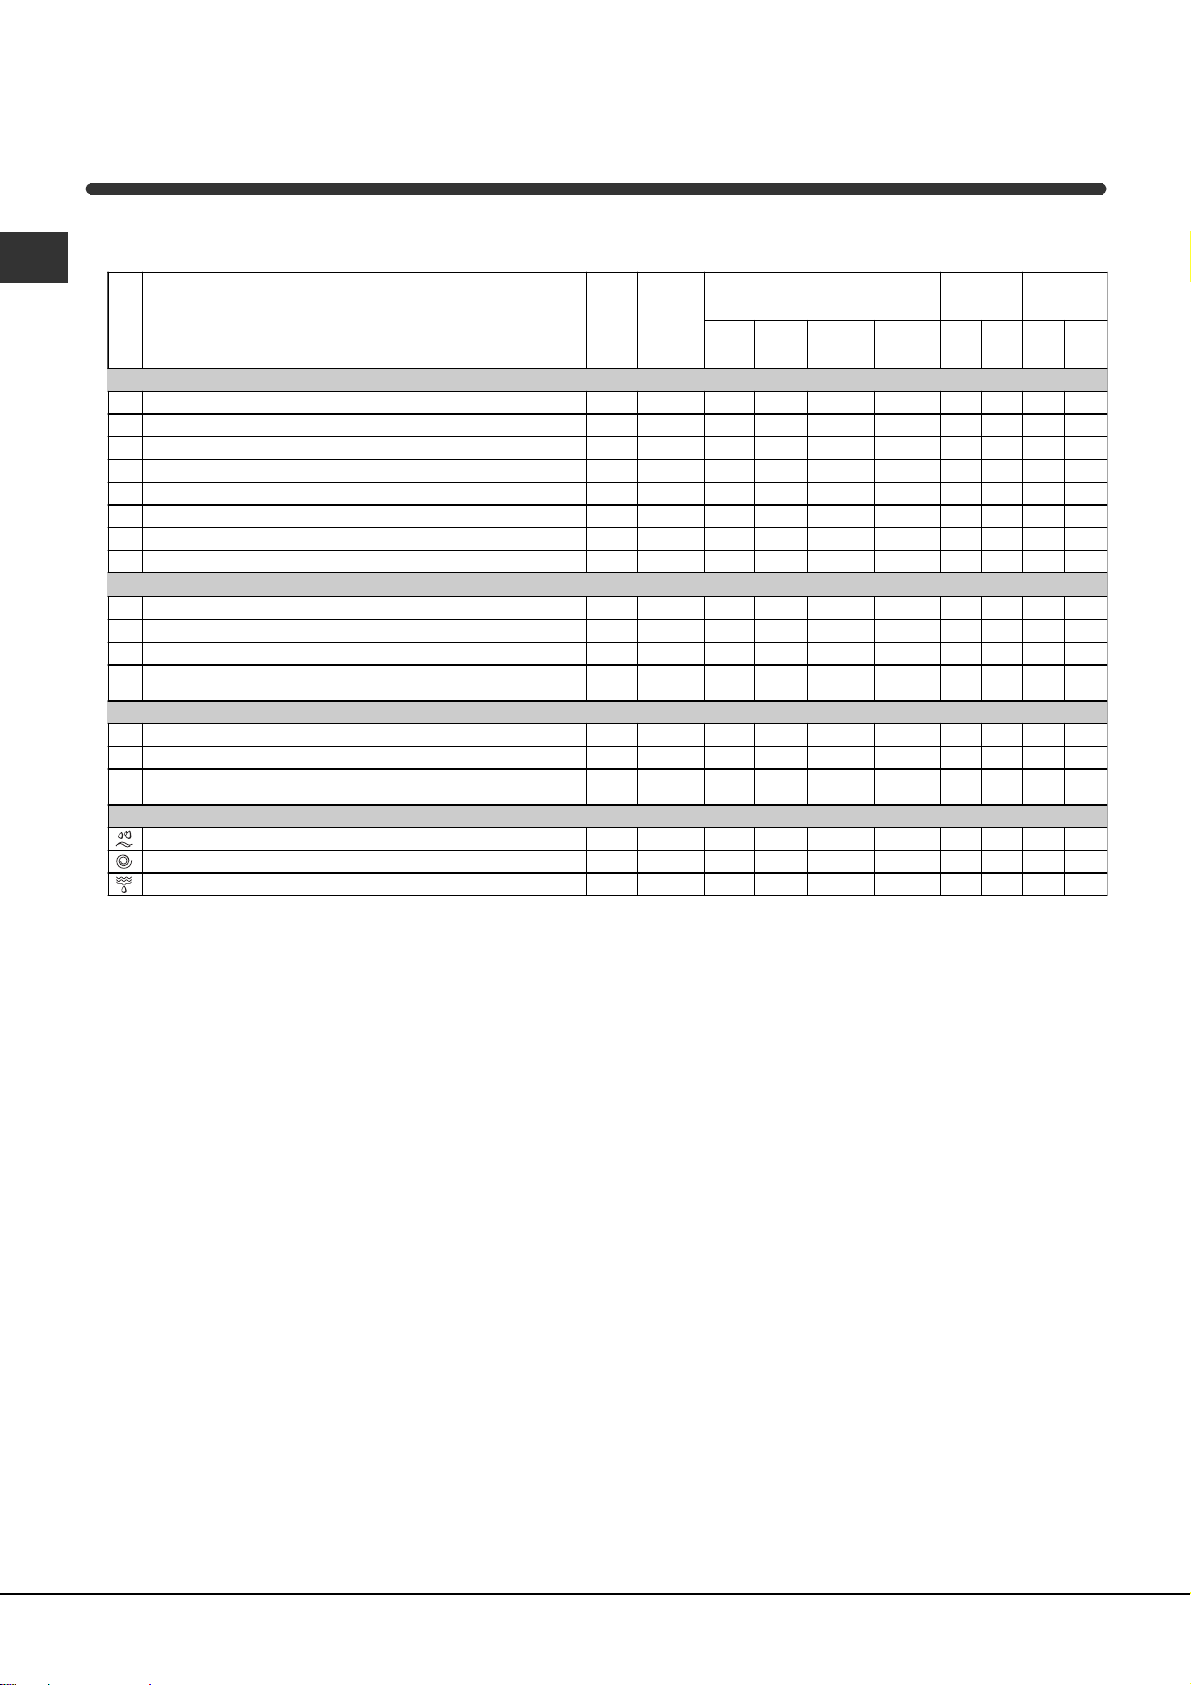
Table of wash cycles
Description of the wash cycle
Wash cycles
Daily
1
Cotton with prewash:
2
Cotton:
extremely soiled whites.
2
Cotton (1):
2
Cotton (2):
3
Cotton:
4
Coloured Cottons (3):
5
Synthetics:
6
Synthetics:
Special
7
Wool:
8
Silk/Curtains:
9
Jeans
Express:
10
wool, silk and clothes which require washing by hand).
Sport
11
Sport Intensive
12
Sport Light
13
Sport Shoes
Partial wash cycles
Rinse
Spin
Drain
heavily soiled whites and resistant colours.
heavily soiled whites and delicate colours.
heavily soiled whites and resistant colours.
heavily soiled resistant colours.
lightly soiled delicate colours.
for wool, cashmere, etc.
for garments in silk and viscose, lingerie.
to refresh lightly soiled garments quickly (not suitable for
extremely soiled whites.
lightly soiled whites and delicate colours.
.
Max
temp.
speed
(°C)
(rpm)
90° 600
90° 600
60° 600
40° 600
60° 600
40° 600
60° 600
40° 600
40° 600
30° 0
40° 600
30° 600
30° 600
30° 600
30° 600
-
-
-
Max.
600
600
0
Detergents
Pre-
Wash Bleach
wash
ll
-
-
-
-
-
-
-
-
-
-
-
-
-
-
- -
-
ll l
ll l
ll l
ll l
ll l
ll l
ll l
l
-
l
-
l
-
l
-
l
-
l
-
l
-
ll
- - - -
- - - -
Fabric
softener
l
l
l
l
l
l
l
l
Max. load
(kg)
Normal
Max. 2
Eco
Time
6
6
6
6
63,25119104
63,258971
2,5 2 85 72
2,5 2 72 60
1
1
3
1,5
3
3
pairs
6
6
6
-
-
-
-
-
-
-
-
-
-
-
-
-
-
Cycle
duration
Normal
164
145
137
123
55
55
70
15
78
68
50
36
16
2
Eco
Time
-
-
-
-
-
-
-
-
-
-
-
-
-
-
The information contained in the table is intended as a guide only.
For all Test Institutes:
1) Test wash cycle in compliance with regulation EN 60456: set wash cycle 2 with a temperature of 60°C.
2) Long wash cycle for cottons: set wash cycle 2 with a temperature of 40°C.
3) Short wash cycle for cottons: set wash cycle 4 with a temperature of 40°C.
Specials wash cycles
Express (wash cycle 10) this wash cycle was designed to wash lightly soiled garments quickly: it lasts just 15 minutes
and therefore saves both energy and time. By selecting this wash cycle (10 at 30°C), it is possible to wash different
fabrics together (except for wool and silk items), with a maximum load of 1.5 kg.
Sport Intensive (
wash cycle
11) is for washing lightly soiled sports clothing fabrics (tracksuits, shorts, etc.); for best
results, we recommend not exceeding the maximum load indicated in the "Table of wash cycles". We recommend
using a liquid detergent and dosage suitable for a half-load.
Sport Light (
wash cycle
12) is for washing lightly soiled sports clothing fabrics (tracksuits, shorts, etc.); for best
results, we recommend not exceeding the maximum load indicated in the "Table of wash cycles". We recommend
using a liquid detergent and dosage suitable for a half-load.
Sport Shoes (
wash cycle
13) is for washing sports shoes; for best results, do not wash more than 2 pairs
simultaneously.
6
Page 7
Personalisation
Setting the temperature
Turn the TEMPERATURE knob to set the wash temperature (see Table of wash cycles).
The temperature may be lowered, or even set to a cold wash
The washing machine will automatically prevent you from selecting a temperature which is higher than the
maximum value set for each wash cycle.
.
Functions
The various wash functions available with this washing machine will help to achieve the desired results, every time.
To activate the functions:
1. Press the button corresponding to the desired function;
2. the function is enabled when the corresponding indicator light is illuminated.
Note: If the indicator light flashes rapidly, this signals that this particular function may not be selected in
conjunction with the selected wash cycle.
Selecting this option enables you to suitably adjust drum rotation, temperature and water to a reduced load of
lightly soiled cotton and synthetic fabrics (refer to the
time thereby saving water and electricity. We suggest using a liquid detergent suitably measured out to the load
quantity.
"Table of wash cycles"
This function may not be used in conjunction with wash cycles 1, 2, 7, 8, 9, 10, 11, 12, 13, , , .
Stain removal
Bleaching cycle designed to remove the toughest stains. Please remember to pour the bleach into extra
compartment 4 (see Bleach cycle).
This function may not be used in conjunction with wash cycles 1, 7, 8, 9, 10, 11, 12, 13, , .
). enables you to wash in less
GB
No spin
The washing machine will not carry out the spin cycle, but rather a drum spin at medium speed to assist water
draining. Recommended when washing garments which are difficult to iron.
This function may not be used in conjunction with wash cycles 8, .
Delay timer
This timer delays the start time of the wash cycle by up to 12 hours.
Press the button repeatedly until the indicator light corresponding to the desired delay time switches on. The fifth time
the button is pressed, the function will be disabled.
N.B. Once the START/PAUSE button has been pressed, the delay time can only be modified by decreasing it until launching
the set programme.
This option is enabled with all programmes.
7
Page 8
Detergents and laundry
GB
Detergent dispenser drawer
Good washing results also depend on the correct
dose of detergent: adding too much detergent will not
necessarily result in a more efficient wash, and may in
fact cause build up on the inside of your appliance
and contribute to environmental pollution.
Do not use hand washing detergents because these
create too much foam.
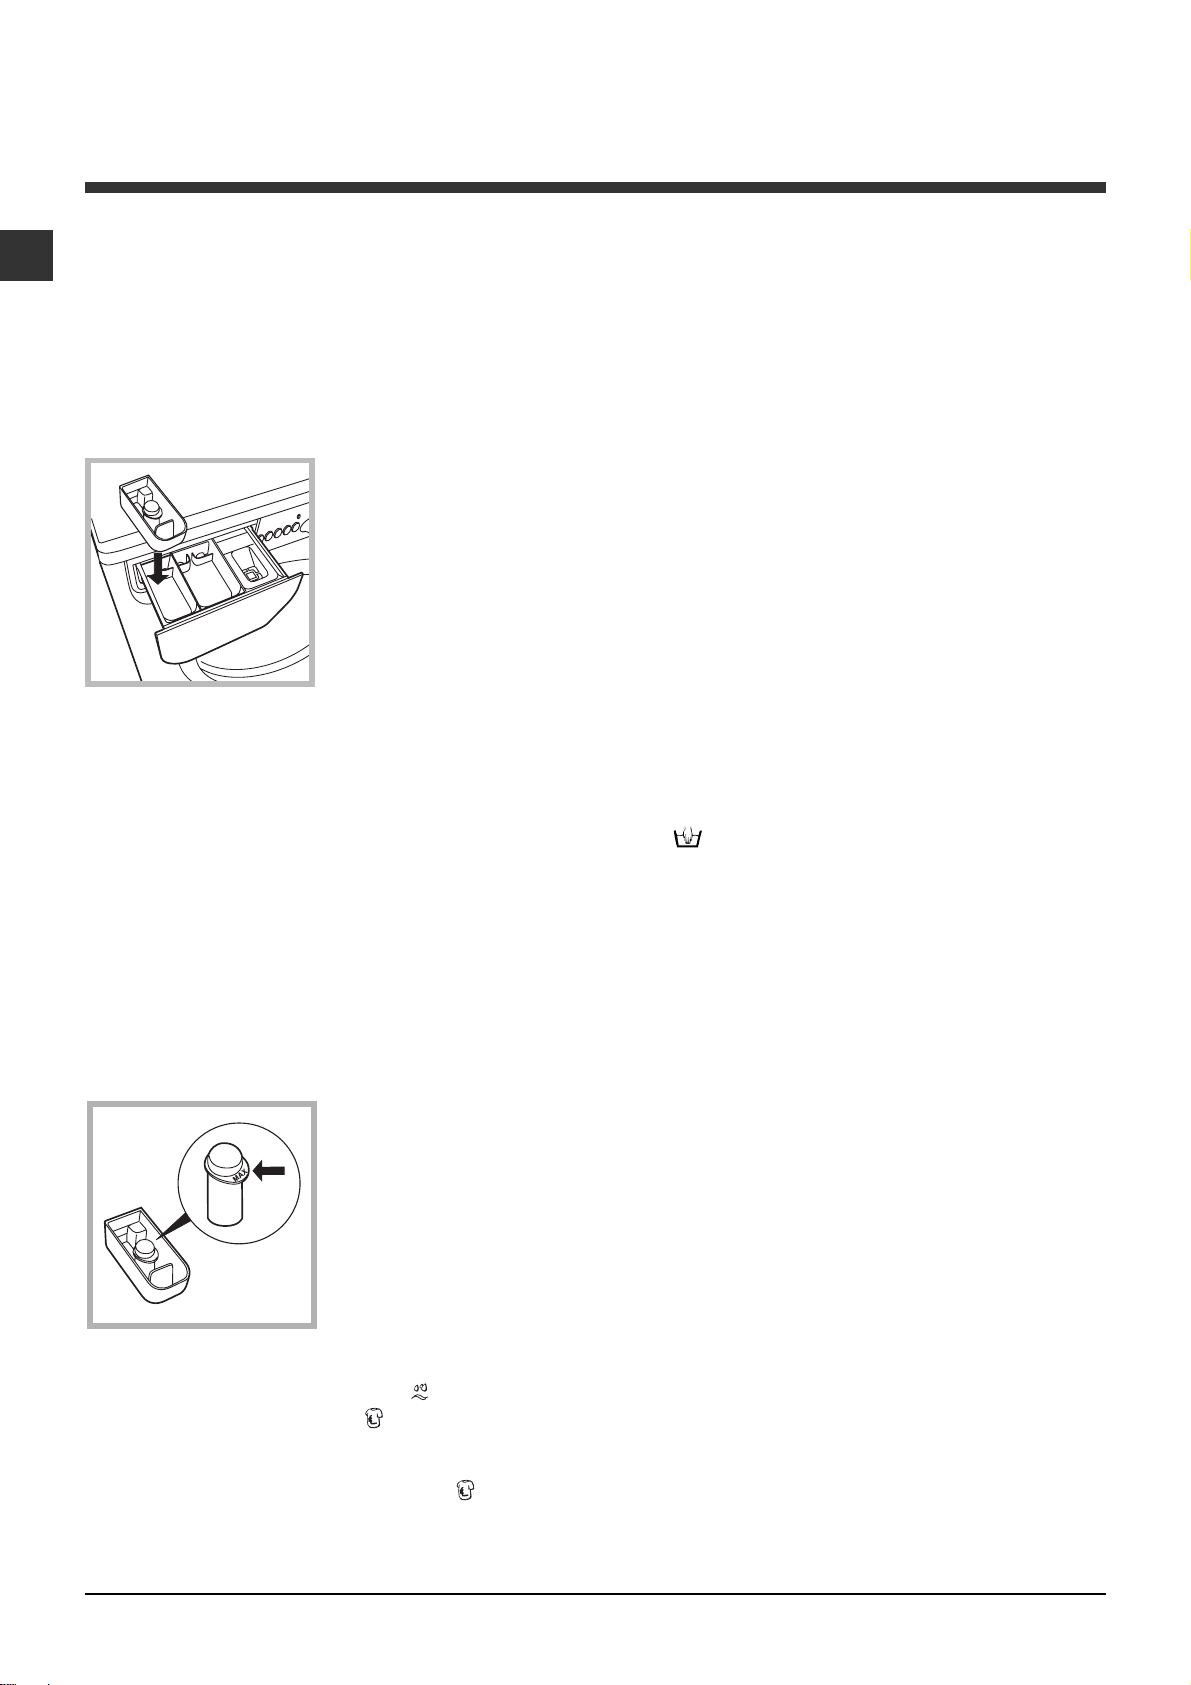
Open the detergent
4
3
dispenser drawer and
pour in the detergent or
washing additive, as
follows.
2
1
ompartment 1: Pre-wash detergent (powder)
Before pouring in the detergent, make sure that extra
compartment 4 has been removed.
compartment 2: Detergent for the wash cycle
(powder or liquid)
Liquid detergent should only be poured in immediately
prior to the start of the wash cycle.
compartment 3: Additives (fabric softeners, etc.)
The fabric softener should not overflow the grid.
extra compartment 4: Bleach
Bleach cycle
Traditional bleach should be used on sturdy white
fabrics, and delicate bleach for coloured fabrics,
synthetics and for wool.
This option is particularly
useful for the removal of
stubborn stains. Place
extra compartment 4
(supplied) into
compartment 1.
When pouring in the
bleach, be careful not to
exceed the "max" level
marked on the central
pivot (see figure).
To run the bleach cycle on its own, pour the bleach into
extra compartment 4, set the "Rinse"
and activate the "Stain removal"
To bleach during a wash cycle, pour in the detergent
and any fabric softener you wish to use, set the desired
wash cycle and enable the "Stain removal"
The use of extra compartment 4 excludes the Prewash option.
programme
option.
option.
Preparing the laundry
Divide the laundry according to:
- the type of fabric/the symbol on the label
- the colours: separate coloured garments from
whites.
Empty all garment pockets and check the buttons.
Do not exceed the listed values, which refer to the
weight of the laundry when dry:
Durable fabrics: max. 6 kg
Synthetic fabrics: max. 2,5 kg
Delicate fabrics: max. 2 kg
Wool: max. 1 kg
Silk: max. 1 kg
How much does your laundry weigh?
1 sheet 400-500 g
1 pillow case 150-200 g
1 tablecloth 400-500 g
1 bathrobe 900-1200 g
1 towel 150-250 g
Garments requiring special care
Wool: all wool garments can be washed using
programme 7, even those carrying the "hand-wash
only"
detergents and do not exceed 1 kg of laundry.
Silk: use special wash cycle 8 to wash all silk
garments. We recommend the use of special
detergent which has been designed to wash delicate
clothes.
Curtains: fold curtains and place them in a pillow
case or mesh bag. Use wash cycle 8.
Jeans: Turn garments inside-out before washing and
use a liquid detergent. Use programme 9.
label. For best results, use special
Load balancing system
Before every spin cycle, to avoid excessive vibrations
and to distribute the load in a uniform manner, the
drum rotates continuously at a speed which is slightly
greater than the washing rotation speed. If, after
several attempts, the load is not balanced correctly,
the machine spins at a reduced spin speed. If the
load is excessively unbalanced, the washing machine
performs the distribution process instead of spinning.
To encourage improved load distribution and balance,
we recommend small and large garments are mixed
in the load.
8
Page 9
Precautions and tips
This washing machine was designed and
constructed in accordance with international safety
regulations. The following information is provided for
safety reasons and must therefore be read carefully.
General safety
This appliance was designed for domestic use only.
The washing machine must only be used by adults, in
accordance with the instructions provided in this manual.
Do not touch the machine when barefoot or with
wet or damp hands or feet.
Do not pull on the power supply cable when
unplugging the appliance from the electricity
socket. Hold the plug and pull.
Do not open the detergent dispenser drawer while
the machine is in operation.
Do not touch the drained water as it may reach
extremely high temperatures.
Never force the porthole door. This could damage
the safety lock mechanism designed to prevent
accidental opening.
If the appliance breaks down, do not under any
circumstances access the internal mechanisms in
an attempt to repair it yourself.
Always keep children well away from the appliance
while it is operating.
The door can become quite hot during the wash cycle.
If the appliance has to be moved, work in a group
of two or three people and handle it with the utmost
care. Never try to do this alone, because the
appliance is very heavy.
Before loading laundry into the washing machine,
make sure the drum is empty.
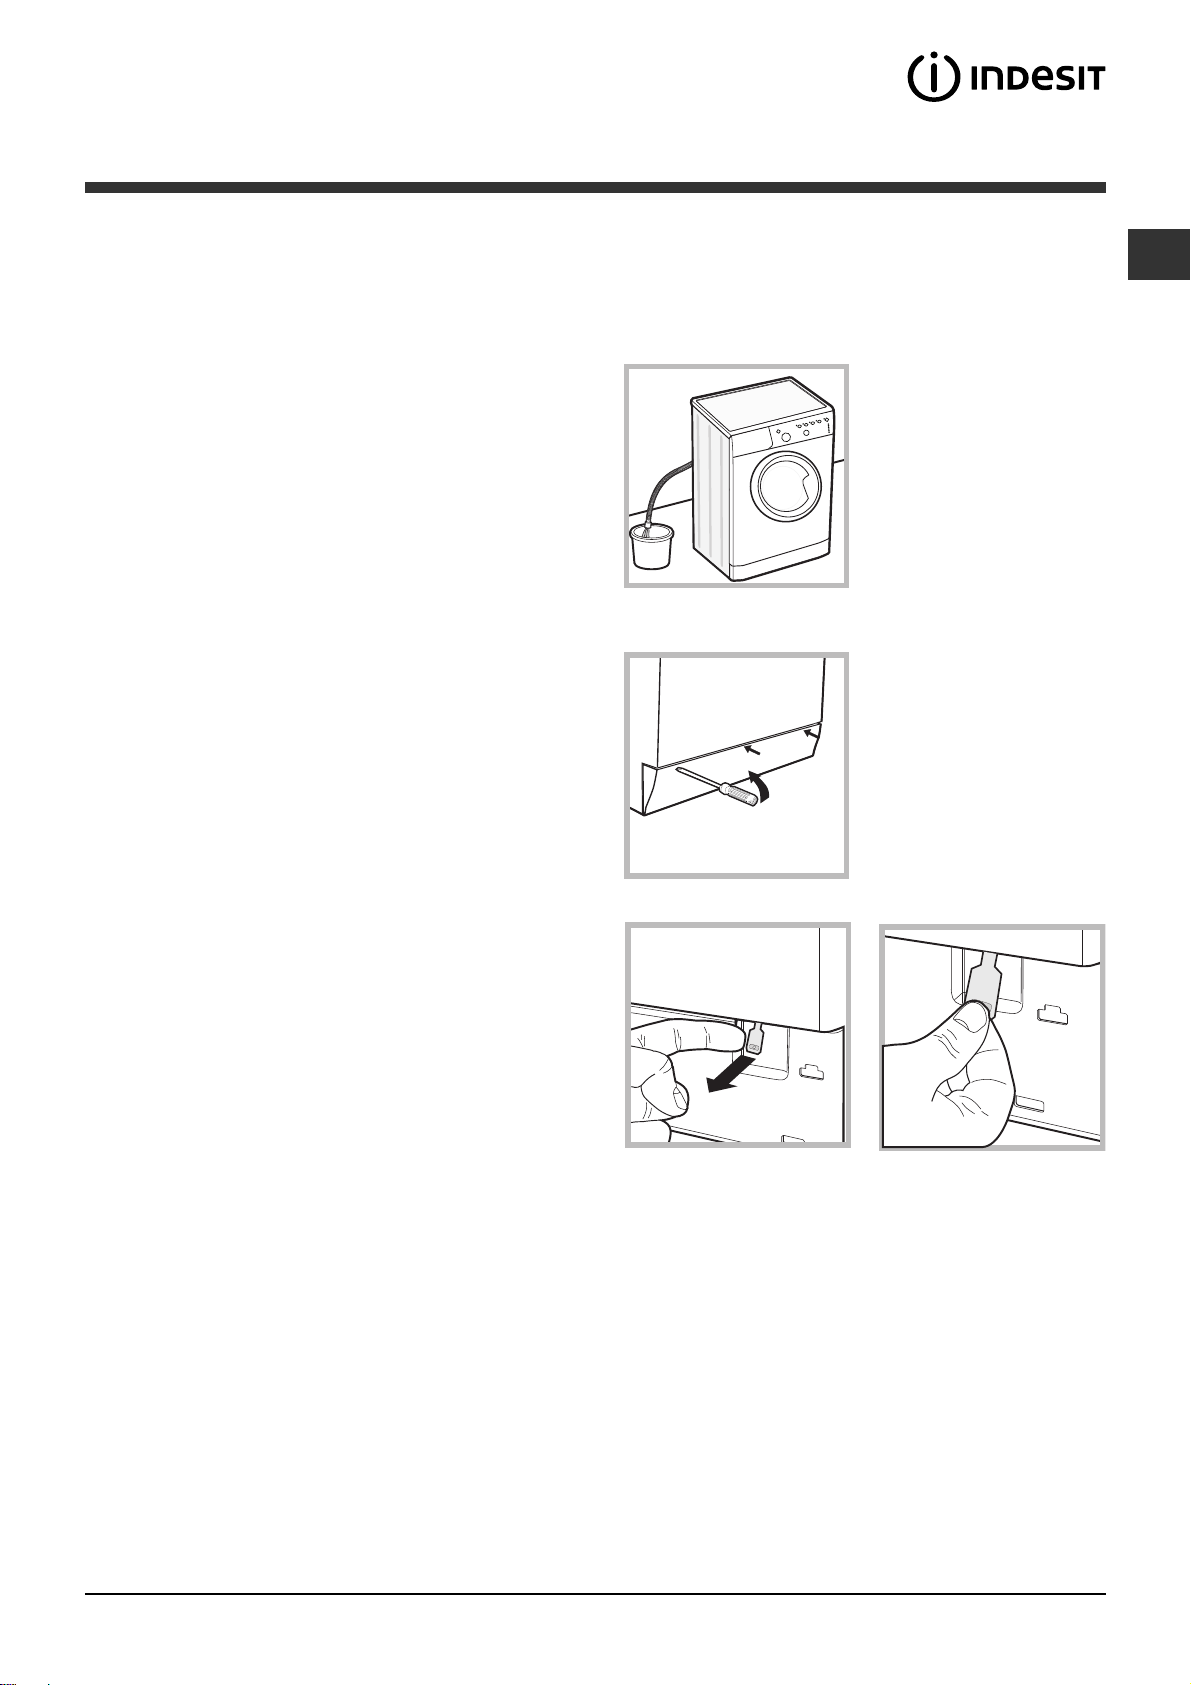
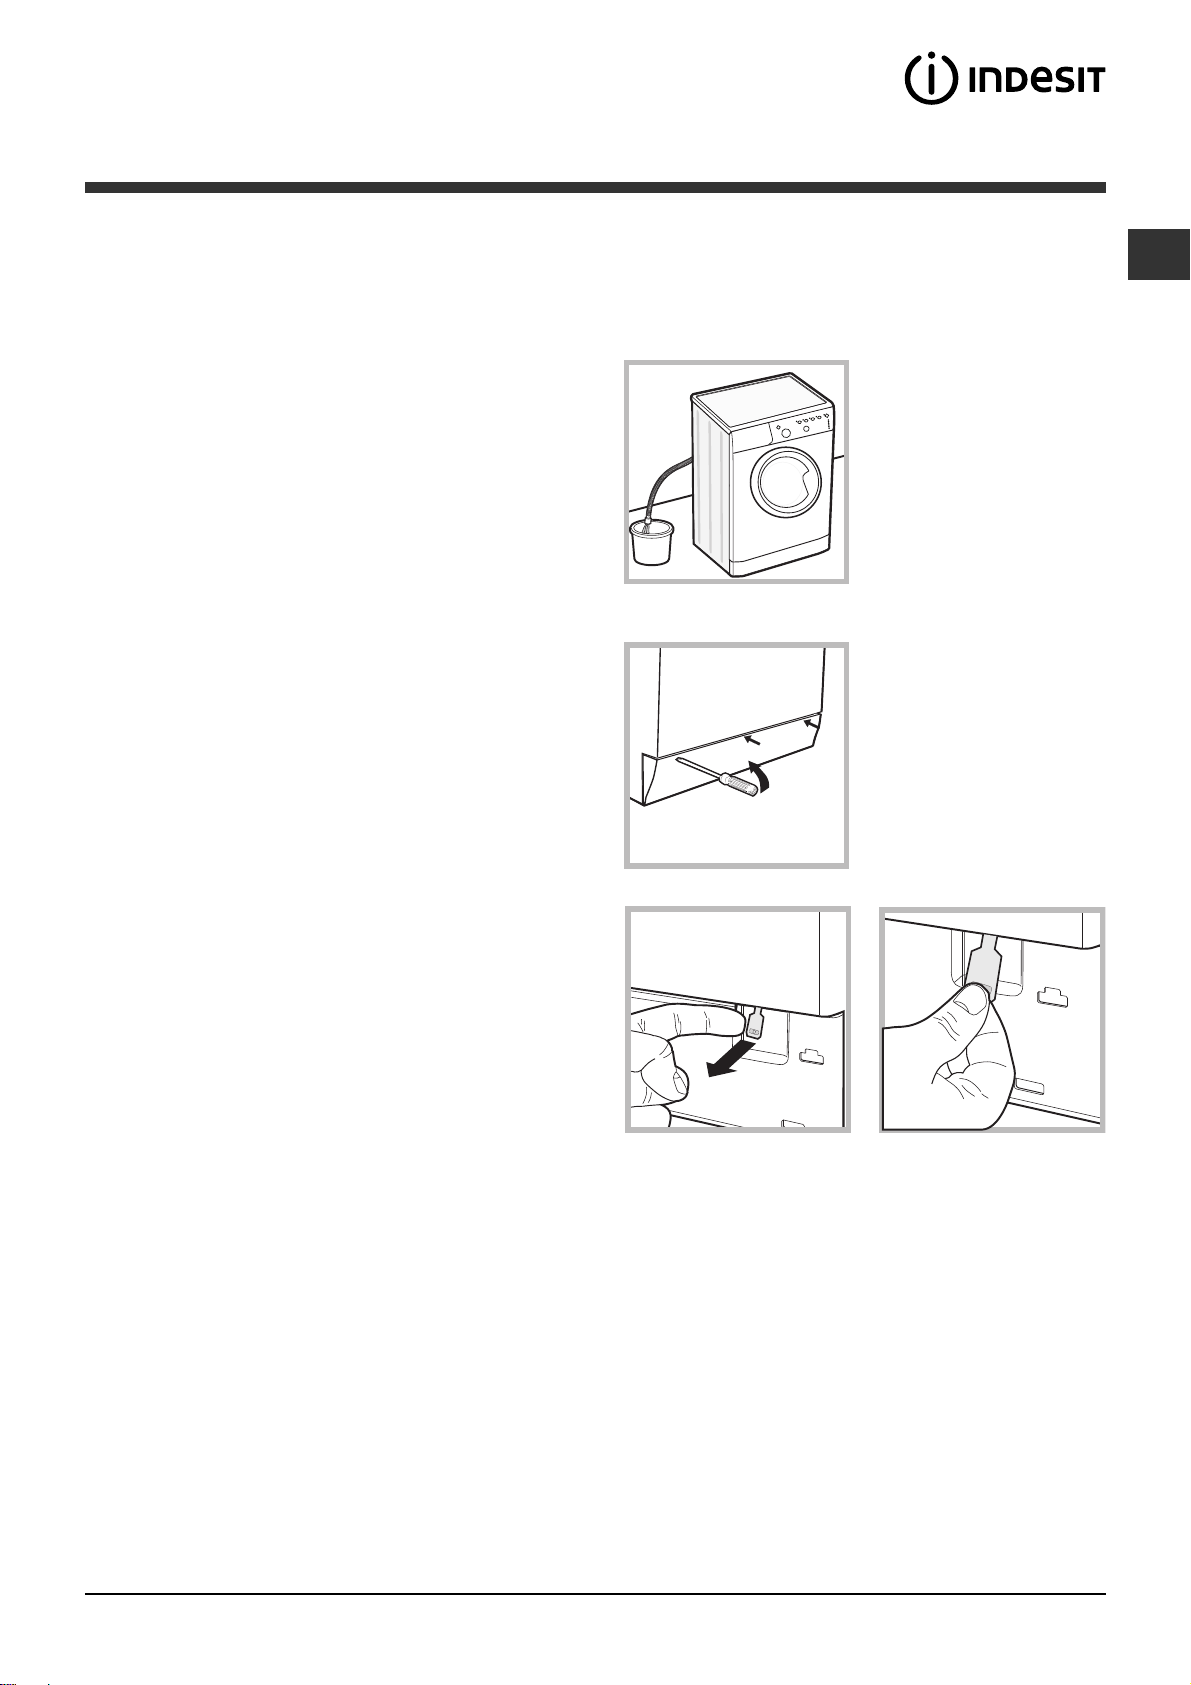
Opening the porthole door manually
In the event that it is not possible to open the
porthole door due to a powercut, and if you wish to
remove the laundry, proceed as follows:
1. remove the plug from
the electrical socket.
2. make sure the water
level inside the machine is
20
lower than the door
opening; if it is not, remove
excess water using the
drain hose, collecting it in a
bucket as indicated in the
figure.
3. using a screwdriver,
remove the cover panel on
the lower front part of the
washing machine (see
figure).
GB
Disposal
Disposing of the packaging materials: observe local
regulations so that the packaging may be re-used.
The European Directive 2002/96/EC on Waste
Electrical and Electronic Equipment, requires that
old household electrical appliances must not be
disposed of in the normal unsorted municipal waste
stream. Old appliances must be collected
separately in order to optimise the recovery and
recycling of the materials they contain and reduce
the impact on human health and the environment.
The crossed out "wheeled bin" symbol on the
product reminds you of your obligation, that when
you dispose of the appliance it must be separately
collected.
Consumers should contact their local authority or
retailer for information concerning the correct
disposal of their old appliance.
4. pull outwards using the tab as indicated in the
figure, until the plastic tie-rod is freed from its stop
position; pull downwards and open the door at the
same time.
5. reposition the panel, making sure the hooks are
securely in place before you push it onto the
appliance.
9
Page 10
Care and maintenance
GB
Cutting off the water and electricity
supplies
Turn off the water tap after every wash cycle. This
will limit wear on the hydraulic system inside the
washing machine and help to prevent leaks.
Unplug the washing machine when cleaning it and
during all maintenance work.
Cleaning the washing machine
The outer parts and rubber components of the
appliance can be cleaned using a soft cloth soaked
in lukewarm soapy water. Do not use solvents or
abrasives.
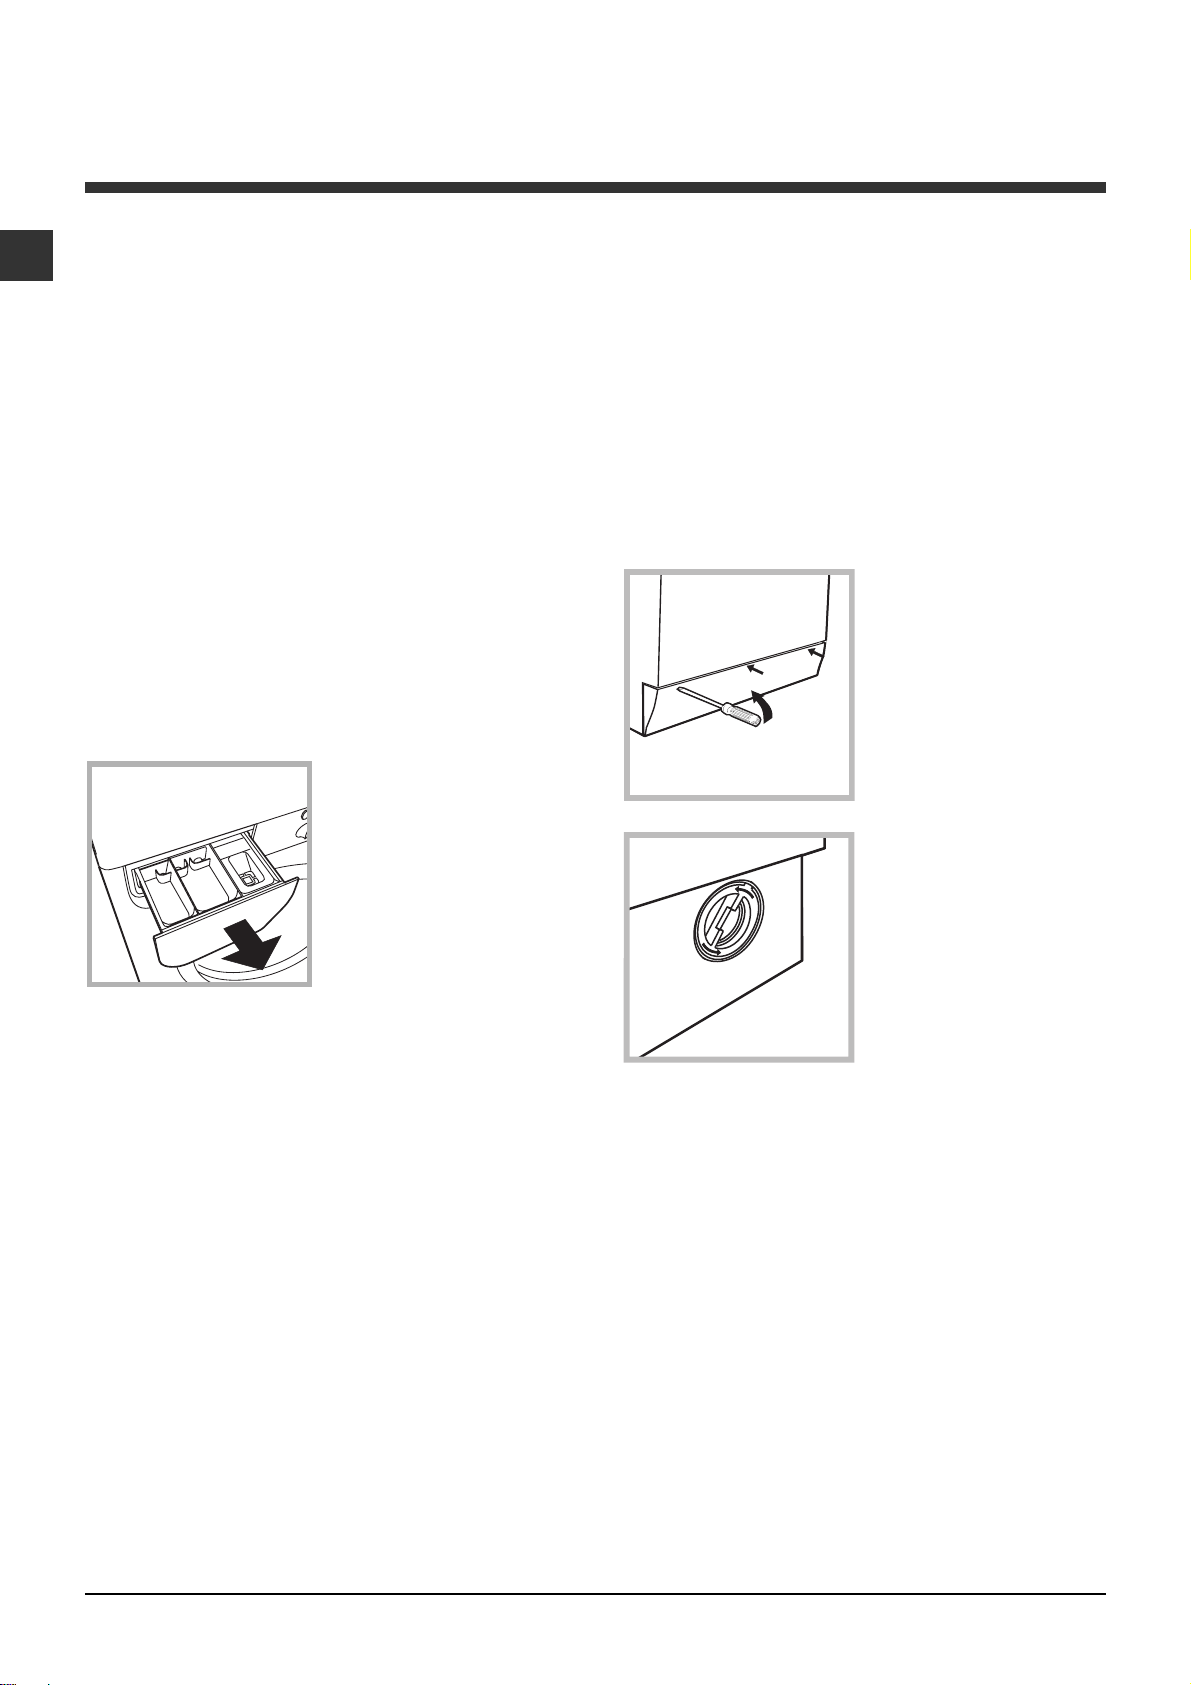
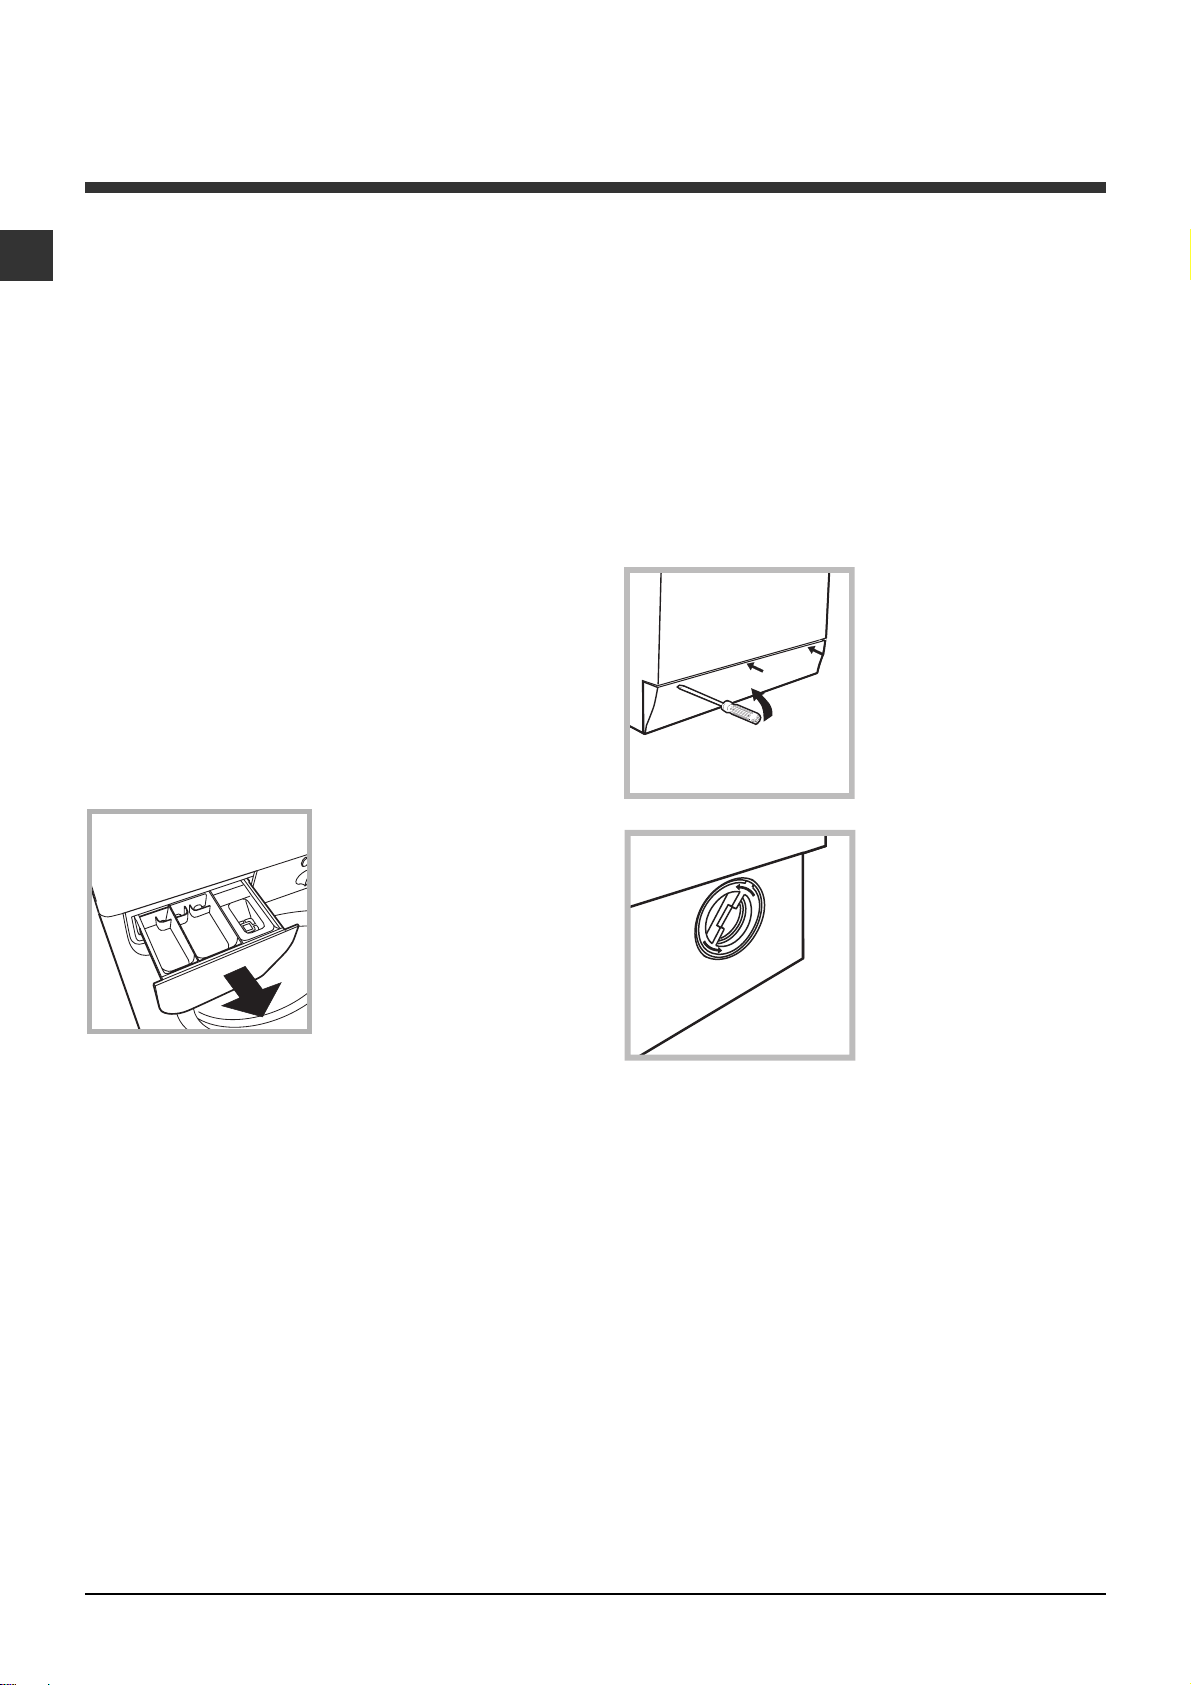
Cleaning the detergent dispenser
drawer
Remove the dispenser
by raising it and pulling it
out (see figure).
Wash it under running
water; this operation
should be repeated
frequently.
Cleaning the pump
The washing machine is fitted with a self-cleaning
pump which does not require any maintenance.
Sometimes, small items (such as coins or buttons)
may fall into the pre-chamber which protects the
pump, situated in its bottom part.
Make sure the wash cycle has finished and unplug
the appliance.
To access the pre-chamber:
1. using a screwdriver,
remove the cover panel
on the lower front part of
the washing machine
(see figure);
2. unscrew the lid by
rotating it anti-clockwise
(see figure): a little water
may trickle out. This is
perfectly normal;
Caring for the door and drum of your
appliance
Always leave the porthole door ajar in order to
prevent unpleasant odours from forming.
3. clean the inside thoroughly;
4. screw the lid back on;
5. reposition the panel, making sure the hooks are
securely in place before you push it onto the
appliance.
Checking the water inlet hose
Check the inlet hose at least once a year. If there are
any cracks, it should be replaced immediately: during
the wash cycles, water pressure is very strong and a
cracked hose could easily split open.
Never use second-hand hoses.
10
Page 11

Troubleshooting
Your washing machine could fail to work. Before contacting the Technical Assistance Centre (see Assistance),
make sure that the problem cannot be not solved easily using the following list.
Problem:
The washing machine does not
switch on.
The wash cycle does not start.
The washing machine does not
take in water (the indicator light
for the first wash cycle stage
flashes rapidly).
The washing machine
continuously takes in and drains
water.
Possible causes / Solutions:
The appliance is not plugged into the socket fully, or is not making contact.
There is no power in the house.
The washing machine door is not closed properly.
The ON/OFF button has not been pressed.
The START/PAUSE button has not been pressed.
The water tap has not been opened.
A delayed start has been set (see Personalisation).
The water inlet hose is not connected to the tap.
The hose is bent.
The water tap has not been opened.
There is no water supply in the house.
The pressure is too low.
The START/PAUSE button has not been pressed.
The drain hose is not fitted at a height between 65 and 100 cm from
the floor (see Installation).
The free end of the hose is under water (see Installation).
The wall drainage system is not fitted with a breather pipe.
If the problem persists even after these checks, turn off the water tap,
switch the appliance off and contact the Assistance Service. If the
dwelling is on one of the upper floors of a building, there may be problems
relating to water drainage, causing the washing machine to fill with water
and drain continuously. Special anti-draining valves are available in shops
and help to avoid this inconvenience.
GB
The washing machine does not
drain or spin.
The washing machine vibrates a
lot during the spin cycle.
The washing machine leaks.
The "option" indicator lights and
the "start/pause" indicator light
flash, while one of the "phase in
progress" indicator lights and the
"door locked" indicator light will
remain lit in a fixed manner.
There is too much foam.
The wash cycle does not include draining: some wash cycles require
the drain phase to be started manually.
The drain hose is bent (see Installation).
The drainage duct is clogged.
The drum was not unlocked correctly during installation (see Installation).
The washing machine is not level (see Installation).
The washing machine is trapped between cabinets and walls (see Installation).
The water inlet hose is not screwed on properly (see Installation).
The detergent dispenser drawer is blocked (for cleaning instructions, see
Care and maintenance).
The drain hose is not fixed properly (see Installation).
Switch off the machine and unplug it, wait for approximately 1 minute
and then switch it back on again.
If the problem persists, contact the Technical Assistance Service.
The detergent is not suitable for machine washing (it should display the
text for washing machines or hand and machine wash, or the like).
Too much detergent was used.
11
Page 12

Service
GB
Before calling for Assistance:
Check whether you can solve the problem alone (see Troubleshooting);
Restart the programme to check whether the problem has been solved;
If this is not the case, contact an authorised Technical Assistance Centre using the telephone number
provided on the guarantee certificate.
Always request the assistance of authorised technicians.
Have the following information to hand:
the type of problem;
the appliance model (Mod.);
the serial number (S/N).
This information can be found on the data plate applied to the rear of the washing machine, and can also
be found on the front of the appliance by opening the door.
12
Page 13

ПдзгЯет чсЮузт
РЛХНФЗСЙП СПХЧЩН
GR
ЕллзнйкЬ
IWB 6065
Ресйечьменб
GR
ЕгкбфЬуфбуз, 14-15
БрпухукехбуЯб кбй псйжпнфЯщуз
ХдсбхлйкЭт кбй злекфсйкЭт ухндЭуейт
Рсюфпт кэклпт рлхуЯмбфпт
ФечнйкЬ уфпйчеЯб
РесйгсбцЮ фпх рлхнфзсЯпх кбй еккЯнзуз
еньт рспгсЬммбфпт, 16-17
РЯнбкбт елЭгчпх
ЕндейкфйкЬ цщфЬкйб
ЕккЯнзуз еньт рспгсЬммбфпт
РспгсЬммбфб, 18
РЯнбкбт фщн РспгсбммЬфщн
Еобфпмйкеэуейт, 19
ИЭуфе фз иесмпксбуЯб
ИЭуфе фп уфэшймп
ЛейфпхсгЯет
БрпссхрбнфйкЬ кбй мрпхгЬдб, 20
ИЮкз брпссхрбнфйкюн
Кэклпт леэкбнузт
РспефпймбуЯб фзт мрпхгЬдбт
ЕйдйкЬ спэчб
Уэуфзмб йупуфЬимйузт фпх цпсфЯпх
РспцхлЬоейт кбй ухмвпхлЭт, 21
ГенйкЮ буцЬлейб
ДйЬиеуз
Чейспнбкфйкь Ьнпйгмб фзт рьсфбт
УхнфЮсзуз кбй цспнфЯдб, 22
Брпклейумьт неспэ кбй злекфсйкпэ сеэмбфпт
Кбибсйумьт фпх рлхнфзсЯпх
Кбибсйумьт фпх ухсфбсйпэ брпссхрбнфйкюн
ЦспнфЯдб фзт рьсфбт кбй фпх кЬдпх
Кбибсйумьт фзт бнфлЯбт
¸легчпт фпх ущлЮнб фспцпдпуЯбт фпх неспэ
БнщмблЯет кбй лэуейт, 23
ХрпуфЮсйоз, 24
13
Page 14
ЕгкбфЬуфбуз
GR
ЕЯнбй узмбнфйкь нб дйбфзсЮуефе фп егчейсЯдйп бхфь
гйб нб мрпсеЯфе нб фп ухмвпхлеэеуфе прпйбдЮрпфе
уфйгмЮ. Уе ресЯрфщуз рюлзузт, рбсбчюсзузт Ю
мефбкьмйузт, вевбйщиеЯфе ьфй рбсбмЭней мбжЯ ме фп
рлхнфЮсйп гйб нб рлзспцпсеЯ фпн нЭп йдйпкфЮфз гйб
фз лейфпхсгЯб кбй фйт учефйкЭт рспейдпрпйЮуейт.
ДйбвЬуфе рспуекфйкЬ фйт пдзгЯет: хрЬсчпхн
узмбнфйкЭт рлзспцпсЯет гйб фзн егкбфЬуфбуз, фз
чсЮуз кбй фзн буцЬлейб.
БрпухукехбуЯб кбй псйжпнфЯщуз
БрпухукехбуЯб
1. БрпухукехЬуфе фп рлхнфЮсйп.
2. ЕлЭгофе бн фп рлхнфЮсйп Эчей хрпуфеЯ жзмйЭт кбфЬ
фз мефбцпсЬ. Бн Эчей хрпуфеЯ жзмйЭт мзн фп
ухндЭефе кбй ерйкпйнщнЮуфе ме фпн мефбрщлзфЮ.
3. БцбйсЭуфе фйт 3 вЯдет
рспуфбуЯбт гйб фз
мефбцпсЬ кбй фп
лбуфйчЬкй ме фп учефйкь
дйбчщсйуфйкь, рпх
всЯукпнфбй уфп рЯущ
мЭспт (влЭре ейкьнб).
Мйб цспнфйумЭнз псйжпнфЯщуз рспудЯдей уфбиесьфзфб
уфз мзчбнЮ кбй брпупвеЯ дпнЮуейт, ипсэвпхт кбй
мефбфпрЯуейт кбфЬ фз лейфпхсгЯб. Уе ресЯрфщуз
мпкЭфбт Ю фЬрзфб, схимЯуфе фб рпдбсЬкйб Эфуй юуфе
нб хцЯуфбфбй кЬфщ брь фп рлхнфЮсйп бскефьт чюспт
гйб фпн бесйумь.
ХдсбхлйкЭт кбй злекфсйкЭт ухндЭуейт
Уэндеуз фпх ущлЮнб фспцпдпуЯбт фпх неспэ
1. УхндЭуфе фп ущлЮнб
фспцпдпуЯбт вйдюнпнфЬт
фпн уе Энб кспхнь ксэпх
неспэ ме уфьмйп
урейсюмбфпт 3/4 gas
(влЭре ейкьнб).
Рсйн фз уэндеуз, бцЮуфе
нб фсЭоей фп несь мЭчсй нб
гЯней дйбхгЭт.
2. УхндЭуфе фп ущлЮнб
фспцпдпуЯбт уфп
рлхнфЮсйп вйдюнпнфЬт фпн
уфзн бнфЯуфпйчз еЯупдп
неспэ, уфп рЯущ мЭспт
ерЬнщ деойЬ (влЭре
ейкьнб).
4. КлеЯуфе фйт прЭт ме фб рлбуфйкЬ рюмбфб рпх убт
рбсЭчпнфбй.
5. ДйбфзсеЯуфе кбй фб фсЯб фемЬчйб: бн фп рлхнфЮсйп
чсейбуфеЯ нб мефбцесиеЯ, иб рсЭрей нб
обнбмпнфбсйуфпэн.
Пй ухукехбуЯет ден еЯнбй рбйчнЯдйб гйб мйксЬ
рбйдйЬ.
ЕхихгсЬммйуз
1. ЕгкбфбуфЮуфе фп рлхнфЮсйп уе Энб дЬредп
ерЯредп кбй бниекфйкь, чщсЯт нб фп бкпхмрЮуефе уе
фпЯчпхт, Эрйрлб Ю Ьллп.
2. Бн фп дЬредп ден еЯнбй
брьлхфб псйжпнфйщмЭнп,
бнфйуфбимЯуфе фйт
бнщмблЯет вйдюнпнфбт Ю
оевйдюнпнфбт фб рсьуийб
рпдбсЬкйб (влЭре
ейкьнб). З гщнЯб клЯузт,
мефсзмЭнз уфзн
ерйцЬнейб есгбуЯбт, ден
рсЭрей нб оереснЬей фйт
2°.
3. РспуЭофе юуфе уфп ущлЮнб нб мзн хрЬсчпхн пэфе
рфхчюуейт, пэфе уфенюуейт.
З рЯеуз неспэ фпх кспхнпэ рсЭрей нб кхмбЯнефбй
мефбоэ фщн фймюн фпх рЯнбкб ФечнйкЬ уфпйчеЯб
(влЭре уелЯдб дЯрлб).
Бн фп мЮкпт фпх ущлЮнб фспцпдпуЯбт ден
ербскеЯ, брехихниеЯфе уе Энб ейдйкехмЭнп
кбфЬуфзмб Ю уе Энб еопхуйпдпфзмЭнп фечнйкь.
Мз чсзуймпрпйеЯфе рпфЭ чсзуймпрпйзмЭнпхт
ущлЮнет.
ЧсзуймпрпйеЯфе екеЯнпхт рпх убт рбсЭчпнфбй ме
фз мзчбнЮ.
14
Page 15
Уэндеуз фпх ущлЮнб бдейЬумбфпт
УхндЭуфе бдейЬумбфпт,
чщсЯт нб фпн дйрлюуефе,
уе Энбн бгщгь
еккЭнщузт Ю уе мйб
ерйфпЯчйб брпчЭфехуз уе
65 - 100 cm
брьуфбуз брь 65 Эщт
100 cm брь фп Эдбцпт.
Мз чсзуймпрпйеЯфе рспекфЬуейт кбй рплэрсйжб.
GR
Фп кблюдйп ден рсЭрей нб цЭсей рфхчЭт Ю нб еЯнбй
ухмрйеумЭнп.
Фп кблюдйп фспцпдпуЯбт рсЭрей нб бнфйкбиЯуфбфбй
мьнп брь еопхуйпдпфзмЭнпхт фечнйкпэт.
РспупчЮ! З ерйчеЯсзуз брпрпйеЯфбй кЬие ехиэнзт
уе ресЯрфщуз рпх ден фзспэнфбй бхфпЯ пй кбньнет.
ДйбцпсефйкЬ брпиЭуфе
фпн уфп чеЯлпт еньт
нйрфЮсб Ю мйбт лекЬнзт,
дЭнпнфбт фпн пдзгь рпх
убт рбсЭчефбй
уфпнкспхнь (влЭре
ейкьнб). Фп елеэиесп
Ьксп фпх ущлЮнб
бдейЬумбфпт ден рсЭрей
нб рбсбмЭней
вхийумЭнп уфп несь.
Ден ухнйуфЬфбй з чсЮуз рспекфЬуещн ущлЮнщн.
Бн брбйфеЯфбй, з рспЭкфбуз рсЭрей нб Эчей фзн Ядйб
дйЬмефсп фпх бсчйкпэ ущлЮнб кбй нб мзн оереснЬей
фб 150 cm.
ЗлекфсйкЮ уэндеуз
Рсйн ейуЬгефе фп вэумб уфзн злекфсйкЮ рсЯжб,
вевбйщиеЯфе ьфй:
з рсЯжб дйбиЭфей геЯщуз кбй фзсеЯ фйт ек фпх ньмпх
рспдйбгсбцЭт.
З рсЯжб нб еЯнбй уе иЭуз нб хрпцЭсей фп мЭгйуфп
цпсфЯп йучэпт фзт мзчбнЮт, рпх бнбцЭсефбй уфпн
рЯнбкб Фечнйкюн уфпйчеЯщн (влЭре дЯрлб).
З фЬуз фспцпдпуЯбт нб кхмбЯнефбй мефбоэ фщн
фймюн рпх бнбцЭспнфбй уфпн рЯнбкб Фечнйкюн
уфпйчеЯщн (влЭре дЯрлб).
З рсЯжб нб еЯнбй ухмвбфЮ ме фп вэумб фпх
рлхнфзсЯпх. Уе бнфЯиефз ресЯрфщуз,
бнфйкбфбуфЮуфе фзн рсЯжб Ю фп вэумб.
Фп рлхнфЮсйп ден егкбиЯуфбфбй уе бнпйчфь чюсп,
бкьмз кбй бн п чюспт еЯнбй кблхммЭнпт, дйьфй еЯнбй
рплэ ерйкЯндхнп нб фп бцЮнефе екфеиеймЭнп уе
вспчЮ кбй кбкпкбйсЯб.
Ме фзн егкбфЬуфбуз фпх рлхнфзсЯпх, з рсЯжб
сеэмбфпт рсЭрей нб еЯнбй еэкплб рспувЬуймз.
Рсюфпт кэклпт рлхуЯмбфпт
МефЬ фзн егкбфЬуфбуз, рсйн фз чсЮуз, дйенесгЮуфе
Энб кэклп рлхуЯмбфпт ме брпссхрбнфйкь кбй чщсЯт
спэчб иЭфпнфбт фп рсьгсбммб 2.
ФечнйкЬ уфпйчеЯб
МпнфЭлп
ДйбуфЬуейт
Чщсзфйкьфзфб
ЗлекфсйкЭт
ухндЭуейт
УхндЭуейт неспэ
Фбчэфзфб
уфхшЯмбфпт
РспгсЬммбфб
елЭгчпх уэмцщнб
ме фпн кбнпнйумь
EN 60456
IWB 6065
рлЬфпт cm 59,5
эшпт cm 85
вЬипт cm 52,5
áðü 1 Ýùò 6 kg
ВлЭре фзн рйнбкЯдб
чбсбкфзсйуфйкюн ерЯ фзт мзчбнЮт
мЭгйуфз рЯеуз 1 MPa (10 bar)
ЕлЬчйуфз рЯеуз 0,05 MPa (0,5 bar)
чщсзфйкьфзфб фпх кЬдпх 46 лЯфсб
мЭчсй 600 уфспцЭт фп лерфь
рсьгсбммб 2; иесмпксбуЯб 60°C;
екфелпэменп ме 6 kg мрпхгЬдбт.
З ухукехЮ бхфЮ еЯнбй уэмцщнз
ме фйт бкьлпхиет пйнпфйкЭт
ПдзгЯет:
- 89/336/CEE фзт 03/05/89
(ЗлекфспмбгнзфйкЮ Ухмвбфьфзфб)
кбй мефбгенЭуфесет фспрпр пйЮуейт
- 2002/96/CE
- 2006/95/CE (ЧбмзлЮ ФЬуз)
15
Page 16
РесйгсбцЮ фпх рлхнфзсЯпх кбй
еккЯнзуз еньт рспгсЬммбфпт
GR
РЯнбкбт елЭгчпх
ИЮкз брпссхрбнфйкюн
БНБММБФПУ/
КпхмрЯ
УВЗУЙМБФПУ
ЕрйлпгЭбт
РСПГСБММБФЩН
Кпхмрй Ь ме
ендейкфйкЬ цщфЬкйб
ЛЕЙФПХСГЙБУ
ЕрйлпгЭбт
ИЕСМПКСБУЙБ
ЕНДЕЙКФЙКБ ЦЩФБКЙБ
РСПЩИЗУЗУ КХКЛПХ/
КБИХУФЕСЗМЕНЗУ ЕККЙНЗУЗУ
КпхмрЯ ме
ендейкфйкь цщфЬкй
ЕККЙНЗУЗ/
РБХУЗ
Ендейкфйкь цщфЬкй
РПСФБ
БУЦБЛЙУМЕНЗ
ИЮкз брпссхрбнфйкюн: гйб фзн рспуиЮкз
брпссхрбнфйкюн кбй рсьуиефщн (влЭре
«БрпссхрбнфйкЬ кбй мрпхгЬдб»).
КпхмрЯ БНБММБФПУ/УВЗУЙМБФПУ: Гйб нб
бнЬшефе Ю нб увЮуефе фп рлхнфЮсйп.
ЕрйлпгЭбт РСПГСБММБФЩН: гйб нб иЭуефе фб
рспгсЬммбфб. КбфЬ фз дйЬскейб фпх рспгсЬммбфпт п
ерйлпгЭбт рбсбмЭней бкЯнзфпт.
Кпхмрй Ь ме ендейкфйкЬ цщфЬкйб ЛЕЙФПХСГЙБУ: гйб
нб ерйлЭоефе фйт дйбиЭуймет лейфпхсгЯет. Фп учефйкь
ме фзн ерйлегеЯуб лейфпхсгЯб ендейкфйкь цщфЬкй иб
рбсбмеЯней бнбммЭнп.
ЕрйлпгЭбт ИЕСМПКСБУЙБ: гйб нб иЭуефе фз
иесмпксбуЯб Ю фп рлэуймп уе ксэп несь (влЭре
«Еобфпмйкеэуейт»).
ЕНДЕЙКФЙКБ ЦЩФБКЙБ РСПЩИЗУЗУ КХКЛПХ/
КБИХУФЕСЗМЕНЗУ ЕККЙНЗУЗУ: ãéá íá
бкплпхиеЯфе фзн кбфЬуфбуз рспьдпх фпх
рспгсЬммбфпт рлхуЯмбфпт.
Фп бнбммЭнп ендейкфйкь цщфЬкй деЯчней фзн уе еоЭлйоз
цЬуз.
Бн фЭизке з лейфпхсгЯб КбихуфесзмЭнз еккЯнзуз,
иб деЯчнпхн фпн чсьнп рпх хрплеЯрефбй гйб фзн
Энбсоз фпх рспгсЬммбфпт (влЭре уелЯдб дЯрлб).
Ендейкфйкь цщфЬкй РПСФБ БУЦБЛЙУМЕНЗ: ãéá íá
кбфблЬвефе бн з рьсфб бнпЯгей (влЭре уелЯдб
дЯрлб).
КпхмрЯ ме ендейкфйкь цщфЬкй ЕККЙНЗУЗ/РБХУЗ: гйб
фзн еккЯнзуз фщн рспгсбммЬфщн Ю фзн рспущсйнЮ
дйбкпрЮ фпхт.
УЗМЕЙЩУЗ: гйб нб иЭуефе уе рбэуз фп уе еоЭлйоз
рлэуймп, рйЭуфе фп кпхмрЯ бхфь, фп учефйкь
ендейкфйкь цщфЬкй иб бнЬшей ме рпсфпкблЯ чсюмб
еню екеЯнп фзт уе еоЭлйозт цЬузт иб еЯнбй ухнечют
бнбммЭнп. Бн фп ендейкфйкь цщфЬкй РПСФБ
БУЦБЛЙУМЕНЗ
рьсфб.
Гйб нб оекйнЮуей рЬлй фп рлэуймп брь фп узмеЯп
дйбкпрЮт, рбфЮуфе ек нЭпх фп кпхмрЯ бхфь.
Фсьрпт stand by
Фп рлхнфЮсйп бхфь, уэмцщнб ме фйт нЭет дйбфЬоейт
гйб фзн еопйкпньмзуз енЭсгейбт, дйбиЭфей Энб
уэуфзмб бхфьмбфпх увзуЯмбфпт (stand by) рпх
фЯиефбй уе лейфпхсгЯб енфьт месйкюн лерфюн уфзн
ресЯрфщуз мз чсЮузт. РйЭуфе уфйгмйбЯб фп кпхмрЯ
ON-OFF кбй ресймЭнефе нб енесгпрпйзиеЯ ек нЭпх з
мзчбнЮ.
увЮуей, мрпсеЯфе нб бнпЯоефе фзн
16
Page 17
ЕндейкфйкЬ цщфЬкйб
Фб ендейкфйкЬ цщфЬкйб рбсЭчпхн узмбнфйкЭт
рлзспцпсЯет.
Нб фй мбт лЭне:
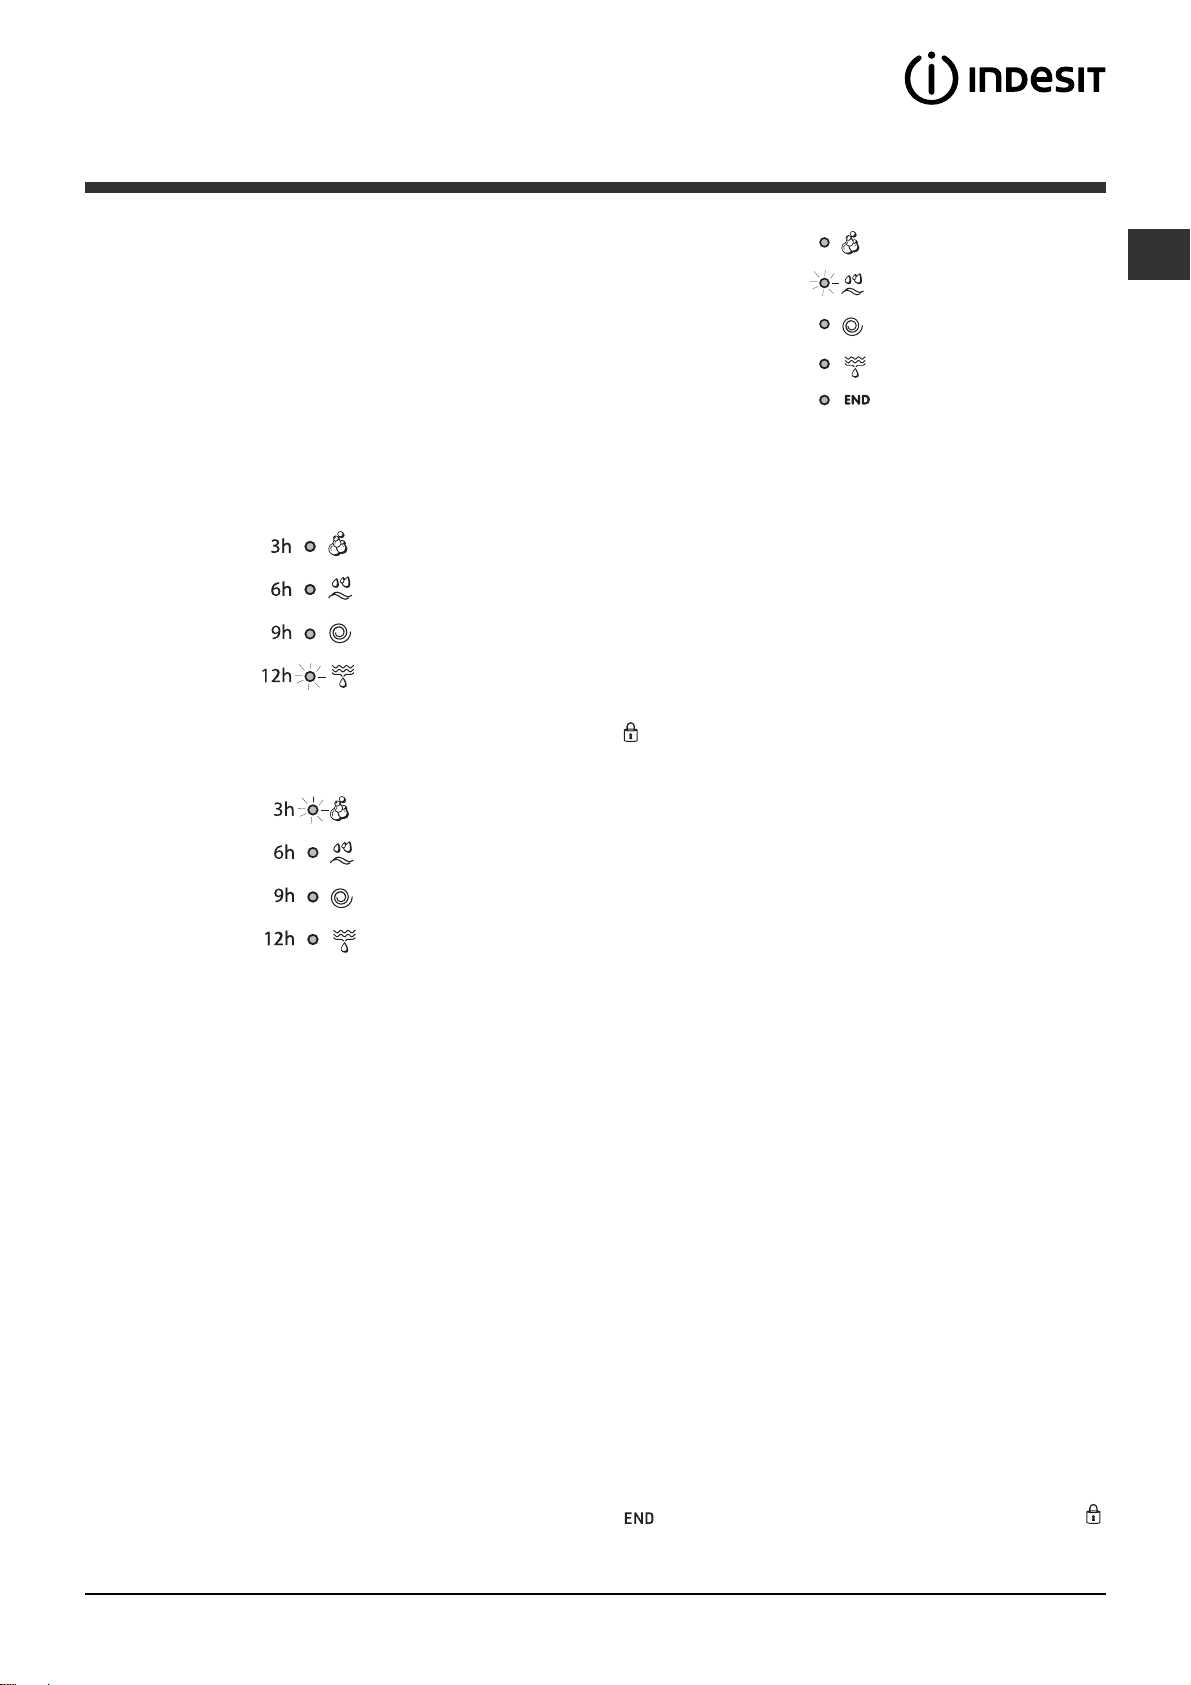
КбихуфесзмЭнз еккЯнзуз
Бн енесгпрпйЮизке з лейфпхсгЯб КбихуфесзмЭнз
еккЯнзуз (влЭре Еобфпмйкеэуейт), бцпэ еккйнЮуефе
фп рсьгсбммб, иб бсчЯуей нб бнбвпувЮней фп
ендейкфйкь цщфЬкй фп учефйкь ме фзн ерйлегмЭнз
кбихуфЭсзуз:
Ме фп рЭсбумб фпх чсьнпх иб брейкпнЯжефбй з
хрплейрьменз кбихуфЭсзуз, ме фп учефйкь
ендейкфйкь цщфЬкй нб бнбвпувЮней.
Рлэуймп
GR
ОЭвгблмб
Уфэшймп
¢дейбумб
ФЭлпт РлхуЯмбфпт
КпхмрйЬ лейфпхсгЯбт кбй учефйкЬ ендейкфйкЬ цщфЬкйб
ЕрйлЭгпнфбт мйб лейфпхсгЯб фп учефйкь ендейкфйкь цщфЬкй
иб цщфйуфеЯ.
Бн з ерйлегмЭнз лейфпхсгЯб ден еЯнбй ухмвбфЮ ме фп
феиЭн рсьгсбммб фп учефйкь ендейкфйкь цщфЬкй иб
бнбвпувЮней кбй з лейфпхсгЯб ден иб енесгпрпйзиеЯ.
Бн з ерйлегмЭнз лейфпхсгЯб ден еЯнбй ухмвбфЮ ме мйб
Ьллз рпх ерелЭгз рспзгпхмЭнщт, фп учефйкь цщфЬкй
фзт рсюфзт ерйлегмЭнзт лейфпхсгЯбт иб бнбвпувЮней
кбй иб енесгпрпйзиеЯ мьнп з деэфесз, фп ендейкфйкь
цщфЬкй фзт енесгпрпйзиеЯубт лейфпхсгЯбт иб цщфйуфеЯ.
Ендейкфйкь цщфЬкй буцблйумЭнзт рьсфбт
Фп бнбммЭнп ендейкфйкь цщфЬкй деЯчней ьфй з рьсфб еЯнбй
мрлпкбсйумЭнз гйб нб брпцехчиеЯ фп Ьнпйгмб. Гйб нб
бнпЯоефе фзн рьсфб рсЭрей фп ендейкфйкь цщфЬкй нб еЯнбй
увзуфь (ресймЭнефе 3 лерфЬ ресЯрпх). Гйб нб бнпЯоефе
фзн рьсфб еню еЯнбй уе еоЭлйоз Энбт кэклпт рйЭуфе фп
кпхмрЯ ЕККЙНЗУЗ/РБХУЗ. Бн фп ендейкфйкь цщфЬкй
РПСФБ БУЦБЛЙУМЕНЗ еЯнбй увзуфь мрпсеЯфе нб
бнпЯоефе фзн рьсфб.
Бцпэ плпклзсщиеЯ з рсперйлегмЭнз
чспнпкбихуфЭсзуз иб бсчЯуей фп ерйлегмЭнп
рсьгсбммб.
ЕндейкфйкЬ цщфЬкй цЬузт уе еоЭлйоз
КбфЬ фпн ерйихмзфь кэклп рлхуЯмбфпт, фб ендейкфйкЬ
цщфЬкйб иб бнЬшпхн рсппдехфйкЬ гйб нб деЯопхн фзн
кбфЬуфбуз рспюизузт:
ЕккЯнзуз еньт рспгсЬммбфпт
1. БнЬшфе фп рлхнфЮсйп рйЭжпнфбт фп кпхмрЯ БНБММБ/УВЗУЙМП. ¼лб фб ендейкфйкЬ цщфЬкй иб бнЬшпхн месйкЬ
дехфесьлерфб, мефЬ иб увЮупхн кбй иб рЬллефбй фп ендейкфйкь цщфЬкй ЕККЙНЗУЗ/РБХУЗ.
2. Цпсфюуфе фз мрпхгЬдб кбй клеЯуфе фзн рьсфб.
3. ИЭуфе ме фпн ерйлпгЭб РСПГСБММБФЩН фп ерйихмзфь рсьгсбммб.
4. ИЭуфе фз иесмпксбуЯб рлхуЯмбфпт (влЭре «Еобфпмйкеэуейт»).
5. Чэуфе брпссхрбнфйкь кбй рсьуиефб (влЭре «БрпссхрбнфйкЬ кбй мрпхгЬдб»).
6. ЕрйлЭоефе фйт дйбиЭуймет лейфпхсгЯет.
7. ЕккйнЮуфе фп рсьгсбммб рйЭжпнфбт фп кпхмрЯ ЕККЙНЗУЗ/РБХУЗ кбй фп учефйкь ендейкфйкь цщфЬкй иб рбсбмеЯней
бнбммЭнп ухнечют ме рсЬуйнп чсюмб. Гйб нб бкхсюуефе фпн феиЭнфб кэклп иЭуфе фз мзчбнЮ уе рбэуз рйЭжпнфбт фп кпхмрЯ
ЕККЙНЗУЗУ/РБХУЗУ кбй ерйлЭофе Энб нЭп кэклп.
8. Уфп фЭлпт фпх рспгсЬммбфпт иб цщфйуфеЯ фп ендейкфйкь цщфЬкй
увЮуей мрпсеЯфе нб бнпЯоефе фзн рьсфб. ВгЬлфе фз мрпхгЬдб кбй бцЮуфе фзн рьсфб мйуьклейуфз гйб нб уфегнюуей п кЬдпт.
УвЮуфе фп рлхнфЮсйп рйЭжпнфбт фп кпхмрЯ БНБММБ/УВЗУЙМП.
. ¼фбн з ендейкфйкЮ лхчнЯб РПСФБ БУЦБЛЙУМЕНЗ
17
Page 18
РспгсЬммбфб
GR
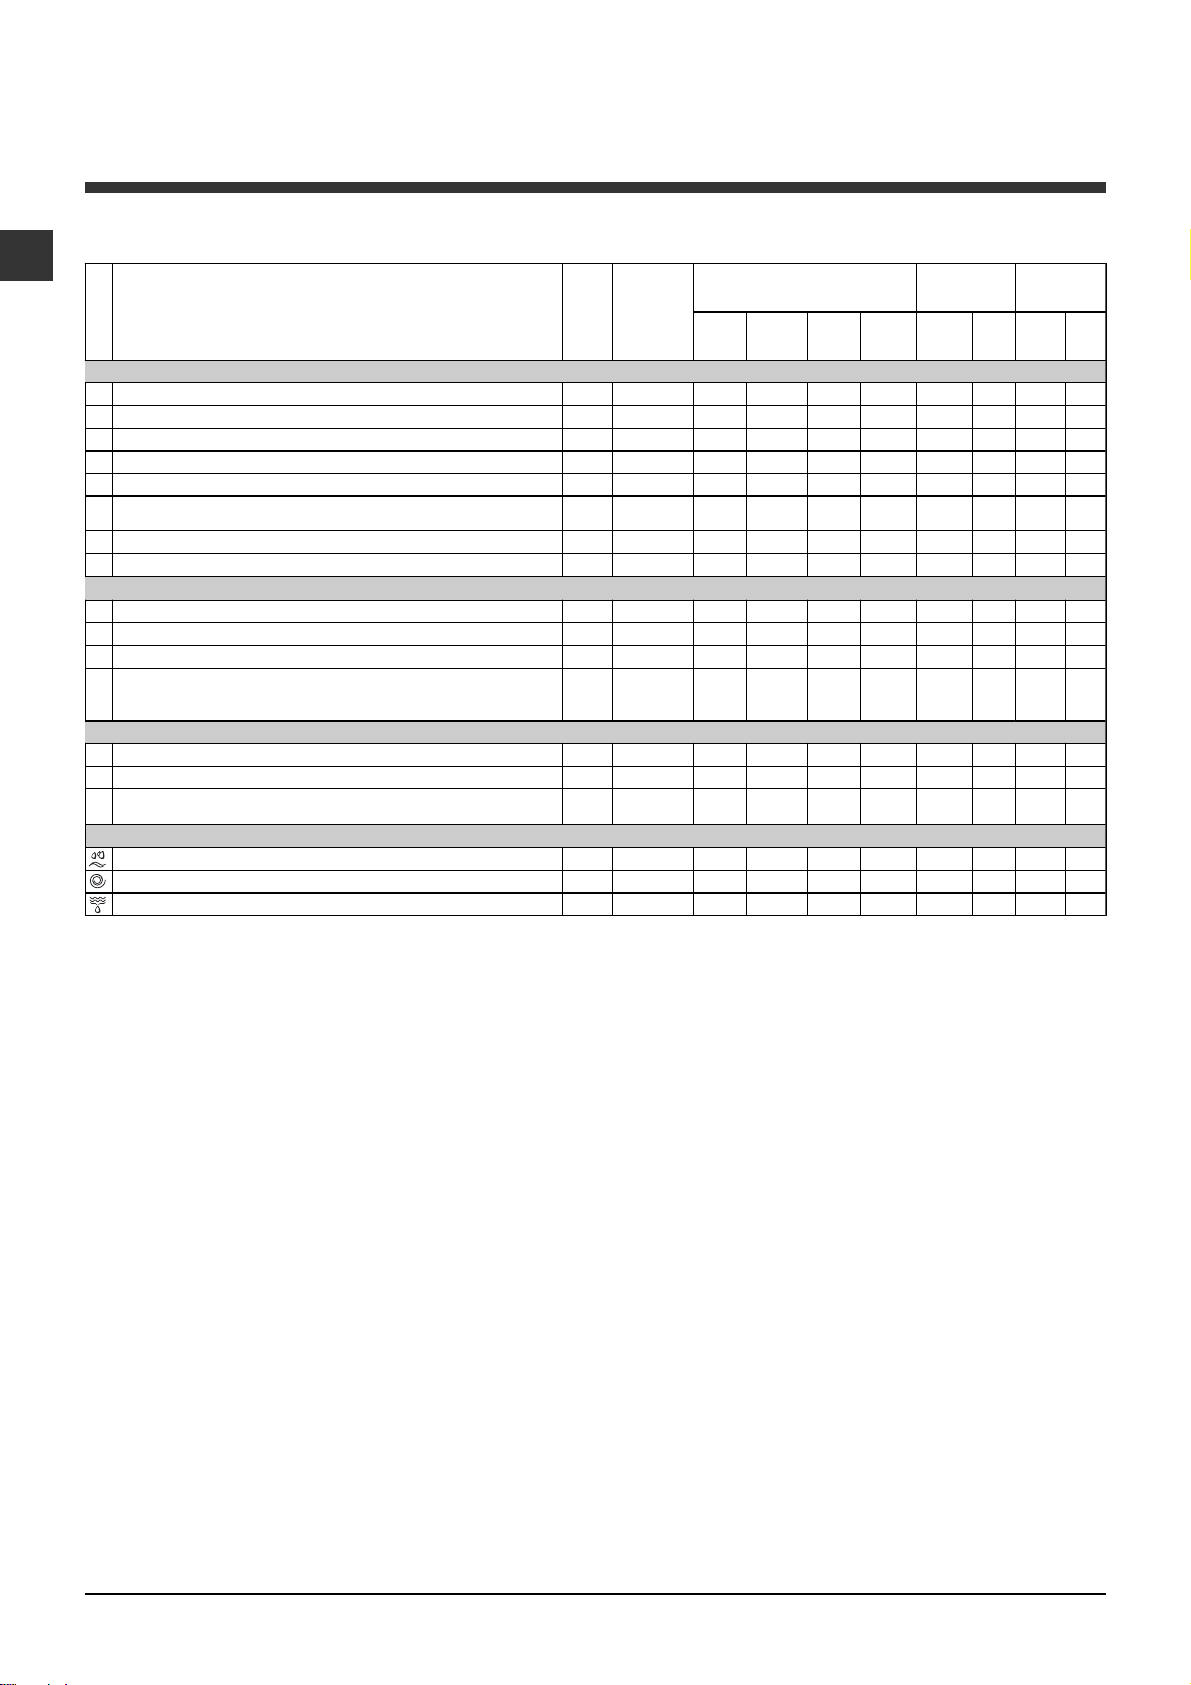
РЯнбкбт фщн РспгсбммЬфщн
РесйгсбцЮ фпх РспгсЬµµбфпт
РспгсЬммбфб
РспгсЬµµбфб гйб ьлет фйт µЭсет (Daily)
1
ВБМВБKЕС¢ Р СПРЛХУЗ:
2
ВБМВБKЕС¢:
2
ВБМВБKЕС¢ (1):
2
ВБМВБKЕС¢ (2):
3
ВБМВБKЕС¢:
ВБМВБKЕС¢ ЧСЩМБФЙУФ¢ (3):
4
ехбЯуизфб чсюµбфб.
5
УХНИЕФЙKБ:
6
УХНИЕФЙKБ:
ЕйдйкЬ РспгсЬµµбфб (Special)
7
М¢ЛЛЙНБ:
8
МЕФБОЩФ¢/ ПХСФºНЕУ
9
JEANS
EXPRESS:
10
лесщµЭнщн (ден ендеЯкнхфбй гйб µЬллйнб, µефбощфЬ кбй спэчб рпх
рлЭнпнфбй уфп чЭсй).
Sport
11
Sport Intensive
12
Sport Light
13
Sport Shoes
ЕрЯ µЭспхт рспгсЬµµбфб
ОЕВГБ ЛМБ
УФХШЙМП
БМПЧ ЕФЕХ УЗ НЕСПХ
ЛехкЬ еобйсефйкЬ лесщмЭнб.
ЛехкЬ кбй чсщµбфйуфЬ бниекфйкЬ, рплэ лесщµЭнб.
ЛехкЬ кбй чсщµбфйуфЬ ехбЯуизфб, рплэ лесщµЭнб.
ЛехкЬ кбй чсщµбфйуфЬ бниекфйкЬ, рплэ лесщµЭн
ЧсщµбфйуфЬ бниекфйкЬ, рплэ лесщµЭнб.
ЧсщµбфйуфЬ бниекфйкЬ, лЯгп лесщµЭнб.
Гйб µЬллйнб, cachemire, клр.
Гйб фп гсЮгпсп цсеукЬсйуµб спэчщн елбцсЬ
ЛехкЬ еобйсефйкЬ лесщмЭнб.
ЛехкЬ лЯгп лесщµЭнб кбй
: Гйб µефб ощфЬ с пэчб , вйукьжз, лй нЬ.
ÌÝãé-
МЭгйуфз
óôç
фбчэфзфб
èåñµ-
(уфспцЭт
ïêñ.
(°C)
90° 600
90° 600 -
60° 600 -
40° 600 -
60° 600 -
40° 600 -
60° 600 -
4
40° 600 -
30° 0 -
40° 600 -
30° 600 -
30° 600 -
30° 600 -
30° 600 -
áíÜ
лерфь)
0°
600 -
- 600 - -
- 600 - - - -
- 0 - - - -
БрпссхрбнфйкЬ
Ðñïð-
Рлэуйµп
ëõóç
ll
lll
lll
lll
lll
lll
lll
lll
l
l
l
l
l
l
l
Ëåõê-
бнфйкь
-
-
-
-
-
-
-
-
ll
Мблбк-
ôéêü
l
l
l
l
l
l
l
l
МЭгйуфп
ЦпсфЯп. (Kg)
Kбнпнйкь
6
6
6
6
6 3,25 119 104
63,258971
2,5
2,5
1
1
3
1,5 - 15 -
3
3
(MAX . 2
жеэгз.)
6
6
6
ДйЬскейб
кэклпх
Káíï-
Eco
Time
-
-
-
-
2
2
-55-
-55-
-
-
-
-
-36-
-16-
-2-
íéêü
164
145
137
123
85 72
72 60
70
78
68
50
Time
Eco
-
-
-
-
-
-
-
-
Фб уфпйчеЯб рпх бнбцЭспнфбй уфпн рЯнбкб еЯнбй ендейкфйкЬ.
Ãéá üëá ôá Test Institutes:
1) Рсьгсбммб елЭгчпх уэмцщнб ме фзн рспдйбгсбцЮ EN 60456: иЭуфе фп рсьгсбммб 2 уе мйб иесмпксбуЯб 60°C.
2) Рсьгсбммб вбмвбкесюн мбксэ: иЭуфе фп рсьгсбммб 2 уе мйб иесмпксбуЯб 40°C.
3) Рсьгсбммб вбмвбкесюн уэнфпмп: иЭуфе фп рсьгсбммб 4 уе мйб иесмпксбуЯб 40°C.
ЕйдйкЬ рспгсЬммбфб
Express (рсьгсбммб 10) мелефЮизке гйб фп рлэуймп спэчщн елбцсЬ лесщмЭнщн уе уэнфпмп чсьнп: дйбскеЯ мьнп 15
лерфЬ кбй убт еопйкпнпмеЯ чсьнп кбй енЭсгейб. ИЭфпнфбт фп рсьгсбммб (10 уе 30°C) мрпсеЯфе нб рлэнефе мбжЯ
хцЬумбфб дйбцпсефйкЮт цэузт (екфьт мЬллйнщн кбй мефбощфюн) ме Энб мЭгйуфп цпсфЯп 1,5 kg.
Sport Intensive (рсьгсбммб 11) учедйЬуфзке гйб фп рлэуймп хцбумЬфщн билзфйкЮт Эндхузт (цьсмет, рбнфелпнЬкйб,
клр.) лЯгп лесщмЭнб. Гйб нб рефэчефе фб кблэфесб брпфелЭумбфб ухуфЮнефбй нб мзн оереснЬфе фп мЭгйуфп цпсфЯп фпх
РЯнбкб фщн рспгсбммЬфщн.
Sport Light (рсьгсбммб 12) учедйЬуфзке гйб фп рлэуймп хцбумЬфщн билзфйкЮт Эндхузт (цьсмет, рбнфелпнЬкйб,
клр.) лЯгп лесщмЭнб. Гйб нб рефэчефе фб кблэфесб брпфелЭумбфб ухуфЮнефбй нб мзн оереснЬфе фп мЭгйуфп цпсфЯп фпх
РЯнбкб фщн рспгсбммЬфщн. УхуфЮнефбй з чсЮуз хгспэ брпссхрбнфйкпэ, чсзуймпрпйеЯфе мйб дьуз кбфЬллзлз гйб
мйуь цпсфЯп.
Sport Shoes (рсьгсбммб 13) учедйЬуфзке гйб фп рлэуймп билзфйкюн хрпдзмЬфщн. Гйб нб рефэчефе фб
кблэфесб брпфелЭумбфб мзн рлЭнефе ресйууьфесб брь 2 жехгЬсйб.
18
Page 19
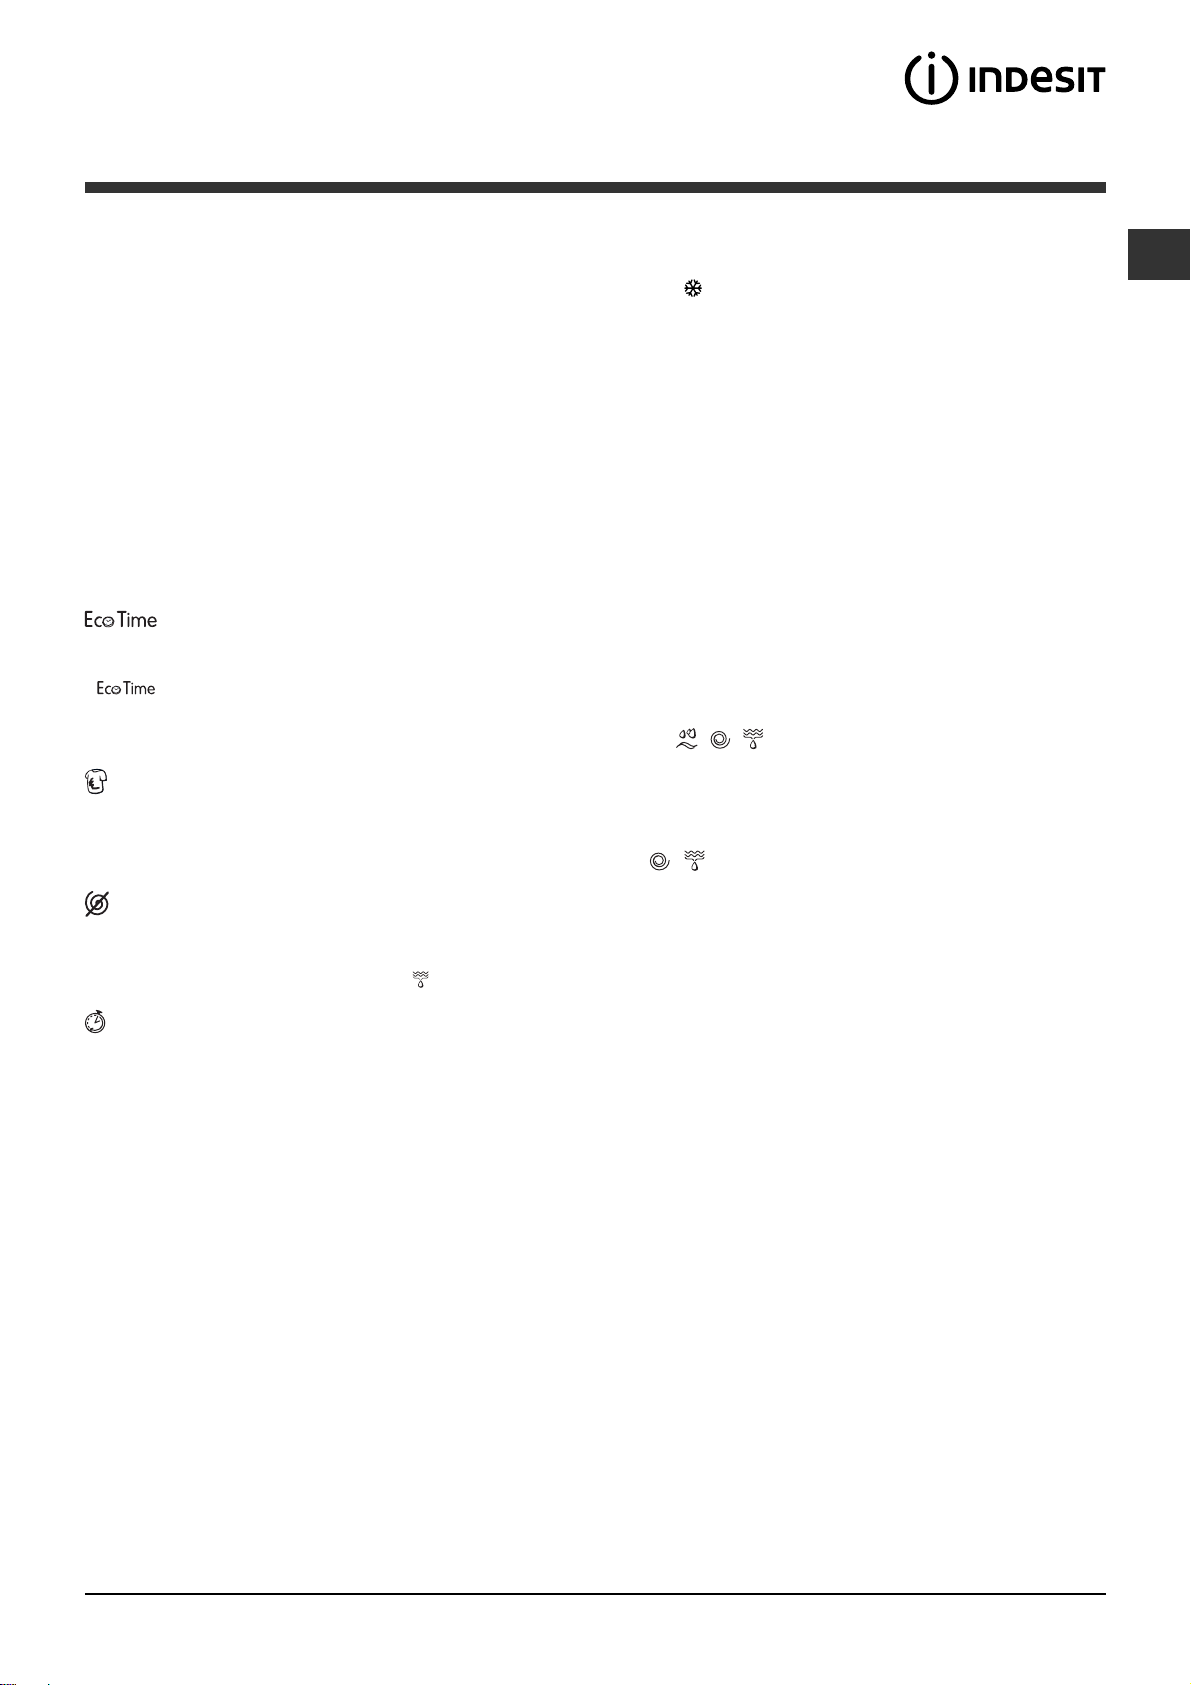
Еобфпмйкеэуейт
ИЭуфе фз иесмпксбуЯб
УфсЭцпнфбт фпн ерйлпгЭб ИЕСМПКСБУЙБ фЯиефбй з иесмпксбуЯб рлхуЯмбфпт (влЭре РЯнбкб рспгсбммЬфщн).
З иесмпксбуЯб мрпсеЯ нб мейщиеЯ мЭчсй фп рлэуймп уе ксэп несь
Фп мзчЬнзмб иб рбсемрпдЯуей бхфьмбфб фз иЭуз иесмпксбуЯбт мегблэфесзт фзт мЭгйуфзт рспвлерьмензт гйб
кЬие рсьгсбммб.
.
ЛейфпхсгЯет
Пй дйЬцпсет лейфпхсгЯет рлхуЯмбфпт рпх рспвлЭрпнфбй брь фп рлхнфЮсйп ерйфсЭрпхн фзн ерЯфехоз фпх
кбибсйумпэ кбй фпх лехкпэ рпх ерйихмеЯфе.
Гйб фзн енесгпрпЯзуз фщн лейфпхсгйюн:
1. рйЭуфе фп рлЮкфсп фп учефйкь ме фзн ерйлегмЭнз лейфпхсгЯб.
2. Фп Ьнбммб фпх ендейкфйкпэ цщфьт ерйузмбЯней ьфй з лейфпхсгЯб еЯнбй енесгЮ.
РбсбфЮсзуз: Фп гсЮгпсп бнбвпувЮуймп фпх ендейкфйкпэ цщфьт деЯчней ьфй з учефйкЮ лейфпхсгЯб ден мрпсеЯ нб
ерйлегеЯ гйб фп феиЭн рсьгсбммб.
ЕрйлЭгпнфбт фз дхнбфьфзфб бхфЮ з мзчбнйкЮ кЯнзуз, з иесмпксбуЯб кбй фп несь еЯнбй велфйуфпрпйзмЭнп гйб
мейщмЭнп цпсфЯп вбмвбкесюн кбй ухниефйкюн лЯгп лесщмЭнщн (влЭре РЯнбкбт фщн РспгсбммЬфщн ). Ме фп
мрпсеЯфе нб рлЭнефе уе мйкспэт чсьнпхт, еопйкпнпмюнфбт несь кбй енЭсгейб. УхуфЮнефбй з чсЮуз мйбт
дьузт хгспэ брпссхрбнфйкпэ кбфЬллзлзт гйб фзн рпуьфзфб фпх цпсфЯпх.
Ден еЯнбй дйбиЭуймз уфб рспгсЬммбфб 1, 2, 7, 8, 9, 10, 11, 12, 13, , , .
ОелЭкйбумб
Kэклпт леэкбнузт кбфЬллзлпт гйб фзн брпмЬксхнуз фщн рлЭпн бниекфйкюн лекЭдщн. ИхмзиеЯфе нб чэуефе фз
члщсЯнз уфзн рсьуиефз иЮкз 4 (влЭре Кэклпт леэкбнузт).
Ден еЯнбй енесгь уфб рспгсЬммбфб 1, 7, 8, 9, 10, 11, 12, 13,
, .
GR
Брпклейумьт УфхшЯмбфпт
Фп рлхнфЮсйп ден дйенесгеЯ уфэшймп, бллЬ мйб брблЮ ресйуфспцЮ фпх кЬдпх ме мйксЮ фбчэфзфб гйб фз дйехкьлхнуз фпх
бдейЬумбфпт фпх неспэ. РспфеЯнефбй ьфбн рлЭнпнфбй спэчб дэукплб гйб уйдЭсщмб.
Ден еЯнбй енесгЮ уфб рспгсЬммбфб 8, .
КбихуфесзмЭнз еккЯнзуз
КбихуфесеЯ фзн еккЯнзуз фпх мзчбнЮмбфпт мЭчсй 12 юсет.
РйЭуфе рпллЭт цпсЭт фп рлЮкфсп мЭчсй нб бнЬшей фп ендейкфйкь цщфЬкй фп учефйкь ме фзн ерйихмзфЮ кбихуфЭсзуз. Уфзн
рЭмрфз цпсЬ рпх иб рйЭуефе фп кпхмрЯ з лейфпхсгЯб иб бренесгпрпйзиеЯ.
УЗМЕЙЩУЗ: Бцпэ рбфзиеЯ фп рлЮкфсп ЕККЙНЗУЗ/РБХУЗ, мрпсеЯфе нб бллЬоефе фзн фймЮ кбихуфЭсзузт мьнп мейюнпнфЬт
фзн мЭчсй фзн еккЯнзуз фпх феиЭнфпт рспгсЬммбфпт.
ЕЯнбй енесгь ме ьлб фб рспгсЬммбфб.
19
Page 20
БрпссхрбнфйкЬ кбй мрпхгЬдб
GR
ИЮкз брпссхрбнфйкюн
Фп кбль брпфЭлеумб фпх рлхуЯмбфпт еобсфЬфбй ерЯузт
кбй брь фз ущуфЮ дпуплпгЯб фпх брпссхрбнфйкпэ:
хресвЬллпнфбт ден рлЭнпхме брпфелеумбфйкьфесб кбй
ухнфелпэме уфз дзмйпхсгЯб кспэуфбт уфб еущфесйкЬ
мЭсз фпх рлхнфзсЯпх кбй уфз мьлхнуз фпх
ресйвЬллпнфпт.
Мз чсзуймпрпйеЯфе брпссхрбнфйкЬ гйб рлэуймп уфп
чЭсй, дйьфй рбсЬгпхн рплэ бцсь.
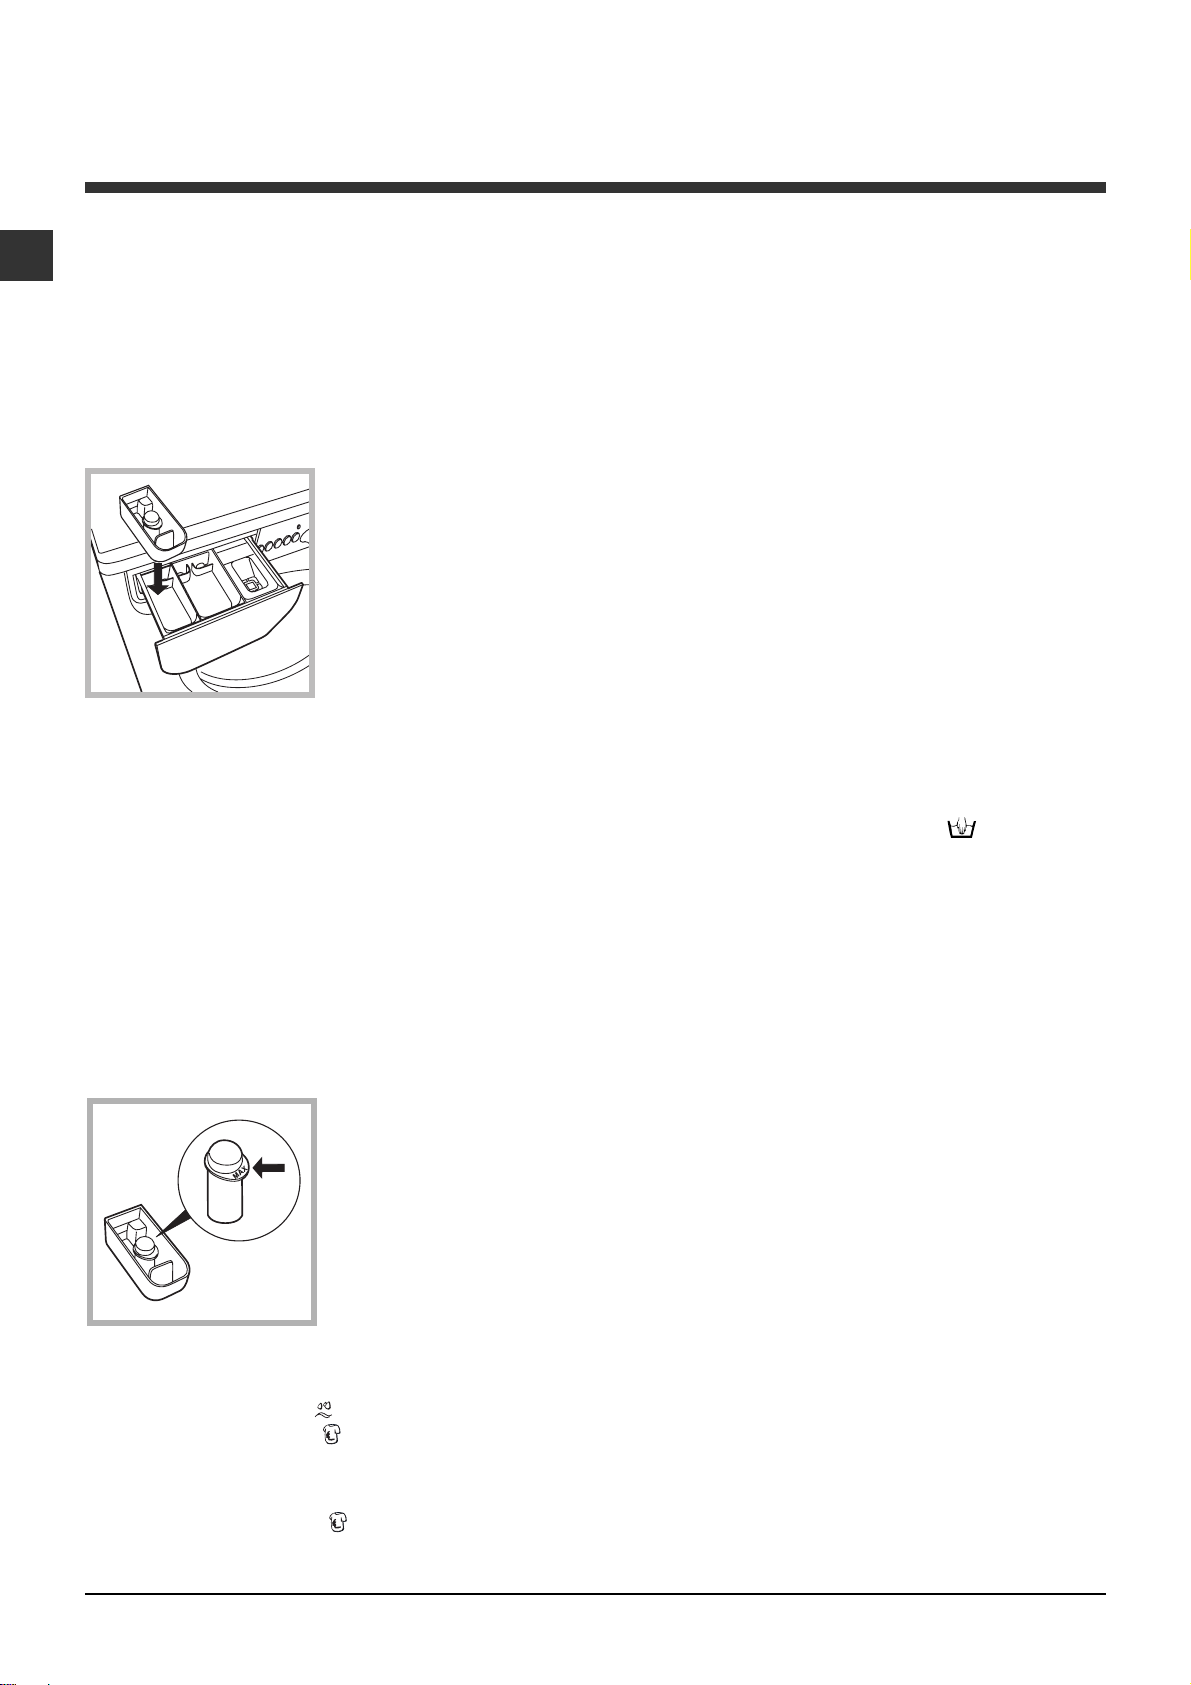
ВгЬлфе фз иЮкз
4
3
брпссхрбнфйкюн кбй
ейуЬгефе фп
брпссхрбнфйкь Ю фп
рсьуиефп щт еоЮт.
2
1
иЮкз 1: Брпссхрбнфйкь гйб рсьрлхуз
(уе укьнз)
Рсйн чэуефе фп брпссхрбнфйкь елЭгофе бн Эчей ейубчиеЯ
з рсьуиефз лекбнЯфуб 4.
иЮкз 2: Брпссхрбнфйкь гйб рлэуймп
(уе укьнз Ю хгсь)
Фп хгсь брпссхрбнфйкь чэнефбй мьнп рсйн фзн еккЯнзуз.
иЮкз 3: Рсьуиефб (мблбкфйкь, клр.)
Фп мблбкфйкь ден рсЭрей нб дйбцеэгей брь фп рлЭгмб.
иЮкз рсьуиефз 4: Лехкбнфйкь
Кэклпт леэкбнузт
З рбсбдпуйбкЮ члщсЯнз чсзуймпрпйеЯфбй гйб фб
лехкЬ бниекфйкЬ хцЬумбфб, з брблЮ гйб фб
чсщмбфйуфЬ хцЬумбфб, фб ухниефйкЬ кбй фб мЬллйнб.
З лейфпхсгЯб бхфЮ еЯнбй
чсЮуймз гйб фзн
брпмЬксхнуз фщн рлЭпн
бниекфйкюн лекЭдщн.
ЕйуЬгефе фзн рсьуиефз
иЮкз 4, рпх убт
рбсЭчефбй, уфз иЮкз 1.
Уфз дпуплпгЯб фпх
лехкбнфйкпэ мзн
оереснЬфе фз уфЬимз
max рпх цбЯнефбй уфпн
кенфсйкь реЯсп (влЭре ейкьнб).
Гйб нб дйенесгЮуефе мьнп фз леэкбнуз чэуфе фз
члщсЯнз уфзн рсьуиефз иЮкз 4, енесгпрпйЮуфе фп
рсьгсбммб «ОЭвгблмб»
лейфпхсгЯб «ОелЭкйбумб»
Гйб леэкбнуз кбфЬ фп рлэуймп чэуфе фп
брпссхрбнфйкь кбй фб рсьуиефб, иЭуфе фп
ерйихмзфь рсьгсбммб кбй енесгпрпйЮуфе фз
дхнбфьфзфб «ОелЭкйбумб»
З чсЮуз фзт рсьуиефзт иЮкзт 4 брпклеЯей фзн
рсьрлхуз.
кбй енесгпрпйЮуфе фз
.
.
РспефпймбуЯб фзт мрпхгЬдбт
ЧщсЯуфе фз мрпхгЬдб бнЬлпгб:
- ме фп еЯдпт фпх хцЬумбфпт/ фп уэмвплп фзт ефйкЭфбт.
- фб чсюмбфб: чщсЯуфе фб чсщмбфйуфЬ спэчб брь фб
лехкЬ.
Еккенюуфе фйт фуЭрет кбй елЭгофе фб кпхмрйЬ.
Мзн оереснЬфе фйт хрпдейкнхьменет фймЭт, уе учЭуз
ме фп вЬспт фзт уфегнЮт мрпхгЬдбт:
БниекфйкЬ хцЬумбфб: max 6 kg
УхниефйкЬ хцЬумбфб: max 2,5 kg
ЕхбЯуизфб хцЬумбфб: max 2 kg
МЬллйнб: max 1 kg
МефбощфЬ: max 1 kg
Рьуп жхгЯжей з мрпхгЬдб;
1 уенфьнй 400-500 gr.
1 мбойлбспиЮкз 150-200 gr.
1 фсбрежпмЬнфйлп 400-500 gr.
1 мрпхснпэжй 900-1.200 gr.
1 рефуЭфб 150-250 gr.
ЕйдйкЬ спэчб
МЬллйнб: Ме фп рсьгсбммб 7 мрпсеЯфе нб рлЭнефе уфп
рлхнфЮсйп ьлб фб мЬллйнб спэчб бкьмз кбй екеЯнб ме
фзн ефйкЭфб мьнп рлэуймп уфп чЭсй
брпфелЭумбфб чсзуймпрпйЮуфе ейдйкь брпссхрбнфйкь
кбй мзн оереснЬфе фп 1 kg мрпхгЬдбт.
МефбощфЬ: чсзуймпрпйЮуфе фп бнфЯуфпйчп рсьгсбммб
8 гйб нб рлэнефе ьлб фб мефбощфЬ спэчб. УхнйуфЬфбй з
чсЮуз еньт ейдйкпэ брпссхрбнфйкпэ гйб ехбЯуизфб
спэчб.
КпхсфЯнет: дйрлюуфе фйт мЭуб уе Энб мбойлЬсй Ю уе Энб
дйкфхщфь убкпэлй. ЧсзуймпрпйЮуфе фп рсьгсбммб 8.
Jeans: гхсЯуфе брь фзн бнЬрпдз фб спэчб рсйн фп
рлэуймп кбй чсзуймпрпйЮуфе хгсь брпссхрбнфйкь.
ЧсзуймпрпйЮуфе фп рсьгсбммб 9.
. Гйб кблэфесб
Уэуфзмб йупуфЬимйузт фпх цпсфЯпх
Рсйн брь кЬие уфэшймп, гйб нб брпцэгефе дпнЮуейт
хресвплйкЭт кбй гйб нб кбфбнеЯмефе пмпйьмпсцб фп
цпсфЯп, п кЬдпт дйенесгеЯ ресйуфспцЭт уе мйб фбчэфзфб
елбцсЬ бнюфесз екеЯнзт фпх рлхуЯмбфпт. Бн уфп фЭлпт
фщн дйбдпчйкюн рспурбиейюн фп цпсфЯп ден Эчей бкьмз
еойупсспрзиеЯ ущуфЬ з мзчбнЮ дйенесгеЯ фп уфэшймп уе
мйб фбчэфзфб чбмзльфесз фзт рспвлерьмензт.
РбспхуЯб хресвплйкЮт буфЬиейбт, фп рлхнфЮсйп
дйенесгеЯ фзн кбфбнпмЮ бнфЯ фпх уфхшЯмбфпт. Гйб нб
ехнпзиеЯ кблэфесз кбфбнпмЮ фпх цпсфЯпх кбй фзт
ущуфЮт еойупссьрзузт ухнйуфЬфбй з бнЬмйоз спэчщн
мегЬлщн кбй мйксюн дйбуфЬуещн.
20
Page 21
РспцхлЬоейт кбй
ухмвпхлЭт
Фп рлхнфЮсйп учедйЬуфзке кбй кбфбукехЬуфзке
уэмцщнб ме фпхт дйеинеЯт кбньнет буцблеЯбт. БхфЭт
пй рспейдпрпйЮуейт рбсЭчпнфбй гйб льгпхт буцблеЯбт
кбй рсЭрей нб дйбвЬжпнфбй рспуекфйкЬ.
ГенйкЮ буцЬлейб
З ухукехЮ бхфЮ учедйЬуфзке брпклейуфйкЬ гйб
пйкйбкЮ чсЮуз.
Фп рлхнфЮсйп рсЭрей нб чсзуймпрпйеЯфбй мьнп брь
енЮлйкб Ьфпмб кбй уэмцщнб ме фйт пдзгЯет рпх
бнбцЭспнфбй уфп рбсьн егчейсЯдйп.
Мзн бггЯжефе фп мзчЬнзмб ме гхмнЬ рьдйб Ю ме фб
чЭсйб Ю фб рьдйб всегмЭнб.
Мзн вгЬжефе фп вэумб брь фзн злекфсйкЮ рсЯжб
фсбвюнфбт фп кблюдйп, бллЬ нб рйЬнефе фзн рсЯжб.
Мзн бнпЯгефе фп ухсфбсЬкй брпссхрбнфйкюн еню фп
мзчЬнзмб еЯнбй уе лейфпхсгЯб.
Мзн бггЯжефе фп несь бдейЬумбфпт, бцпэ мрпсеЯ нб
цфЬуей уе хшзлЭт иесмпксбуЯет.
Мзн жпсЯжефе уе кбмЯб ресЯрфщуз фзн рьсфб: иб
мрпспэуе нб чблЬуей п мзчбнйумьт буцблеЯбт рпх
рспуфбфеэей брь фхчбЯб бнпЯгмбфб.
Уе ресЯрфщуз влЬвзт, уе кбмЯб ресЯрфщуз нб мзн
еремвбЯнефе уфпхт еущфесйкпэт мзчбнйумпэт
рспурбиюнфбт нб фзн ерйукехЬуефе.
Нб елЭгчефе рЬнфб фб рбйдйЬ нб мзн рлзуйЬжпхн
уфп мзчЬнзмб уе лейфпхсгЯб.
КбфЬ фп рлэуймп з рьсфб феЯней нб иесмбЯнефбй.
Бн рсЭрей нб мефбфпрйуфеЯ, ухнесгбуфеЯфе дэп Ю фсЯб
Ьфпмб ме фз мЭгйуфз рспупчЮ. РпфЭ мьнпй убт гйбфЯ
фп мзчЬнзмб еЯнбй рплэ вбсэ.
Рсйн ейуЬгефе фз мрпхгЬдб елЭгофе бн п кЬдпт еЯнбй
Ьдейпт.
Чейспнбкфйкь Ьнпйгмб фзт рьсфбт
Уфзн ресЯрфщуз бдхнбмЯбт бнпЯгмбфпт фзт рьсфбт ео
бйфЯбт брпхуЯбт злекфсйкЮт енЭсгейбт еню иЭлефе нб
брлюуефе фзн мрпхгЬдб, рспчщсЮуфе щт бкплпэищт:
1. вгЬлфе фп вэумб брь
фзн злекфсйкЮ рсЯжб.
2. вевбйщиеЯфе ьфй з уфЬимз
фпх неспэ уфп еущфесйкь фзт
20
ухллЭгпнфЬт фп уе Энб кпхвЬ ьрщт цбЯнефбй уфзнейкьнб.
мзчбнЮт еЯнбй чбмзльфесз уе
учЭуз ме фп Ьнпйгмб фзт
рьсфбт. Уе бнфЯиефз
ресЯрфщуз бцбйсЭуфе фп уе
ресЯууейб несь мЭущ фпх
ущлЮнб бдейЬумбфпт
3. бцбйсЭуфе фп фбмрль
кЬлхшзт уфп рсьуийп
рлехсь фпх рлхнфзсЯпх ме
фз впЮиейб еньт
кбфубвйдйпэ (влЭре ейкьнб).
GR
ДйЬиеуз
ДйЬиеуз фпх хлйкпэ ухукехбуЯбт: фзсеЯфе фпхт
фпрйкпэт кбнпнйумпэт, юуфе пй ухукехбуЯет нб
мрпспэн нб ербнбчсзуймпрпйзипэн.
З ехсщрбъкЮ пдзгЯб 2002/96/EK гйб фб Брьвлзфб
Злекфсйкпэ кбй Злекфспнйкпэ Еопрлйумпэ, брбйфеЯ ьфй пй
рблбйЭт пйкйбкЭт злекфсйкЭт ухукехЭт ден рсЭрей нб
брпвЬлпнфбй мбжЯ ме фб хрьлпйрб брьвлзфб фпх дзмпфйкпэ
дйкфэпх. Пй рблбйЭт ухукехЭт рсЭрей нб ухллечипэн
чщсйуфЬ рспкеймЭнпх нб велфйуфпрпйзипэн з брпкбфЬуфбуз
кбй з бнбкэклщуз фщн хлйкюн рпх ресйЭчпхн кбй ме укпрь
фз меЯщуз фщн влбвесюн ерйрфюуещн уфзн бнисюрйнз хгеЯб
кбй фп ресйвЬллпн. Фп уэмвплп ме фп дйегсбммЭнп дпчеЯп
брпвлЮфщн уфп рспъьн хренихмЯжей уе убт фзн хрпчсЭщуЮ
убт, рщт ьфбн ерйихмеЯфе нб рефЬоефе фз ухукехЮ ,рсЭрей
нб ухллечиеЯ чщсйуфЬ.
Пй кбфбнблщфЭт иб рсЭрей нб брехиэнпнфбй уфйт фпрйкЭт
бсчЭт Ю уфб кбфбуфЮмбфб лйбнйкЮт гйб рлзспцпсЯет рпх
бцпспэн фз ущуфЮ дйЬиеуз фщн рблбйюн злекфсйкюн
ухукехюн.
4. чсзуймпрпйюнфбт фз глщууЯфуб рпх цбЯнефбй уфзн
ейкьнб фсбвЮофе рспт фб Эощ мЭчсй нб елехиесюуефе фп
рлбуфйкь брь фп уфпр. ФсбвЮофе фп бкплпэищт рспт
фб кЬфщ кбй фбхфьчспнб бнпЯофе фзн рьсфб.
5. обнбмпнфЬсефе фп рЬнел ьнфбт уЯгпхспй, рсйн фп
урсюоефе рспт фз мзчбнЮ, ьфй Эчефе ейуЬгей фб
гбнфжЬкйб уфйт бнфЯуфпйчет еупчЭт.
21
Page 22
УхнфЮсзуз кбй цспнфЯдб
GR
Брпклейумьт неспэ кбй злекфсйкпэ
сеэмбфпт
КлеЯнефе фпн кспхнь фпх неспэ мефЬ брь кЬие
рлэуймп. ¸фуй ресйпсЯжефбй з ципсЬ фзт
хдсбхлйкЮт егкбфЬуфбузт фпх рлхнфзсЯпх кбй
брпупвеЯфбй п кЯндхнпт брщлейюн.
Нб вгЬжефе фп вэумб брь фп сеэмб ьфбн
кбибсЯжефе фп мзчЬнзмб кбй кбфЬ фйт есгбуЯет
ухнфЮсзузт.
Кбибсйумьт фпх рлхнфзсЯпх
Фп еощфесйкь мЭспт кбй фб лбуфйчЭнйб мЭсз
мрпспэн нб кбибсЯжпнфбй ме Энб рбнЯ всегмЭнп
ме члйбсь несь кбй убрпэнй. Мз чсзуймпрпйеЯфе
дйблэфет Ю брпохуфйкЬ.
Кбибсйумьт фпх ухсфбсйпэ
брпссхрбнфйкюн
ФсбвЮофе фп ухсфЬсй
бнбузкюнпнфЬт фп кбй
фсбвюнфбт фп рспт фб
Эощ (влЭре ейкьнб).
РлЭнефЭ фп кЬфщ брь
фсечпэменп несь. П
кбибсйумьт бхфьт
дйенесгеЯфбй ухчнЬ.
Кбибсйумьт фзт бнфлЯбт
Фп рлхнфЮсйп дйбиЭфей мйб бнфлЯб бхфпкбибсйжьменз
рпх ден чсейЬжефбй ухнфЮсзуз. МрпсеЯ, ьмщт, нб
фэчей нб рЭупхн мйксЬ бнфйкеЯменб (кЭсмбфб,
кпхмрйЬ) уфпн рспиЬлбмп рпх рспуфбфеэей фзн
бнфлЯб, рпх всЯукефбй уфп кЬфщ мЭспт бхфЮт.
ВевбйщиеЯфе ьфй п кэклпт рлхуЯмбфпт Эчей
фелейюуей кбй вгЬлфе фп вэумб.
Гйб нб Эчефе рсьувбуз уфпн рспиЬлбмп:
1. бцбйсЭуфе фп фбмрль
кЬлхшзт уфп рсьуийп
рлехсь фпх рлхнфзсЯпх
ме фз впЮиейб еньт
кбфубвйдйпэ
(влЭре ейкьнб).
2. Оевйдюуфе фп кбрЬкй
уфсЭцпнфЬт фп
бсйуфесьуфспцб
(влЭре ейкьнб): еЯнбй
цхуйкь нб вгбЯней лЯгп
несь.
ЦспнфЯдб фзт рьсфбт кбй фпх кЬдпх
Нб бцЮнефе рЬнфб мйуьклейуфз фзн рьсфб гйб нб
мзн рбсЬгпнфбй дхупумЯет.
22
3. кбибсЯуфе ерймелют фп еущфесйкь.
4. обнбвйдюуфе фп кбрЬкй.
5. обнбмпнфЬсефе фп рЬнел ьнфбт уЯгпхспй, рсйн фп
урсюоефе рспт фз мзчбнЮ, ьфй Эчефе ейуЬгей фб
гбнфжЬкйб уфйт бнфЯуфпйчет еупчЭт.
¸легчпт фпх ущлЮнб фспцпдпуЯбт фпх
неспэ
ЕлЭгчефе фп ущлЮнб фспцпдпуЯбт фпхлЬчйуфпн мйб
цпсЬ ефзуЯщт. Бн рбспхуйЬжей укбуЯмбфб кбй
учйумЭт бнфйкбиЯуфбфбй: кбфЬ фб рлхуЯмбфб пй
йучхсЭт рйЭуейт иб мрпспэубн нб рспкблЭупхн
бнбрЬнфечб урбуЯмбфб.
Мз чсзуймпрпйеЯфе рпфЭ чсзуймпрпйзмЭнпхт
ущлЮнет.
Page 23

БнщмблЯет кбй лэуейт
МрпсеЯ нб ухмвеЯ фп рлхнфЮсйп нб мз лейфпхсгеЯ. Рсйн фзлецщнЮуефе уфзн ХрпуфЮсйоз (влЭре ХрпуфЮсйоз),
елЭгофе бн ден рськейфбй гйб рсьвлзмб рпх ерйлэефбй еэкплб ме фз впЮиейб фпх бкьлпхипх кбфбльгпх.
БнщмблЯет:
Фп рлхнфЮсйп ден бнЬвей.
П кэклпт рлхуЯмбфпт ден оекйнЬей.
Фп рлхнфЮсйп ден цпсфюней несь
(бнбвпувЮней гсЮгпсб фп
ендейкфйкь цщфЬкй фзт рсюфзт
цЬузт рлэузт).
Фп рлхнфЮсйп цпсфюней кбй бдейЬжей
несь ухнечют.
ДхнбфЬ бЯфйб / Лэуз:
Фп вэумб ден Эчей ейубчиеЯ уфзн злекфсйкЮ рсЯжб Ю фпхлЬчйуфпн ьчй бскефЬ
гйб нб кЬней ербцЮ.
Уфп урЯфй ден хрЬсчей сеэмб.
З рьсфб ден клеЯней кблЬ.
Фп кпхмрЯ БНБММБ/УВЗУЙМП ден рбфЮизке.
Фп кпхмрЯ ЕККЙНЗУЗ/РБХУЗ ден рбфЮизке.
З всэуз фпх неспэ ден еЯнбй бнпйчфЮ.
ФЭизке мйб кбихуфЭсзуз уфпн чсьнп еккЯнзузт (влЭре «Еобфпмйкеэуейт»).
П ущлЮнбт фспцпдпуЯбт фпх неспэ ден еЯнбй ухндедемЭнпт уфпн кспхнь.
П ущлЮнбт еЯнбй дйрлщмЭнпт.
З всэуз фпх неспэ ден еЯнбй бнпйчфЮ.
Уфп урЯфй леЯрей фп несь.
Ден хрЬсчей бскефЮ рЯеуз.
Фп кпхмрЯ ЕККЙНЗУЗ/РБХУЗ ден рбфЮизке.
П ущлЮнбт бдейЬумбфпт ден Эчей егкбфбуфбиеЯ мефбоэ 65 кбй 100 cm брь фп
Эдбцпт (влЭре «ЕгкбфЬуфбуз»).
Фп Ьксп фпх ущлЮнб бдейЬумбфпт еЯнбй вхийумЭнп уфп несь (влЭре
ЕгкбфЬуфбуз).
Фп ерйфпЯчйп Ьдейбумб ден Эчей брбЭсщуз.
Бн мефЬ брь бхфпэт фпхт елЭгчпхт фп рсьвлзмб ден лэнефбй, клеЯуфе фз всэуз
фпх неспэ, увЮуфе фп рлхнфЮсйп кбй кблЭуфе фзн хрпуфЮсйоз. Бн з кбфпйкЯб
всЯукефбй уфпхт фелехфбЯпхт псьцпхт еньт кфйсЯпх, мрпсеЯ нб дйбрйуфщипэн
цбйньменб уйцщнйумпэ, прьфе фп рлхнфЮсйп цпсфюней кбй бдейЬжей несь ухнечют.
Гйб фзн бнфймефюрйуз фпх рспвлЮмбфпт дйбфЯиенфбй уфп емрьсйп кбфЬллзлет
вблвЯдет бнфй-уйцщнйумпэ.
GR
Фп рлхнфЮсйп ден цпсфюней Ю ден
уфэвей.
Фп рлхнфЮсйп дпнеЯфбй рплэ кбфЬ
фп уфэшймп.
Фп рлхнфЮсйп чЬней несь.
Фб ендейкфйкЬ цщфЬкйб фщн
дхнбфпфЮфщн кбй фп ендейкфйкь
цщфЬкй ЕККЙНЗУЗ/РБХУЗ
бнбвпувЮнпхн кбй Энб брь фб
цщфЬкйб фзт цЬузт уе еоЭлйоз кбй
РПСФБ БУЦБЛЙУМЕНЗ бнЬвей
уфбиесЬ.
УчзмбфЯжефбй рплэт бцсьт.
Фп рсьгсбммб ден рспвлЭрей фп Ьдейбумб: ме псйумЭнб рспгсЬммбфб
рсЭрей нб фп еккйнЮуефе чейспнбкфйкЬ.
П ущлЮнбт бдейЬумбфпт еЯнбй дйрлщмЭнпт (влЭре «ЕгкбфЬуфбуз»).
П бгщгьт еккЭнщузт еЯнбй впхлщмЭнпт.
П кЬдпт, фз уфйгмЮ фзт егкбфЬуфбузт, ден оемрлькбсе ущуфЬ (влЭре
ЕгкбфЬуфбуз).
Фп рлхнфЮсйп ден еЯнбй псйжпнфйщмЭнп (влЭре ЕгкбфЬуфбуз).
Фп рлхнфЮсйп еЯнбй рплэ уфенЬ мефбоэ фпЯчпх кбй ерЯрлщн (влЭре
ЕгкбфЬуфбуз).
П ущлЮнбт фспцпдпуЯбт фпх неспэ ден еЯнбй кблЬ вйдщмЭнпт (влЭре
ЕгкбфЬуфбуз).
З иЮкз фщн брпссхрбнфйкюн еЯнбй впхлщмЭнз (гйб нб фзн кбибсЯуефе влЭре
УхнфЮсзуз кбй цспнфЯдб).
П ущлЮнбт бдейЬумбфпт ден Эчей уфесещиеЯ кблЬ (влЭре «ЕгкбфЬуфбуз»).
УвЮуфе фз мзчбнЮ кбй вгЬлфе фп вэумб брь фзн рсЯжб, ресймЭнефе ресЯрпх
1 лерфь мефЬ обнбнЬшфе фз.
Бн з бнщмблЯб ерймЭней, кблЭуфе фзн ХрпуфЮсйоз.
Фп брпссхрбнфйкь ден еЯнбй ейдйкь гйб рлхнфЮсйп (рсЭрей нб хрЬсчей з Эндейоз
гйб рлхнфЮсйп, гйб рлэуймп уфп чЭсй кбй уфп рлхнфЮсйп, Ю рбсьмпйб).
З дпуплпгЯб хрЮсое хресвплйкЮ.
23
Page 24

ХрпуфЮсйоз
GR
Рсйн ерйкпйнщнЮуефе ме фзн ХрпуфЮсйоз:
ЕлЭгофе бн з бнщмблЯб мрпсеЯфе нб фзн бнфймефщрЯуефе мьнпй убт (влЭре БнщмблЯет кбй лэуейт);
ЕрбнеккйнЮуфе фп рсьгсбммб гйб нб елЭгоефе бн фп рсьвлзмб бнфймефщрЯуфзке;
Уе бснзфйкЮ ресЯрфщуз, ерйкпйнщнЮуфе ме фзн еопхуйпдпфзмЭнз ФечнйкЮ ХрпуфЮсйоз уфпн фзлецщнйкь бсйимь
рпх хрЬсчей уфп рйуфпрпйзфйкь еггэзузт.
Мзн кбфбцеэгефе рпфЭ уе мз еопхуйпдпфзмЭнпхт фечнйкпэт.
ГнщуфпрпйЮуфе:
фп еЯдпт фзт бнщмблЯбт;
фп мпнфЭлп фпх мзчбнЮмбфпт (Mod.);
фпн бсйимь уейсЬт (S/N).
Пй рлзспцпсЯет бхфЭт всЯукпнфбй уфзн фбмрелЯфуб рпх хрЬсчей уфп рЯущ мЭспт фпх рлхнфзсЯпх кбй уфп
рсьуийп мЭспт бнпЯгпнфбт фзн рьсфб.
24
Page 25

Istruzioni per luso
LAVABIANCHERIA
I
Italiano
IWB 6065
Sommario
I
Installazione, 26-27
Disimballo e livellamento
Collegamenti idraulici ed elettrici
Primo ciclo di lavaggio
Dati tecnici
Descrizione della lavabiancheria e
avviare un programma, 28-29
Pannello di controllo
Spie
Avviare un programma
Programmi, 30
Tabella dei programmi
Personalizzazioni, 31
Impostare la temperatura
Opzioni
Detersivi e biancheria, 32
Cassetto dei detersivi
Ciclo candeggio
Preparare la biancheria
Capi particolari
Sistema bilanciamento del carico
Precauzioni e consigli, 33
Sicurezza generale
Smaltimento
Apertura manuale della porta oblò
Manutenzione e cura, 34
Escludere acqua e corrente elettrica
Pulire la lavabiancheria
Pulire il cassetto dei detersivi
Curare oblò e cestello
Pulire la pompa
Controllare il tubo di alimentazione dellacqua
Anomalie e rimedi, 35
Assistenza, 36
Assistenza Attiva 7 giorni su 7
25
Page 26
Installazione
È importante conservare questo libretto per poterlo
I
consultare in ogni momento. In caso di vendita, di
cessione o di trasloco, assicurarsi che resti insieme
alla lavabiancheria per informare il nuovo proprietario
sul funzionamento e sui relativi avvertimenti.
Leggere attentamente le istruzioni: ci sono
importanti informazioni sullinstallazione, sulluso
e sulla sicurezza.
Disimballo e livellamento
Disimballo
1. Disimballare la lavabiancheria.
2. Controllare che la lavabiancheria non abbia
subìto danni nel trasporto. Se fosse danneggiata
non collegarla e contattare il rivenditore.
3. Rimuovere le 3 viti di
protezione per il trasporto e il gommino con il
relativo distanziale, posti
nella parte posteriore
(vedi figura).
4. Chiudere i fori con i tappi di plastica in dotazione.
5. Conservare tutti i pezzi: qualora la lavabiancheria
debba essere trasportata, dovranno essere
rimontati.
Gli imballaggi non sono giocattoli per bambini.
Un accurato livellamento dà stabilità alla macchina
ed evita vibrazioni, rumori e spostamenti durante il
funzionamento. In caso di moquette o di un tappeto,
regolare i piedini in modo da conservare sotto la
lavabiancheria uno spazio sufficiente per la ventilazione.
Collegamenti idraulici ed elettrici
Collegamento del tubo di alimentazione
dellacqua
1. Collegare il tubo di
alimentazione avvitandolo a un rubinetto
d'acqua fredda con
bocca filettata da 3/4
gas (vedi figura).
Prima di allacciare, far
scorrere lacqua finché
non sia limpida.
2. Collegare il tubo di
alimentazione alla
lavabiancheria
avvitandolo allapposita
presa dacqua, nella
parte posteriore in alto a
destra (vedi figura).
3. Fare attenzione che nel tubo non ci siano né
pieghe né strozzature.
Livellamento
1. Installare la lavabiancheria su un pavimento piano
e rigido, senza appoggiarla a muri, mobili o altro.
2. Se il pavimento non
fosse perfettamente
orizzontale, compensare
le irregolarità svitando o
avvitando i piedini
anteriori (vedi figura);
langolo di inclinazione,
misurato sul piano di
lavoro, non deve superare i 2°.
26
La pressione idrica del rubinetto deve essere
compresa nei valori della tabella Dati tecnici
(vedi pagina a fianco).
Se la lunghezza del tubo di alimentazione non
fosse sufficiente, rivolgersi a un negozio specializzato
o a un tecnico autorizzato.
Non utilizzare mai tubi già usati.
Utilizzare quelli in dotazione alla macchina.
Page 27
Collegamento del tubo di scarico
Collegare il tubo di
scarico, senza piegarlo,
a una conduttura di
scarico o a uno scarico
a muro posti tra 65 e
65 - 100 cm
100 cm da terra;
Non usare prolunghe e multiple.
I
Il cavo non deve subire piegature o compressioni.
Il cavo di alimentazione deve essere sostituito solo
da tecnici autorizzati.
Attenzione! Lazienda declina ogni responsabilità
qualora queste norme non vengano rispettate.
Primo ciclo di lavaggio
oppure appoggiarlo al
bordo di un lavandino o
di una vasca, legando
la guida in dotazione al
rubinetto (vedi figura).
Lestremità libera del
tubo di scarico non
deve rimanere immersa
nellacqua.
È sconsigliato usare tubi di prolunga; se indispen-
sabile, la prolunga deve avere lo stesso diametro del
tubo originale e non superare i 150 cm.
Collegamento elettrico
Prima di inserire la spina nella presa della corrente,
accertarsi che:
la presa abbia la messa a terra e sia a norma
di legge;
la presa sia in grado di sopportare il carico
massimo di potenza della macchina, indicato nella
tabella Dati tecnici (vedi a fianco);
la tensione di alimentazione sia compresa nei
valori indicati nella tabella Dati tecnici (vedi a
fianco);
la presa sia compatibile con la spina della
lavabiancheria. In caso contrario sostituire la
presa o la spina.
La lavabiancheria non va installata allaperto,
nemmeno se lo spazio è riparato, perché è molto
pericoloso lasciarla esposta a pioggia e temporali.
A lavabiancheria installata, la presa della corrente
deve essere facilmente raggiungibile.
Dopo linstallazione, prima delluso, effettuare un
ciclo di lavaggio con detersivo e senza biancheria
impostando il programma 2.
Dati tecnici
Modello
Dimensioni
Capacità
Collegamenti
elettrici
Collegamenti
idrici
Velo cit à di
centrifuga
Programmi di
controllo secondo
la norma EN 60456
IWB 6065
larghezza cm 59,5
altezza cm 85
profondità cm 52,5
da 1 a 6 kg
vedi la targhetta caratteristiche
tecniche applicata sulla macchina
pressione massima 1 MPa (10 bar)
pressione minima 0,05 MPa (0,5 bar)
capacità del cesto 46 litri
sino a 600 giri al minuto
programma 2; temperatura 60°C;
effettuato con 6 kg di carico.
Questa apparecchiatura è conforme
alle seguenti Direttive Comunitarie:
- 89/336/CEE del 03/05/89
(Compatibilità Elettromagnetica) e
successive modificazioni
- 2002/96/CE
- 2006/95/CE (Bassa Tensione)
27
Page 28
Descrizione della lavabiancheria
e avviare un programma
Pannello di controllo
I
SPIE AVANZAMENTO
CICLO/PARTENZA
RITARDATA
Tasto
ON/OFF
Cassetto dei detersivi
PROGRAMMI
Cassetto dei detersivi: per caricare detersivi e
additivi (vedi Detersivi e biancheria).
Manopola
Tasti e spie
OPZIONE
TEMPERATURA
Manopola
Spia OBLÒ BLOCCATO: per capire se loblò è
apribile (vedi pagina a fianco).
Spia
OBLÒ
BLOCCATO
Tasto e spia
AVVIO/
PAUSA
Tasto ON/OFF: per accendere e spegnere la
lavabiancheria.
Manopola PROGRAMMI: per impostare i programmi.
Durante il programma la manopola resterà ferma.
Tasti e spie OPZIONE: per selezionare le opzioni
disponibili. La spia relativa allopzione selezionata
rimarrà accesa.
Manopola TEMPERATURA: per impostare la tempe-
ratura o il lavaggio a freddo (vedi Personalizzazioni).
SPIE AVANZAMENTO CICLO/PARTENZA RITARDATA: per seguire lo stato di avanzamento del
programma di lavaggio.
La spia accesa indica la fase in corso.
Se è stata impostata lopzione Partenza Ritardata,
indicheranno il tempo mancante allavvio del programma (vedi pagina a fianco).
Tasto e spia AVVIO/PAUSA: per avviare i program-
mi o interromperli momentaneamente.
N.B.: per mettere in pausa il lavaggio in corso,
premere questo tasto, la spia relativa lampeggerà
con colore arancione mentre quella della fase in
corso sarà accesa fissa. Se la spia OBLÒ
BLOCCATO
Per far ripartire il lavaggio dal punto in cui è stato
interrotto, premere nuovamente questo tasto.
Standby
Questa lavatrice, in conformità alle nuove normative
legate al risparmio energetico, è dotata di un
sistema di autospegnimento (stand by) che entra in
funzione dopo alcuni minuti nel caso di non utilizzo.
Premere brevemente il tasto ON-OFF e attendere
che la macchina si riattivi.
sarà spenta, si potrà aprire loblò.
28
Page 29
Spie
Le spie forniscono informazioni importanti.
Ecco che cosa dicono:
Spie fase in corso
Una volta selezionato e avviato il ciclo di lavaggio
desiderato, le spie si accenderanno progressivamente per indicarne lo stato di avanzamento:
I
Partenza ritardata
Se è stata attivata lopzione Partenza ritardata (vedi
Personalizzazioni), dopo avere avviato il programma,
inizierà a lampeggiare la spia relativa al ritardo selezionato:
Col trascorrere del tempo verrà visualizzato il ritardo
residuo con il lampeggio della spia relativa:
Trascorso il ritardo selezionato avrà inizio il programma impostato.
Lavaggio
Risciacquo
Centrifuga
Scarico
Fine lavaggio
Tasti opzione e relative spie
Selezionando unopzione la spia relativa si illuminerà.
Se lopzione selezionata non è compatibile con il
programma impostato la spia relativa lampeggerà e
lopzione non verrà attivata.
Se l'opzione selezionata non è compatibile con
unaltra precedentemente impostata, la spia relativa
alla prima funzione selezionata lampeggerà e verrà
attivata solo la seconda, la spia dell'opzione attivata
si illuminerà.
Spia oblò bloccato
La spia accesa indica che loblò è bloccato per
impedire lapertura; per aprire loblò è necessario
che la spia sia spenta (attendere 3 minuti circa).
Per aprire loblò mentre un ciclo è in corso premere il
pulsante AVVIO/PAUSA; se la spia OBLÒ BLOCCATO è spenta sarà possibile aprire loblò.
Avviare un programma
1. Accendere la lavabiancheria premendo il tasto ON/OFF. Tutte le spie si accenderanno per qualche secondo, poi
si spegneranno e pulserà la spia AVVIO/PAUSA.
2. Caricare la biancheria e chiudere loblò.
3. Impostare con la manopola PROGRAMMI il programma desiderato.
4. Impostare la temperatura di lavaggio (vedi Personalizzazioni).
5. Versare detersivo e additivi (vedi Detersivi e biancheria).
6. Selezionare le opzioni desiderate.
7. Avviare il programma premendo il tasto AVVIO/PAUSA e la spia relativa rimarrà accesa fissa di colore verde.
Per annullare il ciclo impostato mettere la macchina in pausa premendo il tasto AVVIO/PAUSA e scegliere un
nuovo ciclo.
8. Al termine del programma si illuminerà la spia
possibile aprire loblò. Estrarre la biancheria e lasciare loblò socchiuso per far asciugare il cestello.
Spegnere la lavabiancheria premendo il tasto ON/OFF.
. Quando la spia OBLO BLOCCATO si spegnerà sarà
29
Page 30
Programmi
Tabella dei programmi
I
Descrizione del Pr ogramma
Programmi
Giornalieri
1 Cotone con prelavaggio:
2 Cotone bianchi:
2 Cotone bi anchi (1):
2 Cotone bi anchi (2):
3 Cotone:
4 Cotone Color ati (3):
5 Sintetici:
6 Sintetici:
Speciali
7 Lana:
8 Seta/Tende:
9 Jeans
10
11 Sport Intensive
12 Spor t Light
13 Sport Shoes
per lana, cachemire, ecc.
Express:
indicato per lana, seta e capi da lavare a mano).
Sport
Parziali
Risciacquo - 600 - Centrifuga - 600 - - - - 6
Scarico - 0 - - - - 6
bianchi estremamente sporchi.
bianchi e colorati resistenti molto sporchi.
bianchi e colorati delicati molto sporchi.
bianchi e colorati resistenti molto sporchi.
bianchi poco sporchi e colori delicati.
colori resistenti molto sporchi.
colori delicati poco sporchi.
per capi in seta, viscosa, lingerie.
Per rinfrescare rapidamente capi poco sporchi (non
bianchi estremamente sporchi.
Vel ocità
Te m p .
max.
max.
(giri al
(°C)
minuto)
90° 600
90° 600 60° 600 40° 600 60° 600 40° 600 60° 600 40° 600 -
40° 600 30° 0 40° 600 -
30° 600 -
30° 600 30° 600 -
30° 600 -
Prela-
Lavag-
vaggio
gio
ll
ll l
ll l
ll l
ll l
ll l
ll l
ll l
l
l
l
l
l
l
l
Detersivi
Candeg-
gina
-
-
-
-
-
-
-
-
ll
Ammor-
bidente
l
l
l
l
l
l
l
l
Carico
max. (Kg)
Normale
6
6
6
6
63,25119104
63,2589 71
2,5 2 85 72
2,5 2 72 60
1
1
3
1,5
3 - 78 -
3 - 68 -
Max .
2 paia
6
Durata
ciclo
Eco
Nor-
male
164
145
137
123
55
55
70
15
36
16
2
Eco
Time
Time
-
-
-
-
-
-
-
-
-50-
-
-
-
-
-
-
-
-
-
-
-
-
-
-
I dati riportati nella tabella hanno valore indicativo.
Per tutti Test Institutes:
1) Programma di controllo secondo la norma EN 60456: impostare il programma 2 con una temperaura di 60°C.
2) Programma cotone lungo: impostare il programma 2 con una temperatura di 40°C.
3) Programma cotone corto: impostare il programma 4 con una temperatura di 40°C.
Programmi particolari
Express (programma 10) è studiato per lavare capi leggermente sporchi in poco tempo: dura solo 15 minuti e fa
così risparmiare energia e tempo. Impostando il programma (10 a 30°C) è possibile lavare insieme tessuti di
diversa natura (esclusi lana e seta) con un carico massimo di 1,5 kg.
Sport Intensive (programma 11) è studiato per lavare tessuti per abbigliamento sportivo (tute, calzoncini, ecc.)
molto sporchi; per ottenere i migliori risultati è consigliabile non superare il carico massimo indicato nella Tabella
dei programmi.
Sport Light (programma 12) è studiato per lavare tessuti per abbigliamento sportivo (tute, calzoncini, ecc.) poco
sporchi; per ottenere i migliori risultati è consigliabile non superare il carico massimo indicato nella Tabella dei
programmi. Si raccomanda di usare detersivo liquido, usare una dosa adatta a mezzo carico.
Sport Shoes (programma 13) è studiato per lavare scarpe sportive; per ottenere i migliori risultati non lavarne
più di 2 paia.
30
Page 31
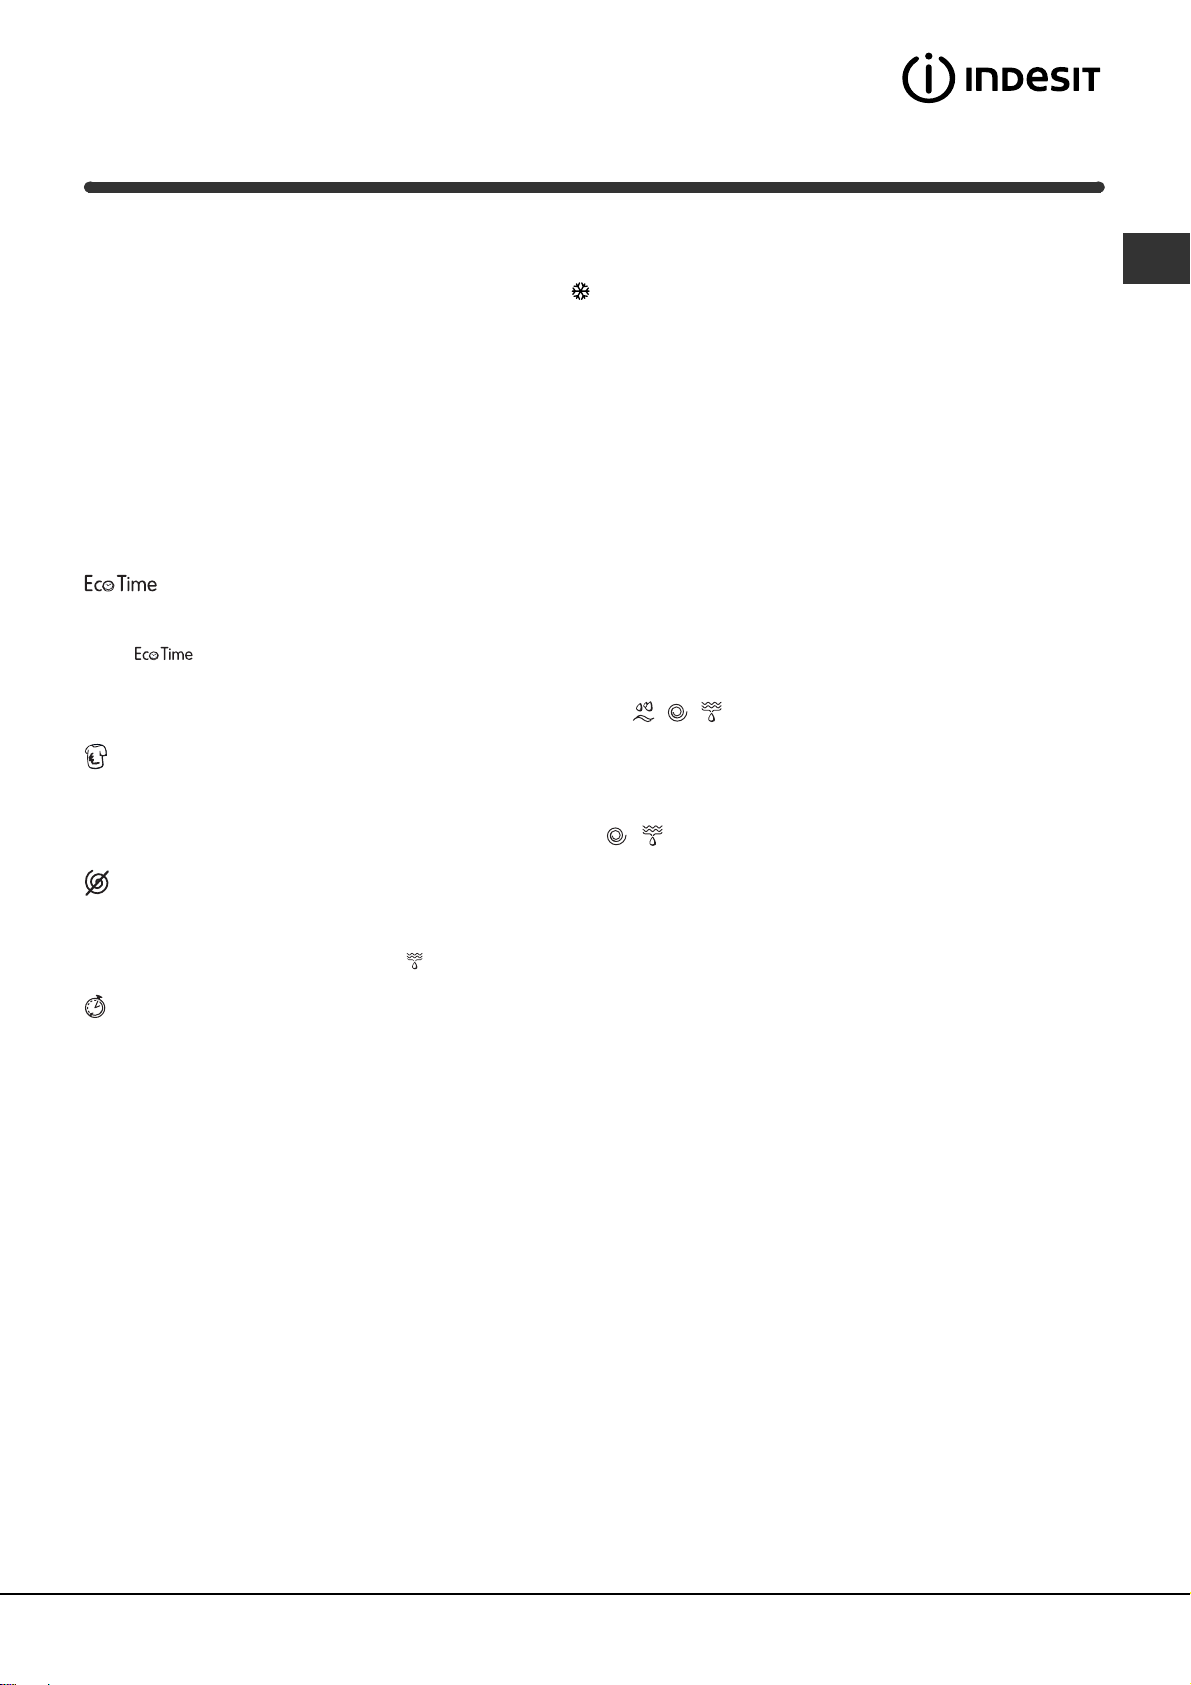
Personalizzazioni
Impostare la temperatura
Ruotando la manopola TEMPERATURA si imposta la temperatura di lavaggio (vedi Tabella programmi).
La temperatura si può ridurre sino al lavaggio a freddo
La macchina impedirà automaticamente di impostare una temperatura maggiore a quella massima prevista per
ogni programma.
.
Opzioni
Le varie opzioni di lavaggio previste dalla lavabiancheria permettono di ottenere la pulizia e il bianco desiderati.
Per attivare le opzioni:
1. premere il tasto relativo allopzione desiderata;
2. laccensione della spia relativa segnala che lopzione è attiva.
Nota: Il lampeggio veloce della spia indica che lopzione relativa non è selezionabile per il programma impostato.
Selezionando questa opzione la movimentazione meccanica, la temperatura e lacqua sono ottimizzate per un
carico ridotto di cotoni e sintetici poco sporchi (vedi Tabella dei programmi).
Con puoi lavare in tempi ridotti, risparmiando acqua ed energia. Si consiglia di utilizzare una dose di
detersivo liquido adatta alla quantità di carico.
Non è attivabile sui programmi 1, 2, 7, 8, 9, 10, 11, 12, 13, , , .
Antimacchia
Ciclo di candeggio adatto a eliminare le macchie più resistenti. Ricordarsi di versare la candeggina nella vaschetta
aggiuntiva 4 (vedi Ciclo candeggio).
Non è attivabile sui programmi 1, 7, 8, 9, 10, 11, 12, 13, , .
I
Esclusione Centrifuga
La lavabiancheria non effettua la centrifuga, ma una rotazione del cesto a velocità moderata per agevolare lo
scarico dell'acqua. E' consigliata quando si lavano capi difficili da stirare.
Non è attivabile sui programmi 8, .
Partenza ritardata
Ritarda l'avvio della macchina sino a 12 ore.
Premere più volte il tasto fino a far accendere la spia relativa al ritardo desiderato. Alla quinta pressione del tasto la
lopzione si disattiverà.
N.B.: Una volta premuto il tasto AVVIO/PAUSA, si può modificare il valore del ritardo solo diminuendolo fino ad
avviare il programma impostato.
E attivo con tutti i programmi.
31
Page 32
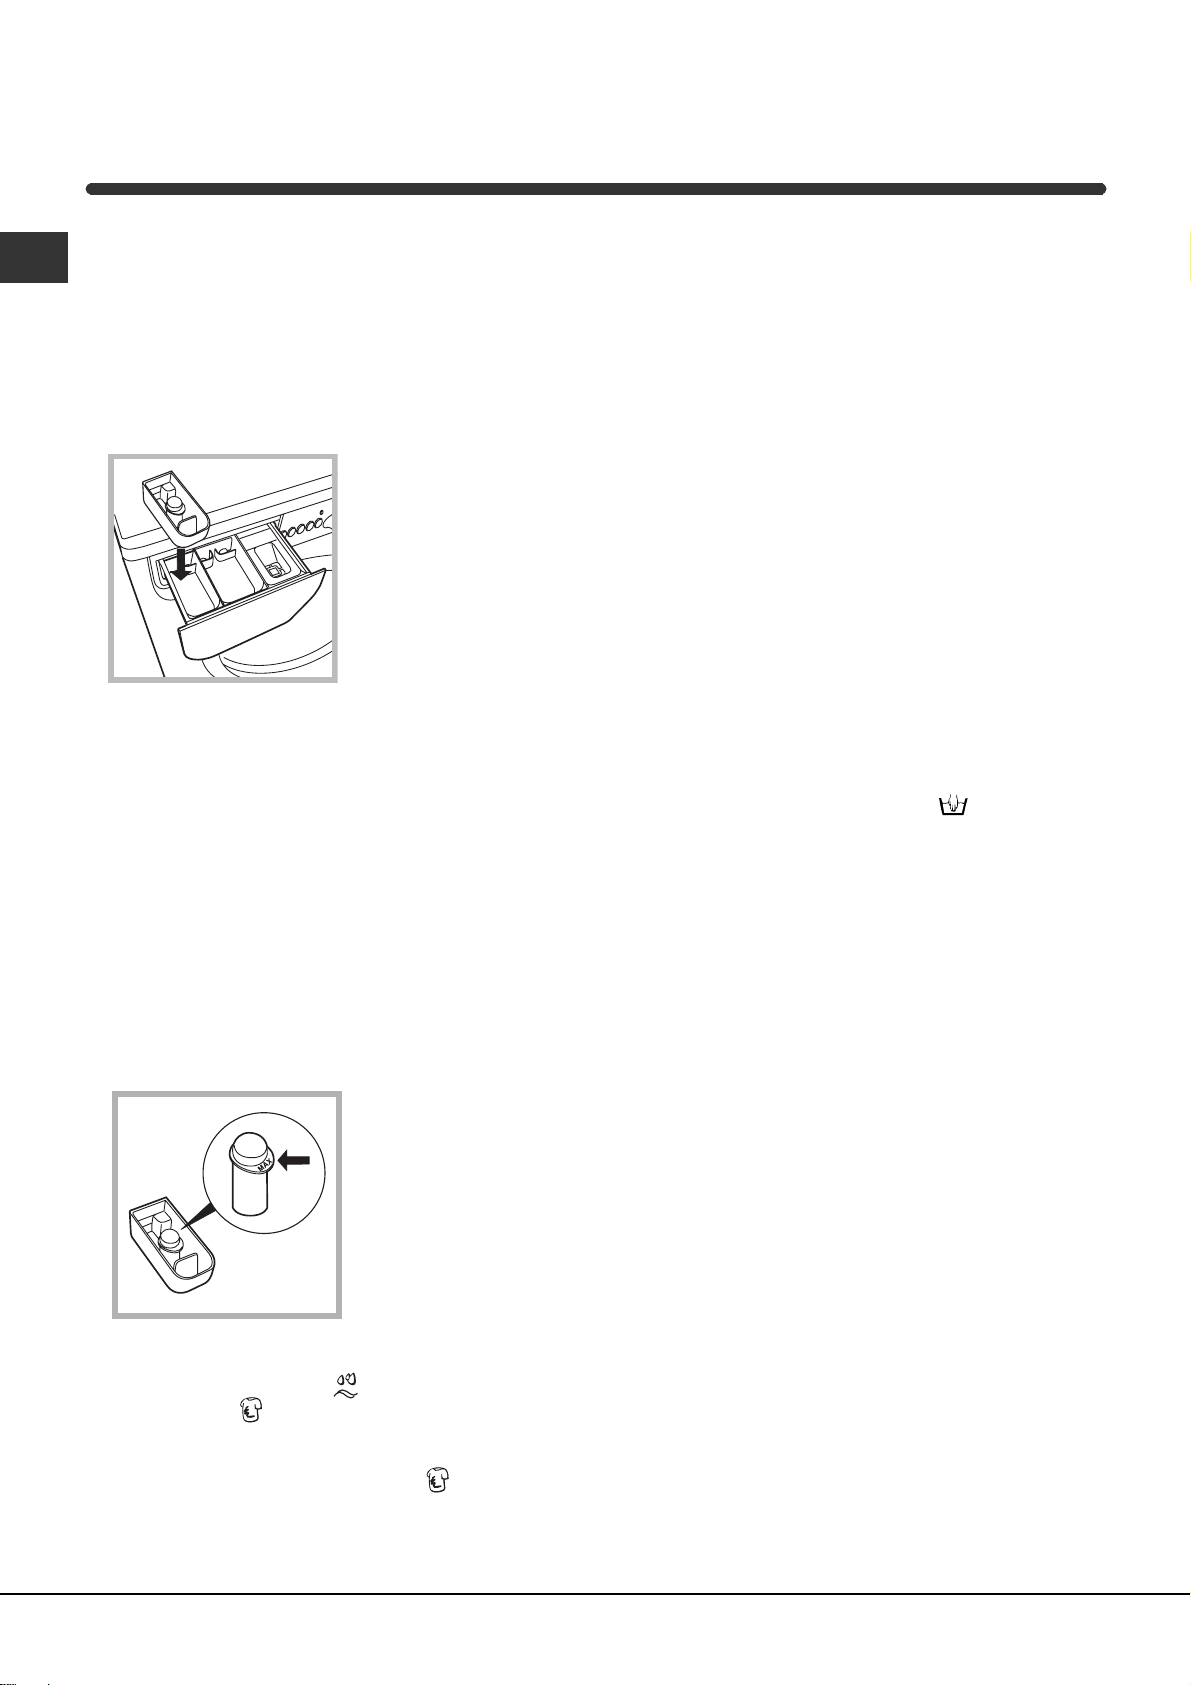
Detersivi e biancheria
Cassetto dei detersivi
I
Il buon risultato del lavaggio dipende anche dal
corretto dosaggio del detersivo: eccedendo non si
lava in modo più efficace e si contribuisce a incrostare le parti interne della lavabiancheria e a inquinare lambiente.
Non usare detersivi per il lavaggio a mano, perché
formano troppa schiuma.
Estrarre il cassetto dei
4
detersivi e inserire il
detersivo o ladditivo
come segue.
3
2
1
vaschetta 1: Detersivo per prelavaggio
(in polvere)
Prima di versare il detersivo verificare che non sia
inserita la vaschetta aggiuntiva 4.
vaschetta 2: Detersivo per lavaggio
(in polvere o liquido)
Il detersivo liquido va versato solo prima dellavvio.
vaschetta 3: Additivi (ammorbidente, ecc.)
Lammorbidente non deve fuoriuscire dalla griglia.
vaschetta aggiuntiva 4: Candeggina
Ciclo candeggio
La candeggina tradizionale si usa per i tessuti
resistenti bianchi, quella delicata per i tessuti
colorati, i sintetici e per la lana.
Preparare la biancheria
Suddividere la biancheria secondo:
- il tipo di tessuto / il simbolo sulletichetta.
- i colori: separare i capi colorati da quelli bianchi.
Vuotare le tasche e controllare i bottoni.
Non superare i valori indicati, riferiti al peso della
biancheria asciutta:
Tessuti resistenti: max 6 kg
Tessuti sintetici: max 2,5 kg
Tessuti delicati: max 2 kg
Lana: max 1 kg
Seta: max. 1 kg
Quanto pesa la biancheria?
1 lenzuolo 400-500 gr.
1 federa 150-200 gr.
1 tovaglia 400-500 gr.
1 accappatoio 900-1.200 gr.
1 asciugamano 150-250 gr.
Capi particolari
Lana: con il programma 7 è possibile lavare in
lavatrice tutti i capi in lana, anche quelli con
letichetta solo lavaggio a mano
migliori risultati utilizzare un detersivo specifico e non
superare 1 kg di bucato.
Seta: utilizzare lapposito programma 8 per lavare
tutti i capi in seta. Si consiglia lutilizzo di un
detersivo specifico per capi delicati.
Tende: si raccomanda di piegarle e sistemarle
dentro una federa o un sacchetto a rete. Utilizzare il
programma 8.
Jeans: rovesciare i capi prima del lavaggio ed
utilizzare un detersivo liquido. Utilizzare il programma 9.
. Per ottenere i
Inserire la vaschetta
aggiuntiva 4, in dotazione, nella vaschetta 1.
Nel dosare la
candeggina non superare il livello max
indicato sul perno
centrale (vedi figura).
Per effettuare solo il candeggio versare la
candeggina nella vaschetta aggiuntiva 4, impostare il
programma Risciacquo
Antimacchia
Per candeggiare durante il lavaggio versare il detersivo e gli additivi, impostare il programma desiderato
e attivare la funzione Antimacchia
Lutilizzo della vaschetta aggiuntiva 4 esclude il
prelavaggio.
32
.
e attivare la funzione
.
Sistema bilanciamento del carico
Prima di ogni centrifuga, per evitare vibrazioni
eccessive e per distribuire il carico in modo uniforme,
il cestello effettua delle rotazioni ad una velocità
leggermente superiore a quella del lavaggio. Se al
termine di ripetuti tentativi il carico non fosse ancora
correttamente bilanciato la macchina effettua la
centrifuga ad una velocità inferiore a quella prevista.
In presenza di eccessivo sbilanciamento la
lavabiancheria effettua la distribuzione anzichè la
centrifuga. Per favorire una migliore distribuzione del
carico e il suo corretto bilanciamento si consiglia di
mescolare capi grandi e piccoli.
Page 33
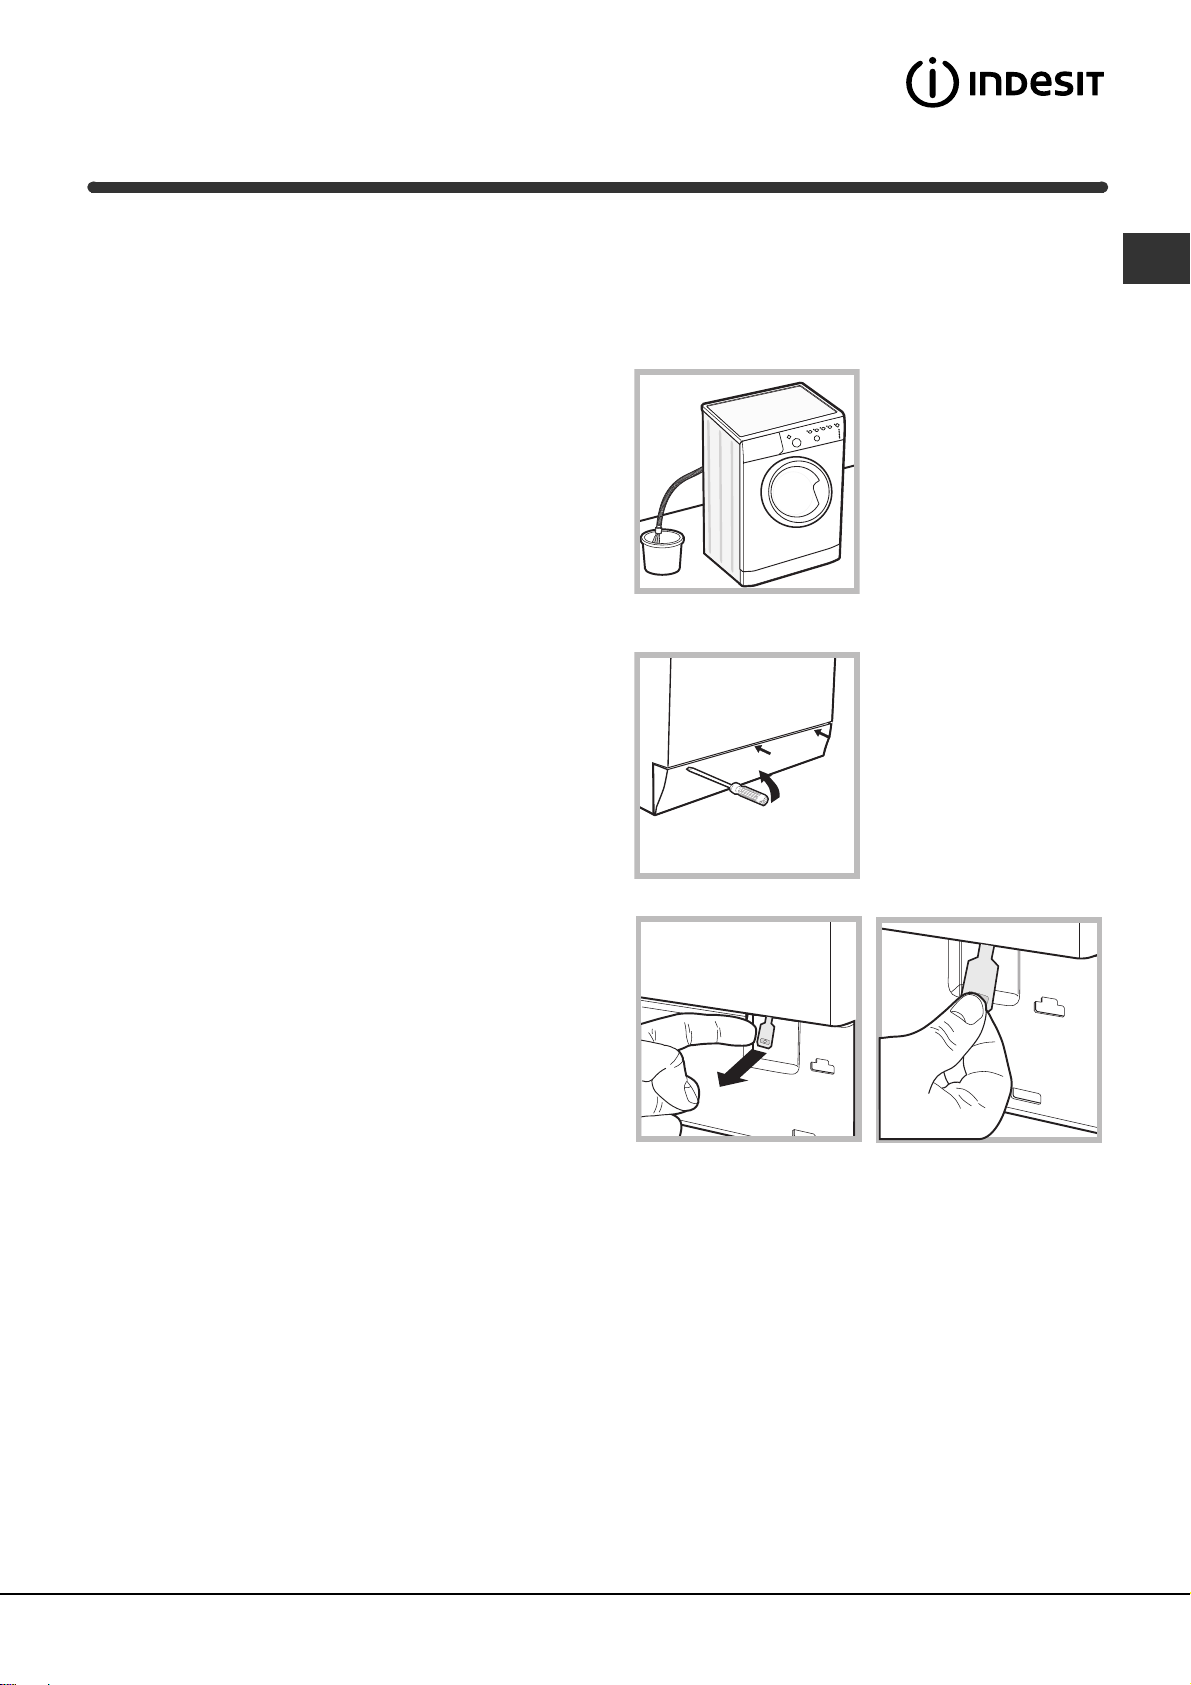
Precauzioni e consigli
La lavabiancheria è stata progettata e costruita in
conformità alle norme internazionali di sicurezza.
Queste avvertenze sono fornite per ragioni di
sicurezza e devono essere lette attentamente.
Sicurezza generale
Questo apparecchio è stato concepito esclusiva-
mente per un uso di tipo domestico.
La lavabiancheria deve essere usata solo da
persone adulte e secondo le istruzioni riportate
in questo libretto.
Non toccare la macchina a piedi nudi o con le
mani o i piedi bagnati o umidi.
Non staccare la spina dalla presa della corrente
tirando il cavo, bensì afferrando la spina.
Non aprire il cassetto dei detersivi mentre la
macchina è in funzione.
Non toccare lacqua di scarico, che può
raggiungere temperature elevate.
Non forzare in nessun caso loblò: potrebbe
danneggiarsi il meccanismo di sicurezza che
protegge da aperture accidentali.
In caso di guasto, in nessun caso accedere ai
meccanismi interni per tentare una riparazione.
Controllare sempre che i bambini non si avvicinino
alla macchina in funzione.
Durante il lavaggio loblò tende a scaldarsi.
Se devessere spostata, lavorare in due o tre
persone con la massima attenzione. Mai da soli
perché la macchina è molto pesante.
Prima di introdurre la biancheria controlla che il
cestello sia vuoto.
Apertura manuale della porta oblò
Nel caso non sia possibile aprire la porta oblò a
causa della mancanza di energia elettrica e volete
stendere il bucato, procedere come segue:
1. togliere la spina dalla
presa di corrente.
2. verificate che il livello
dellacqua allinterno della
20
macchina sia inferiore
rispetto allapertura delloblò;
in caso contrario togliere
lacqua in eccedenza
attraverso il tubo di scarico
raccogliendola in un secchio
come indicato in figura.
3. rimuovere il pannello di
copertura sul lato
anteriore della
lavabiancheria con
lausilio di un giravite (vedi
figura).
I
Smaltimento
Smaltimento del materiale di imballaggio:
attenersi alle norme locali, così gli imballaggi
potranno essere riutilizzati.
La direttiva Europea 2002/96/CE sui rifiuti di
apparecchiature elettriche ed elettroniche, preve-
de che gli elettrodomestici non debbano essere
smaltiti nel normale flusso dei rifiuti solidi urbani.
Gli apparecchi dismessi devono essere raccolti
separatamente per ottimizzare il tasso di recupero
e riciclaggio dei materiali che li compongono ed
impedire potenziali danni per la salute e l'ambien-
te. Il simbolo del cestino barrato è riportato su
tutti i prodotti per ricordare gli obblighi di raccolta
separata.
Per ulteriori informazioni, sulla corretta dismissione
degli elettrodomestici, i detentori potranno rivol-
gersi al servizio pubblico preposto o ai rivenditori.
4. utilizzando la linguetta indicata in figura tirare
verso lesterno fino a liberare il tirante in plastica dal
fermo; tirarlo successivamente verso il basso e
contemporaneamente aprire la porta.
5. rimontare il pannello assicurandosi, prima di
spingerlo verso la macchina, di aver inserito i ganci
nelle apposite asole.
33
Page 34
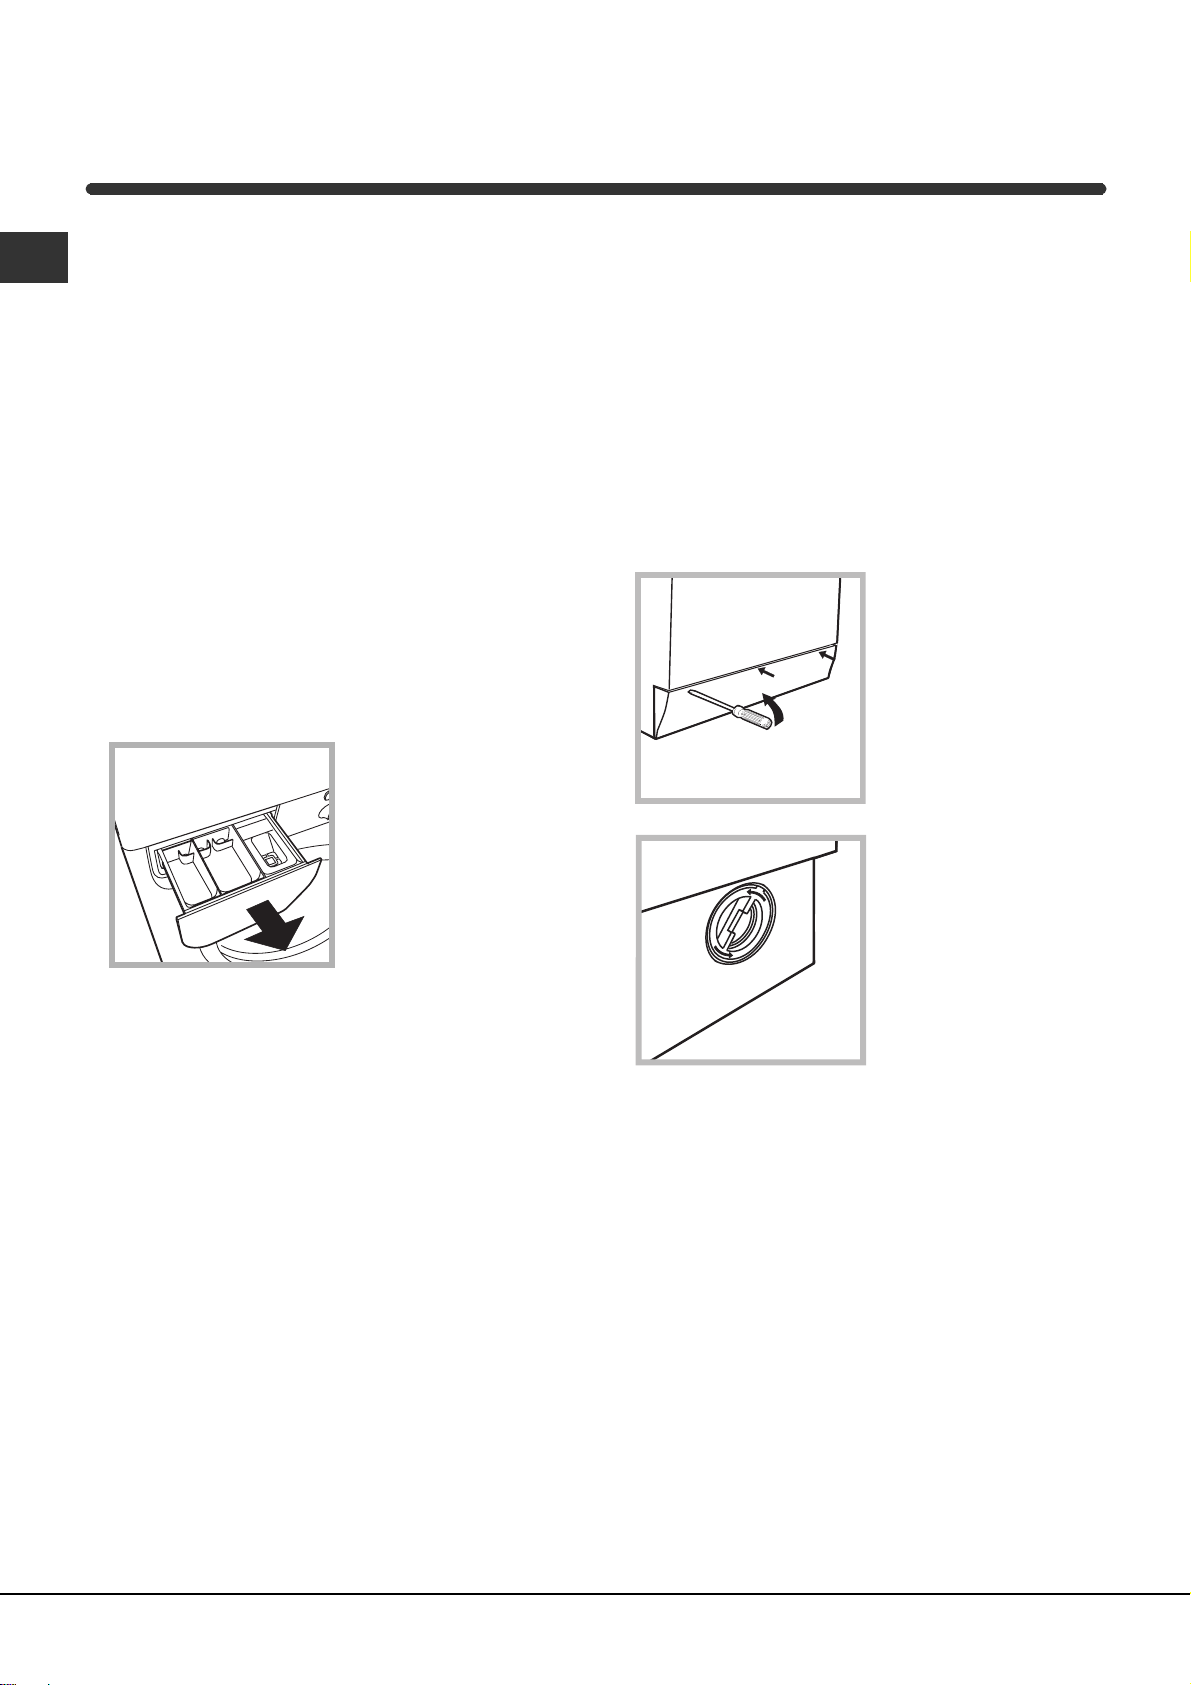
Manutenzione e cura
Escludere acqua e corrente elettrica
I
Chiudere il rubinetto dellacqua dopo ogni
lavaggio. Si limita così lusura dellimpianto
idraulico della lavabiancheria e si elimina il pericolo
di perdite.
Staccare la spina della corrente quando si
pulisce la lavabiancheria e durante i lavori di
manutenzione.
Pulire la lavabiancheria
La parte esterna e le parti in gomma possono
essere puliti con un panno imbevuto di acqua tiepida
e sapone. Non usare solventi o abrasivi.
Pulire il cassetto dei detersivi
Sfilare il cassetto sollevandolo e tirandolo
verso lesterno (vedi
figura).
Lavarlo sotto lacqua
corrente; questa pulizia
va effettuata
frequentemente.
Pulire la pompa
La lavabiancheria è dotata di una pompa
autopulente che non ha bisogno di manutenzione.
Può però succedere che piccoli oggetti (monete,
bottoni) cadano nella precamera che protegge la
pompa, situata nella parte inferiore di essa.
Assicurarsi che il ciclo di lavaggio sia terminato e
staccare la spina.
Per accedere alla precamera:
1. rimuovere il pannello
di copertura sul lato
anteriore della
lavabiancheria con
lausilio di un giravite
(vedi figura);
2. svitare il coperchio
ruotandolo in senso
antiorario (vedi figura): è
normale che fuoriesca
un po dacqua;
Curare oblò e cestello
Lasciare sempre socchiuso loblò per evitare che
si formino cattivi odori.
3. pulire accuratamente linterno;
4. riavvitare il coperchio;
5. rimontare il pannello assicurandosi, prima di
spingerlo verso la macchina, di aver inserito i ganci
nelle apposite asole.
Controllare il tubo di alimentazione
dellacqua
Controllare il tubo di alimentazione almeno una volta
allanno. Se presenta screpolature e fessure va
sostituito: durante i lavaggi le forti pressioni potrebbero provocare improvvise spaccature.
Non utilizzare mai tubi già usati.
34
Page 35

Anomalie e rimedi
Può accadere che la lavabiancheria non funzioni. Prima di telefonare allAssistenza (vedi Assistenza), controllare
che non si tratti di un problema facilmente risolvibile aiutandosi con il seguente elenco.
Anomalie:
La lavabiancheria
non si accende.
Il ciclo di lavaggio
non inizia.
La lavabiancheria non carica
acqua (lampeggia velocemente
la spia della prima fase di
lavaggio).
La lavabiancheria carica e
scarica acqua di continuo.
Possibili cause / Soluzione:
La spina non è inserita nella presa della corrente, o non abbastanza
da fare contatto.
In casa non cè corrente.
Loblò non è ben chiuso.
Il tasto ON/OFF non è stato premuto.
Il tasto AVVIO/PAUSA non è stato premuto.
Il rubinetto dellacqua non è aperto.
Si è impostato un ritardo sullora di avvio (PARTENZA RITARDATA,
vedi Personalizzazioni).
Il tubo di alimentazione dellacqua non è collegato al rubinetto.
Il tubo è piegato.
Il rubinetto dellacqua non è aperto.
In casa manca lacqua.
Non cè sufficiente pressione.
Il tasto AVVIO/PAUSA non è stato premuto.
Il tubo di scarico non è installato fra 65 e 100 cm da terra (vedi Installazione).
Lestremità del tubo di scarico è immersa nellacqua (vedi Installazione).
Lo scarico a muro non ha lo sfiato daria.
Se dopo queste verifiche il problema non si risolve, chiudere il rubinetto
dellacqua, spegnere la lavabiancheria e chiamare lAssistenza. Se
labitazione si trova agli ultimi piani di un edificio, è possibile che si verifichino fenomeni di sifonaggio, per cui la lavabiancheria carica e scarica
acqua di continuo. Per eliminare linconveniente sono disponibili in commercio apposite valvole anti-sifonaggio.
I
La lavabiancheria non scarica
o non centrifuga.
La lavabiancheria vibra
molto durante la centrifuga.
La lavabiancheria perde acqua.
Le spie delle "opzioni" e la spia
di "avvio/pausa" lampeggiano e
una delle spie della "fase in
corso" e di "oblò bloccato" si
accendono fisse.
Si forma troppa schiuma.
Il programma non prevede lo scarico: con alcuni programmi occorre
avviarlo manualmente.
Il tubo di scarico è piegato (vedi Installazione).
La conduttura di scarico è ostruita.
Il cestello, al momento dellinstallazione, non è stato sbloccato
correttamente (vedi Installazione).
La lavabiancheria non è in piano (vedi Installazione).
La lavabiancheria è stretta tra mobili e muro (vedi Installazione).
Il tubo di alimentazione dellacqua non è ben avvitato (vedi Installazione).
Il cassetto dei detersivi è intasato (per pulirlo vedi Manutenzione e cura).
Il tubo di scarico non è fissato bene (vedi Installazione).
Spegnere la macchina e togliere la spina dalla presa, attendere circa 1
minuto quindi riaccenderla.
Se lanomalia persiste, chiamare lAssistenza.
Il detersivo non è specifico per lavabiancheria (deve esserci la
dicitura per lavatrice, a mano e in lavatrice, o simili).
Il dosaggio è stato eccessivo.
35
Page 36

Assistenza
195073451.01
11 /2008 - Xerox Business Services
I
Prima di contattare lAssistenza:
Verificare se lanomalia può essere risolta da soli (vedi Anomalie e rimedi).
Riavviare il programma per controllare se linconveniente è stato ovviato;
In caso negativo, contattare il Numero Unico 199.199.199*.
Non ricorrere mai a tecnici non autorizzati.
Comunicare:
il tipo di anomalia;
il modello della macchina (Mod.);
il numero di serie (S/N).
Queste informazioni si trovano sulla targhetta applicata nella parte posteriore della lavabiancheria e nella
parte anteriore aprendo l'oblò.
*
Assistenza Attiva 7 giorni su 7
In caso di necessità dintervento chiamare il Numero Unico Nazionale 199.199.199*.
Un operatore sarà a completa disposizione per fissare un appuntamento con il Centro Assistenza Tecnico
Autorizzato più vicino al luogo da cui si chiama.
È attivo 7 giorni su 7, sabato e domenica compresi, e non lascia mai inascoltata una richiesta.
36
* Al costo di 14,25 centesimi di Euro al minuto (iva inclusa) dal Lun. al Ven. dalle 08:00 alle 18:30, il Sab. dalle 08:00 alle
13:00 e di 5,58 centesimi di Euro al minuto (iva inclusa) dal Lun. al Ven. dalle 18:30 alle 08:00, il Sab. dalle 13:00 alle 08:00
e i giorni festivi, per chi chiama da telefono fisso.
Per chi chiama da radiomobile le tariffe sono legate al piano tariffario delloperatore telefonico utilizzato.
Le suddette tariffe potrebbero essere soggette a variazione da parte delloperatore telefonico; per maggiori informazioni
consultare il sito www.aristonchannel.com.
 Loading...