

IUPS xxx
English English
English
English English
Suomi Suomi
Suomi
Suomi Suomi
Käyttöohjeet
PAKASTIN
Yhteenveto
Käyttöohjeet, 1
Huoltoapu,3
Laitteen kuvaus, 6
Asennus, 14
Käynnistys ja käyttö, 14
Huolto ja hoito, 15
Varotoimet ja suosituksia, 15
Häiriöt ja korjaustoimet, 16
Svenska Svenska
Svenska
Svenska Svenska
Operating Instructions
FREEZER
Contents
Operating Instructions, 1
Assistance, 3
Description of the appliance, 5
Installation,8
Start-up and use,8
Maintenance and care, 9
Precautions and tips, 9
Troubleshooting, 10
Dansk Dansk
Dansk
Dansk Dansk
Brugervejledning
FRYSEN
Oversigt
Brugervejledning,1
Servicecenter, 3
Beskrivelse af apparatet,5
Installation, 1 1
Start og brug, 1 1
Vedligeholdelse, 12
Forholdsregler og gode råd, 12
Fejlfinding og afhjælpning,13
Bruksanvisning
FRYS
Innehållsförteckning
Bruksanvisning, 1
Kundservice, 3
Beskrivning av apparaten,6
Installation, 17
Start och användning, 17
Underhåll och skötsel, 18
Säkerhetsföreskrifter och råd, 18
Fel och åtgärder, 19
Norsk Norsk
Norsk
Norsk Norsk
Bruksanvisning
FRYSESKAP
Innhold
Bruksanvisning, 1
T eknisk assistanse, 4
Beskrivelse av apparatet, 7
Installasjon, 20
Oppstart og bruk, 21
Hvordan vedlikeholde og ta vare på skapet,21
Forholdsregler og gode råd, 22
Feil og løsninger,22
Deutsch Deutsch
Deutsch
Deutsch Deutsch
Gebrauchsanleitungen
EINBAUTIEFHÜHLGERÄTE
Inhaltsverzeichnis
Gebrauchsanleitungen, 2
Kundendienst,5
Beschreibung Ihres Gerätes,7
Installation, 23
Inbetriebsetzung und Gebrauch, 23
Wartung und Pflege, 24
Vorsichtsmaßregeln und Hinweise, 24
Störungen und Abhilfe, 25
Assistance
Before calling for Assistance:
•
Check if the malfunction can be solved on your own (
Troubleshooting
• If after all the checks, the appliance still does not operate or the
problem persists, call the nearest Service Centre
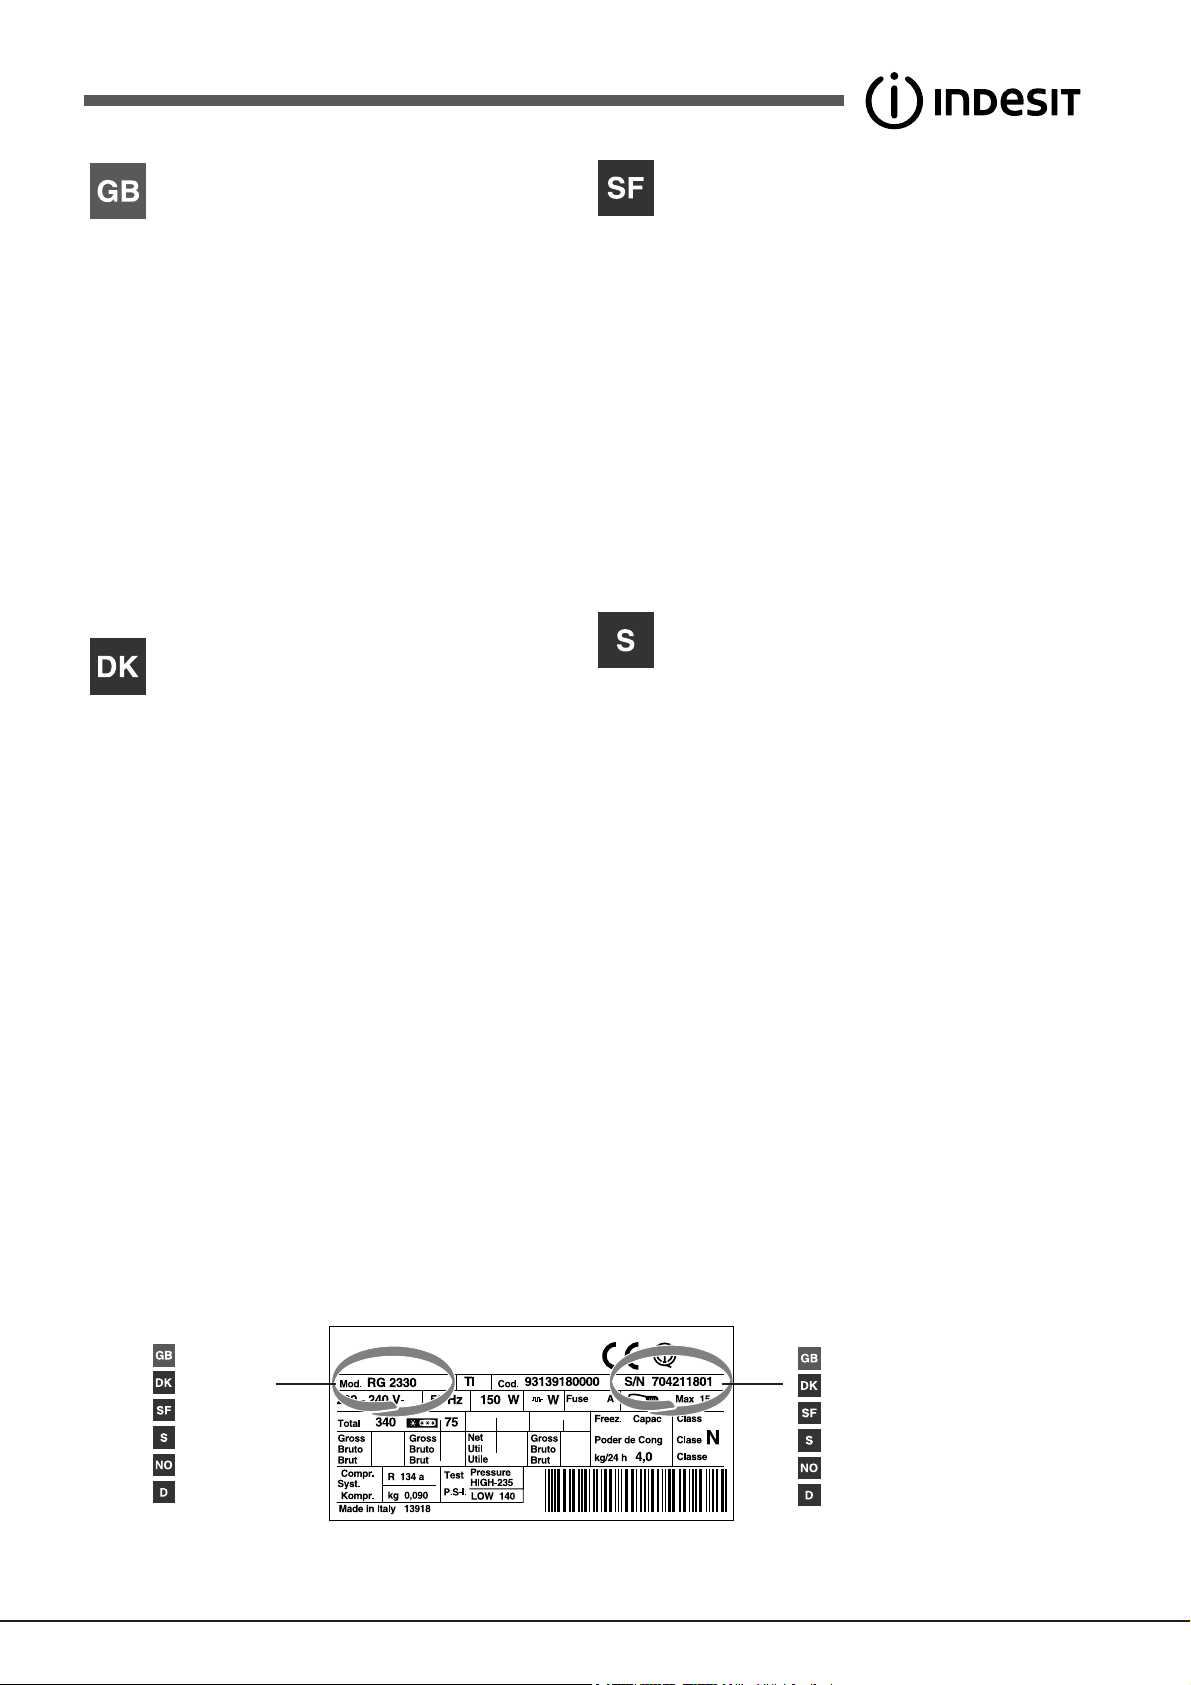
Communicating:
• type of malfunction
• appliance model (Mod.)
• serial number (S/N)
This information can be found on the data plate located on the
bottom left side of the refrigerator compartment.
Never call on unauthorized technicians and always refuse
spare parts which are not originals.
).
see
Servicecenter
Inden Servicecentret kontaktes:
•
Kontrollér, om du selv kan løse fejlen (
afhjælpning
• Hvis apparatet stadig ikke fungerer, og hvis fejlen stadig
findes, skal man kontakte nærmeste Servicecenter.
Man skal oplyse:
• Fejlens art
• Apparatets model (Mod.)
• Serienummer (S/N)
Disse oplysninger findes på skiltet inden i køleskabet nederst til
venstre.
Ret aldrig henvendelse til ikke-autoriserede teknikere, og
benyt ikke uoriginale reservedele.
).
se Fejlfinding og
Huoltoapu
Ennen Huoltoapuun yhteyden ottamista:
• Tarkista, voidaanko häiriö poistaa omin voimin (
korjaustoimet
• Jos kaikista tarkistuksista huolimatta laite ei toimi ja
havaitsemasi vika on olemassa edelleen, soita lähimpään
Huoltoapuun.
Ilmoita:
• häiriön tyyppi
• koneen malli (Mod.)
• sarjanumero (S/N)
Nämä tiedot löytyvät jääkaappiosaston alavasemmalla olevasta
tietolaatasta.
Älä käytä koskaan valtuuttamattomia teknikoita ja kieltäydy
aina muiden kuin alkuperäisten varaosien käytöstä.
).
katso Häiriöt ja
Kundservice
Innan du kontaktar kundservice:
• Kontrollera om du kan åtgärda felet på egen hand (
åtgärder
• Om apparaten inte fungerar och felet inte kan åtgärdas trots
alla kontroller kan du ringa till närmaste servicecenter.
Uppge:
• typ av fel
• maskinmodell (Mod.)
• serienummer (S/N)
Denna information anges på märkskylten som sitter i kylutrymmet
nedan till vänster.
Vänd dig aldrig till ej auktoriserade tekniker och tillåt inte att
reservdelar som inte är original monteras.
).
se Fel och
- model
- model
- malli
- modell
- modell
- modell
- serial number
- serienummer
- serjanumero
- serienummer
- serienummer
- modellnummer
3
Teknisk assistanse
Før du kontakter Teknisk assistanse:
•
Kontroller om feilen kan løses på egen hånd (
løsninger
• Dersom man til tross for alle kontroller ikke får apparatet til å
fungere og feilen fortsatt er tilstede, må dere kontakte
nærmeste senter for teknisk assistanse.
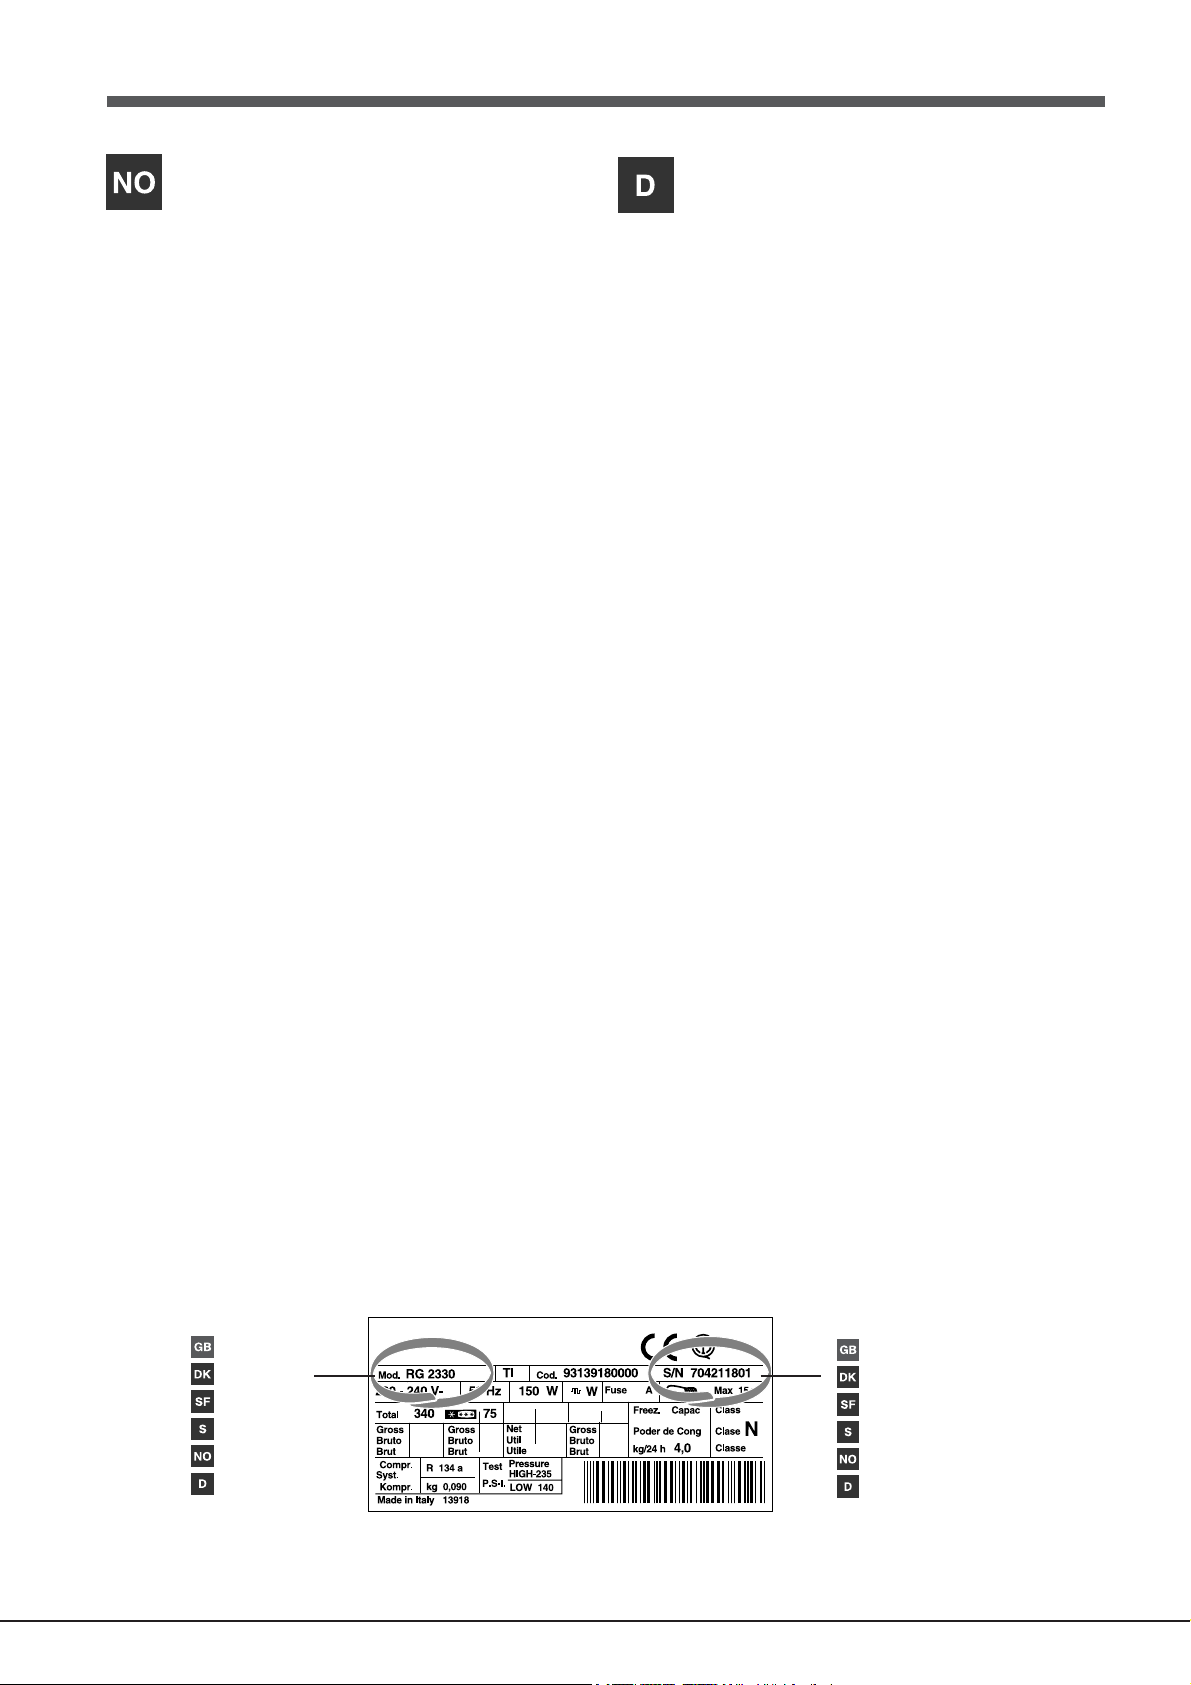
Man må oppgi
• type feil
• Modellen på på apparatet (Mod.)
• serienummeret (S/N)
Denne informasjonen finner du på informasjonsskiltet som er
plassert i kjølerommet nede til venstre.
Bruk aldri teknikere uten offentlig godkjenning, og si alltid nei
til reparasjoner med deler som ikke er originale.
).
se Feil og
Kundendienst
Bevor Sie sich an den Kundendienst wenden:
•
Prüfen Sie, ob die Störung selbst behoben werden kann (
Störungen und Abhilfe
• Sollte trotz aller Kontrollen das Gerät nicht funktionieren und der
von Ihnen festgestellte Fehler weiter bestehen bleiben, dann
fordern Sie bitte den nächstgelegenen technischen
Kundendienst an und teilen Sie dort zusammen mit Ihrer
Fehlerbeschreibung folgende Daten mit:
Geben Sie bitte Folgendes an:
• die Art der Störung
• das Gerätemodell (Mod.)
• die Modellnummer (S/N).
Entnehmen Sie diese Daten bitte dem Typenschild (befindlich im
Kühlraum unten links).
Beauftragen Sie auf keinen Fall einen nicht befugten
Kundendienst und lassen Sie ausschließlich OriginalErsatzteile einbauen.
).
siehe
- model
- model
- malli
- modell
- modell
- modell
4
- serial number
- serienummer
- serjanumero
- serienummer
- serienummer
- modellnummer
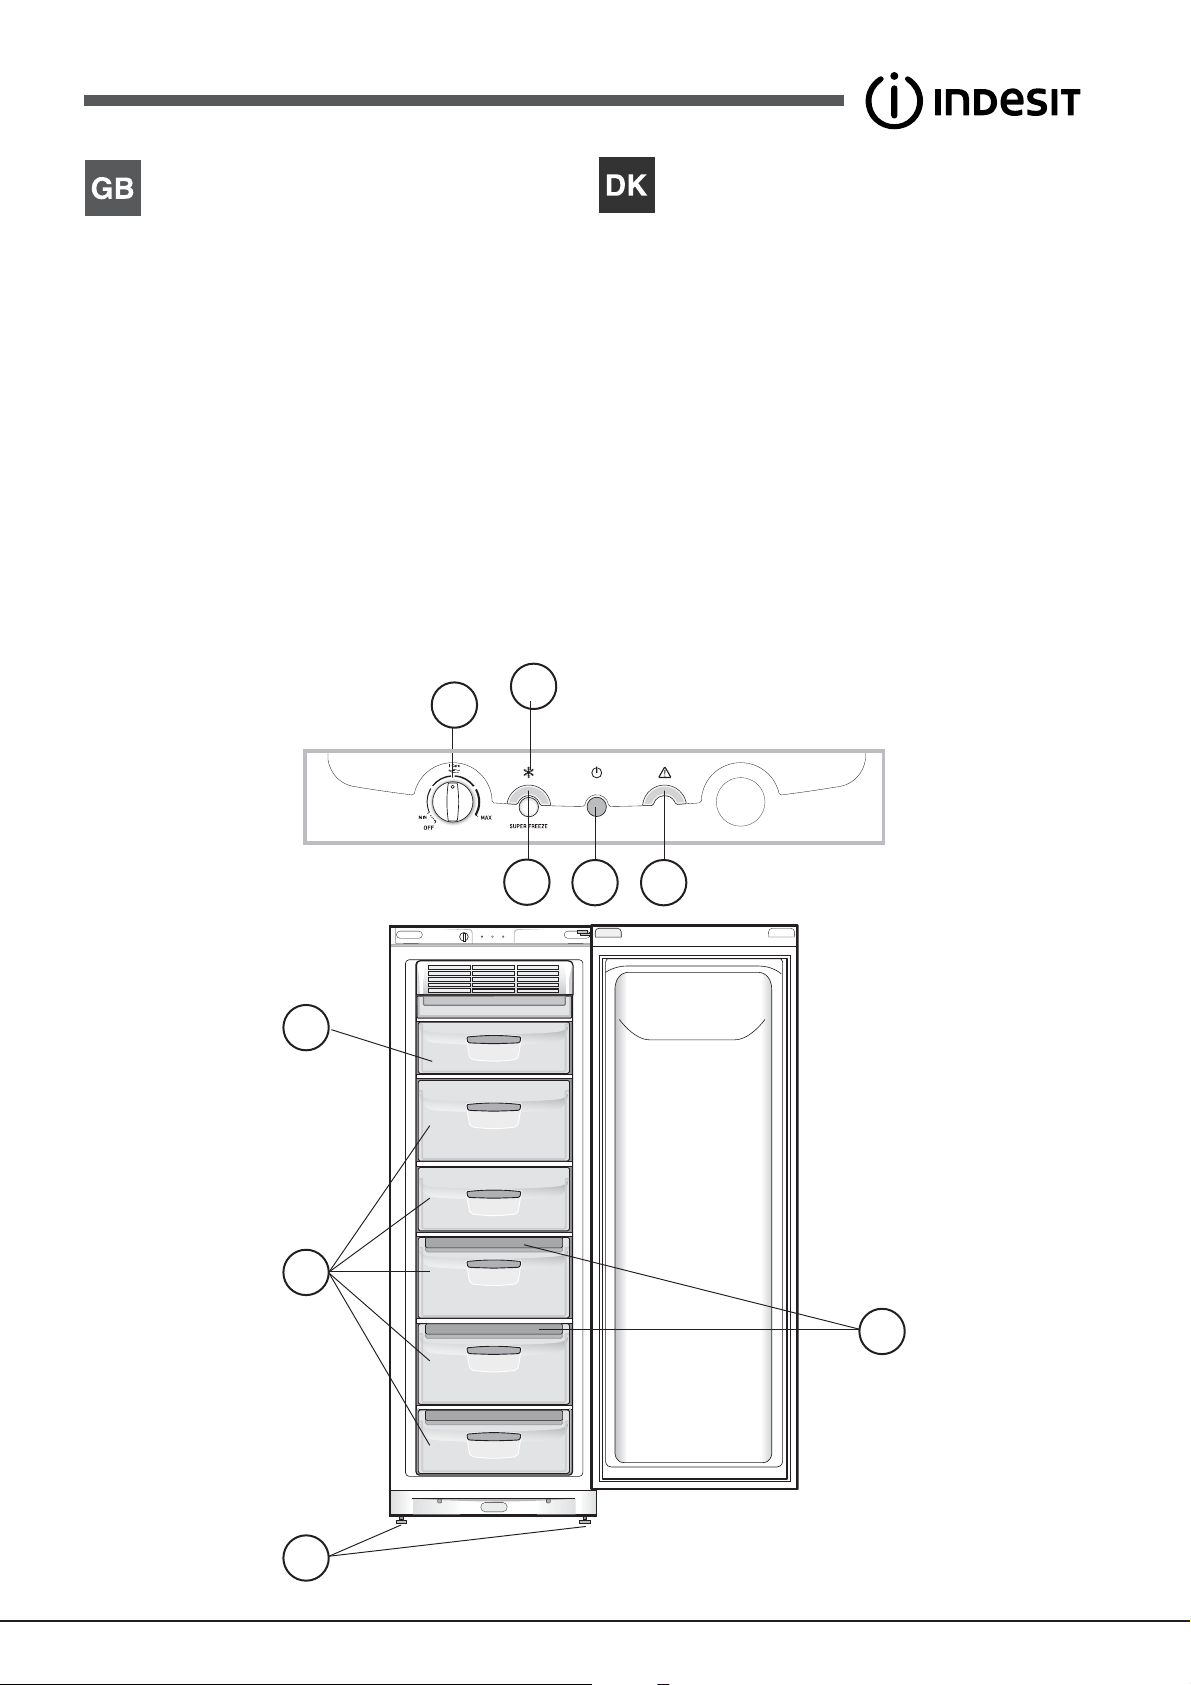
Description of the appliance
Beskrivelse af apparatet
Overall view
The instructions contained in this manual are applicable to different
model refrigerators. The diagrams may not directly represent the
appliance purchased. For more complex features, consult the
following pages.
1 Levelling FEET
2 STORAGE Compartment
3 Flap FREEZING and STORAGE Compartment
4 SUPER FREEZE Button
5 SUPER FREEZE Indicator light
6 POWER Indicator light
7 WARNING Indicator light
8 TEMPERATUE CONTROL Knob
9 Ice3 ice tray •
• Varies by number and/or position.
5
8
4
Komplet oversigt
Brugervejledningen gælder for de forskellige modeller og derfor er
det muligt, at visse funktioner på figuren er anderledes end på det
købte apparat. Der findes en mere omfattende beskrivelse af de
enkelte funktioner på de efterfølgende sider.
1 INDSTILLINGSBEN.
2 FRYSERUM.
3 FRYSE- og OPBEVARINGSRUM
4 Tast til SUPER FREEZE.
5 Kontrollampe for SUPER FREEZE.
6 Kontrollampe for STRØMFORSYNING.
7 Kontrollampe for ALLARME.
8 Knap til REGULERING AF TEMPERATUREN.
9 Isterningebakke Ice
• Kan varieres i antal og/eller placering.
3
•.
6 7
3
2
9
1
331eps
5
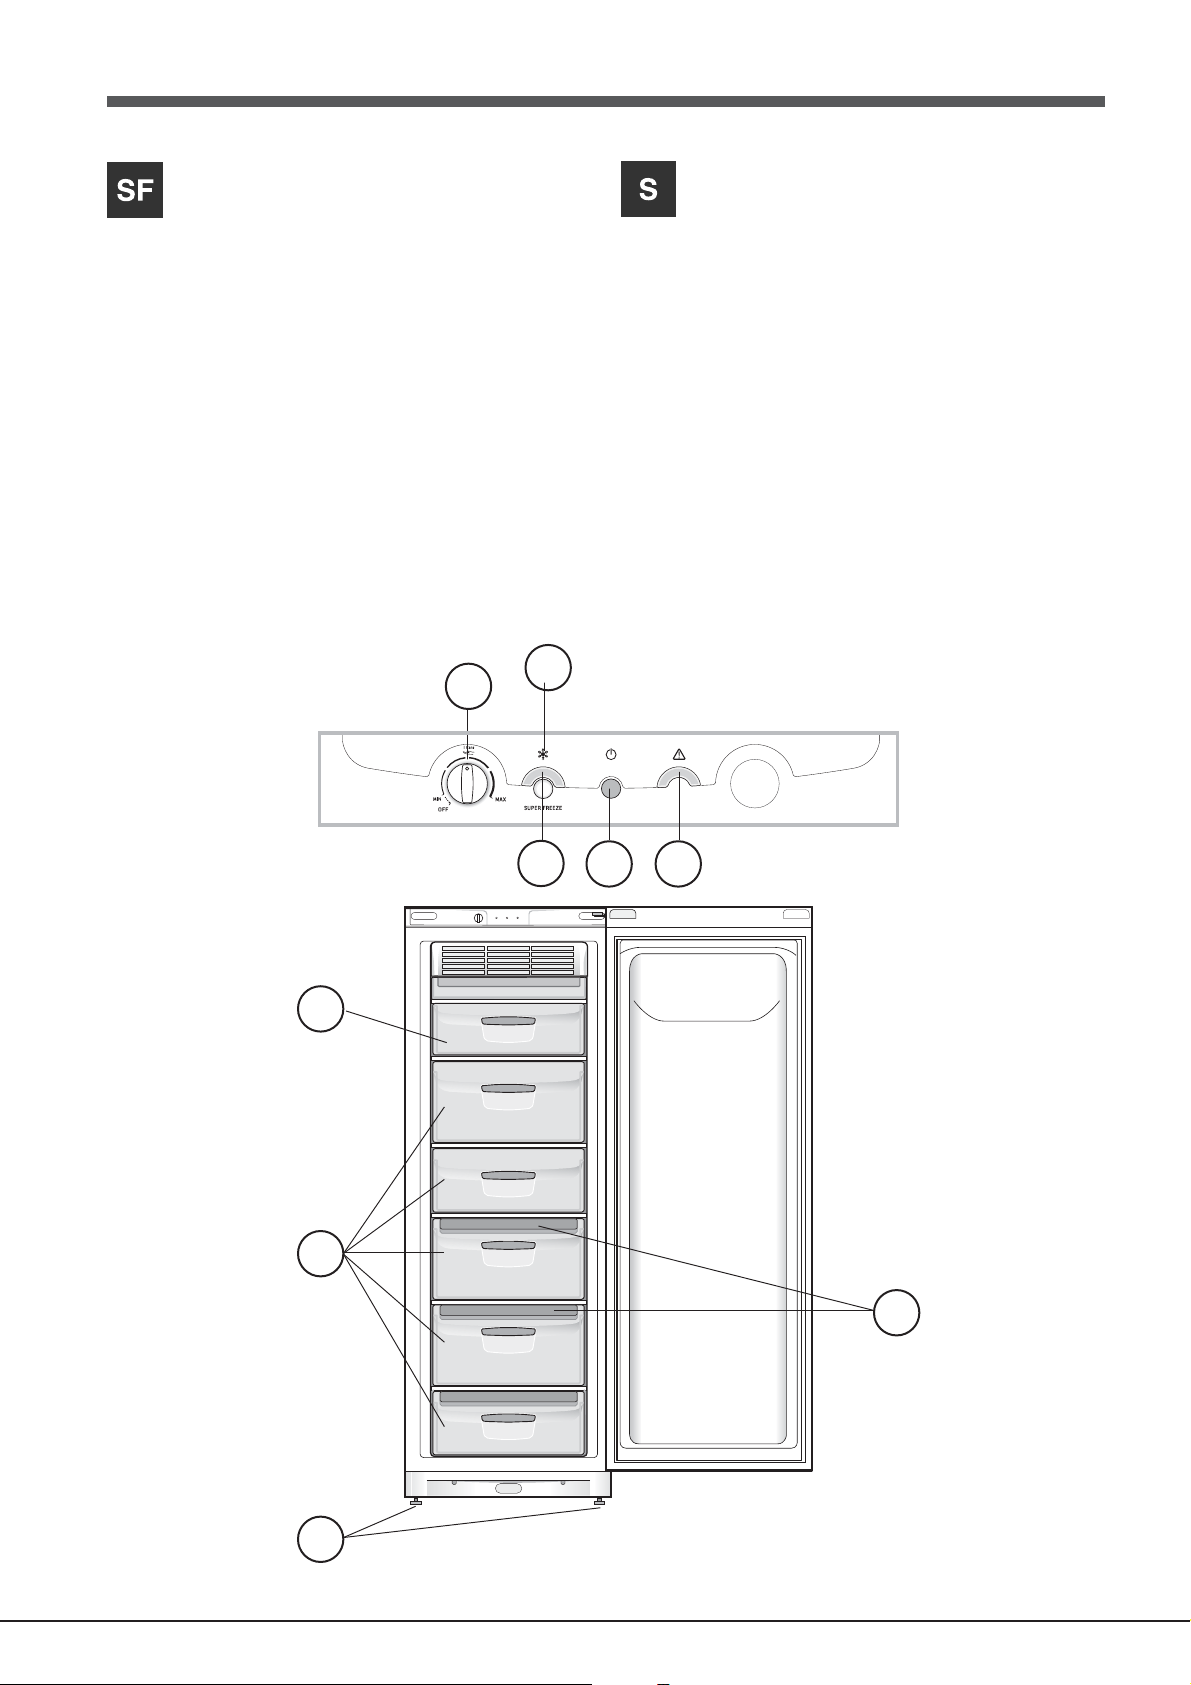
Laitteen kuvaus
Beskrivning av apparaten
Kokonaiskuva
Käyttöohjeet on tarkoitettu eri malleille ja siten on mahdollista, että
kuvan tietyt yksityiskohdat poikkeavat ostetusta laitteesta.
Tärkeimpien osien kuvaus löytyy seuraavilta sivuilta.
1 SÄÄTÖJALKA
2 SÄILYTYSLAATIKKO
3 PAKASTUS- ja SÄILYTYSLAATIKKO
4 Painike SUPER FREEZER
5 Merkkivalo SUPER FREEZER
6 Merkkivalo VIRRANSYÖTTÖ
7 Merkkivalo HÄLYTYKSEN
8 LÄMPÖTILAN SÄÄTÖNAPPULA
9 Jääkuutioastia Ice3•
• Määrä ja/tai asento voivat vaihdella.
5
8
4
Översiktsvy
Anvisningarna angående användning gäller för flera olika modeller
och därför kan delar i figuren skilja sig åt i förhållande till din inköpta
apparat. Beskrivning av mer komplicerade delar finns på följande
sidor.
1 JUSTERFOT
2 Utrymme för FÖRVARING
3 Utrymme för INFRYSNING och FÖRVARING
4 Knapp för SUPER FREEZE
5 Kontrollampa för SUPER FREEZE
6 Kontrollampa för NÄTANSLUTNING
7 Kontrollampa för LARM
8 TEMPERATURVREDET
9 Islåda Ice
• Variabler för nummer och/eller position.
3
•
6 7
3
2
9
1
331eps
6
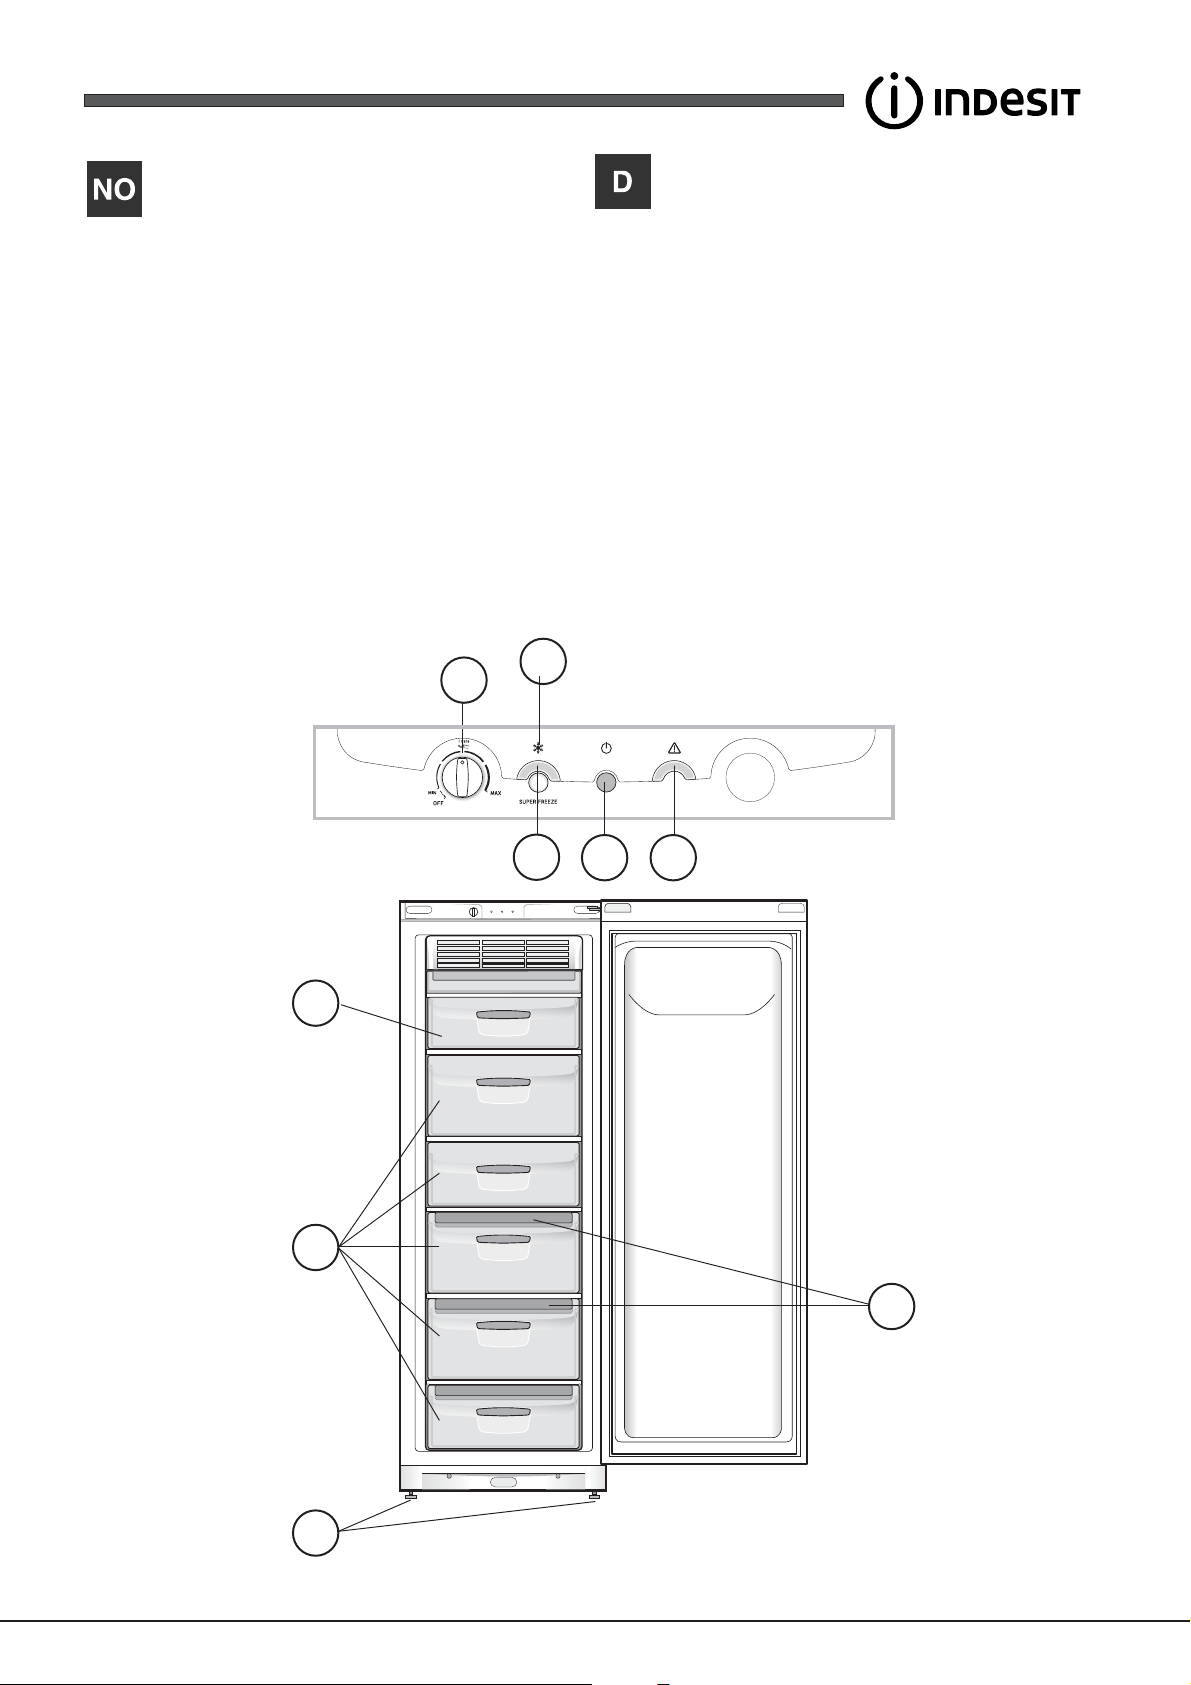
Beskrivelse av apparatet
Beschreibung Ihres Gerätes
Oversikt
Bruksanvisningen gjelder flere modeller slik at det er mulig at
figuren inneholder detaljer som er forskjellig fra det apparatet man
har anskaffet. Beskrivelsen av de mer komplekse enhetene finner
man på de følgende sidene.
1 FOT for nivåregulering
2 Rommet OPPBEVARING
3 Rommet INNFRYSING og OPPBEVARING
4 Tasten SUPER FREEZE
5 Varsellampen SUPER FREEZE
6 Varsellampen STRØMFORSYNING
7 Varsellampen ALARM
8 Bryteren for TEMPERATURREGULERING
9 Isbøtte Ice
• Varierer med hensyn til antall og/eller posisjon.
3
•
5
8
4
Geräteansicht
Die Gebrauchsanleitungen gelten für mehrere Gerätemodelle.
Demnach ist es möglich, dass die Abbildung Details enthält, über
die Ihr Gerät nicht verfügt. Die Beschreibung weiterer
Komponenten ersehen Sie auf nachfolgender Seite.
1 STELLFÜSSE.
2 Fach zum LAGERN
3 Fach zum GEFRIEREN und LAGERN
4 Schalter SUPER FREEZE
5 Kontrollleuchte SUPER FREEZE
6 Kontrollleuchte STROMVERSORGUNG
7 Kontrollleuchte ALARM
8 TEMPERATURSCHALTER
9 Eisschale ICE
• Unterschiedliche Anzahl und Platzierung.
3
•
6 7
3
2
9
1
331eps
7
GB
Installation
Start-up and use
! Before placing your new appliance into operation
please read these operating instructions carefully. They
contain important information for safe use, for installation
and for care of the appliance.
! Please keep these operating instructions for future
reference. Pass them on to possible new owners of the
appliance.
Positioning and connection
Positioning
1. Place the appliance in a well-ventilated humidityfree room.
2. Do not obstruct the rear fan grills. The compressor
and condenser give off heat and require good
ventilation to operate correctly and save energy.
3. Leave a space of at least 10 cm between the top
part of the appliance and any furniture above it, and
at least 5 cm between the sides and any furniture/
side walls.
4. Ensure the appliance is away from any sources of
heat (direct sunlight, electric stove, etc.).
5. In order to maintain the correct distance between
the appliance and the wall behind it, fit the spacers
supplied in the installation kit, following the
instructions provided.
Levelling
1. Install the appliance on a level and rigid floor.
2. If the floor is not perfectly horizontal, adjust the
refrigerator by tightening or loosening the rear feet.
Electrical connections
After the appliance has been transported, carefully place
it vertically and wait at least 3 hours before connecting it
to the electricity mains. Before inserting the plug into the
electrical socket ensure the following:
• The appliance is earthed and the plug is compliant
with the law.
• The socket can withstand the maximum power of the appliance,
which is indicated on the data plate located inside the freezer
(e.g. 150 W).
• The voltage is in the range of values indicated on the data plate
located inside the freezer (e.g. 220-240V).
• The socket is compatible with the plug of the
appliance. If the socket is incompatible with the plug,
ask an authorised technician to replace it (
Assistance
). Do not use extension cords or multiple
sockets.
! Once the appliance has been installed, the power
supply cable and the electrical socket must be easily
accessible.
! The cable must not be bent or compressed.
! The cable must be checked regularly and replaced by
authorised technicians only (see Assistance).
! The manufacturer declines any liability should
these safety measures not be observed.
see
Starting the appliance
! Before starting the appliance, follow the installation
instructions (
! Before connecting the appliance, clean the compartments and
accessories well with lukewarm water and bicarbonate.
! The appliance comes with a motor protection control system
which makes the compressor start approximately 8 minutes after
being switched on. The compressor also starts each time the
power supply is cut off whether voluntarily or involuntarily
(blackout).
1. Insert the plug into the socket and make sure that the green
POWER indicator light illuminates (the TEMPERATURE
ADJUSTMENT knob must be in the OFF position).
2. Turn the TEMPERATURE ADJUSTMENT knob to an average
value and press the SUPER FREEZE button (rapid freezing):
the SUPER FREEZE indicator light
off once the freezer has reached its optimal temperature. At this
point food may be placed inside the appliance.
see Installation
).
will illuminate. It will switch
Using the freezer to its full potential
• Use the TEMPERATURE CONTROL knob to adjust the
temperature.
MIN = warmest
MAX = coldest
is the optimal temperature for energy saving levels.
We recommend, however, a medium position.
• Do not re-freeze food that is defrosting or that has already
been defrosted. These foods must be cooked and eaten
(within 24 hours).
• Fresh food that needs to be frozen must not come into contact
with food that has already been defrosted. Fresh food must be
stored in the top FREEZER and STORAGE compartment.
• Do not place glass bottles which contain liquids, and which are
corked or hermetically sealed in the freezer because they
could break.
• The maximum quantity of food that may be frozen daily is
indicated on the plate containing the technical properties located
within the freezer (for example: Kg/24h: 4).
• To freeze (if the freezer is already operating):
- for small quantities which are less than those indicated on the
data plate, press the rapid freezing SUPER FREEZE button
(corresponding indicator light
and close the door. The function is disabled automatically after
24 hours or when optimal temperatures have been reached
(indicator light goes out);
- for large quantities which are greater than the maximum load
indicated on the data plate, hold down the rapid freezing SUPER
FREEZE button until the corresponding indicator light begins to
flash. After 24 hours the indicator light stops flashing and remains
on constantly. Place the food inside the freezer and close the
door. After another 24 hours, the function will be disabled
automatically (indicator light goes out).
! Do not open the door during freezing.
illuminates), insert the food
8

! If there is a power cut or malfunction, do not open the freezer
door. This will help maintain the temperature inside the freezer,
ensuring that foods are conserved for at least 9 -14 hours.
3
Ice
ice tray
The fact that they are situated on the top part of the freezer
drawers ensures greater cleanliness: the ice no longer comes into
contact with the food placed inside the freezer compartment;
furthermore, the dripping of the water during filling is avoided (a lid
to cover up the hole after filling with water is also provided).
1. Pull out the tray by pushing it up. Check that the tray is ompletely
empty and fill it with water through the opening provided.
2. Take care not to exceed the level indicated (MAX WATER
LEVEL). Excess water prevents the ice cubes from dispensing
(if this happens, wait for the ice to melt and empty the tray).
3. Turn the tray 90°: due to the connected compartments each
mould fills with water (
4. Close the opening with the lid provided and put the tray back,
placing the top part in the corresponding housing and allowing it
to drop in again.
5. When the ice has formed (minimum time approximately 8 hours)
knock the tray against a hard surface and wet the outside so
that the ice cubes come loose and take them out through the
opening.
see diagram
).
MAX
WATER LEVEL
soap or dishwashing liquid. Rinse and dry them carefully.
• The back of the appliance may collect dust which can be
removed by delicately using the hose of a vacuum cleaner set
on medium power. The appliance must be switched off and the
plug must be pulled out before cleaning the appliance.
Avoiding mould and unpleasant odours
• The appliance is manufactured with hygienic materials which are
odour free. In order to maintain an odour free refrigerator and to
prevent the formation of stains, food must always be covered or
sealed properly.
• If you want to switch the appliance off for an extended period of
time, clean the inside and leave the doors open.
Precautions and tips
! The appliance was designed and manufactured in compliance
with international safety standards. The following warnings are
provided for safety reasons and must be read carefully.
This appliance complies with the following Community Directives:
- 73/23/EEC of 19/02/73 (Low Voltage) and subsequent amendments;
-89/336/EEC of 03.05.89 (Electromagnetic Compatibility) and
subsequent amendments;
- 2002/96/CE.
GB
WATER LEVEL
MAX
WATER LEVEL
MAX
Maintenance and care
Switching the appliance off
During cleaning and maintenance it is necessary to
disconnect the appliance from the electricity supply:
1. set the TEMPERATURE CONTROL Knob on OFF;
2. pull the plug out of the socket.
! If this procedure is not followed, the alarm may sound. This alarm
does not indicate a malfunction. To restore normal operation, turn
the TEMPERATURE ADJUSTMENT knob to the OFF position and
then turn it back to the desired value. To disconnect the appliance,
follow point 1 and 2.
Cleaning the appliance
• The external and internal parts, as well as the rubber seals may
be cleaned using a sponge that has been soaked in lukewarm
water and bicarbonate of soda or neutral soap. Do not use
solvents, abrasive products, bleach or ammonia.
• The removable accessories may be soaked in warm water and
General safety
• The appliance was designed for domestic use inside the home
and is not intended for commercial or industrial use.
• The appliance must be used to store and freeze food products
by adults only and according to the instructions in this manual.
• The appliance must not be installed outdoors, even in covered
areas. It is extremely dangerous to leave the appliance
exposed to rain and storms.
• Do not touch the appliance with bare feet or with wet or moist
hands and feet.
• WARNING: do not damage the refrigerant circuit.
• Do not touch the internal cooling elements: this could cause
skin abrasions or frost/freezer burns.
• When unplugging the appliance always pull the plug from the
mains socket, do not pull on the cable.
• Before cleaning and maintenance, always switch off the
appliance and disconnect it from the electrical supply. It is not
sufficient to set the temperature adjustment knobs on OFF
(appliance off) to eliminate all electrical contact.
• In the case of a malfunction, under no circumstances should you
attempt to repair the appliance yourself. Repairs carried out by
inexperienced persons may cause injury or further
malfunctioning of the appliance.
• Do not use utensils other than the scraper provided, or electrical
equipment which is not of the type specified by the
manufacturer, inside the frozen food storage compartments.
• Do not put ice cubes taken directly from the freezer into your
mouth.
• This appliance is not intended for use by persons (including
9

GB
children) with reduced physical, sensory or lack of experience
and knowledge unless they have been given supervision or
instruction concerning use of the appliance by a person
responsible for their safety. Children should be supervised to
ensure that they do not play with the appliance.
• Keep packaging material out of the reach of children! It can
become a choking or suffocation hazard.
Disposal
• Observe local environmental standards when disposing
packaging material for recycling purposes.
• The European Directive 2002/96/EC on Waste Electrical and
Electronic Equipment (WEEE), requires that old household
electrical appliances must not be disposed of in the normal
unsorted municipal waste stream. Old appliances must be
collected separately in order to optimise the recovery and
recycling of the materials they contain and reduce the impact on
human health and the environment. The crossed out “wheeled
bin” symbol on the product reminds you of your obligation, that
when you dispose of the appliance it must be separately
collected. Consumers should contact their local authority or
retailer for information concerning the correct disposal of their
old appliance.
Troubleshooting
If the appliance does not work, before calling for Assistance (see
Assistance), check for a solution from the following list.
The green POWER indicator light
• The plug has not been inserted into the electrical socket, or not
far enough to make contact, or there is no power in the house.
The motor does not start.
• The appliance comes with a motor protection control (
).
and use
The ALARM indicator light
sounds at regular intervals.
a) The temperature in the freezer is too high. Check the quality of
the food products and dispose if necessary.
b) The temperature in the freezer has reached a dangerous level.
The food must be disposed immediately.
does not illuminate.
see Start-up
is illuminated and the buzzer
Respecting and conserving the environment
• Install the appliance in a fresh and well-ventilated room. Ensure
that it is protected from direct sunlight and do not place it near
heat sources.
• Try to avoid keeping the door open for long periods or opening
the door too frequently in order to conserve energy.
• Do not fill the appliance with too much food: cold air must
circulate freely for food to be preserved properly. If circulation is
impeded, the compressor will work continuously.
• Do not place hot food directly into the refrigerator. The internal
temperature will increase and force the compressor to work
harder and will consume more energy.
• Defrost the appliance if ice forms (
layer of ice makes cold transference to food products more
difficult and results in increased energy consumption.
• Regularly check the door seals and wipe clean to ensure they
are free of debris and to prevent cold air from escaping (
Maintenance
).
see Maintenance
). A thick
see
The ALARM indicator light
sounds at regular intervals.
a/b) In both these cases the freezer will maintain a certain
temperature so that the food does not re-freeze.
To restore normal operation bring the TEMPERATURE
CONTROL knob setting to OFF and turn the appliance on
again.
The buzzer sounds at regular intervals.
• The appliance door has been left open for longer than 2 minutes.
The buzzer will stop sounding when you shut the door.
The ALARM indicator light
constantly.
• The door has been opened too frequently.
• The TEMPERATURE CONTROL knob is not in the correct
position.
The motor runs continuously.
• The SUPER FREEZE button has been pressed: the yellow FAST
FREEZE indicator light is on (
• The door is not closed properly or is continuously opened.
• The outside ambient temperature is very high.
The appliance makes a lot of noise.
• The appliance has not been installed on a level surface (
)
Installation
• The appliance has been installed between cabinets that
vibrate and make noise.
• The internal refrigerant makes a slight noise even when the
compressor is off. This is not a defect, it is normal.
The green POWER indicator light
• The appliance is not operating correctly. Contact the Technical
Assistance Centre.
.
is flashing and the buzzer
remains illuminated
see Description
).
is flashing.
see
10

Installation
Start og brug
DK
! Det er vigtigt at denne vejledning gemmes, så den altid kan
konsulteres. Hvis køle-/fryseskabet sælges, overdrages eller
flyttes, skal man sikre sig, at vejledningen følger med apparatet, så
den nye ejer har mulighed for at få oplysninger om funktion og
forholdsregler.
!
Læs instruktionerne omhyggeligt. Vejledningen indeholder vigtige
oplysninger om installation, brug og sikkerhed.
Placering og tilslutning
Placering
1. Placér apparatet på et ikke-fugtigt sted med god ventilation.
2. Undgå at blokere de bageste ventilationsriste.
Kompressoren og kondensatoren udsender varme og skal
have en god ventilation for at kunne fungere optimalt og klare
det elektriske forbrug.
3. Lad der være en afstand på mindst 10 cm mellem toppen af
apparatet og eventuelle køkkenelementer herover og mindst
5 cm mellem siderne og tilstødende køkkenelementer/
vægge.
4. Apparatet skal placeres på afstand af varmekilder (direkte
sollys, et elektrisk komfur).
5. For at sikre at madvarerne ikke placeres for tæt op ad den
bageste væg, kan man montere de medfølgende
afstandsstykker. Se den medfølgende vejledning for
installation.
Nivellering
1. Installér apparatet på en plan og hård overflade.
2. Hvis gulvet ikke er helt vandret, kan man regulere apparatets
stilling ved at skrue på de forreste ben.
Elektrisk tilslutning
Efter transport skal apparatet placeres lodret, og man skal vente
mindst 3 timer inden det sluttes til el-anlægget. Inden stikket
sættes i stikkontakten skal man sikre sig:
• at stikkontakten har jordforbindelse og i øvrigt overholder
reglerne;
• at stikkontakten kan modstå den maksimale belastning fra
apparatet, som er angivet på skiltet i kølerummet (f.eks. 150 W),
• at strømspændingen ligger inden for de angivne værdier på
skiltet i kølerummet (f.eks. 220-240 V),
• at stikkontakten passer til apparatets stik. I modsat fald skal
man få udskiftet stikket af en autoriseret tekniker (
Servicecenter
flerdobbelte stik.
! Når apparatet er installeret, skal der være let adgang til det
elektriske kabel og stikkontakten.
! Kablet må ikke bøjes eller trykkes sammen.
! Kablet skal jævnligt kontrolleres og må udelukkende udskiftes
at autoriserede teknikere (
! Producenten fralægger sig ethvert ansvar, såfremt disser
regler ikke overholdes.
). Anvend ikke forlængerledninger eller
se Servicecenter
).
se
Start af apparatet
! Inden apparatet tændes, skal man følge
installationsinstruktionerne (
! Inden apparatet tilsluttes skal man omhyggeligt rengøre rum
og tilbehør i lunken vand med bicarbonat.
! Apparatet er udstyret med en motorbeskyttelse, der først
tænder kompressoren cirka 8 minutter efter tænding. Dette
gælder også efter strømafbrydelse, tilsigtet eller utilsigtet (black
out).
1. Sæt stikket i stikkontakten, og kontroller, at den grønne
kontrollampe STRØMFORSYNING tænder (knappen
TEMPERATURREGULERING skal være på OFF).
2. Drej knappen TEMPERATURREGULERING over på en middel
værdi, og tryk på knappen SUPER FREEZE (hurtig frys): Den
gule kontrollampe
igen, når fryseren har nået den optimale temperatur. Herefter
kan man lægge madvarer i fryseren.
se Installation
SUPER FREEZE tænder. Den slukker
).
Optimal anvendelse af fryseren
• Brug knappen FRYSERFUNKTION til at justere temperaturen
se Beskrivelse
(
MIN = mindre koldt
MAX =koldere
er den optimale temperatur for lavt forbrug.
Det anbefales dog, at der indstilles på en af de
• Man må ikke genfryse madvarer, som er ved at tø op eller har
været tøet op. Sådanne madvarer skal tilberedes før de
spises (inden 24 timer).
• Friske madvarer, der skal nedfryses, må ikke komme i kontakt
med de madvarer, der allerede er frosset ned. Placér dem i
stedet i øverste rum til NEDFRYSNING og OPBEVARING.
• Læg ikke glasflasker i fryseren, der indeholder væske, er
lukket med prop eller hermetisk lukkede, da de kan sprænge.
• Den maksimale mængde madvarer, man kan nedfryse om
dagen, er angivet på skiltet i kølerummet (for eksempel: Kg/24h
4).
• Nedfrysning (hvis fryseren allerede er i funktion):
- Til små mængder, dvs. under halvdelen af den angivne
mængde på skiltet, trykkes på knappen SUPER FREEZE
(kontrollampen tænder
NEDFRYSNING og OPBEVARING og døren lukkes. Funktionen
deaktiveres automatisk efter 24 timer, eller når den optimale
temperatur er nået (kontrollampen slukker).
- For store mængder, over halvdelen af den maksimalt
angivede mængde på skiltet, skal man trykke og holde
knappen SUPER FREEZE (hurtig frys) nede, indtil
kontrollampen begynder at blinke. Efter 24 timer holder
kontrollampen op med at blinke og lyser konstant. Læg
madvarerne i fryseren, og luk døren. Efter endnu 24 timer
deaktiveres funktionen automatisk (kontrollampen slukker).
! Under nedfrysningen skal man undgå at åbne døren.
! I tilfælde af strømafbrydelse eller fejlfunktion, må
åbne døren til fryseren. På denne måde opbevares de
dybfrosne varer uden ændringer i cirka 9-14 timer.
).
), madvarerne lægges i øverste rum til
man ikke
11

DK
Isterningebakke Ice3.
Placeringen på oversiden af kasserne i fryserummet, sikrer bedre
ergonomiske forhold og lettere rengøring. (isterningerne er ikke i
kontakt med andre madvarer) og konstruktion (det drypper ikke
under isætning).
1. Tag isterningebakken ud ved at trykke den opad. Sørg for at
isterningebakke er helt tom inden den fyldes med vand gennem
åbningen.
2. Bakken må ikke fyldes til over det angivne niveau (MAX WATER
LEVEL). For meget vand vil forhindre isterningerne i at komme
ud (hvis det sker, skal man vente på at isterningerne smelter og
derefter tømme bakken).
3. Drej isterningebakken 90°. Vandet fyldes i hullerne, der er
forbundet med hinanden (
4. Luk åbningen med dækslet, og sæt isterningebakken på plads
ved at placere den øverste del i først og lade bakken falde på
plads.
5. Når isterningerne er færdige (minimum efter ca. 8 timer), skal
man slå bakken mod en hård overflade og skylle den under
vand, så isterningerne løsnes. Lad herefter isterningerne
komme ud gennem åbningen.
se figuren
).
MAX
WATER LEVEL
• De udvendige og indvendige dele og gummilisterne kan
rengøres med en svamp opblødt i lunken vand og natriumbicarbonat eller neutral sæbe. Undgå at anvende
opløsningsmidler, slibemidler, blegemidler eller ammoniak.
• Tilbehøret kan tages ud og lægges i et kar med varmt vand
og sæbe eller opvaskemiddel. Skyl og tør tilbehøret
omhyggeligt.
• Bagsiden af apparatet samler let støv, som kan fjernes
forsigtigt med en støvsuger indstillet til lav sugeevne, efter at
have slukket for apparatet og taget stikket ud af stikkontakten.
Undgå mug og dårlige lugte
• Apparatet er fremstillet af hygiejniske materialer, der ikke
udsender lugte. For at bevare denne egenskab skal
madvarerne altid beskyttes og dækkes til. På denne måde
undgår man også pletter.
• Hvis man ønsker at slukke apparatet i længere tid, skal det
først rengøres indvendigt og døre og låger skal stå åbne.
Forholdsregler og gode råd
! Apparatet er udviklet og konstrueret i overensstemmelse med
internationale sikkerhedsregler. Disse advarsler er angivet af
sikkerhedsmæssige årsager, og de skal læses omhyggeligt.
WATER LEVEL
MAX
WATER LEVEL
MAX
Vedligeholdelse
Afbrydelse af strømmen
Under rengøring og vedligeholdelse skal apparatet frakobles fra
strømforsyningsnettet.
1. Placér knappen REGULERING AF TEMPERATUREN på OFF.
2. Tag stikket ud af stikkontakten.
! Hvis man ikke følger denne fremgangsmåde, udløses alarmen.
Alarmen tilkendegiver ikke en fejlfunktion. For at genoprette
normal funktion er det tilstrækkeligt at dreje knappen
FRYSERFUNKTION over på den ønskede værdi. For at frakoble
strømmen skal man følge punkterne 1 og 2.
Dette apparat er i overensstemmelse med følgende Europæiske
Direktiver:
- 73/23/EØF af 19/02/73 (Lav spænding) og senere ændringer,
- 89/336/EØF af 03/05/89 (Elektromagnetisk kompatibilitet) og
senere ændringer.
- 2002/96/CE.
Generelt om sikkerheden
• Apparatet er udviklet til ikke-professionel brug i hjemmet.
• Apparatet må skal anvendes til opbevaring og nedfrysning af
madvarer, udelukkende af voksne personer og i henhold til
instruktionerne angivet i denne vejledning.
• Apparatet må ikke installeres udenfor, heller ikke på et istandsat
sted, idet det er farligt at udsætte det for regn og uvejr.
• Rør ikke ved apparatet med bare fødder eller med våde
hænder eller fødder.
• Undgå at røre ved de indvendige køleelementer. Der er fare for
brandsår eller sår.
• Tag ikke stikket ud af stikkontakten ved at trække i kablet, men
grib derimod fat om stikket.
• Stikket skal tages ud af stikkontakten inden der udføres
vedligeholdelse eller rengøring. Det er ikke tilstrækkeligt, at
dreje knappen til REGULERING AF TEMPERATUREN over på
position OFF (apparatet slukker) for at afbryde
Rengøring af apparatet
12

strømforsyningen.
• I tilfælde af fejlfunktion må man aldrig forsøge selv at reparere
de indvendige dele.
• Undgå brug af skarpe værktøjer eller elektriske apparater i
rummet til frostvarer, medmindre de anbefales af producenten
• Put aldrig isterninger, der lige er taget ud af fryseren, i munden.
• Dette apparat er ikke beregnet til brug af personer (herunder
børn) med nedsatte fysiske eller mentale evner eller manglende
erfaring eller kendskab til produktet, medmindre det sker under
overvågning og anvisning af en person, der er ansvarlig for
deres sikkerhed. Der skal holdes øje med, at børn ikke leger
med apparatet.
• Emballagen må ikke anvendes af børnene til leg.
Bortskaffelse
• Bortskaffelse af emballagematerialet: Følg de lokale regler. På
denne måde kan emballagen genbruges.
• Det Europæiske Direktiv 2002/96/EC angående Waste
Eelectrical and Electronic Equipment (WEEE –
Affaldshåndtering af Elektriske og Elektroniske udstyr), kræver
at når gamle elektronisk husholdningsudstyr skal udskilles må
dette ikke ske på en usorteret måde. Gamle elektroniske
apperater skal indsamles seperat for at optimere
genbrugligheden af de materialer apperaterne besidder.
Derved reduceres den skadelig påvirkning på mennesker og
miljø mest mulig. Symbolet med krydset over skallespanden på
produktet, vil påminde dig om dit ansvar til at indsamle disse
produkter seperat.
Det opfordres stærkt, at man tager kontakt til sin lokale
kommune eller forhandler for yderligere information angående
affaldshåndteringen af gamle elektroniske apperater.
Spar på forbruget og værn om miljøet
• Installér apparatet på et friskt og godt ventileret sted, beskyt
det mod direkte solstråler og undgå at placere det ved siden af
varmekilder.
• Når madvarer lægges i eller tages ud, skal man sørge for
hurtigst muligt at lukke døren igen.
Hver gang døren åbnes, medfører det et betydeligt energispild.
• Fyld ikke for mange madvarer i køleskabet eller fryseren. For en
optimal opbevaring skal kulden kunne cirkulere frit. Hvis
cirkulationen forhindres, arbejder kompressoren vedvarende.
• Fyld ikke varme madvarer i køleskabet. Derved stiger den
indvendige temperatur og tvinger kompressoren til at arbejde
hårdt, hvilket er spild af energi og strøm.
• Apparatet skal afrimes, når der dannes is (
Et tykt lag is gør det sværere at overføre kulden til madvarerne
og det medfører et øget energiforbrug.
• Hold pakningerne rene og funktionsdygtige, så de slutter tæt til
døren og ikke lader kulden slippe ud (
se Vedligeholdelse
se Vedligeholdelse
).
se Start og brug
(
Kontrollampen
intermitterende lydsignal.
a) Apparatet signalerer, at temperaturen i fryseren er for høj.
Det anbefales, at kontrollere madvarerne. Det kan være
nødvendigt at kassere dem.
Kontrollampen
intermitterende lydsignal
b) Apparatet signalerer, at temperaturen i fryseren er
alarmerende høj. Madvarerne skal kasseres..
a/b) I begge tilfælde bibeholder fryseren en temperatur, så
madvarerne ikke optøes. For at genoprette normal funktion: Drej
knappen TEMPERATURREGULERING på OFF (slukket), og
tænd for apparatet igen.
Der lyder et intermitterende lydsignal.
• Døren til apparatet har stået åben i mere end 2 minutter.
Lydsignalet ophører, når døren lukkes.
Kontrollampen ALARM
• Døren åbnes ofte.
• Knappen TEMPERATURREGULERING er ikke placeret i den
korrekte position. Motoren er hele tiden i gang.
Motoren er hele tiden i gang.
• Tasten SUPER FREEZE er blevet trykket ned (hurtig frys). Den
gule kontrollampe SUPER FREEZE er tændt (
• Døren lukker ikke tæt, eller åbnes hele tiden op.
• Den omgivende temperatur er meget høj.
Apparatet afgiver meget støj.
• Apparatet er ikke installeret plant (
• Apparatet er installeret mellem to køkkenelementer eller
elementer, der vibrerer og udsender støj.
• Den invendige kølegas producerer en svag støj, også når
kompressoren ikke kører. Det er ikke en fejlfunktion, men helt
normalt.
Den grønne kontrollampe STRØMFORSYNING
• Apparatet fungerer ikke korrekt. Kontakt servicecentret.
).
.
).
ALARM lyser og der høres et
ALARM blinker og der høres et
lyser konstant
se Beskr.
se Installation).
DK
).
blinker .
Fejlfinding og afhjælpning
Det kan ske, at apparatet pludselig ikke fungerer. Inden du ringer
til Servicecentret (se Servicecenter), bedes du kontrollere, at det
ikke drejer sig om et simpelt problem, der kan løses ved hjælp af
nedenstående skema.
Den grønne kontrollampe STRØMFORSYNING tænder ikke.
• Stikket er ikke sat i stikkontakten eller det sidder ikke helt i –
eller der er muligvis strømafbrydelse.
Motoren starter ikke.
• Apparatet er udstyret med en motorbeskyttelsesanordning
13

SF
Asennus
Käynnistys ja käyttö
! On tärkeää säilyttää tämä ohjekirja, jotta sitä voidaan tutkia
tarvittaessa. Mikäli laite myydään, luovutetaan tai muuton
yhteydessä, varmista, että ohjekirja pysyy laitteen mukana, jotta
uusi omistaja voi tutustua laitteen toimintaan ja varoituksiin.
!
Lue ohjeet huolellisesti: niissä on tärkeitä tietoja asennuksesta,
käytöstä ja turvallisuudesta.
Sijoittaminen ja liitäntä
Sijoittaminen
1. Sijoita laite ympäristöön, joka on hyvin ilmastoitu ja joka ei ole
kostea.
2. Älä tuki takana olevia tuuletusritilöitä: kompressori ja
kondensaattori tuottavat lämpöä ja vaativat hyvän tuuletuksen
toimiakseen hyvin ja kuluttaakseen vähän sähköä.
3. Jätä vähintään 10 cm:n tila laitteen yläosan ja mahdollisten
yläpuolella olevien huonekalujen väliin ja vähintään 5 cm:n tila
sivuseinien ja huonekalujen/seinien väliin.
4. Sijoita laite kauas lämmönlähteistä (suorasta auringonvalosta
ja sähköuunista).
5. Jotta säilytetään paras mahdollinen etäisyys tuotteen ja
takaseinän välillä, tulee asentaa asennuspaketista löytyvät
etäisyystuet noudattaen niitä kuvaavan esitteen ohjeita.
Vaaitus
1. Asenna laite tasaiselle ja jäykälle lattialle.
2. Jos lattia ei ole täysin tasainen, voidaan ruuvata auki tai kiinni
etutukijalkoja.
Sähköliitäntä
Kuljetuksen jälkeen sijoita laite pystysuoraan ja odota vähintään
3 tuntia ennen sen liittämistä sähköverkkoon. Ennen pistokkeen
työntämistä pistorasiaan varmista, että:
• pistorasia on maadoitettu ja että se on lain vaatimusten
mukainen;
• pistoke kestää koneen tehon enimmäiskuormituksen joka
osoitetaan pakastimen sisällä olevassa tietolaatassa (esim. 150
W);
• syöttöjännite kuuluu pakastimen sisällä olevassa tietolaatassa
ilmoitettuihin arvoihin (esim. 220-240 V);
• pistorasia on yhteensopiva laitteen pistokkeen kanssa.
Päinvastaisessa tapauksessa pyydä, että valtuutettu teknikko
vaihtaa sen (
haaroitusrasioita.
! Laitteen asennuksen jälkeenkin sähköjohdon ja
verkkopistorasian tulee olla helposti saavutettavissa.
! Sähköjohdossa ei saa olla taittumia tai painaumia.
! Sähköjohto tulee tarkistaa ajoittain ja vaihdattaa ainoastaan
valtuutetuilla teknikoilla (
! Valmistaja kieltäytyy kaikesta vastuusta, mikäli näitä
määräyksiä ei noudateta.
katso Huoltoapu
); älä käytä jatkojohtoja ja
katso Huoltoapu
).
Laitteen käynnistys
! Ennen laitteen käynnistämistä, noudata
asennusohjeita (
! Ennen kuin laite liitetään sähköverkkoon, puhdista osastot ja
lisävarusteet huolellisesti lämpimällä vedellä ja ruokasoodalla.
! Laite on varustettu moottorin ylikuormasuojalla, joka käynnistää
kompressorin ainoastaan noin 8 minuutin kuluttua
käynnistyksestä. Tämä tapahtuu myös kaikkien sähkökatkosten
sekä tahallisten että tahattomien (black out) yhteydessä.
1. Työnnä pistoke pistorasiaan ja varmista, että VIRRANSYÖTÖN
vihreä merkkivalo syttyy (nappulan LÄMPÖTILAN SÄÄTÖ tulee
olla asennossa OFF).
2. Kierrä nappula LÄMPÖTILAN SÄÄTÖ yhteen keskimmäisistä
arvoista ja paina painiketta SUPER FREEZE (pikapakastus):
keltainen merkkivalo
sitten, kun pakastin on saavuttanut optimaalisen lämpötilan.
Tässä vaiheessa on mahdollista laittaa ruuat pakastimeen.
katso Asennus
SUPER FREEZE syttyy. Tämä sammuu
).
Miten käyttää pakastinta paremmin
• Lämpötilan säätämiseksi käytä nappulaa LÄMPÖTILAN
SÄÄTÖNAPPULA (katso Kuvaus).
MIN = vähemmän kylmä
MAX = enemmän kylmä
on optimaalinen lämpötila alhaiselle kulutukselle.
Suositellaan kuitenkin käyttämään keskiasentoa.
• Älä pakasta uudelleen ruokia, jotka ovat sulamassa tai
sulaneet; kyseiset ruuat tulee kypsentää kulutusta varten (24
tunnin kuluessa).
• Tuoreita pakastettavia ruokia ei tule laittaa siten, että ne
koskettavat jo pakastettuja ruokia; ne tulee asettaa ylempään
PAKASTUS- ja SÄILYTYSLAATIKKOON.
• Älä laita pakastimeen korkitettuja tai ilmatiiviisti suljettuja
lasipulloja, joissa on nestettä, koska ne voivat rikkoutua.
• Päivittäinen pakastettava enimmäismäärä näkyy tietolaatassa,
joka on kiinnitetty pakastimen sisälle (esimerkiksi: kg/24 h).
• Pakastamiseksi (jos pakastin on jo toiminnassa):
- pienille määrille, jotka ovat enintään puolet tietolaatassa
ilmoitetusta määrästä, paina painiketta SUPER FREEZE
(vastaava merkkivalo syttyy
PAKASTUS ja SÄILYTYS sekä sulje ovi. Toiminto kytkeytyy pois
päältä automaattisesti 24 tunnin kuluttua tai optimaalisten
lämpötilojen saavuttamisen jälkeen (merkkivalo sammuu);
- suurille määrille, jotka ylittävät puolet tietolaatan
osoittamasta enimmäistäyttömäärästä, pidä painettuna painiketta
SUPER FREEZE (pikapakastus), kunnes vastaava merkkivalo
alkaa vilkkua. 24 tunnin kuluttua merkkivalo lakkaa vilkkumasta
ja muuttuu kiinteäksi: laita ruuat pakastimeen ja sulje ovi. Vielä 24
tuntia ja toiminto kytkeytyy pois päältä automaattisesti
(merkkivalo sammuu).
), laita ruuat laatikoihin
14
! Pakastuksen aikana vältä avaamasta pakastimen ovea.

! Sähkökatkoksen tai vian aikana älä avaa pakastimen ovea: tällä
tavoin pakasteet säilyvät muuttumattomina noin 9-14 tuntia.
3
Jääkuutioastia Ice
.
Niiden sijainti pakastelokeron laatikoiden yläpuolisessa osassa
varmistaa paremman puhdistuksen (jää ei joudu kosketuksiin
ruokien kanssa) ja ergonomian (ei valumia täyttövaiheessa).
1. Vedä astia ensin ylöspäin ja sitten ulospäin työntäen.
Tarkista, että astia on täysin tyhjä ja täytä se vedellä
asianmukaisen aukon kautta.
2. Varo ylittämästä osoitettua tasoa (MAX WATER LEVEL). Liiallinen
vesi estää jääkuutioiden ulostuloa (mikäli näin tapahtuu, odota,
että jää sulaa ja tyhjennä jääkuutioastia).
3. Kierrä astiaa 90°: vesi täyttää muotit välittävien letkujen kautta
(katso kuvaa ).
4. Sulje aukko toimitetun tulpan avulla ja aseta astia paikoilleen
työntäen yläosa asianmukaiseen istukkaan ja antaen sen pudota
alaspäin.
5. Kun jää on muodostunut (vähimmäisaika noin 8 tuntia), kopauta
astiaa kovalle pinnalle ja kastele sen ulkopinta jääkuutioiden
irrottamiseksi, sen jälkeen kaada ne ulos aukosta.
MAX
WATER LEVEL
neutraalin saippuan muodostamassa liuoksessa. Älä käytä
liuottimia, hankausaineita, valkaisuaineita tai ammoniakkia.
• Poistettavat lisävarusteet voidaan laittaa likoamaan lämpimään
veteen, jossa on saippuaa tai astianpesuainetta. Huuhtele ja
kuivaa huolellisesti.
• Laitteen takaosa peittyy helposti pölystä, joka voidaan poistaa
varovasti sen jälkeen, kun laite on irrotettu virtapistorasiasta,
käyttäen pölynimurin pitkää suutinta keskiteholla..
Homeiden ja ikävien hajujen välttäminen
• Laite on valmistettu hygieenisistä materiaaleista, jotka eivät
päästä hajuja. Tämän ominaisuuden säilyttämiseksi on tarpeen,
että ruuat suojataan ja suljetaan huolellisesti aina. Täten
voidaan välttää myös tahrojen muodostuminen.
• Mikäli halutaan sammuttaa laite pitkäksi aikaa, puhdista
sisäosat ja jätä ovet auki.
Varotoimet ja suosituksia
! Laite on suunniteltu ja valmistettu kansainvälisten
turvallisuusmääräysten mukaisesti. Nämä varoitukset toimitetaan
turvallisuuden vuoksi ja ne tulee lukea tarkasti.
SF
WATER LEVEL
MAX
WATER LEVEL
MAX
Huolto ja hoito
Poista sähkövirta
Puhdistus ja huoltotoimenpiteiden aikana on tarpeen eristää laite
sähkön syöttöverkosta:
1. laita LÄMPÖTILAN SÄÄTÖNAPPULA asentoon OFF;
2. irrota pistoke pistorasiasta.
! Jos tätä järjestystä ei noudateta, hälytys voi kytkeytyä päälle:
kyseinen hälytys ei ole merkki viasta. Normaalin toiminnan
palauttamiseksi riittää, että laitetaan nappula PAKASTIMEN
TOIMINTA haluttuun arvoon. Laitteen eristämiseksi etene
noudattaen kohtia 1 ja 2.
Puhdista laite
Tämä laite on seuraavien eurooppalaisten direktiivien vaatimusten
mukainen:
- 73/23/CEE, 19/02/73 (Pienjännite) ja sitä seuraavat muutokset;
- 89/336/CEE, 03/05/89 (Sähkömagneettinen yhteensopivuus) ja
sitä seuraavat muutokset;
- 2002/96/CE.
Yleisturvallisuus
• Laite on suunniteltu ei-ammattimaiseen käyttöön
asuinhuoneistossa.
• Laitetta tulee käyttää ruokien säilytykseen ja pakastukseen,
sitä tulee käyttää ainoastaan aikuisten henkilöiden tässä
kirjasessa olevien ohjeiden mukaisesti.
• Laitetta ei tule asentaa ulos edes suojattuun tilaan, koska on
erittäin vaarallista jättää se alttiiksi sateelle ja ukkoselle.
• Älä koske laitetta paljain jaloin tai märillä tai kosteilla käsillä tai
jaloilla.
• Älä koske jäähdyttäviin sisäosiin: on olemassa paleltumis- tai
loukkaantumisvaara.
• Älä irrota pistoketta pistorasiasta sähköjohdosta vetäen vaan
tartu tukevasti pistokkeeseen.
• Pistoke tulee irrottaa pistorasiasta ennen puhdistus- ja
huoltotoimenpiteiden suorittamista. Ei riitä, että siirretään
lämpötilan säätönappulat asentoon OFF (laite sammutettu)
sähköiskuvaaran poistamiseksi.
• Vian tapauksessa ei tule milloinkaan koskettaa sisäisiä
mekanismeja yrittäen korjata laitetta.
• Ulkopinnat, sisäosat ja kumiset tiivisteet voidaan puhdistaa
sienellä, joka huuhdellaan lämpimän veden ja ruokasoodan tai
• Älä käytä pakastettujen ruokien säilytysosastojen sisällä
leikkaavia ja teräviä esineitä tai sähkölaitteita elleivät ne ole
15

SF
tyypiltään valmistajan suosittelemia.
• Älä laita suuhun juuri pakastimesta otettuja jääpaloja.
• Tätä laitetta ei ole tarkoitettu sellaisten henkilöiden (lapset
mukaan lukien) käytettäväksi, joiden fyysinen, henkinen tai
aistien toimintakyky on alentunut tai joilla ei ole kokemusta tai
tietoja laitteen käytöstä, ellei heitä opasta ja valvo heidän
turvallisuudestaan vastuussa oleva henkilö. Lapsia tulee
valvoa sen varmistamiseksi, että he eivät leiki laitteella.
• Pakkaukset eivät ole lasten leluja.
Hävittäminen
• Pakkausmateriaalin hävitys: noudata paikallisia määräyksiä siten
ehkä pakkaukset voidaan käyttää uudelleen.
• Euroopan Direktiivi 2002/96/EC Waste Eelectrical and Electronic
Equipment (WEEE – elektroniikka romulle), vaatii vanhojen
sähkölaitteiden romun erottamisen normaali jätteiden kierrosta.
Vanhat sähkölaitteet tulee kerätä erikseen, jotta näin voidaan
optimoida laitteiden kierrätys ja näin ollen vähentää vaaran
aiheutumista ihmisille ja luonnolle. Merkkinä rasti jäteastian päällä
muistuttaa vastuustasi laitteiden hävittämisestä erikseen.
Kuluttajien tulee ottaa yhteyttä paikallisiin viranomaisiin tai
jälleenmyyjiin saadakseen tietoa vanhojen laitteiden oikeasta
kierrättämisestä.
Säästä ja kunnioita ympäristöä
• Asenna laite viileään ja hyvin ilmastoituun ympäristöön, suojaa
sitä suoralta auringonvalolta, älä aseta sitä lämmönlähteiden
läheisyyteen.
• Ruokatarvikkeiden laittamiseksi tai ottamiseksi avaa laitteen ovi
mahdollisimman lyhyen aikaa.
Jokainen oven avaus aiheuttaa huomattavan lisän
energiankulutuksessa.
• Älä täytä laitetta liiallisesti: hyvän säilyvyyden takaamiseksi
kylmän ilman tulee kiertää vapaasti. Jos estetään ilmankierto,
kompressori työskentelee jatkuvasti.
• Älä laita laitteeseen lämpimiä ruokia: ne nostavat sisälämpötilaa
aikaansaaden suuren työmäärän kompressorille ja tuhlaten
sähköenergiaa.
• Puhdista laite huurteesta, mikäli muodostuu jäätä (
paksu jääkerros tekee vaikeaksi kylmän vapauttamisen ruuille
sekä lisää energiankulutusta.
• Pidä tiivisteet puhtaina ja tehokkaina, jotta ne kiinnittyvät tiukasti
oviin eivätkä päästä kylmää ulos (
katso Huolto
katso Huolto
).
HÄLYTYKSEN
äänimerkin kanssa.
b) Laite ilmoittaa pakastimen lämmenneen vaarallisesti: ruuat tulee
heittää pois.
a/b)Molemmissa tapauksissa pakastin säilyttää lämpötilan
sellaisena, että ruuat eivät pakastu uudelleen.
Normaalitoiminnan palauttamiseksi: vie nappula LÄMPÖTILAN
SÄÄTÖ asentoon OFF (sammutettu) ja käynnistä laite uudelleen.
Voidaan kuulla katkonainen äänimerkki,
• Jääkaapin ovi on jäänyt auki yli 2 minuutin ajaksi. Äänimerkki
loppuu, kun ovi suljetaan.
HÄLYTYKSEN
• Ovea avataan erittäin usein.
• LÄMPÖTILAN SÄÄDÖN nappula ei ole oikeassa asennossa.
Moottori toimii jatkuvasti.
Moottori toimii jatkuvasti.
• On painettu painiketta SUPER FREEZE (pikapakastus):
keltainen merkkivalo SUPER FREEZE on päällä (
).
Kuvaus
• Ovi ei ole kunnolla suljettu tai sitä avataan jatkuvasti.
• Ympäristön lämpötila on erittäin korkea.
Laite on meluisa,
• Laite ei ole asennettu tasaisesti (
• Laite on asennettu huonekalujen tai esineiden väliin, jotka
tärisevät ja päästävät ääniä.
• Jäähdyttävä kaasu aikaansaa pienen äänen myös
kompressorin ollessa pysähdyksissä: tämä ei ole vika vaan
normaalia.
Vihreä SYÖTTÖVIRRAN
• Laite ei toimi kunnollisesti. Soita huoltoliikkeeseen.
);
.
merkkivalo vilkkuu katkonaisen
merkkivalo aina päällä
katso Asennus).
merkkivalo vilkkuu.
katso
Häiriöt ja korjaustoimet
Voi tapahtua, että laite ei toimi. Ennen Huoltoapuun soittamista
(katso Huoltoapu), tarkista, että kyseessä ei ole helposti itse
ratkaistava ongelma käyttäen apuna seuraavaa taulukkoa.
VIRRANSYÖTÖN vihreä merkkivalo ei syty.
• Pistoketta ei ole työnnetty pistorasiaan tai se on työnnetty
huonosti tai kotona ei ole sähkövirtaa.
Moottori ei käynnisty
• Laite on varustettu ylikuormasuojalla (
).
käyttö
HÄLYTYKSEN
kanssa.
a) Laite ilmoittaa pakastimen lämmenneen liiallisesti.
Suositellaan tarkistamaan ruokien tila: voi olla tarpeen heittää ne
pois.
merkkivalo palaa katkonaisen äänimerkin
16
katso Käynnistys ja

Installation
Start och användning
S
! Det är viktigt att förvara denna bruksanvisning så att den alltid
finns till hands. Vid försäljning, överlåtelse eller flytt ska du försäkra
dig om att bruksanvisningen följer med apparaten för att informera
den nya ägaren om apparatens funktion och respektive
säkerhetsföreskrifter.
!
Läs noggrant anvisningarna: Viktig information angående
installation, användning och säkerhet anges.
Placering och anslutning
Placering
1. Placera apparaten i en välventilerad och ej fuktig omgivning.
2. Sätt inte igen de bakre ventilationsgallren: Kompressorn och
kondensatorn avger värme och kräver en god ventilation för
att fungera på ett korrekt sätt och med låg elförbrukning.
3. Lämna ett avstånd på minst 10 cm mellan apparatens övre
del och eventuella ovanstående möbler och minst 5 cm mellan
sidostycken och sidostående möbler eller väggar.
4. Apparaten ska stå på ett långt avstånd från värmekällor
(direkt solljus, elspis).
5. Se till att det upprätthålls ett optimalt avstånd mellan
apparaten och den bakomliggande väggen genom att
montera de distanser som finns i installationssatsen. Följ
anvisningarna i instruktionsbladet.
Nivellering
1. Installera apparaten på ett plant och stabilt golv.
2. Om golvet inte är fullständigt horisontellt kan du kompensera
genom att skruva på de främre stödfötterna.
Elanslutning
Placera apparaten vertikalt efter transporten och vänta minst 3 timmar
innan den ansluts till elsystemet. Innan stickkontakten sätts i vägguttaget
ska du först kontrollera att:
• Vägguttaget är jordanslutet och i enlighet med gällande
standard.
• Uttaget klarar maskinens maxeffekt, som anges på märkskylten
som sitter inuti frysen (t.ex. 150 W).
• Matningsspänningen är inom de värden som anges på
märkskylten, som sitter inuti frysen (t.ex. 220 - 240 V).
• Vägguttaget är kompatibelt med apparatens stickkontakt. I
annat fall ska du låta en auktoriserad tekniker byta ut
stickkontakten (
förlängningssladdar och grenuttag.
! När apparaten är installerad ska elkabeln och vägguttaget vara
lättåtkomliga.
! Kabeln ska inte böjas eller pressas samman.
! Kabeln ska kontrolleras regelbundet och får endast bytas ut av
auktoriserade tekniker(
! Företaget avsäger sig allt ansvar om dessa föreskrifter inte
respekteras.
se Kundservice
se Kundservice
). Använd inte
).
Start av apparaten
! Innan apparaten startas ska installationsanvisningarna följas
se Installation
(
! Innan apparaten ansluts ska utrymmena och tillbehören
rengöras med ljummet vatten och bikarbonat.
! Apparaten är försedd med en motorskyddskontroll som gör att
motorn endast startar cirka 8 minuter efter att apparaten har
satts på. Detta sker även efter varje avsiktligt eller oavsiktligt
strömavbrott.
1. Sätt in stickkontakten i vägguttaget och försäkra dig om att den
gröna kontrollampan för NÄTANSLUTNING tänds (vredet för
TEMPERATURREGLERING ska inte vara i läge OFF).
2. Vrid vredet för TEMPERATURREGLERING till ett medelvärde
och tryck på knappen SUPER FREEZE (snabbfrysning): Den
gula kontrollampan för
släcks när frysen når optimal temperatur. I detta läge går det att
ställa in maten.
).
SUPER FREEZE tänds. Kontrollampan
Använd frysen på bästa sätt
• Vrid vredet för TEMPERATURVREDET för att reglera
temperaturen (
MIN = minst kallt
MAX = mest kallt
är den optimala temperturen med låg förbrukning.
Vi råder dig dock att använda ett mellanläge.
• Frys inte in livsmedel som håller på att tina eller har tinat.
Sådana livsmedel måste tillagas för att konsumeras (inom 24
timmar).
• Färska livsmedel ska inte placeras så att de kommer i kontakt
med redan infrysta livsmedel. Färska livsmedel ska placeras i
det övre utrymmet för INFRYSNING och FÖRVARING.
• Lägg aldrig in igenkorkade eller hermetiskt tillslutna glasflaskor
i frysen. De kan gå sönder.
• Max. mängd livsmedel som kan frysas in dagligen anges på
märkskylten som sitter inuti frysen (t.ex.: 4 kg/24h).
• Vid infrysning (om frysen redan är i drift):
- För små mängder livsmedel (mindre än hälften av vad som
anges på märkskylten), tryck på knappen SUPER FREEZE
(snabbfrysning
livsmedlen i utrymmena INFRYSNING och FÖRVARING. Stäng
sedan dörren. Funktionen stängs av automatiskt efter 24 timmar
eller när optimal temperatur nås (släckt kontrollampa).
- För stora mängder livsmedel (som överstiger hälften av max.
kvantitet som anges på märkskylten), håll knappen SUPER
FREEZE (snabbfrysning) nedtryckt tills respektive kontrollampa
börjar blinka. Efter 24 timmar slutar kontrollampan att blinka och
lyser med fast sken: Lägg in livsmedlen och stäng dörren. Efter
24 timmar stängs funktionen av automatiskt (släckt
kontrollampa).
se Beskrivning
) (respektive kontrollampan tänds), ställ in
! Undvik att öppna dörren under infrysningen.
! Vid strömavbrott eller vid fel ska dörren för frysen inte öppnas:
På detta sätt kan kylda och frysta livsmedel förvaras utan
problem under cirka 9 - 14 timmar.
).
17

Islåda Ice3.
S
De är placerade i den övre delen av lådorna i frysutrymmet vilket är
ergonomiskt bättre samt gör de lättare att göra rent (isen är inte
längre i kontakt med livsmedlen) och ergonomi (islådan droppar
inte vid påfyllningen).
• Apparatens baksida har en benägenhet bli dammig. Dammet
kan tas bort försiktig med hjälp av dammsugarröret efter att
apparaten har stängts av och stickkontakten har dragits ut.
Ställ in dammsugaren på medeleffekt.
1. Dra islådan uppåt och sedan utåt.
Kontrollera att islådan är fullständigt tom och fyll den med vatten
genom det därtill avsedda hålet.
2. Var försiktig så att du inte fyller över den markerade nivån
(MAX. VATTENNIVÅ). För mycket vatten gör det svårt att tömma
ut isbitarna, om detta sker, vänta tills isen tinar och töm islådan).
3. Vrid islådan 90°: Tack vare principen med kommunicerande kärl
fylls formarna (
4. Stäng hålet med det medlevererade locket och sätt tillbaka
islådan genom att låta den falla ned ovantill i sitt därtill avsedda
säte.
5. När isen har bildats (det tar minst 8 timmar), slå islådan mot en
hård yta och blöt utsidan för att lossa isbitarna. Töm sedan ut
isbitarna ur hålet.
se figur
).
MAX
WATER LEVEL
Undvik mögel och dålig lukt
• Apparaten är tillverkad av hygieniska material som inte överför
lukt. För att bibehålla denna effekt är det nödvändigt att maten
alltid täcks över och försluts ordentligt. Detta förhindra
dessutom att fläckar bildas.
• Om du vill stänga av apparaten under en längre tid ska den
rengöras invändigt. Lämna sedan dörrarna öppna.
Säkerhetsföreskrifter och råd
! Apparaten är framtagen och konstruerad i enlighet med
internationella säkerhetsföreskrifter. Dessa föreskrifter ingår i
bruksanvisningen av säkerhetsskäl och ska läsas med stor
uppmärksamhet.
Denna apparat är i enlighet med följande EU-direktiv:
- 73/23/CEE från 19/02/73 (Lågspänningsdirektiv) och följande
ändringar.
- 89/336/CEE från 03/05/89 (Elektromagnetisk kompatibilitet) och
följande ändringar.
- 2002/96/CE.
WATER LEVEL
MAX
WATER LEVEL
MAX
Underhåll och skötsel
Koppla från strömmen
Vid rengöring och underhåll ska apparaten kopplas från elnätet:
1. Ställ vredet för TEMPERATURVREDET i läge OFF.
2. Dra ut stickkontakten ur vägguttaget.
! Om du inte följer denna procedur kan larmet lösa ut: Larmet
beror inte på någon felfunktion. För att återställa normal funktion
räcker det med att vrida vredet för FRYSENS FUNKTION till
önskat värde. Koppla från apparaten genom att följa punkterna 1
och 2.
Rengör apparaten
• De yttre och inre delarna samt tätningslisten av gummi kan
rengöras med en svamp indränkt med ljummet vatten och
natriumbikarbonat eller mild tvål. Använd inte lösningsmedel,
slipmedel, blekmedel eller ammoniak.
• De utdragbara tillbehören kan blötläggas i varmt vatten och
tvål eller handdiskmedel. Skölj och torka dem försiktigt.
Säkerhet i allmänhet
• Apparaten är avsedd för en ej yrkesmässig användning i
hemmet.
• Apparaten ska användas för att förvara och frysa mat.
Apparaten ska endast användas av vuxna personer och i
enlighet med anvisningarna i denna bruksanvisning.
• Apparaten får inte installeras utomhus (ej heller om utrymmet är
skyddat) eftersom det är mycket farligt att låta den utsättas för
väder och vind.
• Ta inte i apparaten med bara fötter eller med våta eller fuktiga
händer eller fötter.
• Ta inte på de inre kyldelarna: Det finns risk för köldskador och
andra skador.
• Ta tag i stickkontakten när du ska dra ut den ur vägguttaget.
Dra inte i sladden.
• Stickkontakten ska dras ut innan rengörings- och
underhållsmoment utförs. Det är inte tillräckligt att vrida
TEMPERATURVREDET till läget OFF (avstängd apparat) för att
eliminera all typ av elektrisk kontakt.
• Ingrip aldrig på inre mekanismer för att försöka reparera
apparaten vid funktionsfel.
• Använd inga vassa verktyg eller elektriska apparater inuti
utrymmen för fryst mat, såvida dessa inte har rekommenderats
av tillverkaren.
• Stoppa inte in iskuber i munnen som precis har tagits ut ur
18

frysen.
• Denna utrustning ska inte användas av barn, personer med
psykiska eller fysiska handikapp eller som saknar erfarenhet av
utrustningen. Undantag kan göras om utrustningen används
under översikt av en vuxen eller om erforderliga anvisningar har
getts angående användningen av utrustningen av en person
som ansvarar för deras säkerhet. Barn ska hållas under uppsikt
för att försäkra dig om att de inte leker med utrustningen.
• Emballagematerialet ska inte användas som leksaker för barn.
Kassering
• Kassering av emballagematerialet: Respektera lokala
föreskrifter, så att emballaget kan återanvändas.
• Det europeiska direktivet 2002/96/EC gällande Waste Eelectrical
and Electronic Equipment (WEEE – hantering av förbrukad
elektrisk och elektronisk utrustning), kräver att gammal
hushållselektronik INTE kasseras tillsammans med det vanliga
osorterade avfallet. Förbrukad utrustning måste samlas ihop
separat för att optimera materialåtervinnandet samt att reducera
negativ inverkan på miljön och människors hälsa. Symbolen av
en överkryssad soptunna påminner dig om din skyldighet att
hantera den förbrukade utrustningen separat.
Du kan kontakta din kommun eller lokala återförsäljare för
ytterligare information gällande hantering av förbrukad
elektronisk utrustning.
Spara energi och värna om miljön
• Installera apparaten i en sval och välventilerad omgivning.
Skydda apparaten mot direkt solljus och undvik att placera den
i närheten av värmekällor.
• Öppna dörrarna så lite som möjligt när du ställer in eller tar ut
livsmedel ur apparaten.
Varje gång som dörrarna öppnas förbrukas en stor mängd
energi.
• Fyll inte apparaten med för mycket livsmedel: För en god
förvaring ska den kalla luften kunna cirkulera fritt. Om
cirkuleringen förhindras arbetar kompressorn oavbrutet.
• Ställ inte in varma livsmedel: En höjning av den inre
temperaturen tvingar kompressorn att arbete hårt och mycket
energi slösas bort.
• Frosta av apparaten när is bildas (
islager gör det svårare för kylan att sprida sig till livsmedlen och
detta gör att energiförbrukningen ökar.
• Se till att tätningslisterna alltid är rena och i ett gott skick så att
det sluter åt ordentligt mot dörrarna och inte släpper ut kylan (
Underhåll
).
se Underhåll
). Ett tjockt
Kontrollampan
ljudsignaler hörs.
a) Apparaten signalerar att temperaturen i frysen är för hög.
Det rekommenderas att livsmedlens skick kontrolleras: Det kan
vara nödvändigt att kasta livsmedlen.
Kontrollampan
ljudsignaler hörs.
b) Apparaten signalerar att temperaturen i frysen är farligt hög.
Livsmedlen måste kastas.
a/b) I båda fallen upprätthålls en temperatur som inte tillåter att
frysa in livsmedlen på nytt. Återställ normal funktion på följande
sätt: Vrid vredet för TEMPERATURREGLERING till läget OFF
(avstängd) och slå åter på apparaten.
Upprepade ljudsignaler hörs
• Apparatens dörr har varit öppen mer än två minuter. Signalen
tystnar när dörren stängs.
Kontrollampan LARM
• Dörren öppnas mycket ofta.
• TEMPERATURVREDET är inte i korrekt läge. Motorn är
kontinuerligt i drift.
Motorn är kontinuerligt i drift.
• Knappen SUPER FREEZE har tryckts ned (snabbfrysning):
Den gula kontrollampan för SUPER FREEZE är tänd (
).
Beskr.
• Dörren är inte ordentligt stängd eller har öppnats ideligen.
• Omgivningstemperaturen är mycket hög.
Apparaten ger ifrån sig mycket buller.
• Apparaten står inte fullständigt plant (
• Apparaten har installerats mellan möbler eller föremål som
vibrerar och avger buller.
• Den inre kylgasen avger ett lätt buller även när kompressorn
är stillastående: Detta är normalt.
Den gröna kontrollampan för NÄTANSLUTNING
blinkar.
• Apparaten fungerar inte korrekt. Ring teknisk assistans.
se
LARM är tänd och upprepade
LARM blinkar och upprepade
lyser
se Installation).
S
se
Fel och åtgärder
Det kan inträffa att apparaten inte fungerar. Innan du ringer till
Kundservice (se Kundservice) ska du kontrollera att det inte rör sig
om ett problem som kan åtgärdas på ett enkelt sätt med hjälp av
följande lista.
Den gröna kontrollampan för NÄTANSLUTNING tänds inte.
• Stickkontakten är inte ordentligt instucken i vägguttaget (eller
inte tillräckligt instucken för att ge kontakt) eller saknas det
ström i huset.
Motorn startar inte.
• Apparaten är försedd med en motorskyddskontroll (
och användning
).
se Start
19

NO
Installasjon
! Før apparatet koples til må rommene og ekstrautstyren gjøres
god rent med lunket vann og natron.
! Det er viktig å ta vare på denne håndboken slik at du til enhver tid kan
slå opp i den ved behov. Dersom du selger, gir bort, eller flytter på
apparatet, må du sørge for at håndboken blir igjen sammen med
apparatet slik at den nye eieren får den nødvendige informasjonen og
tilhørende advarsler.
!
Les bruksanvisningen nøye, det finnes der viktig informasjon om
installasjon, bruk og sikkerhetsforhold.
Plassering og tilkopling
Plassering
1. Apparatet bør plasseres i et rom med god ventilasjon som
ikke er fuktig.
2. Man må ikke dekke til ventilasjoneristene bak på apparatet.
Dette fordi kompressoren (motoren) og kondensatoren gir fra
seg varme og dermed har behov for god ventilasjon for å
sikre korrekt funksjon og for å holde strømforbruket lavt.
3. la det være en avstand på minst 10 cm mellom øvre del av
apparatet og eventuelle hyller eller skap som henger over, i
tillegg bør det være minst 5 cm mellom apparatveggene og
møbler/ vegger på hver side.
4. La apparatet stå langt fra varmekilder (direkte sollys,
elektriske komfyrer).
5. For å opprettholde en ideell avstand mellom produktet og
bakveggen må man montere på avstandsblokker som finnes
i installasjonspakken slik som angitt på bruksanvisningsarket.
Nivåjustering
1. Installer apparatet på et gulv som er rett og hardt.
2. Dersom gulvet ikke er helt vannrett kan man kompensere, og
stille apparatet i vater, ved å skru på de fremre føttene.
Tilkopling til strømnettet
Etter transport settes apparatet opp i loddrett stilling og man må vente i
minst 3 timer før det koples til strømnettet. Før man setter støpslet inn i
stikkontakten må man sjekke følgende:
• at stikkontakten er jordet og i overensstemmelse med gjeldende
regler;
• at kontakten har kapasitet til å tåle maksimum strømuttak som er
angitt på innsiden av fryseren (f.eks. 150 W)
• at inngangsspenningen befinner seg mellom de verdiene som
blir angitt på merkeskiltet som finnes på innsiden av
fryseboksen (es 220-240 V);
• at kontakten er tilpasset støpslet på apparatet.
I motsatt fall må kontakten byttes av en autorisert fagmann (
Teknisk assistanse
); unngå bruk av skjøteledninger og
multippelkontakter.
se
! Apparatet er utstyrt med motorbeskyttende kontroll som setter
kompressoren igang kun ca 8 minutter etter at apparatet er blitt
påslått. Dette skjer også etter hvert strømbrudd eller frakopling
fra strømnettet, enten den er frivillig eller tilfeldig (black out).
1. Sett støpselet inn i stikkontakten og forsikre deg om at den
grønne varsellampen for STRØMTILFØRSEL tennes (knotten
for TEMPERATURJUSTERING må stå på OFF).
2. Drei knotten for TEMPERATURJUSTERING på en middels
verdi og trykk på tasten SUPER FREEZE (hurtigfrysing): Den
gule varsellampen for
SUPER FREEZE vil tennes. Den vil
slukkes når fryseren har nådd optimal temperatur. Det vil nå
være mulig å legge inn matvarene.
3
Isbøtte Ice
.
Det at de er plassert på skuffenes øverste del i frysedelen, sikrer
høyere ergonomi og lettere rengjøring: (isen kommer ikke lenger i
kontakt med matvarene) og mer ergonomisk (det drypper ikke når
den fylles opp).
1. Trekk ut bøtten ved å trykke den oppover.Sjekk at isbøtten er
helt tom, og fyll den deretter med vann gjennom åpningen.
2. Kontroller at det angitte maksimumsnivået ikke overstiges (MAX
WATER LEVEL). For mye vann vil gjøre at det dannes istapper
(dersom dette skjer må man vente på at isen tiner før man kan
tømme bøtten).
3. Vri bøtten 90°: Vannet fylle formene ved hjelp av kanaler mellom
se figur
rommene (
).
4. Lukk utgangen med det medfølgende lokket og sett bøtten på
plass ved å føre øvre del inn på skinnen og så trekke den ned.
5. Når isen er ferdigfrosset (minimumstid ca 8 timer) må bøtten
slås mot en hard overflate og man må fukte utsiden for å få løs
istappene, deretter tas isbitene ut fra åpningen.
MAX
WATER LEVEL
! Når apparatet er ferdig installert må el-ledningen og stikkontakten
være lett tilgjengelige.
! Ledningen må ikke bøyes eller komme i klem.
! Ledningen må kontrolleres jevnlig og må kun byttes ut av
autorisert fagmann (
! Produsenten frasier seg ethvert ansvar dersom
se Teknisk assistanse
).
disse
reglene ikke overholdes.
Oppstart og bruk
Oppstart av apparatet
! Før du starter opp apparatet må installasjonsanvisningene
følges (
20
se installasjon
).
WATER LEVEL
MAX
WATER LEVEL
MAX
Beste mulig bruk av fryseskapet
• For regulering av temperaturen bruker man bryteren
TEMPERATURREGULERING
MIN = lite kaldt
MAX = kaldere
(
se beskrivelse
).

er den optimale temperaturen for lavt energiforbruk.
Vi anbefaler uansett en middels posisjon som innstilling.
• Unngå ny innfrysing av matvarer som holder på å tine opp
eller er opptint, slike matvarer må lages til og brukes (innen 24
timer).
• Ferske matvarer som skal fryses ned må ikke legges inntil
matvarer som allerede er nedfryst, disse må legges i øvre rom
for INNFRYSING og OPPBEVARING.
• Flasker med væske inni som er hermetisk lukket eller har kork
på må ikke plasser fryseren, fordi de kan sprenges.
• Maksimumsmengde med mat som kan fryses hver dag blir
angitt på merkeskiltet plassert inne i fryseren (f.eks. Kg/24h 4).
• For å fryse ned (hvis fryseren allerede er i drift):
- For små mengder, mindre enn halvparten av mengden som
angis på merkeskiltet, trykk på tasten SUPERFREEZE (den
respektive varsellampen tennes
hyllene for FRYSING og OPPBEVARING, og lukk døren.
Funksjonen deaktiverer automatisk når det har gått 24 timer eller
om optimale temperaturer (varsellampen slått av);
- For store mengder, større enn halvparten av mengden som
angis på merkeskiltet, hold tasten SUPER FREEZE
(hurtigfrysing) inne til den respektive varsellmapen begynner å
blinke. Etter 24 timer slutter varsellampen å blinke og vil lyse
fast: Legg inn matvarene og lukk døren. Etter ytterligere 24 timer
vil funksjonen slås automatisk av (varsellampen slukkes).
), legg inn matvarene i
Unngå mugg og vond luk
• Apparatet er fremstilt av hygieniske materialer som ikke
trekker til seg lukt. For å vedlikeholde denne egenskapen er
det nødvendig å beskytte matvarene godt i lukkede
beholdere. Dette forbygger også flekker.
• Dersom appratet skal slås av for en lengre periode bør man
gjøre rent på innsiden og la dørene stå åpne.
Forholdsregler og gode råd
! Apparatet er blitt utformet og utviklet i overensstemmelse med
internasjonale sikkerhetsnormer. Disse advarslene blir gitt av
sikkerhetshensyn og må leses nøye.
Dette apparatet e i overensstemmelse med følgende Direktiver fra
det Europeiske fellesskapet:
- 73/23/EEC av 19/02/73 (Lavspenning) og senere tillempinger;
- 89/336/EEC av 03/05/89 (Elektromagnetisk kompatibilitet) og
senere endringer;
- 2002/96/CE.
NO
! Under innfrysingen må man unngå å åpne døren.
! Dersom det oppstår strømbrudd eller feil må ikke døren til
fryseskapet åpnes. På denne måten vil frysevarene holdes
nedfrosset uten endringer i ca 9-14 timer.
Hvordan vedlikeholde og ta
vare på skapet
Kople fra strømtilførselen
Under rengjøring og vedlikehold er det nødvendig å
kople apparatet fra el-nettet.
1. Sett bryteren TEMPERATURREGULERING på
2. Trekk ut kontakten.
! Dersom denne prosedyren ikke følges kan alarmen settes i
gang. Dette er ikke tegn på at noe er feil. For å få den normale
funksjonen i gang holder det å vri bryteren FRYSEFUNKSJON til
ønsket verdi. For å isolere apparatet må man følge punktene 1
og 2.
Rengjøring av apparatet
• De ytre veggene, de indre veggene og gummipakningene kan
gjøres rene med en klut vriss opp i lunket vann og natron eller
nøytral såpe. Unngå bruk av løsemidler, skuremidler, klorin og
ammoniakk.
• Det ekstrautstyret som kan tas ut kan vaskes i varmt vann og
såpe eller oppvaskmiddel. Skyll og tørk nøye etterpå.
• Baksiden av apparatet har en tendens til å samle støv, dette
kan fjernes ved å støvsuge forsiktig med støvsugerens smale
munnstykke og middels styrke. Dett gjøres med apparatet
avslått.
OFF
.
Generell sikkerhet
• Apparatet er framstilt for privat bruk i hjemmet.
• Apparatet må kun brukes til oppbevaring og nedfrysing av mat,
det må kun brukes av voksne og i overensstemmelse med
instruksjonene i denne håndboken.
• Apparatet må ikke installeres ute, selv ikke på avskjermede
steder fordi det kan bli svært farlig dersom apparatet blir utsatt
for regn eller uvær.
• Man må ikke berøre apparatet når man er barbeint, eller med
våte eller fuktige hender eller føtter.
• Unngå å berøre kjøleoverflatene på innsiden: Dette medfører
fare for isbrenn og andre skader.
• Unngå å trekke ut kontakten ved å dra i ledningen, ta i stedet
tak i støpslet.
• Det er nødvendig å trekke støpslet ut fra stikkontakten før man
gjennomfører rengjøring eller vedlikehold. Det er ikke
tilstrekkelig å vri bryteren TEMPERATURREGULERING i
posisjonen
kontakt.
• I tilfelle feilfunksjoner må man uansett unngå tilgang til de indre
mekanismene i apparatet for å forsøke å reparere på egen
hånd.
• Ikke bruke skarpe eller spisse gjenstander eller elektriske
apparater, hvis de ikke er va typen som anbefales av
produsenten, inne i oppbevaringsboksene for frossen mat.
• Unngå å ta iskuber rett fra fryseren inn i munnen.
• Dette apparatet er ikke ment til å brukes av personer med
reduserte fysiske eller mentale evner eller reduserte sanser,
eller som ikke har erfaring eller kjennskap til hvordan produktet
skal brukes, hvis de ikke da overvåkes eller læres opp i bruken
av apparatet av en som er ansvarlig for deres sikkerhet. Barn
OFF
(avslått apparat) for å fjerne all elektrisk
21

NO
bør overvåkes for å være sikre på at de ikke leker med
apparatet.
• Emballasjen må ikke brukes til å leke med.
Avsetting
• Avsetting av emballasjematerialet: Man må følge lokale normer
slik at emballasjemateriellet resirkuleres.
• Det Europeisk direktiv 2002/96/EC Waste Eelectrical and
Electronic Equipment (WEEE
angående oppbevaring av elektrisk og elektronisk utstyr krever
at gamle elektriske husholdningsapparater å utstyr ikke skal
kastes blant vanlig søppel, men må kildesorteres. Gamle og
defekte husholdningsapparater som skal kastes, må samles på
ett sted til gjenvinning av de forskjellige materialene produktene
er satt sammen av. Dette er for å spare miljøet og naturen.
Søppeldunk med kryss over symbolet minner om påbudet og
viktigheten av å levere inn alle hvitevare produktene til
gjenvinning. Forbrukeren må selv kontakte den lokale
instans/kommune eller butikk som selger store
husholdningsprodukter for informasjon om hvor de skal levere
inn defekte produkter til oppbevaring
- Norsk hvitevare retur) i Norge,
Energisparing og respekt for miljøet
• Installer apparatet i et rom som er kjølig og har god utlufting, og
beskytt den fra direkte sollys, unngå plassering nær
varmekilder.
• Når man setter inn eller tar ut mat må døren åpnes for så kort tid
som mulig. Hver gang døren åpnes fører det til et betydelig
forhøyet strømforbruk.
• Unngå å fylle skapet for mye opp: For at maten skal holdes kald
er det viktig at luften kan sirkulere fritt. Dersom luftsirkulasjonen
hindres vil kompressoren arbeide kontinuerlig.
• Unngå å sette inn varm mat. Dette vil heve temperaturen internt
og tvinge kompressoren til å arbeide hardere, noe som
medfører energisløsing.
• Avrim apparatet dersom det danner seg is på innsiden (
Vedlikehold
maten og øker dermed energiforbruket.
• Hold gummilistene hele og rene slik at de sitter godt fast rundt
dørene, og ikke lar den kalde luften slippe.
), et tykt islag gjør det vanskeligere å avgi kulde til
se
lydsignal med jevne mellomrom.
b) Apparatet angir at fryseren er farlig varm: Matvarene må kastes.
a/b)I begge tilfeller vil temperaturen i fryseren holdes på et nivå
som gjør at matvarene ikke fryses inn igjen. For å gjenopprette
normal drift: Sett knotten for TEMPERATURJUSTERING på
posisjon OFF (avslått) og slå apparatet på igjen.
Det høres et lydsignal med jevne mellomrom
• Apparatets dør har stått åpen i mer enn 2 minutter. Lydsignalet
opphører idet døren lukkes igjen.
Varsellampen ALARM
• Døren åpnes ofte.
• Knotten for TEMPERATURJUSTERING står ikke i korrekt stilling.
Motoren går i ett.
Motoren er hele tiden i gang.
• Tasten SUPER FREEZE (rask innfrysing) er blitt trykket inn: Den
gule varsellampen SUPER FREEZE er tent (
• Romtemperaturen er meget høy.
• Rimlaget er tykkere enn 2-3 mm (
Apparatet lager mye støy.
• Apparatet er ikke blitt installert i vater (
• Apparatet er blitt installert mellom møbeler eller objekter som
vibrere og lager lyd.
• Kjølegassen lager en svak lyd også når kompressoren er
avslått. Dette er ikke en feil, men helt normalt.
Den grønne varsellampen for STRØMTILFØRSEL
• Apparatet fungerer ikke korrekt. Ring etter Teknisk Assistanse.
forblir tent
se Vedlikehold
se Beskr.
).
se Installasjon).
).
blinker.
Feil og løsninger
Noen ganger kan det hende at apparatet ikke fungerer. Før man
ringer og ber om teknisk assistanse (se Teknisk assistanse), bør
man kontroller at det ikke dreier seg om et problem som lett kan
løses, ved hjelp av følgende oversikt.
Den grønne varsellampen STRØMTILFØRSEL slår seg ikke
på.
• Støpslet er ikke satt godt nok i kontakten, eller det mangler
strøm i huset.
Motoren starter ikke.
• Apparatet er utstyrt med en motorbeskyttende kontroll (
).
og bruk
Varsellampen for
lydsignal med jevne mellomrom.
a) Apparatet angir at fryseren er for varm.
Det anbefales å kontrollere matvarene: Det kan være nødvendig
å hive dem.
Varsellampen for
ALARM er tent, og det høres et
ALARM blinker, og det høres et
se Oppstart
22

Installation
! !
! Es ist äußerst wichtig, diese Bedienungsanleitung sorgfältig
! !
aufzubewahren, um sie jederzeit zu Rate ziehen zu können. Sorgen
Sie dafür, dass sie im Falle eines Umzugs oder Übergabe an einen
anderen Benutzer das Gerät stets begleitet, damit auch der
Nachbesitzer die Möglichkeit hat, diese zu Rate zu ziehen.
! !
! Lesen Sie bitte folgende Hinweise aufmerksam durch, sie liefern
! !
wichtige Informationen hinsichtlich der Installation, dem Gebrauch
und der Sicherheit.
Aufstellort und elektrischer Anschluss
Aufstellort
1. Stellen Sie das Gerät in einem gut belüfteten und trockenen
Raum auf.
2. Die hinteren Belüftungsöffnungen dürfen nicht zugestellt bzw.
abgedeckt werden: Kompressor und Kondensator geben
Wärme ab und benötigen eine gute Belüftung um optimal zu
arbeiten und den Stromverbrauch nicht unnötig zu erhöhen
3. Lassen Sie einen Freiraum von mindestens 10 cm oberhalb des
Gerätes, und mindestens 5 cm zwischen den Geräteseiten und
angrenzenden Schrankseiten bzw. Wänden.
4. Stellen Sie das Gerät fern von Wärmequellen auf (Sonnenlicht,
Elektroherd).
5. Zur Einhaltung eines optimalen Abstandes des Gerätes von der
Wand sind die im Installationsbausatz befindlichen
Abstandsstücke zu montieren. Befolgen Sie hierzu die Hinweise
des dem Bausatz beigefügten Arbeitsblattes.
Nivellierung
1. Stellen Sie das Gerät auf einem ebenen und festen Boden auf.
2. Sollte der Fußboden nicht perfekt eben sein, dann gleichen Sie
diese Unebenheit durch entsprechendes Drehen der vorderen
Füße aus.
Elektrischer Anschluss
Warten Sie nach dem Transport etwa 3 Stunden, bevor Sie das
Gerät an das Elektronetz anschließen. Vor Einfügen des Steckers
in die Steckdose ist sicherzustellen, dass
• die Steckdose über eine normgerechte Erdung verfügt;
• die Steckdose die auf dem Typenschild (befindlich im
Kühlschrank unten links) angegebene max. Leistungsaufnahme
des Gerätes trägt (z.B. 150 W);
• die Netzspannung den auf dem Typenschild (befindlich in der
Kühlzone unten links) angegebenen Werten entspricht z.B. 220240 V);
• die Steckdose mit dem Netzstecker übereinstimmt.
Sollte dies nicht der Fall sein, dann lassen Sie den Stecker
durch autorisiertes Fachpersonal (
austauschen; verwenden Sie auf keinen Fall Verlängerungen
oder Vielfachsteckdosen.
! !
! Netzkabel und Stecker müssen bei installiertem Gerät leicht
! !
zugänglich sein.
! !
! Das Netzkabel darf nicht gebogen bzw. eingeklemmt werden.
! !
! !
! Das Kabel muss regelmäßig kontrolliert werden und darf nur
! !
durch autorisiertes Fachpersonal ausgetauscht werden (siehe
Kundendienst).
! Der Hersteller lehnt jede Verantwortung ab, falls diese
Vorschriften nicht eingehalten werden sollten.
siehe Kundendienst
)
Inbetriebsetzung und
Gebrauch
Inbetriebsetzung Ihres Gerätes
! Bevor Sie Ihr Gerät in Betrieb setzen, beachten Sie bitte
aufmerksam die Installationshinweise (
! Bevor Sie das Gerät anschließen, müssen die Fächer und das
Zubehör gründlich mit lauwarmem Wasser und Bikarbonat
gereinigt werden.
! Das Gerät ist mit einem Motorschutzkontrollsystem ausgerüstet,
aufgrund dessen der Kompressor erst 8 Minuten nach Einschalten
startet. Dies geschieht auch nach jeder Stromunterbrechung bzw.
nach jedem Stromausfall. (blackout).
1. Stecken Sie den Netzstecker in die Steckdose und
vergewissern Sie sich, dass die grüne Kontrollleuchte
STROMVERSORGUNG leuchtet (der Schalter
TEMPERATURREGELUNG muss auf OFF geschaltet sein).
2. Drehen Sie den Schalter TEMPERATURREGELUNG auf einen
mittleren Wert und drücken Sie die Taste SUPER FREEZE
(Schnellgefrieren): Die gelbe Kontrollleuchte SUPER FREEZE
leuchtet
Temperatur erreicht hat. Erst jetzt kann das Gefriergut
eingeräumt werden.
. Sie erlischt, wenn die Gefrierzone die optimale
Optimaler Gebrauch der Gefrierzone
• Stellen Sie über den TEMPERATURSCHALTER die Temperatur
ein.
MIN = höchste Temperatur
MAX = kälteste Temperatur
optimale Temperatur mit niedrigem Energieverbrauch.
Es empfiehlt sich, einen mittleren Wert einzustellen.
• An- oder aufgetautes Gefriergut darf nicht wieder eingefroren
werden. Solche Lebensmittel müssen zu einem Fertiggericht
verarbeitet werden (innerhalb 24 Std.)
• Bereits gefrorene Lebensmittel dürfen nicht mit den frisch
einzufrierenden Lebensmitteln in Berührung kommen. Letztere
müssen in der oberen Schale GEFRIEREN und LAGERN
eingefroren werden.
• Lagern Sie in der Gefrierzone bitte keine hermetisch
verschlossenen Glasflaschen mit Flüssigkeiten, beim Gefrieren
könnten sie platzen.
• Die Höchstmenge an Lebensmitteln, die täglich eingefroren
werden kann, ist auf dem Typenschild (befindlich in der
Gefrierzone) ersichtlich (Beispiel: Kg/24h 4).
• Lebensmittel einfrieren (Gefrierzone bereits in Betrieb):
- Bei kleinen Mengen, die unter der Hälfte der auf dem
Typenschild angegebenen Lademenge liegen, drücken Sie die
Taste SUPERFREEZE (die entsprechende Kontrollleuchte
leuchtet auf
GEFRIEREN und LAGERN ein und schließen Sie die Gerätetür.
Diese Funktion wird nach 24 Std. oder nach Erreichen der
optimalen Temperatur automatisch ausgeschaltet
(Kontrollleuchte erlischt).
- Bei Einfrieren großer Mengen, die die Hälfte der auf dem
Typenschild angegebenen maximalen Lademenge übersteigen,
halten Sie die Taste SUPER FREEZE (Schnellgefrieren) so lange
gedrückt, bis die entsprechende Kontrollleuchte auf Blinklicht
schaltet. Nach 24 Stunden erlischt die Blinkanzeige und schaltet
auf Dauerlicht um: Füllen Sie nun das Gefriergut ein und
schließen Sie die Gerätetür. Nach weiteren 24 Stunden schaltet
sich die Funktion automatisch ab. (Kontrollleuchte erlischt)
); legen Sie das Frischgut in die Fächer
siehe Installation
).
D
23

D
! Während des Schnellgefrierens sollte das Öffnen der Tür
vermieden werden.
! Auch während eines Stromausfalls oder einer Störung sollte die
Gefrierzonentür nicht geöffnet werden: Das Gefrier- bzw.
Tiefkühlgut hält sich so unverändert für ungefähr 9-14 Stunden.
Eisschale Ice
Dank der Positionierung dieses Behälters oben an den Schalen der
Gefrierzone ist größere Ergonomie und Sauberkeit gewährleistet: Die
Berührung mit dem gelagerten Gefriergut wird vermieden, wie auch
ein Verschütten von Wasser beim Füllen des Behälters (ein
entsprechender Verschluss, mit dem die Öffnung nach Füllen
verschlossen werden kann, wird mitgeliefert).
1. Ziehen Sie die Eiswürfelschale nach oben hin heraus
Vergewissern Sie sich, dass die Schale ganz leer ist und füllen
Sie sie durch die entsprechende Öffnung.
2. Die angezeigte Füllmenge bitte nicht überschreiten (MAX
WATER LEVEL). Zu viel Wasser behindert das Herausnehmen
der Eiswürfel (in einem solchen Fall warten Sie, bis das Eis
schmilzt und entleeren Sie die Schale).
3. Drehen Sie die Schale um 90°: das Wasser läuft in die einzelnen,
durch kleine Adern verbundenen Formen (
4. Schließen Sie die Öffnung mit dem mitgelieferten Deckel. Fügen
Sie die Schale oben in den entsprechenden Sitz ein und lassen
Sie sie nach unten gleiten.
5. Die geformten Eiswürfel (Mindestzeit ca. 8 Std.) können durch
leichtes Aufschlagen des Behälters auf ein harte Oberfläche
gelöst werden, um sie dann durch die Öffnung herausrutschen
zu lassen.
3
.
siehe Abbildung
MAX
WATER LEVEL
Reinigung Ihres Gerätes
• Das Gehäuse des Gerätes, außen und innen, sowie die
Türdichtungen können mit einem mit Wasser und Bikarbonat oder
einer milden Spüllauge getränkten Schwamm gereinigt werden.
Vermeiden Sie Löse-, Scheuer-, Bleichmittel oder Ammoniak.
• Das Zubehör kann herausgenommen und in einer warmen
Spüllauge gereinigt werden. Anschließend sorgfältig klarspülen
und trockenreiben.
• Auf der Geräterückseite könnte sich Staub ablagern. Dieser kann
vorsichtig mit dem langen Rohrstutzen des auf eine geringe Leistung
eingestellten Staubsaugers entfernt werden, jedoch nicht ohne das
Kühlgerät vom Stromnetz getrennt zu haben.
Vermeidung von Schimmelpilz- und
Geruchsbildung
• Das Gerät wurde mit hygienischen Materialien gefertigt, die
keine Gerüche übertragen. Um diese Eigenschaft nicht zu
verlieren, sind die Lebensmittel stets gut verschlossen bzw.
verpackt zu lagern. Hierdurch wird auch die Bildung von
Flecken vermieden.
• Soll das Gerät für längere Zeit stillgelegt werden, reinigen Sie
den Innenraum und lassen Sie die Gerätetür offenstehen.
Vorsichtsmaßregeln und
Hinweise
! Das Gerät wurde nach den strengsten internationalen
Sicherheitsvorschriften entworfen und gebaut. Nachstehende
Hinweise werden aus Sicherheitsgründen geliefert und sollten
aufmerksam gelesen werden.
WATER LEVEL
MAX
WATER LEVEL
MAX
Wartung und Pflege
Abschalten Ihres Gerätes vom Stromnetz
Bei Reinigungs- und Wartungsmaßnahmen muss das Gerät vom
Stromnetz getrennt werden:
1. Drehen Sie den TEMPERATURSCHALTER auf Position OFF.
2. und ziehen Sie den Netzstecker aus der Steckdose.
! Wird dies nicht befolgt, ertönt das Warnsignal. Dieser Warnton ist
kein Zeichen für eine eventuelle Störung. Um die normale
Betriebsweise wieder herzustellen, drehen Sie den Schalter
GEFRIERZONE auf den gewünschten Wert. Um das Gerät vom
Stromnetz zu trennen, verfahren Sie gemäß der Punke 1 und 2.
Dieses Gerät entspricht den folgenden EG-Richtlinien:
-73/23/EWG vom 19.02.73 (Niederspannung) und nachfolgenden
Änderungen
- 89/336/EWG vom 03.05.89 (elektromagnetische Verträglichkeit)
und nachfolgenden Änderungen.
- 2002/96/CE.
Allgemeine Sicherheit
• Dieses Gerät ist für den nicht professionellen Einsatz im privaten
Haushalt bestimmt.
• Das Gerät ist zum Kühlen und Einfrieren von Lebensmitteln zu
verwenden, und nur von Erwachsenen gemäß den Hinweisen
der vorliegenden Gebrauchsanleitungen zu benutzen.
• Der Kühl-/ und Gefrierkombi darf nicht im Freien aufgestellt
werden, auch nicht, wenn es sich um einen geschützten Platz
handelt. Es ist gefährlich, das Gerät Gewittern und Unwettern
auszusetzen.
• Berühren Sie das Gerät nicht, wenn Sie barfuß sind, und auch
nicht mit nassen oder feuchten Händen oder Füßen.
• Berühren Sie nicht den Rückwandverdampfer:
es besteht Verletzungsgefahr.
• Ziehen Sie den Gerätestecker nicht am Netzkabel aus der
Steckdose, sondern nur am Stecker selbst.
• Vor allen Reinigungs- und Wartungsmaßnahmen muss der
Netzstecker gezogen werden. Es genügt nicht, den
TEMPERATURSCHALTER auf Position OFF (Gerät
ausgeschaltet) zu drehen, um jeglichen Stromkontakt
auszuschließen.
• Bei etwaigen Störungen versuchen Sie bitte nicht, das Gerät
selbst zu reparieren.
24

• Verwenden Sie im Innern der Gefriergutlagerfächer bitte keine
scharfen oder spitzen Gegenstände oder Elektrogeräte,
sondern nur die vom Hersteller erlaubten Hilfsmittel.
• Eiswürfel nicht sofort in den Mund nehmen.
• Dieses Gerät ist nicht zur Verwendung durch Personen
(einschließlich Kinder) mit eingeschränkten körperlichen,
geistigen oder Wahrnehmungsfähigkeiten oder aber ohne
ausreichende Erfahrung und Kenntnis geeignet, es sei denn
unter Aufsicht oder Anleitung durch eine für ihre Sicherheit
verantwortliche Person. Kinder sind zu beaufsichtigen, um zu
verhindern, dass sie mit dem Gerät spielen.”
• Verpackungsmaterial ist kein Spielzeug für Kinder.
Entsorgung
• Entsorgung des Verpackungsmaterials: Befolgen Sie die lokalen
Vorschriften, Verpackungsmaterial kann wiederverwertet werden.
• Gemäß der Europäischen Richtlinie 2002/96/EC über Elektro- und
Elektronik-Altgeräte (WEEE) dürfen Elektrohaushalts-Altgeräte nicht
über den herkömmlichen Haushaltsmüllkreislauf entsorgt werden.
Altgeräte müssen separat gesammelt werden, um die
Wiederverwertung und das Recycling der beinhalteten Materialien
zu optimieren und die Einflüsse auf die Umwelt und die Gesundheit
zu reduzieren. Das Symbol „durchgestrichene Mülltonne” auf jedem
Produkt erinnert Sie an Ihre Verpflichtung, dass
Elektrohaushaltsgeräte gesondert entsorgt werden müssen.
Endverbraucher können sich an Abfallämter der Gemeinden
wenden, um mehr Informationen über die korrekte Entsorgung ihrer
Elektrohaushaltsgeräte zu erhalten.
Energie sparen und Umwelt schonen
• Stellen Sie das Gerät in einem trockenen, gut belüftbaren Raum
auf, nicht direkt in der Sonne oder in der Nähe von
Wärmequellen.
• Öffnen Sie die Gerätetür so kurz wie möglich, wenn Sie
Lebensmittel lagern oder herausnehmen.
Bei jeder Türöffnung geht wertvolle Energie verloren.
• Das Gerät sollte nicht überladen werden:
Zur Haltbarkeit der Lebensmittel muss die Kälte frei zirkulieren
können. Die Behinderung der Zirkulation hat zur Folge, dass der
Kompressor ständig arbeitet.
• Stellen Sie keine warmen Speisen in das Gerät: sie würden die
Temperatur erheblich erhöhen und den Kompressor zu einer
höheren Leistung zwingen, was eine unnötige Verschwendung
an Energie bedeutet.
• Sobald sich Eis bildet, muss das Gerät abgetaut werden (
Wartung
auf das Kühlgut und erhöht den Stromverbrauch.
• Halten Sie die Dichtungen stets effizient und sauber, damit sie
ordnungsgemäß an den Türen anhaften und die Kälte nicht
entweichen lassen (
), eine dicke Eisschicht erschwert die Kälteübertragung
siehe Wartung
).
siehe
Störungen und Abhilfe
Gerätestörung: Bevor Sie sich an den Technischen Kundendienst
wenden (siehe Kundendienst), vergewissern Sie sich bitte zuerst,
ob es sich um eine Kleinigkeit handelt, die Sie selbst beheben
können. Ziehen Sie hierzu nachstehendes Verzeichnis zu Rate.
Die GRÜNE Kontrollleuchte Die GRÜNE Kontrollleuchte
Die GRÜNE Kontrollleuchte
Die GRÜNE Kontrollleuchte Die GRÜNE Kontrollleuchte
• Der Netzstecker steckt nicht in der Steckdose, oder er sitzt
nicht fest, so dass kein Kontakt hergestellt wird; oder es besteht
ein Stromausfall.
Der Motor startet nicht.Der Motor startet nicht.
Der Motor startet nicht.
Der Motor startet nicht.Der Motor startet nicht.
• Das Gerät ist mit einem Motorschutzkontrollsystem ausgestattet
(siehe Inbetriebsetzung und Gebrauch).
Die Kontrollleuchte ALARM Die Kontrollleuchte ALARM
Die Kontrollleuchte ALARM
Die Kontrollleuchte ALARM Die Kontrollleuchte ALARM
Signalton ist eingeschaltet.Signalton ist eingeschaltet.
Signalton ist eingeschaltet.
Signalton ist eingeschaltet.Signalton ist eingeschaltet.
a) Das Gerät signalisiert einen zu hohen Temperaturanstieg in der
Gefrierzone.
Prüfen Sie den Zustand Ihrer Lebensmittel: Möglicherweise sind
sie zu vernichten.
Die Kontrollleuchte ALARM Die Kontrollleuchte ALARM
Die Kontrollleuchte ALARM
Die Kontrollleuchte ALARM Die Kontrollleuchte ALARM
akustisches Signal abgegeben.akustisches Signal abgegeben.
akustisches Signal abgegeben.
akustisches Signal abgegeben.akustisches Signal abgegeben.
b) Das Gerät signalisiert einen gefährlichen Temperaturanstieg in
der Gefrierzone. die Lebensmittel müssen vernichtet werden.
a/b) In beiden Fällen hält die Gefrierzone eine Temperatur, die das
Zusammenfrieren von Lebensmitteln verhindert.
Zur Wiederherstellung des normalen Betriebszustandes: Drehen
Sie den Schalter TEMPERATUREINSTELLUNG auf OFF
(ausgeschaltet) und starten Sie das Gerät neu.
Es wird ein intermittierender Signalton ausgegebenEs wird ein intermittierender Signalton ausgegeben
Es wird ein intermittierender Signalton ausgegeben
Es wird ein intermittierender Signalton ausgegebenEs wird ein intermittierender Signalton ausgegeben
• Die Gerätetür ist länger als 2 Minuten offen geblieben. Sobald
die Tür geschlossen wird, schaltet sich das Warnsignal aus.
Die Kontrollleuchte ALARM Die Kontrollleuchte ALARM
Die Kontrollleuchte ALARM
Die Kontrollleuchte ALARM Die Kontrollleuchte ALARM
• Die Tür wird sehr oft geöffnet.
• Der TEMPERATURSCHALTER ist nicht richtig eingestellt. Der
Motor läuft ununterbrochen.
Der Motor läuft ununterbrochen.Der Motor läuft ununterbrochen.
Der Motor läuft ununterbrochen.
Der Motor läuft ununterbrochen.Der Motor läuft ununterbrochen.
• die Taste SUPERFREEZE wurde gedrückt: die gelbe
Kontrollleuchte FAST FREEZE ist eingeschaltet (siehe
Beschreibung).
• Die Tür ist nicht richtig geschlossen oder wird zu häufig
geöffnet.
• Die Umgebungstemperatur ist sehr hoch.
schaltet sich nicht ein. schaltet sich nicht ein.
schaltet sich nicht ein.
schaltet sich nicht ein. schaltet sich nicht ein.
mit intermittierendem mit intermittierendem
mit intermittierendem
mit intermittierendem mit intermittierendem
blinkt und es wird ein blinkt und es wird ein
blinkt und es wird ein
blinkt und es wird ein blinkt und es wird ein
ist immer eingeschaltet ist immer eingeschaltet
ist immer eingeschaltet
ist immer eingeschaltet ist immer eingeschaltet
Das Betriebsgeräusch ist zu stark.Das Betriebsgeräusch ist zu stark.
Das Betriebsgeräusch ist zu stark.
Das Betriebsgeräusch ist zu stark.Das Betriebsgeräusch ist zu stark.
• Das Gerät wurde nicht eben aufgestellt (siehe Installation).
• Das Gerät wurde zwischen Möbelteilen oder Gegenständen
aufgestellt, die vibrieren und daher zur Geräuschbildung Ihres
Gerätes beitragen.
• Das Kühlmittel verursacht ein leises Geräusch auch wenn der
Kompressor nicht arbeitet: dies ist kein Fehler sondern ganz
normal.
Die grüne Kontrollleuchte STROMVERSORGUNG Die grüne Kontrollleuchte STROMVERSORGUNG
Die grüne Kontrollleuchte STROMVERSORGUNG
Die grüne Kontrollleuchte STROMVERSORGUNG Die grüne Kontrollleuchte STROMVERSORGUNG
• Das Gerät arbeitet nicht ordnungsgemäß. Rufen Sie den
technischen Hilfsdienst.
blinkt. blinkt.
blinkt.
blinkt. blinkt.
25

262728


195088237.00
10/2010
 Loading...