


EXEMPLARISK GENAST
GB
DE
FR
IT
ENGLISH 4 DEUTSCH 24 FRANÇAIS 45 ITALIANO 72
ENGLISH |
4 |
Table of contents
Safety information |
4 |
Technical data |
17 |
Product description |
6 |
Installation |
19 |
Control panel |
8 |
Door safety device |
19 |
Daily use |
9 |
Electrical connection |
20 |
Cleaning and maintenance |
15 |
Environmental concerns |
21 |
What to do if ... |
16 |
IKEA GUARANTEE |
22 |
Safety Information
Read carefully and keep for future reference.
Do not heat, or use flammable materials in or near the oven. Fumes can create a fire hazard or explosion.
Do not use your microwave oven for drying textiles, paper, spices, herbs, wood, flowers, fruit or other combustible materials. Fire could result.
If material inside / outside the oven should ignite or smoke is observed, keep oven door closed and turn the oven off. Disconnect the power cord or shut off power at the fuse or circuit breaker panel.
Do not over-cook food. Fire could result.
Do not leave the oven unattended, especially when using paper, plastic or other combustible materials in the cooking process. Paper can char or burn and some plastics can melt if used when heating foods. Do not use corrosive chemicals or vapors
in this appliance. This type of oven is specifically designed to heat or cook food. It is not designed for industrial or laboratory use.
Eggs
Do not use your microwave oven for cooking or reheating whole eggs with or without shell since they may explode even after microwave heating has ended.
This appliance can be used by children aged from 8 years and above and persons with reduced physical, sensory or mental capabilities or lack of experience and knowledge if they have been given supervision or instruction concerning use of
the appliance in a safe way and understand the hazards involved.
Children shall not play with the appliance. Use, cleaning and user maintenance shall not be made by children unless they are aged from 8 years and above and supervised.
WARNING! The appliance and its  accessible parts may become hot during use.
Care should be taken to avoid touching heating elements.
Children less than 8 years of age shall be kept away unless continuosly supervised. Do not use your microwave oven for heating anything in airtight sealed containers. The pressure increases and may cause damage when opening or may explode.
If the mains cord needs replacing it should be replaced by the original mains cord, which is available via our service organization.
The mains cord may only be replaced by a trained service technician.
Service only to be carried out by a trained service technician. It is hazardous for anyone other than a trained person to carry out any service or repair operation, which involves the removal of any cover, which gives protection against exposure to microwave energy.
Do not remove any cover.
The door seals and the door seal areas must be regularly inspected for damage. If these areas are damaged the appliance should
ENGLISH |
5 |
not be operated until it has been repaired by a trained service technician.
Important precautions
General
This appliance is designed for domestic use only!
This appliance is intended to be used builtin. Do not use it freestanding.
This appliance is intended for heating food and beverages. Drying of food or clothing and heating of warming pads, slippers, sponges, damp cloth and similar may lead to risk of injury, ignition or fire.
The appliance should not be operated without food inside. Operation in this manner is likely to damage the appliance. If you practice operating the oven, put a glass of water inside. The water will absorb the microwave energy and the oven will not be damaged.
Do not use the cavity for any storage purposes.
Remove wire twist-ties from paper or plastic bags before placing bag in the oven.
Deep-frying
Do not use your microwave oven for deepfrying, because the oil temperature cannot be controlled.
Use hot pads or oven mitts to prevent burns, when touching containers, oven parts, and pan after cooking.
Liquids
E.g. beverages or water. Overheating the liquid beyond boiling point can occur without evidence of bubbling. This could
result in a sudden boil over of the hot liquid. To prevent this possibility the following steps should be taken:
1.Avoid using straight-sided containers with narrow necks.
2.Stir the liquid before placing the container in the oven and let the teaspoon remain in the container.
3.After heating, allow standing for a
short time, stirring again before carefully removing the container from the oven.
Careful
Always refer to a microwave cookbook for details. Especially, if cooking or reheating food that contains alcohol.
After heating baby food or liquids in a baby bottle or in a baby food jar, always stir and check the temperature before serving. This will ensure that the heat is evenly distributed and the risk of scalding or burns can be avoided.
Ensure the Lid and the Teat is removed before heating!

ENGLISH |
6 |
Product description
1
2
3
4
|
Control Panel |
|
|
Cavity Lamp |
1 |
3 |
|||
2 |
Grill element |
|
4 |
Door |
Accessories |
|
|
|
|
Turntable support |
Baking plate |
Wire rack |
||
1x |
1x |
1x |
|
Glass turntable |
|
1x
ENGLISH |
7 |
General
There are a number of accessories available on the market. Before you buy, ensure they are suitable for microwave use.
Ensure that the utensils you use are oven proof and allow microwaves to pass through them before cooking.
When you put food and accessories in the microwave oven, ensure that they do not come in contact with the interior of the oven. This is especially important with accessories made of metal or metal parts.
If accessories containing metal come in contact with the oven interior, while the oven is in operation, sparking can occur and the oven could be damaged.
Aluminium foil can be used safely to shield small areas of food as long as it does not come in contact with the oven interior.
Always ensure that the turntable is able to turn freely before starting the oven
Turntable support
Fit the turntable support in the oven. Use the turntable support under the Glass turntable. Never put any other utensils on the turntable support.
Glass turntable
Place the Glass turntable on the turntable support.
Use the Glass turntable with all cooking methods. It collects the dripping juices and food particles that otherwise would stain and soil the interior of the oven.
Wire rack
Use the Wire rack when grilling using the grill or cooking in combination (microwaves and grill).
Baking plate
Use the bakingplate when cooking in Forced air mode only or when grilling. Never use it in combination with microwaves.
ENGLISH |
8 |
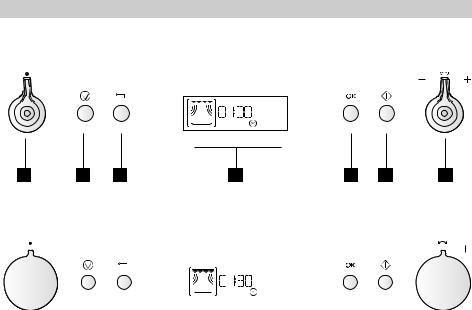
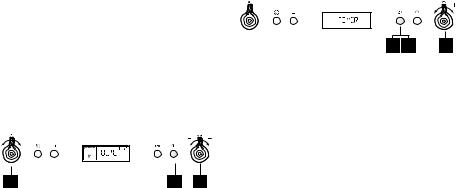
Control panel
EXEMPLARISK
1 |
2 |
3 |
4 |
5 |
6 |
7 |
GENAST
|
|
|
|
|
|
|
|
|
|
|
|
|
|
|
|
|
|
|
|
|
|
|
|
|
|
|
|
|
|
|
|
|
|
|
|
|
|
|
|
|
|
|
|
|
|
|
|
|
|
|
|
|
|
|
|
|
|
|
|
|
|
|
|
|
|
|
|
|
|
|
|
|
|
|
|
|
|
|
|
|
|
|
|
|
|
|
|
|
|
|
|
|
|
|
|
|
|
|
|
|
|
|
|
|
|
|
|
|
|
|
|
|
|
1 |
|
2 |
|
|
|
|
|
|
4 |
|
|
|
|
|
5 |
|
6 |
|
7 |
||||||
|
Multifunction knob |
|
|
|
|
OK button |
|
|
|
|
|
||||||||||||||||
1 |
5 |
|
|
|
|
|
|||||||||||||||||||||
2 |
Stop button |
|
|
|
|
|
|
|
|
|
|
|
6 |
Start button |
|
|
|
|
|
||||||||
3 |
Back button |
|
|
|
|
|
|
|
|
|
|
|
7 |
Adjust knob |
|
|
|
|
|
||||||||
4 |
Display |
|
|
|
|
|
|
|
|
|
|
|
|
|
|
|
|
|
|
|
|
|
|
|
|||

ENGLISH |
9 |
Daily use
Start protection / key lock |
2. Use the Adjust knob to choose one of |
|
the following settings to adjust |
||
This automatic safety function is activated |
||
Clock |
||
one minute after the oven has returned to |
||
Sound |
||
“stand by mode“. (The oven is in “stand by” |
||
ECO |
||
when the 24-hour clock is displayed or if the |
||
Brightness |
||
clock has not been set, when the display is |
||
3. Press the stop button to exit the settings |
||
blank). |
||
function and save all your changes when |
||
The door must be opened and closed |
||
you are done. |
||
e.g. putting food into it, before the safety |
||
Clock |
||
lock is released. Else the display will show |
||
“DOOR”. |
|
Cooling down
When a function is finished, the oven may carry out a cooling procedure. This is normal. After this procedure the oven switches off automatically.
If the temperature is higher than 100°C, “HOT” and the current cavity temperature are displayed when the oven is in standby mode. Be careful not to touch the cavity inside when removing food. Use Oven mittens.
“HOT” warning will remain active until the cavity temperature is below 50°C.
The cooling procedure can be interrupted without any harm to the oven by opening the door.
Settings
When the appliance is first plugged in it will ask you to set the clock.
After a power failure the clock will flash and needs to be reset.
Your oven has a number of functions which can be adjusted to your personal taste.
1 |
2 |
3 |
1.Press the Stop button until Setting is shown (aprox. 3 sec).
1 |
3 |
5 |
2 |
4 |
1.Press the OK button (the left-hand digits (hour’s) flicker).
2.Turn the Adjust knob to set the hours.
3.Press the OK button (the two right hand digits (minutes) flicker).
4.Turn the Adjust knob to set the minutes.
5.Press the OK button again.
The clock is set and in operation.
If you wish to remove the clock from the display once it has been set simply enter the clock setting mode again and press the Stop button while the digits blink.
Sound 


1 |
3 |
2 |
1.Press the OK button.
2.Turn the Adjust knob to turn the sound ON or OFF.
3.Press the OK button again to confirm the change.
ENGLISH |
10 |
Eco 
1 |
3 |
2 |
1.Press the OK button.
2.Turn the Adjust knob to turn the ECO setting ON or OFF.
3.Press the OK button again to confirm the
change.
When ECO is on, the display will automatically turn off after a while to save energy. It will automatically light up again when a button is pressed or the door is opened.
Brightness 
1 |
3 |
2 |
1.Press the OK button.
2.Turn the Adjust knob to set the level of brightness suitable to your preference.
3.Press the OK button again to confirm the change.
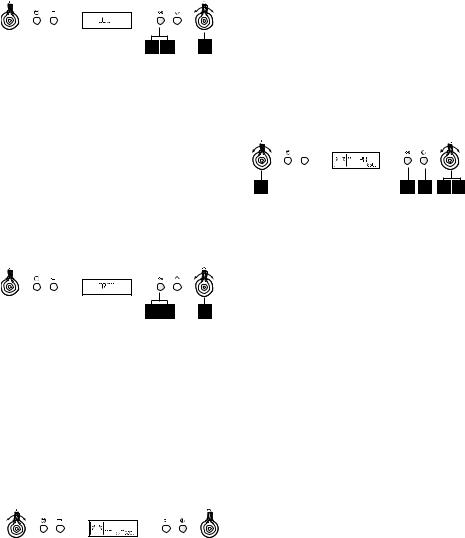
Jet start 
This function is used for quick reheating of food with a high water content such as; clear soups, coffee or tea.
With the knob in the upright postion, press Start button to switch on the Jet Start function.
Jet Start automatically starts with full microwave power level and the cooking time set to 30 seconds. Each additional press increases the time with 30 seconds. You may also alter the time by the Adjust knob to increase or decrease the time.
Cook and reheat with microwaves 

Use this function for normal cooking and reheating, such as vegetables, fish, potatoes and meat.
1 |
3 |
5 |
2 |
4 |
1.Turn the multifunction knob until you find the microwave function.
2.Turn the Adjust knob to set the microwave power level.
3.Press the OK button to confirm your selection.
4.Turn the Adjust knob to set the cooking time.
5.Press the Start button.
Once the cooking process has been started: the time can easily be increased in 30-second steps by pressing the Start button. Each press increases the time with 30 seconds.
You may also alter the time by turning the adjust knob to increase or decrease the time.
Power level can be altered during cooking by pressing the Back button and then turning the Adjust knob.
ENGLISH |
11 |
Power level
Microwaves only
Power |
Suggested use: |
900 W |
Reheating of beverages, water, |
|
clear soups, coffee, tea or other |
|
food with a high water content. If |
|
the food contains egg or cream |
|
choose a lower power. |
750 W |
Cooking of vegetables, meat etc. |
650 W |
Cooking of fish. |
500 W |
More careful cooking e.g. high |
|
protein sauces, cheese and egg |
|
dishes and to finish cooking |
|
casseroles. |
350 W |
Simmering stews, melting butter |
|
and chocolate. |
160 W |
Defrosting. Softening butter, |
|
cheeses. |
90 W |
Softening Ice cream. |
0 W |
When using the Timer only. |
Combi 
Use this function to cook such food as Gratins, Lasagne, Poultry and Baked potatoes.
1 |
3 |
5 |
7 |
2 |
4 |
6 |
1.Turn the multifunction knob until you find the Combi function.
2.Turn the adjust knob to set the grill power level.
3.Press the OK button to confirm your selection. You will automatically be taken to the next setting.
4.Turn the Adjust knob to set microwave power level.
5.Press the OK button to confirm your selection.
6.Turn the Adjust knob to set the cooking time.
7.Press the Start button.
The Max. possible microwave power level when using the Grill is limited to a factory preset level.
It is possible to switch the microwaves off by reducing the microwave power level to 0 W. When 0 W is reached, the oven switches to Grill only mode.
Combi |
|
Power |
Suggested use: |
650 W |
Cooking Vegetables and |
|
Gratins |
350 - 500 W |
Cooking Poultry and |
|
Lasagne |
160 - 350 W |
Cooking Fish and frozen |
|
gratins |
160 W |
Cooking Meat |
90 W |
Gratinating fruit |
Grill 
1 |
3 |
5 |
2 |
4 |
Use this function to quickly give a plesant brown surface to the food.
1.Turn the multifunction knob until you find the grill function.
2.Turn the adjust knob to set the grill power level.
3.Press the OK button to confirm your selection. You will automatically be taken to the next setting.
4.Turn the Adjust knob to set the cooking time.
5.Press the Start button.
Place food on the Wire rack. Turn the food during cooking.
ENGLISH |
12 |
Ensure that the utensils used are heat resistant and ovenproof before grilling with them.
i IMPORTANT: Do not use plastic utensils when grilling. They will melt.
Items of wood or paper are not suitable either.
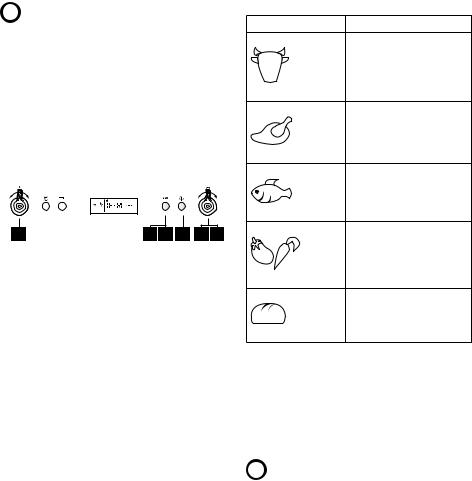
Auto defrost 
Use this function for defrosting Meat, Poultry, Fish, Vegetables and Bread.
Auto Defrost should only be used if the net weight is between 100 g-3 kg.
Always place the food on the glass turntable.
1 |
3 |
5 |
6 |
2 |
4 |
1.Turn the multifunction knob until you find the Auto Defrost function.
2.Turn the Adjust knob to select a food class.
3.Press the OK button to confirm your selection.
4.Turn the Adjust knob to set the weight.
5.Press the OK button to confirm your selection.
6.Press the Start button.
Weight:
This function needs to know the net weight of the food. The oven will then automatically calculate the needed time to finish the procedure.
If the weight is lesser or greater than recommended weight: Follow the procedure for cook and reheat with microwaves and choose 160 W when defrosting.
Frozen foods:
If the food is warmer than deep-freeze temperature (-18°C), choose lower weight of the food.
If the food is colder than deep-freeze temperature (-18°C), choose higher weight of the food.
Food |
Hints |
Meat |
Minced meat, cutlets, |
|
steaks or roasts. Turn |
|
food when oven |
(100 g - 2.0 Kg) |
prompts. |
Poultry |
Chicken whole, pieces |
|
or fillets. Turn food |
(100 g - 3.0 Kg) |
when oven prompts. |
|
|
Fish |
Whole, steaks or fillets. |
|
Turn food when oven |
(100 g - 2.0 Kg) |
prompts. |
Vegetables |
Mixed vegetables, |
|
peas, broccoli etc. |
|
Turn food when oven |
(100 g - 2.0 Kg) |
prompts. |
Bread |
Loaf, buns or rolls. |
|
Turn food when oven |
(100 g - 2.0 Kg) |
prompts. |
For food not listed in this table and if the weight is lesser or greater than
recommended weight, you should follow the procedure for “Cook and reheat with microwaves” and choose 160 W when defrosting.
i |
IMPORTANT: Don’t place Frozen food |
directly on a Hot Turntable. Put a plate |
between Food and Turntable.
Frozen food in plastic bags, plastic films or cardboard packages can be placed directly in the oven as long as the package has no metal parts (e.g. metal twist ties).
The shape of the package alters the defrosting time. Shallow packets defrost more quickly than a deep block.

ENGLISH |
13 |
Separate pieces as they begin to defrost. Individual slices defrost more easily. Shield areas of food with small pieces of aluminum foil if they start to become warm (e.g. chicken legs and wing tips).
Turn large joints halfway through the defrosting process.
Boiled food, stews and meat sauces defrost better if stirred during defrosting time. When defrosting it is better to under-thaw the food slightly and allow the process to finish during standing time.
Standing time after defrosting always improves the result since the temperature will then be evenly distributed throughout the food.
Manual defrost
Follow the procedure for “Cook and Reheat with microwaves” and choose power level 160 W when defrosting manually.
Check and inspect the food regularly. Experience will give you the times needed for various amounts.
MW-Forced air
Use this function to cook roast meats, poultry, and jacket potatoes, frozen convenience foods, sponge cakes, pastry, fish and puddings.
5.Press the OK button to confirm your selection. You will automatically be taken to the next setting.
6.Turn the adjust knob to set the cooking time.
7.Press the Start button.
Always use the Wire rack to put food on to allow the air to circulate properly around the food. Once the heating process has been started the cooking time can easily be adjusted with the adjust knob. Use the back button to return to where you can change power level or end temperature. Microwave power level can be set to 0 W.
The Max. possible microwave power level when using the Forced air is limited to a factory-preset level.
MW-Forced air
Power |
Power suggested use: |
350 W |
Cooking Poultry, Fish & Gratins |
160 W |
Cooking Roasts |
90 W |
Baking Bread & Cakes |
Forced air
Use this function to cook meringues, pastry, sponge cakes, soufflés, poultry and roast meats.
1 |
3 |
5 |
7 |
2 |
4 |
6 |
1.Turn the multifunction knob until you find the MW-Forced air function (default temperature and MW power is displayed).
2.Turn the adjust knob to set the temperature.
3.Press the OK button to confirm your selection. You will automatically be taken to the next setting.
4.Turn the adjust knob to set the Microwave Power Level.
1 |
3 |
5 |
2 |
4 |
1.Turn the multifunction knob until you find the Forced air function (default temperature is displayed).
2.Turn the Adjust knob to set the temperature.
3.Press the OK button to confirm your selection.
4.Turn the Adjust knob to set the cooking time.
5.Press the Start button.
ENGLISH |
14 |
Always use the Wire rack to put food on to allow the air to circulate properly around the food.
Use the Baking plate when baking small items like cookies or rolls. Once the heating process has been started the cooking time can easily be adjusted with the adjust knob. Use the back button to return to where you can change end temperature.
Pre-heat
Use this function to preheat the empty oven. Preheating is always done with the oven empty just like you would in a conventional oven before cooking or baking.
1 |
3 |
2 |
1.Turn the multifunction knob until you find the Pre-heat function (default temperature is displayed).
2.Turn the adjust knob to set the temperature.
3.Press the Start button. The current cavity temperature is displayed during the quick heat process.
Do not place food in oven before or during preheating. It will be burned from the intense heat. Once the heating process has been started the temperature can easily be adjusted by turning the adjust knob. When the set temperature is reached the oven then keeps the set temperature for 10 minutes before switching off.
During this time, insert food and choose Forced Air of MW+Forced Air to begin cooking.
Kitchen timer 
Use this function when you need a kitchen timer to measure exact time for various purposes such as cooking eggs or letting the dough rise before baking etc.
1 |
3 |
2 |
1.Turn the Multifuncion knob until TIMER is shown.
2.Turn the Adjust knob to set the desired length of the timer.
3.Press the OK button.
An acoustic signal will be heard when the timer has finished to count down. Pressing the Stop button or turning the Multifunction knob before the timer has finished will reset the timer to zero.

ENGLISH
Cleaning and maintenance
Cleaning is the only maintenance normally required.
Failure to maintain the oven in a clean condition could lead to deterioration of the surface that could adversely affect the life of the appliance and possibly result in a hazardous situation.
i |
IMPORTANT: do not use metal |
scouring pads, abrasive cleansers, |
steel-wool pads, gritty washcloths, etc. which can damage the control panel, and the interior and exterior oven surfaces. Use a sponge with a mild detergent or a paper towel with spray glass cleaner. Apply spray glass cleaner to a paper towel.
Do not spray directly on the oven.
At regular intervals, especially if spill overs have occurred, remove the turntable, the turntable support and wipe the base of the oven clean.
This oven is designed to operate with the turntable in place.
i |
IMPORTANT: do not operate the |
microwave oven when the turntable |
has been removed for cleaning.
Use a mild detergent, water and a soft cloth to clean the interior surfaces, front and rear of the door and the door opening.
i |
IMPORTANT: do not allow grease or |
|
food particles to build up around the |
door.
For stubborn stains, boil a cup of water in the oven for 2 or 3 minutes. Steam will soften the marks.
i IMPORTANT: do not use steam cleaning appliances when cleaning
your microwave oven.
Adding some lemon juice to a cup of water, placing this on the turntable and boiling for a few minutes can eliminate odors inside the oven.
15
The Grill element does not need cleaning since the intense heat will burn off any splashes, but the cavity ceiling near it may need regular cleaning. This should be done with warm water, detergent and a sponge. If the Grill is not used regularly, it should be run for 10 minutes a month to burn off any splashes.
Dishwasher safe
•Turntable support
•Glass turntable
•Grill grid

ENGLISH |
16 |
What to do if ...
Problem |
Possible cause |
Solution |
The appliance does not work. |
The mains power supply |
Check your fuses and ensure |
|
or the appliance is not |
that there is power avaliable. |
|
connected. |
|
|
The door isn’t closed. |
Open and then close the door |
|
|
before you try again. |
|
|
|
A message is displayed such |
The oven has |
Disconnect and wait 10 |
as: F2, F3C, F7 or Err2, Err3, |
recognized that a fault |
minutes before reconnecting, |
Err5. |
has occured in one of it’s |
then try to operate the oven |
|
sensors or similar. |
once more. If the problem |
|
|
persists: call service. |
The food is unevenly heated. |
Very thin parts such as |
Shield the thinner parts with |
|
chicken wingtips and |
aluminum foil. |
|
such are not shielded. |
|
|
The food was heated at |
Choose a lower power level. |
|
a power level too high. |
|
|
The turntable has |
Check that the turntable and |
|
stopped. |
turntable support is in place |
|
|
and the food is well centered, |
|
|
not touching the cavity walls. |
Food isn’t turning. |
The turntable has |
Check that the turntable and |
|
stopped. |
turntable support is in place |
|
|
and the cavity bottom is |
|
|
clean. |
After-Sales Service
Before calling the After-Sales Service:
1.See if you can solve the problem on your own (see the “What to do if ...” table).
2.Switch the appliance off and on again to see if the problem has disappeared. If the fault persists after the above checks, contact IKEA After Sales Service.
Always specify:
-- the type of fault;
-- exact type and model of appliance;
-- the After-Sales Service number (the number given after the word “Service” on the rating plate) located on the inside edge of the oven cavity (visible when the door is open);
-- your full address;
-- your telephone number.
If any repairs are required, please contact IKEA After Sales Service (to guarantee that original spare parts will be used and repairs carried out correctly).
ENGLISH |
17 |
Technical data
Supply Voltage |
230 V/50 Hz |
Rated Power Input |
2800 W |
Fuse |
16 A |
MW output power |
900 W |
Grill |
1600 W |
Convection |
1200 W |
Outer dimensions (HxWxD) |
455 x 595 x 565 |
Cavity inner dimensions (HxWxD) |
210 x 450 x 420 |
The technical informations are situated in the rating plate inside the appliance.
ENGLISH |
18 |
Data for test heating performance in accordance with IEC 60705.
The International Electrotechnical Commission has developed a standard for comparative testing of heating performance of different microwave ovens. We recommend the following for this oven:
Test |
Amount |
Approx. time |
Power level |
Container |
|
12.3.1 |
1000 g |
12 - 13 min |
650 W |
Pyrex 3.227 |
|
12.3.2 |
475 g |
5 1/2 min |
650 W |
Pyrex 3.827 |
|
12.3.3 |
900 g |
13 - 14 min |
750 W |
Pyrex 3.838 |
|
12.3.4 |
1100 g |
28 - 30 min |
Forced air 190ºC |
|
|
+ 350 W |
Pyrex 3.827 |
||||
|
|
|
|||
12.3.5 |
700 g |
28 - 30 min |
Forced air 175ºC |
|
|
+ 90 W |
Pyrex 3.827 |
||||
|
|
|
|||
12.3.6 |
1000 g |
30 - 32 min |
Forced air 210ºC |
|
|
+ 350 W |
Pyrex 3.827 |
||||
|
|
|
|||
13.3 |
500 g |
10 min |
160 W |
|
In accordance with IEC 60350.
The International Electrotechnical Commission has developed a standard for comparative testing of heating performance of different ovens. We recommend the following for this oven:
Test |
Approx. time |
Temperature |
Preheated oven |
Accessories |
|
8.4.1 |
30 - 35 min |
150 °C |
No |
Baking plate |
|
8.4.2 |
18 - 20 min |
170 °C |
Yes |
Baking plate |
|
8.5.1 |
33 - 35 min |
160 |
°C |
No |
Wire rack |
8.5.2 |
65 - 70 min |
160 |
-170 °C |
Yes |
Wire rack |
NOTE: this information is only for the qualified technician.

ENGLISH |
19 |
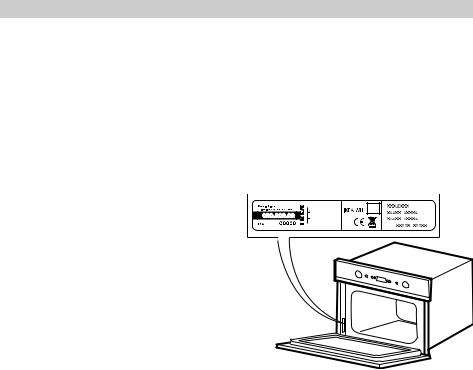
Installation
Mounting the appliance
Follow the supplied separate mounting instructions when installing the appliance.
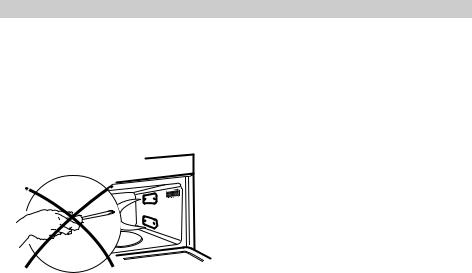
Door safety device
To release the door with the door safety device see Fig 1.
The door safety device can be removed by following the sequence of images (see Fig. 2).
Fig. 1
Fig. 2
ENGLISH
Electrical connection
Prior to connecting
Check that the voltage on the rating plate corresponds to the voltage in your home. Do not remove the microwave inlet protection plates located on the side of the oven cavity wall. They prevent grease and food particles from entering the microwave inlet channels.
Ensure the oven cavity is empty before mounting.
Ensure that the appliance is not damaged. Check that the oven door closes firmly against the door support and that the internal door seal is not damaged. Empty the oven and clean the interior with a soft, damp cloth.
20
Do not operate this appliance if it has a damaged mains cord or plug, if it is not working properly, or if it has been damaged or dropped. Do not immerse the mains cord or plug in water. Keep the cord away from hot surfaces. Electrical shock, fire or other hazards may result.
After connecting
The oven can be operated only if the oven door is firmly closed.
The earthing of this appliance is compulsory. The manufacturer will accept no responsibility for injury to persons, animals or damage to objects arising from the non-observance of this requirement.
The manufacturers are not liable for any problems caused by the user’s failure to observe these instructions.
ENGLISH
Environmental concerns
The packing box may be fully recycled as confirmed by the recycling symbol ( ). Follow local disposal regulations. Keep potentially hazardous packaging (plastic bags, polystyrene etc.) out of the reach of children.
This appliance is marked according to the European directive 2002/96/EC on Waste Electrical and Electronic Equipment (WEEE). By ensuring this product is disposed of correctly, you will help prevent potential negative consequences for the environment and human health, which could otherwise be caused by inappropriate waste handling of this product.
Declaration of conformity 

This appliance, which is intended to come - into contact with foodstuffs, complies with European Regulation ( ) n. 1935/2004 and has been designed, manufactured and sold in conformity with the safety requirements of the “Low Voltage” directive 2006/95/CE (which replaces 73/23/
CEE and subsequent amendments), the protection requirements of “EMC” 2004/108/CE.
21
The symbol  on the product, or on the documents accompanying the product, indicates that this appliance may not be treated as household waste. Instead it shall be handed over to the applicable collection point for the recycling of electrical and electronic equipment.
Disposal must be carried out in accordance with local environmental regulations for waste disposal.
For more detailed information about treatment, recovery and recycling of this product, please contact your local city office, your household waste disposal service or the shop where you purchased the product. Before scrapping, cut off the mains cord so that the appliance cannot be connected to the mains.

ENGLISH
IKEA GUARANTEE
How long is the IKEA guarantee valid?
This guarantee is valid for five (5) years from the original date of purchase of your appliance at IKEA, unless the appliance is named LAGAN in which case two (2) years of guarantee apply. The original sales receipt, is required as proof of purchase. If service work is carried out under guarantee, this will not extend the guarantee period for the appliance.
Which appliances are not covered by the
IKEAfive(5)yearsguarantee?
The range of appliances named LAGAN and all appliances purchased in IKEA before 1st of August 2007.
Who will execute the service?
IKEA service provider will provide the service through its own service operations or authorized service partner network.
What does this guarantee cover?
The guarantee covers faults of the appliance, which have been caused by faulty construction or material faults from the date of purchase from IKEA. This guarantee applies to domestic use only. The exceptions are specified under the headline “What is not covered under this guarantee?” Within the guarantee period, the costs to remedy the fault e.g. repairs, parts, labour and travel will be covered, provided that the appliance is accessible for repair without special expenditure. On these conditions the EU guidelines (Nr. 99/44/
EG) and the respective local regulations are applicable. Replaced parts become the property of IKEA.
What will IKEA do to correct the problem?
IKEA appointed Service Provider will examine the product and decide, at its sole discretion, if it is covered under this guarantee. If considered covered, IKEA Service Provider or its authorized service partner through its own service operations, will then, at its sole discretion, either repair the defective product
22
or replace it with the same or a comparable product.
What is not covered under this guarantee?
•Normal wear and tear.
•Deliberate or negligent damage, damage caused by failure to observe operating instructions, incorrect installation or by connection to the wrong voltage, damage caused by chemical or electrochemical reaction, rust, corrosion or water damage including but not limited to damage caused by excessive lime in the water supply, damage caused by abnormal environmental conditions.
•Consumable parts including batteries and lamps.
•Non-functional and decorative parts which do not affect normal use of the appliance, including any scratches and possible color differences.
•Accidental damage caused by foreign objects or substances and cleaning or unblocking of filters, drainage systems or soap drawers.
•Damage to the following parts: ceramic glass, accessories, crockery and cutlery baskets, feed and drainage pipes, seals, lamps and lamp covers, screens, knobs, casings and parts of casings. Unless such damages can be proved to have been caused by production faults.
•Cases where no fault could be found during a technician’s visit.
•Repairs not carried out by our appointed service providers and/or an authorized service contractual partner or where nonoriginal parts have been used.
•Repairs caused by installation which is faulty or not according to specification.
•The use of the appliance in a non-domestic environment i.e. professional use.
•Transportation damages. If a customer transports the product to his home or
ENGLISH |
23 |
another address, IKEA is not liable for any damage that may occur during transport. However, if IKEA delivers the product
to the customer’s delivery address, then damage to the product that occurs during this delivery will be covered by IKEA.
•Cost for carrying out the initial installation of the IKEA appliance.
However, if an IKEA appointed Service Provider or its authorized service partner repairs or replaces the appliance under the terms of this guarantee, the appointed Service Provider or its authorized
service partner will reinstall the repaired appliance or install the replacement, if necessary.
These restrictions do not apply to fault-free work carried out by a qualified specialist using our original parts in order to adapt the appliance to the technical safety specifications of another EU country.
How country law applies
The IKEA guarantee gives you specific legal rights, which cover or exceed all the local legal demands. However these conditions do not limit in any way consumer rights described in the local legislation.
Area of validity
For appliances which are purchased in one EU country and taken to another EU country, the services will be provided in the framework of the guarantee conditions normal in the new country.
An obligation to carry out services in the framework of the guarantee exists only if the appliance complies and is installed in accordance with:
-the technical specifications of the country in which the guarantee claim is made;
-the Assembly Instructions and User Manual Safety Information.
The dedicated AFTER SALES for IKEA appliances
Please don’t hesitate to contact IKEA
appointed After Sales Service Provider to:
•make a service request under this guarantee;
•ask for clarifications on installation of the IKEA appliance in the dedicated IKEA kitchen furniture;
•ask for clarification on functions of IKEA appliances.
To ensure that we provide you with the best assistance, please read carefully the Assembly Instructions and/or the User Manual before contacting us.
How to reach us if you need our service
Please refer to the last page of this manual for the full list of IKEA appointed After Sales Service Provider and relative national phone numbers.
In order to provide you a quicker service, we recommend to use the specificphonenumberslistedonthis manual. Always refer to the numbers listedinthebookletofthespecific appliance you need an assistance for. Please also always refer to the IKEA articlenumber(8digitcode)and12 digit service number placed on the rating plate of your appliance.
SAVE THE SALES RECEIPT!
It is your proof of purchase and required for the guarantee to apply. The sales receipt also reports the IKEA name and article number (8 digit code) for each of the appliances you have purchased.
Do you need extra help?
For any additional questions not related to After Sales of your appliances please contact your nearest IKEA store call centre. We recommend you read the appliance
documentation carefully before contacting us.

DEUTSCH |
24 |
Inhaltsverzeichnis
Sicherheitshinweise |
24 |
Technische Daten |
37 |
Produktbeschreibung |
26 |
Aufstellung |
39 |
Bedienfeld |
28 |
Kindersicherung |
39 |
Täglicher Gebrauch |
29 |
Elektrischer Anschluss |
40 |
Reinigung und Pflege |
35 |
Hinweise zum Umweltschutz |
41 |
Störung - Was tun? |
36 |
IKEA GARANTIE |
42 |
Sicherheitshinweise
Aufmerksam lesen und zum Nachschlagen aufbewahren.
Erhitzen oder verwenden Sie keine brennbaren Materialien im Gerät oder in seiner Nähe. Rauchentwicklung kann zu Brand oder Explosion führen.
Das Mikrowellengerät nicht zum Trocknen von Textilien, Papier, Gewürzen, Kräutern, Holz, Blumen, Früchten oder anderen brennbaren Materialien verwenden. Es besteht Brandgefahr.
Wenn Material innerhalb oder außerhalb des Garraums zu brennen anfängt, die Gerätetür geschlossen halten und das Gerät ausschalten.ZiehenSiedenNetzsteckeroder schalten Sie die Sicherung im Schaltkasten aus.
Garen Sie die Speisen nicht länger als nötig. Es besteht Brandgefahr.
Das Gerät nicht unbeaufsichtigt lassen, insbesondere dann, wenn beim Garen Papier, Kunststoff oder andere brennbare Materialien verwendet werden. Papier kann verkohlen oder Feuer fangen. Einige Kunststoffe können schmelzen, wenn sie zusammen mit den Speisen erhitzt werden. Keine ätzenden Chemikalien oder Dämpfe in diesem Gerät verwenden. Dieser Gerätetyp wurde speziell zum Aufwärmen oder Garen von Lebensmitteln entwickelt. Er eignet
sich nicht für industrielle Zwecke oder Laborzwecke.
Eier
Verwenden Sie das Mikrowellengerät nicht zum Garen oder Aufwärmen ganzer Eier mit oder ohne Schale, da diese auch nach
Beenden des Garoder Aufwärmvorgangs explodieren können.
Dieses Gerät kann von Kindern ab 8 Jahren und von Personen mit eingeschränkten physischen, sensorischen oder geistigen Fähigkeiten oder eingeschränkter Erfahrung oder Unkenntnis benutzt werden, wenn
sie in die sichere Verwendung des Geräts eingewiesen wurden und die damit verbundenen Gefahren verstanden haben. Kinder dürfen nicht mit dem Gerät spielen. Die Reinigung und Bedienung dieses Geräts darf nicht durch Kinder unter 8 Jahren erfolgen; Kinder in einem Alter darüber sind ständig zu beaufsichtigen.
VORSICHT! Das Gerät und
 zugängliche Teile können sich beim Gebrauch erhitzen.
Das Berühren heißer Teile ist unbedingt zu vermeiden.
Kinder unter 8 Jahren dürfen sich dem Gerät nur unter Aufsicht nähern.
VerwendenSiedasMikrowellengerätniemals zum Erhitzen von Speisen oder Flüssigkeiten in luftdicht verschlossenen Behältern. Der Druck im Behälter nimmt zu. Das kann beim Öffnen des Behälters zu Verletzungen oder zu einer Explosion führen.
Das Netzkabel darf nur gegen ein Originalkabel ausgetauscht werden, das Sie über unseren Kundendienst beziehen können.
Das Netzkabel darf nur von einem dafür geschulten Kundendiensttechniker ausgetauscht werden.
DEUTSCH |
25 |
Reparaturen am Gerät dürfen nur von einem qualifizierten Kundendiensttechniker vorgenommen werden. Laien bringen sich durch Reparaturversuche in
Gefahr, bei denen die zum Schutz vor Mikrowellenstrahlung am Gerät angebrachten Abdeckungen oder Gehäuseteile entfernt werden müssen. Keine Gehäuseteile entfernen.
Überprüfen Sie die Türdichtungen und die umliegenden Bereiche der Türdichtungen regelmäßig auf Beschädigungen. Nehmen Sie das Gerät nach einer Beschädigung erst wieder in Betrieb, nachdem es von einem qualifizierten Kundendiensttechniker repariert wurde.
Wichtige Vorsichtsmaßnahmen
Allgemeines
Das Gerät ist ausschließlich für die Verwendung im Haushalt bestimmt! Dieses Gerät ist für den Einbau vorgesehen. Niemals freistehend verwenden.
Dieses Gerät ist für das Erhitzen von Nahrungsmitteln und Getränken vorgesehen. Das Trocknen von Lebensmitteln, Kleidungsstücken oder das Aufwärmen von Heizpolstern, Sandalen, Schwämmen, feuchten Tüchern oder ähnlichen Materialien kann zu Verletzungen, Entzündung oder Brand führen.
Das Gerät darf nur mit eingestellten Speisen in Betrieb genommen werden. Andernfalls kann es zu Schäden am Gerät kommen.
Um sich mit den Gerätefunktionen vertraut zu machen, stellen Sie ein Glas Wasser in den Garraum. Das Wasser absorbiert die Energie der Mikrowellen, so dass der Herd nicht beschädigt wird.
Verwenden Sie den Garraum nicht als Lagerraum.
Entfernen Sie alle Metallteile wie Verschlüsse von Papieroder Plastikbeuteln, bevor diese in den Garraum gelegt werden.
Frittieren
Verwenden Sie das Mikrowellengerät nicht zum Frittieren, da die Temperatur des Frittieröls nicht kontrolliert werden kann. Immer Topflappen oder Ofenhandschuhe verwenden, wenn nach dem Garen Behälter, GeräteteileundSchalenangefasstwerden.Es besteht Verbrennungsgefahr.
Flüssigkeiten
Z. B. Getränke oder Wasser. Flüssigkeiten können über den Siedepunkt hinaus erhitzt werden, ohne dass es zu einer sichtbaren Blasenbildung kommt. Das kann dazu führen, dass die heiße Flüssigkeit plötzlich überkocht.
Umdieszuvermeiden,ergreifenSiefolgende Vorsichtsmaßnahmen:
1.Verwenden Sie möglichst keine hohen, schmalen Gefäße mit engem Hals.
2.Rühren Sie die Flüssigkeit um, bevor Sie dasGefäßindenGarraumstellen,undlassen Sie einen Teelöffel im Gefäß.
3.Lassen Sie die Flüssigkeit nach dem Erhitzen kurz stehen und rühren Sie sie vor der vorsichtigen Entnahme des Gefäßes aus dem Gerät nochmals um.
Achtung
Genauere Informationen dazu finden Sie im Mikrowellenkochbuch. Dies gilt
besonders für das Garen oder Erhitzen von alkoholhaltigen Speisen.
Babynahrung in Gläsern oder Getränke in Babyflaschen müssen nach dem Erwärmen immer umgerührt und auf die richtige Temperatur überprüft werden. Dadurch wird eine gleichmäßige Wärmeverteilung sichergestellt und das Risiko des Verbrühens oder Verbrennens vermieden.
Nehmen Sie den Deckel bzw. Sauger unbedingt vor dem Erwärmen ab!

DEUTSCH |
26 |
Produktbeschreibung
1
2
3
4
|
Bedienfeld |
|
|
Beleuchtung |
1 |
3 |
|||
2 |
Grillelement |
|
4 |
Tür |
Zubehör |
|
|
|
|
Drehtellerauflage |
Backblech |
Grillrost |
||
1x |
1x |
1x |
Glasdrehteller
1x
DEUTSCH |
27 |
Allgemeines
Eine Reihe von Zubehörteilen kann käuflich erworben werden. Prüfen Sie vor dem Kauf, ob sie für das Mikrowellengerät geeignet sind.
Verwenden Sie bitte nur hitzebeständiges und mikrowellengeeignetes Kochgeschirr. Stellen Sie Speisen und Zubehör so in das Mikrowellengerät, dass diese keinesfalls mit dessen Innenwänden in Berührung kommen. Das gilt besonders dann, wenn die Zubehörteile aus Metall oder Metallteilen bestehen.
Wenn metallhaltige Zubehörteile mit den Innenwänden des Garraums in Berührung kommen, während die Mikrowelle in Betrieb ist, können Funken entstehen, und das Gerät kann beschädigt werden.
Aluminiumfolie kann unbedenklich zum Abdecken kleiner Lebensmittelbereiche benutzt werden, allerdings darf sie die Innenwände des Garraums nicht berühren. Bevor Sie das Gerät einschalten, prüfen Sie stets, ob sich der Drehteller ungehindert drehen kann
Drehtellerauflage
Setzen Sie die Drehtellerauflage in das Gerät ein.
Die Drehtellerauflage muss immer unter dem Glasdrehteller eingesetzt werden. Legen Sie keine anderen Gegenstände auf die Drehtellerauflage.
Glasdrehteller
Stellen Sie den Glasdrehteller auf die Drehtellerauflage.
Benutzen Sie den Glasdrehteller bei allen Zubereitungsarten. Er fängt herunter tropfende Flüssigkeiten und Speiseteilchen auf, so dass eine unnötige Verschmutzung des Innenraums vermieden wird.
Grillrost
Verwenden Sie den Grillrost beim Grillen oder im Kombinationsbetrieb (Mikrowelle und Grill).
Backblech
Verwenden Sie das Backblech nur beim Heißluftoder Grillbetrieb. Verwenden Sie es niemals im Kombinationsbetrieb mit Mikrowelle.

DEUTSCH |
28 |
Bedienfeld
EXEMPLARISK
1 |
2 |
3 |
4 |
5 |
6 |
7 |
GENAST
|
|
|
|
|
|
|
|
|
|
|
|
|
|
|
|
|
|
|
|
|
|
|
|
|
|
|
|
|
|
|
|
|
|
|
|
|
|
|
|
|
|
|
|
|
|
|
|
|
|
|
|
|
|
|
|
|
|
|
|
|
|
|
|
|
|
|
|
|
|
|
|
|
|
|
|
|
|
|
|
|
|
|
|
|
|
|
|
|
|
|
|
|
|
|
|
|
|
|
|
|
|
|
|
|
|
|
|
|
|
|
|
|
|
1 |
|
2 |
|
|
|
|
|
|
4 |
|
|
|
|
|
5 |
|
6 |
|
7 |
||||||
|
Multifunktionsknopf |
|
|
|
|
OK-Taste |
|
|
|
|
|
||||||||||||||||
1 |
5 |
|
|
|
|
|
|||||||||||||||||||||
2 |
Stopptaste |
|
|
|
|
|
|
|
|
|
|
|
6 |
Start -Taste |
|
|
|
|
|
||||||||
3 |
Zurück-Taste |
|
|
|
7 |
Einstellknopf |
|
|
|
|
|
||||||||||||||||
4 |
Display |
|
|
|
|
|
|
|
|
|
|
|
|
|
|
|
|
|
|
|
|
|
|
|
|||
DEUTSCH |
29 |
Täglicher Gebrauch
Startschutz / Kindersicherung
DieseautomatischeSicherheitsfunktionwird eineMinute,nachdemdasGerätinden „Bereitschaftsmodus"zurückgekehrtist,aktiviert. (DasGerätbefindetsichimBereitschaftsmodus, wenndieUhrzeitim24-Stunden-Format angezeigtwirdoder,fallsdieUhrnichteingestellt wurde,wennkeineAnzeigeerscheint).
DieSicherheitsverriegelungwirderstdann freigegeben,wenndieTürgeöffnetoder geschlossenwird,z.B.wennSpeisenindie Mikrowellegestelltwerden.Andernfallszeigtdas DisplaydieMeldung"DOOR"(Tür)an.
Abkühlen
NachAbschlusseinerFunktionstartetdas GerätunterUmständeneinenAbkühlvorgang. Dasistnormal.DanachschaltetsichdasGerät automatischab.
IstdieTemperaturhöherals100°C,werden "HOT"(heiß)unddieaktuelleGarraumtemperatur angezeigt,wennsichderOfenimStandbymodus befindet.AchtenSiedarauf,dassSienichtdie Garrauminnenwändeberühren,wennSieSpeisen ausdemGerätentnehmen.VerwendenSiestets Ofenhandschuhe.
DieWarnung"HOT"(heiß)bleibtsolange aktiv,bisdieGarraumtemperaturunter50°C abgesunkenist.
DerAbkühlvorgangkannohneSchadenfürdas Gerätunterbrochenwerden.DazudieTüröffnen.
Einstellungen
WenndasGerätzumerstenMalandas Stromnetzangeschlossenwird,werdenSie aufgefordert,dieUhreinzustellen.
NacheinemStromausfallblinktdieUhrundmuss neugestelltwerden.
IhrGerätbesitzteineReihevonFunktionen,die Siebeliebigeinstellenkönnen.
1 |
2 |
3 |
1.DrückenSiedieStopptaste,bisdieEinstellung angezeigtwird(ca.3Sek.).
2.DrehenSiedenEinstellknopf,umeineder folgendenAnpassungenvorzunehmen Zeit
Ton
ÖKO(ECO) Helligkeit
3.DrückenSiedieStopptaste,umdie Einstellfunktionzuverlassenundalle Änderungenzuspeichern.
Uhr
1 |
3 |
5 |
2 |
4 |
1.DrückenSiedieOK-Taste(dielinkenZiffern (fürdieStunden)blinken).
2.StellenSiedieStundenmitdemEinstellknopf ein.
3.DrückenSiedieStart-Taste(diezweirechten Ziffern(Minuten)blinken).
4.StellenSiedieMinutenmitdemEinstellknopf ein.
5.DrückenSieerneutdieOK-Taste.
DieUhristnuneingestelltundinBetrieb.
SolldieZeitanzeigenachdemEinstellenderUhr nichtmehraufdemDisplayerscheinen,gehen SieeinfacherneutindenModuszumEinstellen derUhrunddrückendieStopptaste,währenddie Ziffernblinken.
 Loading...