


Model iDL46
FM Stereo Clock Radio
Questions? For immediate assistance, call 1-800-288-2792

Table of Contents |
|
Controls and Indicators / Display........................................................................................................................................ |
1 |
Quick Start.......................................................................................................................................................................... |
2 |
Using the unit .................................................................................................................................................................. |
3-4 |
Using the Alarms ............................................................................................................................................................. |
4-5 |
Listening to iPad, iPhone or iPod Using the Dock or USB Port.......................................................................................... |
6 |
Listening to Radio/Using the Unit in other Countries/Listening to other portable audio devices ........................................ |
7 |
Sleep Operation/Nap Operation/Dimmer Operation........................................................................................................... |
8 |
Installing and Replacing Clock Backup Batteries ............................................................................................................... |
9 |
A Consumer Guide to Product Safety .............................................................................................................................. |
10 |
Trouble Shooting .............................................................................................................................................................. |
11 |
Warranty Information ........................................................................................................................................................ |
12 |
FCC Information |
|
This device complies with Part 15 of the FCC Rules, operation is subject to the following two conditions: (1) This device may not cause harmful interference, and (2) this device must accept any interference received, including interference that may cause undesired operation.
•Warning: Changes or modifications to this unit not expressly approved by the party responsible for compliance could void the user’s authority to operate the equipment.
•NOTE: This equipment has been tested and found to comply with the limits for a Class B digital device, pursuant to Part 15 of the FCC Rules.
These limits are designed to provide reasonable protection against harmful interference in a residential installation. This equipment generates, uses and can radiate radio frequency energy and, if not installed and used in accordance with the instructions, may cause harmful interference to radio communications.
However, there is no guarantee that interference will not occur in a particular installation. If this equipment does cause harmful interference to radio or television reception, which can be determined by turning the equipment off and on, the user is encouraged to try to correct the interference by one or more of the following measures:
•Reorient or relocate the receiving antenna.
•Increase the separation between the equipment and receiver.
•Connect the equipment into an outlet on a circuit different from that to which the receiver is connected.
•Consult the dealer or an experienced radio/TV technician for help.
CAN ICES-3 (B)/NMB-3(B)
Maintenance
•Place the unit on a level surface away from sources of direct sunlight or excessive heat.
•Protect your furniture when placing your unit on a natural wood and lacquered finish. A cloth or other protective material should be placed between it and the furniture.
•Clean your unit with a soft cloth moistened only with mild soap and water. Stronger cleaning agents, such as Benzene, thinner or similar materials can damage the surface of the unit.
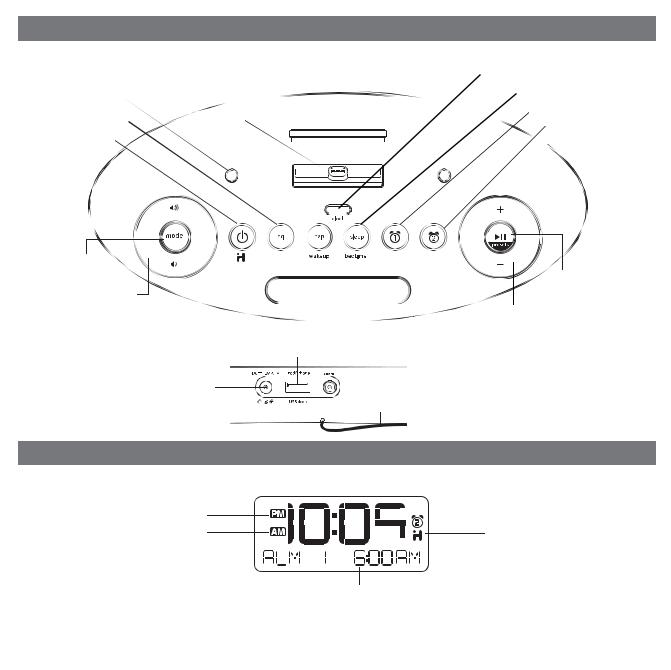
Controls and Indicators
Top Panel |
Device rest |
|
|
|
|
|
||||||
|
|
|
Dock: Flexible Lightning |
Clock Button |
||||||||
|
|
|
Connector for iPad/iPhone/iPod |
|
|
|
|
|
|
Sleep Button |
||
|
|
|
|
|
|
|||||||
iPad Supports |
|
|
|
|
|
|
|
|
||||
|
|
|
|
|
|
|
||||||
|
|
|
|
|
|
|||||||
EQ Button |
|
|
|
|
|
|
|
|
|
|
|
Alarm 1 Button |
|
|
|
|
|
|
|
|
|
|
|
||
|
|
|
|
|
|
|
|
|
|
|
Alarm 2 Button |
|
|
|
|
|
|
|
|||||||
Alarm Reset/ |
|
|
|
|
|
|
|
|
|
|
|
|
|
|
|
|
|
|
|
|
|||||
Power Button |
|
|
|
|
|
|
|
|||||
Mode Button
Lower/Raise
Volume Button
|
|
Play/Pause/ |
snooze | dimmer |
Presets Button |
|
Nap Button |
|
Set –/+ Button, |
|
skip/search FWD/REV |
|
Snooze/Dimmer Button
Rear Panel
|
USB Charging and Playing Dock |
DC Jack |
Jack |
PM Indicator
AM Indicator
NOTE: AM/PM indicators will not appear when clock is set to 24 hour display mode
Display
Time Display


 Alarm Indicators
iHome App Indicator


 Battery Low Indicator
Alarm Time /EQ/ Mode Display (Dock/USB Dock/FM/Aux-in)
1

Quick Start
1: Power
Attach AC adaptor cable to DC jack on back of the unit and plug the other end into a wall socket. Insert 2 included AA batteries into the backup battery compartment on the bottom of the unit. Extend FM antenna for best reception.
3: Setting Clock with AutoSync
Dock your Lightning-compatible iPad, iPhone or iPod (see step 2). The unit will attempt to autosync to the time on your iPad, iPhone or iPod. The time on the display will update. This process takes about 3 seconds.
2: docking your iPad/iPhone/iPod in the Lightning dock 
While the dock accommodates most cases, you may need to remove your case for proper  docking. Gently dock any iPad, iPhone or iPod with Lightning connector onto the Lightning dock on top of the unit. The iPad, iPhone or iPod will charge while docked. Press the
 Button on the unit to play your iPad, iPhone or iPod.
4: Radio
Press and release the Mode Button as needed to select FM band. Press and release the + or – Button to tune in a station. See page 7 for programming presets.
2

Using the Unit
Connecting the Unit to Power Source
Connect the AC adaptor cable plug into the DC jack on the back of the system, then plug the AC adaptor into the wall outlet. Adaptor must be plugged in to operate unit. The unit does not operate on batteries (the battery back up system maintains clock settings during power failures).
Updating your iDL46 firmware
For best performance, make sure to update the iDL46 firmware. To do so, download the free iHome Set app from the App Store. Launch the app, scroll to “Search for Update”, then follow directions to update the firmware.
Turning the Unit ON or OFF
Press the  Button on the unit at any time to turn the unit On or Off. Note that a docked iPad, iPhone or iPod will continue to charge when the unit is turned off as long as the AC adaptor is plugged in. You can also turn the unit ON automatically by docking a playing device (or connecting one to the USB dock), and turn the unit OFF by disconnecting a playing device from the dock OR USB dock.
Setting the Clock Time Using AutoSync
The AutoSync feature automatically syncs the time setting on the unit to the time on your iPad, iPhone or recent model iPod (iPod touch, iPod nano and iPod Classic; older iPod models such as iPod mini do not support this feature).
By default, the unit is set to AUTO SYNC ON mode and will attempt to autosync the time whenever a capable iPad, iPhone or iPad is docked to the Lightning dock OR connected to the USB dock and at 2AM each day.
To manually time sync at any time to a docked device, press and release the Clock Button.
NOTE: iPhone time is automatically updated to the correct time via cell phone towers. The time on your iPad or iPod is accurate only to the time on the computer the last time the iPad/iPod was synced to it. It’s possible to have up to 59 seconds difference between the unit and a synced iPad/iPhone/iPod.
Setting Time and Calendar Manually
Autosync must be OFF to set the clock manually.
1.Press and hold the Clock Button located on the top of the unit until “AUTOSYNC ON” or “AUTOSYNC OFF” flashes on the display,(if AUTOSYNC ON appears, press the + or – Button to toggle to AUTOSYNC OFF setting).
2.Press and release the Clock Button. The time display will flash. Press the + or – Button to adjust the time (hold for a few seconds to advance or reverse rapidly). Remember to set the correct AM or PM hour. An icon to the left of the time display indicates AM or PM.
3.Press and release the Clock Button again. The year will flash in the lower part of the display. Press and release the + or – Button until the current year is displayed.
4.Press and release the Clock Button again. The month and date will flash. Press and release the + or – Button until the current month and date is displayed.
5.Press and release the Clock Button once more. Two beeps will sound to confirm your settings and you will exit Time
and Calendar Setting mode.
3
 Loading...