


Model iP39
FM stereo system with dual timers for iPhone and iPod
- min.
- sec. |
|
|
|
mode |
|
+ sec. |
|
|
|
|
|
|
quick |
|
|
timer |
|
|
|
+1 |
minute |
|
|
|
+ |
min. |
|
|
+5 minute |
|
|
Questions? Visit www.ihomeaudio.com
Table of Contents |
|
Quick Start |
1 |
Controls and Indicators / iP39 Display |
2 |
Getting Started |
3 |
Connect AC adaptor, Install Clock Backup Battery, Install iPod/iPhone insert |
|
Setting Up the iP39 |
4 |
Setting the Time and Calendar using IPhone/iPod Time Sync |
|
Setting Time and Calendar Manually |
|
Timer Operation |
4-5 |
Setting the Quick Timer, Setting Timer 2 |
|
Using the Alarm |
5 |
Setting the Alarm, Review, Arming and Disarming Alarm |
|
Resetting the Alarm to Come on the Next Day, Sure Alarm |
|
Charging your iPod/iPhone and USB Device |
6 |
Listening to iPod/iphone |
6 |
Listening to FM Radio |
7 |
Setting up the Antenna, Tuning and Playing the Radio |
|
Setting FM Radio Frequency/Range touse iP39 in Other Countries |
|
Using the Aux Line-In Jack with other Audio Devices |
7 |
A Consumer Guide to Product Safety |
8 |
Troubleshooting |
9 |
Maintenance
•Place the unit on a level surface away from sources of direct sunlight or excessive heat.
•Protect your furniture when placing your unit on a natural wood and lacquered finish. A cloth or other protective material should be placed between it and the furniture.
•Clean your unit with a soft cloth moistened only with mild soap and water. Stronger cleaning agents, such as Benzine, thinner or similar materials can damage the surface of the unit.
FCC Information
This product bears the selective sorting symbol for waste electrical and electronic equipment (WEEE).
This means that this product must be handled pursuant to European Directive 2002/96/EC in order to be recycled or dismantled to minimize its impact on the environment.
For further information, please contact your local or regional authorities.
Electronic products not included in the selective sorting process are potentially dangerous for the environment and human health due to the presence of hazardous substances.
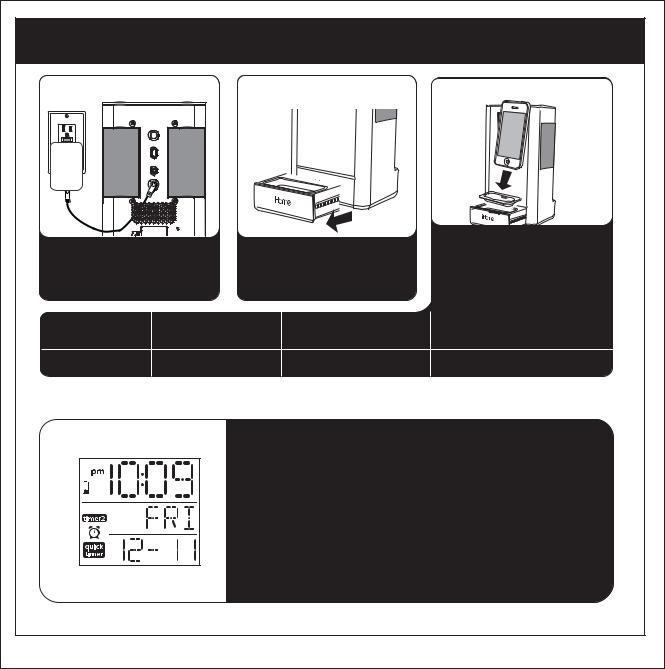
iP39 Quick start
1: Connect to AC power |
2: Access slide-out dock |
3: Dock iPhone/iPod |
|
aux. in |
RESET |
|
RESET |
|
TEST |
|
TEST |
|
time |
time |
sync |
set |
dst |
-1 |
+1 |
Attach AC adaptor cable to the DC jack on back of the iP39 and plug the other end into a working wall socket to play and charge iPhone/iPod and to provide power to the USB port.
Press on the dock door on the front of the unit to release the universal dock. Push dock back into unit when not in use.
Select the proper insert for your iPhone or iPod from the table below and place in dock. Gently place iPhone/iPod into dock (iPhone/iPod must not be in a “skin” or case). iPhone/iPod will charge while docked. Press the Play Button on the iP39 to play your iPhone/iPod.
Use this insert |
iPhone 3G |
iPod touch 2G |
iPod nano 5G |
|
Insert 15 |
insert 16 |
insert 18 |
||
|
||||
For this iPhone/iPod |
iPhone 3G/3GS |
iPod Touch 2G |
iPod nano 5G |
NOTE: If you do not have an insert for your iPhone/iPod, please visit www.ihomeaudio.com or call iHome toll free at 800-288-2792 to purchase one.
4: Time
• To use time sync, dock your iPhone/iPod and press the Time
Sync/Time Set Button. The unit will sync to the time on your iPhone/iPod.
• To set time manually, move the DST switch on rear of unit to +1 or -1 (adds or subtracts an hour for daylight saving time or standard time).
• Press & hold the Time Sync/ Time Set button on the back of unit until the time display flashes. Press the  /
/  buttons to set the current time.
• Press the Time Sync/ Time Set button. The year display flashes. Press the  /
/  buttons to set the current year.
• Press the Time Sync/ Time Set button. The date flashes. Press the  /
/  buttons to set the current date and day.
• Press the Time Sync/ Time Set button to confirm settings.
1

|
|
Controls and Indicators |
|
|
|
Reduce Volume Button |
|
|
|
|
|
Radio/Aux Button |
Play/Pause Button |
|
|
|
|
|
|
|
Back panel |
|
|
|
mo |
Timer Off |
|
|
|
Reverse Button |
de |
|
|
|
|
|
|
|
|
||
|
Power Off/ |
|
|
|
|
|
quick |
|
|
|
|
|
Alarm Reset Button |
|
|
|
|
+1 |
timer |
|
|
|
|
|
min |
|
aux. in |
|
|
|
ute |
|
|
||
Quick Timer/ |
|
|
|
|
Aux-in Jack |
|
Raise Volume Button |
|
|
|
|
+1 minute Button |
|
time |
time |
Time Sync/ |
|
|
|
|
|||
Timer 2 Button |
|
|
sync |
set |
Time Set Button |
|
Alarm Button |
|
|
||
|
|
|
-1 |
DST Switch |
|
|
|
|
dst |
||
|
|
|
+1 |
||
|
|
|
|
||
|
|
Forward Button |
|
|
DC Jack |
|
|
|
|
|
|
|
|
|
|
|
Backup Battery |
|
|
|
|
|
compartment |
|
|
USB Mode Switch |
|
USB |
|
|
|
charging |
USB Jack |
||
Dock |
|
|
|
||
|
|
|
|
|
|
|
|
|
|
|
FM Antenna |
|
|
iP39 Display |
|
|
|
PM Indicator |
|
Time Display |
|
|
|
Battery Low Indicator |
|
|
|
||
|
|
|
|
||
Timer2 Indicator |
|
Day/Timer 2/Sound/Radio mode Display |
|||
Alarm Indicator |
|
|
|
|
|
Quick Timer Indicator |
|
Calendar/ Quick Timer/Alarm/Radio Station Frequency |
|||
|
|
|
ON/OFF Display |
|
|
|
|
2 |
|
|
|
 Loading...