


Model: iBN350V2
Wireless Charging Station +
Music Streaming Stereo System
QUESTIONS? Visit www.ihome.com

W E L C O M E
Thank you for choosing the iBN350V2 from iHome. This user guide will get you up and running quickly and provide helpful hints to maximize enjoyment. For more information about this and other iHome products, please visit www.ihome.com
G E T T I N G S T A R T E D
This unit ships with the following items. Please check to see that all items are present.
1iBN350V2 speaker system
2100-240V Universal AC power adaptor
|
|
|
1 |
2 |
|
1

F E A T U R E S & F U N C T I O N S
Top panel
Wireless charging pad
Power On/O
Button
Volume
Control
Buttons
Alarm 1/Alarm 2
Buttons
Back panel
talk /end |
pai ring |
Sleep Button Snooze/Dimmer
Button
Talk/End Call
Button
Mode Button
Play/Pause Button
+/– Settings Buttons
Bluetooth Pairing Button
DC jack 


 Aux-in jack
DC 9V 3A
9V 3A
|
USB |
DST |
Clock |
|
|
charging |
Switch |
Button |
|
Display |
port |
|
|
|
|
Time Display |
|
||
PM Indicator |
|
|
|
|
AM Indicator |
|
|
|
|
Low Backup |
|
|
|
|
Battery Indicator |
|
|
|
Alarm |
|
|
|
|
|
Sleep Mode Indicator |
|
|
|
Indicators |
Wireless Charging |
Alarm Time/Date Display |
Bluetooth Indicator |
||
Wake-To/Mode Indicators |
|
|||
Indicator |
2 |
|||
|
(Tone/BT/(Bluetooth)Aux) |
|||

C O N N E C T I N G A C A D A P T E R
This unit operates on AC power using the included 100V-240V
universal AC adaptor. Place unit on a stable surface. Plug the power
adaptor into the DC jack on back of the unit and the other end into a working wall socket. The Power Button will glow red.
B A C K U P B A T T E R Y
The iBN350V2 ships with a CR2450 battery installed for backup to provide continuous alarm operation and clock settings in the event of a power failure. Remove the pull tab from the battery compartment on the bottom of the unit before use. If a power failure occurs or the AC cord is accidentally disconnected, the display backlight will not remain lit, but current time and alarm time settings will be temporarily maintained. Otherwise, you must reset the time and alarm settings.
Note: The  Battery Low icon is located at the lower left side of the clock display. When the backup battery is low and needs to be replaced, the Battery Low icon will flash. To replace, follow steps on next page.
3
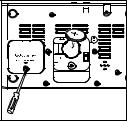
B A C K U P B A T T E R Y ( C O N T I N U E D )
1.Please make sure the AC adaptor is connected. Otherwise all settings may be lost during battery replacement.
2.Use a Phillips screwdriver to open the backup battery compartment door located on the bottom of the unit.
3. Remove the exhausted battery. Insert a new CR2450 battery by easing it under the tabs in the battery well and pressing down. Make sure the side marked + is facing up.
4. Close the battery compartment door and tighten the battery door screw.
Note: Make sure you dispose of battery properly (see your local regulations).
WARNING: Lithium batteries can explode or cause burns if disassembled, shorted, recharged, exposed to water, fire, or high temperatures. Do not place loose batteries in a pocket, purse, or other container containing metal objects, mix with used or other battery types, or store with hazardous or combustible materials. Store in cool, dry, ventilated area. Follow applicable laws and regulations for transport and disposal.
4
 Loading...