

Page 1

GB
Operator’s manual
Please read the operator’s manual carefully and make sure you understand the instructions before using the machine.
ES
DE
FR
Manual de instrucciones
Lea detenidamente el manual de instrucciones y asegúrese de entender su contenido antes de utilizar la máquina.
Bedienungsanweisung
Lesen Sie die Bedienungsanweisung sorgfältig durch und
machen Sie sich mit dem Inhalt vertraut, bevor Sie das
Gerät benutzen.
Manuel d’utilisation
Lire attentivement et bien assimiler le manuel d’utilisation avant d’utiliser la machine.
HUSQVARNA CONSTRUCTION PRODUCTS
PG 400
PG 280
GB ES DE FR
Page 2
KEY TO SYMBOLS
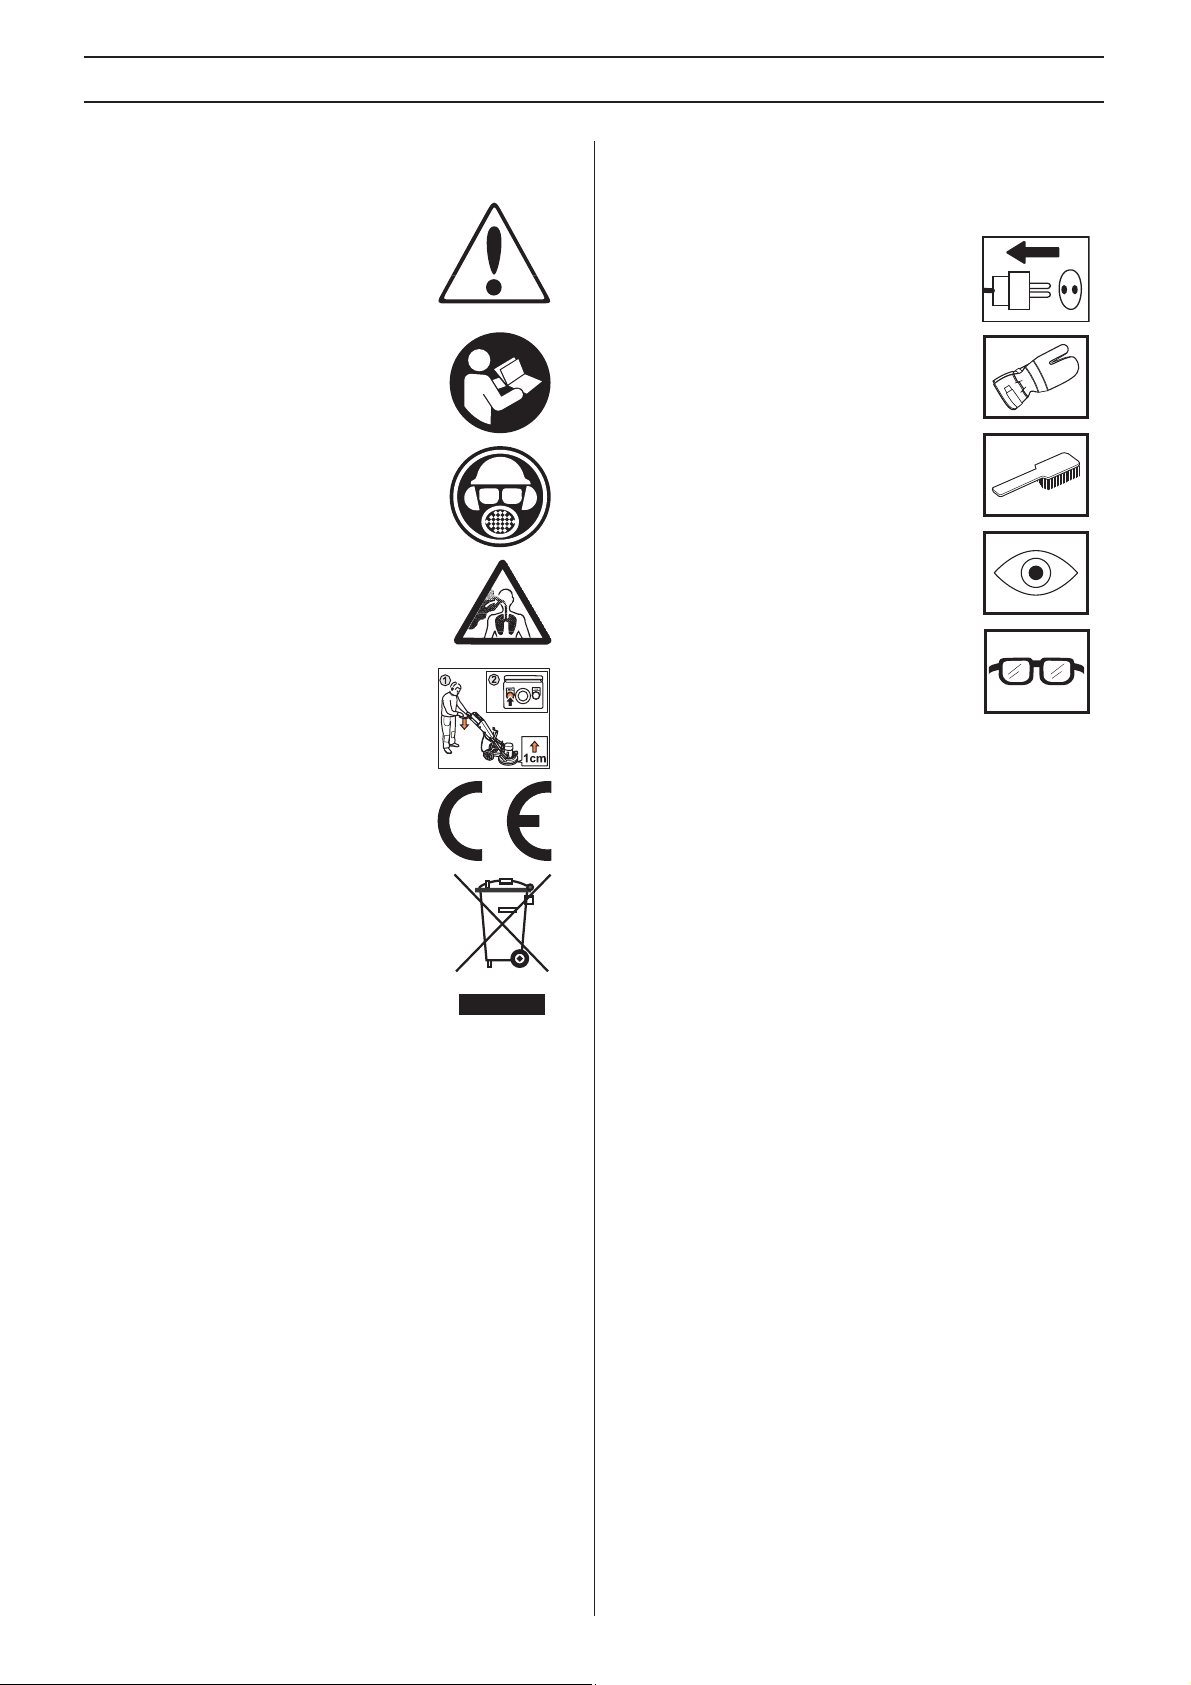
Symbols on the machine:
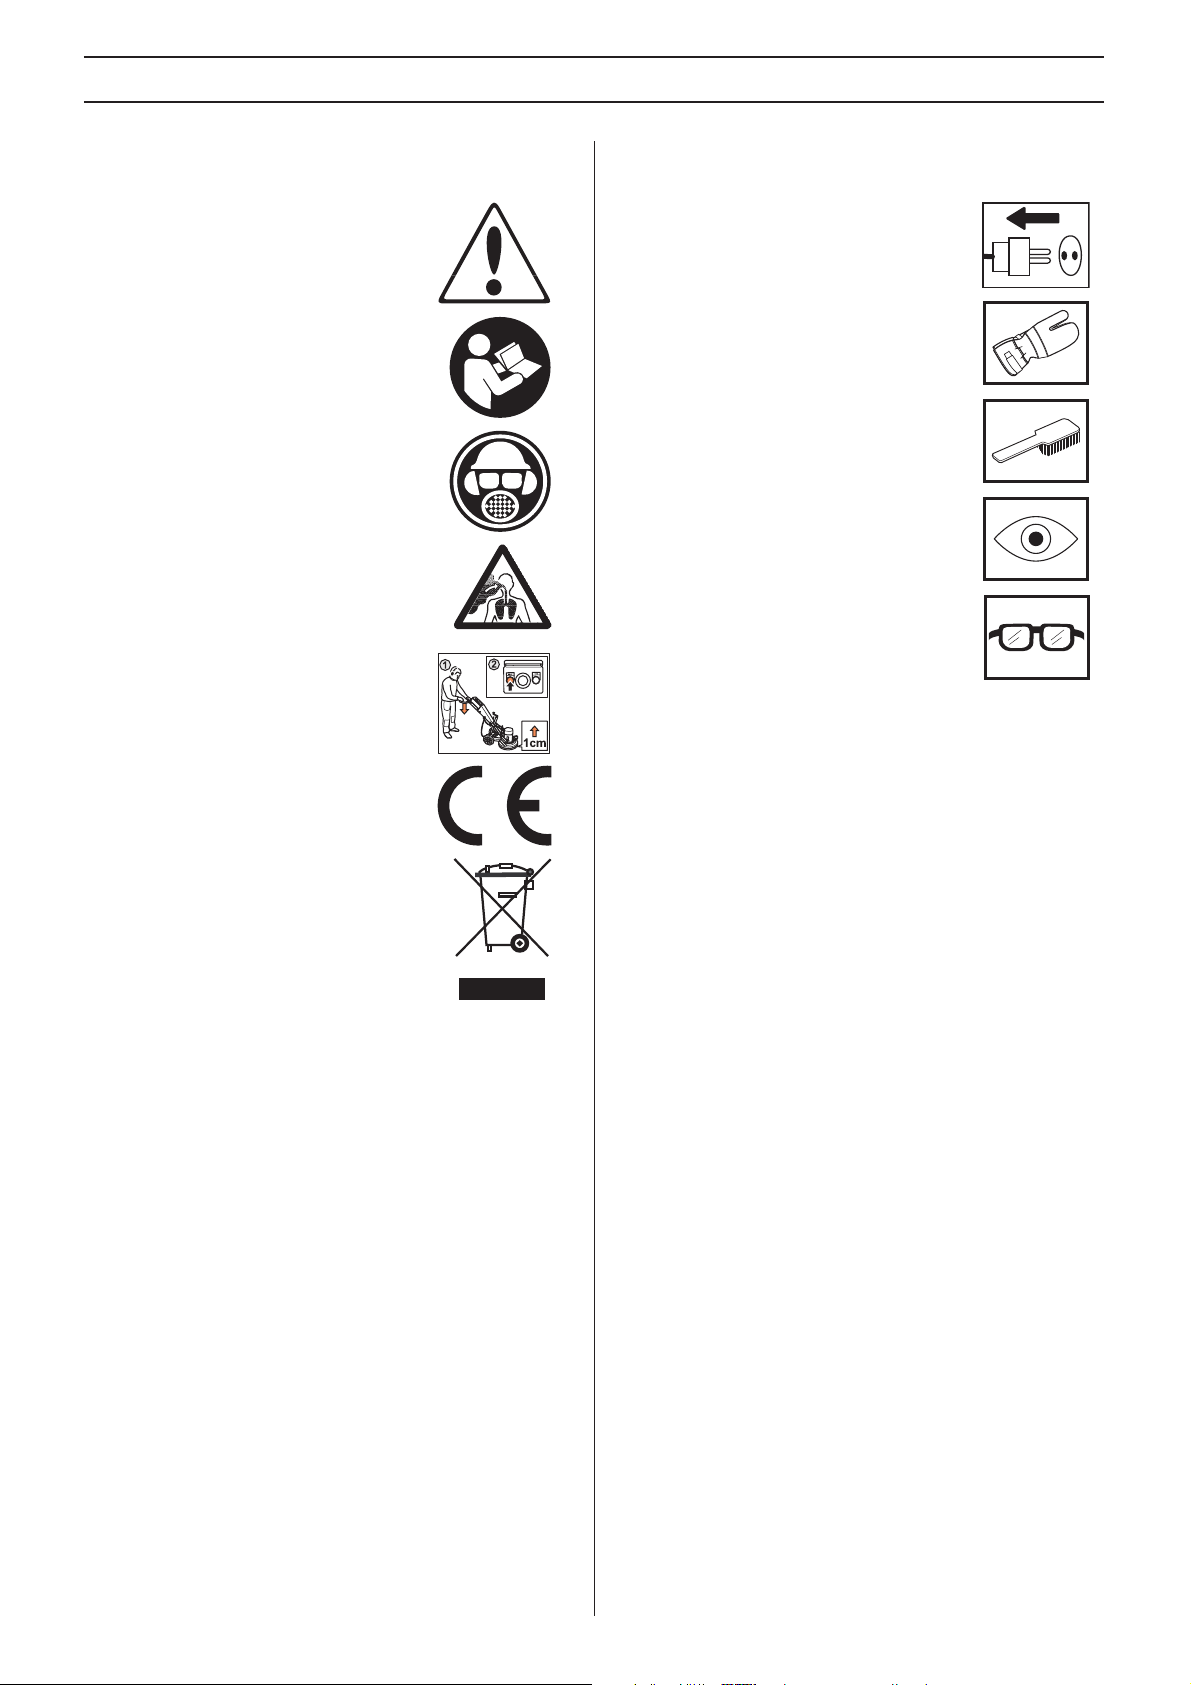
WARNING! The machine can be a
dangerous tool if used incorrectly or
carelessly, which can cause serious or
fatal injury to the operator or others.
Please read the operator’s manual
carefully and make sure y
instructions before using the machine.
Wear personal protective equipment. See
instructions under the heading ”P
protective equipment”.
WARNING! Dust forms when grinding,
which can cause injuries if inhaled.
approved breathing mask. Always provide f or
good ventilation.
Starting: Reduce the pressure between
gr
inding disc and floor by pushing down on
the handle without raising the grinding unit
off the ground.
ou understand the
ersonal
Use an
Symbols in the operator’s manual:
Inspection and/or maintenance should be
carried out with the motor switched off and
the plug disconnected.
Always wear approved protective gloves.
Regular cleaning is required.
Visual check.
Protective goggles or a visor must be worn.
This product is in accordance with
applicable EC directiv
Environmental marking. Symbols on the
product or its packaging indicate that this
product cannot be handled as domestic
waste.
By ensuring that this product is taken care of
correctly, y
potential negative impact on the environment
and people that can otherwise result through
the incorrect waste management of this product.
For more detailed information about recycling this product,
contact your m
shop from where you purchased the product.
Other symbols/decals on the machine refer to special
certification requirements for certain markets.
ou can help to counteract the
es.
unicipality , y our domestic w aste service or the
2 – English
Page 3

CONTENTS
Contents
KEY TO SYMBOLS
Symbols on the machine: ............................................. 2
Symbols in the operator’s manual: ............................... 2
CONTENTS
Contents ...................................................................... 3
WHAT IS WHAT?
What is what on the grinder? ....................................... 4
SAFETY INSTRUCTIONS
Before using a new grinder .......................................... 5
Personal protective equipment ..................................... 5
General safety precautions .......................................... 6
ASSEMBLY
Fit the handle ............................................................... 8
Changing the diamonds ............................................... 8
Connect the vacuum cleaner ....................................... 9
Transport ...................................................................... 9
GRINDING GUIDE
Diamonds ..................................................................... 10
Determining the hardness of concrete ......................... 10
Diamond selection ....................................................... 11
The motor’s direction of rotation .................................. 13
STARTING AND STOPPING
Before starting ............................................................. 14
Starting ........................................................................ 14
Stopping ....................................................................... 14
MAINTENANCE
Faults and trouble shooting .......................................... 15
Maintenance ................................................................ 15
Service ......................................................................... 15
TECHNICAL DATA
Technical data .............................................................. 16
EC-declaration of conformity ........................................ 16
WIRING DIAGRAM
English – 3
Page 4

WHAT IS WHAT?
What is what on the grinder?
1 Electric box
2Cover
3 Crank for adjusing grinding pressure
4 Lifting eye
5 Electric motor
6 Lifting handle
7 Skirt
8 Connection for vacuum cleaner
9 Wheel set
10 Cover locking knob
11 Screws, cover
12 Grinding unit - PG 280 SF
13 Grinding unit - PG 400 SF
14 Handle / handlebar
15 Control Panel
16 Start button
17 Emergency stop
18 Stop button
19 Locking knob for handlebar adjustment
20 Operator
′s manual
4 – English
Page 5
SAFETY INSTRUCTIONS
Before using a new grinder
• Please read the operator’s manual carefully and make
sure you understand the instructions before using the
machine.
• Grinders PG 400 SF and PG 280 SF are designed for
surface remo
like from concrete floors and grinding and flattening out
concrete floors. SF stands for single disc, fixed speed.
• The machine can cause serious personal injury. Read the
safety instr
machine.
• Only staff that have received the necessary education,
both practically and theoretically concer
should operate the machinery.
Always use common sense
It is not possible to cover e v ery conceivable situation y ou can
face. Always exercise care and use your common sense.
Avoid all situations which you consider to be beyond your
capability. If you still feel uncertain about operating
procedures after reading these instructions, you should
consult an expert before continuing.
Do not hesitate to contact your dealer if you have any more
questions about the use of the machine.
service and provide you with advice as well as help you to use
your machine both efficiently and safely.
Let your Husqvarna dealer regularly check the machine and
make essential adjustments and repairs
All information and all data in the Operator’s Manual were
applicable at the time the Oper
val of glue/adhesive residues, putty and the
uctions carefully. Learn how to use the
ning their usage
We will willingly be of
.
ator’s Manual w as sent to print.
Personal protective equipment
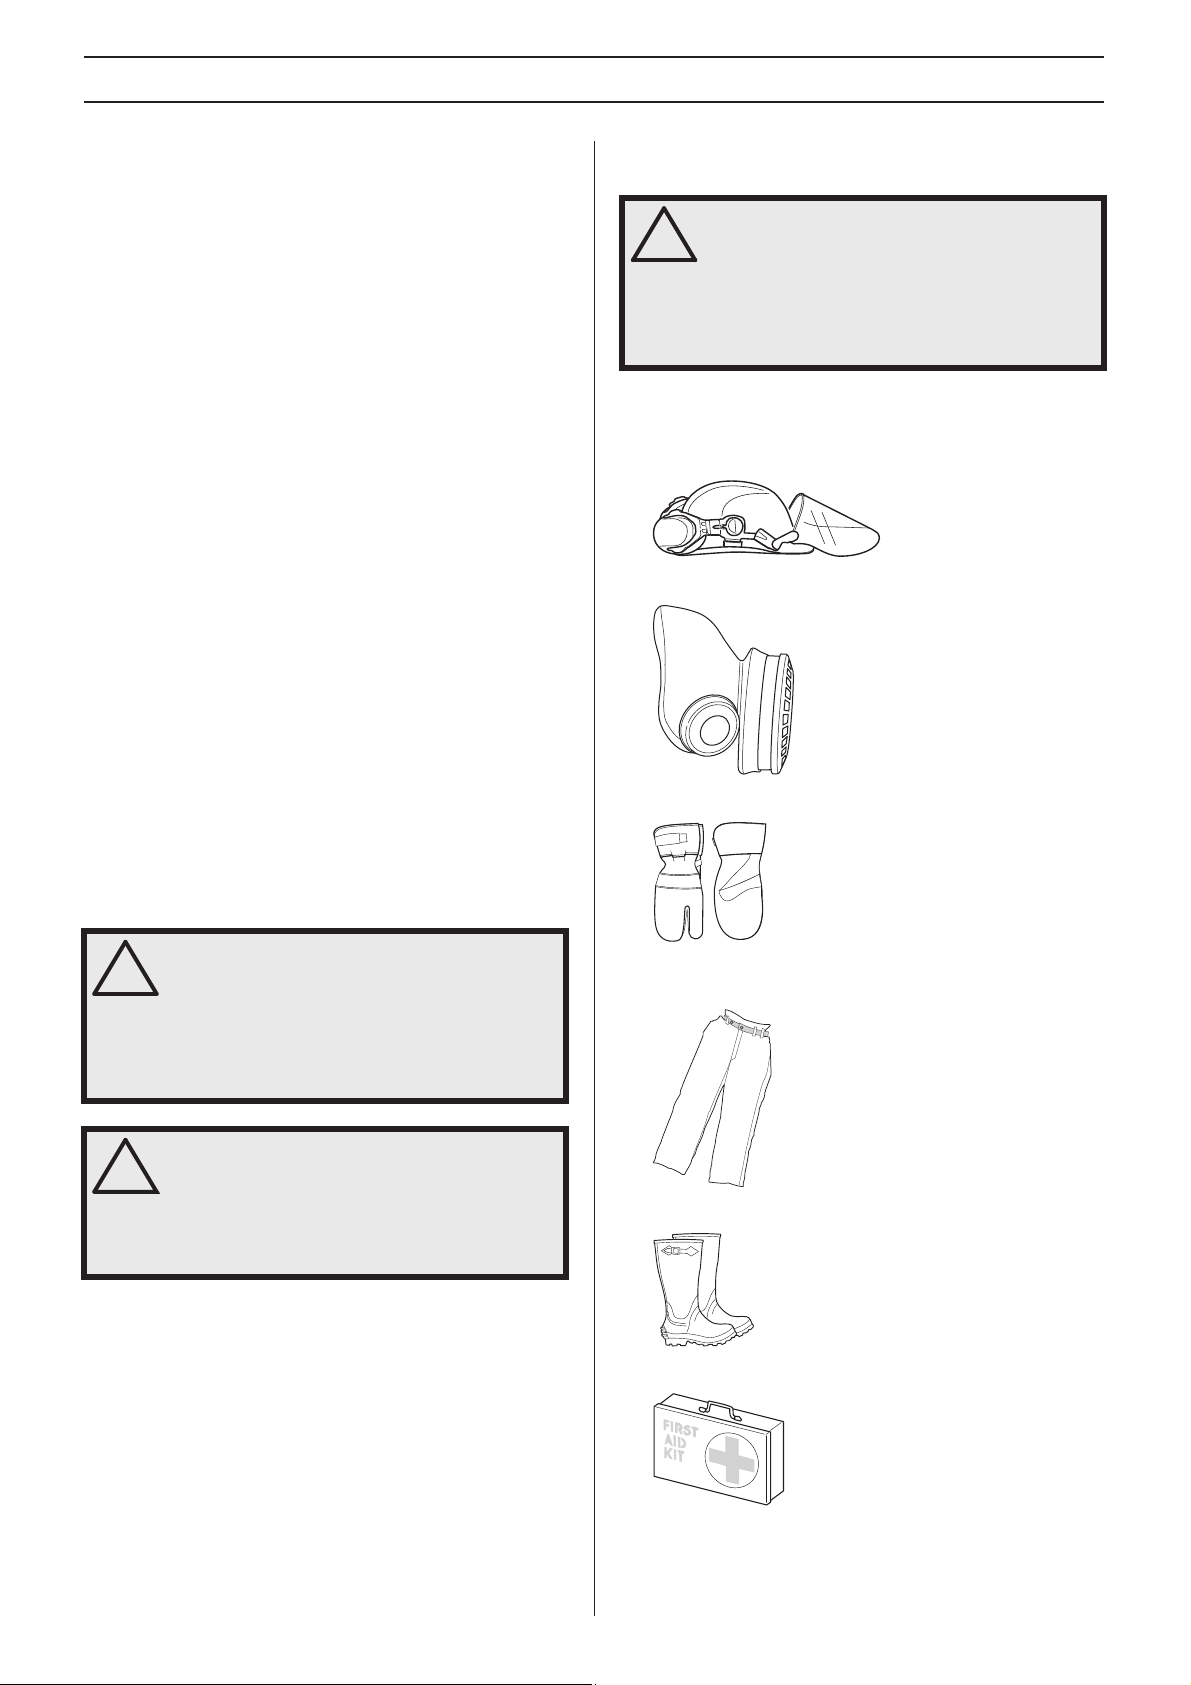
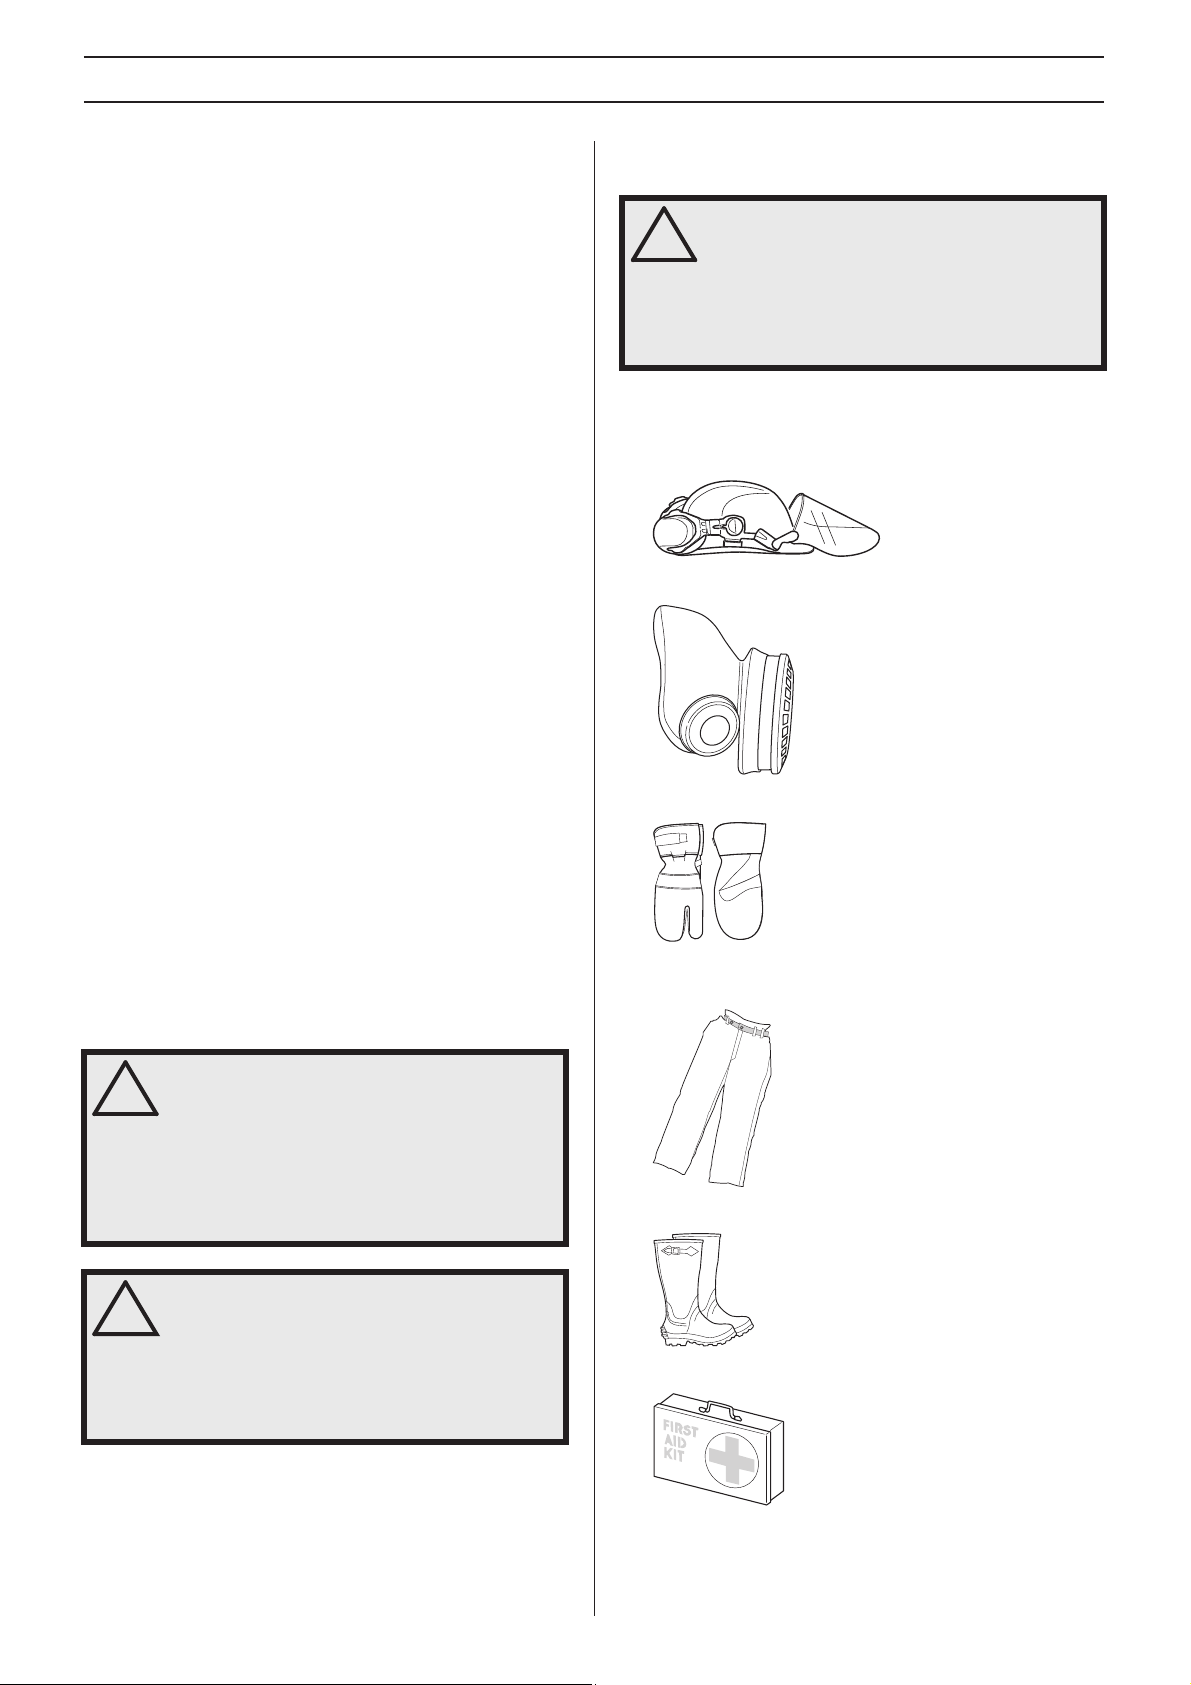
WARNING! You must use approved personal
protective equipment whenever you use the
!
machine. Personal protective equipment
cannot eliminate the risk of injury but it will
reduce the degree of injury if an accident
does happen. Ask your dealer for help in
choosing the right equipment.
• Protective helmet
• Hearing protection
• Protective goggles or a visor
• Breathing mask
• Heavy-duty, firm grip gloves.
WARNING! Under no circumstances should
you modify the original design of the
!
machine without approval from the
manufacturer. Always use original spare
parts. Unauthorized modifications and/or
accessories may lead to serious injury or
death to the user or others.
WARNING! Use of pr oducts which cut, grind,
drill, sand or shape material can generate
!
dust and vapors which may contain harmful
chemicals. Know the nature of the material
being worked on and wear appropriate dust
mask or respirator protection.
• Tight-fitting, heavy-duty and comfortable clothing that
mits full freedom of movement.
per
• Boots with steel toe-caps and non-slip sole.
• Always have a first aid kit nearby.
English – 5
Page 6

SAFETY INSTRUCTIONS
General safety precautions
WARNING! This section describes basic
safety directions for using the machine. This
!
information is never a substitute for
professional skills and experience. If y ou get
into a situation where you feel unsafe, stop
and seek expert advice. Contact your dealer,
service agent or an experienced user. Do not
attempt any task that you feel unsure of!
• Do not use the machine without first reading and
understanding the contents of this Operator’s Manual.
Work area safety
• Do not use the machine in bad weather, such as dense
fog, rain, strong wind, intense cold, etc.
• Keep work area clean and well lit. Cluttered or dark areas
invite accidents
• The machine should not be used in areas where potential
for fire or e
Electrical safety
!
• Never drag the machine by means of the cord and never
pull out the plug by pulling the cord.
• Keep all cables a wa y of w ater , oil and sharp edges. Make
sure the cable is not pinched in doors
It can cause the object to become live.
• Check that the cables are intact and in good condition.
Use cable intended f
• Never use the machine if any cab le is damaged, but hand
it in to an authoriz
• The machine should be connected to an earthed outlet
et.
sock
• Check that the mains voltage corresponds with that stated
on the rating plate on the machine
• Be on your guard for electrical shocks. A v oid having body
contact with lightning-conductors/metal in the ground.
Do not use an extension cord while it is rolled up to av oid
•
erheating.
ov
• Ensure the cord is behind you when you start to use the
machine so that the cord will not be damaged.
.
xplosions exist.
WARNING! There is always a risk of shocks
from electrically powered machines. Avoid
unfavourable weather conditions and body
contact with lightning conductors and metal
objects. Alwa ys follow the instructions in the
Operator’s manual to avoid damage.
, fences or the like.
or outdoor use.
ed service workshop for repair.
.
Personal safety
WARNING! Overexposure to vibration can
lead to circulatory damage or nerve damage
!
in people who have impaired circulation.
Contact your doctor if you experience
symptoms of overexposure to vibration.
Such symptoms include numbness, loss of
feeling, tingling, pricking, pain, loss of
strength, changes in skin colour or
condition. These symptoms normally appear
in the fingers, hands or wrists. These
symptoms may be increased in cold
temperatures.
• Wear personal protective equipment. See instructions
under the heading ”Personal protective equipment”.
• Never use the machine if you are tired, if you have drunk
alcohol, or if you are taking medication that could aff
your vision, your judgement or your co-ordination.
• Never allow anyone else to use the machine without first
ensuring that the
operator’s manual.
• All operators shall be trained in the use of the machine.
The owner is responsib
receive training.
• People and animals can distract you causing you to lose
control of the machine.
concentrated and focused on the task.
• Be careful as clothing, long hair, and jewellery can get
caught in moving par
• Never leave the machine unsupervised with the motor
running.
Make sure that there is always another person close at
•
hand when you use the machines
help if an accident should occur.
• Always ensure you have a safe and stable working
position.
y have understood the contents of the
le for ensuring that the operators
For this reason, always remain
ts.
, so that you can call for
ect
6 – English
Page 7

SAFETY INSTRUCTIONS
Use and care
• Only use the machine for the purpose it was intended for.
• Keep all parts in good working order and ensure that all
fixtures are properly tightened.
Never use a machine that is faulty. Carry out the checks,
•
maintenance and service instr
manual. Some maintenance and service measures must
be carried out by trained and qualified specialists. See
instructions under the heading Maintenance.
• Do not modify safety equipment. Check regularly that they
function as they should.
defective or disassembled safety equipment.
• Never use a machine that has been modified in any way
from its original specification.
Machinery should only be started when grinding heads
•
are resting on the ground unless carr
procedure as outlined in this manual.
• The machine should not be started without the rubber
dust skirt attached.
machine and floor be established for safety, especially
when operating in dry grinding applications.
• During grinding, the machine must be connected to a
vacuum cleaner to suc
• When changing the grinding discs ensure power supply to
the unit is OFF by engaging the Emergency Stop b
and the power-plug disconnected.
• After each grinding/polishing operation always remov e the
diamond tools.
Make sure that the rubber skirt is intact and clean and that
•
it seals tightly against the floor.
should always be replaced.
• When removing glue, asphalt, paint etc. always raise the
machine from the surface after use to pre
sticking to the floor due to the heat. Make sure the
grinding head has stopped rotating before raising the
machine.
• Diamond tools may be very hot after use. Leave machine
to cool off before remo
protective gloves.
• Always use the machine mounted lifting eye when lifting.
• Always carry the machine by the carrying handle and the
.
handle
It is essential a good seal between
king off the dust.
ving the diamond segments. Use
uctions described in this
The machine must not be run with
ying out a testing
utton
Damaged rubber skirt
vent it from
Transport and storage
• The machine should always be transported under cover
limiting the exposed to natural elements – in particular
rain and snow.
• Store the equipment in a lockable area so that it is out of
reach of children and unauthoriz
• The machine should always be stored in a dry place when
not in use.
ed persons.
English – 7
Page 8
ASSEMBLY
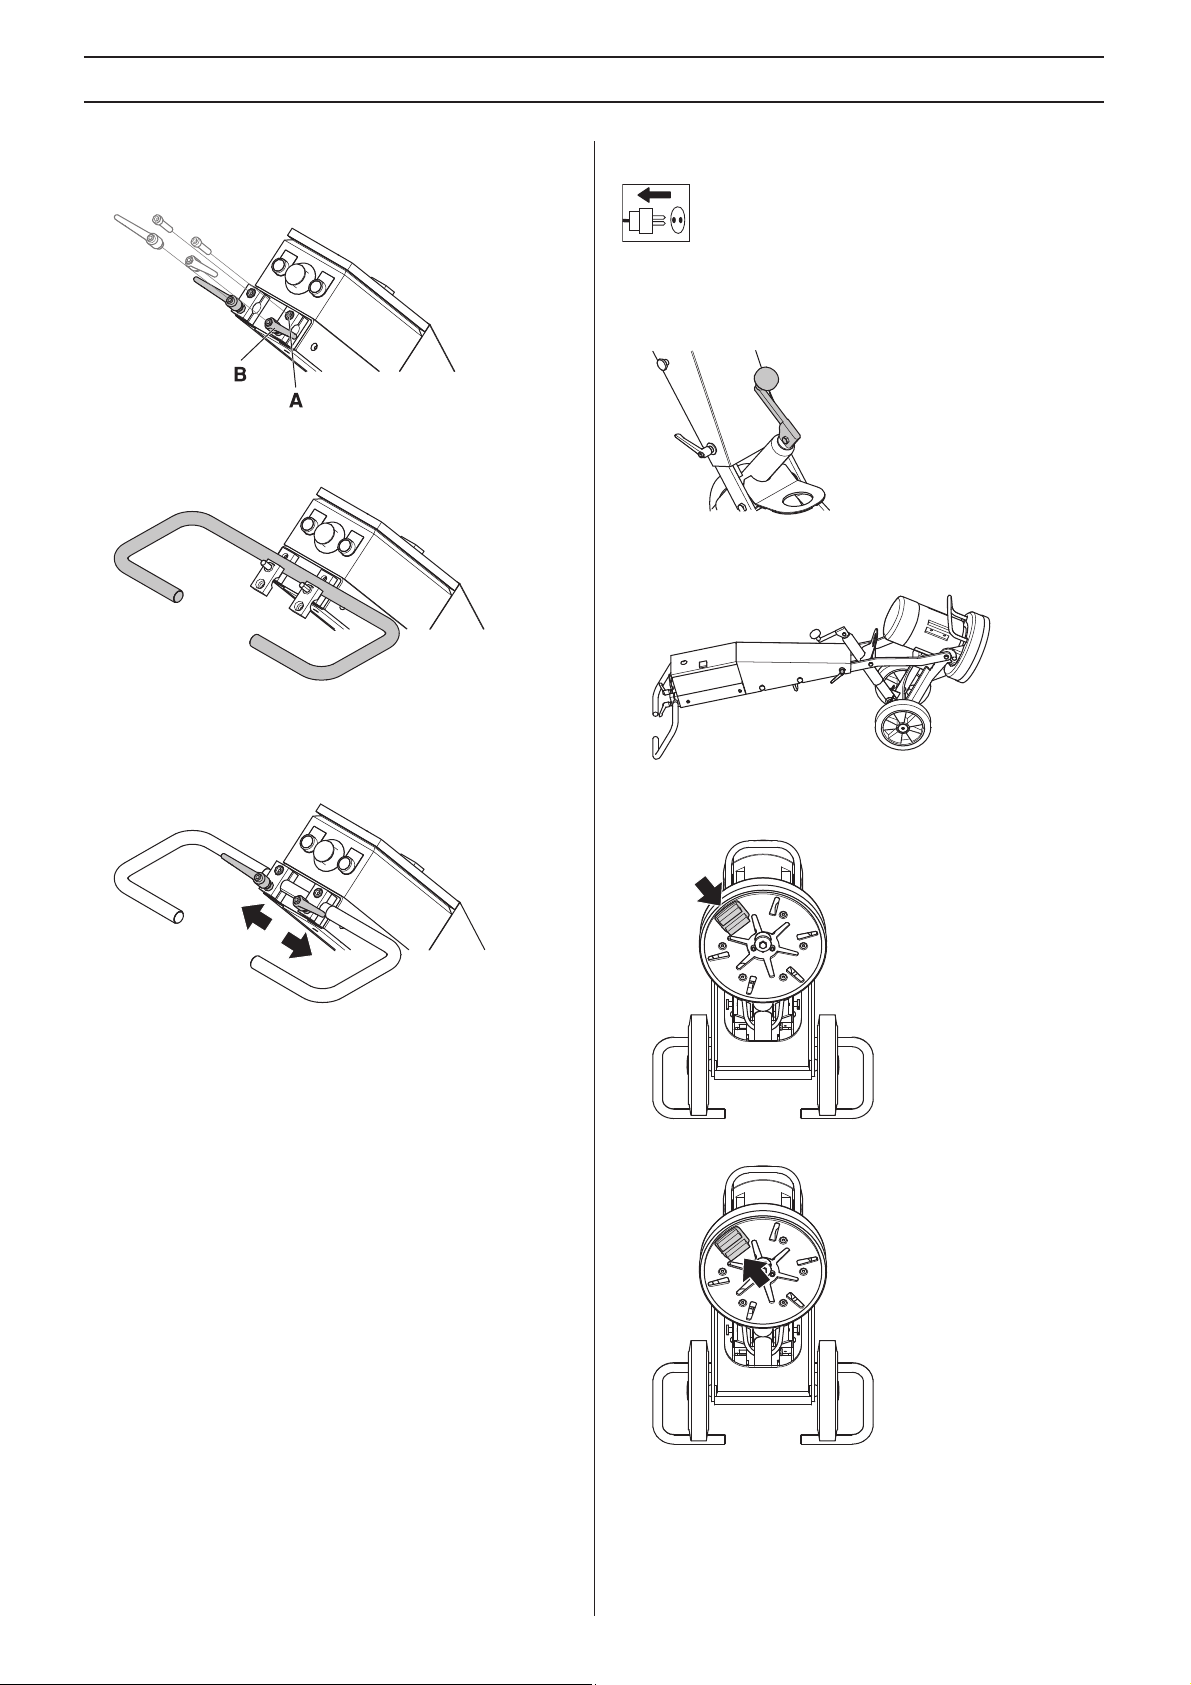
Fit the handle
• Remove the screws (A).
• Remove the locking knobs (B).
• Fit the handle in the handle stand-off on the machine.
• Refit screws (A) and locking knobs (B).
• The locking knobs should be positioned in-line with the
handlebar to reduce the risk of damaging the knobs when
ying down the machinge when changing tools.
la
Changing the diamonds
Shut down the machine and disconnect the power plug.
Have a set of glov es ready , as diamond tools can get v ery hot.
• Crank up the handlebar to the highest position.
• Pull back on handle to lift grinding head off the ground.
• Lay machine back on the ground.
• Put on gloves.
• Use a hammer to remove the diamond segments.
8 – English
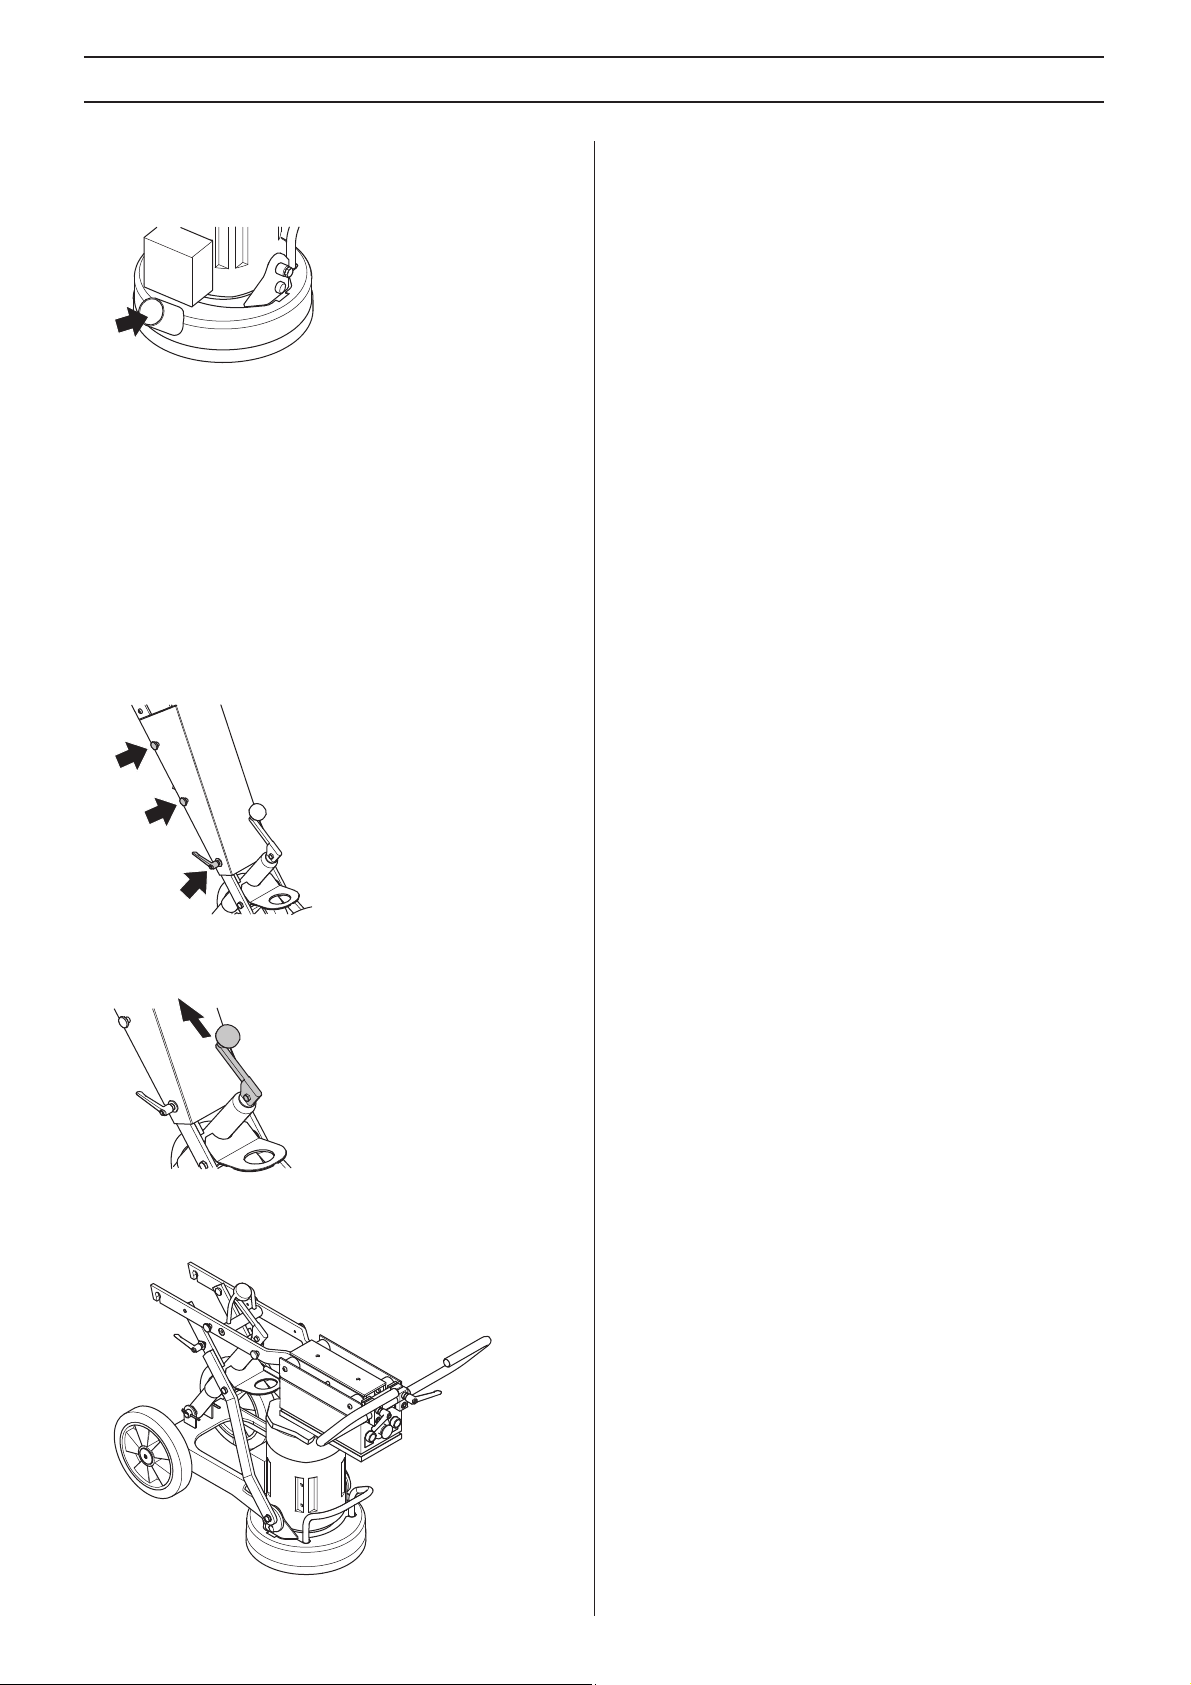
• Affix new diamond segments on the grinding disc.
• Once new diamond segments have been attached,
erse procedure to lower machine to ground.
v
re
Page 9
ASSEMBLY
Connect the vacuum cleaner
Connect the vacuum cleaner to the machine. Use a 50 mm
(2 inch) hose.
• It is highly recommended to use the Husqvarna DC 3300
dust extraction system for complete dust control.
• Make sure that the filters in the vacuum cleaner are intact
and clean. P
• Adjust the rubber skirt to be in contact with the floor to
ensure efficient dust collection.
Transport
The machine can be folded to minimize space needed for
transport.
• Loosen the screws and the lock handle that hold the cov er
in place.
ay attention to dust during operation.
• Remove the cover.
• Place the crank with the handle pointing straight upwards.
• Carefully fold the machine forward. Put padding between
the motor and the electric box to prevent damage to the
machine.
• The cover can be attached to the side of the machine.
English – 9
Page 10

GRINDING GUIDE
Diamonds
Background
Diamond abrasives usually consist of 2 components:
• Diamond powder (also known as diamond crystals or grit).
By changing the size of the diamond po
can change how coarse or fine the scratches will be that
are left behind from the grinding process.
• A binding agent (metal or resin). Diamond powder is
mixed and suspended in either a metal or resin binding
When suspended in a metal binding agent, the
agent.
finished product is referred to as a Metal Bond or Sintered
diamond segment. When suspended in a resin binding
agent, the finished product is referred to as a Resin Bond
diamond segment or pad. By changing the hardness of
the binding agent, we can change how fast or slow the
diamond abrasive will wear.
General Principles
The following are general rules regarding diamond segments
in grinding applications. As with all general rules there are
exceptions or cases when it is not the case.
Diamond grit size
Changing the size of the diamond grit to a smaller particle/grit
size will effect the performance of the diamond tool in the
following ways:
• Create a finer scratch pattern.
• Increase life of diamond tool.
The opposite will occur when changing to a larger particle/grit
ize.
s
Binding agent
Increasing hardness of bond will:
• Create a finer scratch pattern.
• Increase life of diamond tool.
• Decrease production rate.
The opposite will occur when making the metal or resin bond
.
softer
Number of diamond segments/pads under the
machine
Increasing the number of segments under the machine will:
• Reduce pressure on each individual diamond segment reduce wear r
• Reduce load on the machine and cause the grinder to
w less current.
dra
• Create a smoother scratch pattern (particularly on soft
floors).
The opposite will occur when decreasing the number of
segments under the machine
Summary of diamond principles
Diamond segments need to wear in order to achieve
productivity . Diamond segment wear can be influenced by the
following factors:
ate on diamond segments.
.
wder or grit, we
• Pressure.
• Hardness of bond.
• Diamond grit size.
• Number of segments under the machine.
• Adding an additional abrasive (e.g. sand, silicone carbide)
ear
on the floor will increase w
Generally , the faster a diamond segment w ears, the faster the
productivity will be.
can also be made to effect the following:
• Scratch pattern.
• Current draw of machine.
• Flatness of floor (see next section).
• Ease of operation.
By varying the above factors, changes
.
Determining the hardness of concrete
All concretes are measured by their compressive strength
and depending on which part of the world you are from,
different compressive strength indices (e.g. PSi & MPa) are
used. Generally, the higher the compressive strength rating,
the harder the concrete and therefore, the harder it will be to
grind.
However, other factors beside compressive strength ratings
determine ho
correct diamond selection. Since grinding normally only deals
with the surface of the concrete (top 5mm or 1/4 inch), often
the way the concrete floor has been finished or the condition
of the surface will have a greater bearing on what type of
diamond to select, rather than the compressive strength
rating of the concrete.
Surface factors to consider when making a diamond
selection
Generally , if a concrete surf ace is very smooth (i.e. Most likely
it has been heavily trowelled/helicoptered), the concrete will
behave as if it has a high compressive strength and theref ore,
require a soft bond segment.
Accordingly, if a concrete surface is coarse/aggressive (e.g.
rain-damaged, shot b
e.t.c.), the concrete will behave as if it has a lo w compressive
strength and therefore, require a hard bond segment.
Surface coatings/contaminants (e.g. Epoxy coatings , ceramic
tile adhesives
larger bearing on what diamond to select, than will the
compressive strength of the concrete.
As a general rule, when grinding a concrete slab for the first
time and you are unsure about its hardness
with harder bond diamonds under the machine. This will
ensure the least amount of wear on the diamond segments. If
a hard diamond segment is not suited to the application, all it
has cost is a little amount of time without wearing out the
diamonds.
If performed the other way around (i.e. a soft segment is used
to begin with) and the concrete is soft or possesses an
abrasiv
wear-out a considerable amount of diamond in very short
period of time.
w hard the floor will be, and therefore, the
lasted, scarified, exposed aggregate
, levelling compounds/screeds) will often ha ve a
, always begin
e surface or surface contaminant, it is quite possib le to
10 – English
Page 11
GRINDING GUIDE
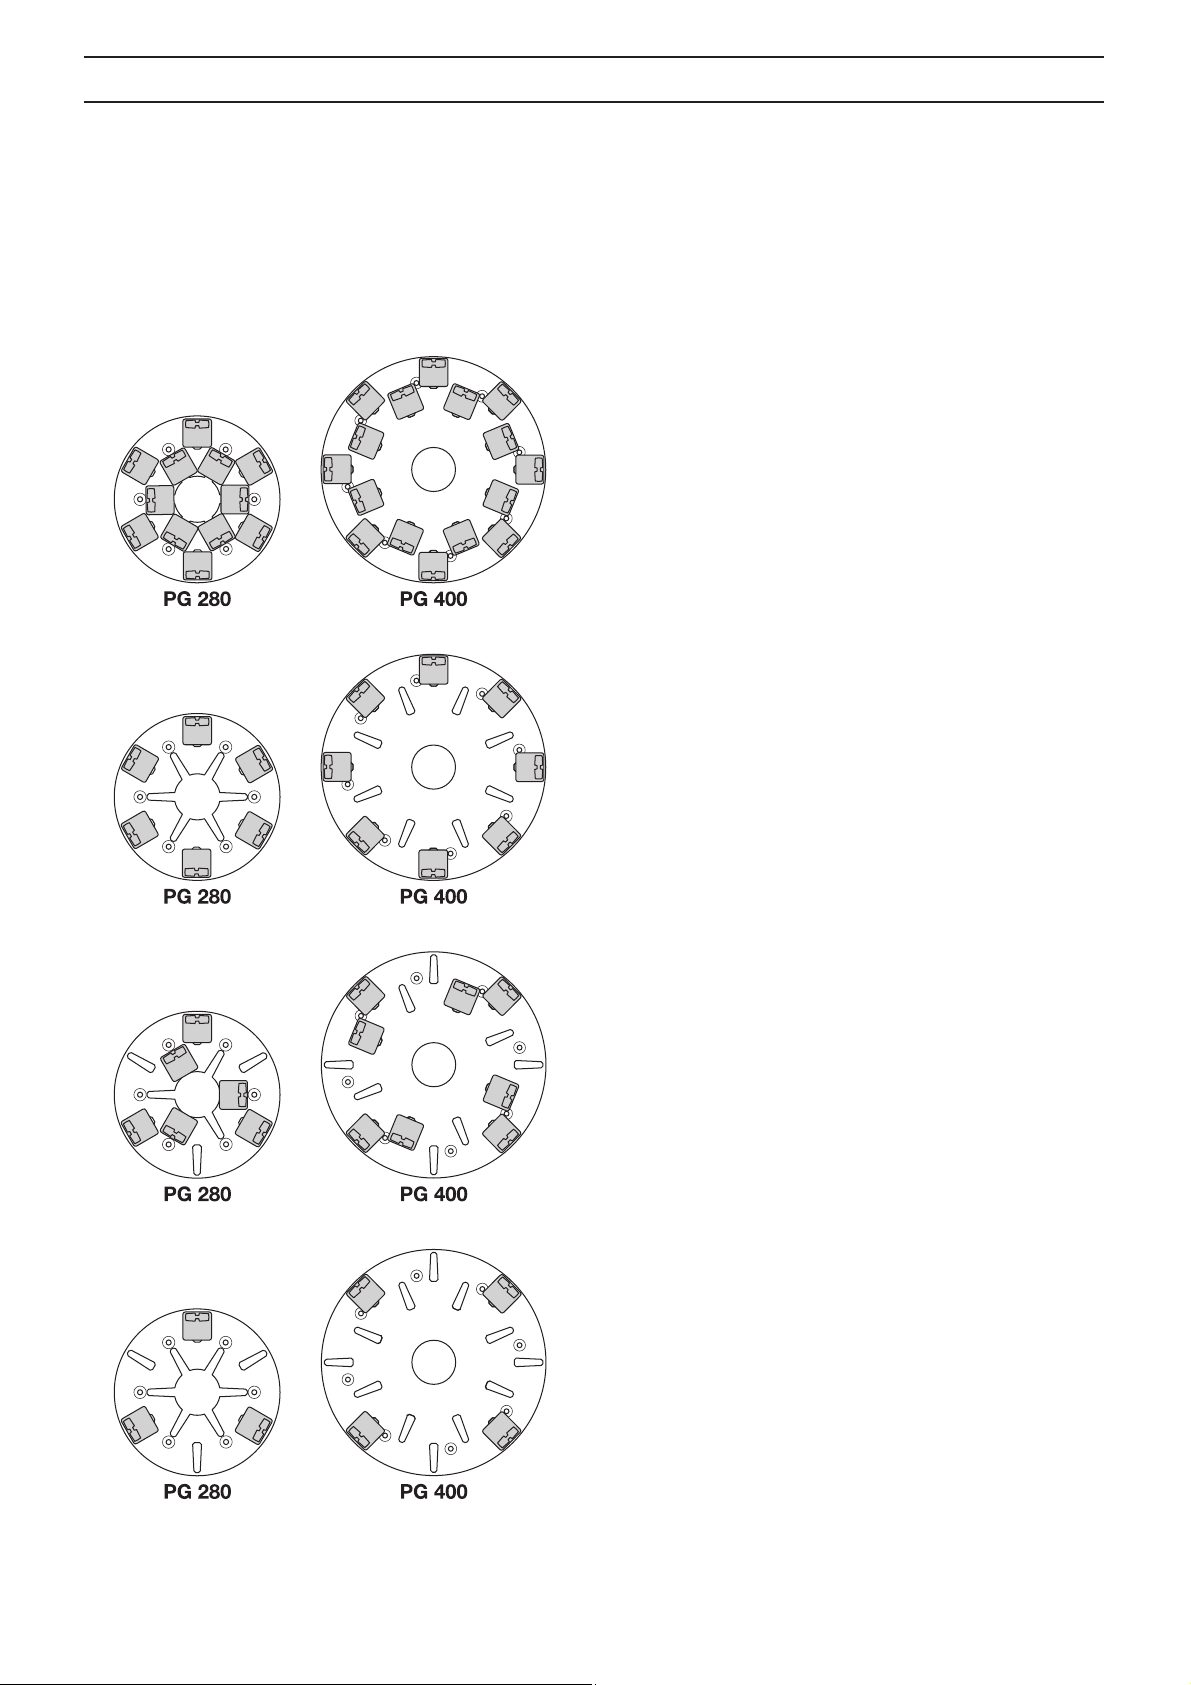
Diamond selection
They way diamond segments are set-up on the g rinding unit will greatly influence the performance of the machine, the productivity
levels and also the finished floor quality.
There are a number of different diamond configurations that can be achieved on both the PG 400 SF and PG 280 SF.
Metal bond diamonds
Full set - inner and outer row
Full set - outer row
Half set - inner and outer row
Half set - outer row
English – 11
Page 12

GRINDING GUIDE
Select the correct metal bond diamonds for your application
The following suggestion cover the basic configurations for metal bonded diamond tools.
Applications
Flatten floor - Hard concrete Soft 16 or 30 X
Flatten floor - Medium concrete Medium 16 or 30 X
Flatten floor - Soft concrete Hard 16 or 30 X
Ceramic tile adhesive removal Medium
Vinyl or Carpet glue removal -
Hard concrete
Vinyl or Carpet glue removal -
Medium concrete
Vinyl or Carpet glue removal -
Soft concrete
Epoxy paint removal -
Hard concrete
Epoxy paint removal -
Medium concrete
Epoxy paint removal -
Soft concrete
Rain damaged concrete Hard 16-30 X X
Smoothen exposed aggregate Hard 16-30 X X
Lippage removal in terrazzo/stone
tiles
Surface polishing of concrete
floors - Hard concrete
Surface polishing of concrete
floors - Medium concrete
Surface polishing of concrete
floors - Soft concrete
Grinding to exposed aggregate in
concrete - Hard concrete
Grinding to exposed aggregate in
concrete - Medium concrete
Grinding to exposed aggregate in
concrete - Soft concrete
Flatten undulation in concrete
floors - Hard concrete
Flatten undulation in concrete
floors - Medium concrete
Flatten undulation in concrete
floors - Soft concrete
Metal
bond
Soft
Medium
Hard
Soft
Medium
Hard
Soft 30 or 60 X
Soft 60 X X
Medium 60 X X
Hard 60 X X
Soft 16-30 X X X
Medium 16-30 X X X
Hard 16-30 X X
Soft 16 or 30 X X X
Medium 16 or 30 X X
Hard 16 or 30 X X
Grit size
PIRANHA™ or
16-30
PIRANHA™ or
16-30
PIRANHA™ or
16-30
PIRANHA™ or
16-30
PIRANHA™ or
16-30
PIRANHA™ or
16-30
PIRANHA™ or
16-30
Full set - inner
and outer row
X
Full set outer row
X X
X
X
Half set - inner
and outer row
X X
X X
X X
Half set outer row
12 – English
Page 13
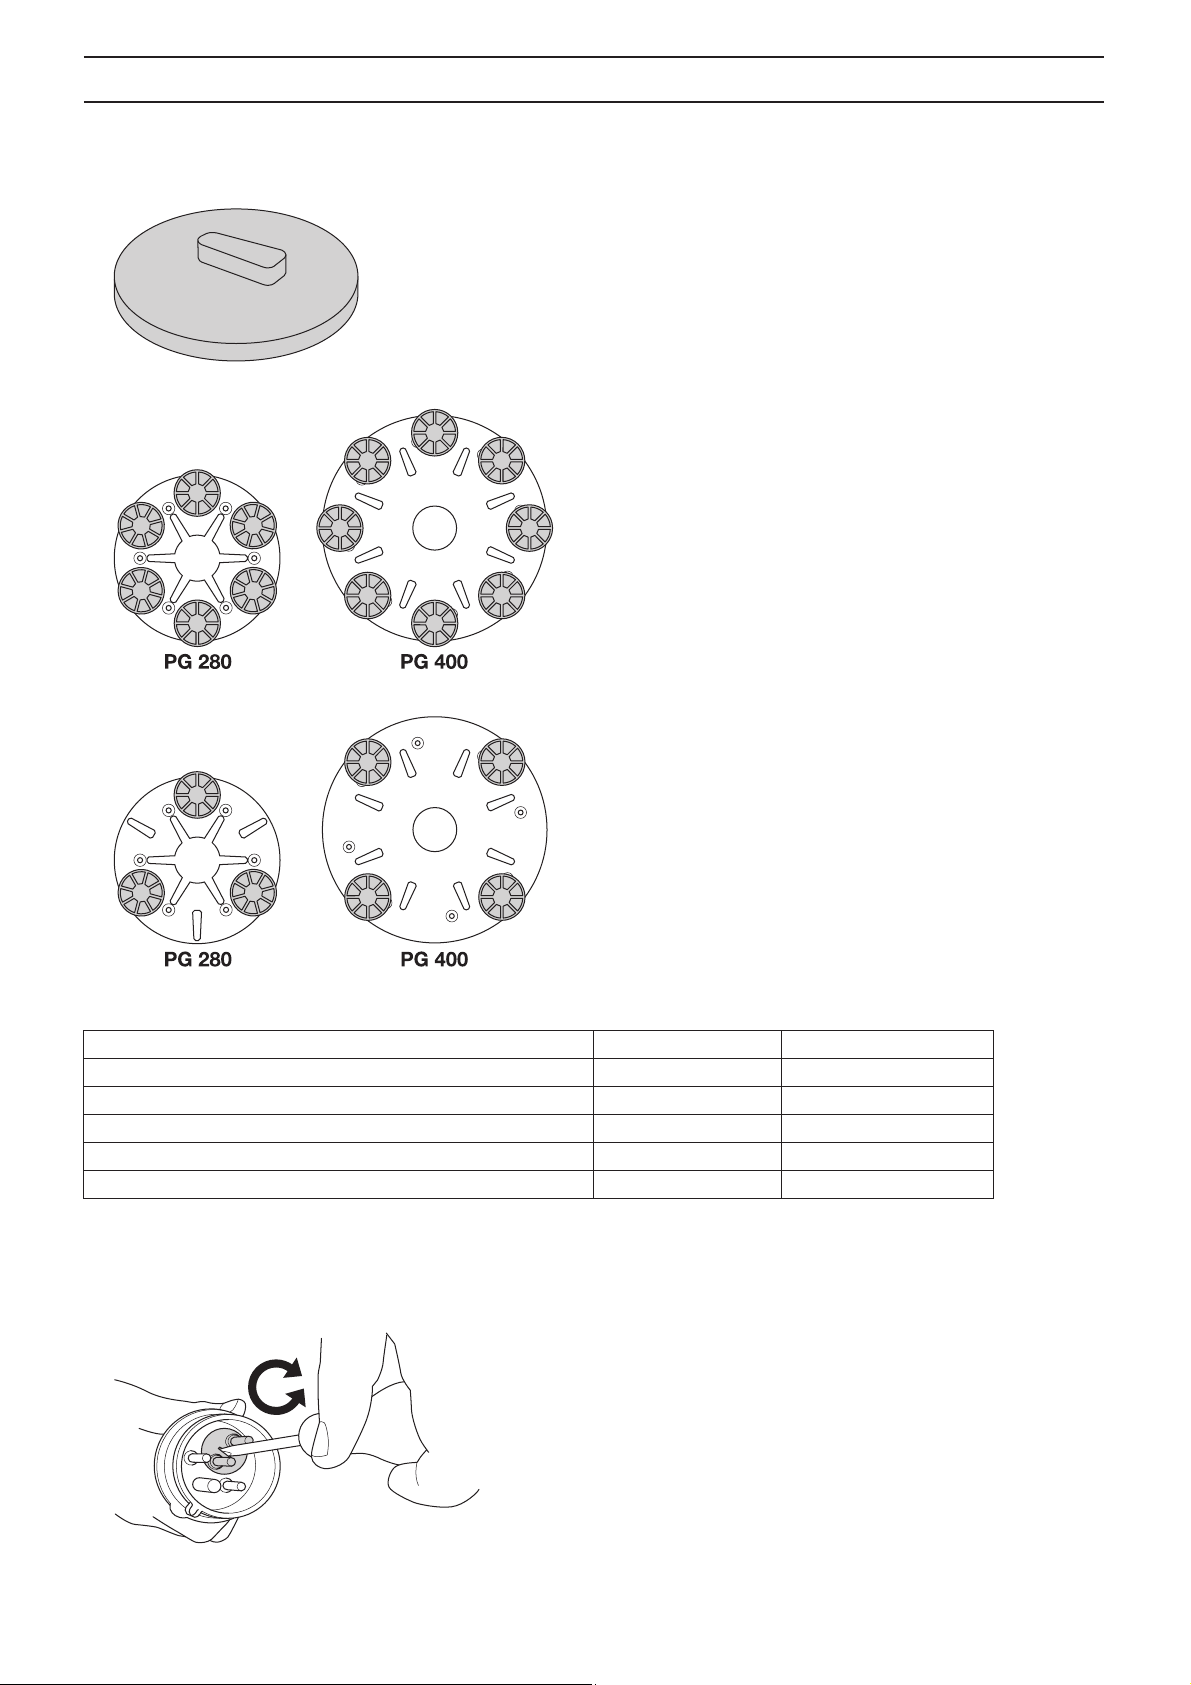
Resin bond diamonds
Redi Lock resin attachment adaptor
Full set - outer row
GRINDING GUIDE
Half set - outer row
Selecting the correct resin bond diamond configuration for your application
Applications Full set - outer row Half set - outer row
Polishing terrazzo/stone tiles X
Resurfacing terrazzo/stone tiles X
Surface polishing of concrete floors - Hard concrete X
Surface polishing of concrete floors - Medium concrete X
Surface polishing of concrete floors - Soft concrete
X
The motor’s direction of rotation (3 phase)
The motor´s direction can be changed by reversing the poles in the power plug.
NOTE! The Piranha/PCD tools are designed to run in only one direction.
English – 13
Page 14
STARTING AND STOPPING
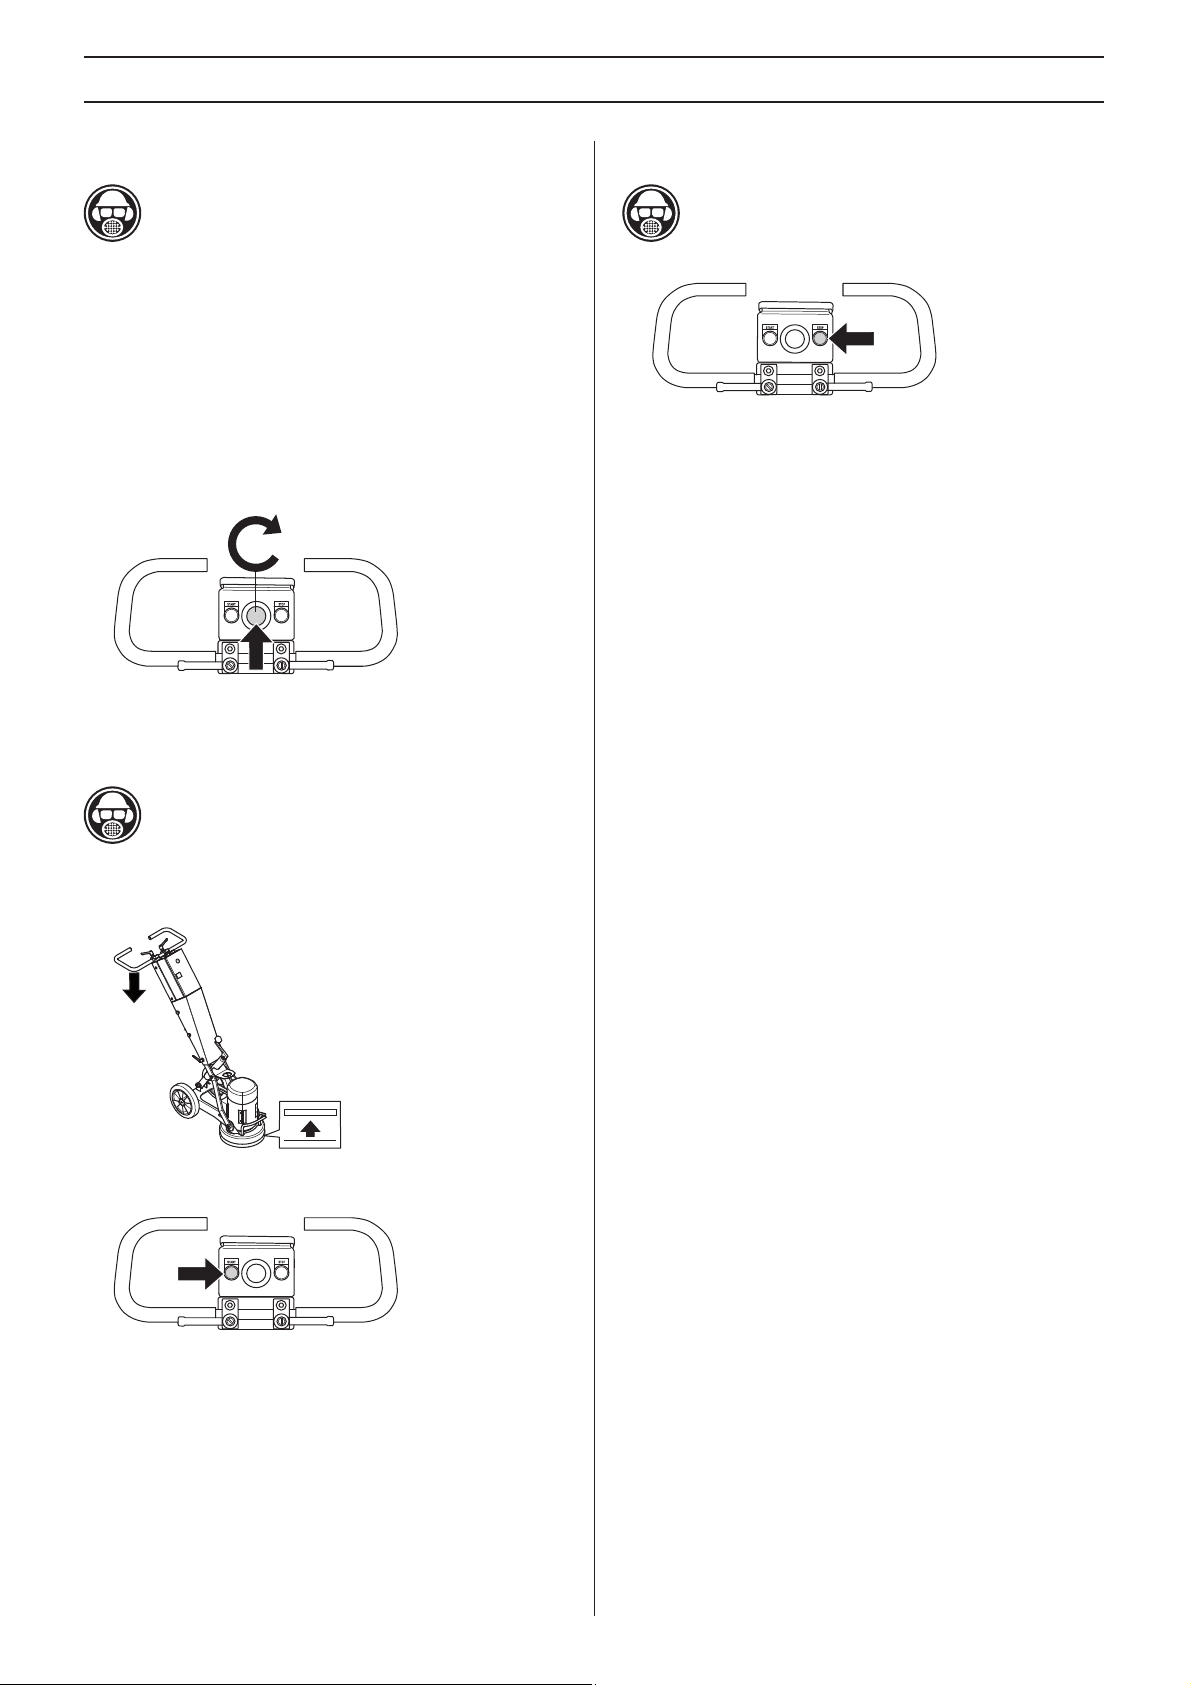
Before starting
• Position grinder on the working area.
• Make sure there are diamonds beneath the machine and
that they are fir
• Connect the vacuum cleaner to the machine.
• Use locking knobs for handlebar adjustment to set most
or
table working height.
comf
• Plug power supply to machine.
• Check that the emergency stop button is not pressed by
ning it cloc
tur
• Check the motor’s direction of rotation
mly attached.
kwise.
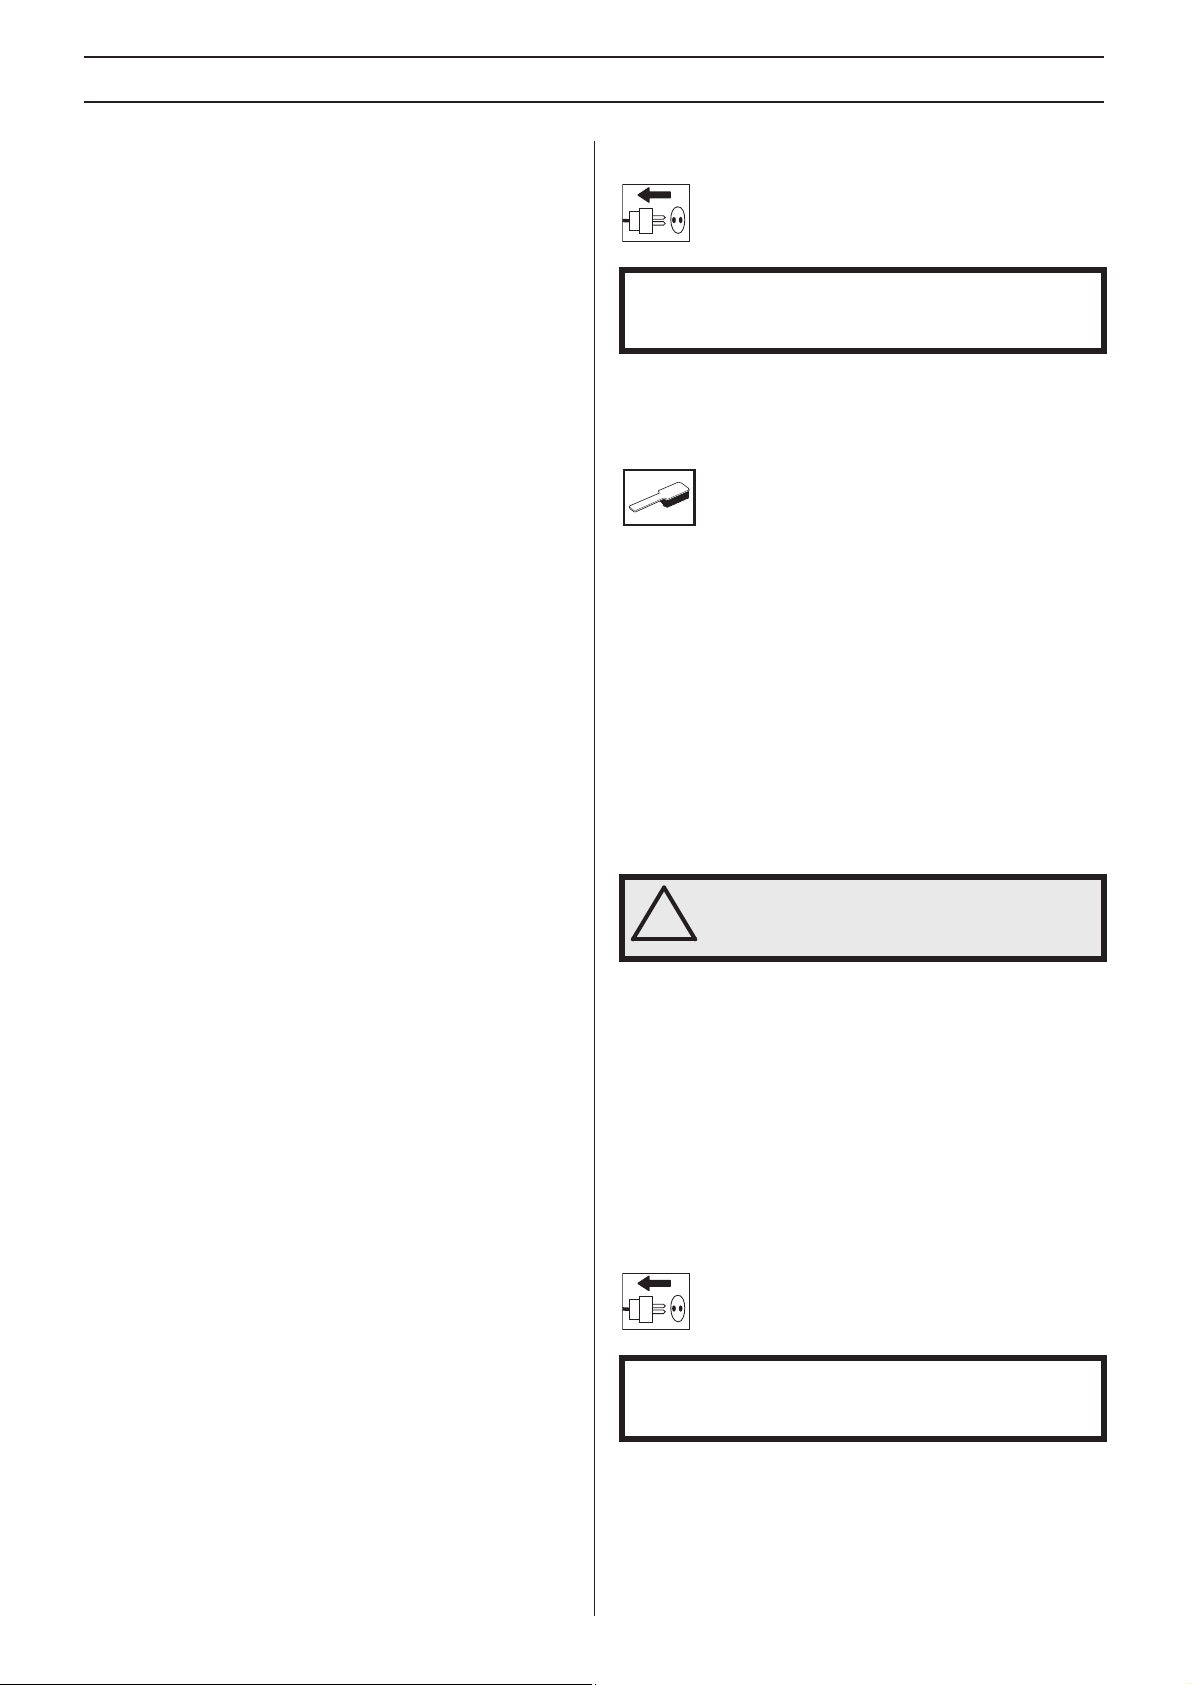
Stopping
• Use the stop button to shut down the machine.
• Keep grinding segments in contact with the floor when
stopping.
stop quickly. Do not lift the grinding head off the floor
when stopping as this can create a significant amount of
dust in the air.
This will help bring the machine to a complete
Starting
• Reduce the pressure between grinding disc and floor by
pushing down on the handle without raising the grinding
unit off the ground.
• Press the start button and keep it pressed a few seconds
to start the machine
.
14 – English
Page 15
MAINTENANCE
Faults and trouble shooting
The machine will not run
• Check the power supply and the power cables and make
sure that they are not damaged.
• Check that the emergency stop button is not pressed by
turning it cloc
Machine is hard to hold onto
• Not enough diamonds under the machine (if grinding thick
glue or soft floors, too few diamonds under the machine
will greatly increase the load on grinder and operator).
Usually also accompanied by high current draw by motor.
Increase number of diamonds under machine to reduce
load on gr
Machine is jumping around
• Rubber shock absorber pads in grinding unit may be worn
out or damaged. Check and change if necessary.
• Diamonds may not be fitted correctly or have different
heights.
and are the same height.
The machine stops after just a while
• The machine is overloaded and the overload protection
has been released. Reduce load. The machine will reboot
after about a minute when the motor has cooled off.
kwise.
inder and operator.
Check to ensure all diamonds are fitted correctly
Maintenance
IMPORTANT! Inspection and/or maintenance should be
carried out with the motor switched off and the plug
disconnected.
Used correctly , the machine is an extremely low-maintenance
and reliable product.
Cleaning
Always pull out the plug from the outlet socket before
cleaning, maintenance or assembly.
Always clean all the equipment at the end of the working day.
Do not use a high pressure washer to clean the machine
In order for the machine to always be cooled sufficiently the
cooling air openings must be k
ept clear and clean.
Rubber shock absorber pads
Check the rubber shock absorbing pads every month.
Replace if necessary.
Electrical Feed
.
The machine stops during start-up
• The electric motor has been overloaded or a phase is
missing. Allow the machine one or two minues to reset
and try again. When this does not help, contact an
authorised service workshop.
WARNING! Ne ver use dama ged cables. They
can cause serious, even fatal, personal
!
injuries.
Check that the cord and extension cord are intact and in good
condition.
Never use the machine if the cord is damaged, hand it in to an
authoriz
ed service workshop for repair.
Skirt
Make sure that the rubber skirt is intact and clean and that it
seals tightly against the floor. Damaged rubber skirt should
always be replaced.
Service
IMPORT ANT! All types of repairs ma y only be carried out by
authorised repairmen. This is so that the operators are not
exposed to great risks.
English – 15
Page 16

TECHNICAL DATA
Technical data
PG 400 SF PG 280 SF PG 280 SF (Single-phase)
Motor Power, kW/hp 4/5,4 3/4 2,2/3,0
Rated current, A 16 16 12,9
Rated voltage, V 400 400 230
Weight, kg/lbs 115/254 70/154 70/154
Grinding width, mm/inch 400/16 280/11 280/11
Grinding pressure, kg/lbs 65/143 35/77 35/77
Speed, rpm 1400 2800 1400
Noise emissions (see note 1)
Sound power level, measured dB(A) 107 107 107
Sound power level, guaranteed L
Sound levels (see note 2)
Sound pressure level at the operators ear , dB(A) 89 89 89
Vibration levels (see note 3)
Handle right, m/s
Handle left, m/s
2
2
dB(A) 108 108 108
WA
3,4 3,4 3,4
3,4 3,4 3,4
Note 1: Noise emissions in the environment measured as sound power (LWA) in conformity with EN 61029-1.
Note 2: Noise pressure level according to EN 61029-1. Reported data for noise pressure level has a typical statistical dispersion
(standard deviation) of 1.0 dB(A).
Vibration level according to EN 61029-1. Reported data for vibration level has a typical statistical dispersion (standard
Note 3:
deviation) of 1 m/s
2
.
EC-declaration of conformity
(Applies to Europe only)
Husqvarna AB, SE-433 81 Göteborg, Sweden, tel: +46-31-949000, declares under sole responsibility that the Husqvarna PG
400 SF, Husqvarna PG 280 SF dating from 2010 serial numbers and onwards (the year is clearly stated on the rating plate,
followed by the serial number), complies with the requirements of the COUNCILíS DIRECTIVE:
• of May 17, 2006 "relating to machinery"
• of December 15, 2004 ”relating to electromagnetic compatibility” 2004/108/EC.
• of December 12, 2006 ”relating to electrical equipment”
The following standards have been applied: EN ISO 12100:2003, EN 55014-1:2006, EN 55015-2/A1:2001, EN 61000-3-2:2006,
EN 61000-3-3/A1/A2:2005, EN 13862/A1:2009.
The supplied machine conforms to the example that underwent EC type examination.
Göteborg December 29, 2009
2006/42/EC
2006/95/EC.
Henric Andersson
Vice President, Head of Power Cutters and Construction Equipment
Husqvarna AB
(Authorized representative for Husqvarna AB and responsible for technical documentation.)
16 – English
Page 17
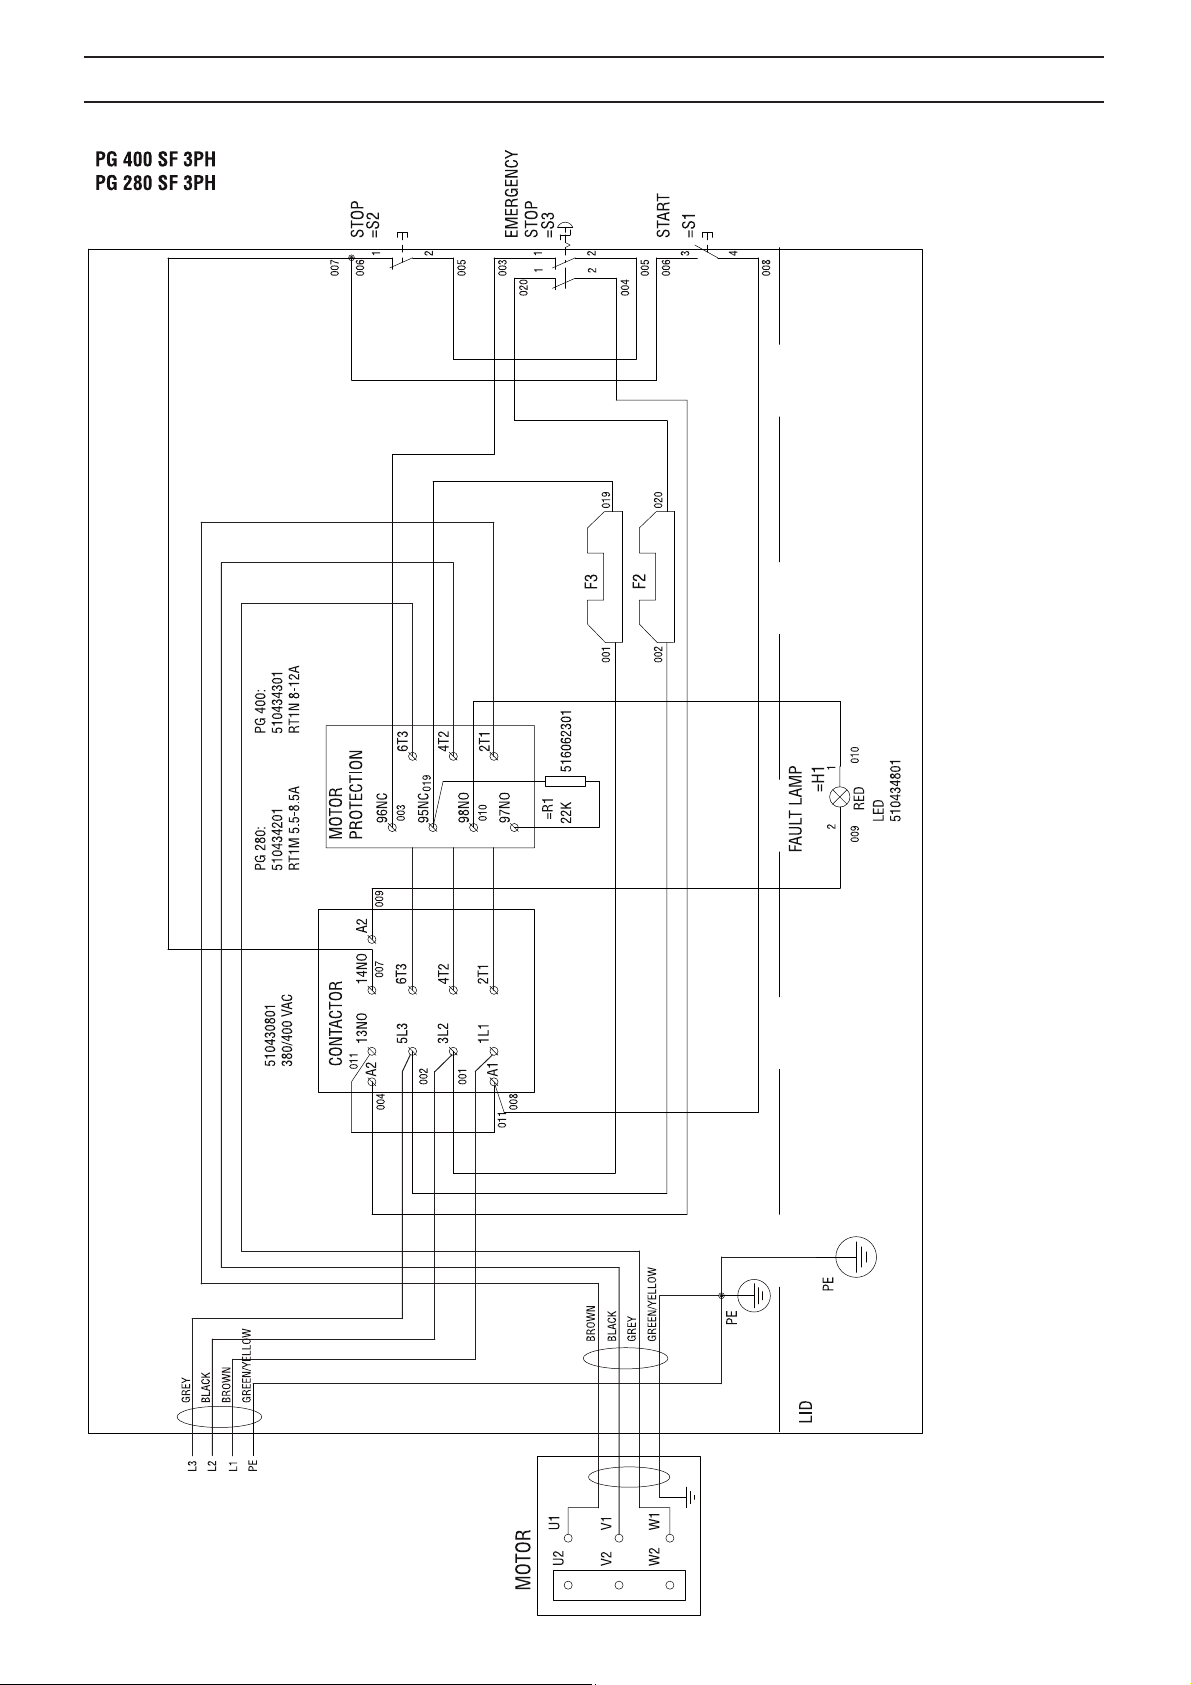
WIRING DIAGRAM
English – 17
Page 18
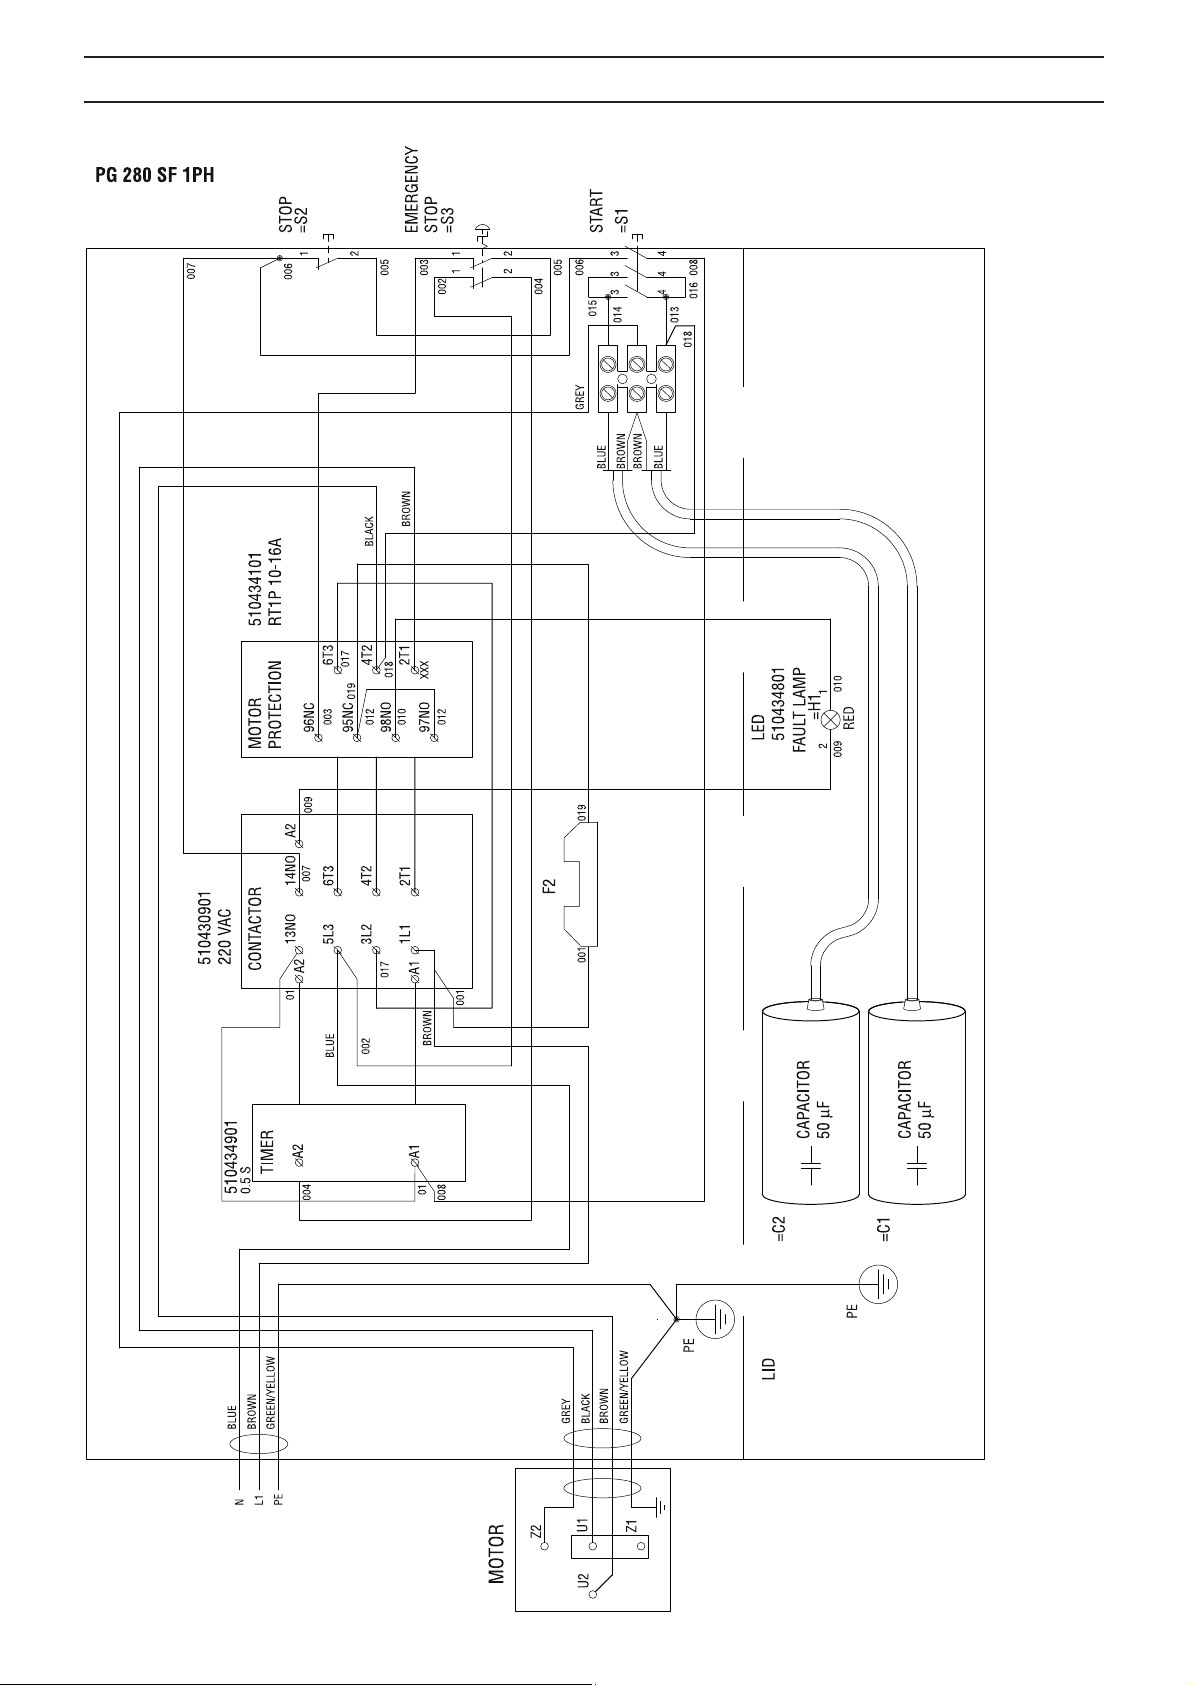
WIRING DIAGRAM
18 – English
Page 19
ACLARACIÓN DE LOS SÍMBOLOS
Símbolos en la máquina:
¡ATENCIÓN! La máquina, si se utiliza de
forma errónea o descuidada, puede ser
una herramienta peligrosa que puede
causar daños graves e incluso la m uerte al
usuario y a otras personas.
Lea detenidamente el manual de
instrucciones y asegúrese de entender su
contenido antes de utilizar la máquina.
Utilice el equipo de protección personal.
las instrucciones bajo el título ”Equipo de
protección personal”.
¡A
TENCIÓN! Al amolar se genera polvo que
puede causar daños por inhalación. Utilice
una máscar
Procure que haya buena ventilación.
Arranque: Reduzca la presión entre el
disco de amolado y el suelo empujando
hacia abajo la empuñadura sin le
unidad de amolado del suelo.
a respiratoria homologada.
V ea
vantar la
Símbolos en el manual de instrucciones:
El control y/o mantenimiento de la máquina
debe hacerse con el motor parado y el
enchufe desenchufado.
Utilice siempre guantes protectores
homologados.
La máquina debe limpiarse regular
Control visual.
Debe utilizarse gafas protectoras o visor.
mente.
Este producto cumple con la directiva CE
vigente.
Etiquetado ecológico. El símbolo en el
producto o en su envase indica que no se
puede tratar este producto como desperdicio
doméstico.
Haciendo que este producto sea manipulado
adecuadamente, se a
consecuencias negativas potenciales para el
medio ambiente y las personas, lo que
puede ocurrir con la manipulación inadecuada como residuos
del producto.
Para obtener inf ormación más detallada sobre el reciclado de
este producto, contacte con la oficina m
servicio de eliminación de desperdicios domésticos o con la
tienda donde compró el producto.
Los demás símbolos/etiquetas que aparecen en la
máquina corresponden a requisitos de homologación
específicos en determinados mercados.
yuda a evitar
unicipal local, con el
Spanish – 19
Page 20

ÍNDICE
Índice
ACLARACIÓN DE LOS SÍMBOLOS
Símbolos en la máquina: ............................................. 19
Símbolos en el manual de instrucciones: .................... 19
ÍNDICE
Índice ........................................................................... 20
¿QUÉ ES QUÉ?
Elementos de la amoladora ......................................... 21
INSTRUCCIONES DE SEGURIDAD
Antes de utilizar una amoladora nueva ........................ 22
Equipo de protección personal .................................... 22
Instrucciones generales de seguridad ......................... 23
MONTAJE
Ajuste la empuñadura. ................................................. 25
Cambio de los diamantes ............................................ 25
Conexión de la aspiradora ........................................... 26
Transporte .................................................................... 26
GUÍA PARA EL AMOLADO
Diamantes .................................................................... 27
Determinación de la dureza del hormigón ................... 27
Selección de diamantes ............................................... 28
Sentido de rotación del motor ...................................... 30
ARRANQUE Y P ARADA
Antes de arrancar ........................................................ 31
Arranque ...................................................................... 31
Parada ......................................................................... 31
MANTENIMIENTO
Fallos y localización de fallos ....................................... 32
Mantenimiento ............................................................. 32
Servicio ........................................................................ 32
DA TOS TECNICOS
Datos técnicos ............................................................. 33
Declaración CE de conformidad .................................. 33
ESQUEMA DE CONEXIONES ELÉCRICAS
20 – Spanish
Page 21

¿QUÉ ES QUÉ?
Elementos de la amoladora
1 Caja eléctrica
2 Cubierta
3 Cigüeñal para ajustar la presión de amolado
4 Cáncamo de elevación
5 Motor eléctrico
6 Asa de levantar
7 Faldón
8 Conexión para la aspiradora
9 Conjunto de eje con ruedas
10 Manija de cierre de la cubierta
11 Tornillos de la cubierta
12 Unidad de amolado - PG 280 SF
13 Unidad de amolado - PG 400 SF
14 Empuñadura / manillar
15 Panel de control
16 Botón de arranque
17 Parada de emergencia
18 Botón de parada
19 Manija de cierre para el ajuste del manillar
20 Manual de instrucciones
Spanish – 21
Page 22
INSTRUCCIONES DE SEGURIDAD
Antes de utilizar una amoladora nueva
• Lea detenidamente el manual de instrucciones y
asegúrese de entender su contenido antes de utilizar la
máquina.
• Las amoladoras PG 400 SF y PG 280 SF están diseñadas
para eliminar los residuos superficiales de cola /
adhesiv
hormigón, así como para amolar y alisar suelos de
hormigón. SF significa un único disco de velocidad fija
(single disc, fixed speed).
• La máquina puede ocasionar lesiones graves. Lea
atentamente las instrucciones de segur
utilizar la máquina.
• Sólo deberá manejar la maquinaria aquel personal que
hay
teórica acerca de su uso.
Emplee siempre el sentido común
Es imposible abarcar todas las situaciones en las que puede
encontrarse. Utilice siempre el equipo con cuidado y sentido
común. Evite todas aquellas situaciones que considere que
sobrepasan sus capacidades. Si, después de leer estas
instrucciones, no está seguro del procedimiento que debe
seguir, consulte a un experto antes de utilizar el equipo.
No dude en ponerse en contacto con su distribuidor si tiene
preguntas acerca del uso de la máquina. Estaremos
encantados de poder aconsejar
máquina de manera eficaz y segura.
Diríjase a su distribuidor de Husqvarna para que revise la
máquina regularmente y par
reparaciones básicas.
Toda la información y todos los datos contenidos en este
manual de instr
impresión del manual.
o, masilla y productos semejantes en suelos de
idad. Aprenda a
a recibido la formación necesaria, tanto práctica como
le y ayudarle a utilizar la
a que realice ajustes y
ucciones son vigentes en la fecha de
Equipo de protección personal
¡ATENCIÓN! Para trabajar con la máquina
debe utilizarse un equipo de protección
!
personal homologado. El equipo de
protección personal no elimina el riesgo de
lesiones, pero reduce su efecto en caso de
accidente. Pida a su distribuidor que le
asesore en la elección del equipo.
• Casco protector
• Protectores auriculares
• Gafas protectoras o visor
• Máscara respiratoria
• Guantes resistentes de agarre seguro.
• Prendas de vestir ceñidas, resistentes y cómodas que
mitan una libertad de movimientos total.
per
!
!
22 – Spanish
¡ATENCIÓN! No está permitido modificar el
diseño original de la máquina, por ningún
motivo, sin la autorización del fabricante.
Utilice siempre accesorios originales. Las
modificaciones y/o el uso de accesorios no
autorizados comportan riesgo de daöos
personales graves y peligro de muerte para
el usuario y otras personas.
¡ATENCIÓN! El uso de productos de corte,
amolado, taladrado, lijado o formación de
materiales puede generar polvo y vapores
que pueden contener productos químicos
perniciosos. Averigüe la índole del material
de trabajo y utilice una máscara contra
polvo o respiratoria adecuada.
• Botas con puntera de acero y suela antideslizante.
• Tenga siempre a mano el equipo de primeros auxilios.
Page 23

INSTRUCCIONES DE SEGURIDAD
Instrucciones generales de seguridad
¡ATENCIÓN! Este apartado trata las normas
de seguridad básicas para trabajar con el
!
dispositivo. Esta información no sustituye
en ningún caso los conocimientos y la
experiencia de un profesional. Si se
encuentra en alguna situación que le haga
sentirse inseguro, deténgase y consulte con
un experto. Consulte a su distribuidor, al
taller de servicio técnico o a un usuario
experimentado. No emplee la máquina en
aplicaciones para las que no se considere
plenamente cualificado.
• No utilice la máquina sin haber leído y comprendido el
contenido de este manual de instrucciones.
Seguridad en el área de trabajo
• No usar en condiciones climáticas desfavorables. Por
ejemplo, niebla densa, lluvia, viento fuerte, frío intenso,
etc.
• Mantenga el área de trabajo limpia y bien iluminada. Las
zonas abarrotadas de cosas u oscur
accidentes.
• La máquina no se usará en áreas donde haya posibilidad
de incendios o explosiones
.
Seguridad eléctrica
¡ATENCIÓN! Existe siempre riesgo de
sacudidas eléctricas al usar máquinas
!
eléctricas. No usar la máquina en
condiciones climáticas desfavorables y
evitar el contacto del cuerpo con pararrayos
y objetos metálicos. Seguir siempre las
instrucciones del manual para evitar daños.
• No arrastre la máquina nunca por el cordón y no quite
nunca el enchufe tirando del cordón.
• Mantenga todos los cables apartados del agua, el aceite
y los bordes agudos.
el cable se enganche en puertas, vallas o similares. Hay
riesgo de cargar objetos con electricidad.
• Compruebe que los cables están intactos y en buen
Utilice el cable proporcionado para el uso externo .
estado.
• Si se daña un cable, no utilice la máquina. Llévela a
reparar a un taller de ser
• La máquina se debe enchufar a un enchufe con masa.
• Compruebe que la tensión de red concuerda con la que
se indica en la placa de car
•
Tenga cuidado con los choques eléctricos. Evite el
contacto corpor
• Un cable de alargue no debe usarse enrollado porque hay
riesgo de sobrecalentamiento
• Al emplear la máquina, hágalo con el cable detrás suyo
vitar dañarlo.
para e
Proceda con cuidado para evitar que
vicio oficial.
acterísticas de la máquina.
al con pararrayos o metales en el suelo.
as favorecen los
.
Seguridad personal
¡ATENCIÓN! La sobreexposición a las
vibraciones puede provocar problemas
!
circulatorios y dolencias de carácter
nervioso, especialmente en personas con
patologías circulatorias. Acuda a un médico
si nota síntomas corporales que puedan
relacionarse con la sobreexposición a las
vibraciones. Son ejemplos de tales síntomas
la pérdida de sensibilidad, el 'cosquilleo', las
'punzadas', el dolor, la pérdida o reducción
de la fuerza normal o los cambios en el color
y la superficie de la piel. Estos síntomas se
presentan normalmente en dedos, manos y
muñecas. Los síntomas pueden aumentar
en temperaturas frías.
• Utilice el equipo de protección personal. Vea las
instrucciones bajo el título ”Equipo de protección
personal”.
• Nunca utilice la máquina si está cansado, si ha ingerido
alcohol o si toma medicamentos que puedan afectar
vista, su capacidad de discernimiento o el control del
cuerpo.
• Nunca deje que terceros utilicen la máquina sin
asegurarse pr
de este manual de instrucciones.
• Todos los operadores deben ser formados en el empleo
de la máquina. El propietar
formación de los operadores.
• Las personas y los animales pueden distraer y hacer
perder el control de la máquina. P
operador debe estar siempre concentrado en su trabajo.
• Tener en cuenta que las ropas, el pelo largo y las joyas
pueden atascarse en piezas móviles.
Mantenga bajo vigilancia la máquina siempre que el
•
motor esté en marcha.
• Al trabajar con las máquinas, procure siempre que haya
alguien cerca, que pueda prestar a
accidente
• Cerciórese siempre de tener una posición de trabajo
segura y firme.
imero de que hayan entendido el contenido
io es responsable de la
or consiguiente, el
yuda en caso de
.
le la
Spanish – 23
Page 24

INSTRUCCIONES DE SEGURIDAD
Uso y cuidado
• Utilice la máquina solamente para el uso al que está
destinada.
• Mantener todas las piezas en perfecto estado y
comprobar que todos los elementos de fijación estén bien
apretados.
No utilice nunca una máquina defectuosa. Siga las
•
instrucciones de mantenimiento
manual. Algunas medidas de mantenimiento y servicio
deben ser efectuadas por especialistas formados y
cualificados. Vea las instrucciones bajo el título
Mantenimiento.
• No modificar nunca los dispositivos de seguridad.
Comprobar regularmente que funcionan como es debido
La máquina no se debe operar con dispositivos de
seguridad defectuosos o ausentes.
• No utilice nunca una máquina que haya sido modificada
de modo que ya no coincida con la configur
• La máquina sólo se deberá arrancar cuando los
cabezales desbastadores estén descansando en el
suelo, a no ser que se esté ef
de prueba tal y como se indica en este manual.
• La máquina no deberá ponerse en marcha sin el faldón de
goma para el polv
una buena hermeticidad entre la máquina y el suelo,
sobre todo cuando se trabaje en una aplicación de
desbastado en seco.
• Durante el amolado, la máquina debe estar conectada a
una aspirador
• Cuando se cambien los discos desbastadores, asegúrese
de que está desconectada la toma de corriente de la
unidad pulsando el botón de par
desenchufando el cable de alimentación.
• Después de cada operación de amolado / pulimentación,
aiga siempre los útiles de diamante.
extr
• Asegúrese de que el reborde de goma está intacto y
limpio y de que queda colocado herméticamente contr
suelo. Si el reborde de goma está dañado, reemplácelo
inmediatamente.
• Cuando elimine cola, asfalto, pintura, etc., levante
siempre la máquina y sepárela de la superficie después
de utilizarla par
al calor. Asegúrese de que el cabezal de amolado ha
dejado de rotar antes de levantar la máquina.
• Los útiles de diamante pueden estar calientes después
de utilizar la máquina. Deje que la máquina se enfríe
antes de e
guantes protectores.
• Utilice siempre la argolla de izada montada en la máquina
vantarla.
para le
• Transporte siempre la máquina usando el mango de
transpor
te y el manillar.
o. Es fundamental que se establezca
a que succione el polvo.
a que no se quede pegada al suelo debido
xtraer los segmentos de diamante. Utilice
, control y servicio de este
ación original.
ectuando un procedimiento
ada de emergencia y
a el
Transporte y almacenamiento
• La máquina se deberá transportar siempre cubierta,
limitando su exposición a los elementos naturales, en
particular a la lluvia y la nieve.
• Guarde el equipo en un lugar seguro fuera del alcance de
los niños y las personas no autorizadas
• La máquina deberá guardarse en un lugar seco, cuando
no esté en uso.
.
.
24 – Spanish
Page 25

MONTAJE
Ajuste la empuñadura.
• Quite los tornillos (A).
• Retire las manijas de cierre (B).
• Coloque la empuñadura en el soporte para la
empuñadura de la máquina.
Monte los tornillos (A) y las manijas de cierre (B).
•
• Las manijas de cierre deberán estar situadas al lado del
manillar para reducir el r
cuando la máquina esté en posición horizontal al cambiar
las herramientas.
iesgo de deterioro de las mismas
Cambio de los diamantes
Apague la máquina y desconecte el enchufe.
Póngase unos guantes protectores, ya que los útiles de
diamante pueden estar muy calientes
• Gire el manillar hasta que alcance la posición más alta.
• Tire hacia atrás de la empuñadura para levantar el
cabezal desbastador del suelo
•
Vuelva a poner la máquina en el suelo.
• Póngase los guantes.
• Utilice un martillo para retirar los segmentos de diamante.
.
.
• Fije los nuevos segmentos de diamante al disco
amolador
Una vez que se hay an fijado los nuevos diamantes, lleve
•
a cabo el procedimiento inv
suelo.
a.
erso para bajar la máquina al
Spanish – 25
Page 26

MONTAJE
Conexión de la aspiradora
Conecte la aspiradora a la máquina. Utilice una manguera de
50 mm (2 pulgadas).
• Se recomienda vivamente usar el sistema de extracción
de polvo Husqvarna DC 3300 para un control completo
del polvo.
• Asegúrese de que los filtros de la aspiradora están
intactos y limpios.
utilización de la máquina.
• Ajuste el reborde de goma para que esté en contacto con
el suelo y capte el polvo de f
Tenga cuidado con el polvo durante la
orma eficaz.
Transporte
La máquina puede plegarse para minimizar el espacio
necesario para el transporte.
• Afloje los tornillos y la manija de cierre que mantienen la
cubierta en su sitio
.
• Doble cuidadosamente la máquina hacia delante.
Coloque un relleno entre el motor y la caja eléctrica par
evitar dañar la máquina.
• La cubierta puede acoplarse a un lado de la máquina.
a
• Quite la cubierta.
• Coloque el cigüeñal con la empuñadura orientada hacia
arriba.
26 – Spanish
Page 27

GUÍA PARA EL AMOLADO
Diamantes
Antecedentes
Los abrasivos de diamantes suelen constar de dos
componentes:
• Polvo de diamante (también conocido como cristales de
diamante o arenilla). Al cambiar el g
diamante o arenilla, podemos cambiar cómo van a ser de
gruesos o finos los rasguños que se queden después del
proceso de desbastado.
• Un aglutinante (metal o resina). El polvo de diamante se
mezcla y se deja suspendido en un aglutinante de metal
o resina. Cuando se deje suspendido en un aglutinante
de metal, se llamará al producto final ligamento metálico
o segmento de diamante sinterizado. Cuando esté
suspendido en un aglutinante de resina, el producto final
se denominará segmento de diamante de ligamento de
resina o almohadilla. Al cambiar la dureza del aglutinante ,
podemos cambiar lo rápido o lento que se gastará el
abrasivo de diamante.
Principios generales
Lo que sigue son reglas generales acerca de los segmentos
de diamante en aplicaciones de desbastado. Como en todas
las reglas generales, hay e xcepciones o casos en los que no
es el caso.
Tamaño del polvo de diamante
El cambio de tamaño del polvo de diamante a una partícula/
tamaño de polvo más pequeño afectará a las prestaciones de
la herramienta de diamantes de las siguientes formas:
• Creará una pauta de rasguños más fina.
• Se aumentará la vida de la herramienta de diamantes.
Ocurrirá lo contrario si se cambia a una partícula/tamaño de
o más g
polv
Aglutinante
Al aumentar la dureza del ligamento:
• Creará una pauta de rasguños más fina.
• Se aumentará la vida de la herramienta de diamantes.
• Decrecerá la tasa de producción.
Ocurrirá lo contrario cuando se haga un ligamento metálico o
de resina más sua
Número de segmentos de diamante/almohadillas
Si se aumenta el número de segmentos debajo de la
máquina:
• Se reducirá la presión en cada segmento de diamantes
individual. – Se reducirá el r
segmentos de diamantes.
• Se reducirá la carga sobre la máquina y provocará que la
desbastadora absorba menos corr
• Creará una pauta de rasguños más suave (sobre todo en
suelos blandos).
Ocurr
segmentos debajo de la máquina.
Resumen de principios del diamante
Los segmentos de diamantes necesitan desgastarse para
lograr productividad. El desgaste del segmento de diamantes
puede depender de los siguientes factores:
rande.
e).
v
itmo de desgaste en los
irá lo contrario cuando se reduzca el número de
rano del polvo de
iente.
• Presión.
• Dureza del ligamento.
• Tamaño del polvo de diamante.
• Número de segmentos debajo de la máquina.
• Si se añade un abrasivo adicional (p.ej. arena, carb uro de
silicona) en el suelo se aumentará el desgaste
En gener
diamantes, ma
factores, también se podrán hacer cambios para infl uir sobre
lo siguiente:
• Pauta de rasguños.
• Absorción de corriente de la máquina.
• Grado de allanado del suelo (véase sección siguiente).
• Facilidad de manejo.
al, cuanto más deprisa se desgaste un segmento de
yor será la productividad. Al variar los citados
.
Determinación de la dureza del hormigón
Todo hormigón se mide por su resistencia a la compresión y,
dependiendo de qué zona del mundo sea cada uno, se
medirá por diferentes índices de resistencia a la compresión
(p.ej. PSi y MPa). En general, cuanto mayor sea el grado de
resistencia a la compresión, más duro será el hormigón y , por
lo tanto, más difícil será de desbastar.
Sin embargo, además del grado de resistencia a la
compresión hay otros f
duro un suelo y, por lo tanto, la selección correcta de
diamantes. Como el desbastado normalmente sólo se aplica
a la superficie de hormigón (parte superior 5mm o 1/4
pulgada), a menudo la manera en la que se ha acabado el
suelo de hormigón o el estado de la superficie tendrá un
mayor peso sobre qué tipo de diamante seleccionar que el
grado de resistencia a la compresión del hormigón.
Factores de la superficie a considerar al seleccionar un
diamante
En general, si una superficie de hormigón es muy suave (es
decir, probablemente se haya allanado/pulido
enormemente), el hormigón se comportará como si tuviera
una elevada resistencia a la compresión y, por tanto, necesita
un segmento de ligamento blando.
Conforme a ello, si una superficie es basta/agresiva (p.ej.
dañada por la lluvia, rota por disparos, escarifi - cada,
conglomerado expuesto, etc.), el hormigón se comportará
como si tuviera una baja resistencia a la compresión y, por
tanto, necesita un segmento de ligamento duro.
Los revestimientos/contaminantes de la superficie (p.ej.
revestimientos epoxi, adhesivos de baldosas de cerámica,
nivelación de compuestos/capas de mortero) tendrán a
menudo un mayor peso en la selección del diamante que la
resistencia a la compresión del hormigón.
Por regla general, cuando se desbaste un bloque de
hormigón por primera vez y no esté seguro de su dureza,
empiece siempre con diamantes de ligamento más duro
debajo de la máquina. Esto garantizará la menor cantidad de
desgaste de los segmentos de diamantes. Si un segmento de
diamantes duros no es adecuado para la aplicación, todo lo
que habrá supuesto habrá sido un poco de tiempo, sin
desgastar los diamantes.
Si se hace de la forma contraria (es decir, se usa un
segmento b
posee una superficie abrasiva o un contaminante de
superficie, es muy posible que desgaste una cantidad
considerable de diamante en un período muy corto de
tiempo.
lando par
actores que determinan cómo es de
a empezar) y el hormigón es blando o
Spanish – 27
Page 28

GUÍA PARA EL AMOLADO
Selección de diamantes
La forma en la que los segmentos de diamante están configurados en la unidad de amolado influirá enormemente en el
rendimiento de la máquina y los niveles de productividad, así como en la calidad del acabado del suelo.
Existen diferentes configuraciones de diamante posibles con los modelos PG 400 SF y PG 280 SF.
Discos diamantados con ligante de metal
Juego completo: fila interior y exterior
Juego completo: fila exterior
Medio juego: fila interior y exterior
Medio juego: fila exterior
28 – Spanish
Page 29

GUÍA PARA EL AMOLADO
Seleccione los discos diamantados con ligante de metal adecuados para la aplicación concreta.
A continuación, le ofrecemos algunas sugerencias para las configuraciones básicas de los discos diamantados con ligante de
metal.
uego
J
Campo de aplicación
Allanamiento suelo – Hormigón
duro
Allanamiento suelo – Hormigón
medio
Allanamiento suelo – Hormigón
lando
b
Extr
acción de adhesivo de
baldosa de cerámica
Extracción de pegamento de
moqueta o vinilo – Hor
Extr
acción de pegamento de
moqueta o vinilo – Hormigón
medio
acción de pegamento de
Extr
moqueta o vinilo – Hormigón
lando
b
Extracción de pintura epoxi –
Hormigón duro
acción de pintura epoxi –
Extr
Hormigón medio
acción de pintura epoxi –
Extr
Hormigón b
Hormigón dañado por la lluvia Duro 16-30 X X
Alisado conglomerado expuesto Duro 16-30 X X
Extracción de irregularidades en
baldosas de terr
Pulido de superficie de suelos de
hormigón – Hor
Pulido de superficie de suelos de
hormigón – Hor
Pulido de superficie de suelos de
hormigón – Hor
Desbastado de conglomerado
expuesto en hor
duro
Desbastado de conglomerado
expuesto en hor
medio
Desbastado de conglomerado
expuesto en hor
blando
Allanamiento de ondulación en
suelos de hormigón – Hor
duro
Allanamiento de ondulación en
suelos de hormigón – Hor
medio
Allanamiento de ondulación en
suelos de hormigón – Hor
blando
lando
migón duro
o / piedra
az
migón duro
migón medio
migón blando
migón – Hormigón
migón – Hormigón
migón – Hormigón
migón
migón
migón
Ligamento
metálico
Blando 16 o 30 X
Medio 16 o 30 X
Duro 16 o 30 X
Medio
Blando
Medio
Duro
Blando
Medio
Duro
Blando 30 o 60 X
Blando 60 X X
Medio 60 X X
Duro 60 X X
Blando 16-30 X X X
Medio 16-30 X X X
Duro 16-30 X X
Blando 16 o 30 X X X
Medio 16 o 30 X X
Duro 16 o 30 X X
Tamaño de
polvo
PIRANHA™ o
16-30
PIRANHA™ o
16-30
PIRANHA™ o
16-30
PIRANHA™ o
16-30
PIRANHA™ o
16-30
PIRANHA™ o
16-30
PIRANHA™ o
16-30
completo:
fila interior
y e
xterior
X
Juego
completo:
fila
exterior
X X
X
X
Medio juego:
fila interior y
exterior
X X
X X
X X
Medio
juego: fila
exterior
Spanish – 29
Page 30

GUÍA PARA EL AMOLADO
Discos diamantados con ligante de resina
Adaptador para la adherencia con resina Redi Lock
Juego completo: fila exterior
Medio juego: fila exterior
Seleccione la configuración de disco diamantado con ligante de resina adecuada para la aplicación concreta.
Campo de aplicación Juego completo: fila exterior Medio juego: fila exterior
Pulimentación de baldosas de terrazo / piedra X
Repavimentación de baldosas de terrazo / piedra X
Pulido de superficie de suelos de hormigón – Hormigón duro X
Pulido de superficie de suelos de hormigón – Hormigón
medio
Pulido de superficie de suelos de hormigón – Hormigón
lando
b
X
X
Sentido de rotación del motor (Trifásica)
Podrá modificarse el sentido de rotación del motor invirtiendo los polos del enchufe.
¡ATENCIÓN! Las herramientas Piranha / PCD están diseñadas para funcionar en una única dirección.
30 – Spanish
Page 31

ARRANQUE Y PARADA
Antes de arrancar
• Coloque la desbastadora en la zona de trabajo.
• Asegúrese de que hay diamantes en la parte inferior de la
máquina y de que están firmemente ajustados
• Conecte la aspiradora a la máquina.
• Utilice manijas de cierre para el ajuste del manillar
haciendo así más cómoda la altur
• Enchufe la toma de corriente a la máquina.
• Compruebe que el botón de parada de emergencia no
está pulsado girándolo en el sentido de las agujas del
reloj.
• Compruebe el sentido de rotación del motor.
a de tr
.
abajo.
Parada
• Utilice el botón de parada para apagar la máquina.
• Mantenga los segmentos de amolado en contacto con el
suelo al parar la máquina.
se pare completamente de forma rápida. No levante el
cabezal de amolado del suelo al parar la máquina, ya que
puede crear una cantidad considerable de polvo en el
aire.
Ello ayudará a que la máquina
Arranque
• Reduzca la presión entre el disco de amolado y el suelo
empujando hacia abajo la empuñadura sin levantar la
unidad de amolado del suelo.
• Mantenga pulsado el botón de arranque durante unos
segundos para arr
ancar la máquina.
Spanish – 31
Page 32

MANTENIMIENTO
Fallos y localización de fallos
La máquina no funciona
• Compruebe el suministro eléctrico y los cables de
alimentación para asegurarse de que no están dañados.
• Compruebe que el botón de parada de emergencia no
está pulsado girándolo en el sentido de las agujas del
reloj.
Es difícil sujetar la máquina
• No hay suficientes diamantes debajo de la máquina (si
hay una capa espesa de cola de desbastado o suelos
blandos, una cantidad insuficiente de diamantes debajo
de la máquina incrementará enormemente la carga sobre
la desbastadora y el operador). Esto suele ir acompañado
de un alto consumo de corriente por parte del motor.
Aumente el número de diamantes debajo de la máquina
para reducir la carga sobre la desbastador
La máquina está dando saltos
• Las almohadillas amortiguadoras de caucho de la unidad
de amolado pueden desgastarse o deteriorarse.
Compruebe su estado y cámbielas si es necesario.
• Los diamantes pueden estar instalados incorrectamente
o a diferentes altur
todos los diamantes están ajustados correctamente y son
de la misma altura.
as. Compruebe y asegúrese de que
a y el operador.
Mantenimiento
¡IMPORTANTE! El control y/o mantenimiento de la
máquina debe hacerse con el motor parado y el enchufe
desenchufado.
Usada correctamente, la máquina tiene un mantenimiento
extremadamente bajo y gran fiabilidad.
Limpieza
Desenchufe siempre el enchufe antes de ef ectuar trabajos de
limpieza, mantenimiento o montaje de la máquina.
Limpiar siempre todo el equipo después de cada turno de
. No utilice un equipo de limpieza a alta presión para
trabajo
limpiar la máquina.
Para que la máquina tenga siempre una buena refrigeración,
las abertur
libres y limpias.
Almohadillas amortiguadoras de caucho.
Verifique las almohadillas amortiguadoras de caucho todos
los meses. Cámbielas si es necesario.
as de paso del aire refrigerante deben mantenerse
La máquina se detiene después de funcionar brevemente
• La máquina está sobrecargada y se ha activado la
protección contra sobrecarga. Reduzca la carga. La
máquina se reactivará después de aproximadamente un
minuto cuando el motor se haya enfriado.
La máquina se detiene al arrancar
• El motor eléctrico está sobrecargado o falta una fase.
Deje que la máquina se reinicie durante uno o dos
minutos e inténtelo de nuevo. Si esto no ayuda, acuda a
un taller de servicio oficial.
Suministro eléctrico
¡ATENCIÓN! No usar nunca cables dañados,
puesto que pueden causar daños
!
personales graves e incluso mortales.
Compruebe que el cable y el cable de empalme está intacto.
Si se daña el cable, no utilice la máquina. Llévela a un taller
de servicio oficial par
a reparar.
Faldón
Asegúrese de que el reborde de goma está intacto y limpio y
de que queda colocado herméticamente contra el suelo. Si el
reborde de goma está dañado, reemplácelo inmediatamente.
Servicio
¡IMPORTANTE! Las reparaciones de todo tipo deben ser
efectuadas por técnicos autorizados, únicamente. De este
modo se evita someter a los operadores a grandes riesgos.
32 – Spanish
Page 33

DATOS TECNICOS
Datos técnicos
PG 400 SF PG 280 SF PG 280 SF (Monofásico)
Potencia del motor, kW/CV 4/5,4 3/4 2,2/3,0
Amperaje nominal, A 16 16 12,9
Tensión nominal, V 400 400 230
Peso, kg/lb 115/254 70/154 70/154
Anchura de desbastado, mm/pulgadas 400/16 280/11 280/11
Presión de desbastado, kg/lbs 65/143 35/77 35/77
Velocidad, r/min 1400 2800 1400
Emisiones de ruido (vea la nota 1)
Nivel de potencia acústica medido dB(A) 107 107 107
Nivel de potencia acústica garantizado L
Niveles acústicos (vea la nota 2)
Nivel de presión acústica en el oído del usuario, dB(A) 89 89 89
Niveles de vibraciones (vea la nota 3)
Empuñadura derecha, m/s
Empuñadura izquierda, m/s
2
2
dB(A) 108 108 108
WA
3,4 3,4 3,4
3,4 3,4 3,4
Nota 1: Emisiones sonoras en el entorno medidas como potencia sonora (LWA) según la norma EN 61029-1.
Nota 2: Nivel de presión sonora conforme a EN 61029-1. Los datos referidos del nivel de presión sonora tienen una dispersión
estadística habitual (desviación típica) de 1,0 dB (A).
Nota 3: Nivel de vibración conforme a EN 61029-1. Los datos referidos del nivel de vibración poseen una dispersión estadística
habitual (desviación típica) de 1 m/s
2
.
Declaración CE de conformidad
(Rige sólo para Europa)
Husqvarna AB, SE-433 81 Göteborg, Suecia, teléfono: +46-31-949000, declaramos que las Husqvarna PG 400 SF, Husqvarna
PG 280 SF a partir del número de serie del año 2010 en adelante (el año se indica claramente en la placa de identifi cación,
seguido del número de serie), cumplen con las siguientes disposiciones de la DIRECTIVA DEL CONSEJO:
2006/42/CE «relativa a máquinas» del 17 de mayo de 2006.
•
• 2004/108/CEE, ”referente a compatibilidad electromagnética”, del 15 de diciembre de 2004.
2006/95/CE del 12 de diciembre de 2006 relativa a equipos eléctricos.
•
Se han aplicado las siguientes normas: EN ISO 12100:2003, EN 55014-1:2006, EN 55015-2/A1:2001, EN 61000-3-2:2006, EN
61000-3-3/A1/A2:2005, EN 13862/A1:2009.
Se han aplicado las siguientes normas: EN 55014-1, EN55014-2, EN61000-3-2, EN61000-3-3.
Göteborg, 29 de diciembre de 2009
Henric Andersson
Vicepresidente, jefe de la sección de cortadoras y maquinaria para la construcción
Husqvarna AB
(Presentante autorizado de Husqvarna AB y responsable de la documentación técnica.)
Spanish – 33
Page 34

ESQUEMA DE CONEXIONES ELÉCRICAS
34 – Spanish
Page 35

ESQUEMA DE CONEXIONES ELÉCRICAS
Spanish – 35
Page 36

SYMBOLERKLÄRUNG
Symbole am Gerät:
WARNUNG! Das Gerät kann falsch oder
nachlässig angewendet gefährlich sein
und zu schweren oder gar
lebensgefährlichen Verletzungen des
Benutzers oder anderer Personen führen.
Lesen Sie die Bedienungsanweisung
sorgfältig durch und machen Sie sich mit
dem Inhalt ver
benutzen.
Tragen Sie persönliche Schutzausrüstung.
Siehe die Anweisungen unter der
Überschr
Schutzausrüstung”.
WARNUNG! Bei der Arbeit mit dem
Schleifer bildet sich Staub
Einatmen gesundheitsschädlich sein kann.
Verwenden Sie einen zugelassenen
Atemschutz. Sorgen Sie stets für gute
Belüftung.
Startvorrichtung: Den Druck zwischen der
Schleifscheibe und dem Boden durch
Herunterdrüc
dass das Schleifgerät vom Boden
angehoben wird.
traut, bevor Sie das Gerät
ift ”Persönliche
, der beim
ken des Griffs senken, ohne
Symbole in der Bedienungsanweisung:
Kontrollen und/oder Wartungsarbeiten sind
bei abgeschaltetem Motor und
abgezogenem Stecker durchzuführen.
Stets zugelassene Schutzhandschuhe
tragen.
Regelmäßige Reinigung ist notw
Visuelle Kontrolle.
Schutzbrille oder Gesichtsschutz müssen
ben
utzt w
erden.
endig.
Dieses Produkt stimmt mit den geltenden
CE-Richtlinien überein.
Umweltkennzeichnung. Das Symbol auf
dem Produkt oder der Verpackung gibt an,
dass dieses Produkt nicht im Hausmüll
entsorgt werden darf.
Durch eine korrekte Entsorgung dieses
Produkts tragen Sie dazu bei, mögliche
e Auswirkungen auf Ihre Umwelt und
negativ
Mitmenschen zu verhindern. Durch eine
unsachgemäße Entsorgung dieses Produkts können
Schäden entstehen.
Ausführliche Recyclinginformationen zu diesem Produkt
erhalten Sie von Ihrer K
für Hausmüll oder dem Geschäft, in dem Sie das Produkt
erworben haben.
Sonstige Symbole/Aufkleber am Gerät beziehen sich auf
spezielle Zertifizierungsanforderungen, die in
bestimmten Ländern gelten.
ommune, Entsorgungsunternehmen
36 – German
Page 37

INHALT
Inhalt
SYMBOLERKLÄRUNG
Symbole am Gerät: ...................................................... 36
Symbole in der Bedienungsanweisung: ....................... 36
INHALT
Inhalt ............................................................................ 37
WAS IST WAS?
Was ist was am Schleifer? ........................................... 38
SICHERHEITSVORSCHRIFTEN
Maßnahmen vor der Benutzung eines neuen Schleifers 39
Persönliche Schutzausrüstung .................................... 39
Allgemeine Sicherheitsvorschriften .............................. 40
MONTAGE
Befestigen des Griffs .................................................... 42
Auswechseln der Diamanten ....................................... 42
Anschließen des Unterdrucksaugers ........................... 43
Transport ...................................................................... 43
ANLEITUNG ZUM SCHLEIFEN
Diamanten ................................................................... 44
Bestimmung des Härtegrads von Beton ...................... 44
Auswahl der Diamanten ............................................... 44
Motordrehrichtung ........................................................ 47
STARTEN UND STOPPEN
Vor dem Start ............................................................... 48
Starten ......................................................................... 48
Stoppen ....................................................................... 48
WARTUNG
Störungsbeseitigung .................................................... 49
Wartung ....................................................................... 49
Service ......................................................................... 49
TECHNISCHE DATEN
Technische Daten ........................................................ 50
EG-Konformitätserklärung ........................................... 50
SCHALTPLAN
German – 37
Page 38

WAS IST WAS?
Was ist was am Schleifer?
1 Steuereinheit
2 Deckplatte
3 Kurbel zum Einstellen des Schleifdrucks
4 Lifting eye
5 Elektromotor
6 Hebegriff
7 Schürze
8 Unterdrucksauger-Anschluss
9 Radsatz
10 Verriegelungshebel Abdeckung
11 Schrauben Abdeckung
12 Schleifvorrichtung - PG 280 SF
13 Schleifvorrichtung - PG 400 SF
14 Griff/Führungsholm
15 Steuerkasten
16 Startknopf
17 Nothalt
18 Stopp-Taste
19 Verriegelungshebel für die Griffleisteneinstellung
20 Bedienungsanweisung
38 – German
Page 39

SICHERHEITSVORSCHRIFTEN
Maßnahmen vor der Benutzung eines neuen Schleifers
• Lesen Sie die Bedienungsanweisung sorgfältig durch und
machen Sie sich mit dem Inhalt vertraut, bevor Sie das
Gerät benutzen.
• Die Schleifer der Typen PG 400 SF und PG 280 SF
wurden zum Entfer
Klebstoffrückständen, Spachtelmasse und ähnlichen
Werkstoffrückständen von Betonböden sowie zum
Schleifen und Ebnen von Betonböden konstruiert. SF
bedeutet „Einzelscheibe, Konstantdrehzal' (single disc,
fixed speed).
• Das Gerät kann schwere Verletzungen verursachen. Die
Sicherheitsvorschr
wie das Gerät anzuwenden ist.
• Die Maschine darf nur von P ersonal bedient werden, das
theoretisch und praktisch an der Maschine unterwiesen
.
wurde
Stets mit gesundem Menschenverstand arbeiten!
Es ist unmöglich, alle denkbaren Situationen abzudecken, die
beim Gebrauch des Geräts auftreten könnten. Gehen Sie
stets mit Vorsicht und Vernunft vor. Vermeiden Sie
Situationen, für die Sie sich nicht ausreichend qualifiziert
fühlen. Falls Sie sich auch nach dem Lesen dieser
Anweisungen nicht über die richtige Vorgehensweise im
Klaren sind, sollten Sie einen Fachmann zu Rate ziehen,
bevor Sie fortfahren.
Sie können sich jederzeit an Ihren Händler wenden, wenn Sie
agen zur Verwendung der Maschine haben. Wir beraten
Fr
Sie gerne dabei, wie Sie Ihre Maschine besser und sicherer
einsetzen können.
Lassen Sie die Maschine regelmäßig von Ihrem HusqvarnaHändler überprüf
Reparaturen vornehmen.
Alle Informationen und Daten dieser Bedienungsanleitung
galten zum Zeitpunkt der Druc
nen von Haftmittel-/
iften gründlich durchlesen. Lernen Sie,
en und notwendige Einstellungen und
klegung.
Persönliche Schutzausrüstung
WARNUNG! Bei der Benutzung des Gerätes
muss die vorgeschriebene persönliche
!
Schutzausrüstung angewendet werden. Die
persönliche Schutzausrüstung beseitigt
nicht die Unfallgefahr, begrenzt aber den
Umfang der Verletzungen und Schäden. Bei
der Wahl der Schutzausrüstung einen
Fachhändler um Rat fragen.
• Schutzhelm
• Gehörschutz
• Schutzbrille oder Visier
• Atemschutzmaske
• Feste, griffsichere Handschuhe.
• Eng anliegende, kräftige und bequeme Kleidung tragen,
olle Bewegungsfreiheit gewährt.
die v
WARNUNG! Ohne Genehmigung des
Herstellers dürfen an der Maschine unter
!
keinen Umständen
Konstruktionsänderungen vorgenommen
werden. Stets Originalzubehör verwenden.
Unzulässige Änderungen und/oder
Zubehörteile können zu schweren
Verletzungen oder tödlichen Unfällen von
Anwendern oder anderen Personen führen.
WARNUNG! Beim Schneiden, Mahlen,
Bohren, Schmirgeln oder Formen können
!
Staubpartikel oder Dämpfe freigesetzt
werden, die gesundheitsschädliche Stoffe
enthalten können. Sie sollten daher das
Material, das bearbeitet werden soll, genau
kennen und die entsprechende Staub- oder
Atemschutzmaske tragen.
• Stiefel mit Stahlkappe und rutschfester Sohle.
• Ein Erste-Hilfe-Set soll immer griffbereit sein.
German – 39
Page 40

SICHERHEITSVORSCHRIFTEN
Allgemeine Sicherheitsvorschriften
WARNUNG! In diesem Abschnitt werden
grundlegende Sicherheitsregeln vorgestellt.
!
Die folgenden Informationen sind kein
Ersatz für das Wissen, das ein
professioneller Anwender durch seine
Ausbildung und praktische Erfahrung
erworben hat. Lassen Sie sich bei
Unsicherheiten von einer Fachkraft beraten.
Fragen Sie Ihren Fachhändler, Ihre
Servicewerkstatt oder einen erfahrenen
Anwender. Führen Sie keine Arbeiten aus,
wenn Unsicherheiten bezüglich der richtigen
Vorgehensweise bestehen.
• Lesen Sie vor der Inbetriebnahme der Maschine diese
Bedienungsanleitung aufmerksam durch und machen Sie
sich mit dem Inhalt vertraut.
Sicherheit im Arbeitsbereich
• Vermeiden Sie es, das Gerät bei schlechtem Wetter zu
benutzen. Z.B. bei dichtem Nebel, Regen oder Wind,
großer Kälte usw.
• Sorgen Sie für einen sauberen und gut ausgeleuchteten
Arbeitsbereich. Durch zugestellte oder dunkle
Arbeitsbereiche steigt die Unf
• Kein Betrieb der Maschine in feuer- und
explosionsgefährdeten Bereichen.
Elektrische Sicherheit
WARNUNG! An elektrisch betriebenen
Geräten besteht stets die Gefahr von
!
elektrischen Schlägen. Ungünstige
Witterungsbedingungen sowie einen
Körperkontakt mit Blitzableiter und
metallischen Gegenständen vermeiden.
Stets die Vorgaben in der
Bedienungsanleitung befolgen, um Schäden
auszuschließen.
• Maschine nicht am Netzkabel ziehen und Stecker nicht
am Kabel aus der Steckdose ziehen.
• Darauf achten, dass die Kabel nicht mit Wasser, Öl oder
scharfen Kanten in Berühr
dass die Kabel nicht in Türen, Zäunen o. ä. eingeklemmt
werden. Es besteht sonst die Gef ahr, dass Gegenstände
unter Strom gestellt werden.
• Kontrollieren, ob die Kabel intakt und in gutem Zustand
sind. Ein für die A
verwenden.
• Das Gerät nicht benutzen, wenn ein Kabel beschädigt ist,
sondern zur Repar
Servicewerkstatt geben.
• Das Gerät muss an ein geerdete Steckdose
angeschlossen werden.
Kontrollieren, ob die Netzspannung mit der auf dem
•
Geräteschild angegebenen übereinstimmt.
ußennutzung geeignetes Kabel
atur in eine autorisierte
allgefahr stark an.
ung kommen. Darauf achten,
• Nehmen Sie sich vor elektrischen Schlägen in Acht.
meiden Sie jegliche Berührung mit Blitzableitern/
Ver
Metall im Boden.
• Keine zusammengerollte Verlängerungsschnur nutzen,
um eine Überhitzungsgefahr zu v
• Darauf achten, dass das Kabel bei der Arbeit hinter Ihnen
liegt, damit es nicht beschädigt werden kann.
ermeiden.
Persönliche Sicherheit
WARNUNG! Personen mit
Blutkreislaufstörungen, die zu oft
!
Vibrationen ausgesetzt werden, laufen
Gefahr, Schäden an den Blutgefäßen oder
am Nervensystem davonzutragen. Gehen
Sie zum Arzt, wenn Sie an Ihrem Körper
Symptome feststellen, die darauf hinweisen,
dass Sie übermäßigen Vibrationen
ausgesetzt waren. Beispiele für solche
Symptome sind: Einschlafen von
Körperteilen, Gefühlsverlust, Jucken,
Stechen, Schmerzen, Verlust oder
Beeinträchtigung der normalen Körperkraft,
Veränderungen der Hautfarbe oder der Haut.
Diese Symptome treten üblicherweise in
Fingern, Händen und Handgelenken auf. Bei
niedrigen Temperaturen können sich diese
Symptome verstärken.
• Tragen Sie persönliche Schutzausrüstung. Siehe die
Anweisungen unter der Überschrift ”Persönliche
Schutzausrüstung”.
• Arbeiten Sie niemals mit dem Gerät, wenn Sie müde sind,
Alkohol getr
haben, da hierdurch Sehkraft, Urteilsvermögen oder
Körperkontrolle beeinträchtigt werden können.
• Lassen Sie niemals jemand anderen das Gerät benutzen,
ohne sich zu verge
der Bedienungsanweisung verstanden hat.
• Sämtliche Bediener müssen für die Benutzung der
Maschine ausgebildet sein. Die
erforderliche Ausbildung liegt beim Eigentümer.
• Menschen und Tiere können zu einer Ablenkung und
damit zum V
Konzentration und Fokussierung auf die Aufgabe sind
daher stets erforderlich.
• Bedenken, dass Kleidung, langes Haar und Schmuck in
eglichen Teilen hängen bleiben können.
bew
• Niemals die Maschine unbeaufsichtigt mit laufendem
Motor stehen lassen.
• Beim Arbeiten mit den Maschinen muss stets eine weitere
erson anw
P
leisten kann.
• Sorgen Sie immer dafür, dass Sie bei der Arbeit fest und
sicher stehen.
unken oder Medikamente eingenommen
wissern, dass die Person den Inhalt
Verantwortung für die
erlust der Kontrolle über das Gerät führen.
esend sein, die bei Unfällen Hilfestellung
40 – German
Page 41

SICHERHEITSVORSCHRIFTEN
Verwendung und Pflege
• Benutzen Sie das Gerät nur für solche Arbeiten, für die es
vorgesehen ist.
• Alle Teile in funktionstauglichem Zustand halten und dafür
sorgen, dass alle Befestigungsteile sorgfältig f
sind.
• Niemals mit einem defekten Gerät arbeiten. Die
tungs-, Kontroll- und Serviceanweisungen in dieser
War
Bedienungsanweisung sind sorgfältig zu befolgen.
Gewisse Wartungs- und Servicemaßnahmen sind von
geschulten, qualifizierten Fachleuten auszuführen. Siehe
die Anweisungen unter der Überschrift Wartung.
• Nehmen Sie keinerlei Änderungen an den
Sicherheitsvorr
regelmäßig deren einwandfreie Funktionsweise. Die
Maschine darf nicht mit defekten Schutzvorrichtungen
bzw. ohne eingebaute Schutzvorrichtungen betrieben
werden.
• Niemals mit einem Gerät arbeiten, das ohne Zustimmung
des Herstellers modifiziert wurde und nicht länger mit der
iginalausführung übereinstimmt.
Or
• Die Maschine sollte erst eingeschaltet werden, wenn die
Schleifköpfe auf dem Boden aufl iegen.
ist lediglich bei dem Funktionstest zulässig, der in diesem
Handbuch wird.
• Kein Betrieb der Maschine ohne Staubschutzschürze.
Aus Sicherheitsg
Trockenschleifen keinen Spalt zwischen Schleifeinheit
und Boden geben.
• Während des Schleifens muss das Gerät an einen
Unterdruc
entstehende Staub abgesaugt wird.
• Vor dem Auswechseln der Schleifscheiben den Not-AusTaster betätigen und den Netzstec
• Nach jedem Schleif-/Poliergang müssen die
Diamantwer
• Stellen Sie sicher, dass die Gummischürze intakt und
sauber ist und dass sie dicht am Boden anliegt.
Beschädigte Gummischürz
auszutauschen.
• Wenn Klebstoffe, Asphaltreste, Farbe usw. entfernt wird,
muss das Gerät nach dem Gebr
Bodenoberfläche angehoben werden, damit es aufgrund
der entstehenden Hitze nicht am Boden kleben bleibt.
Stellen Sie von dem Anheben des Geräts sicher , dass der
Schleifkopf nicht mehr rotiert.
• Diamantwerkzeuge können unmittelbar nach dem
Gebrauch sehr heiß sein.
bevor Sie die Diamantsegmente abmontieren. Tragen Sie
stets Schutzhandschuhe.
• V erwenden Sie zum Anheben des Geräts immer die dafür
vorgesehene Hebeöse
• Tragen Sie das Gerät immer am Hebegriff und an der
Griffleiste
ichtungen vor. Kontrollieren Sie
ründen darf es insbesondere beim
ksauger angeschlossen sein, damit der
ker ziehen.
kzeuge abmontiert werden.
en sind grundsätzlich
auch stets von der
Lassen Sie das Gerät abkühlen,
.
.
estgezogen
Eine Ausnahme
Transport und Aufbewahrung
• Die Maschine ist unter einem Wetterschutz (vor allem
gegen Regen und Schnee) zu transportieren.
• Bewahren Sie das Gerät für Kinder und Unbefugte
unzugänglich in einem abschließbaren Raum auf.
Die Maschine ist an einem trockenen Ort zu lagern.
•
German – 41
Page 42

MONTAGE
Befestigen des Griffs
• Schrauben entfernen (A).
• Feststellknöpfe entfernen (B).
• Handgriff am Handgriffabstandhalter am Gerät
befestigen.
Der Schrauben (A) und Feststellknöpfe (B )wieder
•
anbringen.
•
Die Feststellknöpfe sollten entlang des Lenkers
positioniert w
die beim Ablegen der Maschine zum Wechseln der
Werkzeuge verursacht werden können, zu verringern.
erden, um die Gefahr von Beschädigungen,
Auswechseln der Diamanten
Schalten Sie das gerät aus, und ziehen Sie den Netzstecker
aus der Steckdose.
Schutzhandschuhe bereithalten, da die Diamanten sehr heiß
werden können.
Kurbeln Sie die Griffleiste in die höchste Position.
•
• Griff zurückziehen, um den Schleifkopf anzuheben.
• Maschine auf den Boden legen.
• Schutzhandschuhe anziehen.
• Die Diamantsegmente mit einem Hammer entfernen.
42 – German
• Befestigen Sie neue Diamantsegmente an der
Schleifscheibe
Maschine wieder aufrecht stellen.
•
.
Page 43

MONTAGE
Anschließen des Unterdrucksaugers
Schließen Sie den Unterdrucksauger an das Gerät an. Einen
50 mm-Schlauch verwenden.
• Eine sehr gute Ansaugleistung wird mit der Ansauganlage
Husqvarna DC 3300 erreicht.
• Stellen Sie sicher, dass die Filter des Unterdrucksaugers
intakt und sauber sind. Achten Sie während des Betr
auf die Staubentwicklung.
• Den Gummirand zum effizienten Auffangen des Staubs
so ausrichten, dass er in K
ontakt mit dem Boden ist.
iebs
Transport
Um die Transportgröße zu verringern, kann das Gerät
zusammengeklappt werden.
• Lösen Sie die Schrauben und den V erriegelungshebel der
Abdeckung.
• Klappen Sie das Gerät vorsichtig nach vorn. Eine
ung zwischen dem Motor und dem Elektrikkasten
Polster
platzieren, um Beschädigungen der Maschine zu
vermeiden.
• Die Abdeckung kann an der Seite des Geräts befestigt
werden.
• Nehmen Sie die Abdeckung ab.
• Bewegen Sie den Hebelgriff in eine senkrechte Position,
sodass dieser nach oben zeigt.
German – 43
Page 44

ANLEITUNG ZUM SCHLEIFEN
Diamanten
Hintergrund
Diamantschleifmittel besteht meist aus 2 Komponenten:
• Dem Diamantpulver, auch bekannt als Bortgranulat.
Durch die Körn
festgelegt.
• Dem Bindemittel (Metall oder Harz). Das Diamantpulver
wird auf ein Bindemittel auf Metall- oder Harzbasis
aufgetragen.
Trägermaterial wird die Schleifscheibe auch als
Sinterdiamant bezeichnet. Bei Verwendung von Harz als
Trägermaterial wird von Harzbindung gesprochen. Durch
den Härtegrad des Bindemittels wird festgelegt, wie
schnell das Diamantschleifmittel verschleißt.
Wirkungsweise
Die Grundlagen des Schleifens mit Diamantschleifkörpern
werden nachstehend beschrieben. Die Beschreib ungen sind
allgemeiner Natur; Ausnahmen sind möglich.
Körnung
Die Körnung wirkt sich wie folgt auf die Schleifleistung aus:
• Je höher die Körnung, desto feiner der Schliff.
• Die Gebrauchsdauer des Schleifkörpers verlängert sich.
Umgekehrt gilt: Je grober die Körnung, desto grober der
Schliff und desto kürz
Schleifkörpers.
Bindemittel
Durch einen höheren Härtegrad des Trägermaterials wird
folgende Wirkung erreicht:
• Je höher die Körnung, desto feiner der Schliff.
• Die Gebrauchsdauer des Schleifkörpers verlängert sich.
• Die Schleifl eistung nimmt ab.
Die entgegengesetzte Wirkung wird durch einen niedrigeren
rad erreicht.
teg
Här
Anzahl der Diamantschleifkörper bzw. Pads
Durch Erhöhung der Anzahl der Schleifkörper wird folgende
Wirkung erreicht:
• Geringerer Druck auf den einzelnen Diamantschleifkörper
und damit eine niedrigere
• Geringere Belastung der Maschine und damit niedrigere
Stromaufnahme.
Gleichmäßiger Schliff, insbesondere bei weichen Böden.
•
Eine Verringerung der Schleifkörperzahl hat den
gegenteiligen Eff
ung wird die Feinheit des Schliffs
Bei Verwendung von Metall als
er die Gebrauchsdauer des
Verschleißrate.
ekt.
• Körnung
• Anzahl der Schleifkörper
• Das Aufbringen zusätzlichen Schleifmittels auf den Boden
(Sand, Karbor
Je schneller der Diamantschleifkörper verschleißt, desto
er das Schleifen. Durch Ändern der vorstehenden
effektiv
Faktoren lassen sich f olgende Eigenschaften bzw . Umstände
ändern:
• Schleiftiefe.
• Stromaufnahme.
• Ebenheit des Bodens (vgl. nächsten Abschnitt).
• Bedienkomfort der Maschine.
und) erhöht den
Verschleiß zusätzlich.
Bestimmung des Härtegrads von Beton
Der Härtegrad wird auch als Druckfestigkeit bezeichnet und
in Newton pro Quadratmillimeter angegeben. Je höher die
Druckfestigkeit, desto härter der Beton und desto
aufwändiger das Schleifen.
Neben der Druckfestigkeit bestimmen weitere Faktoren die
Bodenhärte
berücksichtigt werden müssen. Da beim Schleifen
normalerweise nur die obersten 5 mm des Betonbodens
wichtig sind, ist für die Auswahl häufig das Finish bzw. der
Zustand der Fläche wichtiger als die Druckfestigkeit.
Wichtige Bodenkriterien bei der auswahl des
Schleifkörpers
Bei sehr glatten (mit der Kelle geglätteten) Betonflächen
verhält sich der Boden wie Beton mit hoher Druckfestigkeit
und macht eine weiche Bindung erforderlich.
Bei rauen bzw. unebenen Flächen (Regenschäden,
überstehende Zuschlagsstoffe
aufgerissen usw.) verhält sich der Boden wie Beton mit
niedriger Druckfestigkeit und verlangt nach einer harten
Bindung.
Bei Beschichtungen und Verunreinigungen (Epoxid,
Fliesenkleber, A
der Schleifmittelwahl häufig neben der Druckfestigkeit
weitere Kriterien zu berücksichtigen.
Faustregel: Wenn die Druckfestigkeit des Betons unbekannt
ist, sollte das Schleifen mit einer har
werden. Dadurch stellt der Bediener sicher, dass die
Diamantschleifkörper möglichst wenig verschleißen. Sollte
sich der Diamantschleifkörper als ungeeignet erweisen, war
die Arbeitsproduktivität zwar etwas geringer als möglich, aber
es kam nicht zu unnötigem Materialverschleiß.
Bei einer anderen Vorgehensweise (d.h. Beginn der
Schleifarbeiten mit w
Beton oder abrasiver bzw. verunreinigter Bodenfl äche kann
es bereits nach sehr kurzer Zeit zu einem beträchtlichen
Materialverschleiß kommen.
, die bei der Ausw ahl des Schleifkörpers ebenfalls
, Bode abgestrahlt oder
usgleichsspachtelmasse, Estrich) sind bei
ten Bindung begonnen
eichem Trägermaterial) und weichem
Zusammenfassung
Eine gute Schleifl eistung hängt vom schnellen Verschleiß der
Diamantschleifkörper ab. Der Verschleiß der
Diamantschleifkörper ist abhängig von folgenden Faktoren:
•Druck.
• Härtegrad des Bindemittels.
44 – German
Auswahl der Diamanten
Die Anordnung der Diamantschleifkörper in den
Schleifköpfen hat großen Einfluss auf Maschinenleistung,
Arbeitsproduktivität und Schleifqualität.
Sowohl bei PG 400 SF als auch bei PG 280 SF können
mehrere Schleifkörper-Anordn
ungen eingestellt werden.
Page 45

ANLEITUNG ZUM SCHLEIFEN
Metallbindung
Komplettsatz - innere und äußere Reihe
Komplettsatz - äußere Reihe
Halbsatz - innere und äußere Reihe
Halbsatz - äußere Reihe
German – 45
Page 46

ANLEITUNG ZUM SCHLEIFEN
Auswählen der für Ihre Anwendung geeigneten Sinterdiamanten
Nachstehend werden die grundlegenden Anordnungen für Sinterdiamant-Werkzeuge beschrieben.
Einsatzbereich
Planieren von Hartbeton Weich 16 oder 30 X
Planieren von mittelhartem Beton Mittel 16 oder 30 X
Planieren von Weichbeton Hart 16 oder 30 X
Entfernen von Klebstoff auf
amikfliesen
er
K
Abschleifen von Vinyl- oder
Teppichkleber (Har
Abschleifen von Vinyl- oder
Teppichkleber (mittelhar
Abschleifen von Vinyl- oder
Teppichkleber (W
Abschleifen von Epoxidharzfarbe
(Hartbeton)
Abschleifen von Epoxidharzfarbe
(mittelharter Beton)
Abschleif
(Weichbeton)
Ausbessern von Regenschäden
auf Beton
Glätten überstehender Zuschläge Hart 16-30 X X
Nivellieren von Terrazzo- und
Steinfliesen
Polieren von Betonböden
(Har
Polieren von Betonböden
(mittelharter Beton)
olieren von Betonböden
P
(Weichbeton)
Abschleifen überstehender
Betonzuschläge (Hartbeton)
Abschleifen überstehender
Betonzuschläge (mittelharter
Beton)
Abschleif
Betonzuschläge (Weichbeton)
Planieren von Betonböden
(Hartbeton)
Planieren von Betonböden
(mittelharter Beton)
Planieren v
(Weichbeton)
en von Epoxidharzfarbe
tbeton)
en überstehender
on Betonböden
tbeton)
ter Beton)
eichbeton)
Metallbindung
Mittel
Weich
Mittel
Hart
eich
W
Mittel
t
Har
Hart 16-30 X X
Weich 30 oder 60 X
W
eich 60 X X
Mittel 60 X X
t 60 X X
Har
eich 16-30 X X X
W
Mittel 16-30 X X X
t 16-30 X X
Har
eich 16 oder 30 X X X
W
Mittel 16 oder 30 X X
t 16 oder 30 X X
Har
Körnung
PIRANHA™
oder 16-30
PIRANHA™
oder 16-30
PIRANHA™
oder 16-30
PIRANHA™
oder 16-30
PIRANHA™
oder 16-30
PIRANHA™
oder 16-30
PIRANHA™
oder 16-30
Komplettsatz
- innere und
äußere Reihe
X
Komplettsatz
- äußere Reihe
X X
X
X
Halbsatz innere und
äußere Reihe
X X
X X
X X
Halbsatz äußere
Reihe
46 – German
Page 47

ANLEITUNG ZUM SCHLEIFEN
Harzbindung
Adapter für harzgebundene Redi Lock-Aufsätze
Komplettsatz - äußere Reihe
Halbsatz - äußere Reihe
Auswählen der für Ihre Anwendung geeigneten Diamantenanordnung auf Harzbasis
Einsatzbereich Komplettsatz - äußere Reihe Halbsatz - äußere Reihe
Polieren von Terrazzo-/Steinplatten X
Ausbesserung von Terrazzo-/Steinplatten X
Polieren von Betonböden (Hartbeton) X
Polieren von Betonböden (mittelharter Beton) X
Polieren von Betonböden (Weichbeton)
X
Motordrehrichtung (3 Phasen)
Die Motordrehrichtung kann durch Umkehr der Polung im Netzstecker geändert werden.
ACHTUNG! Die Piranha/PCD-Werkzeuge wurden dazu konzipiert, nur in eine Richtung zu laufen.
47 – German
Page 48

STARTEN UND STOPPEN
Vor dem Start
• Schleifmaschine im Arbeitsbereich aufstellen.
• Stellen Sie sicher, dass sich unter dem Gerät Diamanten
befinden und dass diese gut befestigt sind.
• Schließen Sie den Unterdrucksauger an das Gerät an.
• Zur Einstellung des Lenkers auf eine komfortable
Arbeitshöhe die F
• Netzkabel anschließen.
• Stellen Sie sicher, dass die Not-Aus-Taste nicht betätigt
wird, indem Sie sie im Uhrz
•
Prüfen der Motordrehrichtung
eststellknöpf
e verwenden.
eigersinn drehen.
Stoppen
• Schalten Sie das Gerät mit dem Knopf „Stop“ aus.
• Darauf achten, dass Schleifsegmente beim Anhalten in
Kontakt mit dem Boden b
Maschine schnell vollständig angehalten werden. Den
Schleifkopf beim Anhalten nicht vom Boden heben, da
hierdurch in erheblichem Maße Staub aufgewirbelt wird.
leiben. Hierdurch kann die
Starten
• Den Druck zwischen der Schleifscheibe und dem Boden
durch Herunterdrücken des Griffs senken, ohne dass das
Schleifgerät vom Boden angehoben wird.
• Betätigen Sie den Startknopf, und halten Sie ihn einige
Sekunden lang gedrückt, bis das Gerät star
tet.
48 – German
Page 49

WARTUNG
Störungsbeseitigung
Maschine läuft nicht
• Überprüfen Sie die Stromversorgung und die Stromkabel
auf Beschädigungen.
• Stellen Sie sicher, dass die Not-Aus-Taste nicht betätigt
wird, indem Sie sie im Uhrzeigersinn drehen.
Schleifmaschine nur schwer beherrschbar
• Nicht ausreichend Diamanten in den Schleifköpfen. Beim
Beschleifen dicker Klebstoffschichten oder weicher
Böden erhöht sich die Belastung des Bedieners deutlich,
wenn nicht ausreichend Diamanten verwendet werden.
Gewöhnlich wird dies von einer erhöhten Stromaufnahme
durch den Motor begleitet.
Anzahl der Diamanten erhöhen, um die Belastung für
Schleifmaschine und Bediener zu verr
Maschine springt
• Gummistoßkissen im Schleifgerät könnten verschleißen
oder beschädigt werden. Überprüfen und bei Bedarf
auswechseln.
• Die Diamanteinsätze sind möglicherweise nicht richtig
eingepasst oder sind unterschiedlich hoch. Sitz und Höhe
aller Diamanten k
ontrollieren.
Das Gerät hält bereits nach kurzer Zeit
• Das Gerät ist überlastet, und der Überlastschutz wurde
ausgelöst. V erringern Sie die Last. Das Gerät startet nach
etwa einer Minute neu (sobald der Motor abgekühlt hat).
Das Gerät hält unmittelbar nach dem Starten
• Der Elektromotor wurde überlastet oder eine Phase ist
nicht vorhanden. W arten Sie 1 bis 2 Minuten, bis sich die
Maschine zurückgesetzt hat und versuchen Sie es
anschließend erneut. Wenn dies nicht hilft, ist eine
autorisierte Servicewerkstatt zu kontaktieren.
ingern.
Wartung
WICHTIG! Kontrollen und/oder Wartungsarbeiten sind bei
abgeschaltetem Motor und abgezogenem Stecker
durchzuführen.
Bei sachgemäßer Bedienung funktioniert die Maschine
zuverlässig und erfordert nur einen geringen
Wartungsaufwand.
Reinigung
Vor Reinigung, Wartung oder Montage immer den Stecker
aus der Steckdose ziehen.
Reinigen Sie die gesamte Ausrüstung am Ende eines
Arbeitstags.
Hochdruckreiniger.
Damit das Gerät immer ausreichend gekühlt wird, müssen
die Kühlluftöffnungen frei und sauber gehalten w
Gummistoßkissen
Überprüfen Sie die Gummistoßkissen einmal pro Monat. Bei
Bedarf austauschen.
Stromversorgung
Kontrollieren, ob Kabel und Verlängerungskabel intakt und in
gutem Zustand sind.
Das Gerät nicht benutzen, wenn das Kabel beschädigt ist,
sondern zur Repar
geben.
Reinigen Sie das Gerät nicht mit einem
WARNUNG! Niemals beschädigte Kabel
verwenden. Diese können schwere
!
Verletzungen bis hin zur Todesfolge
verursachen.
atur in eine autorisierte Servicewerkstatt
erden.
Schürze
Stellen Sie sicher, dass die Gummischürze intakt und sauber
ist und dass sie dicht am Boden anliegt. Beschädigte
Gummischürzen sind grundsätzlich auszutauschen.
Service
WICHTIG! Sämtliche Reparaturen dürfen nur von
autorisiertem Reparaturpersonal ausgeführt werden. Diese
Vorschrift soll verhindern, dass der Bediener großen
Gefahren ausgesetzt wird.
German – 49
Page 50

TECHNISCHE DATEN
Technische Daten
PG 400 SF PG 280 SF PG 280 SF (1-phasig)
Motorleistung, kW/PS 4/5,4 3/4 2,2/3,0
Nennstrom, A 16 16 12,9
Nennspannung, V 400 400 230
Gewicht, kg/lbs 115/254 70/154 70/154
Schleifbahnbreite, mm/Zoll 400/16 280/11 280/11
Schleifdruck, kg/lbs 65/143 35/77 35/77
Drehzahl, U/min 1400 2800 1400
Geräuschemissionen (siehe Anmerkung 1)
Gemessene Schallleistung dB(A) 107 107 107
Garantierte Schallleistung LWA dB(A) 108 108 108
Lautstärke (siehe Anmerkung 2)
Schalldruckpegel am Ohr des Benutzers, dB(A) 89 89 89
Vibrationspegel (siehe Anmerkung 3)
Handgriff rechts, m/s
Handgriff links, m/s
2
2
3,4 3,4 3,4
3,4 3,4 3,4
Anmerkung 1: Umweltbelastende Geräuschemission gemessen als Schallleistung (LWA) gemäß EN 61029-1.
Anmerkung 2: Schalldruckpegel gemäß EN 61029-1. Berichten zufolge liegt der Schalldruckpegel normalerweise bei einer
Ausbreitungsklasse (standardmäßige Ausbreitung) von 1,0 dB (A).
Anmerkung 3: Vibrationspegel gemäß EN 61029-1. Berichten zufolge liegt der Vibrationspegel normalerweise bei einer
Ausbreitungsklasse (Standardabw
eichung) von 1 m/s2.
EG-Konformitätserklärung
(nur für Europa)
Husqvarna AB, SE-433 81 Göteborg, Schweden, Tel.: +46 31 949000, versichert hiermit, dass die Husqvarna PG 400 SF,
Husqvarna PG 280 SF von den Seriennummern des Baujahrs 2010 an (die Jahreszahl wird im Klartext auf dem Typenschild
angegeben, mitsamt der nachfolgenden Seriennummer) den Vorschriften folgender RICHTLINIEN DES RATES entsprechen:
• vom 17. Mai 2006 „Maschinen-Richtlinie'
• vom 15. Dezember 2004 ”über elektromagnetische Verträglichkeit” 2004/108/EWG.
• vom 12. Dezember 2006 „betreffend elektrische Betriebsmittel'
Folgende Normen wurden angewendet: EN ISO 12100:2003, EN 55014-1:2006, EN 55015-2/A1:2001, EN 61000-3-2:2006, EN
61000-3-3/A1/A2:2005, EN 13862/A1:2009.
Die gelieferte Maschine entspricht dem Exemplar, das der EU-Typenprüfung unterzogen wurde.
Göteborg, den 29. Dezember 2009
2006/42/EG
2006/95/EG.
Henric Andersson
Vice President, Head of Power Cutters and Construction Equipment
Husqvarna AB
(Bevollmächtigter Vertreter für Husqvarna AB, verantwortlich für die technische Dokumentation.)
50 – German
Page 51

SCHALTPLAN
German – 51
Page 52

SCHALTPLAN
52 – German
Page 53

EXPLICATION DES SYMBOLES
Symboles sur la machine:
AVER TISSEMENT! La machine utilisée de
manière imprudente ou inadéquate peut
devenir un outil dangereux, pouvant
causer des blessures graves voire
mortelles à l’utilisateur et aux autres
personnes présentes.
Lire attentivement et bien assimiler le
manuel d’utilisation a
machine.
Utiliser les équipements de protection
personnelle.
de protection personnelle”.
AVERTISSEMENT! La poussière générée
par le meulage peut occasionner des lésions
si elle est inhalée.
masque filtrant homologué. Veiller à toujours
disposer d'une bonne ventilation.
Démarrage: Réduisez la pression entre le
disque de meulage et le sol en appuyant
sur la poignée sans que l'unité de meulage
ne quitte le sol.
Voir au chapitre Ӄquipement
vant d’utiliser la
Il convient d'utiliser un
Symboles dans le manuel:
Les contrôles et/ou les entretiens doivent
être effectués avec le moteur à l’arrêt et la
prise électrique débranchée.
Toujours porter des gants de protection
homologués.
Un netto
Examen visuel.
Porter des lunettes protectrices ou une
visière
yage régulier est indispensable.
.
Ce produit est conf
en vigueur.
Marquage envir onnemental. Ce symbole
figurant sur le produit ou sur son emballage
indique que ce produit ne peut pas être traité
comme déchet ménager.
En veillant à ce que ce produit soit
correctement éliminé, vous pouv
contribuer à prévenir les conséquences
négatives potentielles sur l’environnement et
les hommes, qui pourraient sinon être le résultat d’un
traitement incorrect des déchets de ce produit.
Pour des informations plus détaillées sur le recyclage de ce
produit, contactez votre comm
avez acheté le produit.
Les autres symboles/autocollants présents sur la
machine concernent des exigences de certification
spécifiques à certains marchés.
orme aux directives CE
ez
une ou le magasin où vous
French – 53
Page 54

SOMMAIRE
Sommaire
EXPLICATION DES SYMBOLES
Symboles sur la machine: ............................................ 53
Symboles dans le manuel: ........................................... 53
SOMMAIRE
Sommaire ..................................................................... 54
QUELS SONT LES COMPOSANTS?
Composants de la meule ............................................. 55
INSTRUCTIONS DE SÉCURITÉ
Mesures à prendre avant d'utiliser une nouvelle
meuleuse ..................................................................... 56
Équipement de protection personnelle ........................ 56
Instructions générales de sécurité ............................... 57
MONTAGE
Positionnez la poignée ................................................. 59
Remplacement des diamants ...................................... 59
Brancher l'aspirateur. ................................................... 60
Transport ...................................................................... 60
GUIDE DE MEULAGE
Diamants ...................................................................... 61
Déterminer la dureté du ciment ................................... 61
Sélection des diamants ................................................ 62
Sens de rotation du moteur ......................................... 64
DÉMARRAGE ET ARRÊT
Avant de démarrer la machine ..................................... 65
Démarrage ................................................................... 65
Arrêt ............................................................................. 65
ENTRETIEN
Recherche de pannes et d’erreurs .............................. 66
Entretien ...................................................................... 66
Service ......................................................................... 66
CARACTÉRISTIQUES TECHNIQUES
Caractéristiques techniques ........................................ 67
Assurance de conformité UE ....................................... 67
SCHÉMA ÉLECTRIQUE
54 – French
Page 55

QUELS SONT LES COMPOSANTS?
Composants de la meule
1 Boîtier électrique
2 Capot
3 Manivelle de réglage de la pression de meulage
4 Œillet de levage
5 Moteur électrique
6 Poignée
7 Pare-poussière
8 Raccordement pour aspirateur
9 Train de roues
10 Couvercle du bouton de verrouillage
11 Vis, capot
12 Unité de meulage - PG 280 SF
13 Unité de meulage - PG 400 SF
14 Poignée / guidon
15 Panneau de commande
16 Bouton de démarrage
17 Arrêt d’urgence
18 Bouton d’arrêt
19 Bouton de verrouillage pour le réglage du guidon
20 Manuel d’utilisation
French – 55
Page 56

INSTRUCTIONS DE SÉCURITÉ
Mesures à prendre avant d'utiliser une nouvelle meuleuse
• Lire attentivement et bien assimiler le manuel d’utilisation
avant d’utiliser la machine.
• Les meuleuses PG 400 SF et PG 280 SF sont conçues
pour ôter des résidus de colle/adhésif, de mastic et autre
de sols en béton et pour le meulage et l’aplanissement de
sols en béton.
à vitesse constante (single disc, fixed speed).
• La machine peut provoquer des blessures personnelles
aves. Lire attentivement les consignes de sécurité.
gr
Apprendre à bien utiliser la machine.
• Seul le personnel ayant recu la formation pratique et
théorique nécessaire à l’utilisation des machines est
isé à utiliser ces machines.
autor
Utilisez toujours votre bon sens
Il est impossible de mentionner toutes les situations
auxquelles vous pouvez être confronté. Soyez toujours
vigilant et utilisez l’appareil avec bon sens. Évitez toutes les
situations pour lesquelles vous ne vous estimez pas
suffisamment qualifié. Si, après a voir lu ces instructions, vous
ne vous sentez toujours pas à l’aise quant à la manière de
procéder, il convient de consulter un expert avant de
poursuivre.
N’hésitez pas à prendre contact avec votre re v endeur si vous
ez des questions sur l’utilisation de la machine. Nous
av
sommes à votre disposition et vous conseillerons av ec plaisir
pour vous aider à utiliser votre machine en toute sécurité et
de façon efficace.
Faites régulièrement contrôler la machine par votre
endeur Husqvarna afin qu'il procède aux installations et
rev
réparations adéquates.
T outes les inf ormations et toutes les données indiquées dans
ce manuel d'utilisation étaient v
manuel a été porté à l'impression.
!
L’abréviation « SF » signifie disque unique
alables à la date à laquelle ce
AVERTISSEMENT! Ne jamais modifier, sous
aucun prétexte, la construction initiale de la
machine sans l’autorisation du fabricant.
N’utiliser que des accessoires et des pièces
d’origine. Toute modification non autorisée
et/ou tout emploi d’accessoires non
homologués peuvent provoquer des
accidents graves voire mortels pour
l’utilisateur et les autres.
Équipement de protection personnelle
AVERTISSEMENT! Un équipement de
protection personnelle homologué doit
!
impérativement être utilisé lors de tout
travail avec la machine. L’équipement de
protection personnelle n’élimine pas les
risques mais réduit la gravité des blessures
en cas d’accident. Demander conseil au
concessionnaire afin de choisir un
équipement adéquat.
• Casque de protection
• Protecteur d’oreilles
• Lunettes protectrices ou visière
• Masque respiratoire
• Gants solides permettant une prise sûre.
• Vêtements confortables, robustes et serrés qui
mettent une liberté totale de mouvement.
per
• Bottes avec coquille en acier et semelle antidérapante.
!
56 – French
AVERTISSEMENT! L’utilisation de
découpeuses, rectifieuses, perceuses,
ponceuses ou raboteuses entraîne la
formation de poussières et vapeurs pouv ant
contenir des produits chimiques dangereux.
C’est pourquoi il est essentiel de connaître
le matériau travaillé et de porter un masque
à poussière ou respiratoire approprié.
• Une trousse de premiers secours doit toujours être
disponible
.
Page 57

INSTRUCTIONS DE SÉCURITÉ
Instructions générales de sécurité
AVERTISSEMENT! Le présent chapitre décrit
les consignes de sécurité de base relatives à
!
l'utilisation de la machine. Aucune de ces
informations ne peut remplacer l'expérience
et le savoir-faire d'un professionnel. Si vous
êtes confronté à une situation où vous
pensez ne pas être en sécurité, arrêtez
immédiatement et consultez un spécialiste.
Veillez contacter votre revendeur, votre
atelier de réparation ou un utilisateur
expérimenté. Il convient d'éviter tous les
travaux pour lesquels vous ne vous sentez
pas suffisamment qualifié !
• Ne pas utiliser la machine sans avoir lu et compris
préalablement le présent manuel d'utilisation.
Sécurité dans l'espace de travail
• Ne pas travailler par mauv ais temps: par exemple en cas
de brouillard épais, de pluie, de vent violent, de froid
intense, etc.
• Maintenir un espace de travail propre et bien éclairé. Les
espaces encombrés ou sombres exposent à des
accidents
• La machine ne doit pas être utilisée dans des zones à
risque d’incendie ou d’e
Sécurité électrique
!
• Ne tirez jamais la machine par le câble d’alimentation et
ne la débranchez jamais en tirant sur le câble.
• Tenez à l’écart et protégez tous les câbles de l’eau, de
l’huile et de bords tranchants
soit pas coincé dans des portes, des clôtures ou tout autre
équipement similaire. Des objets pourraient alors être
sous tension.
• Contrôlez que les câbles sont intacts et en bon état.
Utilisez le câble destiné à un usage e
• Ne pas utiliser la machine si le câble est endommagé. Il
convient dès lors de la confier à un atelier de répar
agréé.
• La machine doit être branchée à une prise de terre.
• Contrôler que la tension secteur est conforme aux
indications sur la plaque de la machine
•
Faire attention aux décharges électriques. Éviter tout
contact du corps a
• N’utilisez pas la rallonge lorsqu’elle est enroulée afin
d’éviter toute surchauffe
• V eiller à avoir le câb le derrière soi lors de l'utilisation de la
machine pour ne pas risquer de l'abîmer
.
xplosion.
AVERTISSEMENT! Il existe toujours un
risque de choc avec les machines
électriques. Évitez de travailler par mauvais
temps ainsi que tout contact du corps avec
du métal/un parafoudre. Suivez toujours les
instructions du manuel d’utilisation pour
éviter tout dommage.
. Veillez à ce que le câble ne
xterne.
ation
.
vec du métal/un parafoudre dans le sol.
.
.
Sécurité du personnel
AVERTISSEMENT! Une exposition excessive
aux vibrations peut entraîner des troubles
!
circulatoires ou nerveux chez les personnes
sujettes à des troubles cardio-vasculaires.
Consultez un médecin en cas de symptômes
liés à une exposition excessive aux
vibrations. De tels symptômes peuvent être:
engourdissement, perte de sensibilité,
chatouillements, picotements, douleur,
faiblesse musculaire, décoloration ou
modification épidermique. Ces symptômes
affectent généralement les doigts, les mains
ou les poignets. Ces symptômes peuvent
être accentués par le froid.
• Utiliser les équipements de protection personnelle. Voir
au chapitre ”Équipement de protection personnelle”.
• Éviter d’utiliser la machine en cas de fatigue, d’absorption
d’alcool ou de prise de médicaments susceptib
d’affecter l’acuité visuelle, le jugement ou la maîtrise du
corps.
• Ne jamais laisser d’autres personnes utiliser la machine
sans s’être assuré au préalable que ces personnes ont
bien compr
• Tous les opérateurs doivent recevoir une formation sur
l’utilisation de la machine.
garantir que les opérateurs reçoivent une formation.
• Des personnes ou des animaux peuvent détourner
l’attention de l’opérateur et l’amener à perdre le contrôle
de la machine
être attentif et concentré sur son travail.
• Attention! Les habits, les cheveux longs et les bijoux
peuvent se coincer dans les par
• Ne laissez jamais la machine sans surveillance avec le
moteur en marche.
Lors de l’utilisation des machines, prévoyez toujours une
•
personne à proximité afin de pouv
cas d’accident.
• Toujours adopter une position de travail sûre et stable.
is le contenu du mode d’emploi.
Il incombe au propriétaire de
. C’est pourquoi l’opérateur doit toujours
ties en mouvement.
oir obtenir de l’aide en
les
French – 57
Page 58

INSTRUCTIONS DE SÉCURITÉ
Utilisation et entretien
• Utiliser la machine uniquement pour les travaux auxquels
elle est destinée.
• Assurez-vous que toutes les pièces sont en état de
fonctionnement et que tous les éléments de fixation sont
correctement serrés
• Ne jamais utiliser une machine qui n’est pas en parfait état
de marche.
instructions de maintenance, de contrôle et d’entretien.
Certaines mesures de maintenance et d’entretien doivent
être confiées à un spécialiste dûment formé et qualifié.
Voir au chapitre Entretien.
• Ne modifiez jamais les dispositifs de sécurité. Contrôlez
régulièrement qu’ils fonctionnent correctement.
machine ne doit pas être utilisée si les dispositifs de
sécurité sont défectueux ou ne sont pas montés.
• Ne jamais utiliser une machine qui a été modifiée au point
de ne plus être confor
• La machine ne doit être démarrée que lorsque les têtes
de meulage reposent sur le sol sauf pour effectuer
tains tests indiqués dans ce manuel.
cer
• La machine ne doit pas être démarrée tant que le parepoussière en caoutchouc n’est pas en place.
étanchéité est essentielle entre la machine et le sol pour
des raisons de sécurité, particulièrement pour des
applications de meulage à sec.
• Pendant le meulage, il convient de raccorder la machine
à un aspirateur pour l'év
• Lors du remplacement des disques de meulage, vérifiez
que l’alimentation en courant de l’unité a été coupée (sur
OFF) en actionnant le bouton d’arrêt d’urgence et en
débr
• Après chaque opération de meulage/polissage, il convient
de toujours retirer les éléments en diamant.
• Il convient de s'assurer que la jupe de caoutchouc est
intacte et propre
sol.
Il convient de remplacer la jupe de caoutchouc si elle
est endommagée.
• Après avoir utilisé la machine pour retirer de la colle, de
l'asphalte, de la peinture
soulever du sol afin d'éviter qu'elle adhère au sol à cause
de la chaleur émise. Il convient d'attendre que la tête de
meulage s'immobilise avant de soulever la machine.
• Après utilisation, les éléments diamant peuvent être très
chauds.
éléments diamant. Utiliser des gants de protection.
• Pour soulever la machine, toujours utiliser l'œilleton de
age dont elle est munie.
lev
• Toujours porter la machine par les poignées.
Suivre dans ce manuel d’utilisation les
anchant la prise.
Laisser la machine refroidir avant d'ôter les
.
La
me au modèle original.
Une bonen
acuation de la poussière.
, et qu'elle est posée correctement sur le
, etc., il convient de toujours la
Transport et rangement
• La machine doit toujours être transportée sous une bâche
afin de ne pas être exposée aux éléments tels que la pluie
et la neige.
• Stockez l'équipement dans un endroit verrouillé afin de le
maintenir hors de portée des enf
incompétente.
• La machine doit toujours être remisée dans un endroit sec
quand elle n’est pas utilisée.
ants et de toute personne
58 – French
Page 59

MONTAGE
Positionnez la poignée
• Retirez les vis (A).
• Retirez les boutons de verrouillage (B).
• Placer la poignée dans son support sur la machine.
• Remonter les vis (A) et les boutons de verrouillage (B).
• Les boutons de verrouillage doivent être positionnés le
long du guidon afin de réduire les risques qu'ils soient
endommagés lorsque la machine est posée pour un
changement d'outils
.
Remplacement des diamants
Éteindre la machine et débrancher la prise d'alimentation.
V eiller à a v oir une paire de gants à disposition. Les éléments
diamant peuvent en eff
• Lever le guidon sur la position la plus élevée.
• Tirez la poignée pour lever la tête de surf açage afin qu’elle
ne repose plus sur sol.
• Rabaissez la machine sur le sol.
• Mettez les gants.
• Utilisez un marteau pour retirer les segments en diamant.
et être très chauds.
• Fixer de nouveaux segments diamant sur le disque de
meulage
• Une fois les nouveaux diamants en place, procédez
inv
.
ersement pour abaisser la machine sur le sol.
French – 59
Page 60

MONTAGE
Brancher l'aspirateur.
Raccorder l'aspirateur à la machine. Utilisez une b use de 50
mm.
• Il est fortement recommandé d’utiliser le système
d’extraction de poussière Husqvarna DC 3300 pour un
contrôle optimal de la poussière.
• V eiller à ce que les filtres de l'aspirateur soient en bon état
et propres.
l'opération.
• Ajustez la jupe de caoutchouc afin que la machine soit en
contact av
poussière.
Faire attention à la poussière au cours de
ec le sol pour un ramassage efficace de la
Transport
La machine peut être repliée pour reduire l'encombrement
lors du transport.
• Desserrer les vis et la poignée de verrouillage qui
maintiennent le capot en place.
• Plier délicatement la machine vers l'avant. Placez un
rembourr
éviter d'endommager la machine.
• Le capot peut être attaché sur le côté de la machine.
age entre le moteur et le boîtier électr
ique pour
• Déposer le capot.
• Placer la manivelle, levier pointant vers le haut.
60 – French
Page 61

GUIDE DE MEULAGE
Diamants
Historique
Les diamants sont composés de deux éléments abrasifs:
• La poudre de diamant (aussi appelée cristaux de diamant
ains) Changer la taille de la poudre diamant ou des
ou gr
grains permet de déterminer la taille des rainures – fines
ou grossières – laissées par le processus de surfaçage.
• Un agent de liage (métal ou résine). La poudre de
diamant est mélangée et suspendue dans un agent de
liage en métal ou en résine.
un agent de liage en métal, le produit fini est appelé
alliage métallique ou segment diamanté fritté. En cas de
suspension dans un agent de liage en résine, le produit
fini est appelé segment ou coussinet diamanté à alliage
résineux. Modifier la dureté de l’agent de liage permet de
changer la vitesse d’usure de l’élément abrasif du
diamant.
Principes généraux
Les règles générales suivantes concernent les segments
diamantés dans les applications de surfaçage. Comme toutes
les règles générales, celles-ci comportent des exceptions.
Taille des grains de diamant
Réduire la taille des grains affecte les perf ormances de l’outil
des manières suivantes:
• Création d’un agencement de rayures fines.
• Augmenter la durée de vie de l’outil diamanté.
Le contraire se produit si vous passez à des particules/grains
ros.
plus g
Agent de liage
Une augmentation de la dureté de l’alliage va:
• Création d’un agencement de rayures fines.
• Augmenter la durée de vie de l’outil diamanté.
• Réduire le taux de production.
Le contraire se produit quand l’alliage en métal ou en résine
est plus mou.
Nombre de segments/coussinets en diamant sous
la machine
L’augmentation du nombre de segments sous la machine va:
• Réduire la pression sur chaque segment diamanté. –
Réduire le taux d’usure des segments diamantés.
Réduire la charge sur la machine qui meule utilise moins
•
de courant.
Créer un agencement plus régulier des rayures
•
(particulièrement sur les sols doux).
Le contr
segments sous la machine.
Résumé des principes des diamants
Les segments diamantés doivent s’user pour garantir la
productivité. L’usure des segments diamantés est affectée
par les facteurs suivants :
aire se produit si vous réduisez le nombre de
En cas de suspension dans
• Pression.
• Dureté de l’alliage.
• Taille des grains de diamant.
• Nombre de segments sous la machine.
• L’addition d’un agent abrasif sur le sol (par ex. du sab le ou
ure de silicone) augmenter
du carb
De manière générale, plus un segmenté diamanté s’use
rapidement et plus la productivité est éle
facteurs ci-dessus, des modifi cations peuvent aussi être
effectuées affectant les points suivants:
• Agencement des rayures.
• Consommation de courant de la machine.
• Planéité du sol (voir la section suivante).
• Facilité d’utilisation.
a l’usure.
vée. En variant les
Déterminer la dureté du ciment
Tous les ciments sont mesurés par leur résistance à la
compression et les unités d’évaluation de cette résistance
sont différentes en fonction de la partie du monde dans
laquelle vous vivez (ex. PSi & MPa). De manière générale,
plus la résistance à la compression est élevée, plus le ciment
est dur et plus il sera dur à meuler.
Cependant, des facteurs autres que la résistance à la
compression déterminent la dureté du sol et donc la sélection
du diamant appropr
concerne que la surface du ciment (au plus 5 mm soit 1/4 de
pouce), la manière dont la finition du sol a été effectuée ou
l’état de la surface sera souvent plus importants que la
résistance à la compression du ciment pour sélectionner le
type de diamant à utiliser.
Facteurs de la surface à considérer lors de la sélection du
diamant
Généralement, si une surface en ciment est très lisse (c.-à-d.
qu’elle a probablement été finie à la truelle), le ciment se
comporte comme s’il était d’une résistance élevée à la
compression nécessitant donc un segment à alliage doux.
Ainsi, si une surface en ciment est grossière/agressive (c.-àd. abîmée par la pluie
ciment se comporte comme si sa résistance à la compression
était faible et il nécessite donc un segment en alliage dur.
Les revêtements de surface (tels que les re vêtements epo xy,
les colles pour dalles en céramique
chappes) sont souvent plus importants que la résistance à la
compression du ciment pour le choix du diamant approprié.
Généralement, quand vous polissez un bloc de ciment pour
la première fois sans bien connaître son deg
commencez toujours avec des diamants d’un alliage dur.
Ceci limite au minimum l’usure des segments diamantés. Si
un segment diamanté dur ne convient pas à l’application,
vous avez certes perdu un peu de temps mais vous n’avez
pas usé les diamants.
Si vous aviez, au contraire, commencé par utiliser un
segment doux sur un ciment doux ou recouver
abrasive, il est quasiment certain que vous auriez usé une
quantité considérable de diamant en très peu de temps.
ié. Dans la mesure où le meulage ne
, décapée au sable, scarifiée, etc.), le
, les enduits de lissage/
ré de dureté,
t d’une surface
French – 61
Page 62

GUIDE DE MEULAGE
Sélection des diamants
La façon dont les segments à diamant sont placés sur l'unité de meulage influencera considérablement les performances de la
machine, les niveaux de productivité ainsi que la qualité du sol fini.
Il existe plusieurs configurations différentes que l'on peut utiliser à la fois pour la PG 400 SF et la PG 280 SF.
Diamants à liant métallique
Insertion complète - rangée interieure et extérieure
Insertion complète - rangée extérieure
Insertion à moitié - rangée intérieure et extérieure
Insertion à moitié - rangée extérieure
62 – French
Page 63

GUIDE DE MEULAGE
Sélectionnez les diamants à liant métallique adéquats pour votre application.
La suggestion suivante couvre les configurations de base pour des outils diamant à liant métallique.
Insertion
Domaines d’utilisation
Sol aplani – Ciment dur Doux 16 ou 30 X
Sol aplani – Ciment moyen Moyen 16 ou 30 X
Sol aplani – Ciment doux Dur 16 ou 30 X
Élimination des restes de colle sur
y
azz
en
amique
o / pierre
y
en
y
y
les dalles en cér
Vinyl ou retrait de colle sur un tapis
– Ciment dur
Vinyl ou retrait de colle sur un tapis
– Ciment mo
Vinyl ou retrait de colle sur un tapis
– Ciment doux
Retrait de peinture epoxy –
Ciment dur
Retrait de peinture epoxy –
Ciment moyen
Retrait de peinture epoxy –
Ciment doux
Ciment endommagé par la pluie Dur 16-30 X X
Lissage de béton exposé Dur 16-30 X X
Polissage des irrégularités des
dalles en terr
Polissage de la surface des sols
en ciment – Ciment dur
Polissage de la surface des sols
en ciment – Ciment mo
Polissage de la surface des sols
en ciment – Ciment doux
Surfaçage pour exposer le béton
dans le ciment – Ciment dur
Surfaçage pour exposer le béton
dans le ciment – Ciment mo
Surfaçage pour exposer le béton
dans le ciment – Ciment doux
Aplanissement des sinuosités des
sols en ciment – Ciment dur
Aplanissement des sinuosités des
sols en ciment – Ciment mo
Aplanissement des sinuosités des
sols en ciment – Ciment doux
Alliage
métallique
Mo
yen
Doux
Moyen
Dur
Doux
Moyen
Dur
Doux 30 ou 60 X
Doux 60 X X
Moyen 60 X X
Dur 60 X X
Doux 16-30 X X X
Moyen 16-30 X X X
en
Dur 16-30 X X
Doux 16 ou 30 X X X
Moyen 16 ou 30 X X
en
Dur 16 ou 30 X X
Taille des
grains
PIRANHA™
ou 16-30
PIRANHA™
ou 16-30
PIRANHA™
ou 16-30
PIRANHA™
ou 16-30
PIRANHA™
ou 16-30
PIRANHA™
ou 16-30
PIRANHA™
ou 16-30
complète rangée
interieure et
extérieure
X
Insertion
complète rangée
extérieure
X X
X
X
Insertion à
moitié - rangée
intérieure et
extérieure
X X
X X
X X
Insertion à
moitié rangée
extérieure
French – 63
Page 64

Diamants à liant résinoïde
Adaptateur liant résinoïde Redi Lock
Insertion complète - rangée extérieure
GUIDE DE MEULAGE
Insertion à moitié - rangée extérieure
Sélectionnez la configuration diamants à liant résinoïde adéquate pour votre application.
Domaines d’utilisation
Polissage terrazzos/tuiles en pierre X
Rectification terrazzos/tuiles en pierre X
Polissage de la surface des sols en ciment – Ciment dur X
Polissage de la surf ace des sols en ciment – Ciment mo y en X
Polissage de la surface des sols en ciment – Ciment doux
Insertion complète rangée extérieure
Insertion à moitié - rangée
extérieure
X
Sens de rotation du moteur (3 phases)
Le sens du moteur peut être modifié en inversant les pôles de la fiche d'alimentation électrique.
REMARQUE! Les outils Piranha/PCD sont conçus pour ne fonctionner que dans un sens.
64 – French
Page 65

DÉMARRAGE ET ARRÊT
Avant de démarrer la machine
• Positionnez la machine sur la surface de travail.
• S'assurer qu'il y a des diamants sous la machine et qu'ils
sont fixés solidement.
Raccorder l'aspirateur à la machine.
•
• Utilisez les boutons de verrouillage pour régler le guidon
a
à une hauteur de tr
• Branchez l’alimentation électrique de la machine.
• V eiller à ne pas appuyer sur le bouton d'arrêt d'urgence en
nant dans le sens des aiguilles d'une montre
le tour
• Vérifier le sens de rotation du moteur.
vail plus confortable.
.
Arrêt
• Utiliser le bouton d'arrêt et éteindre la machine.
• Laissez les segments de meulage en contact avec le sol
lors de l'arrêt de la machine.
s'arrêter complètement rapidement. Ne levez pas la tête
de meulage du sol lors de l'arrêt de la machine. Cela
pourrait générer une grande quantité de poussières dans
l'air.
Cela aidera la machine à
Démarrage
• Réduisez la pression entre le disque de meulage et le sol
en appuyant sur la poignée sans que l'unité de meulage
ne quitte le sol.
• Appuyer sur le bouton de démarrage et maintenir la
pression pendant quelques secondes pour démarrer la
machine.
French – 65
Page 66

ENTRETIEN
Recherche de pannes et d’erreurs
La machine ne tourne pas
• Vérifier l'alimentation électrique et les câbles en
s'assurant qu'ils ne sont pas endommagés.
• V eiller à ne pas appuyer sur le bouton d'arrêt d'urgence en
le tournant dans le sens des aiguilles d'une montre
La machine est difficile à tenir
• Pas assez de diamants sous la machine (en cas
d’élimination de colle épaisse sur des sols doux, la charge
sur la machine et l’opérateur augmente considérablement
s’il y a trop peu de diamants sous la machine). L'appareil
est généralement équipé d'un moteur haute tension.
Augmentez le nombre de diamants sous la machine pour
réduire la charge sur la machine et l’opérateur
La machine sursaute
• Les plaques en caoutchouc pour l'absorption des chocs
dans l'unité de meulage peuvent s'user ou
s'endommager. Contrôlez-les et remplacez-les si
nécessaire.
• Il se peut que les diamants ne soient pas placés
correctement ou qu'ils aient des hauteurs différentes.
Vérifiez que tous les diamants sont installés correctement
et qu’ils sont de la même hauteur.
.
.
Entretien
IMPORTANT! Les contrôles et/ou les entretiens doivent
être effectués av ec le moteur à l’arrêt et la prise électrique
débranchée.
Utilisée correctement, la machine est d’une grande fiabilité et
ne nécessite que très peu de maintenance.
Nettoyage
Toujours débrancher la prise av ant le nettoy age, l'entretien et
le montage.
Toujours nettoyer l’équipement complet à la fin de la journée
vail. Ne pas utiliser de netto y eur haute pression pour le
de tra
nettoyage de la machine.
Pour que le refroidissement de la machine fonctionne
correctement, les ouver
doivent être propres et ne pas être bouchées.
Plaques en caoutchouc pour l'absorption des chocs
tures de l’air de refroidissement
La machine s’arrête après un court instant
• La machine est surchargée et la protection contre les
surchages s'est enclenchée. Réduire la charge. La
machine redémarrera après une minute environ, dès que
le moteur aura refroidi.
La machine s’arrête au démarrage
• Le moteur électrique est surchargé ou une phase
manque. Laissez une ou deux minutes à la machine pour
se réinitialiser, puis réessayez. Si le problème demeure,
contacter un atelier de réparation autorisé.
Vérifiez tous les mois les plaques en caoutchouc pour
l'absorption des chocs. Remplacez-les si nécessaire.
Alimentation électrique
AVERTISSEMENT! N’utilisez jamais de
câbles endommagés car ils peuvent
!
entraîner des blessures graves, voire
mortelles.
Contrôler que le câble et la rallonge sont entiers et en bon
état.
Ne pas utiliser la machine si le câble est endommagé, la
confier à un atelier d'entretien agréé pour répar
ation.
Pare-poussière
Il convient de s'assurer que la jupe de caoutchouc est intacte
et propre, et qu'elle est posée correctement sur le sol. Il
convient de remplacer la jupe de caoutchouc si elle est
endommagée.
Service
66 – French
IMPORTANT! Toutes les réparations doivent être
effectuées par des réparateurs agréés. Ceci permet d’éviter
que les opérateurs ne soient exposés à des risques
importants.
Page 67

CARACTÉRISTIQUES TECHNIQUES
Caractéristiques techniques
PG 400 SF PG 280 SF PG 280 SF (Monophasé)
Puissance du moteur, kW/hp 4/5,4 3/4 2,2/3,0
Courant nominal, A 16 16 12,9
Tension nominale, V 400 400 230
Poids, kg/lbs 115/254 70/154 70/154
Largeur de surfaçage, mm/pouces 400/16 280/11 280/11
Pression de surfaçage, kg/lbs 65/143 35/77 35/77
Vitesse, tr/min. 1400 2800 1400
Émissions sonores (voir remarque 1)
Niveau de puissance sonore mesuré dB(A) 107 107 107
Niveau de puissance sonore garanti L
Niveaux sonores (voir remarque 2)
Niveau de pression acoustique au niveau des
oreilles de l’utilisateur, dB(A)
Niveaux de vibrations (voir remarque 3)
Poignée droite, m/s
Poignée gauche, m/s
2
2
dB(A) 108 108 108
WA
89 89 89
3,4 3,4 3,4
3,4 3,4 3,4
Remarque 1: Émission sonore dans l’environnement mesurée comme puissance acoustique (LWA) selon EN 61029-1.
Remarque 2: Niv eau de pression sonore conformément à EN 61029-1. Les données reportées pour le niveau de pression sonore
montrent une dispersion statistique typique (déviation standard) de 1,0 dB (A).
Remarque 3: Niv eau de vibrations conformément à EN 61029-1. Les données reportées pour le niveau de vibrations montrent une
dispersion statistique typique (déviation standard) de 1 m/s
2
.
Assurance de conformité UE
(Concerne seulement l’Europe)
Husqvarna AB, SE-433 81 Göteborg, Suède, tél.: +46-31-949000, déclarons sous notre seule respondabilité que la Husqvarna
PG 400 SF, Husqv arna PG 280 SF à partir des numéros de série de l’année 2010 (l’année est indiquée clairement sur la plaque
signalétique suivie d’un numéro de série) auquel se réfère ce document est conforme aux dispositions des DIRECTIVES DU
CONSEIL:
• du 17 mai 2006 ”directive machines”
• du 15 décembre 2004 ”compatibilité électromagnétique” 2004/108/CEE.
• du 12 décembre, 2006 "relatives aux équipements électriques"
Les normes harmonisées suivantes ont été appliquées: EN ISO 12100:2003, EN 55014-1:2006, EN 55015-2/A1:2001, EN 610003-2:2006, EN 61000-3-3/A1/A2:2005, EN 13862/A1:2009.
La machine livrée correspond à l’exemplaire soumis au contrôle de conformité communautaire.
Göteborg, le 29 décembre 2009
2006/42/CE
2006/95/CE.
Henric Andersson
Vice-président, responsable des découpeuses et équipements de construction
Husqvarna AB
(Représentant autorisé d’Husqvarna AB et responsable de la documentation technique.)
French – 67
Page 68

SCHÉMA ÉLECTRIQUE
68 – French
Page 69

SCHÉMA ÉLECTRIQUE
French – 69
Page 70

´®z+UJ|¶0[¨
´®z+UJ|¶0[¨
Page 71

Page 72

GB - Original instructions, ES - Instrucciones originales, DE - Originalanweisungen, FR - Instructions d’origine
www.husqvarnacp.com
1153429-20
2010-01-26
´®z+UJ|¶0[¨
´®z+UJ|¶0[¨
 Loading...