

Page 1

Notice
F2-1003 (GB)
2003-02-24
1
Page 2

Notice
Copyright (Copyright ⓒ 2001 HUMAX Corporation)
Not to be copied, used or translated in part or whole without HUMAX's prior consent in
writing except approval of ownership of copyright and copyright law.
Warranty
The information in this document is subject to change without notice. HUMAX does not
have any responsibility for direct, indirect, accidental, necessary and other
your offer or use of the information contained in this manual.
damage due to
Trademarks
VIACCESSTM is a trademark of France Telecom.
CryptoWorks(TM) is a trademark of Philips Electronics N.V.
Irdeto is a trademark of Mindport BV.
Nagravision is a registered trademark of KUNDELSKI S.A.
Conax is a trademark of Telenor Conax AS.
'Dolby' and the double-D symbol are trademarks of Dolby Laboratories.
Thank you for purchasing a HUMAX personal video recorder. Please read this user manual carefully, to be able to safely
install, use and maintain the receiver at maximum performance. Keep this user manual next to your recorder for future
reference.
2
Page 3
Safety and Warning
CAUTION: TO REDUCE THE RISK OF ELECTRIC SHOCK, DO
NOT REMOVE COVER (OR BACK). NO USER
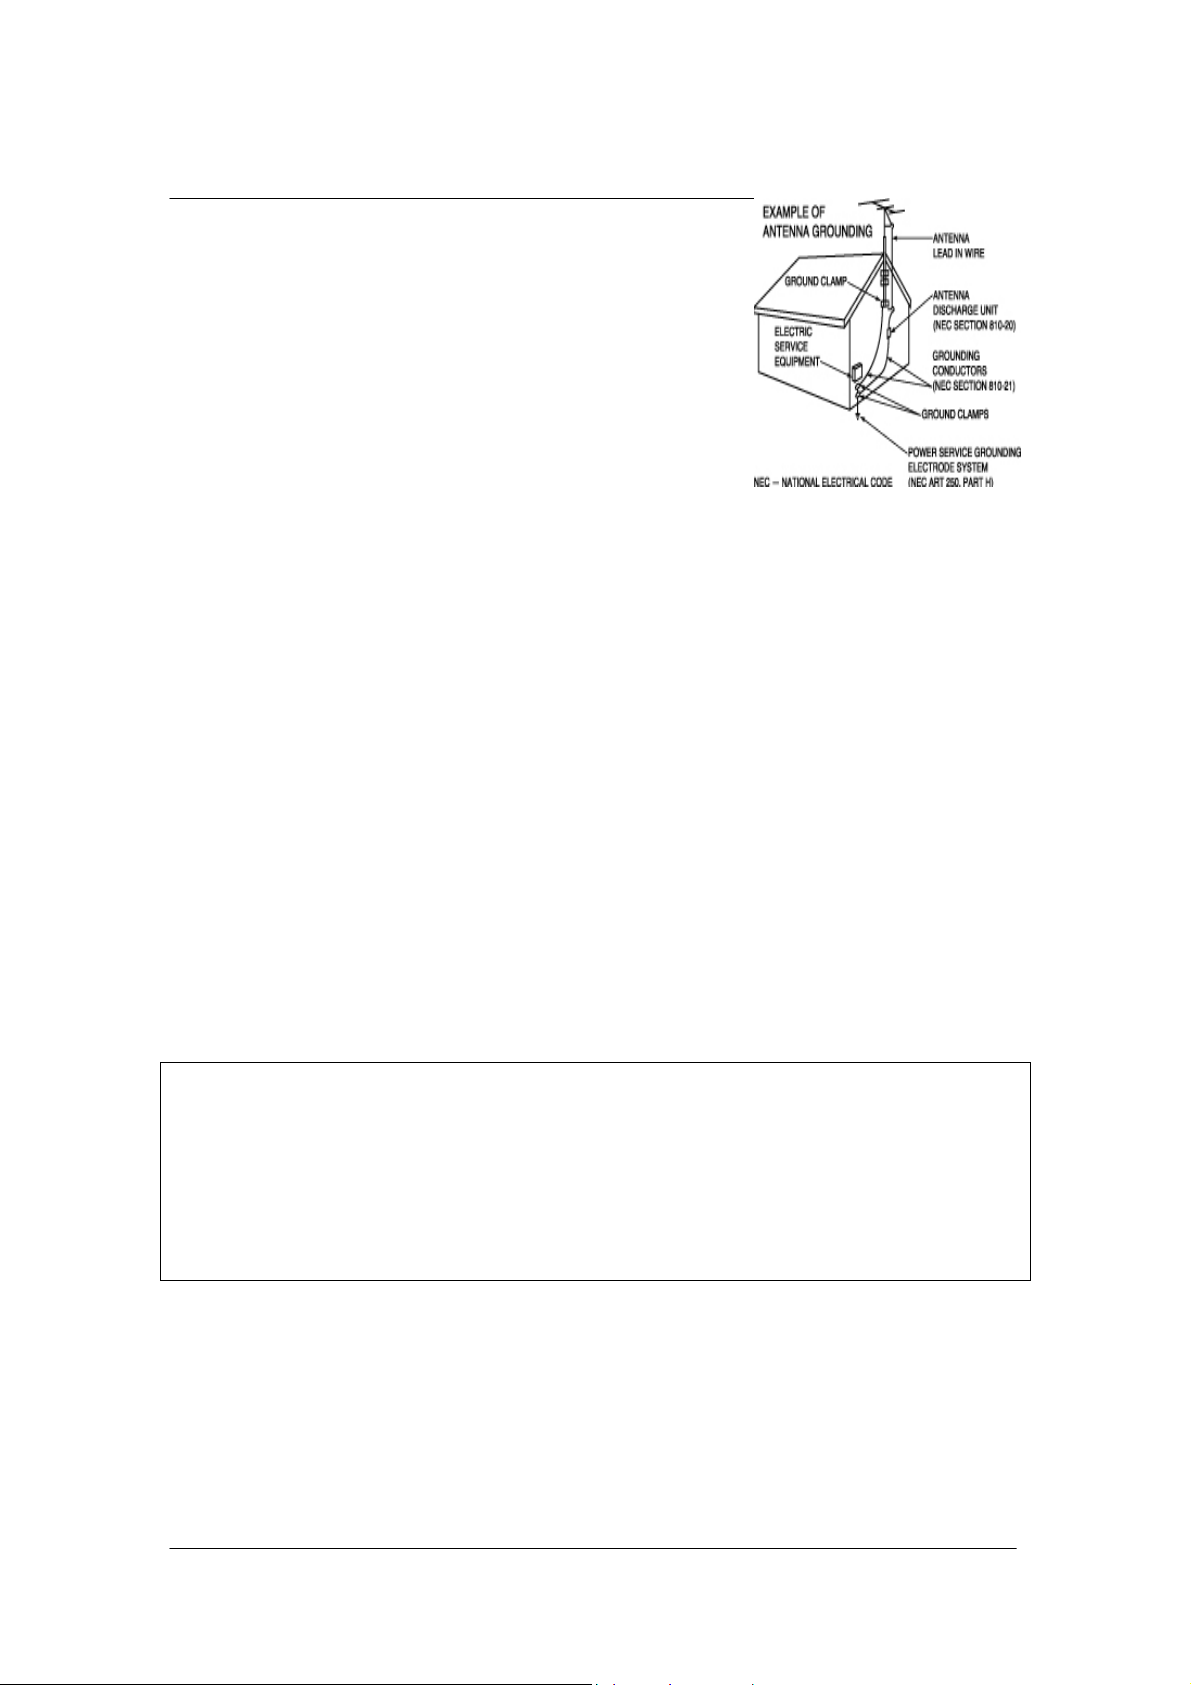
This symbol indicates high voltage is present inside.
It is dangerous to make any kind of contact with any part inside of this
product.
This symbol alerts you that important literature concerning operation and
SERVICEABLE PARTS INSIDE. REFER SERVICING TO
QUALIFIED SERVICE PERSONNEL.
maintenance has been included with this product.
Note to CATV system installer: This reminder is provided to call CATV system installer’s
attention to Article 820-40 of the National Electrical Code that provides guidelines for
proper grounding and,
in particular, specifies that the cable ground shall be connected to the grounding system
of the building as close to the point of cable entry as practical.
Caution: FCC regulations state that any unauthorized changes or modifications to this
equipment may void the user’s authority to operate it.
Caution: To prevent electric shock, match the wide blade of plug to the wide slot, and
fully insert the plug.
Important: One Federal Court has held that unauthorized recording of copyrighted TV
programs is an infringement of U.S. copyright laws.
To prevent damage which may result in fire or electric shock ha zard, do not expose this
appliance to rain or moisture.
3
Page 4

Safety and Warning
Always be careful when using this product. To reduce the risk of fire, electrical
shock, and other injuries, keep these safety precautions in mind when installing,
using, and maintaining your Receiver.
•Read all safety and operating instructions before operating this product.
•Keep the safety and operating instructions for future reference.
•Heed all warnings on the product and in the operating instructions.
•Follow all operating and use instructions.
•Unplug the product from the wall outlet before cleaning. Use a d amp cloth; do not
use liquid or aerosol cleaners.
•Never add any attachments and/or equipment without approval of the manufacturer.
Such additions can increase the risk of fire, electric shock, or other personal injury.
•Do not use the product where contact with or immersion in water is a possibility, such
as near bath tubs, sinks, washing machines, swimming pools, etc.
•Do not place the product on an unstable cart, stand,
tripod, bracket, or table where it can fall. A falling product
can cause serious injury to a child or adult, and serious
damage to the appliance. Use only with a cart, stand,
tripod, bracket, or table recommended by the manufacturer
or sold with the product. Follow the manufacturer’s
instructions when mounting the unit, and use a mounting
accessory recommended by the manufacturer. Move the product and cart with care.
Quick stops, excessive force, and uneven surfaces can make the unit and cart
unsteady and likely to overturn.
•Provide ventilation for the product. The unit is designed with slots in the cabinet for
ventilation to protect it from overheating. Do not block these openings with any object,
and do not place the product on a bed, sofa, rug, or other similar surface. Do not
place it near a radiator or heat register. If you place the product on a rack or
bookcase, ensure that there is adequate ventilation and that you have followed the
manufacturer’s instructions for mounting.
•Operate your product only from the type of power source indicated on the marking
label. If you are not sure of the type of power supplied to your home, consult your
appliance dealer or local power company.
4
Page 5

Safety and Warning
•Use only a grounded or polarized outlet. For your safety, this p roduct is equipped
with a polarized alternating current line plug having one blade wider than the other.
This plug will fit into the power outlet only one way. If you are unable to insert the plug
fully into the outlet, try reversing the plug. If the plug still does not fit, contact your
electrician to replace your outlet.
•Protect the power cord. Power supply cords should be routed so that they will not be
walked on or pinched by objects placed on or against them. Pay particular attention to
cords at plugs, convenience receptacles, and the point where they exit from the unit.
•Unplug the product from the wall outlet and disconnect the anten na or cabling during
a lightning storm or when left unattended and unused for long periods of time. This
will prevent damage to the unit due to lightning and power-line surges.
•Avoid overhead power lines. An outside antenna system should not be placed in the
vicinity of overhead power lines or other electric light or power circuits or where it can
fall into such power lines or circuits. When installing an outside antenna system, be
extremely careful to keep from touching the power lines or circuits. Contact with such
lines can be fatal.
•Do not overload the wall outlet or extension cords. Overloading can result in fire or
electric shock.
•Do not insert anything through the openings in the unit, where they can touch
dangerous voltage points or damage parts. Never spill liquid of any kind on the
product.
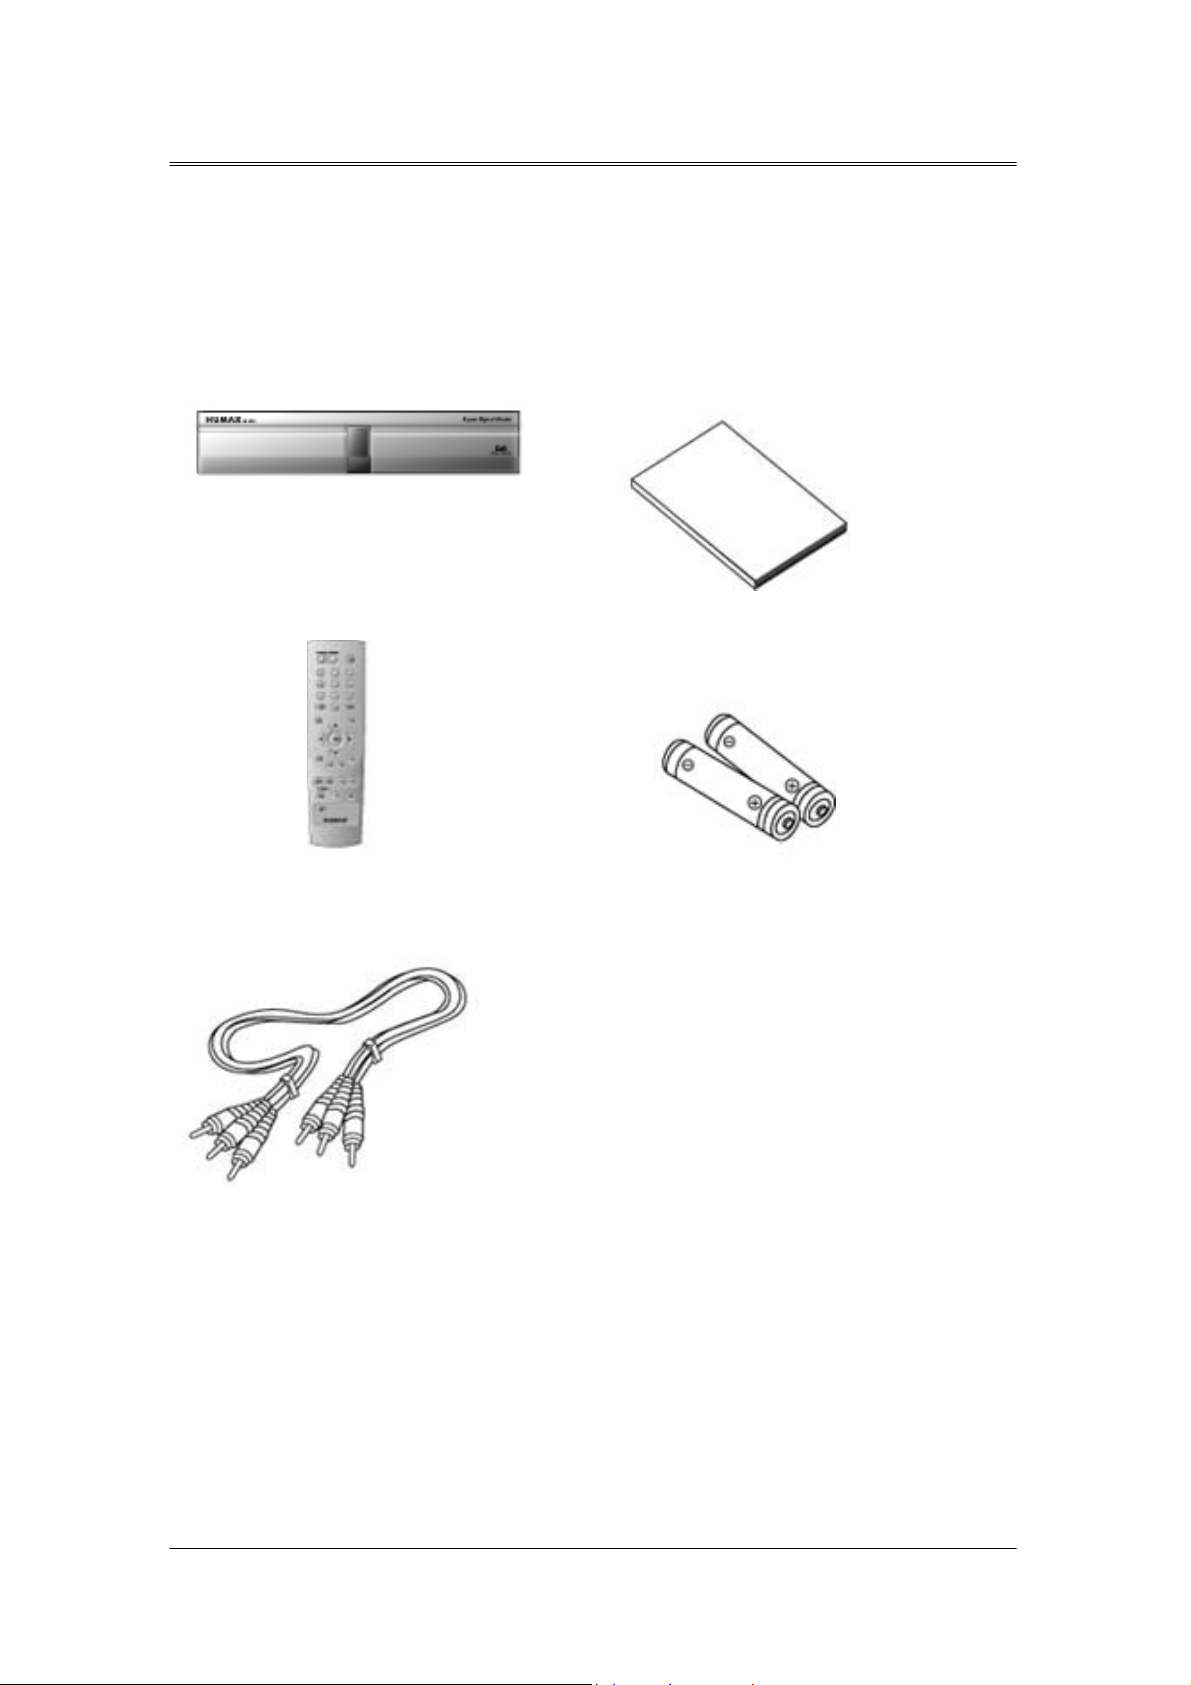
•Ground outdoor antennas. If an outside antenna is connected to the product, be sure
the antenna is grounded so as to provide some protection against voltage surges and
built-up static charges. Section 810 of the National Electrical Code, ANSI/NFPA
No.70-1984, provides information about proper grounding of the mast and supporting
structure, grounding of the lead-in wire to an antenna discharge unit, size of grounding
conductors, location of antenna discharge unit, connection to grounding electrodes,
and requirements for the grounding electrode.
•Do not attempt to service the product yourself. Refer all servicing to qualified service
personnel. Unplug the unit from the wall outlet and refer servicing to qualified service
personnel under the following
5
Page 6
Safety and Warning
conditions:
- when the power-supply cord or plug is damaged
- if liquid has been spilled on the unit or if objects
have fallen into the unit
- if the product has been exposed to rain or water
- if the product does not operate normally by
following the operating instructions
- if the product has been dropped or the cabinet has
been damaged
- when the product exhibits a distinct change in
performance
•If you make adjustments yourself, adjust only those controls that are covered by the
operating instructions. Adjusting other controls may result in damage and will often
require extensive work by a qualified technician to restore the product to normal.
•When replacement parts are required, be sure the service technician uses
replacement parts specified by the manufacturer or those that have the same
characteristics as the original part. Unauthorized substitutions may result in additional
damage to the unit.
•Upon completion of any service or repairs to this product, ask the service technician
to perform safety checks to determine that the product is in a safe operating condition.
This device complies with part 15 of the FCC Rules. Operation is subject to the following
two conditions:
(1) This device may not cause harmful interference, and
(2) This device must accept any interference that may cause undesired operation.
This satellite receiver provides display of television closed captioning in accordance with
§5.119 of the FCC rules.
6
Page 7

Contents
Warnings, Cautions and Notes........................................................................2
Safety and Warning......................................................................................3
1.Before Using the Receiver…………………………………………………………………………..9
1.1 Package Contents.......................................................................9
1.2 Front Panel............................................................................ 10
1.3 Rear Panel ............................................................................ 11
1.4 Remote Control ...................................................................... 12
2.Setup………………………………………………………………………………………………….17
2.1 Connecting the Antenna ............................................................. 14
2.2 Powering On .......................................................................... 15
3.Installation Wizard………………………………………………………………………………..…19
3.1 Language............................................................................... 16
3.2 Area Setting ............................................................................ 16
3.3 Antenna Setting .............................................................................. 16
3.4 Automatic Search ..................................................................... 18
3.5 Time Setting............................................................................ 18
4.Basic Operation……………………………………………………………………………………..22
4.1 Switching Channel..................................................................... 19
4.2 Volume Control ........................................................................ 19
4.4 Change the Subtitle Language...................................................... 19
4.5 Change a Audio Language......................................................... 19
4.6 Program Information (I- plate)...................................................... 20
4.7 Option List.............................................................................. 21
5.Channel List………………………………………………………………………………………….28
5.1 Displaying and Switching Channel List ............................................ 25
5.2 Changing Channel List Group....................................................... 25
5.3 Edit Channels .......................................................................... 26
5.4 Edit Favourite Channels.............................................................. 29
5.5 Channel Change Mode............................................................... 32
6.Programme Guide…………………………………………………………………………………..36
6.1 Viewing Programme Guide Information............................................ 33
6.2 Finding a Programme ................................................................ 34
6.3 Viewing Reserved Programme ...................................................... 36
7.Setting Preferences…………………………………………………………………………………41
7
Page 8

Contents
7.1 Parental Control.............................................................................. 38
7.2 Language Setting ............................................................................ 40
7.3 Time Setting............................................................................ 41
7.4 Schedule................................................................................ 42
7.5 A/V Control............................................................................. 43
7.6 UHF.......................................................................................44
7.7 Miscellaneous................................................................................. 44
8.Installation…………………………………………………………………………………………….49
8.1 Antenna Setting........................................................................ 46
8.2 Automatic Search ..................................................................... 48
8.3 Manual Search......................................................................... 50
8.4 Other Search ........................................................................... 53
8.5 Motor Antenna ......................................................................... 56
8.6 Default Setting......................................................................... 62
9.Software Update…………………………………………………………………………………….66
9.1 OTA (Over the Air)...................................................................... 63
9.2 Software Update from PC ........................................................... 67
10.System Information……………………………………………………………………………..…71
10.1 Status ................................................................................... 68
10.2 Signal Detection....................................................................... 68
11.Games……………………………………………………………………………………………….72
12.Menu Map…………………………………………………………………………………………..73
13.Trouble Shooting…………………………………………………………………………………..74
13.1 Trouble Shooting ........................................................................... 71
13.2 Error Message............................................................................... 72
14.Specification⋯⋯⋯⋯⋯⋯⋯⋯⋯⋯⋯⋯⋯⋯⋯⋯⋯⋯⋯⋯⋯⋯⋯⋯⋯⋯⋯⋯⋯⋯⋯⋯⋯..76
15.Glossary⋯⋯⋯⋯⋯⋯⋯⋯⋯⋯⋯⋯⋯⋯⋯⋯⋯⋯⋯⋯⋯⋯⋯⋯⋯⋯⋯⋯⋯⋯⋯⋯⋯⋯⋯..77
16.Service and Support⋯⋯⋯⋯⋯⋯⋯⋯⋯⋯⋯⋯⋯⋯⋯⋯⋯⋯⋯⋯⋯⋯⋯⋯⋯⋯⋯⋯⋯⋯.79
8
Page 9
1. Before Using the Receiver
This chapter provides detailed instructions on the product and its accessories.
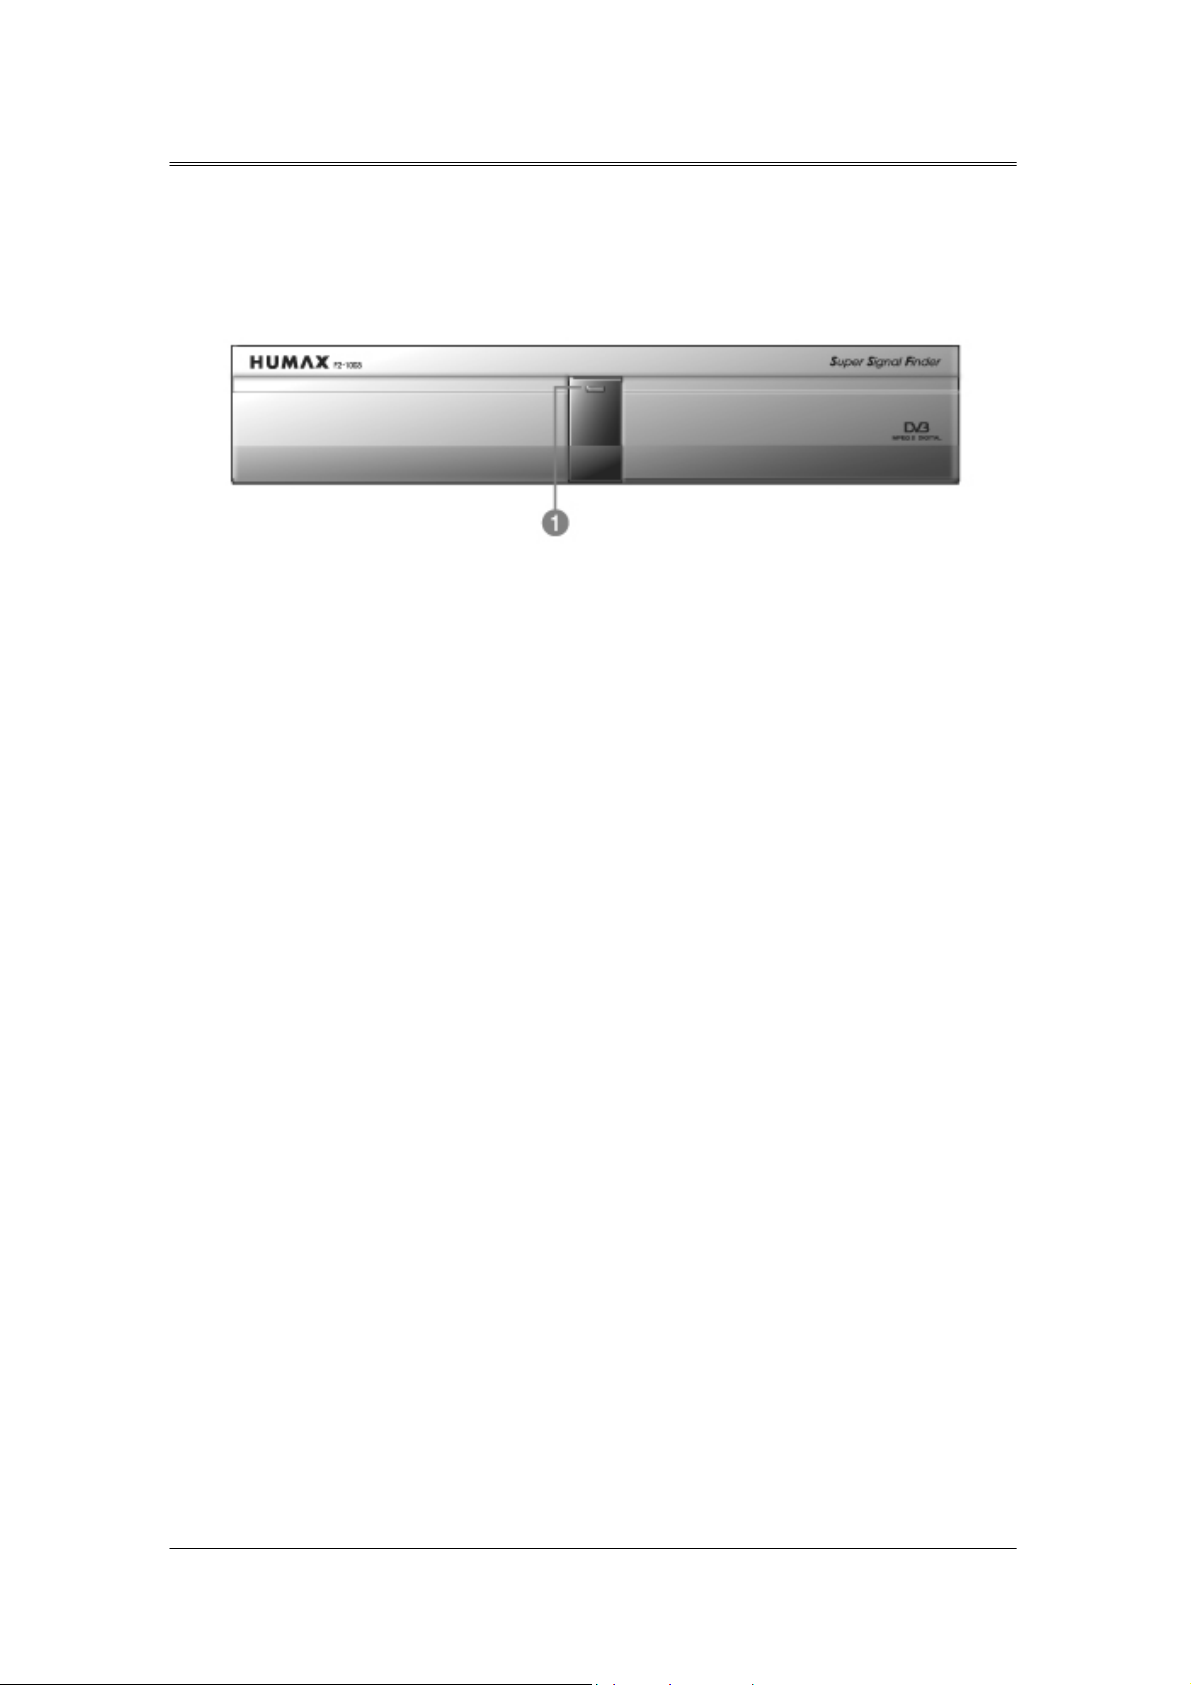
1.1 Package Contents
Please check all package contents before using your product.
Receiver
Remote Control Unit (1)
RCA A/V Cable (1)
user’s Manual
Batteries (2)
[Note]
Since faults may occur if the remote controller is being left without a battery for a long time, always keep th
e battery inserted in the remote controller.
9
Page 10
1. Before Using the Receiver
1.2 Front Panel
① Display
Turns on red light when the product is in Standby mode.
Turns on green light when it is in operation.
10
Page 11
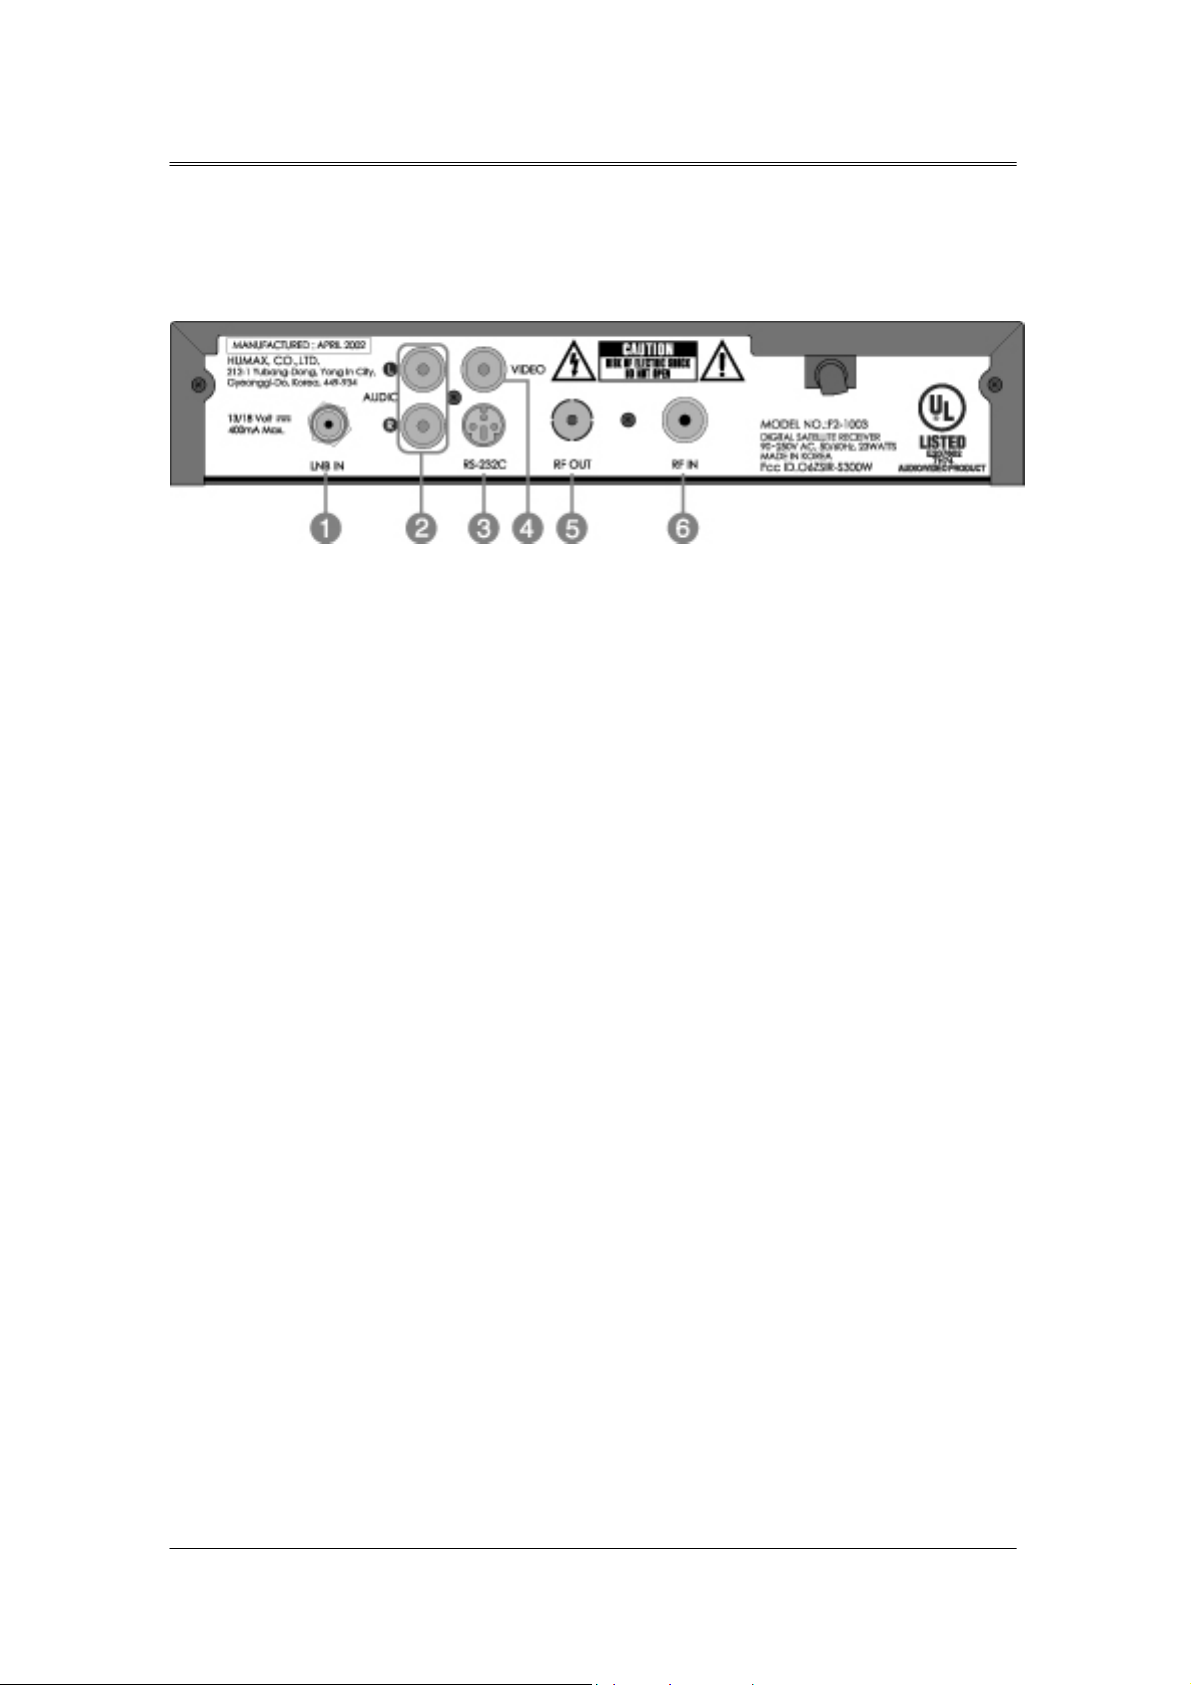
1. Before Using the Receiver
1.3 Rear Panel
① LNB IN
Connects a satellite antenna cable.
② AUDIO L/R
Connects to your TV or VCR and output Audio signals.
③ RS-232C
Connects to your PC to upgrade product’s software programme.
④ VIDEO
Connects to your TV or VCR and output Video signals.
⑤ RF OUT
Connect a RF signal from the product to RF input jack on your TV.
⑥ RF IN
Connect a general aerial antenna with the cable jacks to the RF input jack on the product.
11
Page 12
1. Before Using the Receiver
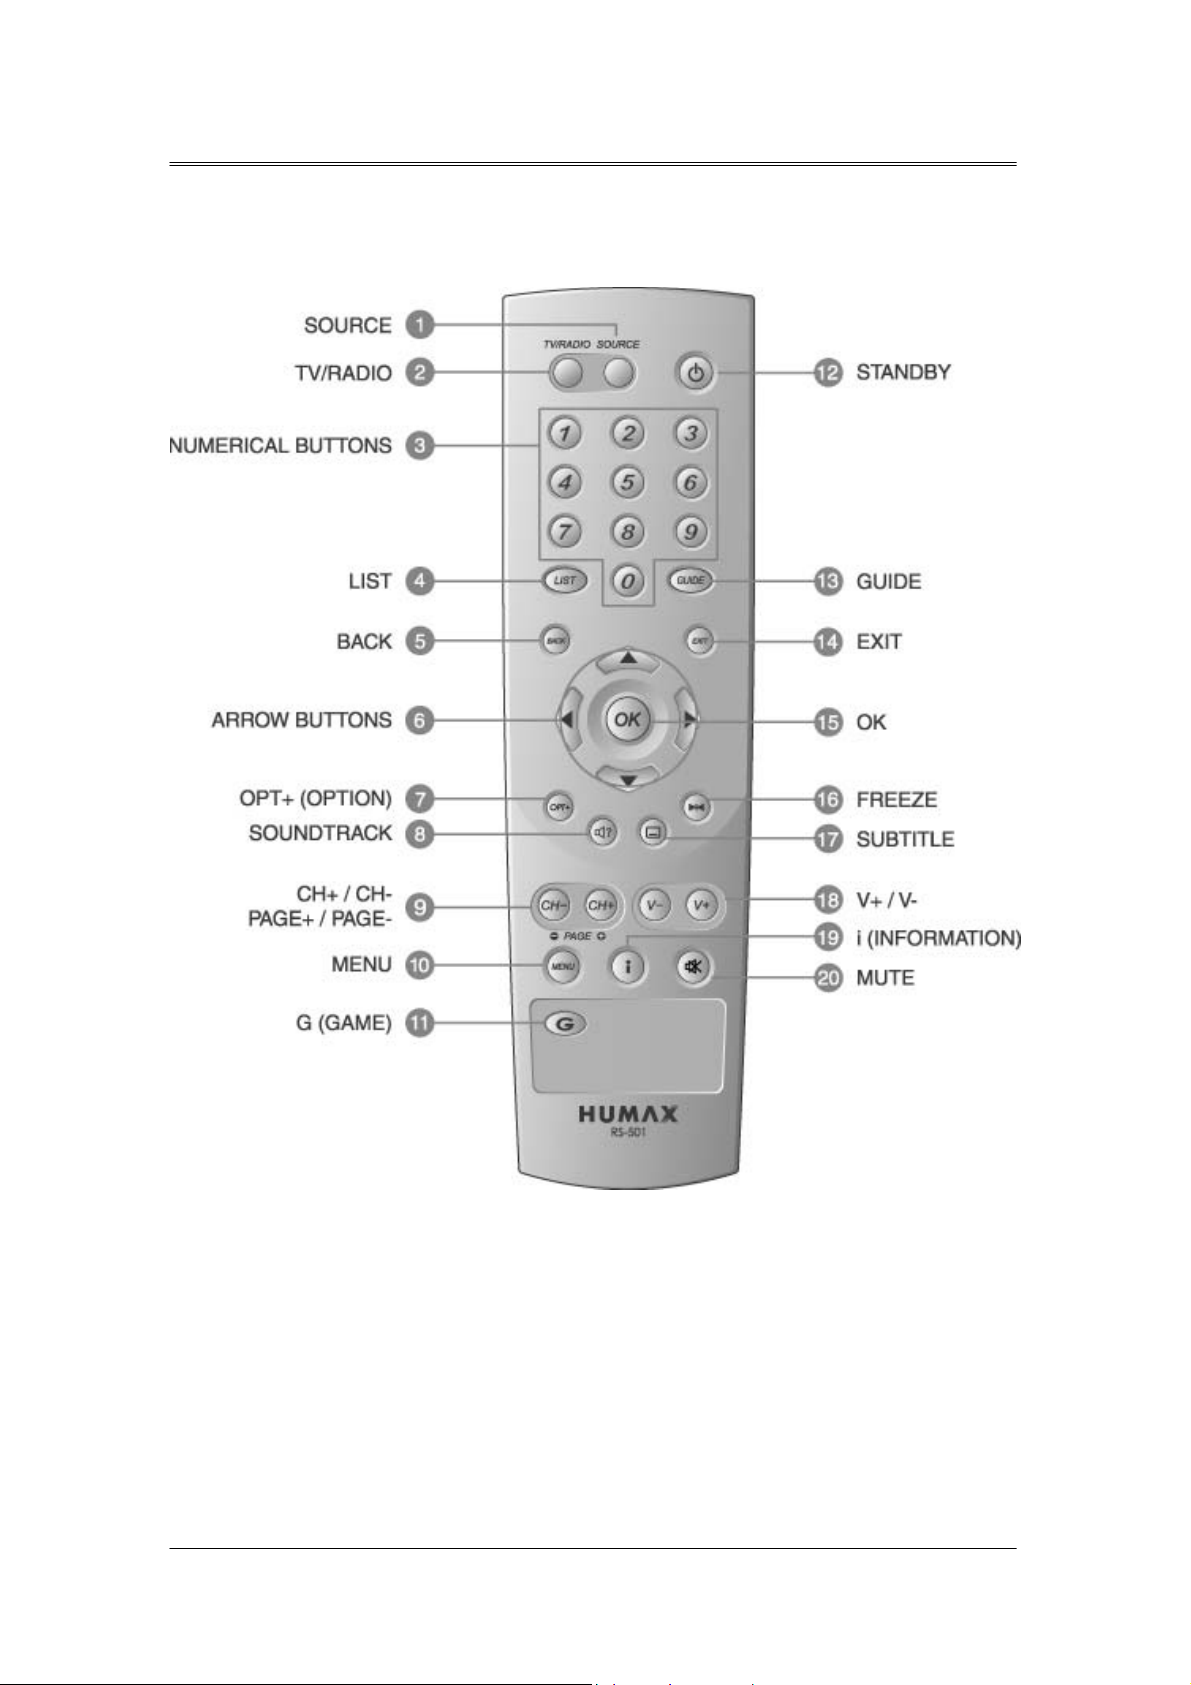
1.4 Remote Control
12
Page 13

1. Before Using the Receiver
1. SOURCE
Selects the input source between TV
and satellite receiver.
2. TV/RADIO
Switches between TV and Radio
modes.
3. NUMERICAL BUTTONS
Enters a TV/Radio channel number
or menu option number.
4. LIST
Displays the channel list.
5. BACK
Returns to the previous menu and
screen.
6. ARROW BUTTONS
Changes the channel or move the
cursor to the up, down, left or right
12. STANDBY
13. GUIDE
14. EXIT
15. OK
16. FREEZE
Switches between Operation and
Standby modes.
Displays the Programme Guide.
Exits the main menu or Guide
screen.
Selects a menu, or confirms the
selected operation. And displays the
channel list during watching a
programme.
Freezes the TV screen you are
watching. Play the audio
continuously.
menu option.
7. OPT+ (OPTION)
Displays the channel attributes
during watching a programme.
8. SOUNDTRACK
Displays the Soundtrack.
9. CH-/CH+
PAGE-/PAGE+
Changes the Channel or Page.
10. MENU
Displays the main menu.
11. G(Game)
Displays the Game.
17. SUBTITLE
Changes the subtitle language.
18. V-/V+
Adjusts the audio volume.
19. i (INFORMATION)
Displays the information about the
channel and programme.
20. MUTE
Pauses the audio temporarily. That
is, volumes on/off temporarily.
13
Page 14
2. Setup
This chapter describes how to set up the receiver. Select the most appropriate procedure depending on
your requirements.
[Note] If you encounter any problem when setting up the receiver, please contact your local product
distributor.
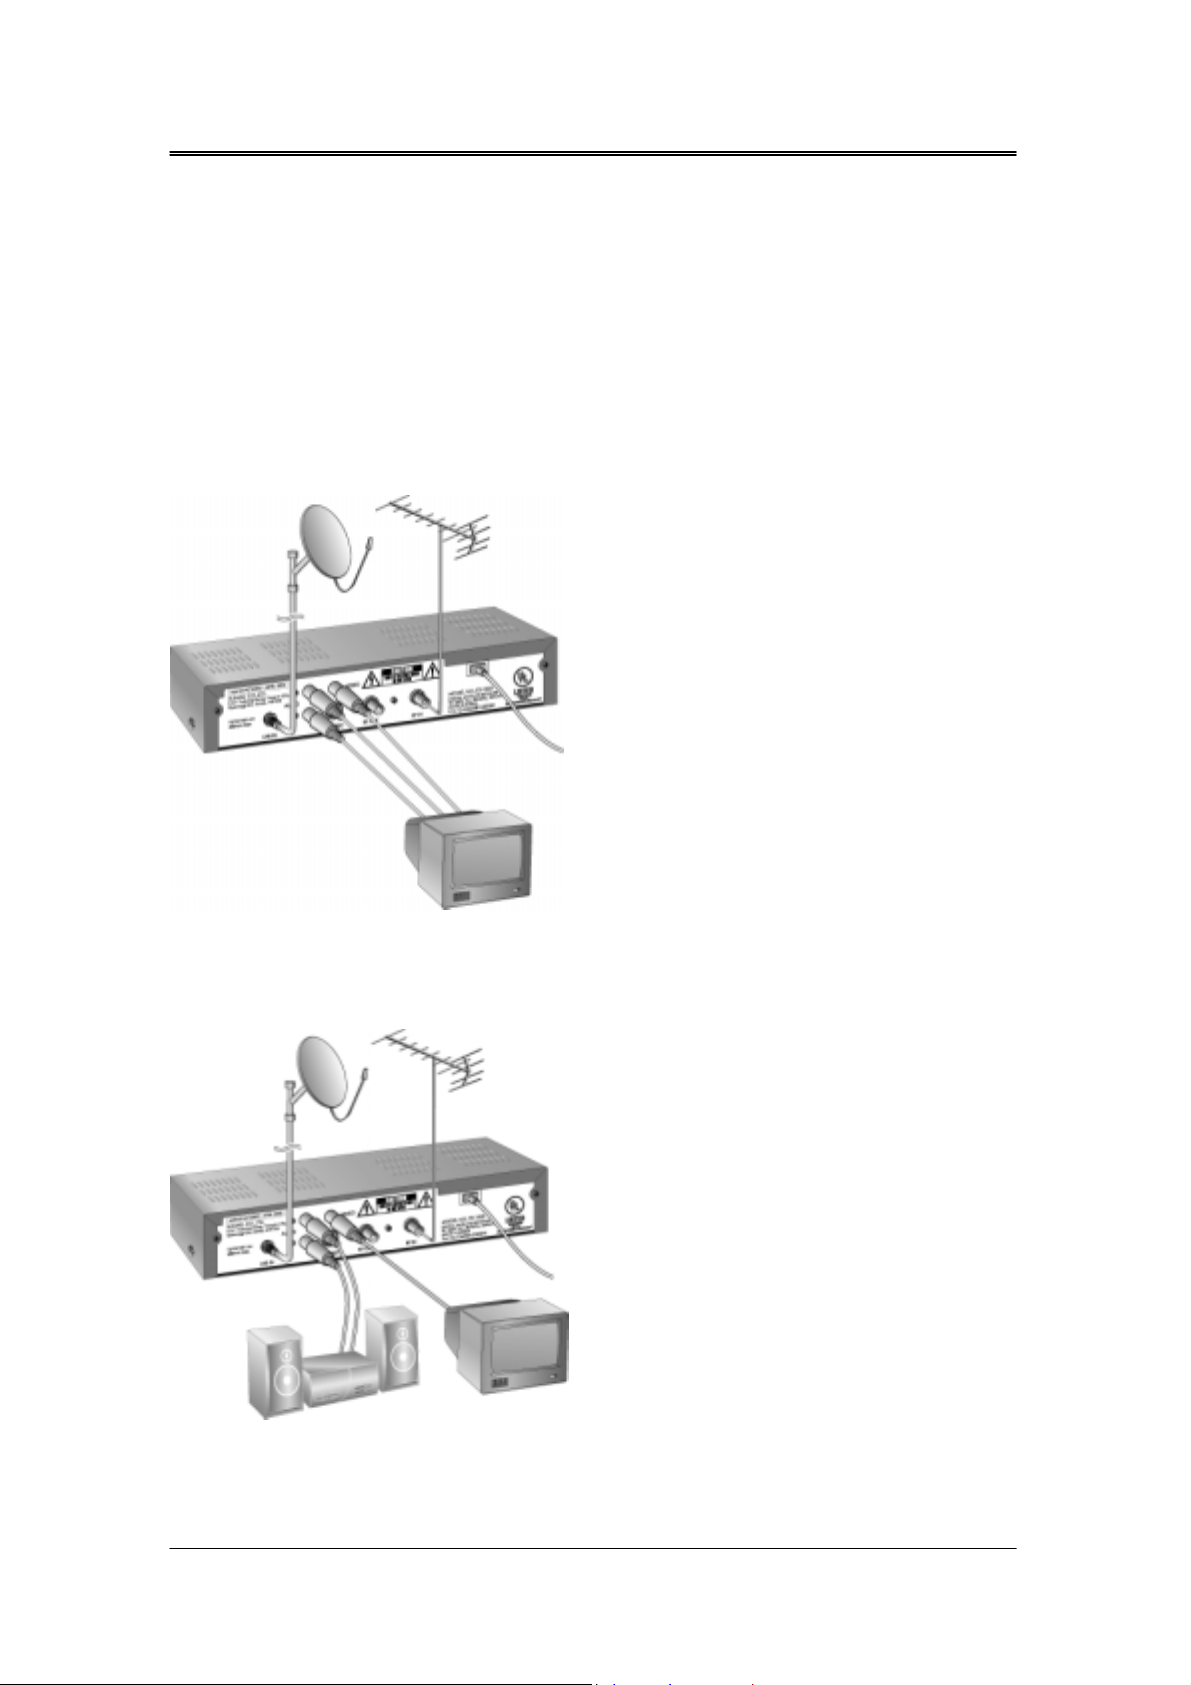
2.1 Connecting the Antenna
(1) Connecting TV
This is the most simple set-up mode.
(2) Connecting Hi-Fi System
Connect the outputs on this receiver to corresponding inputs on your Hi-Fi system.
(left audio out to left audio in, right audio out to right audio in)
14
Page 15
2. Setup
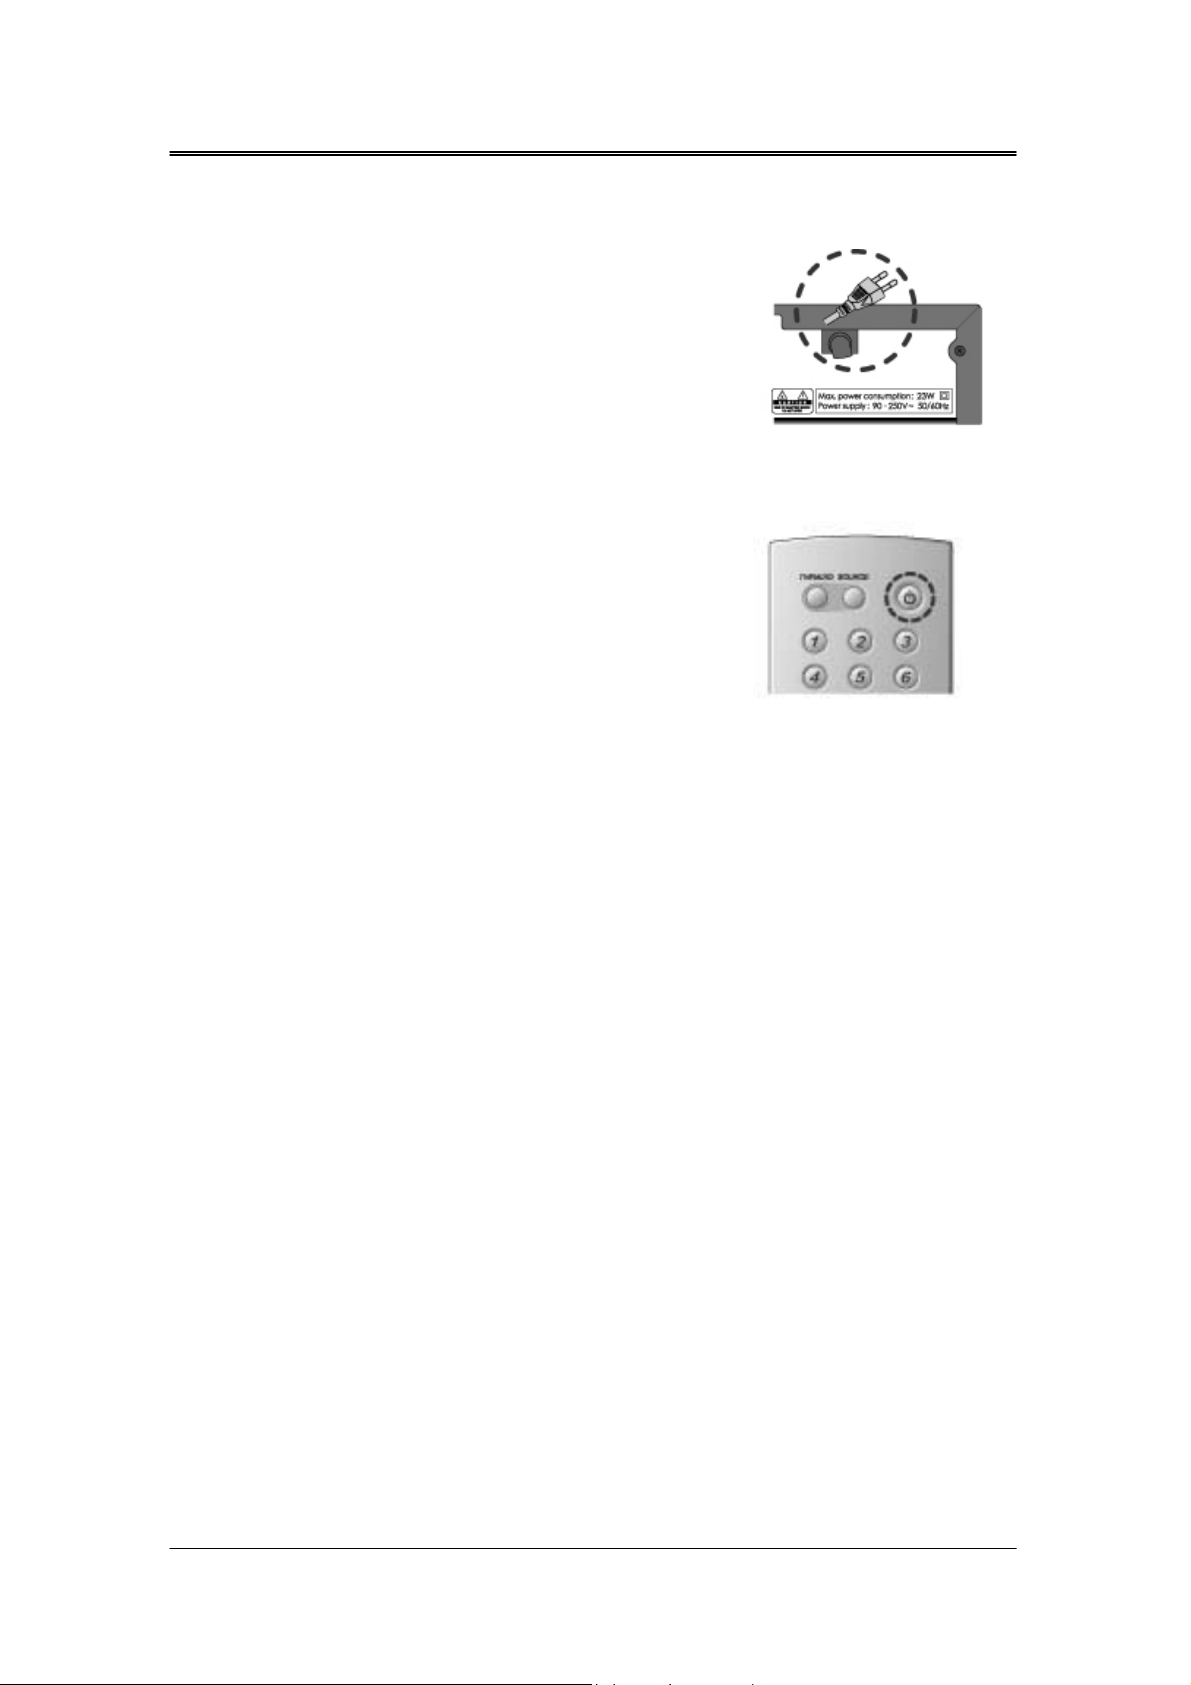
2.2 Powering On
① Connect the power cord of the receiver to a wall
outlet.
② Power on by pressing the <Standby> button at Remote
Controller.
The Standby LED indicator is turned on Green.
15
Page 16

3. Installation Wizard
When powering on your receiver for the first time after purchasing, the Installation Wizard is automatically
started.
You can easily set-up using simple organisation and options, and watch the broadcasting after completing
the set-up procedure. You can select items using the <Numerical> buttons.
[Note] If you press the <Back> button or select Back and press the <OK> button while running
the Installation Wizard, you can return to the previous screen
3.1 Language
You can select Menu, Audio, and the subtitle language.
Select the appropriate language from the list using the ▲
▼ button and press the <OK> button to save the selected
language as a default language and move to the next step
'Antenna Setting.'
3.2 Area Setting
You can select area.
Select the appropriate area from the list using the ▲▼
button and press the <OK> button.
3.3 Antenna Setting
You can set the antenna's properties to watch the programme.
①
Select the Satellite which the antenna points to. Press the <OK> or <X> button to display satellites
list. Select satellite using the ▲▼ button, and press the <OK> button.
②
Set the LNB Frequency.
Press the <OK> or <X> button to display LNB frequency list. Select LNB frequency using the ▲▼
16
Page 17

3. Installation Wizard
button, and press the <OK> button.
If you cannot find the LNB frequency value from the list, select User Define, manually enter the
frequency using the <numerical> button, and then press the <OK> button.
[Note]
When using Universal LNB, select Universal for LNB Frequency which is 9750/10600(MHz). Also, if you
select Universal, 22KHz tone value is disabled.
③ Set up 22kHz Tone.
Select 22kHz Tone using the ▲▼ button, and press the <OK> or <X> button to change the setting.
When using 22kHz tone switch, select Enable. Otherwise, select Disable
④
Select DiSEqC switch.
Select DiSEqC using the ▲▼ button, and press the <OK> or <X> button to display DiSEqC Switch
List.
Select DiSEqC Switch using the ▲▼ button and then press the <OK> button.
.
⑤
When you complete the setting, select Next using the ▲▼ button and press the <OK> button to start
Automatic Search
[Note]
1. If the antenna is correctly set up, the level at signal strength bar and quality bar, which are located at
.
17
Page 18
3. Installation Wizard
the bottom of the screen, are generally moved up.
2. If you encounter any problems or questions when setting up the antenna, please contact your local
product installer or distributor.
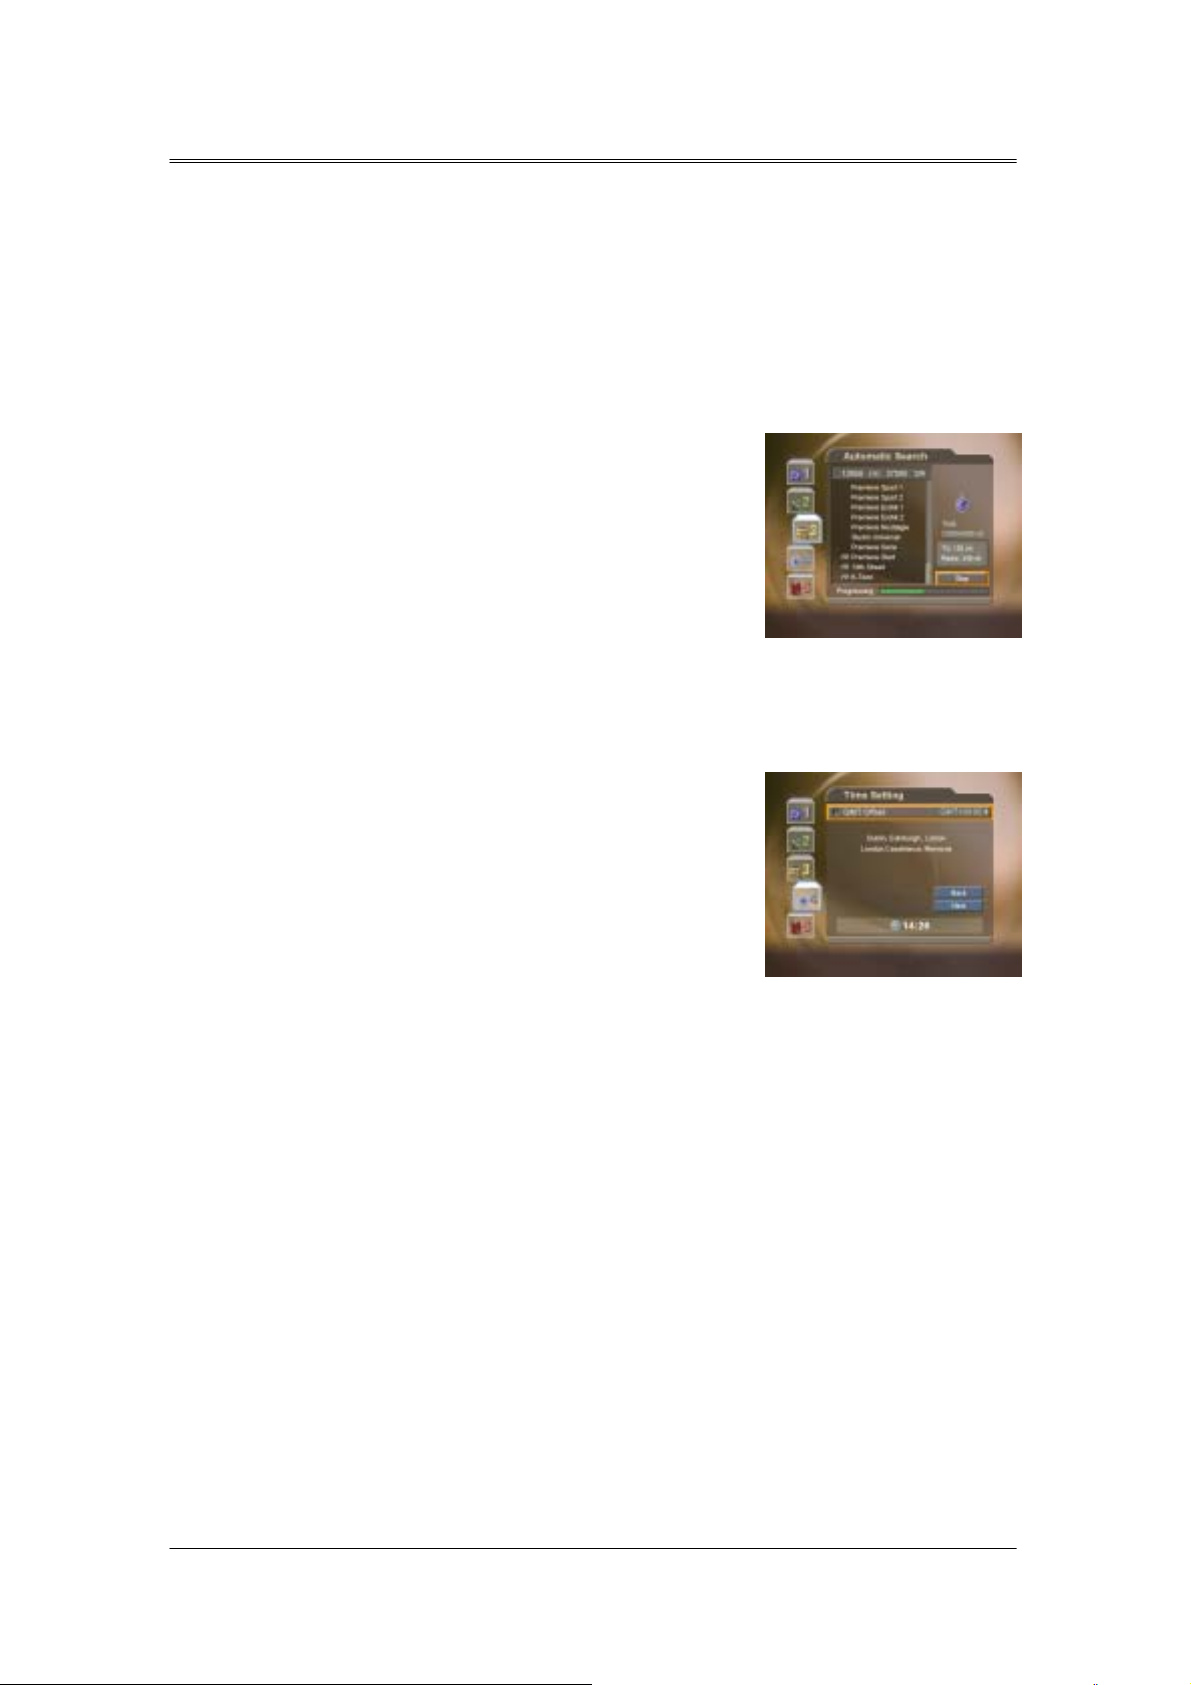
3.4 Automatic Search
You can automatically search for satellites according to the Antenna Setting.
Please wait for finishing the Automatic Search. If you want
to stop the Automatic Search, press the <OK> button.
If the Automatic Search is stopped or finished, the
searched result is automatically saved and go to the next
step.
3.5 Time Setting
You can set the current time.
Press the <OK> or <X> button to display the values for GMT Offset.
Select the appropriate GMT Offset value using the ▲▼ button and
press the <OK> button to set the current time. Check the current
time at the bottom of the screen to see if it's correctly set up. Then
select Next using the ▲▼ button and press the <OK> button to
finish Installation Wizard.
[Warning]
Press the <EXIT> button to save the previous input information and exit the Installation Wizard when
running the Installation wizard. If you exit the Install Wizard without fully completing the setting procedures,
you may not watch any broadcasting normally. In this case, you can use the Menu-Installation-Antenna
Setting and Channel Search menu to configure your receiver as you like.
18
Page 19

4. Basic Operation
This chapter describes functions such as switching channel, volume control, and basic
features for watching programmes.
4.1 Switching Channel
You can switch the current channel using one of the following methods.
(1) Press the CH-/CH+ button.
(2) Enter your desired channel numeric using the Numerical button<0~9> to move to the
channel directly.
(3) Press the <TV/Radio> button to switch between TV channel and Radio channel.
[Note] You can switch channel using the channel list or programme guide. Please refer to Chapter 5 and 6
for more information.
4.2 Volume Control
(1) Press the <V-/V+> buttons to adjust the audio volume.
(2) Press the <Mute> button to stop the sound temporarily.
[Note] The mute function keeps enabled while you change the channel.
4.4 Change the Subtitle Language
If the current programme provides Subtitle information, you can select the language for the
Subtitle.
① Press the <Subtitle> button to display the subtitle
language list.
② Select your desired subtitle language using the ▲▼
button, and press the <OK> button. Then the subtitle
will be displayed in the selected language at the
bottom of the screen.
③ Select OFF from the subtitle language list not to
display subtitle from the screen.
[note] You can select a default subtitle language by selecting MENU – Preferences – Language
Setting – Subtitle Language.
4.5 Change a Audio Language
If the current programme is available in multiple audio languages, you can select the
language that you wish to listen in.
19
Page 20
4. Basic Operation
① Press the <Soundtrack> button to display soundtrack
list.
② Select your desired audio language using the ▲▼
button to change Audio immediately.
③ Select Audio Direction(left, right, stereo) using the WX
button.
[Note]
1. you can select your desired default audio language by selecting MENU – Preferences –
Language Setting –Audio Language.
2. If the programme is Dolby di gital one, you cannot set the audio direction such as left, right, and
stereo.
3. If you select Dolby by selecting MENU – Preferences – Language Setting – Audio Priority,
Dolby Digital programme is automatically broadcasted with Dolby digital audio without
considering default audio language.
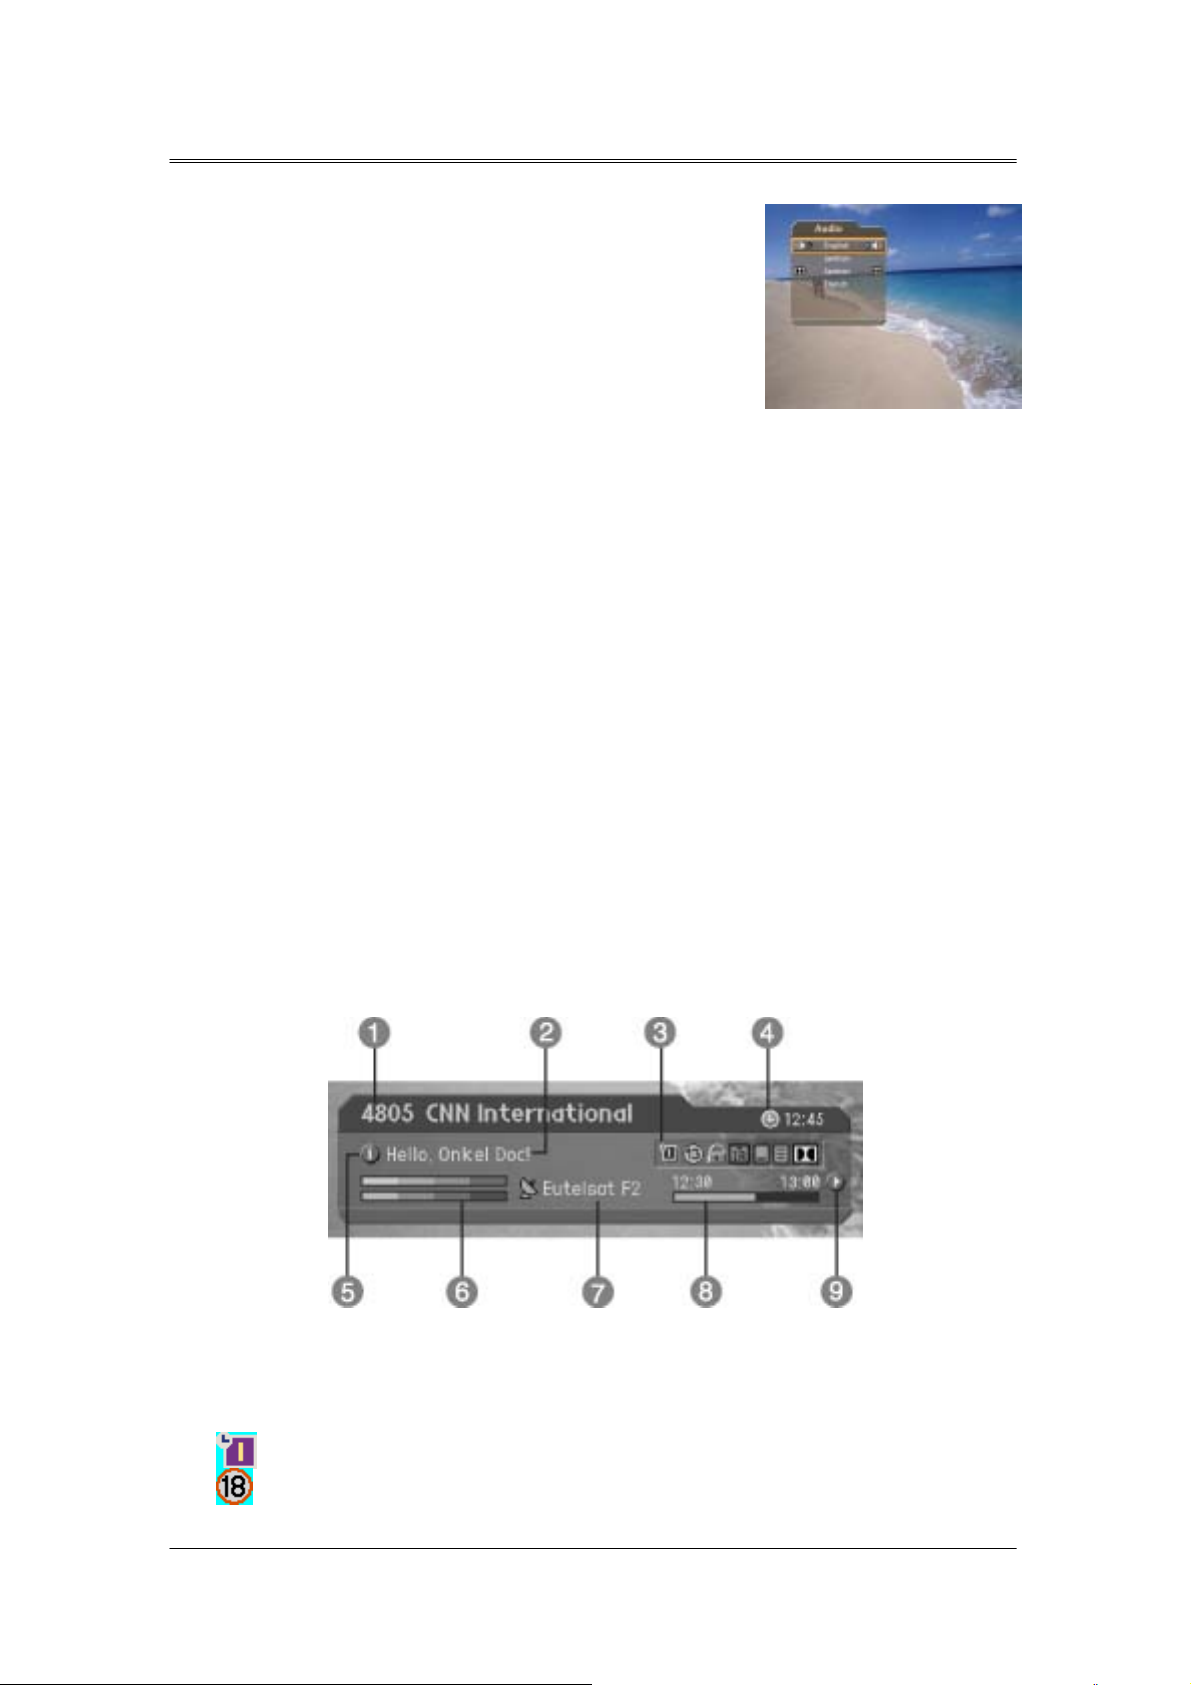
4.6 Program Information (I- plate)
Programme information is always displayed for a specific period of time whenever you
switch channels. You can view the programme information by pressing the <i> button while
watching a programme. Press the <EXIT> button to hide the I-plate.
(1) General Information
The General Information is displayed as following on the screen.
① Channel number and channel name
② Programme name
③ Icons
Displayed only if this programme is reserved.
Represents parental level. It indicates the minimum level of ages that the
20
Page 21
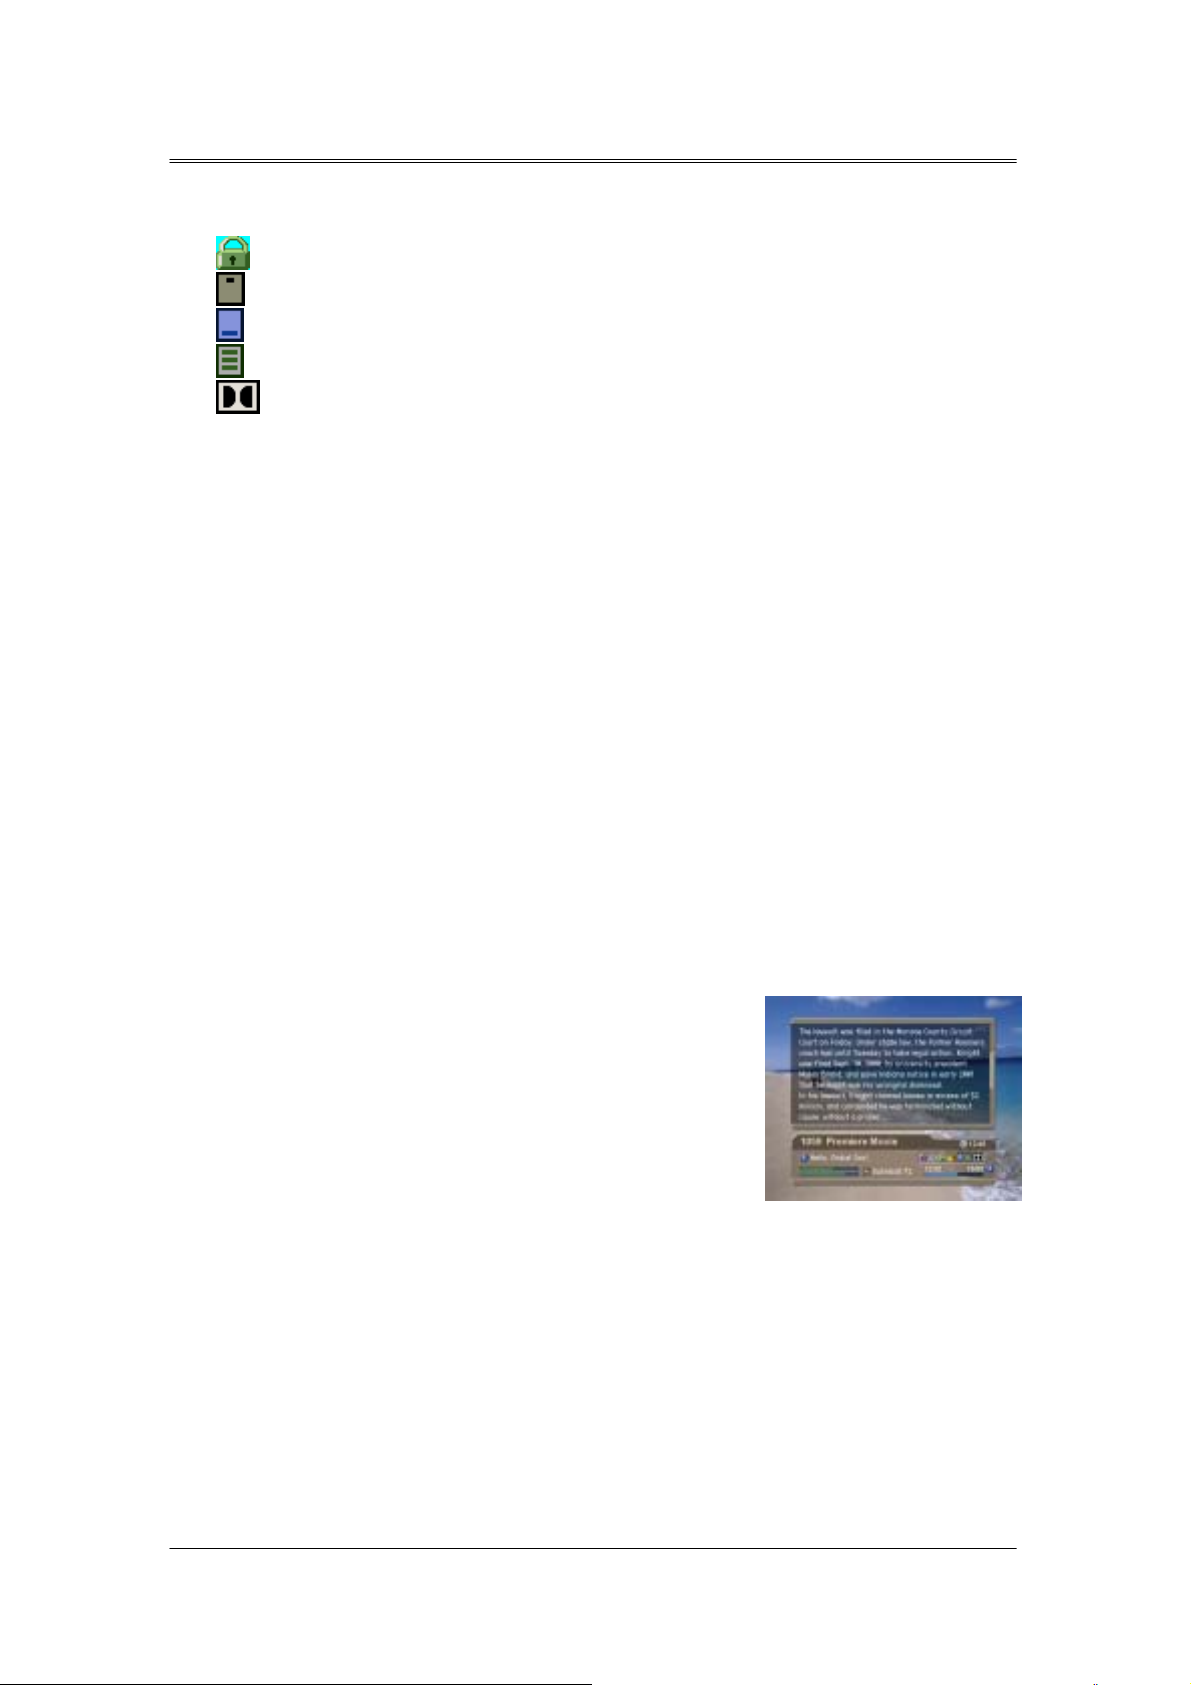
4. Basic Operation
programme is targeted at.
Displayed only when the channel is a locked channel.
Displayed only when the channel is a scrambled channel.
Displayed only when subtitle information is available.
Displayed only when there is any teletext information.
Displayed only when the programme is a dolby digital one.
④ Current time
⑤ Detailed programme information: displayed if detailed programme information is
provided.
⑥ Signal strength and signal quality : indicates signal level.
⑦ Satellite name or channel change mode : If you select All channels by selecting
MENU - Edit channels – Channel Change Mode, the Satellite name, which the current
channel is belonged to, is displayed; if you select Within the current channel list , the
channel list, which you selected, is displayed.
⑧ Programme broadcasting time and progress bar : displays programme playing time
and progress bar.
⑨
Next programme Information : displayed if next programme information is provided. Press the <X>
button to display the next programme information
.
[Note] If there is no available programme information, programme information is not
displayed.
(2) Detailed Programme Information
You can see detailed information about the current
programme. Press the <i> button where I-plate is
displayed to view detailed information.
[Note]
1. Press the <i> button again to hide the information box.
2. If the d etailed programme information is more than one page,
use <▲▼> button to move to the previous or next page.
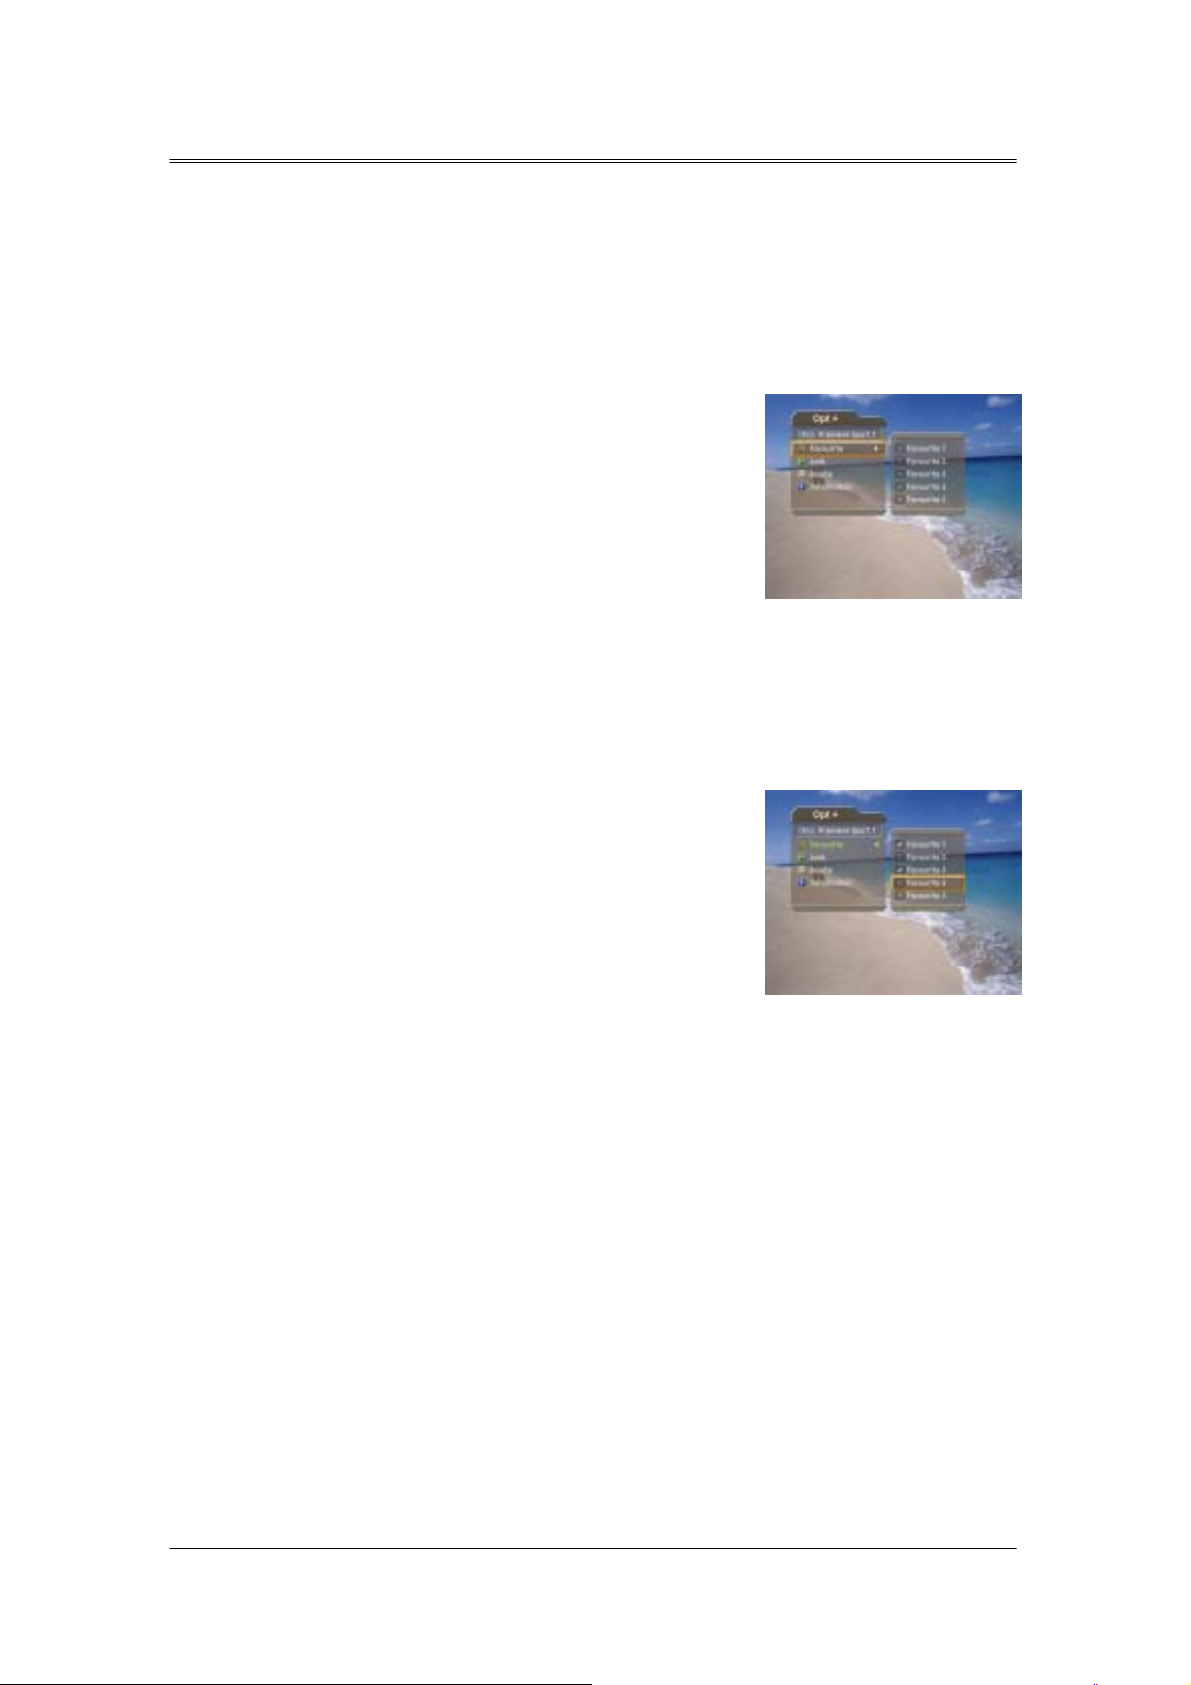
4.7 Option List
you can view and confirm detailed information about the current channel and chang e the inf ormation
in necessary.
[Note] Press the <opt+> button when the channel list is displayed to view option list. Then the
following functions in the option list are performed to the channel where cursor is located.
21
Page 22
4. Basic Operation
(1) Add a channel to favourite group.
You can add current channel to the favourite group immediately. Also, you can add a
channel to multiple Favourite groups.
① Press the <Opt+> button.
② Select Favourite using the ▲▼ button, and press the
③ Select favourite group using the ▲▼ button and press the <OK> button to register for
favourite group.
④ Press the <OK> button again on the selected favourite group to release the registered
channel.
⑤ Move to the parent menu using the <W> button to save the changes automatically.
<OK> or <X> button.
[Note] For detailed information about how to change Favourite Group's name and how to register
Favourite Channel for the whole channels, refer to Chapter 5.
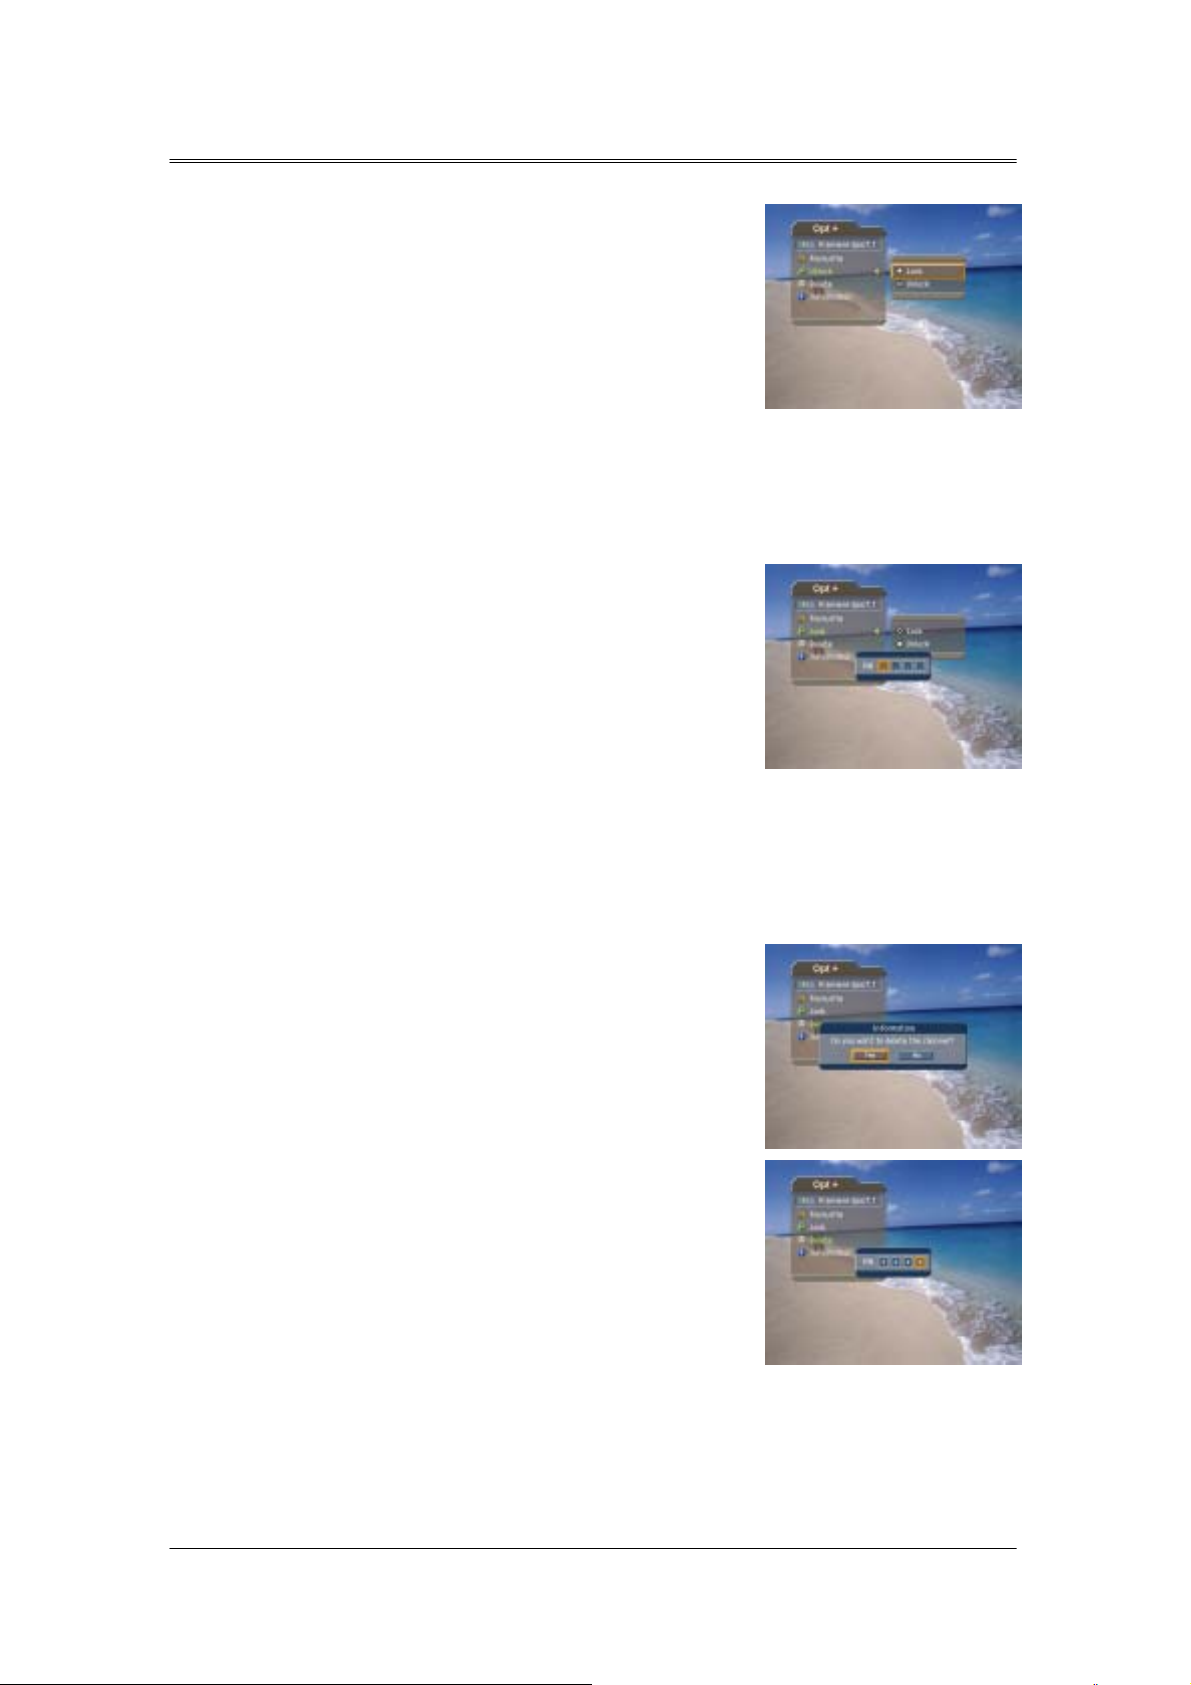
(2) Lock/Unlock a Channel
You can lock or unlock the current channel while watching a programme.
① Press the <Opt+> button.
② Select Lock using the ▲▼ button, and press the
③ Select Lock option using the ▲▼ button, and press the <OK> button.
<OK> or <X> button.
22
Page 23
4. Basic Operation
④ Select Unlock option using the ▲▼ button, and press the <OK> button.
⑤ You will be prompted to enter your password. Enter your password to unlock the
channel.
⑥ Move to the parent menu using the <W> button to save the changes automatically.
[Note] When switching to the locked channel, you must enter the password to watch a programme.
(3) Delete a Channel
You can delete the current channel while watching a programme.
① Press the <Opt+> button.
② Select Delete using the ▲▼ button, and press the
<OK> or <X> button.
③ Select Yes in the confirmation message and press the
<OK> button.
④ Enter your password using the <numerical> button to
delete the current channel.
(4) Channel Information
You can display detailed information about the current channel while watching a
programme.
23
Page 24

4. Basic Operation
① Press the <Opt+> button.
② Select Information using the ▲▼ button to display
channel information automatically.
The following information is displayed on the Information.
1st Line : Provider name
2nd Line : Satellite and CAS type
3rd Line : Transponder Information for the channel (Frequency, Polarisation, Symbol rate,
FEC)
4th Line : Video PID, Audio PID ,PCR PID(Packet Identification)
5th Line : Network ID(NID), Service ID(SID)
24
Page 25

5. Channel List
5 types of channel lists are provided for easy and quick channel finding.
TV : The list of all TV channels with 2 subgroups: one is sorted by channel number, the
other is sorted by channel name.
Radio : The list of all Radio channels with 2 subgroups: one is sorted by channel
number, the other is sorted by channel name.
Favourite :
your private taste.
Satellite : The lists of channels classified by satellites. The number of subgroup is
decided by the result of channel search..
: The list of the favourite channels with 5 subgroups that you can organise channels by
5.1 Displaying and Switching Channel List
You can display channel list using <List> button and switch into other channel on the
channel list.
① Press the <List> button while watching a programme
to display the channel list.
② Select your desired channel using the ▲▼ button and
press the <OK> button to change the channel.
③ Enter the channel numeric directly using <Numerical>
button to move cursor into your desired channel. And
then press the <OK> button to change into the
selected channel.
[Note]
1. If there are multiple channels, press the <page -/+> button to move by page.
2. Whenever you press the <TV/RADIO> button while the channel list is displayed, the channel list
will be switched between TV and Radio channel list.
5.2 Changing Channel List Group
You can select channel list by group.
25
Page 26

5. Channel List
① Press the ▶ button while the channel list is displayed
to view the group list.
② Select your desired channel group using the ▲▼
button.
③ Press the
<OK> or <X> button, select your desired
subgroup using the ▲▼ button, and then press the
<OK> button.
④ The channel list for the selected subgroup is
displayed.
[Note]
1. The subgroup of favourite channel list may exist or not depending on your configuration. And
The subgroup of Satellite channel list may exist or not depending on the result of Channel
Search.
2. If Within the current channel list option is selected from MENU – Edit channels – Channel
Change Mode menu, you can only change programme within the selected channel list using the
<CH+/CH-> while your watching a programme.
5.3 Edit Channels
You can edit all channels or each channel by channel list group.
① Press the <Menu> button.
② Select Edit Channels using the ▲▼ button, and press
the <ok> or <right> button.
③ Select Edit Channel List using the ▲▼ button, and
press the <ok> or <right> button.
④ You will be prompted to enter your password. Enter
your password using <numerical> button.
[Note]
1. Press the <back> or <Left> button to save the changes and
return to the previous menu, press the <Menu> or <exit>
button to exit the menu screen.
2. You can easily navigate all menus using the assigned
numeric for each menu. Press the <MENU> - <2> – <1> in
order at remote controller to select Edit Channel List menu.
26
Page 27

5. Channel List
order at remote controller to select Edit Channel List menu.
(1) Select a Channel Group
You can select the channel list group to edit. TV or Radio, and the subgroups from the
channel search for satellite channel lists are included as channel list groups.
① Pres s the <OK> or <Righ t> button in Group to display
channel list group.
① Select your desired channel list group using the ▲▼
button, and press the <OK> button.
[Note]
1. Press the <TV/RADIO> button to move to TV or RADIO channel list directly.
2. For editing Favourite channel list, move to MENU – Edit Channels – Edit Favourite Channels
menu.
(2) Delete Channels
You can delete one or more channels.
① Move the cursor to the channel list using the ◀▶
button.
② Select your desired channe l, and then press the <OK>
button. You can select multiple channels.
③ Select Delete in the right using the ▶ button, and
press the <OK> button.
(3) Lock/Unlock Channels
You can lock or unlock one or more channels.
① Move the cursor to the channel list using the ◀▶ button.
② S elect your desire d channel, and then press the <OK> butto n. You can select multiple
channels.
③ Select Lock in the right using the ▶ button, and press the <OK> button.
27
Page 28

5. Channel List
[Note]
1. Only if all selected channels are locked, Lock is switched into Unlock. When you press
Unlock, locked channel is switched into unlocked channel.
2. Enter password using the <numerical> button to watch locked channel.
(4) Move Channels
You can move one or more channels into your desired location, which changes the channel number
accordingly.
① Move the cursor to the channel list using the ◀▶
button.
② Select your desired channe l, and then press the <OK>
button. You can select multiple channels.
③ Select Move in the right using the ▶ button, and
press the <OK> button. Then the selected channel(s)
disappears from the channel list for a while.
④ Move the cursor to the desired location in the channel
list using the ▲▼ button, and press the <OK> button.
⑤ The selected channel(s) is moved to the selected
location in order.
[Note] "Move" is available only for TV or radio channel list.
(5) Rename a Channel
28
Page 29

5. Channel List
You can change the channel name as you like.
① Move the cursor to the channel list using the ◀▶
button.
② Select your desired channe l, and then press the <OK>
button. You can select only one channel
③ Select Rename in the right using the ▶ button, and
then press the <OK> button.
④ Enter a channel name directly using the keyboard
displayed on the screen.
⑤ When finishing entering channel name, select OK, and
press the <OK> button.
(6) Select/Unselect All Channels
You can select/unselect all channels at a time.
① Select Select All in the right and press the <OK> button to select all channels.
② Select Unselect All in the right and press the <OK> button to unselect all the selected
channels.
③
5.4 Edit Favourite Channels
You can edit Favourite channel or Favourite channel list.
① Press the <menu> button.
② Select Edit Channels using the ▲▼ button, and press
the <OK> button.
③ Select Edit Favourite Channels using the ▲▼ button,
and press the <OK> or <Right> button.
[Note]
1. Press the <BACK> or <Left> button to save the changes and return to the previous menu. Press
the <MENU> or <EXIT> button to exit the Menu screen.
2. You can easily navigate all menu items using the assigned numerical button for each menu. Press the
<MENU> - <2> – <2> in order on the remote controller to select the Edit Favourite Channels menu.
The buttons for editing the Favourite channel list are described in the following table.
29
Page 30

5. Channel List
Add
Remove
TV/Radio
Fav.Group
Move
Rename
(1) Add/Remove favourite channels
You can add favourite channel(s) to a specific Favourite channel list or remove the added
favourite channel(s) from the list.
① Select Favourite Group using “그림(Fav.Group)”.
② Select your desired channel(s) in all TV/Radio channel
list, and press “그림(Add)” to add Favourite
Sort
Unselect All
Adds Favourite channel.
Removes from the Favourite channel.
Switches between TV and Radio channel list.
Changes Favourite channel list group.
Moves the order of channel list within the Favourite channel list.
Renames the name of Favourite channel list.
Sorts channels by number or name in all TV/Radio channel list.
Unselect all the selected channel.
channel(s).
③ Select your desired channel(s) in Favourite channel
list, and press “그림(Remove)” to remove Favourite
channel(s)
[Note] You can switch between TV and Radio channel list using
<TV/Radio> button at remote controller or “그림(TV/Radio)”.
(2) Move favourite channels
You can move favourite channel(s) to your desired location within the Favourite channel list.
① Select Favourite Group using “그림(Fav.Group)”.
② Select your desired channel to move within the
Favourite channel list and press the <OK> button.
③ Select “그림(Remove)”, and press the <OK> button.
④ Move the cursor to your desired location using the ▲▼
button, and press the <OK> button.
⑤ The selected channel(s) is moved into desired location
30
Page 31

5. Channel List
you selected.
(3) Rename a favourite channel list
You can rename Favourite channel list.
① Select Favourite group using “그림(Fav.Group)”.
② Select “그림(Rename)”, and press the <OK> button.
③ Enter the Favourite channel list name using the
keyboard displayed on the screen.
⑥ When finishing entering the favourite channel list
name, select OK, and press the <OK> button.
(4) Additional Features
Additional Features provides many useful functions which are necessary to add Favourite
Channel.
Change between TV and Radio channel list
You can add not only TV channel(s) but also Radio channel(s) to Favourite channel list.
Press “그림(TV/Radio)” to switch TV or Radio channels.
[Note] You can also change into TV or Radio channel by pressing <TV/Radio> button at remote
controller.
Select a favourite channel list
You can select your desired Favourite channel list to edit.
Press “그림(Fav.Group)” to display the Favourite channel
list. Then select your desired channel list using the ▲▼
button, and press the <OK> button.
Sort a channel list
You can sort all TV or Radio channel list by channel number or name for easy Favourite channel searching.
31
Page 32

5. Channel List
If channel lists are sorted by channel number, “그림(abc)” is displayed. When you press this button, all the
channel lists are sorted by name. Or, if channel lists are sorted by channel name, “그림(abc)” is switched
into “그림(123)”. Press this button to order channels by number
Unselect all the selected channels
Press “그림(Unselect All)” button to unselect all the selected channel.
5.5 Channel Change Mode
You can change the channel either in the group or in the entire channels while watching a
programme.
① Press the <Menu> button.
② Select Channel Change Mode using the ▲▼ button,
and press the <OK> or <Right> button.
③ Select All Channels or Within the current channel list
using the ▲▼ button, and press the <OK> button.
[Note] When Within the current channel list is selected, you can only change the channel within the
current channel list using the <CH+/CH-> buttons. To change the channel in another channel list in which
the current channel list is not located, change the channel list group or select All channels option
.
32
Page 33

6. Program Guide
Displaying the
chnnel
list
The Programme Guide displays programme information about each channel, based on the date and time.
You can also schedule your recording using the information given.
6.1 Viewing Programme Guide Information
You can view programme information for all channels.
① Press the <Guide> button.
② Move to previous or next programme within the same
channel using the ◀▶ button.
③ Move to other desired channel using ▲▼ button. If
there are multiple channels, use <Page-/+> button to
move to channels by page. Also, you can enter your
desired channel number using the <numerical> button
at remote controller to move to the channel directly.
④ Select your desired programme, and press the <OK> button. Then you can watch the programme if it
is on air, or you can reserve it if it is the future programme
.
⑤ Press the <i> button in the selected programme to view detailed information for the
selected programme.
(1) Viewing Guide Information by Channel List Groups
You can view programme information for desired channel list by groups.
① Press the <Guide> button.
② Press the <Red> button to display the channel list
group
group.
③ Select your desired channel list group using the ▲▼
button.
④ Move the cursor to the sub-group using the ▶ button,
select your desired sub-group using the ▲▼ button,
and then press the <OK> button.
⑤ The Programme Guide for selected channel list is displayed
(2) Viewing Programme Information Using Time Bar
You can quickly search for your desired time zone using the Time bar.
33
Page 34

6. Program Guide
① Press the <Guide> button.
② Press the <Green> button to display Time Bar.
③ Select the each button using the ◀▶ button, and
press the <OK> button to move as your desired
amount of time. If you press the button repeatedly,
the same operation is repeated.
④ Each button functions as follows.
Now Moves to the current programme where the cursor is located.
◀ Moves to the previous programme or 30 minutes before.
▶ Moves to the next programme or 30 minutes after.
◀Day Moves to one day before.
Day▶ Moves to one day after.
⑤ Select “” and press the <OK> button to exit the Time Bar.
[Note] Guide provides programme information from the previous day to the next 7 days.
(3) Reserving a Recording
You can automatically reserve your desired programme by selecting the scheduled
programme and pressing the <OK> button.
① Select the desired programme and press the <OK>
button. The following message will be displayed.
② Select Yes and press the <OK> button to reserve the
programme. When reservation has been completed,
the “그림(예약)” is displayed on the reserved
programme.
③ Select No and press the <OK> button not to reserve
Moves to 2 hours before.
Moves to 2 hours after.
the programme.
④ If the channel is locked, parental controlled or restricted by watching time, you will be
prompted to enter your Password. Enter your Password to complete the reservation.
6.2 Finding a Programme
You can find your desired programme by programme name or genre easily.
① Press the <Guide> button.
② Press the <Blue> button to display Find screen.
34
Page 35

6. Program Guide
③ Enter the programme name directly using the keyboard displayed on the screen.
[Note] If you select Previous or Next on the Keyboard displayed on the screen and press
<ok>button, the keyboard layout is switched.
④ When completing entering programme name, select the Find, and press the <OK>
button.
⑤ Select By Genre and press the <OK> button to search programme by genre.
⑥ Select your desired genre and press the <OK> button.
⑦ If you select your desired programme from the Found Programme List screen and
press the <OK> button, you can watch the programme if it is on air, or you can reserve
your recording if it is the future programme.
35
Page 36

6. Program Guide
[Note] The Found Programme List may differ depending on the provided programme information.
6.3 Viewing Reserved Programme
You can add or edit watching-reserved programme by schedule screen.
① Press the <Guide> button.
② Press the <Yellow> button to display the Schedule
screen.
③ Select the reserved programme and press the <OK>
button to edit the reservation information.
④ Select a blank list and press the <OK> button to add a
new watching schedule.
(1) Editing Reserved Programme
① Change the reserved Start Time using the ◀▶ button
and the <Numerical> button.
② Change the reserved End Time using the ◀▶ button
and the <Numerical> button.
③ Change the Repeat mode using the ◀▶ button. The
options are Once, Daily, and Weekly.
④ Change the Lock mode using the ◀▶ button.
⑤ Select the Delete and press the <OK> button to delete the reserved programme.
⑥ Select the Cancel and press the <OK> button to cancel the editing.
⑦ Select the Save and press the <OK> button to complete the editing.
[Note] Lock mode is displayed only for the product with hard disk drive.
(2) Adding Reservation
① Enter your desired channel number using the
<Numerical> button. The channel name is
automatically displayed by channel number.
② Enter your desired Start Time using the ◀▶ button
and the <Numerical> button.
③ Enter your desired End Time using the ◀▶ button
36
Page 37

6. Program Guide
and the <Numerical> button.
④ Select one of Repeat mode options among Once, Daily, and Weekly using the ◀▶
button.
⑤ Select Lock mode using the ◀▶ button.
⑥ Select the Save and press the <OK> button to complete entering.
⑦ Select the Cancel and press the <OK> button to cancel the reservation.
⑧ If the channel is locked, restricted by watching time, you will be prompted to enter your
Password to complete the reservation.
[Note]
1. Lock mode is displayed only for the product with hard disk drive.
2. You can reserve up to 20 programmes.
3. If your desired programmed is already reserved programme, adjust the reservation appropriately.
37
Page 38

7. Setting Preferences
You can set censorship, watching time, and all other items suitable for your environment.
[Note]
1. Press the <BACK> or <Left> button to save the changes and return to the previous menu. Press
the <MENU> or <EXIT> button to exit the Menu screen.
2. You can easily select all menu items using the assigned numerical button for each menu.
7.1 Parental Control
You can set parental control for each programme and watching time. You can also change
your password.
① Press the <Menu> button.
② Select the Preferences using the ▲▼ button, and
press the <OK> or <Right>button.
③ Select the Parental Control using the ▲▼ button, and
press the <OK> or <Right>button.
④ When prompting message is displayed to ask
Password, enter the Password using the <numerical>
button.
(1) Setting Censorship
Censorship Classification allows you to block programmes according to the age level you
have set.
① Select the Censorship Classificat ion using the ▲▼ button, and press the <OK> or <▶
>button.
② Select your desired Age Level using the ▲▼ button, and press the <OK> button
38
Page 39

7. Setting Preferences
View All :All programmes can be watched because there is no age limitation.
7 :Programmes are blocked under the age of 7.
12 :Programmes are blocked under the age of 12.
15 :Programmes are blocked under the age of 15.
18 :Programmes are blocked under the age of 18.
Lock All :All Programmes are blocked without considering the age level.
[Note] You have to enter Password to watch the programme which is blocked by the age level.
(2) Setting Allow Watch Time
You can block programmes according to the watching time for all the channels.
① Select the Allow Time Control using the ▲▼ button.
② Select Enable or Disable the Allow Time Control using the <OK> or <▶> button.
Disable You can watch whenever you want regardless of Allow Time
Enable You can watch only while the time specified by Allow Time.
③ When you have selected Enable, set the Start and End Time using the Numerical
buttons, and select OK and press the <OK> button
④ If you wish to cancel the entered time, select Cancel, and press the <OK> button.
[Note] Once the setting has been completed, you can watch programme only while the time
specified by Allow Time. Or you should enter the Password to watch any programme during
unspecified time.
(3) Change Password
You can change the current password into new one.
39
Page 40

7. Setting Preferences
① Select Change Password using the ▲▼ button, and
press the
② Enter New Password using the <Numerical> button,
and select OK and press <OK> button.
③ Enter the New Password again to confirm the Verify
Password, and select OK and press the <OK> button.
[Note] The Default Password is "0000". If you have forgotten your Password, please contact your
local product distributor.
<OK> or <X> button.
7.2 Language Setting
You can set Language for Menu, Audio, and Subtitle.
① Press the <MENU> button.
② Select Preferences using the ▲▼ button, and press
the <OK> or <▶> button.
③ Select Language Setting using the ▲▼ button, and
press the <OK> or <▶> button.
(1) Menu/Audio/Subtitle Language
You can set the language for Menu, Audio and Subtitle. Default language is English.
① Select Menu/Audio/Subtitle Language using the ▲▼ button.
② Press the
③ Select your desired language using the ▲▼ button, and press the <OK> button.
(2) Audio Priority
This receiver doesn’t provide this function.
(3) Subtitle Display
You can select whether or not to display the Subtitle automatically if provided.
① Select Subtitle Display using the ▲▼ button.
② Select your desired option using the <OK> or <▶> button.
Auto Subtitles are displayed automatically in the predefined subtitle language.
<OK> or <X> button to display the available Language List.
Manual Subtitles are displayed in the language when you select the subtitle
language by pressing the <Subtitle> button at remote controller.
40
Page 41

7. Setting Preferences
(4) Subtitle Font
You can select the Subtitle font.
① Select Subtitle Font using the ▲▼ button.
② Select your desired option using the <OK> or <▶> button.
Variable Uses the horizontally variable Subtitle Font.
Fixed Uses the fixed Subtitle Font.
7.3 Time Setting
You can specify the current time and Power On/Off time.
① Press the <MENU> button.
② Select Preferences using the ▲▼ button, and press
the <OK> or <▶> button.
③ Select Time Setting using the ▲▼ button, and press
the <OK> or <▶> button.
(1) Setting Current Time
You can set the GMT Offset for current time.
① Select GMT Offset using the ▲▼ button.
② Press the
is changed by from 30 minutes to 1 hour.
③ Select your GMT offset using the ▲▼ buttons, and
press the <OK> button.
[Note] The current time is set automatically whenever GMT Offset changes.
(2) Power On Control
You can set the time when the product is automatically powered on.
① Select Power On Control using the ▲▼ button.
② Select either Enable or Disable the Power On Control
<OK> or <X> button to display GMT list. GMT
using the <right> or <OK> button.
Enable Uses the Power On Control and sets the Power on time.
41
Page 42

7. Setting Preferences
Disable Not uses the Power On Control.
③ When you have seleted Enable, enter the Channel No
and Time using the <Numerical> buttons, and select
OK and press the <OK> button.
(3) Power Off Control
You can set the time when the product is automatically powered off.
① Select Power Off Control using the ▲▼ button.
② Select either Enable or Disable the Power Off Control using the <OK> or <▶>button..
Enable Uses the Power Off Control and sets the Power Off time.
Disable Not uses the Power Off Control.
③ When you have selected Enable, enter the Time using the <Numerical> buttons, and
select OK and press the <OK> button.
[Note] Once Power On/Off Control is specified, it is repeated everyday.
7.4 Schedule
You can reserve a programme to watch programme at your desired time.
① Press the <menu> button.
② Select Preferences using the ▲▼ button, and press
the <OK> or <▶> button.
③ Select Schedule using the ▲▼ button, and press the
<OK> or <▶> button.
④ Reserved Pregoramme List is displayed on the screen.
To edit the existing reservation, select your desired
reservation, and press the <OK> button. To add a new
reservation, select a blank list and press the <OK>
button.
[Note]
1. For detailed information about how to edit or add a reservation, refer to Chapter 6 Programm
Guide.
2. This menu is enabled only for the product without hard disk drive.
42
Page 43

7. Setting Preferences
7.5 A/V Control
You can set Audio or Video Output Control.
① Press the <menu> button.
② Select Preferences using the ▲▼ button, and press
the <OK> or <▶> button.
③ Select AV Control using the ▲▼ button, and press the
<OK> or <▶> button
(1) TV-SCART
You can set TV SCART Output.
① Select TV-SCART using the ▲▼ button, and press the <OK> or <▶> button.
② Select one option among CVBS using the ▲▼ button, and press the <OK> button.
(2) VCR-SCART
The receiver doesn’t provide this function.
(3) Screen Ratio
You can set the aspect ratio of your TV.
① Select Screen Ratio using the ▲▼ button.
Select one option from 4:3 or 16:9 using the < OK > or <▶ > button.
(4) Display Format
You can select the Display Format according to TV Screen Ratio.
① Select Display Format using the ▲▼ button, and press the <OK> or <▶> button.
② If the Screen Ratio is set to '4:3', you can select one from Auto/Letter box/Center box
using the ▲▼ button, and press the <OK> button.
③ If the Screen Ratio is set to '16:9', you can select one from Auto/Pillar box/Full mode
using the ▲▼ button, and press the <OK> button.
(5) TV Standard
You can select the TV Standard: PAL or NTSC.
① Select TV Standard using the ▲▼ button, and press the <OK> or <▶>button
② Select one option among Auto/PAL M,N/NTSC using the ▲▼ button, and press the
<OK> button.
43
Page 44

7. Setting Preferences
PAL M,N The TV supports only PAL.
NTSC M The TV supports only NTSC.
(6) NTSC Mode
This receiver doesn’t provide this function.
(7) Audio Output
Set the Audio Output.
① Select Audio Output using the ▲▼ button.
② Select one option form Stereo or Mono using the <OK> or <▶> button.
7.6 VHF
You can set the VHF channel.
① Press the <MENU> button.
② Select Preferences using the ▲▼ button, and press the <OK> or <▶>button.
③ Select VHF using the ▲▼ button, and press the <OK> or <▶>button.
(1) VHF Channel
You can select VHF Channels for the TV.
① Select VHF Channel using the ▲▼ button, and press the <OK> or <▶>button.
② Select channel range based on the following channel criteria using the ▲▼ button,
and press the <OK> button.
Setting value : CH3/CH4
Default value: CH4
44
Page 45

7. Setting Preferences
7.7 Miscellaneous
① Press the <MENU> button.
② Select Preferences using the ▲▼ button, and press
the <OK> or <▶>button.
③ Select Miscellaneous using the ▲▼ button, and press
the <OK> or <▶>button.
(1) i-Plate Display Time
You can set the duration during which the Information box is to be automatically displayed
when you switch the channel.
① Select i-Plate Display Time using the ▲▼ button, and press the <OK> or <▶>button.
② Select a value between 0 ~ 20 seconds using the ▲▼ button, and press the <OK>
button.
[Note] When it is set to '0', the i-Plate will not be displayed when you switch the channel.
(2) OSD Transparency
You can set the transparency of On Screen Display.
① Select OSD Transparency using the ▲▼ button, and press the <OK> or <▶>button.
② Select one option among Disable/25/50/75 using the ▲▼ button, and press the <OK>
button.
Disable Fully opaque screen
25, 50, 75 As the number is bigger, the screen is more transparent.
(3) Option in Channel List
This receiver doesn’t provide this function.
45
Page 46

8. Installation
This chapter describes how to search for channels and a series of procedures.
8.1 Antenna Setting
You can set Antenna and LNB Information for channel search. If antenna is not correctly
set, you cannot search channel, therefore, you cannot watch a programme, either.
① Press the <MENU> button.
② Select Installation using the ▲▼ button, and press the
<OK> or <▶>button.
③ Password is required to use Installation Menu. Enter
Password to directly move to Installation Menu.
④ Select Antenna Setting using the ▲▼ button, and
press the <OK> or <▶>button to enter Antenna
Setting.
[Note]
If no satellite is registered from Antenna Setting menu, Channel Search such as Automatic Search,
Manual Search, Multiple Manual Search, Advanced Search is not available.
Satellite
You can select satellite for Channel Search.
① Select Satellite using the ▲▼ button, and press the
<OK> or <▶>button
② Select the satellite that is the antenna heads for from
the alphabetically sorted satellite list using the ▲▼
button, and press the <OK> button.
③ If no desired satellite exists in the list, select User
Define Satellite item. When you are prompted to select
whether or not to edit User Define Satellite, select Yes,
and press the <OK> to display keyboard to edit the
Name. Enter Satellite Name directly, select OK, and
press the <OK> button.
46
Page 47

8. Installation
Satellite Alternative
You can search and watch a programme by using the antenna headed for the selected
satellite.
① Select Satellite Alternative using the ▲▼ button, and
press the <OK> or <Right> button.
② Then, you can change into one of the following
options.
Disable Does not search the selected satellite.
Enable Searches the selected satellite.
[Note]
If there is no satellite that Satellite Alternative is set to Enable, Channel Search is not available.
LNB Frequency (MHz)
You can enter LNB Frequency.
① Select LNB Frequency using the ▲▼ button, and
press the <OK> or <Right>button.
② Select one value from Universal ,9750,10600, 5150,
11475, User Define using the ▲▼ button. If you have
selected User Define, enter LNB Frequency value
directly, and press the <Ok >button.
[Note]
If you have selected Universal, select 9750/10600. In this case, the 22kHz tone value is disabled.
22kHz Tone
You can select whether or not to use 22kHz Tone.
① Select 22kHz Tone using the ▲▼ button.
② Select whether or not to use 22kHz Tone using the <OK> or <▶> button.
47
Page 48

8. Installation
Enable: Selects Enable if Dual LNB is used or 2 antennas are connected to the 22kHz tone
switch box.
Disable: Selects Disable if 22kHz Tone is not used.
DiSEqC Input
You can select DiSEqC switch.
① Select DiSEqC Input using the ▲▼ button, and press
the <OK> or <Right> button.
Select the DiSEqC Swtich using the ▲▼ button, and
press the <OK> button.
You can select one option among Tone burst A~B,
DiSEqC A~D, DiSEqC A~D for 2.0 and Disable.
LNB Voltage
This receiver doesn’t provide this function.
8.2 Automatic Search
If you select the satellite to search channel according to the Antenna Setting, you can
automatically search the satellite without entering any other information. And You cannot
watch any programme without searching channel.
① Select <MENU> button.
② Select Installation using the ▲▼ button, and press the
<OK> or <RIGHT> button.
③ Select Automatic Search from Installation menu using
the ▲▼ button, and press the <OK> or <RIGHT>
button.
Satellite
You can select which satellite to search the channel.
① Select Satellite using the ▲▼ button, and press the
<OK> or <RIGHT> button.
② Select one of satellites using the ▲▼ button, and
press the <OK> button.
48
Page 49

8. Installation
[Note]
Channel Search is performed only for the satellites that have been set to Enable in Antenna SettingSatellite Alternative menu. If you wish to search channels for satellites, which is not listed on the
Satellite List of Automatic Search, move to Antenna Setting and set the Satell ite Alternative item as
Enable.
Scrambled Type
You can set scrambled type to search by free channel.
① Select Scrambled Type using the ▲▼ button, and
press the <OK> or <Right> button.
② Select All or Free using the ▲▼ button, and press the
<OK> button.
All Searches all channels.
Free Searches only free channels.
Channel Type
You can search by TV or Radio channel.
① Select Channel Type using the ▲▼ button, and press
the <OK> or <RIGHT> button.
② Select one option among All, TV and Radio using the
▲▼ button.
All Searches all channels.
TV Searches only TV Channel.
Radio Searches only Radio Channel.
Search
You can complete the setting and start searching.
49
Page 50

8. Installation
① Select Search, and press the <OK> button to start
Automatic Search.
② During operating search, the cursor is located at
Stop. Therefore, if you press the <OK> button during
searching, the operation is stop and the channels
found until then will be displayed.
③ Even if search operation is completed, and the
channel does not exist, press the <OK> button and
try to reset the search operation again if necessary.
④ You can delete unnecessary channels from the
searched channels. Select your desired channels to
delete and press the <OK> button. Then select Delete
and press the <OK> button. To delete all channels,
select Select All to select all channels, select Delete,
and press the <OK> button.
⑤ When completing Channel Search and deleting
unnecessary channels, select Save to save the
changes.
8.3 Manual Search
You can search channels of the selected satellites by transponders if you know the
Transponder information.
(1) Satellite
Selects a satellite to search from the satellites set in Antenna setting.
① Select Satellite using the ▲▼ button, and press the
<OK> or <Right> button.
② Select one of the Satellite names to search channel
using the ▲▼ button, press the <OK> button.
[Note]
If the satellite scheduled to search channel is not exist in the
Satellite list, move to Antenna Setting menu, set Antenna for
the Satellite, and then try again.
(2) Transponder
Sets transponder value for the satellite.
50
Page 51

8. Installation
① Select TP using the ▲▼ button and press the <OK> or <Right> button.
② Select one value from the transponder value using the ▲▼ button, and press the
<OK> button.
③ If you cannot find your desired Transponder information form the Transponder List,
select User Define, and press the <OK> button to change the Transponder information
as follows.
1 Enter Transponder frequency using the <Numerical> button.
2 Select Polarisation and press the <OK> or <RIGHT> button to select one option
among Auto/Horizontal/Vertical.
[Note] Horizontal outputs 18V, and Vertical outputs 13V through LNB line.
3 Select Symbol Rate(ks/s) and press the <OK> or <RIGHT> button to select one
Symbol Rate value from 27500/26000/ 22000. If your desired value does not exist,
select User Define to enter Symbol Rate value directly using the <Numerical>
button.
4 Select FEC (Forward Error Correction) option and press the <OK> or <RIGHT>
button to select one option among Auto, 1/2, 2/3, 3/4, 5/6, and 7/8.
5 When completing entering Transponder information, select Done and press the
<OK> button to finish entering User Define Transponder value.
51
Page 52

8. Installation
[Note]
1. For channel transponder information, you can find your desired information from Satellite
channel magazine, Satellite channel related home pages, news release and home page of
broadcasting company, etc.
2. If you have correctly completed setting the Transponder infor mation, Strength bar and Quality
bar should represent as High. If the Level is close to 0, please try to reset.
(3) Network Search
If your desired transponder provides the information of other transponder, you can
determine whether or not to search the channel for other transponder.
① Select Network Search using the ▲▼ button.
② Select either Enable or Disable using the <OK> or <▶
> button. Select Enable to run Network Search.
(4) Scrambled Type
You can determine whether or not to search channel by free.
① Select Search Type using the ▲▼ button, and press
the <OK>or <Right>button.
② Select one option among All or Free using the ▲▼
button, and press the <OK> button.
All Searches all types of channel.
Free Searches only Free Channel.
(5) Channel Type
You can search by TV or Radio Channel.
52
Page 53

8. Installation
① Select Channel Type using the ▲▼ button, and press
the <OK> or <Right>button.
② Select one option among All, TV and Radio using the
▲▼ button.
All Searches all channels.
TV Searches only TV Channel.
Radio Searches only Radio Channel.
(6) Search
You can complete the setting and start searching.
① Select Search and press the <OK> button to start Manual Search.
② The next procedures are the same as those of Automatic Search. Please refer to
Automatic Search.
8.4 Other Search
You can directly enter the Packet ID value or find how to search channel using SMATV.
And you can search channel for several transponders at one time.
① Press the <MENU> button to run Menu.
② Select Installation using the ▲▼ button, and press the <OK> or <RIGHT> button.
③ Select Other Search, and press the <OK> or <X> button. Press the <Back> or <W>
button to return to the previous menu.
(1) Advanced Search
You can find your desired channel by entering Video, Audio and PCR Packet ID directly
In Other Search Menu, select Advanced Search using the ▲▼ button, and press the <OK>
or <RIGHT> button to start Advanced Search.
Satellite, Transponder
The setting for satellite and transponder is the same as that of Manual Search. Refer to
the satellite and transponder setting for Manual Search.
Video PID, Audio PID, PCR PID
You can enter the PID value for specific channel.
53
Page 54

8. Installation
① Select the PID to set using the ▲▼ button, and press
the <OK> or <Right>button.
Video PID Enter the Video PID value.
Audio PID Enter the Audio PID value.
PCR PID Enter the PCR PID value.
② Set PID value.
Auto Search PID value automatically.
Hexadecimal Enter PID value in Hexadecimal
numeric.
Decimal Enter PID value in Decimal .
③ When you have select Hexadecimal or Decimal, enter
PID value directly using Keyboard.
④ When completing entering PID value, select OK, and
press the <OK> button.
Search
You can complete setting and start searching.
① Select Search and press the <OK> button to start Advanced Search.
② The next procedures are the same as those of Automatic Search. Please refer to
Automatic Search.
(2) SMATV Search
If your receiver uses the antenna for common use, operate SMATV Search. For SMATV
Search, Channel Search is performed by the antenna for common use regardless of the
setting value in Antenna Setting.
Select SMATV Search in Other Search Menu using the ▲▼ button, and press the <OK> or
<Right>button.
Frequency
① Select Frequency using the ▲▼ button, and press the
<OK> or <RIGHT> button.
② Enter the down converted frequency through common
LNB. You can enter the frequency between 950 and
2150 MHz.
54
Page 55

8. Installation
Polarisation
① Select Polarisation using the ▲▼ button, and press
the <OK> or <RIGHT> button.
② Select one from Disable/Auto/Horizontal/Vertical and
press the <OK> button.
[Note] Horizontal outputs 18V, and Vertical outputs 13V
through LNB line. Select Disable when LNB Power is not
necessary.
Symbol Rate
① Select Symbol Rate using the ▲▼ button, and press
the <OK> or <RIGHT> button.
② Select the symbol rate of the transponder.
If the rate does not exist in the list, select User Define
and enter the value directly.
FEC
① Select FEC using the ▲▼ button, and press the <OK>
or <RIGHT> button.
② Select one option among Auto,1/2,2/3,3/4,5/6,7/8,
and press the <OK> button.
Search
You can complete setting and start searching.
① Select Search and press the <Ok>button to start SMATV Search.
② The next procedures are the same as those of Automatic Search. Please refer to
Automatic Search.
(3) Multiple Manual Search
55
Page 56

8. Installation
If you wish to search multiple transponder at the same time, you can run Multiple Manual
Search. This function is useful when repeating Manual Search.
① Select Multiple Manual Search from Other Search
Menu using the ▲▼ button, press the <OK> or
<Right> button to enable the Multiple Manual Search.
② Select one option among Satellite, Edit TP List,
Scrambled Type, Channel Type using the ▲▼ button,
and press the <OK> or <Right> button.
③ Set the selected item.
[Note]
Settings for Satellite, Scrambled Type, and Channel Type is the same as those of Manual Search.
Refer to Manual Search.
Edit TP List
You can edit TP list to search at a time and change the setting for Transponder.
① Select Edit TP List from Multiple Manual Search, and
press the <OK> or <RIGHT>button.
② Select Add and press the <OK> button to add a new
Transponder data.
③ Select a specific transponder from the transponder
list, press the <OK> button, select Edit, and then
press the <OK> button to edit Transponder data.
④ Select a specific transponder from the transponder
list, press the <OK> button, select Delete, and then
press the <OK> button to delete Transponder data.
You can select multiple transponders to delete.
⑤ When completing configuring transponder list, select
Save and press the <OK> button to save the result and
exit.
[Note]
When you select Default List and press <ok>, default
transponder list is displayed.
8.5 Motor Antenna
If you use Motor Antenna, which is operated by motor, you should set the antenna as
Motor before Channel Search.
56
Page 57

8. Installation
① Press the <Menu> button.
② Select Installation using the ▲▼ button, and press the
<OK> or <RIGHT> button.
③ Select Antenna Setting using the ▲▼ button, and
press the <OK> or <RIGHT> button.
④ Press the <OPT+> button on the Antenna Setting
screen to switch into Motor Antenna Menu.
(1) Motor Type
You should set the Motor Type before Motor Antenna Setting.
① Select Motor Type from Motor Antenna, and press the
<OK> or <RIGHT> button.
② Set LNB Frequency.
1 Select LNB Frequency using the ▲▼ button, and
press the <OK> or <RIGHT> button.
2 Select one value among LNB frequency list. If
desired LNB frequency is not in the list, enter LNB
Frequency value using the <Numerical> button after
selecting User Define.
3 When completing entering LNB Frequency, press the
<OK> button.
③ Set LNB Voltage
Refer to Installaion – Antenna Setting – LNB Voltage.
The distance between antenna and receiver is 30m
instead of 60m.
④ Select Motor Type using the ▲▼ button, and press
the <OK> or <RIGHT> button to select Motor Type.
DiSEqC1.2
USALS Motor Antenna using USALS
⑤ Set My Longitude.
General Motor Antenna using DiSEqC
1.2.
1 Select My Longitude using the ▲▼ button, and
press the <OK> or <RIGHT> button.
2 Enter Longitude value using the <Numerical> button.
3 Set East/West using the <RIGHT>/<LEFT> button.
4 When completing setting, press the <OK> button.
57
Page 58

8. Installation
⑥ Set My Latitude.
1 Select My Latitude using the ▲▼ button, and press
the <OK> or <RIGHT> button.
2 Enter Latitude value using the <Numerical> button
3 Set North/South using the <RIGHT>/<LEFT> button
4 When completing setting, press the <OK> button.
(2) Edit Satellite Data
You can set the position of the Satellite, which the Motor Antenna heads for, and decide
whether or not to use the satellite.
① Select Edit Satellite Data from Motor Antenna Menu
using the ▲▼ button.
② Move to Edit Satellite Data by pressing the <OK>
button.
③ Select Satellite using the ▲▼ button, and press the
<OK> button.
④ Select a satellite to edit, and press the <OK> button.
⑤ Select Satellite Alternative using the ▲▼ button and
press the <OK> button to decide whether or not to use
the selected Satellite.
Enable Channel Search is available.
Disable Currently selected Satellite is regarded as
out of existence. Channel Search is
⑥ Select Satellite Longitude using the ▲▼ button, and
press the <OK> button.
⑦ Enter the Longitude value for Satellite using the
<Numerical> button. Change East/West value using
the <RIGHT>/<LEFT> button.
unavailable.
[Note] Satellite Longitude item is able to edit only for User Define Satellite
(3) Motor Setting
You can set Motor Antenna for Channel Search and watching.
58
Page 59

8. Installation
① Select Motor Setting from Motor Antenna using the ▲
▼ button, and press the <OK> or <RIGHT> button.
② Select Satellite.
1 Select Satellite using the ▲▼ button, and press the
<OK> or <RIGHT> button.
2 Select the satellite which the Antenna heads for.
3 Press the <OK> button.
③ Select transponder using the ▲▼ button, and press
the <OK> or <RIGHT> button.
④ Set Motor Driving.
1 Select Motor Driving using the ▲▼ button, and
press the <OK> or <RIGHT> button.
2 Select Motor Driving Type, and press the <OK>
button.
:.
Continuous Motor moves continuously
Step Motor moves by specified unit.
Time Motor moves during specified time.
3 Adjust Driving Size using the <RIGHT>/<LEFT>
button in case of Step or Time.
Step by Impulse
Time by Second
4 Select [OK], and press the <OK> button.
⑤ Move the Antenna to the position of the selected
Satellite.
1 Select Go to Stored Position using the ▲▼ button.
2 Press the <OK> button to move Antenna to the
position of the Satellite. Please wait during the
Antenna is moving.
59
Page 60

8. Installation
⑥ Confirm Signal Strength and Quality Level and fine-
tune the Antenna direction.
1 Select Go to Stored Position using the ▲▼ button.
2 Move the Antenna to East/West by pressing
<RIGHT>/<LEFT> button. Adjust Signal Level to
maximum/
⑦ Save the adjusted position of Satellite.
1 Select Store Current Position using the ▲▼ button.
2 Press the <OK> button to save the Antenna position
headed for the selected Satellite.
⑧ You can set antenna position by satellite by repeating
the above procedure.
⑨ You can recalculate positions for all other satellite
based on one satellite. Adjust position of antenna by
satellite based on one set position without setting
each position of antenna by satellite.
1 Select Recalculation using the ▲▼ button.
2 Press the <OK> button.
3 To adjust all positions again, select Yes and press
the <OK> button.
[Note] You cannot perform ~ steps in case of USALS Motor
(4) Installer Menu
You can set default setting and operation limit for Motor Antenna.
① Select Installer Menu from Motor Antenna Menu using the ▲▼ button.
② Press the <OK> button to move to Installer Menu.
Motor Limit Setting
You can set the maximum Motor Limit both East and West to prevent damage to the antenna.
60
Page 61

8. Installation
① Select Motor Limit using the ▲▼ button.
② Set Motor Limit to Disable by pressing the <OK> or
<RIGHT> button.
Enable Motor Limit is already set. Motor does not
move more than the amount of limit.
Disable Motor Limit is disabled. Setting is
released.
[Note]
When newly setting Motor Limit, set the value to Disable.
③ Select Limit Position using the ▲▼ button.
④ Select the Direction of Limit by pressing the <OK> or
<RIGHT> button.
East Motor sets East limit to move.
West Motor sets West limit to move.
⑤ Select Set Limit using the ▲▼ button.
⑥ Move antenna to the limit position to set using
<RIGHT> or<LEFT> button.
⑦ Press the <OK> button to set limit.
⑧ If limit is set, Motor Limit option is automatically
changed into Enable.
Reset Position
You can restore the position saved at Motor Antenna to the default setting.
① Select Reset Positions using the ▲▼ button.
② Press the <OK> button.
③ Select Yes and press the <OK> button to restore all
saved value at Motor Antenna to the default setting.
④ Please wait during the Motor Antenna is restored.
[Note]
Motor Antenna may not be reset depending on Antenna condition. In this ca se, please repeat the
61
Page 62

8. Installation
above procedure again.
8.6 Default Setting
Default Setting restores the receiver to the default settings
[Warning]
Please note that once you perform Default Setting, all data such as Antenna Setting information
Channel List, and User Configured data are deleted.
To perform Factory Default:
① Press the <menu> button.
② Select Installation using the ▲▼ button, and press
the<OK> or <Right> button.
③ Enter password using the <Numerical> button.
④ Select Default Setting using the ▲▼ button, press the
<OK> or <Right> button.
⑤ Select Yes and press the <OK> button to restore all
setting to Factory Default.
Select No and press the <OK> or <Back> button to
return to the previous menu.
⑥ Confirm again to start loading default setting. Enter
password using the <Numerical> button to perform
restoring.
⑦ When completing the default setting, press the <OK>
button to automatically run the Installation Wizard.
When default setting is completed, Installation Wizard
is automatically displayed, which helps Channel
Search. For detailed information about Installation
Wizard, refer to 3. Installation Wizard.
62
Page 63

9. Software Update
In order to maintain proper performance of this product, it is essential to have the most up-to-
date software. The latest news and release of software versions may be found at the Humax
website – http://www.humaxdigital.com.
It is recommended that you periodically check for the availability of software update.
9.1 OTA (Over the Air)
OTA, an abbreviation of "over–the-air", means that downloads the software can be downloaded
where the manufacturer reserves the right to decide when and where to release through
Antenna system.
Over the Air(OTA) is simply an alternative method for downloading software versions. However,
the manufacturer reserves the right to decide when and where this software update can take
place by “beaming” latest software versions over the air via antenna systems. Note that OTA is
only limited to certain geographical regions mainly due to different antennas having different
footprints(area where the signal can be received). The software update via satellite system will
only occur under the following circumstances.
1 The equipment should have appropriate loader software.
[Caution]
Please note that if you don't have normal loader software, the equipment may not be updated or
work after software update.
2 The manufacturer decides to release software downloading via a designated antenna
system
3 The equipment must be “tuned” properly to the same antenna that the manufacturer
uses.
4 Update software when the quality of receiving signal strength is high. If the weather is
not so good that the quality of receiving signal strength is not recommendable,
perform the software update later.
[Caution]
1. Please be careful to keep the power on and the power cord plugged in during software update.
If the power is off during software update, it may cause fatal damage to the product.
2. Please be careful not to pull out the signal line (LNB Cable) during software update. Update may
be interrupted and the product may not work.
[Note]
1. The other functions of product cannot work at all during software update.
2. It may take 5 ~10 minutes to update software.
63
Page 64

9. Software Update
3. Scheduling operation cannot work during software update.
(1) If new software is found when powering on
① A message will be displayed to notify that new software is found.
② Select Yes and press the <OK> button to update the software.
③ Starts downloading new software. Please wait until the updated is completed.
④ When completing the software update, the equipment is automatically powered off and
on again.
(2) If updating software from Menu
① Press the <menu> button.
② Select Installation using the ▲▼ button, and press the
<OK> or <Right> button.
③ Enter Password using the <Numerical> button.
④ Select Software Update using the ▲▼ button, and
press the <OK>or <right> button.
If new version of software is detected during watching a programme
① A message will be displayed to notify that new
software is found.
② Select Yes and press the <OK> button to start
upgrading. Select No and press the <OK> button to
return to the previous menu.
If using Automatic Update
You can set the product to find HUMAX software update site and update software
automatically.
① Select Automatic Update from Software Update
screen using the ▲▼ button, and press the <ok>or
<right> button.
64
Page 65

9. Software Update
② Automatically search for new software.
③ When detecting update software, the following result is
displayed. If new software is not found by Automatic,
use Manual Update.
④ Select "Yes" and press the <OK> button to start
updating. Select "No" and press the <OK> button to
return to the previous menu without updating.
⑤ When completing the software update, the product is
automatically powered off and on again.
[Note]
Software Update Sites of HUMAX are listed in the following table.
Satellite Transponder data
Astra1 12669 (V) 22000 5/6
Sirius 12054 (V) 27500 3/4
Hispasat 11811 (H) 27500 3/4
Nilesat 11765 (H) 27500 3/4
Hotbird 11623 (V) 27500 3/4
Among the Software Update Sites of HUMAX, the software search operation is performed
only for the satellites that have been set to Enable in Installation -Antenna Setting-Satellite
Alternative menu and that have all other Antenna Setting correct.
Manual Update
You can perform Manual Update only if you know which satellite has new software and the
Transponder information correctly.
65
Page 66

9. Software Update
① Select Manual Update from Software Update screen
using the ▲▼ button, and press the <ok> or <right>
button.
Select the the Satellite which provides update
software. Satellite list contains the satellites that have
been set to Enable in Installation -Antenna SettingSatellite Alternative menu. For unlisted satellite, start
with Antenna Setting.
② Enter Transponder Frequency in which updated
software is provided.
③ Enter Polarisation value.
④ Select Symbol Rate valu e. If it is not found in the List,
select User Define and enter manually.
⑤ Select FEC value.
[Note]
How to setting Satellite and Transponder for Manual Update
Sites is the same as how to edit User Define Transponder
data in Manual Search. Refer to Manual Search.
⑥ Select Search and Press the <OK> button to search
software.
⑦ It is displayed whether or not New Software exist.
If new software does not exist, press the <OK> button
to return to the Manual Update Menu.
⑧ Select Yes and press the <OK> button to start
updating. Select No and press the <OK> button to
return to the previous menu.
⑨ Performs Software Update. Please wait until it is
completed.
⑩ When completing the software update, the product is
automatically powered off and on again.
66
Page 67

9. Software Update
9.2 Software Update from PC
You can connect your receiver to the PC directly and update your software by transferring
the new software from the PC. Follow these steps to download new software from PC to
this product.
① Download new software file(HDF files) equivalent for
this product model from our website into your
computer(http://www.humaxdigital.com).
② Download and install download tool from our website
into your computer.
③ Connect your PC to this product with RS-232C serial
cable.
④ Execute installed download tool, and then follow the
instructions contained the download tool.
⑤ Press the <standby> button to make this product
operating.
67
Page 68

10. System Information
You can view all system information, signal strength, and Common Interface information.
① Press the <Menu> button.
② Select System using the ▲▼ button, and press the
<ok> or <X> button.
10.1 Status
You can view System information
① Select Status using the ▲▼ button, and press the
<ok> or <X> button.
② Confirm the information about Hardware version,
Software version, Loader version, System ID, Slot1, 2.
10.2 Signal Detection
You can view the signal strength and signal quality receiving from satellite via your satellite
dish.
① Select System Detection using the ▲▼ button, and
press the <ok> or <X> button.
② Display information about the satellite and
transponder, which current channel belongs to and the
graphs and percentage of Signal Strength and Quality
of the channel.
68
Page 69

11. Games
This product provides various games for user’s entertainment.
① Press the <Menu> button.
② Select Game using the ▲▼ button, and press the
<ok> or <X> button.
③ According to the instruction displayed on screen, you can enjoy the game using
<up/down/left/right> and <OK> button.
[Note]
1. Game menu is available only for the product without hard disk drive. You can enjoy a game for
the product with hard disk drive using the <G> button at remote controller.
2. Press the <Exit> or <BACK> button to exit the game.
69
Page 70

12. Menu Map
70
Page 71

13. Trouble Shooting
13.1 Trouble Shooting
Before contacting your local service, please make sure following instructions. If the product
does not work normally after completing the following trouble shooting, please contact your local
product distributor or service centre.
(1) No message is displayed on the front panel or product has no power
− Check the main power cable and check that it is plugged into a suitable power outlet.
− Check whether the Power Switch is On.
(2) No picture
− Make sure that the product is in Operation Mode.
− Make sure that the AV Cable is firmly connected to the TV.
− Make sure that Antenna line is correctly connected to the equipment.
− Make sure that Antenna Setting is correct.
− Check the brightness level of TV.
− Check the channel is on air.
(3) Poor picture & sound quality
− Install the antenna in a place where there is no obstacle.
− Make sure there is no mobile phone or microwave oven near the equipment.
− Use 75 Ω coaxial cable to connecting TV and antenna.
− Keep the product and the antenna cable for satellite far away from each other.
− Make sure the receiving level, and adjust antenna if the level is low. The receiving
level cad be influenced by weather.
[Note]
If the CS Antenna is covered with snow or the RF is weaken by heavy rain, sound and picture may
temporarily be poor. However, these poor sound and picture quality because of weather conditio
ns cannot be not accepted as a malfunction of equipment.
− Change satellite dish into bigger one if satellite dish is small.
− Replace LNB with the one with low nise factor if the noise factor is high.
− Replace LNB with new one if it is damaged or out of order.
(4) No or poor sound
− Check the volume level of the TV and Receiver.
− Check the Mute status of the TV and product.
− Press the Audio button to change the Sound Track type.
(5) Remote controller does not operate
− To control the equipment with the remote controller, the remote controller's top end
should directly point towards the receiving part of receiver's remote controller.
71
Page 72

13. Trouble Shooting
− Check the battery of Remote controller.
− Check the battery of Remote controller.
(6) Reservation is not available
− Check whether it it not overlapped with other reservation.
− Cehck whether the power switch is off.
13.2 Error Message
Error message Possible causes What to do
No or bad signal
The audio is not
available.
LNB short
The satellite dish is not pointing at
the satellite.
Signal to weak. Increase the LNB voltage or
Satellite dish is too small. Change to a large dish.
LNB is faulty. Change the LNB.
Wrong antenna setting. Set the antenna correctly
The channel has signal, but no
Audio.
LNB cable is shorten. Replace LNB Cable.
LNB is internally shorten. Replace LNB.
LNB In Port is inserted by alien
substance or damaged.
Adjust dish.
connect a signal amplifier.
Press the Audio button to
confirm if the channel has
Audio.
Remove the alien substance
and contact local service center
if it is damaged.
72
Page 73

14. Specification
Tuner & Channel
Input Connector F-type, IEC-169-24, Female
Frequency Range 950MHz to 2150MHz
Signal Level -25 to –75dBm
LNB Power &
Polarisation
22kHz Tone Frequency: 22±4kHz Amplitude: 0.6±0.2V
DiSEqC Control Version 1.0/1.2/2.0 Compatible, USALS
Demodulation QPSK
Input Symbol Rate 1~45 Ms/s
FEC mode Convolutional Code Rate 1/2, 2/3, 3/4, 5/6 and 7/8
MPEG Transport Stream A/V Decoding
Transport Stream MPEG-2 ISO/IEC 13818
Profile Level MPEG2 MP@ML
Video Input Rate 15 Mbit/s Max
Aspect Ratio 4:3, 16:9 , Letter box
Video Resolution 720x576, 720x480
Audio Decoding MPEG/MusiCam Layer I & II
Audio Mode Single channel/Dual channel/Joint Stereo/Stereo
Memory
Flash Memory 2M byte
Graphic(MPEG) & System DRAM
EEPROM
RF Modulator
RF Input/Loopthrough output 75Ω, IEC169-2
Frequency 470~862 MHz
Output Channel CH 21~69
TV Standard PAL B/G/I/D/K
A/V & Data In/Out
Video RCA/SCART Video Output(CVBS, RGB, S-video)
Audio R/L RCA/SCART Volume and Mute Control (Resolution: 20
S/PDIF Digital Audio Output, Fiber-Optic(Resolution : 20 bits)
RS-232C Transfer Rate:115,200 bps,3 pin Socket type
Power Supply
Input Voltage 90~250V AC, 50/60Hz
Type SMPS
Power Consumption Max. 31W without hard disk drive
Stand by Power ≤8W
Protection Separate Internal Fuse.
Physical Specifications
Size 370 * 60 * 262 mm
Weight(Net) Around 3.8Kg
Operating Temp 0oC to + 45 oC
Storage Humidity 5% ~ 95% RH(Non-Condensing)
Vertical: +13.5V (+14V at high voltage)
Horizontal: +18V (+18.5V at high voltage)
Current: 500mA Max. Overload Protection
with Constraint Length K=7
Transport Stream Specification
16M byte
Kbyte
8
bits DAC, MAX. 2Vrms)
Max. 40W with hard disk drive
The input should be protected against lighting
73
Page 74

15. Glossary
DiSEqC (Digital Satellite Equipment Control)
A standard through which it is possible to let a DiSEqC compatible receiver send a signal
over the RF cable to a switching device to switch between different LNBs or dishes. The
DiSEqC uses the 22KHx signal to control the switching device.
Programme Guide (Electronic Programme Guide, EPG)
A electronic program guide (EPG) that comes with the broadcast to a particular satellite,
note that every station fills the EPG differently or not, so differences in the EPG are not
necessarily receiver errors.
Frequency
The number of cycles or events per one second, which is expressed in the unit of hertz
FTA (Free- To-Air)
An unscrambled broadcast, which you can view without additional payments to a service
provider.
Hi-Fi (High Fidelity)
The characteristics of audio devices that can play back all the audio frequencies of the
human, which is the range of 16Hz~20KHz, uniformly from the low frequency to high
frequency. Sometimes it is used to indicate good quality of an audio device such as stereo
tape recorder.
LNB (Low Noise Block)
An electronic unit mounted on the satellite dish. It receives the signals reflected by the dish
and converts them to signals that can be used by this product.
OSD (On Screen Display)
The function that displays the information about the monitor that the user needs or has to
know on the screen directly. OSD information includes brightness, contrast, tuning, RGB
adjustment, and screen size and positions (top, left, width, and height), and so on.
OTA (Over The Air)
Means that software downloads where the manufacturer reserves the right to decide when
and where to release them through satellite system.
74
Page 75

15. Glossary
Transponder
An automatic device that receives amplifies and retransmits a signal on a different
frequency.
75
Page 76

16. Service and Support
Humax provides a wide range of customer support and service programmes throughout al
l over the world. However, the available programmes may vary depending on the region.
You can get information such as a troubleshooting guide, software update, and product s
upport guides from the following web sites.
Humax Home page
http://www.humaxdigital.com
http://www.humaxarabia.com
HCSA (Humax Customer Service Area)
FAQ, Software download, Technical question and answer (same as E-mail)
Registration is needed for some menu.
http://www.humaxdigital.com/hcsa
http://www.humaxdigital.com/deutsch/hcsa
Humax Middle East Call Center (Dubai, UAE)
Language: Arabic, English
Tel: + 971 4 359 2323
(English, Deutsch)
(Arabic)
(English)
(Deutsch)
76
 Loading...