

Page 1
Infotainment system
Introduction....................................81
Radio .............................................85
Audio players.................................8 8
Page 2

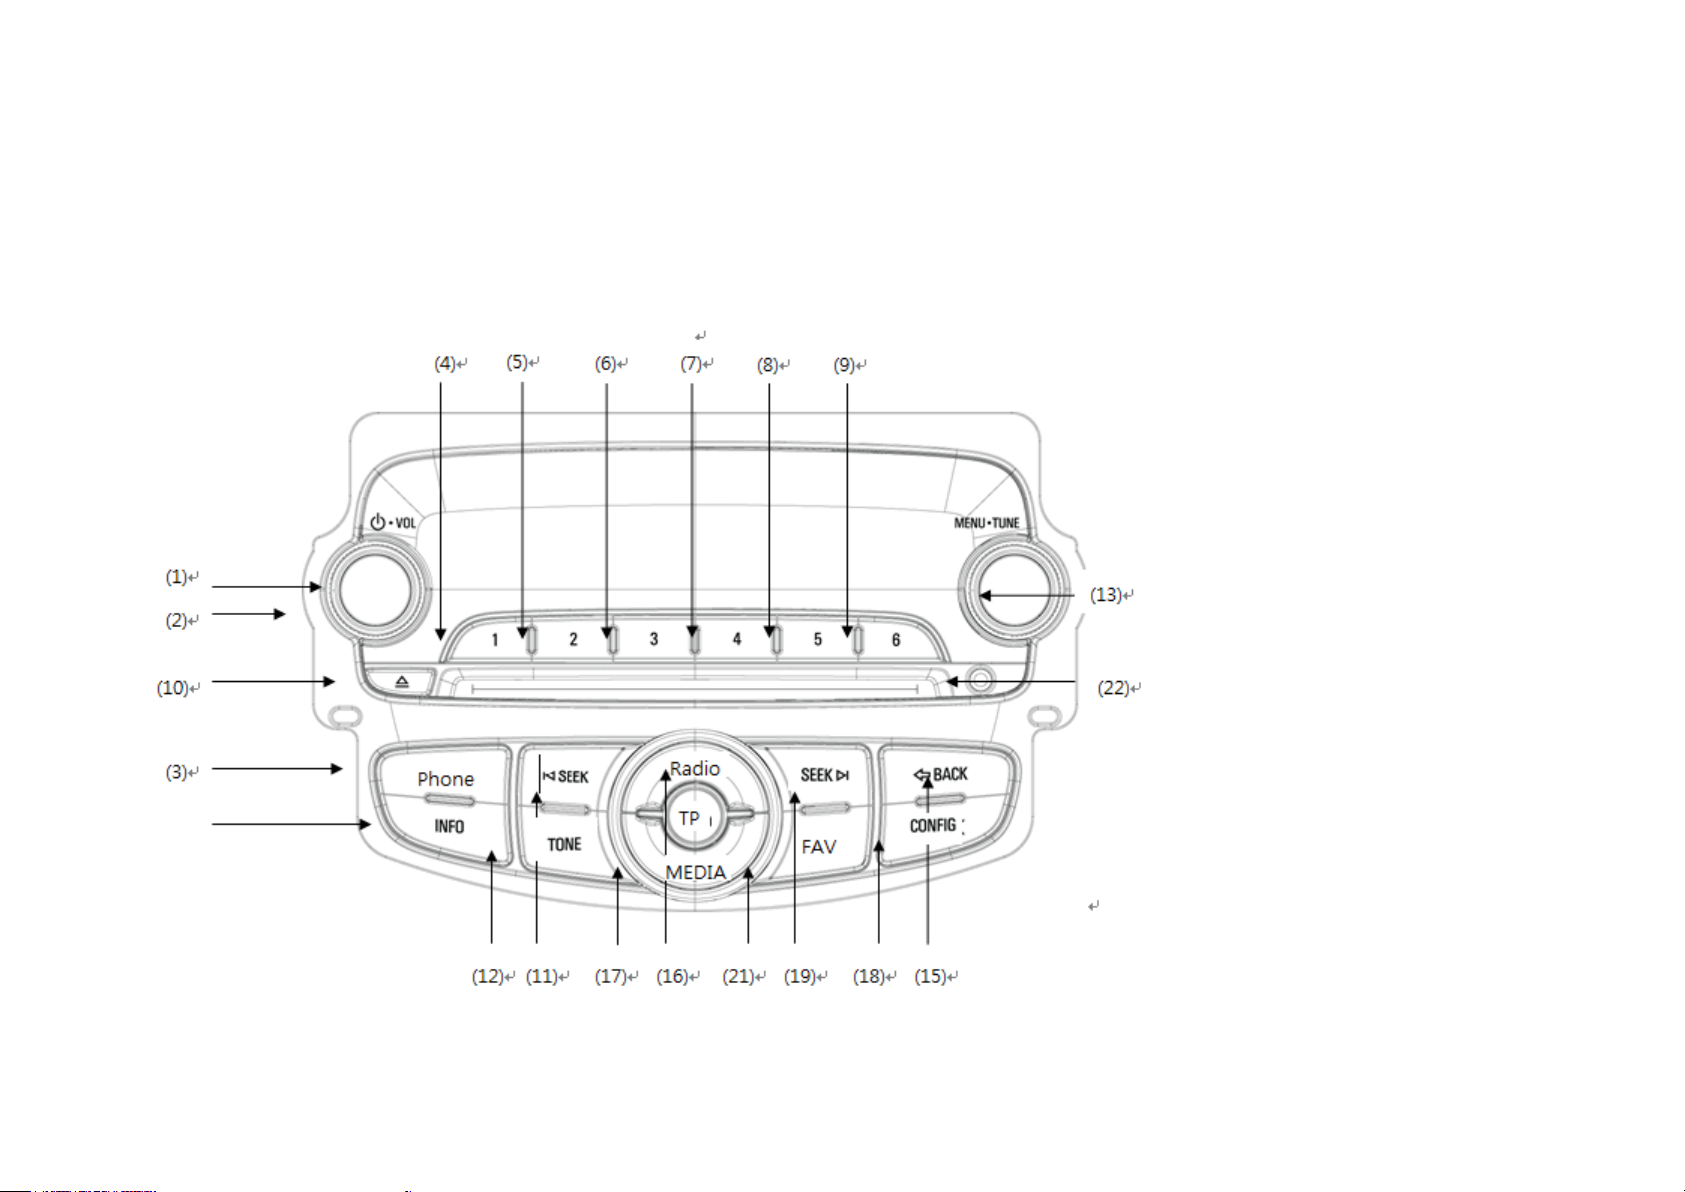
1. [POWER]
When the power is ON:
-.Short press: Audio mute on/off.
-.Long press: Turns on/off the radio.
When the power is OFF:
Pressing the power button turns the power ON.
2. [VOLUME]
Volume adjustment
3. [PHONE/MUTE]
Case 1: without hands-free function
-.Audio mute on/off
Case 2: with hands-free function
-.Short press: Entrance to phone mode
-.Long press: Audio Mute on/off
4~9. [PRESET] #1~#6
Radio Mode
-.Short Press: Recall the pre-memorized station in the preset memory
-.Long Press: Store to preset memory
10. [EJECT]
Eject the disc from the CD deck.
11. [TUNE DOWN]
Radio mode
-.Short Press: FM Memory Skipping Down
-.Long Press: Seek Down
CD mode
-.Short Press: previous track or file playback
-.Long Press:
Fast-reverse playback
12. [TONE]
Entrance to audio setting menu
13. [MENU]
Rotation in Primary Page
Radio mode
-.Clockwise Direction: Next Frequency
-.Anti-clockwise Direction: Previous Frequency
Page 3

Playback mode like CD, USB iPod and so on
-.Clockwise Direction: Show track lists and next track
-.Anticlockwise Direction: Show track lists and previous track
Push on Primary Page
-.Entrance to each menu
Push on Sub-menu Page
-.selection
Rotation in Sub-menu Page
-.Clockwise Direction: Show track lists and next track
-.Anticlockwise Direction: Show track lists and previous track
15. [BACK]
Return to previous display or cancel
16. [Radio]
Radio Mode selection
AM or FM radio band selection
17. [MEDIA]
Entrance to CD, Auxiliary Input and A2DP
19. [TUNE UP ]
Radio mode
-Short Press: FM Memory Skipping Up
-.Long Press: Seek Up
CD mode
-.Short Press: Next track or file playback
-.Long Press:
20. [INFO]
Information display about current mode
Fast-forward
21. [FAV]
Radio Mode
-.Short Press: Selection favorite page
- .Long Press: Auto-store function, Search and memory the best 12 stations.
22. Aux Socket
Stereo Jack input
28. [CONFIG]
Entrance to configuration menu
playback
Page 4

Operation Power On/Off
Power On F Press [POWER] to turn on the radio.
Power off Press [POWER] turn off the radio.
Audio Mute
Press [PHONE/MUTE] to make audio mute when the power is on.
Volume Adjustment
Turn the volume knob clockwise to increase the audio volume.
Turn the volume knob counter-clockwise to decrease the audio volume.
Audio Adjustment Bass Tone Adjustment
In the radio or playback mode, Press the [TONE] you can see the tone main menu.
Radio
AM-FM Radio Radio Mode Se l ection
Press the [BAND] to listen the radio from other mode.
Band Change
The band changes from AM to FM or FM to AM all times [BAND] pressed.
Manua l Tune Up/Down
Seek Up/Down
Press [SEEK UP]/[SEEK DOWN] to find next/previous station automatically.
Favorite preset page
Each time push [FAV], Favorite Preset Page is increased
Favorite Page1, Favorite Page 2, …, Favorite Page6
The number of favorite page can adjust in configuration menu.
Favorite preset memory
It have 6 favorite pages and store up to 48 stations regardless of AM or FM band.
Page 5

It can store current station by the following procedure
Step 1: Seek station or tune station manually you want.
Step 2: Select the favorite page by pressing [FAV/INFO].
Step 3: Press and hold [PRESET #] more than 1 second
By above procedure, the 48 stations are stored in the favorite preset memory.
Recall favorite preset
You can listen to the station stored in the favorite preset by the following procedure.
Step 1: Select the favorite page by pressing [FAV/INFO].
Step 2: press [PRESET #] which is stored the station you want to listen to.
Auto-store Function Auto-store
Press [FAV] more than 1 second, then radio starts auto-store function.
Traffic announcement reception
Press the [TP] to listen the traffic announcement from other station.
Traffic anno uncement reception cancel
Press the [TP/MENU] to cancel the traffic announcement reception the radio make the traffic announcement disable.
Traffic station seek
Press the [TP/MENU] in the station don't have traffic information, the In fotainment system 87 radio search the next station that have
the traffic announcement.
Radio Reception
Radio reception may be disrupted by static, noise, distortion or loss of reception due to „ changes in distance from thetransmitter,multi-path reception due to reflection andshadowing.
Audio players
CD Player
As each CD is inserted, the radio will appear on the display and as each CD is loading, File check will appear on the display.
Once playback begins, the track and track number will appear on the display.
If the ignition or radio is turned off with a CD in the player, it will stay in the player. When a CD is in the player and the ignition is turned on, the radio must be turned on before the current
CD will start playback. When the ignition and radio are turned on, the CD will start playing where it stopped, if it was the last selected audio source.
The CD player can play the smaller 3 inch (8cm) single CDs with an adapter ring. Full-size CDs and the smaller CDs are loaded in the same manner .
If playing a CD-R, the sound quality may be reduced due to CD-R quality, the method of recording, the quality of the music that has been recorded, and the way the CD-R has been handled.
There may be an increase in skipping, difficulty in finding tracks, and/or difficulty in loading and ejecting. If these problems occur, check the bottom surface of the CD. If the surface of the
CD is damaged, such as cracked, broken, or scratched, the CD will not play properly. If the surface of the CD is soiled, see Care of Your CDs for more informatio n.
If there is no apparent damage, try a known good CD.
Page 6

Do not add any label to a CD, it could get caught in the CD player. If a CD is recorded on a personal computer and a description label is needed, try labeling the top of the recorded CD with
a marking pen instead.
Caution
If you add any label to a CD, insert more than one CD into the slot at a time, or attempt to play scratched or damaged CDs, you could damage the CD player. When using the CD player, use
only CDs in good condition without any label, load one CD at a time, and keep the CD player and the loading slot free of foreign materi als , liqui ds, and d ebris.
Disc Insert
Insert a CD into a CD slot with CD label up, then the radio insert into the slot automatically and does playback.
CD Playback Mode Selection
Insert a CD into CD deck, then the radio goes to the playback mode. Or press the [CD] to playback the disc from other mode when CD is inserted.
Infotainment system 89 CD EJECT
Press the [EJECT], then the disc willbe ejected from the radio.Pull out the disc out of the radio.
Pause
Press [CD] to pause playback while a CD is playing back."PAUSE'
Next/Previo us Track
Press [TUNE UP/TUNE DOWN], then the radio starts playback of the next/previous track.
will flash on the display.Press [CD] again to start playback.
Fast forward/Fast reverse
Press and hold [TUNE UP/TUNE DOWN], then the radio plays back fast forward/fast reverse.
Next/Previous Folder - only MP3/WMA disc
Press [SEEK UP/SEEK DOWN], then the radio start playback of the next/previous track.
RPT (Repeat)
Press [2 RPT], then radio plays back current track repeatedly. To cancel this function, press [2 RPT] again.
RDM (Ran dom):
Press [3 RDM], then radio plays back tracks randomly.To cancel this function, press [3RDM] again.
INT (Intro-Scan):
Press [4 INT], then radio plays back just 10 seconds of the current track, jump to next track and do this actionrepeatedly.To cancel this function, press [4 INT] again.
All/Directory Mode - only MP3/WMA disc
Repeat, intro-scan and random function operates in this folder when"all mode" is active.Press [1 DIR] then radio operates inthe directory mode.To cancel this function, press [1 DIR] again.
ID3 Tag information display - only MP3/WMA disc
Press [FAV/INFO], the radio displays the ID3 tag information of the current files.
Auxiliary Devices
Press the [USB] to change to play back the USB files from other mode.
USB playba ck mode USB Playback Mode Selection
Page 7

USB memory insertion
Insert a USB memory into the USB socket, so the radio plays back the USB files automatically.
USB Extraction
Pull the USB memory from the USB socket by hand.
* Other functions are same with CD mode.
AUX mode
The radio has one auxiliary input jack
This is not an audio output; do not plug the headphone
You can however, connect an external audio device such as an iPod, laptop computer, MP3 player, CD changer, or XM™‚ receiver, etc. to the auxiliary input jack for use as another source
for audio listening.
AUX In Mode Selection
Press [AUX] in the other playback mode. If the auxiliary jack isn't detected for the presence of an output jack, the aux mode will be prevented.
BLUETOOTH Mode
Pairing and connection.
1.
Using Configuration.
Step 1. Press Config button.
Step 2. Choice Bluetooth Settings
Step 3. Choice Bluetooth
Step 4. Choice Pair device(Add device) -> “Waiting for Pairing [0000]“
Step 5. Try to pair with set by phone.
Step 6. If phone support auto connection, phone would be connected automatically after paring with set.
If phone doesn’t support auto connection, you have to try to connect by using device lists.
2. Using Phone menu.
Step 1. Press phone button. (“No phone available”)
Step 2. Press phone button again.
Step 5. “Waiting for Pairing [0000]“
Step 6. Try to pair with set by phone.
Make a call
(diameter 3.5mm) located on the lower right side of the faceplate.
set into the front auxiliary input jack
.
Page 8

Step 1 : Connect phone and set (refer to pairing and connection)
Step 2. Press phone button. (“Phone’s name”)
Step 3. Press phone button again. (“Enter number, Phonebook, Call lists, Bluetooth”)
Step 4 : Choice enter number (By pressing menu button at enter number)
Step 5 : Choice number that you want to make a call (By pressing menu button at number)
Step 6 : Make a call (By pressing menu button at number)
Phonebook Download
Whenever turn on the radio, radio download phonebook automatically.
Call list
(If phone send car audio call lists data, car audio will display cell phone’s call list, otherwise car audio display call lists only after connection with car audio.)
Step 1 : Connect phone and set (refer to pairing and connection)
Step 2. Press phone button. (“Phone’s name”)
Step 3. Press phone button again. (“Enter number, Phonebook, Call lists, Bluetooth”)
Step 4 : Choice Call list (By pressing menu button at Call list)
Step 5 : Choice Incoming call (pressing menu button at Incoming call)
Step 5 : Choice Outgoing call (pressing menu button at Incoming call)
Step 5 : Choice missed call (pressing menu button at missed call)
Adjust Ring volume and Ring tone
(If phone send car audio phone’s ring tone, phone’s ring tone will be heard to user, in this case, user can’t adjust ring volume by car audio, otherwise user can adjust ring tone
and volume by car audio)
Step 1. Press phone button. (“Phone’s name” or “No phone available.)
Step 2. Choice Bluetooth Settings (By pressing menu button at Bluetooth settings)
Step 3. Choice Sound&Signals (By pressing menu button at Sound&Signals)
Step 4. Choice Ring volume (By pressing menu button at Ring volume)
Step 4. Choice Ring tone (By pressing menu button at Ring tone)
1. Adjust Ring volume
Ring volume means that let user know incoming call’s ringing.
Ring volume is louder toward 3
Page 9

2. Adjust Ring Tone
User can choice incoming ring tone. The number of ring tone are 5.
Bluetooth factory restore
Step 1. Press phone or config button
Step 3. Choice Bluetooth Settings (By pressing menu button at Bluetooth settings)
Step 4. Choice Factory restore (By pressing menu button at Factory restore)
Step 5. Choice Ring volume (By pressing menu button at Ring volume)
Step 5. Choice Ring tone (By pressing menu button at Ring tone)
** While device is downloading phonebook, connection would be disconnected => After downloading complete, device could be connected automatically**
During download phonebook, our device doesn’t support Handsfree function.
** A2DP could not be played, if you don’t have tried to start to play music by phone after connection.**
Steering wheel audio controls
[PWR]
Power on: Press this button. Power off: Press this button more than 1 second.
Audio mute: Press this button when the power is on.
[+]
Press [+] button to increase the audio volume. Press this button, then the radio increases the audio level. If this button is pressed more tha n 1 second, then the radio incr eas es the au dio
volume step by step.
[–]
Press [–] button to decrease the audio volume. Press this button, then the radio increases the audio volume. If this
button is pressed more than 1 second, then the radio decrease the audio volume step by step.
[SEEK]
RADIO MODE
Press this button to move to next preset station. (Fav orite preset #1→ #2→ #3→ #4...)
Press this button more than 1 second to search for the next station.
.
CDP MODE
Press this button to jump to the next track. (Track01→Track02→...) Press this button more than 1 second to play back the track fast forward.
[MODE]
The play mode will be change by following order whenever this button is pressed. FM→AM→(CDP)→(USB)→(AUX )→FM... The radio skips the CDP mode if there is no disc in the radio.
The radio skips the USB mode if there is no USB memory on the radio. The radio skips the AUX mode if there is aux jack in the socket on the radio.
Page 10

Power supply
DC 12V Negative Ground
Speaker impedance
4 ohm
Max. Power
Dimension
226 x 101 x 180
Active Current
Max 10A
General section
Weight 2210 g
20Wrms per channel into 4 channels at Vbatt = 14.3 V with THD ≤ 5%.
MP3[WMA]/CD section
MP3
Variable Bit Rate (VBR)
8~320Kbps
Sample Rates : 16, 22, 32, 44.1, 48KHz
Channel : Mono, Stereo, Joint Stereo
Playlist Format (m3u, pls)
Support ID3 V1, v2X tag, ASCIIand Unicode.
WMA
Support for WMA 9 and over
Support Meta Data (ㅡ*.wax, *.asx (*.asf)…)
Presentation of the file system according to ISO file hierarchy and Flat file structure
incl. Joliet Extension
CD Optical Disc Format Support
CDDA, CDR, CDRW, CDROM, Mixed Mode CD, Open Session CD, "Book on Disc" audio content
FM/MW/LW Radio section
AM_RANGE
Range Name Lower Limit Upper Limit
AMRange1 530kHz 1710kHz
AMRange2 531kHz 1602kHz
AMRange3 530kHz 1710kHz
Page 11

AMRange4 522kHz 1710kHz
AMRange5 522kHz 1629kHz
FM_RANGE
Range Name Lower Limit Upper Limit FM De-emphasis
FMRange1 87.7 MHz 107.9 MHz 75us
FMRange2 87.5 MHz 108.0 MHz 50us
FMRange3 88.0 MHz 108.0 MHz 75us
FMRange4 76.0 MHz 90.0 MHz 50us
FMRange5 87.0 MHz 108.0 MHz 50us
FMRange6 87.5 MHz 108.0 MHz 75us
Page 12

Recommended Region Programming
Region Name
AMRange (kHz)
AMStep
AM Manual Tune
FMRange (MHz)
FMStep
FM De-emphasis
RDS
Option Code
Anguil&FGE
530 - 1710kHz
10khz
1kHz
87.7-107.9
200kHz
75us
&UL4
AM_Range_1
AM_Step_2
AM_Step_2
FM_Range_1
FM_Step_1
FM_Range_1
Antigua and Barbuda
530 - 1710kHz
10khz
1kHz
87.7-107.9
200kHz
75us
&FGE
Argentina
530 - 1710kHz
10khz
1kHz
87.7-107.9
200kHz
75us
&UL4
AM_Range_1
AM_Step_2
AM_Step_2
FM_Range_1
FM_Step_1
FM_Range_1
Aruba
530 - 1710kHz
10khz
10kHz
87.7-107.9
200kHz
75us
&UL4
AM_Range_1
AM_Step_1
AM_Step_1
FM_Range_1
FM_Step_1
FM_Range_1
Bahamas
530 - 1710kHz
10khz
10kHz
87.7-107.9
200kHz
75us
&FGE
AM_Range_1
AM_Step_1
AM_Step_1
FM_Range_1
FM_Step_1
FM_Range_1
Barbados
530 - 1710kHz
10khz
10kHz
87.7-107.9
200kHz
75us
&UL4
AM_Range_1
AM_Step_1
AM_Step_1
FM_Range_1
FM_Step_1
FM_Range_1
Belize
530 - 1710kHz
10khz
10kHz
87.7-107.9
200kHz
75us
&UL4
AM_Range_1
AM_Step_1
AM_Step_1
FM_Range_1
FM_Step_1
FM_Range_1
Bermuda
530 - 1710kHz
10khz
10kHz
87.7-107.9
200kHz
75us
&UL4
AM_Range_1
AM_Step_1
AM_Step_1
FM_Range_1
FM_Step_1
FM_Range_1
Boliva
530 - 1710kHz
10khz
1kHz
87.7-107.9
200kHz
75us
&FGE
AM_Range_1
AM_Step_2
AM_Step_2
FM_Range_1
FM_Step_1
FM_Range_1
Brazil
530 - 1710kHz
10khz
10kHz
87.7-107.9
200kHz
75us
&UL4
AM_Range_1
AM_Step_1
AM_Step_1
FM_Range_1
FM_Step_1
FM_Range_1
AM_Range_1
AM_Step_1
AM_Step_1
FM_Range_1
FM_Step_1
FM_Range_1
Info
Cayman Is&FGEnds
530 - 1710kHz
10khz
1kHz
87.7-107.9
200kHz
75us
&UL4
Chile
530 - 1710kHz
10khz
10kHz
87.7-107.9
200kHz
75us
&UL4
AM_Range_1
AM_Step_1
AM_Step_1
FM_Range_1
FM_Step_1
FM_Range_1
Columbia
530 - 1710kHz
10khz
1kHz
87.7-107.9
200kHz
75us
&UL4
AM_Range_1
AM_Step_2
AM_Step_2
FM_Range_1
FM_Step_1
FM_Range_1
Costa Rica
530 - 1710kHz
10khz
10kHz
87.7-107.9
200kHz
75us
&UL4
AM_Range_1
AM_Step_1
AM_Step_1
FM_Range_1
FM_Step_1
FM_Range_1
Cuba
530 - 1710kHz
10khz
10kHz
87.7-107.9
200kHz
75us
&FGE
AM_Range_1
AM_Step_1
AM_Step_1
FM_Range_1
FM_Step_1
FM_Range_1
Dominica
530 - 1710kHz
10khz
1kHz
87.7-107.9
200kHz
75us
&FGE
AM_Range_1
AM_Step_2
AM_Step_2
FM_Range_1
FM_Step_1
FM_Range_1
Dominican Republic
530 - 1710kHz
10khz
10kHz
87.7-107.9
200kHz
75us
&FGE
AM_Range_1
AM_Step_1
AM_Step_1
FM_Range_1
FM_Step_1
FM_Range_1
Ecuador
530 - 1710kHz
10khz
1kHz
87.7-107.9
200kHz
75us
&FGE
AM_Range_1
AM_Step_2
AM_Step_2
FM_Range_1
FM_Step_1
FM_Range_1
Tab l e 60: The Americas 1:
AM_Range_1 AM_Step_2 AM_Step_2 FM_Range_1 FM_Step_1 FM_Range_1
Canada 530 - 1710kHz 10khz 10kHz 87.7-107.9 200kHz 75us Yes $FGU
AM_Range_1 AM_Step_2 AM_Step_2 FM_Range_1 FM_Step_1 FM_Range_1
Page 13

Region Name
AMRange (kHz)
AMStep
AM Manual Tune
FMRange (MHz)
FMStep
FM De-emphasis
RDS
Option Code
El Salvador
530 - 1710kHz
10khz
1kHz
87.7-107.9
200kHz
75us
&FGE
AM_Range_1
AM_Step_2
AM_Step_2
FM_Range_1
FM_Step_1
FM_Range_1
Falk&FGEnd Is&FGEnds
530 - 1710kHz
10khz
10kHz
87.7-107.9
200kHz
75us
&FGE
AM_Range_1
AM_Step_1
AM_Step_1
FM_Range_1
FM_Step_1
FM_Range_1
French Guiana
530 - 1710kHz
10khz
10kHz
87.7-107.9
200kHz
75us
&FGE
AM_Range_1
AM_Step_1
AM_Step_1
FM_Range_1
FM_Step_1
FM_Range_1
Green&FGEnd
530 - 1710kHz
10khz
10kHz
87.7-107.9
200kHz
75us
&FGE
AM_Range_1
AM_Step_1
AM_Step_1
FM_Range_1
FM_Step_1
FM_Range_1
Grenada
530 - 1710kHz
10khz
1kHz
87.7-107.9
200kHz
75us
&FGE
Guadeloupe
530 - 1710kHz
10khz
10kHz
87.7-107.9
200kHz
75us
&FGE
AM_Range_1
AM_Step_1
AM_Step_1
FM_Range_1
FM_Step_1
FM_Range_1
Guatema&FGE
530 - 1710kHz
10khz
10kHz
87.7-107.9
200kHz
75us
&FGE
Guvana
530 - 1710kHz
10khz
10kHz
87.7-107.9
200kHz
75us
&FGE
AM_Range_1
AM_Step_1
AM_Step_1
FM_Range_1
FM_Step_1
FM_Range_1
Haiti
530 - 1710kHz
10khz
1kHz
87.7-107.9
200kHz
75us
&FGE
AM_Range_1
AM_Step_2
AM_Step_2
FM_Range_1
FM_Step_1
FM_Range_1
Honduras
530 - 1710kHz
10khz
10kHz
87.7-107.9
200kHz
75us
&FGE
AM_Range_1
AM_Step_1
AM_Step_1
FM_Range_1
FM_Step_1
FM_Range_1
Jamaica
530 - 1710kHz
10khz
10kHz
87.7-107.9
200kHz
75us
&FGE
AM_Range_1
AM_Step_1
AM_Step_1
FM_Range_1
FM_Step_1
FM_Range_1
Martinique
530 - 1710kHz
10khz
10kHz
87.7-107.9
200kHz
75us
&FGE
AM_Range_1
AM_Step_1
AM_Step_1
FM_Range_1
FM_Step_1
FM_Range_1
Mexico
530 - 1710kHz
10khz
10kHz
87.7-107.9
200kHz
75us
Yes
$FGU
AM_Range_1
AM_Step_1
AM_Step_1
FM_Range_1
FM_Step_1
FM_Range_1
Info
Montserrat
530 - 1710kHz
10khz
1kHz
87.7-107.9
200kHz
75us
&FGE
AM_Range_1
AM_Step_2
AM_Step_2
FM_Range_1
FM_Step_1
FM_Range_1
Nether&FGEnds
530 - 1710kHz
10khz
10kHz
87.7-107.9
200kHz
75us
&FGE
AM_Range_1
AM_Step_1
AM_Step_1
FM_Range_1
FM_Step_1
FM_Range_1
Nicaragua
530 - 1710kHz
10khz
10kHz
87.7-107.9
200kHz
75us
&FGE
AM_Range_1
AM_Step_1
AM_Step_1
FM_Range_1
FM_Step_1
FM_Range_1
Panama
530 - 1710kHz
10khz
10kHz
87.7-107.9
200kHz
75us
&FGE
AM_Range_1
AM_Step_1
AM_Step_1
FM_Range_1
FM_Step_1
FM_Range_1
AM_Range_1
AM_Step_2
AM_Step_2
FM_Range_1
FM_Step_1
FM_Range_1
Tab l e 61: The Americas 2:
AM_Range_1 AM_Step_2 AM_Step_2 FM_Range_1 FM_Step_1 FM_Range_1
AM_Range_1 AM_Step_1 AM_Step_1 FM_Range_1 FM_Step_1 FM_Range_1
Paraguay 530 - 1710kHz 10khz 1kHz 87.7-107.9 200kHz 75us &UL4
Page 14

Region Name
AMRange (kHz)
AMStep
AM Manual Tune
FMRange (MHz)
FMStep
FM De-emphasis
RDS
Option Code
AM_Range_1
AM_Step_2
AM_Step_2
FM_Range_1
FM_Step_1
FM_Range_1
Puerto Ric o
530 - 1710kHz
10khz
10kHz
87.7-107.9
200kHz
75us
&FGE
Saint Kitts and Nevis
530 - 1710kHz
10khz
1kHz
87.7-107.9
200kHz
75us
&FGE
AM_Range_1
AM_Step_2
AM_Step_2
FM_Range_1
FM_Step_1
FM_Range_1
Saint Lucia
530 - 1710kHz
10khz
10kHz
87.7-107.9
200kHz
75us
&FGE
AM_Range_1
AM_Step_1
AM_Step_1
FM_Range_1
FM_Step_1
FM_Range_1
St Pierre and M iq uelon
530 - 1710kHz
10khz
1kHz
87.7-107.9
200kHz
75us
&FGE
AM_Range_1
AM_Step_2
AM_Step_2
FM_Range_1
FM_Step_1
FM_Range_1
Suriname
530 - 1710kHz
10khz
1kHz
87.7-107.9
200kHz
75us
&FGE
AM_Range_1
AM_Step_2
AM_Step_2
FM_Range_1
FM_Step_1
FM_Range_1
Trini dad and Tobago
530 - 1710kHz
10khz
10kHz
87.7-107.9
200kHz
75us
&FGE
AM_Range_1
AM_Step_1
AM_Step_1
FM_Range_1
FM_Step_1
FM_Range_1
Turks and Caicos Is&F GEnds
530 - 1710kHz
10khz
1kHz
87.7-107.9
200kHz
75us
&FGE
AM_Range_1
AM_Step_2
AM_Step_2
FM_Range_1
FM_Step_1
FM_Range_1
USA
530 - 1710kHz
10khz
10kHz
87.7-107.9
200kHz
75us
YES
$FGU
AM_Range_1
AM_Step_1
AM_Step_1
FM_Range_1
FM_Step_1
FM_Range_1
Info
Uruguay
530 - 1710kHz
10khz
1kHz
87.7-107.9
200kHz
75us
&FGE
AM_Range_1
AM_Step_2
AM_Step_2
FM_Range_1
FM_Step_1
FM_Range_1
Virgin Is&FGEnds (British)
530 - 1710kHz
10khz
10kHz
87.7-107.9
200kHz
75us
$FGU
AM_Range_1
AM_Step_1
AM_Step_1
FM_Range_1
FM_Step_1
FM_Range_1
Virgin Is&FGEnds (USA)
530 - 1710kHz
10khz
10kHz
87.7-107.9
200kHz
75us
$FGU
AM_Range_1
AM_Step_1
AM_Step_1
FM_Range_1
FM_Step_1
FM_Range_1
Tab l e 62: The Americas 3:
Peru 530 - 1710kHz 10khz 1kHz 87.7-107.9 200kHz 75us &FGE
AM_Range_1 AM_Step_1 AM_Step_1 FM_Range_1 FM_Step_1 FM_Range_1
Page 15

Tab l e 63: Africa and Middle East 1:
Region Name
AMRange (kHz)
AMStep
AM Manual Tune
FMRange (MHz)
FMStep
FM De-emphasis
RDS
Option Code
AM_Range_2
AM_Step_3
AM_Step_3
Algeria
531-1602
9kHz
9kHz
87.5-108.0
100kHz
50us
Yes
&UL8
Angola
531-1602
9kHz
1kHz
87.5-108.0
100kHz
50us
&UL8
AM_Range_2
AM_Step_4
AM_Step_4
FM_Range_2
FM_Step_2
FM_Range_2
Benin
531-1602
9kHz
9kHz
87.5-108.0
100kHz
50us
&UL8
AM_Range_2
AM_Step_3
AM_Step_3
FM_Range_2
FM_Step_2
FM_Range_2
Botswana
531-1602
9kHz
9kHz
87.5-108.0
100kHz
50us
&UL8
AM_Range_2
AM_Step_3
AM_Step_3
FM_Range_2
FM_Step_2
FM_Range_2
Burkina Faso
531-1602
9kHz
9kHz
87.5-108.0
100kHz
50us
&UL8
AM_Range_2
AM_Step_3
AM_Step_3
FM_Range_2
FM_Step_2
FM_Range_2
Cameroon
531-1602
9kHz
1kHz
87.5-108.0
100kHz
50us
&UL8
AM_Range_2
AM_Step_3
AM_Step_4
FM_Range_2
FM_Step_2
FM_Range_2
Central African Republic
531-1602
9kHz
9kHz
87.5-108.0
100kHz
50us
&UL8
AM_Range_2
AM_Step_3
AM_Step_3
FM_Range_2
FM_Step_2
FM_Range_2
Chad
531-1602
9kHz
1kHz
87.5-108.0
50kHz
50us
&UL8
AM_Range_2
AM_Step_4
AM_Step_4
FM_Range_2
FM_Step_3
FM_Range_3
AM_Range_2
AM_Step_3
AM_Step_3
FM_Range_2
FM_Step_2
FM_Range_2
Congo
531-1602
9kHz
9kHz
87.5-108.0
100kHz
50us
&UL8
AM_Range_2
AM_Step_3
AM_Step_3
FM_Range_2
FM_Step_2
FM_Range_2
Djibouti
531-1602
9kHz
9kHz
87.5-108.0
100kHz
50us
&UL8
AM_Range_2
AM_Step_3
AM_Step_3
FM_Range_2
FM_Step_2
FM_Range_2
Egypt
531-1602
9kHz
9kHz
87.5-108.0
100kHz
50us
Yes
&UL8
AM_Range_2
AM_Step_3
AM_Step_3
FM_Range_2
FM_Step_2
FM_Range_2
Data
Ethiopia
531-1602
9kHz
9kHz
N/A
N/A
N/A
&UL8
AM_Range_2
AM_Step_3
AM_Step_3
Gabon
531-1602
9kHz
1kHz
87.5-108.0
100kHz
50us
&UL8
AM_Range_2
AM_Step_4
AM_Step_4
FM_Range_2
FM_Step_2
FM_Range_2
Gambia
531-1602
9kHz
9kHz
87.5-108.0
100kHz
50us
&UL8
AM_Range_2
AM_Step_3
AM_Step_3
FM_Range_2
FM_Step_2
FM_Range_2
Guinea-Bissau
531-1602
9kHz
1kHz
87.5-108.0
100kHz
50us
&UL8
AM_Range_2
AM_Step_4
AM_Step_4
FM_Range_2
FM_Step_2
FM_Range_2
Gulf Cooperative Council
531-1602
9kHz
9kHz
87.5-108.0
100kHz
50us
&UL8
AM_Range_2
AM_Step_3
AM_Step_3
FM_Range_2
FM_Step_2
FM_Range_2
Afghanistan 531-1602 9kHz 9kHz N/A N/A N/A &UL8
AM_Range_2 AM_Step_3 AM_Step_3 FM_Range_2 FM_Step_2 FM_Range_2 Data
Comoros 531-1602 9kHz 9kHz 87.5-108.0 100kHz 50us &UL8
Cote d'Ivoire 531-1602 9kHz 9kHz 87.5-108.0 100kHz 50us &UL8
AM_Range_2 AM_Step_3 AM_Step_3 FM_Range_2 FM_Step_2 FM_Range_2
Page 16

Tab l e 64: Africa and Middle East 2:
Region Name
AMRange (kHz)
AMStep
AM Manual Tune
FMRange (MHz)
FMStep
FM De-emphasis
RDS
Option Code
Iran
531-1602
9kHz
1kHz
87.5-108.0
100kHz
50us
&UL8
AM_Range_2
AM_Step_4
AM_Step_4
FM_Range_2
FM_Step_2
FM_Step_2
Iraq
531-1602
9kHz
9kHz
87.5-108.0
100kHz
50us
&UL8
Kenya
531-1602
9kHz
1kHz
87.5-108.0
100kHz
50us
&UL8
AM_Range_2
AM_Step_4
AM_Step_4
FM_Range_2
FM_Step_2
FM_Range_2
Lesotho
531-1602
9kHz
9kHz
87.5-108.0
100kHz
50us
&UL8
AM_Range_2
AM_Step_3
AM_Step_3
FM_Range_2
FM_Step_2
FM_Range_2
Libya
531-1602
9kHz
1kHz
87.5-108.0
100kHz
50us
&UL8
Madagascar
531-1602
9kHz
1kHz
87.5-108.0
100kHz
50us
&UL8
AM_Range_2
AM_Step_4
AM_Step_4
FM_Range_2
FM_Step_2
FM_Range_2
Malawi
531-1602
9kHz
9kHz
87.5-108.0
100kHz
50us
&UL8
AM_Range_2
AM_Step_3
AM_Step_3
FM_Range_2
FM_Step_2
FM_Range_2
Mali
531-1602
9kHz
9kHz
87.5-108.0
100kHz
50us
&UL8
Mauritania
531-1602
9kHz
1kHz
87.5-108.0
100kHz
50us
&UL8
AM_Range_2
AM_Step_4
AM_Step_4
FM_Range_2
FM_Step_2
FM_Range_2
Mauritius
531-1602
9kHz
9kHz
87.5-108.0
100kHz
50us
&UL8
AM_Range_2
AM_Step_3
AM_Step_3
FM_Range_2
FM_Step_2
FM_Range_2
Mayotte
531-1602
9kHz
9kHz
87.5-108.0
100kHz
50us
&UL8
Morocco
531-1602
9kHz
1kHz
87.5-108.0
100kHz
50us
&UL8
AM_Range_2
AM_Step_4
AM_Step_4
FM_Range_2
FM_Step_2
FM_Range_2
Mozambique
531-1602
9kHz
1kHz
87.5-108.0
100kHz
50us
&UL8
AM_Range_2
AM_Step_4
AM_Step_4
FM_Range_2
FM_Step_2
FM_Range_2
Namibia
531-1602
9kHz
9kHz
87.5-108.0
100kHz
50us
&UL8
Niger
531-1602
9kHz
1kHz
87.5-108.0
100kHz
50us
&UL8
AM_Range_2
AM_Step_4
AM_Step_4
FM_Range_2
FM_Step_2
FM_Range_2
Nigeria
531-1602
9kHz
1kHz
87.5-108.0
100kHz
50us
&UL8
AM_Range_2
AM_Step_4
AM_Step_4
FM_Range_2
FM_Step_2
FM_Range_2
Republic of Guinea
531-1602
9kHz
1kHz
87.5-108.0
100kHz
50us
&UL8
Sao Tome & Principe
531-1602
9kHz
9kHz
87.5-108.0
100kHz
50us
&UL8
AM_Range_2
AM_Step_3
AM_Step_3
FM_Range_2
FM_Step_2
FM_Range_2
AM_Range_2 AM_Step_3 AM_Step_3 FM_Range_2 FM_Step_2 FM_Range_2
AM_Range_2 AM_Step_4 AM_Step_4 FM_Range_2 FM_Step_2 FM_Range_2
AM_Range_2 AM_Step_3 AM_Step_3 FM_Range_2 FM_Step_2 FM_Range_2
AM_Range_2 AM_Step_3 AM_Step_3 FM_Range_2 FM_Step_2 FM_Range_2
AM_Range_2 AM_Step_3 AM_Step_3 FM_Range_2 FM_Step_2 FM_Range_2
AM_Range_2 AM_Step_4 AM_Step_4 FM_Range_2 FM_Step_2 FM_Range_2
Page 17

Tab l e 65: Africa and Middle East 3:
Region Name
AMRange (kHz)
AMStep
AM Manual Tune
FMRange (MHz)
FMStep
FM De-emphasis
RDS
Option Code
Senegal
531-1602
9kHz
9kHz
87.5-108.0
100kHz
50us
&UL8
AM_Range_2
AM_Step_3
AM_Step_3
FM_Range_2
FM_Step_2
FM_Range_2
Sierra
531-1602
9kHz
9kHz
87.5-108.0
100kHz
50us
&UL8
AM_Range_2
AM_Step_3
AM_Step_3
FM_Range_2
FM_Step_2
FM_Range_2
Leone
531-1602
9kHz
9kHz
87.5-108.0
100kHz
50us
&UL8
South Africa
531-1602
9kHz
9kHz
87.5-108.0
100kHz
50us
&UL8
AM_Range_2
AM_Step_3
AM_Step_3
FM_Range_2
FM_Step_2
FM_Range_2
Sudan
531-1602
9kHz
1kHz
87.5-108.0
100kHz
50us
&UL8
AM_Range_2
AM_Step_4
AM_Step_4
FM_Range_2
FM_Step_2
FM_Range_2
AM_Range_2
AM_Step_3
AM_Step_3
FM_Range_2
FM_Step_2
FM_Range_2
Tanzania
531-1602
9kHz
9kHz
87.5-108.0
100kHz
50us
&UL8
Togo
531-1602
9kHz
1kHz
87.5-108.0
100kHz
50us
&UL8
AM_Range_2
AM_Step_4
AM_Step_4
FM_Range_2
FM_Step_2
FM_Range_2
Tunisia
531-1602
9kHz
9kHz
87.5-108.0
100kHz
50us
&UL8
AM_Range_2
AM_Step_3
AM_Step_3
FM_Range_2
FM_Step_2
FM_Range_2
AM_Range_2
AM_Step_3
AM_Step_3
FM_Range_2
FM_Step_2
FM_Range_2
Yemen
531-1602
9kHz
1kHz
87.5-108.0
100kHz
50us
&UL8
Zaire
531-1602
9kHz
1kHz
87.5-108.0
100kHz
50us
&UL8
AM_Range_2
AM_Step_4
AM_Step_4
FM_Range_2
FM_Step_2
FM_Range_2
Zambia
531-1602
9kHz
1kHz
87.5-108.0
100kHz
50us
&UL8
AM_Range_2
AM_Step_4
AM_Step_4
FM_Range_2
FM_Step_2
FM_Range_2
AM_Range_2 AM_Step_3 AM_Step_3 FM_Range_2 FM_Step_2 FM_Range_2
Swaziland 531-1602 9kHz 9kHz 87.5-108.0 100kHz 50us &UL8
AM_Range_2 AM_Step_3 AM_Step_3 FM_Range_2 FM_Step_2 FM_Range_2
Uganda 531-1602 9kHz 9kHz 87.5-108.0 100kHz 50us &UL8
AM_Range_2 AM_Step_4 AM_Step_4 FM_Range_2 FM_Step_2 FM_Range_2
Page 18

Tab l e 66: Pacific and South Asia 1:
Region Name
AMRange (kHz)
AMStep
AM Manual Tune
FMRange (MHz)
FMStep
FM De-emphasis
RDS
Option Code
Australia
522-1710
9kHz
9kHz
87.5-108.0
100kHz
50us
&UL1
AM_Range_4
AM_Step_3
AM_Step_3
FM_Range_2
FM_Step_2
FM_Step_2
Bangladesh
531-1602
9kHz
9kHz
87.5-108.0
100kHz
50us
&FGA
AM_Range_2
AM_Step_3
AM_Step_3
FM_Range_2
FM_Step_2
FM_Step_2
Brunei Darussalam
531-1602
9kHz
9kHz
87.5-108.0
100kHz
50us
&FGA
AM_Range_2
AM_Step_3
AM_Step_3
FM_Range_2
FM_Step_2
FM_Step_2
Cambodia
531-1602
9kHz
1kHz
87.5-108.0
100kHz
50us
&FGA
AM_Range_2
AM_Step_4
AM_Step_4
FM_Range_2
FM_Step_2
FM_Step_2
China
531-1602
9kHz
9kHz
87.0-108.0
100kHz
50us
&FCN
AM_Range_2
AM_Step_3
AM_Step_3
FM_Range_5
FM_Step_2
FM_Step_2
Federated States of Micronesia
531-1602
9kHz
9kHz
87.5-108.0
100kHz
50us
&FGA
AM_Range_2
AM_Step_3
AM_Step_3
FM_Range_2
FM_Step_2
FM_Step_2
Fiji
531-1602
9kHz
9kHz
87.5-108.0
100kHz
50us
&FGA
AM_Range_2
AM_Step_3
AM_Step_3
FM_Range_2
FM_Step_2
FM_Step_2
Guam
531-1602
9kHz
9kHz
87.5-108.0
100kHz
50us
&FGA
AM_Range_2
AM_Step_3
AM_Step_3
FM_Range_2
FM_Step_2
FM_Step_2
India
531-1602
9kHz
1kHz
87.5-108.0
100kHz
50us
&FGA
AM_Range_2
AM_Step_4
AM_Step_4
FM_Range_2
FM_Step_2
FM_Step_2
Indonesia
531-1602
9kHz
1kHz
87.5-108.0
100kHz
50us
&FGA
AM_Range_2
AM_Step_4
AM_Step_4
FM_Range_2
FM_Step_2
FM_Step_2
Japan
531-1602
9kHz
9kHz
76-90
100kHz
50us
&UK1
AM_Range_2
AM_Step_3
AM_Step_3
FM_Range_4
FM_Step_2
FM_Step_2
Kiribati
531-1602
9kHz
9kHz
87.5-108.0
100kHz
50us
&FGA
AM_Range_2
AM_Step_3
AM_Step_3
FM_Range_2
FM_Step_2
FM_Step_2
Laos
531-1602
9kHz
1kHz
87.5-108.0
100kHz
50us
&FGA
AM_Range_2
AM_Step_4
AM_Step_4
FM_Range_2
FM_Step_2
FM_Step_2
Macau
531-1602
9kHz
1kHz
87.5-108.0
100kHz
50us
&FGA
AM_Range_2
AM_Step_4
AM_Step_4
FM_Range_2
FM_Step_2
FM_Step_2
Malaysia
531-1602
9kHz
1kHz
87.5-108.0
100kHz
50us
&FGA
AM_Range_2
AM_Step_4
AM_Step_4
FM_Range_2
FM_Step_2
FM_Step_2
Maldives
531-1602
9kHz
9kHz
87.5-108.0
100kHz
50us
&FGA
AM_Range_2
AM_Step_3
AM_Step_3
FM_Range_2
FM_Step_2
FM_Step_2
Myanmar
531-1602
9kHz
1kHz
87.5-108.0
100kHz
50us
&FGA
AM_Range_2
AM_Step_4
AM_Step_4
FM_Range_2
FM_Step_2
FM_Step_2
Nauru
531-1602
9kHz
9kHz
N/A
N/A
50us
&FGA
AM_Range_2
AM_Step_3
AM_Step_3
FM_Step_2
Nepal
531-1602
9kHz
9kHz
87.5-108.0
100kHz
50us
&FGA
AM_Range_2
AM_Step_3
AM_Step_3
FM_Range_2
FM_Step_2
FM_Step_2
Page 19

Tab l e 67: Pacific and South Asia 2:
Region Name
AMRange (kHz)
AMStep
AM Manual Tune
FMRange (MHz)
FMStep
FM De-emphasis
RDS
Option Code
New Caledonia
531-1602
9kHz
9kHz
87.5-108.0
100kHz
50us
&FGA
AM_Range_2
AM_Step_3
AM_Step_3
FM_Range_2
FM_Step_2
FM_Step_2
New Zealand
522-1710
9kHz
9kHz
87.5-108.0
100kHz
50us
&UL1
AM_Range_4
AM_Step_3
AM_Step_3
FM_Range_2
FM_Step_2
FM_Step_2
North Korea
531-1602
9kHz
9kHz
87.5-108.0
100kHz
50us
&FGA
Northern Mariana Islands
531-1602
9kHz
9kHz
87.5-108.0
100kHz
50us
&FGA
AM_Range_2
AM_Step_3
AM_Step_3
FM_Range_2
FM_Step_2
FM_Step_2
Pakistan
531-1602
9kHz
1kHz
87.5-108.0
100kHz
50us
&FGA
AM_Range_2
AM_Step_4
AM_Step_4
FM_Range_2
FM_Step_2
FM_Step_2
AM_Range_2
AM_Step_3
AM_Step_3
FM_Range_2
FM_Step_2
FM_Step_2
Philippines
522-1629kHz
9kHz
1kHz
87.5-108.0
100kHz
50us
&FGF
Singapore
N/A
N/A
N/A
87.5-108.0
100kHz
50us
&FGA
FM_Range_2
FM_Step_2
FM_Step_2
Solomon Islands
531-1602
9kHz
9kHz
N/A
N/A
50us
&FGA
AM_Range_2
AM_Step_3
AM_Step_3
FM_Step_2
AM_Range_2
AM_Step_3
AM_Step_3
FM_Range_6
FM_Step_2
FM_Step_2
Sri Lanka
531-1602
9kHz
9kHz
87.5-108.0
100kHz
50us
&FGA
Taiwan
531-1602
9kHz
9kHz
87.7-107.9
200kHz
50us
&FGD
AM_Range_2
AM_Step_3
AM_Step_3
FM_Range_1
FM_Step_1
FM_Step_2
Thailand
531-1602
9kHz
9kHz
87.5-108.0
50kHz
50us
&FGA
AM_Range_2
AM_Step_3
AM_Step_3
FM_Range_2
FM_Step_3
FM_Step_2
AM_Range_2
AM_Step_3
AM_Step_3
FM_Range_2
FM_Step_2
FM_Step_2
Vanuatu
531-1602
9kHz
9kHz
87.5-108.0
100kHz
50us
&FGA
AM_Range_2
AM_Step_3
AM_Step_3
FM_Range_2
FM_Step_2
FM_Step_2
Vietnam
531-1602
9kHz
1kHz
87.5-108.0
100kHz
50us
&FGA
AM_Range_2
AM_Step_4
AM_Step_4
FM_Range_2
FM_Step_2
FM_Step_2
AM_Range_2 AM_Step_3 AM_Step_3 FM_Range_2 FM_Step_2 FM_Step_2
Papus New Guinea 531-1602 9kHz 9kHz 87.5-108.0 100kHz 50us &FGA
AM_Range_5 AM_Step_4 AM_Step_4 FM_Range_2 FM_Step_2 FM_Step_2
South Korea 531-1602 9kHz 9kHz 87.5-108.0 100kHz 75us &FGA
Tonga 531-1602 9kHz 9kHz 87.5-108.0 100kHz 50us &FGA
AM_Range_2 AM_Step_3 AM_Step_3 FM_Range_2 FM_Step_2 FM_Step_2
Page 20

Tab l e 68: Europe and North Asia 1:
Region Name
AMRange (kHz)
AMStep
AM Manual Tune
FMRange (MHz)
FMStep
FM De-emphasis
RDS
TMC
Option Code
Albania
522-1629
9kHz
1kHz
87.5-108.0
100kHz
50us
Yes &U2L
AM_Range_5
AM_Step_4
AM_Step_4
FM_Range_2
FM_Step_2
FM_Range_2
Data
Austria
522-1629
9kHz
9kHz
87.5-108.0
100kHz
50us
Yes
Yes
&U2L
AM_Range_5
AM_Step_3
AM_Step_3
FM_Range_2
FM_Step_2
FM_Range_2
Data
Belgium
522-1629
9kHz
9kHz
87.5-108.0
100kHz
50us
Yes
Yes
&U2L
AM_Range_5
AM_Step_3
AM_Step_3
FM_Range_2
FM_Step_2
FM_Range_2
Data
Bosnia
522-1629
9kHz
9kHz
87.5-108.0
100kHz
50us
Yes &U2L
AM_Range_5
AM_Step_3
AM_Step_3
FM_Range_2
FM_Step_2
FM_Range_2
Data
Bulgaria
522-1629
9kHz
9kHz
87.5-108.0
100kHz
50us
Yes &U2L
AM_Range_5
AM_Step_3
AM_Step_3
FM_Range_2
FM_Step_2
FM_Range_2
Data
Canary Islands
522-1629
9kHz
9kHz
87.5-108.0
100kHz
50us
&U2L
AM_Range_5
AM_Step_3
AM_Step_3
FM_Range_2
FM_Step_2
FM_Range_2
Croatia
522-1629
9kHz
9kHz
87.5-108.0
100kHz
50us
Yes &U2L
AM_Range_5
AM_Step_3
AM_Step_3
FM_Range_2
FM_Step_2
FM_Range_2
Data
Czech Republic
522-1629
9kHz
9kHz
87.5-108.0
100kHz
50us
Yes
Coming soon
&U2L
AM_Range_5
AM_Step_3
AM_Step_3
FM_Range_2
FM_Step_2
FM_Range_2
Data
Denmark
522-1629
9kHz
9kHz
87.5-108.0
100kHz
50us
Yes
Yes
&U2L
AM_Range_5
AM_Step_3
AM_Step_3
FM_Range_2
FM_Step_2
FM_Range_2
Data
Finland
522-1629
9kHz
9kHz
87.5-108.0
100kHz
50us
Yes
Yes
&U2L
AM_Range_5
AM_Step_3
AM_Step_3
FM_Range_2
FM_Step_2
FM_Range_2
Data
France
522-1629
9kHz
1kHz
87.5-108.0
100kHz
50us
Yes
Yes
&U2L
AM_Range_5
AM_Step_4
AM_Step_4
FM_Range_2
FM_Step_2
FM_Range_2
Data
Germany
531-1602
9kHz
9kHz
87.5-108.0
100kHz
50us
Yes
Yes
&U2L
AM_Range_2
AM_Step_3
AM_Step_3
FM_Range_2
FM_Step_2
FM_Range_2
Data
Greece
522-1629
9kHz
1kHz
87.5-108.0
100kHz
50us
Yes &U2L
AM_Range_5
AM_Step_4
AM_Step_4
FM_Range_2
FM_Step_2
FM_Range_2
Data
Hungry
522-1629
9kHz
9kHz
87.5-108.0
100kHz
50us
Yes
Coming soon
&U2L
AM_Range_5
AM_Step_3
AM_Step_3
FM_Range_2
FM_Step_2
FM_Range_2
Data
Iceland
522-1629
9kHz
9kHz
87.5-108.0
100kHz
50us
Yes &U2L
AM_Range_5
AM_Step_3
AM_Step_3
FM_Range_2
FM_Step_2
FM_Range_2
Data
Ireland
522-1629
9kHz
9kHz
87.5-108.0
100kHz
50us
Yes &U2L
AM_Range_5
AM_Step_3
AM_Step_3
FM_Range_2
FM_Step_2
FM_Range_2
Data
Israel
522-1629
9kHz
9kHz
87.5-108.0
100kHz
50us
Yes &U2L
AM_Range_5
AM_Step_3
AM_Step_3
FM_Range_2
FM_Step_2
FM_Range_2
Data
Italy (Vatican City)
522-1629
9kHz
1kHz
87.5-108.0
100kHz
50us
Yes
Yes
&U2L
AM_Range_5
AM_Step_4
AM_Step_4
FM_Range_2
FM_Step_2
FM_Range_2
Data
Jordan
522-1629
9kHz
9kHz
87.5-108.0
100kHz
50us
Yes &U2L
AM_Range_5
AM_Step_3
AM_Step_3
FM_Range_2
FM_Step_2
FM_Range_2
Data
Page 21

Tab l e 69: Europe and North Asia 2:
Region
AMRange
AMStep
AM Manual
FMRange
FMStep
FM De-
RDS
TMC
Option
Kazakhstan
522-1629
9kHz
9kHz
87.5-108.0
100kHz
50us
&U2L
AM_Range_5
AM_Step_3
AM_Step_3
FM_Range_2
FM_Step_2
FM_Range_2
Lebanon
522-1629
9kHz
1kHz
87.5-108.0
100kHz
50us
Yes &U2L
AM_Range_5
AM_Step_4
AM_Step_4
FM_Range_2
FM_Step_2
FM_Range_2
Data
Lithuania
522-1629
9kHz
9kHz
87.5-108.0
100kHz
50us
Yes &U2L
AM_Range_5
AM_Step_3
AM_Step_3
FM_Range_2
FM_Step_2
FM_Range_2
Data
Luxembourg
522-1629
9kHz
9kHz
87.5-108.0
100kHz
50us
Yes &U2L
AM_Range_5
AM_Step_3
AM_Step_3
FM_Range_2
FM_Step_2
FM_Range_2
Data
Macedonia
522-1629
9kHz
9kHz
87.5-108.0
100kHz
50us
Yes &U2L
AM_Range_5
AM_Step_3
AM_Step_3
FM_Range_2
FM_Step_2
FM_Range_2
Data
Madeira
522-1629
9kHz
9kHz
87.5-108.0
100kHz
50us
&U2L
AM_Range_5
AM_Step_3
AM_Step_3
FM_Range_2
FM_Step_2
FM_Range_2
Malta
522-1629
9kHz
9kHz
87.5-108.0
100kHz
50us
Yes &U2L
AM_Range_5
AM_Step_3
AM_Step_3
FM_Range_2
FM_Step_2
FM_Range_2
Data
Moldova
522-1629
9kHz
9kHz
87.5-108.0
100kHz
50us
Yes &U2L
AM_Range_5
AM_Step_3
AM_Step_3
FM_Range_2
FM_Step_2
FM_Range_2
Data
Monaco
522-1629
9kHz
9kHz
87.5-108.0
100kHz
50us
Yes &U2L
AM_Range_5
AM_Step_3
AM_Step_3
FM_Range_2
FM_Step_2
FM_Range_2
Data
Morocco
522-1629
9kHz
1kHz
87.5-108.0
100kHz
50us
Yes &U2L
AM_Range_5
AM_Step_4
AM_Step_4
FM_Range_2
FM_Step_2
FM_Range_2
Data
Netherlands
522-1629
9kHz
9kHz
87.5-108.0
100kHz
50us
Yes
Yes
&U2L
AM_Range_5
AM_Step_3
AM_Step_3
FM_Range_2
FM_Step_2
FM_Range_2
Data
Norway
522-1629
9kHz
9kHz
87.5-108.0
100kHz
50us
Yes &U2L
AM_Range_5
AM_Step_3
AM_Step_3
FM_Range_2
FM_Step_2
FM_Range_2
Data
Poland
522-1629
9kHz
9kHz
87.5-108.0
100kHz
50us
Yes &U2L
AM_Range_5
AM_Step_3
AM_Step_3
FM_Range_2
FM_Step_2
FM_Range_2
Data
Portugal
522-1629
9kHz
1kHz
87.5-108.0
100kHz
50us
Yes
Coming
&U2L
AM_Range_5
AM_Step_4
AM_Step_4
FM_Range_2
FM_Step_2
FM_Range_2
Data
Romania
522-1629
9kHz
9kHz
87.5-108.0
100kHz
50us
Yes &U2L
AM_Range_5
AM_Step_3
AM_Step_3
FM_Range_2
FM_Step_2
FM_Range_2
Data
Russia
522-1629
9kHz
9kHz
87.5-108.0
100kHz
50us
Yes &U2L
AM_Range_5
AM_Step_3
AM_Step_3
FM_Range_2
FM_Step_2
FM_Range_2
Data
Serbia
522-1629
9kHz
9kHz
87.5-108.0
100kHz
50us
Yes &U2L
AM_Range_5
AM_Step_3
AM_Step_3
FM_Range_2
FM_Step_2
FM_Range_2
Data
Slovakia
522-1629
9kHz
9kHz
87.5-108.0
100kHz
50us
Yes &U2L
AM_Range_5
AM_Step_3
AM_Step_3
FM_Range_2
FM_Step_2
FM_Range_2
Data
Slovenia
522-1629
9kHz
9kHz
87.5-108.0
100kHz
50us
Yes &U2L
AM_Range_5
AM_Step_3
AM_Step_3
FM_Range_2
FM_Step_2
FM_Range_2
Data
Name
(kHz)
Tune
(MHz)
emphasis
Code
soon
Page 22

Tab l e 70: Europe and North Asia 3:
Region Name
AMRange (kHz)
AMStep
AM Manual Tune
FMRange (MHz)
FMStep
FM De-emphasis
RDS
TMC
Option Code
Spain
522-1629
9kHz
9kHz
87.5-108.0
100kHz
50us
Yes
Yes
&U2L
AM_Range_5
AM_Step_3
AM_Step_3
FM_Range_2
FM_Step_2
FM_Range_2
Data
Sweden
522-1629
9kHz
9kHz
87.5-108.0
100kHz
50us
Yes
Yes
&U2L
AM_Range_5
AM_Step_3
AM_Step_3
FM_Range_2
FM_Step_2
FM_Range_2
Data
Switzerland
522-1629
9kHz
9kHz
87.5-108.0
100kHz
50us
Yes
Yes
&U2L
Syrian
522-1629
9kHz
1kHz
87.5-108.0
100kHz
50us
&U2L
AM_Range_5
AM_Step_4
AM_Step_4
FM_Range_2
FM_Step_2
FM_Range_2
Tunisia
522-1629
9kHz
9kHz
87.5-108.0
100kHz
50us
&U2L
AM_Range_5
AM_Step_3
AM_Step_3
FM_Range_2
FM_Step_2
FM_Range_2
AM_Range_5
AM_Step_4
AM_Step_4
FM_Range_2
FM_Step_2
FM_Range_2
Data
Ukraine
522-1629
9kHz
9kHz
87.5-108.0
100kHz
50us
&U2L
United Kingdom
522-1629
9kHz
9kHz
87.5-108.0
100kHz
50us
Yes
Yes
&U2L
AM_Range_5
AM_Step_3
AM_Step_3
FM_Range_2
FM_Step_2
FM_Range_2
Data
AM_Range_5 AM_Step_3 AM_Step_3 FM_Range_2 FM_Step_2 FM_Range_2 Data
Turkey 522-1629 9kHz 1kHz 87.5-108.0 100kHz 50us Yes &U2L
AM_Range_5 AM_Step_3 AM_Step_3 FM_Range_2 FM_Step_2 FM_Range_2
Page 23

FCC Information to User
This device complies with Part 15 of the FCC Rules. Operation is subject to the following two conditions:
(1) This device may not cause harmful interference, and
(2) this device mustaccept any interference received, including interference that may cause undesired operation
This equipment has been tested and found to comply with the limits for a Class B digital device, pursuant to Part 15 of the FCC Rules. These limits are designed to provide
reasonable protection against harmful interference in a residential installation. This equipment generates, uses and can radiate radio frequency energy and, if not installed
and used in accordance with the instructions, may cause harmful interference to radio communications. However, there is no guarantee that interference will not occur in
a particular installation. If this equipment does cause harmful interference to radio or television reception, which can be determined by turning the equipment off and on,
the user is encouraged to try to correct the interference by one of the following measures:
-Reorient or relocate the receiving antenna.
-Increase the separation between the equipment and receiver.
-Connect the equipment into an outlet on a circuit different from that to which the receiver is connected.
-Consult the dealer or an experienced radio/TV technician for help.
FCC RF exposure requirements
The antenna used with this module must be installed to provide a separation ditance of at least 20cm from all persons, and must not transmit simultaneously with any other
antenna or transmiter except in accordance with FCC multi-transmter product procedures.
Caution
Modifications not expressly approved by the party responsible for compliance could void the user’s authority to operate the equipment.
FCC Compliance Information :
This device complies with Part 15 of the FCC Rules. Operation is subject to the following two conditions:
(1) This device may not cause harmful interference, and
(2) this device must accept any interference received, including interference that may cause undesired operation
 Loading...